Embed Size (px)
Citation preview
Banner 9
Navigation Guide 081418
2 | P a g e
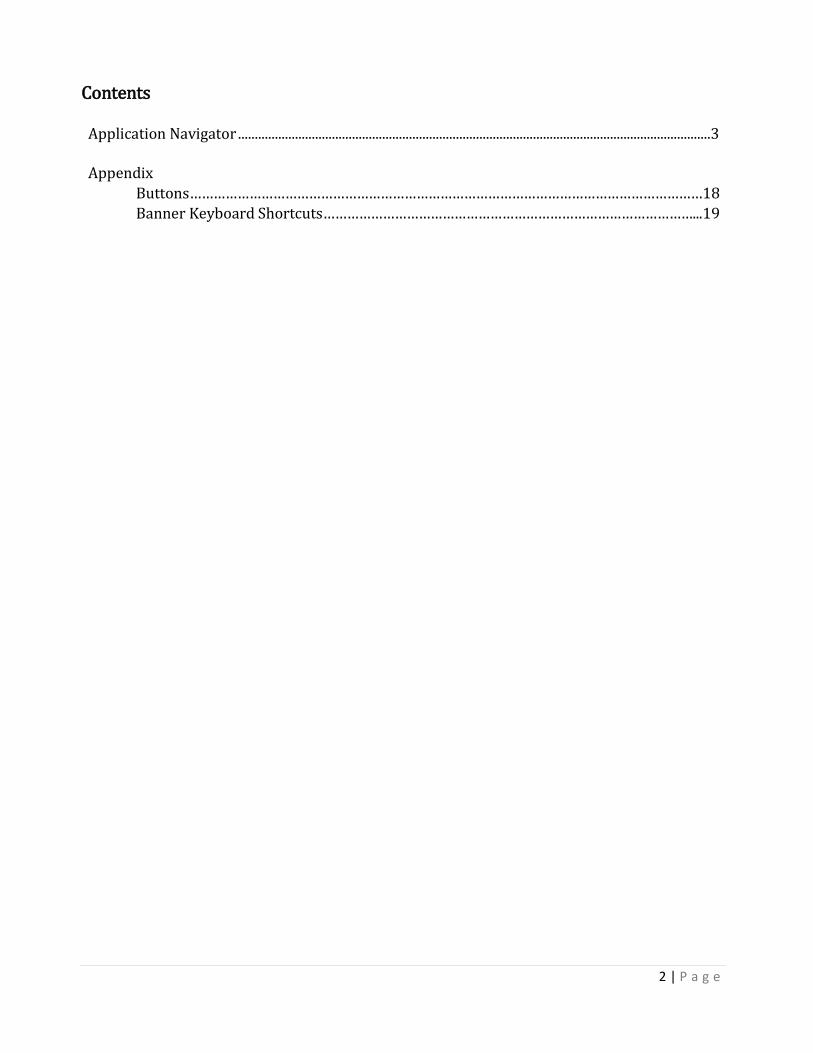
Contents
Application Navigator .............................................................................................................................................3
Appendix Buttons…………………………………………………………………………………………………………………18 Banner Keyboard Shortcuts…………………………………………………………………………………...19
3 | P a g e
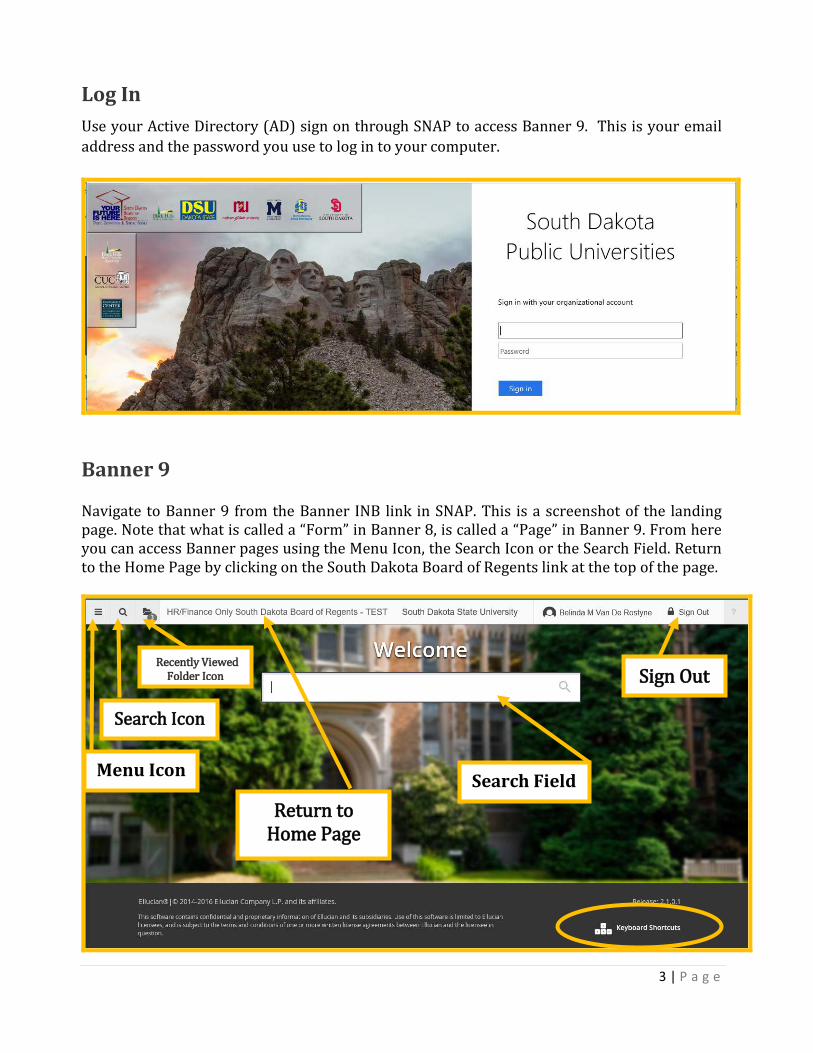
Log In Use your Active Directory (AD) sign on through SNAP to access Banner 9. This is your email address and the password you use to log in to your computer.
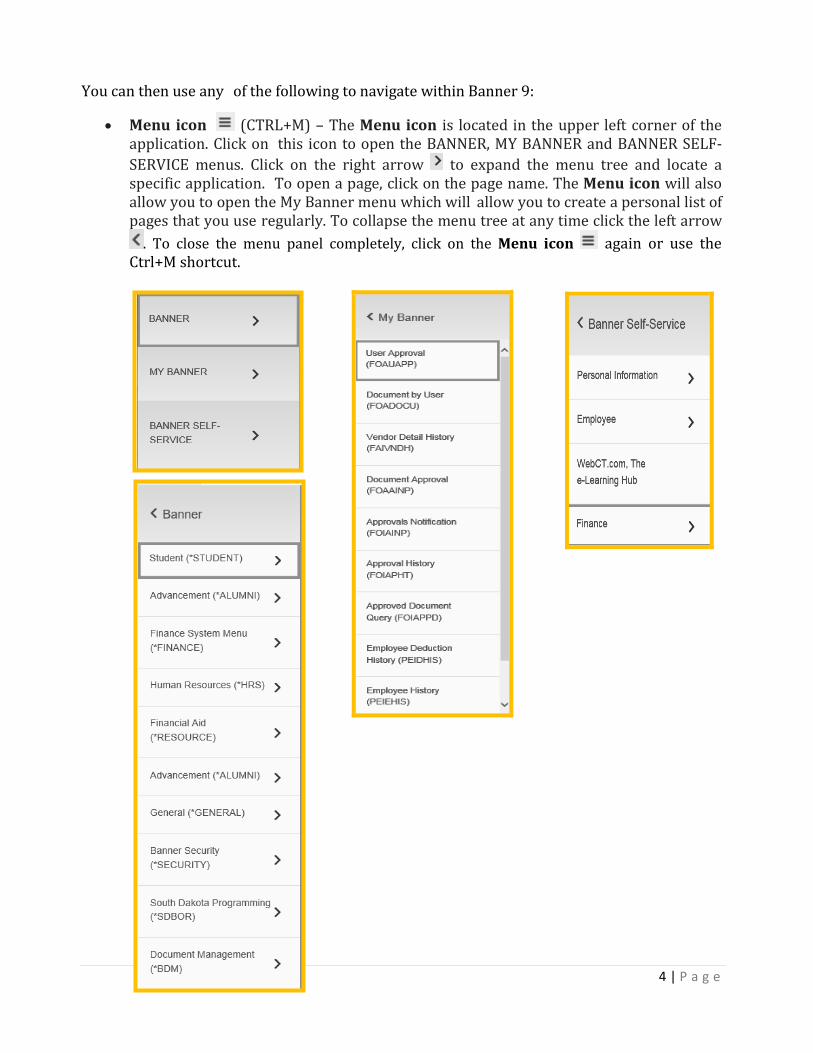
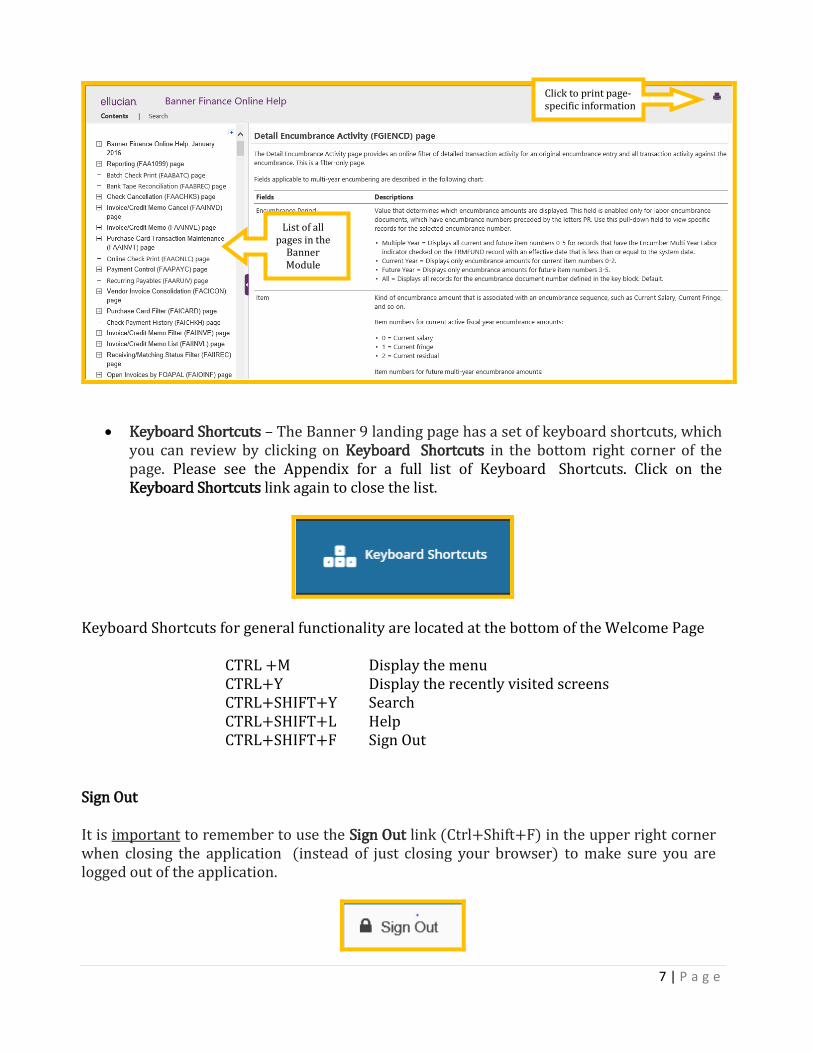
Banner 9 Navigate to Banner 9 from the Banner INB link in SNAP. This is a screenshot of the landing page. Note that what is called a “Form” in Banner 8, is called a “Page” in Banner 9. From here you can access Banner pages using the Menu Icon, the Search Icon or the Search Field. Return to the Home Page by clicking on the South Dakota Board of Regents link at the top of the page.
Search Field
Search Icon
Sign Out
Return to Home Page
Menu Icon
Recently Viewed Folder Icon
4 | P a g e
You can then use any of the following to navigate within Banner 9:
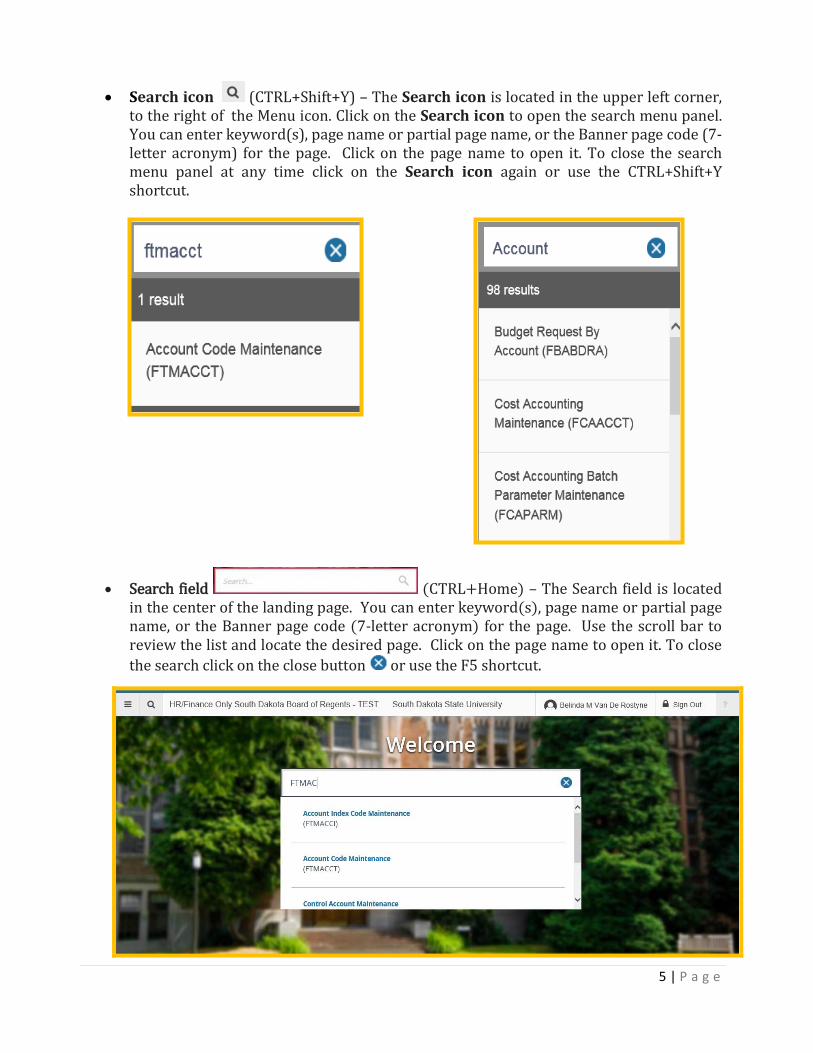
• Menu icon (CTRL+M) – The Menu icon is located in the upper left corner of the application. Click on this icon to open the BANNER, MY BANNER and BANNER SELF-SERVICE menus. Click on the right arrow to expand the menu tree and locate a specific application. To open a page, click on the page name. The Menu icon will also allow you to open the My Banner menu which will allow you to create a personal list of pages that you use regularly. To collapse the menu tree at any time click the left arrow
. To close the menu panel completely, click on the Menu icon again or use the Ctrl+M shortcut.
5 | P a g e
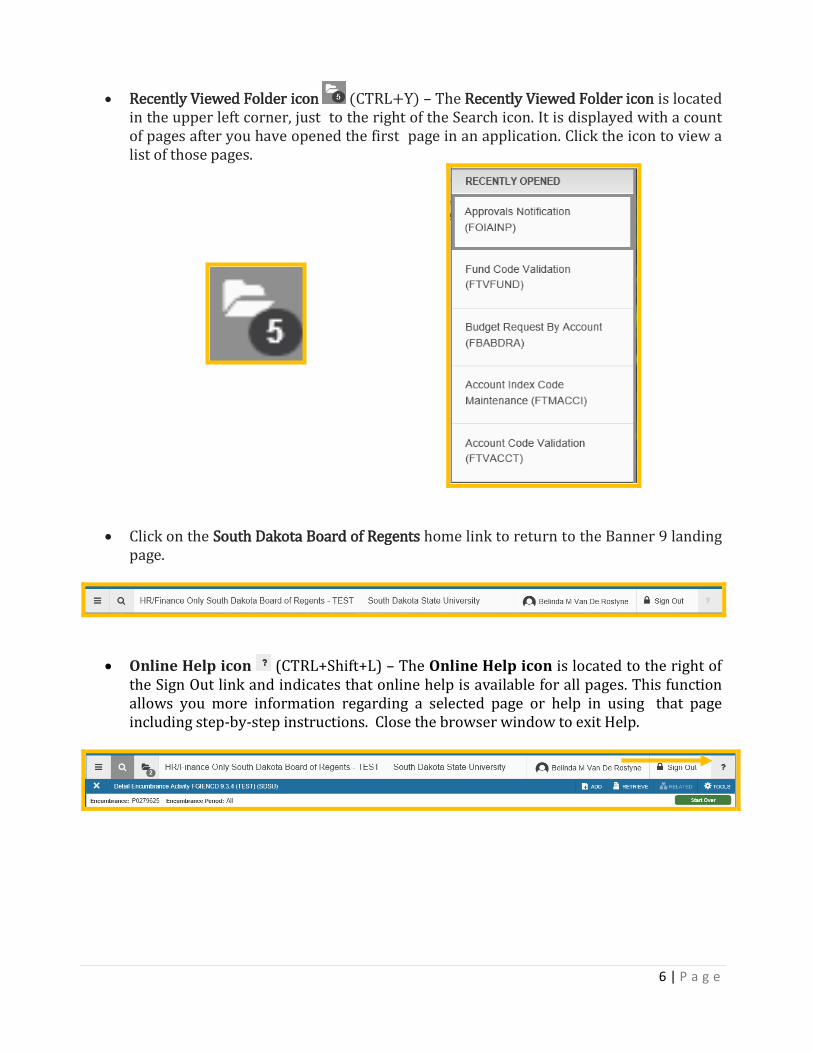
• Search icon (CTRL+Shift+Y) – The Search icon is located in the upper left corner, to the right of the Menu icon. Click on the Search icon to open the search menu panel. You can enter keyword(s), page name or partial page name, or the Banner page code (7-letter acronym) for the page. Click on the page name to open it. To close the search menu panel at any time click on the Search icon again or use the CTRL+Shift+Y shortcut.
• Search field (CTRL+Home) – The Search field is located in the center of the landing page. You can enter keyword(s), page name or partial page name, or the Banner page code (7-letter acronym) for the page. Use the scroll bar to review the list and locate the desired page. Click on the page name to open it. To close the search click on the close button or use the F5 shortcut.
6 | P a g e
• Recently Viewed Folder icon (CTRL+Y) – The Recently Viewed Folder icon is located in the upper left corner, just to the right of the Search icon. It is displayed with a count of pages after you have opened the first page in an application. Click the icon to view a list of those pages.
• Click on the South Dakota Board of Regents home link to return to the Banner 9 landing page.
• Online Help icon (CTRL+Shift+L) – The Online Help icon is located to the right of the Sign Out link and indicates that online help is available for all pages. This function allows you more information regarding a selected page or help in using that page including step-by-step instructions. Close the browser window to exit Help.
7 | P a g e
• Keyboard Shortcuts – The Banner 9 landing page has a set of keyboard shortcuts, which you can review by clicking on Keyboard Shortcuts in the bottom right corner of the page. Please see the Appendix for a full list of Keyboard Shortcuts. Click on the Keyboard Shortcuts link again to close the list.
Keyboard Shortcuts for general functionality are located at the bottom of the Welcome Page
CTRL +M Display the menu CTRL+Y Display the recently visited screens CTRL+SHIFT+Y Search CTRL+SHIFT+L Help CTRL+SHIFT+F Sign Out
Sign Out It is important to remember to use the Sign Out link (Ctrl+Shift+F) in the upper right corner when closing the application (instead of just closing your browser) to make sure you are logged out of the application.
Click to print page-specific information
List of all pages in the
Banner Module
8 | P a g e
Change in “Banner Language”
Banner 8
Banner 9
Query Filter
Record Insert/Record Duplicate Copy/Insert
Date Format: DD-month-YY MM/DD/YYYY
Roll Back Start Over
Next Block Next Section (Icon)
Previous Block Previous Section (Icon)
Screen/Form Page
Basic Navigation The basic navigation of each page (previously Forms) includes the page header, key block, sections, notification center, buttons and section icons.
Header
Section Icon
Online Help
Button
Key Block

9 | P a g e
Page Header
The page header is part of the basic navigation and contains the following items:
• Page close icon “X” – Always use this icon to close your page. • Page title – Includes description, acronym, version, and database. • Add and Retrieve icons – These icons are used with Banner Document Management
(Xtender). • Release and Submit icons – Displayed only with a workflow. • Related icon – Displays a list of pages that can be accessed from this page or use the
Search field to locate a specific page • Tools icon – Will include refresh, export, print, clear record, clear data, item properties,
display ID image, and other options controlled by the page. (formerly Options in Banner 8)
Key Block
Only the Key Block displays initially. The fields, icons, etc. within the key block are the same as in Banner 8. The key block determines what data is entered or displayed on the rest of the page. All the information on the page is related to the key block.
The Lookup icon next to a field allows you to quickly find a value for a field. When the cursor is in the key block, the fields that can be entered in the key block are enabled. When you leave the key block, the fields in the key block are disabled. Populate the key block data and then click Go (previously Next Block) to access the body of the page. Note that the key block collapses, but the information is still viewable. You can return to the key block if you are in the body of a page by clicking the Start Over button (previously Rollback).
10 | P a g e
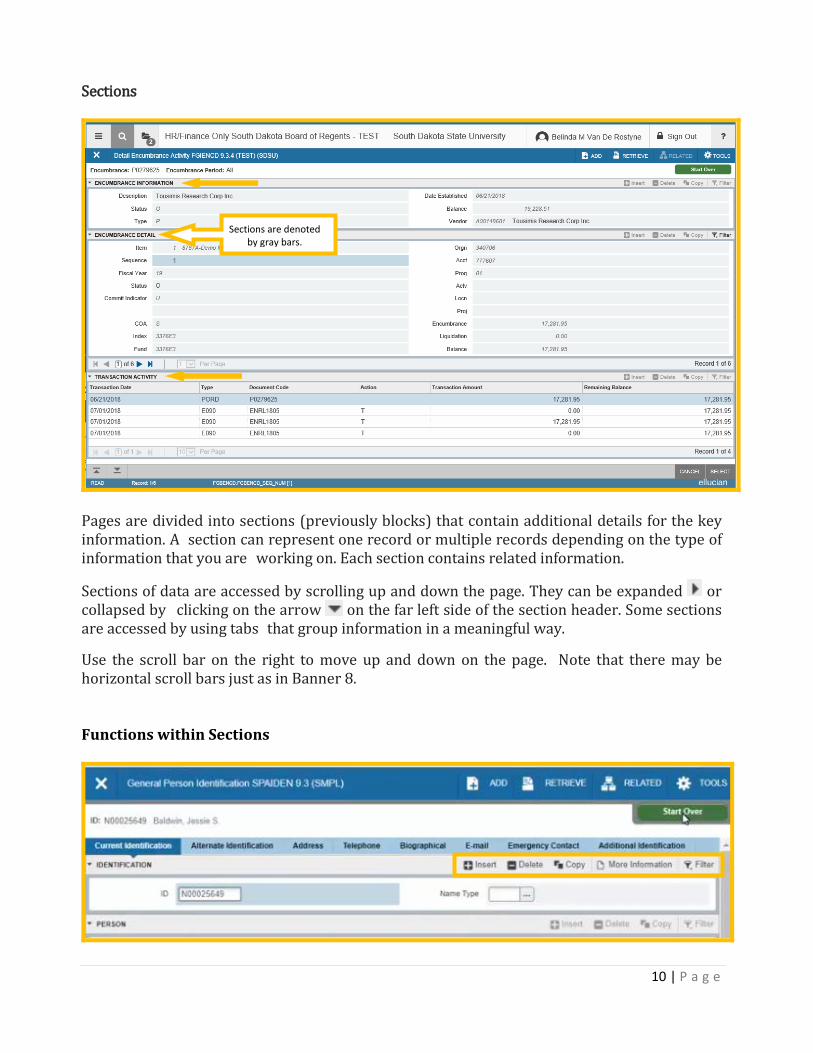
Sections
Pages are divided into sections (previously blocks) that contain additional details for the key information. A section can represent one record or multiple records depending on the type of information that you are working on. Each section contains related information.
Sections of data are accessed by scrolling up and down the page. They can be expanded or collapsed by clicking on the arrow on the far left side of the section header. Some sections are accessed by using tabs that group information in a meaningful way. Use the scroll bar on the right to move up and down on the page. Note that there may be horizontal scroll bars just as in Banner 8. Functions within Sections
Sections are denoted by gray bars.
11 | P a g e
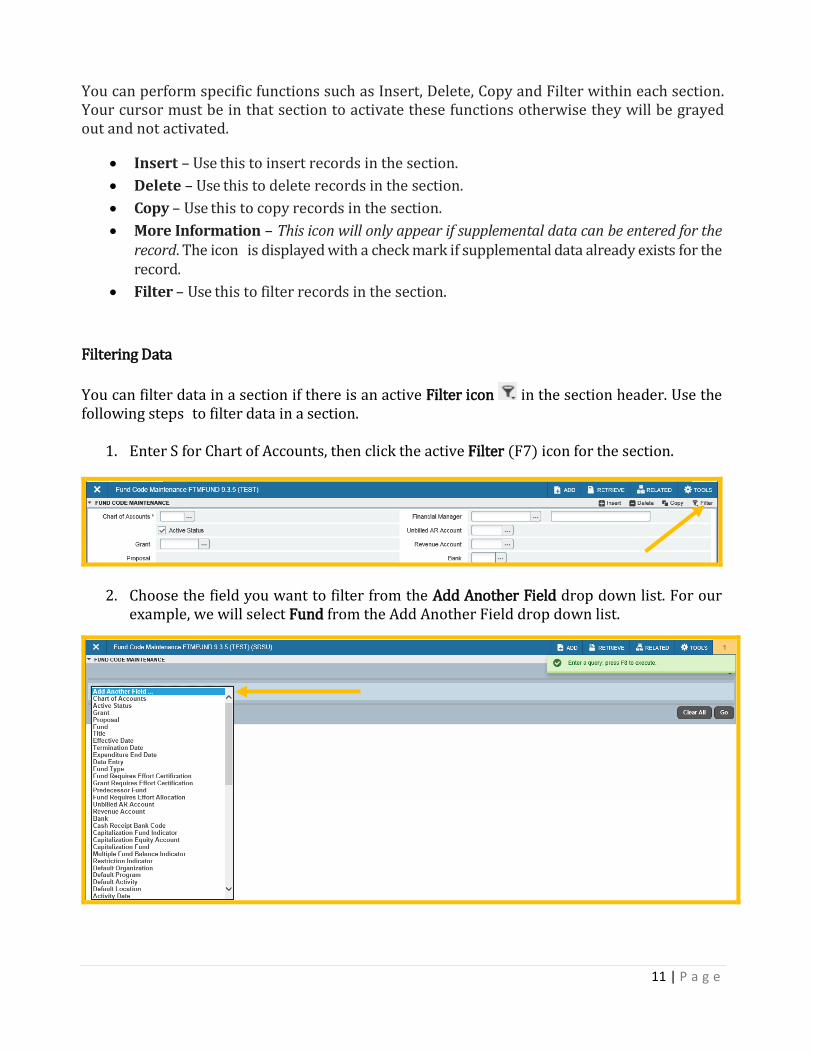
You can perform specific functions such as Insert, Delete, Copy and Filter within each section. Your cursor must be in that section to activate these functions otherwise they will be grayed out and not activated.
• Insert – Use this to insert records in the section. • Delete – Use this to delete records in the section. • Copy – Use this to copy records in the section. • More Information – This icon will only appear if supplemental data can be entered for the
record. The icon is displayed with a check mark if supplemental data already exists for the record.
• Filter – Use this to filter records in the section. Filtering Data You can filter data in a section if there is an active Filter icon in the section header. Use the following steps to filter data in a section.
1. Enter S for Chart of Accounts, then click the active Filter (F7) icon for the section.
2. Choose the field you want to filter from the Add Another Field drop down list. For our example, we will select Fund from the Add Another Field drop down list.
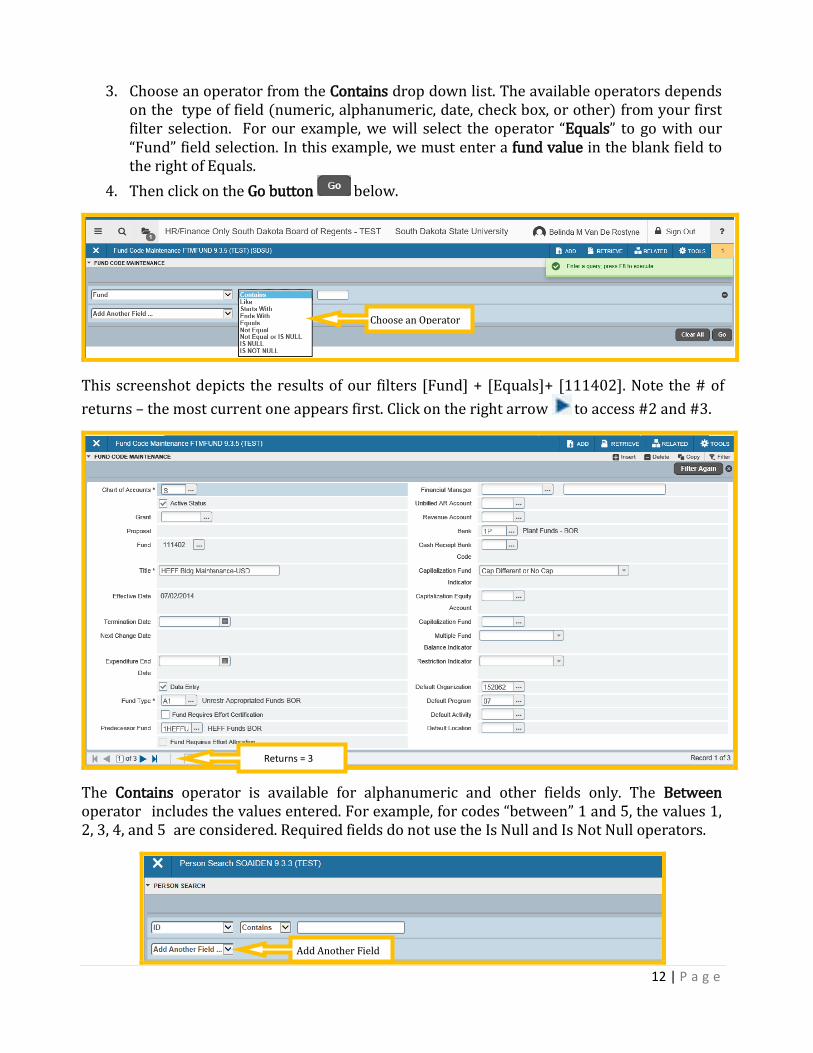
12 | P a g e
3. Choose an operator from the Contains drop down list. The available operators depends on the type of field (numeric, alphanumeric, date, check box, or other) from your first filter selection. For our example, we will select the operator “Equals” to go with our “Fund” field selection. In this example, we must enter a fund value in the blank field to the right of Equals.
4. Then click on the Go button below.
This screenshot depicts the results of our filters [Fund] + [Equals]+ [111402]. Note the # of returns – the most current one appears first. Click on the right arrow to access #2 and #3.
The Contains operator is available for alphanumeric and other fields only. The Between operator includes the values entered. For example, for codes “between” 1 and 5, the values 1, 2, 3, 4, and 5 are considered. Required fields do not use the Is Null and Is Not Null operators.
Choose an Operator
Returns = 3
Add Another Field
13 | P a g e
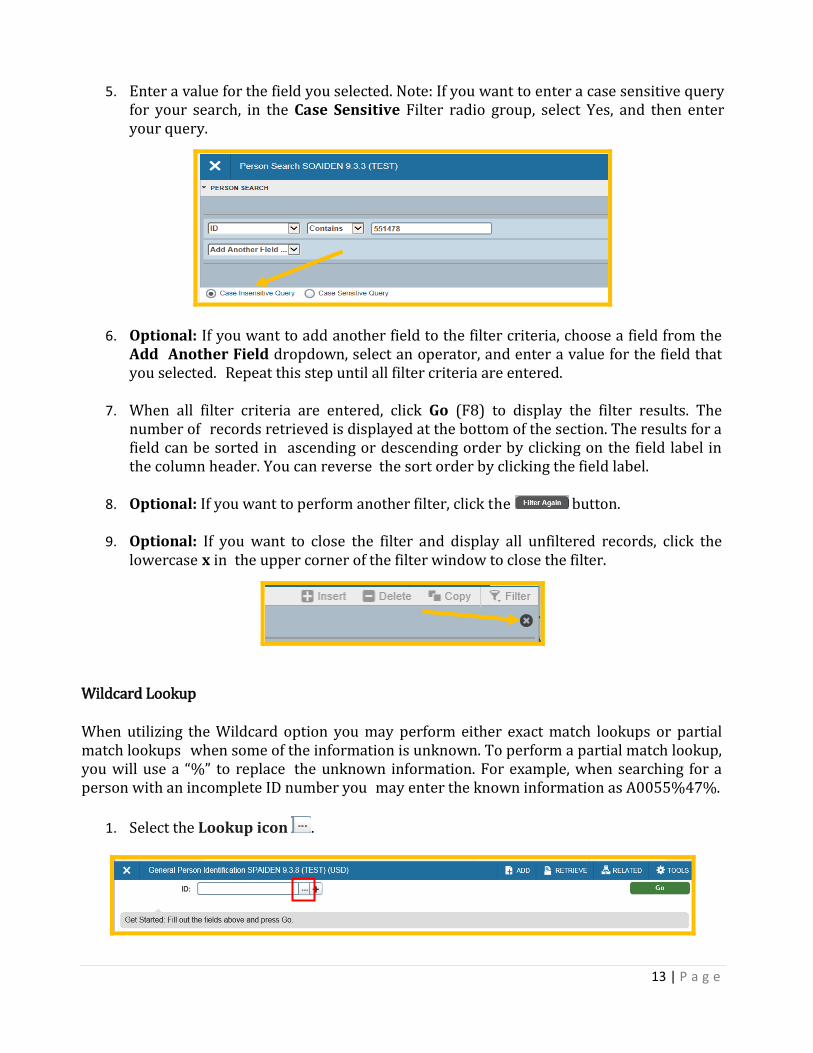
5. Enter a value for the field you selected. Note: If you want to enter a case sensitive query for your search, in the Case Sensitive Filter radio group, select Yes, and then enter your query.
6. Optional: If you want to add another field to the filter criteria, choose a field from the Add Another Field dropdown, select an operator, and enter a value for the field that you selected. Repeat this step until all filter criteria are entered.
7. When all filter criteria are entered, click Go (F8) to display the filter results. The number of records retrieved is displayed at the bottom of the section. The results for a field can be sorted in ascending or descending order by clicking on the field label in the column header. You can reverse the sort order by clicking the field label.
8. Optional: If you want to perform another filter, click the button.
9. Optional: If you want to close the filter and display all unfiltered records, click the
lowercase x in the upper corner of the filter window to close the filter.
Wildcard Lookup When utilizing the Wildcard option you may perform either exact match lookups or partial match lookups when some of the information is unknown. To perform a partial match lookup, you will use a “%” to replace the unknown information. For example, when searching for a person with an incomplete ID number you may enter the known information as A0055%47%.
1. Select the Lookup icon .
14 | P a g e
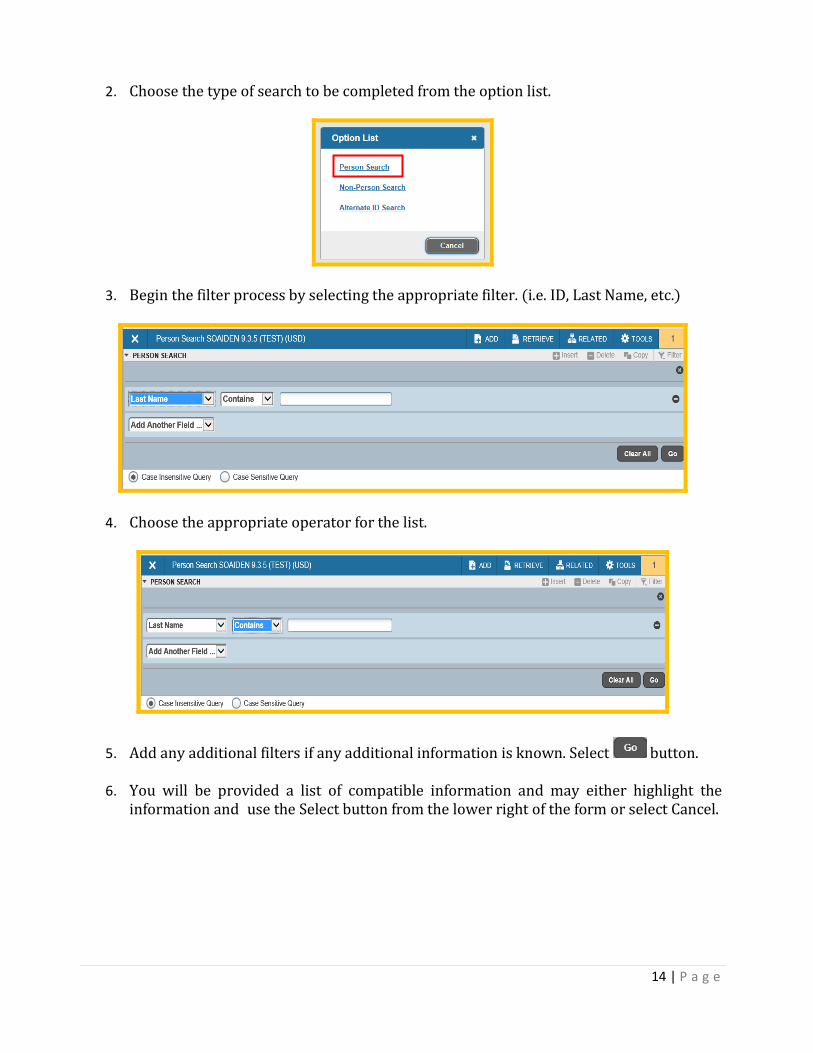
2. Choose the type of search to be completed from the option list.
3. Begin the filter process by selecting the appropriate filter. (i.e. ID, Last Name, etc.)
4. Choose the appropriate operator for the list.
5. Add any additional filters if any additional information is known. Select button.
6. You will be provided a list of compatible information and may either highlight the information and use the Select button from the lower right of the form or select Cancel.
15 | P a g e
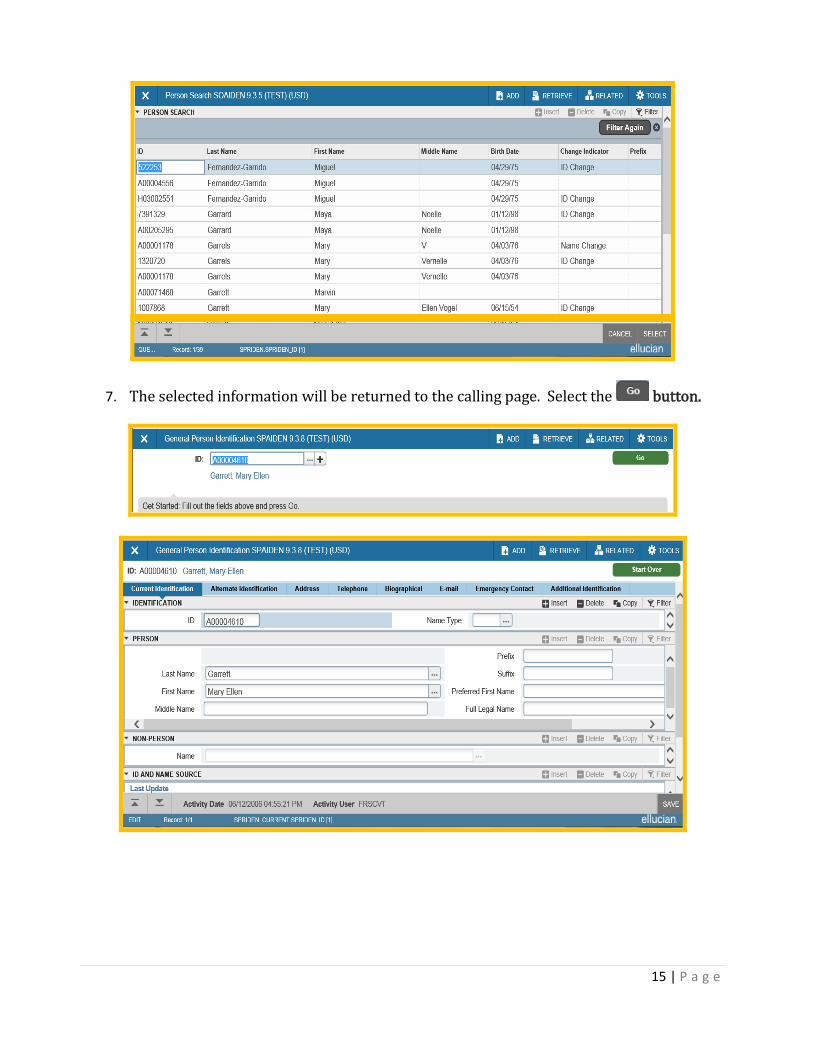
7. The selected information will be returned to the calling page. Select the button.
16 | P a g e
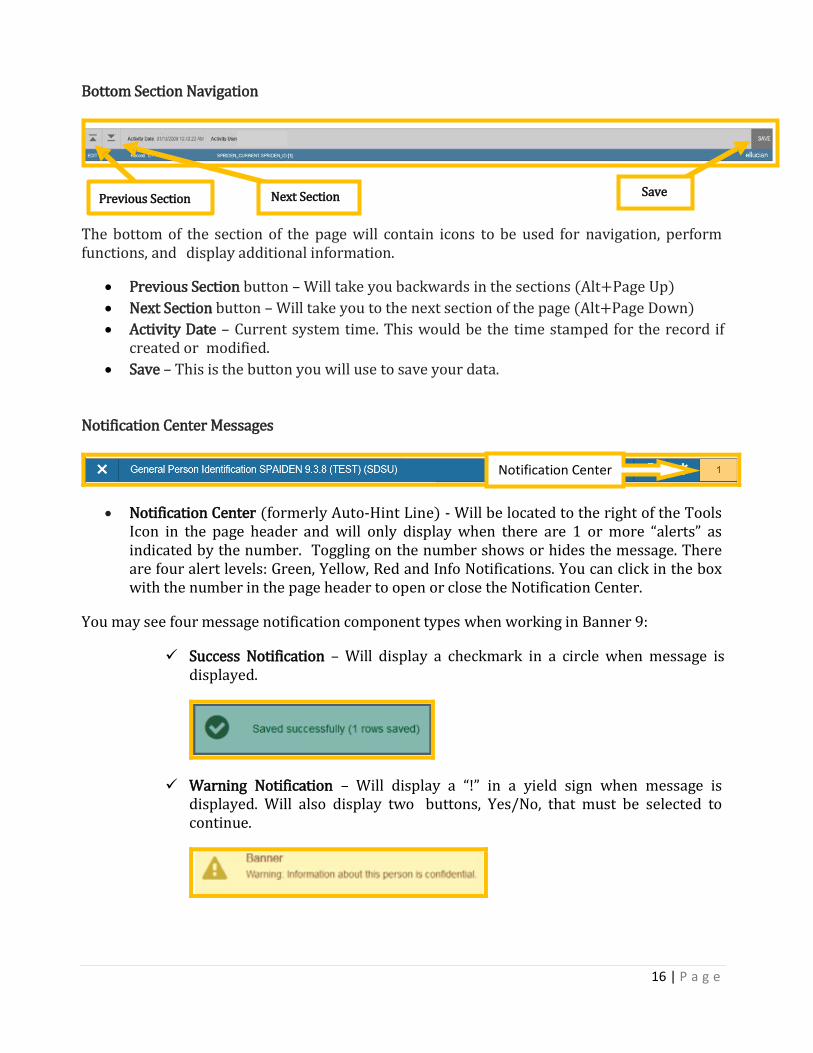
Bottom Section Navigation
The bottom of the section of the page will contain icons to be used for navigation, perform functions, and display additional information.
• Previous Section button – Will take you backwards in the sections (Alt+Page Up) • Next Section button – Will take you to the next section of the page (Alt+Page Down) • Activity Date – Current system time. This would be the time stamped for the record if
created or modified. • Save – This is the button you will use to save your data.
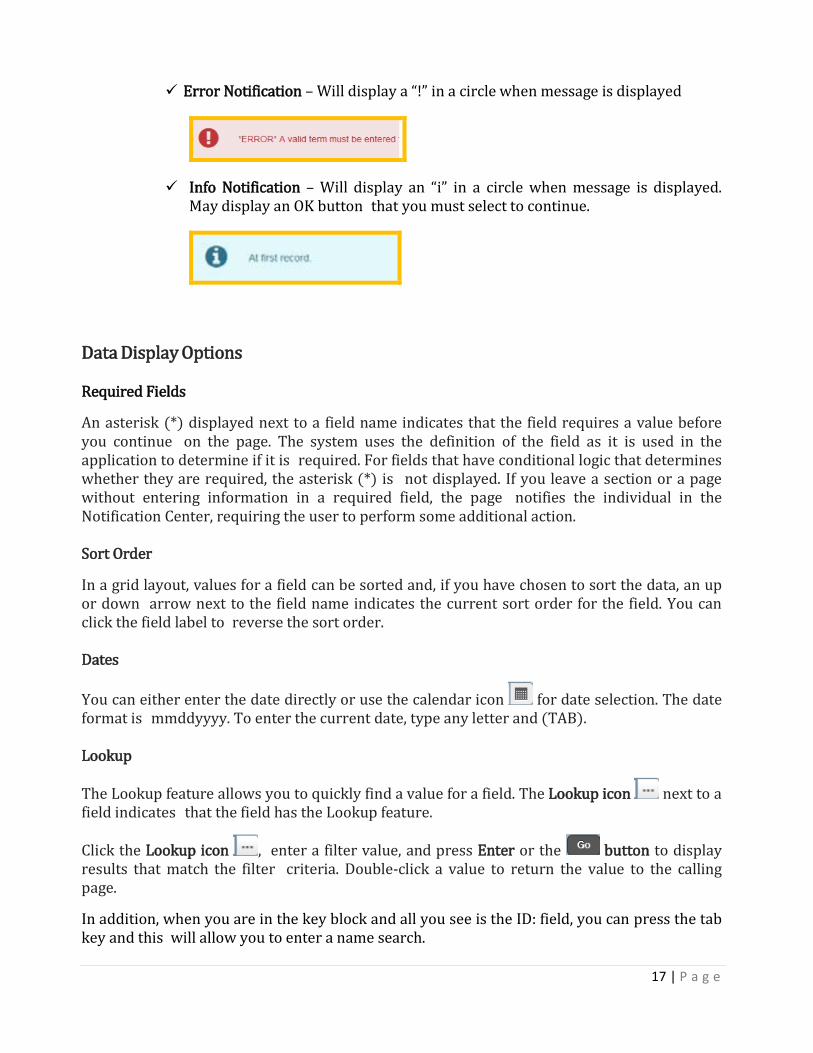
Notification Center Messages
• Notification Center (formerly Auto-Hint Line) - Will be located to the right of the Tools Icon in the page header and will only display when there are 1 or more “alerts” as indicated by the number. Toggling on the number shows or hides the message. There are four alert levels: Green, Yellow, Red and Info Notifications. You can click in the box with the number in the page header to open or close the Notification Center.
You may see four message notification component types when working in Banner 9:
Success Notification – Will display a checkmark in a circle when message is displayed.
Warning Notification – Will display a “!” in a yield sign when message is displayed. Will also display two buttons, Yes/No, that must be selected to continue.
Save Next Section Previous Section
Notification Center
17 | P a g e
Error Notification – Will display a “!” in a circle when message is displayed
Info Notification – Will display an “i” in a circle when message is displayed. May display an OK button that you must select to continue.
Data Display Options Required Fields An asterisk (*) displayed next to a field name indicates that the field requires a value before you continue on the page. The system uses the definition of the field as it is used in the application to determine if it is required. For fields that have conditional logic that determines whether they are required, the asterisk (*) is not displayed. If you leave a section or a page without entering information in a required field, the page notifies the individual in the Notification Center, requiring the user to perform some additional action. Sort Order In a grid layout, values for a field can be sorted and, if you have chosen to sort the data, an up or down arrow next to the field name indicates the current sort order for the field. You can click the field label to reverse the sort order. Dates
You can either enter the date directly or use the calendar icon for date selection. The date format is mmddyyyy. To enter the current date, type any letter and (TAB). Lookup
The Lookup feature allows you to quickly find a value for a field. The Lookup icon next to a field indicates that the field has the Lookup feature.
Click the Lookup icon , enter a filter value, and press Enter or the button to display results that match the filter criteria. Double-click a value to return the value to the calling page. In addition, when you are in the key block and all you see is the ID: field, you can press the tab key and this will allow you to enter a name search.
18 | P a g e
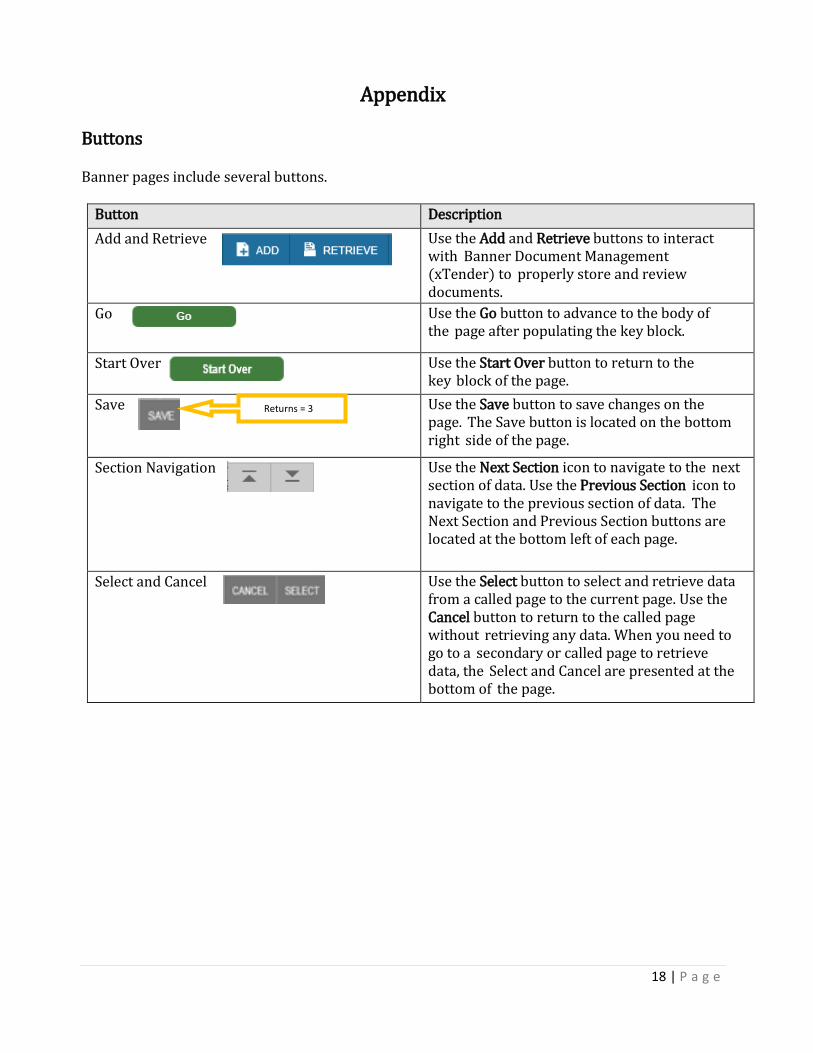
Appendix Buttons Banner pages include several buttons.
Button Description Add and Retrieve Use the Add and Retrieve buttons to interact
with Banner Document Management (xTender) to properly store and review documents.
Go Use the Go button to advance to the body of the page after populating the key block.
Start Over Use the Start Over button to return to the key block of the page.
Save Use the Save button to save changes on the page. The Save button is located on the bottom right side of the page.
Section Navigation Use the Next Section icon to navigate to the next section of data. Use the Previous Section icon to navigate to the previous section of data. The Next Section and Previous Section buttons are located at the bottom left of each page.
Select and Cancel Use the Select button to select and retrieve data from a called page to the current page. Use the Cancel button to return to the called page without retrieving any data. When you need to go to a secondary or called page to retrieve data, the Select and Cancel are presented at the bottom of the page.
Returns = 3
19 | P a g e
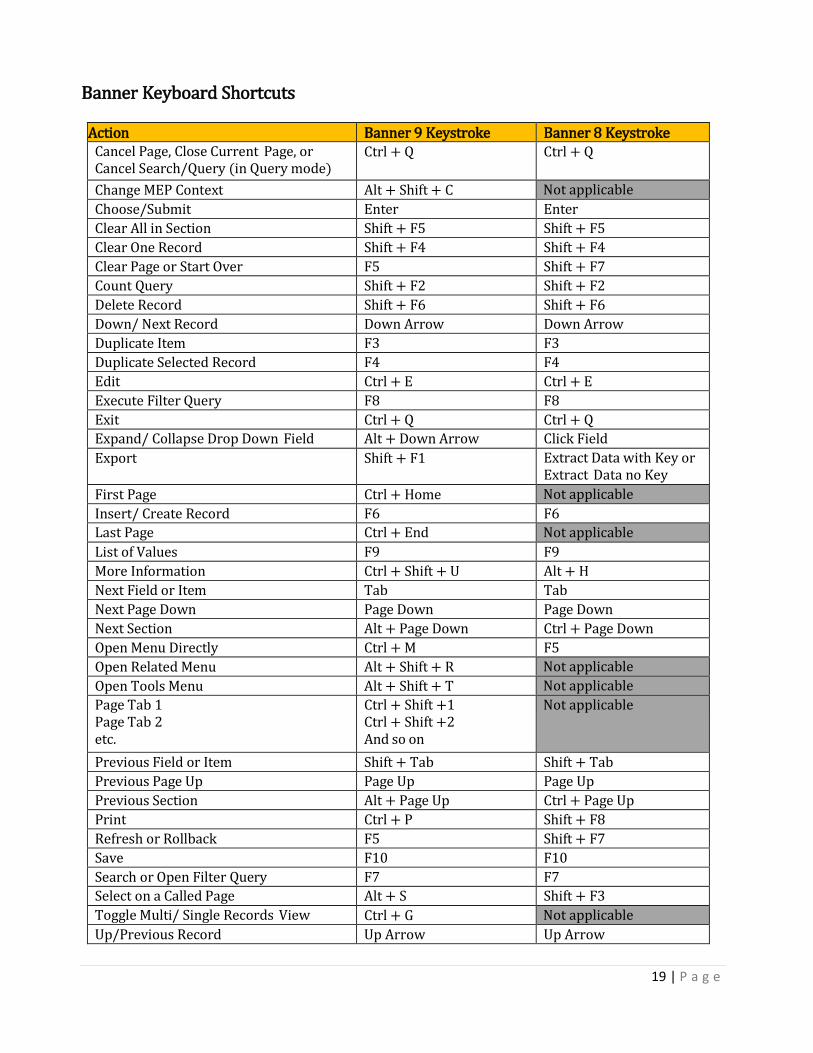
Banner Keyboard Shortcuts Action Banner 9 Keystroke Banner 8 Keystroke
Cancel Page, Close Current Page, or Cancel Search/Query (in Query mode)
Ctrl + Q Ctrl + Q
Change MEP Context Alt + Shift + C Not applicable Choose/Submit Enter Enter Clear All in Section Shift + F5 Shift + F5 Clear One Record Shift + F4 Shift + F4 Clear Page or Start Over F5 Shift + F7 Count Query Shift + F2 Shift + F2 Delete Record Shift + F6 Shift + F6 Down/ Next Record Down Arrow Down Arrow Duplicate Item F3 F3 Duplicate Selected Record F4 F4 Edit Ctrl + E Ctrl + E Execute Filter Query F8 F8 Exit Ctrl + Q Ctrl + Q Expand/ Collapse Drop Down Field Alt + Down Arrow Click Field Export Shift + F1 Extract Data with Key or
Extract Data no Key First Page Ctrl + Home Not applicable Insert/ Create Record F6 F6 Last Page Ctrl + End Not applicable List of Values F9 F9 More Information Ctrl + Shift + U Alt + H Next Field or Item Tab Tab Next Page Down Page Down Page Down Next Section Alt + Page Down Ctrl + Page Down Open Menu Directly Ctrl + M F5 Open Related Menu Alt + Shift + R Not applicable Open Tools Menu Alt + Shift + T Not applicable Page Tab 1 Page Tab 2 etc.
Ctrl + Shift +1 Ctrl + Shift +2 And so on
Not applicable
Previous Field or Item Shift + Tab Shift + Tab Previous Page Up Page Up Page Up Previous Section Alt + Page Up Ctrl + Page Up Print Ctrl + P Shift + F8 Refresh or Rollback F5 Shift + F7 Save F10 F10 Search or Open Filter Query F7 F7 Select on a Called Page Alt + S Shift + F3 Toggle Multi/ Single Records View Ctrl + G Not applicable Up/Previous Record Up Arrow Up Arrow
20 | P a g e
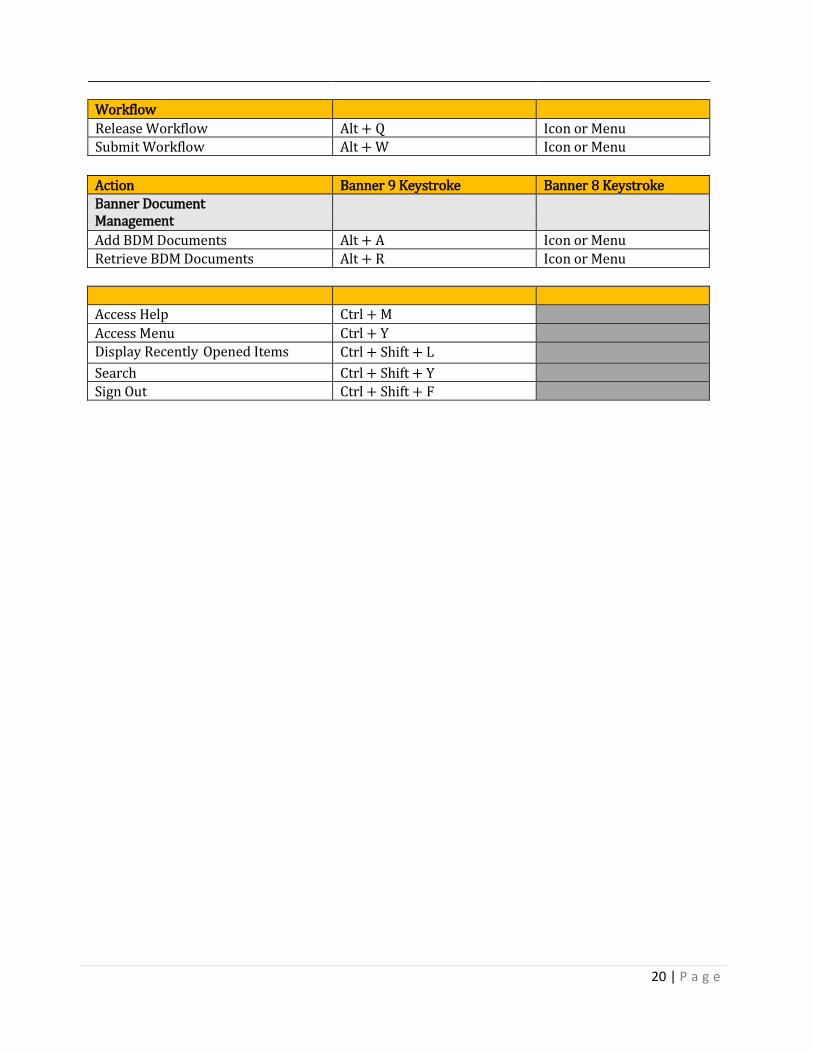
Workflow Release Workflow Alt + Q Icon or Menu Submit Workflow Alt + W Icon or Menu
Action Banner 9 Keystroke Banner 8 Keystroke Banner Document Management
Add BDM Documents Alt + A Icon or Menu Retrieve BDM Documents Alt + R Icon or Menu
Access Help Ctrl + M Access Menu Ctrl + Y Display Recently Opened Items Ctrl + Shift + L Search Ctrl + Shift + Y Sign Out Ctrl + Shift + F


![DATED [dd/mm/yyyy] GOVERNMENT PROCUREMENT SERVICE … · 2019. 3. 27. · 4 This Framework Agreement is made on [insert Framework Commencement Date dd/mm/yyyy] BETWEEN: (1) the Minister](https://img.pdfslide.us/doc/110x75/60df68a662fed96dd000786d/dated-ddmmyyyy-government-procurement-service-2019-3-27-4-this-framework.jpg)
![Title · Web viewThis is a pre-copyedited, author-produced PDF of an article accepted for publication in [insert journal title] following peer review. The version of record [insert](https://img.pdfslide.us/doc/110x75/5f51c3006c4e1e435c142123/title-web-view-this-is-a-pre-copyedited-author-produced-pdf-of-an-article-accepted.jpg)