Embed Size (px)
Citation preview

SAP BusinessObjects Planning and Consolidation 7.5, version for the Netweaver platform
September 2011
English
Legal Consolidation (B64)
SAP AGDietmar-Hopp-Allee 16D 69190 WalldorfGermany
Building Block Configuration Guide

SAP Best Practices Legal Consolidation (B64): Configuration Guide
Copyright
© 2011 SAP AG. All rights reserved.
No part of this publication may be reproduced or transmitted in any form or for any purpose without the express permission of SAP AG. The information contained herein may be changed without prior notice.
Some software products marketed by SAP AG and its distributors contain proprietary software components of other software vendors.
Microsoft, Windows, Excel, Outlook, and PowerPoint are registered trademarks of Microsoft Corporation.
IBM, DB2, DB2 Universal Database, System i, System i5, System p, System p5, System x, System z, System z10, System z9, z10, z9, iSeries, pSeries, xSeries, zSeries, eServer, z/VM, z/OS, i5/OS, S/390, OS/390, OS/400, AS/400, S/390 Parallel Enterprise Server, PowerVM, Power Architecture, POWER6+, POWER6, POWER5+, POWER5, POWER, OpenPower, PowerPC, BatchPipes, BladeCenter, System Storage, GPFS, HACMP, RETAIN, DB2 Connect, RACF, Redbooks, OS/2, Parallel Sysplex, MVS/ESA, AIX, Intelligent Miner, WebSphere, Netfinity, Tivoli and Informix are trademarks or registered trademarks of IBM Corporation.
Linux is the registered trademark of Linus Torvalds in the U.S. and other countries.
Adobe, the Adobe logo, Acrobat, PostScript, and Reader are either trademarks or registered trademarks of Adobe Systems Incorporated in the United States and/or other countries.
Oracle is a registered trademark of Oracle Corporation.
UNIX, X/Open, OSF/1, and Motif are registered trademarks of the Open Group.
Citrix, ICA, Program Neighborhood, MetaFrame, WinFrame, VideoFrame, and MultiWin are trademarks or registered trademarks of Citrix Systems, Inc.
HTML, XML, XHTML and W3C are trademarks or registered trademarks of W3C®, World Wide Web Consortium, Massachusetts Institute of Technology.
Java is a registered trademark of Sun Microsystems, Inc.
JavaScript is a registered trademark of Sun Microsystems, Inc., used under license for technology invented and implemented by Netscape.
SAP, R/3, SAP NetWeaver, Duet, PartnerEdge, ByDesign, SAP BusinessObjects Explorer, StreamWork, and other SAP products and services mentioned herein as well as their respective logos are trademarks or registered trademarks of SAP AG in Germany and other countries.
Business Objects and the Business Objects logo, BusinessObjects, Crystal Reports, Crystal Decisions, Web Intelligence, Xcelsius, and other Business Objects products and services mentioned herein as well as their respective logos are trademarks or registered trademarks of Business Objects Software Ltd. Business Objects is an SAP company.
Sybase and Adaptive Server, iAnywhere, Sybase 365, SQL Anywhere, and other Sybase products and services mentioned herein as well as their respective logos are trademarks or registered trademarks of Sybase, Inc. Sybase is an SAP company.
All other product and service names mentioned are the trademarks of their respective companies. Data contained in this document serves informational purposes only. National product specifications may vary.
These materials are subject to change without notice. These materials are provided by SAP AG and its affiliated companies ("SAP Group") for informational purposes only, without representation or warranty of any kind, and SAP Group shall not be liable for errors or omissions with respect to the materials. The only warranties for SAP Group products and services are those that are set forth in the express warranty statements accompanying such products and services, if any. Nothing herein should be construed as constituting an additional warranty.
© SAP AG Page 2 of 51
SAP Best Practices Legal Consolidation (B64): Configuration Guide
Icons
Icon Meaning
Caution
Example
Note or Tip
Recommendation
Syntax
External Process
Business Process Alternative/Decision Choice
Typographic Conventions
Type Style Description
Example text Words or characters that appear on the screen. These include field names, screen titles, pushbuttons as well as menu names, paths and options.Cross-references to other documentation.
Example text Emphasized words or phrases in body text, titles of graphics and tables.
EXAMPLE TEXT Names of elements in the system. These include report names, program names, transaction codes, table names, and individual key words of a programming language, when surrounded by body text, for example, SELECT and INCLUDE.
Example text Screen output. This includes file and directory names and their paths, messages, source code, names of variables and parameters as well as names of installation, upgrade and database tools.
EXAMPLE TEXT Keys on the keyboard, for example, function keys (such as F2) or the ENTER key.
Example text Exact user entry. These are words or characters that you enter in the system exactly as they appear in the documentation.
<Example text> Variable user entry. Pointed brackets indicate that you replace these words and characters with appropriate entries.
© SAP AG Page 3 of 51
SAP Best Practices Legal Consolidation (B64): Configuration Guide
Contents
Legal Consolidation..................................................................................................................... 61 Use....................................................................................................................................... 62 Terminology......................................................................................................................... 63 Prerequisites........................................................................................................................ 64 Navigation in the System.....................................................................................................65 Configuration........................................................................................................................ 7
5.1 Creating a New Application Set.....................................................................................75.2 Dimensions.................................................................................................................... 9
5.2.1 Updating the Category Dimension........................................................................95.2.2 Updating the InputCurrency Dimension..............................................................105.2.3 Updating the RptCurrency Dimension.................................................................115.2.4 Creating the RateEntity.......................................................................................125.2.5 Creating the Rates..............................................................................................135.2.6 Updating the Entity Dimension............................................................................145.2.7 Updating the IntCo Dimension............................................................................155.2.8 Updating the FLOW Dimension...........................................................................165.2.9 Creating the DataSrc...........................................................................................175.2.10 Creating the ConsoScope...................................................................................185.2.11 Updating the Time Dimension.............................................................................195.2.12 Creating the OwnAccount...................................................................................205.2.13 Creating the ICAccount.......................................................................................215.2.14 Creating the ICDataSrc.......................................................................................225.2.15 Creating the Account...........................................................................................23
5.3 Application...................................................................................................................245.3.1 Creating Ownership Application..........................................................................245.3.2 Updating Rate Application...................................................................................255.3.3 Creating Consolidation Application.....................................................................265.3.4 Creating ICMatching Application.........................................................................27
5.4 Security........................................................................................................................275.4.1 Creating a Task Profile........................................................................................275.4.2 Creating a Member Access Profile......................................................................295.4.3 Creating Teams...................................................................................................315.4.4 Creating BPC Users and Assigning to Team......................................................31
5.5 Work Status................................................................................................................. 335.5.1 Customizing the Appset Work Status Settings....................................................335.5.2 Customizing the Application Work Status Settings..............................................33
5.6 Uploading Template....................................................................................................345.7 Uploading Transformation File.....................................................................................355.8 Business Process Flow................................................................................................365.9 Creating BPF Instance.................................................................................................415.10 Journal Administration.............................................................................................42
© SAP AG Page 4 of 51

SAP Best Practices Legal Consolidation (B64): Configuration Guide
5.11 Setting Application Parameters...............................................................................445.12 Data Management...................................................................................................44
5.12.1 Maintaining Package...........................................................................................445.12.2 Maintaining Script Logic......................................................................................46
5.13 Setting Application Set Status.................................................................................465.14 Business Rule.........................................................................................................47
5.14.1 Setting Business Rule Library.............................................................................475.14.2 Setting Business Rules in Consolidation Application..........................................485.14.3 Setting Business Rules in ICMatching Application..............................................50
6 Test and Use......................................................................................................................51
© SAP AG Page 5 of 51

SAP Best Practices Legal Consolidation (B64): Configuration Guide
Legal Consolidation
1 UseThis document describes the activities performed in the SAP Business Planning and Consolidation to enable the legal consolidation scenarios.
2 TerminologyApplication SetsAn application set is a group of applications. An application set contains a set of dimensions that may be shared among its applications. ApplicationsAn application is a functional unit used for a particular purpose (for example: finance application, sales application). Applications may share dimensions with other applications within the same application set, or have dimensions that are unique.DimensionsDimensions consist of members. If the members of the dimension are arranged in a hierarchical order, the relationship between members is described with terms such as Parent, Child, and Sibling.PropertiesDimension members are described by properties.DataData is described by dimension members.
3 PrerequisitesBefore you start installing this building block, you must install prerequisite building blocks. For more information, see the Building Block Prerequisite Matrix (Prerequisites_Matrix_[xx]_[yy]_ [zz].xls; the placeholder [xx] depends on the SAP Best Practices version you use, e.g. BPC refers to the SAP Best Practices SAP BusinessObjects Planning and Consolidation 7.5, [yy] depends on the language version, e.g. EN for English language, and [zz] depends on the country version, e.g. CN for China: Prerequisites_Matrix_BPC_EN_DE.xls). This document can be found on the SAP Best Practices documentation DVD in the folder ..\[xx]_[zz]\Documentation\; ([xx] depends on the SAP Best Practices version and [zz] depends on the country version).
4 Navigation in the SystemWhen you start the Business Planning and Consolidation application you first see the Launch Page, from where you can select the user interface that you want to work in, for example BPC Administration, BPC for Excel, and so on.Once you have chosen one of the options mentioned above, you see the Action Pane on the right-hand side of your screen, where you can select your tasks and activities. With the buttons
on the top you can see details on the session information, the login information and the current view (CV). You have two options to change the current view:
© SAP AG Page 6 of 51

SAP Best Practices Legal Consolidation (B64): Configuration Guide
In this view, choose the links of the application or the dimensions directly to change the view.
In this view, the drop-down list gives you a history of the applications or dimensions you have already chosen in the past. If you want to choose an application or dimension you have not viewed in the past yet, do not choose it from the drop-down list, but choose the entry (for example: Application, Category) to the left of the drop down list.
Below the title, for example BPC Administration, you can choose various tasks.
With the buttons at the bottom you can open other available interfaces or with See Also open the BPC help.At the top of the Action Pane you can navigate back and forth with the arrows. With the Home button you can return to the start page of the specific BPC application you are in.
5 Configuration5.1 Creating a New Application Set
UseBusiness Planning and Consolidation is delivered with a sample application called ApShell. This application set is used as a starting point for the new application set Best Practices Consolidation.
Procedure1. Open the Business Planning and Consolidation - BPC application.
© SAP AG Page 7 of 51
SAP Best Practices Legal Consolidation (B64): Configuration Guide
Use the user that has been used during BPC installation to create the new application set.
2. From the launch page, choose Administration.
3. On the BPC Administration screen, choose Manage Application Sets under the title Admin Console Tasks.
4. In the occurring dialog box, choose ApShell in the Select AppSet field. Then choose OK.
5. If the Connection Wizard appears enter the required data. Then choose Finish.
6. The administration page opens. In the left screen area, choose ApShell (the top node of the tree).
7. In the action pane in the right-hand screen area, choose Add a new application set. The Add a New Application Set Step 1 of 2 action pane is displayed.
8. In the upper field enter the application set name, for example SAP_BP_Conso_GL. (In this document, we always refer to the new application set as SAP_BP_Conso_GL.)
9. In the middle field, enter a description, for example SAP_BP_Conso_GL.
10. In the lower field, choose ApShell as the application set, which is duplicated.
11. Choose Go to Next Step 2 of 2.
12. Under the headline Which records do you want to copy?, mark all checkboxes except Database records.
13. Choose Add a New Application Set.
14. In the Add a new application set dialog box, choose OK when the task has been successfully completed.
ResultYou have created the Best Practices Legal Consolidation application set, which you can now configure to your needs.
By default, you are still working in the original ApShell application set. To switch to your newly created application set, carry out the following steps:1. In the upper part of the action pane, choose the link ApShell underneath the
entry Session Information.
2. In the BPC dialog box, choose Connection Wizard.3. In the Connection Wizard, choose the correct server and choose Next twice. (If
necessary enter your user and password.) Choose SAP_BP_Conso_GL as default application set and choose Next again. Review the summary and choose Finish.
4. In the BPC dialog box, choose OK.
© SAP AG Page 8 of 51
SAP Best Practices Legal Consolidation (B64): Configuration Guide
5.2 Dimensions
UseThe application set SAP_BP_Conso_GL is a copy of the ApShell application set; however, it does not contain any data. The dimensions and members need to be changed from the defaults to ones that are needed for the SAP_BP_Conso_GL application set.
5.2.1 Updating the Category Dimension
UseChange the default Category members to ones that are needed for the SAP_BP_Conso_GL application set.
Procedure1. From the hierarchical view on the left side of BPC Administration, select the Category
dimension.
2. Choose Maintain dimension property.
3. Maintain property name and length as following entries:
No. Property Name Length
1 CATEGORY_FOR_OPE 20
2 COMPARISON 50
3 EVDESCRIPTION 60
4 FX_DIFFERENCE_ONLY 2
5 FX_SOURCE_CATEGORY 20
6 GROUP 50
7 OPENING_PERIOD 10
8 OPENING_YEAR 4
9 RATE_CATEGORY 20
10 RATE_PERIOD 10
11 RATE_YEAR 10
12 REVIEWER 50
13 STARTMTH 3
14 STYLE 10
15 YEAR 10
4. Choose Modify Dimension Property from the Action Pane, confirm the Modify dimension dialog by clicking OK.
5. Select the Category dimension again, choose Maintain dimension members. The Category.xls workbook is opened.
6. Open BP_Dimension.xls worksheet from \Misc\B64 folder.
7. Select the sheet named Category.
© SAP AG Page 9 of 51

SAP Best Practices Legal Consolidation (B64): Configuration Guide
8. Highlight the entire sheet. From the menu, choose Edit Copy.
9. Switch back to BPC Administration.
10. Highlight the entire sheet. Choose [Del] key to delete the contents of the entire sheet.
11. Go to cell A1 and choose the right mouse button and select Paste.
12. From the Action Pane, select Save to Server.
13. From the Action Pane, select Process dimension.
14. The Process dimensions dialog box is displayed.
15. SSelect OK to start the processing.
16. Confirm the information This task has been successfully completed with OK.
ResultYou have modified the Category dimension.
5.2.2 Updating the InputCurrency Dimension
UseChange the default InputCurrency members to ones that are needed for the SAP_BP_Conso_GL application set.
Procedure1. From the hierarchical view on the left side of BPC Administration, select the InputCurrency
dimension.
2. Choose Maintain dimension property.
3. Maintain property name and length as following entries:
No. Property Name Length
1 ENTITY 20
2 EVDESCRIPTION 60
3 GROUP 50
4 INUSE 4
5 MD 2
6 REPORTING 2
7 SCALE 2
8 STYLE 4
4. Choose Modify Dimension Property from the Action Pane, confirm the Modify dimension dialog by clicking OK.
5. Select the Category dimension again, choose Maintain dimension members. The Inputcurrency.xls workbook is opened.
6. Open BP_Dimension.xls worksheet from \Misc\B64 folder.
7. Select the sheet named InputCurrency.
8. Highlight the entire sheet. From the menu, choose Edit Copy.
© SAP AG Page 10 of 51

SAP Best Practices Legal Consolidation (B64): Configuration Guide
9. Switch back to BPC Administration.
10. Highlight the entire sheet. Choose [Del] key to delete the contents of the entire sheet.
11. Go to cell A1 and choose the right mouse button and select Paste.
12. From the Action Pane, select Save to Server.
13. From the Action Pane, select Process dimension.
14. The Process dimensions dialog box is displayed.
15. Select OK to start the processing.
16. Confirm the information This task has been successfully completed with OK.
ResultYou have modified the InputCurrency dimension.
5.2.3 Updating the RptCurrency Dimension
UseChange the default RptCurrency members to ones that are needed for the SAP_BP_Conso_GL application set.
Procedure1. From the hierarchical view on the left side of BPC Administration, select the RptCurrency
dimension.
2. Choose Maintain dimension property.
3. Maintain property name and length as following entries:
No. Property Name Length
1 CURRENCY 20
2 CURRENCY_TYPE 2
3 ENTITY 20
4 EVDESCRIPTION 60
5 REPORTING 2
4. Choose Modify Dimension Property from the Action Pane, confirm the Modify dimension dialog by clicking OK.
5. Select the Category dimension again, choose Maintain dimension members. The Rptcurrency.xls workbook is opened.
6. Open BP_Dimension.xls worksheet from \Misc\B64 folder.
7. Select the sheet named RptCurrency.
8. Highlight the entire sheet. From the menu, choose Edit Copy.
9. Switch back to BPC Administration.
10. Highlight the entire sheet. Choose [Del] key to delete the contents of the entire sheet.
11. Go to cell A1 and choose the right mouse button and select Paste.
12. From the Action Pane, select Save to Server.
© SAP AG Page 11 of 51

SAP Best Practices Legal Consolidation (B64): Configuration Guide
13. From the Action Pane, select Process dimension.
14. The Process dimensions dialog box is displayed.
15. Select OK to start the processing.
16. Confirm the information This task has been successfully completed with OK.
ResultYou have modified the RptCurrency dimension.
5.2.4 Creating the RateEntity
UseUpdate the members in RateEntity dimension that are needed for the SAP_BP_Conso_GL application set.
Procedure1. From the hierarchical view on the left side of BPC Administration, select Add a new
dimension.
2. Maintain dimension name as RateEntity dimension, and description.
3. Choose Go to Step 2 of 3.
4. Choose Dimension Type with E- Entity and Reference Dimension with InputCurrency.
5. Choose Go to Step 3 of 3.
6. Maintain property name and length as following entries:
No. Property Name Length
1 CURRENCY 20
2 EVDESCRIPTION 60
4 REVIEWER 50
7. Choose Add New Dimension, confirm the Modify dimension dialog by clicking OK.
8. Select the Category dimension again, from the Action Pane, choose Maintain dimension members. The RateEntity.xls workbook is opened.
9. Open BP_Dimension.xls worksheet from \Misc\B64 folder.
10. Select the sheet named RateEntity.
11. Highlight the entire sheet. From the menu, choose Edit Copy.
12. Switch back to BPC Administration.
13. Highlight the entire sheet. Choose [Del] key to delete the contents of the entire sheet.
14. Go to cell A1 and choose the right mouse button and select Paste.
15. From the Action Pane, select Save to Server.
16. From the Action Pane, select Process dimension.
17. The Process dimensions dialog box is displayed.
18. Select OK to start the processing.
19. Confirm the information This task has been successfully completed with OK.
© SAP AG Page 12 of 51

SAP Best Practices Legal Consolidation (B64): Configuration Guide
ResultYou have modified the RateEntity dimension.
5.2.5 Creating the Rates
UseUpdate the members in Rates dimension that are needed for the SAP_BP_Conso_GL application set.
Procedure1. From the hierarchical view on the left side of BPC Administration, select Add a new
dimension.
2. Maintain dimension name as Rates dimension, and description.
3. Choose Go to Step 2 of 3.
4. Choose Dimension Type with A- Account and Reference Dimension with None.
5. Choose Go to Step 3 of 3.
6. Maintain property name and length as following entries:
No. Property Name Length
1 ACCTYPE 3
2 EVDESCRIPTION 60
3 FORMAT 20
4 GROUP 50
5 IS_INPUT 1
6 LIST 20
7 RATETYPE 10
8 SCALING 1
9 STYLE 4
10 TYPELIM 20
7. Choose Add New Dimension, then confirm the following dialog with OK.
8. Select dimension Rates again, from the Action Pane, choose Maintain dimension members. The Rates.xls workbook is opened.
9. Open BP_Dimension.xls worksheet from \Misc\B64 folder.
10. Select the sheet named Rates.
11. Highlight the entire sheet. From the menu, choose Edit Copy.
12. Switch back to BPC Administration.
13. Highlight the entire sheet. Choose [Del] key to delete the contents of the entire sheet.
14. Go to cell A1 and choose the right mouse button and select Paste.
15. From the Action Pane, select Save to Server.
16. From the Action Pane, select Process dimension.
© SAP AG Page 13 of 51

SAP Best Practices Legal Consolidation (B64): Configuration Guide
17. The Process dimensions dialog box is displayed.
18. Select OK to start the processing.
19. Confirm the information This task has been successfully completed with OK.
ResultYou have modified the Rate dimension.
5.2.6 Updating the Entity Dimension
UseAdd new Entity members member sheet. Validate and process the Entity dimension to apply the changes and members using BPC Administration.
Procedure1. From the hierarchical view on the left side of BPC Administration, select the Entity dimension.
2. Choose Maintain dimension property.
3. Maintain property name and length as following entries:
No. Property Name Length
1 CURRENCY 20
2 ELIM 10
3 EVDESCRIPTION 60
4 FX_TYPE 20
5 INTCO 20
6 ISMATCHING 1
7 OWNER 255
8 REVIEWER 255
4. Choose Modify Dimension Property, confirm the Modify Dimension dialog by click OK.
5. Select dimension Entity again, and then from the Action Pane, select Maintain dimension members. The Entity.xls workbook is opened.
6. From the Start menu, select All Programs/Microsoft Office/ Microsoft Office Excel.
7. Open BP_Dimension.xls worksheet from \Misc\B64 folder..
8. Select the sheet Entity.
9. Highlight the entire sheet. From the menu choose select Edit Copy.
10. Choose [Alt]+[Tab] to switch back to BPC Administration.
11. Highlight the entire sheet. Choose [Del] key to delete the contents of the entire sheet.
12. Go to cell A1 and choose the right mouse button and select Paste.
13. Replace the entries with <enter a valid user ID> for property OWNER and Reviewer with the appropriate user ID (for example, cndt50089659\sapbp)
© SAP AG Page 14 of 51

SAP Best Practices Legal Consolidation (B64): Configuration Guide
In current phase, you can use Admin User as Owner and Reviewer, you may assign other Owner or Reviewer after creating new user in chapter Security, and re-process Entity dimension member with new Owner and Reviewer.
14. In the action pane, select Save to Server.
15. From the action pane, select Process dimension.
16. In the Process dimensions dialog box, select OK to start the processing.
For Excel 2007 users, there might be a popup window asking whether the dimension member sheet should be saved in Excel 97-2003 format or Excel 2007 format. It is recommended to save it in Excel 97-2003 format in case there are still BPC users using Excel 2003 in your organisation.
17. Confirm the information This task has been successfully completed with OK.
ResultThe Entity dimension is updated.
5.2.7 Updating the IntCo Dimension
UseChange the default IntCo members to ones that are needed for the SAP_BP_Conso_GL application set.
Procedure1. From the hierarchical view on the left side of BPC Administration, select the IntCo dimension.
2. Choose Maintain dimension property.
3. Maintain property name and length as following entries:
No. Property Name Length
1 ENTITY 20
2 EVDESCRIPTION 60
3 ISMATCHING 1
4 SCALING 1
4. Choose Modify Dimension Property, confirm the Modify Dimension dialog with OK.
5. Select dimension IntCo again, from the Action Pane, select Maintain dimension members. The IntCo.xls workbook is opened.
6. Open BP_Dimension.xls worksheet from \Misc\B64 folder.
7. Select the sheet named IntCo.
8. Highlight the entire sheet. From the menu, choose Edit Copy.
9. Switch back to BPC Administration.
10. Highlight the entire sheet. Choose [Del] key to delete the contents of the entire sheet.
11. Go to cell A1 and choose the right mouse button and select Paste.
© SAP AG Page 15 of 51

SAP Best Practices Legal Consolidation (B64): Configuration Guide
12. From the Action Pane, select Save to Server.
13. From the Action Pane, select Process dimension.
14. The Process dimensions dialog box is displayed.
15. Select OK to start the processing.
16. Confirm the information This task has been successfully completed with OK.
ResultYou have modified the IntCo dimension.
5.2.8 Updating the FLOW Dimension
UseAdd Flow dimension member. Validate and process the Flow dimension to apply the changes and members using BPC Administration.
Procedure1. From the hierarchical view on the left side of BPC Administration, select the FLOW
dimension.
2. Choose Maintain dimension property.
3. Maintain property name and length as following entries:
No. Property Name Length
1 BALANCED 1
2 DIMLIST 20
3 EVDESCRIPTION 60
4 FLOW_DOC 10
5 FLOW_END 1
6 FLOW_TYPE 10
7 IS_INPUT 2
8 SCALING 1
9 SUBTABLES_ORIG 20
10 SUBTABLES_ORIG2 20
11 UPROFILE 10
4. Choose Modify Dimension Property, confirm Modify dimension dialog with OK.
5. Select dimension FLOW again, from the Action Pane, select Maintain dimension members. The Flow.xls workbook is opened.
6. Open BP_Dimension.xls worksheet from \Misc\B64 folder.
7. Select the sheet Flow.
8. Highlight the entire sheet. From the menu choose select Edit Copy.
9. Choose [Alt]+[Tab] to switch back to BPC Administration.
10. Highlight the entire sheet. Choose [Del] key to delete the contents of the entire sheet.
© SAP AG Page 16 of 51

SAP Best Practices Legal Consolidation (B64): Configuration Guide
11. Go to cell A1 and choose the right mouse button and select Paste.
12. In the action pane, select Save to Server.
13. From the action pane, select Process dimension.
14. In the Process dimensions dialog box, Select OK to start the processing.
For Excel 2007 users, there might be a popup window asking whether the dimension member sheet should be saved in Excel 97-2003 format or Excel 2007 format. It is recommended to save it in Excel 97-2003 format in case there are still BPC users using Excel 2003 in your organisation.
15. Confirm the information This task has been successfully completed with OK.
ResultThe Flow dimension is updated.
5.2.9 Creating the DataSrc
UseUpdate the members in DataSrc dimension that are needed for the SAP_BP_Conso_GL application set.
Procedure1. From the hierarchical view on the left side of BPC Administration, select Add a new
dimension.
2. Maintain dimension name as DataSrc dimension, and description.
3. Choose Go to Step 2 of 3.
4. Choose Dimension Type with D- DataSrc.
5. Choose Go to Step 3 of 3.
6. Maintain property name and length as following entries:
No. Property Name Length
1 COPYOPENING 1
2 DATASRC_ORIG 20
3 DATASRC_TYPE 1
4 EVDESCRIPTION 60
5 IS_CONSOL 1
6 IS_CONVERTED 1
7 OPENING_DATASRC 20
8 SCALING 1
7. Choose Add a New Dimension
8. From the Action Pane, select Maintain dimension members. The DataSrc.xls workbook is opened.
9. Open BP_Dimension.xls worksheet from \Misc\B64 folder.
© SAP AG Page 17 of 51

SAP Best Practices Legal Consolidation (B64): Configuration Guide
10. Select the sheet named DataSrc.
11. Highlight the entire sheet. From the menu, choose Edit Copy.
12. Switch back to BPC Administration.
13. Highlight the entire sheet. Choose [Del] key to delete the contents of the entire sheet.
14. Go to cell A1 and choose the right mouse button and select Paste.
15. From the Action Pane, select Save to Server.
16. From the Action Pane, select Process dimension.
17. The Process dimensions dialog box is displayed.
18. Select OK to start the processing.
19. Confirm the information This task has been successfully completed with OK.
ResultYou have modified the DataSrc dimension.
5.2.10 Creating the ConsoScope
UseCreating the members in ConsoScope dimension that are needed for the SAP_BP_Conso_GL application set.
Procedure1. From the hierarchical view on the left side of BPC Administration, select Add a new
dimension.
2. Maintain dimension name as ConsoScope dimension, and description.
3. Choose Go to Step 2 of 3.
4. Choose Dimension Type with G- Group.
5. Choose Go to Step 3 of 3.
6. Maintain property name and length as following entries:
No. Property Name Length
1 CONSO_TYPE 1
2 CURRENCY_TYPE 2
3 DATASRC_LEVEL 1
4 ENTITY 20
5 EVDESCRIPTION 60
6 FIRST_CONS_DATE 20
7 GROUP_CURRENCY 50
8 PARENT_GROUP 20
9 STAGE_ONLY 2
10 STORE_ENTITY 1
© SAP AG Page 18 of 51

SAP Best Practices Legal Consolidation (B64): Configuration Guide
11 STORE_GROUP_CURR 1
7. Choose Modify Dimension Property, confirm Modify dimension dialog with OK.
8. Select dimension ConsoScope again, from the Action Pane, choose Maintain dimension members. The ConsoScope.xls workbook is opened.
9. Open BP_Dimension.xls worksheet from \Misc\B64 folder.
10. Select the sheet named ConsoScope.
11. Highlight the entire sheet. From the menu, choose Edit Copy.
12. Switch back to BPC Administration.
13. Highlight the entire sheet. Choose [Del] key to delete the contents of the entire sheet.
14. Go to cell A1 and choose the right mouse button and select Paste.
15. From the Action Pane, select Save to Server.
16. From the Action Pane, select Process dimension.
17. The Process dimensions dialog box is displayed.
18. Select OK to start the processing.
19. Confirm the information This task has been successfully completed with OK.
ResultYou have modified the ConsoScope dimension.
5.2.11 Updating the Time Dimension
UseUpdate the members in Time dimension that are needed for the SAP_BP_Conso_GL application set.
Procedure1. From the hierarchical view on the left side of BPC Administration, select the Time dimension.
2. Choose Maintain dimension property.
3. Maintain property name and length as following entries:
No. Property Name Length
1 EVDESCRIPTION 60
2 ISBEGINNING 1
3 LEVEL 10
4 MONTHNUM 10
5 PERIOD 10
6 TIMEID 20
7 YEAR 10
4. Choose Modify Dimension Property, confirm modify dimension dialog with OK.
© SAP AG Page 19 of 51

SAP Best Practices Legal Consolidation (B64): Configuration Guide
5. Select dimension Time again, from the Action Pane, select Maintain dimension members. The Time.xls workbook is opened.
6. Open BP_Dimension.xls worksheet from \Misc\B64 folder.
7. Select the sheet named Time.
8. Highlight the entire sheet. From the menu choose Edit Copy.
9. Switch back to BPC Administration.
10. Highlight the entire sheet. Choose [Del] key to delete the contents of the entire sheet
11. Go to cell A1 and click the right mouse button and select Paste.
12. From the Action Pane, select Save to Server.
13. From the Action Pane, select Process dimension.
14. The Process dimensions dialog box is displayed.
15. Select OK to start the processing.
16. Confirm the information This task has been successfully completed with OK.
ResultYou have modified the Time dimension.
5.2.12 Creating the OwnAccount
UseCreating the members in OwnAccount dimension that are needed for the SAP_BP_Conso_GL application set.
Procedure1. From the hierarchical view on the left side of BPC Administration, select Add a new
dimension.
2. Maintain dimension name as OwnAccount dimension, and description.
3. Choose Go to Step 2 of 3.
4. Choose Dimension Type with A- Account, Reference Dimension with None.
5. Choose Go to Step 3 of 3.
6. Maintain property name and length as following entries:
No. Property Name Length
1 ACCTYPE 3
2 EVDESCRIPTION 60
3 GROUP 10
4 IS_INPUT 1
5 RATETYPE 10
6 SCALING 1
7. Choose Modify Dimension Property, confirm Modify dimension dialog with OK.
© SAP AG Page 20 of 51

SAP Best Practices Legal Consolidation (B64): Configuration Guide
8. Select dimension OwnAccount, from the Action Pane, select Maintain dimension members. The OwnAccount.xls workbook is opened.
9. Open BP_Dimension.xls worksheet from \Misc\B64 folder.
10. Select the sheet named OwnAccount.
11. Highlight the entire sheet. From the menu, choose Edit Copy.
12. Switch back to BPC Administration.
13. Highlight the entire sheet. Choose [Del] key to delete the contents of the entire sheet.
14. Go to cell A1 and choose the right mouse button and select Paste.
15. From the Action Pane, select Save to Server.
16. From the Action Pane, select Process dimension.
17. The Process dimensions dialog box is displayed.
18. Select OK to start the processing.
19. Confirm the information This task has been successfully completed with OK.
ResultYou have modified the OwnAccount dimension.
5.2.13 Creating the ICAccount
UseCreating the members in ICAccount dimension that are needed for the SAP_BP_Conso_GL application set.
Procedure1. From the hierarchical view on the left side of BPC Administration, select Add a new
dimension.
2. Maintain dimension name as ICAccount dimension, and description.
3. Choose Go to Step 2 of 3.
4. Choose Dimension Type with A- Account, Reference Dimension with Rates.
5. Choose Go to Step 3 of 3.
6. Maintain property name and length as following entries:
No. Property Name Length
1 ACCTYPE 3
2 DIMLIST 20
3 ELIMACC 20
4 EVDESCRIPTION 60
5 RATETYPE 10
6 SCALING 1
7 TYPELIM 20
8 UPROFILE 10
© SAP AG Page 21 of 51
SAP Best Practices Legal Consolidation (B64): Configuration Guide
7. Choose Add a New Dimension, confirm the dialog with OK.
8. Select dimension ICAccount, from the Action Pane, select Maintain dimension members. The ICAccount.xls workbook is opened.
9. Open BP_Dimension.xls worksheet from \Misc\B64 folder.
10. Select the sheet named ICAccount.
11. Highlight the entire sheet, from the menu, choose Edit Copy.
12. Switch back to BPC Administration.
13. Highlight the entire sheet. Choose [Del] key to delete the contents of the entire sheet.
14. Go to cell A1 and choose the right mouse button and select Paste.
15. From the Action Pane, select Save to Server.
16. From the Action Pane, select Process dimension.
17. The Process dimensions dialog box is displayed.
18. Select OK to start the processing.
19. Confirm the information This task has been successfully completed with OK.
ResultYou have modified the ICAccount dimension.
5.2.14 Creating the ICDataSrc
UseCreating the members in ICDataSrc dimension that are needed for the SAP_BP_Conso_GL application set.
Procedure1. From the hierarchical view on the left side of BPC Administration, select Add a new
dimension.
2. Maintain dimension name as ICDataSrc dimension, and description.
3. Choose Go to Step 2 of 3.
4. Choose Dimension Type with D- DataSrc.
5. Choose Go to Step 3 of 3.
6. Maintain property name and length as following entries:
No. Property Name Length
1 COPYOPENING 1
2 DATASRC_TYPE 1
3 EVDESCRIPTION 60
4 IC_ORIGINE 2
5 IS_CONVERTED 1
6 OPENING_DATASRC 20
7 SCALING 1
© SAP AG Page 22 of 51

SAP Best Practices Legal Consolidation (B64): Configuration Guide
7. Choose Modify Dimension Property, confirm Modify dimension dialog with OK.
8. Select dimension ICDataSrc, from the Action Pane, choose Maintain dimension members. The ICDataSrc.xls workbook is opened.
9. Open BP_Dimension.xls worksheet from \Misc\B64 folder.
10. Select the sheet named ICDataSrc.
11. Highlight the entire sheet. From the menu, choose Edit Copy.
12. Switch back to BPC Administration.
13. Highlight the entire sheet. Choose [Del] key to delete the contents of the entire sheet.
14. Go to cell A1 and choose the right mouse button and select Paste.
15. From the Action Pane, select Save to Server.
16. From the Action Pane, select Process dimension.
17. The Process dimensions dialog box is displayed.
18. Select OK to start the processing.
19. Confirm the information This task has been successfully completed with OK.
ResultYou have modified the ICDataSrc dimension.
5.2.15 Creating the Account
UseCreating the members in Account dimension that are needed for the SAP_BP_Conso_GL application set.
Procedure1. From the hierarchical view on the left side of BPC Administration, select Add a new
dimension.
2. Maintain dimension name as Account dimension, and description.
3. Choose Go to Step 2 of 3.
4. Choose Dimension Type with A- Account, Reference Dimension with Rates.
5. Choose Go to Step 3 of 3.
6. Maintain property name and length as following entries:
No. Property Name Length
1 ACCTYPE 3
2 DIMLIST_DEST 12
3 ELIMACC 12
4 ELIMACC_TYPE 2
5 EVDESCRIPTION 60
6 FLOWAN 50
7 FX_GROUP 10
© SAP AG Page 23 of 51

SAP Best Practices Legal Consolidation (B64): Configuration Guide
8 GROUP 10
9 ISINTERCO 3
10 RATETYPE 10
11 SCALING 1
12 STYLE 2
13 TYPELIM 20
14 UPROFILE 10
7. Choose Add a New Dimension, confirm the dialog with OK.
8. Select dimension Account, from the Action Pane, choose Maintain dimension members. The Account.xls workbook is opened.
9. Open BP_Dimension.xls worksheet from \Misc\B64 folder.
10. Select the sheet named Account.
11. Highlight the entire sheet. From the menu, choose Edit Copy.
12. Switch back to BPC Administration.
13. Highlight the entire sheet. Choose [Del] key to delete the contents of the entire sheet.
14. Go to cell A1 and choose the right mouse button and select Paste.
15. From the Action Pane, select Save to Server.
16. From the Action Pane, select Process dimension.
17. The Process dimensions dialog box is displayed.
18. Select OK to start the processing.
19. Confirm the information This task has been successfully completed with OK.
ResultYou have modified the Account dimension.
5.3 Application5.3.1 Creating Ownership Application
UseCreate new application and assign corresponding dimension into Ownership Application.
Procedure1. From the hierarchical view on the left side of BPC Administration, select the folder of
Application.
2. Choose Add a new application.
3. Maintain New application Name with Ownership and description with ownership application.
4. Choose Go to Step 2 of 4.
5. Choose Non-Reporting Type with Ownership.
6. Choose Go to Step 3 of 4.
© SAP AG Page 24 of 51

SAP Best Practices Legal Consolidation (B64): Configuration Guide
7. Leave default setting and choose Go to Step 4 of 4.
8. Deselect Dimension, and choose Add a New Application.
9. Choose created application Ownership and choose Modify applciation.
10. Use Arrow to adjust dimensions as following tables:
AppSet Dimension Type Secure
Category C
ConsoScope G
Entity E Y
IntCo I
OwnAccount A
Time T
11. Choose Modify Application.
If it has error message like The following dimensions are set as lock dimension; The following dimensions are set as concurrent lock dimension; go to Work Status Setting and Concurrent ock Menu to unlock dimensions and continue.
5.3.2 Updating Rate Application
UseCreate new application and assign corresponding dimension into Rate Application.
Procedure1. From the hierarchical view on the left side of BPC Administration, choose Rate application.
2. Choose Modify application.
3. Use Arrow to adjust dimensions as following tables:
AppSet Dimension Type Secure
Category C
InputCurrency R
Rates A
RateEntity E Y
Time T
4. Choose Modify Application.
If it has error message like The following dimensions are set as lock dimension; The following dimensions are set as concurrent lock dimension; go to Work Status Setting and Concurrent lock Menu to unlock dimensions and continue.
© SAP AG Page 25 of 51

SAP Best Practices Legal Consolidation (B64): Configuration Guide
5.3.3 Creating Consolidation Application
UseCreate new application and assign corresponding dimension into Finance Application.
Procedure1. From the hierarchical view on the left side of BPC Administration, select the folder of
Application
2. Choose Add a new application.
3. Maintain New application Name with Consolidation and description with Consolidation application.
4. Choose Go to Step 2 of 4.
Must assign the RATE and Ownership application just created as reference application to the Finance application.
5. Choose Reporting Type with Consolidation.
6. Choose Go to Step 3 of 4.
7. Choose Rate Application with Rate, Ownership application with Ownership, select all items inApplication option.
8. Choose Go to Step 4 of 4.
9. Deselect Dimension and choose Add a New Application.
10. Choose created application Finance and choose Modify applciation.
11. Use Arrow to adjust dimensions as following tables:
AppSet Dimension Type Secure
Account A
Category C
ConsoScope G
DataSrc D Y
Entity E Y
FLOW S
Intco I
RptCurrency R Y
Time T
12. Choose Modify Application.
If it has error message like The following dimensions are set as lock dimension; The following dimensions are set as concurrent lock dimension; go to Work Status Setting and Concurrent lock Menu to unlock dimensions and continue.
© SAP AG Page 26 of 51

SAP Best Practices Legal Consolidation (B64): Configuration Guide
5.3.4 Creating ICMatching Application
UseCreate new application and assign corresponding dimension into ICMatching Application.
Procedure1. From the hierarchical view on the left side of BPC Administration, select the folder of
Application.
2. Choose Add a new application.
3. Maintain New application Name with ICMatching and description with ICMatching application.
4. Choose Go to Step 2 of 4.
5. Choose Reporting Type with Financial.
6. Choose Go to Step 3 of 4.
7. Select Currency conversion rules in Application option.
8. Leave default setting and choose Go to Step 4 of 4.
9. Deselect Dimension, and choose Add a New Application.
10. Use Arrow to adjust dimensions as following tables:
AppSet Dimension Type Secure
Category C
Entity E Y
FLOW S
ICAccount A
ICDataSrc D
Intco I
RptCurrency R
Time T
11. Choose Add a New Application.
If it has error message like The following dimensions are set as lock dimension; The following dimensions are set as concurrent lock dimension; go to Work Status Setting and Concurrent ock Menu to unlock dimensions and continue.
5.4 Security
UseWith this activity, you create the users’ access.
5.4.1 Creating a Task Profile1. From the hierarchical view on the left side of BPC Administration, expand the Security
Task Profiles folder.
© SAP AG Page 27 of 51

SAP Best Practices Legal Consolidation (B64): Configuration Guide
2. From the Action Pane, select Add new task profiles.
3. Enter as Profile Name Consolid Profile.
4. Enter as Profile Description of Consolidation User Profile.
5. Select Secondary Admin under What type of function will this profile contain.
6. Choose Next to continue.
7. From the View tasks by interface drop down list box, select BusinessProcessFlow. Allow access to the task BPFExecution.
8. Using the same procedures, allow access to the following tasks for the following interfaces:
Interface Tasks
Administration Business RulesLockingsManagDrillThroughMisc
Comments AddCommentManageComments
Journal AdminJournalCreateJournalPostJournalsReviewJournalsUnpostJournals
WorkStatus SetWorkStatus
ZFP AccessContentLib LiveReportWebAdmin
AnalysisCollection eAnalyzeManageTemplateSubmitDataEditDynamicHierachy
File Access Update to company folder
DM ExecuteGeneralAdminPrimaryAdminTeamLeadAdmin
9. Choose Next to continue.
10. Do NOT assign any teams or users at this time and choose Next to continue. The Finish screen is displayed.
11. Choose Apply to process the team profile.
12. Confirm the information The task has successfully finished with OK.
© SAP AG Page 28 of 51

SAP Best Practices Legal Consolidation (B64): Configuration Guide
5.4.2 Creating a Member Access Profile1. From the hierarchical view on the left side of BPC Administration, expand the Security
Member Access Profiles folder.
2. From the Action Pane, select Add new member access profile. Enter as Profile Name Legal Consolidation S000.
3. Enter as Profile Description Legal Consolidation Profile for Company S000.
4. Choose Next to continue.
5. Define the following member access settings on the Consolidation Application panel:
Access Dimension Member
Read & Write Entity [S000] (Choose the field with the three dots
. In the dialog box, mark the checkbox All members in dimension and choose OK.)
Read & Write DataSrc RESTATED
Read & Write RptCurrency LC
6. Select Ownership Application panel and define the following member access settings:
Access Dimension Member
Read & Write Entity [S000]
7. Select ICMatching Application panel and define the following member access settings:
Access Dimension Member
Read & Write Entity [S000]
8. Select RATE Application panel and define the following member access settings:
Access Dimension Member
Read & Write RateEntity [S000]
9. Choose Next to continue.
10. DO NOT assign any teams or users at this time and choose Next to continue. The Finish screen is displayed.
11. Choose Apply to process the member access profile.
12. Confirm the information The task has successfully finished with OK.
13. Repeat step 1 to step 12 accroding to following table.
Member Access Profile
Profile Description
Application Access Dimension Member
Legal Consolidation S001
Legal Consolidation Profile for Company S001
Consolidation Read & Write
Entity S001
Consolidation Read & Write
DataSrc RESTATED
Consolidation Read & Write
RptCurrency LC
© SAP AG Page 29 of 51

SAP Best Practices Legal Consolidation (B64): Configuration Guide
Ownership Read & Write
Entity S001
ICMatching Read & Write
Entity S001
RATE Read & Write
RateEntity S001
Legal Consolidation S002
Legal Consolidation Profile for Company S002
Consolidation Read & Write
Entity S002
Consolidation Read & Write
DataSrc RESTATED
Consolidation Read & Write
RptCurrency LC
Ownership Read & Write
Entity S002
ICMatching Read & Write
Entity S002
RATE Read & Write
RateEntity S002
Legal Consolidation S003
Legal Consolidation Profile for Company S003
Consolidation Read & Write
Entity S003
Consolidation Read & Write
DataSrc RESTATED
Consolidation Read & Write
RptCurrency LC
Ownership Read & Write
Entity S003
ICMatching Read & Write
Entity S003
RATE Read & Write
RateEntity S003
Legal Consolidation ALL
Legal Consolidation Profile for All Company
Consolidation Read & Write
Entity [ALL]
Consolidation Read & Write
DataSrc [ALL]
Consolidation Read & Write
RptCurrency [ALL]
Ownership Read & Write
Entity [ALL]
ICMatching Read & Write
Entity [ALL]
RATE Read & RateEntity [ALL]
© SAP AG Page 30 of 51

SAP Best Practices Legal Consolidation (B64): Configuration Guide
Write
5.4.3 Creating Teams1. From the hierarchical view on the left side of BPC Administration, expand the Security
Teams folder.
2. From the Action Pane, select Add new team. Enter as Team Name S000 Team.
3. Enter as Team Description Company S000 Team.
4. Choose Next to continue.
5. DO NOT include any users at this time and choose Next to continue.
6. Define the BPC Access to match the following settings:
Task Profile Member Access Profiles
Consolidation Profile Legal Consolidation S000 (select the Enable checkbox)
7. Choose Next to continue.
8. Choose Apply to process the team.
9. Confirm the information The task has successfully finished with OK.
10. Repeat step 1 to step 9 accroding to following table.
Team Name Team Description Task Profile Member Access Profile
S001 Team Company S001 Team Consolidation Profile
Legal Consolidation S001
S002 Team Company S002 Team Consolidation Profile
Legal Consolidation S002
S003 Team Company S003 Team Consolidation Profile
Legal Consolidation S003
Consolidation Team
All Company Team Consolidation Profile
Legal Consolidation ALL
Manager Team
Manager Team
5.4.4 Creating BPC Users and Assigning to Team
PrerequisitesIn Windows Server, you need to create following users to proceed further. To do this by choose Start Settings Control Panel Administration Tools Computer Management Local Users and Groups in your Windows Server. Then in the right windows, right click and select New User.
User ID Full Name
User_S000 S000 Operation User
User_S001 S001 Operation User
User_S002 S002 Operation User
© SAP AG Page 31 of 51

SAP Best Practices Legal Consolidation (B64): Configuration Guide
User_S003 S003 Operation User
Manager_S000 S000 Manager
Manager_S001 S001 Manager
Manager_S002 S002 Manager
Manager_S003 S003 Manager
Conso Consolidation User in Holding Company
Procedure1. From the tree view, expand the Security Users <your domain> folder.
2. Choose Add new user to include more user to this application set.
3. Choose drop down of Available domains.
4. Choose User_S000, Manager_S000 and select arrow to new users into Selected for Planning and Consolidation access.
5. Choose Next.
6. Maintain Email & IMaddress for each new user.
7. Choose Next.
8. On the Assign to teams tab, mark all relevant users. In the Team field, choose the entry S000 Team.
9. Choose the arrow pointing to the right to add the users to the Selected Users screen area.
10. On the Assign to task profile tab, mark all relevant users. In the Task Profile field, choose the entry Consolidation Profile.
11. Choose the arrow pointing to the right to add the users to the Selected Users screen area.
12. On the Assign to Member Access profile tab, mark all relevant users. In the Member Access Profile field, choose the entry Legal Consolidation S000.
13. Choose the arrow pointing to the right to add the users to the Selected Users screen area.
14. Choose Next to continue.
15. Choose Apply to process the users.
16. Confirm the information The task has successfully completed with OK.
17. Repeat step 1 to step 16 accroding to following table.
User Team Task Profile Member Access Profile
User_S001 S001 Team Consolidation Profile Legal Consolidation S001
Manager_S001 S001 Team Consolidation Profile Legal Consolidation S001
User_S002 S002 Team Consolidation Profile Legal Consolidation S002
Manager_S002 S002 Team Consolidation Profile Legal Consolidation S002
User_S003 S003 Team Consolidation Profile Legal Consolidation S003
Manager_S003 S003 Team Consolidation Profile Legal Consolidation S003
Conso Consolidation Team Consolidation Profile Legal Consolidation ALL
© SAP AG Page 32 of 51
SAP Best Practices Legal Consolidation (B64): Configuration Guide
Manager_S000 Manager Team
Manager_S001 Manager Team
Manager_S002 Manager Team
Manager_S003 Manager Team
Conso Manager Team
ResultYou have assigned users according to your needs.
After assigning new user in application set SAP_BP_Conso_GL, you may re-assign Owner & Reviewer in dimension Entity, and re-process with new assigned users.
5.5 Work Status
UseThe Work Status feature gives you the ability to define a simple flow of processes within an application set. The flow gives you the ability to manage access to data and interfaces based upon submitted work and updated status.
5.5.1 Customizing the Appset Work Status Settings1. From the BPC Launch Page, choose BPC Administration. The Web Admin Tasks page is
displayed.
2. From the Action Pane, select Manage Application Sets.
3. Logon to your SAP_BP_Conso_GL application set.
4. From the hierarchical view on the left side of BPC Administration, select Work Status.
5. Maintain that your Work Status information looks similar to the following:
Work State DM JRN MAN COMM DOCS ControlledBy
Unlocked All All All All All Both
Submitted Mgr Mgr Locked Locked Locked Both
Approved All All Locked Locked Locked Mgr
6. From the Action Pane, select Update work state.
7. Confirm the information Successfully finished with OK.
5.5.2 Customizing the Application Work Status Settings1. From the hierarchical view on the left side of BPC Administration, expand the Application
folder.
2. Expand the Consolidation folder.
3. Select Work Status Settings. The Work Status information is displayed.
© SAP AG Page 33 of 51

SAP Best Practices Legal Consolidation (B64): Configuration Guide
AppSet Dim Name Work State
Account No
Category Yes
DataSrc No
Entity Owner
FLOW No
IntCo No
RqtCurrency Yes
Time Yes
ConsoScope No
4. From the Action Pane, select Save Work Status Settings.
5.6 Uploading Template
UseThis section describes how to upload and install in the system the predefined report and planning input schedules delivered together with SAP Best Practices.
Procedure1. Log on to Interface for Excel.
To do so start the SAP BPC Launch Page from your desktop icon or via the Start menu of your desktop, then in the Programs folder, choose SAP Business Planning and Consolidation.
2. On the SAP BPC Launch Page, choose Interface for Excel. In the dialog box, select the AppSet SAP_BP_Conso_GL and the Application RATE.
3. Choose OK.
4. In the Connection Wizard dialog box, enter your user ID and password as required and choose Finish.
5. In BPC for Excel from the menu, choose File Open. If there is a message Macros have been disabled disppears, select Options button, then select Enable this content.
6. Browse for the \Misc\B64 folder on the SAP Best Practices for BPC documentation DVD and open files B64_IS_RATE.xlt.
7. Once the files are open for each file from the menu bar choose eTools Save Dynamic Templates.
For Excel 2007 users, make sure that the files are saved in Excel 2003 format and not Excel 2007 format. Otherwise the templates might not be selectable when defining Business Process Flow.
8. Save B64_IS_RATE.xlt to the folder: ..\RATE\eExcel\Input Schedules.
9. Repeat step 2~8 to upload remainging templates according to following table.
Application File Name Target Path
© SAP AG Page 34 of 51

SAP Best Practices Legal Consolidation (B64): Configuration Guide
Ownership B64_Rpt_Perimeters.xlt ..\\Ownership\eExcel\Reports
ICMatching B64_Rpt_IC_Validation_MATCH_ARAP.xlt ..\\ICMatching\eExcel\Reports
ICMatching B64_Rpt_IC_Validation_MATCH_sales.xlt ..\\ICMatching\eExcel\Reports
Consolidation B64_IS_Balance_Sheet_Local.xlt ..\\Consolidation\eExcel\Input Schedules
Consolidation B64_IS_Income_Statement_Local.xlt ..\\Consolidation\eExcel\Input Schedules
Consolidation B64_IS_Intercompany.xlt ..\\Consolidation\eExcel\Input Schedules
Consolidation B64_IS_Owners_Equity_Local.xlt ..\\Consolidation\eExcel\Input Schedules
Consolidation B64_Rpt_Balance_Sheet_Consolidation.xlt ..\\Consolidation\eExcel\Reports
Consolidation B64_Rpt_Con_working_sheet.xlt ..\\Consolidation\eExcel\Reports
Consolidation B64_RPT_Consolidation_validation.xlt ..\\Consolidation\eExcel\Reports
Consolidation B64_Rpt_Income_Statement_Consolidation.xlt ..\\Consolidation\eExcel\Reports
Consolidation B64_Rpt_Validation_Local.xlt ..\\Consolidation\eExcel\Reports
Consolidation B64_Rpt_Work_Status.xlt ..\\Consolidation\eExcel\Reports
5.7 Uploading Transformation File
UseThis section describes how to upload tranformation file delivered together with SAP Best Practices. This tranformation file will be used during data file import.
Procedure1. Log on to Interface for Excel.
To do so start the SAP BPC Launch Page from your desktop icon or via the Start menu of your desktop, then in the Programs folder, choose SAP Business Planning and Consolidation.
2. On the SAP BPC Launch Page, choose Interface for Excel. In the dialog box, select the AppSet SAP_BP_Conso_GL and the Application Consolidation.
3. Choose OK.
4. In the Connection Wizard dialog box, enter your user ID and password as required and choose Finish.
5. In BPC for Excel from the menu, choose File Open
6. Browse for the \Misc\B64 folder on the SAP Best Practices for BPC documentation DVD and open files Transformation file.xls.
7. From BPC for Excel menu, choose Planning & Consolidation eData More Copy Transformation File, in the next popup Save screen, Choose Company in the left column, then in center column, choose System Files folder under TransformationFiles, give the file name as Transformation file.xls then select Save bottom.
© SAP AG Page 35 of 51

SAP Best Practices Legal Consolidation (B64): Configuration Guide
5.8 Business Process Flow
UseCreate a Business Process Flow for consolidation tasks. Business process flows (BPFs) are sequences of steps that are defined for any frequently-performed procedure that is performed by multiple end users.
Procedure1. On the SAP BPC Launch Page, choose BPC Administration.
2. On the BPC Administration page, choose Manage Business Process Flows.
3. In the dialog box select the AppSet SAP_BP_Conso_GL and choose OK.
4. Log on to the system.
5. From the hierarchical view on the left side of BPC Administration, select Business Process Flows.
6. From the Action Pane, select Create new BPF template.
7. In the SAP BusinessObjects - Add a New Business Process Flow dialog box, in the left hand frame, select A. Define BPF and make the following settings.
Field name User action and values
Business Process Flow Name Legal Consolidation
Business Process Flow description Run Legal Consolidation Scenario
What is the Controlling Application Consolidation
8. In the left hand frame, select B. Instance Identifier. Dimension Time is selected as Identity Dimension by default. In the left-hand frame, select C. Set Access.
9. Choose Teams under View by field, in the Available frame, select S000 Team, S001 Team, S002 Team, S003 Team, Consolidation Team, Manager Team and choose the icon with the arrow pointing to the right. Choose Users under View by field, select [domain]\BPC_SYSADMIN and choose the icon with the arrow pointing to the right.
10. Choose Next to continue. The Define Steps/Sub-Steps screen is displayed.
11. Choose Add.
12. In the SAP BusinessObjects – Add New dialog box. Enter name Preparation and description Preparation.
13. Choose Yes for Allow Reopen region. Click Define Step Region Criteria…, enter following data in Step Region Criteria dialog and then choose OK.
Field name User action and values
Choose driver dimension Entity
Choose owner property Owner
Driver Dimension Member Selection
Dimension Members CONSO
Selection SELF
14. Choose OK.
© SAP AG Page 36 of 51

SAP Best Practices Legal Consolidation (B64): Configuration Guide
15. Repeat step 11 to step 13, maintain BPF step and sub-stpes as following following table.
Add steps and sub-steps for BPF: Legal Consolidation
What is the name and instruction for the new step/sub-step?
Driver Dimension Property and member selection
Select Add New Sub-step
Enter Exchange Rate
Select Add New Sub-step
Enter Ownership Information
Select Add New Sub-step
Copy Openning Data
Select Add a new process step
Data Uploading Entity Owner S000 SELF
S001 SELF
S002 SELF
S003 SELF
Select Add New Sub-step
Upload Financial Statements
Select Add New Sub-step
Import Financial Statements
Select Add New Sub-step
Review Balance Sheet
Select Add New Sub-step
Review Profit Loss Statement
Select Add New Sub-step
Check Owner‘s Equity State
Select Add New Sub-step
Review Validation Report
Select Add New Sub-step
Input Inter-Company Data
Select Add New Sub-step
Submit Data
Select AddNew Sub-step
Approve Data
Select Add New Sub-step
Review Work Status
Select Add a new process step
Consolidation Process
Entity Owner CONSO SELF
Select Add New Sub-step
Foreign Currency Conversion
Select Add New Sub-step
Push Data to IC-Matching
© SAP AG Page 37 of 51

SAP Best Practices Legal Consolidation (B64): Configuration Guide
Select Add New Sub-step
Run IC-Matching
Select Add New Sub-step
Review ICMatching Result AR&AP
Select Add New Sub-step
Review ICMatching Result Sales
Select Add New Sub-step
Journey Entry
Select Add New Sub-step
Run Consolidation
Select Add New Sub-step
Review Consolidation Working Sheet
Select Add New Sub-step
Review Consolidation Validation Report
Select Add a new process step
Consolidation Statement
Entity Owner CONSO SELF
Select Add New Sub-step
Review Consolidated Balance Sheet
Select Add New Sub-step
Review Consolidated Profit Loss Statement
16. Choose Next to continue.
17. On the Define Actions screen:
Steps Interface Task Name\Parameter Value
Application Current View
1.1.Entering Exchange Rate
Interface for Excel
Open Template Input Schedules\B64_IS_RATE.xlt
Rate
1.2. Entering Ownership Information
Interface for Excel
Report Library B64_Rpt_Perimeters.xlt
Ownership
1.3 Copy Openning Data
Data Manager
Run user package
2.1 Uploading Financial Statements
Data Manager
Data Upload
2.2 Data Run user
© SAP AG Page 38 of 51

SAP Best Practices Legal Consolidation (B64): Configuration Guide
Importing Financial Statements
Manager Package
2.3 Review Balance Sheet
Interface for Excel
Open Template Input Schedules\B64_IS_Balance_Sheet_Local.xlt
Consolidation
Category: Member Lookup, ActualEntity: Inherit from Step RegionTime: Inherit from Instance
2.4Review Profit Loss Statement
Interface for Excel
Open Template Input Schedules\B64_IS_Income_Statement_Local.xlt
Consolidation
Category: Member Lookup, ActualEntity: Inherit from Step RegionTime: Inherit from Instance
2.5 Checking Owner’s Equity State
Interface for Excel
Open Template Input Schedules\B64_IS_Owners_Equity_Local.xlt
Consolidation
Category: Member Lookup, ActualEntity: Inherit from Step RegionTime: Inherit from Instance
2.6Review Validation Report
Interface for Excel
Report Library B64_Rpt_Validation_Local.xlt
Consolidation
Category: Member Lookup, ActualEntity: Inherit from Step RegionTime: Inherit from Instance
2.7Input Inter-Company Data
Interface for Excel
Open Template Input Schedules\B64_IS_Intercompany.xlt
Consolidation
Category: Member Lookup, ActualEntity: Inherit from Step
© SAP AG Page 39 of 51

SAP Best Practices Legal Consolidation (B64): Configuration Guide
RegionTime: Inherit from Instance
2.8Submit Data
Interface for the Web
Set work status Consolidation
Category: Member Lookup, ActualEntity: Inherit from Step RegionTime: Inherit from Instance
2.9Approve Data
Interface for the Web
Set work status Consolidation
Category: Member Lookup, ActualEntity: Inherit from Step RegionTime: Inherit from Instance
2.10Review Work Status
Interface for Excel
Report Library Rpt_Work_Status.xlt
Consolidation
3.1Foreign Currency Conversion
Data Manager
Run user Package
3.2Pushing Data to IC-Matching
Data Manager
Run user Package
3.3Run ICMatching
Data Manager
Run user Package
3.4Review ICMatching Result(A)
Interface for Excel
Report Library B64_Rpt_IC_Validation_MATCH_ARAP.xlt
ICMatching
3.5 Review ICMatching Result(B)
Interface for Excel
Report Library B64_Rpt_IC_Validation_MATCH_sales.xlt
ICMatching
3.6Journal Entry
Journal Journal Manager
3.7Run Consolidation
Data Manager
Run user package
© SAP AG Page 40 of 51

SAP Best Practices Legal Consolidation (B64): Configuration Guide
3.8Review Consolidation Sheet
Interface for Excel
Report Library B64_Rpt_Con_working_sheet.xlt
Consolidation
3.9Review Validation Report
Interface for Excel
Report Library B64_RPT_Consolidation_validation.xlt
Consolidation
4.1Review Consolid Balance Sheet
Interface for Excel
Report Library B64_Rpt_Balance_Sheet_Consolidation.xlt
Consolidation
4.2Review Consolid P&L Statement
Interface for Excel
Report Library B64_Rpt_Income_Statement_Consolidation.xlt
Consolidation
18. Choose Next to continue.
19. Choose Save. Confirm the dialog box.
20. Choose Close.
21. In the dialog box do you want to save…, choose Yes.
22. Confirm the dialog box.
5.9 Creating BPF Instance1. From the Launch Page, choose BPC Administration.
2. From the Action Pane, select Manage Business Process Flows.
3. Logon to your SAP_BP_Planning application set. The Admin console is displayed.
4. From the hierarchical view on the left side of BPC Administration, select Business Process Flows
5. Choose Simulation and Setting Target under the node Business Process Flows.
6. From the Action Pane, selectCreate BPF instance.
7. Choose filed Time, Select a dimension member for field Time, for example, 2011.DEC.
8. Choose Create Instance Step 2 of 2
9. Choose to select a instance owner for field Select instance owner, for exapmle, [domain]\BPC_SYSADMIN.
10. Choose Create BPF Instance.
11. In the BPF Instance Preview region, the default owner for every steps are listed based on the setting in Driver Dimension Member Selection and Dimension member sheet. If there is any change necessary, please check the item and choose update owners (select user or team to be the owner for every step).
Step Region Owners
Step 1. Preparation
Entity.CON_GROUP [domain]\Conso
Step 2. Data Uploading
© SAP AG Page 41 of 51

SAP Best Practices Legal Consolidation (B64): Configuration Guide
Entity.S000 [domain]\Conso, S000 Team
Entity.S001 [domain]\Conso, S001 Team
Entity.S002 [domain]\Conso, S002 Team
Entity.S003 [domain]\Conso, S003 Team
Step 3. Consolidation Process
Entity.CON_GROUP [domain]\Conso
Step 4. Consolidation Report
Entity.CON_GROUP [domain]\Conso
12. Click Finish. An instance with ID of time selected is created, which is inactive.
13. From the hierarchical view on the left side of BPC Administration, select Business Process Flow. Select Manage BPF Instance on Action Pane.
14. On the Manage BPF Instance screen, choose BPF template Legal Consolidation and status Inactive..
15. Choose Refresh.
16. Click the checkbox before the instance created before and choose Activate.
17. Choose OK.
5.10 Journal Administration
UseCreate a journal template for inter-company entries.
Procedure1. From the application set hierarchy on the left, choose the + sign next to Application and then
the + sign next to Consolidation
2. From the application set hierarchy on the left, choose Journals.
3. From the Action Pane, choose Journal wizard.
4. In the Select Header dimensions area of the Journal create dialog box, select the following 3 dimensions: Category, RptCurrency and Time.
5. Choose Next to continue.
6. Use the UP and DOWN buttons on the Set Header dimension order tab page to sort the header dimension according to the following example:
Header dimension
Time
Category
RptCurrency
7. Choose Next to continue.
8. Use the To left button on the Set Detail dimensions tab page to sort the detail dimensions according to the following example:
© SAP AG Page 42 of 51

SAP Best Practices Legal Consolidation (B64): Configuration Guide
Column1 Column2 Column3 Column4 Column5 Column6
ConsoScope Entity Account Intco DataSrc Flow
9. Choose Next to continue.
10. Choose Next to continue.
11. From the lower right corner of the Summary of new Journal template tab, choose Finish to create the Journal Template.
The creation process can take a few minutes.
12. Confirm the information Successfully finished with OK.
13. Verify that your screen looks similar to the following:
You can logon the interface for Excel, choose Journals in the action pane, then choose Enter a new journal.
© SAP AG Page 43 of 51

SAP Best Practices Legal Consolidation (B64): Configuration Guide
5.11 Setting Application Parameters1. From the BPC Launch Page, choose Administration. The Web Admin Tasks page is
displayed.
2. From the Action Pane, make sure AppSet is SAP_BP_Conso_GL, Application is Ownership.
3. Choose Set Application Parameters.
4. Maintain following parameters, then select Update button.
KeyID Value
ORG_ACCOUNTLIST METHOD,POWN,PCON
ORG_ACCOUNTOWN PGROUP
ORG_INTCO I_NONE
ORG_PARENTPROPERTY PARENT_GROUP
ORG_OWNERSHIPCUBE OWNERSHIP
YTDINPUT Yes
YTDInputTimeHir H1
5. Make sure parameter YTDINPUT is set to Yes, and YTDInputTimeHir is set to H1 in Consolidation, Rate, and ICMatching application.
In some circumstance, parameter ORG_OWNERSHIPCUBE could disappear, when you logon from admin console. But never maintain this parameter twice, otherwise you could get error.
5.12 Data Management5.12.1 Maintaining Package
UseThis activity describes how to run a data management process which will recalculate existing data in the system.
Procedure1. Log on to Interface for Excel.
2. To do so start the SAP BPC Launch Page from your desktop icon or via the Start menu of your desktop, then choose Programs SAP Business Planning and Consolidation.
3. On the SAP BPC Launch Page choose BPC for Excel. In the dialog box select the AppSet SAP_BP_Conso_GL and the Application Consolidation.
4. Choose OK.
5. In the Connection Wizzard dialog box, enter your user ID and password as required and choose Finish.
6. From the menu bar, choose eDATA More Organize Package List and select the Financial Process package group from the list.
7. From the menu bar of the Data Manager, select the first icon to add a new package.
© SAP AG Page 44 of 51

SAP Best Practices Legal Consolidation (B64): Configuration Guide
8. In the Data Manager – Add Package dialog box, choose process chain for package type,
then choose the Select icon right to the process chain field.
9. Choose Business Planning & Consolidation: System in Add Group region. Then select RUN_BPC_LOGIC process chain and choose select.
10. Enter Legal Consolidation as Package name and Description, select User Package and Admin Package as Task Type and choose Add to add the new package to Data Management package group.
11. Choose Save to save the Package.
12. From the menu bar, choose eDATA More Organize Package List and select the Financial Process package group from the list.
13. Select the package Legal Consolidation from the list and choose Modify package using the context menu.
14. Select View Package beside the File field.
15. Choose Advanced to access the dynamic script editor to modify the package.
16. Entering script with LegalConsolidation.txt from \Misc\B64 folder. (see then screen as below):
17. Choose OK to close the dialog box Data Manager Dynamic Script.
© SAP AG Page 45 of 51

SAP Best Practices Legal Consolidation (B64): Configuration Guide
18. Choose Save to close the dialog box Data Manager Package View & Dynamic Script Editor.
19. Choose Save to close the dialog box Modify Package.
20. Repeat from step 1 to step 20 according to following table.
Application Package Name Description Script file in \Misc\B64 folder
Consolidation Copy Opening Copy Opening Data CopyOpening.txt
Consolidation Push To ICMatching Push InterCompany Data to IC Matching Application
Push ToICMatching.txt
ICMatching IC Matching InterCompany Data Matching
IC Matching.txt
5.12.2 Maintaining Script Logic
UseThis activity describes programming included into script logic to run step Rate of Currency and IC Elimination.
Procedure1. Logon on Adminstration Consol.
2. From the application set hierarchy on the left, choose the + sign next to Application and then the + sign next to Consolidation
3. From the application set hierarchy on the left, choose Script Logic.
4. choose Create new logic.
5. Enter Logic name ACCOUNT CALCULATION.
6. Open Account calculation.lgf with note pad and copy the content into above new script logic.
7. Choose Save Logic in action pane.
8. Repeat step 2 to 7 to upload scripts according to following table.
Application Script Name File Name
Consolidation COPYOPENING CopyOpening.lgf
Consolidation FXTRANS FXTrans.lgf
Consolidation LEGALCONSOLIDATION LegalConsolidation.lgf
Consolidation PUSH TOICMATCHING Push ToICMatching.lgf
ICMatching IC MATCHING IC Matching.lgf
5.13 Setting Application Set Status
UseTo be able to load data for the application set you have created you need to set the status to Available.
© SAP AG Page 46 of 51

SAP Best Practices Legal Consolidation (B64): Configuration Guide
Procedure1. Mark the application set SAP_BP_Conso_GL in the tree structure in the left-hand screen
area.
2. In the action pane choose Set application set status.
3. Mark the checkbox Available.
4. Choose Update application set status.
ResultYou have successfully created a new application set, which is now available to the user.
5.14 Business Rule
UseBusiness rules are parameter-driven functions for calculating and posting monetary amounts in support of common accounting activities, such as intercompany reconciliation and currency translation.
5.14.1 Setting Business Rule Library5.14.1.1 Adding Consolidation Methods1. From the application set hierarchy on the left, choose the + sign next to Business Rule
Library and then choose Consolidation methods
2. Enter parameters according to following table. (two more column exist in NW version, Share Range and Percent Control)
Method code
Method name Method type Share Range
Percent Control
90 Holding Parent Holding 1 1
86 Global Global 0.5<=, <=1 1
80 NEW New
30 Acquisition Equity 0.2<=, <0.5 PCON
70 Proportional Method Proportional 0.5 PCTRL
25 Leaving (During the year)
Disposed on last year-end
20 Leaving (End Of Year)
Disposed during the year
0<,<0.2 0
3. On action pane, choose Validate and confirm Consolidation methods rule table.
5.14.1.2 Adding Consolidation Rules1. From the application set hierarchy on the left, choose the + sign next to Business Rule
Library and then choose Consolidation rules formulas
2. Enter BA1_BA1_M1 in Rule ID field, Intercompany Transaction Elimination Rule in Rule description field.
3. Enter parameters in lower part of the window according to following table.
© SAP AG Page 47 of 51

SAP Best Practices Legal Consolidation (B64): Configuration Guide
Entity method
Intco method
“All” formula Group formula Minority formula
Remark
90 30 MIN(PCON,I_PCON) MIN(PCON,I_PCON) Intercompany Transaction Elimination Rule
30 90 MIN(PCON,I_PCON) MIN(PCON,I_PCON) Intercompany Transaction Elimination Rule
30 30 MIN(PCON,I_PCON) MIN(PCON,I_PCON) Intercompany Transaction Elimination Rule
4. On action pane, choose Save without validation.
5. Choose Validate and confirm Consolidation rules formulas rule table.
6. Repeat step 2 to step 4 to maintain other consolidation rules according to following table.
Rule ID Rule Type Rule Description
BA1_BA1_M2 PL for Retained Earnings
Entity method
Intco method
“All” formula Group formula Minority formula
Remark
90 30 MIN(PCON,I_PCON) PL for Retained Earnings
30 90 MIN(PCON,I_PCON) PL for Retained Earnings
30 30 MIN(PCON,I_PCON) PL for Retained Earnings
5.14.2 Setting Business Rules in Consolidation Application5.14.2.1 Adding Currency Conversion Rules1. From the hierarchical view on the left side of BPC Administration, expand the Application
folder.
2. Expand the Consolidation folder, then expand Business Rules folder.
3. Choose Currency converson.
4. Enter or select AVG in Account rate type field
5. Enter parameters according to following table.
Source flow
Destination Account
Destination flow
Formula Force closing
Apply to periodic
Entity FX type
PL99 [AVG]
6. On action pane, choose Validate and confirm Currency conversion rule table.
© SAP AG Page 48 of 51
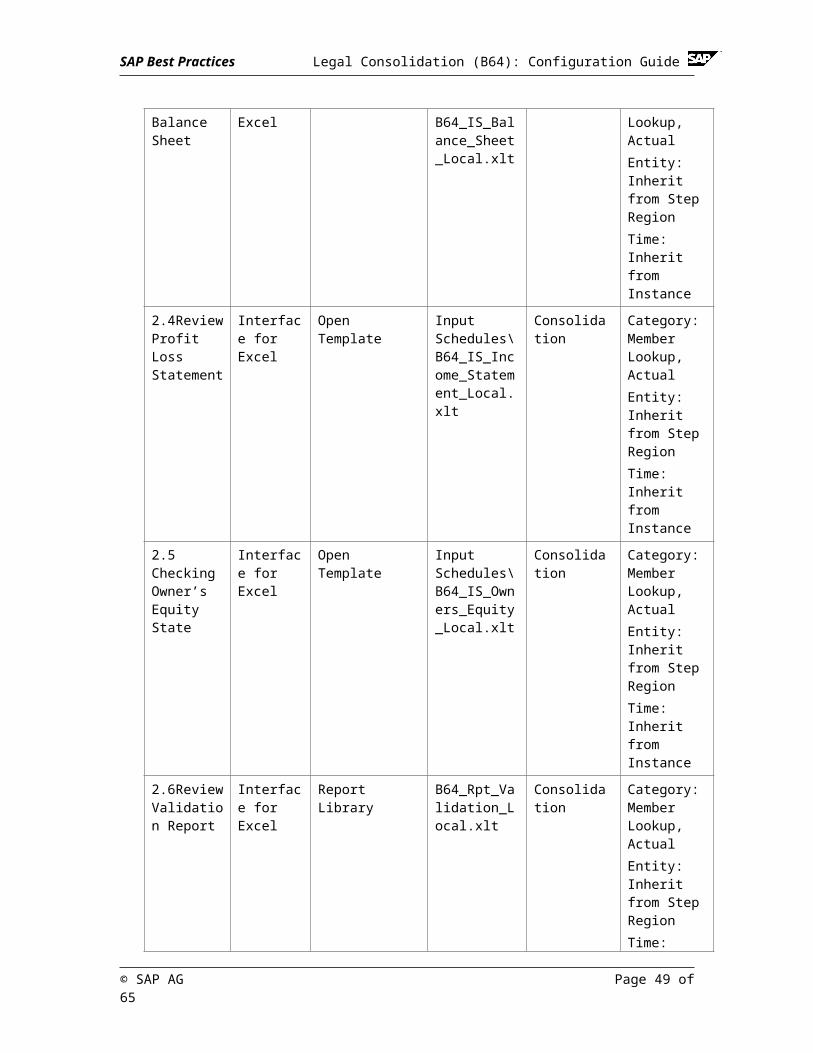
SAP Best Practices Legal Consolidation (B64): Configuration Guide
7. Repeat step 3 to step 6 to maintain other consolidation rules accroding to following table.
Account rate type Remarks
END
Source flow
Destination Account
Destination flow
Formula Force closing
Apply to periodic
Entity FX type
F99 [END]
F00 [AS_IS]
Account rate type Remarks
HIST
Source flow Destination Account
Destination flow
Formula Force closing
Apply to periodic
Entity FX type
S_CONV_AV [AVG] √
F00 [AS_IS] √
5.14.2.2 Adding Automatic Adjustments Rules1. From the hierarchical view on the left side of BPC Administration, expand the Application
folder.
2. Expand the Consolidation folder, then expand Business Rules folder.
3. Choose Automatic adjustments.
4. Enter or select ICELIM01 in Adjustment ID field, ELIM11 in Destination data source field, 0 in Adjustment level, and Intercompany transaction elimination rule in Remark filed.
5. Enter parameters according to following table.
Source account
Reverse sign
Destination “ALL” account
Destination group account
Destination minority account
Destination equity account
Rule ID
Source flow
Destination flow
Force closing
Forced intco member
Swap entity-intco
Apply to periodic
Remark
S_ICBS01
S_ICBS01
CLIC01
BA1_BA1_M1
F99
F99 I_NONE
Intercompany transaction elimination
© SAP AG Page 49 of 51

SAP Best Practices Legal Consolidation (B64): Configuration Guide
S_ICBS05
S_ICBS05
CLIC05
BA1_BA1_M1
F99
F99 I_NONE
Intercompany transaction elimination
S_ICIS01
S_ICIS01
CLIC01
BA1_BA1_M1
PL99
PL99
I_NONE
Intercompany transaction elimination
S_ICIS01
NW01BS0504
BA1_BA1_M2
PL99
F99 I_NONE
Intercompany transaction elimination
6. On action pane, choose Save rule tableValidate and confirm Automatic adjustments rule table.
5.14.2.3 Adding Carry-Forward Rules1. From the hierarchical view on the left side of BPC Administration, expand the Application
folder.
2. Expand the Consolidation folder, then expand Business Rules folder.
3. Choose Carry-forward.
4. Enter or select NW01BS0 in Source account field, F99 in Source flow filed, F00 in Destination flow field.
5. On action pane, choose Save rule tableValidate and confirm Carry-forward rule table.
5.14.3 Setting Business Rules in ICMatching Application5.14.3.1 Adding Currency Conversion Rules1. From the hierarchical view on the left side of BPC Administration, expand the Application
folder.
2. Expand the ICMatching folder, then expand Business Rules folder.
3. Choose Currency converson.
4. Enter or select AVG in Account rate type field
5. Enter parameters according to following table.
© SAP AG Page 50 of 51

SAP Best Practices Legal Consolidation (B64): Configuration Guide
Source flow
Destination Account
Destination flow
Formula Force closing
Apply to periodic
Entity FX type
PL99 [AVG]
6. On action pane, choose Save rule tableValidate and confirm Currency conversion rule table.
7. Repeat step 3 to step 6 to maintain other consolidation rules accroding to following table.
Account rate type Remarks
END
Source flow
Destination Account
Destination flow
Formula Force closing
Apply to periodic
Entity FX type
F99 [END]
Account rate type Remarks
HIST
Source flow Destination Account
Destination flow
Formula Force closing
Apply to periodic
Entity FX type
S_CONV_AV [AVG] √
F00 [AS_IS] √
6 Test and UseRefer to the Business Process Documentation of this scenario to find out how to carry out the business processes.
© SAP AG Page 51 of 51


