Embed Size (px)
Citation preview
Accutome
B‐Scan Pro
Quick Reference Guide 24‐6410
Rev ‐
©Accutome, Inc. All Rights Reserved Page 2 of 33 Document 24-6410 Rev -
Accutome B-Scan Pro Table of Contents
1. Quick Start Guide 1.1. Installing the B-Scan Pro Software…………………………………………………….4 1.2. Start the B-Scan Pro Application………………………………………………………4 1.3. Performing an Exam……………………………………………………………………6 1.4. Creating Reports……………………………………………………………...…………6 1.5. Reviewing Exams…………………………………………………………..……………6
2. Safety 2.1. Safety Information………………………………………………………………………7 2.2. Safety Issues to Consider When Using the Accutome B-Scan Pro…………………...7 2.3. Indications for use……………………………………………………………………….7 2.4. Symbol Definitions for the Accutome.............................................................................7 2.5. Safety Precautions……………………………………...................................................7 2.6. Sterilization……………………………………………...................................................8 2.7. Disinfection and Cleaning……………………………………........................................8 2.8. Electrical Hazard and Safety………………………………...........................................8 2.9. Avoiding Equipment Damage………………………......................................................9 2.10. ALARA Principle……………………………………...................................................9
3. Settings 3.1. Probe Controls................................................................................................................10 3.2. Info on Image..................................................................................................................11 3.3. Snapshot + Print Format...............................................................................................11 3.4. Image Controls…………………………………………………………………………12 3.5. Gain……………………………………………………………………………………..13 3.6. Image Controls System Defaults……………………………………………………...13 3.7. Exiting Setup…………………………………………………………………………...13
4. The B-Scan Pro Application 4.1. Exam Information Displayed Above Image……………………………………...…..14 4.2. Probe and Scan Controls Tools Palette…………………………...……………...…..14 4.3. Adjusting the Gain……………………………………...……………………………...15 4.4. Printing an Image…………………………...……………………………………..…..15 4.5. Capturing a Snap shot……………………………………...………………………….16 4.6. Zoom and Move Image Controls……………………………………………….....…..18 4.7. Taking Measurements………………………………………….……………….....…..18 4.8. Displaying A-Vector……………………………………………….........................…..20 4.9. Add Comments to Exam………………………………………………..................…..20 4.10. Play Controls………………………………………………..................………….….22 4.11. Load Saved Cine………………………………………………..................………....22
5. Performing Exams 5.1. Overview………………….....…………………..………………………………….......23
©Accutome, Inc. All Rights Reserved Page 3 of 33 Document 24-6410 Rev -
5.2. Exam Steps………………….....…………………..……………………………….......23 5.3. How to Start Exam for New Patient………………….....…………..…………..…....24 5.4. How to Start Exam for Existing Patient………………….....…………………..…....24
6. Creating Reports 6.1. Create Reports from Image……………………………….....…………………..…....24
7. Specifications 7.1. Overview……………………………….....…………………………………………….25 7.2. Physical Specifications……………………………….....…………………………..…25 7.3. Environmental Specifications……………………………….....…………………..….27 7.4. Computer Specifications……………………………….....……………………….…..28 7.5. Operating Mode……………………………….....……………………….…………....29 7.6. Storage/Range Specifications……………………………….....………………………30 7.7. Acoustic Output………………………………………….….....………………………31
8. Warranty and Repairs 8.1. Warranty……………………………….....……………………………………………32 8.2. Product Returns……………………………….....…………………………………….32 8.3. Service and Repairs……………………………………………………………………32

©Accutome, Inc. All Rights Reserved Page 4 of 33 Document 24-6410 Rev -
1. Quick Start Guide 1.1. Installing the B-Scan Pro Software
Installing the B-Scan Pro Software is similar to installing any wizard based Windows application
1.1.1 Follow the instructions and respond
The installation process is straightforward and does not require any special technical expertise
1.1.2 Plug the probe into an available USB port
Connect the probe to an available USB port prior to launching the B-Scan Pro application. If the probe is not plugged in prior to launch of the application the user will be unable to perform an exam, though they still have the ability to review an existing one.
Figure 1 No Probe Warning
1.2 Start the B-Scan Pro Application
Once installed, the “Accutome B-Scan Pro” shortcut appears on the Windows desktop and in the Start Menu. Click on the desktop icon to start the Accutome B-Scan Pro application.
1.3 Performing an Exam 1.3.1 Probe Preparation
Prior to performing an exam, an appropriate gel must be applied to the tip of the probe. Accutome Inc. recommends using the supplied GenTeal Gel.
1.3.2 Start New Exam
©Accutome, Inc. All Rights Reserved Page 5 of 33 Document 24-6410 Rev -
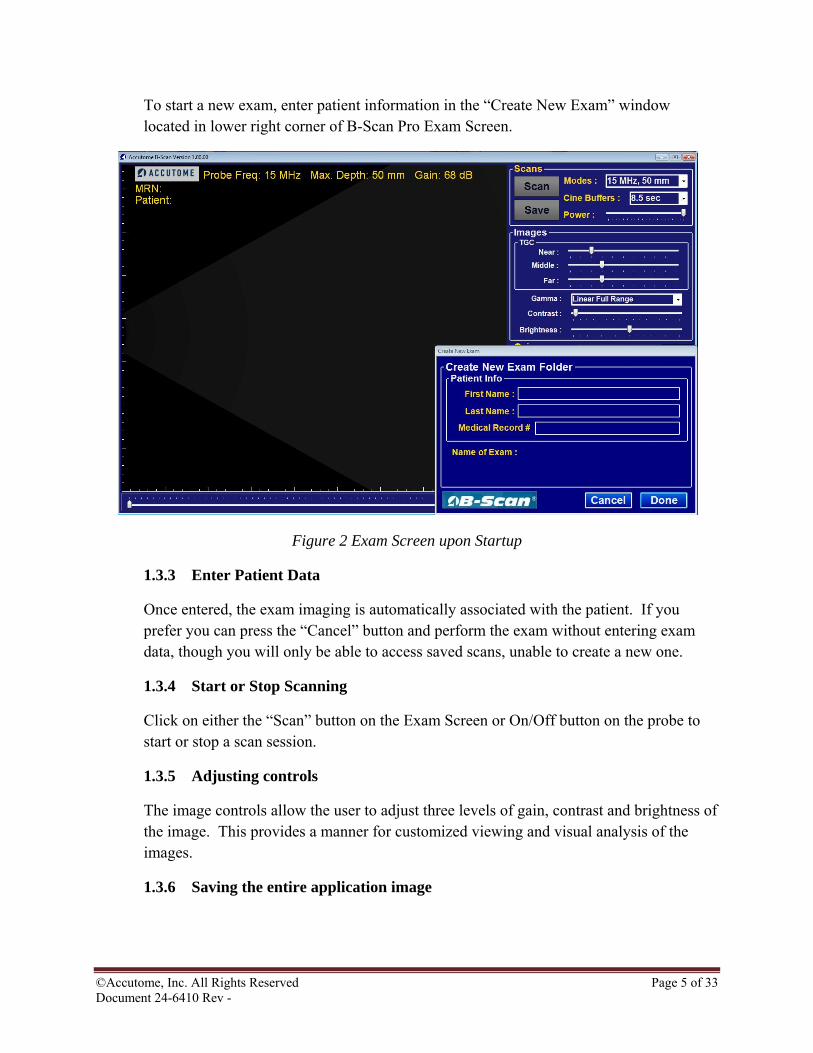
To start a new exam, enter patient information in the “Create New Exam” window located in lower right corner of B-Scan Pro Exam Screen.
Figure 2 Exam Screen upon Startup
1.3.3 Enter Patient Data
Once entered, the exam imaging is automatically associated with the patient. If you prefer you can press the “Cancel” button and perform the exam without entering exam data, though you will only be able to access saved scans, unable to create a new one.
1.3.4 Start or Stop Scanning
Click on either the “Scan” button on the Exam Screen or On/Off button on the probe to start or stop a scan session.
1.3.5 Adjusting controls
The image controls allow the user to adjust three levels of gain, contrast and brightness of the image. This provides a manner for customized viewing and visual analysis of the images.
1.3.6 Saving the entire application image

©Accutome, Inc. All Rights Reserved Page 6 of 33 Document 24-6410 Rev -
Press the Snap Shot button to save a JPEG picture of the entire application (including probe and control settings). These pictures are stored in the patients’ directory for future exam analysis.
1.3.7 Saving the session and current image
The current exam is automatically saved once a scan is taken.
1.4 Creating Reports 1.4.1 Create report from images
To create a report, click on the “B-Scan Report Base” icon on the desktop
1.4.2 Add images to report
Double-click “Accutome” folder on desktop
Double- click “Exported Snapshots” folder on desktop
Select images to be included in report
Drag and Drop image into report
NOTE: Make sure to place the cursor in the location where you wish to insert the image
1.4.3 Complete Report
Resize images as necessary and add text as with any Microsoft Word Document
“Save as” and name report accordingly
1.5 Reviewing Exams 1.5.1 Overview
From the B-Scam Pro Exam Screen click “Load Save Cine” button
1.5.2 Select exam folder and scan to review
Select exam folder to review from pop-up window.
Select scan to review. Click Open
B-Scan Pro Exam Screen will display selected scan
©Accutome, Inc. All Rights Reserved Page 7 of 33 Document 24-6410 Rev -
2 Safety
2.1 Safety Information The section lists:
• Safety Precautions associated with the Accutome B-Scan Pro • Safety Precautions of a general nature
Federal law restricts this device to sale by or on the order of a physician.
2.2 Safety Issues to Consider When Using the Accutome B-Scan Pro
The Accutome B-Scan Pro is non-invasive. The ultrasound probe touches the surface of the anesthetized eye during image acquisition, and energy in the form of ultrasound is transmitted into the eye. The power level of the ultrasound pulses is controllable by the Application Software, and the user has control of this power setting. The maximum power allowed to be set by the Application Software, and/or by the user is below the maximum FDA, Health Canada, and EU power limits.
The Accutome B-Scan Pro Probe must be cleaned and disinfected before use.
2.3 Indications for use This instrument is used for imaging the internal structure of the eye including the opaque media and posterior pathology for the purpose of diagnosing pathological or traumatic conditions in the eye.
2.4 Symbol Definitions for the Accutome
Statements, graphics and symbols listed below are used on components of the Accutome B-Scan Pro. Descriptions and meanings are listed to the right of the symbols.
"Attention! Consult Instruction Manual."
No User Serviceable Parts.
Do Not Use Near Flammable Gasses.
Type B Medical Device
Type II Insulation
2.5 Safety Precautions There are several areas in the use of the Accutome B-Scan Pro that require special attention, as they may pose a safety threat.
©Accutome, Inc. All Rights Reserved Page 8 of 33 Document 24-6410 Rev -
2.6 Sterilization
Sterilization issues are confined to the B-Scan probe tip that comes in contact with the patient’s eye. In order to prevent the transmission of disease, OSHA and CDC guidelines are referenced for proper control of sterilization issues. These guidelines are frequently updated so be sure to contact OSHA, CDC, or your local disease control officer for the latest information and sterilization techniques.
Infection control techniques that are compatible with the Accutome B-Scan Pro probe include immersion of the probe tip in an antibacterial solution, such as SporicidinTM or CidexTM
*Note: Please follow the manufacturer’s written protocol when using any antibacterial solution.
2.7 Disinfection and Cleaning
The recommended disinfection technique is to clean the probe and probe tip with isopropyl alcohol (and no other substance). It is imperative that the alcohol be given time to evaporate before applying a probe to the patient’s eye.
WARNING! DO NOT AUTOCLAVE! Disinfection issues are confined to the probe tip that comes in contact with the patient’s eye. In order to prevent the transmission of disease, refer to the OSHA and CDC guidelines for proper control of disinfection. These guidelines are frequently updated so be sure to contact OSHA, CDC, or your local disease control for the latest information and disinfection technique.
WARNING! DO NOT IMMERSE THE PROBE’S CABLE OR METAL CONNECTOR. ALLOW TO DRY BEFORE USE.
CAUTION: General indications for use of the Accutome probe include on external structurally intact areas of the eye globe and orbit areas only.
2.8 Electrical Hazard and Safety
The instrument, foot switch and probe of the Accutome B-Scan Pro are electrical/electronic devices. Reasonable care should be taken when making electrical connection and handling electrically powered devices. Avoid use of damaged electrical equipment or frayed electrical cords. If repair or maintenance is being performed, the equipment must be turned off and the power cord disconnected.

©Accutome, Inc. All Rights Reserved Page 9 of 33 Document 24-6410 Rev -
2.9 Avoiding Equipment Damage
The Accutome B-Scan Pro provides no explosion protection from static discharge or arcing components. Do not operate the instrument in the presence of explosive gases such as flammable mixtures of anesthetic and air, or nitrous oxide.
2.10 ALARA Principle When using this instrument, the ALARA (As Low As Reasonably Achievable) principle should be followed. This principle is used to reduce unnecessary, potentially hazardous exposure to individuals, by keeping doses and test repetition As Low As Reasonably Achievable to achieve the required diagnostic information.
©Accutome, Inc. All Rights Reserved Page 10 of 33 Document 24-6410 Rev -
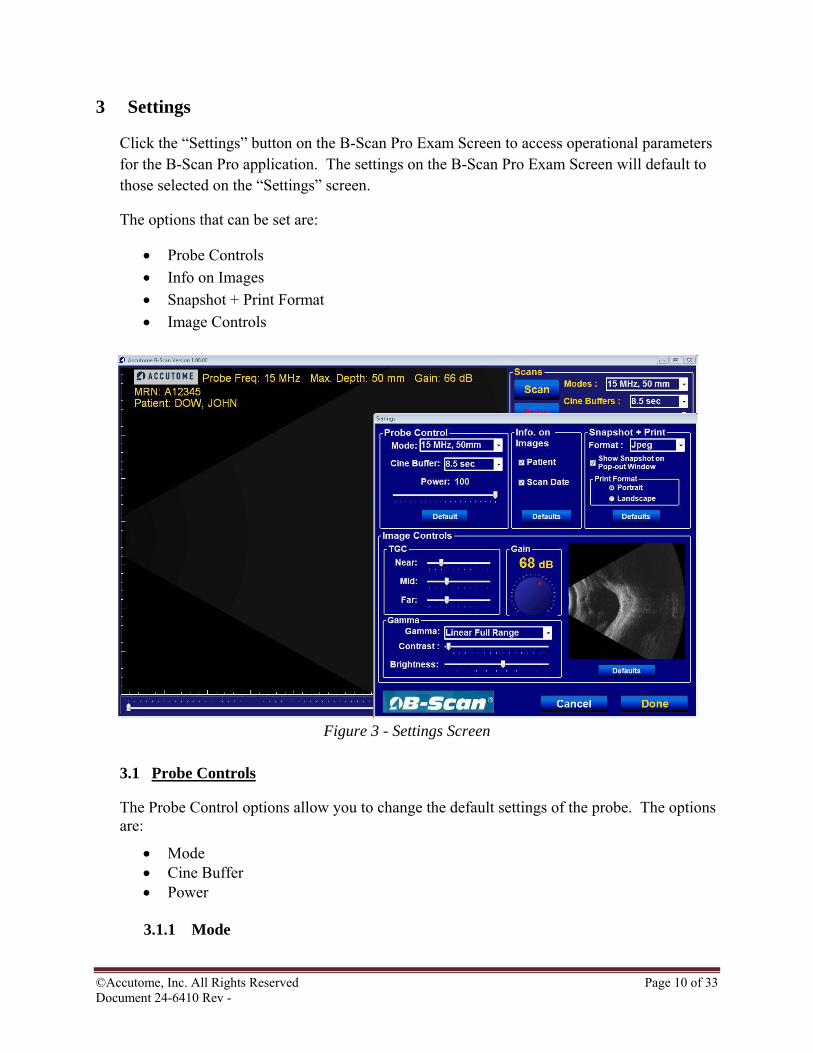
3 Settings
Click the “Settings” button on the B-Scan Pro Exam Screen to access operational parameters for the B-Scan Pro application. The settings on the B-Scan Pro Exam Screen will default to those selected on the “Settings” screen.
The options that can be set are:
• Probe Controls • Info on Images • Snapshot + Print Format • Image Controls
Figure 3 - Settings Screen
3.1 Probe Controls
The Probe Control options allow you to change the default settings of the probe. The options are:
• Mode • Cine Buffer • Power
3.1.1 Mode
©Accutome, Inc. All Rights Reserved Page 11 of 33 Document 24-6410 Rev -
The probe mode field allows you to select from two frequencies: 12 MHz or 15 MHz and two depths. Which frequency you choose for scanning will determine what depth settings you can select. If you choose 12 MHz the depth options are 30 mm and 60 mm. If you choose a frequency of 15 MHz the depth options are 50 mm and 100 mm. The default probe settings are 12 MHz and 60 mm.
To change the frequency and depth select the appropriate value from the drop down list located at the right of the “Mode” field.
3.1.2 Cine Buffer The Cine Buffer is the length of time data is stored for each acquired image. For example, with a setting of 8.5 seconds, the last 8.5 seconds of the scanning time are saved as the scanned image.
The cine buffer options are:
• 4.5 sec • 8.5 sec • 17 sec • 34 sec
The default cine buffer is 8.5 sec.
To change the cine buffer select the appropriate value from the drop down list located at the right of the Cine Buffer field.
3.1.3 Power The Power selection allows you to adjust the power level of the signal through the B-Scan probe. The power level is indicated by a number (a percentage from 0 to 100) located beneath the label "Power" and by the location of the adjustment arrow on the scale. To adjust the power select the arrow indicator and slide until you reach the appropriate value.
3.1.4 System Defaults
When you select "Defaults" in the Setting Screen, all probe settings will return to the default settings
3.2 Info on Images
The "Info on Images" selections allow you to choose what information is displayed on patient images and the position of the measured data. The options are:
• Patient • Scan Date
To have any of the fore mentioned fields display on an image click in the checkbox to enable the field. The default is to show the Scan date only.
3.3 Snapshot + Print Format
3.3.1 The following image formats are available for snapshots.
• JPEG
©Accutome, Inc. All Rights Reserved Page 12 of 33 Document 24-6410 Rev -
• Bitmap • Git • Png • Tif
The default setting for the Snapshot image format is JPEG. To change image format select the appropriate type from the drop down list.
Select the check box to the left of "Show Snapshot in Pop-out Window" to have the snapshot image automatically displayed in a pop-out window upon image capture.
3.3.2 Print Format The Print Format option determines the page layout when printing a patient image; Portrait or Landscape. The default is Landscape. To change print format select either radio button.
3.4 Image Controls One of the great features of the Accutome B-Scan Pro is the ability to view the actual adjustments to image controls. The image controls on the Setup Options Screen allow you to adjust:
• TGC • Gamma • Gain
3.4.1 TGC TGC (Time Gain Compensation) is the ability to adjust the signal gain segmentally as distance from the probe increases.
There are three TGC setup options:
• Near - increases the gain for the anterior portion of the eye in the B-Scan image, near the probe
• Middle - increases the gain for the middle portion of the eye • Far - increases the gain for the far portion of the eye
To adjust the TGC image scan presets slide the appropriate setting indicators.
3.4.2 Gamma Settings
The Gamma portion of the Image Controls Setup allows you to choose a preset gamma for scanning and to adjust the brightness and contrast for captured images.
3.4.2.1 Preset Gamma
Adjusting gamma settings make certain parts of the scanned image brighter and others less bright. There are 4 preset gamma settings:
• Linear Full Range • S-Curve Full Range • Log Full Range

©Accutome, Inc. All Rights Reserved Page 13 of 33 Document 24-6410 Rev -
• Color
The default gamma setting is Linear Full Range. To change the gamma preset select the appropriate value from the drop down list located at the right of the depth field.
3.4.2.2 Contrast You can adjust the contrast between light and dark areas of the scanned image capture by dragging the slide indicator.
3.4.2.3 Brightness You can adjust the brightness of the scanned image capture by dragging the slide indicator.
3.5 Gain The gain feature of the Accutome B-Scan Pro allows you to adjust the strength of the signal as it travels through the eye, thereby making the captured image brighter.
3.5.1 Adjusting the Gain The Accutome B-Scan Pro provides a user-adjustable gain feature. To the left of the Small Image Window there is a knob with a red drag point. Adjustment to the gain is as simple as dragging the knob. As you adjust the gain you can see the difference in the Small Image Window.
To adjust the Image Control Gain: • Select the red drag point the gain adjustment knob.
• Drag the knob until the dB level (and the image visual) reaches the appropriate level.
3.6 Image Controls System Defaults To restore all adjustments made to the Image Controls to the System Defaults, click "Defaults" button located under the Small Image Window.
3.7 Exiting Setup To leave the B-Scan Setup function you must select one of the following:
• Done - Selecting "Done" closes the Setup window and returns you to the Accutome B-Scan Pro Exam Screen.
• Cancel - Allows you to reject any changes that may have been made in Setup. If you select "Cancel" a dialog box will appear. Select "OK" if you would like to cancel all changes made and return to the B-Scan Pro Exam Screen.
©Accutome, Inc. All Rights Reserved Page 14 of 33 Document 24-6410 Rev -
4 The B-Scan Pro Application Upon start of the exam the Accutome B-Scan Pro launches the Exam Screen. The Exam Screen displays:
• Exam Information • Probe and Scan Controls Tools Palette • TGC Adjustments • Gamma Adjustments • Gain Controls • Zoom and Image Controls • Taking Measurements • Displaying A-Vector • Adding Comments • Play Controls • Print and Snap Shot
4.1 Exam Information Displayed above Image
Above the Exam Screen’s Imaging area, in the top right or left corner there is an area that displays some or all of the following fields:
• Probe Frequency (Probe Frequency) • Maximum Probe Signal Depth (Max. Depth) • Medical Record Number (MRN) • Exam Creation Time (Date) • Patient Name (Last, First)
The information fields displayed and the position of the information on the screen is determined by the Options selected in “Settings” screen.
4.2 Probe and Scan Controls Tool Palette The tools palette contains all tools for adjusting and controlling scans. In the palette there are tabs for:
• Probe • TGC • Gamma
4.2.1 Probe and Scan Controls
The probe and scan controls allow you to adjust the probe settings and start and stop image scans. In this area you can also adjust the probe power level for scanning.
4.2.1.1 Probe Settings
In the probe settings are you can adjust: • Frequency - 12 MHz or 15 MHz • Range - 6 cm or 3 cm for 12 MHz; 10 cm or 5 cm for 15 MHz
©Accutome, Inc. All Rights Reserved Page 15 of 33 Document 24-6410 Rev -
• Cine Buffers - 4.5 sec, 8.5 sec, 17 sec, or 34 sec. • Power - Adjustable sliding probe power indicator. To increase or
decrease the probe power, drag the indicator to the right or left.
4.2.1.2 Scan/Stop and Save Cine When ready to start a sequence step the button will display "Scan". Clicking "Scan" starts the scanning process and the display on the button changes to "Stop". When satisfied with image acquired click on "Stop" and "Save" to save the scanning for the active step.
This is another location where you can start and stop scans in addition to the footswitch and the button on the probe.
4.2.2 TGC Adjustments TGC (Time Gain Compensation) is an adjustment to compensate for the strength of the signal through the eye. The TGC adjustments are:
• Near - adjustment for signal near the probe • Mid - adjustment for the middle of signal • Far - adjustment for portion of signal farthest from probe.
4.2.3 Gamma Adjustments Gamma curves are a type of contrast adjustment that favors selectively, the low end, high end, or middle end of the contrast gradient. There is no correct gamma only the one that best delineates the subject of interest. The Gamma adjustments allow you to adjust the brightness mapping of the B-Scan image. The adjustments area contains a drop down list of predefined gamma settings, and gamma contrast and brightness controls that can be adjusted by dragging.
4.3 Adjusting the Gain You may decide the signal gain for your new view is too strong or not strong enough. To adjust the signal gain:
• Select the red dot in the adjustable gain knob with the mouse cursor. • Holding down the left mouse button drag the knob until you reach the gain value you
want. • If the mouse you are using has a scroll wheel you can move the wheel instead of
dragging the knob to reach the gain value
4.4 Printing an Image With the Accutome B-Scan Pro you can easily print any frame of any scan by simply selecting the frame, making any necessary image adjustments and clicking the "Print Image" button. You can also select a frame and save the frame as a snapshot.
The steps to print a patient image are:
• If not printing an active patient scan, select the appropriate patient exam

©Accutome, Inc. All Rights Reserved Page 16 of 33 Document 24-6410 Rev -
• Select the frame you would like to print. and adjust accordingly • Click on the "Print Image" button • The frame will be immediately printed to either plain paper printer on plain paper or
to thermal paper from a USB video graphic printer. • Save or print the report
4.5 Capturing a Snapshot
Images to be included in a patient’s report must be captured as snapshots.
4.5.1 To capture a snapshot: • Play the selected exam • Pause at the frame you would like to make a snapshot. • Adjust any of the image settings if necessary. • Click "Snap Shot" button. • The frame will be exported to a file, linked to the patient in either a bit map or
jpg format. The file name for the snapshot is determined by the "Exam Name Combination" selected during setup. Snapshots can easily be incorporated into an email or pasted into a report.
Figure 4Capturing a Snap Shot
• Screen Snap shot window will be displayed with captured snap shot • Click “Close” to exit the Screen Snap Shot window
4.5.2 To Review Snapshots:

©Accutome, Inc. All Rights Reserved Page 17 of 33 Document 24-6410 Rev -
• Click “List all Snapshots” button to review all snapshots captured for current exam
Figure 5 Reviewing List of Snap Shots
• Double click on particular snap shot to be reviewed
©Accutome, Inc. All Rights Reserved Page 18 of 33 Document 24-6410 Rev -
Figure 5 Reviewing Specific Snap Shot from List
• Click “Close” to exit Screen Snap Shot window
4.6 Zoom and Move Image Controls The zoom feature allows you to zoom in on a selected patient image. Zoom proportionally expands the image and fills the B-Scan screen. Zoom has preset values that increment by steps of .2 from 1.2 to 8; e.g. 1, 1.2, 1.4, 1.6, 1.8, 2.0 etc., up to 7.99
4.6.1 To use the Zoom feature:
• Click the "Zoom" selection. • Continue clicking until the image is zoomed at the appropriate level.
4.6.2 Reset Zoom After you have zoomed in on an image you may want to reset the view back to the default normal view. To reset the zoom, click “Reset Zoom" button.
4.6.3 How to Move Image After you have made adjustments to the size of the image you may want to move the image around on the screen to view different portions of the eye. It is simple to move images in the Accutome B-Scan Pro. Place the Windows mouse cursor over any location on the image and notice the cursor become a small cross (small +). Then hold down the mouse button and the + becomes directional compass. Holding the mouse button down and moving the mouse causes the image to move.
Move the icon and the image will move in the same directions
4.7 Taking Measurements The Analyze Screen provides the diagnostic feature of making measurements on a B-Scan Pro image. You can measure on a zoomed image; you get much finer resolution of the measurements. Measurements as small as 0.1 mm can be taken using the Measurements function.
4.7.1 Measurement Types
The B-Scan Pro provides for two line, or distance measurements and two area measurements. You can display all four measurements on the screen simultaneously
• Line 1
• Line 2
• Area 1
• Area 2
4.7.2 Taking Distance Measurements To take a distance measurement:
• Select either Line 1 or Line 2 in the Measurements area
©Accutome, Inc. All Rights Reserved Page 19 of 33 Document 24-6410 Rev -
• Right click and hold on the image at the starting point of the measurement, and drag the line along the length of the feature you would like to measure.
• The measurement will be displayed on the screen
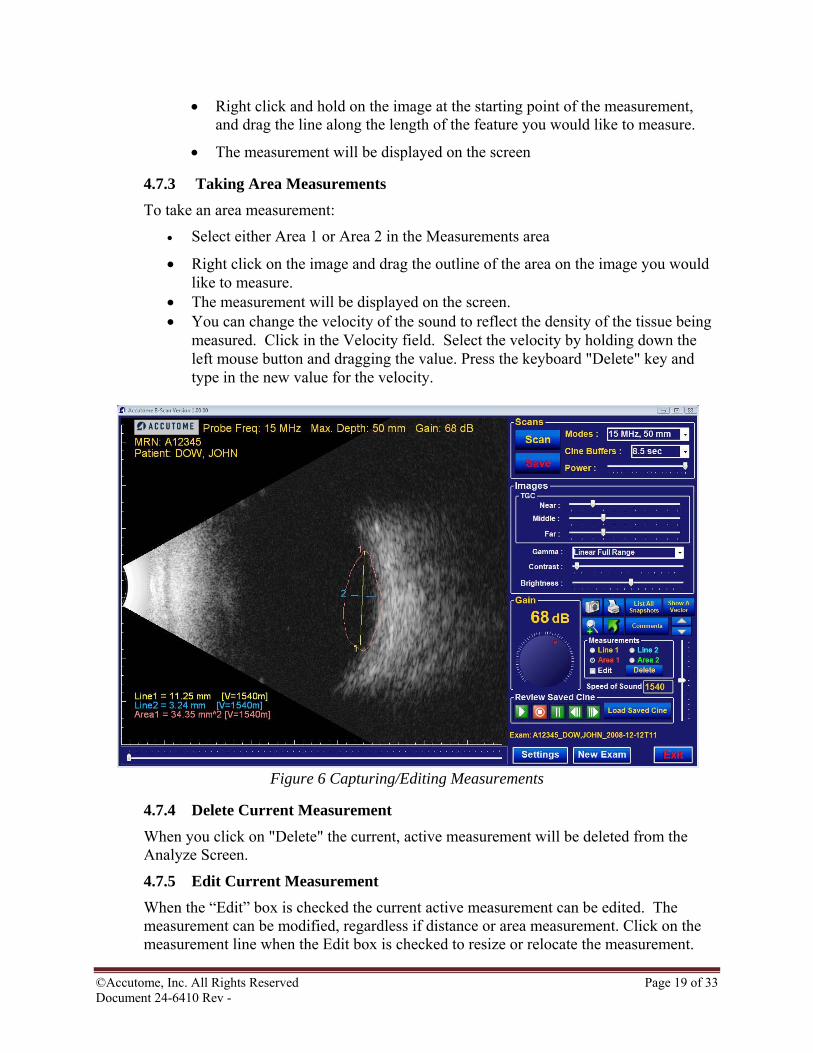
4.7.3 Taking Area Measurements To take an area measurement:
• Select either Area 1 or Area 2 in the Measurements area
• Right click on the image and drag the outline of the area on the image you would like to measure.
• The measurement will be displayed on the screen. • You can change the velocity of the sound to reflect the density of the tissue being
measured. Click in the Velocity field. Select the velocity by holding down the left mouse button and dragging the value. Press the keyboard "Delete" key and type in the new value for the velocity.
Figure 6 Capturing/Editing Measurements
4.7.4 Delete Current Measurement
When you click on "Delete" the current, active measurement will be deleted from the Analyze Screen.
4.7.5 Edit Current Measurement When the “Edit” box is checked the current active measurement can be edited. The measurement can be modified, regardless if distance or area measurement. Click on the measurement line when the Edit box is checked to resize or relocate the measurement.

©Accutome, Inc. All Rights Reserved Page 20 of 33 Document 24-6410 Rev -
4.8 Displaying A-Vector The A-Vector function displays an equivalent A-Scan of the captured B-Scan Pro image. Looking at the A-Vector you can get a graphical picture of the echoes received back through the eye from the ultrasonic probe.
The echoes are represented as spikes arising from the baseline and indicate the sound beam travelling through the different intraocular tissues.
4.8.1 To activate the A-Vector:
• Click "Show A-Vector" button from the Tools palette. • Use Up/Down Arrows or Slider Bat to move the position on the A-Vector • The A-Vector will be displayed under the live image. To close the A-Vector
select "Hide A-Vector".
Figure 7 A-Vector Displayed
4.9 Add Comments to Exam The Accutome B-Scan Pro allows you to place comments on an image from a patient exam. The comments feature can be important in providing an accurate image analysis.
• To place a comment on an image click “Comments” button
• The "Comments on Image" dialog will display on the screen.
• Click in the text field and enter your comments.

©Accutome, Inc. All Rights Reserved Page 21 of 33 Document 24-6410 Rev -
Figure 8 Add Comments to Image
• If you would like to clear the comments that you have typed, click on "Clear" • Select "Done" when you are finished. • The entered comments will appear on the image as shown
Figure 9 Comments on Image
©Accutome, Inc. All Rights Reserved Page 22 of 33 Document 24-6410 Rev -
4.10 Play Controls The play controls allow you to play, pause, stop, move forward and move back through an image scan, allowing you to view any portion of a scan film loop. They are intuitive and easy to use and similar in appearance to controls on a VCR or DVD remote controller.
The playback controls consist of:
• Play • Stop (and return to the beginning of the film loop) • Pause • Forward one frame at a time or continuously • Backward one frame at a time or continuously
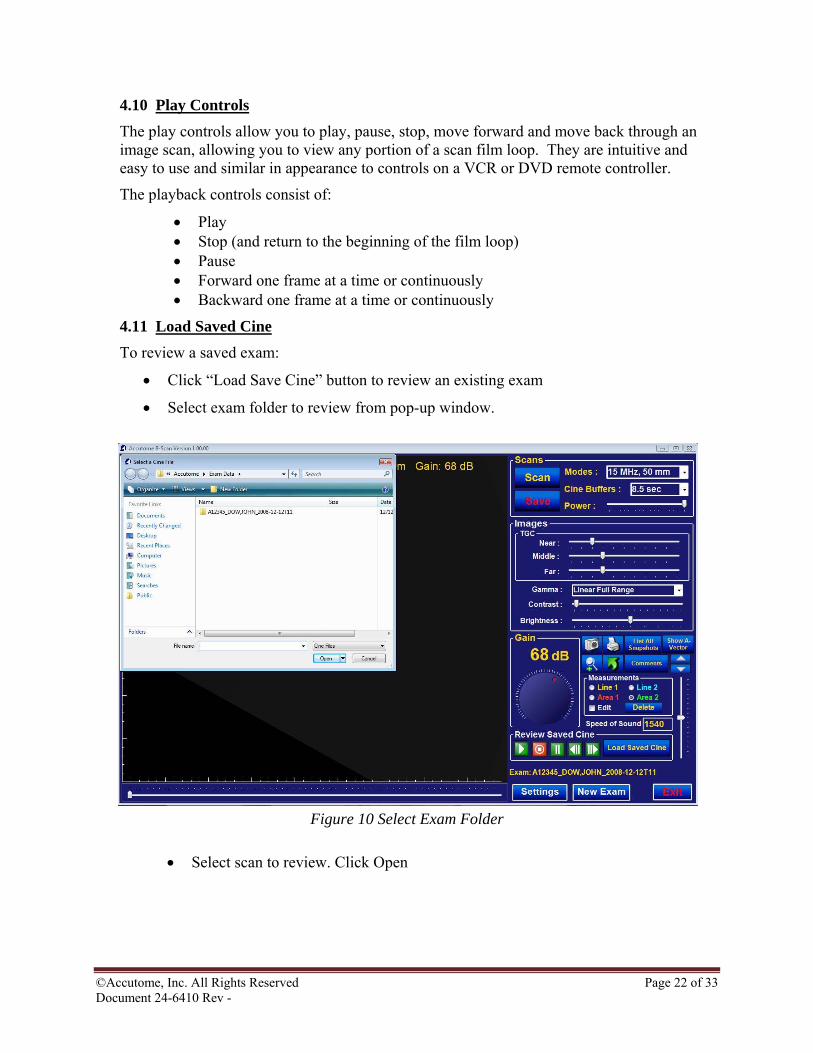
4.11 Load Saved Cine To review a saved exam:
• Click “Load Save Cine” button to review an existing exam
• Select exam folder to review from pop-up window.
Figure 10 Select Exam Folder
• Select scan to review. Click Open
©Accutome, Inc. All Rights Reserved Page 23 of 33 Document 24-6410 Rev -
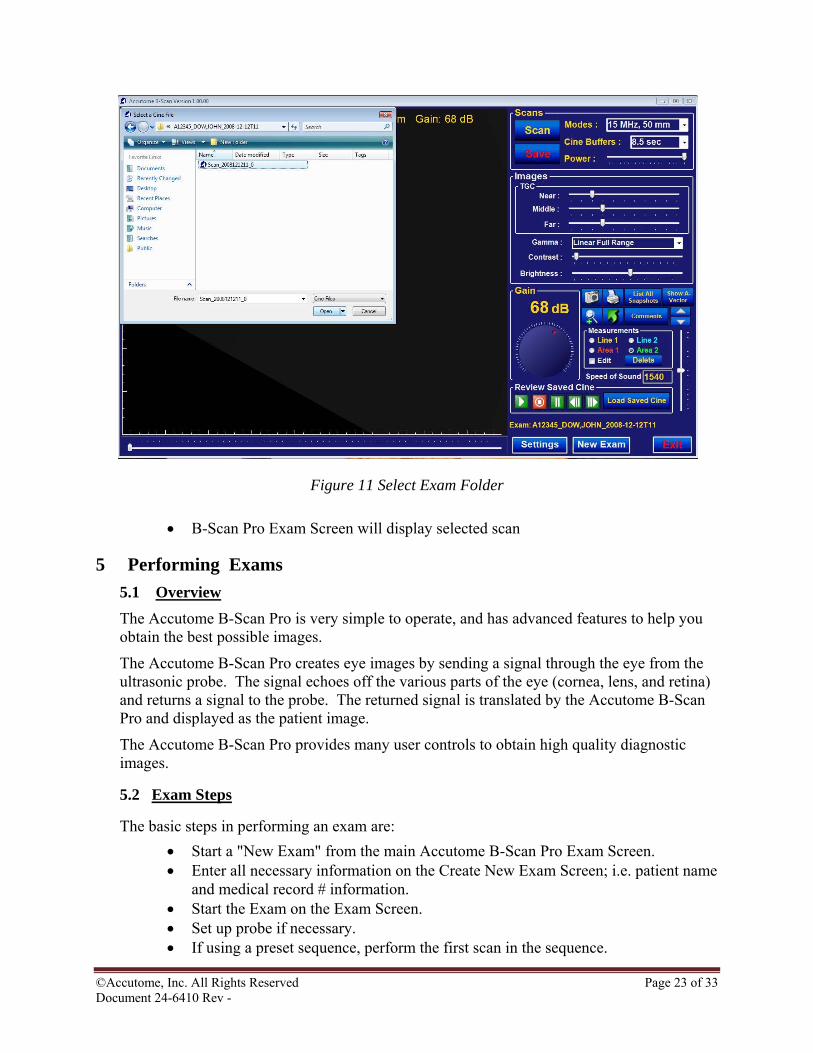
Figure 11 Select Exam Folder
• B-Scan Pro Exam Screen will display selected scan
5 Performing Exams 5.1 Overview The Accutome B-Scan Pro is very simple to operate, and has advanced features to help you obtain the best possible images.
The Accutome B-Scan Pro creates eye images by sending a signal through the eye from the ultrasonic probe. The signal echoes off the various parts of the eye (cornea, lens, and retina) and returns a signal to the probe. The returned signal is translated by the Accutome B-Scan Pro and displayed as the patient image.
The Accutome B-Scan Pro provides many user controls to obtain high quality diagnostic images.
5.2 Exam Steps
The basic steps in performing an exam are: • Start a "New Exam" from the main Accutome B-Scan Pro Exam Screen. • Enter all necessary information on the Create New Exam Screen; i.e. patient name
and medical record # information. • Start the Exam on the Exam Screen. • Set up probe if necessary. • If using a preset sequence, perform the first scan in the sequence.
©Accutome, Inc. All Rights Reserved Page 24 of 33 Document 24-6410 Rev -
• If not using a preset sequence, perform the first scan and label the scan if necessary.
• Make any necessary image adjustments while scanning. • Add scan views if necessary. • Analyze exam or start new exam.
5.3 How to Start Exam for New Patient To create an exam for a new patient follow the steps outlined in Section 1.3 Starting an Exam.
5.4 How to Add Exam for Existing Patient Once a patient scan has been taken, it is no longer necessary to perform the steps involved in creating a new scan.
An individual folder is created for each patient that has a scan performed on them. Additional scans are then appended to the existing folder.
5.4.1 Access Patient Existing Exam
To access an existing exam for a patient click the “Cancel” button in the “Create New Exam” Window.
Load exam as outlined in Section 3.11 Load Cine File
5.4.2 Add New Exam to Patient File Once the existing exam has been loaded according to Section 3.11 Load Cine File, click the “Scan” button to capture a new scan.
Perform the necessary adjustments to the captured image as outlined throughout this manual after the scan has been completed.
Note: Subsequent scans will continue to be added to the Patient’s file.
6 Creating Reports With the Accutome B-Scan Pro you can create a report for any patient. The report can contain the following:
• Patient Name • Physician • Clinician • Indication for Scan • Patient snapshot images
All patient information is saved as part of the patient record. Snapshot images of the patient exam are also saved with the patient record every time you save a scan frame as a snapshot.
6.1 Create report from images
To create a report, click on the “B-Scan Report Base” icon on the desktop
6.1.1 To add images to report
©Accutome, Inc. All Rights Reserved Page 25 of 33 Document 24-6410 Rev -
• Double-click “Accutome” folder on desktop • Double- click “Exported Snapshots” folder on desktop • Select snap shots to be included in report • Drag and Drop image into report
NOTE: Make sure to place the cursor in the location where you wish to insert the image
6.1.2 Complete Report • Resize images as necessary and add text as with any Microsoft Word Document • “Save as” and name report accordingly
7 Specifications
7.1 Overview This section provides the physical and operational specifications of the Accutome B-Scan Pro.
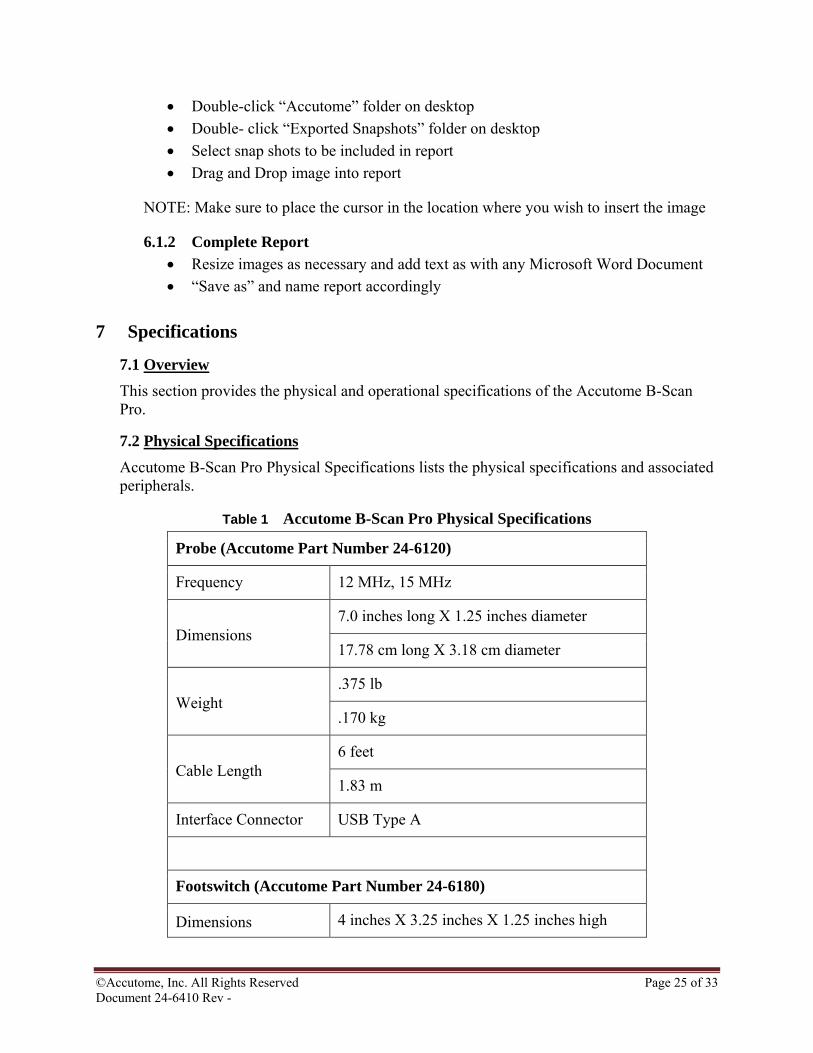
7.2 Physical Specifications Accutome B-Scan Pro Physical Specifications lists the physical specifications and associated peripherals.
Table 1 Accutome B-Scan Pro Physical Specifications
Probe (Accutome Part Number 24-6120)
Frequency 12 MHz, 15 MHz
Dimensions 7.0 inches long X 1.25 inches diameter
17.78 cm long X 3.18 cm diameter
Weight .375 lb
.170 kg
Cable Length 6 feet
1.83 m
Interface Connector USB Type A
Footswitch (Accutome Part Number 24-6180)
Dimensions 4 inches X 3.25 inches X 1.25 inches high

©Accutome, Inc. All Rights Reserved Page 26 of 33 Document 24-6410 Rev -
10.16 cm X 8.26 cm X 3.18 cm high
Weight .337 lb.
.153 kg
Cable Length 6 feet (1.83m)
Interface Connector USB Type A
Probe Holder (Accutome Part Number 24-6170)
Dimensions 7.7 Inches X 4.3 Inches X 2.09 Inches High
19.56 cm X 10.92 cm X 5.61 cm
Weight .75 Lb.
.340 kg
Safety and EMI Standards
IEC 60601-1 Medical Electrical Equipment: General Requirements for Safety
IEC 60601-1-2 Medical Electrical Equipment: Electromagnetic Compatibility
IEC 60601-2-37 Medical Electrical Equipment: Particular Requirements for Ultrasound Equipment
©Accutome, Inc. All Rights Reserved Page 27 of 33 Document 24-6410 Rev -
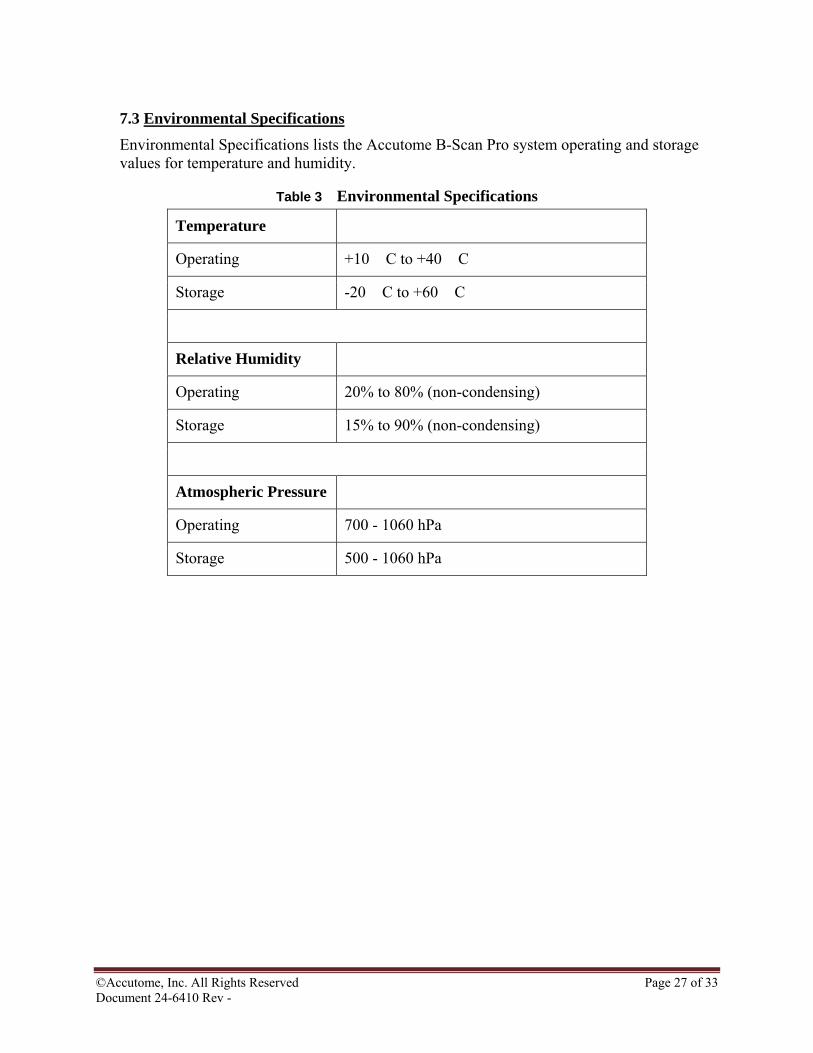
7.3 Environmental Specifications Environmental Specifications lists the Accutome B-Scan Pro system operating and storage values for temperature and humidity.
Table 3 Environmental Specifications
Temperature
Operating +10� C to +40� C
Storage -20� C to +60� C
Relative Humidity
Operating 20% to 80% (non-condensing)
Storage 15% to 90% (non-condensing)
Atmospheric Pressure
Operating 700 - 1060 hPa
Storage 500 - 1060 hPa
©Accutome, Inc. All Rights Reserved Page 28 of 33 Document 24-6410 Rev -
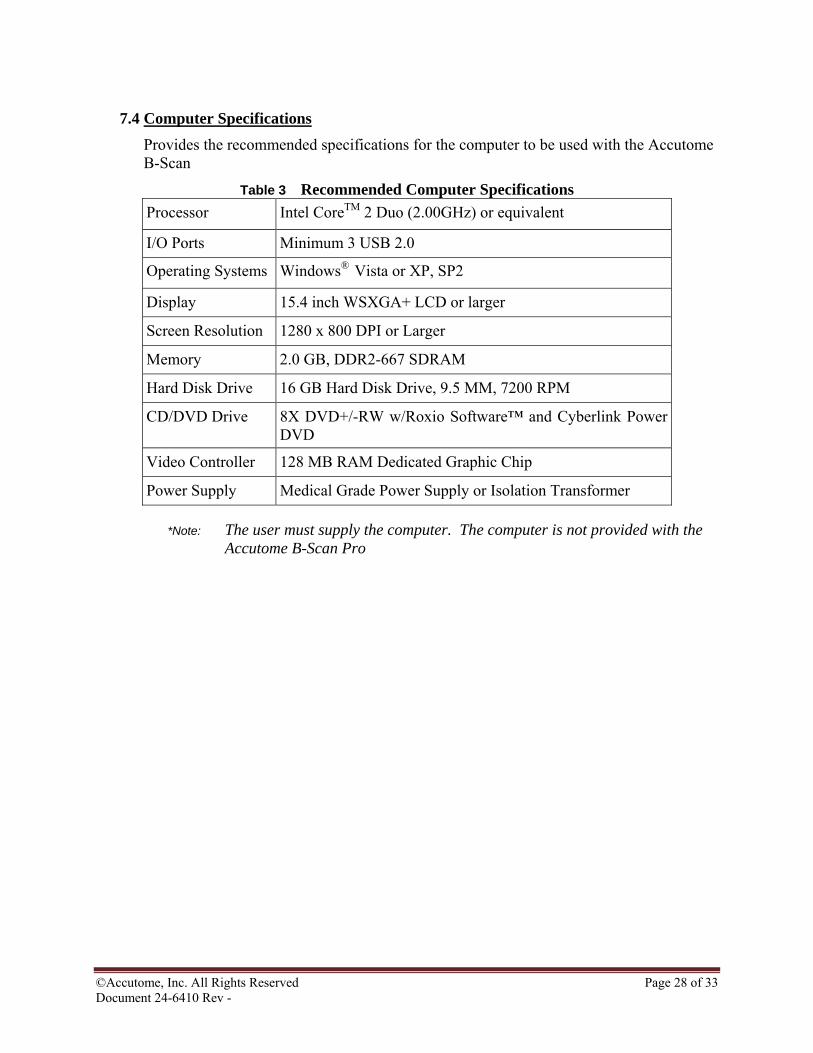
7.4 Computer Specifications Provides the recommended specifications for the computer to be used with the Accutome B-Scan
Table 3 Recommended Computer Specifications Processor Intel CoreTM 2 Duo (2.00GHz) or equivalent
I/O Ports Minimum 3 USB 2.0
Operating Systems Windows® Vista or XP, SP2
Display 15.4 inch WSXGA+ LCD or larger
Screen Resolution 1280 x 800 DPI or Larger
Memory 2.0 GB, DDR2-667 SDRAM
Hard Disk Drive 16 GB Hard Disk Drive, 9.5 MM, 7200 RPM
CD/DVD Drive 8X DVD+/-RW w/Roxio Software™ and Cyberlink Power DVD
Video Controller 128 MB RAM Dedicated Graphic Chip
Power Supply Medical Grade Power Supply or Isolation Transformer
*Note: The user must supply the computer. The computer is not provided with the Accutome B-Scan Pro
©Accutome, Inc. All Rights Reserved Page 29 of 33 Document 24-6410 Rev -
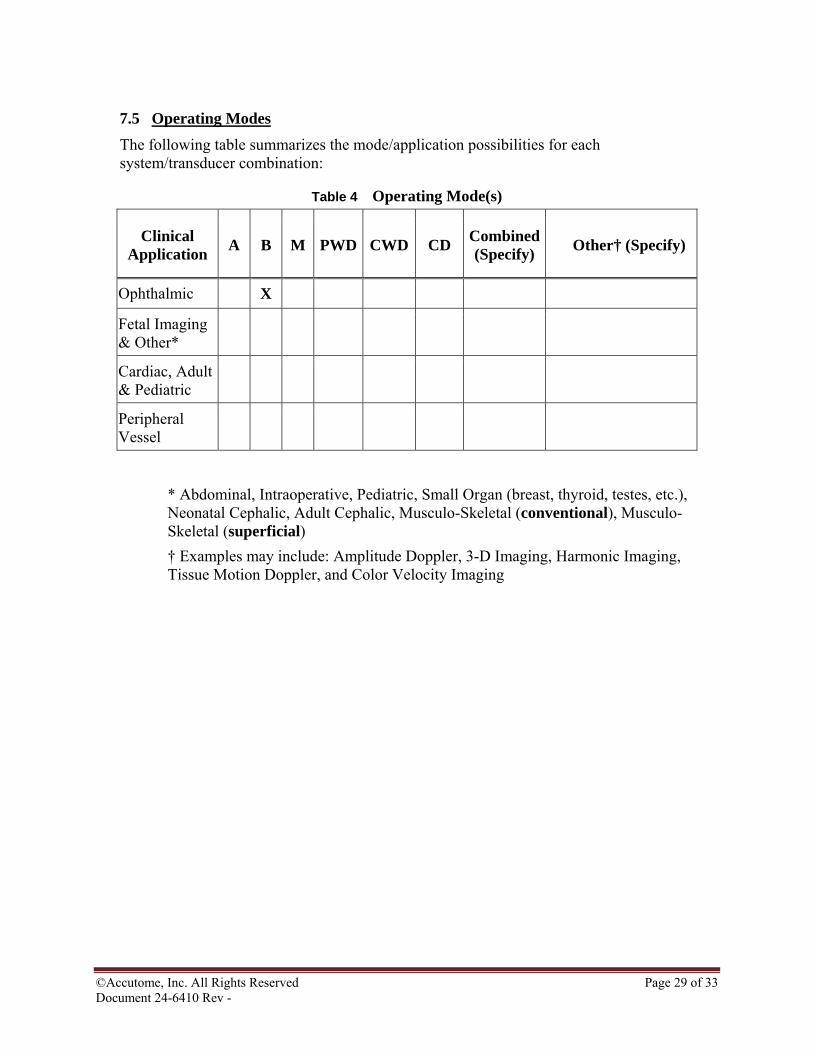
7.5 Operating Modes The following table summarizes the mode/application possibilities for each system/transducer combination:
Table 4 Operating Mode(s)
Clinical Application A B M PWD CWD CD Combined
(Specify) Other† (Specify)
Ophthalmic X
Fetal Imaging & Other*
Cardiac, Adult & Pediatric
Peripheral Vessel
* Abdominal, Intraoperative, Pediatric, Small Organ (breast, thyroid, testes, etc.), Neonatal Cephalic, Adult Cephalic, Musculo-Skeletal (conventional), Musculo-Skeletal (superficial) † Examples may include: Amplitude Doppler, 3-D Imaging, Harmonic Imaging, Tissue Motion Doppler, and Color Velocity Imaging
©Accutome, Inc. All Rights Reserved Page 30 of 33 Document 24-6410 Rev -
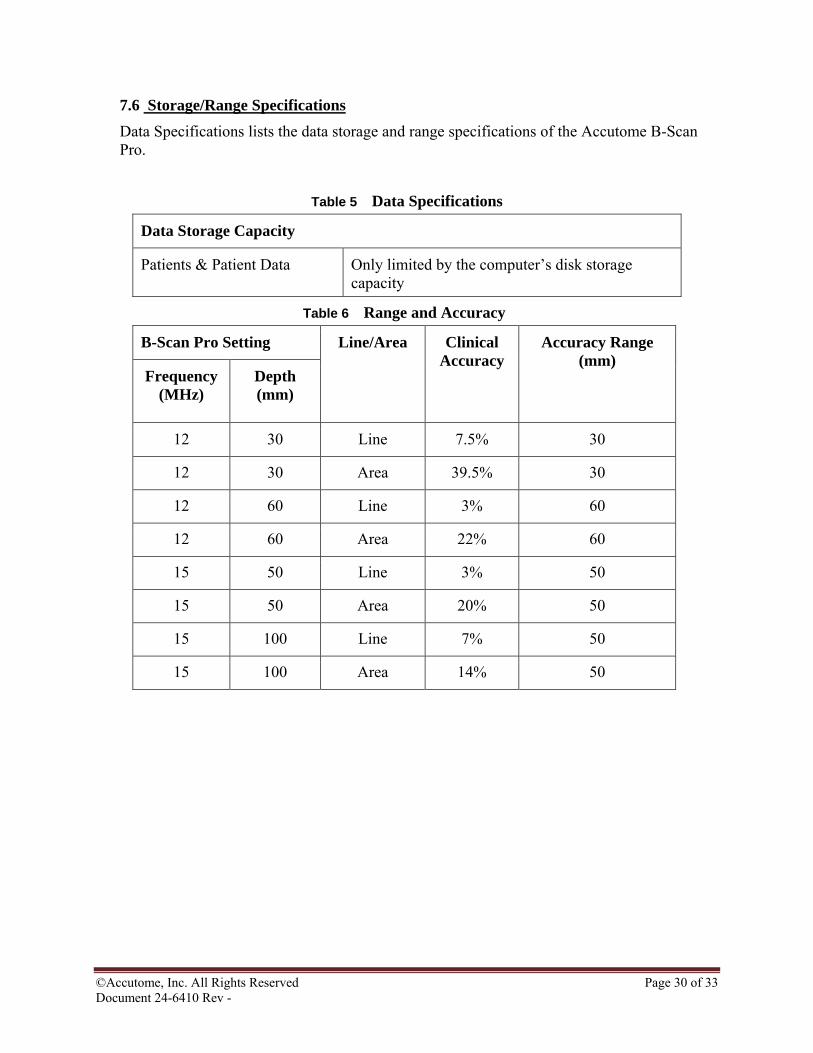
7.6 Storage/Range Specifications Data Specifications lists the data storage and range specifications of the Accutome B-Scan Pro.
Table 5 Data Specifications
Data Storage Capacity
Patients & Patient Data Only limited by the computer’s disk storage capacity
Table 6 Range and Accuracy
B-Scan Pro Setting Line/Area Clinical Accuracy
Accuracy Range (mm)
Frequency (MHz)
Depth (mm)
12 30 Line 7.5% 30
12 30 Area 39.5% 30
12 60 Line 3% 60
12 60 Area 22% 60
15 50 Line 3% 50
15 50 Area 20% 50
15 100 Line 7% 50
15 100 Area 14% 50
©Accutome, Inc. All Rights Reserved Page 31 of 33 Document 24-6410 Rev -
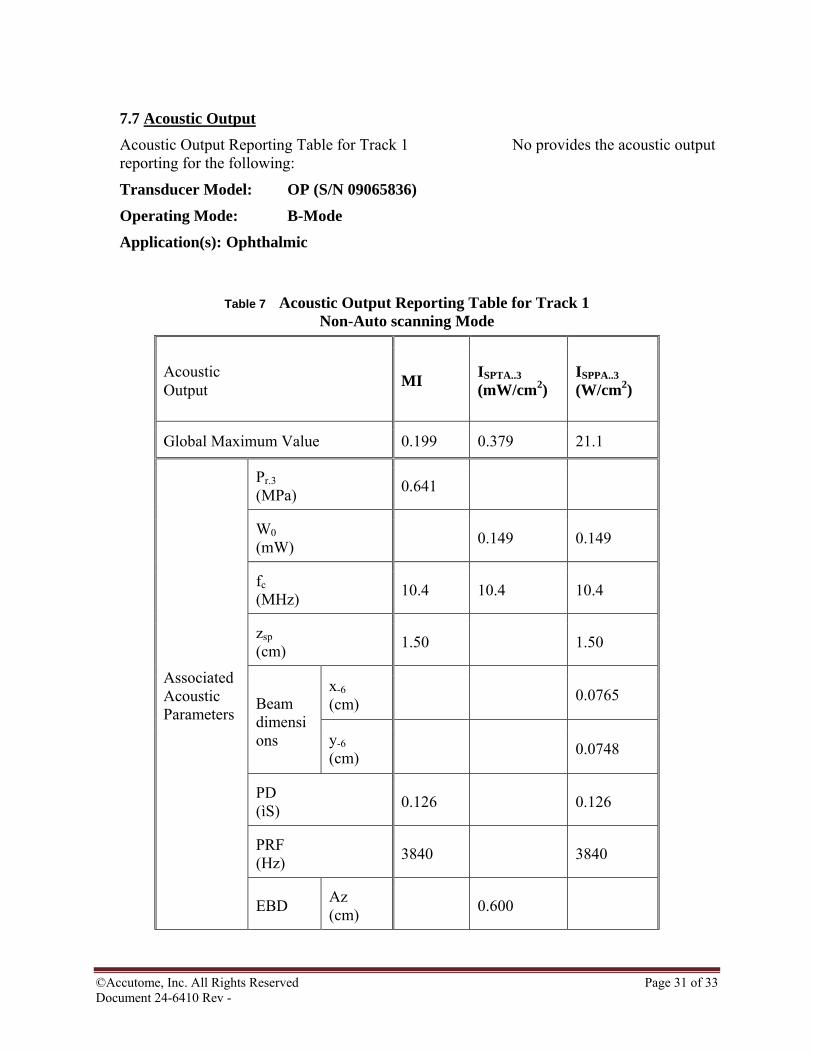
7.7 Acoustic Output Acoustic Output Reporting Table for Track 1 No provides the acoustic output reporting for the following:
Transducer Model: OP (S/N 09065836)
Operating Mode: B-Mode
Application(s): Ophthalmic
Table 7 Acoustic Output Reporting Table for Track 1 Non-Auto scanning Mode
Acoustic Output MI ISPTA..3
(mW/cm2) ISPPA..3 (W/cm2)
Global Maximum Value 0.199 0.379 21.1
Associated Acoustic Parameters
Pr.3 (MPa) 0.641
W0 (mW) 0.149 0.149
fc (MHz) 10.4 10.4 10.4
zsp (cm) 1.50 1.50
Beam dimensions
x-6 (cm) 0.0765
y-6 (cm) 0.0748
PD (ìS) 0.126 0.126
PRF (Hz) 3840 3840
EBD Az (cm) 0.600
©Accutome, Inc. All Rights Reserved Page 32 of 33 Document 24-6410 Rev -
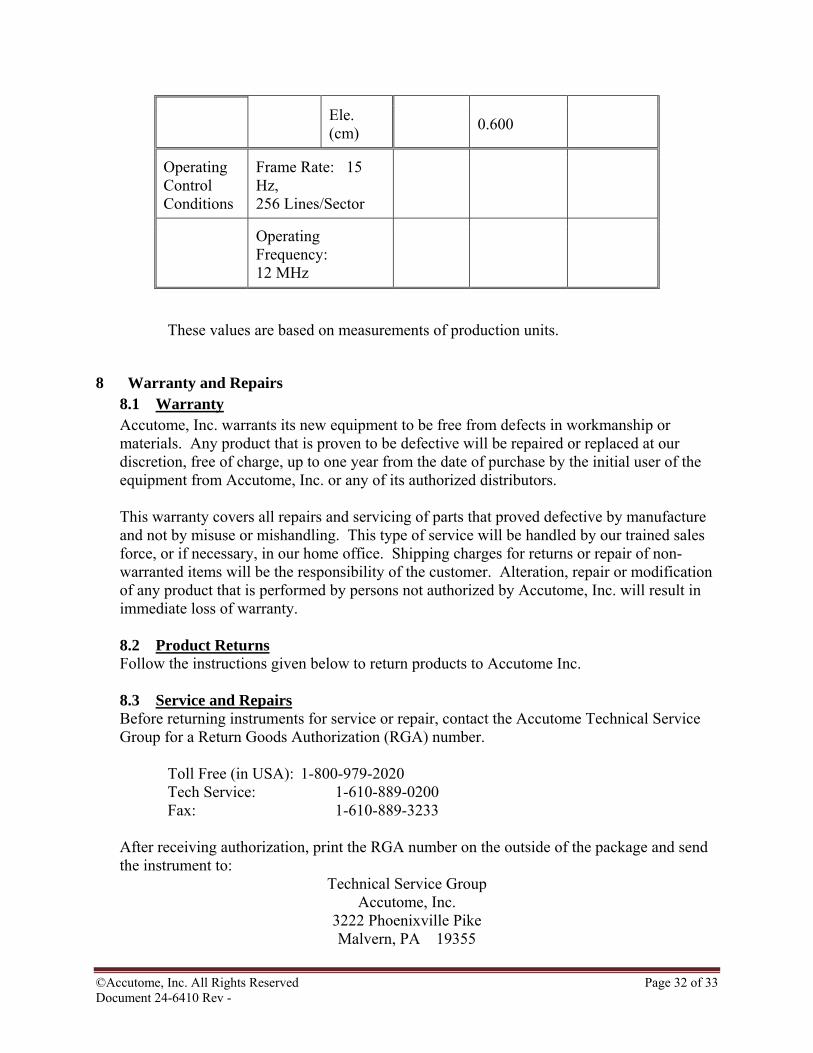
Ele. (cm) 0.600
Operating Control Conditions
Frame Rate: 15 Hz, 256 Lines/Sector
Operating Frequency: 12 MHz
These values are based on measurements of production units.
8 Warranty and Repairs 8.1 Warranty Accutome, Inc. warrants its new equipment to be free from defects in workmanship or materials. Any product that is proven to be defective will be repaired or replaced at our discretion, free of charge, up to one year from the date of purchase by the initial user of the equipment from Accutome, Inc. or any of its authorized distributors. This warranty covers all repairs and servicing of parts that proved defective by manufacture and not by misuse or mishandling. This type of service will be handled by our trained sales force, or if necessary, in our home office. Shipping charges for returns or repair of non-warranted items will be the responsibility of the customer. Alteration, repair or modification of any product that is performed by persons not authorized by Accutome, Inc. will result in immediate loss of warranty.
8.2 Product Returns Follow the instructions given below to return products to Accutome Inc. 8.3 Service and Repairs Before returning instruments for service or repair, contact the Accutome Technical Service Group for a Return Goods Authorization (RGA) number.
Toll Free (in USA): 1-800-979-2020 Tech Service: 1-610-889-0200 Fax: 1-610-889-3233
After receiving authorization, print the RGA number on the outside of the package and send the instrument to:
Technical Service Group Accutome, Inc.
3222 Phoenixville Pike Malvern, PA 19355
©Accutome, Inc. All Rights Reserved Page 33 of 33 Document 24-6410 Rev -
All Other Returns Returns for non-service related reasons must be authorized by the Accutome Customer Service Department. Please contact Customer Service for an RGA number. Merchandise returned within 60 days of date of invoice will be credited as follows:
• Full credit for all merchandise returned in resalable condition
Non-Returnable Merchandise Accutome Inc. will not authorize a return for:
• Merchandise held longer than 60 days
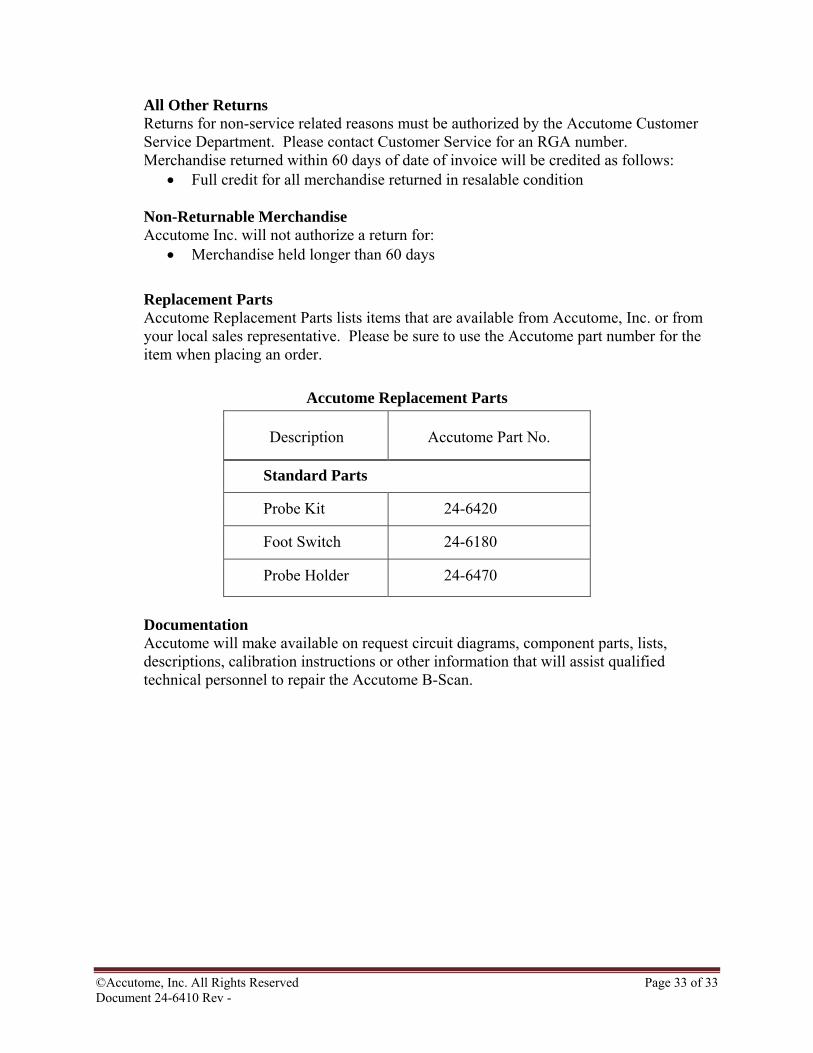
Replacement Parts Accutome Replacement Parts lists items that are available from Accutome, Inc. or from your local sales representative. Please be sure to use the Accutome part number for the item when placing an order.
Accutome Replacement Parts
Description Accutome Part No.
Standard Parts
Probe Kit 24-6420
Foot Switch 24-6180
Probe Holder 24-6470
Documentation Accutome will make available on request circuit diagrams, component parts, lists, descriptions, calibration instructions or other information that will assist qualified technical personnel to repair the Accutome B-Scan.


ABR · in autoclave or in automatic machine. Chemothermal disinfection: in this procedure, a disinfecting agent is added after the cleaning cycle of heat-sensitive instruments](https://img.pdfslide.us/doc/110x75/607c0a0f3dfa2349e74140bb/medcp300-in-autoclave-or-in-automatic-machine-chemothermal-disinfection-in.jpg)