Embed Size (px)
Citation preview
Axel Remote Management
Administration Software for Axel Terminals and Office
Servers
April 2004 - Ref.: AxRME-5
The reproduction of this material, in part or whole, is strictly prohibited. For additional information, please contact:
14 Avenue du Québec Bât. K2 - BP 728
91962 Courtabœuf cedex - FRANCE Tel.: 33 1.69.28.27.27 Fax: 33 1.69.28.82.04 Email: [email protected]
The information in this document is subject to change without notice. AXEL assumes no responsibility for any errors that may appear in this document.
All trademarks and registered trademarks are the property of their respective holders.
© - 2003-2004 - AXEL - All Rights Reserved.
WARNING This documentation describes the Axel administration software. It is assumed that the reader is familiar with the Axel hardware. For more information please consult the User's Manuals. (from www.axel.com).
TABLE of CONTENTS
1 - INTRODUCTION ..........................................................................................1
2 - INSTALLATION / REMOVAL OF THE SOFTWARE ..................................3 2.1 - PREREQUISITES ..................................................................................4 2.2 - UPGRADING..........................................................................................4 2.3 - INSTALLATION......................................................................................4 2.4 - REMOVAL..............................................................................................7
3 - LAUNCHING AND USING...........................................................................8 3.1 - BASIC FUNCTIONS ............................................................................10
3.1.1 - Get Terminal Information...............................................................11 3.1.2 - Obtaining Network Statistics of the Terminal ................................13 3.1.3 - Obtaining the configuration of the terminal....................................15 3.1.4 - Rebooting the Terminal .................................................................17 3.1.5 - Configuring Terminals ...................................................................19 3.1.6 - Downloading Firmware..................................................................22 3.1.7 - Reloading Factory Settings ...........................................................24
3.2 - ACCESSING THE TERMINAL INTERACTIVE SET-UP .....................25 3.2.1 - Telnet Protocol (AX3000 and AX4000) .........................................25 3.2.2 - COM Port (AX4000 only)...............................................................26
3.3 - THE TERMINAL DATABASE...............................................................26 3.3.1 - Manually Editing Database............................................................27 3.3.2 - Adding Terminals by Scanning the Network .................................28 3.3.3 - Adding Terminals from Another Database ....................................29 3.3.4 - Synchronizing the Database .........................................................29
3.4 - MANAGEMENT OF COMMAND FILE.................................................29 3.4.1 - Creation of the command file.........................................................30 3.4.2 - Execution of the command file ......................................................32
3.5 - ASSIGNING IP ADDRESSES..............................................................34 3.5.1 - Set Manually ..................................................................................34 3.5.2 - Batch Operation.............................................................................35
3.6 - USING BOOTP TO DOWNLOAD A FIRMWARE................................37 3.6.1 - Overview........................................................................................37 3.6.2 - Setting the BOOTP Server ............................................................37
3.6.3 - Running BOOTP and Downloading the Firmware ........................38 3.6.4 - Advanced Settings of the BOOTP Server .....................................39
3.7 - TUNING AXRM....................................................................................40 3.7.1 - The Network ..................................................................................40 3.7.2 - The Default Folders.......................................................................41 3.7.3 - The Terminal Database.................................................................42 3.7.4 - AxRM Password............................................................................43 3.7.5 - Using a Third Party Telnet Client ..................................................43
APPENDIX.......................................................................................................45 A.1 - TCP/IP COMMANDS USED................................................................46 A.2 - FORMAT OF THE COMMAND FILE...................................................47 A.3 - FORMAT OF THE DATABASE FILE ..................................................49 A.4 - REGISTRY VARIABLES .....................................................................50

Axel Remote Management 1
- 1 - INTRODUCTION
2 Axel Remote Management
This chapter introduces the main features of the AxRM Software.
The AxRM software allows system administrators to manage and configure Axel TCP/IP products remotely over a network. The remote Axel device is selected by its IP address or network name. (The software can also assign an IP address to a newly installed terminal that has not had an IP address set)
AxRM is an abbreviation for Axel Remote Management software.
AxRM is used for: - obtaining hardware and firmware revision levels, - obtaining Ethernet and serial line configuration, - obtaining network and device statistics, - obtaining set-up configuration, - rebooting the peripheral, - remotely configuring a peripheral, - downloading firmware, - reloading factory settings. - entering the interactive set-up via a telnet client.
It is also possible: - to build and manage a terminal database, - to compile a list (batch) of commands to run consecutively, - to download a firmware though BOOTP, - to set IP addresses by using the device’s MAC address.
This document covers: - Installation / Removal of AxRM, - Launching and Using, - Appendices.
Axel Remote Management 3
- 2 - INSTALLATION / REMOVAL
OF THE SOFTWARE
4 Axel Remote Management
This chapter gives details of installation and removal procedures.
2.1 - PREREQUISITES AxRM is certified for Windows (95, 98, NT, 2000 and XP).
(Certain advanced functions are only supported by Windows NT, 2000 or XP)
2.2 - UPGRADING If AxRM is already installed on the Windows machine it is imperative to remove before loading a newer version. (see chapter 2.4).
2.3 - INSTALLATION Decompress the file ‘AxRM.zip’.
To start the installation, double click on the file ‘setup.exe’ and follow the instructions.
Axel Remote Management 5
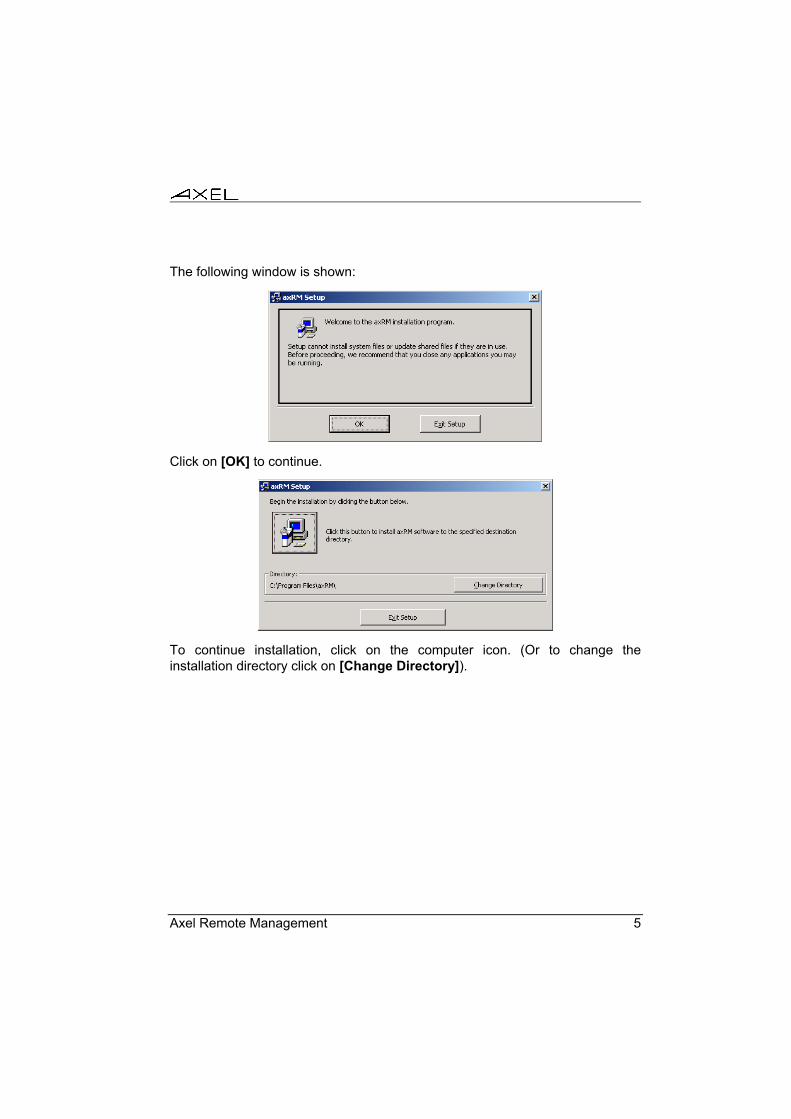
The following window is shown:
Click on [OK] to continue.
To continue installation, click on the computer icon. (Or to change the installation directory click on [Change Directory]).
6 Axel Remote Management
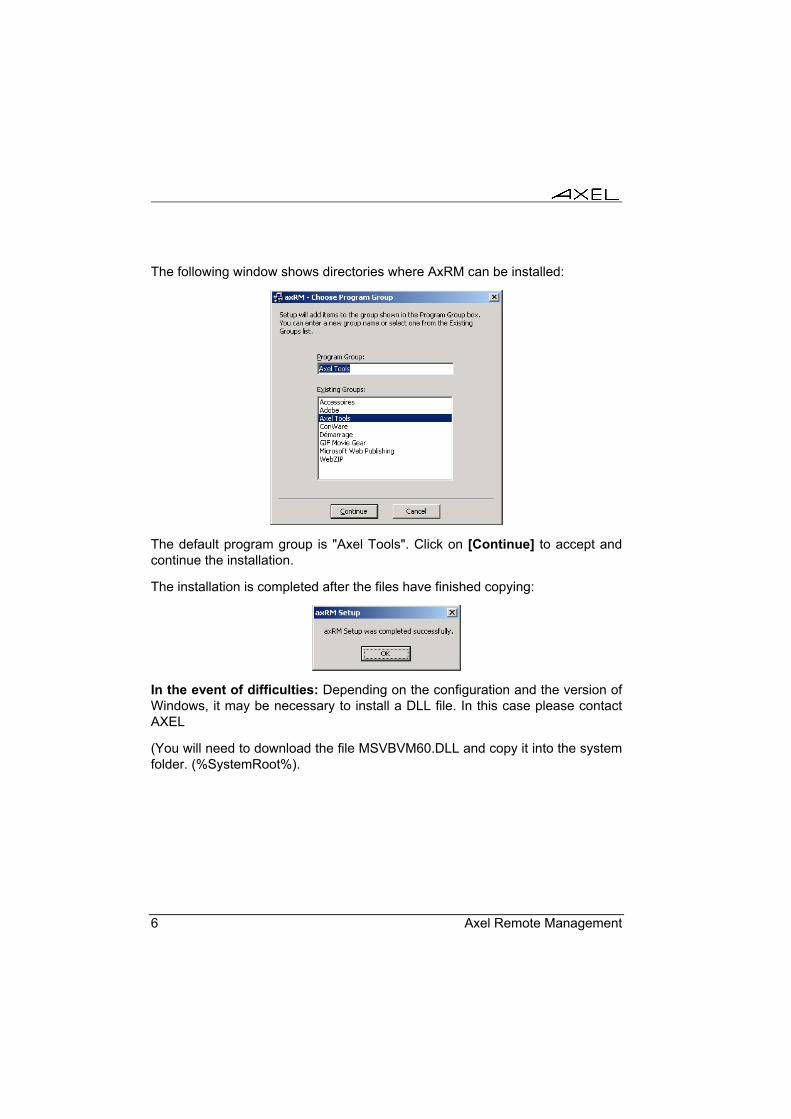
The following window shows directories where AxRM can be installed:
The default program group is "Axel Tools". Click on [Continue] to accept and continue the installation.
The installation is completed after the files have finished copying:
In the event of difficulties: Depending on the configuration and the version of Windows, it may be necessary to install a DLL file. In this case please contact AXEL
(You will need to download the file MSVBVM60.DLL and copy it into the system folder. (%SystemRoot%).
Axel Remote Management 7
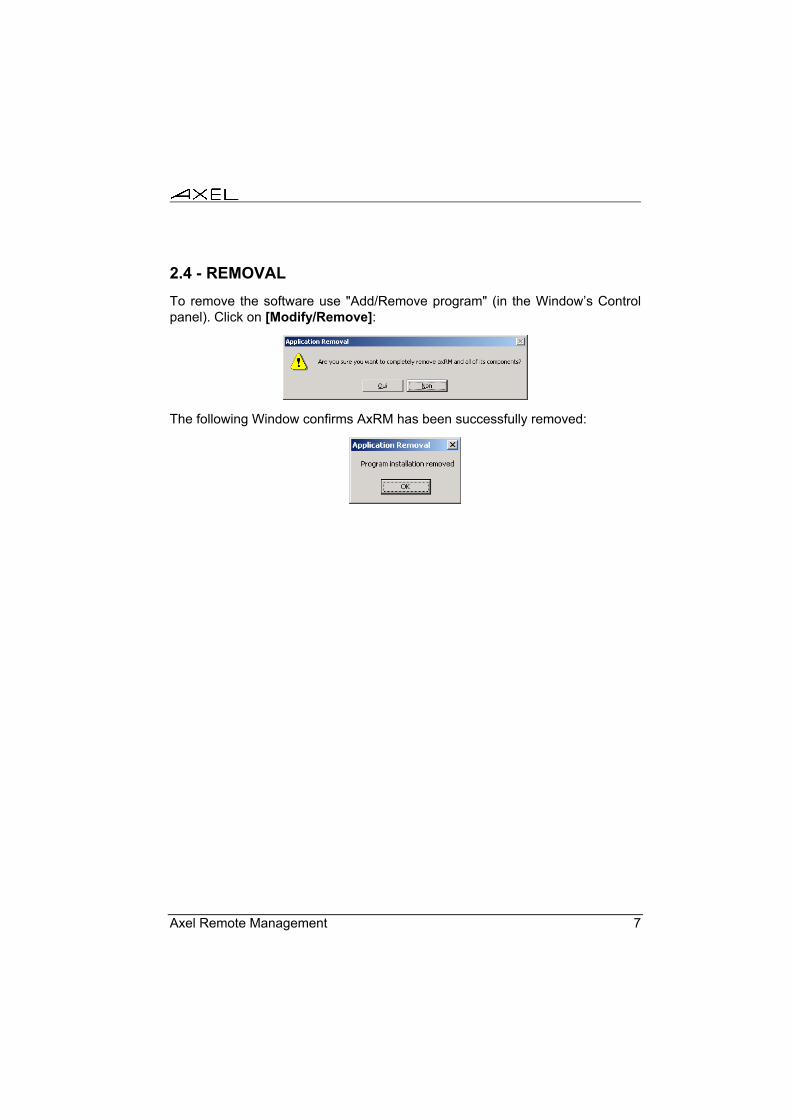
2.4 - REMOVAL To remove the software use "Add/Remove program" (in the Window’s Control panel). Click on [Modify/Remove]:
The following Window confirms AxRM has been successfully removed:
8 Axel Remote Management
- 3 - LAUNCHING AND USING
Axel Remote Management 9
This chapter describes the use and functionality of the AxRM software.
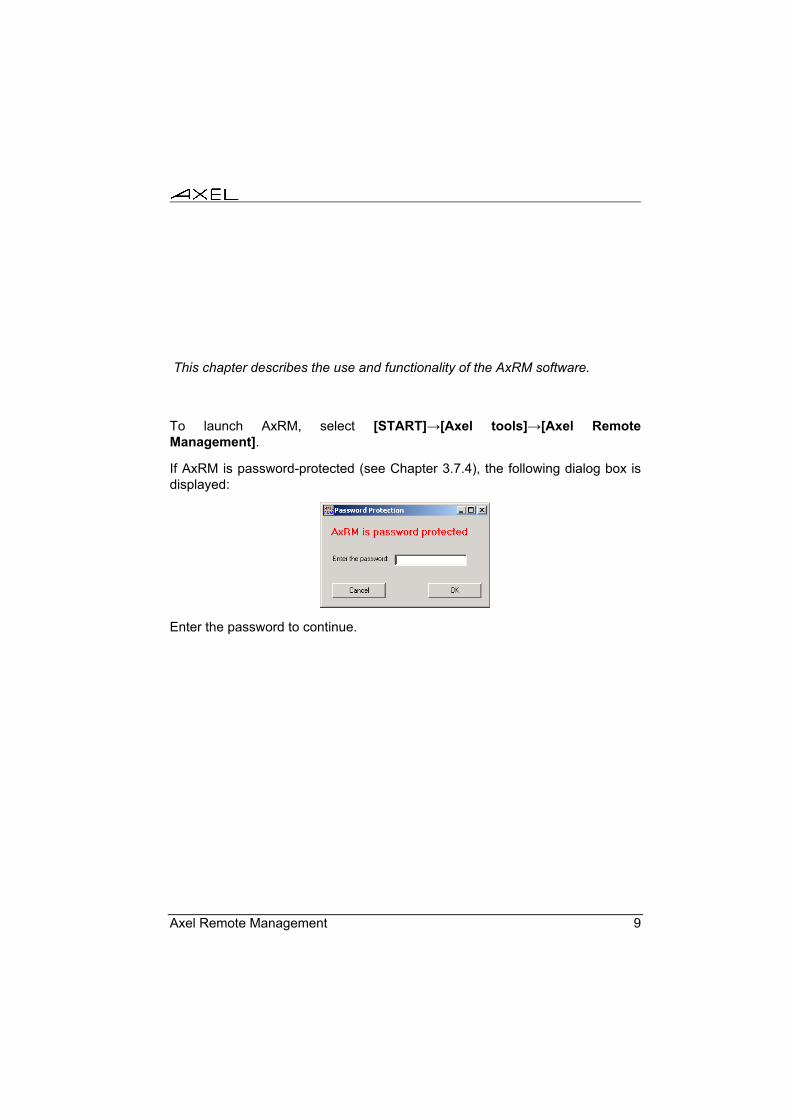
To launch AxRM, select [START]→[Axel tools]→[Axel Remote Management].
If AxRM is password-protected (see Chapter 3.7.4), the following dialog box is displayed:
Enter the password to continue.

10 Axel Remote Management
The main console window is displayed:
Note: In this manual the device will simply be referred to as "terminal" – The IP address or name may be used.
3.1 - BASIC FUNCTIONS To access the basic functions click the "Remote Commands" tab.
Then enter the name or IP address of the terminal to be accessed in the field "Name or IP Address".
Notes: - multiple IP addresses or names can be entered. Use a space as
separator.
Axel Remote Management 11
- <F2> or the [...] button (at the right of "Name or IP Address") allows the device to be selected through a database (see chapter 3.3).
After entering "Name or IP Address" other fields and buttons are enabled.
The [Ping] button confirms the target terminal is accessible.
The "Password" field allows a password to be entered if the terminal is password protected. Entering the password is mandatory for certain commands if a password has been set for the terminal.
Commands are selected by clicking on the corresponding button. Once selected options for that command are enabled.
[Run Command] initiates the command selected.
The "Status/Help" field provides various information about the command being run.
The [Advanced Functions] allows other functions to be run (terminal database, batch files, etc.). For more information, see Chapter 3.3 and beyond.
The [Help] button (or <F1>) displays available function keys.
Detailed information for each command follows:
3.1.1 - Get Terminal Information
This option obtains the following information: - the "MAC Address" (or Ethernet Address) - the serial number - the hardware and firmware revision
12 Axel Remote Management
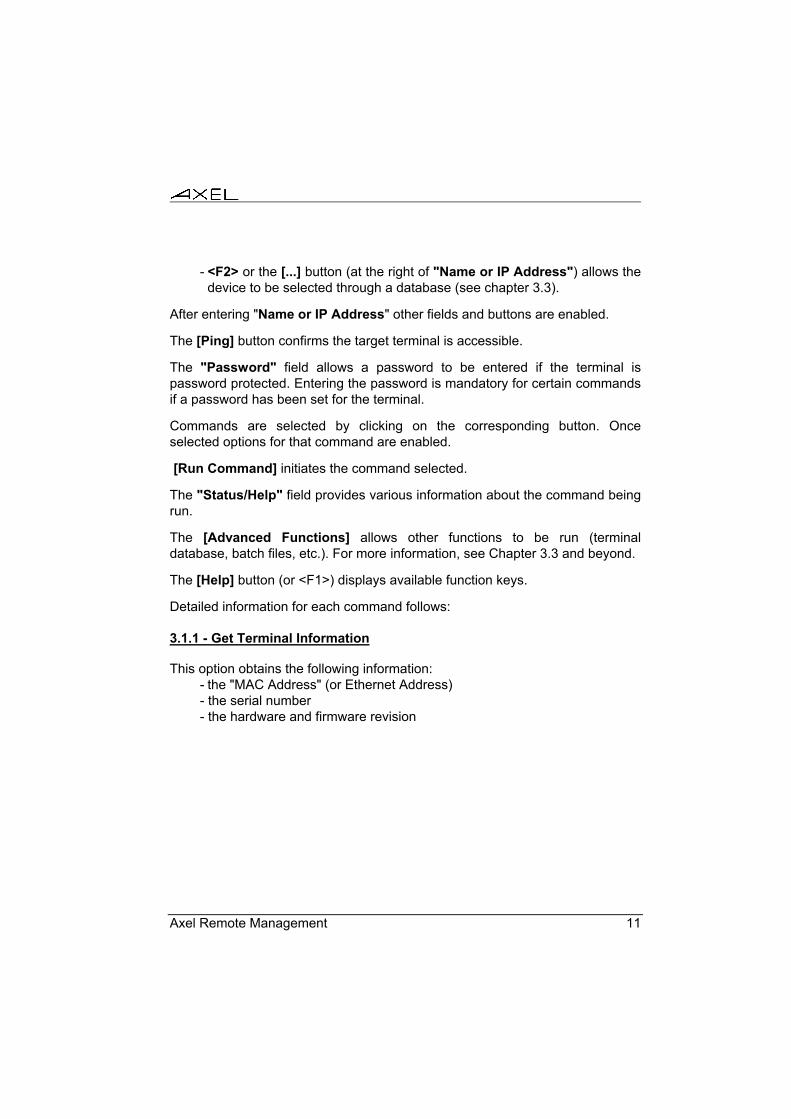
Click on "Get Terminal Information". The following window is displayed:
Information is displayed in the "Status/Help" window whilst the command runs.
To direct this information into a file, tick the "Output to a file" option and choose a name for the file in the "File to store info." field.
Note: the button [...] can be used to select the location for this file.
Axel Remote Management 13
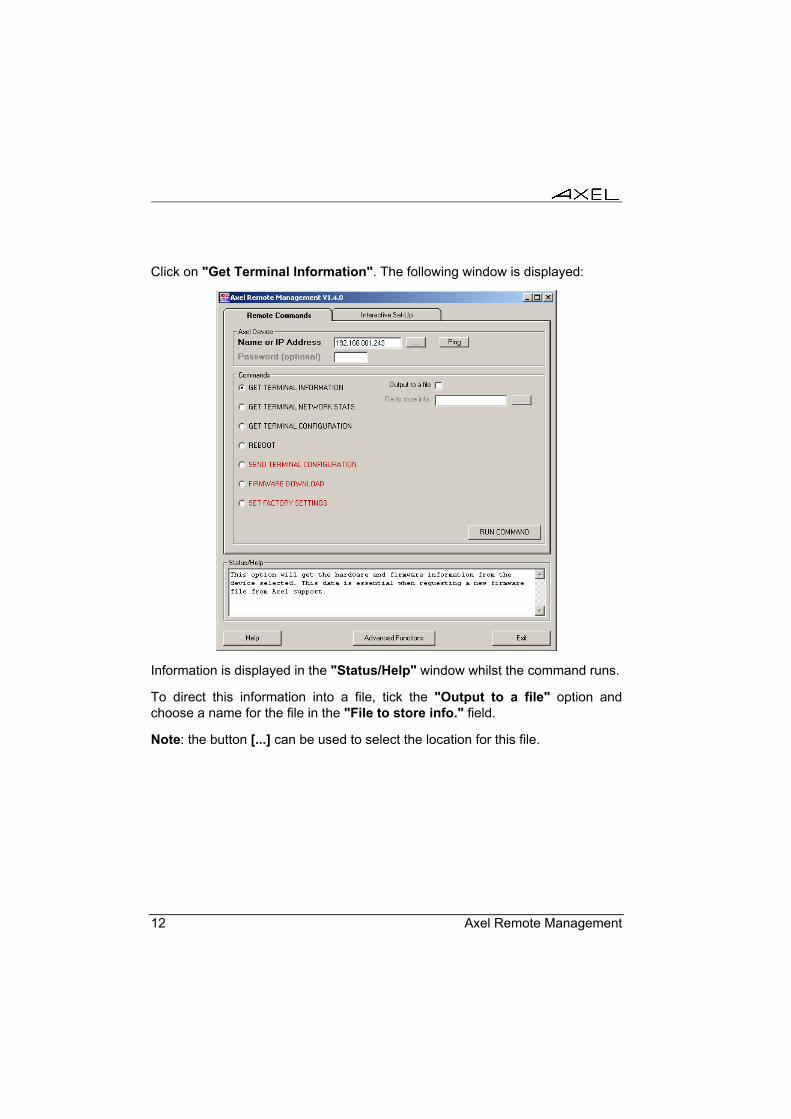
Here is an example of the command:
Note: the MAC address and serial number are not obtainable when - AxRM is run from Windows 95 and 98 (due to the limited functions of arp
within these operating systems). - Or the terminal is not on the same LAN as the AxRM machine
The terminal database is automatically updated (message "Terminal database updated") if the database auto-update function is enabled (see Chapter 3.7.2).
3.1.2 - Obtaining Network Statistics of the Terminal
The AxRM software enables network information to be viewed and/or saved in a file.
14 Axel Remote Management
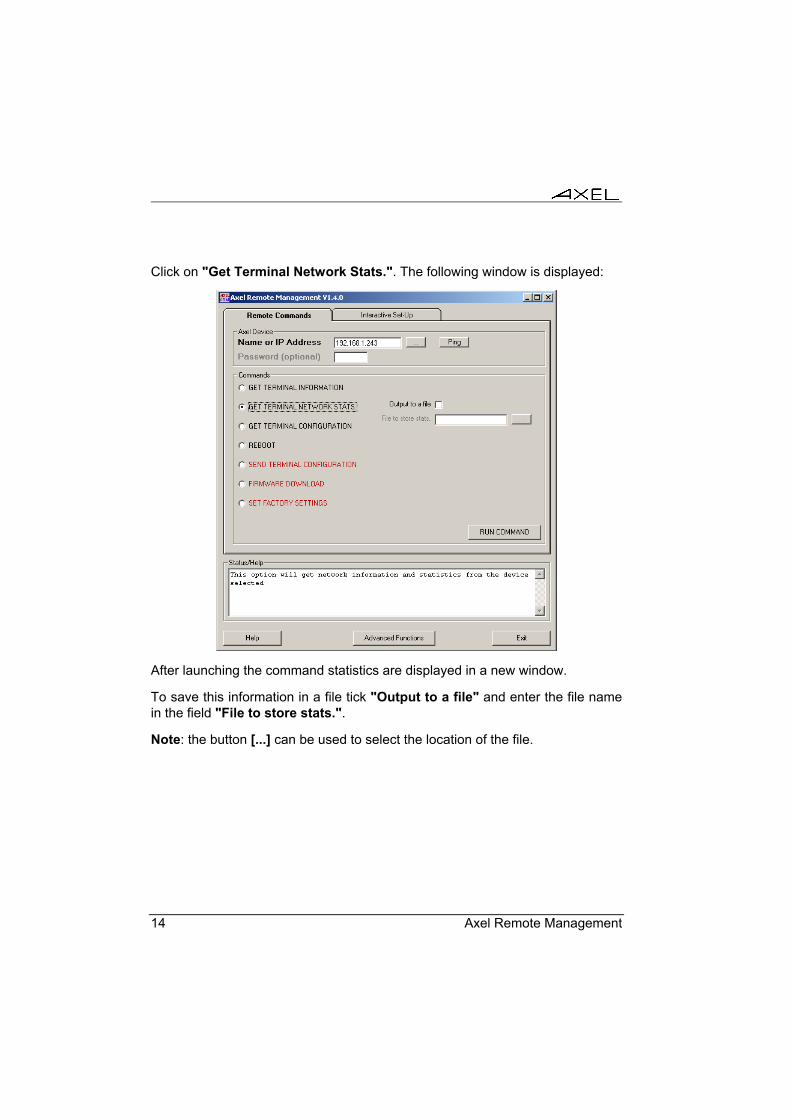
Click on "Get Terminal Network Stats.". The following window is displayed:
After launching the command statistics are displayed in a new window.
To save this information in a file tick "Output to a file" and enter the file name in the field "File to store stats.".
Note: the button [...] can be used to select the location of the file.
Axel Remote Management 15
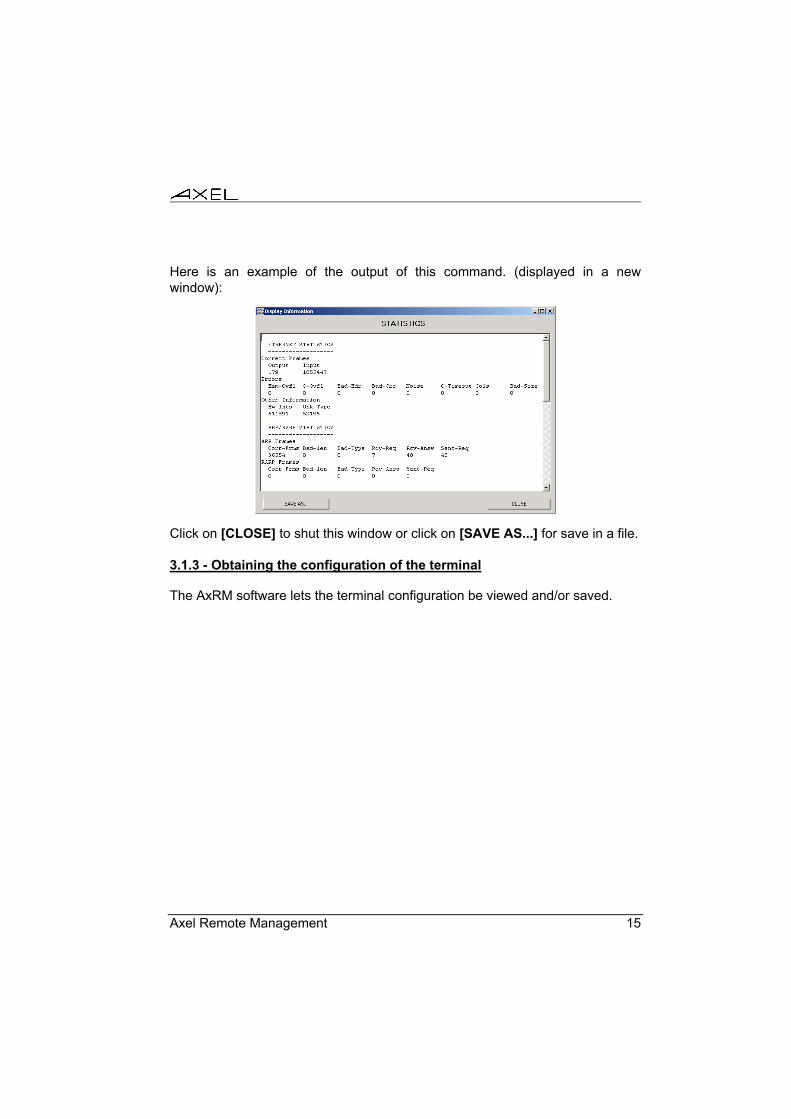
Here is an example of the output of this command. (displayed in a new window):
Click on [CLOSE] to shut this window or click on [SAVE AS...] for save in a file.
3.1.3 - Obtaining the configuration of the terminal
The AxRM software lets the terminal configuration be viewed and/or saved.
16 Axel Remote Management
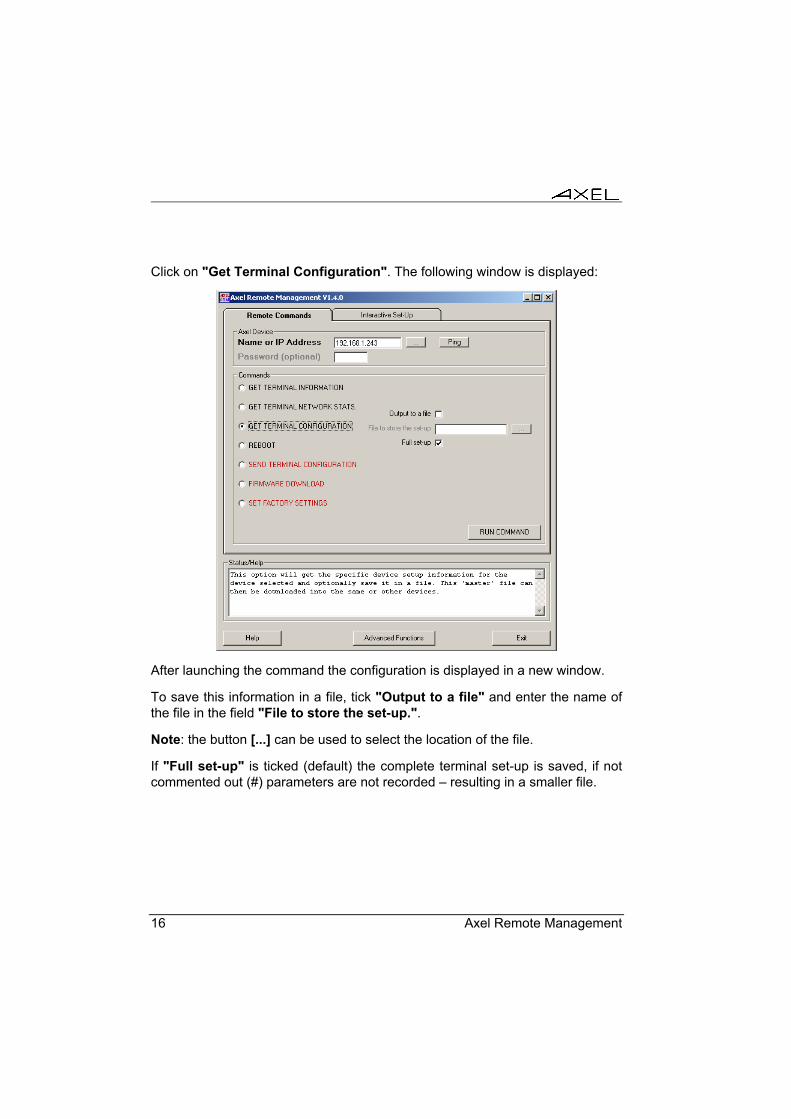
Click on "Get Terminal Configuration". The following window is displayed:
After launching the command the configuration is displayed in a new window.
To save this information in a file, tick "Output to a file" and enter the name of the file in the field "File to store the set-up.".
Note: the button [...] can be used to select the location of the file.
If "Full set-up" is ticked (default) the complete terminal set-up is saved, if not commented out (#) parameters are not recorded – resulting in a smaller file.
Axel Remote Management 17
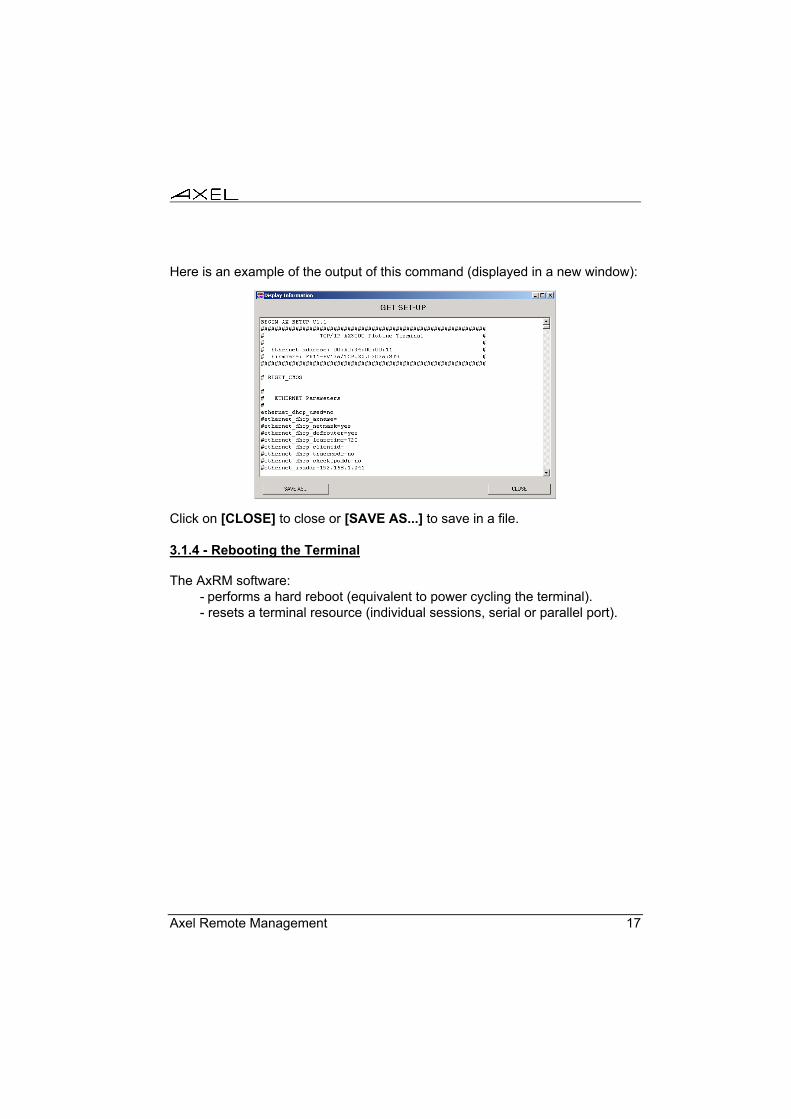
Here is an example of the output of this command (displayed in a new window):
Click on [CLOSE] to close or [SAVE AS...] to save in a file.
3.1.4 - Rebooting the Terminal
The AxRM software: - performs a hard reboot (equivalent to power cycling the terminal). - resets a terminal resource (individual sessions, serial or parallel port).
18 Axel Remote Management
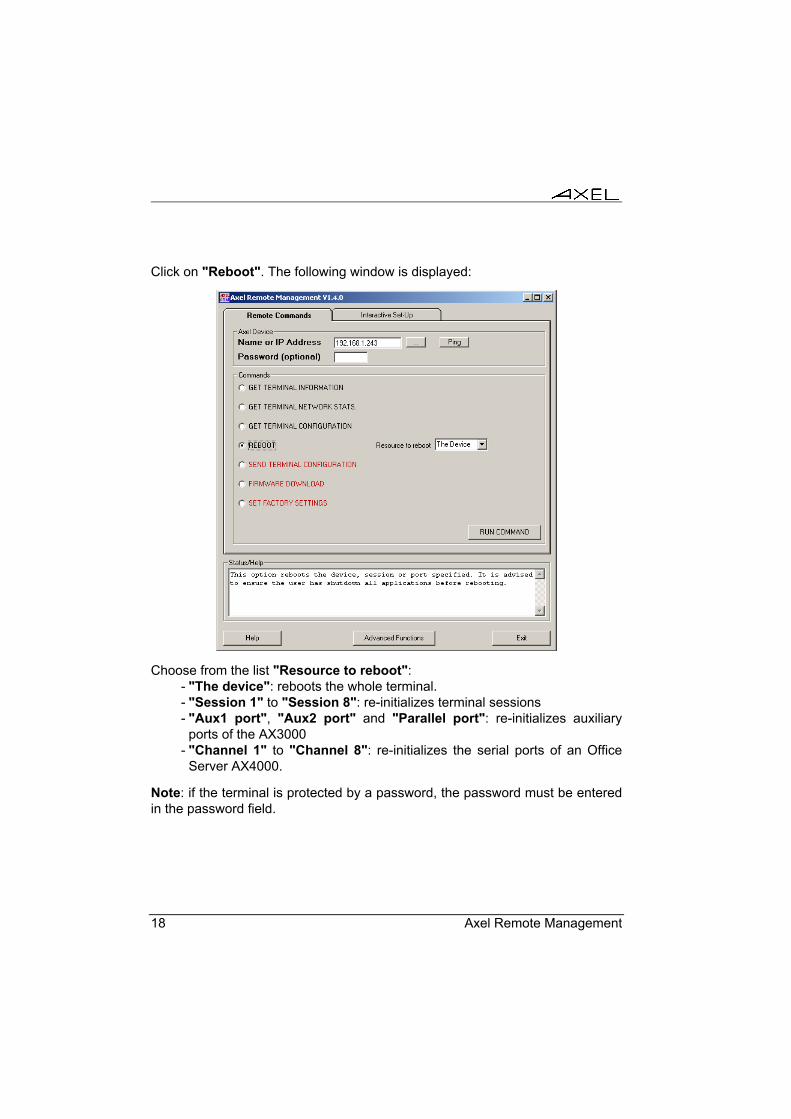
Click on "Reboot". The following window is displayed:
Choose from the list "Resource to reboot": - "The device": reboots the whole terminal. - "Session 1" to "Session 8": re-initializes terminal sessions - "Aux1 port", "Aux2 port" and "Parallel port": re-initializes auxiliary
ports of the AX3000 - "Channel 1" to "Channel 8": re-initializes the serial ports of an Office
Server AX4000.
Note: if the terminal is protected by a password, the password must be entered in the password field.
Axel Remote Management 19
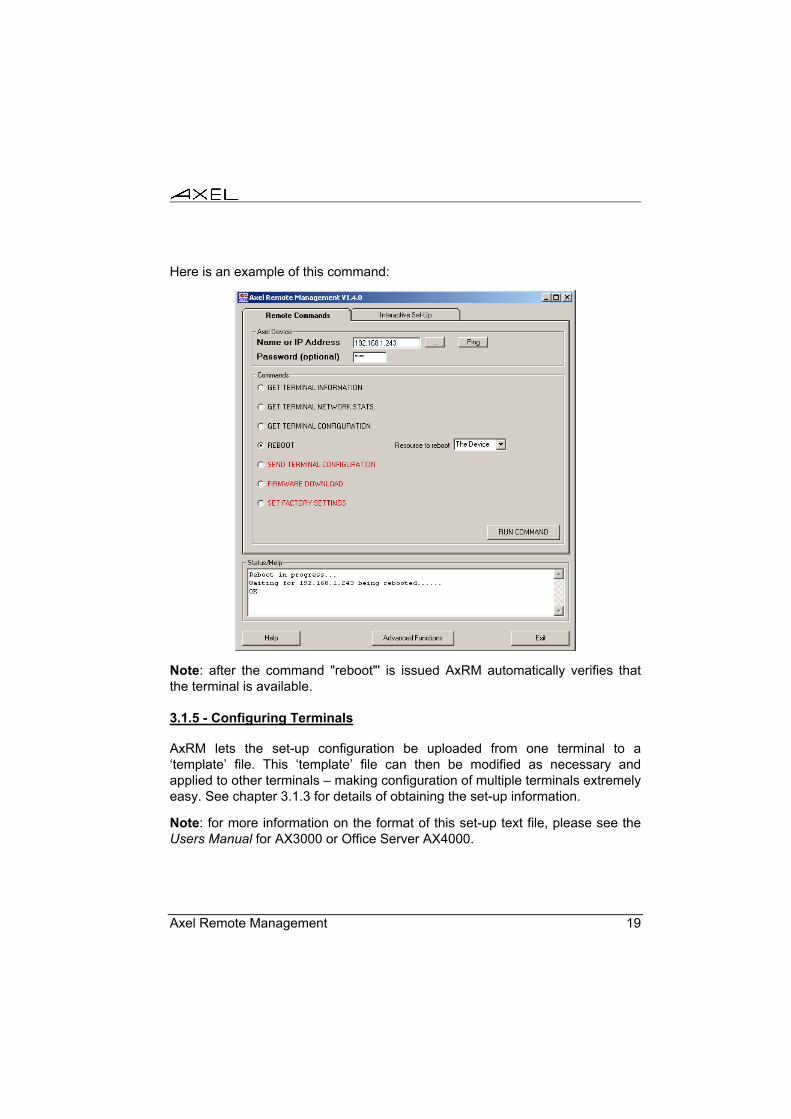
Here is an example of this command:
Note: after the command "reboot"' is issued AxRM automatically verifies that the terminal is available.
3.1.5 - Configuring Terminals
AxRM lets the set-up configuration be uploaded from one terminal to a ‘template’ file. This ‘template’ file can then be modified as necessary and applied to other terminals – making configuration of multiple terminals extremely easy. See chapter 3.1.3 for details of obtaining the set-up information.
Note: for more information on the format of this set-up text file, please see the Users Manual for AX3000 or Office Server AX4000.
20 Axel Remote Management
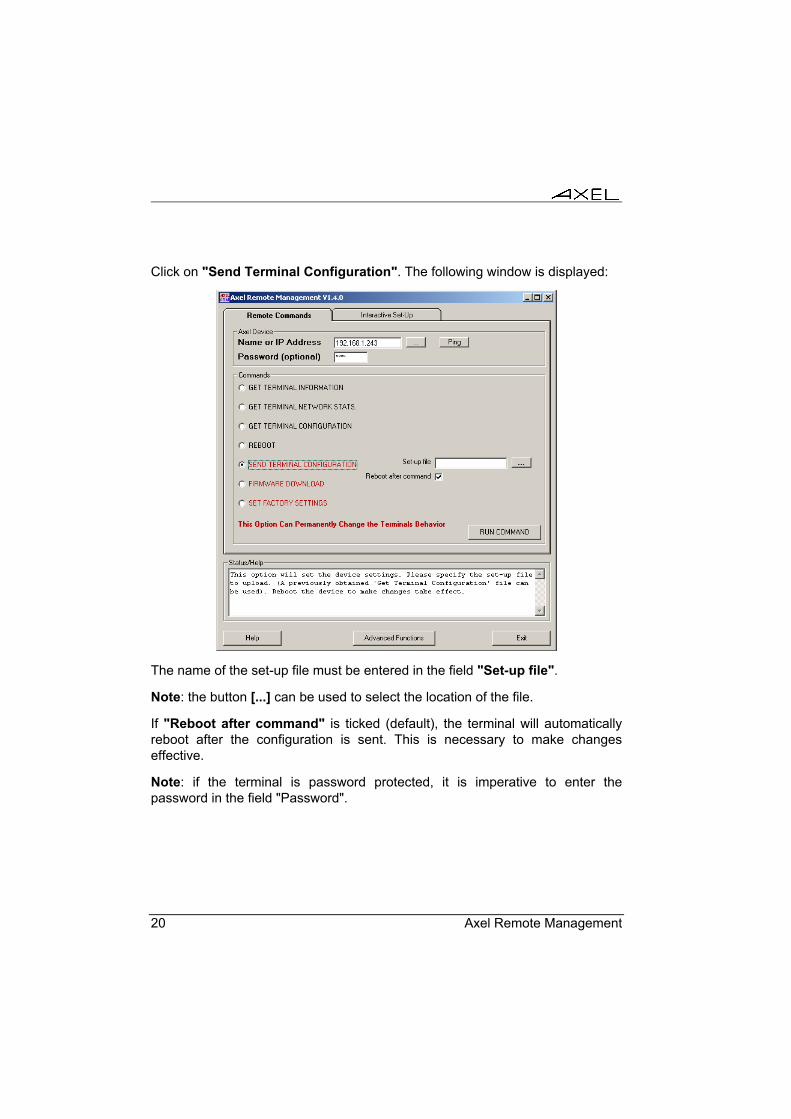
Click on "Send Terminal Configuration". The following window is displayed:
The name of the set-up file must be entered in the field "Set-up file".
Note: the button [...] can be used to select the location of the file.
If "Reboot after command" is ticked (default), the terminal will automatically reboot after the configuration is sent. This is necessary to make changes effective.
Note: if the terminal is password protected, it is imperative to enter the password in the field "Password".
Axel Remote Management 21
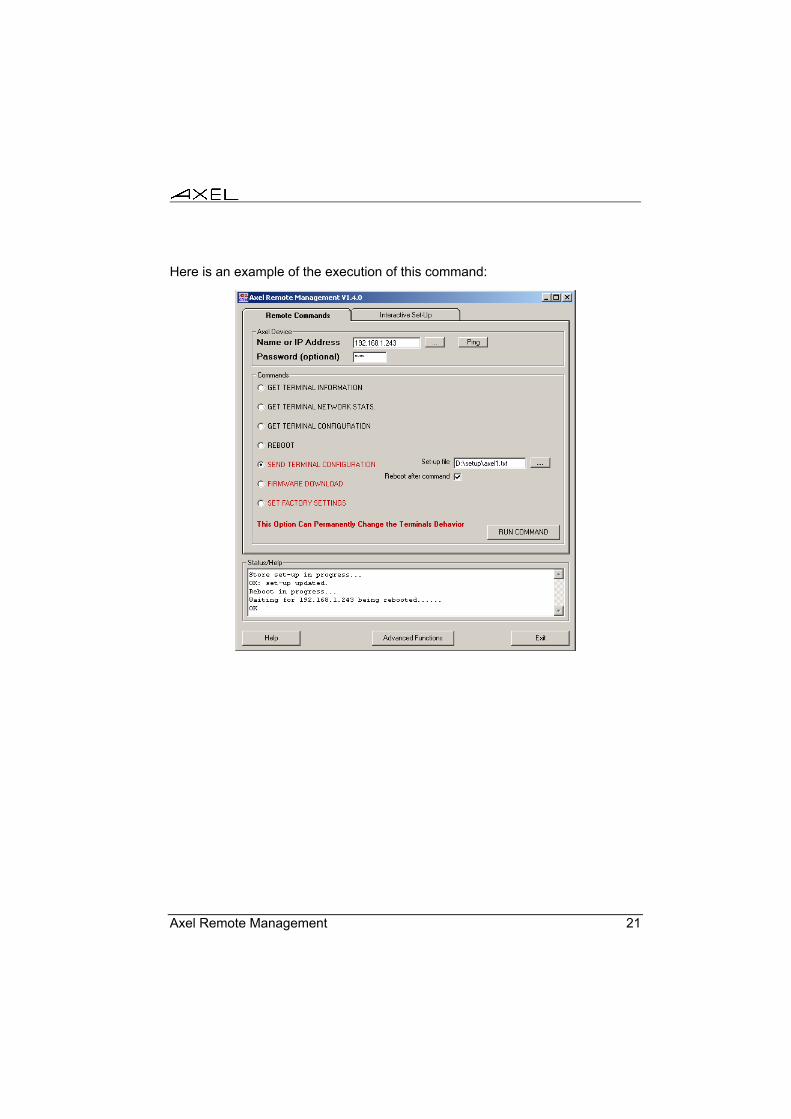
Here is an example of the execution of this command:
22 Axel Remote Management
3.1.6 - Downloading Firmware
AxRM is used to change the terminal’s firmware. (TFTP protocol is used).
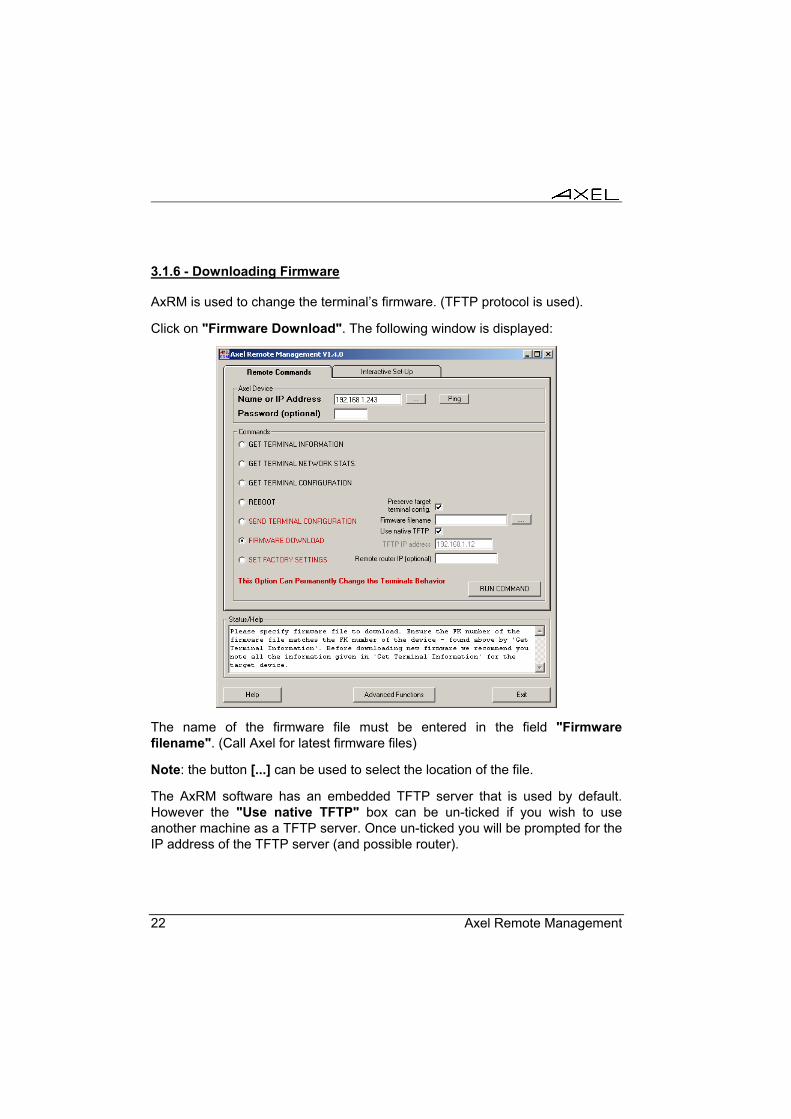
Click on "Firmware Download". The following window is displayed:
The name of the firmware file must be entered in the field "Firmware filename". (Call Axel for latest firmware files)
Note: the button [...] can be used to select the location of the file.
The AxRM software has an embedded TFTP server that is used by default. However the "Use native TFTP" box can be un-ticked if you wish to use another machine as a TFTP server. Once un-ticked you will be prompted for the IP address of the TFTP server (and possible router).
Axel Remote Management 23
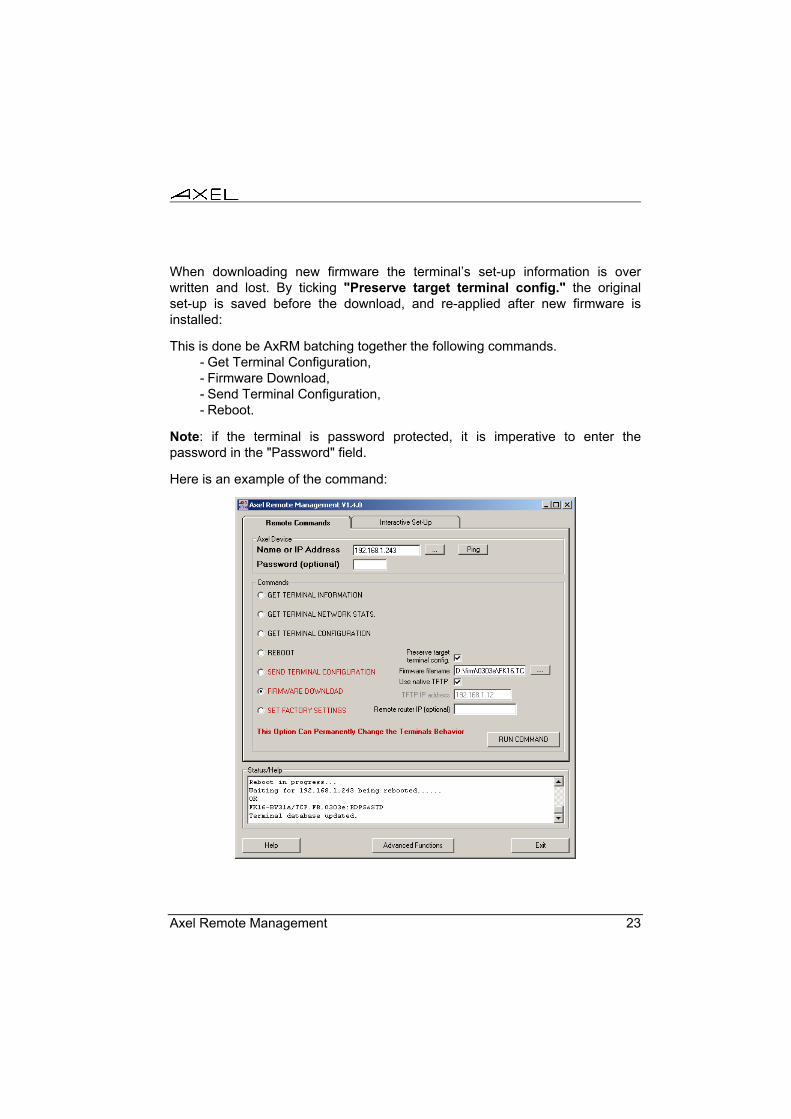
When downloading new firmware the terminal’s set-up information is over written and lost. By ticking "Preserve target terminal config." the original set-up is saved before the download, and re-applied after new firmware is installed:
This is done be AxRM batching together the following commands. - Get Terminal Configuration, - Firmware Download, - Send Terminal Configuration, - Reboot.
Note: if the terminal is password protected, it is imperative to enter the password in the "Password" field.
Here is an example of the command:
24 Axel Remote Management
Note: the terminal database is automatically updated, if the database auto-update function is enabled (see Chapter 3.7.2).
3.1.7 - Reloading Factory Settings
AxRM can also be used the reset the terminal back to factory default values.
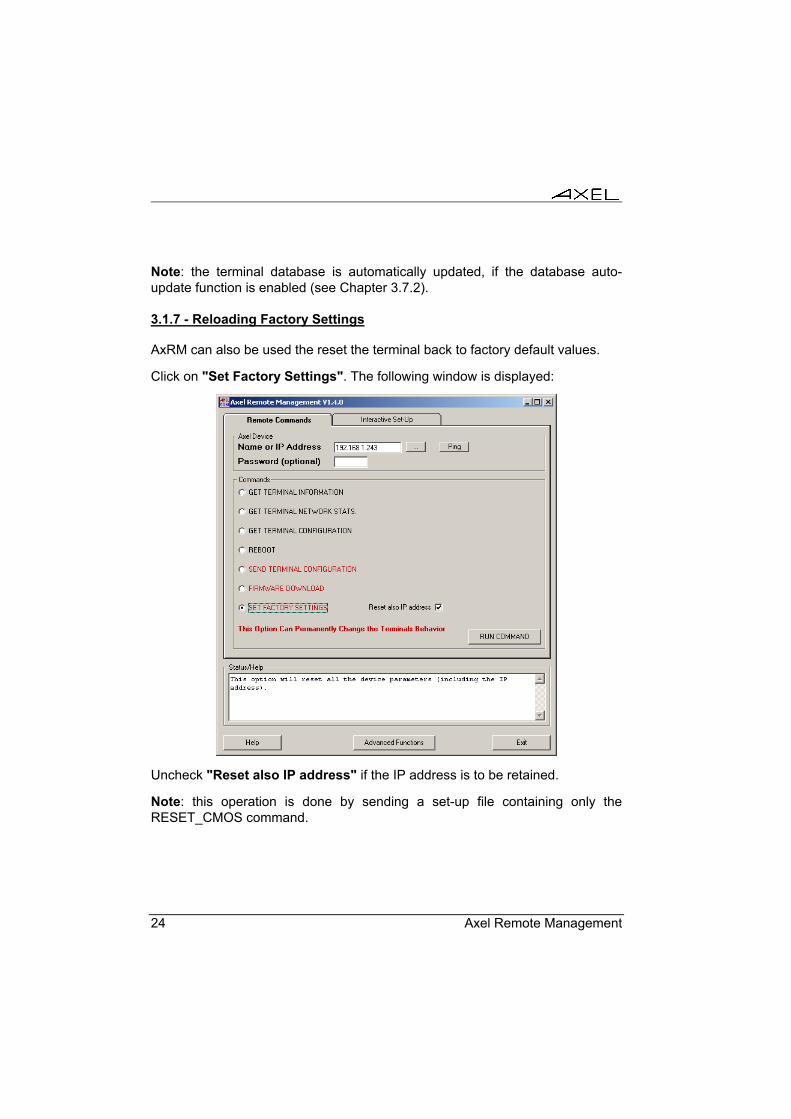
Click on "Set Factory Settings". The following window is displayed:
Uncheck "Reset also IP address" if the IP address is to be retained.
Note: this operation is done by sending a set-up file containing only the RESET_CMOS command.
Axel Remote Management 25
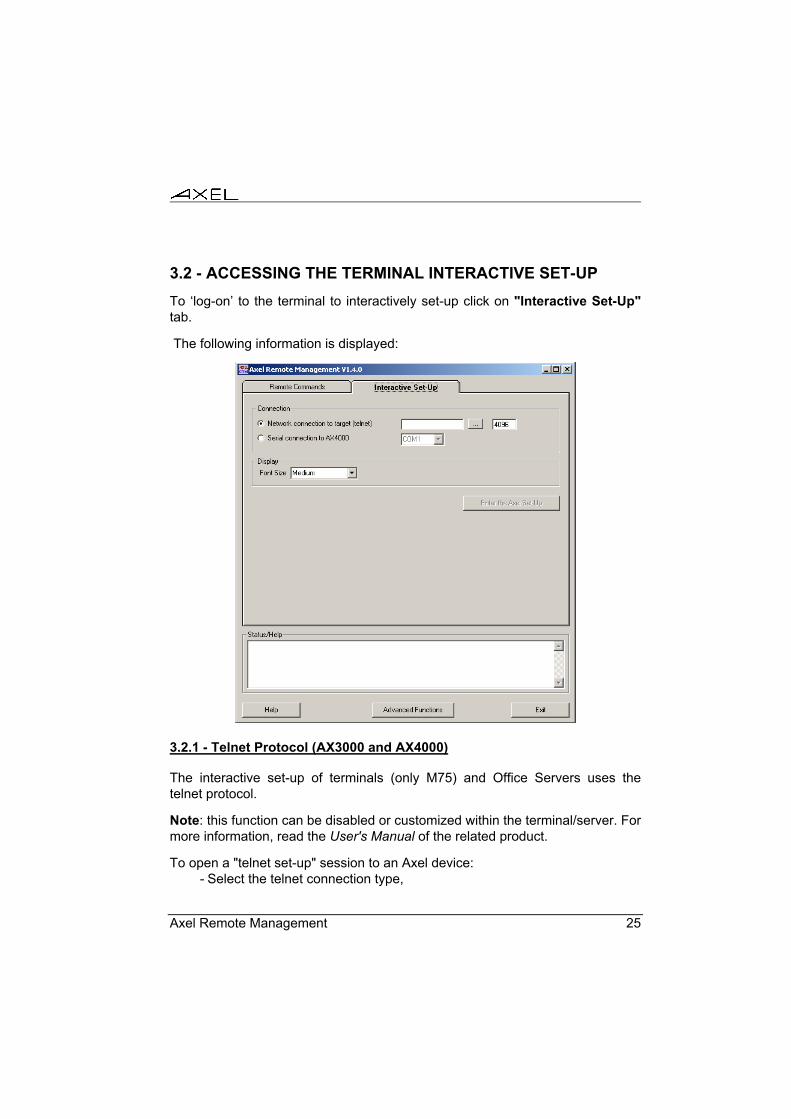
3.2 - ACCESSING THE TERMINAL INTERACTIVE SET-UP To ‘log-on’ to the terminal to interactively set-up click on "Interactive Set-Up" tab.
The following information is displayed:
3.2.1 - Telnet Protocol (AX3000 and AX4000)
The interactive set-up of terminals (only M75) and Office Servers uses the telnet protocol.
Note: this function can be disabled or customized within the terminal/server. For more information, read the User's Manual of the related product.
To open a "telnet set-up" session to an Axel device: - Select the telnet connection type,
26 Axel Remote Management
- Enter the IP address or the name of the Axel terminal (use the [...] button to browse the Axel database),
- Enter the set-up TCP port (default 4096), - Select the font size, - Click the [Enter the Axel Set-Up] button.
A window containing the terminal set-up is displayed.
Note: AxRM provides an embedded telnet client which is designed specifically for Axel set-up. A third party telnet client can be used but would need to be configured within the AxRM tunings (see Chapter 3.7.5).
3.2.2 - COM Port (AX4000 only)
The AX4000 interactive set-up can be also accessed via a serial RS232 connection.
To open a "serial set-up" session do the following: - Use a serial cable to connect the Office Server with the Windows
machine. - Select the "Serial connection to AX4000" type, - Select the Windows COM port, - Select the font size, - Click the [Enter the Axel Set-Up] button.
An empty window is displayed. Push the "Admin Mode" switch (located on the AX4000 rear panel). The main menu of the AX4000 set-up is displayed.
3.3 - THE TERMINAL DATABASE AxRM supports a terminal database containing for each entry:
- the terminal name or IP address, - the serial number, - the hardware/firmware revision, - the date of the last update of this entry, - a group: a free character string (which allows the database to be sorted) - a comment.
Axel Remote Management 27
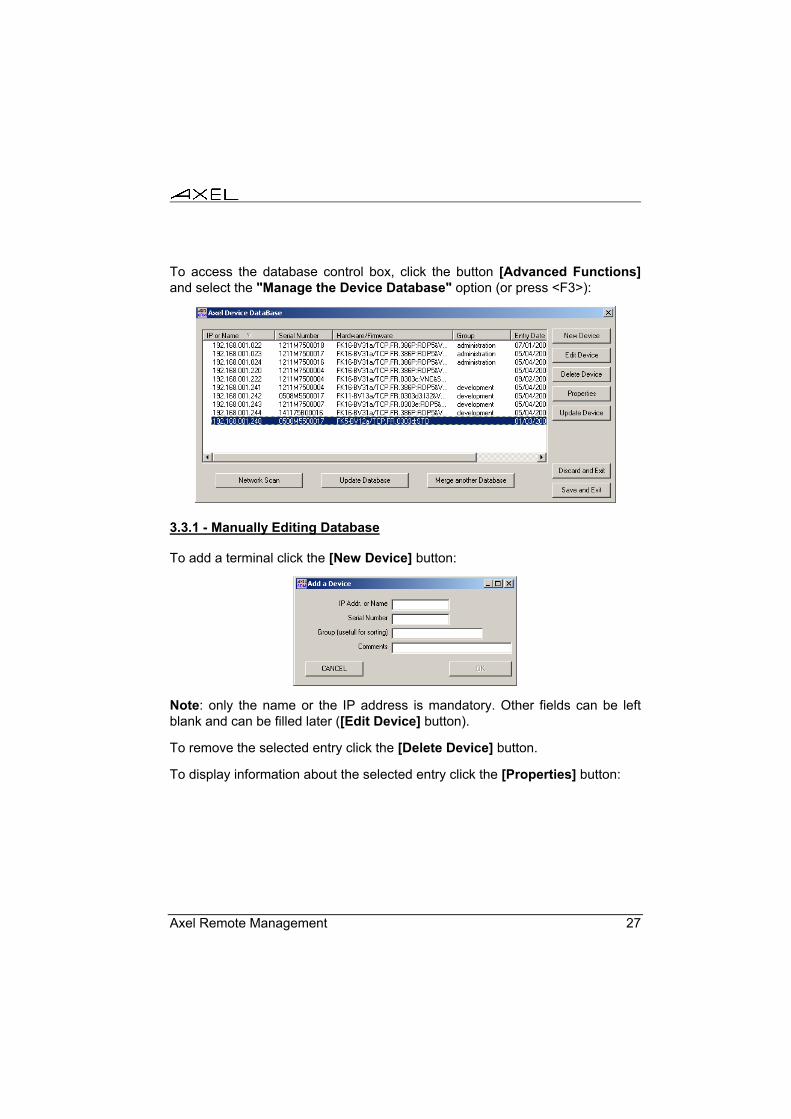
To access the database control box, click the button [Advanced Functions] and select the "Manage the Device Database" option (or press <F3>):
3.3.1 - Manually Editing Database
To add a terminal click the [New Device] button:
Note: only the name or the IP address is mandatory. Other fields can be left blank and can be filled later ([Edit Device] button).
To remove the selected entry click the [Delete Device] button.
To display information about the selected entry click the [Properties] button:

28 Axel Remote Management
The [Device Update] button runs a "Get Terminal Information" function. This allows the database to be synchronized. In addition, this function updates the "Hardware/Firmware" field.
3.3.2 - Adding Terminals by Scanning the Network
The [Network Scan] button allows terminal to be automatically discovered by scanning the network:
First, fill the "IP Range" fields.
Then, click the [Scan Network] button to run the scan. The discovered IP devices are displayed in real time during the scan.
Axel Remote Management 29
During a scan the following field are displayed: - "IP or Name": by default, the IP address is displayed. But, if the "resolve
name" function is enabled (see Chapter 3.7.5), AxRM tries to retrieve the name of this device. If a such name exists, this name is displayed.
- "Status": - Not Alive: the target IP address is unreachable (ping command) - Not Axel: the target IP address is not an Axel terminal (no
response to a "Get Terminal Information" command) - Axel Device: the target IP address is an Axel terminal
- "Serial Number": this field is updated only if the terminal is an "Axel Device" and if this terminal belongs to the same network as AxRM.
- "Hardware/Firmware": this field is always updated for an "Axel Device".
During (or after) the scan process the output can be filtered using the "Filter" section.
The button [Clear this List] allows the list to be cleared.
Note: multiple scans can be performed to browse multiple IP ranges.
If at least one "Axel Device" is found, the [Update Database] button is enabled. Click this button to add the "Axel Device" entries to the current database.
3.3.3 - Adding Terminals from Another Database
The button [Merge Another Database] allows terminals from another database to be added to the current database. (For example when a terminal database is created with another AxRM machine located on a remote network).
3.3.4 - Synchronizing the Database
The button [Update Database] runs, for each terminal database entry, a "Get Terminal Information" function. This function updates the "Hardware/Firmware" field.
3.4 - MANAGEMENT OF COMMAND FILE The AxRM software lets a batch of commands be launched on one or several terminals.
30 Axel Remote Management
These commands and their parameters are saved in a ‘command file’. Execution of this batch file generates a log file.
3.4.1 - Creation of the command file
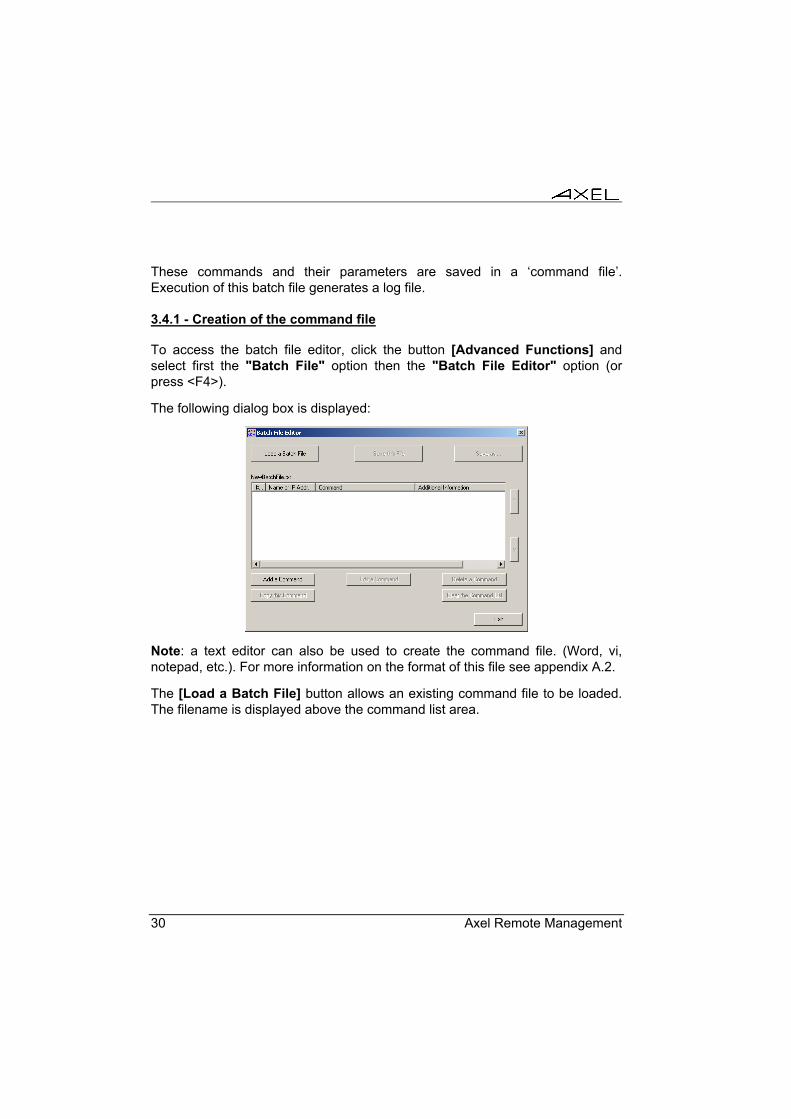
To access the batch file editor, click the button [Advanced Functions] and select first the "Batch File" option then the "Batch File Editor" option (or press <F4>).
The following dialog box is displayed:
Note: a text editor can also be used to create the command file. (Word, vi, notepad, etc.). For more information on the format of this file see appendix A.2.
The [Load a Batch File] button allows an existing command file to be loaded. The filename is displayed above the command list area.
Axel Remote Management 31
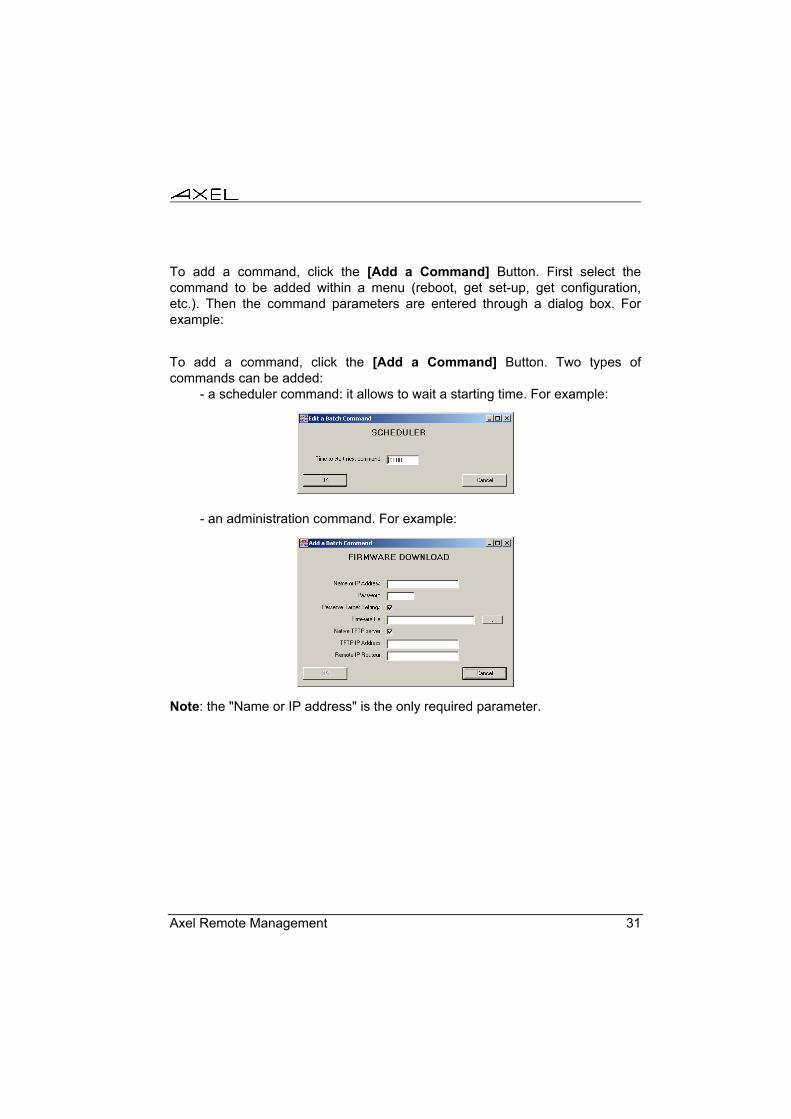
To add a command, click the [Add a Command] Button. First select the command to be added within a menu (reboot, get set-up, get configuration, etc.). Then the command parameters are entered through a dialog box. For example:
To add a command, click the [Add a Command] Button. Two types of commands can be added:
- a scheduler command: it allows to wait a starting time. For example:
- an administration command. For example:
Note: the "Name or IP address" is the only required parameter.
32 Axel Remote Management
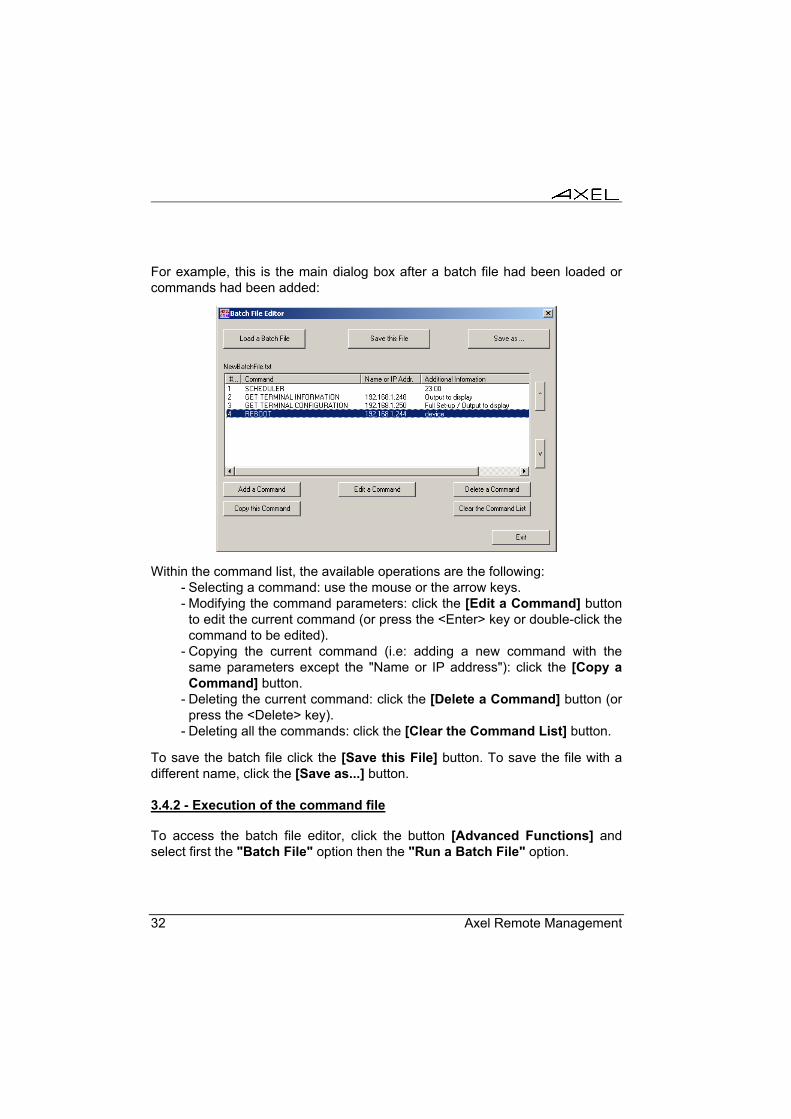
For example, this is the main dialog box after a batch file had been loaded or commands had been added:
Within the command list, the available operations are the following: - Selecting a command: use the mouse or the arrow keys. - Modifying the command parameters: click the [Edit a Command] button
to edit the current command (or press the <Enter> key or double-click the command to be edited).
- Copying the current command (i.e: adding a new command with the same parameters except the "Name or IP address"): click the [Copy a Command] button.
- Deleting the current command: click the [Delete a Command] button (or press the <Delete> key).
- Deleting all the commands: click the [Clear the Command List] button.
To save the batch file click the [Save this File] button. To save the file with a different name, click the [Save as...] button.
3.4.2 - Execution of the command file
To access the batch file editor, click the button [Advanced Functions] and select first the "Batch File" option then the "Run a Batch File" option.
Axel Remote Management 33
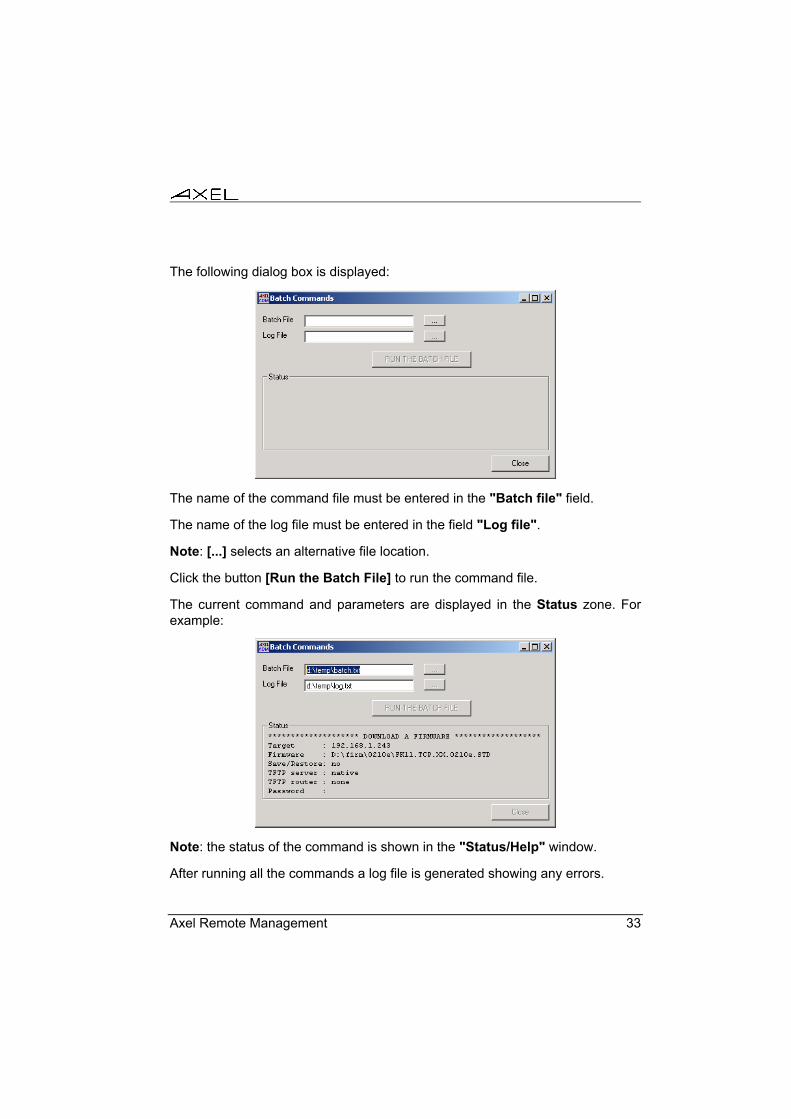
The following dialog box is displayed:
The name of the command file must be entered in the "Batch file" field.
The name of the log file must be entered in the field "Log file".
Note: [...] selects an alternative file location.
Click the button [Run the Batch File] to run the command file.
The current command and parameters are displayed in the Status zone. For example:
Note: the status of the command is shown in the "Status/Help" window.
After running all the commands a log file is generated showing any errors.
34 Axel Remote Management
3.5 - ASSIGNING IP ADDRESSES Most AxRM functions require the terminal to already have an IP address.
If the terminal does not have an IP address (i.e. a brand new terminal or the address is unknown), it is possible to set an IP address remotely using either the terminal’s serial number or MAC address.
Note: the serial number and MAC address are written on the base of the unit and on the outside of the shipping box.
IMPORTANT: This function will not work if: - The terminal and the Windows machine are not on the same LAN
(because routers require IP addresses). - The firmware of the terminal does not support this function. Firmware
0303a (or higher) for terminals AX3000 and 9926a (or higher) for the Office Server AX4000. (Approximately products shipped after April 2003)
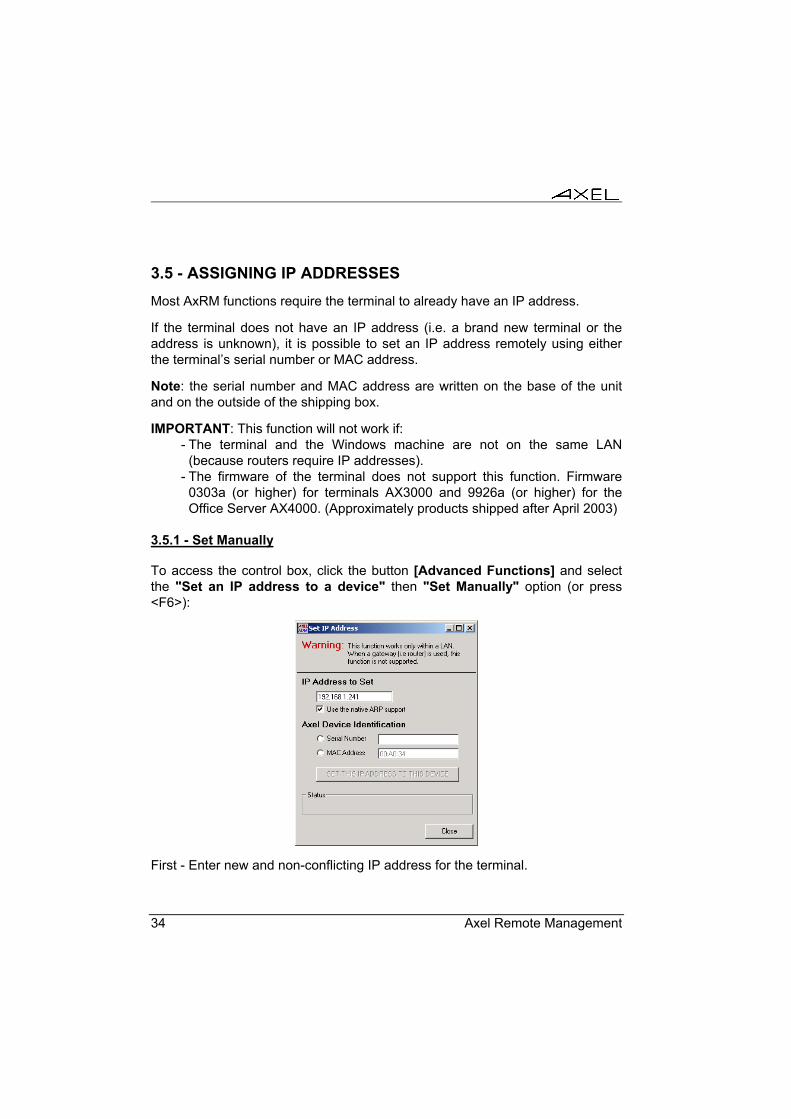
3.5.1 - Set Manually
To access the control box, click the button [Advanced Functions] and select the "Set an IP address to a device" then "Set Manually" option (or press <F6>):
First - Enter new and non-conflicting IP address for the terminal.
Axel Remote Management 35
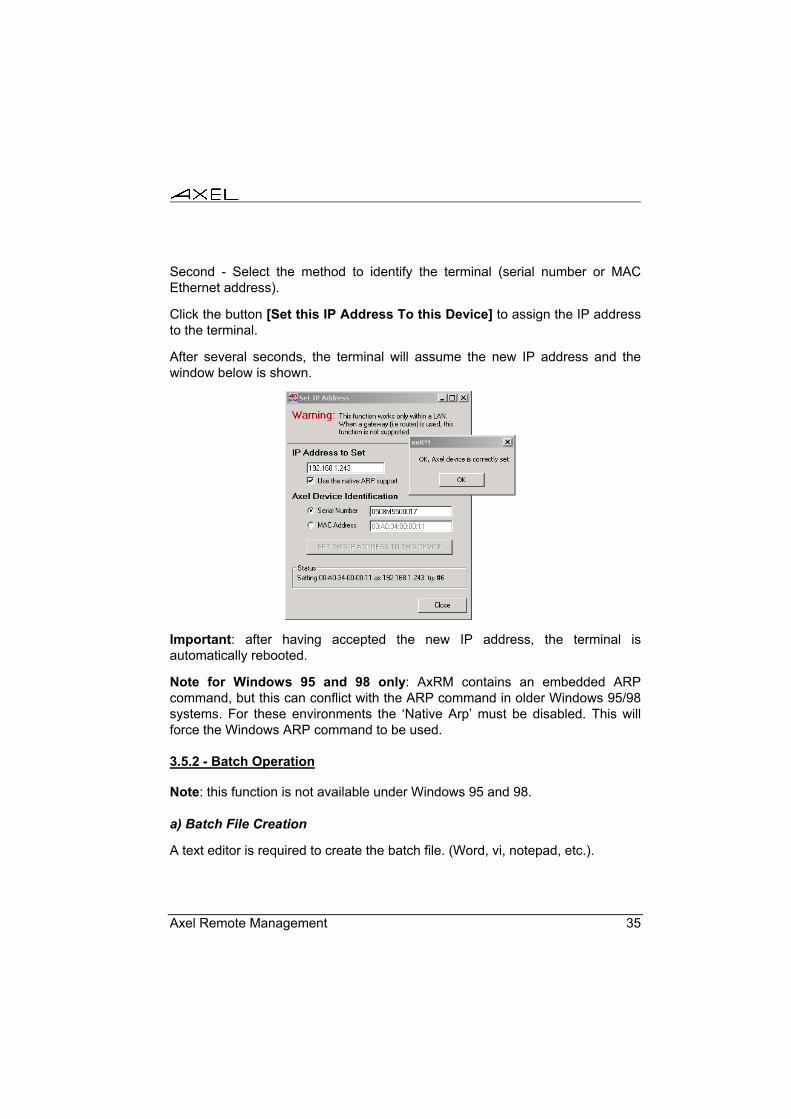
Second - Select the method to identify the terminal (serial number or MAC Ethernet address).
Click the button [Set this IP Address To this Device] to assign the IP address to the terminal.
After several seconds, the terminal will assume the new IP address and the window below is shown.
Important: after having accepted the new IP address, the terminal is automatically rebooted.
Note for Windows 95 and 98 only: AxRM contains an embedded ARP command, but this can conflict with the ARP command in older Windows 95/98 systems. For these environments the ‘Native Arp’ must be disabled. This will force the Windows ARP command to be used.
3.5.2 - Batch Operation
Note: this function is not available under Windows 95 and 98.
a) Batch File Creation
A text editor is required to create the batch file. (Word, vi, notepad, etc.).
36 Axel Remote Management
For this batch file the following rules must be applied: - The first line is a header (see example below). - A valid line is first the terminal ID (serial number or MAC address), then
the equal symbol (=), then the IP address. - Lines beginning by a hash (#) are ignored.
Batch file example:
AxRM IP BATCH V1.0
### First Terminal
00:A0:34:0B:00:02=192.168.1.245
### Second Terminal
0000M7500034=192.168.1.241
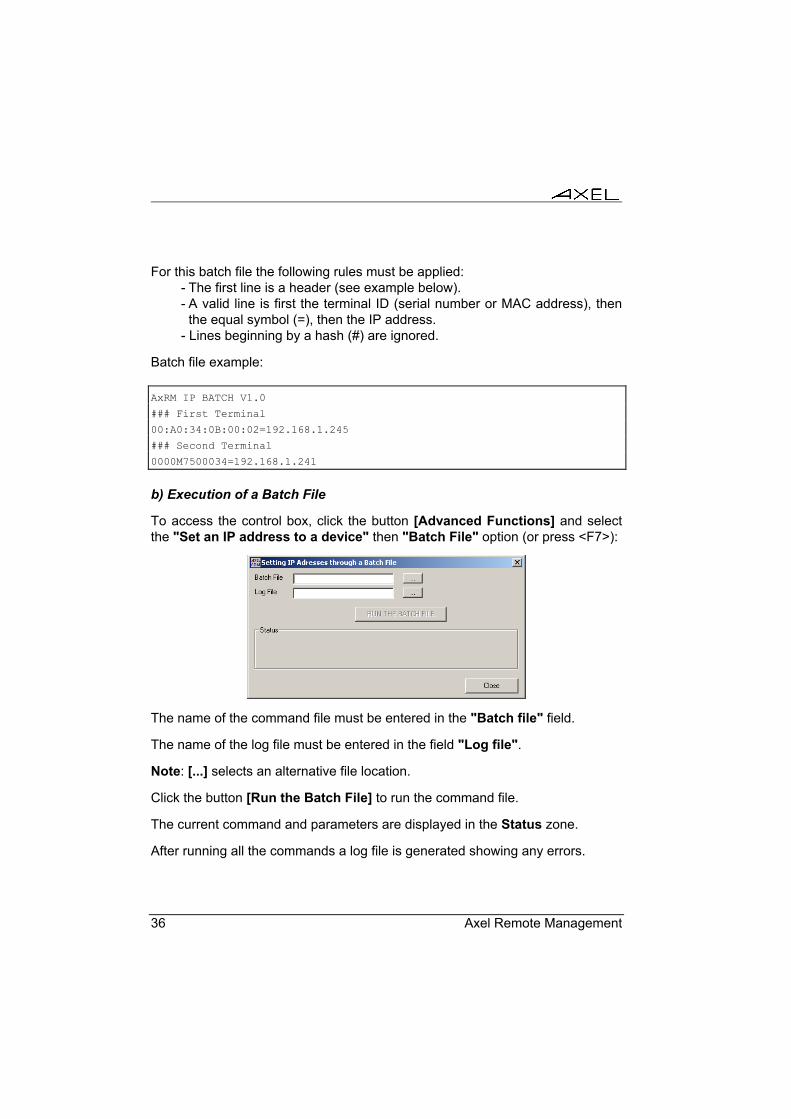
b) Execution of a Batch File
To access the control box, click the button [Advanced Functions] and select the "Set an IP address to a device" then "Batch File" option (or press <F7>):
The name of the command file must be entered in the "Batch file" field.
The name of the log file must be entered in the field "Log file".
Note: [...] selects an alternative file location.
Click the button [Run the Batch File] to run the command file.
The current command and parameters are displayed in the Status zone.
After running all the commands a log file is generated showing any errors.
Axel Remote Management 37
3.6 - USING BOOTP TO DOWNLOAD A FIRMWARE
3.6.1 - Overview
For certain Axel products, during the firmware downloading process, the current firmware is deleted, than the new firmware is transferred across the network by TFTP.
If an occurrence interrupts the transfer the terminal is left in a state where the new firmware download failed and is not loaded and the old firmware has been deleted.
In this eventuality the Axel terminal is programmed to use a low level bootp emergency procedure to find and load new firmware.
Bootp requests are broadcasted by the terminal, which when received by a bootp server start the download procedure. The parameters required are IP address to give terminal, IP address of TFTP server and the firmware filename.
With this information, the Axel product sends a TFTP request to get a valid firmware. If the TFTP server and the firmware are available the firmware is downloaded.
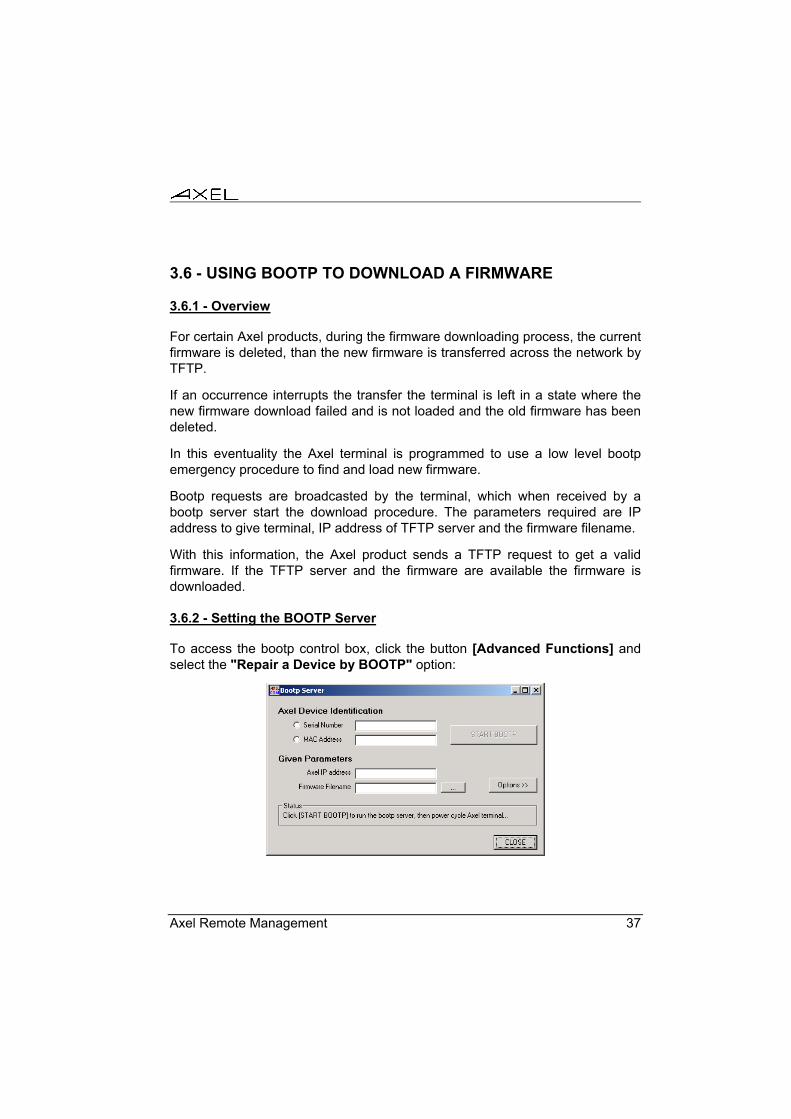
3.6.2 - Setting the BOOTP Server
To access the bootp control box, click the button [Advanced Functions] and select the "Repair a Device by BOOTP" option:
38 Axel Remote Management
First, select the method to identify the terminal (serial number or MAC Ethernet address)
Second; fill the two requested parameters: the terminal IP address and the firmware filename.
IN this case, AxRM acts as both BOOTP server and a TFTP server. If this is not the case see Chapter 3.6.4.
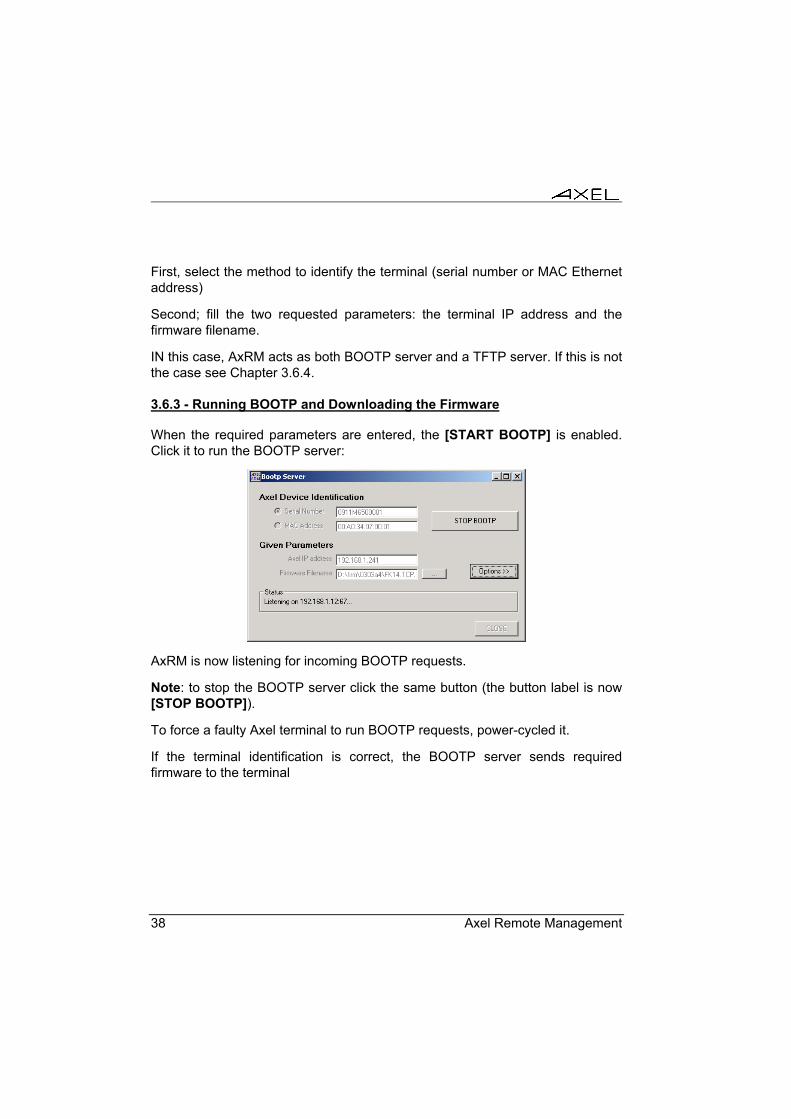
3.6.3 - Running BOOTP and Downloading the Firmware
When the required parameters are entered, the [START BOOTP] is enabled. Click it to run the BOOTP server:
AxRM is now listening for incoming BOOTP requests.
Note: to stop the BOOTP server click the same button (the button label is now [STOP BOOTP]).
To force a faulty Axel terminal to run BOOTP requests, power-cycled it.
If the terminal identification is correct, the BOOTP server sends required firmware to the terminal
Axel Remote Management 39
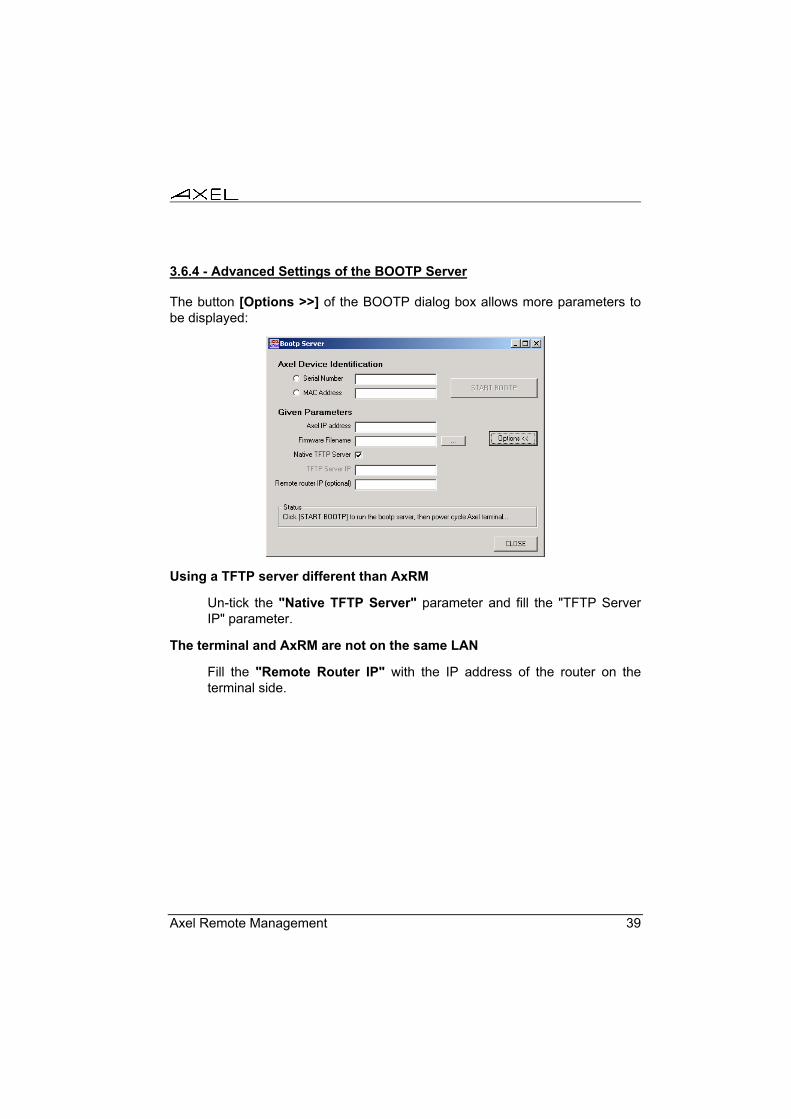
3.6.4 - Advanced Settings of the BOOTP Server
The button [Options >>] of the BOOTP dialog box allows more parameters to be displayed:
Using a TFTP server different than AxRM
Un-tick the "Native TFTP Server" parameter and fill the "TFTP Server IP" parameter.
The terminal and AxRM are not on the same LAN
Fill the "Remote Router IP" with the IP address of the router on the terminal side.
40 Axel Remote Management
3.7 - TUNING AXRM To access the tuning control box, click the button [Advanced Functions] and select the "Tunings" option (or press <F12>).
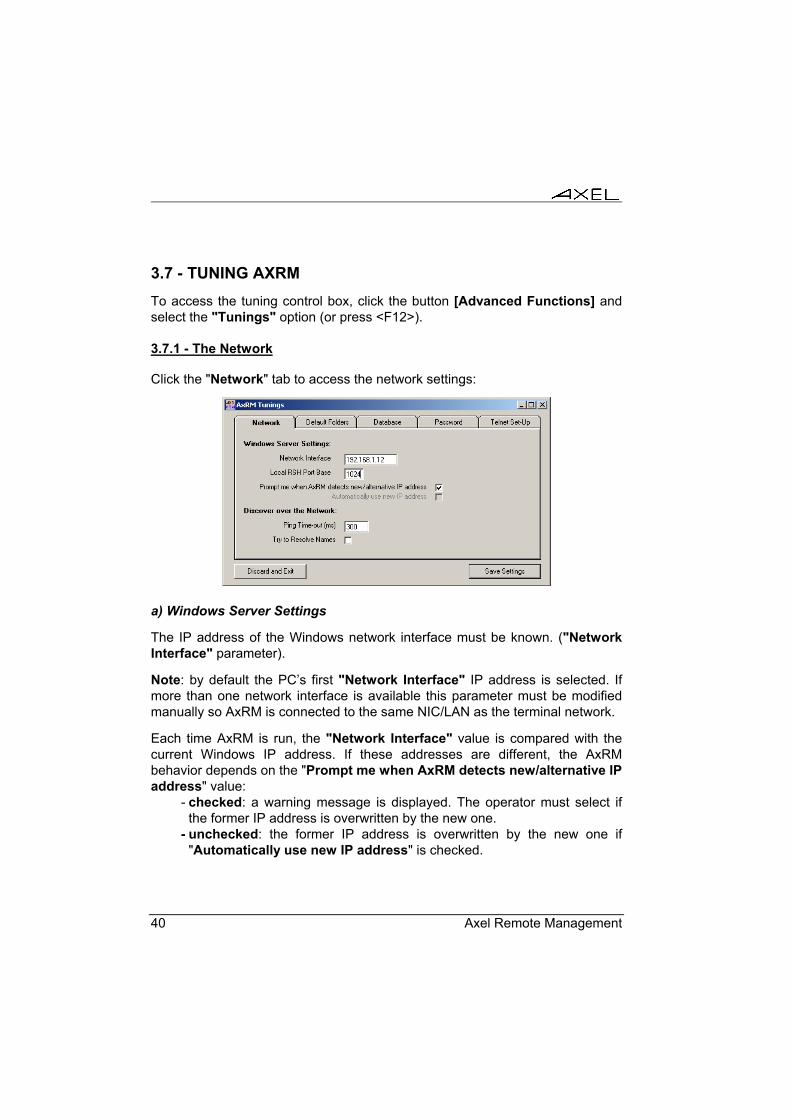
3.7.1 - The Network
Click the "Network" tab to access the network settings:
a) Windows Server Settings
The IP address of the Windows network interface must be known. ("Network Interface" parameter).
Note: by default the PC’s first "Network Interface" IP address is selected. If more than one network interface is available this parameter must be modified manually so AxRM is connected to the same NIC/LAN as the terminal network.
Each time AxRM is run, the "Network Interface" value is compared with the current Windows IP address. If these addresses are different, the AxRM behavior depends on the "Prompt me when AxRM detects new/alternative IP address" value:
- checked: a warning message is displayed. The operator must select if the former IP address is overwritten by the new one.
- unchecked: the former IP address is overwritten by the new one if "Automatically use new IP address" is checked.
Axel Remote Management 41
Note: if the Windows IP address is given by DHCP, set AxRM to automatically use the new IP address. This will prevent a warning message being displayed each time AxRM is run.
The AxRM administration commands are RSH-based. For an RSH command a local TCP port must be reserved. The "Local RSH Port Base" is the first value used by AxRM to find a free TCP port. This parameter can be modified in the event of a firewall preventing an RSH connection.
b) Scanning the Network
The two network scan parameters are: - the ping timer command. To know if a target IP is available, a ping
command is run. The ping timer (when the IP address is not responding) can have a significant impact for a large IP range scan.
- the name resolution. When a target IP address is valid, AxRM can try to resolve the name. The time needed by a name resolution operation depends on the DNS server settings (and can have a significant impact for a large IP range scan). So the name resolution function is disabled by default.
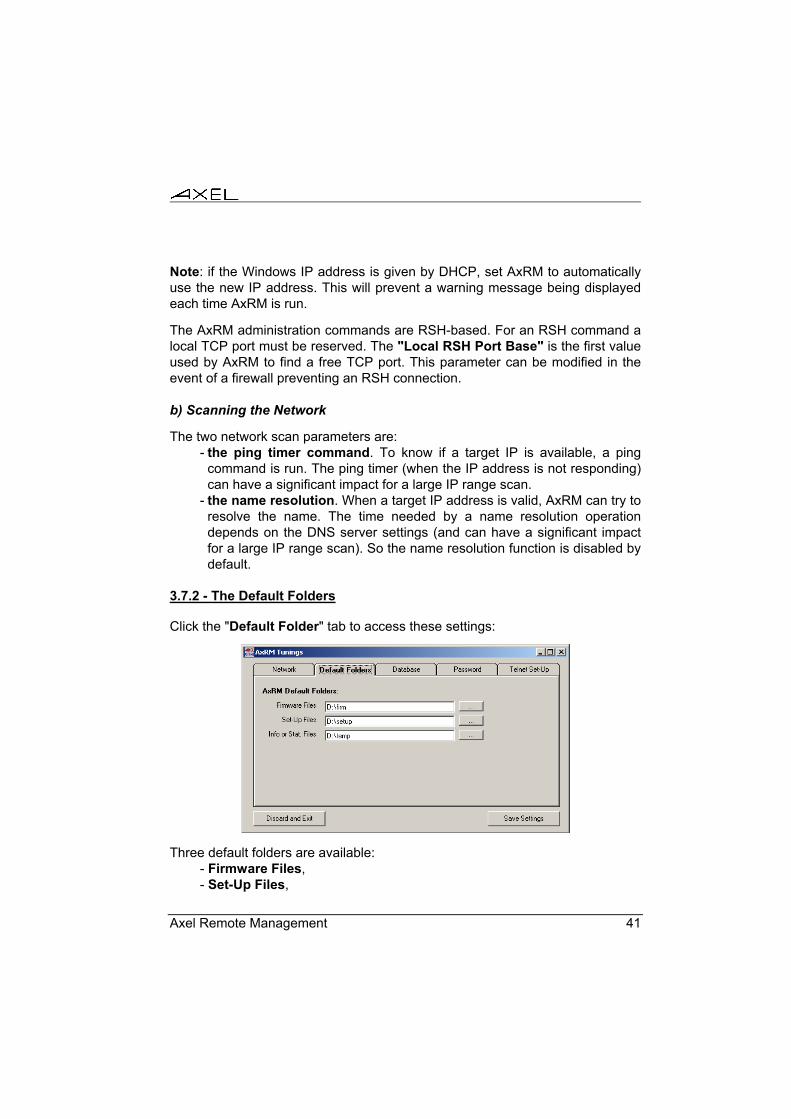
3.7.2 - The Default Folders
Click the "Default Folder" tab to access these settings:
Three default folders are available: - Firmware Files, - Set-Up Files,
42 Axel Remote Management
- Info or Stat. Files.
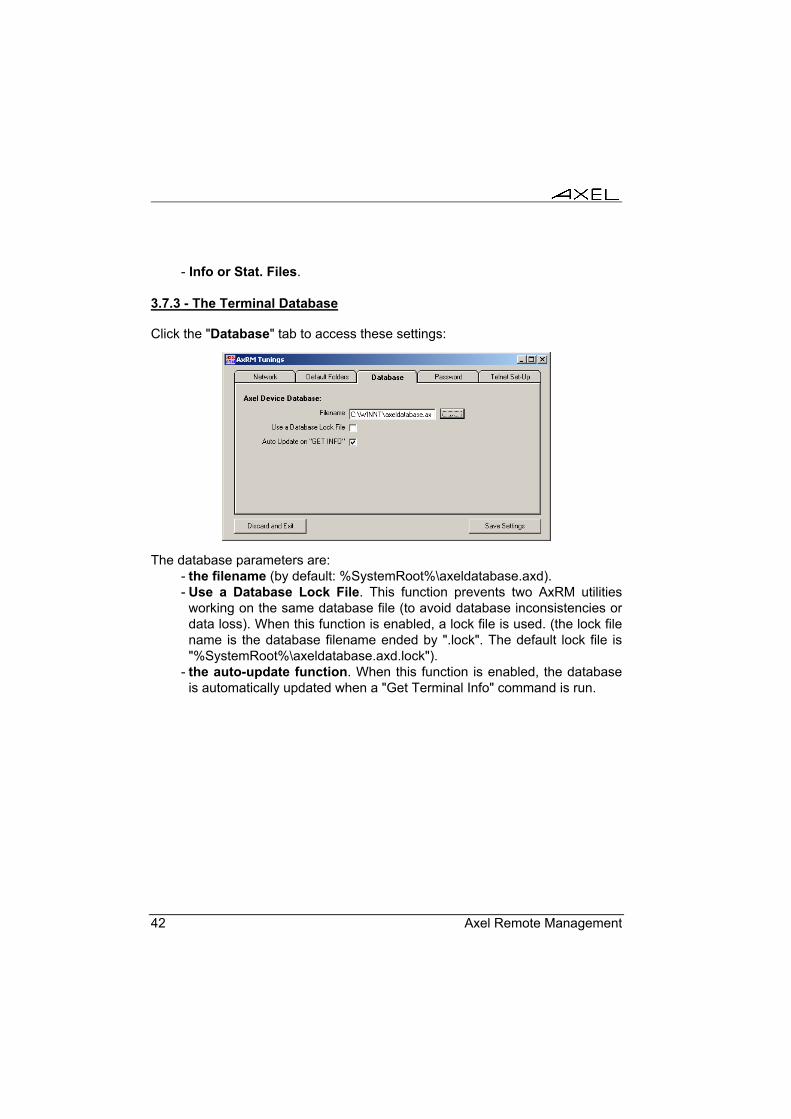
3.7.3 - The Terminal Database
Click the "Database" tab to access these settings:
The database parameters are: - the filename (by default: %SystemRoot%\axeldatabase.axd). - Use a Database Lock File. This function prevents two AxRM utilities
working on the same database file (to avoid database inconsistencies or data loss). When this function is enabled, a lock file is used. (the lock file name is the database filename ended by ".lock". The default lock file is "%SystemRoot%\axeldatabase.axd.lock").
- the auto-update function. When this function is enabled, the database is automatically updated when a "Get Terminal Info" command is run.
Axel Remote Management 43
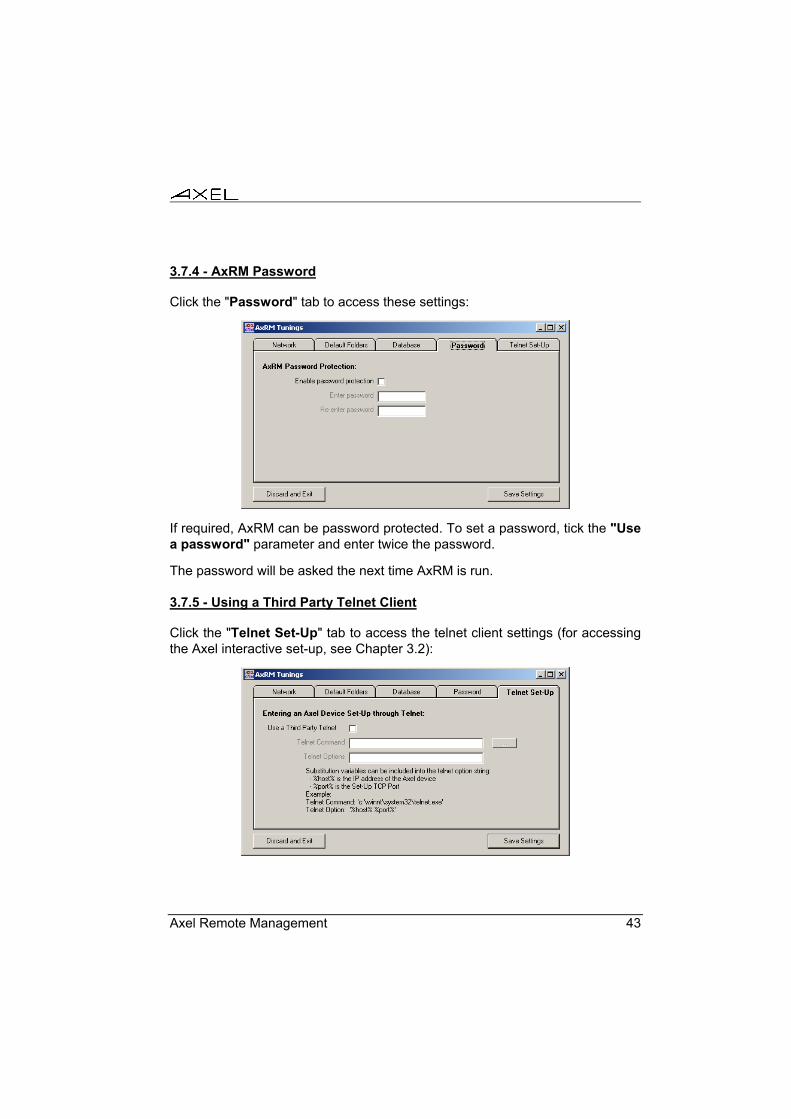
3.7.4 - AxRM Password
Click the "Password" tab to access these settings:
If required, AxRM can be password protected. To set a password, tick the "Use a password" parameter and enter twice the password.
The password will be asked the next time AxRM is run.
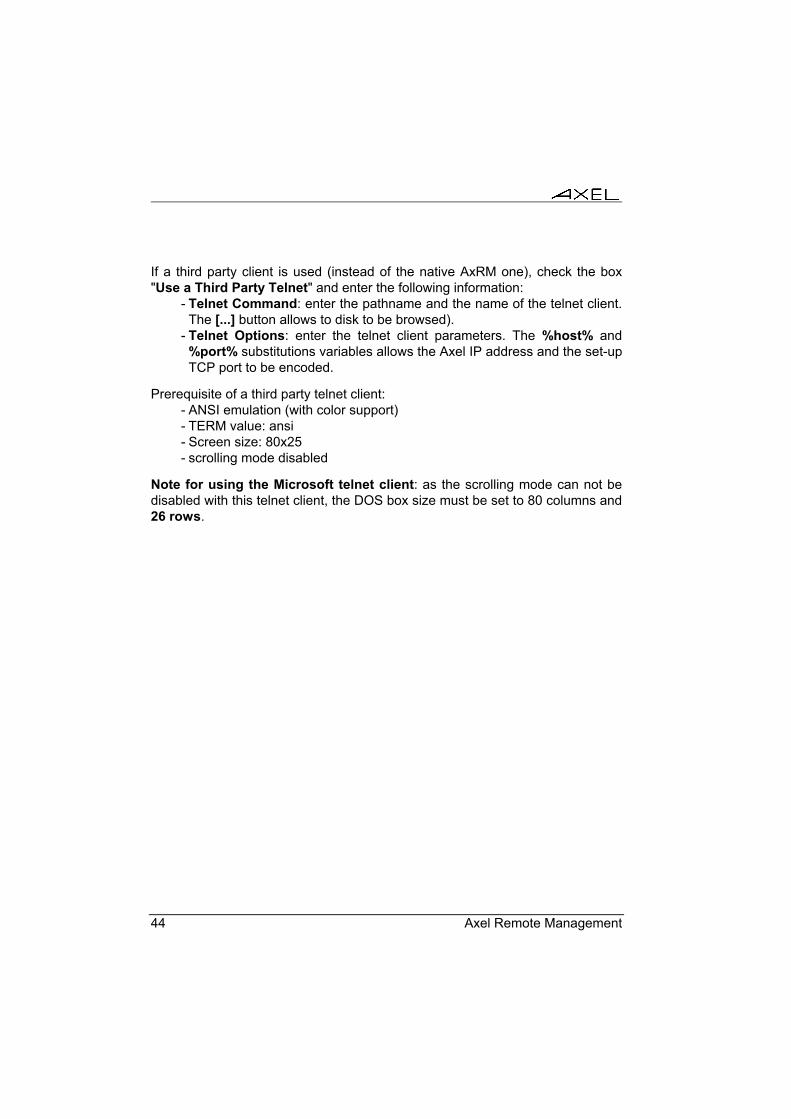
3.7.5 - Using a Third Party Telnet Client
Click the "Telnet Set-Up" tab to access the telnet client settings (for accessing the Axel interactive set-up, see Chapter 3.2):
44 Axel Remote Management
If a third party client is used (instead of the native AxRM one), check the box "Use a Third Party Telnet" and enter the following information:
- Telnet Command: enter the pathname and the name of the telnet client. The [...] button allows to disk to be browsed).
- Telnet Options: enter the telnet client parameters. The %host% and %port% substitutions variables allows the Axel IP address and the set-up TCP port to be encoded.
Prerequisite of a third party telnet client: - ANSI emulation (with color support) - TERM value: ansi - Screen size: 80x25 - scrolling mode disabled
Note for using the Microsoft telnet client: as the scrolling mode can not be disabled with this telnet client, the DOS box size must be set to 80 columns and 26 rows.
Axel Remote Management 45
APPENDIX
46 Axel Remote Management
This Appendix gives information for administrators who wish to learn more about the abilities and internal workings of the AxRM Software.
A.1 - TCP/IP COMMANDS USED Various standard TCP/IP commands are embedded in the AxRM Software (rsh, arp, tftp and ping). Depending on your operating system these commands may also be included in Windows.
The AxRM software uses ‘rsh’ to send proprietary terminal commands to the Axel device. These commands are described in the Users Manual of the terminal / Office Server.
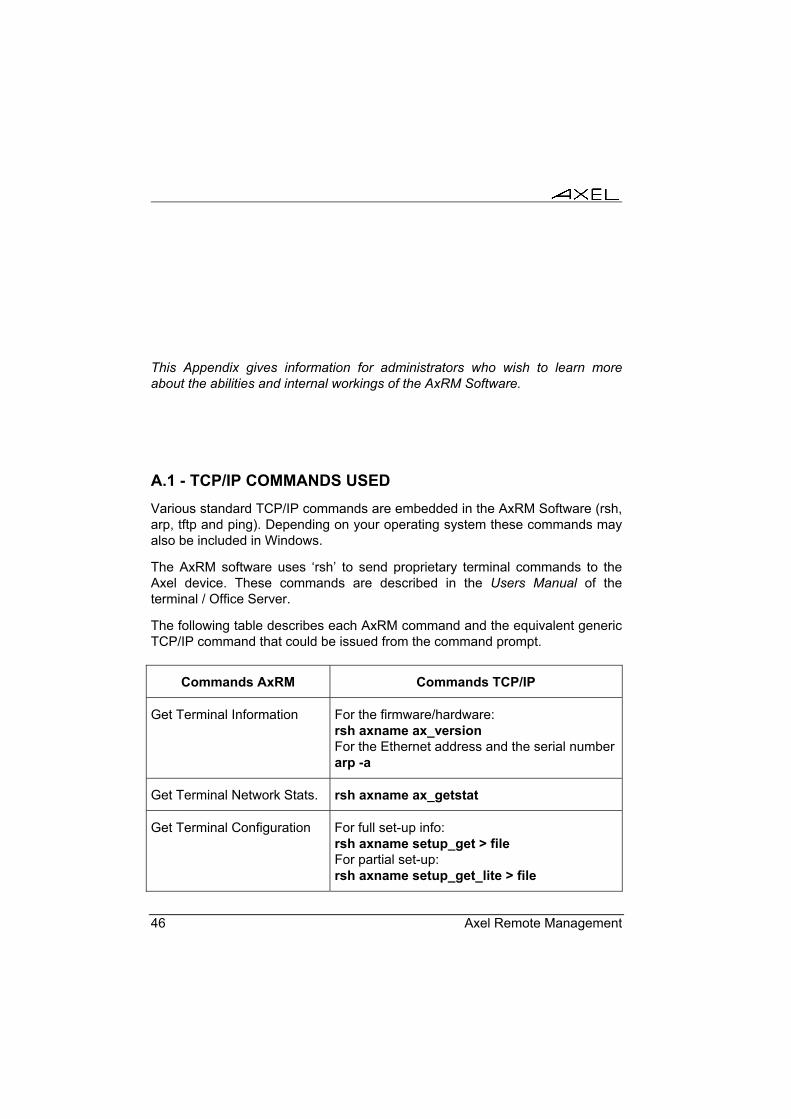
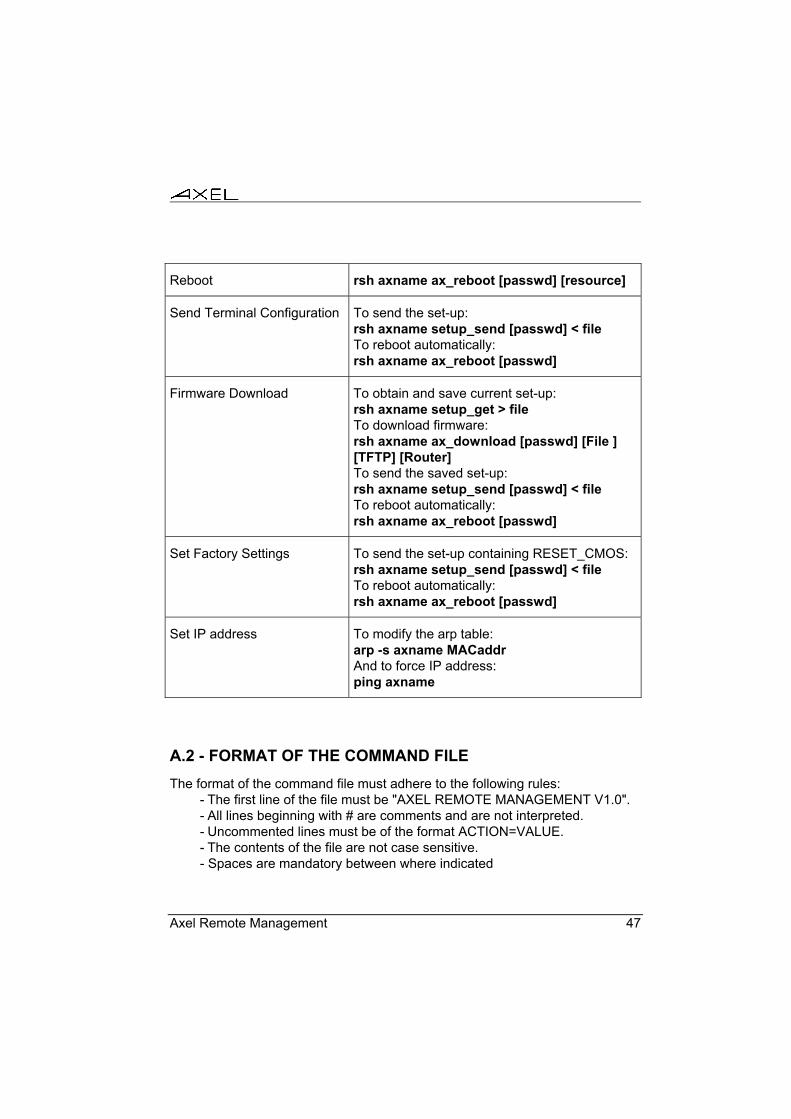
The following table describes each AxRM command and the equivalent generic TCP/IP command that could be issued from the command prompt.
Commands AxRM Commands TCP/IP
Get Terminal Information For the firmware/hardware: rsh axname ax_version For the Ethernet address and the serial number arp -a
Get Terminal Network Stats. rsh axname ax_getstat
Get Terminal Configuration For full set-up info: rsh axname setup_get > file For partial set-up: rsh axname setup_get_lite > file
Axel Remote Management 47
Reboot rsh axname ax_reboot [passwd] [resource]
Send Terminal Configuration To send the set-up: rsh axname setup_send [passwd] < file To reboot automatically: rsh axname ax_reboot [passwd]
Firmware Download To obtain and save current set-up: rsh axname setup_get > file To download firmware: rsh axname ax_download [passwd] [File ] [TFTP] [Router] To send the saved set-up: rsh axname setup_send [passwd] < file To reboot automatically: rsh axname ax_reboot [passwd]
Set Factory Settings To send the set-up containing RESET_CMOS: rsh axname setup_send [passwd] < file To reboot automatically: rsh axname ax_reboot [passwd]
Set IP address To modify the arp table: arp -s axname MACaddr And to force IP address: ping axname
A.2 - FORMAT OF THE COMMAND FILE The format of the command file must adhere to the following rules:
- The first line of the file must be "AXEL REMOTE MANAGEMENT V1.0". - All lines beginning with # are comments and are not interpreted. - Uncommented lines must be of the format ACTION=VALUE. - The contents of the file are not case sensitive. - Spaces are mandatory between where indicated
48 Axel Remote Management
The options for ACTIONs are: - COMMAND: available commands are:
- REBOOT, GET INFO, GET STATS, GET SET-UP, SEND SET-UP and DOWNLOAD.
- SCHEDULER - IP ADDR: IP address (or name) of the terminal - FILENAME: name of the file required by the command (set-up file,
firmware file...). - PASSWORD: password. - RESOURCE: keyword describing the resource to be initialized. Options
are: device, sessX, aux1, aux2, parallel, chX (X is appropriate number) - TFTP IP: name of TFTP server - ROUTER IP: name of the router - NATIVE TFTP: to select or de-select the native TFTP server: (Y or N) - REBOOT: to select or de-select terminal reboot: (Y or N) - PRESERVE: to select or de-select preserving the configuration during
firmware download: (Y or N) - FULL SET-UP: to select or de-select requesting full set-up: (Y or N) - STARTING TIME: the time for the starting time
Here are some examples: - COMMAND=GET INFO: IP ADDR, FILENAME - COMMAND=GET STATS: IP ADDR, FILENAME - COMMAND=GET SET-UP: IP ADDR, FILENAME, FULL SET-UP - COMMAND=REBOOT: IP ADDR, PASSWORD and RESOURCE - COMMAND=SEND SET-UP: IP ADDR, PASSWORD, FILENAME and
REBOOT - COMMAND=DOWNLOAD: IP ADDR, PASSWORD, FILENAME,
PRESERVE, NATIVE TFTP, TFTP IP and ROUTER IP - COMMAND=SCHEDULER: STARTING TIME
Axel Remote Management 49
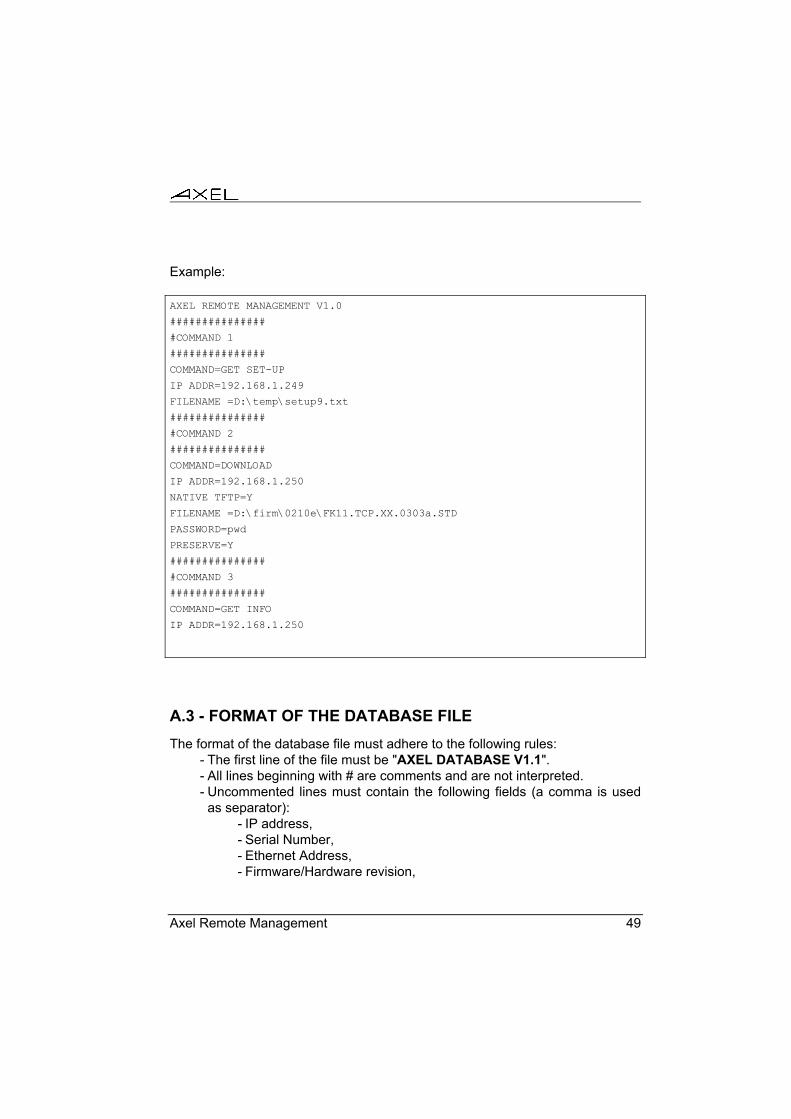
Example:
AXEL REMOTE MANAGEMENT V1.0
###############
#COMMAND 1
###############
COMMAND=GET SET-UP
IP ADDR=192.168.1.249
FILENAME =D:\temp\setup9.txt
###############
#COMMAND 2
###############
COMMAND=DOWNLOAD
IP ADDR=192.168.1.250
NATIVE TFTP=Y
FILENAME =D:\firm\0210e\FK11.TCP.XX.0303a.STD
PASSWORD=pwd
PRESERVE=Y
###############
#COMMAND 3
###############
COMMAND=GET INFO
IP ADDR=192.168.1.250
A.3 - FORMAT OF THE DATABASE FILE The format of the database file must adhere to the following rules:
- The first line of the file must be "AXEL DATABASE V1.1". - All lines beginning with # are comments and are not interpreted. - Uncommented lines must contain the following fields (a comma is used
as separator): - IP address, - Serial Number, - Ethernet Address, - Firmware/Hardware revision,
50 Axel Remote Management
- date and time of the last modification, - group, - comment.
Note: if the file header is "AXEL DATABASE V1.0", the group field is not present.
A.4 - REGISTRY VARIABLES AxRM uses the Windows "registry" to store internal variables. These variables, stored in HKEY_LOCAL_MACHINE\SOFTWARE\Axel\AxRM, are:
- DBAutoUpdate: enabling or not the auto-update function. - DBFile: terminal database filename. - DontNotifyChangeIP: displaying or not a warning message when the
Windows IP address had been modified. - FirmwareFolder: default folder for firmware files. - InfoStatFolder: default folder for information/statistics files. - IPAutoUpdate: automatically updating (or not) HostIP when the
Windows IP address had been modified. - LocalRSHPort: base for finding a free RSH TCP port. - SetupFolder: default folder for set-up files. - HostIP: Windows IP address. - Passwd: AxRM password (encrypted). - ScanPingTimeOut: timer for the network scan ping command - ScanResolveName: enabling or not the name resolution function. - TelnetThirdParty: using or not a third party telnet client. - TelnetCommand: pathname and name of the telnet client. - TelnetOption: telnet client parameters.
Note: we strongly advise to not modify the registry yourself.

14 Avenue of the Quebec Bât. K2 - BP 728
91962 Courtabœuf cedex - FRANCE Tel.: 01.69.28.27.27 - Fax: 01.69.28.82.04 - Email: [email protected]