Embed Size (px)
Citation preview

Axel Remote Management Version 4.4
(Document for AxRM version 4.4 and higher)
Administration Software for Axel Thin Clients
Mai 2018 - Ref.: AxRM44A-1

The reproduction of this material, in part or whole, is strictly prohibited. For additional information,
please contact:
Z.A. Courtabœuf
14 Avenue du Québec
Bât. K2 - BP 728
91962 Les Ulis cedex - FRANCE
Tel.: 33 1.69.28.27.27
Fax: 33 1.69.28.82.04
Email: [email protected]
The information in this document is subject to change without notice. AXEL assumes no responsibility
for any errors that may appear in this document.
All trademarks and registered trademarks are the property of their respective holders.
© - 2015-2018 - AXEL - All Rights Reserved.

WARNING This documentation describes the Axel administration software. It is assumed that the reader is familiar with the Axel hardware. For more information please consult the User's Manuals. (From www.axel.com)

TABLE of CONTENTS
1 - INTRODUCTION ........................................................................................................................... 1
2 - INSTALLATION / REMOVAL OF THE SOFTWARE ................................................................... 3
2.1 - PREREQUISITES ................................................................................................................... 4 2.2 - UPGRADING .......................................................................................................................... 4 2.3 - INSTALLATION ....................................................................................................................... 4
2.3.1 - On Windows ..................................................................................................................... 4 2.3.2 - On Linux ........................................................................................................................... 8
2.4 - REMOVAL ............................................................................................................................... 8 2.4.1 - On Windows ..................................................................................................................... 8 2.4.2 - On Linux ........................................................................................................................... 8
3 - LAUNCHING THE SOFTWARE ................................................................................................... 9
3.1 - CHOOSE LANGUAGE .......................................................................................................... 10 3.2 - PASSWORD ......................................................................................................................... 10 3.3 - EMPTY DATABASE .............................................................................................................. 10 3.4 - IMPORTING FROM AUTO-CONFIGURATION .................................................................... 11 3.5 - THE MAIN CONSOLE ........................................................................................................... 12
3.5.1 - The Button Bar on the Top of the Screen ...................................................................... 13 3.5.2 - Folder Panel ................................................................................................................... 13 3.5.3 - Thin Client Panel ............................................................................................................ 14 3.5.4 - Log Zone ........................................................................................................................ 14
4 - MANAGEMENT OF THE DEVICE DATABASE ........................................................................ 15
4.1 - THE DATABASE ................................................................................................................... 16 4.1.1 - Text File Management ................................................................................................... 16 4.1.2 - MS-SQL or MySQL Management .................................................................................. 16 4.1.3 - Import/Export functions .................................................................................................. 16
4.2 - MANAGEMENT OF THE DATABASE .................................................................................. 16 4.2.1 - Folders ........................................................................................................................... 17 4.2.2 - Thin clients ..................................................................................................................... 17
4.3 - ADDING AND MODIFYING DATABASE ENTRIES .............................................................. 17 4.3.1 - Scanning for Thin clients ................................................................................................ 17
a) Detection Methods............................................................................................................. 18 b) Adding Thin Clients to the Database ................................................................................. 18
4.3.2 - Adding Thin Clients Manually ........................................................................................ 19 4.3.3 - Modification .................................................................................................................... 20
4.4 - IMPORT/EXPORT FUNCTIONS .......................................................................................... 20 4.4.1 - Exporting to a CSV File .................................................................................................. 20 4.4.2 - Recording Selected Thin Clients to GLPI via FusionInventory ...................................... 21 4.4.3 - Exporting Selected Thin Clients as OCS Files .............................................................. 22 4.4.4 - Importing a Database (Text File) ................................................................................... 23 4.4.5 - Importing a CSV File ...................................................................................................... 24 4.4.6 - Importing Devices Discovered with Auto-Configuration ................................................ 24
4.5 - REFRESHING THIN CLIENT DATABASE............................................................................ 25 4.5.1 - SNMP Discover .............................................................................................................. 25 4.5.2 - Configuration Files ......................................................................................................... 25 4.5.3 - Other Options ................................................................................................................. 25
5 - THIN CLIENT ADMINISTRATION .............................................................................................. 26
5.1 - OBTAINING THIN CLIENT GENERAL INFORMATION ....................................................... 27 5.2 - REMOTE ADMINISTRATION ............................................................................................... 29
5.2.1 - Getting Thin Client Configuration ................................................................................... 30 5.2.2 - Configuring the Thin client ............................................................................................. 31 5.2.3 - Downloading Firmware .................................................................................................. 32 5.2.4 - Handling Power-On and Power-Off ............................................................................... 33 5.2.5 - Displaying a Message .................................................................................................... 33

5.2.6 - Getting Thin Client Statistics .......................................................................................... 34 5.2.7 - Enabling/Disabling Auto-Configuration .......................................................................... 34 5.2.8 - Running Command(s) from Auto-Configuration File ..................................................... 35
5.3 - MANAGING THE THIN CLIENT LOCAL STORE.................................................................. 36 5.3.1 - Adding a Picture ............................................................................................................. 37 5.3.2 - Adding a Certificate........................................................................................................ 37 5.3.3 - Deleting an Object ......................................................................................................... 37 5.3.4 - Clear the Local Store ..................................................................................................... 38
5.4 - REMOTE ACCESS TO A THIN CLIENT ............................................................................... 39 5.4.1 - Text-Only Remote Control ............................................................................................. 39 5.4.2 - VNC Remote Control ..................................................................................................... 40 5.4.3 - Telnet Set-Up ................................................................................................................. 41
6 - AUTO-CONFIGURATION .......................................................................................................... 42
6.1 - AUTO-CONFIGURATION SET-UP ...................................................................................... 44 6.1.1 - Use of Groups ................................................................................................................ 44 6.1.2 – Group Tab ..................................................................................................................... 46
a) Local Folder ....................................................................................................................... 46 b) Thin client models ............................................................................................................. 46 c) FK Code............................................................................................................................. 46 d) List of Serial Numbers ....................................................................................................... 47 e) Range of Serial Numbers .................................................................................................. 48 f) Subnet ................................................................................................................................ 48 g) External file ........................................................................................................................ 48
6.1.2 - Priority of the Groups ..................................................................................................... 49 6.1.3 – “Command Tab” ............................................................................................................ 50
a) Password ........................................................................................................................... 50 b) Firmware file ...................................................................................................................... 50 c) Options related to the firmware ......................................................................................... 50 d) Set-up file .......................................................................................................................... 51 e) Logo file ............................................................................................................................. 51
6.1.4 - SSL Protocol .................................................................................................................. 51 6.1.5 - Handling the Environment File ....................................................................................... 51
6.2 - LAUNCHING THE AUTO-CONFIGURATION ...................................................................... 52 6.2.1 - Interactive Mode ............................................................................................................ 52
a) Receiving a Thin Client Request ....................................................................................... 52 b) Downloading Firmware ...................................................................................................... 53 c) Sending a Configuration File ............................................................................................. 53
6.2.2 - Service Mode ................................................................................................................. 53 a) Installing the Service ......................................................................................................... 54 b) Starting the Service ........................................................................................................... 55 c) View LOG File ................................................................................................................... 55 d) Stopping the Service ......................................................................................................... 56 e) Uninstalling the Service ..................................................................................................... 56
6.3 - THIN CLIENT ACTIVITY .......................................................................................................... 57
7 - OTHER FUNCTIONS .................................................................................................................. 58
7.1 - ASSIGNMENT OF AN IP ADDRESS .................................................................................... 59 7.2 - USING BOOTP TO RELOAD FIRMWARE ........................................................................... 59
7.2.1 - Basic Concept ................................................................................................................ 59 7.2.2 - Configuring the BOOTP Server ..................................................................................... 60 7.2.3 - Launching BOOTP to Download Firmware ................................................................... 60 7.2.4 - Configuring the BOOTP Server (Advanced) .................................................................. 61
7.3 - AXRM SETTINGS ................................................................................................................. 61 7.3.1 - General Parameters....................................................................................................... 61
a) Language Selection ........................................................................................................... 62 b) Network Interface .............................................................................................................. 62 c) Password ........................................................................................................................... 62
7.3.2 - Administration Protocol .................................................................................................. 62

a) Protocol ............................................................................................................................. 62 b) Miscellaneous .................................................................................................................... 63 c) Windows DNS Cache ........................................................................................................ 63
7.3.3 - The Database................................................................................................................. 63 a) Text-File Database ............................................................................................................ 64 b) MySQL or MS-SQL Database ........................................................................................... 64
7.3.4 - Default Folders ............................................................................................................... 64 7.3.5 - Remote Control .............................................................................................................. 65
a) Alternate Telnet Command ............................................................................................... 65 b) Alternate VNC Command .................................................................................................. 65
APPENDIX ....................................................................................................................................... 66
A.1 - ADDITIONAL SOFTWARE ................................................................................................... 67 A.1.1 - AxViewer: Remote Control ............................................................................................ 67 A.1.2 - AxRAC: Remote Administration Command ................................................................... 67
A.2 - USING WITH A FIREWALL .................................................................................................. 69 A.3 - FORMAT OF THE TEXT-FILE DATABASE .......................................................................... 70 A.4 - FORMAT OF THE SQL DATABASE ..................................................................................... 70 A.5 - AXRM CONFIGURATION FILE ............................................................................................ 70 A.6 - MANAGING DHCP THIN CLIENTS ...................................................................................... 72
A.6.1 - IP Address vs DNS NAME ............................................................................................ 72 A.6.2 - The Windows DNS Cache ............................................................................................. 73
A.7 - RSH-BASED COMMANDS .................................................................................................. 74 A.8 - SNMP SUPPORT ................................................................................................................. 75 A.9 - SECURING XML WITH TLS/SSL ......................................................................................... 75
A.9.1 - Auto-Configuration ......................................................................................................... 76 A.9.2 - Administration Commands ............................................................................................ 76
A.10 - AUTO-CONFIGURATION DHCP VENDOR OPTIONS ...................................................... 76 A.10.1 - 'axrmserv' Option: XML auto-configuration ................................................................. 77 A.10.2 - 'axrmservssl' Option: XML-SSL auto-configuration ..................................................... 77

Axel Remote Management V4 1
- 1 - INTRODUCTION

2 Axel Remote Management V4
This chapter introduces the main features of the AxRM software.
The AxRM software allows system administrators to manage and configure Axel Thin Clients
remotely over a network. The Axel device is selected by its IP address or network name.
AxRM creates and maintains a database of Axel devices on the network and lets the administrator
perform the following functions:
- Obtain hardware and firmware revision levels,
- Obtain network and device statistics,
- Obtain set-up configuration,
- Reboot the device,
- Remotely configure the device,
- Download firmware,
- Remote access: take remote control of the device and/or enter the interactive set-up.
The auto-configuration allows a firmware and/or a configuration to be automatically sent to a thin
client powered on for the very first time.
This document covers:
- Installation / Removal of AxRM,
- Launching the software,
- Management of the thin client database,
- Thin client administration
- Auto-Configuration function,
- Other functions,
- Appendices.

Axel Remote Management V4 3
- 2 - INSTALLATION / REMOVAL
OF THE SOFTWARE

4 Axel Remote Management V4
This chapter gives details of installation and removal procedures.
2.1 - PREREQUISITES
AxRM is certified for Windows (NT4, 2000, 2003, 2008, 2008R2, 2012R2, 2016, XP, Vista, Windows
7, 8 and 10).
AxRM is also certified for recent Linux distributions (Ubuntu for example)
It's strongly advised to use a computer supporting at least 15bpp (32765 colors).
2.2 - UPGRADING
If AxRM V4 is already installed, it is advised but not imperative to remove before loading a newer
version. (See chapter 2.4).
Note: AxRM V4 and former AxRM version (V3 and V2) can be installed on the same computer.
2.3 - INSTALLATION
2.3.1 - On Windows
Two packages are available: AxRMV4_X64.exe (for 64 bit platforms) and AxRMV4_X86.exe (for 32
bit platforms)
To start the installation, double click on the '.exe' file and follow the instructions.
Note: for Windows 7 and later, please run this installer 'as administrator'.
The first window is a language selection box:
Axel Remote Management V4 5
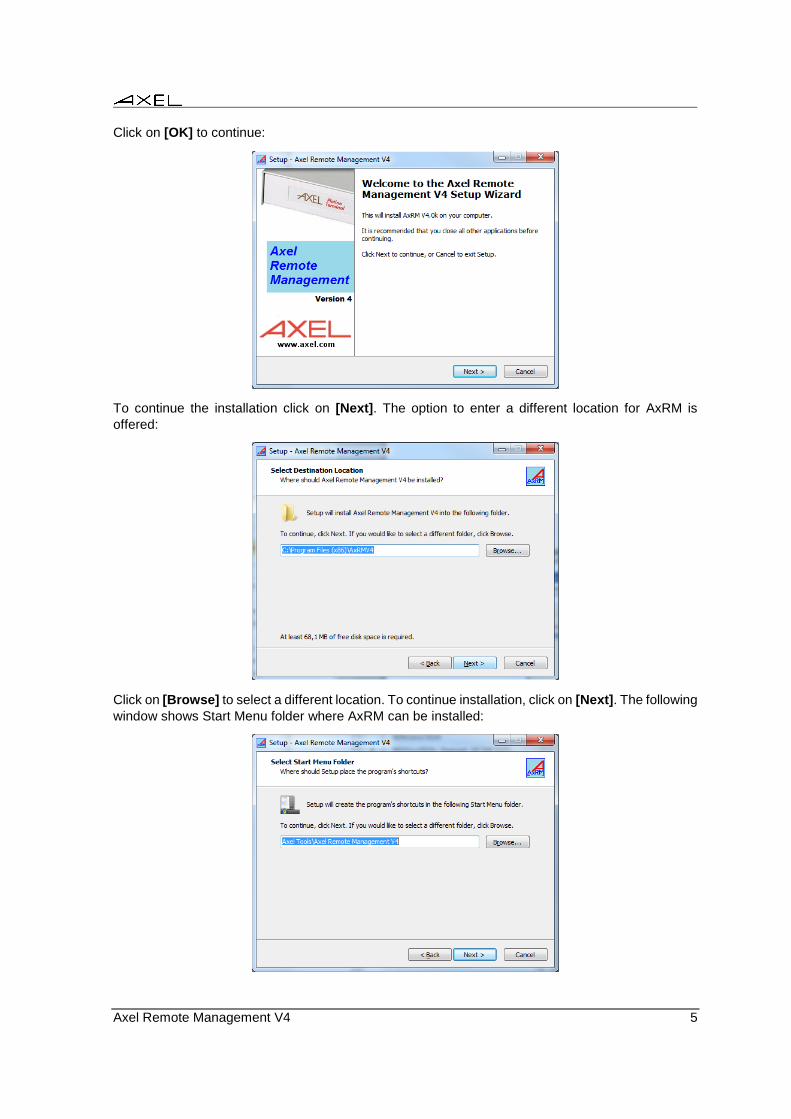
Click on [OK] to continue:
To continue the installation click on [Next]. The option to enter a different location for AxRM is
offered:
Click on [Browse] to select a different location. To continue installation, click on [Next]. The following
window shows Start Menu folder where AxRM can be installed:
6 Axel Remote Management V4
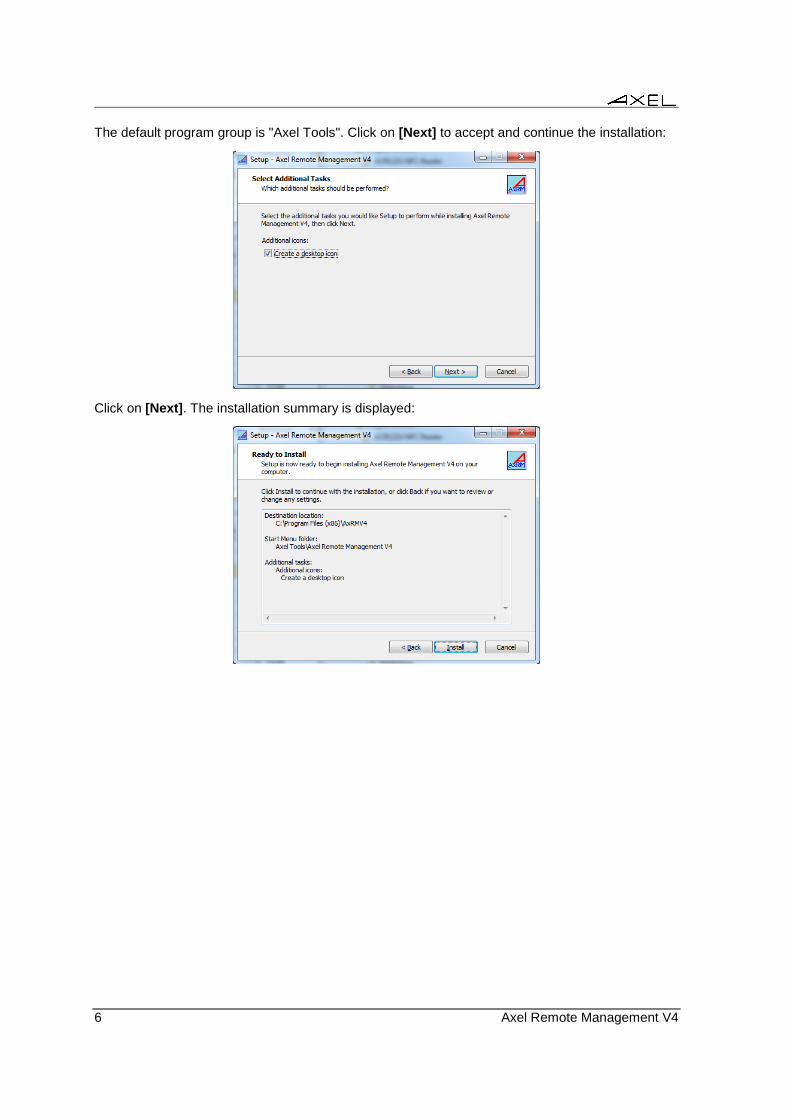
The default program group is "Axel Tools". Click on [Next] to accept and continue the installation:
Click on [Next]. The installation summary is displayed:

Axel Remote Management V4 7
Click on [Install] to start the installation.
If the AxRM auto-configuration service is running (installed by a former AxRM version), the service
is stopped and uninstalled:
Now files are copied onto the installation folder:
- Axel Remote Management (AxRMV4.exe)
- Axel Viewer (AxelViewer.exe)
- Axel Auto-Configuration Service (AxRMV4-AutoConf-Service.exe)
- Uninstall Axel Remote Management
- DLL files

8 Axel Remote Management V4
Then the AxRM auto-configuration service is re-installed and re-started:
The installation is completed:
2.3.2 - On Linux
Create a folder for the application (command mkdir)
Copy AxRMV4_LX86.tgz or AxRMV4_LX64.tgz onto this folder.
Decompress the file with the 'unzip' command'
Set the execution permission with the following commands:
chmod +x AxRMV4
chmod +x AxRAC
2.4 - REMOVAL
2.4.1 - On Windows
IMPORTANT: Before uninstalling AxRM, if necessary stop the auto-configuration service. See
Chapter 6.2.
To remove AxRM, go to the "Control Pane" or select "Uninstall Axel Remote Management" in the
menu [Start]-[Programs]-[Axel Tools]-[Axel Remote Management V4].
2.4.2 - On Linux
Simply remove the installation folder.

Axel Remote Management V4 9
- 3 - LAUNCHING THE SOFTWARE

10 Axel Remote Management V4
This chapter covers AxRM’s setup and startup operation.
To launch the administration software:
- On Windows: click on the AxRMV4 icon.
- On Linux: go to the installation folder and run "./AxRMV4"
Before the main console is displayed some dialog boxes will require completing.
3.1 - CHOOSE LANGUAGE
When AxRM is run for the first time, the language and the IP address of the host are prompted:
This information can be changed at a later time (see chapter 7.3.1).
3.2 - PASSWORD
If the access to the AxRM is restricted the following dialog box is shown (see chapter 7.3.5):
Enter the password to continue.
3.3 - EMPTY DATABASE
AxRM maintains a database of the Axel thin clients. This database is presented in the form of a tree
structure (with a root and folders).

Axel Remote Management V4 11
If the current database is empty the following dialog box is displayed:
The name of the database (root folder) can be changed now or at a later date (see Chapter 4.2.1).
3.4 - IMPORTING FROM AUTO-CONFIGURATION
The Auto-Configuration function allows thin client updates to be automatically processed. (See
Chapter 6)
This function may be independently run from AxRM. ("Service Mode”, see Chapter 6.2.2)
Each time AxRM is run new devices recorded by the Auto-Configuration service are checked. If new
thin client descriptions are found or the thin client descriptors have changed, the following dialog box
is displayed:
If the importation operation is selected a dialog box allowing selection and importation of thin clients
is displayed. For more information see Chapter 4.4.6.

12 Axel Remote Management V4
3.5 - THE MAIN CONSOLE
The AxRM Main Console displays the thin client database and allows administration commands to
be performed.
The main console is made up of the following:
- On the top, a horizontal button bar. (See Chapter 3.5.1)
- Below a text zone with the current folder path and a button to go back to the parent folder.
- A left panel listing sub-folders (of the current folder). Below this panel, 4 buttons are available
for folder operations.
- A right panel listing thin clients of the current folder (and sub-folders). Below this panel:
- 4 buttons for managing thin clients in the database
- 4 buttons for administering thin clients
- 2 buttons for selecting/deselecting thin clients
- A log zone.

Axel Remote Management V4 13
3.5.1 - The Button Bar on the Top of the Screen
The following buttons are available:
[Database] Button
Creating, opening, importing, exporting and saving a database.
For more information see Chapter 4.1.
[Network Scanning] Button
Discovering thin clients by broadcasting or scanning IP address
ranges. See Chapter 4.3.
[Refreshing the database] Button
Refreshing the database by scanning all existing thin clients. See
Chapter 4.5.
[Auto-Configuration] Button
Automatic update of thin clients. See Chapter 6.
[Console Settings] Button
A contextual menu allows the main console display to be
customized. See Chapters 3.5.2, 3.5.3, 3.5.4 and 5.
[AxRM Settings] Button
Setting AxRM preferences. See Chapter 7.3.
[Other Functions] Button
Setting IP address by Ping commands (see Chapter 7.1) and
uploading a firmware by BOOTP+TFTP (see Chapter 7.2).
3.5.2 - Folder Panel
Two display modes are available for the Folder panel:
- Tree mode: all sub-folders are displayed in a tree
structure
- Flat mode: only the sub-folders of the current
folder are displayed
This display mode is selected from the contextual menu
of [Console Settings] button.
For more information about the 4 buttons below the
Folder panel, please see the Chapter 4.2.1.
Available actions on the Folder panel:
- Left click: changing the current folder

14 Axel Remote Management V4
- Right click (Windows only): showing a contextual menu with the same action than the 4 buttons
below the Folder panel.
The button bar can be hidden from the contextual menu of [Console Settings] button (Windows
only).
3.5.3 - Thin Client Panel
The following screenshot is an example of the Thin Client panel:
For more information about the 4 buttons on the left below the Thin Client panel, please see Chapter
4.2.2. For other buttons (administering thin client), see Chapter 5
The button bar can be hidden from the contextual menu of [Console Settings] button (Windows
only).
The thin client list can be sort by clicking the header of a column.
From the contextual menu of [Console Settings] button:
- Some columns can be hidden or shown.
- Possible IP conflicts can be shown (a red cross is added to the thin client icon).
- The Thin Client display mode can be selected:
- Recursive mode: thin clients of the current folder and sub-folders are displayed.
- Non-Recursive mode: only thin clients of the current folder are displayed.
Available actions on the Thin Client panel:
- Left click: selecting/deselecting a thin client
- Right click (Windows only): showing a contextual menu with the same action than the buttons
below the Thin Client panel.
- Left double-click: showing information about a thin Client (same then the '?' button)
The number of selected thin clients is displayed below the list.
3.5.4 - Log Zone
Actions on thin client database and administration commands are listed in this Log Zone.
This zone can be hidden or its content empties from the contextual menu of [Console Settings]
button.

Axel Remote Management V4 15
- 4 - MANAGEMENT OF THE DEVICE DATABASE

16 Axel Remote Management V4
This chapter describes the creation and the handling of the database.
4.1 - THE DATABASE
The thin client database can be handled:
- By a single file (text format)
- By MS-SQL or MySQL
This is the database management button. Click this button to open
this menu:
Note: the 'Save' options are disabled when using an SQL database (in this case database updates
are done in real time).
4.1.1 - Text File Management
By default the text file name is "AxRM.axd". On Windows its location is "%ProgramData%\AxRMV4".
On Linux, it's located in the same folder as the AxRMV4 binary.
To change the text file name go to the AxRM Tunings (See Chapter 7.3.3).
The 'Database' menu options are:
- Creating a new database,
- Opening an existing database,
- Saving the current database. (When exiting AxRMV4, if the database had been modified, a
dialog box will be displayed to propose the database saving).
- Saving the current database a different name.
4.1.2 - MS-SQL or MySQL Management
The AxRM preferences allow the MS-SQL or MySQL connection details to be given (See Chapter
7.3.3). The SQL user must have the 'database creation' permission.
In this situation the database is updated in real time. So there is no 'Save database' or 'Reload
database' command.
4.1.3 - Import/Export functions
Some Import/Export functions are also available. See Chapter 4.4.
4.2 - MANAGEMENT OF THE DATABASE
The thin client database can be logically organized by adding folders and sub-folders to contain thin
clients.

Axel Remote Management V4 17
4.2.1 - Folders
These are the buttons for the folder management (on Windows, these actions are also available by
a contextual menu):
[Creating] Button
Only the folder name is requested. This folder is created in the
current folder
[Renaming] Button
A simple dialog box allows the folder name to be changed.
[Deleting] Button
After confirmation the folder and its contents are deleted.
[Moving] Button
The possible destinations are displayed. After selection, the folder
and its contents are moved.
Note: the root of the tree structure is regarded as a directory. It can be renamed but not deleted or
moved.
4.2.2 - Thin clients
Click on the line of a thin client to select/unselect it (the line background of a selected thin client is
blue). Multiple thin clients can be selected.
These are the buttons for the thin client management (on Windows, these actions are also available
by a contextual menu):
[Adding] Button
A dialog box allows a thin client to be manually added. See
Chapter 4.3.2.
[Editing] Button
A dialog box allows the thin client description to be modified. See
Chapter 4.3.3.
[Deleting] Button
After confirmation the selected thin client(s) is deleted.
[Moving] Button
The possible destinations are displayed. After selection, the
selected thin client(s) is moved.
4.3 - ADDING AND MODIFYING DATABASE ENTRIES
A thin client can be added manually or automatically.
4.3.1 - Scanning for Thin clients
The automatic scan adds all thin clients found on the network to the database
18 Axel Remote Management V4
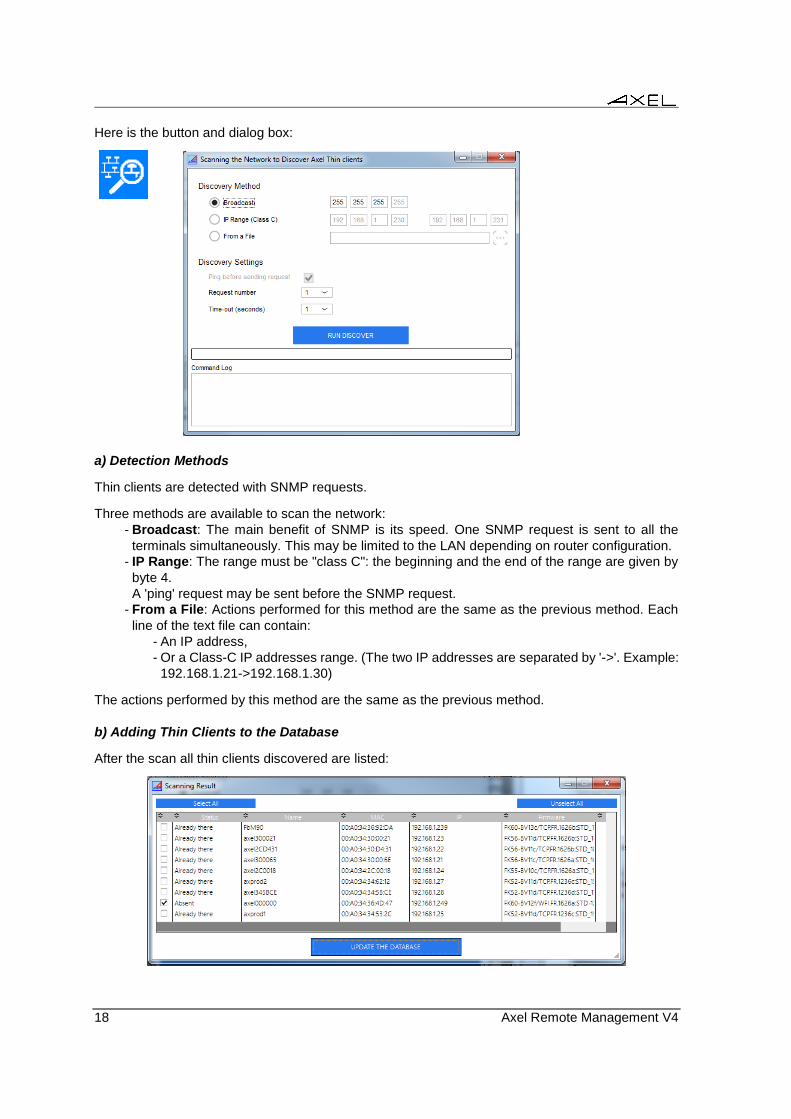
Here is the button and dialog box:
a) Detection Methods
Thin clients are detected with SNMP requests.
Three methods are available to scan the network:
- Broadcast: The main benefit of SNMP is its speed. One SNMP request is sent to all the
terminals simultaneously. This may be limited to the LAN depending on router configuration.
- IP Range: The range must be "class C": the beginning and the end of the range are given by
byte 4.
A 'ping' request may be sent before the SNMP request.
- From a File: Actions performed for this method are the same as the previous method. Each
line of the text file can contain:
- An IP address,
- Or a Class-C IP addresses range. (The two IP addresses are separated by '->'. Example:
192.168.1.21->192.168.1.30)
The actions performed by this method are the same as the previous method.
b) Adding Thin Clients to the Database
After the scan all thin clients discovered are listed:

Axel Remote Management V4 19
The status is given for each thin client:
- 'absent': The thin client is not yet entered in the database
- 'To be updated': The thin client is already entered but its details have changed.
- 'Already there’: The thin client is already in the database.
For each thin client a check box is available. Only the ticked thin clients will be added to the database.
4.3.2 - Adding Thin Clients Manually
A thin client can be added manually to the database. In this case certain information is required.
Here is the button and corresponding dialog box
The following information is required:
- IP address: Enter the IP address and specify if it's static or given 'by DHCP'. The [Ping] button
allows this address to be checked.
- Friendly or DNS name: when a dynamic IP address is used this name should be a DNS
name. In this case use the [Get IP] button to retrieve the IP address and to confirm if it is a
static or dynamic address.
- Identification: (mandatory for admin functions - not mandatory to enter in database). Enter
either serial number or MAC address. , This is used to identify thin client. Press the [GET IT]
button to get these details directly from the thin client or enter manually.
Note: the [GET IT] button is not available if the XML protocol is not enabled.
- Hardware/Firmware: this value can only be obtained by the button [?] located on the right.
- Comment: free field for user comments.
After validation the thin client is added to the current location in the database.

20 Axel Remote Management V4
4.3.3 - Modification
Here is the icon and corresponding dialog box
Note: for more information about this dialog box, please see the previous chapter.
The 'IP Address', 'Friendly or DNS Name' and the 'Comment' can be modified but the 'Device
Identification' can't be changed.
4.4 - IMPORT/EXPORT FUNCTIONS
This is the button for import/export functions. The following menu
is displayed:
4.4.1 - Exporting to a CSV File
The database can be exported as a text file compatible with Notepad, Excel, etc.

Axel Remote Management V4 21
In the menu, select [Export to a CSV File]. The following dialog box is shown:
Select the Fields to be included in the export file. Only the thin client name is mandatory.
The Field Separator can be a comma, semi colon or tab as selected.
Other options are:
- Export root folder: by default this is the current folder
- Include the thin client full pathname: when selected, folder path is included in the thin client
name.
- Include the root folder: when the full pathname is included, the root folder can be used or
not (may not necessary when re-importing the database).
- Folder separator: when the full pathname is included, the folder separator can be set (by
default '"/")
After entering name and location for the file click [EXPORT].
4.4.2 - Recording Selected Thin Clients to GLPI via FusionInventory
GLPI is a network management tool andFusionInventory is a GLPI plugin for automatic inventory of
hardware and software.
With this function, the description of each selected thin client is recorded in a GLPI database.

22 Axel Remote Management V4
Select one or more thin clients, and in the menu select [Record Selected Thin Clients to GLPI
Server]. The following dialog box is shown:
On the top of the box, a drop-down list shows thin clients previously selected to be operated on.
By default, thin client descriptions are generated with information contained in the current database,
in which case no access to the thin client is needed. If 'Full Information' is ticked, the thin client will
be accessed by remote commands to get further information.
The "URL FusionInventory" is the interface with GLPI. By default this URL is proposed by AxRM:
http://myserver/glpi/plugins/fusioninventory/front/communication.php
Change 'myserver' to the name or IP address of the GLPI server.
It is possible to specify the port number (default 80) by adding ":xxxx" in the URL after the server
(where xxxx is the listening port number of the GLPI server).
Example: http://myserver:81/plugins/fusioninventory/front/communication.php
Click [START GLPI RECORD]. The description of each selected thin client is sent to this URL.
4.4.3 - Exporting Selected Thin Clients as OCS Files
The OCS Inventory NG is a network management tool. It allows automatic inventory of hardware and
software. With this export function, for each selected thin client, an OCS description file is generated.
This file can be imported in the OCS NG database.

Axel Remote Management V4 23
Select one or more thin clients, and in the menu select [Export Selected Thin Clients as OCS
Files]. The following dialog box is shown:
On the top of the box, a drop-down list shows thin clients previously selected to be operated on.
By default, OCS files are generated with information contained in the current database, in which case
no access to the thin client is needed. If 'Full Information' is ticked, the thin client will be accessed
by remote commands to get further information.
The "Export Folder" will contain the generated OCS files.
Click [START EXPORT]. For each thin client, an OCS file is generated with a name based on the
thin client Ethernet address (00-A0-34-xx-yy-zz.ocs).
4.4.4 - Importing a Database (Text File)
A 'text file' database can be imported to the current database.
In the menu, select [Import a Database (Text File)]. The following dialog box is shown:
Select the database file and the destination folder.
Other options are:
- Import folders: folders will be created to comply with the original thin client full pathname
- Import the root folder: if 'Import folders' is selected, the root folder to be also imported.
Click [IMPORT] button. When the importation is completed the number of thin clients added or
updated is displayed.
24 Axel Remote Management V4
4.4.5 - Importing a CSV File
A database previously exported (see Chapter 4.4.1) can be imported to the current database.
In the menu, select [Import a CSV File]. The following dialog box is shown:
Select the CSV File and the Destination Folder.
Other options are:
- Field Separator and Folder Separator: these are the separators selected for the importation
(see Chapter 4.1.1)
- Import folders: folders will be created to comply with the original thin client full pathname
- Import the root folder: this option allows the root folder to be imported.
Click [IMPORT] button. When the importation is completed the number of thin clients added or
updated is displayed.
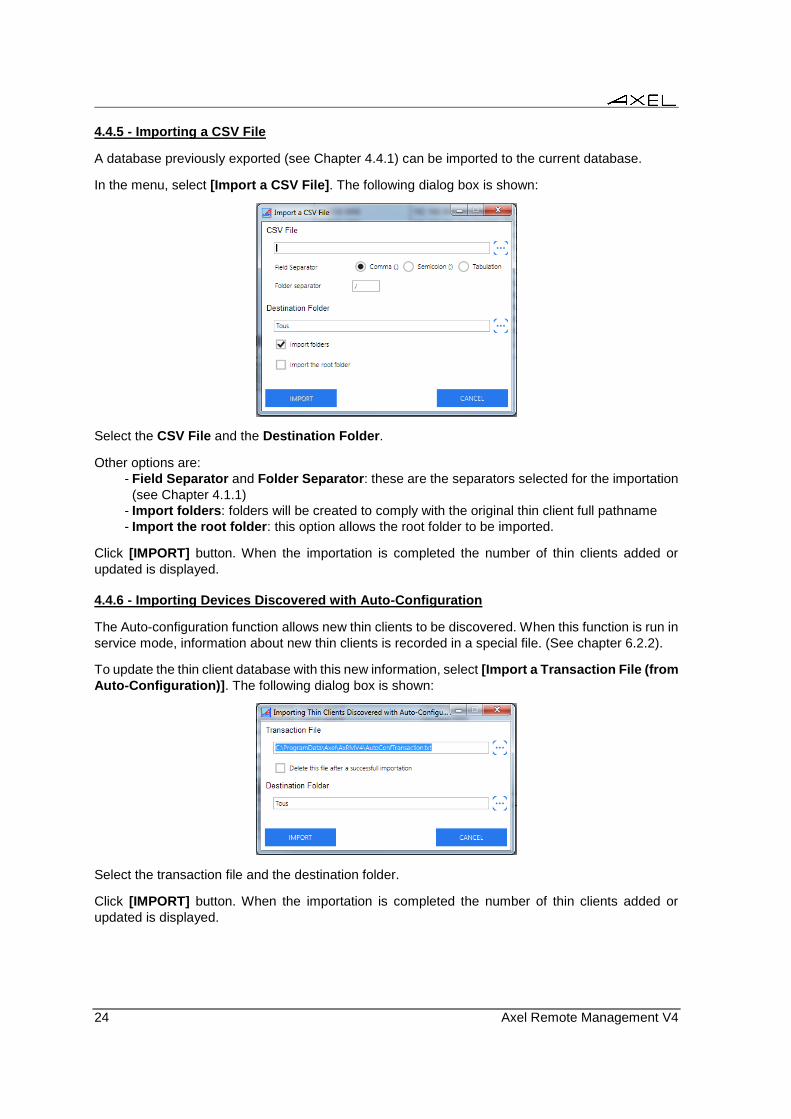
4.4.6 - Importing Devices Discovered with Auto-Configuration
The Auto-configuration function allows new thin clients to be discovered. When this function is run in
service mode, information about new thin clients is recorded in a special file. (See chapter 6.2.2).
To update the thin client database with this new information, select [Import a Transaction File (from
Auto-Configuration)]. The following dialog box is shown:
Select the transaction file and the destination folder.
Click [IMPORT] button. When the importation is completed the number of thin clients added or
updated is displayed.

Axel Remote Management V4 25
4.5 - REFRESHING THIN CLIENT DATABASE
This function allows entries for existing thin clients in the database to be updated:
- Thin client information (thin client name, firmware revision…) is refreshed.
- The thin client set-up can be optionally collected.
Note: Only existing thin clients in the database will be scanned.
The function is invoked from the toolbar. Here is the icon and dialog box:
Note: At the top, a drop-down list shows thin clients previously selected to be operated on.
The Execution Time' allows the command to be run at a given time. If this field is empty the command
is run immediately.
4.5.1 - SNMP Discover
The scenario is the following: a unicast SNMP request is sent to each thin client. If no response is
received before the " Time-out (seconds)" expiration another request is sent. Until the "Request
Number" is reached or an SNMP response is received.
The SNMP response allows thin client information to be updated: thin client name, firmware revision
and comment. This allows also the MAC Address to be checked.
4.5.2 - Configuration Files
With this function, thin client configuration files can also be collected. Just specify the "Backup
Folder" and the 'Password (optional)".
For each thin client available with the SNMP command, a remote administration command is issued
to get the configuration file. The filenames are the MAC Address plus a ".txt" suffix.
4.5.3 - Other Options
The 'Log file' option allows the output of this command (messages, errors...) to be stored.

26 Axel Remote Management V4
- 5 - THIN CLIENT
ADMINISTRATION

Axel Remote Management V4 27
This chapter describes how to select one or more thin clients from the database on which to perform
management operations.
The administration of a thin client or a group of thin clients is composed of two phases:
- Selection of the thin client(s)
- Selection and order of actions.
Most of the management commands can be executed on one or multiple thin clients.
Click on a thin client to select/deselect it (the line background of a selected thin client is blue).
The thin client selection mode can be customized:
- Multiple: click left to add or remove a thin client to/from the selection. This mode is advised
for Linux or when using a touch screen.
- Individual: this mode operates as described below:
- Click left: clear the current selection and add this thin client to the selection.
- Ctrl + Click left (Windows only): add this thin client to the selection.
- Shift + Click left (Windows only): clear the current selection and select the group of thin
clients from the former selected thin client to the current selected thin client.
Note: the selection mode is chosen with the [Console Settings] button. See Chapter 3.5.1.
Selection can also be done by these buttons:
[Select All] Button
All the thin client of the panel are selected.
[Unselect All] Button
All the thin client of the panel are unselected.
Once selection is made use buttons under the thin client panel. (On Windows a contextual menu is
available by right click).
Note: by default, AxRM uses the DNS name to administer thin clients with dynamic IP address. It's
not advised, but this can be changed to use a static IP address through the AxRM tunings (see
Chapter 7.3.2).
5.1 - OBTAINING THIN CLIENT GENERAL INFORMATION
This command is available when only one thin client is selected (or on Windows when double clicking
a thin client).

28 Axel Remote Management V4
Here is the icon and corresponding dialog box
At the top of the box, general information is displayed.
'Connectors' Section
Lists physical characteristics of this thin client.
'Configuration' Section
Drop-down lists allow the screen session and the auxiliary ports configuration’s to be shown.
Note: These two drop-down lists are displayed if the thin client is on-line. If not, they also may be
displayed if a back-up configuration file is available.

Axel Remote Management V4 29
5.2 - REMOTE ADMINISTRATION
Here is the icon and corresponding dialog box:
General options are located on the top of the box:
- Target Thin Clients: A drop-down list shows thin clients previously selected to be operated
on. If only one thin client has been selected, this list is disabled. The [PING] button is available
if only one thin client had been selected.
- Password: Depending on the administration command and thin client set-up, a password may
be required.
- Execution Time: This option allows the command to be started at a later time.
- Auto Power-On: This option allows target thin clients to be powered-on (if needed) before
starting the remote command. This option is enabled if the WakeOnLan capability is supported
by at least one of the target thin clients.
- Administration Protocol: by default the displayed value is the selected protocol of AxRM
Preferences (see Chapter 7.3.2). If this protocol is "XML over SSL", the possible values are
XML and XML-SSL.
The remote administration is separated in three tabs:
- Administration commands
- Auto-configuration commands.
- Local store
At the bottom of the dialog box a zone allows the display of the order log, in case of error in order to
attract attention, this zone change in red background.

30 Axel Remote Management V4
Above is in French…..
5.2.1 - Getting Thin Client Configuration
AxRM can be used to remotely access and store the thin client’s setup configuration.
Below is the corresponding dialog box:
If "Full set-up" is selected the entire setup information is obtained. If not selected only non-default
settings are obtained - making the file smaller.
To save this information in a file, provide a name in the field "Store to File".
Note: the button [...] can be used to navigate to a preferred file location.
If no filename is given, the configuration will be stored in the "Back-up Folder" (see Chapter 7.3.4)
with a name based on the Ethernet Address (00-A0-34-xx-yy-zz.txt).
IMPORTANT: if this command is password-protected (check the thin client set-up), the password
must be entered in the "Password" field.
Axel Remote Management V4 31
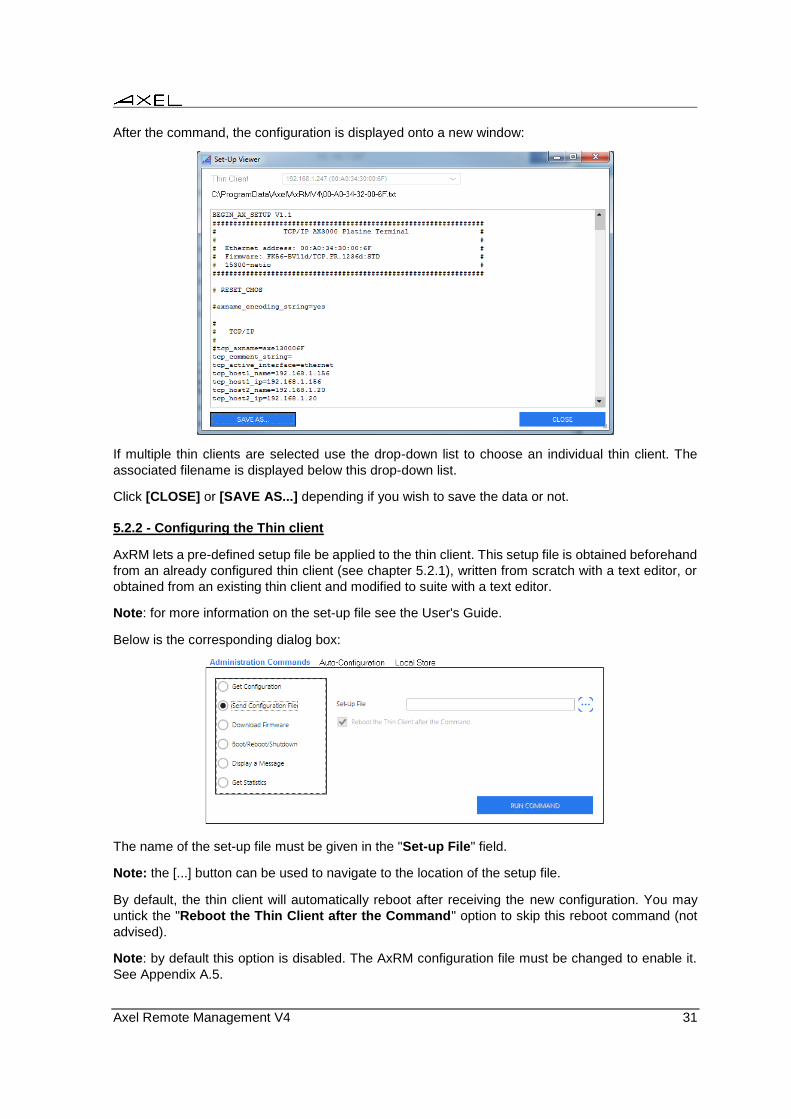
After the command, the configuration is displayed onto a new window:
If multiple thin clients are selected use the drop-down list to choose an individual thin client. The
associated filename is displayed below this drop-down list.
Click [CLOSE] or [SAVE AS...] depending if you wish to save the data or not.
5.2.2 - Configuring the Thin client
AxRM lets a pre-defined setup file be applied to the thin client. This setup file is obtained beforehand
from an already configured thin client (see chapter 5.2.1), written from scratch with a text editor, or
obtained from an existing thin client and modified to suite with a text editor.
Note: for more information on the set-up file see the User's Guide.
Below is the corresponding dialog box:
The name of the set-up file must be given in the "Set-up File" field.
Note: the [...] button can be used to navigate to the location of the setup file.
By default, the thin client will automatically reboot after receiving the new configuration. You may
untick the "Reboot the Thin Client after the Command" option to skip this reboot command (not
advised).
Note: by default this option is disabled. The AxRM configuration file must be changed to enable it.
See Appendix A.5.

32 Axel Remote Management V4
IMPORTANT: if the thin client is password-protected, the password must be entered in the
"Password" field.
5.2.3 - Downloading Firmware
AxRM can be used to upgrade the thin client firmware.
Below is the corresponding dialog box:
The name of the firmware file must be entered in the "Firmware File" field.
Note: the [...] button can be used to select the location of this file.
Upgrading the firmware will result in the thin client losing its existing configuration. By ticking the
"Preserve Configuration" the original configuration will be re-applied. The following sequence of
commands is run:
- Get thin client configuration (saved as a temporary file)
- Download firmware
- Reboot (the device)
- Send configuration (send file generated above)
- Reboot (the device).
The field "Remote Router" is shown only when the administration protocol is set to "RSH" (see
Chapter 7.3.2). When the Axel thin client and the AxRM machine are not on the same local area
network, it is imperative to complete IP address of the router on the side of the Axel thin client
IMPORTANT: if the thin client is password-protected, the password must be entered in the
"Password" field.
Axel Remote Management V4 33
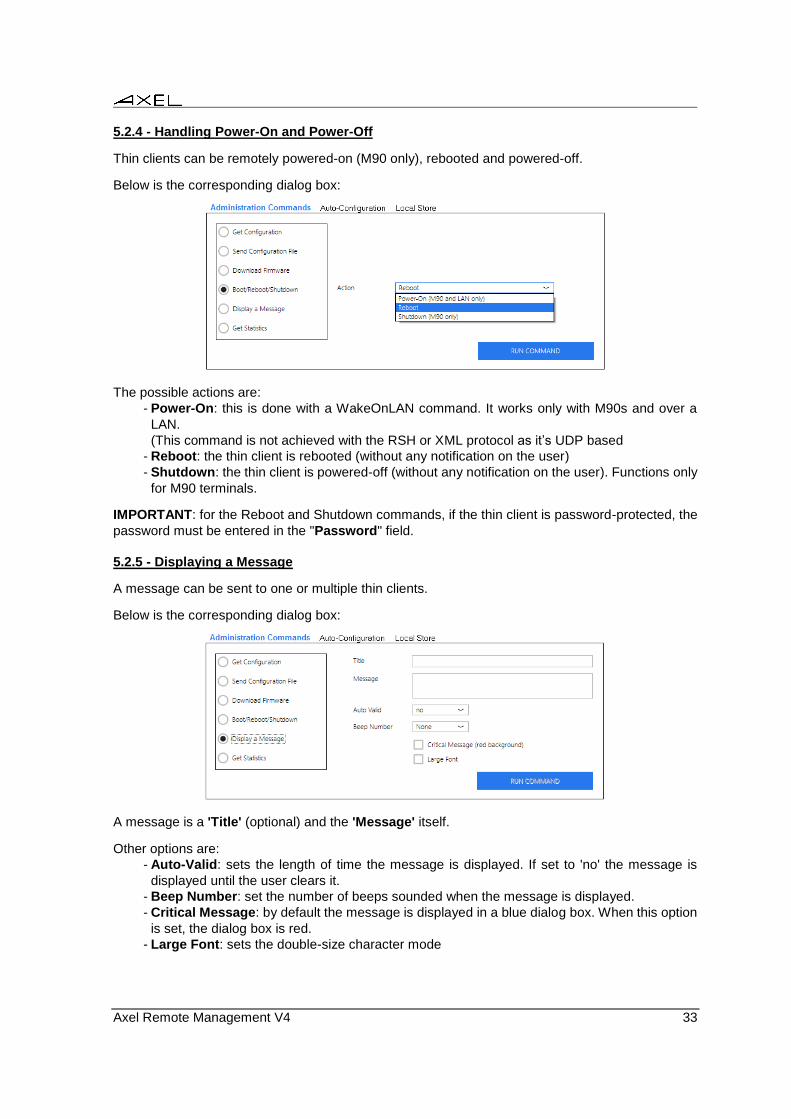
5.2.4 - Handling Power-On and Power-Off
Thin clients can be remotely powered-on (M90 only), rebooted and powered-off.
Below is the corresponding dialog box:
The possible actions are:
- Power-On: this is done with a WakeOnLAN command. It works only with M90s and over a
LAN.
(This command is not achieved with the RSH or XML protocol as it’s UDP based
- Reboot: the thin client is rebooted (without any notification on the user)
- Shutdown: the thin client is powered-off (without any notification on the user). Functions only
for M90 terminals.
IMPORTANT: for the Reboot and Shutdown commands, if the thin client is password-protected, the
password must be entered in the "Password" field.
5.2.5 - Displaying a Message
A message can be sent to one or multiple thin clients.
Below is the corresponding dialog box:
A message is a 'Title' (optional) and the 'Message' itself.
Other options are:
- Auto-Valid: sets the length of time the message is displayed. If set to 'no' the message is
displayed until the user clears it.
- Beep Number: set the number of beeps sounded when the message is displayed.
- Critical Message: by default the message is displayed in a blue dialog box. When this option
is set, the dialog box is red.
- Large Font: sets the double-size character mode

34 Axel Remote Management V4
IMPORTANT: if this command is password-protected (check the thin client set-up), the password
must be entered in the "Password" field.
5.2.6 - Getting Thin Client Statistics
AxRM can be used to remotely access and store the thin client’s network statistics.
Below is the corresponding dialog box:
To save this information in a file, provide a name in the field "Store to File".
Note: the button [...] can be used to navigate to a preferred file location.
After the command, the statistics information is displayed onto a new window:
If multiple thin clients are selected use the drop-down list to choose a singlethin client. The associated
filename is displayed below this drop-down list.
Click [CLOSE] or [SAVE AS...] depending if you wish to save the data or not.
5.2.7 - Enabling/Disabling Auto-Configuration
AxRM can be used to enable/disable thin client auto-configuration feature (see Chapter 6).

Axel Remote Management V4 35
Select the "Auto-Configuration" tab then click the "Configure the auto-configuration of thin
client(s)" option. Below is the corresponding dialog box:
The "Delay" option is the maximum number of seconds allowed for the auto-configuration process.
(If no auto-configuration response is received before the timeout expiration, the thin client continues
the usual boot scenario).
Two methods allow the AxRM machine (IP address / TCP Port) to be located by the thin client:
- Static: IP address (or DNS) name and TCP port are given.
- Dynamic: information will be given by a DHCP server.
IMPORTANT: if the thin client is password-protected, the password must be entered in the
"Password" field.
The thin client doesn't reboot after receiving the enable/disable auto-configuration command. This
command will take effect the next time the thin client will be rebooted.
Note: to disable the auto-configuration, simply click the "Disable the auto-configuration of thin
client(s)" option. The password is required and the target thin client(s) won't reboot when receiving
this command.
5.2.8 - Running Command(s) from Auto-Configuration File
AxRM can be used to launch commands issued from the auto-configuration file (see Chapter 6).
Select the "Auto-Configuration" tab then click the "Run commands from this auto-configuration
file" option. Below is the corresponding dialog box:
The name of the environment file is issued from the auto-configuration settings.

36 Axel Remote Management V4
5.3 - MANAGING THE THIN CLIENT LOCAL STORE
A local store is offered by AX3000 Thin Clients. Three types of objects can be stored:
- TSE License: sent by a TSE server.
- Logo: a JPEG bitmap (only one logo can be stored).
- Security Certificate: PFX, PEM, P12 and CER are supported.
- TSE Printer Configuration: sent by a TSE server.
Note: the AX3000 Local Store is not available when the administration protocol is 'RSH' (See AxRM
Preferences - Chapter 7.3.2)
Below are the button and the corresponding dialog boxes (regarding if one or multiple thin clients are
selected):
Only one thin client had been selected
Multiple thin clients had been selected
Note: when a single thin client is selected the store content can be displayed by synchronizing,
shown below:

Axel Remote Management V4 37
5.3.1 - Adding a Picture
Below are the button and the corresponding dialog box for adding a logo:
Parameters are the following:
- File: click the […] button to browse the disk.
- Clear All Existing Objects: empty the store before adding this object.
- Clear Existing Logo: only one logo can be stored
After confirmation, the adding command is issued to one or more thin clients. The store content is
updated.
5.3.2 - Adding a Certificate
Below are the button and the corresponding dialog box for adding a certificate:
Parameters are the following:
- Certificate Format: supported formats are PFX, PEM, P12 and CER.
- File: click the […] button to browse the disk.
- Clear All Existing Objects: empty the store before adding this object.
- Certificate Type: select "Personal" or "Authority (CA)".
- User Friendly Name: this name is displayed in the "Information" field of the local store. This
allows the certificate to be selected when needed.
- Password: this password is required for the certificate installation. If it's not given now, it will
have to be given later from the thin client interactive set-up.
After confirmation, the adding command is issued to one or more thin clients. The store content is
updated.
5.3.3 - Deleting an Object
Note: only available when a single thin client is selected.
38 Axel Remote Management V4
[Delete] Button
Select an object on the store content and click this button to delete
it.
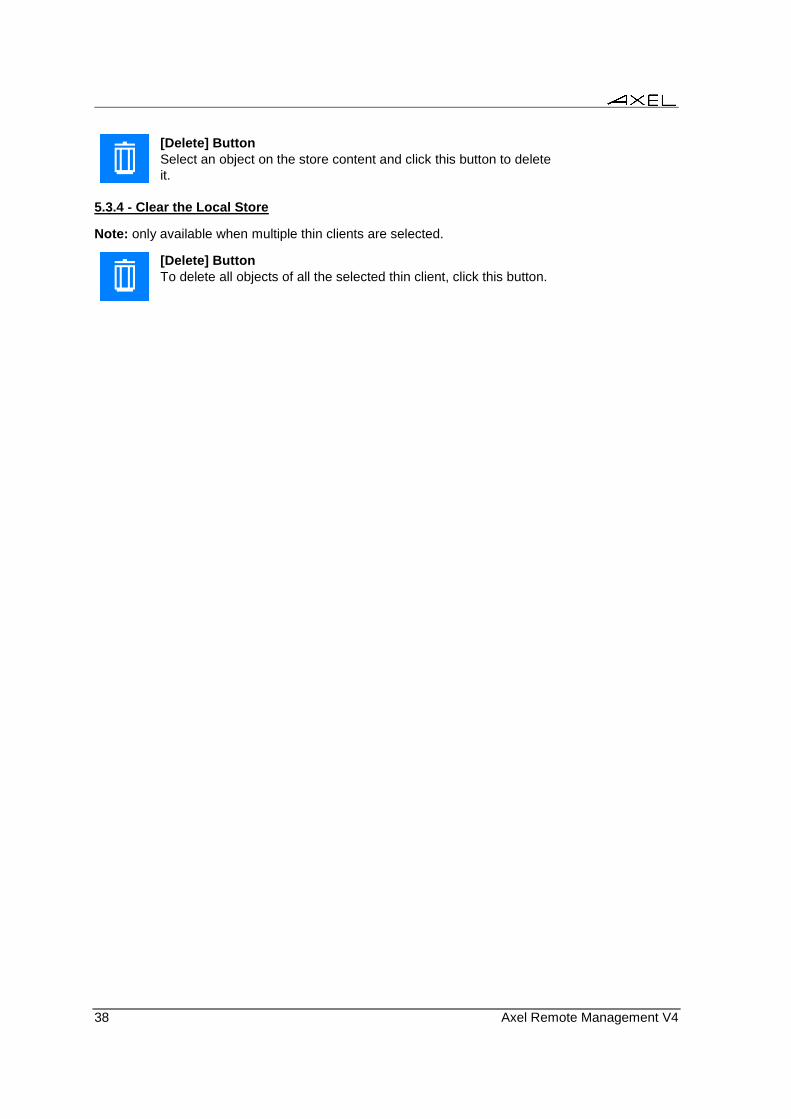
5.3.4 - Clear the Local Store
Note: only available when multiple thin clients are selected.
[Delete] Button
To delete all objects of all the selected thin client, click this button.

Axel Remote Management V4 39
5.4 - REMOTE ACCESS TO A THIN CLIENT
A remote access to a thin client is either taking the control of a remote thin client (see Chapter 5.4.1)
or entering the interactive set-up of a remote thin client (see Chapter 5.4.2).
Warning: Only one thin client can be accessed at a time.
Note: these remote access functions can be enabled/disabled through the thin client set-up. For
more information, please consult the AX3000 User's Manual.
On Windows, by default the remote control is offered by the AxelViewer software (installed at the
same time as AxRM). Alternate third party software can be specified (see Chapter 7.3.5).
On Linux, the AxelViewer software is not available. So, alternate commands must be specified (see
Chapter 7.3.5)
Below are the button and the corresponding dialog box:
With the AxelViewer software
With the alternate commands
Note: the "Text-Mode" remote control is not available with alternate commands as it's based on an
Axel proprietary protocol.
5.4.1 - Text-Only Remote Control
This functionality allows an administrator to remotely take control of a thin client. The administrator
can passively watch the users screen or actively take control with his own keyboard for various
support or administration purposes.
To open a 'remote control' session:
- Select the 'Text Mode' connection type,
- Enter port TCP (default 4098),
- Click on [CONNECTION].

40 Axel Remote Management V4
A window showing the display of the Axel thin client is opened:
The display of the thin client is displayed in real time. In addition the keystrokes from the Windows
machine are sent to the thin client. This allows a full control of the thin client.
The buttons on the left are the thin client sessions. Click on of these buttons to switch the session.
The [set-up] button allows the thin client set-up to be entered. This is a short cut to
<Ctrl><Alt><Esc>.
The [Ctrl-Alt-Del] button emulates this keystroke.
The [Quit] button quit the remote control window.
Only the text-mode session (5250, 3270, Unix emulation, set-up environment set-up) can be remote
controlled. If the current session is a graphical-mode session (Windows for example) the window
becomes grey and a help message is displayed.
Access control capabilities (see the AX3000 User's Manual):
- The remote control can be password-protected.
- An authorization from the thin client user may be requested to allow to remote control
connection.
5.4.2 - VNC Remote Control
This functionality allows an administrator to remotely take the total control of a thin client (text and
graphical modes).
To open a 'remote control' session:
- Select the 'VNC' connection type,
- Enter port TCP (default 5900),
- Click on [CONNECTION].
The display of the thin client is displayed in real time. In addition the keystrokes from the Windows
machine are sent to the thin client. This allows a full control of the thin client.

Axel Remote Management V4 41
Access control capabilities (see the AX3000 User's Manual):
- The remote control can be password-protected.
- An authorization from the thin client user may be requested to allow to remote control
connection. In this case the VNC client keyboard is disabled until the thin client user accepts
the remote control.
The remote control console can be closed by clicking the Windows cross on the upper right corner
or pressing [CTRL] [ALT] [F4] simultaneously.
5.4.3 - Telnet Set-Up
This functionality allows remotely entering the thin client interactive set-up.
To open a 'telnet set-up' session:
- Select the 'Telnet' connection type,
- Enter port TCP (default 4096),
- Click on [CONNECTION].
A window showing the set-up of the Axel thin client is opened:
Note: on the thin client, the set-up is also displayed,but to avoid conflict the thin client keyboard is
locked. The 'TELNET SETUP' label allows differentiating when the set-up is locally or remotely
entered.
This window is automatically closed when the set-up is exited.
Note: AxRM provides a pre-tuned telnet client designed specifically to access the thin client. It is also
possible to use a generic telnet client with the correct parameters (see chapter 7.3.6).

42 Axel Remote Management V4
- 6 - AUTO-CONFIGURATION

Axel Remote Management V4 43
This chapter describes the auto-configuration function.
The auto-configuration function allows a thin client to automatically obtain a new firmware file and/or
a pre-defined configuration. This is achieved without any human intervention at the thin client.
Within AxRM thin client groups are created. For each group, criteria of membership must be selected
(model type, serial number(s)...), and operations to be performed must be defined (firmware upgrade,
configuration update...).
Auto-configuration requests are sent by the thin client:
- Automatically at the very first power-on (i.e. Factory Settings),
- At each boot time (if this had been enabled in the thin client set-up).
It is necessary to configure AxRM beforehand with information of which firmware and configuration
files are to be sent to which thin clients.

44 Axel Remote Management V4
6.1 - AUTO-CONFIGURATION SET-UP
Below are the button and the corresponding dialog box:
XML or XML-SSL can be used with Auto-Configuration
By default, the listening TCP port is 80 for XML and 443 for XML-SSL.
If the service is already running when this window is opened, AxRM is positioned directly on the
« Service mode » tab
6.1.1 - Use of Groups
When receiving an auto-configuration request, AxRM determines whether the thin client belongs to
one of the groups previously created by the administrator.
A group is defined by:
A name (user definable)
A criteria of group membership:
The criteria is a key element to allow different operations to be performed on different
groups of terminals.
Criteria available are:
o All thin clients

Axel Remote Management V4 45
o Local Folder
o Thin client models
o FK code
o List of serial numbers
o Range of serial numbers
o Subnet
o External File
What instigates the auto-configuration
o A new thin client (from factory settings)
o At each boot time
o Any
Operations:
Using a password (optional): if thin clients are password-protected.
Sending a firmware file (optional) with a 'preserve configuration' capability
Sending configuration file
Disabling the auto-configuration after the configuration is sent (optional)
Sending logo file (optional)
Below are the button and the dialog box for creating a group:
The « Group » tab differs according to the group selected. Only the « Type of Auto-Configuration »
is always present at the end of the tab.
The « Orders » tab remains always the same. ????

46 Axel Remote Management V4
6.1.2 – Group Tab
a) Local Folder
« Local Folder » criteria is used to select the folder (including subfolders) to serve as a selection
criteria. The list of affected thin clients is displayed on the right side.
In this case the « auto-configuration type » is grayed out and forced to « At each boot time ».
In this example the group « Axel Update » updates any thin client belonging to Axel, Admin and Prod
issuing a auto-configuration request « At each boot time ».
b) Thin client models
The criteria "thin client models" allows one specific model to be updated.A list of all models is offered
In this example, the « M85 » group will update any M85 thin client that issues an auto-configuration
request.
c) FK Code
The FK code denotes the terminal’s hardware. For example; M75, 75B and 75E were equipped with
FK16 and the M90 is equipped with FK60.

Axel Remote Management V4 47
In this example the group « FK60 » concerns any thin client equipped with an FK60 card issuing a
request for auto-configuration of type « From factory settings ».
d) List of Serial Numbers
This criteria lets you enter a list of serial numbers already existing in the local database or yet to be
addedSerial numbers must be entered in the field "Serial Number (free entry)" and validated by the
"Add" button. It is also possible to force the name of the thin client (for the update of the
configuration), this requires to suffix the serial number by its name separated by ";" (Semicolon) or
"," (comma).
Example: 230185B01040;FbM85.london.axel.com
The "Delete" button deletes the selected line (blue).
Note: It is possible to modify, add or delete a name associated with a serial number by clicking on
the corresponding cell.
The button "Selecting the database" is used to select serial numbers in the local database list (In
this case, the associated name is automatically added).
The selection must be validated by clicking on the button "Confirm selection"
Note: the greyed lines are the serial numbers already selected in the general list and they are no
longer selectable.
48 Axel Remote Management V4
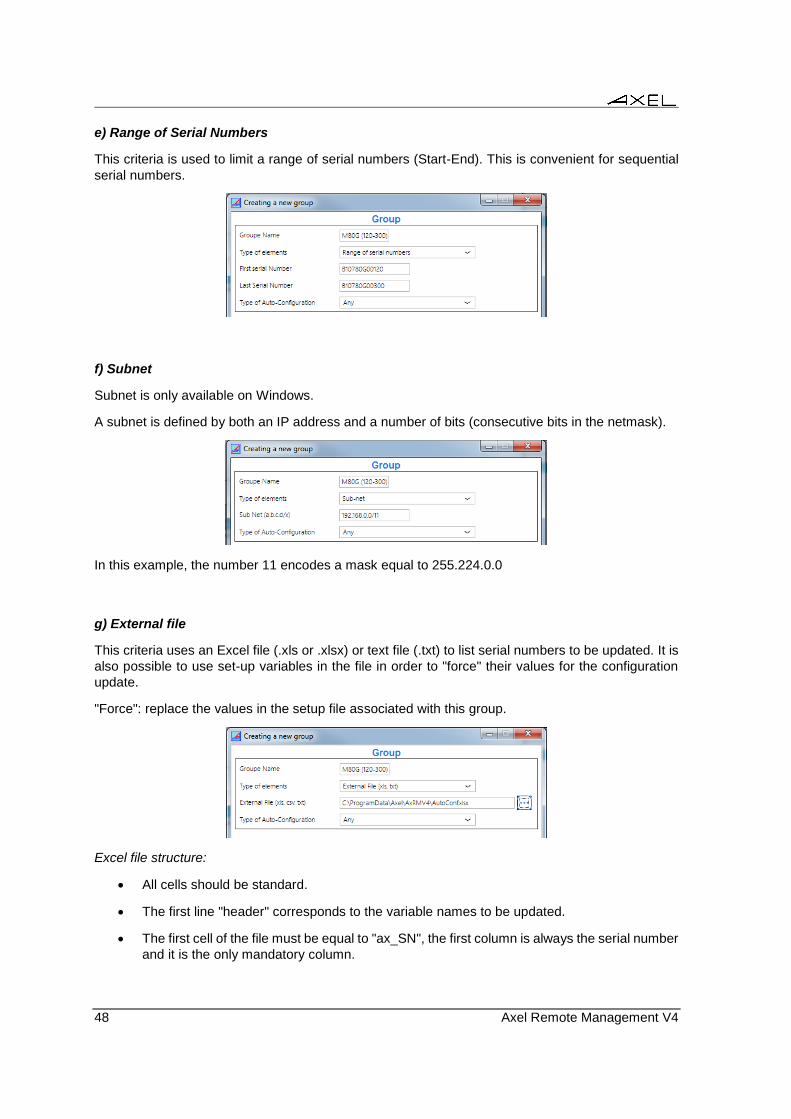
e) Range of Serial Numbers
This criteria is used to limit a range of serial numbers (Start-End). This is convenient for sequential
serial numbers.
f) Subnet
Subnet is only available on Windows.
A subnet is defined by both an IP address and a number of bits (consecutive bits in the netmask).
In this example, the number 11 encodes a mask equal to 255.224.0.0
g) External file
This criteria uses an Excel file (.xls or .xlsx) or text file (.txt) to list serial numbers to be updated. It is
also possible to use set-up variables in the file in order to "force" their values for the configuration
update.
"Force": replace the values in the setup file associated with this group.
Excel file structure:
All cells should be standard.
The first line "header" corresponds to the variable names to be updated.
The first cell of the file must be equal to "ax_SN", the first column is always the serial number
and it is the only mandatory column.

Axel Remote Management V4 49
Text file structure:
The first line named "header" corresponds to the variable names to be updated.
The first word of the header line must be the word "ax_SN", the first word of each line is the
serial number and it is the only mandatory information.
The separator is the first character found after the word "ax_SN".
Sample Files:
The following 4 sample files will give the same results
Excel file example:
ax_SN tcp_axname tcp_comment_string
B509M9012345
B509M9012346 Sales Position 5
B509M9012347 Prod12 B509M9012348 Accounting1 Sylvia thin-client (Accounting)
Text file example 1 (separator « ; ») : ax_SN;tcp_axname;tcp_comment_string
B509M9012345
B509M9012346;; Sales Position 5 B509M9012347;Prod12
B509M9012348; Accounting1;Sylvia thin-client (Accounting)
Text file example 2 (separator « ; ») : ax_SN;tcp_axname;tcp_comment_string
B509M9012345;;
B509M9012346;; Sales Position 5 B509M9012347;Prod12;
B509M9012348; Accounting1; Sylvia thin-client (Accounting)
Text file example 3 (separator « | »): ax_SN|tcp_axname|tcp_comment_string
B509M9012345
B509M9012346|| Sales Position 5
B509M9012347|Prod12
B509M9012348| Accounting1| Sylvia thin-client (Accounting)
6.1.2 - Priority of the Groups
When AxRM receives an auto-configuration request it determines to which group the thin client
belongs. The order of the groups is significant because a thin client can belong to several groups.
The two buttons on the right of the list allow the priority to be 'raised' or 'lowered’. (I.e. the higher up
the list the higher the priority)

50 Axel Remote Management V4
6.1.3 – “Command Tab”
Three types of commands are available, firmware update, configuration update and logo update.
They are cumulative for the same group.
a) Password
The password is optional and it is related to the whole group, it corresponds to the access
password to the setup of the thin clients.
Note: If a password is entered for a thin client that does need password, the thin client will still
accept the commands.
b) Firmware file
This is the full path of the firmware file to be used for updating firmware for the group.
In this path, it is possible to use wildcards (*,?), in order to be able to process thin clients of
different hardware in the same group.
In this case AxRM lists the corresponding files in alphabetical order and then according to the FK of
the thin client AxRM chooses the first FK ... file that corresponds.
Example: C: \ Firmwares \ FK * 1626b * 18100
Select all the files FK... 1626b version 18100 compin C: \ firmwares, AxRM will send the 1st FK ...
(if present) corresponding to the thin client that is making the request.
Tip: To check your list, use the "dir" command in a windows DOS command prompt. C :> dir C:\Firmwares\FK*1626b*18100
c) Options related to the firmware
Preserve configuration:
The check box "Preserve Configuration" retrieves the thin client configuration before sending the
new firmware, then sends back the saved configuration as well.
This option is useful only when the thin client is making the request "At each boot time" , It does not
impact clients updating “From factory setup" mode as they by definition have no previous config to
be retained.
If this option is selected, entering the setup file is automatically dimmed.
Enable “Smart Firmware Analysis” :

Axel Remote Management V4 51
The checkbox "Enable Smart Firmware Analysis” allows AxRM to check if the firmware version to
be sent is identical to that already in place on the thin client, in this case AxRM does not send the
firmware and stops the auto-configuration (the setup files and logos are not sent).
d) Set-up file
This is the full path of the setup file that will be used to update the configuration of this group
Some information in this file can be “forced” by the variables of the external file or the name
associated in the list of serial numbers, or the checkbox "Force disabling auto-configuration" which
is located just after.
e) Logo file
This is the full path of the logo file that will be used to update this group.
If a setup file is used in the group, the logo file is sent before.
6.1.4 - SSL Protocol
The SSL option can be used for securing communication with thin clients (requires firmware minimum
version of 1626a).
When the SSL mode is enabled, an X509 certificate must be selected (by clicking the […] button or
entering the name manually).
Note: the selected protocol for auto-configuration (XML or XML-SSL) can be different to the protocol
used for administration commands.
For more information about the SSL protocol, please consult Appendix A.9.
6.1.5 - Handling the Environment File
The current settings (TCP port, manual management, groups etc.) are automatically saved in an
'environment' file (.ini).
By default, the last environment file is automatically reloaded on startup.
[File] Button
This button allows an environment file to be created, loaded or saved.
Note: the checkbox "Service Mode: Re-read environment file after each request" allows the settings
to be refreshed without stopping and restarting the auto-configuration service.

52 Axel Remote Management V4
6.2 - LAUNCHING THE AUTO-CONFIGURATION
Two modes are available:
- Interactive mode: actions are performed and displayed in real time and the option "unknown
thin clients" is supported.
- Service mode: the auto-configuration service is run as a Windows service in the background.
There is no need for the PC to be logged on. A log file is generated to view activity.
6.2.1 - Interactive Mode
The Interactive Mode can be started if at least one group is created (see chapter 6.1.1):
To start this mode, click the 'Interactive Mode' tab and click on [LAUNCH THE AUTO-
CONFIGURATION]:
The service is stopped by clicking on the same button, now named [STOP].
Note: this dialog box can only be closed after the process is stopped.
The status zone provides details of in-coming requests and subsequent actions.
a) Receiving a Thin Client Request
When a thin client request is received, the following information is displayed in the status zone:
Connection request received from .AX3000 M90 : 192.168.1.239 / 00:A0:34:36:92:DA
Axel Remote Management V4 53
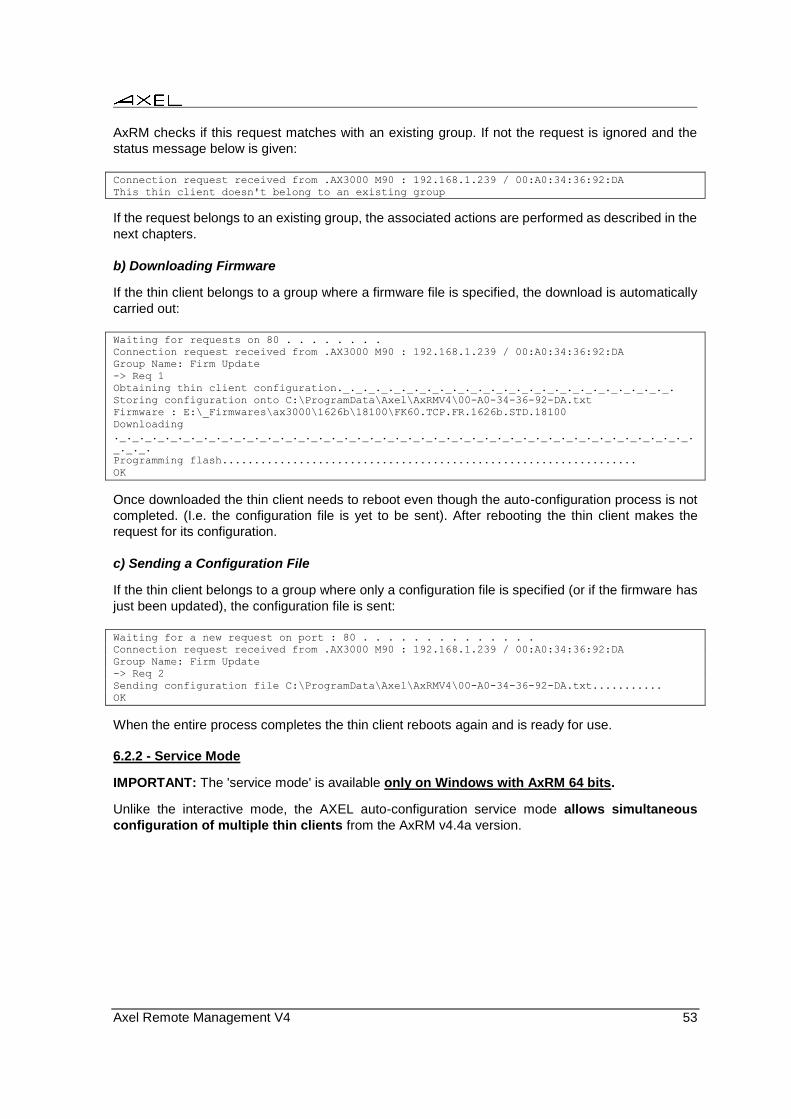
AxRM checks if this request matches with an existing group. If not the request is ignored and the
status message below is given:
Connection request received from .AX3000 M90 : 192.168.1.239 / 00:A0:34:36:92:DA
This thin client doesn't belong to an existing group
If the request belongs to an existing group, the associated actions are performed as described in the
next chapters.
b) Downloading Firmware
If the thin client belongs to a group where a firmware file is specified, the download is automatically
carried out:
Waiting for requests on 80 . . . . . . . .
Connection request received from .AX3000 M90 : 192.168.1.239 / 00:A0:34:36:92:DA
Group Name: Firm Update
-> Req 1
Obtaining thin client configuration._._._._._._._._._._._._._._._._._._._._._._._._._._.
Storing configuration onto C:\ProgramData\Axel\AxRMV4\00-A0-34-36-92-DA.txt
Firmware : E:\_Firmwares\ax3000\1626b\18100\FK60.TCP.FR.1626b.STD.18100
Downloading
._._._._._._._._._._._._._._._._._._._._._._._._._._._._._._._._._._._._._._._._._._._._._.
_._._.
Programming flash.................................................................
OK
Once downloaded the thin client needs to reboot even though the auto-configuration process is not
completed. (I.e. the configuration file is yet to be sent). After rebooting the thin client makes the
request for its configuration.
c) Sending a Configuration File
If the thin client belongs to a group where only a configuration file is specified (or if the firmware has
just been updated), the configuration file is sent:
Waiting for a new request on port : 80 . . . . . . . . . . . . . .
Connection request received from .AX3000 M90 : 192.168.1.239 / 00:A0:34:36:92:DA
Group Name: Firm Update
-> Req 2
Sending configuration file C:\ProgramData\Axel\AxRMV4\00-A0-34-36-92-DA.txt...........
OK
When the entire process completes the thin client reboots again and is ready for use.
6.2.2 - Service Mode
IMPORTANT: The 'service mode' is available only on Windows with AxRM 64 bits.
Unlike the interactive mode, the AXEL auto-configuration service mode allows simultaneous
configuration of multiple thin clients from the AxRM v4.4a version.

54 Axel Remote Management V4
On the Auto-configuration windows, select the 'Service Mode' tab:
The check box "Dynamic reading of the environment file in case of changes" allows the modification
of the environment of the auto-configuration without having to stop and restart the auto-configuration
service.
Note 1: with the service mode, mapped network drive must NOT be used for file location. (A network
drive is created when the user logons. And there is no user logon with a service mode)
Note 2: for the XML-SSL protocol, the user account must have the SSL certificate installed in his
personal store and have the privilege for installing and starting a service (utility subincla.exe)
a) Installing the Service
The first step is the service installation.
A user account is required. It can be the system account (LocalSystem) or any user account with the
administrative rights.
A check box allows the option of auto-starting the service when the Windows machine is booted. If
this check box is not ticked, the service will have to be manually started each time the Windows
machine is booted up or when required.
Click on [INSTALL THE SERVICE] to start the installation. If the installation is successful, the service
start-up part is activated:

Axel Remote Management V4 55
b) Starting the Service
Two files are associated with this service:
- Log File: auto-configuration activity will be recorded in this file.
- Transaction File: information about devices using the auto-configuration service is recorded in
this file. This allows the AxRM Thin client Database to be regularly updated. (See Chapters
3.4 and 4.4.6)
Click on [START THE SERVICE] to start. When running only the [STOP THE SERVICE] button is
available:
Each time the service is started, AxRM offers to append the existing log file or to create a new one
(in which case the old file is saved in .back):
Once the service is started, auto-configuration is started in the background. It is not necessary to
stay in AxRM or for the PC to be logged on
Note: when starting the service an event is recorded in the Microsoft Event Viewer (Application part).
All subsequent auto-configuration events are recorded in the log file.
c) View LOG File
The "View LOG File" button is used to display all auto-configuration events in a windows dynamically
update.

56 Axel Remote Management V4
d) Stopping the Service
To stop the service click on [STOP THE SERVICE] (for example to change the environment file):
e) Uninstalling the Service
Uninstalling the service is only possible when the service is stopped.
Click on [UNINSTALL THE SERVICE]:
IMPORTANT: Always uninstall the service before uninstalling AxRM.

Axel Remote Management V4 57
6.3 - THIN CLIENT ACTIVITY
When the thin client is switched on for the very first time, the auto-configuration function is
automatically started. (It could be also started at each boot time). No human intervention is
necessary.
The following happens:
Thin client obtains an IP address by DHCP (optional).
Thin client locates the AxRM server. Possible methods are:
o The AxRM information (IP address and TCP port) is given by DHCP vendor options. See
Appendix A.10.
o The AxRM hostname is 'axrmserv' (and default TCP port is 80) or 'axrmservssl' (and default
TCP port is 443).
o AxRM is running on the DHCP server (and we assume TCP port is 80).
o The AxRM location is specified in the thin client set-up.
Thin client sends auto-configuration requests (req 1).
New firmware file received (optional).
o IF the firmware is received.
Thin client reboot automatically
Thin client sends auto-configuration requests (req 2).
Logo file received (optional).
New configuration file received.
AxRM sends a reboot command to the Thin client
Normally during a firmware update the thin client reboots after the new firmware is applied and again
after the configuration file is appliedCAUTION: During the "Writing Flash" phase it is critical the
process is not interrupted or the terminal could be left in a state with no firmware installed.. In this
case use the function "Repair by BOOTP + TFTP" (see chapter 7.2).
For more information on the behavior of the thin client in auto-configuration, see the AX3000 User's
Manual.
58 Axel Remote Management V4
- 7 - OTHER FUNCTIONS

Axel Remote Management V4 59
This chapter describes more operations possible with AxRM.
7.1 - ASSIGNMENT OF AN IP ADDRESS
The basic functions of AxRM require the thin client to already have a valid IP address.
If the thin client does not have an address IP (or has an unknown address IP), it is possible to re-
apply a new address IP if the serial number or Ethernet MAC address of the thin client are known.
Note: the serial number and the Ethernet address are given on the label on the bottom of the thin
client.
Important: this function is only available if:
- The thin client and the AxRM machine are on the same network (This function does not work
through routers as routers work at the IP level and this command works at the hardware MAC
address level).
- This option is enabled in the thin client set-up.
To call the dialog box, click the button on the upper right corner with the 3 dots and select on the
menu [Setting an IP Address by Ping]:
Step 1 - Identify the thin client by either serial number of Ethernet MAC address
Step 2 - Enter new IP address address to assign to the thin client
Step 3 - Run command by pressing [SET THE IP ADDRESS]
After several seconds AxRM will confirm the command executed successfully.
Important: After the new IP address the thin client is automatically rebooted.
7.2 - USING BOOTP TO RELOAD FIRMWARE
7.2.1 - Basic Concept
For certain Axel products firmware download comprises of a critical phase where the existing
firmware is erased and the new firmware has not downloaded. If a problem occurs during this phase

60 Axel Remote Management V4
(i.e. network incident or corrupt firmware file) the Axel product can be left without valid firmware. In
this situation, on booting, it follows a certain procedure.
The thin client sends out a BOOTP broadcast on the network to recover the parameters necessary
download new firmware. These parameters are: thin client IP address, name of the firmware file and
the TFTP server address.
Providing a BOOTP server is listening for such a request and that the BOOTP server "recognizes"
this product (from to its Ethernet address), the firmware is reloaded.
7.2.2 - Configuring the BOOTP Server
To call the dialog box, click the button on the upper right corner with the 3 dots and select on the
menu [Repair by BOOTP + TFTP]:
Select the method of identification (serial number or Ethernet address).
Provide an IP address for the thin client and the name of the firmware file to be downloaded.
In this case, AxRM acts as both BOOTP server and a TFTP server. To change that, see Chapter
7.2.4.
7.2.3 - Launching BOOTP to Download Firmware
When all the parameters are given press the [START BOOTP] to start the service:
AxRM is now listening for BOOTP requests.
Note: the BOOTP server can be stopped by pressing the same button which is now called [STOP
BOOTP].
Power cycle the thin client to force it to send out a BOOTP request. If all the parameters are correct
BOOTP will initiate the firmware transfer automatically.

Axel Remote Management V4 61
7.2.4 - Configuring the BOOTP Server (Advanced)
The [MORE OPTION] button gives access to the advanced settings:
To use a third party TFTP server (i.e. not the embedded AxRM TFTP server) fill the "TFTP Server
IP address" field
The thin client and AxRM are not on the same local area network: Enter the IP address of the
router on the ‘other’ side in the "Remote Router IP Address" field.
7.3 - AXRM SETTINGS
Click this button, on the upper right corner of the console, to enter
the AxRM settings box.
7.3.1 - General Parameters
Click on the "General" tab:

62 Axel Remote Management V4
a) Language Selection
Use the drop-down list to select a language
b) Network Interface
For XML-SSL and RSH protocol administration, AxRM must know the IP address of its host Windows
machine.
If needed the 'Network Interface' option allows this IP address to be changed. The hostname is also
displayed for information after the IP address.
Note 1: the default value is set when AxRM is launched for the first time (see Chapter 3.1).
Note 2: The wrong interface may be selected and require changing if you have more than one
interface - for example if there is both a WiFi and Ethernet interface the wrong interface may be
selected
c) Password
If necessary the control of AxRM can be controlled by a password. Enter your chosen password
twice.
The password is required the next time AxRM is launched.
7.3.2 - Administration Protocol
Click on the "Administration" tab:
a) Protocol
The "Remote Administration Command" option is:
- XML: default protocol using the TCP Port 80,
- RSH: historical protocol (firewall settings can be requested).
With the XML protocol,
- The password required by certain administration commands can be encrypted. (An error 114
will be sent back if this option is not supported by the thin client firmware)
- The SSL option can be used to secure communication. (Requires thin client firmware minimum
version of 1626a). In this case, an X.509 certificate must be selected by clicking the […] or by
manually entering the name.
Click the [TEST SSL SERVER] button to check if everything is correct.

Axel Remote Management V4 63
Note: SSL is not support with Linux. Please read Appendix A.9 form more information about
SSL.
With Linux, two additional options are available:
- To check if a thin client is available, by default AxRM opens a connection to the TCP port 514.
The 'Alternate ping command' option allows a customizable command to be used. For example
'/bin/ping -c 1 -w 1'.
- For the 'Assignment of an IP address' function (see Chapter 7.1), AxRM needs to update the
ARP table. The full pathname of this command must be specified. For example '/usr/sbin/arp'
b) Miscellaneous
Use the IP address to administrate DHCP thin clients
By default, a thin client with a dynamic IP address is administered by its DNS name which requires
the use of Dynamic DNS being used. If DDNS is not used, the IP address can be used, but this is
not advised as the terminals DHCP supplied IP address is liable to change at which point it won’t
be consistent with the database.
For more information about DHCP thin client management, please consult the Appendix A.6.
Retain the friendly name when the thin client is already listed in database
When a discovered thin client is already listed in the database, this option indicates if the friendly
name should be updated.
c) Windows DNS Cache
Note: this option is not available on Linux
We strongly advise to disable the Windows DNS Cache when DHCP thin clients are used (see
Appendix A.6.2).
The DNS service status (enabled/disabled) is shown. If enabled, the service can be temporarily or
definitively disabled
7.3.3 - The Database
Click on the "Database" tab:
Three database types are available: Text-File MySQL and MS-SQL.
Note: on Linux, only the Text File type is supported.

64 Axel Remote Management V4
a) Text-File Database
The single option is the file name.
By default the text file name is "AxRM.axd". On Windows its location is "%ProgramData%\AxRMV4".
On Linux, it's located in the same folder as the AxRMV4 binary.
b) MySQL or MS-SQL Database
The database parameters are:
- Server: With MySQL it's simply the server IP address and with MS SQL it's the string
<host>\<instance>.
- Authentication: username and password (this user must have 'database creation'
permission)
- Database Name.
The [TEST] button allows these settings to be tested. If the database doesn't exist it will be
automatically created. For more information about the database structure see Appendix A.4.
7.3.4 - Default Folders
Click on the "Default Folders" tab:
Three types of folders are shown:
- Set-Up and Statistics Files: default folder for the set-up and statistics remote commands.
- Firmware Files: default folder for the firmware download remote commands,
- Configuration back-up: default folder for set-up files to be automatically archived. By default
on Windows its location is "%ProgramData%\AxRMV4". On Linux, it's located in the same
folder as the AxRMV4 binary. See Chapter 5.2.1.

Axel Remote Management V4 65
7.3.5 - Remote Control
Click on the "Remote Control" tab:
The remote control is usually done with the Axel Viewer software. But, when needed, alternate
commands can be used.
Note: these alternate commands must be used on Linux, because Axel Viewer is not supported on
this platform.
For these alternate commands, the %host%, %port% and %display% substitution variables allows
the Axel IP address, the TCP port and the X11 display number to be programmed
a) Alternate Telnet Command
Prerequisite of a third party emulator:
- ANSI emulation (with color support)
- TERM value: ansi
- Screen size: 80x25
- Scrolling mode disabled
Note for using the Microsoft telnet client: as the scrolling mode cannot be disabled with this telnet
client, the DOS box size must be set to 80 columns and 26 rows.
b) Alternate VNC Command
The single prerequisite is enabling the 'full color' mode.
Example:
/usr/bin/vncviewer.exe %host%:%port%

66 Axel Remote Management V4
APPENDIX

Axel Remote Management V4 67
This Appendix gives information for administrators who wish to learn more about the abilities and
internal workings of the AxRM Software.
A.1 - ADDITIONAL SOFTWARE
Two additional software packages are available in the AxRM installation folder.
A.1.1 - AxViewer: Remote Control
AxViewer allows the thin client remote control without the need of AxRM.
Usage:
Axelviewer [Thin-client[-mode=mode][-port=port][-lang=lang][-help]]
Description:
Thin-client Thin client IP address. In this case, the IP address can't be modified in the
dialog box.
-language=xxx Possible values: EN (English) or FR (French)
-mode=xxx Remote control mode: vnc, text or telnet (default vnc)
-port=xxx TCP port. (Default : vnc 5900, text 4098, telnet 4096)
Note 1: '-' can be replace by '/' on the command arguments
Note 2: when the /mode option is given, the remote control is immediately launched (the dialog box
is not displayed).
For more information, see Chapter 5.4.
A.1.2 - AxRAC: Remote Administration Command
AxRAC allows administration commands without the need of AxRM.
AxRAC can be used in ‘Background’ mode or in 'Interactive’ mode. Both the XML and RSH protocols
can be used for administration commands.
Usage:
AxRAC [AxelDevice [Command [/Option1=aaa] ... [/OptionN= zzz] ] ]
Description:
AxelDevice IP address (or DNS name) of the thin client
Command GetConfig | GetStats | SendConfig | SendMessage | WakeOnLAN |
Shutdown | Reboot | Download
/Log=xxx Log file for the Background mode (could be set to NULL when a logfile is not
needed)
/File=xxx Result file for GetConfig and GetStats commands
Configuration file for SendConfig command
Firmware file for Download command
/Message=xxx Message for SendMessage
Additional options: /MsgTitle=xxx /MsgAutoValid=5-10-30 /MsgBeep=1-2-5
/MsgLargeFont /MsgCritical
/NotPreserveConfig The thin client configuration is not preserved when downloading a firmware
/FullConfig A full configuration is returned with the GetConfig command
/Ethernet=xxx Thin client Ethernet address for the WakeOnLAN command
/Language=xxx FR (French) or EN (English)

68 Axel Remote Management V4
/Password=xxx Required for password-protected thin clients
/Protocol=xxx Administration protocol RSH or XML (default)
/Host=xxx IP address of this host
/SSLCertificate=xxx Name of X.509 certificate (XML-SSL protocol)
/Help Display this help
IMPORTANT: By default, AxRAC operates in Interactive mode (with a dialog box). The Background
mode is used only when the ‘/Log’ option is specified.
The following are examples:
Display online help
AxRAC /Help
Interactive Mode
AxRAC 192.168.1.12 SendConfig
Display the dialog box with the given options (from the command line):
Background Mode
AxRAC 192.1.1.12 SendConfig /File=c:\temp\setup.txt /Log= c:\temp\log.txt
A configuration file is sent to the thin client in XML protocol.
IMPORTANT: No more information is displayed after AxRAC is launched. Only the logfile (/Log
option) allows the result of the administration command to be seen.

Axel Remote Management V4 69
A.2 - USING WITH A FIREWALL
The AxRM tool uses the following commands:
- PING: checking thin client availability,
- XML, RSH or SSL: running administration commands,
- SNMP: discovering new thin clients,
- TFTP: downloading firmware,
- TELNET: entering thin client set-up,
- BOOTP: "repairing" a thin client when the firmware is lost,
- WOL (WakeOnLAN): booting up a thin client.
If you have a firewall there is a high chance that some services will be blocked by default.
There are three ways to resolve this issue.
1. Connect the thin client to a non-firewalled PC, (maybe direct with crossover Ethernet cable)
thereby avoiding the firewall.
2. Turning off the firewall for the duration of the download
3. Enabling AxRM to work through the firewall. This is covered in more detail below.
Enabling PING
The ICMP protocol must be allowed.
Enabling XML
Enable the outgoing TCP port 80.
Enabling XML-SSL
Enable the outgoing TCP port 80 and incoming port 443.
Enabling RSH
From the PC/Firewall, RSH requires an outgoing and an incoming port. When 'RSH' is allowed within
the firewall:
- An outgoing port is enabled (514),
- A range of incoming ports starting at 1024 are enabled.
(Sometimes the 'Local RSH Port Base' default valued can be modified)
Enabling SNMP
Enable the outgoing UDP port 161.
Enabling TELNET
By default the telnet TCP port is 4096. This incoming port must be enabled.
Enabling TFTP
Enable UDP port 69 - this is the port TFTP listens to.
Enabling BOOTP
Enable UDP port 70 - this is the port TFTP listens to.
Enabling WOL
Enable the outgoing UDP port 9.

70 Axel Remote Management V4
A.3 - FORMAT OF THE TEXT-FILE DATABASE
The format of the database file must adhere to the following rules:
- The first line of the file must be "AXEL DATABASE V2.0".
- All lines beginning with # are comments and are not interpreted.
- Uncommented lines must contain the following fields (a comma is used as separator):
- Identifier of the element's parent in the tree
- Identifier of this element (Nxxx for a folder, Lxxx for a thin client)
- Name of this element
- Ethernet Address,
- IP address or DNS name,
- Firmware/Hardware revision,
- Comment.
A.4 - FORMAT OF THE SQL DATABASE
The SQL database contains two tables:
- T_LEAFS: thin client table,
- T_NODES: folder table.
These tables are created as shown below:
CREATE TABLE T_LEAFS (
leaf_key varchar(10) NOT NULL,
leaf_parent varchar(10) NOT NULL,
leaf_name varchar(45) NOT NULL,
leaf_IP varchar(80) NOT NULL,
leaf_MAC varchar(17) NOT NULL,
leaf_FW varchar(80) NOT NULL,
leaf_comment varchar(80) NOT NULL,
PRIMARY KEY (leaf_key)
)
CREATE TABLE T_NODES (
node_key varchar(10) NOT NULL,
node_parent varchar(10) NOT NULL,
node_name varchar(45) NOT NULL,
PRIMARY KEY (node_key)
)
A.5 - AXRM CONFIGURATION FILE
The AxRM configuration file is "AxRM.ini". On Windows, it's located in "%ProgramData%\AxRMV4".
On Linux, it's located on the same folder than AxRMV4 binary.
Here an example of configuration file:
[Global]
Configuration File Version=V1.1
AxRM Password=13050B0F040B120A0508080E130C06070F
AxRM IP=192.168.1.12
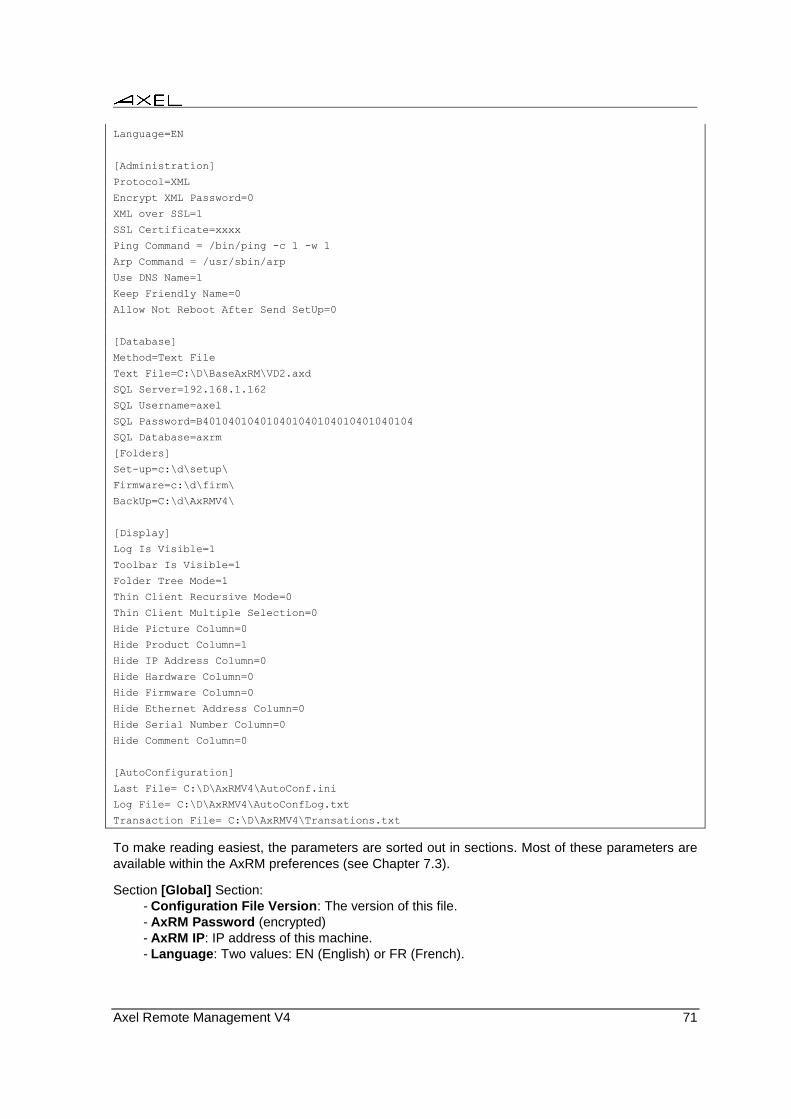
Axel Remote Management V4 71
Language=EN
[Administration]
Protocol=XML
Encrypt XML Password=0
XML over SSL=1
SSL Certificate=xxxx
Ping Command = /bin/ping -c 1 -w 1
Arp Command = /usr/sbin/arp
Use DNS Name=1
Keep Friendly Name=0
Allow Not Reboot After Send SetUp=0
[Database]
Method=Text File
Text File=C:\D\BaseAxRM\VD2.axd
SQL Server=192.168.1.162
SQL Username=axel
SQL Password=B401040104010401040104010401040104
SQL Database=axrm
[Folders]
Set-up=c:\d\setup\
Firmware=c:\d\firm\
BackUp=C:\d\AxRMV4\
[Display]
Log Is Visible=1
Toolbar Is Visible=1
Folder Tree Mode=1
Thin Client Recursive Mode=0
Thin Client Multiple Selection=0
Hide Picture Column=0
Hide Product Column=1
Hide IP Address Column=0
Hide Hardware Column=0
Hide Firmware Column=0
Hide Ethernet Address Column=0
Hide Serial Number Column=0
Hide Comment Column=0
[AutoConfiguration]
Last File= C:\D\AxRMV4\AutoConf.ini
Log File= C:\D\AxRMV4\AutoConfLog.txt
Transaction File= C:\D\AxRMV4\Transations.txt
To make reading easiest, the parameters are sorted out in sections. Most of these parameters are
available within the AxRM preferences (see Chapter 7.3).
Section [Global] Section:
- Configuration File Version: The version of this file.
- AxRM Password (encrypted)
- AxRM IP: IP address of this machine.
- Language: Two values: EN (English) or FR (French).

72 Axel Remote Management V4
[Administration] Section:
- Protocol: Two values for the administration protocol: XML or RSH.
- Encrypt XML Password: With some administration commands (sending a configuration,
sending a firmware...), the thin client password is required. With the XML protocol this
password can be encrypted (if also supported by the thin client firmware).
- XML over SSL : securing XML data with SSL
- SSL Certificate : X.509 certificate name
- Ping Command: Alternate ping command (linux only)
- ARP Command: Alternate ARP command (linux only)
- USE DNS Name: Force a discovered thin client to be recorded with its DNS name (not its IP
address).
- Keep Friendly Name: When a discovered thin client is already listed, this option indicates if
its friendly name is updated or kept.
- Allow Not Reboot After Sending SetUp: Allows the option "Reboot the Thin Client after the
Command" to be available when sending a configuration file to a thin client.
[Database] Section:
- Method: Three values: 'Text File', 'MySQL' or 'MS SQL'
- SQL Server: With MySQL it is the server IP address and with MS SQL it is the string
<host>\<instance>.
- SQL Username
- SQL Password (crypted)
- SQL Database
[Folders] Section:
- Set-Up: Default folder when opening or saving config and statistics files.
- Firmware: Default folder when opening firmware files.
- BackUp: Default folder when configuration files are automatically saved.
[Display] Section:
- Log Is Visible: Displaying (or not) the log area in the main console.
- Toolbar Is Visible: Displaying (or not) the button bar in the main console.
- Folder Tree Mode: Displaying (or not) folders as a tree structure.
- Thin Client Recursive Mode: Displaying (or not) thin clients in recursive mode.
- Thin Client Multiple Selection: enabling/disabling the thin client multiple selection.
- Hide xxx Column: Hiding/displaying the column 'xxx' (Thin Client panel).
[Auto Configuration] Section:
- Last File: Current auto-configuration environment file name.
- Log File
- Transaction File
A.6 - MANAGING DHCP THIN CLIENTS
A.6.1 - IP Address vs DNS NAME
To open a connection to a thin client (i.e. to remotely administrate a thin client), AxRM must know
the ID of the thin client.
When static IP addresses are used the IP address is suitable for this identifier.

Axel Remote Management V4 73
However when the IP address is provided by DHCP, the IP address can't be used as the IP address
is liable to change. In this situation the ID must be the DNS name.
Note: by default, AxRM uses the DNS name to administrate a thin client with a dynamic IP address.
It's not advised, but this can be changed through the AxRM tunings (see Chapter 7.3.2).
When the ID is the DNS name, DDNS (Dynamic DNS) must be used. In this scenario the DHCP
server collaborates with the DNS server, updating the DNS server with the new thin client's DNS
name.
Using a DNS name allows AxRM to administer thin clients in a dynamic-IP-addressing environment.
Care needs to be taken over the 'DNS Cache' on the machine where AxRM is running.
A.6.2 - The Windows DNS Cache
When a TCP/IP device opens a connection in a DNS environment, the DNS name of the destination
must first be "resolved". This DNS resolution allows the IP address to be obtained from the DNS
name, allowing the connection to be established. (This IP address can be dynamic when using a
DHCP environment).
Each time a DNS name has to be resolved a DNS request is sent to the DNS server(s).
'DNS Cache' Overview
To reduce the number of DNS requests, a DNS cache is maintained on Windows machines. This is
an array where known associations between name and IP are stored. The Windows machine first
searches for an entry in its DNS cache before sending a DNS request to the server.
This causes a potential problem in the following scenario:
The thin client boots, obtains an IP address via DHCP, the DHCP server updates the DNS server.
The first time AxRM contacts this thin client it resolves the thin client's DNS name and obtains the IP
address. Connection is established, remote commands work and the PC caches the thin client's DNS
name and IP address. When the thin client reboots it will re-contact the DHCP server to request an
IP address. This IP address may be different to the address previously provided. Now, when the
AxRM PC tries to contact the thin client, it will first access its own DNS cache, lookup the DNS name
and find the old IP address is still associated to the DNS, and the connection with fail....
Solution:
The solution is to disable the DNS cache so each time a DNS name is resolved a new DNS request
is sent.
The AxRM preferences allow the DNS cache to be disabled. See Chapter 7.3.1.
To manually disable the DNS cache, enter the following command from a DOS prompt.
net stop dnscache
Note: To disable the DNS cache permanently in Windows, use the Service Controller tool or the
Services tool to set the DNS Client service startup type to Disabled. Note that the name of the
Windows DNS Client service may also appear as "Dnscache".
For more information consult the Microsoft knowledge base: http://support.microsoft.com/kb/318803.

74 Axel Remote Management V4
A.7 - RSH-BASED COMMANDS
The preferred mode for administrative commands is XML. XML provides the following benefits over
RSHe:
- Easy firewall administration (only one outgoing TCP port)
- Firmware downloading is faster and does not require TFTP.
Various standard TCP/IP commands are embedded in the AxRM Software (rsh, arp, tftp and ping).
Depending on your operating system these commands may also be included in Windows.
RSH-based administration commands can be emulated from a DOS prompt. The following table
gives for each administration command the equivalent generic DOS command:
Commands AxRM Commands TCP/IP
Get thin client information rsh axname ax_version
Get thin client statistics rsh axname ax_getstat
Get thin client configuration For full set-up info:
rsh axname setup_get > file
For partial set-up:
rsh axname setup_get_lite > file
Reboot thin client rsh axname ax_reboot [passwd]
Send thin client configuration To send the set-up:
rsh axname setup_send [passwd] < file
To reboot automatically:
rsh axname ax_reboot [passwd]
Firmware download To obtain and save current set-up:
rsh axname setup_get > file
To download firmware:
rsh axname ax_download [passwd] [File ] [TFTP] [Router]
To send the saved set-up:
rsh axname setup_send [passwd] < file
To reboot automatically:
rsh axname ax_reboot [passwd]
Close session rsh axname ax_reboot [passwd] sessX
('X' is the session number : sess1, sess2…)
Switch session rsh axname ax_switch sessX
('X' is the session number : sess1, sess2…)
Set IP address To modify the arp table:
arp -s axname MACaddr
And to force IP address:
ping axname
Note: for more information about RSH commands supported by Axel products, please consult the
User's Manual of the thin client / Office Server.

Axel Remote Management V4 75
A.8 - SNMP SUPPORT
To discover thin clients, SNMP requests can be sent by AxRM over the network (broadcast or IP
address scan).
Only one SNMP command is supported: sysDescr (MIB-2 / OID .1.3.6.1.2.1.1.1 / Community=public)
When receiving a sysDescr command the terminal sends back a character string composed by peers
« attribute:value ». A space is used as a separator between peers. The attribute of the first peer is
always 'AXEL'.
Example:
AXEL:00:a0:34:30:01:4d FW:FK56-BV11e/TCP.FR.1236d:STD_16235 IP:STATIC
IPV4_ADDR:192.168.1.247 NAME:axel30014D
The possible attributes are listed below:
Attribute Value
AXEL MAC address of Ethernet interface (00:A0:34:aa:bb:cc)
IPV4_ADDR IP address of Ethernet interface (0.0.0.0 when the interface is not enabled)
IP Equals to 'DHCP' when IPV4_ADDR obtained by DHCP. Otherwise equals to
'STATIC'.
WAXEL MAC address of WiFi interface
WIPV4_ADDR IP address of WiFi interface (0.0.0.0 when the interface is not enabled)
WIP Equals to 'DHCP' when WIPV4_ADDR obtained by DHCP. Otherwise equals to
'STATIC'.
FW Hardware and firmware information
NAME Name of thin client (only if FQDN is not specified).
FQDN Full Qualified Domain Name of the thin client (given only when the IP address
and the default domain name are obtained with DHCP).
COMMENT Optional commentary issued from the thin client set-up
A.9 - SECURING XML WITH TLS/SSL
Note: the full name of the protocol is TLS/SSL will be referred to as SSL for the rest of this chapter
for the ease of reading.
Both XML administration commands and auto-configuration can be secured with SSL.
The SSL offers two levels of security:

76 Axel Remote Management V4
- Data encryption,
- With authentication: the server identity (i.e. AxRM) can be checked by the thin client
For both XML administration commands and auto-configuration, AxRM acts as an SSL server. An
X.509 certificate with private/public keys must be installed onto the AxRM machine.
IMPORTANT: This X.509 certificate must be installed in the personal store of the AxRM user. This
can be achieved with Internet Explorer or with the 'Certificate' Snap-in of MMC.exe.
When the X.509 certificate is correctly installed, the [...] button can be used to access it (in AxRM
preferences or AxRM auto-configuration dialog box.
The SSL server will fail if the X.509 certificate is not available or if this certificate can't be used for
authentication.
A.9.1 - Auto-Configuration
With auto-configuration the thin client initiates the connection so the thin client acts as the SSL client
and AxRM as the SSL server.
The thin client opens an SSL connection to the AxRM auto-configuration service. If the connection
is accepted, the XML administration commands are sent over this secure channel.
A.9.2 - Administration Commands
With XML administration commands AxRM initiates the connection so AxRM acts as a client and the
thin client as a server.
However in XML-SSL mode, this must be reversed because AxRM is the SSL server. Performing an
XML-SSL command is described as:
Step 1: AxRM starts the SSL server and sends an XML (not secured) to the thin client. This command
requests an SSL connection from the thin client. This command includes:
- The name and the IP address of the AxRM machine
- And the Ethernet address of the thin client
Step 2: This request can be denied by the thin client (for example if the Ethernet address contained
in the request doesn't match the actual Ethernet address of the thin client). If the request is accepted,
an XML 'OK' response is sent back to AxRM and the thin client opens an SSL connection to AxRM.
Step 3: When the SSL connection is established, the thin client must confirm its identity (an XML
packet is sent over this secured channel. If AxRM agrees, the administration commands are sent
over this secured channel.
IMPORTANT: as described in Step 2, the thin client must open an SSL connection to AxRM. This
assumes the IP address and the name of AxRM machine are known by AxRM. Check this information
is correctly specified in AxRM preferences (see Chapter 7.3.1)
A.10 - AUTO-CONFIGURATION DHCP VENDOR OPTIONS
In addition to the standard options (IP addresses, DNS server...), the DHCP server can be used to
communicate manufacturer specific information (vendor option).
With Axel, a vendor option can be used to specify the network location (IP address and TCP port) of
the AxRM auto-configuration service.

Axel Remote Management V4 77
The Axel options are contained within the range of numbers from 231 to 240. The ‘type’ is always
‘character string’. The format of the entry is as follows:
- Entry starts with a keyword followed by one or more parameters.
- The symbol ":" is used as separator.
Note: In contrast to some implementations Axel uses a ‘keyword’ rather than a specific number. The
actual number (231 to 240) is irrelevant so any non-conflicting number in this range can be used.
A.10.1 - 'axrmserv' Option: XML auto-configuration
The 'axrmserv' option specifies the network location (IP address and TCP port) of the AxRM auto-
configuration service in XML mode.
The format is as follows:
axrmserv:param1:param2
The parameters are:
- The IP address or DNS name of the AxRM server
- The XML port AxRM is listening on (by default 80)
A.10.2 - 'axrmservssl' Option: XML-SSL auto-configuration
The 'axrmservssl' option specifies the network location (IP address and TCP port) of the AxRM auto-
configuration service in XML-SSL mode.
The format is as follows:
axrmservssl:param1:param2
The parameters are:
- The IP address or DNS name of the AxRM server
- The XML-SSL port AxRM is listening on (by default 443)
Note: when the both options 'axrmserv' and 'axrmservssl' are published, 'axrmservssl' takes priority.


Z.A. Courtabœuf
14 Avenue du Québec
Bât. K2 - BP 728
91962 Les Ulis cedex - FRANCE
Tel.: +33 1.69.28.27.27 - Fax: +33 1.69.28.82.04 - Email: [email protected]