Embed Size (px)
Citation preview

0
5
25
75
95
100
aw_DP268_Manual_G10_150418
2015 5 27 17:02:34
Congratulation on your purchase of the professional digital piano.This piano is an easy-to-use digital piano. Inside the slim cabinet, it has so many professional and modernized preset styles and songs, easy but powerful functions, and features that enhance your performance. Enjoy your performance with the piano!
You are recommended to study this manual carefully before using the unit.
Congratulations
Inside This package
Please make sure the package completely contains the following:
Right Side Panel
Left Side PanelPiano Cabinet(including adapter cable)
Pedal Box(including pedal cable)
Rear Panel Screw Bag
Instruction Manual
2Version:G10
0
5
25
75
95
100
aw_DP268_Manual_G10_150418
2015 5 27 17:02:35
3
Important Notes
Please read the following carefully before use:
Do not expose the piano to high temperature, direct sunlight and excessively dusty places.
Do not place the piano too close to other electrical appliances such as television and radio.It may cause interference.
Do not place the piano to excessive humid area. Avoid putting container with liquid on top ofthe piano for preventing the damage of the internal parts of the piano by flowing liquid.
Always unplug cables by gripping the plug firmly, but not pulling on the cable.
Do not apply excessive force to the switches and buttons.
When the piano is not in use or in the time of thunderstorm, please remeber disconnect the power supply.
Avoid adjusting the volume level to the maximum or to the levels that you feel uncomfortable, werecommend you to limit the volume level to two-third of the max to prevent the damage ofaudiory sense.
Unplug the power cable before cleaning the piano,and do not connect or disconnect the power cablewith a wet hand.
Check and clean the power plug periodically.
To avoid damage to the piano and other devices to which it is connected, turn the power switches of all related device off prior to connecting or disconnecting cables.
Clean the piano with a dry soft cloth, a slightly damp cloth could be used to remove dirt as well.
Never use cleaners such as thinner or alcohol. To prevent damage the surface of the LCD display,please use lens cleaning tissue to clean the display.
If the piano cable is damaged, please do not use the piano. Otherwise it may cause fire or electrical hazard.
In the case of malfunction due to improper handling the piano,please switch off and on again after 30 seconds.
Do not attempt to disassemble or repair the piano by yourself, as well as the internal parts. If the piano does not work properly, please contact the approved repairer.
The normal function of the product may be disturbed by Strong Electro Magnetic Interference. If so, simply reset the product to resume normal operation by following the instruction manual. In case the function could not resume, please use the product in other location.
Note
0
5
25
75
95
100
aw_DP268_Manual_G10_150418
2015 5 27 17:02:35

Main Features
●
4
Keyboard:
88-keys touch response keyboard with 3 touch levels.
Display:
Multi-function LCD display.
Operation:
Friendly user-interface, using dial or add/sub button to select styles, songs and voices.
Voices:
210 voices. 16 voices can be selected by direct select button.
Styles:
120 styles. 12 styles can be selected by direct select button.
Songs:
60 songs (with Melody off functions).
Demo songs:
3 demo songs.
Chord:
Single-fingered detect and multi-fingered detect
Recording:
one user song.
Memory:
4 Banks, each has 4 Memories.
Styles controlling:
SYNC, START/STOP, FILL IN A/NORMAL, FILL IN B/VARIATION, INTRO/ENDING.
Other functions:
DUAL ,SPLIT ,O.T.S., METRONOME, TRANSPOSE,TUNING,BEAT,TOUCH,SPLIT ,DSP LEVEL,USB
Mixer:
Drum Volume, Bass Volume, Orchestra Volume, Voice R1 Volume, Voice R2 Volume, Voice L Volume.
Jacks:
1. USB jack.
2. Head Phone jack.
3. Audio output.
4. Pedal jacks (sustain, soft, sostenuto).
●
●
●
●
●
●
●
●
●
●
●
●
●
NOTE:
Hold down [+] and [-] buttons simultaneously
then turn on the power, the piano will reset factory
setting. You will lost all information that you set. Press together
0
5
25
75
95
100
aw_DP268_Manual_G10_150418
2015 5 27 17:02:38
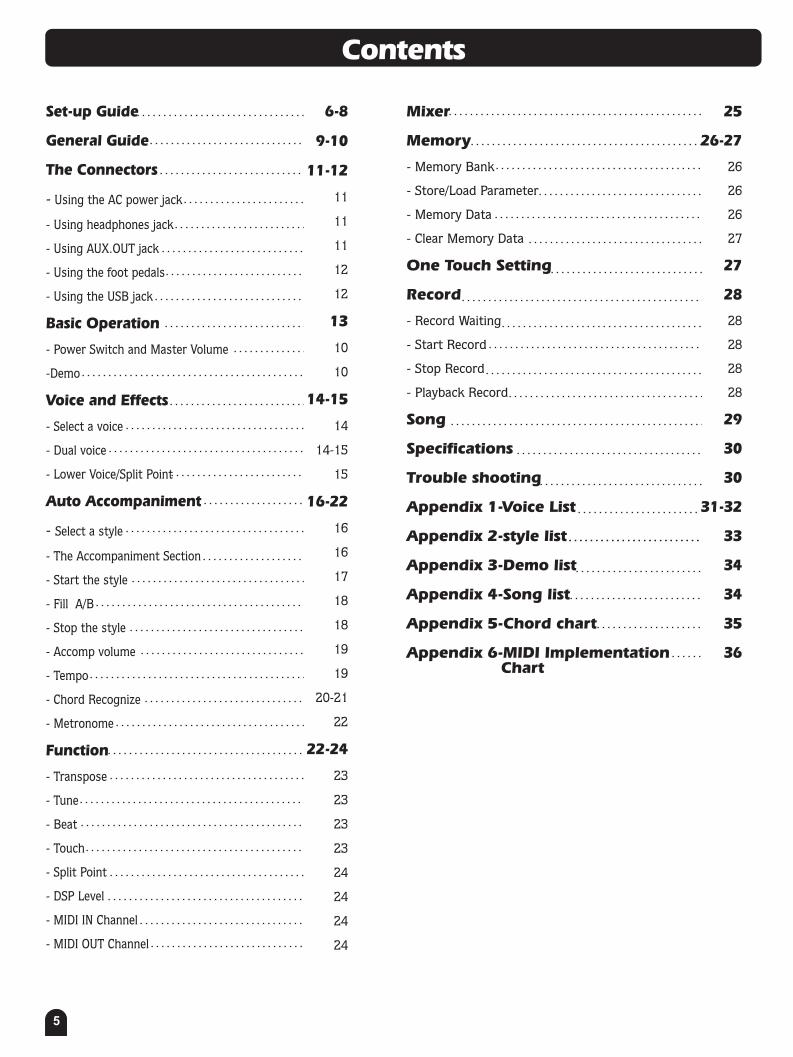
Contents
5
Set-up Guide
General Guide
The Connectors
- Using the AC power jack
- Using headphones jack
- Using AUX.OUT jack
- Using the foot pedals
- Using the USB jack
Basic Operation
- Power Switch and Master Volume
-Demo
Voice and Effects
- Select a voice
- Dual voice
- Lower Voice/Split Point
Auto Accompaniment
- Select a style
- The Accompaniment Section
- Start the style
- Fill A/B
- Stop the style
- Accomp volume
- Tempo
- Chord Recognize
- Metronome
Function
- Transpose
- Tune
- Beat
- Touch
- Split Point
- DSP Level
- MIDI IN Channel
- MIDI OUT Channel
Mixer
Memory
- Memory Bank
- Store/Load Parameter
- Memory Data
- Clear Memory Data
One Touch Setting
Record
- Record Waiting
- Start Record
- Stop Record
- Playback Record
Song
Specifications
Trouble shooting
Appendix 1-Voice List
Appendix 2-style list
Appendix 3-Demo list
Appendix 4-Song list
Appendix 5-Chord chart
Appendix 6-MIDI Implementation
6-8
9-10
11-12
11
11
11
12
12
13
10
10
14-15
14
14-15
15
16-22
16
16
17
18
18
19
19
20-21
22
22-24
23
23
23
23
24
24
24
24
25
26-27
26
26
26
27
27
28
28
28
28
28
29
30
30
31-32
33
34
34
35
36Chart
0
5
25
75
95
100
aw_DP268_Manual_G10_150418
2015 5 27 17:02:38

Before assembly, please make sure that all of the following items are present.
1.Piano Cabinet
2.Right Side Panel
3.Left Side panel
4.Big Rear Panel
5.Pedal Box
6
7.Screw 6X30(X4)
8. Screw (X5)
9. Adhesive Clamp(X2)
10.Power Supply Cable
Φ
Φ4 15X
12.Pedal Cable
13.Plastic Cap(x4)
6.Screw(X4)
11.Screw 6 2Φ 1X (X2)
Set-up Guide
1
2
34
5
11
9
107
8
6
12
13
0
5
25
75
95
100
aw_DP268_Manual_G10_150418
2015 5 27 17:02:38
Set-up Guide
7
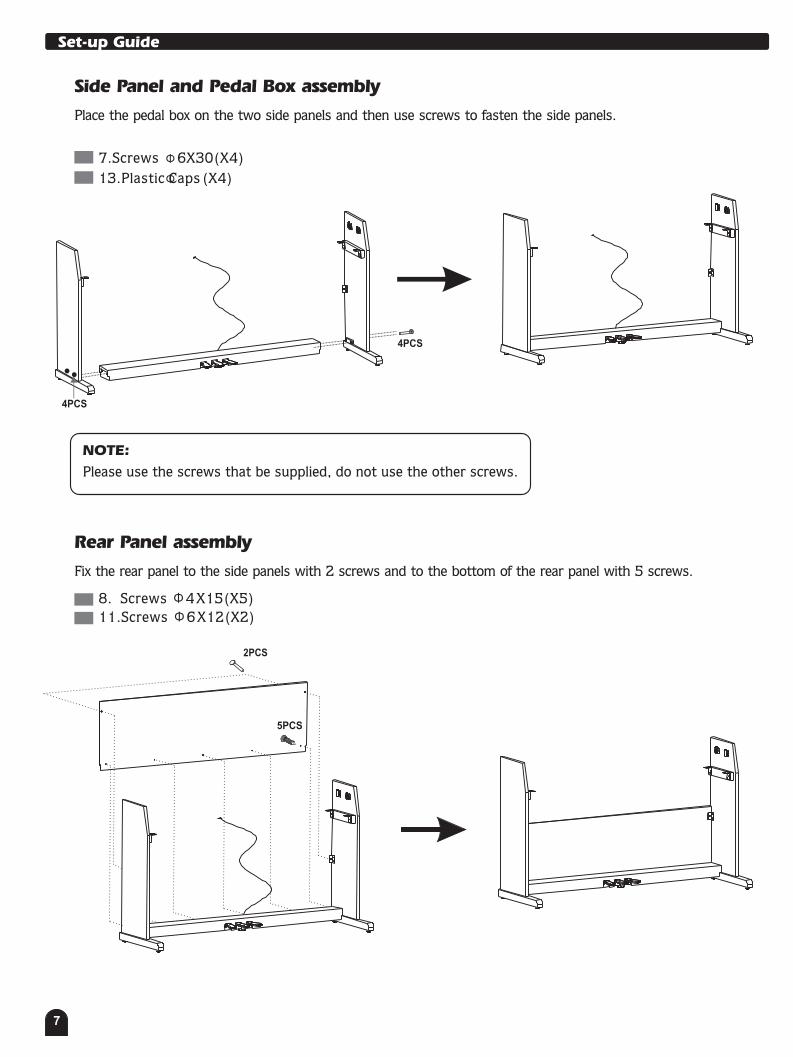
7.Screws 6X30(X4)
13.Plastic Caps(X4)
8. Screws 4X15(X5)Φ
11.Screws 6X12(X2)Φ
Φ
Φ
2PCS
5PCS
Side Panel and Pedal Box assembly
Rear Panel assembly
Place the pedal box on the two side panels and then use screws to fasten the side panels.
Fix the rear panel to the side panels with 2 screws and to the bottom of the rear panel with 5 screws.
NOTE:
Please use the screws that be supplied, do not use the other screws.
4PCS
4PCS
0
5
25
75
95
100
aw_DP268_Manual_G10_150418
2015 5 27 17:02:39

8
Adhesive clamps
HookA(2X 2PCS)
HookA
HookB
Hook B(2X 2PCS)
6.Screws (X4)
Set-up Guide
Attach the Piano Cabinet
Fix the cables
Place the piano cabinet on the stand, fix it using four screws.
Attach 2 adhesive clamps on right and the left side panels to fix the cables.
Insert the DIN plug of pedal cable into the proper socket of cabinet.
Place the piano in its final location and adjust on floor the pedal clog under pedals group.
0
5
25
75
95
100
aw_DP268_Manual_G10_150418
2015 5 27 17:02:40
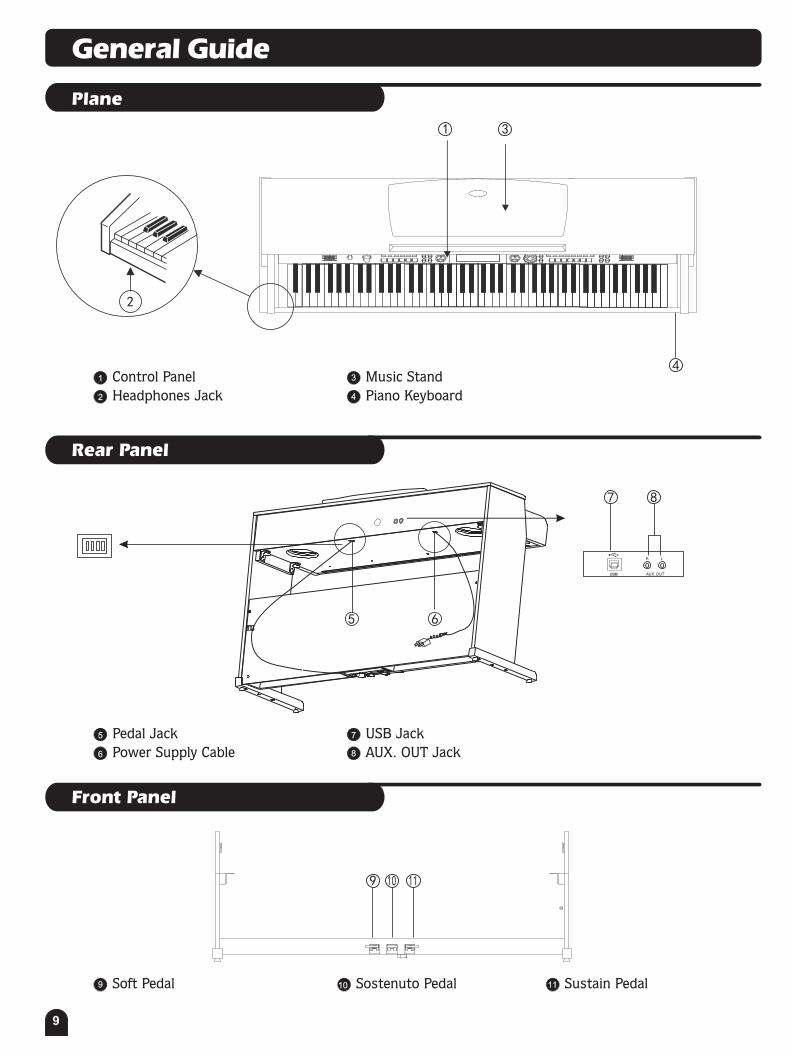
Plane
Rear Panel
General Guide
Control Panel
Headphones Jack
1
2
Music Stand
Piano Keyboard
3
4
1 3
2
4
Soft Pedal9 Sostenuto Pedal10
9
9 1110
Sustain Pedal11
Front Panel
Pedal Jack
Power Supply Cable
5
6
USB Jack
AUX. OUT Jack
7
8
5 6
7 8
0
5
25
75
95
100
aw_DP268_Manual_G10_150418
2015 5 27 17:02:41

Control Panel
DUAL
SPLIT
TOUCH
RECORD
A.B.C.
FILL A
FILL B
MELODY OFF
GENERAL
1
2
4
35
6
7 8
9
10
10 11
12
13 14
15 16
17
18
19 20
2221
TEMPO +/-
MIXER
FUNCTON
METRONOME
STYLE
6
7
8
9
10
12
13
Press [STYLE]、[VOICE] buttons
simultaneously to play DEMO.
DIAL、+、-
VOICE
SONG
11
STYLE MODE-START/STOP
-SYNC
-INTRO/ENDING
-FILL A
-FILL B
-A.B.C.
SONG MODE
-MELODY OFF
POWER SWITCH
MASTER VOLUME
STYLES DIRECT SELECT3
4
ACCOMP VOLUME +/-5
212
1 14 VOICE DIRECT SELECT
15 BANK
16
17
21
19
20
18
STORE
ONE TOUCH SETTING(M1-M4)
ONE TOUCH SETTING
DUAL
LOWER
RECORD
PLAY/STOP22
LCD Display
1
2
3
4
A.B.C
FILL A
FILL B
MELODY OFF
DUAL5
SPLIT
TOUCH
RECORD
6
7
8
VOICE/STYLE/SONG/FORMAT/FILE9
CHORD10
11 TEMPO/VEL
BEAT
15
MEMORY/TICK/O.T.S.
DSP
MEASURE 12
13
14
1 DUAL
SPLIT
TOUCH
RECORD
A.B.C.
FILL A
FILL B
MELODY OFF
VOICE LR12 DIRSTYLE SONG FILE
TEMPO MEASURE BEAT MEMORYTICK O.TS.
DSPcard
2
3
4
5
6
7
8
9
10
11 12 13 14
15
GrdPiano
10
General Guide
POWER
VOLUME
METRO
MIXER
START/ STOP SYNC INTRO/ENDING FILL A FILL B A.B.C.
MELODY OFF
FUNCTION
102 S.Waltz001 8 Beat 034 Rock 087 Tango 096 March062 Swing
008 Pop16Bt1 044 Disco 091 Samba 099 Polka 112 Dandut2083 Rhumba
ACC. VOL
TEMPO
SONG
STYLE VOICE
ONE TOUCH SETTING
BANK STORE M1 M2 M3 M4 O.T.S.
DUAL SPLIT
REC PLAY/STOP
001 GrdPiano 012 Vibes 022 Accordin 041 Violin 057 Trumpet 069 Oboe 188 PiPa 200 Std-Kit1
005 ElPiano1 020 ChrOrgan 026 SteelGt 049 Strings1 067 TenorSax 072 Clarinet 191 GuZhen 210 ChinPerc
DEMO
ON
OFF
0
5
25
75
95
100
aw_DP268_Manual_G10_150418
2015 5 27 17:02:41
The Connectors
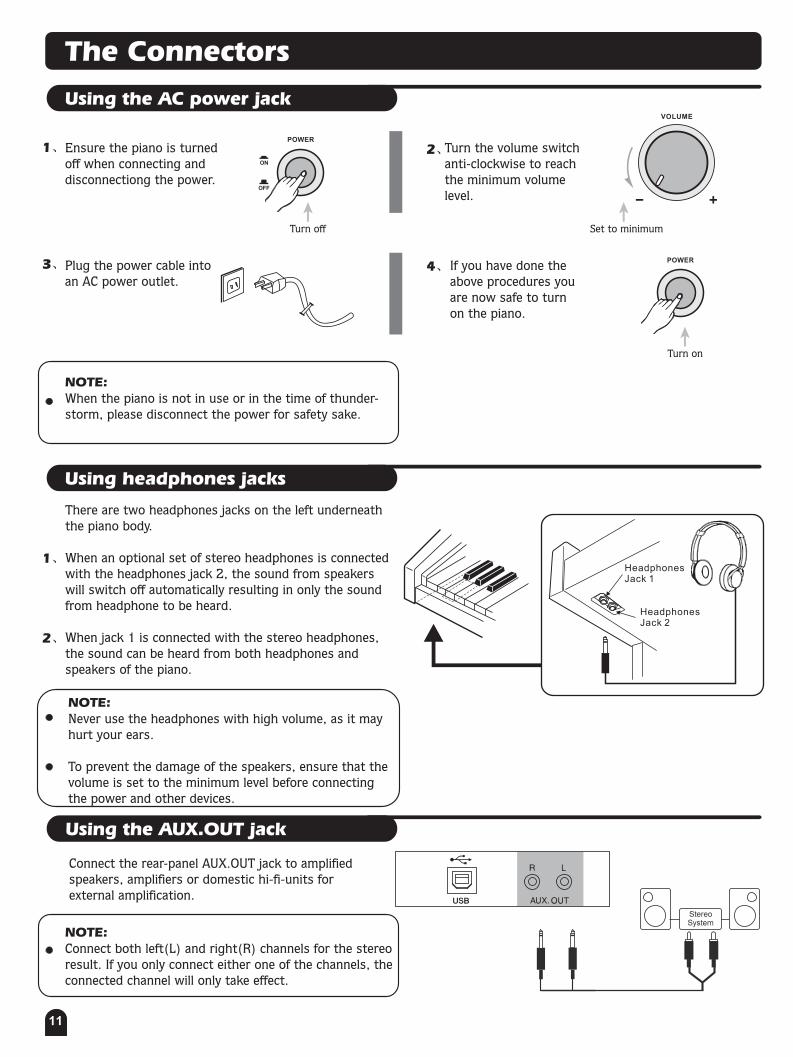
Ensure the piano is turnedoff when connecting and disconnectiong the power.
1、 Turn the volume switchanti-clockwise to reachthe minimum volume level.
Connect the rear-panel AUX.OUT jack to amplifiedspeakers, amplifiers or domestic hi-fi-units forexternal amplification.
There are two headphones jacks on the left underneaththe piano body.
When an optional set of stereo headphones is connectedwith the headphones jack 2, the sound from speakers will switch off automatically resulting in only the soundfrom headphone to be heard.
When jack 1 is connected with the stereo headphones,the sound can be heard from both headphones andspeakers of the piano.
HeadphonesJack 1
HeadphonesJack 2
2、
3、 4、If you have done the above procedures you are now safe to turn on the piano.
11
Using the AC power jack
Using headphones jacks
Using the AUX.OUT jack
POWER
POWERPlug the power cable into an AC power outlet.
1、
2、
Set to minimumTurn off
Turn on
NOTE:When the piano is not in use or in the time of thunder-storm, please disconnect the power for safety sake.
NOTE:Connect both left(L) and right(R) channels for the stereo result. If you only connect either one of the channels, theconnected channel will only take effect.
NOTE:Never use the headphones with high volume, as it may hurt your ears.
To prevent the damage of the speakers, ensure that the volume is set to the minimum level before connecting the power and other devices.
VOLUME
ON
OFF
0
5
25
75
95
100
aw_DP268_Manual_G10_150418
2015 5 27 17:02:41

SOFT SUSTAIN
The connectors
Connect the plug of the foot pedal unit to the pedal jackon the rear panel.You will experience the sustain/soft/sostenuto effect.
12
Using the foot pedals
SOSTENUTO
NOTE:When the sustain pedal is pressed, notes continue to play after their keys have been released. Releasing the pedal will silence the sustained notes.
If you play a note on the keyboard and press the sostenuto pedal while the notes are held, those notes will still sustain as long as you hold the pedal. But all subsequently played notes will not be sustained.
The soft pedal reduces the volume while the pedal is pressed. The soft pedal will not affect notes that are already playing when it pressed.
Using the USB Jack
1、
2、
Connect PC or other USB host devices that support USB audio.
For devices with USB cable, you can simply connect the MIDI/USB convertor to your USB connector on your devices and plug the MIDI in or MIDI out cables into the piano, after the driver is installed and initialization is finished, you can choose USB Audio Device in the device menu of the software to transfer midi data.
0
5
25
75
95
100
aw_DP268_Manual_G10_150418
2015 5 27 17:02:41

Basic Operation
Demo
There are total 3 demos. (See appendix)
Power Switch and Master Volume
First, make sure the correct connections.1、
1、
Use the [VOLUME] control switch to adjust the volume
to your desired level.
3、
3、
Turn the [POWER] switch on. The LCD display lights up.
2、
2、
13
DEMO
DEMO
STYLE
STYLE
VOICE
VOICE
歌曲
歌曲
DUAL
SPLIT
TOUCH
RECORD
A.B.C.
FILL A
FILL B
MELODY OFF
STYLE SONG FILE
TEMPO VEL MEASURE BEAT MEMORYTICK O.TS.
DSPcard
DEMO1
POWER
VOLUME
Rotate to adjust the volume
Press them simultaneously to play demo.
Press them to select demo.
Press them simultaneously to exit from the demo mode.
Or press it to exit from the demo mode.
Turn on LCD lights up
NOTE:If the LCD display does not light up after you turned onthe piano, please check the power supply.
If the piano is silent, that means the volume has adjusted to its minimum level.
STYLE SONG FILE
TEMPO VEL MEASURE BEAT MEMORYTICK O.TS.
DSPcard
GrdPiano
Press [VOICE] & [STYLE] simultaneously to play demo
song.
Press [+] / [-] or rotate the dial to select demo song
number.
Press [VOICE] & [STYLE] simultaneously again or press
[START/STOP] to stop playing.
START/STOP SYNC INTRO/ENDING FILL A
ON
OFF
0
5
25
75
95
100
aw_DP268_Manual_G10_150418
2015 5 27 17:02:42

001 GrdPiano 012 Vibes 022 Accordin 041 Violin 057 Trumpet 069 Oboe 188 PiPa 200 Std-Kit1
005 ElPiano1 020 ChrOrgan 026 SteelGt 049 Strings1 067 TenorSax 072 Clarinet 191 GuZhen 210 ChinPerc
Select a Voice
Voices and Effects
There are 210 voices in total (see appendix).
After selecting a voice, you can now play the piano.
When power on, the default VOICE R1 is No.001, the VOICE R1 flag lit up and the voice name appears on LCD.
Press [VOICE] button to select three separate voice modes:VOICE R1, VOICE R2, VOICE L.
You can select the voice you wanted with [+] / [-] button or dial.
Use the 16 Voices Direct Select Button to select the voicewith 2 direct voices in each button (upper & nether)
Dual Voice
“ ” “ ”Press [DUAL] button to turn on the DUAL VOICE,
VOICE1 light off, VOICE R2 and DUAL flag would both be displayed on LCD. The dual voice name is also displayed on LCD. Then, you will hear two different sounds at the same time when you press a key in the right area of the keyboard.
The piano has dual voice. You can create the new sound through this function for richer and punchier sounds. It seems that you can get two different sounds at the same time when you press a key in the right area in the keyboard.
14
DUAL SPLIT
DUAL
SPLIT
TOUCH
RECORD
A.B.C.
FILLA
FILL B
MELODY OFF
STYLE SONG FILE
TEMPO VEL MEASURE BEAT MEMORYTICK O.TS.
DSPcard
GrdPiano
DEMO
STYLE VOICE
SONG
DUAL
SPLIT
TOUCH
RECORD
A.B.C.
FILL A
FILL B
MELODY OFF
STYLE SONG FILE
TEMPO VEL MEASURE BEAT MEMORYTICK O.TS.
DSPcard
Strings2
Enter voice mode
Enter dual voice mode
Select a voice
1、
1、
3、
4、
5、
2、
NOTE:While changing a voice, pay attention to the rules:If you press the same button, the voice will be changedbetween the upper and nether key.
When the upper/nether voice is on, and then you press another direct button, the corresponding upper/nether voice will be selected.
Two voices will sound at the same time.
Eg. Piano
Eg. Cello
0
5
25
75
95
100
aw_DP268_Manual_G10_150418
2015 5 27 17:02:43
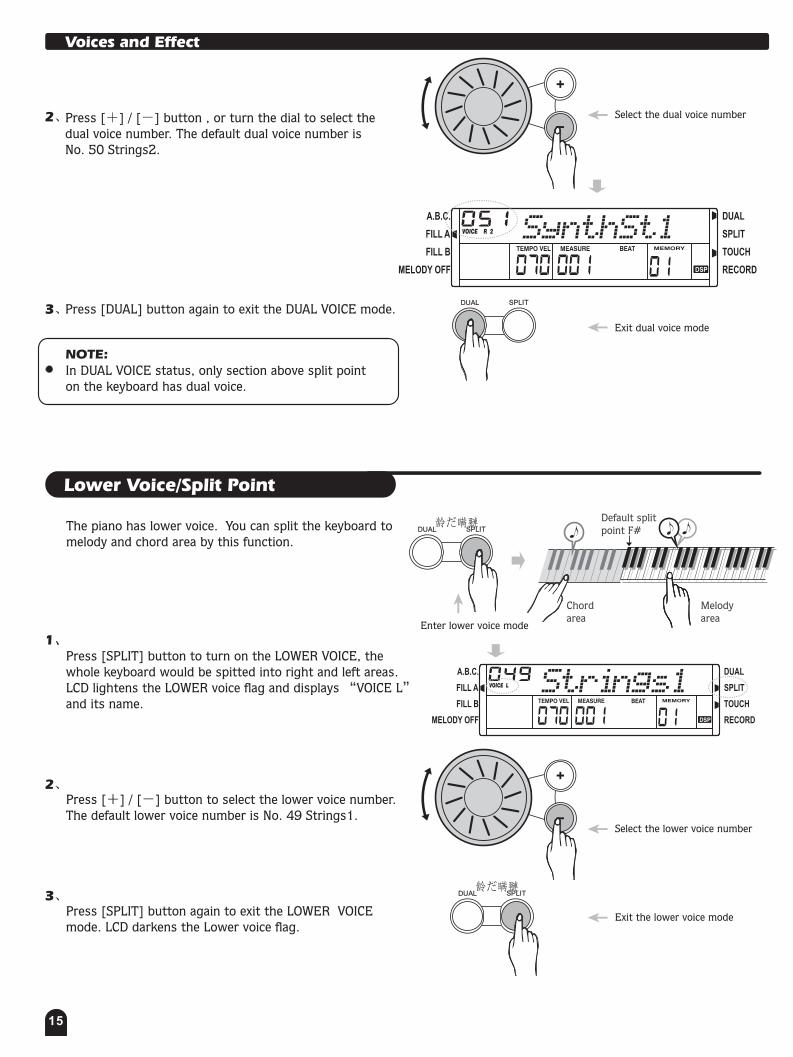
Lower Voice/Split Point
“ ”
Press [SPLIT] button to turn on the LOWER VOICE, the whole keyboard would be spitted into right and left areas. LCD lightens the LOWER voice flag and displays VOICE Land its name.
Press [+] / [-] button to select the lower voice number. The default lower voice number is No. 49 Strings1.
Press [SPLIT] button again to exit the LOWER VOICE mode. LCD darkens the Lower voice flag.
The piano has lower voice. You can split the keyboard to melody and chord area by this function.
Voices and Effect
15
龄だ瞒翴
龄だ瞒翴
DUAL
SPLIT
TOUCH
RECORD
A.B.C.
FILL A
FILL B
MELODY OFF
STYLE SONG FILE
TEMPO VEL MEASURE BEAT MEMORYTICK O.TS.
DSPcard
Strings1
DUAL
SPLIT
TOUCH
RECORD
A.B.C.
FILL A
FILL B
MELODY OFF
STYLE SONG FILE
TEMPO VEL MEASURE BEAT MEMORYTICK O.TS.
DSPcard
SynthSt1
Press [+] / [-] button , or turn the dial to select the dual voice number. The default dual voice number is No. 50 Strings2.
Press [DUAL] button again to exit the DUAL VOICE mode.3、
3、
2、
2、
1、
DUAL
DUAL
SPLIT
SPLIT
DUAL SPLIT
Exit dual voice mode
Enter lower voice mode
Select the lower voice number
Exit the lower voice mode
Select the dual voice number
NOTE:In DUAL VOICE status, only section above split pointon the keyboard has dual voice.
Melodyarea
Chord area
Default split point F#
0
5
25
75
95
100
aw_DP268_Manual_G10_150418
2015 5 27 17:02:43

Auto Accompaniment
Select a Style
The Accompaniment Section
When power on, the default style number is 001.Press [STYLE] button or style direct select button to enter the style mode, the STYLE flag is lit up and the name of style appears on LCD.
You can press [+]/[-] button or dial to select the styles you want.
Use the 6 Styles Direct Select Button to select the stylewith 2 direct styles in each button(upper & nether).
After selecting a style, you can now play the piano.
16
DUAL
SPLIT
TOUCH
RECORD
A.B.C.
FILL A
FILL B
MELODY OFF
STYLE SONG FILE
TEMPO VEL MEASURE BEAT MEMORYTICK O.TS.
DSPcard
DEMO
STYLE VOICE
SONG
There are 120 styles in total, from 001 to
120 (see appendix).
Enter style mode Select a style
102 S.Waltz001 8 Beat 034 Rock 087 Tango 096 March062 Swing
008 Pop16Bt1 044 Disco 091 Samba 099 Polka 112 Dandut2083 Rhumba
NOTE:While changing a style, pay attention to the rules:If you press the same button twice, the style will be swapped from one to another.
When the upper/nether voice is on, and then you press another direct button, the corresponding upper/nether voice will be selected.
Accompaniment consists of INTRO, NORMAL, VARIATION, FILL, ENDING. Using different section based on the structure of songs enables you to enhance musical performance.
INTROPress the [INTRO/ENDING] button to insert an intro section before you start to play. The main section will be followed by the INTRO section.
NORMAL AND VARIATIONThere are two main section: normal and variation. Each section consists of 2 to 4 measures.
FILLWhile the accompaniment is playing, you can fill in the rhythm/accompaniment by pressing the [FILL A] buttonor the [FILL B] button. This will automatically insert a fill section.
ENDINGWhen you press the [INTRO/ENDING] button, it brings rhythm accompaniment and your performance to the end.
1、
1、
3、
3、
4、
4、
2、
2、
0
5
25
75
95
100
aw_DP268_Manual_G10_150418
2015 5 27 17:02:44

Auto Accompaniment
17
DUAL
SPLIT
TOUCH
RECORD
A.B.C.
FILL A
FILL B
MELODY OFF
STYLE SONG FILE
TEMPO VEL MEASURE BEAT MEMORYTICK O.TS.
DSPcard
DUAL
SPLIT
TOUCH
RECORD
A.B.C.
FILL A
FILL B
MELODY OFF
STYLE SONG FILE
TEMPO VEL MEASURE BEAT MEMORYTICK O.TS.
DSPcard
DUAL
SPLIT
TOUCH
RECORD
A.B.C.
FILL A
FILL B
MELODY OFF
STYLE SONG FILE
TEMPO VEL MEASURE BEAT MEMORYTICK O.TS.
DSPcard
A.B.C. Mode:The default setting of A.B.C. is off. Press [A.B.C./MELODY OFF] button to turn on the auto bass chord. The A.B.C. icon will appear on the LCD.The area to the left of split point is known as the chord area. When playing the chord, both the bass and the chord voice sound.
Synchronous Start:Press the [SYNC] button to enters Sync start waiting mode, and the beat indicators on LCD will flash.
If the A.B.C. mode is off, play any key on keyboard only start playing the style by drum voice.
If the A.B.C mode is on, play any key in left area of keyboard will start playing the style.
INTRO Start:Press [INTRO/ENDING] button to insert an intro section before you start to play the style.
Press [START/STOP] button, then the normal or variation style will play after the intro style.
Press [INTRO/ENDING] button when the style is playing, style will be stopped after the ending.
START/STOP
START/STOP
START/STOP
SYNC
SYNC
SYNC
INTRO/ENDING
INTRO/ENDING
INTRO/ENDING
FILL A
FILL A
FILL A
FILL B
FILL B
FILL B
A.B.C.
A.B.C.
A.B.C.
MELODY OFF
MELODY OFF
MELODY OFF
Enter A.B.C. mode
Enter Sync start waiting mode
Insert an intro section
Flashing
Flash simultaneously
NOTE:There are 2 ways to detect the chord: single finger detect and fingers detect. If the chord played according with fingers detect, it is recognized as the fingers chord. If not, single finger chord will be recognized.
3、
4、
2、
Chord area
Start the Style
Start immediately:Press [START/STOP] button to start the style(only drum).
DUAL
SPLIT
TOUCH
RECORD
A.B.C.
FILL A
FILL B
MELODY OFF
STYLE SONG FILE
TEMPO VEL MEASURE BEAT MEMORYTICK O.TS.
DSPcard
START/STOP SYNC INTRO/ENDING FILL A FILL B A.B.C.
MELODY OFF
Start the style immediately1、
0
5
25
75
95
100
aw_DP268_Manual_G10_150418
2015 5 27 17:02:44

Flashing
Flashing
Stop a Style
FILL A/B
DUAL
SPLIT
TOUCH
RECORD
A.B.C.
FILL A
FILL B
MELODY OFF
STYLE SONG FILE
TEMPO VEL MEASURE BEAT MEMORYTICK O.TS.
DSPcard
DUAL
SPLIT
TOUCH
RECORD
A.B.C.
FILL A
FILL B
MELODY OFF
STYLE SONG FILE
TEMPO VEL MEASURE BEAT MEMORYTICK O.TS.
DSPcard
18
In NORMAL mode, press [FILL A] button to insert 1 measure fill and LCD flashes 'FILL A'. After one measureis over, it will smoothly lead to NORMAL style.
In NORMAL mode, press [FILL B] button to insert 1 measure fill and LCD flashes 'FILL B'. After one measure is over, it will smoothly lead to VARIATION style.
In VARIATION mode, press [FILL A] button to insert 1 measure fill and LCD flashes 'FILL A ', After one measure is over, it will smoothly lead to NORMAL style will be returned.
In VARIATION mode, press [FILL B] button to insert 1 measure fill and LCD flashes 'FILL B', After one measure is over, it will smoothly lead to VARIATION style will be returned.
START/STOP
START/STOP
START/STOP
START/STOP
SYNC
SYNC
SYNC
SYNC
INTRO/ENDING
INTRO/ENDING
INTRO/ENDING
INTRO/ENDING
FILL A
FILL A
FILL A
FILL A
FILL B
FILL B
FILL B
FILL B
A.B.C.
A.B.C.
A.B.C.
A.B.C.
MELODY OFF
MELODY OFF
MELODY OFF
MELODY OFF
Press and hold down
Press and hold down
NOTE:Press and hold down the [FILL A] or [FILL B] button when the style is playing, the selected FILL pattern repeats continuously until button is released.
Press [FILL A] when style stop, it will change to the main section, the 'FILL A' flag on the LCD will be lightened.
Press [FILL B], it will change to the variation section, the'FILL B flag on the LCD will be lightened.
Stop immediately:The accompaniment can be stopped at any time by pressingthe [START/STOP] button.
Ending Stop:Press the [INTRO/ENDING] button to complete the song with ending section. The ending section will begin from the top of the next measure.
Sync Stop:Press the [SYNC] button to stop playing, and the synch-ronized start mode will activated.
1、
1、
3、
3、
4、
2、
2、
Auto Accompaniment
START/STOP SYNC INTRO/ENDING FILL A FILL B A.B.C.
MELODY OFF
START/STOP SYNC INTRO/ENDING FILL A FILL B A.B.C.
MELODY OFF
START/STOP SYNC INTRO/ENDING FILL A FILL B A.B.C.
MELODY OFF
0
5
25
75
95
100
aw_DP268_Manual_G10_150418
2015 5 27 17:02:44
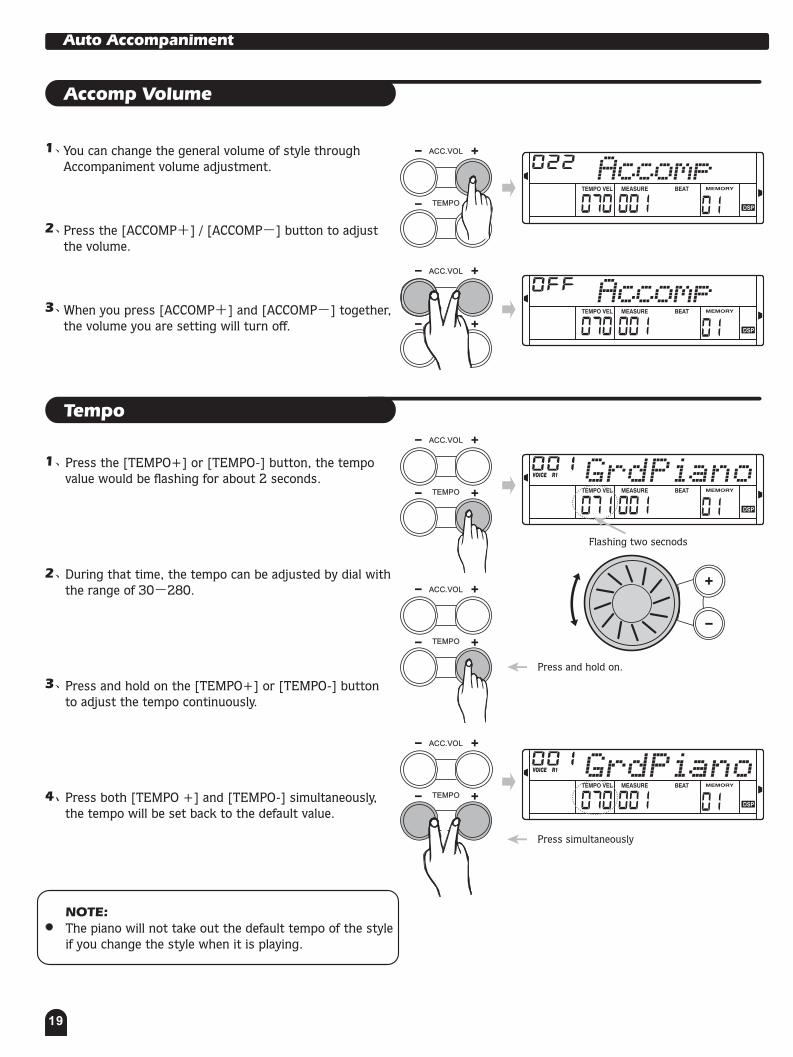
Accomp Volume
You can change the general volume of style through Accompaniment volume adjustment.
Press the [ACCOMP+] / [ACCOMP-] button to adjust the volume.
When you press [ACCOMP+] and [ACCOMP-] together, the volume you are setting will turn off.
Tempo
Press the [TEMPO+] or [TEMPO-] button, the tempo value would be flashing for about 2 seconds.
During that time, the tempo can be adjusted by dial with the range of 30-280.
Press and hold on the [TEMPO+] or [TEMPO-] button to adjust the tempo continuously.
Press both [TEMPO +] and [TEMPO-] simultaneously, the tempo will be set back to the default value.
STYLE SONG FILE
TEMPO VEL MEASURE BEAT MEMORYTICK O.TS.
DSPcard
Accomp
STYLE SONG FILE
TEMPO VEL MEASURE BEAT MEMORYTICK O.TS.
DSPcard
Accomp
19
Auto Accompaniment
ACC.VOL
TEMPO
ACC.VOL
ACC.VOL
TEMPO
TEMPO
ACC.VOL
ACC.VOL
TEMPO
TEMPO
1、
1、
3、
3、
4、
2、
2、
STYLE SONG FILE
TEMPO VEL MEASURE BEAT MEMORYTICK O.TS.
DSPcard
GrdPiano
STYLE SONG FILE
TEMPO VEL MEASURE BEAT MEMORYTICK O.TS.
DSPcard
GrdPiano
NOTE:The piano will not take out the default tempo of the styleif you change the style when it is playing.
Flashing two secnods
Press and hold on.
Press simultaneously
0
5
25
75
95
100
aw_DP268_Manual_G10_150418
2015 5 27 17:02:45

20
Chord Recognize
Auto Accompaniment
"A.B.C." is disabled during the default setting.
Press [A.B.C./MELODY OFF] button to turn on this
"auto bass chord" function; the A.B.C. flag on the LCD
is lightened. The left section of the keyboard is known
as the "chord area", while playing the chord, both the
bass and the chord voices phonate.
There are 2 ways to detect a chord: "single finger detect" and "multi fingers
detect".
Single Finger
If the chord played is based on "multi fingers detect", it is recognized as the "multi fingers chord".
If not, "single finger chord" will be recognized.
Single finger type not only can detect single finger but also can detect multi finger. And the single finger makes it easily to play chords through only one, two or three keys. Including major, minor, seventh, and minor seventh chord. Refer to relevant picture on the right for details.
Multi Finger
Multi finger type only can recognize those chords have listed in the chord list, and also can be found in the dictionary function.
NOTE:
When A.B.C. is on, press the keys on the left
of the split point. The chord will be recognized
as single finger chords.
NOTE:
Since the chord detection of A.B.C. is based on the
Chord Root priority, some chords that could be
played under the Chord Dictionary may not be
recognised by A.B.C. though, eg. B6, bB6, B6(9),
bB6 ,9, Baug, bBaug, bBm6, Bm6, Adim7, bBdim7,
Bdim.
DUAL
SPLIT
TOUCH
RECORD
A.B.C.
FILL A
FILL B
MELODY OFF
STYLE SONG FILE
TEMPO VEL MEASURE BEAT MEMORYTICK O.TS.
DSPcard
START/STOP SYNC INTRO/ENDING FILL A FILL B A.B.C.
MELODY OFF
Major TriadOnly press the root note on the keyboard.
Minor TriadPress the root note and the nearest left black key simultaneously.
Seventh chordPress the root note and the nearest left white key simultaneously.
Minor seventh chordPress the root note and the nearest left white and black keys simultaneously.
C7
Cm7
Cm
C
C
0C6
1 2CM7 CM7(#11)
3CM(9)
4 5CM7
(9)
Caug
7 8Cm Cm6
9 11Cm7
(b5)6C6
(9) Cm7
10
13Cm7
(9)14Cm7
(11)15CmM 7
16CmM 7
(9)17CdimCm(9)
12
18Cdim7
19C7
20C7sus4
21C7
(b5) C7(9)
22 23C7 (#11)
7augC2928
7augCM27C7
(#9)26C7
(b13)25C7
(b9)C7(13)
24
30Csus 4 C1+2+5
31
0
5
25
75
95
100
aw_DP268_Manual_G10_150418
2015 5 27 17:02:46

Auto Accompaniment
Chord BasicsA chord, in music, is any harmonic set of three or more notes that is heard as if sounding simultaneously. The most frequently encountered chords are triads. A triad is a set of three notes that can be stacked in thirds. When stacked in thirds, the triad's members, from lowest pitched tone to highest, are called: the Root, the Third, and the Fifth.
Triad TypeThere are following basic triad types:
Chord InversionWe define this chord its root is not in the bass (i.e., is not the lowest note) as an inversion chord. When the root is in the bass, we call the chord: root-position chord. If we put the Third and Fifth in the root position, then it forms Inversion, we call this chord Inversion Chord. See the following major triad and its inverted chord.
Chord NameThe chord name contains two parts content: Chord root and Chord type.
Root
Fifth
Third
Major Triad
Minor Triad
Augmented Triad
Diminished Triad
A root with a major third added above and a perfect fifth will consist as a Major Triad.
A root with a minor third added above and a perfect fifth will consist as a Minor Triad.
A root with a major third added above and an augmented fifth will consist as an Augmented Triad.
A root with a minor third added above and a diminished fifth will consist as a Diminished Triad.
Major Triad Minor Triad
Augmented Triad Diminished Triad
Root Position First Inversion Second Inversion
Chord Root Chord Type
21 0
5
25
75
95
100
aw_DP268_Manual_G10_150418
2015 5 27 17:02:46

Press [METRO] button to turn on metronome and the metronome sound will be played.
In the Function menu, you can adjust the beat with dial,[+]/[-]. The range is 0, 2~9.(See Function Operation).
Press [METRO] button again, you will turn off the metronome.
METRONOME
MIXER
MIXER
FUNCTION
FUNCTION
METRO
METRO
22
Auto Accompaniment
STYLE SONG FILE
TEMPO VEL MEASURE BEAT MEMORYTICK O.TS.
DSPcard
Strings2
Indicates the beat number in the measure
NOTE:Metronome can be played in tempo with the accompaniment whenever you turn on the style.
When stopping style, turn on the Metronome, the beat type will follow the measure.
When playing style, turn on the Metronome, the metronome sound begins to respond in next section, the beat type will follow the style.
If first turn on the Metronome, then play the style, the Metronome will automatically be set to match the tempoof the style, but you can also change the tempo yourself.
1、
2、
3、
Function
Press [FUNCTION] button to enter function menu. When power on, the first option of the menu is “Transpose”, Press [FUNCTION] button repeatedly to select function option, then press [+]/[-] or dial to adjust its parameter, see below table:
LCD Display
Transpos
-12 +12
0
Tune -50 50
0
Beat 0, 2 9 4
Touch OFF,1,2,3 2
Split pt 1 88
34(F3#)
DSPlevel
OFF 、 1 7
2
Midi In
01 — 16 、 ALL
ALL
Midi Out
01 — 16
01
—
—
—
—
—
content
Transpose
Tune
Beat
Touch
Split point
DSP reverb level
MIDI IN channel
MIDI OUT channel
Range Default Value
NOTE:If you do not press any button for 5 seconds after entering FUNCTION menu, it will quit this menu automatically.
0
5
25
75
95
100
aw_DP268_Manual_G10_150418
2015 5 27 17:02:46
23
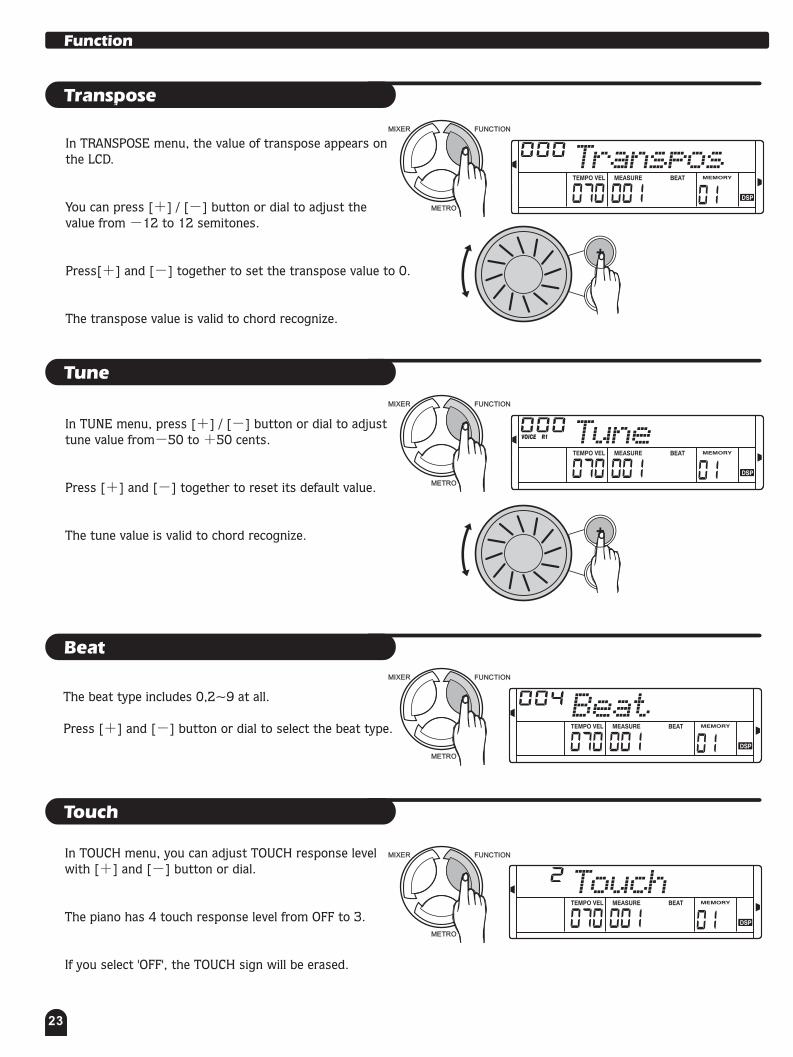
In TRANSPOSE menu, the value of transpose appears on the LCD.
You can press [+] / [-] button or dial to adjust the value from -12 to 12 semitones.
Press[+] and [-] together to set the transpose value to 0.
The transpose value is valid to chord recognize.
TransposeSYNC. STOP
MIXER FUNCTION
METRO
STYLE SONG FILE
TEMPO VEL MEASURE BEAT MEMORYTICK O.TS.
DSPcard
Transpos
MIXER FUNCTION
METRO
In TUNE menu, press [+] / [-] button or dial to adjust tune value from-50 to +50 cents.
Press [+] and [-] together to reset its default value.
The tune value is valid to chord recognize.
Tune
STYLE SONG FILE
TEMPO VEL MEASURE BEAT MEMORYTICK O.TS.
DSPcard
Tun
Function
STYLE SONG FILE
TEMPO VEL MEASURE BEAT MEMORYTICK O.TS.
DSPcard
B at
Beat
The beat type includes 0,2~9 at all.
Press [+] and [-] button or dial to select the beat type.
MIXER FUNCTION
METRO
STYLE SONG FILE
TEMPO VEL MEASURE BEAT MEMORYTICK O.TS.
DSPcard
Touch
Touch
In TOUCH menu, you can adjust TOUCH response level with [+] and [-] button or dial.
The piano has 4 touch response level from OFF to 3.
If you select 'OFF', the TOUCH sign will be erased.
MIXER FUNCTION
METRO
0
5
25
75
95
100
aw_DP268_Manual_G10_150418
2015 5 27 17:02:47

24
Split Point
In split point menu, press [+] and [-] button ordial or press the key to set its value.
Parameter Range: from 1 to 88, the default value is 34.
The keys on the right side to the point that you set is right hand area, and the other side is left hand area(chord area).
MIXER FUNCTION
METRO
STYLE SONG FILE
TEMPO VEL MEASURE BEAT MEMORYTICK O.TS.
DSPcard
Split pt
DSP Level
In DSP level menu, press [+] and [-] button ordial or press the key to set its value.
Parameter Range: from off to 7, the default value is 2.
MIXER FUNCTION
METRO
STYLE SONG FILE
TEMPO VEL MEASURE BEAT MEMORYTICK O.TS.
DSPcard
DSP L v l
Function
MIDI IN Channel
In MIDI IN channel menu, press [+] and [-] button or dial or press the key to set its value.
Parameter Range: from 1 to 16, all.
The default receiving channel is all.
MIXER FUNCTION
METRO
STYLE SONG FILE
TEMPO VEL MEASURE BEAT MEMORYTICK O.TS.
DSPcard
Midi In
MIDI OUT Channel
In MIDI OUT channel menu, press [+] and [-] button or dial or press the key to set its value.
Parameter Range: from 1 to 16.
The default transmitting channel is 01.
MIXER FUNCTION
METRO
STYLE SONG FILE
TEMPO VEL MEASURE BEAT MEMORYTICK O.TS.
DSPcard
Midi Out
0
5
25
75
95
100
aw_DP268_Manual_G10_150418
2015 5 27 17:02:48

MIXER
LCD Display
Drum Vol
Bass Vol
Oc Vol
Voice R1
Voice R2
Voice L
000 - 031
020
000 - 031 018
000 - 031 021
000 - 031 024
000
000
-
-
012
031
031
012
MIXER FUNCTION
METRO
STYLE SONG FILE
TEMPO VEL MEASURE BEAT MEMORYTICK O.TS.
DSPcard
Drum Vol
25
Press [MIXER] button to enter the menu of MIXER.The default option of the menu is Drum volume. When you enter this menu next time, you will find the option is the same as last time.
Press [MIXER] button to select the option you want to set.You can adjust keyboard voice volume ,style volume through MIXER by pressing [+] and [-] button or usingdial.
The option and the parameters are as the follow:
Adjust content
DRUM volume
BASS volume
ORCHESTRA volume
UPPER1 volume
UPPER2 volume
LOWER volume
Range Default value
NOTE:If you do not press any button for 5 seconds after entering MIXER menu, it will quit this menu automa-tically.
When you press [+] and [-] together, the volume you are setting will turn off.
Press together
0
5
25
75
95
100
aw_DP268_Manual_G10_150418
2015 5 27 17:02:48
Memory Data
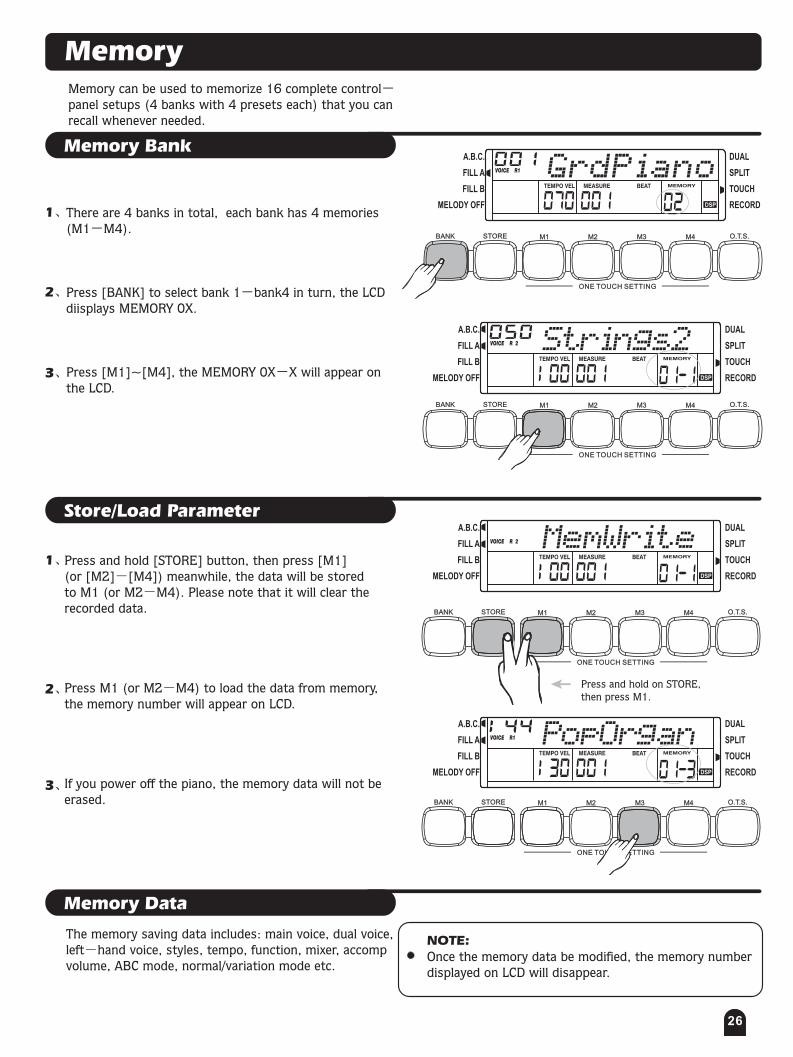
Memory can be used to memorize 16 complete control-panel setups (4 banks with 4 presets each) that you canrecall whenever needed.
Memory
There are 4 banks in total, each bank has 4 memories (M1-M4).
Press [BANK] to select bank 1-bank4 in turn, the LCDdiisplays MEMORY 0X.
Press [M1]~[M4], the MEMORY 0X-X will appear on the LCD.
Memory Bank
ONE TOUCH SETTING
M1 M2 M3 M4BANK STORE O.T.S.
DUAL
SPLIT
TOUCH
RECORD
A.B.C.
FILL A
FILL B
MELODY OFF
STYLE SONG FILE
TEMPO VEL MEASURE BEAT MEMORYTICK O.TS.
DSPcard
GrdPiano
ONE TOUCH SETTING
M1 M2 M3 M4BANK STORE O.T.S.
DUAL
SPLIT
TOUCH
RECORD
A.B.C.
FILL A
FILL B
MELODY OFF
STYLE SONG FILE
TEMPO VEL MEASURE BEAT MEMORYTICK O.TS.
DSPcard
Strings2
26
1、
1、
3、
3、
2、
2、
ONE TOUCH SETTING
ONE TOUCH SETTING
M1
M1
M2
M2
M3
M3
M4
M4
BANK
BANK
STORE
STORE
O.T.S.
O.T.S.
Store/Load ParameterDUAL
SPLIT
TOUCH
RECORD
A.B.C.
FILL A
FILL B
MELODY OFF
STYLE SONG FILE
TEMPO VEL MEASURE BEAT MEMORYTICK O.TS.
DSPcard
M mWrit
DUAL
SPLIT
TOUCH
RECORD
A.B.C.
FILL A
FILL B
MELODY OFF
STYLE SONG FILE
TEMPO VEL MEASURE BEAT MEMORYTICK O.TS.
DSPcard
PopOrgan
Press and hold [STORE] button, then press [M1] (or [M2]-[M4]) meanwhile, the data will be stored to M1 (or M2-M4). Please note that it will clear the recorded data.
Press M1 (or M2-M4) to load the data from memory, the memory number will appear on LCD.
If you power off the piano, the memory data will not be erased.
Press and hold on STORE,then press M1.
The memory saving data includes: main voice, dual voice, left-hand voice, styles, tempo, function, mixer, accomp volume, ABC mode, normal/variation mode etc.
NOTE:Once the memory data be modified, the memory number displayed on LCD will disappear.
0
5
25
75
95
100
aw_DP268_Manual_G10_150418
2015 5 27 17:02:49
ON
OFF
ON
OFF
27
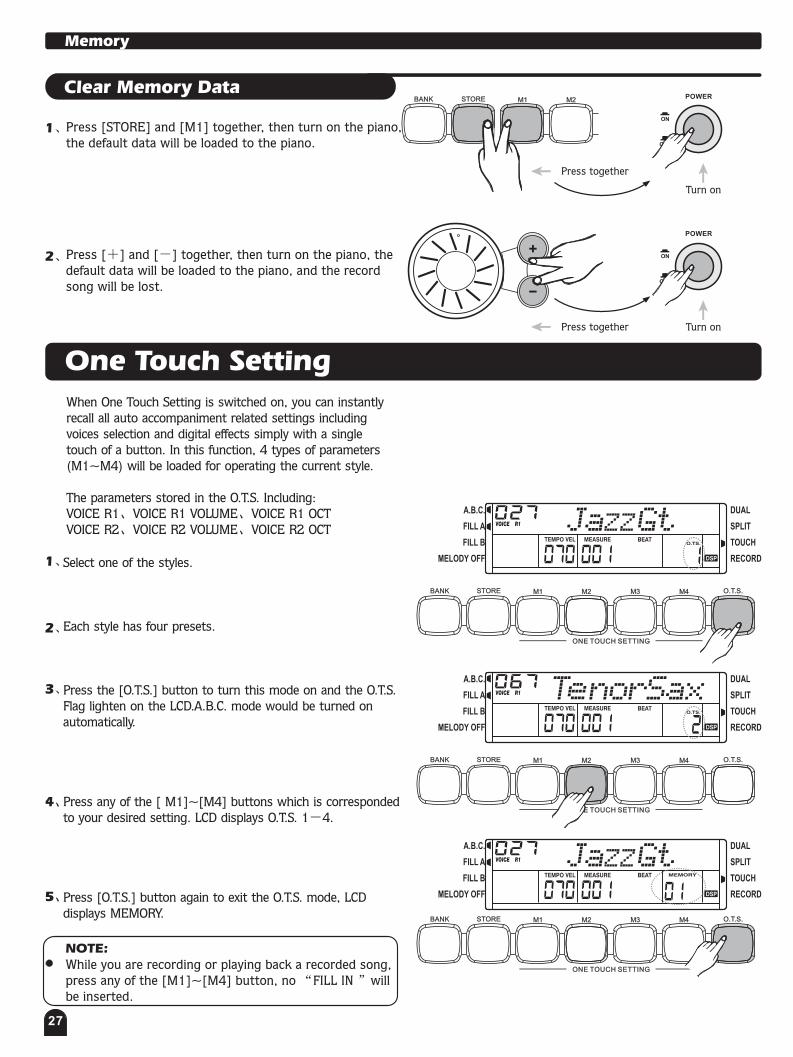
One Touch SettingWhen One Touch Setting is switched on, you can instantly recall all auto accompaniment related settings including voices selection and digital effects simply with a single touch of a button. In this function, 4 types of parameters (M1~M4) will be loaded for operating the current style.
The parameters stored in the O.T.S. Including:VOICE R1、VOICE R1 VOLUME、VOICE R1 OCTVOICE R2、VOICE R2 VOLUME、VOICE R2 OCT
DUAL
SPLIT
TOUCH
RECORD
A.B.C.
FILL A
FILL B
MELODY OFF
STYLE SONG FILE
TEMPO VEL MEASURE BEAT MEMORY O.TS.
DSPcard
Select one of the styles.
Each style has four presets.
Press the [O.T.S.] button to turn this mode on and the O.T.S.Flag lighten on the LCD.A.B.C. mode would be turned on automatically.
Press any of the [ M1]~[M4] buttons which is corresponded to your desired setting. LCD displays O.T.S. 1-4.
Press [O.T.S.] button again to exit the O.T.S. mode, LCD displays MEMORY.
1、
1、
3、
5、
2、
2、
4、
NOTE:While you are recording or playing back a recorded song,press any of the [M1]~[M4] button, no “FILL IN ”willbe inserted.
Memory
Clear Memory Data
Press [STORE] and [M1] together, then turn on the piano, the default data will be loaded to the piano.
Press [+] and [-] together, then turn on the piano, the default data will be loaded to the piano, and the record song will be lost.
M1 M2BANK STORE
Press together
Press together
ONE TOUCH SETTING
M1 M2 M3 M4BANK STORE O.T.S.
DUAL
SPLIT
TOUCH
RECORD
A.B.C.
FILL A
FILL B
MELODY OFF
STYLE SONG FILE
TEMPO VEL MEASURE BEAT MEMORY O.TS.
DSPcard
ONE TOUCH SETTING
M1 M2 M3 M4BANK STORE O.T.S.
DUAL
SPLIT
TOUCH
RECORD
A.B.C.
FILL A
FILL B
MELODY OFF
STYLE SONG FILE
TEMPO VEL MEASURE BEAT MEMORY O.TS.
DSPcard
T norSax
ONE TOUCH SETTING
M1 M2 M3 M4BANK STORE O.T.S.
POWER
POWER
Turn on
Turn on
0
5
25
75
95
100
aw_DP268_Manual_G10_150418
2015 5 27 17:02:49

Record
Record Waiting
Start Record
REC PLAY/STOP
Playback Record
DUAL
SPLIT
TOUCH
RECORD
A.B.C.
FILL A
FILL B
MELODY OFF
STYLE SONG FILE
TEMPO VEL MEASURE BEAT MEMORYTICK O.TS.
DSPcard
GrdPiano
DUAL
SPLIT
TOUCH
RECORD
A.B.C.
FILL A
FILL B
MELODY OFF
STYLE SONG FILE
TEMPO VEL MEASURE BEAT MEMORYTICK O.TS.
DSPcard
GrdPiano
STYLE SONG FILE
TEMPO VEL MEASURE BEAT MEMORYTICK O.TS.
DSPcard
Empty
28
Press [RECORD] to enter record waiting mode, the REC flag lit up on LCD, the beat starts flashing.
Then you can select voice number, style number and adjust tempo, mixer parameters.
Flashing
In the record waiting mode, press [START/STOP] or press any key on the keyboard to start recording.
And the beat will display according to the current tempo.
Enter Record Waiting Status.
REC PLAY/STOP
Stop Record
STYLE SONG FILE
TEMPO VEL MEASURE BEAT MEMORYTICK O.TS.
DSPcard
FullREC PLAY/STOP
In the recording mode, press [RECORD] to stop recording.
If the memory is full, the recording will be stopped automatically, “FULL” will appear on LCD.
Press [PLAY/STOP] button to start playing the recordeddata.
Press [PLAY/STOP] button again to stop playing.
NOTE:If the recording memory is empty, when you press [PLAY/STOP], “EMPTY” will appear temporarily on LCD.
1、
1、
1、
1、
2、
2、
2、
2、
START/STOP SYNC INTRO/ENDING FILL A FILL B A.B.C.
MELODY OFF
Start Record
NOTE:If you power off the piano, the recorded data will not be erased.
Press[+] and [-] together, then turn on the piano, the default data will be loaded to the piano, and the recorded data will be lost.
Press [RECORD] and [PLAY/STOP] together, then turn on the piano, the recorded data will be lost.
REC PLAY/STOP
Press together
POWER
Turn on
Press together
POWER
Turn on
0
5
25
75
95
100
aw_DP268_Manual_G10_150418
2015 5 27 17:02:50

Song
DEMO
STYLE VOICE
SONG
DEMO
STYLE VOICE
SONG
DUAL
SPLIT
TOUCH
RECORD
A.B.C.
FILL A
FILL B
MELODY OFF
TEMPO VEL MEASURE BEAT MEMORYTICK O.TS.
DSPcard
DUAL
SPLIT
TOUCH
RECORD
A.B.C.
FILL A
FILL B
MELODY OFF
TEMPO VEL MEASURE BEAT MEMORYTICK O.TS.
DSPcard
29
The piano has 60 songs with MELODY OFF function, which allows you to listen to the Song playback without the melody ,useful for you to play with the song.
Press [SONG] to enter song mode, the flag of song lit up on the LCD.
Press [START/STOP] to play song, press [START/STOP]again to stop song playing.
When you stop the song play, press [STYLE] , [VOICE] , [DUAL] or [LOWER] to exit song mode.
Press[+] /[-] or dial to select song number, the name of song will appear on the LCD.
The song starts to play with its own introductory beat which measure is from negative value to 001.
When in SONG mode, press [MELODY OFF] could turn on/off the main melody of the song.
TEMPO VEL MEASURE BEAT MEMORYTICK O.TS.
DSPcard
START/STOP
START/STOP
SYNC
SYNC
INTRO/ENDING
INTRO/ENDING
FILL A
FILL A
FILL B
FILL B
A.B.C.
A.B.C.
MELODY OFF
MELODY OFF
Start/Stop song playing
Turn on/off the main melody
Enter song mode
DUAL LOWER
NOTE:When start playing the song with [SONG], it will play all of the songs in circle.
If you play the song by pressing [START/STOP], it will play the current song repeatedly.
1、
3、
4、
5、
6、
2、
0
5
25
75
95
100
aw_DP268_Manual_G10_150418
2015 5 27 17:02:51

1 Keyboard....................................................:
2 Voices...........................................................:
3 Styles........................................................:
4 Demo/Song..................................................:
5 Polyphony..................................................:
6 Display........................................................:
7 Switch and Buttons.......................................:
8 Accompaniment Control.............................:
9 Record......................................................:
10 Panel Memory.........................................:
11 MIDI.....................................................:
12 Connectors............................................:
13 Speaker...............................................:
14 Dimension(L×W×H)....................................:
15 Weight.......................................................:
16 Accessories......................................................
Trouble Shooting
Specifications
88 Keys, 3 kinds of touch level.
210 Voices.
120 Voices.
3 Demos,60 Songs.
64-note(turn off DSP effect)、38-note(turn on DSP effect).
Multi-functional LCD display with blue backlit.
POWER SWITCH、VOLUME、AUTO BASS CHORD、MELODY OFF、
ACCOMP VOLUME +/-、TEMPO +/-、FUNCTION、MIXER、
METRONOME、DEMO、SONG、VOICE、STYLE、+/-、BANK、
STORE(M1-M4)、ONE TOUCH SETTING、DUAL、SPLIT、RECORD、
PLAY/STOP.
START/STOP、SYNC START、INTRO/ENDING、FILL A、FILL B.
RECORD、PLAY/STOP.
4 Banks, each has 4 memories.
Receive/transmit.
AUX.OUT、HEADPHONES、3 PEDALS、USB、AC POWER.
8ohm 25WX2 .
1419×473×855mm.
47KG.
Instruction Manual.
No matter the instrument is turned on or off, a popping sound will be temporarily produced.
* All specifications and appearances are subject to change without notice.
There is no sound even when the keyboard is played or when a song or style is being played.
This is normal and indicates that the instrumentis receiving electrical power.
Check if any cable or headphone is connected to the PHONES jack on the left underneath the piano body.. When a set of headphones is plugged into this jack, no sound is output.
Problem Possible Cause and Solution
30 0
5
25
75
95
100
aw_DP268_Manual_G10_150418
2015 5 27 17:02:51

Appendix 1- Voice List
NAME
1
Acoustic Grand Piano
2
Bright Acoustic Piano
3
Electric Grand Piano
4
Honky - Tonk Piano
5
Electric Piano 1
6
Electric Piano 2
7
Harpsichord
8
Clavi
9 Celesta
10 Glockenspiel
11 Music Box
12 Vibraphone
13 Marimba
14 Xylophone
15 Tubular Bells
16 Dulcimer
17 Drawbar Organ
18 Jazz Organ
19 Rock Organ
20 Church Organ
21 Reed Organ
22 Accordion 23 Harmonica 24 Tango Accordion 25 Nylon Guitar 26 Steel Guitar 27 Jazz Guitar 28 Clean Guitar 29 Muted Guitar 30 Overdriven Guitar 31 Distortion Guitar 32
Guitar Harmonics
33
Acoustic Bass
34
Finger Bass
35
Pick Bass
36
Fretless Bass
37
Slap Bass 1
38
Slap Bass 2
39 Synth Bass 1
40 Synth Bass 2
NO NAMENO
81
Square
82
Sawtooth
83
Calliope
84
Chiff
85
Charang
86
Voice
87
Fifths
88
Bass Lead
89
Fantasia
90 Warm
91 Poly Synth
92 Choir
93 Bowed
94 Metallic
95 Halo
96 Sweep
97 Fx1(rain)
98 Fx2(soundtrack)
99 Fx3(crystal)
100 Fx4(atmosphere)
101 Fx5(brightness)
102 Fx6(goblins)
103 Fx7(echoes)
104 Fx8(sci - fi) 105 Sitar 106 Banjo 107 Shamisen 108 Koto 109 Kalimba 110 Bag Pipe 111 Fiddle 112 Shanai 113 Tinkle Bell 114
Agogo
115
Steel Drums
116
Wood Block
117
Taiko Drum
118
Melodic Tom
119
Synth Drum
120
Reverse Cymbal
121
G uitar Fret Noise
122 Breath Noise
NAMENO
41 Violin
42 Viola
43 Cello
44 Contrabass
45 Tremolo Strings
46 Pizzicato Strings
47 Orchestral Harp
48 Timpani
49 Strings Ensemble1
50 Strings Ensemble
51 Synth Strings 1
52 Synth Strings 2
53 Choir Aahs
54 Voice Oohs
55 Synth Voice
56 Orchestra Hit
57 Trumpet
58 Trombone
59 Tuba
60 Muted Trumpet
61 French Horn
62 Brass Section
63 Synth Brass 1
64 Synth Brass 2
65 Soprano Sax
66 Alto Sax
67 Tenor Sax
68 Baritone Sax
69 Oboe
70 English Horn
71 Bassoon
72 Clarinet
73 Piccolo
74 Flute
75 Recorder
76 Pan Flute
77 Blown Bottle
78 Shakuhachi
79 Whistle
80 Ocarina
31 0
5
25
75
95
100
aw_DP268_Manual_G10_150418
2015 5 27 17:02:51
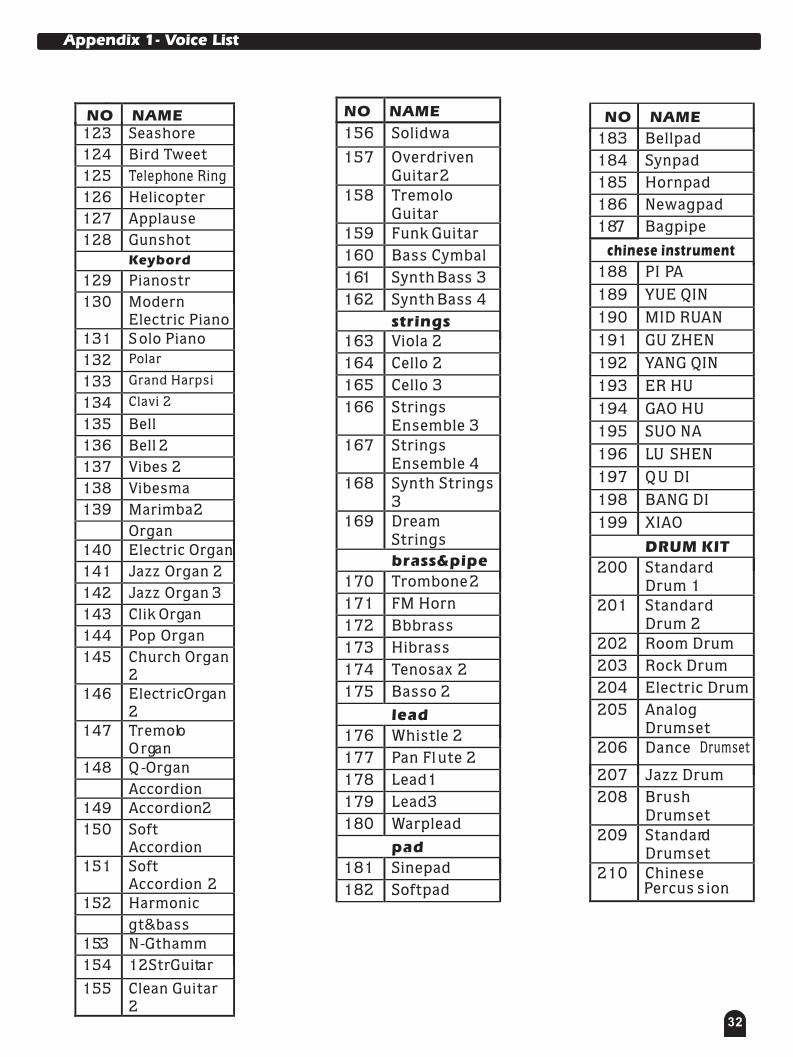
123 Seashore
124 Bird Tweet
125 Telephone Ring
126 Helicopter
127 Applause
128 Gunshot
Keybord
129 Pianostr
130 Modern Electric Piano
131 S olo Piano
132 Polar
133 Grand Harpsi
134 Clavi 2
135 Bell
136 Bell 2
137 Vibes 2
138 Vibesma
139 Marimba 2
Organ 140 Electric Organ
141 Jazz Organ 2
142 Jazz Organ
143 Clik Organ
144 Pop Organ
145 Church Organ2
146 Electric Org2
147 Tremolo O rgan
148 Q -Organ
Accordion 149 Accordion 2
150 Soft Accordion
151 Soft Accordion 2
152 Harmonic
gt&bass 153 N-Gthamm
154 12Str Guitar
155 Clean Guitar2
3
an
NAMENO156 Solidwa
157 Overdriven Guitar 2
158 Tremolo Guitar
159 Funk Guitar
160 Bass Cymbal
161 Synth Bass 3
162 Synth Bass 4
strings 163 Viola 2
164 Cello 2
165 Cello 3
166 Strings Ensemble 3
167 Strings Ensemble 4
168 Synth Strings 3
169 Dream Strings
brass&pipe
170 Trombone 2
171 FM Horn
172 Bbbrass
173 Hibrass
174 Tenosax 2
175 Basso 2
lead
176 Whistle 2
177 Pan Fl ute 2
178 Lead1
179 Lead3
180 Warplead
pad
181 Sinepad
182 Softpad
NAMENO
chinese instrument
188 PI PA
189 YUE QIN
190 MID RUAN
191 GU ZHEN
192 YANG QIN
193 ER HU
194 GAO HU
195 SUO NA
196 LU SHEN
197 QU DI
198 BANG DI
199 XIAO
DRUM KIT
200 Standard Drum 1
201 Standard Drum 2
202 Room Drum
203 Rock Drum
204 Electric Drum
205 Analog Drumset
206 Dance Drumset 207 Jazz Drum
208 Brush Drumset
209 Standard Drumset
210 Chinese Percus s ion
183 Bellpad
184 Synpad
185 Hornpad
186 Newagpad
187 Bagpipe
NAMENO
Appendix 1- Voice List
32 0
5
25
75
95
100
aw_DP268_Manual_G10_150418
2015 5 27 17:02:51

Appendix 2-Style List
8 BEAT & 16 BEAT
001
8 Beat
002
Guita r Pop 1
003
8 Beat Disco
004
8 Beat Dance
005
60s 8 Beat
006
Pop Funk
007
16 Beat Ball ad
008
Pop 16 Beat 1
009
Pop 16 Beat 2
010
16 Beat Modern
011 Modern 16 Beat
012 16 Beat Bossa Nova
013 16 Beat Funk
014 Cool Beat
POP
015 Guita r Pop 2
016 Pop beat
017 Soft Beat
018 Sting Latin
019 Brit Pop 1
020 Brit Pop 2 021 New Age 022 Pop Hit 023 Fusion Shuffle
BALLA D 024 Folk Ball ad 025 Pop Ballad 1 026 Pop Ballad 2 027 Rock Ballad 028
Easy Ballad
029
Love Ballad
030
Natural Ball ad
031
Piano Ballad
032
EP Ballad
033 New R&B Ballad
ROCK 034
Rock
035
Folk Rock 036
Slow Rock1
037
Hard Rock
NAMENO
038
6/8 Rock
039
Rock & Ro ll
040
70 s Rock & Ro ll
041
Rock Shuffle
042
4/4 Blues
DANCE
043
Club Dance
044
Disco
045
70’s Disco Funk
046
Garage
047
Rap 1
048
Rap 2
049
Hou se
050
Euro Dance
051
Techno
SOUL & FUNK
052
Jazz Funk
053 Cool Funky
054 Groove
055 Samba Funk
056 Soul
057 Soul Beat 058 Hip Hop Soul 059 Br itish Soul Pop 060 Hip Hop Beat 061
R & B Ba llad
JAZZ
062
Swing
063
Jazz Brush 064
Cool Jazz Ba llad
065
Acid Jazz 1 066
Acid Jazz 2
067
Big Band Medium
068
Big Band Ba llad
069
Swing Shuffle
070
Fusion
071
Jazz Fusion
COUN TRY
072
Country 8 Beat
073
Country Pop 1
074
Country Ba llad
075 Modern Country
NAM ENO
NAM ENO
099 Polka 100 Polka Pop 1 101 Polka Pop 2 102 Slow Waltz 103 Country Waltz 104 Jazz Waltz 105
Musette
PIANO
106
Pianist
107
Ballad
108
S low Rock 2
109
Bossa Nova2 110
Twist
INDONESIA
111
Dandut1 112
Dandut2
113
Dangdu 114
Dangdut 1
115
Dangdut 2
Dangdut 3 116
117
Kerco ng 1
118 Kerco ng 2
076
Country Folk
077
2/4 Country
078
Country Pop 2
079
Country Shuffle
080
C ountry Quick S tep s
081
Bluegras s
LATIN/BALLROOM
082
Bossa Nova 1
083
Rhumba
084
Cha Cha
Cha
085
Pop Cha Cha
086
Beguine
087
Tango
088
Swing Fox
089
Mambo
090
Salsa
091
Samba
092 Pasodoble
093 Slow Bolero
094 Habanera
095 Latin Rock
TRADITIONAL
096 March
097 German March
098 6/8 March
119
PopKcong
120 Sdangdut
33 0
5
25
75
95
100
aw_DP268_Manual_G10_150418
2015 5 27 17:02:52

附录六: 歌曲(SONG)中英文对照表Appendix 3-Song List
1 DEMO1
2 DEMO2
3 DEMO3
PIANO
1
2
Habanera
3
Four Little Swans
4
Moseta Dance
5
Germanic Dance
6
Turkish March
7
March
8
Away In A Manger
9
Chopsticks
10
2-Part Invention #13 In A Minor.B.W. Iii
FOLK & COUNTRY
11 Country
12 Jambalaya
13 Susanna
14 Bridge
15 Battle Hymne Of The Republic
16 The Old Gray Mare
17 American Patrol
18 In The Rain
19 SippinCider Through A Straw
GOLDEN & POP
20 Are You Lonesome Tonight
21 Only You 22 End Of The World 23 House Of Rising Sun 24 The Blue-Bells Of Scotland
25 Over The Rainbow 26 Beautiful Dreamer 27
Edelweiss
28
O S ole Mio
29
Silent Night
30
Ave Maria
31 Five Hundred Miles
NAMENO
38
Entertainer
39
Annie Laurie
40
Killing Me Softly
With His Song
41 Last Rose Of Summer
42 The Old King Cole
JAZZ & FUSION
43 Maple Leaf Rag
44 June Samba
45 Funk
46 I Can......
47 Sea Shore
48 Guitar&Saxphone
49 The Hip Hop`S Night
50 Blue Lunch 51 Cobweb 52 Wine 53 Jazz Old Man 54 Dark Eyes 55 Carlos 56 Sad 57 The Jazz
CHINESE
58
South Mud Bay
59
Give You A Rose
60
Flowing Rill
32
Happy New Year
33
It`S Beginning To Look A Lot Like Christmas
34
Jeanie With The Light Brown Hair
35
My Bonnie 36
Song Of The Pear lfisher
37
The Stage Coach
NAMENO
Appendix 3-Song List
NAMENO
34
Fur Elise
0
5
25
75
95
100
aw_DP268_Manual_G10_150418
2015 5 27 17:02:52

Appendix 5-Chord List
CMadd9
35
0
5
25
75
95
100
aw_DP268_Manual_G10_150418
2015 5 27 17:02:52

Appendix 6-MIDI Implementation ChartFunction
Transmitted
Recognized
Remarks
Basic
Default
ChangedChannel
1ch
1- 16ch
1-16ch
1- 16ch
Default
Mode
Messages
Altered
×
×
***********
3
×
×
NoteNumber :
True voice
9-120
***********
Velocity: Note on
Note off 〇 9nH,V=1-127
〇 9nH,V=1- 127
After
Touch
Keys
Chs ×
×
× ×
×
PitchBend 〇 〇
Control
Change
0
1
5
6
7
10
11
64
65
66
67
80
81
91
93
120
121
123
○
○
×
○
○
×
○
○
×
×
○
○
○
○
○
○
○
○
○
○
○
○
○
○
○
○
○
○
Program
Change
:True #
○ ***********
○
0-127
System Exclusive × System :Song Position
:Song Select :Tune
×
×
×
System
Real Time : Clock
:Commands
×
×
Aux
Messages
: Local on/off
: All Notes off
:Active sense
:Reset
×
×
×
○ × × × × ×
× 〇
〇
〇
Note:
0- 127
0- 127
×
×
×
×
○
○
○
○
○
〇
X
O
Bank Select
Modul ation
Portamento Time
Data Entry
Volume
Pan
Expression
Sustain Pedal
Portamento ON/OFF
Sostenuto Pedal
Soft Pedal Reverb Program
Chorus Program
Level
Chorus Level All Sound
Off
Reset A ll C ontrollers
All Notes Off
Reverb
*1 When the accompaniment is started, an FAH message is transmitted. When accompaniment is stoped, an FCH message is transmitted. When an FAH message is received, accompaniment is started. When an FCH message is received, accompaniment is stoped.
Mode 1: OMNI ON , POLY Mode 2 : OMNI ON , MONO : YESMode 3: OMNI OFF , POLY Mode 4 : OMNI OFF , MONO : NO
36 0
5
25
75
95
100
aw_DP268_Manual_G10_150418
2015 5 27 17:02:53