Embed Size (px)
Citation preview

AVS4YOU Help - AVS Video Editor v.4
AVS4YOU Programs Help
AVS Video Editor v.4
www.avs4you.com
© Online Media Technologies, Ltd., UK. 2004 - 2009 All rights reserved

Contact Us
If you have any comments, suggestions or questions regarding AVS4YOU programs or if you have a new feature that you feel can be added to improve our product, please feel free to contact us.
When you register your product, you may be entitled to technical support.
Technical Support
AVS4YOU programs do not require any professional knowledge. If you experience any problem or have a question, please refer to the AVS4YOU Programs Help. If you cannot find the solution, please contact our support staff.
Note: only registered users receive technical support.
AVS4YOU staff provides several forms of automated customer support:
AVS4YOU Support SystemYou can use the Support Form on our site to ask your questions.
E-mail SupportYou can also submit your technical questions and problems via e-mail to [email protected].
Note: for more effective and quick resolving of the difficulties we will need the following information:
Name and e-mail address used for registration
System parameters (CPU, hard drive space available, etc.)
Operating System
The information about the capture, video or audio devices, disc drives connected to your computer
(manufacturer and model)
Detailed step by step describing of your action
Please do NOT attach any other files to your e-mail message unless specifically requested by AVS4YOU.com support staff.
General information: [email protected]
Technical support: [email protected]
Sales: [email protected]
Help and other documentation: [email protected]
AVS4YOU Programs Help
© Online Media Technologies Ltd., UK 2004 - 2009 All rights reserved. www.avs4you.com
Page 2 of 198

Resources
Documentation for your AVS4YOU software is available in a variety of formats:
In-product (.chm-file) and Online Help
To reduce the size of the downloaded software installation files the in-product help was excluded from the installation although you can always download it from our web-site for your convenience. Please, visit AVS4YOU web-site at http://onlinehelp.avs4you.com/index.aspx to download the latest available version of the help executable, run it and install into the AVS4YOU programs folder. After that you will be able to use it through the Help menu of the installed AVS4YOU software.
Online Help include all the content from the In-product help file and updates and links to additional instructional content available on the web. You can find the Online Help at our web-site - http://onlinehelp.avs4you.com/index.aspx. Please note, that the most complete and up-to-date version of AVS4YOU programs help is always on the web.
PDF Documentation
The offline help is also available as a pdf-file that is optimized for printing. All PDF help files are available for download at the programs pages at AVS4YOU web-site (both http://www.avs4you.com/index.aspx and http://onlinehelp.avs4you.com/index.aspx). To be able to read and print AVS4YOU PDF help files you will need to have a PDF reading program installed.
User Guides
You have access to a wide variety of resources that help you make the most of your AVS4YOU software. The step-by-step user guides will be of help not only to the novice users but also to the users that face a certain task to be performed and look for a way to do it. Please, visit our User Guides section of AVS4YOU web-site at http://www.avs4you.com/Guides/index.aspxto read the detailed instructions for various software and tasks
Technical Support
Visit the AVS4YOU Support web-site at http://support.avs4you.com to ask your questions concerning AVS4YOU software installation, registration and use. Feel free to also use our e-mail address [email protected].
Downloads
Visit the Downloads section - http://www.avs4you.com/downloads.aspx - of our web-site to find free updates, tryouts, and other useful software. We constantly update the software, new versions of the most popular programs and new software are also frequently released.
AVS4YOU Programs Help
© Online Media Technologies Ltd., UK 2004 - 2009 All rights reserved. www.avs4you.com
Page 3 of 198

Overview
Welcome to AVS Video Editor, a powerful, full-featured and easy to use software for working with video data! Our software has a
number of great opportunities for creating the best possible video and audio, which makes working with video easy and constructive.
The unique interface is universal for any categories of users as much as possible.
AVS Video Editor will offer you a number of features to process your video. Using it you can easily do the following:
create your videos in an easiest way - AVS Video Editor is first of all intended for those new to video editing;
choose between heaps of innovative video effects and transitions, apply text and credits to video, experiment with
picture-in-picture or chromakey effects;
use an advanced timeline or a storyboard for accurate editing, easy and clear navigation and video effects application;
edit videos from HD-cameras quickly and easily - all key formats are supported: HD Video (inc. AVCHD, MPEG-2 HD and
WMV HD), TOD, MOD, M2TS;
insert one or more audio tracks into your media file, make audio corrections, mix or trim audio clips, record your
voice or live music and combine audio tracks with video;
split video into scenes and delete unnecessary ones;
edit videos of practically all formats, save movies to AVI (DivX, Xvid, etc.), MP4 (inc. Sony PSP and Apple iPod), WMV, 3GP,
3G2, QuickTime (MOV), DVD, VOB, VRO, MPEG-1, 2, 4, MPG, DAT, MJPEG, Real Video (RM, RMV);
save video project for PC, DVD, Blu-ray, DivX/Xvid discs, mobile device, Web, upload your collections to PSP, iPod,
Archos, Creative Zen Vision, mobile phones, portable DVD players, burn your video collections onto a CD-R/RW, DVD+/-R,
DVD+/-RW, DVD-RAM, Double/Dual Layer;
use ready individual menu styles for every occasion and taste;
To start AVS Video Editor go to Start menu and choose All Programs -> AVS4YOU -> Video -> AVS Video Editor.
AVS4YOU Programs Help - AVS Video Editor v.4
© Online Media Technologies Ltd., UK 2004 - 2009 All rights reserved. www.avs4you.com
Page 4 of 198

Program Interface
The Main Window of AVS Video Editor comprises the following parts:
Top Menu - is used to get access to all the main functions and features of the program.
Top Toolbar - is used to get quick access to the basic features, such as working with projects and files.
Menu Panes - are used to quickly access the program principle editing options.
Files and Effects Area - shows the imported media files, available transitions, effects, lets manage voice recording and
chapter creation.
Preview Area - is used to preview the imported media files, transitions and effects as well as the editing result.
Timeline/Storyboard Area - is used to add and manage your videos, effects and transitions.
AVS4YOU Programs Help - AVS Video Editor v.4
© Online Media Technologies Ltd., UK 2004 - 2009 All rights reserved. www.avs4you.com
Page 5 of 198

Top Menu
AVS Video Editor can be operated with the help of Top Menu elements. Flexible system of menu elements is a perfect tool for
navigating and operating the application, controlling all the processes.
The Top Menu has the following structure:
File menu section
Item Shortcut Description
New Project Ctrl+NUse it to start a new project, add new videos to your future movie and edit and save it into a
file or onto a disc.
Open Project... Ctrl+O Use it to open a previously saved project to edit it or save a video into a file or onto a disc.
Reopen ProjectUse it to open a previously saved project that is displayed in the list of the recently opened/
saved projects.
Save Project Ctrl+S Use it to save the currently edited project.
Save Project
As...
Shift+Ctrl
+SUse it to save the currently edited project under a different name.
Import Media
Library...Use it to load the multimedia files from the exported library.
Export Media
Library...
Use it to create a data file containing the information about all multimedia files loaded into
AVS Video Editor.
Import Media... Ctrl+IUse it to import media files of all supported types into the program Files and Effects Area
so that they can be used to create a movie.
Capture Video... Ctrl+RUse it to start AVS Video Recorder and capture video from a capture device connected to
your personal computer.
Save Movie... Ctrl+PUse it to save movie into one of the supported formats and burn it onto a disc or upload to a
portable device.
Exit Use it to finish work with AVS Video Editor and exit.
Edit menu section
Item Shortcut Description
Undo Ctrl+ZUse it to reverse the latest performed command. If this option is not available, it means there
is no action to undo.
RedoShift+Ctrl
+ZUse it to repeat your latest performed command or action.
Object
Use it to edit the selected object placed to the Timeline/Storyboard. Depending on the
object type - video, transition, audio or effect - and the selected Timeline or Storyboard
view different options for editing the object will be available.
LineUse it to change the Timeline files and effects lines layout. This option is unavailable if the
Storyboard view is selected.
AVS4YOU Programs Help - AVS Video Editor v.4
© Online Media Technologies Ltd., UK 2004 - 2009 All rights reserved. www.avs4you.com
Page 6 of 198

ChaptersUse it to set chapters for your created video. This might be quite useful if you are going to
save your resulting video to DVD or Blu-ray disc and create a menu for it.
Split Use this button to split the video into two parts at the current cursor position.
Freeze Use it to make a still shot from the video at the current cursor position.
Aspect RatioUse it to change the aspect ratio of your resulting video depending on the device that will be
used to watch it.
Volume and
Balance...
Use it to change the volume of the sound in the output video. Here you can also change the
proportion of the volume value for the main video and the added soundtrack, completely
mute the main video audio and leave the added soundtrack only and so on.
Settings... Ctrl+Enter Use it to change the project and the video settings.
View menu section
Item Shortcut Description
TimelineUse it to change the main view to the Timeline to be able to add video effects, audio
soundtracks and so on.
StoryboardUse it to change the main view to the Storyboard to be able to add videos and transitions
and change their properties.
ZoomUse it to zoom in and out the video and the effects on the Timeline. This option is
unavailable if the Storyboard view is selected.
Section Use it to switch between the program Menu Panes.
ViewUse it to change the way the files and effects are represented in the Files and Effects Area.
You can choose between the Thumbnails, List and Details.
Sort by
Use it to arrange the media files in the Files and Effects Area according to the Time they
were added to the Files and Effects Area, their Name, Date modified, their Type or Size.
You can also change their location in an upward/downward direction.
Help menu section
Item Shortcut Description
Help F1 Use it to open the AVS Video Editor help file.
AVS Home Page Use it to visit AVS4YOU web site.
AVS Support
PageUse it to visit AVS4YOU support site.
E-mail us... Use it to write an e-mail and send it to our support team.
About Use it to read the information about the AVS Video Editor program.
AVS4YOU Programs Help - AVS Video Editor v.4
© Online Media Technologies Ltd., UK 2004 - 2009 All rights reserved. www.avs4you.com
Page 7 of 198

Top Toolbar
The Top Toolbar lets the user quickly access the main operations with the projects and files and consists of the following buttons:
Button Name Description
New ProjectIs used to start a new project, add new videos to your future movie and edit and save it into a
file or onto a disc.
Open Project Is used to open a previously saved project to edit it or save a video into a file or onto a disc.
Save Project Is used to save the currently edited project.
UndoIs used to reverse the latest performed command. If this option is not available, it means
there is no action to undo.
Redo Is used to repeat your latest performed command or action.
4:3 Aspect
Ratio
Is used to change the aspect ratio of your resulting video so that it could fit a common CRT or
4:3 LCD display without any distortions and without black mattes in the upper and lower parts
of the video.
16:9 Aspect
Ratio
Is used to change the aspect ratio of your resulting video so that it could fit a widescreen 16:9
LCD display without any distortions and without black mattes on sides of the video.
Save Movie...Is used to save movie into one of the supported formats and burn it onto a disc or upload to a
portable device.
AVS4YOU Programs Help - AVS Video Editor v.4
© Online Media Technologies Ltd., UK 2004 - 2009 All rights reserved. www.avs4you.com
Page 8 of 198
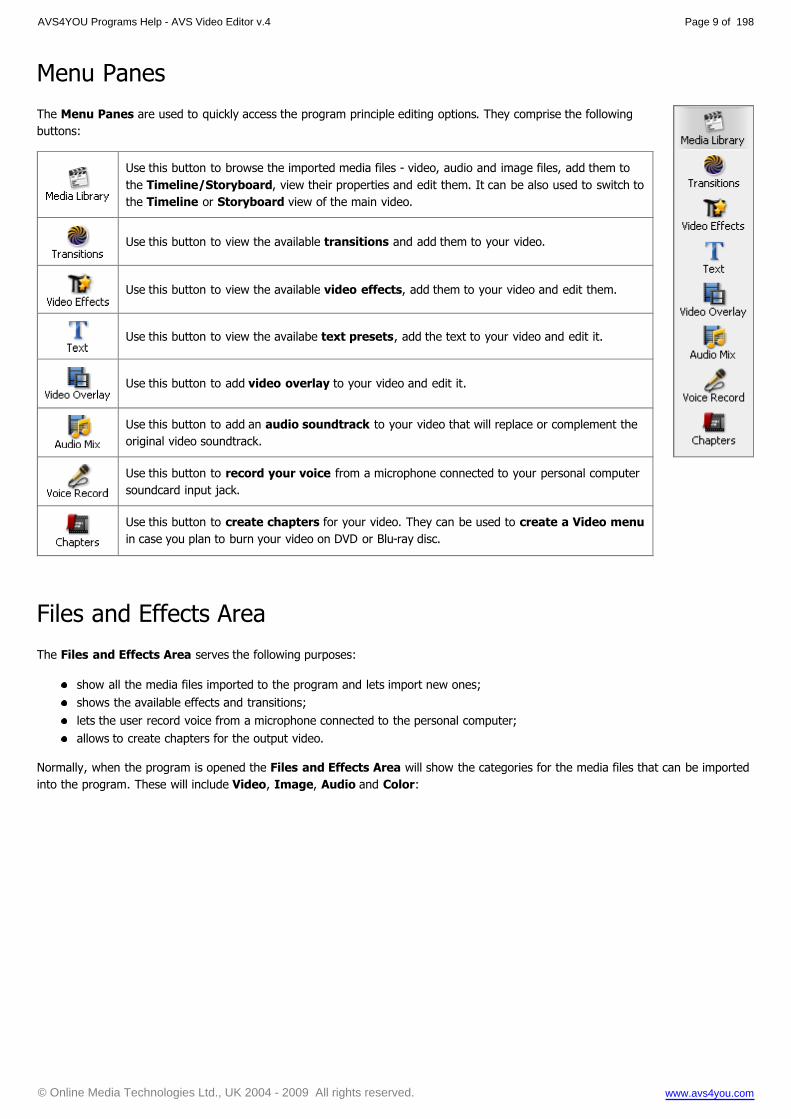
Menu Panes
The Menu Panes are used to quickly access the program principle editing options. They comprise the following
buttons:
Use this button to browse the imported media files - video, audio and image files, add them to
the Timeline/Storyboard, view their properties and edit them. It can be also used to switch to
the Timeline or Storyboard view of the main video.
Use this button to view the available transitions and add them to your video.
Use this button to view the available video effects, add them to your video and edit them.
Use this button to view the availabe text presets, add the text to your video and edit it.
Use this button to add video overlay to your video and edit it.
Use this button to add an audio soundtrack to your video that will replace or complement the
original video soundtrack.
Use this button to record your voice from a microphone connected to your personal computer
soundcard input jack.
Use this button to create chapters for your video. They can be used to create a Video menu
in case you plan to burn your video on DVD or Blu-ray disc.
Files and Effects Area
The Files and Effects Area serves the following purposes:
show all the media files imported to the program and lets import new ones;
shows the available effects and transitions;
lets the user record voice from a microphone connected to the personal computer;
allows to create chapters for the output video.
Normally, when the program is opened the Files and Effects Area will show the categories for the media files that can be imported
into the program. These will include Video, Image, Audio and Color:
AVS4YOU Programs Help - AVS Video Editor v.4
© Online Media Technologies Ltd., UK 2004 - 2009 All rights reserved. www.avs4you.com
Page 9 of 198

You can select one of the categories double-clicking it with the mouse or using the drop-down box in the upper right corner. When
selected, the category will show all the files of a certain selected type - video, image, audio or colors - available in it. Here is an
example of the selected video category:
If you want to add some video or other media to your output movie, you will need to import it first. To do that click the
button and browse for the media files or simply drag-and-drop them to the program window. You can also capture video from a
capture device connected to your personal computer clicking the button.
To return back to the Media Library view double-click the upward green arrow - .
AVS4YOU Programs Help - AVS Video Editor v.4
© Online Media Technologies Ltd., UK 2004 - 2009 All rights reserved. www.avs4you.com
Page 10 of 198

When you click the Transition button of the Menu Panes, the list of all the available transitions will be displayed:
You can sort them by subcategories using the upper right corner drop-down box.
The same way pressing the Video Effects button of the Menu Panes will show all the effect present in the program in the Files
and Effects Area. The effects can be sorted by subcategories as well:
You can change the representation of the list of the Files and Effects Area elements clicking the Views button. Pressing it
and selecting the View as option you can choose between Thumbnails, List and Details to view the Files and Effects Area
elements. With media files - video, images and audio - it is also possible to arrange them by time they were added to the Media
Library, their name, date modified, type or size with the Sort by option. You can also change their location in an upward/downward
direction.
AVS4YOU Programs Help - AVS Video Editor v.4
© Online Media Technologies Ltd., UK 2004 - 2009 All rights reserved. www.avs4you.com
Page 11 of 198
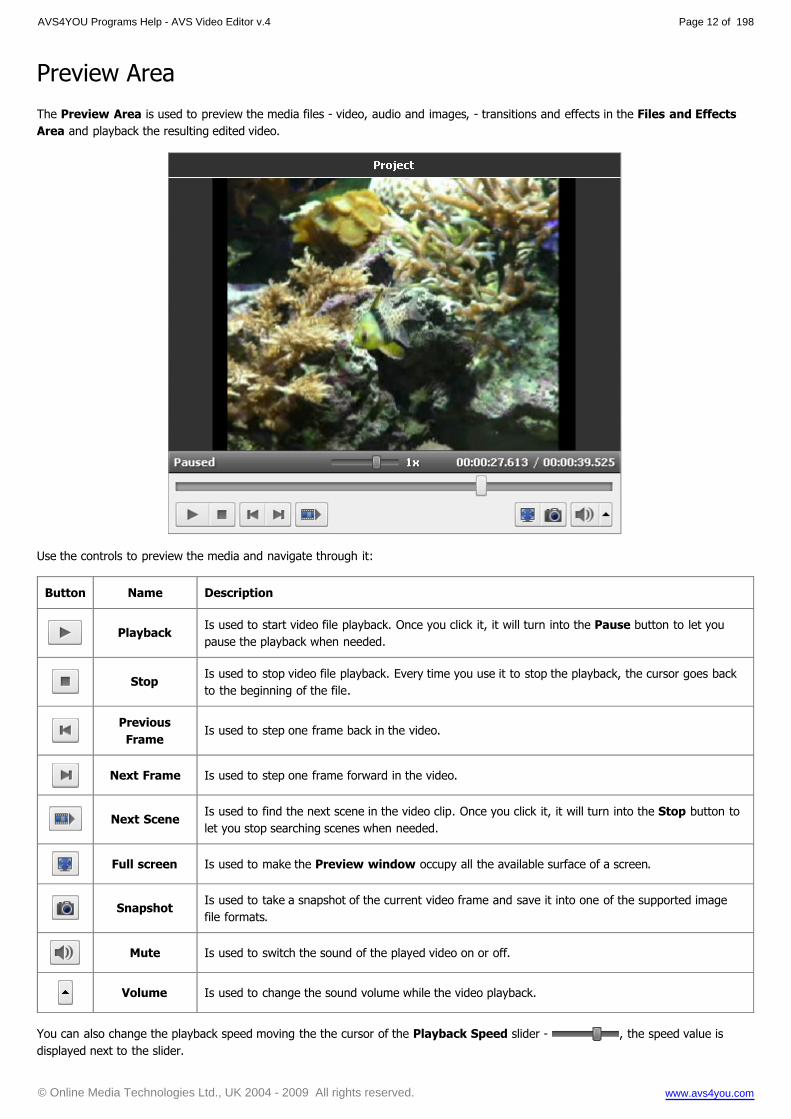
Preview Area
The Preview Area is used to preview the media files - video, audio and images, - transitions and effects in the Files and Effects
Area and playback the resulting edited video.
Use the controls to preview the media and navigate through it:
Button Name Description
PlaybackIs used to start video file playback. Once you click it, it will turn into the Pause button to let you
pause the playback when needed.
StopIs used to stop video file playback. Every time you use it to stop the playback, the cursor goes back
to the beginning of the file.
Previous
FrameIs used to step one frame back in the video.
Next Frame Is used to step one frame forward in the video.
Next SceneIs used to find the next scene in the video clip. Once you click it, it will turn into the Stop button to
let you stop searching scenes when needed.
Full screen Is used to make the Preview window occupy all the available surface of a screen.
SnapshotIs used to take a snapshot of the current video frame and save it into one of the supported image
file formats.
Mute Is used to switch the sound of the played video on or off.
Volume Is used to change the sound volume while the video playback.
You can also change the playback speed moving the the cursor of the Playback Speed slider - , the speed value is
displayed next to the slider.
AVS4YOU Programs Help - AVS Video Editor v.4
© Online Media Technologies Ltd., UK 2004 - 2009 All rights reserved. www.avs4you.com
Page 12 of 198

Values Description
from -16x to -2x If you set this value, it will increase the backward playback speed
-1x If you set this value, it will play backwards at normal speed
from -0,5x to 0x If you set this value, it will decrease the backward playback speed
from 0x to 0,5x If you set this value, it will decrease the forward playback speed
1x If you set this value, it will play forwards at normal speed
from 2x to 16x If you set this value, it will increase the forward playback speed
Note: if the playback slider reaches the beginning of the file, when the negative speed value is set, it continues
to play video at normal speed (+1x).
To quickly navigate through your video file use the Playback slider - .
When you launch the program for the first time, the Preview window will show you the Info Tips. These Tips give you advice on
how to use the main features of the program. Switch between the buttons of Menu Panes to read the new tips corresponding to
each option.
If you don't want the Tips to be shown during your work, just click the Close link. If you need to disable the Tips, check the Don't
show tips box, nevertheless you'll be able to activate them from the Settings window of the program.
Timeline/Storyboard Area
The purpose of the Timeline/Storyboard Area is creating and editing your movies. Here you can create, edit, add different effects
to your video. The Timeline/Storyboard Area can be represented in two views:
1. Timeline view - is used when you add different effects - video effects, audio, text and video overlay - to your video.
and
2. Storyboard view - is used to add videos and transitions to the Timeline/Storyboard Area.
You can easily switch between both the views using the appropriate buttons:
- is used to switch into Timeline view;
- is used to switch into Storyboard view.
AVS4YOU Programs Help - AVS Video Editor v.4
© Online Media Technologies Ltd., UK 2004 - 2009 All rights reserved. www.avs4you.com
Page 13 of 198

Timeline view
The Timeline view allows you to achieve accuracy and precision in applying effects and editing your videos.
AVS Video Editor allows you to apply one or several effects to your media file. For details on specific effect, please refer to
respective chapters. The Timeline view displays all the possible editing options simultaneously. You can see the Video Effects,
Text, Video Overlay and Audio Mix lines used to edit your video clip.
To expand any effect applied to the video you need to press the '+' button near it, to collapse it press the '-' button.
To include the effect or media file into output video or to exclude it from it the Enable/Disable line button is used.
To block the line while applying effects to other lines, use the Lock/Unlock line button.
When you select a line with video or effect on the Timeline certain buttons will be available on the Timeline Toolbar:
Note: the Timeline buttons differ depending on the Timeline element selected and can be present or absent
for various elements.
Button Name Description
Split
Use this button to split the video into two parts at the current cursor position. See the Placing
Imported Media Files to the Storyboard section for more information on this option. This button is
only available if a video clip is selected on the Timeline.
DeleteUse this button to delete the currently selected element (video clip with the adjacent transition, video
effect, text, video overlay or audio mix) from the Timeline.
Trim
Use this button to edit your video clips and video overlay effect duration. See the Using Trim and
Multiple Trim Options section for more information on this option. This button is only available if a
video clip or video overlay effect is selected on the Timeline.
SpeedUse this button to change the playback speed of your video. This button is only available if a video clip
is selected on the Timeline.
ColorUse this button to adjust the tonal range, color, and sharpness of your video. This button is only
available if a video clip is selected on the Timeline.
AudioUse this button to apply some audio effects to the audio track of your video. This button is only
available if a video clip is selected on the Timeline.
Video
Effects
Use this button to edit a video effect applied directly on the main video. This button is only available
if a video clip with an applied effect is selected on the Timeline.
AVS4YOU Programs Help - AVS Video Editor v.4
© Online Media Technologies Ltd., UK 2004 - 2009 All rights reserved. www.avs4you.com
Page 14 of 198

TransitionUse this button to edit the selected transition duration. This button is only available if a transition is
selected on the Timeline.
Edit EffectUse this button to open the Properties window to edit the applied effects. This button is only available
if a video effect is selected on the Timeline.
DurationUse this button to edit the selected element duration on the Timeline. This button is only available if a
video effect or text is selected on the Timeline.
Edit TextUse this button to open the Properties window to edit text. This button is only available if a text is
selected on the Timeline.
Edit
Overlay
Use this button to open and edit the video overlay Properties window. This button is only available if a
video overlay is selected on the Timeline.
Storyboard Use this button to switch to the Storyboard view.
Volume
and
Balance
Use this button to open the Volume and Balance window and adjust these audio settings.
ZoomUse the Zoom slider to zoom in and out the the video and the effects on the Timeline. Click the Zoom
to fit button to disable the zooming.
Storyboard view
The Storyboard view shows the sequence of video clips with the Transitions between them. You can change the order of clips in
your video. To add clips to the Storyboard simply drag them from Files and Effects Area and drop to the necessary place in the
Storyboard. The same way the transitions are added.
When you select a video clip or a transition on the Storyboard certain buttons will be available on the Storyboard Toolbar:
Note: the Storyboard buttons differ depending on the Storyboard element selected and can be present or
absent for various elements.
Button Name Description
Move LeftUse this button to move the video clip towards the beginnig of the movie (i.e. to the left part of the
Storyboard). This button is only available if a video clip is selected on the Storyboard.
AVS4YOU Programs Help - AVS Video Editor v.4
© Online Media Technologies Ltd., UK 2004 - 2009 All rights reserved. www.avs4you.com
Page 15 of 198

Move
Right
Use this button to move the video clip towards the end of the movie (i.e. to the right part of the
Storyboard). This button is only available if a video clip is selected on the Storyboard.
Delete Use this button to delete the currently selected element (video clip or transition) from the Storyboard.
Delete All Use this button to delete all the elements (both video clips and transitions) from the Storyboard.
Trim
Use this button to edit your video clips duration. See the Using Trim and Multiple Trim Options
section for more information on this option. This button is only available if a video clip is selected on the
Storyboard.
SpeedUse this button to change the playback speed of your video. This button is only available if a video clip
is selected on the Storyboard.
ColorUse this button to adjust the tonal range, color, and sharpness of your video. This button is only
available if a video clip is selected on the Storyboard.
AudioUse this button to apply some audio effects to the audio track of your video. This button is only
available if a video clip is selected on the Storyboard.
Video
Effects
Use this button to edit a video effect applied directly on the main video. This button is only available if
a video clip with an applied effect is selected on the Storyboard.
TransitionUse this button to edit the selected transition duration. This button is only available if a transition is
selected on the Storyboard.
Timeline Use this button to switch to the Timeline view.
Volume
and
Balance
Use this button to open the Volume and Balance window and adjust these audio settings.
Keyboard Shortcuts
The following keyboard shortcuts are available to AVS Video Editor users:
Main Window general purpose shortcuts
Menu Panes shortcuts
Preview Area/Player shortcuts
Timeline shortcuts
Trim/MultiTrim/Video Effects properties/Video Overlay properties windows common shortcuts
Main Window general purpose shortcuts
ShortcutCorresponding
ButtonDescription
Ctrl+N New ProjectUse it to start a new project, add new videos to your future movie and edit and save it into a
file or onto a disc.
Ctrl+O Open Project... Use it to open a previously saved project to edit it or save a video into a file or onto a disc.
Ctrl+S Save Project Use it to save the currently edited project.
Shift+Ctrl
+S
Save Project
As...Use it to save the currently edited project under a different name.
AVS4YOU Programs Help - AVS Video Editor v.4
© Online Media Technologies Ltd., UK 2004 - 2009 All rights reserved. www.avs4you.com
Page 16 of 198

Ctrl+I Import Media...Use it to import media files of all supported types into the program Files and Effects Area
so that they can be used to create a movie.
Ctrl+R Capture Video...Use it to start AVS Video Recorder and capture video from a capture device connected to
your personal computer.
Ctrl+P Save Movie...Use it to save movie into one of the supported formats and burn it onto a disc or upload to a
portable device.
Ctrl+Z UndoUse it to reverse the latest performed command. If this option is not available, it means there
is no action to undo.
Shift+Ctrl
+Z/
Ctrl+Y
Redo Use it to repeat your latest performed command or action.
Ctrl+Enter Settings... Use it to change the project and the video settings.
F1 Help Use it to open the AVS Video Editor help file.
Menu Panes shortcuts
ShortcutCorresponding
ButtonDescription
Ctrl+1 Media Library
Use it to browse the imported media files - video, audio and image files, add them to the
Timeline/Storyboard, view their properties and edit them. It can be also used to switch to
the Timeline or Storyboard view of the main video.
Ctrl+2 Transitions Use it to view the available transitions and add them to your video.
Ctrl+3 Video Effects Use it to view the available video effects, add them to your video and edit them.
Ctrl+4 Text Use it to view the availabe text presets, add the text to your video and edit it.
Ctrl+5 Video Overlay Use it to add video overlay to your video and edit it.
Ctrl+6 Audio MixUse it to add an audio soundtrack to your video that will replace or complement the
original video soundtrack.
Ctrl+7 Voice RecordUse it to record your voice from a microphone connected to your personal computer
soundcard input jack.
Ctrl+8 ChaptersUse it to create chapters for your video. They can be used to create a Video menu in
case you plan to burn your video on DVD or Blu-ray disc.
Preview Area/Player shortcuts
ShortcutCorresponding
ButtonDescription
Ctrl
+SpacePlay/Pause
Use it to playback or pause the currently edited video or selected effect or transition in the
Preview Area. This shortcut is common for all the windows where player is present.
Alt+S StopUse it to stop video file playback. Every time you use it to stop the playback, the cursor goes
back to the beginning of the file.
AVS4YOU Programs Help - AVS Video Editor v.4
© Online Media Technologies Ltd., UK 2004 - 2009 All rights reserved. www.avs4you.com
Page 17 of 198

Alt+Left Previous FrameUse it to go to the previous frame of the currently edited video or selected effect or transition
in the Preview Area. This shortcut is common for all the windows where player is present.
Alt+Right Next FrameUse it to go to the next frame of the currently edited video or selected effect or transition in
the Preview Area. This shortcut is common for all the windows where player is present.
Alt+N Next SceneUse it to find the next scene in the video clip. Once you click it, it will turn into the Stop
button to let you stop searching scenes when needed.
Alt+Down Decrease Speed
Use it to change the backward preview playback speed of the currently edited video or
selected effect or transition in the Preview Area. Each time you use thie shortcut the
playback speed will change to -0.25x, -0.5x, -1x, -2x, -4x, -8x, -16x speed.
In case you start using this shortcut after the Increase Playback Speed shortcut has been
used and the speed is somewhat increased (0.25x, 0.5x, 1x, 2x, 4x, 8x or 16x) the
Decrease Playback Speed shortcut will decrease the playback speed gradually each time
you press it until the playback speed reaches 0.25x. After that the shortcut will begin acting
as Fast Backward and will start changing the backward video playback speed. This shortcut
is common for all the windows where player is present.
Alt+Up Increase Speed
Use it to change the forward preview playback speed of the currently edited video or selected
effect or transition in the Preview Area. Each time you use this shortcut the playback speed
will change to 0.25x, 0.5x, 1x, 2x, 4x, 8x, 16x speed.
In case you start using this shortcut after the Decrease Playback Speed shortcut has been
used and the speed is somewhat decreased (-0.25x, -0.5x, -1x, -2x, -4x, -8x or -16x) the
Increase Playback Speed shortcut will increase the playback speed gradually each time you
press it until the playback speed reaches -0.25x. After that the shortcut will begin acting as
Fast Forward and will start changing the forward video playback speed. This shortcut is
common for all the windows where player is present.
Alt+M MuteUse it to switch the sound of the played video on or off. This shortcut is common for all the
windows where player is present.
Timeline shortcuts
ShortcutCorresponding
ButtonDescription
Ctrl+PgDn Zoom in Use it to zoom the Timeline in and enlarge the view of the added video and effects.
Ctrl+PgUp Zoom out Use it to zoom the Timeline out reduce the view of the added video and effects.
F9 Zoom to FitUse it to return the view of the video and effects at the Timeline so that the whole video was
displayed at the Timeline Area.
F8 Split Use it to split the video at the Timeline at the current cursor position.
Del Delete Use it to remove the currently selected element from the Timeline.
Trim/MultiTrim/Video Effects properties/Video Overlay properties
windows common shortcuts
ShortcutCorresponding
ButtonDescription
AVS4YOU Programs Help - AVS Video Editor v.4
© Online Media Technologies Ltd., UK 2004 - 2009 All rights reserved. www.avs4you.com
Page 18 of 198

Alt+N Next SceneUse it to find the next scene in the video clip. Once you use it, it will turn into the Stop
shortcut to let you stop searching scenes when needed.
Alt+L
(F3)
Mark in
(Left bound)Use it to mark the beginning of the trimmed area.
Alt+R
(F4)
Mark out
(Right bound)Use it to mark the end of the trimmed area.
Alt+I
(F5)Fade in Use it to mark the fade in area.
Alt+O
(F6)Fade out Use it to mark the fade out area.
MultiTrim window specific shortcuts
F8 Split Scene Use it to split the video into scenes at current cursor position.
Alt+DStart Scene
DetectionUse it to start scene detection.
Alt+Z Zoom Use it to open the zoom timeline.
Ctrl+M Merge Scenes Use it to join the selected scenes together.
Del Delete Scenes Use it to delete the currently selected scene.
Video Overlay properties window specific shortcuts
Ctrl+LeftPrevious Time
StampUse it to quickly go to the previous time stamp of the trajectory.
Ctrl+RightNext Time
StampUse it to quickly go to the next time stamp of the trajectory.
Ctrl+Ins Add Time StampUse it to add a new time stamp at the current overlay position. You can change the trajectory
at this time stamp after that clicking it with the mouse and dragging it to the desired position.
Ctrl+DelRemove Time
Stamp
Use it to delete the currently selected time stamp. The trajectory will be changed to a straight
line connecting the two time stamps before and after the deleted one.
Video Overlay properties Presets tab/Text properties Presets tab
window specific shortcuts
Ctrl+S Save Preset Use it to save the currently edited preset.
Del Delete Preset Use it to delete the currently selected preset.
Text properties window specific shortcuts
Ctrl+C CopyUse it to copy the currently selected text box with the text to the program clipboard and paste
it to another place.
Ctrl+V Paste Use it to paste the previously copied or cut text box with the text.
Ctrl+X CutUse it to cut out the currently selected text box with the text to the program clipboard and
paste it to another place.
AVS4YOU Programs Help - AVS Video Editor v.4
© Online Media Technologies Ltd., UK 2004 - 2009 All rights reserved. www.avs4you.com
Page 19 of 198

Working with AVS Video Editor
Working with AVS Video Editor is quite simple and does not require any specific knowledge on video editing. All you need is to
follow simple steps in creating and editing your own video.
1. Start AVS Video Editor. A new project will be automatically created for you or a previously edited one will be opened.
2. Set the project and video parameters. This is necessary for the correct and comfortable work and video creation and editing.
3. Import the media files that you want to be included into your movie (videos, audio tracks and images) or you can capture
your video if it is recorded on a DV camera, for instance.
4. Put the imported or captured video to the Timeline/Storyboard Area. This is necessary to form the succession of
video clips in your future movie and for editing them.
5. Start editing your movie by adding transitions between video clips in the Timeline/Storyboard Area.
6. Add video effects to your video and edit them as you like.
7. Add text captions to your movie where necessary.
8. You might want to add video overlay effect or change the movie soundtrack or record your voice from
microphone.
9. When all the editing is done, you will need to save your video into a file or record it onto a disc or upload it to a portable
device of yours. You can also create a disc menu for you movie in case you save it into a DVD or Blu-ray format.
And that's just it - as an output you will get a video that can be watched using a favorite program or a device of yours.
Working with Projects
Working with AVS Video Editor is built around the project conception. This means that once a project is created and saved, the next
time saving the video to some other format will be very fast and easy - you simply load the same project and click the Save Movie...
button.
Projects are also very useful in case you do not have a possibility to create, edit and save your video all at once. If this is your case,
you will need to save the project and next time start from the place where you left your editing.
When AVS Video Editor is launched for the first time, a new project will automatically be created for you.
The project file represents a data file with a .vep4 extension containing the information on the video and audio clips, effects and
transitions added to your movie. You cannot read the saved project with a third-party application, only AVS Video Editor is able to
open (or reopen) the created project file.
Note: it is strongly recommended not to change the location of the media files used in your project while
working on it.
Working with projects is done the following way:
1. You can create a new project of yours.
2. Set the project parameters so that it could meet your requirements.
3. Save your created project to be able to use it in future.
Note: the project file will only contain all the necessary information on the video clips and your
actions, but not these elements themselves.
4. Or alternatively open an already saved project to additionally edit it or save your created video into some other format.
AVS4YOU Programs Help - AVS Video Editor v.4
© Online Media Technologies Ltd., UK 2004 - 2009 All rights reserved. www.avs4you.com
Page 20 of 198

Starting a New Project
So, when AVS Video Editor is launched for the first time, a new project will automatically be created for you. But you can create a
new project yourself. To do that click the New Project button or use the File section of the Top Menu.
You will be asked if you want to save the previous project or not:
It is recommended to save the changes, so that you could use the project in future. Or you might want to press Cancel if you do not
plan to close the previous project and start a new one.
After the new project is created, you will need to change its settings and save it afterwards.
Changing Settings
The settings window can be opened using the Edit section of the Top Menu. It will be opened to the General tab first:
Here you can set the following parameters:
Project - the settings pertaining to the project:
Automatically open last edited project at startup - mark this option to let the program open the latest edited
project for you at startup. If unmarked, a new empty project will be opened when the program is launched.
Enable autosave - mark this option to let the program automatically save the project every set interval of time
(hours:minutes:seconds). This can be convenient if you experience power shutdowns and your work results can be
lost if you do not save your project frequently.
AVS4YOU Programs Help - AVS Video Editor v.4
© Online Media Technologies Ltd., UK 2004 - 2009 All rights reserved. www.avs4you.com
Page 21 of 198
Preview - the settings of the Preview Area:
Quality - the quality used to preview your video (can be Low (Fastest), Medium (Default) and High (Slowest)) -
you can change it to the lower value if your computer fails to playback the video correctly.
Note: this option affects the video preview only and does NOT in any way affect the quality of
the output video.
Messages - the option gives you helpful information on how to use the main functions of the program.
Show info tips - tick this box to confirm that you want to read the tips while working with AVS Video Editor. The
tips window appears in place of the Preview window every time you switch to a new element of the Menu Panes.
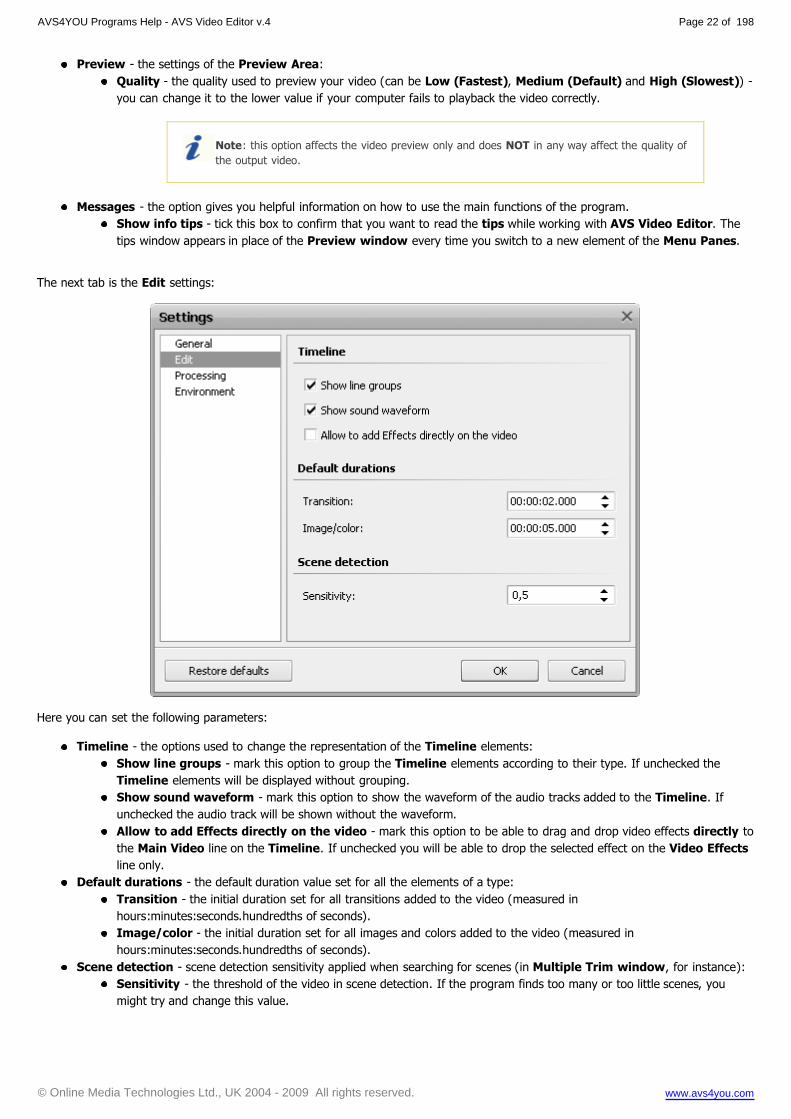
The next tab is the Edit settings:
Here you can set the following parameters:
Timeline - the options used to change the representation of the Timeline elements:
Show line groups - mark this option to group the Timeline elements according to their type. If unchecked the
Timeline elements will be displayed without grouping.
Show sound waveform - mark this option to show the waveform of the audio tracks added to the Timeline. If
unchecked the audio track will be shown without the waveform.
Allow to add Effects directly on the video - mark this option to be able to drag and drop video effects directly to
the Main Video line on the Timeline. If unchecked you will be able to drop the selected effect on the Video Effects
line only.
Default durations - the default duration value set for all the elements of a type:
Transition - the initial duration set for all transitions added to the video (measured in
hours:minutes:seconds.hundredths of seconds).
Image/color - the initial duration set for all images and colors added to the video (measured in
hours:minutes:seconds.hundredths of seconds).
Scene detection - scene detection sensitivity applied when searching for scenes (in Multiple Trim window, for instance):
Sensitivity - the threshold of the video in scene detection. If the program finds too many or too little scenes, you
might try and change this value.
AVS4YOU Programs Help - AVS Video Editor v.4
© Online Media Technologies Ltd., UK 2004 - 2009 All rights reserved. www.avs4you.com
Page 22 of 198

The next tab is the Processing settings:
Here you can select the one of the available Resize filters:
"Nearest Neighbor" - the simplest method of image resizing, i.e. the processing power used is the smallest, but the result
also has the poorest quality. Speaking of the process itself, when the resizing is done using the "Nearest Neighbor" filter,
only the pixels closest to the sample point are taken into consideration, with no input from other surrounding pixels. This
method can be really recommended only in case the speed is crucial and the quality can be neglected.
Bilinear - a slightly better method of image resizing, being a reasonable compromise between the speed and the output
image quality. When the resizing is done with the Bilinear filter, a sample point takes the four closest pixel centers and
linearly interpolates their color values according to their distance from the sample point. The method takes more computing
power than the "Nearest Neighbor". This method is particularly useful when an image is being enlarged, or transformed
without decrease in average size.
Bicubic - the best method of image resizing among available ones. Images resampled with bicubic filter are smoother and
have fewer artifacts. At the same time this filter will require more computing time and power.
Depending on your computer configuration, the time you have to perform the conversion and all the other factors, you can select one
of the filters and the appropriate resizing will be performed.
It is also possible to set the Conversion priority: Highest, Above Normal, Normal or Below Normal. Select the Normal or
Below Normal priority, if you plan to do some other work on your computer - watch a movie, play a game, - while the conversion
process takes place. In case you need to convert files as soon as possible, use the Highest or Above Normal conversion priority.
AVS4YOU Programs Help - AVS Video Editor v.4
© Online Media Technologies Ltd., UK 2004 - 2009 All rights reserved. www.avs4you.com
Page 23 of 198

The next tab is the Environment settings:
Select the Temporary Directory used to store all the program work files using the Browse button. The program will show the
Free storage space in selected folder in the appropriate place.
Note: you might need quite a lot space for video editing, so we strongly recommend that you select the drive
with the largest available free space value for the temporary folder.
Undo - the number of the undo/redo actions:
Number of steps - the number of the steps handled by the program. If the number of steps exceeds the value, the first
undos will become unavailable. This number depends on the memory installed on your computer, but you can try and increase
it if you plan a large project.
AVS4YOU Programs Help - AVS Video Editor v.4
© Online Media Technologies Ltd., UK 2004 - 2009 All rights reserved. www.avs4you.com
Page 24 of 198

Opening Existing Projects
To edit an old project that has been previously saved you will need to open it. Click the Open Project button or use the File
section of the Top Menu. The following window will be opened:
Select the necessary project and click the Open button. The project will be loaded into AVS Video Editor reflecting all the applied
and saved changes.
You can also open one of the recently modified projects using the Reopen Project option of the File section of the Top Menu and
selecting the necessary project from the list of available ones.
AVS4YOU Programs Help - AVS Video Editor v.4
© Online Media Technologies Ltd., UK 2004 - 2009 All rights reserved. www.avs4you.com
Page 25 of 198

Saving Projects
Whenever a new project is created or you edit an old project, you will need to save it so that all the changes were available in the
future. Click the Save Project button or use the File section of the Top Menu. The following window will be opened:
Select the location, enter the project name and click the Save button. The next time you need to edit the same project, simply open
it.
In case you need to save the same project but under a different name use the Save Project as... option of the File section of the
Top Menu.
Creating and Editing Videos
Once a new project is created or an older one started, you can begin work with the media files you have on your computer hard disk
drive. Normally, the work with the videos is started with importing media files that you have on your computer or an optical disc
into AVS Video Editor program. This can be done the following way:
You can either import the media files - videos, audio and images - into the program;
or will need to capture your video from a capture device of yours - a miniDV camcorder or something alike - and then these
captured videos will be automatically imported into the program.
In either case after the files are added to the Files and Effects Area you need to place them to the Timeline/Storyboard Area
to be able to edit them.
AVS4YOU Programs Help - AVS Video Editor v.4
© Online Media Technologies Ltd., UK 2004 - 2009 All rights reserved. www.avs4you.com
Page 26 of 198

Creating Videos
Click the Media Library button to view what media files are already loaded into AVS Video Editor. If this is your
first project, no videos or audio or image files will be loaded into the program. So you will need to import them. If
you plan to create a movie from the video recorded by a miniDV camcorder of yours, you will need to capture the
recorded video to the computer hard disk drive prior to working with them.
After the files are imported to the program, you can preview them, preedit them if needed and after that place them to the
Timeline/Storyboard Area to create a movie.
Importing Multimedia Files
Before you can begin editing your video, you need make the files available to AVS Video Editor. This means, that you
will need to import your video, audio and image files from your computer hard disk drive into the program. First click
the Media Library button of the Menu Panes and then the Import button in the Files and Effects Area. The same can be done
using the Import Media option of the File section of the Top Menu.
The Import Media window will be opened:
Select the necessary media files and click the Open button. The selected files will be added to the Files and Effects Area into the
appropriate category - Video, Audio or Image:
AVS4YOU Programs Help - AVS Video Editor v.4
© Online Media Technologies Ltd., UK 2004 - 2009 All rights reserved. www.avs4you.com
Page 27 of 198

You can select one of the categories double-clicking it with the mouse or using the drop-down box in the upper right corner. When
selected, the category will show all the files of a certain selected type - video, image, audio or colors - available in it. Here is an
example of the selected video category:
After that you can either import more media files or preview the imported media files or preprocess them before you place them
to the Timeline/Storyboard Area.
AVS4YOU Programs Help - AVS Video Editor v.4
© Online Media Technologies Ltd., UK 2004 - 2009 All rights reserved. www.avs4you.com
Page 28 of 198

Capturing Video
Sometimes you might want to create a home movie out of the material recorded onto a miniDV camera or some other
device that requires the video captured before you can edit it. AVS Video Editor lets you do that with no difficulties.
First of all you will need to properly connect your miniDV camcorder or another capture device to your personal computer and, after
you launch AVS Video Editor, press the Capture button. AVS Video Recorder program will start and let you capture your video
to the computer hard disk drive:
Please, refer to the AVS Video Recorder Online Help for detailed information on how to capture video from a capture device.
When you finish capturing video, press the Exit button in AVS Video Recorder bottom right corner to return to AVS Video Editor.
You will find your captured video in the Video section of the Files and Effects Area:
AVS4YOU Programs Help - AVS Video Editor v.4
© Online Media Technologies Ltd., UK 2004 - 2009 All rights reserved. www.avs4you.com
Page 29 of 198

Using Preview
Before you add the media files to the Timeline/Storyboard Area you might want to preview them or edit them.
Click the Media Library button to view the imported media files. After that select one of the categories - Video,
Audio, Image or Color and double-click it.
After that select a media file to preview clicking it. Now use the Preview Area to watch or listen to the media file you have selected:
Use the Playback button to start the media file playback. Or, alternatively, you can simply double-click the media file in the
Files and Effects Area to start its playback. If you want you can play your files on full screen. To open a Full Screen mode, please,
use the button or double click the Preview window. To go back to the windowed mode click the button once again,
double click the picture or press the Esc button.
The buttons of the Preview Area are quite self explanatory, though you can read their detailed description here.
The same way the effects and transitions are previewed. Simply select the appropriate section of the Menu Panes - Transitions or
Video Effects or Text and click the necessary element of the Files and Effects Area.
Preprocessing Files
Not all the media files that you import to AVS Video Editor can be used in your output movie right away. Some of them will, for
sure, need preprocessing - trimming, cutting off some unnecessary scenes and so on.
The easiest way to access all the actions that you can do to the imported media files is via the right-click express menu. You will
be able to view the files properties, change their duration, alter the aspect ratio value and even extract audio from the
video clip so that you will be able to use it in your editing afterwards.
AVS4YOU Programs Help - AVS Video Editor v.4
© Online Media Technologies Ltd., UK 2004 - 2009 All rights reserved. www.avs4you.com
Page 30 of 198

Files Express Menu
The easiest way to view all the actions that you can do the files in the Files and Effects Area is to use the right-click express menu.
Select the media file you want and click it with the right mouse button:
Here you can choose to perform the following actions (depending on the file type):
Video files express menu
Add to Main
Video
Use this option to add the selected video clip to the Timeline/Storyboard
Area and include it to the output movie.
Add to Video
Overlay
Use this option to add the selected video clip to the Timeline/Storyboard
Area on the Video Overlay line.
Add to Audio
Mix
Use this option to add the audio track of the selected video clip to the
Timeline/Storyboard Area on the Audio Mix line.
TrimUse this option to open the Trim window and edit the selected video clip
duration.
Multi TrimUse this option to open the MultiTrim window and edit the selected video clip
duration.
Detect
Scenes
Use this option to detect scenes in the selected video clip and split it into
scenes.
Extract Audio
Use this option to extract audio from the selected video clip and save it into
the .mp3 or uncompressed .wav format. The extracted audio will be
automatically imported to the Audio section of the Files and Effects Area.
RenameUse this option to change the name of the video clip in the Files and Effects
Area.
Delete Use this option to delete the selected videos from the Files and Effects Area.
Select All Use this option to select all the videos in the Files and Effects Area.
Properties Use this option to display the video clip properties window.
AVS4YOU Programs Help - AVS Video Editor v.4
© Online Media Technologies Ltd., UK 2004 - 2009 All rights reserved. www.avs4you.com
Page 31 of 198

Image files express menu
Add to Main VideoUse this option to add the selected image to the Timeline/
Storyboard Area and include it to the output movie.
Add to Video OverlayUse this option to add the selected image to the Timeline/
Storyboard Area on the Video Overlay line.
Rotate
Counterclockwise
Use this option to rotate the image counterclockwise. A new image
with the rotation changes will be created.
Rotate ClockwiseUse this option to rotate the image clockwise. A new image with the
rotation changes will be created.
RenameUse this option to change the name of the image in the Files and
Effects Area.
DeleteUse this option to delete the selected images from the Files and
Effects Area.
Select AllUse this option to select all the images in the Files and Effects
Area.
Properties Use this option to display the image properties window.
Audio files express menu
Add to Music
Mix
Use this option to add the selected audio track to the Timeline/Storyboard
Area and include it to the output movie.
RenameUse this option to change the name of the audio track in the Files and Effects
Area.
DeleteUse this option to delete the selected audio track from the Files and Effects
Area.
Select All Use this option to select all the audio files in the Files and Effects Area.
Properties Use this option to display the audio properties window.
AVS4YOU Programs Help - AVS Video Editor v.4
© Online Media Technologies Ltd., UK 2004 - 2009 All rights reserved. www.avs4you.com
Page 32 of 198

Color files express menu
Add to Main
Video
Use this option to add the selected color to the Timeline/Storyboard
Area and include it to the output movie.
Add to Video
Overlay
Use this option to add the selected color to the Timeline/Storyboard
Area on the Video Overlay line.
RenameUse this option to change the name of the color in the Files and Effects
Area.
DeleteUse this option to delete the selected color from the Files and Effects
Area.
Select All Use this option to select all the colors in the Files and Effects Area.
Properties Use this option to display the color properties window.
Properties Windows
Right-click the file in the Files and Effects Area and select the Properties option.
The files Properties windows display all the available properties for the files of different types.
Video files properties window
File:
File name - the name and the path of the selected file.
File size - the size of the file measured in kilobytes/ megabytes/
gigabytes.
Date modified - the date and time the file was changed and re-written.
Video:
Size - the size of the video clip image (width and height) measured in
pixels.
Aspect ratio - the relationship of screen width to height.
Framerate - the number of video frames displayed every second.
Bitrate - the number of bits transferred per second.
Codec - type of format used to code the video information into the video
file.
Duration - the length of the video clip (hours:minutes:seconds).
Audio:
Channels - number of channels in the audio track (mono - one channel,
stereo - two channels, quadro - four channels, 4.1 - five channels, 5.1 -
six channels, 6.1 - seven channels, 7.1 - eight channels).
Sample rate - the sampling frequency specified in hertz.
Bitrate - the number of data points used to approximate the true wave
form (kilobits per second).
Codec - the codec used to encode the video clip soundtrack.
Duration - the length of the video clip soundtrack
(hours:minutes:seconds).
AVS4YOU Programs Help - AVS Video Editor v.4
© Online Media Technologies Ltd., UK 2004 - 2009 All rights reserved. www.avs4you.com
Page 33 of 198
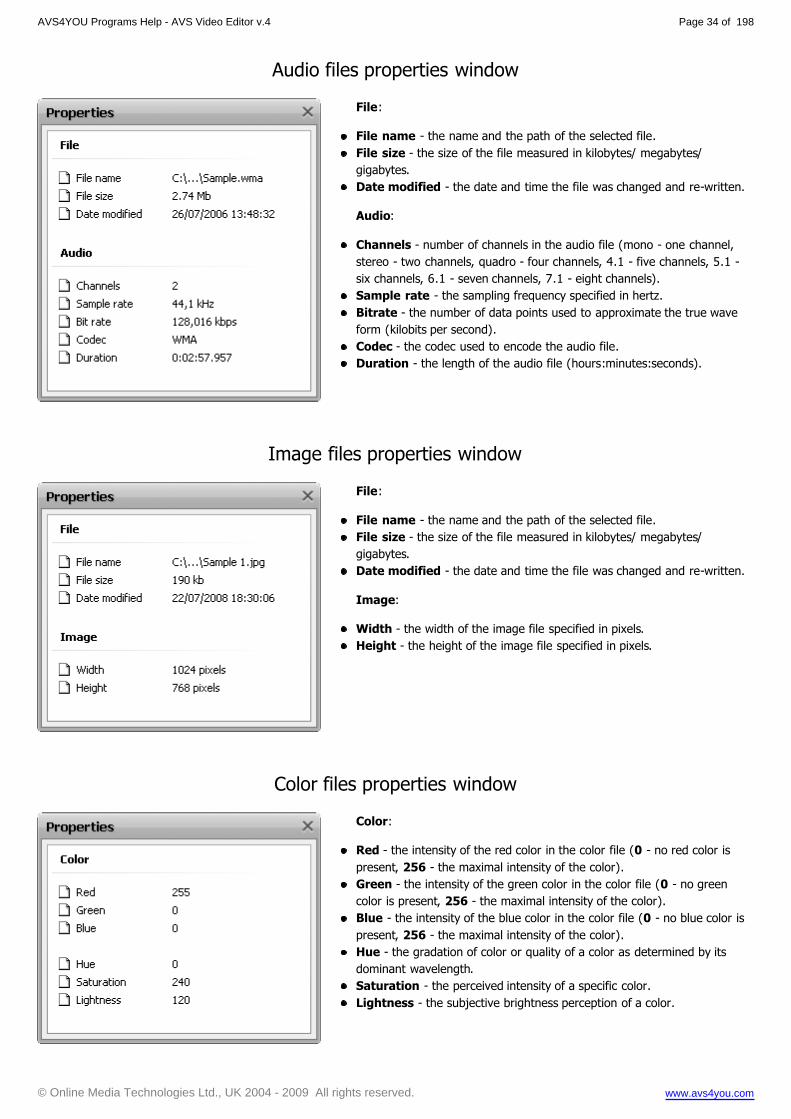
Audio files properties window
File:
File name - the name and the path of the selected file.
File size - the size of the file measured in kilobytes/ megabytes/
gigabytes.
Date modified - the date and time the file was changed and re-written.
Audio:
Channels - number of channels in the audio file (mono - one channel,
stereo - two channels, quadro - four channels, 4.1 - five channels, 5.1 -
six channels, 6.1 - seven channels, 7.1 - eight channels).
Sample rate - the sampling frequency specified in hertz.
Bitrate - the number of data points used to approximate the true wave
form (kilobits per second).
Codec - the codec used to encode the audio file.
Duration - the length of the audio file (hours:minutes:seconds).
Image files properties window
File:
File name - the name and the path of the selected file.
File size - the size of the file measured in kilobytes/ megabytes/
gigabytes.
Date modified - the date and time the file was changed and re-written.
Image:
Width - the width of the image file specified in pixels.
Height - the height of the image file specified in pixels.
Color files properties window
Color:
Red - the intensity of the red color in the color file (0 - no red color is
present, 256 - the maximal intensity of the color).
Green - the intensity of the green color in the color file (0 - no green
color is present, 256 - the maximal intensity of the color).
Blue - the intensity of the blue color in the color file (0 - no blue color is
present, 256 - the maximal intensity of the color).
Hue - the gradation of color or quality of a color as determined by its
dominant wavelength.
Saturation - the perceived intensity of a specific color.
Lightness - the subjective brightness perception of a color.
AVS4YOU Programs Help - AVS Video Editor v.4
© Online Media Technologies Ltd., UK 2004 - 2009 All rights reserved. www.avs4you.com
Page 34 of 198

Trimming Video
Right-click the file in the Files and Effects Area and select the Trim option. There are two options available:
Trim - lets the user change the video clip duration cutting out the unnecessary parts in the beginning and the end of it.
MultiTrim - lets the user detect the scenes and change the video clip cutting out the unnecessary parts in any place of the
video clip.
Using Trim option
The Trim option is quite useful when you need to cut out some video from the beginning or the end of the video clip, or both from
the beginning and the end of the clip. Click the right mouse button on the video clip and select Trim. The following window will be
opened:
The window buttons are used the following way:
Button Name Description
PlaybackIs used to start video file playback. Once you click it, it will turn into the Pause button to let you
pause the playback when needed.
StopIs used to stop video file playback. Every time you use it to stop the playback, the cursor goes back
to the beginning of the file.
Frame Back Is used to step one frame back in the video.
Frame
ForwardIs used to step one frame forward in the video.
Next SceneIs used to find the next scene in the video clip. Once you click it, it will turn into the Stop button to
let you stop searching scenes when needed.
AVS4YOU Programs Help - AVS Video Editor v.4
© Online Media Technologies Ltd., UK 2004 - 2009 All rights reserved. www.avs4you.com
Page 35 of 198

Mark StartIs used to mark the beginning of the trimmed area. All the video to the left of this area will be
deleted.
Mark End Is used to mark the end of the trimmed area. All the video to the right of this area will be deleted.
You will need to place the slider cursor to the place where you want your video to begin. Do it using the mouse button. You can find
the exact position in the video either using the Frame Back or Frame Forward button or using the time fields of the Start Time
and End Time areas in the right part of the Trim window. The total duration of the trimmed video will be shown under the Duration
caption.
Click the Mark Start button to mark the beginning of the video (all the video to the left of the cursor will be deleted) and the Mark
End button to designate the end of the trimmed video (all the video to the right of the cursor will be deleted as well) - so only the
video within the highlighted area will be left.
To accept the changes click the OK button, to discard the changes and close the Trim window use the Cancel button.
Using MultiTrim option
The MultiTrim option is very useful in case you need to delete several scenes in different parts of the video clip - beginning, end or
anyplace in the middle. Click the right mouse button on the video clip and select MultiTrim. The following window will be opened:
The window buttons are used the following way:
Button Name Description
PlaybackIs used to start video file playback. Once you click it, it will turn into the Pause button to let you
pause the playback when needed.
AVS4YOU Programs Help - AVS Video Editor v.4
© Online Media Technologies Ltd., UK 2004 - 2009 All rights reserved. www.avs4you.com
Page 36 of 198

StopIs used to stop video file playback. Every time you use it to stop the playback, the cursor goes back
to the beginning of the file.
Frame Back Is used to step one frame back in the video.
Frame
ForwardIs used to step one frame forward in the video.
Next SceneIs used to find the next scene in the video clip. Once you click it, it will turn into the Stop button to
let you stop searching scenes when needed.
Mark Start Is used to mark the beginning of the current trimmed area.
Mark End Is used to mark the end of the current trimmed area.
Split Is used to split the video into scenes at current cursor position.
Zoom Is used to open the zoom timeline (see below).
Detect Scenes Is used to start scene detection.
When you click the Zoom button the zoom timeline will be displayed. In this case the upper part will show the whole video clip
timeline and the lower part will only show the area between the and enlarged. This way you can find the necessary scene more
easily using the lower timeline.
You can either manually select all the scenes in the video clip and choose what to keep and what will be deleted or find the scene
changes automatically. For manual scenes marking place the slider cursor to the place where you want your video to begin. Do it
using the mouse button. You can find the exact position in the video using the Frame Back or Frame Forward button.
AVS4YOU Programs Help - AVS Video Editor v.4
© Online Media Technologies Ltd., UK 2004 - 2009 All rights reserved. www.avs4you.com
Page 37 of 198

Click the Mark Start button to mark the beginning of the scene and the Mark End button to designate the end of the trimmed
scene - the video within the highlighted area will be left. The same way all the other scenes are trimmed.
Although it might be better use the scene detection algorithm offered by AVS Video Editor. To do it click the Detect Scenes
button. It will take the program some time to find all the scenes in the video. After this is done, the found scenes will be
displayed in the right part of the MultiTrim window.
Now you can select one of the scenes and click the Delete Scene button to remove the scene from the video, or select several
scenes with the mouse (the Ctrl and Shift buttons on the keyboard might help you in this - press and hold them while selecting
scenes with the mouse to select several videos) and click the Merge Scenes button to join the selected scenes together.
If you want, for example, to join the first and the third scenes and delete the second one, please, don't use the Merge Scenes
option as in this case all the previously selected deletion areas will be discarded. Go back to the main window and drag-and-drop the
necessary scenes to the Timeline/Storyboard Area from the Files and Effects Area in order to continue editing.
To accept the changes click the OK button, to discard the changes and close the Trim window use the Cancel button.
Extracting Audio
If you need to take only the soundtrack from the video clip it can be done using the Extract Audio option of the Express Menu.
Right-click the file in the Files and Effects Area and select the Extract Audio option. The following window will be opened:
Select the location and enter the name for your audio track, choose the format - compressed .mp3 (MPEG-1 Layer 3 codec will be
used to encode your exported audio) or uncompressed .wav (PCM format with a better quality but taking more disk space) - and click
the Save button. The audio track will be saved onto your computer hard disk drive into the selected folder under the selected name
and automatically imported to the Audio section of the Files and Effects Area.
Note: if you need to edit the audio track of the imported video clip, simply drag and drop the selected video
clip to the Audio Mix line on the Timeline.
AVS4YOU Programs Help - AVS Video Editor v.4
© Online Media Technologies Ltd., UK 2004 - 2009 All rights reserved. www.avs4you.com
Page 38 of 198

Changing Aspect
The latest thing you should choose for your output video is the aspect ratio used. The aspect ratio of an image is its displayed width
divided by its height (usually expressed as "x:y"). In common life you will not need all the theoretical knowledge on the aspect ration
and its peculiarities. We'd recommend that you use the following simple rules while choosing the necessary aspect for your output
video:
Use the Aspect Ratio buttons of the Top Toolbar or the Aspect Ratio option of the Edit section of the Top Menu and select one
of the options:
- the 4:3 aspect ratio is used if you plan to watch your output video on a common CRT-display or CRT-television set that has
the proportions of the width and height 4:3 (it looks almost square, in fact, its screen width being slightly longer than height).
- the 16:9 aspect ratio is used if you plan to watch your output video on a wide-screen LCD or plasma display or TV-set that has
the proportions of the width and heigth 16:9 (you can for sure distinguish it from that with the 4:3 aspect as it is quite
elongated horizontally, its width being almost twice the size of its length).
Note: in case you import 4:3 video files and then choose the 16:9 aspect ratio the black bars
(mattes) will be added by the sides of the output video to preserve the image size and prevent
distortions. See the Using Crop Scale section to find out how to save video with an aspect ratio
different from that of the imported files without mattes adding.
Placing Imported Media Files to the Storyboard/Timeline
When your video is ready to be added to your future movie, you can add it to the Timeline/Storyboard Area. This can be simply
done drag-and-dropping the video with the mouse from the Files and Effects Area to the Timeline/Storyboard Area:
AVS4YOU Programs Help - AVS Video Editor v.4
© Online Media Technologies Ltd., UK 2004 - 2009 All rights reserved. www.avs4you.com
Page 39 of 198

Click the Media Library button of the Menu Panes, select the video clip to be added and, without releasing the left mouse
button, drag the file to the Timeline/Storyboard Area and only there release the mouse button dropping the file.
Note: it is not too much important whether you add the files using the Timeline or Storyboard view for the
Timeline/Storyboard Area as you can manage the order of the videos afterwards.
If you do not like drag-and-dropping or simply prefer some other methods, it is possible to use the Express Menu to add files to the
Timeline/Storyboard Area. Click the file to be added with the right mouse button and select the Add to Main Video option:
AVS4YOU Programs Help - AVS Video Editor v.4
© Online Media Technologies Ltd., UK 2004 - 2009 All rights reserved. www.avs4you.com
Page 40 of 198

The selected file will be added to the Timeline/Storyboard Area:
The files of all types are added the same way - videos, audios, images and colors - you can either drag-and-drop them or use the
Express Menu. Just select the necessary category in the Files and Effects Area and add them to the Timeline/Storyboard Area
using one of the methods described above. After that you can manage the Timeline/Storyboard Area layout and files order.
Managing Timeline/Storyboard
You can manage the way the Timeline looks. It looks like this by default:
AVS4YOU Programs Help - AVS Video Editor v.4
© Online Media Technologies Ltd., UK 2004 - 2009 All rights reserved. www.avs4you.com
Page 41 of 198

You can group different elements according to their type - video effects, audios, overlays. Use the Settings option of the Edit section
of the Top Menu and in the Edit tab check the Show line groups option. This will make the Timeline look the following way:
It is also possible to change the videos order in the Timeline/Storyboard Area. For that switch into the Storyboard view using the
Storyboard View button or the Storyboard option of the View section of the Top Menu:
Now you can move the video clips towards the beginning of the future movie using the Move Left button or to the end of the movie
using the Move Right button. Click the video clip in the Storyboard which place in the video you would like to change and click the
appropriate button to change the video clips order.
When you click the Move Left button the selected video clip will change places with the adjacent left video clip and vice versa -
pressing the Move Right button will change the place of the selected video and the adjacent right video clip. This way you can create
the necessary video clips order in your future movie.
AVS4YOU Programs Help - AVS Video Editor v.4
© Online Media Technologies Ltd., UK 2004 - 2009 All rights reserved. www.avs4you.com
Page 42 of 198

Editing Videos
After you place your video clips to the Timeline you can begin editing it, i.e. add transitions between video clips, add video
effects to your video, text, video overlay effect or audio soundtrack. You can also change the duration of the video clips on the
Timeline using the Trim and MultiTrim options, adjust the playback speed, make the color correction of the image, correct
the video image size using the Crop Scale option and split video into chapters so that you could create a video menu later.
Adding Transitions
Transitions are used to help your video clips smoothly go into one another. You can add transitions when two or more clips are
placed to the Timeline/Storyboard Area. The transitions can be added by simple drag-and-dropping them to the Timeline/
Storyboard Area (it is better to use the Storyboard view for transitions adding) or using the transition express menu.
So you can follow the steps:
Click the Transitions button of the Menu Panes.
Switch into the Storyboard view using the Storyboard View button.
Select the transition you would like to add to the video of yours, and click it with the left mouse button. Then, without
releasing the button, drag the selected transition to the rectangle between the video clips and drop it there.
Or alternatively select a rectangle with the arrow between the two video clips at the Storyboard where a transition should be
added, click the transition to be added with the right mouse button and select one of the options:
Add or Replace Transition - use this option to add the currently selected transition to the previously selected rectangle
between two video clips at the Storyboard.
Apply Transition to All - use this option to add the currently selected transition between all the video clips at the
Storyboard.
Apply Random Transitions - use this option to add random transitions between all the video clips at the Storyboard.
AVS4YOU Programs Help - AVS Video Editor v.4
© Online Media Technologies Ltd., UK 2004 - 2009 All rights reserved. www.avs4you.com
Page 43 of 198

Changing Transitions in Storyboard View
After a transition is added to the Timeline/Storyboard Area you can change its duration between the scenes.
Click a transition with the mouse and select the Transition button of the Storyboard Toolbar. Or use the right mouse button on
the necessary transition and select the Transition option in the right-click express menu.
The following window will be opened:
Here you can playback the video and see how the added transition is applied. Use the player buttons under the preview window to do
that:
Playback - is used to play/pause the video;
Stop - is used to stop the video playback;
Frame Back - is used to step one frame back in the video;
Frame Forward - is used to step one frame forward in the video;
The Transition Duration field is used to alter the length of the transition between the two clips - you can enter the duration
manually or use the up and down arrows.
AVS4YOU Programs Help - AVS Video Editor v.4
© Online Media Technologies Ltd., UK 2004 - 2009 All rights reserved. www.avs4you.com
Page 44 of 198

When you click the Zoom button the zoom timeline will be displayed. In this case the upper part will show the whole timeline of
the two video clips with the transition between them and the lower part will only show the area between the and enlarged. This
way you can navigate the video clips more easily using the lower timeline:
Click the OK button to accept changes or Cancel to discard changes and close the Transition Properties window.
Changing Transitions in Timeline View
A transition duration in the Timeline View can be changed similarly to the changing the duration in the Storyboard View: you
click the video with the transition to be changed with the left mouse button and after that click the Transition button of the
Timeline Toolbar. The Transition Properties window will be opened.
However, it is also possible to change the transition duration between the video clips using the Timeline: select two video clips where
you can change the transition:
Click the second in the row video clip with the left mouse button, it will turn into a hand - . Without releasing the left mouse
button drag the second video clip to the left (thus to the beginning of the movie) to increase the transition duration. Or move the
mouse to the right decreasing it, just note that your transition can disappear if its duration reaches a 0 (zero) value:
Now when you release the mouse button, the transition duration will be altered:
Note: this way of changing the transitions duration is faster than that using the Transition Properties
window, but the latter is more precise as you can set the transition boundaries more exactly.
AVS4YOU Programs Help - AVS Video Editor v.4
© Online Media Technologies Ltd., UK 2004 - 2009 All rights reserved. www.avs4you.com
Page 45 of 198

Video Effects
While processing your videos in the AVS Video Editor program you can also add different video effects to them, such as grayscale
to make your video look black and white or invert to change the colors of a video fragment or to add a romantic touch to your film
with a snow effect and many other effects. The detailed description of each effect can be found in the next sections.
To apply an effect you should proceed through the following easy steps:
1. Selecting an effect to add
After importing a video to the program and dragging it to the Timeline/Storyboard Area press the Video Effects button
from the Menu Panes. In the Files and Effects Area you will see all the video effects you can apply to your video. The
effects view can be changed to suit your convenience, if you click the View button and choose the View As option and
then one of the view types: thumbnails, list, details.
Note: The Sort by option of the View button is not available, when the Video Effects pane is
pressed.
In the dropdown list situated near the View button you can select the effects groups that will be displayed in the Files and
Effects Area or the All video effects option. So you will easily find the necessary effect, if you know to what group it
belongs.
2. Placing the video effect on a special line
After you found an effect you want to apply, right-click it and choose the
Add or Replace Video Effect option. If you have already added an
effect and choose this option, the previously added effect will be replaced
by the new one. If there are several effects in the Timeline/Storyboard
Area, the highlighted effect will be replaced. It's also possible to drag the
necessary effect from the Files and Effects Area and drop it to the
Timeline/Storyboard Area within the Line for Video Effects (see the figure below).
AVS4YOU Programs Help - AVS Video Editor v.4
© Online Media Technologies Ltd., UK 2004 - 2009 All rights reserved. www.avs4you.com
Page 46 of 198

It's also possible to add video effects directly on the main video.
3. Setting the effect duration
You can set the duration of the added effect by left-clicking it (it will be highlighted) and
pressing the Duration button on the Timeline Toolbar or right-clicking the necessary
effect and selecting the Duration option. A window (see the figure on the left) will appear
where you can set the necessary value by entering it through the keyboard or using the
arrow buttons. Then press the OK button to apply the set duration of the effect. You can
achieve the same goal by dragging the effect boundaries in the Timeline/Storyboard
Area.
4. Changing the effect properties
AVS Video Editor allows you also to change the effect properties. To do that, press the necessary effect in the Timeline/
Storyboard Area and hit the Edit Effect button on the Timeline Toolbar or right-click the effect and choose the Edit
Effect option. After that the Video Effects window will be opened (see the figure below).
In the Properties Area of the Video Effects window select an effect applying area in the Mask drop-down list. The
following options are available: none, rectangle, ellipse and polygon. If you select None, the effect will be applied to the entire
picture area.
Then set other effect properties. They vary from effect to effect. The detailed effects properties description can be found in
the Special, Effect and Transform chapters.
AVS4YOU Programs Help - AVS Video Editor v.4
© Online Media Technologies Ltd., UK 2004 - 2009 All rights reserved. www.avs4you.com
Page 47 of 198

5. Setting the fade-in and fade-out areas
Within the Video Effects window you can also set the Fade-in and Fade-out areas for the effect you applied to your video
file using the slider under the preview area. Fade-in is the area where the effect starts being reflected on your video. In the
area of maximum representation the effect is applied to 100% capacity. In the Fade-out area the effect is being reduced
until it completely disappears.
You can set Fade-in and Fade-out boundaries by dragging the cursor of the slider area to the place where you want the
Fade-in area to end and hit the button. The Fade-in area will be marked. Then drag the same cursor to the place on
the slider area where you want the Fade-out area to begin and press the button. After that the Fade-out area will be
marked. It's also possible to direct the mouse cursor at the edge of the slider area and drag the boundaries inwards or
outwards. If you want to set the Fade-out effect, drag the right edge of the slider area to the left. To apply the Fade-in
effect, drag the left edge of the slider area to the right (see the figure below).
6. Previewing the applied effect
After adding an effect to the video file you can preview the applied effect using the playback controls situated under the
slider area. These buttons have the same functionality as the buttons of the Preview Area situated in the Main Window.
The latter ones are described here.
If you want to delete the applied effect, you should select it and press the appropriate button on the Timeline Toolbar or
right-click the effect you want to delete and choose the Delete Object option.
AVS4YOU Programs Help - AVS Video Editor v.4
© Online Media Technologies Ltd., UK 2004 - 2009 All rights reserved. www.avs4you.com
Page 48 of 198

Video Effects List and Description
All the video effects that can be applied in AVS Video Editor are devided into 3 groups: Special, Effects and Transform. In the
table below you will find all effects situated according to their belonging to one of the groups and their brief description.
Group Effect Description
Special
Effects
Sepia Applies Sepia effect to transform image spectrum to brownish and yellowish photo paper
Old Movie Applies Old Movie effect to get a black and white image with scratches
Glass
Mosaic
Applies Glass Mosaic effect to see your video through a number of rectangular glass pieces, each displaying a
part of the whole video image
Puzzle Applies Puzzle effect to divide your picture in tens of rectangles or puzzle form rectangles
Glass Applies Glass effect to make an image appear as if it were being viewed through different types of glass
Snow Applies Snow effect to add a romantic touch to your film
Watercolor Applies Watercolor effect to make your videos look like water color paintings
Pencil
SketchApplies Pencil Sketch effect to turn any image of your film into a hand-drawn sketch
Glow Applies Glow effect to make your picture look like it's emanating light
Wind Applies Wind filter to make an image look as if the colors are being blown off your photo
Gray Out Applies Gray Out effect to transform colors of the picture to the gray part of the spectrum
TV
SimulationApplies TV Simulation effect to imitate bad quality of the broadcast video signal
Newsprint Applies Newsprint effect to turn your image into a photo from a newspaper
Film Applies Film effect to put film negative borders on your video
Timer Applies Timer effect to add a timepiece (that measures a time interval) to your video
Effects
Blur Applies Blur effect to reduce contrast between adjacent pixels visually smoothing and softening the image
Gaussian
BlurApplies Gaussian Blur effect to reduce contrast between adjacent pixels according to a mathematical equation
Motion
BlurApplies Motion Blur effect to reduce contrast. This effect gives the impression of motion
Sharpen Applies Sharpen effect to increase contrast to seemingly bring the images into better focus
Mosaic Applies Mosaic effect to define a selection by clumping pixels of similar color values in cells
Noise Applies Noise effect to add some texture to an image by way of tiny pixel dustings
Diffuse Applies Diffuse effect to make the selection look less focused
Emboss Applies Emboss effect to give an image a 3D look
Filter
MinimalApplies Filter Minimal effect to emphasize the dark pixels in an image
Filter
MaximalApplies Filter Maximal effect to emphasize the light pixels in an image
Deinterlace Applies Deinterlacing effect to remove interlacing effect.
Median Applies Median effect to replace each pixel with a pixel that has the median color value of neighboring pixels
Invert Applies Invert effect to invert the colors in an image
Colorize Applies Colorize effect to colorize the entire file in an RGB-specified file
Grayscale Applies Grayscale effect to convert color images to just two color levels: black (0) and white (255)
PosterizeApplies Posterize effect to specify the tonal level (or brightness values) and then map pixels to the closest
matching level
ThresholdApplies Threshold effect to determine how much contrast there is between neighboring pixels for the
sharpening to affect them
AVS4YOU Programs Help - AVS Video Editor v.4
© Online Media Technologies Ltd., UK 2004 - 2009 All rights reserved. www.avs4you.com
Page 49 of 198

Transform
Effects
Flip Opens Flip effect to flip an entire image horizontally or vertically
Perspective Opens Perspective effect to transform the perspective in an image horizontally or vertically
Skew Opens Skew effect to skew the entire image horizontally or vertically
Shift Opens Shift effect to move your image along X and Y axes
Rotate Opens Rotate effect to rotate the entire image
Resample Opens Resample effect to reproduce the entire image
Zoom Opens Zoom effect to magnify or reduce the image
Mirror Opens Mirror effect to duplicate a part of the image
Twirl Opens Twirl effect to twirl the image
Ripple Opens Ripple effect to add spaced ripples to the image's surface
Wave Opens Wave effect to create an undulating pattern on your image
Sphere Opens Sphere effect to make a certain sphere-shaped area blurred
Cylinder Opens Cylinder effect to make a certain cylinder-shaped area blurred
AVS4YOU Programs Help - AVS Video Editor v.4
© Online Media Technologies Ltd., UK 2004 - 2009 All rights reserved. www.avs4you.com
Page 50 of 198

Special Effects
The Special effects allow you to imitate faded photos and old movie, turn your film into a hand-drawn sketch or watercolor painting.
Effect Description
Sepia Applies Sepia effect to transform image spectrum to brownish and yellowish photo paper
Old Movie Applies Old Mivie effect to get a black and white image with scratches
Glass
Mosaic
Applies Glass Mosaic effect to see your video through a number of rectangular glass pieces, each displaying a
part of the whole video image
Puzzle Applies Puzzle effect to divide your picture in tens of rectangles or puzzle form rectangles
Glass Applies Glass effect to make an image appear as if it were being viewed through different types of glass
Snow Applies Snow effect to add a romantic touch to your film
Watercolor AppliesWatercolor effect to make your videos look like water color paintings
Pencil
SketchApplies Pencil Sketch effect to turn any image of your film into a hand-drawn sketch
Glow Applies Glow effect to make your picture look like it's emanating light
Wind AppliesWind filter to make an image look as if the colors are blowing off your photo
Gray Out Applies Gray Out effect to transform colors of the picture to the gray part of the spectrum
TV
SimulationApplies TV Simulation effect to imitate bad quality of the broadcast video signal
Newsprint Applies Newsprint effect to turn your image into a photo from a newspaper
Film Applies Film effect to put film negative borders on your video
Timer Applies Timer effect to add a timepiece (that measures a time interval) to your video
AVS4YOU Programs Help - AVS Video Editor v.4
© Online Media Technologies Ltd., UK 2004 - 2009 All rights reserved. www.avs4you.com
Page 51 of 198

Before applying the Sepia effect After applying the Sepia effect
Sepia
The Sepia transforms image spectrum to brownish which imitates faded photos and yellowish photo paper. Use it to
give your photos an antique appearance.
In the Properties Area of the Video Effect window you can change the effect properties. The properties of
the Sepia effect available for setting are its Level, Brightness and the Red, Green, Blue colors.
On the figures below you can see the video picture before and after applying the Sepia effect:
Old Movie
If you apply the Old Movie effect you'll get a black and white image with scratches. It also adds noise, shake and
dust to your video, making it look as if it's playing on an old projector.
In the Properties Area of the Video Effect window you can change the effect properties. The properties of
the Old Movie effect available for setting are its Artifacts (film damage - dust, hair, specks, etc.), Scratch, Jitter
(vibration), Brightness and Contrast.
On the figures below you can see the video picture before and after applying the Old Movie effect:
AVS4YOU Programs Help - AVS Video Editor v.4
© Online Media Technologies Ltd., UK 2004 - 2009 All rights reserved. www.avs4you.com
Page 52 of 198

Before applying the Old Movie effect After applying the Old Movie effect
Before applying the Glass Mosaic effect After applying the Glass Mosaic effect
Glass Mosaic
The Glass Mosaic effect lets you see your video through a number of rectangular glass pieces, each displaying a
part of the whole video image.
In the Properties Area of the Video Effect window you can change the effect properties. The properties of
the Glass Mosaic effect available for setting are Width of each glass piece, its Height, Angle of the entire glass
set, Curvature of objects displayed through glass pieces, Smooth value (sharpens or smooths the objects outline) and video image
Quality.
On the figures below you can see the video picture before and after applying the Glass Mosaic effect:
AVS4YOU Programs Help - AVS Video Editor v.4
© Online Media Technologies Ltd., UK 2004 - 2009 All rights reserved. www.avs4you.com
Page 53 of 198

Before applying the Puzzle effect After applying the Puzzle effect
Before applying the Glass effect After applying the Glass effect
Puzzle
The Puzzle effect divides your picture in tens of rectangles or puzzle form rectangles, or as it was made of dozen of
pieces fit accurately together into one picture.
In the Properties Area of the Video Effect window you can change the effect properties. Here you can select
a puzzle Type and set Size of puzzle pieces.
On the figures below you can see the video picture before and after applying the Puzzle effect:
Glass
The Glass effect makes an image appear as if it were being viewed through different types of glass.
In the Properties Area of the Video Effect window you can change the effect properties. You can customize
the glass surface changing the Level value. The higher values make the picture less clear.
On the figures below you can see the video picture before and after applying the Glass effect:
AVS4YOU Programs Help - AVS Video Editor v.4
© Online Media Technologies Ltd., UK 2004 - 2009 All rights reserved. www.avs4you.com
Page 54 of 198

Before applying the Snow effect After applying the Snow effect
Snow
If you need to add a romantic touch to your film use the Snow effect. It gives to your picture a winter day
appearance when millions of snowflakes fall down from the sky.
In the Properties Area of the Video Effect window you can change the effect properties. The properties of
the Snow effect allow you to set the Size and Count of the snowflakes, their Direction, Deviation and Speed.
It's also possible to choose the Color of the snowflakes and their transparence by changing the Alpha value. If you untick the
Snowdrift option activated by default, the snow won't be accumulated at the bottom of the video image during the file playback.
On the figures below you can see the video picture before and after applying the Snow effect:
Watercolor
The Watercolor effect makes your videos look like watercolor paintings. This effect is reached thanks to blur and
equalizer filters which reduce contrast between large parts of color areas with uniform color but keep most
contrasting transitions.
In the Properties Area of the Video Effect window you can change the effect properties. The properties of
the Watercolor effect allow you to set the Size and Coarseness of color areas.
On the figures below you can see the video picture before and after applying the Watercolor effect:
AVS4YOU Programs Help - AVS Video Editor v.4
© Online Media Technologies Ltd., UK 2004 - 2009 All rights reserved. www.avs4you.com
Page 55 of 198

Before applying the Watercolor effect After applying the Watercolor effect
Before applying the Pencil Sketch effect After applying the Pencil Sketch effect
Pencil Sketch
The Pencil Sketch effect turns any image of your film into a hand-drawn sketch like it was pained by a professional
artist.
In the Properties Area of the Video Effect window you can change the effect properties. The properties of
the Pensil Sketch effect available for setting are its Level, Brightness and Contrast.
On the figures below you can see the video picture before and after applying the Pencil Sketch effect:
AVS4YOU Programs Help - AVS Video Editor v.4
© Online Media Technologies Ltd., UK 2004 - 2009 All rights reserved. www.avs4you.com
Page 56 of 198

Before applying the Glow effect After applying the Glow effect
Before applying the Wind effect After applying the Wind effect
Glow
The Glow effect makes your picture look like it's emanating light.
In the Properties Area of the Video Effect window you can change the effect properties. The only property
available for setting is the Glow Level. Lower glow level values make the picture darker and higher values make it
shine intensely.
On the figures below you can see the video picture before and after applying the Glow effect:
Wind
The Wind filter makes it seem as if the colors are being blown off your photo.
In the Properties Area of the Video Effect window you can change the effect properties. The properties of
Wind effect available for setting are its Direction and Density. The negative Direction values make the wind
blow to the left, the positive values make it blow to the right.
On the figures below you can see the video picture before and after applying the Wind effect:
AVS4YOU Programs Help - AVS Video Editor v.4
© Online Media Technologies Ltd., UK 2004 - 2009 All rights reserved. www.avs4you.com
Page 57 of 198

Before applying the Gray Out effect After applying the Gray Out effect
Gray Out
The Gray Out effect transforms all colors of the picture to the gray part of the spectrum and only one color (you
select) will appear.
In the Properties Area of the Video Effect window you can change the effect properties. Here you can select
a certain color to be appeared, to modifiy Threshold and Filter values.
On the figures below you can see the video picture before and after applying the Gray Out effect:
TV Simulation
The TV Simulation effect imitates bad quality of the broadcast video signal when the video stream is divided into
separate frames. The sequence of frames is displayed with low speed and image deformation.
In the Properties Area of the Video Effect window you can change the effect properties. The following
properties of the TV Simulation effect are available for setting: Interline (deformation of the image), Amplitude,
Amplitude Offset, Vertical Speed, Vertical Offset and Interframe Size (size of the black zone between the frames).
On the figures below you can see the video picture before and after applying the TV Simulation effect:
AVS4YOU Programs Help - AVS Video Editor v.4
© Online Media Technologies Ltd., UK 2004 - 2009 All rights reserved. www.avs4you.com
Page 58 of 198

Before applying the TV Simulation effect After applying the TV Simulation effect
Before applying the Newsprint effect After applying the Newsprint effect
Newsprint
Newsprint turns your images into a photo from a newspaper.
In the Properties Area of the Video Effect window you can change the effect properties. The only property
available for setting is newsprint Level.
On the figures below you can see the video picture before and after applying the Newsprint effect:
Film
The Film allows you to put film negative borders on your video, then it looks like a long film strip with perforations
along each frame. You can change the number of perforations, their speed and position.
In the Properties Area of the Video Effect window you can change the effect properties. The properties of
the Film effect available for setting are the borders Size and their Speed. Check the Vertical box to add vertical
borders, if unchecked they take a horizontal position. The Border box allows you to add borders without perforation and place your
picture in the center of the negative strip.
AVS4YOU Programs Help - AVS Video Editor v.4
© Online Media Technologies Ltd., UK 2004 - 2009 All rights reserved. www.avs4you.com
Page 59 of 198

Before applying the Film effect After applying the Film effect
On the figures below you can see the video picture before and after applying the Film effect:
Timer
The Timer effect adds a timepiece (that measures a time interval) to your video. You can set the time value and
interval, specify the timer position, choose the appropriate color and size for the clock.
In the Properties Area of the Video Effect window you can change the effect properties. The following
properties of the Timer effect are available: Time settings, Font settings, Brush settings, Shadow settings
and Edge settings. Click the appropriate button to open the properties that you want to modify.
Time Settings
Time Mask - select the measurement units and their order
Start Time - here you can enter the zero point for your timer
Press the button to reset start time. Select one of the options: reset to zero
or reset at the beginning of effect
Font Settings
Font - select one of the available fonts from the dropdown list
Size - set the font size
Font Style - the following options are available here: bold, italic,
underline, strike (bold is pressed by default)
Brush Settings
Brush Type - select one of the available brush types from the dropdown
list: solid, gradient, hatch and texture.
Color - choose the color of your timer
Alpha - set the color transparency
AVS4YOU Programs Help - AVS Video Editor v.4
© Online Media Technologies Ltd., UK 2004 - 2009 All rights reserved. www.avs4you.com
Page 60 of 198

Before applying the Timer effect After applying the Timer effect
Shadow Settings
Enable shadow - this box is checked by default, if you uncheck it no
shadow will be added to your timer figures
Color - choose the color of the shadow
Alpha - select the color transparency
Offset X - set the shadow offset along the X-axis
Offset Y - set the shadow offset along the Y-axis
Blur - select a value for shadow blur
Edge Settings
Enable edge - this box is checked by default, if you uncheck it no edge
will be added to your timer figures
Color - choose the color of the edge
Alpha - select the color transparency
Distance - select a value for distance from the timer figures to the edge
You can also move and rotate the timer rectange. To move the timer rectangle direct the mouse
cursor to it and the cursor will turn into the . Then without releasing the mouse button, move
the rectangle in the direction you need. To rotate the timer rectangle click the green circle with
the left mouse button, the mouse cursor will change into a round arrow - - click the mouse button
and, without releasing it, drag it to change the timer orientation.
On the figures below you can see the video picture before and after applying the Timer effect:
AVS4YOU Programs Help - AVS Video Editor v.4
© Online Media Technologies Ltd., UK 2004 - 2009 All rights reserved. www.avs4you.com
Page 61 of 198

Effect
These effects allow you to introduce various painting, mosaic, blur and similar adjustments to your media file.
Effect Description
Blur Applies Blur effect to reduce contrast between adjacent pixels visually smoothing and softening the image
Gaussian BlurApplies Gaussian Blur effect to reduce contrast between adjacent pixels according to a mathematical
equation
Motion Blur Applies Motion Blur effect to reduce contrast. This effect gives the impression of motion
Sharpen Applies Sharpen effect to increase contrast to seemingly bring the images into better focus
Mosaic Applies Mosaic effect to define a selection by clumping pixels of similar color values in cells
Noise Applies Noise effect to add some texture to an image by way of tiny pixel dustings
Diffuse Applies Diffuse effect to make the selection look less focused
Emboss Applies Emboss effect to give an image a 3D look
Filter Minimal Applies Filter Minimal effect to emphasize the dark pixels in an image
Filter Maximal Applies Filter Maximal effect to emphasize the light pixels in an image
Deinterlace Applies Deinterlacing effect to remove interlacing effect
Median Applies Median effect to replace each pixel with a pixel that has the median color value of neighboring pixels
Invert Applies Invert effect to invert the colors in an image
Colorize Applies Colorize effect to colorize the entire file in an RGB-specified file
Grayscale Applies Grayscale effect to convert color images to just two color levels: black (0) and white (255)
PosterizeApplies Posterize effect to specify the tonal level (or brightness values) and then map pixels to the closest
matching level
ThresholdApplies Threshold effect to determine how much contrast there is between neighboring pixels for the
sharpening to affect them
AVS4YOU Programs Help - AVS Video Editor v.4
© Online Media Technologies Ltd., UK 2004 - 2009 All rights reserved. www.avs4you.com
Page 62 of 198

Before applying the Blur effect After applying the Blur effect
Before applying the Gaussian Blur effect After applying the Gaussian Blur effect
Blur Effects
AVS Video Editor offers three blur variations.
Blur
Blur reduces contrast between adjacent pixels by lightening pixels next to well-defined edges and shadows, visually
smoothing and softening the image.
In the Properties Area of the Video Effect window you can change the effect properties. The only property of
the Blur effect available for setting is blur level.
On the figures below you can see the video picture before and after applying the Blur effect:
Gaussian Blur
Gaussian Blur uses a mathematical equation (a bell-shaped curve) to calculate the transition between adjacent
pixels, resulting in most of the blurred pixels ending up in the middle range between the two original colors. The
Gaussian Blur adds low-frequency detail and can produce a hazy effect.
In the Properties Area of the Video Effect window you can change the effect properties. The only property of
the Gaussian Blur effect available for setting is size.
On the figures below you can see the video picture before and after applying the Gaussian Blur effect:
AVS4YOU Programs Help - AVS Video Editor v.4
© Online Media Technologies Ltd., UK 2004 - 2009 All rights reserved. www.avs4you.com
Page 63 of 198

Before applying the Motion Blur effect After applying the Motion Blur effect
Before applying the Sharpen effect After applying the Sharpen effect
Motion Blur
Motion Blur gives the impression of motion in the image by adding directional and angle controls for the blurring
process. You can choose an angle between -90° to 90° and a distance from 1 to 999 pixels to control the effects of
the Motion Blur.
In the Properties Area of the Video Effect window you can change the effect properties. The properties of
the Motion Blur effect available for setting are angle and distance.
On the figures below you can see the video picture before and after applying the Motion Blur effect:
Sharpen
The Sharpen effect increases contrast to seemingly bring the images into better focus (although it cannot substitute
for an image that's properly focused in the first place). It focuses blurry images by increasing the contrast of adjacent
pixels.
In the Properties Area of the Video Effect window you can change the effect properties. The only property of
the Sharpen effect available for setting is its level (the magnitude of displacement).
On the figures below you can see the video picture before and after applying the Sharpen effect:
AVS4YOU Programs Help - AVS Video Editor v.4
© Online Media Technologies Ltd., UK 2004 - 2009 All rights reserved. www.avs4you.com
Page 64 of 198
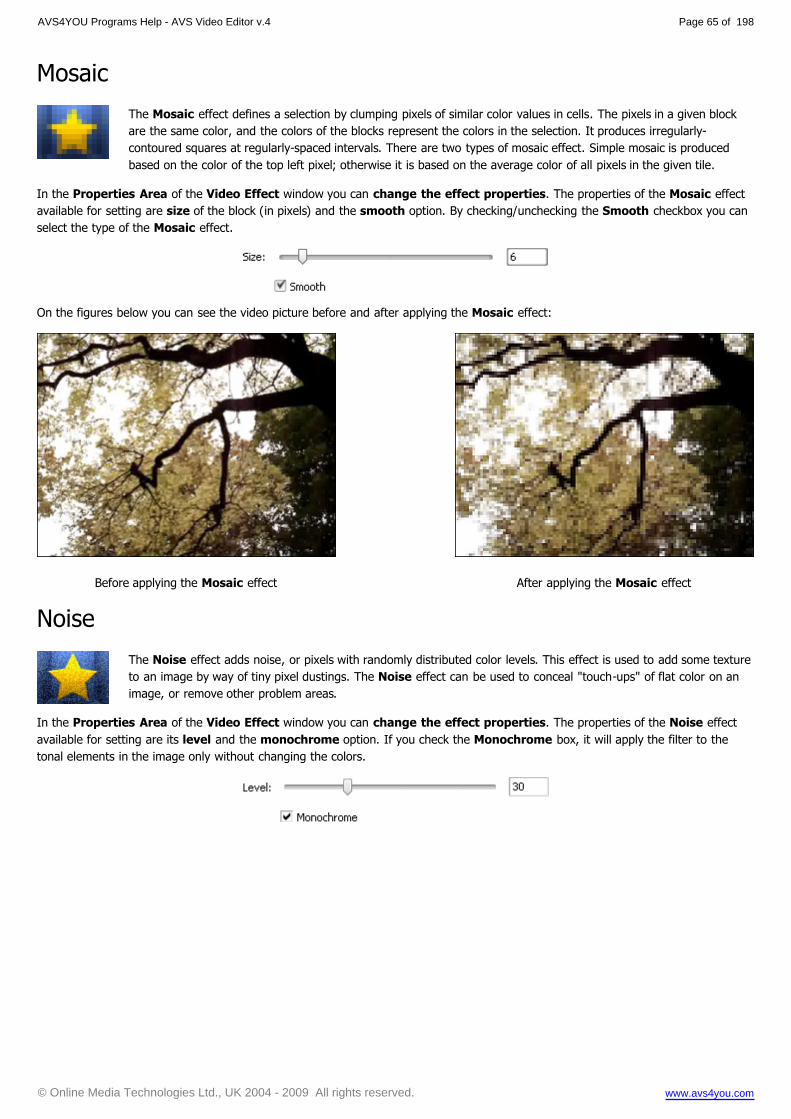
Before applying the Mosaic effect After applying the Mosaic effect
Mosaic
The Mosaic effect defines a selection by clumping pixels of similar color values in cells. The pixels in a given block
are the same color, and the colors of the blocks represent the colors in the selection. It produces irregularly-
contoured squares at regularly-spaced intervals. There are two types of mosaic effect. Simple mosaic is produced
based on the color of the top left pixel; otherwise it is based on the average color of all pixels in the given tile.
In the Properties Area of the Video Effect window you can change the effect properties. The properties of the Mosaic effect
available for setting are size of the block (in pixels) and the smooth option. By checking/unchecking the Smooth checkbox you can
select the type of the Mosaic effect.
On the figures below you can see the video picture before and after applying the Mosaic effect:
Noise
The Noise effect adds noise, or pixels with randomly distributed color levels. This effect is used to add some texture
to an image by way of tiny pixel dustings. The Noise effect can be used to conceal "touch-ups" of flat color on an
image, or remove other problem areas.
In the Properties Area of the Video Effect window you can change the effect properties. The properties of the Noise effect
available for setting are its level and the monochrome option. If you check the Monochrome box, it will apply the filter to the
tonal elements in the image only without changing the colors.
AVS4YOU Programs Help - AVS Video Editor v.4
© Online Media Technologies Ltd., UK 2004 - 2009 All rights reserved. www.avs4you.com
Page 65 of 198

Before applying the Noise effect After applying the Noise effect
Before applying the Diffuse effect After applying the Diffuse effect
On the figures below you can see the video picture before and after applying the Noise effect:
Diffuse
The Diffuse effect shuffles pixels in a selection to make the selection look less focused according to the selected
magnitude of the effect. The effect moves pixels to the selected distance randomly, ignoring color values.
In the Properties Area of the Video Effect window you can change the effect properties. The only property of
the Diffuse effect available for setting is distance of pixel relocation (in pixels).
On the figures below you can see the video picture before and after applying the Diffuse effect:
AVS4YOU Programs Help - AVS Video Editor v.4
© Online Media Technologies Ltd., UK 2004 - 2009 All rights reserved. www.avs4you.com
Page 66 of 198
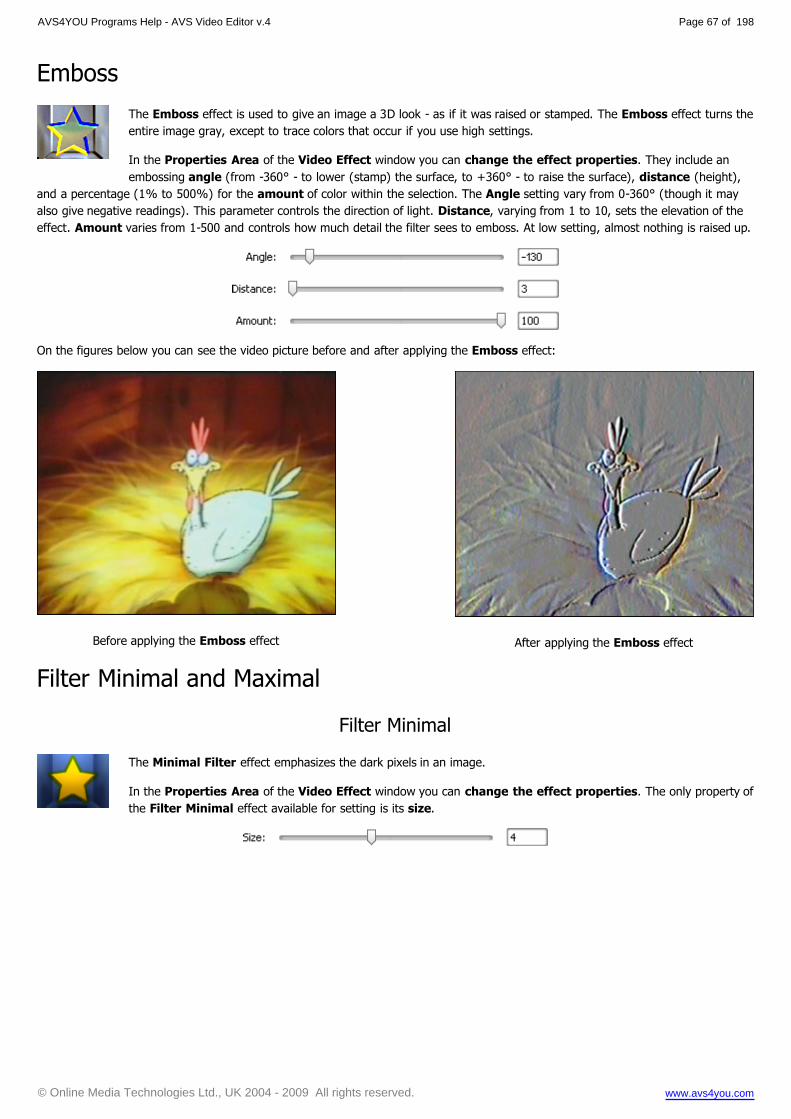
Before applying the Emboss effect After applying the Emboss effect
Emboss
The Emboss effect is used to give an image a 3D look - as if it was raised or stamped. The Emboss effect turns the
entire image gray, except to trace colors that occur if you use high settings.
In the Properties Area of the Video Effect window you can change the effect properties. They include an
embossing angle (from -360° - to lower (stamp) the surface, to +360° - to raise the surface), distance (height),
and a percentage (1% to 500%) for the amount of color within the selection. The Angle setting vary from 0-360° (though it may
also give negative readings). This parameter controls the direction of light. Distance, varying from 1 to 10, sets the elevation of the
effect. Amount varies from 1-500 and controls how much detail the filter sees to emboss. At low setting, almost nothing is raised up.
On the figures below you can see the video picture before and after applying the Emboss effect:
Filter Minimal and Maximal
Filter Minimal
The Minimal Filter effect emphasizes the dark pixels in an image.
In the Properties Area of the Video Effect window you can change the effect properties. The only property of
the Filter Minimal effect available for setting is its size.
AVS4YOU Programs Help - AVS Video Editor v.4
© Online Media Technologies Ltd., UK 2004 - 2009 All rights reserved. www.avs4you.com
Page 67 of 198

Before applying the Filter Minimal effect After applying the Filter Minimal effect
Before applying the Filter Maximal effect After applying the Filter Maximal effect
On the figures below you can see the video picture before and after applying the Filter Minimal effect:
Filter Maximal
The Maximal filter emphasizes the light pixels in an image.
In the Properties Area of the Video Effect window you can change the effect properties. The only property of
the Filter Maximal effect available for setting is its size.
On the figures below you can see the video picture before and after applying the Filter Maximal effect:
AVS4YOU Programs Help - AVS Video Editor v.4
© Online Media Technologies Ltd., UK 2004 - 2009 All rights reserved. www.avs4you.com
Page 68 of 198

Before applying the Deinterlace effect After applying the Deinterlace effect
Before applying the Median effect After applying the Median effect
Deinterlace
AVS Video Converter allows you to remove interlacing artifact using deinterlacing filter. For interlaced video a
frame contains either top (odd) fields or bottom (even) fields, for non-interlaced video frame contains both even and
odd field. One of these fields commence one field period later than the other on a progressive display (monitor).
Mostly this effect appears in video that was captured from TV tuners or DV cameras. Applying Deinterlacing effect
removes the interlacing artifacts.
In the Properties Area of the Video Effect window you can change the effect properties. The properties of the Deinterlace
effect available for setting are even and interpolate. Check Even and/or Interpolate check-boxes, if needed. Doing it you can
remove interlacing artifact by removing one field of a video (the Even lines) and blend (Interpolate) the remaining lines.
On the figures below you can see the video picture before and after applying the Deinterlace effect:
Median
The Median effect replaces each pixel with a pixel that has the median color value of neighboring pixels with the
specified radius. At low radius values, this effect is useful for reducing some types of noise. At higher radius values,
this effect gives an image a painterly appearance.
In the Properties Area of the Video Effect window you can change the effect properties. The only property of
the Median effect available for setting is its level.
On the figures below you can see the video picture before and after applying the Median effect:
AVS4YOU Programs Help - AVS Video Editor v.4
© Online Media Technologies Ltd., UK 2004 - 2009 All rights reserved. www.avs4you.com
Page 69 of 198

Before applying the Invert effect After applying the Invert effect
Before applying the Colorize effect After applying the Colorize effect
Invert
The Invert effect inverts the colors in an image. When you invert an image, the brightness value of each pixel in the
channels is converted to the inverse value on the 256-step color-values scale. For example, a pixel in a positive image
with a value of 255 is changed to 0, and a pixel with a value of 5 to 250.
On the figures below you can see the video picture before and after applying the Invert effect:
Colorize
The Colorize effect lets you colorize the entire file in an RGB-specified file. The video is colorized in the tones of the
selected color while the overall balance of the file is maintained.
In the Properties Area of the Video Effect window you can change the effect properties. The following properties of the
Colorize effect are available for setting: red, green and blue colors.
On the figures below you can see the video picture before and after applying the Colorize effect:
AVS4YOU Programs Help - AVS Video Editor v.4
© Online Media Technologies Ltd., UK 2004 - 2009 All rights reserved. www.avs4you.com
Page 70 of 198

Before applying the Grayscale effect After applying the Grayscale effect
Before applying the Posterize effect After applying the Posterize effect
Grayscale
The Grayscale effect converts color images to gray scale palette: black (0) and white (255).
In the Properties Area of the Video Effect window you can change the effect properties. The only property
available for setting is the Desaturate option. You can check the Desaturate box to desaturate the video to the
shades of gray (remove colors). The desaturated video may be slightly darker and can lose some detail.
On the figures below you can see the video picture before and after applying the Grayscale effect:
Posterize
The Posterize effect lets you specify the tonal level (or brightness values) and then maps pixels to the closest
matching level.
In the Properties Area of the Video Effect window you can change the effect properties. The only property available for
setting is Posterize Level.
On the figures below you can see the video picture before and after applying the Posterize effect:
AVS4YOU Programs Help - AVS Video Editor v.4
© Online Media Technologies Ltd., UK 2004 - 2009 All rights reserved. www.avs4you.com
Page 71 of 198
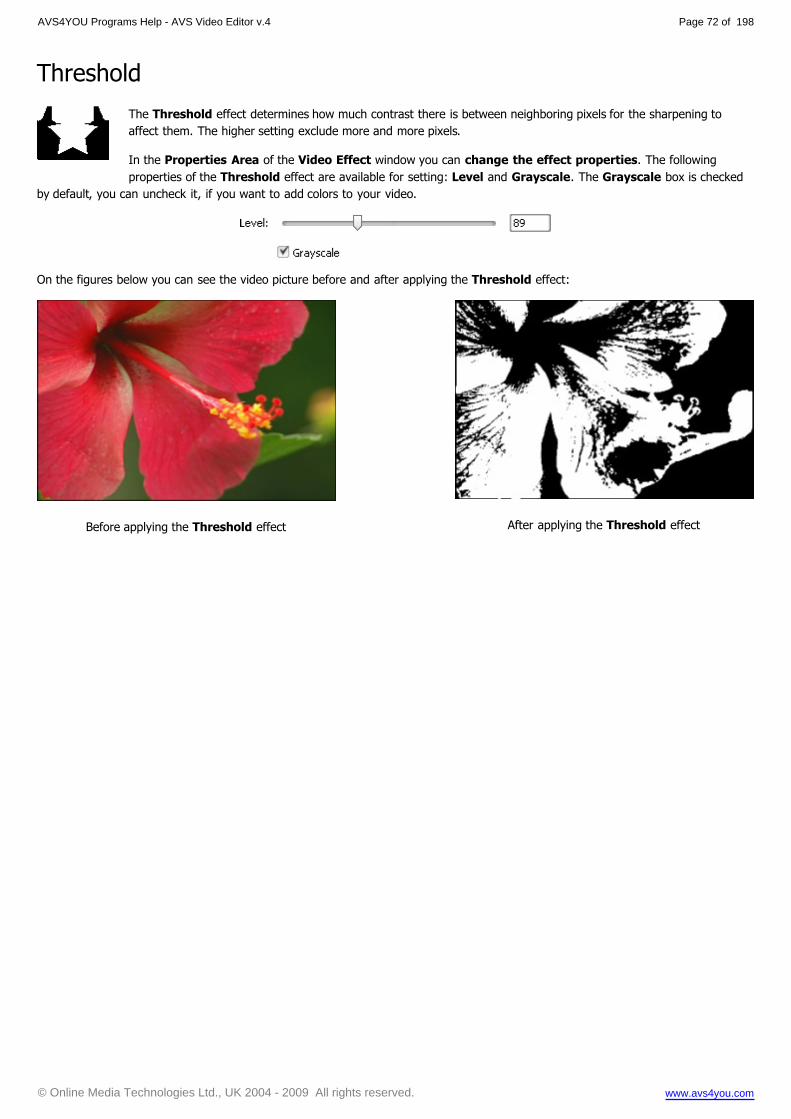
Before applying the Threshold effect After applying the Threshold effect
Threshold
The Threshold effect determines how much contrast there is between neighboring pixels for the sharpening to
affect them. The higher setting exclude more and more pixels.
In the Properties Area of the Video Effect window you can change the effect properties. The following
properties of the Threshold effect are available for setting: Level and Grayscale. The Grayscale box is checked
by default, you can uncheck it, if you want to add colors to your video.
On the figures below you can see the video picture before and after applying the Threshold effect:
AVS4YOU Programs Help - AVS Video Editor v.4
© Online Media Technologies Ltd., UK 2004 - 2009 All rights reserved. www.avs4you.com
Page 72 of 198

Transform
The Transform effects allow you to introduce various transformations, such as rotation, shift and other to your media file. It also lets
you reproduce the entire image or a part of it.
Effect Description
Flip Opens Flip effect to flip an entire image horizontally or vertically
Perspective Opens Perspective effect to transform the perspective in an image horizontally or vertically
Skew Opens Skew effect to skew the entire image horizontally or vertically
Shift Opens Shift effect to move your image along X and Y axes
Rotate Opens Rotate effect to rotate the entire image
Resample Opens Resample effect to reproduce the entire image
Zoom Opens Zoom effect to magnify or reduce the image
Mirror Opens Mirror effect to duplicate a part of the image
Twirl Opens Twirl effect to twirl the image.
Ripple Opens Ripple effect to add spaced ripples to the image's surface
Wave Opens Wave effect to create an undulating pattern on your image
Sphere Opens Sphere effect to make a certain sphere-shaped area blurred
Cylinder Opens Cylinder effect to make a certain cylinder-shaped area blurred
AVS4YOU Programs Help - AVS Video Editor v.4
© Online Media Technologies Ltd., UK 2004 - 2009 All rights reserved. www.avs4you.com
Page 73 of 198

Before applying the Flip effect After applying the Flip effect
Before applying the Perspective effect After applying the Perspective effect
Flip
The Flip transformation lets you flip an entire image horizontally or vertically.
In the Properties Area of the Video Effect window you can change the effect properties. The only property of
the Flip effect available for setting is the Vertical option. The horizontal direction is set by default, if you'd like to
flip the image vertically, you should tick the Vertical option.
On the figures below you can see the video picture before and after applying the Flip effect:
Perspective
The Perspective effect allows you to transform the perspective in an image. It has two variations: horizontal and
vertical transformations.
In the Properties Area of the Video Effect window you can change the effect properties. The properties of
the Perspective effect available for setting are angle and the Vertical option. The vertical type is set by default,
to apply the horizontal one, you should untick the Vertical box.
On the figures below you can see the video picture before and after applying the Perspective effect:
AVS4YOU Programs Help - AVS Video Editor v.4
© Online Media Technologies Ltd., UK 2004 - 2009 All rights reserved. www.avs4you.com
Page 74 of 198

Before applying the Skew effect After applying the Skew effect
Before applying the Shift effect After applying the Shift effect
Skew
The Skew transformation lets you skew an entire image horizontally or vertically.
In the Properties Area of the Video Effect window you can change the effect properties. The properties of
the Skew effect available for setting are angle and the Vertical option. The vertical direction is set by default, if
you'd like to skew the image horizontally, you should untick the Vertical option.
On the figures below you can see the video picture before and after applying the Skew effect:
Shift
The Shift transformation allows you to move your image along the X and Y axes.
In the Properties Area of the Video Effect window you can change the effect properties. The properties of
the Shift effect available for setting are OffsetX and OffsetY (axial coordinates).
On the figures below you can see the video picture before and after applying the Shift effect:
AVS4YOU Programs Help - AVS Video Editor v.4
© Online Media Technologies Ltd., UK 2004 - 2009 All rights reserved. www.avs4you.com
Page 75 of 198

Before applying the Rotate effect After applying the Rotate effect
Before applying the Resample effect After applying the Resample effect
Rotate
The Rotate transformation allows you to rotate the entire image.
In the Properties Area of the Video Effect window you can change the effect properties. The only property of
the Rotate effect available for setting is the angle of rotation.
On the figures below you can see the video picture before and after applying the Rotate effect:
Resample
The Resample transformation allows you to reproduce the entire image.
In the Properties Area of the Video Effect window you can change the effect properties. The only property of
the Resample effect available for setting is count (the number of reproductions).
On the figures below you can see the video picture before and after applying the Resample effect:
AVS4YOU Programs Help - AVS Video Editor v.4
© Online Media Technologies Ltd., UK 2004 - 2009 All rights reserved. www.avs4you.com
Page 76 of 198

Before applying the Zoom effect After applying the Zoom effect
Before applying the Mirror effect After applying the Mirror effect
Zoom
The Zoom feature lets you magnify or reduce your view of the image.
In the Properties Area of the Video Effect window you can change the effect properties. The only property of
the Zoom effect available for setting is magnitude of zoom.
On the figures below you can see the video picture before and after applying the Zoom effect:
Mirror
The Mirror effect lets you duplicate a part of the image.
In the Properties Area of the Video Effect window you can change the effect properties. The properties of
the Mirror effect available for setting are its level and type (bottom, top, left, right).
On the figures below you can see the video picture before and after applying the Mirror effect:
AVS4YOU Programs Help - AVS Video Editor v.4
© Online Media Technologies Ltd., UK 2004 - 2009 All rights reserved. www.avs4you.com
Page 77 of 198

Before applying the Twirl effect After applying the Twirl effect
Twirl
The Twirl effect tweaks the angle of the texture coordinate.
In the Properties Area of the Video Effect window you can change the effect properties. The properties of
the Twirl effect available for setting are its degree and angle.
On the figures below you can see the video picture before and after applying the Twirl effect:
Wave
The Wave effect creates an undulating pattern on your image or a selection of the image. You can choose the
appropriate wave size and amplitude, change the speed of their movement, make them vertical or horizontal.
In the Properties Area of the Video Effect window you can change the effect properties. The properties of
the Wave effect available for setting are Peaks (number of wave peaks), Amplitude (wave amplitude), Speed
(wave motion speed), Offset (objects offset along the waves) values and Vertical option. The vertical direction is set by default, if
you'd like to make horizontal waves, you should untick this option.
AVS4YOU Programs Help - AVS Video Editor v.4
© Online Media Technologies Ltd., UK 2004 - 2009 All rights reserved. www.avs4you.com
Page 78 of 198

Before applying the Wave effect After applying the Wave effect
Before applying the Ripple effect After applying the Ripple effect
On the figures below you can see the video picture before and after applying the Wave effect:
Ripple
The Ripple effect adds spaced ripples to the image's surface (like ripples on the surface of a pond). You can change
the number of added ripples and the speed of their movement.
In the Properties Area of the Video Effect window you can change the effect properties. The properties of
the Ripple effect available for setting are Omega (number of ripple rings), Speed (the positive speed values let the
ripples travel outward from the center point, the negative values make the ripples move toward the center point) and Offset (objects
offset along the ripple rings) values.
On the figures below you can see the video picture before and after applying the Ripple effect:
AVS4YOU Programs Help - AVS Video Editor v.4
© Online Media Technologies Ltd., UK 2004 - 2009 All rights reserved. www.avs4you.com
Page 79 of 198

Before applying the Sphere effect After applying the Sphere effect
Before applying the Cylinder effect After applying the Cylinder effect
Sphere
The Sphere effect lets you make a certain sphere-shaped area blurred.
In the Properties Area of the Video Effect window you can change the effect properties. The only property of
the Sphere effect available for setting is its degree.
It's also possible to change the location and size of the sphere area like while applying the ellipse effect.
On the figures below you can see the video picture before and after applying the Sphere effect:
Cylinder
The Cylinder effect lets you make a certain cylinder-shaped area blurred.
In the Properties Area of the Video Effect window you can change the effect properties. The properties of
the Cylinder effect available for setting are center, radius, degree and vertical option. The vertical direction is
set by default, if you'd like to blur the image horizontally, you should untick the Vertical option.
On the figures below you can see the video picture before and after applying the Cylinder effect:
AVS4YOU Programs Help - AVS Video Editor v.4
© Online Media Technologies Ltd., UK 2004 - 2009 All rights reserved. www.avs4you.com
Page 80 of 198

Adding Multiple Effects
AVS Video Editor gives you a possibility to apply multiple video effects on a video clip placed on the Timeline/Storyboard Area
and edit them in one window. Click the Video Effects button from the Menu Panes and select the necessary effect in the Files and
Effects Area. After you found an effect you want to apply, drag and drop it to the video.
Note: make sure that the Allow to add Effects directly on the video option is enabled in the project you're
working at. To check it, open the Settings window.
The same way, you can add several video effects to your video. The modified video will be marked by this sign on the Timeline/
Storyboard Area.
The Video Effect sign on the Timeline
The Video Effect sign on the Storyboard
AVS4YOU Programs Help - AVS Video Editor v.4
© Online Media Technologies Ltd., UK 2004 - 2009 All rights reserved. www.avs4you.com
Page 81 of 198

To change the properties of the applied effect, press the Video Effects button on the Timeline/Storyboard Toolbar or click the
video file on the Timeline/Storyboard Area with the right mouse button and select the Video Effects option of the express menu.
The Video Effects window will be opened (see the figure below).
In the right part of the window you can see the List of effects and the Properties area, in the left part you can set the Fade-in
and Fade-out areas and preview the result.
First of all select the effect from the list whose properties you want to modify by clicking it with the left mouse button.
Note: the appropriate Effect box should be checked, if unchecked the effect and its properties will be
disabled.
In the Properties area of the Video Effects window select the Mask from the drop-down list. The following options are available:
none, rectangle, ellipse and polygon. If you select None, the effect will be applied to the entire picture area.
Then set other effect properties. They vary from effect to effect. The detailed effects properties description can be found in the
Special, Effect and Transform chapters.
With help of the Video Effects window you are able to create your own visual effect combining various types of video effects, for
example, the combined Watercolor effect and Sharpen filter make your image look like an impressionism painting.
Click the OK button to save the changes or Cancel to discard all the changes and close the Video Effects window.
AVS4YOU Programs Help - AVS Video Editor v.4
© Online Media Technologies Ltd., UK 2004 - 2009 All rights reserved. www.avs4you.com
Page 82 of 198

Text and Graphics
The Text and Graphics effect is used to add different captions (static and animated), shapes and images to your movie:
First you will need to select a Text preset and add it to the Timeline. After that you will be able to change text properties, add
and edit graphics.
Then you can preview the video using the Preview Area to make sure that the objects look the way you want them to.
Note: you can apply not one but several text effects. If you want to disable any effect, check the respective
window off clicking the icon (it will turn into an icon then). To enable the effect click this icon once
again.
AVS4YOU Programs Help - AVS Video Editor v.4
© Online Media Technologies Ltd., UK 2004 - 2009 All rights reserved. www.avs4you.com
Page 83 of 198

Adding Text
Now you can add a text effect to the Timeline/Storyboard Area. First select the Text button of the Menu Panes. Then
drag-and-drop the text with the mouse from the Files and Effects Area to the Timeline/Storyboard Area:
Alternatively you can click the necessary text effect with the right mouse button and select Add or Replace Text option of the
express menu. The selected text effect will be placed to the Timeline. The added text duration can be changed either using the
Timeline or clicking the Duration button on the Timeline Toolbar.
Changing Text Duration
To change the duration on the Timeline locate the text effect there (it will be in the Text group) and click the left or right boundary
with the left mouse button. Then, without releasing the mouse button, drag it to the necessary direction - left or right - to alter
the Text duration in the movie:
Alternatively you can click the Text effect on the Timeline and use the Duration button of the Timeline Toolbar. The following
window will appear:
AVS4YOU Programs Help - AVS Video Editor v.4
© Online Media Technologies Ltd., UK 2004 - 2009 All rights reserved. www.avs4you.com
Page 84 of 198
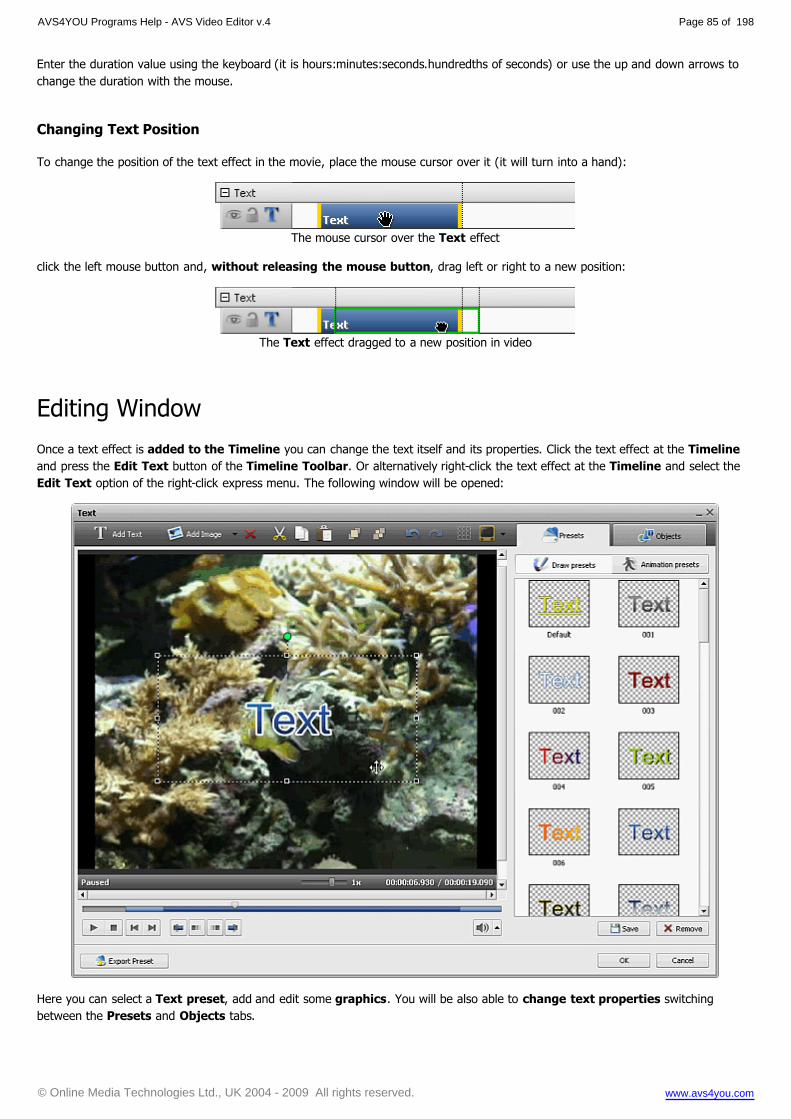
Enter the duration value using the keyboard (it is hours:minutes:seconds.hundredths of seconds) or use the up and down arrows to
change the duration with the mouse.
Changing Text Position
To change the position of the text effect in the movie, place the mouse cursor over it (it will turn into a hand):
The mouse cursor over the Text effect
click the left mouse button and, without releasing the mouse button, drag left or right to a new position:
The Text effect dragged to a new position in video
Editing Window
Once a text effect is added to the Timeline you can change the text itself and its properties. Click the text effect at the Timeline
and press the Edit Text button of the Timeline Toolbar. Or alternatively right-click the text effect at the Timeline and select the
Edit Text option of the right-click express menu. The following window will be opened:
Here you can select a Text preset, add and edit some graphics. You will be also able to change text properties switching
between the Presets and Objects tabs.
AVS4YOU Programs Help - AVS Video Editor v.4
© Online Media Technologies Ltd., UK 2004 - 2009 All rights reserved. www.avs4you.com
Page 85 of 198

Text Toolbar
You can use the Toolbar over the preview area to edit the text and graphics. It has the following buttons:
Add TextUse this button to add a new text box with the text to your video. The added text can be edited
independently from the other texts in the video.
Add ImageUse this button to add an image or a geometrical shape to your video. The added object can be edited
independently from the other texts and objects in the video.
Remove
ObjectUse this button to remove the currently selected object or text from the video.
CutUse this button to cut out the currently selected object (text or shape) to the program clipboard and
paste it to another place.
CopyUse this button to copy the currently selected object (text or shape) to the program clipboard and paste
it to another place.
Paste Use this button to paste the previously copied or cut object (text or shape).
Bring to
Foreground
Use this button to bring the currently selected object (text or shape) to the foreground as related to the
other objects. This option is only available if more than one object is present in the text effect and the
currently selected object is not in the most foreground position.
Move to
Background
Use this button to move the currently selected object (text or shape) to the background as related to
the other objects. This option is only available if more than one object is present in the edit window
and the currently selected object is not in the most background position.
Undo Use this button to undo the latest performed action.
Redo Use this button to redo the latest undone action.
Show GridUse this button to show or hide the vertical/horizontal grid lines. This might be helpful if you want to
align the text in the video.
TV Safe Zone
Use this button to show or hide the borders of the 4:3 CRT display, 4:3 LCD display and 16:9 LCD
widescreen display so that you could see if the video and all its elements will be displayed correctly on a
screen of your display/TV set during the playback.
Preview Area
The Preview Area of the editing window allows you to see the added text and objects and control their color, size and position on
the screen. The following buttons help you navigate through your video, set the beginning and the end of the effect and fade in/out
areas:
PlaybackIs used to start video file playback. Once you click it, it will turn into the Pause button to let you
pause the playback when needed.
StopIs used to stop video file playback. Every time you use it to stop the playback, the cursor goes back to
the beginning of the file.
Previous
FrameIs used to step one frame back in the video.
AVS4YOU Programs Help - AVS Video Editor v.4
© Online Media Technologies Ltd., UK 2004 - 2009 All rights reserved. www.avs4you.com
Page 86 of 198

Next Frame Is used to step one frame forward in the video.
Mark In Is used to mark the initial position of the applied effect in the video.
Fade In Is used to set the end of the fade-in area for the applied effect.
Fade Out Is used to set the beginning of the fade-out area for the applied effect.
Mark Out Is used to mark the final position of the applied effect in the video.
Preview Slider
Using the Preview Slider situated under the preview area you can mark the beginning and the end of the applied effect and set the
Fade-in and Fade-out areas.
Place the cursor of the slider area where you want the applied effect to begin and hit the Mark In button. The beginning of the
effect area will be marked. Then drag the cursor to the end of the slider and mark the point where the effect ends clicking the Mark
Out button.
If you need to make your effect appear and disappear gradually, use the Fade-in and Fade-out buttons in the same way that you
marked the beginning and the end of the applied effect.
It's also possible to direct the mouse cursor at the edge of the slider area and drag the boundaries inwards or outwards. When the
cursor turns into a double-sided arrow you can specify the initial and final positions of the effect, but if the cursor looks like a
simple arrow , you're able to change the duration of the Fade-in and Fade-out areas.
Note: it's possible to set all these areas for each text effect, geometrical shape or image you add to your video,
just open the Objects tab and select the necessairy element.
Working with Text Presets
Any changes you make to the text effect or graphics can be saved to a preset so that you can use them later if you plan to apply
the same effect to a different video.
AVS4YOU Programs Help - AVS Video Editor v.4
© Online Media Technologies Ltd., UK 2004 - 2009 All rights reserved. www.avs4you.com
Page 87 of 198

This is right both for the Draw presets tab where you can select the
appropriate text preset and for the Animation presets tab where you can set
the text effect Fade in and Fade out.
When you want to apply a text effect to your video, first, select one of the
presets from the Draw presets tab clicking it with a right mouse button and
selecting the Apply option (if there is no text effect on your video yet) or Add
option (if you want to add one more text to your video) from the express menu.
It's also possible to drag and drop the desired preset to the preview area of the
edit window.
Then you can modify it to completely suit your needs. Edit the Font, Brush,
Shadow and Edge properties of the text in the Objects tab, change its size
and orientation.
Open the Animation presets tab to choose the way the text will appear on the
screen and disappear from it. Each animation preset contains a Fade in and
Fade out effect, if you don't like one of the effects, select another one in the
Objects tab.
To save the currently edited text settings as a preset, just click the Save button
in the bottom of the presets area. The following window will be opened:
Enter a new unique preset name and click the OK button. The saved preset will be displayed in the list of the available presets now,
and you will be able to use it later on. You can also delete unnecessary presets from the list using the Remove button of the preset
area.
When you add some graphics to your movie, all the objects, images and their settings can also be saved as a preset. For this
purpose, please, use the button located in the left lower corner of the edit text window. Then type a name in the
opened Enter preset name window and hit the OK button. After that you will find the saved preset in the Favorites category when
you click the Text button on the Menu Pane.
To be able to apply one of the saved presets, use the right-click menu and select the appropriate option among the available ones:
Add or Replace Text, Rename, Delete.
AVS4YOU Programs Help - AVS Video Editor v.4
© Online Media Technologies Ltd., UK 2004 - 2009 All rights reserved. www.avs4you.com
Page 88 of 198

Editing Text
Once a text effect is added to your video using the Add Text button or selected from the Presets list you can change the text itself
and its properties.
First of all open the Objects tab and select the text preset you want to modify from the objects list. You can uncheck the box with
an object name to disable it while you edit other text or geometrical shape.
After that you'll see the text box on the preview area of the window. Double click it to type your own text, just take into
consideration that each time you press the Enter key the cursor will start a new line.
Properties - Text Draw
Font
Font - the text font-face used in the text effect. You can select a font-face
from the drop-down list.
Size - the text font-size used in the text effect. You can either select a
value from the drop-down list or enter it manually using the keyboard.
Font Style - the text font style used in the text effect. You can select B for
bold text, I for italicized text, U for underlined text and S for strikethrough
text.
Aligned - the text position in the rectangle box that surrounds the text
effect.
AVS4YOU Programs Help - AVS Video Editor v.4
© Online Media Technologies Ltd., UK 2004 - 2009 All rights reserved. www.avs4you.com
Page 89 of 198

Brush
Brush type - the style of the main filling used in the text. Can be Solid
(no color change throughout the filling), Gradient (smooth color change
from one selected color to the other), Hatch (a pattern composed of two
selected colors) and Texture (an image used as a filling for your text).
Color - the color or the colors (for Gradient and Hatch) used for the
main text filling.
Alpha - the transparency of the colors (can differ from 0 - full transparency
- to 100 - not transparent color).
Gradient - (available for Gradient brush type only) is used to select the pattern of the Gradient.
Texture - (available for Texture brush type only) is used to select the image to be used as filling and change it.
Fill - (available for Hatch brush type only) is used to change the pattern of the Hatch.
Shadow
Enable shadow - is used to switch the text shadow display on and off. If
marked the below properties will be available.
Color - the color of the shadow.
Offset X - the horizontal offset of the shadow in relation to the text itself
(positive values move the shadow to the right of the text, negative values
move the shadow to the left of the text).
Offset Y - the vertical offset of the shadow in relation to the text itself
(positive values move the shadow above the text, negative values move the
shadow below the text).
Blur - the text shadow smearing (0 being the Blur absense, 100 marking
the maximum Blur value).
Alpha - the transparency of the shadow colors (can differ from 0 - full transparency - to 100 - not transparent color).
Edge
Enable edge - is used to switch the text edge display on and off. If
marked the below properties will be available
Color - the color of the edge.
Distance - the thickness of the text edge (0 value will display no edge,
100 is the maximal value for the edge property).
Alpha - the transparency of the edge colors (can differ from 0 - full
transparency - to 100 - not transparent color).
Properties - Text Animation
The Text Animation option is used to set the text Fade in and Fade out
effect - i.e. how the text effect appears and disappears in the movie.
You can choose the effect used when the text appears in your video
clicking the drop-down menu beside the Fade in Animation caption and
selecting the necessary effect from the list of available ones. The same is
done for the Fade out Animation.
The duration of the Fade in and Fade out for the text effect is set on the
preview slider.
It's also possible to select an Animation preset from the presets list. Each Animation preset contains an already selected Fade-in
and Fade-out effect.
AVS4YOU Programs Help - AVS Video Editor v.4
© Online Media Technologies Ltd., UK 2004 - 2009 All rights reserved. www.avs4you.com
Page 90 of 198

You can also change the Text box size and orientation. To change the Text orientation, click the green circle (visible when the
text is selected with the mouse) with the left mouse button, the mouse cursor will change into a round arrow - - click the mouse
button and, without releasing it, drag it to change the text orientation.
Adding and Editing Graphics
The Text window allows you to add not only various text presets, but geometrical shapes and images to your media file. To do it,
open the edit text window and click the downward arrow near the Add Image button to select the desired shape from the drop-
down list. The program offers a wide range of shapes: Line, Rectangle, Ellipse, Pie, Sector, Polygon and Polyline.
Select one of the geometrical shapes to highlight an object in the video. You'll be able to draw only borders of a shape or it will be
covered with specified color while the rest of the picture remains untouched.
Click the Objects tab to change the geometrical shape properties. First you
need to select the object you want to modify, if you have added several
shapes to your movie.
Uncheck the box with an object name to disable it while you edit other
geometrical shapes.
If you want to include a filled shape to your video, stay in the brush mode set by default and select the color and
alpha value (transparence), as well as a brush type from the following available ones: solid, gradient, hatch, texture.
Choose the Solid option, if you want your shape to be of a homogen color. Set the color and alpha value.
Another available option is Gradient, that is a gradual blend of color, which can be considered as even graduation from low
to high values. By selecting the Gradient option you should also set the color in, color out, gradient type, as well as
alpha in and alpha out values (transparence).
AVS4YOU Programs Help - AVS Video Editor v.4
© Online Media Technologies Ltd., UK 2004 - 2009 All rights reserved. www.avs4you.com
Page 91 of 198

Choosing the Hatch option, you can add closely spaced parallel lines to your ellipse effect. The type of it you can select in the
Fill drop-down list.
If you decide to apply Texture brush type, you should load an image and set an alpha value.
If you would like to include only an outline of the shape, you should click the button to choose the color, alpha
value (transparence) and the pen thickness on the size slider. You can also check the Apply Antialias box to smooth the outline of
the shape.
The properties area when the Brush button is pressed The properties area when the Pen button is pressed
In case you plan to add an image to your video, click the Add Image button or select the same option from the drop-down list.
Then browse for the necessary image in your computer hard disk drive and load it to the program.
The following properties are available for setting: keep aspect ratio, apply
transparent color, color (it's available when the latter checkbox is checked)
and alpha.
Check the Keep aspect ratio box, if you'd like to preserve the aspect of the
imported image.
Ticking the Apply transparent color box you make one color of the
imported image transparent, then you should select this color in the
appropriate box. Change the transparence value moving the Alpha slider or
typing numbers in the field.
It's possible to change the location and size of the added object within the preview area of the edit text window. To move the
object to some other place on the video picture, you should direct the mouse cursor to the object area (the mouse cursor will turn to
the sign) and drag it to the place where you want the object to be situated. To change the size of the object, direct the mouse
cursor to one of the black squares (the mouse cursor will turn to the sign) and, without releasing the mouse button,
drag it within the preview area.
AVS4YOU Programs Help - AVS Video Editor v.4
© Online Media Technologies Ltd., UK 2004 - 2009 All rights reserved. www.avs4you.com
Page 92 of 198

Video Overlay
The Video Overlay effect is used to let you superpose video image over the video clip you would like to edit:
First you will need to select a Video Overlay preset and add it to the Timeline. After that you will be able to edit video overlay
and change its properties.
Then you can preview the video using the Preview Area to make sure that the video overlay effect looks the way you want it to.
Note: you can apply not one but several video overlay effects. If you want to disable any effect, check the
respective window off clicking the icon (it will turn into an icon then). To enable the effect click this
icon once again.
AVS4YOU Programs Help - AVS Video Editor v.4
© Online Media Technologies Ltd., UK 2004 - 2009 All rights reserved. www.avs4you.com
Page 93 of 198

Adding Video Overlay
Now you can add a video overlay effect to the Timeline/Storyboard Area. First select the Video Overlay button
of the Menu Panes. Then drag-and-drop the video overlay with the mouse from the Files and Effects Area to the
Timeline/Storyboard Area:
Alternatively you can click the necessary video overlay effect with the right mouse button and select Add to Video Overlay option of
the express menu. The selected video overlay effect will be placed to the Timeline.
The added video overlay duration can be changed either using the Timeline or clicking the Trim button on the Timeline Toolbar.
Changing Overlay Duration
To change the duration on the Timeline locate the video overlay effect there (it will be in the Video Overlay group) and click the
left or right boundary with the left mouse button. Then, without releasing the mouse button, drag it to the necessary direction -
left or right - to alter the Video Overlay duration in the movie:
Alternatively you can click the Video Overlay effect on the Timeline and use the Trim button of the Timeline Toolbar (it is going
to be the Duration button if you use an image as an overlay). The following window will appear:
AVS4YOU Programs Help - AVS Video Editor v.4
© Online Media Technologies Ltd., UK 2004 - 2009 All rights reserved. www.avs4you.com
Page 94 of 198

See the Trimming Video section for more detail on how to use the Trim option. In case you use an image for the overlay simply
enter the duration value using the keyboard (it is hours:minutes:seconds.hundredths of seconds) or use the up and down
arrows to change the duration with the mouse.
Changing Overlay Position
To change the position of the video overlay effect in the movie, place the mouse cursor over it (it will turn into a hand):
The mouse cursor over the Video Overlay effect
click the left mouse button and, without releasing the mouse button, drag left or right to a new position:
The Video Overlay effect dragged to a new position in video
AVS4YOU Programs Help - AVS Video Editor v.4
© Online Media Technologies Ltd., UK 2004 - 2009 All rights reserved. www.avs4you.com
Page 95 of 198

Editing Video Overlay
Once a video overlay effect is added to the Timeline you can change the overlay properties. Click the video overlay at the
Timeline and press the Edit Overlay button of the Timeline Toolbar. Or alternatively right-click the video overlay at the Timeline
and select the Edit Overlay option of the right-click express menu. The following window will be opened:
You can change the following overlay properties:
Attributes tab
Draw
Transparency - the transparency of the video or image used for the
overlay (can differ from 0 - not transparent video - to 100 - full
transparency).
Chromakey - a composite effect which allows you to add video overlay
that will be half transparent so that only part of it that has the specific color
you need will be visible and all the rest will disappear to reveal the video
underneath.
Color - select the color to be transparent clicking the downdward arrow. In
the opened window select the color that forms the area you would like to
be transparent.
It's also possible to change the angle of the Video Overlay effect. Click the green circle (visible when the overlay is selected with
the mouse) with the left mouse button, the mouse cursor will change into a round arrow - - click the mouse button and, without
releasing it, drag it to change the video overlay orientation.
You can also change the Video Overlay box size using the black squares on its boundaries (the mouse button will look like this
when you hover it over one of the black squares - click the mouse button and, without releasing it, drag it to change the video
overlay size).
AVS4YOU Programs Help - AVS Video Editor v.4
© Online Media Technologies Ltd., UK 2004 - 2009 All rights reserved. www.avs4you.com
Page 96 of 198
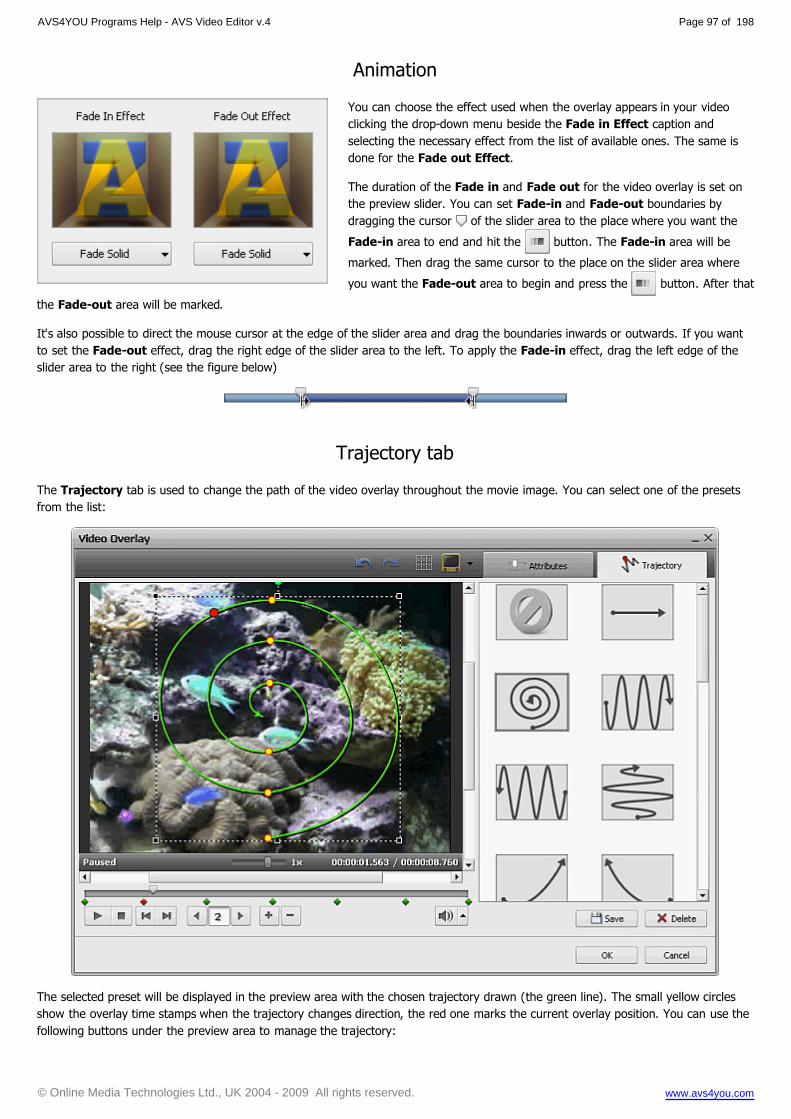
Animation
You can choose the effect used when the overlay appears in your video
clicking the drop-down menu beside the Fade in Effect caption and
selecting the necessary effect from the list of available ones. The same is
done for the Fade out Effect.
The duration of the Fade in and Fade out for the video overlay is set on
the preview slider. You can set Fade-in and Fade-out boundaries by
dragging the cursor of the slider area to the place where you want the
Fade-in area to end and hit the button. The Fade-in area will be
marked. Then drag the same cursor to the place on the slider area where
you want the Fade-out area to begin and press the button. After that
the Fade-out area will be marked.
It's also possible to direct the mouse cursor at the edge of the slider area and drag the boundaries inwards or outwards. If you want
to set the Fade-out effect, drag the right edge of the slider area to the left. To apply the Fade-in effect, drag the left edge of the
slider area to the right (see the figure below)
Trajectory tab
The Trajectory tab is used to change the path of the video overlay throughout the movie image. You can select one of the presets
from the list:
The selected preset will be displayed in the preview area with the chosen trajectory drawn (the green line). The small yellow circles
show the overlay time stamps when the trajectory changes direction, the red one marks the current overlay position. You can use the
following buttons under the preview area to manage the trajectory:
AVS4YOU Programs Help - AVS Video Editor v.4
© Online Media Technologies Ltd., UK 2004 - 2009 All rights reserved. www.avs4you.com
Page 97 of 198
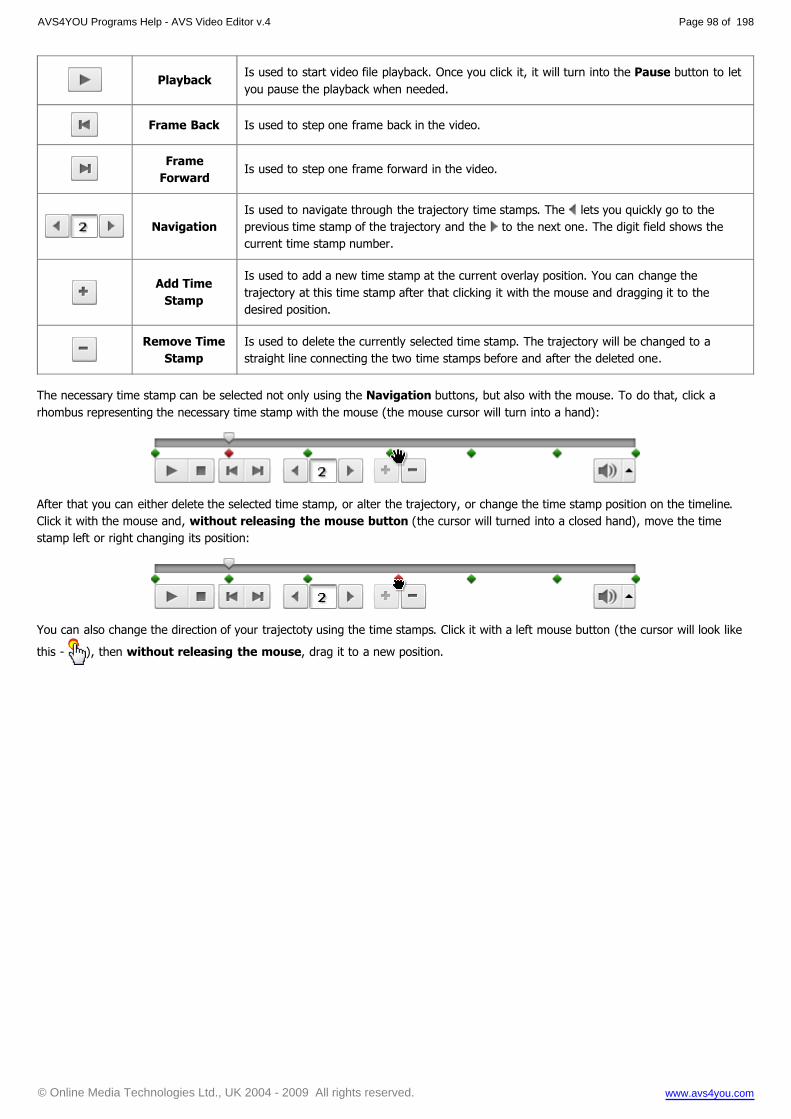
PlaybackIs used to start video file playback. Once you click it, it will turn into the Pause button to let
you pause the playback when needed.
Frame Back Is used to step one frame back in the video.
Frame
ForwardIs used to step one frame forward in the video.
Navigation
Is used to navigate through the trajectory time stamps. The lets you quickly go to the
previous time stamp of the trajectory and the to the next one. The digit field shows the
current time stamp number.
Add Time
Stamp
Is used to add a new time stamp at the current overlay position. You can change the
trajectory at this time stamp after that clicking it with the mouse and dragging it to the
desired position.
Remove Time
Stamp
Is used to delete the currently selected time stamp. The trajectory will be changed to a
straight line connecting the two time stamps before and after the deleted one.
The necessary time stamp can be selected not only using the Navigation buttons, but also with the mouse. To do that, click a
rhombus representing the necessary time stamp with the mouse (the mouse cursor will turn into a hand):
After that you can either delete the selected time stamp, or alter the trajectory, or change the time stamp position on the timeline.
Click it with the mouse and, without releasing the mouse button (the cursor will turned into a closed hand), move the time
stamp left or right changing its position:
You can also change the direction of your trajectoty using the time stamps. Click it with a left mouse button (the cursor will look like
this - ), then without releasing the mouse, drag it to a new position.
AVS4YOU Programs Help - AVS Video Editor v.4
© Online Media Technologies Ltd., UK 2004 - 2009 All rights reserved. www.avs4you.com
Page 98 of 198

Presets
Any changes you make to the trajectory of the Video Overlay effect can be saved to a preset so that you can use them later if you
plan to apply the same overlay trajectory to a different video.
Use the Preset area of the appropriate tab, click the Save button to save the currently edited video overlay trajectory as a preset.
You can also remove unnecessary presets from the list using the Delete button of the preset area.
Video Overlay Toolbar
You can use the Video Overlay Toolbar over the preview area to additionally manage the overlay. It has the following buttons:
Undo Use this button to undo the latest performed action.
Redo Use this button to redo the latest undone action.
Show
Grid
Use this button to show or hide the vertical/horizontal grid lines. This might be helpful if you want to align the
overlay in the video.
TV Safe
Zone
Use this button to show or hide the borders of the 4:3 CRT display, 4:3 LCD display and 16:9 LCD widescreen
display so that you could see if the video and all its elements will be displayed correctly on a screen of your
display/TV set during the playback.
AVS4YOU Programs Help - AVS Video Editor v.4
© Online Media Technologies Ltd., UK 2004 - 2009 All rights reserved. www.avs4you.com
Page 99 of 198

Audio
The Audio Mix is used to add a new soundtrack to your movie that will replace the original movie sound or just, for instance,
supplement it with some music.
First you will need to import the necessary audio into AVS Video Editor. Read the Importing Multimedia Files section to learn
how to do that.
Then select an audio soundtrack itself and add it to the Timeline. After that you will be able to modify the audio and change the
original and the added sound volume. You can also use a microphone connected to your personal computer to record your voice
and overlay your movie with it.
Note: you can apply not one but several tracks. If you want to disable any audio track, check the respective
window off clicking the icon (it will turn into an icon then). To enable the track click this icon once
again.
Then you can preview the video using the Preview Area to make sure that the added audio is fine.
Note: you cannot add transitions between two audio clips. The length of time the two audio clips play together
is determined by the amount of overlap between the two clips. When two audio clips overlap, the volume of
each audio clip is lowered by 50 percent during the part where they overlap.
AVS4YOU Programs Help - AVS Video Editor v.4
© Online Media Technologies Ltd., UK 2004 - 2009 All rights reserved. www.avs4you.com
Page 100 of 198

Adding Audio Soundtrack
Now you can add a soundtrack to the Timeline/Storyboard Area. First select the Audio Mix button of the Menu
Panes. Then drag-and-drop the audio with the mouse from the Files and Effects Area to the Timeline/Storyboard
Area:
Alternatively you can click the necessary audio with the right mouse button and select Add to Audio Mix option of the express
menu. The selected audio will be placed to the Timeline.
The added audio duration can be changed using the Timeline. Locate the added audio there (it will be in the Audio Mix group) and
click the left or right boundary with the left mouse button. Then, without releasing the mouse button, drag it to the necessary
direction - left or right - to alter the Audio Mix duration in the movie:
AVS4YOU Programs Help - AVS Video Editor v.4
© Online Media Technologies Ltd., UK 2004 - 2009 All rights reserved. www.avs4you.com
Page 101 of 198

To change the position of the audio mix in the movie, place the mouse cursor over it (it will turn into a hand):
The mouse cursor over the Audio Mix line
click the left mouse button and, without releasing the mouse button, drag left or right to a new position:
The Audio Mix dragged to a new position in video
You can adjust the audio levels between the two audio tracks (the original audio that was recorded as part of a video clip on the video
track and the audio that was recorded or imported and added to the audio track). Adjusting the audio levels determines which audio
will play louder than the other. The default setting plays the audio in both tracks at equal levels. The audio levels you select will play
throughout the entire portion of your movie. By adjusting the audio levels, it could be set so that dialog in your video clip can be
heard over the music that plays in the background. To adjust audio levels please use the Volume and Balance button at the
Timeline/Storyboard Toolbar. The Volume and Balance window will be opened:
Drag the upper slider to set the main video audio level, the central slider to set the audio level for the video overlay and the bottom
one for the added audio mix volume.
To change the audio level in the added soundtrack itself, use the envelope displayed on the audio track line. For each audio track at
the Timeline an envelope that depicts the volume control can be seen.
You can alter it differently according to your project's details. To add a control point to the envelope, double-click within the envelope
line (where the mouse cursor changes to a bidirectional arrow):
AVS4YOU Programs Help - AVS Video Editor v.4
© Online Media Technologies Ltd., UK 2004 - 2009 All rights reserved. www.avs4you.com
Page 102 of 198

and a new control point (a red dot) will appear. Then you can drag it to the location where you want it. To move a point on the
envelope, click and hold the point and drag it to a new location:
You can use this feature to smooth transition between two tracks. When the mouse cursor is located over a point, you will see it
change from an arrow to a rhombus.
Note: in case you move the point more than 20 pixels over the track line up or down, the point will be
deleted.
Recording Voice
If you plan to add some commentaries to your movie, you can not only add text to it, but also record voice from
microphone connected to your personal computer sound card.
Select the Voice Record button of the Menu Panes. The Recording Voice panel will become available to you:
Here you can select the following parameters (switching among the tabs Source, Format, Options):
Audio Source
Audio Device - the device that will be used for sound recording. Press the drop-
down combo-box and select the necessary device from the list, if you have more
than one input device installed on your computer.
Source - the input jack active on the device. The following input jacks might be
available depending on your input device configuration:
Mono Mix - allows you to record the sound from a program player or a hardware
tuner connected to your personal computer in mono mode;
AVS4YOU Programs Help - AVS Video Editor v.4
© Online Media Technologies Ltd., UK 2004 - 2009 All rights reserved. www.avs4you.com
Page 103 of 198

Stereo Mix - allows you to record the sound from a program player or a hardware tuner connected to your personal
computer in stereo mode;
SPDIF - allows you to record the sound from any external device connected to the digital input jack of your computer
sound card;
Aux - allows you to record the sound from any external device connected to the Aux (auxiliary) input of your computer
sound card;
CD Player - allows you to record the sound from a laser audio disc in you computer CD/DVD-ROM drive;
Line In - allows you to record the sound from any external device connected to the Line In input of your computer
sound card;
Microphone - allows you to record the sound from a microphone connected to the Microphone input of your computer
sound card;
Phone Line - allows you to record the sound from an external device connected to the Phone Line input of your
computer sound card.
Recording Format
Format - the codec used to record audio from the input device. You can select
among MP3 (MPEG-1 Layer 3 codec will be used to encode your recorded
audio), WMA (Windows Media Audio format) or PCM (an uncompressed format
with a better quality but taking more disk space)
Frequency - the sampling frequency specified in hertz used to encode the
audio.
Bitrate - the number of data points used to approximate the true wave form
(kilobits per second) - the bigger the value the better the quality will be though the recorded file size will also be bigger.
Channels - the number of channels in the recorded audio (mono - one channel - or stereo - two channels).
Options
Mute Player - use this option to switch the sound of the main video off/on. This
might be helpful when you record some audio and the preview player does not
let you hear the recorded sound properly.
Delay Recording - use this option to delay the recording a certain period of
time which can be selected either manually or entered into the appropriate field
using the keyboard (hours:minutes:seconds).
Time Limit - use this option to restrict the recording time to certain time after which the recording will be stopped. You can
change the value either manually or enter it into the appropriate field using the keyboard (hours:minutes:seconds).
When all is ready, click the Start Recording button to begin the recording.
Note: the recording will start right from the current cursor position at the Timeline. If you plan to record
voice from a certain position in the video, please make sure that the current cursor position is correct.
Once pressed the Start Recording button will turn into Stop Recording to let you stop the recording whenever needed. The
resulting recorded audio can be managed just like a common added audio soundtrack:
AVS4YOU Programs Help - AVS Video Editor v.4
© Online Media Technologies Ltd., UK 2004 - 2009 All rights reserved. www.avs4you.com
Page 104 of 198

Audio Effects
AVS Video Editor offers you a possibility to introduce various audio effects to the audio track of the imported video. In order to
make audio adjustments, please, place your video file to the Timeline/Storyboard and click the Audio button on the Timeline/
Storyboard Toolbar or click the video file on the Timeline/Storyboard Area with the right mouse button and select the Audio
option of the express menu. The Audio Correction window will be opened:
In the right part of the window you can select the audio effect to apply and change its properties, in the left part you can set the
fade-in and fade-out areas and preview the result. The following audio effects are available: Amplify, Noise Remover, Equalizer,
Normalize, Compressor, Pitch Shift.
To apply the desired effect, check the box near the effect name. After that you can set the Fade-in and Fade-out areas for the
selected effect, if necessary. Drag the cursor of the slider area, place it where you want the Fade-in area to end and hit the .
The Fade-in area will be marked. Then drag the same cursor to the position where you want the Fade-out area to begin and press
the button. The Fade-out area will be marked.
AVS4YOU Programs Help - AVS Video Editor v.4
© Online Media Technologies Ltd., UK 2004 - 2009 All rights reserved. www.avs4you.com
Page 105 of 198

It's also possible to direct the mouse cursor at the edge of the slider area and drag the boundaries inwards or outwards. If you want
to set the Fade-out effect, drag the right edge of the slider area to the left. To apply the Fade-in effect, drag the left edge of the
slider area to the right (see the figure below)
If you plan to use this video clip once again, for example, in Video Overlay effect and want to save the audio correction settings,
tick the Apply to all occurrences box in the bottom of the window.
Note: the audio correction settings don't affect the input video files.
Click the OK button to accept all the changes and continue work with AVS Video Editor or Cancel to discard all the changes. If you
save the adjustments you've made, the video file will be marked by this sign on the Timeline/Storyboard Area.
The Audio correction sign on the Timeline
Amplify
The Amplify effect lets you amplify your audio recording as you wish.
It's possible to select the necessary preset from the dropdown list clicking the Load preset button or set a custom
Gain value in the properties of this effect.
Noise Remover
The Noise Remover effect lets the user attenuate the noise sound of a certain frequency based on the Fast Fourier
Transformation.
It's possible to select the necessary preset from the dropdown list clicking the Load preset button or set a custom
Reduce value and select one of the available FFT (Fast Fourier Transformation) options.
Pitch Shift
The Pitch Shift effect shifts the frequency spectrum of the input signal. It can be used to disguise a person's voice, or
make the voice sound like that of the "chipmunks", through to "Darth Vader". It is also used to create harmony in lead
passages, although it is an "unintelligent" harmonizer.
It's possible to select the necessary preset from the dropdown list clicking the Load preset button or set a custom Rate value.
AVS4YOU Programs Help - AVS Video Editor v.4
© Online Media Technologies Ltd., UK 2004 - 2009 All rights reserved. www.avs4you.com
Page 106 of 198

Equalizer
The Equalizer filter is used to change the frequency pattern of the audio file, attenuate some of the frequencies and
amplify others.
It's possible to select the necessary preset from the dropdown list clicking the Load preset button or manually change
the properties.
Normalize
Use the Normalize effect to achieve the greatest amount of amplification that will not result in clipping.
It's possible to select the necessary preset from the dropdown list clicking the Load preset button or set a custom
Normalize value. You can also tick the Bias Adjust option to adjust the addition of a high frequency signal to the
audio.
Compressor
The Compressor is a variable gain device, where the amount of gain used depends on the level of the input. In this
case, the gain will be reduced when the signal level is high that makes louder passages softer, reducing the dynamic
range. This effect equals to dynamic volume regulator and makes loud sounds quieter, and the quiet sounds louder.
It's possible to select the necessary preset from the dropdown list clicking the Load preset button or set custom values for
Threshold, Ratio, Root Mean Square (RMS) and Post Amplify.
AVS4YOU Programs Help - AVS Video Editor v.4
© Online Media Technologies Ltd., UK 2004 - 2009 All rights reserved. www.avs4you.com
Page 107 of 198

Splitting Videos into Chapters
If you plan to create a DVD or Blu-ray with a menu, it will be useful to split your video into chapters beforehand.
Select the Chapters button of the Menu Panes.
The following window will be opened:
You can choose either to set chapters automatically using the Auto Set Chapters button, or create them manually using the Add
and Delete buttons.
If you select the first option (Auto Set Chapters) you will need to opt for one of the variants - At the Beginning of Each Clip (in
this case a new chapter will be created at the beginning of each new clip added to the Timeline/Storyboard Area) or At a Time
Interval (in this case you will need to select a time interval which will determine a new chapter creation). The interval window will let
you select the desired interval:
Note: the At the Beginning of Each Clip option will only add chapters to your video if more than one clip is
added to the Timeline/Storyboard Area. In case only one clip is added to the Timeline/Storyboard Area
the only chapter will be created at the beginning of the movie.
AVS4YOU Programs Help - AVS Video Editor v.4
© Online Media Technologies Ltd., UK 2004 - 2009 All rights reserved. www.avs4you.com
Page 108 of 198

The second option is used the following way: click the place at the timeline scale where you want your chapter to begin and use the
button to mark the beginning of a new chapter. Or select an already added chapter and use the button to
remove it from the video.
When you add all the chapters they will be displayed in the Files and Effects Area:
AVS4YOU Programs Help - AVS Video Editor v.4
© Online Media Technologies Ltd., UK 2004 - 2009 All rights reserved. www.avs4you.com
Page 109 of 198

Using Trim and Multiple Trim Options
After you add your video to the Timeline/Storyboard Area and edit it, you can still trim it and detect scenes and insert transitions
between them.
Click the main video area at the Timeline and use the Trim button of the Timeline Toolbar to open the Trim window. Or
alternatively click the video at the Timeline with the right mouse button and select the Trim option.
Please read the Trimming Video section to learn how to use the Trim option.
The same way the Multiple Trim option can be used to find scenes in your video added to the Timeline/Storyboard Area. Open
the MultiTrim window using the right mouse button on the main video at the Timeline and selecting the MultiTrim option. The
opened MultiTrim will look like this:
Please read the Trimming Video section to learn how to use the MultiTrim option.
After you split your video using either of the Trim options, you can add transitions between scenes of the video or continue editing
it.
Note: if there is an audio track placed to the Timeline and you have marked an area of deletion using Trim
or MultiTrim option, the part of audio file present in the area of deletion will also be cut. If you don't want the
part of the audio to be deleted, lock the Audio mix line.
AVS4YOU Programs Help - AVS Video Editor v.4
© Online Media Technologies Ltd., UK 2004 - 2009 All rights reserved. www.avs4you.com
Page 110 of 198

Using Crop Scale
When you import video files of one aspect ratio and then change the aspect to a different value for the output video, there can
be two different situations which can be solved in a similar way:
the input files have the 4:3 aspect and the output file will have the 16:9 aspect ratio - in this case the mattes will be
added to the left and right sides of the video image to prevent distortion;
the input files have the 16:9 aspect and the output file will have the 4:3 aspect ratio - in this case the mattes will be
added to the top and bottom sides of the video image to prevent distortion.
In both these cases you can get rid of the mattes using the Crop Scale option available in AVS Video Editor. Select the
necessary aspect ratio and click the video at the Timeline with the right mouse button. Choose the Crop Scale option. The Crop
Scale window will be opened:
In the above figure you can see an example of the first above case of the aspect ratio change - an input 4:3 video image changed into
an output 16:9 video file. As you can see, mattes are added to the sides of the video so that it could fit an 16:9 frame (the black bars
on top and bottom of the video are added simply to fit it into the square player window and will not actually be added to the output
video).
Now if you use the field and click the button, the slider will become available that will
let you change the visible part of the video. Move the slider using the mouse to get rid of the mattes:
AVS4YOU Programs Help - AVS Video Editor v.4
© Online Media Technologies Ltd., UK 2004 - 2009 All rights reserved. www.avs4you.com
Page 111 of 198

Note: using the Crop Scale function will enlarge the video image so that it could fit a new frame size with an
aspect different from that of the original video. It means that a part of the video, namely some video image at
the top and the bottom parts will be cut out and lost.
And this is how your transformed cropped video will look like in the Preview Area:
AVS4YOU Programs Help - AVS Video Editor v.4
© Online Media Technologies Ltd., UK 2004 - 2009 All rights reserved. www.avs4you.com
Page 112 of 198

As you can see, the resulting video has no mattes on either side. At the same time it is slightly enlarged and cropped on top and
bottom. So you will have to decide what is more important for you: have video fit your display or TV-set screen or have the whole
source video image.
Taking Snapshots
If you need to capture a particular moment of your video clip and include it in your future movie, you can use a Snapshot option.
The process of taking a snapshot is very quick and easy with AVS Video Editor.
Place your video clip to the Timeline and find the necessary frame moving the Timeline cursor or using the slider under the
Preview window. Then click the Snapshot button. The following dialog window appears:
Here you can specify the file location, enter the file name and open the dropdown menu to select the appropriate file format for your
picture. There is a wide list of supported formats:
BMP (standard Windows bitmap file format)
WMF (standard Windows Metafile format)
EMF (Enhanced Windows Metafile format)
JPEG (Joint Photographic Expert Group file format)
GIF (Graphics Interchange file Format)
PNG (Portable Network Graphics file format)
TIFF (Tagged-Image File Format)
Finaly press the Save button. In case you need to use this picture in your current project, just import it into the Files and Effects
Area, place to the Timeline/Storyboard and continue your film creation.
AVS4YOU Programs Help - AVS Video Editor v.4
© Online Media Technologies Ltd., UK 2004 - 2009 All rights reserved. www.avs4you.com
Page 113 of 198

Adjusting the Playback Speed
AVS Video Editor allows you to change the playback speed of video content placed on the Timeline/Storyboard Area. Use this
feature to correct too slow or too fast episodes speeding up or slowing down your clips. You can create interesting voice effects by
adjusting playback speed. Faster speed makes the voice sound small and wacky and slow makes the voice sound large and ominous.
Select the video clip on the Main video or Overlay video line by clicking it, then press the Speed button on the Timeline/
Storyboard Toolbar. The following window will appear:
The Speed field shows the current speed value, click the button and adjust the speed value dragging the Slider -
The values from 0x to 0,9x will decrease the playback speed.
The 1x value will playback video at normal speed.
The values from 1,25x to 12x will increase the playback speed.
Note: at present using this function you can change the forward playback speed only.
You can play the video clip using the Player controls to see if the speed adjustments you've made suit your needs. If your video file
includes an audio track, the audio playback speed could also be changed according to the video stream speed or it can be switched
off. Select the Stretch option from the Audio drop-down menu to adjust audio speed or choose Mute to make speed adjustments to
the video without affecting the accompanying audio.
To accept the changes click the OK button, to discard the changes and close the Speed window use the Cancel button.
AVS4YOU Programs Help - AVS Video Editor v.4
© Online Media Technologies Ltd., UK 2004 - 2009 All rights reserved. www.avs4you.com
Page 114 of 198

Color correction
AVS Video Editor allows you to adjust the tonal range, color, and sharpness of your video files. In order to improve the quality of
the imported videos, please, place your video file to the Timeline/Storyboard and click the Color button on the Timeline/
Storyboard Toolbar or click the video file on the Timeline/Storyboard Area with the right mouse button and select the Color
option of the express menu. The Color Correction window will be opened:
In the right part of the window you can easily correct colors applying a certain video effect, in the left part you can preview the result.
Depending on the problem you experience or the result you want to get you can select one of the video effects:
The Brightness effect lets you make simple adjustments to the tonal range of a file. Brightness is the relative lightness or darkness of
the color.
The Temperature effect lets you adjust your video image to warm (red) or cold (blue) colors. Negative values represent cold colors
and positive values transform to warm colors correspondingly.
The Contrast effect adjusts the contrast of an image. Values can range from -100 to +100.
The Saturation sometimes called chroma, is the strength or purity of the color. It makes colors more vivid or more muted and
represents the amount of gray in proportion to the hue, measured as -100 (gray) to 100 (fully saturated).
The Gamma effect measures the brightness of midtone values and modifies the pixel values in an image. A higher gamma value yields
an overall lighter image.
The Hue effect shifts all colors in an image. The hue, or color, adjustment represents a move around the color wheel. It's the color
reflected from or transmitted through an object. It's measured as a location on the standard color wheel, expressed as a degree
between -180 and 180. In common use, hue is identified by the name of the color such as red, orange, or green.
You can adjust your image using the slider controls of each effect or typing the necessary value manually in the appropriate field. If
you don't achieve the desired effect, click the button near the value field or the Reset All button and try again.
If you plan to use this video clip once again, for example, in Video Overlay effect and want to save the color correction settings,
tick the Apply to all occurrences box in the bottom of the window.
AVS4YOU Programs Help - AVS Video Editor v.4
© Online Media Technologies Ltd., UK 2004 - 2009 All rights reserved. www.avs4you.com
Page 115 of 198

Note: the color correction settings don't affect the input video files.
Click the OK button to accept all the changes and continue work with AVS Video Editor or Cancel to discard all the changes. If you
save the adjustments you've made, the video file will be marked by this sign on the Timeline/Storyboard Area.
The Color correction sign on the Timeline
The Color correction sign on the Storyboard
Freeze Frame Option
The Freeze Frame option allows you to make a still shot from your video clip. It's a special effect in which a single frame is shown
over and over. Move the cursor in the Timeline to find the exact frame you want to freeze, then select the Freeze option from the
Edit section of the Top Menu.
The still shot will look like this on the Timeline:
It can be also viewed on the Storyboard:
The Freeze Frame function creates an image file in PNG format named freezeframe_001, freezeframe_002, etc. by default.
The newly created images are automatically added into the Image category of the Files and Effects Area.
You can change the duration of the still image clicking the Duration button on the Timeline/Storyboard Toolbar or right-clicking
it and selecting the Duration option from the express menu. The Duration window will appear where you can set the necessary
value by entering it through the keyboard or using the arrow buttons. Then press the OK button to apply the set duration of the
image.
AVS4YOU Programs Help - AVS Video Editor v.4
© Online Media Technologies Ltd., UK 2004 - 2009 All rights reserved. www.avs4you.com
Page 116 of 198
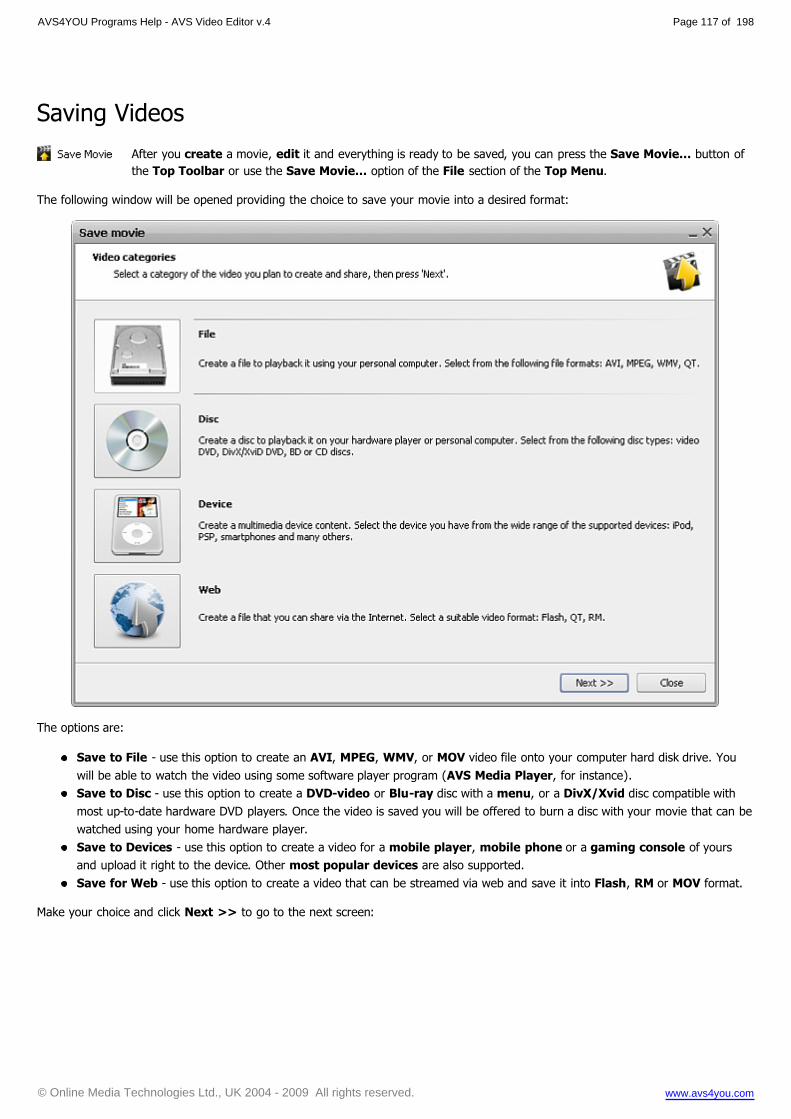
Saving Videos
After you create a movie, edit it and everything is ready to be saved, you can press the Save Movie... button of
the Top Toolbar or use the Save Movie... option of the File section of the Top Menu.
The following window will be opened providing the choice to save your movie into a desired format:
The options are:
Save to File - use this option to create an AVI, MPEG, WMV, or MOV video file onto your computer hard disk drive. You
will be able to watch the video using some software player program (AVS Media Player, for instance).
Save to Disc - use this option to create a DVD-video or Blu-ray disc with a menu, or a DivX/Xvid disc compatible with
most up-to-date hardware DVD players. Once the video is saved you will be offered to burn a disc with your movie that can be
watched using your home hardware player.
Save to Devices - use this option to create a video for a mobile player, mobile phone or a gaming console of yours
and upload it right to the device. Other most popular devices are also supported.
Save for Web - use this option to create a video that can be streamed via web and save it into Flash, RM or MOV format.
Make your choice and click Next >> to go to the next screen:
AVS4YOU Programs Help - AVS Video Editor v.4
© Online Media Technologies Ltd., UK 2004 - 2009 All rights reserved. www.avs4you.com
Page 117 of 198
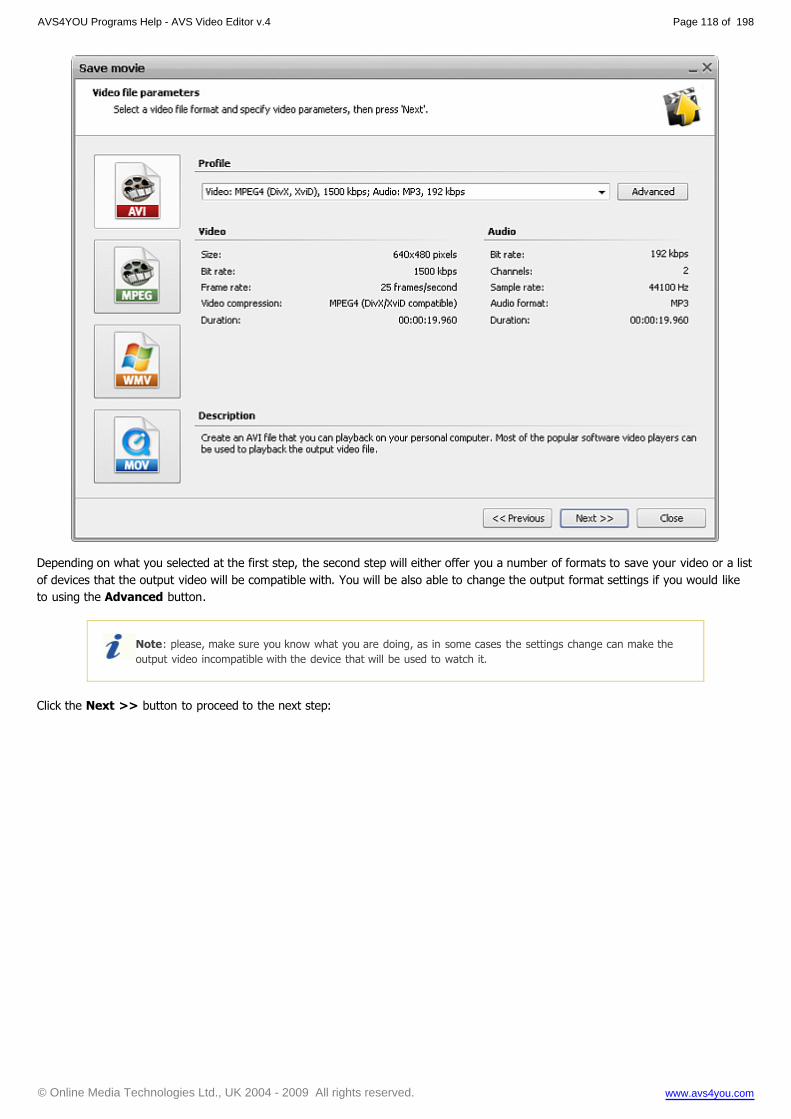
Depending on what you selected at the first step, the second step will either offer you a number of formats to save your video or a list
of devices that the output video will be compatible with. You will be also able to change the output format settings if you would like
to using the Advanced button.
Note: please, make sure you know what you are doing, as in some cases the settings change can make the
output video incompatible with the device that will be used to watch it.
Click the Next >> button to proceed to the next step:
AVS4YOU Programs Help - AVS Video Editor v.4
© Online Media Technologies Ltd., UK 2004 - 2009 All rights reserved. www.avs4you.com
Page 118 of 198
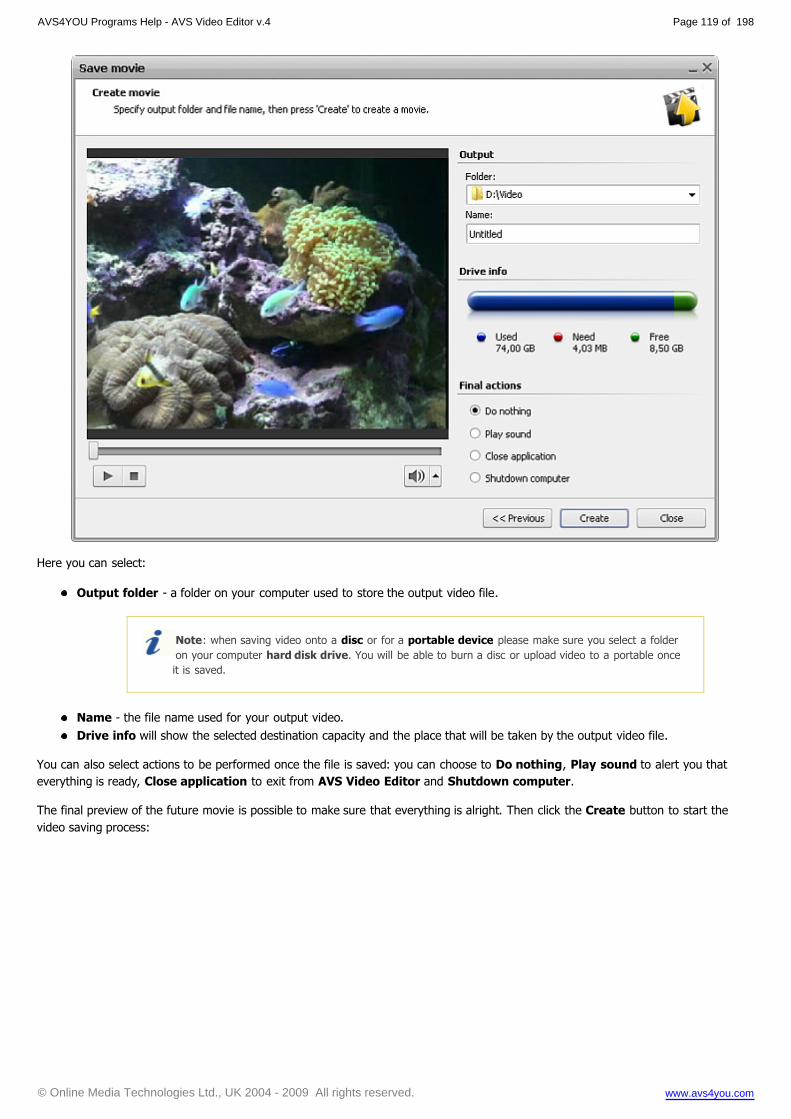
Here you can select:
Output folder - a folder on your computer used to store the output video file.
Note: when saving video onto a disc or for a portable device please make sure you select a folder
on your computer hard disk drive. You will be able to burn a disc or upload video to a portable once
it is saved.
Name - the file name used for your output video.
Drive info will show the selected destination capacity and the place that will be taken by the output video file.
You can also select actions to be performed once the file is saved: you can choose to Do nothing, Play sound to alert you that
everything is ready, Close application to exit from AVS Video Editor and Shutdown computer.
The final preview of the future movie is possible to make sure that everything is alright. Then click the Create button to start the
video saving process:
AVS4YOU Programs Help - AVS Video Editor v.4
© Online Media Technologies Ltd., UK 2004 - 2009 All rights reserved. www.avs4you.com
Page 119 of 198

You will monitor the process of file creation using the preview (if Show preview is checked) and the additional information:
Elapsed time - the time spent by the program since the beginning of the file saving process.
Remaining time - the estimated time till the file saving process is finished.
Progress - the progress of the process shown in percent.
When overall progress reaches 100%, the program will offer some further actions depending on what you chose before and on the
format selected. For instance, for the Save to File option the following dialog window will appear:
AVS4YOU Programs Help - AVS Video Editor v.4
© Online Media Technologies Ltd., UK 2004 - 2009 All rights reserved. www.avs4you.com
Page 120 of 198

Supported Formats
Most of the commonly used media file formats are supported by AVS Video Editor:
Format Read Write
HD Video formats
(.m2ts, .m2t, .mts, .tod, index.bdm, index.bdmv)
Blu-ray video
AVCHD
MPEG-2 HD
+ +
AVI - Audio Video Interleave (including HD video)
(.avi, .divx, .xvid, .ivf, .div, etc )
DivX codec *
Xvid codec
H.264 codec
DV codec
Cinepak codec
Indeo codec
MJPEG codec
Uncompressed codec
MS MPEG-4 codec
and other
*if necessary codec is installed
+ +
WMV - Windows Media Formats (including HD video)
(.wmv, .asf, .asx, .dvr-ms)
Windows Media Video
Advanced Systems Format
DVR-MS
++
(.wmv only)
MPEG - Motion Picture Experts Group (including HD video)
(.mpg, .mpeg, .mp2, .m1v, .mpe, .m2v, .dat, .ifo, .vob, .vro, .mg4, .mod, .mvv
)
MPEG-1
MPEG-2
VCD, SVCD, DVD (PAL and NTSC)
VOB, VRO
MPEG-4
+ +
Mobile video formats
(.3gp2, .3gpp, .3gp, .3g2, .mp4)
MP4 (inc. Sony PSP and Apple iPod)
3GPP
3GPP2
+ +
Quick Time movie (including HD video)
(.mov, .qt, .m4v, .mp4)+ +
AVS4YOU Programs Help - AVS Video Editor v.4
© Online Media Technologies Ltd., UK 2004 - 2009 All rights reserved. www.avs4you.com
Page 121 of 198

Adobe Flash
(.swf1, .flv, .f4v, .f4p)
+
(except .swf1)
+
(.swf and .flv only)
RealNetworks
(.rm, .rv, .ram, .rmvb, .ivr)+ +
Matroska (including HD video)
(.mkv)
+ -
Ogg Media (including HD video)
(.ogm, .ogg, .ogv)+ -
AMV/MTV files
(.amv, .mtv)+ -
TS files
(ts, .m2ts, .m2t, .mts, .tp)+ -
Nintendo DS files
(.dpg)+ -
NullSoft Video
(.nsv)+ -
FLIC files
(.fli, .flc)+ -
CDG files2
(.cdg)+ -
1- .swf files with video content only can be loaded into AVS Video Editor.
2- CDG files are karaoke files. To load video file together with audio track, make sure that video and audio files are located in one
and the same folder and have the same name, e.g. "song.cdg" and "song.mp3" (CDG+MP3 format) or "song.cdg" and
"song.ogg" (CDG+OGG format).
AVS4YOU Programs Help - AVS Video Editor v.4
© Online Media Technologies Ltd., UK 2004 - 2009 All rights reserved. www.avs4you.com
Page 122 of 198

Saving to File
You can use the Save to File option to save your video into a file using different formats and codecs. The
following options are available here:
Save to AVI - use this option to save your movie into a video file with an .avi extension. The video will be
encoded using MPEG-4 (DivX/Xvid) codec, H.264 codec, or using a preset for a certain video service -
Google video, YouTube video or Myspace video. There is also a possibility to save your movie into an
uncompressed AVI video.
Save to MPEG - use this option to save your movie into a video file with a .mpeg extension. The video will be encoded using
MPEG-1 or MPEG-2 codec.
Save to WMV - use this option to save your movie into a video file with a .wmv extension. The video will be encoded using
Microsoft WMV codec and compatible with many portable players - Microsoft Zune, Archos, Creative ZEN, Epson Multimedia
Storage Viewer P3000/P5000, Palm Treo series devices, HP iPaq series devices and other different mobiles and portables that
use Microsoft Windows Mobile as an operating system.
Save to MOV - use this option to save your movie into a video file with a .qt extension. The video will be encoded using
Quick Time codec and will be compatible with Apple Quick Time player.
AVS4YOU Programs Help - AVS Video Editor v.4
© Online Media Technologies Ltd., UK 2004 - 2009 All rights reserved. www.avs4you.com
Page 123 of 198

Saving to AVI
The Save to AVI option is used to save your movie into a video file with an .avi extension. The video will be
encoded using MPEG-4 (DivX/Xvid) codec, H.264 codec, or using a preset for a certain video service -
Google video, YouTube video or Myspace video. There is also a possibility to save your movie into an
uncompressed AVI video.
You select one of the available Profiles from the drop-down list and review its settings in the list of Video and
Audio properties:
VIDEO PROPERTIES Description
SizeDisplays the size of the video frame used in the output video. The size is shown as a width to
height ratio and is measured in pixels.
Bitrate Displays the number of bits transferred per second, measured in kilobits per second.
Framerate Shows the number of video frames displayed every second, measured in frames in second.
Video compressionDisplays the name of the codec used to encode the video information into the video file. You can
change the MPEG-4 and H.264 codecs advanced settings.
Duration Shows the length of the video clip (measured in hours:minutes:seconds.hundredths of seconds).
AUDIO PROPERTIES Description
BitrateDisplays the number of data points used to approximate the true wave form (measured in kilobits
per second).
ChannelsShows the number of channels in the movie audio track (mono - one channel, stereo - two
channels)
Sample Rate Defines the number of samples per second taken from a continuous signal and is measured in Hz.
Audio Format Shows the codec used to encode the video clip soundtrack.
Duration Displays the length of the video clip soundtrack (hours:minutes:seconds.hundredths of seconds).
If you would like to change some of the settings, you will need to click the Advanced button next to the Profile drop-down list.
Note: please, make sure you know what you are doing, as in some cases the settings change can make the
output video incompatible with the device that will be used to watch it.
AVS4YOU Programs Help - AVS Video Editor v.4
© Online Media Technologies Ltd., UK 2004 - 2009 All rights reserved. www.avs4you.com
Page 124 of 198
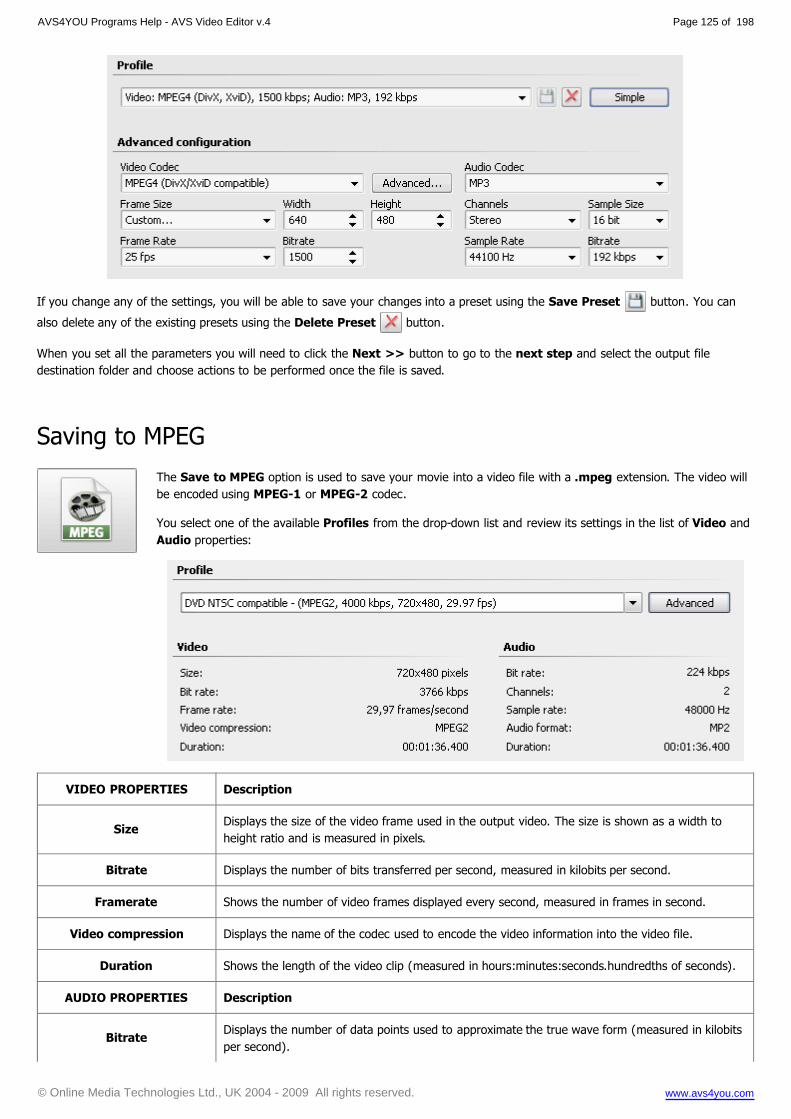
If you change any of the settings, you will be able to save your changes into a preset using the Save Preset button. You can
also delete any of the existing presets using the Delete Preset button.
When you set all the parameters you will need to click the Next >> button to go to the next step and select the output file
destination folder and choose actions to be performed once the file is saved.
Saving to MPEG
The Save to MPEG option is used to save your movie into a video file with a .mpeg extension. The video will
be encoded using MPEG-1 or MPEG-2 codec.
You select one of the available Profiles from the drop-down list and review its settings in the list of Video and
Audio properties:
VIDEO PROPERTIES Description
SizeDisplays the size of the video frame used in the output video. The size is shown as a width to
height ratio and is measured in pixels.
Bitrate Displays the number of bits transferred per second, measured in kilobits per second.
Framerate Shows the number of video frames displayed every second, measured in frames in second.
Video compression Displays the name of the codec used to encode the video information into the video file.
Duration Shows the length of the video clip (measured in hours:minutes:seconds.hundredths of seconds).
AUDIO PROPERTIES Description
BitrateDisplays the number of data points used to approximate the true wave form (measured in kilobits
per second).
AVS4YOU Programs Help - AVS Video Editor v.4
© Online Media Technologies Ltd., UK 2004 - 2009 All rights reserved. www.avs4you.com
Page 125 of 198

ChannelsShows the number of channels in the movie audio track (mono - one channel, stereo - two
channels)
Sample Rate Defines the number of samples per second taken from a continuous signal and is measured in Hz.
Audio Format Shows the codec used to encode the video clip soundtrack.
Duration Displays the length of the video clip soundtrack (hours:minutes:seconds.hundredths of seconds).
If you would like to change some of the settings, you will need to click the Advanced button next to the Profile drop-down list.
Note: please, make sure you know what you are doing, as in some cases the settings change can make the
output video incompatible with the device that will be used to watch it.
If you change any of the settings, you will be able to save your changes into a preset using the Save Preset button. You can
also delete any of the existing presets using the Delete Preset button.
When you set all the parameters you will need to click the Next >> button to go to the next step and select the output file
destination folder and choose actions to be performed once the file is saved.
Saving to WMV
The Save to WMV option is used save your movie into a video file with a .wmv extension. The video will be
encoded using Microsoft WMV codec and compatible with many portable players - Microsoft Zune, Archos,
Creative ZEN, Epson Multimedia Storage Viewer P3000/P5000, Palm Treo series devices, HP iPaq series devices
and other different mobiles and portables that use Microsoft Windows Mobile as an operating system.
AVS4YOU Programs Help - AVS Video Editor v.4
© Online Media Technologies Ltd., UK 2004 - 2009 All rights reserved. www.avs4you.com
Page 126 of 198

You select one of the available Profiles from the drop-down list and review its settings in the list of Video and Audio properties:
VIDEO PROPERTIES Description
SizeDisplays the size of the video frame used in the output video. The size is shown as a width to
height ratio and is measured in pixels.
Bitrate Displays the number of bits transferred per second, measured in kilobits per second.
Framerate Shows the number of video frames displayed every second, measured in frames in second.
Video compressionDisplays the name of the codec used to encode the video information into the video file. You can
change the WMV codec advanced settings.
Duration Shows the length of the video clip (measured in hours:minutes:seconds.hundredths of seconds).
AUDIO PROPERTIES Description
BitrateDisplays the number of data points used to approximate the true wave form (measured in kilobits
per second).
ChannelsShows the number of channels in the movie audio track (mono - one channel, stereo - two
channels)
Sample Rate Defines the number of samples per second taken from a continuous signal and is measured in Hz.
Audio Format Shows the codec used to encode the video clip soundtrack.
Duration Displays the length of the video clip soundtrack (hours:minutes:seconds.hundredths of seconds).
If you would like to change some of the settings, you will need to click the Advanced button next to the Profile drop-down list.
Note: please, make sure you know what you are doing, as in some cases the settings change can make the
output video incompatible with the device that will be used to watch it.
AVS4YOU Programs Help - AVS Video Editor v.4
© Online Media Technologies Ltd., UK 2004 - 2009 All rights reserved. www.avs4you.com
Page 127 of 198

If you change any of the settings, you will be able to save your changes into a preset using the Save Preset button. You can
also delete any of the existing presets using the Delete Preset button.
When you set all the parameters you will need to click the Next >> button to go to the next step and select the output file
destination folder and choose actions to be performed once the file is saved.
Saving to MOV
The Save to MOV option is used to save your movie into a video file with a .qt extension. The video will be
encoded using Quick Time codec and will be compatible with Apple Quick Time player.
You select one of the available Profiles from the drop-down list and review its settings in the list of Video and
Audio properties:
VIDEO PROPERTIES Description
SizeDisplays the size of the video frame used in the output video. The size is shown as a width to
height ratio and is measured in pixels.
Bitrate Displays the number of bits transferred per second, measured in kilobits per second.
Framerate Shows the number of video frames displayed every second, measured in frames in second.
Video compression Displays the name of the codec used to encode the video information into the video file.
Duration Shows the length of the video clip (measured in hours:minutes:seconds.hundredths of seconds).
AUDIO PROPERTIES Description
AVS4YOU Programs Help - AVS Video Editor v.4
© Online Media Technologies Ltd., UK 2004 - 2009 All rights reserved. www.avs4you.com
Page 128 of 198

BitrateDisplays the number of data points used to approximate the true wave form (measured in kilobits
per second).
ChannelsShows the number of channels in the movie audio track (mono - one channel, stereo - two
channels)
Sample Rate Defines the number of samples per second taken from a continuous signal and is measured in Hz.
Audio Format Shows the codec used to encode the video clip soundtrack.
Duration Displays the length of the video clip soundtrack (hours:minutes:seconds.hundredths of seconds).
If you would like to change some of the settings, you will need to click the Advanced button next to the Profile drop-down list.
Note: please, make sure you know what you are doing, as in some cases the settings change can make the
output video incompatible with the device that will be used to watch it.
If you change any of the settings, you will be able to save your changes into a preset using the Save Preset button. You can
also delete any of the existing presets using the Delete Preset button.
When you set all the parameters you will need to click the Next >> button to go to the next step and select the output file
destination folder and choose actions to be performed once the file is saved.
Saving to Disc
You can use the Save to Disc option to save your video onto different types of discs. The following options are
available here:
Save to DVDs - use this option to create DVD-video and burn your output movie onto a DVD disc. You will be
also able to create and edit DVD menu for decoration and quick and easy navigation through your video.
The resulting disc will be compatible with most types of modern hardware players supporting DVD±R/RW discs.
Save to Blu-ray - use this option to create Blu-ray video and burn your output movie onto a Blu-ray disc. You will be also
able to create and edit Blu-ray menu for decoration and quick and easy navigation through your video. The resulting disc
will be compatible with most of well known hardware and software Blu-ray players.
Save to DivX/Xvid - use this option to create DivX/Xvid video and burn your output movie onto a CD or a DVD disc. The
resulting disc will be compatible with most types of modern hardware players supporting playback of DivX/Xvid video discs.
AVS4YOU Programs Help - AVS Video Editor v.4
© Online Media Technologies Ltd., UK 2004 - 2009 All rights reserved. www.avs4you.com
Page 129 of 198

When the movie creation is over, you will be offered to burn it onto a the disc using the internal AVS Video Editor burning engine.
You do not need any other additional programs to burn your created discs.
Saving to DVDs
The Save to DVD option is used to create DVD-video and burn your output movie onto a DVD disc. You will be
also able to create and edit DVD menu for decoration and quick and easy navigation through your video.
The resulting disc will be compatible with most types of modern hardware players supporting DVD±R/RW discs.
You select one of the available Profiles from the drop-down list and review its settings in the list of Video and
Audio properties:
AVS4YOU Programs Help - AVS Video Editor v.4
© Online Media Technologies Ltd., UK 2004 - 2009 All rights reserved. www.avs4you.com
Page 130 of 198

VIDEO PROPERTIES Description
SizeDisplays the size of the video frame used in the output video. The size is shown as a width to
height ratio and is measured in pixels.
Bitrate Displays the number of bits transferred per second, measured in kilobits per second.
Framerate Shows the number of video frames displayed every second, measured in frames in second.
Video compression Displays the name of the codec used to encode the video information into the video file.
Duration Shows the length of the video clip (measured in hours:minutes:seconds.hundredths of seconds).
AUDIO PROPERTIES Description
BitrateDisplays the number of data points used to approximate the true wave form (measured in kilobits
per second).
ChannelsShows the number of channels in the movie audio track (mono - one channel, stereo - two
channels)
Sample Rate Defines the number of samples per second taken from a continuous signal and is measured in Hz.
Audio Format Shows the codec used to encode the video clip soundtrack.
Duration Displays the length of the video clip soundtrack (hours:minutes:seconds.hundredths of seconds).
Note: you cannot change any settings in the profile as all the settings are restricted by the standards
compatibility and only an exact profile can be chosen.
After you select a profile from the drop-down list and click the Next >> button, you will go to the DVD menu creation step.
Saving to Blu-ray
The Save to Blu-ray option is used to create Blu-ray video and burn your output movie onto a BD disc. You
will be also able to create and edit Blu-ray menu for decoration and quick and easy navigation through your
video. The resulting disc will be compatible with most types of modern hardware and software Blu-ray players.
Note: for a Blu-ray disc only the 16:9 aspect can be selected.
You select one of the available Profiles from the drop-down list and review its settings in the list of Video and Audio properties:
AVS4YOU Programs Help - AVS Video Editor v.4
© Online Media Technologies Ltd., UK 2004 - 2009 All rights reserved. www.avs4you.com
Page 131 of 198

VIDEO PROPERTIES Description
SizeDisplays the size of the video frame used in the output video. The size is shown as a width to
height ratio and is measured in pixels.
Bitrate Displays the number of bits transferred per second, measured in kilobits per second.
Framerate Shows the number of video frames displayed every second, measured in frames in second.
Video compression Displays the name of the codec used to encode the video information into the video file.
Duration Shows the length of the video clip (measured in hours:minutes:seconds.hundredths of seconds).
AUDIO PROPERTIES Description
BitrateDisplays the number of data points used to approximate the true wave form (measured in kilobits
per second).
ChannelsShows the number of channels in the movie audio track (mono - one channel, stereo - two
channels)
Sample Rate Defines the number of samples per second taken from a continuous signal and is measured in Hz.
Audio Format Shows the codec used to encode the video clip soundtrack.
Duration Displays the length of the video clip soundtrack (hours:minutes:seconds.hundredths of seconds).
Note: you cannot change any settings in the profile as all the settings are restricted by the standards
compatibility and only an exact profile can be chosen.
After you select a profile from the drop-down list and click the Next >> button, you will go to the BD menu creation step.
Saving to DivX/Xvid
The Save to DivX/Xvid option is used to create DivX/Xvid video and burn your output movie onto a CD or a
DVD disc. The resulting disc will be compatible with most types of modern hardware players supporting playback
of DivX/Xvid video discs.
You select one of the available Profiles from the drop-down list and review its settings in the list of Video and
Audio properties:
AVS4YOU Programs Help - AVS Video Editor v.4
© Online Media Technologies Ltd., UK 2004 - 2009 All rights reserved. www.avs4you.com
Page 132 of 198
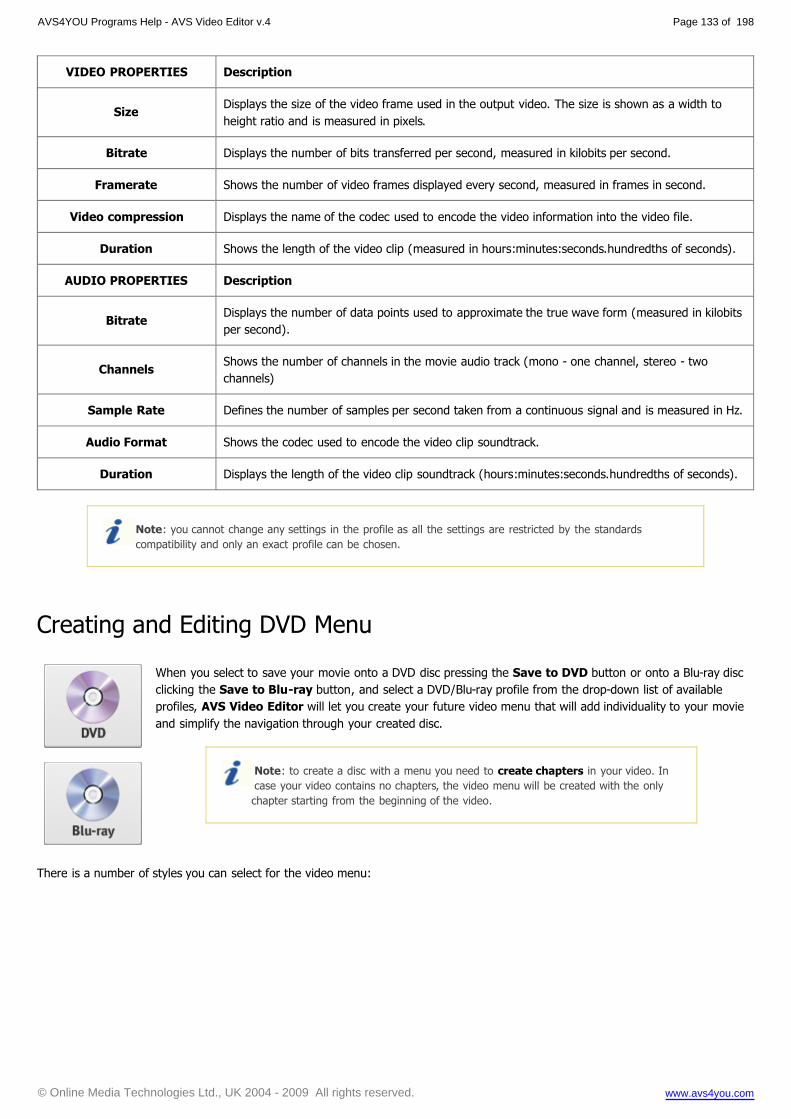
VIDEO PROPERTIES Description
SizeDisplays the size of the video frame used in the output video. The size is shown as a width to
height ratio and is measured in pixels.
Bitrate Displays the number of bits transferred per second, measured in kilobits per second.
Framerate Shows the number of video frames displayed every second, measured in frames in second.
Video compression Displays the name of the codec used to encode the video information into the video file.
Duration Shows the length of the video clip (measured in hours:minutes:seconds.hundredths of seconds).
AUDIO PROPERTIES Description
BitrateDisplays the number of data points used to approximate the true wave form (measured in kilobits
per second).
ChannelsShows the number of channels in the movie audio track (mono - one channel, stereo - two
channels)
Sample Rate Defines the number of samples per second taken from a continuous signal and is measured in Hz.
Audio Format Shows the codec used to encode the video clip soundtrack.
Duration Displays the length of the video clip soundtrack (hours:minutes:seconds.hundredths of seconds).
Note: you cannot change any settings in the profile as all the settings are restricted by the standards
compatibility and only an exact profile can be chosen.
Creating and Editing DVD Menu
When you select to save your movie onto a DVD disc pressing the Save to DVD button or onto a Blu-ray disc
clicking the Save to Blu-ray button, and select a DVD/Blu-ray profile from the drop-down list of available
profiles, AVS Video Editor will let you create your future video menu that will add individuality to your movie
and simplify the navigation through your created disc.
Note: to create a disc with a menu you need to create chapters in your video. In
case your video contains no chapters, the video menu will be created with the only
chapter starting from the beginning of the video.
There is a number of styles you can select for the video menu:
AVS4YOU Programs Help - AVS Video Editor v.4
© Online Media Technologies Ltd., UK 2004 - 2009 All rights reserved. www.avs4you.com
Page 133 of 198

Choose a Menu Style from the list simply clicking its image with the name, it will be applied to the menu at once. You can also edit
the menu appearance, so that it looked better for your movie. Use the Change background button to customize the background
picture or select other pictures for your chapters.
After you choose a style, you can test it using the tabs of the preview window:
Main tab - displays the main video menu page.
Chapters... tab - displays the video menu page with chapters list (there can be several such tabs in case the video contains a
lot of chapters).
When your video menu style is selected and the menu functionality is tested, you can click the Next >> button to proceed on.
Burning discs
When the conversion process is over, you will be offered to burn the created file or folder onto the disc using the internal AVS Video
Editor burning engine. To do that, please, click the Burn to Disc... button in the opened window:
The next window allows you to select the disc drive you want to use, verify the destination of the file or folder to burn and set some
burning settings.
AVS4YOU Programs Help - AVS Video Editor v.4
© Online Media Technologies Ltd., UK 2004 - 2009 All rights reserved. www.avs4you.com
Page 134 of 198

In order to select the appropriate disc drive click the downward arrow next to the current disc drive name and choose the drive you
want to use from the drop down list, if you have several drives. Then insert an optical disc into the disc drive you've selected and
verify its status. The application informs you if this disc is Closed, Empty or Not Empty.
Note: if the inserted disc is not empty, all existing data will be erased from it during the burning process.
The line below the drive name shows you the Disc label you are going to create. You can also set the burning speed value clicking
the small black arrow, just note that the available values depend on the disc type you use. Tick the Verify disc box to make sure the
disc is recorded correctly.
Finally click the Start burning! button to record your CD/DVD/BD disc.
It is also possible to burn a previously converted film onto a disc using the same application. Click the file you're going to write with
the right mouse button and select the Send To -> AVS Video Burner option from the express menu. It can be very useful if you
are not able to burn disc right after the conversion is done. Thanks to this application you can create your disc any time you need it.
After the burning is over the disc will be ejected automatically. Note, if you checked the Verify disc box, the recording will take a
little longer depending on the size of the output files as the program will need time to verify them.
AVS4YOU Programs Help - AVS Video Editor v.4
© Online Media Technologies Ltd., UK 2004 - 2009 All rights reserved. www.avs4you.com
Page 135 of 198

Saving to Devices
You can use the Save to Devices option to create a video for a mobile player, mobile phone or a gaming
console of yours and upload it right to the device. Other most popular devices are also supported. The following
options are available here:
Save to Mobile Players - use this option to save your movie into video files compatible with various mobile
players - Apple iPhone, Apple iPod of different models including iPod Touch, Sony PSP, Microsoft Zune, Archos,
Creative Zen Vision, iAudio, iRiver and Epson players.
Save to Gaming Consoles - use this option to save your movie into video files compatible with most popular gaming
consoles - Microsoft Xbox 360, Sony PlayStation 3 and Sony PSP.
Save to Mobile Phones - use this option to save your movie into video files compatible with many mobile phones supporting
video playback - BlackBerry 8 and 81 series phones, Apple iPhone, HP iPaq series devices, Palm Treo series and other pocket
PCs and PDAs. If your device is not on the list, you can try and use a generic 3GPP/MPEG-4 mobile phone profile.
Save to Other Devices - use this option to save your movie into video files compatible with Apple TV and Epson multimedia
players.
When the movie creation is over, you will be offered to upload it to the portable using AVS Mobile Uploader that comes together
with AVS Video Editor. You do not need any other additional programs to transfer your created movie to a portable of yours.
Note: some devices do not allow third party programs to upload files to them as it can damage their files
database and make all the previously uploaded files inaccessible. AVS Mobile Uploader will not be launched
for these devices. Please use the proprietary programs that come bundled with such devices to transfer the
output video files to them.
AVS4YOU Programs Help - AVS Video Editor v.4
© Online Media Technologies Ltd., UK 2004 - 2009 All rights reserved. www.avs4you.com
Page 136 of 198

Saving to Mobile Players
The Save to Mobile Players option is used to save your movie into video files compatible with various mobile
players - Apple iPhone, Apple iPod of different models including iPod Touch, Sony PSP, Microsoft Zune, Archos,
Creative Zen Vision, iAudio, iRiver and Epson players.
You select one of the available Profiles from the drop-down list and review its settings in the list of Video and
Audio properties:
VIDEO PROPERTIES Description
SizeDisplays the size of the video frame used in the output video. The size is shown as a width to
height ratio and is measured in pixels.
Bitrate Displays the number of bits transferred per second, measured in kilobits per second.
Framerate Shows the number of video frames displayed every second, measured in frames in second.
Video compression Displays the name of the codec used to encode the video information into the video file.
Duration Shows the length of the video clip (measured in hours:minutes:seconds.hundredths of seconds).
AUDIO PROPERTIES Description
BitrateDisplays the number of data points used to approximate the true wave form (measured in kilobits
per second).
ChannelsShows the number of channels in the movie audio track (mono - one channel, stereo - two
channels)
Sample Rate Defines the number of samples per second taken from a continuous signal and is measured in Hz.
Audio Format Shows the codec used to encode the video clip soundtrack.
Duration Displays the length of the video clip soundtrack (hours:minutes:seconds.hundredths of seconds).
If you would like to change some of the settings, you will need to click the Advanced button next to the Profile drop-down list.
Note: please, make sure you know what you are doing, as in some cases the settings change can make the
output video incompatible with the device that will be used to watch it.
AVS4YOU Programs Help - AVS Video Editor v.4
© Online Media Technologies Ltd., UK 2004 - 2009 All rights reserved. www.avs4you.com
Page 137 of 198

If you change any of the settings, you will be able to save your changes into a preset using the Save Preset button. You can
also delete any of the existing presets using the Delete Preset button.
When you set all the parameters you will need to click the Next >> button to go to the next step and select the output file
destination folder and choose actions to be performed once the file is saved.
Saving to Gaming Consoles
The Save to Gaming Consoles option is used to save your movie into video files compatible with most
popular gaming consoles - Microsoft Xbox 360, Sony PlayStation 3 and Sony PSP.
You select one of the available Profiles from the drop-down list and review its settings in the list of Video and
Audio properties:
VIDEO PROPERTIES Description
SizeDisplays the size of the video frame used in the output video. The size is shown as a width to
height ratio and is measured in pixels.
Bitrate Displays the number of bits transferred per second, measured in kilobits per second.
Framerate Shows the number of video frames displayed every second, measured in frames in second.
Video compression Displays the name of the codec used to encode the video information into the video file.
Duration Shows the length of the video clip (measured in hours:minutes:seconds.hundredths of seconds).
AUDIO PROPERTIES Description
BitrateDisplays the number of data points used to approximate the true wave form (measured in kilobits
per second).
AVS4YOU Programs Help - AVS Video Editor v.4
© Online Media Technologies Ltd., UK 2004 - 2009 All rights reserved. www.avs4you.com
Page 138 of 198

ChannelsShows the number of channels in the movie audio track (mono - one channel, stereo - two
channels)
Sample Rate Defines the number of samples per second taken from a continuous signal and is measured in Hz.
Audio Format Shows the codec used to encode the video clip soundtrack.
Duration Displays the length of the video clip soundtrack (hours:minutes:seconds.hundredths of seconds).
If you would like to change some of the settings, you will need to click the Advanced button next to the Profile drop-down list.
Note: please, make sure you know what you are doing, as in some cases the settings change can make the
output video incompatible with the device that will be used to watch it.
If you change any of the settings, you will be able to save your changes into a preset using the Save Preset button. You can
also delete any of the existing presets using the Delete Preset button.
When you set all the parameters you will need to click the Next >> button to go to the next step and select the output file
destination folder and choose actions to be performed once the file is saved.
Saving to Mobile Phones
The Save to Mobile Phones option is used to save your movie into video files compatible with many mobile
phones supporting video playback - BlackBerry 8 and 81 series phones, Apple iPhone, HP iPaq series devices,
Palm Treo series and other pocket PCs and PDAs. If your device is not on the list, you can try and use a generic
3GPP/MPEG-4 mobile phone profile.
You select one of the available Profiles from the drop-down list and review its settings in the list of Video and
Audio properties:
AVS4YOU Programs Help - AVS Video Editor v.4
© Online Media Technologies Ltd., UK 2004 - 2009 All rights reserved. www.avs4you.com
Page 139 of 198

VIDEO PROPERTIES Description
SizeDisplays the size of the video frame used in the output video. The size is shown as a width to
height ratio and is measured in pixels.
Bitrate Displays the number of bits transferred per second, measured in kilobits per second.
Framerate Shows the number of video frames displayed every second, measured in frames in second.
Video compression Displays the name of the codec used to encode the video information into the video file.
Duration Shows the length of the video clip (measured in hours:minutes:seconds.hundredths of seconds).
AUDIO PROPERTIES Description
BitrateDisplays the number of data points used to approximate the true wave form (measured in kilobits
per second).
ChannelsShows the number of channels in the movie audio track (mono - one channel, stereo - two
channels)
Sample Rate Defines the number of samples per second taken from a continuous signal and is measured in Hz.
Audio Format Shows the codec used to encode the video clip soundtrack.
Duration Displays the length of the video clip soundtrack (hours:minutes:seconds.hundredths of seconds).
If you would like to change some of the settings, you will need to click the Advanced button next to the Profile drop-down list.
Note: please, make sure you know what you are doing, as in some cases the settings change can make the
output video incompatible with the device that will be used to watch it.
If you change any of the settings, you will be able to save your changes into a preset using the Save Preset button. You can
also delete any of the existing presets using the Delete Preset button.
When you set all the parameters you will need to click the Next >> button to go to the next step and select the output file
destination folder and choose actions to be performed once the file is saved.
AVS4YOU Programs Help - AVS Video Editor v.4
© Online Media Technologies Ltd., UK 2004 - 2009 All rights reserved. www.avs4you.com
Page 140 of 198

Saving to Other Devices
The Save to Other Devices option is used to save your movie into video files compatible with Apple TV and
Epson multimedia players.
You select one of the available Profiles from the drop-down list and review its settings in the list of Video and
Audio properties:
VIDEO PROPERTIES Description
SizeDisplays the size of the video frame used in the output video. The size is shown as a width to
height ratio and is measured in pixels.
Bitrate Displays the number of bits transferred per second, measured in kilobits per second.
Framerate Shows the number of video frames displayed every second, measured in frames in second.
Video compression Displays the name of the codec used to encode the video information into the video file.
Duration Shows the length of the video clip (measured in hours:minutes:seconds.hundredths of seconds).
AUDIO PROPERTIES Description
BitrateDisplays the number of data points used to approximate the true wave form (measured in kilobits
per second).
ChannelsShows the number of channels in the movie audio track (mono - one channel, stereo - two
channels)
Sample Rate Defines the number of samples per second taken from a continuous signal and is measured in Hz.
Audio Format Shows the codec used to encode the video clip soundtrack.
Duration Displays the length of the video clip soundtrack (hours:minutes:seconds.hundredths of seconds).
If you would like to change some of the settings, you will need to click the Advanced button next to the Profile drop-down list.
Note: please, make sure you know what you are doing, as in some cases the settings change can make the
output video incompatible with the device that will be used to watch it.
AVS4YOU Programs Help - AVS Video Editor v.4
© Online Media Technologies Ltd., UK 2004 - 2009 All rights reserved. www.avs4you.com
Page 141 of 198

If you change any of the settings, you will be able to save your changes into a preset using the Save Preset button. You can
also delete any of the existing presets using the Delete Preset button.
When you set all the parameters you will need to click the Next >> button to go to the next step and select the output file
destination folder and choose actions to be performed once the file is saved.
AVS4YOU Programs Help - AVS Video Editor v.4
© Online Media Technologies Ltd., UK 2004 - 2009 All rights reserved. www.avs4you.com
Page 142 of 198
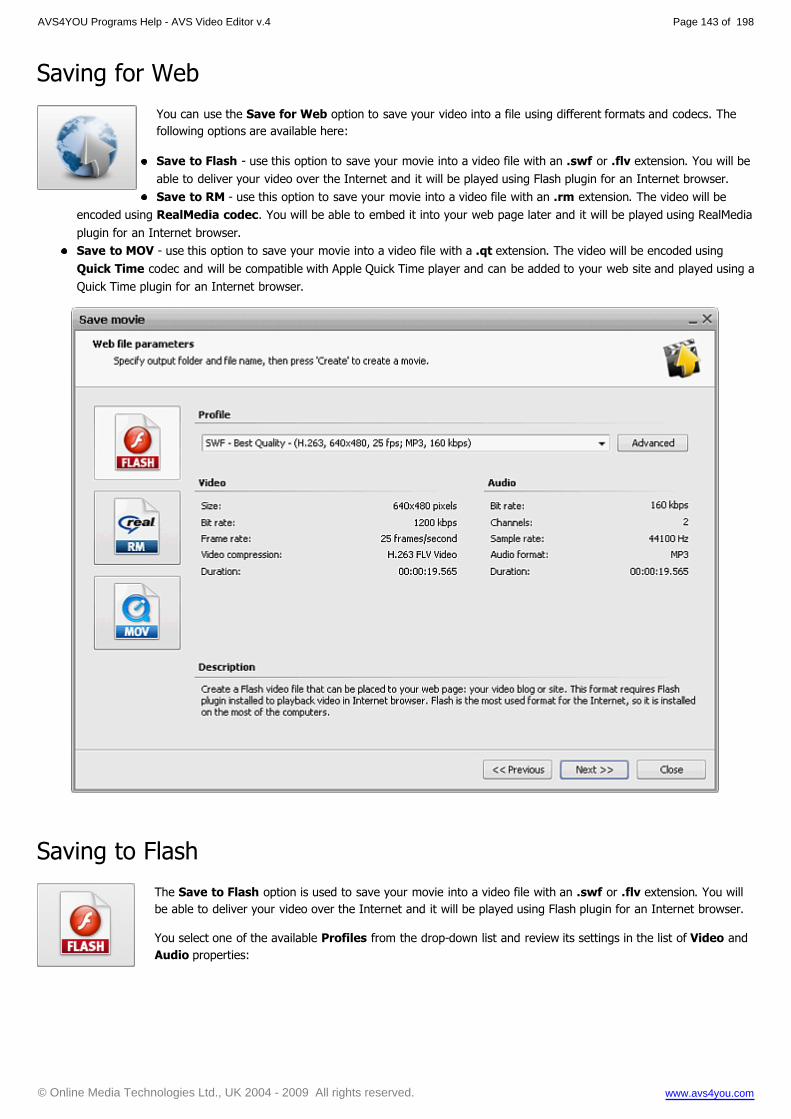
Saving for Web
You can use the Save for Web option to save your video into a file using different formats and codecs. The
following options are available here:
Save to Flash - use this option to save your movie into a video file with an .swf or .flv extension. You will be
able to deliver your video over the Internet and it will be played using Flash plugin for an Internet browser.
Save to RM - use this option to save your movie into a video file with an .rm extension. The video will be
encoded using RealMedia codec. You will be able to embed it into your web page later and it will be played using RealMedia
plugin for an Internet browser.
Save to MOV - use this option to save your movie into a video file with a .qt extension. The video will be encoded using
Quick Time codec and will be compatible with Apple Quick Time player and can be added to your web site and played using a
Quick Time plugin for an Internet browser.
Saving to Flash
The Save to Flash option is used to save your movie into a video file with an .swf or .flv extension. You will
be able to deliver your video over the Internet and it will be played using Flash plugin for an Internet browser.
You select one of the available Profiles from the drop-down list and review its settings in the list of Video and
Audio properties:
AVS4YOU Programs Help - AVS Video Editor v.4
© Online Media Technologies Ltd., UK 2004 - 2009 All rights reserved. www.avs4you.com
Page 143 of 198

VIDEO PROPERTIES Description
SizeDisplays the size of the video frame used in the output video. The size is shown as a width to
height ratio and is measured in pixels.
Bitrate Displays the number of bits transferred per second, measured in kilobits per second.
Framerate Shows the number of video frames displayed every second, measured in frames in second.
Video compression Displays the name of the codec used to encode the video information into the video file.
Duration Shows the length of the video clip (measured in hours:minutes:seconds.hundredths of seconds).
AUDIO PROPERTIES Description
BitrateDisplays the number of data points used to approximate the true wave form (measured in kilobits
per second).
ChannelsShows the number of channels in the movie audio track (mono - one channel, stereo - two
channels)
Sample Rate Defines the number of samples per second taken from a continuous signal and is measured in Hz.
Audio Format Shows the codec used to encode the video clip soundtrack.
Duration Displays the length of the video clip soundtrack (hours:minutes:seconds.hundredths of seconds).
If you would like to change some of the settings, you will need to click the Advanced button next to the Profile drop-down list.
Note: please, make sure you know what you are doing, as in some cases the settings change can make the
output video incompatible with the device that will be used to watch it.
AVS4YOU Programs Help - AVS Video Editor v.4
© Online Media Technologies Ltd., UK 2004 - 2009 All rights reserved. www.avs4you.com
Page 144 of 198

If you change any of the settings, you will be able to save your changes into a preset using the Save Preset button. You can
also delete any of the existing presets using the Delete Preset button.
When you set all the parameters you will need to click the Next >> button to go to the next step and select the output file
destination folder and choose actions to be performed once the file is saved.
Saving to RM
The Save to RM option is used to save your movie into a video file with an .rm extension. The video will be
encoded using RealMedia codec. You will be able to embed it into your web page later and it will be played
using RealMedia plugin for an Internet browser
You select one of the available Profiles from the drop-down list and review its settings in the list of Video and
Audio properties:
VIDEO PROPERTIES Description
SizeDisplays the size of the video frame used in the output video. The size is shown as a width to
height ratio and is measured in pixels.
Bitrate Displays the number of bits transferred per second, measured in kilobits per second.
Framerate Shows the number of video frames displayed every second, measured in frames in second.
Video compression Displays the name of the codec used to encode the video information into the video file.
Duration Shows the length of the video clip (measured in hours:minutes:seconds.hundredths of seconds).
AUDIO PROPERTIES Description
BitrateDisplays the number of data points used to approximate the true wave form (measured in kilobits
per second).
ChannelsShows the number of channels in the movie audio track (mono - one channel, stereo - two
channels)
Sample Rate Defines the number of samples per second taken from a continuous signal and is measured in Hz.
Audio Format Shows the codec used to encode the video clip soundtrack.
Duration Displays the length of the video clip soundtrack (hours:minutes:seconds.hundredths of seconds).
If you would like to change some of the settings, you will need to click the Advanced button next to the Profile drop-down list.
AVS4YOU Programs Help - AVS Video Editor v.4
© Online Media Technologies Ltd., UK 2004 - 2009 All rights reserved. www.avs4you.com
Page 145 of 198
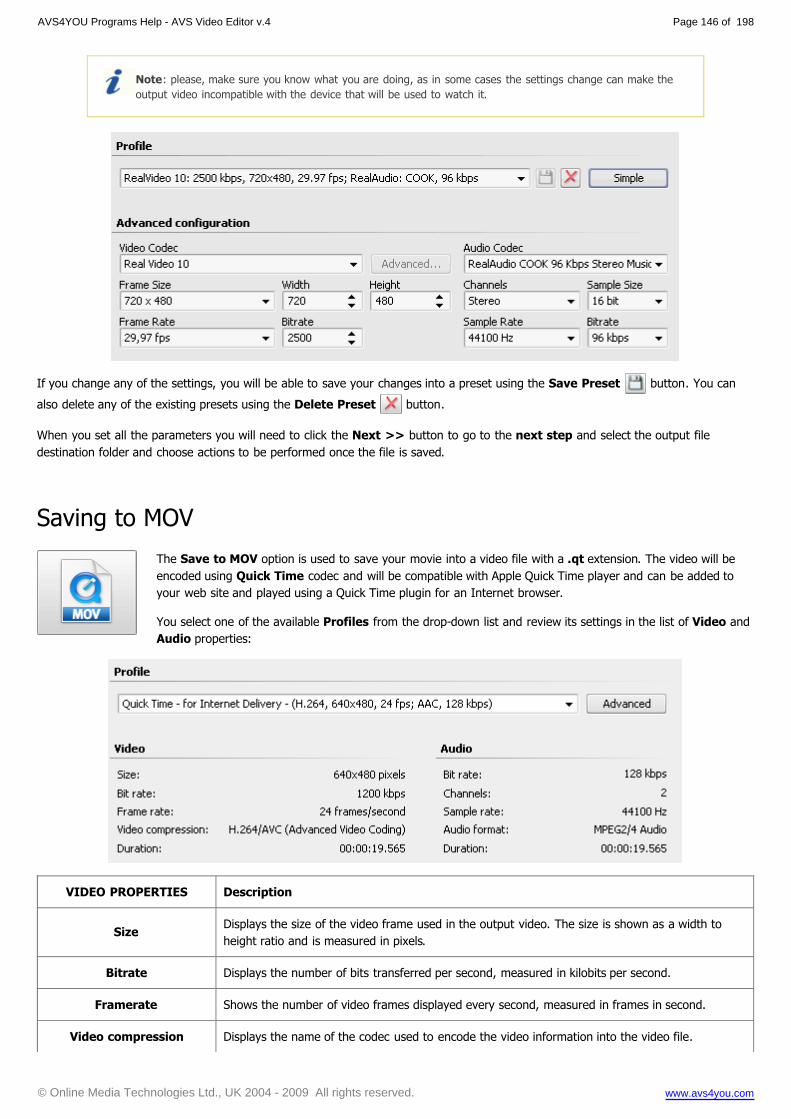
Note: please, make sure you know what you are doing, as in some cases the settings change can make the
output video incompatible with the device that will be used to watch it.
If you change any of the settings, you will be able to save your changes into a preset using the Save Preset button. You can
also delete any of the existing presets using the Delete Preset button.
When you set all the parameters you will need to click the Next >> button to go to the next step and select the output file
destination folder and choose actions to be performed once the file is saved.
Saving to MOV
The Save to MOV option is used to save your movie into a video file with a .qt extension. The video will be
encoded using Quick Time codec and will be compatible with Apple Quick Time player and can be added to
your web site and played using a Quick Time plugin for an Internet browser.
You select one of the available Profiles from the drop-down list and review its settings in the list of Video and
Audio properties:
VIDEO PROPERTIES Description
SizeDisplays the size of the video frame used in the output video. The size is shown as a width to
height ratio and is measured in pixels.
Bitrate Displays the number of bits transferred per second, measured in kilobits per second.
Framerate Shows the number of video frames displayed every second, measured in frames in second.
Video compression Displays the name of the codec used to encode the video information into the video file.
AVS4YOU Programs Help - AVS Video Editor v.4
© Online Media Technologies Ltd., UK 2004 - 2009 All rights reserved. www.avs4you.com
Page 146 of 198

Duration Shows the length of the video clip (measured in hours:minutes:seconds.hundredths of seconds).
AUDIO PROPERTIES Description
BitrateDisplays the number of data points used to approximate the true wave form (measured in kilobits
per second).
ChannelsShows the number of channels in the movie audio track (mono - one channel, stereo - two
channels)
Sample Rate Defines the number of samples per second taken from a continuous signal and is measured in Hz.
Audio Format Shows the codec used to encode the video clip soundtrack.
Duration Displays the length of the video clip soundtrack (hours:minutes:seconds.hundredths of seconds).
If you would like to change some of the settings, you will need to click the Advanced button next to the Profile drop-down list.
Note: please, make sure you know what you are doing, as in some cases the settings change can make the
output video incompatible with the device that will be used to watch it.
If you change any of the settings, you will be able to save your changes into a preset using the Save Preset button. You can
also delete any of the existing presets using the Delete Preset button.
When you set all the parameters you will need to click the Next >> button to go to the next step and select the output file
destination folder and choose actions to be performed once the file is saved.
AVS4YOU Programs Help - AVS Video Editor v.4
© Online Media Technologies Ltd., UK 2004 - 2009 All rights reserved. www.avs4you.com
Page 147 of 198
Aspect Ratio
The evolution of film and TV aspect ratios
Original aspect ratio
Letterboxing and Pillar Boxing
Working with aspect ratio in AVS Video Editor
Selecting aspect ratio when you create a new project
Changing aspect ratio in video file properties
Saving movies using aspect correction
The aspect ratio of an image is its displayed width divided by its height (usually expressed as "x:y"). For instance, the aspect ratio of a
traditional television screen is 4:3, or 1.33:1. High definition television uses an aspect of 16:9, or about 1.78:1. Aspect ratios of
2.39:1 or 1.85:1 are frequently used in cinematography, while the aspect ratio of a sync-sound 35 mm film frame is around 1.37:1
(also known as "Academy" ratio). Silent films which used the full frame were shot in 1.33:1.
The evolution of film and TV aspect ratios
The 4:3 ratio for standard television has been in use since television's origins and many computer monitors use the same aspect ratio.
Since 4:3 is the aspect ratio of the usable frame within the Academy format once the soundtrack had been taken into account, films
could be satisfactorily viewed on TV in the early days of the medium. When cinema attendance dropped, Hollywood created
widescreen aspect ratios to immerse the viewer in a more realistic experience and, possibly, to make broadcast films less enjoyable if
watched on a regular TV set.
16:9 is the format of Japanese and American HDTV as well as European non-HD widescreen television (EDTV). Many digital video
cameras have the capability to record in 16:9. Anamorphic DVD transfers store the information in 16:9 vertically stretched to 4:3; if
the TV can handle an anamorphic image the signal will be de-anamorphosed by the TV to 16:9. If not, the DVD player will unstretch
the image and add letterboxing before sending the image to the TV. Wider ratios such as 1.85:1 and 2.39:1 are accommodated
within the 16:9 DVD frame by adding some additional masking within the image itself.
Within the motion picture industry, the convention is to assign a value of 1 to the image height, so that, for example, an anamorphic
frame is described as 2.39:1 or just "2.39". This way of speaking comes about because the width of a film image is restricted by the
presence of sprocket holes and a standard intermittent movement interval of 4 perforations, as well as an optical soundtrack running
down the projection print between the image and the perforations on one side. The most common projection ratios in American
theaters are 1.85 and 2.39.
The 16:9 format adopted for HDTV is actually narrower than commonly-used cinematic widescreen formats. Anamorphic widescreen
(2.39:1) and American theatrical standard (1.85:1) have wider aspect ratios, while the European theatrical standard (1.66:1) is just
slightly less. (IMAX, contrary to some popular perception, is 1.33:1, the traditional television aspect ratio.)
Super 16mm film is frequently used for television production due to its lower cost, lack of need for soundtrack space on the film itself,
and aspect ratio similar to 16:9 (Super 16mm is natively 1.66 whilst 16:9 is 1.78).
Original aspect ratio
Original Aspect Ratio is a home cinema term for the aspect ratio or dimensions in which a film or visual production was produced
— as envisioned by the people involved in the creation of the work. As an example, the film Gladiator was released to theaters in the
2.39:1 aspect ratio. It was filmed in Super 35 and, in addition to being presented in cinemas and television in the original aspect ratio
of 2.39:1, it was also broadcast without the mattes its original aspect ratio release had.
AVS4YOU Programs Help - Appendix
© Online Media Technologies Ltd., UK 2004 - 2009 All rights reserved. www.avs4you.com
Page 148 of 198

Letterboxing and pillar boxing
Letterboxing is the practice of transferring widescreen films to video formats while preserving the original aspect ratio. Since the
video display is most often a more square aspect ratio than the original film, the resulting video must include masked-off areas above
and below the picture area (often referred to as "black bars," or, more accurately, as mattes). Letterboxing takes its name from the
similarity of the resulting image to a horizontal opening in a postal letter box.
Letterboxing offers an alternative to the pan and scan or full screen method of transferring a widescreen film to video. In pan and
scan, the original image is cropped to to suit the 1.33:1 (or 4:3) ratio of the television screen. In contrast, letterboxing preserves
most of the original composition of the film as seen in the theater.
Pillar boxing refers to what happens when a 1.33:1 image is displayed on a wider screen, adding bars on the side. The pillar box
effect occurs in widescreen video displays when black bars (mattes or masking) are placed on the sides of the image. It becomes
necessary when video that was not originally designed for widescreen is shown on a widescreen display. The original material is
shrunk and placed in the middle of the widescreen frame. "Pillar box", sometimes called windowboxing, comes from the similarity of
this display to free-standing mailboxes in the UK and the British Commonwealth.
Working with aspect ratio in AVS Video Editor
When you work with video files in AVS Video Editor, it is sometimes necessary to set their aspect ratio parameters. You will need to
select the initial aspect parameters when you start creating a new project, you can change the video file aspect ratio
settings in the properties window and finally, you can use the aspect correction option when you save your video file
into the available video formats. See the sections below to get more information on this topics.
Selecting aspect ratio when you create a new project
When you create a new project it is necessary to select the future video image aspect ratio. The fact is, hardware and software DVD
players can playback your created DVDs in accordance with their aspect ratio that will not always coincide with the image physical
width to height ratio. That is why you should bear this in mind when you create a new project and save your movie later in DVD or
MPEG format. You should decide from the very beginning what aspect ratio your movie will have.
When you save your movie in DVD or MPEG format, you can choose 4:3 aspect ratio if you plan to watch your movie using a
common television set, or 16:9 aspect ratio to watch your video on a widescreen TV.
When you save your movie in all other supported formats (AVI, RM, and others), it is strongly recommended that you leave
Original Aspect setting.
If you have already created a project with the settings like in this one but with other video material and used the Crop function in the
video properties, you can set here the crop percentage that will be used by default in your current project. If you need to change it,
you can do that later, using the video file properties.
AVS4YOU Programs Help - Appendix
© Online Media Technologies Ltd., UK 2004 - 2009 All rights reserved. www.avs4you.com
Page 149 of 198

Changing aspect ratio in video file properties
When you add a video clip to the Storyboard you can view its properties and change some of them if necessary.
In the Aspect tab you can modify the aspect ratio of your video clip. It might be useful if the video was prerecorded with distortions -
elongated in horizontal or vertical dimension. You can correct that changing current aspect width and current aspect height, selecting
Custom aspect ratio in the upper drop-down list, leave the Original aspect, or change it to the 4 to 3 or 16 to 9 ratio.
You can also use the Video Crop Scale option to cut out the editor created mattes (black areas), but please note, that a part of
image will also be lost. You cannot cut out the mattes initially present in the video material using this function. This function is similar
to pan and scan option in DVD players.
Saving movies using aspect correction
Sometimes your video file aspect ratio does not coincide with the physical resolution width to height ratio. If you leave the parameters
this way there can be image distortions during playback. To correct this situation the aspect correction function was introduced
into AVS Video Editor. You can use this function when you save your video into all the main formats, except DVD and MPEG. These
two formats use the aspect ratio in-built identification and you can set their aspect ratio when you create a new project. For all the
other formats three options are available:
AVS4YOU Programs Help - Appendix
© Online Media Technologies Ltd., UK 2004 - 2009 All rights reserved. www.avs4you.com
Page 150 of 198

1. Use aspect correction - the Video Editor will correct the initial project frame size to optimally fit the set aspect ratio. For
instance, the editor can increase or decrease the video frame height so that the physical width to height ratio coincided with
the aspect ratio.
Note: when you convert and save your video file into 3GP format and into MP4 format for mobile
phones, this option is disabled. This is done due to the fact that mobile phones support only videos with
fixed frame sizes that cannot be altered in accordance with aspect ratio.
2. No aspect correction - the Video Editor will correct the initial aspect ratio according to the video file physical frame size
ratio. If the aspect ratio is wider than that of the physical dimensions', the editor can add mattes above or below the image
(letterboxing). In case the aspect ratio is narrower than the physical dimensions ratio, the editor can add mattes on the sides
of the image (pillow boxing).
3. Resize - free resize with no aspect correspondence. All the aspect related changes will be neglected and discarded. The image
will be resized according to the width and height specified.
AVS4YOU Programs Help - Appendix
© Online Media Technologies Ltd., UK 2004 - 2009 All rights reserved. www.avs4you.com
Page 151 of 198

MPEG-4 Advanced Settings
MPEG-4 - ISO/IEC open standard for video encoding developed by MPEG (Moving Picture Experts Group). It is characterized by a
small output video file size and quite good picture quality even when a relatively low bit rate is used. The most known resulting output
when you use MPEG-4 format for compression is the AVI file type which is commonly used in home video. It is coded with Xvid, DivX,
3ivx, Nero Digital and other video codecs.
The following tabs of the codec settings window are available:
Main settings - include Profile @ level, Encoding type, Bitrate/Target quantizer/Target size, Quarter pixel,
Lumimasking enabled, Chroma optimizer, Grayscale enabled, Stat file.
Quantization settings - include Quantization type, Min I-frame quantizer, Max I-frame quantizer, Min P-frame
quantizer, Max P-frame quantizer, Min B-frame quantizer, Max B-frame quantizer and Trellis quantization.
Motion settings - include Motion search type, VHQ Mode, Frame drop ratio, Max key interval, Global motion
compensation, Use chroma motion, Cartoon mode and Turbo mode.
B-VOPs settings - include Use B-VOPs, Max consecutive B-VOPs, Quantizer ratio, Quantizer offset.
Optimization settings - include Automatically detect optimizations, Force optimizations.
Main Settings
[Profile @ level] [Encoding type] [Bitrate/Target quantizer/Target size] [Quarter pixel]
[Lumimasking enabled] [Chroma optimizer] [Grayscale enabled] [Stat file]
Profile @ level - restricts the usage of MPEG-4 tools and limits the encoded bit rate so that the output movie is compatible with
hardware decoders. If you are acquainted with Xvid codec settings you will find that the Profile levels coincide with the Xvid profiles.
In the table below you can see which profile allows you to change the specific codec settings and use different quantization types,
what maximum resolution, frame rate or bit rate is recommended for every profile.
AVS4YOU Programs Help - Appendix
© Online Media Technologies Ltd., UK 2004 - 2009 All rights reserved. www.avs4you.com
Page 152 of 198

Profile level
Recommended
max
resolution and
frame rate
Maximum
average
bit rate
Lumimasking
enabled
B-
Frames
(Use B-
VOPs
Quantization
type
Interlacing
encoding
Quarter
pixel
Global motion
compensation
Simple @ L0 176x144x15 fps 64 kbps not allowednot
allowedH.263 only not allowed
not
allowednot allowed
Simple @ L1 176x144x15 fps 64 kbps allowednot
allowedH.263 only not allowed
not
allowednot allowed
Simple @ L2 352x288x15 fps 128 kbps allowednot
allowedH.263 only not allowed
not
allowednot allowed
Simple @ L3 352x288x15 fps 384 kbps allowednot
allowedH.263 only not allowed
not
allowednot allowed
ARTS @ L1 176x144x15 fps 64 kbps allowednot
allowedH.263 only not allowed
not
allowednot allowed
ARTS @ L2 352x288x15 fps 128 kbps allowednot
allowedH.263 only not allowed
not
allowednot allowed
ARTS @ L3 352x288x30 fps 384 kbps allowednot
allowedH.263 only not allowed
not
allowednot allowed
ARTS @ L4 352x288x30 fps 2000 kbps allowednot
allowedH.263 only not allowed
not
allowednot allowed
AS @ L0 176x144x30 fps 128 kbps allowed allowedH.263 or
MPEGallowed allowed allowed
AS @ L1 176x144x30 fps 128 kbps allowed allowedH.263 or
MPEGallowed allowed allowed
AS @ L2 352x288x15 fps 384 kbps allowed allowedH.263 or
MPEGallowed allowed allowed
AS @ L3 352x288x30 fps 768 kbps allowed allowedH.263 or
MPEGallowed allowed allowed
AS @ L4 352x576x30 fps 3000 kbps allowed allowedH.263 or
MPEGallowed allowed allowed
AS @ L5 720x576x30 fps 8000 kbps allowed allowedH.263 or
MPEGallowed allowed allowed
As can be seen Profile levels "Simple @ L0", "Simple @ L1", "Simple @ L2", "Simple @ L3", "ARTS @ L1", "ARTS @ L2"
and "AS @ L2" roughly correspond to the DivX Handheld Profile that is intended to enable the decoding of DivX video content at
bit rates and resolutions appropriate for small handheld devices such as mobile phones and digital watches.
Profile levels "ARTS @ L3", "ARTS @ L4", "AS @ L0", "AS @ L1" and "AS @ L3" can correspond to the DivX Portable
Profile which will enable high-quality DivX video content for portable video devices, including video-enabled MP3 players and small
video playback devices such as PDA.
Profile level "AS @ L4" can correspond to the DivX Home Theater Profile. The specifications for this profile will ensure that DivX
Certified home theater devices such as DVD players, set-top boxes, and gaming consoles, can playback all versions of high-quality
DivX content.
And Profile level "AS @ L5" can correspond to the DivX High Definition Profile that is intended for any hardware device that
can playback high-definition resolution DivX content.
Profile level setting can be chosen from the preset list only and cannot be altered.
The Encoding type section allows you to select the number of passes that the compression will take and configure these passes. It
can be selected from the list:
Single pass - Bitrate is used to convert the video file with a constant target bitrate. You can use this option to convert the
file with relatively fast speed when you need to get an output file with a certain target bitrate. The target bitrate is selected in
the Bitrate/Target quantizer/Target size section.
AVS4YOU Programs Help - Appendix
© Online Media Technologies Ltd., UK 2004 - 2009 All rights reserved. www.avs4you.com
Page 153 of 198

Single pass - Quantizer is used to convert the video file with a constant quality. You can use this option to convert the file
so that the output video will have an unknown size, but the quality will be better. The target quantizer is selected in the
Bitrate/Target quantizer/Target size section.
Twopass - 1st pass is used for the first pass of the multipass conversion mode. See below to learn more on how to perform
multipass conversion.
Twopass - 2nd pass is used for the second and all the following passes of the multipass conversion mode. See below to
learn more on how to perform multipass conversion.
You can perform multipass conversion with the AVS Video Converter program. If you wish your video to reach a specific accurate
file size at the end of the encode and pertain a certain quality, you'll need to use a multipass mode. To start encoding in the multipass
mode, you need to select the Twopass - 1st pass encoding type first, set all the parameters of the codec, click OK and, on closing
the AVI Profile editor, click the Convert Now! button. When the conversion is over, you will need to open the AVI Profile editor
for the second time and press the Configure button. Now you can select the Twopass - 2nd pass encoding type, set the
necessary codec parameters and repeat the conversion once again.
Note: when you select the Twopass - 1st pass encoding type, no conversion actually takes place. The codec
only analyzes the input video and creates a log file - Stat file, where all the information about the file is saved.
And only when you select the Twopass - 2nd pass encoding type and press the Convert Now! button, the
conversion is done. You should bear it in mind, as there will be no output Twopass - 1st pass mode.
Bitrate/Target quantizer/Target size - section allows the user to select the desired output bitrate, quantizer or size values.
Note: the Average Bitrate will make the codec convert the output video with a constant average bitrate,
while the Quantizer will let the codec concentrate on the output file quality, not taking into account the file
size.
The Average Bitrate values can be between 0 and 5000, the default values are 800 for low quality, 1200 for medium quality and
1400 for high quality presets.
The Target quantizer values can be between 0 and 51, the default value is 26. The higher the value, the lower the quality of the
output video file.
The Target size values can be selected only when you are going to perform a second pass in Twopass mode. This can be especially
useful, if you would like to save your output video file onto some storage of a certain size - a CD-R/RW, for instance. The higher the
value, the better the quality of the output video file.
Quarter pixel - the codec works with quarter pixels for encoding with a more precise motion compensation. Enabling this option
increases the size of auxiliary data so when the bit rate is low the quality can decrease. If you turn the setting on you should bear in
mind that the coding and decoding load on the CPU increases heavily and devices with slower CPU's might even not be able to
playback the output video files. The compression time with Quarter pixel setting On increases.
Quarter pixel setting can be either checked or unchecked.
Lumimasking enabled - used to apply more compression to very dark and very bright frames where it cannot be easily noticed by
the human eye. At the same time the algorithm releases the resources allowing to decrease the compression of the other frames so
the picture looks better. Recommended to turn On if the movie contains lots of very dark or very bright scenes. Not recommended for
music video clips.
Lumimasking enabled setting can be either checked or unchecked.
Chroma optimizer - used to produce a better impression of objects edges by reducing the noise around them. It is achieved by
interpolating the colors in the dark and bright areas situated near the object edges. As the compression ratio of the picture without the
noise is higher the output video will have better quality. Recommended to leave it On.
Chroma optimizer setting can be either checked or unchecked.
AVS4YOU Programs Help - Appendix
© Online Media Technologies Ltd., UK 2004 - 2009 All rights reserved. www.avs4you.com
Page 154 of 198

Grayscale enabled - lets the codec not to write the information about the color into the frames thus reducing the video frames size
in the output video file up to 10%. These saved resources will be used to enhance the output video quality. Can be recommended if
you need to convert a black-and-white source video file.
Grayscale enabled setting can be either checked or unchecked.
In the Stat file section you can select the file that will be used to store the information on the input video. This information will be
used for the codec to perform a second pass. This option is enabled in twopass mode only.
If you are not sure which settings to use you can press the Default button to discard the changes and restore default settings.
When ready press the OK button to accept the changes you have made.
Quantization Settings
[Quantization type] [Min I-frame quantizer] [Max I-frame quantizer] [Min P-frame quantizer]
[Max P-frame quantizer] [Min B-frame quantizer] [Max B-frame quantizer] [Trellis quantization]
Quantization type - quantization matrices used to convert the movie. Depends on the video bit rate used, movie type and picture
quality.
AVS4YOU Programs Help - Appendix
© Online Media Technologies Ltd., UK 2004 - 2009 All rights reserved. www.avs4you.com
Page 155 of 198

Quantization type Details
H.263
Recommended to use with bit rates below 900 kbps for the movies with average frame sizes (512x288
and alike - DivX/Xvid movies that fit into one CD) and smaller as this matrix blurs the picture thus
increasing the compression ratio and the quality of the output video on lower bit rates. But if the
resolution (frame size) is above average (for instance, 720x480) the picture quality will be worse and it
is recommended to use bit rates above 900 kbps.
Also suitable for coding the movies with very good picture quality and cartoons.
MPEG
Recommended to use with bit rates above 900 kbps (movies that fit into two CD's) as this matrix keeps
the picture sharper using more bits of the information to code the video image. Also suitable for coding
the movies with not very good picture quality. At higher bit rates sharpens the images.
Quantization type setting can be chosen from the preset list only and cannot be altered.
Min I-frame quantizer - lets the user configure the minimum quantizer for I-frames. It is strongly recommended that you leave
these settings at their default. See also the B-VOPs section for more details on different frames types.
The possible values vary from 0 to 10000. The default value is 1.
Max I-frame quantizer - lets the user configure the maximum quantizer for I-frames. It is strongly recommended that you leave
these settings at their default. See also the B-VOPs section for more details on different frames types.
The possible values vary from 0 to 10000. The default value is 31.
Min P-frame quantizer - lets the user configure the minimum quantizer for P-frames. It is strongly recommended that you leave
these settings at their default. See also the B-VOPs section for more details on different frames types.
The possible values vary from 0 to 10000. The default value is 1.
Max P-frame quantizer - lets the user configure the maximum quantizer for P-frames. It is strongly recommended that you leave
these settings at their default. See also the B-VOPs section for more details on different frames types.
The possible values vary from 0 to 10000. The default value is 31.
Min B-frame quantizer - lets the user configure the minimum quantizer for B-frames. It is strongly recommended that you leave
these settings at their default. See also the B-VOPs section for more details on different frames types.
The possible values vary from 0 to 10000. The default value is 1.
Max B-frame quantizer - lets the user configure the maximum quantizer for B-frames. It is strongly recommended that you leave
these settings at their default. See also the B-VOPs section for more details on different frames types.
The possible values vary from 0 to 10000. The default value is 31.
Trellis quantization - an advanced algorithm that lets the codec estimate the quality-size ratio and choose the coding variant based
on it. Can improve the quality keeping the file size smaller. At the same time the conversion time increases as compared to the
conversion with this setting disabled.
If you are not sure which settings to use you can press the Default button to discard the changes and restore default settings.
When ready press the OK button to accept the changes you have made.
AVS4YOU Programs Help - Appendix
© Online Media Technologies Ltd., UK 2004 - 2009 All rights reserved. www.avs4you.com
Page 156 of 198
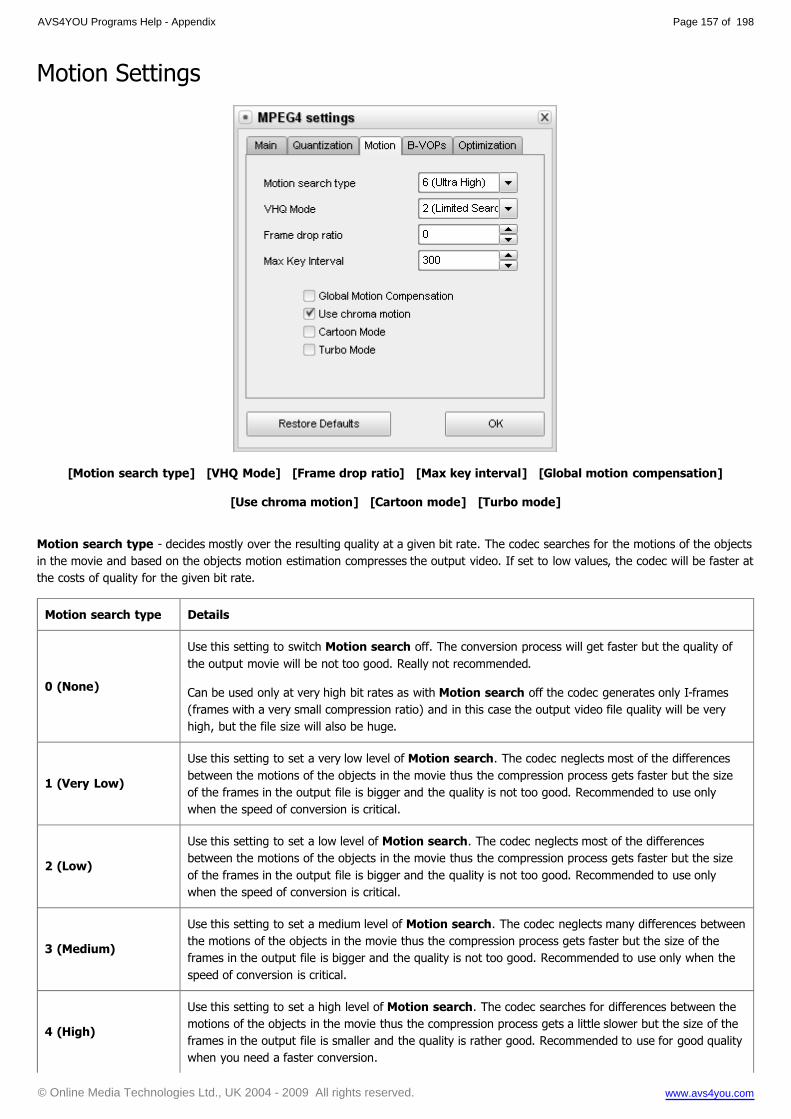
Motion Settings
[Motion search type] [VHQ Mode] [Frame drop ratio] [Max key interval] [Global motion compensation]
[Use chroma motion] [Cartoon mode] [Turbo mode]
Motion search type - decides mostly over the resulting quality at a given bit rate. The codec searches for the motions of the objects
in the movie and based on the objects motion estimation compresses the output video. If set to low values, the codec will be faster at
the costs of quality for the given bit rate.
Motion search type Details
0 (None)
Use this setting to switch Motion search off. The conversion process will get faster but the quality of
the output movie will be not too good. Really not recommended.
Can be used only at very high bit rates as with Motion search off the codec generates only I-frames
(frames with a very small compression ratio) and in this case the output video file quality will be very
high, but the file size will also be huge.
1 (Very Low)
Use this setting to set a very low level of Motion search. The codec neglects most of the differences
between the motions of the objects in the movie thus the compression process gets faster but the size
of the frames in the output file is bigger and the quality is not too good. Recommended to use only
when the speed of conversion is critical.
2 (Low)
Use this setting to set a low level of Motion search. The codec neglects most of the differences
between the motions of the objects in the movie thus the compression process gets faster but the size
of the frames in the output file is bigger and the quality is not too good. Recommended to use only
when the speed of conversion is critical.
3 (Medium)
Use this setting to set a medium level of Motion search. The codec neglects many differences between
the motions of the objects in the movie thus the compression process gets faster but the size of the
frames in the output file is bigger and the quality is not too good. Recommended to use only when the
speed of conversion is critical.
4 (High)
Use this setting to set a high level of Motion search. The codec searches for differences between the
motions of the objects in the movie thus the compression process gets a little slower but the size of the
frames in the output file is smaller and the quality is rather good. Recommended to use for good quality
when you need a faster conversion.
AVS4YOU Programs Help - Appendix
© Online Media Technologies Ltd., UK 2004 - 2009 All rights reserved. www.avs4you.com
Page 157 of 198

5 (Very High)
Use this setting to set a very high level of Motion search. The codec searches for most of the
differences between the motions of the objects in the movie and uses an advanced algorithm to convert
the picture in the movie thus the compression process gets slower but the size of the frames in the
output file is smaller and the quality is good. Recommended to use for good quality conversion if you
want to fit your movie to two CD's.
6 (Ultra High)
Use this setting to set an ultra high level of Motion search. The codec searches for most of the the
differences between the motions of the objects in the movie and uses an advanced algorithm to convert
the picture in the movie thus the compression process gets slower but the size of the frames in the
output file is smaller and the quality is good. Recommended to use for the best quality conversion if you
want to fit your movie to one CD.
Motion search type setting can be chosen from the preset list only and cannot be altered.
VHQ Mode - an algorithm that decides which format will be used to store motion vectors thus reducing the file size. Depends on the
Motion search type used - the best compression and the best quality can be achieved when Motion search is equal to 6 (Ultra
High) and VHQ mode is equal to 4 (Wide search). Cannot be used together with Global Motion Compensation.
VHQ Mode Details
0 (Off)Use this setting to switch VHQ Mode off. The biggest output file size and the highest speed of
conversion.
1 (Mode Decision)Use this setting to set VHQ Mode to the lowest level. The big output file size and the high speed of
conversion.
2 (Limited Search)Use this setting to set VHQ Mode to low level. The medium output file size and the medium speed of
conversion.
3 (Medium Search)Use this setting to set VHQ Mode to medium level. The smaller output file size and the lower speed of
conversion.
4 (Wide Search)Use this setting to set VHQ Mode to the highest level. The smallest output file size and the lowest
speed of conversion.
VHQ Mode setting can be chosen from the preset list only and cannot be altered.
Frame drop ratio - allows to set the percentage of frames that don't have any important information and thus can be dropped. It is
done to reduce the output file size and preserve the quality. The higher the value the more frames are dropped and the picture might
have a "jittering" effect. At the same time the picture quality might increase due to the released resources that are redistributed to
enhance the quality of the frames that were not dropped so the Frame drop ratio setting should be picked experimentally. When set
to 0 no frames are dropped.
Frame drop ratio setting can be altered manually to suit your personal needs - you can enter the values using the keyboard or with
the mouse clicks. Possible values are 0 - 100.
Max key interval - maximum number of delta frames (interframes) between two keyframes (intraframes - frames with a very small
compression ratio) compulsorily inserted by the codec in addition to automatic I-frames insertion. This is used to reduce the seeking
time for fast forward or backward mode when watching the movie. It is necessary for the codec to use I-frames to increase the
output video quality as the P-frames (delta frames or interframes) situated between two keyframes are compressed based on the
preceding I-frames.
The recommended setting about 300. It is possible to lower the value a little in fast-motion videos although if the value is too small
then too many keyframes (I-frames) are inserted and the video cannot be compressed very effectively thus lowering the output video
quality. At the same time it is possible to increase the value in videos with a lot of slow-motion scenes as the codec is able to insert I-
frames by itself when needed.
AVS4YOU Programs Help - Appendix
© Online Media Technologies Ltd., UK 2004 - 2009 All rights reserved. www.avs4you.com
Page 158 of 198

Max key interval setting can be altered manually to suit your personal needs - you can enter the values using the keyboard or with
the mouse clicks.
Global motion compensation - helps while coding the objects that only change their size or place in the picture but keep static (for
instance, when the camera zooms in or out or moves shooting the panoramic view). It is recommended to use this option when
converting movies with nature views and alike. The compression ratio can be increased up to 3% (the released resources will be used
to enhance the output video quality) but the conversion and decoding speed will be lower. Most effective for compressing the videos
with greater resolution. Cannot be used together with the VHQ Mode.
Global motion compensation setting can be either checked or unchecked.
Use chroma motion - an algorithm that lets the codec detect motion in an advanced way and calculate the possibility to additionally
compress the output file without the quality loss. The compression ratio can be increased up to 7% thus increasing the final quality
but the conversion speed will be much lower.
Use chroma motion setting can be either checked or unchecked.
Cartoon mode - special possibilities for motion estimation when converting cartoons (animated pictures).
Cartoon mode setting can be either checked or unchecked.
Turbo mode - lets the algorithm estimate the motion for b-frames and quarterpel faster.
Turbo mode setting can be either checked or unchecked.
If you are not sure which settings to use you can press the Default button to discard the changes and restore default settings.
When ready press the OK button to accept the changes you have made.
B-VOPs Settings
[Use B-VOPs] [Max consecutive B-VOPs] [Quantizer ratio] [Quantizer offset]
AVS4YOU Programs Help - Appendix
© Online Media Technologies Ltd., UK 2004 - 2009 All rights reserved. www.avs4you.com
Page 159 of 198

Use B-VOPs - an option that allows the codec algorithm to use so called bidirectional frames that are much smaller in size than usual
frames and are predicted based on the frames before and after them. They let the codec increase the compression ratio without
quality loss.
In video compression three types of frames can be used: I-, P- and B-frames. I-frames are the frames with a very small compression
ratio. They are also called keyframes (intraframes) - see Max key interval. When watching the film the navigation is done using the
I-frames. Between two I-frames the codec uses a succession of P-frames (delta frames or interframes), which have a much higher
compression ratio, for instance:
I P P P P P P P P P P P P P P P P I P P P P P P P
and so on. To further increase the video compression ratio, B-frames were introduced. They are inserted between two less
compressed frames - I-frames or P-frames, so that the succession of the frames in the video file looks like
I P B P B P B P B P B P B P B P I P B P B P B P B
Compression ratio for the B-frames is the highest among all the frames as they are compared with the previous and the following
frames and only difference between them is written into B-frames. The released compression possibility is redistributed between the I-
frames and P-frames allowing to compress them less but at the same time keeping the file size smaller. And though the quality of B-
frames is worse than the quality of P-frames and I-frames, the picture quality remains quite good due to the reduction of compression
of the latters.
It is recommended to leave the Use B-VOPs setting On.
Use B-VOPs setting can be either checked or unchecked.
Max consecutive B-VOPs - maximum number of sequential bidirectional frames in the video stream. The best result might be
achieved when bidirectional frames and interframes are interleaved thus the Max consecutive B-VOPs number is equal to 1. If you
set this number to 0 the result will be the same as to uncheck the Use B-VOPs setting. At higher values the movie picture might
flicker but you might try to change the value to see the result for yourselves.
Quantizer ratio - the ratio used to calculate the bidirectional frames quantizer according to the following formula:
B-frames quantizer = [(Quantizer of previous P-frame + Quantizer of following P-frame) * (B-frame quantizer ratio)/200 + (B-frame
offset/100)].
As can be seen, if you increase the default value the ratio of bidirectional frames compression will be also increased decreasing the
ratio of compression of the other frames thus improving their quality. At the same time the quality of bidirectional frames will get
worse so you should check the output result. If the default value is decreased the ratio of bidirectional frames compression will also
decrease thus increasing the compression of the other frames and reducing their quality or increasing the size of the output video file
which is not recommended.
Quantizer offset - the offset used to calculate the bidirectional frames quantizer. It is not recommended to change this value
although you can try to change it to compare the results.
If you are not sure which settings to use you can press the Default button to discard the changes and restore default settings.
When ready press the OK button to accept the changes you have made.
AVS4YOU Programs Help - Appendix
© Online Media Technologies Ltd., UK 2004 - 2009 All rights reserved. www.avs4you.com
Page 160 of 198

Optimization Settings
[Automatically detect optimizations] [Force optimizations]
Automatically detect optimizations - this setting lets the codec automatically detect the CPU type and the instructions set it can
use best.
It is recommended to leave this setting On.
Force optimizations - this setting lets you override the codec internal CPU detection and use the instructions set you consider
necessary.
Usually, you should leave this on auto detection. If you get weird crashes or strange results, you might first try to disable SSE + SSE
2, if still nothing changed disable 3DNow! + 3DNow! 2 and so on.
This is only for situations where the wrong CPU extensions get used and produce erroneous output.
3DNow! and 3DNow! 2 belongs to AMD (Advanced Micro Devices), while the rest are Intel Architecture technology.
It is not recommended to change this setting.
If you are not sure which settings to use you can press the Default button to discard the changes and restore default settings.
When ready press the OK button to accept the changes you have made.
AVS4YOU Programs Help - Appendix
© Online Media Technologies Ltd., UK 2004 - 2009 All rights reserved. www.avs4you.com
Page 161 of 198

H.264 Advanced Settings
H.264 - H.264, or AVC, for Advanced Video Coding, is a digital video codec standard which is noted for achieving very high data
compression. It was written by the ITU-T Video Coding Experts Group together with the ISO/IEC Moving Picture Experts Group as the
product of a collective partnership effort known as the Joint Video Team. The intent of the H.264/AVC project was to create a
standard that would be capable of providing good video quality at bit rate that are substantially lower (e.g., half or less) than what
previous standards would need (e.g., relative to MPEG-2, H.263, or DivX and Xvid).
The following tabs of the codec settings window are available:
Bitrate - include Encoding type, Average bitrate/Quantizer, Stat file.
Rate Control settings - include Bitrate, Quantization Limits, Scene cuts.
MBs and Frames settings - include Partitions, B-Frames.
More settings - include Motion Estimation, Miscellaneous options.
Bitrate Settings
[Encoding type] [Average bitrate/Quantizer] [Stat file]
The Encoding type section allows you to select the number of passes that the compression will take and configure these passes. It
can be selected from the list:
Single pass - Bitrate is used to convert the video file with a constant target bitrate. You can use this option to convert the
file with relatively fast speed when you need to get an output file with a certain target bitrate.
Single pass - Quantizer is used to convert the video file with a constant quality. You can use this option to convert the file
so that the output video will have an unknown size, but the quality will be better.
AVS4YOU Programs Help - Appendix
© Online Media Technologies Ltd., UK 2004 - 2009 All rights reserved. www.avs4you.com
Page 162 of 198

Multipass - First pass is used for the first pass of the multipass conversion mode. See below to learn more on how to
perform multipass conversion.
Multipass - First pass (Fast) is used for the fast first pass of the multipass conversion mode. See below to learn more on
how to perform multipass conversion.
Multipass - Nth pass is used for the second and all the following passes of the multipass conversion mode. See below to
learn more on how to perform multipass conversion.
You can perform multipass conversion with the AVS Video Converter program. If you wish your video to reach a specific accurate
file size at the end of the encode and pertain a certain quality, you'll need to use a multipass mode. To start encoding in the multipass
mode, you need to select the Multipass - First pass or Multipass - First pass (Fast) encoding types first, set all the parameters
of the codec, click OK and, on closing the AVI Profile editor, click the Convert Now! button. When the conversion is over, you
will need to open the AVI Profile editor for the second time and press the Configure button. Now you can select the Multipass -
Nth pass encoding type, set the necessary codec parameters and repeat the conversion once again.
Note: when you select the Multipass - First pass or Multipass - First pass (Fast) encoding types, no
conversion actually takes place. The codec only analyzes the input video and creates a log file - Stat file, where
all the information about the file is saved. And only when you select the Multipass - Nth pass encoding type
and press the Convert Now! button, the conversion is done. You should bear it in mind, as there will be no
output video file after the Multipass - First pass or Multipass - First pass (Fast) modes.
The Average bitrate/Quantizer section allows the user to select the desired output bitrate or quantizer values.
Note: the Average Bitrate will make the codec convert the output video with a constant average bitrate,
while the Quantizer will let the codec concentrate on the output file quality, not taking into account the file
size.
The Average Bitrate values can be between 0 and 5000, the default values are 800 for low quality, 1000 for medium quality and
1200 for high quality presets.
The Quantizer values can be between 0 and 51, the default value is 26. The higher the value, the lower the quality of the output
video file.
In the Stat file section you can select the file that will be used to store the information on the input video. This information will be
used for the codec to perform a second pass. This option is enabled in multipass mode only.
If you are not sure which settings to use you can press the Restore Defaults button to discard the changes and restore default
settings.
When ready press the OK button to accept the changes you have made.
AVS4YOU Programs Help - Appendix
© Online Media Technologies Ltd., UK 2004 - 2009 All rights reserved. www.avs4you.com
Page 163 of 198

Rate Control Settings
[Bitrate] [Quantization Limits] [Scene cuts]
The Bitrate section comprises the following codec parameters:
Keyframe boost controls how much the quality of key frames (I-frames) is boosted as compared to the other frames (P-
frames). Please, see the B-VOPs section of the MPEG-4 codec for more detail on different frame types used in video coding.
The boost gives I-frames some extra quality, so frames predicted from them will also be of better quality, leading to a better
visual impression. The higher the value, the more quality is given to the I-frames and the less to the other frames. You can try
the higher values for low-bitrate and low-quality encodes or lower values for bright, continuously fast-moving videos where the
background is frequently changing. The possible values vary from 0 to 70. The default value is 40.
B-frames reduction controls how much the quality of B-frames is reduced as compared to the other frames (P-frames). This
cut in B-frame bitrate is hardly noticeable to the human visual system because B-frames are used inconspicuously in between
other frames to more efficiently recreate the video's motion. It is possible to lower this value a little for high-bitrate/low-
quantizer video thereby ensuring a more uniform quality to details, motion and the video as a whole. For animated content
(cartoons, anime), you might use higher values. The possible values vary from 0 to 60. The default value is 30.
Bitrate Variability controls the extent to which the codec can variate the quality throughout the movie at the bitrate
specified. The lower this option is set, the more unstable and erratic the quality changes can become. The higher this setting
is, the more equal the quality becomes, producing a video with more stable quality. The possible values vary from 0 to 100.
The default value is 60.
All the Bitrate settings can be altered manually to suit your personal needs - you can enter the values using the keyboard or with the
mouse clicks.
The Quantization Limits section comprises the following codec parameters:
Min QP sets the lowest quantizer your video can attain at any point. Very high values are not recommended unless you plan
video with an immensely high bitrate and low resolution. The possible values vary from 0 to 51. The default value is 10.
Max QP sets the highest quantizer you video can reach. It is strongly recommended leaving it where at the default value of
51. The possible values vary from 0 to 51. The default value is 51.
AVS4YOU Programs Help - Appendix
© Online Media Technologies Ltd., UK 2004 - 2009 All rights reserved. www.avs4you.com
Page 164 of 198

Max QP Step controls how how much the quantizer can change between two consecutive frames. Setting this value too low
forces the codec to switch quality levels slowly, which can be devastating to the compression of certain scenes which, for
example, could suddenly use a lower quantizer to maintain similar visual quality. Setting it too high can lead to conspicuous
jumps in quality. The possible values vary from 0 to 50. The default value is 4.
All the Quantization Limits settings can be altered manually to suit your personal needs - you can enter the values using the
keyboard or with the mouse clicks.
The Scene cuts section comprises the following codec parameters:
Scene Cut Threshold determines how much a frame needs to change before being considered a scene change by the codec.
The higher the value, the less sensitive scene change detection will be. For dark videos you might want to decrease this value
so as to let the codec more accurately determine scene changes. As a more general rule, videos with more subtle scene
changes need a higher scene cut threshold and bright high-contrast videos with very prominent scene changes might actually
be reason to attempt to set a lower threshold. The possible values vary from 0 to 100. The default value is 40.
Min IDR-frame interval sets the minimum number of frames between two keyframes. If this value is set too high, too
much time will go by without the codec detecting a scene change and implementing the necessary keyframe. Setting it too low
can result in a waste of bitrate and sometimes flickering. The possible values vary from 0 to 100000. The default value is 25.
Max IDR-frame interval sets the maximum distance between two keyframes. Setting this too low can result in an
oversaturation of key frames, possible flickering, and general bitrate waste, reducing overall quality. Setting this too high can
result in seeking issues, and any artifacts/encoding flaws during the time between key frames will remain on the screen longer.
The possible values vary from 0 to 100000. The default value is 250.
All the Scene cuts settings can be altered manually to suit your personal needs - you can enter the values using the keyboard or with
the mouse clicks.
If you are not sure which settings to use you can press the Restore Defaults button to discard the changes and restore default
settings.
When ready press the OK button to accept the changes you have made.
AVS4YOU Programs Help - Appendix
© Online Media Technologies Ltd., UK 2004 - 2009 All rights reserved. www.avs4you.com
Page 165 of 198

MBs and Frames Settings
[Partitions] [B-Frames]
The Partitions section comprises the following codec parameters:
The partition search and decisions increase the accuracy and thus the quality and compression efficiency of the codec, enabling higher
quality output. As a general rule, the more searches types of searches the codec performs on the visual information, the more
accurately and efficiently it can predict and encode them. Disabling any partition search and decision options will speed up the
encoding process at the expense of the quality.
The 8x8 Transform feature is a very powerful compression technique which acts upon larger blocks of visual information and
enables the usage of other high-quality partition options such as the 8x8 Intra search which would otherwise be unusable without
the 8x8 Transform. Both of these options increase quality to a significant degree, but the usage of the the 8x8 Transform would
make your video High Profile AVC compatible and would break the encoded video's compatibility with Main Profile AVC. Thus you
should make sure your device supports High profile AVC, otherwise you might not be able to playback the resulting output video
file.
All the Partitions settings can be either checked or unchecked.
The B-Frames section comprises the following codec parameters:
Use as reference allows a B-frame to reference another B-frame. Checking this setting might increase quality slightly
because these B-frames can be predicted from one another instead of being limited to the P-frames around them for prediction
and at the same time the time of the conversion will also increase. This setting should be activated when using more than 2
consecutive B-frames (See the Max consecutive setting below).
Max consecutive indicates how many B-frames will be used consecutively. You can use up to 5 consecutive B-frames, but
using 2-3 is the most sensible choice. The possible values vary from 0 to 5. The default value is 0.
Adaptive activates adaptive use of B-frames. Without this feature, the codec will always put as many B-frames in a row as set
in the Max consecutive field.
Bias lets the codec increase or decrease the probability that B-frames are being used. The higher this number, the more
frequently B-frames will be dropped in. Setting this parameter to 100, for instance, will force the codec to use the maximum
AVS4YOU Programs Help - Appendix
© Online Media Technologies Ltd., UK 2004 - 2009 All rights reserved. www.avs4you.com
Page 166 of 198

number of B-frames specified in the Max consecutive box - it will be the same as uncheck Adaptive check-box. Setting this
to -100 will mean that almost no B-frames are used. For most videos, the optimal number of B-frames will be chosen at Bias
value of 0. The possible values vary from -100 to 100. The default value is 0.
Bidirectional ME parameter allows the codec to predict some B-frames using motion before and after them. This increases
quality of the output video.
Weighted bipredictional setting allows B-frames to be predicted more heavily from one P frame or another. It results in
more accurate and efficient B-frames, therefore increasing quality.
Direct B-frame mode allows B-frames to use predicted motion vectors instead of coding the actual motion, thus saving
space and increasing compression efficiency. This setting indicates how motion vectors for B-frames are derived: Spatial uses
neighboring blocks in the same frame, which may result in a higher PSNR (it can be used for animated content as it better
handles inconsistent motion jumps), whereas Temporal makes use of neighboring frames - which many people perceive as
higher quality (better used for real-life content with fluid motion).
If you are not sure which settings to use you can press the Restore Defaults button to discard the changes and restore default
settings.
When ready press the OK button to accept the changes you have made.
More Settings
[Motion Estimation] [Miscellaneous options]
The Motion Estimation section comprises the following codec parameters:
Partition Decision parameter controls the precision of the motion estimation process. The selection menu contains a list of 7
options, arranged from the least quality 1 (Fastest) to the highest quality 6b (RDO on B-frames) options. It is strongly
recommended to use the options below 5 (High Quality) only in case the speed is crucial and the quality is expendable. In all
the other cases the values of 5 (High Quality), 6 (RDO) and 6b (RDO on B-frames) should be used. The higher the
value, the better the quality at the expense of the conversion speed.
AVS4YOU Programs Help - Appendix
© Online Media Technologies Ltd., UK 2004 - 2009 All rights reserved. www.avs4you.com
Page 167 of 198

Method indicates in which direction the motion estimation search is performed. The better the method, the higher the
likelihood of the codec finding and accurately recording motion, thereby increasing the compression quality and efficiency. It is
recommended to use either Hexagonal search for slower machines or Uneven Multi-Hexagon for more powerful
configurations. The Exhaustive Search can be used only on extra-powerful computers as it decreases encoding speed
dramatically.
Range specifies the motion search range in pixels. The higher the range, the more pixels will be analyzed, which is paid by
slower encoding time. This parameter is only used together with Uneven Multi-Hexagon and Exhaustive Search motion
search methods. The possible values vary from 0 to 64. The default value is 16.
Max Ref. frames indicates how many previous frames can be referenced by a P-frame or B-frame. The higher is this value,
the better but the coding process gets slower at the same time. The possible values vary from 0 to 16. The default value is 0.
Mixed Refs option offers the codec greater freedom to make references on a smaller scale when checked. Requires the Max
Ref. frames value to be more than 1 to be turned on.
Chroma ME uses the color information in the video's chroma plane to estimate motions, which increases both the accuracy
and visual quality of motion estimation. This almost always leads to a significant quality increase, especially with animated
material. It can be recommended to switch this option on.
The Quantization Limits section comprises the following codec parameters:
Threads should be equal to the number of encoding threads that can be used in the encoding process. The number of
threads should correspond with the number of processor cores the computer has. Each single Hyper Treading processor can be
counted as 2 threads. When not sure how many cores your computer has, or whether or not it has HT, it's safe to keep this
setting at 1. This option speeds up the encoding process on multi-core machines. The possible values vary from 1 to 4. The
default value is 1.
CABAC - Context Adaptive Binary Arithmetic Coding - is a feature that allows syntax elements of the video stream to be
predicted by context. Basically, it increases compression efficiency at no quality loss (10-15% varying by video and by bitrate),
though the decoding speed can slow down. This option should be unchecked only if you plan to playback the output video on
a portable device with a slow processor. It is On by default.
Noise reduction option switches on and off the image noise prefiltering. The value of 0 turns this option off, the other
values (1 to 65535) turn on the filter of small image noises. The possible values vary from 0 to 65535. The default value is 0.
Trellis is an advanced algorithm that lets the codec estimate the quality-size ratio and choose the coding variant based on it.
Can improve the quality keeping the file size smaller. At the same time the conversion time increases as compared to the
conversion with this setting disabled. It is only available if the CABAC setting is on.
Deblocking filter option switches on or off the in-loop deblocking filter. Enabling this feature also increases the conversion
time.
Strength determines how strong the deblocking effect needs to eliminate the blocks where the Threshold identified them.
The possible values vary from -6 to 6. The default value is 0.
Threshold determines how much of the material actually needs to be deblocked. The higher the value is set, the more of the
video will be perceived as blocks, so the more the deblocker will act upon. The possible values vary from -6 to 6. The default
value is 0.
If you are not sure which settings to use you can press the Restore Defaults button to discard the changes and restore default
settings.
When ready press the OK button to accept the changes you have made.
AVS4YOU Programs Help - Appendix
© Online Media Technologies Ltd., UK 2004 - 2009 All rights reserved. www.avs4you.com
Page 168 of 198

WMV Advanced Settings
[General] [VBR Enabled]
The General WMV codec settings include:
Color Space - an abstract mathematical model describing the way colors are selected for representation in the video. The
following values are available: RGB16, RGB24, RGB32, I420, IYUV, YV12, YUY2.
The Color Space setting can be chosen from the preset list only and cannot be altered.
The default value is RGB16.
Key Interval - maximum interval between two keyframes compulsorily inserted by the codec in addition to automatic I-frames
insertion. This is used to reduce the seeking time for fast forward or backward mode when watching the movie. It is necessary
for the codec to use I-frames to increase the output video quality as the P-frames (delta frames or interframes) situated
between two keyframes are compressed based on the preceding I-frames.
The recommended setting about 8. It is possible to lower the value a little in fast-motion videos although if the value is too
small then too many keyframes (I-frames) are inserted and the video cannot be compressed very effectively thus lowering the
output video quality. At the same time it is possible to increase the value in videos with a lot of slow-motion scenes as the
codec is able to insert I-frames by itself when needed.
Key Interval setting can be altered manually to suit your personal needs - you can enter the values using the keyboard or
with the mouse clicks.
The default value is 8.
Buffer Window - determines the amount of content that can fit into the buffer. The buffer is needed to ensure that the data
flow is continuous.
VBR Enabled - check this option to select the video compression using variable bitrate encoding. This will mean that the program will
encode the video using different bitrate values for different places in the video depending on the video itself and the VBR Type
selected from the drop-down list:
Quality - use this option to select the quality based compression. You can choose the Quality value in the appropriate field
entering it using the keyboard or with the mouse clicks. The best quality corresponds to the 100 value and the worst is
designated by the 0.
AVS4YOU Programs Help - Appendix
© Online Media Technologies Ltd., UK 2004 - 2009 All rights reserved. www.avs4you.com
Page 169 of 198

Constrained - use this option to select the bitrate based compression. You can set the Max Buffer and Max Bitrate values
in the appropriate fields. The bigger values will mean the lesser constrain type and vice versa. You can enter the values using
the keyboard or with the mouse clicks.
Unconstrained - use this option to let the program itself decide what is best for the video compression. The video will be
converted using unconstrained variable bitrate encoding.
If you are not sure which settings to use you can press the Cancel button to discard the changes and close the window.
When ready press the OK button to accept the changes you have made.
AVS4YOU Programs Help - Appendix
© Online Media Technologies Ltd., UK 2004 - 2009 All rights reserved. www.avs4you.com
Page 170 of 198

Overview
This list includes the mobile devices which can handle media files of different types.
Apple iPod, iPod touch & iPhone
Sony PSP
Archos DVR
BlackBerry Pearl
Samsung Players
Creative Players
iRiver
SanDisk Sansa e200 series
Epson P-2000/P-4000 (P-3000/P-5000)
Cowon iAudio X5
Bluetooth is an industrial specification for wireless personal area networks, also known as IEEE 802.15.1. Bluetooth provides a way
to connect and exchange information between devices like personal digital assistants (PDAs), mobile phones, laptops, PCs, printers
and digital cameras via a secure, low-cost, globally available short range radio frequency.
Bluetooth is a radio standard primarily designed for low power consumption, with a short range (power class dependent: 1 meter, 10
meters, 100 meters) and with a low-cost transceiver microchip in each device.
Infrared data transmission is also employed in short-range communication among computer peripherals and personal digital
assistants or mobile phones. These devices usually conform to standards published by IrDA, the Infrared Data Association. Remote
controls and IrDA devices use infrared light-emitting diodes (LEDs) to emit infrared radiation which is focused by a plastic lens into a
narrow beam. The beam is modulated, i.e. switched on and off, to encode the data. The receiver uses a silicon photodiode to convert
the infrared radiation to an electric current. It responds only to the rapidly pulsing signal created by the transmitter, and filters out
slowly changing infrared radiation from ambient light. Infrared communications are useful for indoor use in areas of high population
density. Infrared does not penetrate walls and so does not interfere with other devices in adjoining rooms.
Infrared is the most common way for remote controls to command appliances.
The USB mobile devices it can communicate with the computer in the following ways:
Devices that represent USB Mass Storage Device Class (MSC or UMS) are seen as a removable drive in the system and
some of them as a fixed drive.
Devices representing USB MTP Device Class use Media Transfer Protocol (MTP) supported by Microsoft Windows Media
Player 10 and 11.
Devices that use Microsoft ActiveSync for communication, i.e. mobile phones, smartphones and PDAs or pocket PCs with
Microsoft Windows Mobile or Microsoft Windows CE installed. For these devices support you need to have a personal computer
running Windows 2000 SP4, Windows 2003, Windows XP with ActiveSync program v4.5 or later installed or running Windows
Vista with Windows Mobile Device Center v6 or later installed.
Depending on the communication type used different file types might be available for upload to the same devices.
AVS4YOU Programs Help - Appendix
© Online Media Technologies Ltd., UK 2004 - 2009 All rights reserved. www.avs4you.com
Page 171 of 198

Apple iPod, iPod touch & iPhone
Audio
Frequency response: 20Hz to 20,000Hz
Audio formats supported:
MP3 16 to 320 Kbps (8 to 320 Kbps for iPod shuffle)
MP3 VBR
M4A, M4B with AAC codec 16 to 320 Kbps (8 to 320 Kbps for iPod shuffle)
WAV
Apple Lossless
AIFF (except iPod shuffle)
Upgradable firmware enables support for future audio formats.
Video (iPod Video, iPod touch and iPhone only)
Video formats supported:
H.264 video, up to 1.5 Mbps, 640 by 480 pixels, 30 frames per sec., Low-Complexity version of the H.264 Baseline Profile
with AAC-LC audio up to 160 Kbps, 48 kHz, stereo audio in .m4v, .mp4 file formats;
H.264 video, up to 768 Kbps, 320 by 240 pixels, 30 frames per sec., Baseline Profile up to Level 3.0 with AAC-LC audio up to
160 Kbps, 48 kHz, stereo audio in .m4v, .mp4 file formats;
MPEG-4 video, up to 2.5 Mbps, 640 by 480 pixels, 30 frames per sec., Simple Profile with AAC-LC audio up to 160 Kbps, 48
kHz, stereo audio in .m4v, .mp4 file formats.
Upgradable firmware enables support for future video formats.
Photo support (except iPod touch and iPhones)
Syncs iPod-viewable photos in formats:
JPEG
BMP
GIF
TIFF
PNG
Text support (except iPod shuffle, iPod touch and iPhones)
TXT (.txt files)
VCARD (.vcf files)
Note: iPod first and second generation models (iPod 1G & iPod 2G) are not supported. Upload to all the later
models is supported via USB interface only (Apple iTunes must be installed on the personal computer for iPhone
and iPod touch upload support, although it is not used for uploading).
Video can be converted for all iPod and iPhone models. Uploading to iPhone 3GS and iPhone 3G with firmware
3.x and higher can only be done using Apple iTunes application.
AVS4YOU Programs Help - Appendix
© Online Media Technologies Ltd., UK 2004 - 2009 All rights reserved. www.avs4you.com
Page 172 of 198

Sony PSP
Audio support
UMD:
H.264/MPEG-4 AVC Main Profile Level 3
Linear PCM
ATRAC3plus
Memory Stick:
ATRAC3plus
MP3 (MPEG-1/2 Audio Layer 3)
Linear PCM (WAV form)
AAC (MP4 form)
WMA
Video support
UMD:
H.264/MPEG-4 AVC Main Profile Level 3
Memory Stick:
MPEG-4 SP (MPEG-4 AAC)
H.264/MPEG-4 AVC Main Profile (MPEG-4
AAC)
Photo support
Memory Stick:
JPEG (Conforms with DCF 2.0/Exif 2.21)
TIFF
GIF
PNG
BMP
Archos
Archos AV 500 and AV 700
Audio playback:
Stereo MP3 decoding at 30-320 kb/s CBR & VBR
WMA (including protected WMA files)
WAV (PCM & ADPCM)
Video playback:
MPEG-4 SP with B-Frames with stereo sound
AVI file format (audio/video file container by Microsoft) near DVD quality up to 720x480 @ 30 f/s (NTSC), 720x576 @ 25 f/s
(PAL) (has not been certified by DivX, Inc., may not read all DivX® 4.0 & 5.0 files; does not read DivX® 3.11 & 6.0 files)
Microsoft WMV9 Simple Profile up to 352x288@30f/s and 800 KBit/s; supports WM DRM
Photo viewer:
JPEG (except progressives)
BMP
AVS4YOU Programs Help - Appendix
© Online Media Technologies Ltd., UK 2004 - 2009 All rights reserved. www.avs4you.com
Page 173 of 198

Archos 404/504/604
Audio playback:
Stereo MP3 decoding at 30-320 Kbits/s CBR & VBR
WMA
Protected WMA
WAV (PCM/ADPCM)
With optional software plug-ins:
AAC music files (UMS only, see the Overview for more detail)
AC3 stereo sound files
Video playback:
MPEG-4 (ASP@L5 AVI, up to 720x480 @ 30 f/s (NTSC), 720x576 @ 25 f/s (PAL))
WMV (MP@ML, up to 720x480 @ 30 f/s (NTSC), 720x576 @ 25 f/s (PAL))
With optional software plug-ins:
H.264 up to 720x480 @ 30 f/s (NTSC), 720x576 @ 25 f/s (PAL) and AAC sound (UMS only, see the Overview for more
detail)
MPEG-2 MP@ML up to 10 Mbps (up to 720x480 @ 30 f/s (NTSC), 720x576 @ 25 f/s (PAL)) and AC3 stereo sound (UMS
only, see the Overview for more detail)
Photo viewer:
JPEG
BMP
PNG
Certain audio and video bitrates, video and photo resolutions, and/or file variations may not be compatible.
BlackBerry Pearl
Audio playback:
.mp3
.wav
.m4a
.m4b
.aac
.amr
.mid
Video playback:
.avi
.3gp
The MPEG-4 video files with resolution 320 by 240 pixels at 30 frames per second are supported.
Photo viewer:
.jpg
.jpeg
.bmp
.gif
.tif
.tiff
.png
Certain audio and video bitrates, video and photo resolutions, and/or file variations may not be compatible.
AVS4YOU Programs Help - Appendix
© Online Media Technologies Ltd., UK 2004 - 2009 All rights reserved. www.avs4you.com
Page 174 of 198

Samsung Players
Samsung YP-T8/T8N/T7F/D1
Audio support:
MPEG-1/2/2.5 Layer3 (.mp3 - 8 Kbps~320 Kbps, 8 kHz~48 kHz)
WMA (.wma - 5 Kbps~320 Kbps, 8 kHz~48 kHz)
Ogg (.ogg - Q1~Q10)
Video support:
.svi (Samsung VIdeo - special MPEG-4 video file type with video resolution 208x176 and frame rate 15 fps with MP3 audio of
44,1 kHz 128 Kbps)
.mpg (resolution 160x128 and frame rate 15 fps with MP3 audio of 44,1 kHz 128 Kbps)
.avi (resolution 160x128 and frame rate 15 fps with MP3 audio of 44,1 kHz 128 Kbps)
.wmv (resolution 160x128 and frame rate 15 fps with MP3 audio of 44,1 kHz 128 Kbps)
Image support:
.jpg (file size no more than 3 MB)
.bmp
.gif
Text support:
.txt
Samsung YP-T9
Audio support:
MPEG-1/2/2.5 Layer3 (.mp3 - 8 Kbps~320 Kbps, 8 kHz~48 kHz)
WMA (.wma - 5 Kbps~320 Kbps, 8 kHz~48 kHz)
Ogg (.ogg - Q1~Q10) (UMS only, see the Overview for more detail)
Video support:
.svi (Samsung VIdeo - special MPEG-4 video file type with video resolution 208x176 and frame rate 15 fps with MP3 audio of
44,1 kHz 128 Kbps) (UMS only, see the Overview for more detail)
Image support:
.jpg (file size no more than 3 MB)
Text support:
.txt (UMS only, see the Overview for more detail)
Samsung YP-T7
Audio support:
MPEG-1/2/2.5 Layer3 (.mp3 - 8 Kbps~320 Kbps, 8 kHz~48 kHz)
WMA (.wma - 5 Kbps~320 Kbps, 8 kHz~48 kHz)
Ogg (.ogg - Q1~Q10)
Image support:
.jpg (file size no more than 3 MB)
.bmp
.gif
AVS4YOU Programs Help - Appendix
© Online Media Technologies Ltd., UK 2004 - 2009 All rights reserved. www.avs4you.com
Page 175 of 198
Text support:
.txt
Samsung YP-K5/K3
Audio support:
MPEG-1/2/2.5 Layer3 (.mp3 - 8 Kbps~320 Kbps, 8 kHz~48 kHz)
WMA (.wma - 5 Kbps~320 Kbps, 8 kHz~48 kHz)
Ogg (.ogg - Q1~Q10) (UMS only, see the Overview for more detail)
Image support:
.jpg (file size no more than 3 MB)
Text support:
.txt (UMS only, see the Overview for more detail)
Samsung YP-T6/U3/U2/U1/F2/F1/C1/55
Audio support:
MPEG-1/2/2.5 Layer3 (.mp3 - 8 Kbps~320 Kbps, 8 kHz~48 kHz)
WMA (.wma - 5 Kbps~320 Kbps, 8 kHz~48 kHz)
Ogg (.ogg - Q1~Q10)
Samsung YP-Z5/YH-925
Audio support:
MPEG-1/2/2.5 Layer3 (.mp3 - 8 Kbps~320 Kbps, 8 kHz~48 kHz)
WMA (.wma - 5 Kbps~320 Kbps, 8 kHz~48 kHz)
Image support:
.jpg (file size no more than 3 MB)
Creative Players
Creative ZEN Stone/Nano Plus
Audio support:
MPEG-1/2/2.5 Layer3 (.mp3 - 8 Kbps~320 Kbps, 8 kHz~48 kHz)
WMA (.wma - 5 Kbps~320 Kbps, 8 kHz~48 kHz)
Creative ZEN Stone/Sleek/ Micro/Neeon
Audio support:
MPEG-1/2/2.5 Layer3 (.mp3 - 8 Kbps~320 Kbps, 8 kHz~48 kHz)
WMA (.wma - 5 Kbps~320 Kbps, 8 kHz~48 kHz)
WAV
AVS4YOU Programs Help - Appendix
© Online Media Technologies Ltd., UK 2004 - 2009 All rights reserved. www.avs4you.com
Page 176 of 198

Creative ZEN V/Sleek Photo/ Microphoto
Audio support:
MPEG-1/2/2.5 Layer3 (.mp3 - 8 Kbps~320 Kbps, 8 kHz~48 kHz)
WMA (.wma - 5 Kbps~320 Kbps, 8 kHz~48 kHz)
WAV
Image support:
.jpg
.jpeg
Creative ZEN Vision/Vision W/ Vision:M/V Plus/ Neeon 2
Audio support:
MPEG-1/2/2.5 Layer3 (.mp3 - 8 Kbps~320 Kbps, 8 kHz~48 kHz)
WMA (.wma - 5 Kbps~320 Kbps, 8 kHz~48 kHz)
WAV
Video support:
.avi
.mpg
.mpeg
.wmv
Image support:
.jpg
.jpeg
iRiver
iRiver H10
Audio support:
MP3 (32 to 320 Kbps)
MP3 VBR
WMA (32 to 192 Kbps)
Photo support:
JPEG (the progressive JPG is not supported)
Text support:
TXT
iRiver U10
Audio support:
MPEG-1/2/2.5 Layer 3 (8 to 320 Kbps)
WMA (8 to 320 Kbps)
OGG (up to Q10)
ASF
AVS4YOU Programs Help - Appendix
© Online Media Technologies Ltd., UK 2004 - 2009 All rights reserved. www.avs4you.com
Page 177 of 198

Video support:
AVI (AVI compatible with MPEG-4 SP (Simple Profile) QVGA (320x240) or less/ 15 frames per second or less/ 384 kbps or less
with audio MP3 128 kbps 44.1 kHz CBR)
Photo support:
JPEG (the progressive JPG is not supported)
Text support:
TXT
SanDisk Sansa® e200 Series
Audio support:
MP3 (8 to 320 Kbps)
WMA (8 to 320 Kbps), including WMA with DRM protection
Video support:
MJPEG (up to 176 by 240 pixels, 15 frames per sec., specifically converted and with duration no more than 10 minutes) (UMS
only, see the Overview for more detail)
Photo support:
JPEG (specifically converted from GIF, BMP and TIFF) (UMS only, see the Overview for more detail)
Epson P-2000/P-4000 (P-3000/P-5000)
Audio support:
MP3 (.mp3 - MPEG-1 Layer 3) - maximum bit rate 320 kbps (48KHz, 16bit Stereo)
AAC (.m4a) - maximum bit rate 320 kbps (48KHz, 16bit Stereo)
Video support:
Motion JPG (.mov, .avi) - maximum resolution 640 x 480 pixels, minimum resolution 160 x 112 pixels, supported audio
CODEC: µ-LAW, A-LAW, PCM
MPEG-4 (.asf, .mp4, .mov, .avi) - maximum resolution 640 x 480 pixels, minimum resolution 160 x 112 pixels, supported
audio CODEC: AAC, MP3, G726(ADPCM), µ-LAW, A-LAW, PCM
Photo File Format support:
JPEG (.jpeg, .jpg, .jpe) - minimum image size 160 x 120 pixels, maximum image size 17.8 Megapixels, maximum image aspect
ratio 8:1
TIFF (.tif, .tiff) - display TIFF file stored in header created by EPSON F-3200 scanner
RAW (.nef, .crw, .erw, .cr2, .orf, .mrw, .pef, .erf) - select DSLR (display JPEG stored in header)
AVS4YOU Programs Help - Appendix
© Online Media Technologies Ltd., UK 2004 - 2009 All rights reserved. www.avs4you.com
Page 178 of 198

Cowon iAudio X5
Audio playback:
.mp3
.wma
.ogg
.wav
.asf
.flac
Video playback:
.avi (MPEG-4 video files with resolution is 160 by 120 pixels at 15 frames per second)
Photo viewer:
.jpg
Text support:
.txt
Certain audio and video bitrates, video and photo resolutions, and/or file variations may not be compatible.
AVS4YOU Programs Help - Appendix
© Online Media Technologies Ltd., UK 2004 - 2009 All rights reserved. www.avs4you.com
Page 179 of 198

Troubleshooting
The Troubleshooting section contains the AVS4YOU programs common error messages and notifications and the possible ways to
solve the problems that occur. Below you will see the list of the pages that refer to troubleshooting of various AVS4YOU programs and
some common cases as well:
AVS4YOU programs activation issues;
AVS Mobile Uploader issues.
AVS4YOU Programs Activation Troubleshooting
Error (Message) Description
License key is invalid
Possible Reasons and Ways to Solve the Problem
Your license key may contain both symbols 0 (zero) and the letter O. Make sure that you enter all the digits and letters of the
license key correctly. Please check that you are not mistaking 0 (zero) for the letter O.
It is recommended just to copy your license key from the registration letter and paste it to the appropriate text box in the
activation form. In case you cannot use the mouse right-click menu, please select the license key and use the Ctrl+C
keyboard combination to copy the key and the Ctrl+V to paste it into the appropriate field of the activation application.
Error (Message) Description
Unable to establish connection to the server
Possible Reasons and Ways to Solve the Problem
The firewall or antivirus installed on your computer might block the AVS4YOU activation application internet connection
necessary for the successful activation process. Please create a rule for the activation program so that it could connect our
web server and complete the activation process. In case you do not know how to do that, please disable your antivirus/firewall
during the activation process, and do not forget to enable it back afterwards. AVS4YOU software will need to connect to our
server only once - during activation and validation of your license.
Error (Message) Description
License expired
Possible Reasons and Ways to Solve the Problem
1. Check the date and time settings on your personal computer.
2. Delete all the contents of the C:\Documents and Settings\All Users\Application Data\AVS4YOU\Licence (for Windows XP) or C:
\Users\All Users\AVS4YOU\Licence (for Windows Vista) folder. In case you cannot find the specified folder check if it is hidden
(you can find it out the following way: go to the Windows Start menu, select Control Panel - Folder Options, then the
View tab of the opened window and select the Show hidden files and folders option.)
3. Activate your programs once again.
4. If all the above steps do not help please contact our support team using the Support Form.
Error (Message) Description
The Internet connection could not be established
Possible Reasons and Ways to Solve the Problem
1. Please download the HID Generator utility: www.avsmedia.com/files/HID_Generator.exe. Left click it to download. If you
can not download the utility, please copy the link from the page and paste into the address bar of your browser, next click
Enter on the keyboard (or the browser Go to button) to start downloading.
AVS4YOU Programs Help - Appendix
© Online Media Technologies Ltd., UK 2004 - 2009 All rights reserved. www.avs4you.com
Page 180 of 198

2. Transfer it to your offline PC and launch. After you launch the utility, the Hardware ID window will be opened. Please, press
the Get hardware ID button. You will see your generated hardware ID in the field (it should look similar to this:
"NUpUMjk5RDMtU1QzMTIwMDI2QS0zLjA2=").
3. Please send a message to our support team via the Support Form containing the following information: your hardware ID
(copy it from the Hardware ID window) and your current license key. Also please inform us about the operating system you
use.
4. After that we will make and send you a *.lickey file, which will automatically insert all necessary activation information to your
computer registry so that you could successfully finish the activation process.
AVS Mobile Uploader Troubleshooting
Error (Message) Description
No mobile devices can be detected by the program
Possible Ways to Solve the Problem
1. For all the USB connection types (USB-UMS, USB-MTP, USB-ActiveSync, USB-iPhone/iPod touch):
make sure that the mobile device is on, if not please turn it on;
check the device connection to the personal computer (make sure that the cable is connected and the USB port works
properly), connect the device to the proper USB port of your personal computer if necessary;
make sure that you connect the mobile device directly to the computer USB port, please do not use any USB hubs, USB
extension cables, display or keyboard USB ports.
2. USB-MTP connection type:
check the Windows Media Player version installed on your system, make sure that you have WMP version 10 or higher
(11/12) installed; you can always download and install the latest version of Windows Media Player from the Microsoft
web site.
3. USB-ActiveSync connection type:
check if the Microsoft ActiveSync is installed on your computer; if not please install Microsoft ActiveSync (this can be
downloaded from the Microsoft web site) and after that register the AVSMobileDevice2ActiveSync.dll (to do this go the
the Windows Start menu and select All Programs - AVS4YOU - Repair).
4. USB-iPhone/iPod touch connection:
check the iTunes version installed on your computer, make sure that you have the proper iTunes version for your
mobile device - 7, 8 or later; you can always download and install the latest iTunes version from the Apple web site;
connect only one device (iPhone or iPod touch) to your personal computer in case you have several.
5. Bluetooth connection type:
make sure that the mobile device is on, if not please turn it on;
make sure that the personal computer Bluetooth adapter is on, if not please plug it in and/or turn it on;
make sure that the Bluetooth service of the mobile device is on, if not please enable it;
please check the Bluetooth protocol stack used by your computer Bluetooth adapter, AVS Mobile Uploader supports
Microsoft (Windows XP SP2/3, Windows Vista) and Toshiba (Windows XP SP2/3) Bluetooth protocol stacks only;
BlueSoleil and Widcomm (Broadcom) Bluetooth protocol stacks are not supported.
6. IrDA (Infrared) connection type:
make sure that the mobile device is on, if not please turn it on;
make sure that the personal computer Infrared adapter is on, if not please plug it in and/or turn it on;
make sure that the Infrared port of the mobile device is on, if not please enable it;
check the personal computer Infrared adapter and mobile device Infrared port connectivity, make sure that the adapter
and the device port are directed to each other and nothing blocks the connection; place the computer Infrared adapter
and the mobile device Infrared port as close to each other as possible.
AVS4YOU Programs Help - Appendix
© Online Media Technologies Ltd., UK 2004 - 2009 All rights reserved. www.avs4you.com
Page 181 of 198

Enabling the DMA Mode
DMA mode - Direct Memory Access - allows certain hardware subsystems within a computer to access system memory for reading
and/or writing independently of the CPU. Many hardware systems use DMA including disk drive controllers, graphics cards, network
cards, and sound cards.
DMA is an essential feature of all modern computers, as it allows devices of different speeds to communicate without subjecting the
CPU to a massive interrupt load. Otherwise, the CPU would have to copy each piece of data from the source to one of its registers,
and then write it back again to the new location. During this time the CPU would be unavailable for other tasks.
A DMA transfer essentially copies a block of memory from one device to another. While the CPU initiates the transfer, the transfer
itself is performed by the DMA Controller. A typical example is moving a block of memory from external memory to faster, internal
(on-chip) memory. Such an operation does not stall the processor, which as a result can be scheduled to perform other tasks. It is
essential in providing so-called zero-copy implementations of peripheral device drivers as well as functionalities such as network packet
routing, file copy, streaming video over a network, etc.
To enable the DMA mode you should do the following:
1. Go to the Windows Start menu and select Control Panel;
2. In the Control Panel window choose the System icon, double-click it to open the system properties window;
3. In the Hardware tab there is a Device Manager button:
You should click it to open the Device Manager window:
AVS4YOU Programs Help - Appendix
© Online Media Technologies Ltd., UK 2004 - 2009 All rights reserved. www.avs4you.com
Page 182 of 198

Here you should find IDE ATA/ATAPI controllers among the other devices and click the "+" in front of it to open the list of
available IDE channels that the controller has.
4. Double-click the Primary IDE Channel caption to open the controller properties window:
AVS4YOU Programs Help - Appendix
© Online Media Technologies Ltd., UK 2004 - 2009 All rights reserved. www.avs4you.com
Page 183 of 198

In the Advanced Settings tab you will see the Transfer Mode drop-down box where the current transfer mode is displayed. To
change the transfer mode and enable DMA you should open the drop-down box and choose DMA if available option:
After that click OK to accept the changes you have made. The same can be done for the Secondary IDE Channel. After you
enabled DMA modes for the IDE channels you can close the device manager window. Sometimes the reboot might be needed to apply
all the changes.
Note: not all the controllers allow the user to change the transfer mode. If you install the third party driver for
your computer IDE controller see the instructions that go along with the driver software. Usually when the
special driver for the controller is installed the DMA mode is enabled automatically by the driver software.
AVS4YOU Programs Help - Appendix
© Online Media Technologies Ltd., UK 2004 - 2009 All rights reserved. www.avs4you.com
Page 184 of 198

Disc Types
AVS4YOU programs currently support three types of optical disc formats that are available for consumer use. This section will better
explain the purpose of these formats and their place in history. With the support of other disc types and formats the corresponding
information will be added.
Compact Discs
Digital Versatile Discs
DVDs of different capacities
DVDs of different medium type
Blu-Ray Discs
Compact Discs
Digital Audio Compact Discs (CD-DA) were first introduced to the consumer audio market in 1980 by Philips and Sony as an alternative
to vinyl records and magnetic tape cassettes. In 1984, Philips and Sony extended the technology to include data storage and retrieval
and introduced a new format: the Data Compact Disc (CD-ROM).
Since then, the Compact Disc has dramatically changed the way that we listen music and handle electronic information. With a
capacity of up to 700 megabytes of computer data or 80 minutes of high quality audio, the Compact Disc has revolutionized the
distribution of every kind of electronic information.
In 1990, Philips and Sony extended the technology again and the Compact Disc became recordable (CD-R). Before the introduction of
the CD-R technology, compact discs were produced in commercial replication plants by stamping the media with a pre-recorded
master. Today, discs are produced in replication plants where large quantities are required. For small production volumes (up to 500
copies or more, depending on your location and manufacturers in your market), it can be significantly less expensive to master your
own discs using commercially available Compact Disc writing drives.
Whether a Compact Disc was stamped at a replication facility or "burned" using a compact disc recorder, it can theoretically be read by
any available CD-ROM drive. In reality, some inexpensive media and CD players do not work very well together. Only the physical
composition of a commercially replicated disc and a CD-R disc are different. The former is coated with a reflective layer of aluminum
resulting in a typical silver color. The latter is coated with a reflective layer behind a thin layer of dye (colors can range from blue,
silver, green, and others).
In 1997 Compact Disc ReWritable (CD-RW) - a rewritable optical disc format - was introduced. While a prerecorded compact disc has
its information permanently stamped into its polycarbonate plastic substrate, a CD-RW disc contains a phase-change alloy recording
layer composed of silver, indium, antimony and tellurium. An infra-red laser beam is employed to selectively heat and melt the
crystallized recording layer into an amorphous state or to anneal it at a lower temperature back to its crystalline state. The different
reflectance of the resulting areas make them appear like the pits and lands of a prerecorded CD. A CD-RW recorder can rewrite 700
MB of data to a CD-RW disc roughly 1000 times.
A Compact Disc contain blocks (or sectors) of 2352 bytes each, going from the center hole to the outer diameter. The block at logical
address 0 (beginning of the disc) is located near the center of the disc; the last addressable block (end of the disc) is located near the
outer edge of the disc.
Blank discs are usually available in the following sizes (block sizes approximated).
21 minutes = 94500 blocks
63 minutes = 283500 blocks
74 minutes = 333000 blocks
80 minutes = 360000 blocks
AVS4YOU Programs Help - Appendix
© Online Media Technologies Ltd., UK 2004 - 2009 All rights reserved. www.avs4you.com
Page 185 of 198

Digital Versatile Discs
In January of 1995, Sony was the first to showcase Digital Versatile Disc technology after having announced co-development six
months earlier. Three weeks later, Pioneer, Time Warner, and Toshiba announced their own version of DVD, which had major
differences from the format developed by Philips and Sony. Immediately disputes started over which format should be used, since
each had their own advantages and disadvantages.
The disputes did not stop until May of 1995, when a major report was released by leading hardware and software manufacturers
(Apple, Compaq, Fujitsu, HP, IBM, and Microsoft), stating that the two formats were not going to be supported by the industry when
there were clear advantages in using one format. The result was a mix of the two formats and the formation of the DVD Forum by all
companies involved in the two original formats (Matsushita, Mitsubishi, Pioneer, Philips, Hitachi, JVC, Sony, Thompson, Toshiba, and
Time Warner).
In 1996, the specifications for DVD-ROM and DVD-Video were finalized and DVD players began to ship to market. One year later, the
DVD Forum worked on the specifications for the first recordable (DVD-R) implementation of DVD. In November of 1997, Pioneer
announced the first DVD-R drives, while Matsushita and Toshiba released the first DVD erasable (DVD-RAM) drives.
During 1998, a new coalition was formed to develop re-writable discs specifically for storage of data based on 25-year-old CD patents.
This format was initially called DVD+RW and was not allowed to use the DVD logo after the DVD Forum ruled that it could not be
used in the branch technology. While the technologies between the two formats are similar, licensing rules dictate differences, some of
which can be witnessed in the logo branding of devices and media.
Much like Compact Discs, Digital Versatile Discs are comprised of a continuous spiral of blocks (or sectors) starting from the center
hole ending at the outer rim of the disc. The blocks are only of size 2048 bytes, making the format less complicated.
There are several types of DVD discs depending on their capacity and on the medium type.
The main types of DVDs that differ as to their capacity are:
DVD disc
types
First side Second side
Total
capacityFirst layer
capacity
Second layer
capacity
First layer
capacity
Second layer
capacity
DVD-5 4.7 Gb - - - 4.7 Gb
DVD-9 4.3 Gb 4.3 Gb - - 8.6 Gb
DVD-10 4.7 Gb - 4.7 Gb - 9.4 Gb
DVD-14 4.3 Gb 4.3 Gb 4.7 Gb - 13.3 Gb
DVD-18 4.3 Gb 4.3 Gb 4.3 Gb 4.3 Gb 17.2 Gb
DVD-5 - single sided, single layer (disc capacity about 4.7 Gb, the working surface of such a disc is situated on one side of it and
consists of one layer only);
DVD-9 - single sided, double layer (disc capacity about 8.6 Gb, the working surface of such a disc is situated on one side of it and
consists of two layers about 4.3 Gb each);
DVD-10 - double sided, single layer on both sides (disc capacity about 9.4 Gb, the working surfaces of such a disc are situated on
both its sides and either consists of one layer about 4.7 Gb);
DVD-14 - double sided, double layer on one side and single layer on the other side (disc capacity about 13.3 Gb, the working
surfaces of such a disc are situated on both its sides and consist of two layers about 4.3 Gb each on one side and one layer about 4.7
Gb on the other side);
DVD-18 - double sided, double layer on both sides (disc capacity about 17.2 Gb, the working surfaces of such a disc are situated on
both its sides and either consists of two layers about 4.3 Gb each).
AVS4YOU Programs Help - Appendix
© Online Media Technologies Ltd., UK 2004 - 2009 All rights reserved. www.avs4you.com
Page 186 of 198

Note: the DVD capacity is measured in the so called decimal gigabytes (one gigabyte is equal to 1000
megabytes). The real size of the DVDs is smaller when measured in the so called computer gigabytes or
gibibytes (one gigabyte is equal to 1024 megabytes).
The disc medium can be:
DVD-ROM (read only, industrially manufactured)
A factory-made DVD that is manufactured by a press. The DVD specification Version 1.0 was announced in 1995 and finalized in
September 1996. "DVD" was originally an acronym for "digital video disc"; some members of the DVD Forum believe that it should
stand for "digital versatile disc", to indicate its potential for non-video applications. Toshiba adheres to the interpretation of "digital
versatile disc". The DVD Forum never reached a consensus on the matter, however, and so today the official name of the format is
simply "DVD"; the letters do not "officially" stand for anything.
DVD-R (R = Recordable once)
A DVD-Recordable or DVD-R is an optical disc with a larger storage capacity than a CD-R, typically 4.7 GB instead of 700 Mb, although
the capacity of the original standard was 3.95 Gb. The DVD-R format was developed by Pioneer in autumn of 1997. It is supported by
most DVD players, and is approved by the DVD Forum. A DVD-R can be written to only once.
DVD-RW (RW = ReWritable)
A DVD-RW is a rewritable optical disc with equal storage capacity to a DVD-R, typically 4.7 GB. The format was developed by Pioneer
in November 1999 and has been approved by the DVD Forum. Unlike DVD-RAM, it is playable in about 75% of conventional DVD
players. The primary advantage of DVD-RW over DVD-R is the ability to erase and rewrite to a DVD-RW disc. According to Pioneer,
DVD-RW discs may be written to about 1,000 times before needing replacement, making them comparable with the CD-RW standard.
DVD-RW discs are commonly used for volatile data, such as backups or collections of files. They are also increasingly used for home
DVD video recorders.
DVD-R DL (double layer)
DVD-R DL (Dual Layer) (Also Known as DVD-R9) is a derivative of the DVD-R format standard. DVD-R DL discs employ two
recordable dye layers, each capable of storing nearly the 4.7 GB of a single-layer disc, almost doubling the total disc capacity to 8.54
GB. Discs can be read in many DVD devices (older units are less compatible) and can only be written using DVD±RW DL burners.
DVD+R (R = Recordable once)
A DVD+R is a writable optical disc with 4.7 GB of storage capacity. The format was developed by a coalition of corporations, known as
the DVD+RW Alliance, in mid 2002. Since the DVD+R format is a competing format to the DVD-R format, which is developed by the
DVD Forum, it has not been approved by the DVD Forum, which claims that the DVD+R format is not an official DVD format. The
DVD+R format is divergent from the DVD-R format. Hybrid drives that can handle both, often labeled "DVD±RW", are very popular
since there is not yet a single standard for recordable DVDs. There are a number of significant technical differences between the dash
and plus formats, and although most consumers would not notice the difference, the plus format is considered by some to be better
engineered.
DVD+RW (RW = ReWritable)
A DVD+RW is a rewritable optical disc with equal storage capacity to a DVD+R, typically 4.7 GB (interpreted as 4.7 � 109, actually
2295104 sectors of 2048 bytes each). The format was developed by a coalition of corporations, known as the DVD+RW Alliance, in
late 1997, although the standard was abandoned until 2001, when it was heavily revised and the capacity increased from 2.8 GB to
4.7 GB. Credit for developing the standard is often attributed unilaterally to Philips, one of the members of the DVD+RW Alliance.
Although DVD+RW has not yet been approved by the DVD Forum, the format is too popular for manufacturers to ignore, and as such,
DVD+RW discs are playable in 3/4 of today's DVD players. Unlike the DVD-RW format, DVD+RW was made a standard earlier than
DVD+R.
DVD+R DL (double layer)
DVD+R DL (Double Layer), also known as DVD+R9, is a derivative of the DVD+R format created by the DVD+RW Alliance. Its use
was first demonstrated in October 2003. DVD+R DL discs employ two recordable dye layers, each capable of storing nearly the 4.7 GB
of a single-layer disc, almost doubling the total disc capacity to 8.55 GB. Discs can be read in many DVD devices (older units are less
compatible) and can only be created using DVD+RW DL and Super Multi drives. The latest DL drives write double layer discs slower
AVS4YOU Programs Help - Appendix
© Online Media Technologies Ltd., UK 2004 - 2009 All rights reserved. www.avs4you.com
Page 187 of 198

(2.4x to 8x) than single-layer media (8x-16x). A double layer rewritable version called DVD+RW DL is also in development but is
expected to be incompatible with existing DVD devices.
DVD-RAM (random access rewritable)
DVD-RAM (DVD–Random Access Memory) is a disc specification presented in 1996 by the DVD Forum, which specifies rewritable DVD-
RAM media and the appropriate DVD writers. DVD-RAM media are used in computers as well as camcorders and personal video
recorders since 1998. You can identify a DVD-RAM disc due to lots of little rectangles distributed on the surface of the data carrier.
Compared with other writeable DVDs, DVD-RAM is more closely related to hard disk technology, as it has concentric tracks instead of
one long spiral track. Unlike the competing formats DVD+R, DVD-R, DVD+RW and DVD-RW, you do not need special DVD burning
software to write or read DVD-RAMs on a computer. DVD-RAMs can be accessed like a usual floppy disk or hard drive. DVD-RAM is
more suited to data backups and use in camcorders than DVD±RW. The advantages of DVD-RAM discs are the following: long
durability of minimum 30 years and they can be rewritten more than 100,000 times, and also the fact that no DVD burning software
required in computers as the discs can be used and accessed like a removable hard disk.
Blu-Ray Discs
Blu-ray Disc (BD) is a next-generation optical disc format meant for storage of high-definition video and high-density data. The Blu-ray
standard was jointly developed by a group of leading consumer electronics and PC companies called the Blu-ray Disc Association (BDA)
, led by Sony and Philips. Blu-ray has information capacity per layer of 25 gigabytes.
Blu-ray gets its name from the shorter wavelength (405 nm) of a "blue" (technically blue-violet) laser that allows it to store
substantially more data than a DVD, which has the same physical dimensions but uses a longer wavelength (650 nm) red laser.
BD-R (R = Recordable once)
A single-layer Blu-ray disc (BD) can fit 23.3, 25, or 27 GB; this is enough for approximately four hours of high-definition video with
audio. A dual-layer BD can fit 46.6, 50, or 54 GB, enough for approximately eight hours of HD video. Capacities of 100 GB and 200
GB, using four and eight layers respectively, are currently being researched; TDK has already announced a four-layer 100 GB disc.
BD-RE (RE = REwritable)
The BD-RE (rewritable) standard is available, along with the BD-R (recordable) and BD-ROM formats, which became available in
mid-2004, as part of version 2.0 of the Blu-ray specifications. BD-ROM pre-recorded media are to be available by early 2006.
In addition to 12 cm discs, an 8 cm variation for use with camcorders is planned that will have a capacity of 15 GB.
To ensure that the Blu-ray Disc format is easily extendable (future-proof) it also includes support for multi-layer discs, which should
allow the storage capacity to be increased to 100GB/200GB (25GB per layer) in the future simply by adding more layers to the discs.
Blu-ray drives currently in production can transfer approximately 36 Mbit/s (54 Mbit/s for BD-ROM), but 2x speed prototypes with a 72
Mbit/s transfer rate are in development. Rates of 8x or more are planned for the future.
Because the Blu-ray standard places data so close to the surface of the disc, early discs were susceptible to dust and scratches and
had to be enclosed in plastic caddies for protection. The solution to this problem arrived in January 2004 with the introduction of a
clear polymer that gives Blu-ray discs unprecedented scratch resistance. The coating, developed by TDK Corporation under the name
"Durabis," allows BDs to be cleaned safely with only a tissue - a procedure that can damage CDs, DVDs. Bare BDs with the coating are
reportedly able to withstand attack by a screwdriver.
AVS4YOU Programs Help - Appendix
© Online Media Technologies Ltd., UK 2004 - 2009 All rights reserved. www.avs4you.com
Page 188 of 198

Glossary
A
AAC
Advanced Audio Coding. Standardized, lossy compression and encoding scheme for digital audio. AAC is promoted as the
successor to the MP3 format by MP3’s creator, Fraunhofer IIS. Depending on the encoder used, AAC generally achieves better
sound quality than MP3 at the same bitrate, particularly below 192 kbit/s. AAC’s most famous usage is as the default audio
format of Apple's iPhone, iPod, iTunes, and the format used for all iTunes Store audio (with extensions for proprietary Digital
Rights Management (DRM) where used). AAC is also the standard audio format for Sony’s PlayStation 3, the MPEG-4 video
standard, and HE-AAC is part of digital radio standards like DAB+ and Digital Radio Mondiale.
ADPCM
Adaptive differential pulse-code modulation. A technique for converting sound or analog information to binary information (a
string of 0's and 1's) by taking frequent samples of the sound and expressing the value of the sampled sound modulation in
binary terms. ADPCM is used to send sound on fiber-optic long-distance lines as well as to store sound along with text, images,
and code on a CD-ROM. This method of encoding sound data files takes up less storage space than the regular PCM format
used by WAV and AIFF files--and CD audio for that matter. ADPCM comes in more than one flavor: IMA's ADPCM, for example,
is used on the Sony Mini Disc to cram more data onto a smaller platter; Microsoft ADPCM is used as part of Windows 95's
canon of audio codecs.
AMR
Adaptive Multi-Rate. An audio data compression scheme optimized for speech coding. AMR was adopted as the standard
speech codec by 3GPP in October 1998 and is now widely used in GSM. It uses link adaptation to select from one of eight
different bit rates based on link conditions. AMR is also a file format for storing spoken audio using the AMR codec. Many
modern mobile telephone handsets will allow you to store short recordings in the AMR format, and some commercial programs
exist to convert between this and other formats such as MP3, although it should be remembered that AMR is a speech format
and is unlikely to give ideal results for other audio.
artifacts
Unusual or unwanted video distortion. Examples of artifacts include flicker, jitter, degradation of resolution, and aspect ratio
abnormalities.
aspect ratio
The aspect ratio is the relationship of screen width to height. Standard broadcast TV has a ratio of 4 to 3. Widescreen
commonly has a ratio of 16 to 9 (although 1.85:1 and 2.11:1 are also used). To show widescreen movies on a standard TV
screen, either letterbox (with black bars above and below the image) or 'pan and scan' (which crops the movie to fit the
screen) are common techniques.
audio feedback
A special kind of feedback which occurs when a sound loop exists between an audio input (for example, a microphone or
guitar pickup) and an audio output (for example, a loudspeaker). In this example, a signal received by the microphone is
amplified and passed out of the loudspeaker. The sound from the loudspeaker can then be received by the microphone again,
amplified further, and then passed out through the loudspeaker again. This is a good example of positive feedback. The
frequency of the resulting sound is determined by resonant frequencies in the microphone, amplifier, and loudspeaker, the
acoustics of the room, the directional pick-up and emission patterns of the microphone and loudspeaker, and the distance
between them.
AVI
Audio Video Interleave. The original Microsoft file format for Microsoft's Video for Windows standard. It is an audio video
standard designed by Microsoft and is apparently proprietary and Microsoft Windows specific. It is a format developed for
storing video and audio information. Files in this format have an .AVI extension. However, Video for Windows does not require
any special hardware, making it the lowest common denominator for multimedia applications.
AVS4YOU Programs Help - Appendix
© Online Media Technologies Ltd., UK 2004 - 2009 All rights reserved. www.avs4you.com
Page 189 of 198

B
B-frames
Bidirectional frames - frames used in MPEG-4 format that are compressed based on the frames before and after them. Have
the greatest compression ratio among all frame types. See B-VOPs codec settings section for more detail.
BD
Blu-ray Disc. A next-generation optical disc format meant for storage of high-definition video and high-density data. The Blu-ray
standard was jointly developed by a group of leading consumer electronics and PC companies called the Blu-ray Disc
Association (BDA), led by Sony and Philips. A single-layer Blu-ray disc (BD) can fit 23.3, 25, or 27 GB; this is enough for
approximately four hours of high-definition video with audio. A dual-layer BD can fit 46.6, 50, or 54 GB, enough for
approximately eight hours of HD video. Capacities of 100 GB and 200 GB, using four and eight layers respectively, are
currently being researched; TDK has already announced a four-layer 100 GB disc.
bandwidth
A network's capacity for transferring an amount of data in a given time.
bidirectional frames
See B-frames.
bit rate
The number of bits transferred per second.
brightness
The value of a pixel along the black-white axis.
B-VOPs
An option that allows the codec algorithm to use so called bidirectional frames that are much smaller in size than usual frames
and are predicted based on the frames before and after them.
C
capture
To record audio, video, or still images as digital data in a file.
capture device
Hardware that transfers audio and video from an external source, such as a VCR or camcorder, to a computer.
chapters
DVD discs can be split up into titles, and then further into chapters. For example, on a disc with multiple sporting events, each
event may be designated as a separate title. Each period in the individual sporting event or title may be designated a chapter.
chroma motion
An algorithm that lets the codec detect motion in an advanced way and calculate the possibility to additionally compress the
output file without the quality loss.
chroma optimizer
An algorithm used to produce a better impression of objects edges by reducing the noise around them.
clip
1. The audio, video, or still images within DVD discs. Clips are stored in collections.
2. The audio, video, or still images within AVS Video Editor.
clip creation
The process of detecting and splitting video content into separate clips.
codec
An abbreviation for COmpressor/DECompressor. Software or hardware used to compress and decompress digital media.
compression
A process for removing redundant data from a digital media file or stream to reduce its size or the bandwidth used.
content
Audio, video, images, text, or any other information that is contained in a digital media file or stream.
AVS4YOU Programs Help - Appendix
© Online Media Technologies Ltd., UK 2004 - 2009 All rights reserved. www.avs4you.com
Page 190 of 198

CSS
"Content Scramble System". The official DVD-Video digital encryption scheme.
D
data rate
The speed of a data transfer process, usually expressed in kilobytes (thousands of bytes) per second. See also bit rate.
DC Bias (DC offset)
An offsetting of a signal from zero. The term originated in electronics, where it refers to a direct current voltage, but the
concept has been extended to any representation of a waveform. DC offset is the mean amplitude of the waveform; if the
mean amplitude is zero, there is no DC offset. DC offset is usually undesirable. For example, in audio processing, a sound that
has DC offset will not be at its loudest possible volume when normalized (because the offset consumes headroom), and this
problem can possibly extend to the mix as a whole, since a sound with DC offset and a sound without DC offset will have DC
offset when mixed. It may also cause other artifacts depending on what is being done with the signal. DC offset can be
reduced in real-time by a one-pole one-zero high-pass filter. When one already has the entire waveform, subtracting the mean
amplitude from each sample will remove the offset if the offset is constant throughout the waveform. Otherwise, the high-pass
filter should be used.
decode
The process of converting the data on a DVD into the video image on the screen.
decompress
Convert video and audio data from a compressed form back into its original form.
delta frames
See P-frames.
digital video (DV)
Video images and sound stored in a digital format.
to download
To transfer a file over a network in response to a request from the device that receives the data. Downloaded content is kept
on the receiving device for playback on demand. In contrast, streamed content is played as it is delivered.
DVD
Digital Versatile Disc - an optical disc used to store information that has rather a large capacity as compared with usual CD's.
Needs special DVD drive to read such a disc.
E
encode
Convert video or audio into a compressed format.
F
FFT
Fast Fourier transform. An efficient algorithm to compute the discrete Fourier transform (DFT) and its inverse. FFTs are of
great importance to a wide variety of applications, from digital signal processing and solving partial differential equations to
algorithms for quick multiplication of large integers. The discrete Fourier transform, occasionally called the finite Fourier
transform, is a transform for Fourier analysis of finite-domain discrete-time signals. As with most Fourier analyses, it expresses
an input function in terms of a sum of sinusoidal components by determining the amplitude and phase of each component.
However, the DFT is distinguished by the fact that its input function is discrete and finite: the input to the DFT is a finite
sequence of real or complex numbers, which makes the DFT ideal for processing information stored in computers. In
particular, the DFT is widely employed in signal processing and related fields to analyze the frequencies contained in a sampled
signal, to solve partial differential equations, and to perform other operations such as convolutions. The DFT can be computed
efficiently in practice using a fast Fourier transform algorithm. Since FFT algorithms are so commonly employed to compute the
DFT, the two terms are often used interchangeably in colloquial settings, although there is a clear distinction: "DFT" refers to a
mathematical transformation, regardless of how it is computed, while "FFT" refers to any one of several efficient algorithms for
AVS4YOU Programs Help - Appendix
© Online Media Technologies Ltd., UK 2004 - 2009 All rights reserved. www.avs4you.com
Page 191 of 198

the DFT. This distinction is further blurred, however, by the synonym "finite Fourier transform" for the DFT, which apparently
predates the term "fast Fourier transform" but has the same initialism.
frame
One of many sequential images that make up video.
frame drop ratio
The percentage of frames that don't have any important information and thus can be dropped.
frame rate
The number of video frames displayed per second. Higher frame rates generally produce smoother movement in the picture.
frame size
The number of pixels that form the video image (horizontally/vertically).
full motion video
Content that shows 30 (interlaced) or 24 (film content) frames per second.
G
gain
A measure of the ability of a circuit to increase the amplitude or power of a signal. It is usually defined as the mean ratio of the
signal output of a system to the signal input of the same system. It may also be defined as the decimal logarithm of the same
ratio.
Thus, the term gain on its own is ambiguous. For example, 'a gain of five' may imply that either the voltage or the power is
increased by a factor of five.
global motion compensation
An algorithm that helps while coding the objects that only change their size or place in the picture but keep static.
GSM
An open file format designed for telphony use in Europe, GSM is a very practical format for telephone quality voice. It makes a
good compromise between file size and quality. Note that WAV files can also be encoded with the GSM codec.
H
HD DVD
High-Definition Digital Versatile Disc or High-Density Digital Versatile Disc is a high-density optical disc format designed for the
storage of data and high-definition video. HD DVD-ROM has a single-layer capacity of 15 GB, a dual-layer capacity of 30 GB,
and a 51 GB single-sided triple-layer disc (which uses slightly bigger 17 GB layers), approved in September 2007 by the DVD
Forum. However, the 51 GB spec is only a preliminary spec and compatibility with existing hardware is unknown at this time.
HD DVD-R and HD DVD-RW has a single-layer capacity of 15 GB, a dual-layer capacity of 30 GB.
HDD
Hard disk drive.
highlight
Activate or focus menu or selection. When the cursor is moved over an option on a DVD menu, that menu often changes
color. It is then "highlighted".
I
I-frames
Also called intraframes or keyframes - frames with a very small compression ratio used to form the base of the video picture.
See B-VOPs codec settings section for more detail.
import
The process of bringing existing digital audio, video, and still image files into AVS Video Converter or AVS Video Editor
programs.
AVS4YOU Programs Help - Appendix
© Online Media Technologies Ltd., UK 2004 - 2009 All rights reserved. www.avs4you.com
Page 192 of 198

interframes
See P-frames.
intraframes
See I-frames.
J
jitter
The smoothness of frame delivery over time.
K
keyframes
See I-frames.
L
letterboxing
The practice of transferring widescreen films to video formats while preserving the original aspect ratio.
LFO
Low-frequency oscillation. An audio signal usually below 20 Hz which creates a pulsating rhythm rather than an audible tone.
LFO predominantly refers to an audio technique specifically used in the production of electronic music. The abbreviation is also
very often used to refer to low-frequency oscillators themselves, which produce the effects explored in this article.
lumimasking
An algorithm used to apply more compression to very dark and very bright areas where it cannot be easily noticed by the
human eye.
M
M4A
M4A files are actually the audio layer of (non-video) MPEG-4 movies. M4A is slated to become the new standard for audio file
compression. This format is also known as Apple Lossless, Apple Lossless Encoder, or ALE. It is a new codec designed to
provide lossless encoding in less storage space.
matte (usually used in plural - mattes)
The masked-off areas above and below the picture area, used to maintain original aspect ratio when viewing video on the
screen with a different aspect ratio.
max consecutive B-VOPs
Maximum number of sequential bidirectional frames in the video stream.
max key interval
Maximum number of delta frames (interframes) between two keyframes (intraframes).
motion search type
An algorithm that allows the codec to search for the motions in the movie and better compress them with a higher quality.
MOV
A file extension for QuickTime Video Clip. QuickTime is a video and animation system developed by Apple Computer.
QuickTime is built into the Macintosh operating system and is used by most Mac applications that include video or animation.
PCs can also run files in QuickTime format, but they require a special QuickTime driver. QuickTime supports most encoding
formats, including Cinepak, JPEG, and MPEG. QuickTime is competing with a number of other standards, including AVI and
ActiveMovie. For more information see the Apple site and their Support page.
movie file
AVS4YOU Programs Help - Appendix
© Online Media Technologies Ltd., UK 2004 - 2009 All rights reserved. www.avs4you.com
Page 193 of 198

The file created by combining the audio, video, and still images contained in your project.
MP+
A Musepack music format, a popular high quality lossy compression that offers higher audio quality than MP3. Nowadays
Musepack audio files generally have the extension .mpc, but lots of files with the extension .mp+ still float around file sharing
networks. Musepack is based on the MPEG-1 Audio Layer 2 standard (MP2), but includes many improvements. It is believed by
audiophiles to be one of the highest quality lossy compressions available for music.
MP2
MPEG-1 Audio Layer II, sometimes Musicam. An audio codec defined by ISO/IEC 11172-3. An extension exists: MPEG-2 Layer
II and is defined in ISO/IEC 13818-3. The file extension for files containing such audio data is usually .mp2. While it has
largely been superseded by MP3 for PC and Internet applications, it remains a dominant standard for audio broadcasting as
part of the DAB digital radio and DVB digital television standards. It is also used internally within the radio industry, for
example in NPR's PRSS Content Depot programming distribution system.
MP3
MPEG-1 Audio Layer 3. An audio encoding format. It uses a lossy compression algorithm that is designed to greatly reduce the
amount of data required to represent the audio recording, yet still sound like a faithful reproduction of the original
uncompressed audio to most listeners. It was invented by a team of European engineers at Philips, CCETT (Centre commun
d'etudes de television et telecommunications), IRT and Fraunhofer Society, who worked in the framework of the EUREKA 147
DAB digital radio research program, and it became an ISO/IEC standard in 1991. MP3 is an audio-specific format. The
compression removes certain parts of sound that are outside the normal human hearing range so cannot be heard by the
listener. It provides a representation of pulse-code modulation — encoded audio in much less space than straightforward
methods, by using psychoacoustic models to discard components less audible to human hearing, and recording the remaining
information in an efficient manner. Using MP3-compression PC-users were able to compress an ordinary music-CD to one tenth
of its original size - thus 12 hours of music could be stored on a recordable CD that on the other hand could be played by a
MP3-CD-player or an ordinary PC.
MPEG
Moving Picture Experts Group. Gives excellent compression with little loss in quality of the video. MPEG supports three types of
data - video, audio and streaming. There are a number of standards: among them there are two flavors of MPEG available
today. MPEG-1 was designed to provide VHS video quality and CD audio quality at a combined data rate of 150 kilobytes per
second. MPEG-1 is displayed at 30 frames per second in a frame that is 352x240 (horizontal x vertical) pixels in size. This
allows relatively high quality video images to be stored in relatively small file sizes for playback across computer networks or
CD-ROM delivery. MPEG-2 is the other side of the compression coin. It is a broadcast standard specifying a playback size of
720 x 480 pixels at 60 fields per second. Data rates can range from 2 to 10 megabits per second. This means large file sizes
and data rates that require specialized hardware for playback. MPEG-2 is one of the core compression technologies for DVD.
See the MPEG site for more information.
MPEG-4
ISO/IEC open standard for video encoding developed by MPEG (Moving Picture Experts Group). It is characterized by a small
output video file size and quite good picture quality even when a relatively low bit rate is used. The most known resulting
output when you use MPEG-4 format for compression is the AVI file type which is commonly used in home video. It is coded
with Xvid, DivX, 3ivx, Nero Digital and other video codecs. Other file types can be found in the output file format section.
MSC
Devices that represent USB Mass Storage Device Class (MSC or UMS) are seen as a removable drive in the system and some
of them as a fixed drive.
MTP
Devices representing USB MTP device class use Media Transfer Protocol (MTP) supported by Microsoft Windows Media Player
10 and 11.
multimedia
Any format that contains more than one media, such as text, still images, sound, animation, and video.
N
navigation
Accessing the features of a DVD-Video disc.
AVS4YOU Programs Help - Appendix
© Online Media Technologies Ltd., UK 2004 - 2009 All rights reserved. www.avs4you.com
Page 194 of 198
NTSC
National Television Systems Committee. A committee of the Electronic Industries Association that prepared the standards for
commercial television broadcasting in the United States, Canada, Japan, and parts of Central and South America. The NTSC
format has 525 scan lines (rows) of resolution at frame rate of thirty frames per second.
O
OGG
An open standard for a free container format for digital multimedia, unrestricted by software patents and designed for efficient
streaming and manipulation. The development of the OGG standard began in 1993, then known as "Squish". It was designed
as a substitute for MP3 and WMA and by now it is almost as popular and well known as MP3. Above all, the algorithm is still
being developed what is mainly due to its flexibility. Although the sound-quality gets better with every further development the
files are backwards compatible and can be played with older players as well. Like MP3 OGG offers encoding at variable bitrates.
Using this compression parts of the song are encoded with a higher compression than others what depends on the source.
Most times, this compression goes along with squishy noises or even small interruptions. OGG is also one of the very few
formats that support multi-channel compression. Surround-files could theoretically be compressed with more than two
channels. OGG is, like it's predecessors, streamable and although the used player has to support this feature, it's one of many
good reasons for OGG.
output file
The file that is a result of conversion of a source file.
P
P-frames
Delta frames or interframes - frames used in MPEG-4 format to increase the compression ratio. A row of P-frames is placed
between two I-frames - thus the name interframes was given. See B-VOPs codec settings section for more detail.
PAL
Phase Alteration Line. This standard is used for commercial broadcasting in most of Europe, Australia, and parts of Central and
South America. PAL format displays at 625 scan lines (rows) of resolution at frame rate of 25 frames per second.
pillow boxing
The practice of transferring films having aspect ratio of 1.33:1 to wide screens while preserving the original aspect ratio.
pitch
The perceived fundamental frequency of a sound. While the actual fundamental frequency can be precisely determined
through physical measurement, it may differ from the perceived pitch because of overtones, or partials, in the sound. The
human auditory perception system may also have trouble distinguishing frequency differences between notes under certain
circumstances. According to ANSI acoustical terminology, it is the auditory attribute of sound according to which sounds can
be ordered on a scale from low to high.
pixel
Picture cell. This is the smallest independent unit of a digital image; similar to each dot on your monitor.
pixel depth
The number of bits of color information per pixel.
player
A program or device that displays multimedia content, typically animated images, video, and audio.
project file
The file created when you save the results of adding various clips to the workspace when you work with AVS Video Editor.
This file is saved with an .vep extension.
Q
QT
Apple Quick Time format for audio/video data.
AVS4YOU Programs Help - Appendix
© Online Media Technologies Ltd., UK 2004 - 2009 All rights reserved. www.avs4you.com
Page 195 of 198
quantizer
Detail removal factor (DRF), or the degree of picture blur due to details reduction. Used to allow picture compression.
quantizer offset
The offset used to calculate frames quantizer.
quantizer ratio
The ratio used to calculate frames quantizer.
R
to record
To capture audio, video, or still images as digital data in a file.
regional coding
Region code - the software protection used on DVD discs to prevent unauthorized playback of the discs made in one country to
be played in another country.
Most DVD-ROM drives let you change the region code a few times, usually between 0 and 5. Once a drive has reached the
limit it can't be changed again unless the vendor or manufacturer resets the drive. This limitation cannot be overridden.
There are 7 regions: (1) Canada, U.S., US Territories; (2) Europe, Japan, South Africa, Middle East (including Egypt); (3)
Southeast Asia, East Asia (including Hong Kong); (4) Australia, New Zealand, Pacific Islands, Central America, Mexico, South
America, Caribbean; (5) Former Soviet Union, Indian Subcontinent, Africa (also North Korea, Mongolia); (6) China and (7)
Transcontinental - used for watching DVD movies onboard the planes, ships and so forth.
resolution
See Frame size
RGB model
Color spectrum represented by mixing red, green, and blue (RGB) colored light in various proportions and intensities.
RM
Real Media streaming format for audio/video data. RealMedia provides one of the oldest and most widespread (85% of all
web-accessing computers have RealPlayer installed) Web delivery formats. The RealMedia files (.rm) can be viewed using
RealPlayer 3 and above. For more information see the RealNetworks site and their user information site.
root-mean-square
Abbreviated RMS or rms, also known as the quadratic mean, is a statistical measure of the magnitude of a varying quantity. It
is especially useful when variates are positive and negative, e.g. waves. It can be calculated for a series of discrete values or
for a continuously varying function. The name comes from the fact that it is the square root of the mean of the squares of the
values.
S
source
Audio and video content that can be captured and encoded from devices installed on your computer or from a file.
split
The process of dividing an audio or video clip into two parts.
still image
A graphic file, such as a .bmp, .gif, or .jpg.
storyboard
A view of the workspace that focuses on the sequencing of your clips (used in AVS Video Editor).
subtitle
Subtitles show the words being spoken on top of video content. They are often used for language translations.
AVS4YOU Programs Help - Appendix
© Online Media Technologies Ltd., UK 2004 - 2009 All rights reserved. www.avs4you.com
Page 196 of 198

SWF
Macromedia/Adobe Flash format, used to create video files that can be easily placed to your home page as they use not too
much space and are supported by most browsers (in case the necessary plugin is installed). See the Adobe web site for
more info on this format.
T
timeline
1. The area of the user interface that shows the timing and arrangement of files that make up a media file.
2. A view of the workspace that focuses on the timing of your clips.
titles
Video programs can be split up into titles, and then further into chapters. A good example of titles is when a DVD contains a
movie (one title), the trailer for the movie (a second title), and biographies of the actors (a third title), all on the same disc.
transition
The method of smoothly moving from one video clip or photo to another.
trim
Hiding parts of a file or clip without deleting them from the original source. Files and clips can be trimmed by adjusting the
start or end trim points. Used in AVS Video Editor.
U
UMS
Devices that represent USB Mass Storage Device Class (MSC or UMS) are seen as a removable drive in the system and some
of them as a fixed drive.
V
VBR
Variable bit rate. This allows DVD compression methods to use more or less compression according to the complexity of the
picture.
VHQ Mode
An algorithm that decides which format will be used to store motion vectors thus reducing the file size.
VOB
DVD video movie file. DVD is the new generation of optical disc storage technology. DVD is essentially a bigger, faster CD that
can hold cinema-like video, better-than-CD audio, still photos, and computer data. DVD aims to encompass home
entertainment, computers, and business information with a single digital format. It has replaced laserdisc, is well on the way to
replacing videotape and video game cartridges, and could eventually replace audio CD and CD-ROM. DVD has widespread
support from all major electronics companies, all major computer hardware companies, and all major movie and music
studios.
VOX
Dialogic ADPCM. An open file format optimized for storing digitized voice data at a low sampling rate. VOX files are most
commonly found in telephony applications, as well as an occasional arcade redemption game. Similar to other ADPCM formats,
it compresses to 4-bits. Unlike a WAV file, a VOX file does not contain a header to specify the encoding format or the sampling
rate, so this information must be known in order to play the file. If not known, it is normally assumed that a VOX file is
encoded with Dialogic ADPCM at a sampling rate of 8000Hz. It is possible that a VOX file may be encoded in a format other
than Dialogic ADPCM, but this is not common.
AVS4YOU Programs Help - Appendix
© Online Media Technologies Ltd., UK 2004 - 2009 All rights reserved. www.avs4you.com
Page 197 of 198

W
WAV/WAVE
Short for Waveform audio format, a Microsoft and IBM audio file format standard for storing audio on PCs. It is a variant of the
RIFF bitstream format method for storing data in "chunks", and thus also close to the IFF and the AIFF format used on Amiga
and Macintosh computers, respectively. It is the main format used on Windows systems for raw audio.
widescreen
Most TVs display in 4:3 ratio. Widescreen display shows you the same ratio that is used for movies, which is frequently 16:9.
If the title is being shown on a widescreen TV it can be shown in its original aspect ratio without the display of the black bars
above and below the image.
Windows Media file
A file containing audio, video, or script data that is stored in Windows Media Format. Depending on their content and purpose,
Windows Media files use a variety of file name extensions, such as: .wma, .wme, .wms, .wmv, .wmx, .wmz, or .wvx.
WMA
Windows Media Audio, an audio data compression technology developed by Microsoft. The name can be used to refer to its
audio file format or its audio codecs. It is a proprietary technology which forms part of the Windows Media framework. WMA
consists of four distinct codecs. The original WMA codec, known simply as WMA, was conceived as a competitor to the popular
MP3 and RealAudio codecs. It is the second most popular audio codec after MP3, based on the number of supported devices
researched by Jupiter Research. WMA Pro, a newer and more advanced codec, supports multichannel and high resolution
audio. A lossless codec, WMA Lossless, compresses audio data without loss of audio fidelity. And WMA Voice, targeted at voice
content, applies compression using a range of low bit rates.
WMV
Windows Media Video, Microsoft's new standard for audio and video which is closely tied with the Windows Operating System.
The player is able to play Windows Media Video (.wmv) and Advanced Streaming Format (.asf) files, and also other formats
such as QuickTime, AVI, MPEG and MP3. See the Windows Media site for more information.
workspace
The area of AVS Video Editor in which you create your movies. It consists of two views: storyboard and timeline, which act
as a container for work in progress.
AVS4YOU Programs Help - Appendix
© Online Media Technologies Ltd., UK 2004 - 2009 All rights reserved. www.avs4you.com
Page 198 of 198


