Embed Size (px)
Citation preview
AVSIM Online - Flight Simulation's Number 1 Site!
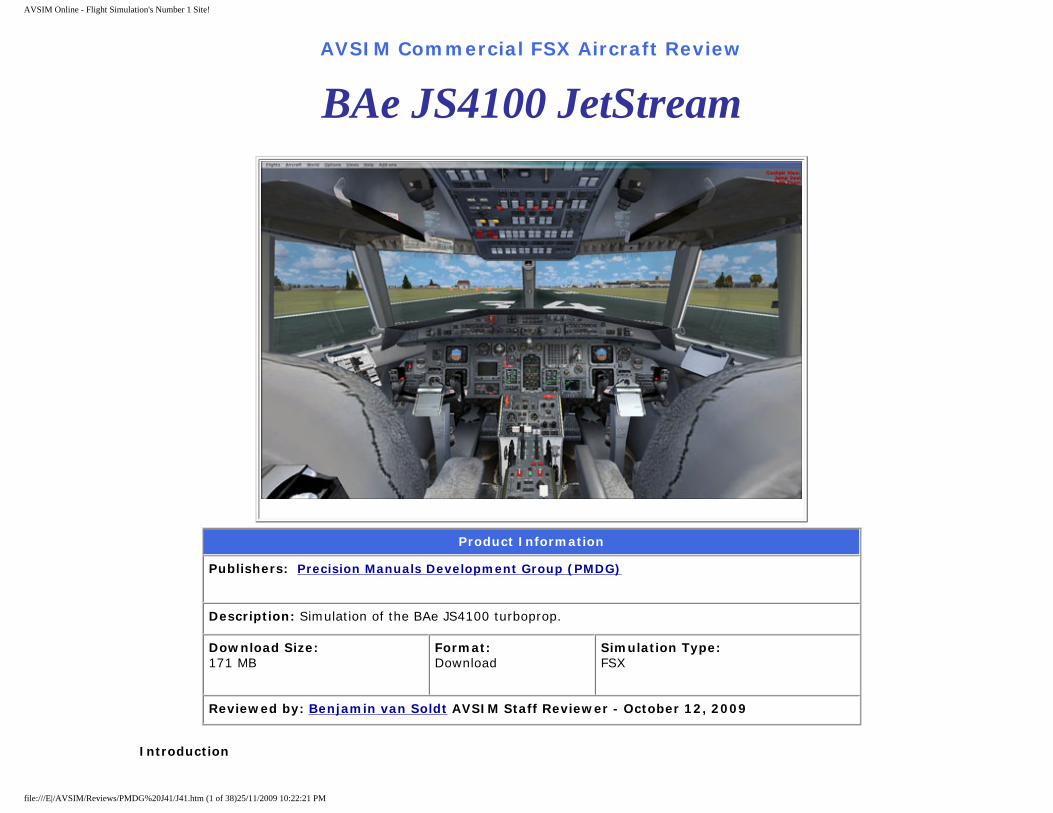
AVSIM Commercial FSX Aircraft Review
BAe JS4100 JetStream
Product Information
Publishers: Precision Manuals Development Group (PMDG)
Description: Simulation of the BAe JS4100 turboprop.
Download Size: 171 MB
Format: Download
Simulation Type: FSX
Reviewed by: Benjamin van Soldt AVSIM Staff Reviewer - October 12, 2009
Introduction
file:///E|/AVSIM/Reviews/PMDG%20J41/J41.htm (1 of 38)25/11/2009 10:22:21 PM
AVSIM Online - Flight Simulation's Number 1 Site!
There are many developers for Flight Simulator, but only a few are well known. One of these is PMDG, the developer of highly acclaimed add-ons like the older Boeing 737NG for FS2004, but also the Boeing 747 and MD-11 for both FS2004 and FSX. All of these are, as you see, jetliners.
But something happened. Their latest product is not a jetliner. It’s not even FS2004 compatible, and it doesn’t have a 2D cockpit: their latest product is a turboprop not that well known and not widely used. What other turboprop than the British Aerospace JS4100 Jetstream could I talk about? Indeed, of the operators that operate the JS4100 (to be called J41 hereafter), only British Airways, British Midland, Eastern Airways and Southwest Airlink are the most notable. For the rest, there are some smaller airlines, in South America for example, that operate this plane.
The J41 did not start out with BAe at all, actually. Handley Page was its “founding father” when it came up with the original Jetstream in the sixties: Jetstream 1. They designed this plane as a 12-seat regional liner and some US airlines placed orders even before the drawings were fully complete. Indeed, in the US this plane instantly became a hit, which was exactly what Handley Page needed. They didn’t have enough money to develop a new jetliner, but they wanted to stay independent from the other two big British aircraft companies (British Aircraft Corporation and Hawker Siddeley).
Needless to say, in 1968 the first Jetstream 1 flew, and 36 were delivered the following year, after which the Jetstream 2 closely followed it. This newer variant had a different engine, for the engines had proven to be a sore spot in the design. At first, the French Turboméca Astazou XIV engines were used, but the fifth prototype was fitted with Garrett AiResearch TPE-331 engines. This was enough to get the US Air Force to order some Jetstreams, but they cancelled their order in 1969, citing “late delivery”. The Jetstream had been fitted with bigger, more robust engines, in the end by Turboméca Astazou, and this was what merited the number change (from 1 to 2). Only two were produced though, and finally, Handley Page closed its doors in 1970.
The aircraft remained popular though, and it didn’t take long for investors and Scottish Aviation to team up and form a new company: Jetstream Aircraft. Together they produced several Jetstream 1s, and some more Jetstream 2s. Also trainer versions were made and subsequently ordered by the Royal Navy. Eventually, Scottish Aviation went bankrupt, and was merged into British Aerospace in 1978.
British Aerospace didn’t stop production either. They continued development of the plane with a new name: Jetstream “Mark 3”. This newer version was fitted with the Garrett engines, like the model that the US Air Force had ordered in 1968. In 1980, the “Mark 3”, or Jetstream 31, flew for the first time.
So how does the Jetstream 41 fit into the story? It is basically a stretched version of the 31. Furthermore, it sported updated avionics, the newer Garrett TPE331-14 engines and more seating (28 seats in a two-by-two arrangement).
And now we have this aircraft in FSX too. I will take you on a tour starting with the exterior model, after which we go through the interior model, panel, sounds, and finally we will be flying from London Heathrow to Birmingham to check out flight dynamics and the workings of various cockpit systems when in action. I conclude this review with an interview with the PMDG team and my final opinion about this add-on aircraft.
Installation and Documentation
Installation is easy and works in no different way than the installation of the majority of add-ons for FS. You click the installer, tell it where to install the plane, and it does it. To my surprise, there was no dialog box that prompted me to validate the key I had gotten, but after loading a flight in this aircraft and quickly noticing that FSX was, for some reason, not loading my flight, it was apparent this was the time to validate my key. And indeed: a small dialog box pops up (although sometimes it hides behind FSX. If you don’t see it, go to windowed mode and look for it!), asking you for
file:///E|/AVSIM/Reviews/PMDG%20J41/J41.htm (2 of 38)25/11/2009 10:22:21 PM
AVSIM Online - Flight Simulation's Number 1 Site!
your key. Validation went smooth for me, and soon I was sitting in my brand new cockpit.
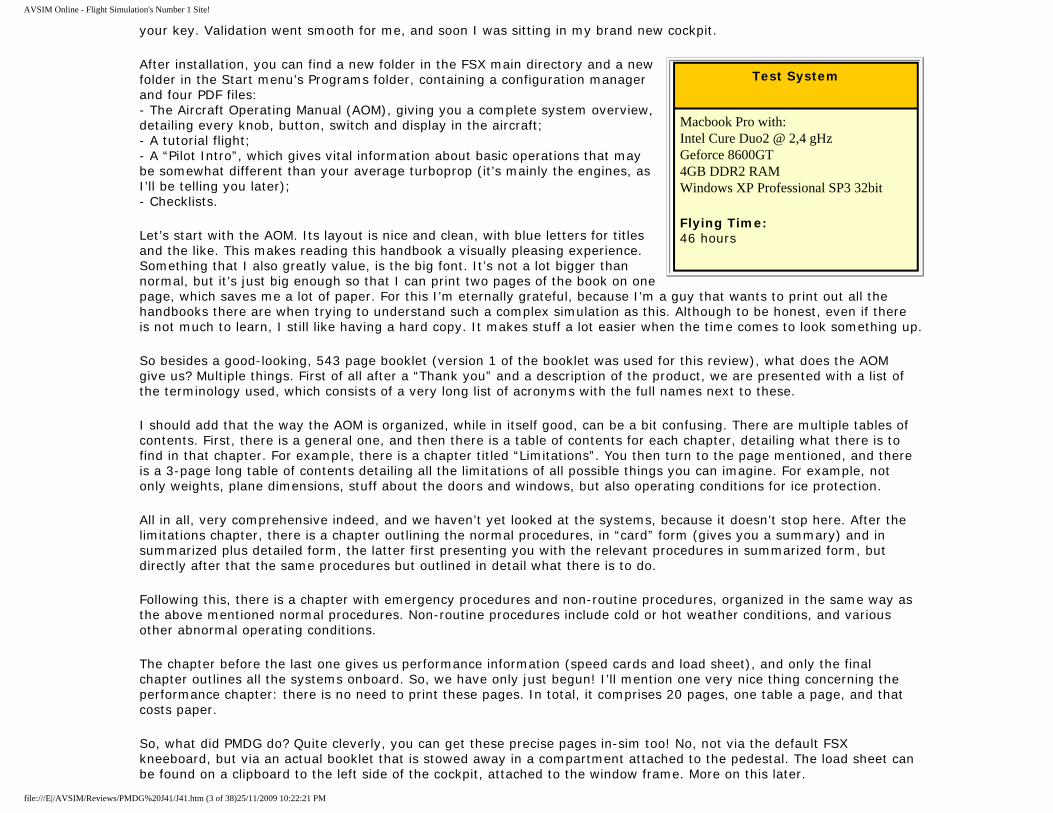
Test System
Macbook Pro with: Intel Cure Duo2 @ 2,4 gHz Geforce 8600GT 4GB DDR2 RAM Windows XP Professional SP3 32bit
Flying Time: 46 hours
After installation, you can find a new folder in the FSX main directory and a new folder in the Start menu’s Programs folder, containing a configuration manager and four PDF files: - The Aircraft Operating Manual (AOM), giving you a complete system overview, detailing every knob, button, switch and display in the aircraft; - A tutorial flight; - A “Pilot Intro”, which gives vital information about basic operations that may be somewhat different than your average turboprop (it’s mainly the engines, as I’ll be telling you later); - Checklists.
Let’s start with the AOM. Its layout is nice and clean, with blue letters for titles and the like. This makes reading this handbook a visually pleasing experience. Something that I also greatly value, is the big font. It’s not a lot bigger than normal, but it’s just big enough so that I can print two pages of the book on one page, which saves me a lot of paper. For this I’m eternally grateful, because I’m a guy that wants to print out all the handbooks there are when trying to understand such a complex simulation as this. Although to be honest, even if there is not much to learn, I still like having a hard copy. It makes stuff a lot easier when the time comes to look something up.
So besides a good-looking, 543 page booklet (version 1 of the booklet was used for this review), what does the AOM give us? Multiple things. First of all after a “Thank you” and a description of the product, we are presented with a list of the terminology used, which consists of a very long list of acronyms with the full names next to these.
I should add that the way the AOM is organized, while in itself good, can be a bit confusing. There are multiple tables of contents. First, there is a general one, and then there is a table of contents for each chapter, detailing what there is to find in that chapter. For example, there is a chapter titled “Limitations”. You then turn to the page mentioned, and there is a 3-page long table of contents detailing all the limitations of all possible things you can imagine. For example, not only weights, plane dimensions, stuff about the doors and windows, but also operating conditions for ice protection.
All in all, very comprehensive indeed, and we haven’t yet looked at the systems, because it doesn’t stop here. After the limitations chapter, there is a chapter outlining the normal procedures, in “card” form (gives you a summary) and in summarized plus detailed form, the latter first presenting you with the relevant procedures in summarized form, but directly after that the same procedures but outlined in detail what there is to do.
Following this, there is a chapter with emergency procedures and non-routine procedures, organized in the same way as the above mentioned normal procedures. Non-routine procedures include cold or hot weather conditions, and various other abnormal operating conditions.
The chapter before the last one gives us performance information (speed cards and load sheet), and only the final chapter outlines all the systems onboard. So, we have only just begun! I’ll mention one very nice thing concerning the performance chapter: there is no need to print these pages. In total, it comprises 20 pages, one table a page, and that costs paper.
So, what did PMDG do? Quite cleverly, you can get these precise pages in-sim too! No, not via the default FSX kneeboard, but via an actual booklet that is stowed away in a compartment attached to the pedestal. The load sheet can be found on a clipboard to the left side of the cockpit, attached to the window frame. More on this later.
file:///E|/AVSIM/Reviews/PMDG%20J41/J41.htm (3 of 38)25/11/2009 10:22:21 PM
AVSIM Online - Flight Simulation's Number 1 Site!
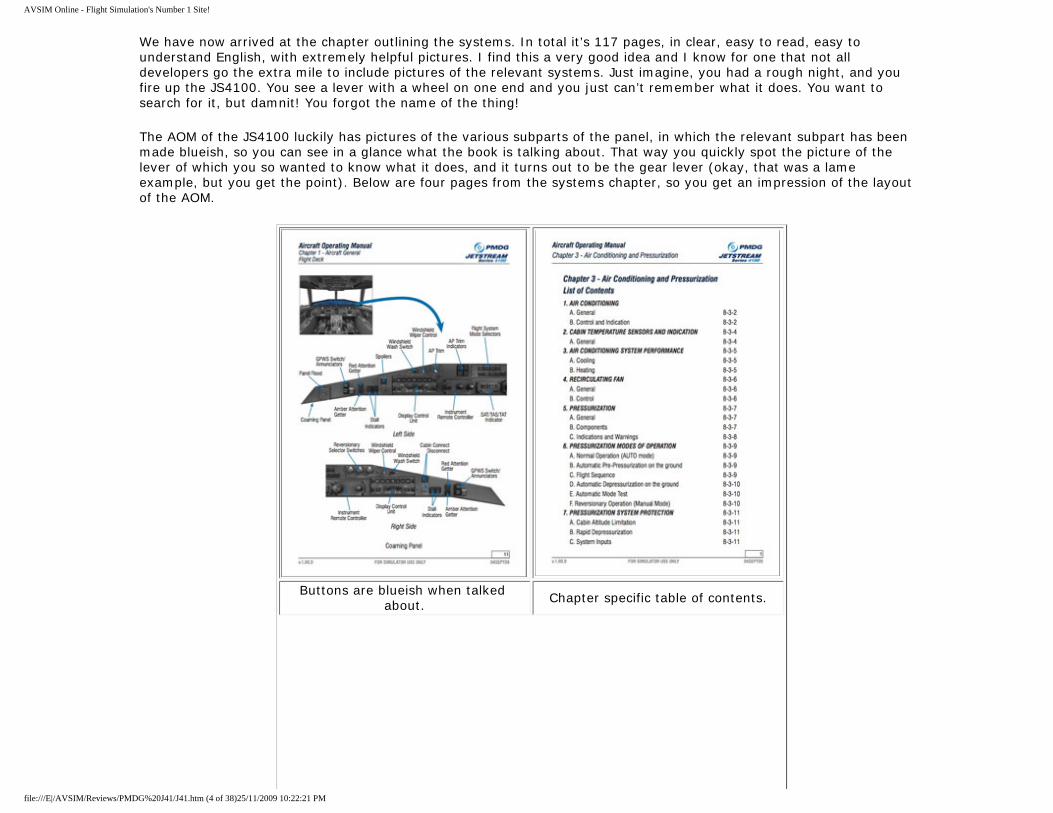
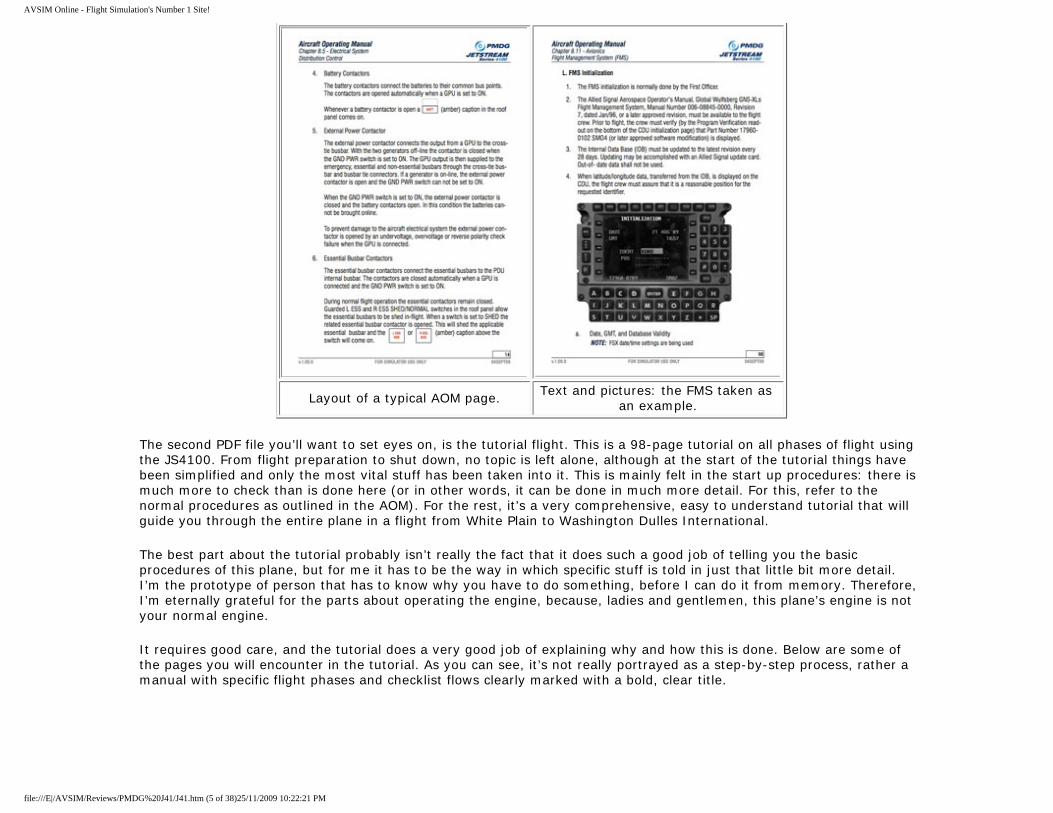
We have now arrived at the chapter outlining the systems. In total it’s 117 pages, in clear, easy to read, easy to understand English, with extremely helpful pictures. I find this a very good idea and I know for one that not all developers go the extra mile to include pictures of the relevant systems. Just imagine, you had a rough night, and you fire up the JS4100. You see a lever with a wheel on one end and you just can’t remember what it does. You want to search for it, but damnit! You forgot the name of the thing!
The AOM of the JS4100 luckily has pictures of the various subparts of the panel, in which the relevant subpart has been made blueish, so you can see in a glance what the book is talking about. That way you quickly spot the picture of the lever of which you so wanted to know what it does, and it turns out to be the gear lever (okay, that was a lame example, but you get the point). Below are four pages from the systems chapter, so you get an impression of the layout of the AOM.
Buttons are blueish when talked about. Chapter specific table of contents.
file:///E|/AVSIM/Reviews/PMDG%20J41/J41.htm (4 of 38)25/11/2009 10:22:21 PM
AVSIM Online - Flight Simulation's Number 1 Site!
Layout of a typical AOM page. Text and pictures: the FMS taken as an example.
The second PDF file you’ll want to set eyes on, is the tutorial flight. This is a 98-page tutorial on all phases of flight using the JS4100. From flight preparation to shut down, no topic is left alone, although at the start of the tutorial things have been simplified and only the most vital stuff has been taken into it. This is mainly felt in the start up procedures: there is much more to check than is done here (or in other words, it can be done in much more detail. For this, refer to the normal procedures as outlined in the AOM). For the rest, it’s a very comprehensive, easy to understand tutorial that will guide you through the entire plane in a flight from White Plain to Washington Dulles International.
The best part about the tutorial probably isn’t really the fact that it does such a good job of telling you the basic procedures of this plane, but for me it has to be the way in which specific stuff is told in just that little bit more detail. I’m the prototype of person that has to know why you have to do something, before I can do it from memory. Therefore, I’m eternally grateful for the parts about operating the engine, because, ladies and gentlemen, this plane’s engine is not your normal engine.
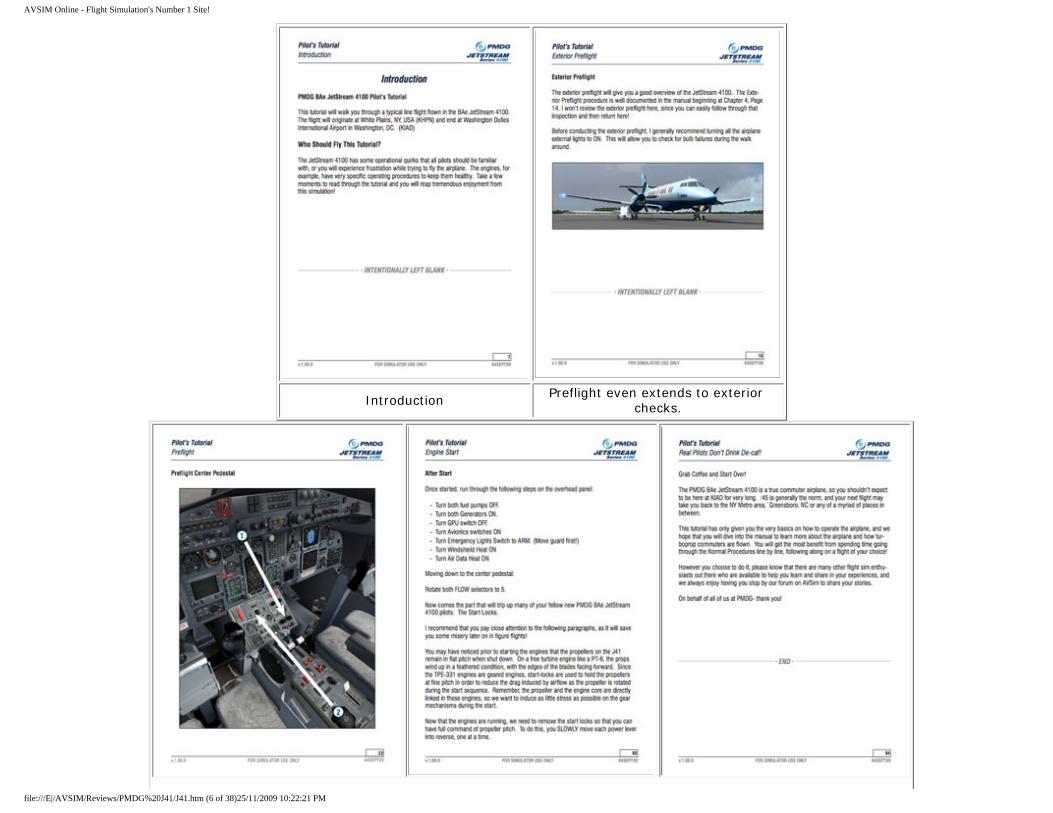
It requires good care, and the tutorial does a very good job of explaining why and how this is done. Below are some of the pages you will encounter in the tutorial. As you can see, it’s not really portrayed as a step-by-step process, rather a manual with specific flight phases and checklist flows clearly marked with a bold, clear title.
file:///E|/AVSIM/Reviews/PMDG%20J41/J41.htm (5 of 38)25/11/2009 10:22:21 PM
AVSIM Online - Flight Simulation's Number 1 Site!
Introduction Preflight even extends to exterior checks.
file:///E|/AVSIM/Reviews/PMDG%20J41/J41.htm (6 of 38)25/11/2009 10:22:21 PM
AVSIM Online - Flight Simulation's Number 1 Site!
Checking the pedestal during preflight. What to do after start. End of the tutorial. I recommend,
indeed, starting over!
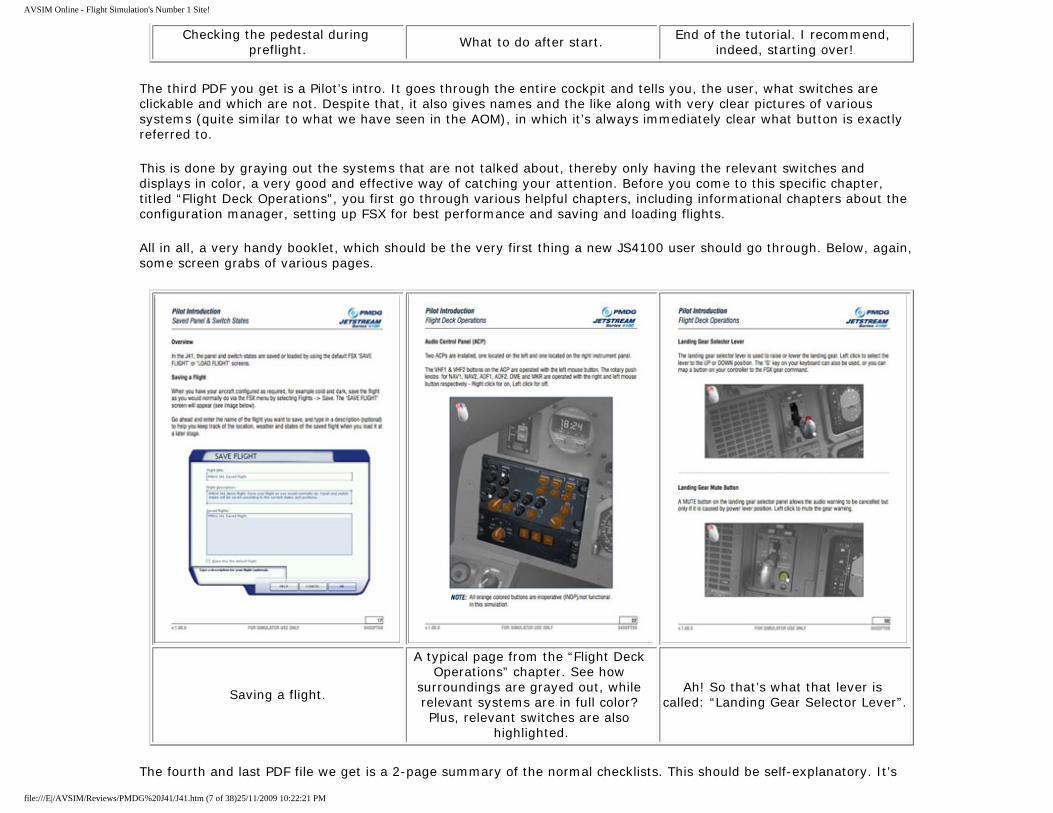
The third PDF you get is a Pilot’s intro. It goes through the entire cockpit and tells you, the user, what switches are clickable and which are not. Despite that, it also gives names and the like along with very clear pictures of various systems (quite similar to what we have seen in the AOM), in which it’s always immediately clear what button is exactly referred to.
This is done by graying out the systems that are not talked about, thereby only having the relevant switches and displays in color, a very good and effective way of catching your attention. Before you come to this specific chapter, titled “Flight Deck Operations”, you first go through various helpful chapters, including informational chapters about the configuration manager, setting up FSX for best performance and saving and loading flights.
All in all, a very handy booklet, which should be the very first thing a new JS4100 user should go through. Below, again, some screen grabs of various pages.
Saving a flight.
A typical page from the “Flight Deck Operations” chapter. See how
surroundings are grayed out, while relevant systems are in full color? Plus, relevant switches are also
highlighted.
Ah! So that’s what that lever is called: “Landing Gear Selector Lever”.
The fourth and last PDF file we get is a 2-page summary of the normal checklists. This should be self-explanatory. It’s
file:///E|/AVSIM/Reviews/PMDG%20J41/J41.htm (7 of 38)25/11/2009 10:22:21 PM
AVSIM Online - Flight Simulation's Number 1 Site!
short, concise and clear; precisely what such a checklist should be.
All in all, I hope to have given you a good impression of the quality of the included documentation. I for one am very pleased, and as small typos (didn’t spot a lot, though) and the like are taken out, it will get even better. Whatever happens, new pilots know this: you DO want to look at the tutorial. You can skip all other documentation, but the tutorial is a must-read!
The configuration manager
The configuration manager is a small, handy application, that lets you change some settings of the J41. Don’t think too much of it, because there really isn’t a lot to see. You can choose panel color (grey/metal or beige, I prefer the grey/metal), display quality and refresh rates of some of the gauges and that sort of thing. Don’t expect options like in the PMDG MD-11 or Boeing 747, though. While you can set some parameters, it’s by far not the as extensive as the configuration managers of earlier PMDG products, and can better be compared to the configuration manager of Flight1’s ATR 72, except you can’t load the plane with fuel or passengers – fuel is loaded onto the plane with the generic FS fuel loader, and passengers and payload is done with the interactive load sheet, which I will discuss soon.
All in all, this is a nice utility, with a good layout and easy to understand options. No problems here!
Now, time to go on to the actual plane.
Before starting: a few words
Before I start with the actual plane, let it be known: This plane is not for everybody! There are basic things in this plane that PMDG will not, and in my opinion should not have to do differently in any way. I have seen topics on the PMDG forums that kept asking for missing features that I don’t think PMDG really should be doing if they want to keep the JS4100 at the current price ($45).
These things include: - The lack of a full 2D panel. Currently, there is no full 2D panel, and PMDG has made it abundantly clear that there will not be a full 2D panel. This plane is strictly VC only, for one because VC is titled “the future”, but also because it cuts costs big-time according to PMDG. - Secondly, the FMS is not saved when saving the flight. All the other buttons are, though. I will go deeper into this later on, but suffice to say, FMS settings are not saved, and it will not be made so that it will be saved. This is a pity, but, as PMDG stated, it cuts costs not to do this, and keeps the plane payable (I admit, this is something I myself posted about, but nevertheless, I thought it important to mention here).
Now we’ve got that out of the way, time to start checking out the visuals of this fancy plane.
Exterior Model
Maybe you thought it too when you set your eyes on this plane for the first time, but my initial reaction was something along the lines of “Ugh, what an ugly plane that is…”. I can’t explain why, but the entire design of the plane seemed wrong. The nose is too long, the tail is weird, wings are somehow too small for the fuselage, and the engines seem clunky.
This isn’t PMDG’s fault: that’s just how the plane is: weird. It’s like a Russian plane in that respect: the plane is not
file:///E|/AVSIM/Reviews/PMDG%20J41/J41.htm (8 of 38)25/11/2009 10:22:21 PM

AVSIM Online - Flight Simulation's Number 1 Site!
tender, it’s made for work. Or so it seems. Because eventually, the more I flew the plane the more I appreciated the weird, long nose, and the more I liked the strange design of the tail. The fuselage seemed right and the wings are no longer not fitting.
The engines look great and powerful, and the way the windows are arranged and shaped is perfect for the type of plane. In a word, the plane’s fun. It looks fun. It looks like something that is designed for work, and while at first you may find it obnoxious, after a few hours you’ll see through that thick skin, and appreciate the greatness of the design.
So, now that I have convinced myself of the design of the plane, how did PMDG fare reproducing it? I’ll take you on a small tour, starting with an overview.
Apparent from the start is the good overall look of the model. There are no blocky parts or sharp edges. Everything seems as smooth as should be. The reflections of the windows are very nicely executed, giving them a true 3D look. Also, the passenger and pilots look good and they even are animated. You’ll often times notice the pilots move, looking around, flipping switches, and you’ll even see the passengers move their heads from time to time.
A photograph of a real life J41, in service of US Airways Express.
Photograph by Brad Harris.
The overall shape of the model I will compare to a real life version of this turboprop.
A first inspection tells us the model is a good look-alike. There are no obvious mistakes, and also the details seem correctly placed and modeled. Overall, a fine piece of work.
Looking a bit closer, there are things that strike me as a bit off, though it could be me or the settings of my FSX installation. For example, it seems to me that the passenger windows of the real plane are more round than the ones on PMDG’s model. Also the front most cockpit window seems to me like it’s bigger than the PMDG model makes us believe. Of course, these are but tiny details and I’m nitpicky here. To me that’s the best confirmation that I have been looking hard for something to complain about and when I’m looking hard for it, it means the work PMDG did is good.
For the rest, the shape of the fuselage is quite perfect, and there is nothing wrong. The actual dimensions of the plane seem to be spot on: length is good, width is good, and especially difficult to model parts, like the nose and tail, seem perfectly replicated. Indeed, in short, the entire fuselage is looking just great and I don’t have a lot to say about it. It simply looks stunning.
file:///E|/AVSIM/Reviews/PMDG%20J41/J41.htm (9 of 38)25/11/2009 10:22:21 PM
AVSIM Online - Flight Simulation's Number 1 Site!
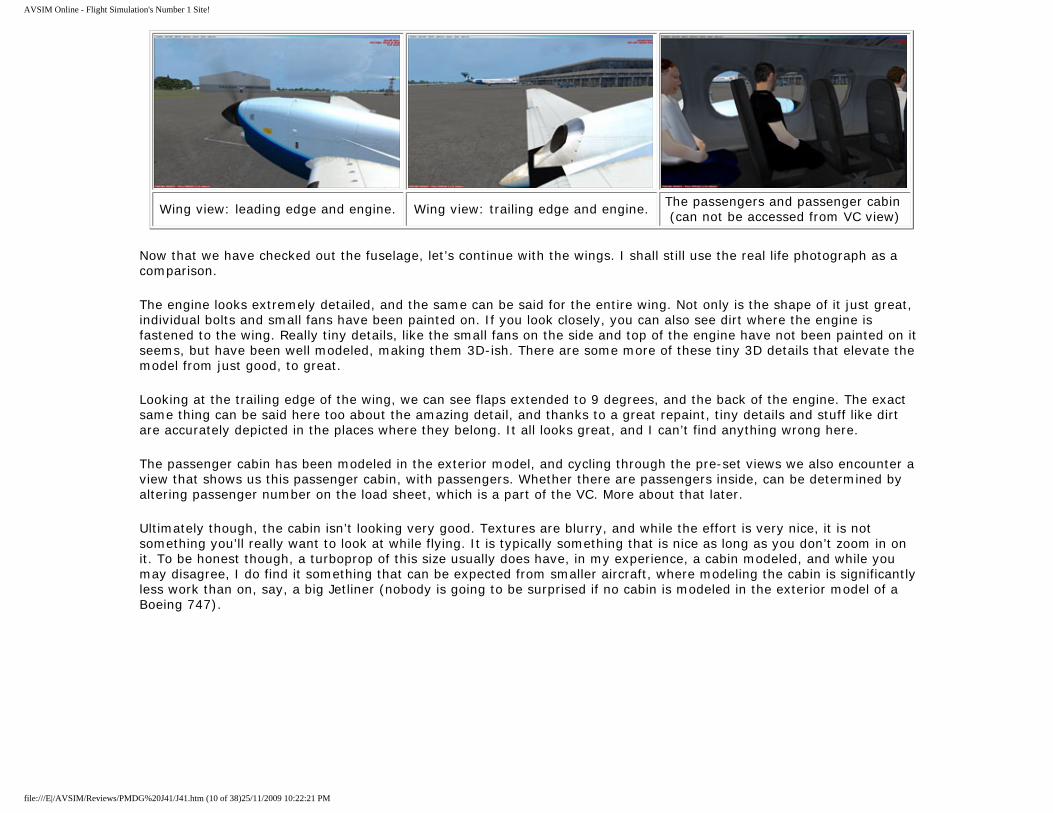
Wing view: leading edge and engine. Wing view: trailing edge and engine. The passengers and passenger cabin (can not be accessed from VC view)
Now that we have checked out the fuselage, let’s continue with the wings. I shall still use the real life photograph as a comparison.
The engine looks extremely detailed, and the same can be said for the entire wing. Not only is the shape of it just great, individual bolts and small fans have been painted on. If you look closely, you can also see dirt where the engine is fastened to the wing. Really tiny details, like the small fans on the side and top of the engine have not been painted on it seems, but have been well modeled, making them 3D-ish. There are some more of these tiny 3D details that elevate the model from just good, to great.
Looking at the trailing edge of the wing, we can see flaps extended to 9 degrees, and the back of the engine. The exact same thing can be said here too about the amazing detail, and thanks to a great repaint, tiny details and stuff like dirt are accurately depicted in the places where they belong. It all looks great, and I can’t find anything wrong here.
The passenger cabin has been modeled in the exterior model, and cycling through the pre-set views we also encounter a view that shows us this passenger cabin, with passengers. Whether there are passengers inside, can be determined by altering passenger number on the load sheet, which is a part of the VC. More about that later.
Ultimately though, the cabin isn’t looking very good. Textures are blurry, and while the effort is very nice, it is not something you’ll really want to look at while flying. It is typically something that is nice as long as you don’t zoom in on it. To be honest though, a turboprop of this size usually does have, in my experience, a cabin modeled, and while you may disagree, I do find it something that can be expected from smaller aircraft, where modeling the cabin is significantly less work than on, say, a big Jetliner (nobody is going to be surprised if no cabin is modeled in the exterior model of a Boeing 747).
file:///E|/AVSIM/Reviews/PMDG%20J41/J41.htm (10 of 38)25/11/2009 10:22:21 PM

AVSIM Online - Flight Simulation's Number 1 Site!
Wheels Under the plane. Under the plane: close up on details.
oving on, let’s take a look at the bottom of this plane. We stay on the ground to give the wheels a look, and after that I have sent the plane into the air so we can give the details of the fuselage another look.
The wheels are very well modeled, and the texturing looks even better. Just look at that nose wheel: the round parts have been made perfectly round, it seems. There is some great detail in there! Look at the modeling of those tires: the shaping has been done amazingly well, no matter from what side you look at it. In whatever way, it is done very well.
What especially caught my eye here is the texturing of the gear strut. It’s not simply grey, or overly shiny, but it is just as it should be. Also the lights look very well modeled, although the two upper ones texturing could have been a bit better. This is really just me being nitpicky, because in general this looks awesome. The same goes for the hind gear, which can be better seen on one of the first three exterior screenshots. You’ll notice electrical wires running down the gear struts that have been modeled in a very lifelike fashion. When comparing it to the real life photograph, it is just about perfectly replicated.
Now up in the air, we can give the bottom of this fuselage a better look. The same conclusion can be drawn here as with the other parts we looked at: the replication has been done accurately. The final screenshot of the above series shows all the tiny details, in the forms of small antennae, that all seem to be placed accurately.
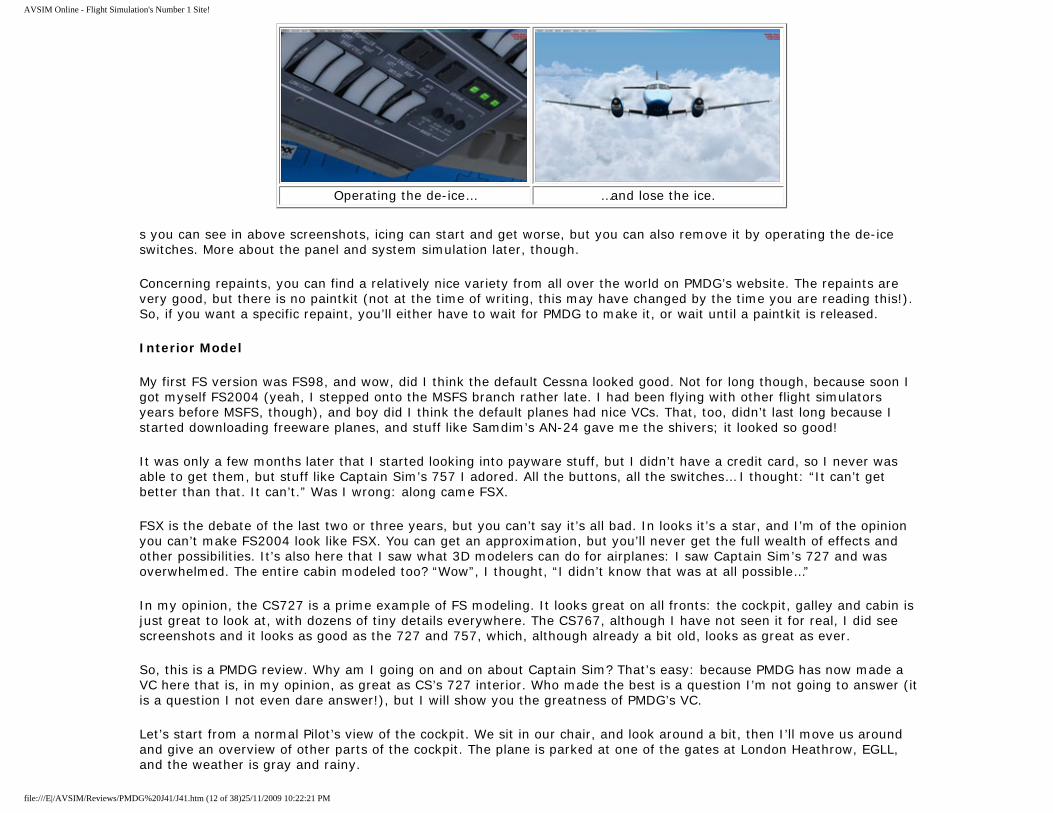
All in all, this looks great. A very good exterior model indeed! There is just one thing that drew my attention, and that is the icing effects on the fuselage and propellers:
Icing of the nose in early stage. Icing gets gradually worse. A warning will appear in the cockpit.
file:///E|/AVSIM/Reviews/PMDG%20J41/J41.htm (11 of 38)25/11/2009 10:22:21 PM
AVSIM Online - Flight Simulation's Number 1 Site!
Operating the de-ice… …and lose the ice.
s you can see in above screenshots, icing can start and get worse, but you can also remove it by operating the de-ice switches. More about the panel and system simulation later, though.
Concerning repaints, you can find a relatively nice variety from all over the world on PMDG’s website. The repaints are very good, but there is no paintkit (not at the time of writing, this may have changed by the time you are reading this!). So, if you want a specific repaint, you’ll either have to wait for PMDG to make it, or wait until a paintkit is released.
Interior Model
My first FS version was FS98, and wow, did I think the default Cessna looked good. Not for long though, because soon I got myself FS2004 (yeah, I stepped onto the MSFS branch rather late. I had been flying with other flight simulators years before MSFS, though), and boy did I think the default planes had nice VCs. That, too, didn’t last long because I started downloading freeware planes, and stuff like Samdim’s AN-24 gave me the shivers; it looked so good!
It was only a few months later that I started looking into payware stuff, but I didn’t have a credit card, so I never was able to get them, but stuff like Captain Sim’s 757 I adored. All the buttons, all the switches… I thought: “It can’t get better than that. It can’t.” Was I wrong: along came FSX.
FSX is the debate of the last two or three years, but you can’t say it’s all bad. In looks it’s a star, and I’m of the opinion you can’t make FS2004 look like FSX. You can get an approximation, but you’ll never get the full wealth of effects and other possibilities. It’s also here that I saw what 3D modelers can do for airplanes: I saw Captain Sim’s 727 and was overwhelmed. The entire cabin modeled too? “Wow”, I thought, “I didn’t know that was at all possible…”
In my opinion, the CS727 is a prime example of FS modeling. It looks great on all fronts: the cockpit, galley and cabin is just great to look at, with dozens of tiny details everywhere. The CS767, although I have not seen it for real, I did see screenshots and it looks as good as the 727 and 757, which, although already a bit old, looks as great as ever.
So, this is a PMDG review. Why am I going on and on about Captain Sim? That’s easy: because PMDG has now made a VC here that is, in my opinion, as great as CS’s 727 interior. Who made the best is a question I’m not going to answer (it is a question I not even dare answer!), but I will show you the greatness of PMDG’s VC.
Let’s start from a normal Pilot’s view of the cockpit. We sit in our chair, and look around a bit, then I’ll move us around and give an overview of other parts of the cockpit. The plane is parked at one of the gates at London Heathrow, EGLL, and the weather is gray and rainy.
file:///E|/AVSIM/Reviews/PMDG%20J41/J41.htm (12 of 38)25/11/2009 10:22:21 PM
AVSIM Online - Flight Simulation's Number 1 Site!
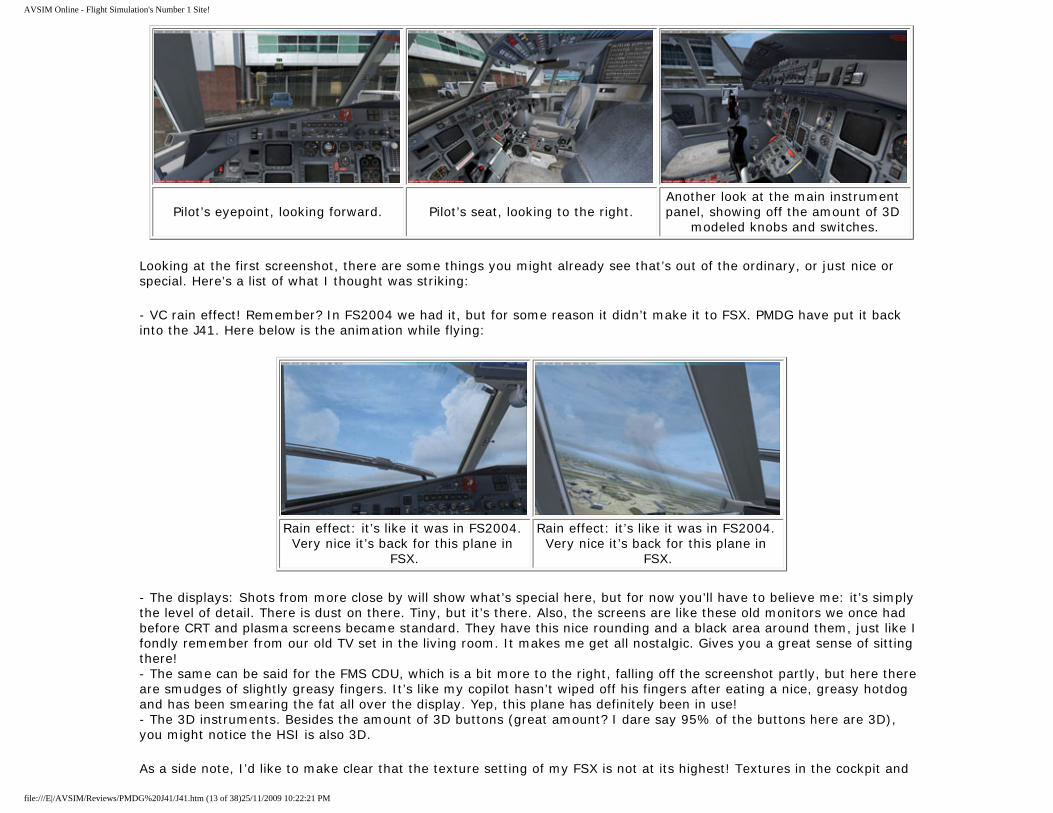
Pilot’s eyepoint, looking forward. Pilot’s seat, looking to the right.Another look at the main instrument panel, showing off the amount of 3D
modeled knobs and switches.
Looking at the first screenshot, there are some things you might already see that’s out of the ordinary, or just nice or special. Here’s a list of what I thought was striking:
- VC rain effect! Remember? In FS2004 we had it, but for some reason it didn’t make it to FSX. PMDG have put it back into the J41. Here below is the animation while flying:
Rain effect: it’s like it was in FS2004. Very nice it’s back for this plane in
FSX.
Rain effect: it’s like it was in FS2004. Very nice it’s back for this plane in
FSX.
- The displays: Shots from more close by will show what’s special here, but for now you’ll have to believe me: it’s simply the level of detail. There is dust on there. Tiny, but it’s there. Also, the screens are like these old monitors we once had before CRT and plasma screens became standard. They have this nice rounding and a black area around them, just like I fondly remember from our old TV set in the living room. It makes me get all nostalgic. Gives you a great sense of sitting there! - The same can be said for the FMS CDU, which is a bit more to the right, falling off the screenshot partly, but here there are smudges of slightly greasy fingers. It’s like my copilot hasn’t wiped off his fingers after eating a nice, greasy hotdog and has been smearing the fat all over the display. Yep, this plane has definitely been in use! - The 3D instruments. Besides the amount of 3D buttons (great amount? I dare say 95% of the buttons here are 3D), you might notice the HSI is also 3D.
As a side note, I’d like to make clear that the texture setting of my FSX is not at its highest! Textures in the cockpit and
file:///E|/AVSIM/Reviews/PMDG%20J41/J41.htm (13 of 38)25/11/2009 10:22:21 PM
AVSIM Online - Flight Simulation's Number 1 Site!
on all other screenshots you will be seeing are what they are, because my computer can’t handle any higher settings!
Let’s continue on our tour of the VC now. We look to the right, and we see… a hell of a lot of detail. The smallest details seem to be in there. All the gauges look perfect: sharp and easy to read. The modeling of the knobs, switches, buttons, seats, control yokes… it’s all just great. The texturing is also very good, even though my settings are not at their max. Just look at that copilot’s seat. The sharpness of the textures is staggering, and you’ve got to love the attention to detail that was given to the windows frames. You can really see how the glass was put into the frame.
Also look down, under the seats: the mechanisms to change seat height and position seem to have been replicated to the last detail, and the same goes for the back area, which contains a large panel full of tiny buttons. So okay, that’s a texture and not a 3D modeling, but it’s nevertheless a great looking thing.
The final screenshot in the above series attempts to give you some sense of the amount of 3D modeled switches, knobs and buttons on the main instrument panel. Not just buttons and such, but also the screens and separate panels (take the enunciator panel, for example, which is the big “block” of tiny black rectangles). It’s not just 3D, it’s also textured beautifully, which makes the respective button, panel, etc., not only stand out, but also dissolve into the bigger picture. This is a good thing.
I remember add-ons that had rather plain texturing on the main instrument panel, whereas a lot was 3D modeled. These parts were nicely textured. The result you got, was a drab background, on which various panels, knobs and buttons, seemed to have been stuck with glue, giving the entire panel a very “plastic” look. This is definitely not the case here. The J41 panel, as presented here, looks like a genuinely often used block of instrumentation. A very good job, in my opinion.
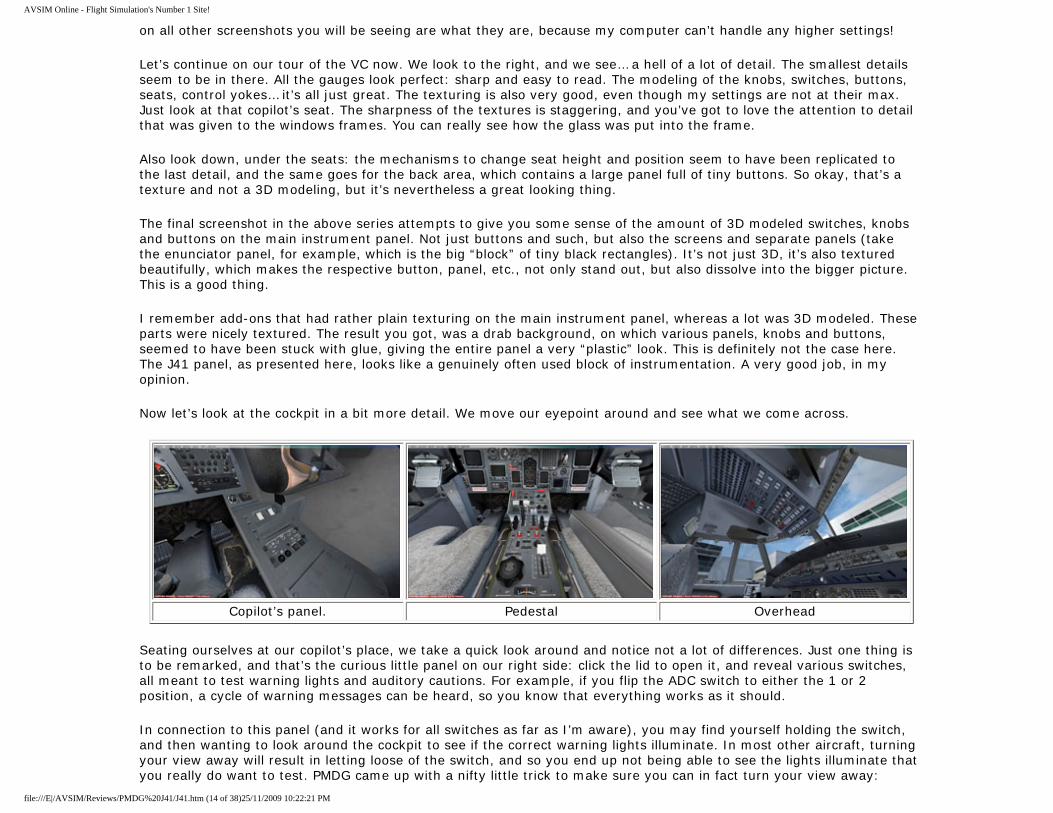
Now let’s look at the cockpit in a bit more detail. We move our eyepoint around and see what we come across.
Copilot’s panel. Pedestal Overhead
Seating ourselves at our copilot’s place, we take a quick look around and notice not a lot of differences. Just one thing is to be remarked, and that’s the curious little panel on our right side: click the lid to open it, and reveal various switches, all meant to test warning lights and auditory cautions. For example, if you flip the ADC switch to either the 1 or 2 position, a cycle of warning messages can be heard, so you know that everything works as it should.
In connection to this panel (and it works for all switches as far as I’m aware), you may find yourself holding the switch, and then wanting to look around the cockpit to see if the correct warning lights illuminate. In most other aircraft, turning your view away will result in letting loose of the switch, and so you end up not being able to see the lights illuminate that you really do want to test. PMDG came up with a nifty little trick to make sure you can in fact turn your view away:
file:///E|/AVSIM/Reviews/PMDG%20J41/J41.htm (14 of 38)25/11/2009 10:22:21 PM
AVSIM Online - Flight Simulation's Number 1 Site!
simply hold down your mouse button (thereby “clicking” the switch), and now drag your mouse away, in any direction. The switch will stay put, and you can look around the cockpit. To deactivate the switch, simply click on it again. And by the way, all warning tests work.
We now move our view to the pedestal. As you can see, there is not a lot on here. At the far end we see pressurization related stuff, including some anti-ice and other miscellaneous stuff. Then, the engine power and condition levers (there is no spoiler lever! To activate the spoilers, you simply flip the “Spoiler Arm” switch on the main instrument panel. A pilot can’t manually extend and retract the spoilers on this plane). Furthermore there are the autopilot commands, and finally trim related knobs and the flap handle. All of it is reproduced in careful detail, with beautiful detail.
The overhead is a similar case. Everything here is 3D and beautifully textured, with some special mouse settings, so you can easily and comfortably use the knobs, switches and buttons included. Animations of these buttons are very nice and the sounds are equally good. All in all, a beautiful looking overhead.
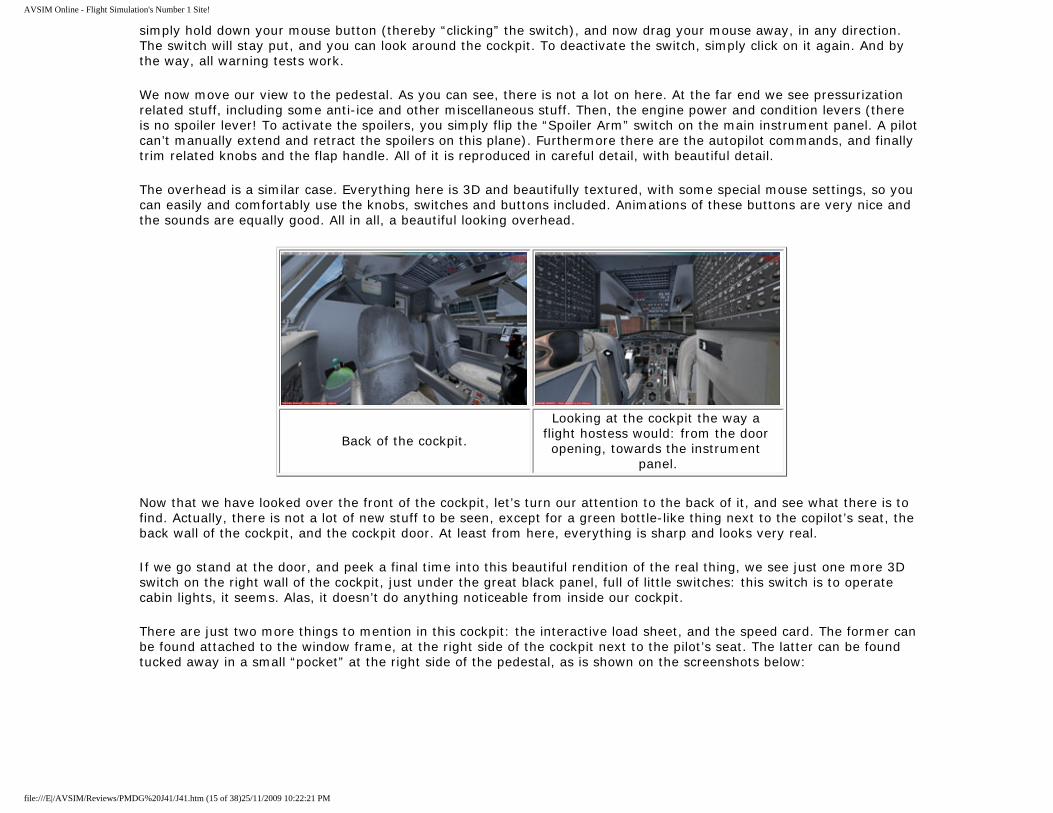
Back of the cockpit.
Looking at the cockpit the way a flight hostess would: from the door opening, towards the instrument
panel.
Now that we have looked over the front of the cockpit, let’s turn our attention to the back of it, and see what there is to find. Actually, there is not a lot of new stuff to be seen, except for a green bottle-like thing next to the copilot’s seat, the back wall of the cockpit, and the cockpit door. At least from here, everything is sharp and looks very real.
If we go stand at the door, and peek a final time into this beautiful rendition of the real thing, we see just one more 3D switch on the right wall of the cockpit, just under the great black panel, full of little switches: this switch is to operate cabin lights, it seems. Alas, it doesn’t do anything noticeable from inside our cockpit.
There are just two more things to mention in this cockpit: the interactive load sheet, and the speed card. The former can be found attached to the window frame, at the right side of the cockpit next to the pilot’s seat. The latter can be found tucked away in a small “pocket” at the right side of the pedestal, as is shown on the screenshots below:
file:///E|/AVSIM/Reviews/PMDG%20J41/J41.htm (15 of 38)25/11/2009 10:22:21 PM
AVSIM Online - Flight Simulation's Number 1 Site!
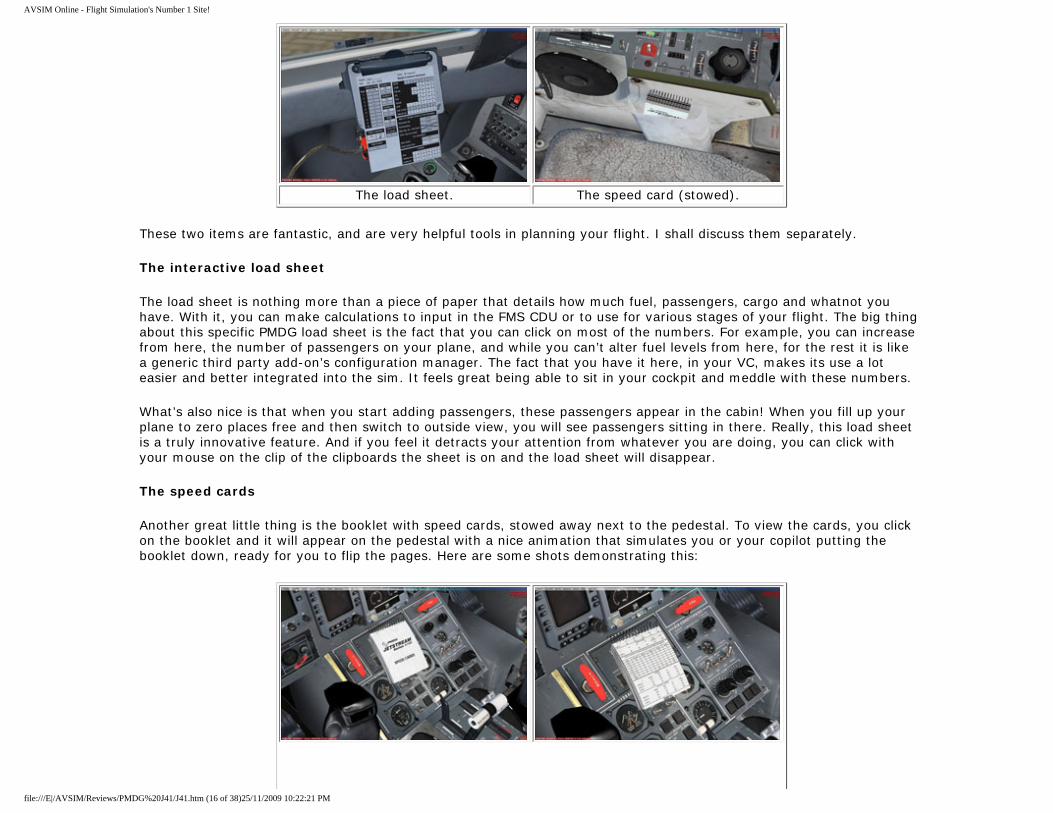
The load sheet. The speed card (stowed).
These two items are fantastic, and are very helpful tools in planning your flight. I shall discuss them separately.
The interactive load sheet
The load sheet is nothing more than a piece of paper that details how much fuel, passengers, cargo and whatnot you have. With it, you can make calculations to input in the FMS CDU or to use for various stages of your flight. The big thing about this specific PMDG load sheet is the fact that you can click on most of the numbers. For example, you can increase from here, the number of passengers on your plane, and while you can’t alter fuel levels from here, for the rest it is like a generic third party add-on’s configuration manager. The fact that you have it here, in your VC, makes its use a lot easier and better integrated into the sim. It feels great being able to sit in your cockpit and meddle with these numbers.
What’s also nice is that when you start adding passengers, these passengers appear in the cabin! When you fill up your plane to zero places free and then switch to outside view, you will see passengers sitting in there. Really, this load sheet is a truly innovative feature. And if you feel it detracts your attention from whatever you are doing, you can click with your mouse on the clip of the clipboards the sheet is on and the load sheet will disappear.
The speed cards
Another great little thing is the booklet with speed cards, stowed away next to the pedestal. To view the cards, you click on the booklet and it will appear on the pedestal with a nice animation that simulates you or your copilot putting the booklet down, ready for you to flip the pages. Here are some shots demonstrating this:
file:///E|/AVSIM/Reviews/PMDG%20J41/J41.htm (16 of 38)25/11/2009 10:22:21 PM

AVSIM Online - Flight Simulation's Number 1 Site!
When clicking on the booklet as showed on the screenshot above, the booklet disappears, and with a nice “putting down” animation, appears
on the pedestal. If you now right click on the booklet, you can flip through
the cards. Left click to go back through the cards.
After clicking on the booklet, this is what you see: a normal speed card, showing you everything you need.
So why is this thing great? A number of reasons: 1) It adds realism to the plane; 2) You don’t spend 20 pages printing out the speed cards yourself - every time you need to check your speeds, you just look it up in the booklet: very easy and very cleverly done!
As an added bonus, the VC comes in two styles: grey and beige. You can set which cockpit color you want in the configuration manager. Also, the way you control the gauges does need a bit of getting used to, because just about every person who normally works on computers will feel that left clicking is the main thing and right clicking is just an alternative that gives you extra functions. In the J41, is almost the other way around: right clicking makes a setting go up, or a page in a booklet flip forward, and left clicking will do the opposite. So, if you want to go forward, you have to right click. I had to get used to this and memorize it, and I still find myself doing it wrong now and then.
In essence, this way of doing it is intuitive. Just think about it: when you flip the page of a book, you go to the right, not to the left. When you turn a knob to increase a setting, you turn it to the right, not to the left. So think of it this way, and all will be alright. Still, you might need to get used to it, but you will in the end.
And this concludes the part about the Virtual Cockpit. Next up: the panel!
Panel
The heart of any FS add-on, is the system simulation. Depending on the add-on, more or less time is spent perfecting the system simulation. This can be seen with products like Airsimmer’s A320 add-on that has been in development for a very long time, mostly because of the insanely detailed (or so it seems) system simulation.
Of PMDG we know we usually get a top notch system simulation. Their 737, 747 and MD-11 are all jam-packed with innovative features and highly realistic systems that work as they do in real life, the only exception being their Beechcraft plane, which is lighter than the other planes. The question to be answered now: Is the J41 as heavily simulated, and hard to learn, as the other planes? The answer is a mixed bag: yes and no.
It really depends on what you term as “complicated”, “difficult” or “hard”. In my opinion, this aircraft is not very hard to learn. Why not? Mostly because there simply isn’t a lot to know in the classic sense: this is a rather simple plane, compared to the heavies, like the Boeing 747 and MD-11.
The differences are not necessarily because the J41 is so small, but because it serves a different purpose: it is a small regional turboliner. You don’t have to cross the Atlantic with it. It has an FMS, autopilot and all the normal things you’d expect. What it does not have, is a huge overhead filled with tiny buttons. It also has no autothrottle. For the rest, the cockpit is surprisingly simplistic: a lot of analog gauges are spread out across the main instrument panel, as can be seen from the VC screenshots.
file:///E|/AVSIM/Reviews/PMDG%20J41/J41.htm (17 of 38)25/11/2009 10:22:21 PM
AVSIM Online - Flight Simulation's Number 1 Site!
There are some screens, but these don’t even seem to be LCD screens like in modern jetliners. Just look closely. You’ll notice how the screens are rounded at the sides, just like an old TV screen. Of course, the type of screen doesn’t say much about the systems of a plane (just look at a Concorde cockpit!), but what it does tell us, is that it’s not really a state of the art plane and so we don’t have to expect all the latest technologies, which require learning.
Don’t get me wrong though. While I think this plane is a lot easier to understand than the PMDG 747 or MD-11, you still need to study it! There are some things that, if you don’t get it right, will make you go down in smoke. Go look at the forums and you’ll see what I mean: dozens of people complaining about them not understanding how to operate the engines. You have to get it right, or otherwise you might as well not take off.
You also need some time to get used to the A/P and FMC, while probably easier to understand than the PMDG MD-11 A/P, they still work a bit differently than your average A/P and FMC. So okay, the A/P isn’t such a problem but the FMC CDU has a very different layout from Boeing or Airbus FMC CDUs. Luckily for us, we have a very good tutorial that will take you by the hand and explain the basics. In my opinion, if you do the tutorial flight twice, you should be able to do a simple flight.
To perfect your skills, do it several times more. Even do a self-planned flight, but use the tutorial as a guide. That will get you up and running pretty soon, because, and I’ll say it again: I don’t think this plane is very complicated, or hard to understand! (As a disclaimer, this is just my opinion, for others and maybe for you too, this plane is hell…)
Not hard to understand, I say. I even say “not complicated”, but is this really the case? In practice, not at all. For the pilot, I think this plane is not complicated, but that doesn’t mean the system simulation wasn’t masterfully done. Yes indeed, from a simulation perspective, the systems are complicated; they are simply not that complicated to understand.
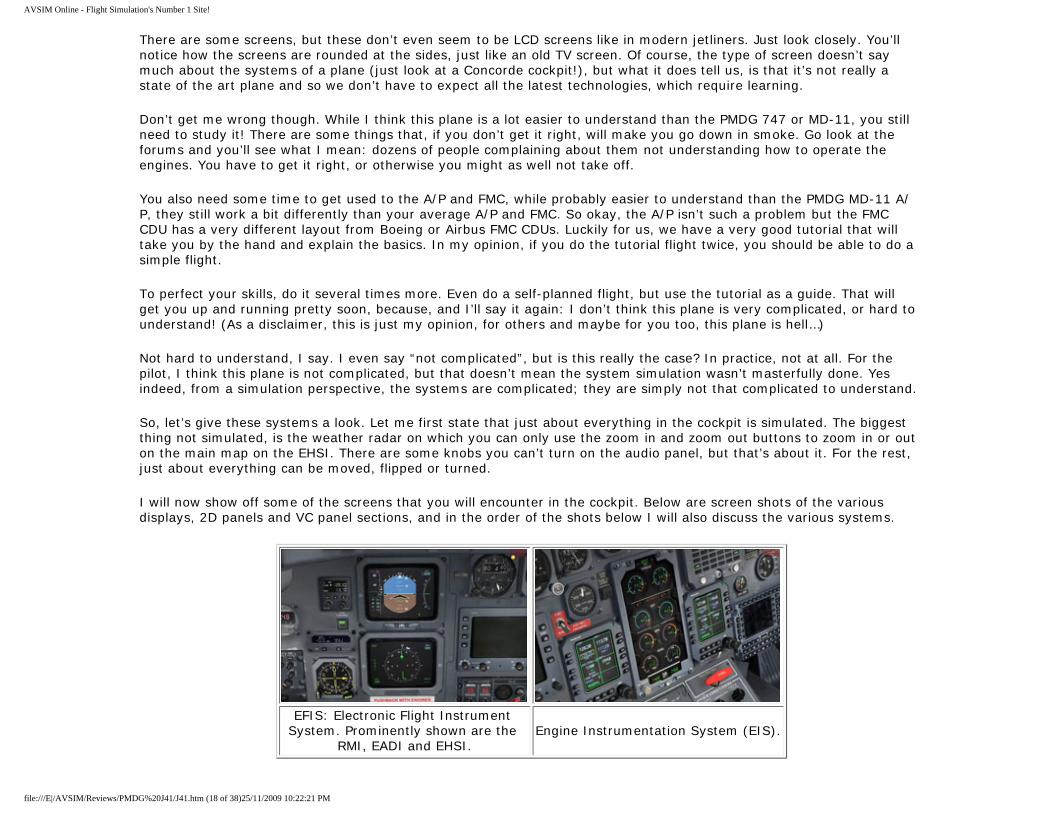
So, let’s give these systems a look. Let me first state that just about everything in the cockpit is simulated. The biggest thing not simulated, is the weather radar on which you can only use the zoom in and zoom out buttons to zoom in or out on the main map on the EHSI. There are some knobs you can’t turn on the audio panel, but that’s about it. For the rest, just about everything can be moved, flipped or turned.
I will now show off some of the screens that you will encounter in the cockpit. Below are screen shots of the various displays, 2D panels and VC panel sections, and in the order of the shots below I will also discuss the various systems.
EFIS: Electronic Flight Instrument System. Prominently shown are the
RMI, EADI and EHSI.Engine Instrumentation System (EIS).
file:///E|/AVSIM/Reviews/PMDG%20J41/J41.htm (18 of 38)25/11/2009 10:22:21 PM
AVSIM Online - Flight Simulation's Number 1 Site!
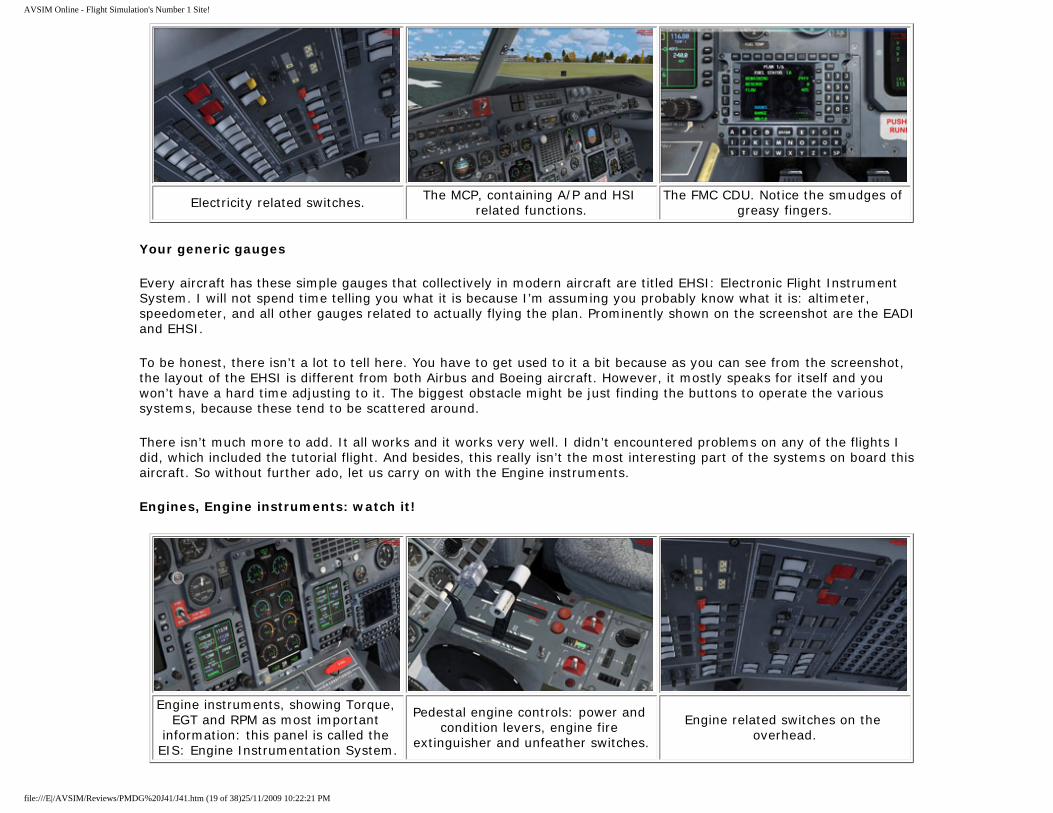
Electricity related switches. The MCP, containing A/P and HSI related functions.
The FMC CDU. Notice the smudges of greasy fingers.
Your generic gauges
Every aircraft has these simple gauges that collectively in modern aircraft are titled EHSI: Electronic Flight Instrument System. I will not spend time telling you what it is because I’m assuming you probably know what it is: altimeter, speedometer, and all other gauges related to actually flying the plan. Prominently shown on the screenshot are the EADI and EHSI.
To be honest, there isn’t a lot to tell here. You have to get used to it a bit because as you can see from the screenshot, the layout of the EHSI is different from both Airbus and Boeing aircraft. However, it mostly speaks for itself and you won’t have a hard time adjusting to it. The biggest obstacle might be just finding the buttons to operate the various systems, because these tend to be scattered around.
There isn’t much more to add. It all works and it works very well. I didn’t encountered problems on any of the flights I did, which included the tutorial flight. And besides, this really isn’t the most interesting part of the systems on board this aircraft. So without further ado, let us carry on with the Engine instruments.
Engines, Engine instruments: watch it!
Engine instruments, showing Torque, EGT and RPM as most important
information: this panel is called the EIS: Engine Instrumentation System.
Pedestal engine controls: power and condition levers, engine fire
extinguisher and unfeather switches.
Engine related switches on the overhead.
file:///E|/AVSIM/Reviews/PMDG%20J41/J41.htm (19 of 38)25/11/2009 10:22:21 PM
AVSIM Online - Flight Simulation's Number 1 Site!
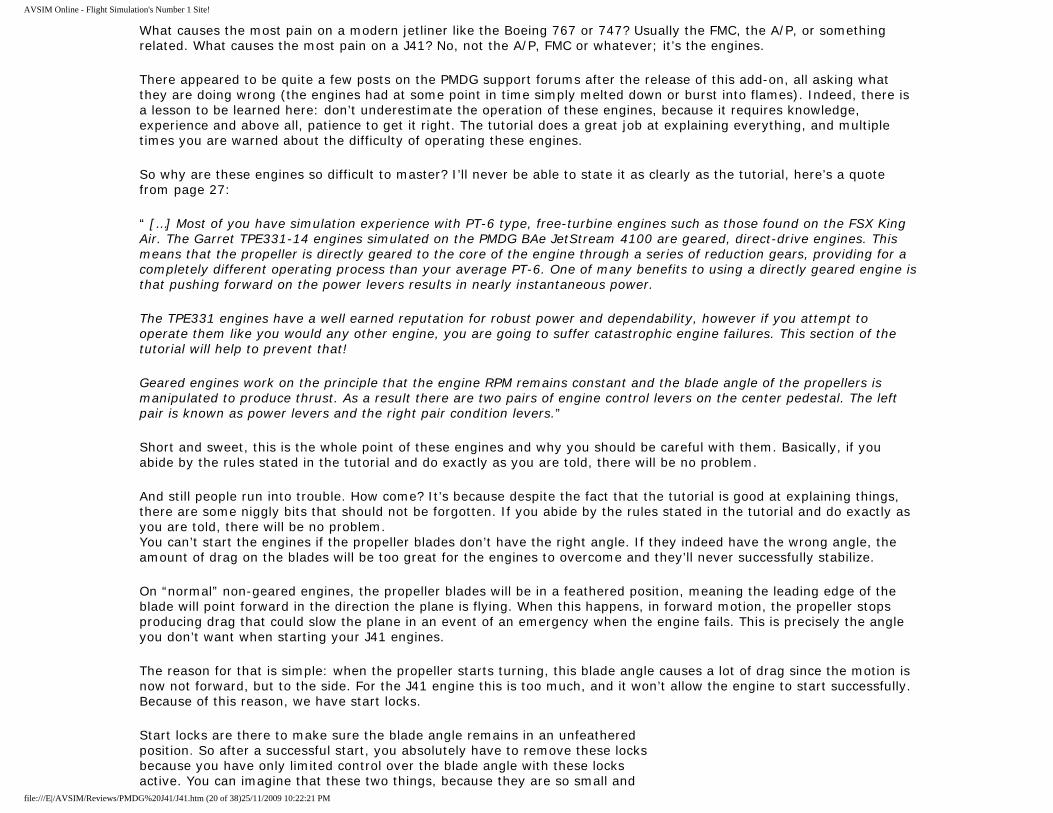
What causes the most pain on a modern jetliner like the Boeing 767 or 747? Usually the FMC, the A/P, or something related. What causes the most pain on a J41? No, not the A/P, FMC or whatever; it’s the engines.
There appeared to be quite a few posts on the PMDG support forums after the release of this add-on, all asking what they are doing wrong (the engines had at some point in time simply melted down or burst into flames). Indeed, there is a lesson to be learned here: don’t underestimate the operation of these engines, because it requires knowledge, experience and above all, patience to get it right. The tutorial does a great job at explaining everything, and multiple times you are warned about the difficulty of operating these engines.
So why are these engines so difficult to master? I’ll never be able to state it as clearly as the tutorial, here’s a quote from page 27:
“ […] Most of you have simulation experience with PT-6 type, free-turbine engines such as those found on the FSX King Air. The Garret TPE331-14 engines simulated on the PMDG BAe JetStream 4100 are geared, direct-drive engines. This means that the propeller is directly geared to the core of the engine through a series of reduction gears, providing for a completely different operating process than your average PT-6. One of many benefits to using a directly geared engine is that pushing forward on the power levers results in nearly instantaneous power.
The TPE331 engines have a well earned reputation for robust power and dependability, however if you attempt to operate them like you would any other engine, you are going to suffer catastrophic engine failures. This section of the tutorial will help to prevent that!
Geared engines work on the principle that the engine RPM remains constant and the blade angle of the propellers is manipulated to produce thrust. As a result there are two pairs of engine control levers on the center pedestal. The left pair is known as power levers and the right pair condition levers.”
Short and sweet, this is the whole point of these engines and why you should be careful with them. Basically, if you abide by the rules stated in the tutorial and do exactly as you are told, there will be no problem.
And still people run into trouble. How come? It’s because despite the fact that the tutorial is good at explaining things, there are some niggly bits that should not be forgotten. If you abide by the rules stated in the tutorial and do exactly as you are told, there will be no problem. You can’t start the engines if the propeller blades don’t have the right angle. If they indeed have the wrong angle, the amount of drag on the blades will be too great for the engines to overcome and they’ll never successfully stabilize.
On “normal” non-geared engines, the propeller blades will be in a feathered position, meaning the leading edge of the blade will point forward in the direction the plane is flying. When this happens, in forward motion, the propeller stops producing drag that could slow the plane in an event of an emergency when the engine fails. This is precisely the angle you don’t want when starting your J41 engines.
The reason for that is simple: when the propeller starts turning, this blade angle causes a lot of drag since the motion is now not forward, but to the side. For the J41 engine this is too much, and it won’t allow the engine to start successfully. Because of this reason, we have start locks.
Start locks are there to make sure the blade angle remains in an unfeathered position. So after a successful start, you absolutely have to remove these locks because you have only limited control over the blade angle with these locks active. You can imagine that these two things, because they are so small and
file:///E|/AVSIM/Reviews/PMDG%20J41/J41.htm (20 of 38)25/11/2009 10:22:21 PM

AVSIM Online - Flight Simulation's Number 1 Site!
This is what happens when you don’t do as you are told. In mid flight, I though it’d be fun if I reduce the condition levers to TAXI settings,
which ended up in the abrupt expulsion of gasses and flames.
unusual, are very easily forgotten.
The problems don’t stop here, though. In flight, especially when taking off, you need to keep a very close eye on the EIS. You must not let the engine run in overtemp conditions or you’ll have some great problems! Luckily, the engineers at BAe have made it all so that while still an obstacle, it shouldn’t pose such a great barrier anymore. Again, if you do as the tutorial tells you there shouldn’t be a problem. If you don’t, this is the result.
I think the simulation of the engine procedures are extremely well done, and this is what will pose the biggest problem for new J41 pilots.
Power up, power down
Next up is the electrical stuff on the plane. Honestly, there isn’t a lot to tell because it’s rather similar to any other plane out there because there simply is no need for anything more than what’s really required.
The panel includes switches to enable or disable the battery, ground power and generators, plus a host of other switches I’m not going to tell you about. One thing that is interesting to mention however, is the avionics switches. These are the white switches with the yellow safe-guard switches. When you turn these on, you only have to wait for the system to initialize and that’s it.
You can see a counter on the EHSI to see how far the process has gone along, (it will take about 3 minutes) if you flip the right switch. Interestingly, there isn’t a IRS that has to be separately aligned, like in just about any jetliner I can think of. What you do have to do, is set your current position in the FMC but we’ll get there soon enough.
Autopilot: don’t blame me, blame him!
As I already said, the A/P on this plane needs a little getting used to. Partly because there is no autothrottle, but also because you’ll have to take some time finding the right buttons and understand what they do.
Most of the A/P commands are on the MCP: we see an altitude knob, heading knob, and various commands for the autopilot mode. The rest of the buttons however, are found on the pedestal; just below the engine controls. It is there you will find the A/P and yaw damper on/off button, plus some other commands.
Most of the time, the A/P does exactly what you tell it to do and there isn’t a lot of fuss. Climbing and descending however, will need some practice. Since there is no autothrottle (A/T), you have to manually control the engine thrust and this is even required to be able to descend and climb. The system is a bit complicated but once you get the hang of it, there should be no trouble.
There are two ways to change altitude: VS and IAS mode. In VS mode, you will set a climb rate and you can stick by it or alter it by using the thumbwheel on the autopilot control panel situated on the pedestal. IAS is a bit different: you generally start the climb or descend manually and stick to a specific speed. You then press the IAS button. The whole point of this mode is that the plane sticks to a certain speed and using that, you can climb or descend by lower or increasing the throttle. If you decrease the throttle, the plane will notice and descend to gain speed. Vice versa if you increase throttle. Get the hang of this and in my opinion, you have gone a long way in understanding the A/P!
file:///E|/AVSIM/Reviews/PMDG%20J41/J41.htm (21 of 38)25/11/2009 10:22:21 PM

AVSIM Online - Flight Simulation's Number 1 Site!
I should add that ever since SP1, finding the A/P controls is hardly a problem because of the inclusion of more and better 2D panels that encompass all A/P related functions in one, good looking 2D panel. More about the 2D panels later.
The FMC: a different computer
After going over the FMC and how it works several times, I started thinking what this FMC actually does for the autopilot. In short, it does LNAV and gives you VNAV-esque calculations for climbing and descending, but it doesn’t seem to do a lot more than that.
Does this mean this FMC is simple? No. I found that my biggest problem when operating this FMC, is that it seems to be so very different from Boeing FMCs, which is the FMC I had worked with most of the time. It requires time and patience to learn what it all does and what everything means.
Here are some shots that will show you what the FMC is all about. You will notice the different layout of the keys, and the UI being very different.
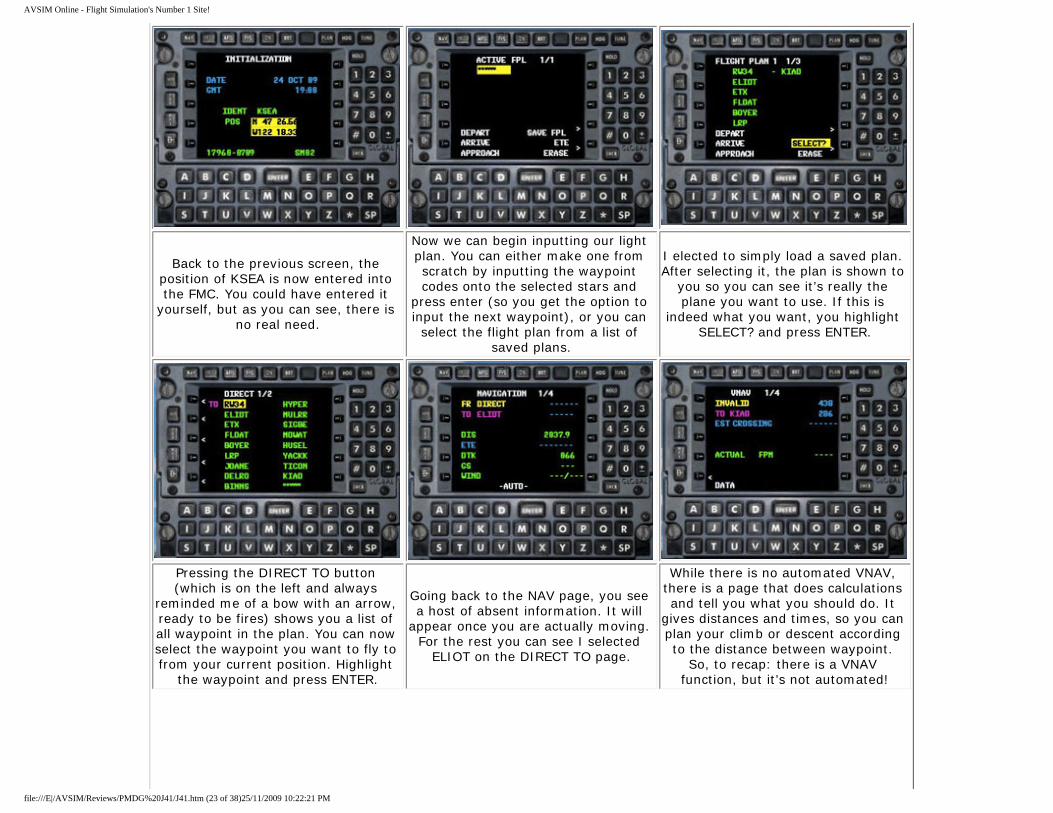
Starting the FMC: A self test, which fortunately doesn’t last too long.
The first page you encounter, asks you what your location is. As you can
see, I’m at KSEA here. There is no real need to put in your exact
position, unless you are doing this in mid flight (in which case you’re probably a bit late doing this…)
After pressing the ENTER button, you are presented with a screen that
basically asks your confirmation. Just press ENTER to go to the next screen.
file:///E|/AVSIM/Reviews/PMDG%20J41/J41.htm (22 of 38)25/11/2009 10:22:21 PM
AVSIM Online - Flight Simulation's Number 1 Site!
Back to the previous screen, the position of KSEA is now entered into the FMC. You could have entered it
yourself, but as you can see, there is no real need.
Now we can begin inputting our light plan. You can either make one from scratch by inputting the waypoint codes onto the selected stars and
press enter (so you get the option to input the next waypoint), or you can
select the flight plan from a list of saved plans.
I elected to simply load a saved plan. After selecting it, the plan is shown to
you so you can see it’s really the plane you want to use. If this is
indeed what you want, you highlight SELECT? and press ENTER.
Pressing the DIRECT TO button (which is on the left and always
reminded me of a bow with an arrow, ready to be fires) shows you a list of all waypoint in the plan. You can now select the waypoint you want to fly to from your current position. Highlight
the waypoint and press ENTER.
Going back to the NAV page, you see a host of absent information. It will
appear once you are actually moving. For the rest you can see I selected
ELIOT on the DIRECT TO page.
While there is no automated VNAV, there is a page that does calculations and tell you what you should do. It
gives distances and times, so you can plan your climb or descent according to the distance between waypoint.
So, to recap: there is a VNAV function, but it’s not automated!
file:///E|/AVSIM/Reviews/PMDG%20J41/J41.htm (23 of 38)25/11/2009 10:22:21 PM
AVSIM Online - Flight Simulation's Number 1 Site!
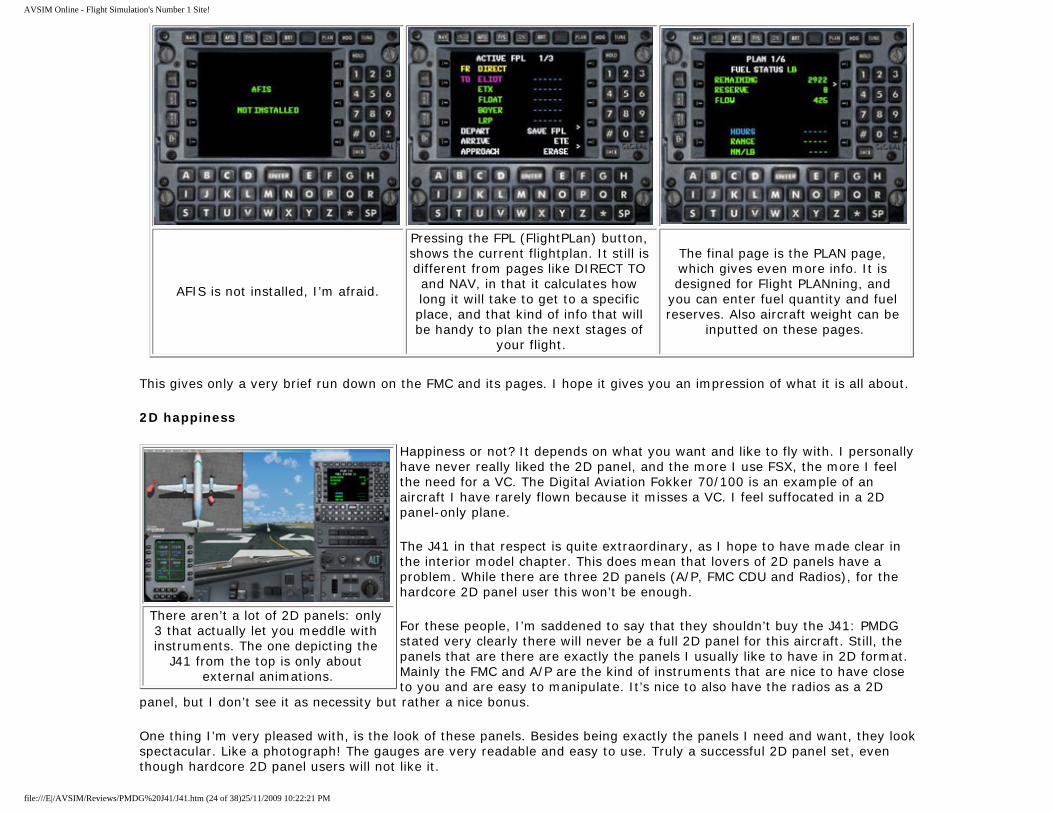
AFIS is not installed, I’m afraid.
Pressing the FPL (FlightPLan) button, shows the current flightplan. It still is different from pages like DIRECT TO and NAV, in that it calculates how long it will take to get to a specific place, and that kind of info that will be handy to plan the next stages of
your flight.
The final page is the PLAN page, which gives even more info. It is designed for Flight PLANning, and
you can enter fuel quantity and fuel reserves. Also aircraft weight can be
inputted on these pages.
This gives only a very brief run down on the FMC and its pages. I hope it gives you an impression of what it is all about.
2D happiness
There aren’t a lot of 2D panels: only 3 that actually let you meddle with instruments. The one depicting the
J41 from the top is only about external animations.
Happiness or not? It depends on what you want and like to fly with. I personally have never really liked the 2D panel, and the more I use FSX, the more I feel the need for a VC. The Digital Aviation Fokker 70/100 is an example of an aircraft I have rarely flown because it misses a VC. I feel suffocated in a 2D panel-only plane.
The J41 in that respect is quite extraordinary, as I hope to have made clear in the interior model chapter. This does mean that lovers of 2D panels have a problem. While there are three 2D panels (A/P, FMC CDU and Radios), for the hardcore 2D panel user this won’t be enough.
For these people, I’m saddened to say that they shouldn’t buy the J41: PMDG stated very clearly there will never be a full 2D panel for this aircraft. Still, the panels that are there are exactly the panels I usually like to have in 2D format. Mainly the FMC and A/P are the kind of instruments that are nice to have close to you and are easy to manipulate. It’s nice to also have the radios as a 2D
panel, but I don’t see it as necessity but rather a nice bonus.
One thing I’m very pleased with, is the look of these panels. Besides being exactly the panels I need and want, they look spectacular. Like a photograph! The gauges are very readable and easy to use. Truly a successful 2D panel set, even though hardcore 2D panel users will not like it.
file:///E|/AVSIM/Reviews/PMDG%20J41/J41.htm (24 of 38)25/11/2009 10:22:21 PM
AVSIM Online - Flight Simulation's Number 1 Site!
Hopping in, hopping out
One more thing to cover is something that I find highly annoying about most airplane add-ons: whenever you have to stop your flight, that’s it. You can’t usually continue because most switches are not saved when you save the flight. That’s why I think twice when buying a plane that doesn’t have this capability.
I don’t have the time to sit 5 hours straight behind my computer to fly a flight! I need to be done in a maximum of 2-3 hours, meaning I often can’t do a long haul flight. Short haul flights are all I can manage and even then, I’m not always sure I’ll make it (I should mention that of course some planes do have the ability to save and load panel state, one of which is the PMDG 747).
The J41 has a compromise on this part. It is a short haul propliner and therefore most of the time you might not need a panel saving function, but just for when you do need it, it is there, partially. Partially? Yes, partially.
The situation is as follows: when you save your flight in FSX, ALL buttons, switches and whatever are saved, EXCEPT the settings in your FMC. This isn’t such an obstacle though! The only thing you have to remember to do is save the flight plan you entered if it wasn’t saved already from a previous flight. When you load your flight, turn on the FMC and load the flightplan you need, go to the DIRECT TO page and select the waypoint you were previously flying on. Now unpause and you should be good to go, easy as that.
Sounds
People that have read earlier reviews of mine might remember I usually state how important sounds are. And indeed, that’s still exactly how I feel about this topic. Good sounds are probably as necessary as good looks to be able to immerse the user fully.
It’s because of this I highly value a good soundest, and J41 has one. There is a great multitude of sounds, too! Not just engine sounds and the general set every add-on aircraft has these days, but also individual keys have their own sound.
The FMC CDU keys have their own distinct “click” sound, which is great for your immersion. I can greatly recommend going over to youtube.com, follow the link I provide at the end of this review to get a sense of the sounds on this plane. It isn’t something I can describe; you have to hear it. It’s truly well done, although the volume often times has me lowering the volume of my computer.
Maybe that’s the volume of the plane, but I think it’s a bit too loud. Of course you can easily overcome this by altering your sound options within FSX.
Taking it for a flight
I always find this the most exciting part of a review. You get to tell people of your experience on a flight with the product. In this review, I will not discuss the tutorial flight, like I usually do, but I’ll do a flight from EGLL (London Heathrow) to EGBB (Birmingham). The distance between these two airports is only approximately 84NM, meaning default ATC is useless here. It will probably tell me to contact “something” approach, and will direct me to the runway – at 84NM out. So, I will only use ATC for takeoff (I did file an IFR flightplan and I will do all the regular steps, but directly after takeoff, I will cancel my IFR flightplan, and continue using the flightplan I put into the FMC) and for landing.
Any flight starts at the same place: the gate. That’s precisely where this flight will start too.
file:///E|/AVSIM/Reviews/PMDG%20J41/J41.htm (25 of 38)25/11/2009 10:22:21 PM
AVSIM Online - Flight Simulation's Number 1 Site!
AES, I’m afraid, didn’t position my aircraft quite the right way. My left
wing is now stuck in the jetway.
Inputting the data into the loadsheet, which then does all necessary
calculations for me.
Meddling with the FMC: I’m inputting my flight plan. As you can see, I
prefer the 2D panel for this, but the VC version is perfectly useable too.
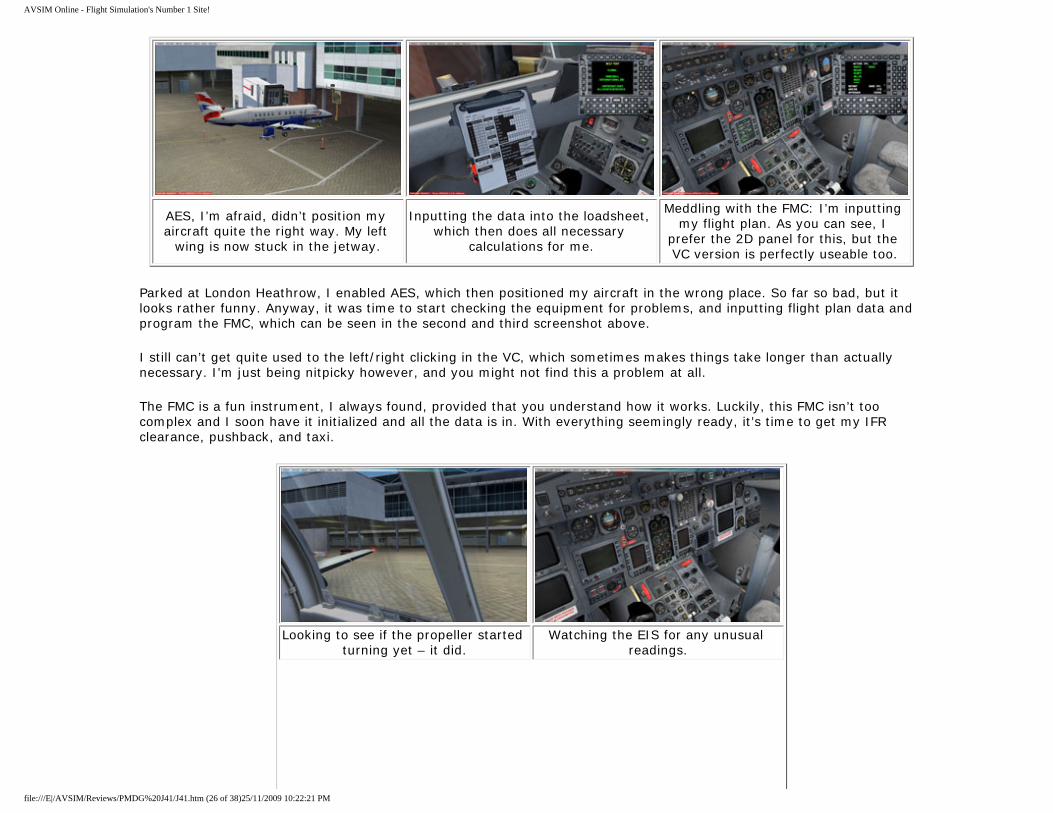
Parked at London Heathrow, I enabled AES, which then positioned my aircraft in the wrong place. So far so bad, but it looks rather funny. Anyway, it was time to start checking the equipment for problems, and inputting flight plan data and program the FMC, which can be seen in the second and third screenshot above.
I still can’t get quite used to the left/right clicking in the VC, which sometimes makes things take longer than actually necessary. I’m just being nitpicky however, and you might not find this a problem at all.
The FMC is a fun instrument, I always found, provided that you understand how it works. Luckily, this FMC isn’t too complex and I soon have it initialized and all the data is in. With everything seemingly ready, it’s time to get my IFR clearance, pushback, and taxi.
Looking to see if the propeller started turning yet – it did.
Watching the EIS for any unusual readings.
file:///E|/AVSIM/Reviews/PMDG%20J41/J41.htm (26 of 38)25/11/2009 10:22:21 PM

AVSIM Online - Flight Simulation's Number 1 Site!
Pushback is aligning me now with the line, by first pushing me back, and
then pulling me onto it, so to speak. Rather nice to look at how it all turns
out.
Cleared for taxi!
A big, white sticker in the cockpit tells me you mustn’t start your engines while at the gate, which to me seems like quite a logical thing anyway: for as far as I know, you never start your engines at the gate, whether you’re flying a turboliner or a jetliner. Anyway, while the ground personnel are preparing my plane for pushback, I go over the before start checklist and see that everything is in the right position. The two avionics switches are switches off, the fuel pumps are switched on, various lights are flipped on, and I wait until I get clearance to start the engines.
I soon get it, and I begin the engine start procedure. I tend to find this one of the most exciting moments of any flight. You are ready to go, and it’s time to activate your plane, a brutal lump of aluminum, screaming with power – and you are going to unleash it. Lovely, no?
The start master is first set to the left engine – we are going to start that one first. Now we simply press the START button, and wait. A slow rumble starts off, and I look outside to verify the movement of the prop. Soon it begins spinning, at which time I check the EIS: any unusual readings there? Nope, and the engine finally stabilizes after spooling up. We turn the generator for the left engine on, and turn the relevant fuel pump off. We won’t need it anymore.
The right engine is the same procedure, and soon we are on the yellow line, our engines happily rumbling. Now we only need to get clearance from ATC and ground personnel for actual taxi. I contact EGLL ground, and clearance is soon obtained: we are to head to runway 9R. This is a pity as the flight plan I obtained from vroute actually expects me to take off from runway 27, left or right. In the end, this didn’t appear to be a problem and it was soon forgotten. Meanwhile, ground signals me on the left that I can taxi out into the active.
file:///E|/AVSIM/Reviews/PMDG%20J41/J41.htm (27 of 38)25/11/2009 10:22:21 PM
AVSIM Online - Flight Simulation's Number 1 Site!
Taxiing. Being bored looking around.
Still not there yet? Holding short: waiting for the Boeing
767 to take off. It’s bound for a transatlantic flight.
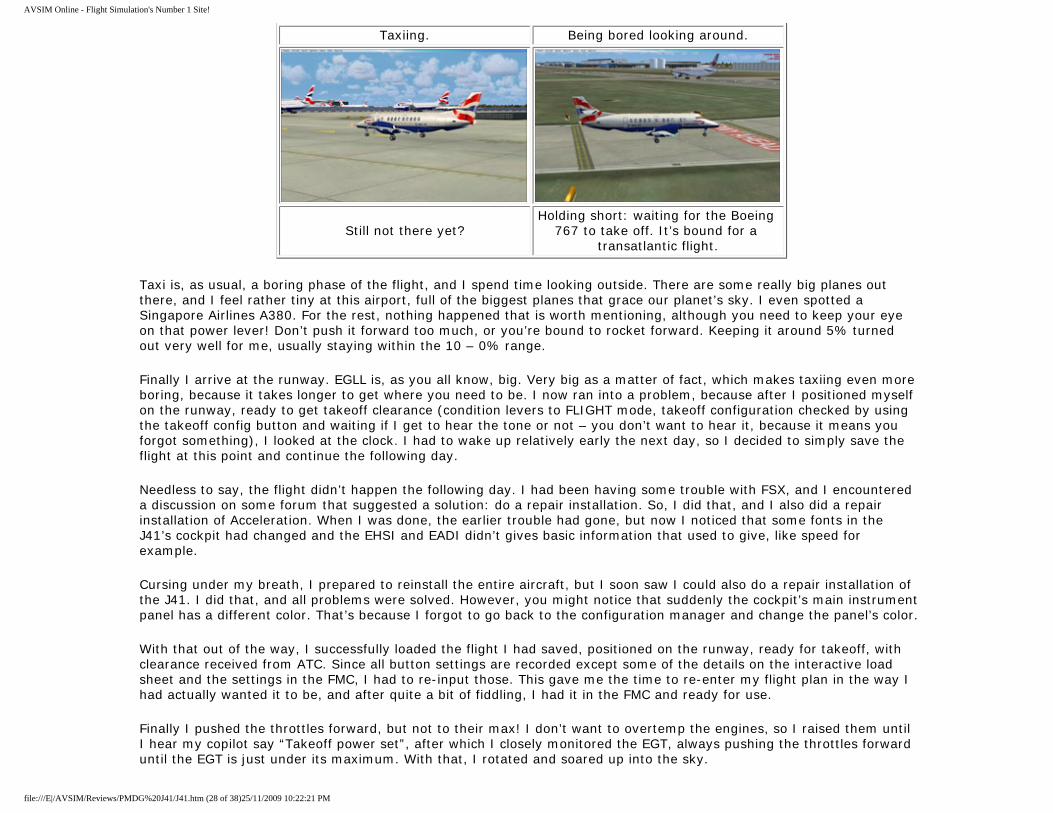
Taxi is, as usual, a boring phase of the flight, and I spend time looking outside. There are some really big planes out there, and I feel rather tiny at this airport, full of the biggest planes that grace our planet’s sky. I even spotted a Singapore Airlines A380. For the rest, nothing happened that is worth mentioning, although you need to keep your eye on that power lever! Don’t push it forward too much, or you’re bound to rocket forward. Keeping it around 5% turned out very well for me, usually staying within the 10 – 0% range.
Finally I arrive at the runway. EGLL is, as you all know, big. Very big as a matter of fact, which makes taxiing even more boring, because it takes longer to get where you need to be. I now ran into a problem, because after I positioned myself on the runway, ready to get takeoff clearance (condition levers to FLIGHT mode, takeoff configuration checked by using the takeoff config button and waiting if I get to hear the tone or not – you don’t want to hear it, because it means you forgot something), I looked at the clock. I had to wake up relatively early the next day, so I decided to simply save the flight at this point and continue the following day.
Needless to say, the flight didn’t happen the following day. I had been having some trouble with FSX, and I encountered a discussion on some forum that suggested a solution: do a repair installation. So, I did that, and I also did a repair installation of Acceleration. When I was done, the earlier trouble had gone, but now I noticed that some fonts in the J41’s cockpit had changed and the EHSI and EADI didn’t gives basic information that used to give, like speed for example.
Cursing under my breath, I prepared to reinstall the entire aircraft, but I soon saw I could also do a repair installation of the J41. I did that, and all problems were solved. However, you might notice that suddenly the cockpit’s main instrument panel has a different color. That’s because I forgot to go back to the configuration manager and change the panel’s color.
With that out of the way, I successfully loaded the flight I had saved, positioned on the runway, ready for takeoff, with clearance received from ATC. Since all button settings are recorded except some of the details on the interactive load sheet and the settings in the FMC, I had to re-input those. This gave me the time to re-enter my flight plan in the way I had actually wanted it to be, and after quite a bit of fiddling, I had it in the FMC and ready for use.
Finally I pushed the throttles forward, but not to their max! I don’t want to overtemp the engines, so I raised them until I hear my copilot say “Takeoff power set”, after which I closely monitored the EGT, always pushing the throttles forward until the EGT is just under its maximum. With that, I rotated and soared up into the sky.
file:///E|/AVSIM/Reviews/PMDG%20J41/J41.htm (28 of 38)25/11/2009 10:22:21 PM

AVSIM Online - Flight Simulation's Number 1 Site!
Say goodbye to Heathrow! Following the SID BUZ3J that will lead me to BUZAD. Over London.
As the climb progressed, I enabled the A/P by pressing the A/P button on the pedestal. Pressing that button will automatically enable the yaw damper. To make the A/P follow the flightplan, you go over to the EHSI controls and press LNAV, after which you press the NAV button on the FD. Don’t forget to press the LNAV button! If you don’t do that, the A/P will disconnect from the FMC and will stop flying the flight plan.
I had more than once forgotten to press the LNAV buttons, or I had left the LNAV EHSI page, which indeed disconnected the A/P from the FMC and soon I found myself clueless about why the A/P stopped following the flight plan. So in short, don’t forget to go to the LNAV screen and stay there. The only time you will leave that screen is when you will be landing. For that, you go to V/L on the EHSI, and you’ll be able to set the A/P to APR (APpRoach) mode.
We’re not that far yet as we’re still in out climb. The A/P has now also taken command over the climb, since I enabled ALT SEL mode (ALTitude SELect) and IAS mode. As I explained earlier, you set the A/P to keep a certain speed, but unlike aircraft that are equipped with autothrottle, the only way the J41 can make sure the speed doesn’t change, is by climbing or descending, depending on what happens with your current speed.
So, if you go slower, the plane will descend to accelerate and will climb to decelerate in the event that your speed increases. Using this mechanism and the power levers, you can manipulate the plane’s descent rate. To master this is difficult, but it is a very rewarding experience once you get the hang of it.
As the flight continues, the A/P follows the flight plan and does this well. It turns when it has to and keeps to its altitude just fine. Now and then the plan is shaken by turbulence, but all is well. The A/P manages to overcome everything pretty well and it’s generally a very nice and calm flight.
file:///E|/AVSIM/Reviews/PMDG%20J41/J41.htm (29 of 38)25/11/2009 10:22:21 PM
AVSIM Online - Flight Simulation's Number 1 Site!
Climbing and enjoying the view. Everything works automatically here, although I have to keep an eye on
the power levers.
Descent has already begun (cruise was very short on this flight!).
It’s not very noticeable, but just enough to see we are descending. She proudly cuts through the clear,
autumn air.
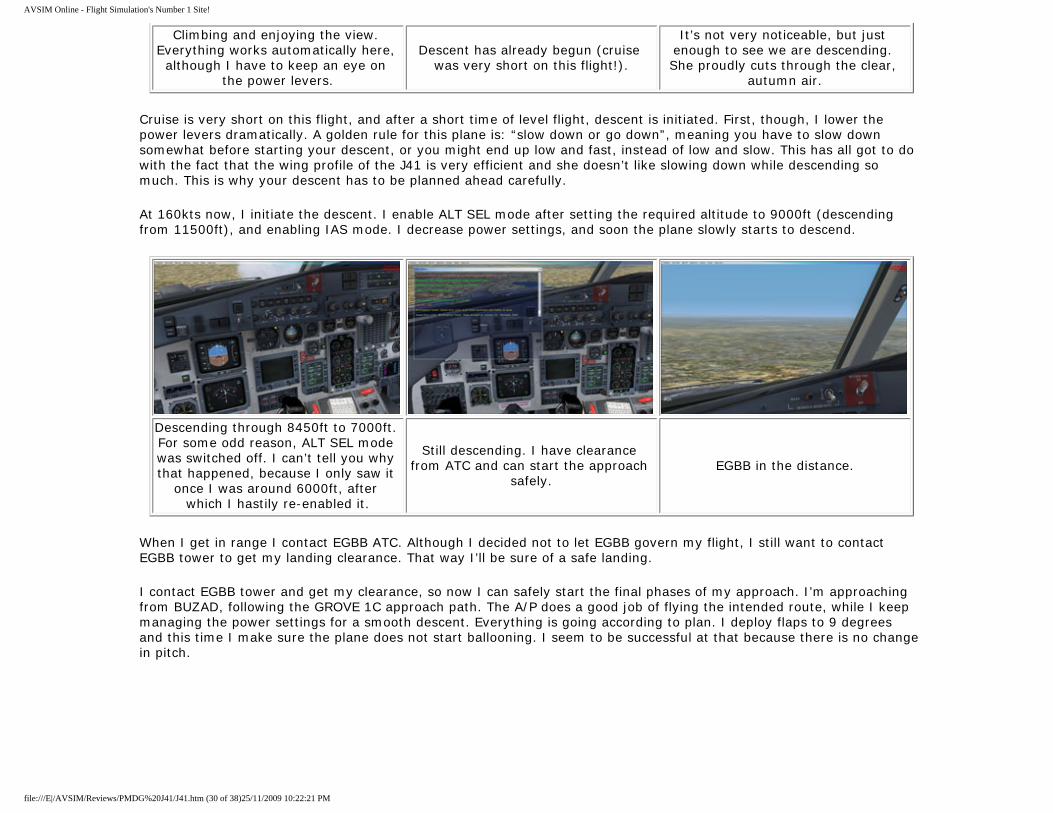
Cruise is very short on this flight, and after a short time of level flight, descent is initiated. First, though, I lower the power levers dramatically. A golden rule for this plane is: “slow down or go down”, meaning you have to slow down somewhat before starting your descent, or you might end up low and fast, instead of low and slow. This has all got to do with the fact that the wing profile of the J41 is very efficient and she doesn’t like slowing down while descending so much. This is why your descent has to be planned ahead carefully.
At 160kts now, I initiate the descent. I enable ALT SEL mode after setting the required altitude to 9000ft (descending from 11500ft), and enabling IAS mode. I decrease power settings, and soon the plane slowly starts to descend.
Descending through 8450ft to 7000ft. For some odd reason, ALT SEL mode was switched off. I can’t tell you why that happened, because I only saw it
once I was around 6000ft, after which I hastily re-enabled it.
Still descending. I have clearance from ATC and can start the approach
safely. EGBB in the distance.
When I get in range I contact EGBB ATC. Although I decided not to let EGBB govern my flight, I still want to contact EGBB tower to get my landing clearance. That way I’ll be sure of a safe landing.
I contact EGBB tower and get my clearance, so now I can safely start the final phases of my approach. I’m approaching from BUZAD, following the GROVE 1C approach path. The A/P does a good job of flying the intended route, while I keep managing the power settings for a smooth descent. Everything is going according to plan. I deploy flaps to 9 degrees and this time I make sure the plane does not start ballooning. I seem to be successful at that because there is no change in pitch.
file:///E|/AVSIM/Reviews/PMDG%20J41/J41.htm (30 of 38)25/11/2009 10:22:21 PM

AVSIM Online - Flight Simulation's Number 1 Site!
After enabling approach mode, the A/P takes the duty of landing the plane upon itself. It starts turning to align
the plane with the runway.
I extend more flaps and gear in expectation of the successful
alignment.
ATC, as always, had cleared another plan for landing, but subsequently asks it to do a go-around. That’s
fortunate; I hadn’t want to do this attempt at landing a second time!
Landed successfully. Spoilers are deployed when you go into reverse
thrust.
Turning onto the taxiway after setting the condition levers back to TAXI.
I feel that landing is always a hectic time because there is so much to do, and I’m always afraid the A/P will not do what it’s told. I needn’t worry in the J41’s case: the A/P aligns me successfully.
When approaching the airport, LNAV mode is still active on the EHSI. At a certain point when you feel you’re getting close to the airport, you have to double-click V/L mode to be able to get the A/P’s APR mode to function. When you do press APR mode, the A/P will turn the plane in a way it can easily intercept the ILS signal, but NAV mode will not be activated – not yet, at least.
As soon as it captures the ILS signal, APR mode automatically turns off and the same goes for ALT mode (ALTitude). When the vertical ILS beam is intercepted, ALT mode turns off and the A/P takes command over climb and descent rate. Note that you still need to watch the power settings!
Anyway, after successfully aligning and guiding me down to the runway, I spot a familiar sight: an aircraft is landing just in front of me. Before I can think “damnit”, ATC tells the AI plane to do a go-around so I can continue my landing. This is fortunate, because I didn’t feel like doing a go-around myself!
With everything out of the way, I switch off the A/P at 200ft above the runway and bring my plane down softly and file:///E|/AVSIM/Reviews/PMDG%20J41/J41.htm (31 of 38)25/11/2009 10:22:21 PM
AVSIM Online - Flight Simulation's Number 1 Site!
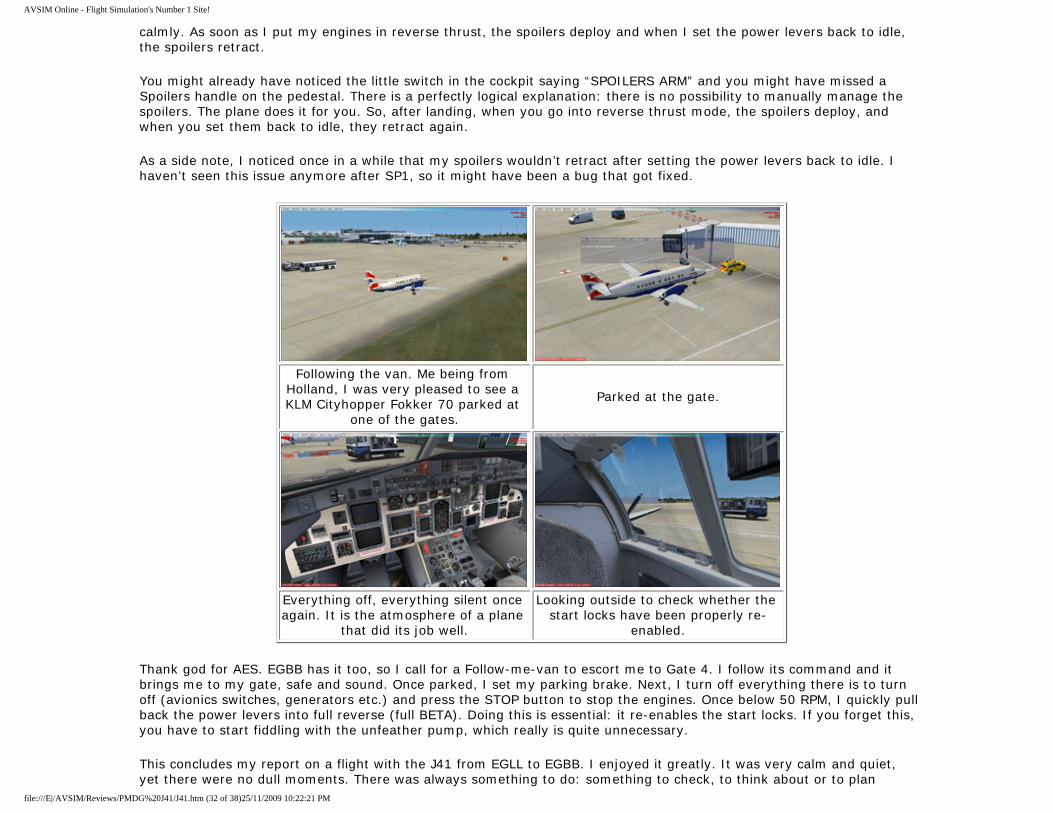
calmly. As soon as I put my engines in reverse thrust, the spoilers deploy and when I set the power levers back to idle, the spoilers retract.
You might already have noticed the little switch in the cockpit saying “SPOILERS ARM” and you might have missed a Spoilers handle on the pedestal. There is a perfectly logical explanation: there is no possibility to manually manage the spoilers. The plane does it for you. So, after landing, when you go into reverse thrust mode, the spoilers deploy, and when you set them back to idle, they retract again.
As a side note, I noticed once in a while that my spoilers wouldn’t retract after setting the power levers back to idle. I haven’t seen this issue anymore after SP1, so it might have been a bug that got fixed.
Following the van. Me being from Holland, I was very pleased to see a KLM Cityhopper Fokker 70 parked at
one of the gates.
Parked at the gate.
Everything off, everything silent once again. It is the atmosphere of a plane
that did its job well.
Looking outside to check whether the start locks have been properly re-
enabled.
Thank god for AES. EGBB has it too, so I call for a Follow-me-van to escort me to Gate 4. I follow its command and it brings me to my gate, safe and sound. Once parked, I set my parking brake. Next, I turn off everything there is to turn off (avionics switches, generators etc.) and press the STOP button to stop the engines. Once below 50 RPM, I quickly pull back the power levers into full reverse (full BETA). Doing this is essential: it re-enables the start locks. If you forget this, you have to start fiddling with the unfeather pump, which really is quite unnecessary.
This concludes my report on a flight with the J41 from EGLL to EGBB. I enjoyed it greatly. It was very calm and quiet, yet there were no dull moments. There was always something to do: something to check, to think about or to plan
file:///E|/AVSIM/Reviews/PMDG%20J41/J41.htm (32 of 38)25/11/2009 10:22:21 PM

AVSIM Online - Flight Simulation's Number 1 Site!
ahead for. This is surely no dull aircraft! And what can I say? I feel this plane taught me to be a better pilot.
Normally I’m rather casual, but this plane pushed me further; further than I normally go. I went as far as to acquire vroute, a flight planning utility, in search of a good flight plan from EGLL to EGBB. I sure am thoroughly satisfied with how this flight turned out, and I hope to acquire more sceneries in the UK so I have more places to fly (I am a snob. I don’t go to places I don’t have third part scenery for). For now, I’m letting the J41 rest at the gate at EGBB, where I have left her, ready for another pilot to fly her back.
At the gate at EGBB. This was a great flight, and I hope this will be just one
of many nice flights with a great aircraft!.
ATR or BAe?
On the PMDG forums you will find a wealth of information. One piece of this heap of info, tells of possible problems with Flight1’s ATR72-500 after installing the PMDG J41. I have not tested this issue because, although I do have the ATR72-500, I am not proficient enough in that plane to understand what I’m doing, let alone replicate such a problem.
If you find yourself wanting to know more, I redirect you to the PMDG forums, hosted by Avsim on the Avsim forums.
An interview with the developers
At the end of the review, but not quite. I did a small interview with Robert S. Randazzo, from PMDG. I found the given answers rather interesting, and I hope you do too.
1) Looking at the PMDG support forums and reading the manuals, it appears that you were a real J41 pilot once (or maybe still are?). Was this the reason to do this aircraft? Were there more reasons, or is the decisive reason something different than you piloting one?
"Once a JetStream Driver, Always a JetStream Driver." I acquired a few thousand hours of PIC time flying the JetStream 4100 for now defunct United Airlines partner, Atlantic Coast Airlines. This was my first Part 121 Airline PIC experience, so I have an admitted soft-spot for J41s.
In spite of this, the decision to create this simulation was not mine. In 2008 we added Henning van Rensburg (founder of Aeroworx) to the PMDG roster and his mission was to lead development on a line of mid-range simulations to compliment our airliners. After some consideration and research, Henning came back with the suggestion to create one
file:///E|/AVSIM/Reviews/PMDG%20J41/J41.htm (33 of 38)25/11/2009 10:22:21 PM

AVSIM Online - Flight Simulation's Number 1 Site!
of his favorite regional turboprops, the JetStream 4100. (The J41 is in use with South African, and Henning is from there, you see, so the attraction was natural for him.) Henning had prepared a range of arguments to convince me that this "crazy little unknown turboprop" was a good fit for our product line, but he never got the opportunity to make his argument. I'm not sure if Henning was more surprised at the fact that I knew what a J41 was, or that I held a type rating and a few thousand hours of PIC time in one.
Needless to say, we immediately partnered with Northstar Aviation, who purchased a number of Atlantic Coast's J41s, and the rest was easy."
2) How was development influenced by you being an actual pilot on this plane? In other words, how great a help was it?
"My experience flying the airplane was very helpful in some areas, and unhelpful in others. One of the things that always surprises simmers is how quickly line pilots forget fine details of a particular airplane type once you stop flying it. Little things like the color of items on the displays, the sequence of events in a particular action, etc. I haven't flown a J41 since 2004, and I've re-typed on the 747-400 since then, so while some details are crystal-clear in my mind, some are entirely gone, or have been over-written with data from Boeing. I think I gave the devs fits with bogus recall on a few items, (Sorry, Henning!) but I prefer to say that they misunderstood my mis-remembered details.
Other aspects of my experience with the JetStream 4100 were helpful, however. For example, the JetStream 4100 has some well established behaviors that all J41 pilots recognize: The tendency to not slow down in an idle power descent, the anemic climb rates above 13,000 MSL in summer, the tendency to balloon when selecting FLAPS 9 and the significant loss of lift when selecting FLAPS 0, using the temperature hash marks to set power in the climb, etc. Hours of question and answer with Dr. Vaos enabled him to bring his considerable expertise to bear, and this allowed us to capture these behaviors effectively within the simulation so that the airplane exhibits the natural character of the type."
3) This is a plane that really needs some getting used to, judging from the many people complaining about failed engine starts on the PMDG forums. How are you trained in the real world for this aircraft, to make sure your first engine start isn't as disastrous as with many people trying her in FSX?
"Well, the difference between a simmer and a line pilot is that the line pilot gets the benefit of four weeks of classroom instruction, two weeks in a fixed based trainer and three weeks in the full motion simulator.
We prepared a tutorial document to help new J41 simmers climb over some of the obstacles, but in their excitement to fly a new airplane, very few choose to read the document before pressing the FLY NOW button.
The JetStream 4100 uses TPE-331 engines, which are vastly different than the PT6 free turbine type engines that many simmers have experienced in other simulations. As such, they take some explaining, and they take a completely different handling methodology. We decided to model the TPE-331 in detail and added engine failures and fires in order to make sure the simmer learned the engine type effectively. In the end, the engines are very easy to operate, you just have to spend enough time with the tutorial so that you understand what it is doing.
The other area that has gotten quite a bit of attention is the tendency for inexperienced J41 pilots to wind up "high and fast" on approaches. The JetStream 4100 has a very efficient wing design, and since the TPE-331 engines are very much averse to negative Torque loading, the engineers tuned them to provide 22% thrust even at idle power in flight. This means that going down while slowing down just wasn't something you did much with a J41 unless you had miles and miles of space to decelerate. This has caught a few new PMDG J41 pilots by surprise, but it catches new real-world J41 pilots by surprise also."
file:///E|/AVSIM/Reviews/PMDG%20J41/J41.htm (34 of 38)25/11/2009 10:22:21 PM
AVSIM Online - Flight Simulation's Number 1 Site!
4) Indeed, many people have problems understanding this aircraft, it seems. Yes, I too have been puzzled at time why the engines don't seem to do what I wanted them to do. What, in your perception, is the thing most people seem to do wrong, with the consequence of blowing up an engine or two?
"The number one thing? Ignoring the tutorial we provided to help new PMDG J41 pilots learn the airplane in the most basic terms. That being said, the number of customers having trouble is really quite small. I think most simmers are continually thirsty for "something new" and "something we haven't seen before." The PMDG JetStream 4100 delivers here, because the engine operating process is significantly different than any other turboprop. Spending a bit of time in the tutorial is really the simplest method to learn the basics. The beauty of flight simulation is that we get to try new airplanes and learn new things very inexpensively.
Aside from the start-locks, the J41 is really just like any other airplane. This is just the first time most simmers have seen start locks, so it takes some adjustment in the thought process. Once you've used them once or twice, they become quite easy to understand."
5) For me the enjoyment of the J41 stems mostly from the fact that, flying this plane, I get the feeling it's actually quite a lot of work. It is also why I find the J41 to be more fun than, say, a Boeing 747. Whereas the 747 has options to be fully automated, the J41 just isn't. I feel much more involved because of that, making me feel more like I'm actually piloting the aircraft than with most other planes I have. Do you guys feel the same way?
"That was precisely the goal in selecting an airplane with this level of automation. While heavy automation makes the larger airliners fun, this simulation flies more like an airplane than just about anything we've done to date. In my opinion, this comes from a combination of visual immersion, attention to the character of the real airplane, and the accuracy of the flight and engine models. Flying the PMDG BAe JS4100 simulation comes very close to the feel of flying the actual airplane, including the workload levels and attention required during critical phases of flight."
6) SP1 brought some new features, including, for example, reworked and new 2D panels. Was this something the users wanted, or is this the way it was planned to be from the beginning, yet only fulfilled with SP1? If the latter is true, how come it ended up in SP1, and not in the initial release?
"We added a number of items after hearing feedback from customers post-release. At PMDG we are always mindful to monitor feedback from customers. If you go back through the history of our products you will find that we spend a few weeks collecting ideas from customers that are using the product, then we try to insert them into a future SP. We like to imagine that we can't possibly miss the opportunity to include features our customers want- but the reality is that often-times a customer using the product will tell us that they'd like something we've never thought of before, or that we didn't feel was necessary. Most of the truly significant changes we make to any product during an SP are the result of customer feedback."
7) SP1 brought us also joy in the way of rain effects in the VC. If you are at liberty to say: how did you do this? Do you think other FS developers could do this too in FSX?
"Vin had been working at this for awhile and finally made it click. He has a few other goodies that he's been working on that we just weren't able to include with the SP. Unfortunately, we are starting to run into hard limits within FSX in terms of parts geometry, so we'll not be able to add anything else to the J41. The NGX, however..."
8) The Jetstream 41 is quite a unique plane. What do you guys, at PMDG, like best (and hate most) about this plane?
"Well, it is obviously difficult to select just one thing that we like best. Overall, we are exceptionally pleased with the way file:///E|/AVSIM/Reviews/PMDG%20J41/J41.htm (35 of 38)25/11/2009 10:22:21 PM

AVSIM Online - Flight Simulation's Number 1 Site!
the visual quality came together. The level of visual detail, even when zoomed in to great detail, is simply astounding. This was a technique that we developed in anticipation of providing this level of detail to our future products, and we are very excited about bringing it to the 737.
As for dislikes: We are continually frustrated by what appear to be arbitrary limits within Flight Simulator that were placed there by the FS development team for reasons that nobody can quite place their finger on. Animated part number limits, polygon limits, texture limits and the like. We are certain that there are reasons why these things exist, but they aren't readily apparent."
9) How about the future? Do you plan to bring us more turboprop happiness?
"Absolutely! We have already announced a Dash-8, and there will be others to follow. The community has responded enthusiastically to this new line of products so we will continue to develop products in this genre so long as adequate demand is present."
Robert S. Randazzo Precision Manuals Development Group
So there you have it. Some interesting things have been said and a bright future seems to be in front of us with upcoming PMDG products. I’d like to thank Robert for the time spent answering my questions, and I wish him and his team the best of luck in future products.
Summary / Closing Remarks
This aircraft retails for $45, and with that, it’s the first FSX aircraft PMDG made that’s under $50. PMDG actually referred to this product as a “light” product, compared to the MD-11, for example, and gave that as a reason for the relatively low price.
In essence, though, I can’t think of this add-on as anyway near “light”. There is a lot to do on this plane and that’s what makes it so enjoyable. You feel like you really are piloting the aircraft, and not merely pushing buttons (that’s also why I tend to enjoy old jetliners more than modern ones).
In short: the system simulation of this aircraft add-on is extraordinarily good, and really gives you the feeling of truly operating your plane! Couple this to a great looking visual model with great animations (including moving pilots and passengers), a very usable and versatile Virtual Cockpit and a great soundset, and you have got yourself a winner. PMDG has done it again, people. If you are into turboprop aircraft, you will definitely want this add-on.
Even if you are not so into turboprop aircraft, but you like the sound of constantly having to meddle with power lever settings and constantly monitoring your plane’s instruments, I dare say you will really enjoy this plane. This add-on is hard to beat, and I can recommend it to all people interested.
I guess what Robert Randazzo said is true: " Once a JetStream Driver, Always a JetStream Driver."
Useful links
If this plane interests you, I HIGHLY recommend popping over to PMDG’s website, and downloading the manuals of this
file:///E|/AVSIM/Reviews/PMDG%20J41/J41.htm (36 of 38)25/11/2009 10:22:21 PM

AVSIM Online - Flight Simulation's Number 1 Site!
plane, which have been posted there.
The PMDG support forum: a lot of questions have already been answered here. If you have a problem, search this forum, and you’ll likely find a solution to your problem.
A startup guide for the J41, if you have problems starting up the engines.
More information on the Start locks, or stop locks, as they are sometimes also called.
A (rather old) video, demonstrating the J41.
What I Like About The JS4100 Jetstream
● Great looking exterior (with passengers!);● Great looking VC, also very usable, with easy to read gauges and most of the time
intuitive controls;● System simulation is very good. I love how you have to understand the plane
before flying it;● Instructions are very clear and easy to read, plus nice layout;● Very good tutorial: a MUST READ!
What I Don't Like About The JS4100 Jetstream
● I can’t find anything major enough to put in this box, I’m afraid…
file:///E|/AVSIM/Reviews/PMDG%20J41/J41.htm (37 of 38)25/11/2009 10:22:21 PM
AVSIM Online - Flight Simulation's Number 1 Site!
PrintingIf you wish to print this review or read it offline at your leisure, right click on the link
below, and select "save as"
BAe JS4100 Jetstream
(adobe acrobat required)
Comments?
Standard Disclaimer The review above is a subjective assessment of the product by the author. There is no connection between
the product producer and the reviewer, and we feel this review is unbiased and truly reflects the performance of the product in the simming environment as experienced by the reviewer. This disclaimer is
posted here in order to provide you with background information on the reviewer and any presumed connections that may exist between him/her and the contributing party.
Tell A Friend About this Review!
© 2009 - AVSIM Online All Rights Reserved
Powered by AVSIM SimWords Become a SimWord Publisher!
Flight Simulator Links Discover the world wide Flight Simulator Community. Enter your FS related website in the largest links database online. www.avsim.com
Flyware Developer Gauge Library Gauge library OCX for simulation/instrumentation applications - gauge definition controlled by script file - Demo SDK http://www.flyware.nl
AVSIM Reviews Want to stay on top of the most recent ad ons? See our Reviews! www.avsim.com
VRS F/A-18E NOW SHIPPING! The first military true fly-by-wire add-on with the sophistication and realism of a high-end transport! NOW SHIPPING FOR FS9! Vertical Reality Simulations
The Flight Simulator Network A Different Approach to Flight Simulation. Competitions, screenshots, videos, forums, live chat, games and more. http://flightsimulator.ning.com/
file:///E|/AVSIM/Reviews/PMDG%20J41/J41.htm (38 of 38)25/11/2009 10:22:21 PM