Embed Size (px)
Citation preview
AVImark ReadMe Version 2010.5.0
1. New Update Process
2. New Patient Chart
3. New Document Management Window
4. Lifelearn ClientEd Online
5. New Treatment Association Tab
6. New Client Referral Options
7. Green Indicator Used to Show Information is Stored
8. SOAP Enhancement
9. New Advanced Option to Save Area Code When the Client Zip Code Changes
10. Inactivating User Removes Address from ‘Reply From’ E-mail Selection List
11. Ability to view Client and Patient Names for “Orphaned” Antech Results
12. ASAP Email Option
13. ASAP for Michigan
14. ASAP report for Oklahoma
15. Kenai Peninsula Borough
16. NABP Number
17. 2010.5 Fixes
1
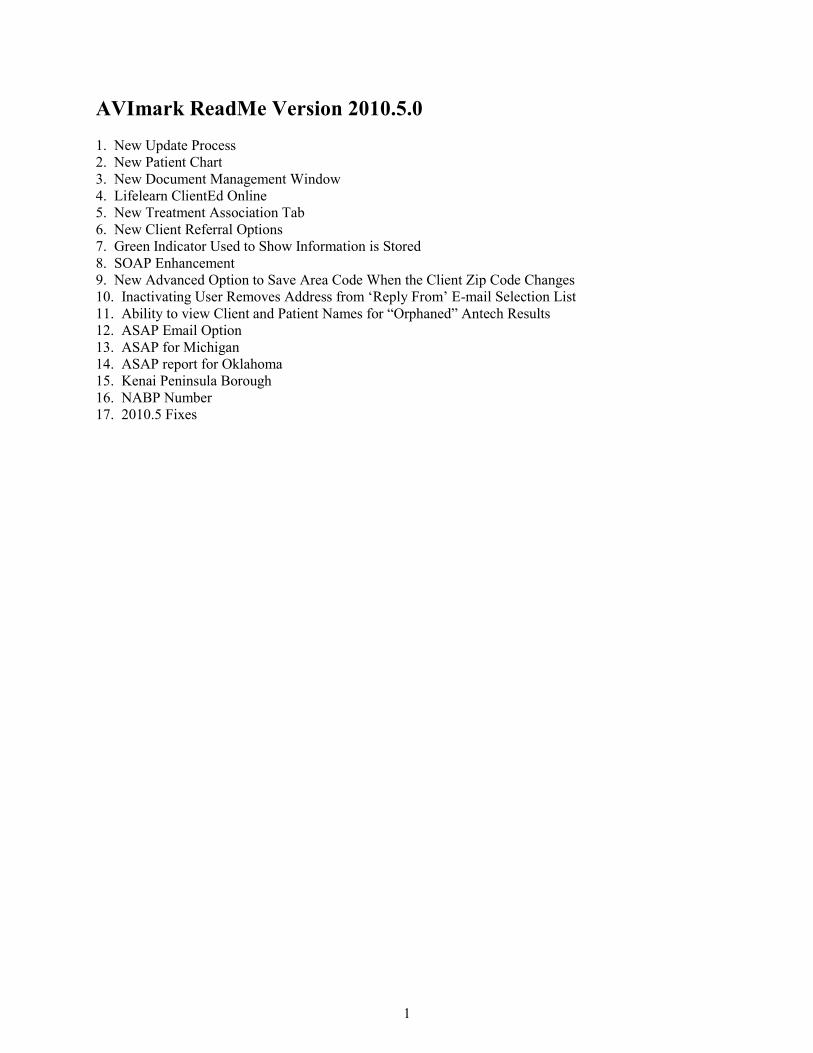
New Update Process *** IMPORTANT: For those that use an antivirus, please verify you have added V2$ to your exclusions list to ensure AVImark will perform properly. Also, those that do manual backups, outside of AVImark, please add the V2$ files to your backup. With version 2010.5, the update process windows will display differently due to enhancements that have been made to the database update method and file storage system. During an AVImark update, VM$ files will now be converted to V2$ files. It is very important to allow AVImark to perform this function and DO NOT cancel or interrupt this conversion process. Within the update window, the progress will be indicated with a status bar and a notation will be displayed indicating which VM$ records are being converted to the new V2$ format. These V2$ file types are being put into place to increase storage capacity per record for future updates.
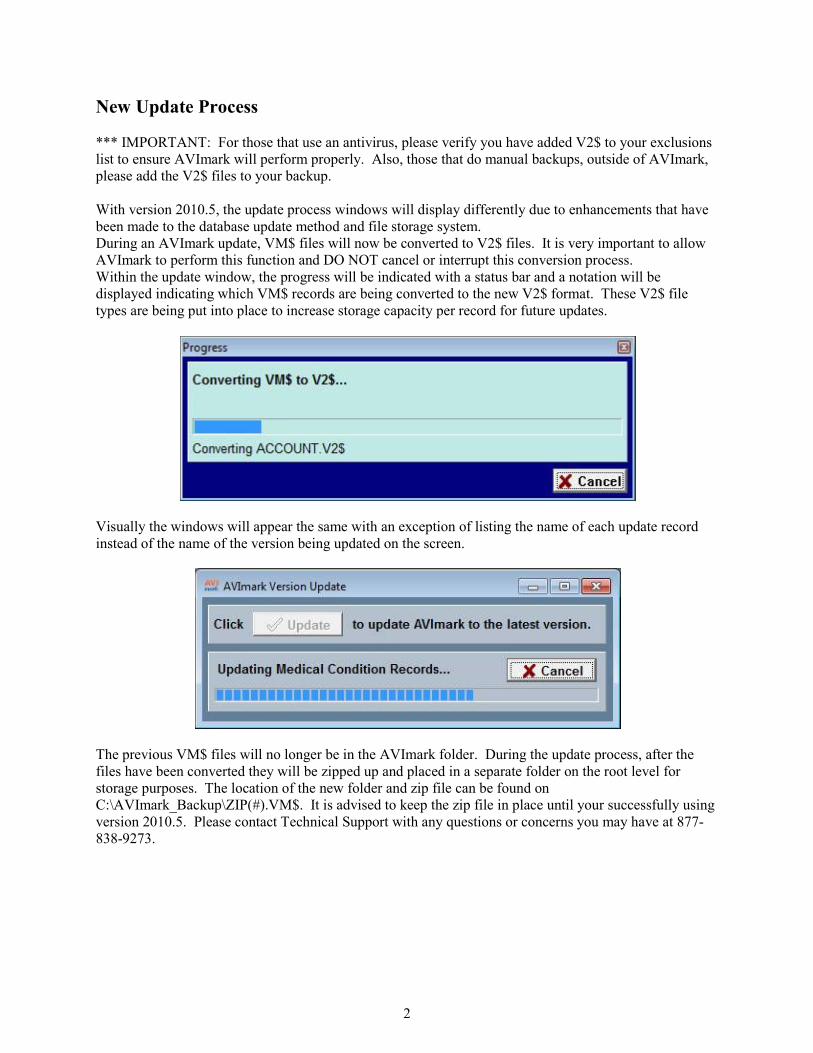
Visually the windows will appear the same with an exception of listing the name of each update record instead of the name of the version being updated on the screen.
The previous VM$ files will no longer be in the AVImark folder. During the update process, after the files have been converted they will be zipped up and placed in a separate folder on the root level for storage purposes. The location of the new folder and zip file can be found on C:\AVImark_Backup\ZIP(#).VM$. It is advised to keep the zip file in place until your successfully using version 2010.5. Please contact Technical Support with any questions or concerns you may have at 877-838-9273.
2
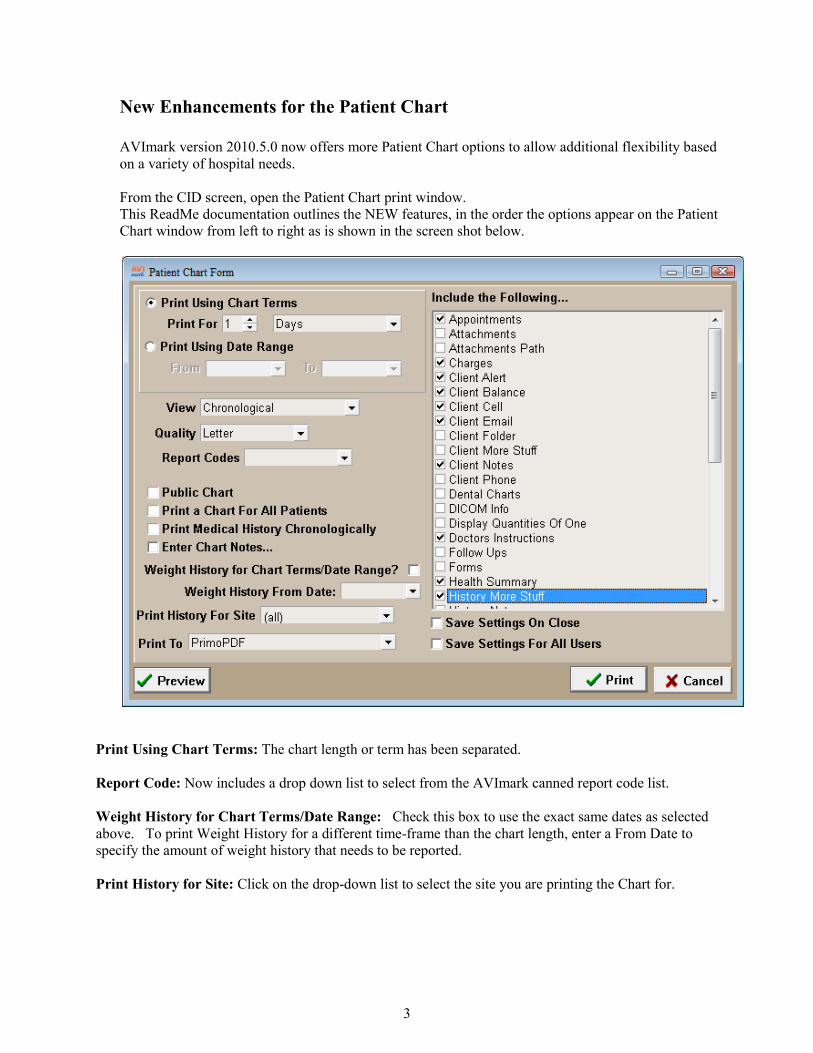
New Enhancements for the Patient Chart
AVImark version 2010.5.0 now offers more Patient Chart options to allow additional flexibility based
on a variety of hospital needs.
From the CID screen, open the Patient Chart print window.
This ReadMe documentation outlines the NEW features, in the order the options appear on the Patient
Chart window from left to right as is shown in the screen shot below.
Print Using Chart Terms: The chart length or term has been separated.
Report Code: Now includes a drop down list to select from the AVImark canned report code list.
Weight History for Chart Terms/Date Range: Check this box to use the exact same dates as selected
above. To print Weight History for a different time-frame than the chart length, enter a From Date to
specify the amount of weight history that needs to be reported.
Print History for Site: Click on the drop-down list to select the site you are printing the Chart for.
3
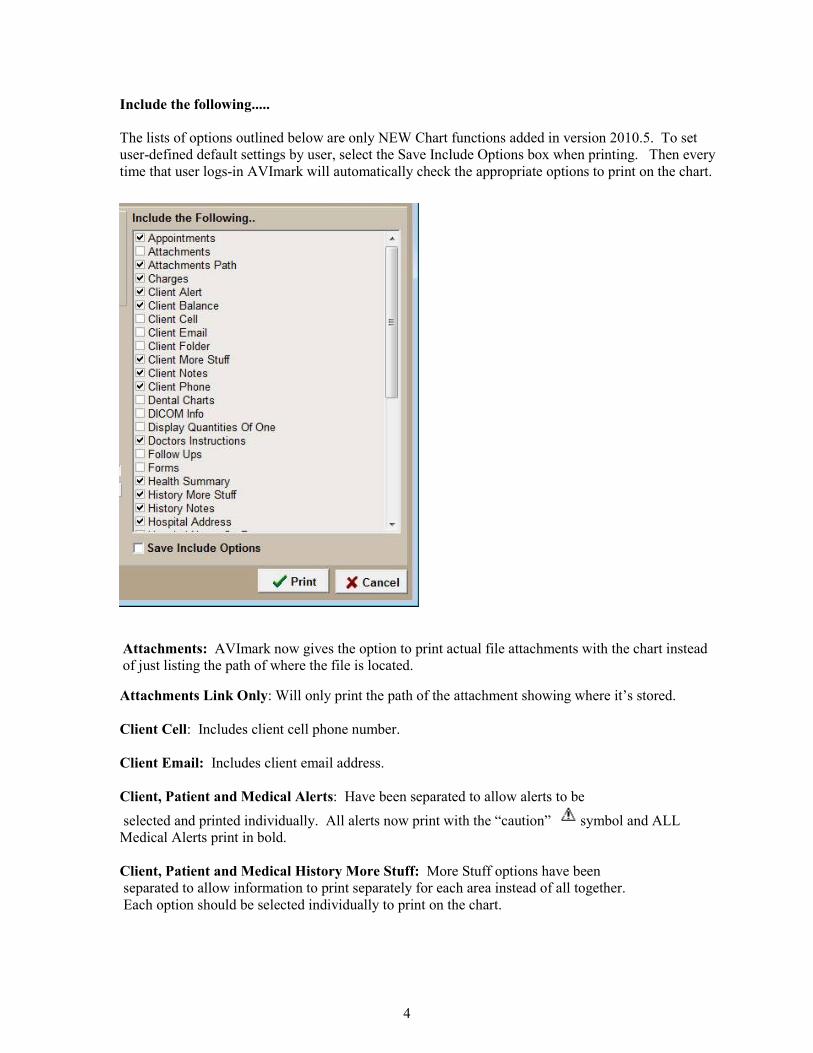
Include the following.....
The lists of options outlined below are only NEW Chart functions added in version 2010.5. To set
user-defined default settings by user, select the Save Include Options box when printing. Then every
time that user logs-in AVImark will automatically check the appropriate options to print on the chart.
Attachments: AVImark now gives the option to print actual file attachments with the chart instead
of just listing the path of where the file is located.
Attachments Link Only: Will only print the path of the attachment showing where it’s stored.
Client Cell: Includes client cell phone number.
Client Email: Includes client email address.
Client, Patient and Medical Alerts: Have been separated to allow alerts to be
selected and printed individually. All alerts now print with the “caution” symbol and ALL
Medical Alerts print in bold.
Client, Patient and Medical History More Stuff: More Stuff options have been
separated to allow information to print separately for each area instead of all together.
Each option should be selected individually to print on the chart.
4
Client, Patient and Medical History Notes: Notes have been separated to also print individually
accordingly to the option(s) chosen.
Dental Charts: Now print after the Patient Chart and shows the Medical History entry
that had the chart attached by listing ‘Dental Chart\time\day’ on the chart print out.
DICOM info: This option is not yet functional.
Display Quantities of One: Will allow quantities of 1 or below entered in Medical
History to print on the patient chart.
Doctors Instructions: You can now add Doctors Instructions on the fly by using Right-Click...
Doctor’s Instructions from the menu in Medical History. Having the Doctor Instruction chart
option selected will allow canned instructions to print on the chart that are brought over from
the Treatment and Item List as well as new ones created on the fly.
Follow-Ups: Follow-ups that are currently due and those that are overdue will be included
on the Chart.
Soap Client Instructions: Will now print on the chart; they are located in the Plan Area of the
Medical Condition Record. These notes will appear on the chart under the entry the SOAP record is
attached to.
Tests: When checking the option to include Test on the chart analyte notes will now be included
with the results.
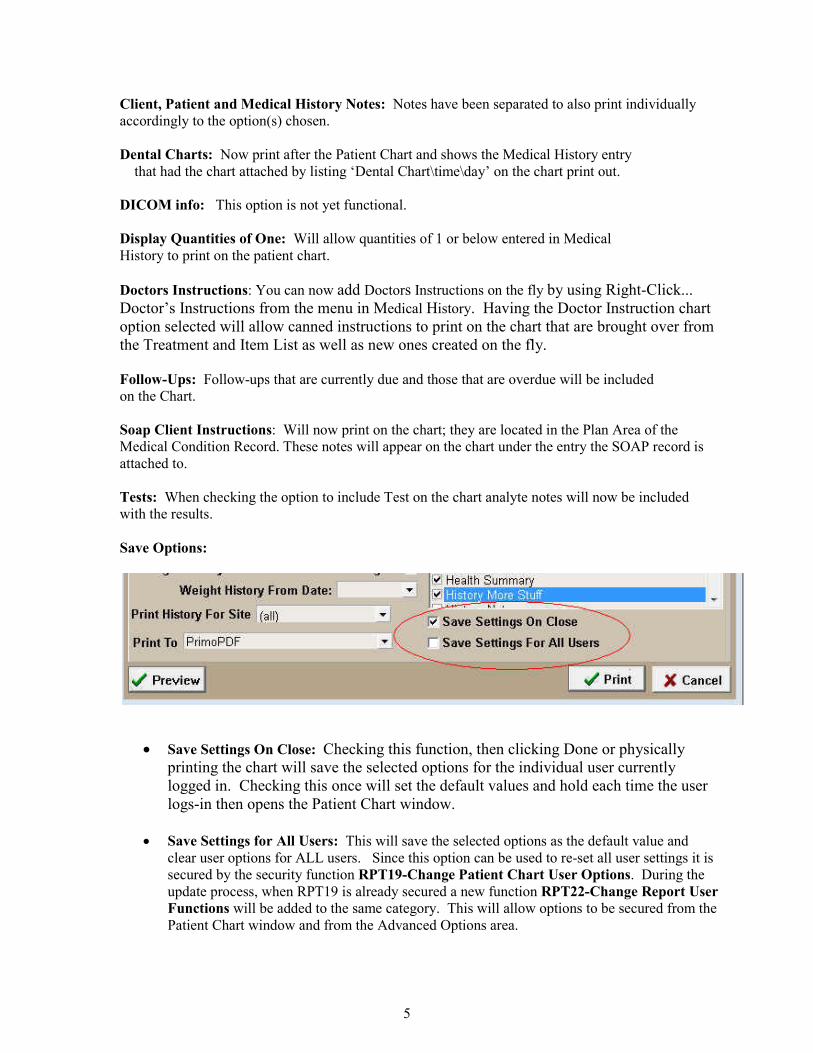
Save Options:
• Save Settings On Close: Checking this function, then clicking Done or physically
printing the chart will save the selected options for the individual user currently
logged in. Checking this once will set the default values and hold each time the user
logs-in then opens the Patient Chart window.
• Save Settings for All Users: This will save the selected options as the default value and
clear user options for ALL users. Since this option can be used to re-set all user settings it is
secured by the security function RPT19-Change Patient Chart User Options. During the
update process, when RPT19 is already secured a new function RPT22-Change Report User
Functions will be added to the same category. This will allow options to be secured from the
Patient Chart window and from the Advanced Options area.
5
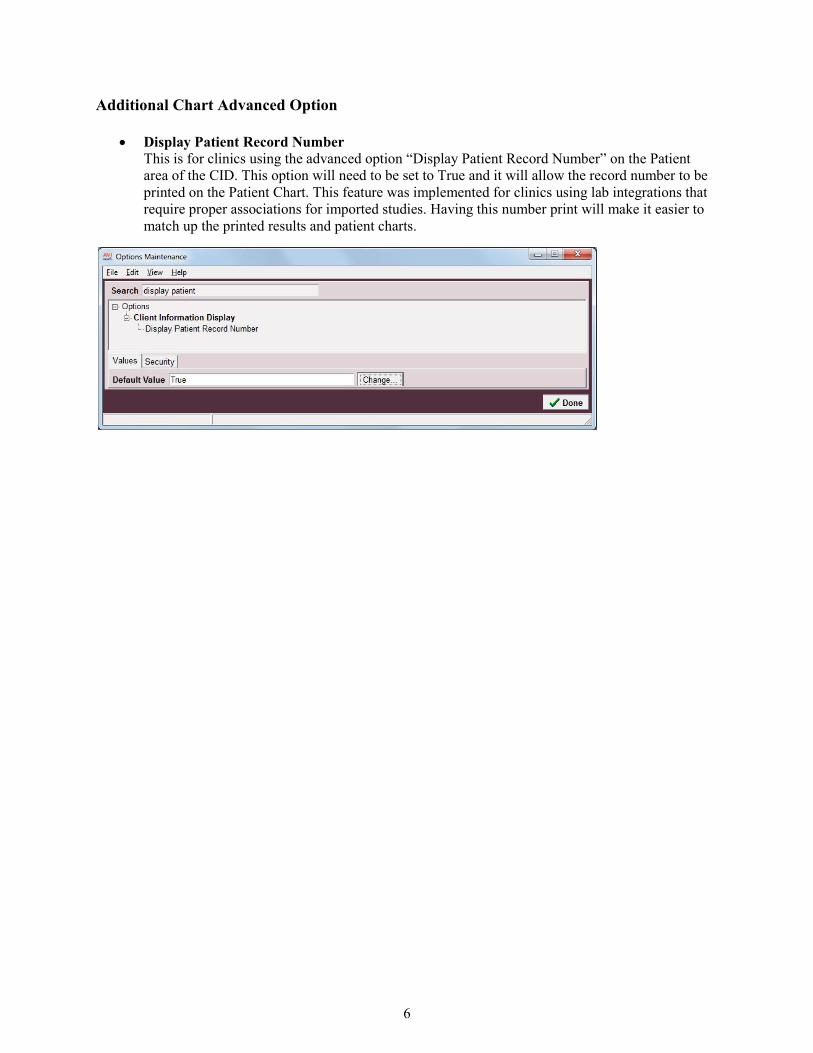
Additional Chart Advanced Option
• Display Patient Record Number
This is for clinics using the advanced option “Display Patient Record Number” on the Patient
area of the CID. This option will need to be set to True and it will allow the record number to be
printed on the Patient Chart. This feature was implemented for clinics using lab integrations that
require proper associations for imported studies. Having this number print will make it easier to
match up the printed results and patient charts.
6
Document Management Area
We are pleased to provide the new Document Management area that allows users the ability to add,
remove, update, or switch documents for all treatments, items, diagnoses, and problems from one
location.
**Please note: This feature does not replace the ability to add, change, or remove documents directly
from the Change window, Documents tab. Document fields in the Treatment List, Inventory List,
Diagnosis and Problem Lists’ all have the same appearance and functionality.
To launch the Document Management window, select Utilities, Document Management. This area will
default to opening Tx, Items, Dx, and Problems that have document associations.
Document Management window options:
• Load All Codes – Will load all AVImark treatment, item, diagnosis, and problems codes,
including those without associated documents.
• Load All Lifelearn Documents *only visible for Lifelearn users* – Will load all Lifelearn
documents, including those that are not associated to any treatment, item, diagnosis, or problem.
• Lifelearn ClientEd Update *only visible for Lifelearn users* – Will compare your current
Lifelearn documents to currently available documents from Lifelearn, and update/replace any
necessary. These changes will appear in the Document Management area only, and not applied to
the AVImark database until changes are applied. This will allow users the opportunity to make
any personalized changes before using the Preview and Apply button to make the changes
permanent.
• Lifelearn ClientEd Online link *only visible for Lifelearn users* – will launch the Lifelearn site
(www.lifelearn-cliented.com /).
• Group by – Will allow you to group the displayed entries by the following methods:
o Species
o Code
o Old Document
o New Document
o Error Code
• Subgroup by – Will allow you to further categorize displayed entries if a “Group by” option has
been selected. These subgroup options are:
o Species
o Code
o Old Document
o New Document
o Error Code
• Validate File Names – When checked will verify document names in the New Document field
before applying. Any document name entered that does not exist in the My Documents folder
will cause a warning prompt upon clicking Preview & Apply Changes.
Document assignment:
7
• Select a line entry for which you wish to make a document modification.
o To add a document to an AVImark code with or without a current document displayed
in the Old Document field, click in the New Document field, and select the ellipsis.
� This will open to display the documents contained in the My Documents folder
allowing you to make your document selection, and click OK.
� You will now see your document selection in the New Document column.
o To remove a document from an AVImark code, click in the New Document field and
swipe out the document name.
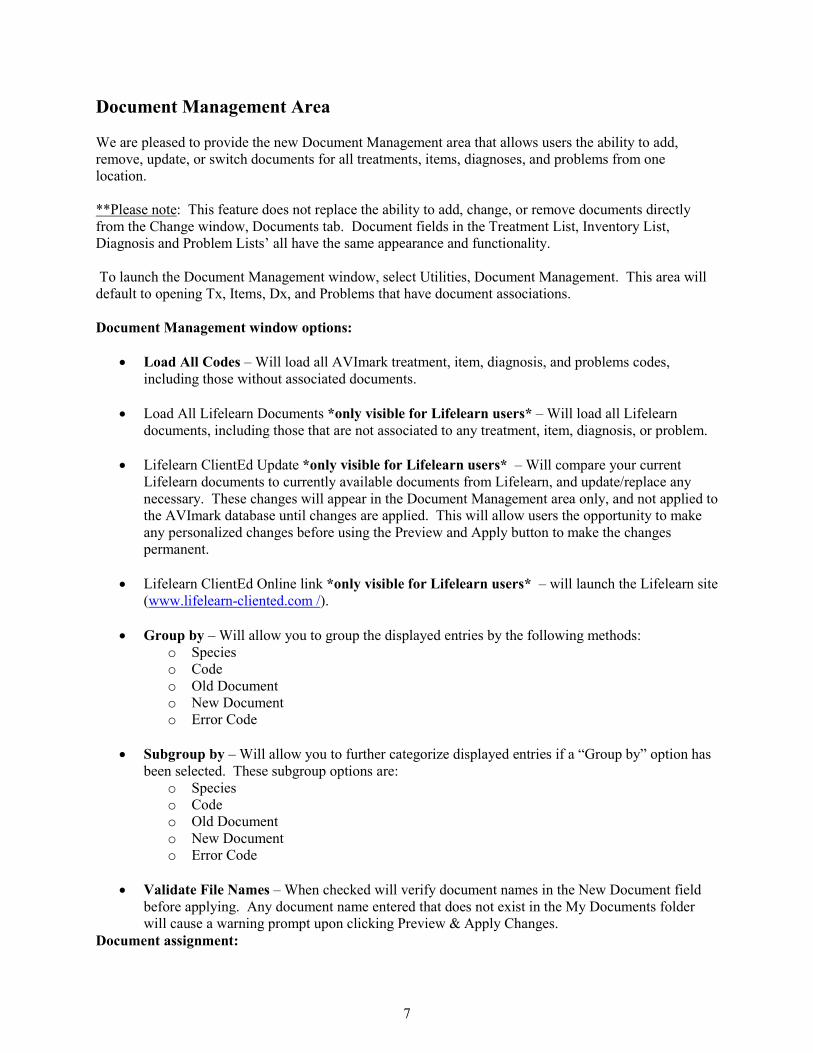
**Important Note: If at any time you wish to revert to the document listed in the “Old
Document” field, simply click into the Old Document field for that line entry and select the
double right arrow. This will reassign the document name as it was prior to the change.
However this ONLY applies to changes that have not yet been applied.
• When all document additions, modifications, and removals have taken place, select Preview &
Apply Changes. This will open the Preview Changes window displaying all changes that will be
made in your database. Selecting Proceed will confirm and process the changes. Pressing
Cancel will return you to the Document Management window to make further changes.
• If any of the attempted changes are invalid, you will be notified when Preview and Apply
Changes is selected, and will be returned to the Document Management window. The offending
entries will display the error in the error column. Once all corrections are made, the Preview and
Apply Changes process can be attempted again.
**NOTE: Offending document entries can be easily identified if the Document Management
window is grouped or sub-grouped by Error Code. Error code grouping is automatically
applied when an error occurs during processing.
• Adding one or multiple species specific documents to an AVImark code can be accomplished,
however you cannot add more than one document per species to an AVImark code. For
example, your AVImark treatment may have two documents assigned, one each for canine,
feline, but cannot have two feline entries.
o To add a species specific document to an AVImark code entry that does not currently
have a document attached, select the AVImark line entry, and choose the desired species
from the Species drop down list. Then make your document selection to be attached.
o If an AVImark code has a saved document, you cannot change the species assignment
for that line entry; however, you can create a new line entry for that AVImark code and
make your species association on that new entry.
� To create the new line entry, click into the row labeled “Click here to add a new
row.”
� Each field has the ability to enter or select the appropriate information.
• Click into the Code field and type in the exact AVImark code or you
may choose to use the ellipsis to open the Select Entry Code window to
make a selection.
8
• From within the Select Entry Code window a list of Treatments, Items,
Diagnoses, and Problems can be displayed by entering some or all of
description until the desired code is displayed.
• Highlight the entry and click OK. You will be returned to the Document
Management window with your Code and Description fields filled on
your new row.
• Select the applicable species option from the Species field.
• Select the desired document.
• When all fields are complete, press Enter on your keyboard and your
new line entry will be complete.
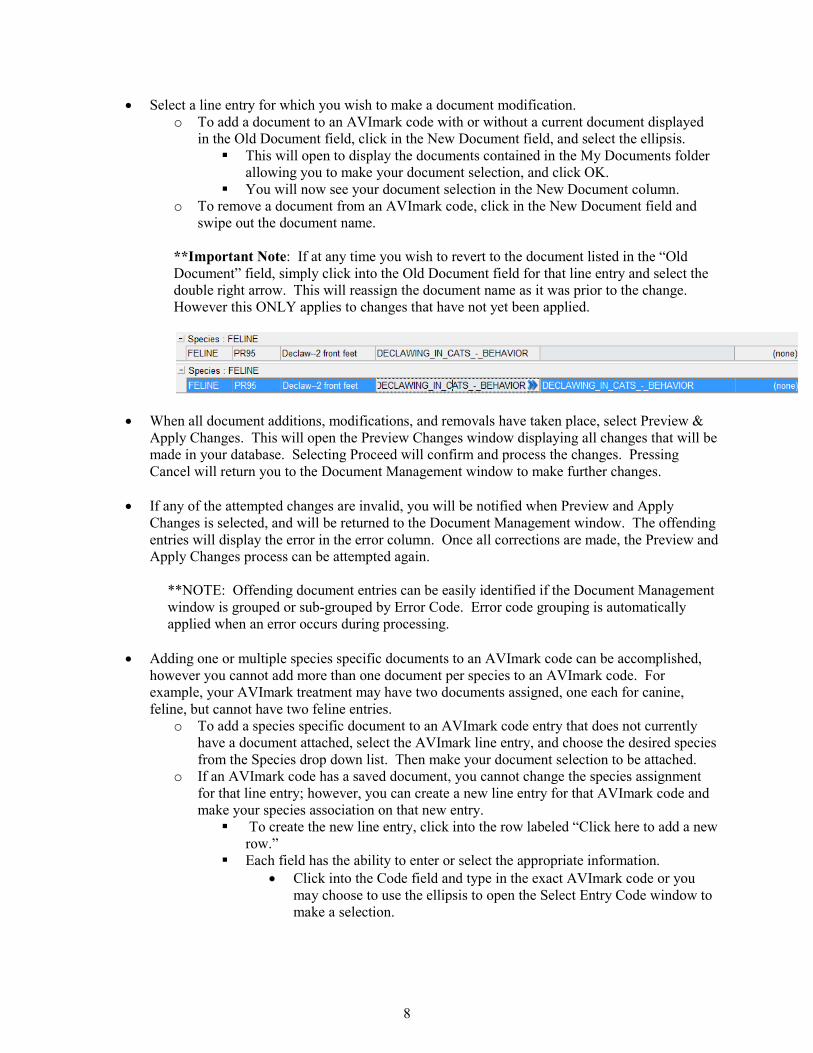
• Search fields have been added to allow users to locate and display all entries meeting user
specified criteria. By clicking on the row labeled “Click here to search” in the field representing
the area for which you wish to search, you can enter identifying information. All entries in the
Document Management area meeting your search criteria will be displayed. The example below
shows I used Declaw as my search criteria in the Description field and the resulting search
results.
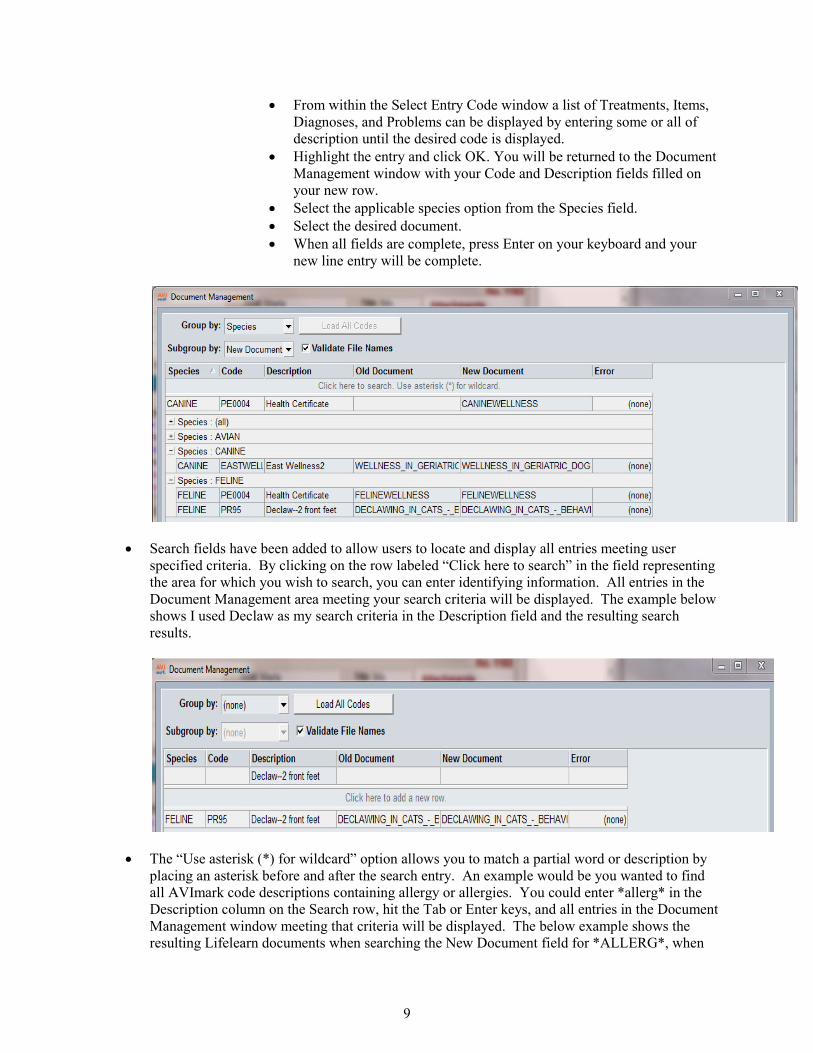
• The “Use asterisk (*) for wildcard” option allows you to match a partial word or description by
placing an asterisk before and after the search entry. An example would be you wanted to find
all AVImark code descriptions containing allergy or allergies. You could enter *allerg* in the
Description column on the Search row, hit the Tab or Enter keys, and all entries in the Document
Management window meeting that criteria will be displayed. The below example shows the
resulting Lifelearn documents when searching the New Document field for *ALLERG*, when
9
the “Load All Lifelearn Documents” option was used.
10
Lifelearn ClientED Online
The Lifelearn ClientEd Document feature in AVImark has been updated to allow a more user friendly
application by streamlining document assignment and better access to the most current client handout
documents.
For Lifelearn ClientEd purchase information and installation assistance, please contact our MSS Sales
Department at 877-838-9273, option 2, submenu 4. A member of our Sales Team will assist you with
downloading and installing the following files:
The following files will be downloaded and placed in the AVImark directory:
• ArticlesToDP.xtr
• LL05to09
• A Lifelearn subdirectory must be added to your existing AVImark Documents folder, generally
found within the AVImark directory. It is necessary for this Lifelearn folder to be a
subdirectory to the AVImark Documents folder. This Lifelearn directory will contain:
o Lifelearn_ClientEd_Sync.jar
o Lib folder containing the following two files:
� appframework-1.0.3.jar
� swing-worker-1.1.jar
In order to begin using this feature, it is necessary to possess login credentials provided by Lifelearn.
These credentials can be obtained by contacting 1-800-375-7994 or [email protected].
Setup –
In AVImark, you will need to verify the path to the Lifelearn Files Path directory. This can be
accomplished by the following:
• Launch Advanced Options, and enter Lifelearn in the Search field.
• Verify the path for the Lifelearn folder. It is important that the Lifelearn folder is a subdirectory
of the folder used for AVImark documents. The path will be simply “LIFELEARN” using the
recommended setup.
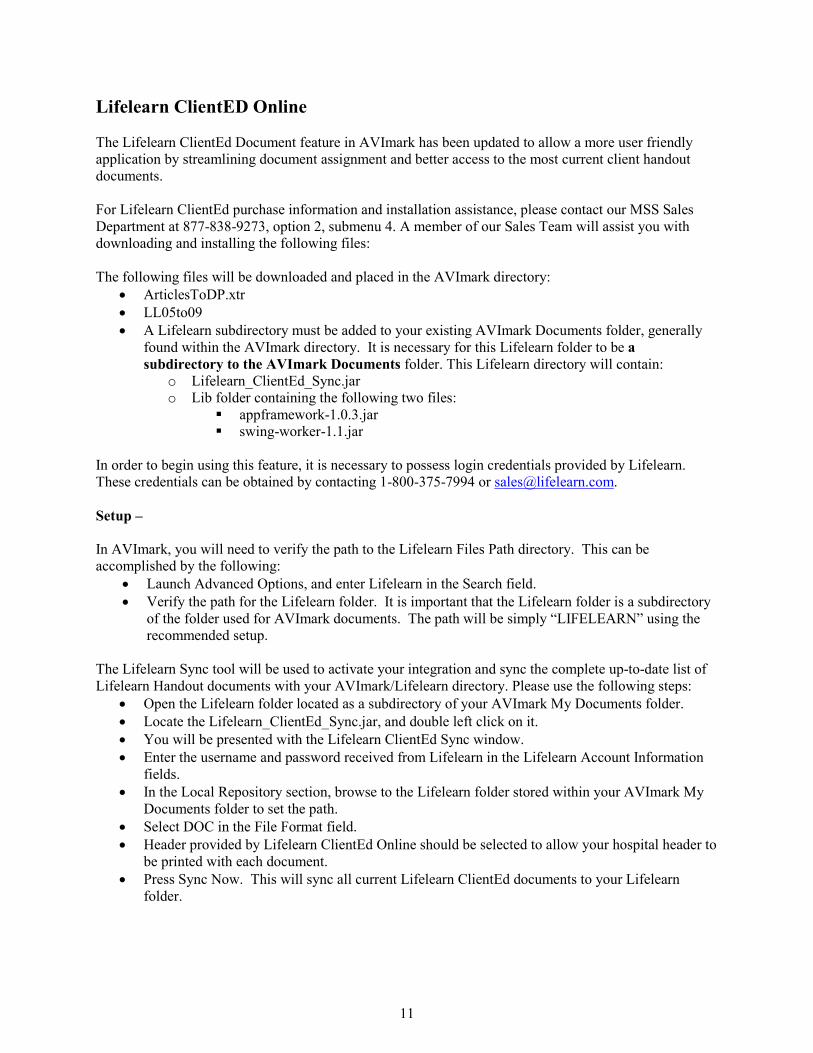
The Lifelearn Sync tool will be used to activate your integration and sync the complete up-to-date list of
Lifelearn Handout documents with your AVImark/Lifelearn directory. Please use the following steps:
• Open the Lifelearn folder located as a subdirectory of your AVImark My Documents folder.
• Locate the Lifelearn_ClientEd_Sync.jar, and double left click on it.
• You will be presented with the Lifelearn ClientEd Sync window.
• Enter the username and password received from Lifelearn in the Lifelearn Account Information
fields.
• In the Local Repository section, browse to the Lifelearn folder stored within your AVImark My
Documents folder to set the path.
• Select DOC in the File Format field.
• Header provided by Lifelearn ClientEd Online should be selected to allow your hospital header to
be printed with each document.
• Press Sync Now. This will sync all current Lifelearn ClientEd documents to your Lifelearn
folder.
11
AVImark Species settings-
• It will be necessary to assign your Lifelearn Species to your AVImark Species Table. Please use
the available species options found in the Lifelearn Species drop down list in the Change Species
window.
Feature use -
Lifelearn ClientEd Document Search window –
A new area has been provided to allow users the ability to search for the desired Lifelearn document.
This window has been made available from multiple locations.
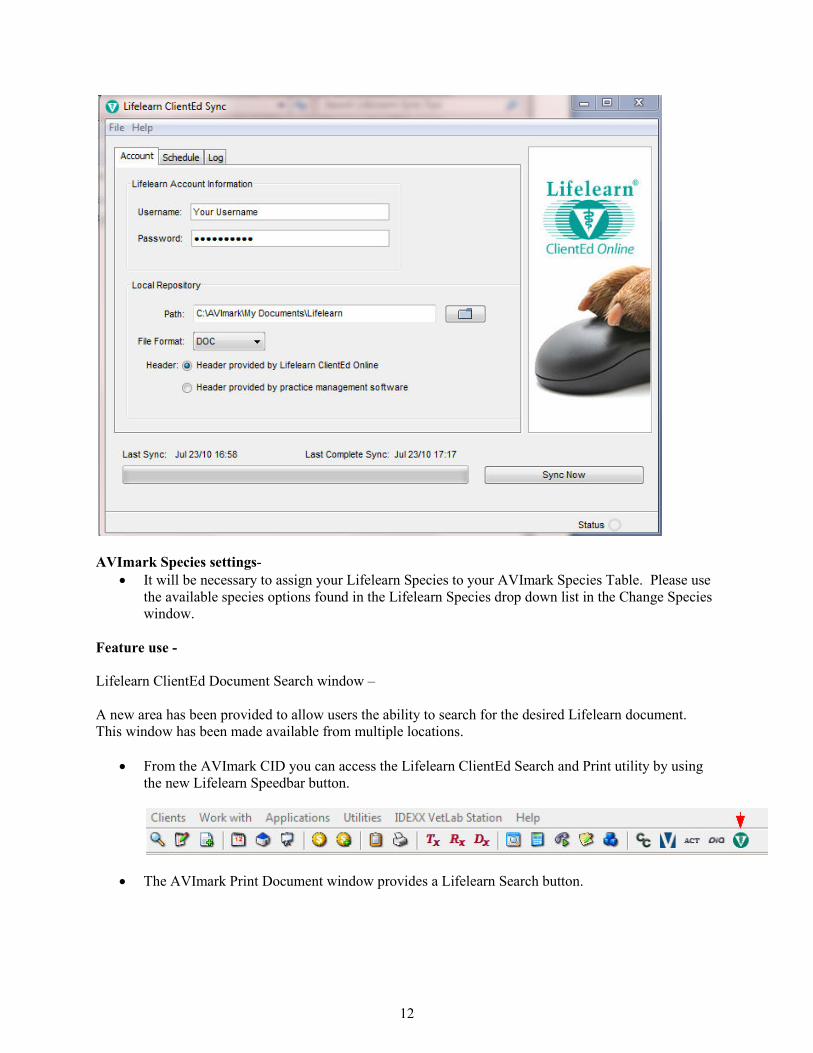
• From the AVImark CID you can access the Lifelearn ClientEd Search and Print utility by using
the new Lifelearn Speedbar button.
• The AVImark Print Document window provides a Lifelearn Search button.
12

• The AVImark Change Item, Treatment, Diagnosis, and Problem windows all have the Lifelearn
Search button located in the New Document window of the Documents tab.
o The Lifelearn ClientEd Document Search window offers several search options for
locating, sorting, and filtering, Lifelearn documents. The Search, Filter, and Sort options
include:
� Title Words –
� Keywords –
� Species –
� Summary –
� Topics –
� Systems –
� File name –
Each of these options is able to be used by entering information in their respective fields. By
clicking in a field listed above, the Index search window is automatically updated to display
selection options appropriate for that field. Double clicking on an Index menu entry will allow
that entry to be added to the chosen field. When entries are selected, click the Search button to
display all Lifelearn documents that meet the selected criteria. Multiple entries are able to be
selected, however only documents meeting all selected criteria will be displayed. For example,
In the Topics field, select Breeding, then select Conditions, and press the Search button. You will
only be presented with a list of documents that meet both Breeding and Conditions criteria,
instead of Breeding or Conditions. Once the desired document is found, double left clicking will
open the Print window so the document can be previewed or printed.
13

Document Management area -
We are pleased to provide the new Document Management area that allows users the ability to add,
remove, update, or switch documents for all treatments, items, diagnoses, and problems from one
location. Lifelearn document management ability has been incorporated to utilize this area as well.
To launch the Document Management window, select Utilities, Document Management.
• This area will default to opening with all treatments, item, diagnoses, and problems, with
document associations.
• Load All Codes – Will load all AVImark treatment, item, diagnosis, and problems codes,
including those without associated documents.
• Load All Lifelearn Documents – Will load all Lifelearn documents, including those that are not
associated to any treatment, item, diagnosis, or problem.
• Lifelearn ClientEd Online link – will launch the Lifelearn site (www.lifelearn-cliented.com /).
• Actions menu, Convert Lifelearn file names to new online version – Will compare any attached
Lifelearn documents with currently available documents from Lifelearn, and update/replace any
necessary. These changes will appear in the Document Management area only, and not applied to
the AVImark database until changes are applied. This will allow users the opportunity to make
any personalized changes before using the Preview and Apply button to make the changes
permanent.
• Group by – will allow you to group the displayed entries by the following methods:
o Species
o Code
o Old Document
o New Document
o Error Code
• Subgroup by – will allow you to further categorize displayed entries if a “Group by” option has
been selected. These subgroup options are:
o Species
o Code
o Old Document
o New Document
o Error Code
• Validate File Names – when checked will verify document names in the New Document field
before applying. Any document name entered that does not exist in the My Documents folder
will cause a warning prompt upon clicking Preview & Apply Changes.
Document assignment –
• Select a line entry for which you wish to make a document modification.
o To add a Lifelearn document to an AVImark code with or without a current document
displayed in the Old Document field, click in the New Document field, and select the
Lifelearn button.
� This will open the Lifelearn ClientEd Document Search window where you can
make your Lifelearn document selection, and click OK.
� You will now see your Lifelearn selection in the New Document column.
o To remove a document from an AVImark code, click in the New Document field and
swipe out the document name.
14

**NOTE: If at any time you wish to revert to the document listed in the “Old Document”
field, simply click into the Old Document field for that line entry and select the double right
arrow. This will reassign the document name as it was prior to the change. However this
ONLY applies to changes that have not yet been applied.
• When all document additions, modifications, and removals have taken place, select Preview &
Apply Changes. This will open the Preview Changes window displaying all changes that will be
made in your database. Selecting Proceed will confirm and process the changes. Pressing
Cancel will return you to the Document Management window to make further changes.
• If any of the attempted changes are invalid, you will be notified when Preview and Apply
Changes is selected, and will be returned to the Document Management window. The offending
entries will display the error in the error column. Once all corrections are made, the Preview and
Apply Changes process can be continued.
**NOTE: Offending document entries can be easily identified if the Document Management
window is grouped or sub-grouped by Error Code. Error code grouping is automatically
applied when an error occurs during processing.
• Adding one or multiple species specific documents to an AVImark code can be accomplished,
however you cannot add more than one document per species to an AVImark code. For
example, your AVImark treatment may have two documents assigned, one each for canine,
feline, but cannot have two feline entries.
o To add a species specific document to an AVImark code entry that does not currently
have a document attached, select the AVImark line entry, and choose the desired species
from the Species drop down list. Then make your document selection to be attached.
o If an AVImark code has a saved document, you cannot change the species assignment
for that line entry; however, you can create a new line entry for that AVImark code and
make your species association on that new entry.
� To create the new line entry, click into the row labeled “Click here to add a new
row.”
� Each field has the ability to enter or select the appropriate information.
• Click into the Code field and type in the exact AVImark code or you
may choose to use the ellipsis to open the Select Entry Code window to
make a selection.
• From within the Select Entry Code window a list of Treatments, Items,
Diagnoses, and Problems can be displayed by entering some or all of
description until the desired code is displayed.
• Highlight the entry and click OK. You will be returned to the Document
Management window with your Code and Description fields filled on
your new row.
• Select the applicable species option from the Species field.
• Select the desired document.
• When all fields are complete, press Enter on your keyboard and your
new line entry will be complete.
15

• Search fields have been added to allow users to locate and display all entries meeting user
specified criteria. By clicking on the row labeled “Click here to search” in the field representing
the area for which you wish to search, you can enter identifying information. All entries in the
Document Management area meeting your search criteria will be displayed. The example below
shows I used Declaw as my search criteria in the Description field and the resulting search
results.
• The “Use asterisk (*) for wildcard” option allows you to match a partial word or description by
placing an asterisk before or after the search entry. An example would be you wanted to find all
AVImark code descriptions containing allergy or allergies. You could enter *allerg or allerg* in
the Description column on the Search row, hit the Tab or Enter key, and all entries in the
Document Management window meeting that criteria will be displayed. The below example
shows the resulting Lifelearn documents when searching the New Document field for
*ALLERG, when the “Load All Lifelearn Documents” option was used.
16
New Treatment/Item Association Tab
Version 2010.5 has integrated the new window format of using column customization to the
Associated Treatment\Items window. This new window also allows treatments and items to be
sorted by using drag and drop. You can easily re-arrange the order of the codes the way you want
them to be listed in Medical History then on to the client Invoice.
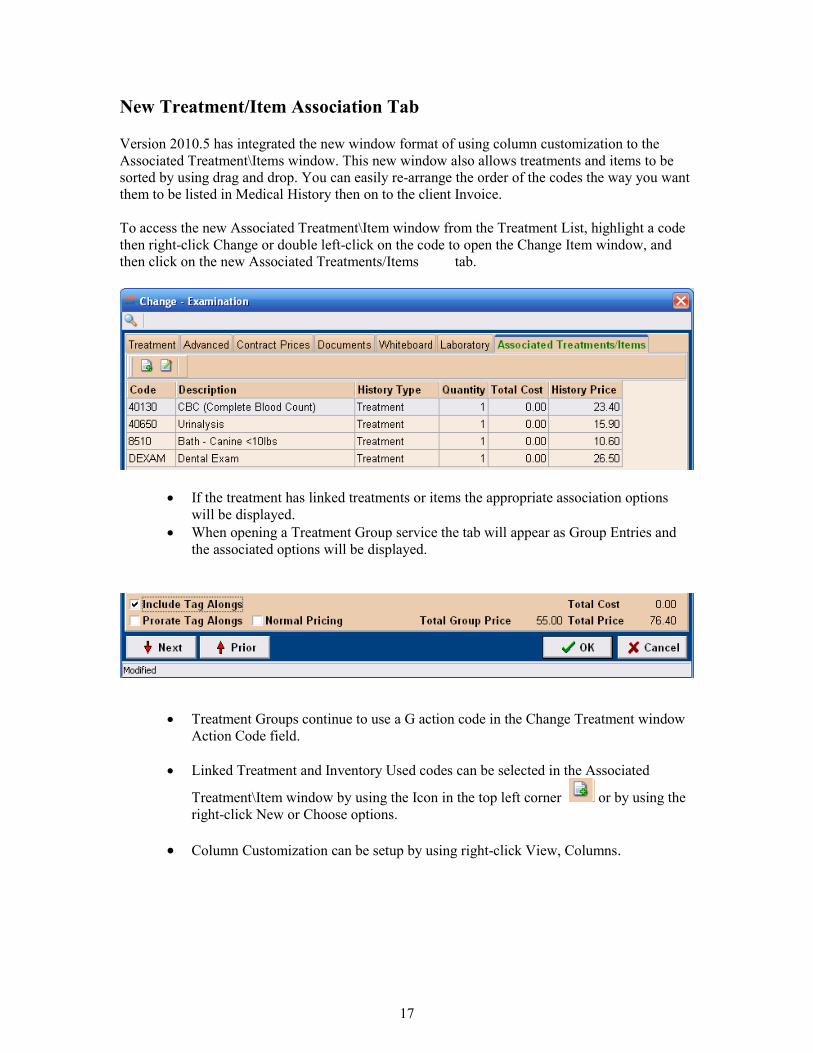
To access the new Associated Treatment\Item window from the Treatment List, highlight a code
then right-click Change or double left-click on the code to open the Change Item window, and
then click on the new Associated Treatments/Items tab.
• If the treatment has linked treatments or items the appropriate association options
will be displayed.
• When opening a Treatment Group service the tab will appear as Group Entries and
the associated options will be displayed.
• Treatment Groups continue to use a G action code in the Change Treatment window
Action Code field.
• Linked Treatment and Inventory Used codes can be selected in the Associated
Treatment\Item window by using the Icon in the top left corner or by using the
right-click New or Choose options.
• Column Customization can be setup by using right-click View, Columns.
17
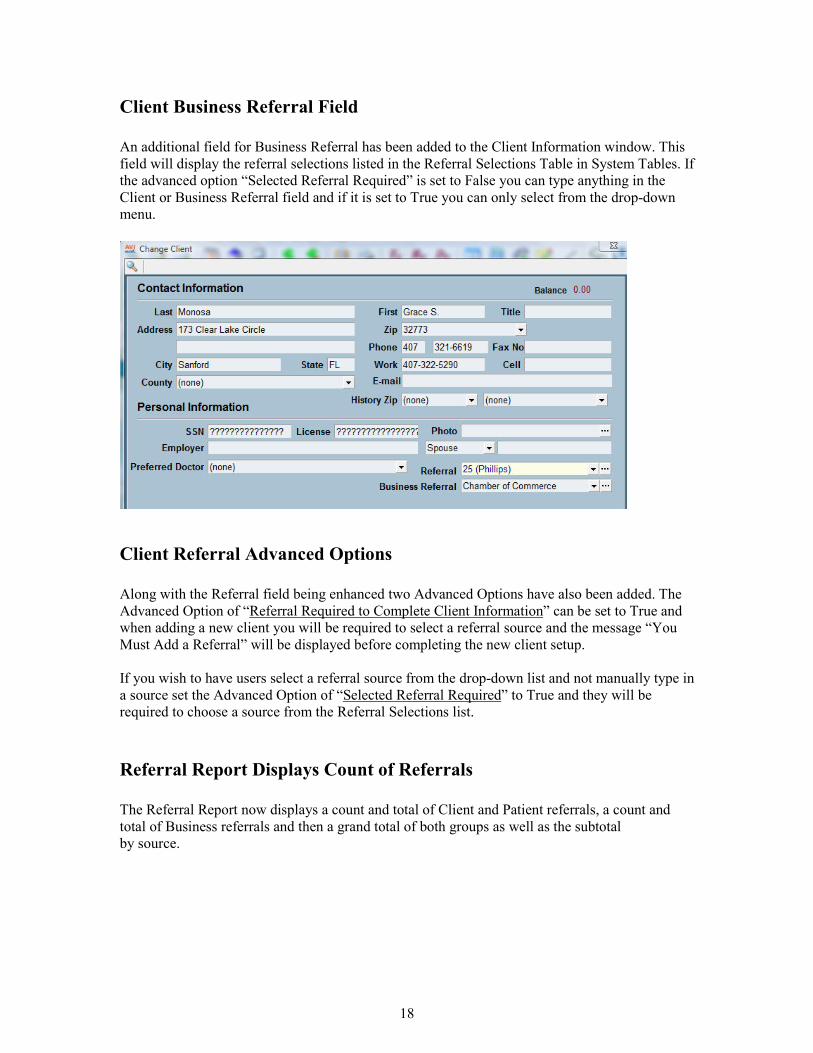
Client Business Referral Field
An additional field for Business Referral has been added to the Client Information window. This
field will display the referral selections listed in the Referral Selections Table in System Tables. If
the advanced option “Selected Referral Required” is set to False you can type anything in the
Client or Business Referral field and if it is set to True you can only select from the drop-down
menu.
Client Referral Advanced Options
Along with the Referral field being enhanced two Advanced Options have also been added. The
Advanced Option of “Referral Required to Complete Client Information” can be set to True and
when adding a new client you will be required to select a referral source and the message “You
Must Add a Referral” will be displayed before completing the new client setup.
If you wish to have users select a referral source from the drop-down list and not manually type in
a source set the Advanced Option of “Selected Referral Required” to True and they will be
required to choose a source from the Referral Selections list.
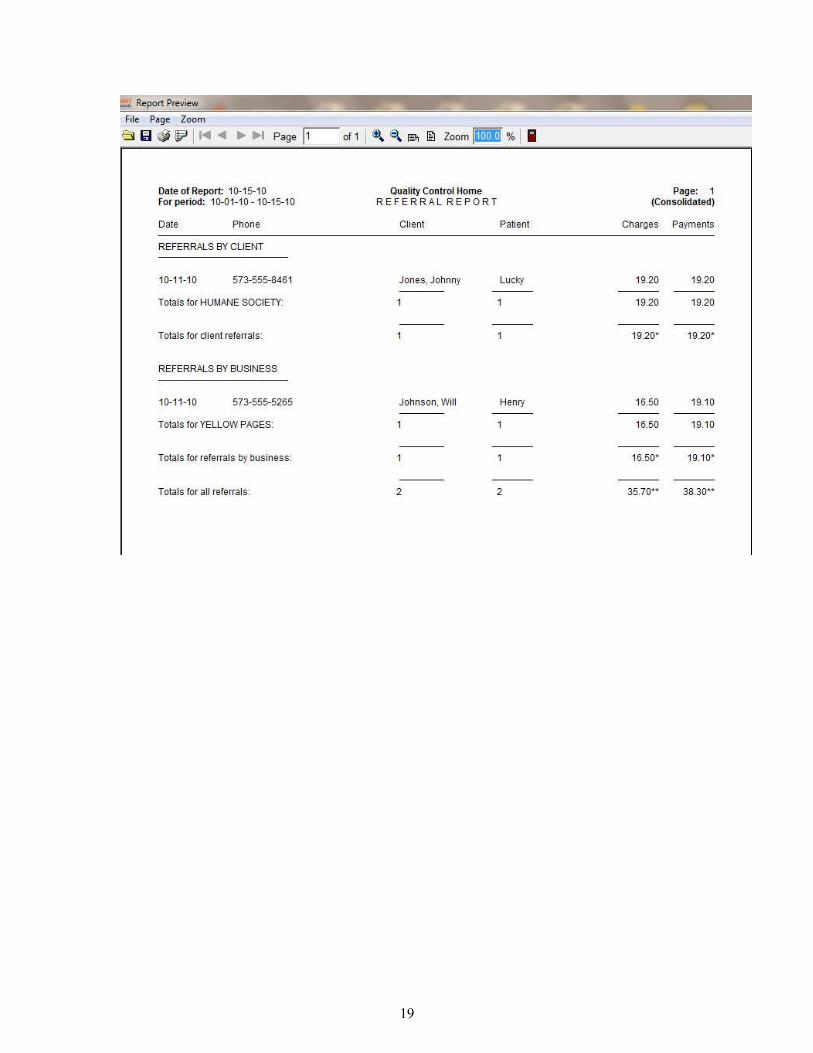
Referral Report Displays Count of Referrals
The Referral Report now displays a count and total of Client and Patient referrals, a count and
total of Business referrals and then a grand total of both groups as well as the subtotal
by source.
18
19
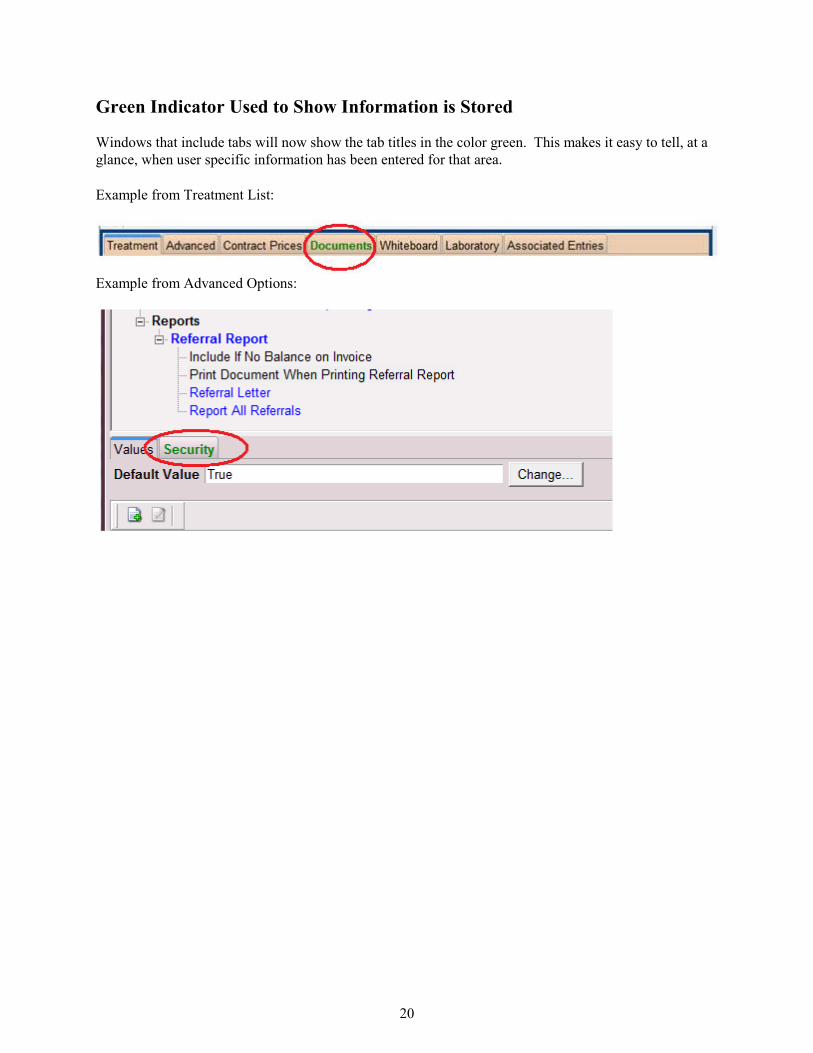
Green Indicator Used to Show Information is Stored
Windows that include tabs will now show the tab titles in the color green. This makes it easy to tell, at a
glance, when user specific information has been entered for that area.
Example from Treatment List:
Example from Advanced Options:
20

New Medical Condition Record Enhancement
Hospitals can now make changes to their Abnormalities and Body Subsystems held in System Tables
without affecting past medical records. In previous versions of AVImark a user could not change an
abnormality or body subsystem code or description without losing stored information linked to previous
SOAP records. Flexibility added to version 2010.5 includes:
• Ability to add, edit and/or remove codes and descriptions in the Abnormality and Body
Subsystem Tables.
• Ability to drag and drop Abnormalities and have them display in that order on new SOAP
records.
21
New Advanced Option to Save Area Code When the Client Zip Code Changes
In previous versions of AVImark, when a client zip code is changed on the CID the client area code is
also changed due to the area code linked to that specific zip in System Tables, Zip Code table. Due to the
common use of cell phones as a main phone line this has become an issue causing client numbers to be
wrong. Version 2010.5 gives a new Advanced Option named “Auto-assign Area Code by Zip Code” that
can be set to True of False. Upon updating the default setting is True to keep the original functionality in
place, but users that Do Not want the client area code to be updated to match the zip code table can set
this option to False.
22

Inactivating User Removes Address from ‘Reply From’ E-mail Selection List
In Users and Security, Change User window AVImark allows administration and staff members to enter
an email address to be used as a reply address when e-mailing clients. A drop-down selection list of
email addresses can be accessed when sending e-mail from the CID Client Area, Right-Click Send Email
and from Information Search. Version 2010.5 no longer displays the address of persons that have been
inactivated in Users and Security.
23
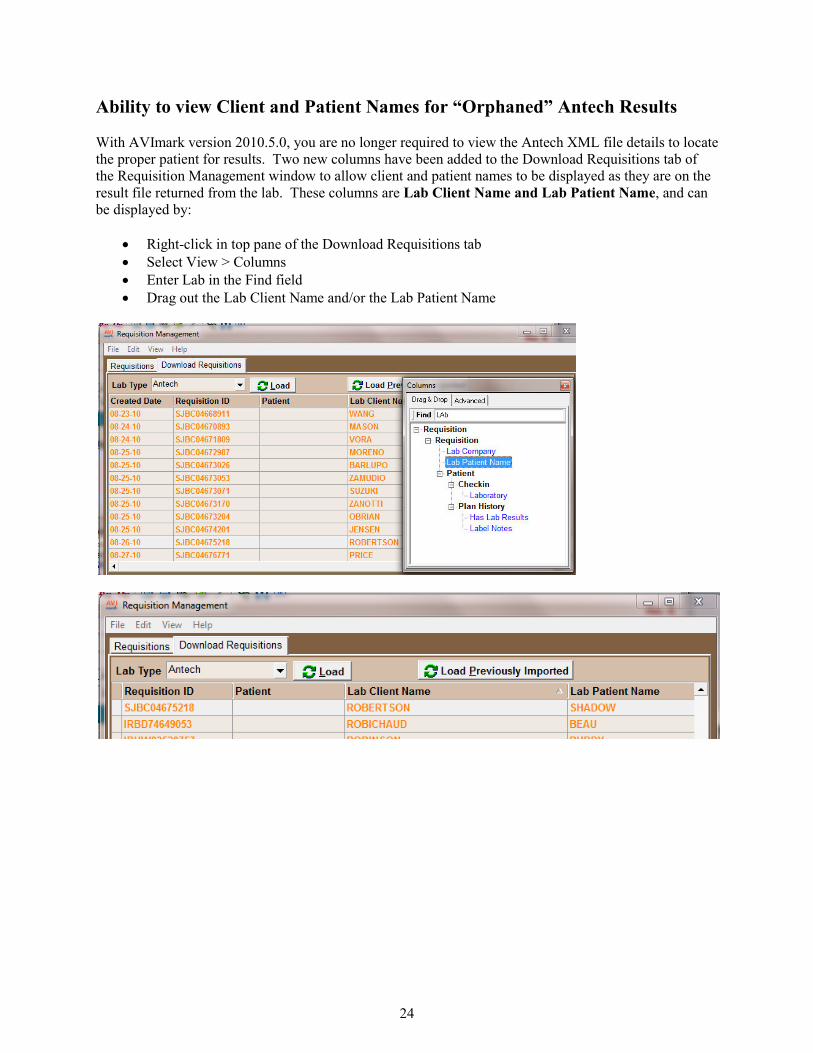
Ability to view Client and Patient Names for “Orphaned” Antech Results
With AVImark version 2010.5.0, you are no longer required to view the Antech XML file details to locate
the proper patient for results. Two new columns have been added to the Download Requisitions tab of
the Requisition Management window to allow client and patient names to be displayed as they are on the
result file returned from the lab. These columns are Lab Client Name and Lab Patient Name, and can
be displayed by:
• Right-click in top pane of the Download Requisitions tab
• Select View > Columns
• Enter Lab in the Find field
• Drag out the Lab Client Name and/or the Lab Patient Name
24
ASAP Email Option
As of version 2010.5 submitting your ASAP report will be even easier. The ability to send the report as
an email attached has been added to the program. By simply checking the option “Send as an E-Mail
Attachment”, you will be able to enter the e-mail address of the controlled substance information
collection agency (where applicable). Contact you agency to find the email address.
IMPORTANT: You will need to have your email setup in advanced options for this feature to work.
Please call our technical support at 1-877-838-9273 option 1 for assistance setting up email.
25
ASAP for Michigan
The ASAP report for Michigan now requires the Client’s First Name and Client’s Date of Birth. You will
need to setup an Additional Data Field (More Stuff) to accommodate this. You will need to setup a More
Stuff field with the Field Name of Owner_DOB, and type of Date. Then you will enter the Client’s Date
of Birth into this field.
Please contact our technical support staff at 1-877-838-9273 for assistance in setting this up.
26
ASAP report for Oklahoma
Oklahoma now requires clinics to report controlled substances in the ASAP 2007 format. In an effort to
keep these clinics in compliance with these requirements, AVImark has changed the ASAP utility to meet
the needs of these clinics.
To access this utility to begin generating the report for the State of Oklahoma, you are required to:
• Have your Hospital DEA number assigned on the Demographics tab in Hospital Setup
• Assign your doctor DEA numbers in Users and Security
• Assign your doctor NABP numbers in Users and Security
• Make sure the AVImark items to be reported have the C Action code (denoting it as
Controlled Substance) and the NDC number assigned
• Have the “Include Sequence Number option for printing Drug Labels” set to True in
advanced options
• Printing prescription labels through AVImark will assign numbers and maintain them in
sequential order. This number will be a unique Rx number that will be printed on the
corresponding Drug Label, as well as being reported for that Controlled Substance line entry
on the ASAP report.
• Setup the Days Supply for the controlled substances. You will do this in the “Minimum
Interval Between Refills” field, on the Pharmacy tab in the change item window of the
controlled substance.
• Setup client More Stuff with the Field Name of Owner_DOB, and type of Date, and there is
an actual Client DOB entered into this field
• Setup client More Stuff with the Field Name of Owner_Gender, and type of Phrase, and enter
M for Male or F for Female into this field
To get the properly reported data for your state:
• From the AVImark CID, select Utilities, Utilities….
• Type in ASAP
• You will be prompted with a backup option, if you currently do daily backups you can click
No. If you would like AVImark to be backed up, click Yes.
• In the ASAP utility, select the From date and Days to send
• For Export to, select the location to which you wish to export the file. For example, the C:[ ]
option.
• Select your state: Oklahoma
• Select the option “Only report entries with label notes". If a Controlled Substance entry in
Medical History contains drug label notes, only those entries will be reported when using this
option.
• Click Run.
• When completed, you will find the file at the location you selected, having a date for the
filename such as YYYMMDD.DAT, (20100401.DAT).
• You will then send this file to the State of Oklahoma
27
NABP Number Added To Change User Window
There is now a space for the Doctor’s NABP number in the change user window. Some states require this
number to be included in their controlled substance reports. This field will hold up to 10 characters.
To access this new feature, go to Work With… Users and Security, find a doctor that has an NABP
number and Right Click… Change on their name. You will see the new field on the left in the User is a
Doctor area.
28
Kenai Peninsula Borough, Alaska Sales Tax Cap According to the Kenai Peninsula Borough, Alaska tax code, businesses are only allowed to charge tax on the first 500.00 of an invoice. To help make this compliance easier for AVImark users, we have added a new Advanced Option – “Tax First $500 Only”. If you fall under this rule, you will need to open the Advanced Options (the wrench speed bar button) and set the option for “Tax First $500 Only” to True. This will only apply your tax rate to the first $500 of the invoice and after that will not apply any tax. IMPORTANT: If you find it necessary to remove part of the invoice you MUST remove the entire invoice from medical history and accounting and reapply it. Without removing all entries from the invoice, the tax will not be calculated correctly on your reports.
29
2010.5.0.14086 Fixes List
Accounting:
5750 - Invoice Number Limitation
There is a 10 character limitation for the length of an invoice number, but only the first 6 characters were being displayed in the accounting window.
875 - New or Change Transaction Window Unnecessary Date Field
The New or Change Transaction window was displaying a date drop field. This will now only be displayed for Held Checks.
Appointments:
4813 - Access Violation Attempting to Print Appointments to File
When creating an appointment for a new client, and attempting to print to file from the "Daily, Consolidated" appointment view; an Access Violation was being displayed and the file was not being created. 5262 - Can No Longer Drag and Drop Linked Appointments
Dragging and dropping appointments to link them together was not working, you had to manually select the linked appointment with the space bar. 4684 - Printing Appointments to Excel No Longer Brings Over Date Column
When printing the Appointments to Excel, the column heading were no longer showing.
Antech:
5318 - Antech- Message Prompt When “Use Zoasis Web Service” is Set to False
When using Antech and NOT using the webservice (the Advanced Option “Use Zoasis Web Service” is set to False), upon trying to add\change an Antech ID on an AVImark Treatment code following error was populated: "Service, Antech, is not available. Please check that the service is enabled in advanced options." Back Up:
5026 - AVImarkGuardian.exe is not included in backup
When doing a backup in AVImark, the AVImarkGuardian.exe was not being backed up. The AVImarkGuardian.exe will now be included in the AVImark backup.
4778 - Missing Warning When Backup Doesn't Fit
When the selected backup media does not have sufficient space for the backup file, AVImark did not give any indication.
30
Error Messages:
4498 - Error Adding New Patient Activity to Whiteboard
If using Client Server, and adding a New Whiteboard Activity to the Checked In Tab of the Whiteboard; the following error was being displayed: “Error. Record, Whiteoboard Activity More Stuff, record number, -1, record state, new. Destroying modified object."
4753 - (Null) Error Received When Blanking Out "New Price" Field of Markup Analysis Window
When attempting to mark up Items, if the price was left blank in the Mark Up Analysis window the following error would be displayed: "Could not convert variant of type (Null) into type (Double)".
1024 - "Attempt to Read a Record" Error Rebuilding the Boarding Index
When rebuilding the Boarding index with repair the following error was being displayed: "Attempt to read a record from VISIT.VM$ that doesn't exist.” 1042 - Check-In Document Causing Access Violation
Having a check in document with the merge word <boarding-notes> was causing an Access Violation.
Idexx VetTest:
4204 - IDEXX- VetTest
When the VetTest instrument connected directly to the AVImark computer (not using the IDEXX VetStation), and the Transmission Format option is set to Original Format; upon clicking 6 on the VetTest, to initialize remote devices, it would revert back to the Idexx VetConnect Format setting, which would not allow it to transfer. Inventory:
4305 - Allocated Quantity Not Reset When Declining Treatment With Inventory Used
When the Advanced Option "Post Declined History" was set to FALSE and a treatment with attached inventory used was declined; the allocated quantity of the item was not being reset.
5629 - Allocated Quantity Incorrect
If an item is linked to a treatment. Then the inventory used is changed after the treatment has been posted, it was causing the allocated quantity to be incorrect.
Medical History:
5610 - Unable to Move Service with a Form Attached
If a medical history entry had a form attached to it; this entry would not move to a different pet.
Miscellaneous:
3740 - Who got list not working for Problems
When selecting "Go to" or "r-click...Patient" from the Problem List "Whogot"; it was going back to current patient on the CID; instead of bringing up the correct one.
31
4543 - X-Charge Receipt Showing Hand Keyed After Card is Swiped
Using X-Charge when swiping a card the x-charge receipt was printing "hand keyed." 4609 - Included Services Field Only Holds 255
Earlier versions of AVImark allowed a number higher than 255 to be used in the Count field of the Included Services window, in the Discount Plan table, in System Tables. However, on versions 183.4 and higher, when you entered a number higher than 255, it reverted to 255 when you tab or clicked Done. The count field will now hold up to 65535.
5755 - OpenOffice creating locked file in my documents folder
5311 - No Date on the Test result print out
On the new Test results print out, there was nothing that shows the date the test was given. To make the report more user friendly the date has been added to the report.
5425 - Abaxis VS2: CHW Result Shows Blank on Results Report
5482 - Remove * From Any Result Coming From the VetScan Chemistry
The VetScan Chemistry, imported the * on the values, making the normals and “out of bounds” not apply.
5691 - Problem With the Way AVImark is Adding PACS User Accounts
Logging in as yourself in AVImark and adding a PACS password for another user was not allowing that user to appear as a PACS user in the PACS login window.
5724 - ASAP Report for Michigan Incorrect
ASAP report for Michigan was reporting the Pet's First Name and Date of Birth.. This was incorrect. The report will now report the Owner's First Name and Date of Birth. To be in compliance, clinics will need to setup an additional data field in system tables called Owner_DOB with a type of Phrase. You will then need to enter the client’s date of birth in the More Stuff of the client area. 769 - Adding Clinic Information to Index Rebuild Reports
The clinic information will be added to the index rebuild error reports. 4564 - AVImark will open a client multiple times when checking out multiple patients
When checking out a multiple patients, on the same client, from the boarding calendar; the client was being opened multiple times. Reminders:
4667 - Advanced Option “Restrict to Patients Without Appointments” Only Pertains to First
Reminders
The Advanced Option “Restrict to Patients Without Appointments” was only affecting first reminders. When that option is set to TRUE, clients with appointments were still receiving 2nd and 3rd reminders. This has been corrected. 826 - Access Violation Printing Reminders with <appt-doctorname> Merge Word in Text
When printing reminders with <appt-doctorname> merge word in the text, an Access Violation was being displayed.
32
Reports:
4908 - Account Summary Cuts Off Credit Card Payments in Total
If the credit card payments total carries the number to 8 places (i.e. 153678.39); then the Account Summary was dropping off the farthest right character (i.e. 153678.3). 5350 - Account Number Column Needs to Be Made Longer on the Transaciton Journal
The transaction journal only allowed for 5 digits in the account number field. The report will now allow for account number over 100,000. 5659 - Tax On Incorrect on Period Totals
Changing the “Prescription Fees Taxed”, in advanced options, from True to False (or False to True) caused the Tax On amount on the Period Totals is also change. The Tax On will no longer be affected by this change. 1065 - <serv-doctorname> merge word not working correctly for Referral Report.
When printing the Referral Report; and including a Referral Letter, the merge word, <serv-doctorname> was filling in (unassigned) instead ofwith the doctor assigned to the first Medical History entry posted to a patient of the new "referred" client.
SOAP:
5355 - Obsolete Treatments Showing in Treatment/Inventory List From Plan Area of MCR
When selecting a treatment or item from the plan area of the MCR, obsolete treatments/items were being shown. 5632 - SOAP: Access Violation Using Notes on Abnormalities
When clicking Done on a SOAP record that had a note, on an abnormality, created or changed; an Access Violation would be displayed. Treatments:
5741 - Access Violation Printing Drug Labels from the Treatment List
When printing a drug label from the treatment list, an Access Violation was being displayed. Users and Security:
5109 - Unable to Drag and Drop in the User Functions Window
Utility Programs:
5640 – Error Running ZipLookup
The utility ZipLookup needed to be updated to work with the current version of AVImark. It has also been built into the program.
33

5747 - Login Window Running Utilities
When running built in utilities the log in window was coming up and stopping the utility. The log on window will not interrupt the running of utilities. VetCentric:
5219 - Block the Ability to Set the VetCentric Prescription Expiration Date
In the past selecting an Expiration date for a past date, on a VetCentric item, was allowed. This will no longer be allowed. 5386 - VetCentric- Only Allows 1 Year Expiration Date for Non-Diet
AVImark allowed the expiration date to be set without limit. Clinics should only be allowed to set the expiration date for non-diet up 1 year and nothing greater than 2 years for diets.
VetConnect:
5475 - Vetconnect: Lipemia off CHM25 Test is Causing the Report to Print a Full Blank Page
There was an issue with the way CHM 25 tests printed on the report for the analyte: Lipemia Index When printing the CHM25 alone or selecting it first along with other tests, it was making the report print 1 full blank page after it.
34
2010.5.0.14298 Fixes List
1441 - Update VSurv Export
New VSurv.exe dated 1-10-11 has been added to the update file 1442 - VSurv include Health Check Method
VSurv comserver.dll corrected to work with V2$ files
1201 - Estimate Document Including Declined Entries
When an entry is declined on an estimate, it was still being included in the estimate total when the document was printed. 1452 - Cost Incorrect When Using Copied From Using Site
When copying the inventory list from the main clinic to the site, the package and unit cost of items, was
being changed.
35

2010.5.0.14434 Fixes List
1505 – DBFExport Utility
The DBFExport utility has been made compatible with the new V2$ files. The new "header fields" has also been added to the utility. The utility has a new checkbox named "Include Header Fields" at the bottom of the window.
36
2010.5.0.14731 Fixes List
1632 - Abnormality Not Printing
When an Abnormality is unchecked, but notes are entered on the Abnormality, the abnormality was not printing on the Patient Chart or the MCR print out. This has been corrected, the notes will now printer whether the abnormality is checked or unchecked 1132 - Attempt to Read a Record from HOSPITAL.V2$ that Doesn't Exist
After importing or refreshing the sidekick, upon opening the sidekick data, the following error was being displayed: “Attempt to read a record from HOSPITAL.V2$ that doesn't exist” 855 - RabiesCSV Microchip Number Used to Generate Client\Patient Information for El Paso
The RabiesCSV utility has been made to work correctly for El Paso, TX 1538 - UpdateAVPCodes Utility Needs to be Recompiled to Work with V2$
The UpdateAVPCodes utility will now work with the new V2$ files.
VetCentric:
1630 - Default the Maximum Expiration to 1 During Update
The max expiration, for VetCentric, will be set to default to 1 during the update process.
1633 - Resolve Changes Warning
When sending VetCentric orders from different workstations at the same time, but for different clients, one of the users was presented with a "Resolve Changes" warning indicating that Changes have been made by another user on the network.
37
2010.5.0.14734 Fixes List
1501 - VetCentric Wizard Failing to Load Categories
In the VetCentric set up “Setup by selecting Categories needed and importing new items” was not loading, a blank white screen was being displayed. Important note: You must rebuild Options and Inventory with Repair checked for this correction.
38
2010.5.0.14894 Fixes List
1523 - DBFexport Locking up with Data that has Test Results
Running DBFexport with data that has test results locked at ANLYTWP.V2$.
1529 - Error Opening Treatments
“Error. Record, Treatment Association, record number, 1, record state, Modified. Destroying modified object” was being displayed upon closing some treatments.
39

2010.5.0.15038 Fixes List
1065 - <serv-doctorname> Merge Word Not Working Correctly for Referral Report
When a referral letter was included with the referral report, the <serv-doctorname> merge word was not working correctly. 1332 - Clicking a Code is Not Selecting Entry in MCR Plan Area
40
2010.5.0.15401 Fixes List
1489 - Abnormality Notes Show on MCR
The notes entered on an abnormality, in system tables, were showing when clicking on the abnormality in the MCR.
41

2010.5.0.15541 Fixes List
1784 - Drug Label Places VetCentric Information on Notes
On a select few clients, no matter what drug they enter into medical history, the drug label was placing VetCentric information into the notes.
42


![Jacques IBERT [2010.5.]=Catalogue.pdf](https://img.pdfslide.us/doc/110x75/577c7db01a28abe0549f9507/jacques-ibert20105cataloguepdf.jpg)