Embed Size (px)
Citation preview
AvediaPlayer Plugin V3.0
Installation and User Guide
AvediaPlayer Plugin 3.0
2 Installation and User’s Guide
Notices
© Exterity Limited 2006, 2012
This document contains information that is protected by copyright. Reproduction, adaptation, or translation without prior permission is prohibited, except as under the copyright laws.
Document Reference
0000-0043-0001
Edition
Version 3.0 Issue 2, November 2012 Printed in UK
Exterity Limited Ridge Way, Hillend Industrial Park, Dalgety Bay, Fife KY11 9JD Scotland, UK http://www.exterity.com
Products Covered By This Guide AvediaPlayer Plugin
Trademarks
The Exterity building IPTV logo, AvediaStream, AvediaServer, AvediaCentre, and AvediaPlayer are trademarks or registered trademarks of Exterity Limited.
Microsoft®, Windows
®, and Windows Media
Player® are U.S. registered trademarks of
Microsoft Corporation.
Sony® and Ziris™ are trademarks of Sony
Corporation.
Scala® is a registered trademark of Scala Inc.
All other trademarks are the property of their respective owners. All rights reserved.
Disclaimer
The information contained in this document is subject to change without notice.
EXTERITY LIMITED MAKES NO WARRANTY OF ANY KIND WITH REGARD TO THIS MATERIAL, INCLUDING, BUT NOT LIMITED TO, THE IMPLIED WARRANTIES OF MERCHANTABILITY AND FITNESS FOR A PARTICULAR PURPOSE. Exterity Limited shall not be liable for errors contained herein or for incidental or consequential damages in connection with the furnishing, performance, or use of this material.
Warranty
A copy of the specific warranty terms applicable to your Exterity products and replacement parts can be obtained from Exterity. To request more information or parts, email
Safety Notices
Before installing and operating these products, please read the safety information in this manual.
AvediaPlayer Plugin 3.0
Installation and User’s Guide 3
Contents
Contents .................................................................................................................................................. 3
1 Introduction .................................................................................................................................... 4
Scope ....................................................................................................................................... 4
Audience .................................................................................................................................. 4
Terms and definitions ............................................................................................................... 4
What is IPTV? ............................................................................................................................... 5
2 Installation ..................................................................................................................................... 6
System Requirements ................................................................................................................... 6
Installation ..................................................................................................................................... 6
AvediaPlayer Plugin Manual Installation ....................................................................................... 7
Removing the AvediaPlayer Plugin ............................................................................................. 10
Command Line Installation .......................................................................................................... 10
3 Using the AvediaPlayer Plugin .................................................................................................... 12
Specifying Content ...................................................................................................................... 12
Overscan Cropping ..................................................................................................................... 13
Using the AvediaPlayer Plugin with Windows Media Player ...................................................... 14
Play Content Using a URL ..................................................................................................... 14
Adding Content to a Web Page................................................................................................... 16
Play Content Using a Metafile Playlist ........................................................................................ 16
Using the AvediaPlayer Plugin with Sony Ziris ........................................................................... 19
Using the AvediaPlayer Plugin with Sedao ................................................................................. 22
Using the AvediaPlayer Plugin with Scala .................................................................................. 23
DirectShow Integration ................................................................................................................ 24
Overview ................................................................................................................................ 24
GraphBuilder instantiation ...................................................................................................... 24
Manual Instantiation ............................................................................................................... 25
IntelligentConnect Operation ....................................................................................................... 26
Video pin colour formats ............................................................................................................. 26
Audio pin formats ........................................................................................................................ 26
Filter control ................................................................................................................................. 26
4 Troubleshooting .......................................................................................................................... 27
AvediaPlayer Plugin 3.0
4 Installation and User’s Guide
1 Introduction
This manual explains how to install, set up, and use the Exterity AvediaPlayer Plugin. The Exterity AvediaPlayer Plugin is a DirectShow 9 compatible source filter that can be called from a digital signage application or can be used with Windows Media Player 9 onwards.
Windows Media Player, when used with the AvediaPlayer Plugin, allows you to play any unencrypted single program transport streams available on your network.
Each installation of the AvediaPlayer Plugin requires a license which is node locked to the MAC address of the installation PC/device.
Scope
This edition of the manual refers to version 3.0 of the AvediaPlayer Plugin software. It shows you how to install the AvediaPlayer Plugin and configure various applications to make use of the AvediaPlayer Plugin.
Audience
This manual is intended for use by systems integrators or systems administrators who are installing and setting up Exterity products. The manual assumes that readers are familiar with installing and configuring network-based and audio-visual products.
Terms and definitions
The following terms and definitions are used in this document:
Table 1 Terms and Definitions
Term Definition
IPTV Internet Protocol Television
LAN Local Area Network
MAC Media Access Control
RTP Real Time Protocol
RTSP Real Time Streaming Protocol
SAP Session Announcement Protocol
SNMP Simple Network Management Protocol
UDP User Datagram Protocol
AvediaPlayer Plugin 3.0
Installation and User’s Guide 5
What is IPTV?
Internet Protocol Television, or IPTV, refers to television that is distributed over an IP network—the same network you are using within your building or campus to manage files and exchange emails.
IPTV technology enables an organisation’s IP network to carry much more than just television. With IPTV, you can easily distribute terrestrial and satellite television and radio, videos/DVDs, digital videos on-demand (VoD), digital signage, information boards, and web content throughout your facility. All of this multimedia content can be viewed using existing TVs, PCs, and AV display units without requiring a separate satellite/aerial signal distribution system.
The Exterity AvediaPlayer Plugin allows you to display your IPTV network video/audio content on your digital signage device.
AvediaPlayer Plugin 3.0
6 Installation and User’s Guide
2 Installation
System Requirements
This chapter details the minimum system required for the successful operation of the AvediaPlayer Plugin. It also shows you how to carry out the installation process on local and remote devices.
The following system requirements refer to successful operation of the Windows Media Player and Exterity AvediaPlayer Plugin:
Intel® Core™ 2 Duo processor or equivalent
Windows XP, Windows Vista, or Windows 7 (32 and 64 bit) operating system
1GB of RAM
1GB Hard Disk
DirectX 9.0 compatible graphics card
LAN connection to IPTV network
Speakers/headphones for audio content
Note: You should also take account of any additional requirements if you are including or embedding the Media Player in another application such as digital signage or browser software.
Installation
The AvediaPlayer Plugin can be installed directly by launching the installer. Administrator privileges for the device are required. You can also use command line installation on both local and remote devices (refer to Command Line (Silent) Installation on page 10). During the installation you are asked to provide the location of the license file for the installation device.
Note: The license is node locked to the MAC address of the device(s) specified during purchase. License requests from your Exterity reseller should also be accompanied by the MAC addresses of the targeted installation devices.
AvediaPlayer Plugin 3.0
Installation and User’s Guide 7
AvediaPlayer Plugin Manual Installation
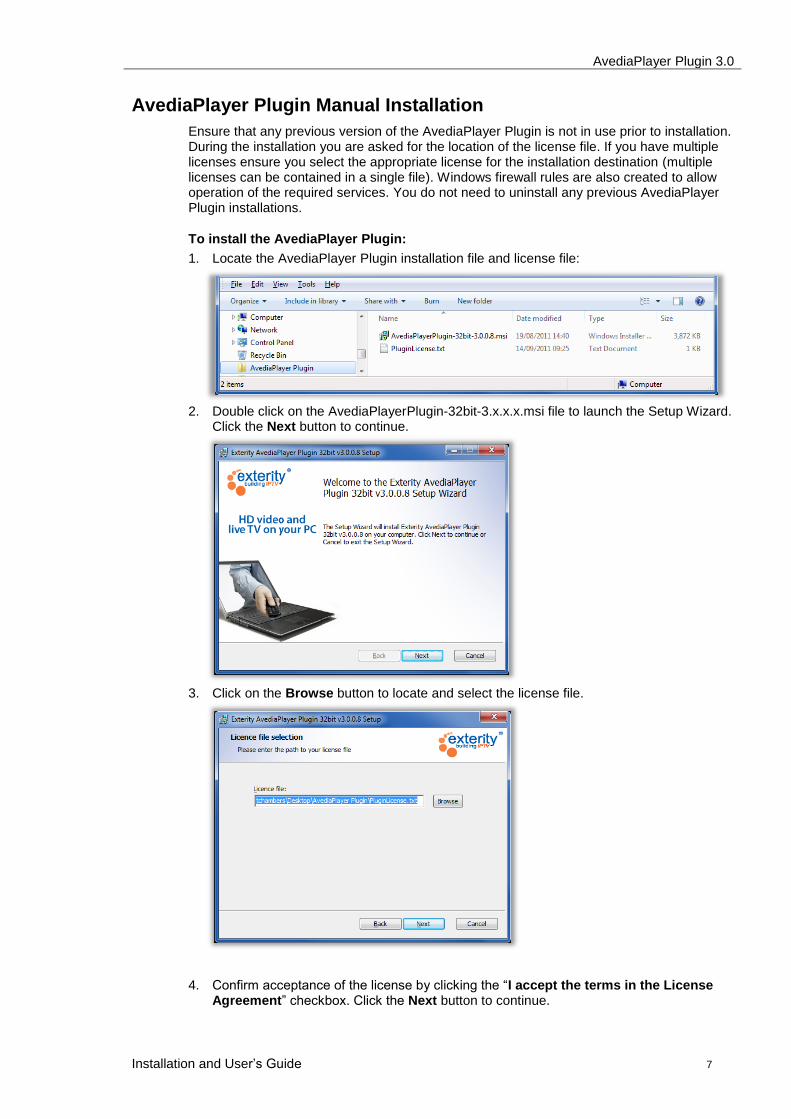
Ensure that any previous version of the AvediaPlayer Plugin is not in use prior to installation. During the installation you are asked for the location of the license file. If you have multiple licenses ensure you select the appropriate license for the installation destination (multiple licenses can be contained in a single file). Windows firewall rules are also created to allow operation of the required services. You do not need to uninstall any previous AvediaPlayer Plugin installations.
To install the AvediaPlayer Plugin:
1. Locate the AvediaPlayer Plugin installation file and license file:
2. Double click on the AvediaPlayerPlugin-32bit-3.x.x.x.msi file to launch the Setup Wizard. Click the Next button to continue.
3. Click on the Browse button to locate and select the license file.
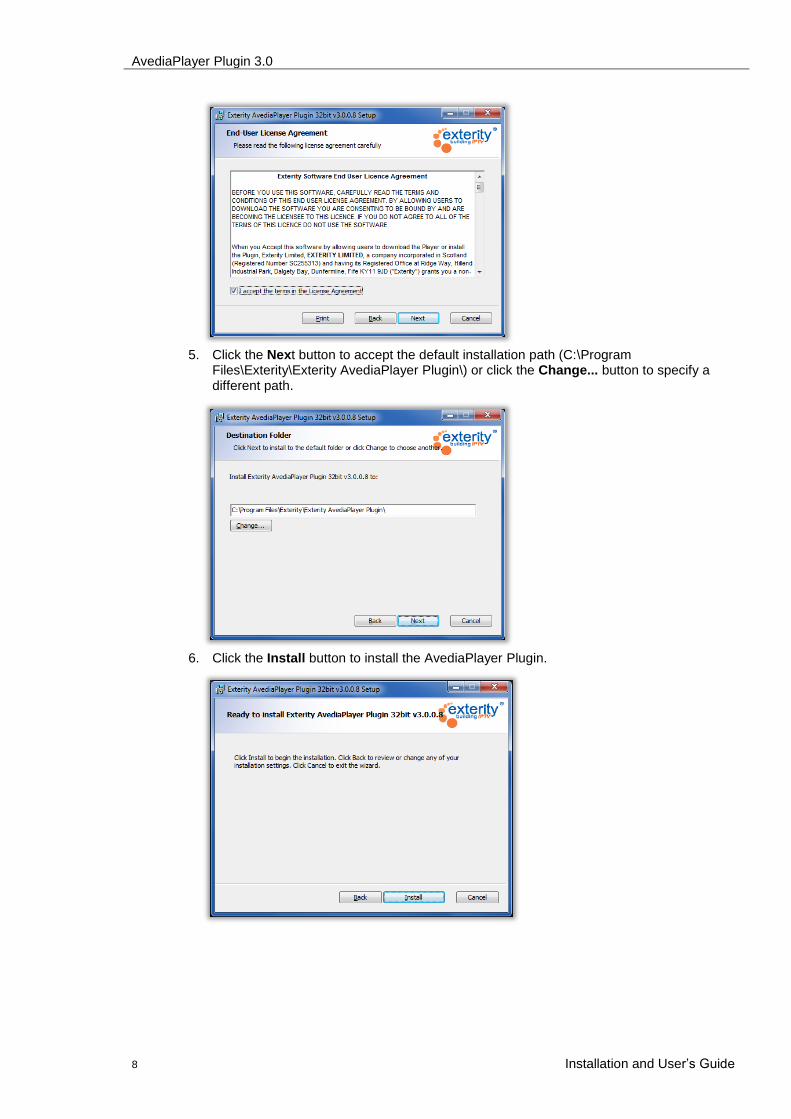
4. Confirm acceptance of the license by clicking the “I accept the terms in the License Agreement” checkbox. Click the Next button to continue.
AvediaPlayer Plugin 3.0
8 Installation and User’s Guide
5. Click the Next button to accept the default installation path (C:\Program Files\Exterity\Exterity AvediaPlayer Plugin\) or click the Change... button to specify a different path.
6. Click the Install button to install the AvediaPlayer Plugin.
AvediaPlayer Plugin 3.0
Installation and User’s Guide 9
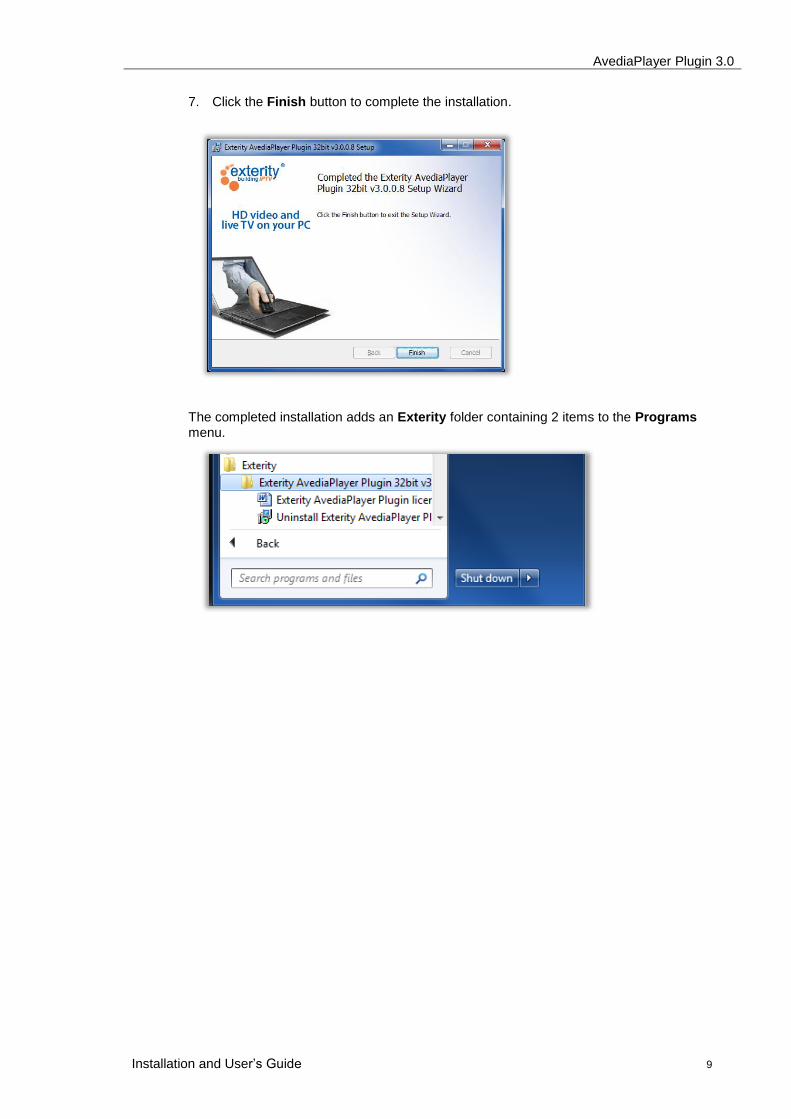
7. Click the Finish button to complete the installation.
The completed installation adds an Exterity folder containing 2 items to the Programs menu.
AvediaPlayer Plugin 3.0
10 Installation and User’s Guide
Removing the AvediaPlayer Plugin
The AvediaPlayer Plugin can be removed if required.
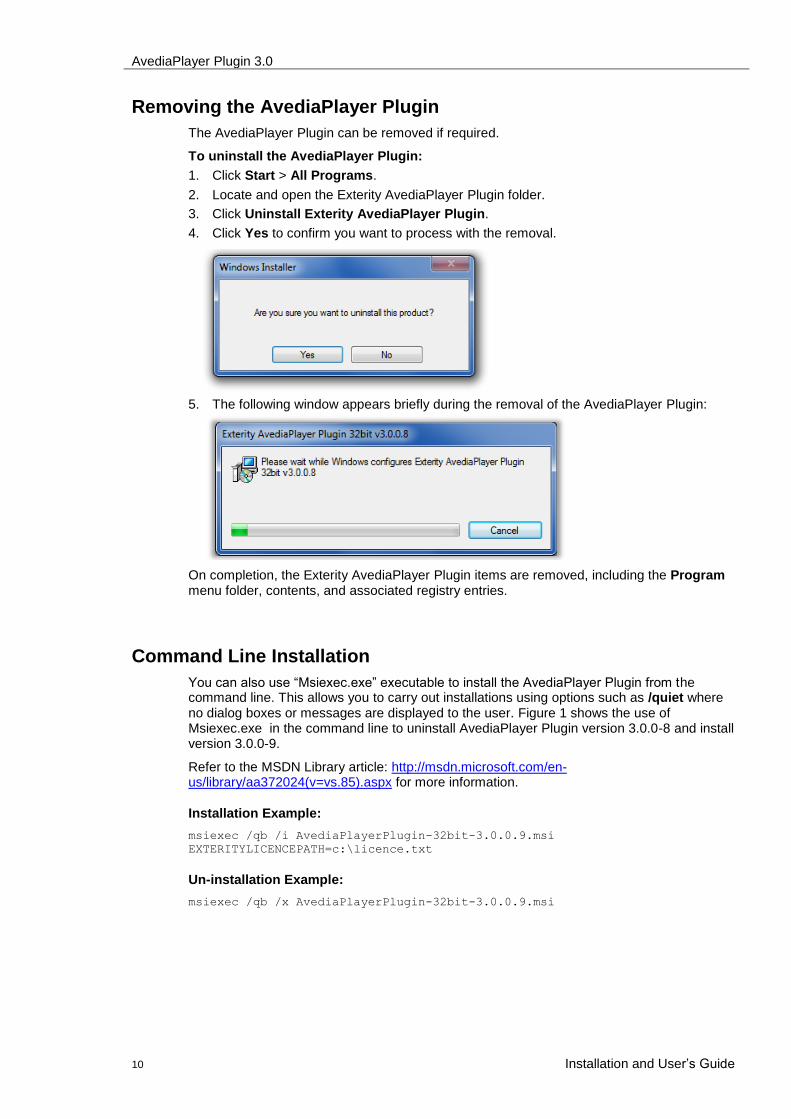
To uninstall the AvediaPlayer Plugin:
1. Click Start > All Programs.
2. Locate and open the Exterity AvediaPlayer Plugin folder.
3. Click Uninstall Exterity AvediaPlayer Plugin.
4. Click Yes to confirm you want to process with the removal.
5. The following window appears briefly during the removal of the AvediaPlayer Plugin:
On completion, the Exterity AvediaPlayer Plugin items are removed, including the Program menu folder, contents, and associated registry entries.
Command Line Installation
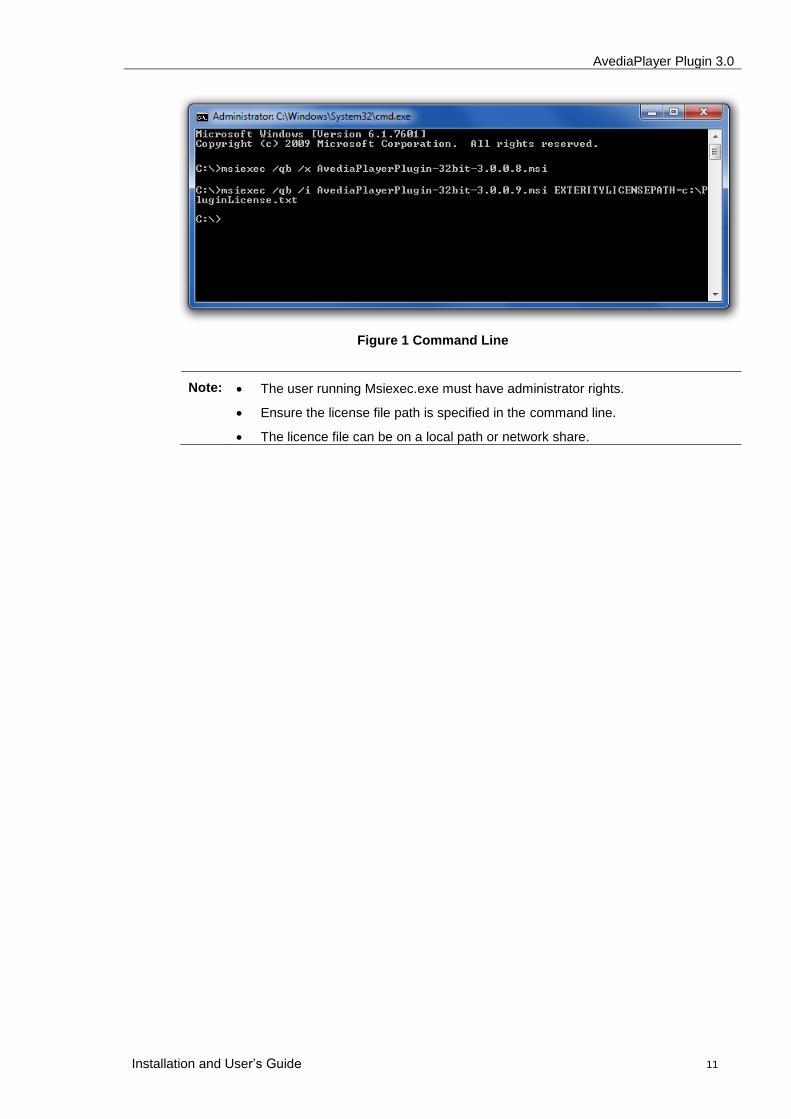
You can also use “Msiexec.exe” executable to install the AvediaPlayer Plugin from the command line. This allows you to carry out installations using options such as /quiet where no dialog boxes or messages are displayed to the user. Figure 1 shows the use of Msiexec.exe in the command line to uninstall AvediaPlayer Plugin version 3.0.0-8 and install version 3.0.0-9.
Refer to the MSDN Library article: http://msdn.microsoft.com/en-us/library/aa372024(v=vs.85).aspx for more information.
Installation Example:
msiexec /qb /i AvediaPlayerPlugin-32bit-3.0.0.9.msi
EXTERITYLICENCEPATH=c:\licence.txt
Un-installation Example:
msiexec /qb /x AvediaPlayerPlugin-32bit-3.0.0.9.msi
AvediaPlayer Plugin 3.0
Installation and User’s Guide 11
Figure 1 Command Line
Note: The user running Msiexec.exe must have administrator rights.
Ensure the license file path is specified in the command line.
The licence file can be on a local path or network share.
AvediaPlayer Plugin 3.0
12 Installation and User’s Guide
3 Using the AvediaPlayer Plugin
The AvediaPlayer Plugin can interoperate with digital signage applications. This section shows you how to configure an application to make use of the AvediaPlayer Plugin to access the available media content on your network. It contains the following sections:
Specifying Content
Overscan Cropping
Using the AvediaPlayer Plugin with Windows Media Player
Adding Content to a Web Page
Play Content Using a Metafile Playlist
Using the AvediaPlayer Plugin with Sony Ziris
Using the AvediaPlayer Plugin with Sedao
Using the AvediaPlayer Plugin with Scala
DirectShow Integration
Specifying Content
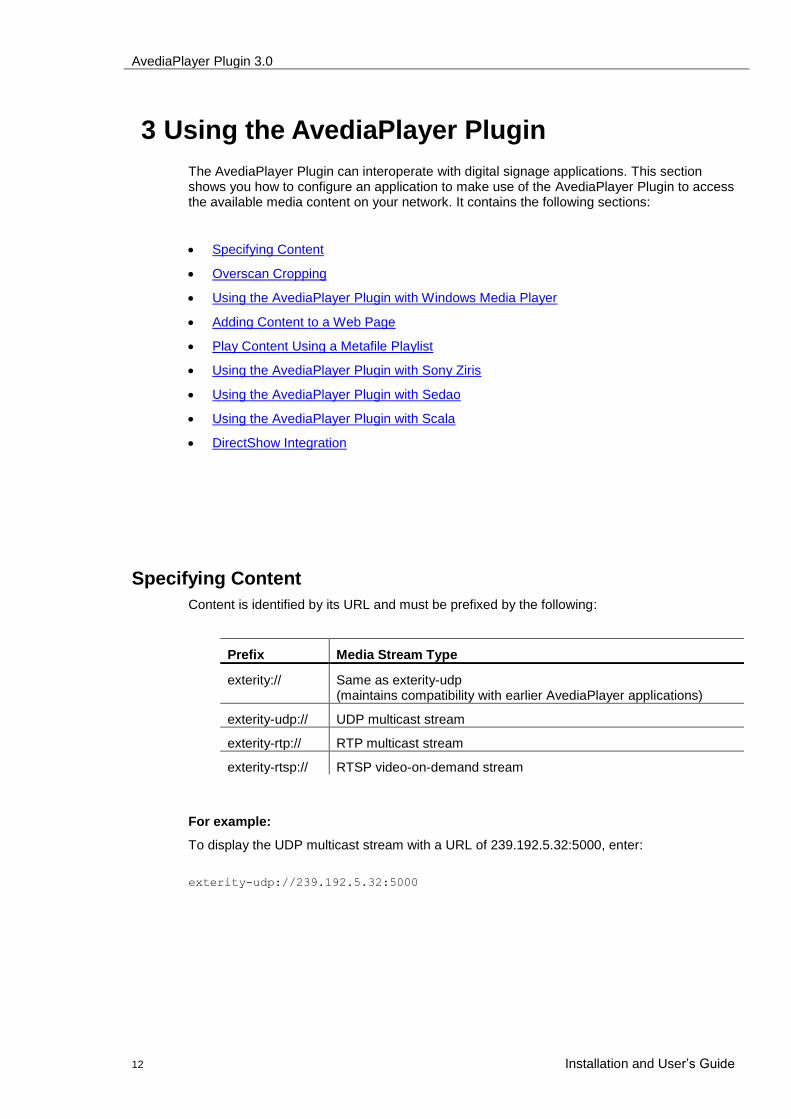
Content is identified by its URL and must be prefixed by the following:
Prefix Media Stream Type
exterity:// Same as exterity-udp (maintains compatibility with earlier AvediaPlayer applications)
exterity-udp:// UDP multicast stream
exterity-rtp:// RTP multicast stream
exterity-rtsp:// RTSP video-on-demand stream
For example:
To display the UDP multicast stream with a URL of 239.192.5.32:5000, enter:
exterity-udp://239.192.5.32:5000
AvediaPlayer Plugin 3.0
Installation and User’s Guide 13
Overscan Cropping
Overscan provides an extra area around all four edges of a video image. Its purpose was to compensate for the variability of how images were rendered on CRT displays. Some SD channels exhibit overscan borders when the full video image is displayed with modern panel displays or software clients.
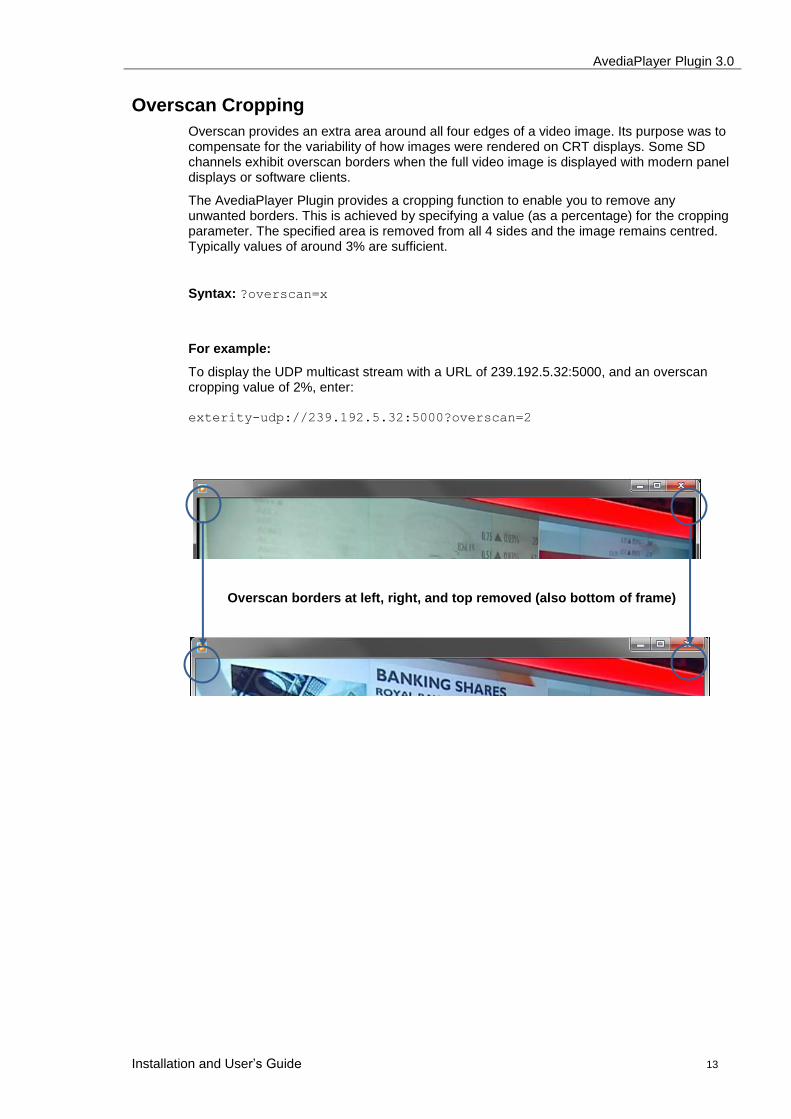
The AvediaPlayer Plugin provides a cropping function to enable you to remove any unwanted borders. This is achieved by specifying a value (as a percentage) for the cropping parameter. The specified area is removed from all 4 sides and the image remains centred. Typically values of around 3% are sufficient.
Syntax: ?overscan=x
For example:
To display the UDP multicast stream with a URL of 239.192.5.32:5000, and an overscan cropping value of 2%, enter: exterity-udp://239.192.5.32:5000?overscan=2
Overscan borders at left, right, and top removed (also bottom of frame)
AvediaPlayer Plugin 3.0
14 Installation and User’s Guide
Using the AvediaPlayer Plugin with Windows Media Player
Installation of the AvediaPlayer Plugin allows you to access media content (audio and video) distributed as transport streams on your network. To access the content you must know its URL, or have the URL added to a play list. This section shows you examples of both.
Play Content Using a URL
To play content using the URL of the channel, you must enter the appropriate prefix and stream URL directly.
To use a URL to access content:
1. Determine the URL of the content you want to access.
2. Launch Windows Media Player.
3. If the Windows Media Player menu bar is not visible, press CTRL+M to display it.
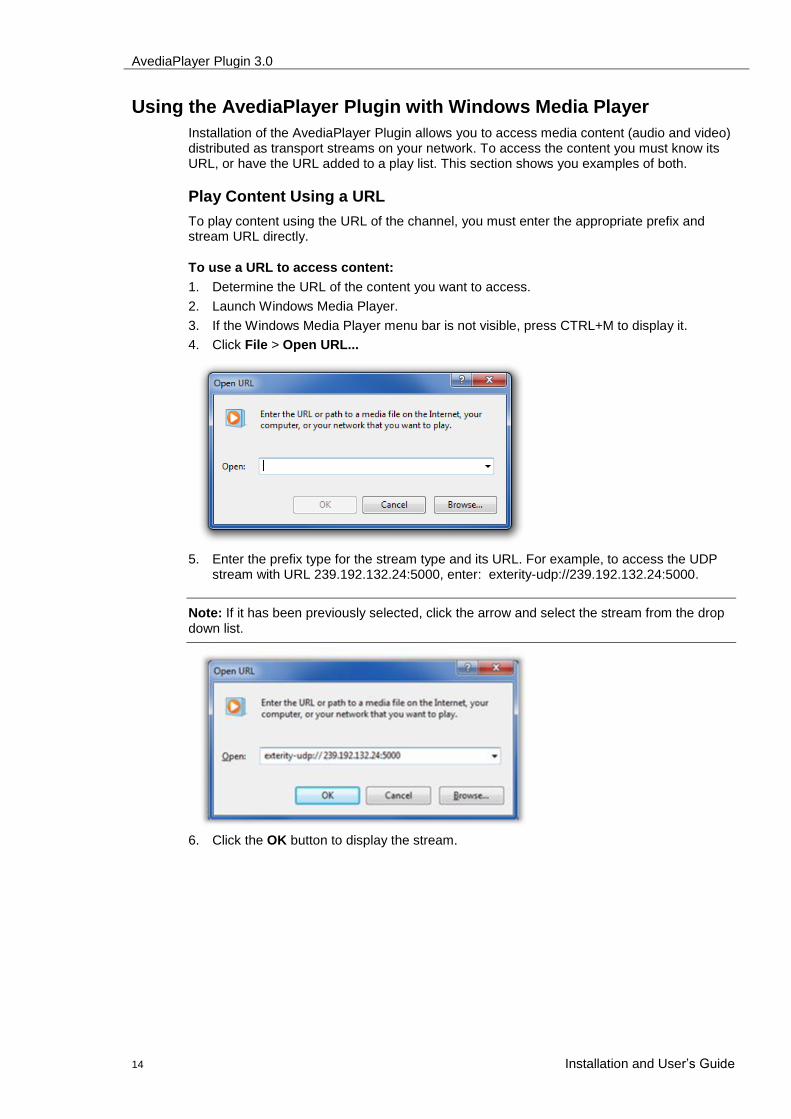
4. Click File > Open URL...
5. Enter the prefix type for the stream type and its URL. For example, to access the UDP stream with URL 239.192.132.24:5000, enter: exterity-udp://239.192.132.24:5000.
Note: If it has been previously selected, click the arrow and select the stream from the drop down list.
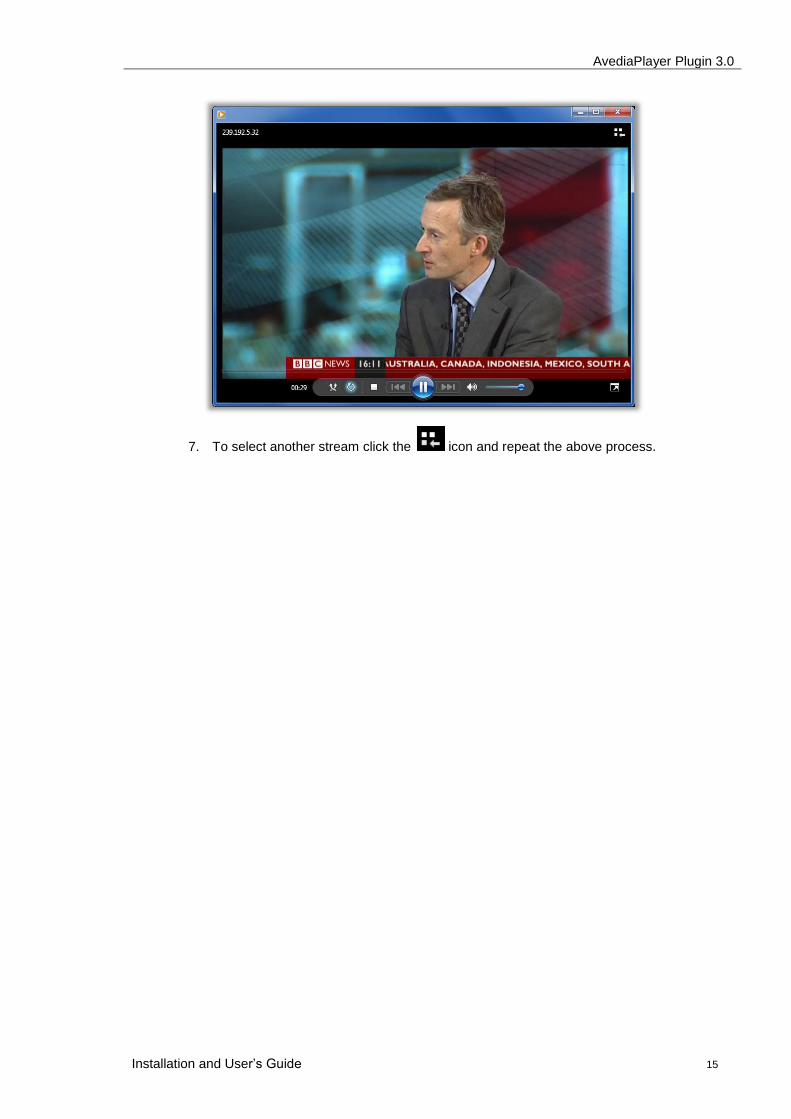
6. Click the OK button to display the stream.
AvediaPlayer Plugin 3.0
Installation and User’s Guide 15
7. To select another stream click the icon and repeat the above process.

AvediaPlayer Plugin 3.0
16 Installation and User’s Guide
Adding Content to a Web Page
The Windows Media Player can be embedded in an HTML document. With the addition of the Exterity AvediaPlayer Plugin, you can add streamed content to a webpage. This article describes the process for adding the Windows Media Player: http://technet.microsoft.com/en-us/library/bb676136.aspx#XSLTsection129121120120
To add streamed content to a webpage:
1. Open the required web page in an HTML editor (or simple text editor)
2. Identify the URL of the content you want to stream in the web page.
3. Refer to the section Inserting the Player Control in this article: http://technet.microsoft.com/en-us/library/bb676136.aspx#XSLTsection129121120120
4. Add the Windows Media Player Object at the required location on the web page using the code:
<OBJECT id="VIDEO" width="320" height="240"
CLASSID="CLSID:6BF52A52-394A-11d3-B153-00C04F79FAA6"
type="application/x-oleobject">
<PARAM NAME="URL" VALUE="exterity-udp://239.192.5.32:5000">
<PARAM NAME="SendPlayStateChangeEvents" VALUE="True">
<PARAM NAME="AutoStart" VALUE="True">
<PARAM name="uiMode" value="none">
</OBJECT>
For streamed content, specify the source in the form shown in the highlighted line above.
5. In this example, a TV News channel is added to the Exterity AvediaPlayer web page.
6. Right click on the player window to access the Windows Media Player controls.
Play Content Using a Metafile Playlist
You can use the playlist feature of Window Media Player to create channel name lists. By defining the content name and URL in an Advanced Stream Redirector file (.asx), you can
AvediaPlayer Plugin 3.0
Installation and User’s Guide 17
create playlists, adding each item to the appropriate list. For additional information about adding metafile playlists refer to http://msdn.microsoft.com/en-us/library/aa386633.aspx.
The following example shows how to create a playlist of TV News channels from the streams available on a network.
To create channel playlists:
1. Determine the names and URLs of the media you want to include in a playlist.
2. Open a simple text editor to create the metafile.
Note: Ensure you use a text editor that does not apply any formatting codes.
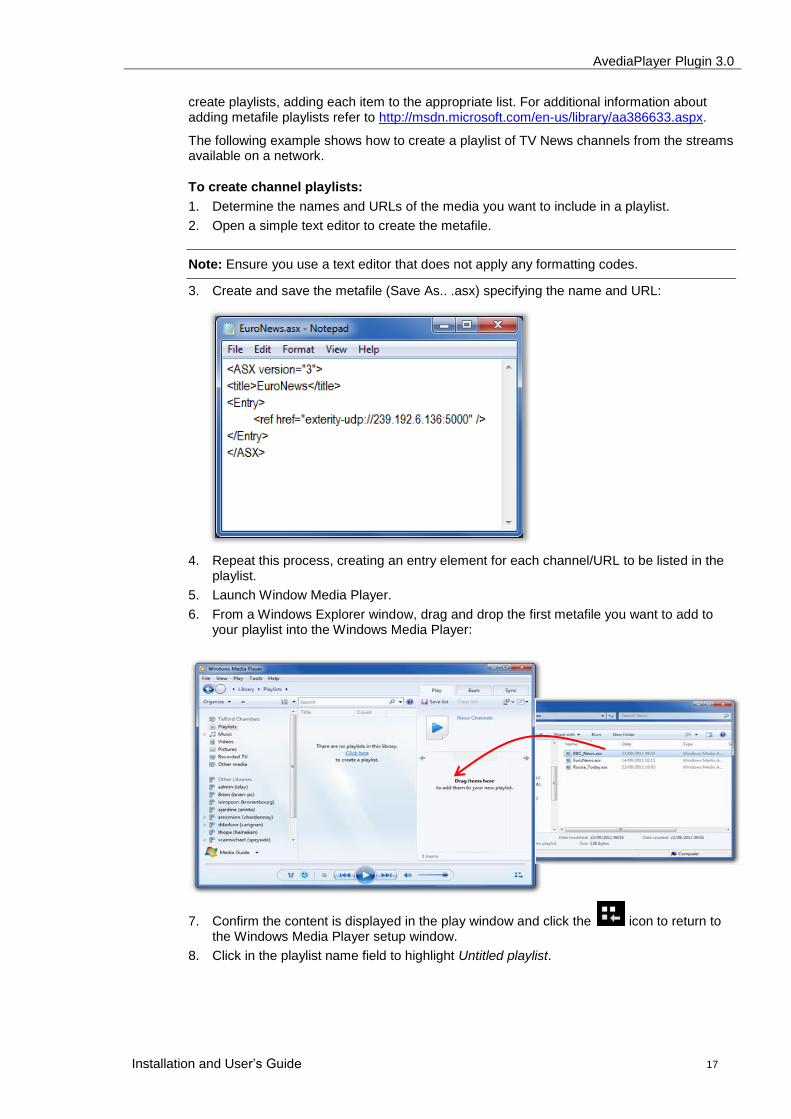
3. Create and save the metafile (Save As.. .asx) specifying the name and URL:
4. Repeat this process, creating an entry element for each channel/URL to be listed in the playlist.
5. Launch Window Media Player.
6. From a Windows Explorer window, drag and drop the first metafile you want to add to your playlist into the Windows Media Player:
7. Confirm the content is displayed in the play window and click the icon to return to the Windows Media Player setup window.
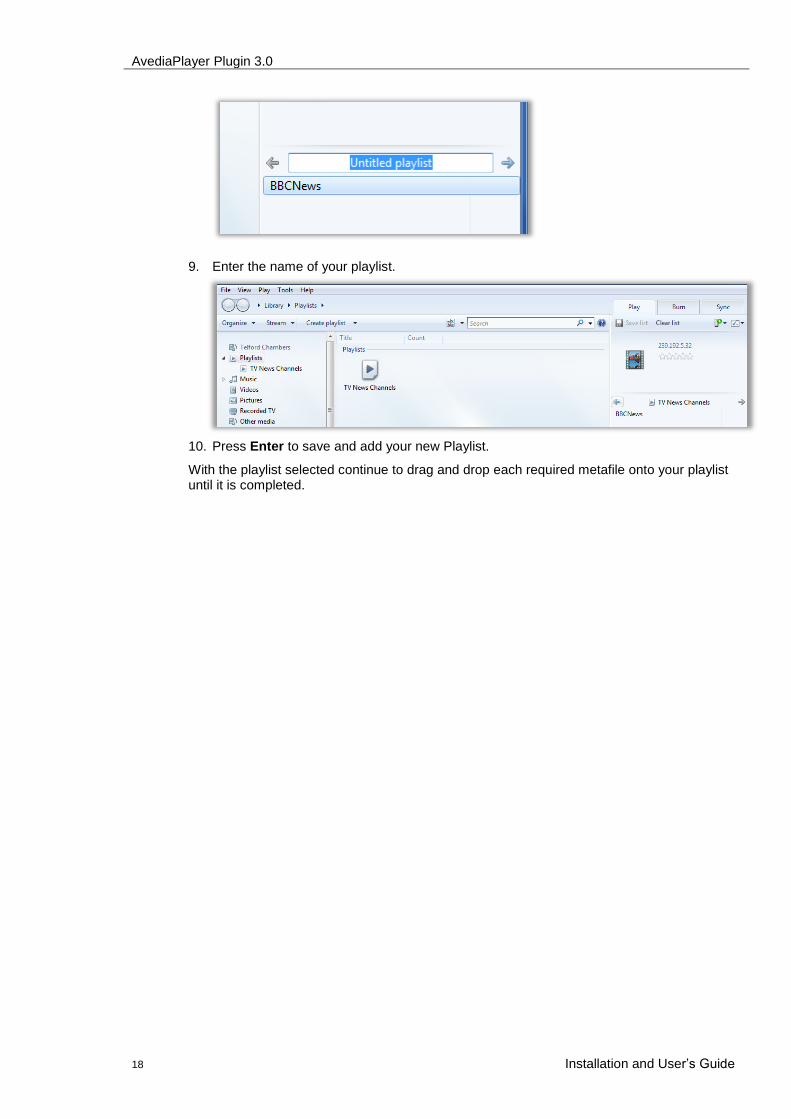
8. Click in the playlist name field to highlight Untitled playlist.
AvediaPlayer Plugin 3.0
18 Installation and User’s Guide
9. Enter the name of your playlist.
10. Press Enter to save and add your new Playlist.
With the playlist selected continue to drag and drop each required metafile onto your playlist until it is completed.
AvediaPlayer Plugin 3.0
Installation and User’s Guide 19
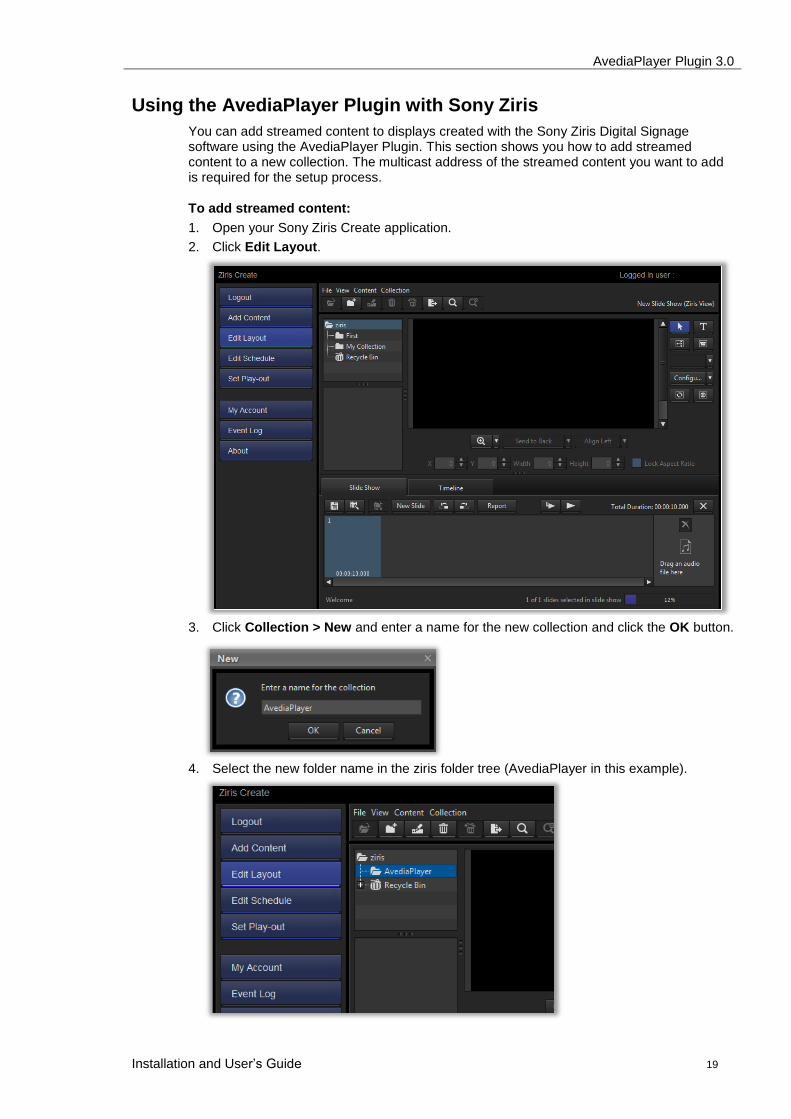
Using the AvediaPlayer Plugin with Sony Ziris
You can add streamed content to displays created with the Sony Ziris Digital Signage software using the AvediaPlayer Plugin. This section shows you how to add streamed content to a new collection. The multicast address of the streamed content you want to add is required for the setup process.
To add streamed content:
1. Open your Sony Ziris Create application.
2. Click Edit Layout.
3. Click Collection > New and enter a name for the new collection and click the OK button.
4. Select the new folder name in the ziris folder tree (AvediaPlayer in this example).
AvediaPlayer Plugin 3.0
20 Installation and User’s Guide
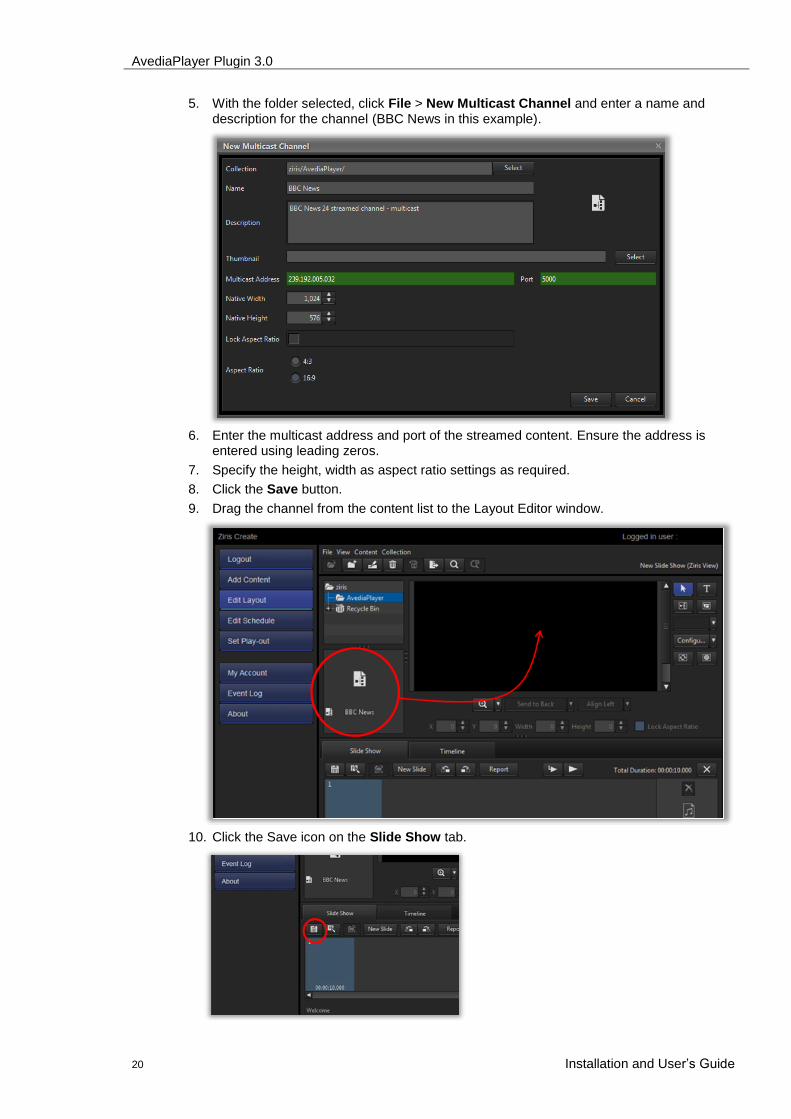
5. With the folder selected, click File > New Multicast Channel and enter a name and description for the channel (BBC News in this example).
6. Enter the multicast address and port of the streamed content. Ensure the address is entered using leading zeros.
7. Specify the height, width as aspect ratio settings as required.
8. Click the Save button.
9. Drag the channel from the content list to the Layout Editor window.
10. Click the Save icon on the Slide Show tab.
AvediaPlayer Plugin 3.0
Installation and User’s Guide 21
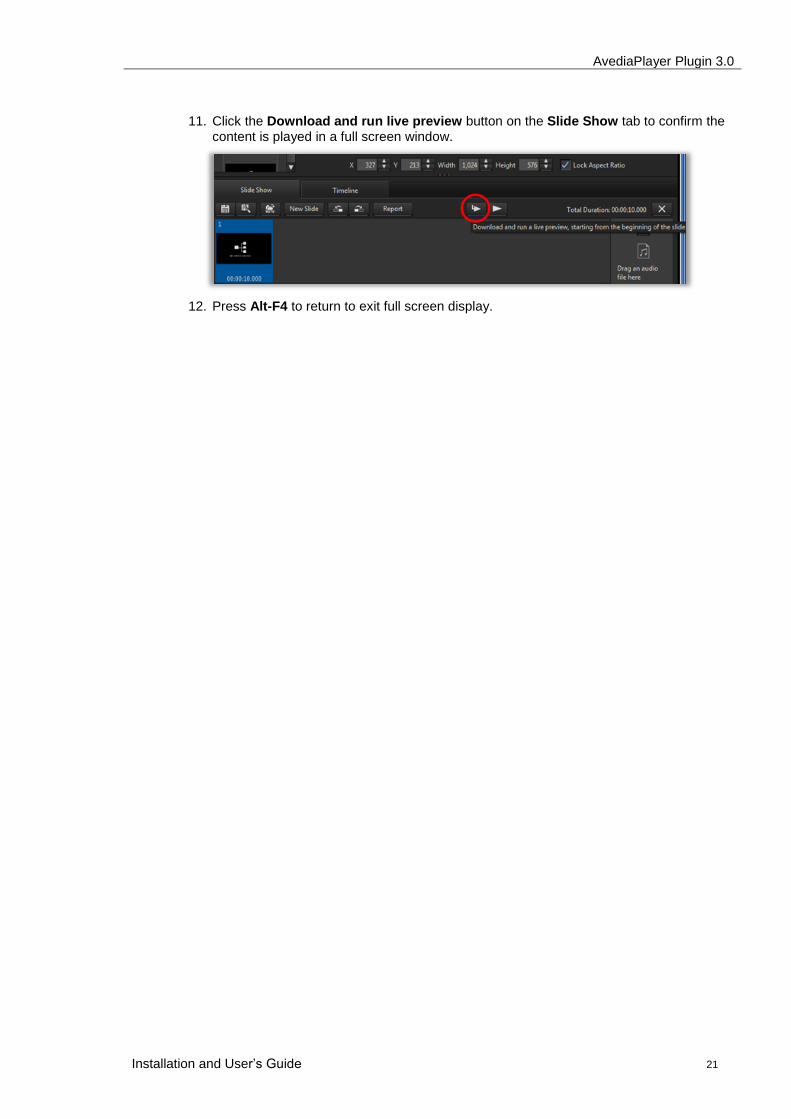
11. Click the Download and run live preview button on the Slide Show tab to confirm the content is played in a full screen window.
12. Press Alt-F4 to return to exit full screen display.
AvediaPlayer Plugin 3.0
22 Installation and User’s Guide
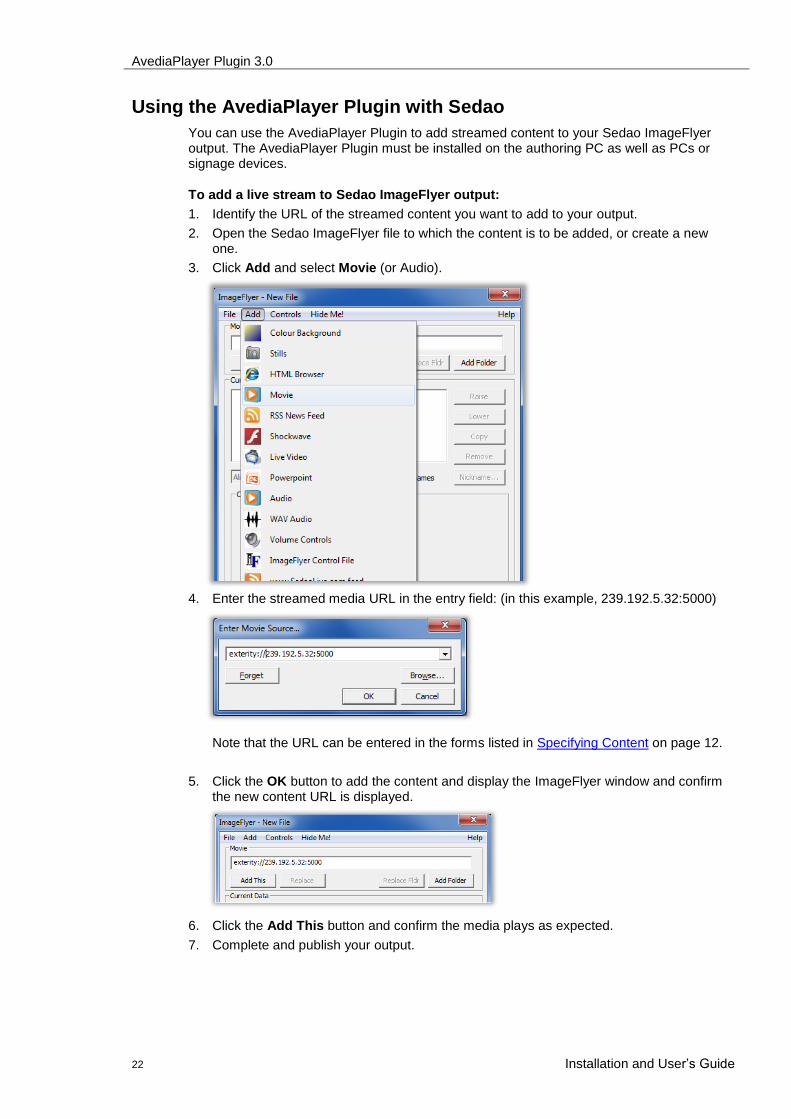
Using the AvediaPlayer Plugin with Sedao
You can use the AvediaPlayer Plugin to add streamed content to your Sedao ImageFlyer output. The AvediaPlayer Plugin must be installed on the authoring PC as well as PCs or signage devices.
To add a live stream to Sedao ImageFlyer output:
1. Identify the URL of the streamed content you want to add to your output.
2. Open the Sedao ImageFlyer file to which the content is to be added, or create a new one.
3. Click Add and select Movie (or Audio).
4. Enter the streamed media URL in the entry field: (in this example, 239.192.5.32:5000)
Note that the URL can be entered in the forms listed in Specifying Content on page 12.
5. Click the OK button to add the content and display the ImageFlyer window and confirm the new content URL is displayed.
6. Click the Add This button and confirm the media plays as expected.
7. Complete and publish your output.
AvediaPlayer Plugin 3.0
Installation and User’s Guide 23
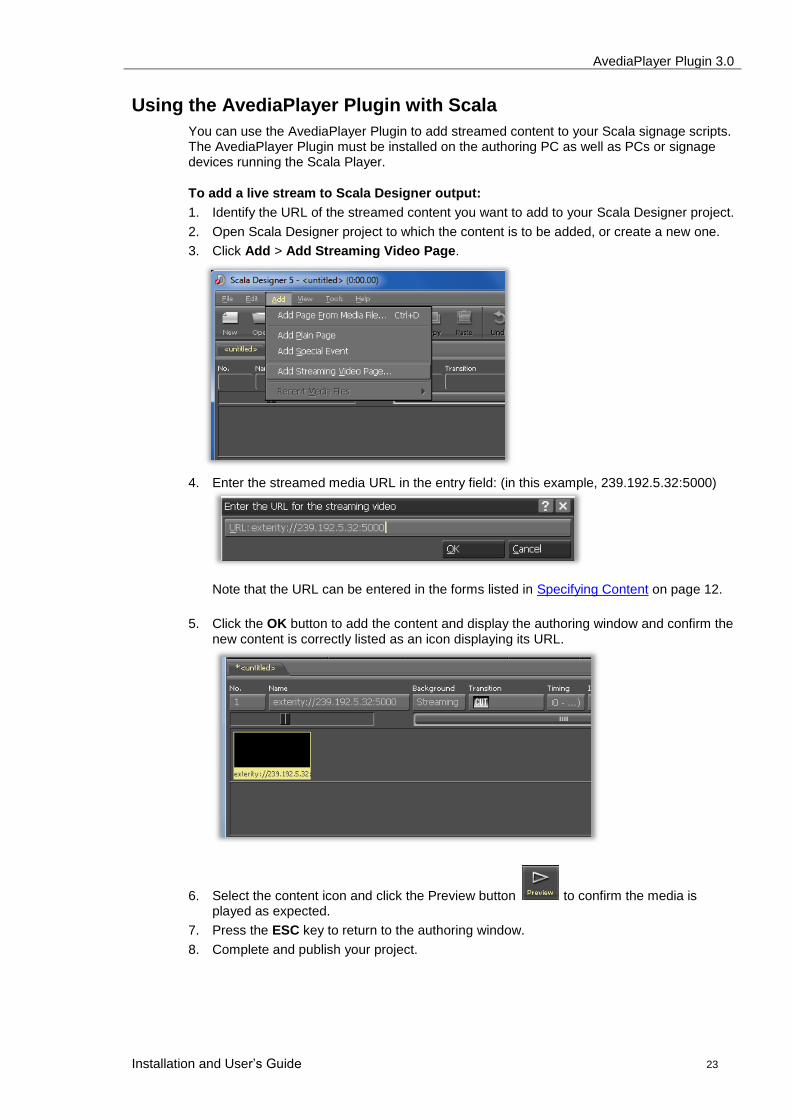
Using the AvediaPlayer Plugin with Scala
You can use the AvediaPlayer Plugin to add streamed content to your Scala signage scripts. The AvediaPlayer Plugin must be installed on the authoring PC as well as PCs or signage devices running the Scala Player.
To add a live stream to Scala Designer output:
1. Identify the URL of the streamed content you want to add to your Scala Designer project.
2. Open Scala Designer project to which the content is to be added, or create a new one.
3. Click Add > Add Streaming Video Page.
4. Enter the streamed media URL in the entry field: (in this example, 239.192.5.32:5000)
Note that the URL can be entered in the forms listed in Specifying Content on page 12.
5. Click the OK button to add the content and display the authoring window and confirm the new content is correctly listed as an icon displaying its URL.
6. Select the content icon and click the Preview button to confirm the media is played as expected.
7. Press the ESC key to return to the authoring window.
8. Complete and publish your project.
AvediaPlayer Plugin 3.0
24 Installation and User’s Guide
DirectShow Integration
Whilst the AvediaPlayer Plugin can be used with Windows Media Player or embedded in another application, some applications may require use of the AvediaPlayer Plugin at a lower level using DirectShow. This section describes the lower level operation of the AvediaPlayer Plugin and the interfaces that it supports and/or provides.
Overview
The AvediaPlayer Plugin is constructed as a single DirectShow filter, and can be integrated into applications using the Microsoft DirectShow APIs.
There are 3 main types of DirectShow filters:
Source Filters
Transform Filters
Rendering Filters
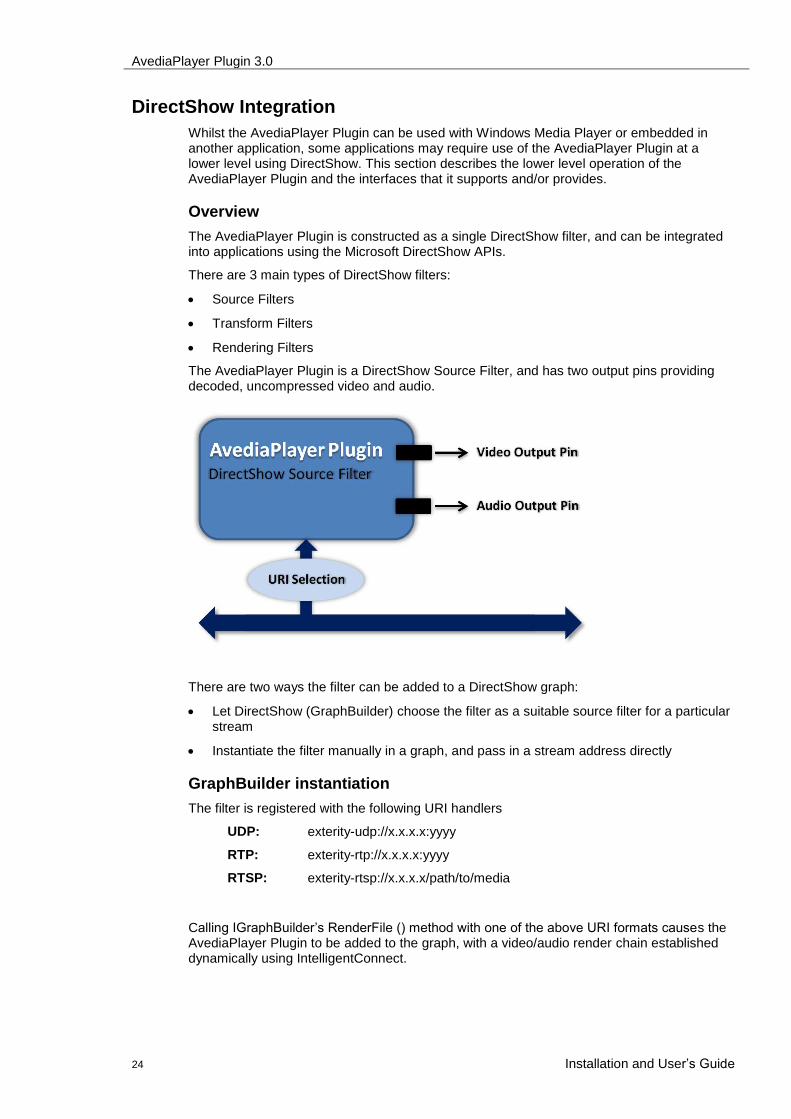
The AvediaPlayer Plugin is a DirectShow Source Filter, and has two output pins providing decoded, uncompressed video and audio.
There are two ways the filter can be added to a DirectShow graph:
Let DirectShow (GraphBuilder) choose the filter as a suitable source filter for a particular stream
Instantiate the filter manually in a graph, and pass in a stream address directly
GraphBuilder instantiation
The filter is registered with the following URI handlers
UDP: exterity-udp://x.x.x.x:yyyy
RTP: exterity-rtp://x.x.x.x:yyyy
RTSP: exterity-rtsp://x.x.x.x/path/to/media
Calling IGraphBuilder’s RenderFile () method with one of the above URI formats causes the AvediaPlayer Plugin to be added to the graph, with a video/audio render chain established dynamically using IntelligentConnect.
AvediaPlayer Plugin 3.0
Installation and User’s Guide 25
Manual Instantiation
The classid of the filter is:
{B87FD264-201A-4945-A49C-5DC811400C4E}
You can use this to find and instantiate the filter manually in an application. The filter supports the IFileSourceFilter interface – the Load() method of this interface can be used to specify the media address to be used. STDMETHODIMP AvediaSourceFilter::Load(LPCOLESTR addr, const
AM_MEDIA_TYPE *pmt);
The pmt value is not used, and should always be set NULL. The address can be one of the four Exterity handler addresses documented earlier.
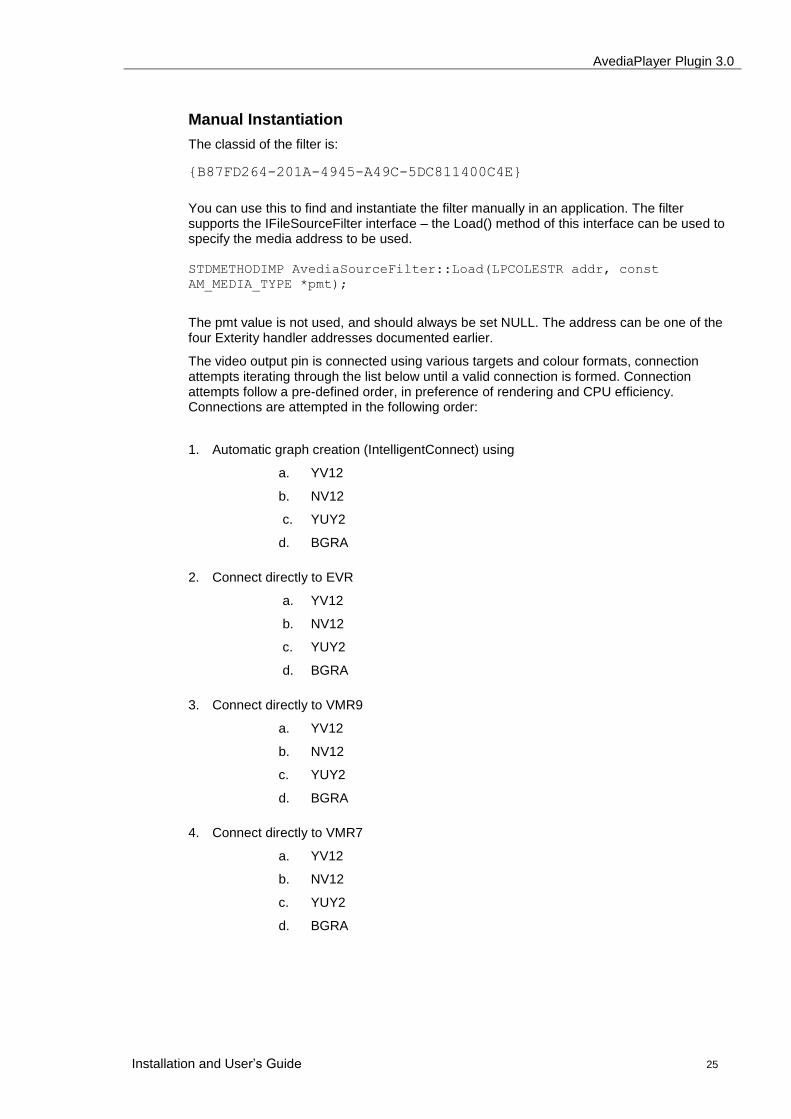
The video output pin is connected using various targets and colour formats, connection attempts iterating through the list below until a valid connection is formed. Connection attempts follow a pre-defined order, in preference of rendering and CPU efficiency. Connections are attempted in the following order:
1. Automatic graph creation (IntelligentConnect) using
a. YV12
b. NV12
c. YUY2
d. BGRA
2. Connect directly to EVR
a. YV12
b. NV12
c. YUY2
d. BGRA
3. Connect directly to VMR9
a. YV12
b. NV12
c. YUY2
d. BGRA
4. Connect directly to VMR7
a. YV12
b. NV12
c. YUY2
d. BGRA
AvediaPlayer Plugin 3.0
26 Installation and User’s Guide
IntelligentConnect Operation
In general, IntelligentConnect finds the most appropriate renderer for the video and audio output pins from the Exterity filter. However, it is useful to be aware of some features and limitations of this:
1. If a suitable audio/video renderer is already present in the DirectShow graph, IntelligentConnect typically chooses to connect to it, even if it would not have been chosen by default. This can result in sub-optimal performance, where, for example, the older VMR7 renderer is chosen over the much newer and more efficient EVR.
2. If a renderer is chosen that doesn’t support the default colour format (YV12), and a third party DirectShow colour space converter is available on the host system, IntelligentConnect may try to use this to convert to the format the renderer is requesting. This can result in an invalid graph set up and a resulting green/black output during playback. Removing the colour space converter from the host system resolves this issue.
Video pin colour formats
The filter supports the following colour formats. They are listed in order of preference. Using any format other than YV12 incurs an extra overhead as video data requires a software conversion from YV12 to the required format.
YV12: No extra overhead
NV12: Line by line copy of chrominance, byte by byte copy of luminance
YUY2: Byte by byte copy of chrominance and luminance
BGRA: Byte by byte copy and colour space conversion
Audio pin formats
The audio pin supports a single output format as detailed below. The only variable parameter is the sample rate, which will always match the sample rate of the source audio.
Format: Signed PCM
Channels: 2 (mono audio is replicated across both channels)
Bits per sample: 16
Sample rate: Matches source
Filter control
Once a valid DirectShow graph has been established, the filter can be controlled using the following methods: STDMETHODIMP AvediaSourceFilter::Run(REFERENCE_TIME tStart);
STDMETHODIMP AvediaSourceFilter::Pause();
STDMETHODIMP AvediaSourceFilter::Stop();
Calling Run() starts the data flowing in the graph. Pause() temporarily pauses the graph – this can be re-started by calling Run(). Stop() can be called when the graph is running or paused.
AvediaPlayer Plugin 3.0
Installation and User’s Guide 27
4 Troubleshooting
To help resolve any issues you may have with the operation of the AvediaPlayer Plugin or the playing of a specific channel, you can enable output to dbgview. This output can subsequently be used to help diagnose the issue.
By specifying debug and the interval in the channel URL, a set of debug values can be output to dbgview at the set intervals (specified in seconds).
Syntax: ?debuginterval=x
For example:
To output to dbgview at 5 second intervals when displaying the UDP multicast stream with a URL of 239.192.5.32:5000, enter:
exterity-udp://239.192.5.32:5000?debuginterval=5
Note: this can be combined with overscan cropping to maintain the intended display whilst capturing debug information. For example:
exterity-udp://239.192.5.6:5000?debugInterval=60&overscan=3
AvediaPlayer Plugin 3.0
28 Installation and User’s Guide
APPENDIX A Support and Contact Information Technical Support for Exterity products is provided by authorised Systems Integrators and Resellers. Please contact your Systems Integrator or Reseller with any Support issues.


![DataManager Plugin - d36j349d8rqm96.cloudfront.net Plugin - M… · DataManager Plugin 6Version History 6 Version History 6.1Plugin Version Plugin-Version Date [dd.mm.yyyy] Notes](https://img.pdfslide.us/doc/110x75/5f05b5577e708231d4144e44/datamanager-plugin-plugin-m-datamanager-plugin-6version-history-6-version.jpg)
![DIALux4[1].0- · PDF filedialux 2 plugin. 1.X. plugin , plugin. luminaire selection Plugin plugin . home page, Intenet Explorer](https://img.pdfslide.us/doc/110x75/5a715aac7f8b9a98538cccda/dialux410-wwwpowerengineeringblogfacomssuacirkhadamatkarkonanarticlesbarghdialux4-learningpdfpdf.jpg)