Embed Size (px)
Citation preview
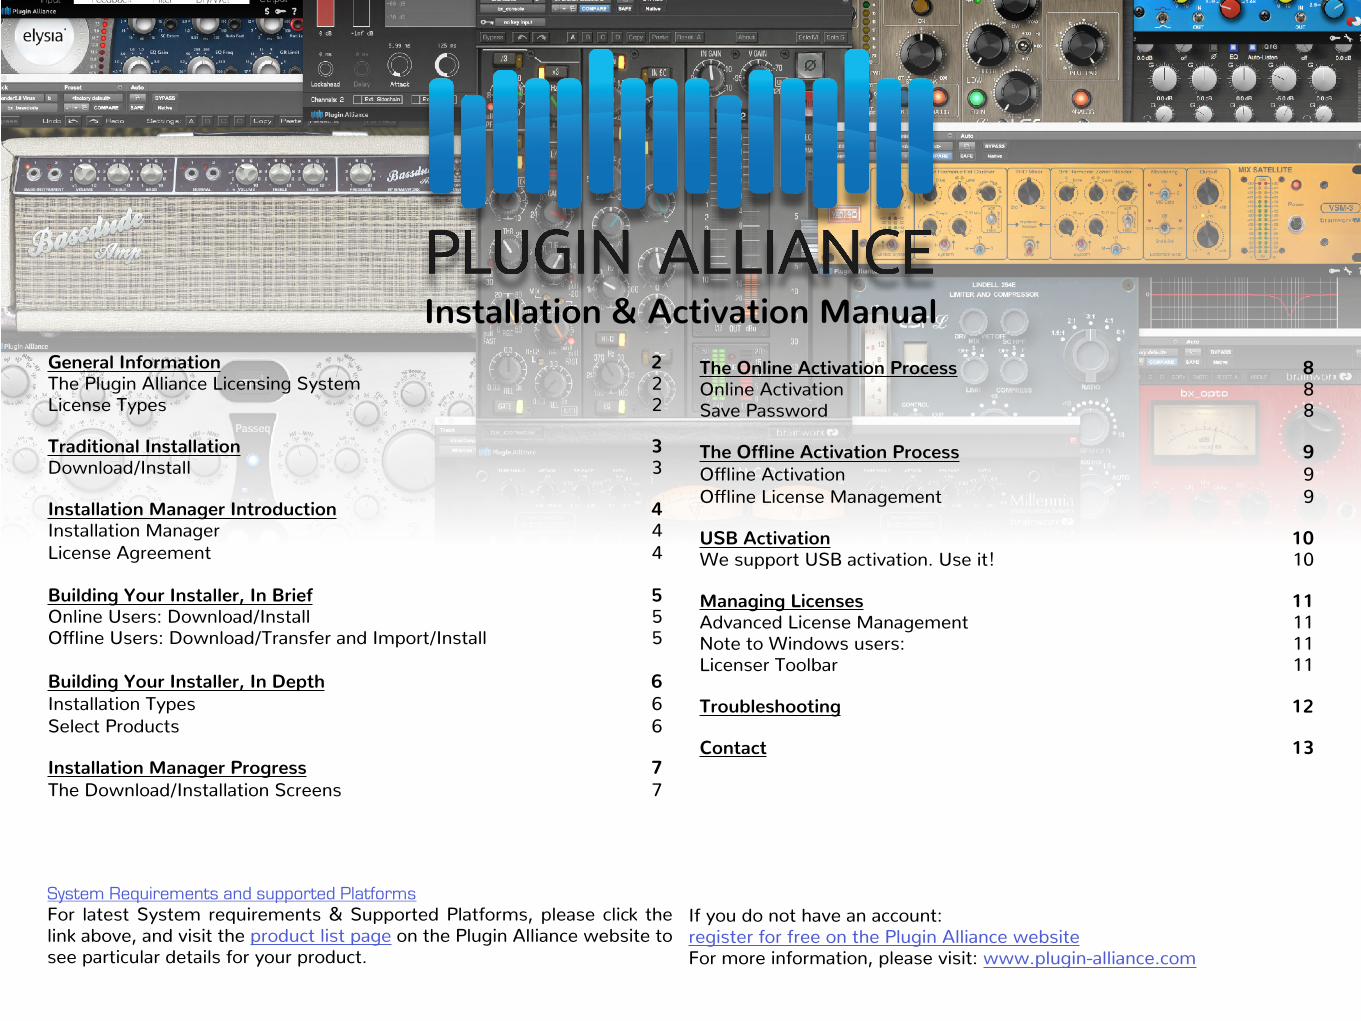
System Requirements and supported PlatformsFor latest System requirements & Supported Platforms, please click the link above, and visit the product list page on the Plugin Alliance website to see particular details for your product.
If you do not have an account:register for free on the Plugin Alliance websiteFor more information, please visit: www.plugin-alliance.com
Installation & Activation Manual
General Information 2
The Plugin Alliance Licensing System 2License Types 2
Traditional Installation 3
Download/Install 3
Installation Manager Introduction 4
Installation Manager 4License Agreement 4
Building Your Installer, In Brief 5
Online Users: Download/Install 5Offline Users: Download/Transfer and Import/Install 5
Building Your Installer, In Depth 6
Installation Types 6Select Products 6
Installation Manager Progress 7
The Download/Installation Screens 7
The Online Activation Process 8
Online Activation 8Save Password 8
7KH�2IǦLQH�$FWLYDWLRQ�3URFHVV 9
Offline Activation 9Offline License Management 9
USB Activation 10
We support USB activation. Use it! 10
Managing Licenses 11
Advanced License Management 11Note to Windows users: 11Licenser Toolbar 11
Troubleshooting 12
Contact 13
2
General Information
The Plugin Alliance Licensing SystemAlliance products include a proprietary licensing system which is completely software based. Thus, no hardware license dongle, special drivers, or serial numbers are required to run any of them. Everything is handled from within the software product. All of your licenses are stored on our server and linked to a single file that resides on your computer or USB flash drive, which is uniquely tied to the machine identifier of that system. This file must be updated whenever you buy or demo a new Alliance product and install it on your computer.
We support either online or offline activation. We highly recommend using online activation, if possible. A standard license entitles you to three authorizations, which means you can activate your software on up to three different computers or USB flash drives.
Authorization requires you to have a current Plugin Alliance acount. If you don’t already have one, you can create an account at https://www.plugin-alliance.com/en/registration.html. Opening an account is easy to do, totally free, and entitles you to many benefits.
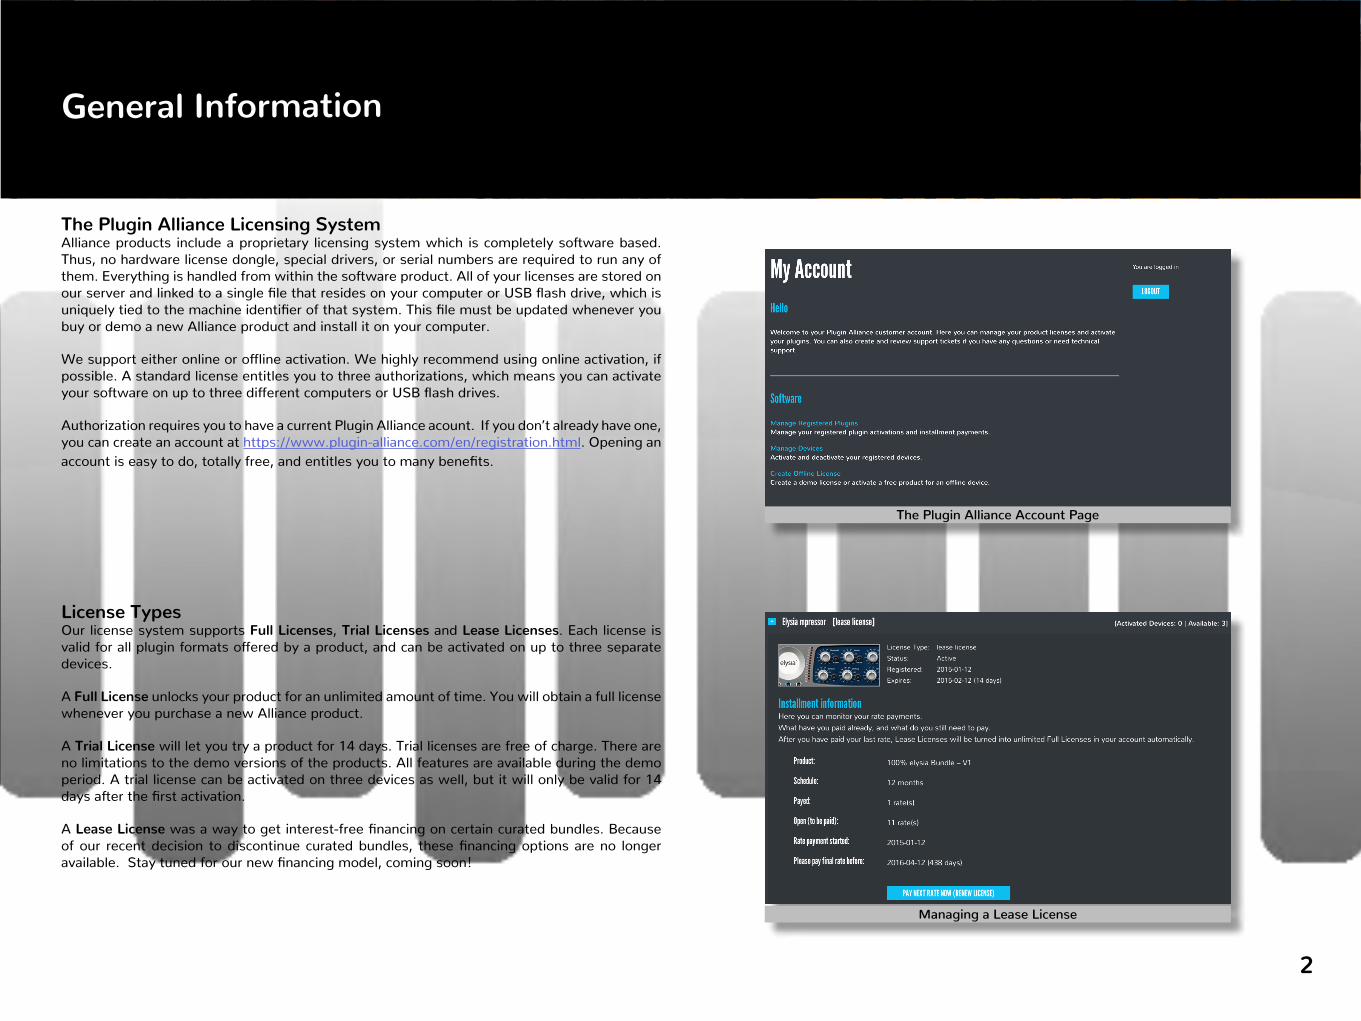
License TypesOur license system supports Full Licenses, Trial Licenses and Lease Licenses. Each license is valid for all plugin formats offered by a product, and can be activated on up to three separate devices.
A Full License unlocks your product for an unlimited amount of time. You will obtain a full license whenever you purchase a new Alliance product.
A Trial License will let you try a product for 14 days. Trial licenses are free of charge. There are no limitations to the demo versions of the products. All features are available during the demo period. A trial license can be activated on three devices as well, but it will only be valid for 14 days after the first activation.
A Lease License was a way to get interest-free financing on certain curated bundles. Because of our recent decision to discontinue curated bundles, these financing options are no longer available. Stay tuned for our new financing model, coming soon!
Managing a Lease License
The Plugin Alliance Account Page
3
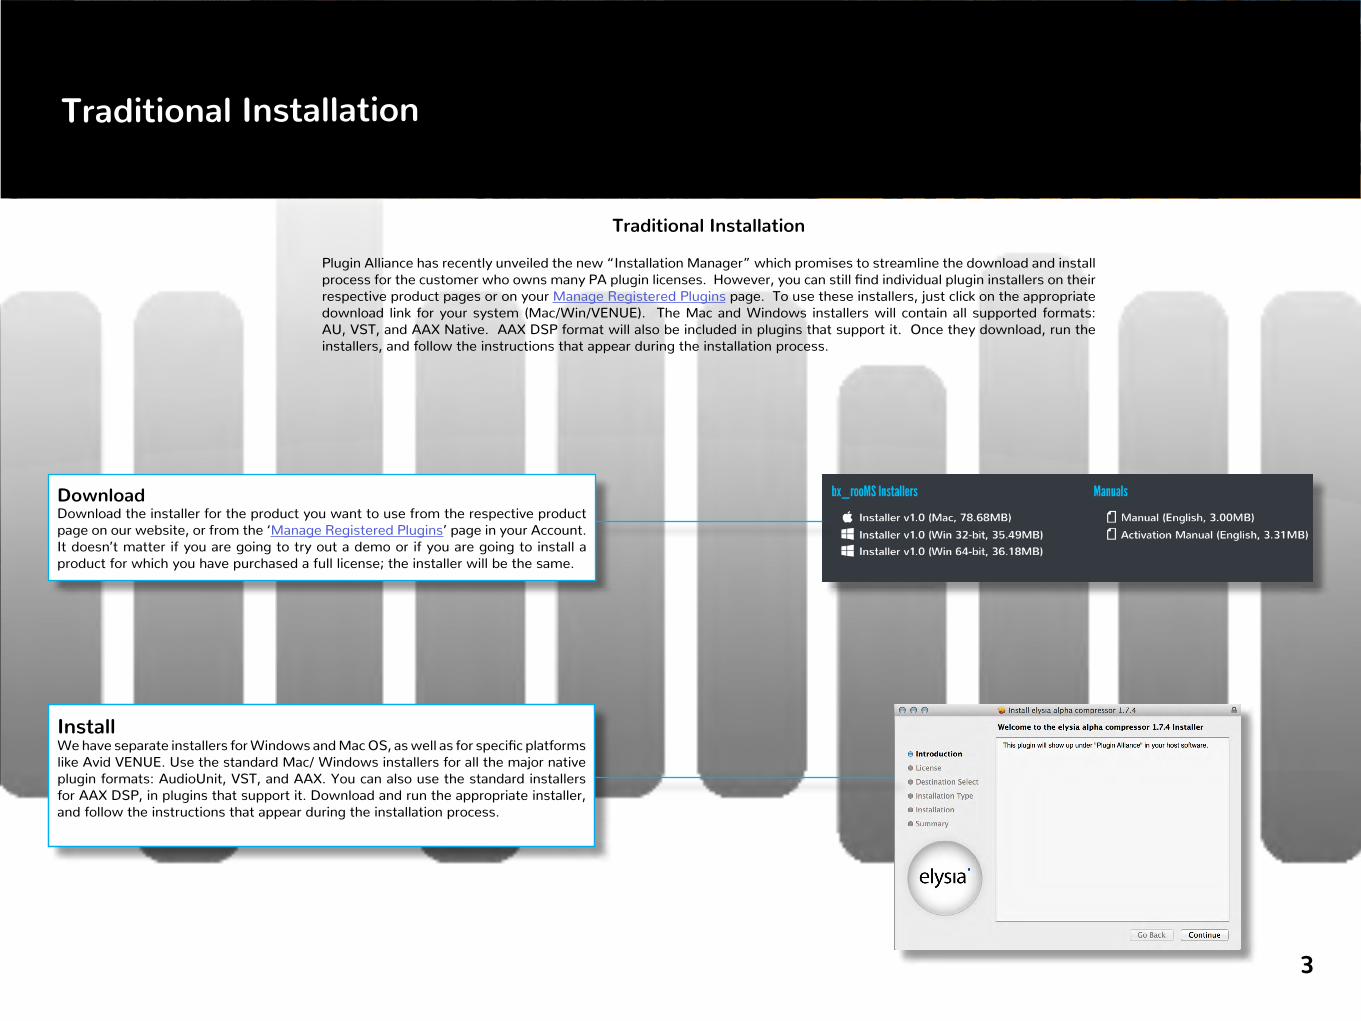
DownloadDownload the installer for the product you want to use from the respective product page on our website, or from the ‘Manage Registered Plugins’ page in your Account. It doesn’t matter if you are going to try out a demo or if you are going to install a product for which you have purchased a full license; the installer will be the same.
InstallWe have separate installers for Windows and Mac OS, as well as for specific platforms like Avid VENUE. Use the standard Mac/ Windows installers for all the major native plugin formats: AudioUnit, VST, and AAX. You can also use the standard installers for AAX DSP, in plugins that support it. Download and run the appropriate installer, and follow the instructions that appear during the installation process.
Traditional Installation
Traditional Installation
Plugin Alliance has recently unveiled the new “Installation Manager” which promises to streamline the download and install process for the customer who owns many PA plugin licenses. However, you can still find individual plugin installers on their respective product pages or on your Manage Registered Plugins page. To use these installers, just click on the appropriate download link for your system (Mac/Win/VENUE). The Mac and Windows installers will contain all supported formats: AU, VST, and AAX Native. AAX DSP format will also be included in plugins that support it. Once they download, run the installers, and follow the instructions that appear during the installation process.
4
Installation Manager Introduction
Installation Manager
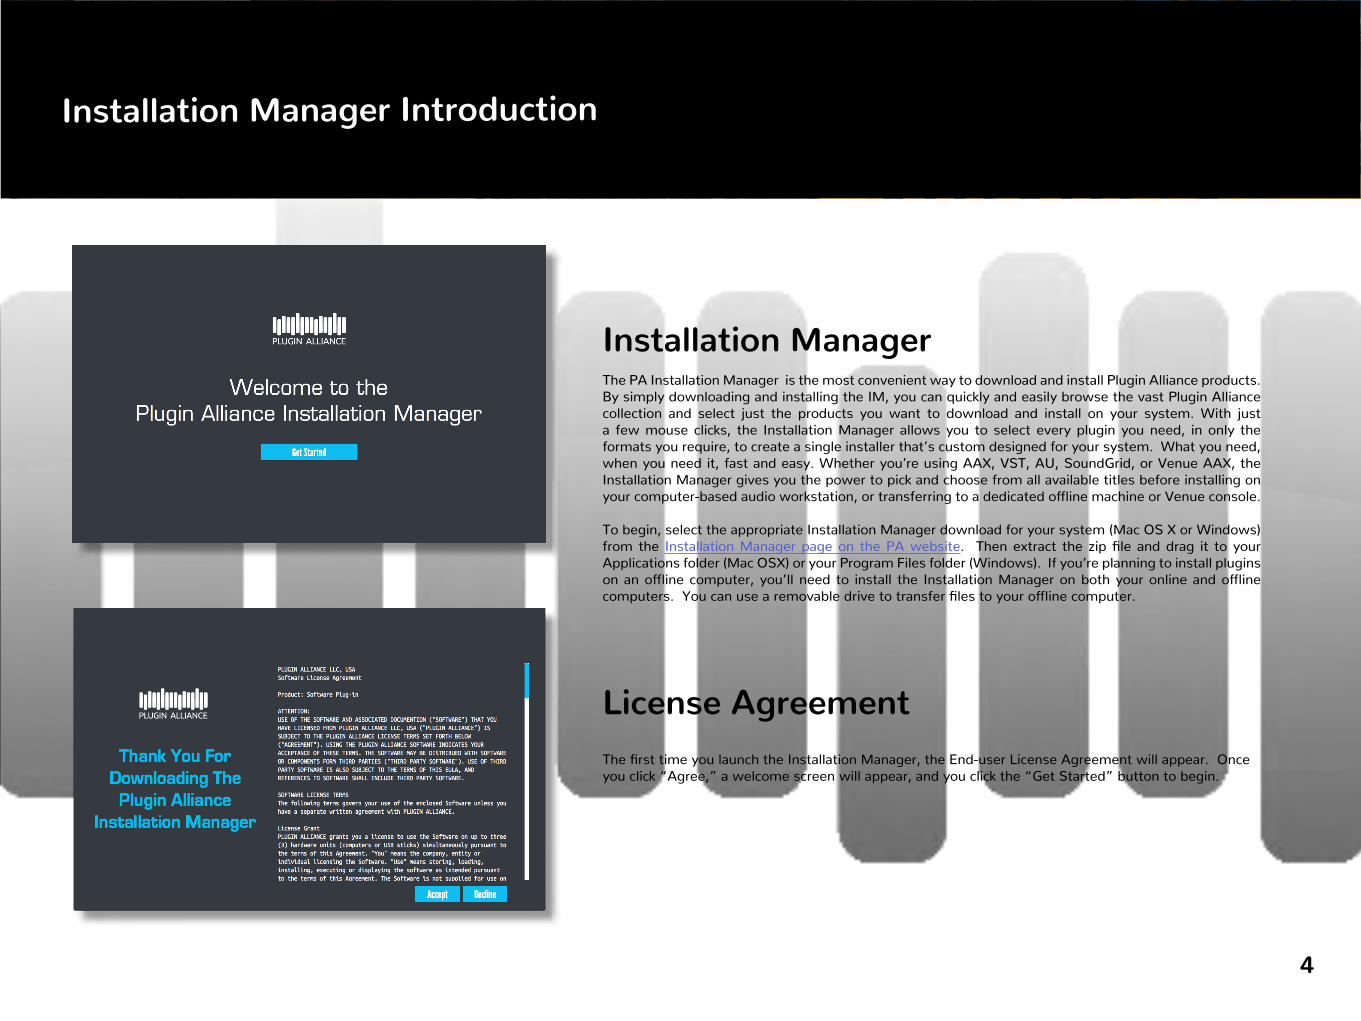
The PA Installation Manager is the most convenient way to download and install Plugin Alliance products. By simply downloading and installing the IM, you can quickly and easily browse the vast Plugin Alliance collection and select just the products you want to download and install on your system. With just a few mouse clicks, the Installation Manager allows you to select every plugin you need, in only the formats you require, to create a single installer that’s custom designed for your system. What you need, when you need it, fast and easy. Whether you’re using AAX, VST, AU, SoundGrid, or Venue AAX, the Installation Manager gives you the power to pick and choose from all available titles before installing on your computer-based audio workstation, or transferring to a dedicated offline machine or Venue console.
To begin, select the appropriate Installation Manager download for your system (Mac OS X or Windows) from the Installation Manager page on the PA website. Then extract the zip file and drag it to your Applications folder (Mac OSX) or your Program Files folder (Windows). If you’re planning to install plugins on an offline computer, you’ll need to install the Installation Manager on both your online and offline computers. You can use a removable drive to transfer files to your offline computer.
License Agreement
The first time you launch the Installation Manager, the End-user License Agreement will appear. Once you click “Agree,” a welcome screen will appear, and you click the “Get Started” button to begin.
5
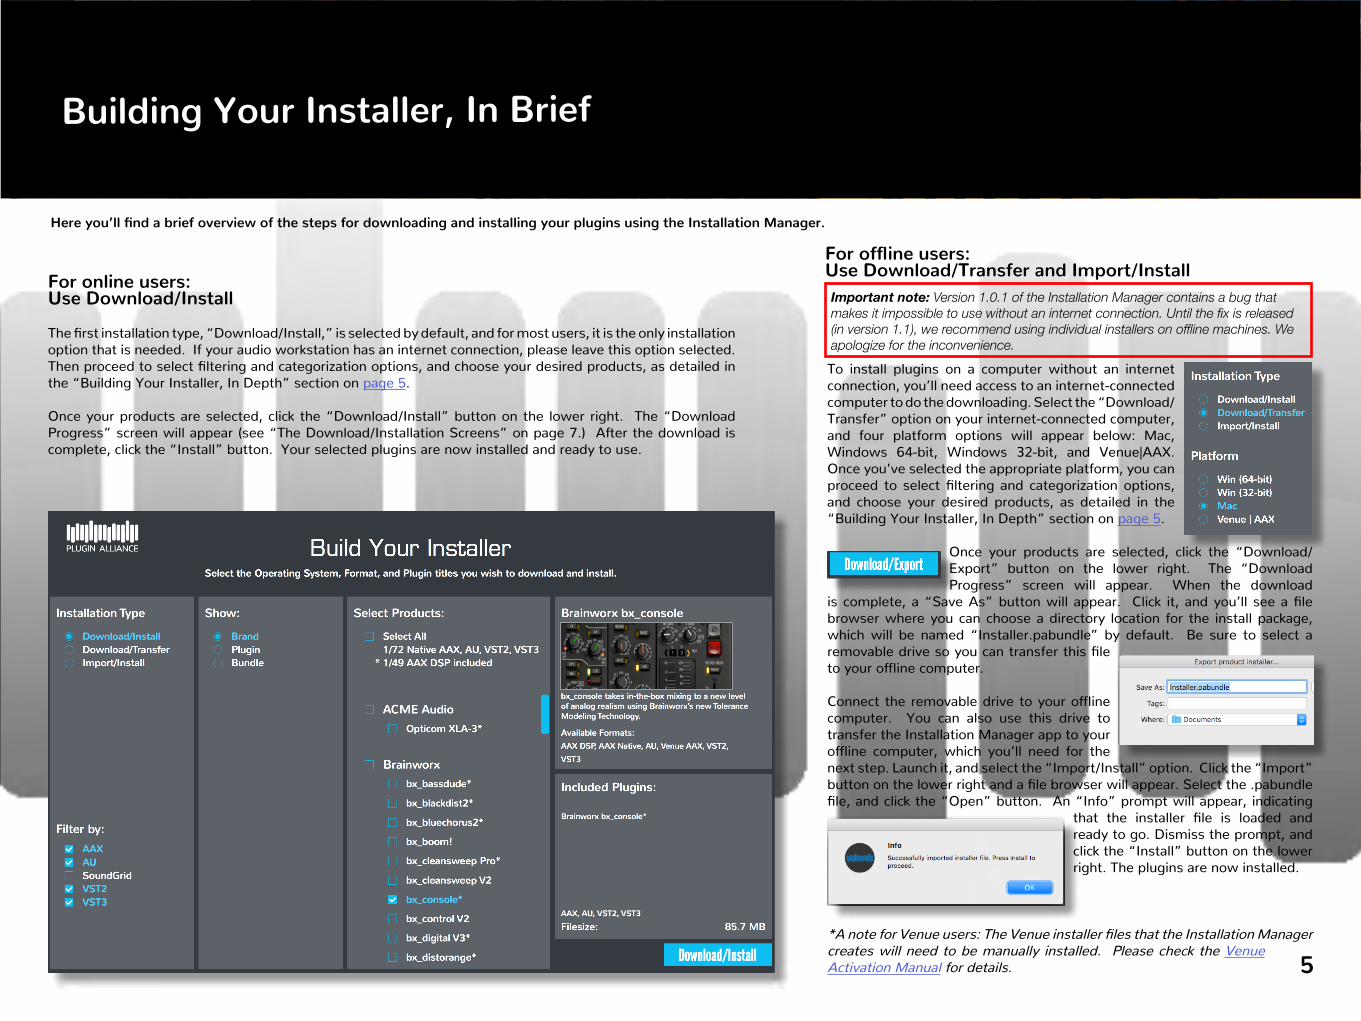
Building Your Installer, In Brief
To install plugins on a computer without an internet connection, you’ll need access to an internet-connected computer to do the downloading. Select the “Download/Transfer” option on your internet-connected computer, and four platform options will appear below: Mac, Windows 64-bit, Windows 32-bit, and Venue|AAX. Once you’ve selected the appropriate platform, you can proceed to select filtering and categorization options, and choose your desired products, as detailed in the “Building Your Installer, In Depth” section on page 5.
Once your products are selected, click the “Download/Export” button on the lower right. The “Download Progress” screen will appear. When the download
is complete, a “Save As” button will appear. Click it, and you’ll see a file browser where you can choose a directory location for the install package, which will be named “Installer.pabundle” by default. Be sure to select a removable drive so you can transfer this file to your offline computer.
Connect the removable drive to your offline computer. You can also use this drive to transfer the Installation Manager app to your offline computer, which you’ll need for the next step. Launch it, and select the “Import/Install” option. Click the “Import” button on the lower right and a file browser will appear. Select the .pabundle file, and click the “Open” button. An “Info” prompt will appear, indicating
that the installer file is loaded and ready to go. Dismiss the prompt, and click the “Install” button on the lower right. The plugins are now installed.
*A note for Venue users: The Venue installer files that the Installation Manager creates will need to be manually installed. Please check the Venue Activation Manual for details.
For online users: Use Download/Install
The first installation type, “Download/Install,” is selected by default, and for most users, it is the only installation option that is needed. If your audio workstation has an internet connection, please leave this option selected. Then proceed to select filtering and categorization options, and choose your desired products, as detailed in the “Building Your Installer, In Depth” section on page 5.
Once your products are selected, click the “Download/Install” button on the lower right. The “Download Progress” screen will appear (see “The Download/Installation Screens” on page 7.) After the download is complete, click the “Install” button. Your selected plugins are now installed and ready to use.
+HUH�\RXǂOO�ǥQG�D�EULHI�RYHUYLHZ�RI�WKH�VWHSV�IRU�GRZQORDGLQJ�DQG�LQVWDOOLQJ�\RXU�SOXJLQV�XVLQJ�WKH�,QVWDOODWLRQ�0DQDJHU�
)RU�RIǦLQH�XVHUV��Use Download/Transfer and Import/Install
Important note: Version 1.0.1 of the Installation Manager contains a bug that makes it impossible to use without an internet connection. Until the fix is released (in version 1.1), we recommend using individual installers on offline machines. We apologize for the inconvenience.
6
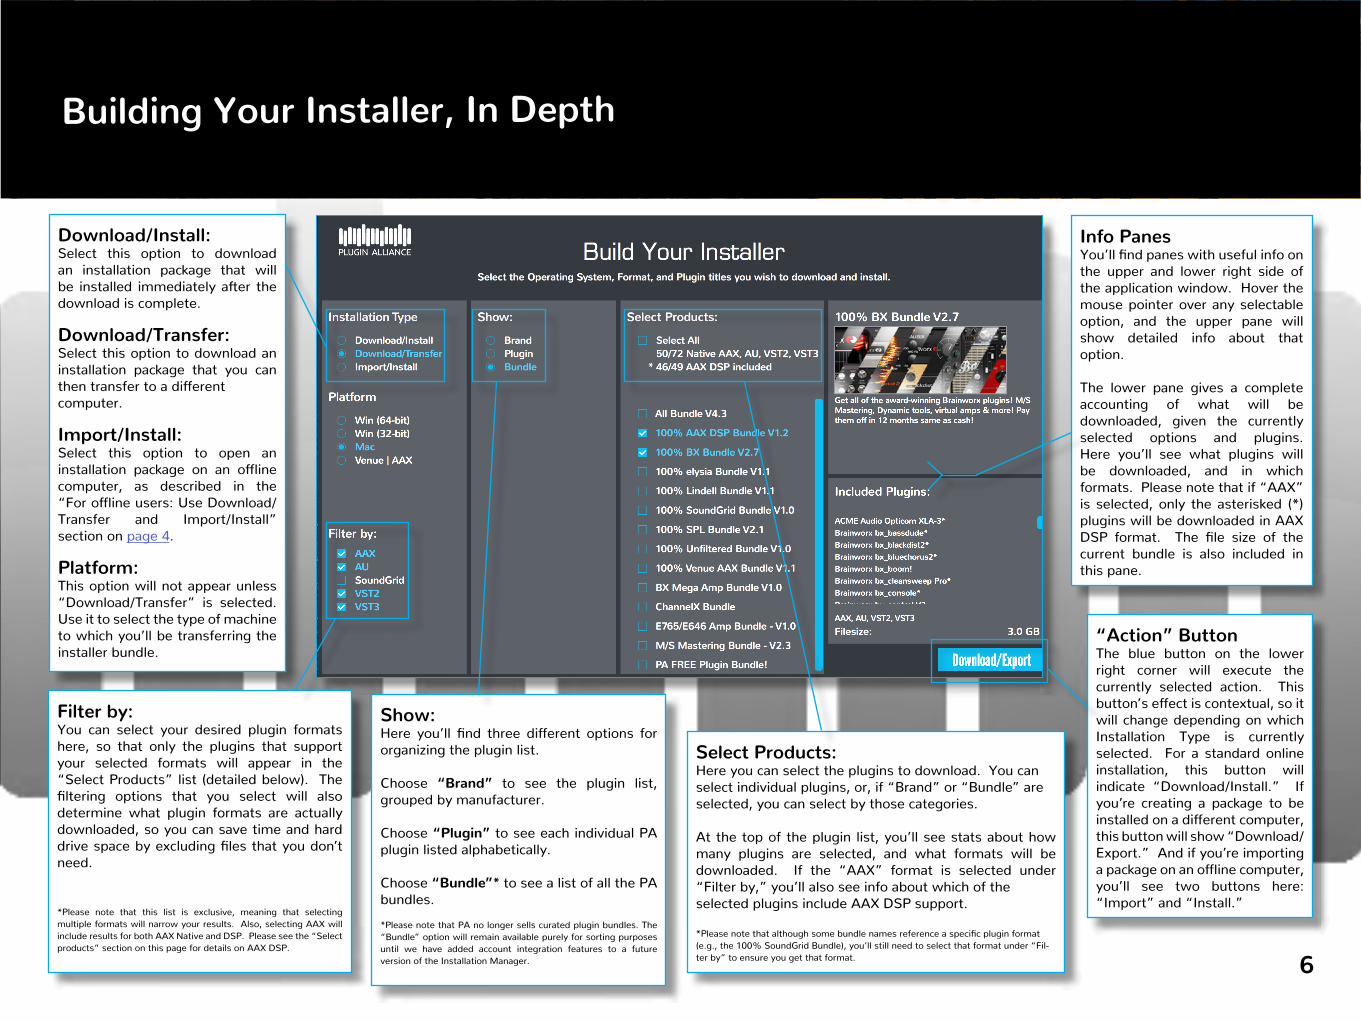
Building Your Installer, In Depth
Download/Install:Select this option to download an installation package that will be installed immediately after the download is complete.
Download/Transfer:Select this option to download an installation package that you can then transfer to a different computer.
Import/Install:Select this option to open an installation package on an offline computer, as described in the “For offline users: Use Download/Transfer and Import/Install” section on page 4.
Platform:This option will not appear unless “Download/Transfer” is selected. Use it to select the type of machine to which you’ll be transferring the installer bundle.
Info PanesYou’ll find panes with useful info on the upper and lower right side of the application window. Hover the mouse pointer over any selectable option, and the upper pane will show detailed info about that option.
The lower pane gives a complete accounting of what will be downloaded, given the currently selected options and plugins. Here you’ll see what plugins will be downloaded, and in which formats. Please note that if “AAX” is selected, only the asterisked (*) plugins will be downloaded in AAX DSP format. The file size of the current bundle is also included in this pane.
Show:Here you’ll find three different options for organizing the plugin list.
Choose “Brand” to see the plugin list, grouped by manufacturer.
Choose “Plugin” to see each individual PA plugin listed alphabetically.
Choose “Bundle”* to see a list of all the PA bundles.*Please note that PA no longer sells curated plugin bundles. The “Bundle” option will remain available purely for sorting purposes until we have added account integration features to a future version of the Installation Manager.
Filter by:You can select your desired plugin formats here, so that only the plugins that support your selected formats will appear in the “Select Products” list (detailed below). The filtering options that you select will also determine what plugin formats are actually downloaded, so you can save time and hard drive space by excluding files that you don’t need.
*Please note that this list is exclusive, meaning that selecting multiple formats will narrow your results. Also, selecting AAX will include results for both AAX Native and DSP. Please see the “Select products” section on this page for details on AAX DSP.
Select Products:Here you can select the plugins to download. You can select individual plugins, or, if “Brand” or “Bundle” are selected, you can select by those categories.
At the top of the plugin list, you’ll see stats about how many plugins are selected, and what formats will be downloaded. If the “AAX” format is selected under “Filter by,” you’ll also see info about which of the selected plugins include AAX DSP support.
*Please note that although some bundle names reference a specific plugin format (e.g., the 100% SoundGrid Bundle), you’ll still need to select that format under “Fil-ter by” to ensure you get that format.
“Action” ButtonThe blue button on the lower right corner will execute the currently selected action. This button’s effect is contextual, so it will change depending on which Installation Type is currently selected. For a standard online installation, this button will indicate “Download/Install.” If you’re creating a package to be installed on a different computer, this button will show “Download/Export.” And if you’re importing a package on an offline computer, you’ll see two buttons here: “Import” and “Install.”
7
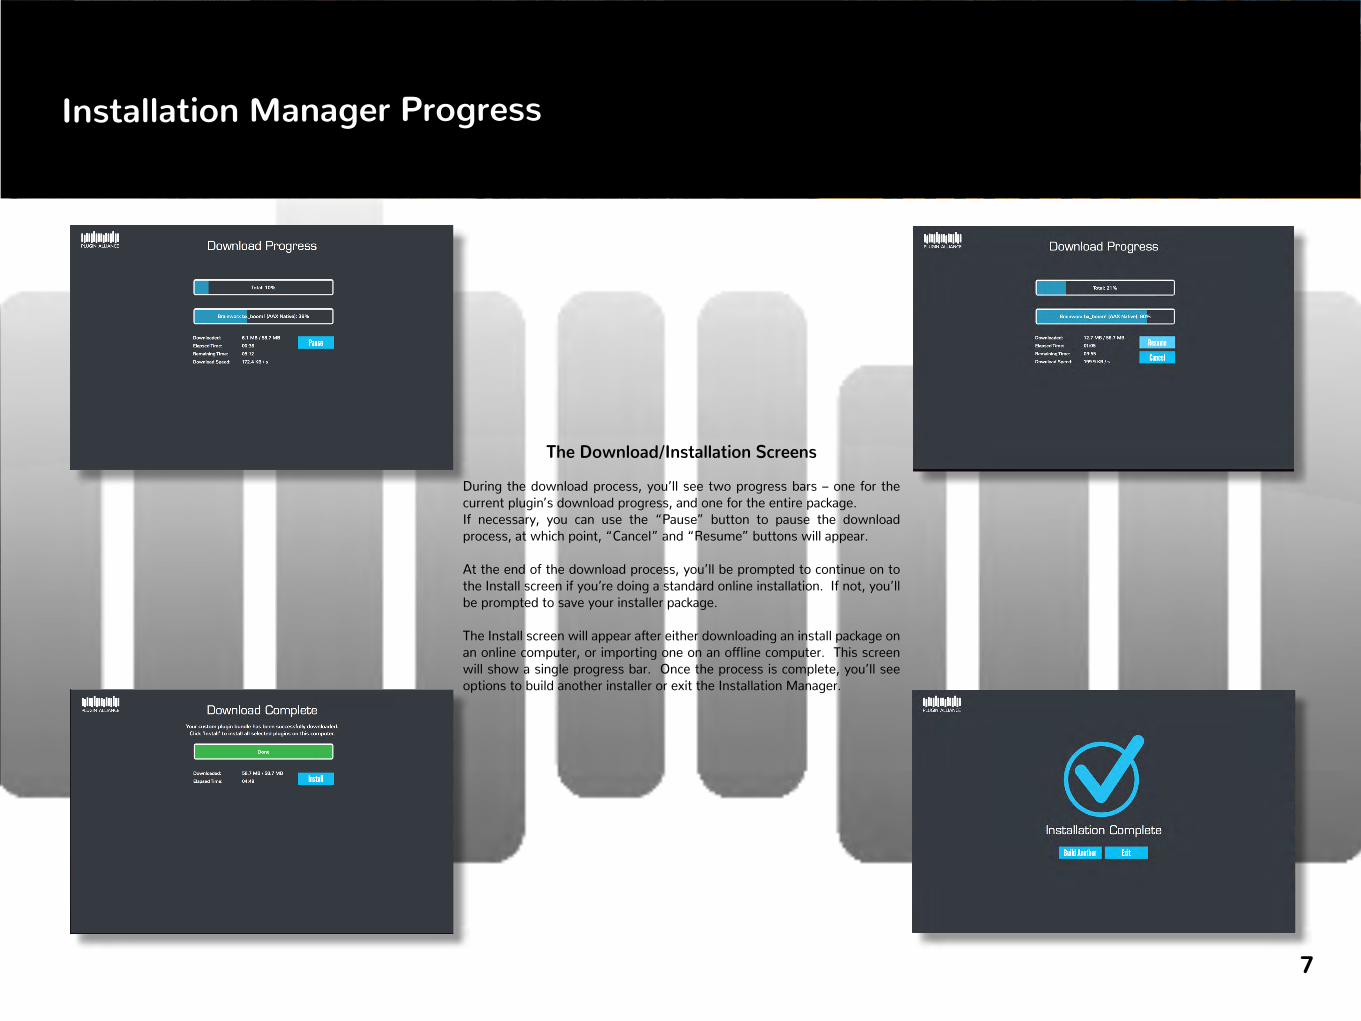
Installation Manager Progress
The Download/Installation Screens
During the download process, you’ll see two progress bars – one for the current plugin’s download progress, and one for the entire package. If necessary, you can use the “Pause” button to pause the download process, at which point, “Cancel” and “Resume” buttons will appear.
At the end of the download process, you’ll be prompted to continue on to the Install screen if you’re doing a standard online installation. If not, you’ll be prompted to save your installer package.
The Install screen will appear after either downloading an install package on an online computer, or importing one on an offline computer. This screen will show a single progress bar. Once the process is complete, you’ll see options to build another installer or exit the Installation Manager.
8
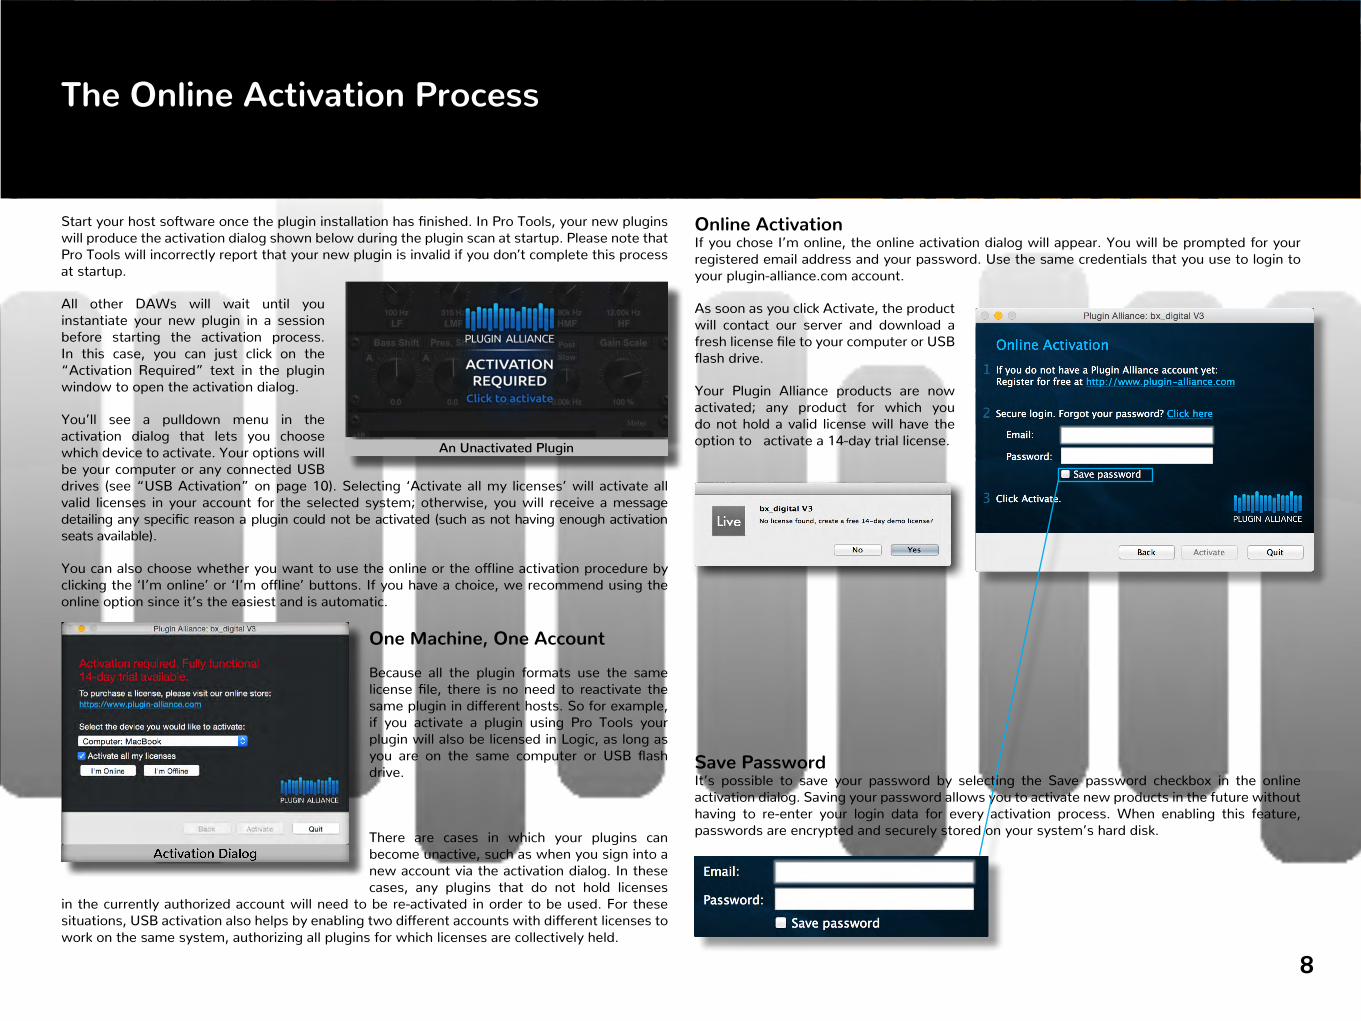
The Online Activation Process
Start your host software once the plugin installation has finished. In Pro Tools, your new plugins will produce the activation dialog shown below during the plugin scan at startup. Please note that Pro Tools will incorrectly report that your new plugin is invalid if you don’t complete this process at startup.
All other DAWs will wait until you instantiate your new plugin in a session before starting the activation process. In this case, you can just click on the “Activation Required” text in the plugin window to open the activation dialog.
You’ll see a pulldown menu in the activation dialog that lets you choose which device to activate. Your options will be your computer or any connected USB drives (see “USB Activation” on page 10). Selecting ‘Activate all my licenses’ will activate all valid licenses in your account for the selected system; otherwise, you will receive a message detailing any specific reason a plugin could not be activated (such as not having enough activation seats available).
You can also choose whether you want to use the online or the offline activation procedure by clicking the ‘I’m online’ or ‘I’m offline’ buttons. If you have a choice, we recommend using the online option since it’s the easiest and is automatic.
One Machine, One Account
Because all the plugin formats use the same license file, there is no need to reactivate the same plugin in different hosts. So for example, if you activate a plugin using Pro Tools your plugin will also be licensed in Logic, as long as you are on the same computer or USB flash drive.
There are cases in which your plugins can become unactive, such as when you sign into a new account via the activation dialog. In these cases, any plugins that do not hold licenses
in the currently authorized account will need to be re-activated in order to be used. For these situations, USB activation also helps by enabling two different accounts with different licenses to work on the same system, authorizing all plugins for which licenses are collectively held.
Activation Dialog
An Unactivated Plugin
Online ActivationIf you chose I’m online, the online activation dialog will appear. You will be prompted for your registered email address and your password. Use the same credentials that you use to login to your plugin-alliance.com account.
As soon as you click Activate, the product will contact our server and download a fresh license file to your computer or USB flash drive.
Your Plugin Alliance products are now activated; any product for which you do not hold a valid license will have the option to activate a 14-day trial license.
Save PasswordIt’s possible to save your password by selecting the Save password checkbox in the online activation dialog. Saving your password allows you to activate new products in the future without having to re-enter your login data for every activation process. When enabling this feature, passwords are encrypted and securely stored on your system’s hard disk.
9
7KH�2IǦLQH�$FWLYDWLRQ�3URFHVV
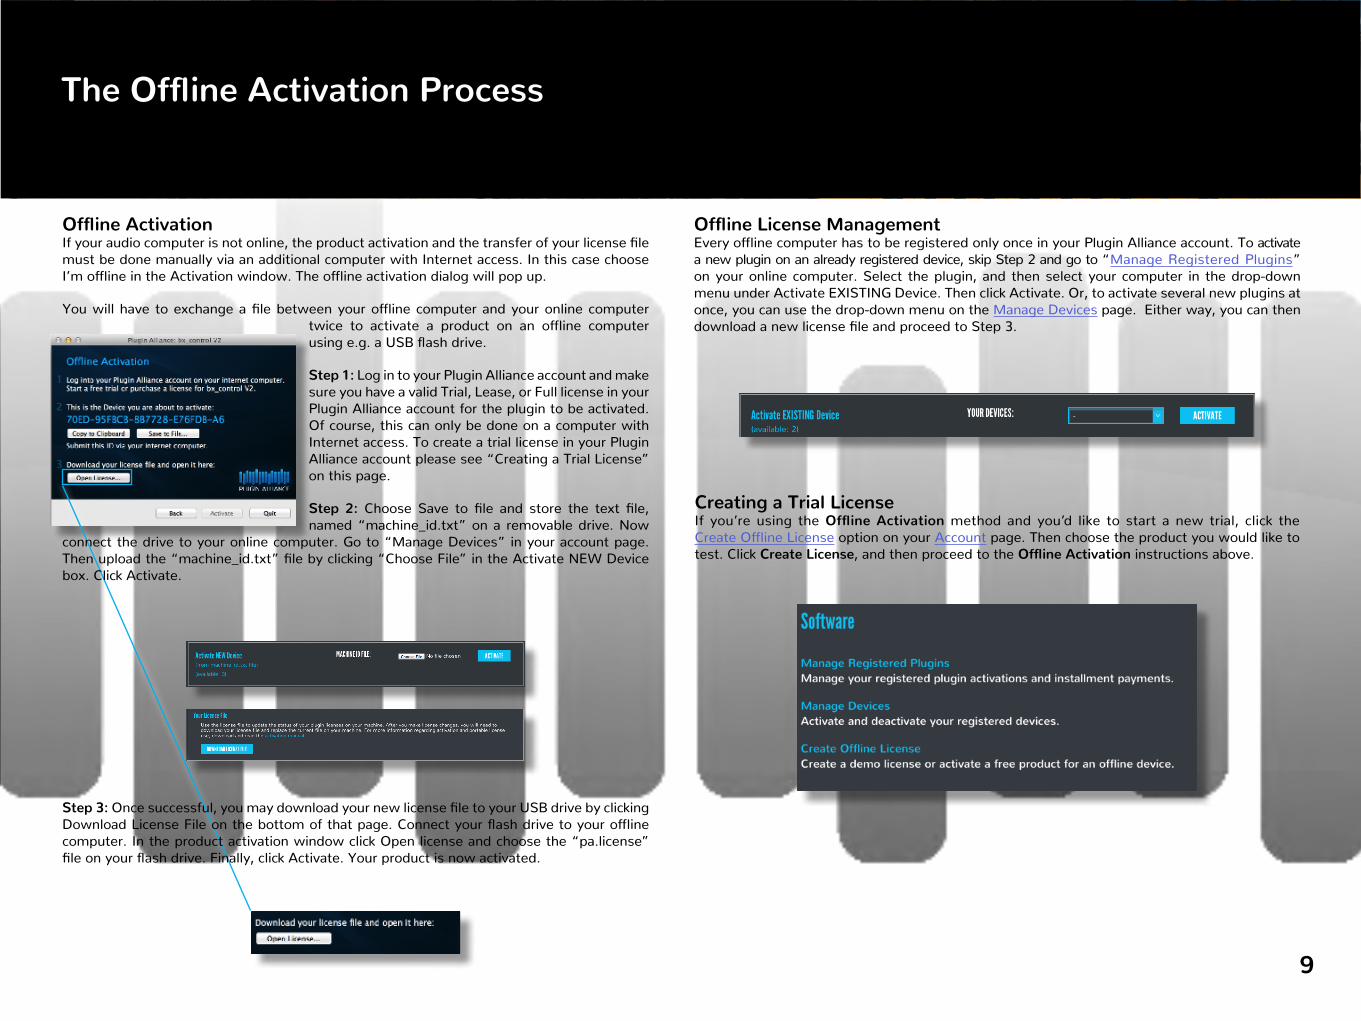
2IǦLQH�/LFHQVH�0DQDJHPHQWEvery offline computer has to be registered only once in your Plugin Alliance account. To activate a new plugin on an already registered device, skip Step 2 and go to “Manage Registered Plugins” on your online computer. Select the plugin, and then select your computer in the drop-down menu under Activate EXISTING Device. Then click Activate. Or, to activate several new plugins at once, you can use the drop-down menu on the Manage Devices page. Either way, you can then download a new license file and proceed to Step 3.
Creating a Trial LicenseIf you’re using the 2IǦLQH�$FWLYDWLRQ method and you’d like to start a new trial, click the Create Offline License option on your Account page. Then choose the product you would like to test. Click Create License, and then proceed to the 2IǦLQH�$FWLYDWLRQ instructions above.
2IǦLQH�$FWLYDWLRQIf your audio computer is not online, the product activation and the transfer of your license file must be done manually via an additional computer with Internet access. In this case choose I’m offline in the Activation window. The offline activation dialog will pop up.
You will have to exchange a file between your offline computer and your online computer twice to activate a product on an offline computer using e.g. a USB flash drive.
Step 1: Log in to your Plugin Alliance account and make sure you have a valid Trial, Lease, or Full license in your Plugin Alliance account for the plugin to be activated. Of course, this can only be done on a computer with Internet access. To create a trial license in your Plugin Alliance account please see “Creating a Trial License” on this page.
Step 2: Choose Save to file and store the text file, named “machine_id.txt” on a removable drive. Now
connect the drive to your online computer. Go to “Manage Devices” in your account page. Then upload the “machine_id.txt” file by clicking “Choose File” in the Activate NEW Device box. Click Activate.
Step 3: Once successful, you may download your new license file to your USB drive by clicking Download License File on the bottom of that page. Connect your flash drive to your offline computer. In the product activation window click Open license and choose the “pa.license” file on your flash drive. Finally, click Activate. Your product is now activated.
10
USB Activation
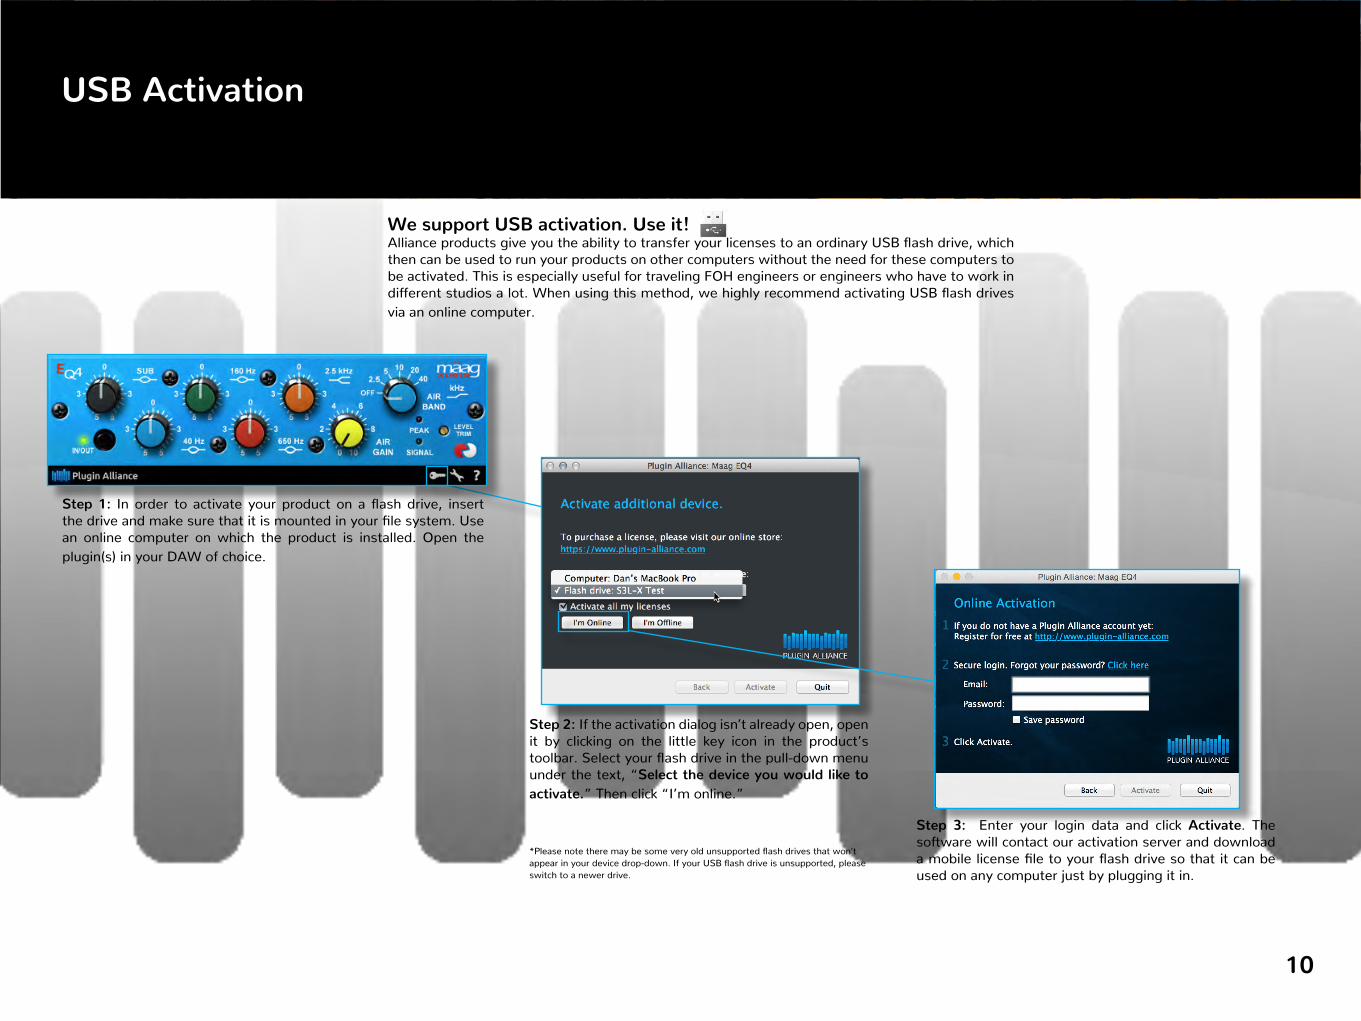
:H�VXSSRUW�86%�DFWLYDWLRQ��8VH�LW��Alliance products give you the ability to transfer your licenses to an ordinary USB flash drive, which then can be used to run your products on other computers without the need for these computers to be activated. This is especially useful for traveling FOH engineers or engineers who have to work in different studios a lot. When using this method, we highly recommend activating USB flash drives via an online computer.
Step 1: In order to activate your product on a flash drive, insert the drive and make sure that it is mounted in your file system. Use an online computer on which the product is installed. Open the plugin(s) in your DAW of choice.
Step 2: If the activation dialog isn’t already open, open it by clicking on the little key icon in the product’s toolbar. Select your flash drive in the pull-down menu under the text, “Select the device you would like to
DFWLYDWH�” Then click “I’m online.”
*Please note there may be some very old unsupported flash drives that won’t appear in your device drop-down. If your USB flash drive is unsupported, please switch to a newer drive.
Step 3: Enter your login data and click Activate. The software will contact our activation server and download a mobile license file to your flash drive so that it can be used on any computer just by plugging it in.
11
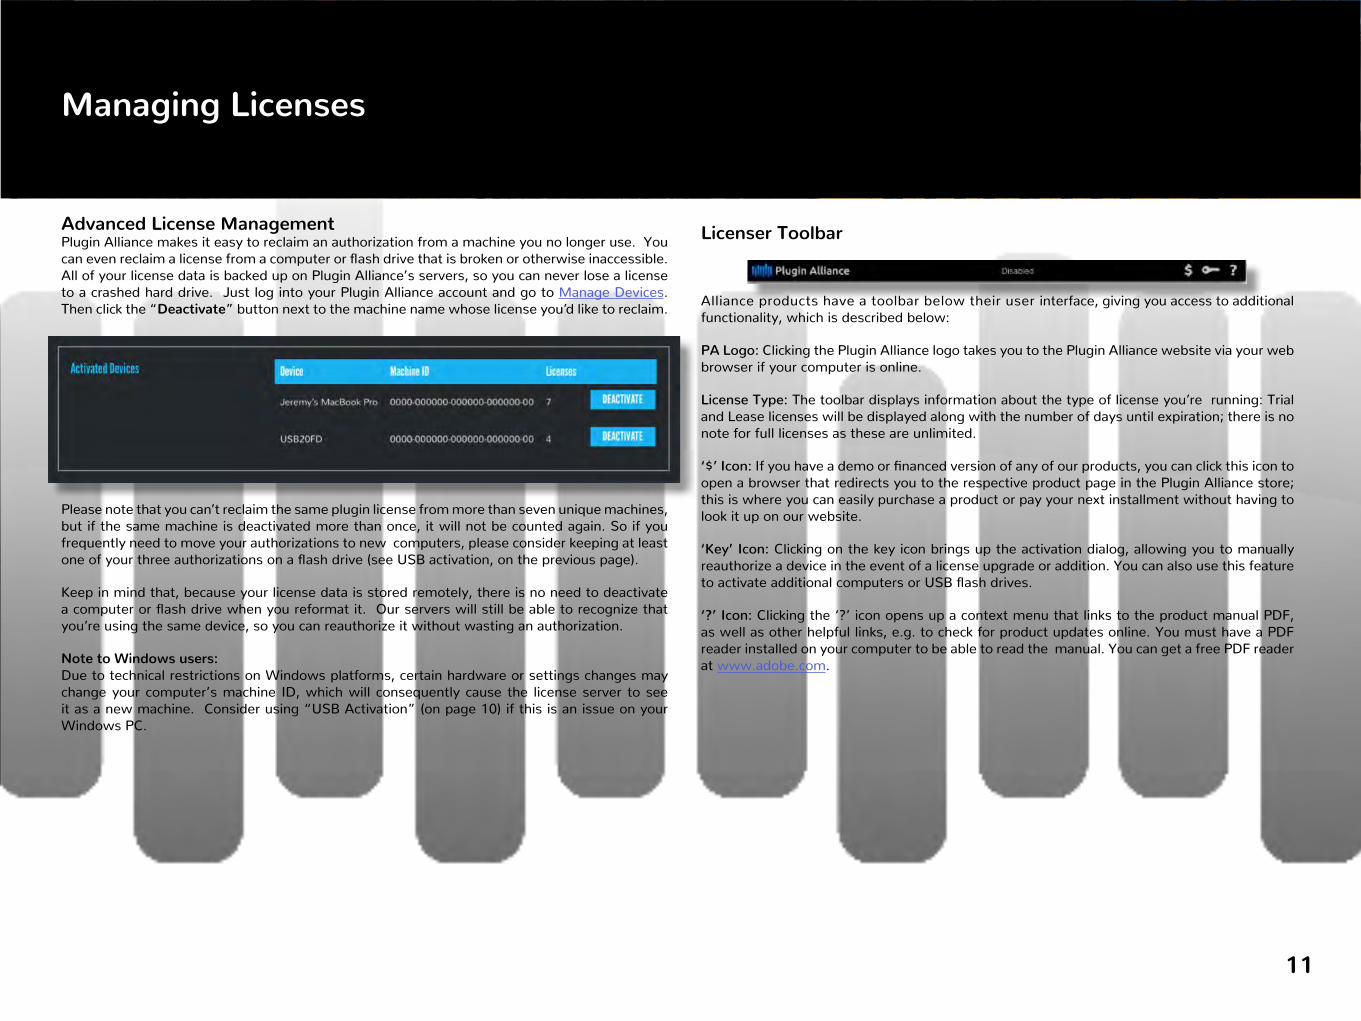
Advanced License ManagementPlugin Alliance makes it easy to reclaim an authorization from a machine you no longer use. You can even reclaim a license from a computer or flash drive that is broken or otherwise inaccessible. All of your license data is backed up on Plugin Alliance’s servers, so you can never lose a license to a crashed hard drive. Just log into your Plugin Alliance account and go to Manage Devices. Then click the “Deactivate” button next to the machine name whose license you’d like to reclaim.
Please note that you can’t reclaim the same plugin license from more than seven unique machines, but if the same machine is deactivated more than once, it will not be counted again. So if you frequently need to move your authorizations to new computers, please consider keeping at least one of your three authorizations on a flash drive (see USB activation, on the previous page).
Keep in mind that, because your license data is stored remotely, there is no need to deactivate a computer or flash drive when you reformat it. Our servers will still be able to recognize that you’re using the same device, so you can reauthorize it without wasting an authorization.
Note to Windows users:
Due to technical restrictions on Windows platforms, certain hardware or settings changes may change your computer’s machine ID, which will consequently cause the license server to see it as a new machine. Consider using “USB Activation” (on page 10) if this is an issue on your Windows PC.
Managing Licenses
Licenser Toolbar
Alliance products have a toolbar below their user interface, giving you access to additional functionality, which is described below:
PA Logo: Clicking the Plugin Alliance logo takes you to the Plugin Alliance website via your web browser if your computer is online.
License Type: The toolbar displays information about the type of license you’re running: Trial and Lease licenses will be displayed along with the number of days until expiration; there is no note for full licenses as these are unlimited.
‘$’ Icon: If you have a demo or financed version of any of our products, you can click this icon to open a browser that redirects you to the respective product page in the Plugin Alliance store; this is where you can easily purchase a product or pay your next installment without having to look it up on our website.
‘Key’ Icon: Clicking on the key icon brings up the activation dialog, allowing you to manually reauthorize a device in the event of a license upgrade or addition. You can also use this feature to activate additional computers or USB flash drives.
‘?’ Icon: Clicking the ‘?’ icon opens up a context menu that links to the product manual PDF, as well as other helpful links, e.g. to check for product updates online. You must have a PDF reader installed on your computer to be able to read the manual. You can get a free PDF reader at www.adobe.com.

12
Stuck in the process? Below are some solutions for common issues that users may experience during the installation or activation process.
I purchased a license for a plugin, but it’s still running as a trial.Many PA plugins look similar or have similar sounding names (like the “bx_opto” and the “bx_opto Pedal”), so double-check to be sure you installed the right plugin.
Check to see if you inadvertently created a second Plugin Alliance account. The activation server will report that you don’t have a license if you don’t enter the same login credentials you used when you purchased your license.
I installed a plugin, but I can’t find it in my DAW.If you’re in ProTools and you’re inserting a mono effect (like an EQ) on to a stereo track, be sure to look in the “multi-mono plug-in” category, instead of the “multichannel plug-in” category.
If you’re using a plugin that is exclusively for processing a stereo signal (like the bx_shredspread), you won’t find it in the plugin list on a mono track.
If you’re on Windows, be sure you picked the right installer (32 or 64 bit). The plugin’s bit architecture has to match that of your DAW, which is not necessarily the same as that of your OS. If you’re not sure which one is supported on your DAW, just install both of them.
I installed a free plugin, but it’s still asking for authorization.You still need to have a Plugin Alliance account to use the free plugins. Just enter your login info the first time you use the free plugins, and then they will be available to use on your computer.
I’m wasting one of my authorizations because the same machine is being counted twice.
If the same computer name appears twice on the Manage Devices page, and you’re not sure which one is the computer you’re currently using, click both of the “Deactivate” buttons to deactivate both computers. Then launch your DAW and run the licenser again. Then your computer will be properly authorized, and you won’t be wasting an authorization. If this happens frequently, please contact Customer Support.
There are certain settings changes you can make on Windows that will change your machine ID, so if you find that you are frequently making changes that make your computer unrecognizable to the licenser, please consider keeping at least one of your three authorizations on a flash drive. For details, check the “USB Activation” section of the Activation Manual.
I keep getting an “Activation server did not respond” message when I try to activate.Our servers sometimes get particularly high traffic at certain times, so try authorizing at a different time of day.
Make sure that you don’t have any apps running in the background that block certain internet connections.
If you’re only authorizing one plugin, try deselecting the “Activate all my plugins” option in the activation prompt.
If the first three options don’t help, you can use the “Offline Authorization” method, as described in the Activation Manual. This method is mainly for users who don’t have internet on their DAW computer, but it can also be helpful for users who have trouble with the standard authorization procedure.
The licenser is behaving strangely (i.e., repeatedly asking to authorize the same plugin, etc.)On rare occasions, the PA license file can become corrupt. If you think this may have happened to you, you can delete your license file. This will not cause you to lose your licenses. It will just cause the plugin licenser to run the next time you use your plugins, and then it will regenerate your license file. To find your license file on Mac OS X, go to Finder > Go > Go to Folder, and enter this file path:
~/Library/Application Support/
On Windows, go to this file path:
%USERPROFILE%\AppData\Roaming\
Either way, you can then look through the resulting directory, find the folder named “Plugin Alliance” and throw it away.
I installed a PA plugin, and it doesn’t have any factory presets.Go into your preset folder, create a folder inside it named “Plugin Alliance” and then run the plugin installer again. Preset folder locations can vary, depending on the DAW and any user customizations, but here are the most common preset locations:
Mac:
~/Documents/Pro Tools/Plug-In Settings
~/Library/Audio/Presets
Windows:
%USERPROFILE%\Documents\VST3 Presets\
%USERPROFILE%\Documents\Pro Tools\Plug-In Settings\
If the presets still don’t appear, please contact Customer Support.
Troubleshooting
13
Contact
Plugin Alliance LLC
1200 Pacific Avenue · Suite 290 Santa Cruz, California 95060United States of Americawww.plugin-alliance.com
![DataManager Plugin - d36j349d8rqm96.cloudfront.net Plugin - M… · DataManager Plugin 6Version History 6 Version History 6.1Plugin Version Plugin-Version Date [dd.mm.yyyy] Notes](https://img.pdfslide.us/doc/110x75/5f05b5577e708231d4144e44/datamanager-plugin-plugin-m-datamanager-plugin-6version-history-6-version.jpg)


![DIALux4[1].0- · PDF filedialux 2 plugin. 1.X. plugin , plugin. luminaire selection Plugin plugin . home page, Intenet Explorer](https://img.pdfslide.us/doc/110x75/5a715aac7f8b9a98538cccda/dialux410-wwwpowerengineeringblogfacomssuacirkhadamatkarkonanarticlesbarghdialux4-learningpdfpdf.jpg)