Embed Size (px)
Citation preview

Graduate Theses and Dissertations Iowa State University Capstones, Theses andDissertations
2012
Automation and further development of theborehole shear testTheodore BechtumIowa State University
Follow this and additional works at: https://lib.dr.iastate.edu/etd
Part of the Civil Engineering Commons
This Thesis is brought to you for free and open access by the Iowa State University Capstones, Theses and Dissertations at Iowa State University DigitalRepository. It has been accepted for inclusion in Graduate Theses and Dissertations by an authorized administrator of Iowa State University DigitalRepository. For more information, please contact [email protected].
Recommended CitationBechtum, Theodore, "Automation and further development of the borehole shear test" (2012). Graduate Theses and Dissertations.12886.https://lib.dr.iastate.edu/etd/12886

Automation and further development of the borehole shear test
by
Theodore David Bechtum
A thesis submitted to the graduate faculty
in partial fulfillment of the requirements for the degree of
MASTER OF SCIENCE
Major: Civil Engineering (Geotechnical Engineering)
Program of Study Committee:
Jeramy Ashlock, Major Professor
Vernon Schaefer
Jon Matthews Rouse
Iowa State University
Ames, IA
2012

ii
TABLE OF CONTENTS
LIST OF TABLES vi
LIST OF FIGURES vii
ACKNOWLEDGMENTS xii
ABSTRACT xiii
CHAPTER 1. INTRODUCTION 1
1.1 Borehole Shear Test Description 2
CHAPTER 2. LITERATURE REVIEW 5
2.1 Review of the Borehole Shear Test 5
2.2 Review of Liquefaction Analysis and Cyclic Soil Testing 8
CHAPTER 3. AUTOMATION OF THE BOREHOLE SHEAR TEST 12
3.1 Testing Method and Automation Criteria 12
3.2 Mechanical Development of the Automated Borehole Shear Test 14
3.2.1 Stepper Motor 16
3.2.2 Normal and Shear Pressure Sensors 17
3.2.3 Pressure Selector Valve for Manual or Automated Operation 19
3.2.4 Computer Measurement and Control 19
3.3 Development of the Automated Borehole Shear Test Control
Program 20
3.3.1 Data Input and Output 20
3.3.2 Oversampling and Input Data Smoothing 21
3.3.3 Incorporation of Data into Control Program 22
3.3.4 Failure Envelope Criteria 23
3.3.5 Advancing to Subsequent Normal Stress 25
3.3.6 Saving Data Files 26
3.3.7 Post-processing Capabilities of the Control Program 27
3.4 Preliminary Field Testing with the Automated Borehole Shear Test 28
3.4.1 Test Results in Sandy Glacial Till 29
3.4.2 Test Results in Soft Clay 31
3.4.3 Discussion of Shear-Displacement Behavior 35
3.4.4 Conclusions from Preliminary ABST Field Tests 38

iii
CHAPTER 4. ABST SHEAR HEAD DISPLACEMENT
MEASUREMENTS 40
4.1 Displacement Measurement via Stepper Motor 42
4.1.1 Error in Stepper Motor Displacement Measurements 43
4.1.2 Compliance of Dynamometer Cylinders 46
4.1.3 Compliance of Pull Rods 49
4.1.4 Compliance of Pull Strap 50
4.1.5 Slippage at Rod Clamp 52
4.1.6 Settlement of Base Plate 53
4.1.7 Conclusions from Shear Head Displacement Measurement 53
4.2 Measuring Displacement via Additional Sensors 54 4.2.1 Measurement at Top of Pull Rods using String Potentiometer
or LVDT 54
4.2.2 Measurement at Shear Plates using String Potentiometer 57
CHAPTER 5. DEVELOPMENT OF A NEW CYCLIC ABST 60
5.1 Modifications to the Control Program 63
5.2 Mechanical Modifications 64
5.2.1 Preliminary Apparatus Modifications 65
5.2.2 Double-Strap Shear Head Design 66
5.3 Dynamic Instrumentation 73
5.3.1 Preliminary Cyclic Displacement Measurements 74
5.3.2 Proposed Displacement and Acceleration Measurements 74
5.3.3 Proposed Force Measurement 75
5.3.4 Pore Water Pressure Measurement 75
5.4 Cyclic ABST Results 76
5.4.1 Laboratory Results in Compacted Loess 76
5.4.2 Field Tests in Sandy Glacial Till 78
5.5 Cyclic ABST Conclusions 81
CHAPTER 6. NUMERICAL ANALYSIS OF THE BST 84
6.1 Development of Finite Element Model 84
6.1.1 Model Geometry 85
6.1.2 Model Meshing 86
6.1.3 Soil Properties and Constitutive Modeling 87
6.1.4 Boundary and Initial Conditions 88
6.1.5 Loading Conditions 89
6.2 Normal Stresses Resulting from the Shear Plate 90
6.3 Effect of Soil Mesh Density 91

iv
6.4 Effect of Mesh Continuity between Shear Plate and Soil 93
6.5 Normal Stress and Shear Stress Distribution 95
6.6 Development of Strains in Soil 96
6.7 Numerical Model Conclusions 99
CHAPTER 7. CONCLUSIONS 101
7.1 ABST and Cyclic ASBT Limitations 103
7.2 Recommendations for Future Research 104
APPENDIX A. ABST PROGRAM USER GUIDE AND
TROUBLESHOOTING MANUAL 106
A.1 ABST Stand Alone Program User Guide 106
A.2 ABST Troubleshooting Manual 114
APPENDIX B. MICROSOFT EXCEL POST-PROCESSING 118
B.1 Microsoft Excel ABST Post-processing Code 118
B.2 Microsoft Excel ABST Post-processing Code Output 124
APPENDIX C. FIELD ABST RESULTS 126
C.1 ABST Results in Sandy Glacial Till 126
C.2 ABST Results in Soft Clay 129
APPENDIX D. DIRECT SHEAR TESTS ON FIELD SAMPLES 133
D.1 Direct Shear Test Results in Sandy Glacial Till 133
D.2 Direct Shear Test Results in Soft Clay 136
APPENDIX E. ABST DISPLACEMENT MEASUREMENTS 137
E.1 Rod, Shear Head, and Stepper Displacement 137
E.2 Rod, Clamp, and Cross-Plate Displacement with Fixed Rod Base 145
E.3 Supplementary ABST Stiffness Plots with Fixed Rod Base 153
APPENDIX F. CYCLIC ABST DESIGN 154
F.1 Additions to the User Guide 154
F.2 Double-Strap Cyclic Shear Head Design 158
F.3 Cyclic ABST Stress Analysis Results 164
APPENDIX G. CYCLIC ABST RESULTS 166
G.1 Laboratory Results in Compacted Loess 166
G.2 Field Results in Sandy Glacial Till 170

v
BIBLIOGRAPHY 178

vi
LIST OF TABLES
Table 3.1: Components used to automate the borehole shear test apparatus
Source: Ashlock and Bechtum (2011) 14
Table 3.2: Glacial till ABST and laboratory direct shear test results 31
Table 3.3: Soft clay ABST and direct laboratory shear test results 32
Table 6.1: Soil properties for BST FEM analysis 87
Table 6.2: Drucker Prager hardening 87
Table C.1: Glacial till ABST results (Test 1) 126
Table C.2: Glacial till ABST results (Test 2) 127
Table C.3: Glacial till ABST results (Test 3) 128
Table C.4: Soft clay ABST results (Test 1) 129
Table C.5: Soft clay ABST results (Test 2) 130
Table C.6: Soft clay ABST results (Test 3) 131
Table C.7: Soft clay ABST results (Test 4) 132
Table F.1: Dimensions for double-strap design 159
Table F.2: Properties for materials in double-strap apparatus 159
Table F.3: Double-strap apparatus stress analysis results 164
Table F.4: Double-strap apparatus damping analysis 165

vii
LIST OF FIGURES
Figure 1.1: Components of manually operated borehole shear test device
Source: Handy Geotechnical Instruments, Inc. (2002) 2
Figure 1.2: Typical borehole shear testing procedure (Typical loading rate for
increasing shear displacement is 0.002 in/s) 3
Figure 2.1: Liquefaction potential for clean sand based on corrected SPT blow count
Source: Youd et al. (2001) 9
Figure 3.1: Automation components within electronics case 15
Figure 3.2: Automation component within existing BST case 15
Figure 3.3: Modified borehole shear test base plate 16
Figure 3.4: Automated borehole shear tester console case 18
Figure 3.5: ABST control program 24
Figure 3.6: Glacial till failure envelope for ABST at a depth of 27.5 inches 30
Figure 3.7: Glacial till failure envelope for direct shear test at a depth of 27.5 inches 30
Figure 3.8: Soft clay failure envelope at depth of 61 inches (Test 4) 34
Figure 3.9: Glacial till shear displacement behavior for ABST at a depth of 27.5 inches 35
Figure 3.10: Glacial till shear displacement behavior for direct shear test at depth
of 27.5 inches 36
Figure 3.11: Stress path for the borehole shear test and direct shear test with an initial
in situ stress condition assumed 37
Figure 4.1: Testing configuration for stepper displacement investigation 44
Figure 4.2: Stepper displacement vs. shear head displacement at 15 psi normal stress 46
Figure 4.3: Testing configuration for compliance investigation 47
Figure 4.4: Representative cylinder compliance curve 48
Figure 4.5: Comparison of measured and theoretical rod compliance 49
Figure 4.6: Representative strap and rod compliance curve 51
Figure 4.7: Investigation of slippage at the rod clamp 52
Figure 4.8: Comparison of rod displacement to shear head displacement for two
tests at 20 psi normal stress 55
Figure 4.9: Stress displacement behavior obtained for rod and shear head in steel tube 56
Figure 4.10: Stress displacement behavior obtained for rod and shear head in
compacted loess 57
Figure 4.11: Shear displacement behavior obtained with direct measurement of
shear head displacement using a string potentiometer 58
Figure 5.1: Laboratory cyclic ABST in air dry, compacted loess 66
Figure 5.2: Anticipated typical force-displacement response of soil in cyclic test
Source: Ashlock (2012) 71
Figure 5.3: Stress-controlled cyclic ABST laboratory results 77
Figure 5.4: Comparison of stress-controlled cyclic ABST field results for boring 2 79
Figure 6.1: Monotonic BST soil model 86
Figure 6.2: Normal stress distribution in soil along shear plate width (0.25” mesh) 90
Figure 6.3: Normal stress distribution in soil along shear plate width (0.35” mesh) 91
Figure 6.4: Normal stress distribution in soil along shear plate width (0.90” mesh) 92

viii
Figure 6.5: Normal stress distribution in soil along shear plate width (0.90” global
mesh) 93
Figure 6.6: Normal stress in soil adjacent to shear plate (Pascals) 94
Figure 6.7: Shear stress in soil adjacent to the shear plate (Pascals) 94
Figure 6.8: Total logarithmic shear strain contours in soil adjacent to shear plate 95
Figure 6.9: Total logarithmic shear strain extending radially from borehole 96
Figure 6.10: Plastic logarithmic shear strain contours in soil adjacent to shear plate 97
Figure 6.11: Shear stress extending radially from the borehole 98
Figure 6.12: Stress-strain relationship extending radially from the borehole 98
Figure 6.13: Shear modulus extending radially from the borehole 99
Figure A.1: Test save control set 107
Figure A.2: Stepper port 107
Figure A.3: Shear head movement controls 108
Figure A.4: Consolidation controls 109
Figure A.5: Monitoring set 109
Figure A.6: Shear stress record plot 110
Figure A.7: Tare controls 111
Figure A.8: Peak stress controls 111
Figure A.9: Lower shear head controls 112
Figure A.10: Failure envelope plot 113
Figure A.11: Failure envelope adjustments 114
Figure A.12: Stress record plot control 114
Figure B.1: Visual Basic code for ABST data processing 118
Figure B.2: Failure envelope from ABST post-processing code 124
Figure B.3: Plot of shear stress against stepper displacement from ABST
post-processing code 124
Figure B.4: Plot of shear stress against time from ABST post-processing code 125
Figure C.1: Shear record and failure envelope for ABST in glacial till (Test 1) 126
Figure C.2: Shear record and failure envelope for ABST in glacial till (Test 2) 127
Figure C.3: Shear record and failure envelope for ABST in glacial till (Test 3) 128
Figure C.4: Failure envelope for ABST in soft clay (Test 1) 129
Figure C.5: Failure envelope for ABST in soft clay (Test 2) 130
Figure C.6: Failure envelope for ABST in soft clay (Test 3) 131
Figure C.7: Failure envelope for ABST in soft clay (Test 4) 132
Figure D.1: Direct shear test results (Spangler: Test 1 ≈ 27.5 in.) 133
Figure D.2: Direct shear test results (Spangler: Test 2 ≈ 67.5 in.) 134
Figure D.3: Direct shear test results (Spangler: Test 3 ≈ 98.0 in.) 135
Figure D.4: Direct shear test results (Scholl Rd: Test 1 at 50-72 in.) 136
Figure E.1: Stepper displacement vs. actual shear head displacement at normal
stress of 7 psi 137
Figure E.2: Displacement at top of pull rod vs. actual shear head displacement at
normal stress of 7 psi 137
Figure E.3: Shear stress vs. stepper displacement at normal stress of 7 psi 138
Figure E.4: Shear stress vs. rod and shear head displacements at normal stress
of 7 psi 138

ix
Figure E.5: Rod and strap elongation at normal stress of 7 psi 138
Figure E.6: Stepper displacement vs. actual shear head displacement at normal
stress of 10 psi 139
Figure E.7: Displacement at top of pull rod vs. actual shear head displacement at
normal stress of 10 psi 139
Figure E.8: Shear stress vs. stepper displacement at normal stress of 10 psi 140
Figure E.9: Shear stress vs. rod and shear head displacements at normal stress
of 10 psi 140
Figure E.10: Rod and strap elongation at normal stress of 10 psi 140
Figure E.11: Stepper displacement vs. actual shear head displacement at normal
stress of 15 psi 141
Figure E.12: Displacement at top of pull rod vs. actual shear head displacement at
normal stress of 15 psi 141
Figure E.13: Shear stress vs. stepper displacement at normal stress of 15 psi 142
Figure E.14: Shear stress vs. rod and shear head displacements at normal stress
of 15 psi 142
Figure E.15: Rod and strap elongation at normal stress of 15 psi 142
Figure E.16: Stepper displacement vs. actual shear head displacement at normal
stress of 20 psi 143
Figure E.17: Displacement at top of pull rod vs. actual shear head displacement at
normal stress of 20 psi 143
Figure E.18: Shear stress vs. stepper displacement at normal stress of 20 psi 144
Figure E.19: Shear stress vs. rod and shear head displacements at normal stress
of 20 psi 144
Figure E.20: Rod and strap elongation at normal stress of 20 psi 144
Figure E.21: Trend fit to relationship between cylinder compression and shear stress
for Test 1 with locking pliers used to reduce slippage 145
Figure E.22: Comparison of theoretical and measured rod elongation for Test 1 with
locking pliers used to reduce slippage 145
Figure E.23: Slippage between the clamp and rod for Test 1 with locking pliers
used to reduce slippage 146
Figure E.24: Comparison between predicted and measured cylinder compression for
Test 2 with locking pliers used to reduce slippage 147
Figure E.25: Comparison of theoretical and measured rod elongation for Test 2 with
locking pliers used to reduce slippage 147
Figure E.26: Slippage between the clamp and rod for Test 2 with locking pliers
used to reduce slippage 148
Figure E.27: Comparison between predicted and measured cylinder compression for
Test 1 without locking pliers 149
Figure E.28: Comparison of theoretical and measured rod elongation for Test 1
without locking pliers 149
Figure E.29: Slippage between the clamp and rod for Test 1 without locking pliers 150
Figure E.30: Comparison between predicted and measured cylinder compression for
Test 2 without locking pliers 151

x
Figure E.31: Comparison of theoretical and measured rod elongation for Test 2
without locking pliers 151
Figure E.32: Slippage between the clamp and rod for Test 2 without locking pliers 152
Figure E.33: Investigation into the effect of location on cross-plate displacement
measurement with locking pliers used to reduce slippage 153
Figure E.34: Investigation of possible movement at the base of the fixed pull rod with
locking pliers used to reduce slippage 153
Figure F.1: DAQ channel controls 154
Figure F.2: Cyclic test controls 154
Figure F.3: Limit controls 154
Figure F.4: String pot indicators 154
Figure F.5: Peak stress controls 156
Figure F.6: Cyclic shear record graph 157
Figure F.7: Double-strap shear head 158
Figure F.8: Upper and lower hanger 160
Figure F.9: Pipes and box section 160
Figure F.10: Loading rod 161
Figure F.11: Shear head 161
Figure F.12: Shear plate 162
Figure F.13: Strap 162
Figure F.14: Piston 163
Figure G.1: Stress-controlled cyclic ABST results (5 psi normal stress: Test 1) 166
Figure G.2: Stress-controlled cyclic ABST results (5 psi normal stress: Test 2) 166
Figure G.3: Stress-controlled cyclic ABST results (5 psi normal stress: Test 3) 167
Figure G.4: Stress-controlled cyclic ABST results (10 psi normal stress: Test 1) 167
Figure G.5: Stress-controlled cyclic ABST results (10 psi normal stress: Test 2) 168
Figure G.6: Stress-controlled cyclic ABST results (15 psi normal stress: Test 1) 168
Figure G.7: Stress-controlled cyclic ABST results (15 psi normal stress: Test 2) 169
Figure G.8: Displacement-controlled cyclic ABST results (5 psi normal stress: Test 1) 169
Figure G.9: Shear record from monotonic ABST with string potentiometer
(Boring 1: Depth of 2 feet) 170
Figure G.10: Failure envelope from monotonic ABST with string potentiometer
(Boring 1: Depth of 2 feet) 170
Figure G.11: Stress-controlled cyclic ABST results at 10 psi and shearing rate of 2
revolutions per second 171
Figure G.12: Stress-controlled cyclic ABST results at 10 psi and shearing rate of 0.2
revolutions per second 171
Figure G.13: Stress-controlled cyclic ABST results at 10 psi and shearing rate of 5
revolutions per second 172
Figure G.14: Stress-controlled cyclic ABST results at 10 psi and shearing rate of 7
revolutions per second 172
Figure G.15: Stress-controlled cyclic ABST results at 10 psi and shearing rate of 0.2
revolutions per second 173
Figure G.16: Stress-controlled cyclic ABST results at 10 psi and shearing rate of 5
revolutions per second 173

xi
Figure G.17: Stress-controlled cyclic ABST results at 10 psi and shearing rate of 7
revolutions per second 174
Figure G.18: Displacement-controlled cyclic ABST results at 10 psi and shearing rate
of 7 revolutions per second 174
Figure G.19: Comparison of stress-controlled cyclic ABSTs at different shearing rates
for boring 1 175
Figure G.20: Comparison of stress-controlled cyclic ABSTs at different shearing rates
for boring 2 175
Figure G.21: Comparison of equivalent damping ratios from stress-displacement
loops at a normal stress of 10 psi in boring 1 176
Figure G.22: Comparison of equivalent damping ratios from stress-displacement
loops at a normal stress of 10 psi in boring 2 176
Figure G.23: Comparison of equivalent secant shear modulus values from
stress-displacement loops at a normal stress of 10 psi in boring 1 177
Figure G.24: Comparison of equivalent secant shear modulus values from
stress-displacement loops at a normal stress of 10 psi in boring 2 177

xii
ACKNOWLEDGEMENTS
I would to thank my advisor, Dr. Jeramy Ashlock, for his assistance throughout my graduate
studies and his enthusiasm for engineering. I am grateful for the many opportunities that he
presented, which greatly increased my understanding of geotechnical engineering with laboratory,
field, and analytical research experience.
Dr. Richard Handy provided many of the resources for this research. His experience and
knowledge provided significant help during the fabrication of the ABST and subsequent field testing,
and he greatly improved the quality of this work. Don Eichner provided significant assistance during
the fabrication of the ABST. Dr. Vernon Schaefer and Caleb Douglas provided assistance in drilling
and sampling at Spangler lab.
I would also like to thank Dr. Vernon Schaefer for his assistance with field testing and his
guidance throughout my graduate studies. A special thanks also goes to Dr. Vernon Schaefer and Dr.
Matt Rouse for serving on my committee.
Additionally, I would like acknowledge Bing, Shibin, and Mohammad for sharing an office
and advice for the last year or more.
Most of all, I would like to thank my wife, Alyson, for her continual support, encouragement,
and understanding throughout this process. Without her support, this would not have been possible.

xiii
ABSTRACT
The purpose of this work was to automate and further develop the borehole shear test (BST).
The description of the successful automation procedure is presented, and investigations into soil
displacement and cyclic BST loading are described. Displacement and cyclic loading investigations
were performed with additional instrumentation to measure soil displacement, and modifications were
created for the basic testing procedure. Numerical analysis was utilized to determine the stresses and
strains created during a monotonic test in dry sand. Automated monotonic testing was successfully
performed on a variety of soil types. Significant potential exists for a cyclic BST, and a starting point
for future efforts to standardize and gain acceptance for the cyclic process is provided. Findings
include comparisons between the shear displacement behavior obtained with direct shear tests and
borehole shear tests. Additionally, cyclic stress records obtained with the automated BST are
analyzed and found to correspond to expected soil behavior.

1
CHAPTER 1. INTRODUCTION
Accurate characterization of in situ soil behavior is currently one of the most important areas
for advancing the state of knowledge in geotechnical engineering. A number of analytical and
computational models have been developed that can calculate soil response with greater precision
than that with which the soil parameters can be measured. As a result, an engineer’s ability to create
an economical design while maintaining safety can be most effectively increased by improving the
methods by which soil parameters are determined. However, the costs related to subsurface
investigations can quickly outweigh the benefits gained from accurate soil parameter determinations.
Therefore, the development of improved testing methods needs to include simplicity and efficiency as
primary considerations. By utilizing simple and efficient methods, in situ soil parameters can be
quickly and accurately determined by an engineer or technician with a reduced chance of error, and
the costs related to an individual soil investigation can be reduced.
In situ soil testing methods have been proven to increase the accuracy and economy of a
variety of engineering designs that require knowledge of soil parameters. Since in situ tests measure
soil properties in place, the costs and efforts associated with collecting, transporting, and preserving a
soil sample and testing it in a laboratory can be reduced or eliminated. In addition, by measuring soil
properties in situ, the effects of soil disturbance can be reduced, giving soil properties that more
closely model actual soil behavior. A thorough geotechnical investigation can therefore combine
laboratory testing with in situ testing to increase the accuracy of the soil parameters and provide a
more economical design.
Many in situ tests, such as the standard penetration test (SPT), rely upon empirical
correlations to determine soil properties indirectly from indices rather than from direct measurements
of the properties of interest. The empirical correlations are commonly developed from comparisons
between in situ test results and those from field or laboratory tests. Although such empirical
correlations can provide adequate results for many current engineering designs, they do not realize the

2
potential for in situ tests to increase the accuracy of an engineering design by direct measurement of
the desired properties of the soil in its natural state. To provide advancements towards such direct in
situ measurement of soil shear strength parameters, this thesis describes the automation and further
development of an apparatus designed to allow direct measurement of soil shear strength in situ; the
Borehole Shear Test (BST).
1.1 Borehole Shear Test Description
The borehole shear test is performed with the apparatus shown in Figure 1.1, which was
developed in the 1960’s by Dr. Richard Handy and his associates (Handy and Fox, 1967). The test is
able to determine the drained friction angle and cohesion of almost any soil type by essentially
Figure 1.1: Components of manually operated borehole shear test device
Source: Handy Geotechnical Instruments, Inc. (2002)
Cross-plate

3
performing a direct shear test in situ. The BST apparatus functions by lowering an expandable shear
head into a suitably prepared borehole, such as one created by a 3-inch Shelby tube. A desired
normal stress is then applied to the soil by the shear head, and time (typically 5 to 15 minutes) is
allowed for any excess pore water pressure caused by application of the normal stress to dissipate.
After sufficient consolidation time has elapsed, an upward force is applied to the shear head by a
hand-crank, and the shear strength (peak shear stress) is measured using a shear gauge and
dynamometer. The shear head is then lowered until the shear stress in the soil is reduced to nearly
zero. In the staged test configuration, a larger normal stress is then applied to the previously tested
soil, and additional consolidation time (typically 5 to 10 minutes) is provided to allow the soil to
drain. Since the staged test is performed without relocating the shear head or removing the normal
pressure, the drainage times will be cumulative for each normal stress and will allow for pore water
pressure dissipation (Lutenegger and Tierney, 1986). After the soil has drained, the shear head is
raised and the peak shear stress is measured for the higher normal stress. This process is repeated for
a range of normal stresses as shown in Figure 1.2, and a failure envelope is constructed from a best-fit
line passing through the measured normal and peak shear stresses. From this failure envelope, the
shear strength parameters φ’ and c’ can be determined.
Shear strength
data points
c’
φφφφ’ Shear stress, τ
Wait
15 min
Normal
stress, σ’ 5 min 5 min 5 min
Figure 1.2: Typical borehole shear testing procedure (Typical loading rate for increasing
shear displacement is 0.002 in/s)

4
The borehole shear test has the advantage of measuring shear strength parameters directly in
situ without the need for laboratory testing or empirical correlations. In addition, soil disturbance is
minimized, since the soil being tested is not removed from the ground. Although the testing surface
will be slightly distorted from friction related to borehole preparation, this disturbance will likely be
less than that of a laboratory specimen that has been extruded or remolded. For these reasons, the
borehole shear test has proved extremely useful for investigation of landslides, which require an
accurate determination of the in situ shear strength (Handy, 1986). Additionally, a soil’s shear
strength parameters can be determined in under an hour, which is significantly faster than direct shear
laboratory tests with clays. Shortfalls of the borehole shear test include testing on a vertical plane
rather than a horizontal plane and the potential for gravel to cause an erroneous shear strength
measurement. In addition, the determination of soil pore water pressure during testing can be difficult
and often requires experience (Handy, 2002).
It is the goal of this research to build on these advantages by further increasing the
effectiveness and reliability of the borehole shear test by automating the process. Additional
applications, such as cyclic loading, have also been investigated, and preliminary designs and results
are presented in this thesis.
This thesis will present the automation process for the borehole shear test and compare the
strength parameters obtained with the automated borehole shear test and direct shear test.
Additionally, above ground shear displacement measurement methods will be investigated. A cyclic
borehole shear test and an investigation into the strains developed next to the shear head are also
presented.

5
CHAPTER 2. LITERATURE REVIEW
A literature review is presented in this chapter to provide background information related to
the BST. Many of the test’s applications are presented, and the soil’s response under staged versus
fresh testing is reviewed. The effect of pore water pressure on the test results is examined, and the
repeatability of the test is discussed. This review will aid in the development of the automated
borehole shear test (ABST), and will guide the implementation of modifications while also improving
the interpretation of test results.
To provide background for the development of a cyclic borehole shear test (CBST), state-of-
the-art procedures for liquefaction analysis are described, and cyclic triaxial testing standards are
discussed.
2.1 Review of the Borehole Shear Test
As demonstrated in multiple studies, the borehole shear test has proven to be a versatile and
reliable in situ test. The most straightforward application of the test is to determine the drained
strength parameters φ’ and c’ in freely draining soils, such as sands. The BST has also been utilized
to obtain drained strength parameters in stiff clays. The BST is particularly useful for slope stability
analyses, because strength parameters are obtained at a single soil depth. As a result, the spatial
variation in strength parameters may be more accurately determined, enhancing the applicability of a
probabilistic analysis of the slope’s stability (Handy, 1986). The BST has also been utilized to study
the unsaturated strength of soil in situ (e.g., Ashlock and Lu, 2012). Miller et al. (1998) reported that
as matric suction is increased, the BST shows an increase in friction angle and a decrease in cohesion.
Theoretically, the friction angle should remain constant and the cohesion should increase with
increasing matric suction (Lu and Likos, 2004). However, the BST results are consistent with similar
triaxial tests, and the results were utilized in Miller et al. (1998) to accurately predict drilled shaft
uplift capacity. The BST can also be used to model the decrease in strength as a borehole swells,

6
which can be applied to the design of drilled shafts, and the shear plates can be replaced with smooth
plates to model soil-pile interaction (Handy et al., 1985).
When testing the soil, the shear strength is determined for each applied normal pressure.
Elasticity theory indicates that shear stresses will dissipate much more quickly than normal stresses.
As a result, the maximum shear stress will occur near the shear plate in a region that approximately
experiences the applied normal pressure (Handy and Fox, 1967).
A staged testing method is typically utilized for the BST. This method consists of
determining the shear resistance of the soil at increasing normal pressures without changing the
location of the shear head. Staged testing has been shown to increase the speed and accuracy of the
test (Handy and Fox, 1967). However, an important concern regarding staged testing is whether the
same shear plane is tested at increasing normal pressures, since a constant shear plane will potentially
lead to residual shear strengths. During or after shearing at a given normal pressure, the soil in the
shear plane will reconsolidate. This will increase the strength of this soil layer, and will cause the
shear plane to move outward to the weaker, undisturbed material. The shear plane moves outward
because the consolidated-drained cohesion of the sheared material is greater than the consolidated-
drained cohesion in the adjacent undisturbed material. The grooved teeth engage the soil and help
cause the shear plane to move outward from the plate under increasing normal stress. The
reconsolidated layer typically becomes caked onto the shear plate. In stiff soils, the shear plate’s
teeth can often fail to fully engage the soil. In this case, the measured strength will result from the
friction between the disturbed and undisturbed soil (Lutenegger et al., 1978). This behavior is
referred to by Handy (2002) as progressive seating, and results in a failure envelope with a 45 degree
slope and a negative cohesion. In such situations, an adequate failure envelope might be obtained if
the normal pressure could be increased sufficiently. For this purpose, modified shear plates with a
reduced area have been developed which allow for the measurement of strength in stiff soils.

7
However, use of the modified plates often requires the application of a normal stress in a fresh or
undisturbed location, and therefore precludes staged testing.
Additional uses of the BST as described by Handy (2002) include indentifying
overconsolidated behavior and pore water pressure effects. If the soil is overconsolidated, a bilinear
failure envelope will typically be obtained. The normal pressure corresponding to the intersection is
the horizontal preconsolidation pressure, and this value can be converted to the vertical
preconsolidation pressure using the measured normally consolidated friction angle (Handy, 2002).
Handy also suggests that the presence of excess pore water pressure can be identified by shear
strengths that fall below the failure envelope at high normal pressures. However, this behavior may
also correspond to full expansion of the shear head, which limits the magnitude of normal stress
applied to the soil.
Pore water pressures are an important consideration related to the borehole shear test. In free
draining materials such as sand, increased pore water pressure is immediately dissipated, and the
drained strength parameters will result from the test. In addition, unsaturated soils may yield drained
strength parameters. However, in saturated soils with a low permeability, such as clay, pore water
pressures during consolidation, shearing, and after shearing must be considered. For staged tests, at
least ten minutes should be allowed for consolidation following an increase in normal pressure for all
clay soils (Lutenegger and Tierney, 1986). In addition, Lutenegger and Tierney (1986) showed that
excess pore water pressures arising from application of normal stress to the soil are two to five times
larger in fresh shearing locations than in staged testing. In addition, the pore water pressure
distribution on the shear plate is more uniform for staged testing. Although the excess pore water
pressures dissipate more quickly in fresh shearing locations, the overall time for consolidation is
reduced in staged testing. Significant pore water pressures may also be generated during the shearing
phase. These pore water pressures may be approximately triangularly distributed on the shear head
with the maximum pore water pressure existing at the top of the plate. As a result, the pore water

8
pressure at the center of the plate may provide the average pore water pressure and could be utilized
to approximate the drained strength parameters (Lutenegger and Tierney, 1986). However, this
method is not universally accepted (Handy, 2002). Lutenegger and Tierney (1986) also showed that
approximately 20 minutes may be required to allow the excess pore water pressures to dissipate after
shearing. The difference between the total and effective friction angle and cohesion will change
based on the stress history and overconsolidation ratio of the soil. The tests performed by these
researchers show minor differences between the effective and total strength parameters.
Research performed by Lutenegger and Timian (1987) demonstrated that strength parameters
determined by experienced and inexperienced operators will have approximately the same mean and
standard deviation. In addition, they showed that there is no significant difference in measured
strength parameters for fresh versus staged testing with standard shear plates, and that the coefficient
of variation for cohesion is larger than the coefficient of variation for the friction angle.
2.2 Review of Liquefaction Analysis and Cyclic Soil Testing
Liquefaction is described as the transformation of a solid soil to a liquefied state, which
typically occurs in saturated loose or medium dense cohesionless material (Youd et al., 2001). Soils
susceptible to liquefaction typically have poor drainage and contain some impermeable material.
Liquefaction occurs due to rapid shearing of the soil that does not allow time for drainage. This
shearing causes pore water pressures to increase and the effective stresses in the soil to decrease. In
loose soil, liquefaction causes large cyclic deformations and a loss of shear strength. In denser soils,
cyclic strains can dilate the soil and prevent complete strength loss, giving rise to “cyclic mobility”.
The simplified procedure for determining liquefaction (Seed and Idriss, 1971) consists of an
empirical relationship between the cyclic stress ratio (CSR) and a measure of the cyclic resistance
ratio (CRR). The CSR represents the seismic demand placed on the soil and is related to the peak
horizontal acceleration at the ground surface, stresses due to overburden, and a reduction coefficient
that accounts for flexibility of the soil. CRR represents the ability of the soil to resist liquefaction and

9
can be expressed in terms of measurements from in situ tests, such as SPT, CPT, or shear wave
velocity measurements, or laboratory tests such as cyclic triaxial or cyclic simple shear tests
Since costly specialized drilling methods are required to obtain an undisturbed cohesionless
sample, in situ testing methods have become the state-of-the-art method for determining liquefaction
potential (Youd et al., 2001). Common in situ test methods that are utilized to determine liquefaction
potential include the standard penetration test (SPT), cone penetration test (CPT), and shear wave
velocity (VS). Semi-empirical methods are utilized to determine the liquefaction potential based on
SPT and CPT test results. A plot of CSR against corrected blow count is used for the SPT tests, and a
plot of CSR against corrected tip resistance is utilized for the CPT. To develop the CRR curves,
points are placed on these graphs according to the experienced earthquakes and in situ test results.
These points are then identified as corresponding to liquefaction or nonliquefaction behavior, and
Figure 2.1: Liquefaction potential for clean sand
based on corrected SPT blow count
Source: Youd et al. (2001)
10
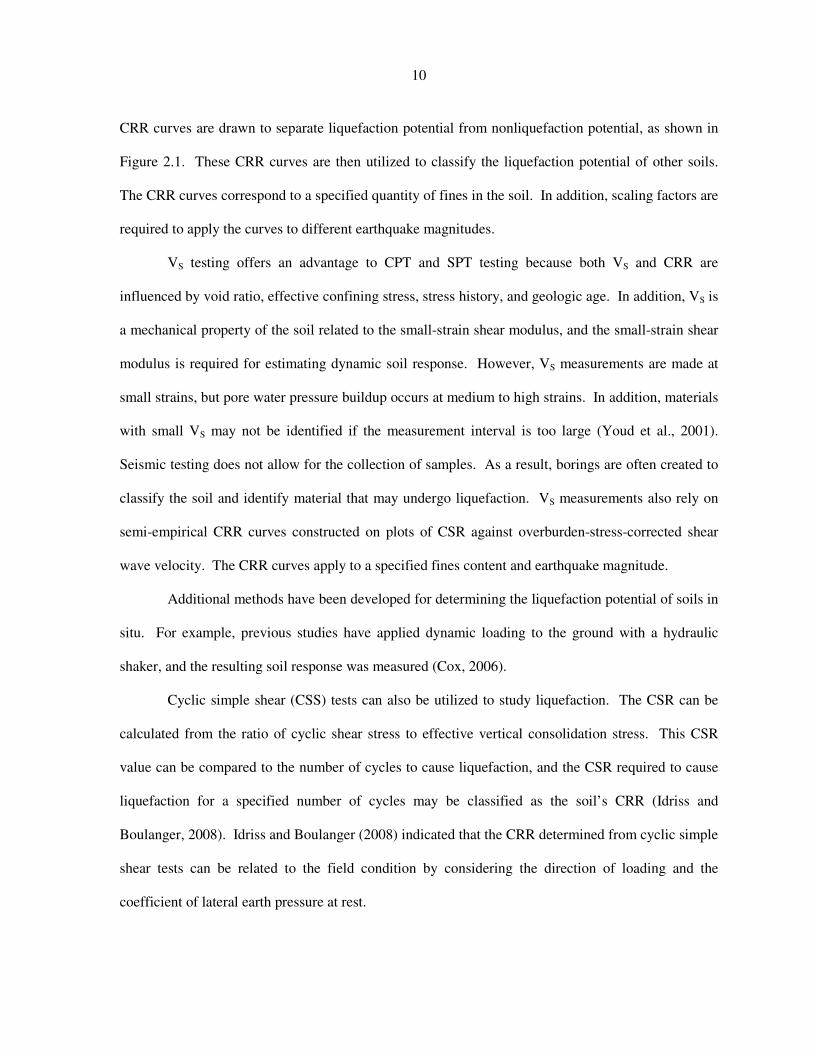
CRR curves are drawn to separate liquefaction potential from nonliquefaction potential, as shown in
Figure 2.1. These CRR curves are then utilized to classify the liquefaction potential of other soils.
The CRR curves correspond to a specified quantity of fines in the soil. In addition, scaling factors are
required to apply the curves to different earthquake magnitudes.
VS testing offers an advantage to CPT and SPT testing because both VS and CRR are
influenced by void ratio, effective confining stress, stress history, and geologic age. In addition, VS is
a mechanical property of the soil related to the small-strain shear modulus, and the small-strain shear
modulus is required for estimating dynamic soil response. However, VS measurements are made at
small strains, but pore water pressure buildup occurs at medium to high strains. In addition, materials
with small VS may not be identified if the measurement interval is too large (Youd et al., 2001).
Seismic testing does not allow for the collection of samples. As a result, borings are often created to
classify the soil and identify material that may undergo liquefaction. VS measurements also rely on
semi-empirical CRR curves constructed on plots of CSR against overburden-stress-corrected shear
wave velocity. The CRR curves apply to a specified fines content and earthquake magnitude.
Additional methods have been developed for determining the liquefaction potential of soils in
situ. For example, previous studies have applied dynamic loading to the ground with a hydraulic
shaker, and the resulting soil response was measured (Cox, 2006).
Cyclic simple shear (CSS) tests can also be utilized to study liquefaction. The CSR can be
calculated from the ratio of cyclic shear stress to effective vertical consolidation stress. This CSR
value can be compared to the number of cycles to cause liquefaction, and the CSR required to cause
liquefaction for a specified number of cycles may be classified as the soil’s CRR (Idriss and
Boulanger, 2008). Idriss and Boulanger (2008) indicated that the CRR determined from cyclic simple
shear tests can be related to the field condition by considering the direction of loading and the
coefficient of lateral earth pressure at rest.

11
Cyclic loading is often applied in various laboratory tests to determine soil parameters that
can be utilized to evaluate natural and engineered structures under dynamic loads. For meaningful
results, soil specimens should be consolidated to a condition that represents the field condition of
interest before testing. Cyclic tests can be performed with either stress or displacement control, and
for cyclic triaxial testing, the loading equipment should be capable of applying a uniform sinusoidal
load at a frequency of 0.1 to 2 Hz, according to ASTM D3999 (2011). The cyclic loading will
typically result in a hysteresis loop that can be utilized to determine the soil’s damping ratio and
modulus. The first half cycle should be loaded with a 0.5 to 1 Hz sinusoidal load. In addition,
hysteresis loop migration along the displacement axis may occur in soft to medium stiff soils. This
migration is caused by permanent deformation related to unbalanced cyclic loading or anisotropic
consolidation. In order to utilize a hysteresis loop for determining soil parameters, successive peaks
on the loop must have a closure error of less than 0.0001 inches (ASTM 2011).

12
CHAPTER 3. AUTOMATION OF THE BOREHOLE SHEAR TEST
Automation of the borehole shear test would provide users the ability to test multiple
locations simultaneously while recording a complete shear stress versus displacement record of the
soil, which is not typically obtained in the manual BST. In addition, the need to estimate the
maximum pressure from a continually varying dial on a pressure gauge could be replaced by a
program that automatically and more accurately detects a peak or plateau in the shear stress and
advances to the next normal stress. As a result, the consistency and reproducibility of the borehole
shear test would be increased, and the potential for errors related to individual interpretations would
be reduced. In addition, the ability of an automated system to provide quick, graphical shear records
and failure envelopes could also efficiently convey information to individuals not familiar with soil
mechanics.
The automated borehole shear test (ABST) apparatus was created by modifying a standard
borehole shear test (BST) unit. As one of the design goals, other existing borehole shear units can be
similarly retrofitted for automated functionality.
3.1 Testing Method and Automation Criteria
The automated borehole shear test (ABST) was designed to run independently following
advancement of a borehole and lowering of the shear head to the desired testing depth. The shear
head is placed at the desired depth by attaching 9.5 mm (3/8 in.) diameter threaded pull rods to the
shear head and lowering the rods through the center of the ring gear (Figure 1.1). A rod clamp is then
utilized to hold the rods in position and transfer the tensile pull-rod force to the shear head, which in
turn applies a vertical shearing stress to the borehole wall.
An automation criterion was that the control program runs independently once the shear head
is inserted to the desired depth and the control program is started. The following steps are completed
within the program to perform the test with the same procedure as the manual BST. First, the initial

13
tare weight of the hanging shear head and rods is measured and stored for correction of the measured
shear stresses. The automated process then proceeds by applying the first normal stress specified in
the program, and this normal stress is held constant for a user-defined period of consolidation. After
the excess pore pressure generated by application of the normal stress is allowed to dissipate in the
consolidation phase, the shear head is raised at an adjustable speed, and the shear stress is
automatically recorded and plotted. The shear head will typically be raised at a rate of 0.002 in/sec
by the stepper motor, which corresponds to two revolutions of the hand-crank and worm gear per
second. The program then automatically recognizes a peak or plateau in the shear stress according to
user-specified parameters and terminates the shearing phase. The maximum shear stress
corresponding to the applied normal stress is then plotted in a shear stress-normal stress plot, and the
shear head is lowered until a near-zero residual shear stress is reached. The procedure is then
repeated for the remaining user defined normal pressures, which typically consist of three to six
increasing values. The automation process described above allows users to reliably gather
information according to predefined parameters, and also permits these parameters to be changed
during the test to adjust for observed soil behavior. The program is versatile, since nearly every
aspect of the test can be controlled by the user. This allows one to accurately investigate the effects
of variable shear rates, consolidation times, and numerous other test parameters.
After the failure envelope is constructed for a given test depth, the shear head is manually
removed from the borehole by removing the rod clamp and lifting the pull rods (Figure 1.1). The
shear head is then cleaned and reinserted in the borehole to perform tests at any remaining depths. A
set of instructions for the borehole shear test provided with the apparatus provide more detailed
information related to properly positioning the base plate and other aspects of the test (Handy, 2002).
In addition, a user manual and troubleshooting guide were developed for the ABST and are included
in Appendix A.

14
The automated borehole shear test is also designed to be fully functional if power is lost or
one of the electronic components malfunctions. The normal and shear stresses measured by
electronic pressure transducers are simultaneously displayed on Bourdon dial pressure gages, and a
removable hand crank is included with the device to operate the device in the traditional manual
mode. In such instances, the data acquisition device can still be used to record the stress records
while shearing the soil with the hand crank.
3.2 Mechanical Development of the Automated Borehole Shear Test
This section describes the mechanical features added to the traditional borehole shear
apparatus to create the automated borehole shear test device. Since the original ABST apparatus was
Table 3.1: Components used to automate the borehole shear test apparatus
Component Manufacturer Model Number
16 bit, 1 MHz USB data
acquisition device (DAQ) Omega OMB-DAQ-3000
Din rails for mounting DAQ Omega OMB-PDQ10
External power supply for DAQ Omega OMB-TR-2U
Stepper motor Applied Motion Products HT17-075
Stepper motor switching power
supply Applied Motion Products PS150A24
Stepper motor controller Applied Motion Products ST5-Si-NN
RS-232 to USB Interface
Converter TRENDnet TU-S9
200 psi pressure sensor Omega PX309-200G5V
300 psi pressure sensor Omega PX309-300G5V
300 psi analog electropneumatic
pressure regulator Marsh Bellofram
Bellofram Type 3110 Circuit
Card Regulator, part
#110TE0G300D0000
Electronics case Pelican 1550
Source: Ashlock and Bechtum (2011)

15
developed with the desire to provide additional capabilities for future expansion and research, some
of the components utilized may be replaced with more economical alternatives on production units
(Ashlock and Bechtum, 2011). Development of the computer program and computer-based
Power supply
Stepper motor controller
Data acquisition device
Figure 3.1: Automation components within electronics case
Pressure regulator
Figure 3.2: Automation component within existing BST case

16
measurement and control systems is presented in Section 3.3. Table 3.1 provides a summary of the
components used to automate the borehole shear test. Figure 3.1 displays the automation components
within the electronics Pelican case. Figure 3.2 displays the automation component within the existing
BST Pelican case.
3.2.1 Stepper Motor
An Applied Motion Products model HT17-075 high torque stepper motor is mounted inside a
case on the Dynamometer cross-plate to allow for computer controlled shear stress application
(Figure 3.3). The case utilizes a rubber seal to protect the motor from the elements while in the field,
and also acts as a heat sink. The stepper case is attached to the cross-plate with a slotted PVC plate to
allow for adjustment of the belt tension. Shear stress is applied by means of a toothed belt that
Stepper motor case
Drive belt attached
to worm gear
Manual hand crank
200 psi pressure sensor
Dynamometer
cross-plate
Figure 3.3: Modified borehole shear test base plate

17
connects the motor to the worm gear, which is mounted through two pillow blocks. The opposite side
of the worm gear is left open for attachment of the hand crank, which should only be attached during
manual use. The configuration shown in Figure 3.3 allows the base plate to fit in the existing BST
Pelican case with only minor modifications to the case.
A 2:1 gear ratio was utilized for the stepper motor and worm gear. Since the stepper motor
will have two revolutions for every revolution of the worm gear, the motor torque is doubled when
applied to the worm gear, which reduces binding in the system. However, under unfavorable
circumstances, the system may still bind. A kill switch for the stepper motor is therefore located
within the new electronics case that houses the data acquisition device, and the switch can be utilized
to change the test from automatic to manual operation if binding is encountered. This event rarely
occurs, and further discussion is provided in Appendix A.
3.2.2 Normal and Shear Pressure Sensors
A 300 psi pressure sensor was installed behind the console face of the existing BST case to
measure the normal pressure applied to the soil (Figure 3.4). Normal pressure is applied with CO2
controlled by a regulator. The shear pressure is measured with a 200 psi pressure sensor mounted on
the base plate (Figure 3.3). As downward forces are applied to the cross-pate during shear, the oil
pressure in the dynamometer is increased, which is measured by the 200 psi sensor for determination
of the shear stress. Both pressure sensors require 9-30 volts DC excitation and output five volts DC
at their maximum rated pressures.
The 200 psi pressure sensor exhibited significant noise during preliminary testing and steps
were taken to provide cleaner, more accurate measurements. Although the manufacturer claims that
this is a three wire sensor and the fourth green wire is not needed, it was determined that grounding
the green wire reduced the noise. It is recommended that future ABST units utilize this approach for
Omega pressure sensors. Additional information regarding the proposed wiring and electrical scheme
of the ABST was documented in the previous report on the automated borehole shear test’s

18
development (Ashlock and Bechtum, 2011). In addition, it was found that the digital stepper motor
wires created significant electrical noise in the shear stress measurement if the wires were bundled
into the same cable. Therefore, a separate, shielded coaxial cable with BNC connectors was utilized
to transfer the 200 psi sensor’s shear stress measurement from the base plate to the electronics case.
Filters and oversampling were also applied to the measured data to reduce noise. Methods utilized by
the computer to smooth the data are discussed in more detail within Section 3.3.
In addition to the 300 psi pressure sensor utilized to measure the normal pressure applied by
the shear plates, an analog, electro-pneumatic pressure regulator was used to apply normal pressure
with CO2. This regulator requires 15-24 Volt DC power and a 0-10 Volt command signal. The
regulator also provides a 0-10 Volt analog output signal, which can be used to monitor the actual
pressure applied. If the pressure regulator’s monitor signal can be shown to have comparable
precision, the 300 psi pressure sensor could potentially be eliminated from the design (Ashlock and
Bechtum, 2011).
Figure 3.4: Automated borehole shear tester console case
Auto/Manual pressure selection valve
300 psi pressure sensor
Electro-pneumatic
pressure regulator

19
3.2.3 Pressure Selector Valve for Manual or Automatic Operation
A new four-way ball valve allows the user to select whether the normal pressure will be
applied automatically or manually (Figure 3.4). The valve functions by allowing either the manual or
electro-pneumatic pressure regulator to supply the defined normal pressure, which is simultaneously
measured by the 300 psi pressure sensor and the traditional Bourdon dial gage.
3.2.4 Computer Measurement and Control
An Omega OMB-DAQ-3000 USB data acquisition (DAQ) module was utilized for recording
the normal and shear stresses applied to the soil during consolidation and shearing, and for sending
the control signal to the electro-pneumatic pressure regulator. The DAQ allows the measurement of
eight differential inputs or 16 single-ended inputs. Differential wiring can reduce noise related to a
ground current, and it was determined during development that differential wiring provided
noticeable reductions in the noise related to shear and normal stress measurements. As a result,
differential wiring is recommended for any additional expansions to the system. In addition, it is
recommended that each ground port on the DAQ be physically wired together to further reduce noise,
as the grounding inside the unit is not optimal. The DAQ is connected to a controlling computer with
a USB cable and is controlled by the LabVIEW control program (National Instruments, 2009).
An Applied Motion Products model ST5-Si-NN stepper motor controller was used to control
the stepper motor within the LabVIEW control program using Serial Command Language. A USB-
to-serial converter was used to create a virtual serial port for sending the commands to the stepper
motor controller via the USB cable.
The DAQ and stepper motor controller are placed inside an additional Pelican electronics
case. An Applied Motion Products 150 Watt, 24 Volt model PS250A24 power supply in the
electronics case powers the pressure sensors, pressure regulator, and stepper motor.

20
3.3 Development of the Automated Borehole Shear Test Control Program
LabVIEW is used to control and record data in the automated borehole shear test. This
section will focus on the control program’s development and intended function. An ABST user’s
guide is provided in Appendix A, which provides step-by-step instructions for carrying out an ABST
test with the control program in the field.
3.3.1 Data Input and Output
Raw data in the form of voltages are collected in the LabVIEW control program from the
DAQ to determine the shear stress displacement behavior of the soil. The data can be sampled at a
user defined rate. In initial versions of the program, the data was often sampled at 400 samples per
second, and the program started a new sampling sequence every 100 samples. Each group of 100
samples was then averaged to give one representative value every quarter of a second.
As discussed in the DAQ 3000 manual, increased accuracy can be achieved if the DAQ is
used to oversample internally at a rate of 16,384 readings per returned sample, as this minimizes
voltage transients caused by switching between the internal channels. For the ABST, it is envisioned
that a maximum of three channels will typically be required, since a string potentiometer will also be
used to measure shear head displacement as discussed in Section 4.2. Each voltage reading takes one
microsecond, and each channel samples sequentially. As a result, a total of 16,384 microseconds is
required to sample each channel, and 0.05 seconds are required to sample all three channels. This
indicates that a maximum scan rate of 20 samples per second can be utilized within the program when
using oversampling. Since the failure envelopes obtained with previous versions of the program were
benchmarked with laboratory results, the original generation rate of one shear value every quarter of a
second was specified in the control program. As a result, four oversampled values are obtained each
second, providing smooth measurements with low noise.
The resolution of the input data can be increased by selecting input voltage ranges that
correspond to the expected stress measurements. Since the DAQ has 16-bit resolution, the minimum

21
measureable voltage will correspond to the specified maximum voltage divided by 216
. As a result,
the smallest possible maximum input voltage should be specified in the program for the expected soil
parameters of interest. The maximum measureable soil shear stress in the current ABST design is
approximately 50 psi at an input measurement of five volts, and this stress corresponds to a pressure
sensor reading of 200 psi. If a maximum shear stress of less than 20 psi is expected, then a maximum
input range of two volts can be specified to improve the resolution of the stress measurements. In
general, a maximum input voltage of five volts can be specified to allow for measurements over the
full range of the pressure sensors.
In addition to the input measurements, a voltage signal is generated by the DAQ to control
the pressure regulator. This allows the user to programmatically control the normal pressure applied
to the soil during the test iterations. Additional output is sent to the stepper motor controller to
control stepper motor operation using Serial Command Language (SCL) as discussed above. The
SCL commands are used to start, stop, and change the speed and direction of the motor. These
changes can be made before and during the test.
3.3.2 Oversampling and Input Data Smoothing
Oversampling and smoothing techniques were implemented to reduce the effects of electrical
noise on the normal and shear stress records. As described in Section 3.2.1 above, for each data point
in the soil’s shear displacement record, the program collected 100 samples at a rate of 400 Hz, giving
four data points per second. In order to smooth the data by removing higher frequency electrical
noise, a lowpass filter was added with a cutoff frequency of five Hz. After the data is filtered, each
100 samples are averaged to determine one representative value for the shear record each quarter
second. This process is then repeated until a peak shear stress is detected by the program. After the
peak shear stress is reached, the shear head is reversed until the initial tare shear stress is nearly
reached, the normal pressure is incremented, and the process of consolidation delay followed by
shearing of the soil is repeated.

22
When oversampling is enabled, the DAQ will automatically sample at a high rate and obtain
representative values by averaging a large number of voltage readings to achieve a chosen effective
sampling rate with reduced noise. The averaged reading is then recorded in the control program. By
utilizing oversampling in the current version of the control program, filtering is not required and
sampling parameters are simplified, which makes the program more streamlined and user friendly.
3.3.3 Incorporation of Data into Control Program
As previously discussed, the shear stress is measured at a rate of four samples per second and
used to construct the shear record of the soil for a given normal stress. In the control program, the
shear stress is plotted against time and against the displacement reported by the stepper motor, which
is used as a measure of the shearing displacement. The stepper internally monitors its absolute
rotation, from which the displacement of the pull-rod clamp relative to the cross-plate is calculated
and plotted in the shear record. However, the stepper displacement is only an approximation of the
actual displacement of the shear plates, as the stepper displacement does not account for elongation of
the pull-rods and pull-strap, compression of the dynamometer cylinders and associated expansion of
their internal rubber belloframs, or slippage of the rod clamp on the pull-rods. A study aimed at
developing measurements of the various stiffnesses within the apparatus with the goal of correcting
the stepper displacement to obtain true shear plate displacement is discussed in Section 4.1.
The dynamometer cylinders convert the force applied to the cross plate into a proportional
pressure which is measured by the 200 psi pressure sensor and dial gage mounted on the base plate.
To determine the actual shear stress acting on the soil, the initial pressure caused by the hanging
weight of the shear head and pull rods must be subtracted from the shear stress measured during
shearing. This is accomplished by measuring the stress applied to the 200 psi pressure sensor
immediately after the test is begun and before the shear head is expanded to contact the borehole wall.
This shear stress tare value is saved by the program and is automatically subtracted from measured

23
shear stress values to obtain the corrected shear stress. The corrected shear stress is then displayed in
the program plots and exported in the data files.
During preliminary testing, it was discovered that a small amount of pressure is measured by
the 300 psi pressure sensor even when the pressure regulator is given a zero pressure control signal.
A tare measurement of the normal pressure sensor is therefore taken before the test begins, and this
pressure is subtracted from the normal stresses measured while the shear measurements are recorded.
The normal stress is sampled at the same rate as the shear stress, but only a single normal stress is
required for each shear record to construct a failure envelope. To account for any slight variation
during testing, the measured normal stress records are averaged and plotted against maximum shear
stress in order to construct the Mohr-Coulomb failure envelope.
3.3.4 Failure Envelope Criteria
The soil’s shear displacement behavior is measured and plotted for each normal pressure at a
rate of four points per second with each point corresponding to one iteration of a while-loop within
the program. A few different algorithms were developed to enable the program to detect a peak shear
stress and therefore exit the while-loop.
Three methods are used within the program for detecting the peak shear stress corresponding
to a given normal stress, as shown in Figure 3.5. The first method is a button that allows the user to
manually advance the test to the next normal pressure based on their judgment of the shear
displacement behavior. However, the power of the program results from the ability to automate the
entire process. Therefore, algorithms were implemented to automatically detect a peak or a plateau in
the shear stress based on specified criteria. A “peak” is identified when the shear stress falls below a
user-defined percentage of the maximum measured shear stress with a default ratio of 80%. Once a
shear stress decreases below this limit, the program exits the while-loop which terminates the
shearing phase and advances to the next normal pressure. For failures which do not exhibit a peak but
are characterized by a gradual increase in shear stress up to a constant value, the “plateau” method

24
Fig
ure
3.5
: A
BS
T c
on
trol
pro
gra
m
The soil’s shear displacement behavior is measured and plotted for each normal pressure at is
S
tres
s re
cord
plo
t

25
is provided within the program to identify the maximum shear stress for the Mohr-Coulomb failure
envelope. An algorithm was developed which continually calculates the percent change in shear
stress between the beginning and end of a user-defined shear displacement interval, termed the
“plateau length”. A continually updated section from the end of the shear displacement behavior is
examined, and the percent difference between the samples at the beginning and end of the length is
calculated. If the calculated percent difference falls below a user-defined threshold, the program will
then terminate the shearing while-loop and advance to the next normal stress.
During development of the control program, it was determined that the “plateau” method
typically provides the most representative failure envelope. Gravel and roots can occasionally be
encountered, which cause the shear stress to quickly increase or decrease. If the “peak” method is
utilized, the program may prematurely advance without the actual peak shear stress being determined.
However, if the “plateau” method is utilized, the shear stress will typically return to normal before the
plateau length is reached, and the test will continue. The “peak” method may be useful for clays that
exhibit softening behavior. If testing is performed in overconsolidated clay, a significant decrease in
strength may occur shortly after the peak shear stress is reached, and this decrease can be readily
recognized with the “peak” method. The same is true for dense, sandy soils.
3.3.5 Advancing to a Subsequent Normal Stress
After the peak shear stress is identified, the control program will exit the while-loop to
terminate the shearing phase. The program will then send a command to reverse the stepper motor in
order to lower the shear head and reduce the shear stress to the initial tare value. While the shear
head is lowered, the shear stress is continually monitored, and the shear head movement is halted
once the measured shear stress is less than a specified residual soil shear stress. However, if the halt
command were simply sent to the motor when the measured shear stress reached the target tare value,
the finite deceleration rate of the motor and the time required for one iteration of the controller loop
would result in overshooting of the target stress. To avoid overshooting, the user can specify the

26
threshold that will cause the shear head to stop lowering. For example, the halt command can be
issued when the shear stress is 0.5 psi larger than the initial shear stress or tare value. Once the
criteria for lowering the shear head to a residual shear stress is met, the program will apply the next
normal pressure and immediately begin a countdown timer for the second consolidation delay phase.
The application of normal pressure and consolidation time occurs in an outer loop that
contains the majority of the program. The number of iterations of this outer loop corresponds to the
number of different normal pressures specified by the user. As long as the final consolidation phase
has not yet begun, the user can freely adjust the number of test points or modify the pending normal
stress values and consolidation delay times during testing. Each desired normal pressure will
correspond to one point on the failure envelope, and a minimum of three points should be used to
construct the envelope.
3.3.6 Saving Data Files
All data collected during a test is saved by the control program. Specifically, the failure
envelope points (peak shear stress and average normal stress), shear stress displacement behavior,
stepper displacement, vector of sample times, and normal and shear stress tare values are recorded. A
more accurate displacement record is also saved in versions of the program that incorporate direct
measurement of the shear head displacement as discussed in Section 4.2.
Two formats are used in the control program for exporting data. The primary format is
LabVIEW Measurement (LVM), which is a comma-delimited format with a .lvm extension. LVM
text files can be opened with standard text editor programs and imported into Microsoft Excel for
interpretation. In addition to the LVM format, data can be saved in smaller binary Matlab (MAT)
format files with a .mat extension. Data in MAT files is stored with pre-assigned variable names and
the desired plots can therefore be quickly constructed. However, conversion of data to the binary
MAT format is not an intrinsic feature of LabVIEW and therefore required the use of subroutines
created by the community of LabVIEW developers. Unfortunately, the regular release of new

27
versions of both Matlab and LabVIEW often resulted in file incompatibilities, which required that the
Matlab conversion routines be re-written with each new release. Since the Matlab post-processing
and plotting routines can be modified to use the text format LVM files which are fully supported by
each new release of LabVIEW, the subroutine for exporting binary MAT format files will ultimately
be removed from the program.
The current version of the control program allows both LVM and MAT data formats to be
toggled on or off before the program is started, as shown in Figure 3.5. When utilizing the LVM
format, a folder location is specified, and separate files corresponding to the failure envelope, shear
records, and tare values are written within this folder. By utilizing text files as the primary method of
saving information, unprocessed data files can be stored for long periods of time, and the possibility
of the files becoming outdated or corrupt is reduced. When the binary MAT format is utilized, the
complete directory and filename including the .mat extension are specified by the user, and all of the
data is saved in a single binary file with pre-defined variable names.
3.3.7 Post-processing Capabilities of the Control Program
Once the peak shear stresses corresponding to each normal stress are measured, the values are
plotted on the screen. After at least three combinations of normal stress and peak shear stress are
measured, a best-fit failure envelope is determined and plotted. The location for this plot is shown in
Figure 3.5. The failure envelope is updated immediately after measurement of each peak stress, and
the slope, y-intercept, and coefficient of determination of the best fit line through the data points are
determined based on the least squares method. From this statistical analysis, the friction angle,
cohesion, and reliability in terms of the R2 value of the test are immediately determined and displayed
on the screen. In addition, the individual points used to construct the failure envelope can be toggled
on and off throughout the test, and the statistics corresponding to the desired points will be
automatically updated. By toggling off a failure envelope point, the failure envelope is only modified

28
on the computer screen, and the complete set of normal and peak shear stresses are still exported to
the data files.
Above the failure envelope plot, the shear stress is also plotted in real-time against stepper
displacement and time in separate plots in the control program, as shown in Figure 3.5. These plots
can be used to monitor the performance of the test and aid in the identification of a peak shear stress.
Like the data points in the best-fit failure envelope, the individual shear records corresponding to each
normal pressure can also be toggled on and off by the user during the test.
In addition to display and analysis capabilities within the program, a Microsoft Excel macro
was written in Visual Basic to process the LVM files. This macro prompts the user to open the LVM
files to be processed. The macro will then delete any zeros appended to the end of the saved stress
records. Zeros may be appended to the stress records, since the control program saves stress records
with the same number of rows. A stress record that was developed in a short time will have zeros
appended to the measured values until the number of rows is the same as that for the longest shear
record. The macro then automatically creates plots of shear stress against stepper displacement, shear
stress against time, and the best-fit Mohr-Coulomb failure envelope. The statistical quantities
corresponding to the failure envelope are also calculated by the macro. A complete description and
set of instructions for using the Excel macro are included in the user’s guide provided in Appendix A.
The source code and examples of the output are included in Appendix B.
3.4 Preliminary Field Testing with the Automated Borehole Shear Test
Field testing was performed with the automated borehole shear test in order to verify the
performance of the electro-mechanical components and control program. Although many different
methods may be used to create a borehole suitable for BST testing (Lutenegger, 1987), the best
results are typically obtained when the test is performed in the cavity left by a 3-inch diameter Shelby
tube. Since Shelby tube samples are classified as “undisturbed”, they are suitable for performing
shear strength tests in the laboratory. Additionally, the 3-inch sample size allows specimens to be

29
trimmed for performing tests on 2.5-inch diameter direct shear specimens or 1.4 to 2.8-inch diameter
triaxial specimens, enabling a direct comparison between field and laboratory results. To facilitate
this comparison, direct shear tests were performed on 2.5-inch diameter specimens trimmed
horizontally from Shelby tube samples in this study. The resulting friction angle, cohesion, and shape
of the shear stress displacement behavior plot are compared to those of the ABST. In order to obtain
results for a range of soil types, tests were performed in sandy glacial till and soft clay.
3.4.1 Test Results in Sandy Glacial Till
The glacial till was tested in situ using the ABST at the Spangler Geotechnical Laboratory at
Iowa State University. The soil tested had a typical USCS classification of SC-SM. The borehole
was advanced with a 5.5-inch solid-stem, continuous flight auger. Four 3-inch diameter Shelby tubes
were pushed approximately 26 inches each. The four tubes were pushed from 4.0 to 29.5 inches, 27.5
to 53.5 inches, 48.0 to 72.5 inches, and 78.0 to 101 inches. After ABST tests were performed near
the bottom of each tube’s cavity, the auger was used to ream the existing borehole before the next
tube was pushed below the bottom of the borehole. It should be noted that the fourth tube was
obtained from a second borehole located 24 inches away from the first, since a Shelby tube became
stuck in the first borehole and could not be retrieved. Automated borehole shear tests were performed
near the bottom of the Shelby tube cavities at depths of 27.5, 67.5, and 98.0 inches after pushing the
1st, 3
rd, and 4
th tubes. Consolidation times for the ABST were 10 minutes for the first normal stress
and five minutes for the remaining normal stresses. The failure envelope (Figure 3.6) and shear
displacement behavior (Figure 3.9) are provided for the test at 27.5 inches. The remaining ABST
results are provided in Appendix C.1. The shear displacement behaviors for these sets of tests were
determined with stepper displacements. The stepper motor displacement will not accurately
correspond to the shear head displacement, so the shapes of these records should not be taken as
correct as discussed in Section 3.4.3.

30
y = 0.7423x + 4.581
R² = 0.9988
0
5
10
15
20
25
0 5 10 15 20 25 30
Sh
ea
r S
tre
ss(p
si)
Normal Stress (psi)
ABST Failure Envelope
φ = 36.6˚
c = 4.5 psi
Figure 3.6: Glacial till failure envelope for ABST at a depth of 27.5 inches
Direct shear tests were performed on the samples extruded from the Shelby tubes with the
ISU DigiShear soil testing system from Geotac. The tests were performed by shearing a horizontal
surface in a fresh sample for each normal stress application. The failure envelope (Figure 3.7) and
shear displacement behavior (Figure 3.10) corresponding to a depth of 27.5 inches are provided
below. The remaining direct shear test results are provided in Appendix D.1. The shear displacement
y = 0.6035x + 9.2667
R² = 0.9492
0
5
10
15
20
25
0 5 10 15 20 25 30
Sh
ear
Str
ess
(p
si)
Normal Stress (psi)
Direct Shear Test Failure Envelope
φ = 31.1˚
c = 9.3 psi
Figure 3.7: Glacial till failure envelope for direct shear test at a depth of 27.5 inches

31
behavior obtained from the laboratory direct shear test at a normal stress of 10 psi and depth of 27.5
inches potentially exhibited overconsolidated behavior, since the shear stress reduced toward a
residual value after the peak shear stress was reached, as shown in Figure D.1. Since it is standard
practice for the BST to advance to the next normal stress shortly after a peak shear stress is reached,
and the residual value was reached after a large displacement, overconsolidated behavior would not
have been identified in the field ABST shear displacement behavior. Dilation was also observed
during the direct shear test at a normal pressure of 10 psi. However, a bilinear failure envelope was
not obtained in the BST which indicates that normally consolidated soil was tested.
The results of the ABST and direct shear tests are provided in Table 3.2. These results
indicate the ABST consistently measured a friction angle approximately four degrees larger than the
direct shear test. In addition, the cohesion measured with the direct shear test was typically twice as
large as the cohesion measured with the ABST. Possible sources for these discrepancies include
sampling disturbance, which will lower the strength measured in the laboratory with the direct shear
test and potential moisture loss before laboratory testing, which could create suction stresses and
increase the apparent cohesion. Strength anisotropy of the soil also could have led to deviations in
the results, since the ABST shears the soil on a vertical plane, while the direct shear specimens were
trimmed horizontally from the Shelby tubes.
3.4.2 Test Results in Soft Clay
Soft clay was tested in order to investigate ABST results in soils that were potentially
overconsolidated. The tests were performed at the edge of an ISU research farm at the North end of
Table 3.2: Glacial till field ABST and laboratory direct shear test results
Test Depth
(in)
ABST Friction
Angle (˚)
ABST cohesion
(psi)
DS Friction
Angle (˚) DS cohesion (psi)
27.5 36.6 4.5 31.1 9.3
67.5 39.2 2.5 36.6 5.1
98.0 38.2 2.3 34.9 3.4

32
Scholl Road in Ames, Iowa. It was suspected that the soil may be overconsolidated due to lateral
loading from freeze-thaw cycles in the soil. The borings were created using a 5.5 inch diameter solid-
stem, continuous flight auger. A Shelby tube was then pushed at the base of the borehole to create a
cavity for testing the soil. In addition, the Shelby tube samples were utilized to obtain specimens for
laboratory direct shear tests.
Due to testing difficulties, two borings were utilized at the site. After pushing a Shelby tube
from 50 to 74 inches in the first borehole, the cavity swelled, and the shear head could not fit inside
the cavity. A 3.25 inch bucket-type hand auger was then used to increase the cavity size. An ABST
was then performed in the enlarged cavity, and the parameters provided in Table 3.3 were obtained.
The shear head was then removed, cleaned, rotated 90 degrees, and the second test was performed at
the same depth. The failure envelopes for these tests are provided in Appendix C.2. Due to the large
diameter of the cavity, the shear head fully expanded at a specified normal stress of 30 psi. The
expanded shear head resulted in a peak shear stress that no longer increased in proportion to the
normal stress, and the resulting point was therefore not included in the failure envelope as is standard
procedure in such cases (Handy, 2002). It should be noted that consolidation times were zero for the
first test and the shear displacement behaviors were not saved, due to malfunctions of the preliminary
version of the control program. Recourse was made to an earlier version of the control program for
the second test. Although this corrected the problem of zero consolidation times, the shear
displacement behaviors were also lost for the second test.
Table 3.3: Soft clay ABST and laboratory direct shear test results
Borehole-
Test
Test Depth
(in)
ABST Friction
Angle (˚)
ABST
cohesion (psi)
DS Friction
Angle (˚) DS cohesion (psi)
1-1a 68.0 25.2 -0.2 - -
1-2 68.0 30.6 0.7 - -
2-3 61.0 24.4 6.0 24.8 8.1
2-4 61.0 22.3 4.0 - - a No consolidation delay time used

33
A second borehole was prepared 11 inches from the first borehole, and a Shelby tube was
pushed from a depth of 50 to 72 inches. For this set of tests, the shear head was inserted into the
cavity before swelling prevented testing. However, squeezing of the borehole prevented the shear
head from being lowered fully to the base of the cavity, and testing was therefore performed at a
depth of 61 inches. The parameters obtained from the two tests in the second borehole are provided in
Table 3.3, and the shear displacement behaviors and failure envelopes are provided in Appendix C.2.
The significant cohesion observed in tests three and four indicate that the clay encountered at
the site was likely overconsolidated. However, test two indicates that the soil has a negligible
cohesion and a friction angle over five degrees larger than test one. It is expected that disturbance
would at least partially destroy the soil’s structure. Since the first borehole was expanded with an
auger before testing, it is likely that the cavity walls experienced a larger amount of disturbance. If
overconsolidated clay existed at the site, a portion of the bonds that existed within the clay would
have been destroyed, and the cohesion would potentially decrease. In addition, the soil disturbance
may have resulted in a material state that resembled a fully softened condition. The strength of a fully
softened soil corresponds to the peak shear strength obtained from a normally consolidated state
(Skempton, 1970). As a result, the cohesion of the sample would be negligible, and the friction angle
may be larger than that of the undisturbed sample due to the bilinear failure envelope of an
overconsolidated soil.
The difference in strength parameters obtained in tests three and four can be interpreted based
on differences in the applied shearing rate. Test three utilized the standard shearing rate of 2
revolutions per second (0.002 in./sec), and the failure envelope is curved. This behavior is expected
when the soil is partially undrained during the shearing stage of the test. The shearing rate utilized in
test four was therefore reduced to one-tenth the normal rate, or 0.0002 inches per second. The slower
testing rate utilized in test four resulted in a more linear failure envelope. From examination of the
strength parameters obtained from tests three and four, the friction angle and cohesion are seen to

34
decrease when the shearing rate is decreased. This behavior may occur in an overconsolidated clay
experiencing pore pressure generation during shearing. Pore pressure generation during shearing is
often responsible for increasing the measured cohesion. In addition, if drainage is not allowed in
overconsolidated clay, the pore water will experience negative pressure as the soil is sheared. This
will increase the effective stress in the soil, and as a result, the total-stress friction angle will be
increased relative to the drained friction angle. Although this behavior may not correspond to all
overconsolidated clay soils, an undrained friction angle is typically larger than a drained friction angle
in overconsolidated clays. The strength parameters obtained with tests three and four therefore
indicate that an undrained response was likely obtained in an overconsolidated clay. Further
reductions in the shearing rate would be required to determine if test four yielded a drained response,
and there is a potential for future research on shearing rate effects.
The preceding analysis is based on the assumption that the clay at the site was
overconsolidated. If overconsolidated clay was tested, a bilinear failure envelope would be expected.
However, the measured failure envelope appears to be linear, and the first data point is indicative of
partial seating and may therefore be ignored (Figure 3.8). In addition, attempts to fit a bilinear
Figure 3.8: Soft clay failure envelope at depth of 61 inches (Test 4)
y = 0.4103x + 3.9992
R² = 0.9925
0
5
10
15
20
25
0 5 10 15 20 25 30 35 40 45
Sh
ea
r S
tre
ss(p
si)
Normal Stress (psi)
ABST Failure Envelope
φ = 22.3˚
c = 4.0 psi

35
envelope to the data yield inadequate results. Since the parameters represent overconsolidated soil
according to the discussion above, data scatter or partial seating could potentially result in an inability
to obtain a bilinear envelope. However, an alternative interpretation of the results may classify the
soil as normally consolidated. If the reduced shearing rate still produced substantial pore pressures
during shearing, then an apparent cohesion may have resulted in test four, and the true cohesion may
be zero. The decrease in the friction angle as the shearing rate was decreased could also have resulted
from soil heterogeneity, as the shear head was rotated 90° between tests 3 and 4.
3.4.3 Discussion of Shear-Displacement Behavior
Figure 3.9 displays a shear displacement behavior obtained with the automated borehole
shear testing apparatus. This test was performed in sandy glacial till at a depth of 27.5 inches. Since
the displacement of the shear head is measured by the stepper motor, this displacement is actually a
measurement of vertical rod clamp displacement relative to the Dynamometer cross-plate. The shear
displacement behaviors obtained with the ABST show a characteristic initial increase in stiffness
followed by a decrease as the shear stress increases to the peak value. The ABST displacement
Figure 3.9: Glacial till shear displacement behavior for ABST at a depth of 27.5
inches
Strain-stiffening
6 psi
11 psi
20 psi
16 psi
25 psi
Shear Stress vs. Stepper Displacement

36
Figure 3.10: Glacial till shear displacement behavior for direct shear test at depth
of 27.5 inches
0
5
10
15
20
25
0 0.05 0.1 0.15 0.2 0.25 0.3 0.35
Sh
ea
r S
tre
ss (
psi
)
Shear Displacement (in)
Direct Shear Test Shear History
20 psi
15 psi
10 psi
measurements are believed to be initially affected by the nonlinear stiffening of the slender pull-strap
as slack is taken up, as well as the expansion of the rubber bellofram membranes as the hydraulic oil
pressure increases in the Dynamometer cylinders. The characteristic strain-stiffening region of the
shear stress versus stepper displacement records is therefore believed to be non-representative of
actual soil behavior.
For comparison, Figure 3.10 displays the shear displacement behavior obtained from a direct
shear test performed on the Shelby tube sample corresponding to Figure 3.9. Since the typical direct
shear results of Figure 3.10 exhibit a much higher initial slope and essentially continuous decrease in
stiffness as shear stress is increased, the atypical shape of the ABST shear records are believed to
result from the method used to measure shear displacements rather than the actual shear
displacements themselves. As previously stated, the ABST uses the reported stepper motor
displacement as a measure of the shearing displacement of the shear head. However, the elongation
of the pull-strap and pull-rods, compression of the Dynamometer cylinders with associated expansion
of the bellofram membranes under increasing oil pressure, settlement of the baseplate due to soil
15 psi
10 psi
20 psi
Shear Stress vs. Shear Displacement

37
compliance, slippage of the clamp on the pull-rod, and drive belt and pulley slippage can all affect the
stepper measurement. As evidenced by the ABST results of Figure 3.9, these contributions are not
negligible and should be accounted for to provide an accurate measurement of the soil’s shear
displacement behavior if the stepper displacement is to be used. Chapter 4 documents an
investigation into the measurement of the ABST component compliances for correction of the stepper
displacement to give the actual shear head displacement. If the various compliances can be
accurately and reliably characterized, a correction could then be applied to stepper displacements to
obtain an accurate shear plate displacement record. In addition to compliance predictions, an accurate
measurement of displacement would also require an LVDT to measure the settlement of the base
plate relative to the surrounding ground. However, if the test was performed with the base plate
resting on a hollow-stem auger extending above the ground, the base plate settlement would likely be
negligible.
Although accurate displacements could potentially be obtained by correcting the stepper
displacement to give shear head displacement, smaller displacements will be required to fail the soil
with the ABST when compared to a direct shear test, as shown in Figure 3.11. Figure 3.11 displays
Figure 3.11: Stress path for the borehole shear test and direct
shear test with an initial in situ stress condition assumed

38
the stress path for the BST and direct shear test if it is assumed that both tests start from the in situ
stress condition.
3.4.4 Conclusions from Preliminary ABST Field Tests
Based upon the comparisons between field and laboratory tests, the ABST results in sandy
glacial till are believed to be relatively accurate in terms of friction angle and somewhat less accurate
in terms of cohesion. Although the friction angles obtained with the direct shear test in glacial till are
approximately four degrees lower than the friction angles obtained with the ABST, these relative
measurements are expected, since disturbance will lower the measured strength of the material. In
addition, the increased cohesion measured with the direct shear test could potentially result from
moisture loss before laboratory testing. This moisture loss would cause suction and increase the
apparent cohesion in the material. However, reductions in strength due to disturbance are often relied
upon in laboratory testing to compensate for relatively fast loading rates, since fast loading typically
increases the strength of a material. As a result, the strength parameters measured with the ABST
may overestimate the soil’s strength due to loading rate effects.
The field ABST tests performed in soft clay were found to provide strength parameters that
agreed well with the direct shear test (Table 3.3). However, the stress conditions corresponding to
these strength parameters are affected by pore pressures generated during loading. The in situ ABST
tests in soft clay indicated that pore water pressures were generated during shearing. In order to
examine whether partially undrained behavior is obtained in BST testing, the shearing rate can be
reduced, and the change in cohesion and friction angle can be monitored. If cohesion decreases as the
shearing rate is decreased, it is likely that an undrained response was obtained for the faster loading
case. Since permeability in clay varies widely, it is not possible to recommend a single shearing rate
for drained behavior that will be appropriate for all sites. Engineering judgment must therefore be
utilized when performing ABSTs in clay in order to judge whether the stress conditions for the

39
measured strength parameters correspond to a drained or undrained response. Alternatively, a pore
water pressure transducer could be implemented to directly monitor the pore water pressure.

40
CHAPTER 4. ABST SHEAR HEAD DISPLACEMENT
MEASUREMENTS
The BST is an interface test and the shear strains in the soil are therefore unknown, similar to
laboratory direct shear tests. However, analytical solutions or finite element or difference analyses
could be used to aid in the determination of the three-dimensional strain field in the soil
corresponding to known stresses and displacements applied at the soil boundary by the shear plates.
The number of potential applications for the automated borehole shear test (ABST) could be greatly
increased if displacements of the shear plate could accurately be obtained. For example, soil modulus
values and cyclic stress-strain behavior could potentially be determined from ABST results. If the
soil stress-strain behavior can be accurately characterized, the ABST could offer significant
advantages over common in situ tests such as SPT and CPT, which rely on empirical relationships for
correlation to properties such as liquefaction resistance or constrained modulus.
As mentioned in the previous chapter, the compliances of the various BST components make
it difficult to accurately determine the true displacement of the shear plates from measurements of the
rod clamp or pull rod motion. Even if the pull rod displacement relative to the ground surface is
known, the pull rods undergo elastic elongation in proportion to their total length while the pull strap
(Figure 1.1) exhibits a nonlinearly increasing stiffness that varies with its initial amount of slack.
Researchers have previously made use of BST shear displacements for various applications
(e.g., Demartinecourt and Bauer, 1983, White and Handy, 2001, Suleiman et al., 2011). However, the
shear head displacement should be accurately determined for proper interpretation of such tests.
Three methods were investigated in this study for measuring the displacement of the ABST
shear plates;
1. The first method utilizes the existing stepper motor to determine the rotation
of the worm gear. This method is the simplest to implement, since no additional sensors are

41
required. Demartinecourt and Bauer (1983) similarly attempted to measure shear
displacement by counting the number of revolutions of the worm gear. However, all of the
apparatus compliances discussed in Chapter 3 introduce errors into the measurements which
must be accounted for when using this approach. A laboratory study aimed at correcting for
these sources of error is described below.
2. The second method for measuring ABST shear plate displacement is to
directly measure the displacement at the top of the rod or rod clamp with a displacement
transducer, then correct the measured displacements using calibrated compliances of the pull
rods and strap. This method eliminates the influence of the Dynamometer cylinder
(Bellofram) compliance. However, if the displacement measurement is not referenced to the
ground surface, the settlement of base plate will also introduce errors in the measured
displacements. This error may be negligible when the base plate rests on a hollow-stem
auger. White and Handy (2001) used a dial gauge to measure pull rod displacement with a
resolution of 0.0025 mm to determine soil preconsolidation pressure and elastic modulus, but
the reference point for the dial gauge was not specified. Similarly, Suleiman et al. (2011)
used a dial gauge to measure the displacement of the rod clamp relative to the base plate to
obtain t-z curves for steel piles using smooth shear plates. These two studies did not address
corrections for compliance of the various BST components, and the results therefore often
exhibited a characteristic strain-stiffening upward curvature in the shear stress versus
displacement curves. The severity of the curvature is dependent upon the initial prestress
force applied to the pull rods and strap during test setup. The nonlinear strain-stiffening
behavior will be illustrated below.
3. The third method was to directly measure the displacement of the shear
plates by connecting them to a string potentiometer (or string pot) at the base plate via high-
strength fishing line with swivels and wire leaders at the shear head. This method avoids the

42
errors associated with device compliance. If the string pot is referenced to the ground surface
rather than the base plate, then the influence of settlement is also avoided. Fishing line could
potentially be replaced with piano wire to reduce creep within the line. Laboratory tests
indicated that creep and slippage at the knots of the fishing line may be significant, with 0.01
to 0.05 inches of elongation in the line occurring after 15 minutes. As a result, shear records
that are obtained within a short interval of time will likely be more representative of actual
soil displacement.
The following sections will investigate the above methods in detail.
4.1 Displacement Measurement via Stepper Motor
The ABST stepper motor moves the shear head by rotating the worm gear and reports its
absolute angular rotation to the control program. As a result, a measure of shear plate displacement
can potentially be determined directly from the ABST without the use of additional sensors. The
stepper motor drive employs microstepping to obtain a resolution of 4000 steps per revolution. The
2:1 gear ratio between the worm gear and stepper results in one revolution of the stepper motor per
0.0005 inches of vertical displacement of the pull rod clamp relative to the cross plate. This results in
a very high stepper motor displacement resolution of 0.125 µ-in. per step. However, the stress-
displacement relationships determined from the rotation of the worm gear typically exhibit a stiffness
that first increases with displacement before eventually decreasing to zero at failure (Figure 3.9).
This behavior is generally contradictory to the expected soil behavior routinely observed in typical
laboratory direct shear tests, and likely results from the compliance of the components in the ABST
apparatus as discussed above.
To quantify the error associated with the stepper displacement, a direct-current displacement
transducer (DCDT) was used to measure the actual movement of the shear head. In addition, multiple
displacement transducers were placed on the apparatus to measure the compliance of individual
components as a function of pull rod force. The DCDTs were incorporated into the control program

43
by activating additional input channels and applying the transducer sensitivities to the measured
voltages. Separate data files were then exported for each transducer.
As explained above, the stepper displacement is a measure of the rod clamp’s displacement
relative to the Dynamometer cross-plate, but the compliance of the pull rods, pull straps, and
Dynamometer cylinders will also affect the measured stepper displacement. Any slippage between
the rod and clamp will contribute further error towards the resulting estimate of shear head
displacement. Additionally, belt elongation or slippage of the pulleys used to turn the worm gear
could lead to deviations, and these components should be accounted for if a correction could be
developed. To measure the compliance sources with the exception of belt elongation and pulley
slippage, multiple displacement transducers were used simultaneously to determine the displacement
of each of the apparatus components. If each component’s compliance could be reliably measured,
then the additional displacements caused by the measured pull-force could be subtracted from the
stepper displacement to more accurately estimate the actual shear head displacement with no
additional device instrumentation required.
4.1.1 Error in Stepper Motor Displacement Measurements
As shown in Figure 3.9, the use of stepper motor displacements typically results in stress-
displacement curves that exhibit an initial increase in stiffness as the soil is sheared. In order to
determine whether this is a result of device compliance, displacement transducers were used to
compare the actual shear plate movement to the stepper displacement. Figure 4.1 shows a steel test
frame that was fabricated to enable measurement of the ABST component compliances as well as the
shear head displacement. For these tests, smooth concrete plates were attached to the shear head in
order to prevent damage to the teeth on the steel shear plates. The shear head was lowered into a steel
pipe welded to a steel support plate, and two vertical hollow steel tubes were used to support the BST
base plate in a relatively rigid manner, so that elongation of the pull rods and compression of the
Dynamometer cylinders could be measured. A hole was drilled through the support plate to allow a

44
Figure 4.1: Testing configuration for stepper displacement
investigation
DCDT on rod
DCDT on
shear head
Shear head
inside pipe
DCDT to be attached to the bottom of the shear head to measure its displacement. In addition, a
DCDT was placed at the top of the pull rod to examine the accuracy of displacements measured at
this point.
A range of normal stresses were applied through the shear head which was then raised using
the stepper motor. The static friction was overcome, causing the shear plates to slide against the
metal pipe in kinetic friction, and the resulting shear stress-displacement curves were recorded along
with displacements of the shear head and the top of the pull rod. Appendix E.1 contains plots of the
results corresponding to normal stresses of 7, 10, 15, and 20 psi in Figures E.1, E.6, E.11 and E.16,

45
respectively. Comparison of these figures illustrates that deviations between the measured shear head
displacements and those calculated from the stepper motor increase with increasing normal stress.
This is expected, since larger normal stresses result in larger maximum shear stresses, which in turn
cause increased elongation of the pull strap and pull rods as well as increased compression of the
Dynamometer cylinders. The stress-displacement curve corresponding to a normal stress of 15 psi is
shown in Figure 4.2. This test confirms that the stepper displacement is greater than the actual
measured shear head displacement, primarily due to the Dynamometer cylinders being compressed
and the initial slack being taken up from the pull strap. The incremental displacements of the stepper
and shear head become approximately equal beyond a shear head displacement of 0.02 inches. This
can potentially be explained by the nonlinear stiffness of the pull strap and Dynamometer cylinders
increasing until the static friction between and the concrete shear plates and steel tube is overcome at
which point the shear plates begin to slide in kinetic friction against the steel tube. The slope of the
linear regression line is slightly greater than 1.0 beyond this point because the shear stress continues
to increase (see e.g., Figure E.3), causing additional elastic elongation of the pull rod and pull strap.
These results indicate that utilizing the stepper to measure displacement will result in an
overestimation of the actual displacement by approximately 0.05 inches for this case. Since the peak
shear stress in BST soil tests is often reached after a shear head displacement of 0.1 inches (Figure
4.11), this overestimation is significant. The line corresponding to equal stepper and shear head
displacement is also provided in Figure 4.2 for reference, illustrating the magnitude of the stepper
displacement error. Similar plots are shown for displacements measured at the top of the rod in
Figures E.2, E.7, E.12, and E.17. These figures show that the error is reduced if rod displacements
rather than stepper displacements are used as the estimates of shear head displacement, since the
influence of the Dynamometer cylinder compliance and rod clamp slippage is eliminated. However,
such an approach requires additional instrumentation and is more time-consuming than using the
stepper displacement.

46
Figure 4.2: Stepper displacement vs. shear head displacement at 15
psi normal stress
y = 1.0868x + 0.0452
R² = 0.9974
0
0.02
0.04
0.06
0.08
0.1
0.12
0 0.01 0.02 0.03 0.04 0.05 0.06 0.07
Ste
pp
er
(in
)
Shear Head Displacement (in)
15 psi Normal Stress Test 1:
Stepper vs. Shear Head
Line of equality
A smooth red line is used to plot the subset of the measured data in Figure 4.2 where the
incremental stepper and shear head displacements become approximately equal. The least squares
method was used to fit a trendline through this portion of the data, resulting in a coefficient of
determination of R2=0.997. This indicates that the stepper motor rotation becomes an accurate
measure of shear head displacement only after a certain point is reached, and this point can be shown
to occur near the peak shear stress, as shown in the plots of Appendix E.1. As a result, the stepper
motor only gives accurate displacement measurements when the maximum shear stress is nearly
reached, and the errors associated with the stepper displacements are significant. However, by
determining and accounting for the compliance curves of the apparatus components, the deviations
between the shear head displacements and stepper displacements could potentially be corrected. This
possibility is examined in the following sections.
4.1.2 Compliance of Dynamometer Cylinders
Since the cylinders compress as the pull rod force increases, the stepper motor elevation will
decrease during shearing, and the absolute upward movement of the rod will be reduced while the
relative displacement between the cross plate and rod (i.e. the stepper displacement) will increase. As
a result, it is necessary to account for the cylinder compliance if an accurate displacement at the shear

47
Figure 4.3: Testing configuration for compliance investigation
DCDT on
rod clamp
DCDT on rod
DCDT on
cross-plate
Fixed rod base
Vice-Grips
head is to be determined from the stepper displacement. If a force-displacement curve can be reliably
measured for the cylinders, then the cylinder displacement corresponding to the pull rod force
measured at any point in the shearing phase can be subtracted from the stepper displacement to obtain
a corrected shear head displacement.
Figure 4.3 presents the testing configuration utilized to isolate the compliance of the
cylinders. The base of the rod was fixed by threading it into the frame’s bottom support plate. A
DCDT was placed on the cross-plate to monitor displacement of the cylinders with increasing tensile

48
Figure 4.4: Representative cylinder compliance curve
y = 1.1995E-06x3 - 1.0037E-04x2 + 3.2601E-03x - 4.4569E-03
R² = 9.9734E-01
0
0.005
0.01
0.015
0.02
0.025
0.03
0.035
0.04
0.045
0.05
0 5 10 15 20 25 30 35 40 45
Cro
ss-P
late
Dis
pla
cem
en
t (i
n)
Shear Stress (psi)
Representative Cylinder Stiffness Curve
Vise-Grip Utilized: Test 1
force in the pull rod. Recall that the pull rod force measured by the Dynamometer cylinders and
displayed on the base plate dial-gauge is in the form of a soil shear stress and is obtained by dividing
the pull rod force by the shear plate contact area of 10 in2. For direct interpretation of test data, the
following results are therefore presented in terms of equivalent soil shear stress rather than pull rod
force. The force in pounds can be obtained by simply multiplying the shear stress in psi by 10 in2. By
simultaneously recording the equivalent applied shear stress and cross-plate displacement, a
compliance curve is obtained for the cylinders. If such a curve is repeatable, then the cylinder
displacements experienced at a given shear stress can be subtracted from the stepper displacement to
correct for cylinder compression. Figure 4.4 displays a typical shear stress vs. cross-plate
displacement curve obtained for the test setup of Figure 4.3, which represents the nonlinear
compliance of the cylinders. Since this curve is representative of the tests, a trendline was fit to the
curve to obtain a calibrated compliance for use in correcting the stepper displacement. Additional
compliance curves for the cylinder are presented in Figures E.21, E.24, E.27, and E.30 of Appendix
E.2. The measurements in Figure 4.4 were obtained using a set of Vise-Grip locking pliers to supply
additional compression at the rod clamp to reduce slippage. As shown in Figure E.24 of Appendix
E.2, this trendline adequately predicts cylinder compression when similar rod clamp slippage

49
Figure 4.5: Comparison of measured and theoretical rod compliance
-0.002
-0.001
0
0.001
0.002
0.003
0.004
0.005
0 50 100 150 200 250 300 350 400 450
Ro
d D
isp
lace
me
nt
(in
)
Force (lb)
Rod Stiffness
Vise-Grips Utilized: Test 1
Measured
Theoretical
conditions are encountered. However, if a Vise-Grip is not utilized, the trendline can produce errors
of 0.01 inches (Figures E.27 and E.30). Since the peak shear stress can be reached in some soils at
displacements below 0.1 inches, this error is potentially significant. From the results shown in
Appendix E.2, it was determined that the cylinder compression is sensitive to the apparatus’s
condition and varies based on slippage conditions. The cylinder compliance is therefore not
sufficiently repeatable. In addition, Figure E.33 demonstrates that large deviations exist between the
compliance curves determined with one DCDT at the edge of the cross-plate compared to two
DCDTs located on either side of the cross-plate and averaged. This conclusion is drawn from Figure
E.33, since the cylinder compliance curve measured with one exterior DCDT gave displacements
larger than those predicted with the trendline, and the curves measured with an average of two
DCDTs on each side of the cross-plate gave displacements smaller than predicted with the trendline.
This is caused by small plate rotations during shearing due to imperfect alignment of the pull rod and
will likely lead to different cylinder compliance curves each time the ABST is assembled.
4.1.3 Compliance of Pull Rods
In addition to nonlinear compression of the cylinders, elongation of the pull rods as shear
stress is applied to the soil will result in deviations between the shear plate displacement and the

50
stepper displacement. As the rod elongation will be elastic, it will only depend on the area, clamped
length, Young’s modulus, and measured force. The elongation of the rods can thus be theoretically
predicted and subtracted from the stepper displacement to correct for the pull rod compliance.
The test configuration shown in Figure 4.3 was used to test the adequacy of the theoretical
calculation of rod elongation. Since the base of the rod is fixed, the DCDT at the top of the rod will
record the total elongation between the base and the rod clamp. In addition, the upward displacement
of the frame’s support plate was measured to account for any lack of perfect rigidity. Figure 4.5
shows the displacement measured at the top of the rod against the measured pull force, together with
the theoretical rod elongation. Similar plots are provided for additional tests in Figures E.22, E.25,
E.28, E.31, and E.34 of Appendix E.2. As shown in Figure 4.5, the measured ultimate rod
displacement is close to the calculated value; a maximum deviation of approximately 0.001 inches
exists between the measured and calculated elongation. Since this deviation accounts for only one
percent of the typical soil shear displacement at failure, the elastic solution could be utilized to correct
for rod elongation with acceptable error. However, this error corresponds to approximately a
clamped length of two-thirds of one 0.5 meter long pull rod. For longer lengths of rod corresponding
to typical testing depths of up to 30 feet, additional tests should be performed with longer rod lengths
to verify the adequacy of the calculation. Equation 4.1 presents the calculation of rod compliance.
Within this equation, ∆ represents rod elongation, F represents force, E represents the rod’s Young’s
Modulus, and A and L represent the rod’s area and length.
AE
L
F=
∆ (4.1)
4.1.4 Compliance of Pull Strap
As the shear head is raised, the slender pull strap, which typically begins a test in a slightly
compressed and buckled state, will straighten and elongate with a corresponding nonlinear stiffness
increase, eventually becoming adequately straight and tensioned, responding more elastically. This

51
-0.002
0
0.002
0.004
0.006
0.008
0.01
0.012
0 20 40 60 80 100 120
Ro
d a
nd
Str
ap
Elo
ng
ati
on
(in
)
Force(lb)
20 psi Normal Stress Test 1:
Strap Stiffness
Theoretical (Rod Only)
Measured
Figure 4.6: Representative strap and rod compliance curve
process will further increase the deviation between stepper and shear plate displacements. The test
configuration presented in Figure 4.1 was utilized to investigate the effect of strap elongation on the
measured displacement. DCDTs were placed at the top of the rod and at the base of the shear head.
The difference between the two DCDT measurements indicates the total rod and strap elongation.
Since the rod elongation can be calculated as demonstrated in the previous section, the approximate
strap elongation can be determined from the measurements. A representative test result is provided in
Figure 4.6, and additional plots are provided in Appendix E.1 in Figures E.5, E.10, E.15 and E.20.
From these plots together with Figures E.2, E.7, E.12, and E.17, it can be determined that elastic
deformation of the rod accounts for only about 10% of the total elongation, and the pull straps
account for the other 90%. In addition, the strap elongation is inconsistent at low shear stresses. This
inconsistent behavior is likely a result of the orientation and initial slack of the straps changing
between tests. The straps are very thin and can flex and twist, so they provide little lateral resistance
by design. Although these inconsistencies may be small, substantial accuracy is required for the
measured displacements, since the peak shear stress in some soils may be reached below a
displacement of 0.1 inches.

52
Figure 4.7: Investigation of slippage at the rod clamp
-0.001
0
0.001
0.002
0.003
0.004
0.005
-0.001 -0.0005 0 0.0005 0.001 0.0015 0.002 0.0025 0.003 0.0035 0.004
Cla
mp
Dis
pla
cem
en
t (i
n)
Rod Displacement (in)
Slippage Investigation
Vise-Grips Utilized - Test 1
4.1.5 Slippage at Rod Clamp
Since the stepper motor measures the movement of the clamp relative to the cross-plate, any
slippage between the rod clamp and pull rod will lead to discrepancies between the stepper
displacement and the shear head displacement. The test configuration of Figure 4.3 was also utilized
to investigate slippage by placing a DCDT on the clamp as well as the top of the pull rod. If
deviations between the two measurements exist, then slippage is occurring at the rod clamp. Figure
4.7 shows the results from a test performed to investigate slippage. The solid black line of equality
indicates the condition in which no slippage is occurring. Additional plots from similar tests are also
presented in Figures E.23, E.26, E.29, and E.32 of Appendix E.2. Figure 4.7 and the plots provided
in the Appendix indicate that the clamp experiences more displacement than the rod, and this result is
consistent with slippage developing. This slippage is typically limited to 0.002 inches. However, the
magnitude of slippage was inconsistent between the tests and would be difficult to predict. In
addition, attempts to increase the compression of the clamp did not have a significant effect on the
results. As a result, slippage will lead to deviations between the stepper and shear head displacements
that cannot be quantified without additional instrumentation.

53
4.1.6 Settlement of Base plate
Any settlement of the base plate will also contribute to deviations between the stepper
displacement and the shear head displacement. As the base plate settles, the elevation of the stepper
will be reduced. This will lead to a stepper displacement that is larger than the shear head
displacement. Since settlement of the base plate depends on the soil properties, the magnitude of
settlement will change based on the testing site and preparation of the ground surface before a test.
As a result, typical base plate settlement cannot be accurately predicted, and a displacement
transducer placed on the base plate is recommended to compensate for settlement. Alternatively, the
base plate can be placed on a hollow-stem auger extending above the ground surface, if available, to
minimize settlement.
4.1.7 Conclusions from Shear Head Displacement Measurement
Test results such as those shown in Figure 4.2 indicate that the stepper motor cannot
adequately measure shear head displacement without corrections to account for the compliance of the
various apparatus components. If a correction is not utilized, the deviation between the stepper
displacement and the shear head displacement may reach 0.05 inches. Since the peak shear stress
often occurs after a shear plate displacement of 0.1 inches for some soils, this error is significant.
By measuring the deformation of the apparatus components with increasing pull-rod force, a
correction curve could be determined for the stepper motor. However, the above efforts to determine
a correction curve demonstrate that most of the apparatus components do not exhibit consistent
compliance curves. Specifically, the measured cylinder compliance is significantly impacted by the
displacement transducer location. In addition, the initial prestress load on the cylinders affects the
displacement measurement. The compliance of the strap is another component that is difficult to
determine. Although the strap displays a relatively consistent compliance at high stresses, the initial
orientation of the strap has a great influence its initial compliance. Slippage at the rod clamp,
settlement of the base plate, and slippage of the drive belt or pulleys can further complicate the

54
corrections required for the stepper motor displacement. The inconsistencies or errors related to each
component’s compliance have the potential to be cumulative and could give misleading test results
with poor repeatability. As a result, accurately calculating the shear plate displacement from the
measured stepper motor displacement is exceedingly difficult. In addition, the compliance correction
may change as the apparatus ages or is used in differing conditions. Since accurately determining
shear plate displacement with the stepper motor is not practical, investigations into utilizing
additional instrumentation to measure the actual displacement are presented in the following section.
4.2 Measuring Displacement via Additional Sensors
Two methods for determining the displacement of the shear plates with additional sensors
were investigated. The first method involves placing a displacement transducer at the top of the pull
rod and assuming that the pull rod displacement will be approximately equal to the shear plate
displacement. This method has been utilized in past investigations of soil behavior. The second
method consists of attaching a string potentiometer directly to the shear head or shear plates. This
method will allow for the direct measurement of displacement without the apparatus compliance
affecting the results.
4.2.1 Measurement at Top of Pull Rods using String Potentiometer or LVDT
The test configuration shown in Figure 4.1 was utilized to determine the adequacy of
approximating shear plate displacement with a displacement transducer placed at the top of the pull
rods. A DCDT was placed at the top of the pull rods and at the base of the shear head. Concrete
shear plates were utilized within a steel tube and various normal contact stresses were applied as
detailed in Section 4.1.1. A hole was drilled into the base of the support apparatus to allow a DCDT
to be attached to the shear head.
Figure 4.8 contains a representative comparison of the rod displacement to the shear head
displacement for a pair of tests with a 20 psi normal stress. Similar plots from tests at other normal
stresses are provided in Figures E.2, E.7, E.12, and E.17 of Appendix E.1. The solid black line

55
y = 1.0989x + 0.0073
R² = 0.9963
0
0.01
0.02
0.03
0.04
0.05
0.06
0.07
0 0.01 0.02 0.03 0.04 0.05 0.06
To
p o
f R
od
Dis
pla
cem
en
t (i
n)
Shear Head Displacement (in)
20 psi Normal Stress Test 2:
Rod vs. Shear Head
y = 0.9734x + 0.0089
R² = 0.9992
0
0.01
0.02
0.03
0.04
0.05
0.06
0.07
0 0.01 0.02 0.03 0.04 0.05 0.06
To
p o
f R
od
Dis
pla
cem
en
t (i
n)
Shear Head Displacement (in)
20 psi Normal Stress Test 1:
Rod vs. Shear Head
Figure 4.8: Comparison of rod displacement to shear head displacement
for two tests at 20 psi normal stress
indicates equal rod and shear head displacements. As seen in the figures, the measured data are above
the line of equality, indicating that elongation of the rod and strap causes noticeable deviation from
the actual shear head displacement. The difference between the pull rod displacement and shear head
displacement depends on the applied normal stress, but is typically on the order of 0.01 inches. This
deviation accounts for approximately ten percent of the shear plate displacement at failure for typical
soil tests. In addition, since the majority of the deviation results from the initial removal of slack in
the straps as demonstrated in Section 4.1.4, the initial shape of the measured curve exhibits significant

56
deviation from the actual shear head displacement.
As shown in Figure 4.8, the displacement of the rod is approximately equal to the
displacement of the shear head after the initial slack is removed from the straps. As the slack is taken
up, however, the deviation from the actual shear plate displacements causes the same type of strain-
stiffening upward-curvature observed for stepper displacements and discussed in the previous
sections. This can be seen directly in Figure 4.9, which demonstrates that an inflection point exists on
the plot of stress against rod displacement after the initial slack is removed from the strap. Beyond
the inflection point, the stiffness decreases with additional displacement, and the shear displacement
behavior beyond this point more closely follows the actual shear head displacement and thus
corresponds to expected soil behavior.
As previously discussed, the strap elongation and degree of stiffening is highly variable
between tests. Figure 4.8 displays the results from two successive tests at a normal pressure of 20 psi.
The slack is removed after 0.001 inches of shear head displacement in the first test and after 0.005
inches in the second test. This indicates that a consistent correction for strap elongation cannot be
applied to the displacement measurements.
Figure 4.9: Stress displacement behavior obtained for rod and shear head in
steel tube
0
2
4
6
8
10
12
14
0 0.01 0.02 0.03 0.04 0.05 0.06 0.07 0.08
Sh
ear
Str
ess
(p
si)
Displacement (in)
20 psi Normal Stress Test 1:
Stress History for Rod and Shear Head
vs. Rod
vs. Shear Head
Incremental rod and shear head
displacements approx. equal after this point

57
0
5
10
15
20
0 0.02 0.04 0.06 0.08 0.1 0.12
Sh
ea
r S
tre
ss (
psi
)
Displacement (in)
15 psi Normal Stress:
Stress History for Rod and Shear Plate
vs. Shear Plate
vs. Rod
Figure 4.10: Stress displacement behavior obtained for rod and shear head
in compacted loess
The test results provided in Figure 4.10 were obtained in the laboratory with a sample of
compacted loess. The shear displacement behaviors were obtained by attaching a string potentiometer
to the top of the pull rod in one test, then rotating the shear head 90 degrees, attaching the string
potentiometer to the shear plates, and repeating the test. As can be seen in the figure, there is a
significant difference in the shape of the shear displacement behaviors obtained. These test results
further indicate that discrepancies will result when using the displacement at the top of the rod to
approximate shear plate displacement at the borehole surface. Only the latter will offer results similar
to laboratory direct shear tests, and thus enable proper interpretation of shear stress versus shear
displacement behavior in borehole shear tests. In addition, the stress-displacement plots obtained by
directly measuring the movement of the shear plate indicate that the shear plates will not move until a
threshold stress is reached. This “sticking” behavior was also observed in later field tests employing
the string potentiometer.
4.2.2 Measurement at Shear Plates using String Potentiometer
By measuring displacement directly at the shear head or shear plates, a result that is not
affected by the apparatus compliance can be obtained. Figure 4.11 presents the ABST shear

58
Figure 4.11: Shear displacement behavior obtained with direct
measurement of shear head displacement using a string potentiometer
0
5
10
0 0.05 0.1 0.15 0.2
Sh
ea
r S
tre
ss (
psi
)
Displacement (in)
ABST in Sandy Glacial Till
2 psi
4 psi
6 psi
8 psi
10 psi
displacement behavior of a sandy glacial till, and the displacements in this figure were measured
directly at the shear head. The shear displacement behavior was obtained by securing a string
potentiometer on the base plate of the ABST, and connecting the extensible cable to the shear head
using fishing line and a set of leaders, hooks and swivels in a Y-configuration to enable connection to
both shear plates. As shown in the figure, the displacement errors which manifested as unusual
strain-stiffening upward-curvature of the type presented in Figure 3.9 as well as other studies, such as
White and Handy (2001) and Suleiman et al. (2011), are successfully removed, and the shear
displacement behaviors are now similar to the direct shear test results of Figure 3.10. These findings
are especially important for proper interpretation of BST measurements in the frameworks of pile t-z
curves and soil elastic moduli as performed in the two aforementioned studies.
Although this method removes the displacement deviations created by the apparatus
compliance, new difficulties are created, such as attaching the shear head to the string potentiometer,
and the potential for any falling soil in the borehole to hit the fishing line and affect the measured
displacement. However, since this method provides a true shear displacement behavior, direct
measurement of the shear plate displacement is recommended when accurate shear displacement
2 psi
4 psi
6 psi
8 psi
10 psi

59
measurements are required. Since any settlement of the base plate can also contribute significantly to
displacement error, it is further recommended that the string potentiometer be secured to a reference
beam that is not attached to the base plate, and has its ends supported on the ground a suitable
distance away.

60
CHAPTER 5. DEVELOPMENT OF A NEW CYCLIC ABST
Since the ABST can accurately record a complete record of shear stress versus displacement,
the apparatus has the potential to measure a soil’s response to cyclic loading. A cyclic borehole shear
test could be useful for accurate in situ measurement of liquefaction potential in cohesionless soils or
the cyclic softening and residual strength of clays and plastic silts. Liquefaction occurs in loose
saturated, cohesionless soils when the direction of applied stresses changes rapidly or the soil is
subjected to ground vibration. This type of loading rapidly densifies or deforms the soil, and pore
water pressures increase for contractive soils. Once pore water pressures equal the overburden
pressure, the effective stress will vanish, and the soil will lose its strength. If the BST shear head is
rapidly raised and lowered in a cyclic manner within a saturated cohesionless soil, the rapid
deformation created by the shear head may cause local liquefaction of the soil near the shear head.
According to Seed and Lee (1966), the decrease in strength related to liquefaction may rapidly occur
after only a few cycles in some soils or may require hundreds of cycles in others. Since pore water
pressures often increase to the overburden pressure over one or two stress cycles in loose sands,
liquefaction may occur rapidly. However, in dense sands, shear strength may decrease slowly as the
pore water pressure is generated over time (Seed & Lee, 1966). Liquefaction in loose sands could
therefore be identified with a cyclic ABST if the measured shearing stress decreases to zero during a
displacement controlled test. In addition, a cyclic ABST could be utilized with a pore water pressure
transducer to indicate when liquefaction is occurring under cyclic loading. Once the pore water
pressure equals the total stress, liquefaction has occurred within the soil. Alternatively, the excess
pore pressure ratio ( /u vc
r u σ ′= ∆ ) could be monitored, which is the ratio of excess pore pressure to
initial vertical effective stress. When this ratio reaches unity, liquefaction has occurred. In dense
sands, the pore water pressure may equal the total stress over a narrow range of time during cyclic
loading. This is referred to as partial liquefaction, and soil strength will continue to decrease with

61
time under further cyclic loading (Seed & Lee, 1966). All BST units include a small porous stone
embedded in one of the shear plates for use with an optional pressure transducer and readout box.
Replacing the large external pressure transducer and readout box with a modern miniaturized pressure
transducer would enable pore pressures to be recorded in the ABST control program.
A cyclic ABST could be used to help study the effects of the total normal stress on
liquefaction behavior during in situ cyclic shearing on a vertical plane. In cyclic triaxial tests,
liquefaction occurs when pore water pressures reach the total normal stress on the plane experiencing
the maximum shear stress (Seed & Lee, 1966). The ideal way to study liquefaction in situ would be
to apply cyclic shear stresses on a horizontal plane or create a condition of cyclic simple shear.
However, the shear stresses applied by the BST shear plates act on a vertical curved borehole surface,
and because the BST is an interface test, the vertical shear stresses do not necessarily produce
complementary shear stresses on horizontal planes adjacent to the shear plates. Since the maximum
shear stress applied by the BST is in the vertical direction, liquefaction is expected to occur during a
cyclic ABST when the pore water pressures increase to the total normal (horizontal) stress applied by
the shear head.
As discussed in Section 2.2, the state of the art procedure for determining liquefaction
potential is based on in situ test methods, since obtaining an undisturbed sample of granular material
for cyclic testing is difficult and expensive. Soil liquefaction potential is often investigated with SPT
or CPT tests, and semi-empirical methods are utilized to determine liquefaction potential from these
tests. Alternatively, shear wave velocity can be measured in geophysical borehole or surface wave
tests. The shear wave velocity and CRR (see Chapter 2) are influenced by similar factors and are
both related to the small-strain shear modulus (Youd et al., 2001). Shear wave velocity tests also
provide measurement of the small-strain shear modulus used for analyzing dynamic soil response,
and therefore offer advantages over SPT and CPT tests. However, shear wave velocity tests still rely
on semi-empirical relationships between CSR and overburden stress-corrected shear wave velocity to

62
determine a soil’s potential for liquefaction. CSR is the ratio of average shear stress on a horizontal
surface to the initial vertical effective stress acting on a soil (voav
CSR '/ στ= ). In addition, borings
are often required to confirm the presence of liquefiable soils indicated in shear wave velocity tests,
since physical samples are not recovered for surface wave or seismic CPT shear wave velocity tests
(Youd et al., 2001).
As discussed above, the state of the art procedures for assessing liquefaction potential are
developed from semi-empirical correlations, with CPT and SPT testing being the two most widely
used measures of CRR. A test that directly measures the soil’s response to cyclic loading in terms of
engineering parameters, such as shear stress, pore pressure, and shearing displacement, as opposed to
empirical indices would thus find immediate application in engineering practice. Since an ABST
with some modification could potentially measure the soil’s response to cyclic loading in terms of
stress, pore pressure, and displacement, the effects of seismic excitation could be simulated, and soil’s
liquefaction potential assessed in a mechanistic rather than empirical framework.
In addition to liquefaction potential, the cyclic ABST could potentially be used to study the
general dynamic response of soils in terms of stress-strain hysteresis loops, which are used to
characterize damping ratio and shear modulus over a range of loading levels and rates. However,
similar to direct shear laboratory tests, the ABST is currently capable of measuring shearing
displacement but not shear strain, as the latter varies three dimensionally around the borehole and
shear plates. As the ABST currently measures both shear and normal stress, interpretation of the test
results in terms of stress-strain relations requires a link between the displacements measured by the
ABST and the shear strains resulting in the surrounding soil. This problem may be approached
through formulation of analytical solutions for displacements and strains in the three-dimensional soil
mass corresponding to the boundary conditions applied by the shear plates in the BST. While such
theoretical solutions in the form of cavity expansion theories have been successfully applied to
interpretation of pressuremeter tests, the boundary conditions of the BST are non-axisymmetric and

63
therefore more complex than the pressuremeter test. Another approach that is well-suited to the
geometric and material complexities of the problem is to use computational finite element or discrete
element analyses of the interaction between the soil and BST shear head to understand the state of
strain within the soil, which is the subject of Chapter 6.
The present ABST device would require a number of modifications in order to perform a true
cyclic test to measure the liquefaction potential or general dynamic response of a soil. The apparatus
would first need to be modified to apply a downward force. Currently, the shear head cannot be
loaded in compression, since loads are transferred to the shear plates through thin pull straps and
slender pull rods. In addition, the base plate is designed to provide a reaction for applying only an
upward force.
This chapter describes a preliminary investigation to determine the feasibility of modifying
the ABST to measure the in situ cyclic response of a soil. Field and laboratory results are also
provided, demonstrating the ability of the current ABST to measure cyclic loading with modifications
to the ABST apparatus and control program. The goal of this chapter is not to present the complete
development of a functioning cyclic test for liquefaction analysis, as such a project would take many
years to complete. Rather, a basis for the cyclic ABST will be developed to lay the groundwork for
future research projects.
5.1 Modifications to the Control Program
To perform a cyclic test with the current stepper motor configuration, modifications to the
control program are necessary primarily to change the displacement direction after a specified stress
or displacement limit is reached. When the stepper motor is replaced with a dynamic actuator in the
future, the program will also need to incorporate displacement and stress feedback loops to control
the excitation levels. The control program for the cyclic ABST is very similar to that utilized for the
traditional ABST, with some added algorithms and user controls. Appendix F.1 provides additional
instructions to the user manual for the operation of the cyclic ABST program.

64
The control program was first modified to enable performance of both stress-controlled and
displacement-controlled tests. The control type for a cyclic test is selected on the front panel of the
program. For both types of tests, the stress or displacement limits are entered by the user in the
control program. The shear stresses and displacements experienced by the apparatus are measured by
the Dynamometer and a string potentiometer, respectively, and recorded inside a while loop in the
program. During each iteration of the while loop, the instantaneous shear or displacement value is
compared to the specified limit. If the measured value exceeds the specified boundary, the stepper
motor is reversed, and the shear head moves in the opposite direction.
A “cyclic” toggle switch is placed on the front panel of the control program to specify
whether a cyclic ABST or a traditional monotonic ABST will be performed. Therefore, a single
program can be utilized for both cyclic and monotonic tests.
A plot of shear stress against displacement is displayed during the cyclic test. This plot can
be used to monitor the soil’s response to the specified loading sequence. In addition, the failure
envelope is provided within the control program for monotonic tests as previously described.
5.2 Mechanical Modifications
A true cyclic test would require application of positive as well as negative shear stress cycles,
i.e. a dynamic loading centered about zero stress. For such tests, the ability of the ABST to provide
downward and upward forces on the shear head is required. However, multiple modifications would
be required for the ABST to apply a downward force on the shear head. Since the straps are not able
to sustain compression, a method to transfer downward loads to the shear head will need to be
developed. Apparatus designs were considered and will be discussed in the following sections.
In addition to modifying the rods and shear head, the base plate will need to be replaced or
modified to apply a downward force. Currently, a ring gear that is rotated by the stepper motor raises
a hollow ACME threaded rod which surrounds the pull rod. The threaded rod then raises the rod
clamp that is attached to the pull rod (Figure 1.1). In order to apply a downward force, a clamp would

65
need to be placed at the base of the hollow screw in order to move the rods downward. In addition, a
restraint will need to be placed above the ring gear to prevent the ring gear from traveling up the
hollow screw. Although these modifications could be implemented, the stepper motor is not able to
supply the required cyclic torque or displacement for frequencies up to 30 Hz of interest to typical
seismic problems. The loading capacity and maximum cycling rate of the stepper motor and gear-
train configuration are inadequate for the ultimate intended use of the cyclic ABST. A design
incorporating a servo-electrical or servo-hydraulic actuator will likely be required, which is beyond
the scope of this study.
5.2.1 Preliminary Apparatus Modifications
In order to perform preliminary cyclic tests with the current ABST device, a strut was placed
between the strap hanger and the shear head. This strut prevents buckling in the straps and allows
downward forces to be transferred to the shear plates. In addition, a rod clamp was placed below the
cross-plate in order to provide a downward force. The ring gear was also clamped to the cross-plate
to help prevent upward movement of the ring gear, and a string potentiometer was used to measure
displacement of the shear plates as described in Chapter 4.
This configuration was intended strictly as a temporary measure to determine if cyclic
measurements with the ABST were a possibility. The modifications allowed some internal
movement between the base plate components. However, since displacements were measured with a
string potentiometer attached to the shear plates, an accurate stress-displacement record was obtained.
This configuration was utilized for laboratory cyclic tests performed in an air-dry loess that was
compacted in a 6 inch California bearing ratio (CBR) mold, as shown in Figure 5.1.
In addition to the laboratory tests, cyclic field tests were performed using the string
potentiometer for displacement measurement. However, instead of using the strut, the field tests were
performed with a positive static bias by loading the soil halfway to the failure shear stress, then
cycling the shear stress about the halfway point while maintaining a positive upward shear stress and

66
tensile force in the pull rod. As a result, design modifications were not required, since a net upward
force was maintained throughout the entire test. This method is similar to ASTM D3999 (2011) and
ASTM D D5311 (2011), which specify that cyclic triaxial devices should be able to apply the cyclic
load about an initial static stress. Without the use of the strut, this configuration cannot apply cyclic
shear stresses centered about zero, as is common for cyclic simple shear laboratory tests. However,
this method allowed for the feasibility of the test to be investigated without requiring design
modifications.
5.2.2 Double-Strap Shear Head Design
In order to perform a true cyclic test with sinusoidal loading, the pull rods and shear head
apparatus must be modified to apply a downward force. The straps on the current shear head
apparatus are only 0.03 inches thick and will buckle almost immediately under compression. A few
design alternatives were considered for the shear head. The first was a reinforced shear head with
guides to keep the shear plates from rotating when a load is applied to the center of the shear head.
Figure 5.1: Laboratory cyclic ABST in air dry, compacted loess
String
potentiometer line
Strut

67
For this design, however, it would be difficult to keep the shear plates from rotating relative to each
other since load would be applied at the center of the shear head. The second design considered was a
double-head design with a larger shear head used as a reaction for a smaller head to push against. A
problem with this design is that the larger anchor head would not provide a fixed anchor point and
could possibly liquefy or shear unintended soil layers unless anchored inside a hollow-stem auger.
Finally, a new double-strap design was proposed that would maintain tension in an additional set of
straps used to pull downward on the plates.
Figure F.7 of Appendix F illustrates the double-strap shear head design developed to apply
shear stresses to the soil in both upward and downward directions. The double-strap shear head uses
a pipe to transfer an applied downward force to the bottom hanger. The downward force will then
create tensile forces in the bottom strap that will lower the shear head. The straps will be pre-
tensioned to ensure that buckling does not occur in straps during loading. If buckling did occur, the
ability of the shear head to apply the desired force would not be compromised, since either the upper
or lower strap will always be in tension and pulling the shear plates up or down. However, buckling
in the straps could potentially result in slack within the apparatus. Since this slack will be taken up as
the load is reversed, an inconsistent or unintended shearing displacement behavior may result. An
initial tension will therefore help ensure that forces are immediately applied to the soil upon load
reversal. It should be noted that the box section does not contact the body of the shear head, but
surrounds it and transfers the upward and downward loads to the hangars, which in turn apply cyclic
loads to the shear plates through tension in the straps. Since the straps apply their load directly at the
shear plates, this design avoids the problems of the movable shear plates buckling or racking the shear
head if the cyclic force were applied directly to the body of the shear head.
To analyze the stresses created within the shear head apparatus during typical testing
conditions, a finite element model was created in Abaqus 6.10. The stress distributions will be used

68
to design the apparatus and ensure against material yielding. The following sections describe the
development and results of the Abaqus model.
5.2.2.1 Geometry and Meshing
Parts were developed for the hangers, straps, pipe, shear head, shear plates, piston, and pull
rod. A sketch corresponding to each part is provided in Figures F.8 through F.14, and the dimensions
for each part are provided in Table F.1 of Appendix F.2. Each part was developed with as few
generalizations as possible. However, the shear head was approximated as a solid cylinder with a
solid plate or end cap on each end of the cylinder (Figure F.11). The true shear head cylinder is
hollow, but the interface between the thin, hollow cylinder and the end caps led to meshing
difficulties that were unable to be resolved. Specifically, the meshes were highly distorted and
consisted of very small elements. To alleviate these problems, the shear head was approximated with
a solid cylinder to help ensure stability in the final model. Since the double-strap apparatus is
designed to minimize torques on the shear head which would cause the shear plates to rotate, this
approximation should have a limited impact on the stress analysis. The pull rods were replaced with
stout aluminum loading rods sized to withstand the required compressive forces and braced every 6
feet to prevent buckling (Ashlock 2012). The new double strap shear head was analyzed in detail,
and the loading rods were only incorporated into a few of the finite element models in order to
identify their effect on the final results.
The mesh for the solid parts consisted primarily of hexahedral elements. Quadratic, fully
integrated elements were used to provide accurate stress distributions. The strap was the only
component that was not modeled as a solid. Due to its slenderness, the strap was modeled with linear
shell elements. Distortions of the mesh were minimized for all parts to provide accurate results. In
addition, a uniform, fine mesh size was used to help ensure accurate results without excessive
computational demand.

69
5.2.2.2 Material Properties
A material with properties corresponding to spring steel was defined for the strap, and a
material with aluminum properties was defined for the loading rod. The remaining parts utilized a
material with the properties of stainless steel. The properties of these materials are provided in Table
F.2 of Appendix F.2. The modulus of elasticity and density corresponding to each material are
defined within the model. The yield strength of each material is utilized to determine if the stresses
resulting from the analysis will create excessive deformations or failure in the apparatus.
Rayleigh damping and critical damping ratios were both examined for modeling the damping
of the apparatus materials. A mass proportional Rayleigh damping factor was used in the analysis,
and results for a range of damping factors were compared. Stiffness proportional Rayleigh damping
factors could not be applied to the model due to numerical instabilities. The critical damping ratios
could only be applied for linear perturbation steps, and these steps required that the shear plates were
fixed in each degree of freedom. To allow for a direct comparison between the different damping
treatments, Rayleigh damping was therefore also analyzed with the plates fixed in each degree of
freedom. The maximum stresses in the apparatus for the different damping treatments are presented in
Table F.4. After comparing the results from a variety of damping conditions, it was determined that
errors in the maximum stress associated with the defined damping will be limited to approximately 6
ksi. Since this is less than ten percent of the yield strength in the shear head apparatus, the error is
considered to be acceptable.
5.2.2.3 Initial Conditions
The initial boundary conditions defined for the model were maintained throughout each step
of the analysis. These boundary conditions consisted of fixing the nodes on the exterior of the shear
plates against displacement in each degree of freedom except for the vertical direction. Vertical
springs and dashpots in parallel were then specified as a first-level model of the soil’s resistance.
Each of the spring/dashpot elements had a stiffness of 2,000 lb/in and damping ratio of 10%. These

70
values were based on previous shear stress-displacement backbone curves measured in monotonic
(i.e. non-cyclic) ABSTs (Ashlock, 2012). Since Abaqus requires specification of a damping
coefficient rather than a damping ratio for the dashpot, Equation 5.1 was used to determine the
damping coefficient (c) associated with the chosen viscous damping ratio (ζ). In this equation, m
represents the system’s mass of 6.54 kg, and ωn represents the system’s circular natural frequency,
which was determined to be 327 rad/sec. From Equation 5.1, a viscous damping coefficient of 428
kg/s was calculated for the soil. In addition, hysteretic damping was investigated by multiplying the
right-hand side of Equation 5.1 by the ratio of natural frequency to excitation frequency. This
resulted in a damping coefficient of 743 kg/s for hysteretic damping at an excitation frequency of 30
Hz. The main difference between viscous and hysteretic damping models is that the viscous damping
force is linearly proportional to excitation frequency, while the hysteretic damping force is
independent of excitation frequency. Table F.3 indicates that the hysteretic damping conditions result
in lower system stresses. As a result, viscous damping leads to a worst-case condition, and this
condition will be utilized for the stress analysis.
2
nc mζ ω= ( 5.1)
The straps were also preloaded with an initial tensile force of 800 lb per strap, which would
be applied by the pipe and box section assembly of Figure F.7. As mentioned above, spring steel was
utilized for the straps, which has a yield stress between 60 and 150 ksi depending on the particular
grade. The maximum soil shear stress measured by the monotonic BST is typically 20 psi, which
corresponds to a pull-rod force of 200 lb at the top of the hanger (100 lb per strap). If this maximum
force is applied only to the upper hangar and straps while the initial tension of 800 lb in each strap is
not changed (i.e. the amount of the 200 lb force taken up by the pre-compressed pipe is neglected),
the straps will experience a net tensile stress of approximately 39 ksi, which is at most 65 percent of
the yield strength. However, this calculation is only a preliminary static analysis, and the dynamic
loading effects will need to be closely examined. In addition, an initial tensile force of 800 lb in each

71
strap will allow for load reduction under the superimposed dynamic loads without the straps buckling
during the tests. However, a method for removing this strap load after testing should be provided in
order to prevent the possibility of significant tensile load reduction in the straps due to creep.
5.2.2.4 Loading Conditions
The maximum load applied to the shear head during typical monotonic testing conditions is
200 lb, which corresponds to a shear stress of 20 psi on the soil surface, as shown in Figure 5.2. In
order to simulate potential dynamic loading conditions in the cyclic ABST, the maximum load of 200
lb was applied as a sine wave at loading frequencies of 2 Hz and 30 Hz in the finite element model by
scaling the load vector with time. The dynamic load was applied to the top hanger. In the simulation
case that incorporated the loading rods, a sinusoidal, concentrated force of approximately 668 lbs was
specified at the top of the loading rods to give the maximum force required to move the system. The
668 lb force applied to the loading rods was determined with a preliminary dynamic analysis that
treated the rods as rigid bodies and assumed simple harmonic motion of the shear head with no soil
resistance (Ashlock, 2012). The 668 lb force applied at the top of the loading rods resulted in stresses
and displacements that were comparable to the models that did not include a loading rod. Therefore,
the 668 lb force applied to the loading rods was used in later models.
200
Force (lb)
Displacement (in.)
k0
0.05 0.2
ks
Figure 5.2: Anticipated typical force-displacement response
of soil in cyclic test
Source: Ashlock (2012)

72
5.2.2.5 Results
The maximum stresses generated in the double-strap apparatus under typical testing
conditions are presented in Table F.3. The stresses for each part are less than their corresponding
yield strengths. Therefore, significant plastic deformation is not expected to occur in the double-strap
apparatus under typical testing conditions. However, with an initial strap tension of 800 lb, the
maximum stress in the pipe and shear plates is approximately 80 percent of the yield strength. Since
the yield strength will correspond to minor plastic deformation, a maximum stress of approximately
50 to 60 percent of the yield strength would be more desirable.
When the initial strap tension is reduced to 550 lb, the maximum stress in the pipe is reduced
to approximately 60% of the yield strength, while the maximum stress in the shear plates remains at
approximately 80% of the yield strength. As a result, it may be necessary to use a material with
larger yield strength for the shear plates. If ASTM A-514 high strength steel is used, the maximum
stress in the shear plates will be approximately 60% of the yield strength, and the probability of
plastic deformation will be reduced. However, it is likely that the soil will yield long before the shear
plates, and hysteretic damping conditions resulted in reduced shear plate stresses. The large
calculated stresses on the outside of the shear plates are a result of the linear elastic soil behavior that
results from the use of springs and dashpots with assumed damping conditions. At large stresses, this
linear elastic model will not properly represent yielding behavior in the soil, and a more sophisticated
soil constitutive model incorporating hyperelasticity or plastic yielding should be used.
Along with the stresses induced in the pipe and shear heads, the maximum stress in the straps
was found to be 30% to 85% of the yield stress. It is therefore important to choose a type of spring
steel that has a yield strength larger than 100 ksi. The maximum stress calculated in the hangers is
approximately 20% of the yield strength, and that in the loading rods is approximately 10% of the
yield strength. However, reducing the cross-sectional area of the rods would also reduce their
stiffness, which would make dynamic control of the shear head displacement more difficult.

73
From the above analysis, it can be concluded that an initial strap tension of 550 lb will result
in acceptable stresses in the double-strap apparatus. These lower stresses will also enable larger loads
of up to 300 lb to be applied to the upper hanger. It is likely that the maximum stresses calculated by
Abaqus result from stress concentrations, since the maximum stresses often occurred at corners.
These stress concentrations will result in a conservative comparison between the calculated stresses
and the yield strengths, and can be reduced by rounding and filleting of corners. The presence of
stress concentrations in the simulation increases the confidence that the double-strap apparatus will
not likely experience plastic deformations if an initial strap tension of 550 lb is utilized.
The 550 lb strap tension was specified as an initial condition in Abaqus, and the model was
brought to equilibrium before the dynamic load was applied. However, the initial strap stress also
causes compression of the pipes, which results in a smaller equilibrium force of 490 lb or equivalent
stress of 21.0 ksi in the straps at the beginning of the dynamic analysis. For the physical device, the
tension in the straps should therefore be slowly increased to 490 lb before using the apparatus for
testing. This initial force can be determined from strain gauges on the straps, and the force can be
applied with a screw mechanism in the lower section of the pipe, since space for an accelerometer is
only required above the shear head. As mentioned above, the strap tension should be removed after
testing to prevent strap elongation due to creep. Additionally, the initial strap tension of 490 lb will
result in a minimum strap stress of 8.4 ksi under the action of the dynamic loads, which maintains
tension in the straps throughout the test.
5.3 Dynamic Instrumentation
Additional instrumentation will be required to convert the ABST from a monotonic test to a
cyclic test. Since the applied force and resulting displacement of the shear plates are the two primary
measurements of importance for a cyclic test, methods for accurately measuring these variables will
need to be developed. Although an accurate measurement of force is provided in the current ABST,
the transition to an actuator will remove the current Dynamometer design and require an alternative
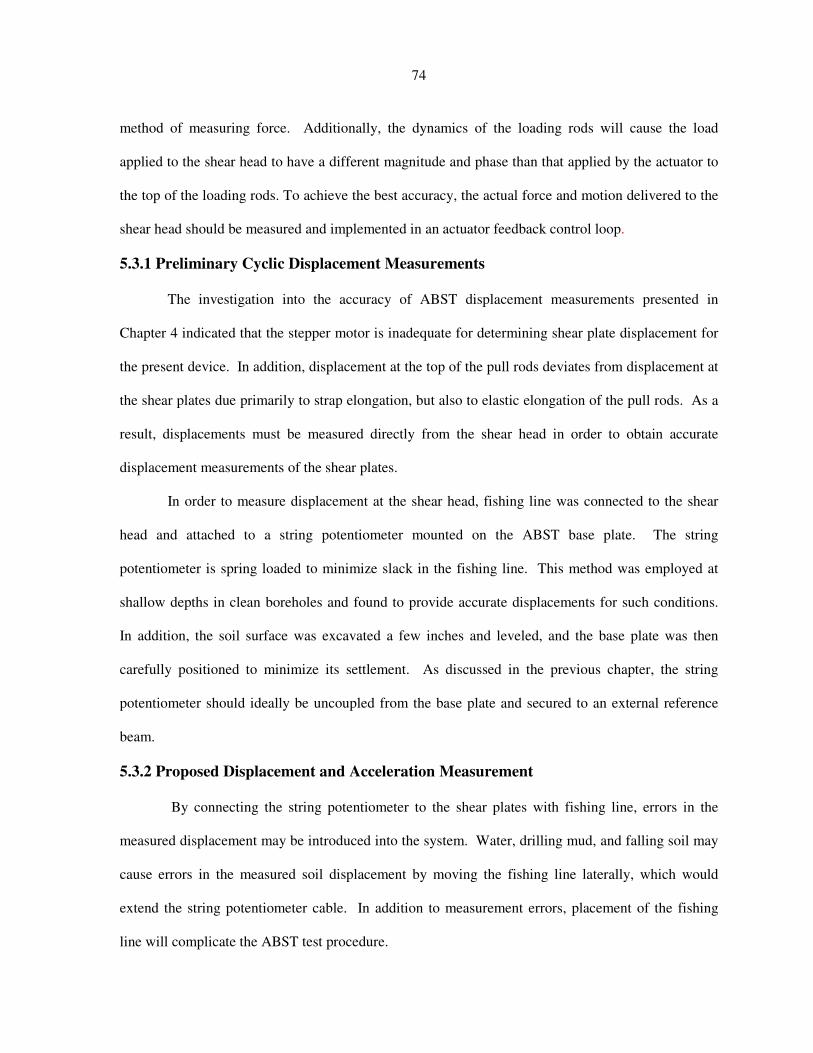
74
method of measuring force. Additionally, the dynamics of the loading rods will cause the load
applied to the shear head to have a different magnitude and phase than that applied by the actuator to
the top of the loading rods. To achieve the best accuracy, the actual force and motion delivered to the
shear head should be measured and implemented in an actuator feedback control loop.
5.3.1 Preliminary Cyclic Displacement Measurements
The investigation into the accuracy of ABST displacement measurements presented in
Chapter 4 indicated that the stepper motor is inadequate for determining shear plate displacement for
the present device. In addition, displacement at the top of the pull rods deviates from displacement at
the shear plates due primarily to strap elongation, but also to elastic elongation of the pull rods. As a
result, displacements must be measured directly from the shear head in order to obtain accurate
displacement measurements of the shear plates.
In order to measure displacement at the shear head, fishing line was connected to the shear
head and attached to a string potentiometer mounted on the ABST base plate. The string
potentiometer is spring loaded to minimize slack in the fishing line. This method was employed at
shallow depths in clean boreholes and found to provide accurate displacements for such conditions.
In addition, the soil surface was excavated a few inches and leveled, and the base plate was then
carefully positioned to minimize its settlement. As discussed in the previous chapter, the string
potentiometer should ideally be uncoupled from the base plate and secured to an external reference
beam.
5.3.2 Proposed Displacement and Acceleration Measurement
By connecting the string potentiometer to the shear plates with fishing line, errors in the
measured displacement may be introduced into the system. Water, drilling mud, and falling soil may
cause errors in the measured soil displacement by moving the fishing line laterally, which would
extend the string potentiometer cable. In addition to measurement errors, placement of the fishing
line will complicate the ABST test procedure.

75
In order to simplify the test and minimize measurement errors, an accelerometer is proposed
for measuring the motion of the shear head. The accelerometer could be attached to the top of shear
head within the pipe that transfers compressive loads in the double-strap design. The box section on
this pipe will nearly contact the end caps on the shear head, and rubber seals could be installed
between the box section and end caps to prevent the accelerometer from being exposed to water.
Additionally, an epoxy material could be utilized as a seal. The rubber seal or flexible epoxy would
not transfer significant loads to the shear head. With proper attention to filtering and trend-removal
techniques to reduce numerical error, the acceleration time-histories could be double-integrated to
determine the shear head displacement.
5.3.3 Proposed Force Measurement
The force applied to the shear plates and resulting shear stresses applied to the soil could be
measured with a variety of methods. One of the simplest and most cost effective methods would be
to install strain gauges on the steel pull straps attached to the shear plates. These strain gauges could
be used to monitor the stresses in the straps. The gauges on the four pull straps could also be
analyzed to determine whether the two shear plates apply equal loading to the soil. The placement of
the strain gauges will depend on the final design of the double-strap shear head, which is left for
subsequent studies.
5.3.4 Pore Water Pressure Measurement
The measurement of pore water pressure is important for examining the liquefaction potential
of soil. As discussed in Chapter 4, liquefaction can be indicated by the pore water pressure in the soil
reaching the total stress or by the excess pore pressure ratio reaching unity. In stress-controlled tests,
the displacement will grow to large values upon liquefaction, while in displacement-controlled tests,
the applied shear stress will decrease towards zero. Pore pressure measurements will therefore allow
for a more complete representation of soil behavior and liquefaction potential.

76
When using the cyclic ABST to determine the damping ratio and shear modulus of soil, a
transducer to measure pore water pressure would identify any generated pore water pressures during
shearing. These pore water pressures could be used to indicate the effective stress in the soil that
corresponds to the stress-displacement behavior.
Since the proposed cyclic ABST could also be used for a monotonic test, pore water pressure
measurements could also be useful for monitoring consolidation after the application of a normal
stress. In addition, pore water pressure changes during and after the shearing stage can be monitored.
Pore pressure readings during the monotonic shearing stage would allow for the resulting strength
parameters to be more easily interpreted as drained or undrained.
5.4 Cyclic ABST Results
Preliminary cyclic ABST tests were performed in both laboratory and field settings. The
effects of normal stress and shearing rate were investigated to determine whether the cyclic ABST
can potentially be used to obtain meaningful measurements of a soil’s cyclic behavior.
5.4.1 Laboratory Results in Compacted Loess
The laboratory testing methods were intended to cycle the applied shear stresses about zero in
both upward and downward directions. Since this required the temporary modifications discussed in
Section 5.2.1, the apparatus experienced internal movements and was unable to apply large
downward loads. Therefore, small upward and downward cyclic stresses of only 0.75 psi were
applied to the soil. The results for these tests are presented in Appendix G.1. It should be noted that
some of the tests did not exhibit a symmetric cyclic load about zero stress. For example, Figure G.7
shows maximum upward and downward shear stresses of approximately 1.3 and -0.4 psi,
respectively. This was due to a faulty tare value that led to an initial static shear stress bias of -0.4
psi. The shear stresses were then automatically cycled about this value by the ABST control program
which resulted in hysteresis loops that are not symmetrical about zero shear stress.

77
Figure 5.3 shows results from a compacted loess sample with an applied normal stress of
5 psi that are representative of the laboratory results obtained. The remaining test results are
presented in Appendix G.1. Based on these preliminary results, it is evident that the cyclic ABST can
potentially produce useful results for cyclic loading of soils. In addition, the results generally display
the type of stress-displacement hysteresis loops that were expected for the cyclic tests. However,
displacement readings were inconsistent between tests, and the stiffness and damping characteristics
also appear to be inconsistent and independent of the applied normal stress. Based on many previous
studies of dynamic soil behavior, it is expected that larger normal stresses will result in increased
stiffness and decreased damping, which is indicated by steeper hysteresis loops with smaller areas.
The inability of the current base plate assembly to properly apply a downward force is one reason for
the observed inconsistencies, since the base plate assembly’s upward movement was restricted only
by attaching clamps. Additionally, since the base plate was only able to apply small downward loads
and displacements, small errors in the initial shear stress tare value had noticeable effects on the
-1.5
-1
-0.5
0
0.5
1
1.5
-0.004 -0.002 0 0.002 0.004 0.006
Sh
ea
r st
ress
(p
si)
Shear head displacement from string pot (in)
Cyclic ABST on Compacted, Air Dry Loess
5 psi Normal Stress: Test 2
Figure 5.3: Stress-controlled cyclic ABST laboratory results

78
results. Additional research studies should focus on replacing the base plate with an actuator attached
to a drill rig or reaction frame to apply larger and more consistent downward loads.
5.4.2 Field Tests in Sandy Glacial Till
Field tests were performed with the cyclic ABST to further examine its ability to measure the
cyclic response of soil in situ and to investigate whether an influence of shearing rate on modulus and
damping could be measured. Since the laboratory results indicate that the current base plate design is
unable to apply consistent downward forces, tests were performed with a static shear stress bias. The
static bias tests were performed by first determining the shear strength corresponding to a given
normal stress in a traditional monotonic test. This shear strength was then used to decide upon
appropriate cyclic stress limits for the test. For example, Figure G.9 indicates that a shear strength of
9 psi was supplied by the soil under an applied normal stress of 10 psi. The stress limits were then
chosen to be 1 and 8 psi for cyclic loading, so that the cyclic shear stress would not exceed the shear
strength, nor be reduced to zero. Cyclic stress limits were determined similarly for the other cyclic
tests. These stress limits were selected in order to obtain larger stress-displacement hysteresis loops
than possible in the laboratory tests, so that the loops can be more easily compared.
The field tests were performed in a sandy glacial till with a USCS group name of clayey sand.
Borings were made to a depth of 2 feet with a 3.25-inch diameter hand auger, and then a 2.5-inch
outer diameter split-soil core sampler was driven a distance of 6 inches below the bottom of the
borehole. The recovered core consisted of relatively disturbed soil and was utilized to classify the
soil. The shield provided with the BST was then used to over-ream the cavity left by the core
sampler. The shield created a smooth 3-inch diameter cavity of appropriate size for testing with the
ABST, and the cavity walls were carefully trimmed to minimize soil disturbance or smearing at the
testing surface. After the monotonic test was performed to determine the soil’s shear strength, the
shear head was rotated 90 degrees and the cyclic tests were performed.

79
Tests were performed in two separate boreholes separated by a distance of approximately five
feet. Appendix G.2 presents the results obtained from the cyclic tests performed in each borehole at
varying shear rates. Figure 5.4 contains plots of the cyclic response measured in the second borehole,
in which the raw loops of Figures G.15 through G.17 were corrected to remove the migration caused
by the static bias to enable calculation of loop areas. The loops were corrected by calculating the
amount of migration between successive upper limits and then using this displacement difference to
offset the top of the loop. From this figure, it can be seen that the rate of shearing has a significant
effect on the initial stiffness of the soil, since the upper stress limit is reached with less displacement
as the loading rate is increased. However, with subsequent cyclic loading, the stress-strain loops were
essentially independent of the shearing rate.
In dynamic laboratory element tests, shear stress is typically plotted against shear strain to
determine the shear modulus and damping ratio of a soil. Since the shearing displacement can be
obtained from the cyclic ABST, but the shear strain varies three dimensionally and is currently
unknown, an “equivalent” damping ratio and shear modulus were determined from the stress-
Figure 5.4: Comparison of stress-controlled cyclic ABST field results for boring 2
0
1
2
3
4
5
6
7
8
9
0 0.005 0.01 0.015 0.02 0.025 0.03 0.035 0.04 0.045 0.05
Sh
ea
r S
tre
ss (
psi
)
Shear head displacement from string pot (in)
Cyclic ABST in Sandy Glacial Till
10 psi Normal Stress with Loops Corrected for Migration: Boring 2
0.2 rev/s
5 rev/s
7 rev/s

80
displacement plots. These values should not be used for engineering designs, but are useful for
analyzing the potential of the cyclic ABST. From the test results, the equivalent secant shear
modulus was calculated as the slope of the line passing through the loop endpoints. The equivalent
damping ratio (D) was determined from ASTM D3999 (2011) with Equation 5.2, where WD is the
area of the entire loop and WS is the area of a right triangle with two of its vertices corresponding to
the maximum stress and center of the loop. The final vertex of the triangle has an x-coordinate
corresponding to the maximum stress of the loop, and a y-coordinate corresponding to the center of
the loop.
4
D
S
WD
Wπ= (5.2)
Figures G.21 and G.22 in Appendix G.2 show the calculated damping ratio (D) versus loop
number, and indicate that shearing rate did not have a significant effect on the measured equivalent
damping ratio. Figure G.23 and G.24 contain the equivalent secant shear modulus, which slightly
increases as the shearing rate is increased. The equivalent damping and modulus values presented in
these figures were determined for each full loop obtained at the shearing rates tested. Only those tests
having cyclic stress limits of 1 and 8 psi were used to calculate the equivalent values. Since the
equivalent values are not significantly affected by the shearing rate, the cyclic ABST can be utilized
effectively at the higher shearing rates for this particular clayey sand. This will significantly increase
the efficiency of the test, since individual tests can be performed in a short amount of time.
Figure G.18 presents results from a displacement-controlled test where the cyclic
displacement limits are chosen based on the hysteresis loops observed in the previous stress-
controlled tests. For this soil, the shear stresses required to reach the specified displacement limits
were observed to decrease with increasing loading cycles. This behavior clearly indicates strain
softening with increasing cycles, indicating that this particular soil’s strength decreases under large

81
cumulative strains. These results further demonstrate the potential usefulness of the cyclic ABST if an
appropriate measure of shear strain can be determined.
5.5 Cyclic ABST Conclusions
The foundation for future development of a working cyclic ABST was presented in this
chapter. The preliminary field and laboratory tests performed with the current cyclic ABST device
demonstrated that future versions of the cyclic ABST have the potential to accurately measure the
cyclic response and possibly quantify the liquefaction potential of a soil. However, modifications
need to be made to the cyclic ABST apparatus to allow for application of sinusoidal or random
loading at frequencies up to 30 Hz for characterization of seismic response. A double-strap shear
head design that allows for the application of a downward force was analyzed using a dynamic finite
element simulation, and stresses in the device under the proposed large cyclic loads were found to be
within safe limits. In addition to the shear head design, the base plate will need to be replaced with an
actuator attached to a drill rig or other reaction frame to supply the required loads. Design of such an
actuator and accompanying feedback control system is beyond the scope of this study, and is
recommended for future research.
The cyclic ABST can apply shear stresses to soil in a vertical but not horizontal direction,
except for special cases where a horizontal borehole can be created. This is a known limitation of the
traditional BST, and this limitation remains for the cyclic ABST. For seismic and liquefaction
problems, the primary case of geotechnical interest is that of vertically propagating, horizontally
polarized shear waves, which cause horizontal cyclic stresses in a soil mass. Such stresses cannot be
applied in situ by the proposed cyclic ABST, but are a case for further research. Similarly, complete
in situ characterization of the properties of anisotropic soil will not be feasible without modification
to enable application of horizontal shear stresses. However, the vertical shear strength measured with
the traditional BST was determined by Handy and Fox (1967) to often properly represent the strength

82
of the soil, and testing with the final cyclic ABST apparatus will allow investigations into the impact
of anisotropic soil properties on cyclic response.
Although many of the discrepancies between a traditional cyclic test and the cyclic ABST can
potentially be resolved, the migration of stress-displacement loops may be a lasting concern for the
cyclic ABST. According to ASTM D3999 (2011), the loop closure between two successive shear
stress peaks must be less than an axial strain of 0.2 percent in a cyclic triaxial test, and large loop
closures may be related to anisotropic consolidation. Since it would be difficult to maintain isotropic
consolidation for the cyclic ABST, loop closure may be a reoccurring difficultly for the test. The
stress-displacement loops in this study were corrected for migration to determine the “equivalent”
damping ratio and shear modulus for the soil, but it is recommended that the device be modified with
an actuator to enable true bi-directional loading with zero static bias. Additional testing will be
required with the final cyclic ABST to determine if correcting the loops for migration is an acceptable
procedure.
Additional studies will also be required to obtain measures of shear strain from the measured
shear displacements, since the damping ratio and shear modulus are based on shear stress-strain
response. An appropriate computational framework for this task may be possible by using finite
element or discrete element methods, which feature constitutive models that incorporate plasticity and
coupled pore pressure generation. In addition, the “equivalent” shear modulus and damping ratio
presented herein for the cyclic ABST could be compared to the shear modulus and damping ratio
determined from conventional cyclic triaxial tests. These comparisons could be used to develop a
correction for the “equivalent” displacement-related properties to obtain their strain-related
counterparts.
Despite the additional modifications required for the cyclic ABST, the present study has
demonstrated the feasibility of the test to provide measurement of expected cyclic shear behavior for
soils in situ. With further modification, the cyclic ABST has the potential to directly determine the

83
liquefaction properties of a soil in situ in terms of mechanistic properties, such as stress, displacement
and pore pressure, rather than the empirical indices used in modern engineering practice. As a result,
the cyclic ABST has significant potential to become a useful dynamic testing tool in the future.

84
CHAPTER 6. NUMERICAL ANALYSIS OF THE BST
It is desirable to perform a numerical analysis of the borehole shear test in order to better
understand the strains that the soil experiences during shearing. By understanding the stress-strain
behavior, the strain-dependent shear modulus and damping ratio for a soil could be determined during
a cyclic test. In addition, an understanding of strains would allow for the soil’s liquefaction potential
to be more accurately determined.
A numerical analysis of the BST would also allow for an examination of the actual stress
conditions imposed upon the soil during the test. Although the BST has been shown to give soil
friction angles that closely agree with laboratory test measurements, it is beneficial to understand the
accuracy of the assumptions of uniform shear stress and normal stress distributions. The actual three-
dimensional states of stress and strain from static and dynamic numerical analyses would be of use to
future researchers.
6.1 Development of Finite Element Model
The process of developing a complete finite element model for a cyclic BST would be
extensive if all device components and geometries as well as their interactions were modeled in
addition to the coupled soil-water continuum behavior. To provide a preliminary understanding of
the BST-soil interaction, this study will focus on analysis of a monotonic BST in dry sand using the
finite element program Abaqus (Dassault Systems, 2010). The results from this static study cannot be
utilized to determine the cyclic shear modulus or damping ratio, since these properties require a cyclic
test. However, the initial small-strain tangent modulus Gmax can be determined if a representative
stress-strain relationship can be calculated for the soil. It is expected that stresses and strains will
decrease with distance from the shear plates. Owing to the dependence of the small-strain shear
modulus of soils on the state of stress, a three-dimensional distribution of shear modulus may
potentially be obtained. Modeling the strains related to liquefaction will also require an analysis of

85
excess pore water pressures developed during cyclic testing in a saturated sand. Such an analysis will
require a coupled analysis of the solid matrix and pore fluid, with the ability to model pore pressure
generation under dilation and contraction. Although this may be beyond the capabilities of the
Abaqus finite element program, future studies may benefit from the use of finite difference codes
with pore pressure generation capabilities. The present model therefore has limitations related to
extending the capabilities of a cyclic BST for liquefaction studies, but will serve as a starting point for
future studies. Additionally, the model geometry and boundary conditions generated in the present
study may be useful for future studies. In the following analyses, the effects of mesh density will be
investigated, and the nature of variation of the calculated stress and strain distributions in the soil
around the shear head and borehole will be demonstrated.
6.1.1 Model Geometry
The developed finite element soil model for a portion of a borehole in soil is shown in Figure
6.1. This model consists of a cube with a length, height, and width equal to nine inches. The
borehole diameter utilized is three inches, and the depth of the borehole is eight inches.
Small, cubic dimensions were utilized for the model in order to obtain a very fine mesh
without exceeding program limitations related to the allowable number of nodes. In addition, small
dimensions allow for a model with a very fine mesh to complete calculations in a reasonable amount
of time. If a cyclic test were investigated, “infinite elements” (also referred to as a “silent and
absorbing boundary”) would need to be specified at the edges of the cube. Since stress waves can
rebound from the model boundaries and interfere with subsequent calculations during dynamic
simulation, infinite elements would be necessary to absorb these waves at the perimeter of the model
and help prevent interference.
The shear plate geometry was not altered from the geometry utilized in the analysis of the
double-strap shear head apparatus as presented in in Table F.1. The base of the shear plates is located
one inch above the base of the borehole in the monotonic BST model.

86
6.1.2 Model Meshing
The model part representing the soil consisted of hexagonal, 8-node linear brick elements.
Although 20-node quadratic bricks would potentially allow for an even more accurate analysis, the
software is not able to support the number of nodes that correspond to quadratic elements at the mesh
densities desired. A parametric study on the effect of mesh density is reported in Section 6.3.
The model of the shear plates also used hexagonal, 8-node linear brick elements. In order to
model the contact between the shear plates and the soil, the corresponding nodes on the shear plate
and soil were tied together. Although this contact treatment will not model slippage between the
shear plates and soil or punching through the soil, it will approximate the testing conditions and allow
for the stresses to be transferred from the shear plates to the soil. The actual contact conditions
between the shear plates and soil would be difficult to predict and likely change from test to test.
Although substantial effort on modeling the contact is beyond the scope of this investigation, the
mesh density of the shear plates was varied to identify whether mesh continuity between the shear
plates and soil significantly affected the results. This investigation is described in Section 6.4.
Figure 6.1: Monotonic BST soil model

87
6.1.3 Soil Properties and Constitutive Modeling
The monotonic BST model utilized moderately dense, dry sand as the material in the soil
domain. The constitutive model selected for the sand was the elasto-plastic Drucker-Prager model.
This model uses input parameters to define a yield surface having an elliptical shape in principal
stress space. At stress states inside this yield surface, linear elastic material behavior will occur as
determined by the specified Young’s modulus and Poisson’s ratio. At stress states on the yield
surface, plastic deformation will occur. A non-associative flow rule is used in the region of shear
failure. Associative flow occurs beyond the yield surface and below the failure envelope on the cap
(Abaqus, 2010). The Drucker-Prager model allows for the yield surface to be increased as plastic
strain occurs through the use of hardening parameters which account for strain-hardening material
behavior. In addition, the Drucker-Prager model allows for small tensile stresses to be developed in a
material. This will lead to small irregularities between the actual and modeled soil behavior, since
dry un-cemented sand will have essentially zero tensile strength.
The Mohr-Coulomb constitutive model is another material option provided in the standard
Abaqus interface. In principle stress space, the Mohr-Coulomb constitutive model has a polygonal
yield surface, whereas the Drucker-Prager model has a smooth elliptical yield surface. There are
additional minor differences between these two models, including the fact that the Mohr-Coulomb
model does not consider the influence of the intermediate principal stress.
The Drucker-Prager constitutive model was selected to model soil behavior because it was
deemed to produce more appropriate results. The Mohr-Coulomb model also failed to converge when
Table 6.1: Soil properties for BST FEM analysis
Drucker-Prager
Angle of Friction (°) 35
Flow Stress Ratio 1
Dilation Angle (°) 0
Elastic Young's Modulus (psi) 5000
Poisson's Ratio 0.3
Table 6.2: Drucker Prager hardening
Plastic Strain Yield Stress (psi)
0 10.9
0.058 12.0
0.116 10.9

88
modeling a circular borehole, but this shortcoming was not present for square holes.
Table 6.1 contains the material properties of the soil used for the Drucker-Prager plasticity
model and elastic model. Table 6.2 presents the parameters that were used to specify the hardening
behavior of the constitutive model. A unit weight of 102 pcf was used for the soil.
The flow stress ratio in the Drucker-Prager model specifies the ratio of flow stress in triaxial
tension to flow stress in triaxial compression (Abaqus, 2010). For this preliminary analysis, it was
assumed that the tensile and compressive flow stresses were equal. The dilation angle is used to
quantify the inelastic volume change during shearing. Since the sample is assumed to be moderately
dense, a value of zero was used for the dilation angle, corresponding to a soil near the critical void
ratio. If the soil was very loose, this value would be negative. However, negative values are not
accepted by the constitutive model implemented in Abaqus.
The Drucker-Prager model should only be used for analyses of the monotonic BST. Both the
Drucker-Prager and Mohr-Column constitutive models are not able to consider cyclic stress, large
stress reversals, and pore water conditions (Lade, 2005). Therefore, a more rigorous constitutive
model should be used to model the cyclic ABST for general unsaturated and saturated conditions.
In addition to the soil model, stainless steel material properties were specified for the shear
plates. These material properties were discussed in Chapter 5 and presented in Table F.2.
6.1.4 Boundary and Initial Conditions
On the base of the soil cube, boundary conditions that fix the displacement of each node in
the x, y, and z directions were specified. These boundary conditions will prevent rigid body modes.
Displacements were fixed normal to the external sides of the cube to represent the pressure that would
be present from adjacent soil. Displacements are typically not fixed in the vertical direction on the
sides of a soil model in order to allow settlement.
Displacements were also fixed normal to the borehole while leaving the nodes free to move in
the vertical direction. These boundary conditions simulate a casing that may be utilized to prevent

89
caving in a non-cohesive soil. As expected, convergence was not obtained without this boundary
condition. However, an actual casing would allow soil to compress and leave a gap between the
borehole and casing. With the nodes fixed in the normal direction, small tensile forces would be
developed at the locations that would otherwise separate from the casing, leading to minor modeling
errors. In order to accurately model a borehole shear test with a borehole casing, the soil nodes
adjacent to the shear plates were not fixed normal to the borehole, and the normal stress provided by
the shear plates supported the borehole.
An initial effective stress was given to the soil in order to specify equilibrium. If effective
stresses are not specified, the model will find equilibrium and large settlements will typically result.
The effective stress specified was equal to the soil unit weight multiplied by the soil depth, since the
sand is dry. An equilibrium step was utilized before the normal stress was applied to the plates in
order to verify that excessive settlements did not occur.
6.1.5 Loading Conditions
The loading applied to the soil consists of shear and normal stresses. The normal stresses are
applied during a step immediately after equilibrium is reached. Shear stresses are then applied in a
step after the normal stress application.
The normal stresses are applied as a uniform pressure on the flat back of the shear plates. For
this model, it was desired to create a normal stress of 20 psi in the soil. As a result, a force of 100
pounds was to be applied to the back of each plate, since the front of the plates has an area of five
square inches. The back of the shear plates has an area of 4.55 inches. Therefore, in order to apply
the desired force of 100 pounds, a uniform pressure of 22 psi was applied to the back of the plates.
The shear stresses are also applied as a uniform pressure on the back of the shear plates. For
this model, a shear stress of 10 psi was applied to the soil. Since the friction angle specified is 35°, a
shear stress of approximately 14 psi would be required to fail the soil under the specified normal
stress of 20 psi. In order to apply a shear stress of 10 psi to the soil, the approach described in the

90
previous paragraph was utilized to determine that a shear stress of 11 psi would need to be applied to
the back of the shear plates.
In addition to the normal and shear stresses, gravity was applied to the entire model for every
step. By specifying the initial effective stresses in the soil, settlement did not result from the gravity
loads.
6.2 Normal Stresses Resulting from the Shear Plate
In order to ensure that the model is functioning as intended, the normal stress distribution in
the soil adjacent to the shear plate can be compared to theoretical stress distributions in an elastic,
non-cohesive material. The theoretical stress distribution in an elastic material beneath a rigid contact
is smallest at the center and increases to infinity at the edges. A real material such as sand cannot
sustain the infinite stress, and yielding therefore occurs under the edges resulting in a saddle shape.
Since there is a lack of cohesion and lateral confinement in sand, the stress at the edge of the
foundation will increase to support the load (Das, 2010).
Figure 6.2: Normal stress distribution in soil along shear plate width (0.25” mesh)
Shear Plate Position

91
Figure 6.2 shows the normal stress distribution obtained across the width of the plate at its
mid-height. The normal stress distribution was obtained using cubic mesh elements with dimensions
of 0.25 inches. This was the finest mesh investigated. From this figure, it can be seen that the sand
possesses the expected normal stress distribution. However, two deviations from the theoretical stress
distribution exist. These deviations include the increased stress beyond the edges of the shear plate
and the slight tensile stresses outside the shear plate. It is not expected that the theoretical normal
stress distribution will perfectly match a finite element analysis, but the tensile stresses are a shortfall
of this model. These tensile stresses result from the constitutive model utilized and the fixed nodes
along the borehole. Although the tensile stresses are not desirable, the overall results are
approximately equal to the theoretical distribution, and the model is considered to be acceptable.
6.3 Effect of Soil Mesh Density
In order to increase the efficiency of future analyses of the BST model, it is desirable to
determine the largest meshing element size that will give acceptable results. The primary method
Figure 6.3: Normal stress distribution in soil along shear plate width (0.35” mesh)

92
used to judge the adequacy of the various models was to examine the normal stress distribution along
the width of the shear plate.
The results of Figure 6.2 were obtained with the finest mesh and are considered to be the
benchmark. The mesh element size utilized in this model approaches the minimum allowed by the
program. The maximum soil normal stress calculated by the program at the plate mid-height is
approximately 18 psi, which differs from the expected stress of 20 psi by 10 percent. It was found by
integrating the stress along the outside of the curved shear plate that 87 pounds are applied normal to
the soil surface. As a result, the entire desired normal load of 100 lbs is not applied to the shear plate
on the soil side. It was also found that the shear plate is at equilibrium in the model. The normal
stress corresponding to an applied force of 87 pounds is 17.5 psi. As a result, the mesh element size
is deemed small enough to calculate representative shear stresses.
If the cubic mesh element dimensions are increased to 0.35 inches, the normal stress
distribution displayed in Figure 6.3 results. This figure shows a maximum normal stress of
approximately 16 psi. As a result, there is a 10 percent stress reduction from the “correct”
Figure 6.4: Normal stress distribution in soil along shear plate width (0.90” mesh)

93
distribution. However, this model can be run in approximately five minutes, and the analysis with the
finest mesh takes over an hour to complete. As a result, this model is much more efficient, and the
normal pressure distribution is qualitatively the same.
Figure 6.4 displays the normal stress distribution resulting from a cubic mesh element
dimension of 0.90 inches. This result is not acceptable, since the shape does not approximately match
Figure 6.2. Since a 10 percent difference between the “correct” and calculated normal stress for this
investigation will be taken as acceptable, the ideal cubic mesh element dimension is 0.35 inches for
the soil.
6.4 Effect of Mesh Continuity between Shear Plate and Soil
Since the contact between the shear plates and soil is modeled by connecting the shear plate
nodes to the soil nodes, the effect of mesh continuity between the shear plate and soil was
investigated. Figure 6.3 was obtained for soil mesh elements with cubic dimensions equal to 0.35
inches and shear plate cubic elements with dimensions of 0.25 inches. Increasing the shear plate
mesh element dimension to 0.35 inches to obtain continuity between the shear plate and soil gives the
Figure 6.5: Normal stress distribution in soil along shear plate width (0.90” global mesh)

94
Figure 6.6: Normal stress in soil adjacent to shear plate (Pascals)
results shown in Figure 6.5. It is clear that the accuracy of the stress distribution corresponding to the
model with continuity is reduced. Accuracy is determined with a comparison to the “correct”
distribution shown in Figure 6.2. When mesh continuity did not exist, but the shear plate mesh was
finer, a difference from the “correct” model of approximately 10 percent existed. When the shear
Figure 6.7: Shear stress in soil adjacent to the shear plate (Pascals)

95
Figure 6.8: Total logarithmic shear strain contours in soil adjacent to shear plate
plate mesh size was increased to match the soil, a difference of 25 percent resulted. As a result, mesh
continuity between the shear plate and soil may be of secondary importance for the model.
6.5 Normal Stress and Shear Stress Distributions
Figure 6.6 and 6.7 show the normal and shear stress distribution in the soil adjacent to the
shear plate for a mesh with cubic elements having nominal dimensions of 0.35 inches. According to
the direct shear test and BST assumptions, the normal and shear stresses are uniformly distributed
over the contact surface during shearing. These figures demonstrate that normal stress and shear
stress concentrations exist near the top of the shear plate, but amount to 1 to 3 psi for both normal and
shear stress, compared to average normal and shear stresses of 16 and 7 psi, respectively. As a result,
the assumption of a uniform stress distribution may be adequate, and research has shown that the
strength parameters obtained from the BST are representative of the soil (Handy, 1967). However,
since the actual stress distributions across the shear plates are non-uniform, the strains will also be
non-uniform. Additional research is needed to determine whether a single representative average

96
strain can be determined for the soil adjacent to the shear plate in order to calculate modulus values
and damping ratios from monotonic and cyclic BSTs.
6.6 Development of Strains in Soil
In addition to analyzing the expected stress states, the model can be utilized to predict the
strain that will be developed in the soil. The objective of this section is to examine whether the
analysis of shear strains is possible with the developed model. By combining the calculated stresses
and strains in the soil, modulus values for the soil could be determined.
Figure 6.8 demonstrates that the shear strain distribution in the soil is non-uniform with the
maximum shear strains occurring beyond the top of the shear plate. This increase in strain is likely
due to the “bulldozing” effect on soil in front of the shear plate. This behavior was previously
identified by Lutenegger as a potential source for increased pore water pressures near the top of the
shear plate (Lutenegger, 1986).
Figure 6.9 displays the strain dissipation with increasing radial distance from the borehole.
This figure indicates that the decrease in strain with radial distance will be approximately linear until
Figure 6.9: Total logarithmic shear strain extending radially from borehole

97
Figure 6.10: Plastic logarithmic shear strain contours in soil adjacent to shear plate
a small residual strain exists. The majority of the strain will be dissipated at a distance of
approximately 0.036 meters (1.4 in.) from the borehole. Since the shear strains are very small, the
engineering and logarithmic strains will be very close.
Figure 6.10 demonstrates that plastic shear strain accounts for approximately one-half of the
total shear strain at the edges and above the plate. According to Figure 6.10, failure along the edges
of the shear plate begins to develop at an applied shear stress of only 10 psi. The shear stress along
the plate decreases at the sides and base of the plate. Therefore, the plastic strain development at the
sides and base of the plate is due to the shape of the yield surface in principal stress space. This may
lead to slightly different plastic strain calculations if a different constitutive model is utilized. The
plastic strains above the shear plate result from the increased shear stress at this location.
A model could be used in the future to investigate the relationship between stress and strain.
Figure 6.11 displays the shear stress dissipation with radial distance, and Figure 6.12 displays the
stress-strain relationship corresponding to Figure 6.11. According to the Drucker Prager parameters
provided in Tables 6.1 and 6.2, elastic behavior is occurring in the soil, and as a result, a

98
linear stress-strain graph would be expected. Additionally, the stresses can be combined with strain
to determine the shear modulus for the soil, and the change in the calculated shear modulus with
distance is provided in Figure 6.13.
Figure 6.11: Shear stress extending radially from the borehole
Figure 6.12: Stress-strain relationship extending radially from the borehole

99
6.7 Numerical Model Conclusions
This chapter presented a numerical analysis of the BST. The model created for this analysis
was developed with the main goal of analyzing stress states along the shear plate. The normal stress
in the soil increased towards the value of applied stress at the edges of the plate and decreased slightly
towards the middle of the plate. Since this result approximately corresponds to expected theoretical
behavior for the stress distribution under a rigid flat plate on sand, the analysis is accepted as
adequate. In addition, a parametric study was completed to determine the most efficient mesh density
for the model.
Additional studies will be able to use this model as a starting point for determining strains,
since this chapter demonstrated that strains can be calculated with this static model. Strains
determined with a cyclic model can be utilized to determine the shear modulus and damping ratio of
the soil. However, the determination of accurate strains within a model for each BST or cyclic BST
performed may be difficult, since soil properties that cannot be determined from the BST are often
required in constitutive models. Soil disturbance and heterogeneity will increase the difficulty related
Figure 6.13: Shear modulus extending radially from the borehole

100
to specifying accurate parameters in the model. Different constitutive models will also lead to
changes in the calculated strains within the soil. In addition to difficulties related to parameter
specification, the utilization of the cyclic BST may be hindered if soil strains can only be determined
from a numerical analysis.
To overcome these difficulties, a range of soil properties and constitutive models can be
studied using the finite element model described herein to determine corresponding strains in the soil.
From these results, empirical or numerically based correlations could potentially be developed
between the soil properties and the shear strain as a function of shear stress. Alternatively, a shear
influence depth could be correlated to the soil’s properties, and strain could be calculated from a
measurement of shear displacement. However, these correlations could only be properly developed if
an equivalent, uniform shear strain for the soil can be determined.
In addition to an adequate determination of strain within the soil, pore water pressure effects
will need to be investigated in future studies. The generation of pore water pressures in saturated,
granular soils will need to be considered in order to determine the strains that occur during
liquefaction. In addition, the suction effects in unsaturated soil may add increased complexity to the
model’s development.

101
CHAPTER 7. CONCLUSIONS
The BST is an in situ test developed to determine the strength parameters of a soil. Research
has demonstrated that this test can be performed on all soil types. However, the testing method and
results should be further studied to better quantify the drainage conditions (i.e. drained, undrained,
partially drained) corresponding to the measured shear strength parameters (Handy, 2002). A unique
feature of the BST is that the soil’s shear strength is measured directly, whereas many in situ soil tests
rely on empirical correlations. The BST has the potential to become one of the most useful in situ
testing methods if disturbance to the borehole is minimized and pore water pressures during shearing
can be better understood. The current BST testing method requires the user to manually raise the
shearing head and record the maximum shear stress corresponding to the applied normal stress. As a
result, the BST requires at least one individual to commit all their attention and field efforts to one
testing process. With automation, a single engineer could perform multiple tests or be free to
complete additional tasks in the vicinity of the boreholes.
This thesis described the development of a new automated borehole shear test (ABST)
device, along with a software control/data acquisition program and a post-processing macro. The
ABST will apply each normal stress, allow time for consolidation, record an entire shear stress record
corresponding to each normal stress, automatically detect a peak or plateau in shear stress, then lower
the shear head and apply the next normal stress. The Mohr-Coulomb shear strength envelope is
automatically calculated in real-time as testing progresses, and suspicious data points can be omitted
from the calculation. Although the ABST still requires the user to manually place the shear head into
a borehole and supply the required pressure, the test can essentially run independently after this point.
This creates the potential for multiple tests to be run simultaneously by a single user, and frees them
to perform additional tasks such as visually inspecting soils while the test is running. Automation will
reduce operator variability which will improve the consistency and repeatability of test results, and
will enable the development of additional automated capabilities such as cyclic tests or creep tests.

102
One advantage of the new ABST is the ability to obtain a record of the shear stress versus
shearing displacement. However, it was shown in this study that use of the worm-gear rotation or
LVDTs attached to the pull rods or rod clamp can give inaccurate measurements of shear plate
displacements due to the compliance of various BST components. Specifically, it was shown that the
deviation between displacement at the top of the rod and the shear plates results primarily from
removal of slack in the straps. Additional displacement deviations result at the stepper from
compression of the dynamometer cylinders. Attempts were made to compensate for these nonlinear
compliances by measuring them experimentally. However, the compliances were found to have low
repeatability as they varied with each test setup. Therefore, it is recommended that shear
displacement measurement be performed directly at the shear head using additional instrumentation
such as a string potentiometer. Such an approach was shown to provide superior results in this study.
This study also presented experimental and computational studies of a new cyclic test, which
could be useful for determining the liquefaction susceptibility or residual strength of soils. In order to
perform a cyclic test, the control program was modified to apply downward shear head
displacements, and temporary device modifications were made to enable the application of a
compressive force in the connecting rods. Laboratory and field tests demonstrated that soil responses
obtained from the cyclic ABST correspond to anticipated soil behavior. Using the measured shear
stress record as a function of displacement, secant shear modulus and damping values were calculated
from corrected hysteresis loops. With further development, it is anticipated that the cyclic ABST may
provide an in situ alternative to laboratory cyclic triaxial and cyclic simple shear tests.
The cyclic ABST could potentially be utilized to perform tests that otherwise would be
impossible or exceedingly expensive. For example, an undisturbed sand sample cannot be extracted
and preserved for laboratory testing without substantial effort. If the borehole could be supported
using a carefully designed shield or self-boring mechanism, a cyclic ABST could potentially be used
to perform a cyclic test on undisturbed saturated cohesionless soils. The cyclic ABST could therefore

103
be useful for characterizing the liquefaction potential of saturated sands, in addition to the dynamic
modulus and damping behavior.
In order to measure useful engineering design parameters with the cyclic ABST, a stiffer
testing apparatus with a greatly increased cyclic loading capacity would be required. To this end, a
double-strap shear head design was developed which transfers downward forces directly to the shear
plates, avoiding racking of the shear head that would result from a load applied directly to its body. A
dynamic finite element analysis was performed, demonstrating that the proposed shear head design is
structurally sound. In addition to developing a new cyclic testing apparatus, a procedure for
converting the measured shear displacements to soil shear strains is also needed for stress-strain
characterization. For this purpose, a preliminary finite element analysis of the probe-soil interaction
was performed under monotonic loading. The model was found to give calculated normal stress
distributions along the shear plate that were similar to the expected theoretical distributions. In
addition, reasonable calculated shear stress distributions were obtained, indicating that plastic strains
are greatest at the leading edge of the shear plates. Shear strains were also calculated to demonstrate
the potential of the numerical model, which provides a starting point for additional studies aimed at
quantifying cyclic shear strains in the soil based on the measured shear plate displacements.
7.1 ABST and Cyclic ABST Limitations
As discussed above, automation of the borehole shear test brings improved efficiency and
repeatability to the traditional manual test procedure. The BST has been shown capable of accurately
measuring soil strength parameters in situ, and research has indicated that the test gives accurate
results in sand, silt, and clay. However, the main limitation related to the BST is the lack of
knowledge on the pore water pressures corresponding to the measured strength parameters. Although
the strength parameters are often accepted as drained, significant pore water pressures can potentially
be developed in fine-grained soils during shearing. A variety of methods, such as the examination of
measured cohesion in normally consolidated clays, could help in assessing drainage conditions, but

104
additional factors such as suction and partial saturation may complicate the results. As a result, the
drainage condition is often unknown in clay soils, and the drained or undrained condition is simply
assumed. This limitation also exists for the ABST, therefore further research is recommended to
better understand drainage conditions in the test.
Current limitations related to the cyclic ABST are more substantial, and additional research
will be required to develop a reliable test. The current ABST apparatus is unable to apply a large
downward force to the shear plates, and the loading frequency of the stepper is limited. A more
robust mechanism such as a servo-hydraulic actuator and stout compression rods will be required for
performing cyclic tests at useful frequencies and load levels. In addition, shear strains will need to be
estimated from measured displacements of the shear plates and used with the stress record to
determine the modulus and damping of the soil. A preliminary numerical analysis was performed in
this study to examine shear strains in the soil. However, the model did not incorporate pore water
pressure generation nor dynamic loading. Borehole disturbance in saturated cohesionless soils and
modeling error may also lead to differences between the calculated strains and the actual strains.
7.2 Recommendations for Future Research
A main limitation or consideration for the ABST is the pore water pressure conditions
corresponding to the measured strength parameters. In soils with low permeability, partially drained
conditions may exist during shearing, making interpretation of the strength parameters difficult.
Additional research could incorporate a pore water pressure transducer on the shear plate. Since the
data acquisition system can be used to record the pore pressure record with time, the effective shear
stress record could conceivably be determined by subtracting the pore pressure from the measured
total shear stress. Using this method, the pore pressure and drainage conditions corresponding to the
strength parameters could be more clearly understood, and liquefaction behavior of cohesionless soils
could be studied. Previous research has indicated that the pore pressure distribution across the shear
plates is non-uniform, with larger pore pressures near the top of the shear plate (Lutenegger and

105
Timian, 1986). Additional studies are needed to determine whether a single representative value of
pore pressure over the shear plate can be used for calculating the effective normal and shear stresses
in the soil.
Additional research related to the cyclic ABST could be aimed at replacing the entire base
plate assembly with a drill-rig-mounted actuator capable of upward and downward loads of
approximately 1,000 lb at frequencies up to 30 Hz (Ashlock, 2012). The double-strap shear head
design developed in this thesis could be used with such an actuator and suitably braced compression
rods to develop a new cyclic ABST apparatus. Furthermore, a shield or casing could be designed to
surround the shear head to prevent caving in cohesionless soils.
Full utilization of the cyclic ABST requires the measurement of shear strain, so that shear
modulus and damping ratio can be determined in situ. Cyclic strains could also aid in the evaluation
of liquefaction potential in stress controlled tests using the concept of the threshold strain (NRC,
1985). The current cyclic ABST measures shear displacements with a string potentiometer.
However, the resulting three-dimensional distribution of shear strains within the soil is presently
unknown. By performing a numerical analysis of the cyclic ABST, the strains in the soil could
potentially be determined based on the measured shear stress, displacement, and soil properties. This
thesis presented a basic model for calculating the strains from a monotonic test in dry sand.
Additional research is recommended to examine the effect of pore water pressure on the calculated
strains in the model. This is an important area of research, since the analysis of liquefaction potential
will be highly dependent on the rate of generation of pore water pressures. In addition, parametric
studies could be performed to examine the effects of various soil properties and constitutive models
on the calculated strains. The results could potentially be used to develop a numerically-based
correlation between soil type and the depth of shear stress influence. If such a correlation could be
developed reliably, strain values could potentially be calculated from the measured displacements in
real time.

106
APPENDIX A. ABST PROGRAM USER GUIDE AND
TROUBLESHOOTING MANUAL
A.1 ABST Stand Alone Program User Guide
This ABST stand alone program user guide describes the procedure required for the basic test
and the function of each control in the program. A stand alone program was also developed in order
to allow the selection of active input channels, and this program has a separate manual.
This manual can be utilized to understand the function of the ABST control program but
should be considered a supplement for the BST instructions provided with the manual (Handy, 2002).
The stand alone program user guide supplied with a new ABST may be different from this guide, and
the supplied guide should be utilized as the primary reference.
A.1.1 Preparation
Before beginning the program, the laptop should be connected to the electronics Pelican case
with the two supplied USB A Male to A Male cables. The two gray multi-pin cables should be used
to connect the electronics case to the base plate and BST console face. A single cable with BNC
connectors should also be used to connect the base plate to the electronics case. A pure sine wave
inverter or an inverter generator must be used as the power supply. The power supply needs to have a
capacity of 500 W, but the case will only draw what it requires. After the electronics case is turned
on, the stand alone program may be started.
All controls should be set to their appropriate value before starting the test to ensure that the
desired testing conditions are met. Most controls can be altered while the program is running, but
care must be exercised to ensure that controls are altered at the desired point in the test. This manual
will help users become familiar with the proper use of controls that may be non-functional during
certain points in the test.

107
In addition to manually initializing the controls, the file location for the measured data should
be initially specified. Figure A.1 displays the text save control set, and the following list describes
the function of the controls in the set.
• Save to Text: Determines whether a
text file will be saved.
• Text Save Folder: Determines the
location of the text folder. It is
important not to add a .txt to the end of the path because a folder will be created at the desired
location.
With the retract option on the BST console face selected, a pressure larger than the maximum
desired normal stress is to be supplied at the console. This pressure can be increased simply by
turning the knob clockwise. The automatic control option on the console face should then be selected
with the pressure selector valve. When the normal stress gauge returns to zero, the expand option is
selected.
The VISA resource name control (Figure A.2) specifies the port used
for the stepper during the test. The appropriate port can be found by right-
clicking My Computer in the Start Menu and selecting Properties. The
Device Manager is then selected under the Hardware tab. The Ports section can then be expanded to
determine the COM port of the USB-to-serial converter.
A.1.2 Test Boring
Before the test can be performed, a smooth borehole with a three inch diameter should be
created. There are no controls in the program related to the test boring, and the BST instructions
should be referenced for more information (Handy, 2002).
Figure A.1: Text save control set
Figure A.2:
Stepper port

108
A.1.3 Insertion of the Shear Head
The shear head should be inserted into the borehole according to the provided instructions
(Handy, 2002). Once the shear head is inserted to the appropriate depth and secured to the base plate,
the shear head can be slightly raised or lowered with the raise/lower shear head control set. In
addition to positioning the shear head, this procedure is useful for ensuring that the apparatus is
working properly. Figure A.3 displays a screen shot of this control set. After the shear head is in the
appropriate position, the Tare Normal Pressure control should be selected. This step will record the
initial normal pressure, and the initial stress will be subtracted from the measured values if the Tare
control is selected. After the Tare Normal Pressure control is selected, the button will be replaced
with a Start Test button. Start Test should be selected to start the
automated test. The following list describes the remaining controls in the
raise/lower shear head control set.
• Manual Speed Control: Sets the angular velocity of the worm gear in
revolutions per second. This control can be changed in one-tenth
increments by using the page up and page down keys located on the
keyboard.
• Stop Motor: Prevents the shear head from being raised or lowered
when the Manual Jog control is deactivated.
• Reverse: Determines whether the shear head is raised or lowered. The
head will be lowered when this control is activated.
• Manual Jog: Allows the user to rotate the worm gear at a speed
specified by the Jog Speed control. When activated, the head moves
only when the Jog control is held by the user. Only positive numbers
should be entered into the Jog Speed control, and the Reverse control Figure A.3: Shear
head movement
controls

109
should be used to determine the direction of movement.
• Current Speed: Displays the current angular velocity of the worm gear in revolutions per second.
A.1.4 Application of Normal Stress
After the Start Test button is selected, the first normal stress is applied to the soil. Figure A.4
displays the consolidation control set, and the following list describes the purpose of the controls.
• # of Points: Enter the number of separate normal stresses to
apply during the test.
• Stress (psi): Enter the value of each normal stress to apply.
• Time to wait (min): Specifies the consolidation time for each
normal stress.
• Current Normal Stress/Current delay time: Displays the
current normal stress and delay time being used in the test.
The values in the consolidation control set should be set
before starting the test. The number of points, stresses, and times
can be changed while the program is running. However, it is
important to have each point entered before the program either
finishes the test or reaches the point of interest. The program can be paused while the shear head is
being lowered to the tare value, and the points can be altered while the program is paused to improved
reliability.
Figure A.5 displays the monitoring control set, and the following list describes the function of
the controls.
• Consolidation Time (sec): Displays a countdown of
the consolidation time remaining before the shear
stress is applied. When this time reaches zero, the Figure A.5: Monitoring set
Figure A.4: Consolidation
controls

110
shearing stage will automatically be initiated after of pause of approximately 10 to 20 seconds to
clear the DAQ buffer.
• End Consolidation: Immediately aborts the current consolidation segment of the test and initiates
the shearing stage following a brief pause of 10 to 20 seconds to clear the buffer.
• Shear Stress and Normal Stress (psi): Displays the current stress being measured by the normal
and shear pressure sensors.
After the consolidation time has expired, the program will remain idle for a period of time
before the shear stress is applied. This idle time will be approximately equal to the consolidation time
divided by 60. For example, a consolidation time of 20 minutes will have an idle time of
approximately 20 seconds before the shear stress is applied. This time is utilized to clear the buffer
before the shear record is measured.
A.1.5 Application of Shearing Stress
Shear stress will be automatically applied to the soil after the consolidation phase is
completed. Figure A.6 shows an example of the shear record plot that is generated as the shear head
is raised. Each shear stress record is plotted on the same graph. The time record can be viewed by
Figure A.6: Shear stress record plot

111
selecting the shear stress time record tab. The x and y axes in each plot within the program can be
auto-scaled by right-clicking on the graph and selecting Auto Scale. If Auto Scale is not selected, the
axis limits can be specified by double clicking on the first or last axis label.
Figure A.7 presents the tare control set. The Initial Shear (psi)
indicator displays shear stress applied to the apparatus from self weight
before a normal stress is applied. The initial shear value is recorded
immediately after the Start Test control is activated.
Figure A.8 displays the control set that specifies how a peak shear stress will be automatically
detected by the program. The following list describes the controls utilized to select the peak shear
stress. All percentages throughout the program should be entered in percentage form.
• Advance on Peak: Allows the program to terminate the shearing phase if a peak is detected in the
shear stress record.
• % of Peak Stress to Trigger Advance: The peak shear stress is continually monitored and
compared to the current shear stress. The shearing phase will be terminated if the current shear
stress falls below this specified percentage of the peak shear stress.
• Advance on Plateau: Allows the program to terminate
the shearing phase if a plateau is detected in the shear
stress record. The plateau is indicated by a shear stress
that changes by less than a specified percentage over a
specified distance.
• Distance for Plateau (in): Specifies the distance over
which the shear head must be raised (based on stepper
displacement) without a specified change in shear stress
to advance the test.
Figure A.7: Tare
controls
Figure A.8: Peak stress controls

112
• Percent Difference on Plateau: Specifies the percent difference between the maximum and
minimum values on the plateau that will allow the test to advance.
• Advance Now: Allows the user to immediately terminate the shearing phase and advance the test
to the next normal pressure.
• Reason for Previous Advance: Displays the reason the test advanced to the next normal stress.
The speed of the shear head can be modified by utilizing the same procedure that was used
while the shear head was initially positioned. Figure A.3 displays the screenshot of this control set.
The test can be paused while shear stress is being applied and after the shear head is lowered.
Figure A.3 displays the Pause control. If the Pause control is activated, the program will pause at the
next available point. To perform an emergency stop, abort the test by clicking the stop icon in the
toolbar and then run a new test quickly to stop the shear head movement. This procedure should be
used with caution because any measured data will be lost. The stepper motor can also be shut off
with the switch on the electronics case. If this is done, the program will need to be restarted after
turning the stepper power back on.
A.1.6 Completing the Test
Upon termination of the shearing phase for each peak shear stress, the shear head should be
lowered until only a small residual shear stress remains. Figure A.9 displays the control set that
corresponds to lowering the shear head, and the following list describes the function of the controls.
• Lower Head after each test: Causes the shear head to be lowered automatically after each
maximum shear stress is found.
• Residual Shear Stress (psi): Determines the difference between
the current shear stress and the initial shear stress that will cause
the shear head to stop lowering. This value is used to maintain a
small residual shear stress between tests as recommended by the Figure A.9: Lower shear
head controls

113
BST Instruction Manual and to avoid the stepper motor overshooting the initial tare stress and
putting the rods into compression. The recommended value of 0.5 psi should work well in most
situations.
• Manual: Shear Head in Position: Pressing this button will cause the shear head to stop lowering
and immediately advance the test to the next normal stress.
After the final data point is obtained, the normal stress will be automatically decreased to
zero by the pressure regulator. The shear head can be retracted by rotating the ‘auto-manual’ selector
on the BST console face to manual and releasing the pressure manually. The retract option can be
selected on the BST console face when a pressure of approximately 5 psi is supplied.
Once the shear head is retracted, the shear head can be removed and cleaned according to the
BST instructions (Handy 2002).
A.1.7 Results
Figure A.10 displays the failure envelope shown on the front panel of the program. The
maximum shear stress for each normal stress is plotted on the chart, and a linear regression is
performed. The friction angle, cohesion, and R2 value are automatically updated after each data point
is obtained.
Figure A.11 displays a row of check-boxes that are used to turn on and off the different test
points of Figure A.10, which is useful for eliminating suspect data points from the failure envelope
calculation. The points are
arranged in chronological order
from left to right. The best fit
shear strength parameters are re-
calculated each time a point is
turned on or off.
Figure A.10: Failure envelope plot

114
Figure A.12 displays a similar row of check-boxes that are used to show or hide the plots of
the various shear stress records. The shear stress
records also are arranged in chronological order.
However, the line colors are associated with the
number of active curves in the plot rather than the
individual curves themselves. As a result, the color of the
individual curves will change when showing or hiding shear
stress records on this plot.
The Stop Plot Adjust control is used to stop the
program after a test corresponding to each specified normal stress has been performed. This control
allows the failure envelope to be manipulated until the user is satisfied. It is important to stop the test
by utilizing the Stop Plot Adjust control. If the test is aborted by clicking the stop icon in the toolbar,
the measured data will not be saved. To run a new test, change the data folder names and click on
the single rightward pointing arrow below the menu bar at the top of the screen.
A.2 ABST Troubleshooting Manual
The subdivisions within this section are organized according to the steps in the ABST test
procedure. Each subdivision presents suggestions or considerations for each step. In addition,
potential problems that may arise in each step are presented in list form with corresponding solutions.
A.2.1 Initial Stage and Shear Head Positioning
It is strongly recommended to check that the stepper responds during the initial phase of the test.
If the wrong port is selected for the motor, the test will have to be reset.
• Stepper Motor does not respond.
o Ensure that the proper port or COM is selected in the program.
o Check that the USB cables are properly attached to the data acquisition console.
o Ensure that the data acquisition console is plugged in and turned on.
Figure A.11: Failure envelope
adjustments
Figure A.12: Stress record
plot control

115
A.2.2 Consolidation Phase
• Specified normal pressure is not applied.
o Turn in the pressure regulator knob on the BST console face to ensure adequate
pressure is supplied for the desired normal stress.
o Ensure that the compressed CO2 container is fully open.
o Attach a full CO2 container to the BST console.
A.2.3 Shear Phase
The program automatically advances to the next normal stress after finding a peak or plateau in
the shear record. The Advance on Plateau and Advance on Peak controls can be turned off at any
time, and the program can be manually advanced with the Advance Now control.
• Shear stress is not applied as the head is raised.
o The acme cylinder and rod clamp are not engaged.
1. Quickly turn off the Advance on Peak and Advance on Plateau controls to
ensure that the program does not read a maximum shear stress and advance
to the next test point.
2. Apply upward force on the acme cylinder and downward force on the rod
clamp until the cylinder engages the rod clamp, and the rod begins to pull. A
near equal upward and downward force should be applied to ensure that a
faulty stress is not recorded.
3. Turn the Advance on Peak and Advance on Plateau controls on after the
shear stress exceeds the maximum stress recorded while the cylinder was
being engaged.
o Slack needs to be taken out of the shear head apparatus.
1. Turn off the Advance on Peak and Advance on Plateau controls until the
slack is taken up.

116
2. Turn the controls back on after the shear stress exceeds the maximum stress
recorded while slack was being taken out of the apparatus.
• Shear record abruptly shows a plateau at an abnormally low shear stress.
o It is likely that the shear head encountered an inconsistency in the borehole.
1. Quickly turn off the Advance on Peak and Advance on Plateau controls to
ensure that the program does not read a maximum shear stress and advance
to the next test point.
2. Wait for the shear stress to increase.
3. If the shear stress record is not acceptable for multiple points, stop the test,
adjust the shear head position, and restart the test.
• The motor begins to bind while raising the head.
o The motor cannot supply enough torque to raise the shear head.
1. Quickly select the Pause program control to stop the motor and data
acquisition.
2. Use the switch on the Pelican electronics case to turn off the stepper motor.
3. Attach the manual crank to the worm gear.
4. Select the PAUSE control to continue recording data.
5. Use the crank to raise the shear head at the desired rate.
6. Use the Advance Now program control to record the maximum shear stress.
7. Use the manual crank along with the program’s data logging capabilities to
finish the test.
o Binding of the motor most likely results from improper alignment. The user should
check that the pull rod is vertical and centered, ensure that the belt is properly
positioned, and apply lubricant to the gears.

117
A.2.4 Shear Head Lowering
• The motor continues to lower the head even though the minimum shear stress has been
obtained.
o The Residual Shear Stress program control is set too low or a faulty tare was
recorded.
1. Select the Manual: Shear Head in Position program control.
2. The Residual Shear Stress program control can be increased for subsequent
tests to leave a small residual stress.
To prevent damage to the apparatus, the program should be monitored throughout the test,
especially while the shear head is being raised. By ensuring that the test is progressing properly, the
need to repeat tests can be avoided.

118
APPENDIX B. MICROSOFT EXCEL POST-PROCESSING
B.1 Microsoft Excel ABST Post-processing Code
Sub BSTSummary()
Dim NormalStress(1 To 15) As Single
Dim ShearStress(1 To 15) As Single
MsgBox ("Open Failure Envelope File")
strFileName = Application.GetOpenFilename("All Files,*.", , "File to process.")
Workbooks.OpenText Filename:=strFileName _
, Origin:=437, StartRow:=1, DataType:=xlDelimited, TextQualifier:= _
xlDoubleQuote, ConsecutiveDelimiter:=False, Tab:=False, Semicolon:=False _
, Comma:=True, Space:=False, Other:=False, FieldInfo:=Array(1, 1), _
TrailingMinusNumbers:=True
TestCount = 0
Cells(23, 2).Select
TCell = ActiveCell.Value
Do
If IsEmpty(TCell) Then
Exit Do
Else
ActiveCell.Offset(0, 1).Select
TCell = ActiveCell.Value
TestCount = TestCount + 1
End If
Loop
Cells(23, 2).Select
J = 1
For J = 1 To TestCount
ActiveCell.Value = VBA.Round(ActiveCell.Value, 1)
ActiveCell.Offset(0, 1).Select
Next J
Cells(23, 2).Select
J = 1
For J = 1 To TestCount
NormalStress(J) = ActiveCell.Value
ActiveCell.Offset(0, 1).Select
Figure B.1: Visual Basic code for ABST data processing

119
Next J
J = 1
Cells(24, 2).Select
For J = 1 To TestCount
ShearStress(J) = ActiveCell.Value
ActiveCell.Offset(0, 1).Select
Next J
If TypeName(Selection) <> "Range" Then Exit Sub
Set rngChtData = Selection
Set mychtObj = ActiveSheet.ChartObjects.Add _
(Left:=500, Width:=600, Top:=5, Height:=250)
With mychtObj.Chart
.ChartType = xlXYScatter
.HasTitle = True
.ChartTitle.Characters.Text = "Failure Envelope"
.Axes(xlCategory, xlPrimary).HasTitle = True
.Axes(xlCategory, xlPrimary).AxisTitle.Characters.Text = "Normal Stress (psi)"
.Axes(xlValue, xlPrimary).HasTitle = True
.Axes(xlValue, xlPrimary).AxisTitle.Characters.Text = "Shear Stress(psi)"
.HasLegend = False
Do Until .SeriesCollection.Count = 0
.SeriesCollection(1).Delete
Loop
With .SeriesCollection.NewSeries
.Values = ActiveSheet.Range(Cells(24, 2), Cells(24, (2 + TestCount)))
.XValues = ActiveSheet.Range(Cells(23, 2), Cells(23, (2 + TestCount)))
.Name = "Failure Envelope"
End With
.SeriesCollection(1).Trendlines.Add Type:=xlLinear, Name:="Linear Trend"
With .SeriesCollection(1).Trendlines(1)
.DisplayRSquared = True
.DisplayEquation = True
End With
End With
MsgBox ("Open Shear History File")
Figure B.1: (continued)

120
strFileName = Application.GetOpenFilename("All Files,*.", , "File to process.")
Workbooks.OpenText Filename:=strFileName _
, Origin:=437, StartRow:=1, DataType:=xlDelimited, TextQualifier:= _
xlDoubleQuote, ConsecutiveDelimiter:=False, Tab:=False, Semicolon:=False _
, Comma:=True, Space:=False, Other:=False, FieldInfo:=Array(1, 1), _
TrailingMinusNumbers:=True
ColumnCount = TestCount * 2
RowCount = 1
Cells(23, 2).Select
RCell = ActiveCell.Value
Do
If IsEmpty(RCell) Then
Exit Do
Else
ActiveCell.Offset(1, 0).Select
RCell = ActiveCell.Value
RowCount = RowCount + 1
End If
Loop
LastCell = Cells(23, 2).Select
N = 1
For N = 1 To ColumnCount
Do
If IsEmpty(LastCell) Then
Exit Do
Else
ActiveCell.Offset(1, 0).Select
LastCell = ActiveCell.Value
End If
Loop
Do
ActiveCell.Offset(-1, 0).Select
If (ActiveCell.Value = 0#) Then
ActiveCell.Clear
Else
ActiveCell.Offset(0, 1).Select
LastCell = ActiveCell.Value
Exit Do
End If
Figure B.1: (continued)

121
Loop
Next N
If TypeName(Selection) <> "Range" Then Exit Sub
Set rngChtData = Selection
Set mychtObj = ActiveSheet.ChartObjects.Add _
(Left:=650, Width:=600, Top:=5, Height:=300)
With mychtObj.Chart
.ChartType = xlXYScatterLinesNoMarkers
.HasTitle = True
.ChartTitle.Characters.Text = "Shear History"
.Axes(xlCategory, xlPrimary).HasTitle = True
.Axes(xlCategory, xlPrimary).AxisTitle.Characters.Text = "Distance (in)"
.Axes(xlValue, xlPrimary).HasTitle = True
.Axes(xlValue, xlPrimary).AxisTitle.Characters.Text = "Shear Stress (psi)"
.Axes(xlValue).MaximumScaleIsAuto = True
.Axes(xlValue).MinimumScale = Application.Min(0)
Do Until .SeriesCollection.Count = 0
.SeriesCollection(1).Delete
Loop
N = 1
For N = 1 To TestCount
With .SeriesCollection.NewSeries
.Values = ActiveSheet.Range(Cells(23, (N * 2) + 1), Cells((23 + RowCount), (N * 2) + 1))
.XValues = ActiveSheet.Range(Cells(23, (N * 2)), Cells((23 + RowCount), (N * 2)))
.Name = NormalStress(N) & " psi"
End With
Next N
End With
MsgBox ("Open Time History")
strFileName = Application.GetOpenFilename("All Files,*.", , "File to process.")
Workbooks.OpenText Filename:=strFileName _
, Origin:=437, StartRow:=1, DataType:=xlDelimited, TextQualifier:= _
xlDoubleQuote, ConsecutiveDelimiter:=False, Tab:=False, Semicolon:=False _
, Comma:=True, Space:=False, Other:=False, FieldInfo:=Array(1, 1), _
TrailingMinusNumbers:=True
ColumnCount = TestCount * 2
Figure B.1: (continued)

122
RowCount = 1
Cells(23, 2).Select
RCell = ActiveCell.Value
Do
If IsEmpty(RCell) Then
Exit Do
Else
ActiveCell.Offset(1, 0).Select
RCell = ActiveCell.Value
RowCount = RowCount + 1
End If
Loop
LastCell = Cells(23, 2).Select
N = 1
For N = 1 To ColumnCount
Do
If IsEmpty(LastCell) Then
Exit Do
Else
ActiveCell.Offset(1, 0).Select
LastCell = ActiveCell.Value
End If
Loop
Do
ActiveCell.Offset(-1, 0).Select
If (ActiveCell.Value = 0#) Then
ActiveCell.Clear
Else
ActiveCell.Offset(0, 1).Select
LastCell = ActiveCell.Value
Exit Do
End If
Loop
Next N
If TypeName(Selection) <> "Range" Then Exit Sub
Figure B.1: (continued)

123
Set rngChtData = Selection
Set mychtObj = ActiveSheet.ChartObjects.Add _
(Left:=650, Width:=600, Top:=5, Height:=300)
With mychtObj.Chart
.ChartType = xlXYScatterLinesNoMarkers
.HasTitle = True
.ChartTitle.Characters.Text = "Time History"
.Axes(xlCategory, xlPrimary).HasTitle = True
.Axes(xlCategory, xlPrimary).AxisTitle.Characters.Text = "Time (s)"
.Axes(xlValue, xlPrimary).HasTitle = True
.Axes(xlValue, xlPrimary).AxisTitle.Characters.Text = "Shear Stress (psi)"
.Axes(xlValue).MaximumScaleIsAuto = True
.Axes(xlValue).MinimumScale = Application.Min(0)
Do Until .SeriesCollection.Count = 0
.SeriesCollection(1).Delete
Loop
N = 1
For N = 1 To TestCount
With .SeriesCollection.NewSeries
.Values = ActiveSheet.Range(Cells(23, (N * 2) + 1), Cells((23 + RowCount), (N * 2) + 1))
.XValues = ActiveSheet.Range(Cells(23, (N * 2)), Cells((23 + RowCount), (N * 2)))
.Name = NormalStress(N) & " psi"
End With
Next N
End With
End Sub
Figure B.1: (continued)

124
B.2 Microsoft Excel ABST Post-processing Code Output
Figure B.2: Failure envelope from ABST post-processing code
0
1
2
3
4
5
6
7
8
9
10
0 0.05 0.1 0.15 0.2 0.25 0.3
Sh
ea
r S
tre
ss (
psi
)
Distance (in)
Shear History
1.9 psi
3.9 psi
5.9 psi
7.8 psi
9.8 psi
Figure B.3: Plot of shear stress against stepper displacement from ABST post-processing
code

125
0
1
2
3
4
5
6
7
8
9
10
0 20 40 60 80 100 120 140
Sh
ea
r S
tre
ss (
psi
)
Time (s)
Time History
1.9 psi
3.9 psi
5.9 psi
7.8 psi
9.8 psi
Figure B.4: Plot of shear stress against time from ABST post-processing code

126
APPENDIX C. FIELD ABST RESULTS
C.1 ABST Results in Sandy Glacial Till
Table C.1: Glacial till ABST results (Test 1)
Location Northwest Corner of Spangler footing plot
Depth 27.5 in
Angle of Friction 36.6˚
Cohesion 4.5 psi
Figure C.1: Shear record and failure envelope for ABST in glacial till (Test 1)
Shear Stress vs. Stepper Displacement
6 psi
11 psi
16 psi
20 psi
25 psi

127
Table C.2: Glacial till ABST results (Test 2)
Location Northwest Corner of Spangler footing plot
Depth 67.5 in
Angle of Friction 39.2˚
Cohesion 2.5 psi
Figure C.2: Shear record and failure envelope for ABST in glacial till (Test 2)
Shear Stress vs. Stepper Displacement
11 psi
15 psi
20 psi
25 psi
30 psi
35 psi

128
Table C.3: Glacial till ABST results (Test 3)
Location Northwest Corner of Spangler footing plot
Depth 98.0 in
Angle of Friction 38.2˚
Cohesion 2.3 psi
Figure C.3: Shear record and failure envelope for ABST in glacial till (Test 3)
Shear Stress vs. Stepper Displacement
5 psi
10 psi
25 psi
15 psi
20 psi

129
C.2 ABST Results in Soft Clay
Table C.4: Soft clay ABST results (Test 1)
Location Scholl Road
Depth 68.0 in
Angle of Friction 25.2˚
Cohesion -0.1 psi
Figure C.4: Failure envelope for ABST in soft clay (Test 1)

130
Table C.5: Soft clay ABST results (Test 2)
Location Scholl Road
Depth 68 in
Angle of Friction 30.7˚
Cohesion 0.6 psi
Figure C.5: Failure envelope for ABST in soft clay (Test 2)

131
Table C.6: Soft clay ABST results (Test 3)
Location Scholl Road
Depth 61.0 in
Angle of Friction 24.4˚
Cohesion 6.0 psi
Figure C.6: Failure envelope for ABST in soft clay (Test 3)
Shear Stress vs. Stepper Displacement
5 psi
10 psi
15 psi
20 psi
30 psi

132
Note: Slow shearing rate of 0.2 rps (0.0002 in./sec)
Table C.7: Soft clay ABST results (Test 4)
Location Scholl Road
Depth 61.0 in
Angle of Friction 22.3˚
Cohesion 4.0 psi
Figure C.7: Failure envelope for ABST in soft clay (Test 4)
Shear Stress vs. Stepper Displacement
5 psi
10 psi
15 psi
20 psi
30 psi
40 psi

133
APPENDIX D. DIRECT SHEAR TESTS ON FIELD SAMPLES
D.1 Direct Shear Test Results in Sandy Glacial Till
Figure D.1: Direct shear test results (Spangler: Test 1 ≈ 27.5 in.)
10 psi
15 psi
20 psi
10 psi
15 psi
20 psi

134
Figure D.2: Direct shear test results (Spangler: Test 2 ≈ 67.5 in.)
10 psi
15 psi
20 psi
10 psi
15 psi
20 psi

135
Figure D.3: Direct shear test results (Spangler: Test 3 ≈ 98.0 in.)
10 psi
15 psi
20 psi
10 psi
15 psi
20 psi

136
D.2 Direct Shear Test Results in Soft Clay
Figure D.4: Direct shear test results (Scholl Rd: Test 1 at 50-72 in.)
5 psi
10 psi 15 psi
30 psi
20 psi
5 psi
10 psi
15 psi
20 psi
30 psi

137
APPENDIX E. ABST DISPLACEMENT MEASUREMENTS
E.1 Rod, Shear Head, and Stepper Displacement
y = 0.9465x + 0.004
R² = 0.9985
0
0.02
0.04
0.06
0.08
0.1
0.12
0 0.01 0.02 0.03 0.04 0.05 0.06 0.07 0.08
To
p o
f R
od
Dis
pla
cem
en
t (i
n)
Shear Head Displacement (in)
7 psi Normal Stress Test 1:
Rod vs. Shear Head
y = 1.121x + 0.0206
R² = 0.9915
0
0.02
0.04
0.06
0.08
0.1
0.12
0 0.01 0.02 0.03 0.04 0.05 0.06 0.07 0.08
Ste
pp
er
(in
)
Shear Head Displacement (in)
7 psi Normal Stress Test 1:
Stepper vs. Shear Head
Figure E.1: Stepper displacement vs. actual shear head
displacement at normal stress of 7 psi
Figure E.2: Displacement at top of pull rod vs. actual shear head
displacement at normal stress of 7 psi

138
0
0.5
1
1.5
2
2.5
3
3.5
4
4.5
5
0 0.01 0.02 0.03 0.04 0.05 0.06 0.07 0.08
Sh
ea
r Str
ess
(p
si)
Stepper Displacement (in)
7 psi Normal Stress Test 1:
Shear Stress vs. Stepper
Incremental stepper and shear head
displacements approx. equal after this point
0
0.5
1
1.5
2
2.5
3
3.5
4
4.5
5
0 0.01 0.02 0.03 0.04 0.05 0.06 0.07 0.08
Sh
ear
Str
ess
(p
si)
Displacement (in)
7 psi Normal Stress Test 1:
Shear Stress vs. Displacement
vs. Rod
vs. Shear Head
Incremental rod and shear head displacements
approx. equal after this point
-0.002
-0.001
0
0.001
0.002
0.003
0.004
0.005
0 5 10 15 20 25 30 35 40 45 50
Ro
d a
nd
Str
ap
Elo
ng
ati
on
(in
)
Force(lb)
7 psi Normal Stress Test 1:
Rod and Strap Movement vs. Force
Theoretical
(Rod Only)Measured
Figure E.3: Shear stress vs. stepper displacement at normal stress
of 7 psi
Figure E.4: Shear stress vs. rod and shear head displacements at
normal stress of 7 psi
Figure E.5: Rod and strap elongation at normal stress of 7 psi

139
y = 1.1066x + 0.0358
R² = 0.9937
0
0.02
0.04
0.06
0.08
0.1
0.12
0 0.01 0.02 0.03 0.04 0.05 0.06
Ste
pp
er
(in
)
Shear Head Displacement (in)
10 psi Normal Stress Test 2:
Stepper vs. Shear Head
y = 1.0039x + 0.009
R² = 0.9985
0
0.02
0.04
0.06
0.08
0.1
0.12
0 0.01 0.02 0.03 0.04 0.05 0.06
To
p o
f R
od
Dis
pla
cem
en
t (i
n)
Shear Head Displacement (in)
10 psi Normal Stress Test 2:
Rod vs. Shear Head
Figure E.6: Stepper displacement vs. actual shear head
displacement at normal stress of 10 psi
Figure E.7: Displacement at top of pull rod vs. actual shear head
displacement at normal stress of 10 psi

140
0
1
2
3
4
5
6
7
8
0 0.01 0.02 0.03 0.04 0.05 0.06
Sh
ea
r Str
ess
(p
si)
Stepper Displacement (in)
10 psi Normal Stress Test 2:
Shear Stress vs. Stepper
Incremental stepper and shear head
displacements approx. equal after this point
0
1
2
3
4
5
6
7
8
0 0.01 0.02 0.03 0.04 0.05 0.06
Sh
ear
Str
ess
(p
si)
Displacement (in)
10 psi Normal Stress Test 2:
Shear Stress vs. Displacement
vs. Rod
vs. Shear Head
Incremental rod and shear head
displacements approx. equal after this point
-0.002
0
0.002
0.004
0.006
0.008
0.01
0.012
0 10 20 30 40 50 60 70 80
Ro
d a
nd
Str
ap
Elo
ng
ati
on
(in
)
Force(lb)
10 psi Normal Stress Test 2:
Rod and Strap Movement vs. Force
Theoretical (Rod Only)
Measured
Figure E.8: Shear stress vs. stepper displacement at normal stress
of 10 psi
Figure E.9: Shear stress vs. rod and shear head displacements at
normal stress of 10 psi
Figure E.10: Rod and strap elongation at normal stress of 10 psi

141
y = 1.0868x + 0.0452
R² = 0.9974
0
0.02
0.04
0.06
0.08
0.1
0.12
0 0.01 0.02 0.03 0.04 0.05 0.06 0.07
Ste
pp
er
(in
)
Shear Head Displacement (in)
15 psi Normal Stress Test 1:
Stepper vs. Shear Head
y = 0.9557x + 0.0103
R² = 0.9994
0
0.02
0.04
0.06
0.08
0.1
0.12
0 0.01 0.02 0.03 0.04 0.05 0.06 0.07
To
p o
f R
od
Dis
pla
cem
en
t (i
n)
Shear Head Displacement (in)
15 psi Normal Stress Test 1:
Rod vs. Shear Head
Figure E.11: Stepper displacement vs. actual shear head
displacement at normal stress of 15 psi
Figure E.12: Displacement at top of pull rod vs. actual shear head
displacement at normal stress of 15 psi

142
0
2
4
6
8
10
12
0 0.01 0.02 0.03 0.04 0.05 0.06 0.07
Sh
ea
r Str
ess
(p
si)
Stepper Displacement (in)
15 psi Normal Stress Test 1:
Shear Stress vs. Stepper
Incremental stepper and shear head
displacements approx. equal after this point
0
2
4
6
8
10
12
0 0.01 0.02 0.03 0.04 0.05 0.06 0.07
Sh
ear
Str
ess
(p
si)
Displacement (in)
15 psi Normal Stress Test 1:
Shear Stress vs. Displacement
vs. Rod
vs. Shear Head
Incremental rod and shear head
displacements approx. equal after this point
-0.004
-0.002
0
0.002
0.004
0.006
0.008
0.01
0.012
0 20 40 60 80 100 120
Ro
d a
nd
Str
ap
Elo
ng
ati
on
(in
)
Force(lb)
15 psi Normal Stress Test 1:
Rod and Strap Movement vs. Force
Theoretical (Rod Only)
Measured
Figure E.13: Shear stress vs. stepper displacement at normal stress
of 15 psi
Figure E.14: Shear stress vs. rod and shear head displacements at
normal stress of 15 psi
Figure E.15: Rod and strap elongation at normal stress of 15 psi

143
y = 1.0546x + 0.0488
R² = 0.9997
0
0.02
0.04
0.06
0.08
0.1
0.12
0 0.01 0.02 0.03 0.04 0.05 0.06
Ste
pp
er
(in
)
Shear Head Displacement (in)
20 psi Normal Stress Test 1:
Stepper vs. Shear Head
y = 0.9734x + 0.0089
R² = 0.9992
0
0.02
0.04
0.06
0.08
0.1
0.12
0 0.01 0.02 0.03 0.04 0.05 0.06
To
p o
f R
od
Dis
pla
cem
en
t (i
n)
Shear Head Displacement (in)
20 psi Normal Stress Test 1:
Rod vs. Shear Head
Figure E.16: Stepper displacement vs. actual shear head
displacement at normal stress of 20 psi
Figure E.17: Displacement at top of pull rod vs. actual shear head
displacement at normal stress of 20 psi

144
0
2
4
6
8
10
12
0 0.01 0.02 0.03 0.04 0.05 0.06 0.07 0.08
Sh
ea
r Str
ess
(p
si)
Stepper Displacement (in)
20 psi Normal Stress Test 1:
Shear Stress vs. Stepper
Incremental stepper and shear head
displacements approx. equal after this point
0
2
4
6
8
10
12
14
0 0.01 0.02 0.03 0.04 0.05 0.06 0.07 0.08
Sh
ear
Str
ess
(p
si)
Displacement (in)
20 psi Normal Stress Test 1:
Stress History for Rod and Shear Head
vs. Rod
vs. Shear Head
Incremental rod and shear head
displacements approx. equal after this point
-0.002
0
0.002
0.004
0.006
0.008
0.01
0.012
0 20 40 60 80 100 120
Ro
d a
nd
Str
ap
Elo
ng
ati
on
(in
)
Force(lb)
20 psi Normal Stress Test 1:
Rod and Strap Movement vs. Force
Theoretical (Rod Only)
Measured
Figure E.18: Shear stress vs. stepper displacement at normal stress
of 20 psi
Figure E.19: Shear stress vs. rod and shear head displacements at
normal stress of 20 psi
Figure E.20: Rod and strap elongation at normal stress of 20 psi

145
E.2 Rod, Clamp, and Cross-Plate Displacement with Fixed Rod Base
y = 1.1995E-06x3 - 1.0037E-04x2 + 3.2601E-03x - 4.4569E-03
R² = 9.9734E-01
0
0.005
0.01
0.015
0.02
0.025
0.03
0.035
0.04
0.045
0.05
0 5 10 15 20 25 30 35 40 45
Cro
ss-P
late
Dis
pla
cem
en
t (i
n)
Shear Stress (psi)
Cylinder Compression vs. Stress
Vise-Grip Utilized - Test 1
-0.002
-0.001
0
0.001
0.002
0.003
0.004
0.005
0 50 100 150 200 250 300 350 400 450
Ro
d D
isp
lace
me
nt
(in
)
Force (lb)
Rod Elongation vs. Force
Vise-Grips Utilized - Test 1
Measured
Theoretical
Figure E.21: Trend fit to relationship between cylinder compression and shear stress for
Test 1 with locking pliers used to prevent slippage
Figure E.22: Comparison of theoretical and measured rod elongation for Test 1 with
locking pliers used to prevent slippage

146
-0.001
0
0.001
0.002
0.003
0.004
0.005
-0.001 -0.0005 0 0.0005 0.001 0.0015 0.002 0.0025 0.003 0.0035 0.004
Cla
mp
Dis
pla
cem
en
t (i
n)
Rod Displacement (in)
Clamp Displacement vs. Rod Displacement
Vise-Grips Utilized - Test 1
Figure E.23: Slippage between the clamp and rod for Test 1 with locking pliers used to
prevent slippage

147
0
0.005
0.01
0.015
0.02
0.025
0.03
0.035
0.04
0.045
0.05
0 5 10 15 20 25 30 35 40 45
Cro
ss-P
late
Dis
pla
cem
en
t (i
n)
Shear Stress (psi)
Cylinder Compression vs. Stress
Vise-Grip Utilized - Test 2
Measured
Calculated
-0.0015
-0.001
-0.0005
0
0.0005
0.001
0.0015
0.002
0.0025
0 50 100 150 200 250 300 350 400 450
Ro
d D
isp
lace
me
nt
(in
)
Force (lb)
Rod Elongation vs. Force
Vise-Grips Utilized - Test 2
Measured
Theoretical
Figure E.24: Comparison between predicted and measured cylinder compression for Test 2
with locking pliers used to prevent slippage
Figure E.25: Comparison of theoretical and measured rod elongation for Test 2 with
locking pliers used to prevent slippage

148
-0.001
0
0.001
0.002
0.003
0.004
0.005
0.006
-0.001 -0.0005 0 0.0005 0.001 0.0015 0.002 0.0025
Cla
mp
Dis
pla
cem
en
t (i
n)
Rod Displacement (in)
Clamp Displacement vs. Rod Displacement
Vise-Grips Utilized - Test 2
Figure E.26: Slippage between the clamp and rod for Test 2 with locking pliers used to
prevent slippage

149
-0.01
0
0.01
0.02
0.03
0.04
0.05
0.06
0 5 10 15 20 25 30 35 40 45
Cro
ss-P
late
Dis
pla
cem
en
t (i
n)
Shear Stress (psi)
Cylinder Compression vs. Stress
No Vise-Grips Utilized - Test 1
Measured
Calculated
-0.002
-0.001
0
0.001
0.002
0.003
0.004
0.005
0 50 100 150 200 250 300 350 400 450
Ro
d D
isp
lace
me
nt
(in
)
Force(lb)
Rod Elongation vs. Force
No Vise-Grips Utilized - Test 1
Measured
Theoretical
Figure E.27: Comparison between predicted and measured cylinder compression for Test 1
without locking pliers
Figure E.28: Comparison of theoretical and measured rod elongation for Test 1 without
locking pliers

150
-0.0015
-0.001
-0.0005
0
0.0005
0.001
0.0015
0.002
0.0025
0.003
0.0035
0.004
-0.001 -0.0005 0 0.0005 0.001 0.0015 0.002 0.0025 0.003 0.0035 0.004
Cla
mp
Dis
pla
cem
en
t (i
n)
Rod Displacement (in)
Clamp Displacement vs. Rod Displacement
No Vise-Grips Utilized - Test 1
Figure E.29: Slippage between the clamp and rod for Test 1 without locking pliers

151
0
0.01
0.02
0.03
0.04
0.05
0.06
0 5 10 15 20 25 30 35 40 45
Cro
ss-P
late
Dis
pla
cem
en
t (i
n)
Shear Stress (psi)
Cylinder Compression vs. Stress
No Vise-Grips Utilized - Test 2
Measured
Calculated
-0.002
-0.001
0
0.001
0.002
0.003
0.004
0.005
0 50 100 150 200 250 300 350 400 450
Ro
d D
isp
lace
me
nt
(in
)
Force (lb)
Rod Elongation vs. Force
No Vise-Grips Utilized - Test 2
Measured
Theoretical
Figure E.30: Comparison between predicted and measured cylinder compression for Test
2 without locking pliers
Figure E.31: Comparison of theoretical and measured rod elongation for Test 2 without
locking pliers

152
-0.001
0
0.001
0.002
0.003
0.004
0.005
0.006
-0.001 0 0.001 0.002 0.003 0.004
Cla
mp
Dis
pla
cem
en
t (i
n)
Rod Displacement (in)
Clamp Displacement vs. Rod Displacement
No Vise-Grips Utilized - Test 2
Figure E.32: Slippage between the clamp and rod for Test 2 without locking pliers

153
E.3 Supplementary ABST Stiffness Plots with Fixed Rod Base
0
0.005
0.01
0.015
0.02
0.025
0.03
0.035
0.04
0.045
0.05
0 5 10 15 20 25 30 35 40 45
Cro
ss-
Pla
te D
isp
lace
me
nt
(in
)
Shear Stress (psi)
Cylinder Compression vs. Stress
Vise-Grips Utilized
Exterior
Calculated
Average
-0.002
-0.001
0
0.001
0.002
0.003
0.004
0.005
0 50 100 150 200 250 300 350 400 450
Ro
d D
isp
lace
me
nt
(in
)
Force(lb)
Rod Movement vs. Force
Vise Grips Utilized
Rod
Theoretical
Rod-Bottom
Figure E.33: Investigation into the effect of location on cross-plate displacement
measurement with locking pliers used to prevent slippage
Figure E.34: Investigation of possible movement at the base of the fixed pull rod with
locking pliers used to prevent slippage

154
Figure F.1: DAQ channel controls
APPENDIX F. CYCLIC ABST DESIGN
F.1 Additions to the User Guide
Appendix A.1 presents the ABST stand alone program user guide. This user guide outlines
the function of the controls within the program and identifies when those controls should be utilized.
The following sections describe additional controls that are present in the cyclic ABST control
program. Only the steps in the BST procedure that are associated with the additional cyclic controls
will be described.
This user guide describes how to perform the test using a string potentiometer to measure
displacement of the shear plates. A string potentiometer can be connected to the shear head with
fishing line, and the length of the line can be adjusted by adding or removing leaders. This additional
instrumentation can easily be incorporated into the ABST without significant changes to the
apparatus. However, the process of attaching the shear head to the string potentiometer with fishing
line may become complicated under some circumstances. For example, a deep boring or a drilling
procedure that incorporates drilling mud may complicate the use of the string potentiometer. As a
result, it is proposed that an accelerometer be used to measure displacements when a new shear head
apparatus is constructed (Section 5.3.2).
F.1.1 Preparation
Since the cyclic ABST requires a method of measuring the displacement of the shear head, it
is recommended that a string potentiometer be secured to the base plate and attached to the shear head

155
Figure F.2: Cyclic
test controls
when the original apparatus is used. The string potentiometer should then be wired to input channel
two on the DAQ. The front panel of the program can be used to activate or deactivate channel two
and change the minimum and maximum voltage for the channel (Figure F.1). The voltage range
should be set as small as possible based on the expected displacement range to increase the
measurement resolution. Section 3.3.1 can be referenced for more information on selecting voltage
ranges. The power for the string potentiometer can be obtained from the power supply housed in the
Pelican electronics case. This program was developed for a 4-20 mA transducer output signal rather
than a DC voltage device, since the sensitivity of the former is not affected by the power supply’s
voltage. However, it is important to check that the power supply’s voltage does not violate the
maximum or minimum input voltage specified for the device.
The Cyclic Test button shown in Figure F.2 should be activated
(green light on) if a cyclic test will be performed. If this control is not
selected, a traditional automated BST will be performed. Since the
program has the capability for both cyclic and monotonic tests, the controls
on the front panel that do not correspond to the selected test can be
disregarded.
If a cyclic test is to be performed, the controls shown in Figure F.3
can be utilized to set the limits of the test. The Limit Type control can be
set to either Displacement or Shear Stress. The desired stress or
displacement limits should then be entered into the Upper Limit and Lower
Limit boxes. The displacement limits should be entered in inches and the
stress boundaries in psi.
Figure F.3: Limit
controls
Figure F.4: String
pot indicators

156
F.1.2 Insertion of Shear Head
Since a string potentiometer is used for a cyclic ABST, it is beneficial to check the initial
measurement of the string potentiometer. If the initial measurement is too close to the limits of the
device, fishing leaders can be added or removed to extend or retract the cable to acquire an initial
condition with an adequate available range of motion.
Figure F.4 shows the string pot (in) indicator that is used to check the initial string
potentiometer measurement before the test is started. This indicator will continually update with the
current string potentiometer measurement throughout the test. Indicators displaying the initial
measurement and current string potentiometer displacements are also shown in Figure F.4. Once an
adequate initial cable extension for the string potentiometer is set, the Position Set button can be
clicked (Figure F.2). Once the Position Set control is selected, the normal stress tare can be obtained
and the test begun.
F.1.3 Application of Normal Stress
Only one normal stress should be utilized for each cyclic test. If multiple normal stresses are
to be tested, the shear head should be rotated or inserted to a new depth each time in order to test at a
fresh location. It is possible that staged testing could be used,
since the shear failure plane in the soil may move outward
upon application of a higher normal stress. However, since
the cyclic ABST is still in its infancy, it is not recommended
that staged testing be performed with the cyclic ABST.
F.1.4 Application of Shearing Stress
The Advance on Peak and Advance on Plateau
buttons shown in Figure F.5 should be de-activated for a
cyclic test (green lights off). Once the test begins, the shear
Figure F.5: Peak stress controls

157
head will be raised until the Upper Limit (Figure F.3) is reached and then lowered until the Lower
Limit is reached. This process will be repeated for as many cycles as desired by the user. The
controls shown in Figure F.3 can be modified at any point during the shearing stage of the test. Once
the user has obtained the required stress cycles, the Advance Now button in Figure F.5 should be
clicked.
F.1.5 Results
The failure envelope plot should be disregarded for the cyclic ABST. In addition to the
graphs that exist for the monotonic test, a new graph is presented which plots shear stress against
string potentiometer displacement (Figure F.6). This plot should be used to monitor the adequacy of
the results during testing.
Figure F.6: Cyclic shear record graph

158
F.2 Double-Strap Cyclic Shear Head Design
Figure F.7 displays the double-strap shear head apparatus design. Table F.1 displays the
dimensions and material types for the double-strap parts displayed in Figures F.8 through F.14. Table
F.2 presents the properties utilized in the Abaqus model for each material. Figure F.7 was developed
with AutoCad 2012, and Figures F.8 through F.14 were developed with Abaqus 6.10.
The hollow box section of the pipe will encase the cylindrical section of the shear head. This
box section will transfer compressive loads
to the lower hanger without contacting the
shear head. In addition, the proposed
accelerometer can be placed on the shear
head inside the box section. A rubber seal
or flexible epoxy coating can be applied
between the box section and the shear head
end plates to prevent water from reaching
the accelerometer.
Straps Shear
Plate
Pipe
Box Section
of Pipe
Hanger
Figure F.7: Double-strap shear head
apparatus.

159
Table F.1: Dimensions for double-strap design
Part Dimensions (in)a Material
Hangers Radius = 2.5; Thickness = 1 Stainless Steel
Pipe Pipe Section: Outer Radius = 0.875; Inner Radius = 0.5; Height = 10.45
Box Section: Height = 2.2; Thickness = 2.2; Width = 1.78 Stainless Steel
Loading rod Outer Radius = 0.75; Inner Radius = 0.5b Aluminum
Shear head Cylinder Section: Radius = 1.865; Width = 1.78
End Plates: Height = 2.38; Thickness = 1.89; Width = 0.185 Stainless Steel
Shear plates Height = 2.5; Thickness = 1.82; Center Width = 0.365; Radius = 1.317 Stainless Steel
Strap Thickness = 0.78; Width = 0.03 Spring Steel
Piston Radius = 0.25; Width c = 0.62 Stainless Steel
a For Figures F.8 through F.14: Height = y dimension; Thickness = z dimension; Width = x dimension
b Loading rod height used in Abaqus analysis was 30 feet
c Apparatus width with piston (expanded) = 3.5 inches; Apparatus width without piston = 2.88 inches
Table F.2: Properties for materials in double-strap apparatus
Material Young's Modulus (ksi) Poisson's Ratio Density (pcf) Yield Strength (ksi)
Stainless Steel 26,000 0.30 490 75
Spring Steel 30,500 0.30 490 60 to 150
Aluminum 10,000 0.33 170 14

160
Figure F.8: Upper and lower hanger
Figure F.9: Pipes and box section

161
Figure F.10: Loading rod
Figure F.11: Shear head

162
Figure F.12: Shear plate
Figure F.13: Strap

163
Figure F.14: Piston

164
Table F.3: Double-strap apparatus stress analysis results F
.3 C
yclic A
BS
T S
tress A
naly
sis Resu
lts
Run 1 2 3 4 5 6 7
Run C
har
acte
rist
ics
Model Type Shear
Head
Shear
Head
Shear
Head
Shear
Head
Shear Head
& Loading
rods
Expanded Shear
Head & Loading
rods
Shear Head
& Loading
rodsd
Mass Proportional
Damping Factor for
Material
10 50 50 50 50 50 50
Soil Damping
Coefficient (kg/s) 0 0 428 428 428 428 428/743
Frequency of Load
Scaling Sine Wave (Hz) 2 2 2 30 30 30 30
Initial Strap Tension (lb) 800a 800 800 800 800 800 550
b
Peak Load Applied (lb) 200 200 200 200 668 668 668
Contr
oll
ing P
rinci
pal
Str
ess
(ksi
)
Pipe -52.2 -52.2 -52.2 -52.2 -60.6 -50.8 -46.1/-36.7
Strap 53.6 53.6 53.6 55.1 63.8 45.0 50.8c/35.8
Shear Plates +/-10.2 +/-10.2 +/-10.2 +/-17.4 +/-59.5 +/-59.5 +/-59.5/0.4
Shear Head -0.7 -0.7 -0.7 -0.8 -1.7 -2.9 -1.7/0.1
Hangers -13.5 -13.5 -13.5 -14.1 -14.1 -13.7 -14.1/15.0
Loading rods N/A N/A N/A N/A +/- 1.2 +/- 1.2 +/- 1.2/0.7
Piston N/A N/A N/A N/A N/A 0.1 N/A a Midpoint strap tension of 720 lb (30.7 ksi) at equilibrium condition
b Midpoint strap tension of 490 lb (21.0 ksi) at equilibrium condition
c Minimum stress of 8.4 ksi in axial direction
d Viscous and hysteretic damping conditions compared: (viscous/hysteretic)

165
Table F.4: Double-strap apparatus damping analysis
Run 1 2 3
Run C
har
acte
rist
ics
Model Typea
Shear Head &
Loading rod
Shear Head &
Loading rod
Shear Head &
Loading rod
Mass Proportional Damping Factor
for Material N/A 50 N/A
Critical Damping Ratio 0.09 N/A 0.02
Soil Damping Coefficient N/A N/A N/A
Frequency of Load Scaling Sine
Wave (Hz) 30 30 30
Initial Strap Tension 800 800 800
Peak Load Applied (lb) 1000 1000 1000
Contr
oll
ing P
rinci
pal
Str
ess
(ksi
)
Pipe -65.7 -68.2 -66.7
Strap 66.1 60.9 66.1
Shear Plates -1.6 -1.2 -1.6
Shear Head -1.7 -1.7 -1.7
Hangers -20.6 -22.6 -21.3
Loading rods 1.5 1.5 1.7 a Shear plates are fixed in each degree of freedom.

166
APPENDIX G. CYCLIC ABST RESULTS
G.1 Laboratory Results in Compacted Loess
-1.5
-1
-0.5
0
0.5
1
1.5
-0.004 -0.002 0 0.002 0.004 0.006
Sh
ea
r st
ress
(p
si)
Shear head displacement from string pot (in)
Cyclic ABST on Compacted, Air Dry Loess
5 psi Normal Stress: Test 2
Figure G.2: Stress-controlled cyclic ABST results (5 psi normal stress: Test 2)
Figure G.1: Stress-controlled cyclic ABST results (5 psi normal stress: Test 1)
-1.5
-1
-0.5
0
0.5
1
1.5
-0.004 -0.002 0 0.002 0.004 0.006
Sh
ea
r st
ress
(p
si)
Shear head displacement from string pot (in)
Cyclic ABST on Compacted, Air Dry Loess
5 psi Normal Stress: Test 1

167
Figure G.4: Stress-controlled cyclic ABST results (10 psi normal stress: Test 1)
-1.5
-1
-0.5
0
0.5
1
1.5
-0.004 -0.002 0 0.002 0.004 0.006
Sh
ea
r st
ress
(p
si)
Shear head displacement from string pot (in)
Cyclic ABST on Compacted, Air Dry Loess
10 psi Normal Stress: Test 1
Figure G.3: Stress-controlled cyclic ABST results (5 psi normal stress: Test 3)
-1.5
-1
-0.5
0
0.5
1
1.5
-0.004 -0.002 0 0.002 0.004 0.006
Sh
ea
r st
ress
(p
si)
Shear head displacement from string pot (in)
Cyclic ABST on Compacted, Air Dry Loess
5 psi Normal Stress: Test 3

168
Figure G.5: Stress-controlled cyclic ABST results (10 psi normal stress: Test 2)
-1.5
-1
-0.5
0
0.5
1
1.5
-0.004 -0.002 0 0.002 0.004 0.006
Sh
ea
r st
ress
(p
si)
Shear head displacement from string pot (in)
Cyclic ABST on Compacted, Air Dry Loess
10 psi Normal Stress: Test 2
Figure G.6: Stress-controlled cyclic ABST results (15 psi normal stress: Test 1)
-1.5
-1
-0.5
0
0.5
1
1.5
-0.004 -0.002 0 0.002 0.004 0.006
Sh
ea
r st
ress
(p
si)
Shear head displacement from string pot (in)
Cyclic ABST on Compacted, Air Dry Loess
15 psi Normal Stress: Test 1

169
Figure G.7: Stress-controlled cyclic ABST results (15 psi normal stress: Test 2)
-1.5
-1
-0.5
0
0.5
1
1.5
-0.004 -0.002 0 0.002 0.004 0.006
Sh
ea
r st
ress
(p
si)
Shear head displacement from string pot (in)
Cyclic ABST on Compacted, Air Dry Loess
15 psi Normal Stress: Test 2
Figure G.8: Displacement-controlled cyclic ABST results (5 psi normal stress: Test 1)
-1.5
-1
-0.5
0
0.5
1
1.5
-0.004 -0.002 0 0.002 0.004 0.006
Sh
ea
r st
ress
(p
si)
Shear head displacement from string pot (in)
Cyclic ABST on Compacted, Air Dry Loess
5 psi Normal Stress: Test 1
Loop1
Loop2
Loop3
Loop4

170
G.2 Field Results in Sandy Glacial Till
Figure G.9: Shear record from monotonic ABST with string potentiometer (Boring 1: Depth
of 2 feet)
0
5
10
0 0.05 0.1 0.15 0.2
Sh
ea
r S
tre
ss (
psi
)
Distance (in)
ABST in Sandy Glacial Till
Boring 1
2 psi
4 psi
6 psi
8 psi
10 psi
y = 0.851x + 0.9188
R² = 0.9989
0
2
4
6
8
10
0 2 4 6 8 10 12
Sh
ea
r S
tre
ss(p
si)
Normal Stress (psi)
ABST in Sandy Glacial Till
Boring 1
φ = 40.4˚
c = 0.9 psi
Figure G.10: Failure envelope from monotonic ABST with string potentiometer (Boring 1:
Depth of 2 feet)
2 psi
4 psi
6 psi
8 psi
10 psi

171
Figure G.11: Stress-controlled cyclic ABST results at 10 psi and shearing rate of 2
revolutions per second
0
0.5
1
1.5
2
2.5
3
3.5
4
4.5
0 0.002 0.004 0.006 0.008 0.01 0.012 0.014 0.016 0.018 0.02
Sh
ea
r S
tre
ss (
psi
)
Shear head displacement from string pot (in)
Cyclic ABST in Sandy Glacial Till
10 psi Normal Stress with 2 rev/s Shear Rate: Boring 1
Figure G.12: Stress-controlled cyclic ABST results at 10 psi and shearing rate of 0.2
revolutions per second
0
1
2
3
4
5
6
7
8
9
0 0.01 0.02 0.03 0.04 0.05 0.06 0.07 0.08 0.09 0.1
Sh
ea
r S
tre
ss (
psi
)
Shear head displacement from string pot (in)
Cyclic ABST in Sandy Glacial Till
10 psi Normal Stress with 0.2 rev/s Shear Rate: Boring 1

172
0
1
2
3
4
5
6
7
8
9
0 0.01 0.02 0.03 0.04 0.05 0.06 0.07 0.08 0.09 0.1
Sh
ea
r S
tre
ss (
psi
)
Shear head displacement from string pot (in)
Cyclic ABST in Sandy Glacial Till
10 psi Normal Stress with 5 rev/s Shear Rate: Boring 1
Figure G.13: Stress-controlled cyclic ABST results at 10 psi and shearing rate of 5
revolutions per second
0
1
2
3
4
5
6
7
8
9
0 0.01 0.02 0.03 0.04 0.05 0.06 0.07 0.08 0.09 0.1
Sh
ea
r S
tre
ss (
psi
)
Shear head displacement from string pot (in)
Cyclic ABST in Sandy Glacial Till
10 psi Normal Stress with 7 rev/s Shear Rate: Boring 1
Figure G.14: Stress-controlled cyclic ABST results at 10 psi and shearing rate of 7 revolutions
per second

173
Figure G.16: Stress-controlled cyclic ABST results at 10 psi and shearing rate of 5
revolutions per second
0
1
2
3
4
5
6
7
8
9
0 0.01 0.02 0.03 0.04 0.05 0.06 0.07 0.08 0.09 0.1
Sh
ea
r S
tre
ss (
psi
)
Shear head displacement from string pot (in)
Cyclic ABST in Sandy Glacial Till
10 psi Normal Stress with 5 rev/s Shear Rate: Boring 2
Figure G.15: Stress-controlled cyclic ABST results at 10 psi and shearing rate of 0.2
revolutions per second
0
1
2
3
4
5
6
7
8
9
0 0.01 0.02 0.03 0.04 0.05 0.06 0.07 0.08 0.09 0.1
Sh
ear
Str
ess
(p
si)
Shear head displacement from string pot (in)
Cyclic ABST in Sandy Glacial Till
10 psi Normal Stress with 0.2 rev/s Shear Rate: Boring 2

174
Figure G.17: Stress-controlled cyclic ABST results at 10 psi and shearing rate of 7
revolutions per second
0
1
2
3
4
5
6
7
8
9
0 0.01 0.02 0.03 0.04 0.05 0.06 0.07 0.08 0.09 0.1
Sh
ea
r S
tre
ss (
psi
)
Shear head displacement from string pot (in)
Cyclic ABST in Sandy Glacial Till
10 psi Normal Stress with 7 rev/s Shear Rate: Boring 2
-2
0
2
4
6
8
10
0 0.005 0.01 0.015 0.02 0.025 0.03 0.035 0.04
Sh
ea
r S
tre
ss (
psi
)
Shear head displacement from string pot (in)
Cyclic ABST in Sandy Glacial Till
10 psi Normal Stress with 7 rev/s Shear Rate: Boring 2
Figure G.18: Displacement-controlled cyclic ABST results at 10 psi and shearing rate of 7
revolutions per second

175
Figure G.20: Comparison of stress-controlled cyclic ABSTs at different shearing rates for
boring 2
0
1
2
3
4
5
6
7
8
9
0 0.005 0.01 0.015 0.02 0.025 0.03 0.035 0.04 0.045 0.05
Sh
ea
r S
tre
ss (
psi
)
Shear head displacement from string pot (in)
Cyclic ABST in Sandy Glacial Till
10 psi Normal Stress with Loops Corrected for Migration: Boring 2
0.2 rev/s
5 rev/s
7 rev/s
0
1
2
3
4
5
6
7
8
9
0 0.005 0.01 0.015 0.02 0.025 0.03 0.035 0.04 0.045 0.05
Sh
ea
r S
tre
ss (
psi
)
Shear head displacement from string pot (in)
Cyclic ABST in Sandy Glacial Till
10 psi Normal Stress with Loops Corrected for Migration: Boring 1
0.2 rev/s
5 rev/s
7 rev/s
Figure G.19: Comparison of stress-controlled cyclic ABSTs at different shearing rates for
boring 1

176
Figure G.22: Comparison of equivalent damping ratios from stress-displacement loops at a
normal stress of 10 psi in boring 2
0.20
0.22
0.24
0.26
0.28
0.30
0.32
0.34
0 1 2 3 4 5 6 7
Eq
uiv
ale
nt
Da
mp
ing
Ra
tio
Loop #
Equivalent Damping Ratio from Stress-Displacement Plots
10 psi Normal Stress: Boring 2
0.2 rev/s
5 rev/s
7 rev/s
Figure G.21: Comparison of equivalent damping ratios from stress-displacement loops at a
normal stress of 10 psi in boring 1
0.20
0.22
0.24
0.26
0.28
0.30
0.32
0.34
0 2 4 6 8 10 12
Eq
uiv
ale
nt
Da
mp
ing
Ra
tio
Loop #
Equivalent Damping Ratio from Stress-Displacement Plots
10 psi Normal Stress: Boring 1
0.2 rev/s
5 rev/s
7 rev/s

177
250
300
350
400
450
500
0 2 4 6 8 10 12
Eq
uiv
ale
nt
Se
can
t S
he
ar
Mo
du
lus
(psi
/in
)
Loop #
Equivalent Secant Shear Modulus from Stress-Displacement Plots
10 psi Normal Stress: Boring 1
0.2 rev/s
5 rev/s
7 rev/s
Figure G.23: Comparison of equivalent secant shear modulus values from stress-
displacement loops at a normal stress of 10 psi in boring 1
250
300
350
400
450
500
0 1 2 3 4 5 6 7
Eq
uiv
ale
nt
Se
can
t S
he
ar
Mo
du
lus
(psi
/in
)
Loop #
Equivalent Secant Shear Modulus from Stress-Displacement Plots
10 psi Normal Stress: Boring 2
0.2 rev/s
5 rev/s
7 rev/s
Figure G.24: Comparison of equivalent secant shear modulus values from stress-
displacement loops at a normal stress of 10 psi in boring 2

178
BIBLIOGRAPHY
ABAQUS User’s and Theory Manual Version 6.10. (2011). Hibbit, Karlson, and Sorensen,
Pawtucket, R.I.
ASTM Standard D3999. 1991 (2011). “Standard Test Methods for the Determination of the Modulus
and Damping Properties of Soils Using the Cyclic Triaxial Apparatus.” ASTM International,
West Conshohocken, PA, 2011, DOI: 10.1520/D3999-11, www.astm.org.
ASTM Standard D5311. 1992 (2011). “Standard Test Method for Load Controlled Cyclic Triaxial
Strength of Soil.” ASTM International, West Conshohocken, PA, 2011, DOI:
10.1520/D5311-11, www.astm.org.
Ashlock, J.C. and Bechtum, T.D. (2011). “Automated Borehole Shear Soil Testing Device: Final
Report”, submitted to Handy Geotechnical Instruments, Inc. and Iowa State University
Institute for Physical Research and Technology, 218 pp., May 2011.
Ashlock, J.C. (2012). “Actuator Design for Cyclic Borehole Shear Test Device.” Department of Civil,
Construction, and Environmental Engineering, Iowa State University, Ames, IA.
Ashlock, J.C. and Lu, N. (2012). “Interpretation of Borehole Shear Strength Tests of Unsaturated
Loess by Suction Stress Characteristic Curves”, GeoCongress 2012, State of the Art and
Practice in Geotechnical Engineering, Oakland, CA, March 25-29, 10 pp.
Cox, B.R. (2006). “Development of a Direct Test Method for Dynamically Assessing the
Liquefaction Resistance of Soils In Situ”, Ph.D. Dissertation, The University of Texas at
Austin.
Das, B.M. (2010). Principles of Geotechnical Engineering, Cengage Learning, Stamford.
Dassault Systems. (2010). Abaqus 6.10 [computer software]. Providence, Rhode Island.
Demartincourt, J.P. and Bauer, G.E. (1983). “The modified borehole shear device.” Geotechnical
Testing Journal, ASTM, Vol. 6, pp 24-29.

179
Handy, R.L. and Fox, N.S. (1967). “A Soil Bore-Hole Direct Shear Test Device.” Highway Research
News, Highway Research Board, No. 27, pp. 42-51.
Handy, R.L. Schmertmann, J.H. and Lutenegger, A.J. (1985). “Borehole Shear Tests in a Shallow
Marine Environment.” ASTM STP No. 883, pp. 140-153
Handy, R.L. (1986). “Borehole Shear Test and Slope Stability.” Use of In Situ Tests in Geotechnical
Engineering, ASCE, pp. 161-175.
Handy, R.L. (2002). Borehole Shear Test Manual, Handy Geotechnical Instruments, Inc., Madrid, IA.
Idriss, I.M. and Boulanger, R.W. (2008). “Soil Liquefaction during Earthquakes.” Publication MNO-
12, Earthquake Engineering Research Institute (EERI), Oakland, CA
Lade, P.V. (2005). “Overview of Constitutive Models for Soils.” ASCE Geotechnical Special
Publication No. 128, Soil Constitutive Models: Evaluation, Selection, and Calibration, pp. 1-
34.
Lu, N. and Likos, W.J. (2004). Unsaturated Soil Mechanics, John Wiley & Sons, Inc. Hoboken, NJ.
Lutenegger, A.J. Remmes, B.D. and Handy, R.L. (1978). “Borehole Shear Tests for Stiff Soils.”
Journal of the Geotechnical Engineering Division, ASCE, Vol. 104, No. GT11, pp. 1403-
1407.
Lutenegger, A.J. and Tierney, K.F. (1986). “Pore Pressure Effects in Borehole Shear Testing.” Use of
In Situ Tests in Geotechnical Engineering, ASCE, pp. 752-764.
Lutenegger, A.J. (1987). “Suggested Method for Performing the Borehole Shear Test.” Geotechnical
Testing Journal, GTJODJ, Vol. 10, No. 1, pp. 19-25.
Lutenegger, A.J. and Timian, D.A. (1987). “Reproducibility of Borehole Shear Test Results in
Marine Clay.” Geotechnical Testing Journal, ASTM, Vol. 10, No. 1, pp. 13-18.
Lutenegger, A.J. and Powell, J.J.M. (2008). “Borehole Shear Tests in Stiff London and Gault Clay.”
Proceedings of the 3rd International Symposium on Site Characterization, pp. 719-723,
Taipei.

180
Miller, G.A. Azad, S. and Hassell, C.E. (1998). “Iowa Borehole Shear Testing in Unsaturated Soil.”
Geotechnical Site Characterization, Vol. 1/2, pp. 1321-1326, Rotterdam.
National Instruments. (2009). Labview [Computer Software]. Austin, Texas.
National Research Council (NRC). (1985). “Liquefaction of Soils During Earthquakes.” National
Academy Press, Washington, DC, 240 pp.
Seed, H.B. and Lee, K.L. (1966). “Liquefaction of Saturated Sands during Cyclic Loading.” Journal
of the Soil Mechanics and Foundations Division, ASCE, Vol. 92, No. SM6, pp. 105-134.
Skempton, A.W. (1970). “First-Time Slides in Over-Consolidated Clays.” Geotechnique 20, No. 3,
pp. 320-324.
Suleiman, M. AbdelSalam, S. and Sritharan, S. (2011). “Improving Prediction of the Load-
Displacement Response of Axially Loaded Friction Piles.” Proceedings of Geo-Frontiers
2011, Advances in Geotechnical Engineering, ASCE, pp. 36-45.
White, D.J. and Handy, R.L. (2001). “Preconsolidation Pressures and Soil Moduli from Borehole
Shear Tests.” Proceedings from International Conference on In Situ Measurement of Soil
Properties and Case Histories, In Situ 2001, Bali, Indonesia.
Youd, T.L. Idriss, I.M. Andrus, R.D. Arango, I. Castro, G. Christian, J.T. Dobry, R. Liam Finn, W.D.
Harder Jr., L.F. Hynes, M.E. Ishihara, K. Koester, J.P. Liao, S.S. Marcuson III, W.F. Martin,
G.R. Mitchell, J.K. Moriwaki, Y. Power, M.S. Robertson, P.K. Seed, R.B. and Stokoe II,
K.H. (2001). “Liquefaction Resistance of Soils: Summary report from the 1996 NCEER and
1998 NCEER/NSF Workshops on Evaluation of Liquefaction Resistance of Soils.” Journal
of Geotechnical and Geoenvironmental Engineering, ASCE, Vol. 127, No. 10, pp. 817-833.