Embed Size (px)
Citation preview

Automated Plate Sealing
Protocol Guide
For Research Use Only. Not for use in diagnostic procedures.
Original Instructions

Notices© Agilent Technologies, Inc. 2017
No part of this manual may be reproduced in any form or by any means (including electronic storage and retrieval or translation into a foreign language) without prior agreement and written consent from Agilent Technologies, Inc. as governed by United States and international copyright laws.
User Guide Part Number
G5590-90002
Edition
Revision A, October 2017
Contact Information
Agilent Technologies Inc. Automation Solutions 5301 Stevens Creek Blvd. Santa Clara, CA 95051 USA
Technical Support: 1.800.979.4811 (US) or +1.408.345.8011 (rest of world) [email protected]
Customer Service: 800-227-9770 (US and Canada) By country: http://www.agilent.com/en-us/contact-us/page
Documentation feedback: [email protected]
Web: http://www.agilent.com/en-us/products/automation-solutions
Acknowledgements
Adobe® and Acrobat® are trademarks of Adobe Systems Incorporated.
Microsoft® and Windows® are either registered trademarks or trademarks of the Microsoft Corporation in the United States and other countries.
Warranty
The material contained in this docu-ment is provided “as is,” and is sub-ject to being changed, without notice, in future editions. Further, to the max-imum extent permitted by applicable law, Agilent disclaims all warranties, either express or implied, with regard to this manual and any information contained herein, including but not limited to the implied warranties of merchantability and fitness for a par-ticular purpose. Agilent shall not be liable for errors or for incidental or consequential damages in connection with the furnishing, use, or perfor-mance of this document or of any information contained herein. Should Agilent and the user have a separate written agreement with warranty terms covering the material in this document that conflict with these terms, the warranty terms in the sep-arate agreement shall control.
Technology Licenses
The hardware and/or software described in this document are furnished under a license and may be used or copied only in accordance with the terms of such license.
Restricted Rights Legend
If software is for use in the performance of a U.S. Government prime contract or subcontract, Software is delivered and licensed as “Commercial computer software” as defined in DFAR 252.227-7014 (June 1995), or as a “commercial item” as defined in FAR 2.101(a) or as “Restricted computer software” as defined in FAR 52.227-19 (June 1987) or any equivalent agency regulation or contract clause. Use, duplication or disclosure of Software is subject to Agilent Technologies’ standard commercial license terms, and non-DOD Departments and Agencies of the U.S. Government will receive no greater than Restricted Rights as defined in FAR 52.227-19(c)(1-2) (June 1987). U.S. Government users will receive no greater than Limited Rights as defined in FAR 52.227-14
(June1987) or DFAR 252.227-7015 (b)(2) (November 1995), as applicable in any technical data.
Safety Noticies
A WARNING notice denotes a hazard. It calls attention to an operating procedure, practice, or the like that, if not correctly performed or adhered to, could result in personal injury or death. Do not proceed beyond a WARNING notice until the indicated conditions are fully understood and met.
A CAUTION notice denotes a hazard. It calls attention to an operating procedure, practice, or the like that, if not correctly performed or adhered to, could result in damage to the product or loss of important data. Do not proceed beyond a CAUTION notice until the indicated conditions are fully understood and met.

1
Automated Plate Sealing Protocol Guide
Automated Plate Sealing Protocol Guide
This guide contains the following topics:
• “About this guide” on page 2
• “Protocol description” on page 4
• “Before you start” on page 4
• “Starting and setting up the workstation” on page 7
• “Setting up the protocol” on page 11
• “Running the protocol” on page 12

1 Automated Plate Sealing Protocol GuideAbout this guide
2 Automated Plate Sealing Protocol Guide
About this guide
This guide describes how to run the Automated Plate Sealing protocol using an Agilent G5590A BenchCel Workstation that includes the PlateLoc Thermal Microplate Sealer. This guide describes how to open the protocol and run it using a VWorks form. For details on the task parameters or how to create a different protocol, see the VWorks Automation Control User Guide.
Assumptions
This guide assumes the following:
• The Agilent G5590A BenchCel Workstation with PlateLoc Sealer has been installed and is operating correctly.
• The device teachpoints have been set and verified.
• You are familiar with the devices in the workstation and the VWorks Automation Control software.
Safety information
Ensure that you are properly trained in:
• General laboratory safety
• The correct and safe operation of the workstation
• Emergency stops
For general safety precautions, intended product use statement, and the list of safety labels, see the Automation Solutions Products General Safety Guide.
For detailed safety information, see the BenchCel Microplate Handler User Guide and the PlateLoc Thermal Microplate Sealer User Guide.
Related user guides and where to find them
You should use this guide in conjunction with the following guides:
• Automation Solutions Products General Safety Guide. Provides general safety information and describes potential safety hazards that you might encounter when using Agilent Automation Solutions products.
• BenchCel Microplate Handler User Guide. Contains the safety guidelines and describes the installation, setup, operation, and maintenance procedures for the BenchCel Microplate Handler.
• PlateLoc Thermal Microplate Sealer User Guide. Contains the safety guidelines and describes the installation, setup, operation, and maintenance procedures for the PlateLoc Sealer.
• VWorks Automation Control User Guide. Describes how to create, run, import, and export protocols.
• VWorks Automation Control Setup Guide. Explains how to define labware, specify pipetting speed and accuracy, manage labware in storage, and manage user accounts.

3
1 Automated Plate Sealing Protocol GuideAbout this guide
Automated Plate Sealing Protocol Guide
You can access these guides in the Literature Library page of the BenchCel Workstations software interface.
You can find the user guides for all the Automation Solutions products in the VWorks knowledge base. You can open the knowledge base in the following ways:
• In the BenchCel Workstations software, go to the Literature Library page, and then click Open for the VWorks knowledge base.
• Within the VWorks software, select Help > Knowledge Base or press F1.
• From the Microsoft Windows 10 All Apps menu, select Agilent Technologies > VWorks Knowledge Base.
You can also find these guides in the online VWorks knowledge base at www.agilent.com/chem/askb.

1 Automated Plate Sealing Protocol GuideProtocol description
4 Automated Plate Sealing Protocol Guide
Protocol description
Plate Sealing protocol. The Automated Plate Sealing protocol seals up to n microplates in a single automated protocol run.
Note: The number (n) of microplates that a protocol can process depends on the number of labware racks on the BenchCel Microplate Handler. Depending on the model, the BenchCel Microplate Handler can have two, four, or six labware racks (BenchCel 2R, 4R, or 6R).
Before you start
Hardware requirements
The following figure and table describes the components used in the Plate Sealing protocol. The BenchCel Microplate Handler in the workstation can be a BenchCel 2R, 4R, or 6R model.
IMPORTANT If your workstation includes additional devices and you want to use this protocol, the VWorks device file that is linked to the protocol must be edited to include all the workstation devices before you can run the protocol successfully. For instructions on how to modify a device file and link to the protocol, see the VWorks Automation Control User Guide.
Figure G5590A BenchCel Workstation (BenchCel6R) including PlateLoc Sealer

5
1 Automated Plate Sealing Protocol GuideBefore you start
Automated Plate Sealing Protocol Guide
Software requirements
The minimum software requirements for running the protocol are as follows:
• Microsoft Windows 10 64- bit operating system
• VWorks Automation Control software 13.1
• BenchCel Workstations software 1.0
The BenchCel Workstations software includes the device profiles for connecting to your devices and the files required to run the BenchCel Workstation protocols.
Item Name Description See...
1 Computer and monitor
The controlling computer that runs the VWorks Automation Control software.
VWorks Automation Control User Guide
2 BenchCel Microplate Handler
The device that stores stacks of labware and moves labware to and from the other devices in the workstation. Depending on the BenchCel model, two, four, or six labware racks are installed on the stackers.
• BenchCel 2R has two stackers for labware racks.
• BenchCel 4R has four stackers for labware racks.
• BenchCel 6R has six stackers for labware racks.
The labware rack height can be 250- , 660- , or 860- mm.
BenchCel Microplate Handler User Guide
3 BenchCel safety equipment
An emergency- stop pendant and a shield in front of the BenchCel robot protect operators from moving-parts hazards.
BenchCel Microplate Handler User Guide
4 PlateLoc Thermal Microplate Sealer
The robot- accessible automated microplate sealer (PlateLoc Sealer) that applies a sealing material on top of microplates to seal individual wells.
PlateLoc Thermal Microplate Sealer User Guide

1 Automated Plate Sealing Protocol GuideBefore you start
6 Automated Plate Sealing Protocol Guide
Consumables and labware
Ensure that the appropriate Agilent seal is loaded on the PlateLoc Sealer for your labware and application. For loading instructions, see the PlateLoc Thermal Microplate Sealer User Guide.
The following table lists the labware options that you can choose when running this protocol.
Table Labware options
CAUTION Use only the labware specified, and place them at the locations specified in the instructions. Using different labware or placing labware at an unapproved location can cause a collision resulting in equipment damage.
Labware entry in VWorks list* Labware name Manufacturer part number
96 Costar 3961 PP 2ml assay block 96- Well Clear V- Bottom 2mL Polypropylene Deep Well Plate
Corning Costar 3961
96 Greiner 655101 PS Clr Rnd Well Flat Btm
96- Well Microplate, Polystyrene, Round Well, Flat Bottom
Greiner 655101
96 EK 2460 PP Rnd Well U Btm 96 Target Well Plates, 500 µL, U- Bottom, Clea
E&K Scientific EK- 2460
96 Nunc Deep Well 1 mL Nunc 96 DeepWell plate, sterile, 1.3- mL volume
Thermo Scientific 260251
96 Seahorse Storage Plate 2ml Square Pyramid
Seahorse 96- well PD- 702 polypropylene storage microplate, 2ml/square well, pyramid bottom
Agilent Technologies 201379100
384 Greiner 781101 PS clr flt btm Greiner 384 well plate, polystyrene, clear flat bottom
Greiner 781101
1536 Greiner 782076 blk sqr well flt btm Greiner FLUOTRAC 200 1536- well plate, black polystyrene, flat bottom
Greiner 782076
*The labware that you use must have a corresponding labware definition in the VWorks software. In the labware definition, the BenchCel properties should specify the Stack holding method: Hold with stacker grippers. For detailed instructions on how to create or edit labware definitions, see the VWorks Automation Control Setup Guide.

7
1 Automated Plate Sealing Protocol GuideStarting and setting up the workstation
Automated Plate Sealing Protocol Guide
Starting and setting up the workstation
Starting up the workstation
To start the workstation:
1 Start up the BenchCel Microplate Handler as follows:
a Position the BenchCel robot head underneath a stacker, and place the gripper arms to the right, facing the PlateLoc Sealer. See previous figure.
b Turn on the BenchCel air supply.
c Turn on the BenchCel power..
d Wait for the BenchCel head to finish the homing routine.
2 Start up the PlateLoc Sealer as follows:
a Press the on/off switch to the on position (I). b Push the AIR ON/OFF switch to the ON position.
When you turn on the air, the PlateLoc Sealer door opens. The door remains open while the device is in idle mode, until you load a microplate.
3 At the PlateLoc Sealer, load the appropriate plate insert, if applicable, for your labware.
Note: During the run, the BenchCel robot loads the microplates automatically.
4 Turn on the computer and monitor. Wait for the Microsoft Windows operating system to finish starting up.
00191PlateLocconnections
00191PlateLocconnections
Lower gripper to load seal
Press toclose gripper

1 Automated Plate Sealing Protocol GuideStarting and setting up the workstation
8 Automated Plate Sealing Protocol Guide
5 At the BenchCel Microplate Handler, install the labware racks on the stackers. See the BenchCel Microplate Handler User Guide.
IMPORTANT Make sure the BenchCel power and compressed air are turned on before you install or uninstall a labware rack.
Figure Labware rack, front-load
6 Ensure the PlateLoc Sealer has sufficient seal loaded for the number of plates to be processed. For instructions, see the PlateLoc Thermal Microplate Sealer User Guide.
PlateLoc

9
1 Automated Plate Sealing Protocol GuideOpening the protocol
Automated Plate Sealing Protocol Guide
Opening the protocol
IMPORTANT Ensure that the VWorks software is closed before you start the BenchCel Workstations software.
To open the protocol:
1 Start the BenchCel Workstations software .
2 Click App Library. The VWorks software starts.
3 When the User Authentication dialog box opens, type your VWorks user name and password, and then click OK.
.
The Applications Library form opens.

1 Automated Plate Sealing Protocol GuideOpening the protocol
10 Automated Plate Sealing Protocol Guide
.
4 In the Plate Sealing area, click the button that corresponds to your BenchCel stacker configuration: BenchCel 2R, BenchCel 4R, or BenchCel 6R.
The Plate Sealing form opens in the VWorks window.
Figure VWorks window displaying the Plate Sealing form for BenchCel 6R

11
1 Automated Plate Sealing Protocol GuideSetting up the protocol
Automated Plate Sealing Protocol Guide
Setting up the protocol
To set up the protocol:
1 Optional. In the form, click Reset All Values to Default to set all the form settings to their defaults.
2 Optional. If you want to view the VWorks toolbars and menus, click Full Screen on/off to change the scale of the form display within the VWorks window.
3 Set up the BenchCel stackers as follows:
a In the Stacker Setup area of the form, determine which stackers are designated for source microplates.
For example, the protocol for the BenchCel 6R designates the first three stackers for source plates. In this case, if you are using fewer than three stackers of labware, fill Stacker 1 before you fill Stacker 2, and so forth.
Figure Stacker Setup area for the BenchCel 6R
b Fill the labware racks on the corresponding BenchCel stackers with the source microplates. For instructions, see the BenchCel Microplate Handler User Guide.
Figure Opening a labware rack, front-load
CAUTION Improperly seated labware can cause a hardware collision, resulting in equipment damage. Ensure that all labware are properly seated and in the correct orientation within the labware racks.

1 Automated Plate Sealing Protocol GuideRunning the protocol
12 Automated Plate Sealing Protocol Guide
4 Specify the seal parameters for a seal cycle in the PlateLoc Setup area:
a In the Seal Time box, type the duration of time (seconds).
b In the Seal Temp box, type the temperature (°C).
5 In the Run Setup area:
a Enter the Number of Plates to Process.
b In the Labware Type list, select the labware that matches the source plates in the stacker on the BenchCel device.
6 Confirm that the physical layout of the hardware and labware matches the selections in the form.
Running the protocol
Before you start the run
About performing a mock run (optional)
If you are unfamiliar with the protocol and would like to see how it operates and troubleshoot problems before running it with valuable samples and reagents, you can perform a mock run. A mock run uses empty or water- filled labware.
You prepare for a mock run the same way you would prepare for a real protocol run, except that you use empty labware for a totally dry run or labware containing water for a wet run.
CAUTION Improperly seated labware can cause a hardware collision, resulting in equipment damage. Ensure that all labware are properly seated within the stacker.
WARNING The BenchCel Workstation has many moving parts that can cause possible pinching, piercing, or bruising. Keep away from the workstation while it is in motion.
CAUTION A collision can occur if an object is placed in the path of the moving gripper. To prevent potential equipment damage, ensure that the path is clear of objects, such as extra labware, that could cause a potential collision.

13
1 Automated Plate Sealing Protocol GuideRunning the protocol
Automated Plate Sealing Protocol Guide
Starting and monitoring the protocol run
To start and monitor the protocol run:
1 Optional. In the form, click Initialize all devices. If you skip this step, the software will prompt you to initialize the devices in the next step.
The initialization process establishes communication with the BenchCel Microplate Handler and the PlateLoc Sealer and homes the devices.
2 Click Start Run .
If you have not already initialized the devices, a message appears asking you to initialize the devices.
The protocol run starts. To monitor the progress of the run, check the Progress tab at the bottom of the VWorks window.
At the end of the run, the BenchCel stacker grippers automatically release the labware so that you can unload the labware.
A protocol complete message appears.
If you close the protocol form, a message asks if you would like to save changes to the form:
• Click Yes to save the parameter settings in the form.
• Click No to keep the previously saved parameter settings in the form.
The next time you open the form, it displays the last set of saved parameter settings. If you want to return to the default values, click Reset All Values to Default.
1 Automated Plate Sealing Protocol GuideRunning the protocol
14 Automated Plate Sealing Protocol Guide
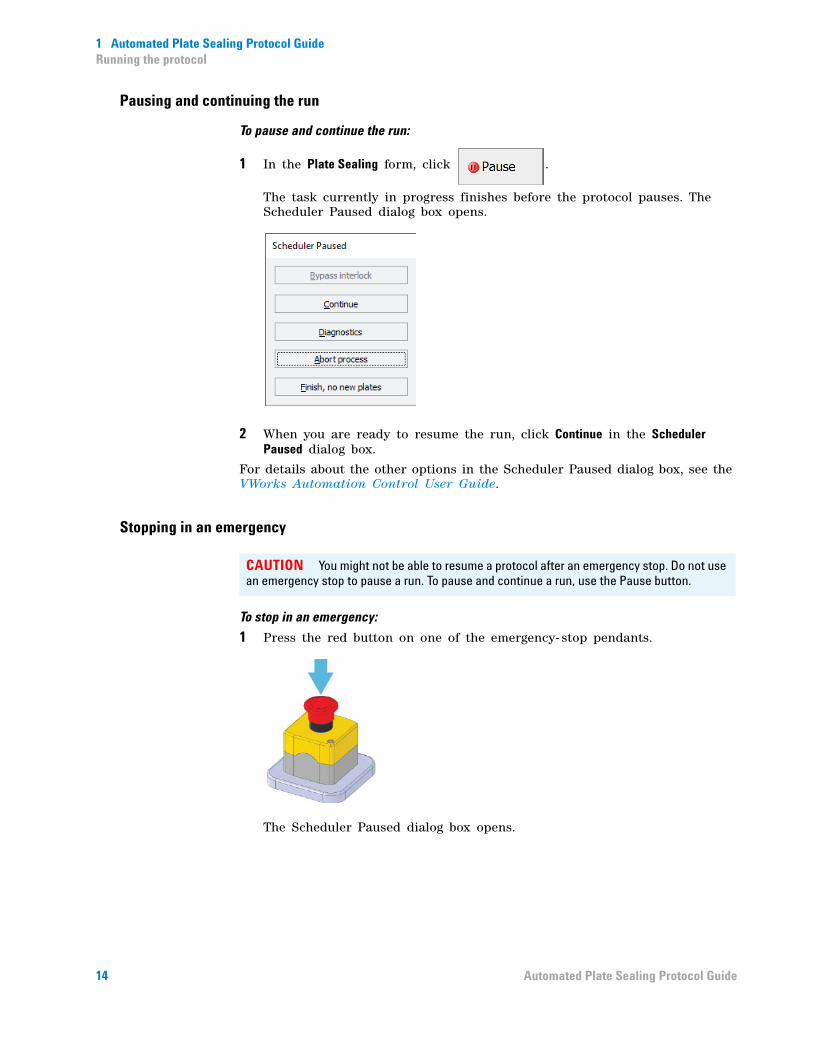
Pausing and continuing the run
To pause and continue the run:
1 In the Plate Sealing form, click .
The task currently in progress finishes before the protocol pauses. The Scheduler Paused dialog box opens.
2 When you are ready to resume the run, click Continue in the Scheduler Paused dialog box.
For details about the other options in the Scheduler Paused dialog box, see the VWorks Automation Control User Guide.
Stopping in an emergency
To stop in an emergency:
1 Press the red button on one of the emergency- stop pendants.
The Scheduler Paused dialog box opens.
CAUTION You might not be able to resume a protocol after an emergency stop. Do not use an emergency stop to pause a run. To pause and continue a run, use the Pause button.

15
1 Automated Plate Sealing Protocol GuideRunning the protocol
Automated Plate Sealing Protocol Guide
2 To reactivate the emergency- stop, turn the red button clockwise. The spring- loaded button pops up.
3 In the Scheduler Paused dialog box, select the appropriate command. For details, see the VWorks Automation Control User Guide.
Depending on the state of the workstation when the emergency stop was activated, the run may not be recoverable.

Protocol Guide
G5590-90002 Revision A
October 2017