Embed Size (px)
Citation preview

SOUND LEISURE
MILESTONES IN MUSIC
March 2011
Top of the Pops logo is a trademark of the British Broadcasting Corporation and is used under licence. Licensed by BBC Worldwide Ltd. Top pf the Pops logo © BBC 2003
Sound leisure Ltd Sandleas Way, Leeds, LS15 8AR
www.soundleisure.com

Milestone in Music
2
Introduction
This is a computer based digital audio or audio/video jukebox system. Up to 30,000 Audio
tracks and up to 10,000 video tracks are stored on the computers hard drive. The customer inserts coins and selects tracks from a user-friendly touch screen. These songs are then
played through the locations sound system or through the on board amplifier. The content is updated via a DVD Rom or online via the internet and new tracks can be
added to the most or least played music genres on the machine. You can manually delete a track at any time if it is deemed unsuitable for a site.
The machines are available in floor-standing kiosk, floor-standing jukebox and wall mounted formats. Any machine in the range can be linked to any number of other machines to
provide remote selectors. There are also advertising facilities, including Video Overlay Adverts and site programmable
promotional scrolling text messages, for special events, sports, bingo, B.G.M., etc. N.B. When mounting the Jukebox or Wallbox unit please consider the following:-
It must not be placed over a radiator or heat source. It must not be placed in direct sun light.
It must have access on either side (180mm / 7" minimum) to allow access doors to open and also enable sufficient airflow through the louvers.
Milestone in Music
3
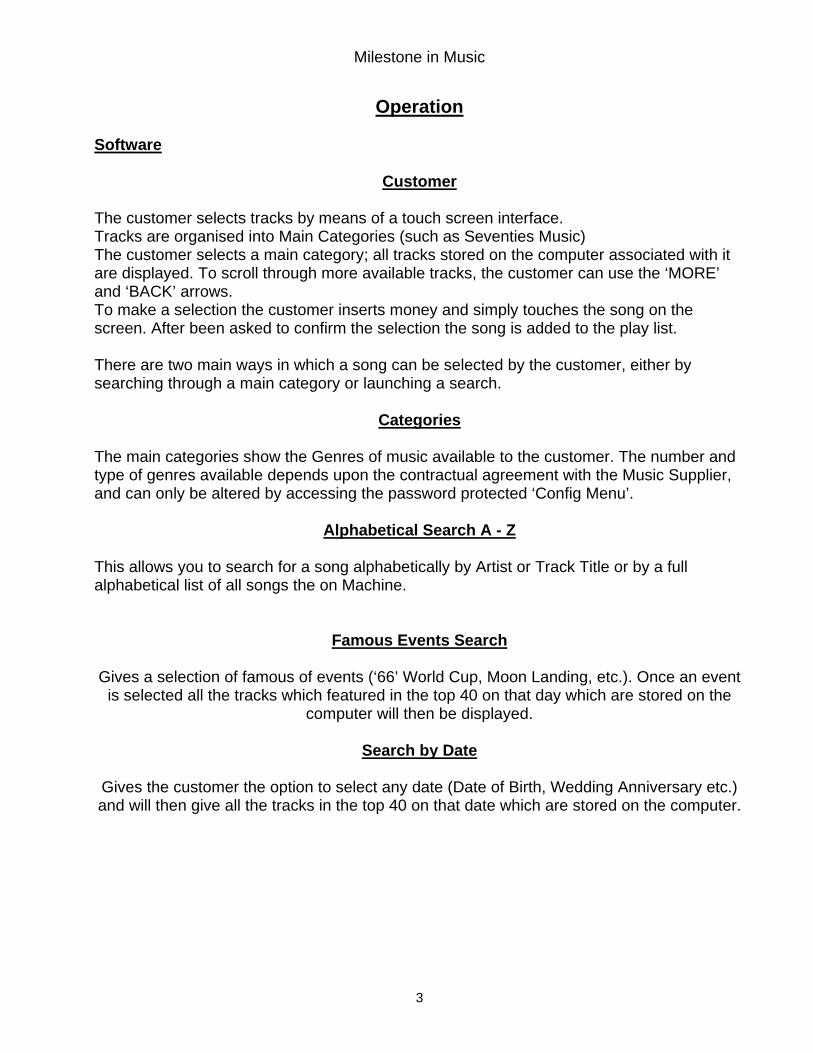
Operation Software
Customer The customer selects tracks by means of a touch screen interface. Tracks are organised into Main Categories (such as Seventies Music) The customer selects a main category; all tracks stored on the computer associated with it are displayed. To scroll through more available tracks, the customer can use the ‘MORE’ and ‘BACK’ arrows. To make a selection the customer inserts money and simply touches the song on the screen. After been asked to confirm the selection the song is added to the play list. There are two main ways in which a song can be selected by the customer, either by searching through a main category or launching a search.
Categories The main categories show the Genres of music available to the customer. The number and type of genres available depends upon the contractual agreement with the Music Supplier, and can only be altered by accessing the password protected ‘Config Menu’.
Alphabetical Search A - Z This allows you to search for a song alphabetically by Artist or Track Title or by a full alphabetical list of all songs the on Machine.
Famous Events Search
Gives a selection of famous of events (‘66’ World Cup, Moon Landing, etc.). Once an event is selected all the tracks which featured in the top 40 on that day which are stored on the
computer will then be displayed.
Search by Date
Gives the customer the option to select any date (Date of Birth, Wedding Anniversary etc.) and will then give all the tracks in the top 40 on that date which are stored on the computer.

Milestone in Music
4
Introduction / Instructions page Search Options
Play track confirmation page By Date
Historic Charts Famous Historical Events

Milestone in Music
5
Service Menu (Collectors / Engineers Menus)
When the jukeboxes main door is opened two menus appears on the
Screen. To select an option touch it on screen.
a) Collectors Menu b) Engineers Menu.
3.1) Collectors Menu
Touch the ‘Collectors Menu’ button on screen to enter the ‘Collectors Menu’, the contents of
which can be set up in the engineers menu using the ‘Menu Setup’ option.
Milestone in Music
6
Manual Directory
PAGE No Changes to Engineers Menu Options 8 1.0 Coin Mech 10 2.0 Back Ground Music (BGM) 10 2.1 Introduction – Background Music 10 2.2 Timer Priorities and Names 11 2.3 Enabling Timers 12 2.4 Changing Timer Details 12 2.4.1 On-Off Times and Days 13 2.4.2 BGM Volume 13 2.4.3 Interval Between BGM Songs & display options 14 2.4.4 BGM Type 15 2.4.4.1 Beats Per Minute’ 15 2.4.4.2 Least Played Songs 16 2.4.4.3 Most Played Songs 16 2.4.5 Change Excluded Categories 16 2.4.6 Change Excluded Songs 17 2.4.7 BPM and year range 18 2.4.7.1 Setting BPM Range 18 3.0 Jukebox Info 19 4.0 Calibration 20 5.0 Playlist 21 6.0 ON/OFF Timer 22 7.0 Price of Play 22 8.0 Time and Day 22 9.0 Update 22 10.0 Backup data stick 23 11.0 Error Log 25 12.0 Menu Setup 25 13.0 Happy Hour 25 13.1 Set Happy Hour Timer 26 13.1.1 Happy Hour on/off times 27 13.1.2 Set various ‘Happy Hour’ price of play levels 27 13.2 Set the Happy Hour advert settings 29 13.2.1 Play Happy Hour attract mode advert 29 13.2.3 Number of adverts before Happy Hour advert is shown 30 13.2.3 Clear play list after Happy Hour 30 14.0 Attract Mode 31 15.0 Special Category 32 16.0 Setup 32 17.0 Remote Selector 33 18.0 View Reports 33 19.0 Data Collection 33 20.0 Remote Credits 33 21.0 Config Menu 34 22.0 RPS Setup 34

Milestone in Music
7
23.0 Song Filters 34 24.0 Password 35 25.0 Albums 35 26.0 Rollback 37 27.0 Server 38 28.0 Pricing 40 29.0 Delete Songs 41 30.0 Site Name 42 31.0 Maintenance 42 32.0 Update CD Option 42 33.0 Adverts 43 34.0 Scrolling Messages 43 35.0 Monitor Switch 43 36.0 Language Setup 43 37.0 Jukebox Locking 43 38.0 Video Trailers 43 39.0 Video Output 43 40.0 Light Control Board 43 41.0 Custom Play list 43 42.0 User Play list 43 43.0 Play list Limit ` 43 44.0 Venue Favourite 43 45.0 Bingo 43 46.0 Bluetooth 44 47.0 Whats On Events 44 48.0 Sports Events 44 49.0 Pub Quiz 44 50.0 SLE 1026 45 50.1 Description 45 50.2 Connections 45 51.0 SLE 1026 Diagram 48 52.0 Wall Unit Installation 49 52.1 Wall Box Cable Diagram 52 53.0 MK7 Stereo/Mono Sound System 54 53.1 MK7 Slave Output 56 53.2 MK7 Stereo/Mono Amplifier 56 53.3 MK7 Amp Controls 57 53.4 NK7 Input Connections 58 54.0 MK8 Version 2 4 Channel & Quad Amp 59 55.0 Mk8 Version 1 Amplifier 66 56.0 Speaker Wiring 74
Engineer’s Notes 75

Milestone in Music
8
Changes To Engineers Menu Options Many of the engineer menu options have remained unchanged from the surfer technology, however, since the advent of the milestone in music technology extra options have been added and some previous options have been altered. The aim of this article is to explain the changes made to these menu options from the surfer technology.
Menu Options Changed From Surfer Engineer Page Menu Albums No 3 of 5 Adverts New (MIM AV only) 4 of 5 Attract Mode Yes 2 of 5 Backup Data Stick New 1 of 5 Bingo New 4 of 5 BGM Yes 1 of 5 Bluetooth New 4 of 5 Calibrate Touch Screen No 1 of 5 Coin Mech No 1 of 5 Config Menu Yes 3 of 5 Custom Play Lists Yes 4 of 5 Data Collection Yes 2 of 5 Delete Songs Yes 3 of 5 Error Log No 2 of 5 Happy Hour No 2 of 5 Ipod New (If Enabled) 5 of 5 Jukebox Info Yes 1 of 5 Jukebox Locking New 4 of 5 Language Setup New 4 of 5 Light Control Board New (If Enabled) 5 of 5 Maintenance New 4 of 5 Menu Setup New 2 of 5 Monitor Switch New (MIM AV only) 5 of 5 On/Off Timer No 1 of 5 Password Yes 3 of 5 Play List Yes 1 of 5 Play List Limit New 4 of 5 Price of Play No 1 of 5 Pricing Setup New 3 of 5 Pub Quiz New 5 of 5 Rollback Music New 3 of 5 Remote Selector No 2 of 5 Remote Credits No 2 of 5 RPS Setup New 3 of 5 Scrolling Messages New (MIM AV only) 3 of 5

Milestone in Music
9
Menu Options Changed From Surfer Engineer Page Menu Server New 3 of 5 Setup Yes 2 of 5 Site Name Yes 3 of 5 Song Filter New 3 of 5 Special Categories New 2 of 5 Sports Events Advert New 5 of 5 Time & Date No 1 of 5 Update Yes 1 of 5 Update CD Option New 4 of 5 User Play List New (If Enabled) 4 of 5 Venue Favourites New 4 of 5 Video Trailers New (MIM AV only) 4 of 5 Video Outputs New (MIM AV only) 4 of 5 View Reports Yes 2 of 5 Whats on Events New 4 of 5

Milestone in Music
10
1.0 Coin Mech Location: Engineer’s Menu Page 1 of 5
Enables you to set up the coin value, for each channel on the coin mech.
2.0 BGM
2.1 Introduction - Background Music or BGM Location: Engineers Menu Page 1 of 5 The Background Music option enables you to quickly program the jukebox, and to automatically play tightly controlled selections of music during pre set periods of time. There are fifteen individual timers each of which can be profiled by:- 1. On/Off Times. 2. Days of the week. 3. Interval between BGM Songs + Display Options. 4. Audio BGM type most played songs, BPM Range + Playlist 5. Exclude individual categories. 6. Exclude individual songs. 7. Allocate individual name to any timer. 8. Change BGM Volume. 9. Prioritise timers To set up a BGM timer first select BGM from the ‘Engineers menu’. The ‘BGM Timers’ screen will appear as shown below. From here you can enable or disable individual timers, view a summary of a BGM timer and edit the details of a timer. Or give the Timer a particular name. If the machine is a new audio Milestone the BGM timers will be disabled but will be pre-programmed by Soundnet. If the machine is new Milestone AV there are no pre-programmed timers available.

Milestone in Music
11
2.2 Timer Priorities and Names
Location: Engineers Menu page 1 of 5 select ‘BGM’ then ‘Name Selected’. The previous screen showed a list of 15 timers, MIM A.V. by default all are called ‘New Timer’, MIM Audio are preset and renamed. The first Timer in the list has the highest priority, while the bottom Timer in the list has the lowest priority. Therefore if timers overlap or more than one timer is programmed for a single time slot, the BGM profile will be taken from the highest relevant timer in the list. Timers can be renamed to clarify which timer will play at a given time. I.E. Friday evening, daytime, weekend etc. You can set up Timer names for all the timers. To set or change a Timer name, select the required Timer by touching the timer on screen. The timer will be highlighted as white text on a blue bar, once the timer is highlighted, use the ‘Move up’ and ‘Move Down’ buttons to position it’s priority within the table. Press the ‘Name Selected’ button to give the timer a name, the screen below will appear.
Touch characters on the screen keyboard to write the Timer name in the top white display area. If the Timer name is too long for one line it will automatically continue on a second line. Touch the ‘CAPS’ key on screen to toggle the keyboard between Upper and Lower Case. Touch the Green ‘Exit’ button to return to the main ‘BGM Timers’ Screen, discarding anything you have typed. Press the ‘Enter’ button to return to the main ‘BGM Timer’ screen, using the new Timer name that you have typed.

Milestone in Music
12
2.3 Enabling Timers Location: Engineers Menu page 1 of 5/BGM To enable a timer select it by touching the timer on screen to highlight it as white text on a blue bar. The selected timer will be highlighted as white on a blue background as shown on the left of the screen (first timer selected). Once selected press the ‘Enable’ button on the screen. You will see the Timer status change from Disabled to Enabled.
2.4 Changing Details Location: Engineers Menu page 1 of 5/BGM/Change Details Touch any Timer shown as ‘Enabled’ on the main BGM timer screen, now press the ‘Change Details’ button. The BGM settings screen will appear. Please Note: Screenshot shows MIM AV Timer, which has some extra menus.

Milestone in Music
13
2.4.1 On - Off Timers and Days Location: Engineers Menu page 1 of 5/BGM/Change Details/Change On – Off Timers and Days To set the days and times during which the selected BGM timer will be active press the ‘Change On / Off timers and days’ button on screen to enable the screen below. To set the On/Off times touch one of the orange areas marked ‘Hour’ and ‘Mins’ on screen. When selected the squares will turn yellow. At this point use the on screen keyboard to enter values. Values entered in the ‘Hour’ field must be in 24 hour clock format. (00h – 23h). To set the days on which the timer should operate touch the day(s) on screen to be included in the current timer. Once touched the Orange ‘No’ button will change to a green ‘Yes’ button. To return the buttons to the ‘No’ state touch them again.
2.4.2 BGM Volume Location: Engineers Menu page 1 of 5/BGM/Change Details/BGM Volume Touch the ‘BGM Volume’ button on the BGM Settings screen to show the BGM Volume Screen. To adjust the volume level of tracks within this BGM timer, select the appropriate level on screen. Touch ‘Test Volume Level’ to check level of volume (button changes to green) and ‘Test Mode On’ is displayed. The maximum BGM Volume is the same as the current Paid Play level. If you press ‘Exit’ from the ‘Test Mode’ screen, the volume will remain low until the end of that Paid Play and return to full level on the next.

Milestone in Music
14
2.4.3 Interval between BGM Songs & Display Option
Location: Engineers Menu page 1 of 5/BGM/Change Details/Interval Between Songs & Display Option
To set a BGM interval between each song use the on screen keyboard to enter a value. This forces the jukebox to pause for a given time in minutes between each BGM track. If the Interval is set to ‘0’ then BGM plays constantly I.E. zero minutes between each track. If ‘ONLY DISPLAY THE SONGS THAT ARE IN THE BGM RANGE’ is set to ‘YES’ jukebox customers will only be able to see songs in the current BGM Timer range for paid play selection. This allows you to control the ambience of an event by preventing customers
making paid play selections of songs outside the BGM range you have chosen. To check the tracks which remain available for selection use the ‘CHANGE EXCLUDED TRACKS’ on page 16. Warning Hiding song from the customer selection screen can affect takings. Consider the affect of this option carefully before enabling.

Milestone in Music
15
2.4.4 BGM Type Location: Engineers Menu page 1 of 5/BGM/Change Details/BGM Type Touch the ‘BGM Type’ button to see the following screen:
There are three available options: 1) Beats Per Minute and Speed 2) Most played songs 3) Playlist Select one of the following BGM types and then follow the instructions carefully as the set up procedure differs between the three BGM types. The option you select on this screen will affect the BGM options available in other screens, as each option requires different details in order to profile the BGM tracks played.
2.4.4.1 Beats per Minute
Beats per minute refers to the tempo of a song. Each track loaded onto the machine has a BPM rating programmed into its code, usually somewhere between 60 – 185 BPM. A track with a slow tempo would have a low BPM rating (i.e. Frank Sinatra – Strangers in the Night 90bpm) where as a fast track would have a much higher BPM rating. (I.e. The Beatles – She Loves You 151bpm). To set the BPM range for a timer see page18.

Milestone in Music
16
2.4.4.2 Most Played Songs Selecting this BGM type causes the jukebox to play the ‘Most Played’ selections on the machine. The jukebox logs each paid play selection and creates a jukebox chart of all the tracks on the machine, from most popular to least popular. This option allows the user to define how many of the most played tracks to select for the BGM timer, (i.e. select from the 20 most played songs) and also to exclude songs that are less than a preset number of weeks old (i.e. ignore songs that have been on the jukebox less than 3 weeks) ‘’Last 3 Weeks’’ and “All Time Most Played”.
2.4.4.3 Play List To set up a new play list go to the following location. Location: Engineers Menu Page 4 of 5/Custom Playlists. First set up a new Play list. By using a Play list you may choose the tracks you want to play within the BGM Timer. The Play list can be set to play in sequential or random order.
2.4.5 Change Excluded Categories
To exclude a specific category from the BGM timer select ‘Change Excluded Categories’ from the ‘BGM settings’ screen. The ‘Change Excluded Categories’ screen appears as shown to the left. To exclude a category, touch the category name on the left side of the screen. When selected the category text will turn white on a blue background as shown (Alt Country selected on screenshot). Press the ‘Add’ button to exclude the category from the current play list.
Once a category has been excluded from the current BGM timer it will be displayed in the white area on the right hand side of the screen under ‘Excluded Sub Categories’. Any tracks within the excluded category will not be used during this BGM timer. To remove a category from the ‘Excluded Sub Categories’ list touch a category name on the right hand side of the screen, when selected the category text will turn white on a blue background. Once selected press the ‘Remove’ button on screen. The selectd category will now return to the ‘Included sub categories’ area on the left hand side of the screen and any tracks contained within the category will be included in the current BGM timer play list.

Milestone in Music
17
Once you have excluded all the required sub categories from the current BGM timer press the back button to return to the ‘BGM settings’ screen. Warning If you have enabled the ‘ONLY DISPLAY THE SONGS THAT ARE IN THE BGM RANGE’ option, removing a category will result in the category graphics being hidden on the customer interface. No tracks from the exclude category will be available for customer selection.
2.4.6 Change Excluded Songs To exclude a specific song from the BGM timer select ‘Change Excluded songs’ from the ‘BGM settings’ screen. The ‘Change Excluded songs’ screen appears as shown. The screen shows the total number of songs available to the current BGM timer, taking into account the options chosen in all the previous ‘BGM setting’ pages. (i.e. BPM type and rate, year range etc.) The current BGM timers play list is listed alphabetically by the Artist’s name. Use the ‘Up’ and ‘Down’ arrows to scroll to the top
and bottom of the list. This is for viewing purposes only, BGM tracks will be selected randomly by the software. To add a track to the ‘Excluded songs’ list touch the track name on screen. When selected the track text will turn white on a blue background as shown above. Press the ‘Add’ button to exclude the songs from the current play list. Once a track has been excluded from the current BGM timer it will be displayed in the white area at the bottom of the screen under ‘Excluded Songs’. To remove a track from the ‘Excluded Songs’ list touch the song name on screen in the ‘excluded songs’ window. When selected the song text will turn white on a blue background. Once selected press the ‘Remove’ button on screen. The selected song will now return to the ‘Included songs’ area at the top of the screen and the track will be included in the current BGM timer play list. Once you have excluded all the required tracks from the current BGM timer press the back button to return to the ‘BGM settings’ page.

Milestone in Music
18
2.4.7 BPM and Year Range Location: Engineers Menu page 1 of 5/BGM/Change Details/BGM Type/BPM and Year Range The Year Range has three options:
• You can set a range of years from Lowest to Highest, where the lowest possible year is 1930 and the highest is the current year,
• Or any combination of years in between (i.e. 1950 – 1969),
• Or you can select ‘All Years’ to allow the current BGM timer access to the entire Jukebox music library.
To enter the highest or lowest year, select highest or lowest box by touching it on screen, when selected the box will turn yellow. Now enter the year using the keypad or press the ‘Present Day’ button. If you enter a year it will be shown in the relevant box. If you press the ‘Present Day’ button ‘NOW’ will be displayed as the highest value. To profile the current BGM timer to play tracks from all years, touch the ‘All Years’ button on screen. Both the Lowest and Highest values will display “ALL”.
Warning When setting a year range which should include tracks from the current year, always use the ‘Present Day’ setting rather typing in the current year. This ensures that current material will continue to be played when the year changes on New Years day.
2.4.7.1 Setting BPM Range Touch BPM range ‘From’ window, then select the lowest BPM setting by pressing (Slow, Medium, Fast or very Fast). When selected the the range text will turn white on a blue background. Do the same for the highest BPM range. Bear in mind the BPM range of tracks held on an average machine is between 60 – 185 BPM approximately. Note: The ‘To’ Range must always be equal to or faster than the ‘’From’ Range. Press the ‘calculate’ button to display how many tracks are within the parameters you have entered.
Milestone in Music
19
2.4.8 MIM AV BGM Options (This applies on Video Machines only) With MIM AV you can setup BGM as:- Audio only Video only Audio and Video If set on Audio and Video, then the ratio of video to audio tracks can be set as well. It can also be set to play in a in Random or Sequential order.
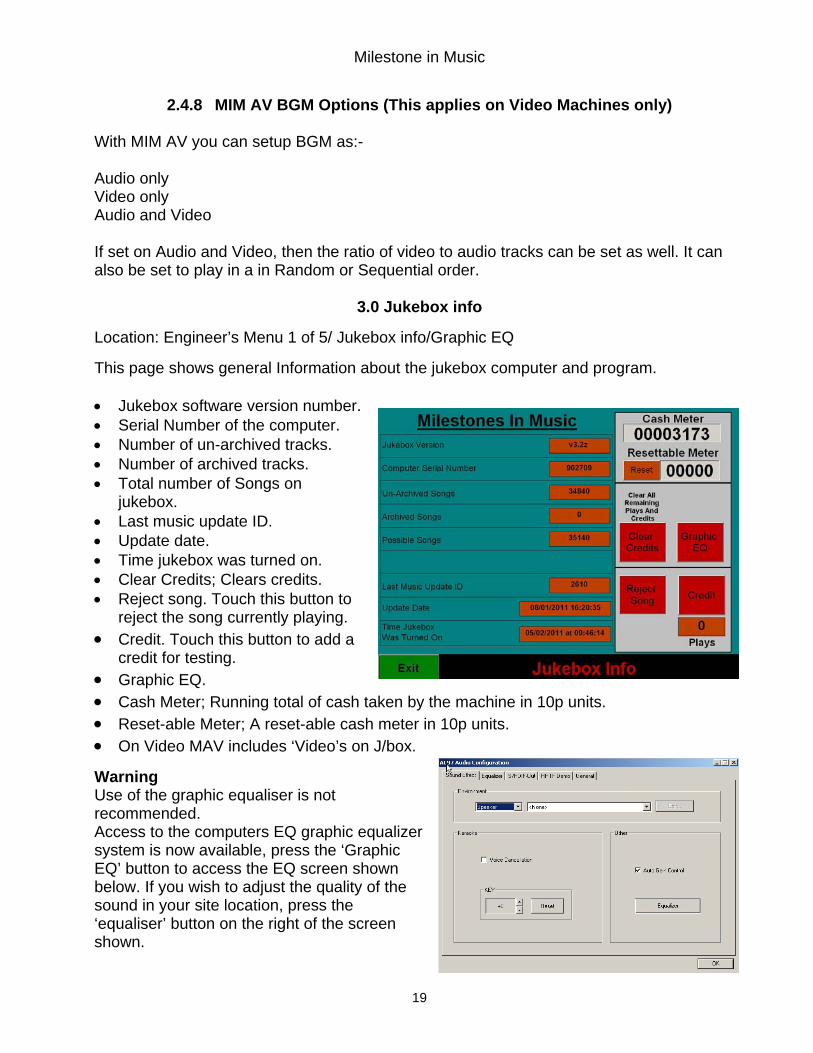
3.0 Jukebox info
Location: Engineer’s Menu 1 of 5/ Jukebox info/Graphic EQ This page shows general Information about the jukebox computer and program. • Jukebox software version number. • Serial Number of the computer. • Number of un-archived tracks. • Number of archived tracks. • Total number of Songs on
jukebox. • Last music update ID. • Update date. • Time jukebox was turned on. • Clear Credits; Clears credits. • Reject song. Touch this button to
reject the song currently playing. • Credit. Touch this button to add a
credit for testing. • Graphic EQ. • Cash Meter; Running total of cash taken by the machine in 10p units. • Reset-able Meter; A reset-able cash meter in 10p units. • On Video MAV includes ‘Video’s on J/box. Warning Use of the graphic equaliser is not recommended. Access to the computers EQ graphic equalizer system is now available, press the ‘Graphic EQ’ button to access the EQ screen shown below. If you wish to adjust the quality of the sound in your site location, press the ‘equaliser’ button on the right of the screen shown.

Milestone in Music
20
The screen displayed will allow you to set your own custom settings or select one of the pre-set settings I.E. Dance, Club, Rock, Party etc. If you want to save the changes you have made to the graphic equalizer, press the ‘Save’ button before exiting, and follow the next onscreen instructions. To exit the EQ screen press ‘OK’, it will return you to the Jukebox info screen.
When you exit the Jukebox info screen you will be asked if you wish to save any changes made to the EQ settings. Press ‘Save Setting’ this will cause the PC to reset automatically saving any changes made to the Graphic EQ. The following screen will be displayed.
Pressing the ‘Exit’ button from the screen above will let you exit the screen without Saving any changes made to the EQ.
4.0 Calibrate Touch Screen Enables you to calibrate Touch screen

Milestone in Music
21
5.0 Play List
Location: Engineer’s Menu 1 of 5/Play List
The play list screen shows info about the track currently playing, and songs that have been selected and are queued to play. It also shows which BGM timer is currently active. From this screen the customer has one of four options.
1. Pressing the ‘Clear All Song’ button will clear the entire play list.
2. Pressing the ‘Clear Selected Songs’ will clear only the songs you have selected.
3. Pressing the ‘Show Current BGM Tracks’ button, will display a list of all tracks available for the current BGM profile.
4. Pressing the ‘Reject Song’ button will reject the track currently playing.
Music Status Info The screen also shows music status information about the song currently playing: Status – Stopped or Playing. Position – Current position in the song’s total duration. Duration – the length of the song. Total plays today – number of paid plays since machine is switched on. Songs on Jukebox – Total number of tracks in jukebox database. Type of Song Playing – Paid Play or BGM. Current BGM Timer.
Milestone in Music
22
6.0 ON/OFF Timer
Allows you to set the times when Jukebox turns on and goes off.
7.0 Price of Play Used for setting the cost of selecting a track and adjusting any Bonus Play’s.
8.0 Time and Day Enables you set the time and day, daylight saving Etc.
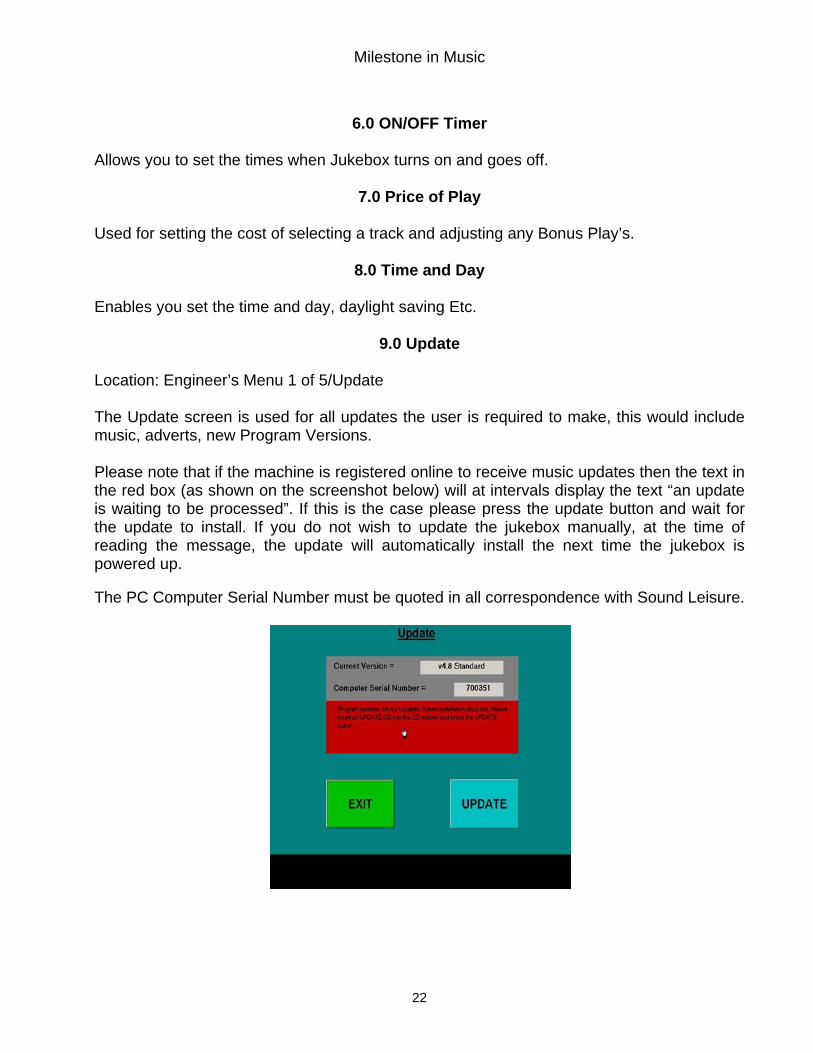
9.0 Update Location: Engineer’s Menu 1 of 5/Update The Update screen is used for all updates the user is required to make, this would include music, adverts, new Program Versions. Please note that if the machine is registered online to receive music updates then the text in the red box (as shown on the screenshot below) will at intervals display the text “an update is waiting to be processed”. If this is the case please press the update button and wait for the update to install. If you do not wish to update the jukebox manually, at the time of reading the message, the update will automatically install the next time the jukebox is powered up. The PC Computer Serial Number must be quoted in all correspondence with Sound Leisure.

Milestone in Music
23
10.0 Backup Data Stick
Location: Engineer’s Menu 1 of 5/Backup Data Stick A flash memory stick is attached to the PC via a USB port. The purpose of the memory stick is to hold a copy of the machines settings. Settings would include a full list of all the jukebox settings, price of play, activated music genre, BGM timers, archived tracks etc. Whenever any changes are made to the jukebox settings it is worth while making a backup of these settings. If the PC is swapped, the copied settings held on the data stick can be used to instantly reset the replacement PC to the exact same settings. The memory data stick can be used in one of two ways.
1. Upload a profile from the computer to the memory stick. 2. Download a profile from the memory stick to the computer.
Upload a profile Press the ‘Backup Data Stick’ button on screen to show the memory backup screen (shown right). Ensure the machines backup memory stick is removed from the USB port before plugging a clean memory stick in. Press the ‘Backup/Copy’ button The memory stick duplication screen will appear. Press ‘Start Duplication’ to initiate a data transfer. Once all the data has been backed up onto the memory stick the screen will read ‘Backup data stick has been created successfully’.
The screen shown to the left will appear. Press ‘Exit’.

Milestone in Music
24
At this point a copy of all the setup data files have been loaded onto the memory stick except for the computer serial number you can now remove the memory and replace with the original memory stick. The removed memory stick contains a copy of all the settings on the PC. Now press the ‘OK I HAVE DONE AS INSTRUCTED’ button.
The screen shown to the left will appear. It will then return to the engineers menu when it has finished updating.
Download a Profile from memory stick Remove any resident USB memory sticks from the machine. Insert the new profile memory stick into a USB port. Press the ‘Backup Data Stick’ button to show the screen on the right. You are being asked if you wish to download the new settings on the memory stick. Press ‘YES’ to the following question, ‘Do you wish to install the new settings from the memory stick?’. Press ‘Yes’ on the next screen that appears. The screen will appear as on the right. When settings have finished loading the PC will need to reboot. Leave the memory stick in place.
The screen on the left will appear after loading has finished, press ‘Restart Now’

Milestone in Music
25
When rebooted go back to the previous location (Backup Data Stick menu), and the screen will return to the one shown on the right. Press the ‘NO’ button.
The screen will change to the one shown on the left. Remove the memory stick and replace with the original. Press ‘OK I HAVE DONE AS INSTRUCTED’. The new settings will now be saved onto the original memory stick.
11.0 Error Log Contains details of any software errors or audio errors.
12.0 Menu Setup This allows you to ENABLE any submenus within the three Menus given below (12.1-12.3). It gives a list of every available category to display in each menu, and allows them to be enabled and disabled, therefore allowing you to change the options given when you enter each menu. PLEASE BE AWARE THAT WHEN SETTING THE MENU OPTIONS FOR THE SPECIAL EVENT MENU, DO NOT ENABLE OPTIONS UNSUITABLE FOR USE BY LANDLORD/CUSTOMER I.E. PRICE OF PLAY MENU.
12.1 Engineers Menu 12.2 Collectors Menu
12.3 Special Event Menu
13.0 Happy Hour Location: Engineer’s Menu/2 of 5/Happy Hour This facility offers an opportunity to allow special pricing schemes for a pre-set time period during the week. There are 4 individual timers, which can all be tailored by day, time, and price of play.

Milestone in Music
26
A basic function of this facility would be to offer cut-price or free tracks on the jukebox during a Friday evening Happy hour, or to reduce the price of play during less busy periods of the week. The price scheme can also be increased to make the jukebox more expensive during a certain time period if required. Once the computer clock reaches the end of the ‘Happy Hour’ time period the price of play reverts to the default settings programmed in the ‘Price of Play’ engineers menu. At this point the play list can be retained or cleared depending on how the ‘Happy Hour’ timers have been programmed.
13.1 Set Happy hour timer Location: Engineer’s Menu/2 of 5/Happy Hour
First select ‘Happy Hour’ from the Engineers Menu. The Happy Hour screen will appear. If there are currently no timers enabled the screen will appear as shown on the left. Select a timer by touching it on screen. When selected the Timer text will turn white on a blue background as shown on the left. (Timer 4 (Disabled).
Press the ‘Enable’ button. Once the timer is enabled it will automatically enter default values for certain settings. These settings can be altered during the ‘Happy Hour’ set up procedure. First set the days and times during which the Timer pricing scheme will be active. To do so, touch the grey square under ‘Times / Days’ as shown on the left.
Milestone in Music
27
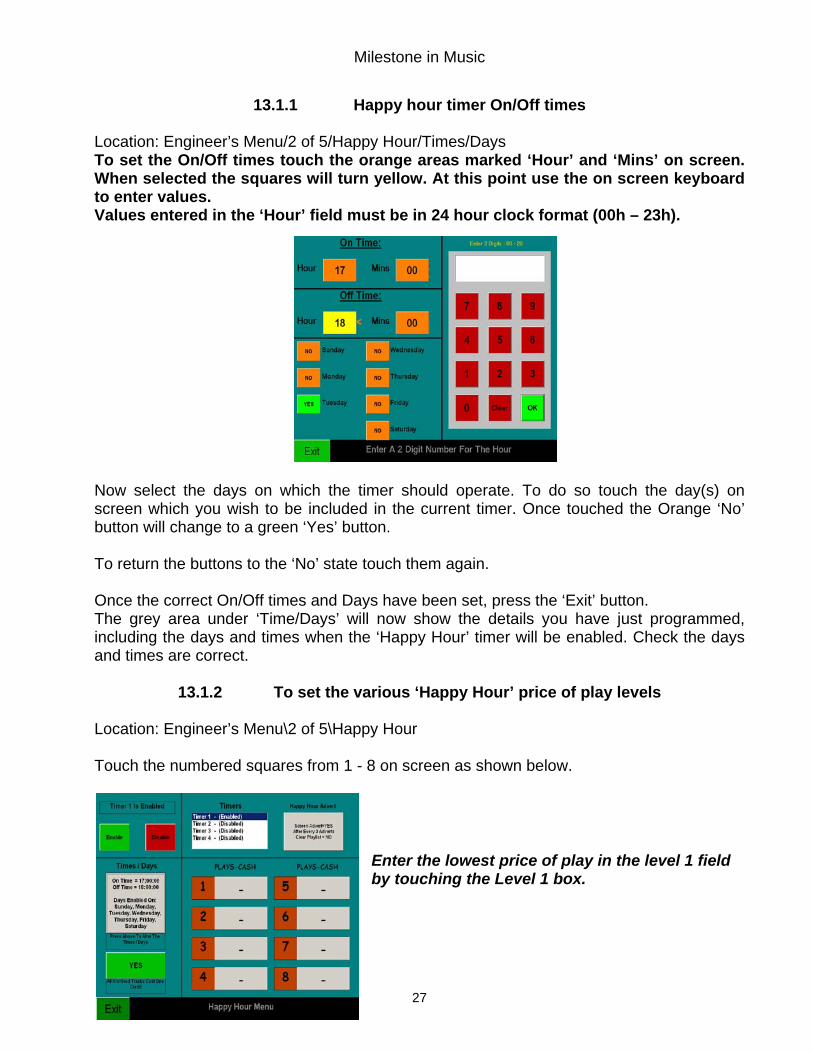
13.1.1 Happy hour timer On/Off times Location: Engineer’s Menu/2 of 5/Happy Hour/Times/Days To set the On/Off times touch the orange areas marked ‘Hour’ and ‘Mins’ on screen. When selected the squares will turn yellow. At this point use the on screen keyboard to enter values. Values entered in the ‘Hour’ field must be in 24 hour clock format (00h – 23h). Now select the days on which the timer should operate. To do so touch the day(s) on screen which you wish to be included in the current timer. Once touched the Orange ‘No’ button will change to a green ‘Yes’ button. To return the buttons to the ‘No’ state touch them again. Once the correct On/Off times and Days have been set, press the ‘Exit’ button. The grey area under ‘Time/Days’ will now show the details you have just programmed, including the days and times when the ‘Happy Hour’ timer will be enabled. Check the days and times are correct.
13.1.2 To set the various ‘Happy Hour’ price of play levels Location: Engineer’s Menu\2 of 5\Happy Hour Touch the numbered squares from 1 - 8 on screen as shown below.
Enter the lowest price of play in the level 1 field by touching the Level 1 box.

Milestone in Music
28
A new screen will appear with 2 separate boxes for ‘Plays’ and ‘Cash’. Touch the ‘Plays’ box so it turns yellow and enter a number. Next touch the ‘Cash’ box square so it turns yellow and enter a price for the number of plays you’ve just set.
The ‘Price’ value must be in multiples of 10 pence units. Example:-1 play = 30 pence
Enter 1 in the plays box Enter 3 in the cash box
NOTE Enter 00 in both the ‘Plays’ and ‘Cash’ boxes to enable FREE PLAY during happy hour.
When the ‘Happy Hour’ level 1 price of play has been set press EXIT. Next (if required) enter a Happy Hour level 2 price of play by touching Level 2 box on screen as shown below.
The Price value must be in multiples of 10pence units. Eg. 2 plays = 50 pence Enter 2 in the plays box Enter 5 in the cash box
Continue in this way until all the required ‘Happy Hour’ pricing levels have been set. You can choose to advertise the reduced price or free play ‘Happy Hour’ periods, by enabling Happy Hour adverts as follows.
Milestone in Music
29
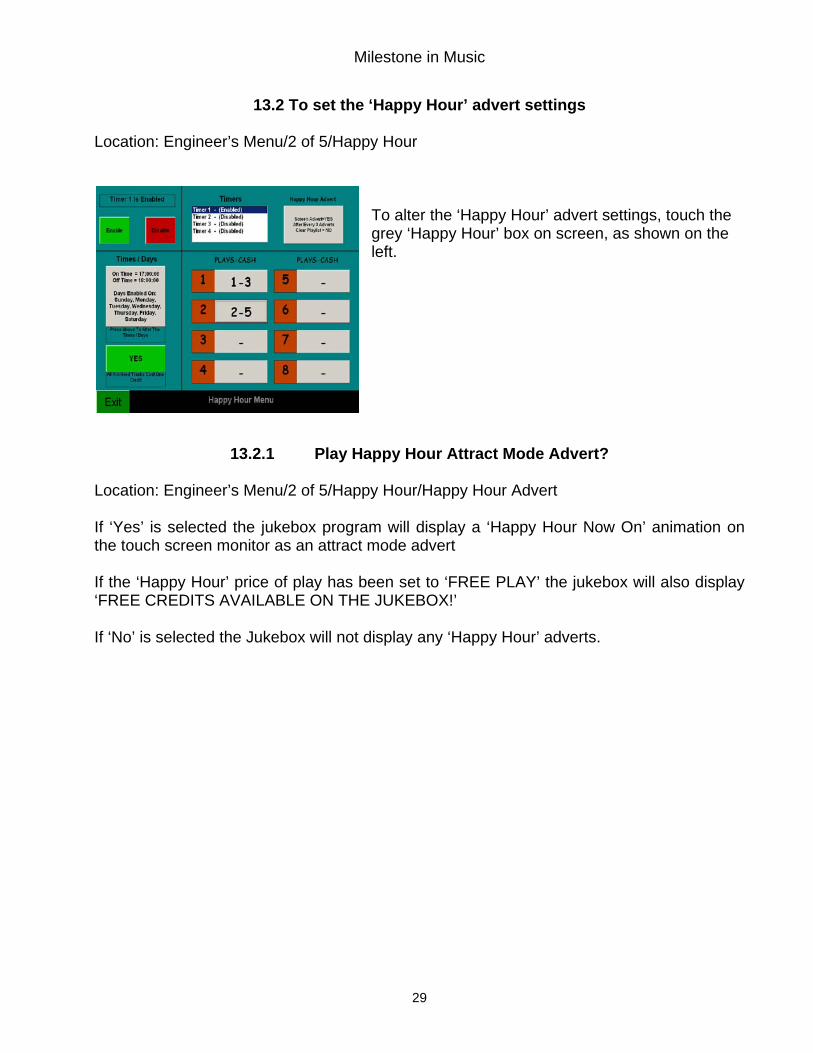
13.2 To set the ‘Happy Hour’ advert settings
Location: Engineer’s Menu/2 of 5/Happy Hour
To alter the ‘Happy Hour’ advert settings, touch the grey ‘Happy Hour’ box on screen, as shown on the left.
13.2.1 Play Happy Hour Attract Mode Advert?
Location: Engineer’s Menu/2 of 5/Happy Hour/Happy Hour Advert If ‘Yes’ is selected the jukebox program will display a ‘Happy Hour Now On’ animation on the touch screen monitor as an attract mode advert If the ‘Happy Hour’ price of play has been set to ‘FREE PLAY’ the jukebox will also display ‘FREE CREDITS AVAILABLE ON THE JUKEBOX!’ If ‘No’ is selected the Jukebox will not display any ‘Happy Hour’ adverts.

Milestone in Music
30
13.2.2 Number of Adverts before Happy Hour Advert is Shown Location: Engineer’s Menu\2 of 5\Happy Hour\Happy Hour Advert In the example on the previous page this is set to ‘3’ which means that during the current timer the sequence will be: 3 x Adverts Happy Hour Advert 3 x Adverts Happy Hour Advert Etc….
A new screen will appear with three options on it as shown on the left.. To enable Happy Hour adverts. Press the ‘Happy Hour attract mode advert’ button to show ‘YES’.
13.2.3 Clear Play List After Happy Hour. (Only used for Free Play)
Location: Engineer’s Menu/2 of 5/Happy Hour/ Clear Play list after Happy Hour? During ‘FREE PLAY’ pricing periods the jukebox play list often becomes very long. Setting this facility to ‘Yes’ deletes any remaining play list at the end of the ‘Happy Hour’ time period. It is only recommended setting this option to ‘YES’ if a “Free play” timer has been operational. Do not enable for reduced price Happy Hour times. This facility has the benefit that tracks selected and paid for after the ‘Happy Hour’ period are not added to the end of a long list of ‘FREE PLAY’ selections. Customers are also encouraged to pay for tracks on the jukebox as the machine will either go silent or revert back to a BGM timer, rather than continuing to play tracks selected during the ‘FREE PLAY’ period. If ‘No’ is selected tracks in the play list entered during the happy hour timer will be retained and played out as usual. If ‘Yes’ is selected all tracks in the play list will be cleared at the end of the happy hour timer.

Milestone in Music
31
14.0 Attract Mode (see Dynamic Photo Display in ‘Boxing Clever’ handout) The attract mode aims to attract users to the jukebox by displaying constantly altering images and animations, rather than displaying the same image constantly. If the touch screen is not used for 30 seconds when this feature is enabled, the computer replaces the standard ‘Getting Started’ Sound Surfer introduction with an advert. If no adverts are held on the computer the interface will ‘page flip’ to a random selection of music. The interval time between adverts or ‘page flip’ can be set anywhere between ten seconds and 100 minutes. Adverts can take the form of almost anything from food and drink promotions, quiz nights, or upcoming sporting events. It can also be used to advertise local shops, taxi companies or take away restaurants. The potential extra revenue available through this feature is an important aspect of the jukebox. Sound Leisure provides a full in house design facility for the quick production of both still and animated adverts. Contact us for more details. DIY on Site: - Adding still adverts can now be done by the Landlord, Engineer, Etc. by following the on screen instructions and using an optional USB extension cable. If the landlord wishes to do so him/her self, then the “Attract Mode” menu must be enabled in the special events menu via menu setup, please see section 12.0 for details. Additionally “Milestone in music” comes with several “Themed” adverts pre-installed. These can be Enable/disabled in the attract mode menu, by pressing the “More” button.
• Show new update adverts • Show album of the month advert • Show Top of the Pops adverts • If it’s a Milestones AV there is a further option to enable adverts to be shown on the
composite video out, instead of showing the swirl pattern when playing an audio track.
When these adverts are enabled they appear on a pre-set cycle, when the cycle ends the screen reverts to the ‘new release’ screen.
Disabled Show user adverts over
Audio songs instead of swirl patterns

Milestone in Music
32
15.0 Special Categories Special music categories can be enabled to show at certain times, for example the Christmas category could be enabled from 1st December and disabled on the 1st January. If you have a special football event, the football music category could be enabled during the time which that event takes place. The following screen shows two special categories. To enable or disable a category select it on screen. When selected it appears as white text with a blue background. (There are more Special Categories than shown.) Press the ‘Configure Selected’ button to reveal the following screen. To enable the selected category press the ‘enable’ button. The following screen is displayed.
Set the start date and end date over which the category will be enabled. By selecting them on screen and using the keypad to enter values.
Press save to exit.
16.0 Setup
This is the Jukebox Setup, Special Events, Currency, Track Repeat Restriction, Etc.

Milestone in Music
33
17.0 Remote selector Up to four wall selector units can be connected to the juke box. Pressing the ‘Remote Selector’ button will display the status of each individual remote selector.
18.0 View Reports Location: Engineer’s Menu 2 of 5/ View Reports There are three options: • View Plays Report • View Music Updates • View Category Plays
19.0 Data Collection Enables you to collect site data, with a USB Memory stick. Also you can alter site name and number. (this changes Option ‘Site Name’)
20.0 Remote Credits
Allows free credits to be given between certain times on certain days. These credits have to be setup by an engineer, and cannot be setup by a landlord. This only works with the Wired Remote Volume Control (the 2-Button Version) or the optional Infra-Red Handset.

Milestone in Music
34
21.0 Config Menu This option is for setting up the available music categories and is only required to used at the factory, during loading of the music. This option is Password protected and is only available to authorised personnel.
22.0 RPS Setup
This is used to enable the music to be profiled to the requirements of the site, via a memory stick or CD.
23.0 Song Filters Location: Engineer’s Menu page 3 of 5/Song Filters Music filters are used in cases where offence may be cause by a particular song or group of songs. For example assume a machine is being placed in a room in which people accompany there children. Songs which may have offensive content would be inappropriate, so can be filtered out. If a machine was to be sited in Scotland, then filters would be applied to English, Irish, and Welsh sports songs to inhibit there availability on the machine to avoid causing offence. Press the ‘Song Filters’ button to reveal the screen below. This screen shows the music genre the filters are applied to.
Filter: • Kids (Mr Blobby, Bob the builder) • Controversial (offensive rap) • Novelty (crazy frog) • English Sport (swing low sweet chariot) • Irish sport • Welsh Sport • Scottish Sport • General Sport • Urban Controversial • Video Controversial • Comedy : Comedy (Explicit)
To enable or disable a filter first select the filter category by touching it on screen, when selected the text will turn white on a blue background as shown above. To activate a filter press the ‘Enable Filter’ button, once enabled, tracks within this category will be hidden from customer view and will not be selected by BGM timers.

Milestone in Music
35
To disable a filter press the ‘Disable Filter’ button all tracks within this category type are available for jukebox selection. To view the tracks hidden by an active filter press the ‘Modify Filter’ button on screen. The following page is displayed. You can pick individual tracks to include or exclude from the filter list. Select the track you wish to exclude from the selected filter by touching it on the screen. When selected the text will turn white on a blue background, press ‘Exclude’ button to change the state of the track. The track will now be excluded from the active music genre.
24.0 Password WARNING This option is for setting up a password. Once set, you have to type a password in every time you want enter the Engineers Menu.
25.0 Albums This option allows you to show complete albums as well as individual tracks. Check out the some of the latest international album releases, including all album tracks updated weekly. To view simply press ‘Album of the Month’ on the main categories screen shown right. Use the Next and Back buttons when available to view more albums.
Albums which are displayed can be edited via the engineers menu shown left. Press the ‘Albums’ buttons to reveal the next screen.

Milestone in Music
36
This screen offers two options.
• View Albums: View all enabled and disabled albums.
• Settings: Select the category of albums you wish to display.
View Albums From this screen albums can be enabled, disabled or archived. To scroll though more albums use the ‘UP’ and ‘DOWN’ buttons. Touch the album name on screen in the text window. When selected the album text will turn white on a blue background. Once selected press the ‘Enable’, ‘Disable’ or ‘Archive’ button on screen. If the album is disabled then, it is not displayed when the customer select option ‘Album Of The Month’ from the main screen. If the album is Enabled then, the album is displayed when the customer select option ‘Album Of The Month’ from the main screen. If the album is archived and enabled, tracks within it can be viewed and selected but will be charged at a different cost to normal tracks. Settings
Albums which fall into a certain music genre can be included or excluded automatically during the update procedure from the album of the month category. The screen left allows you to enable or disable five different music genres. I.E Top Hits, Pop albums, Rock albums, Indie albums, Dance albums. If a ‘Rock album’ is set to ‘NO’ and a rock album is available on the update, the jukebox will retain the album but automatically ‘Hide’ it. If the machine profile is altered the hidden album is available for display if required.

Milestone in Music
37
26.0 Rollback Music This feature is very useful if the current music data base become corrupted. A previously loaded data base may be reloaded by over writing the corrupted data base. Touch the ‘Rollback Music’ button to show the screen right. When this screen appears the jukebox is compiling a list of previously loaded data bases. A list of data base updates will be shown. To roll back to a particular data base just touch the date on screen. When selected the text will turn white on a blue background. Once selected press the ‘ROLLBACK SELECTED’ button.
You will be asked to confirm your desire to roll back to the data base selected.

Milestone in Music
38
27.0 Server Please note a gate ID will be required, this can be obtained from Soundnet. Before proceeding, please ensure that the network cable is plugged into the back of the PC. The following instructions show how to connect with a fixed internet line, other methods can be used, for further information please discuss with digitech.
Enter the server menu. Enter the required password; this password can be obtained from digitech at sound leisure. A warning screen will appear. Press “Continue”.
A second screen appears, press “Setup the Internet”. Another warning screen appears, press “OK”.

Milestone in Music
39
On the next screen press the button in the top right entitled “ADSL using a Router”, it will turn green. A black arrow will appear next to the button, when it does so press “check internet connection”. The Google home page will appear, this indicates that the PC is connected to the internet. Click “close window” in the top right corner of the screen.
You will return to the previous screen. Press “Exit”, then on the next screen press “OK”.
On the grey box entitled “Soundnet Server” press the “Disabled” button. On the next screen click “Yes”.

Milestone in Music
40
On the next screen enter the gate ID that you have previously acquired from Soundnet. If gate ID is correct “Authorisation OK” will appear. Press “Back”.
You will return to the previous screen where you need to press “More”. The page displayed will show if there is a music download currently downloading or when the next one is due, the last successful login to the server and the Gate ID. Press “Back” until you return to the
main menu.
28 .0 Pricing Setup Location: Engineer’s Menu 3 of 5/Archive Settings Tracks which fall outside the jukebox music profile can be retained on screen and displayed as archived tracks. The ‘Price of Play’ for archived tracks can be set at an increased level from standard jukebox tracks. In the example on the right, archived tracks are set at 2 credits. To increase/decrease the price of play for archived tracks press the + or – buttons. A track which has been selected becomes de-archived for a limited time, during which it can be selected at the standard price of play. The period over which it remains un-archived is set using the archive week setting. The example right shows a life cycle of 8-weeks. If nobody selects the track within 8-weeks, then the track will revert to an ‘archived’ selection after 8-weeks.

Milestone in Music
41
29.0 Delete Songs Location: Engineer’s Menu 3 of 5/Delete Songs This screen appears if you touch the Delete Songs button on the engineers menu. It allows you to delete songs from the jukebox if they are faulty or unsuited to a particular site’s preference. Only shows what is in the BGM range when BGM is set to show ONLY BGM range. (Only way to delete songs is to disable BGM timers and then reset the same, after deletion)
No tracks can be deleted from the “MILESTONES IN MUSIC” system as this would hamper its ability to be instantly re-profiled. Instead tracks are hidden which means they are retained on the jukebox pc but can’t be viewed on screen or selected by the BGM timers. Use the Up and Down Arrows to scroll through the entire music library held on the jukebox and listed by Artist or use the << >> buttons to scroll the tracks alphabetically (organised by artist name). Locate and then select the required track by touching it on screen until it appears as white text highlighted on a blue bar. Touch the ‘Red Hide’ button. Touch ‘Hide’ to remove the track from the play list.
Milestone in Music
42
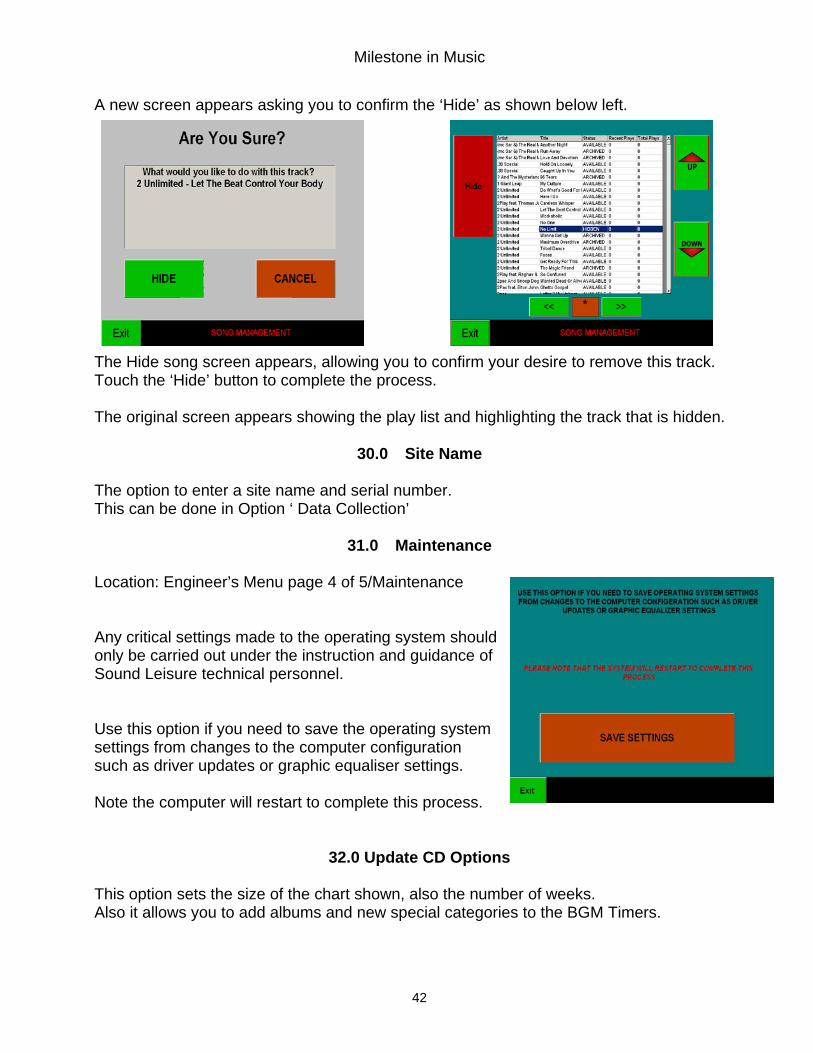
A new screen appears asking you to confirm the ‘Hide’ as shown below left.
The Hide song screen appears, allowing you to confirm your desire to remove this track. Touch the ‘Hide’ button to complete the process. The original screen appears showing the play list and highlighting the track that is hidden.
30.0 Site Name The option to enter a site name and serial number. This can be done in Option ‘ Data Collection’
31.0 Maintenance Location: Engineer’s Menu page 4 of 5/Maintenance Any critical settings made to the operating system should only be carried out under the instruction and guidance of Sound Leisure technical personnel. Use this option if you need to save the operating system settings from changes to the computer configuration such as driver updates or graphic equaliser settings. Note the computer will restart to complete this process.
32.0 Update CD Options This option sets the size of the chart shown, also the number of weeks. Also it allows you to add albums and new special categories to the BGM Timers.

Milestone in Music
43
33.0 Adverts (A.V. Machines Only)
34.0 Scrolling Messages (A.V. Machines Only)
See ‘Boxing Clever’ handout
35.0 Monitor Switch (A.V. Machines Only) Used to enable screen switching so composite video out appears on selection screen when not been used.
36.0 Language setup Currently set to English, but French and Spanish Available
37.0 Jukebox locking
Used to enable/disable a jukebox.
38.0 Video Tracks – Video Trailer (A.V. Machines Only)
39.0 Video Output (A.V. Machines Only)
40.0 Light Control Board (Not Used)
41.0 Custom Playlist
Compile a custom play list to use in BGM, Special Event, Etc.
42.0 User Playlist
Allows the Landlord to create a library Custom Playlists to be selected for Special Events
43.0 Playlist Limit
44.0 Venue Favourite
Is category that shows on the selection screen, the contents of which can be set up manually by an engineer.
45.0 Bingo See ‘Boxing Clever’ handout. An automated bingo machine, which calls out the numbers over the Audio and displays them on the Monitors’ in the case of a Video Machine, or on the selection screen in the case of an Audio Machine.

Milestone in Music
44
46.0 Bluetooth
Used in conjunction with Trackdial
47.0 Whats on Events See ‘Boxing Clever’ handout or (See Managers User/Trailing Manual)
48.0 Sport Events See ‘Boxing Clever’ handout or (See Managers User/Trailing Manual)
49.0 Pub Quiz
See ‘Boxing Clever’ handout or (See Managers User/Trailing Manual)

Milestone in Music
45
50.0 SLE1026 interface
50.1 Description
The sle1026 interface monitors devices connected to it and sends the data to the computer. The computer sends data back to switch various outputs. The input devices are: - • CON1 Coin mech. 10p, 20p, 50p, £1, £2. • CON10 Special event (puts jukebox in standby during football) • TB3-4 eject input • TB4-4 eject input • Eject push button on board • CON7 Door switches (cash door and main jukebox door) • Free credit button on board The output devices are: - • CON1 coin enable on coin mech. • CON2 Mechanical meter for cash • TB1 Video playing output, a 12V signal that indicates a video is playing. This can be
used to switch the scart input of video players and tv's automatically. • TB2 17 V DC • CON5-4 AGC reset output to amplifier • CON6-4 AGC reset output to amplifier At power on (if during on timer) the computer will tell the sle1026 to accepts coins, put AGC,s low and enable to touch screen controller. When coins are entered the information is passed to the computer which will calculate and display the number of credits. The customers then makes a selection, the AGC outputs are released (go high) and the video output comes on (12v) and the music and video play. If the eject is pressed the data is passed to the computer which will stop playing, the computer will then tell the sle1026 to clamp the AGC's and the video output will go off (0v).
50.2 Connections Con1 coinmech 7 way stocko • 1 12v • 2 bit 0 of binary coin input • 3 bit 1 • 4 bit 2 • 5 bit 3 • 6 gnd • 7 coin lockout o/c output Con2 meter 2 way stocko • 1 o/c output • 2 12v
Milestone in Music
46
Con3 power 5 way stocko • 1 12v ac • 2 gnd • 3 12v ac • 4 o/c output for P.C. Reset. • 5 Con4 rs232 to PC and Midas power 6 way stocko • 1 rx to PC tx 3 • 2 tx to PC rx 2 • 3 gnd to PC 5 • 4 nc • 5 gnd for Midas • 6 17v for Midas Con5 to amp A 4 way stocko • 1 dc volume level to amp A • 2 dc volume level to amp A • 3 rvc gnd • 4 agc clamp amplifier A Con6 to amp B 4 way stocko • 1 dc volume level to amp B • 2 dc volume level to amp B • 3 rvd gnd • 4 agc clamp amplifier B Con7 door switches 3-way stocko • 1 gnd (common) • 2 cash door n/o • 3 main door n/o Con10 special event 2 way kk Molex 90 deg • 1 gnd • 2 special event input n/o Tb1 video playing output 2 way terminal block "VIDEO" • 1 gnd • 2 12v switchout when video playing Tb2 17V DC Tb3 RVC B 4 way terminal block • 1 rvc b ch1 slider

Milestone in Music
47
• 2 rvc b ch2 slider • 3 gnd • 4 rvc b eject Tb4 RVC A 4 way terminal block • 1 rvc a ch1 slider • 2 rvc a ch2 slider • 3 gnd • 4 rvc a eject Molex Con 4 way Key Board Coms Link ) • 1 Ground ) • 2 Data (---- NOT USED • 3 Clock ) • 4 N.C. )

Milestone in Music
48
51.0 SLE 1026 Processor Diagram

Milestone in Music
49
52.0 Wall Unit Installation Sheet Wall mounted Jukeboxes and Floor standing Jukeboxes, can have additional wallbox selector versions added on to the system. If one or more wallboxs are required then a network hub (Ethernet Hub) will be needed, this will be mounted external to the main machine and all wallboxes will have to be wired to the Hub. Using Cat 5 Straight Through cable, also use Cat 5 Straight Through cable from machine to the Hub. N.B. When a wall mounted unit is sited it’s situation must be
considered very carefully. It must not be placed over a radiator or heat source. It must not be placed in direct sun light.
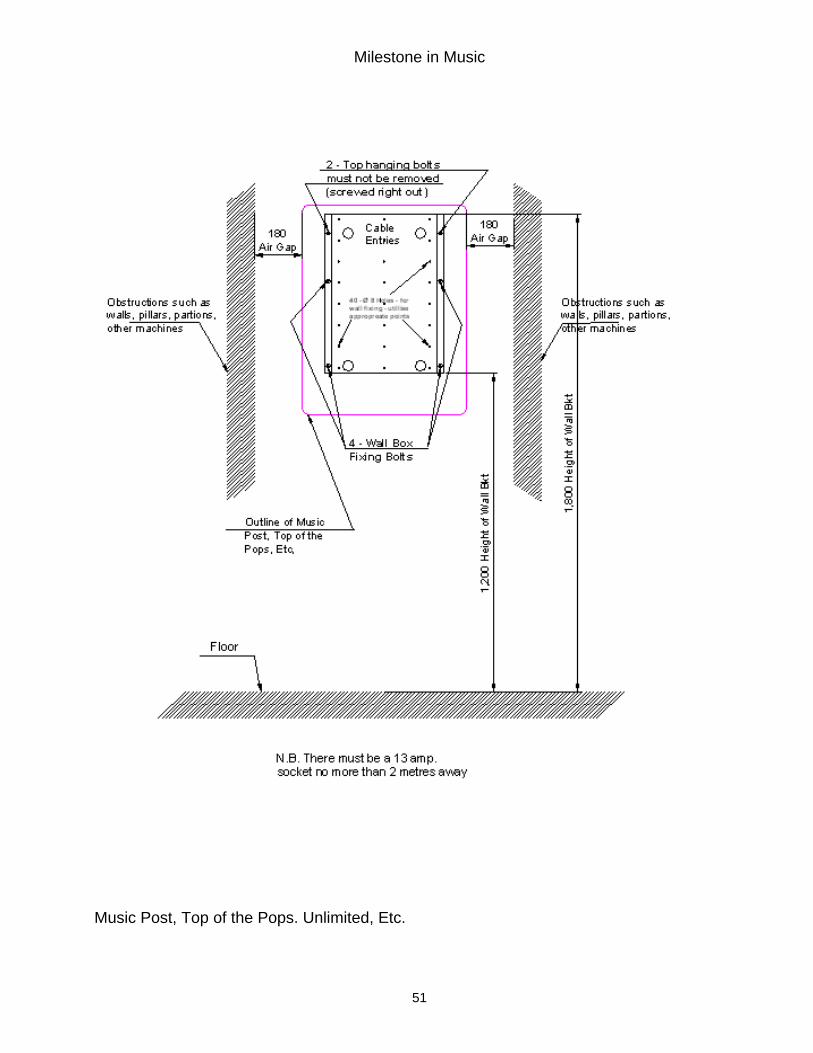
It must have access on either side (180mm / 7" minimum) to allow access doors to open and also enable sufficient airflow through the louvers. The wall needs to be reasonably flat and solid, a minimum of 4 rawl bolts is advised, because of the weight. (See weight list below) The (One Stop, Jukebox, Sound Surfer, Etc.), hanging bracket diagram shows suggested height for this style of machine. Please note that the door must be closed and locked when hanging or removing the unit. The Music Post, Music on Line, Top of the Pops, Unlimited, Etc., hanging bracket diagram shows suggested height for the styles of machine. Please note that the top screws in the hanging bracket must not be removed from the bracket, these are the hanging points. Please note that the door must be closed and locked when hanging or removing the unit.. When siting the wall units ensure that there is a 13 Amp mains socket no more than 2 metres away.
Important Information…Weight List :- Jukebox…44 Kg, Digitracks…45.5 Kg, Regencey One Stop..,34 Kg, One Stop…35.5 Kg and Sound Surfer 45 Kg. Top of the Pops, Music Post and Unlimited… 48 Kg, Music on line…25 Kg.

Milestone in Music
50
Jukebox, One Stop. Sound Surfer, Etc.
Milestone in Music
51
Music Post, Top of the Pops. Unlimited, Etc.

Milestone in Music
52
52.1 Wallbox cable diagram (Cat 5).
Wires Colour Code (if instructions are in black and white) Wire Number (as labelled on diagram) Colour
1 Orange/White 2 Orange 3 Green/White 4 Blue 5 Blue/White 6 Green 7 Brown/White 8 Brown
1 1 2
3
4
2 3
4
5 5
6 6 7 7
8 8
Straight-Thru Category 5 Ethernet Cable
8 7 6 5 4 3 2 1
Network PLUG CONNECTIOS All 8 wires MUST be connected N.B. All colours must be used
In the order shown .

Milestone in Music
53
When the Jukebox front door is opened the
‘E
ngineer Screen’ appears .
Locate the ‘VIDE
O O
UTPU
T OPTIO
NS’ on page 3 of the
engineers menu and press it.
The following screen appears:-
BLU
E JU
KE VID
EO
FUSE 2.5 A Slo B
lo

Milestone in Music
54
53.0 MK7 Stereo/mono sound system INPUTS Three 5-pin 180 Din sockets. Input 1 CD (Line Input) Stereo input with priority and auto-fade control over input 2. Each channel has pre-set gain, base and treble controls.
In addition the stereo channels can be combined to form two, independent, mono channels.
Input 2 Auxiliary (Aux Line Input)
This input can be used to connect any external auxillary equipment, (for example CD Player or Sky TV system) If the Jukebox is idle (not playing music) the Aux input will then be enabled after a 5 second delay period. The preset volume control is VR11 and is situated directly behind the Aux input connector (CON 2). Note: The Aux input also uses Bass and Treble controls.
Input 3 Microphone (Mic) The Mic input has the highest priority with auto fade control over inputs 1 and 2. The mic channel also incorporates preset gain, bass and treble controls. N.B. Line input level is assumed to be 0.5V to 1V peak-to-peak. (Ideal 0.75 v.) Also: the microphone should be a low impedance type (600 ). LEDS There are three LED's on the pre-amplifier board. These are denoted L1, L2 and L3. When the machine is first powered up, L1 will light for 3 seconds before proceeding to flash. This indicates that the PIC 16C84 micro- controller is working correctly. When an audio signal is detected at the CD input, L2 will illuminate. This shows that an audio channel has opened and music should, therefore, be heard. If a microphone input occurs, L2 will turn off and the music will fade out. As soon as microphone input ceases, L2 will turn on again and the CD audio signal will fade back in. Operation of the auxiliary channel is indicated by L3 turning on.

Milestone in Music
55
CONTROL CHANNEL 1 CHANNEL 2 INITIAL SETTINGMaster Volume VR1 VR2 Centre
Slave Volume VR3 VR4 Centre
Mid-Range VR5 VR6 CentreTreble VR7 VR8 For 'Best' Sound
Bass VR9 VR10 For 'Best' Sound
AUXILLIARY MICROPHONEVolume VR11 VR12 Centre
Treble VR7 & VR8 VR13 For 'Best' Sound
Bass VR9 & VR10 VR14 For 'Best' Sound
C.D.
This can only occur when a signal is present at the auxiliary input and no CD input has occurred during the previous 60 seconds. VOLUME CONTROLS Independent control of each channel is possible via a 2 x 22 k (log)
Rotary (with switched off position) or slider remote volume control (R.V.C.). The RVC circuit is of the d.c. type and may be run over long distances without the use of screened cable.
54.1 MK7 Pre-amplifier set-up for standard Machine and Rackmount Set stereo/mono link, LK1, to: M for mono (normal pub installation). ST for stereo, if required. Leave link LK2 in the position shown on the pre-amplifier component layout diagram. (See page 52) Set 8-way dil switches, SW1, to: 1 .. ON 5 .. ON 2 .. ON 6 .. ON 3 .. ON 7 .. ON 4 .. ON 8 .. ON Set-up when using Slave Amplifiers Mk 7 Dil switches 5 & 6 Both OFF Mk 8 Dil switches 5 & 6 Both ON The function of the various potentiometers and their initial settings are shown in the following table:
Milestone in Music
56
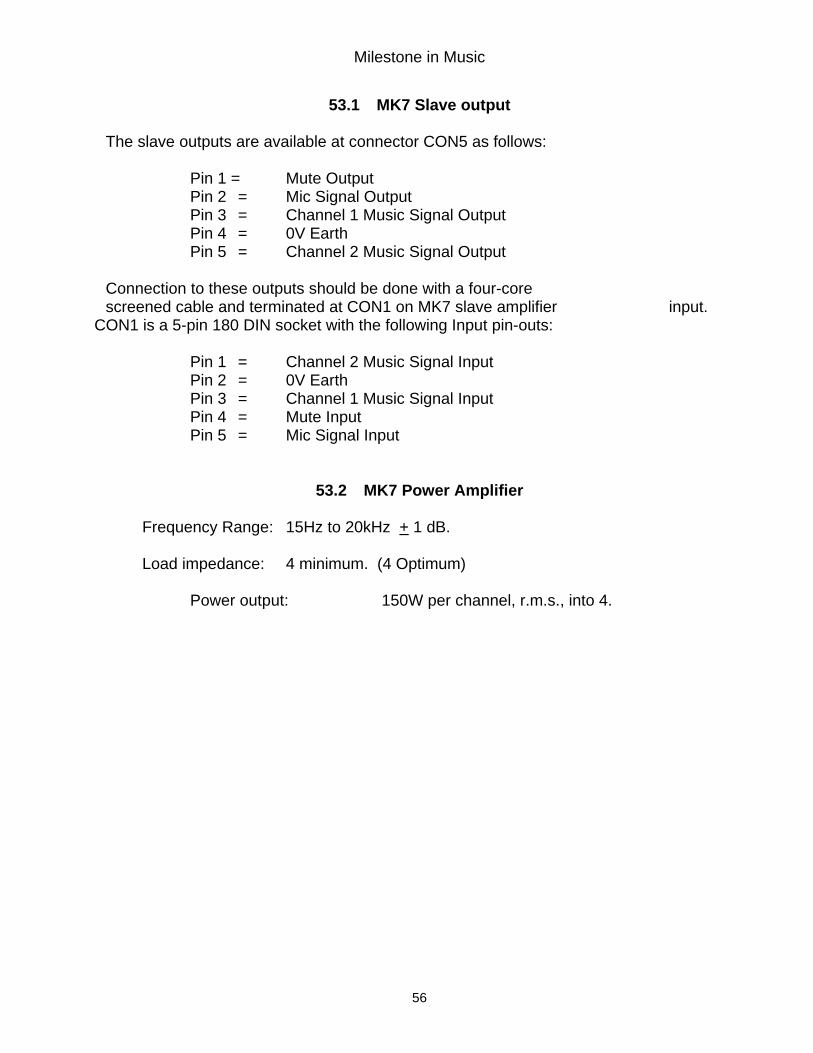
53.1 MK7 Slave output The slave outputs are available at connector CON5 as follows: Pin 1 = Mute Output Pin 2 = Mic Signal Output Pin 3 = Channel 1 Music Signal Output Pin 4 = 0V Earth Pin 5 = Channel 2 Music Signal Output Connection to these outputs should be done with a four-core screened cable and terminated at CON1 on MK7 slave amplifier input. CON1 is a 5-pin 180 DIN socket with the following Input pin-outs: Pin 1 = Channel 2 Music Signal Input Pin 2 = 0V Earth Pin 3 = Channel 1 Music Signal Input Pin 4 = Mute Input Pin 5 = Mic Signal Input
53.2 MK7 Power Amplifier Frequency Range: 15Hz to 20kHz + 1 dB. Load impedance: 4 minimum. (4 Optimum) Power output: 150W per channel, r.m.s., into 4.

Milestone in Music
57
53.3 MK7 Amp Controls
1 = NEG (-Vs.)2 = 0 V. Earth3 = Poz (+Vs.)
MID FREQ.CH2 CH1
ON
SW1VR14
CH2CH2
CH1 CH1
CH1
CH2
CH2
TB1
TB1
CH1
VR 3 VR 4
LK1
LK2 VR11VR12
VR13
PSU FROM POWER AMP
SLD1000MK 7 AMPLIFIER
MIC BASS
PIN2 = 0v Earth3 = Left sig.1 = Right sig.
1 = CH1 control2 = CH2 control3 = 0v. Common4 = Mute
SIGNAL to power3 = CH22 = 0v.1 = CH1
PIN2 = 0v Earth3 = Left sig.5 = Right sig.
PIN2 = 0v Earth3 = Mic 15 = Mic 24 = Music Overide1 = Autofade overide
SLAVE OUT GAIINS
BASS
BASS
MONOSTEREO
MICMIC
CH1 CH2
AUXTREBLE
TREBLE
TREBLE
VOLUME
Con 6 SLD1000
3 2 1
54321
54321
321
321
3 1
5 42
3 1
5 42
3 1
5 42
TO RVC MODULE
PRESETVOLUME
PRESETVOLUME

Milestone in Music
58
53.4 MK 7 Input Connections
(INPUTS STEREO) (OUTPUT MONO OR STEREO)
VIEWED LOOKING AT FRONT FACE OF FIVE-PIN DIN PLUGS
SIDE VIEW OF AMPLIFIER
1 1 1
2 2 2
3 3 3
4 4 4 5 5 5
AUXILLARY MICRO-PHONE JUKEBOX / CD
LEFT CHANNEL
RIGHT CHANNEL
RIGHT CHANNEL
LEFT CHANNEL
1
2
3
1
2
3
3
2
4
DIN4
Screen Cable

Milestone in Music
59
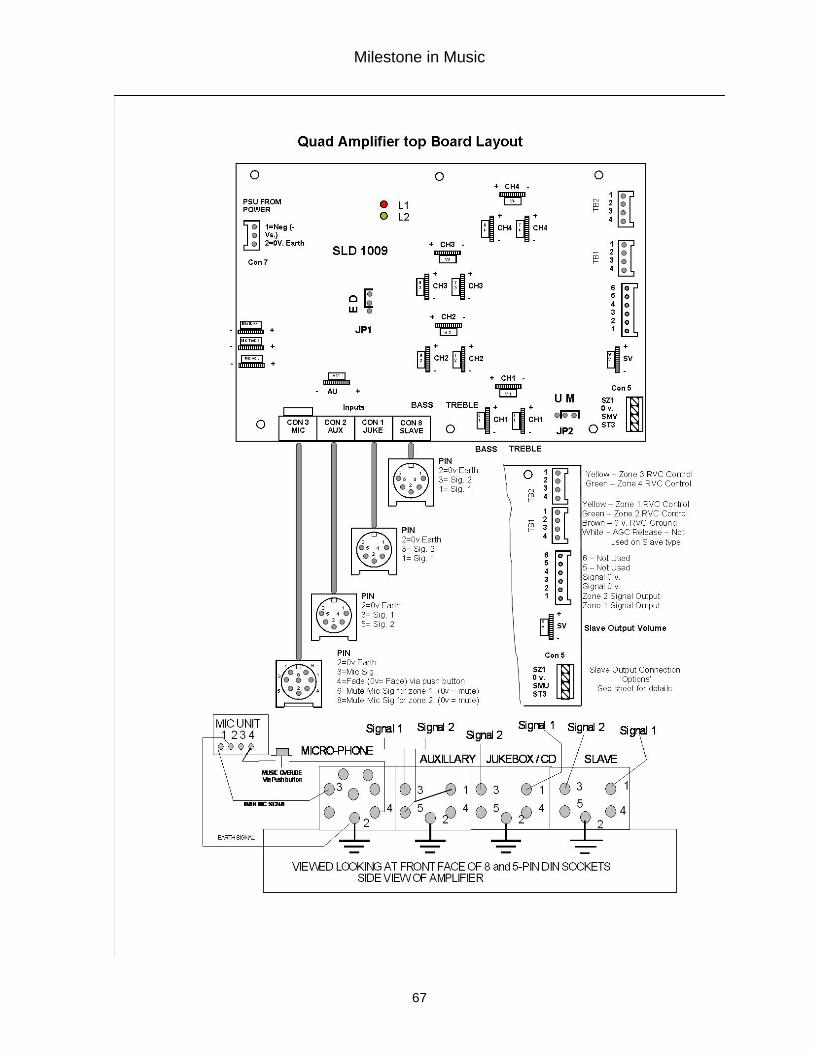
54.0 MK 8 Amplifier Version 2
4 Channel And Quad / 2

Milestone in Music
60

Milestone in Music
61
MK8 MONO SOUND SYSTEM The MK8 sound system uses the SLD1009 pre-amp top board and is a 2 or 4-Zone mono system. INPUTS Three 5-pin 180 Din sockets for music inputs One 8-pin Din socket for Mic signal and control inputs. Con1 Juke (Master Input)
Used for Jukebox music input. (Master amplifier) This input takes priority over the Auxiliary input.
Pin 1 = signal 1 Pin 2 = 0v earth 5 pin 180 Din Pin 3 = signal 2
Con2 Auxiliary (Aux Line Input)
Used for connection to an external music source. Auto-fade-in of this input occurs approximately 30 seconds after last track on Juke input has finished.
Pin 3 = signal 1 Pin 2 = 0v earth 5 pin 180 Din
Pin 5 = signal 2 Con3 Microphone (Mic)
The microphone connected should be of the low impedance 600 ohm type. The Mic input has the highest priority using a manual “fade” signal to control the amplifiers music inputs. Although this connector is an 8 pin Din socket a 5 pin 180 Din plug can be used and the following connections used to create a basic microphone interface.
Pin 3 = Mic signal Pin 2 = Mic 0v screen Pin 4 = Fade (0v = Fade) via push button
When pin 4 is connected to pin 2 (0v screen) for example via a “push to talk button” any music input given to the amplifier will fade out and only the microphone will be available as an input.

Milestone in Music
62
Otherwise the microphone input will appear on top of any music input, ie “Karaoke”
Con3 Microphone (Mic) continued Two more control inputs are also available as follows: Pin 6 = Mute Mic signal for Zone 1 (0v = mute) Pin 8 = Mute Mic signal for Zone 2 (0v = mute)
Therefore if these signals were switched to 0v for example via a toggle switch, the Microphone signal can be controlled for Zone1 and Zone 2 .
Note: An 8 pin Din socket would be needed to use this facility. The remainder of the pin allocations for Con 3 as follows:
Pin 1 = allocated for future use Pin 7 = allocated for future use Pin 5 = When using a “Balanced line” microphone this is the 2nd signal line to be used in conjunction with Pin 3.
Con8 Slave Input When the MK8 needs to be used as a “Slave” amplifier this input must be used.
Pin 1 = signal 1 Pin 2 = 0v earth 5 pin 180 Din
Pin 3 = signal 2
STATUS LEDS There are two LED's on the pre-amplifier board. These are denoted L1 and L2 When the machine is first powered up, L1 will light for 2 seconds before proceeding to flash. This indicates that the PIC16F84 micro- controller is working correctly.
When the Jukebox MPU detects an audio signal, L2 will illuminate. This shows that the MK8 amplifier music channels are open.

Milestone in Music
63
If a manual “fade” signal is detected at the microphone input Con 3 (Pin 4= 0v) LED L2 should turn off and the music will fade out. As soon as the “fade” signal is removed, L2 will turn on again and the music signal will fade back in.
JUMPER LINKS
The MK8 has two jumper links denoted JP1 and JP2. These link options work in conjunction with CON5 Slave output connector
Jumper Link JP1
Controls the type of Microphone signal that will be sent to the Slave output connector CON5 and has 2 positions marked “D” or “E” Position “D” = The Mic signal is Direct (No Bass and Treble control) Position “E” = The Mic signal is Equalised (with Bass and Treble
control) Factory set to “D” position Jumper Link JP2
Controls which Slave output Terminal the Microphone signal will appear on and has 2 positions “M” or “U”
Position “M” = The Mic signal will be Mixed with the music and appear at terminal ST3 of the Slave output connector.
Position “U” = The Mic signal will be Unmixed and appear at terminal SMU of the Slave output connector (separate to the Music) Factory set to “M” position
MK8 SLAVE OUTPUT OPTIONS
The slave outputs are available at connector CON5. This is a 4-way screw terminal block and is labelled as follows:
ST3 SMU 0V SZ1 These slave output options are described as follows:

Milestone in Music
64
ST3 Will always carry the slave music signals and will also carry the slave Mic signal if Jumper link JP2 is in the “M” position.
Note: The slave music signal does not have Bass and Treble control. SMU The slave Mic signal will appear on this terminal if jumper link JP2 is in the “U” position SZ1 Will carry the slave output of Zone1. This signal is a copy of the
Music and Mic signals and will be under control of the Volume, Bass and Treble controls for Zone1.
0V This is the 0v ground terminal for the slave output system and must be connected to the screen of the screened cable when connecting signals to external slave amplifiers.
MK8 POTENTIOMETER CONTROLS
V1 = Volume control for Zone 1 B1 = Bass control for Zone 1 T1 = Treble control for Zone 1 V2 = Volume control for Zone 2 B2 = Bass control for Zone 2 T2 = Treble control for Zone 2 MV = Microphone volume control MB = Microphone Bass control MT = Microphone Treble control SV = Slave output volume control V3 = Volume Control for Zone 3 ) B3 = Bass control for Zone 3 ) T3 = Treble control for Zone 3 ) Quad :---- 4 Channel V4 = Volume control for Zone 4 ) Only B4 = Bass control for Zone 4 ) T4 = Treble control for Zone 4 )

Milestone in Music
65
MK8 QUAD AMP 4 Channel
MK8 QUAD AMP 2 Channel

Milestone in Music
66
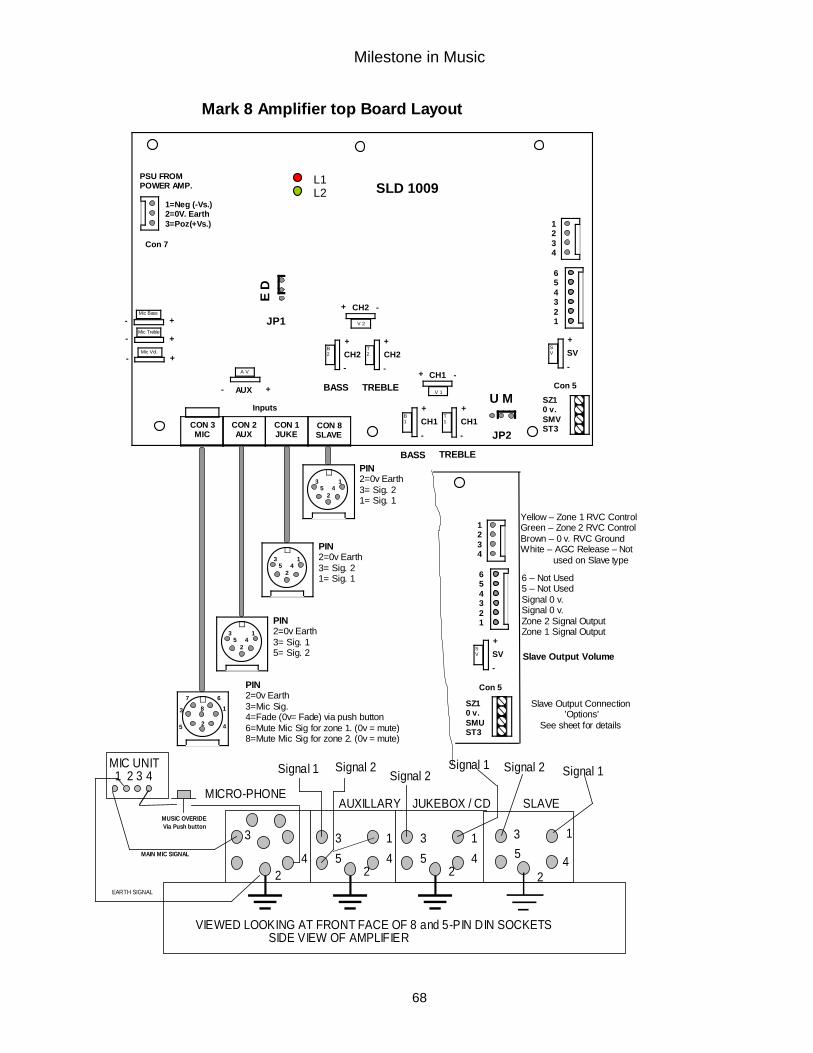
55.0 Mk 8 Amplifier Version 1
Milestone in Music
67
Milestone in Music
68
S V
Mic Bass
Mic Treble
Mic Vol.
T 1
B 1
V 1
V 2
B 2
T 2
1 2 3 4
+ - AUX
A V
3 1 5 4 2
PIN 2=0v Earth 3= Sig. 2 1= Sig. 1
1=Neg (-Vs.) 2=0V. Earth 3=Poz(+Vs.)
PSU FROM POWER AMP.
Con 5
SZ1 0 v. SMV ST3
+
-
SV
6 5 4 3 2 1
+ - CH1
+
-
CH1
+
-
CH1 CON 8 SLAVE
3 1 5 4 2
PIN 2=0v Earth 3= Sig. 2 1= Sig. 1
BASS TREBLE
U M
CON 1 JUKE
CON 2 AUX
CON 3 MIC
Inputs
+ - CH2
+
-
CH2
+
-
CH2
BASS TREBLE
+ -
+ -
+ -
3 1 5 4 2
PIN 2=0v Earth 3= Sig. 1 5= Sig. 2
7
PIN 2=0v Earth 3=Mic Sig. 4=Fade (0v= Fade) via push button 6=Mute Mic Sig for zone 1. (0v = mute) 8=Mute Mic Sig for zone 2. (0v = mute)
5
6
3 1
4
8
2
Con 7
E D
S V
1 2 3 4
Con 5
+
-
SV
6 5 4 3 2 1
3
2 4
3 5
2 4 1 3
5 2
4 1
MUSIC OVERIDE Via Push button
MAIN MIC SIGNAL
MICRO-PHONE
MIC UNIT 1 2 3 4
EARTH SIGNAL
VIEWED LOOKING AT FRONT FACE OF 8 and 5-PIN DIN SOCKETS SIDE VIEW OF AMPLIFIER
Signal 1 Signal 2
AUXILLARY
Signal 2
JUKEBOX / CD
Signal 1
3 5
1
4 2
Signal 2 Signal 1
SLAVE
L1 L2
SZ1 0 v. SMU ST3
Yellow – Zone 1 RVC Control Green – Zone 2 RVC Control Brown – 0 v. RVC Ground White – AGC Release – Not used on Slave type
6 – Not Used 5 – Not Used Signal 0 v. Signal 0 v. Zone 2 Signal Output Zone 1 Signal Output
Slave Output Volume
JP1
JP2
SLD 1009
Mark 8 Amplifier top Board Layout
Slave Output Connection ’Options’
See sheet for details

Milestone in Music
69
MK8 MONO SOUND SYSTEM The MK8 sound system uses the SLD1009 pre-amp top board and is a 2-Zone mono system. INPUTS Three 5-pin 180 Din sockets for music inputs One 8-pin Din socket for Mic signal and control inputs. Con1 Juke (Master Input)
Used for Jukebox music input. (Master amplifier) This input takes priority over the Auxiliary input.
Pin 1 = signal 1 Pin 2 = 0v earth 5 pin 180 Din Pin 3 = signal 2
Con2 Auxiliary (Aux Line Input)
Used for connection to an external music source. Auto-fade-in of this input occurs approximately 30 seconds after last track on Juke input has finished.
Pin 3 = signal 1 Pin 2 = 0v earth 5 pin 180 Din
Pin 5 = signal 2 Con3 Microphone (Mic)
The microphone connected should be of the low impedance 600 ohm type. The Mic input has the highest priority using a manual “fade” signal to control the amplifiers music inputs. Although this connector is an 8 pin Din socket a 5 pin 180 Din plug can be used and the following connections used to create a basic microphone interface.
Pin 3 = Mic signal Pin 2 = Mic 0v screen Pin 4 = Fade (0v = Fade) via push button
When pin 4 is connected to pin 2 (0v screen) for example via a “push to talk button” any music input given to the amplifier will fade out and only the microphone will be available as an input.

Milestone in Music
70
Otherwise the microphone input will appear on top of any music input, ie “Karaoke”
Con3 Microphone (Mic) continued Two more control inputs are also available as follows: Pin 6 = Mute Mic signal for Zone 1 (0v = mute) Pin 8 = Mute Mic signal for Zone 2 (0v = mute)
Therefore if these signals were switched to 0v for example via a toggle switch, the Microphone signal can be controlled for Zone1 and Zone 2 .
Note: An 8 pin Din socket would be needed to use this facility. The remainder of the pin allocations for Con 3 as follows:
Pin 1 = allocated for future use Pin 7 = allocated for future use Pin 5 = When using a “Balanced line” microphone this is the 2nd signal line to be used in conjunction with Pin 3.
Con8 Slave Input When the MK8 needs to be used as a “Slave” amplifier this input must be used.
Pin 1 = signal 1 Pin 2 = 0v earth 5 pin 180 Din
Pin 3 = signal 2
STATUS LEDS There are two LED's on the pre-amplifier board. These are denoted L1 and L2 When the machine is first powered up, L1 will light for 2 seconds before proceeding to flash. This indicates that the PIC16F84 micro- controller is working correctly.

Milestone in Music
71
When the Jukebox MPU detects an audio signal, L2 will illuminate. This shows that the MK8 amplifier music channels are open.
If a manual “fade” signal is detected at the microphone input Con 3 (Pin 4= 0v) LED L2 should turn off and the music will fade out. As soon as the “fade” signal is removed, L2 will turn on again and the music signal will fade back in.
JUMPER LINKS
The MK8 has two jumper links denoted JP1 and JP2. These link options work in conjunction with CON5 Slave output connector
Jumper Link JP1
Controls the type of Microphone signal that will be sent to the Slave output connector CON5 and has 2 positions marked “D” or “E” Position “D” = The Mic signal is Direct (No Bass and Treble control) Position “E” = The Mic signal is Equalised (with Bass and Treble
control) Factory set to “D” position Jumper Link JP2
Controls which Slave output Terminal the Microphone signal will appear on and has 2 positions “M” or “U”
Position “M” = The Mic signal will be Mixed with the music and appear at terminal ST3 of the Slave output connector.
Position “U” = The Mic signal will be Unmixed and appear at terminal SMU of the Slave output connector (separate to the Music) Factory set to “M” position

Milestone in Music
72
MK8 SLAVE OUTPUT OPTIONS
The slave outputs are available at connector CON5. This is a 4-way screw terminal block and is labelled as follows:
ST3 SMU 0V SZ1 These slave output options are described as follows:
ST3 Will always carry the slave music signals and will also carry the slave Mic signal if Jumper link JP2 is in the “M” position.
Note: The slave music signal does not have Bass and Treble control. SMU The slave Mic signal will appear on this terminal if jumper link JP2 is in the “U” position
MK8 SLAVE OUTPUT OPTIONS continued SZ1 Will carry the slave output of Zone1. This signal is a copy of the
Music and Mic signals and will be under control of the Volume, Bass and Treble controls for Zone1.
0V This is the 0v ground terminal for the slave output system and must be
connected to the screen of the screened cable when connecting signals to external slave amplifiers.
MK8 POTENTIOMETER CONTROLS V1 = Volume control for Zone 1 B1 = Bass control for Zone 1 T1 = Treble control for Zone 1 V2 = Volume control for Zone 2 B2 = Bass control for Zone 2 T2 = Treble control for Zone 2 MV = Microphone volume control MB = Microphone Bass control MT = Microphone Treble control SV = Slave output volume control

Milestone in Music
73
.

Milestone in Music
74
56.0 Speaker Wiring The optimum load impedance for Sound Leisure amplifiers is 4 and should be regarded as a minimum value - do not go below. The following diagrams depict various parallel/serial combinations of 8 speakers and the resulting load impedance.
5.33 OHMS 4 OHMS
8 OHMS 4 OHMS
8 OHMS

Milestone in Music
75
ENGINEER’S NOTES