Embed Size (px)
Citation preview
L.H. Thomson Co. Inc. 7800 N.E. Industrial Blvd.Macon, Georgia USA 31216-7748phone: 478.788.5052email: [email protected]
All new Thomson Seatposts come with a 12° top clamp. The clamp usually works best with the word “FRONT” facing the front of the bike. If the nose of the seat will not tilt up enough (very rare) turn the clamp around for extra adjustment.
1
2
3
4
Assembly 5
6
7
8
9
Front Towards Front of Bike
FRONT 4123
29Positive Stop
R R
Do Not Tighten Hard Against StopRear Bolt Must be Tight Against Front BoltR
Seatpost
Clamp
Bicycle Seat Tube
Must Have Gap
Gap
Congratulations!
THANK YOU for purchasing the Thomson Seatpost. The following instructions should be read completely before installation. If you have any questions regarding installation or service of this product, please contact your local dealer. We recommend that a professional bicycle mechanic install and service this product.
Angle head of seatpost down and pull top clamp away from bottom – still holding bottom clamp up against seatpost head.
Work the top clamp onto the seat rails at the back of the seat, and then slide into position.
PLEASE NOTE:Disassemble top clamp completely before installing onto carbon rails
PLEASE NOTE: The only piece of the assembly that could cause damage by being assembled improperly is the spherical washer. The spherical seat in the washer must face the spherical seat underneath the head of the bolt.
See diagram at left for correct installation.
Adjust angle of seat by tightening one spherical bolt and loosening the other. Slide seat to desired fore, aft position.
Use 4mm allen wrench and tighten bolts to proper torque.
Elite – 6.8 NmMasterpiece 5.1 Nm
Grease only bolt threads. Do not grease under bolt head or washer and do not use anti-seize.
All Thomson Seatposts are designed with positive metal to metal stops. These positive stops and bolt lengths are designed to work together to allow a maximum 5° up tilt and 29° down tilt.
This means the tilt adjustment of the clamps will be stopped by the positive stop before the back bolt runs out of the nut. This prevents damage to bolts, nuts, ears, and clamps that may otherwise occur with over adjustment. DO NOT replace the stock bolt with a longer bolt. A longer bolt will not allow more tilt.
Never tighten the front bolt hard against the positive stop. Make sure that the bolts are tightened against each other. Always tighten the back bolt to 6.8 Nm of torque. For the Masterpiece, always tighten the back bolt to no more than 5.1 Nm. If the front bolt is tightened hard against the front ear, the force created by that tightening will be subtracted from the bolt’s avail-able force to withstand high impact loads. If the front bolt is tightened hard against the stop and not against the rear bolt, the rear bolt could loosen during impact loads.
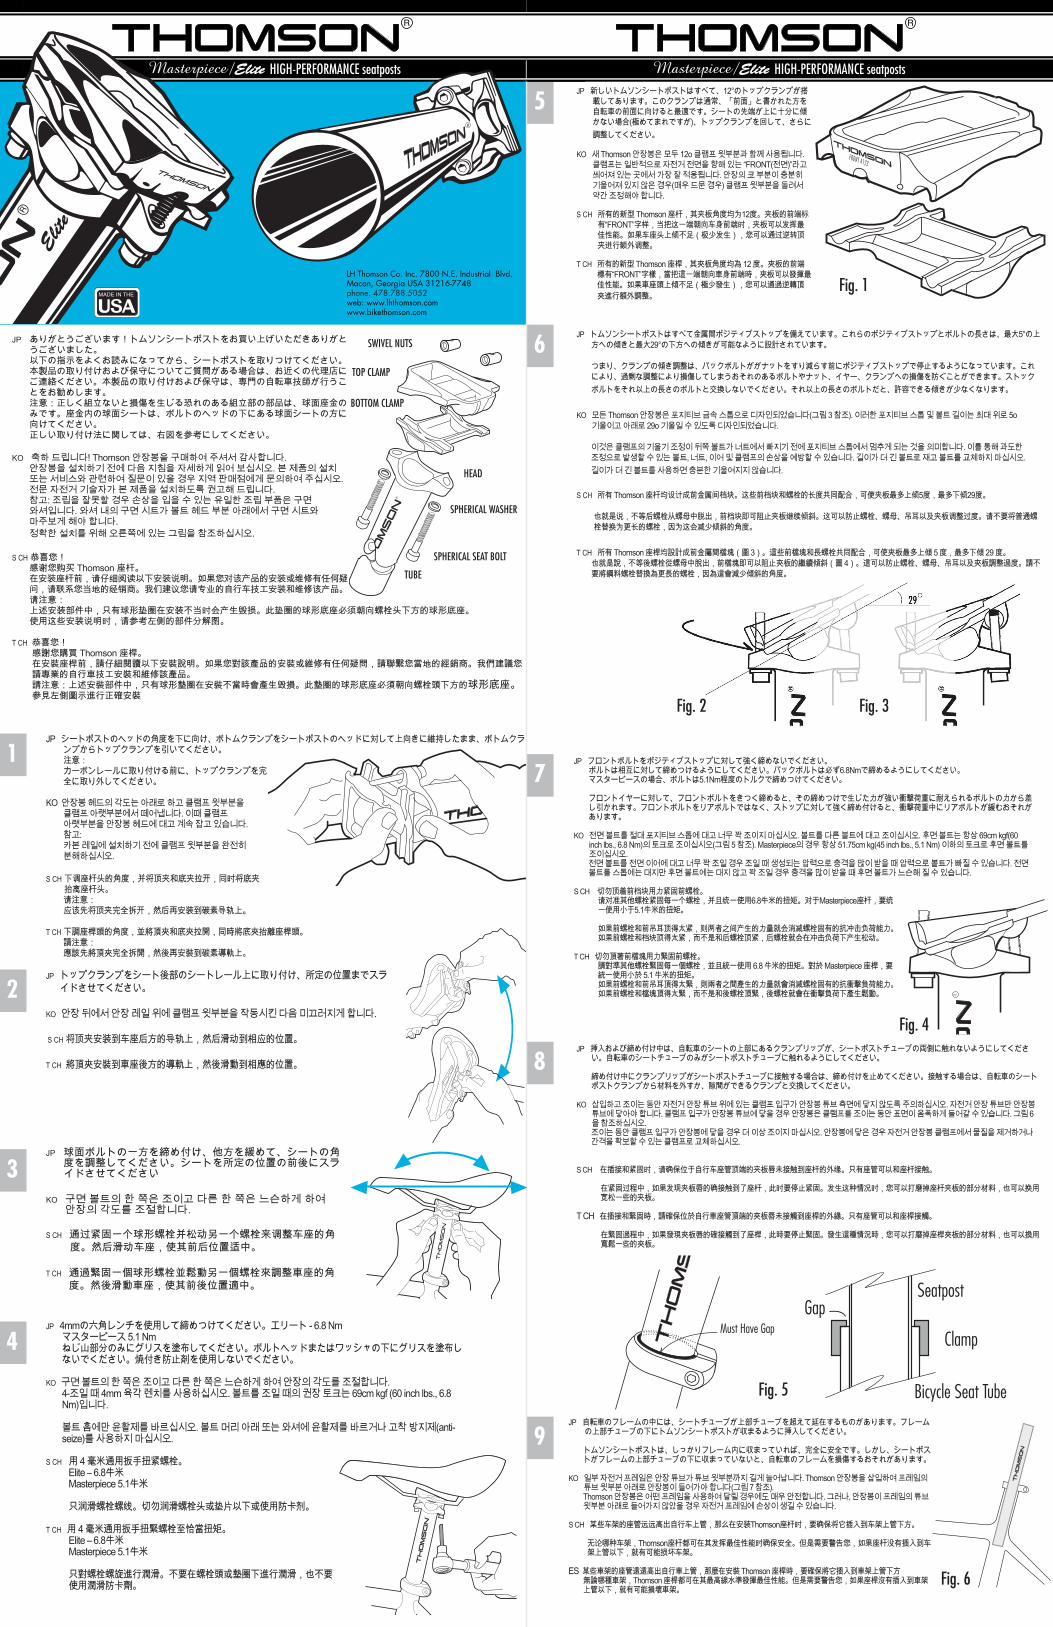
During insertion and tightening, make sure that the clamp lip located at the top of the bicycle’s seat tube does not touch the sides of the seatpost tube. Only the bicycle seat tube should touch the seatpost tube.
If the clamp lip does touch the seatpost at any time during tightening, do not continue to tighten. If contact occurs, either remove material from the bicycle seatpost clamp, or replace it with a clamp that will allow clearance.
On some bicycle frames the seat tube extends long above the tube. Make sure you insert the Thomson Seatpost so that it sinks below the frame’s top tube.
The Thomson Seatpost is perfectly safe to run at its max line in any frame. However, please be warned that if the seatpost is not sunk below the top tube of the frame, there is a risk of damaging the bicycle frame.
US patents 5,649,738; 5,664,829; 413,284; 407,998; 451,847EU patents 0842083D1 EP; 6967174.6-8 Germ
Seatpost
Clamp
Bicycle Seat Tube
Must Have Gap
Gap
LH Thomson Co. Inc. 7800 N.E. Industrial Blvd.Macon, Georgia USA 31216-7748phone: 478.788.5052web: www.lhthomson.comwww.bikethomson.com
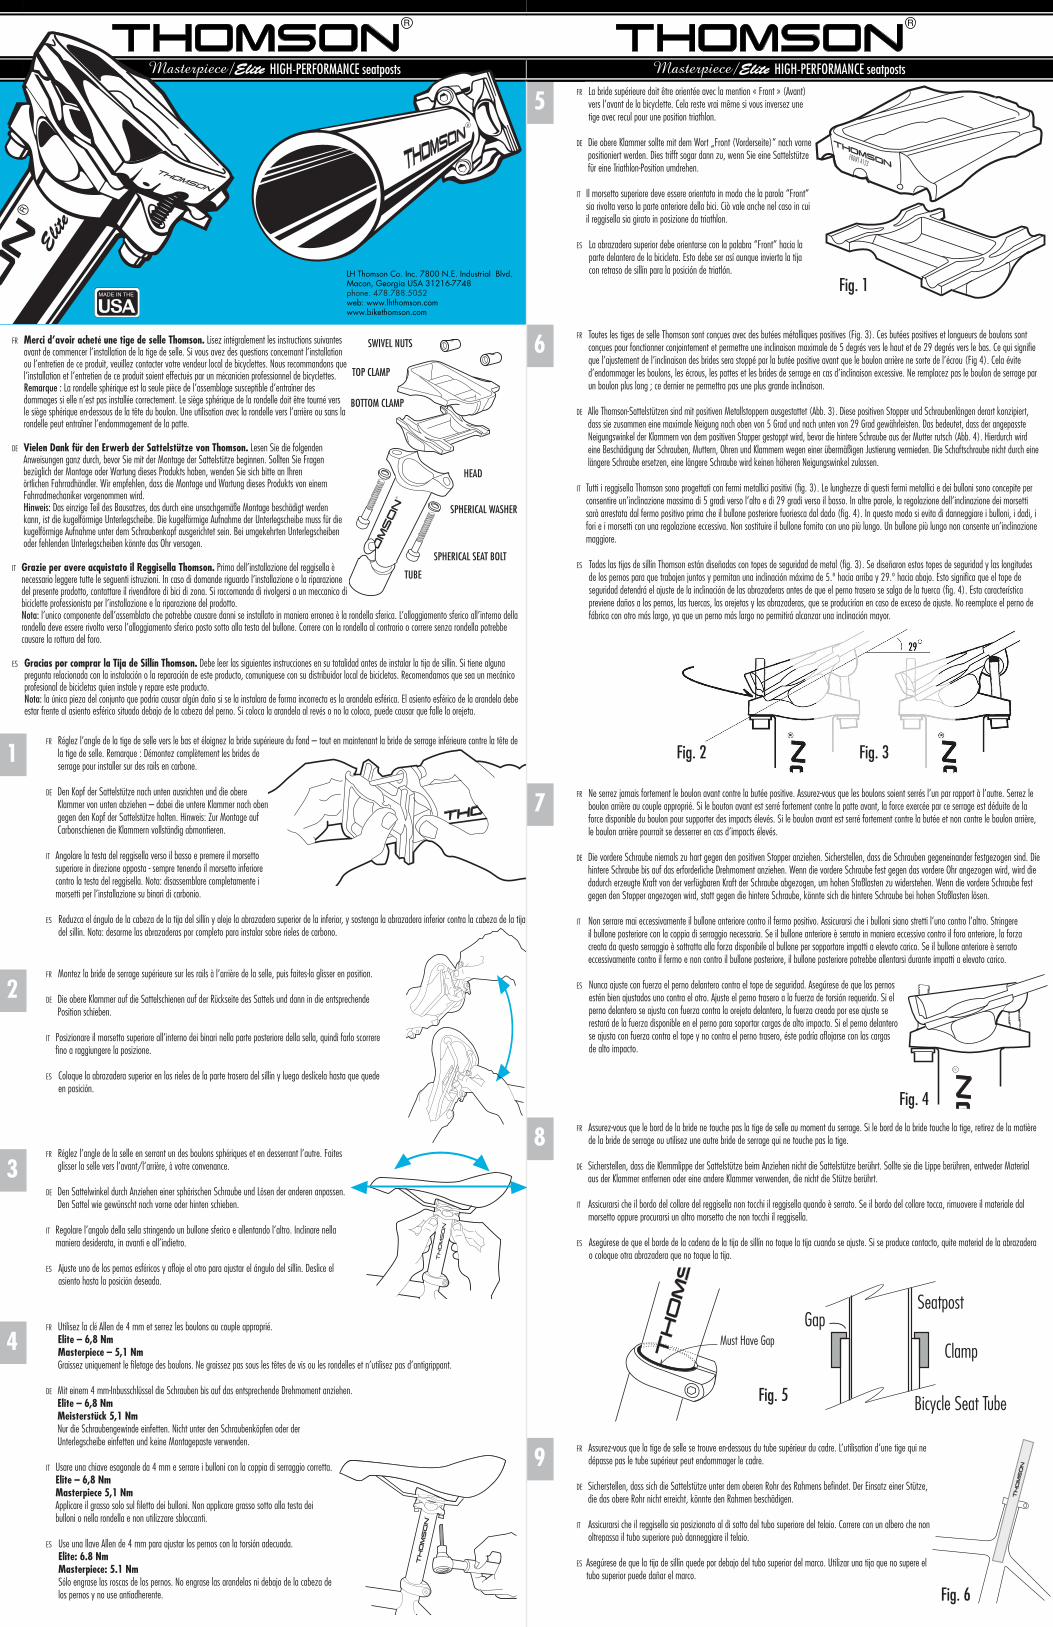
Fig. 2 Fig. 3
Fig. 5
Elite and Masterpiece Seatposts
FRONT 4123
Fig. 1
1
5
6
7
8
9
2
3
4
Fig. 4
R
Fig. 6
FR Merci d’avoir acheté une tige de selle Thomson. Lisez intégralement les instructions suivantes avant de commencer l’installation de la tige de selle. Si vous avez des questions concernant l’installation ou l’entretien de ce produit, veuillez contacter votre vendeur local de bicyclettes. Nous recommandons que l’installation et l’entretien de ce produit soient effectués par un mécanicien professionnel de bicyclettes. Remarque : La rondelle sphérique est la seule pièce de l’assemblage susceptible d’entraîner des dommages si elle n’est pas installée correctement. Le siège sphérique de la rondelle doit être tourné vers le siège sphérique en-dessous de la tête du boulon. Une utilisation avec la rondelle vers l’arrière ou sans la rondelle peut entraîner l’endommagement de la patte.
DE Vielen Dank für den Erwerb der Sattelstütze von Thomson. Lesen Sie die folgenden Anweisungen ganz durch, bevor Sie mit der Montage der Sattelstütze beginnen. Sollten Sie Fragen bezüglich der Montage oder Wartung dieses Produkts haben, wenden Sie sich bitte an Ihren örtlichen Fahrradhändler. Wir empfehlen, dass die Montage und Wartung dieses Produkts von einem Fahrradmechaniker vorgenommen wird. Hinweis: Das einzige Teil des Bausatzes, das durch eine unsachgemäße Montage beschädigt werden kann, ist die kugelförmige Unterlegscheibe. Die kugelförmige Aufnahme der Unterlegscheibe muss für die kugelförmige Aufnahme unter dem Schraubenkopf ausgerichtet sein. Bei umgekehrten Unterlegscheiben oder fehlenden Unterlegscheiben könnte das Ohr versagen.
IT Grazie per avere acquistato il Reggisella Thomson. Prima dell’installazione del reggisella è necessario leggere tutte le seguenti istruzioni. In caso di domande riguardo l’installazione o la riparazione del presente prodotto, contattare il rivenditore di bici di zona. Si raccomanda di rivolgersi a un meccanico di biciclette professionista per l’installazione e la riparazione del prodotto. Nota: l’unico componente dell’assemblato che potrebbe causare danni se installato in maniera erronea è la rondella sferica. L’alloggiamento sferico all’interno della rondella deve essere rivolto verso l’alloggiamento sferico posto sotto alla testa del bullone. Correre con la rondella al contrario o correre senza rondella potrebbe causare la rottura del foro.
ES Gracias por comprar la Tija de Sillín Thomson. Debe leer las siguientes instrucciones en su totalidad antes de instalar la tija de sillín. Si tiene alguna pregunta relacionada con la instalación o la reparación de este producto, comuníquese con su distribuidor local de bicicletas. Recomendamos que sea un mecánico profesional de bicicletas quien instale y repare este producto. Nota: la única pieza del conjunto que podría causar algún daño si se la instalara de forma incorrecta es la arandela esférica. El asiento esférico de la arandela debe estar frente al asiento esférico situado debajo de la cabeza del perno. Si coloca la arandela al revés o no la coloca, puede causar que falle la orejeta.
FR Réglez l’angle de la tige de selle vers le bas et éloignez la bride supérieure du fond – tout en maintenant la bride de serrage inférieure contre la tête de la tige de selle. Remarque : Démontez complètement les brides de serrage pour installer sur des rails en carbone.
DE Den Kopf der Sattelstütze nach unten ausrichten und die obere Klammer von unten abziehen – dabei die untere Klammer nach oben gegen den Kopf der Sattelstütze halten. Hinweis: Zur Montage auf Carbonschienen die Klammern vollständig abmontieren.
IT Angolare la testa del reggisella verso il basso e premere il morsetto superiore in direzione opposta - sempre tenendo il morsetto inferiore contro la testa del reggisella. Nota: disassemblare completamente i morsetti per l’installazione su binari di carbonio.
ES Reduzca el ángulo de la cabeza de la tija del sillín y aleje la abrazadera superior de la inferior, y sostenga la abrazadera inferior contra la cabeza de la tija del sillín. Nota: desarme las abrazaderas por completo para instalar sobre rieles de carbono.
FR La bride supérieure doit être orientée avec la mention « Front » (Avant) vers l’avant de la bicyclette. Cela reste vrai même si vous inversez une tige avec recul pour une position triathlon.
DE Die obere Klammer sollte mit dem Wort „Front (Vorderseite)“ nach vorne positioniert werden. Dies trifft sogar dann zu, wenn Sie eine Sattelstütze für eine Triathlon-Position umdrehen.
IT Il morsetto superiore deve essere orientato in modo che la parola “Front” sia rivolta verso la parte anteriore della bici. Ciò vale anche nel caso in cui il reggisella sia girato in posizione da triathlon.
ES La abrazadera superior debe orientarse con la palabra “Front” hacia la parte delantera de la bicicleta. Esto debe ser así aunque invierta la tija con retraso de sillín para la posición de triatlón.
FR Toutes les tiges de selle Thomson sont conçues avec des butées métalliques positives (Fig. 3). Ces butées positives et longueurs de boulons sont conçues pour fonctionner conjointement et permettre une inclinaison maximale de 5 degrés vers le haut et de 29 degrés vers le bas. Ce qui signifie que l’ajustement de l’inclinaison des brides sera stoppé par la butée positive avant que le boulon arrière ne sorte de l’écrou (Fig 4). Cela évite d’endommager les boulons, les écrous, les pattes et les brides de serrage en cas d’inclinaison excessive. Ne remplacez pas le boulon de serrage par un boulon plus long ; ce dernier ne permettra pas une plus grande inclinaison.
DE Alle Thomson-Sattelstützen sind mit positiven Metallstoppern ausgestattet (Abb. 3). Diese positiven Stopper und Schraubenlängen derart konzipiert, dass sie zusammen eine maximale Neigung nach oben von 5 Grad und nach unten von 29 Grad gewährleisten. Das bedeutet, dass der angepasste Neigungswinkel der Klammern von dem positiven Stopper gestoppt wird, bevor die hintere Schraube aus der Mutter rutsch (Abb. 4). Hierdurch wird eine Beschädigung der Schrauben, Muttern, Ohren und Klammern wegen einer übermäßigen Justierung vermieden. Die Schaftschraube nicht durch eine längere Schraube ersetzen, eine längere Schraube wird keinen höheren Neigungswinkel zulassen.
IT Tutti i reggisella Thomson sono progettati con fermi metallici positivi (fig. 3). Le lunghezze di questi fermi metallici e dei bulloni sono concepite per consentire un’inclinazione massima di 5 gradi verso l’alto e di 29 gradi verso il basso. In altre parole, la regolazione dell’inclinazione dei morsetti sarà arrestata dal fermo positivo prima che il bullone posteriore fuoriesca dal dado (fig. 4). In questo modo si evita di danneggiare i bulloni, i dadi, i fori e i morsetti con una regolazione eccessiva. Non sostituire il bullone fornito con uno più lungo. Un bullone più lungo non consente un’inclinazione maggiore.
ES Todas las tijas de sillín Thomson están diseñadas con topes de seguridad de metal (fig. 3). Se diseñaron estos topes de seguridad y las longitudes de los pernos para que trabajen juntos y permitan una inclinación máxima de 5.º hacia arriba y 29.º hacia abajo. Esto significa que el tope de seguridad detendrá el ajuste de la inclinación de las abrazaderas antes de que el perno trasero se salga de la tuerca (fig. 4). Esta característica previene daños a los pernos, las tuercas, las orejetas y las abrazaderas, que se producirían en caso de exceso de ajuste. No reemplace el perno de fábrica con otro más largo, ya que un perno más largo no permitirá alcanzar una inclinación mayor.
FR Ne serrez jamais fortement le boulon avant contre la butée positive. Assurez-vous que les boulons soient serrés l’un par rapport à l’autre. Serrez le boulon arrière au couple approprié. Si le bouton avant est serré fortement contre la patte avant, la force exercée par ce serrage est déduite de la force disponible du boulon pour supporter des impacts élevés. Si le boulon avant est serré fortement contre la butée et non contre le boulon arrière, le boulon arrière pourrait se desserrer en cas d’impacts élevés.
DE Die vordere Schraube niemals zu hart gegen den positiven Stopper anziehen. Sicherstellen, dass die Schrauben gegeneinander festgezogen sind. Die hintere Schraube bis auf das erforderliche Drehmoment anziehen. Wenn die vordere Schraube fest gegen das vordere Ohr angezogen wird, wird die dadurch erzeugte Kraft von der verfügbaren Kraft der Schraube abgezogen, um hohen Stoßlasten zu widerstehen. Wenn die vordere Schraube fest gegen den Stopper angezogen wird, statt gegen die hintere Schraube, könnte sich die hintere Schraube bei hohen Stoßlasten lösen.
IT Non serrare mai eccessivamente il bullone anteriore contro il fermo positivo. Assicurarsi che i bulloni siano stretti l’uno contro l’altro. Stringere il bullone posteriore con la coppia di serraggio necessaria. Se il bullone anteriore è serrato in maniera eccessiva contro il foro anteriore, la forza creata da questo serraggio è sottratta alla forza disponibile al bullone per sopportare impatti a elevato carico. Se il bullone anteriore è serrato eccessivamente contro il fermo e non contro il bullone posteriore, il bullone posteriore potrebbe allentarsi durante impatti a elevato carico.
ES Nunca ajuste con fuerza el perno delantero contra el tope de seguridad. Asegúrese de que los pernos estén bien ajustados uno contra el otro. Ajuste el perno trasero a la fuerza de torsión requerida. Si el perno delantero se ajusta con fuerza contra la orejeta delantera, la fuerza creada por ese ajuste se restará de la fuerza disponible en el perno para soportar cargas de alto impacto. Si el perno delantero se ajusta con fuerza contra el tope y no contra el perno trasero, éste podría aflojarse con las cargas de alto impacto.
FR Assurez-vous que le bord de la bride ne touche pas la tige de selle au moment du serrage. Si le bord de la bride touche la tige, retirez de la matière de la bride de serrage ou utilisez une autre bride de serrage qui ne touche pas la tige.
DE Sicherstellen, dass die Klemmlippe der Sattelstütze beim Anziehen nicht die Sattelstütze berührt. Sollte sie die Lippe berühren, entweder Material aus der Klammer entfernen oder eine andere Klammer verwenden, die nicht die Stütze berührt.
IT Assicurarsi che il bordo del collare del reggisella non tocchi il reggisella quando è serrato. Se il bordo del collare tocca, rimuovere il materiale dal morsetto oppure procurarsi un altro morsetto che non tocchi il reggisella.
ES Asegúrese de que el borde de la cadena de la tija de sillín no toque la tija cuando se ajuste. Si se produce contacto, quite material de la abrazadera o coloque otra abrazadera que no toque la tija.
FR Assurez-vous que la tige de selle se trouve en-dessous du tube supérieur du cadre. L’utilisation d’une tige qui ne dépasse pas le tube supérieur peut endommager le cadre.
DE Sicherstellen, dass sich die Sattelstütze unter dem oberen Rohr des Rahmens befindet. Der Einsatz einer Stütze, die das obere Rohr nicht erreicht, könnte den Rahmen beschädigen.
IT Assicurarsi che il reggisella sia posizionato al di sotto del tubo superiore del telaio. Correre con un albero che non oltrepassa il tubo superiore può danneggiare il telaio.
ES Asegúrese de que la tija de sillín quede por debajo del tubo superior del marco. Utilizar una tija que no supere el tubo superior puede dañar el marco.
FR Montez la bride de serrage supérieure sur les rails à l’arrière de la selle, puis faites-la glisser en position.
DE Die obere Klammer auf die Sattelschienen auf der Rückseite des Sattels und dann in die entsprechende Position schieben.
IT Posizionare il morsetto superiore all’interno dei binari nella parte posteriore della sella, quindi farlo scorrere fino a raggiungere la posizione.
ES Coloque la abrazadera superior en los rieles de la parte trasera del sillín y luego deslícela hasta que quede en posición.
FR Réglez l’angle de la selle en serrant un des boulons sphériques et en desserrant l’autre. Faites glisser la selle vers l’avant/l’arrière, à votre convenance.
DE Den Sattelwinkel durch Anziehen einer sphärischen Schraube und Lösen der anderen anpassen. Den Sattel wie gewünscht nach vorne oder hinten schieben.
IT Regolare l’angolo della sella stringendo un bullone sferico e allentando l’altro. Inclinare nella maniera desiderata, in avanti e all’indietro.
ES Ajuste uno de los pernos esféricos y afloje el otro para ajustar el ángulo del sillín. Deslice el asiento hasta la posición deseada.
FR Utilisez la clé Allen de 4 mm et serrez les boulons au couple approprié. Elite – 6,8 Nm Masterpiece – 5,1 Nm Graissez uniquement le filetage des boulons. Ne graissez pas sous les têtes de vis ou les rondelles et n’utilisez pas d’antigrippant.
DE Mit einem 4 mm-Inbusschlüssel die Schrauben bis auf das entsprechende Drehmoment anziehen. Elite – 6,8 Nm Meisterstück 5,1 Nm Nur die Schraubengewinde einfetten. Nicht unter den Schraubenköpfen oder der Unterlegscheibe einfetten und keine Montagepaste verwenden.
IT Usare una chiave esagonale da 4 mm e serrare i bulloni con la coppia di serraggio corretta. Elite – 6,8 Nm Masterpiece 5,1 Nm Applicare il grasso solo sul filetto dei bulloni. Non applicare grasso sotto alla testa dei bulloni o nella rondella e non utilizzare sbloccanti.
ES Use una llave Allen de 4 mm para ajustar los pernos con la torsión adecuada. Elite: 6.8 Nm Masterpiece: 5.1 Nm Sólo engrase las roscas de los pernos. No engrase las arandelas ni debajo de la cabeza de los pernos y no use antiadherente.
Seatpost
Clamp
Bicycle Seat Tube
Must Have Gap
Gap
LH Thomson Co. Inc. 7800 N.E. Industrial Blvd.Macon, Georgia USA 31216-7748phone: 478.788.5052web: www.lhthomson.comwww.bikethomson.com
Fig. 2 Fig. 3
Fig. 5
Elite and Masterpiece Seatposts
FRONT 4123
Fig. 1
1
5
6
7
8
9
2
3
4
Fig. 4
R
Fig. 6
JP ありがとうございます!トムソンシートポストをお買い上げいただきありがとうございました。
以下の指示をよくお読みになってから、シートポストを取りつけてください。本製品の取り付けおよび保守についてご質問がある場合は、お近くの代理店にご連絡ください。本製品の取り付けおよび保守は、専門の自転車技師が行うことをお勧めします。
注意:正しく組立ないと損傷を生じる恐れのある組立部の部品は、球面座金のみです。座金内の球面シートは、ボルトのヘッドの下にある球面シートの方に向けてください。
正しい取り付け法に関しては、右図を参考にしてください。
KO 축하드립니다!Thomson안장봉을구매하여주셔서감사합니다. 안장봉을설치하기전에다음지침을자세하게읽어보십시오.본제품의설치
또는서비스와관련하여질문이있을경우지역판매점에게문의하여주십시오.전문자전거기술자가본제품을설치하도록권고해드립니다.
참고:조립을잘못할경우손상을입을수있는유일한조립부품은구면와셔입니다.와셔내의구면시트가볼트헤드부분아래에서구면시트와마주보게해야합니다.
정확한설치를위해오른쪽에있는그림을참조하십시오.
S CH 恭喜您! 感谢您购买Thomson座杆。 在安装座杆前,请仔细阅读以下安装说明。如果您对该产品的安装或维修有任何疑
问,请联系您当地的经销商。我们建议您请专业的自行车技工安装和维修该产品。 请注意: 上述安装部件中,只有球形垫圈在安装不当时会产生毁损。此垫圈的球形底座必须朝向螺栓头下方的球形底座。 使用这些安装说明时,请参考左侧的部件分解图。
TCH恭喜您!感謝您購買Thomson座桿。在安裝座桿前,請仔細閱讀以下安裝說明。如果您對該產品的安裝或維修有任何疑問,請聯繫您當地的經銷商。我們建議您請專業的自行車技工安裝和維修該產品。請注意:上述安裝部件中,只有球形墊圈在安裝不當時會產生毀損。此墊圈的球形底座必須朝向螺栓頭下方的球形底座。參見左側圖示進行正確安裝
JPシートポストのヘッドの角度を下に向け、ボトムクランプをシートポストのヘッドに対して上向きに維持したまま、ボトムクランプからトップクランプを引いてください。
注意: カーボンレールに取り付ける前に、トップクランプを完
全に取り外してください。
KO안장봉헤드의각도는아래로하고클램프윗부분을클램프아랫부분에서떼어냅니다.이때클램프아랫부분을안장봉헤드에대고계속잡고있습니다.
참고: 카본레일에설치하기전에클램프윗부분을완전히
분해하십시오.
S CH 下调座杆头的角度,并将顶夹和底夹拉开,同时将底夹抬离座杆头。
请注意: 应该先将顶夹完全拆开,然后再安装到碳素导轨上。
TCH下調座桿頭的角度,並將頂夾和底夾拉開,同時將底夾抬離座桿頭。 請注意: 應該先將頂夾完全拆開,然後再安裝到碳素導軌上。
JP 新しいトムソンシートポストはすべて、12°のトップクランプが搭載してあります。このクランプは通常、「前面」と書かれた方を自転車の前面に向けると最適です。シートの先端が上に十分に傾かない場合(極めてまれですが)、トップクランプを回して、さらに調整してください。
KO 새Thomson안장봉은모두12o클램프윗부분과함께사용됩니다.클램프는일반적으로자전거전면을향해있는“FRONT(전면)”라고씌어져있는곳에서가장잘적용됩니다.안장의코부분이충분히기울어져있지않은경우(매우드문경우)클램프윗부분을돌려서약간조정해야합니다.
S CH 所有的新型Thomson座杆,其夹板角度均为12度。夹板的前端标有“FRONT”字样,当把这一端朝向车身前端时,夹板可以发挥最佳性能。如果车座头上倾不足(极少发生),您可以通过逆转顶夹进行额外调整。
TCH 所有的新型Thomson座桿,其夾板角度均為12度。夾板的前端標有“FRONT”字樣,當把這一端朝向車身前端時,夾板可以發揮最佳性能。如果車座頭上傾不足(極少發生),您可以通過逆轉頂夾進行額外調整。
JP トムソンシートポストはすべて金属間ポジティブストップを備えています。これらのポジティブストップとボルトの長さは、最大5°の上方への傾きと最大29°の下方への傾きが可能なように設計されています。
つまり、クランプの傾き調整は、バックボルトががナットをすり減らす前にポジティブストップで停止するようになっています。これにより、過剰な調整により損傷してしまうおそれのあるボルトやナット、イヤー、クランプへの損傷を防ぐことができます。ストックボルトをそれ以上の長さのボルトと交換しないでください。それ以上の長さのボルトだと、許容できる傾きが少なくなります。
KO 모든Thomson안장봉은포지티브금속스톱으로디자인되었습니다(그림3참조).이러한포지티브스톱및볼트길이는최대위로5o기울이고아래로29o기울일수있도록디자인되었습니다.
이것은클램프의기울기조정이뒤쪽볼트가너트에서빠지기전에포지티브스톱에서멈추게되는것을의미합니다.이를통해과도한조정으로발생할수있는볼트,너트,이어및클램프의손상을예방할수있습니다.길이가더긴볼트로재고볼트를교체하지마십시오.길이가더긴볼트를사용하면충분한기울여지지않습니다.
S CH 所有Thomson座杆均设计成前金属间档块。这些前档块和螺栓的长度共同配合,可使夹板最多上倾5度,最多下倾29度。
也就是说,不等后螺栓从螺母中脱出,前档块即可阻止夹板继续倾斜。这可以防止螺栓、螺母、吊耳以及夹板调整过度。请不要将普通螺栓替换为更长的螺栓,因为这会减少倾斜的角度。
TCH 所有Thomson座桿均設計成前金屬間檔塊(圖3)。這些前檔塊和長螺栓共同配合,可使夾板最多上傾5度,最多下傾29度。 也就是說,不等後螺栓從螺母中脫出,前檔塊即可以阻止夾板的繼續傾斜(圖4)。這可以防止螺栓、螺母、吊耳以及夾板調整過度。請不
要將鋼料螺栓替換為更長的螺栓,因為這會減少傾斜的角度。
JP フロントボルトをポジティブストップに対して強く締めないでください。 ボルトは相互に対して締めつけるようにしてください。バックボルトは必ず6.8Nmで締めるようにしてください。 マスターピースの場合、ボルトは5.1Nm程度のトルクで締めつけてください。
フロントイヤーに対して、フロントボルトをきつく締めると、その締めつけで生じた力が強い衝撃荷重に耐えられるボルトの力から差し引かれます。フロントボルトをリアボルトではなく、ストップに対して強く締め付けると、衝撃荷重中にリアボルトが緩むおそれがあります。
KO 전면볼트를절대포지티브스톱에대고너무꽉조이지마십시오.볼트를다른볼트에대고조이십시오.후면볼트는항상69cmkgf(60inchlbs.,6.8Nm)의토크로조이십시오(그림5참조).Masterpiece의경우항상51.75cmkg(45inchlbs.,5.1Nm)이하의토크로후면볼트를조이십시오.
전면봍트를전면이어에대고너무꽉조일경우조일때생성되는압력으로충격을많이받을때압력으로봍트가빠질수있습니다.전면볼트를스톱에는대지만후면볼트에는대지않고꽉조일경우충격을많이받을때후면볼트가느슨해질수있습니다.
S CH 切勿顶着前档块用力紧固前螺栓。 请对准其他螺栓紧固每一个螺栓,并且统一使用6.8牛米的扭矩。对于Masterpiece座杆,要统
一使用小于5.1牛米的扭矩。
如果前螺栓和前吊耳顶得太紧,则两者之间产生的力量就会消减螺栓固有的抗冲击负荷能力。如果前螺栓和档块顶得太紧,而不是和后螺栓顶紧,后螺栓就会在冲击负荷下产生松动。
TCH 切勿頂著前檔塊用力緊固前螺栓。 請對準其他螺栓緊固每一個螺栓,並且統一使用6.8牛米的扭矩。對於Masterpiece座桿,要
統一使用小於5.1牛米的扭矩。 如果前螺栓和前吊耳頂得太緊,則兩者之間產生的力量就會消減螺栓固有的抗衝擊負荷能力。
如果前螺栓和檔塊頂得太緊,而不是和後螺栓頂緊,後螺栓就會在衝擊負荷下產生鬆動。
JP 挿入および締め付け中は、自転車のシートの上部にあるクランプリップが、シートポストチューブの両側に触れないようにしてください。自転車のシートチューブのみがシートポストチューブに触れるようにしてください。
締め付け中にクランプリップがシートポストチューブに接触する場合は、締め付けを止めてください。接触する場合は、自転車のシートポストクランプから材料を外すか、隙間ができるクランプと交換してください。
KO 삽입하고조이는동안자전거안장튜브위에있는클램프입구가안장봉튜브측면에닿지않도록주의하십시오.자전거안장튜브만안장봉튜브에닿아야합니다.클램프입구가안장봉튜브에닿을경우안장봉은클램프를조이는동안표면이옴폭하게들어갈수있습니다.그림6을참조하십시오.
조이는동안클램프입구가안장봉에닿을경우더이상조이지마십시오.안장봉에닿은경우자전거안장봉클램프에서물질을제거하거나간격을확보할수있는클램프로교체하십시오.
S CH 在插接和紧固时,请确保位于自行车座管顶端的夹板唇未接触到座杆的外缘。只有座管可以和座杆接触。
在紧固过程中,如果发现夹板唇的确接触到了座杆,此时要停止紧固。发生这种情况时,您可以打磨掉座杆夹板的部分材料,也可以换用宽松一些的夹板。
TCH在插接和緊固時,請確保位於自行車座管頂端的夾板唇未接觸到座桿的外緣。只有座管可以和座桿接觸。
在緊固過程中,如果發現夾板唇的確接觸到了座桿,此時要停止緊固。發生這種情況時,您可以打磨掉座桿夾板的部分材料,也可以換用寬鬆一些的夾板。
JP 自転車のフレームの中には、シートチューブが上部チューブを超えて延在するものがあります。フレームの上部チューブの下にトムソンシートポストが収まるように挿入してください。
トムソンシートポストは、しっかりフレーム内に収まっていれば、完全に安全です。しかし、シートポストがフレームの上部チューブの下に収まっていないと、自転車のフレームを損傷するおそれがあります。
KO 일부자전거프레임은안장튜브가튜브윗부분까지길게늘어납니다.Thomson안장봉을삽입하여프레임의튜브윗부분아래로안장봉이들어가야합니다(그림7참조).
Thomson안장봉은어떤프레임을사용하여달릴경우에도매우안전합니다.그러나,안장봉이프레임의튜브윗부분아래로들어가지않았을경우자전거프레임에손상이생길수있습니다.
S CH 某些车架的座管远远高出自行车上管,那么在安装Thomson座杆时,要确保将它插入到车架上管下方。
无论哪种车架,Thomson座杆都可在其发挥最佳性能时确保安全。但是需要警告您,如果座杆没有插入到车架上管以下,就有可能损坏车架。
ES 某些車架的座管遠遠高出自行車上管,那麼在安裝Thomson座桿時,要確保將它插入到車架上管下方 無論哪種車架,Thomson座桿都可在其最高線水準發揮最佳性能。但是需要警告您,如果座桿沒有插入到車架
上管以下,就有可能損壞車架。
JP トップクランプをシート後部のシートレール上に取り付け、所定の位置までスライドさせてください。
KO 안장뒤에서안장레일위에클램프윗부분을작동시킨다음미끄러지게합니다.
S CH将顶夹安装到车座后方的导轨上,然后滑动到相应的位置。
TCH 將頂夾安裝到車座後方的導軌上,然後滑動到相應的位置。
JP 球面ボルトの一方を締め付け、他方を緩めて、シートの角度を調整してください。シートを所定の位置の前後にスライドさせてください
KO 구면볼트의한쪽은조이고다른한쪽은느슨하게하여안장의각도를조절합니다.
S CH 通过紧固一个球形螺栓并松动另一个螺栓来调整车座的角度。然后滑动车座,使其前后位置适中。
TCH 通過緊固一個球形螺栓並鬆動另一個螺栓來調整車座的角度。然後滑動車座,使其前後位置適中。
JP 4mmの六角レンチを使用して締めつけてください。エリート-6.8Nm マスターピース5.1Nm ねじ山部分のみにグリスを塗布してください。ボルトヘッドまたはワッシャの下にグリスを塗布し
ないでください。焼付き防止剤を使用しないでください。
KO 구면볼트의한쪽은조이고다른한쪽은느슨하게하여안장의각도를조절합니다. 4-조일때4mm육각렌치를사용하십시오.볼트를조일때의권장토크는69cmkgf(60inchlbs.,6.8
Nm)입니다.
볼트홈에만윤활제를바르십시오.볼트머리아래또는와셔에윤활제를바르거나고착방지제(anti-seize)를사용하지마십시오.
S CH 用4毫米通用扳手扭紧螺栓。 Elite–6.8牛米 Masterpiece5.1牛米
只润滑螺栓螺线。切勿润滑螺栓头或垫片以下或使用防卡剂。
TCH 用4毫米通用扳手扭緊螺栓至恰當扭矩。 Elite–6.8牛米 Masterpiece5.1牛米
只對螺栓螺旋進行潤滑。不要在螺栓頭或墊圈下進行潤滑,也不要使用潤滑防卡劑。