Embed Size (px)
Citation preview

ArubaVersion 6.4
Con
figur
atio
n G
uid
e

Aruba Configuration Guide | 0510641-01 Copyrights and Revisions | 2
Copyright
© 2009 Aruba Networks, Inc. AirWave®, Aruba Networks®, Aruba Mobility Management System®, Bluescanner, For Wireless That Works®, Mobile Edge Architecture®, People Move. Networks Must Follow®, RFProtect®, The All Wireless Workplace Is Now Open For Business, Green Island, and The Mobile Edge Company® are trademarks of Aruba Networks, Inc. All rights reserved. All other trademarks are the property of their respective owners.
While every effort has been made to ensure technical accuracy, information in this document is subject to change without notice and does not represent a commitment on the part of AirWave Wireless.
AirWave Wireless is not connected, affiliated or related to Airwave O2 Limited in any manner.
Open Source Code
Certain Aruba products include Open Source software code developed by third parties, including software code subject to the GNU General Public License (GPL), GNU Lesser General Public License (LGPL), or other Open Source Licenses. The Open Source code used can be found at this site:
http://www.arubanetworks.com/open_source
Legal Notice
The use of Aruba Networks, Inc. switching platforms and software, by all individuals or corporations, to terminate other vendors' VPN client devices constitutes complete acceptance of liability by that individual or corporation for this action and indemnifies, in full, Aruba Networks, Inc. from any and all legal actions that might be taken against it with respect to infringement of copyright on behalf of those vendors.
Warranty
This hardware product is protected by the standard Aruba warranty of one year parts/labor. For more information, refer to the ARUBACARE SERVICE AND SUPPORT TERMS AND CONDITIONS. Altering this device (such as painting it) voids the warranty.
Part Number 0510641-01
http://www.airwave.com
AirWave Wireless, Inc. 1344 Crossman Ave.Sunnyvale, CA 94089-1113Phone: (408) 227-4500Fax: (408) 227-4550
http://www.arubanetworks.com
1344 Crossman AvenueSunnyvale, California 94089
Phone: 408.227.4500Fax 408.227.4550

Document Revisions and Enhancements
Table 1 summarizes new Aruba Configuration features in AWMS Version 6.4, to describe graphical user interface (GUI) enhancements and and additional document changes from the prior Aruba Configuration Guide, Version 6.3. Additional information supporting AWMS Version 6.4 is available in the documents cited in “Related Documents” on page 12.
Table 1 AirWave Configuration Guide Document Revisions, AWMS Version 6.4
Enhancement Document Section Description
AWMS Version 6.4 Enhancements
General document Document adds GUI, procedural, and feature-oriented enhancements in support of the Aruba Configuration feature in AWMS 6.4.
Deploying Aruba APs “Using AWMS to Deploy Aruba APs for the First Time” on page 38
New procedure describes how to deploy and name Aruba APs and controllers from AWMS for the first time, rather than importing such configurations from AOS.
Using Groups and Folders in AWMS
“Using General AWMS Device Groups and Folders” on page 39
New procedure describes two ways in which to deploy device groups and folders in AWMS. This general group-level topic also has potential benefit of Aruba AP Groups. Generally, device groups in AWMS can be deployed as follows: Deploy device groups by device type and folders by location. Deploy device groups by location and folders by type.
3 | Copyrights and Revisions Aruba Configuration Guide | Version 6.4

Aruba Configuration Guide | 0510641-01 Copyrights and Revisions | 4

Aruba | Version 6.4
Contents
Preface 7Document Audience and Organization 7
Related Documents 7
Text Conventions 8
Contacting AirWave Wireless and Aruba Networks 8
Chapter 1 Overview of Aruba Configuration in AWMS11Introduction 11
Requirements, Restrictions, and AOS Support in AWMS 12Requirements 12Restrictions 12AOS Support in AWMS 12
AOS 3.4.0 12
Overview of Aruba Configuration in AWMS 13The Primary Pages of Aruba Configuration 13Device Setup > Aruba Configuration Page 13
Aruba AP Groups Section 14AP Overrides Section 14WLANs Section 16Profiles Section 16Security Section 17Advanced Services Section 17
Groups > Aruba Config Page 18APs/Devices > List Page 18APs/Devices > Manage Page 19APs/Devices > Monitor Page 19Groups > Basic Page 19
Additional Concepts and Components of Aruba Configuration 20Global Configuration and Scope 20Embedded Profile Setup in Aruba Configuration 20Save, Save and Apply, and Revert Buttons 21Folders, Users, and Visibility 21Additional Concepts and Benefits 21
Scheduling Configuration Changes 21Auditing and Reviewing Configurations 21Licensing and Dependencies in Aruba Configuration 21
Setting Up Initial Aruba Configuration 22Prerequisites 22Procedure 22
What Next? 28Additional Capabilities of Aruba Configuration 28
Chapter 2 Using Aruba Configuration in Daily Operations29Introduction 29
General Aruba AP Groups Procedures and Guidelines 30Guidelines and Pages for Aruba AP Groups in Aruba Configuration 30Selecting Aruba Controller Groups 30Configuring Aruba AP Groups 30
What Next? 31Retaining Unreferenced Aruba Configuration Profiles 32
General WLAN Procedures and Guidelines 32
Contents | 5

Guidelines and Pages for WLANs in Aruba Configuration 32Configuring or Editing WLANs with Basic View 32Configuring or Editing WLANs with Advanced View 33
General Profiles Guidelines 34
General Controller Procedures and Guidelines 35Using Master, Standby Master, and Local Controllers in Aruba Configuration 35Pushing Device Configurations to Controllers 35
Supporting APs with Aruba Configuration 36AP Overrides Guidelines 36Configuring or Editing AP Overrides 36Changing Adaptive Radio Management (ARM) Settings 37Changing SSID and Encryption Settings 37Changing the Aruba AP Group for an AP Device 37Using AWMS to Deploy Aruba APs for the First Time 38Using General AWMS Device Groups and Folders 39
Visibility in Aruba Configuration 40Visibility Overview 40Defining Visibility for Aruba Configuration 40
Index 43
6 | Contents Aruba | Version 6.4

Aruba | Version 6.4
Preface
Document Audience and OrganizationThis configuration guide is intended for wireless network administrators and helpdesk personnel who deploy ArubaOS (AOS) on the network and wish to manage it with the AirWave Wireless Management Suite (AWMS). AWMS Version 6.3 and later releases support Aruba Configuration. This document provides instructions for using Aruba Configuration and contains the following chapters:
Related DocumentsThe following documentation supports the AirWave Wireless Management Suite:
Table 1 Document Organization and Purposes
Chapter Description
Chapter 1, “Overview of Aruba Configuration in AWMS” Introduces the concepts, components, navigation, and initial setup of Aruba Configuration.
Chapter 2, “Using Aruba Configuration in Daily Operations” Provides a series of procedures for configuring, modifying, and using Aruba Configuration once initial setup is complete. This chapter is oriented around the most common tasks in Aruba Configuration.
ArubaOS Documentation
AOS User Guide
AirWave Wireless Management Suite / AirWave Management Platform
Release Notes for the AirWave Wireless Management Suite AirWave Wireless Management Suite Knowledge Base AWMS Quick Start Guide AWMS User Guide Aruba Configuration Guide (this document) Supported APs/Devices Supported Firmware Versions
VisualRF
Release Notes for the AirWave Wireless VisualRF Module Overview Page User Guide
RAPIDS
Overview Page AirWave Management Client User Guide Download AirWave Management Client
Best Practice Guides
Aruba and AirWave Best Practices Guide Choosing the Right Server Hardware Helpdesk Guide: Troubleshooting WLAN Issues Converting Cisco IOS APs to LWAPP
Interfacing With AWMS
AWMS Integration Matrix State and Statistical XML API Documentation Location XML API Documentation
NMS Integration
See AMP Setup NMS Download AWMS Trap MIB AWMS/NMS Integration Guide
AMPWatch Widget
AMPWatch is a widget for the Yahoo! Widget Engine
Download AMPWatch
| 7

Text ConventionsThe following conventions are used throughout this manual to emphasize important concepts:
This document uses the following notice icons to emphasize advisories for certain actions, configurations, or concepts:
Contacting AirWave Wireless and Aruba Networks
Table 2 Text Conventions
Type Style Description
Italics This style is used to emphasize important terms and to mark the titles of books.
GUI components Bold, sans-serif font indicates that the AWMS GUI displays this item exactly as cited in body text.
System items This fixed-width font depicts the following: Sample screen output System prompts Filenames, software devices, and specific commands when mentioned in the text
Commands In the command examples, this bold font depicts text that you must type exactly as shown.
N O T E
Indicates helpful suggestions, pertinent information, and important things to remember.
!CAUTION
Indicates a risk of damage to your hardware or loss of data.
Online Contact and Support
Main Website http://www.airwave.com
Email Contact
AirWave Wireless Sales [email protected]
AirWave Wireless Technical Support [email protected]
Aruba Networks general information [email protected]
Aruba Networks Sales [email protected]
Aruba Networks Technical Support in the Americas and APAC [email protected]
Aruba Networks Technical Support in the EMEA [email protected]
WSIRT Email—Please email details of any security problem found in an AirWave or Aruba product.
Telephone Contact and Support
AirWave Wireless Corporate Headquarters +1 (408) 227-4500
FAX +1 (408) 227-4550
Support
United States 800-WI-FI-LAN (800-943-4526)
Universal Free Phone Service Number (UIFN): Australia, Canada, China, France, Germany, Hong Kong, Ireland, Israel, Japan, Korea, Singapore, South Africa, Taiwan, and the UK.
+800-4WIFI-LAN (+800-49434-526)
All Other Countries +1 (408) 754-1200
8 | Aruba | Version 6.4

Aruba | Version 6.4 | 9

10 | Aruba | Version 6.4

Aruba | Version 6.4
Chapter 1
Overview of Aruba Configuration in AWMS
IntroductionArubaOS (AOS) is the operating system, software suite, and application engine that operates Aruba mobility controllers and centralizes control over the entire mobile environment. The AOS Wizards, the AOS command-line interface (CLI), and the AOS WebUI are the primary means by which to configure and deploy AOS.
The Aruba Configuration feature in the AirWave Wireless Management Suite consolidates AOS configuration and pushes global Aruba configurations from one utility. This chapter introduces the components and initial setup of Aruba Configuration with the following topics:
Overview of Aruba Configuration in AWMS
The Primary Pages of Aruba Configuration
Device Setup > Aruba Configuration Page
Aruba AP Groups Section
AP Overrides Section
WLANs Section
Profiles Section
Security Section
Advanced Services Section
Groups > Aruba Config Page
APs/Devices > List Page
APs/Devices > Manage Page
APs/Devices > Monitor Page
Groups > Basic Page
Additional Concepts and Components of Aruba Configuration
Global Configuration and Scope
Embedded Profile Setup in Aruba Configuration
Save, Save and Apply, and Revert Buttons
Folders, Users, and Visibility
Additional Concepts and Benefits
Setting Up Initial Aruba Configuration
N O T E
AWMS supports Aruba AP Groups, and these are distinct and must not be confused with standard AWMS Device Groups. This document provides information about the configuration and use of Aruba AP Groups, and describes how Aruba AP Groups interoperate with standard AWMS Device Groups.
| 11

Requirements, Restrictions, and AOS Support in AWMS
RequirementsAruba Configuration has the following requirements in AWMS:
AWMS 6.3 or a later AWMS version must be installed and operational on the network.
Aruba Controllers on the network must have AOS installed and operational.
Ensure you have Telnet/SSH credentials (configuration only) and the “enable” password (configuration only). Without proper Telnet/SSH credentials a user is not able to fetch the running configuration, nor acquire license and serial information from controllers.
RestrictionsAruba Configuration has the following restrictions in AWMS:
At the present time, Aruba Configuration in AWMS does not support every AOS Network component. AWMS supports only IP Mobility and VLANs in the Advanced Services section, for example.
Future versions of AWMS will support additional AOS features, to include Aruba AP Group and Profile distribution from the Master Console.
AOS Support in AWMS
AWMS users can choose between the existing template-based configuration and new GUI-based configuration for Aruba devices on firmware 3.3.2.10 and greater. Upon upgrading to AWMS, groups with all devices in monitor-only mode will automatically use the GUI-based configuration.
Only global configuration is supported; AWMS can work in a master-local or an all-master configuration.
Configuration changes are pushed to the controller via SSH with no reboot required.
All settings for Profiles, Aruba AP Groups, Servers and Roles are supported, as is the AOS WLAN Wizard (basic view). Controller IP addresses, VLANs and interfaces are not supported, nor are Advanced Services with the exception of VPN and IP Mobility.
AWMS now understands AOS license dependencies.
You can provision thin APs from the AP/Devices > Manage page. You can move APs into Aruba AP
Groups from the Modify These Devices option on the APs/Devices > List page.
You can configure AP names as AP Overrides on the Device Setup > Aruba Configuration page.
Support for AOS GUI configuration via global groups and the AWMS Master Console will be added in a future release.
Changes to dependency between the AMP group and folders help customers who want to use the folder structure to manage configuration; however, users are now be able to see (but not access) group and folder paths for which they do not have permissions.
For more detailed information about this feature, as well as steps for transition from template-based configuration to web-based configuration, refer to additional chapters in this user guide. For known issues in the general AWMS release, refer to the AWMS Release Notes.
AOS 3.4.0
AWMS 6.4 and later versions support AOS 3.4.0 with these additional enhancements:
AMP displays Aruba APs with disabled radios as up.
N O T E
Refer also to “Using AWMS to Deploy Aruba APs for the First Time” on page 38.
12 | Aruba | Version 6.4

AMP supports IP addresses for Aruba thin APs.
Air Monitor is now a per-radio mode in AMP.
AMP displays the user’s cipher for Aruba clients, as supported in AOS 3.4.
AWMS supports several additional IDS traps.
AWMS supports additional Aruba 600 Series controllers and the Aruba AP-105 access point.
Refer to the AWMS 6.4 Release Notes for additional information.
Overview of Aruba Configuration in AWMSThis section describes the Device Setup > Aruba Configuration page and all additional pages in AWMS that support Aruba Configuration.
The Primary Pages of Aruba ConfigurationAWMS supports Aruba Configuration with the following pages:
Device Setup > Aruba Configuration Page—deploys and maintains Aruba Configuration in AWMS. This page supports several sections, as follows:
Aruba AP Groups Section
AP Overrides Section
WLANs Section
Profiles Section
Security Section
Advanced Services Section
Groups > Aruba Config Page—manages Aruba AP group and other controller-wide settings defined on the Device Setup > Aruba Configuration page.
APs/Devices > List Page—modifies or reboots all devices, including Aruba devices deployed with Aruba Configuration.
APs/Devices > Manage Page—supports device-level settings and changes in AWMS as a whole.
APs/Devices > Monitor Page—supports device-level monitoring in AWMS as a whole.
Groups > Basic Page—enables Aruba Configuration in the AWMS GUI and displays preferences for Aruba and other devices.
Device Setup > Aruba Configuration PageThis page uses an expandable navigation pane to support Aruba AP Groups, AP Overrides, WLANs, Profiles, Security, and Advanced Services.
Figure 1 Device Setup > Aruba Configuration Navigation Pane (Contracted and Expanded)
Aruba | Version 6.4 | 13

The navigation pane can be used as follows:
Any portion with a plus sign (+) expands with a click to display additional contents.
Any portion of the navigation tree can be contracted by clicking the contract sign (-).
You can display the Edit or Details page for any component with a single click.
Aruba AP Groups Section
An Aruba AP Group is a collection of configuration profiles that define specific settings on Aruba controllers and the devices that they govern. An Aruba AP Group references multiple configuration profiles, and in turn links to multiple WLANs.
Navigate to the Device Setup > Aruba Configuration > Aruba AP Groups page. Figure 2 illustrates one example of this page.
Figure 2 Device Setup > Aruba Configuration > Aruba AP Groups Navigation
Aruba AP Groups are not to be confused with conventional AWMS device groups. AWMS supports both group types and both are viewable on the Groups > List page when so configured.
Aruba AP Groups have the following characteristics:
Aruba AP Groups are global, and any Aruba controller can support multiple Aruba AP Groups.
Aruba AP Groups are assigned to folders, and folders define visibility. Using conventional AWMS folders to define visibility, Aruba AP Groups can provide visibility to some or many components while blocking visibility to other users for more sensitive components, such as SSIDs. Navigate to the Users pages to define folder visibility, and refer to “Visibility in Aruba Configuration” on page 40.
You can import a controller configuration file from ArubaOS for Aruba AP Group deployment in AWMS.
For additional information, refer to the following sections in this document:
“Setting Up Initial Aruba Configuration” on page 22
“General Aruba AP Groups Procedures and Guidelines” on page 30
AP Overrides Section
The second major component of Aruba Configuration is the AP Overrides page, appearing immediately below Aruba AP Groups in the Navigation Pane. Figure 3 illustrates this location and access:
N O T E
Only Aruba AP Groups, AP Overrides, and WLANs contain custom-created items in the navigation pane.
14 | Aruba | Version 6.4

Figure 3 Device Setup > Aruba Configuration > AP Overrides Navigation
AP Overrides operate as follows in Aruba Configuration:
Custom-created AP Overrides appear in the Aruba Configuration navigation pane, as illustrated in Figure 3.
Aruba controllers and AP devices operate in Aruba AP Groups that define shared parameters for all devices in those groups. The Device Setup > Aruba Configuration > Aruba AP Groups page displays all current Aruba AP groups.
AP Override allows you to change some parameters for any specific device without having to create an Aruba AP group per AP.
The name of any AP Override should be the same as the name of the device to which it applies. This establishes the basis of all linking to that device.
Once you have created an AP Override for a device in a group, you specify the WLANs to be included and excluded.
For additional information about how to configure and use AP Overrides, refer to these topics:
“AP Overrides Guidelines” on page 36
“Configuring or Editing AP Overrides” on page 36
Aruba | Version 6.4 | 15
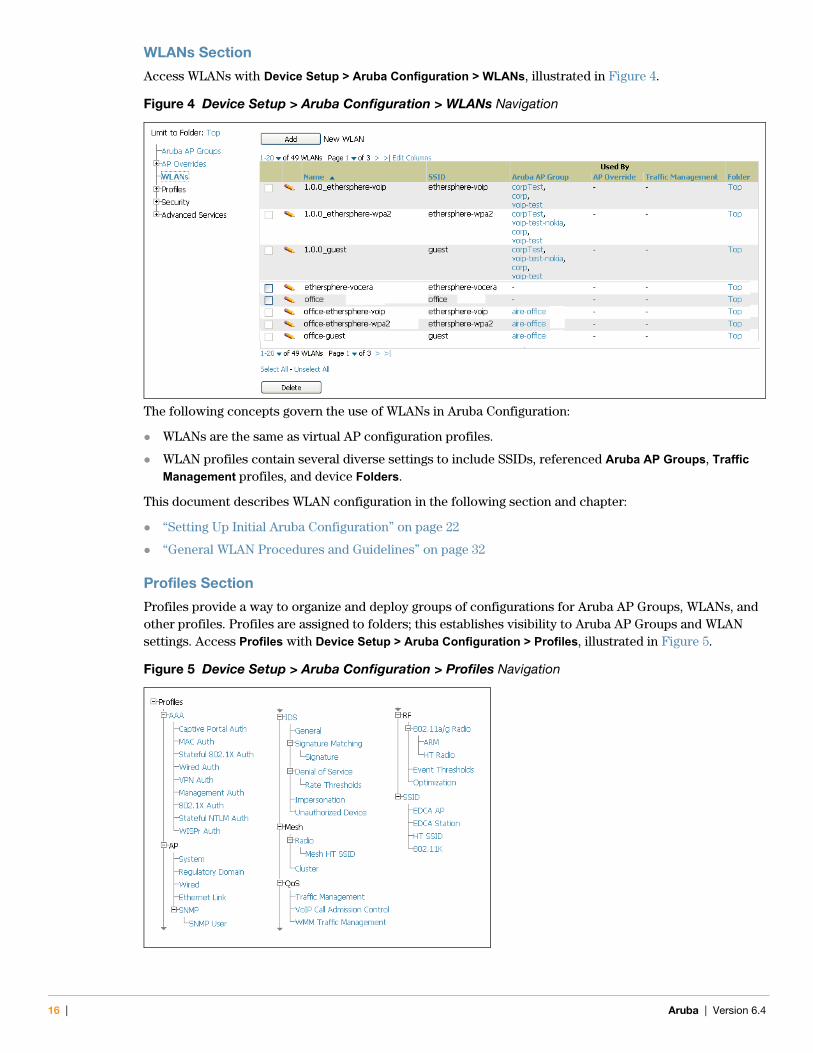
WLANs Section
Access WLANs with Device Setup > Aruba Configuration > WLANs, illustrated in Figure 4.
Figure 4 Device Setup > Aruba Configuration > WLANs Navigation
The following concepts govern the use of WLANs in Aruba Configuration:
WLANs are the same as virtual AP configuration profiles.
WLAN profiles contain several diverse settings to include SSIDs, referenced Aruba AP Groups, Traffic
Management profiles, and device Folders.
This document describes WLAN configuration in the following section and chapter:
“Setting Up Initial Aruba Configuration” on page 22
“General WLAN Procedures and Guidelines” on page 32
Profiles Section
Profiles provide a way to organize and deploy groups of configurations for Aruba AP Groups, WLANs, and other profiles. Profiles are assigned to folders; this establishes visibility to Aruba AP Groups and WLAN settings. Access Profiles with Device Setup > Aruba Configuration > Profiles, illustrated in Figure 5.
Figure 5 Device Setup > Aruba Configuration > Profiles Navigation
16 | Aruba | Version 6.4

Profiles are organized by type in Aruba Configuration. Custom-named profiles do not appear in the navigation pane as do custom-named Aruba AP Groups, WLANs, and AP Overrides.
For additional information about profile procedures and guidelines, refer to the following sections in this document:
“Setting Up Initial Aruba Configuration” on page 22
“General Profiles Guidelines” on page 34
Security Section
The Security section displays, adds, edits, or deletes security profiles in multiple categories, to include user roles, policies, rules, and servers such as RADIUS, TACACS+, and LDAP servers. Navigate to Security with the Device Setup > Aruba Configuration > Security path, illustrated in Figure 6.
Figure 6 Device Setup > Aruba Configuration > Security Navigation
The following general guidelines apply to Security profiles in Aruba configuration:
Roles can have multiple policies; each policy can have numerous roles.
Server groups are comprised of servers and rules. Security rules apply in Aruba Configuration in the same way as deployed in AOS.
Advanced Services Section
Navigate to Advanced Services with the Device Setup > Aruba Configuration > Advanced Services path. The Advanced Services section includes IP Mobility and VPN Services. Figure 7 illustrates this navigation and the components.
Figure 7 Device Setup > Aruba Configuration > Advanced Services Navigation
Aruba | Version 6.4 | 17

Groups > Aruba Config PageThis focused submenu page displays and edits all configured Aruba AP groups, with the following factors:
Aruba AP Groups must be defined from the Device Setup > Aruba Configuration page before they are visible on the Groups > Aruba Config page.
Use this page to select the Aruba AP Groups that you push to controllers. Use this page to associate a standard device group to one or more Aruba AP Groups. From this page, you can select other profiles that are defined on the controller, like an internal server.
Figure 8 Groups > Aruba Config Page Illustration
APs/Devices > List PageThis page supports devices in all of AWMS. This page supports controller reboot, controller re-provisioning, and changing Aruba AP groups. Select Modify Devices to configure thin AP settings.
Figure 9 APs/Devices List Page Illustration (Partial Display)
18 | Aruba | Version 6.4

APs/Devices > Manage PageThis page configures device-level settings, including Manage mode that enables pushing configurations to controllers. For additional information, refer to “Pushing Device Configurations to Controllers” on page 35.
Figure 10 APs/Devices > Manage Page Illustration (Partial Display)
APs/Devices > Monitor PageUsed in conjunction with the Manage page, the Monitor page enables review of device-level settings. This page is large and often contains a great amount of information, to include the following sections:
Status information
User and Bandwidth flash graphs
CPU Utilization and Memory Utilization flash graphs
APs Managed by this Controller (when viewing a controller)
Alert Summary
Recent Events
Audit Log
For additional information, refer to “Pushing Device Configurations to Controllers” on page 35.
Groups > Basic PageThe Groups > Basic page deploys the following aspects of Aruba Configuration:
This page contains a new Aruba GUI Config field. Use this page and field to make the Device Setup >
Aruba Config page visible. This page is enabled by default in AWMS.
Use this page to control which device settings appear on the Groups pages.
If you are using Aruba firmware prior to version 3.0, you should disable Aruba GUI configuration from the Groups > Basic page and use template-based configuration.
Refer to Figure 13 for an illustration of this page.
Aruba | Version 6.4 | 19
Additional Concepts and Components of Aruba ConfigurationAruba Configuration emphasizes the following components and network management concepts:
Global Configuration and Scope Embedded Profile Setup in Aruba Configuration Save, Save and Apply, and Revert Buttons Folders, Users, and Visibility Additional Concepts and Benefits
Global Configuration and ScopeAruba Configuration supports AOS as follows:
AWMS supports global configuration from both a master-local controller deployment and an all-master controller deployment:
In a master-local controller deployment, AOS is the agent that pushes global configurations from master controllers to local controllers. AWMS supports this AOS functionality.
In an all-master-controller scenario, every master controller operates independent of other master controllers. AWMS provides the ability to push configuration to all master controllers in this scenario.
AWMS Aruba Configuration supports AOS profiles, Aruba AP Profiles, Servers, and User Roles.
For additional information about these and additional functions, refer to “General Controller Procedures and Guidelines” on page 35.
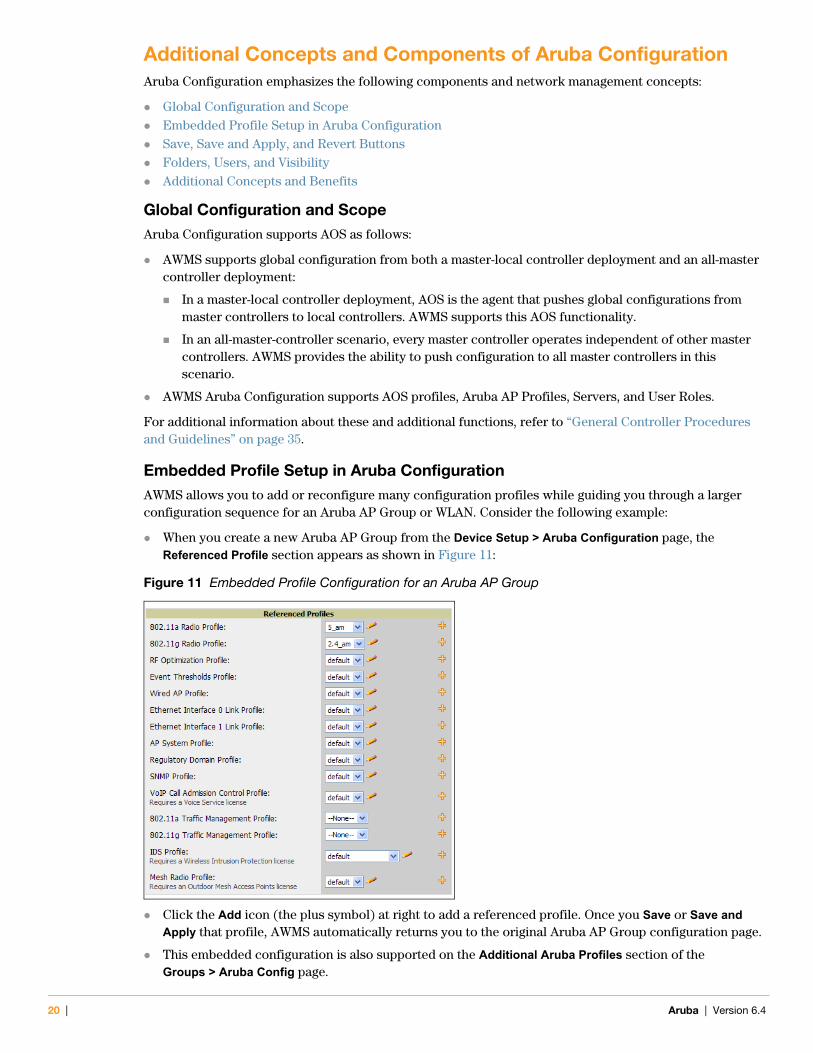
Embedded Profile Setup in Aruba ConfigurationAWMS allows you to add or reconfigure many configuration profiles while guiding you through a larger configuration sequence for an Aruba AP Group or WLAN. Consider the following example:
When you create a new Aruba AP Group from the Device Setup > Aruba Configuration page, the Referenced Profile section appears as shown in Figure 11:
Figure 11 Embedded Profile Configuration for an Aruba AP Group
Click the Add icon (the plus symbol) at right to add a referenced profile. Once you Save or Save and
Apply that profile, AWMS automatically returns you to the original Aruba AP Group configuration page.
This embedded configuration is also supported on the Additional Aruba Profiles section of the Groups > Aruba Config page.
20 | Aruba | Version 6.4

Save, Save and Apply, and Revert ButtonsSeveral Add or Detail pages in Aruba Configuration include the Save, Save and Apply, and Revert buttons. These buttons function as follows:
Save—This button saves a configuration but does not apply it, allowing you to return to complete or apply the configuration at a later time. If you use this button, you may see the following alert on other Aruba Configuration pages. You can apply the configuration when all changes are complete at a later time.
Figure 12 Unapplied Aruba Configuration Changes Message
Save and Apply —This button saves and applies the configuration with reference to Manage and Monitor modes. For example, you must click Save and Apply for a configuration profile to propagate to all devices immediately if the controller is in Manage mode. If you have devices in Monitor mode, AWMS compares the current device configuration with the new desired configuration. For additional information and instructions about using Manage and Monitor modes, refer to “Pushing Device Configurations to Controllers” on page 35.
Revert—This button cancels out of a new configuration or reverts back to the last saved configuration.
Folders, Users, and VisibilityAccess and edit folders and visibility using the Folder column on the Groups > Aruba Config page. Profiles and Aruba AP Groups are assigned to folders. Folders allow you to set the visibility for controller information, and to set read/write privileges as required.
As one example, it may be necessary to provide AWMS users with RF radio parameters while restricting access to SSID profiles.
Additional Concepts and Benefits
Scheduling Configuration Changes
You can schedule deployment of Aruba Configuration to minimize impact on network performance. For example, configuration changes can be accumulated over time by using Save and Apply for devices in Monitor mode, then pushing all configuration changes at one time by putting devices in Manage mode. Refer to “Pushing Device Configurations to Controllers” on page 35.
AWMS pushes configuration settings that are defined in the GUI to the Aruba Controllers as a set of CLI commands using Secure Shell (SSH). No controller reboot is required.
Auditing and Reviewing Configurations
AWMS supports auditing or reviewing in these ways.
1. You can review the AOS running configuration file. This is configuration information that AWMS reads from the device. In template-based configuration, you can review the running configuration file when working on a related template.
2. You can use the APs/Devices > Audit page for device-specific auditing.
3. Once you audit your controller, you can click Import from the APs/Devices > Audit page to reverse all of the profiles on the controller.
Licensing and Dependencies in Aruba Configuration
You can review your current licensing status with the Licensing link on the APs/Devices > Monitor page.
AWMS requires that you have PEF always installed on all Aruba controllers. If you push a policy to a controller without PEF, a Good configuration will not result, and the controller will show as Mismatched on AWMS pages that reflect device configuration status.
Aruba | Version 6.4 | 21

Aruba Configuration includes several settings or functions that are dependent on special licenses. The user interface conveys that a special license is required for any such setting, function, or profile. AWMS does not push such configurations when a license related to those configurations is unavailable.
The following licenses are required for additional functions, profiles, or settings in Aruba Configuration:
External Services Interface (ESI)
Indoor Mesh Access Points
Ortronics Access Points
Outdoor Mesh Access Points
Policy Enforcement Firewall
Remote Access Points
Voice Service Module
VPN Server Module
Wireless Intrusion Protection Module
xSec Module
Setting Up Initial Aruba ConfigurationThis section describes how to deploy an initial setup of Aruba Configuration in AWMS 6.3 or later versions.
Prerequisites
Complete the AWMS 6.4 upgrade from a prior AWMS version. Refer to “Related Documents” on page 7 for installation or upgrade documents. Upon upgrade to AWMS Version 6.3 or later, Aruba Configuration is enabled by default in groups with devices in monitor-only mode and AOS firmware of 3.3.2.10 or greater.
Back up your ArubaOS controller configuration file. Information about backing AWMS is available in the AWMS User Guide in the “Performing Daily Operations in AWMS” chapter.
Procedure
Perform the following steps to deploy Aruba Configuration when at least one Aruba AP Group currently exists on at least one Aruba controller on the network:
1. On the Groups > Basic page, enable device preferences for Aruba devices. Figure 13 illustrates this page.
This configuration defines optional group display options. This step is not critical to setup, and default settings will support groups appropriate for Aruba Configuration. One important setting on this page is the Aruba GUI Config option. Ensure that setting is Yes, which is the default setting.
22 | Aruba | Version 6.4

Figure 13 Groups > Basic Page Illustration (Partial Display)
2. Authorize Aruba controllers into the AMP Group.
3. Navigate to the AP/s/Devices > Audit page for the first controller to prepare for importing an existing Aruba controller configuration file. Figure 14 illustrates this page when all configurations are current. Much additional information is available if the device is mismatched.
Figure 14 APs/Devices > Audit Page Illustration
!CAUTION
When authorizing the first controller onto a group, you must add the device in monitor-only mode. Otherwise, AWMS removes the configuration of the controller before you have a chance to import the configuration, and this would remove critical network configuration and status.
N O T E
Aruba Configuration is enabled by default in AWMS.
Aruba | Version 6.4 | 23

4. Navigate to the APs/Devices > Manage page for this device. Import the Aruba controller settings from an Aruba Controller that has already been configured. Click Import and AWMS advises you with a confirmation page.
Importing this configuration creates all the Profiles and Aruba AP Groups on the Device Setup > Aruba
Configuration page. This action also adds and selects the Aruba AP Groups that appear on the Groups >
Aruba Config page.
The folder for all the Profiles and Aruba AP Groups is set to the top folder of the AWMS user who imports the configuration. This folder is Top in the case of managing administrators with read/write privileges.
5. After configuration file import is complete, navigate to the Device Setup > Aruba Configuration page.
This page displays a list of APs authorized on the AMP that are using the Aruba AP Group.
The User Role is the Aruba User Role used in firewall settings.
The Folder column cites the visibility level to devices in each Aruba AP Group. For additional information, refer to “Visibility in Aruba Configuration” on page 40.
6. Add or modify Aruba AP Groups as required.
a. Navigate to the Device Setup > Aruba Configuration > Aruba AP Groups page, illustrated in Figure 15.
Figure 15 Device Setup > Aruba Configuration > Aruba AP Groups Page
a. Click Add from the Aruba AP Groups page to create a new Aruba AP Group. To edit an Aruba AP Group, click the pencil icon next to the group. The Details page for the Aruba AP Group group appears. This page allows you to select the profiles to apply to the Aruba AP Group, and to select one or more WLANs that support that Aruba AP Group. Figure 16 illustrates this page.
24 | Aruba | Version 6.4

Figure 16 Device Setup > Aruba Configuration > Aruba AP Groups > Add/Edit Details Page
The following section of this configuration guide provide additional information about configuring Aruba AP Groups:
“General Aruba AP Groups Procedures and Guidelines” on page 30
7. Add or edit WLANs in Aruba Configuration as required.
a. Navigate to Device Setup > Aruba Configuration > WLANs page. This page can display all WLANs currently configured, or can display only selected WLANs.
b. Click Add to create a new WLAN, or click the pencil icon to edit an existing WLAN.
You can add or edit WLANs in one of two ways, as follows:
Basic—This display is essentially the same as the AOS Wizard View on the Aruba controller. This page does not require in-depth knowledge of the profiles that define the Aruba AP Group.
Advanced—This display allows you to select individual profiles that define the WLAN and associated Aruba AP Group. This page requires in-depth knowledge of all profiles and their respective settings.
The following section of this configuration guide provide additional information and illustrations for configuring WLANs:
“General WLAN Procedures and Guidelines” on page 32
8. Add or edit Aruba Configuration Profiles as required.
a. Navigate to Device Setup > Aruba Configuration > Profiles section of the navigation pane.
b. You must select the type of profile to configure: AAA, AP, IDS, Mesh, QoS, RF, or SSID.
c. Click Add from any of these specific profile pages to create a new profile, or click the pencil icon to edit an existing profile.
Aruba | Version 6.4 | 25
Most profiles in AWMS are similar to the All Profiles display in the Aruba Controller WebUI. The primary difference in AWMS is that AAA and SSID profiles are not listed under the Wireless LAN
column as the controller.
d. Save changes to each element as you proceed through profile and WLAN configuration.
All other settings supported on Aruba controllers can be defined on the Device Setup > Aruba
Configuration page. The following section in this document provides additional information about configuring profiles:
“General Profiles Guidelines” on page 34
9. Provision multiple Aruba AP Groups on one or more controllers by putting the controllers into an AMP group and configuring that group to use the selected Aruba AP Groups. Configure such Aruba AP Groups settings on the Group > Aruba Config page. The following section of this document provides additional information:
“General Aruba AP Groups Procedures and Guidelines” on page 30
10. As required, add or edit AP devices. The following section of this document has additional information:
“Supporting APs with Aruba Configuration” on page 36
11. Each AP can be assigned to a single Aruba AP Group. Make sure to choose an AP Group that has been configured on that controller using that controller's AMP Group. Use the APs/Devices > List, Modify
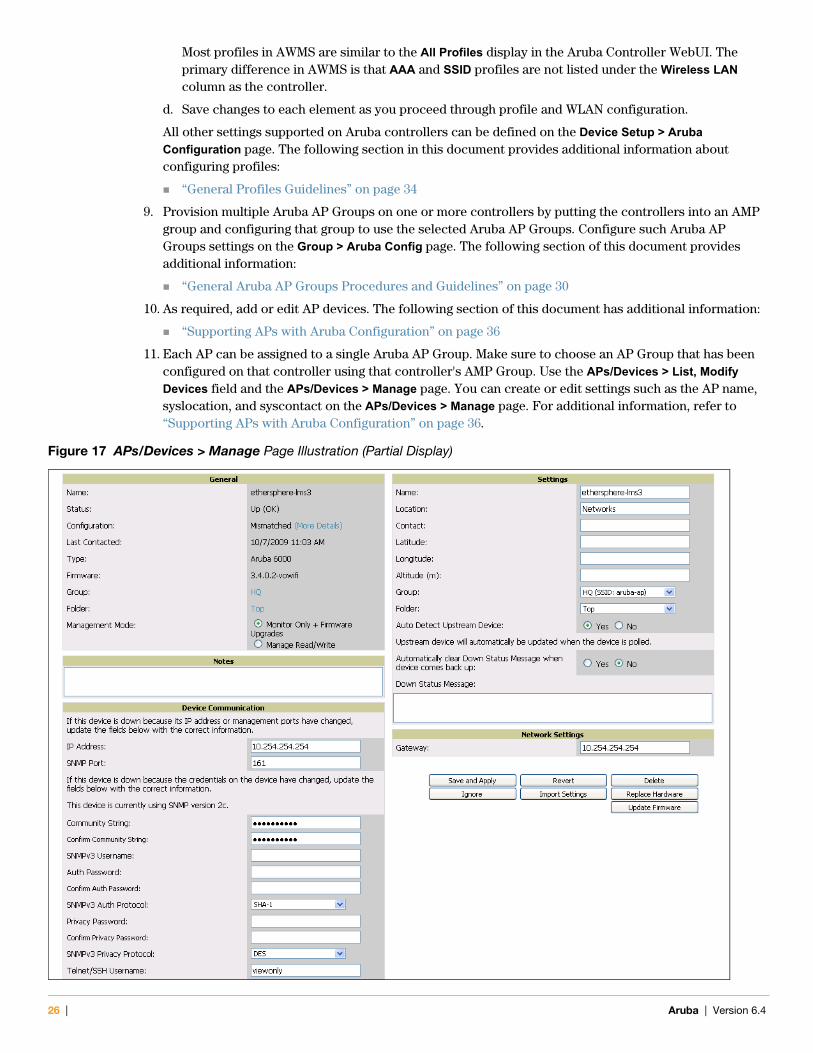
Devices field and the APs/Devices > Manage page. You can create or edit settings such as the AP name, syslocation, and syscontact on the APs/Devices > Manage page. For additional information, refer to “Supporting APs with Aruba Configuration” on page 36.
Figure 17 APs/Devices > Manage Page Illustration (Partial Display)
26 | Aruba | Version 6.4

12. Navigate to the APs/Devices > Audit page for the controller to view mismatched settings. This page provides links to display additional and current configurations. You can display all mismatched devices by navigating to the APs/Devices > Mismatched page.
Figure 18 APs/Devices > Audit Page Illustration (Partial Display)
Figure 19 APs/Devices > Mismatched Page Illustration
Aruba | Version 6.4 | 27

What Next?After initial AOS deployment with the Aruba Configuration feature, you can make many additional configurations or continue with maintenance tasks, such as with the following examples:
Once Aruba Configuration is deployed in AWMS, you can perform debugging with Telnet/SSH. Review the telnet_cmds file in the /var/log folder from the command line interface, or access this file from the System > Status page. Such configurations are supported on the Groups > Basic and Device Setup >
Communications pages of AWMS. Refer to the AWMS User Guide for additional information.
To resolve communication issues, review the credentials on the AP Manage page.
Mismatches can occur when importing profiles because AWMS deletes orphaned profiles, even if following a new import. To display and resolve mismatched devices, refer to “Pushing Device Configurations to Controllers” on page 35.
Use the Groups > Templates page to configure Aruba controllers that use 2.x firmware.
Additional Capabilities of Aruba ConfigurationAWMS supports many additional AOS configurations and settings. Refer to these additional resources for more information:
AOS User Guide
AWMS User Guide
AirWave and Aruba Best Practices Guide
28 | Aruba | Version 6.4

Aruba | Version 6.4
Chapter 2
Using Aruba Configuration in Daily Operations
IntroductionThis chapter presents the more common tasks or concepts after initial setup of Aruba Configuration is complete, as described in the section “Setting Up Initial Aruba Configuration” on page 22. This chapter emphasizes frequent procedures as follows:
General Aruba AP Groups Procedures and Guidelines
Guidelines and Pages for Aruba AP Groups in Aruba Configuration
Selecting Aruba Controller Groups
Configuring Aruba AP Groups
Retaining Unreferenced Aruba Configuration Profiles
General WLAN Procedures and Guidelines
Guidelines and Pages for WLANs in Aruba Configuration
Configuring or Editing WLANs with Basic View
Configuring or Editing WLANs with Advanced View
General Controller Procedures and Guidelines
Using Master, Standby Master, and Local Controllers in Aruba Configuration
Pushing Device Configurations to Controllers
Supporting APs with Aruba Configuration
AP Overrides Guidelines
Configuring or Editing AP Overrides
Changing the Aruba AP Group for an AP Device
Changing Adaptive Radio Management (ARM) Settings
Changing SSID and Encryption Settings
Visibility in Aruba Configuration
Visibility Overview
Defining Visibility for Aruba Configuration
Using AWMS to Deploy Aruba APs for the First Time
| 29

General Aruba AP Groups Procedures and Guidelines
Guidelines and Pages for Aruba AP Groups in Aruba ConfigurationThe following guidelines govern the configuration and use of Aruba AP Groups across AWMS:
Aruba AP Groups function with standard AWMS groups that contain them. Add Aruba AP Groups to standard AWMS groups. Additional procedures in this document explain their interoperability.
APs can belong to a controller's AWMS group or to an AWMS group by themselves.
All configurations of Aruba AP Groups must be pushed to Aruba controllers to become active on the network.
Additional dynamics between master, standby master, and local controllers still apply. In this case, refer to “Using Master, Standby Master, and Local Controllers in Aruba Configuration” on page 35.
The following pages in AWMS govern the configuration and use of Aruba AP Groups or standard device groups across AWMS:
The Device Setup > Aruba Configuration navigation pane displays standard AOS components and your custom-configured Aruba AP Groups, WLANs, and AP Overrides.
You define or modify Aruba AP Groups on the Device Setup > Aruba Configuration page. Click Aruba AP
Groups from the navigation pane.
You select Aruba AP Groups to associate with AMP (AWMS) Groups with the Groups > Aruba Config page.
You modify devices in Aruba AP Groups with the APs/Devices > List page, clicking Modify These Devices. This is the page at which you assign devices to a given group and Aruba AP Group.
Selecting Aruba Controller GroupsTo select Aruba AP Groups, navigate to the Device Setup > Aruba AP Groups page. This page is central to defining Aruba AP Groups, to viewing the AMP groups with which an Aruba AP Group is associated, changing or deleting Aruba AP Groups, and assigning AP devices to an Aruba AP Group.
Configuring Aruba AP GroupsPerform the following steps to display, add, edit, or delete Aruba AP Groups in Aruba Configuration.
1. Browse to the Device Setup > Aruba Configuration page, and click the AP Groups heading in the navigation pane on the left. The Groups Summary page appears and displays all current Aruba AP Groups.
Figure 20 Device Setup > Aruba Configuration > AP Groups Page Illustration
30 | Aruba | Version 6.4

2. To add a new group, click the Add AP Group button.
To edit an existing group, click the pencil icon next to the group name.
The Group Details page appears with current or default configurations. Figure 21 illustrates the Details page for a new group to be defined.
Figure 21 Device Setup > Aruba Configuration > Add/Edit Group Details Page Illustration
3. Click Add or Save to finish creating or editing the Aruba AP Group. Click Cancel to back out of this screen and to cancel the AP Group configurations.
4. New AP groups appear in the AP Groups section of the Aruba Configuration navigation pane, and clicking the group name takes you to the Details page for that group.
5. When this and other procedures are completed, push the configuration to the Aruba controllers by clicking Save and Apply. The principles of Monitor and Manage mode still apply. For additional information, refer to “Pushing Device Configurations to Controllers” on page 35.
What Next?
Once Aruba AP groups are defined, ensure that all desired WLANs are referenced in Aruba AP Groups, as required. Repeat the above procedure to revise WLANs as required. You can add or edit AP devices in Aruba AP Groups, and you can configure AP Override settings that allow for custom AP configuration within the larger group in which it operates.
Aruba | Version 6.4 | 31

Retaining Unreferenced Aruba Configuration ProfilesAWMS supports the ability to retain Aruba Configuration profiles even when they are not used. Perform these steps to define the retention of unused Aruba Configuration profiles.
1. Navigate to the AMP Setup > General page.
2. Locate the Configuration Options section and adjust settings as required. The settings in this field configure whether certain changes can be pushed to devices in monitor-only mode.
3. In the Configuration Options section, adjust the setting for the Keep Unreferenced Aruba Configuration
field as required.
This setting allows AWMS to retain unused ArubaOS configuration profiles pertaining to Aruba Configuration. With Aruba Configuration, you can define profiles on an Aruba controller but it is not necessary to reference them from a virtual AP configuration or other component of Aruba Configuration. Normally AWMS deletes unreferenced profiles, but this setting retains them when enabled with Yes.
4. Click Save to retain this setting.
General WLAN Procedures and Guidelines
Guidelines and Pages for WLANs in Aruba Configuration The Device Setup > Aruba Configuration navigation pane displays custom-configured WLANs and Aruba
AP Groups. You define or modify WLANs on the Device Setup > Aruba Configuration page. Click WLANs from the navigation pane.
You can create or edit any profile in an WLAN as you define or modify that WLAN. If you digress to profile setup from a different page, AWMS returns you to your place on the WLAN setup page once you are done with profile setup.
All configurations must be pushed to Aruba controllers to become active on the network.
Configuring or Editing WLANs with Basic ViewPerform the following steps to create or configure a basic WLAN in Aruba Configuration.
1. Navigate to the Aruba Configuration > WLANs page. This page displays currently configured WLANs. Figure 22 illustrates this page.
Figure 22 Device Setup > Aruba Configuration > WLANs Page Illustration
32 | Aruba | Version 6.4

2. To add a new WLAN, click the Add WLAN button. To edit an existing WLAN, click the pencil icon next to the WLAN name. Select Basic to define or modify the settings. Otherwise, refer to the “Configuring or Editing WLANs with Advanced View” on page 33 for additional information. Figure 26 illustrates the Basic view.
Figure 23 Device Setup > WLANs > Add > Basic Page Illustration
3. Click Add or Save. The added or edited WLAN appears on the WLANs page. You can now use this WLAN with one or more Aruba AP Groups.
4. Repeat this procedure or continue to additional procedures to complete WLAN, Profile, Aruba AP Group or other configurations.
5. Push the newly added or edited WLAN to the desired Aruba Controllers. Refer to “Pushing Device Configurations to Controllers” on page 35.
Configuring or Editing WLANs with Advanced View1. Navigate to the Aruba Configuration > WLANs page. This page displays currently configured WLANs.
Figure 22 illustrates this page.
2. To add a new WLAN, click the Add WLAN button. To edit an existing WLAN, click the pencil icon next to the WLAN name. Select Advanced to define or modify the settings that pertain to advanced WLAN configuration. Figure 24 illustrates the Advanced view.
Aruba | Version 6.4 | 33

Figure 24 Device Setup > Aruba Configuration > WLANs > Add > Advanced Page Illustration
3. Click Add or Save. The added or edited WLAN appears on the WLANs page. You can now use this WLAN with one or more Aruba AP Groups.
4. Repeat this procedure or continue to additional procedures to complete WLAN, Profile, Aruba AP Group or other configurations.
5. Push the newly added or edited WLAN to the desired Aruba Controllers. For additional information, refer to “Pushing Device Configurations to Controllers” on page 35.
General Profiles GuidelinesAOS elements can be added or edited after an AOS configuration file is imported to AWMS and pushed to controllers with the steps described in “Setting Up Initial Aruba Configuration” on page 22.
Profiles in Aruba configuration entail the following concepts or dynamics:
Profiles define nearly all parameters for Aruba AP Groups and WLANs, and Aruba Configuration supports many diverse profile types.
Some profiles provide the configurations for additional profiles that reference them. When this is the case, this document describes the interrelationship of such profiles to each other.
Profiles can be configured in standalone fashion using the procedures in this chapter, then applied elsewhere as desired. Otherwise, you can define referenced profiles as you progress through Aruba AP Group or WLAN setup. In the latter case, AWMS takes you to profile setup on separate pages, then returns you to your place in Aruba AP Group or WLAN setup.
34 | Aruba | Version 6.4

General Controller Procedures and Guidelines
Using Master, Standby Master, and Local Controllers in Aruba ConfigurationAWMS implements the following general approaches in relation to controllers.
Master Controller—This controller maintains and pushes all global configurations. AWMS pushes configurations only to a master controller.
Standby Controller—The master controller synchronizes with the standby master controller, which remains ready to govern global configurations for all controllers should the active master controller fail.
Local Controller—Master controllers push local configurations to local controllers. Local controllers retain settings such as the interfaces and global VLANs.
AWMS is aware of differences in what is pushed to master controllers and local controllers, and automatically pushes all configurations to the appropriate controllers. Thin AP provisioning is pushed to the controller to which a thin AP is connected.
You can determine additional details about what is specific to each controller by reviewing information on the Groups > Aruba Config page, and the Groups > Monitor page for any specific AP that lists its master and standby master controller.
Pushing Device Configurations to ControllersWhen you add or edit device configurations, you can push device configurations to controllers as follows:
Make device changes on the Device Setup > Aruba Configuration page and click Save and Apply.
Make devices changes on the Groups > Aruba Config page and click Save and Apply.
A device must be in Manage mode to push configurations in this way.
Normally, devices are in Monitor mode. It may be advisable in some circumstances to accumulate several configuration changes in Monitor mode prior to pushing an entire set of changes to controllers. Follow these general steps when implementing configuration changes for devices in Monitor mode:
1. Make all device changes using the Device Setup > Aruba Configuration page and the Groups > Aruba
Config page. Click Save and Apply as you complete device-level changes. This builds an inventory of pending configuration changes that have not been pushed to the controller and APs.
2. Review the entire set of newly mismatched devices on the APs/Devices > Mismatched page.
3. For each mismatched device, navigate to the APs/Devices > Audit page to audit recent configuration changes as desired.
4. Once all mismatched device configurations are verified to be correct from the APs/Devices > Audit page, use the Modify Devices link on the Groups > Monitor page to place these devices into Management mode. This instructs AWMS to push the device configurations to the controller.
5. As desired, return devices to Monitor mode until the next set of configuration changes is ready to push to controllers.
N O T E
If you click Save and Apply when a device is in Monitor mode, this initiates a verification process in which AWMS advises you of the latest mismatches. Mismatches are viewable from the APs/Devices > Mismatched page. Additional Audit and Group pages list mismatched status for devices.
Aruba | Version 6.4 | 35

Supporting APs with Aruba Configuration
AP Overrides GuidelinesThe AP Override component of Aruba Configuration appears in the navigation pane of the Device Setup >
Aruba Configuration page. This component operates with the following principles:
AP devices function within groups that define operational parameters for groups of APs. This is standard across all of AWMS.
AP Overrides allows you to change some parameters of any given AP without having to remove that AP from the configuration group in which it operates.
The name of any AP Override that you create should be the same as the name of the AP device to which it applies. This establishes the basis of all linking to that AP device.
Once you have created an AP Override, you select the WLANs in which it applies.
Once you have created the AP Override, you can go one step further with the Exclude WLANs option of AP Override, which allows you to exclude certain SSIDs from the AP override. For example, if you have a set of WLANs with several SSIDs available, the Exclude WLANs option allows you to specify which SSIDs to exclude from the AP Override.
You can also exclude mesh clusters from the AP Override.
In summary, the AP Override feature prevents you from having to create a new AP group for customized APs that otherwise share parameters with other APs in a group. AP Override allows you to have less total AP groups than you might otherwise require.
Configuring or Editing AP OverridesPerform the following steps to create or edit AP Overrides.
1. Navigate to the Aruba Configuration > AP Overrides page. This page displays currently configured AP overrides. Figure 25 illustrates this page.
Figure 25 Device Setup > Aruba Configuration > AP Overrides Page Illustration
2. To add a new AP Override, click the Add New AP Override button.
To edit an existing AP Override, click the pencil icon next to the AP Override name.
The details page appears. Figure 26 illustrates the AP Overrides detail view.
36 | Aruba | Version 6.4

Figure 26 AP Overrides Add or Edit Page Illustration (Non-scrolling View)
3. Click Add or Save. The added or edited AP Override appears on the AP Overrides page.
4. Push the newly added or edited AP Override configuration to the desired Aruba Controllers. Refer to “Pushing Device Configurations to Controllers” on page 35.
5. Repeat this procedure or continue to additional procedures to complete WLAN, Profile, Aruba AP Group or other configurations.
Changing Adaptive Radio Management (ARM) SettingsYou can adjust ARM settings for the radios of a particular Aruba AP Group. To do so, refer to the following topic that describe ARM in relation to Aruba AP groups and device-level radio settings:
“Configuring Aruba AP Groups” on page 30
Changing SSID and Encryption SettingsYou can adjust SSID and Encryption parameters for devices by adjusting the profiles that define these settings, then applying those profiles to Aruba AP Groups and WLANs that support them. To do so, refer to the following topics that describe relevant steps and configuration pages:
“Configuring Aruba AP Groups” on page 30
“Guidelines and Pages for WLANs in Aruba Configuration” on page 32
Changing the Aruba AP Group for an AP DeviceYou can change the Aruba AP Group to which an AP device is associated. Perform the following steps to change the Aruba AP Group for an AP device:
Aruba | Version 6.4 | 37

1. As required, review the Aruba AP Groups currently configured in AWMS. Navigate to the Device Setup >
Aruba Configuration page, and click Aruba AP Groups from the navigation pane. This page displays and allows editing for all Aruba AP Groups that are currently configured in AWMS.
2. Navigate to the APs/Devices > List page to view all devices currently seen by AWMS.
3. If necessary, add the device to AWMS using the APs/Devices > New page.
To discover additional devices, ensure that the controller is set to perform a thin AP poll period.
4. On the APs/Devices > List page, you can specify the Group and Folder to which a device belongs. Click Modify Devices to change more than one device, or click the Wrench icon associated with any specific device to make changes. The APs/Devices > Manage page appears.
5. In the Settings section of the APs/Devices > Manage page, select the new Aruba AP Group to assign to the device. Change or adjust any additional settings as desired.
6. Click Save and Apply to retain these settings and to propagate them throughout AWMS, or click one of the alternate buttons as follows for an alternative change:
Click Revert to cancel out of all changes on this page.
Click Delete to remove this device from AWMS.
Click Ignore to keep the device in AWMS but to ignore it.
Click Import Settings to define device settings from previously created configurations.
Click Replace Hardware to replace the AP device with a new AP device.
Click Update Firmware to update the Firmware that operates this device.
7. Push this configuration change to the AP controller that is to support this AP device. For additional information, refer to “Pushing Device Configurations to Controllers” on page 35.
Using AWMS to Deploy Aruba APs for the First TimeIn addition to migrating Aruba access points (APs) from AOS-oriented administration to AWMS administration, you can use AWMS to deploy Aruba APs for the first time without separate AOS configuration. Be aware of the following dynamics in this scenario:
AWMS can manage all wireless network management functions, to include:
the first-time provisioning of Aruba APs
managing Aruba controllers with AWMS
In this scenario, when a new Aruba AP boots up, AWMS may discover the AP before you have a chance to configure and launch it through AOS configuration on the Aruba controller. In this case, the AP appears in AWMS with a device name based on the MAC address.
When you provision the AP through the Aruba controller and then rename the AP, the new AP name is not updated in AWMS.
One possible workaround to update an Aruba AP device name in AWMS would be as follows, and this is not the most efficient approach:
1. Configure and deploy the AP from AOS (separate from AWMS).
2. Delete the AP from AWMS.
3. Have AWMS rediscover the device.
A more efficient and robust approach is to deploy Aruba APs in AWMS with the following steps:
1. Define communication settings for Aruba APs pending discovery. Use the Device Setup > Communication page. This assigns communication settings to multiple devices at the time of discovery, and prevents having to define such settings manually for each device after discovery.
2. Add or discover new Aruba APs with AWMS. You can do so with the following pages:
38 | Aruba | Version 6.4
Device Setup > Add
Device Setup > Discover
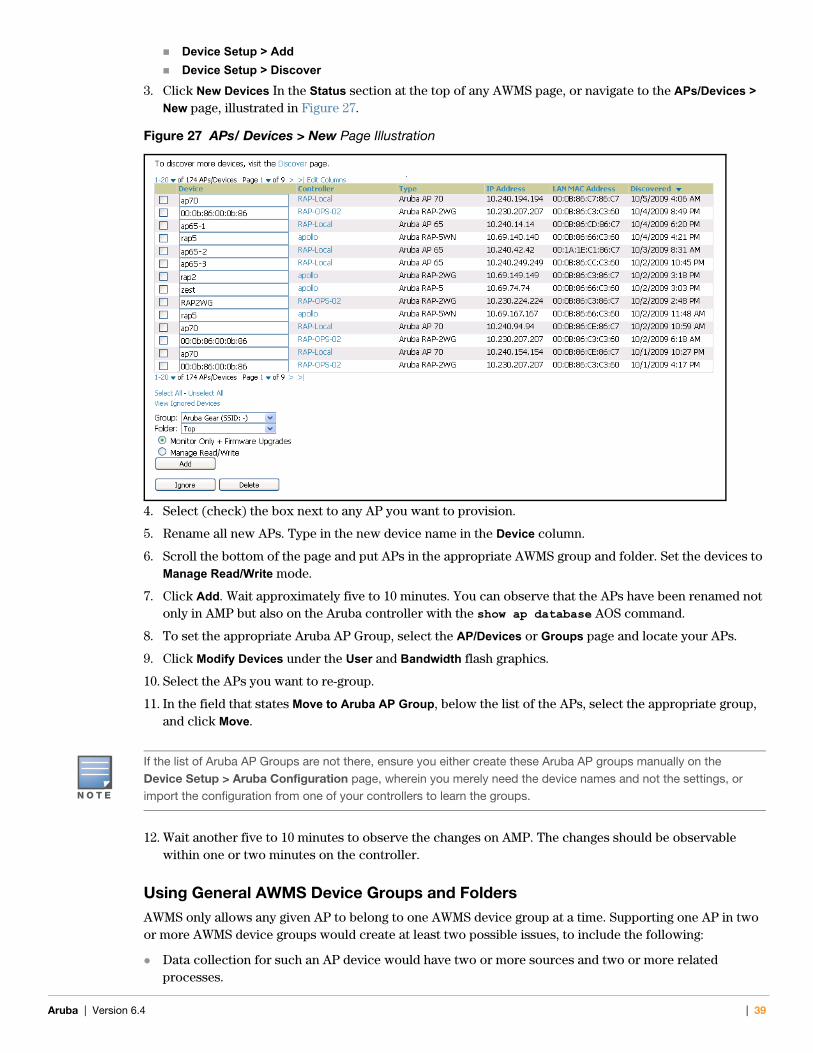
3. Click New Devices In the Status section at the top of any AWMS page, or navigate to the APs/Devices >
New page, illustrated in Figure 27.
Figure 27 APs/ Devices > New Page Illustration
4. Select (check) the box next to any AP you want to provision.
5. Rename all new APs. Type in the new device name in the Device column.
6. Scroll the bottom of the page and put APs in the appropriate AWMS group and folder. Set the devices to Manage Read/Write mode.
7. Click Add. Wait approximately five to 10 minutes. You can observe that the APs have been renamed not only in AMP but also on the Aruba controller with the show ap database AOS command.
8. To set the appropriate Aruba AP Group, select the AP/Devices or Groups page and locate your APs.
9. Click Modify Devices under the User and Bandwidth flash graphics.
10. Select the APs you want to re-group.
11. In the field that states Move to Aruba AP Group, below the list of the APs, select the appropriate group, and click Move.
12. Wait another five to 10 minutes to observe the changes on AMP. The changes should be observable within one or two minutes on the controller.
Using General AWMS Device Groups and FoldersAWMS only allows any given AP to belong to one AWMS device group at a time. Supporting one AP in two or more AWMS device groups would create at least two possible issues, to include the following:
Data collection for such an AP device would have two or more sources and two or more related processes.
N O T E
If the list of Aruba AP Groups are not there, ensure you either create these Aruba AP groups manually on the Device Setup > Aruba Configuration page, wherein you merely need the device names and not the settings, or import the configuration from one of your controllers to learn the groups.
Aruba | Version 6.4 | 39

A multi-group AP would be counted several times and that would change the value calculations for AWMS graphs.
As a result, some users may wish to evaluate how they deploy the group or folder for any given AP.
You can organize and manage any group of APs by type and by location. Use groups and folders with either of the following two approaches:
Organize AP device groups by device type, and device folders by device location.
In this setup, similar devices are in the same device group, and operate from a similar configuration or template. Once this is established, create and maintain device folders by location.
Organize AP device groups by location, and device folders by type.
In this setup, you can organize all devices according to location in the device groups, but for viewing, you organize the device hierarchy by folders and type.
Be aware of the following additional factors:
Configuration audits are done at the AWMS group level.
AWMS folders support multiple sublevels.
Therefore, unless there is a compelling reason to use the folders-by-device-type approach, AirWave generally recommends the first approach where you use groups for AP type and folders strictly for AP location.
Visibility in Aruba Configuration
Visibility OverviewAruba Configuration supports device configuration and user information in the following ways;
user roles
AP/Device access level
folders.
These and additional factors for visibility are as follows:
Administrative and Management users in AWMS can view the Device Setup > Aruba Configuration page and the APs/Devices > Aruba Config pages.
Administrative users are enabled to view all configurations.
Management users have access to all profiles and Aruba AP groups for their respective folders.
The Device Setup > Aruba Configuration page has a limit to folder drop-down options for customers that manage different accounts and different types of users.
Aruba Configuration entails specific user role and security profiles that define some components of visibility.
AWMS continues to support the standard operation of folders, users, and user roles as described in the AWMS User Guide.
Defining Visibility for Aruba ConfigurationPerform these steps to define or adjust visibility for users to manage and support Aruba Configuration:
1. As required, create a new AWMS device folder with management access.
N O T E
Aruba APs can also belong to Aruba AP Groups, but each AP is still limited to one general AWMS device group.
40 | Aruba | Version 6.4

a. Navigate to the APs/Device > List page, scroll to the bottom of the page. (An alternate page supporting new folders is Users > Connected page).
b. Click the Add New Folder link. The Folder detail page appears, as illustrated in Figure 28:
Figure 28 APs/Devices > Add New Folder > Folders Page Illustration
c. Click Add. The APs/Devices > List page reappears. You can view your new folder by selecting it from the Go to folder drop-down list at the top right of this page. Figure 29 illustrates an unpopulated device page for an example folder.
Figure 29 APs/Devices > List Page With No Devices
2. Add Aruba controller devices to that folder as required. Use the Device Setup > Add page following instructions available in the AWMS User Guide.
3. As required, create or edit a user role that is to have rights and manage privileges required to support their function in Aruba Configuration.
a. At least one user must have administrative privileges, but several additional users may be required, with less rights and visibility, to support Aruba Configuration without access to the most sensitive information, such as SSIDs or other security related data.
b. Navigate to the AMP Setup > Roles page, and click Add New Role to create a new role with appropriate rights, or click the pencil (manage) icon next to an existing role to adjust rights as required. The Role page appears, illustrated in Figure 30.
Aruba | Version 6.4 | 41

Figure 30 AMP Setup > Roles > Add/Edit Role Page Illustration
c. As per standard AWMS configuration, complete the settings on this page. The most important fields with regard to Aruba Configuration, device visibility and user rights are as follows:
Type—Specify the type of user. Important consideration should be given to whether the user is an administrative user with universal access, or an AP/Device manager to specialize in device administration, or additional users with differing rights and access.
AP/Device Access Level—Define the access level that this user is to have in support of Aruba controllers, devices, and general Aruba Configuration operations.
Top Folder—Specify the folder created earlier in this procedure, or specify the Top folder for an administrative user.
d. Click Add to complete the role creation, or click Save to retain changes to an existing role. The AMP
> Setup page now displays the new or revised role.
4. As required, add or edit one or more users to manage and support Aruba Configuration. This step creates or edits users to have rights appropriate to Aruba Configuration. This user inherits visibility to Aruba controllers and Aruba Configuration data based on the role and device folder created earlier in this procedure.
a. Navigate to the AMP Setup > Users page.
b. Click Add New User, or click the pencil (manage) icon next to an existing user to edit that user.
c. Select the user role created with the prior step, and complete the remainder of this page as per standard AWMS configuration. Refer to the AWMS User Guide, as required.
5. Observe visibility created or edited with this procedure.
The user, role, and device folder created with this procedure are now available to configure, manage, and support Aruba Configuration and associated devices according to the visibility defined in this procedure. Any component of this setup can be adjusted or revised by referring to the steps and AWMS pages in this procedure.
6. Add or discover devices for the device folder defined during step 1 of this procedure. Information about devices is available in the AWMS User Guide.
7. Continue to other elements of Aruba Configuration, described in this document. Early emphasis entails creation or editing of Aruba AP Groups and WLANs with which they are associated.
42 | Aruba | Version 6.4
Aruba | Version 6.4
Index
AAdaptive Radio Management (ARM) ..................... 37Advanced Services
defined ............................................................ 17AP Overrides
guidelines ........................................................ 36APs
deploying with AWMS for the first time ............ 38using in groups and folders ............................... 39
APs/Devices > List ............................................... 18APs/Devices > Manage ......................................... 19APs/Devices > Monitor ......................................... 19Aruba AP Groups
defined ............................................................ 14general procedures and guidelines ..................... 30
Aruba APs ............................................................ 38Aruba Configuration
Advanced Services ........................................... 17Aruba AP Groups ............................................14commences in AWMS 6.3 ................................ 11components of ................................................. 20Folders, Users, and Visibility ............................ 21initial setup ...................................................... 22initial setup procedure ...................................... 22navigating ....................................................... 13prerequisites .................................................... 22primary AWMS pages ...................................... 13Profiles ........................................................... 16requirements .................................................... 12restrictions ....................................................... 12Security ........................................................... 17WLANs .......................................................... 16
Ddevice groups
using with APs ................................................ 39Device Setup > Aruba Configuration ...................... 13
EEncryption ........................................................... 37
FFolders
defined ............................................................ 21folders
using with APs ................................................ 39G
groups
using with APs ................................................ 39Groups > Basic ..................................................... 19
PProfiles
defined ............................................................ 16embedded configuration ................................... 20
SSave, Save and Apply, and Revert buttons .............. 21Security
defined ............................................................ 17SSIDs .................................... 14, 16, 21, 25, 36, 37
UUsers ................................................................... 21
VVisibility .............................................................. 21
WWLANs
adding or editing ........................................ 32, 33defined ............................................................ 16
Index | 43

44 | Index Aruba | Version 6.4

Aruba | Version 6.4 Index | 45

Part Number 0510641-01
http://www.airwave.com
AirWave Wireless, Inc. 1344 Crossman Ave.Sunnyvale, CA 94089-1113Phone: (408) 227-4500Fax: (408) 227-4550
46 | Index Aruba | Version 6.4


![Aruba Networks 社 - NVC...1. AirWave にSSH もしくはコンソールからログインします。 2. Upgrade の[7]を入力し、Enter を押します。 AirWave Management Platform](https://img.pdfslide.us/doc/110x75/5f2441194928f47bdd6cfd45/aruba-networks-c-nvc-1-airwave-ssh-fffff.jpg)