Embed Size (px)
Citation preview
Artificial Floating Islands: Creating artificial ecosystems for habitat restoration
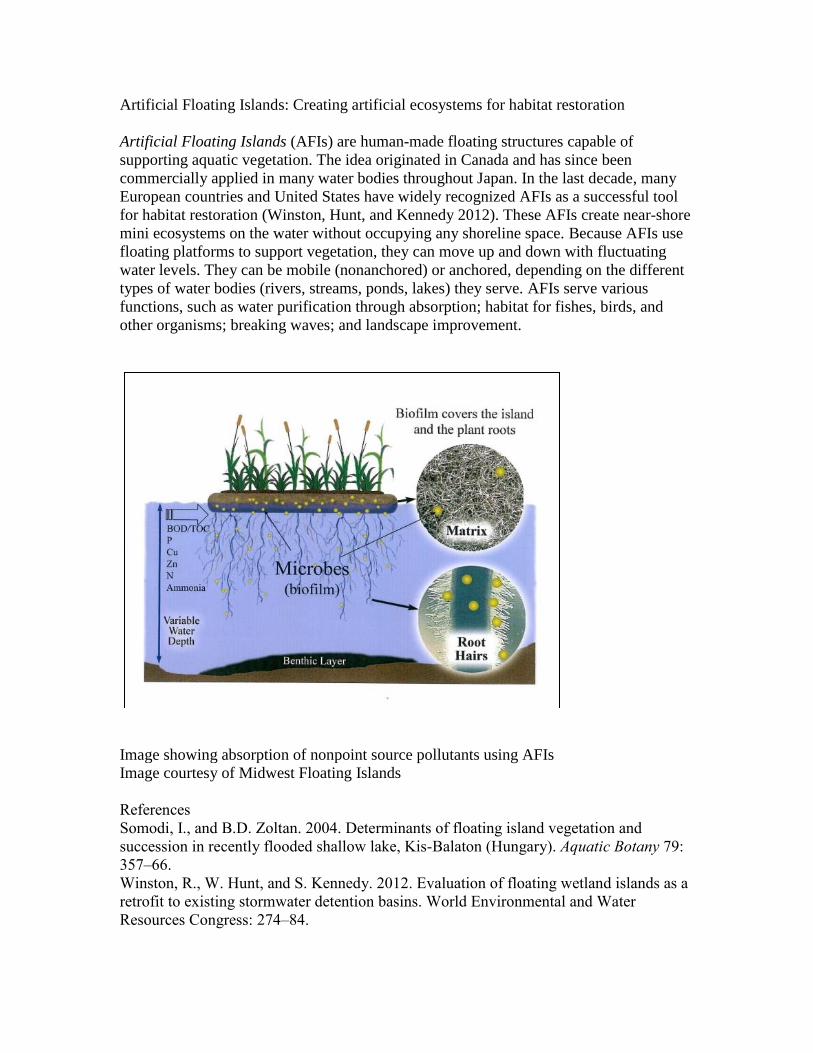
Artificial Floating Islands (AFIs) are human-made floating structures capable of
supporting aquatic vegetation. The idea originated in Canada and has since been
commercially applied in many water bodies throughout Japan. In the last decade, many
European countries and United States have widely recognized AFIs as a successful tool
for habitat restoration (Winston, Hunt, and Kennedy 2012). These AFIs create near-shore
mini ecosystems on the water without occupying any shoreline space. Because AFIs use
floating platforms to support vegetation, they can move up and down with fluctuating
water levels. They can be mobile (nonanchored) or anchored, depending on the different
types of water bodies (rivers, streams, ponds, lakes) they serve. AFIs serve various
functions, such as water purification through absorption; habitat for fishes, birds, and
other organisms; breaking waves; and landscape improvement.
Image showing absorption of nonpoint source pollutants using AFIs
Image courtesy of Midwest Floating Islands
References
Somodi, I., and B.D. Zoltan. 2004. Determinants of floating island vegetation and
succession in recently flooded shallow lake, Kis-Balaton (Hungary). Aquatic Botany 79:
357–66.
Winston, R., W. Hunt, and S. Kennedy. 2012. Evaluation of floating wetland islands as a
retrofit to existing stormwater detention basins. World Environmental and Water
Resources Congress: 274–84.
Resources
Artificial floating island (AFI) method—
www.pwri.go.jp/team/rrt/eng/img/report/contentnew2.pdf
Artificial islands mimic nature’s way of cleansing water—
http://ensia.com/articles/artificial-islands-mimic-natures-way-of-cleansing-water
Floating island will restore life to Minnesota’s Spring Lake—
http://inhabitat.com/floating-islands-will-restore-life-to-minnesotas-spring-lake
How to build a floating trash island—www.lowtechmagazine.com/how-to-build-a-
floating-trash-island.html
In Minnesota: Artificial islands made of recycled plastic bottles—
www.mnnature.org/minnesota-artificial-islands
Making a Styrofoam watershed—
www.iwla.org/index.php?ht=a/GetDocumentAction/i/2194
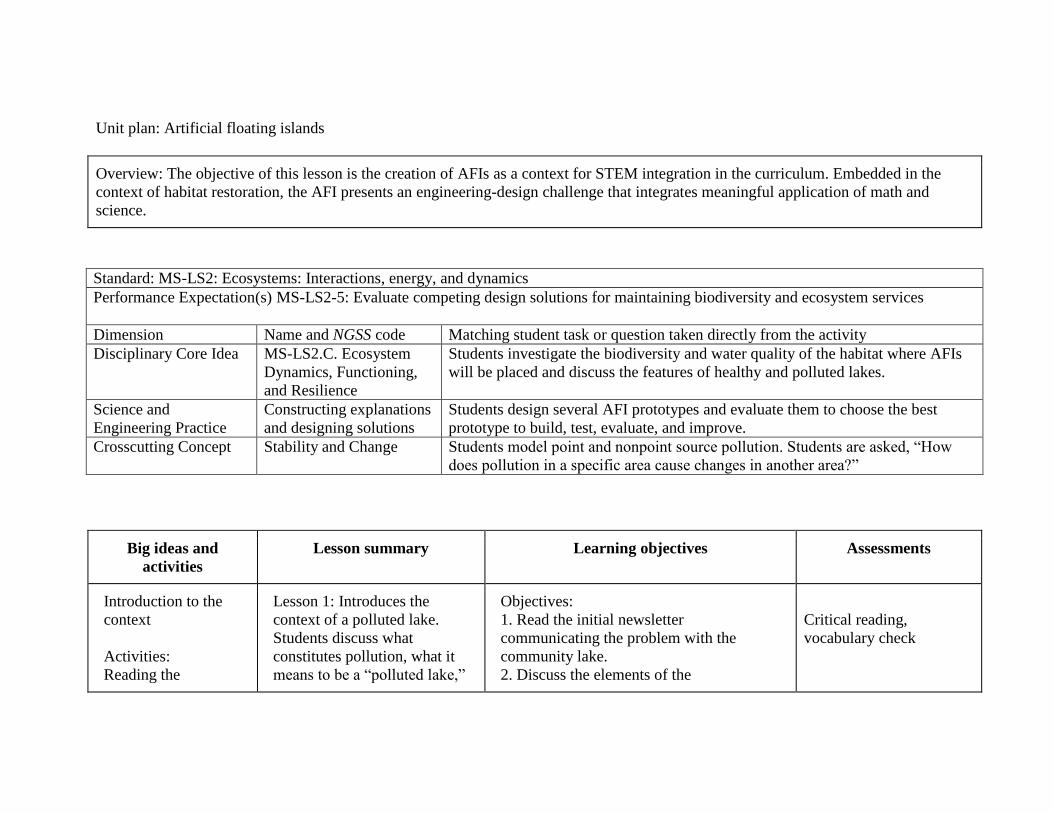
Unit plan: Artificial floating islands
Overview: The objective of this lesson is the creation of AFIs as a context for STEM integration in the curriculum. Embedded in the
context of habitat restoration, the AFI presents an engineering-design challenge that integrates meaningful application of math and
science.
Big ideas and
activities
Lesson summary Learning objectives Assessments
Introduction to the
context
Activities:
Reading the
Lesson 1: Introduces the
context of a polluted lake.
Students discuss what
constitutes pollution, what it
means to be a “polluted lake,”
Objectives:
1. Read the initial newsletter
communicating the problem with the
community lake.
2. Discuss the elements of the
Critical reading,
vocabulary check
Standard: MS-LS2: Ecosystems: Interactions, energy, and dynamics
Performance Expectation(s) MS-LS2-5: Evaluate competing design solutions for maintaining biodiversity and ecosystem services
Dimension Name and NGSS code Matching student task or question taken directly from the activity
Disciplinary Core Idea MS-LS2.C. Ecosystem
Dynamics, Functioning,
and Resilience
Students investigate the biodiversity and water quality of the habitat where AFIs
will be placed and discuss the features of healthy and polluted lakes.
Science and
Engineering Practice
Constructing explanations
and designing solutions
Students design several AFI prototypes and evaluate them to choose the best
prototype to build, test, evaluate, and improve.
Crosscutting Concept Stability and Change Students model point and nonpoint source pollution. Students are asked, “How
does pollution in a specific area cause changes in another area?”
newsletter what the potential sources of
water pollution could be
within the context provided.
communication. What is it saying about the
water system?
A lake
ecosystem/lake
ecology
Activities:
1. Testing water
quality: abiotic
factors (turbidity,
pH, temperature,
nitrogen,
phosphorus)
2. Testing water
quality: biotic factors
3. Habitat analysis
Lessons 2: Water quality.
Students explore the sources
of pollution and pollutants for
the lake system identified in
the context.
Objectives:
1. Explain why water quality is or is not
important for organisms that live at least part
of their lives in the water.
2. Use various water-quality parameters to
measure the water quality.
3. Illustrate how tolerance to water quality
conditions varies among macro invertebrate
organisms.
4. Explain how population diversity provides
insight into the health of an ecosystem.
5. Students will determine the habitat
characteristics of the lake for which they will
design the floating island.
Assessment of water
quality
Use of EnviroScape
model for point and
nonpoint source
pollution activity
Activities:
EnviroScape demo
Lesson 3: Students
demonstrate how everyone
contributes to the pollution of
a lake within a watershed and
recognize that through a
change in individual and
group practices and behavior,
a difference can be made.
Objectives:
1. Students will differentiate between point
and nonpoint source pollution.
2. Students will recognize that everyone
contributes to and is responsible for the
pollution of a lake’s water quality.
3. Identify best management practices to
reduce water pollution.
Have students express
their opinions about
individual contributions to
protect water quality.
Write a paragraph to
identify the sources of
water pollution.
Differentiate these
sources into point and
nonpoint sources.
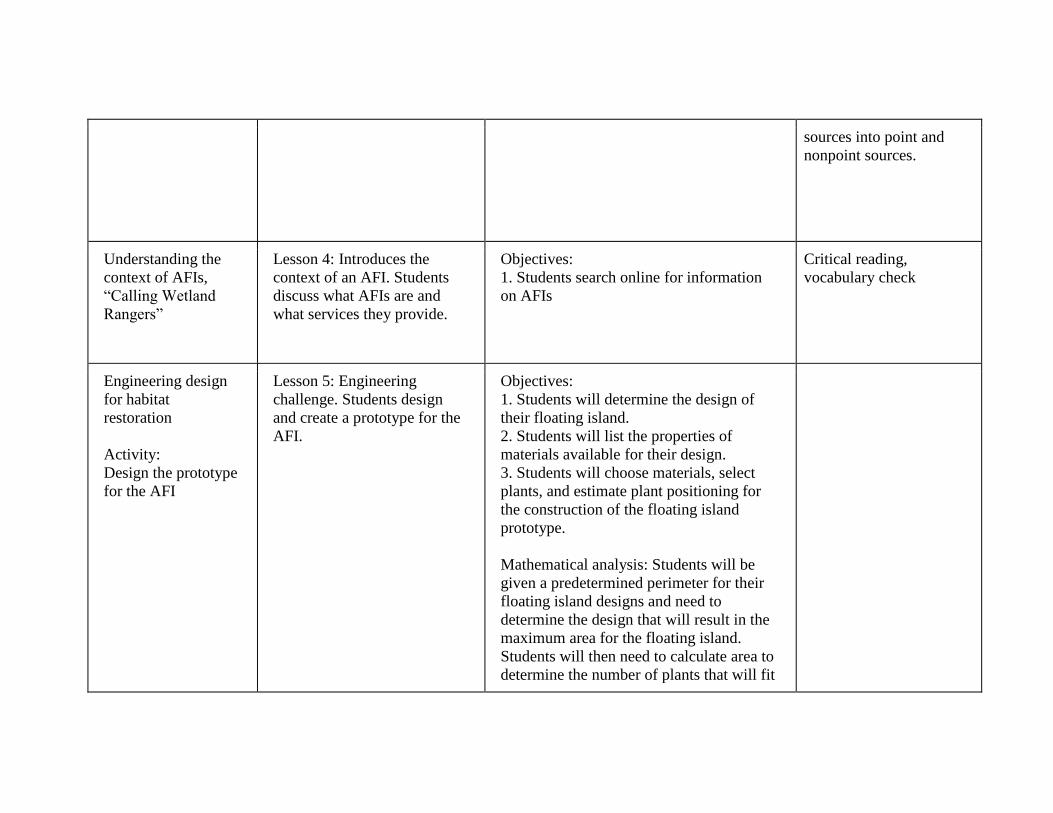
Understanding the
context of AFIs,
“Calling Wetland
Rangers”
Lesson 4: Introduces the
context of an AFI. Students
discuss what AFIs are and
what services they provide.
Objectives:
1. Students search online for information
on AFIs
Critical reading,
vocabulary check
Engineering design
for habitat
restoration
Activity:
Design the prototype
for the AFI
Lesson 5: Engineering
challenge. Students design
and create a prototype for the
AFI.
Objectives:
1. Students will determine the design of
their floating island.
2. Students will list the properties of
materials available for their design.
3. Students will choose materials, select
plants, and estimate plant positioning for
the construction of the floating island
prototype.
Mathematical analysis: Students will be
given a predetermined perimeter for their
floating island designs and need to
determine the design that will result in the
maximum area for the floating island.
Students will then need to calculate area to
determine the number of plants that will fit
on the floating island.
Lesson 1
Big question: What do we mean by “water pollution”?
Newsletter: Students read that swimming and fishing has been suspended at a nearby lake.
Introduced to the context of a polluted lake, students discuss what constitutes pollution, what it means to
be a “polluted lake,” and what the potential sources of water pollution could be within the context
provided.
Activity:
1. Read the initial newsletter communicating the problem with the community lake.
2. Discuss the elements of the communication. What is it saying about the water system?
3. Brainstorm the plan of action.
Lesson 2
Big question: What does water quality tell us about the health of a lake system?
Objectives: By the end of the activity, students will be able to:
1. Explain why water quality is or is not important to humans, as well as organisms that live at least
part of their lives in the water.
2. Explain how pH, dissolved oxygen, phosphorus, and nitrogen affect lake organisms and humans.
3. Make a prediction based on the data that the instructor provides regarding how the ecosystem
will change if the water quality is getting worse each year.
Introduction
Nitrogen (N) and phosphorus (P) pollution, also called nutrient pollution, is a common impairment of
lake water quality and is responsible for slimy green algae blooms that are a familiar sight on our lakes
in the summer. Excess algae growth damages drinking-water supplies, endangers the organisms that live
in lakes, and degrades the recreational and aesthetic values of lakes.
In this activity, students will examine the water samples from the identified lake to determine the
natural range of factors that indicate the health of water (see the table below for more details).
Water quality is determined by three major means:
• Chemical analysis “water quality” (pH, oxygen, carbon dioxide, nitrates, ammonia, phosphates)
• Biological indicators (invertebrates/fish change in response to the changing chemicals)
• Physical measurements of color, clarity, and conductivity of the water (Secchi disk, conductivity
meter)
Normal water quality changes are based on a number of factors:
• Water source (i.e. river, lake, well, swamp)
• As lakes age over geological time, they change from oligotrophic (low productivity) to eutrophic
(high productivity) with corresponding changes in the bio-indicators and chemicals
• Pollution sources
o Nutrients from sewage and agricultural sources
o Thermal pollution
o Stormwater runoff
• Natural cycles within the ecosystem (e.g., natural decomposition and decay)
Part A: Physical and chemical analysis
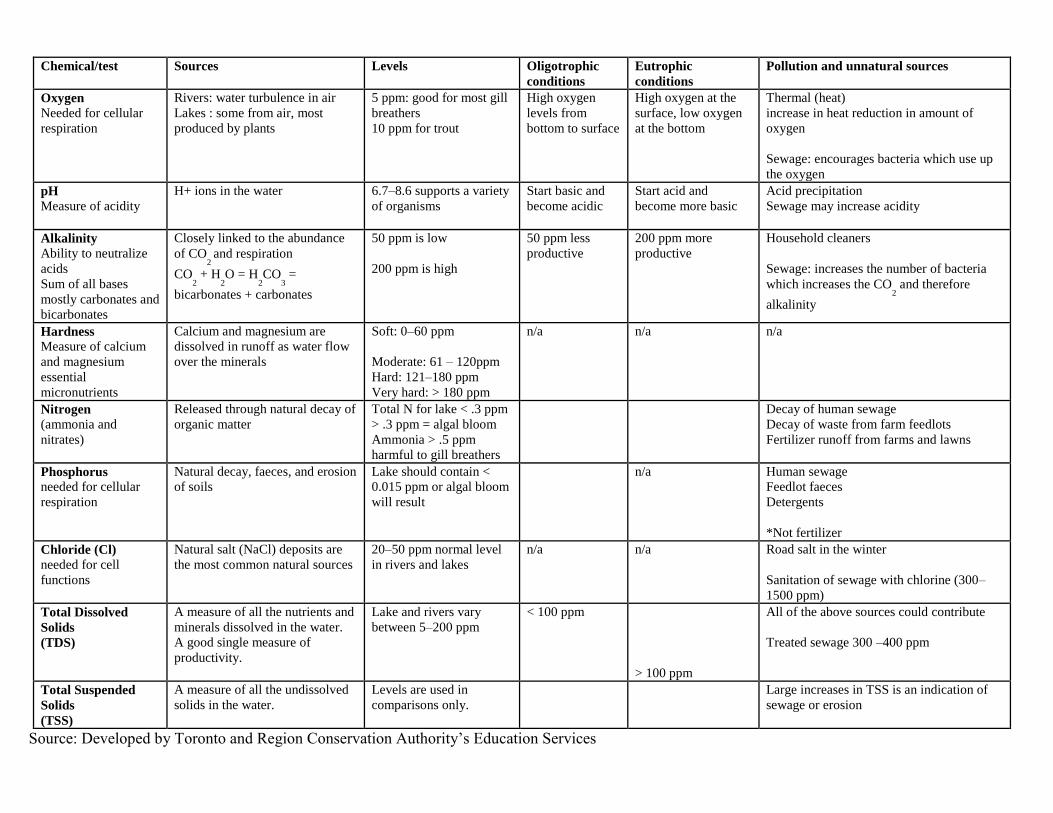
Chemical/test Sources Levels Oligotrophic
conditions
Eutrophic
conditions
Pollution and unnatural sources
Oxygen Needed for cellular
respiration
Rivers: water turbulence in air
Lakes : some from air, most
produced by plants
5 ppm: good for most gill
breathers
10 ppm for trout
High oxygen
levels from
bottom to surface
High oxygen at the
surface, low oxygen
at the bottom
Thermal (heat)
increase in heat reduction in amount of
oxygen
Sewage: encourages bacteria which use up
the oxygen
pH Measure of acidity
H+ ions in the water
6.7–8.6 supports a variety
of organisms
Start basic and
become acidic
Start acid and
become more basic
Acid precipitation
Sewage may increase acidity
Alkalinity Ability to neutralize
acids
Sum of all bases
mostly carbonates and
bicarbonates
Closely linked to the abundance
of CO2 and respiration
CO2 + H
2O = H
2CO
3 =
bicarbonates + carbonates
50 ppm is low
200 ppm is high
50 ppm less
productive
200 ppm more
productive
Household cleaners
Sewage: increases the number of bacteria
which increases the CO2 and therefore
alkalinity
Hardness Measure of calcium
and magnesium
essential
micronutrients
Calcium and magnesium are
dissolved in runoff as water flow
over the minerals
Soft: 0–60 ppm
Moderate: 61 – 120ppm
Hard: 121–180 ppm
Very hard: > 180 ppm
n/a n/a n/a
Nitrogen (ammonia and
nitrates)
Released through natural decay of
organic matter
Total N for lake < .3 ppm
> .3 ppm = algal bloom
Ammonia > .5 ppm
harmful to gill breathers
Decay of human sewage
Decay of waste from farm feedlots
Fertilizer runoff from farms and lawns
Phosphorus needed for cellular
respiration
Natural decay, faeces, and erosion
of soils
Lake should contain <
0.015 ppm or algal bloom
will result
n/a Human sewage
Feedlot faeces
Detergents
*Not fertilizer
Chloride (Cl) needed for cell
functions
Natural salt (NaCl) deposits are
the most common natural sources
20–50 ppm normal level
in rivers and lakes
n/a n/a Road salt in the winter
Sanitation of sewage with chlorine (300–
1500 ppm)
Total Dissolved
Solids
(TDS)
A measure of all the nutrients and
minerals dissolved in the water.
A good single measure of
productivity.
Lake and rivers vary
between 5–200 ppm
< 100 ppm
> 100 ppm
All of the above sources could contribute
Treated sewage 300 –400 ppm
Total Suspended
Solids
(TSS)
A measure of all the undissolved
solids in the water.
Levels are used in
comparisons only.
Large increases in TSS is an indication of
sewage or erosion
Source: Developed by Toronto and Region Conservation Authority’s Education Services
Water samples should be collected on the day of the study in sealable jars and kept
refrigerated until tested. Glass or clear plastic bottles with airtight lids are considered suitable for
the storage of water samples. Each sample bottle should be filled to the top with no air remaining
in the jar. Samples should be collected from the center of streams, if possible. Water collected
from the natural environment should be handled with care. The quality of the water is unknown
and it may contain contaminants. The surrounding land use should be recorded at each site as it
may have a direct effect on the water quality. It is not reasonable or economically feasible for all
students to do all chemical tests. To ensure consistency, teams of two or three students should test
each water sample using the same chemical test. These data can then be shared with the other
students. Some tests take up to 15 minutes to complete.
Debrief
Did any of the water samples have higher than acceptable levels? Is this normal (i.e., due to natural
processes or is there a potential water pollution problem?) What levels would change with an
increase in fertilizer use? What water quality variables would change if there was a sewage leak
into the stream or river? Did you detect any of these changes?
Materials
• Water-quality testing kits
• Tests for pH, oxide-reduction potential, dissolved solids content, and temperature
Safety issues
• Care must be taken when collecting the water sample (i.e., slippery surfaces, steep slopes, high or
fast water)
• Dispose of wastewater from the tests in an appropriate manner
• Careful handling of water test kits
Lesson 3
Students demonstrate how everyone contributes to the pollution of a lake within a watershed and
recognizes that through a change in individual and group practices and behavior, a difference can
be made.
Big question: How is each individual responsible for the water quality of a river or a lake?
Activities:
Use of EnviroScape model for student led demonstration of point and nonpoint source pollution.
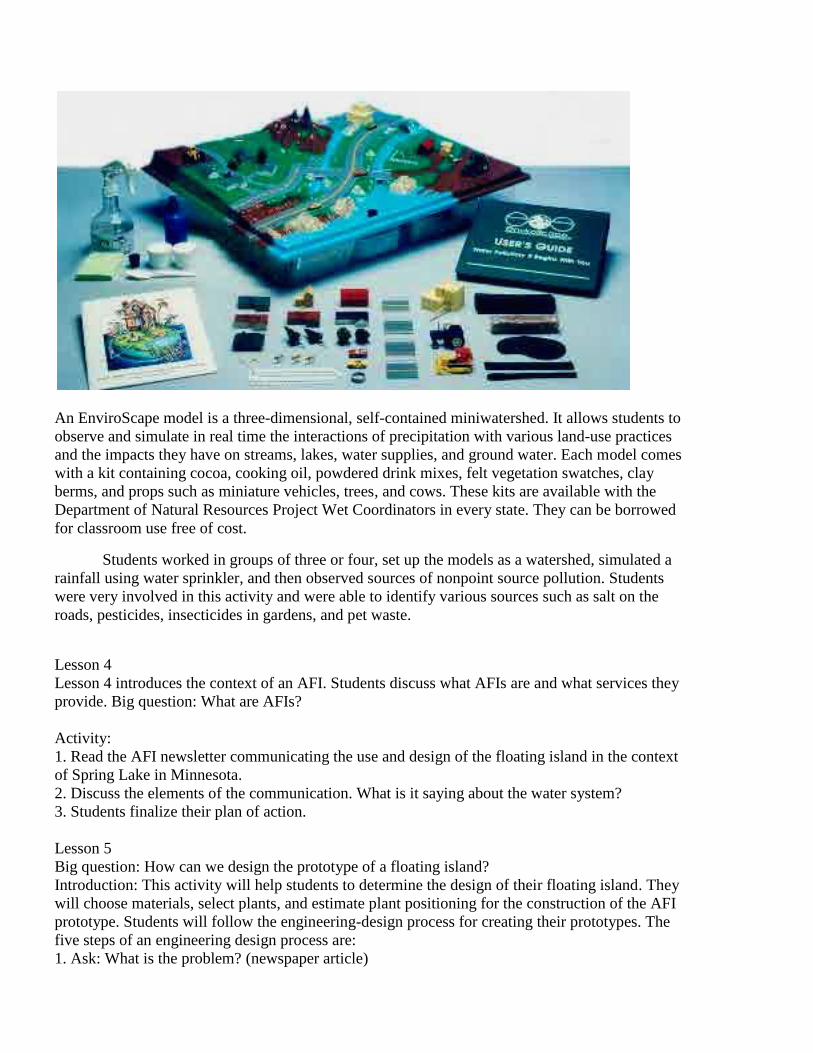
An EnviroScape model is a three-dimensional, self-contained miniwatershed. It allows students to
observe and simulate in real time the interactions of precipitation with various land-use practices
and the impacts they have on streams, lakes, water supplies, and ground water. Each model comes
with a kit containing cocoa, cooking oil, powdered drink mixes, felt vegetation swatches, clay
berms, and props such as miniature vehicles, trees, and cows. These kits are available with the
Department of Natural Resources Project Wet Coordinators in every state. They can be borrowed
for classroom use free of cost.
Students worked in groups of three or four, set up the models as a watershed, simulated a
rainfall using water sprinkler, and then observed sources of nonpoint source pollution. Students
were very involved in this activity and were able to identify various sources such as salt on the
roads, pesticides, insecticides in gardens, and pet waste.
Lesson 4
Lesson 4 introduces the context of an AFI. Students discuss what AFIs are and what services they
provide. Big question: What are AFIs?
Activity:
1. Read the AFI newsletter communicating the use and design of the floating island in the context
of Spring Lake in Minnesota.
2. Discuss the elements of the communication. What is it saying about the water system?
3. Students finalize their plan of action.
Lesson 5
Big question: How can we design the prototype of a floating island?
Introduction: This activity will help students to determine the design of their floating island. They
will choose materials, select plants, and estimate plant positioning for the construction of the AFI
prototype. Students will follow the engineering-design process for creating their prototypes. The
five steps of an engineering design process are:
1. Ask: What is the problem? (newspaper article)
2. What have others done? (reuse the floating island newsletter)
a. What are the constraints?
3. Imagine: What could be some solutions?
b. Brainstorm ideas.
c. Choose the best one.
4. Plan: Draw a diagram.
5. Make a list of the materials you need.
6. Create: Follow your plan and create it.
7. Test it out.
8. Improve: Make your design better and test it out.
Activity 1
Ask: Designing a floating island
Students write descriptive answers to the following questions, keeping in mind the givens:
Givens: The perimeter for the floating island must be 66 cm. Students will need to determine the
shape that would provide the most area for plant growth. Students record each shape on their
worksheet. Students will also need to consider the number of plants the floating island can hold
given that one plant can be planted every square inch.
1. What is the goal?
2. What criteria do we need to think about when designing the island?
3. What does a floating island need?
4. What materials are most important for our design?
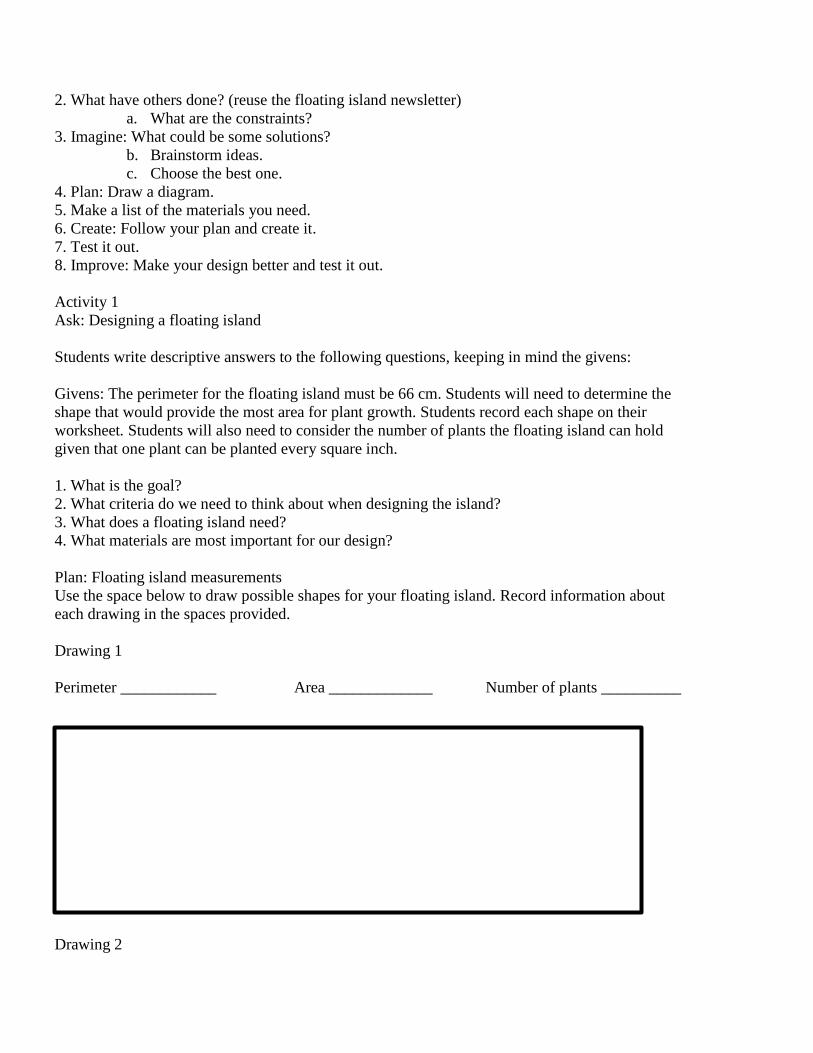
Plan: Floating island measurements
Use the space below to draw possible shapes for your floating island. Record information about
each drawing in the spaces provided.
Drawing 1
Perimeter ____________ Area _____________ Number of plants __________
Drawing 2
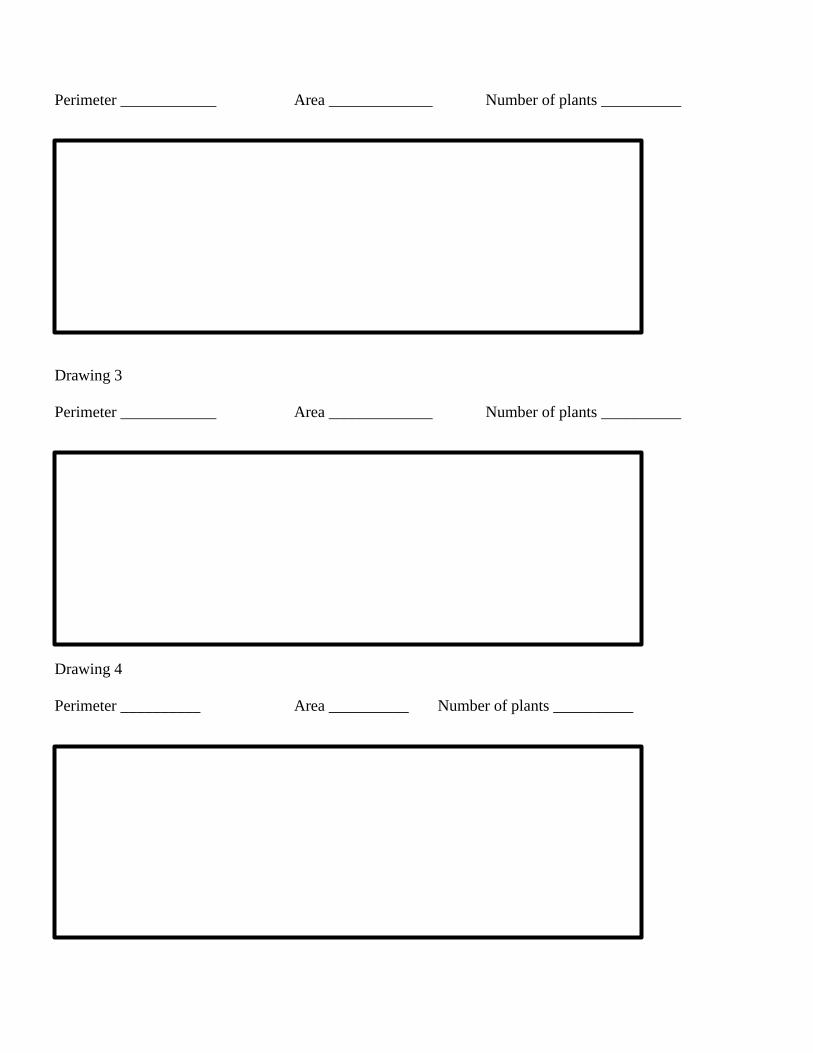
Perimeter ____________ Area _____________ Number of plants __________
Drawing 3
Perimeter ____________ Area _____________ Number of plants __________
Drawing 4
Perimeter __________ Area __________ Number of plants __________
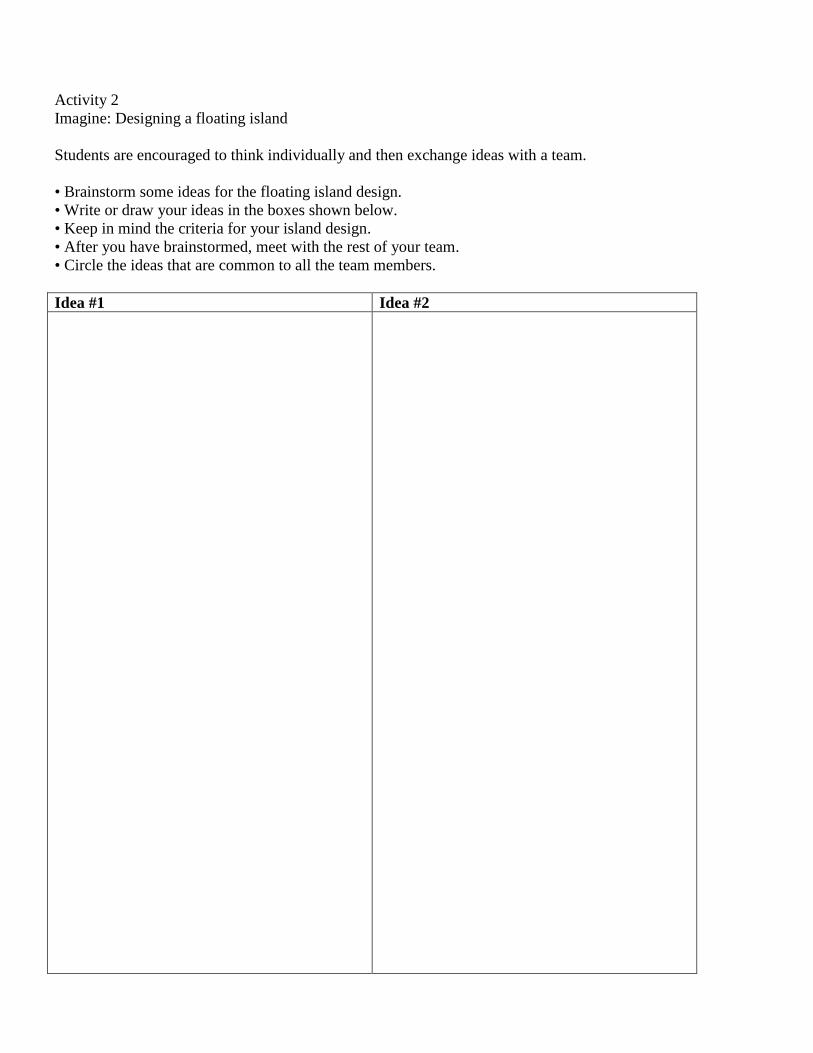
Activity 2
Imagine: Designing a floating island
Students are encouraged to think individually and then exchange ideas with a team.
• Brainstorm some ideas for the floating island design.
• Write or draw your ideas in the boxes shown below.
• Keep in mind the criteria for your island design.
• After you have brainstormed, meet with the rest of your team.
• Circle the ideas that are common to all the team members.
Idea #1 Idea #2
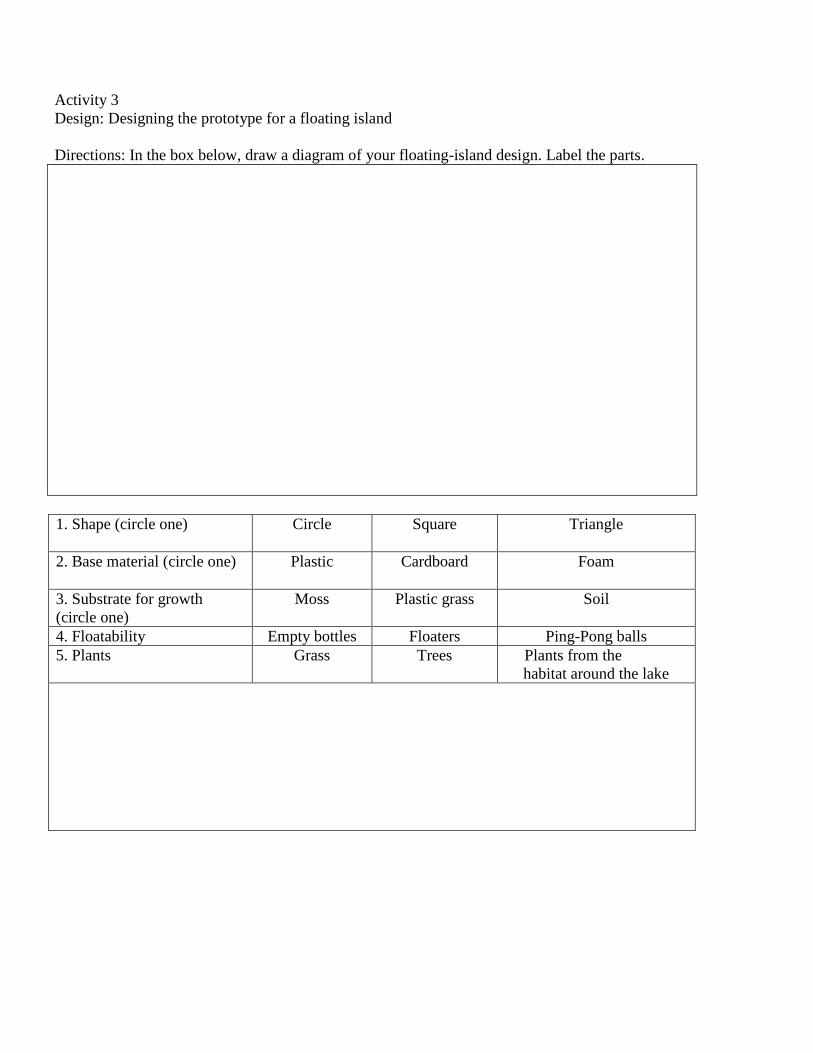
Activity 3
Design: Designing the prototype for a floating island
Directions: In the box below, draw a diagram of your floating-island design. Label the parts.
1. Shape (circle one) Circle Square Triangle
2. Base material (circle one) Plastic
Cardboard Foam
3. Substrate for growth
(circle one)
Moss Plastic grass Soil
4. Floatability Empty bottles Floaters Ping-Pong balls
5. Plants Grass Trees Plants from the
habitat around the lake
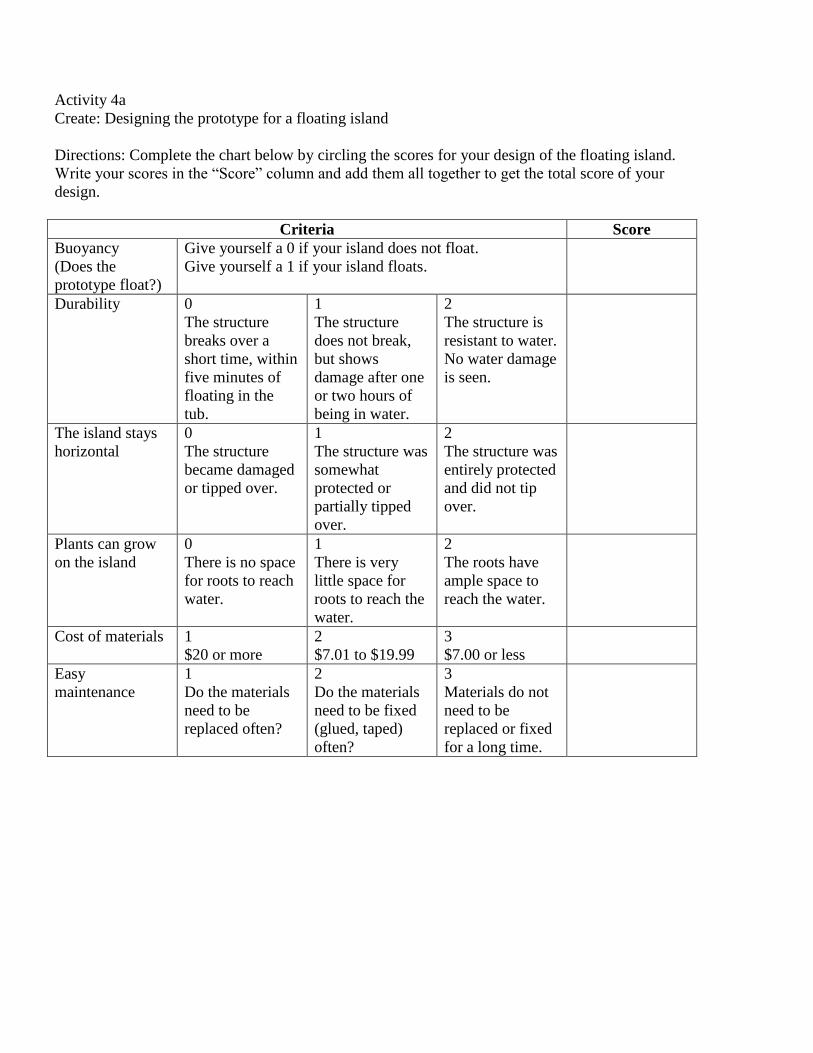
Activity 4a
Create: Designing the prototype for a floating island
Directions: Complete the chart below by circling the scores for your design of the floating island.
Write your scores in the “Score” column and add them all together to get the total score of your
design.
Criteria Score
Buoyancy
(Does the
prototype float?)
Give yourself a 0 if your island does not float.
Give yourself a 1 if your island floats.
Durability 0
The structure
breaks over a
short time, within
five minutes of
floating in the
tub.
1
The structure
does not break,
but shows
damage after one
or two hours of
being in water.
2
The structure is
resistant to water.
No water damage
is seen.
The island stays
horizontal
0
The structure
became damaged
or tipped over.
1
The structure was
somewhat
protected or
partially tipped
over.
2
The structure was
entirely protected
and did not tip
over.
Plants can grow
on the island
0
There is no space
for roots to reach
water.
1
There is very
little space for
roots to reach the
water.
2
The roots have
ample space to
reach the water.
Cost of materials
1
$20 or more
2
$7.01 to $19.99
3
$7.00 or less
Easy
maintenance
1
Do the materials
need to be
replaced often?
2
Do the materials
need to be fixed
(glued, taped)
often?
3
Materials do not
need to be
replaced or fixed
for a long time.
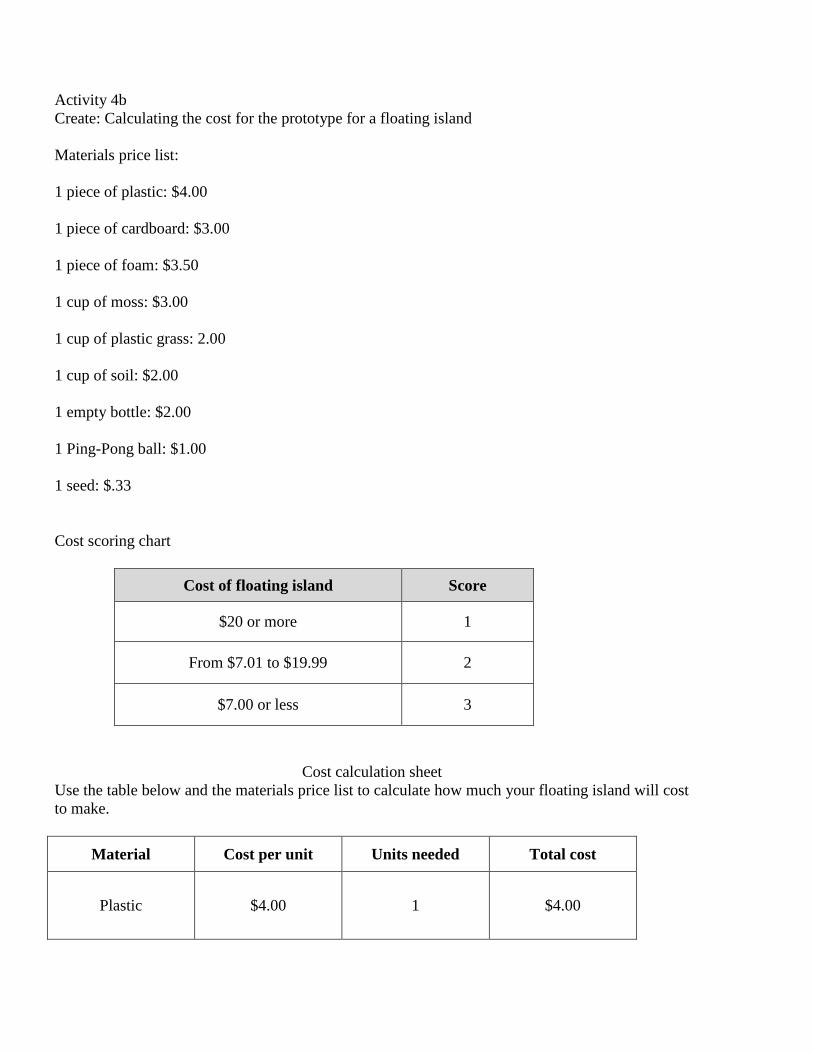
Activity 4b
Create: Calculating the cost for the prototype for a floating island
Materials price list:
1 piece of plastic: $4.00
1 piece of cardboard: $3.00
1 piece of foam: $3.50
1 cup of moss: $3.00
1 cup of plastic grass: 2.00
1 cup of soil: $2.00
1 empty bottle: $2.00
1 Ping-Pong ball: $1.00
1 seed: $.33
Cost scoring chart
Cost of floating island Score
$20 or more 1
From $7.01 to $19.99 2
$7.00 or less 3
Cost calculation sheet
Use the table below and the materials price list to calculate how much your floating island will cost
to make.
Material Cost per unit Units needed Total cost
Plastic $4.00 1 $4.00
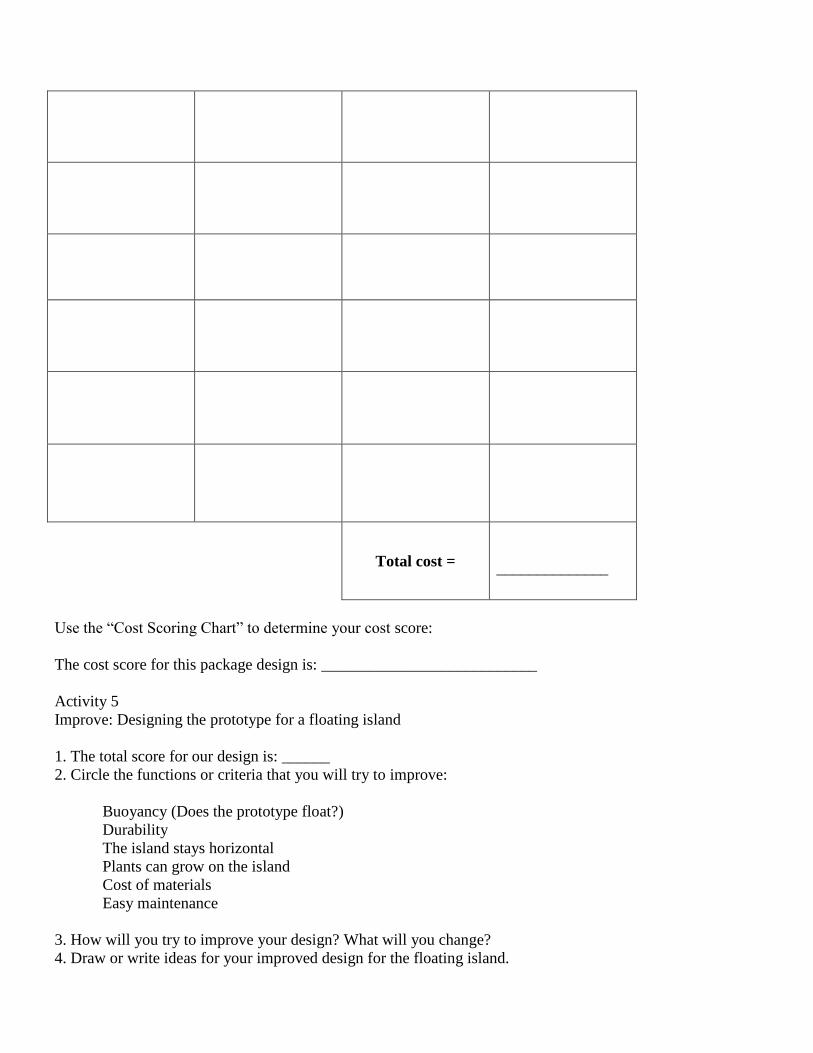
Total cost =
______________
Use the “Cost Scoring Chart” to determine your cost score:
The cost score for this package design is: ___________________________
Activity 5
Improve: Designing the prototype for a floating island
1. The total score for our design is: ______
2. Circle the functions or criteria that you will try to improve:
Buoyancy (Does the prototype float?)
Durability
The island stays horizontal
Plants can grow on the island
Cost of materials
Easy maintenance
3. How will you try to improve your design? What will you change?
4. Draw or write ideas for your improved design for the floating island.