Embed Size (px)
Citation preview

Arsen Hayrapetyan Martin Vala A. I. Alikhanyan National Scientific Laboratory, Yerevan,
Armenia; European Organisation for Nuclear Research (CERN)
Institute of Experimental Physics, Slovak Academy of Sciences;
European Organisation for Nuclear Research (CERN)

Outline
Introduction to ROOT
ROOT hands-on exercises
Introduction to PROOF
PROOF hands-on exercises
GridKa School 2011, ROOT/PROOF tutorial

What is ROOT?
Object-oriented data handling and analysis framework Framework: ROOT provides building blocks (root classes)
to use in your program. Data handling: ROOT has classes designed specifically for
storing large amount of data (GB, TB, PB) to enable effective…
Analysis: ROOT has complete collection of statistical, graphical, networking and other classes that user can use in their analysis.
Object-oriented: ROOT is based on OO programming paradigm and is written in C++.
GridKa School 2011, ROOT/PROOF tutorial

Who is developing ROOT?
ROOT is an open source project started in 1995 by René Brun and Fons Rademakers.
The project is developed as a collaboration between: Full time developers: 7 developers at CERN (PH/SFT) 2 developers at Fermilab (US)
Large number of part-time contributors (160 in CREDITS file included in ROOT software package)
A vast army of users giving feedback, comments, bug fixes and many small contributions ~5,500 users registered to RootTalk forum ~10,000 posts per year
GridKa School 2011, ROOT/PROOF tutorial

Who is using ROOT?
All High Energy Physics experiments in the world
Astronomy: AstroROOT (http://www.isdc.unige.ch/astroroot/index)
Biology: xps package for Bioconductor project
(http://prs.ism.ac.jp/bioc/2.7/bioc/html/xps.html)
Telecom: Regional Internet Registry for Europe, RIPE (Réseaux IP Européens) NCC Network Coordination Centre
(http://www.ripe.net/data-tools/stats/ttm/current-hosts/analyzing-test-box-data)
Medical fraud detection, Finance, Insurance, etc.
ROOT is used in a many scientific fields as well as in industry.
GridKa School 2011, ROOT/PROOF tutorial

What can I do with ROOT?
You can: Store large amount of data (GB, TB, PB) in ROOT-
provided containers: files, trees, tuples. Visualise the data in one of numerous ways
provided by ROOT: histograms (1, 2 and 3-dimensional), graphs, plots, etc.
Use physics analysis tools: physics vectors, fitting, etc.
Write your own C++ code to process the data stored in ROOT containers.
GridKa School 2011, ROOT/PROOF tutorial

ROOT features: Data containers ROOT provides different types of data containers: Files, folders Trees, Chains, etc.
GridKa School 2011, ROOT/PROOF tutorial

ROOT features: Data visualisation ROOT provides a range of data visualisation methods:
histograms (one- and multi-dimensional), graphs, plots (scatter, surface, lego, …)
GridKa School 2011, ROOT/PROOF tutorial

ROOT features: GUI
The Graphical User Interface (CLI) allows you to manipulate graphical objects (histograms, canvases, graphs, axes, plots, …) clicking on buttons and typing values in text boxes.
GridKa School 2011, ROOT/PROOF tutorial

ROOT features: CLI
The Command Line Interface (CLI) allows you to type in the commands (C++, root-specific, OS shell) and processes them interactively via CINT – C++ interpreter.
GridKa School 2011, ROOT/PROOF tutorial

More information on ROOT http://root.cern.ch Download binaries, source
Documentation User’s guide
Tutorials
FAQ
Mailing list
Forum
GridKa School 2011, ROOT/PROOF tutorial

ROOT Tutorial
GridKa School 2011, ROOT/PROOF tutorial

In this tutorial you will learn how to…
Use CLI and GUI Create functions and histograms Visualise (draw) them
Create and explore files Create and explore trees Create chains Analyse data contained in trees and chains on your
machine
GridKa School 2011, ROOT/PROOF tutorial

Preparations for the tutorial
Connect to your UI login server Attention! Use –Y option for SSH: e.g. ssh –Y –p 24 [email protected]
Connect to one of machines gks-1-NNN.fzk.de e.g. ssh –Y [email protected] We will tell you the number of machine you should connect to Verify that you have connected to proper machine running “hostname –f”
Run the following command: source /opt/PEAC/sw/sl-x86_64-4.1.2/VO_PEAC/ROOT/v5-30-01/peac-env.sh It will set system paths to include ROOT binary and the libraries
Start root: root
You should see ROOT start screen with logo and the ROOT version: 5-30-01
GridKa School 2011, ROOT/PROOF tutorial
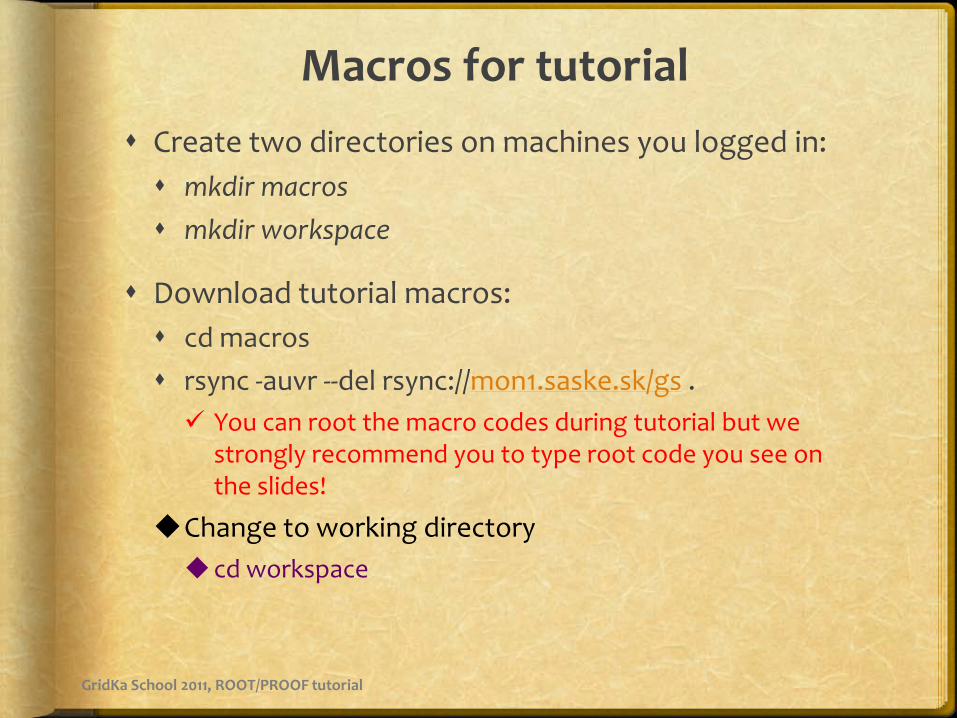
Macros for tutorial Create two directories on machines you logged in: mkdir macros mkdir workspace
Download tutorial macros: cd macros rsync -auvr --del rsync://mon1.saske.sk/gs . You can root the macro codes during tutorial but we
strongly recommend you to type root code you see on the slides!
Change to working directory cd workspace
GridKa School 2011, ROOT/PROOF tutorial

Ex. 1: Entering and quitting CLI To enter ROOT CLI, type the following
command on the Linux shell: root You are provided with ROOT prompt, indicated by root [N] (N is
the number of commands processed so far by root since starting it) where you can type in C++ statements, arithmetical expressions, and even Linux shell commands.
To quit the CLI, type the following command: .q
To avoid opening the graphical screen with ROOT logo in the beginning supply ‘-l’ option: • root -l
GridKa School 2011, ROOT/PROOF tutorial

Ex. 2: Simple commands
You can use ROOT CLI for mathematical calculations: root [] sin(0.5) * cos(0.5) + 3/4 root [] sin(0.5) * cos(0.5) +3/4;
C++ code snippet: root [] for (i=1; i<3; ++i) cout << "Hi there!\n";
Linux shell commands should be preceded .!: root [] .! date
GridKa School 2011, ROOT/PROOF tutorial

Ex. 3: Drawing Graphs Let’s plot a graph of a simple one-dimensional
function, f(x)=2*sin(x)-6. ROOT has a predefined class for one-dimensional functions:
TF1. We will use it to create an object of that class and draw it.
root [] TF1 f1(“1DFunc”, “2*sin(x)-6”, -9, 9); root [] f1.Draw();
ROOT has classes for two- and three-dimensional functions,
TF2 and TF3, respectively. All ROOT classes start with ‘T’: TF1, TH1F, TCanvas, TTree, … Macro: root/ex3.C
GridKa School 2011, ROOT/PROOF tutorial

Macros ROOT macro is a file containing source code which can
be interpreted by CINT. Macros can be unnamed or named. Unnamed macro contains the code enclosed in and . You can run it using .x command on the ROOT prompt: root [] .x mymacro.C
Named macro contains the code within a function having the same name as the macro file, without extension. You can run it using .L command to load it and then typing the
name of the function: root [] .L mymacro.C root [] mymacro
TF1* f1 = new TF1("1DFunc", "2*sin(x)-6", -9,9); TCanvas* c1 = new TCanvas("c1", "c1", 0, 0, 800, 600); f1->Draw(); Macro: root/unnamed_macro.C
void mymacro() TF1* f1 = new TF1("1DFunc", "2*sin(x)-6", -9,9); TCanvas* c1 = new TCanvas("c1", "c1", 0, 0, 800, 600); f1->Draw(); Macro: root/named_macro.C
GridKa School 2011, ROOT/PROOF tutorial

Ex. 4: Histograms ROOT has classes for one, two and three dimensional histograms. We will use
one of them: TH1F – one dimensional histograms with float numbers. Open an editor and type in the following lines. Save the file to create unnamed macro gui1.C.
Open a text editor and type in the following lines.
Give file the name hist1.C and save it.
Run the macro:
root [] .x hist1.C
TH1F* h1 = new TH1F("SampleHist1", "1-D Histogram", 20, -2, 2); h1->FillRandom("gaus", 1000000); TCanvas c1("SampleCanvas", "Sample Canvas", 0, 0, 800, 600); h1->Draw(); Macro: root/ex4.C
GridKa School 2011, ROOT/PROOF tutorial

Ex. 5: GUI
You can manipulate ROOT objects using GUI. As an exercise let us change the line thickness, add some colour and draw grid lines to the histogram we have just created. Draw the histogram using macro hist1.C. In the histogram window select View->Editor.
GridKa School 2011, ROOT/PROOF tutorial
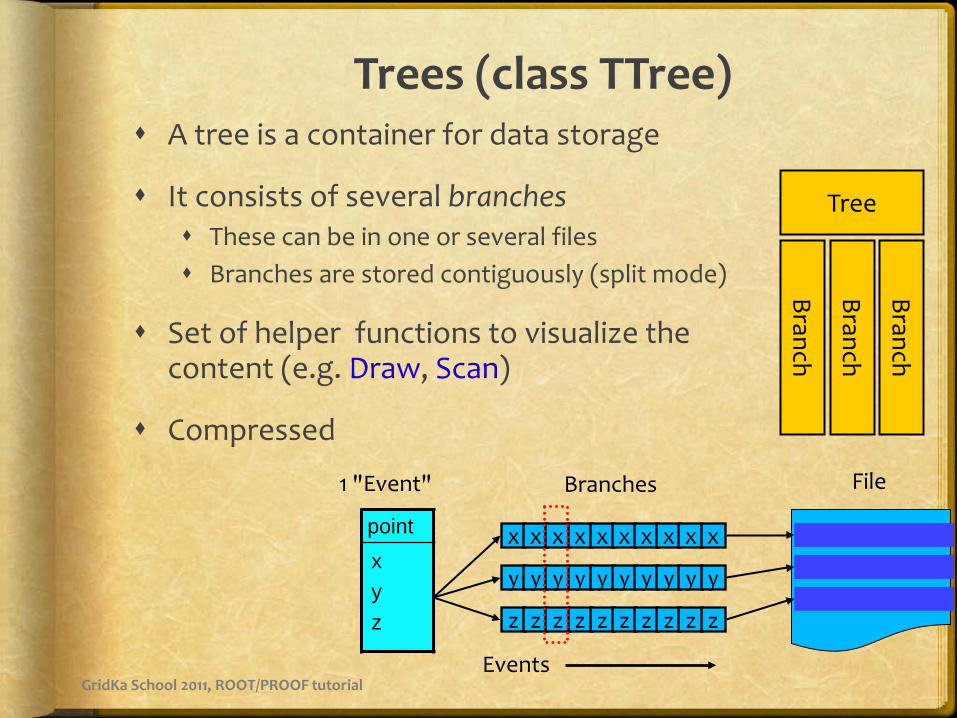
Trees (class TTree) A tree is a container for data storage
It consists of several branches These can be in one or several files Branches are stored contiguously (split mode)
Set of helper functions to visualize the content (e.g. Draw, Scan)
Compressed
Tree
Branch
Branch
Branch
point x y z
x x x x x x x x x x
y y y y y y y y y y
z z z z z z z z z z
Branches File 1 "Event"
Events GridKa School 2011, ROOT/PROOF tutorial

Events
Events are units of data which are stored in trees and can be processed independently from each other (PROOF’s event-level parallelism is based on these properties).
In the following exercises we will create a simple event class, then we will create a tree containing events, inspect and process/analyse it.
GridKa School 2011, ROOT/PROOF tutorial

Ex. 6: Simple event class (1) Create a file TGridKaEvent.C with the following
content.
Compile and print information about the class: root [] .L TGridKaEvent.C+ root [] TGridKaEvent* event = new TGridKaEvent(); root [] event->Dump();
#include <TObject.h> class TGridKaEvent : public TObject private: public: TGridKaEvent() : TObject() ; virtual ~TGridKaEvent() ; ClassDef(TGridKaEvent,1) ;
GridKa School 2011, ROOT/PROOF tutorial

Ex. 6: Simple event class (2)
We are now extending the TGridKaEvent class so that for every event it contains three variables fX, fY, fZ with double precision Add 3 ‘Getter’-Functions GetX(),GetY(),GetZ() Initialize fX, fY, fZ in the constructor with ‘0’ Add a method void FillGaus() which fills fX, fY, fZ
with random variables from a Gaussian distribution Use gRandom->Gaus(<mean>, <sigma>)
GridKa School 2011, ROOT/PROOF tutorial

Ex. 6: Simple event class (3) Edit the file TGridKaEvent.C: add the lines marked
with red: #include <Tobject.h> #include <TRandom.h> #include <Rtypes.h> class TGridKaEvent : public TObject private: Double_t fX, fY, fZ; public: Double_t GetX() return fX; Double_t GetY() return fY; Double_t GetZ() return fZ; void FillGaus(); TGridKaEvent() : TObject(), fX(0) , fY(0), fZ(0) ; virtual ~TGridKaEvent() ; ClassDef(TGridKaEvent,1) ; void TGridKaEvent::FillGaus() fX = gRandom->Gaus(4,2); fY = gRandom->Gaus(6,3); fZ = gRandom->Gaus(8,4);
GridKa School 2011, ROOT/PROOF tutorial

Ex. 6: Simple event class (4) Recompile the class: root [] .L TGridKaEvent.C+
Create a new Event object:
root [] TGridKaEvent* e = new TGridKaEvent;
Call the FillGaus() method and print the event object: root [] e->FillGaus(); root [] e->Dump(); root [] e->FillGaus(); root [] e->Dump();
GridKa School 2011, ROOT/PROOF tutorial

Ex. 7: Creating tree (1) In this exercise we will create a tree and fill it with
events of class TGridKaEvent. We will Create a macro WriteGridKaTree.C which will create
a file gridkaevents.root to store a TTree witTGridKaEventh events containing one branch of type. We will use function FillGaus() to fill 1M times the event. Finally, we will fill the tree with events and save it to the file.
GridKa School 2011, ROOT/PROOF tutorial

Ex. 7: Creating tree (2) gROOT->ProcessLine(".L TGridKaEvent.C+"); TFile* f = TFile::Open("gridkaevents.root", "RECREATE"); TTree* tree = new TTree("GridKa", "The GridKa Event Tree"); TGridKaEvent* gridkaevent = new TGridKaEvent(); TBranch* branch = tree->Branch("gridkaevent", "TGridKaEvent", &gridkaevent); for(Int_t i=0; i<1000000; ++i) gridkaevent->FillGaus(); tree->Fill(); tree->Write(); f->Close();
GridKa School 2011, ROOT/PROOF tutorial

Ex. 8: Inspecting the content of the tree
In this exercise we will inspect the content of the tree i) using ls() method of the file object containing the tree, ii) using ROOT Object Browser.
Open the tree file for reading: root [] .L TGridKaEvent.C+ root [] TFile* file = TFile::Open("gridkaevents.root"); root [] file->ls(); root [] Ttree* t = (Ttree*) file->Get(“GridKa”); root [] t->Draw(“fX”);
Create a TBrowser & inspect the tree root [] new TBrowser;
root [2] file->ls(); TFile** gridkaevents.root TFile* gridkaevents.root KEY: TTree GridKa;1 The GridKa Event Tree
GridKa School 2011, ROOT/PROOF tutorial

Data analysis: Selectors (1)
To perform tree-based data analysis one can loop over all events in the tree and process them with Selector. The method TTree::Process() loops over the events in the tree and executes the code written in the Selector for every event. We will create a selector to fill a histogram with the distribution
of variable fX of the class GridKaEvent which we created in Exercise 7.
GridKa School 2011, ROOT/PROOF tutorial

Data analysis: Selectors (2)
The class TSelector provides the following methods: TSelector::Begin() – This method is called once at the beginning
of the tree processing. This is the place to create the histograms which you want to fill with the data of the tree.
TSelector::Process() – This method is invoked for every event in the tree. This is the place to put the analysis code and fill your histograms.
TSelector::Terminate() – This method is invoked at the end of the loop over tree events. This is the place to fit and draw your histograms.
GridKa School 2011, ROOT/PROOF tutorial

Ex. 9: Creating Selector for data analysis (1) In this exercise we will create selector to traverse the tree
events
Create an empty selector macro GridKaAna.C to analyze your tree by calling MakeSelector on the tree object: root [] .L TGridKaEvent.C+ root [] TFile* f = TFile::Open(“gridkaevents.root”); root [] TTree* t = (TTree*) file->Get("GridKa"); root [] t->MakeSelector("GridKaAna"); Two files will be created in your current directory: GridKaAna.C
and GridKaAna.h. They will contain the class GridKaAna inherited from TSelector. We need to add our code to methods Begin(), SlaveBegin(), Process(), SlaveTerminate() and Terminate() to do the analysis.
GridKa School 2011, ROOT/PROOF tutorial

Ex. 9: Creating Selector for data analysis (2) Edit GridKaAna.h to add a pointer for the output histogram: Add these two lines to GridKaAna.h in appropriate places: #include <TH1F.h> TH1F* fHist; (as a public data member)
Add the following line to GridKaAna::SlaveBegin() in GridKaAna.C: fHist = new TH1F("fHist","x hist",100,-4,4);
Add the following line to GridKaAna::Process() in GridKaAna.C: GetEntry(entry); fHist->Fill(fX);
Add the following line to GridKaAna::Terminate() in GridKaAna.C: fHist->DrawCopy();
GridKa School 2011, ROOT/PROOF tutorial

Ex. 9: Creating Selector for data analysis (3)
(Re-)start your ROOT session
Run the selector macro: TFile* file = TFile::Open("gridkaevents.root"); TTree* GridKa = (TTree*) file->Get("GridKa"); GridKa->Process("GridKaAna.C+");
The "+" after GridKaAna.C results in compilation of the code before execution Always recommended
Look at your results (in results.root)!
GridKa School 2011, ROOT/PROOF tutorial

Chains (class TChain) A chain is a list of trees (in several files)
TTree methods can be used Draw, Scan these iterate over all elements of the chain
Selectors can be used with chains Process(const char* selectorFileName)
Chain
Tree1 (File1)
Tree2 (File2)
Tree3 (File3)
Tree4 (File3)
Tree5 (File4)
GridKa School 2011, ROOT/PROOF tutorial

Ex.10: Analysing the chain data
Run the selector macro: TChain* ch = new TChain(“GridKa”, “GridKa Chain”); ch->AddFile(“gridkaevents.root”); ch->Process("GridKaAna.C+");
GridKa School 2011, ROOT/PROOF tutorial

What is PROOF? Why PROOF?
PROOF stands for Parallel ROOt Facility
It allows parallel processing of large amount of data. The output results can be directly visualised (e.g. the output histogram can be drawn at the end of the proof session).
PROOF is NOT a batch system.
The data which you process with PROOF can reside on your computer, PROOF cluster disks or grid.
The usage of PROOF is transparent: you should not rewrite your code you are running locally on your computer.
No special installation of PROOF software is necessary to execute your code: PROOF is included in ROOT distribution.
GridKa School 2011, ROOT/PROOF tutorial

End of ROOT tutorial!
Questions?
GridKa School 2011, ROOT/PROOF tutorial

root
Remote PROOF Cluster
Data
root
root
root
Client – Local PC
ana.C
stdout/result
node1
node2
node3
node4
ana.C
root
How does PROOF analysis work?
Data
Proof master Proof slave
Result
Data
Result
Data
Result
Result
GridKa School 2011, ROOT/PROOF tutorial

Trivial parallelism
GridKa School 2011, ROOT/PROOF tutorial

PROOF terminology The following terms are used in PROOF:
PROOF cluster Set of machines communicating with PROOF protocol. One of those machines is normally designated as Master (multi-Master
setup is possible as well). The rest of machines are Workers.
Client Your machine running a ROOT session that is connected to a PROOF master.
Master Dedicated node in PROOF cluster that is in charge of assigning workers the chunks of data to be processed, collecting and
merging the output and sending it to the Client.
Slave/Worker A node in PROOF cluster that processes data.
Query A job submitted from the Client to the PROOF cluster. A query consists of a selector and a chain.
Selector A class containing the analysis code (more details later)
Chain A list of files (trees) to process (more details later)
PROOF Archive (PAR) file Archive file containing files for building and setting up a package on the PROOF cluster. Normally is used to supply extra
packages used by user job.
GridKa School 2011, ROOT/PROOF tutorial

What should I do to run a job on PROOF cluster?
Create a chain containing the files you want to analyse.
Write your job code and put it in the selector (class deriving from TSelector).
Define inputs and outputs via predefined (by class TSelector) lists (TList objects) fInput and fOutput.
Create extra packages (if any) which you need by your analysis and put them in PAR file to be deployed on the PROOF cluster.
GridKa School 2011, ROOT/PROOF tutorial
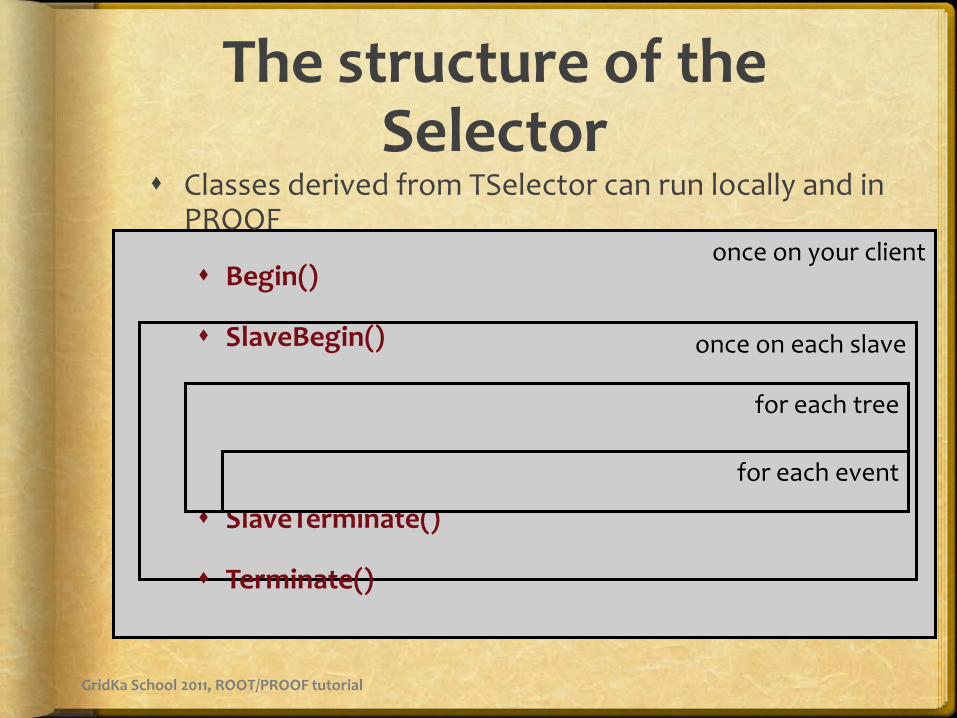
once on your client
once on each slave
The structure of the Selector
Classes derived from TSelector can run locally and in PROOF
Begin()
SlaveBegin()
Init(TTree* tree)
Process(Long64_t entry)
SlaveTerminate()
Terminate()
for each tree
for each event
GridKa School 2011, ROOT/PROOF tutorial

Input / Output
The TSelector class has two members of type TList: fInput, fOutput These are used to get input data or put output data
Input list Before running a query the input list is populated
gProof->AddInput(myObj) In the selector (Begin, SlaveBegin) the object is retrieved:
fInput->FindObject("myObject")
GridKa School 2011, ROOT/PROOF tutorial

Input / Output (2)
Output list The output has to be added to the output list on each
slave (in SlaveBegin/SlaveTerminate) fOutput->Add(fResult)
PROOF merges the results from each slave automatically (see next slide)
On the client (in Terminate) you retrieve the object and save it, display it, ... fOutput->FindObject("myResult")
GridKa School 2011, ROOT/PROOF tutorial

Input / Output (3) Merging Objects are identified by name Standard merging implementation
for histograms, trees, n-tuples available
Other classes need to implement Merge(TCollection*)
When no merging function is available all the individual objects are returned
Result from Slave 1
Result from Slave 2
Final result
Merge()
GridKa School 2011, ROOT/PROOF tutorial

The structure of the PAR files
PAR files: PROOF ARchive Gzipped tar file PROOF-INF directory BUILD.sh, building the package, executed per Worker SETUP.C, set environment, load libraries, executed per
Worker
API to manage and activate packages gProof->UploadPackage("package") gProof->EnablePackage("package")
GridKa School 2011, ROOT/PROOF tutorial

ROOT Tutorial (4) Use an automatic selector macro for tree analysis
Load the next event; fill the histogram in Process Bool_t GridKaAna::Process(Long64_t entry) … GetEntry(entry); // load the next event fHist->Fill(fX);
Write the histogram to a file in Terminate
void GridKaAna::Terminate() … TFile resultfile("results.root", "RECREATE"); fOutput->Write(); resultfile.Close();
GridKa School 2011, ROOT/PROOF tutorial

ROOT Tutorial (4)
How-to run your selector macro [chains]
Run the selector macro: TChain* ch = new TChain(“GridKa”, “GridKa Chain”); ch->AddFile(“gridkaevents.root”); ch->Process("GridKaAna.C+");
GridKa School 2011, ROOT/PROOF tutorial

Running on PROOF Lite TPoof::Open(“”); TChain* ch = new TChain(“GridKa”, “GridKa Chain”); ch->AddFile(“gridkaevents.root”); ch->SetProof(); ch->Process("GridKaAna.C+");
GridKa School 2011, ROOT/PROOF tutorial

ROOT Features: Data Analysis
GridKa School 2011, ROOT/PROOF tutorial
New Event structure We will look at more complex Event structure Event Tracks EventHeader
Event.h, Event.cxx
We will generate files GenerateFiles.C
We will create MySelector from scratch MySelector.C, MySelector.h
GridKa School 2011, ROOT/PROOF tutorial

Processing data on PROOF
We will use RunSelector.C ProofBenchDataSel.par CreateDataSet.C
PROOF Lite Local files Local files using xrootd Dataset
PROOF cluster Small dataset Full dataset
GridKa School 2011, ROOT/PROOF tutorial

Thank you for your attention!
GridKa School 2011, ROOT/PROOF tutorial

How PROOF cluster works
GridKa School 2011, ROOT/PROOF tutorial

Installation of PROOF cluster
Install root on all workers
Start xproofd daemon By hand Using PoD http://pod.gsi.de
Using PEAC (using SSH plugin from PoD)
Start xrootd and cmsd daemons Using PEAC data management setup (available soon)
GridKa School 2011, ROOT/PROOF tutorial

PoD schema
picture
GridKa School 2011, ROOT/PROOF tutorial