Embed Size (px)
Citation preview
ArrowSphere xSP Central
User guide
Version 3.6
ArrowSphere xSP Central Page: 2 / 110
User guide Date: 26/07/2016
Writer: Cloud Operations Client: ARROW ECS Diffusion: External Ref.: CLD-XSP-USERG-3.5
Document validation:
Introduction
Managed service providers using ArrowSphere xSP Central have instant access to a dynamically
growing portfolio of product, program and pricing information for 1000+ software licenses in one
place.
This enables MSPs to select the best combination of technology and cost for their chosen cloud
service, while benefiting from the ability to quickly expand their offerings as new services
continuously become available.
The platform xSP Central is also a reporting tool for all MSP resellers. The platform allows
subscribing for different SP programs, reporting the monthly consumption and associating every
report with one of your customers.
Name Company Role
Eric GOURMELEN Arrow ECS CTO Global Apps
Miguel REAL Arrow ECS Project Manager

ArrowSphere xSP Central Page: 3 / 110
User guide Date: 26/07/2016
Writer: Cloud Operations Client: ARROW ECS Diffusion: External Ref.: CLD-XSP-USERG-3.5
INTRODUCTION ............................................................................................................................................................ 2
DOCUMENT OBJECTIVES .......................................................................................................................................... 4
PLATFORM USAGE ....................................................................................................................................................... 6
MAIN MENU .......................................................................................................................................................... 7 1.1.1 New user account ......................................................................................................................................... 7 1.1.2 Dashboard: general functionalities .............................................................................................................. 9 1.1.3 Widget Dashboard (available to MSP User on request) ............................................................................ 11 1.1.4 Stack builder............................................................................................................................................... 16
1.1.4.1 SaaS finder ...................................................................................................................................... 17 1.1.4.2 Software finder ................................................................................................................................ 27 1.1.4.3 IaaS finder ....................................................................................................................................... 34
1.1.5 Stack Finder ............................................................................................................................................... 40 MANAGEMENT AND SETTINGS ....................................................................................................................................... 42
1.1.6 Programs .................................................................................................................................................... 42 1.1.6.1 How to subscribe for a new program? ............................................................................................ 42
1.1.7 Catalog usage............................................................................................................................................. 44 1.1.7.1 How to export the product list? ....................................................................................................... 44
1.1.8 Reporting .................................................................................................................................................... 45 1.1.8.1 Specific reporting for Riverbed SPP, Office 365, Microsoft SPLA and VEEAM VCP. ................ 45 1.1.8.2 How to create, edit, validate and delete a report? ........................................................................... 46 1.1.8.3 How to upload report using the wizard? ......................................................................................... 51 1.1.8.4 How to make a VCAN report using the wizard ? ............................................................................ 55 1.1.8.5 How to create a quote ...................................................................................................................... 56 1.1.8.6 Orders .............................................................................................................................................. 64
1.1.9 Contacts ..................................................................................................................................................... 66 1.1.9.1 How to add a new contact? ............................................................................................................. 66 1.1.9.2 How to invite a colleague? .............................................................................................................. 67 1.1.9.3 How to edit a contact? ..................................................................................................................... 69
1.1.10 Customers / Reporters ................................................................................................................................ 70 1.1.10.1 How to add a new customer? .......................................................................................................... 70 1.1.10.2 How to import a list of customers? ................................................................................................. 72 1.1.10.3 How to edit customer information? ................................................................................................. 72 1.1.10.4 How to delete a customer? .............................................................................................................. 72 1.1.10.5 How to create a reporter? ................................................................................................................ 73
1.1.11 Microsoft CSP program ............................................................................................................................. 79 1.1.11.1 Subscription .................................................................................................................................... 79 1.1.11.2 Quote and Order .............................................................................................................................. 83 1.1.11.3 My Customers’ license .................................................................................................................... 90 1.1.11.4 Invoices ........................................................................................................................................... 92
1.1.12 Notifications ............................................................................................................................................... 95 1.1.12.1 How to configure your notifications?.............................................................................................. 95 1.1.12.2 How to remove notifications by e-mail? ......................................................................................... 98 1.1.12.3 Notification center......................................................................................................................... 101 1.1.12.4 How to configure and enable notifications by slack ..................................................................... 101
1.1.13 My profile setting ..................................................................................................................................... 107 1.1.13.1 How to edit my profile information?............................................................................................. 107
1.1.14 How to contact xSP Central administrator? ............................................................................................ 107 SUPPORT TEAM CONTACTS ................................................................................................................................ 109 DOCUMENT HISTORY ......................................................................................................................................... 110

ArrowSphere xSP Central Page: 4 / 110
User guide Date: 26/07/2016
Writer: Cloud Operations Client: ARROW ECS Diffusion: External Ref.: CLD-XSP-USERG-3.5
Document objectives
The document explains in details every functionality of the xSP Central. You’ll find the short
description of the functionality and the screenshots to help you find and use any functionality on the
platform.
NB: This user guide refers to xSP V3.3 of the platform.
SaaS Catalog (ArrowSphere SaaS Catalog)
Software Catalog:
Brocade BCSPP
Citrix CSPP
Corent-SURPAAS
CTERA Networks CTMSP
IBM ASL-M/ASL-P
McAfee
Microsoft O365/O365-ACADEMIS/SPLA-ACADEMIC/SPLA-CORPORATE
NetQ
Red Hat RH-CCSP-M/ RH-CCSP-P
Riverbed RSPP Symantec ExSP
Trend Micro TMMSPP/ TMMSPP-NA
Veeam VCP/VCPR/ VCSPR-NA VMware VCAN/CIPP
Zimbra
IaaS Catalog:
Artisan
BT Cloud
Century Link CLPP
Colt Cloud Service COLTCS
Connectria Hosting
Dimension Data (OpSource) DDPCaaS
Din Cloud
IBM-PCDPS
Faction Cloud
NaviSite Partner ProgramNet App NETAPP MSP NetIQ Cloud Services NETIQ-CSPP Rackspace
Sherweb SHERWEB-IAAS
SoftLayer
PaaS Catalog
Microsoft Cloud Solution Provider (MSCSP)
ArrowSphere xSP Central Page: 5 / 110
User guide Date: 26/07/2016
Writer: Cloud Operations Client: ARROW ECS Diffusion: External Ref.: CLD-XSP-USERG-3.5
MSP Programs:
Citrix CSPP
Corent Technology CORENT-SURPAAS
IBM ASL-M/ASL-P
McAfee MSPP
Microsoft O365/SPLA-ACADEMIC/SPLA-CORPORATE
NetIQ NETIQ-CSPP
Riverbed RSPP
Symantec ExSP
Trend Micro TMMSPP
Veeam VCP/VCPR
Vmware VSPP/CIPP
Zimbra BSP
ArrowSphere xSP Central Page: 6 / 110
User guide Date: 26/07/2016
Writer: Cloud Operations Client: ARROW ECS Diffusion: External Ref.: CLD-XSP-USERG-3.5
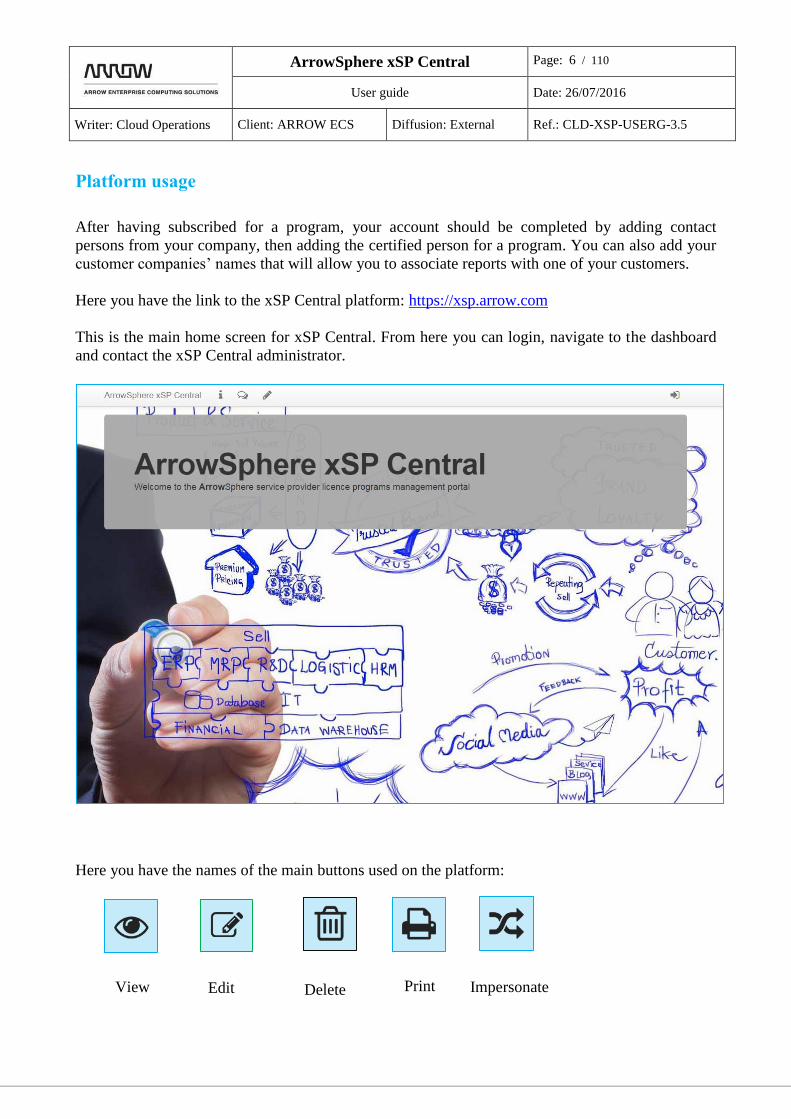
Platform usage
After having subscribed for a program, your account should be completed by adding contact
persons from your company, then adding the certified person for a program. You can also add your
customer companies’ names that will allow you to associate reports with one of your customers.
Here you have the link to the xSP Central platform: https://xsp.arrow.com
This is the main home screen for xSP Central. From here you can login, navigate to the dashboard
and contact the xSP Central administrator.
Here you have the names of the main buttons used on the platform:
View Validate Edit
Delete View
Edit Print Impersonate
ArrowSphere xSP Central Page: 7 / 110
User guide Date: 26/07/2016
Writer: Cloud Operations Client: ARROW ECS Diffusion: External Ref.: CLD-XSP-USERG-3.5
Main menu
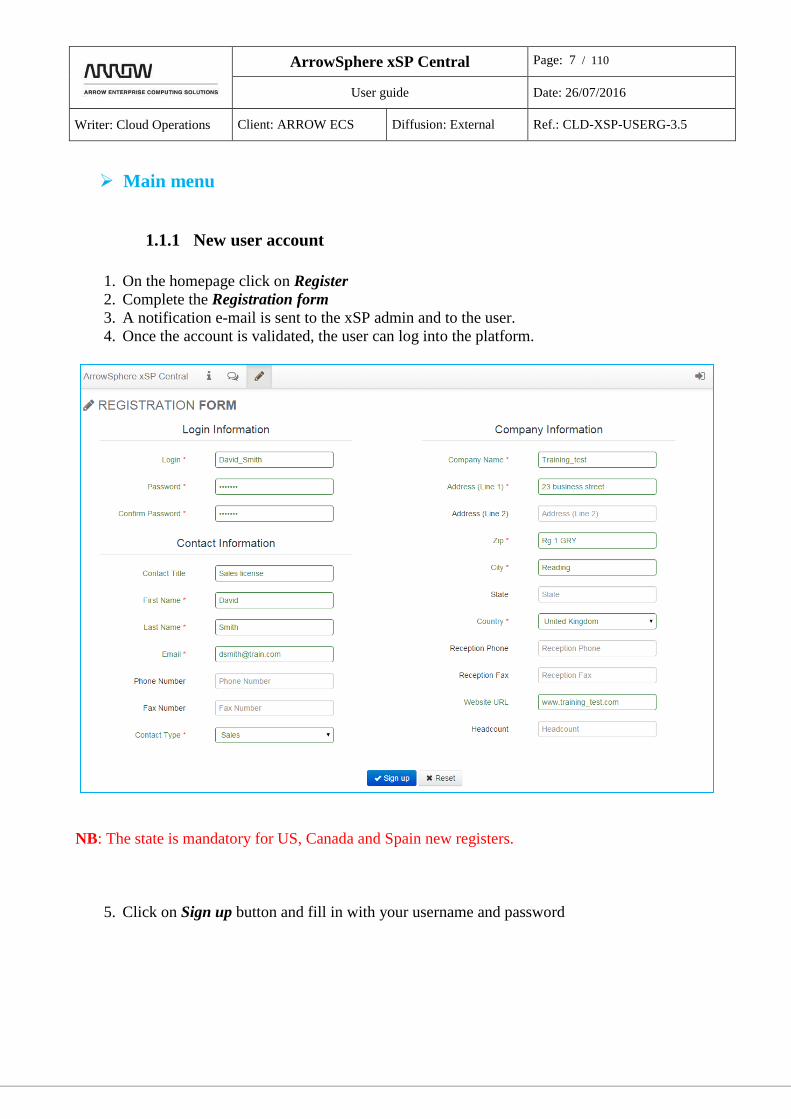
1.1.1 New user account
1. On the homepage click on Register
2. Complete the Registration form
3. A notification e-mail is sent to the xSP admin and to the user.
4. Once the account is validated, the user can log into the platform.
NB: The state is mandatory for US, Canada and Spain new registers.
5. Click on Sign up button and fill in with your username and password

ArrowSphere xSP Central Page: 8 / 110
User guide Date: 26/07/2016
Writer: Cloud Operations Client: ARROW ECS Diffusion: External Ref.: CLD-XSP-USERG-3.5
6. ArrowSphere EULA are mentioned at first logging to the platform, and need to be accepted
to access ArrowSphere platform
ArrowSphere xSP Central Page: 9 / 110
User guide Date: 26/07/2016
Writer: Cloud Operations Client: ARROW ECS Diffusion: External Ref.: CLD-XSP-USERG-3.5
1.1.2 Dashboard: general functionalities
The dashboard presents a general view on the consumption presented with a graphical view.
You also have the list of the subscribed programs, created reports and orders.
(General view)

ArrowSphere xSP Central Page: 10 / 110
User guide Date: 26/07/2016
Writer: Cloud Operations Client: ARROW ECS Diffusion: External Ref.: CLD-XSP-USERG-3.5
ArrowSphere xSP Central Page: 11 / 110
User guide Date: 26/07/2016
Writer: Cloud Operations Client: ARROW ECS Diffusion: External Ref.: CLD-XSP-USERG-3.5
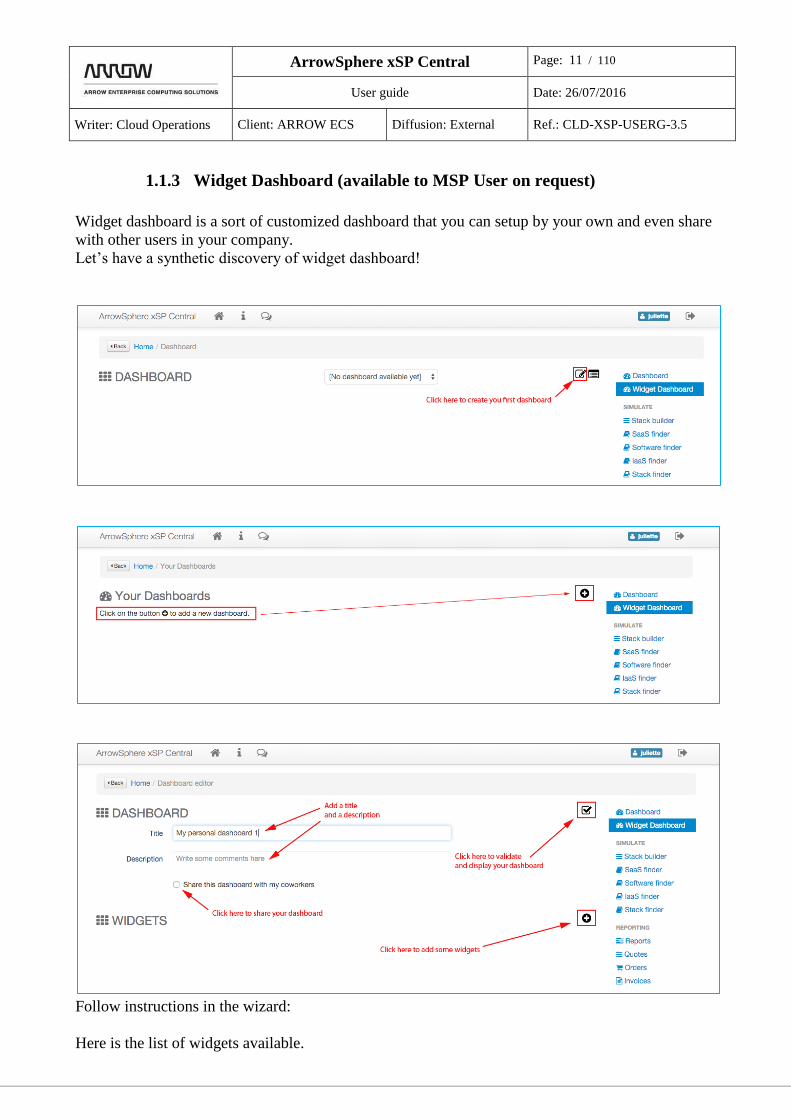
1.1.3 Widget Dashboard (available to MSP User on request)
Widget dashboard is a sort of customized dashboard that you can setup by your own and even share
with other users in your company.
Let’s have a synthetic discovery of widget dashboard!
Follow instructions in the wizard:
Here is the list of widgets available.

ArrowSphere xSP Central Page: 12 / 110
User guide Date: 26/07/2016
Writer: Cloud Operations Client: ARROW ECS Diffusion: External Ref.: CLD-XSP-USERG-3.5
Choose the widget and follow instructions. For each widget you can choose thought the wizard
different sizes, colors and options.
1. Per program previous month costs:
This widget allows you to see your previous month costs for a given subscription.
In edition mode you can change the subscription.
ArrowSphere xSP Central Page: 13 / 110
User guide Date: 26/07/2016
Writer: Cloud Operations Client: ARROW ECS Diffusion: External Ref.: CLD-XSP-USERG-3.5
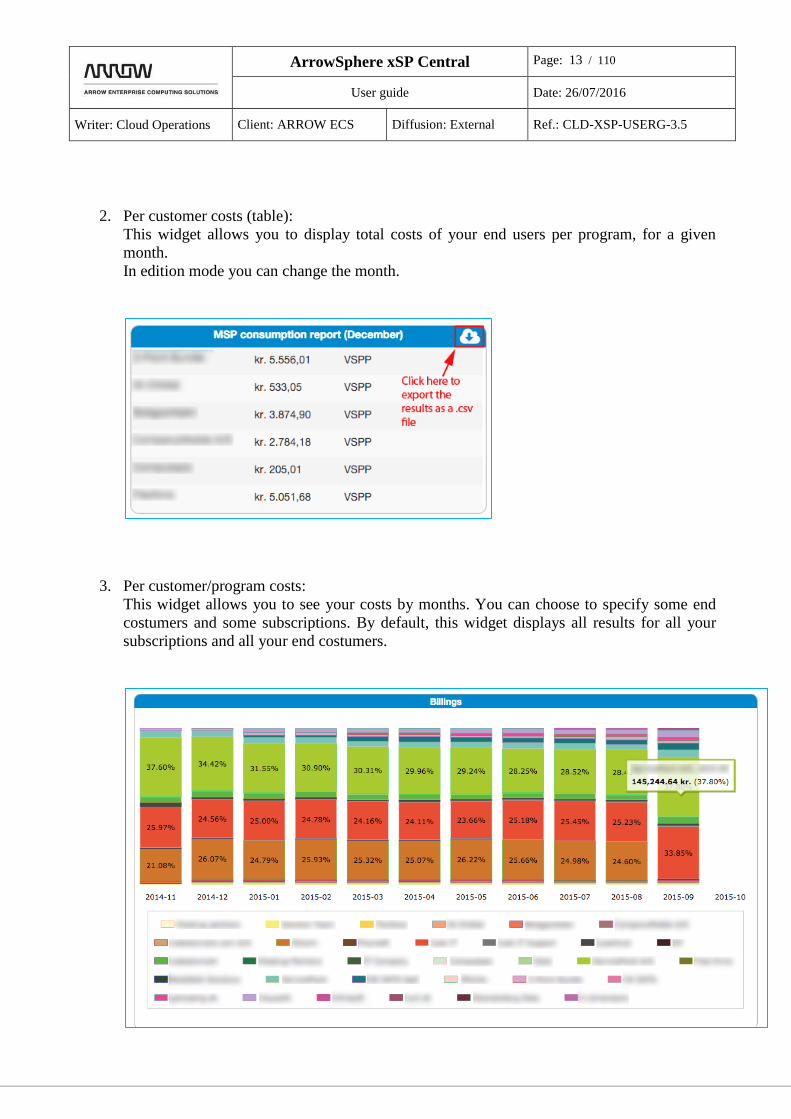
2. Per customer costs (table):
This widget allows you to display total costs of your end users per program, for a given
month.
In edition mode you can change the month.
3. Per customer/program costs:
This widget allows you to see your costs by months. You can choose to specify some end
costumers and some subscriptions. By default, this widget displays all results for all your
subscriptions and all your end costumers.
ArrowSphere xSP Central Page: 14 / 110
User guide Date: 26/07/2016
Writer: Cloud Operations Client: ARROW ECS Diffusion: External Ref.: CLD-XSP-USERG-3.5
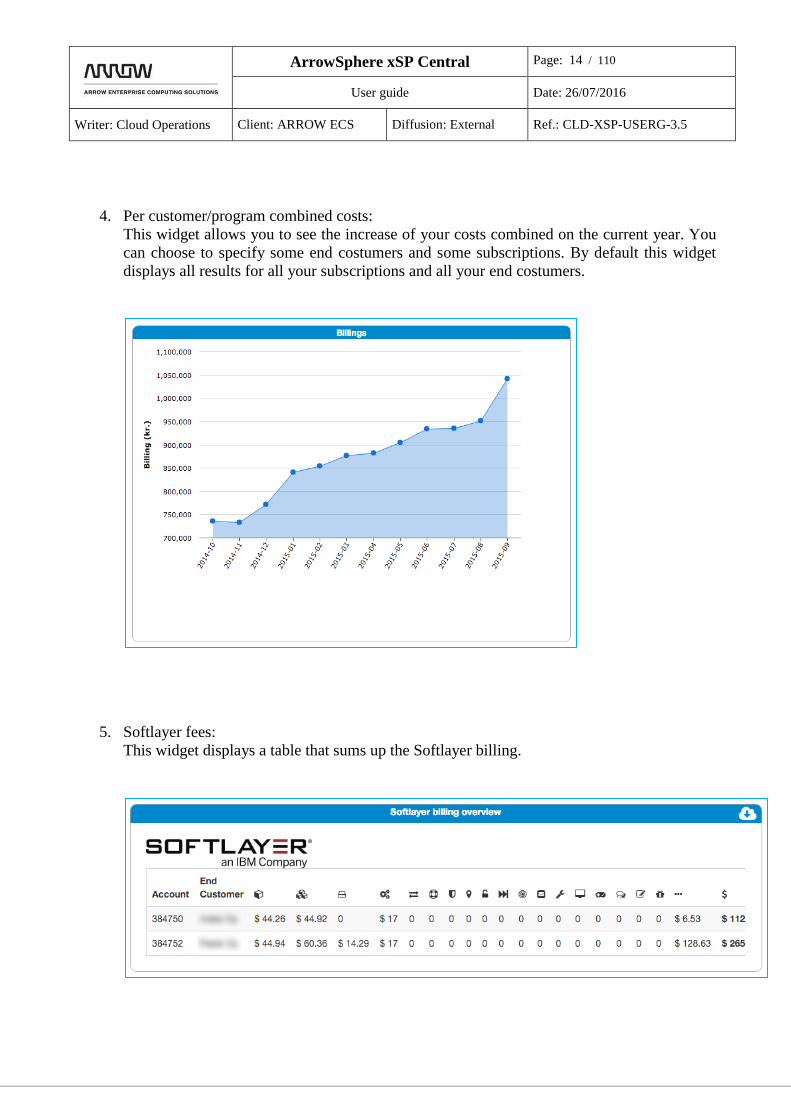
4. Per customer/program combined costs:
This widget allows you to see the increase of your costs combined on the current year. You
can choose to specify some end costumers and some subscriptions. By default this widget
displays all results for all your subscriptions and all your end costumers.
5. Softlayer fees:
This widget displays a table that sums up the Softlayer billing.

ArrowSphere xSP Central Page: 15 / 110
User guide Date: 26/07/2016
Writer: Cloud Operations Client: ARROW ECS Diffusion: External Ref.: CLD-XSP-USERG-3.5
6. Previous month consumption variance per product:
This widget displays the top 5 products sold by subscription with month over month
progression. In edition mode you can change the subscription, the number of products and
the unit (in percent or in currency).
NB: As you can share a dashboard with your coworkers, you can copy and edit a shared dashboard.
ArrowSphere xSP Central Page: 16 / 110
User guide Date: 26/07/2016
Writer: Cloud Operations Client: ARROW ECS Diffusion: External Ref.: CLD-XSP-USERG-3.5
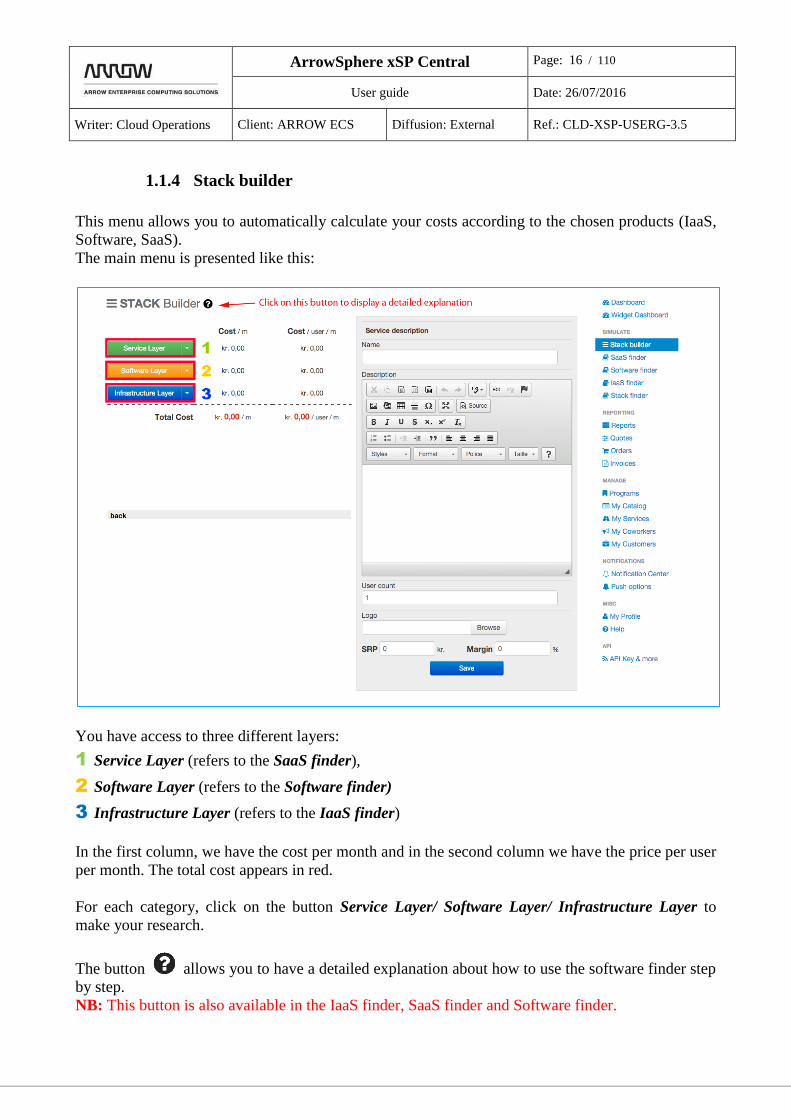
1.1.4 Stack builder
This menu allows you to automatically calculate your costs according to the chosen products (IaaS,
Software, SaaS).
The main menu is presented like this:
You have access to three different layers:
1 Service Layer (refers to the SaaS finder),
2 Software Layer (refers to the Software finder)
3 Infrastructure Layer (refers to the IaaS finder)
In the first column, we have the cost per month and in the second column we have the price per user
per month. The total cost appears in red.
For each category, click on the button Service Layer/ Software Layer/ Infrastructure Layer to
make your research.
The button allows you to have a detailed explanation about how to use the software finder step
by step.
NB: This button is also available in the IaaS finder, SaaS finder and Software finder.

ArrowSphere xSP Central Page: 17 / 110
User guide Date: 26/07/2016
Writer: Cloud Operations Client: ARROW ECS Diffusion: External Ref.: CLD-XSP-USERG-3.5
1.1.4.1 SaaS finder
a. How to select a product in the catalog?
1. Click on Find in the catalog to look for a product or click directly on User define to enter
details of your own product.
2. Click on Show details to see the product.
Please notice that you can apply different filter to optimize your search.

ArrowSphere xSP Central Page: 18 / 110
User guide Date: 26/07/2016
Writer: Cloud Operations Client: ARROW ECS Diffusion: External Ref.: CLD-XSP-USERG-3.5
3. Select your product.
Requirements button to know all you need to use this product.
Features button to have a detailed product description
4. Click on Add
ArrowSphere xSP Central Page: 19 / 110
User guide Date: 26/07/2016
Writer: Cloud Operations Client: ARROW ECS Diffusion: External Ref.: CLD-XSP-USERG-3.5
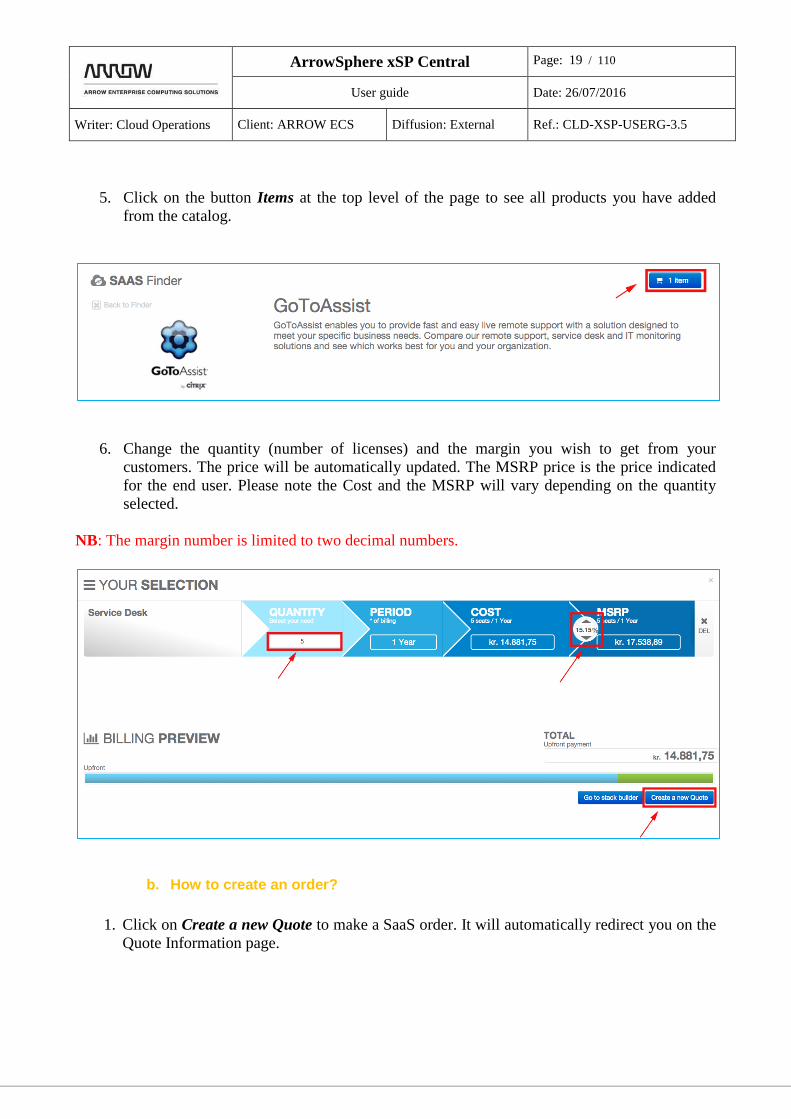
5. Click on the button Items at the top level of the page to see all products you have added
from the catalog.
6. Change the quantity (number of licenses) and the margin you wish to get from your
customers. The price will be automatically updated. The MSRP price is the price indicated
for the end user. Please note the Cost and the MSRP will vary depending on the quantity
selected.
NB: The margin number is limited to two decimal numbers.
b. How to create an order?
1. Click on Create a new Quote to make a SaaS order. It will automatically redirect you on the
Quote Information page.
ArrowSphere xSP Central Page: 20 / 110
User guide Date: 26/07/2016
Writer: Cloud Operations Client: ARROW ECS Diffusion: External Ref.: CLD-XSP-USERG-3.5
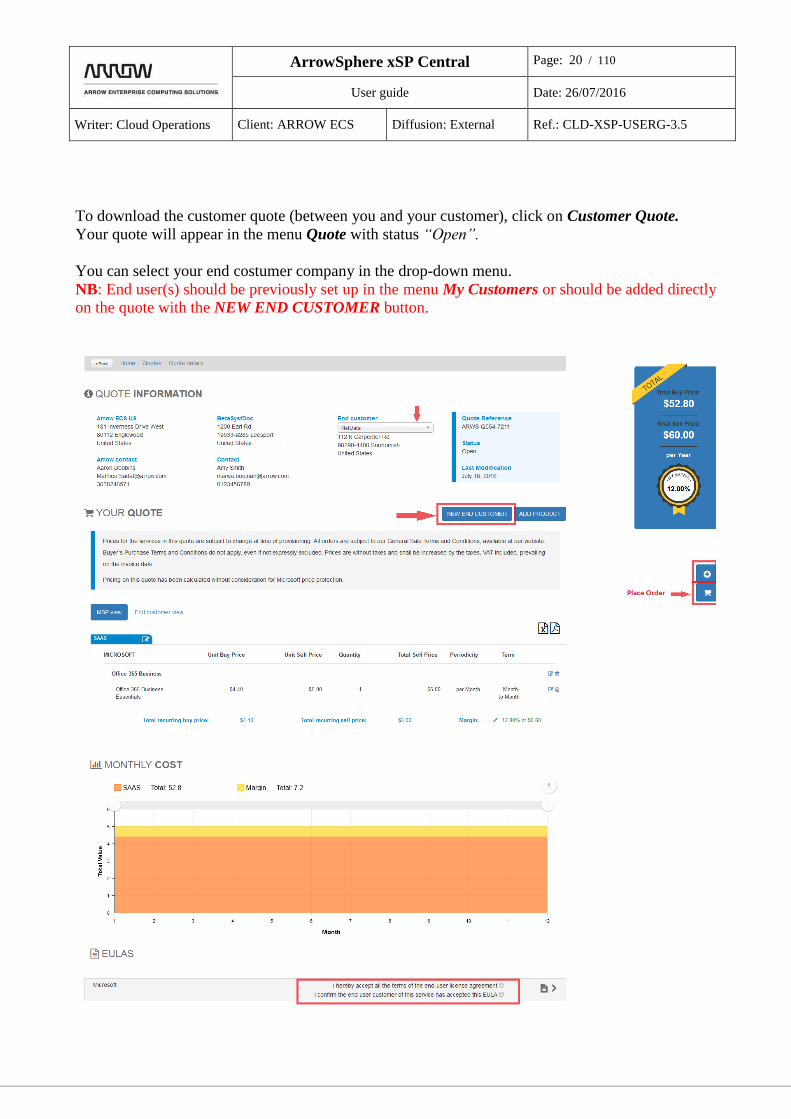
To download the customer quote (between you and your customer), click on Customer Quote.
Your quote will appear in the menu Quote with status “Open”.
You can select your end costumer company in the drop-down menu.
NB: End user(s) should be previously set up in the menu My Customers or should be added directly
on the quote with the NEW END CUSTOMER button.
ArrowSphere xSP Central Page: 21 / 110
User guide Date: 26/07/2016
Writer: Cloud Operations Client: ARROW ECS Diffusion: External Ref.: CLD-XSP-USERG-3.5
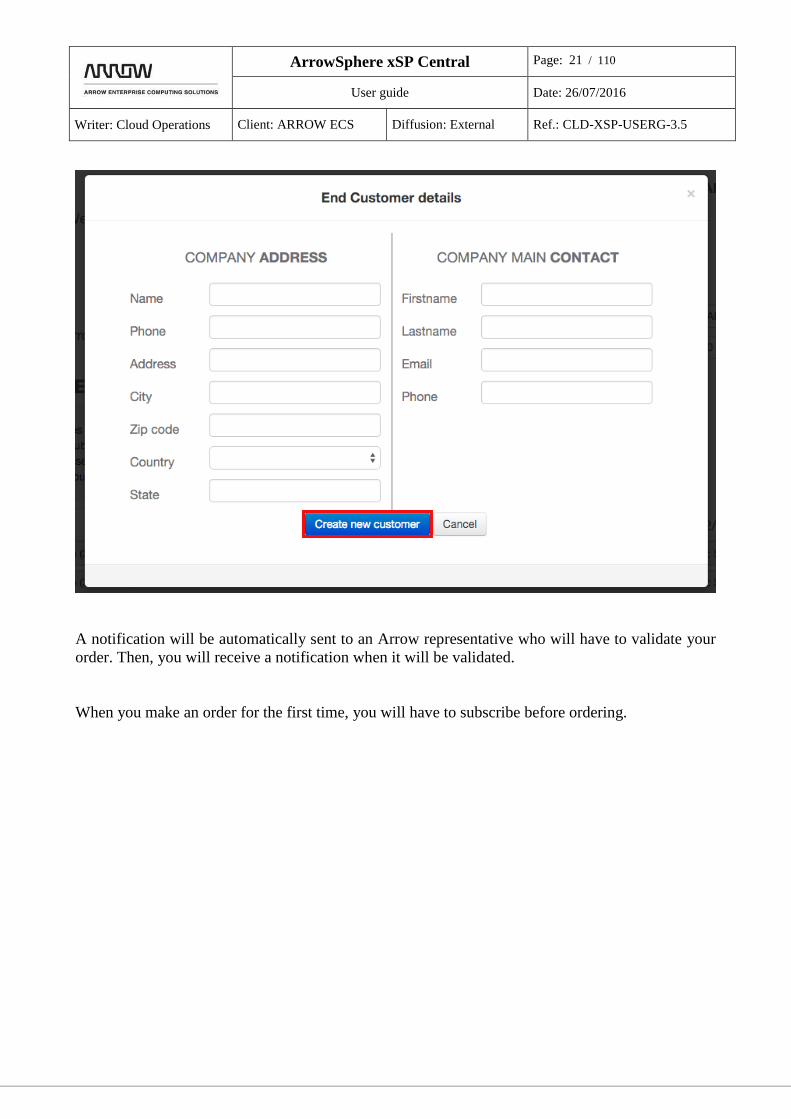
A notification will be automatically sent to an Arrow representative who will have to validate your
order. Then, you will receive a notification when it will be validated.
When you make an order for the first time, you will have to subscribe before ordering.
ArrowSphere xSP Central Page: 22 / 110
User guide Date: 26/07/2016
Writer: Cloud Operations Client: ARROW ECS Diffusion: External Ref.: CLD-XSP-USERG-3.5
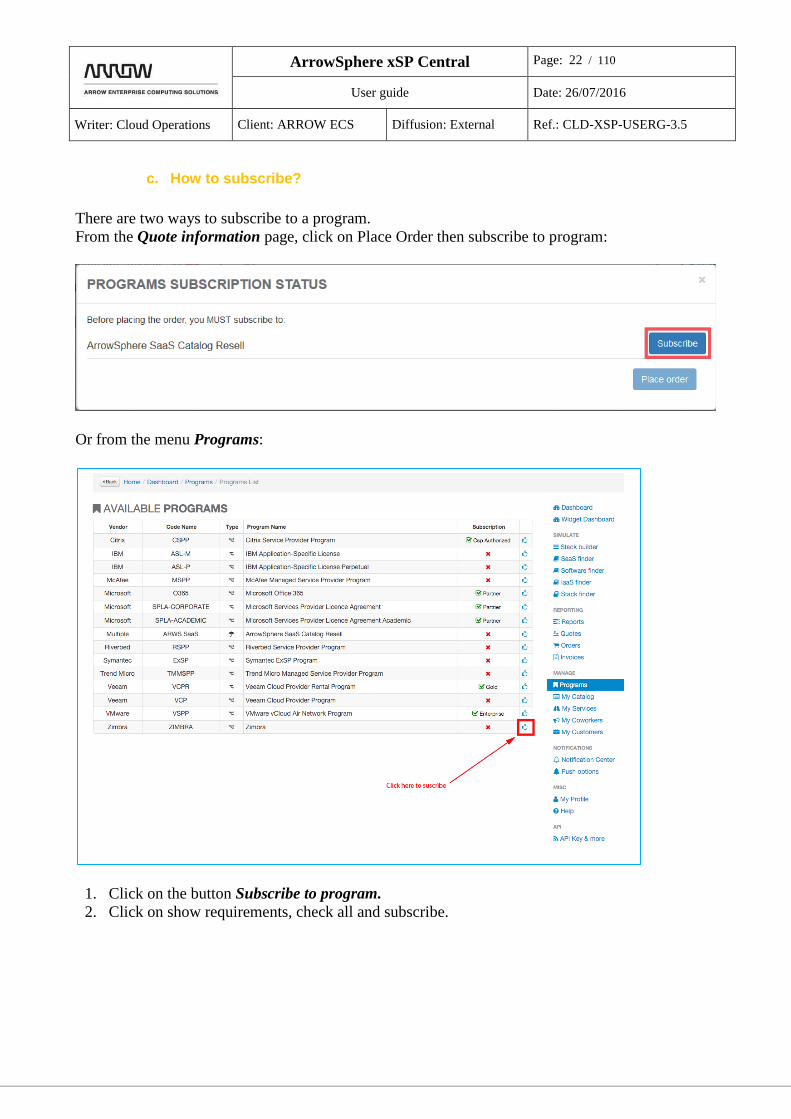
c. How to subscribe?
There are two ways to subscribe to a program.
From the Quote information page, click on Place Order then subscribe to program:
Or from the menu Programs:
1. Click on the button Subscribe to program.
2. Click on show requirements, check all and subscribe.
ArrowSphere xSP Central Page: 23 / 110
User guide Date: 26/07/2016
Writer: Cloud Operations Client: ARROW ECS Diffusion: External Ref.: CLD-XSP-USERG-3.5
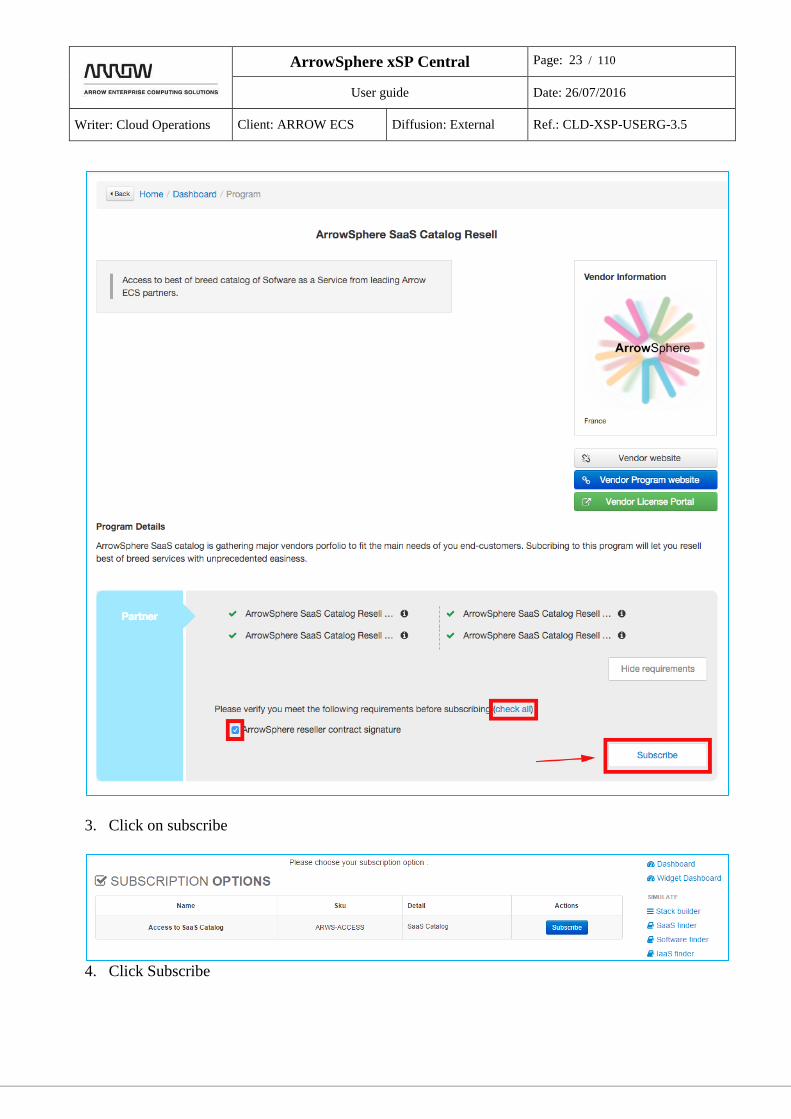
3. Click on subscribe
4. Click Subscribe
ArrowSphere xSP Central Page: 24 / 110
User guide Date: 26/07/2016
Writer: Cloud Operations Client: ARROW ECS Diffusion: External Ref.: CLD-XSP-USERG-3.5
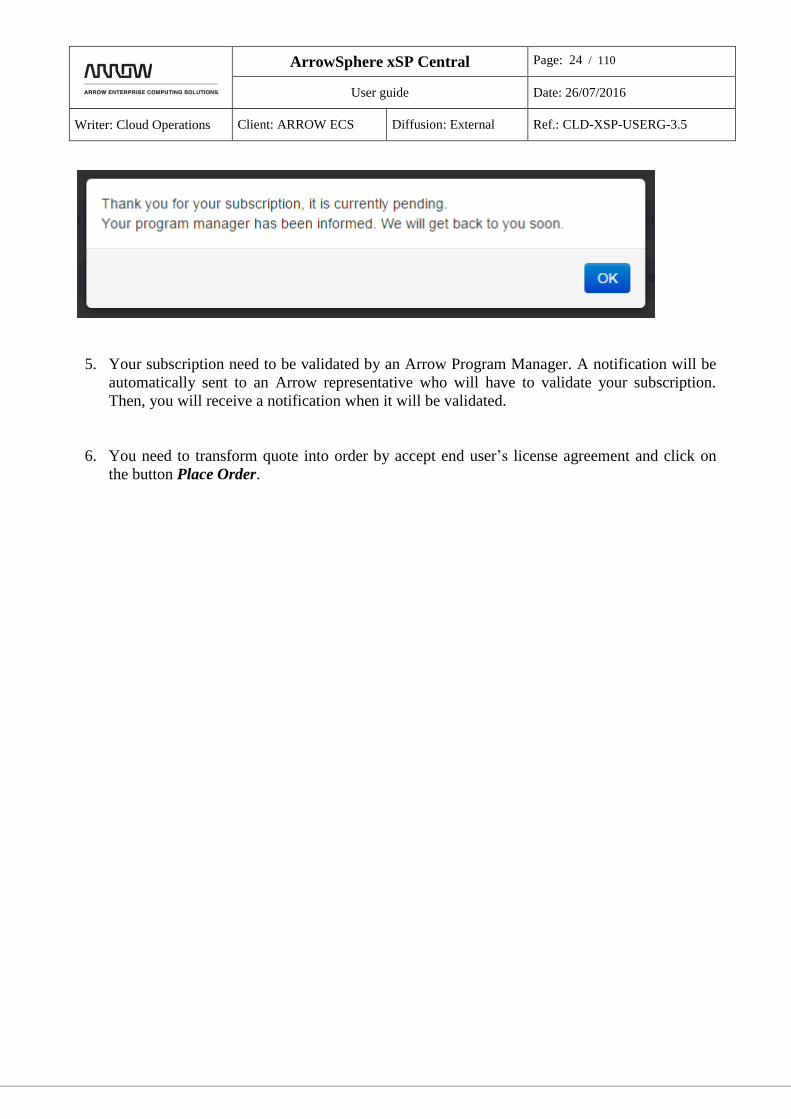
5. Your subscription need to be validated by an Arrow Program Manager. A notification will be
automatically sent to an Arrow representative who will have to validate your subscription.
Then, you will receive a notification when it will be validated.
6. You need to transform quote into order by accept end user’s license agreement and click on
the button Place Order.
ArrowSphere xSP Central Page: 25 / 110
User guide Date: 26/07/2016
Writer: Cloud Operations Client: ARROW ECS Diffusion: External Ref.: CLD-XSP-USERG-3.5
ArrowSphere xSP Central Page: 26 / 110
User guide Date: 26/07/2016
Writer: Cloud Operations Client: ARROW ECS Diffusion: External Ref.: CLD-XSP-USERG-3.5
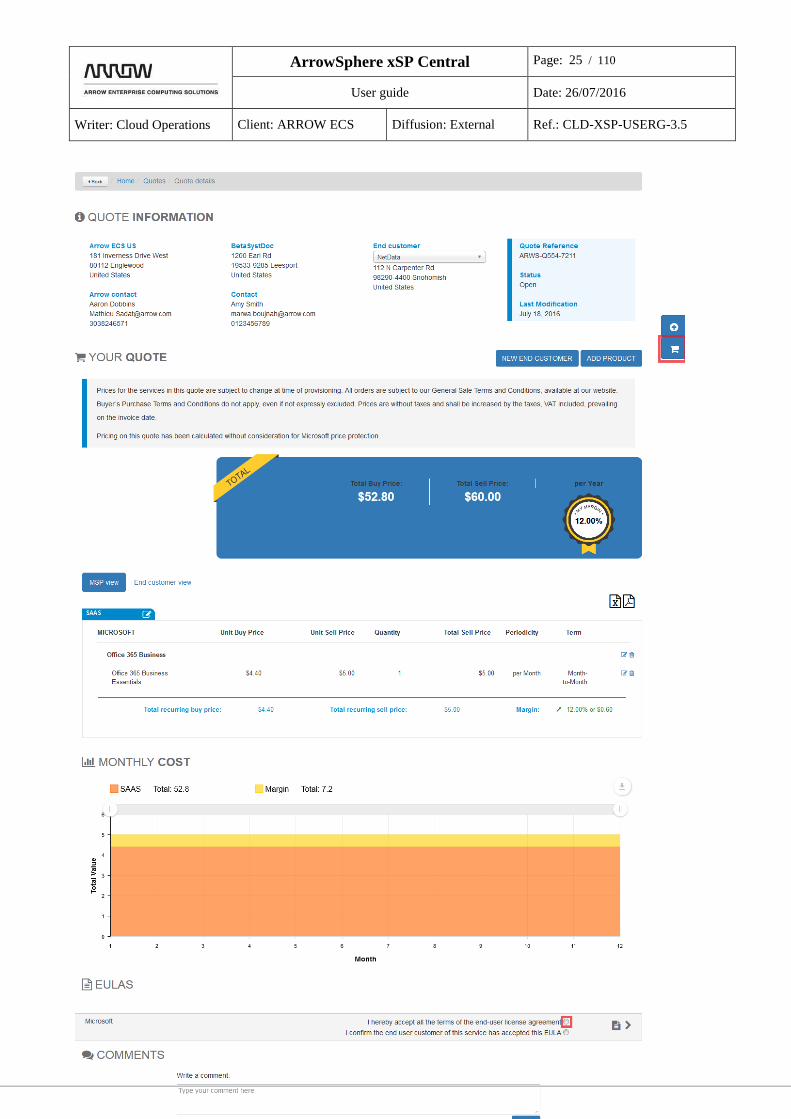
7. Click on the drop-down End customer company menu to create a new customer or to choose
an existing one.
8. Complete your company address and your company main contact and click on Place Order to
creat your order.
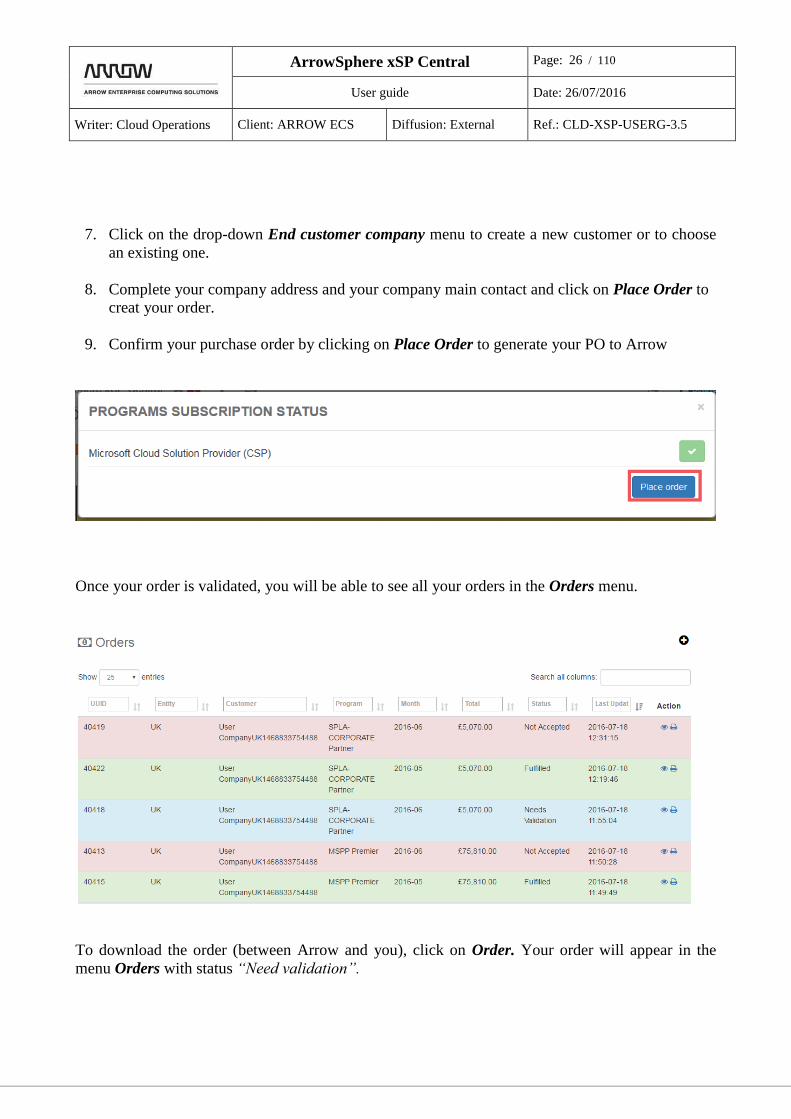
9. Confirm your purchase order by clicking on Place Order to generate your PO to Arrow
Once your order is validated, you will be able to see all your orders in the Orders menu.
To download the order (between Arrow and you), click on Order. Your order will appear in the
menu Orders with status “Need validation”.
ArrowSphere xSP Central Page: 27 / 110
User guide Date: 26/07/2016
Writer: Cloud Operations Client: ARROW ECS Diffusion: External Ref.: CLD-XSP-USERG-3.5
1.1.4.2 Software finder
d. How to find a product in the catalog?
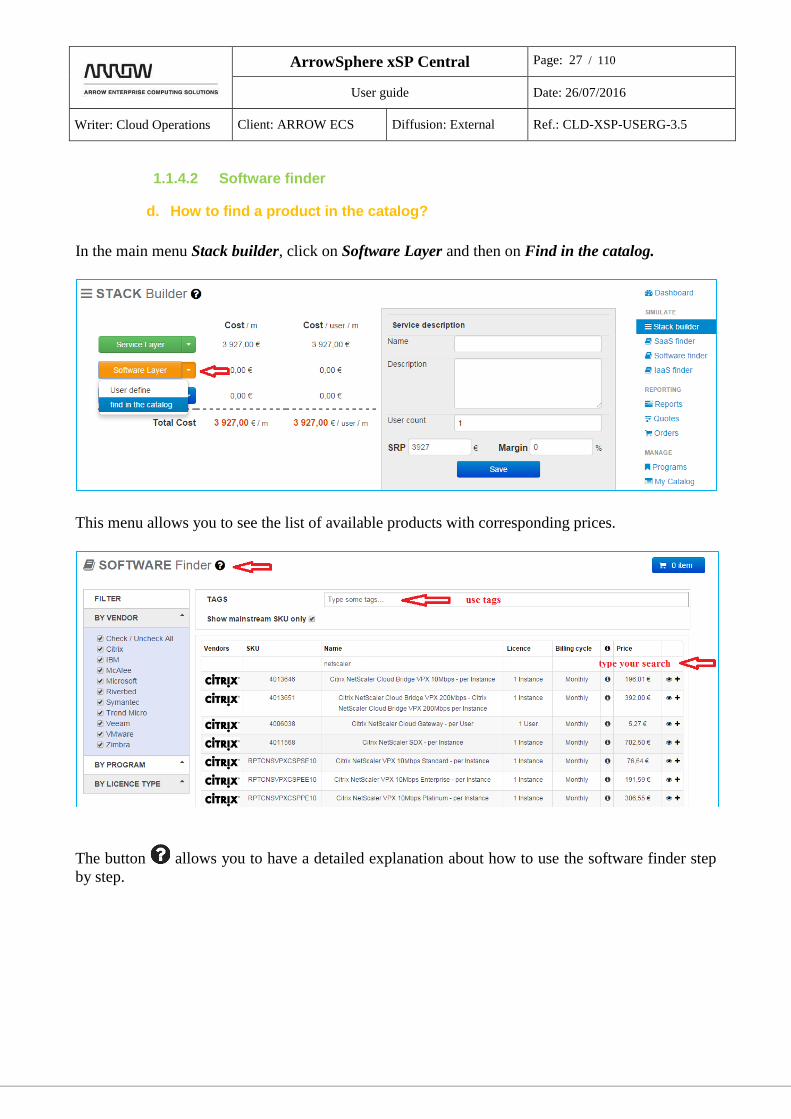
In the main menu Stack builder, click on Software Layer and then on Find in the catalog.
This menu allows you to see the list of available products with corresponding prices.
The button allows you to have a detailed explanation about how to use the software finder step
by step.

ArrowSphere xSP Central Page: 28 / 110
User guide Date: 26/07/2016
Writer: Cloud Operations Client: ARROW ECS Diffusion: External Ref.: CLD-XSP-USERG-3.5
On the left side of the page, you can filter more precisely what you are looking for. As an addition,
if you type some tags, you will see a list of predefined tags to help you.
The button allows you to have more details on prices
You can see different prices depending on the selected plan in local currency.
e. How to select a product?
1. Click on the button View to see the product.
2. Then you will see the description of the product you have chosen.
Click on Site to go directly on the vendor’s website.
Click on Product info to go on the product description page of the vendor.
The rubric Tags shows you all tags referring to this product.
ArrowSphere xSP Central Page: 29 / 110
User guide Date: 26/07/2016
Writer: Cloud Operations Client: ARROW ECS Diffusion: External Ref.: CLD-XSP-USERG-3.5
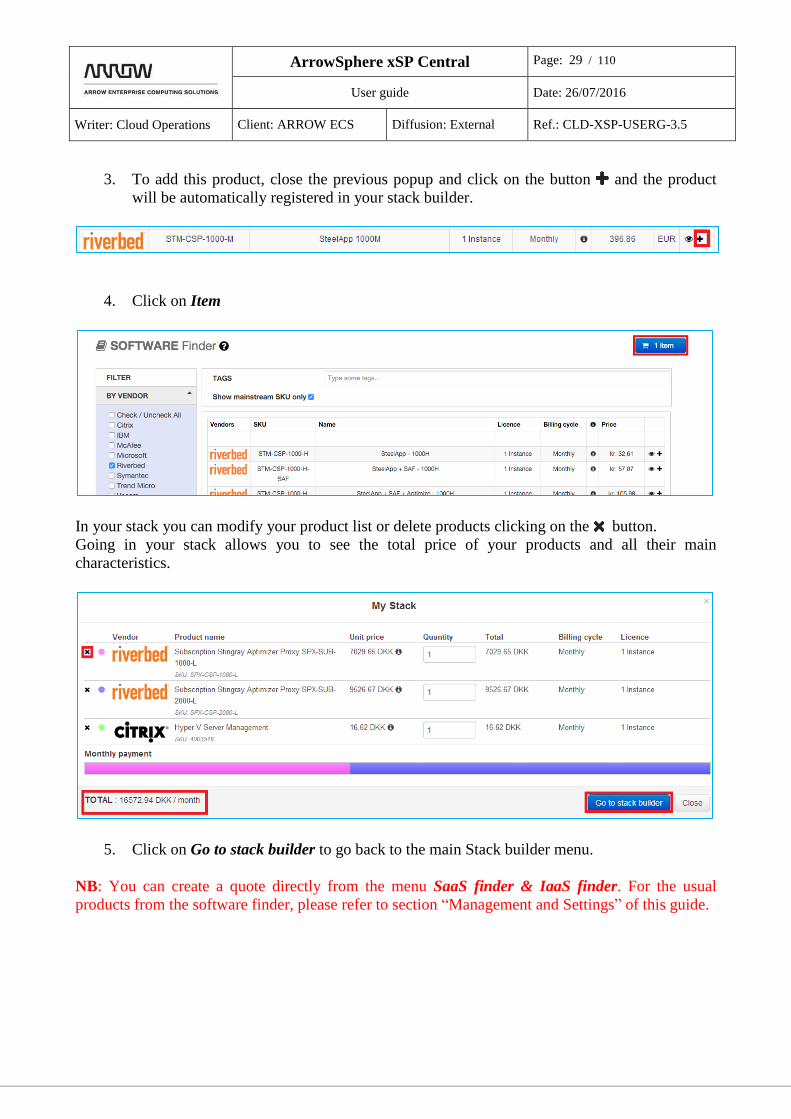
3. To add this product, close the previous popup and click on the button and the product
will be automatically registered in your stack builder.
4. Click on Item
In your stack you can modify your product list or delete products clicking on the button.
Going in your stack allows you to see the total price of your products and all their main
characteristics.
5. Click on Go to stack builder to go back to the main Stack builder menu.
NB: You can create a quote directly from the menu SaaS finder & IaaS finder. For the usual
products from the software finder, please refer to section “Management and Settings” of this guide.

ArrowSphere xSP Central Page: 30 / 110
User guide Date: 26/07/2016
Writer: Cloud Operations Client: ARROW ECS Diffusion: External Ref.: CLD-XSP-USERG-3.5
f. Deep dive in the stack builder
Once you have added some products in your stack, the main menu Stack Builder will appear like
this. This menu is divided in 2 different parts:
A: Here we can see the total cost of each category.
Colored areas in the bottom show the sharing out of costs. Click on an area to see the details.
In the same way, if you want to see the list of products you have added in your Software Layer, just
click on the little arrow next to each category to see all products you have added.

ArrowSphere xSP Central Page: 31 / 110
User guide Date: 26/07/2016
Writer: Cloud Operations Client: ARROW ECS Diffusion: External Ref.: CLD-XSP-USERG-3.5
B: This part allows you to add some comments about your products. You can add a name, a
description (that you can edit in HTML by clicking in the button Source), you can also download a
logo for your stack. Then, fill in User count and Margin to calculate the SRP (Suggested Retail
Price) witch is the price suggested for the end user.
After having completed this, click on Save and it will automatically be saved under My Services
menu.

ArrowSphere xSP Central Page: 32 / 110
User guide Date: 26/07/2016
Writer: Cloud Operations Client: ARROW ECS Diffusion: External Ref.: CLD-XSP-USERG-3.5
You can create your reports directly for all products from your service (NB: only if you have
subscribed to the associated Service Provider Program):
1. Go to the menu My services and click on Create a report
2. Put number of users, period and click on Validate
ArrowSphere xSP Central Page: 33 / 110
User guide Date: 26/07/2016
Writer: Cloud Operations Client: ARROW ECS Diffusion: External Ref.: CLD-XSP-USERG-3.5
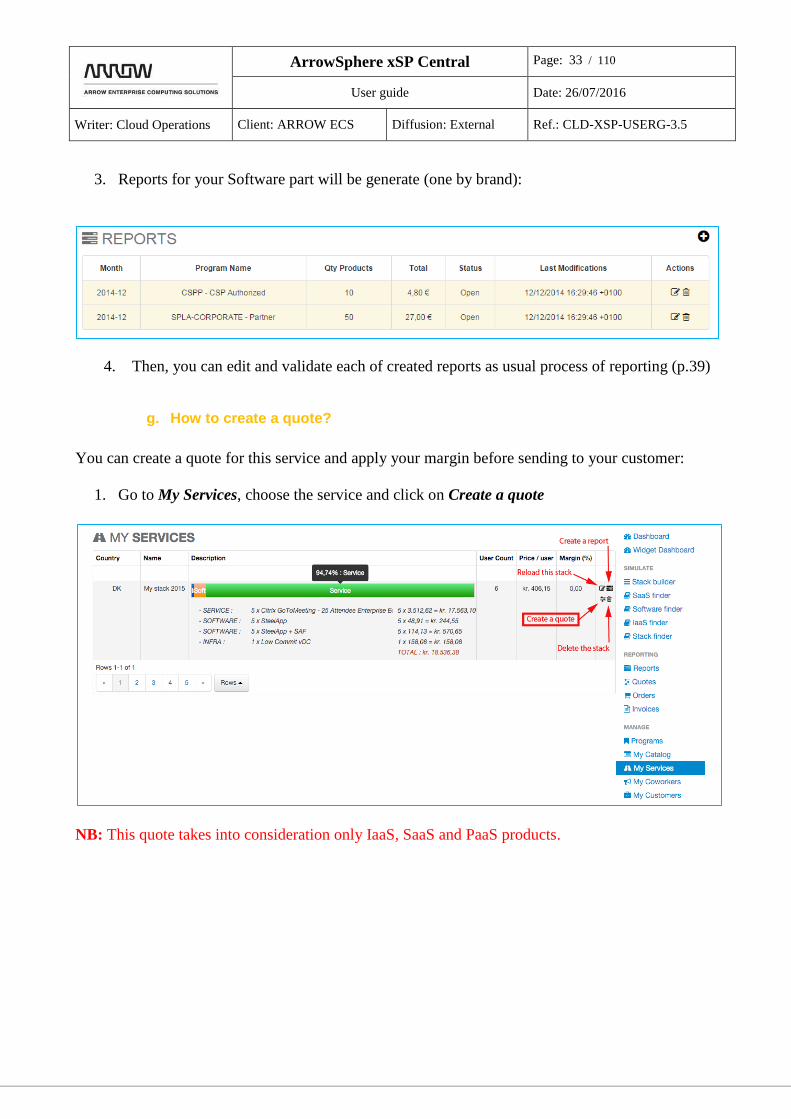
3. Reports for your Software part will be generate (one by brand):
4. Then, you can edit and validate each of created reports as usual process of reporting (p.39)
g. How to create a quote?
You can create a quote for this service and apply your margin before sending to your customer:
1. Go to My Services, choose the service and click on Create a quote
NB: This quote takes into consideration only IaaS, SaaS and PaaS products.
ArrowSphere xSP Central Page: 34 / 110
User guide Date: 26/07/2016
Writer: Cloud Operations Client: ARROW ECS Diffusion: External Ref.: CLD-XSP-USERG-3.5
1.1.4.3 IaaS finder
h. How to add a product?
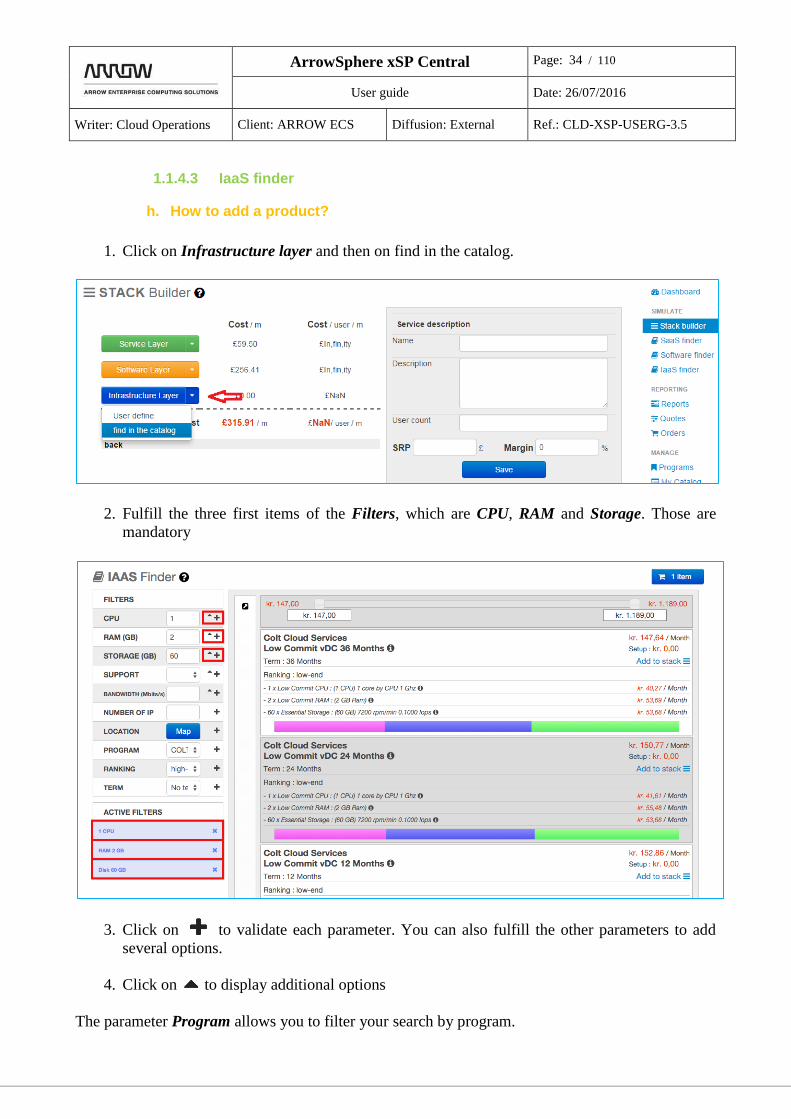
1. Click on Infrastructure layer and then on find in the catalog.
2. Fulfill the three first items of the Filters, which are CPU, RAM and Storage. Those are
mandatory
3. Click on to validate each parameter. You can also fulfill the other parameters to add
several options.
4. Click on to display additional options
The parameter Program allows you to filter your search by program.

ArrowSphere xSP Central Page: 35 / 110
User guide Date: 26/07/2016
Writer: Cloud Operations Client: ARROW ECS Diffusion: External Ref.: CLD-XSP-USERG-3.5
The parameter Location allows you to choose the country where you want to look for a datacenter.
If the location doesn’t matter for you, just don’t complete that part.
On the top of the page you can filter the list of products by price.
For each product, you have the price per month in red and the set up price.
i. How to create an order?
1. Add the product in your stack clicking on the button Add to stack.
ArrowSphere xSP Central Page: 36 / 110
User guide Date: 26/07/2016
Writer: Cloud Operations Client: ARROW ECS Diffusion: External Ref.: CLD-XSP-USERG-3.5
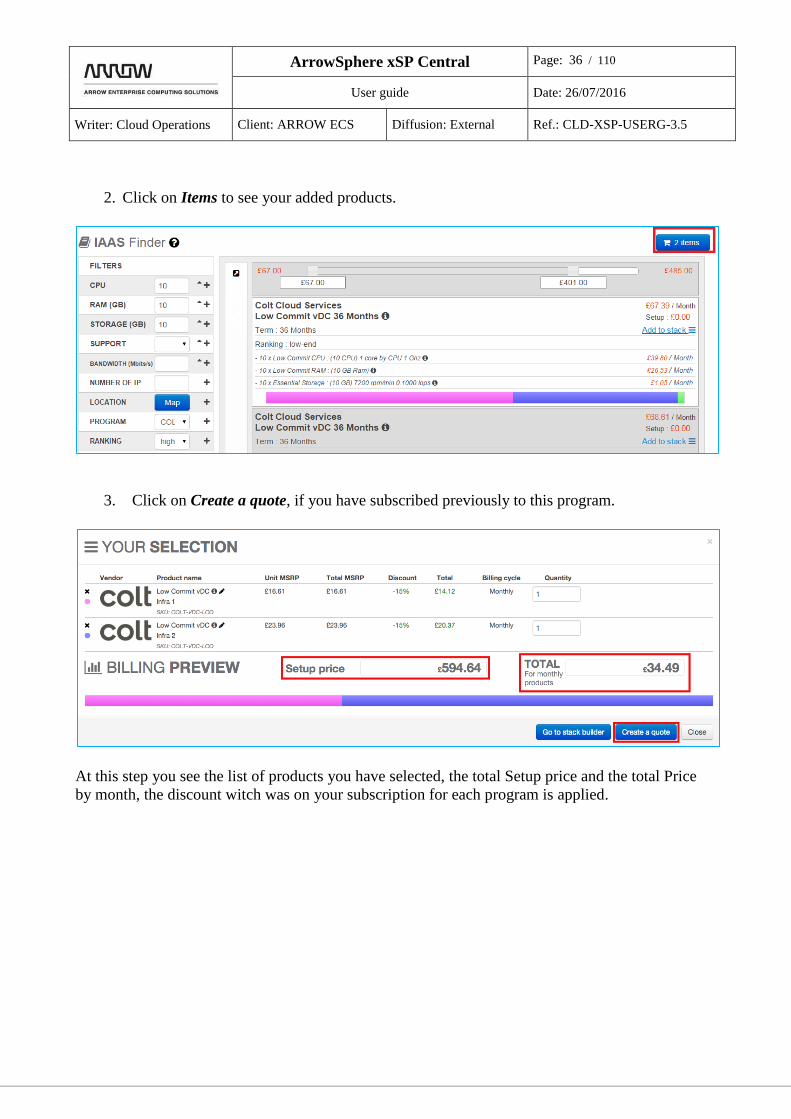
2. Click on Items to see your added products.
3. Click on Create a quote, if you have subscribed previously to this program.
At this step you see the list of products you have selected, the total Setup price and the total Price
by month, the discount witch was on your subscription for each program is applied.

ArrowSphere xSP Central Page: 37 / 110
User guide Date: 26/07/2016
Writer: Cloud Operations Client: ARROW ECS Diffusion: External Ref.: CLD-XSP-USERG-3.5
Your quote is generated and appears. If you want to create your order later, you’ll find this quote in
the main menu Quotes.
NB: You can apply uplift to the whole quote, or apply uplift by product.

ArrowSphere xSP Central Page: 38 / 110
User guide Date: 26/07/2016
Writer: Cloud Operations Client: ARROW ECS Diffusion: External Ref.: CLD-XSP-USERG-3.5
Figure 1 Quote uplift
Figure 2 Product uplift
4. To get your order now, click on cart button
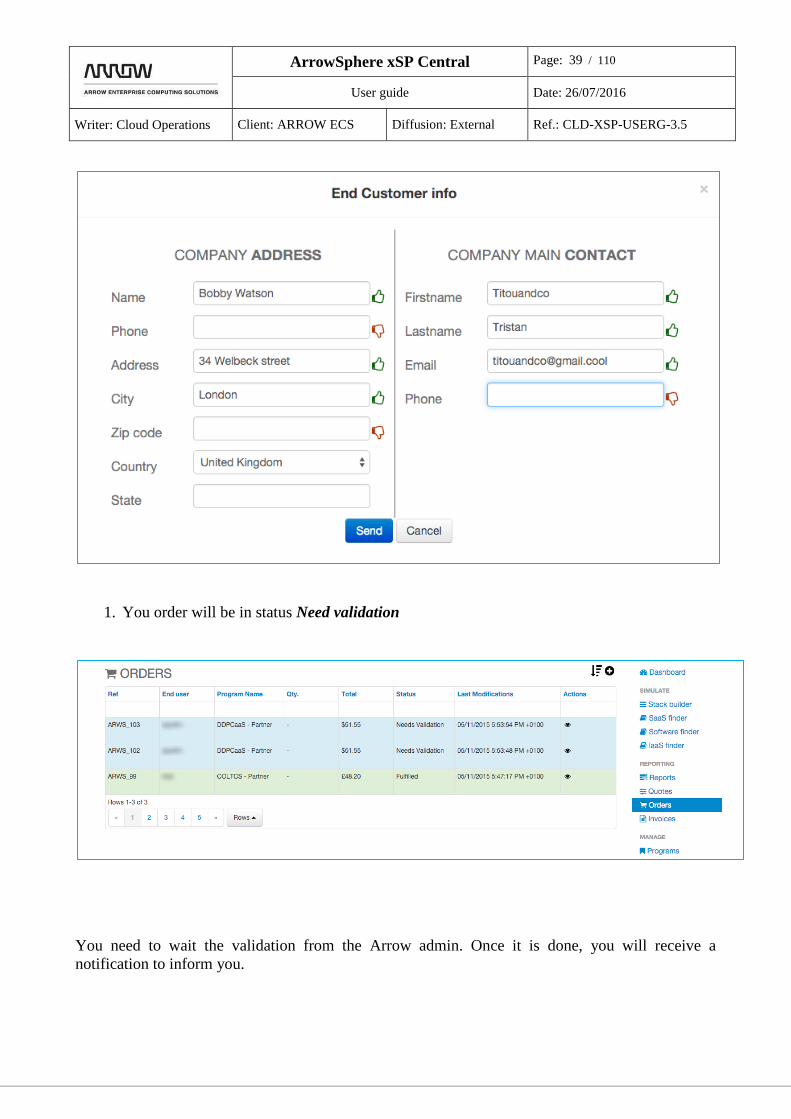
5. Choose your end customer or create a new one by filling all fields of the following
form, then click on Place Order
ArrowSphere xSP Central Page: 39 / 110
User guide Date: 26/07/2016
Writer: Cloud Operations Client: ARROW ECS Diffusion: External Ref.: CLD-XSP-USERG-3.5
1. You order will be in status Need validation
You need to wait the validation from the Arrow admin. Once it is done, you will receive a
notification to inform you.
ArrowSphere xSP Central Page: 40 / 110
User guide Date: 26/07/2016
Writer: Cloud Operations Client: ARROW ECS Diffusion: External Ref.: CLD-XSP-USERG-3.5
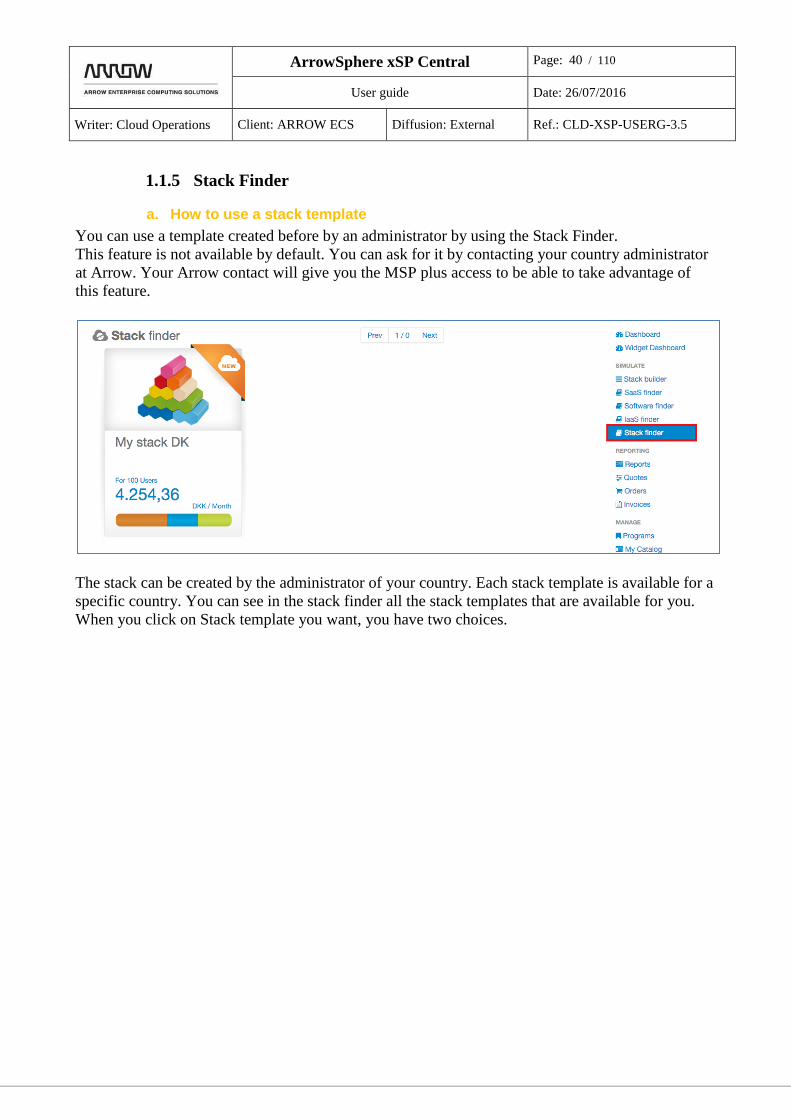
1.1.5 Stack Finder
a. How to use a stack template
You can use a template created before by an administrator by using the Stack Finder.
This feature is not available by default. You can ask for it by contacting your country administrator
at Arrow. Your Arrow contact will give you the MSP plus access to be able to take advantage of
this feature.
The stack can be created by the administrator of your country. Each stack template is available for a
specific country. You can see in the stack finder all the stack templates that are available for you.
When you click on Stack template you want, you have two choices.
ArrowSphere xSP Central Page: 41 / 110
User guide Date: 26/07/2016
Writer: Cloud Operations Client: ARROW ECS Diffusion: External Ref.: CLD-XSP-USERG-3.5
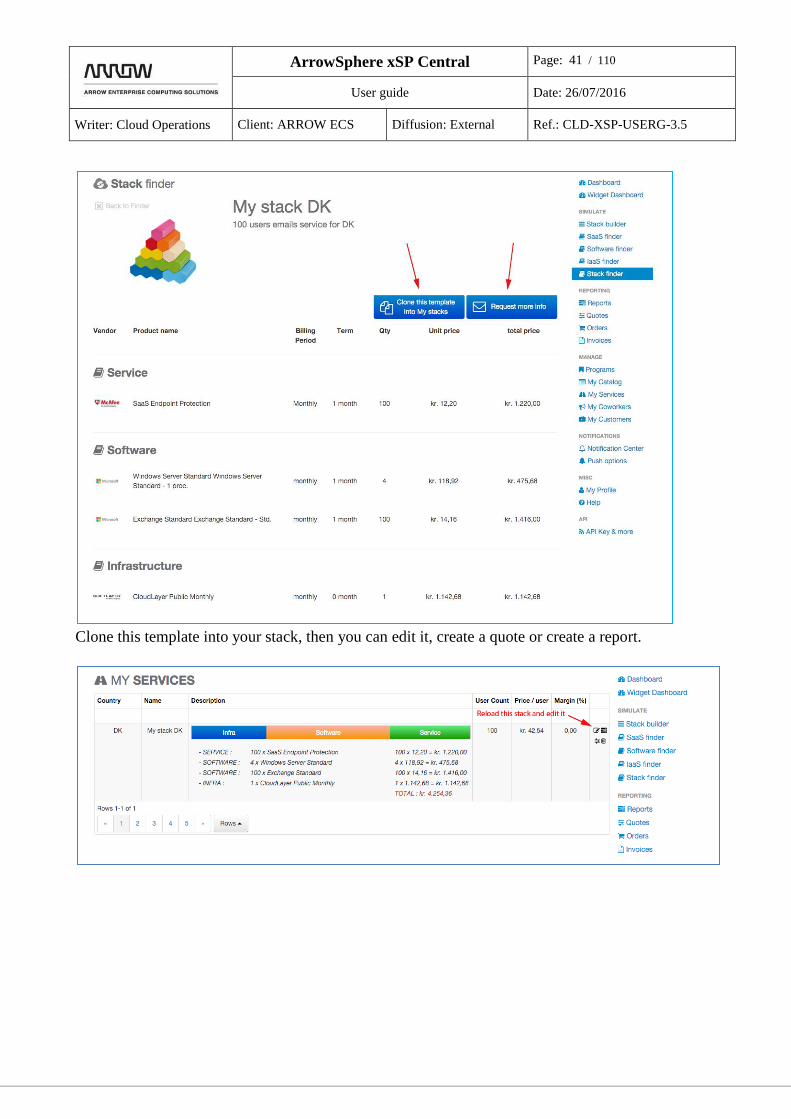
Clone this template into your stack, then you can edit it, create a quote or create a report.
ArrowSphere xSP Central Page: 42 / 110
User guide Date: 26/07/2016
Writer: Cloud Operations Client: ARROW ECS Diffusion: External Ref.: CLD-XSP-USERG-3.5
Management and settings
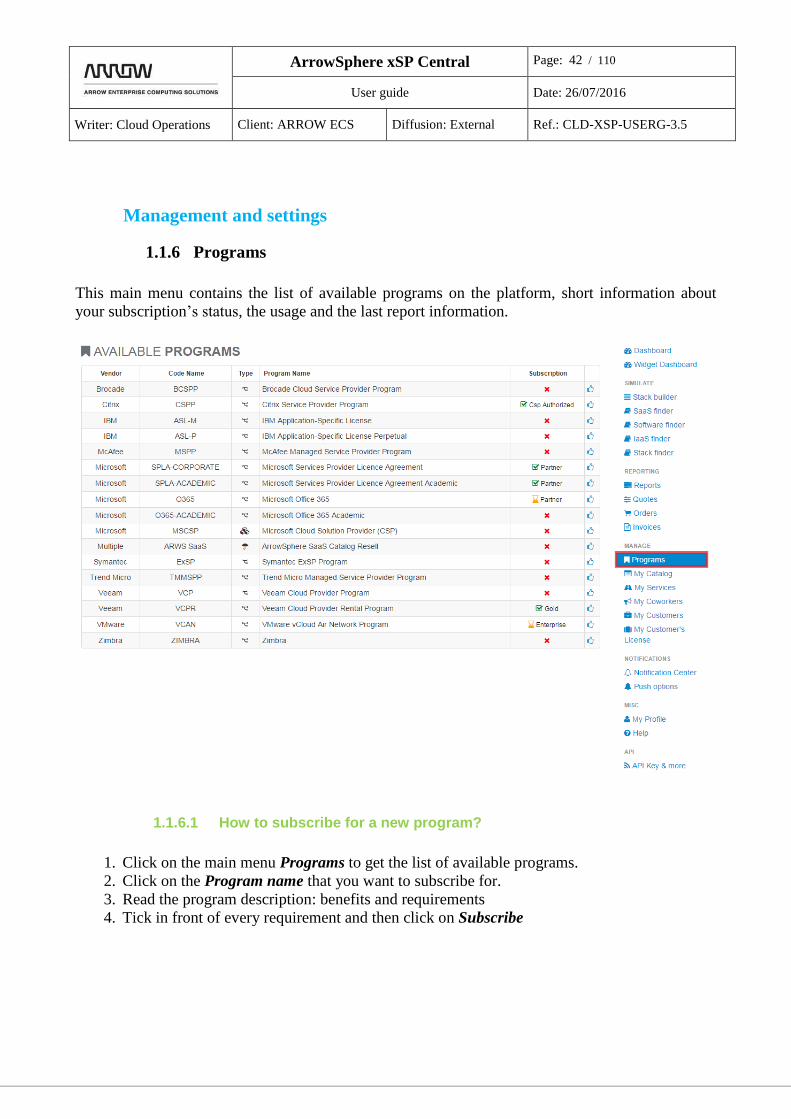
1.1.6 Programs
This main menu contains the list of available programs on the platform, short information about
your subscription’s status, the usage and the last report information.
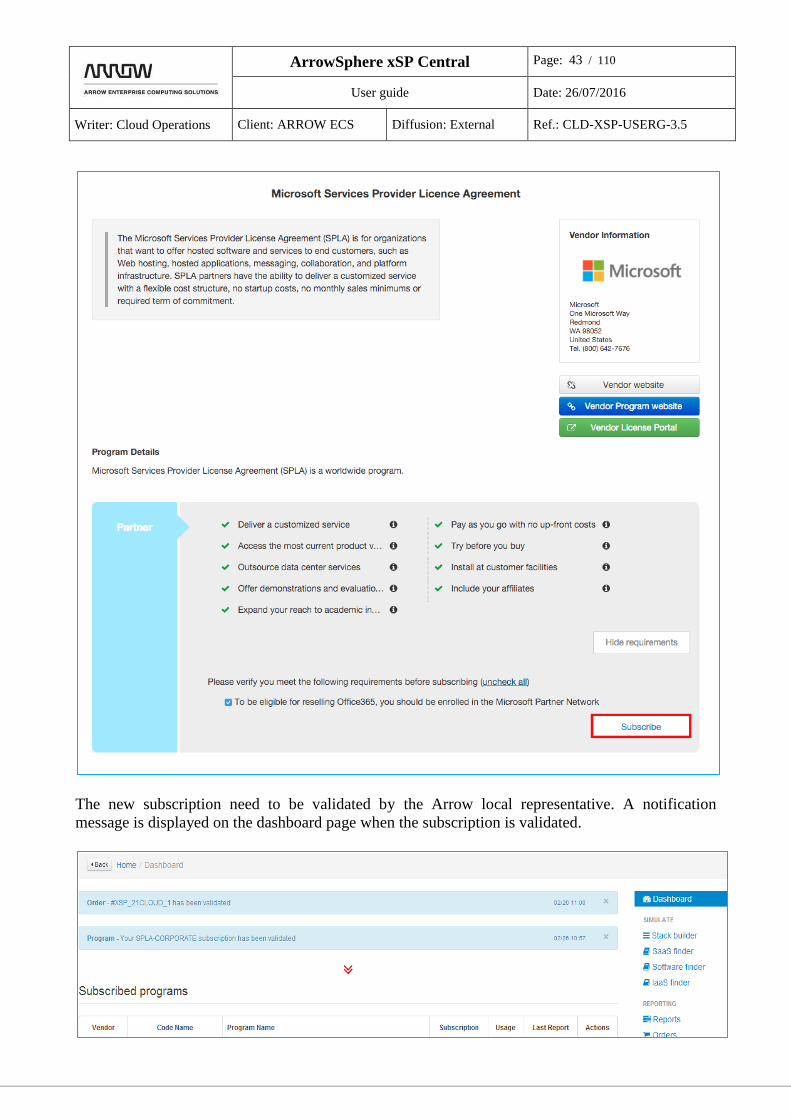
1.1.6.1 How to subscribe for a new program?
1. Click on the main menu Programs to get the list of available programs.
2. Click on the Program name that you want to subscribe for.
3. Read the program description: benefits and requirements
4. Tick in front of every requirement and then click on Subscribe
ArrowSphere xSP Central Page: 43 / 110
User guide Date: 26/07/2016
Writer: Cloud Operations Client: ARROW ECS Diffusion: External Ref.: CLD-XSP-USERG-3.5
The new subscription need to be validated by the Arrow local representative. A notification
message is displayed on the dashboard page when the subscription is validated.

ArrowSphere xSP Central Page: 44 / 110
User guide Date: 26/07/2016
Writer: Cloud Operations Client: ARROW ECS Diffusion: External Ref.: CLD-XSP-USERG-3.5
1.1.7 Catalog usage
This page is dedicated to show the complete product catalog with SKUs prices.
To filter products by name, program etc, please use the second line of the list. You can type the full
name of the program, vendor or product or just a part of.
1.1.7.1 How to export the product list?
In the menu Catalog, put your filters and click on the wanted format file icon:
The file will be automatically downloaded.
ArrowSphere xSP Central Page: 45 / 110
User guide Date: 26/07/2016
Writer: Cloud Operations Client: ARROW ECS Diffusion: External Ref.: CLD-XSP-USERG-3.5
1.1.8 Reporting
This functionality allows you to report every month the consumption data directly in the platform,
view your consumptions per month in the graphic dashboard view.
After creation of a report, the system allows you to edit it before validation. It allows you to
preview your monthly reports and in the beginning of the month you will only need to validate it.
Each validated report generates an automatic order. After each validation of a new report, a
notification e-mail is sent to the Arrow representative and to yourself.
Then, you will be notified by e-mail when the Arrow manager will validate the order.
1.1.8.1 Specific reporting for Riverbed SPP, Office 365, Microsoft SPLA and VEEAM VCP.
Riverbed SPP: every month the xSP admin will upload the monthly consumption for this
program that will generate the automatic report for the respective month. You will only have
to validate the report during the following 4 days. You’ll be always notified when the
validation from your side is available.
Office 365: You should create directly an order by going in the menu Orders. Then, the
Arrow Brand Manager, as for other programs, will validate the order.
Microsoft SPLA and VEEAM VCP: you need to complete your report with the end
customer information.
NB: You have to set up previously customer company name in the menu Customers or when
creating quote to be able to assign the order to one of your customers. It is mandatory to assign an
End User(s) to every order.

ArrowSphere xSP Central Page: 46 / 110
User guide Date: 26/07/2016
Writer: Cloud Operations Client: ARROW ECS Diffusion: External Ref.: CLD-XSP-USERG-3.5
1.1.8.2 How to create, edit, validate and delete a report?
1. Go to the Reports menu
2. Click on Add report icon
3. Choose the program from the list of available programs for reporting.
4. Choose the report month and let the button on OFF.
It is also possible to copy the report from previous month and edit it after creation.

ArrowSphere xSP Central Page: 47 / 110
User guide Date: 26/07/2016
Writer: Cloud Operations Client: ARROW ECS Diffusion: External Ref.: CLD-XSP-USERG-3.5
5. Click on Create Report
6. Click on Add line and complete the reporting information: Product, Quantity, Customer etc.
7. Click on validate, the report is created.

ArrowSphere xSP Central Page: 48 / 110
User guide Date: 26/07/2016
Writer: Cloud Operations Client: ARROW ECS Diffusion: External Ref.: CLD-XSP-USERG-3.5
The report is created and is visible in the list of reports with the status Open (the status is Accepted
while you have validated your report). From the list of report you can Edit and Delete your report
by clicking on the corresponding button:
.
(Report menu view)
NB: All reports can be created whenever you want during the month. However, it is mandatory to
validate your reports for the current month during the 1st week of the next month.
It allows you to prepare in advance the report, edit the consumption data if needed and validate it
when the reporting month is finished.
8. If you want to validate or modify the report, click on Edit report icon.

ArrowSphere xSP Central Page: 49 / 110
User guide Date: 26/07/2016
Writer: Cloud Operations Client: ARROW ECS Diffusion: External Ref.: CLD-XSP-USERG-3.5
Then add your modification and click on Validate this report on the bottom of the page.
At this moment, you will see a last dialog box where you can complete your internal PO number
reference if you want to show it on the invoice (this is not mandatory) then click on the button to
Validate definitively your report.
Once the report validated, an order is automatically created and an e-mail notification is sent to the
Arrow representative. The list of orders is available in the corresponding menu Orders and on the
Dashboard list of orders too.

ArrowSphere xSP Central Page: 50 / 110
User guide Date: 26/07/2016
Writer: Cloud Operations Client: ARROW ECS Diffusion: External Ref.: CLD-XSP-USERG-3.5
You can also create a comment linked with a report. To do that, edit the report and enter a comment

ArrowSphere xSP Central Page: 51 / 110
User guide Date: 26/07/2016
Writer: Cloud Operations Client: ARROW ECS Diffusion: External Ref.: CLD-XSP-USERG-3.5
1.1.8.3 How to upload report using the wizard?
You can also upload each month your report in an excel format using xSP report template.
a. Click on Add report on the dashboard report list
b. Choose the program and the month and click on Create report
c. Click on the icon XLS Uploader
ArrowSphere xSP Central Page: 52 / 110
User guide Date: 26/07/2016
Writer: Cloud Operations Client: ARROW ECS Diffusion: External Ref.: CLD-XSP-USERG-3.5
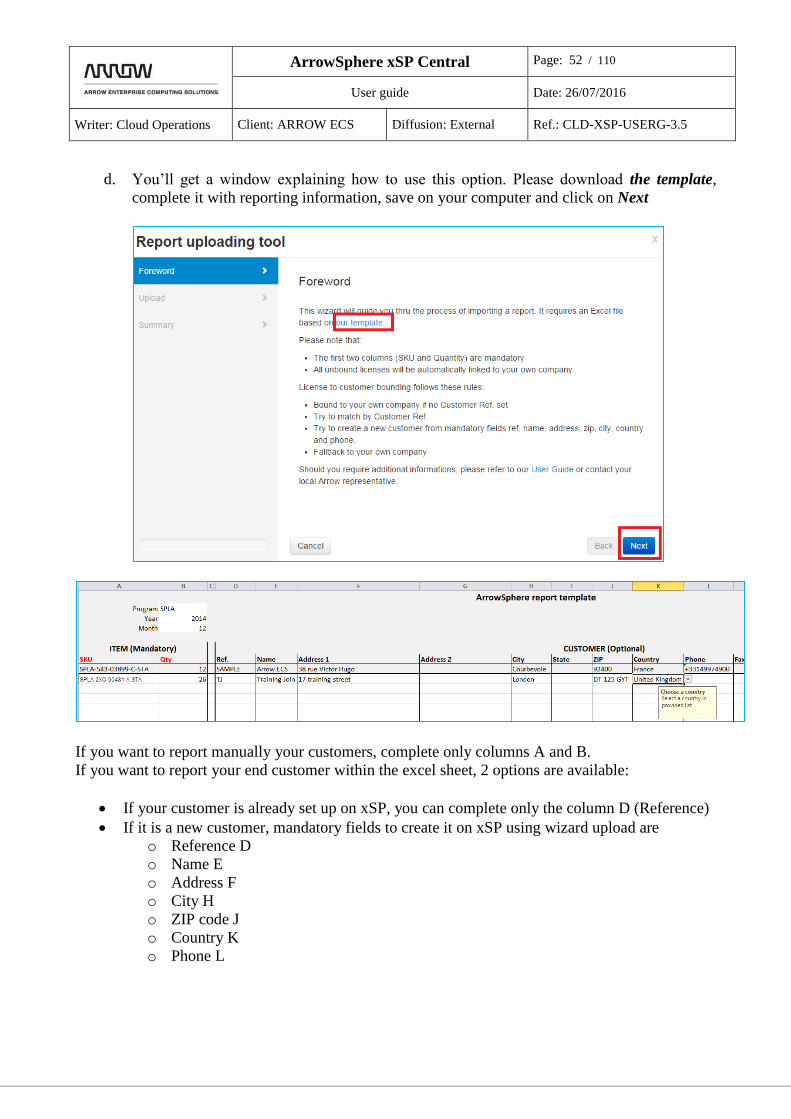
d. You’ll get a window explaining how to use this option. Please download the template,
complete it with reporting information, save on your computer and click on Next
If you want to report manually your customers, complete only columns A and B.
If you want to report your end customer within the excel sheet, 2 options are available:
If your customer is already set up on xSP, you can complete only the column D (Reference)
If it is a new customer, mandatory fields to create it on xSP using wizard upload are
o Reference D
o Name E
o Address F
o City H
o ZIP code J
o Country K
o Phone L
ArrowSphere xSP Central Page: 53 / 110
User guide Date: 26/07/2016
Writer: Cloud Operations Client: ARROW ECS Diffusion: External Ref.: CLD-XSP-USERG-3.5
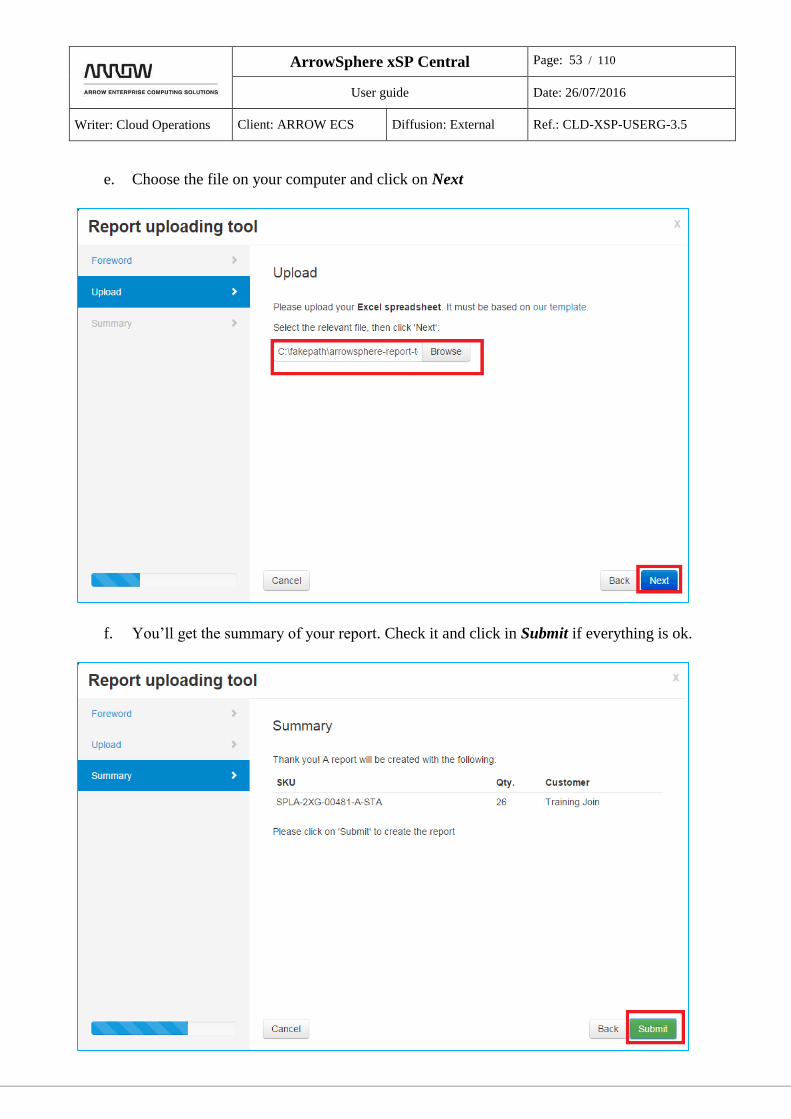
e. Choose the file on your computer and click on Next
f. You’ll get the summary of your report. Check it and click in Submit if everything is ok.
ArrowSphere xSP Central Page: 54 / 110
User guide Date: 26/07/2016
Writer: Cloud Operations Client: ARROW ECS Diffusion: External Ref.: CLD-XSP-USERG-3.5
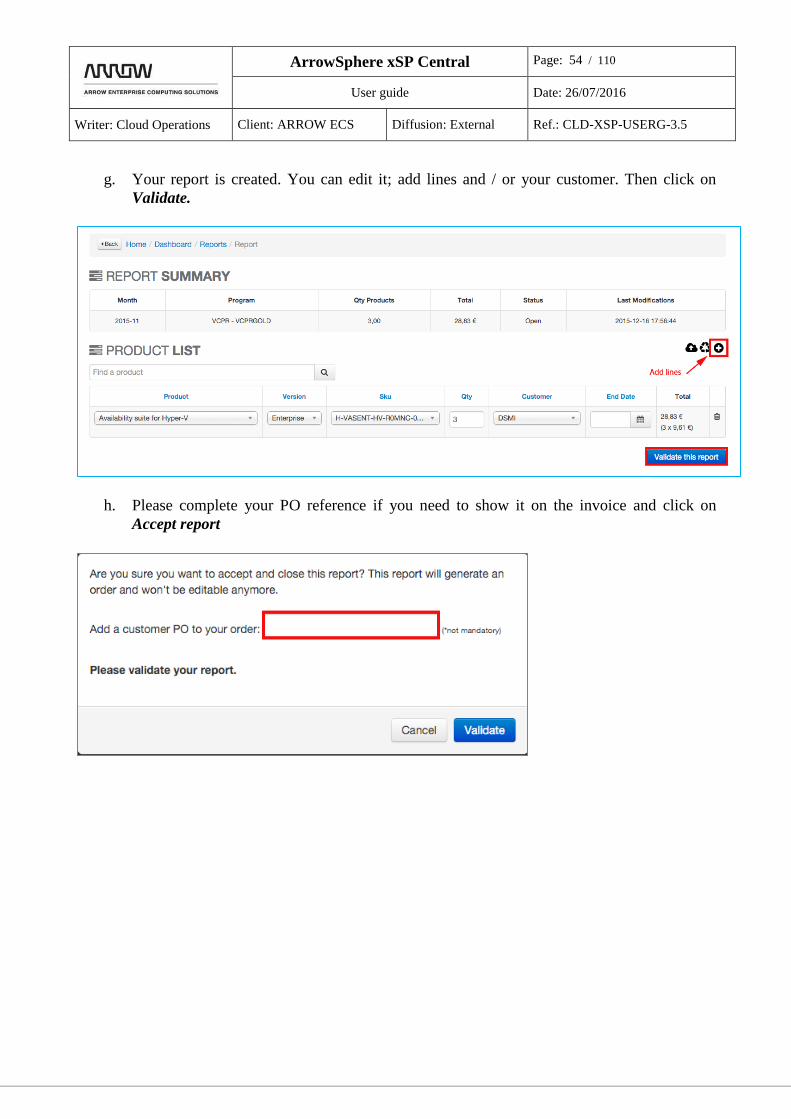
g. Your report is created. You can edit it; add lines and / or your customer. Then click on
Validate.
h. Please complete your PO reference if you need to show it on the invoice and click on
Accept report

ArrowSphere xSP Central Page: 55 / 110
User guide Date: 26/07/2016
Writer: Cloud Operations Client: ARROW ECS Diffusion: External Ref.: CLD-XSP-USERG-3.5
1.1.8.4 How to make a VCAN report using the wizard ?
Click Report item on right menu
Chose VCAN program and select the appropriated report period date.
Click Create report button
Since February 2016 VMware have changed their report process and have required that you need to
report before on their portal named IASSET. Arrow need also you report your VCAN consumption
but do their best to avoid double enter by MSP.
So when you have already create your report on IASSET, xSP will find your report and import it
immediately and you just have to validate it and that’s it.
If you didn’t already create your report on IASSET, xSP will show you the screen following.
Click on the paper plane button to go to your IASSET portal and report your consumption on
VMware portal. Please report every IASSET issue if ever to VMware customer support.
xSP will import your VCAN report once it is submitted in pending SP status with a night batch or
immediately if you come back to xSP and refresh the screen above.
Your report will be created and you can make the final check before validation.

ArrowSphere xSP Central Page: 56 / 110
User guide Date: 26/07/2016
Writer: Cloud Operations Client: ARROW ECS Diffusion: External Ref.: CLD-XSP-USERG-3.5
1.1.8.5 How to create a quote
Start to click on the item menu at right of the screen.

ArrowSphere xSP Central Page: 57 / 110
User guide Date: 26/07/2016
Writer: Cloud Operations Client: ARROW ECS Diffusion: External Ref.: CLD-XSP-USERG-3.5
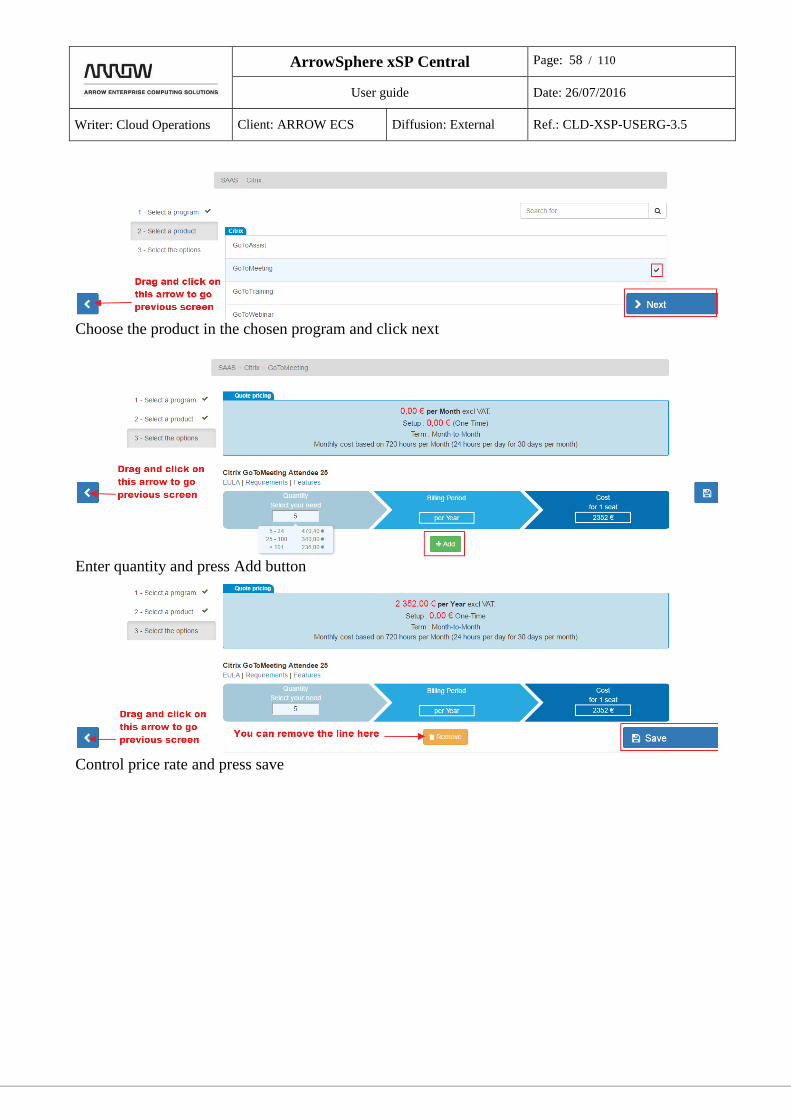
Select a program (in this example Citrix) and press Next
ArrowSphere xSP Central Page: 58 / 110
User guide Date: 26/07/2016
Writer: Cloud Operations Client: ARROW ECS Diffusion: External Ref.: CLD-XSP-USERG-3.5
Choose the product in the chosen program and click next
Enter quantity and press Add button
Control price rate and press save

ArrowSphere xSP Central Page: 59 / 110
User guide Date: 26/07/2016
Writer: Cloud Operations Client: ARROW ECS Diffusion: External Ref.: CLD-XSP-USERG-3.5
You can hide buy prices by clicking on End Customer view
ArrowSphere xSP Central Page: 60 / 110
User guide Date: 26/07/2016
Writer: Cloud Operations Client: ARROW ECS Diffusion: External Ref.: CLD-XSP-USERG-3.5
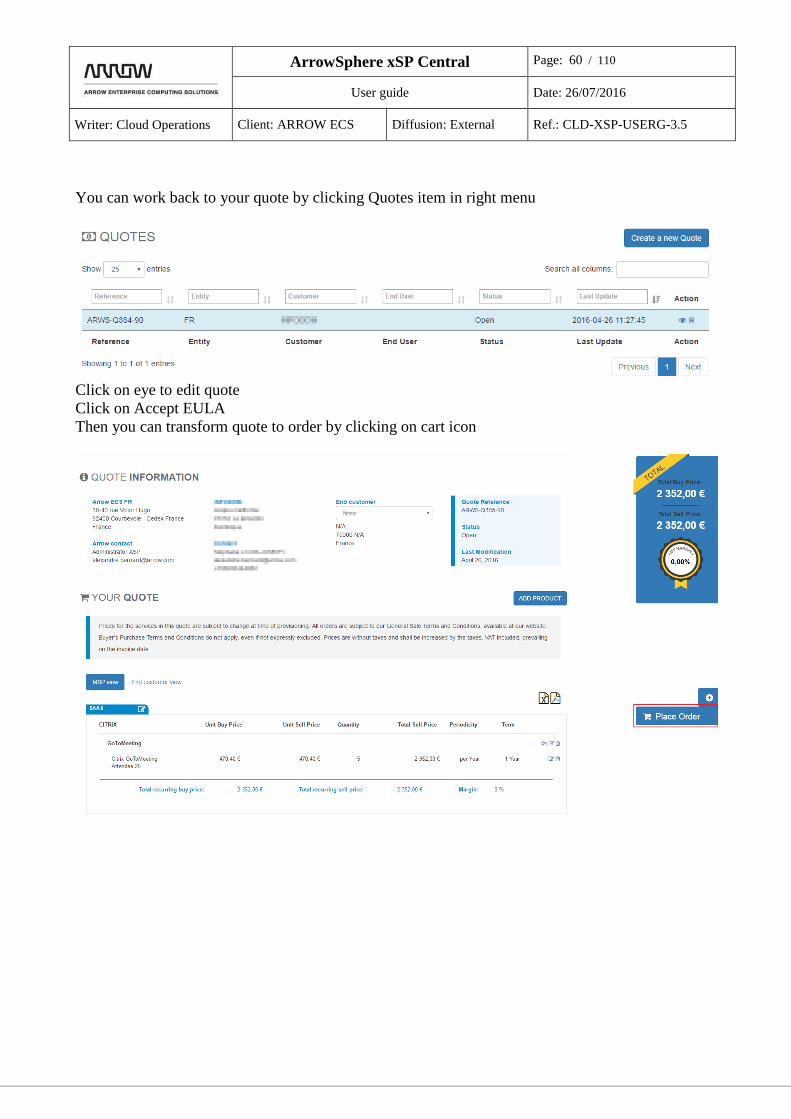
You can work back to your quote by clicking Quotes item in right menu
Click on eye to edit quote
Click on Accept EULA
Then you can transform quote to order by clicking on cart icon
ArrowSphere xSP Central Page: 61 / 110
User guide Date: 26/07/2016
Writer: Cloud Operations Client: ARROW ECS Diffusion: External Ref.: CLD-XSP-USERG-3.5
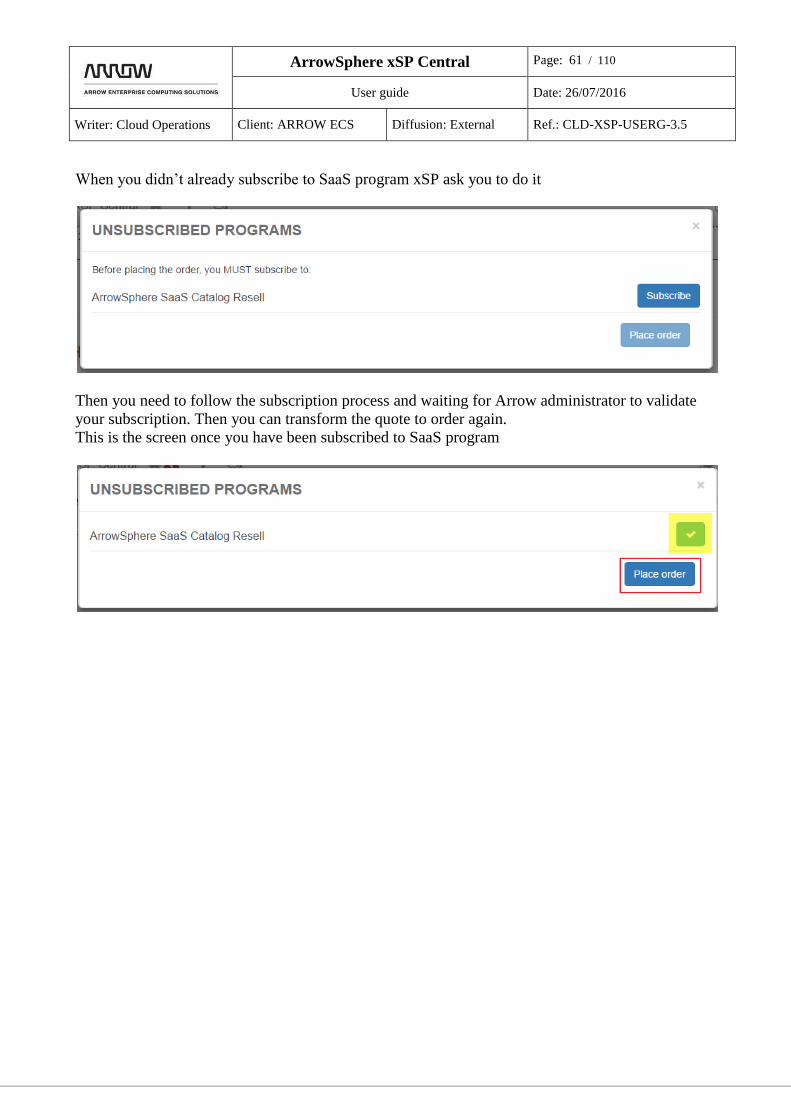
When you didn’t already subscribe to SaaS program xSP ask you to do it
Then you need to follow the subscription process and waiting for Arrow administrator to validate
your subscription. Then you can transform the quote to order again.
This is the screen once you have been subscribed to SaaS program

ArrowSphere xSP Central Page: 62 / 110
User guide Date: 26/07/2016
Writer: Cloud Operations Client: ARROW ECS Diffusion: External Ref.: CLD-XSP-USERG-3.5
ArrowSphere xSP Central Page: 63 / 110
User guide Date: 26/07/2016
Writer: Cloud Operations Client: ARROW ECS Diffusion: External Ref.: CLD-XSP-USERG-3.5
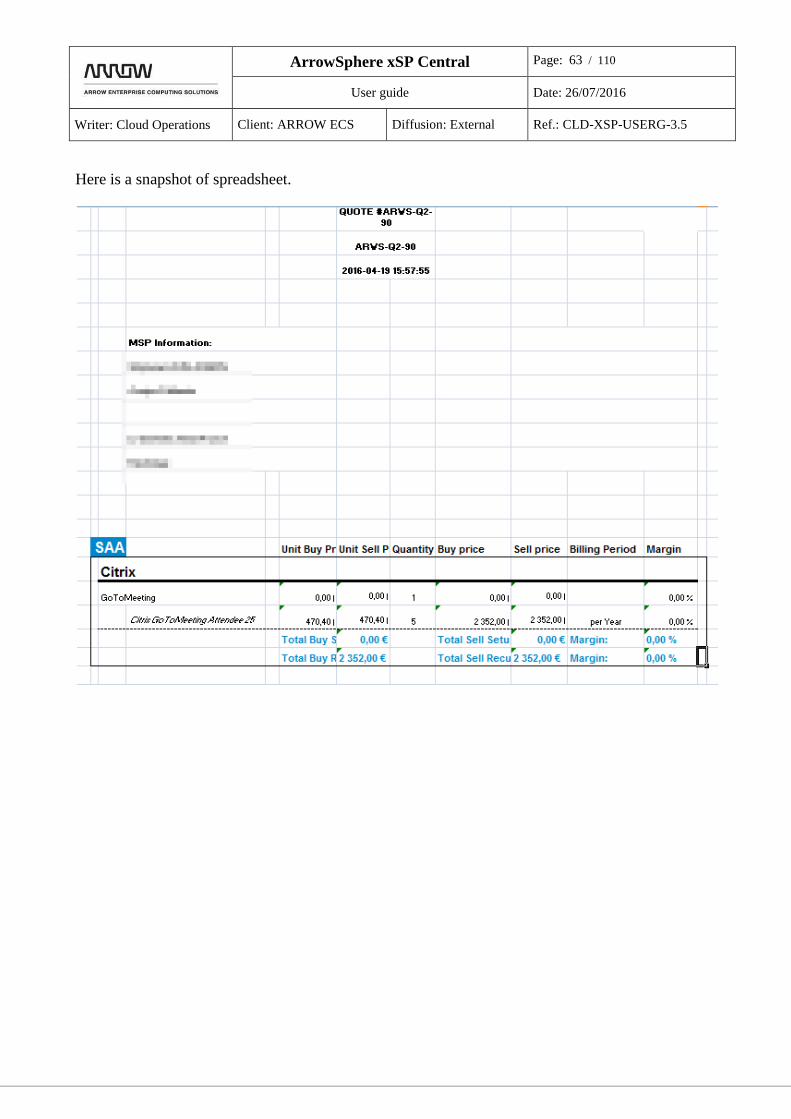
Here is a snapshot of spreadsheet.

ArrowSphere xSP Central Page: 64 / 110
User guide Date: 26/07/2016
Writer: Cloud Operations Client: ARROW ECS Diffusion: External Ref.: CLD-XSP-USERG-3.5
1.1.8.6 Orders
This menu contains all orders created after report validation, via IaaS finder, Software finder, and
SaaS finder or, as for Office 365, created directly from this menu. In this menu, you can visualize
your orders, download the PO and follow up the status of order validations.
b. How to create an order?
The orders are created automatically after your reports validation.
As for Office 365, you should add an order directly from this menu by clicking on Add order icon.
Then you complete the form with the program name and Customer associated and click on Create
Order button. Switch on the button if you want to copy your previous month order.
NB: You have to set up previously customer company name in the menu Customers or when
creating a quote, to be able to assign the order to one of your customers. It is mandatory to assign
an End User to every order.
You can also create an order from the menus IaaS finder / SaaS finder.
ArrowSphere xSP Central Page: 65 / 110
User guide Date: 26/07/2016
Writer: Cloud Operations Client: ARROW ECS Diffusion: External Ref.: CLD-XSP-USERG-3.5
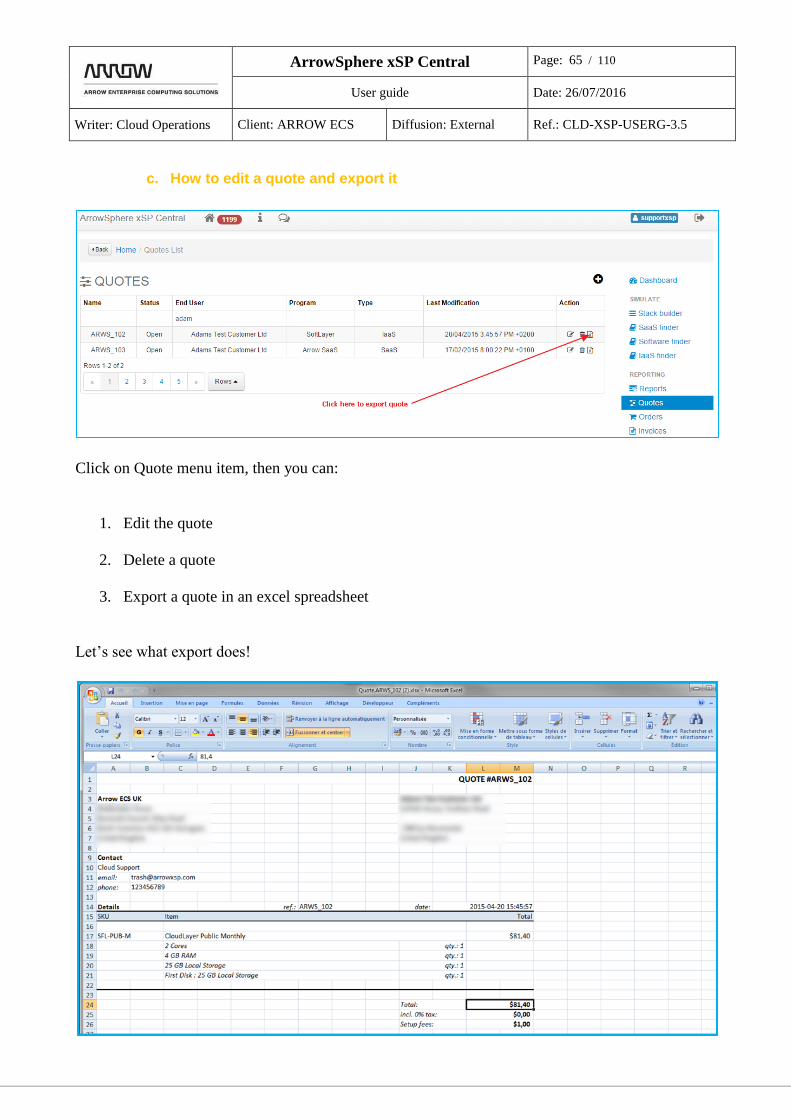
c. How to edit a quote and export it
Click on Quote menu item, then you can:
1. Edit the quote
2. Delete a quote
3. Export a quote in an excel spreadsheet
Let’s see what export does!
ArrowSphere xSP Central Page: 66 / 110
User guide Date: 26/07/2016
Writer: Cloud Operations Client: ARROW ECS Diffusion: External Ref.: CLD-XSP-USERG-3.5
1.1.9 Contacts
This menu allows you to add contacts from your company.
A Coworker – is someone who will be able to only see the platform information or see the
information and make actions.
A Contact – is any contact from your company that you need to have details on the platform. This
person will not have account on xSP Central and will not be able to use the platform.
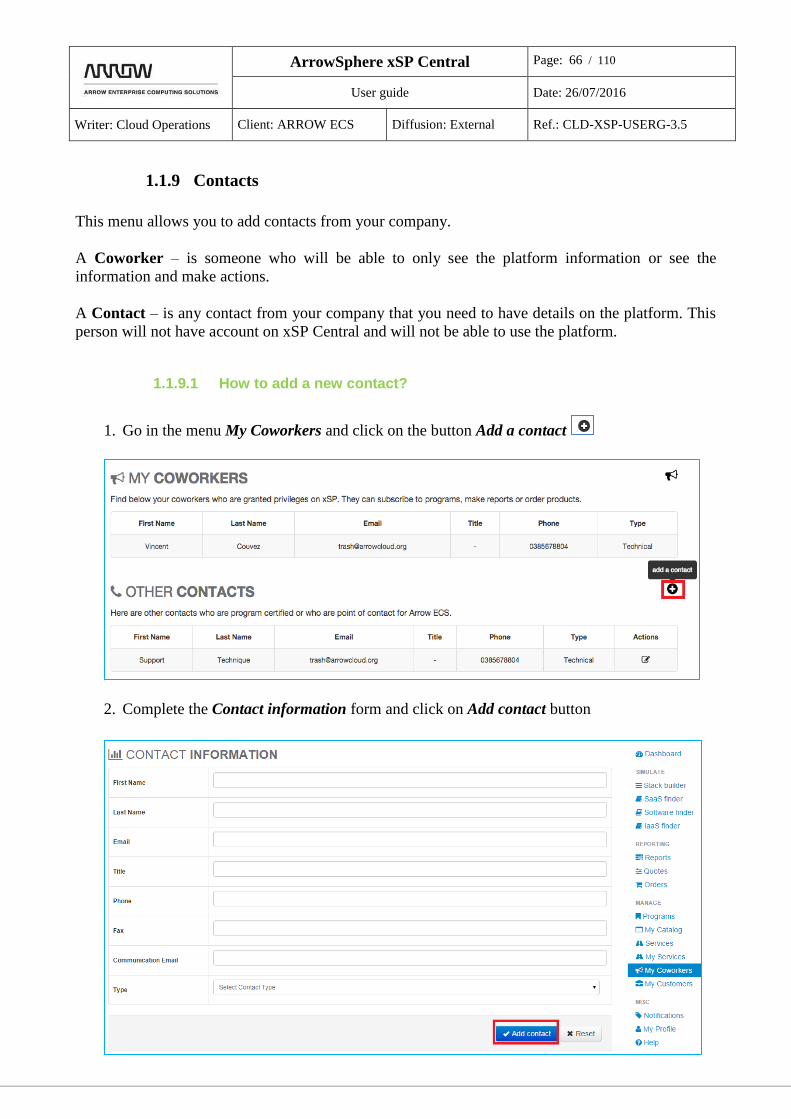
1.1.9.1 How to add a new contact?
1. Go in the menu My Coworkers and click on the button Add a contact
2. Complete the Contact information form and click on Add contact button

ArrowSphere xSP Central Page: 67 / 110
User guide Date: 26/07/2016
Writer: Cloud Operations Client: ARROW ECS Diffusion: External Ref.: CLD-XSP-USERG-3.5
1.1.9.2 How to invite a colleague?
1. Go to the menu My Coworkers and click on Invite a colleague
2. Complete the colleague’s e-mail address (the e-mail extension should be the same as yours =
company extension) and click on Invite and then, OK.
The user (invited by you colleague) receives a notification e-mail with the link to the xSP Central
registration form.

ArrowSphere xSP Central Page: 68 / 110
User guide Date: 26/07/2016
Writer: Cloud Operations Client: ARROW ECS Diffusion: External Ref.: CLD-XSP-USERG-3.5
1. The new user should complete the subscription form and click on Register.
The subscription is automatically validated; the user is created and can use the platform.

ArrowSphere xSP Central Page: 69 / 110
User guide Date: 26/07/2016
Writer: Cloud Operations Client: ARROW ECS Diffusion: External Ref.: CLD-XSP-USERG-3.5
1.1.9.3 How to edit a contact?
1. Go in the menu My Coworkers / Contacts and click on the Edit icon
2. Edit the Contact information and click on Edit contact button
ArrowSphere xSP Central Page: 70 / 110
User guide Date: 26/07/2016
Writer: Cloud Operations Client: ARROW ECS Diffusion: External Ref.: CLD-XSP-USERG-3.5
1.1.10 Customers / Reporters
Customer = your customer company for whom you are reselling the service.
Reporter = dedicated person from your customer company who has a specific xSP account that
allows him to see reports (created by you), edit if required and notify about it the reseller, you.
NB: it is mandatory to assign a Customer to every order of the Office 365, every report for RSPP
and VCP. So, please, set up your customers ordering Office 365 before the order creation.
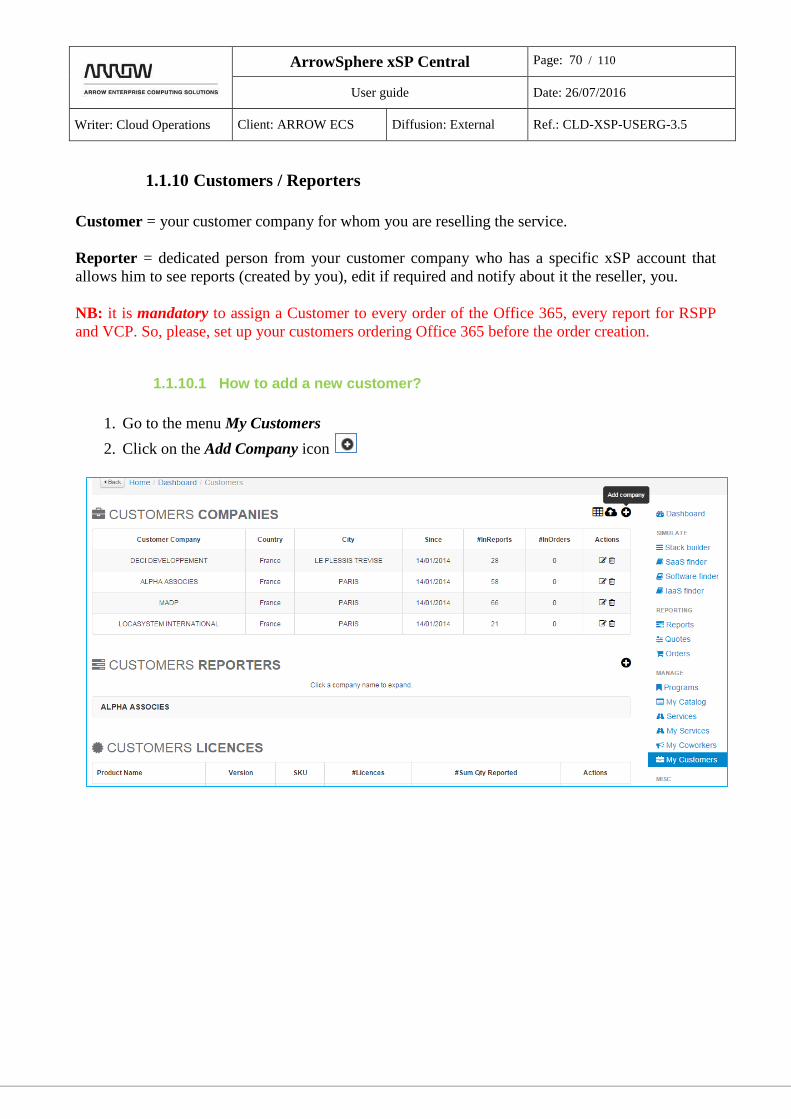
1.1.10.1 How to add a new customer?
1. Go to the menu My Customers
2. Click on the Add Company icon

ArrowSphere xSP Central Page: 71 / 110
User guide Date: 26/07/2016
Writer: Cloud Operations Client: ARROW ECS Diffusion: External Ref.: CLD-XSP-USERG-3.5
3. Complete the New Customer information form and click on Save Customer
To onboard quickly a list of customer, you can download the excel template and upload it back once
you have filled in with the required information. More details in the next point.

ArrowSphere xSP Central Page: 72 / 110
User guide Date: 26/07/2016
Writer: Cloud Operations Client: ARROW ECS Diffusion: External Ref.: CLD-XSP-USERG-3.5
1.1.10.2 How to import a list of customers?
1. In the My Customers menu click on the Download Excel template icon to download
the template to be completed.
2. Complete the template and save it in the location of your choice
3. Click on the Bulk Upload icon
4. Browse the file with the list of customers
5. Click on Bulk upload customers list
1.1.10.3 How to edit customer information?
1. Go to the list of customer in the menu My Customers
2. Click on the button Edit in the line with the customer you want to edit
3. Edit the necessary information and click on Save Customer button
1.1.10.4 How to delete a customer?
1. Go through the list of customer in the menu Customers
2. Click on the button Delete in the line with customer you want to delete
3. Confirm the deletion by clicking on Delete Customer button
ArrowSphere xSP Central Page: 73 / 110
User guide Date: 26/07/2016
Writer: Cloud Operations Client: ARROW ECS Diffusion: External Ref.: CLD-XSP-USERG-3.5
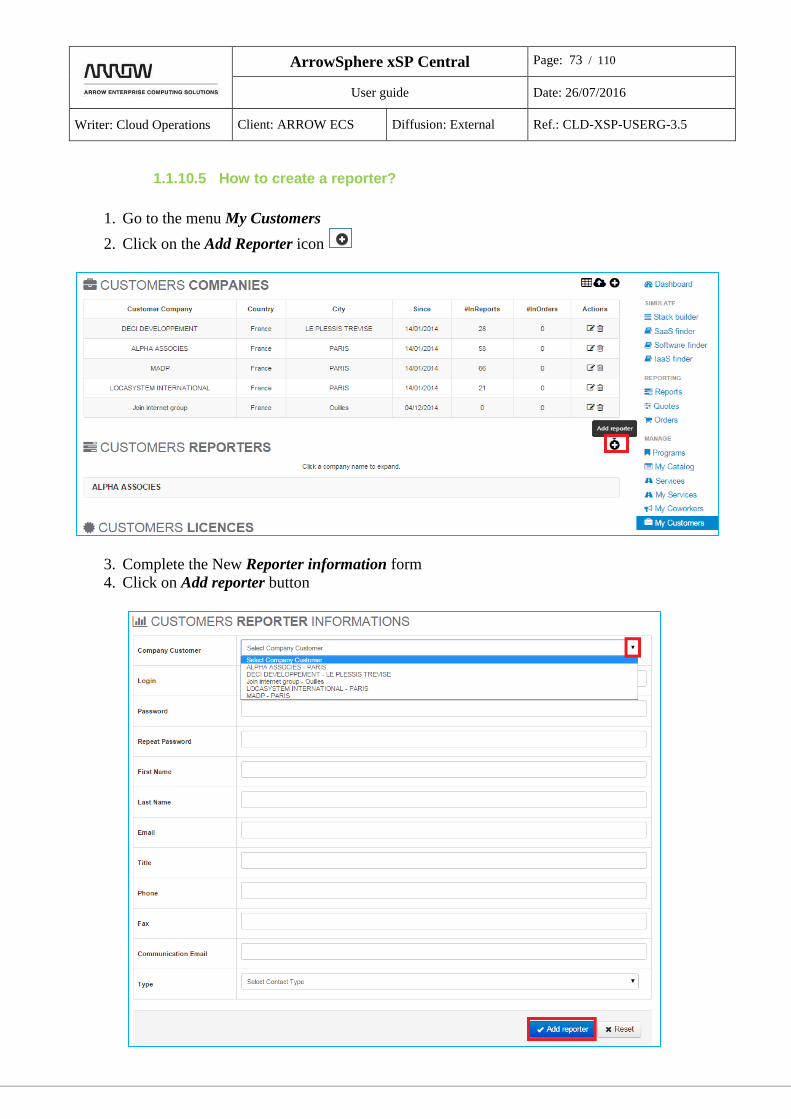
1.1.10.5 How to create a reporter?
1. Go to the menu My Customers
2. Click on the Add Reporter icon
3. Complete the New Reporter information form
4. Click on Add reporter button
ArrowSphere xSP Central Page: 74 / 110
User guide Date: 26/07/2016
Writer: Cloud Operations Client: ARROW ECS Diffusion: External Ref.: CLD-XSP-USERG-3.5
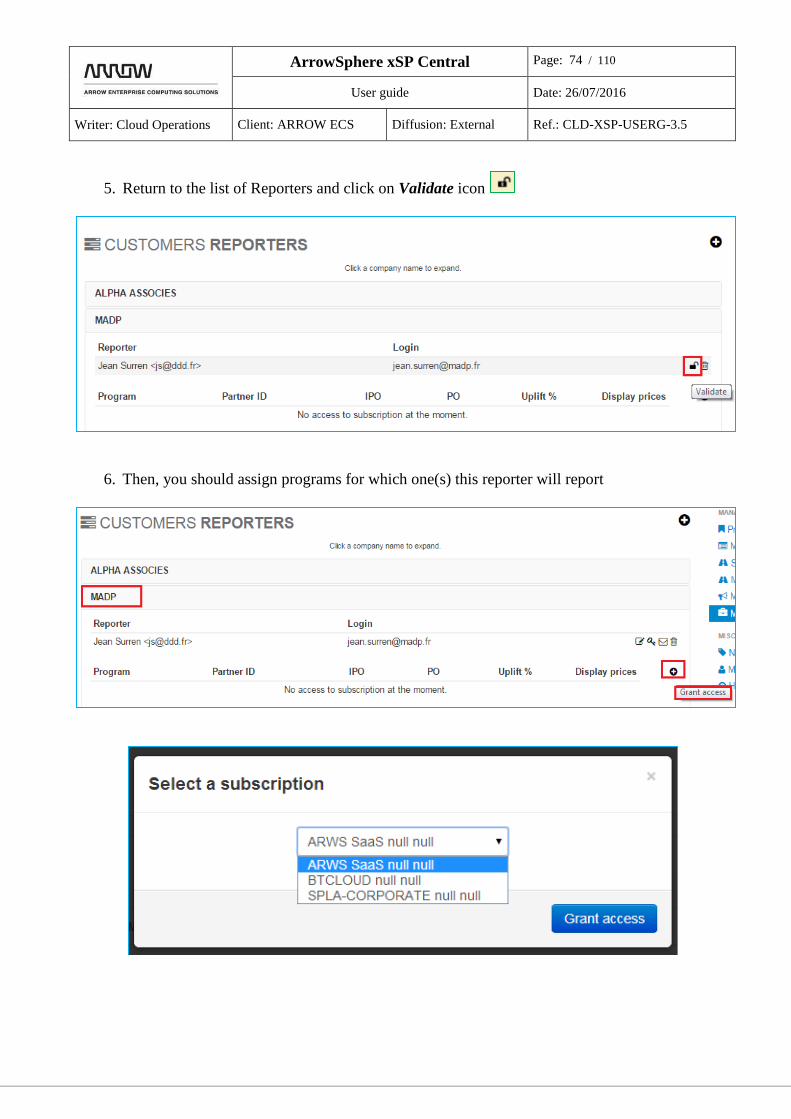
5. Return to the list of Reporters and click on Validate icon
6. Then, you should assign programs for which one(s) this reporter will report

ArrowSphere xSP Central Page: 75 / 110
User guide Date: 26/07/2016
Writer: Cloud Operations Client: ARROW ECS Diffusion: External Ref.: CLD-XSP-USERG-3.5
7. You can also add an uplift and decide if you want the reporter see his prices by ticking
“Display prices” option
The reporter account has been created; it can go to the platform, edit and validate his reports that
you previously opened from your account.
Reporters’ functionalities
The main Reporter role is to validate reports created by the reseller, YOU, and notify when it’s
done. The Reporter will only see reports menu, be able to edit created reports and notify his reseller.
.
Reporter account dashboard view:

ArrowSphere xSP Central Page: 76 / 110
User guide Date: 26/07/2016
Writer: Cloud Operations Client: ARROW ECS Diffusion: External Ref.: CLD-XSP-USERG-3.5
View on created by the reseller reports:
After report edition by your customer, you’ll receive a notification message and a new report is
displayed in your account.
ArrowSphere xSP Central Page: 77 / 110
User guide Date: 26/07/2016
Writer: Cloud Operations Client: ARROW ECS Diffusion: External Ref.: CLD-XSP-USERG-3.5
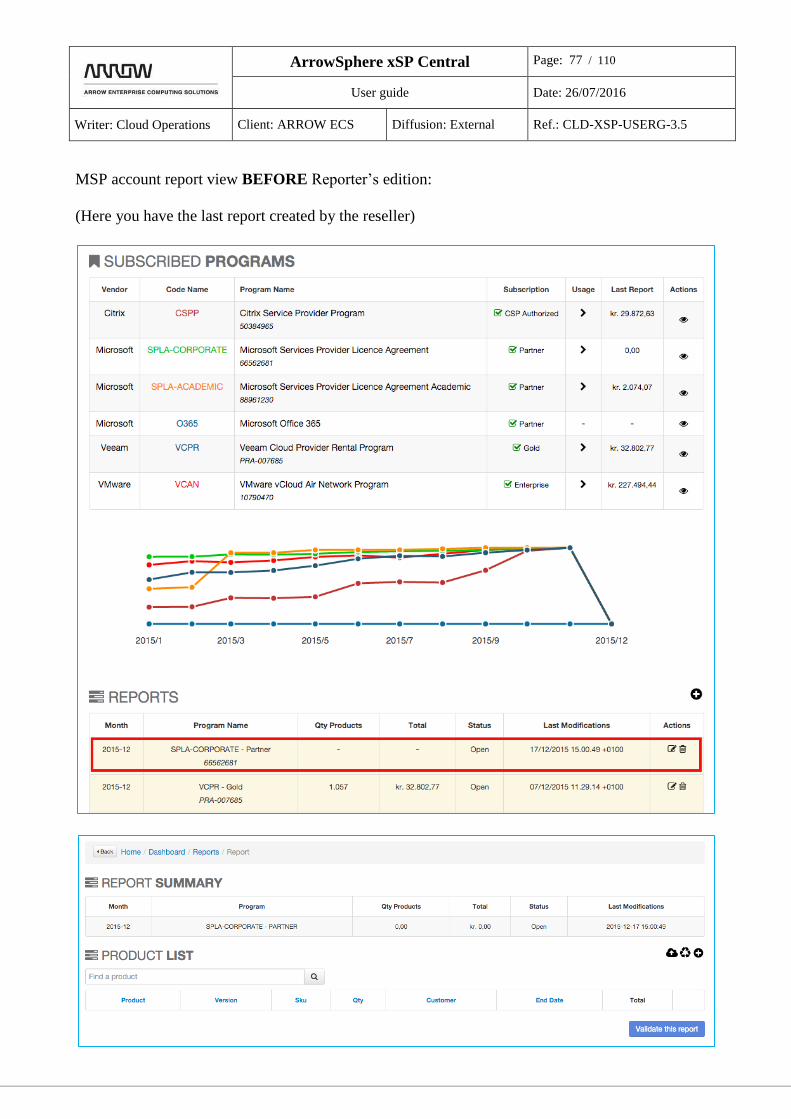
MSP account report view BEFORE Reporter’s edition:
(Here you have the last report created by the reseller)

ArrowSphere xSP Central Page: 78 / 110
User guide Date: 26/07/2016
Writer: Cloud Operations Client: ARROW ECS Diffusion: External Ref.: CLD-XSP-USERG-3.5
MSP account report view AFTER Reporter’s edition:
(Last report edited and validated by the Reporter – reseller view)
The Reporter can edit the report (add lines, change quantity) until this one is in the OPEN status in
the reseller account. Once the report validated by the reseller, it will disappear from the Reporter
account view.
Reporter account report view AFTER reseller validation:

ArrowSphere xSP Central Page: 79 / 110
User guide Date: 26/07/2016
Writer: Cloud Operations Client: ARROW ECS Diffusion: External Ref.: CLD-XSP-USERG-3.5
1.1.11 Microsoft CSP program
The Microsoft Cloud Solution Provider (MSCSP) program offers access to Microsoft cloud offrings
such as Office 365, Azure, Microsoft Dynamics CRM Online, etc.
1.1.11.1 Subscription
1. Click on the main menu Programs to get the list of available programs.
2. Click on MSCSP program to subscribe for.
3. Read the program description: benefits and requirements
4. Tick in front of every requirement and then click on Subscribe
ArrowSphere xSP Central Page: 80 / 110
User guide Date: 26/07/2016
Writer: Cloud Operations Client: ARROW ECS Diffusion: External Ref.: CLD-XSP-USERG-3.5
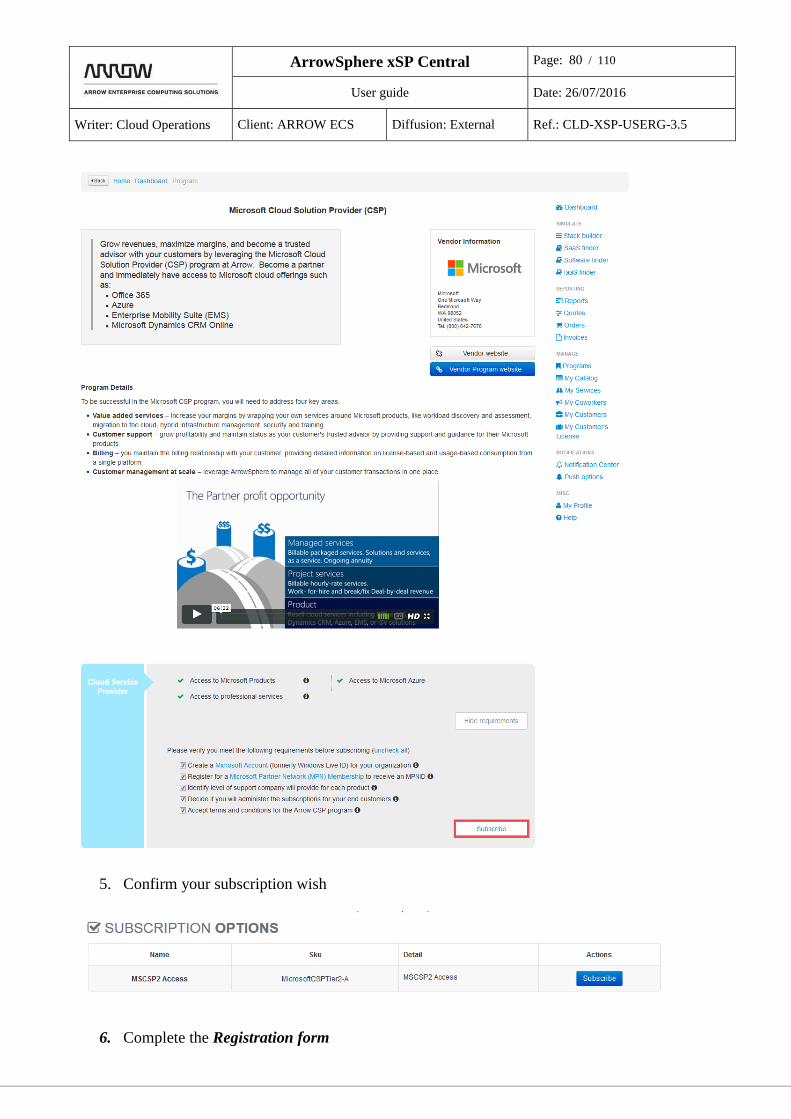
5. Confirm your subscription wish
6. Complete the Registration form
ArrowSphere xSP Central Page: 81 / 110
User guide Date: 26/07/2016
Writer: Cloud Operations Client: ARROW ECS Diffusion: External Ref.: CLD-XSP-USERG-3.5
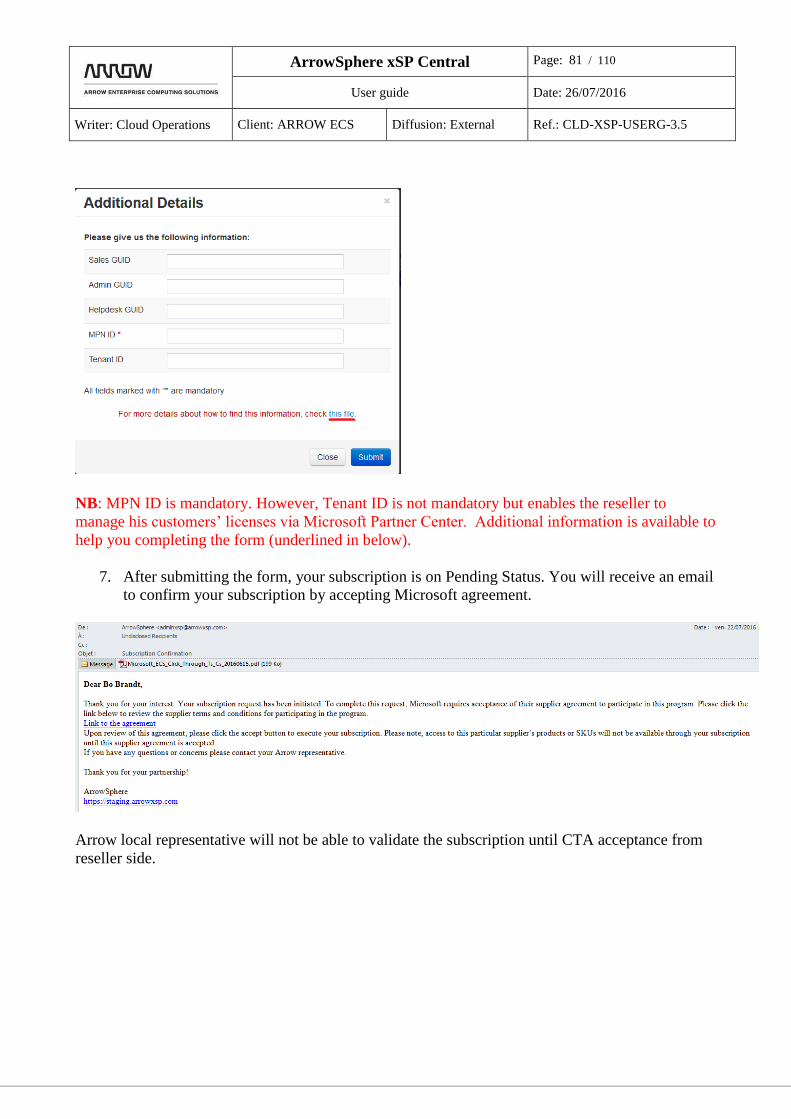
NB: MPN ID is mandatory. However, Tenant ID is not mandatory but enables the reseller to
manage his customers’ licenses via Microsoft Partner Center. Additional information is available to
help you completing the form (underlined in below).
7. After submitting the form, your subscription is on Pending Status. You will receive an email
to confirm your subscription by accepting Microsoft agreement.
Arrow local representative will not be able to validate the subscription until CTA acceptance from
reseller side.
ArrowSphere xSP Central Page: 82 / 110
User guide Date: 26/07/2016
Writer: Cloud Operations Client: ARROW ECS Diffusion: External Ref.: CLD-XSP-USERG-3.5
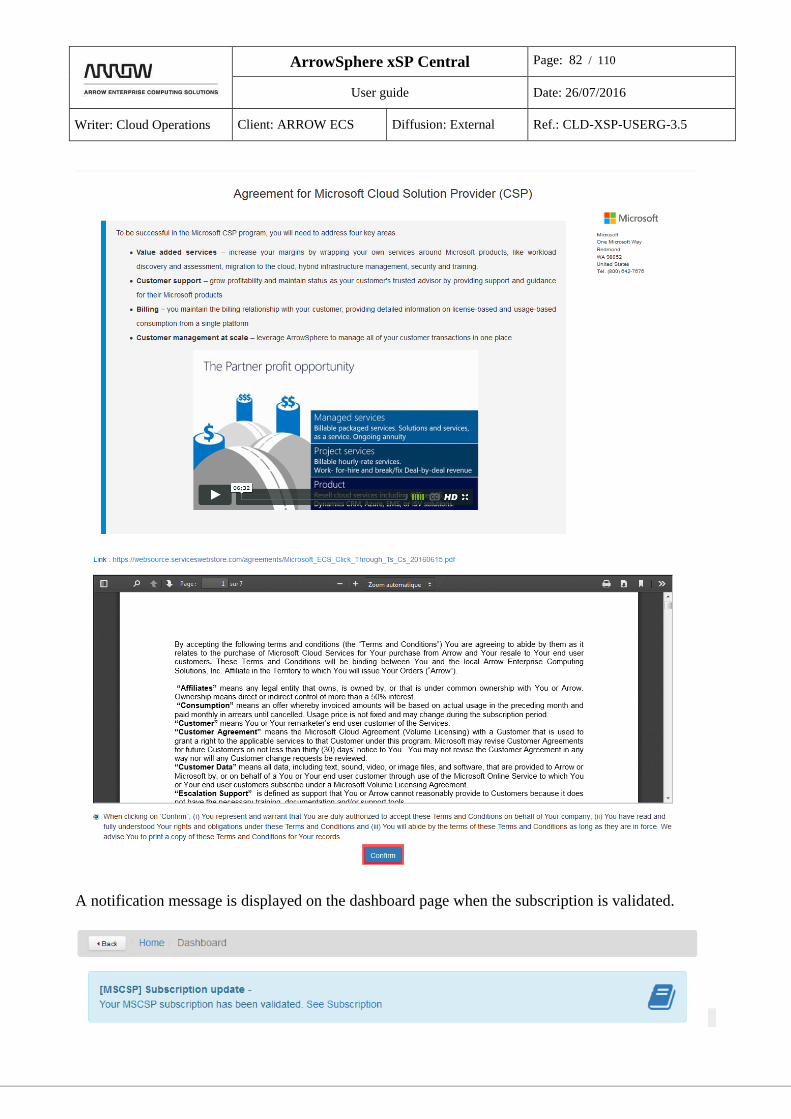
A notification message is displayed on the dashboard page when the subscription is validated.

ArrowSphere xSP Central Page: 83 / 110
User guide Date: 26/07/2016
Writer: Cloud Operations Client: ARROW ECS Diffusion: External Ref.: CLD-XSP-USERG-3.5
1.1.11.2 Quote and Order
This menu contains the workflow details for PaaS products ordering.
1. Click on the main menu Quotes.
2. Click on Create a new Quote.
3. Select or add your End Customer
4. Click on Add Product
5. Select Microsoft PaaS Program
6. You can choose to create an empty account or to create a quote that contains product

ArrowSphere xSP Central Page: 84 / 110
User guide Date: 26/07/2016
Writer: Cloud Operations Client: ARROW ECS Diffusion: External Ref.: CLD-XSP-USERG-3.5
d. Creating an empty account
1. Click on Save button to create an empty account
2. A quote will be created with empty product fields
3. Click on Place Order
4. Confirm or edit your End Customer details then click Next
ArrowSphere xSP Central Page: 85 / 110
User guide Date: 26/07/2016
Writer: Cloud Operations Client: ARROW ECS Diffusion: External Ref.: CLD-XSP-USERG-3.5
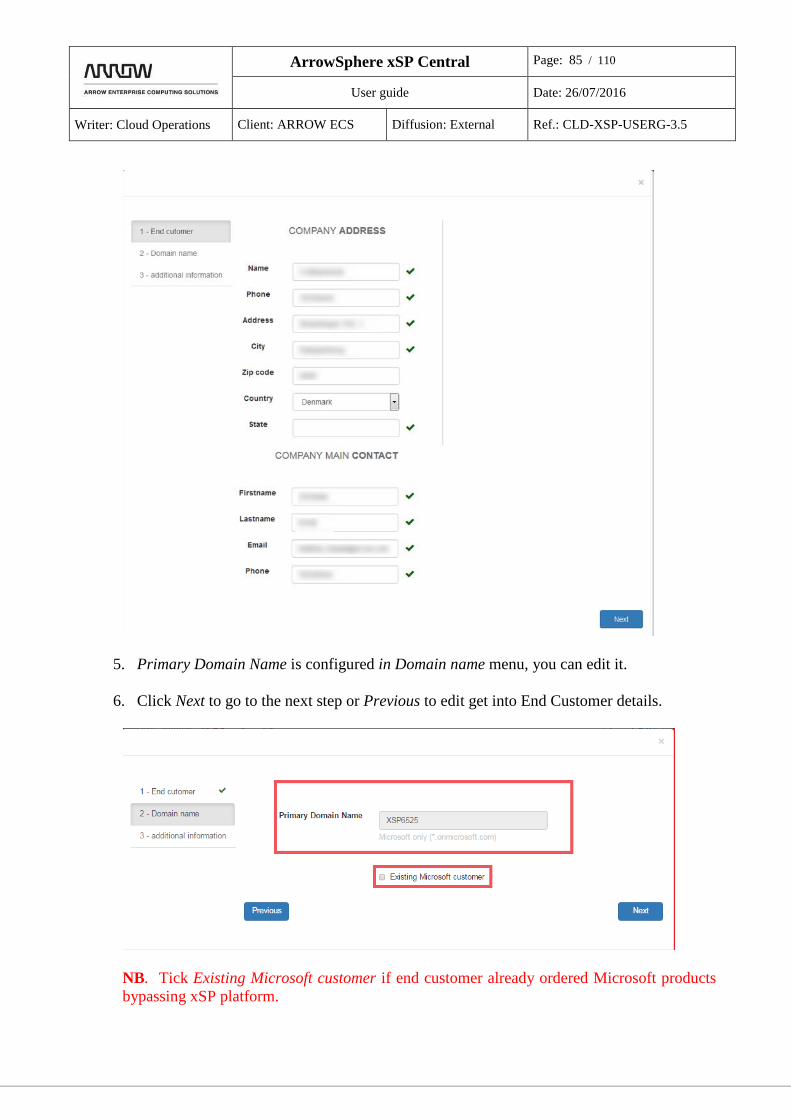
5. Primary Domain Name is configured in Domain name menu, you can edit it.
6. Click Next to go to the next step or Previous to edit get into End Customer details.
NB. Tick Existing Microsoft customer if end customer already ordered Microsoft products
bypassing xSP platform.
ArrowSphere xSP Central Page: 86 / 110
User guide Date: 26/07/2016
Writer: Cloud Operations Client: ARROW ECS Diffusion: External Ref.: CLD-XSP-USERG-3.5
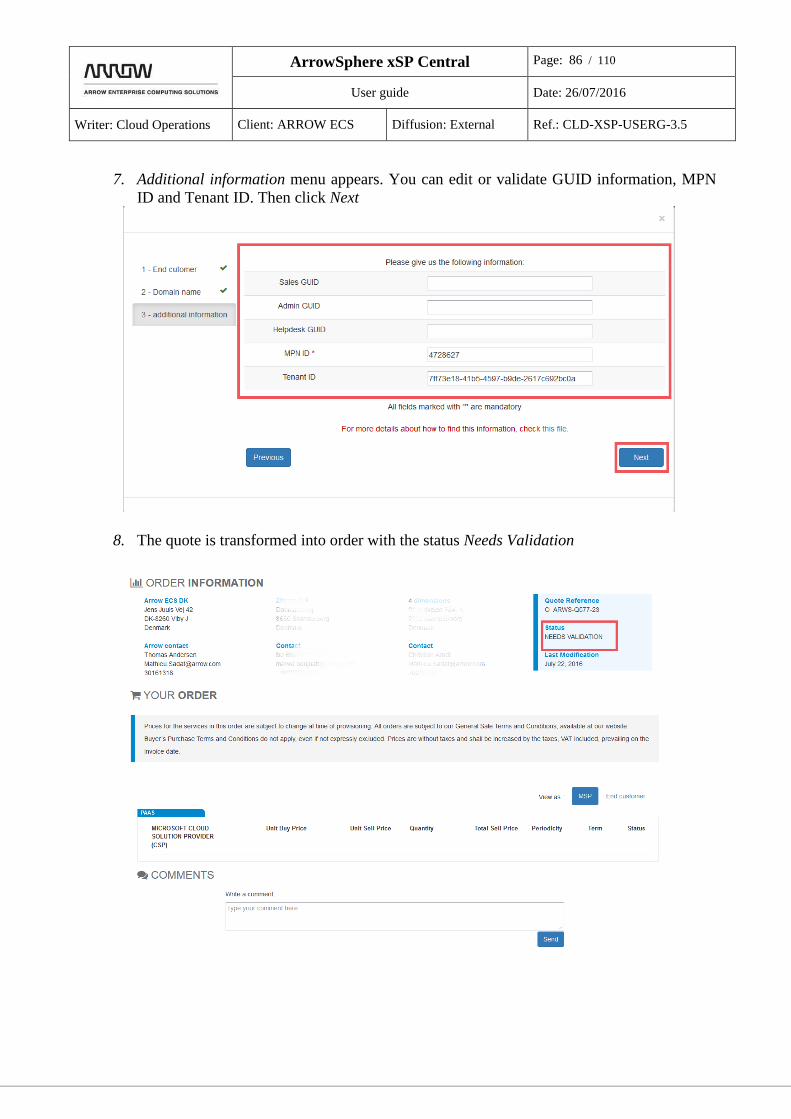
7. Additional information menu appears. You can edit or validate GUID information, MPN
ID and Tenant ID. Then click Next
8. The quote is transformed into order with the status Needs Validation
ArrowSphere xSP Central Page: 87 / 110
User guide Date: 26/07/2016
Writer: Cloud Operations Client: ARROW ECS Diffusion: External Ref.: CLD-XSP-USERG-3.5
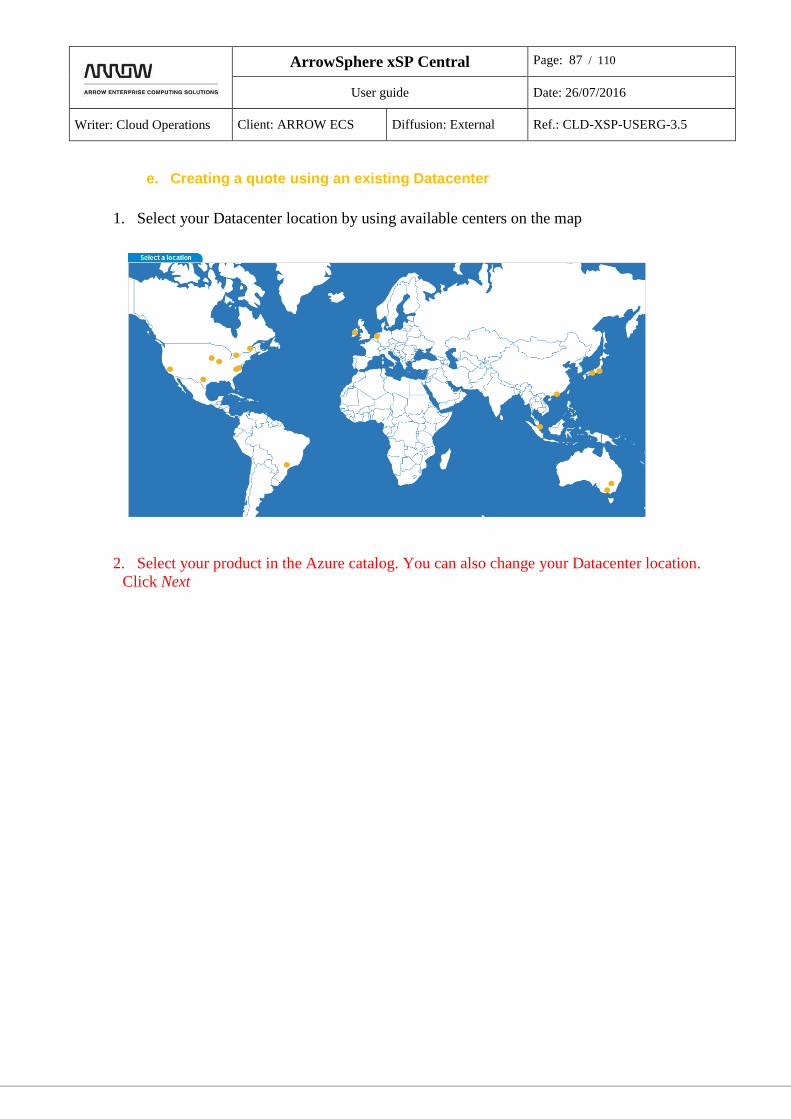
e. Creating a quote using an existing Datacenter
1. Select your Datacenter location by using available centers on the map
2. Select your product in the Azure catalog. You can also change your Datacenter location.
Click Next
ArrowSphere xSP Central Page: 88 / 110
User guide Date: 26/07/2016
Writer: Cloud Operations Client: ARROW ECS Diffusion: External Ref.: CLD-XSP-USERG-3.5
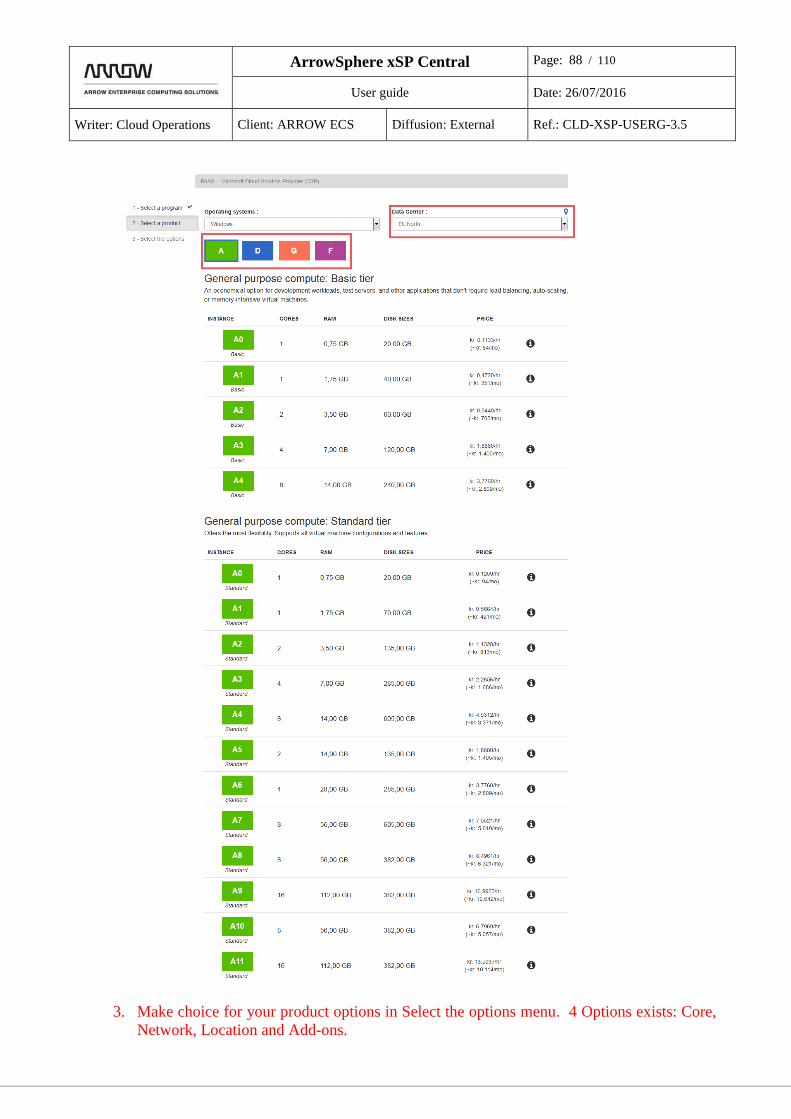
3. Make choice for your product options in Select the options menu. 4 Options exists: Core,
Network, Location and Add-ons.
ArrowSphere xSP Central Page: 89 / 110
User guide Date: 26/07/2016
Writer: Cloud Operations Client: ARROW ECS Diffusion: External Ref.: CLD-XSP-USERG-3.5
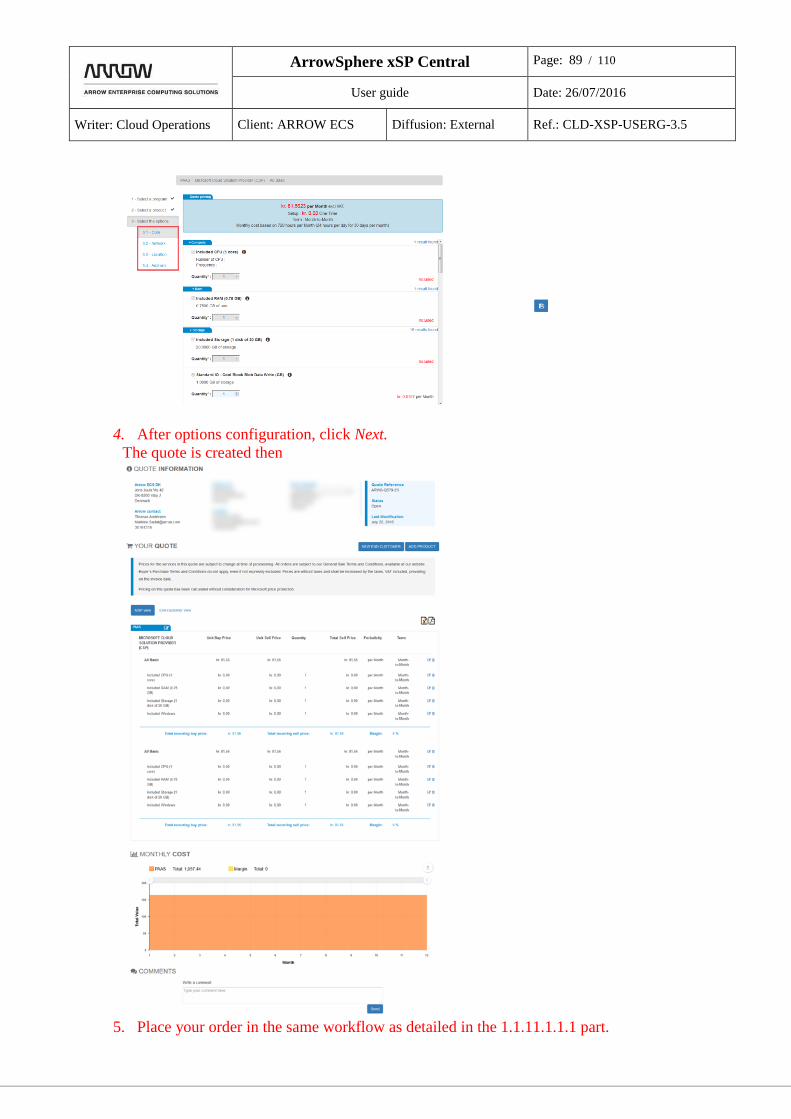
4. After options configuration, click Next.
The quote is created then
5. Place your order in the same workflow as detailed in the 1.1.11.1.1.1 part.

ArrowSphere xSP Central Page: 90 / 110
User guide Date: 26/07/2016
Writer: Cloud Operations Client: ARROW ECS Diffusion: External Ref.: CLD-XSP-USERG-3.5
1.1.11.3 My Customers’ license
You can update, suspend or reactivate your customers’ Microsoft licenses from My Customer’s
License menu
1. Select “My Customer’s License”
2. Select the end customer
3. Click Next

ArrowSphere xSP Central Page: 91 / 110
User guide Date: 26/07/2016
Writer: Cloud Operations Client: ARROW ECS Diffusion: External Ref.: CLD-XSP-USERG-3.5
To change end customer’s seats number, put the wanted number then click on Update
To suspend the end customer’s license usage, click on Suspend
Licenses will be suspended
To reactivate end customer licenses, click Reactivate
The licenses are active again, you can change seats’ number or suspend

ArrowSphere xSP Central Page: 92 / 110
User guide Date: 26/07/2016
Writer: Cloud Operations Client: ARROW ECS Diffusion: External Ref.: CLD-XSP-USERG-3.5
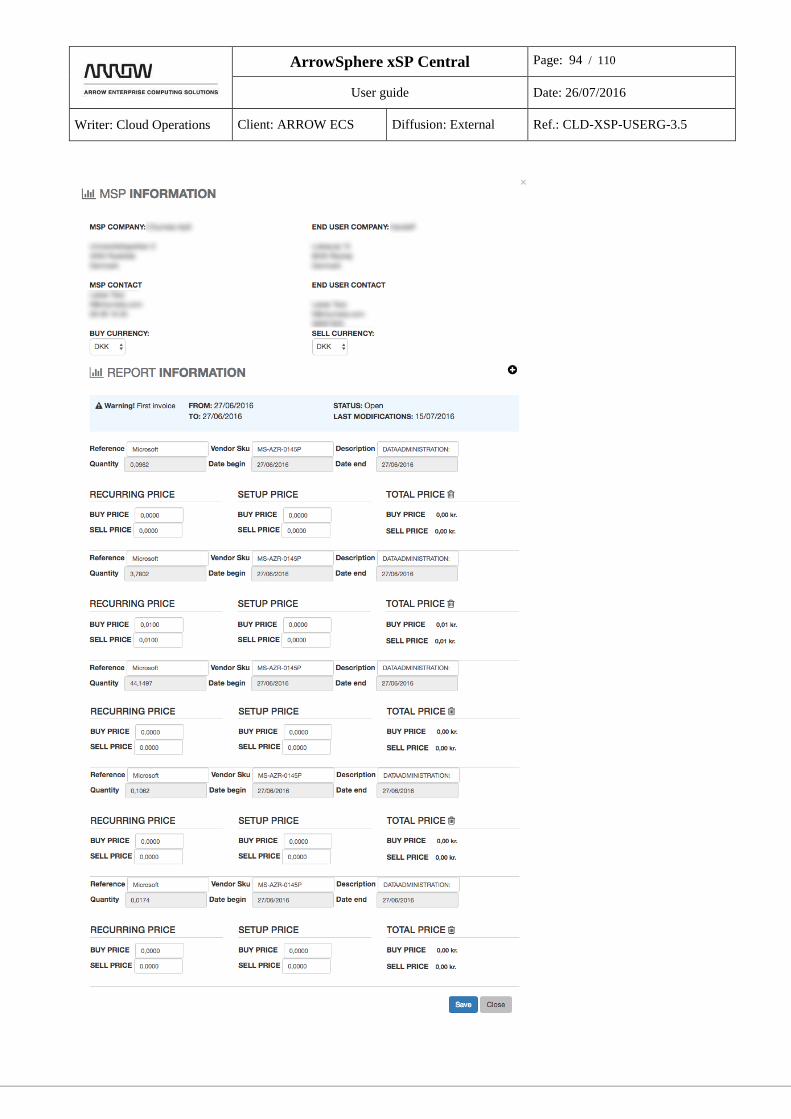
1.1.11.4 Invoices
Microsoft Cloud Solution Provider (MSCSP) Azure program has a usage based billing.

ArrowSphere xSP Central Page: 93 / 110
User guide Date: 26/07/2016
Writer: Cloud Operations Client: ARROW ECS Diffusion: External Ref.: CLD-XSP-USERG-3.5
ArrowSphere xSP Central Page: 94 / 110
User guide Date: 26/07/2016
Writer: Cloud Operations Client: ARROW ECS Diffusion: External Ref.: CLD-XSP-USERG-3.5
ArrowSphere xSP Central Page: 95 / 110
User guide Date: 26/07/2016
Writer: Cloud Operations Client: ARROW ECS Diffusion: External Ref.: CLD-XSP-USERG-3.5
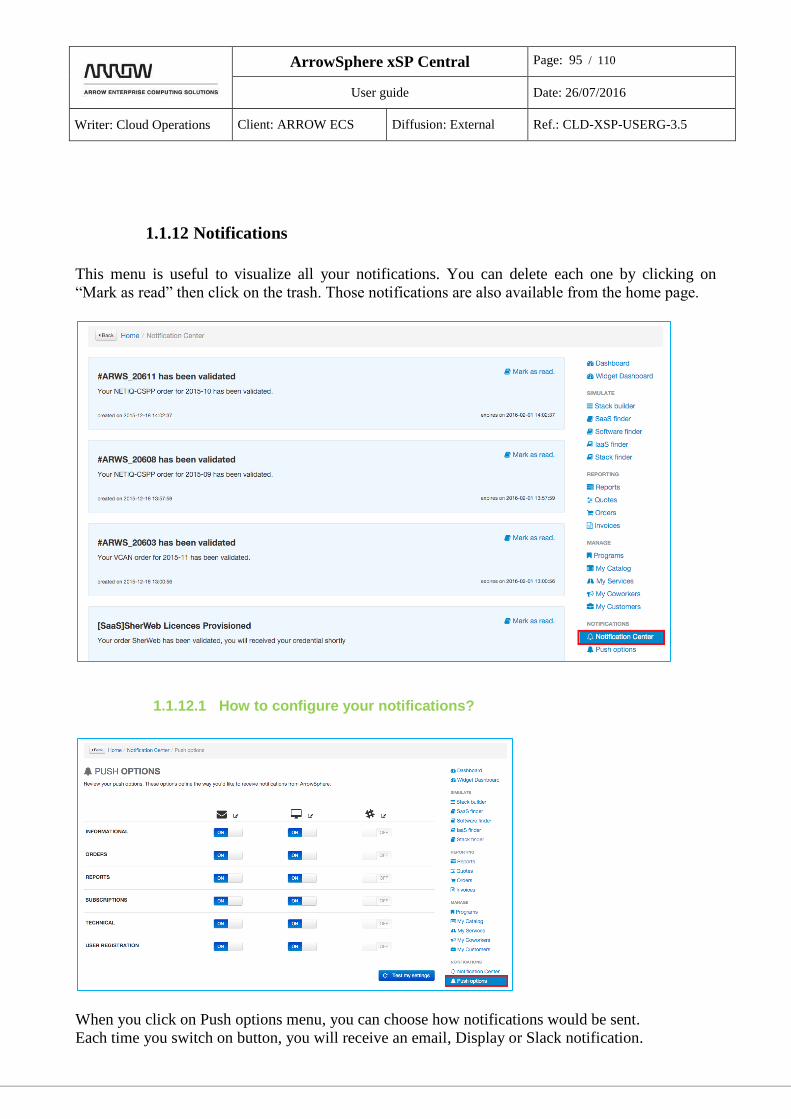
1.1.12 Notifications
This menu is useful to visualize all your notifications. You can delete each one by clicking on
“Mark as read” then click on the trash. Those notifications are also available from the home page.
1.1.12.1 How to configure your notifications?
When you click on Push options menu, you can choose how notifications would be sent.
Each time you switch on button, you will receive an email, Display or Slack notification.

ArrowSphere xSP Central Page: 96 / 110
User guide Date: 26/07/2016
Writer: Cloud Operations Client: ARROW ECS Diffusion: External Ref.: CLD-XSP-USERG-3.5
You can test all channels and all topics by clicking on “Test my settings”.
NB: At any moment, you can switch of a button to stop receiving notification in any topic and any
channel.
a) The first column edit button let you to define some email address to notify by email in
addition to you. If you leave blank Report for example, will receive report notification to
your profile email address by default.

ArrowSphere xSP Central Page: 97 / 110
User guide Date: 26/07/2016
Writer: Cloud Operations Client: ARROW ECS Diffusion: External Ref.: CLD-XSP-USERG-3.5
ArrowSphere xSP Central Page: 98 / 110
User guide Date: 26/07/2016
Writer: Cloud Operations Client: ARROW ECS Diffusion: External Ref.: CLD-XSP-USERG-3.5
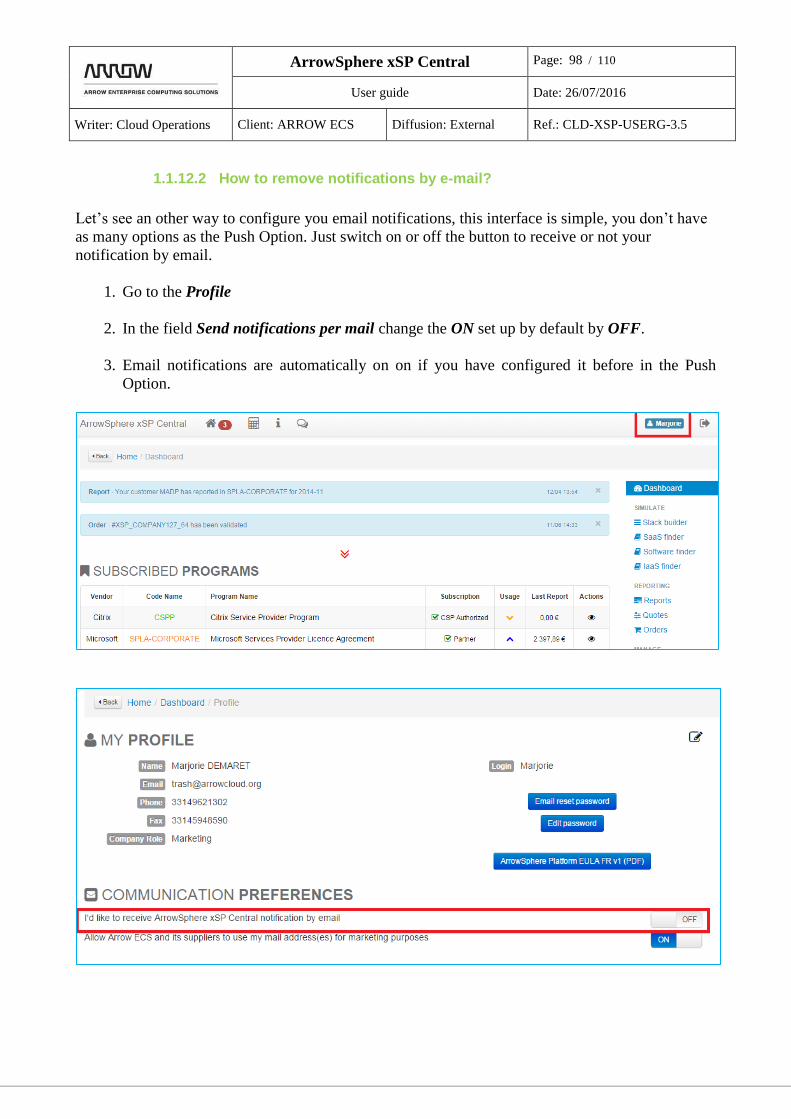
1.1.12.2 How to remove notifications by e-mail?
Let’s see an other way to configure you email notifications, this interface is simple, you don’t have
as many options as the Push Option. Just switch on or off the button to receive or not your
notification by email.
1. Go to the Profile
2. In the field Send notifications per mail change the ON set up by default by OFF.
3. Email notifications are automatically on on if you have configured it before in the Push
Option.
ArrowSphere xSP Central Page: 99 / 110
User guide Date: 26/07/2016
Writer: Cloud Operations Client: ARROW ECS Diffusion: External Ref.: CLD-XSP-USERG-3.5
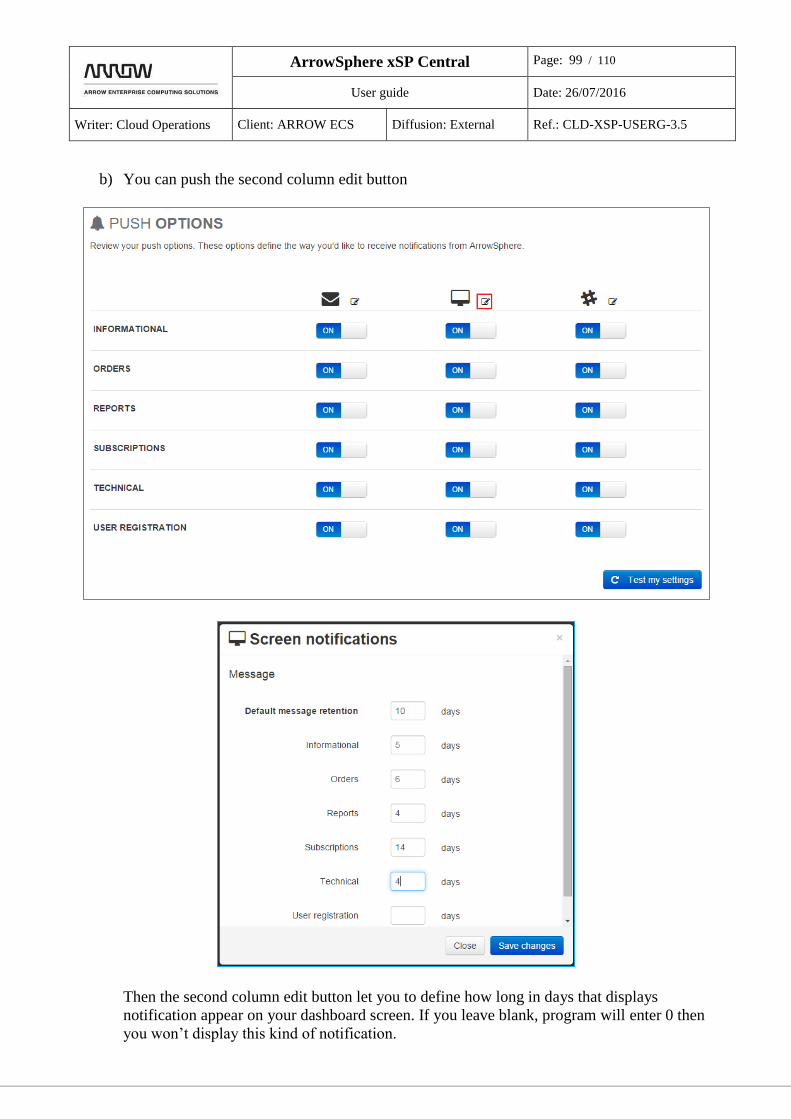
b) You can push the second column edit button
Then the second column edit button let you to define how long in days that displays
notification appear on your dashboard screen. If you leave blank, program will enter 0 then
you won’t display this kind of notification.

ArrowSphere xSP Central Page: 100 / 110
User guide Date: 26/07/2016
Writer: Cloud Operations Client: ARROW ECS Diffusion: External Ref.: CLD-XSP-USERG-3.5
c) You can push the third column edit button
The notification message will be pushed to a slack system. See next chapter (1.1.12.2) to
learn how to create and use your Slack Webhook.

ArrowSphere xSP Central Page: 101 / 110
User guide Date: 26/07/2016
Writer: Cloud Operations Client: ARROW ECS Diffusion: External Ref.: CLD-XSP-USERG-3.5
1.1.12.3 Notification center
You can open the notification center to browse all notification xSP sent to you.
An interesting feature is that if you recorded a comment on a report, you can click on the link
See comment in order to open the report and read the comment.
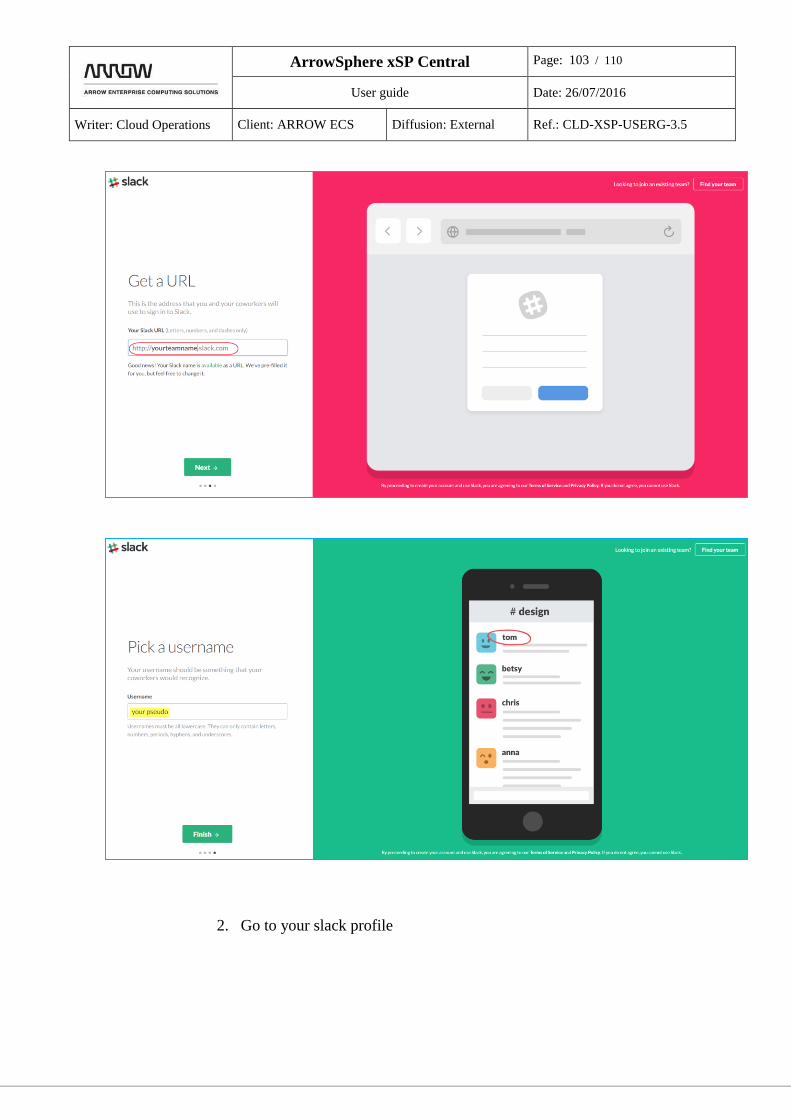
1.1.12.4 How to configure and enable notifications by slack
1. Create an account on https://slack.com/

ArrowSphere xSP Central Page: 102 / 110
User guide Date: 26/07/2016
Writer: Cloud Operations Client: ARROW ECS Diffusion: External Ref.: CLD-XSP-USERG-3.5
Note your team URL
ArrowSphere xSP Central Page: 103 / 110
User guide Date: 26/07/2016
Writer: Cloud Operations Client: ARROW ECS Diffusion: External Ref.: CLD-XSP-USERG-3.5
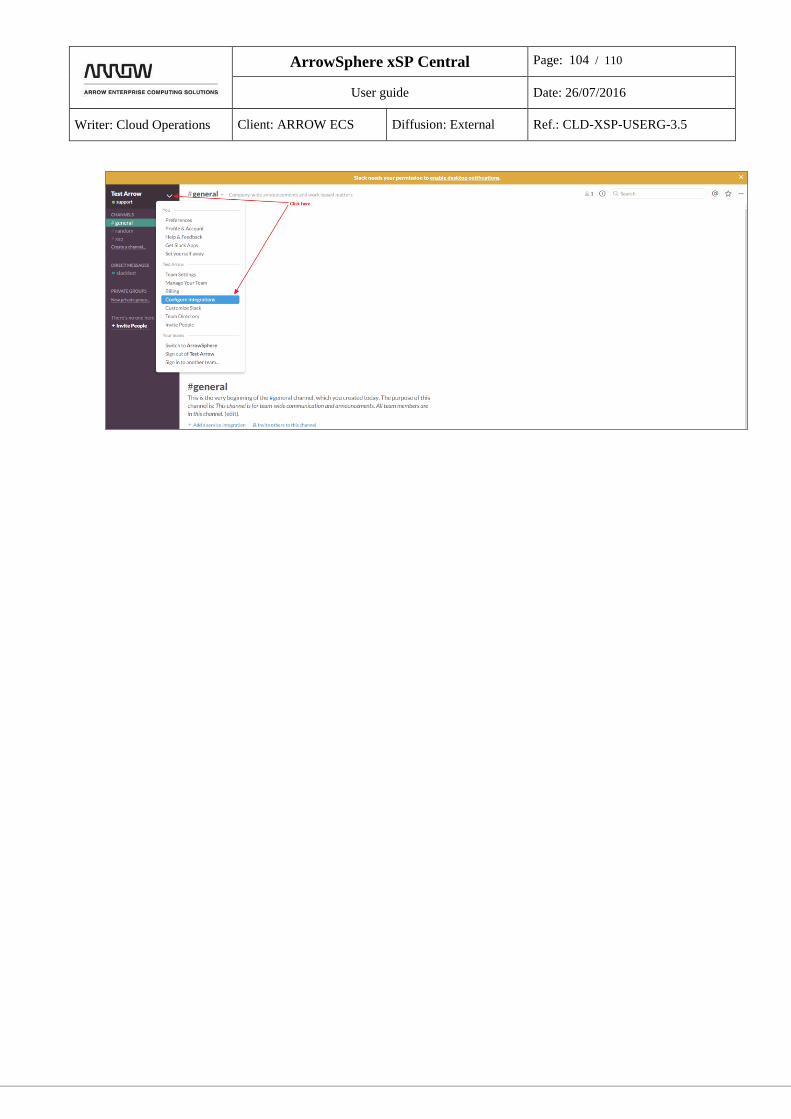
2. Go to your slack profile
ArrowSphere xSP Central Page: 104 / 110
User guide Date: 26/07/2016
Writer: Cloud Operations Client: ARROW ECS Diffusion: External Ref.: CLD-XSP-USERG-3.5
ArrowSphere xSP Central Page: 105 / 110
User guide Date: 26/07/2016
Writer: Cloud Operations Client: ARROW ECS Diffusion: External Ref.: CLD-XSP-USERG-3.5
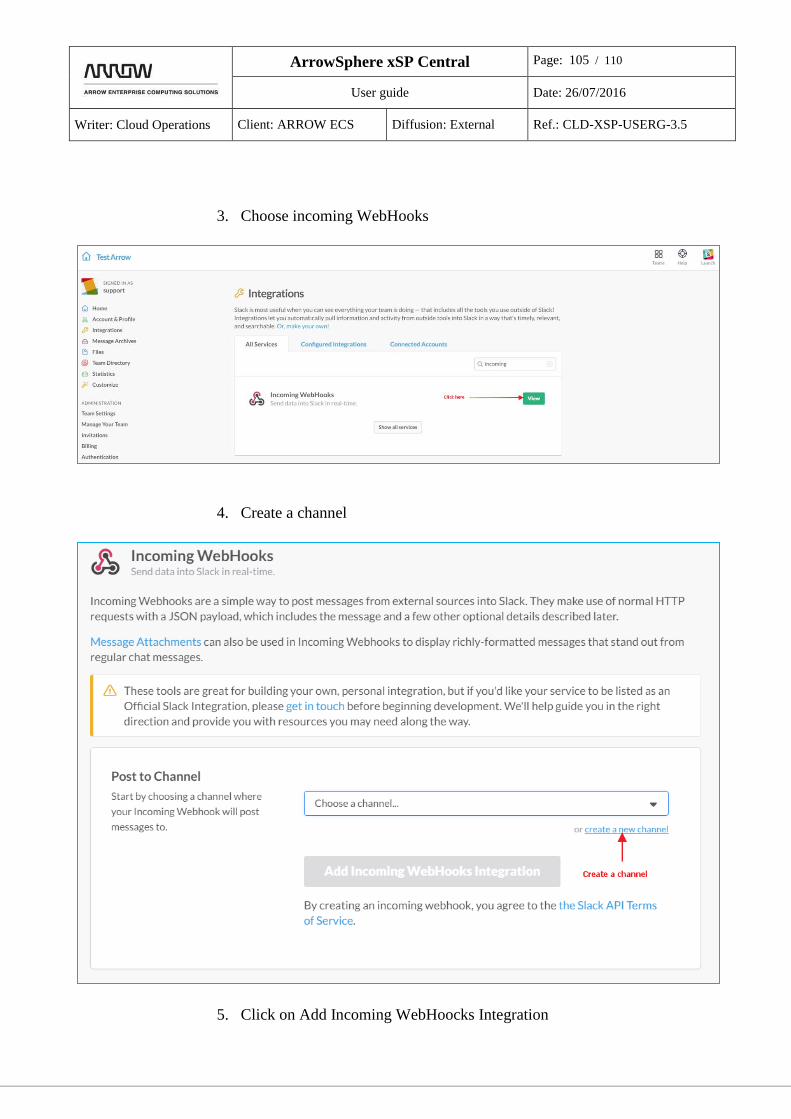
3. Choose incoming WebHooks
4. Create a channel
5. Click on Add Incoming WebHoocks Integration
ArrowSphere xSP Central Page: 106 / 110
User guide Date: 26/07/2016
Writer: Cloud Operations Client: ARROW ECS Diffusion: External Ref.: CLD-XSP-USERG-3.5
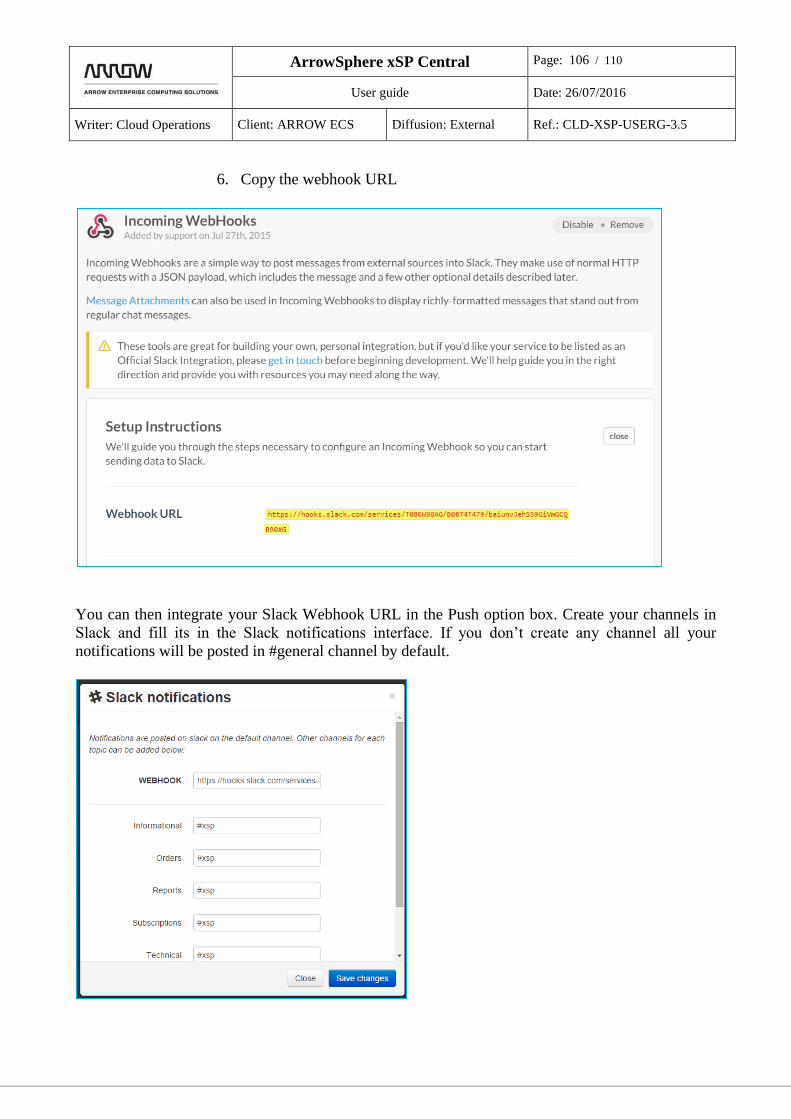
6. Copy the webhook URL
You can then integrate your Slack Webhook URL in the Push option box. Create your channels in
Slack and fill its in the Slack notifications interface. If you don’t create any channel all your
notifications will be posted in #general channel by default.

ArrowSphere xSP Central Page: 107 / 110
User guide Date: 26/07/2016
Writer: Cloud Operations Client: ARROW ECS Diffusion: External Ref.: CLD-XSP-USERG-3.5
1.1.13 My profile setting
This menu allows changing of some information from the user profile: user and company
information, login and password. You can also download the Terms and Conditions of Platform
use.
1.1.13.1 How to edit my profile information?
7. In the My Profile menu click on the Edit icon
8. Edit the information and click on Save changes button
How to add my company information?
1. In the My Profile in the section My Company menu click on the Edit icon
2. Edit or add the information and click on Save changes button
1.1.14 How to contact xSP Central administrator?
ArrowSphere xSP Central Page: 108 / 110
User guide Date: 26/07/2016
Writer: Cloud Operations Client: ARROW ECS Diffusion: External Ref.: CLD-XSP-USERG-3.5
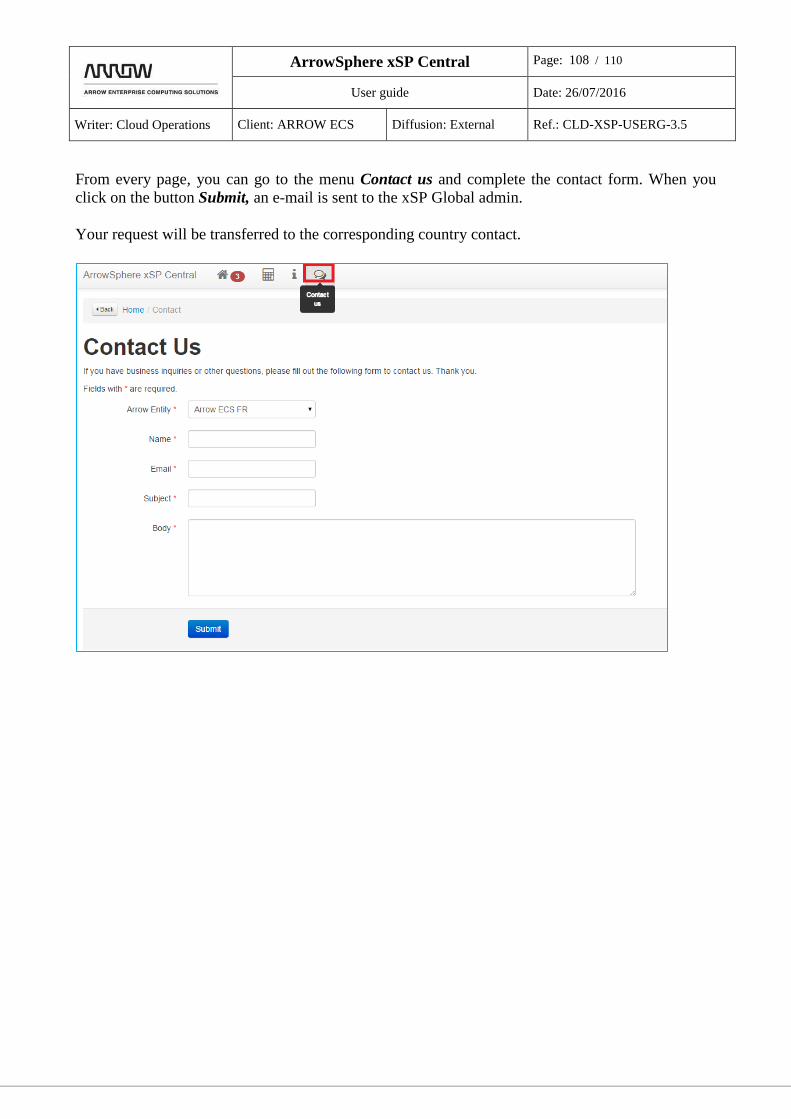
From every page, you can go to the menu Contact us and complete the contact form. When you
click on the button Submit, an e-mail is sent to the xSP Global admin.
Your request will be transferred to the corresponding country contact.
ArrowSphere xSP Central Page: 109 / 110
User guide Date: 26/07/2016
Writer: Cloud Operations Client: ARROW ECS Diffusion: External Ref.: CLD-XSP-USERG-3.5
Support team contacts
For any question, please contact your local Arrow representative.
For Technical support in EMEA region, you can contact the Cloud support team by:
E-mail: [email protected]
Phone: +44 11 89 71 15 12
All requests should be submitted in English.
For Technical support in NA region, you can contact Arrow S3 support by:
E-mail: [email protected]
Phone: 866-495-8590 (toll free) / 469-528-4570 (Direct)
Should you require e-mail support, put the following Subject: xSP Central : <request topic>

ArrowSphere xSP Central Page: 110 / 110
User guide Date: 26/07/2016
Writer: Cloud Operations Client: ARROW ECS Diffusion: External Ref.: CLD-XSP-USERG-3.5
Document history
Version Date Author Comments
v0.1 12/06/2013 Anna Ladkina Document creation
v0.2 20/06/2013 Anna Ladkina Edition of the xSP team contacts p.39
v0.3 23/07/2013 Anna Ladkina Addition of the functionality ‘Invite a colleague’ p.27
v0.4 11/09/2013 Anna Ladkina Modification of the names of homepage buttons
v0.5 17/12/2013 François Masclef Note on reporters
v0.6
29/01/2014
Anna Ladkina
Some updates on report SPLA & VCP.
Graphical updates
V1.0
31/03/2014
Ophélie Barba
Anna Ladkina
Addition of the Stack builder, Saas finder, software
finder and IaaS finder.
V2.0
01/06/2014
Ophélie Barba
General updates on Menu
V2.1 13/06/2014 Ophélie Barba Screenshots updated
V2.2 03/07/2014 Anna Ladkina Global updates on Reporting methods and customer
reporters
Some general updates
V2.2.3 18/12/2014 Anna Ladkina Update on Reports: Upload of the report in an excel
format is now available; new version of the VSPP report
using the wizard is available.
General updates.
V2.2.4 21/04/2015 Eric VINOT Automatic contents update. Quote export.
V3.0 31/07/2015 Eric VINOT Add Widget dashboard, Stack finder, Slack notification.
Update Quote and order workflows.
V3.3.1 21/12/2015 Virginie Bazot Add Widgets, Push Option.
V3.3.2 15/02/2016 Eric VINOT New quotes feature
V3.3.4 19/04/2016 Eric VINOT New quotes design and features
3.6 26/07/2016 Marwa BOUJNAH New quotes features
New orders features
My Customer’s License menu
MSCSP program