Embed Size (px)
Citation preview
Argos Version 3.1 Release Guide Document version 1.0
Last Updated 04/04/2008

Argos Version 3.1 Release Guide, Version 1.0 Last Updated 04/04/2008
2
Evisions, Inc. • 14522 Myford Rd • Irvine, CA 92606 • Phone: 949.833.1384 • Fax: 714.730.2524 • http://www.evisions.com/support
TABLE OF CONTENTS
Introduction ............................................................................. 3
MAP Server Updates ................................................................. 4
Thread Lock Fix....................................................................................... 4
Individual Processes for Each Scheduled Report........................................... 4
Automatic Termination of Schedules During Restart ..................................... 4
New Argos Features ................................................................. 5
Interface Design Change .......................................................................... 5
Maximum Size of Names Increased............................................................ 5
Trash Bin ............................................................................................... 6 Restoring a Deleted Item ........................................................................................... 7 Emptying the Trash Bin ............................................................................................. 7
Chart Wizard .......................................................................................... 8 Invoking the Chart Wizard on the DataBlock Parameter Form.......................................... 8 Invoking the Chart Wizard in a Banded Report .............................................................. 9
Drag Alignment for Banded Reports ......................................................... 10
Undo/Redo ........................................................................................... 11
API Interface ........................................................................................ 12

Argos Version 3.1 Release Guide, Version 1.0 Last Updated 04/04/2008
3
Evisions, Inc. • 14522 Myford Rd • Irvine, CA 92606 • Phone: 949.833.1384 • Fax: 714.730.2524 • http://www.evisions.com/support
INTRODUCTION
Since their introduction in the fall of 2007, Evisions has continued to update and improve Argos 3.0 and MAPS 3.0 in order to increase stability, improve efficiency, and add new, highly requested features. This document outlines the majority of these updates and improvements made to the products since the original 3.0 release.
This latest release contains a variety of product enhancements as described in the following sections. It also contains a section describing the Application Program Interface (API), a new optional add-on feature of Argos that allows Argos reports and QuickViews to be called from third-party applications, such as web portals. Please contact Evisions to find out more about evaluating and implementing the API module.
As always, we appreciate the incredible feedback received from all of our users. Our products would not be what they are today without your continued support. If you have any comments or suggestions, please do not hesitate to open a HelpDesk ticket (http://helpdesk.evisions.com) and let us know!

Argos Version 3.1 Release Guide, Version 1.0 Last Updated 04/04/2008
4
Evisions, Inc. • 14522 Myford Rd • Irvine, CA 92606 • Phone: 949.833.1384 • Fax: 714.730.2524 • http://www.evisions.com/support
MAP SERVER UPDATES
In addition to the new features in Argos, this release also includes several improvements to the MAP Server in order to assure stability under a variety of different situations and to provide more consistent and reliable nightly restarts.
Below are highlights of the most significant changes. A detailed list can be found in the Release Notes on the Server screen of MAPS.
Thread Lock Fix
We identified and resolved situations where a TCP/IP thread lock would prevent the MAP service from restarting.
Individual Processes for Each Scheduled Report
The advantage of having each scheduled report run in its own process is that when two or more scheduled reports exist for the same time, they can execute concurrently. Users will not have to wait for one to finish before the next begins. In addition, if there are errors or problems with any of the schedules, the rest can continue to execute normally.
Automatic Termination of Schedules During Restart
As part of the new scheduler, when the MAP Server shuts down, it will end any scheduled processes in progress instead of trying to wait for them to complete. Important Note: Due to this change, any reports run before the nightly maintenance begins should be given plenty of time to complete.
Argos Version 3.1 Release Guide, Version 1.0 Last Updated 04/04/2008
5
Evisions, Inc. • 14522 Myford Rd • Irvine, CA 92606 • Phone: 949.833.1384 • Fax: 714.730.2524 • http://www.evisions.com/support
NEW ARGOS FEATURES
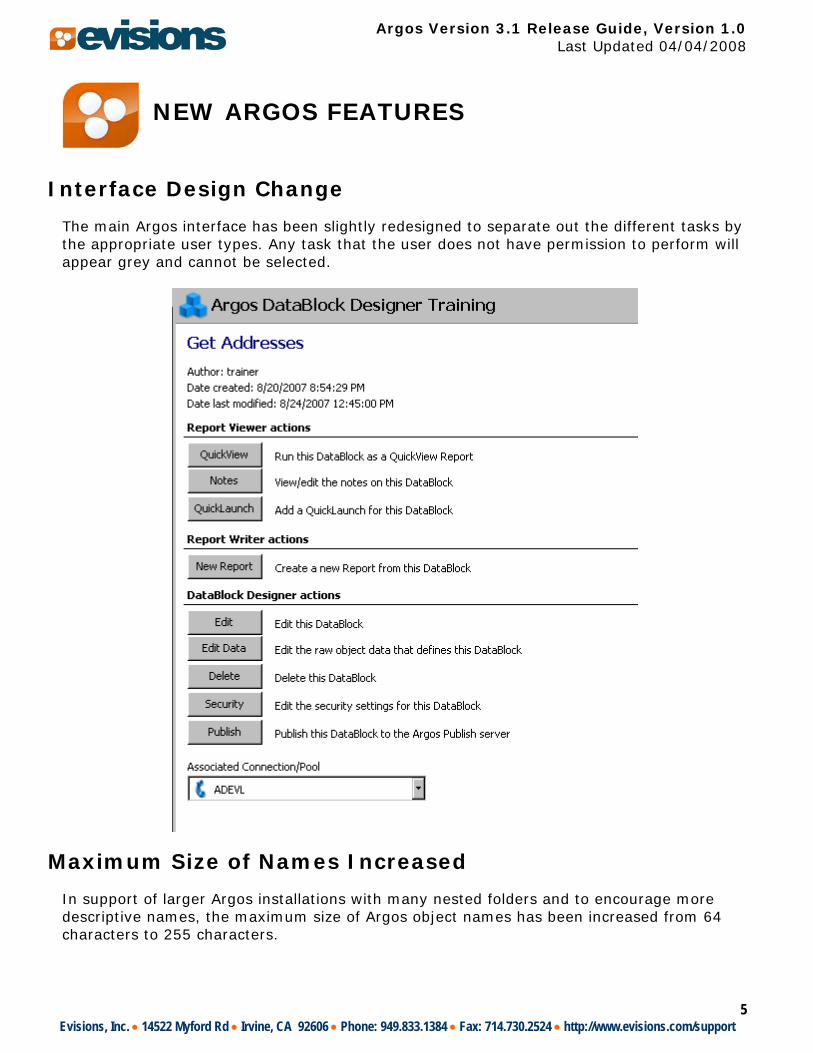
Interface Design Change
The main Argos interface has been slightly redesigned to separate out the different tasks by the appropriate user types. Any task that the user does not have permission to perform will appear grey and cannot be selected.
Maximum Size of Names Increased
In support of larger Argos installations with many nested folders and to encourage more descriptive names, the maximum size of Argos object names has been increased from 64 characters to 255 characters.
Argos Version 3.1 Release Guide, Version 1.0 Last Updated 04/04/2008
6
Evisions, Inc. • 14522 Myford Rd • Irvine, CA 92606 • Phone: 949.833.1384 • Fax: 714.730.2524 • http://www.evisions.com/support
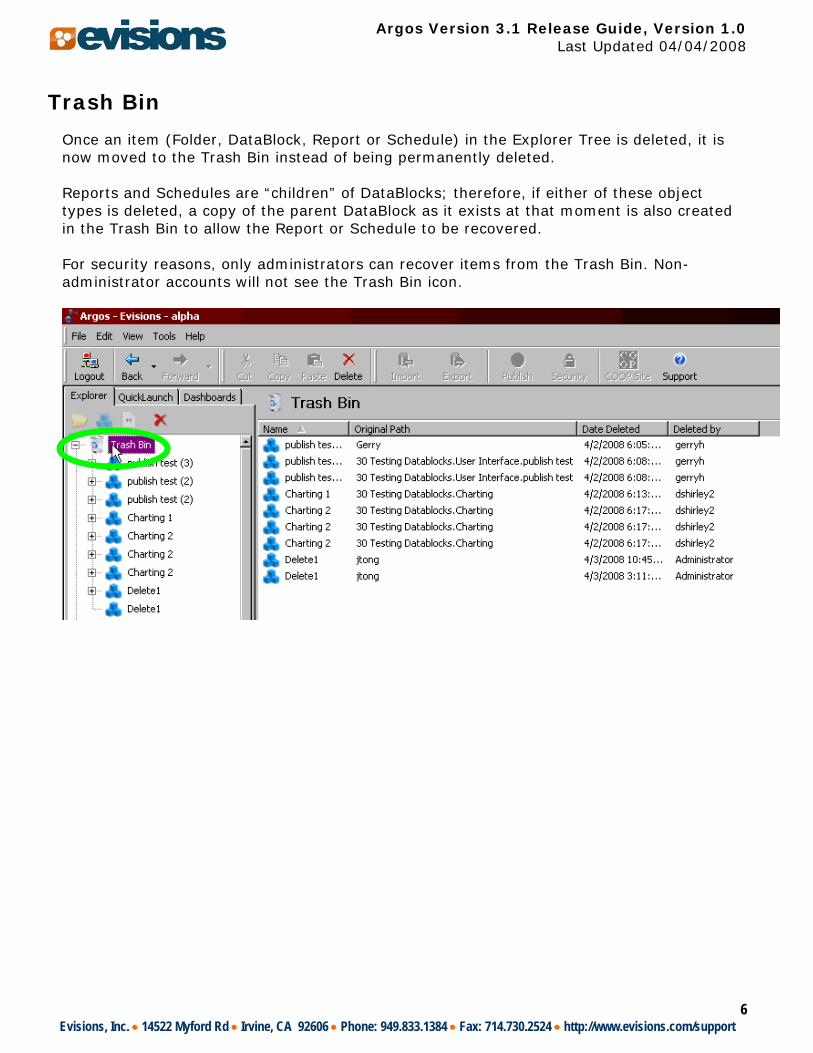
Trash Bin
Once an item (Folder, DataBlock, Report or Schedule) in the Explorer Tree is deleted, it is now moved to the Trash Bin instead of being permanently deleted. Reports and Schedules are “children” of DataBlocks; therefore, if either of these object types is deleted, a copy of the parent DataBlock as it exists at that moment is also created in the Trash Bin to allow the Report or Schedule to be recovered. For security reasons, only administrators can recover items from the Trash Bin. Non-administrator accounts will not see the Trash Bin icon.

Argos Version 3.1 Release Guide, Version 1.0 Last Updated 04/04/2008
7
Evisions, Inc. • 14522 Myford Rd • Irvine, CA 92606 • Phone: 949.833.1384 • Fax: 714.730.2524 • http://www.evisions.com/support
Restoring a Deleted Item
Administrators may right click on the item they wish to restore, and select ‘Restore’. The restored item is returned to its original location in the Explorer Tree. If a Report is to be restored, the complete DataBlock containing that Report will return to its original location.
Emptying the Trash Bin
Administrators may also right click on the Trash Bin and choose ‘Empty Trash Bin’ to permanently delete all of the items in the bin.
Argos Version 3.1 Release Guide, Version 1.0 Last Updated 04/04/2008
8
Evisions, Inc. • 14522 Myford Rd • Irvine, CA 92606 • Phone: 949.833.1384 • Fax: 714.730.2524 • http://www.evisions.com/support
Chart Wizard
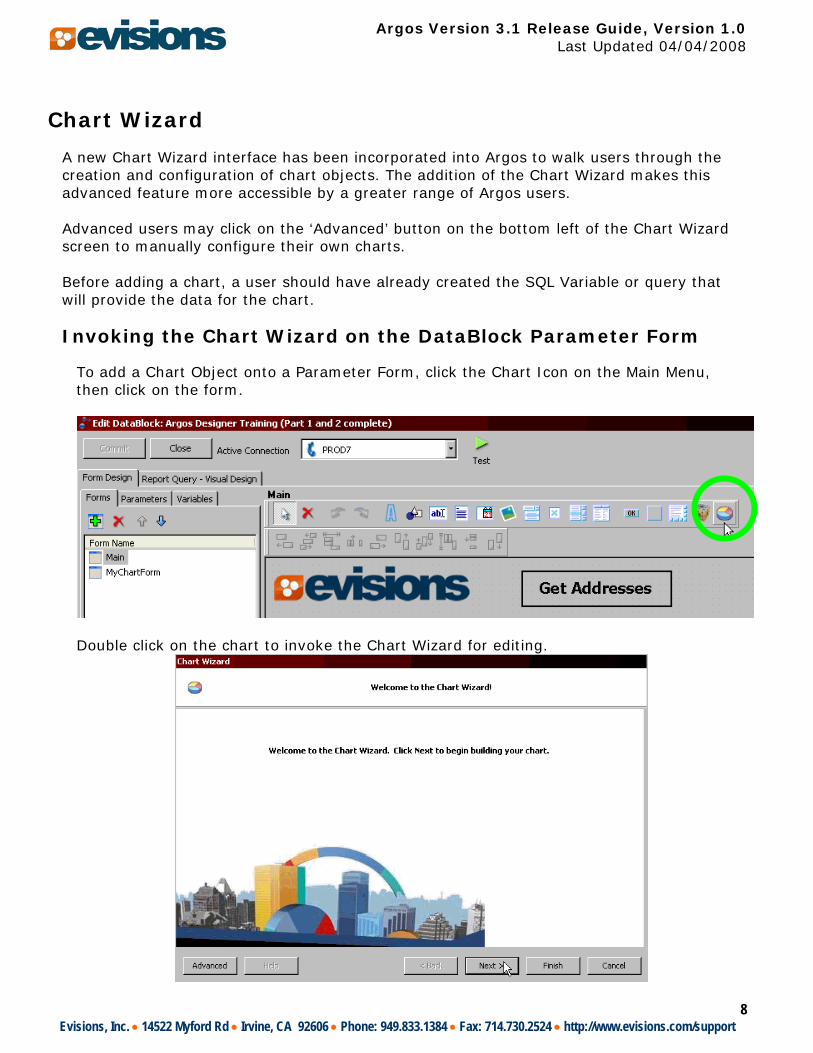
A new Chart Wizard interface has been incorporated into Argos to walk users through the creation and configuration of chart objects. The addition of the Chart Wizard makes this advanced feature more accessible by a greater range of Argos users. Advanced users may click on the ‘Advanced’ button on the bottom left of the Chart Wizard screen to manually configure their own charts. Before adding a chart, a user should have already created the SQL Variable or query that will provide the data for the chart.
Invoking the Chart Wizard on the DataBlock Parameter Form
To add a Chart Object onto a Parameter Form, click the Chart Icon on the Main Menu, then click on the form.
Double click on the chart to invoke the Chart Wizard for editing.
Argos Version 3.1 Release Guide, Version 1.0 Last Updated 04/04/2008
9
Evisions, Inc. • 14522 Myford Rd • Irvine, CA 92606 • Phone: 949.833.1384 • Fax: 714.730.2524 • http://www.evisions.com/support
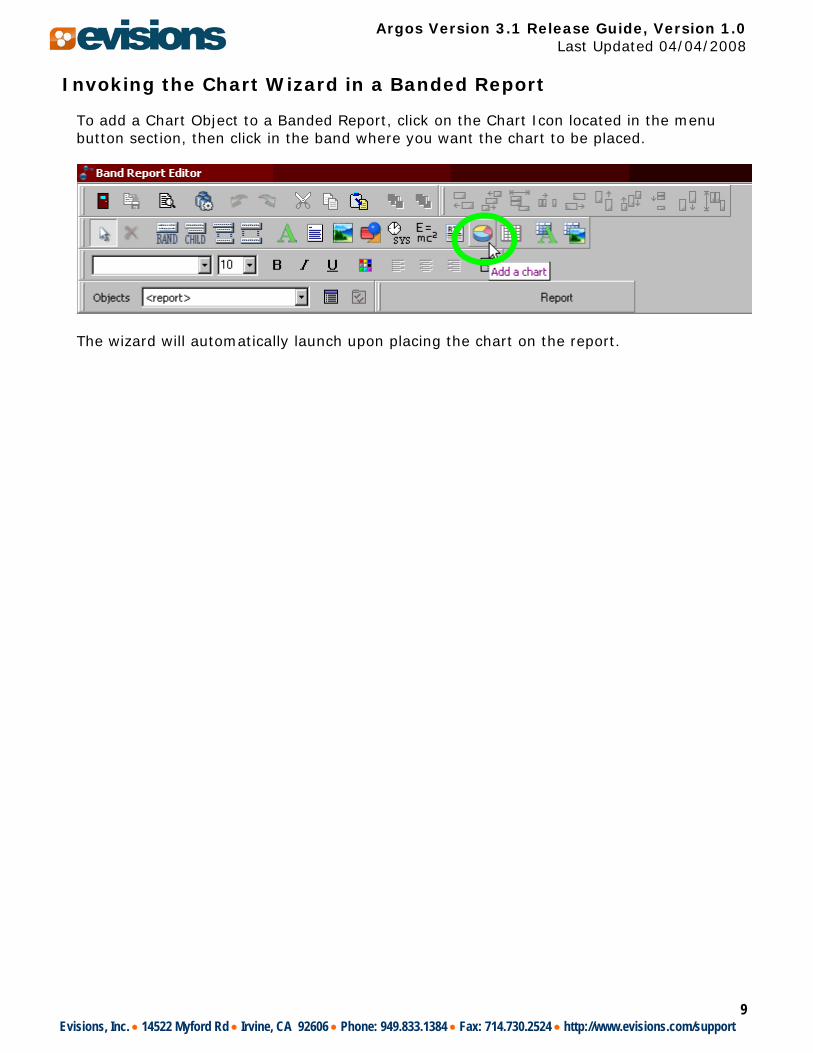
Invoking the Chart Wizard in a Banded Report
To add a Chart Object to a Banded Report, click on the Chart Icon located in the menu button section, then click in the band where you want the chart to be placed.
The wizard will automatically launch upon placing the chart on the report.

Argos Version 3.1 Release Guide, Version 1.0 Last Updated 04/04/2008
10
Evisions, Inc. • 14522 Myford Rd • Irvine, CA 92606 • Phone: 949.833.1384 • Fax: 714.730.2524 • http://www.evisions.com/support
Drag Alignment for Banded Reports
When moving objects in a banded report the Drag Alignment feature creates thin lines to show when the object you are dragging is aligned vertically, horizontally, or centered to other objects on the page. This feature works across multiple bands, so for example, columns of data in one band can be aligned vertically with their headers in another band.
In the following example the field is aligning horizontally inside the detail band as well as vertically across two bands.
Argos Version 3.1 Release Guide, Version 1.0 Last Updated 04/04/2008
11
Evisions, Inc. • 14522 Myford Rd • Irvine, CA 92606 • Phone: 949.833.1384 • Fax: 714.730.2524 • http://www.evisions.com/support
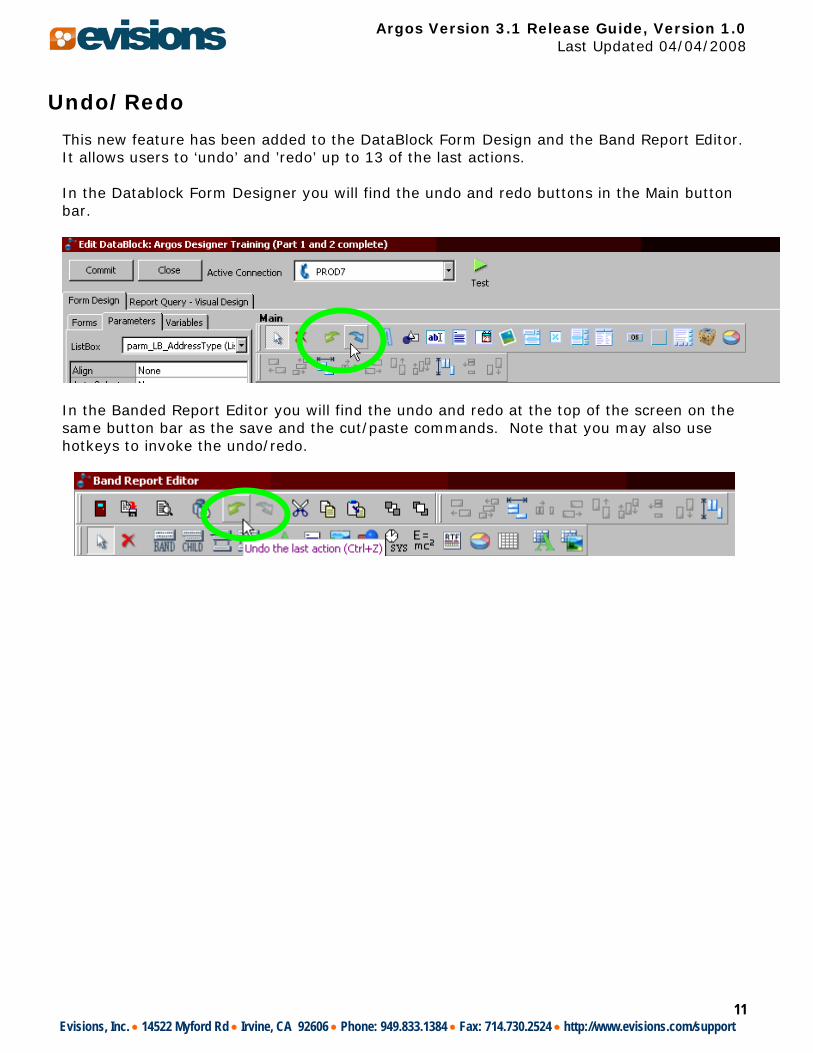
Undo/Redo
This new feature has been added to the DataBlock Form Design and the Band Report Editor. It allows users to ‘undo’ and ’redo’ up to 13 of the last actions. In the Datablock Form Designer you will find the undo and redo buttons in the Main button bar.
In the Banded Report Editor you will find the undo and redo at the top of the screen on the same button bar as the save and the cut/paste commands. Note that you may also use hotkeys to invoke the undo/redo.

Argos Version 3.1 Release Guide, Version 1.0 Last Updated 04/04/2008
12
Evisions, Inc. • 14522 Myford Rd • Irvine, CA 92606 • Phone: 949.833.1384 • Fax: 714.730.2524 • http://www.evisions.com/support
API Interface
One of the most exciting new features in 3.1 is the new API interface. This optional add-on feature allows institutions to call Argos reports without having to use the Argos Client, and to allow seamless integration of Argos into various portals, web pages, and 3rd party applications such as AppWorx. Running a report via the API is accomplished in three steps. The first is adding the HTTP Referrer to MAPS, this allows the server to call an API enabled report. The next is enabling the API for a specific report. Once API access is enabled for a given report, a Report Unique Identifier is generated. The last step is using the Report Unique Identifier to execute that report via an HTML GET, POST Form, or via a UNIX command line utility that we have created called MAPRAPI from the authorized server specified in MAPS. We will discuss each of these steps in more detail in the following sections.
MAPS API HTTP Referrer
The ability to invoke a report via the API can be controlled in the MAPS configuration tool. There is a new screen called “API HTTP REFERRER“ that is used to grant the ability to call reports via the API to specific machines. This prevents arbitrary machines from executing reports, even if they have the Report Unique Identifier.
To add a new approved HTTP Referrer, click on the green “Add Referrer” button at the top. Name the server, then add any URLs or IP addresses that the server might be using by clicking on the ADD URL button on the right hand side. You may also chose to have a default username and password for API reports from that server to be run as here. Usernames and passwords that are passed in via GET, POST form, or MAPRAPI will override the username and password here.
Argos Version 3.1 Release Guide, Version 1.0 Last Updated 04/04/2008
13
Evisions, Inc. • 14522 Myford Rd • Irvine, CA 92606 • Phone: 949.833.1384 • Fax: 714.730.2524 • http://www.evisions.com/support
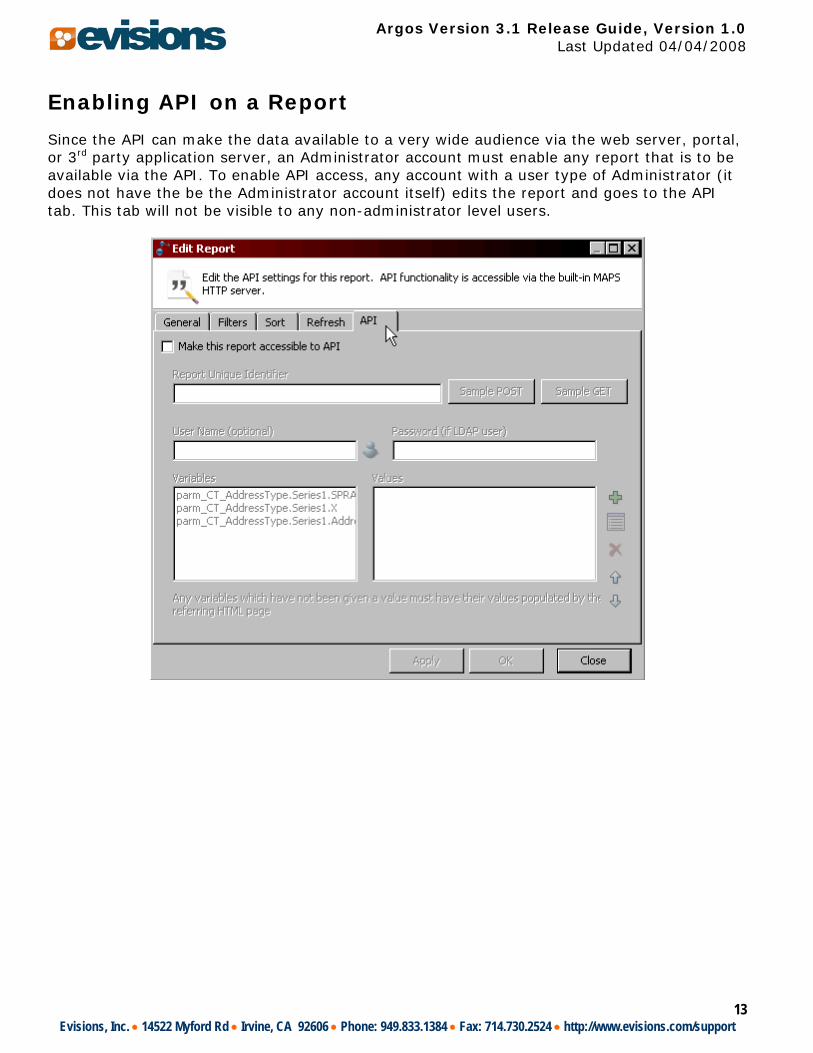
Enabling API on a Report
Since the API can make the data available to a very wide audience via the web server, portal, or 3rd party application server, an Administrator account must enable any report that is to be available via the API. To enable API access, any account with a user type of Administrator (it does not have the be the Administrator account itself) edits the report and goes to the API tab. This tab will not be visible to any non-administrator level users.

Argos Version 3.1 Release Guide, Version 1.0 Last Updated 04/04/2008
14
Evisions, Inc. • 14522 Myford Rd • Irvine, CA 92606 • Phone: 949.833.1384 • Fax: 714.730.2524 • http://www.evisions.com/support
On the API tab, check the “Make this report accessible to API” box. Once the check box is marked, MAPS will generate a Report Unique Identifier for the report. If the report or the datablock are moved or copied, a new Report Unique Identifier will need to be generated. A default username and/or password for this report may be defined here. If there is a username and password that is passed in via the GET, POST form or the MAPRAPI application, it will override the username and password entered here. If the default user is an LDAP user, you must assign a password here or pass in the password via the API call. If you choose to default any parameter values you may do so in the Variables section at the bottom. Any parameter values passed in from the GET, POST, or MAPRAPI call will override the default values here.

Argos Version 3.1 Release Guide, Version 1.0 Last Updated 04/04/2008
15
Evisions, Inc. • 14522 Myford Rd • Irvine, CA 92606 • Phone: 949.833.1384 • Fax: 714.730.2524 • http://www.evisions.com/support
Using the Report Unique Identifier
There are two ways of integrating an API enabled report with a portal or web page once you have the Report Unique ID. An API enabled report can be executed through either an HTTP GET request which is much like a standard URL web page link. Another way of executing the report is via a POST form, which allows the user to have interactive user interface objects that would allow the user some degree of control over the parameters of the report. For more information on these two types of requests and the user interface objects that you can create you can refer to an HTML reference or go to:
http://www.w3.org/TR/html4/interact/forms.html For further study, a set of training materials with various examples of different GET and POST situations will be available shortly.
HTTP GET Request
Clicking on the “Sample Get” button will copy an example of the HTML GET code to the clipboard that can then be placed in a web page.
Argos Version 3.1 Release Guide, Version 1.0 Last Updated 04/04/2008
16
Evisions, Inc. • 14522 Myford Rd • Irvine, CA 92606 • Phone: 949.833.1384 • Fax: 714.730.2524 • http://www.evisions.com/support
HTTP POST Form
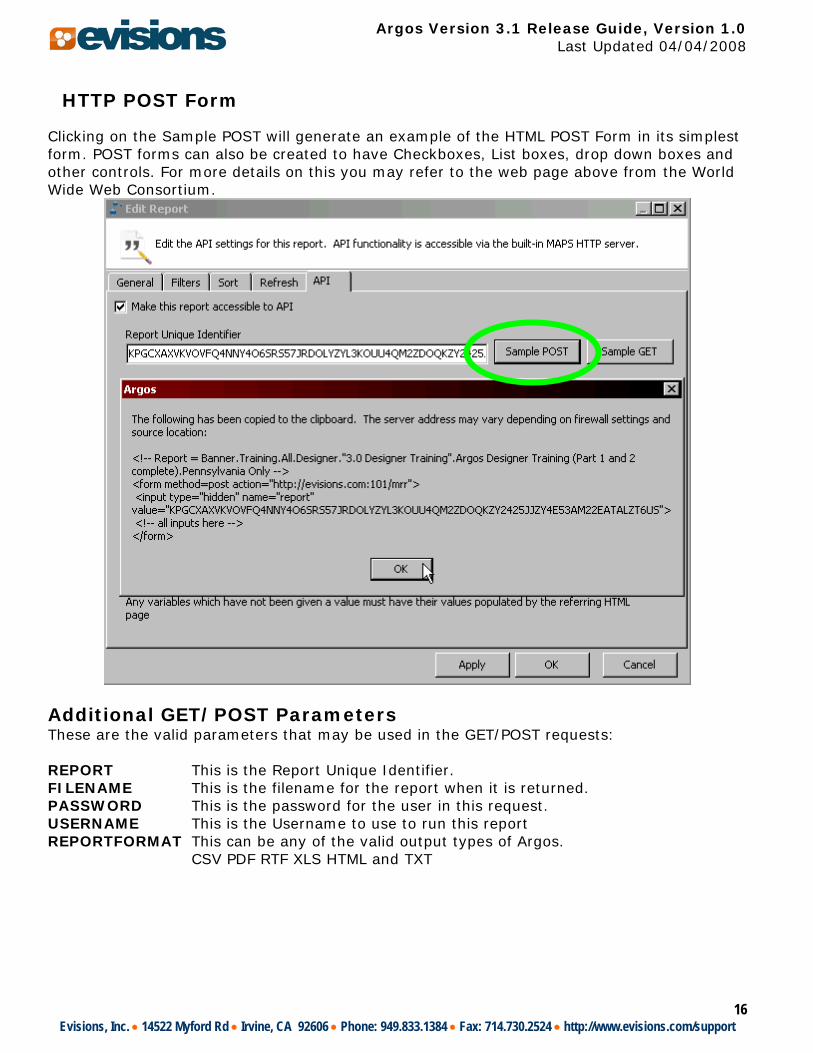
Clicking on the Sample POST will generate an example of the HTML POST Form in its simplest form. POST forms can also be created to have Checkboxes, List boxes, drop down boxes and other controls. For more details on this you may refer to the web page above from the World Wide Web Consortium.
Additional GET/POST Parameters These are the valid parameters that may be used in the GET/POST requests: REPORT This is the Report Unique Identifier. FILENAME This is the filename for the report when it is returned. PASSWORD This is the password for the user in this request. USERNAME This is the Username to use to run this report REPORTFORMAT This can be any of the valid output types of Argos. CSV PDF RTF XLS HTML and TXT
Argos Version 3.1 Release Guide, Version 1.0 Last Updated 04/04/2008
17
Evisions, Inc. • 14522 Myford Rd • Irvine, CA 92606 • Phone: 949.833.1384 • Fax: 714.730.2524 • http://www.evisions.com/support
MAPRAPI (MAP Report API) The third method of accessing an API enabled report is by using an Evisions developed executable called the MAPRAPI (MAP Report API). This program is distributed as source code, and is to be compiled on a UNIX server. This program can be called by 3rd party applications to execute an API enabled Argos report and save the results into a specified location. This can be used in conjunction with shell scripts for maximum flexibility. To obtain a copy, please open up a help desk request and a copy of the most recent source code will be sent to you. Once compiled, run the program with no parameters or switches and the instructions will be displayed.