Embed Size (px)
Citation preview
App Development for Smart Devices � �
CS 495/595 - Fall 2013 �
Tamer Nadeem �Dept. of Computer Science�
Lec #6: Location and Maps Try It Out�
Page 2 Fall 2013 CS 495/595 - App Development for Smart Devices
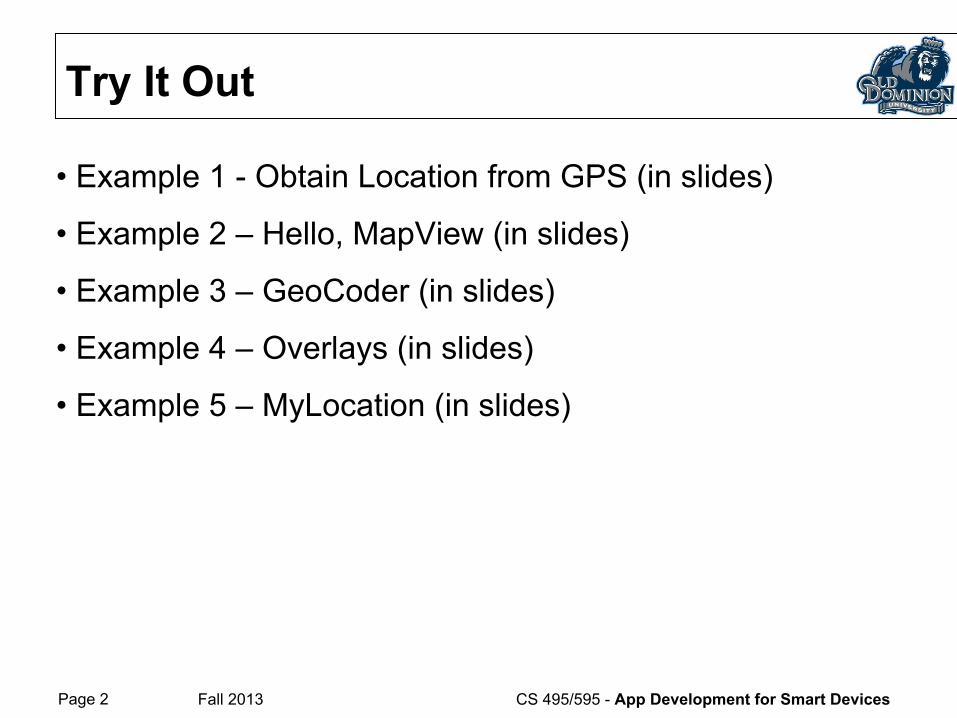
• Example 1 - Obtain Location from GPS (in slides)
• Example 2 – Hello, MapView (in slides)
• Example 3 – GeoCoder (in slides)
• Example 4 – Overlays (in slides)
• Example 5 – MyLocation (in slides)
Try It Out
Page 3 Fall 2012 CS 495/595 - App Development for Smart Devices
Example 1
Page 4 Fall 2013 CS 495/595 - App Development for Smart Devices
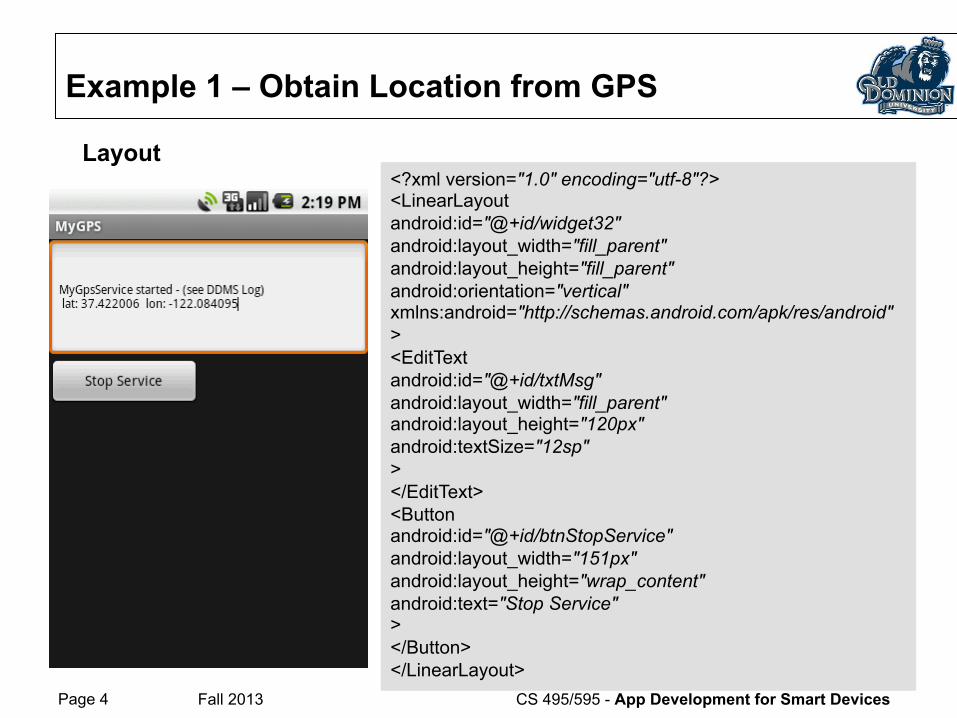
Example 1 – Obtain Location from GPS
<?xml version="1.0" encoding="utf-8"?> <LinearLayout android:id="@+id/widget32" android:layout_width="fill_parent" android:layout_height="fill_parent" android:orientation="vertical" xmlns:android="http://schemas.android.com/apk/res/android" > <EditText android:id="@+id/txtMsg" android:layout_width="fill_parent" android:layout_height="120px" android:textSize="12sp" > </EditText> <Button android:id="@+id/btnStopService" android:layout_width="151px" android:layout_height="wrap_content" android:text="Stop Service" > </Button> </LinearLayout>
Layout
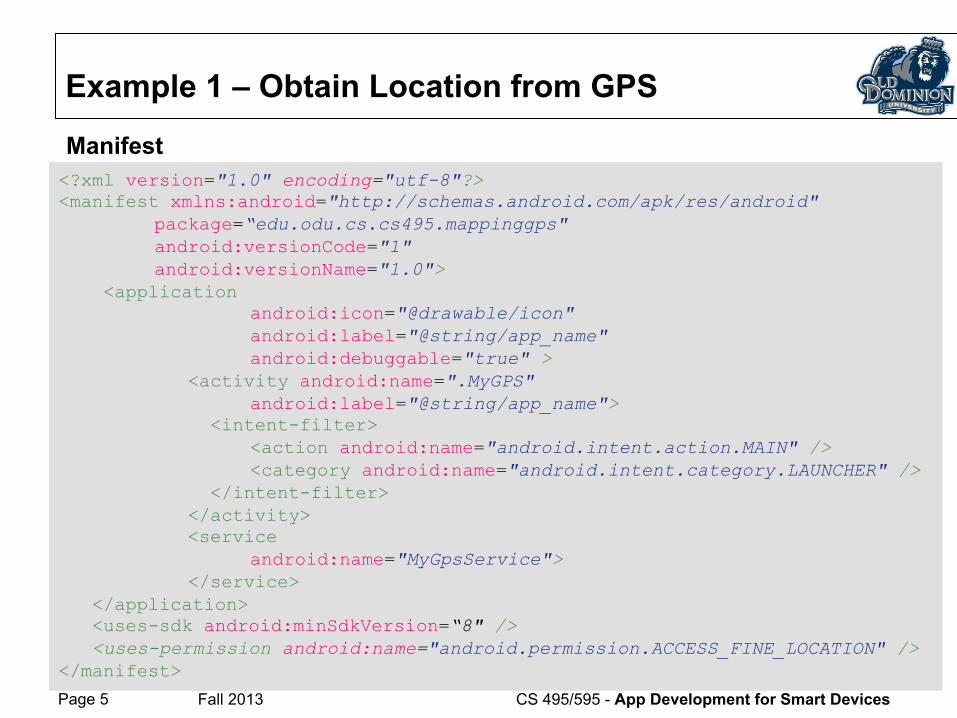
Page 5 Fall 2013 CS 495/595 - App Development for Smart Devices
Example 1 – Obtain Location from GPS
Manifest <?xml version="1.0" encoding="utf-8"?> <manifest xmlns:android="http://schemas.android.com/apk/res/android"
package=“edu.odu.cs.cs495.mappinggps" android:versionCode="1" android:versionName="1.0">
<application android:icon="@drawable/icon" android:label="@string/app_name" android:debuggable="true" > <activity android:name=".MyGPS" android:label="@string/app_name"> <intent-filter> <action android:name="android.intent.action.MAIN" /> <category android:name="android.intent.category.LAUNCHER" /> </intent-filter> </activity> <service android:name="MyGpsService"> </service>
</application> <uses-sdk android:minSdkVersion=“8" /> <uses-permission android:name="android.permission.ACCESS_FINE_LOCATION" /> </manifest>
Page 6 Fall 2013 CS 495/595 - App Development for Smart Devices
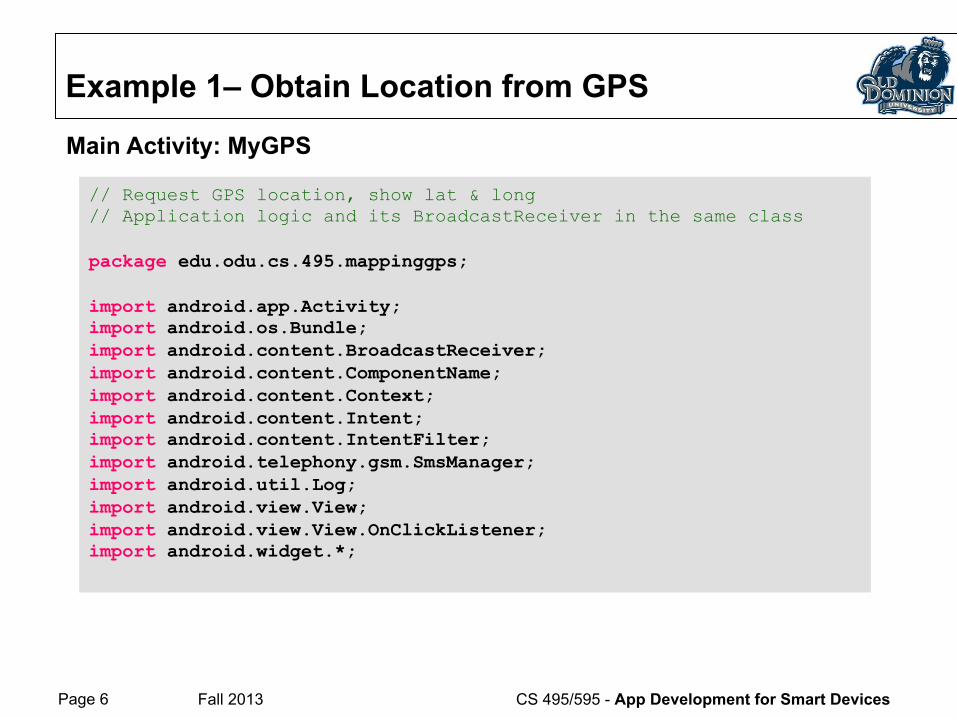
Example 1– Obtain Location from GPS
Main Activity: MyGPS
// Request GPS location, show lat & long // Application logic and its BroadcastReceiver in the same class package edu.odu.cs.495.mappinggps; import android.app.Activity; import android.os.Bundle; import android.content.BroadcastReceiver; import android.content.ComponentName; import android.content.Context; import android.content.Intent; import android.content.IntentFilter; import android.telephony.gsm.SmsManager; import android.util.Log; import android.view.View; import android.view.View.OnClickListener; import android.widget.*;
Page 7 Fall 2013 CS 495/595 - App Development for Smart Devices
Example 1– Obtain Location from GPS
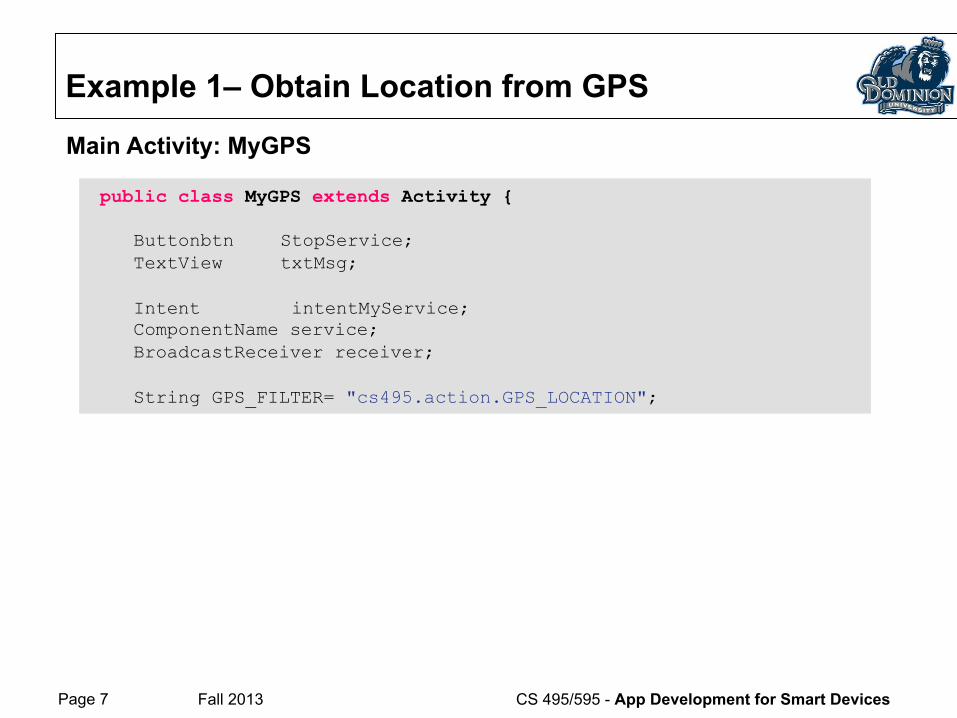
Main Activity: MyGPS
public class MyGPS extends Activity { Buttonbtn StopService; TextView txtMsg; Intent intentMyService; ComponentName service; BroadcastReceiver receiver; String GPS_FILTER= "cs495.action.GPS_LOCATION";
Page 8 Fall 2013 CS 495/595 - App Development for Smart Devices
Example 1– Obtain Location from GPS
Main Activity: MyGPS
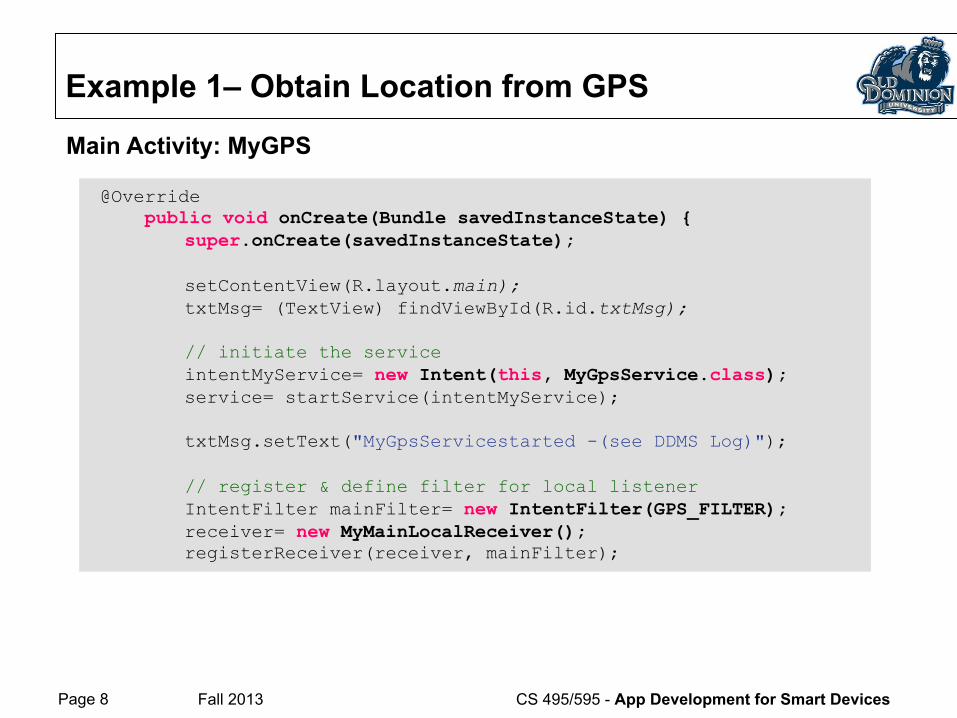
@Override public void onCreate(Bundle savedInstanceState) {
super.onCreate(savedInstanceState);
setContentView(R.layout.main); txtMsg= (TextView) findViewById(R.id.txtMsg);
// initiate the service intentMyService= new Intent(this, MyGpsService.class); service= startService(intentMyService);
txtMsg.setText("MyGpsServicestarted -(see DDMS Log)");
// register & define filter for local listener IntentFilter mainFilter= new IntentFilter(GPS_FILTER); receiver= new MyMainLocalReceiver(); registerReceiver(receiver, mainFilter);

Page 9 Fall 2013 CS 495/595 - App Development for Smart Devices
Example 1– Obtain Location from GPS
Main Activity: MyGPS
btnStopService= (Button) findViewById(R.id.btnStopService); btnStopService.setOnClickListener(new OnClickListener() {
public void onClick(View v) { try{ stopService(new Intent(intentMyService) );
txtMsg.setText("After stopingService: \n“ + service.getClassName()); btnStopService.setText("Finished"); btnStopService.setClickable(false); } catch(Exception e) { Log.e("MYGPS", e.getMessage() ); } }
}); }//onCreate
Page 10 Fall 2013 CS 495/595 - App Development for Smart Devices
Example 1– Obtain Location from GPS
Main Activity: MyGPS
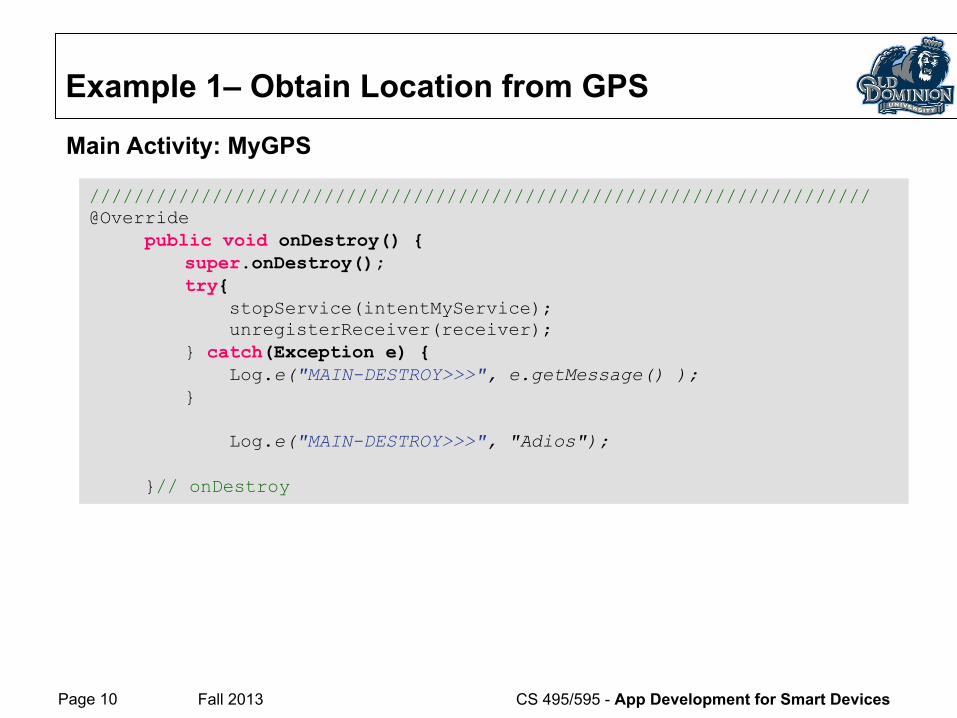
////////////////////////////////////////////////////////////////////// @Override public void onDestroy() {
super.onDestroy(); try{ stopService(intentMyService); unregisterReceiver(receiver); } catch(Exception e) { Log.e("MAIN-DESTROY>>>", e.getMessage() ); }
Log.e("MAIN-DESTROY>>>", "Adios");
}// onDestroy
Page 11 Fall 2013 CS 495/595 - App Development for Smart Devices
Example 1– Obtain Location from GPS
Main Activity: MyGPS
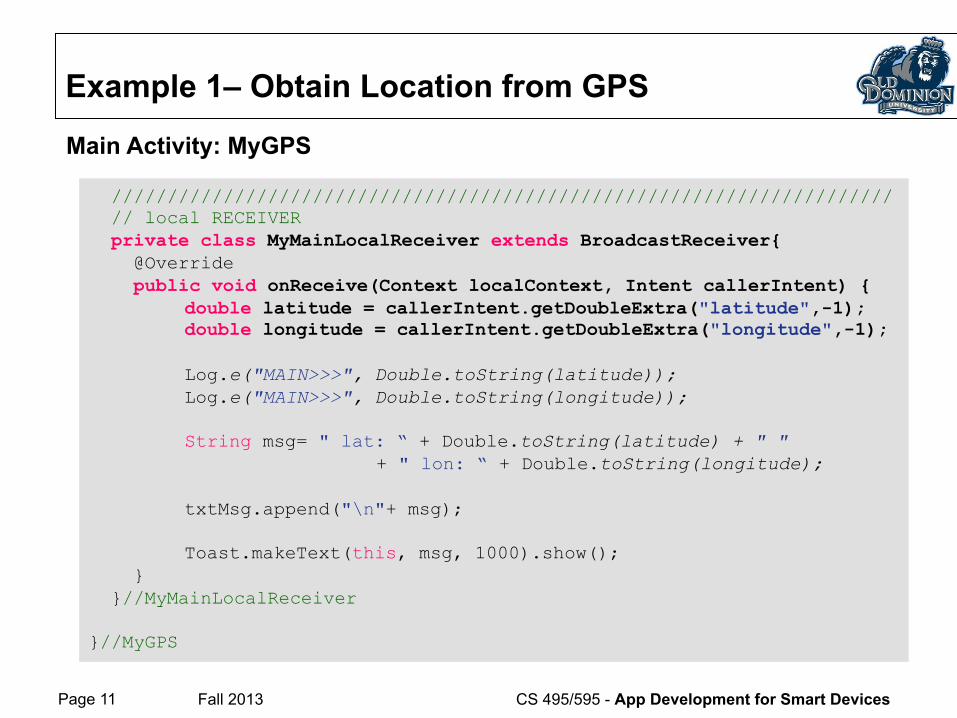
////////////////////////////////////////////////////////////////////// // local RECEIVER private class MyMainLocalReceiver extends BroadcastReceiver{ @Override public void onReceive(Context localContext, Intent callerIntent) {
double latitude = callerIntent.getDoubleExtra("latitude",-1); double longitude = callerIntent.getDoubleExtra("longitude",-1);
Log.e("MAIN>>>", Double.toString(latitude)); Log.e("MAIN>>>", Double.toString(longitude));
String msg= " lat: “ + Double.toString(latitude) + " " + " lon: “ + Double.toString(longitude);
txtMsg.append("\n"+ msg);
Toast.makeText(this, msg, 1000).show();
} }//MyMainLocalReceiver }//MyGPS
Page 12 Fall 2013 CS 495/595 - App Development for Smart Devices
Example 1– Obtain Location from GPS
Main Activity: MyGpsService
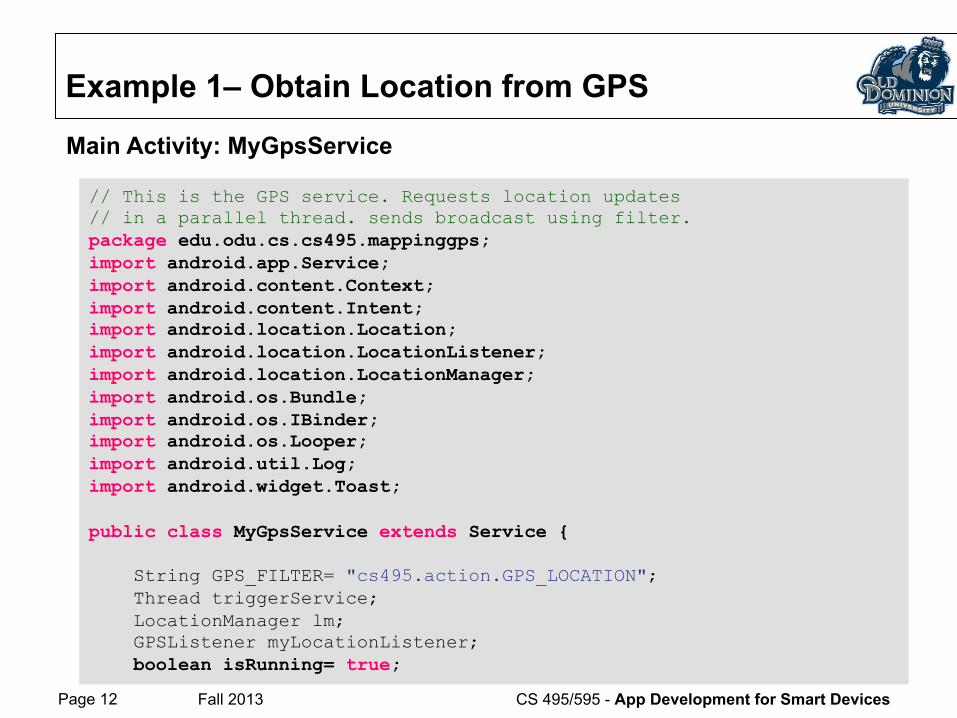
// This is the GPS service. Requests location updates // in a parallel thread. sends broadcast using filter. package edu.odu.cs.cs495.mappinggps; import android.app.Service; import android.content.Context; import android.content.Intent; import android.location.Location; import android.location.LocationListener; import android.location.LocationManager; import android.os.Bundle; import android.os.IBinder; import android.os.Looper; import android.util.Log; import android.widget.Toast; public class MyGpsService extends Service { String GPS_FILTER= "cs495.action.GPS_LOCATION"; Thread triggerService; LocationManager lm; GPSListener myLocationListener; boolean isRunning= true;
Page 13 Fall 2013 CS 495/595 - App Development for Smart Devices
Example 1– Obtain Location from GPS
Main Activity: MyGpsService
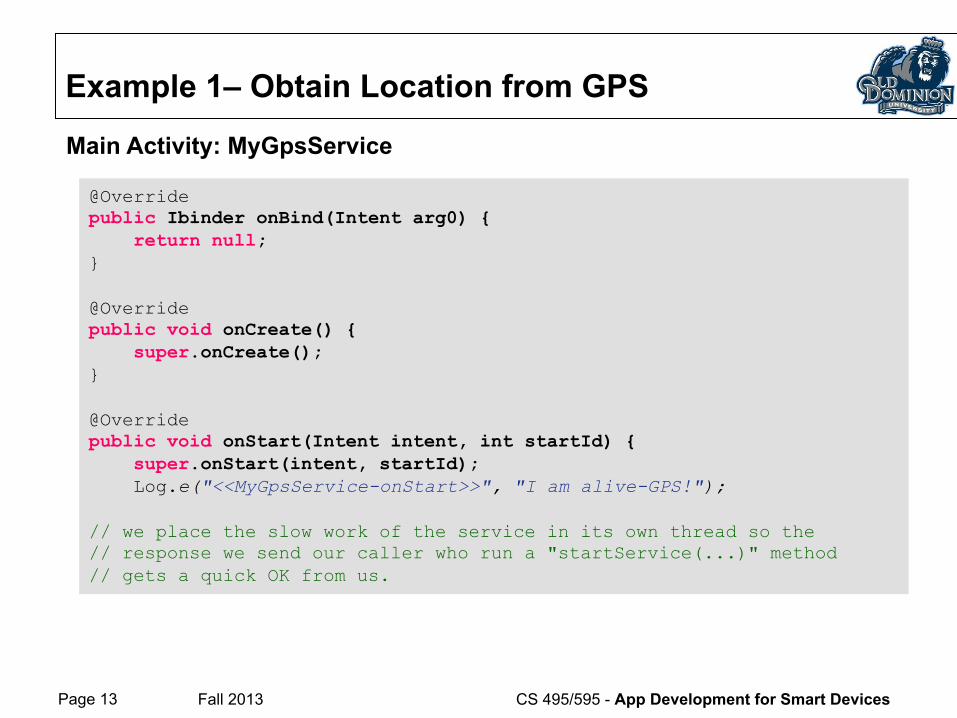
@Override public Ibinder onBind(Intent arg0) { return null; } @Override public void onCreate() { super.onCreate(); } @Override public void onStart(Intent intent, int startId) { super.onStart(intent, startId); Log.e("<<MyGpsService-onStart>>", "I am alive-GPS!"); // we place the slow work of the service in its own thread so the // response we send our caller who run a "startService(...)" method // gets a quick OK from us.
Page 14 Fall 2013 CS 495/595 - App Development for Smart Devices
Example 1– Obtain Location from GPS
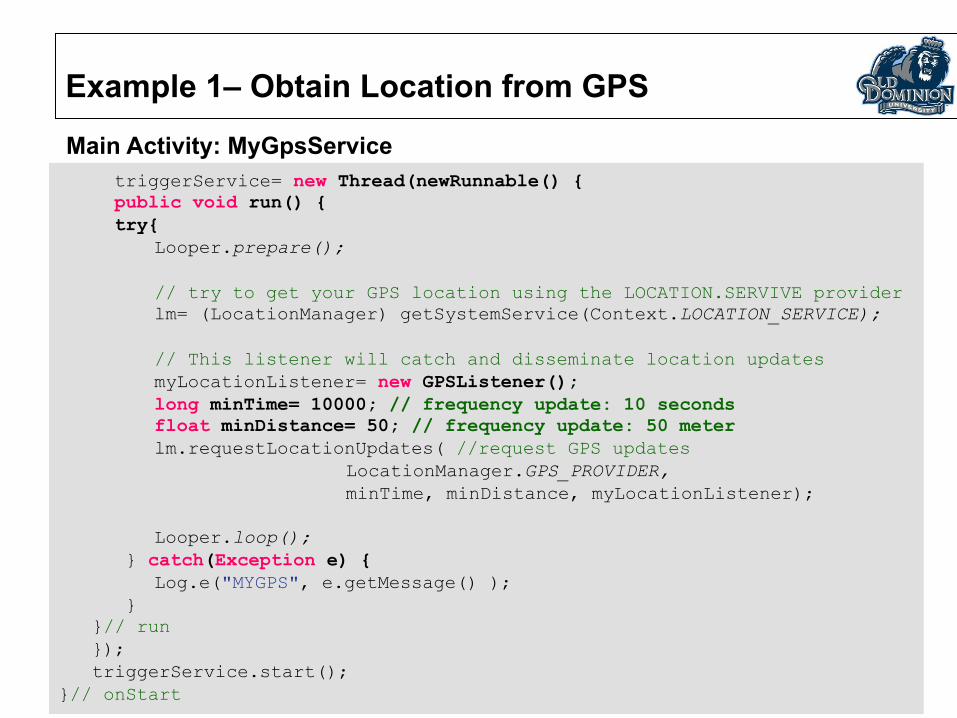
Main Activity: MyGpsService triggerService= new Thread(newRunnable() { public void run() { try{
Looper.prepare();
// try to get your GPS location using the LOCATION.SERVIVE provider lm= (LocationManager) getSystemService(Context.LOCATION_SERVICE);
// This listener will catch and disseminate location updates myLocationListener= new GPSListener(); long minTime= 10000; // frequency update: 10 seconds float minDistance= 50; // frequency update: 50 meter lm.requestLocationUpdates( //request GPS updates LocationManager.GPS_PROVIDER, minTime, minDistance, myLocationListener);
Looper.loop();
} catch(Exception e) { Log.e("MYGPS", e.getMessage() );
} }// run }); triggerService.start(); }// onStart
Page 15 Fall 2013 CS 495/595 - App Development for Smart Devices
Example 1– Obtain Location from GPS
Main Activity: MyGpsService
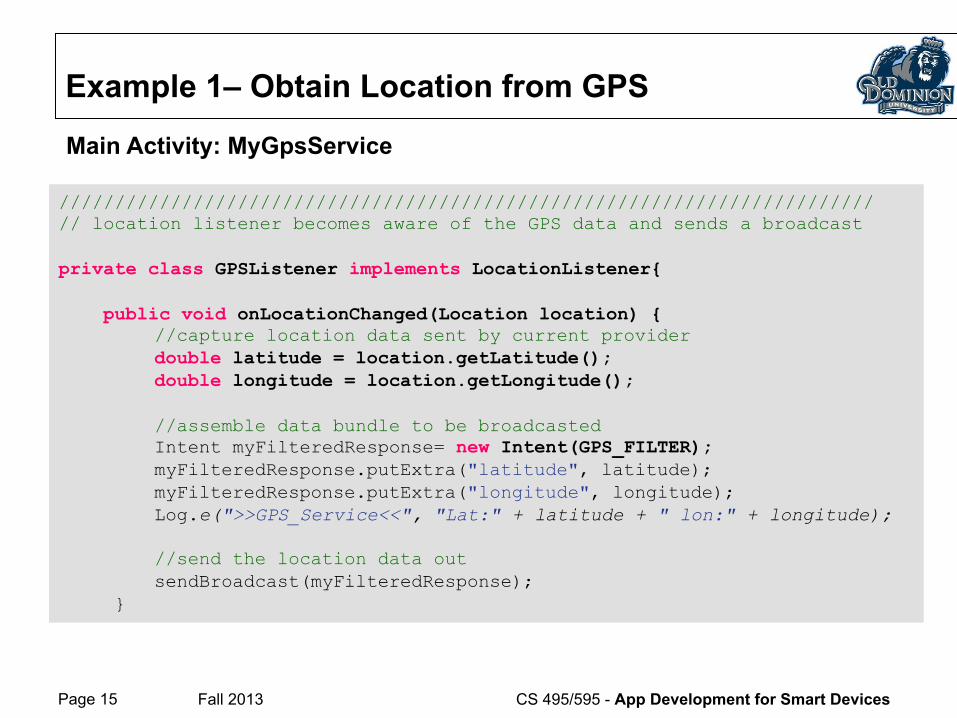
///////////////////////////////////////////////////////////////////////// // location listener becomes aware of the GPS data and sends a broadcast private class GPSListener implements LocationListener{ public void onLocationChanged(Location location) {
//capture location data sent by current provider double latitude = location.getLatitude(); double longitude = location.getLongitude();
//assemble data bundle to be broadcasted Intent myFilteredResponse= new Intent(GPS_FILTER); myFilteredResponse.putExtra("latitude", latitude); myFilteredResponse.putExtra("longitude", longitude); Log.e(">>GPS_Service<<", "Lat:" + latitude + " lon:" + longitude);
//send the location data out sendBroadcast(myFilteredResponse);
}
Page 16 Fall 2013 CS 495/595 - App Development for Smart Devices
Example 1– Obtain Location from GPS
Main Activity: MyGpsService
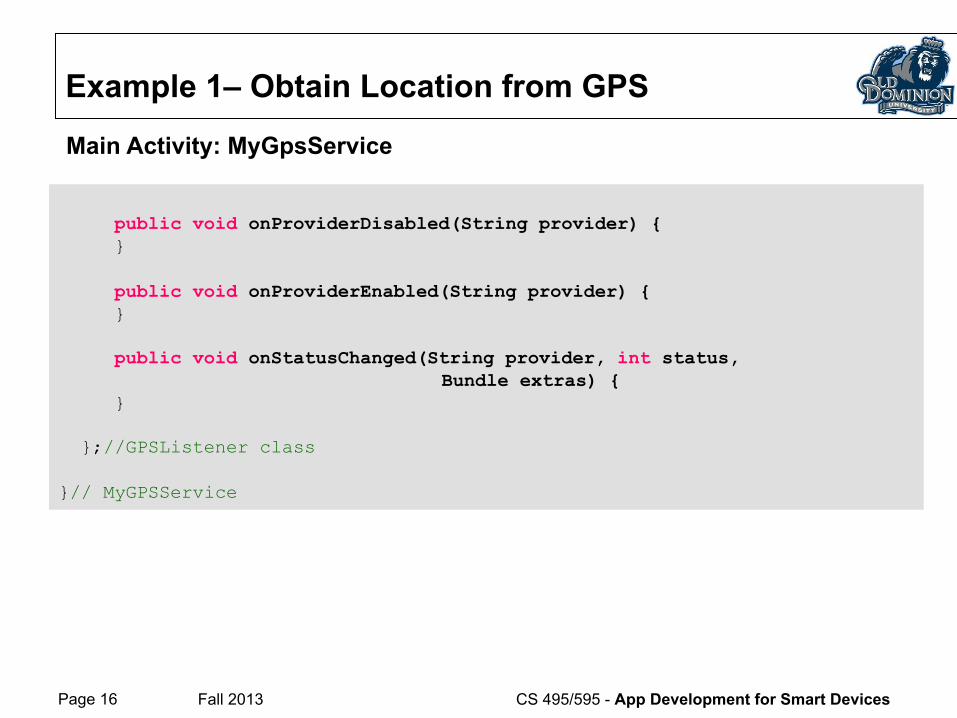
public void onProviderDisabled(String provider) { } public void onProviderEnabled(String provider) { } public void onStatusChanged(String provider, int status,
Bundle extras) { } };//GPSListener class }// MyGPSService

Page 17 Fall 2012 CS 495/595 - App Development for Smart Devices
Example 2
Page 18 Fall 2013 CS 495/595 - App Development for Smart Devices
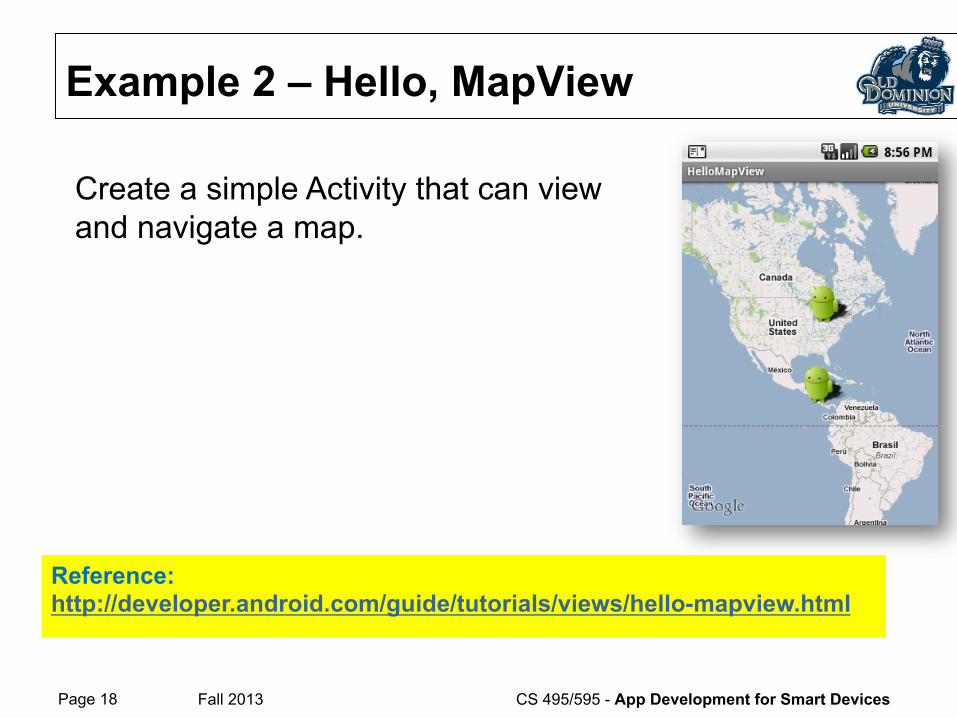
Example 2 – Hello, MapView Create a simple Activity that can view and navigate a map.
Reference: http://developer.android.com/guide/tutorials/views/hello-mapview.html
Page 19 Fall 2013 CS 495/595 - App Development for Smart Devices
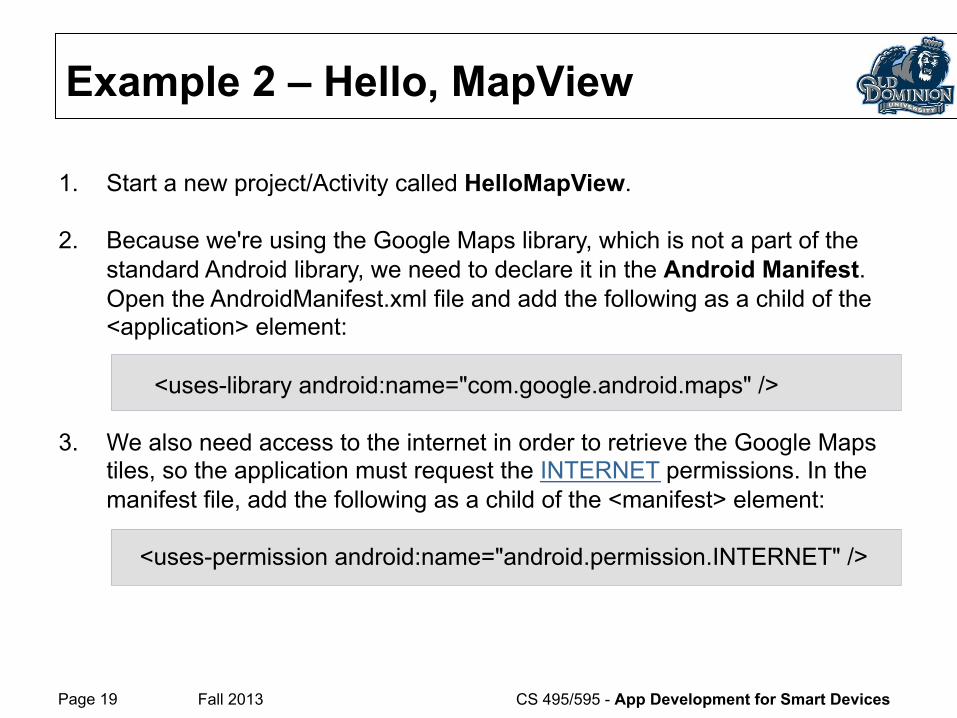
Example 2 – Hello, MapView 1. Start a new project/Activity called HelloMapView.
2. Because we're using the Google Maps library, which is not a part of the standard Android library, we need to declare it in the Android Manifest. Open the AndroidManifest.xml file and add the following as a child of the <application> element:
<uses-library android:name="com.google.android.maps" />
3. We also need access to the internet in order to retrieve the Google Maps
tiles, so the application must request the INTERNET permissions. In the manifest file, add the following as a child of the <manifest> element:
<uses-permission android:name="android.permission.INTERNET" />
Page 20 Fall 2013 CS 495/595 - App Development for Smart Devices
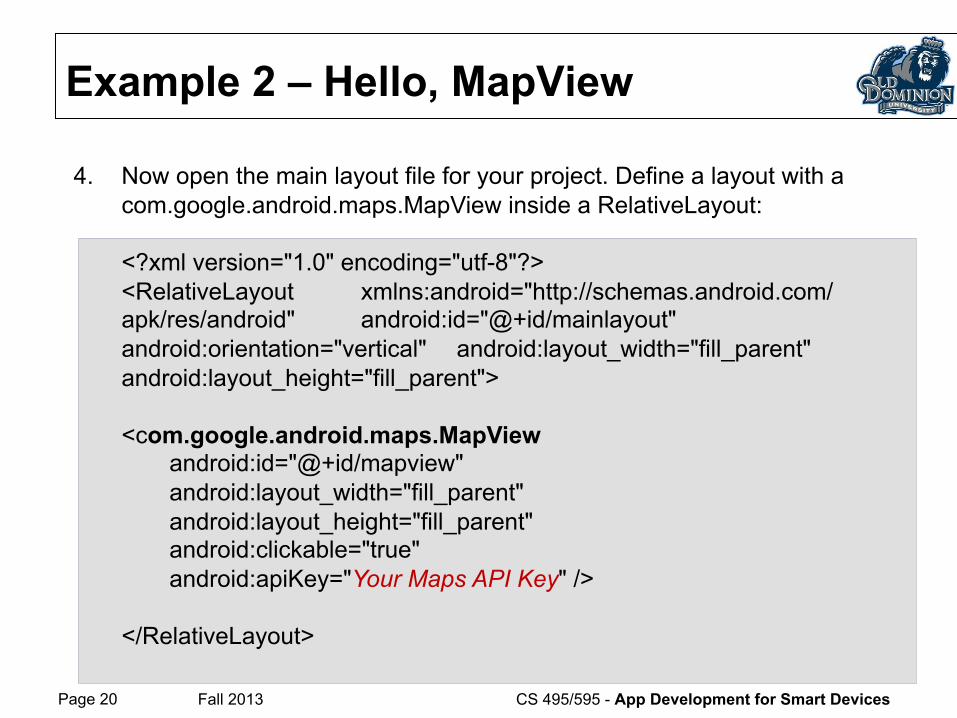
Example 2 – Hello, MapView 4. Now open the main layout file for your project. Define a layout with a
com.google.android.maps.MapView inside a RelativeLayout:
<?xml version="1.0" encoding="utf-8"?> <RelativeLayout xmlns:android="http://schemas.android.com/apk/res/android" android:id="@+id/mainlayout" android:orientation="vertical" android:layout_width="fill_parent" android:layout_height="fill_parent">
<com.google.android.maps.MapView android:id="@+id/mapview" android:layout_width="fill_parent" android:layout_height="fill_parent" android:clickable="true" android:apiKey="Your Maps API Key" />
</RelativeLayout>
Page 21 Fall 2013 CS 495/595 - App Development for Smart Devices
Example 2 – Hello, MapView
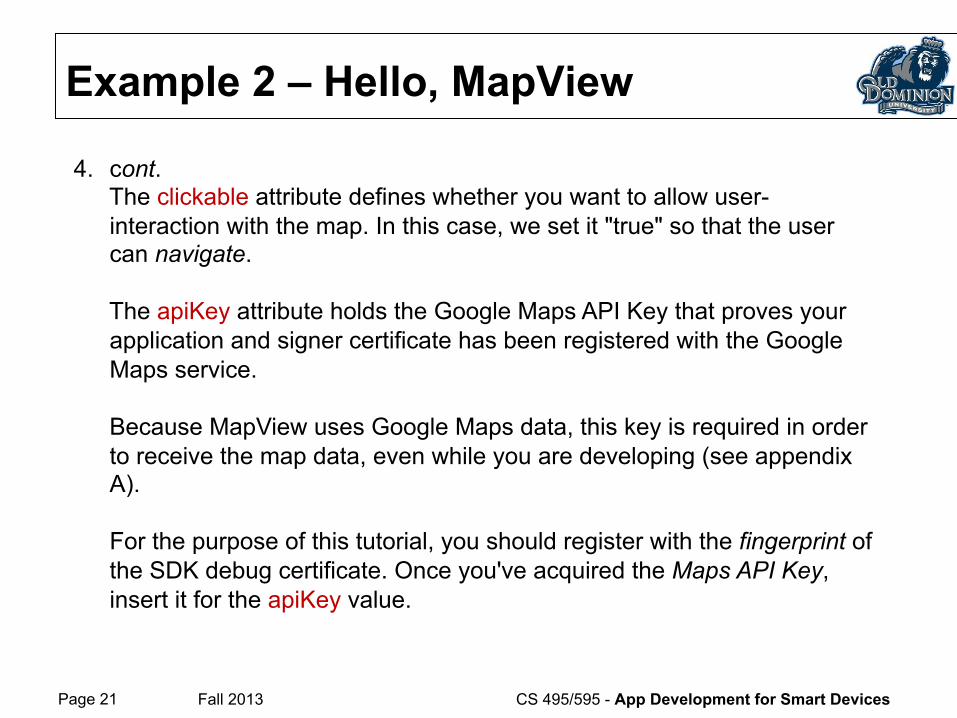
4. cont. The clickable attribute defines whether you want to allow user-interaction with the map. In this case, we set it "true" so that the user can navigate. The apiKey attribute holds the Google Maps API Key that proves your application and signer certificate has been registered with the Google Maps service. Because MapView uses Google Maps data, this key is required in order to receive the map data, even while you are developing (see appendix A).
For the purpose of this tutorial, you should register with the fingerprint of the SDK debug certificate. Once you've acquired the Maps API Key, insert it for the apiKey value.
Page 22 Fall 2013 CS 495/595 - App Development for Smart Devices
Example 2 – Hello, MapView
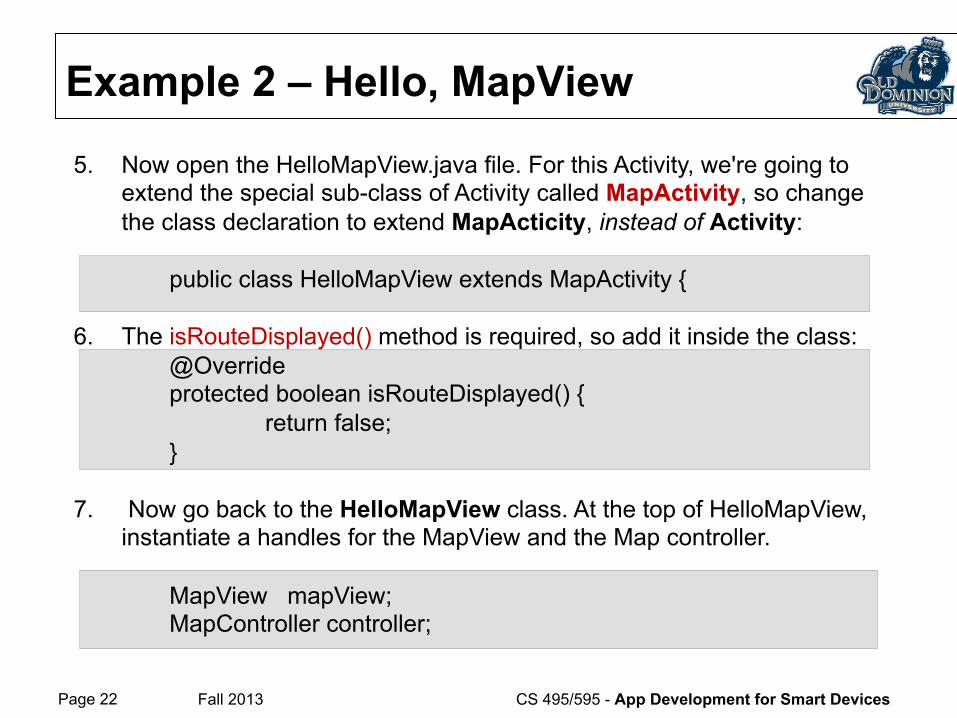
5. Now open the HelloMapView.java file. For this Activity, we're going to extend the special sub-class of Activity called MapActivity, so change the class declaration to extend MapActicity, instead of Activity: public class HelloMapView extends MapActivity {
6. The isRouteDisplayed() method is required, so add it inside the class:
@Override protected boolean isRouteDisplayed() { return false; }
7. Now go back to the HelloMapView class. At the top of HelloMapView,
instantiate a handles for the MapView and the Map controller.
MapView mapView; MapController controller;
Page 23 Fall 2013 CS 495/595 - App Development for Smart Devices
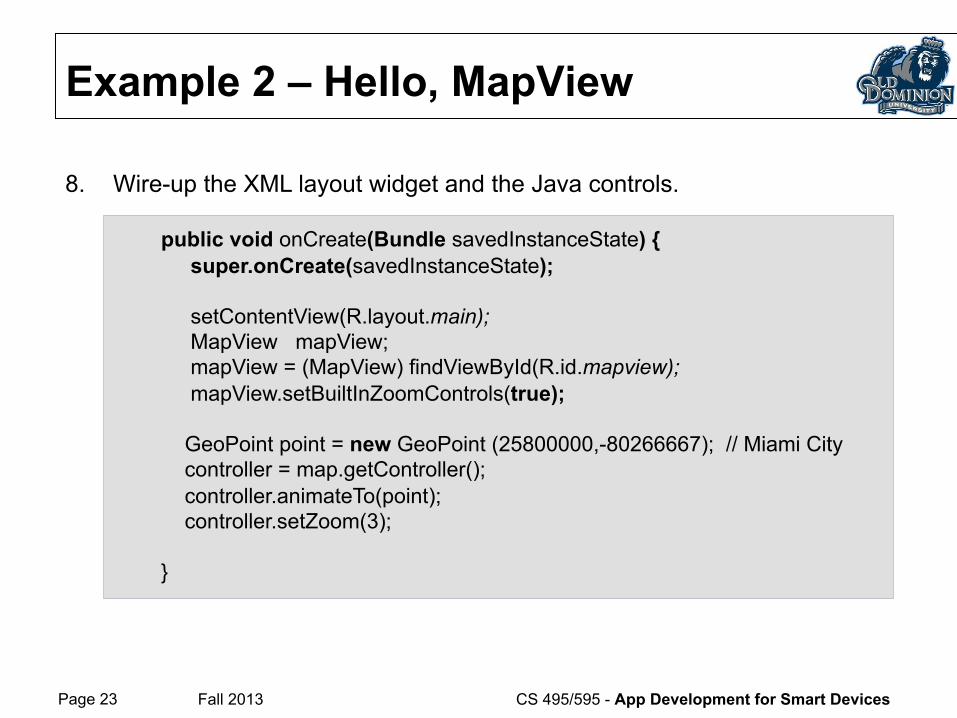
Example 2 – Hello, MapView 8. Wire-up the XML layout widget and the Java controls.
public void onCreate(Bundle savedInstanceState) { super.onCreate(savedInstanceState); setContentView(R.layout.main); MapView mapView;
mapView = (MapView) findViewById(R.id.mapview); mapView.setBuiltInZoomControls(true);
GeoPoint point = new GeoPoint (25800000,-80266667); // Miami City
controller = map.getController(); controller.animateTo(point); controller.setZoom(3);
}
Page 24 Fall 2013 CS 495/595 - App Development for Smart Devices
Example 2 – Hello, MapView
9. In the previous fragment the mapView is activated by the use of the built-
in zoom facility (new feature). This zoom control will appear at the center-bottom of the screen each time the user taps on the screen, and will disappear a few seconds later.
10. The MapController method .animateTo(geoPoint) center the map on the given coordinates.
11. The zoom factor range is 1..17 (17 closest to the map).
12. Ready to run.
Page 25 Fall 2013 CS 495/595 - App Development for Smart Devices
Example 2 – Hello, MapView
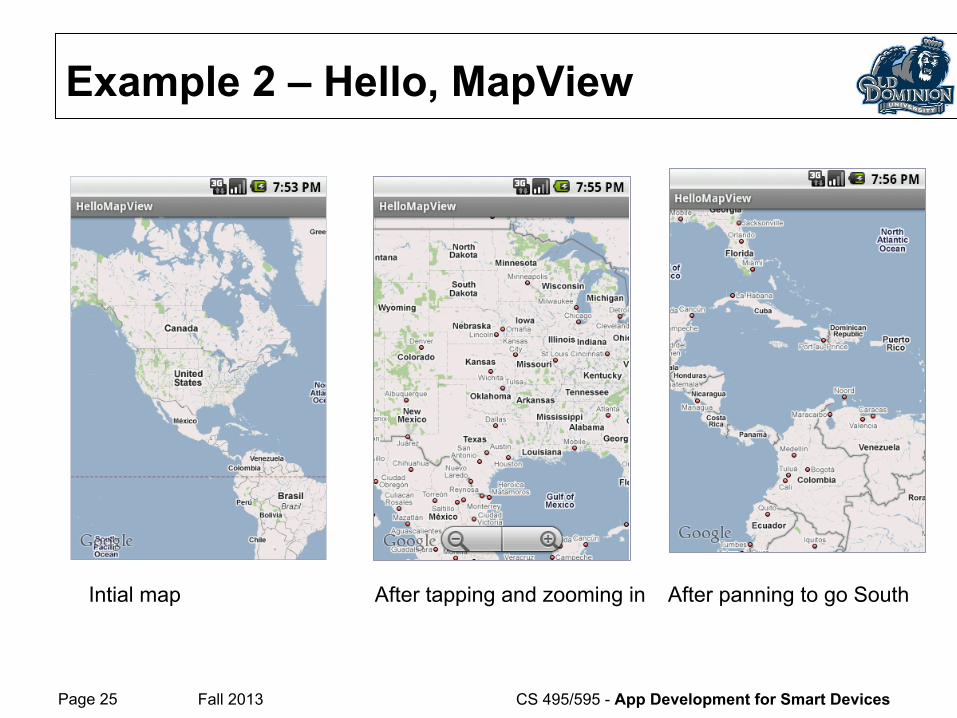
Intial map After tapping and zooming in After panning to go South

Page 26 Fall 2012 CS 495/595 - App Development for Smart Devices
Example 3
Page 27 Fall 2013 CS 495/595 - App Development for Smart Devices
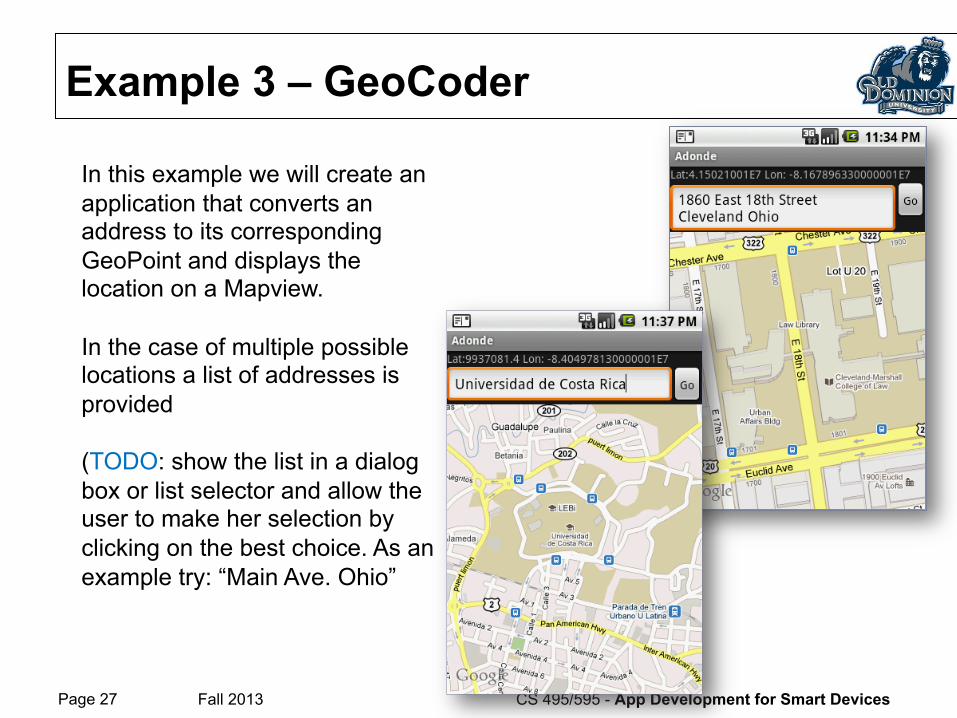
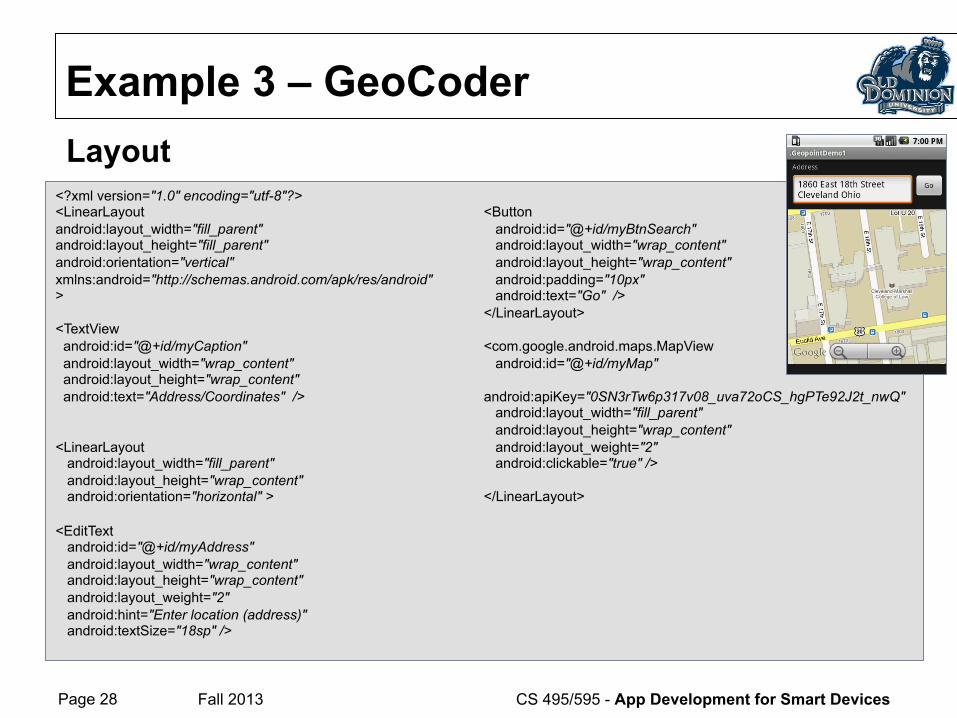
Example 3 – GeoCoder
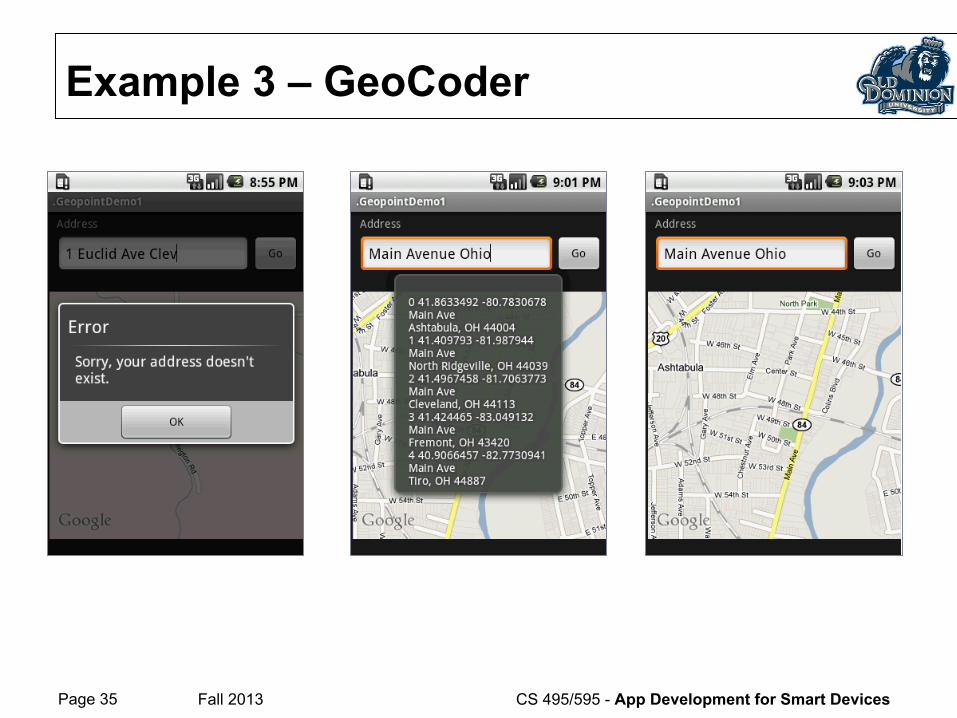
In this example we will create an application that converts an address to its corresponding GeoPoint and displays the location on a Mapview.
In the case of multiple possible locations a list of addresses is provided
(TODO: show the list in a dialog box or list selector and allow the user to make her selection by clicking on the best choice. As an example try: “Main Ave. Ohio”
Page 28 Fall 2013 CS 495/595 - App Development for Smart Devices
Example 3 – GeoCoder
<?xml version="1.0" encoding="utf-8"?> <LinearLayout android:layout_width="fill_parent" android:layout_height="fill_parent" android:orientation="vertical" xmlns:android="http://schemas.android.com/apk/res/android" > <TextView android:id="@+id/myCaption" android:layout_width="wrap_content" android:layout_height="wrap_content" android:text="Address/Coordinates" /> <LinearLayout android:layout_width="fill_parent" android:layout_height="wrap_content" android:orientation="horizontal" > <EditText android:id="@+id/myAddress" android:layout_width="wrap_content" android:layout_height="wrap_content" android:layout_weight="2" android:hint="Enter location (address)" android:textSize="18sp" />
<Button android:id="@+id/myBtnSearch" android:layout_width="wrap_content" android:layout_height="wrap_content" android:padding="10px" android:text="Go" /> </LinearLayout> <com.google.android.maps.MapView android:id="@+id/myMap" android:apiKey="0SN3rTw6p317v08_uva72oCS_hgPTe92J2t_nwQ" android:layout_width="fill_parent" android:layout_height="wrap_content" android:layout_weight="2" android:clickable="true" /> </LinearLayout>
Layout
Page 29 Fall 2013 CS 495/595 - App Development for Smart Devices
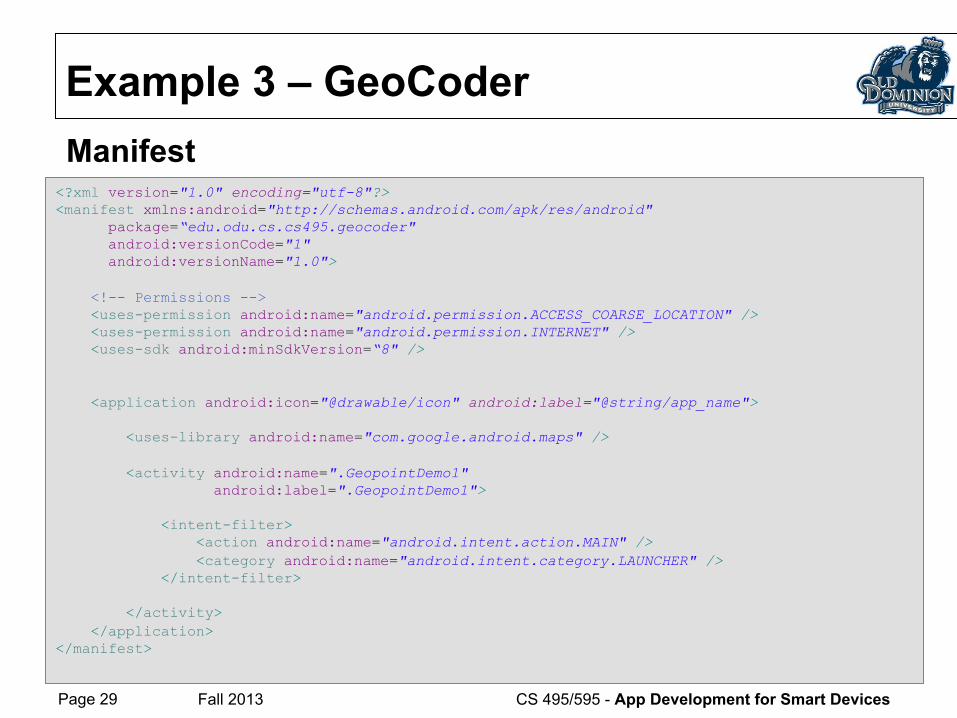
Example 3 – GeoCoder
<?xml version="1.0" encoding="utf-8"?> <manifest xmlns:android="http://schemas.android.com/apk/res/android" package=“edu.odu.cs.cs495.geocoder" android:versionCode="1" android:versionName="1.0"> <!-- Permissions --> <uses-permission android:name="android.permission.ACCESS_COARSE_LOCATION" /> <uses-permission android:name="android.permission.INTERNET" /> <uses-sdk android:minSdkVersion=“8" /> <application android:icon="@drawable/icon" android:label="@string/app_name"> <uses-library android:name="com.google.android.maps" /> <activity android:name=".GeopointDemo1" android:label=".GeopointDemo1"> <intent-filter> <action android:name="android.intent.action.MAIN" /> <category android:name="android.intent.category.LAUNCHER" /> </intent-filter> </activity> </application> </manifest>
Manifest
Page 30 Fall 2013 CS 495/595 - App Development for Smart Devices
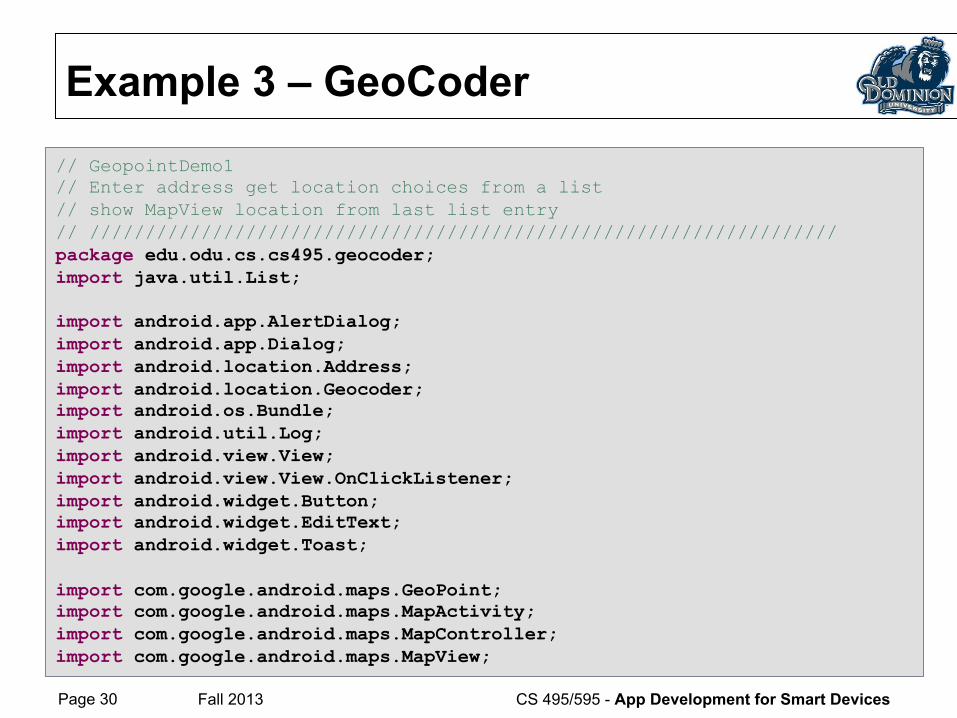
Example 3 – GeoCoder
// GeopointDemo1 // Enter address get location choices from a list // show MapView location from last list entry // /////////////////////////////////////////////////////////////////// package edu.odu.cs.cs495.geocoder; import java.util.List; import android.app.AlertDialog; import android.app.Dialog; import android.location.Address; import android.location.Geocoder; import android.os.Bundle; import android.util.Log; import android.view.View; import android.view.View.OnClickListener; import android.widget.Button; import android.widget.EditText; import android.widget.Toast; import com.google.android.maps.GeoPoint; import com.google.android.maps.MapActivity; import com.google.android.maps.MapController; import com.google.android.maps.MapView;
Page 31 Fall 2013 CS 495/595 - App Development for Smart Devices
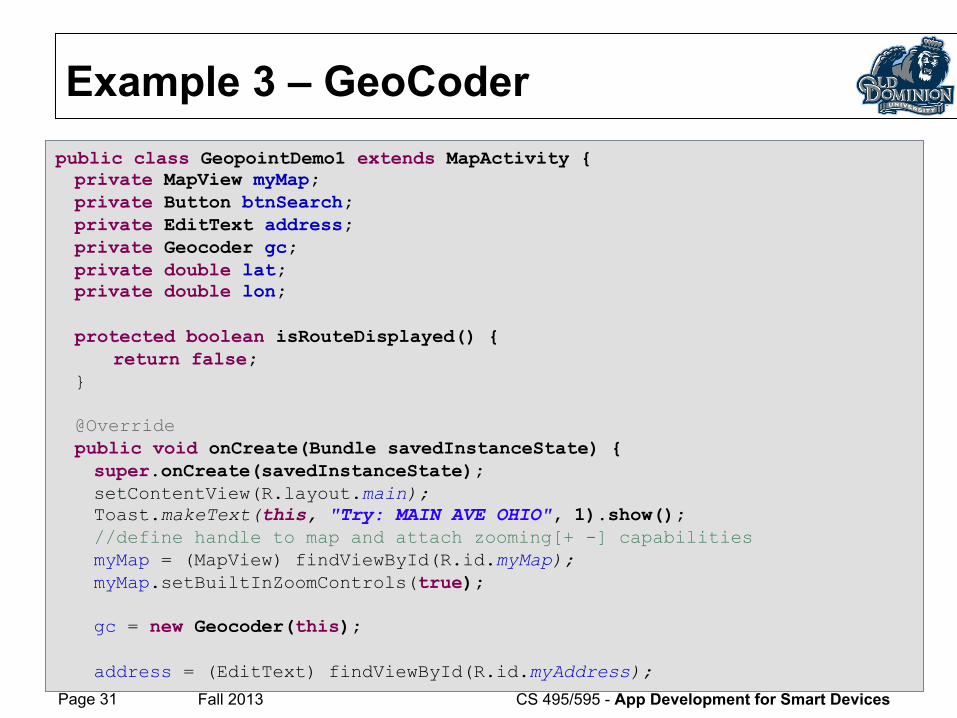
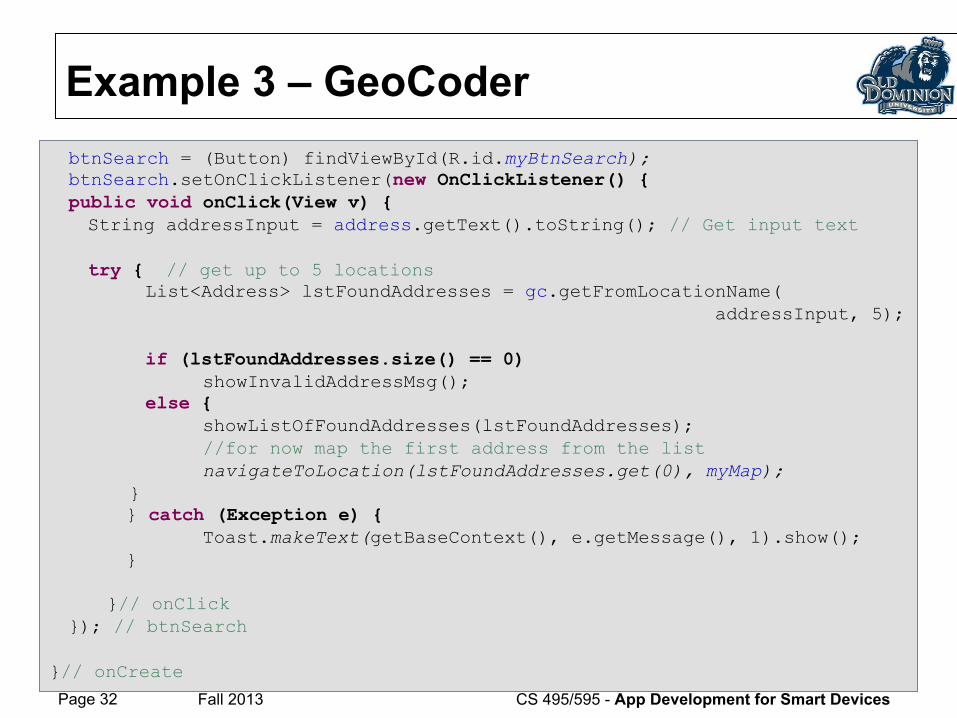
Example 3 – GeoCoder public class GeopointDemo1 extends MapActivity { private MapView myMap; private Button btnSearch; private EditText address; private Geocoder gc; private double lat; private double lon; protected boolean isRouteDisplayed() {
return false; } @Override public void onCreate(Bundle savedInstanceState) { super.onCreate(savedInstanceState); setContentView(R.layout.main); Toast.makeText(this, "Try: MAIN AVE OHIO", 1).show(); //define handle to map and attach zooming[+ -] capabilities myMap = (MapView) findViewById(R.id.myMap); myMap.setBuiltInZoomControls(true); gc = new Geocoder(this); address = (EditText) findViewById(R.id.myAddress);
Page 32 Fall 2013 CS 495/595 - App Development for Smart Devices
Example 3 – GeoCoder btnSearch = (Button) findViewById(R.id.myBtnSearch); btnSearch.setOnClickListener(new OnClickListener() { public void onClick(View v) { String addressInput = address.getText().toString(); // Get input text try { // get up to 5 locations List<Address> lstFoundAddresses = gc.getFromLocationName( addressInput, 5); if (lstFoundAddresses.size() == 0) showInvalidAddressMsg(); else { showListOfFoundAddresses(lstFoundAddresses); //for now map the first address from the list navigateToLocation(lstFoundAddresses.get(0), myMap); } } catch (Exception e) { Toast.makeText(getBaseContext(), e.getMessage(), 1).show(); } }// onClick }); // btnSearch }// onCreate
Page 33 Fall 2013 CS 495/595 - App Development for Smart Devices
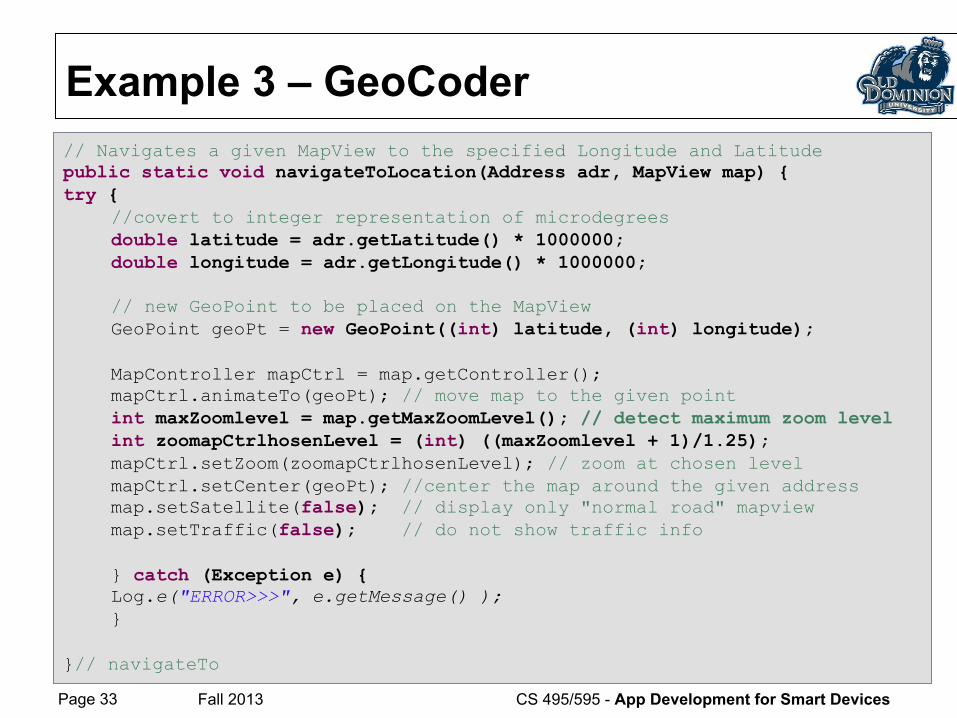
Example 3 – GeoCoder // Navigates a given MapView to the specified Longitude and Latitude public static void navigateToLocation(Address adr, MapView map) { try {
//covert to integer representation of microdegrees double latitude = adr.getLatitude() * 1000000; double longitude = adr.getLongitude() * 1000000; // new GeoPoint to be placed on the MapView GeoPoint geoPt = new GeoPoint((int) latitude, (int) longitude); MapController mapCtrl = map.getController(); mapCtrl.animateTo(geoPt); // move map to the given point int maxZoomlevel = map.getMaxZoomLevel(); // detect maximum zoom level int zoomapCtrlhosenLevel = (int) ((maxZoomlevel + 1)/1.25); mapCtrl.setZoom(zoomapCtrlhosenLevel); // zoom at chosen level mapCtrl.setCenter(geoPt); //center the map around the given address map.setSatellite(false); // display only "normal road" mapview map.setTraffic(false); // do not show traffic info } catch (Exception e) { Log.e("ERROR>>>", e.getMessage() ); }
}// navigateTo
Page 34 Fall 2013 CS 495/595 - App Development for Smart Devices
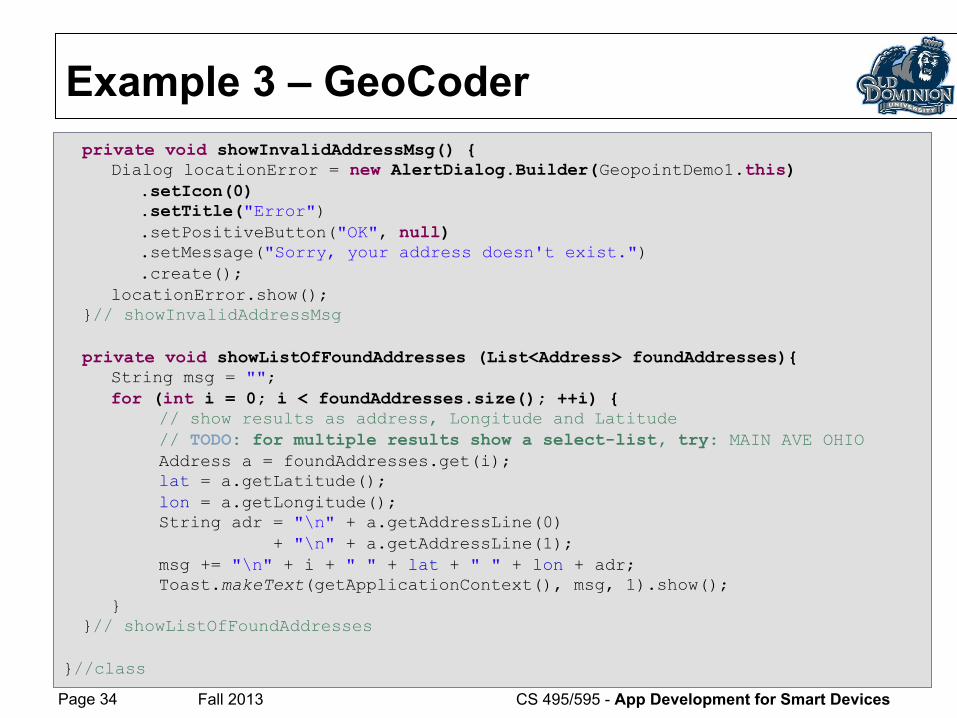
Example 3 – GeoCoder private void showInvalidAddressMsg() {
Dialog locationError = new AlertDialog.Builder( GeopointDemo1.this) .setIcon(0) .setTitle("Error") .setPositiveButton("OK", null) .setMessage("Sorry, your address doesn't exist.") .create(); locationError.show();
}// showInvalidAddressMsg private void showListOfFoundAddresses (List<Address> foundAddresses){
String msg = ""; for (int i = 0; i < foundAddresses.size(); ++i) {
// show results as address, Longitude and Latitude // TODO: for multiple results show a select-list, try: MAIN AVE OHIO Address a = foundAddresses.get(i); lat = a.getLatitude(); lon = a.getLongitude(); String adr = "\n" + a.getAddressLine(0) + "\n" + a.getAddressLine(1); msg += "\n" + i + " " + lat + " " + lon + adr; Toast.makeText(getApplicationContext(), msg, 1).show();
} }// showListOfFoundAddresses }//class
Page 35 Fall 2013 CS 495/595 - App Development for Smart Devices
Example 3 – GeoCoder

Page 36 Fall 2012 CS 495/595 - App Development for Smart Devices
Example 4
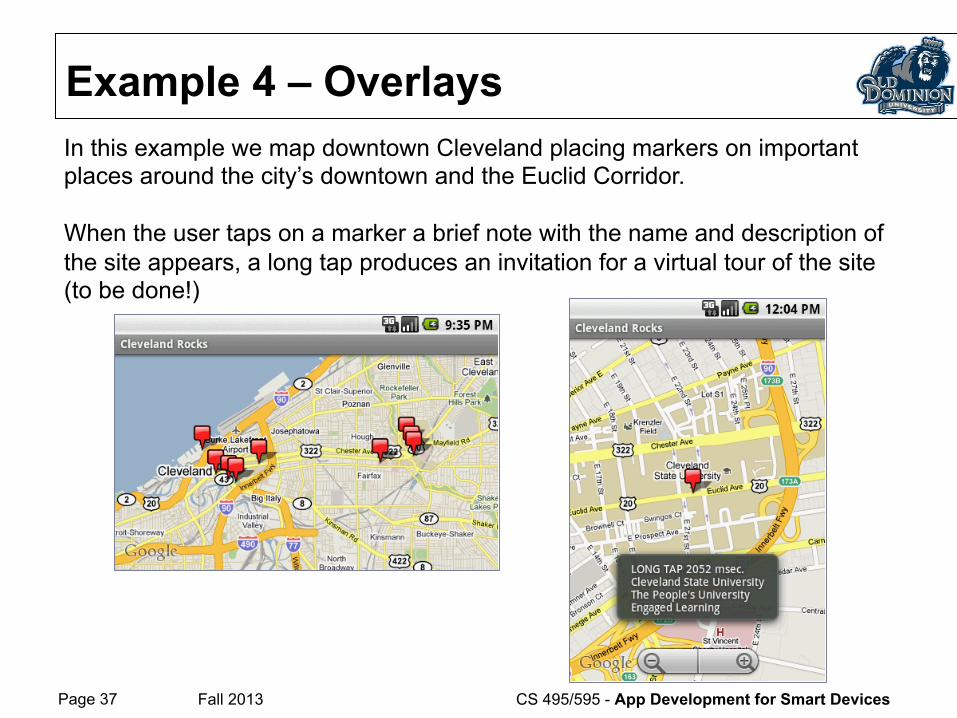
Page 37 Fall 2013 CS 495/595 - App Development for Smart Devices
Example 4 – Overlays In this example we map downtown Cleveland placing markers on important places around the city’s downtown and the Euclid Corridor. When the user taps on a marker a brief note with the name and description of the site appears, a long tap produces an invitation for a virtual tour of the site (to be done!)
Page 38 Fall 2013 CS 495/595 - App Development for Smart Devices
Example 4 – Overlays
<?xml version="1.0" encoding="utf-8"?> <RelativeLayout xmlns:android="http://schemas.android.com/apk/res/android" android:layout_width="fill_parent" android:layout_height="fill_parent"> <com.google.android.maps.MapView android:id="@+id/map" android:layout_width="fill_parent" android:layout_height="fill_parent" android:apiKey="0SN3rTw6p317v08_uva72oCS_hgPTe92J2t_nwQ" android:clickable="true" /> </RelativeLayout>
Page 39 Fall 2013 CS 495/595 - App Development for Smart Devices
Example 4 – Overlays
<?xml version="1.0" encoding="utf-8"?> <manifest xmlns:android="http://schemas.android.com/apk/res/android" package=“edu.odu.cs.cs495.overlays" android:versionCode="1" android:versionName="1.0"> <!-- Permissions --> <uses-permission android:name="android.permission.ACCESS_COARSE_LOCATION" /> <uses-permission android:name="android.permission.INTERNET" /> <uses-sdk android:minSdkVersion=“8" /> <application android:icon="@drawable/icon" android:label="@string/app_name"> <uses-library android:name="com.google.android.maps" /> <activity android:name="ClevelandOverlays" android:label="Cleveland Overlays"> <intent-filter> <action android:name="android.intent.action.MAIN" /> <category android:name="android.intent.category.LAUNCHER" /> </intent-filter> </activity> </application> </manifest>
Page 40 Fall 2013 CS 495/595 - App Development for Smart Devices
Example 4 – Overlays package edu.odu.cs.cs495.overlays; // Mapping CLEVELAND DOWNTOWN - OHIO // demonstrates SHORT & LONG TAP events import android.content.res.Resources.NotFoundException; import android.graphics.drawable.Drawable; import android.graphics.Canvas; import android.os.Bundle; import android.view.KeyEvent; import android.view.MotionEvent; import android.widget.Toast; import com.google.android.maps.GeoPoint; import com.google.android.maps.ItemizedOverlay; import com.google.android.maps.MapActivity; import com.google.android.maps.MapView; import com.google.android.maps.OverlayItem; import java.util.ArrayList; import java.util.List; public class ClevelandRocks extends MapActivity { // handle to the MapView private MapView map = null; //next two variables are part of a test for longPress event private long lastTouchTimeDown = -1; private long lastTouchTimeUp = -1;
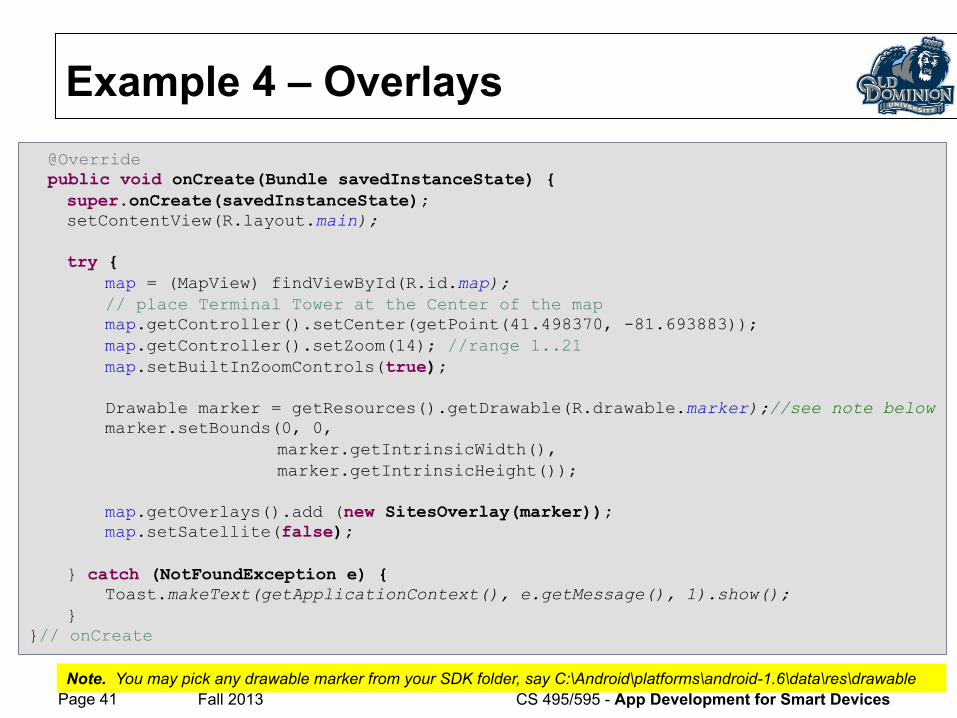
Page 41 Fall 2013 CS 495/595 - App Development for Smart Devices
Example 4 – Overlays @Override public void onCreate(Bundle savedInstanceState) { super.onCreate(savedInstanceState); setContentView(R.layout.main); try { map = (MapView) findViewById(R.id.map); // place Terminal Tower at the Center of the map map.getController().setCenter(getPoint(41.498370, -81.693883)); map.getController().setZoom(14); //range 1..21 map.setBuiltInZoomControls(true); Drawable marker = getResources().getDrawable(R.drawable.marker);//see note below marker.setBounds(0, 0,
marker.getIntrinsicWidth(), marker.getIntrinsicHeight());
map.getOverlays().add (new SitesOverlay(marker)); map.setSatellite(false); } catch (NotFoundException e) { Toast.makeText(getApplicationContext(), e.getMessage(), 1).show(); } }// onCreate
Note. You may pick any drawable marker from your SDK folder, say C:\Android\platforms\android-1.6\data\res\drawable
Page 42 Fall 2013 CS 495/595 - App Development for Smart Devices
Example 4 – Overlays
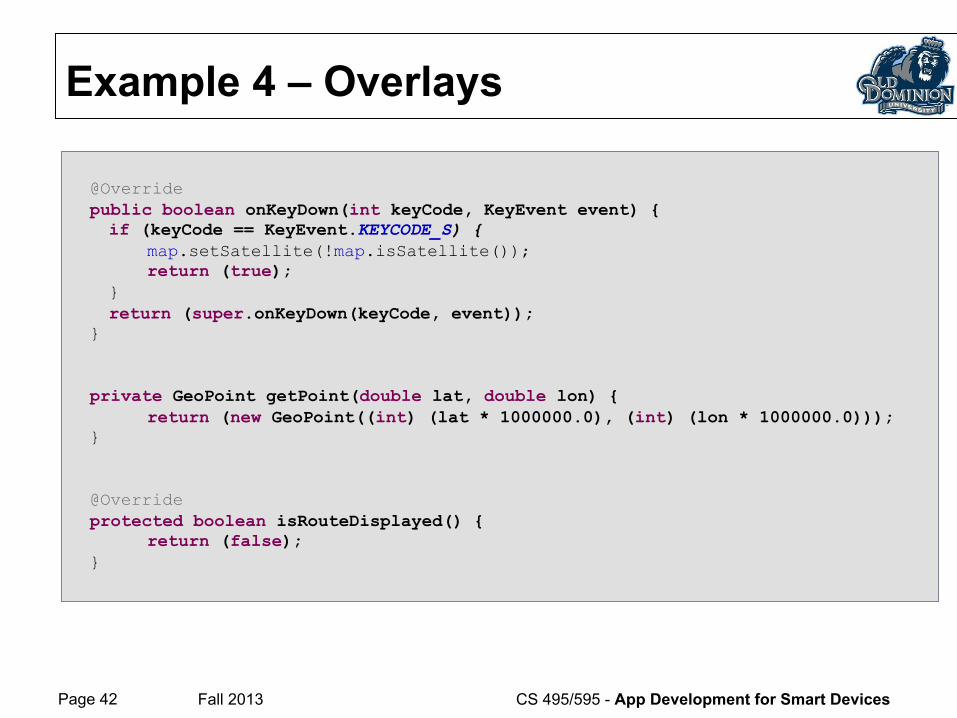
@Override public boolean onKeyDown(int keyCode, KeyEvent event) { if (keyCode == KeyEvent.KEYCODE_S) { map.setSatellite(!map.isSatellite()); return (true); } return (super.onKeyDown(keyCode, event)); } private GeoPoint getPoint(double lat, double lon) { return (new GeoPoint((int) (lat * 1000000.0), (int) (lon * 1000000.0))); } @Override protected boolean isRouteDisplayed() { return (false); }
Page 43 Fall 2013 CS 495/595 - App Development for Smart Devices
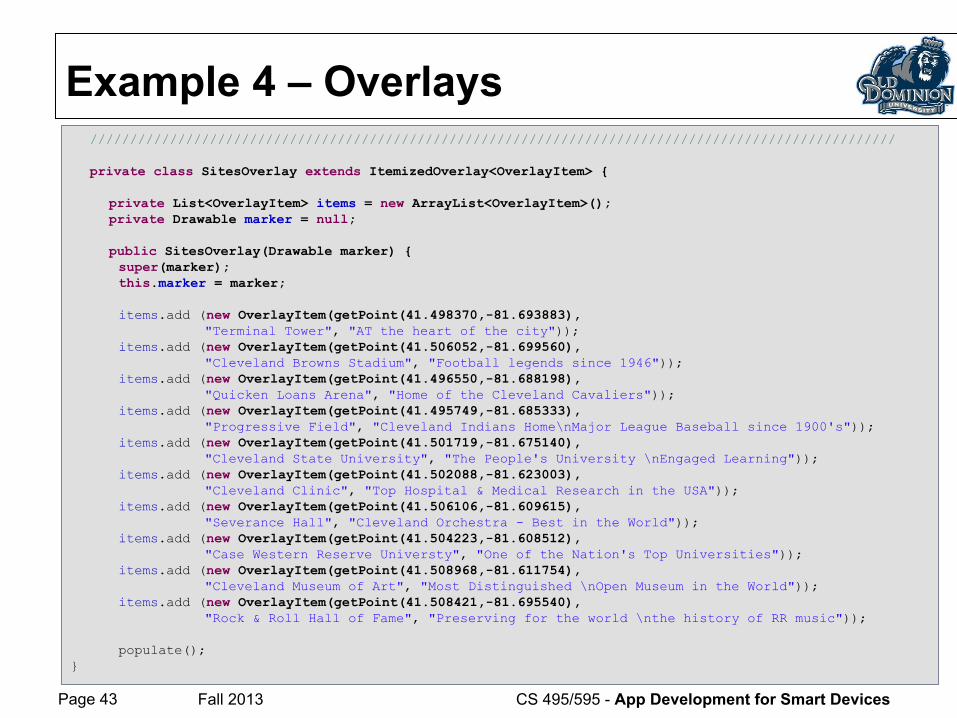
Example 4 – Overlays /////////////////////////////////////////////////////////////////////////////////////////////////////
private class SitesOverlay extends ItemizedOverlay<OverlayItem> {
private List<OverlayItem> items = new ArrayList<OverlayItem>(); private Drawable marker = null;
public SitesOverlay(Drawable marker) {
super(marker); this.marker = marker; items.add (new OverlayItem(getPoint(41.498370,-81.693883), "Terminal Tower", "AT the heart of the city")); items.add (new OverlayItem(getPoint(41.506052,-81.699560),
"Cleveland Browns Stadium", "Football legends since 1946")); items.add (new OverlayItem(getPoint(41.496550,-81.688198),
"Quicken Loans Arena", "Home of the Cleveland Cavaliers")); items.add (new OverlayItem(getPoint(41.495749,-81.685333),
"Progressive Field", "Cleveland Indians Home\nMajor League Baseball since 1900's")); items.add (new OverlayItem(getPoint(41.501719,-81.675140),
"Cleveland State University", "The People's University \nEngaged Learning")); items.add (new OverlayItem(getPoint(41.502088,-81.623003),
"Cleveland Clinic", "Top Hospital & Medical Research in the USA")); items.add (new OverlayItem(getPoint(41.506106,-81.609615),
"Severance Hall", "Cleveland Orchestra - Best in the World")); items.add (new OverlayItem(getPoint(41.504223,-81.608512),
"Case Western Reserve Universty", "One of the Nation's Top Universities")); items.add (new OverlayItem(getPoint(41.508968,-81.611754),
"Cleveland Museum of Art", "Most Distinguished \nOpen Museum in the World")); items.add (new OverlayItem(getPoint(41.508421,-81.695540),
"Rock & Roll Hall of Fame", "Preserving for the world \nthe history of RR music")); populate();
}
Page 44 Fall 2013 CS 495/595 - App Development for Smart Devices
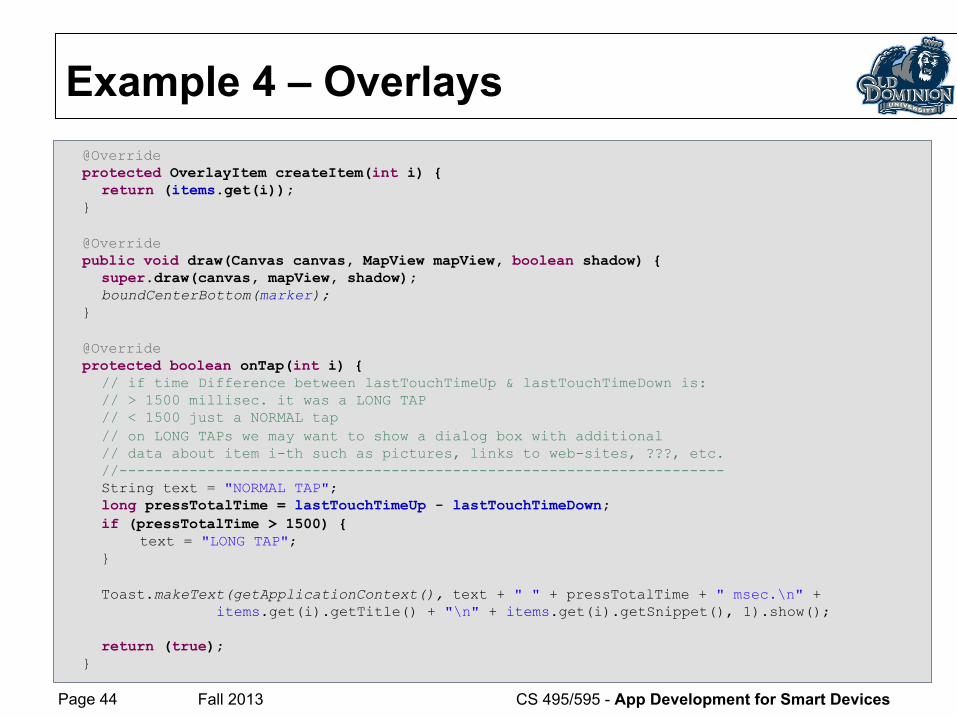
Example 4 – Overlays @Override protected OverlayItem createItem(int i) { return (items.get(i)); }
@Override public void draw(Canvas canvas, MapView mapView, boolean shadow) { super.draw(canvas, mapView, shadow); boundCenterBottom(marker); }
@Override protected boolean onTap(int i) { // if time Difference between lastTouchTimeUp & lastTouchTimeDown is: // > 1500 millisec. it was a LONG TAP // < 1500 just a NORMAL tap // on LONG TAPs we may want to show a dialog box with additional // data about item i-th such as pictures, links to web-sites, ???, etc. //--------------------------------------------------------------------- String text = "NORMAL TAP"; long pressTotalTime = lastTouchTimeUp - lastTouchTimeDown; if (pressTotalTime > 1500) { text = "LONG TAP"; }
Toast.makeText(getApplicationContext(), text + " " + pressTotalTime + " msec.\n" + items.get(i).getTitle() + "\n" + items.get(i).getSnippet(), 1).show();
return (true);
}
Page 45 Fall 2013 CS 495/595 - App Development for Smart Devices
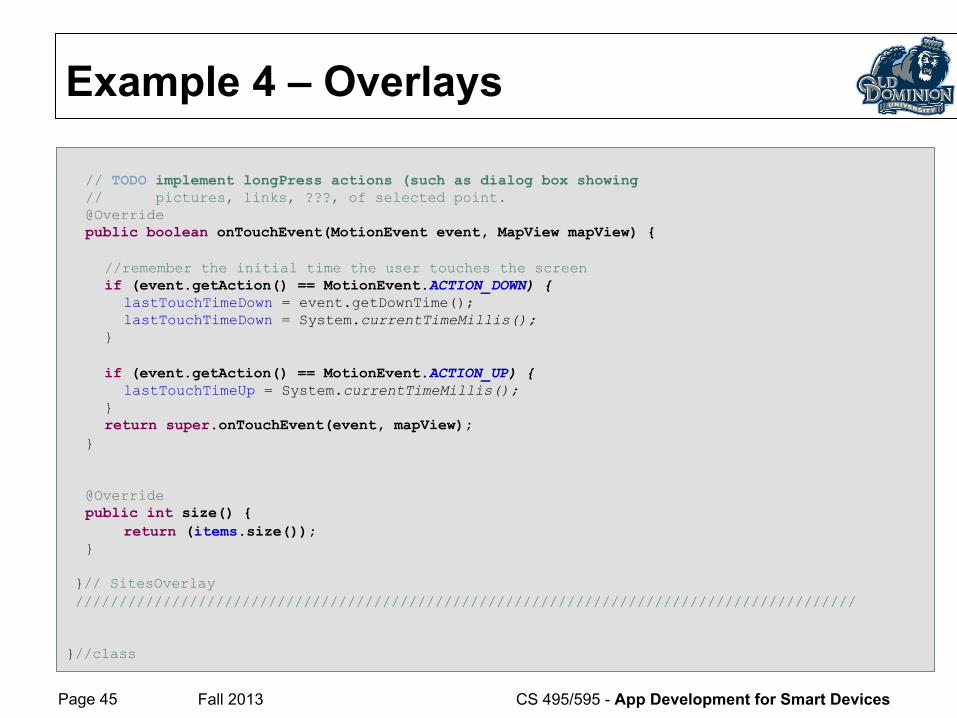
Example 4 – Overlays // TODO implement longPress actions (such as dialog box showing // pictures, links, ???, of selected point. @Override public boolean onTouchEvent(MotionEvent event, MapView mapView) {
//remember the initial time the user touches the screen if (event.getAction() == MotionEvent.ACTION_DOWN) { lastTouchTimeDown = event.getDownTime(); lastTouchTimeDown = System.currentTimeMillis(); }
if (event.getAction() == MotionEvent.ACTION_UP) { lastTouchTimeUp = System.currentTimeMillis(); } return super.onTouchEvent(event, mapView); }
@Override public int size() { return (items.size()); }
}// SitesOverlay ///////////////////////////////////////////////////////////////////////////////////////// }//class

Page 46 Fall 2012 CS 495/595 - App Development for Smart Devices
Example 5
Page 47 Fall 2013 CS 495/595 - App Development for Smart Devices
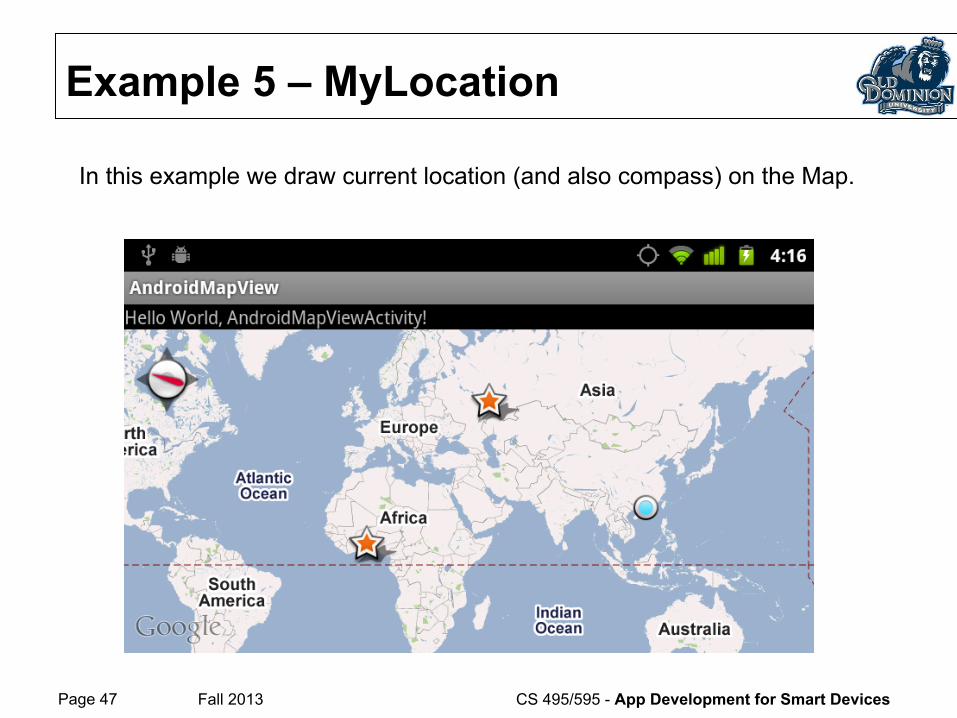
Example 5 – MyLocation
In this example we draw current location (and also compass) on the Map.
Page 48 Fall 2013 CS 495/595 - App Development for Smart Devices
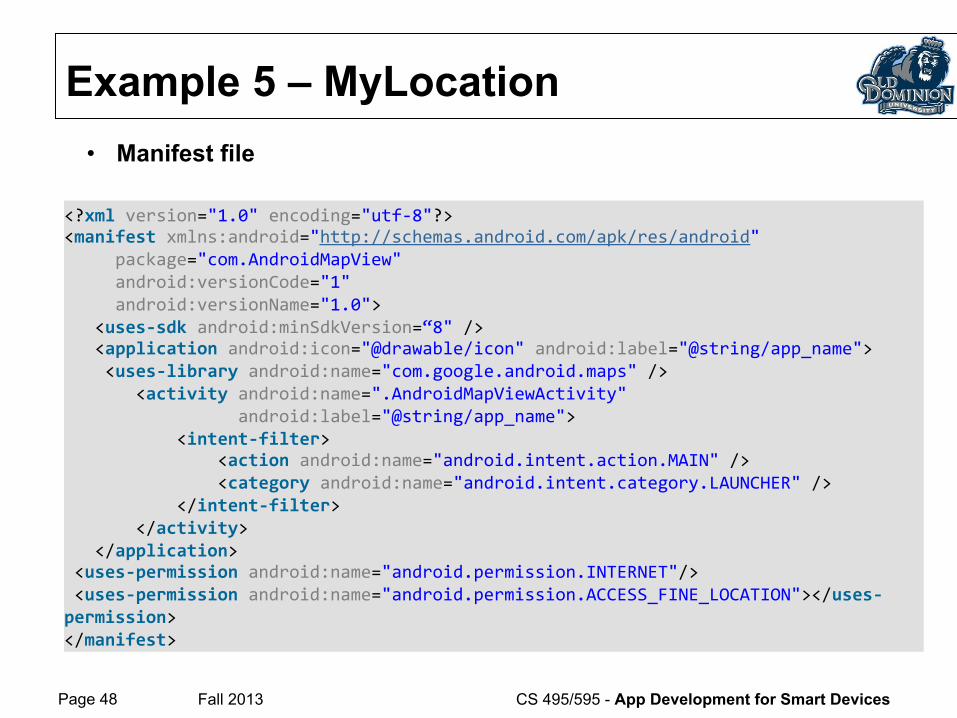
<?xml version="1.0" encoding="utf-‐8"?> <manifest xmlns:android="http://schemas.android.com/apk/res/android" package="com.AndroidMapView" android:versionCode="1" android:versionName="1.0"> <uses-‐sdk android:minSdkVersion=“8" /> <application android:icon="@drawable/icon" android:label="@string/app_name"> <uses-‐library android:name="com.google.android.maps" /> <activity android:name=".AndroidMapViewActivity" android:label="@string/app_name"> <intent-‐filter> <action android:name="android.intent.action.MAIN" /> <category android:name="android.intent.category.LAUNCHER" /> </intent-‐filter> </activity> </application> <uses-‐permission android:name="android.permission.INTERNET"/> <uses-‐permission android:name="android.permission.ACCESS_FINE_LOCATION"></uses-‐permission> </manifest>
• Manifest file
Example 5 – MyLocation

Page 49 Fall 2013 CS 495/595 - App Development for Smart Devices
<?xml version="1.0" encoding="utf-‐8"?> <LinearLayout xmlns:android="http://schemas.android.com/apk/res/android" android:orientation="vertical" android:layout_width="fill_parent" android:layout_height="fill_parent" > <TextView android:layout_width="fill_parent" android:layout_height="wrap_content" android:text="@string/hello" /> <com.google.android.maps.MapView android:id="@+id/mapview" android:layout_width="fill_parent" android:layout_height="fill_parent" android:clickable="true" android:apiKey="Your Maps API key here" /> </LinearLayout>
• Main.xml
Example 5 – MyLocation
Page 50 Fall 2013 CS 495/595 - App Development for Smart Devices
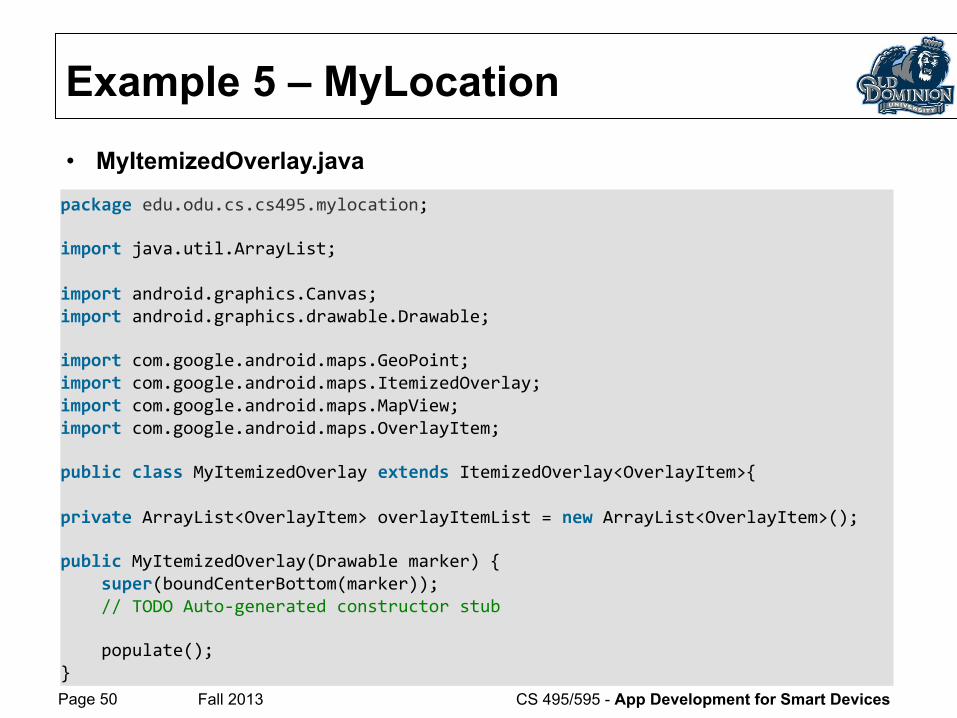
package edu.odu.cs.cs495.mylocation; import java.util.ArrayList; import android.graphics.Canvas; import android.graphics.drawable.Drawable; import com.google.android.maps.GeoPoint; import com.google.android.maps.ItemizedOverlay; import com.google.android.maps.MapView; import com.google.android.maps.OverlayItem; public class MyItemizedOverlay extends ItemizedOverlay<OverlayItem>{ private ArrayList<OverlayItem> overlayItemList = new ArrayList<OverlayItem>(); public MyItemizedOverlay(Drawable marker) { super(boundCenterBottom(marker)); // TODO Auto-‐generated constructor stub populate(); }
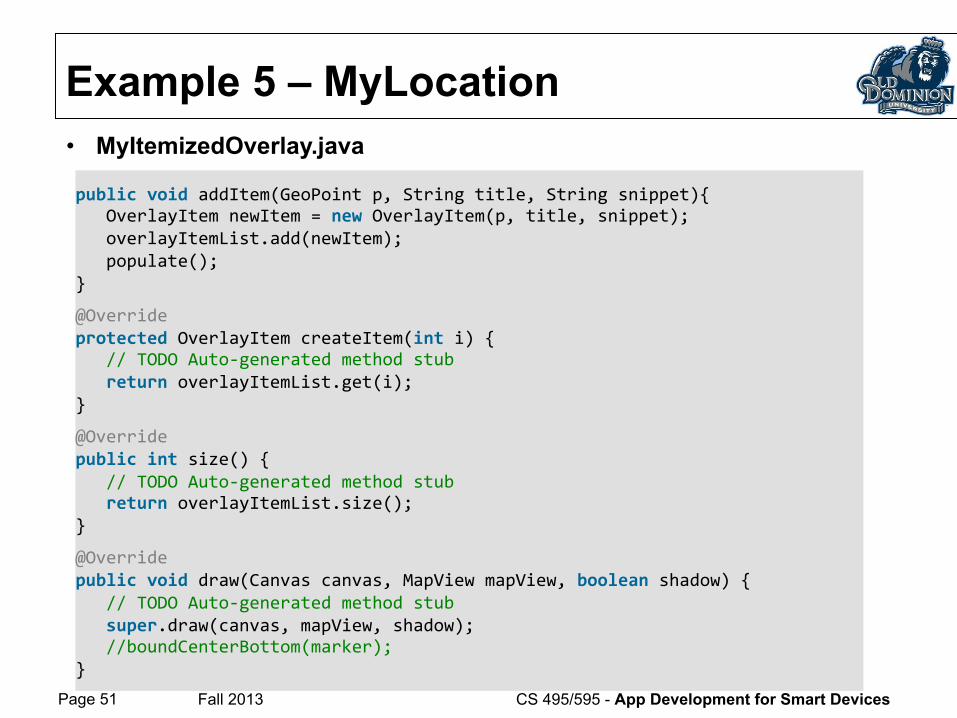
• MyItemizedOverlay.java
Example 5 – MyLocation
Page 51 Fall 2013 CS 495/595 - App Development for Smart Devices
public void addItem(GeoPoint p, String title, String snippet){ OverlayItem newItem = new OverlayItem(p, title, snippet); overlayItemList.add(newItem); populate(); }
@Override protected OverlayItem createItem(int i) { // TODO Auto-‐generated method stub return overlayItemList.get(i); }
@Override public int size() { // TODO Auto-‐generated method stub return overlayItemList.size(); }
@Override public void draw(Canvas canvas, MapView mapView, boolean shadow) { // TODO Auto-‐generated method stub super.draw(canvas, mapView, shadow); //boundCenterBottom(marker); }
• MyItemizedOverlay.java
Example 5 – MyLocation
Page 52 Fall 2013 CS 495/595 - App Development for Smart Devices
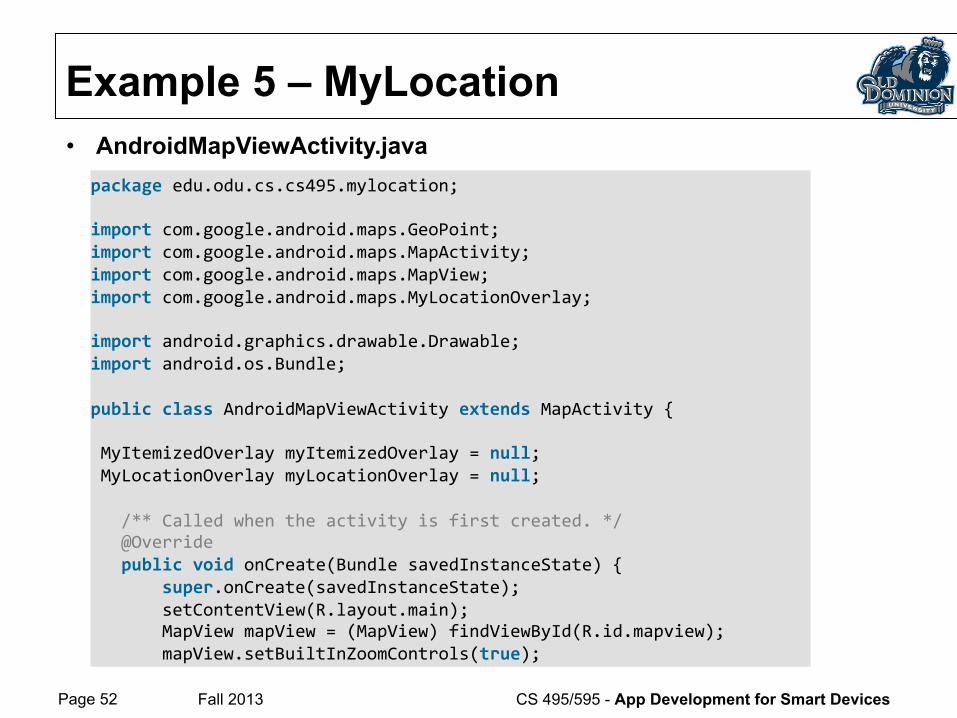
• AndroidMapViewActivity.java
Example 5 – MyLocation
package edu.odu.cs.cs495.mylocation; import com.google.android.maps.GeoPoint; import com.google.android.maps.MapActivity; import com.google.android.maps.MapView; import com.google.android.maps.MyLocationOverlay; import android.graphics.drawable.Drawable; import android.os.Bundle; public class AndroidMapViewActivity extends MapActivity { MyItemizedOverlay myItemizedOverlay = null; MyLocationOverlay myLocationOverlay = null; /** Called when the activity is first created. */ @Override public void onCreate(Bundle savedInstanceState) { super.onCreate(savedInstanceState); setContentView(R.layout.main); MapView mapView = (MapView) findViewById(R.id.mapview); mapView.setBuiltInZoomControls(true);
Page 53 Fall 2013 CS 495/595 - App Development for Smart Devices
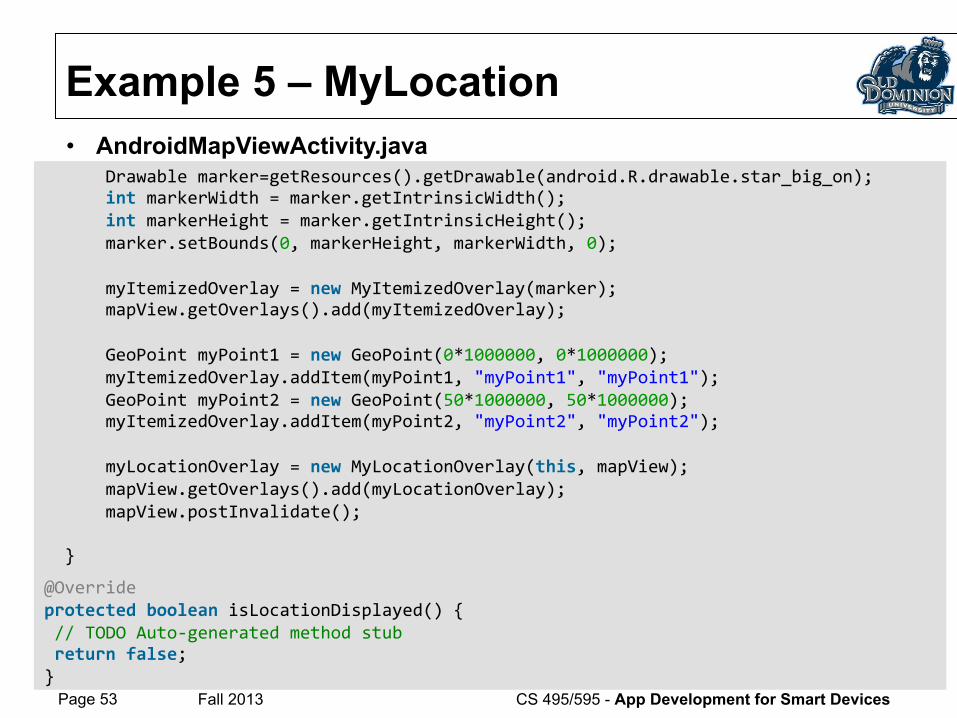
• AndroidMapViewActivity.java
Example 5 – MyLocation
Drawable marker=getResources().getDrawable(android.R.drawable.star_big_on); int markerWidth = marker.getIntrinsicWidth(); int markerHeight = marker.getIntrinsicHeight(); marker.setBounds(0, markerHeight, markerWidth, 0); myItemizedOverlay = new MyItemizedOverlay(marker); mapView.getOverlays().add(myItemizedOverlay); GeoPoint myPoint1 = new GeoPoint(0*1000000, 0*1000000); myItemizedOverlay.addItem(myPoint1, "myPoint1", "myPoint1"); GeoPoint myPoint2 = new GeoPoint(50*1000000, 50*1000000); myItemizedOverlay.addItem(myPoint2, "myPoint2", "myPoint2"); myLocationOverlay = new MyLocationOverlay(this, mapView); mapView.getOverlays().add(myLocationOverlay); mapView.postInvalidate(); }
@Override protected boolean isLocationDisplayed() { // TODO Auto-‐generated method stub return false; }
Page 54 Fall 2013 CS 495/595 - App Development for Smart Devices
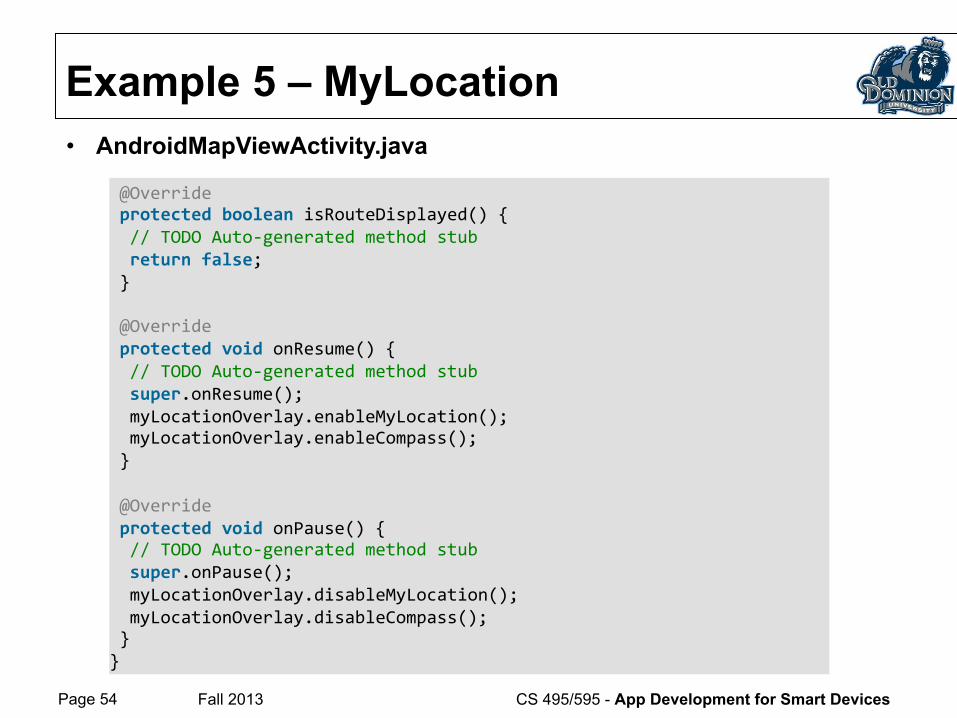
• AndroidMapViewActivity.java
Example 5 – MyLocation
@Override protected boolean isRouteDisplayed() { // TODO Auto-‐generated method stub return false; } @Override protected void onResume() { // TODO Auto-‐generated method stub super.onResume(); myLocationOverlay.enableMyLocation(); myLocationOverlay.enableCompass(); } @Override protected void onPause() { // TODO Auto-‐generated method stub super.onPause(); myLocationOverlay.disableMyLocation(); myLocationOverlay.disableCompass(); } }