Embed Size (px)
Citation preview
Apex – Italy – www.apex.it
Apex Planner A Microsoft™ Dynamics™ CRM 2011 Plugin
For On Premise and Online Deployments
User Guide v. 1.3 June 2013
Contents
1. Introduction ................................................................................................................................................... 2
1.1. What’s new in 1.3? ................................................................................................................................. 2
2. Installation and configuration ....................................................................................................................... 3
2.1. Default Configuration ............................................................................................................................. 3
2.2. Custom configurations ........................................................................................................................... 5
2.3. About the license .................................................................................................................................... 5
3. The user interface .......................................................................................................................................... 6
3.1. Main page ............................................................................................................................................... 6
3.2. Type of views .......................................................................................................................................... 7
3.2.1. Timeline view ................................................................................................................................... 8
3.2.2. Month view ...................................................................................................................................... 8
3.2.3. Day view .......................................................................................................................................... 9
3.3. User panel ............................................................................................................................................. 10
3.4. Calendar navigator pane ...................................................................................................................... 11
4. Planning with Apex Planner ......................................................................................................................... 12
4.1. Create a new appointment ................................................................................................................... 12
4.2. Edit appointments ................................................................................................................................ 14
4.3. Service appointments ........................................................................................................................... 14
5. Using Apex Planner features ....................................................................................................................... 15
5.1. Reminders ............................................................................................................................................. 15
5.2. Time zone settings ................................................................................................................................ 16
6. Troubleshooting .......................................................................................................................................... 17

Apex – Italy – www.apex.it
1. Introduction Apex Planner is a plugin module for Microsoft Dynamics CRM 2011 tailored to visually schedule resources
within Microsoft Dynamics CRM Service Module. It has been designed for those business that need to
streamline a shared calendar management.
Apex Planner for Microsoft Dynamics CRM 2011 enhances the service calendar adding features from
Microsoft Outlook in a web-based planning table. It extends the standard calendar allowing drag-and-drop
features to reschedule or assign appointments to other users or facilities. Users can be grouped into teams
to access only the calendar of a given team at a time. Facilities can be grouped into sites.
Apex Planner allows to show the users both as single user and as team. Each appointment can be moved in
time and assigned to other users through a drag and drop. The same can be done for facilities and equipment.
The information included in each appointment is displayed in a wider area to allow the schedule manger to
get all the facts without opening each appointment.
A custom form allows the creation of appointments and service activities without using the Microsoft
Dynamics CRM standard form. Within a form you can edit and clone each appointment directly.
Apex Planner for Microsoft Dynamics CRM 2011 allows the configuration of the time line to be displayed and
the choice of which security role users must be member of to be shown in the calendar.
Apex Planner is available for Microsoft Dynamics CRM 2011, Microsoft Dynamics CRM Online and Microsoft
Dynamics CRM per Outlook.
1.1. What’s new in 1.3?
In this update we have added many interesting features:
print the planner area from a new printing utility;
navigate the date interval from the navigation pane;
some fields are autocompleted;
send custom email reminders when you add/update/cancel your appointments;
set a default start/finish time for all new appointments;
use facility time or local time on the appointments.
Apex – Italy – www.apex.it
2. Installation and configuration 1. Import the solution into Dynamics CRM.
2. Make sure that the maximum file size is greater than the solution file (6MB). You can set the
Maximum File Size of Dynamics CRM under Settings -> Administration -> System Settings -> E-mail.
Scroll down the window to find the Maximum File Size (in kilobytes) text box. Set a value greater
than 6500. You can set this value back to the original value after importing the solution.
3. Should the import process give a warning such “0x80048026 Translated labels for the following
languages could not be imported because they have not been enabled for this organization: xxxx”,
then it can be ignored. The cause of this warning is that the system you are importing Apex Planner
to does not contain all the Planner languages.
2.1. Default Configuration
Grant the proper permission to all users you want to use Apex Planner. Go to “Settings - Administration -
Users”. Select the desired user(s) and open security roles. Click on “Manage Roles“ and check the role
“Execute Apex Planner”.
In “Settings - Extensions” you can find “Planner Configurations”. The first configuration you have to create is
the default configuration. Click on the “New” button on the ribbon. Here there are some tips on how to fill
the fields.
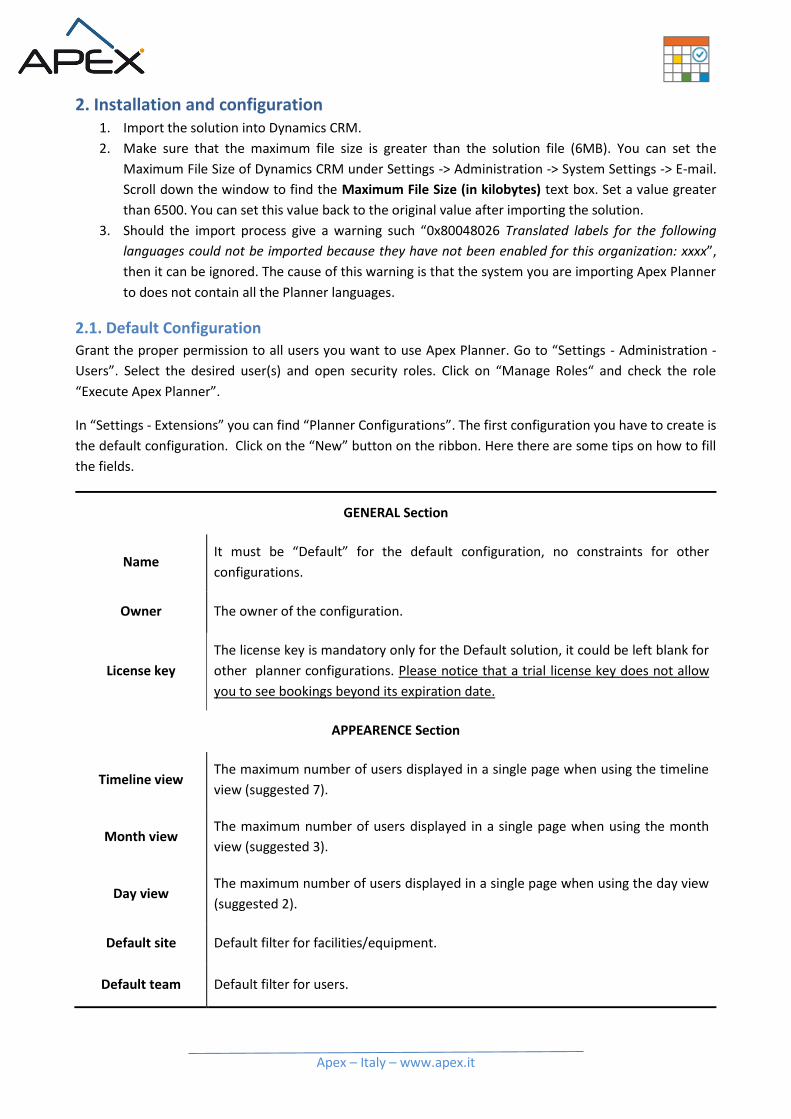
GENERAL Section
Name It must be “Default” for the default configuration, no constraints for other
configurations.
Owner The owner of the configuration.
License key
The license key is mandatory only for the Default solution, it could be left blank for
other planner configurations. Please notice that a trial license key does not allow
you to see bookings beyond its expiration date.
APPEARENCE Section
Timeline view The maximum number of users displayed in a single page when using the timeline
view (suggested 7).
Month view The maximum number of users displayed in a single page when using the month
view (suggested 3).
Day view The maximum number of users displayed in a single page when using the day view
(suggested 2).
Default site Default filter for facilities/equipment.
Default team Default filter for users.
Apex – Italy – www.apex.it
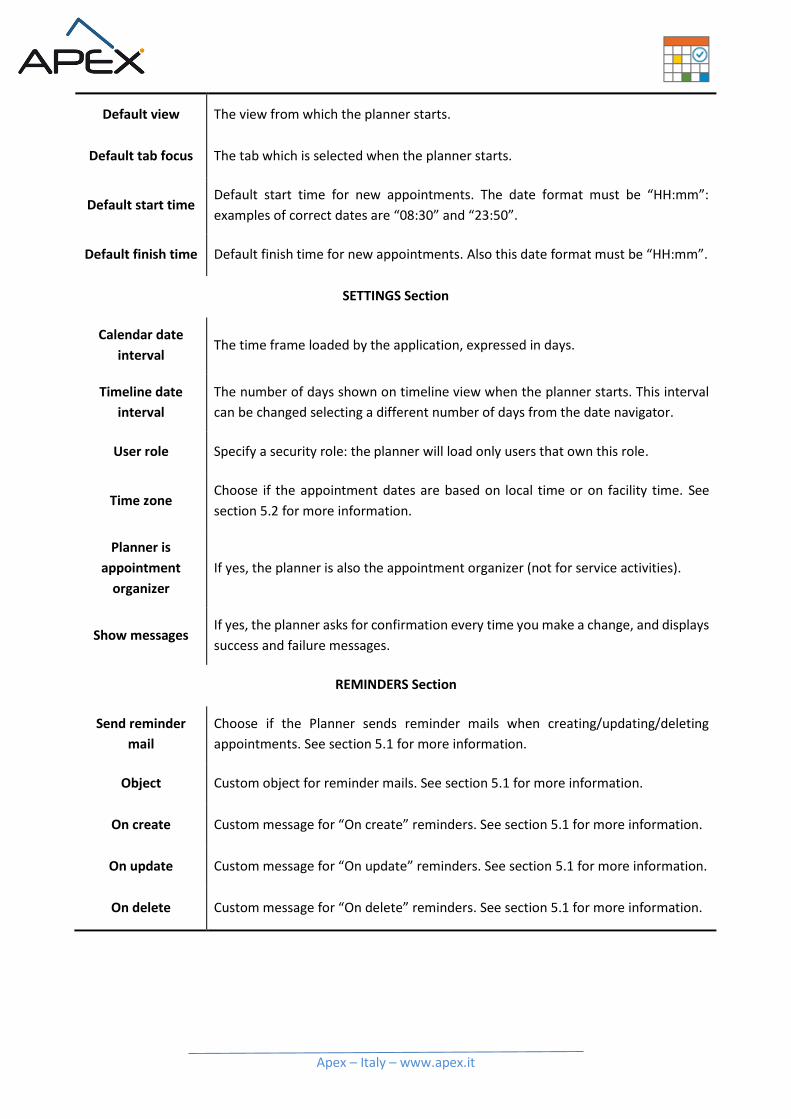
Default view The view from which the planner starts.
Default tab focus The tab which is selected when the planner starts.
Default start time Default start time for new appointments. The date format must be “HH:mm”:
examples of correct dates are “08:30” and “23:50”.
Default finish time Default finish time for new appointments. Also this date format must be “HH:mm”.
SETTINGS Section
Calendar date
interval The time frame loaded by the application, expressed in days.
Timeline date
interval
The number of days shown on timeline view when the planner starts. This interval
can be changed selecting a different number of days from the date navigator.
User role Specify a security role: the planner will load only users that own this role.
Time zone Choose if the appointment dates are based on local time or on facility time. See
section 5.2 for more information.
Planner is
appointment
organizer
If yes, the planner is also the appointment organizer (not for service activities).
Show messages If yes, the planner asks for confirmation every time you make a change, and displays
success and failure messages.
REMINDERS Section
Send reminder
Choose if the Planner sends reminder mails when creating/updating/deleting
appointments. See section 5.1 for more information.
Object Custom object for reminder mails. See section 5.1 for more information.
On create Custom message for “On create” reminders. See section 5.1 for more information.
On update Custom message for “On update” reminders. See section 5.1 for more information.
On delete Custom message for “On delete” reminders. See section 5.1 for more information.
Apex – Italy – www.apex.it
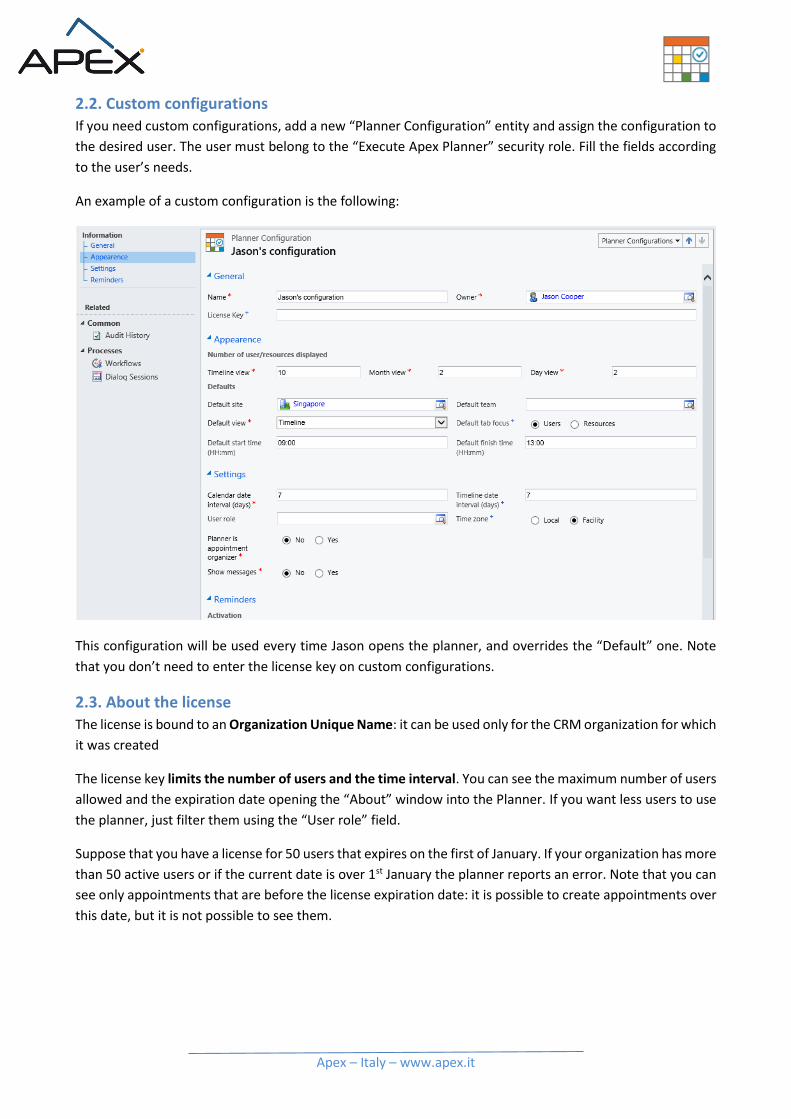
2.2. Custom configurations
If you need custom configurations, add a new “Planner Configuration” entity and assign the configuration to
the desired user. The user must belong to the “Execute Apex Planner” security role. Fill the fields according
to the user’s needs.
An example of a custom configuration is the following:
This configuration will be used every time Jason opens the planner, and overrides the “Default” one. Note
that you don’t need to enter the license key on custom configurations.
2.3. About the license
The license is bound to an Organization Unique Name: it can be used only for the CRM organization for which
it was created
The license key limits the number of users and the time interval. You can see the maximum number of users
allowed and the expiration date opening the “About” window into the Planner. If you want less users to use
the planner, just filter them using the “User role” field.
Suppose that you have a license for 50 users that expires on the first of January. If your organization has more
than 50 active users or if the current date is over 1st January the planner reports an error. Note that you can
see only appointments that are before the license expiration date: it is possible to create appointments over
this date, but it is not possible to see them.
Apex – Italy – www.apex.it
3. The user interface
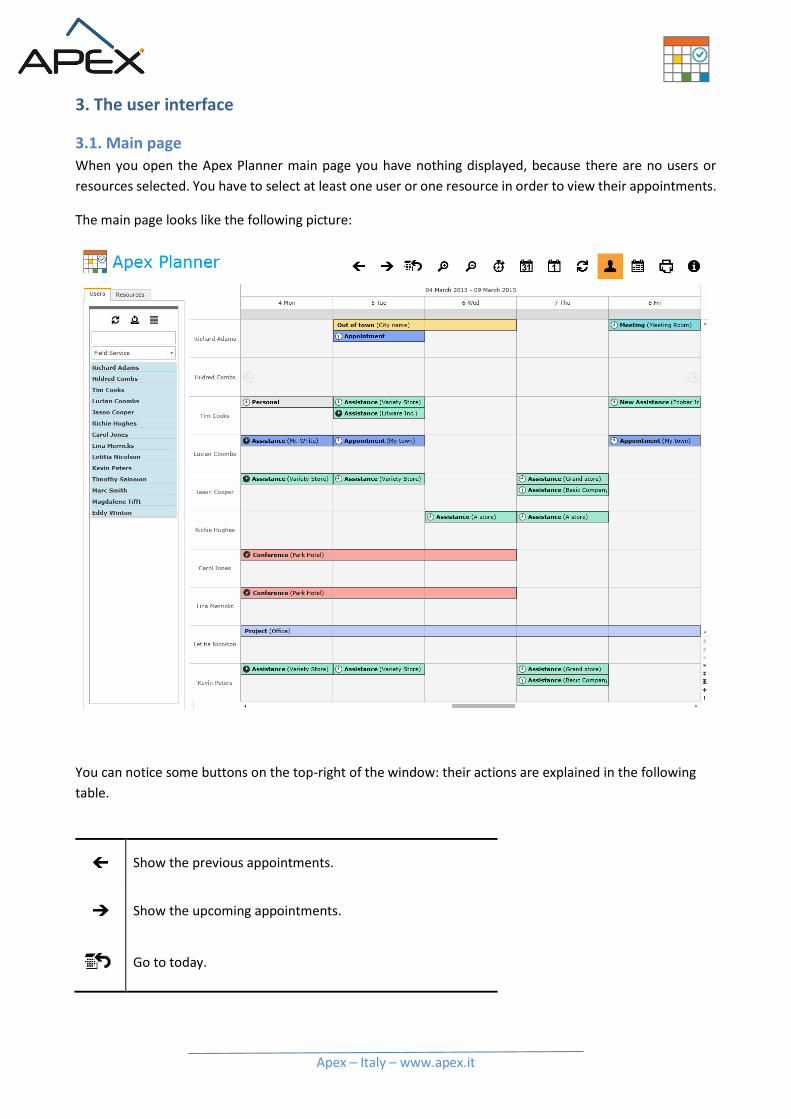
3.1. Main page
When you open the Apex Planner main page you have nothing displayed, because there are no users or
resources selected. You have to select at least one user or one resource in order to view their appointments.
The main page looks like the following picture:
You can notice some buttons on the top-right of the window: their actions are explained in the following
table.
Show the previous appointments.
Show the upcoming appointments.
Go to today.
Apex – Italy – www.apex.it
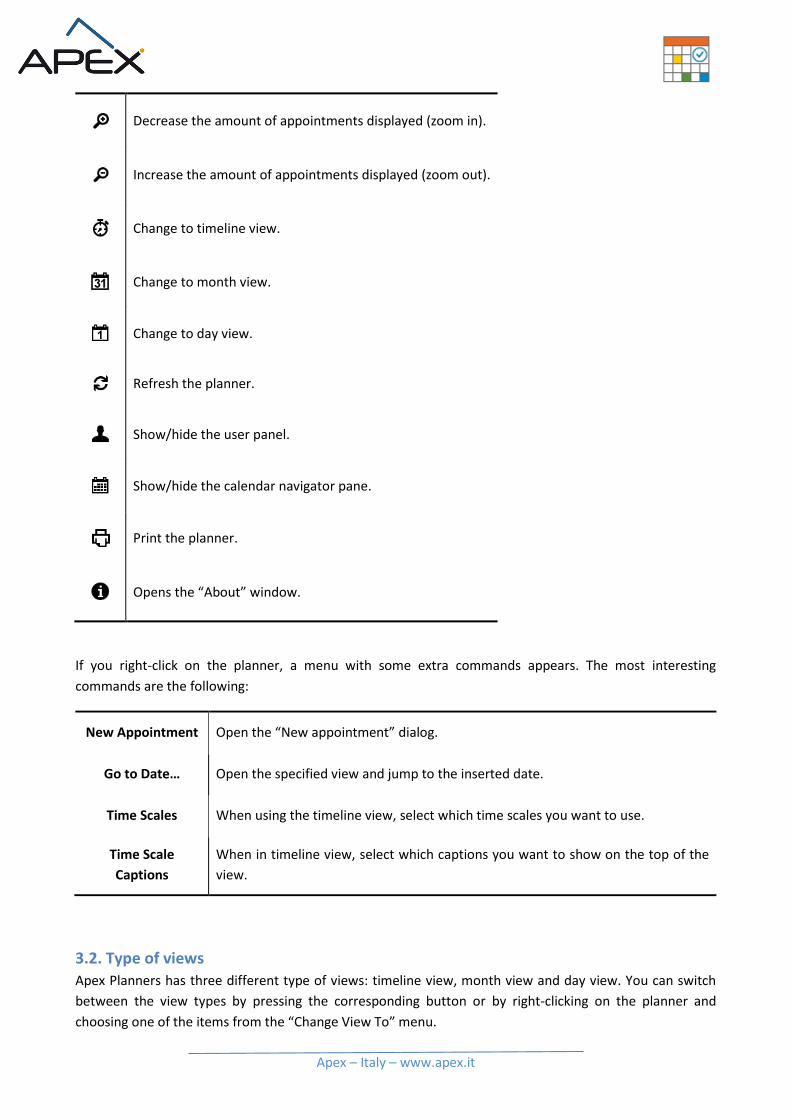
Decrease the amount of appointments displayed (zoom in).
Increase the amount of appointments displayed (zoom out).
Change to timeline view.
Change to month view.
Change to day view.
Refresh the planner.
Show/hide the user panel.
Show/hide the calendar navigator pane.
Print the planner.
Opens the “About” window.
If you right-click on the planner, a menu with some extra commands appears. The most interesting
commands are the following:
New Appointment Open the “New appointment” dialog.
Go to Date… Open the specified view and jump to the inserted date.
Time Scales When using the timeline view, select which time scales you want to use.
Time Scale
Captions
When in timeline view, select which captions you want to show on the top of the
view.
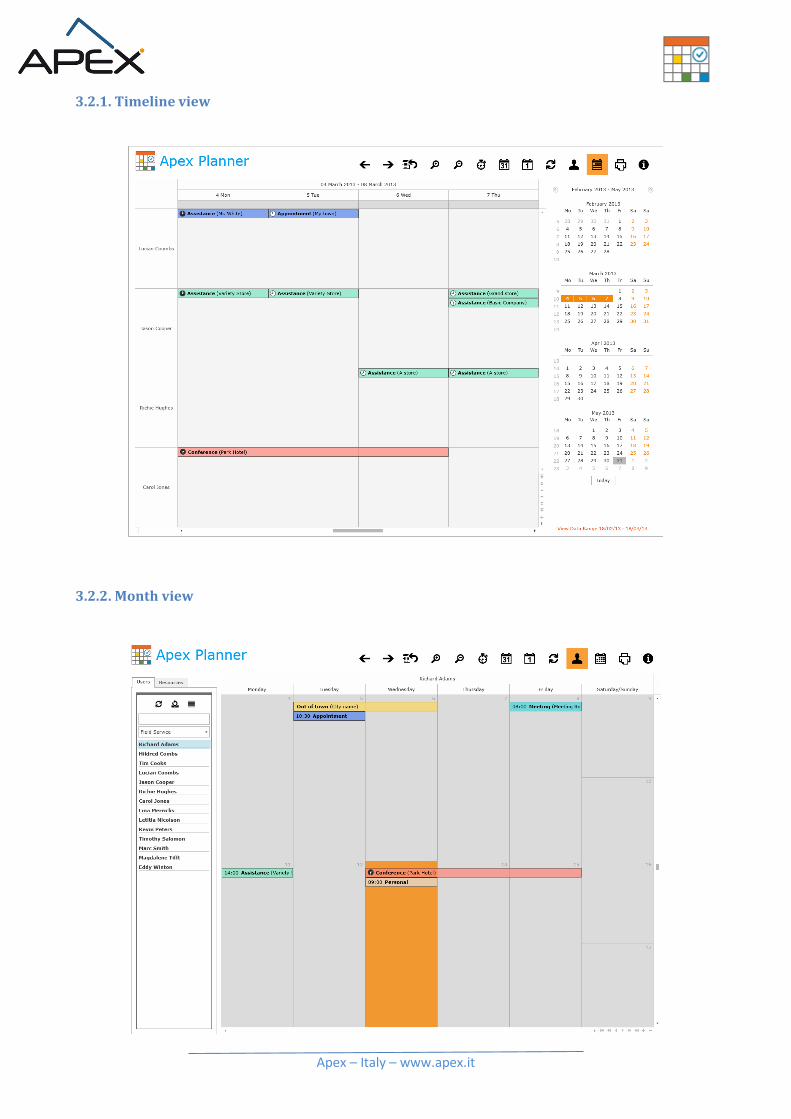
3.2. Type of views Apex Planners has three different type of views: timeline view, month view and day view. You can switch
between the view types by pressing the corresponding button or by right-clicking on the planner and
choosing one of the items from the “Change View To” menu.
Apex – Italy – www.apex.it
3.2.1. Timeline view
3.2.2. Month view
Apex – Italy – www.apex.it
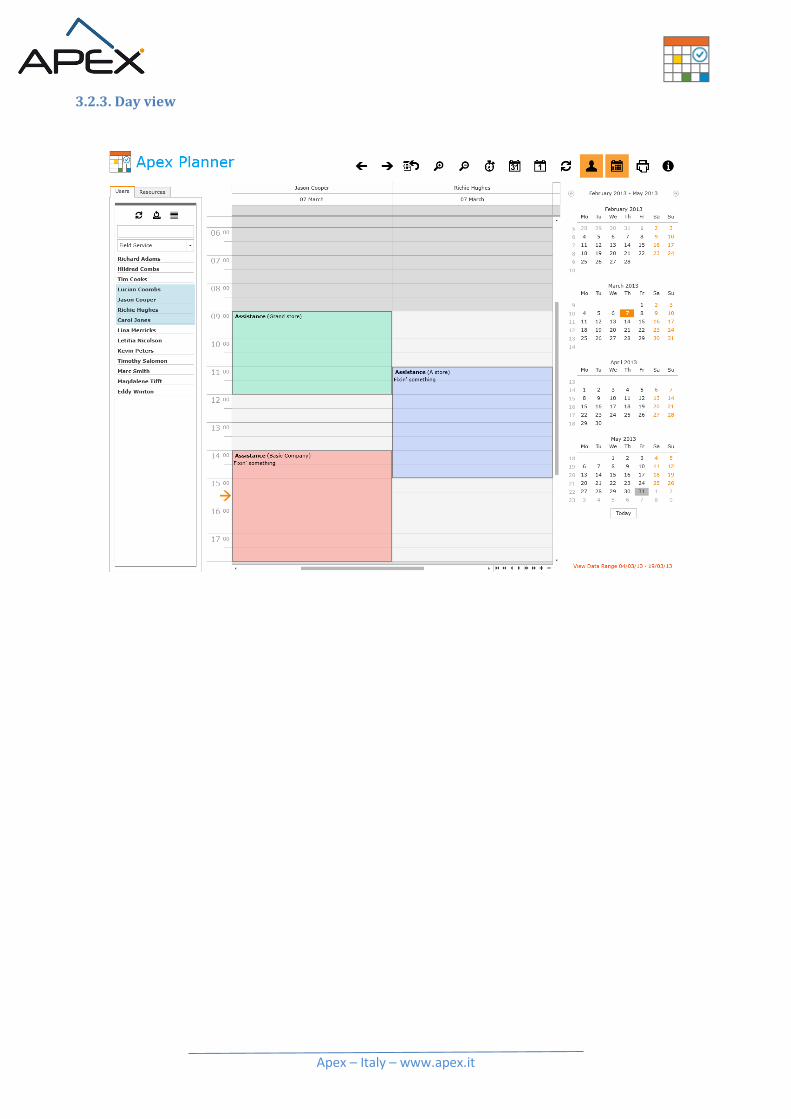
3.2.3. Day view
Apex – Italy – www.apex.it
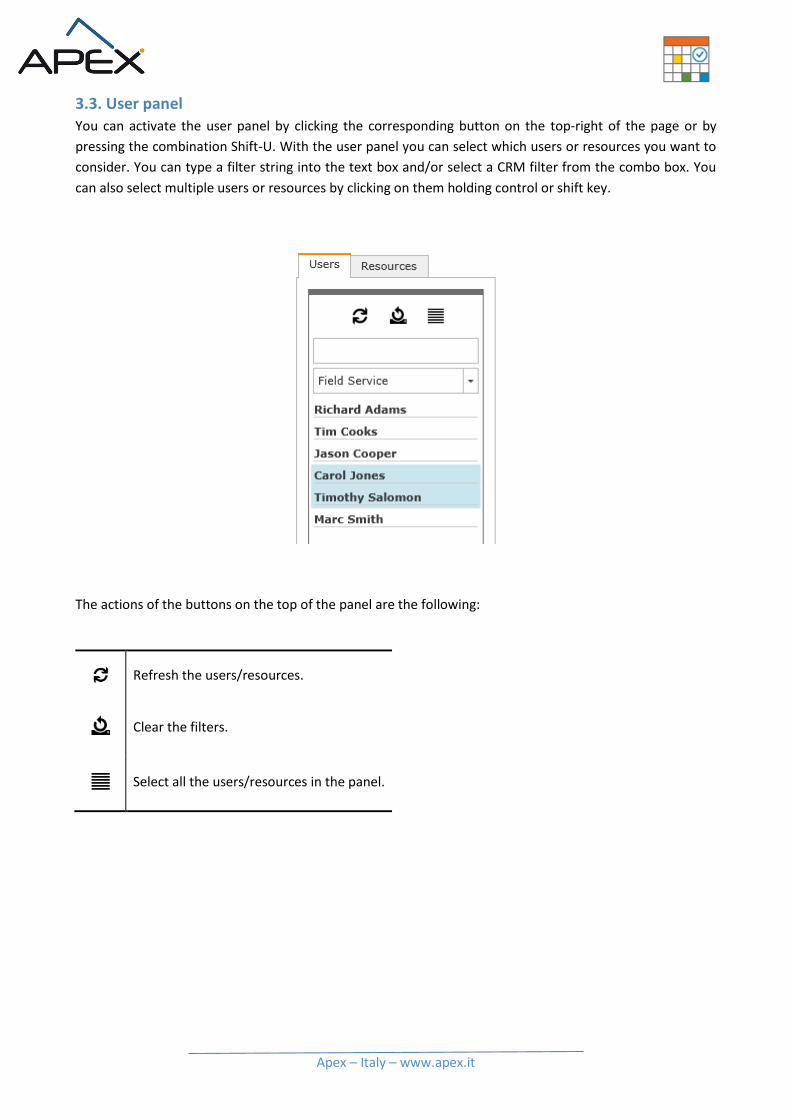
3.3. User panel
You can activate the user panel by clicking the corresponding button on the top-right of the page or by
pressing the combination Shift-U. With the user panel you can select which users or resources you want to
consider. You can type a filter string into the text box and/or select a CRM filter from the combo box. You
can also select multiple users or resources by clicking on them holding control or shift key.
The actions of the buttons on the top of the panel are the following:
Refresh the users/resources.
Clear the filters.
Select all the users/resources in the panel.
Apex – Italy – www.apex.it
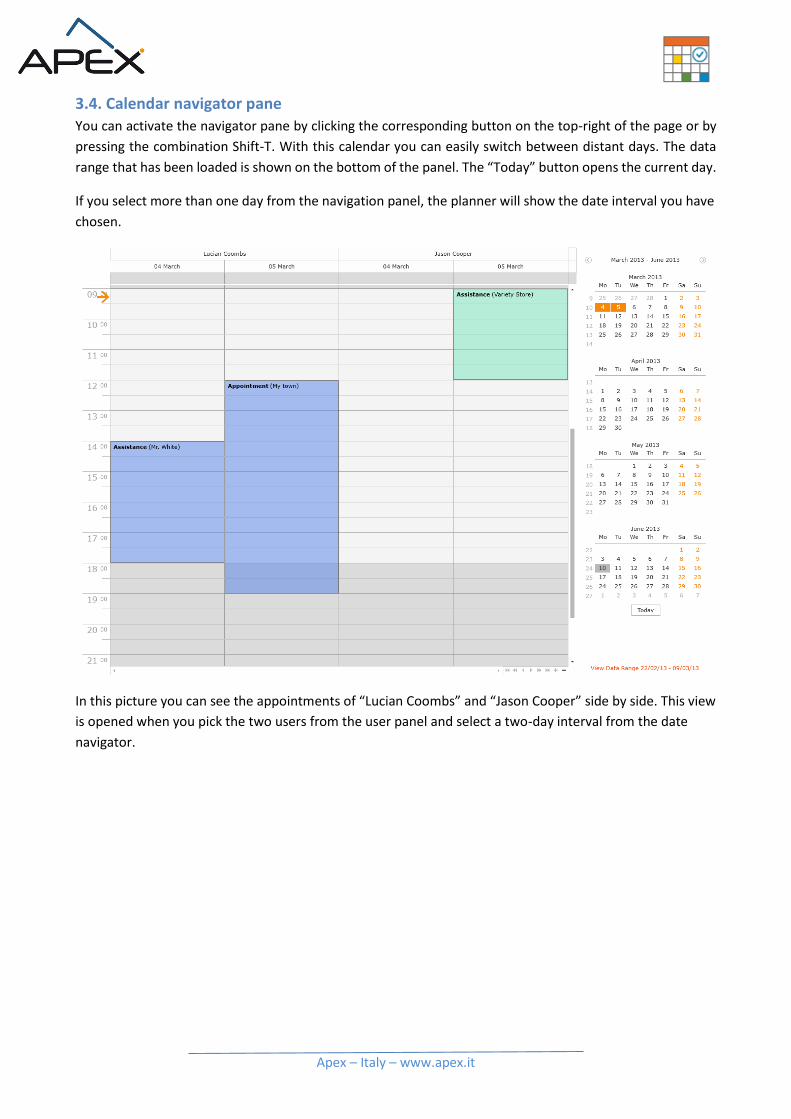
3.4. Calendar navigator pane
You can activate the navigator pane by clicking the corresponding button on the top-right of the page or by
pressing the combination Shift-T. With this calendar you can easily switch between distant days. The data
range that has been loaded is shown on the bottom of the panel. The “Today” button opens the current day.
If you select more than one day from the navigation panel, the planner will show the date interval you have
chosen.
In this picture you can see the appointments of “Lucian Coombs” and “Jason Cooper” side by side. This view
is opened when you pick the two users from the user panel and select a two-day interval from the date
navigator.
Apex – Italy – www.apex.it
4. Planning with Apex Planner With Apex Planner it is easy to create new appointments and update the existing ones. You can simply drag
and drop your appointments if you want to move them to different dates or you can change more accurately
the appointment information using an edit dialog.
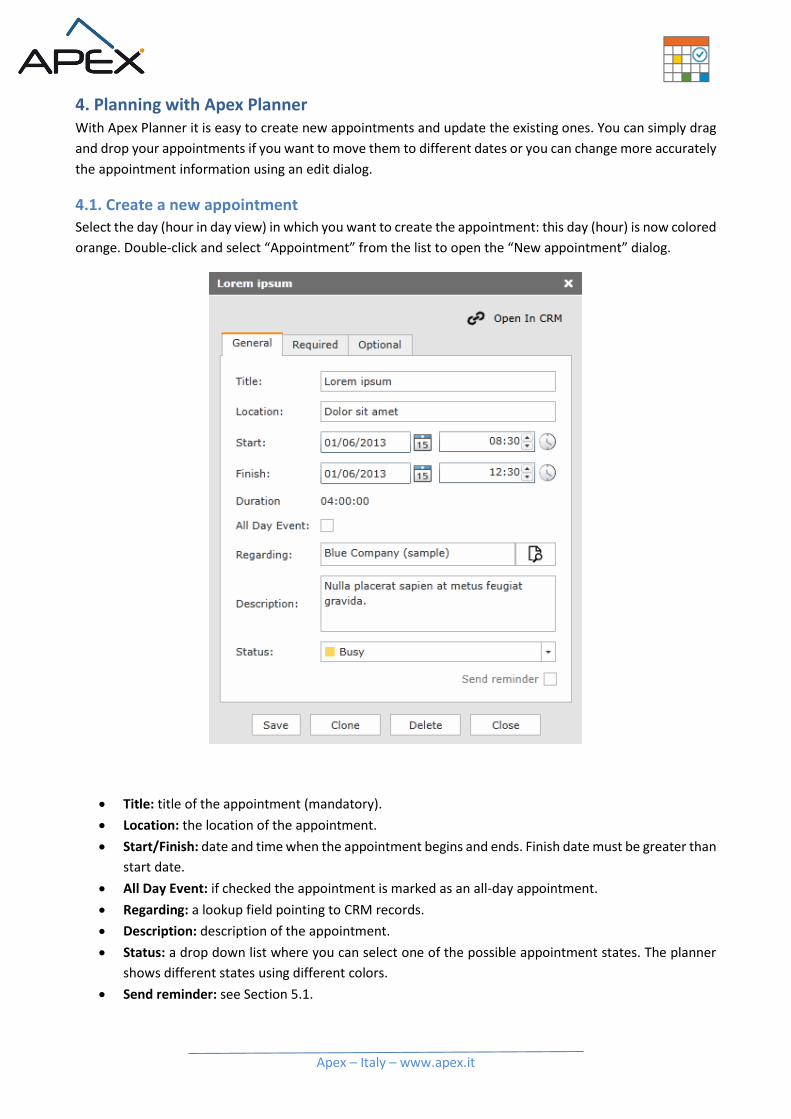
4.1. Create a new appointment Select the day (hour in day view) in which you want to create the appointment: this day (hour) is now colored
orange. Double-click and select “Appointment” from the list to open the “New appointment” dialog.
Title: title of the appointment (mandatory).
Location: the location of the appointment.
Start/Finish: date and time when the appointment begins and ends. Finish date must be greater than
start date.
All Day Event: if checked the appointment is marked as an all-day appointment.
Regarding: a lookup field pointing to CRM records.
Description: description of the appointment.
Status: a drop down list where you can select one of the possible appointment states. The planner
shows different states using different colors.
Send reminder: see Section 5.1.
Apex – Italy – www.apex.it
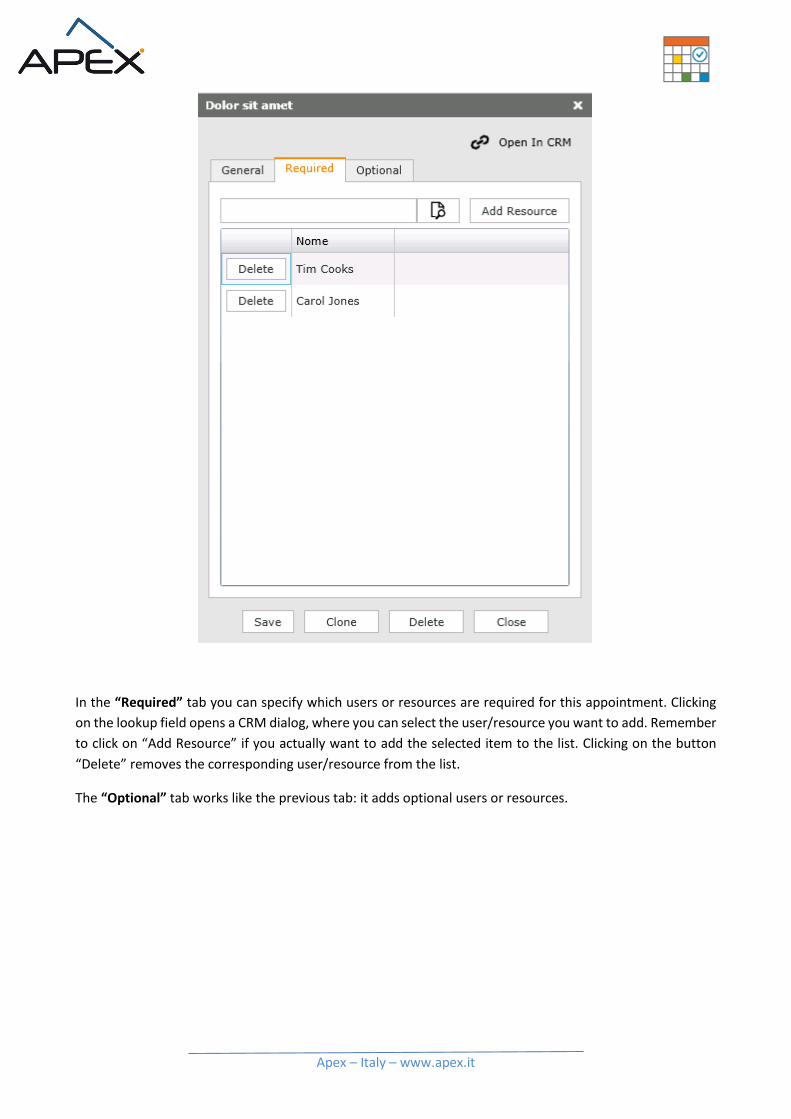
In the “Required” tab you can specify which users or resources are required for this appointment. Clicking
on the lookup field opens a CRM dialog, where you can select the user/resource you want to add. Remember
to click on “Add Resource” if you actually want to add the selected item to the list. Clicking on the button
“Delete” removes the corresponding user/resource from the list.
The “Optional” tab works like the previous tab: it adds optional users or resources.

Apex – Italy – www.apex.it
The resulting appointment is the following (on day view):
4.2. Edit appointments
When you want to update an appointment you can just double-click on it and edit the information using the
same dialog you have used to create it.
If you want to assign the appointment to another user, simply drag and drop the appointment on another
user’s section. This also works if you want to change the date of the appointment.
By pressing the button “Clone” you can create an appointment identical to that selected: you can edit its
information before save it.
Pressing the button “Delete” removes the current appointment both from the planner and the CRM.
4.3. Service appointments
Service appointments behave in the same manner as appointments. The only differences are:
There is one more mandatory lookup field named “Service”.
There is one more optional field named “Site”.
The “Optional” tab is not present.
Apex – Italy – www.apex.it
5. Using Apex Planner features
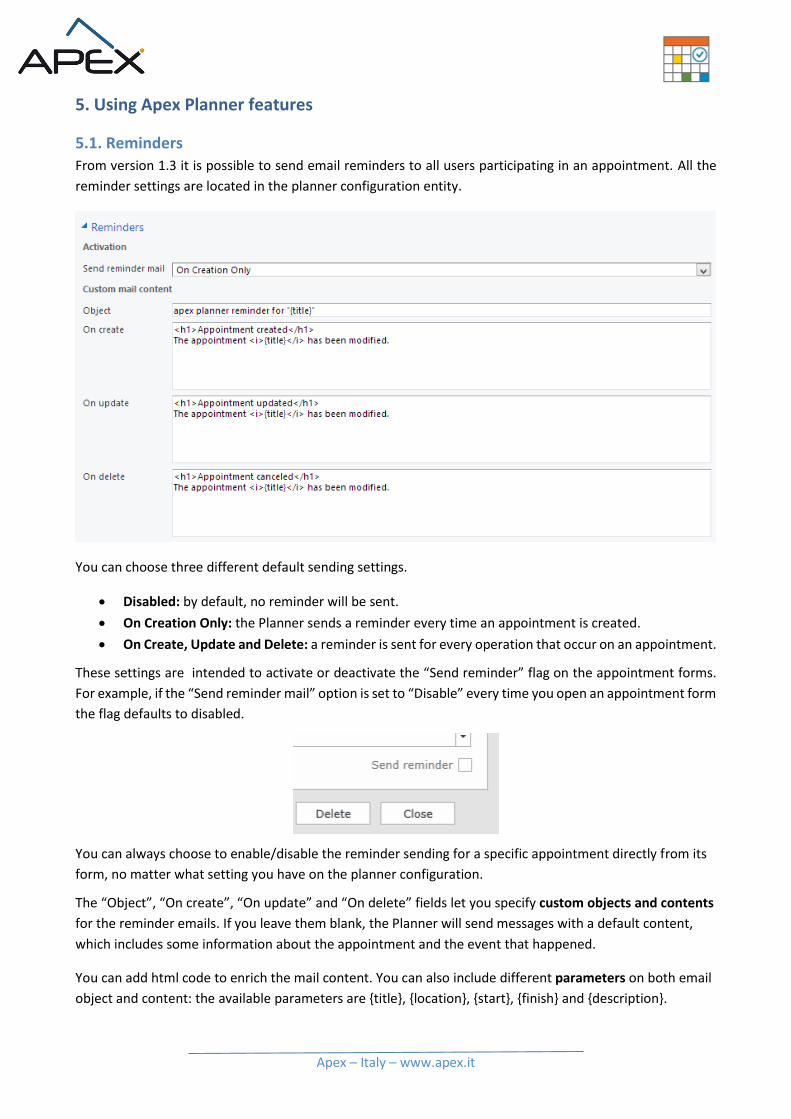
5.1. Reminders
From version 1.3 it is possible to send email reminders to all users participating in an appointment. All the
reminder settings are located in the planner configuration entity.
You can choose three different default sending settings.
Disabled: by default, no reminder will be sent.
On Creation Only: the Planner sends a reminder every time an appointment is created.
On Create, Update and Delete: a reminder is sent for every operation that occur on an appointment.
These settings are intended to activate or deactivate the “Send reminder” flag on the appointment forms.
For example, if the “Send reminder mail” option is set to “Disable” every time you open an appointment form
the flag defaults to disabled.
You can always choose to enable/disable the reminder sending for a specific appointment directly from its
form, no matter what setting you have on the planner configuration.
The “Object”, “On create”, “On update” and “On delete” fields let you specify custom objects and contents
for the reminder emails. If you leave them blank, the Planner will send messages with a default content,
which includes some information about the appointment and the event that happened.
You can add html code to enrich the mail content. You can also include different parameters on both email
object and content: the available parameters are {title}, {location}, {start}, {finish} and {description}.
Apex – Italy – www.apex.it
5.2. Time zone settings
When you plan appointments for facilities that are outside your time zone, Apex Planner lets you see the
appointment time in two different ways.
Local time zone: your time zone is applied to all appointments.
Facility time zone: every appointment that involves a facility uses that facility time zone.
Suppose that you are planning from UK, so using British time zone setting within your CRM. You create one
appointments that involves a facility situated in Sidney. The start time you enter from the Planner is 9am.
If you set “Local time zone”, you have entered 9am UK time, so the appointment is meant to start at 6pm
Sidney time. If you set “Facility time zone”, you have entered 9am Sidney time: note that, in this case, the
CRM shows you the correspondent UK time, which is 12am.
Apex – Italy – www.apex.it
6. Troubleshooting This section is intended as a quick help to resolve the most common errors. For any other trouble, feel free
to contact us at [email protected].
When opening Apex Planner, it stops working and displays the message: “License is not valid or expired”.
Check on the Planner configuration if the license key is correct.
Check if your Organization Unique Name matches the one on the registration email. You can find the CRM Organization Unique Name under Settings -> Customization -> Developer Resources.
Your demo license or your subscription may have ended. Contact [email protected] for a new license key.
I cannot see all my users on the Planner. Check the Planner configuration and see if there is a “User Role” filter: only the users who have that
security role are loaded. In case, leave that field blank.
Apex Planner displays the message: “The maximum number of users allowed by the license has been exceeded”.
Associate only the users you want to display to a security role and add this role to the “User
role” configuration field.
Contact us at [email protected] to get a new license for more users. Remember that the maximum
number of users you can handle is indicated into your license terms and on the About window of the
Planner. Demo licenses can handle an unlimited amount of users.
The Planner takes too long to load when changing the date interval.
Try to set the field “Calendar date interval” to a lesser value.
Filter users and/or resources using “Default team” and “Default site” fields.
The Planner reloads too often when changing the date interval. Try to set the field “Calendar date interval” to a higher value.


![DataManager Plugin - d36j349d8rqm96.cloudfront.net Plugin - M… · DataManager Plugin 6Version History 6 Version History 6.1Plugin Version Plugin-Version Date [dd.mm.yyyy] Notes](https://img.pdfslide.us/doc/110x75/5f05b5577e708231d4144e44/datamanager-plugin-plugin-m-datamanager-plugin-6version-history-6-version.jpg)