Embed Size (px)
Citation preview

ANZACS AT MESSINES — JUNE 1917
Graham Power

Contents Preface 2
Introduction 5
Background 6
Plumer’s Plan 7 ......................................................................................................
The German Defences 10
II ANZAC Corps 13
New Zealand Division 15
The Advance of the New Zealand Division 17 ...........................................................
The NZ 2nd and Rifle Brigades 18 ..........................................................................
2 Brigade 19 ..........................................................................................................
NZ Rifle Brigade 24 ...............................................................................................
1 Brigade 30 ..........................................................................................................
The Australian 3rd Division 35
10 Brigade 36 ........................................................................................................
9 Brigade 45 ..........................................................................................................
The Australian 4th Division 53
ANZAC Casualties 57
New Zealand Division - Infantry Casualties Only 58 .................................................
The 3rd and 4th Australian Division-Infantry Casualties Only. 61 ..............................
The Final Word 65
Appendix Map 67
The battle in a few words was won by the weight of metal that was thrown onto
the enemy positions, and the mettle of the men who advanced to attack them.
MAJOR-GENERAL RUSSELL IN A LETTER TO JAMES ALLEN (THE NZ MINISTER OF DEFENCE),
DATED 19 JUNE 1917.
�1

PREFACE
There are at least 4 reasons why the Battle of Messines is important:
1. After the failures in the previous 12 months at the Somme, along the Chemin des Dames and at Arras, it was an Allied success in that all the objectives were achieved in a timely manner. However, the Anzac casualties were too high.
2. It demonstrated that through meticulous planning and coordination between infantry, artillery and the air force, that the British and Imperial Forces were capable of breaking through the German defensive wall. The lessons learnt at Messines were applied during the Allied August offensive in 1918 but unfortunately not at Passchendaele.
3. For the first time on the Western Front, Australian and New Zealand soldiers fought side-by- side and bore the brunt of the German counter-battery fire.
4. The 100th anniversary of the Battle will be commemorated on 7 June 2017.
In describing the advance of the New Zealand Division, I have primarily relied on the official histories of the Auckland, Wellington, Canterbury and Otago Regiments and of the Rifle Brigade. These histories can be found on the website: http://nzetc.victoria.ac.nz/tm/scholarly/tei-corpus-WH1.html. The website also contains the volume: The New Zealand Division 1916 - 1919: A Popular History Based on Official
�2
1

Records, (1921) by Colonel Hugh Stewart which was invaluable in integrating the actions of the various battalions.
The ‘Official History of Australia in the War of 1914–1918’ by Charles Bean provided a comprehensive description of the actions of the 3rd and 4th Australian Divisions at Messines. Unlike New Zealand, Australia provides an on-line version of the World War 1 Diaries of all Australian battalions on a month by month basis. This is a major source of primary material and can be accessed at: https://www.awm.gov.au/collection/awm4/.
This e-book is dedicated to my Great-Uncle Andrew Ewan McGregor (10/1587) of the 1st Battalion, Wellington Infantry Regiment.
Andrew McGregor volunteered on 15 December 1914, aged 22 years. This action was prompted by the enlistment of his younger brother Philip, three days earlier. Raised in
ANDREW MCGREGOR 10/1587 HEADSTONE. BROMLEY CEMETERY
� �
�3

the Lake Tekapo District, at the time of enlistment he was working as a railway fireman in Palmerston North. He was wounded at Gallipoli, participated in the Battle of Messines and in that battle was severely wounded twice on 8 June 1917. As a result of these major wounds, he was transferred to England and was in Hospital for various periods over the next 5 months. On 27 August 1917 he married Beatrice Taylor in St David’s Chapel, Mold, North Wales. He re-joined his unit in May 1918 but had periods of ill-health until his arrival back in New Zealand in May 1919. He died on 16 August 1920 as a result of his wounds and is buried at the Bromley Cemetery, Christchurch.
�4

INTRODUCTION
The Largest Non-Nuclear, Man-Made Explosion At 2.50am on 7 June 1917, the Allied artillery barrage from some 2,260 howitzers and field guns that had pounded the German lines along the Messines-Wytschaete Ridge in Flanders for the previous 18 days, suddenly stopped. Anticipating an immediate infantry attack, the Germans rushed to their frontline trenches and illuminated the darkness with flares. But there was no immediate sign of an Allied attack. Then 20 minutes later, at exactly 3.10am, 19 underground mines beneath the German frontline trenches erupted as 450,000 kg of high explosive was detonated.
There was a tremble and a swaying of the ground; then a shudder. The sentry…was hurled against the revetment.
Another was thrown over the breastworks. Dugouts collapsed, burying and crushing those inside. Suddenly we were
enveloped in darkness and the air was full of soil and dust. From the sky came huge clods of earth, timber, wire
pickets, human limbs and whole bodies; everything swirling in confusion. Trenches are flattened by the falling mass.
Those who cannot dig themselves out are suffocated. The English have exploded a mine!
LEUTNANT WOLLINSKY, 126TH INFANTRY REGIMENT, QUOTED IN GERMAN OFFICIAL HISTORY,
DER WELTKREIG 1914-18, 1939. FROM ‘MESSINES 1917’ BY ALEXANDER TURNER, OSPREY PUBLISHING. 2010. P 5.
The tremors from the explosion were felt as far away as London. Immediately after the mines exploded, 9 Allied Divisions along a frontline of some 15 kilometres attacked up the western face of the Messines-Wytschaete Ridge accompanied by an artillery barrage. The Battle of Messines had started.
�5
2
BACKGROUND
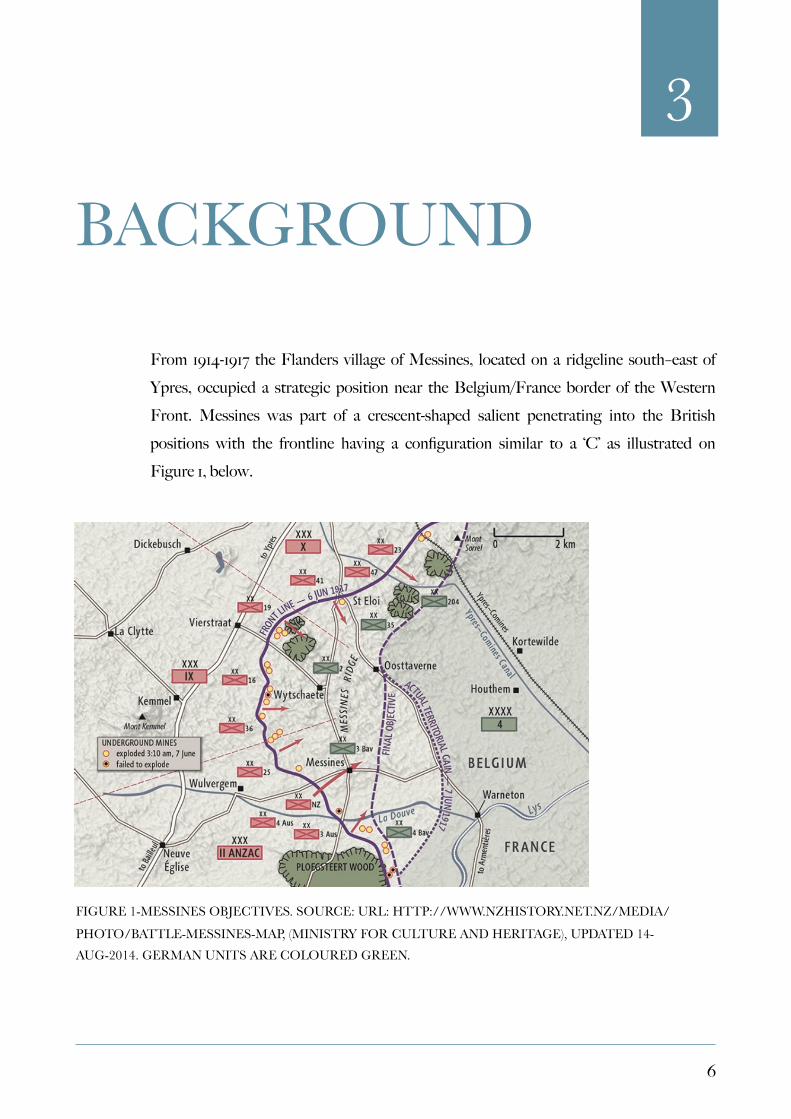
From 1914-1917 the Flanders village of Messines, located on a ridgeline south–east of Ypres, occupied a strategic position near the Belgium/France border of the Western Front. Messines was part of a crescent-shaped salient penetrating into the British positions with the frontline having a configuration similar to a ‘C’ as illustrated on Figure 1, below.
FIGURE 1-MESSINES OBJECTIVES. SOURCE: URL: HTTP://WWW.NZHISTORY.NET.NZ/MEDIA/
PHOTO/BATTLE-MESSINES-MAP, (MINISTRY FOR CULTURE AND HERITAGE), UPDATED 14-AUG-2014. GERMAN UNITS ARE COLOURED GREEN.
�6
3

The Germans had taken the Messines Ridge in November 1914 and from the ridgeline they had a commanding view of the British positions from Ypres to Armentieres.
Since 1916, Field-Marshall Haig had sought a ‘breakthrough’ of the German lines in Flanders, the occupation of the Belgium ports and with the assistance of the Royal Navy, the out-flanking of the Germans and the end of the war by Christmas 1917. To achieve this ‘breakthrough’, it would be necessary, first of all, to capture the Messines ridgeline and prevent the Germans from observing the necessary build-up of men and material around Ypres. Under Haig’s grand plan, the capture of Messines would be immediately followed by a massive Allied offensive to take the Passchendaele ridge and sweep through to the Belgium coast and eventual victory.
Haig allocated the task of taking Messines to General Herbert Plumer and his Second Army, of which II ANZAC Corps was one of the 3 Corps. With his portly appearance and little white moustache, Plumer looked like a caricature of ‘Colonel Blimp’. But the soldiers of the Second Army respected his leadership and his emphasis on detailed planning and training for the battle.
Plumer’s Plan
In order to avoid the slaughter of the Somme the previous year, Plumer’s objective was limited to an advance that averaged about 2,500m in the ANZAC sector. In contrast to the sweeping offensive planned for the Somme, Messines would be a ‘bite and hold’ operation. In particular, the new frontline captured would be reinforced with fresh troops who would dig in and reinforce the captured territory. To achieve this objective, the assault would not follow the standard practice of an artillery bombardment followed by an exposed infantry attack over open ground. In order to completely obliterate the fortified German trenches, underground mines would be exploded and from the air
�7

reconnaissance planes would direct artillery onto enemy artillery positions and relay information on the progress of the assault. In order to reduce the extent of casualties, the Second Army would attack the German positions at the following 3 levels:
TUNNELLING BELOW THE GROUND
The Royal Engineers had commenced tunnelling and the laying of mines in the Ypres Salient in 1915. At the start of the 1916-17 winter, they were joined by Australian, New Zealand and Canadian engineers in digging 26 deep mines in preparation for the battle. The galleries dug to service these mines totalled 7,300m and some were at a depth of 40m. It was a herculean effort. At 3.10am on 7 June 1917, 19 of the 26 mines beneath the German frontline were exploded with 450,000 kg of high explosive.
NEW INFANTRY TACTICS ON THE SURFACE AND GREATER USE OF ARTILLERY
In February 1917, new training manuals (SS 143 and 144) were introduced recommending alternatives to exposed infantry attacks that contributed to the appalling casualties at the Somme. The new 40 man platoon organisation consisted of a Lewis Gun section, a bombing section using hand and rifle grenades and two sections of riflemen. The new organisation exploited the increased fire power of the Lewis Gun which was capable of firing 500 ‘303’ rounds per minute and weighed only 12.7 kg, about half the weight of a Vickers machine gun. When attacking an enemy strongpoint, the Lewis Gun crew provided covering fire for the rifle and hand grenade sections to attack the strong point on its flanks using the available ground cover to minimise their exposure to the enemy. The Lewis Gun was so effective that captured guns were used by the Germans.
Plumer understood the importance of artillery in both destroying strongpoints and knocking out German artillery pieces and reducing the level of counter battery fire. He employed 2,260 artillery pieces at Messines, nearly twice as many as at the Somme.
�8

AIR SUPERIORITY AND RECONNAISSANCE.
Given the height of the Messines Ridge, the location of German artillery east of the ridge was concealed. The success of the battle depended upon air superiority and reconnaissance of German positions, particularly the position of their artillery which could bombard any newly captured territory. The Royal Flying Corp provided 300 aircraft for achieving these objectives. During the attack specially identified air planes flew along the frontline and when certain objectives were taken, Company Commanders fired green flares to confirm their position. This information was then relayed to Headquarters who adjusted the advancing artillery barrage.
�9

THE GERMAN DEFENCES
The Germans had occupied the Messines Ridge and the land to the north and south since November 1914. During their occupation, the Germans had constructed an interconnected system of solid trenches to defend the village. Geography also favoured the Germans. The crest of Messines Village, now reduced to a pile of rubble (refer to the photo below) was at a maximum height of 65m. However, the NZ frontline was located 1000m to the west, just beyond the Steenebeek Stream and at a lower level of 30-35m.
AN AERIAL PHOTO OF MESSINES VILLAGE IN JUNE 1917 SUPERIMPOSED ON A RECENT GOOGLE AERIAL. UNKNOWN SOURCE.
�10
4

With a fully laden pack, the western slope of Messines was a major obstacle to ascend. A further obstacle was the Steenebeek Stream. The Stream meandered sluggishly to the south where it met the La Douve River and in places was choked with debris, barbed wire and smashed culverts which formed a series of small swamps.
The western side of the Messiness ridge contained a number of well-defended strong-points which are identified on Figure 3 and on the descriptive map in the Appendix (‘the Appendix Map’) contained on the second to last page of this document. Half way up the ridge, were the ruins of the ‘Au Bon Fermier Cabaret’, an old inn with underground cellars. Some 200m north of the ‘Cabaret’ was the shattered remains of a mill named Moulin de l 'Hospice. The mill was set on a high knoll and surrounded by a well-defended trench. Within the ruins of Messines village were 5 interconnected underground concrete bunkers. The troops within these bunkers had orders to defend their position to the last man.
In addition to machine gun emplacements, along the ANZAC frontage from Messines to St. Yves, the Germans had constructed observation posts and dugouts and erected a number of reinforced concrete bunkers containing 2 or 3 machine guns and garrisoned by 15-40 soldiers. The Oosttaverne or Green Line, the final objective of the Allied advance located some 1500m east of the Messines ridgeline, contained several well-camouflaged concrete bunkers that were a major obstacle to the advance of the Australian 4th Division.
�11

GERMAN REINFORCED CONCRETE BUNKER WITH 2 FEET THICK WALLS LOCATED IN THE
GROUNDS OF THE NZ MEMORIAL LOCATED ON NIEUW ZEALANDERSTRAAT. CALUM GIBSON. HTTP://RNZAF.PROBOARDS.COM/THREAD/23241/FRANCE-TRIP-2015
�12

II ANZAC CORPS
Commanded by Lt. General Godley, II ANZAC Corps, was one of the 3 Corps allocated to the attack. II ANZAC Corps comprised the following 4 Divisions:
• 25 Division-A British Division that had fought at the Somme.
• New Zealand Division commanded by Major-General Andrew Russell.
• 3 Australian Division-A new Division commanded by Major-General John Monash.
• 4 Australian Division-The Division suffered heavy casualties at the 1st Battle of Bullecourt, April 1917. It was commanded by Major-General William Holmes.
As illustrated in Figure 2, (overleaf) II ANZAC Corps was responsible for the southern sector of the attack including the capture of the fortified stronghold of Messines. From the Allied frontline (coloured purple in Figure 2), the plan of attack was for the 25th Division to the north, the NZ Division in the centre and 3 Australian Division on the right flank, as far south to Saint Yves, to advance three abreast to the Black Line, some 2,000m from the NZ Division front-line. On capturing the Black Line, the NZ and 25 Divisions were ordered to push out patrols, to capture the enemy guns and establish posts on a Black Dotted line some 250m to the east of the Black Line. The capture of the Green (or Oosttaverne) Line was allotted to the 4th Australian Division, which would pass through the positions of the New Zealand Division.
�13
5

FIGURE 2: THE ANZAC ADVANCE. SOURCE: CAPTAIN D FERGUSON. THE HISTORY OF THE CANTERBURY REGIMENT, N.Z.E.F. 1914 – 1919.1921 P168. LINES COLOURED BY THE AUTHOR.
In describing the attack of II ANZAC Corps, the emphasis will be on the progress of the New Zealand and 3rd Australian Divisions and on the period from 6-10 June 1917. Within the two Divisions the focus will be on the individual infantry battalions that took part in the attack, moving from north to south along the frontline starting with the New Zealand Division. The Appendix Map illustrates the advance (in diagrammatic form) of the individual battalions in the NZ and 3rd Australian Divisions.
�14

NEW ZEALAND DIVISION
The NZ Division (about 15,000 soldiers) comprising 1 and 2 Brigades and the NZ Rifle Brigade was formed in Egypt in early 1916 after the ANZACS had fought in Gallipoli in 1915. The Division’s first major battle on the Western Front was at the Somme in September 1916. By the time of its withdrawal from the Somme in early October, the Division had suffered 7,000 casualties.
The Division was well-prepared for the Battle of Messines and from March 1917 training had started by simulated attacks over rising ground in the French countryside, similar to that of the Messines Ridge. In addition, patrols were regularly sent into no-mans-land to take prisoners and determine the location and strength of the German defences. At St. Yves, a scale model of the Messines Ridge, the size of 2 tennis courts, was built illustrating the topography and the location of German trenches and strong-points. This was studied by both officers and NCO’s. The positive effect of this training and the detailed planning was emphasised by the Brigadier W G Braithwaite, Commanding Officer of 2 Brigade who in his report after the completion of the Battle stated:
"The rapidity and ease with which the Brigade moved out of their assembly trenches and crossed
No-Man's-Land, I attribute to the fact that we had already rehearsed this advance six times on a
carefully prepared position in the Quelmes area, during the period of training for the offensive,
�15
6

where our own assembly trenches and that of the enemy on the Messines Ridge had been cut as
near as possible to scale; and so accurately were they sited and so true was the representation, that
when the men came to carry out the actual attack, they found little difficulty in finding their way
to their objectives in the German lines.”
FERGUSON, CAPTAIN D. THE CANTERBURY REGIMENT-1914-1919. P.160-161.
At the beginning of 1917, the 3 Brigades of the NZ Division were re-organised by Godley. Godley placed all the North Island battalions in the 1st Brigade while all the South Island battalions were in the 2nd Brigade. The changes were deeply resented by officers and men alike. The Rifle Brigade remained unchanged with four battalions. Godley was also disliked by the Australians.
The Division’s plan of attack was divided into three phases:
In the first phase, the 1st Otago and 1st Canterbury Battalions in 2 Brigade and the 1st and 3rd Battalions of the Rifle Brigade, advancing side-by-side, were to take the forward German trenches coloured red, blue and brown as illustrated on Figure 3, overleaf.
In the second phase, 2nd Otago and 2nd Canterbury would attack the northern sections of the fortified strong points within Messines. The 2nd and 4th Battalions of the Rifle Brigade would complete the capture of Messines by taking the southern and south-eastern sectors of the ruined village, with both Brigades advancing to the yellow line.
In the 3rd phase, the Auckland and Wellington Battalions of 1st Brigade would leapfrog the 2nd and Rifle Brigade positions, extend the advance to the Black Line and establish a series of outposts on the Black Dotted Line. These outposts on the Black Dotted Line would assist the advance of the 4th Australian Division towards the Green or Oosttaverne Line.
�16
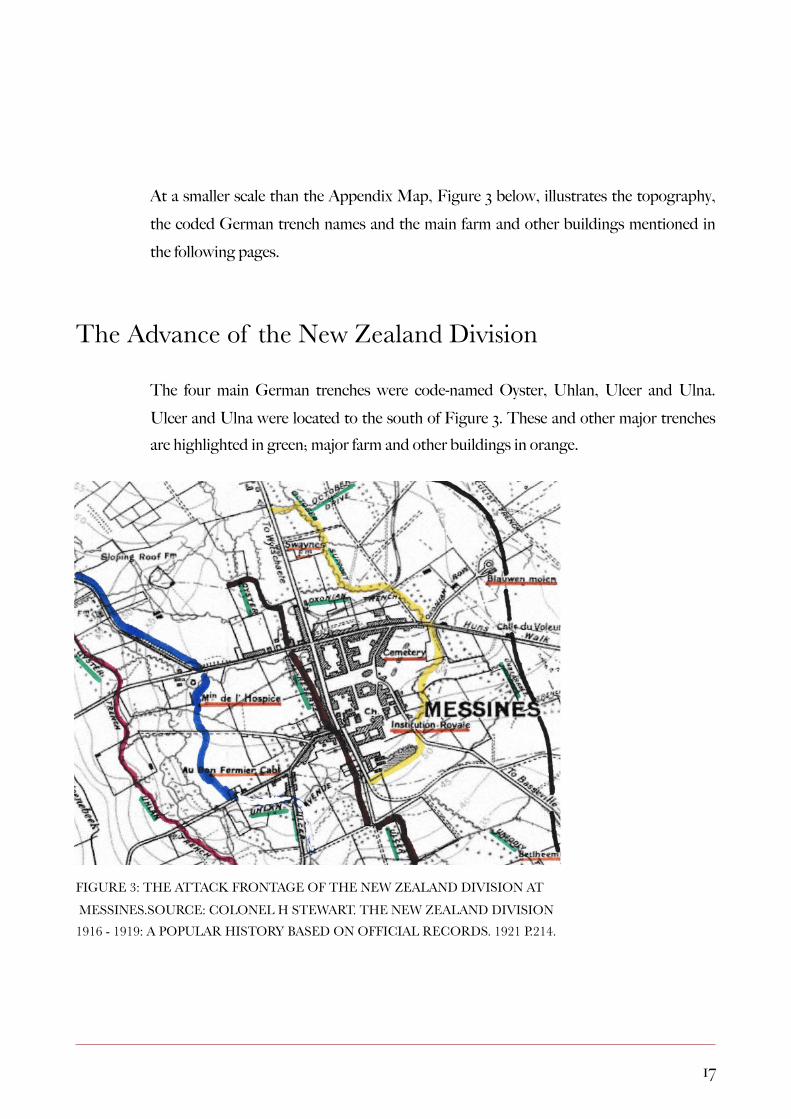
At a smaller scale than the Appendix Map, Figure 3 below, illustrates the topography, the coded German trench names and the main farm and other buildings mentioned in the following pages.
The Advance of the New Zealand Division
The four main German trenches were code-named Oyster, Uhlan, Ulcer and Ulna. Ulcer and Ulna were located to the south of Figure 3. These and other major trenches are highlighted in green; major farm and other buildings in orange.
FIGURE 3: THE ATTACK FRONTAGE OF THE NEW ZEALAND DIVISION AT MESSINES.SOURCE: COLONEL H STEWART. THE NEW ZEALAND DIVISION 1916 - 1919: A POPULAR HISTORY BASED ON OFFICIAL RECORDS. 1921 P.214.
�17

The NZ 2nd and Rifle Brigades
The 2nd Brigade consisted of 4 Battalions:
The 1st and 2nd Canterbury Battalions-collectively referred to as the Canterbury Regiment.
The 1st and 2nd Otago Battalions-collectively referred to as the Otago Regiment.
The Rifle Brigade also consisted of 4 Battalions; the 1st, 2nd, 3rd and 4th Rifles.
Two battalions in each Brigade were to advance up the western slope of the Messines Ridge, capturing the trenches on the Blue and Brown lines. The remaining two battalions in each Brigade would assault the fortified strong-point on the Messines Ridge and push out the advance to the Yellow Line. The advance of the two Brigades will be described from north to south, starting with 1 Otago Battalion whose objective was the capture of the Oyster trench system up to the Brown Line.
�18

2 Brigade
1 OTAGO BATTALION
THE OTAGO REGIMENT AFTER THE BATTLE WITH SOME GERMAN SOUVENIRS. ATL REF:
1/4-009516-G.
1 Otago were positioned on the left flank of the Division advance, including the Messines to Wulverghem Road (currently numbered the N314) in the centre and adjoining the advance of 25 Division to the north. The two leading companies of 1 Otago were the Southland Company on the left and on the right, the 4th (Otago) Company under Captain C.H. Molloy a law clerk from Oamaru. Molloy was wounded in the head and shoulder at Messines and awarded the Military Cross but was killed in action at Passchendaele on New Zealand’s darkest day-12 October 1917.
�19

“We went ‘over the bags’ at 3.10am, the big mines just going up on our
left-a wonderful sight. The earth shook as great volumes of flames lept from
the earth. However, our barrage began almost simultaneously, so we did not
wait to see more of the spectacle. The chaps were over before the barrage
started and kept well under it all the way. I was in command of the 4th
Otago Company and our objective was the Hun frontline and support
trenches. We gained our objectives without a great deal of resistance, the
Hun almost without exception surrendering everywhere. They came out of
the dugouts with their hands up shouting ‘Kamerad’. There was little fight
left among them. We ran into a couple of machine guns here and there,
which caused us a few casualties. However, we soon fixed them. Their
rnachine-gunners are good. They fire until they have no hope and then put
their hands up. These fellows got no mercy. Further on than our objective the
Hun resisted more strenuously, but our fellows swept on and gained every
objective according to time and exactly as planned. The worst part of the
business comes when the objective is gained and we have to dig in. However,
we got to work in good style and, although the chaps were dog-tired, kept
them going until we were finished.”
EXTRACT OF A LETTER WRITTEN BY CAPTAIN MOLLOY ON 20
JUNE 1917, TO HIS MOTHER, WHILE IN HOSPITAL IN ENGLAND. LETTERS FROM THE BATTLEFIELD: NEW ZEALAND SOLDIERS WRITE HOME, 1914-18 EDITED BY GLYN HARPER. HARPER
COLLINS PUBLISHERS (NEW ZEALAND) 2001.
�CAPTAIN CYRIL M.
MOLLOY.
�20

Special platoons from these two companies were detailed to deal with the two strong-points— Birthday Farm on the left and the Moulin de l'Hospice on the right-numbered 2 and 4 respectively on the Appendix Map. As illustrated on Figure 3 and on the Appendix Map, 1 Otago were to be responsible for the capture of the Red Line (usually lightly defended) and the heavily defended support trenches within the Blue and the Brown Lines.
Several minutes after zero hour, the Red line was easily taken and the troops advanced up the slopes of the ridge with incredible speed and captured and consolidated the Blue Line. The two strongholds, Birthday Farm and Moulin de l’Hospice, were surrounded and captured and five machine guns and 50 prisoners were taken.
The two platoons committed to the capture of the Moulin de l'Hospice, were led to the final assault by Sergeant John Wilson, a carpenter from Dunedin, as the officers were casualties. Wilson was awarded the Military Medal (MM) for his actions. He earned a second MM at Polderhoek in December 1917. Promoted to 2nd Lieutenant he earned the Military Cross (MC) at Neuville in October 1918. Immediately this objective was gained, consolidation was commenced by digging a line 80 yards in advance of the enemy strong-point. It was at this stage that Private Charles A. Fitzpatrick, a labourer from Auckland, on jumping into a shell-hole encountered an enemy machine gun which he attacked single-handed, bayoneting five of the crew and capturing the gun and one of the enemy. For this and other actions Fitzpatrick was awarded the Distinguished Conduct Medal (DCM). Fitzpatrick was killed in action at Passchendaele on 12 October 1917.
The North Otago Company and two platoons of the South Otago Company, under the command of Captain E. F. Selby, established themselves on a line approximately 175m to the south of Swayne's Farm (numbered 1 on the Appendix Map) and commenced consolidation. A machine gun came into action from Swayne's Farm and threatened to
�21

interfere with operations. However, a tank attached to the Battalion arrived and Captain Selby directed the tank to Swayne's Farm. The tank demolished the superstructure and the garrison surrendered.
2 OTAGO
2 Otago had two main tasks. The first was to follow 1 Otago and if the advance faltered, the Battalion would reinforce the attack with fresh troops. The second task was to support 2 Canterbury in its assault on the northern sections of Messines village. As the advance was successful, 2 Otago were mainly involved with clearing out pockets of resistance and captured that part of Oyster Trench, just south-west of Swaynes Farm. In providing support for 2 Canterbury, Companies of the Battalion passed through Swaynes Farm, crossed Wytschaete Road and captured October Support trench-the northern most point of the NZ Division’s advance. 200m to the east of this trench, a new line was dug and reinforced with machine guns.
The DCM was awarded to Private Thomas Beck, a labourer from Canterbury. He was the Battalion runner who, although wounded, remained on duty throughout the Battle. A veteran of Gallipoli he had already received the M.M. As a result of his wounds at Messines he was shipped to England. A few months later he was promoted to Lance Corporal, but in January 1918 his stripe was removed while in camp in England for: ‘Wearing a jacket not issued by Ordinance’ He was eventually promoted to Corporal.
The DCM was also conferred upon Company Sergeant-Major John Fothergill, a 33yr old Commercial Traveller from Dunedin. Fothergill was promoted to 2nd Lieutenant in May 1918 but was killed in action on 23 October 1918-19 days before the Armistice.
�22
!
CORPRL. T. J. BECK, D.C.M.,
M.M

1 CANTERBURY
To the right or south of the Otago Regiment was the Canterbury Regiment, whose task was to capture the Red, Blue and Brown lines and the trench system code-named ‘Uhlan’. Leading the 1 Canterbury attack was the Nelson-Marlborough Company on the left and the South Canterbury Company on the right. The Canterbury (mainly Christchurch) and North Canterbury/West Coast Companies were in support. There was no creeping barrage across No-Man's Land, but there was a stationary 18-pounder barrage on the enemy front line till nine minutes after zero-3.19am. Immediately the barrage lifted, the Blue Line (mainly Uhlan Trench) was captured by 3.25am. The barrage continued forward and a platoon of the Canterbury Company took the Au Bon Fermier Cabaret (numbered 7 on the Appendix Map) with three machineguns and seventeen prisoners. Approaching the Brown Line, the advance was halted by a machine gun post. Although both were wounded, Lance-Corporal Gordon Hewitt, a farmer from the Hawkes Bay and Private R Garlick attacked the post killing all 6 men. Hewitt was awarded the DCM. The Canterbury/Westland Company followed up the barrage and took the Brown Line (mainly Oyster Reserve trench) at 3.50 a.m.
Immediately after the capture of these objectives, the battalion consolidated in three lines, between the old German front line and the Brown Line but at the same time the Battalion came under heavy fire from the enemy's artillery. This fire continued without intermission until 5 p.m. the following day and was the main cause of the battalion's casualties but the work of improving the trenches went on steadily. Trench improvements continued until 4pm on 9 June when the Battalion moved back to rest.
2 CANTERBURY
Meanwhile, the 2nd Canterbury Battalion had been following close on the heels of the 1st Battalion. After the 1st Battalion had captured the Brown Line, the leading companies of 2 Battalion followed the barrage into the northern section of Messines
�23

village up to Oxonian Trench. Meanwhile the rear-guard companies of the Battalion attacked machine gun posts, which had been passed by the leading troops of 1 Battalion. These guns were rushed and the crews killed.
Major resistance was encountered at Oxonian Trench, however, two platoons worked their way around to the right flank and on the barrage lifting, Oxonian Trench was rushed by the whole of the Company. Many of the enemy were killed and fifty prisoners were taken. Further resistance was experienced at a small cemetery (numbered 5 on the Appendix Map) on the yellow line. At the cemetery, outstanding work was undertaken by Private Fred White, a hairdresser from Christchurch who, on his own, had entered an enemy dug-out and captured 18 prisoners. He then led a party against a machine gun post, killed five of the crew and brought out the sixth with the machine gun. He was awarded the DCM. By 5am, 2 Otago and 2 Canterbury had captured, without serious opposition, all its objectives in accordance with the timetable. Practically no German artillery fire was encountered till after 5am and no heavy fire until Oxonian Trench was captured. After the capture of the final objective, the work of consolidation commenced. This consisted of a narrow and deep trench parallel to and about 200m in advance of Oxonian Trench. The digging of the trench proceeded under shell fire and it was here that the chief losses of the battalion were incurred.
On 9 June, the Battalion moved back to rest.
NZ Rifle Brigade
The Rifle Brigade were positioned on the right or southern flank of the Canterbury Regiment with the Messines to Gooseberry Farm Road (now named Nieuw-Zealanderstraat) as the northern boundary-refer to the Appendix Map. The 3rd Rifles were on the left flank and the 1st on the right flank to the north of the La Douve River.
�24

The objective of the 1st and 3rd Rifles (plus two platoons from the 2nd) working abreast, was to capture the Red, Blue and Brown Lines. The 4th Battalion (plus one company from the 2nd) was to take the southern section of Messines ridge and advance to the Yellow Line beyond; the 2nd Battalion (less one company and two platoons) was to dig in behind the Brown Line as Brigade reserve.
3RD RIFLES BATTALION
At 3.10am, the two leading companies of 3rd Rifles, B Company on the left and D Company on the right, advanced up the slope of the Messines Ridge. Both Companies made good progress as they advanced across no-man’s land to capture the trenches of the Blue Line and started consolidating the captured position.
A and C Companies, following the two leading companies, passed through the Blue Line and led the attack up the slopes of the ridge to the Brown Line. The advance proceeded swiftly with the scattered groups of the enemy surrendering freely. However, on the left flank the attack was halted by fire from two machine gun posts located in the ruins on the western edge of Messines. The two companies started taking major casualties, including some of the senior officers. This awkward situation was relieved by the daring action of Lance-Corporal Samuel Frickleton. Without waiting for orders and followed by his 9 man section he, although wounded in the arm, advanced through his own artillery barrage towards the first machine gun post. Concealed by the noise and debris from the artillery barrage and the covering fire from his section, he was able to get within a few yards of the post and lobbed in a Mills bomb/grenade. When it exploded he leapt into the post and bayoneted the survivors. Without hesitating, he then proceeded to the second machine gun post some 20m away. He killed the 3 men manning the gun and then destroyed the remainder of the crew. Six of his section were wounded in the assault. One of the survivors, Rifleman C. J. Maubon, a labourer from Hawarden, Canterbury, followed Frickleton closely and rendered material assistance.
�25

Later, Maubon engaged a machine-gun firing from the Institution Royale, and by daring and skilful bombing work killed the gunner and smashed the gun. He was awarded the MM.
Frickleton’s courageous actions prevented further casualties to his Battalion and was instrumental in the capture of the Brown Line in a timely manner. The 3rd Battalion advance was able to continue forward, including Sam Frickleton. However, he was
SAMUEL FRICKLETON WAS BORN IN THE SCOTTISH MINING TOWN OF SLAMANNAN, NEAR GLASGOW IN 1891. IN 1908 HIS
FAMILY IMMIGRATED TO NEW ZEALAND AND FRICKLETON WORKED AS A COALMINER IN BLACKBALL ON THE SOUTH
ISLAND’S WEST COAST. BY THE MIDDLE OF 1913 FIVE FRICKLETON BROTHERS (WILLIAM, SAMUEL, JAMES, THOMAS
AND HERBERT) WERE WORKING AT BLACKBALL. A CLOSE-KNIT AND UNRULY FAMILY, KEEN ON BOXING, THEY ARE
REMEMBERED IN BLACKBALL AS THE ‘FIGHTING FRICKLETONS’. WITH THE OUTBREAK OF WWI, SAMUEL AND
HIS FOUR BROTHERS JOINED THE NZEF AND ALL SAW SERVICE ON GALLIPOLI IN 1915. SAM FRICKLETON WAS
INVALIDED HOME FROM GALLIPOLI AND DISCHARGED AS UNFIT FOR ACTIVE SERVICE. HE RECOVERED, RE-ENLISTED
AND WAS POSTED TO THE RIFLE BRIGADE TO SERVE IN FRANCE. AFTER MESSINES HE WAS COMMISSIONED AS AN
OFFICER AND REMAINED IN THE ARMY AFTER THE WAR, RETIRING WITH THE RANK OF CAPTAIN IN 1927 AND JOINING
THE TERRITORIAL FORCE. A KEEN SPORTSMAN, HE WON MANY TROPHIES FOR BILLIARDS, BOWLS AND GOLF. HE WAS
MARRIED IN 1921 AND HAD ONE SON BORN IN 1928.
SAM FRICKLETON DIED AT WELLINGTON IN 1970 AT THE AGE
OF 80. (ARMYMUSEUM.CO.NZ)
!
FRICKLETON BEING INVESTED WITH THE
VICTORIA CROSS BY GEORGE V. PHOTOGRAPH Q
54478. IWM
�26

wounded again and suffering from the effects of gas, he was evacuated from the battlefield. For these actions he was awarded the Victoria Cross.
In taking the Red, Blue and Brown Lines, the 3rd Rifles captured nearly 100 prisoners and 3 machine guns.
1ST RIFLE BATTALION
As illustrated on the Appendix Map, 1 Rifle was located on the very right flank of the NZ Division frontage, adjoining the 40th Battalion of the Australian 3rd Division. The initial attack was undertaken by C Company on the left and A Company on the right. C Company over-ran the ruins of the German forward trench and moved steadily towards the support trench. Fire from machine-guns halted the advance but bombing parties promptly moved against the positions and captured both guns and crews. Corporal H. J. Jeffery, a labourer from New Plymouth, suddenly found himself facing a dug-out from which a German machine-gunner was enfilading the Australians advancing on the right. The German machine-gunner darted into the dug-out followed by a bomb from Jeffrey which killed 5 Germans. The rest of the Germans in the dugout surrendered and Jeffrey took 12 prisoners. Jeffery was awarded the DCM but was killed 13 days later on 20 June. Sergeant J. V. M. Cauty, of Wellington, attacked single-handedly and bombed out a nest of enemy sharp-shooters who were delaying the advance. For this action he was awarded the M.M. There was little further opposition.
�27
!
CORPORAL HENRY JEFFREY DCM

A Company, on the right flank of the NZ Division perimeter, met little resistance from the enemy salient at La Petite Douve Farm and cleared their section of the surrounding trenches. As A and C companies dug in on the Blue Line, B and D Companies passed through the Blue Line, and advanced to capture the trenches on the Brown Line. The Brown Line contained 2 concrete dugouts and was located some 500m further east.
B Company on the right, had a comparatively long advance, but met with little resistance. D Company on the left, was held up momentarily by parties of the enemy who had established themselves in a hedge running across the line of advance, about midway between Blue and Brown Lines. Three posts here were rushed and their garrisons bombed or bayoneted and the advance continued towards the trenches of the Brown Line. These were captured with ease. On the standing barrage lifting, the men made the final dash and reached their objective before the Germans could raise their heads. In their ascent up to the Brown Line, 1 Rifles captured over 70 prisoners and 4 machine guns.
The whole of the allotted section of the Brown Line had been taken by 1 and 3 Battalions by the scheduled time of 3.50 a.m., 40 minutes after zero hour and at the same time as 1 Canterbury and 1 Otago captured the northern sections of the Brown Line.
2ND AND 4TH RIFLE BATTALIONS
Advancing to the Yellow line, the 2nd and 4th Battalions of the Rifle Brigade met fierce opposition from sections of Germans ensconced in the ruins on the southern and eastern sides of Messines. But all opposition was overcome and the Battalions proceeded to dig trenches and erect barbed wire to counter any enemy attacks.
About 4.40 a.m. the Germans launched an artillery barrage on the Messines ridge as the men were digging new trenches. This fire increased considerably after 6 am.
�28

Acts of bravery were not confined to infantrymen. Alfred Dunthorne, a tailor from Auckland and a stretcher-bearer with the 4th Rifles, noticed that an enemy salvo had buried a handful of his comrades. He at once rushed along the trench and amid falling shells, toiled to recover them. He had dug out 2 of the 3 buried men, when another salvo completely buried them again and severely shook and dazed Dunthorne himself. Although the salvoes continued to fall on the trench, he worked on and eventually succeeded in extricating and saving the lives of all 3 men. Recommended for the V.C., he received the DCM.
A strong German counter-attack was launched at 1 p.m. but was checked by artillery and machine-gun fire. The 4th Australians passed through the Rifle Brigade and at 3.10 p.m., exactly twelve hours after zero hour, advanced to the Green Line.
During 8 June the New Zealand Rifle Brigade was withdrawn from the line, the portions held by the different units being taken over by battalions of the 1st and 2nd Brigades. All four Rifle Battalions supplied strong parties for road-making and cable-burying on 8, 9 and 10 June, working steadily through a series of high-explosive and gas bombardments. During its attack on Messines, the Brigade captured 285 prisoners, one 77mm gun, eleven machine-guns, and one trench mortar and miscellaneous ammunition, arms and specialist gear.
�29
!
RIFLEMAN ALFRED DUNTHORNE. DCM

1 Brigade
The first task of 1 Brigade was to push out the frontline of the Division from the Yellow Line to the Black Line some 500m to the east. The second task was to establish a set of strongpoints on the Black Dotted Line a further 300m to the east. These strongpoints would aid the advance of the 4th Australian Division to the Green Line.
1 WELLINGTON
North of the village, 1 Wellington had followed close behind the assault by 2 Otago and in order not to miss the barrage were in October Support Trench immediately behind the Otagoes. The Battalion attacked with 3 companies abreast, Hawkes Bay Company on the left, Taranaki Company in the centre and Ruahine Company was on the right. Ruahine Company moved south-east to connect with the Aucklanders once it had rounded Messines.
Wellington-West Coast Company, in reserve, had detailed two platoons, under 2nd Lieutenant A. Blennerhasset, to capture Blauwen Molen (Blue Mill, numbered 3 on the Appendix Map), a German Artillery Headquarters. The Blennerhasset platoons, had a few minutes' sharp fighting at the Mill and Private Rizk Alexander, born in Syria and a farmer from the Wairarapa, received the MM for his actions.
HIS CITATION READ:
‘At Blauwen Molen this man captured a German machine gun and its
entire crew single-handed. Throughout the fighting he showed coolness and
courage of a high order.’
!
RIZK ALEXANDER. MM.
�30
Some 2 weeks later Alexander was seriously gassed and returned to NZ in early 1918.
Ruahine Company did not meet with much opposition, and 2 machine guns and 25 prisoners fell to them. In this company, Sergeant Roy Corkill, a farmer from Paihiatua, led his platoon on the right of the battalion sector with skill and determination, reorganising and maintaining direction under difficult conditions. Upon reaching his objective, Sergeant Corkill lost an eye from a sniper's bullet; but refused to leave his post, until his platoon had made contact with Aucklanders on the right and consolidation was well advanced. He then collapsed from pain and exhaustion. He was awarded the DCM.
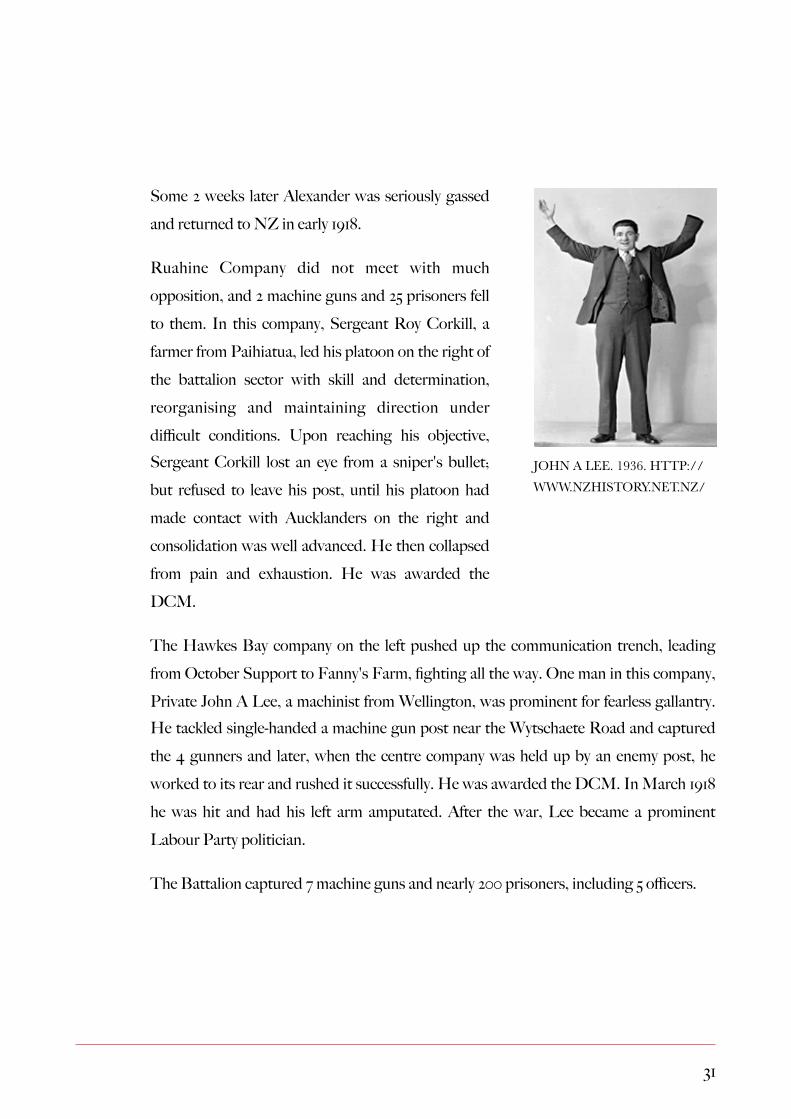
The Hawkes Bay company on the left pushed up the communication trench, leading from October Support to Fanny's Farm, fighting all the way. One man in this company, Private John A Lee, a machinist from Wellington, was prominent for fearless gallantry. He tackled single-handed a machine gun post near the Wytschaete Road and captured the 4 gunners and later, when the centre company was held up by an enemy post, he worked to its rear and rushed it successfully. He was awarded the DCM. In March 1918 he was hit and had his left arm amputated. After the war, Lee became a prominent Labour Party politician.
The Battalion captured 7 machine guns and nearly 200 prisoners, including 5 officers.
�31
!
JOHN A LEE. 1936. HTTP://WWW.NZHISTORY.NET.NZ/

2 WELLINGTON
After dark on 8 June, 2 Wellington, in reserve, relieved 1 Wellington who had dug in on that part of the Black Line north-east of Messines. 1 Auckland was located on the right flank. Just before the relief was complete, the Germans launched a heavy bombardment on the Black Line and counter-attacked. However, this was repulsed by the Australian 4th Division entrenched on the Green Line some 750m east of the Black line.
Liaison between the Australians on the Green Line and the New Zealanders on the Black Line was poor, particularly in regard to some German strong points located on the northern flank between the 2 lines. Consequently, 2 Wellington sent two strong patrols under Lieut. A. Melles, a dentist from Palmerston North, to reconnoitre the area. Partly under observation by the Germans, the patrols experienced intermittent shell fire. Lieut. Melles's task was a difficult one in unchartered territory and for his conduct that night he shortly afterwards received the Military Cross.
During the night of 9/10 June, 2 Wellington was relieved by units of the 4th Australian Division.
1 AUCKLAND
1 Battalion, passing to the south of Messines, moved to their jumping off line in readiness for the attack on Ungodly Trench. At 4.55 a.m. the artillery barrage moved forward. The effect of the barrage was such that the Hauraki and Waikato Companies had no difficulty in occupying the trench. Similarly, the North Auckland and Auckland Companies attacking to the north captured Unbearable Trench, finally digging in on the Black Line at 5.20 a.m. A strong-point was established on the Black Dotted Line, and the Battalion's work was done. Sterling work was undertaken by Sergeant Paul Calame, a watchmaker from Grey Lynn, who had received the MM at Gallipoli.
�32

Throughout 8 June, the Battalion remained holding the ground they had won. However, there was no slackening of the German artillery barrage and casualties were high. The Battalion was relieved late on 9 June. The journey back was slow and tedious.
2 AUCKLAND
The Auckland and Hauraki Companies advanced at 6.40 a.m. to a position to the rear of the Black Line, from where they established four posts on the Black Dotted Line. A 77mm field gun was captured and along with the two taken by 1 Auckland, were the first field guns to be taken by the New Zealand Division. At 9.40 a.m. patrols were sent out to the Green Line and reported that the wire in front had been cut. However, later that morning the Germans opened up with a furious barrage on the Black Line.
The North Auckland Company was ordered to dig a communication trench between Ungodly and Unbearable Trenches. Moving around to the right of the village they came under direct observation and were heavily shelled but escaped with light casualties.
For conspicuous gallantry, Company Sergeant-Major Thomas Gordon, a bushman from the Hokianga and a Gallipoli veteran, was awarded the DCM. In October 1917 he was promoted to 2nd Lieutenant.
�33
!
2ND LIEUTENANT THOMAS
GORDON DCM

In the afternoon, the 4th Australian Division advanced through the Battalion’s lines but on advancing to the Green Line lost direction with the failure of a British Brigade to arrive on their left flank and were subject to enfilading fire.
Confined to their trenches for the next 2 days, the Battalion had to endure both the counter-barrage from the Germans and Allied artillery falling short.
FURTHER ACTION BY THE NEW ZEALAND DIVISION
On 12 June 1917, the New Zealand Division pushed the German outposts back to the neighbouring town of La Basseville and stayed in the line until 31st August 1917.
�34

THE AUSTRALIAN 3RD DIVISION
THE BATTLE OF MESSINES. CHARLES WHEELER (1923). MEN OF THE 3RD AUSTRALIAN DIVISION
LEAVING THEIR TRENCHES AS THE SKY IS LIT BY EXPLOSIONS.
�35
7

Formed in Australia in February 1916, the Division contained the following 3 Brigades:
• 9 Brigade
• 10 Brigade
• 11 Brigade
Each Brigade contained 4 battalions. After an extensive period of training in England, the 3rd Division saw its first active service on the Western Front in November 1916. Messines would be the Division’s first major battle.
As illustrated on the Appendix Map, the objective of the 3rd Division at Messines was to capture the southern portion of the salient from la Petite Douve Farm, south to St. Yves and east to the Black Line. Given the different geography facing the Division and the shorter distance to the Black Line, there were no intermediate objectives designated blue, brown or yellow. The NZ Division would be on their left or northern flank but there was no other Allied Division on their southern flank. The Division would attack on a two brigade front with 10 Brigade on the left or northern flank and 9 Brigade on the right flank. 11 Brigade would be in reserve.
The advance of the two Brigades will be described from north to south starting with 10 Brigade and 40 Battalion who were located north and south of La Douve River.
10 Brigade
Upon formation in 1916, it consisted of four infantry battalions which were raised in Victoria and Tasmania. These were:
• 37 - Recruited mainly from Melbourne, Gippsland and the NE part of the state.
�36

• 38 - Recruited mainly from Bendigo and the surrounding area.
• 39 - Recruited mainly from the Western Districts of Victoria.
• 40 - Recruited from Tasmania.
As illustrated on the Appendix Map, the Brigade would initially attack on a two battalion front with 40 Battalion to the north and 39 Battalion to the south. After capturing the Black line some 2 hours after zero hour, 39 Battalion would be the Brigade reserve. 38 Battalion would then pass through the 40 Battalion positions and capture the trenches from Bethleem Farm to Schnitzel Farm (numbered 8 and 9 respectively on the Appendix Map) and east to where Ungodly Avenue Trench crossed the Green Line.
37 Battalion was not involved in the initial assault, but at zero hour plus 9 hours 30mins (i.e. 12.40pm) it was to pass through 38 Battalion positions and assemble at the rear of the Black Line. 30 minutes later (1.10pm) 37 Battalion would advance with 47 Battalion (part of the Australian 4th Division) on its left flank to consolidate on the Green Line.
From north to south the progress of each battalion in 10 Brigade was as follows:
40 BATTALION
The task of 40 Battalion was to capture the frontline trenches and bridge the La Douve River west of La Douve Farm. As D Company was allocated to 37 Battalion and two platoons from other companies to 38 Battalion, the Battalion was reduced to 10 platoons when it set off at 11pm on 6 June on its march to the start line. On its approach march, enemy shellfire and a major gas attack accounted for 90 casualties and the mist from the gas dispersed the columns of the 10 platoons. At the start line the depleted Battalion assembled north and south of La Douve River. Just after zero hour the
�37

northern platoons captured Ulna Support Trench and laid plank bridges across the Douve.
While commanding his platoon, Sergeant Keith Swann, a bank clerk from Adelaide, received the MM for seizing an enemy trench before attacking and successfully holding four key bridges over the Douve River while under heavy shell-fire.
The platoons south of La Douve River, reached Ulna Support Trench at 3.30am without too much difficulty and the Battalion was in touch with the 39th Battalion on the right and the NZ Rifle Brigade on the left. The 10 platoons joined up and dug a ditch between Ulna Avenue Trench and La Douve Farm. A few minutes later the 38th Battalion leapfrogged through the Battalion on their way to the Black Line. As soon as the 38th passed through, the Battalion began to dig in. Shelling on the position was light and scattered till 10 a.m. However, when the mist cleared, enemy balloons
A WOODEN PLANK BRIDGE PLACED ACROSS THE LA DOUVE RIVER BY 40 BATTALION ON 7 JUNE. (AWM
E01286)
SERGEANT LK SWANN. MM.
� �
�38
overlooked the Battalion’s position and the Douve valley was heavily shelled with high explosive. Casualties were fairly heavy. Work proceeded amid heavy shelling until 2 p.m., when most of the Battalion were sent forward to assist the 37th Battalion in capturing the Green Line. But before the Green Line was taken, the 37th Battalion were ordered to withdraw to an overcrowded Black Line and the 40th followed and eventually returned to the Ulna Trench positions. The Battalion was relieved early morning on 9 June by 42 Battalion.
39 BATTALION
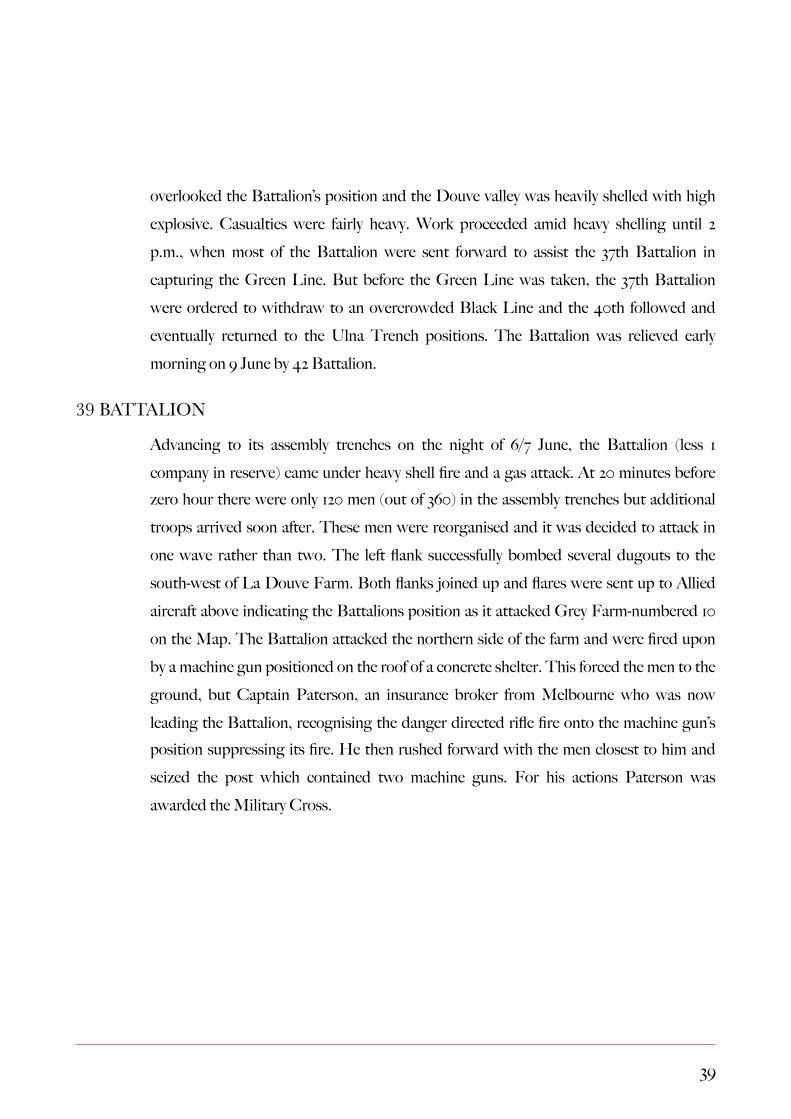
Advancing to its assembly trenches on the night of 6/7 June, the Battalion (less 1 company in reserve) came under heavy shell fire and a gas attack. At 20 minutes before zero hour there were only 120 men (out of 360) in the assembly trenches but additional troops arrived soon after. These men were reorganised and it was decided to attack in one wave rather than two. The left flank successfully bombed several dugouts to the south-west of La Douve Farm. Both flanks joined up and flares were sent up to Allied aircraft above indicating the Battalions position as it attacked Grey Farm-numbered 10 on the Map. The Battalion attacked the northern side of the farm and were fired upon by a machine gun positioned on the roof of a concrete shelter. This forced the men to the ground, but Captain Paterson, an insurance broker from Melbourne who was now leading the Battalion, recognising the danger directed rifle fire onto the machine gun’s position suppressing its fire. He then rushed forward with the men closest to him and seized the post which contained two machine guns. For his actions Paterson was awarded the Military Cross.
�39
With the Brigade established on the Black Line, the Battalion was now the Brigade reserve and was ordered to the north side of the La Douve. During 8 June, the 39th continued digging a communication trench towards Schnitzel and Bethleem Farms. The Battalion was relieved early morning on 9 June.
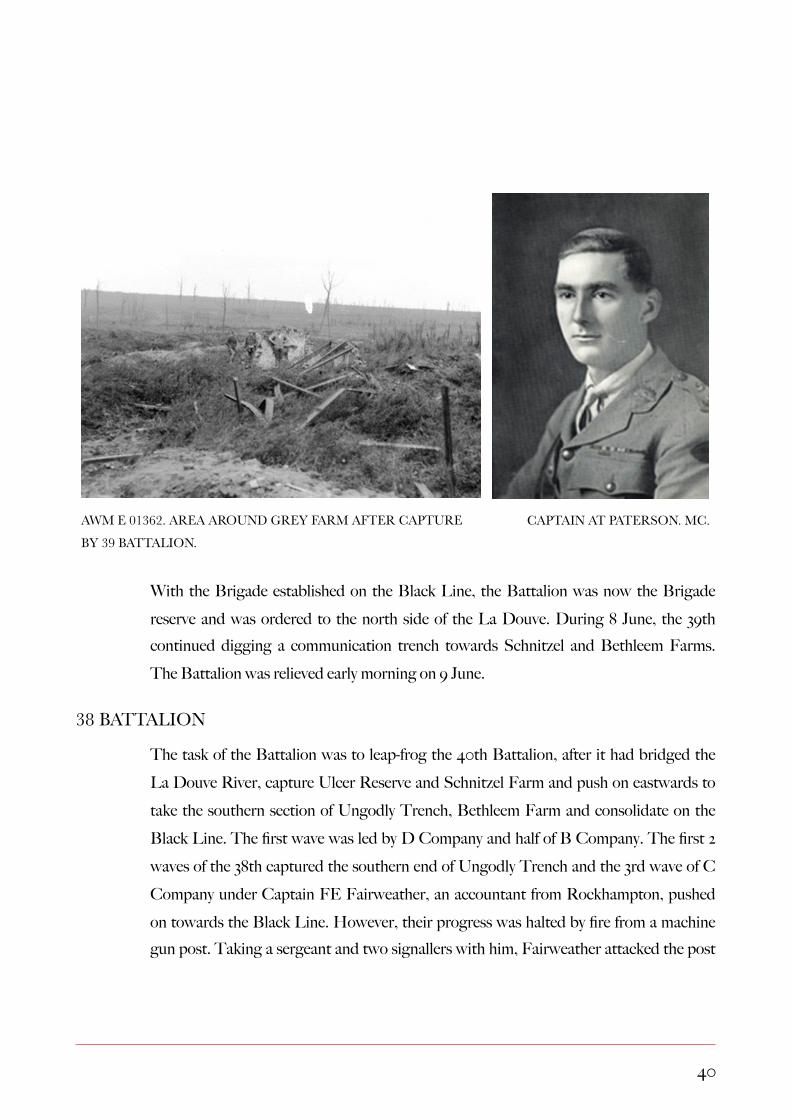
38 BATTALION
The task of the Battalion was to leap-frog the 40th Battalion, after it had bridged the La Douve River, capture Ulcer Reserve and Schnitzel Farm and push on eastwards to take the southern section of Ungodly Trench, Bethleem Farm and consolidate on the Black Line. The first wave was led by D Company and half of B Company. The first 2 waves of the 38th captured the southern end of Ungodly Trench and the 3rd wave of C Company under Captain FE Fairweather, an accountant from Rockhampton, pushed on towards the Black Line. However, their progress was halted by fire from a machine gun post. Taking a sergeant and two signallers with him, Fairweather attacked the post
AWM E 01362. AREA AROUND GREY FARM AFTER CAPTURE
BY 39 BATTALION.
CAPTAIN AT PATERSON. MC.
� �
�40

from the rear, captured the gun and turned it on the fleeing Germans. For his actions Fairweather was awarded the MC.
The Battalion dug in on the Black Line and put in a block in Ungodly Avenue just east of the Messines to Potteries Road. In the morning of 8 June, German aircraft flew low over the Black Line and this was followed by a heavy enemy barrage. By the morning of 9 June the trench on the Black Line was 7 feet deep with fire-steps. The Battalion was relieved on the morning of 9 June by 42nd Battalion.
During its advance the Battalion captured 7 machine guns and two 77mm field guns.
AWM E01288. BETHLEEM FARM AREA CAPTURED BY 38 BATTALION
CAPTAIN FE FAIRWEATHER MC
� �
�41

37 BATTALION
The 37th were not involved in the original assault by the 3rd Division at zero hour. Its task, in conjunction with the 4th Australian Division, was, at 1.10pm (but postponed to 3.10pm), to advance through the positions of 38 Battalion to the Green Line. On the Green Line, the Battalion would consolidate between the bridge over the La Douve and Huns Walk. During this attack 47 Battalion of 12 Brigade would be on their left or northern flank.
At 3.10pm the Allied artillery barrage thickened and moved forward followed by the 37th Battalion which advanced to the Green Line. A Company on the left flank linked up with the 47th (4 Division) who were advancing north of Huns Walk. C and D companies were in the centre of the advance and D Company of the 40 Battalion (which was temporarily attached to the 37th for this operation) was on the right flank-refer to Figure 4 overleaf. However, the 2 hour delay to the advance had enabled the Germans to reinforce their positions. Machine Gun posts and a nest of snipers in Uncanny and Undulating Support Trenches halted the advance and the Battalion started taking casualties.
�42

FIGURE 4 THE ADVANCE OF 37 BATTALION. THE THIRTY SEVENTH, MCNICOL, N. MELBOURNE.
1936
Half-way to a German trench, A Company came under sustained and heavy machine gun fire which struck down half the men and all the officers except the Company Commander, Captain Robert Grieve. Having no Lewis machine guns or trench mortars at his disposal and his company facing decimation, Grieve, a commercial traveller from Melbourne, grabbed a bag of grenades and attacked the machine gun post on his own.
�43

Hurling hand grenades at the frontal loop hole of the bunker, Grieve ran from shell-hole to shell-hole and eventually reached the rear of the bunker. On the roof of the bunker he rolled 2 grenades through the loop-hole and killed or wounded all of the German crew. For this action he was awarded the Victoria Cross. While giving directions to his company (now reduced to 40 out of the 100 plus that attacked in the afternoon), Grieve was badly wounded by a sniper. The bravery demonstrated by Grieve was not an isolated incident. A Company was now without any officers but the NCO’s carried on. In fighting from tree to hedgerow, A and C company troops became mixed with those of the 47th which created confusion about their position. Some groups of soldiers had advanced beyond the Green Line but officers to the rear were not aware of these
BORN IN 1889 IN MELBOURNE, TO JOHN AND ANNIE DEAS
GRIEVE (NÉE BROWN), ROBERT GRIEVE WAS EDUCATED AT WESLEY COLLEGE. AFTER LEAVING SCHOOL, HE BECAME AN
INTERSTATE COMMERCIAL TRAVELLER IN THE SOFTGOODS TRADE. HE ENLISTED IN THE AUSTRALIAN IMPERIAL FORCE
AS A PRIVATE IN JUNE 1915. HE WAS COMMISSIONED AS A SECOND LIEUTENANT IN THE 37TH BATTALION IN JANUARY
1916, WAS PROMOTED TO LIEUTENANT IN MAY 1916. AFTER TRAINING IN ENGLAND, HE WAS PROMOTED TO CAPTAIN IN
FRANCE IN FEBRUARY 1917. WOUNDED AT MESSINES, GRIEVE WAS EVACUATED TO ENGLAND, AND ON RECOVERY
RETURNED TO HIS UNIT IN OCTOBER. HOWEVER, HE SUBSEQUENTLY SUFFERED ACUTE TRENCH NEPHRITIS AND
DOUBLE PNEUMONIA, AND WAS INVALIDED TO AUSTRALIA IN MAY 1918. IN AUGUST, HE MARRIED SISTER MAY ISABEL
BOWMAN OF THE AUSTRALIAN ARMY NURSING SERVICE WHO HAD NURSED HIM DURING HIS ILLNESS. POST-WAR HE
ESTABLISHED THE BUSINESS OF GRIEVE, GARDNER & CO., SOFT-GOODS FIRM, IN MELBOURNE, AND WAS MANAGING
DIRECTOR UNTIL 4 OCTOBER 1957 WHEN HE DIED OF CARDIAC FAILURE.
!
CAPTAIN R C GRIEVE. VC
�44

isolated groups of the 37th and 47th and they were hit by Allied artillery. With troops withdrawing to their right and left, the depleted ranks of the 37th had no option but to also withdraw to the Black Line. The next morning at 2.30 am, the 44th occupied the Green line positions taken by the 37th the previous day. On 8 and 9 June 37 Battalion positions on the Black Line were heavily shelled before the Battalion was relieved.
9 Brigade
The Brigade consisted of the following 4 infantry battalions:
• 33 Battalion-Recruited mainly from Armidale and the surrounding area.
• 34 Battalion-Recruited mainly from Maitland and the Hunter Valley.
• 35 Battalion-Mainly recruited from Newcastle and the Hunter Valley
• 36 Battalion-Were recruited mainly from rifle clubs in N.S.W and named ‘Carmichaels 1000’.
After training in Australia, the Brigade was shipped to England before being committed to the fighting on the Western Front in France and Belgium in November 1916. Messines would be its first major battle.
That part of the front allocated to 9 Brigade at Messines was the last sector south to St. Yves, as illustrated on the Appendix Map. As described in the Brigade War Diary (AWM4-23/9/8 p.53), the Brigade would attack on a two battalion front with 34 Battalion to the north and 33 Battalion to the south, 35 Battalion was in the second ‘wave’ following the 33 and 34 Battalions. 36 Battalion was in reserve. From north to south the progress of each battalion was as follows:
�45

34 BATTALION
The objective of the Battalion was to capture and consolidate the Black Line from the Douve River south to the left flank of 33 Battalion. Similar to other units of 3 Division, on their approach march to the front line, the Battalion had 40 casualties from a German gas attack. The exploding mines at Trench 127 destroyed a large part of the German line and as a result initial resistance was quickly overcome. With A Company on the left flank, the Battalion made good progress and captured the ruins of Grey Farm by following close behind the creeping barrage. The Battalion reached the Black Line by 4.25 am and started digging and consolidating the line. By 7.20am consolidation on the Black line was about two/thirds complete. That night an enemy party, from the direction of the Potteries Farm (numbered 11 on the Appendix Map), attacked Grey Farm but were repulsed.
In the afternoon of 8 June enemy shelling of the Black Line intensified and was very heavy on 9 June. Also Allied shelling was falling short and landing on the Black Line. On 9 June Lieutenant C Jeffries, a surveyor from the Hunter Valley, led a patrol of 50 men with the object of reconnoitring Potterie Farm, the source of German attacks over the previous days. This patrol came under heavy machine gun fire and on returning reported the position was fairly strongly held. When approaching the farm, Lieutenant Jeffries was hit in the thigh by machine gun fire and evacuated. On 12 October 1917,
�46
!LIEUTENANT C JEFFRIES. VC.

during the Battle of Passchendaele Jeffries was killed when capturing two machine gun posts. He was awarded the VC posthumously.
The Battalion was relieved by 36 Battalion on the night of 9/10 June.
33 BATTALION
As the southern-most battalion of the Allied attack, 33 Battalion had a difficult task as there would be no Allied forces protecting their right flank.
Led by Lt.-Colonel Morshead (who in 1941 commanded the Australian 7th Division at Tobruk), the Battalion raced from their trenches and overcame the German frontline trenches before they had time to respond. However, there were two mine craters blown at 3.10am that affected their progress. The one to the right, dug by the 3rd Canadian Tunnelling Company, centred on Factory Farm (described as ‘Trench 122 Right’) completely destroyed a German strong point but left a crater with a diameter of 70m on the right flank of the 33rd’s advance.
When the Germans attempted to enfilade the Battalion from the southern side of this crater, these men were taken out by a team of snipers. The mine crater to the left (‘Trench 122 Left’) which contained a relatively small explosive charge of 9,000kg created few difficulties. However, the right flank continued to experience sustained fire from a machine gun post located beyond the southern edge of the barrage. Three soldiers were hit, but another, Private James Spence, a labourer from Tamworth,
�47
!
PRIVATE JAMES SPENCE.
DCM. RSLVIRTUALWARMEMORIAL.ORG.AU

obtained the help of four additional men, and setting two to fire on the machine gun with rifle-grenades, worked his way behind the post, killed the German crew and captured the gun. For his actions he was awarded the DCM
Outstanding work was also undertaken by Private John Carroll, a railway guard from Kalgoorlie. Carroll dashed out in front of the Battalion’s advancing line and was the first man to reach the German parapet bayoneting four of the occupants. He then noticed a comrade in difficulty and went to his assistance, killing another of the enemy. Next, he single-handedly attacked a machine-gun team, killing three of them and capturing the gun. Later, two of his comrades were buried by a shell; in spite of heavy shelling and machine-gun fire, he managed to rescue them. For these actions Carroll was awarded the Victoria Cross.
�48

The Battalion had advanced to the Black Line by 4 a.m. and consolidated their position. By 7am D Company on the right flank had dug a trench 4 feet 6 inches deep. During the rest of the day the Battalion experienced sporadic shellfire. On the following day, 8 June, the German shellfire was more accurate and the Battalion suffered heavy casualties. The shellfire continued for the next 2 days but by this time the trenches were 7 feet deep and offered greater protection. On 9 June the Battalion established a forward machine gun post at Thatched Cottage (numbered 12 on the Appendix Map) and in the house on Ash Avenue. The Battalion was relieved by the 35th on 11 June.
JOHN CARROLL (1891-1971), WAS BORN ON 16 AUGUST 1891 IN
BRISBANE, SON OF JOHN CARROLL, LABOURER, AND HIS WIFE
CATHERINE, NÉE WALLACE, BOTH IRISH-BORN. WHEN HE WAS 2
YEARS OLD, THE FAMILY MOVED TO WESTERN AUSTRALIA. ABOUT
1905 THEY SETTLED AT KURRAWANG WHERE JOHN AND HIS FATHER
JOINED THE GOLDFIELDS FIREWOOD SUPPLY CO. AS LABOURERS.
TALL AND WELL BUILT, CARROLL WAS A GOOD ATHLETE AND A
PROMINENT MEMBER OF THE LOCAL FOOTBALL CLUB AS A 24 YEAR
OLD WORKING AS A RAILWAY GUARD ON THE KURRAWANG LINE,
HE ENLISTED IN THE AIF IN APRIL 1916. HE WAS SEVERELY
WOUNDED AT PASSCHENDAELE ON 12 OCTOBER 1917 AND
HOSPITALISED IN ENGLAND. AFTER DEMOBILIZATION CARROLL
RESUMED WORK AS A GUARD ON THE KURRAWANG LINE. HE
MARRIED MARY BROWN ON 23 APRIL 1923; THEY HAD NO CHILDREN.
IN 1927 HE HAD HIS FOOT AMPUTATED IN A WORK ACCIDENT. HE
DIED IN PERTH ON 4 OCTOBER 1971 AND WAS BURIED IN
KARRAKATTA CEMETERY WITH FULL MILITARY HONOURS.
CARROLL, WHO WAS KNOWN AMONG HIS A.I.F. COMRADES AS 'THE
WILD IRISHMAN', WAS CASUAL AND HAPPY-GO-LUCKY BY NATURE. IT
IS CLAIMED THAT HE MISSED THREE DATES FOR HIS INVESTITURE
WITH THE V.C. AND HAD TO BE SENT FOR ON THE FOURTH
OCCASION; AFTER THE CEREMONY HE AMUSED HIMSELF BY
EXERCISING THE VICTORIA CROSS WINNERS' RIGHT TO TURN OUT
THE BUCKINGHAM PALACE GUARD. TWO OF HIS BROTHERS SERVED
AS PRIVATES IN THE A.I.F.
!
PRIVATE JOHN CARROLL.
VC. HTTP://ADB.ANU.EDU.AU
�49

35 BATTALION
Although 35 Battalion was designated to be part of the ‘second wave’ on 7 June, the Brigade War Diary states that the Battalion went ‘over the top’ at zero hour with the 33 and 34 Battalions. With little opposition, the Battalion captured the Ulster Switch Trench and cleared the surrounding ground. After 34 Battalion passed through their position, they advanced to the Black Line and consolidated. Captain Hugh J Connell, a school-teacher from Newcastle, was awarded the Military Cross for his actions. His citation read:
“At St-Yves during the offensive on the 7th to the 12th of June
1917, this Officer showed to be a good leader and a very efficient
Officer. His work throughout was above praise. His fine leadership, thoroughness and continuous
exhibition of personal courage was an inspiration to all who came in contact with him. This
Officer during a reconnaissance of assembly trenches on x night showed great coolness and
determination in carrying out the work, and his was the one of three parties that succeeded in
getting through. On previous occasions this Officer has been noteworthy for his meritorious work”.
From the afternoon of 7 June, enemy shellfire was heavy and the Battalion suffered many casualties. During the evening of 9/10 June the Battalion was relieved by 36 Battalion. However, on the following evening it relieved the 33 Battalion to the south.
�50
!
CAPTAIN HUGH CONNELL. MC -
WWW.HARROWERCOLLECTION.COM

36 BATTALION
36 BATTALION. ‘HUT MATES’ 1916. TWO OF THE ABOVE WERE KILLED IN ACTION AT MESSINES
AND ANOTHER DIED OF WOUNDS.
The 36th Battalion were the reserve battalion for the 9th Brigade and were not involved in the initial assault on 7 June. However, 2 companies were involved in carrying supplies to the frontline troops. On the night of 9/10 June the Battalion relieved 34 and 35 Battalions. At 11pm, 10 June under a heavy Allied barrage, 200 men of the Battalion, led by Captain W Wells, a professional soldier from Sydney, who won an MC at Houplines, launched an assault on the heavily defended Potterie Farm trenches located some 500m east of the Black Line. During the day, Germans had been observed
�51

undertaking works to reinforce the machine gun posts at the Farm. The assault was successful and the Battalion established 4 strong posts beyond the Black Line. In the capture of the Potterie Farm position, Lance-Corporal Stanley Smith, a farmer from Western NSW, together with his section successfully attacked a strong enemy post. Smith was awarded the DCM. His citation read:
“His bravery and initiative was a fine factor in the capture of La Potterie on the 10th June. His
platoon, during the assault was held up by a strong enemy post. Posting his Lewis-Gun to cover
his advance, attacked the enemy from a flank, and not only captured a strong point but out of the
retreat of the whole of the garrison, who were promptly mopped up by his platoon. His capable
handling of the situation had an important bearing on the whole operation”.
In 1918 he was promoted to Lieutenant.
�52

THE AUSTRALIAN 4TH DIVISION
The 4th Division was formed in Egypt in February 1916. The new Division included the 4th Infantry Brigade and non-infantry units which had fought at Gallipoli. The 12th and 13th Infantry Brigades were formed by taking half the personnel of the 4th and 3rd Infantry Brigades.
The Division fought at First Bullecourt in April 1917 and breached the Hindenburg Line but left isolated and unsupported it suffered heavy casualties. The Division was battle-hardened and effective and in June 1917 consisted of the following 3 Infantry Brigades:
• 4th Brigade
• 12th Brigade
• 13th Brigade
Once the NZ and the 25th Divisions had taken Messines and consolidated their positions on the Black Line, it was the task of the 4th Australian Division to pass through their lines and extend the frontline to the Green Line, some 750m further to the east, at the point it crossed Huns Walk. In order to avoid confusion with the mixing of NZ and Australian troops, the Aussies would be wearing a pink band 2 inches wide above the elbow.
�53
8

The attack to the east by 4 Division would be undertaken by 2 Brigades. The 13th Brigade would attack on the left or northern flank and the 12th Brigade on the southern or left flank. The 4th Brigade of the Division would be in reserve.
The day did not start well for the Division. Zero hour for their advance was postponed 2 hours to 3.10pm. However, this instruction did not filter through to the Division until late morning. During the wait the troops were assembled in unprotected positions on the forward and reverse slopes of the Messines Ridge and were subject to heavy shelling by the German artillery. Just after 1pm the Germans reinforced the Oosttaverne Line, shelled both sides of the Messines ridge and attacked towards the Black Dotted Line. However, the Germans came under heavy rifle and machine gun fire and withdrew to the Oosttaverne Line.
At 3.10pm the creeping barrage commenced and the Australians went forward behind it. 52 Battalion (South and West Australia and Tasmania) advanced on the extreme left of the Division front but discovered that the 33 Brigade of the British 11th Division was not on their left flank. In order to protect the flank of the Battalion, Captain Arthur Maxwell MC, a sheep station manager from Tasmania and a Gallipoli veteran, led his Company across the unprotected front heading in a north-east direction into the Wambeek Valley. As illustrated in the following diagram, the 49th (Queensland) followed in a north-easterly direction and the troops were dispersed over a wide area.
�54

With little opposition Maxwell’s company occupied trenches just west of the Oosttaverne Line. For his leadership at Messines, Maxwell was awarded the Distinguished Service Order (DSO). The other companies of the 52nd followed and the Battalion was now occupying the entire objective of the 33rd Brigade of the British 11th Division. The 49th Battalion also advanced in a north-easterly direction but this left a gap of some 1000 yards with the 12 Brigade Battalions to the south.
12 Brigade faced similar difficulties. That part of the Green Line south of the Blauwepoortbeek Valley contained a series of concrete bunkers, interspersed with a maze of support trenches, hedges and trees. None of these features were illustrated on the operational maps held by each company of the Brigade. Consequently, the attacking battalions were confronted with withering fire from all quarters. The experience of the 37th Battalion is indicative of that encountered by the Battalions of the 4th Division. In addition, the maze of trenches made it difficult for officers and NCO’s to determine
BEAN C. VOLUME IV. THE AUSTRALIAN IMPERIAL FORCE IN
FRANCE 1917 (11TH EDITION 1941) PAGE 633.
CAPTAIN ARTHUR MAXWELL.
DSO MC
� �
�55

their position. Consequently, groups of soldiers advanced past the Green Line. A further problem was that the 2 hour delay enabled the Germans to reinforce the Green Line with counter-attacking troops. Despite these difficulties 4 Division had captured most of the Green Line except for the Blauwepoortbeek Valley by early evening.
Artillery support was provided to 4 Division but because of poor communication and locational uncertainty, most of the barrage landed on the positions of the Division. This led some companies to withdraw and others followed in order to protect their flank. By evening most of the Division had withdrawn to the Black Line. Fresh battalions were sent forward after midnight to retake the Green Line positions. Fortunately, the Germans were unaware of the withdrawal and the Green Line positions were consolidated. Over the next 3 days any counter-attacks by the Germans were repulsed and by 11 June the Germans had withdrawn from the Blauwepoortbeek Valley.
�56

ANZAC CASUALTIES
NZ WOUNDED SOLDIERS BEING ATTENDED TO BY AMBULANCE CORPS AT AN ADVANCED
DRESSING STATION IN THE GERMAN SECOND LINE AT MESSINES. NATLIB.GOVT.NZ: 1/2-012773-G.
�57
9
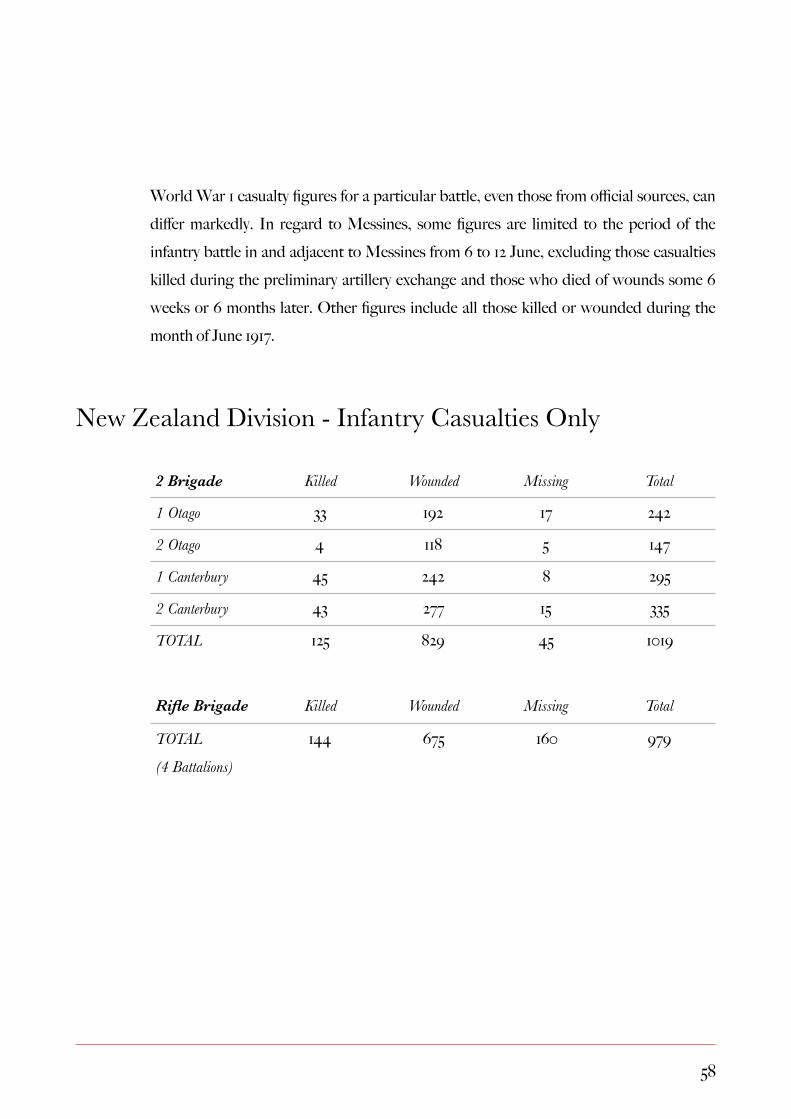
World War 1 casualty figures for a particular battle, even those from official sources, can differ markedly. In regard to Messines, some figures are limited to the period of the infantry battle in and adjacent to Messines from 6 to 12 June, excluding those casualties killed during the preliminary artillery exchange and those who died of wounds some 6 weeks or 6 months later. Other figures include all those killed or wounded during the month of June 1917.
New Zealand Division - Infantry Casualties Only
2 Brigade Killed Wounded Missing Total
1 Otago 33 192 17 242
2 Otago 4 118 5 147
1 Canterbury 45 242 8 295
2 Canterbury 43 277 15 335
TOTAL 125 829 45 1019
Rifle Brigade Killed Wounded Missing Total
TOTAL (4 Battalions)
144 675 160 979
�58
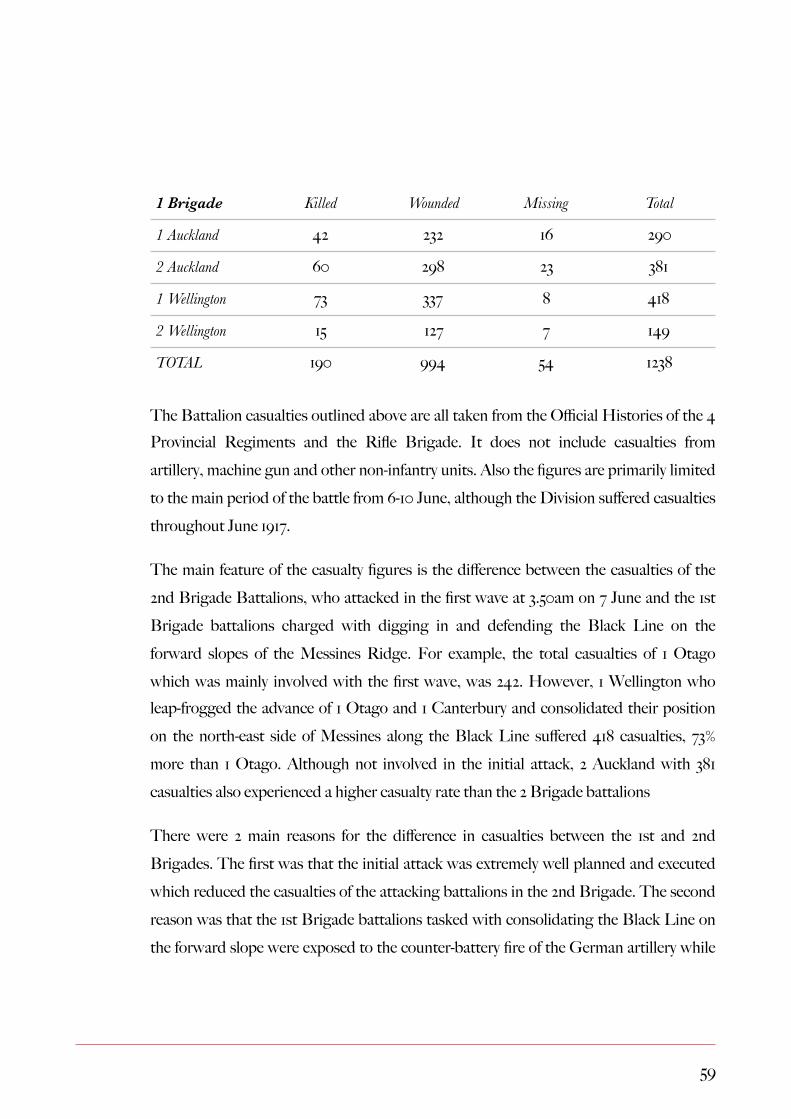
The Battalion casualties outlined above are all taken from the Official Histories of the 4 Provincial Regiments and the Rifle Brigade. It does not include casualties from artillery, machine gun and other non-infantry units. Also the figures are primarily limited to the main period of the battle from 6-10 June, although the Division suffered casualties throughout June 1917.
The main feature of the casualty figures is the difference between the casualties of the 2nd Brigade Battalions, who attacked in the first wave at 3.50am on 7 June and the 1st Brigade battalions charged with digging in and defending the Black Line on the forward slopes of the Messines Ridge. For example, the total casualties of 1 Otago which was mainly involved with the first wave, was 242. However, 1 Wellington who leap-frogged the advance of 1 Otago and 1 Canterbury and consolidated their position on the north-east side of Messines along the Black Line suffered 418 casualties, 73% more than 1 Otago. Although not involved in the initial attack, 2 Auckland with 381 casualties also experienced a higher casualty rate than the 2 Brigade battalions
There were 2 main reasons for the difference in casualties between the 1st and 2nd Brigades. The first was that the initial attack was extremely well planned and executed which reduced the casualties of the attacking battalions in the 2nd Brigade. The second reason was that the 1st Brigade battalions tasked with consolidating the Black Line on the forward slope were exposed to the counter-battery fire of the German artillery while
1 Brigade Killed Wounded Missing Total
1 Auckland 42 232 16 290
2 Auckland 60 298 23 381
1 Wellington 73 337 8 418
2 Wellington 15 127 7 149
TOTAL 190 994 54 1238
�59

digging new trenches. Also the trenches were overcrowded. Russell wanted to reduce the number of soldiers in these forward trenches but was over-ruled by Godley, the Commander of II Anzac Corp:
General Russell had known this retaliation was inevitable and had sought permission to thin out his defences, proposing instead to rely on the Division’s firepower to hold the positions. It was refused and Russell was angry at the needless cost. He wrote to Allen (the NZ Minister of Defence):
“Consequently I regret very much that we were not allowed to thin out and reduce the number of
men left on the ridge after we had won it. Had we been allowed-as I proposed-to reduce the
garrison, our losses would have been considerably smaller with the same result”.
HARPER, GLYN. JOHNNY ENZED. 2015. P.406
�60

The 3rd and 4th Australian Division-Infantry Casualties
Only.
A 3RD AUSTRALIAN DIVISIONAL FIELD DRESSING STATION AT KANDAHAR FARM ON THE
AFTERNOON OF 7 JUNE 1917. HTTP://WWW.AWM.GOV.AU/COLLECTION/E00482.
The casualty figures for the various Brigades are quoted from ‘The Official History of Australia in the War of 1914-18’ by CEW Bean, p.682. Beans figures differ from some of those in the Brigade War diaries.
�61

THE 3RD AUSTRALIAN DIVISION
10 Brigade Total Casualties
37 Battalion 408
38 Battalion 257
39 Battalion 306
40 Battalion 15
TOTAL 1312
9 Brigade Total Casualties
33 Battalion 390
34 Battalion 388
35 Battalion 436
36 Battalion 430
TOTAL 1644
11 Brigade Total Casualties
41 Battalion 134
42 Battalion 209
43 Battalion 122
44 Battalion 257
TOTAL 722
�62

THE 4TH AUSTRALIAN DIVISION
The above figures demonstrate that 9 Brigade bore the brunt of the casualties. This is not surprising given that the Brigade were attacking along the southern-most edge of the Allied offensive with no supporting units on its right flank, Consequently, the Brigade and particularly 33 Battalion were subject to enfilading fire.
12 Brigade Total Casualties
45 Battalion 568
46 Battalion 127
47 Battalion 463
48 Battalion 66
TOTAL 1224
13 Brigade Total Casualties
49 Battalion 379
50 Battalion 149
51 Battalion 113
52 Battalion 325
TOTAL 966
4 Brigade Total Casualties
TOTAL 222
�63

The 45th Battalion in the Australian 4th Division had a total of 568 casualties. This was the highest level of casualties of any battalion in the New Zealand and Australian Divisions. When attacking the Green or Oosttaverne Line, the 45th came under extensive machine gun fire which split the Battalion with 2 companies veering to the north and two to the south. This blunted the effectiveness of the Battalion. At the same time the Battalion had run into the leading waves of a sustained German counter-attack. Allied artillery falling short further increased the number of casualties.
�64

THE FINAL WORD
As the official war correspondent embedded with the Australian Imperial Force, Charles Bean meticulously observed and recorded the actions of the AIF from Gallipoli to the last days of the war. He concluded the following about the Battle of Messines:
Nevertheless Messines meant far more to both sides than a mere subsidiary fight. Although even
the frankest of German historians does not face – or perhaps does not know – the full truth of
this defeat, the German official history says that the British stroke “fully succeeded” that the
Messines salient “had been lost with dreadful casualties” and that “French confidence began to
grow again”. General von Khul describes the battles as “one of the worst tragedies in the world
war”. For the British the result was a revelation – how welcome, only those know who can fully
recall their own feelings at the time – that the British staff could plan and carry through a first-
rate stroke with brilliant success. To the Australians who took part, the British higher leadership
in this fight was as heartening as that in the Bullecourt operations had been depressing. It is true
that Haig’s intention to capture the bulk of the German guns in the afternoon attack was not
fulfilled, most of the guns lying behind the Oosttaverne Line. Moreover especially in the later
phases, mistakes were made partly due to the inexperience even of the Second Army staff in such
offensives.
But the impressive success of the British mining operations, the clearness of the plans, the
overwhelming bombardment, the counter-battery fire which during the first stage stamped out most
of the enemy’s artillery, the effective observation maintained by the British air force, the transport
�65
10

of material and food by improvised pack-trains – which, at least for the 47th Battalion, came by
June 9th right up to the front line, delivering a hot meal to the tired troops there – the swift and
comparatively smooth evacuation of the wounded, gave Australians a confidence in the staff such
as had been engendered by no previous operation excepting perhaps the skilful evacuation of
Gallipoli.
BEAN C. VOLUME IV. THE AUSTRALIAN IMPERIAL FORCE IN FRANCE 1917
(11TH EDITION 1941) PAGE 679.
�66

APPENDIX MAP ANZAC ADVANCE-7 JUNE 1917
THE UNDERLYING TOPOGRAPHICAL BASE IS FROM THE BELGIUM NATIONAL GEOGRAPHIC INSTITUTE.MESEN 28/5-6-REFER OVERLEAF. SCALE: 1:20,000 APPROX.
�67
ALLIED FRONTLINE- The purple dotted line.
O1, O2: OTAGO Btns
C1, C2: CANTERBURY Btns
R1, R2, R4. RIFLE BRIGADE Btns
W1: WELLINGTON Btns
-A1, A2: AUCKLAND Btns
3 AUS DIV Btns- Coloured Green.
KEY 1. Swaynes Farm
2. Birthday Farm
3. Blauwen Molen
4. Moulin de l’Hospic
5. Cemetery
6. Institution Royale
7. Au Bon Fermier
8. Bethleem Farm
9. Schnitzel Farm
10. Grey Farm
11. Potteries
12. Thatched Cottag
11

BELGIUM NATIONAL GEOGRAPHIC INSTITUTE.MESEN 28/5-6. (2000) SCALE: 1:20,000.
�68