Embed Size (px)
Citation preview

ACID PRO 4.0 An overview of new features
ACIDAn overvie
By Ga
This document explores the newuse this document is to downl
features for yourself as http://www.sonic
®
- 1 -
PRO 4.0 w of new features
ry Rebholz and Michael Bryant
features in ACID PRO 4.0 in great detail. The best way to oad the trial version of ACID PRO 4.0 and try out the new you read along. To get your free trial version go to: foundry.com/download/step2.asp?DID=401.

ACID PRO 4.0 An overview of new features
- 2 -
Introduction
In many ways, the 4.0 upgrade to ACID PRO is the strongest upgrade to the product ever. Enhancements include greatly expanded MIDI capabilities (including Yamaha
OPT support), ASIO support, 5.1 surround-sound mixing, plug-in effects automation, bus tracks, Loop Cloning, VST Instrument support and support for alternate time signatures. But there are many behind-the-scenes enhancements as well including optimizations to the audio playback engine, and improved time stretching on beatmapped tracks, among others. This document takes you on a detailed tour of the new features found in ACID PRO 4.0 (it assumes you already know the basics of the software). It not only lists the new features, but also explains them fully, and (where appropriate) walks you through the use of these new features with real-life examples that you can easily follow along with in a demo version of ACID PRO 4.0.
When you’re done with this document, you’ll have valuable information that you can use in deciding whether or not to upgrade to ACID PRO 4.0, or to purchase the software for the first time.
Plug-In Effects Automation
Plug-In Effects automation allows you to change the parameters of automation-enabled DirectX plug-in FX over the course of a project, thus creating an “automated”
mix. It’s like having a studio assistant who adjusts the parameters of the FX in exactly the same way at exactly the same moment every time you play or render your project. This makes it possible to fix problem areas, create interesting special FX, and achieve other creative goals.
As an example, imagine that you add a long .wav file as a beatmapped or one-shot track. A short portion of the .wav file contains very harsh high end that’s not present in the rest of the recording. In previous versions of ACID, you could use the Track EQ plug-in to define an EQ setting for that entire track. You could set the EQ to bring down the high end and thus correct the problem area. But this approach might very well make the non-problem areas of the track sound dull and lifeless. You really need one EQ setting for the majority of the track, and a different setting for the problem area. In other words, you need to change the parameters of the EQ over time. Plug-In Effects Automation makes this possible—and easy—to accomplish.
You can use plug-in FX automation anywhere in ACID PRO that you can add normal plug-ins: As Track FX, and—in conjunction with ACID PRO’s new bus track feature which we’ll discuss later—as Bus FX, and Assignable FX. Let’s automate the Track EQ on a track now. In a new ACID project, navigate to the folder Drums & Percussion | Dance Essentials on the ACID PRO content disc, and add the loop The BD is Rattling my Teeth. (If you don’t have access to this file, use any four-beat drum pattern loop.) Paint it out for eight measures so that you have four repetitions of this two-bar loop. Define a loop region to cover the same eight measures, and click the Loop Playback button. Play the project to hear how the drum beat sounds with no effects added to it. Stop playback when you’re done listening. Now let’s automate the Track EQ settings to create an effect that gives the drum pattern a very different character.
By default, each new track in your project contains a Track FX chain with the automated Track EQ plug-in already added. Notice that the track header for your track contains a modified version of the familiar Track FX button: . This modified button indicates that at least one automated FX plug-in exists in the Track FX chain (by default, each track contains Track EQ). Click the Track FX button to open the Audio Plug-In window. Everything in this

ACID PRO 4.0 An overview of new features
- 3 -
window looks and works the same as in ACID 3.0, with the exception of two new buttons shown in Figure 1: FX Automation (which enables you to choose the parameters to automate) and Enable/Bypass FX Automation (which enables you to toggle automation off and on so that you can do an “A/B” comparison).
Figure 1 The FX Automation and FX Bypass buttons are new to the Audio Plug-in window.
Before you click the FX Automation button, click the Edit Chain button to open the Plug-In Chooser window shown in Figure 2. In the tree view of the chooser, expand the FX folder, then click on the Automatable folder to display its contents in the list view. The list view now shows all of the automatable plug-ins available on your computer. Notice that the modified Track FX icon identifies these plug-ins as automatable. Click Cancel to close the Plug-in Chooser window without making any changes to the chain.
Figure 2 This figure shows the contents of the Automatable FX folder in the Plug-in Chooser.
Back in the Audio Plug-In window (refer back to Figure 1), notice that in its default state, all of the control circles have a gain of 0.0 dB, indicating that the plug-in does not currently affect the audio on this track. We’ll automate the gain on two frequencies to create the desired effect. Before we do that however, we need to make a few other adjustments that need not be automated.
FX Automation button
FX Bypass button

ACID PRO 4.0 An overview of new features
- 4 -
Click circle #1 to make it the active controller. Choose Band from the Band Mode drop-down list (just below the Enabled checkbox). Next, set the Bandwidth slider to 4.0 (full right). Finally, click circle #3 to make it the active controller, and set the Bandwidth slider to 4.0. Now we’re ready to add the automation to the gain of both of these controllers to create our effect. Since we’ll be automating the gain, you need not make any adjustments to the Gain settings in the Audio Plug-In window.
Click the FX Automation button to open the FX Automation Chooser window shown in Figure 3. Click in both the Band1 Gain and Band3 Gain checkboxes to activate them.
Figure 3 Click the checkboxes for Band1 Gain and Band3 Gain to automate those parameters.
Click OK and notice that an envelope line now runs through your track. (If the Audio Plug-In window obscures the track, move it out of the way, but don’t close it.) In reality, there are two envelope lines present, but one lies directly on top of the other. In order to ensure that you’re working on the correct envelope, click the small arrow to the right of the Track FX button, and choose Track EQ: Band1 Gain from the menu as shown in Figure 4. You now see only the envelope for Track1 Gain.

ACID PRO 4.0 An overview of new features
- 5 -
Figure 4 You can choose which automation envelope you want to view.
FX Automation envelopes work just the same as the Volume and Pan envelopes you’ve used in previous versions of ACID PRO. Right-click at the beginning of the second measure (you may need to zoom in to find the second measure) and choose Add Point from the menu. In the same way, add new points at the beginning of every measure, including measure nine (which is at the very end of the event if you’ve followed instructions properly). Starting with the second point on the envelope (at the beginning of measure two), drag every other point all the way down to the bottom of the event (-15 dB). Your envelope now has a “saw-tooth” look.
Click on the arrow next to the Track FX button again, and choose Track EQ: Band3 Gain from the menu. Add points to this envelope just as you did to the first envelope, but this time drag every other point (starting at measure two) to the top of the event so that you’ve created the mirror image of the first envelope. Click the arrow next to the Track FX button once again, and choose Show all FX Automation Envelopes from the menu so that you can see both envelopes simultaneously as shown in Figure 5.
Figure 5 The two automation envelopes create a "diamond" pattern over the event.
Now for the payoff! Click the Play From Start button and listen to how the automation envelopes you added have changed the character of the drum pattern. For fun, watch the Audio Plug-In window where you see the EQ controllers reacting in real time to the automation you’ve created.
Alternate Time Signature Support
For those of you who want to work in alternate time signatures, ACID PRO 4.0 offers good news. You can now set your project to any time signature you desire. By default,
ACID PRO starts every new project in 4/4 time—that is, each measure has four beats, and each beat receives the value of a quarter note. Although you could always work in alternate time signatures even in the first version of ACID PRO, there was no way to adjust your Beat ruler or grid markers to reflect your alternate signature, and thus the ruler quickly became virtually useless in such a project. In ACID PRO 4.0, when you adjust your project’s time signature, the Beat ruler and grid markers change to reflect the new timing, so that they are now just as useful in a project written in 3/4 time as one in 6/8 time or one in 4/4 time.

ACID PRO 4.0 An overview of new features
- 6 -
To change the time signature of your project, click the Project Time Signature button (between the Project Tempo and Project Key controls at the bottom of the Track List area as shown in Figure 6).
Figure 6 The Project Time Signature button enables you to specify alternate time signatures.
Choose the desired time signature from the menu, or choose Other to open the Custom Time Signature window where you can specify any time signature you want. Notice that the Beat ruler and grid spacing update accordingly.
You can also add markers to the timeline to change the time signature of your project on the fly. This enables you to easily write music that incorporates time signature changes. To add a Signature change marker, place your cursor at the point in your project where you want the change to occur (musically, it makes sense that your signature changes occur on the first beat of a new measure, therefore ACID PRO moves the time signature change to an appropriate downbeat). Choose Insert | Tempo/Key/Time Signature Change to open the Tempo/Key/Time Signature Change window. Select the Time Signature change checkbox, and enter the values you want in the Beats per measure, and Beat value fields. Click OK when you’re done. This inserts the marker at the current cursor position as shown in Figure 7, and changes the Beat ruler and grid markers to reflect the new time signature from the marker on to the end of the project (or to the next Time Signature marker).
Figure 7 Time Signature markers enable you to change the time signature in the middle of your project. You can add as many markers as you need.
Notice that when you play your project, the signature change markers have no effect on the sound of your project. These markers simply help you keep track of measures and beats—it’s still up to you to write music that sounds nice in these new time signatures!
5.1 Surround Mixing and Panning Automation
You can now create true 5.1 surround mixes in ACID PRO, which enables you to bring a completely new dimension to your musical projects. Naturally, to take advantage of
the 5.1 surround mixing capabilities, you’ll need a 5.1 surround sound system on your computer. There are three ways to configure your hardware. First, you can use any sound card that has at least three stereo outputs. Second, you can use three separate sound cards,
Time Signature Markers
Time Signature Settings

ACID PRO 4.0 An overview of new features
- 7 -
each of which has one stereo output. And finally, you can use a 5.1 compatible sound card. Connect these outputs to six powered speakers, or to a 6-channel amplifier/mixer that is connected to six passive speakers.
Once you’ve set your hardware up so that you can monitor 5.1 surround sound, ACID PRO makes creating a surround mix easy. Start a new project in ACID PRO. As usual, the new project opens with the traditional stereo configuration. Note that the Master bus in the Mixer is the standard stereo bus.
Choose File | Properties and click the Audio tab in the Project Properties dialog. Alternatively, click the Project Audio Properties button in the Mixer window to go directly to the Audio tab of the Project Properties dialog, shown in Figure 8. Choose 5.1 Surround from the Master bus mode drop-down list. You can adjust the frequency above which no signal will be sent to the Low Frequency Effects channel (LFE). To do so, choose the desired value from the Lowpass cutoff frequency drop-down list. For example, a setting of 120 indicates that no audio with a frequency above 120 Hz will be sent to the LFE. This ensures that the LFE receives only very deep bass frequencies.
Figure 8 Set your project to mix surround sound in the Audio tab of the Project Properties dialog.
Click OK to accept the changes and dismiss the Project Properties dialog.
Notice the change in the Master bus (you may need to expand your Mixer window to see the entire Surround Master bus). The Master now contains four controls as shown in Figure 9: A stereo control that allows you to monitor and adjust the volume level of the Front (left and right) speakers, a stereo control for the Rear (left and right) speakers, and one mono control each for the Center and LFE channels. Use these controls to adjust the volume of the surround mix once you’ve assigned tracks to them.
Select Stereo or 5.1 Surround
Select LFE parameters

ACID PRO 4.0 An overview of new features
- 8 -
Figure 9 In a 5.1 surround project, the mixer contains two stereo and two mono meters/faders to control output to the various channels.
Next, adjust your project routing so that you can send the appropriate signal to each speaker in your 5.1 system. Choose Options | Preferences to open the Preferences dialog, and click the Audio tab. From the Audio device type drop-down list, choose Windows Classic Wave Driver. (Some sound cards require that you choose something other than Windows Classic Wave Driver. In these cases, the appropriate choice will appear in the Audio device type drop-down. Consult your sound card manual for more information.) Figure 10 shows the preference dialog box.
Figure 10 Use the Audio tab of the Preferences dialog to route your signal from the ACID PRO Mixer to the appropriate sound card outputs.
Click Ok to dismiss the Preferences dialog.
Click the Device Selection button, which now appears at the top of the surround bus in the Mixer, choose the target channel pair from the menu, and from the submenu choose the soundcard outputs that you want to assign to those channels as shown in Figure 11. (If you are unable to make these selections, it may be that your audio card requires you to change the sampling rate of your project. Please check your card’s documentation for proper settings.) Repeat this process until you have assigned all of the surround channels to the appropriate output. Note that the left channel of the Center/LFE pair is the center channel, and the right channel is the LFE channel.
ACID PRO 4.0 An overview of new features
- 9 -
Figure 11 Use the Device Selection button as an alternative method of routing signal to the appropriate channel.
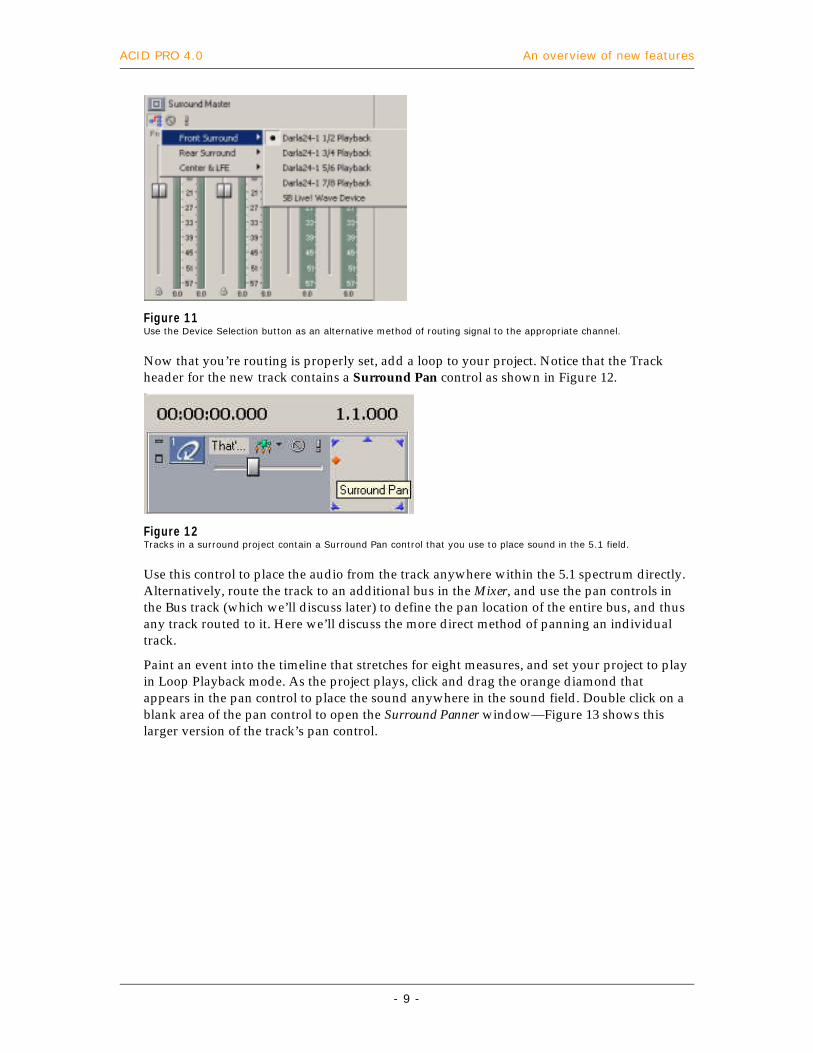
Now that you’re routing is properly set, add a loop to your project. Notice that the Track header for the new track contains a Surround Pan control as shown in Figure 12.
Figure 12 Tracks in a surround project contain a Surround Pan control that you use to place sound in the 5.1 field.
Use this control to place the audio from the track anywhere within the 5.1 spectrum directly. Alternatively, route the track to an additional bus in the Mixer, and use the pan controls in the Bus track (which we’ll discuss later) to define the pan location of the entire bus, and thus any track routed to it. Here we’ll discuss the more direct method of panning an individual track.
Paint an event into the timeline that stretches for eight measures, and set your project to play in Loop Playback mode. As the project plays, click and drag the orange diamond that appears in the pan control to place the sound anywhere in the sound field. Double click on a blank area of the pan control to open the Surround Panner window—Figure 13 shows this larger version of the track’s pan control.

ACID PRO 4.0 An overview of new features
- 10 -
Figure 13 The Surround Pan control gives you even more control over the placement of the audio in the surround field.
Place the orange Pan Placement control directly on the upper-left speaker icon. This places the sound 100% in the front-left speaker. Drag the Pan Placement control to the lower-right speaker icon, and listen as the sound now comes from the rear-right speaker.
Use the Center fader to adjust the scale of movement away from the center channel. For example, with the Center fader set to 0.0 dB, note the location of the first horizontal guide line (which represents a 6 dB drop in the signal sent to each front speaker, including the center channel). Set the Center fader to 12.0 dB, and note the new location of the –6 dB guide. Click on the Center channel speaker icon to disable the center channel (that is, prevent any signal from being routed to the center channel). In the same way, click on any of the other speaker icons to enable/disable those channels.
To send the signal from this track completely to the LFE channel, click the LFE Only button. The Move Freely—Move left/right only—Move front/rear only button enables you to restrict the placement of the orange square to right and left or up and down movements only.
To automate your panning for a track, right-click the Track icon and choose Insert/Remove Envelopes | Surround Pan Keyframes. A keyframe control area appears at the bottom of the track. This control area will be very familiar to you if you use Sonic Foundry Vegas Video. The control contains one keyframe by default. A keyframe defines the state of the pan settings at a particular moment in time. Click on the existing keyframe, and set the panning as desired. Next, click at another point later in the timeline to place the project cursor there. Now reposition the orange pan indicator box. This adds a new keyframe to the control. In the Surround Panner window, a dotted line indicates the transition from the first keyframe to the second. Add as many keyframes to the controller as you need in order to move the sound around the surround field the way you want. Right-click a keyframe to choose the type of transition you want from that keyframe to the next. Figure 14 shows an example of an automated pan control.
Pan Placement control
LFE only button

ACID PRO 4.0 An overview of new features
- 11 -
Figure 14 You can fully automate your surround mix to create the sensation of sound “flying” around the surround spectrum.
MIDI General
ACID PRO 4.0 expands upon the support for MIDI (Musical Instrument Digital Interface) that was originally introduced in ACID PRO 3.0. You can now record the
output of a MIDI controller and rout this data to both internal soft synthesizers (soft synths) and external MIDI devices. Then, you arrange the MIDI information across the timeline just as you do your audio loops and files.
New features also allow you to precisely edit the MIDI data using either the MIDI Event List Editor or the MIDI Piano Roll Editor. These tools allow you to edit the MIDI data to create and/or fine-tune your MIDI performance.
Optimized DLS Soft Synth Model
The most basic operation involving a MIDI file in ACID PRO is to add the file to your project and listen to the output of the file through the default DLS (Downloadable
Sounds) software-based synthesizer (soft synth). The new soft synth model in ACID PRO 4.0 offers greatly improved flexibility, allowing you to route several tracks to a single soft synth bus. Use the Explorer window to add an existing MIDI file to your project. Then use the Draw Tool or the Paint Tool to create an event on the MIDI track. These are the exact techniques you use to incorporate any loop, one-shot, or beatmapped file into your project.
When you add the MIDI file, a Soft Synth bus appears in the Mixer as shown in Figure 15, and ACID PRO routes the MIDI track to that bus (as indicated by the MIDI bus assignment icon on the Track header for the MIDI track shown in Figure 16).

ACID PRO 4.0 An overview of new features
- 12 -
Figure 15 ACID PRO adds a Soft Synth bus to the Mixer if you have no other MIDI devices connected to your computer and available to ACID PRO.
Figure 16 The bus assignment icon indicates that this track routes to Soft Synth bus 1 (refer to Figure 15).
The MIDI information then routes from the bus to the GS sound set which is a DLS soft synth contained within the Windows operating system. Finally, the audio generated by the synth routes to the Master bus so that you hear it in your mix. In this way, ACID PRO assures that you’ll hear your MIDI track regardless of whether you have an external synth or any additional soft synths loaded on your computer. Notice that the Soft Synth bus contains the same controls as regular buses so that you can add FX to the bus, mute or solo the audio generated by the MIDI device (external or soft synth) to which the bus routes, adjust the volume of the bus output, and monitor the levels of the audio output by the synth.
Naturally, you don’t have to route your audio to the GS sound set if you don’t want to. If you have other DLS soft synths, you can route your Soft Synth bus to any of those as well. To use an alternate DLS soft synth, double-click the bus icon for the MIDI bus to open the Soft Synth Properties dialog shown in Figure 17. Click the Open DLS Voice Set button, and navigate to the location of your DLS files. Choose the desired DLS and click Open.
Figure 17 The Open DLS Voice Set button enables you to assign any of your DLS soft synths to a soft synth bus.
Open DLS Voice Set button

ACID PRO 4.0 An overview of new features
- 13 -
Now when you play the file, the Soft Synth bus uses the new DLS file to generate the audio. The Soft Synth Properties dialog also displays the available voices of the current voice set and gives patch and bank information. You can use this information as a reference when choosing patches in the List Editor.
Playing MIDI through a VST Instrument Soft Synth
ACID PRO 4.0 also features support for Virtual Studio Technology (VST) instruments. Another form of soft synth, VST Instrument plug-ins boast much more robustness than
DLS sound sets. Whereas DLS files allow you to load different sound sets into your project, VST Instrument files provide an interface through which you can control countless parameters of the synth to precisely shape the sound you’re after.
To use your VST Instrument plug-ins, first choose Options | Preferences to open the Preferences dialog, and click the VST Instruments tab, as in Figure 18. The Default VST Instrument search folder field lists the default folder to which ACID PRO looks in search of VST Instrument plug-ins. Install your VST Instrument plug-ins in the default folder in order for ACID PRO to find them automatically. If you have installed your Soft Synths to an alternate folder, enter the file path to that folder in the Alternate VST Instrument search folder 1 and 2 fields, or use the Browse buttons to specify the file path. If your VST Instrument plug-ins are in any one of the specified folders, they appear in the Select VST Instruments to be available as Soft Synths list. Click on the checkbox for each listed VST instrument to make it available for use in ACID PRO.
Figure 18 Enable your VST instruments on the VST Instruments tab of the Preferences dialog.
Note that once you’ve actually routed MIDI to an enabled VST Instrument in your project, you cannot disable it in the same project. In other words, the VST Instrument is considered locked, and you can’t unlock it in the current project. The small lock icon next to the checkbox indicates whether a VST Instrument is locked or not. When you’ve made the desired VST Instrument plug-ins available, click OK to dismiss the Preferences dialog.
Next, double-click the bus icon for the MIDI bus to open the Soft Synth Properties dialog, and then click the Edit Soft Synth button to open the Soft Synth Chooser as in Figure 19.

ACID PRO 4.0 An overview of new features
- 14 -
Figure 19 Use the Soft Synth Chooser to assign one of your available DLS or VST Instruments soft synths to the soft synth bus.
Each of the available VST Instruments and DLS soft synths appears in the list. Choose the desired VST Instrument, and click OK. The interface for the VST Instrument plug-in now appears in the Soft Synth Properties dialog. (The interface for a VST Instrument will change from plug-in to plug-in. Examples appear in Figure 20.)
Figure 20 This figure shows three different VST Instrument interfaces.
Play your project, and experiment with different settings in the VST Instrument interface to learn how you can shape the sound.
Playing MIDI through an external Synth
You can also send the MIDI information in your ACID PRO project out to your external synthesizer so that you can take advantage of your outboard gear’s sounds.
To send MIDI to your outboard gear, you must first specify which MIDI in and out ports you want to use. These ports, when enabled, allow for communication between your computer, ACID PRO, and external MIDI controllers and hardware synths. Choose Options | Preferences to open the Preferences dialog, and then click the MIDI tab, shown in Figure 21. Next click the check box next to each port you want to activate. Make sure to activate at least

ACID PRO 4.0 An overview of new features
- 15 -
one output port (in the top half of the MIDI tab) and one input port (in the bottom half of the MIDI tab) to ensure that you can both send MIDI into and out of ACID PRO.Click OK to dismiss the Preference dialog.
Figure 21 In the MIDI tab of the Preferences dialog, click the checkboxes of each MIDI port you want to activate.
Once you make these ports available, they will be available in all your future ACID projects unless you come back to the Preference dialog and make them unavailable. If you have a slower computer, this might be important because these ports use your computer resources whether you are actually sending MIDI data through them or not. If you’re not sending or receiving MIDI through these ports, make them unavailable to free up the computer resources they require.
Connect the MIDI out of your external synth to the available MIDI in port on your computer sound card or MIDI device. Next connect an available MIDI out port to your external MIDI synth. You are now able to send MIDI information from the synth to ACID, and from ACID to the synth. Now, click the MIDI bus assignment icon on the MIDI Track header, and choose the MIDI out port to which you connected to the MIDI in of your hardware synthesizer (and which you also made available earlier) as in Figure 22.
Figure 22 Choose the MIDI device connected to your outboard MIDI synthesizer from the MIDI bus assignment list.
Play your project, and the MIDI track now plays through your external synth.
Keep in mind that when you route MIDI to your external synth, the audio generated by the external synth does not get rendered to your final stereo mixed file when you render your ACID PRO project (for example as stereo .wav file). By contrast, MIDI routed to a soft synth does get rendered to your final mixed file. If you want to use the audio from your hardware synth

ACID PRO 4.0 An overview of new features
- 16 -
in the final render, you must first record the analog outputs of your synth to a new ACID PRO track.
Also, remember that when you make one or more MIDI out ports available, new MIDI tracks no longer route to the GS sound set by default. Instead, they route to the first available device, which would in this case be one of your available MIDI out ports. If you want your new MIDI tracks to route to the GS sound set, set all of your MIDI out ports to unavailable.
Sending MIDI into ACID PRO
So far our MIDI discussion has focused on playing existing MIDI files—that is, we’ve talked strictly about MIDI out issues. But there are also ways to send MIDI into ACID
PRO using an external MIDI controller, and to create MIDI using the tools right inside ACID PRO. In other words, you can use ACID PRO to create and edit original MIDI compositions.
MIDI Record
The most straightforward way to create a MIDI file in ACID PRO is to record your performance as you play on a MIDI controller device (for this discussion, we’ll assume
you’re using a MIDI keyboard). Make sure you’ve enabled a MIDI in port as discussed earlier, and have properly connected the MIDI out of your controller to the enabled port. Then, click the Record button in the Navigation toolbar just as you would to record audio. This opens the Record dialog, shown in Figure 23. At the top of the Record dialog, click the MIDI radio button. Press a key on your MIDI keyboard, and watch the Record meters to verify that ACID PRO is properly receiving the MIDI signal. If the meters do not register any signal, make sure the Monitor checkbox is selected. If it is, and you still register no signal in the meters, make sure that the MIDI in port to which you’ve connected your controller is chosen in the Record device field.
Figure 23 Select the MIDI radio button in the Record dialog to record MIDI data.
Now that you’ve got MIDI successfully coming into ACID PRO, the Record dialog provides a couple of options you need to decide on before starting the recording process. Give the file that will be recorded a name in the File name field. Enter a file path, or browse to the location to which you want to save the MIDI file using the Recorded folder and its Browse button. Use the options in the Record from section to specify whether you want recording to start at the beginning of the file or a specific location within the file.
Finally click Start to begin recording. The Start button changes to the Stop button. Click Stop when you’re finished with the performance. A new track appears and displays the MIDI data that you just recorded. Keep in mind that you’ve recorded only the MIDI data (not the sound

ACID PRO 4.0 An overview of new features
- 17 -
from your external synth), so you can now adjust the routing of the new MIDI track just as you did with existing MIDI files earlier so that you can hear your performance played back through your favorite soft synth or back out through your external synth.
Yamaha Open Plug-in Technology Support
Before continuing with our discussion of creating and editing MIDI, we need to talk about another of the new features in ACID PRO 4.0: support for Yamaha’s Open Plug-
in Technology (OPT). This new plug-in standard opens a world of support and functionality for MIDI-related applications. With OPT, developers can design software interfaces for hardware devices, soft synths, FX plug-ins, and additional software functionality that can be added to (or “plugged into”) software applications much like the DirectX standard enables developers to create audio plug-ins that work right inside ACID PRO.
Using OPT technology, ACID PRO now contains robust options for MIDI track properties. Double-click the Track icon for a MIDI track to open the Track Properties window. This window contains three tabs: General, Piano Roll Editor, and List Editor. Each of these tabs is actually an OPT plug-in. Other OPT plug-ins are available from third-party developers, and these may also be useful in ACID PRO. You can choose which OPT plug-ins you want to appear in the Track Properties dialog. Click the MIDI Editors button to open the OPT MIDI Editor Plug-In Chooser. The Connected editor plug-ins list shows the three default editors mentioned above. If you have other OPT plug-ins on your system, they appear in the Available editor plug-ins list. Use the buttons between the two lists to add editor plug-ins to—or remove them from—the Connected editor plug-ins list.
MIDI Track Properties
The editors available in the MIDI Track Properties dialog enable you to significantly change your MIDI files (and, in fact, create new ones entirely from scratch), as we
discuss in detail in the next few sections. If you make changes that you don’t want to keep, click the Reload button to set the MIDI file back to its original settings. Click the Replace button and navigate to another MIDI file if you want to assign a different file to this track. Click the Save File button to make your changes permanent to the MIDI file, or the Save File As button to create a new file with your changes while leaving the original file untouched.
The General Tab
The General tab (shown in Figure 24) lists the MIDI tracks that are included in the MIDI file. Here you use familiar tools (Mute, Solo, Volume and Pan controls) to mix the
MIDI file. The General tab also lists the name of each track; double-click the name of the track and type a new name if you want to change the current name. Double-click the Channel value for a track and enter a new channel number to change the MIDI channel to which that track is assigned.
Use the familiar Transport controls at the bottom of the General tab to control the playback of your MIDI file as you create your mix. You can also enter pitch shift and root note information here in the General tab that dictates how your MIDI track reacts to changes you make to pitch in your ACID PRO project.

ACID PRO 4.0 An overview of new features
Figure 24 This figure shows the General tab of the Tra
Click the Add New Track button toDelete Track button to delete the s
Usually, there is important MIDI co(for instance patch changes, Sys Extransport controls to start playbackbypassing this important controllerautomatically “chasing” (that is, upFilter button to open the Chase Eventypes that you don’t want ACID PRplayback. Click the Playback Filtercheckbox for any event type in the playback.
MIDI List Editor
The List Editor (shown in Figincluding patch change, con
placement, on/off, velocity, and piwe’ll discuss shortly). Double-clickand click the List Editor tab.
Add New Track Delete Track
Chase Filter
- 18 -
ck Properties dialog for a MIDI track.
create a new track in the current MIDI file. Click the elected track from the current MIDI file.
ntroller information at the beginning of every MIDI file , and so forth). Sometimes, you’ll use the General tab of your MIDI file at a point other than the beginning, thus information. ACID PRO solves this problem by dating) this type of MIDI information. Click the Chase t Filter dialog. Here you can filter out any MIDI event O to chase. You can also filter out MIDI events on button to open the MIDI Event Filter dialog. Select the list that you want ACID PRO to ignore (filter out) on
ure 25) enables the editing of all kinds of MIDI data troller information, MIDI channel and track, note tch, and also provides access to step recording (which the MIDI track icon to open the Track Properties dialog,
Playback Filter

ACID PRO 4.0 An overview of new features
- 1
Figure 25 This figure shows the List Editor tab of the Track Properties dialog for a MIDI track.
Use the transport buttons at the bottom of the List Editor to control playback of the MIDI file from within the List Editor. All of the buttons work as you would expect from your experience with the main transport buttons in the ACID PRO timeline. The exception is the Step Recording button, which we’ll talk about a little later.
To change any of the values in the List Editor, double-click the current value and type in the new value. For example, change the value of a note on a note event, or assign a new patch to a patch change event. (Refer to the Soft Synth Properties or your hard synth’s owner’s manual for a list of available patches.) Press your Enter key to accept the edit. You can also click the Edit Event button (Figure 26 shows a closer look at the List Editor button bar) to open the Edit MIDI Event window for the event that you’ve selected in the List Editor. In the Edit MIDI Event window you have access to all of the parameters of the MIDI event, and can change them as you see fit. To insert a new MIDI event, click the Insert Event button. The Edit MIDI Event window opens again, and enables you to define the parameters of the new event. Click the Delete button to remove the selected event from the List Editor.
Figure 26 This figure shows the buttons available on the List Editor
Track Dropdown list
E
Monitor
Edit Event9 -
. Ins
Delete Event
ert Event Solo Current Track Quantize
Mark Loop Start
Mark Loop End
vent Filter

ACID PRO 4.0 An overview of new features
- 20 -
To define a loop region in the List Editor for use in Loop Playback mode, select the beginning event and click the Mark Loop Start button. Then select the last event and click the Mark Loop End button.
Click the Solo Current Track button to listen to just the track you’ve selected in the Track dropdown. The Solo Current Track button is not available when you select All Tracks or Conductor. Click the Filter button to display or hide various types of MIDI events from the List View. For instance, disable all of the MIDI event types except Note if you’re interested in only the note information in your MIDI file.
To quantize (a method of forcing events to align with musical beats based on selectable parameters such as quarter note, eighth note, and so on) a MIDI track, click the Quantize button and select the parameter (start time, note duration, etc.) you want to quantize and the Quantize resolution (Quarter note, eighth note, etc.)
To monitor your individual events in the List Editor, click the Monitor button. From the main ACID PRO menu bar, choose Options | Enable Real-time MIDI (or click the Enable Real-time MIDI button at the top of the Track Properties dialog) to make it possible to hear the MIDI event in real time. Now, click on any of the MIDI Note events in the List Editor, and you hear the event played through the assigned MIDI device. Note that the Enable Real-time MIDI option requires resources from you computer even if you’re not using it. Therefore, you should turn it off if you don’t need to preview your MIDI in the manner described here.
MIDI Step Recording
You can use the List Editor’s Step Recording feature to record your own MIDI data into ACID PRO. To open the MIDI Step Recording dialog, click the Step Recording button
at the bottom of the List Editor.
The MIDI Step Recording dialog, shown in Figure 27, gives you tools for building your MIDI file one step at a time in two ways. In the first method, set the parameters of the desired note (starting with the Start time field, and ending with the Duration field). Then click the Insert button to create the event in the event list. You can continue adding notes in this fashion to build your MIDI file.
Figure 27 The MIDI Step Recording dialog enables you to record MIDI information note by note.

ACID PRO 4.0 An overview of new features
- 21 -
The second method of step recording lets you use your external MIDI controller to add the desired notes. First, close the MIDI Step Recording window if it is still open. Connect your MIDI controller to your computer as previously described, and activate the MIDI in port into which the controller is plugged. Chose Options | Enable Real-time MIDI if real-time MIDI is not already active, and click the Monitor button in the List Editor if it’s not already on. Finally, click the Step Recording button to open the MIDI Step Recording dialog.
Select the input port to which you’ve connected your MIDI controller from the Input port drop-down. Choose the settings you want from the Step size and Duration fields. Press a key on your controller keyboard. ACID PRO adds the note as an event in the Step Record list. Notice that no matter how long you held the controller’s key down, the duration of the note that the Step Recorder adds matches the value in the Duration field. Note also that if you have the Auto advance on insert and record checkbox selected, two or more keys pressed simultaneously on the controller will not result in a chord as you might expect. Instead, each note will be offset from the others by the amount in the Step Size field. To record a chord, deselect the Auto advance on insert and record checkbox, then press two or more keys simultaneously. When you’re done recording your events, click OK to add them to the List Editor event list, and thus, your MIDI track.
Monitoring audio through a soft synth as you play on your MIDI controller
During our discussion on Step Recording, you used your external MIDI controller as an input device. You probably listened to the sound of your keyboard synth while step recording, but some of you may have used a controller that does not contain a built-in synth. Even if your controller does contain a synth, perhaps you’d rather listen to one of your soft synths while you record. To do this (that is, use your MIDI controller to play sounds from a soft synth), follow the instructions above for preparing ACID PRO to receive MIDI data from your MIDI controller.
If your project does not contain a soft synth bus, click the Insert Soft Synth button, in the Mixer Window to open the Soft Synth Chooser. All of the available soft synths appear in the chooser. Select a soft synth from the list. When you click OK to close the Soft Synth Chooser, a new soft synth bus appears in the Mixer, and the Soft Synth Properties dialog opens. Click the External MIDI Input Port button in the Soft Synth Properties dialog, and choose the input port to which your controller is connected. Press a key on your controller, and you hear the sound of the soft synth. You’re now controlling your soft synth with your hardware MIDI controller.
If you’re not using ASIO drivers, you may experience some latency between your MIDI controller and the audio output of the Soft Synths. In other words, when you press a key on your keyboard controller, there is a delay before you hear the audio produced by your soft synth. This phenomenon is known as latency. To solve the problem, choose Options | Preferences | Audio. Set the Playback buffering (seconds) slider, shown in Figure 28, to somewhere around 0.14 seconds. Click OK to dismiss the Preferences dialog. Press a key on your MIDI controller, and you should notice a vast improvement in the amount of latency. You might have to experiment with the playback buffering in order to find the perfect setting for your system.

ACID PRO 4.0 An overview of new features
- 22 -
Figure 28 If latency is a problem, adjust the Playback buffering in the Audio tab of the Preferences dialog to improve performance.
MIDI Piano Roll Editor
The ACID PRO MIDI Piano Roll Editor, shown in Figure 29, provides a graphical interface that you can use to edit and create MIDI note information such as pitch,
placement, duration, and velocity. To use the MIDI Piano Roll Editor, double-click the Track icon for the MIDI track you want to work with, and click on the Piano Roll Editor tab of the Track Properties dialog.
Figure 29 If you know how to work in the main ACID PRO timeline, you’ll quickly become proficient with the Piano Roll Editor.
Playback buffering slider

ACID PRO 4.0 An overview of new features
- 23 -
On the left side of the Piano Roll Editor, you see a piano keyboard graphic. The majority of the dialog contains the Piano Roll Editor timeline. In many respects, the Piano Roll Timeline works just like the main ACID PRO timeline, so it won’t take you long to get comfortable here.
A series of buttons appear above the Piano Roll timeline. You’ve seen and used these buttons in the main timeline (for example, Cut/Copy/Paste, the Draw Tool, the Paint Tool, and so on). These tools perform the same functions here as in the main timeline, except that instead of working with loops, one-shots, and beatmapped tracks, you are working with MIDI note events within the MIDI file that you have loaded into your project. Familiar transport buttons (Play, Stop, and so on) appear at the very bottom of the dialog, and you already know how to use those too.
The Piano Roll Editor has its own scroll bars and zoom tools that function exactly like those in the main timeline. For instance, if your Piano Roll timeline looks blank, and you know that you have an existing MIDI file loaded into it, the MIDI events must be located outside of the visible area. Use the vertical scroll bar to scroll up and down and the horizontal scroll bar to scroll right and left in the Piano Roll until you see the various colored bars that represent MIDI note events. Finally, the Piano Roll timeline has its own Loop Region indicator, which again functions just like the one in the main ACID PRO timeline.
With all of these familiar interface features, you’re already well on your way to understanding and using the Piano Roll Editor. But let’s take a look at the tools with which you may not be familiar. The Track drop-down list enables you to choose a specific track within the MIDI file for the Piano Roll editor to display. A MIDI file may contain just one track, in which case there will be only one option in the Track drop-down list. On the other hand, many MIDI files contain complete arrangements of multiple tracks. For instance, the piano may be on track one, the flute on track two, and so on. When you’re working on a MIDI file that contains multiple tracks, it can be very helpful to isolate the track that contains just the instrument that you want to edit. For instance, if you want to edit the flute part in the example we give above, choose Track 2 (which may, by the way have a name other than “Track 2”, for instance, it might be labeled “Flute”) from the Track drop-down list. Now only the MIDI events of the flute track (Track 2) appear in the timeline. You can edit these events while the events from all other tracks are protected from inadvertent editing, as well as being hidden so that they don’t cause visual clutter and confusion.
When your MIDI file contains more than one track, choosing a specific track from the Track drop-down list hides the MIDI events that are assigned to all of the other tracks, but it does not mute the audio created by those MIDI events. In other words, when you choose the piano track, you still hear the flute track even though you can't see the flute track's MIDI events. Use the Solo button to listen to just the track you've chosen in the Track drop-down list.
The Monitor button allows you to hear the notes that correspond to the keys on the keyboard graphic to the left of the Piano Roll timeline. Click the Monitor button, and remember to choose Options | Enable Real-time MIDI so that you can hear the note through the specified synth. Now, click on one of the keys from the keyboard graphic, and ACID PRO plays the note. This enables you to audition notes before you add them to your Piano Roll timeline. Notice that when you hover your mouse over a key on the keyboard, the Current Note field in the bottom-right corner of the Piano Roll identifies the note at which you are pointing.
Once you've found the right note, draw a MIDI event into the Piano Roll timeline just like you draw events into the main ACID PRO timeline. The Current Note field shows the note at which you are pointing while you draw. You can also select, paint, erase, and zoom in on events as you do in the main timeline. Set a loop region, and listen to your Piano Roll in Loop

ACID PRO 4.0 An overview of new features
- 24 -
Playback mode so you can concentrate on a particular section of your file. You can also cut, copy, paste, delete, edge trim, and move MIDI events just like you do regular events in the main timeline.
As you draw each new MIDI event, you make instant decisions on the note value (which note you are drawing) and note duration. Each note event you draw receives a velocity value of 64, as indicated by the vertical bars in the Velocity section at the bottom of the Piano Roll Editor. The velocity assigned to a note dictates the volume with which that note will be played out of the synth. You can easily adjust the velocity of your MIDI note events. When you point to the Velocity area, the mouse icon changes to the Draw Tool (if it's not already). Click and drag across the velocity bars. As you do, each bar extends or shrinks to correspond to the drag height. With this technique, you can easily "automate" your velocity across several MIDI events. If two notes have the exact same Note on location (that is, the MIDI note events start at the same time) as in a chord, the velocity bar affects both notes. It is possible to set the velocity for two simultaneous notes differently, but you must use the List Editor that we talked about earlier to make such an edit.
ASIO Driver Support
ASIO drivers offer a low-latency driver model that can make working with audio on your computer more efficient. ACID PRO now supports ASIO drivers. To use ASIO
drivers in ACID PRO, install the driver for your sound card on your computer. Then, choose Options | Preferences to open the Preferences dialog. Click the Audio tab, and choose the ASIO driver from the Audio device type drop-down list as in Figure 30.
Figure 30 Once your ASIO driver is installed, choose it from the Audio device type list.
Master, Auxiliary, and Effects Bus Tracks
One of the items that has been on many ACID PRO wish lists is now available in ACID PRO 4.0: the ability to create a fade-out ending on a project without it being necessary
to fade out each track individually. This problem—and many others—has been solved by the new bus tracks in ACID PRO 4.0. Any bus controller that you can add to the ACID PRO mixer can now be automated with volume and panning envelopes using bus tracks.
Every project has one bus track by default: the Master bus track. To view your project’s bus tracks, choose View | Show Bus Tracks. The Master bus track appears in a separate section at the bottom of the timeline, along with tracks for any other buses you may have added to your project. This section of the timeline has its own scrolling controls so that you can scroll to see other bus tracks if you have more than one. Click and drag the horizontal bar that

ACID PRO 4.0 An overview of new features
- 25 -
separates bus tracks from regular tracks to resize the bus track area so that you can see more than one bus track at once.
Notice that Bus Track headers contain many of the same controls as regular Track headers, as well as some of the controls available in the buses themselves. For instance, click the Minimize Track Height button to make the track as short as possible (allowing you to see more bus tracks at once). To solo a bus, click the Solo button at the top of the bus in the Mixer, or click the Solo button in the Track header for that bus’ track. Similarly, you now have more than one way to mute a bus, reroute it, and add FX to it.
To create that fade-out ending that we talked about for your project, right-click a blank spot within the Master Bus Track header and choose Insert/Remove Envelope | Volume from the menu. A volume envelope appears in the timeline of the Master Bus track. Right-click the envelope where you want your fade out to begin and choose Add Point from the menu. Add another point on the envelope at the very end of your project. Drag the point at the end of your project all the way to the bottom of the Master Bus track (-Inf dB), and you’ve successfully created your fade-out ending (Figure 31 shows the results). Play your project to verify that you have the fade out that you want.
Figure 30 A volume envelope has been applied to the Master bus track to create a fade out ending
Similarly, you can add Volume and Pan envelopes to auxiliary buses, and Soft Synth buses in your project. In addition, you can add FX autobus tracks if the FX chains on those buses contain automatable FX (disdocument).
Loop Cloning™: Chopper™ Editing Tool
The Chopper tool, first introduced in ACID PRO 3.0, allows youportions of a loop to your project and create interesting pattern
of the loop. It’s a great way to get more mileage out of your loop colleLoop Cloning feature introduced in version 4.0, the Chopper also becovaluable loop creation tools. Creating new loops with the Chopper’s Las easy as selecting a portion of an existing loop, and “cloning” that ploop.
Bus tracks
e
Volume envelopfor the project.
Assignable FX buses, mation to any of your cussed earlier in this
to quickly add s based on small pieces ction. With the new mes one of your most oop Cloning features is
ortion as a brand new

ACID PRO 4.0 An overview of new features
- 26 -
To create a new loop with the Chopper, navigate to Bass | Synth Bass on the ACID PRO content disc, and add the file Cool Funk to a project. Draw an event on the new track that lasts for 4 bars (that’s one occurrence the loop since this loop is 16 beats long). We’ll clone a portion of this loop to create a new one that you can use in your project.
Right-click the event you just drew, and choose Select in Chopper to open the Chopper window with this loop showing. Let’s use the first four beats for our new loop. Adjust the selection in the Chopper so that only the first four beats are selected. Right-click the waveform in the Chopper and choose Chop to New Track from the menu. The Chop to New Track dialog, shown in Figure 31, opens.
Figure 31 Use the Chop to New Track command to create a new loop based on the portion of the file selected in the Chopper.
This dialog works much the same as the Save As dialog, and enables you to name your new loop and choose a save destination. Navigate to your My Documents folder (or choose your desired save location) in the Save in field. Notice that ACID PRO suggests a name for you. This name includes the name of the original loop (Cool Funk), the word “Chopped,” and the beats that were cloned from the original loop (1.1 – 2.1). You can replace this name with a name of your choice if you want. Choose a file type, and click the Save button. ACID PRO saves the new loop file to the specified save location and adds the loop to a new track in your project. You can now draw the new loop in as you would any other loop.
Experiment with other selections in the Chopper to see what interesting loops you can come up with. For instance, clone a selection from 3.3 to 4.3. Notice how you can clone different areas from the same loop to create interesting loops that seem far different from the original. This is also a great way to create loops when you are working in alternate time signatures. For instance, clone three beats from a four-beat loop to create a loop you can use in a project set to 3/4 time.
New Event Fade Types
In addition to the Linear, Fast, and Slow fade types that have always been available for envelopes in ACID PRO, version 4.0 introduces three new fade types: Smooth, Sharp,
and Hold. Figure 32 shows the available fade options.

ACID PRO 4.0 An overview of new features
-
Figure 32 This figure shows the five fade types now available for are available for the attack portion of the ASR envelope
The Smooth fade starts slowly, speeds up todown again toward the end of the fade areathat it starts off fast, slows down toward theThe Hold fade simply creates an instant jumthe setting at the end (the Hold fade is not a
Multiple Media File Previewin
ACID PRO 4.0 introduces enhanced lnow select a range of loops for ACID
great way to quickly find the loops you wan
For example, imagine that you’re searchingproject. Perhaps you have a collection of snamove through them until you find the rightto select more than one adjacent loop files. Wbutton to begin previewing the loops (previenabled the Auto Preview button).
The first selected loop begins to preview. Wpreview, and so on. You can quickly identif( ) that appears in front of the loop name. your project timeline as normal.
Default Track Properties
You can now control the properties odo so, set the properties of an existing
appear when you add them to your project.and choose Set Default Track Properties toshown in Figure 33.
Slow
Linear
Fast
)
Smooth (newSharp (new)
27 -
the release portion of the ASR envelope. The same fade types s.
ward the midpoint of the fade, and then slows . The Sharp fade behaves much the opposite in midpoint, and speeds up again toward the end. p from the setting at the beginning of the fade to vailable for ASR envelopes on individual events).
g
oop previewing in the Explorer window. You can PRO to preview one after the other. This is a t to use in your project.
for the perfect one-shot snare hit to use in your re hits on one of your loop libraries. To quickly
one, use the Shift+click or Ctrl+click technique ith several files selected, click the Start Preview
ew will start automatically as usual if you’ve
hen it is finished, the next file in the list begins to y the currently previewing file by the Play icon At any time, you can click and drag a file into
f each new track that you add to your project. To track just the way you want all new tracks to
Right-click the Track icon for the existing track, open the Set Default Track Properties window,

ACID PRO 4.0 An overview of new features
- 28 -
Figure 33 The Set Default Track Properties dialog enables you to define the properties of every new track added to your project.
Click in the checkbox for each property that you want to match the current track’s properties. Click OK to finalize your choices.
Windows Media™ Audio and Video Import
ACID PRO 4.0 features full support of Windows Media Audio (.wma) and Windows Media Video (.wmv) files. This means that you can import these file types into your
ACID PRO project, and incorporate them into your music along with .wav, .aiff, .mp3 and all of the other supported file types.
Summary
Many impressive new features have been packed into the 4.0 upgrade to ACID PRO. Major items can now be checked off from loyal ACID PRO users’ wish lists including
powerful MIDI functionality and mixing automation enhancements. These additions to the software’s functionality make ACID PRO more powerful than ever for creating professional-quality, royalty free music. And, they make ACID PRO more fun to use. For more information, visit www.sonicfoundry.com.