Embed Size (px)
Citation preview
An Oracle DBA’s Guide to Actifio Copy Data Management
Actifio CDS and Sky 7.0

Copyright, Trademarks, and other Legal Matter
Copyright © 2010 — 2016 Actifio, Inc. All rights reserved.
Actifio® is a registered trademark of Actifio, Inc. AnyIT™, Dedup Async™, Manage Data Simply™, Virtual Data Pipeline™, VDP™, Protection and Availability Storage Platform™, PAS™, Copy Data Storage Platform™, CDS™, Actifio Sky™ and Actifio One™ are trademarks of Actifio, Inc. All other brands, product names, goods and/or services mentioned herein are trademarks or property of their respective owners.
Actifio, Inc., is a provider of data protection and availability products. Actifio’s technology is used in products sold by the company and products and services sold and offered by its commercial partners. The current list of Actifio patents is available online at: http://www.actifio.com/patents/
Actifio believes the information in this publication is accurate as of its publication date. Actifio reserves the right to make changes to information published in this document, including without limitation specifications and product descriptions, at any time and without notice. This document supersedes and replaces all information supplied prior to the publication hereof.
THE INFORMATION IN THIS PUBLICATION IS PROVIDED “AS IS.” ACTIFIO, INC. MAKES NO REPRESENTATIONS OR WARRANTIES OF ANY KIND WITH RESPECT TO THE INFORMATION IN THIS PUBLICATION, AND SPECIFICALLY DISCLAIMS IMPLIED WARRANTIES OF MERCHANTABILITY OR FITNESS FOR A PARTICULAR PURPOSE.
This software and the associated documentation are proprietary and confidential to Actifio. Use, copying, and distribution of any Actifio software described in this publication requires an applicable software license. Any unauthorized use or reproduction of this software and the documentation may be subject to civil and/or criminal liability.
Actifio strives to produce quality documentation and welcomes your feedback. Please send comments and suggestions to [email protected].
ii | actifio.com |An Oracle DBA’s Guide to Actifio Copy Data Management
Contents
Contents................................................................................................................................................................................................................. iii
The Actifio Now Customer Portal ......................................................................................................................................... v
Actifio Support Centers ......................................................................................................................................................... v
Chapter 1 - Oracle DBA’s Introduction to Actifio Copy Data Management ........................................................................................................................... 1
Capturing Oracle Data ........................................................................................................................................................... 2
Replicating Data .................................................................................................................................................................... 3
Accessing Data ...................................................................................................................................................................... 4
Chapter 2 - Actifio Prerequisites for Protecting an Oracle Database ....................................................................................................................................... 7
Chapter 3 - Oracle Database Authentication .............................................................................................................................................................................. 9
Enabling Database Authentication for an Oracle Database Server........................................................................................................ 10
Chapter 4 - Data Capture under File System and Under ASM Disk Group ......................................................................................................................... 11
When You Capture an Oracle Database Image Under a File System.................................................................................. 12
When You Capture an Oracle Database Image Under an ASM Disk Group....................................................................... 13
Chapter 5 - Preparing Oracle Databases for Protection .......................................................................................................................................................... 15
Patching Oracle 12c............................................................................................................................................................. 15
Preparing Oracle Databases in a Unix Environment Using OS Authentication.................................................................. 16
Preparing to Capture a Database from Oracle ASM to Oracle ASM .................................................................................. 17
Preparing Oracle Database Authentication in a Unix Environment .................................................................................... 18
Enable Database Tracking (optional) .................................................................................................................................. 20
Configuring RAC Transparent Failover of Actifio RMAN Backup to Other Nodes .......................................................... 21
Manually Calculating Log Staging Disk Size (optional) .................................................................................................... 22
Protecting from an Oracle Data Guard Node ...................................................................................................................... 22
Configuring Oracle Database Services for Load Balancing across Multiple Nodes........................................................... 23
Preparing Oracle Protection in a Windows Environment.................................................................................................... 24
Chapter 6 - Advanced Settings for Oracle Databases .............................................................................................................................................................. 25
SLA Advanced Settings for Oracle Databases .................................................................................................................... 25
Application Advanced Settings for Oracle Databases......................................................................................................... 26
Chapter 7 - Virtualizing an Oracle Database for Data Protection and Agility via the Actifio Desktop ..............................................................................29
Chapter 8 - Accessing, Recovering, or Restoring an Oracle Database via the Actifio Desktop ........................................................................................... 31
Mounting an Oracle Database Image Protected Under an ASM Disk Group for Data Access........................................... 32
| actifio.com | An Oracle DBA’s Guide to Actifio Copy Data Management iii
Mounting an Oracle Database Image Protected Under a File System for Data Access...................................................... 34
Mounting an Oracle Database as a Virtual Application ...................................................................................................... 36
Restoring a Database via the Actifio Desktop, Overwriting the Production Database ....................................................... 38
Chapter 9 - Recovering an Oracle Database Manually Using RMAN ...................................................................................................................................41
Recovering a Non-RAC Oracle Database to a Scheduled Backup Point if the archivelog is Not Protected through Actifio42
Recovering a RAC ASM Oracle Database to a Scheduled Backup Point if the archivelog is Not Protected through Actifio43
Recovering a Non-RAC Oracle Database to a Scheduled Backup Point with Roll-Forward of Actifio-Protected archivelog45
Recovering a RAC ASM Oracle Database to a Scheduled Backup Point with Roll-Forward of Actifio-Protected archivelog47
Recovering an Oracle Database to a Scheduled Backup Point if the archivelog is not Protected through Actifio ............ 49
Recovering an Oracle Database to a Scheduled Backup Point with Roll-Forward of Actifio-Protected archivelog ......... 51
Recovering Tablespace and Data Files................................................................................................................................ 53
Chapter 10 - Instant Oracle Database Recovery or Migration Using ASM Switch and Rebalance ....................................................................................55
Chapter 11 - Recovering Oracle Databases in a Windows Environment Manually Using RMAN ......................................................................................59
Chapter 12 - Oracle Logs ............................................................................................................................................................................................................61
Chapter 13 - Oracle Script Library: Database Management Using the API .........................................................................................................................63
Configuration Setup (CDSconfig)....................................................................................................................................... 64
Database Backup ................................................................................................................................................................. 65
Clone ................................................................................................................................................................................... 66
New Clone ..............................................................................................................................................................................................66
Refresh a Clone.......................................................................................................................................................................................69
Mount of Image................................................................................................................................................................... 70
Cleanup (Unmount and Delete of Image) ........................................................................................................................... 71
Run Workflow ..................................................................................................................................................................... 72
Creating a Direct Mount Workflow ........................................................................................................................................................72
Creating a LiveClone Workflow.............................................................................................................................................................73
Image Details (lsimagedetails) ............................................................................................................................................ 74
Create LiveClone Image (createliveclone).......................................................................................................................... 75
Refresh LiveClone image (refresh live clone image).......................................................................................................... 76
Restore ASM Database Switch (restoreASMswitch).......................................................................................................... 77
Rebalance a Restored ASM Database (restoreASMrebalance)........................................................................................... 78
actDBM.pl Script Template................................................................................................................................................. 79
iv | actifio.com |An Oracle DBA’s Guide to Actifio Copy Data Management
| a
Preface
The information presented in this guide is intended for users who are familiar with basic Actifio processes and procedures as described in Getting Started with Actifio Copy Data Management and who are qualified to administer Oracle databases.
This guide provides step-by-step instructions on how to use the Actifio SLA Architect. It assumes you have read Getting Started with Actifio Copy Data Management, are familiar with the components of the Actifio Desktop, and have a grasp of the basic concepts associated with an Actifio appliance.
Your Actifio appliance’s Documentation Library contains detailed, step-by-step, application-specific instructions on how to protect and access your data. Each guide is in PDF format and may be viewed online, downloaded, or printed on demand. The following guides will be of particular interest:
• Connecting Hosts to Actifio Appliances
• Virtualizing and Protecting Copy Data with the Application Manager
• Accessing and Recovering Copy Data with the Application Manager
• Restoring Copy Data with the Application Manager
The Actifio Now Customer PortalDuring the configuration and initialization of your Actifio appliance your Actifio representative provided you with a user name and password for the Actifio Now customer portal.
From the customer portal you can obtain detailed reports about your Actifio appliance as well as search the portal’s knowledge base for answers to specific questions.
To log into the Actifio Now customer portal:
1. Go to: https://now.actifio.com
2. When prompted, enter the user name and password provided by your Actifio representative.
Actifio Support CentersTo contact an Actifio support representative, you can:
• Send email to: [email protected]
• Call:
From anywhere: +1.315.261.7501
US Toll-Free: +1.855.392.6810
Australia: 0011 800-16165656
Germany: 00 800-16165656
New Zealand: 00 800-16165656
UK: 0 800-0155019
ctifio.com | An Oracle DBA’s Guide to Actifio Copy Data Management v

vi
| actifio.com |An Oracle DBA’s Guide to Actifio Copy Data Management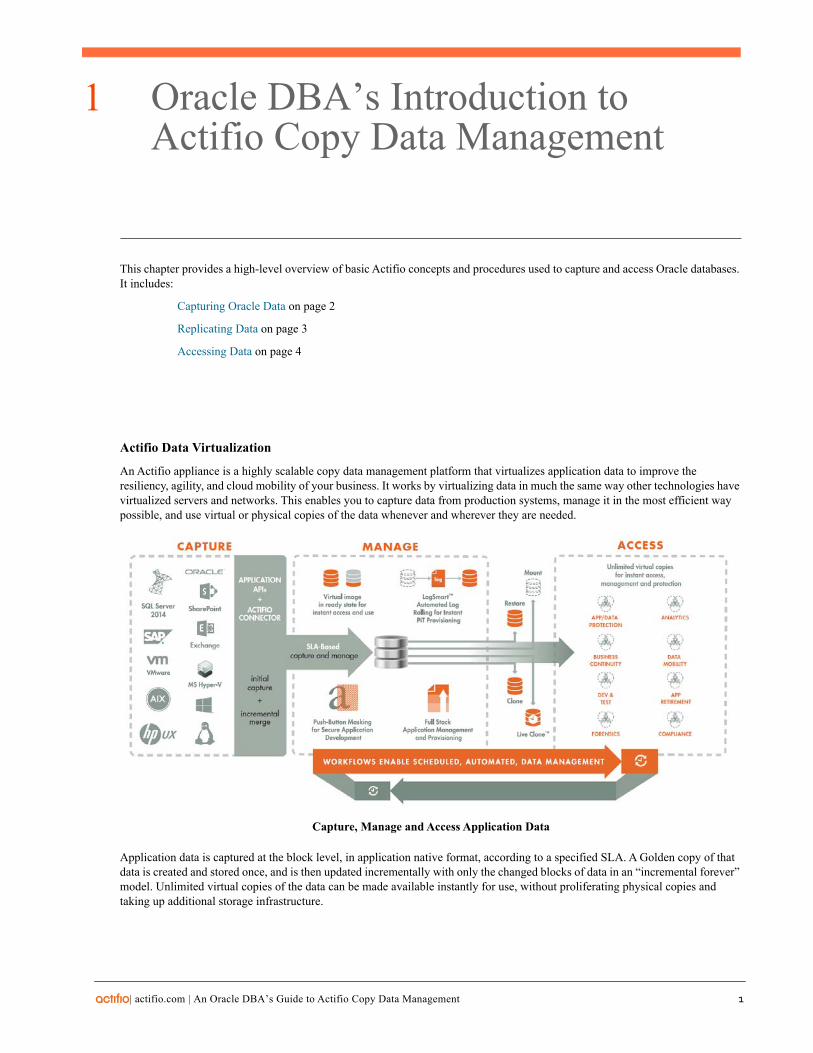
1
| a
Oracle DBA’s Introduction to Actifio Copy Data Management
This chapter provides a high-level overview of basic Actifio concepts and procedures used to capture and access Oracle databases. It includes:
Capturing Oracle Data on page 2
Replicating Data on page 3
Accessing Data on page 4
Actifio Data Virtualization
An Actifio appliance is a highly scalable copy data management platform that virtualizes application data to improve the resiliency, agility, and cloud mobility of your business. It works by virtualizing data in much the same way other technologies have virtualized servers and networks. This enables you to capture data from production systems, manage it in the most efficient way possible, and use virtual or physical copies of the data whenever and wherever they are needed.
Capture, Manage and Access Application Data
Application data is captured at the block level, in application native format, according to a specified SLA. A Golden copy of that data is created and stored once, and is then updated incrementally with only the changed blocks of data in an “incremental forever” model. Unlimited virtual copies of the data can be made available instantly for use, without proliferating physical copies and taking up additional storage infrastructure.
ctifio.com | An Oracle DBA’s Guide to Actifio Copy Data Management 1
2
Capturing Oracle DataCapturing Oracle data consists of four simple steps:
1. Add servers that host Oracle databases.
2. Discover an Oracle database as an application.
3. Define Actifio Policy Templates and Resource Profiles according to your RPOs and RTOs.
4. Assign Actifio Policy Templates and Resource Profiles to discovered Oracle databases.
The Actifio Connector
The Actifio Connector is used to capture selected Oracle databases. The Actifio Connector is a small-footprint, lightweight service that can be installed on either virtual or physical servers. The Actifio Connector makes use of Oracle RMAN for capture and access operations.
Specifically, the Actifio Connector:
• Discovers Oracle databases.
• Uses RMAN image copy and incremental merge API to capture data at block level in incremental forever fashion.
• Identifies changes to database data for Actifio’s incremental forever capture strategy.
• Captures and manages archivelog:
o Captures Oracle database(s) and logs with one SLA.
o Purges Oracle database archivelog.
o Rolls forward Oracle database archivelog for point-in-time recovery when accessing virtual copies.
Oracle Database change block tracking (BCT)
Oracle tracking enables fast database backups by identifying which blocks have changed. Only changed blocks are included in the backup operation.
• Actifio incremental-forever supports both databases running with BCT enabled and databases running with BCT disabled.
• Change Block Tracking is enabled at database level.
• Oracle records the changed blocks in each data file in a tracking file (small binary file stored in the database area).
• With tracking enabled, RMAN uses the BCT file to get the changed blocks for incremental backup.
• RMAN scans each block in a data file for all data files in the database during incremental backup when Change Block Tracking on the database is not enabled.
• With BCT not enabled the incremental backup time will increase.
Protecting Oracle Databases in an Actifio Consistency Group
A consistency group can contain only a single Oracle database application and any number of file system applications from the Oracle server. A consistency group is a very good choice if you are managing Oracle databases for test/dev and other business agility purposes.
| actifio.com |An Oracle DBA’s Guide to Actifio Copy Data Management
Replicating DataData can be replicated to a second Actifio appliance or to the cloud for recovery, disaster recovery, or test/development purposes.
Data replication has traditionally been an inhibitor to efficient data management in a geographically distributed environment. Actifio replication addresses these issues with a global deduplication and compression approach that:
• Drives down overall network usage.
• Eliminates the need for a dedicated WAN accelerator/optimizer.
• Does not require storage array vendor licenses as data is sent from one Actifio appliance to another.
• Is heterogeneous from any supported array to any supported array: Tier 1 to Tier 2 and/or Vendor A to Vendor B.
• Preserves write-order, even across multiple LUNs.
• Is fully integrated with VMware Site Recovery Manager (SRM) and Actifio Resiliency Director.
• Encrypts data using the AES-256 encryption standard. Authentication between Actifio appliances is performed using 1024-bit certificates.
Replication is controlled by Actifio Policy Template policies:
• Production to Mirror policies have several options to replicate data to a second Actifio appliance.
• Dedup Backup to Dedup DR policies use a fixed, Actifio proprietary replication engine to replicate data to a second Actifio appliance. In addition, Dedup Backup to Dedup DR policies allow you to replicate data to two locations.
• Production to Vault policies use a fixed, Actifio proprietary replication engine to replicate data to the cloud.
| actifio.com | An Oracle DBA’s Guide to Actifio Copy Data Management 3
4
Accessing DataThe Actifio appliance can instantly present a copy of the database rolled forward to a specific point of time. The roll forward operation is performed from the Actifio Desktop (user interface).
Access options include:
Mounts
LiveClones
Restores
Workflows
Mounts
The Actifio mount function provides instant access to data without moving data. Captured copies of databases can be rolled forward via the Actifio user interface and mounted on any Oracle database server.
An Actifio appliance provides two ways to mount an Oracle database:
• The standard mount presents and makes a captured Oracle database backup image copy available to a target server as a file system or as an ASM Disk group depending on the capture method. This is useful for any tablespace/datafile recovery on source or to make a physical copy on target using RMAN duplicate.
• The Application Aware mount presents and makes the captured Oracle data available to a target server as a virtual Oracle database. This allows you to address the unique challenges associated with creating and managing copies of production databases for non-production use. Application Aware mounts are performed from the Actifio appliance and do not require manual intervention by database, server, or storage administrators. Application Aware mounts can be used for such things as database reporting, analytics, integrity testing, and test and development. Application Aware mounts are described in Mounting an Oracle Database as a Virtual Application on page 36.
LiveClones
The LiveClone is an independent copy of Oracle data that can be refreshed when the source data changes. The advantage of LiveClones is that they are independent copies of data that can be incrementally refreshed and masked before being made available to users. This allows teams such as development and test to ensure they are working on the latest set of data without having to manually manage the data and not access or interfere with the production environment.
Restores
The restore function reverts the production data to a specified point in time. Restore operations actually move data. Typically restore operations are performed to restore a database to a valid state after a massive data corruption or storage array failure. The amount of time required to complete a restore operation depends on the amount of data involved.
Workflows
While SLAs govern the automated capture of a production Oracle database, Workflows automate access to the captured database.
Workflows are built with captured Oracle data. Workflows can present data as either a direct mount or as a LiveClone:
• Direct mounts (standard or application aware) work well for Oracle data that does not need to be masked prior to being presented. A mounted copy of data can be refreshed manually or on automatically on a schedule. Direct mounts allow you to instantly access captured Oracle data without actually moving the data.
• A LiveClone is a copy of your production Oracle data that can be updated manually or on a scheduled basis. You can mask sensitive Oracle data in a LiveClone prior to making it available to users.
Combining Actifio’s automated Oracle data capture and access control with Workflows and their optional data masking capabilities allows you to create self-provisioning environments. Now, instead of having to wait for DBAs to update test and development environments, users can provision their own environments almost instantly.
For example, an Actifio administrator can create an SLA Template Policy that captures Oracle data according to a specified schedule. Optionally, the administrator can mark the captured production Oracle data as sensitive and only accessible by users with the proper access rights.
| actifio.com |An Oracle DBA’s Guide to Actifio Copy Data Management
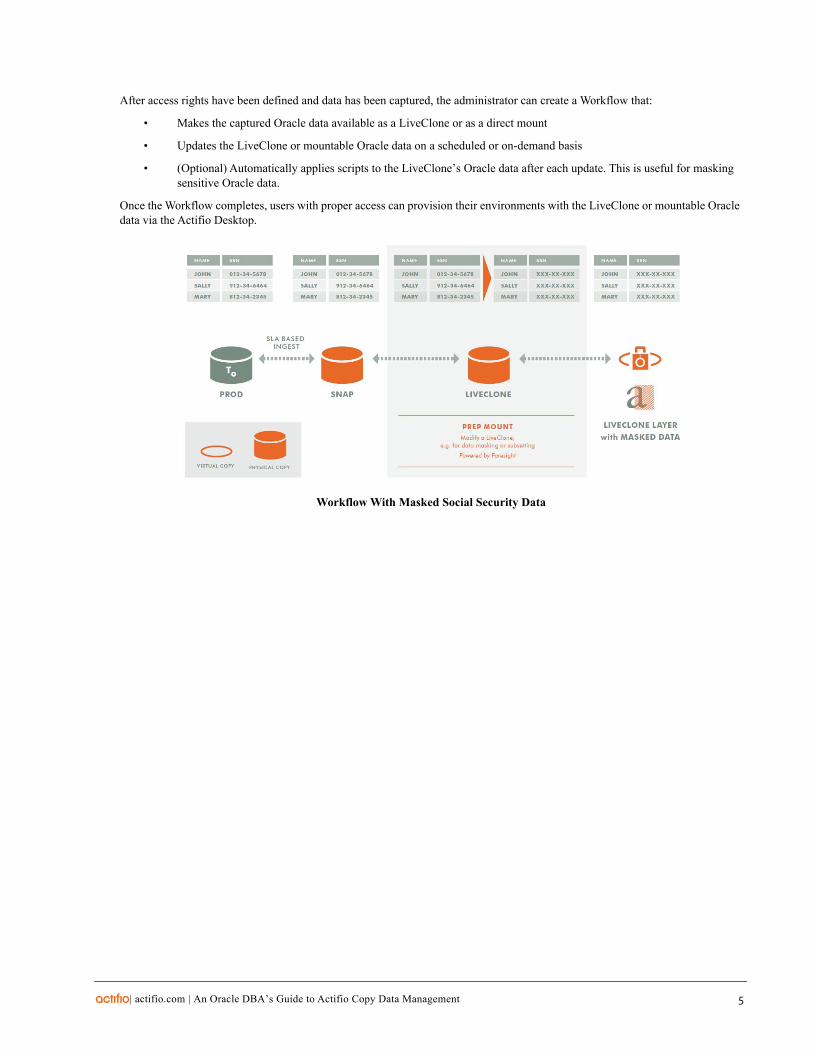
After access rights have been defined and data has been captured, the administrator can create a Workflow that:
• Makes the captured Oracle data available as a LiveClone or as a direct mount
• Updates the LiveClone or mountable Oracle data on a scheduled or on-demand basis
• (Optional) Automatically applies scripts to the LiveClone’s Oracle data after each update. This is useful for masking sensitive Oracle data.
Once the Workflow completes, users with proper access can provision their environments with the LiveClone or mountable Oracle data via the Actifio Desktop.
Workflow With Masked Social Security Data
| actifio.com | An Oracle DBA’s Guide to Actifio Copy Data Management 5

6
| actifio.com |An Oracle DBA’s Guide to Actifio Copy Data Management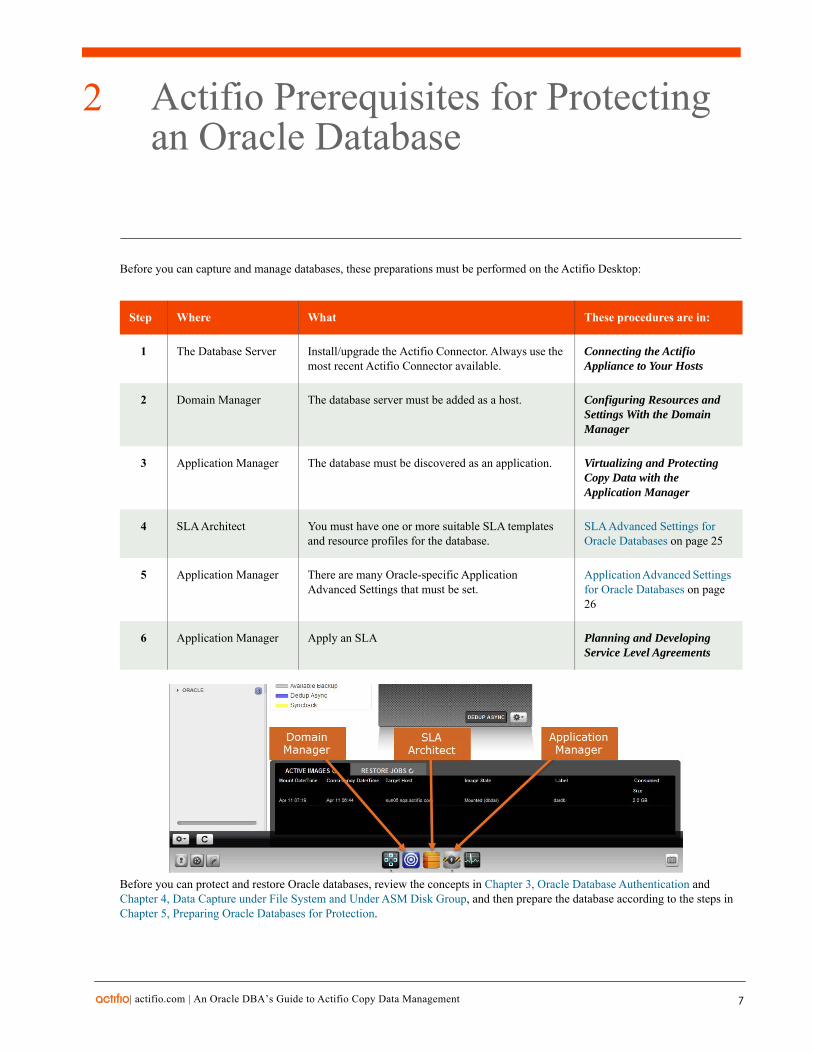
2
| a
Actifio Prerequisites for Protecting an Oracle Database
Before you can capture and manage databases, these preparations must be performed on the Actifio Desktop:
1 The Database Server Install/upgrade the Actifio Connector. Always use the most recent Actifio Connector available.
Connecting the Actifio Appliance to Your Hosts
2 Domain Manager The database server must be added as a host. Configuring Resources and Settings With the Domain Manager
3 Application Manager The database must be discovered as an application. Virtualizing and Protecting Copy Data with the Application Manager
4 SLA Architect You must have one or more suitable SLA templates and resource profiles for the database.
SLA Advanced Settings for Oracle Databases on page 25
5 Application Manager There are many Oracle-specific Application Advanced Settings that must be set.
Application Advanced Settings for Oracle Databases on page 26
6 Application Manager Apply an SLA Planning and Developing Service Level Agreements
Before you can protect and restore Oracle databases, review the concepts in Chapter 3, Oracle Database Authentication and Chapter 4, Data Capture under File System and Under ASM Disk Group, and then prepare the database according to the steps in Chapter 5, Preparing Oracle Databases for Protection.
Step Where What These procedures are in:
ctifio.com | An Oracle DBA’s Guide to Actifio Copy Data Management 7

8
| actifio.com |An Oracle DBA’s Guide to Actifio Copy Data Management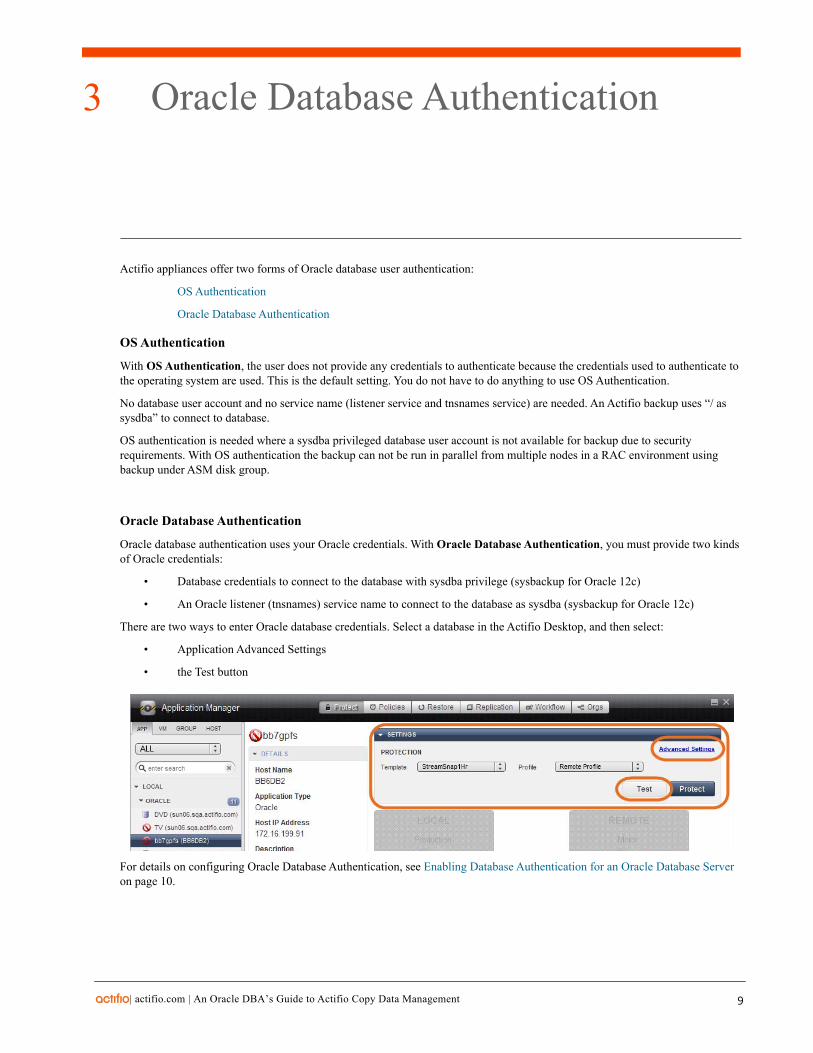
3
| a
Oracle Database Authentication
Actifio appliances offer two forms of Oracle database user authentication:
OS Authentication
Oracle Database Authentication
OS Authentication
With OS Authentication, the user does not provide any credentials to authenticate because the credentials used to authenticate to the operating system are used. This is the default setting. You do not have to do anything to use OS Authentication.
No database user account and no service name (listener service and tnsnames service) are needed. An Actifio backup uses “/ as sysdba” to connect to database.
OS authentication is needed where a sysdba privileged database user account is not available for backup due to security requirements. With OS authentication the backup can not be run in parallel from multiple nodes in a RAC environment using backup under ASM disk group.
Oracle Database Authentication
Oracle database authentication uses your Oracle credentials. With Oracle Database Authentication, you must provide two kinds of Oracle credentials:
• Database credentials to connect to the database with sysdba privilege (sysbackup for Oracle 12c)
• An Oracle listener (tnsnames) service name to connect to the database as sysdba (sysbackup for Oracle 12c)
There are two ways to enter Oracle database credentials. Select a database in the Actifio Desktop, and then select:
• Application Advanced Settings
• the Test button
For details on configuring Oracle Database Authentication, see Enabling Database Authentication for an Oracle Database Server on page 10.
ctifio.com | An Oracle DBA’s Guide to Actifio Copy Data Management 9
10
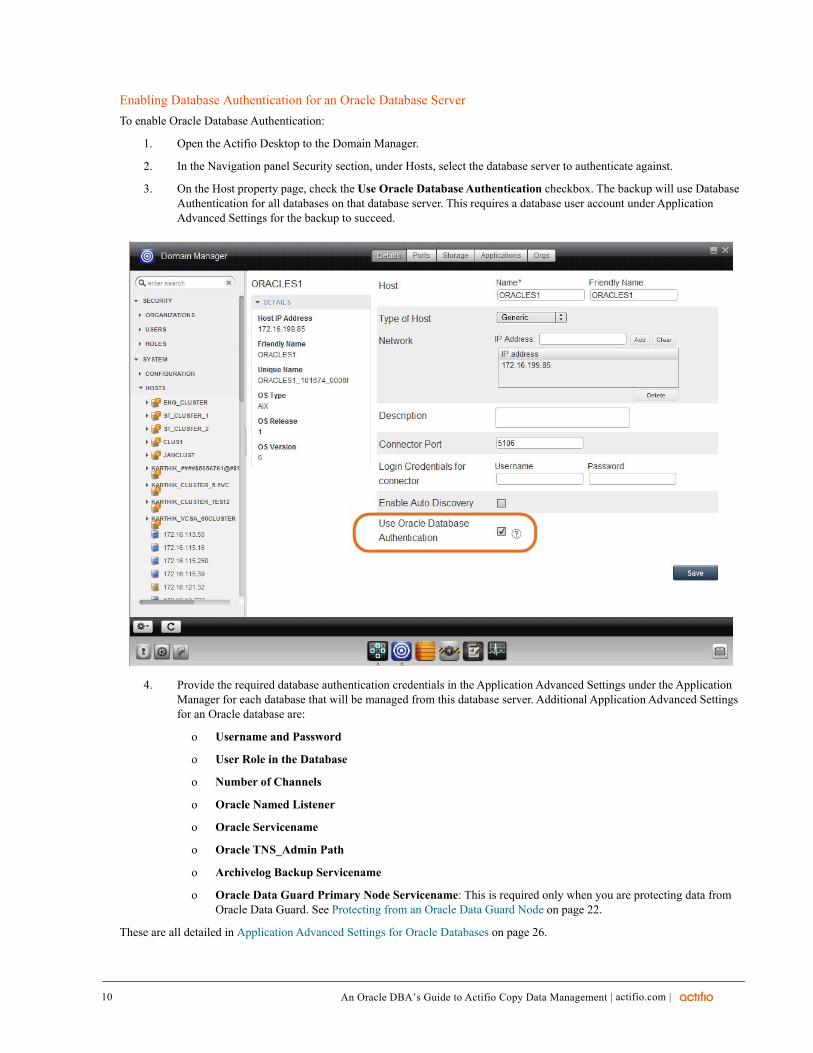
Enabling Database Authentication for an Oracle Database Server
To enable Oracle Database Authentication:
1. Open the Actifio Desktop to the Domain Manager.
2. In the Navigation panel Security section, under Hosts, select the database server to authenticate against.
3. On the Host property page, check the Use Oracle Database Authentication checkbox. The backup will use Database Authentication for all databases on that database server. This requires a database user account under Application Advanced Settings for the backup to succeed.
4. Provide the required database authentication credentials in the Application Advanced Settings under the Application Manager for each database that will be managed from this database server. Additional Application Advanced Settings for an Oracle database are:
o Username and Password
o User Role in the Database
o Number of Channels
o Oracle Named Listener
o Oracle Servicename
o Oracle TNS_Admin Path
o Archivelog Backup Servicename
o Oracle Data Guard Primary Node Servicename: This is required only when you are protecting data from Oracle Data Guard. See Protecting from an Oracle Data Guard Node on page 22.
These are all detailed in Application Advanced Settings for Oracle Databases on page 26.
| actifio.com |An Oracle DBA’s Guide to Actifio Copy Data Management
4
| a
Data Capture under File System and Under ASM Disk Group
Oracle database capture has different properties depending on whether the images are protected under a:
File System: The application advanced settings do NOT include ASM configuration. Oracle databases can be protected as a file system even if the database being protected is actually on an ASM Disk Group. For more information on protecting an Oracle database under a file system, see When You Capture an Oracle Database Image Under a File System on page 12.
ASM Disk Group: The application advanced settings include ASM configuration. The ASM configuration enables the database to be mounted back to an ASM Disk Group. For more information on protecting an Oracle database under an Oracle ASM disk group, see When You Capture an Oracle Database Image Under an ASM Disk Group on page 13.
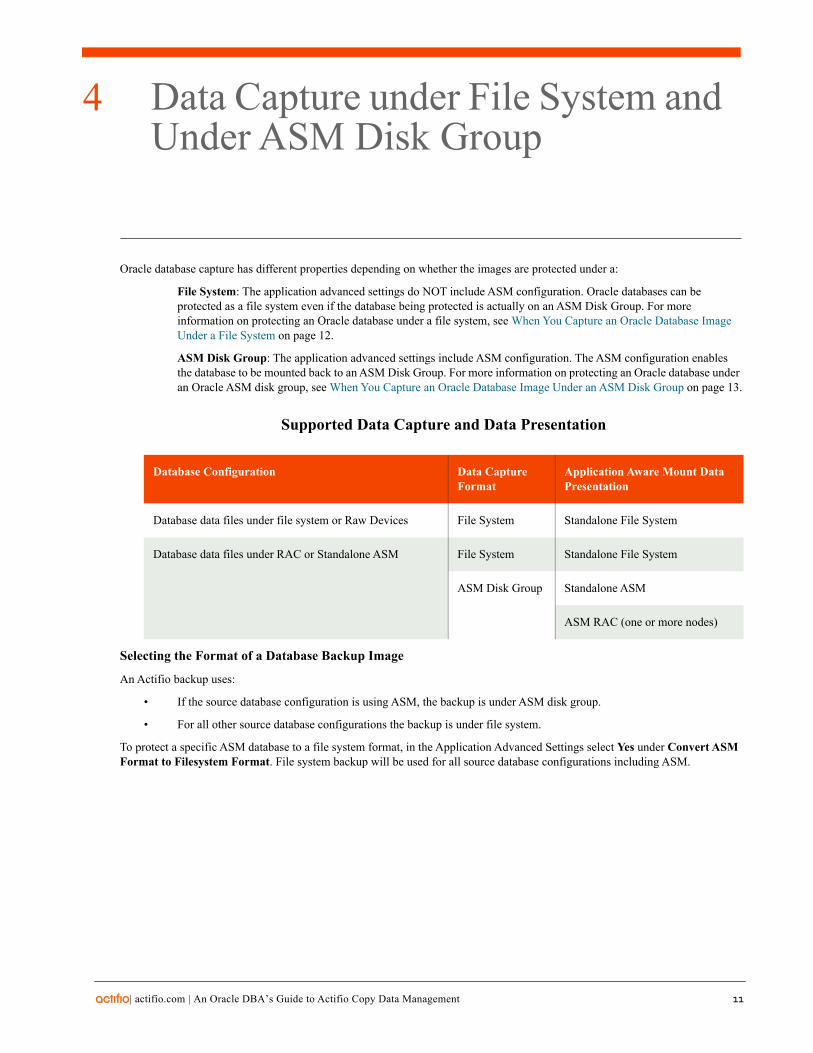
Supported Data Capture and Data Presentation
Database data files under file system or Raw Devices File System Standalone File System
Database data files under RAC or Standalone ASM File System Standalone File System
ASM Disk Group Standalone ASM
ASM RAC (one or more nodes)
Selecting the Format of a Database Backup Image
An Actifio backup uses:
• If the source database configuration is using ASM, the backup is under ASM disk group.
• For all other source database configurations the backup is under file system.
To protect a specific ASM database to a file system format, in the Application Advanced Settings select Yes under Convert ASM Format to Filesystem Format. File system backup will be used for all source database configurations including ASM.
Database Configuration Data Capture Format
Application Aware Mount Data Presentation
ctifio.com | An Oracle DBA’s Guide to Actifio Copy Data Management 11
12
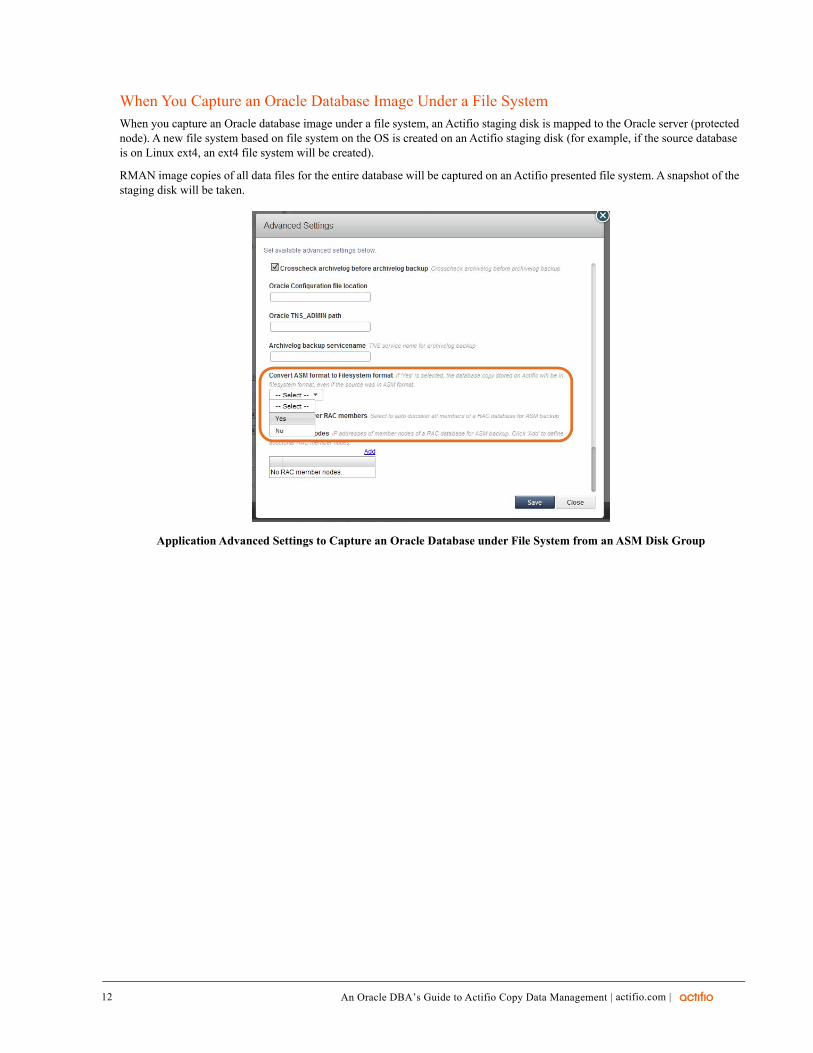
When You Capture an Oracle Database Image Under a File SystemWhen you capture an Oracle database image under a file system, an Actifio staging disk is mapped to the Oracle server (protected node). A new file system based on file system on the OS is created on an Actifio staging disk (for example, if the source database is on Linux ext4, an ext4 file system will be created).
RMAN image copies of all data files for the entire database will be captured on an Actifio presented file system. A snapshot of the staging disk will be taken.
.
Application Advanced Settings to Capture an Oracle Database under File System from an ASM Disk Group
| actifio.com |An Oracle DBA’s Guide to Actifio Copy Data Management
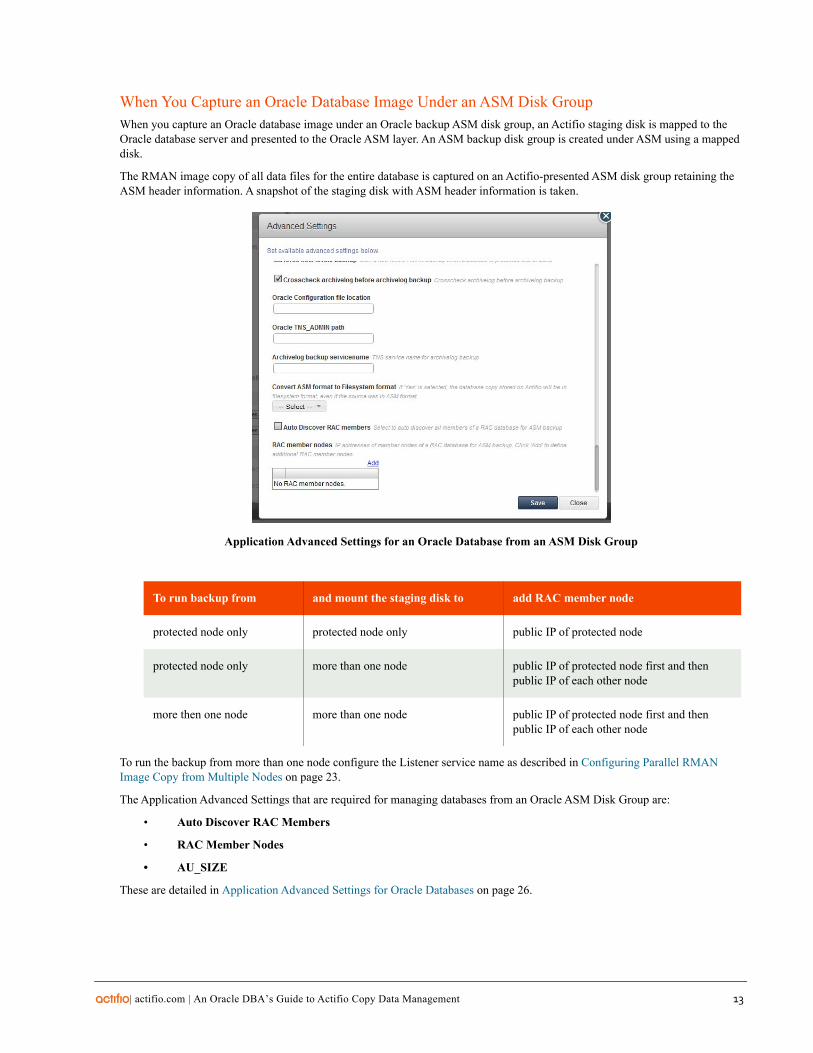
When You Capture an Oracle Database Image Under an ASM Disk GroupWhen you capture an Oracle database image under an Oracle backup ASM disk group, an Actifio staging disk is mapped to the Oracle database server and presented to the Oracle ASM layer. An ASM backup disk group is created under ASM using a mapped disk.
The RMAN image copy of all data files for the entire database is captured on an Actifio-presented ASM disk group retaining the ASM header information. A snapshot of the staging disk with ASM header information is taken.
.
Application Advanced Settings for an Oracle Database from an ASM Disk Group
protected node only protected node only public IP of protected node
protected node only more than one node public IP of protected node first and then public IP of each other node
more then one node more than one node public IP of protected node first and then public IP of each other node
To run the backup from more than one node configure the Listener service name as described in Configuring Parallel RMAN Image Copy from Multiple Nodes on page 23.
The Application Advanced Settings that are required for managing databases from an Oracle ASM Disk Group are:
• Auto Discover RAC Members
• RAC Member Nodes
• AU_SIZE
These are detailed in Application Advanced Settings for Oracle Databases on page 26.
To run backup from and mount the staging disk to add RAC member node
| actifio.com | An Oracle DBA’s Guide to Actifio Copy Data Management 13

14
| actifio.com |An Oracle DBA’s Guide to Actifio Copy Data Management
5
| a
Preparing Oracle Databases for Protection
Before Actifio appliances can manage Oracle databases, these preparation steps must be performed by a DBA.
Preparation Procedures for Oracle Databases in Unix Environments
1 Patching Oracle 12c on page 15
Preparing Oracle Databases in a Unix Environment Using OS Authentication on page 16
2 Preparing to Capture a Database from Oracle ASM to Oracle ASM on page 17 (This is needed only for RAC or Standalone ASM configurations.)
3 Preparing Oracle Database Authentication in a Unix Environment on page 18
Enable Database Block Change Tracking (optional) on page 20
Configuring RAC Transparent Failover of Actifio RMAN Backup to Other Nodes on page 21
Manually Calculating Log Staging Disk Size (optional) on page 22
Protecting from an Oracle Data Guard Node on page 22
Configuring Oracle Database Services for Load Balancing across Multiple Nodes on page 23
This section also includes Preparing Oracle Protection in a Windows Environment on page 24.
Patching Oracle 12cActifio Application Aware mounts may fail if your Oracle 12c installation does not include this patch, which can be downloaded from the Oracle support portal: Oracle Database 12c Bug# 19404068 (ORA-1610 ON RECOVER DATABASE FOR CREATED CONTROLFILE)
• (Patch 19404068) Linux x86-64 for Oracle 12.1.0.2.0
• (Patch 19404068) IBM AIX on POWER Systems (64-bit) for Oracle 12.1.0.2.0
• (Patch 19404068) Solaris on SPARC (64-bit) for Oracle 12.1.0.2.0
• (Patch 22809813): WINDOWS for Oracle 12.1.0.2.0 OR April 2016 CPU patchset
To see if the patch is installed, run:
$cd $ORACLE_HOME/OPatch$./opatch lsinventory -details
Step Preparation Procedure
ctifio.com | An Oracle DBA’s Guide to Actifio Copy Data Management 15
16
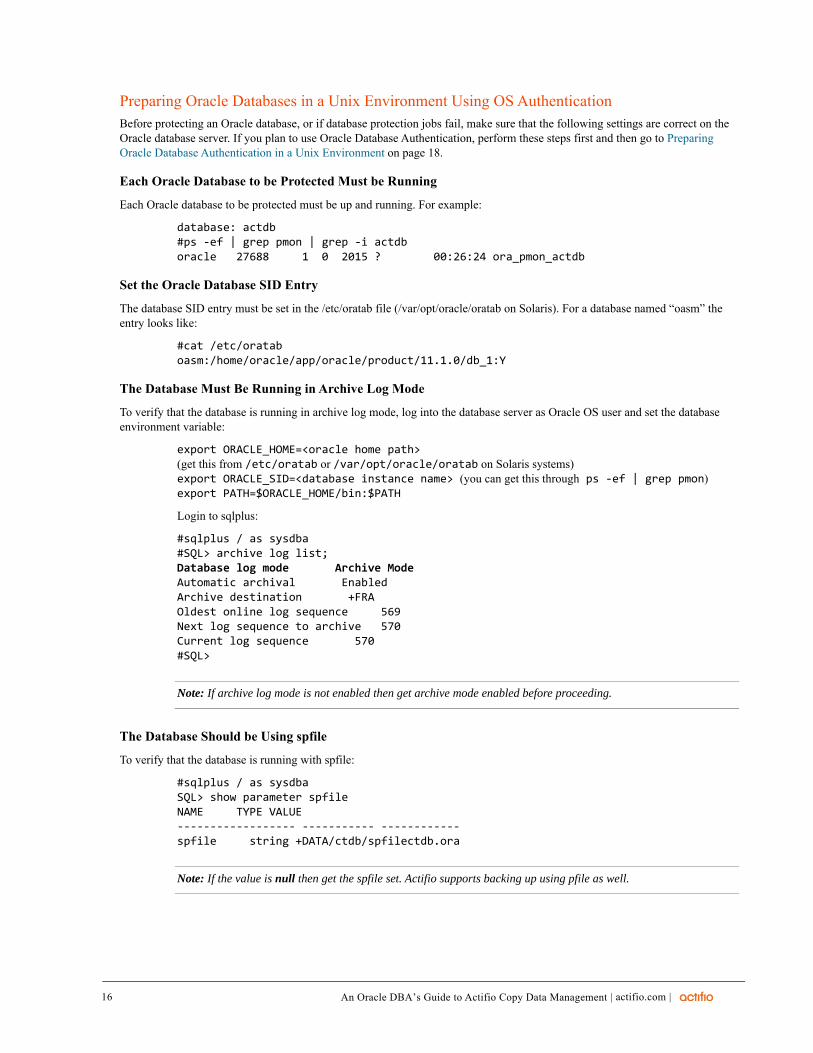
Preparing Oracle Databases in a Unix Environment Using OS AuthenticationBefore protecting an Oracle database, or if database protection jobs fail, make sure that the following settings are correct on the Oracle database server. If you plan to use Oracle Database Authentication, perform these steps first and then go to Preparing Oracle Database Authentication in a Unix Environment on page 18.
Each Oracle Database to be Protected Must be Running
Each Oracle database to be protected must be up and running. For example:
database: actdb#ps -ef | grep pmon | grep -i actdboracle 27688 1 0 2015 ? 00:26:24 ora_pmon_actdb
Set the Oracle Database SID Entry
The database SID entry must be set in the /etc/oratab file (/var/opt/oracle/oratab on Solaris). For a database named “oasm” the entry looks like:
#cat /etc/orataboasm:/home/oracle/app/oracle/product/11.1.0/db_1:Y
The Database Must Be Running in Archive Log Mode
To verify that the database is running in archive log mode, log into the database server as Oracle OS user and set the database environment variable:
export ORACLE_HOME=<oracle home path> (get this from /etc/oratab or /var/opt/oracle/oratab on Solaris systems)export ORACLE_SID=<database instance name> (you can get this through ps -ef | grep pmon)export PATH=$ORACLE_HOME/bin:$PATH
Login to sqlplus:
#sqlplus / as sysdba#SQL> archive log list;Database log mode Archive ModeAutomatic archival EnabledArchive destination +FRAOldest online log sequence 569Next log sequence to archive 570Current log sequence 570#SQL>
Note: If archive log mode is not enabled then get archive mode enabled before proceeding.
The Database Should be Using spfile
To verify that the database is running with spfile:
#sqlplus / as sysdbaSQL> show parameter spfileNAME TYPE VALUE------------------ ----------- ------------spfile string +DATA/ctdb/spfilectdb.ora
Note: If the value is null then get the spfile set. Actifio supports backing up using pfile as well.
| actifio.com |An Oracle DBA’s Guide to Actifio Copy Data Management
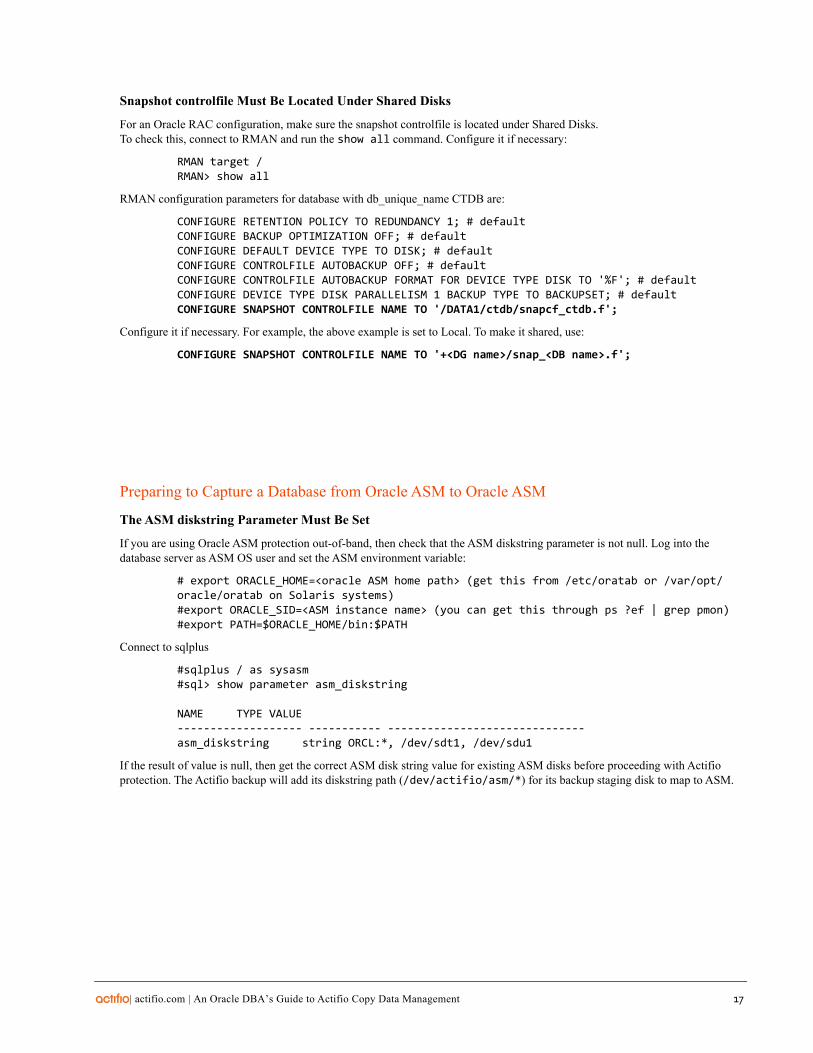
Snapshot controlfile Must Be Located Under Shared Disks
For an Oracle RAC configuration, make sure the snapshot controlfile is located under Shared Disks. To check this, connect to RMAN and run the show all command. Configure it if necessary:
RMAN target /RMAN> show all
RMAN configuration parameters for database with db_unique_name CTDB are:
CONFIGURE RETENTION POLICY TO REDUNDANCY 1; # defaultCONFIGURE BACKUP OPTIMIZATION OFF; # defaultCONFIGURE DEFAULT DEVICE TYPE TO DISK; # defaultCONFIGURE CONTROLFILE AUTOBACKUP OFF; # defaultCONFIGURE CONTROLFILE AUTOBACKUP FORMAT FOR DEVICE TYPE DISK TO '%F'; # defaultCONFIGURE DEVICE TYPE DISK PARALLELISM 1 BACKUP TYPE TO BACKUPSET; # defaultCONFIGURE SNAPSHOT CONTROLFILE NAME TO '/DATA1/ctdb/snapcf_ctdb.f';
Configure it if necessary. For example, the above example is set to Local. To make it shared, use:
CONFIGURE SNAPSHOT CONTROLFILE NAME TO '+<DG name>/snap_<DB name>.f';
Preparing to Capture a Database from Oracle ASM to Oracle ASM
The ASM diskstring Parameter Must Be Set
If you are using Oracle ASM protection out-of-band, then check that the ASM diskstring parameter is not null. Log into the database server as ASM OS user and set the ASM environment variable:
# export ORACLE_HOME=<oracle ASM home path> (get this from /etc/oratab or /var/opt/oracle/oratab on Solaris systems)#export ORACLE_SID=<ASM instance name> (you can get this through ps ?ef | grep pmon)#export PATH=$ORACLE_HOME/bin:$PATH
Connect to sqlplus
#sqlplus / as sysasm#sql> show parameter asm_diskstring
NAME TYPE VALUE------------------- ----------- ------------------------------asm_diskstring string ORCL:*, /dev/sdt1, /dev/sdu1
If the result of value is null, then get the correct ASM disk string value for existing ASM disks before proceeding with Actifio protection. The Actifio backup will add its diskstring path (/dev/actifio/asm/*) for its backup staging disk to map to ASM.
| actifio.com | An Oracle DBA’s Guide to Actifio Copy Data Management 17
18
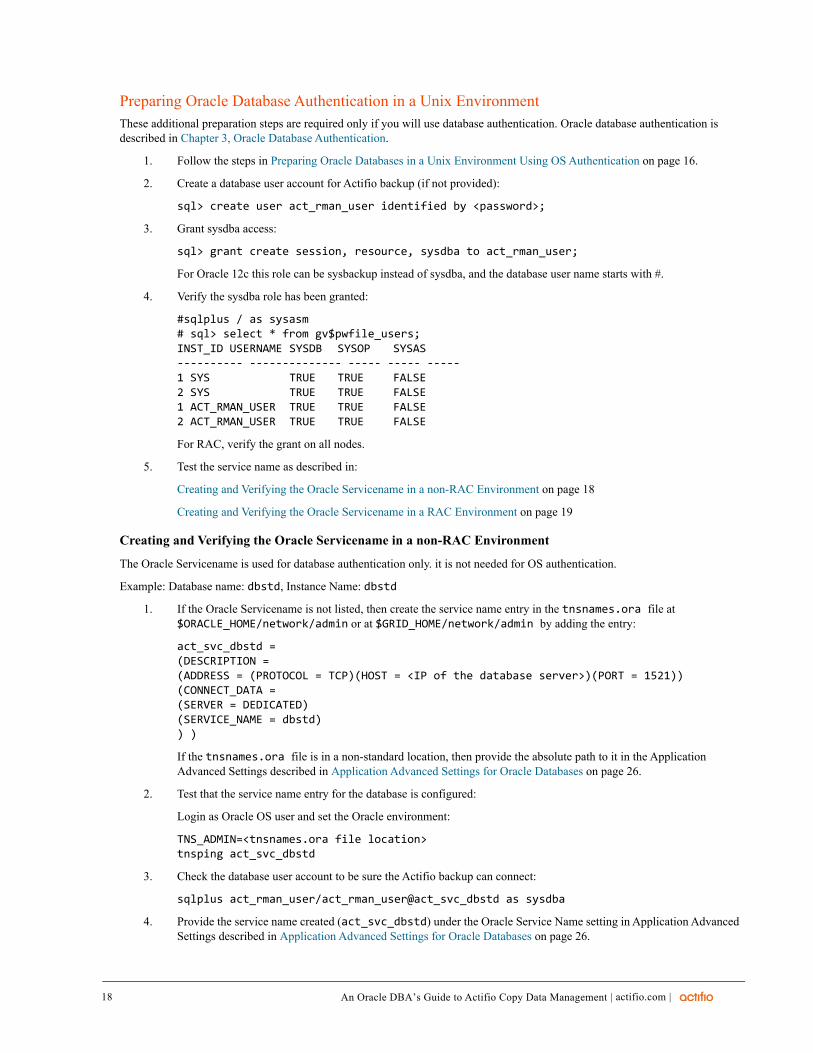
Preparing Oracle Database Authentication in a Unix EnvironmentThese additional preparation steps are required only if you will use database authentication. Oracle database authentication is described in Chapter 3, Oracle Database Authentication.
1. Follow the steps in Preparing Oracle Databases in a Unix Environment Using OS Authentication on page 16.
2. Create a database user account for Actifio backup (if not provided):
sql> create user act_rman_user identified by <password>;
3. Grant sysdba access:
sql> grant create session, resource, sysdba to act_rman_user;
For Oracle 12c this role can be sysbackup instead of sysdba, and the database user name starts with #.
4. Verify the sysdba role has been granted:
#sqlplus / as sysasm# sql> select * from gv$pwfile_users;INST_ID USERNAME SYSDB SYSOP SYSAS---------- -------------- ----- ----- -----1 SYS TRUE TRUE FALSE2 SYS TRUE TRUE FALSE1 ACT_RMAN_USER TRUE TRUE FALSE2 ACT_RMAN_USER TRUE TRUE FALSE
For RAC, verify the grant on all nodes.
5. Test the service name as described in:
Creating and Verifying the Oracle Servicename in a non-RAC Environment on page 18
Creating and Verifying the Oracle Servicename in a RAC Environment on page 19
Creating and Verifying the Oracle Servicename in a non-RAC Environment
The Oracle Servicename is used for database authentication only. it is not needed for OS authentication.
Example: Database name: dbstd, Instance Name: dbstd
1. If the Oracle Servicename is not listed, then create the service name entry in the tnsnames.ora file at $ORACLE_HOME/network/admin or at $GRID_HOME/network/admin by adding the entry:
act_svc_dbstd =(DESCRIPTION =(ADDRESS = (PROTOCOL = TCP)(HOST = <IP of the database server>)(PORT = 1521))(CONNECT_DATA =(SERVER = DEDICATED)(SERVICE_NAME = dbstd)) )
If the tnsnames.ora file is in a non-standard location, then provide the absolute path to it in the Application Advanced Settings described in Application Advanced Settings for Oracle Databases on page 26.
2. Test that the service name entry for the database is configured:
Login as Oracle OS user and set the Oracle environment:
TNS_ADMIN=<tnsnames.ora file location>tnsping act_svc_dbstd
3. Check the database user account to be sure the Actifio backup can connect:
sqlplus act_rman_user/act_rman_user@act_svc_dbstd as sysdba
4. Provide the service name created (act_svc_dbstd) under the Oracle Service Name setting in Application Advanced Settings described in Application Advanced Settings for Oracle Databases on page 26.
| actifio.com |An Oracle DBA’s Guide to Actifio Copy Data Management
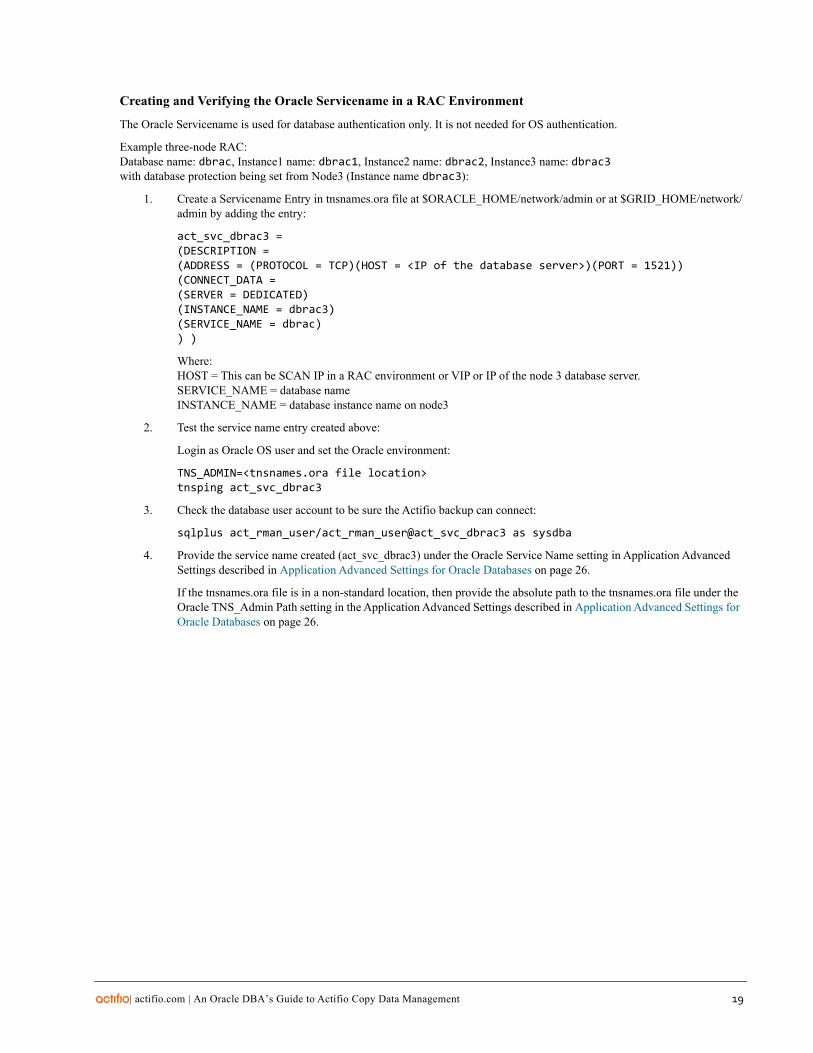
Creating and Verifying the Oracle Servicename in a RAC Environment
The Oracle Servicename is used for database authentication only. It is not needed for OS authentication.
Example three-node RAC: Database name: dbrac, Instance1 name: dbrac1, Instance2 name: dbrac2, Instance3 name: dbrac3with database protection being set from Node3 (Instance name dbrac3):
1. Create a Servicename Entry in tnsnames.ora file at $ORACLE_HOME/network/admin or at $GRID_HOME/network/admin by adding the entry:
act_svc_dbrac3 =(DESCRIPTION =(ADDRESS = (PROTOCOL = TCP)(HOST = <IP of the database server>)(PORT = 1521))(CONNECT_DATA =(SERVER = DEDICATED)(INSTANCE_NAME = dbrac3)(SERVICE_NAME = dbrac)) )
Where:HOST = This can be SCAN IP in a RAC environment or VIP or IP of the node 3 database server.SERVICE_NAME = database nameINSTANCE_NAME = database instance name on node3
2. Test the service name entry created above:
Login as Oracle OS user and set the Oracle environment:
TNS_ADMIN=<tnsnames.ora file location>tnsping act_svc_dbrac3
3. Check the database user account to be sure the Actifio backup can connect:
sqlplus act_rman_user/act_rman_user@act_svc_dbrac3 as sysdba
4. Provide the service name created (act_svc_dbrac3) under the Oracle Service Name setting in Application Advanced Settings described in Application Advanced Settings for Oracle Databases on page 26.
If the tnsnames.ora file is in a non-standard location, then provide the absolute path to the tnsnames.ora file under the Oracle TNS_Admin Path setting in the Application Advanced Settings described in Application Advanced Settings for Oracle Databases on page 26.
| actifio.com | An Oracle DBA’s Guide to Actifio Copy Data Management 19
20
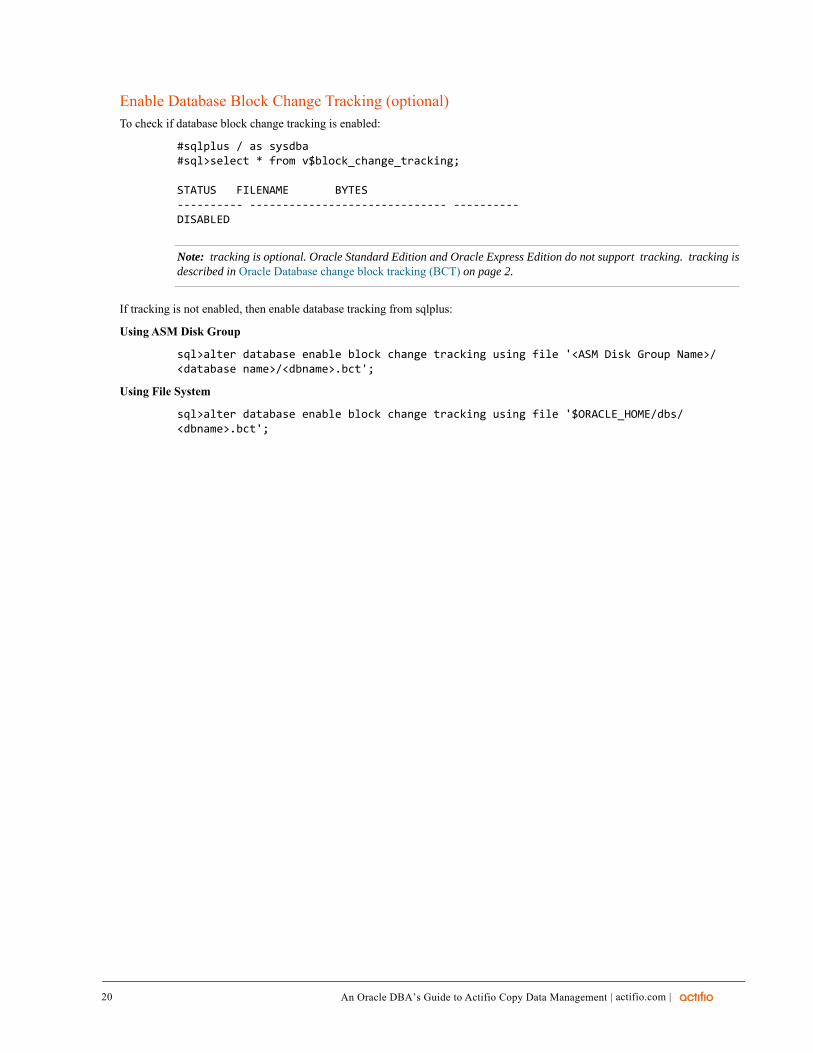
Enable Database Block Change Tracking (optional)To check if database block change tracking is enabled:
#sqlplus / as sysdba#sql>select * from v$block_change_tracking;
STATUS FILENAME BYTES---------- ------------------------------ ----------DISABLED
Note: tracking is optional. Oracle Standard Edition and Oracle Express Edition do not support tracking. tracking is described in Oracle Database change block tracking (BCT) on page 2.
If tracking is not enabled, then enable database tracking from sqlplus:
Using ASM Disk Group
sql>alter database enable block change tracking using file '<ASM Disk Group Name>/<database name>/<dbname>.bct';
Using File System
sql>alter database enable block change tracking using file '$ORACLE_HOME/dbs/<dbname>.bct';
| actifio.com |An Oracle DBA’s Guide to Actifio Copy Data Management
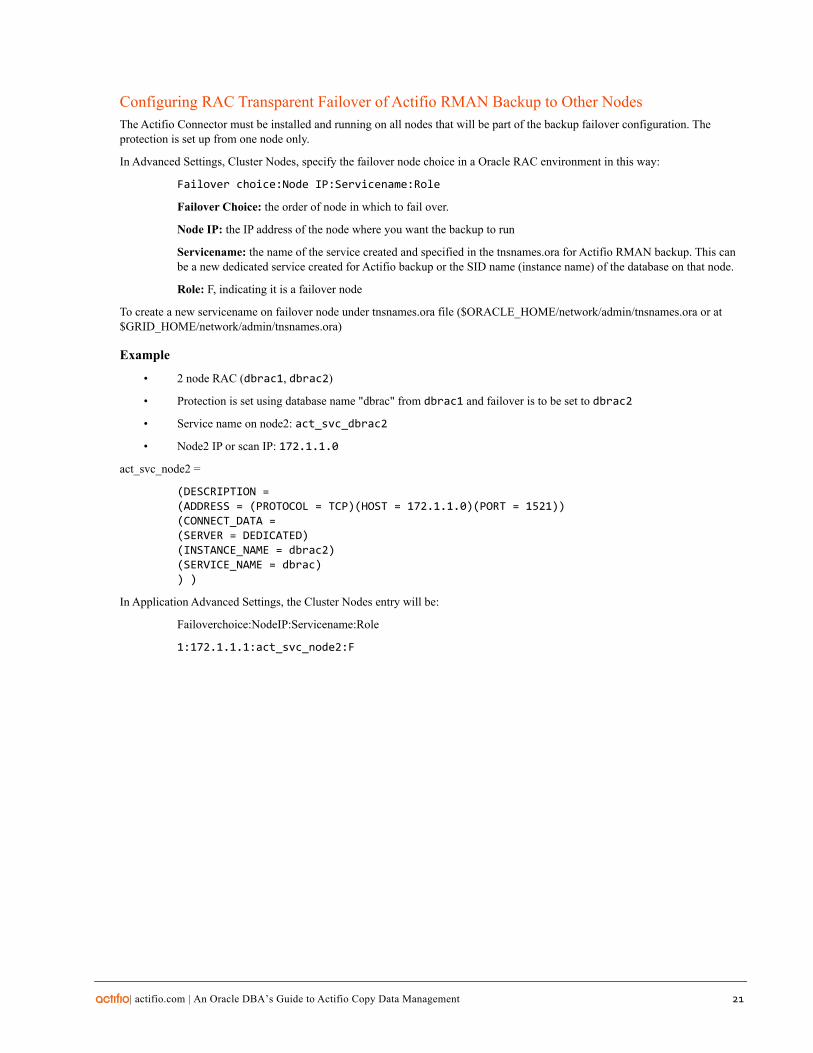
Configuring RAC Transparent Failover of Actifio RMAN Backup to Other NodesThe Actifio Connector must be installed and running on all nodes that will be part of the backup failover configuration. The protection is set up from one node only.
In Advanced Settings, Cluster Nodes, specify the failover node choice in a Oracle RAC environment in this way:
Failover choice:Node IP:Servicename:Role
Failover Choice: the order of node in which to fail over.
Node IP: the IP address of the node where you want the backup to run
Servicename: the name of the service created and specified in the tnsnames.ora for Actifio RMAN backup. This can be a new dedicated service created for Actifio backup or the SID name (instance name) of the database on that node.
Role: F, indicating it is a failover node
To create a new servicename on failover node under tnsnames.ora file ($ORACLE_HOME/network/admin/tnsnames.ora or at $GRID_HOME/network/admin/tnsnames.ora)
Example
• 2 node RAC (dbrac1, dbrac2)
• Protection is set using database name "dbrac" from dbrac1 and failover is to be set to dbrac2
• Service name on node2: act_svc_dbrac2
• Node2 IP or scan IP: 172.1.1.0
act_svc_node2 =
(DESCRIPTION =(ADDRESS = (PROTOCOL = TCP)(HOST = 172.1.1.0)(PORT = 1521))(CONNECT_DATA =(SERVER = DEDICATED)(INSTANCE_NAME = dbrac2)(SERVICE_NAME = dbrac)) )
In Application Advanced Settings, the Cluster Nodes entry will be:
Failoverchoice:NodeIP:Servicename:Role
1:172.1.1.1:act_svc_node2:F
| actifio.com | An Oracle DBA’s Guide to Actifio Copy Data Management 21
22
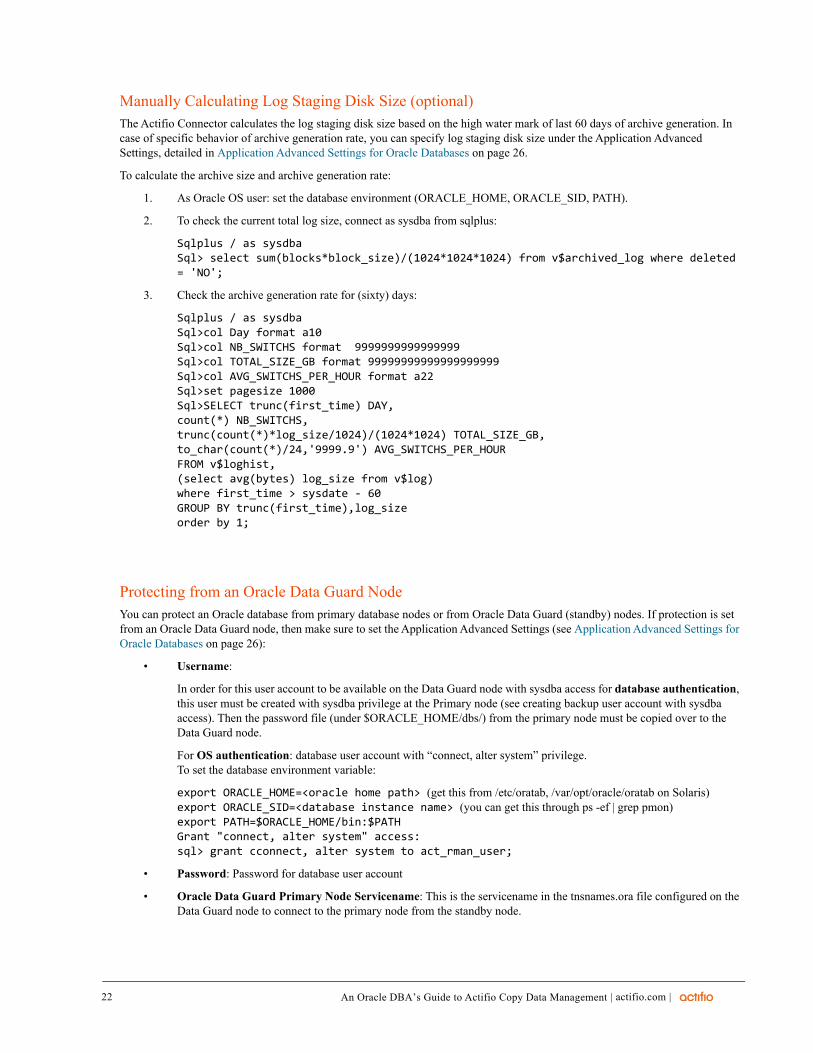
Manually Calculating Log Staging Disk Size (optional)The Actifio Connector calculates the log staging disk size based on the high water mark of last 60 days of archive generation. In case of specific behavior of archive generation rate, you can specify log staging disk size under the Application Advanced Settings, detailed in Application Advanced Settings for Oracle Databases on page 26.
To calculate the archive size and archive generation rate:
1. As Oracle OS user: set the database environment (ORACLE_HOME, ORACLE_SID, PATH).
2. To check the current total log size, connect as sysdba from sqlplus:
Sqlplus / as sysdbaSql> select sum(blocks*block_size)/(1024*1024*1024) from v$archived_log where deleted = 'NO';
3. Check the archive generation rate for (sixty) days:
Sqlplus / as sysdbaSql>col Day format a10Sql>col NB_SWITCHS format 9999999999999999Sql>col TOTAL_SIZE_GB format 99999999999999999999Sql>col AVG_SWITCHS_PER_HOUR format a22Sql>set pagesize 1000Sql>SELECT trunc(first_time) DAY,count(*) NB_SWITCHS,trunc(count(*)*log_size/1024)/(1024*1024) TOTAL_SIZE_GB,to_char(count(*)/24,'9999.9') AVG_SWITCHS_PER_HOURFROM v$loghist,(select avg(bytes) log_size from v$log)where first_time > sysdate - 60GROUP BY trunc(first_time),log_sizeorder by 1;
Protecting from an Oracle Data Guard NodeYou can protect an Oracle database from primary database nodes or from Oracle Data Guard (standby) nodes. If protection is set from an Oracle Data Guard node, then make sure to set the Application Advanced Settings (see Application Advanced Settings for Oracle Databases on page 26):
• Username:
In order for this user account to be available on the Data Guard node with sysdba access for database authentication, this user must be created with sysdba privilege at the Primary node (see creating backup user account with sysdba access). Then the password file (under $ORACLE_HOME/dbs/) from the primary node must be copied over to the Data Guard node.
For OS authentication: database user account with “connect, alter system” privilege.To set the database environment variable:
export ORACLE_HOME=<oracle home path> (get this from /etc/oratab, /var/opt/oracle/oratab on Solaris)export ORACLE_SID=<database instance name> (you can get this through ps -ef | grep pmon)export PATH=$ORACLE_HOME/bin:$PATHGrant "connect, alter system" access: sql> grant cconnect, alter system to act_rman_user;
• Password: Password for database user account
• Oracle Data Guard Primary Node Servicename: This is the servicename in the tnsnames.ora file configured on the Data Guard node to connect to the primary node from the standby node.
| actifio.com |An Oracle DBA’s Guide to Actifio Copy Data Management
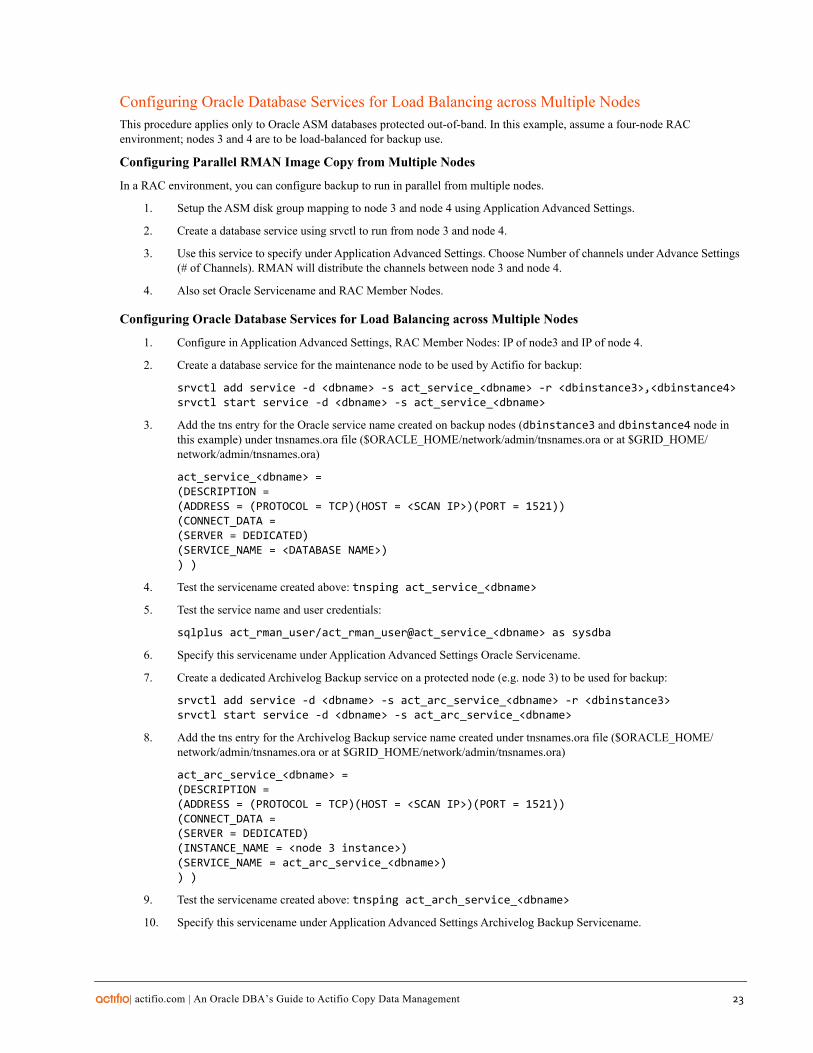
Configuring Oracle Database Services for Load Balancing across Multiple NodesThis procedure applies only to Oracle ASM databases protected out-of-band. In this example, assume a four-node RAC environment; nodes 3 and 4 are to be load-balanced for backup use.
Configuring Parallel RMAN Image Copy from Multiple Nodes
In a RAC environment, you can configure backup to run in parallel from multiple nodes.
1. Setup the ASM disk group mapping to node 3 and node 4 using Application Advanced Settings.
2. Create a database service using srvctl to run from node 3 and node 4.
3. Use this service to specify under Application Advanced Settings. Choose Number of channels under Advance Settings (# of Channels). RMAN will distribute the channels between node 3 and node 4.
4. Also set Oracle Servicename and RAC Member Nodes.
Configuring Oracle Database Services for Load Balancing across Multiple Nodes
1. Configure in Application Advanced Settings, RAC Member Nodes: IP of node3 and IP of node 4.
2. Create a database service for the maintenance node to be used by Actifio for backup:
srvctl add service -d <dbname> -s act_service_<dbname> -r <dbinstance3>,<dbinstance4> srvctl start service -d <dbname> -s act_service_<dbname>
3. Add the tns entry for the Oracle service name created on backup nodes (dbinstance3 and dbinstance4 node in this example) under tnsnames.ora file ($ORACLE_HOME/network/admin/tnsnames.ora or at $GRID_HOME/network/admin/tnsnames.ora)
act_service_<dbname> =(DESCRIPTION =(ADDRESS = (PROTOCOL = TCP)(HOST = <SCAN IP>)(PORT = 1521))(CONNECT_DATA =(SERVER = DEDICATED)(SERVICE_NAME = <DATABASE NAME>)) )
4. Test the servicename created above: tnsping act_service_<dbname>
5. Test the service name and user credentials:
sqlplus act_rman_user/act_rman_user@act_service_<dbname> as sysdba
6. Specify this servicename under Application Advanced Settings Oracle Servicename.
7. Create a dedicated Archivelog Backup service on a protected node (e.g. node 3) to be used for backup:
srvctl add service -d <dbname> -s act_arc_service_<dbname> -r <dbinstance3>srvctl start service -d <dbname> -s act_arc_service_<dbname>
8. Add the tns entry for the Archivelog Backup service name created under tnsnames.ora file ($ORACLE_HOME/network/admin/tnsnames.ora or at $GRID_HOME/network/admin/tnsnames.ora)
act_arc_service_<dbname> =(DESCRIPTION =(ADDRESS = (PROTOCOL = TCP)(HOST = <SCAN IP>)(PORT = 1521))(CONNECT_DATA =(SERVER = DEDICATED)(INSTANCE_NAME = <node 3 instance>)(SERVICE_NAME = act_arc_service_<dbname>)) )
9. Test the servicename created above: tnsping act_arch_service_<dbname>
10. Specify this servicename under Application Advanced Settings Archivelog Backup Servicename.
| actifio.com | An Oracle DBA’s Guide to Actifio Copy Data Management 23
24
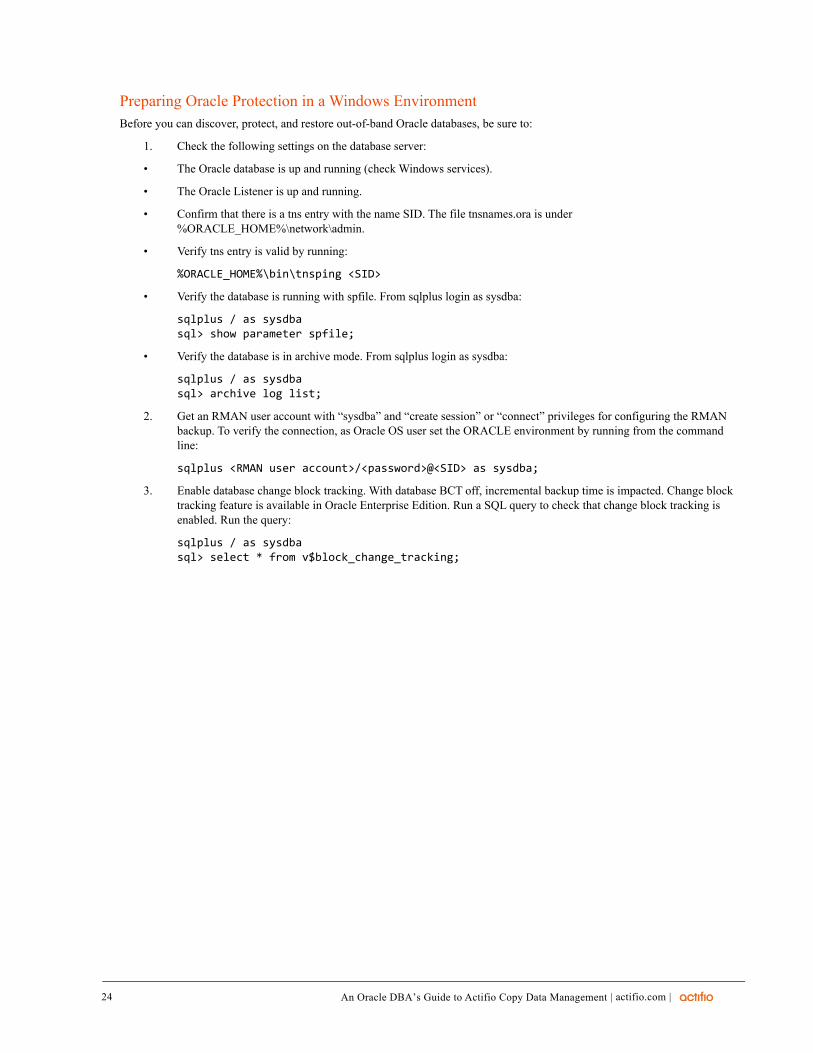
Preparing Oracle Protection in a Windows EnvironmentBefore you can discover, protect, and restore out-of-band Oracle databases, be sure to:
1. Check the following settings on the database server:
• The Oracle database is up and running (check Windows services).
• The Oracle Listener is up and running.
• Confirm that there is a tns entry with the name SID. The file tnsnames.ora is under %ORACLE_HOME%\network\admin.
• Verify tns entry is valid by running:
%ORACLE_HOME%\bin\tnsping <SID>
• Verify the database is running with spfile. From sqlplus login as sysdba:
sqlplus / as sysdbasql> show parameter spfile;
• Verify the database is in archive mode. From sqlplus login as sysdba:
sqlplus / as sysdbasql> archive log list;
2. Get an RMAN user account with “sysdba” and “create session” or “connect” privileges for configuring the RMAN backup. To verify the connection, as Oracle OS user set the ORACLE environment by running from the command line:
sqlplus <RMAN user account>/<password>@<SID> as sysdba;
3. Enable database change block tracking. With database BCT off, incremental backup time is impacted. Change block tracking feature is available in Oracle Enterprise Edition. Run a SQL query to check that change block tracking is enabled. Run the query:
sqlplus / as sysdbasql> select * from v$block_change_tracking;
| actifio.com |An Oracle DBA’s Guide to Actifio Copy Data Management
6
| a
Advanced Settings for Oracle Databases
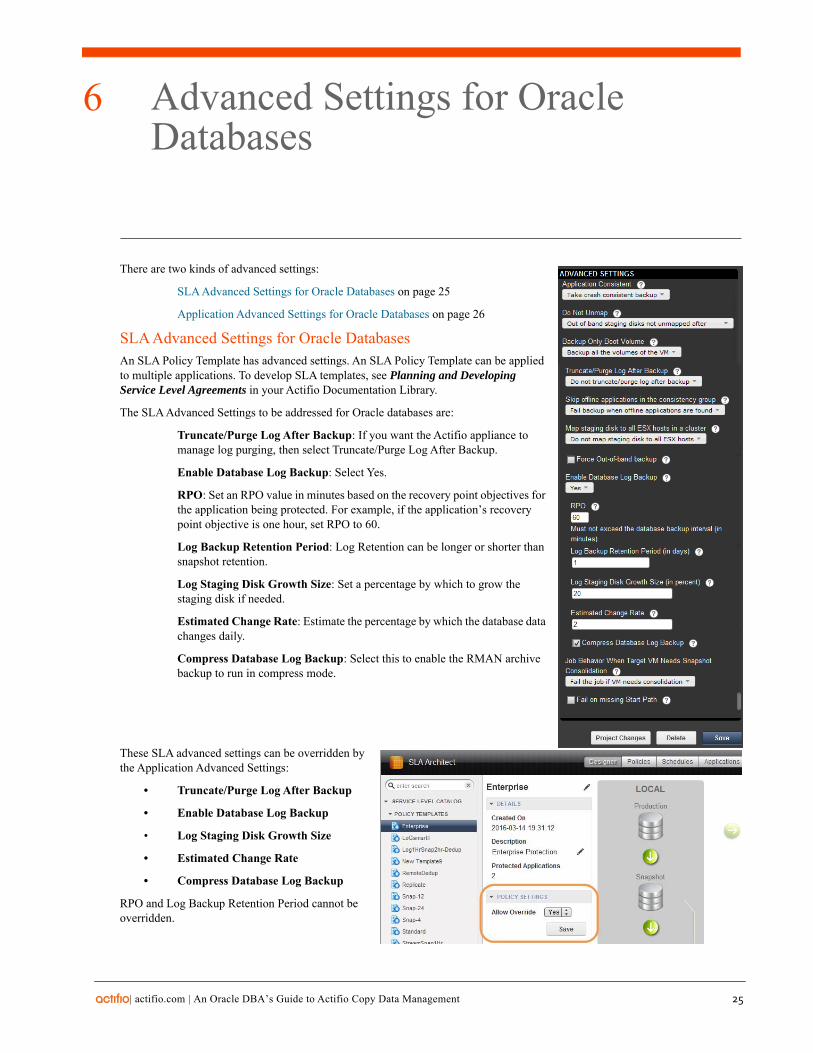
There are two kinds of advanced settings:
SLA Advanced Settings for Oracle Databases on page 25
Application Advanced Settings for Oracle Databases on page 26
SLA Advanced Settings for Oracle DatabasesAn SLA Policy Template has advanced settings. An SLA Policy Template can be applied to multiple applications. To develop SLA templates, see Planning and Developing Service Level Agreements in your Actifio Documentation Library.
The SLA Advanced Settings to be addressed for Oracle databases are:
Truncate/Purge Log After Backup: If you want the Actifio appliance to manage log purging, then select Truncate/Purge Log After Backup.
Enable Database Log Backup: Select Yes.
RPO: Set an RPO value in minutes based on the recovery point objectives for the application being protected. For example, if the application’s recovery point objective is one hour, set RPO to 60.
Log Backup Retention Period: Log Retention can be longer or shorter than snapshot retention.
Log Staging Disk Growth Size: Set a percentage by which to grow the staging disk if needed.
Estimated Change Rate: Estimate the percentage by which the database data changes daily.
Compress Database Log Backup: Select this to enable the RMAN archive backup to run in compress mode.
These SLA advanced settings can be overridden by the Application Advanced Settings:
• Truncate/Purge Log After Backup
• Enable Database Log Backup
• Log Staging Disk Growth Size
• Estimated Change Rate
• Compress Database Log Backup
RPO and Log Backup Retention Period cannot be overridden.
ctifio.com | An Oracle DBA’s Guide to Actifio Copy Data Management 25
26
Application Advanced Settings for Oracle DatabasesThe Application Advanced Settings for an Oracle database are:
• Username and Password: When Operating System authentication is not or cannot be employed, enter a username and password for database authentication.
• User Role in the Database: The default value is sysdba, but you can select sysbackup if you have an Oracle 12c database.
• Number of Channels: Enter the number of RMAN channels based on the host computing power. Number of channels should be configured based on # of cores available on the server, taking into account other database backups configured to run in parallel. The default number of channels is one.
• Staging Disk Size: By default, the Oracle connector calculates the size as 1.5 times the maximum size of the database. To specify a value manually, allocate a staging disk to allow for two years future growth of the database. Do not confuse this entry with Log Staging Disk Size, below.
• Staging Disk Granularity: Default size is 1TB.
• Last Staging Disk Minimum Size: If an application might require multiple staging disks, enter the minimum size to be allocated for the staging disk used for the last part of that application.
• Staging Disk Mount Point: Allows you mount the staging disk to a specific location.
• Oracle Named Listener: If the protected database uses a named listener, specify the listener name here. The Oracle Named Listener is used only with database authentication.
• RMAN Log Location: By default the rman log location is /var/act/log/rman<db name>.log. This entry allows you to change the RMAN log file location. enter the full path, with RMAN filename.
• Restore Validate: RMAN provides restore validation for the backups. When this option is checked, the connector will invoke RMAN restore validate for each backup. This validation will add time to the backup.
• Catalog DB Name: Optional: This is the CATALOG database SID name. This is for the user environment where RMAN CATALOG DATABASE is set up for RMAN backup. The CATALOG database SID name must have an entry in the tnsnames.ora file for Actifio to connect.
• Catalog User and Password: Catalog database user name and password for RMAN backup.
• Oracle Servicename: Provides the ability to specify a new service name in tnsnames.ora file to be used by Actifio backup, as described in Creating and Verifying the Oracle Servicename in a non-RAC Environment on page 18 and in Creating and Verifying the Oracle Servicename in a RAC Environment on page 19. If not specified, then by default Actifio will use the Oracle SID name (instance name) as the service name. Either the new service name or the default SID name must have an entry in the tnsnames.ora file for Actifio to connect. The Oracle Servicename is used only with database authentication.
• Oracle Data Guard Primary Node Servicename: This is the servicename in the tnsnames.ora file configured on the Data Guard node to connect to the primary node from the standby node. This is required only when you are protecting data from Oracle Data Guard. For more information, see Protecting from an Oracle Data Guard Node on page 22.
• Cluster Nodes: Specify a failover node choice in format Failover choice:Node IP:servicename:role.This is used for RAC only, see Configuring RAC Transparent Failover of Actifio RMAN Backup to Other Nodes on page 21. Example: 1:172.16.16.21:svc_orarac2_act:F
role should be F (failover).
role can also be M (maintenance). When an appliance member role is specified as M, then the Actifio appliance uses it as the primary backup node instead of using the original protected node.
• Choose Do Not Unmap if you want temporary staging disks mapped to the host and used during data movement for backup to remain mapped to the host. LUNs are mapped during the first job and all the subsequent jobs reuse the same mapped LUN. By default, this option is selected.
| actifio.com |An Oracle DBA’s Guide to Actifio Copy Data Management

• Truncate Log after Backup: This is to set the archive log purging. The current database archive logs will be purged with the next database backup job. If database logs are protected, then purging is based on the Log Purging Retention Period option. See Archive Log Behavior When Policy Advanced Settings are Overridden by Oracle Application Advanced Settings on page 28.
• Connector Options: Use this only under the direction of Actifio Support.
• Force out-of-band backup: This option is to force an out-of-band backup when database datafiles are in-band. This is used only for databases stored in-band on storage managed by an Actifio appliance appliance.
• Estimated Change Rate: Entering a percentage for the database’s daily change rate will allow the Actifio appliance to better predict how to grow the staging VDisk for the database’s log file.
• Compress Database Log Backup: Flag to enable the log backup compression. If selected, the backup of archive log will be run using RMAN compress option.
• Log Purging Retention Period: In the space provided, enter the number of hours to retain archive logs in the primary log destination. For example, if this is set to 4, then archive logs older than four hours will be purged from the database primary archive destination. The default value is 24 hours.
• Number of Successful Log Backups: By default, archive purging does not check for the number of successful log backups. Enter a number of successful log backups after which to run the archive purge.
• Maxcorrupt Parameter Setting: RMAN backup will continue with backup skipping the said number of corrupted data block in each datafile. By default this value is 0 and backup will fail if there is any corrupt data block in any data file.
• AU_SIZE: Allocation Unit size of ASM disk group. Default is 1 MB. This is used for the first backup under ASM disk group only.
• Number of Times Backing Up Archivelog: Archivelog backup will run if this has not been reached.
• Log Staging Disk Size: This applies when a log backup policy is set. By default Actifio will use the 30-day high-water mark to determine the staging disk size for archive backup staging disk. To specify a value manually, refer to Manually Calculating Log Staging Disk Size (optional) on page 22 for more information on determining this value.
• Do Not Uncatalog: To keep RMAN backup cataloged after each backup job. By default, Actifio backup will be cataloged at the start of backup and then be un-cataloged at the end of the backup.
• Force New level 0 Backup: If for any reason a full level 0 backup is required, overwriting the Actifio incremental backup, then select this option for a single backup job. Be sure to uncheck it after the full level0 backup is complete, or else this will force each backup to be a new level 0 Oracle RMAN out-of-band backup. This has impact on snapshot pool storage.
• Crosscheck Archivelog Before Archive Backup: By default crosscheck does not run with archive backup. Select this to run crosscheck and delete expired archivelogs with each archive backup.
• Oracle Configuration File Location: Use this if you are backing up any Oracle configuration files with an Oracle OOB backup such as wallet for encryption support. This requires a full path name. If the folder name is specified then all files under that folder will be backed up. If a file name is specified then only the specified file will be backed up.
Note: For security reasons, keys are not backed up with the database backup.
• Oracle TNS_Admin Path: If tnsnames.ora is in a nonstandard location, then provide the full path of the directory where it is located. The Oracle TNS_Admin Path is used only with database authentication.
• Archivelog Backup Servicename: Provide a dedicated Oracle database service name for the archive log backup in RAC environment when Oracle service name is set to run from more than one node. The Archivelog Backup Servicename is used only with database authentication.
• Convert ASM Format to Filesystem Format: By default, the database is captured in its native format, either ASM or file system. The backup destination is ASM to ASM and non-ASM to file system. Set this to Yes if the source database is ASM and backup destination must be set to file system.
| actifio.com | An Oracle DBA’s Guide to Actifio Copy Data Management 27
28
Archive Log Behavior When Policy Advanced Settings are Overridden by Oracle Application Advanced Settings
Yes No No value No value Purge log will run at end of each database backup with a retention of 24 hours i.e. delete archivelog older then sysdate -1
Yes Yes No value No value Purge log will run at the end of each archive backup with a retention of 24 hours i.e. delete archivelog older then sysdate -1
Yes No Do not Truncate/Purge
No Value Archive log will not be purged
Yes Yes Do not Truncate/Purge
No Value Archive log will not be purged
No No Truncate/Purge log
No value Purge log will run at end of each database backup with a retention of 24 hours i.e. delete archivelog older then sysdate -1
No No Truncate/Purge log
Value (n hours)
Purge log will run at end of each database backup with a retention of n hours i.e. delete archivelog older then sysdate -n/24
No Yes Truncate/Purge log
No value Purge log will run at the end of each archive backup with a retention of 24 hours i.e. delete archivelog older then sysdate -1
No Yes Truncate/Purge log
Value(n hours)
Purge log will run at the end of each archive backup with a retention of n hours i.e. delete archivelog older then sysdate -n/24
• Auto Discover RAC Members: Check this checkbox to autodiscover all members of the RAC database databases in an ASM disk group out-of-band configuration. This enables mapping the staging disk to all nodes. Auto-discovery will not work if the hostname does not have fully qualified domain name. In that case add the nodes manually.
• RAC Member Nodes: If you choose not to autodiscover RAC members, then provide a node list for mapping the staging disk as a shared volume for backup. List the protected nodes first. Use this only for protecting Oracle databases in an ASM disk group.
Policy Advanced Setting Application Advanced Setting Behavior
Truncate Log
Enable Log Backup
Purge Log After Backup
Log Purging Retention
| actifio.com |An Oracle DBA’s Guide to Actifio Copy Data Management
7
| a
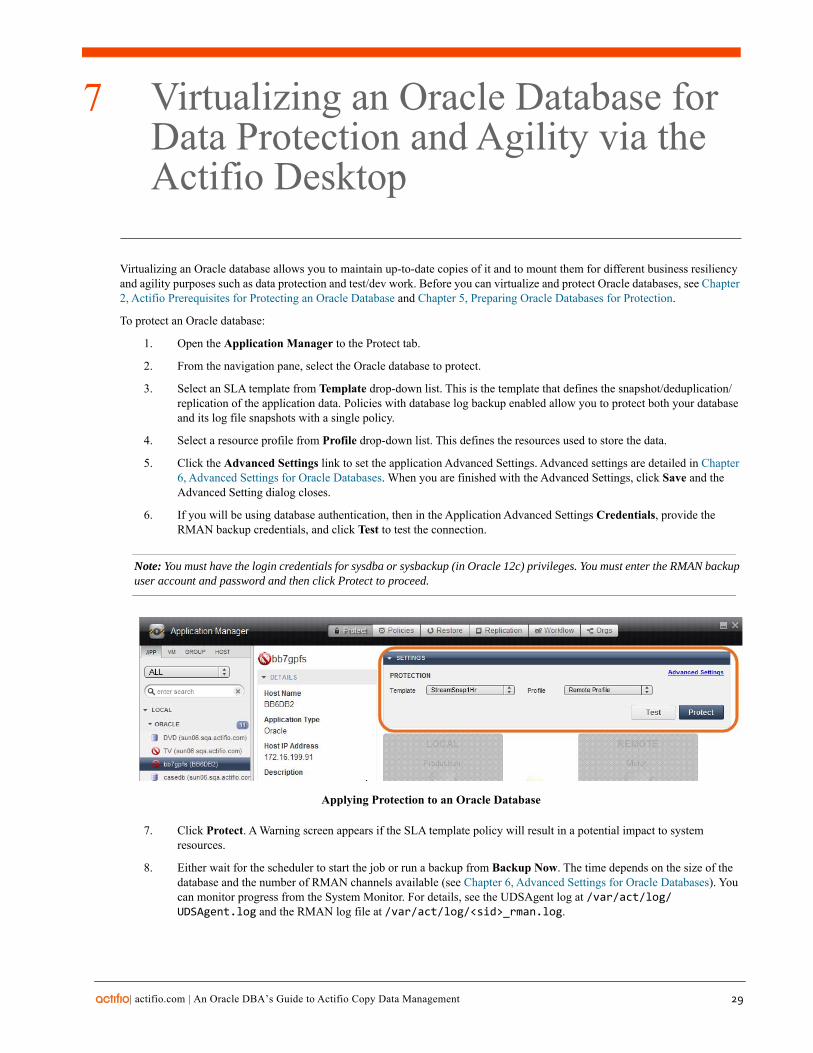
Virtualizing an Oracle Database for Data Protection and Agility via the Actifio Desktop
Virtualizing an Oracle database allows you to maintain up-to-date copies of it and to mount them for different business resiliency and agility purposes such as data protection and test/dev work. Before you can virtualize and protect Oracle databases, see Chapter 2, Actifio Prerequisites for Protecting an Oracle Database and Chapter 5, Preparing Oracle Databases for Protection.
To protect an Oracle database:
1. Open the Application Manager to the Protect tab.
2. From the navigation pane, select the Oracle database to protect.
3. Select an SLA template from Template drop-down list. This is the template that defines the snapshot/deduplication/ replication of the application data. Policies with database log backup enabled allow you to protect both your database and its log file snapshots with a single policy.
4. Select a resource profile from Profile drop-down list. This defines the resources used to store the data.
5. Click the Advanced Settings link to set the application Advanced Settings. Advanced settings are detailed in Chapter 6, Advanced Settings for Oracle Databases. When you are finished with the Advanced Settings, click Save and the Advanced Setting dialog closes.
6. If you will be using database authentication, then in the Application Advanced Settings Credentials, provide the RMAN backup credentials, and click Test to test the connection.
Note: You must have the login credentials for sysdba or sysbackup (in Oracle 12c) privileges. You must enter the RMAN backup user account and password and then click Protect to proceed.
Applying Protection to an Oracle Database
7. Click Protect. A Warning screen appears if the SLA template policy will result in a potential impact to system resources.
8. Either wait for the scheduler to start the job or run a backup from Backup Now. The time depends on the size of the database and the number of RMAN channels available (see Chapter 6, Advanced Settings for Oracle Databases). You can monitor progress from the System Monitor. For details, see the UDSAgent log at /var/act/log/UDSAgent.log and the RMAN log file at /var/act/log/<sid>_rman.log.
ctifio.com | An Oracle DBA’s Guide to Actifio Copy Data Management 29

30
| actifio.com |An Oracle DBA’s Guide to Actifio Copy Data Management
8
| a
Accessing, Recovering, or Restoring an Oracle Database via the Actifio Desktop
Actifio offers several ways to access data, including mounting and restoring. These are described in Accessing Data on page 4 and detailed in Accessing and Recovering Copy Data with the Application Manager and Restoring Copy Data with the Application Manager, both in your Actifio Documentation Library.
The most common ways to access an Oracle database:
The standard mount provides instant access to data without moving data. Captured copies of databases can be rolled forward via the Actifio user interface and mounted on any database server. Standard mount methods include:
o Mounting an Oracle Database Image Protected Under an ASM Disk Group for Data Access on page 32
o Mounting an Oracle Database Image Protected Under a File System for Data Access on page 34
The Application Aware mount presents and makes the captured Oracle database available to a target server as a virtual Oracle database. This allows you to address the unique challenges associated with creating and managing copies of production databases for non-production use. Application Aware mounts are performed from the Actifio appliance and do not require manual intervention by database, server, or storage administrators. Application Aware mounts can be used for such things as database reporting, analytics, integrity testing, and test and development. Application Aware mounts are described in Mounting an Oracle Database as a Virtual Application on page 36.
The restore function reverts the production data to a specified point in time. Restore operations actually move data. Typically restore operations are performed to restore a database to a valid state after a massive data corruption or storage array failure. The amount of time required to complete a restore operation depends on the amount of data involved. To restore a database, see Restoring a Database via the Actifio Desktop, Overwriting the Production Database on page 38.
You can also clone and LiveClone Oracle databases following the general procedures in Accessing and Recovering Copy Data with the Application Manager; there are no Oracle-specific procedures for those methods of data access.
Oracle-specific workflows are detailed in Creating Automated Workflows for Oracle Databases.
ctifio.com | An Oracle DBA’s Guide to Actifio Copy Data Management 31

32
Mounting an Oracle Database Image Protected Under an ASM Disk Group for Data AccessTo mount an Oracle database image for data access:
1. Open the Actifio Desktop to the Application Manager and select the Restore tab.
2. In the Navigation pane, select the protected Oracle application..
Mounting an Oracle Database
3. Under Select a backup on the right, select a snapshot image.
4. From the gear icon dropdown menu, select Mount. The Mount window opens..
Mount Details for an Oracle Database with ASM Data
| actifio.com |An Oracle DBA’s Guide to Actifio Copy Data Management
5. Provide a label as needed. This is optional.
6. If necessary, change the default storage pool from the Select default storage pool drop-down list. The available free space in the pool is indicated in parentheses.
7. In the Select Host drop down list, select target Node1 of the RAC node.
8. Enter a diskgroup name for the mounted image copy under Preferred diskgroup name.
9. RAC Node list:
o To provision a RAC database on the target RAC cluster, specify the IP address of all nodes for the target RAC cluster separated by a colon (:) in the order of RAC nodes 1....n.
o To provision a single node RAC database on a target RAC cluster or a standalone database under ASM on a non-RAC ASM target, provide the IP address of the target node.
10. Mount Drive: Ignore this setting.
11. Mount Point: Enter the full path at which you want to mount the log.
o If the path exists as an empty folder, the Actifio Connector will use it.
o If it does not exist, the Connector will create it.
o If it exists as a file or as a folder that is not empty, then the job will fail.
If there are multiple volumes to be mounted, the Connector uses the mount point that you specify for one of the volumes, and for the remaining volumes it appends an underscore followed by a number, i.e., <specified>_#
o The Oracle database image will be mounted to ASM with a disk group name specified under <preferred disk group> (see Step 8).
o If logs are Actifio-protected, then the logs image will be mounted to /act/mnt/<jobid>_Log, and subsequent logs images to /act/mnt/<jobid>_Log_1, /act/mnt/<jobid>_Log_2, and so on.
12. Check Select All to mount all volumes.
| actifio.com | An Oracle DBA’s Guide to Actifio Copy Data Management 33
34
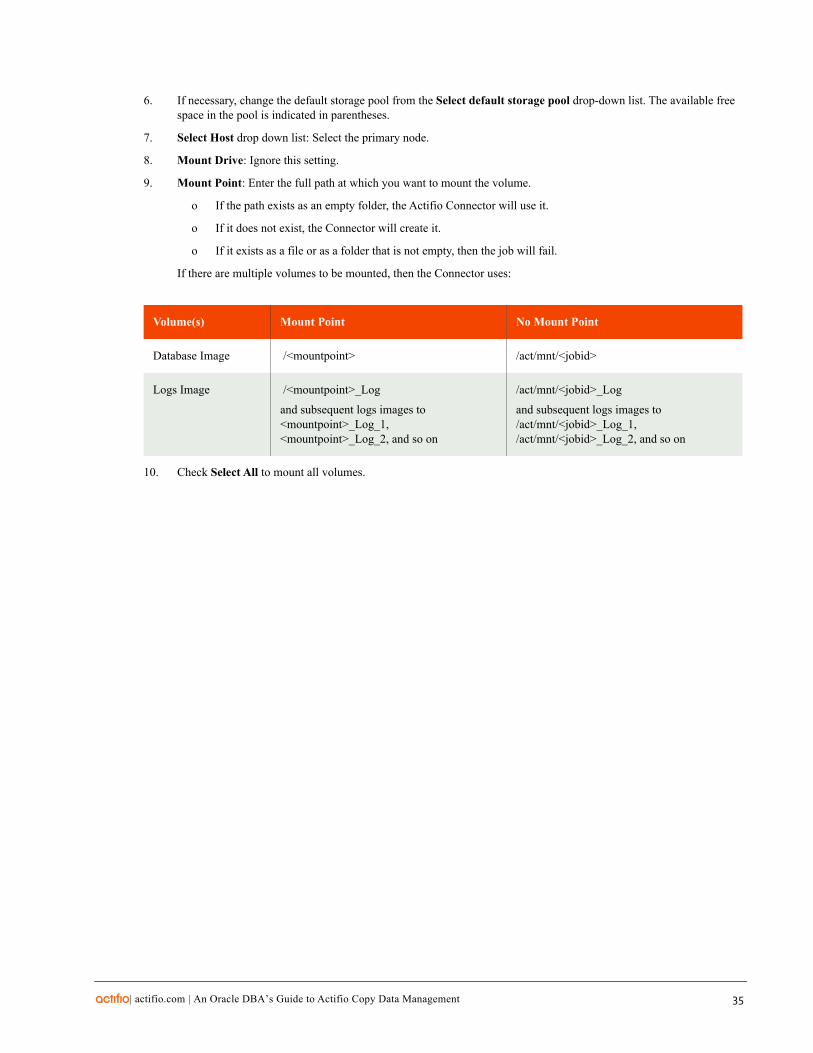
Mounting an Oracle Database Image Protected Under a File System for Data AccessTo mount an Oracle database image from a file system for data access:
1. Open the Actifio Desktop to the Application Manager and select the Restore tab.
2. In the Navigation pane, select the protected Oracle application..
Mounting an Oracle Database
3. Under Select a backup on the right, select a snapshot image.
4. From the gear icon dropdown menu, select Mount. The Mount window opens..
Mount Details for an Oracle Database from a File System
5. Provide a label as needed. This is optional.
| actifio.com |An Oracle DBA’s Guide to Actifio Copy Data Management
6. If necessary, change the default storage pool from the Select default storage pool drop-down list. The available free space in the pool is indicated in parentheses.
7. Select Host drop down list: Select the primary node.
8. Mount Drive: Ignore this setting.
9. Mount Point: Enter the full path at which you want to mount the volume.
o If the path exists as an empty folder, the Actifio Connector will use it.
o If it does not exist, the Connector will create it.
o If it exists as a file or as a folder that is not empty, then the job will fail.
If there are multiple volumes to be mounted, then the Connector uses:
Database Image /<mountpoint> /act/mnt/<jobid>
Logs Image /<mountpoint>_Log
and subsequent logs images to <mountpoint>_Log_1, <mountpoint>_Log_2, and so on
/act/mnt/<jobid>_Log
and subsequent logs images to /act/mnt/<jobid>_Log_1, /act/mnt/<jobid>_Log_2, and so on
10. Check Select All to mount all volumes.
Volume(s) Mount Point No Mount Point
| actifio.com | An Oracle DBA’s Guide to Actifio Copy Data Management 35

36
Mounting an Oracle Database as a Virtual ApplicationAn Actifio Application Aware mount mounts a captured Oracle database as a virtual application. It allows you to quickly bring a database online without having to actually move the data and without having to manually configure a new instance of the database. An Application Aware mount addresses the challenges of creating and managing copies of production databases without manual intervention by database, server, and storage administrators.
Note: Oracle virtual applications consume a minimum 300 MB to account for redo logs and the control file.
Note: Oracle databases captured in Actifio Vault storage cannot be mounted as virtual applications.
To mount an Oracle database as a virtual application:
1. Start mounting the image as detailed in Mounting an Oracle Database Image Protected Under a File System for Data Access on page 34. At the bottom of the Mount page, select App Aware Mount.
Mounting and Confirming an Application Aware Oracle Database Mount
2. Fill in the form as needed for this virtual application. Fields marked with an asterisk (*) are required. The ? icons beside each field provide helpful information.
o Target Database SID: Specify SID for the new Oracle database to be provisioned on the target.
o User Name/Password: Specify Oracle Operating System user credentials on the target. A password is optional.
o Oracle Home Directory: Specify the Oracle Home Directory ($ORACLE_HOME) on the target database server.
o TNS Admin Directory Path: Specify TNS_ADMIN Directory path (path of tnsnames.ora file) on the target database server.
| actifio.com |An Oracle DBA’s Guide to Actifio Copy Data Management
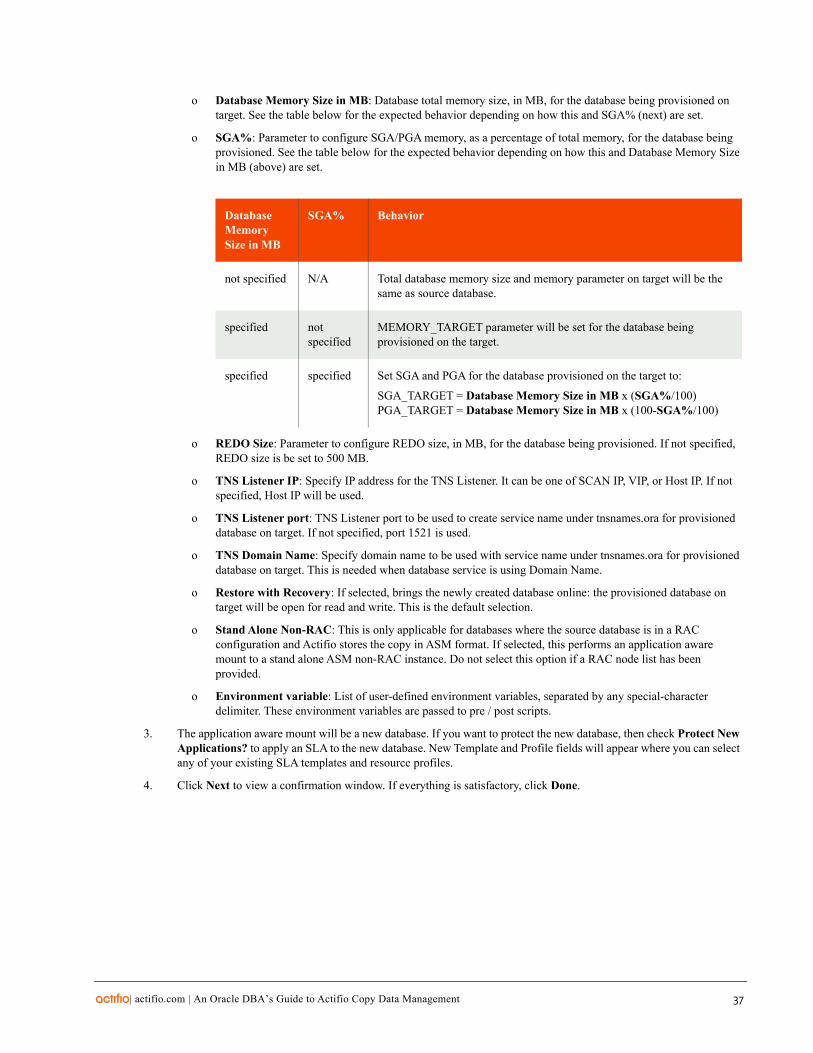
o Database Memory Size in MB: Database total memory size, in MB, for the database being provisioned on target. See the table below for the expected behavior depending on how this and SGA% (next) are set.
o SGA%: Parameter to configure SGA/PGA memory, as a percentage of total memory, for the database being provisioned. See the table below for the expected behavior depending on how this and Database Memory Size in MB (above) are set.
not specified N/A Total database memory size and memory parameter on target will be the same as source database.
specified not specified
MEMORY_TARGET parameter will be set for the database being provisioned on the target.
specified specified Set SGA and PGA for the database provisioned on the target to:
SGA_TARGET = Database Memory Size in MB x (SGA%/100) PGA_TARGET = Database Memory Size in MB x (100-SGA%/100)
o REDO Size: Parameter to configure REDO size, in MB, for the database being provisioned. If not specified, REDO size is be set to 500 MB.
o TNS Listener IP: Specify IP address for the TNS Listener. It can be one of SCAN IP, VIP, or Host IP. If not specified, Host IP will be used.
o TNS Listener port: TNS Listener port to be used to create service name under tnsnames.ora for provisioned database on target. If not specified, port 1521 is used.
o TNS Domain Name: Specify domain name to be used with service name under tnsnames.ora for provisioned database on target. This is needed when database service is using Domain Name.
o Restore with Recovery: If selected, brings the newly created database online: the provisioned database on target will be open for read and write. This is the default selection.
o Stand Alone Non-RAC: This is only applicable for databases where the source database is in a RAC configuration and Actifio stores the copy in ASM format. If selected, this performs an application aware mount to a stand alone ASM non-RAC instance. Do not select this option if a RAC node list has been provided.
o Environment variable: List of user-defined environment variables, separated by any special-character delimiter. These environment variables are passed to pre / post scripts.
3. The application aware mount will be a new database. If you want to protect the new database, then check Protect New Applications? to apply an SLA to the new database. New Template and Profile fields will appear where you can select any of your existing SLA templates and resource profiles.
4. Click Next to view a confirmation window. If everything is satisfactory, click Done.
Database Memory Size in MB
SGA% Behavior
| actifio.com | An Oracle DBA’s Guide to Actifio Copy Data Management 37
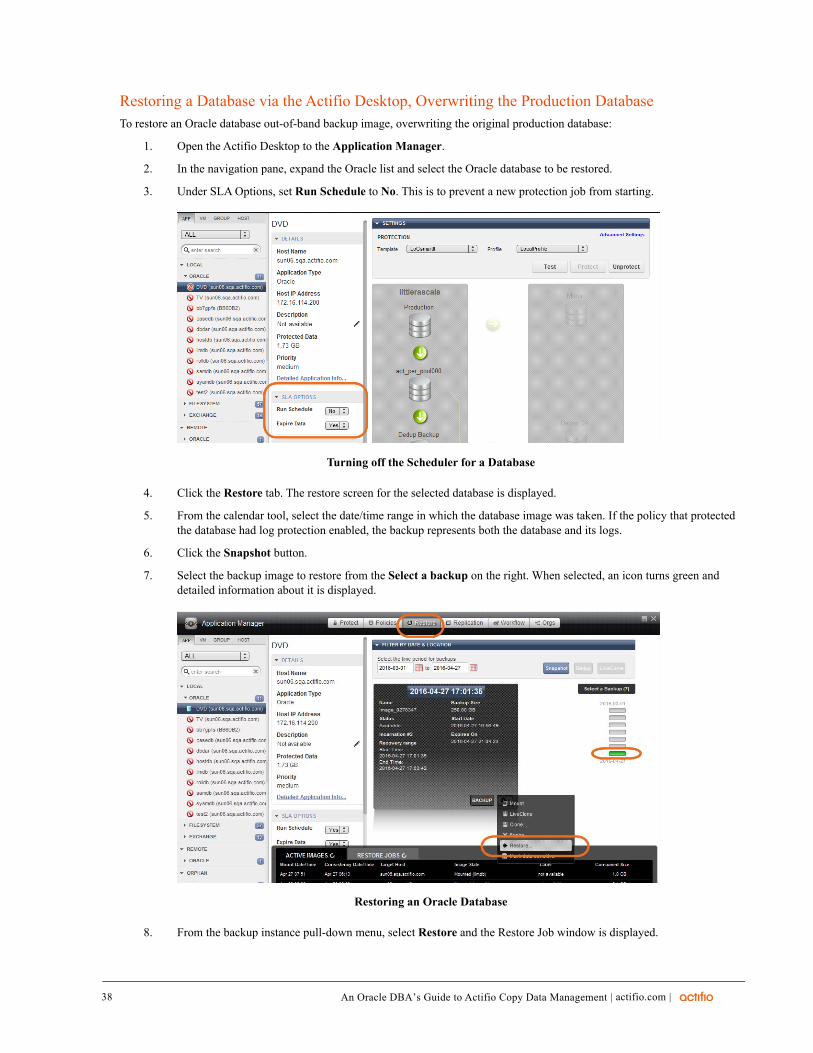
38
Restoring a Database via the Actifio Desktop, Overwriting the Production DatabaseTo restore an Oracle database out-of-band backup image, overwriting the original production database:
1. Open the Actifio Desktop to the Application Manager.
2. In the navigation pane, expand the Oracle list and select the Oracle database to be restored.
3. Under SLA Options, set Run Schedule to No. This is to prevent a new protection job from starting. .
Turning off the Scheduler for a Database
4. Click the Restore tab. The restore screen for the selected database is displayed.
5. From the calendar tool, select the date/time range in which the database image was taken. If the policy that protected the database had log protection enabled, the backup represents both the database and its logs.
6. Click the Snapshot button.
7. Select the backup image to restore from the Select a backup on the right. When selected, an icon turns green and detailed information about it is displayed.
.
Restoring an Oracle Database
8. From the backup instance pull-down menu, select Restore and the Restore Job window is displayed.
| actifio.com |An Oracle DBA’s Guide to Actifio Copy Data Management
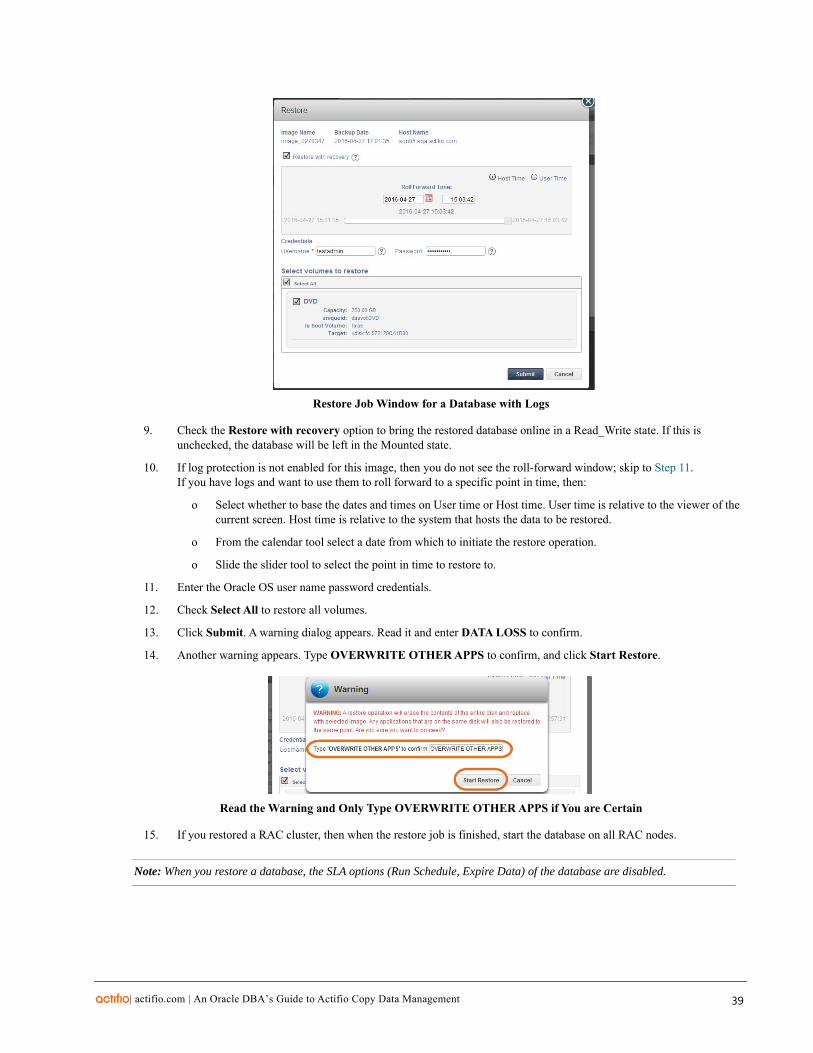
Restore Job Window for a Database with Logs
9. Check the Restore with recovery option to bring the restored database online in a Read_Write state. If this is unchecked, the database will be left in the Mounted state.
10. If log protection is not enabled for this image, then you do not see the roll-forward window; skip to Step 11. If you have logs and want to use them to roll forward to a specific point in time, then:
o Select whether to base the dates and times on User time or Host time. User time is relative to the viewer of the current screen. Host time is relative to the system that hosts the data to be restored.
o From the calendar tool select a date from which to initiate the restore operation.
o Slide the slider tool to select the point in time to restore to.
11. Enter the Oracle OS user name password credentials.
12. Check Select All to restore all volumes.
13. Click Submit. A warning dialog appears. Read it and enter DATA LOSS to confirm.
14. Another warning appears. Type OVERWRITE OTHER APPS to confirm, and click Start Restore.
Read the Warning and Only Type OVERWRITE OTHER APPS if You are Certain
15. If you restored a RAC cluster, then when the restore job is finished, start the database on all RAC nodes.
Note: When you restore a database, the SLA options (Run Schedule, Expire Data) of the database are disabled.
| actifio.com | An Oracle DBA’s Guide to Actifio Copy Data Management 39

40
| actifio.com |An Oracle DBA’s Guide to Actifio Copy Data Management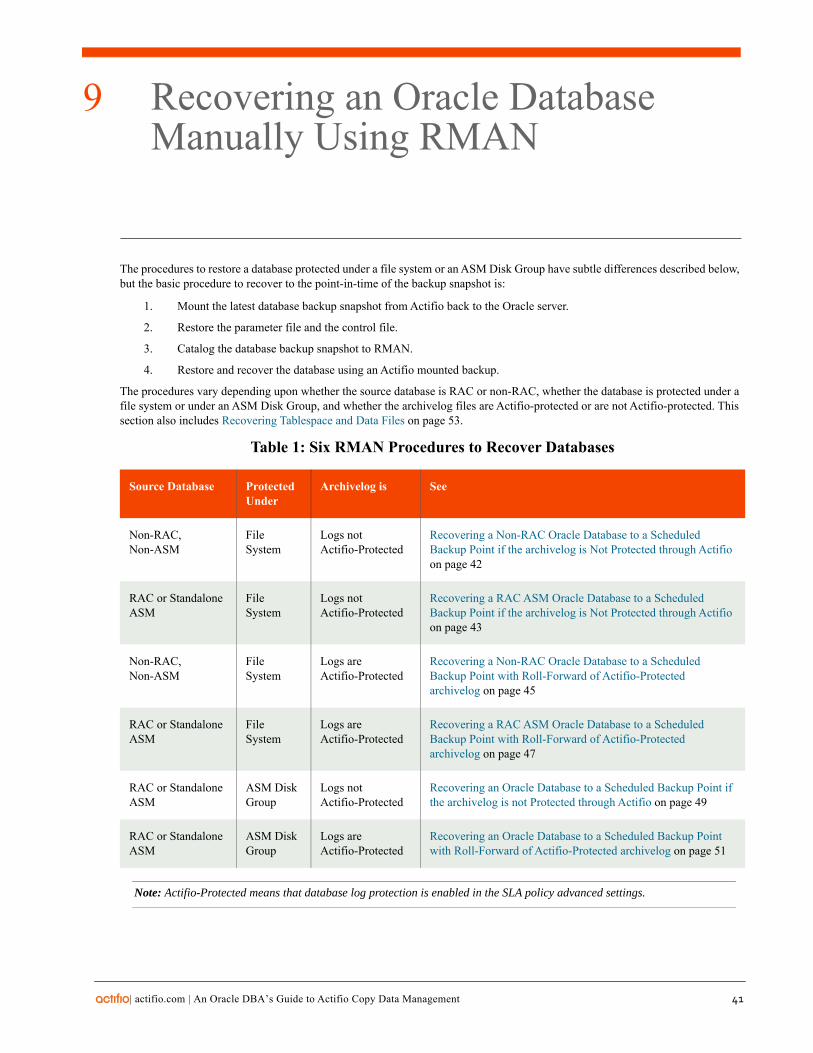
9
| a
Recovering an Oracle Database Manually Using RMAN
The procedures to restore a database protected under a file system or an ASM Disk Group have subtle differences described below, but the basic procedure to recover to the point-in-time of the backup snapshot is:
1. Mount the latest database backup snapshot from Actifio back to the Oracle server.
2. Restore the parameter file and the control file.
3. Catalog the database backup snapshot to RMAN.
4. Restore and recover the database using an Actifio mounted backup.
The procedures vary depending upon whether the source database is RAC or non-RAC, whether the database is protected under a file system or under an ASM Disk Group, and whether the archivelog files are Actifio-protected or are not Actifio-protected. This section also includes Recovering Tablespace and Data Files on page 53.
Table 1: Six RMAN Procedures to Recover Databases
Non-RAC, Non-ASM
File System
Logs not Actifio-Protected
Recovering a Non-RAC Oracle Database to a Scheduled Backup Point if the archivelog is Not Protected through Actifio on page 42
RAC or Standalone ASM
File System
Logs not Actifio-Protected
Recovering a RAC ASM Oracle Database to a Scheduled Backup Point if the archivelog is Not Protected through Actifio on page 43
Non-RAC, Non-ASM
File System
Logs are Actifio-Protected
Recovering a Non-RAC Oracle Database to a Scheduled Backup Point with Roll-Forward of Actifio-Protected archivelog on page 45
RAC or Standalone ASM
File System
Logs are Actifio-Protected
Recovering a RAC ASM Oracle Database to a Scheduled Backup Point with Roll-Forward of Actifio-Protected archivelog on page 47
RAC or Standalone ASM
ASM Disk Group
Logs not Actifio-Protected
Recovering an Oracle Database to a Scheduled Backup Point if the archivelog is not Protected through Actifio on page 49
RAC or Standalone ASM
ASM Disk Group
Logs are Actifio-Protected
Recovering an Oracle Database to a Scheduled Backup Point with Roll-Forward of Actifio-Protected archivelog on page 51
Note: Actifio-Protected means that database log protection is enabled in the SLA policy advanced settings.
Source Database Protected Under
Archivelog is See
ctifio.com | An Oracle DBA’s Guide to Actifio Copy Data Management 41
42
Recovering a Non-RAC Oracle Database to a Scheduled Backup Point if the archivelog is Not Protected through Actifio
Non-RAC, Non-ASM File System Not Actifio-Protected
To recover a non-RAC Oracle database for point-in-time recovery if the logs are not protected by Actifio:
1. Mount the image from the source database server to recover. In the Mount window, provide a mount point for the image, for example: /acttestdb. For instructions on how to mount a database image, see Mounting an Oracle Database Image Protected Under a File System for Data Access on page 34.
2. Set the Oracle environment, and use sqlplus to shut down the database:
sqlplus / as sysdbasql> shutdown immediate;
Verify that the database is shut down. Kill any orphan process for the database.
ps -ef | grep <db name>
3. Create a new spfile from the existing pfile and restart the database:
Start the database in nomount state using the parameter file from the mounted volume. The parameter file will be under a top mounted folder, for example: /acttestdb
sqlplus / as sysdbasql> startup nomount pfile='/acttestdb/<database sid>___backup.ora';
Create an spfile from the pfile:
sql> create spfile='$ORACLE_HOME/dbs/spfile<database sid>.ora' from pfile='/acttestdb/<database sid>___backup.ora';
Restart the database in nomount state with the new spfile:
sql> shutdown immediate;sql> startup nomount;
4. Use RMAN to restore the controlfile from the Actifio mounted volume:
rman target /rman> restore controlfile from '/acttestdb/cf-D_<sid>-id_<id>.ctl' ;
5. Mount the database:
rman> alter database mount;
6. Catalog the datafile and archivelog folder from the Actifio mounted volume to RMAN:
rman> run { catalog start with '/acttestdb/datafile' noprompt; catalog start with '/acttestdb/archivelog' noprompt; }
7. Restore and recover the database:
rman> run { restore database ; recover database ; }
Note: Ignore any warning from RMAN looking for the next archivelog as this is a point-in-time recovery.
8. Open the database with the reset log option:
rman> alter database open resetlogs;
The database is available for read and write.
Source Database Protected Under Archivelog is
| actifio.com |An Oracle DBA’s Guide to Actifio Copy Data Management
Recovering a RAC ASM Oracle Database to a Scheduled Backup Point if the archivelog is Not Protected through Actifio
RAC or Standalone ASM File System Not Actifio-Protected
To recover a standalone ASM or RAC Oracle database for point-in-time recovery if the logs are not Actifio-protected:
1. Mount the image from the source database server to recover. In the Mount window, provide a mount point for the image, for example: /acttestdb. For instructions on how to mount a database image, see Mounting an Oracle Database Image Protected Under a File System for Data Access on page 34.
2. Shut down the Oracle database.
From node 1, su to the Oracle OS user:
su - oracle
Set the Oracle environment and use srvctl to stop the database across all nodes:
srvctl stop database -d <database name>
Verify that the database is shut down on all nodes. Kill any orphan process for the database.
ps -ef | grep <db name>
3. Start the database in nomount state using the parameter file from the mounted volume. The parameter file will be under a top mounted folder for example: /acttestdb
sqlplus / as sysdbasql> startup nomount pfile='/acttestdb/<db name>___backup.ora';
4. Create a new spfile and restart the database:
To get the path of original spfile under disk group:
cat $ORACLE_HOME/dbs/init<database sid>.ora
For example: spfile=+<preferred disk group>/<db name>/spfile<db name>.ora
sql> create spfile='+<preferred disk group>/<db name>/spfile<db name>.ora' from pfile='/acttestdb/<db name>___backup.ora';
Restart the database with spfile in nomount state:
sql> shutdown immediate;sql> startup nomount;
5. Restore the control file using RMAN from the Actifio mounted volume.
rman target /rman> restore controlfile from '/acttestdb/cf-D_<db name>-id_<id>.ctl' ;
6. Mount the database:
rman> alter database mount;
7. Catalog the datafile and archivelog folder from Actifio mounted volume to RMAN:
rman> run { catalog start with '/acttestdb/datafile' noprompt; catalog start with '/acttestdb/archivelog' noprompt; }
8. Restore and recover the database:
rman> run { restore database ; recover database ; }
Source Database Protected Under Archivelog is
| actifio.com | An Oracle DBA’s Guide to Actifio Copy Data Management 43

44
Note: Ignore any warning from RMAN looking for the next archivelog as this is a point-in-time recovery.
9. Open the database with the reset log option:
rman> alter database open resetlogs;
10. Shutdown the database on node 1 and start the database across all nodes.
Use sqlplus to shut down the database:
sqlplus / as sysdbasql> shutdown immediate;
Use srvctl to start database across all nodes:
srvctl start database -d <database name>
The database is available for read and write.
| actifio.com |An Oracle DBA’s Guide to Actifio Copy Data Management
Recovering a Non-RAC Oracle Database to a Scheduled Backup Point with Roll-Forward of Actifio-Protected archivelog
Non-RAC, Non-ASM File System Actifio-Protected
To recover a non-RAC Oracle database for point-in-time recovery if the logs are Actifio-protected:
1. Mount the image from the source database server to recover. In the Mount window, provide a mount point for the image, for example: /acttestdb. For instructions on how to mount a database image, see Mounting an Oracle Database Image Protected Under a File System for Data Access on page 34.
The database backup image will be mounted at:/acttestdb
The protected archive log will be mounted at: /acttestdb_Log
With high growth in archive generation, the protected archive image mount can be more than one mount, for example:
/acttestdb_Log/acttestdb_Log_1
2. Set the Oracle environment and use sqlplus to shut down the database:
sqlplus / as sysdbasql> shutdown immediate;
Verify the database is shut down. Kill any orphan process for the database.
ps -ef | grep <db name>
3. Start the database in nomount state using the backup parameter file from the mounted volume. The backup parameter file will be under top mounted folder, for example /acttestdb
4. Set the Oracle environment and use sqlplus to start the database:
sqlplus / as sysdbasql> startup nomount pfile='/acttestdb/<database sid>___backup.ora';
5. Create a new spfile from the existing pfile and restart the database.
Create an spfile from the pfile:
sql> create spfile='$ORACLE_HOME/dbs/spfile<database sid>.ora' from pfile='/acttestdb/<database sid>___backup.ora';
Restart the database with spfile in nomount state:
sql> shutdown immediate;sql> startup nomount;
6. Restore the control file using RMAN from the Actifio mounted archive log image. Use the latest control file from Log mounted image, for example: /acttestdb_Log/cf-D_<sid>-id_<id>.ctl or if more than one log image: /acttestdb_Log_1/cf-D_<sid>-id_<id>.ctl
rman target /rman> restore controlfile from '/acttestdb_Log_1/cf-D_<sid>-id_<id>.ctl' ;
7. Mount the database:
rman> alter database mount;
8. Catalog the datafile and archivelog folder from Actifio mounted database image and archive log image to RMAN
rman> run { catalog start with '/acttestdb/datafile' noprompt; catalog start with '/acttestdb/archivelog' noprompt;
Source Database Protected Under Archivelog is
| actifio.com | An Oracle DBA’s Guide to Actifio Copy Data Management 45

46
catalog start with '/acttestdb_Log' noprompt;}
9. Restore and recover the database:
rman> run { restore database ; recover database ; }
For a specific point in time recovery using the format yyyymmddhh24mi:
rman> run{restore database;recover database until time "to_date('<desired time stamp>','yyyymmddhh24mi')";}
10. Open the database with the reset log option:
rman> alter database open resetlogs;
The database is available for read and write.
| actifio.com |An Oracle DBA’s Guide to Actifio Copy Data Management
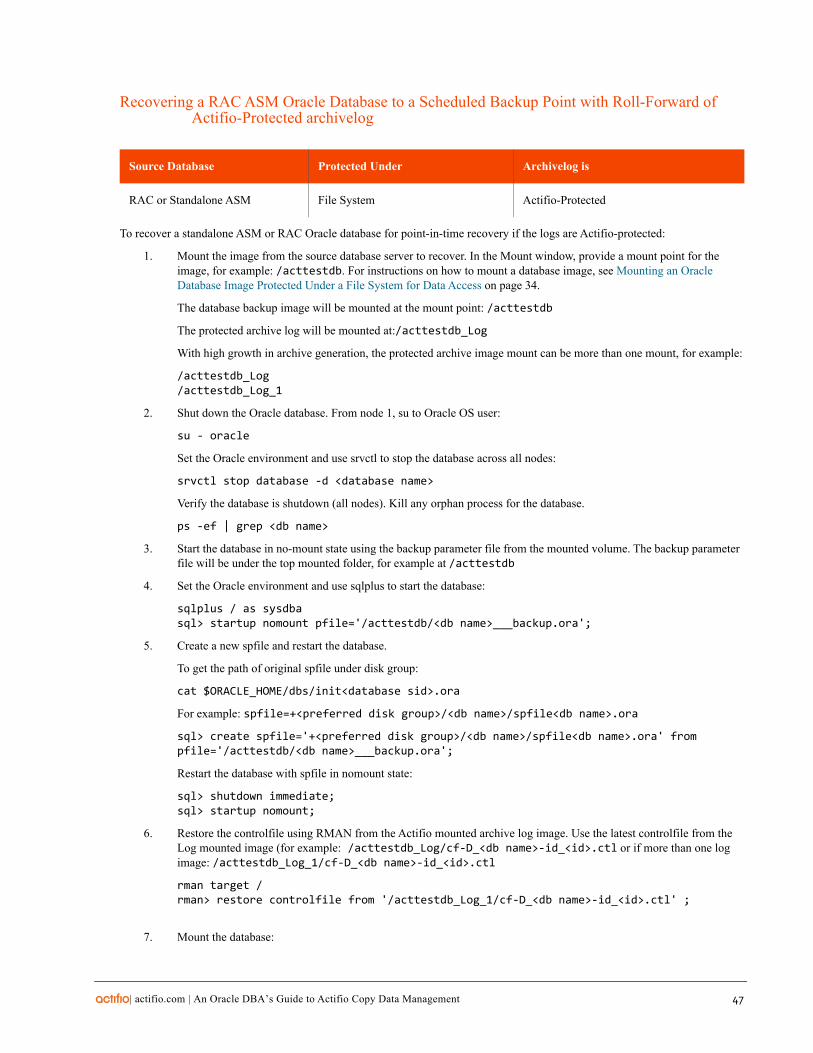
Recovering a RAC ASM Oracle Database to a Scheduled Backup Point with Roll-Forward of Actifio-Protected archivelog
RAC or Standalone ASM File System Actifio-Protected
To recover a standalone ASM or RAC Oracle database for point-in-time recovery if the logs are Actifio-protected:
1. Mount the image from the source database server to recover. In the Mount window, provide a mount point for the image, for example: /acttestdb. For instructions on how to mount a database image, see Mounting an Oracle Database Image Protected Under a File System for Data Access on page 34.
The database backup image will be mounted at the mount point: /acttestdb
The protected archive log will be mounted at:/acttestdb_Log
With high growth in archive generation, the protected archive image mount can be more than one mount, for example:
/acttestdb_Log/acttestdb_Log_1
2. Shut down the Oracle database. From node 1, su to Oracle OS user:
su - oracle
Set the Oracle environment and use srvctl to stop the database across all nodes:
srvctl stop database -d <database name>
Verify the database is shutdown (all nodes). Kill any orphan process for the database.
ps -ef | grep <db name>
3. Start the database in no-mount state using the backup parameter file from the mounted volume. The backup parameter file will be under the top mounted folder, for example at /acttestdb
4. Set the Oracle environment and use sqlplus to start the database:
sqlplus / as sysdbasql> startup nomount pfile='/acttestdb/<db name>___backup.ora';
5. Create a new spfile and restart the database.
To get the path of original spfile under disk group:
cat $ORACLE_HOME/dbs/init<database sid>.ora
For example: spfile=+<preferred disk group>/<db name>/spfile<db name>.ora
sql> create spfile='+<preferred disk group>/<db name>/spfile<db name>.ora' from pfile='/acttestdb/<db name>___backup.ora';
Restart the database with spfile in nomount state:
sql> shutdown immediate;sql> startup nomount;
6. Restore the controlfile using RMAN from the Actifio mounted archive log image. Use the latest controlfile from the Log mounted image (for example: /acttestdb_Log/cf-D_<db name>-id_<id>.ctl or if more than one log image: /acttestdb_Log_1/cf-D_<db name>-id_<id>.ctl
rman target /rman> restore controlfile from '/acttestdb_Log_1/cf-D_<db name>-id_<id>.ctl' ;
7. Mount the database:
Source Database Protected Under Archivelog is
| actifio.com | An Oracle DBA’s Guide to Actifio Copy Data Management 47
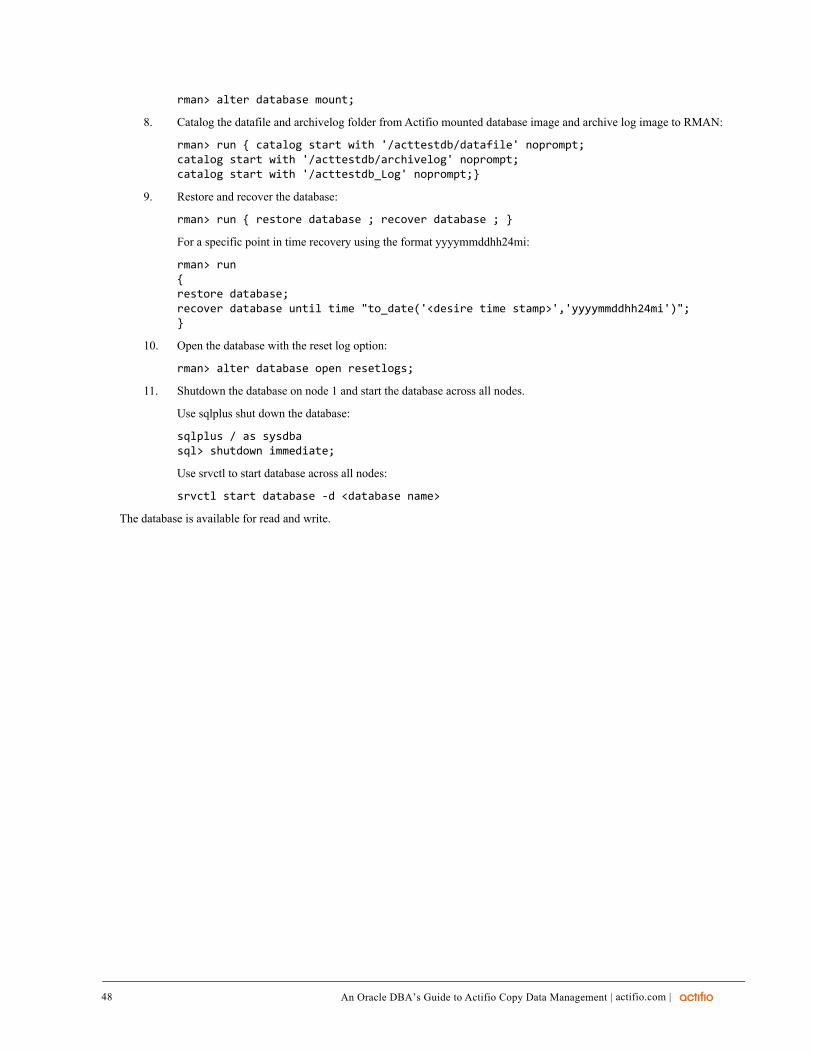
48
rman> alter database mount;
8. Catalog the datafile and archivelog folder from Actifio mounted database image and archive log image to RMAN:
rman> run { catalog start with '/acttestdb/datafile' noprompt; catalog start with '/acttestdb/archivelog' noprompt; catalog start with '/acttestdb_Log' noprompt;}
9. Restore and recover the database:
rman> run { restore database ; recover database ; }
For a specific point in time recovery using the format yyyymmddhh24mi:
rman> run{restore database;recover database until time "to_date('<desire time stamp>','yyyymmddhh24mi')";}
10. Open the database with the reset log option:
rman> alter database open resetlogs;
11. Shutdown the database on node 1 and start the database across all nodes.
Use sqlplus shut down the database:
sqlplus / as sysdbasql> shutdown immediate;
Use srvctl to start database across all nodes:
srvctl start database -d <database name>
The database is available for read and write.
| actifio.com |An Oracle DBA’s Guide to Actifio Copy Data Management
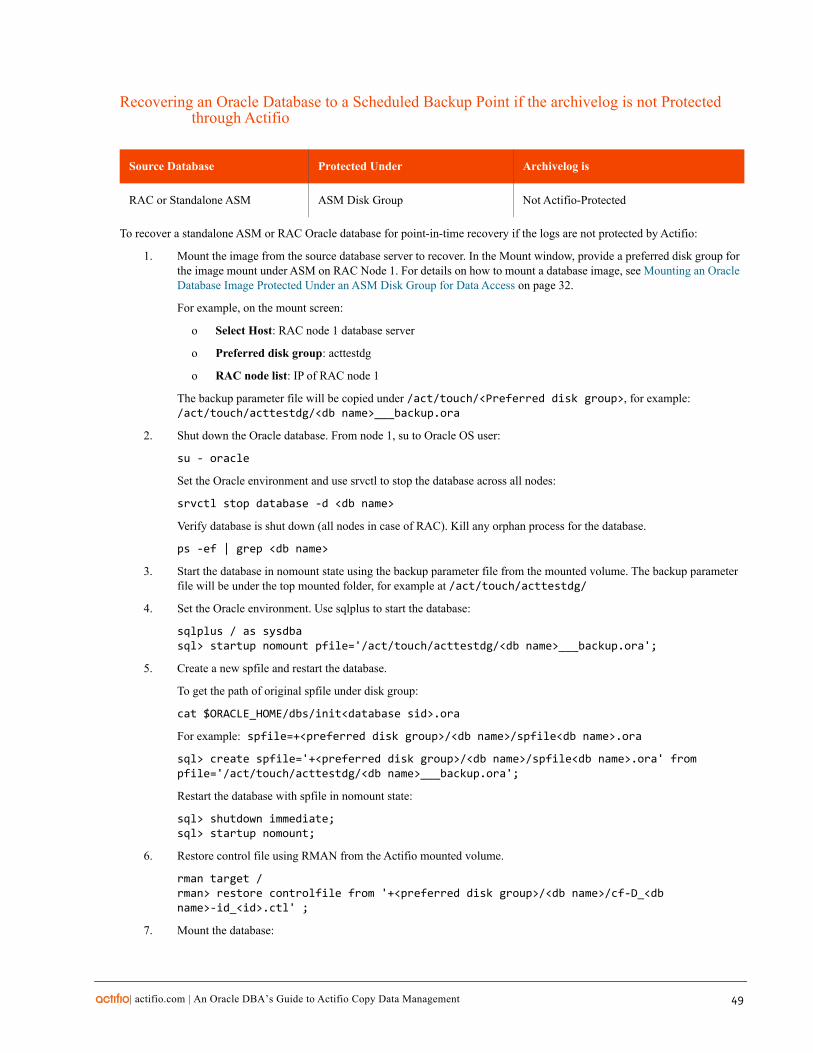
Recovering an Oracle Database to a Scheduled Backup Point if the archivelog is not Protected through Actifio
RAC or Standalone ASM ASM Disk Group Not Actifio-Protected
To recover a standalone ASM or RAC Oracle database for point-in-time recovery if the logs are not protected by Actifio:
1. Mount the image from the source database server to recover. In the Mount window, provide a preferred disk group for the image mount under ASM on RAC Node 1. For details on how to mount a database image, see Mounting an Oracle Database Image Protected Under an ASM Disk Group for Data Access on page 32.
For example, on the mount screen:
o Select Host: RAC node 1 database server
o Preferred disk group: acttestdg
o RAC node list: IP of RAC node 1
The backup parameter file will be copied under /act/touch/<Preferred disk group>, for example: /act/touch/acttestdg/<db name>___backup.ora
2. Shut down the Oracle database. From node 1, su to Oracle OS user:
su - oracle
Set the Oracle environment and use srvctl to stop the database across all nodes:
srvctl stop database -d <db name>
Verify database is shut down (all nodes in case of RAC). Kill any orphan process for the database.
ps -ef | grep <db name>
3. Start the database in nomount state using the backup parameter file from the mounted volume. The backup parameter file will be under the top mounted folder, for example at /act/touch/acttestdg/
4. Set the Oracle environment. Use sqlplus to start the database:
sqlplus / as sysdbasql> startup nomount pfile='/act/touch/acttestdg/<db name>___backup.ora';
5. Create a new spfile and restart the database.
To get the path of original spfile under disk group:
cat $ORACLE_HOME/dbs/init<database sid>.ora
For example: spfile=+<preferred disk group>/<db name>/spfile<db name>.ora
sql> create spfile='+<preferred disk group>/<db name>/spfile<db name>.ora' from pfile='/act/touch/acttestdg/<db name>___backup.ora';
Restart the database with spfile in nomount state:
sql> shutdown immediate;sql> startup nomount;
6. Restore control file using RMAN from the Actifio mounted volume.
rman target /rman> restore controlfile from '+<preferred disk group>/<db name>/cf-D_<db name>-id_<id>.ctl' ;
7. Mount the database:
Source Database Protected Under Archivelog is
| actifio.com | An Oracle DBA’s Guide to Actifio Copy Data Management 49

50
rman> alter database mount;
8. Catalog the datafile and archivelog folder from Actifio mounted ASM disk group to RMAN
rman> run { catalog start with '+acttestdg/<db name>/datafile' noprompt; catalog start with '+acttestdg/<db name>/archivelog' noprompt; }
9. Restore and recover the database:
rman> run { restore database ; recover database ; }
10. Open the database with the reset log option:
rman> alter database open resetlogs;
11. Shutdown the database on node 1 and start the database across all nodes.
Use sqlplus to shut down the database:
sqlplus / as sysdbasql> shutdown immediate;
Use srvctl to start database across all nodes:
srvctl start database -d <database name>
The database is available for read and write.
| actifio.com |An Oracle DBA’s Guide to Actifio Copy Data Management
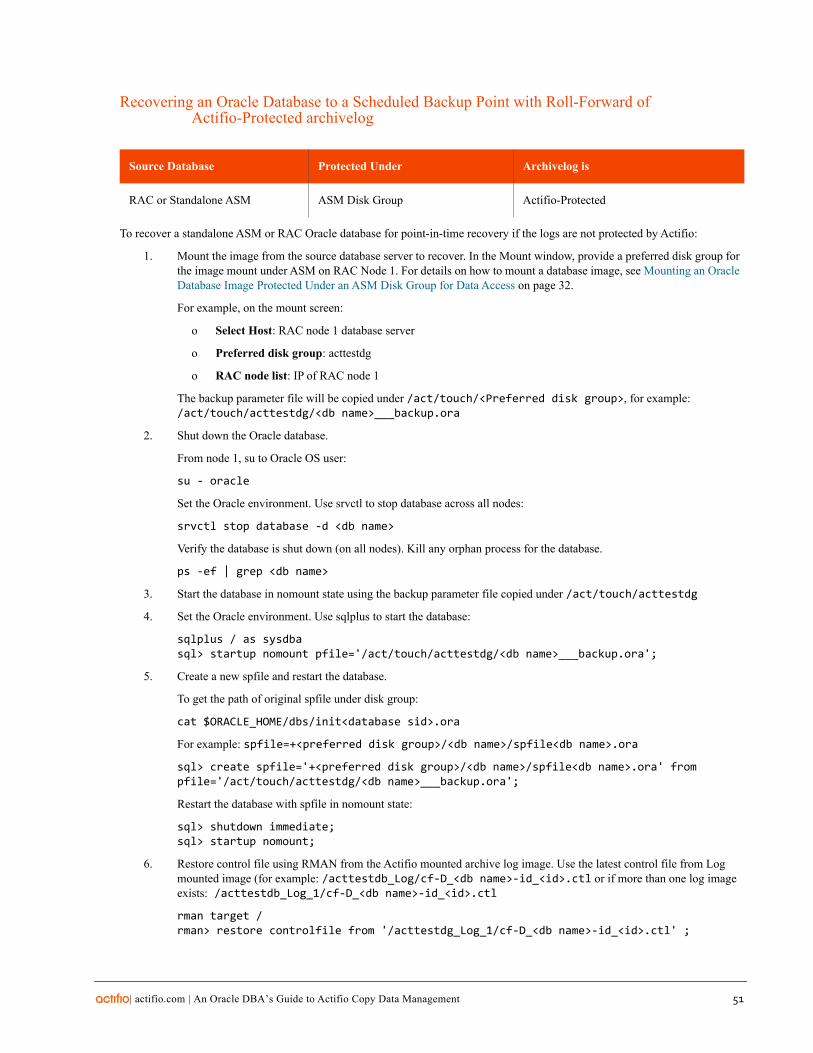
Recovering an Oracle Database to a Scheduled Backup Point with Roll-Forward of Actifio-Protected archivelog
RAC or Standalone ASM ASM Disk Group Actifio-Protected
To recover a standalone ASM or RAC Oracle database for point-in-time recovery if the logs are not protected by Actifio:
1. Mount the image from the source database server to recover. In the Mount window, provide a preferred disk group for the image mount under ASM on RAC Node 1. For details on how to mount a database image, see Mounting an Oracle Database Image Protected Under an ASM Disk Group for Data Access on page 32.
For example, on the mount screen:
o Select Host: RAC node 1 database server
o Preferred disk group: acttestdg
o RAC node list: IP of RAC node 1
The backup parameter file will be copied under /act/touch/<Preferred disk group>, for example: /act/touch/acttestdg/<db name>___backup.ora
2. Shut down the Oracle database.
From node 1, su to Oracle OS user:
su - oracle
Set the Oracle environment. Use srvctl to stop database across all nodes:
srvctl stop database -d <db name>
Verify the database is shut down (on all nodes). Kill any orphan process for the database.
ps -ef | grep <db name>
3. Start the database in nomount state using the backup parameter file copied under /act/touch/acttestdg
4. Set the Oracle environment. Use sqlplus to start the database:
sqlplus / as sysdbasql> startup nomount pfile='/act/touch/acttestdg/<db name>___backup.ora';
5. Create a new spfile and restart the database.
To get the path of original spfile under disk group:
cat $ORACLE_HOME/dbs/init<database sid>.ora
For example: spfile=+<preferred disk group>/<db name>/spfile<db name>.ora
sql> create spfile='+<preferred disk group>/<db name>/spfile<db name>.ora' from pfile='/act/touch/acttestdg/<db name>___backup.ora';
Restart the database with spfile in nomount state:
sql> shutdown immediate;sql> startup nomount;
6. Restore control file using RMAN from the Actifio mounted archive log image. Use the latest control file from Log mounted image (for example: /acttestdb_Log/cf-D_<db name>-id_<id>.ctl or if more than one log image exists: /acttestdb_Log_1/cf-D_<db name>-id_<id>.ctl
rman target /rman> restore controlfile from '/acttestdg_Log_1/cf-D_<db name>-id_<id>.ctl' ;
Source Database Protected Under Archivelog is
| actifio.com | An Oracle DBA’s Guide to Actifio Copy Data Management 51
52
7. Mount the database:
rman> alter database mount;
8. Catalog the datafile and archivelog folder from Actifio mounted database image and archive log image to RMAN:
rman> run { catalog start with '+acttestdg/<db name>/datafile' noprompt;catalog start with '+acttestdg/<db name>/archivelog' noprompt;catalog start with '/acttestdg_Log' noprompt;}
9. Restore and recover the database:
rman> run { restore database ; recover database ; }
For a specific point in time recovery run the recover command as under:
rman> run{restore database;recover database until time "to_date('<desired time stamp>','yyyymmddhh24mi')";}
10. Open the database with the reset log option:
rman> alter database open resetlogs;
11. Shutdown the database on node 1 and start the database across all nodes.
Use sqlplus to shut down the database:
sqlplus / as sysdbasql> shutdown immediate;
Use srvctl to start the database across all nodes:
srvctl start database -d <database name>
The database is available for read and write.
| actifio.com |An Oracle DBA’s Guide to Actifio Copy Data Management
Recovering Tablespace and Data FilesTo recover a single tablespace data file, for example, due to data corruption:
1. Mount the latest database snapshot from the Actifio appliance back to the Oracle server.
2. Catalog the database backup snapshot to RMAN.
3. Restore and recover the tablespace users using the backup snapshot.
Recovering a Single Tablespace of a Production Database on an ASM Disk Group
Script Location: /act/act_scripts/asmclone on the database server.
To recover a single tablespace of production database:
1. Mount the database point-in-time snapshot as detailed in Chapter 8, Accessing, Recovering, or Restoring an Oracle Database via the Actifio Desktop.
2. From the primary node, log into the database server as Oracle OS user.
3. Set the database environment and log into RMAN:
rman target /
4. At the RMAN prompt, catalog the backup data file and archive log folder under mounted disk group:
rman> catalog start with '+<mounted image disk group name>/<db name>/datafile' no prompt;rman> catalog start with '+<mounted image disk group name>/<db name>/archivelog' no prompt;
Now you can run all RMAN recovery commands, such as:
rman> restore tablespace <tablespace name>;rman> recover tablespace <tablespace name>;
Follow Oracle RMAN recovery commands for your recovery needs.
5. When finished, unmount and delete the image from the Actifio Desktop.
| actifio.com | An Oracle DBA’s Guide to Actifio Copy Data Management 53

54
| actifio.com |An Oracle DBA’s Guide to Actifio Copy Data Management
10
| a
Instant Oracle Database Recovery or Migration Using ASM Switch and Rebalance
Use this in case of storage failure or to migrate a database to new storage. There are five steps to this procedure:
1. Stop the Database to be Recovered on All Nodes on page 55.
2. Select and Mount an Image on page 55.
3. Switch the Database to the Newly Mounted Disk Group on page 56.
At this point the database is up and running in its original configuration on Actifio storage. Now you can migrate the database back to production storage or to new storage.
4. Migrate the Database Back to Production Storage on page 58.
After the database migration, clean up the no-longer-needed mounted images.
5. Unmount and Delete Actifio Mounted Images Used for the ASM Rebelance Operation on page 58.
Stop the Database to be Recovered on All Nodes
1. From the protected node, log in as Oracle OS user and set the database environment. srvctl stop database -d <DB Name>
2. (Optional) If you want to retain the production disk group name post-recovery, then connect to the ASM instance on each non-primary node and dismount the disk group: SQL> alter diskgroup <DG name> dismount;
Then connect to the ASM instance on the primary node and drop the ASM diskgroup: SQL> drop diskgroup <DG name> including contents;
To list and check the existing disk path for diskgroup:
set lines 200set pages 500col name format a15col path format a25select PATH from v$asm_disk where group_number in (select group_number from v$asm_diskgroup where name in upper(<'disk group name','disk group name') ) order by group_number
Select and Mount an Image
3. Mount the image as described in Chapter 8, Accessing, Recovering, or Restoring an Oracle Database via the Actifio Desktop. Mount the image to all RAC nodes of the source database. During the mount, select node 1 as the target host and under RAC Node List provide the IP of the RAC nodes in order node1:node2:node3.
Note: (AIX only) When using an iSCSI connection, an ASM Disk Group can be mounted to only one node in an Oracle ASM RAC environment on AIX.
ctifio.com | An Oracle DBA’s Guide to Actifio Copy Data Management 55
56
Switch the Database to the Newly Mounted Disk Group
This script can be run as root OS user, Oracle OS user, or service account user. The behavior of the script running as different OS user is:
Root OS user: Script will not prompt for any OS user password. The script will use su to Oracle and grid user account to run the required commands.
Oracle OS user: Script will prompt for grid OS user password if the grid account is not using the Oracle OS user (Oracle database instance and ASM instance is not running under Oracle OS user).
Service account user: Script will prompt for Oracle OS user and grid OS user password.
4. From the protected node:
To run the script as root OS user:
o Login as root OS user.
o cd to script folder /act/act_scripts/asmrestore
o change permission to 755
chmod -R /act/act_scripts/asmrestore
or:
To run the script as an Oracle OS user or as a service account user:
o Login as OS user.
o create a folder tempASMRestore
mkdir tempASMRestorecd tempASMRestore
o copy the ASM restore script to this local folder
cp /act/act_scripts/asmrestore/*
o change permission to 755
chmod -R *
5. In the same folder, edit the asm_node_config.conf file to create the list of RAC nodes to switch, restore, and start the database on all nodes. Each line should have only one node entry. For example for a 3 node RAC add one line for each node to asm_node_config.conf:
ASM_NODE1:rhel137-14.dev.actifio.comASM_NODE2:rhel137-15.dev.actifio.comASM_NODE3:rhel137-16.dev.actifio.com
6. Run the ASMOracleRestore.sh script.
./ASMOracleRestore.sh uses 5 required and two optional input parameters: usage: ASMOracleRestore.sh <Oracle Home path> <Disk Group Name> <Oracle User> <Grid User> <standalone yes/no> <log mount path> <timestamp yyyymmddhh24mi>
For example:
ASMOracleRestore.sh /home/oracle/app/oracle/product/11.2.0/dbhome_1 DATA1 oracle grid no /act/mnt/vdbxlog 201404021435
Note: "log mount path", and "timestamp" are optional parameters that should be used only when the database and archive log are both protected using a policy with log protection enabled.
| actifio.com |An Oracle DBA’s Guide to Actifio Copy Data Management
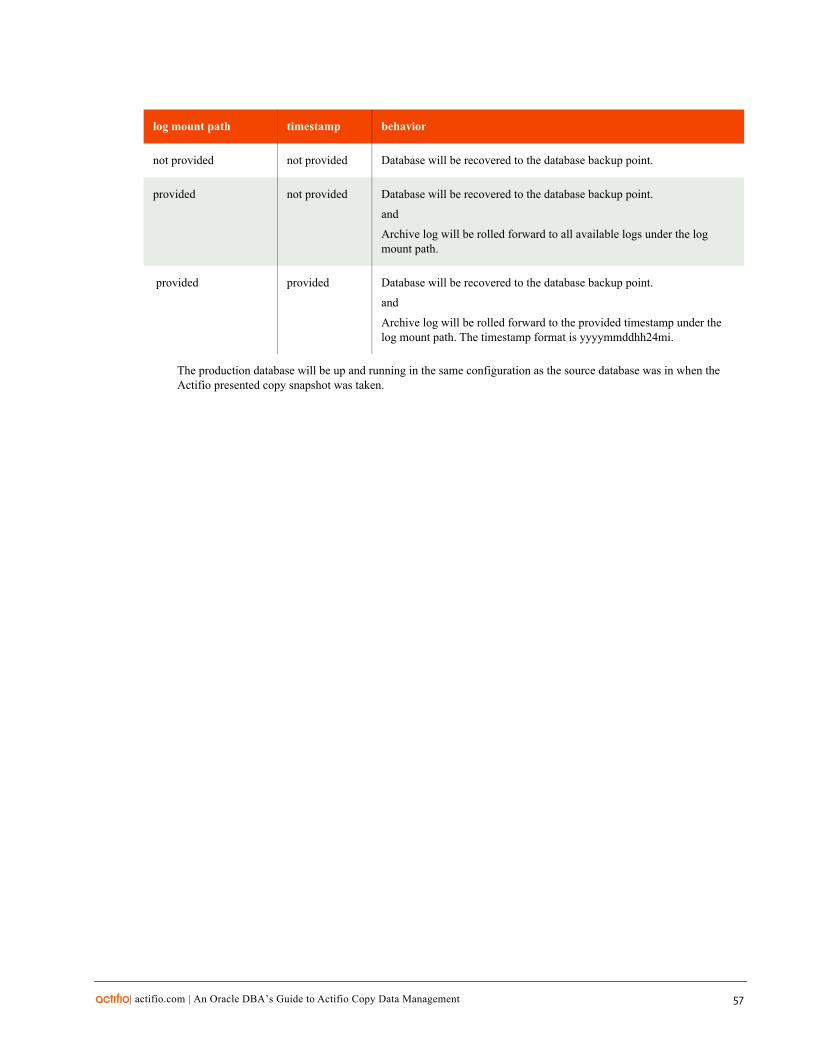
not provided not provided Database will be recovered to the database backup point.
provided not provided Database will be recovered to the database backup point.
and
Archive log will be rolled forward to all available logs under the log mount path.
provided provided Database will be recovered to the database backup point.
and
Archive log will be rolled forward to the provided timestamp under the log mount path. The timestamp format is yyyymmddhh24mi.
The production database will be up and running in the same configuration as the source database was in when the Actifio presented copy snapshot was taken.
log mount path timestamp behavior
| actifio.com | An Oracle DBA’s Guide to Actifio Copy Data Management 57
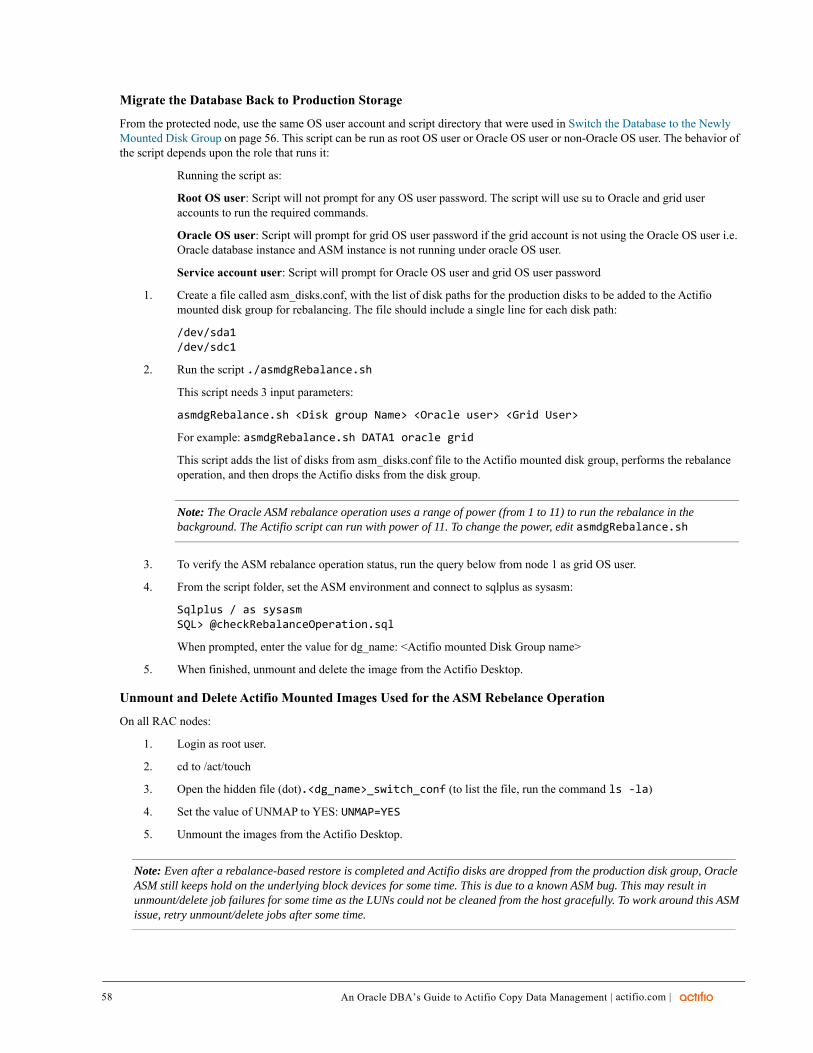
58
Migrate the Database Back to Production Storage
From the protected node, use the same OS user account and script directory that were used in Switch the Database to the Newly Mounted Disk Group on page 56. This script can be run as root OS user or Oracle OS user or non-Oracle OS user. The behavior of the script depends upon the role that runs it:
Running the script as:
Root OS user: Script will not prompt for any OS user password. The script will use su to Oracle and grid user accounts to run the required commands.
Oracle OS user: Script will prompt for grid OS user password if the grid account is not using the Oracle OS user i.e. Oracle database instance and ASM instance is not running under oracle OS user.
Service account user: Script will prompt for Oracle OS user and grid OS user password
1. Create a file called asm_disks.conf, with the list of disk paths for the production disks to be added to the Actifio mounted disk group for rebalancing. The file should include a single line for each disk path:
/dev/sda1/dev/sdc1
2. Run the script ./asmdgRebalance.sh
This script needs 3 input parameters:
asmdgRebalance.sh <Disk group Name> <Oracle user> <Grid User>
For example: asmdgRebalance.sh DATA1 oracle grid
This script adds the list of disks from asm_disks.conf file to the Actifio mounted disk group, performs the rebalance operation, and then drops the Actifio disks from the disk group.
Note: The Oracle ASM rebalance operation uses a range of power (from 1 to 11) to run the rebalance in the background. The Actifio script can run with power of 11. To change the power, edit asmdgRebalance.sh
3. To verify the ASM rebalance operation status, run the query below from node 1 as grid OS user.
4. From the script folder, set the ASM environment and connect to sqlplus as sysasm:
Sqlplus / as sysasmSQL> @checkRebalanceOperation.sql
When prompted, enter the value for dg_name: <Actifio mounted Disk Group name>
5. When finished, unmount and delete the image from the Actifio Desktop.
Unmount and Delete Actifio Mounted Images Used for the ASM Rebelance Operation
On all RAC nodes:
1. Login as root user.
2. cd to /act/touch
3. Open the hidden file (dot).<dg_name>_switch_conf (to list the file, run the command ls -la)
4. Set the value of UNMAP to YES: UNMAP=YES
5. Unmount the images from the Actifio Desktop.
Note: Even after a rebalance-based restore is completed and Actifio disks are dropped from the production disk group, Oracle ASM still keeps hold on the underlying block devices for some time. This is due to a known ASM bug. This may result in unmount/delete job failures for some time as the LUNs could not be cleaned from the host gracefully. To work around this ASM issue, retry unmount/delete jobs after some time.
| actifio.com |An Oracle DBA’s Guide to Actifio Copy Data Management
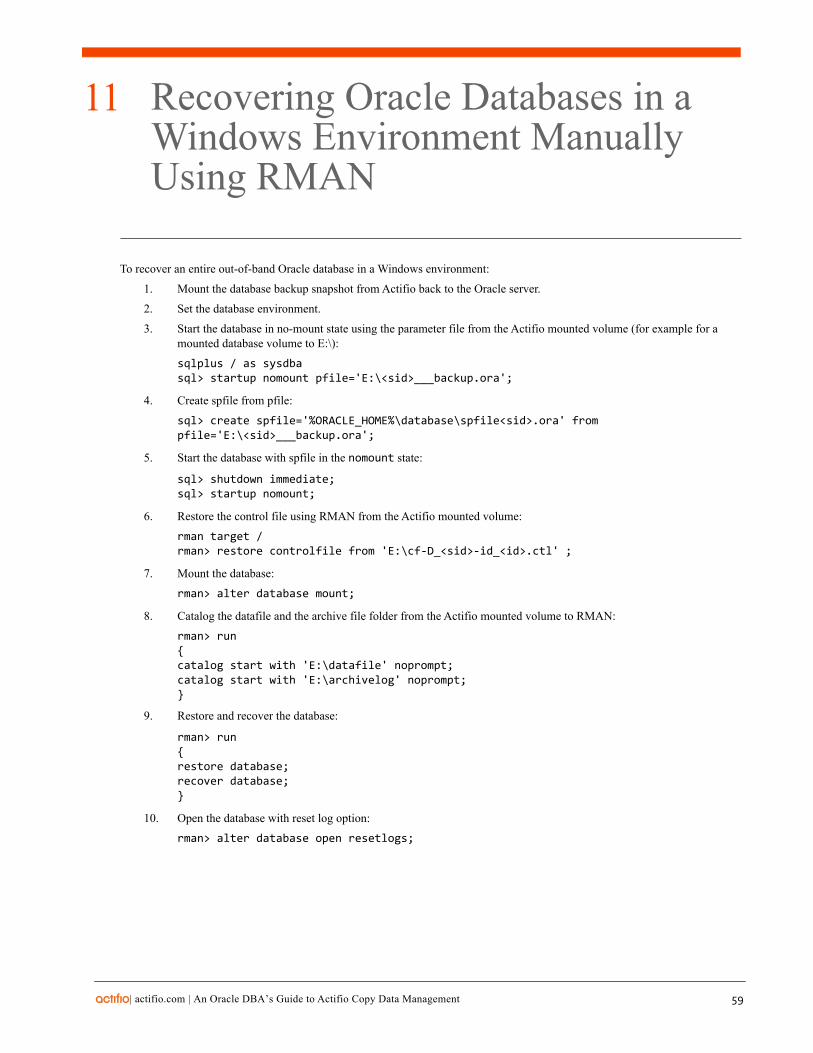
11
| a
Recovering Oracle Databases in a Windows Environment Manually Using RMAN
To recover an entire out-of-band Oracle database in a Windows environment:
1. Mount the database backup snapshot from Actifio back to the Oracle server.
2. Set the database environment.
3. Start the database in no-mount state using the parameter file from the Actifio mounted volume (for example for a mounted database volume to E:\):
sqlplus / as sysdbasql> startup nomount pfile='E:\<sid>___backup.ora';
4. Create spfile from pfile:
sql> create spfile='%ORACLE_HOME%\database\spfile<sid>.ora' from pfile='E:\<sid>___backup.ora';
5. Start the database with spfile in the nomount state:
sql> shutdown immediate;sql> startup nomount;
6. Restore the control file using RMAN from the Actifio mounted volume:
rman target /rman> restore controlfile from 'E:\cf-D_<sid>-id_<id>.ctl' ;
7. Mount the database:
rman> alter database mount;
8. Catalog the datafile and the archive file folder from the Actifio mounted volume to RMAN:
rman> run{catalog start with 'E:\datafile' noprompt;catalog start with 'E:\archivelog' noprompt;}
9. Restore and recover the database:
rman> run{restore database;recover database;}
10. Open the database with reset log option:
rman> alter database open resetlogs;
ctifio.com | An Oracle DBA’s Guide to Actifio Copy Data Management 59

60
| actifio.com |An Oracle DBA’s Guide to Actifio Copy Data Management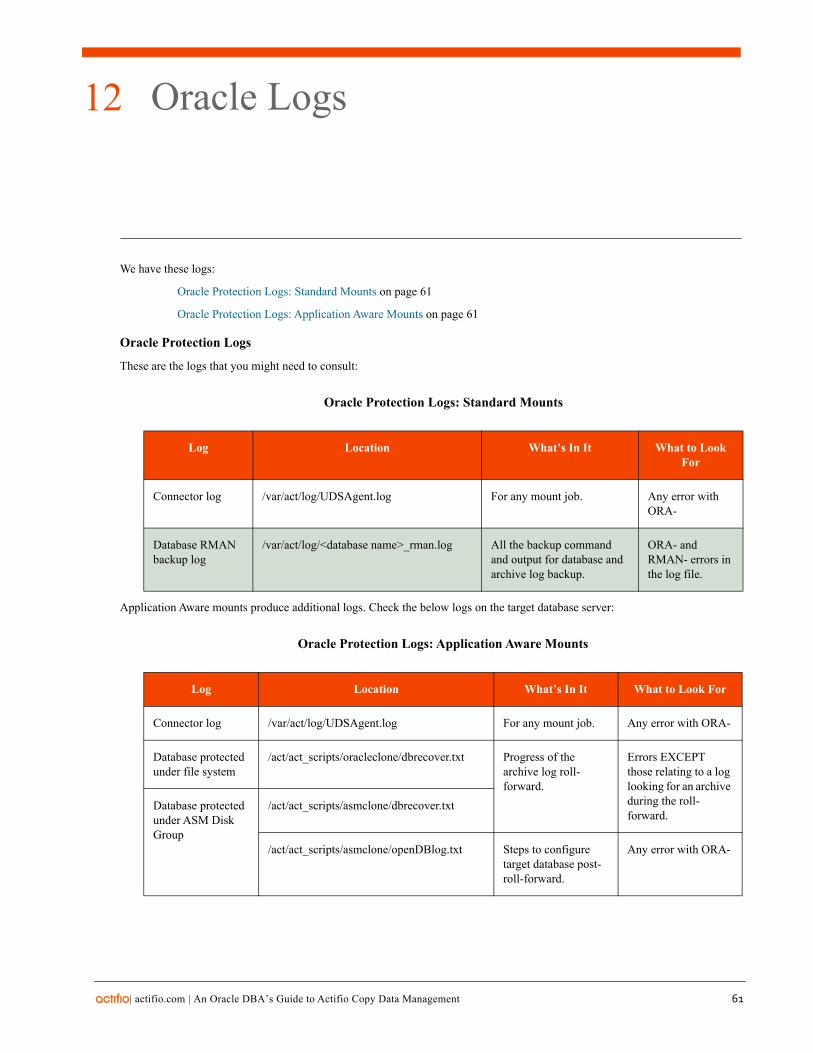
12
| a
Oracle Logs
We have these logs:
Oracle Protection Logs: Standard Mounts on page 61
Oracle Protection Logs: Application Aware Mounts on page 61
Oracle Protection Logs
These are the logs that you might need to consult:
Oracle Protection Logs: Standard Mounts
Connector log /var/act/log/UDSAgent.log For any mount job. Any error with ORA-
Database RMAN backup log
/var/act/log/<database name>_rman.log All the backup command and output for database and archive log backup.
ORA- and RMAN- errors in the log file.
Application Aware mounts produce additional logs. Check the below logs on the target database server:
Oracle Protection Logs: Application Aware Mounts
Connector log /var/act/log/UDSAgent.log For any mount job. Any error with ORA-
Database protected under file system
/act/act_scripts/oracleclone/dbrecover.txt Progress of the archive log roll-forward.
Errors EXCEPT those relating to a log looking for an archive during the roll-forward.
Database protected under ASM Disk Group
/act/act_scripts/asmclone/dbrecover.txt
/act/act_scripts/asmclone/openDBlog.txt Steps to configure target database post-roll-forward.
Any error with ORA-
Log Location What’s In It What to Look For
Log Location What’s In It What to Look For
ctifio.com | An Oracle DBA’s Guide to Actifio Copy Data Management 61

62
| actifio.com |An Oracle DBA’s Guide to Actifio Copy Data Management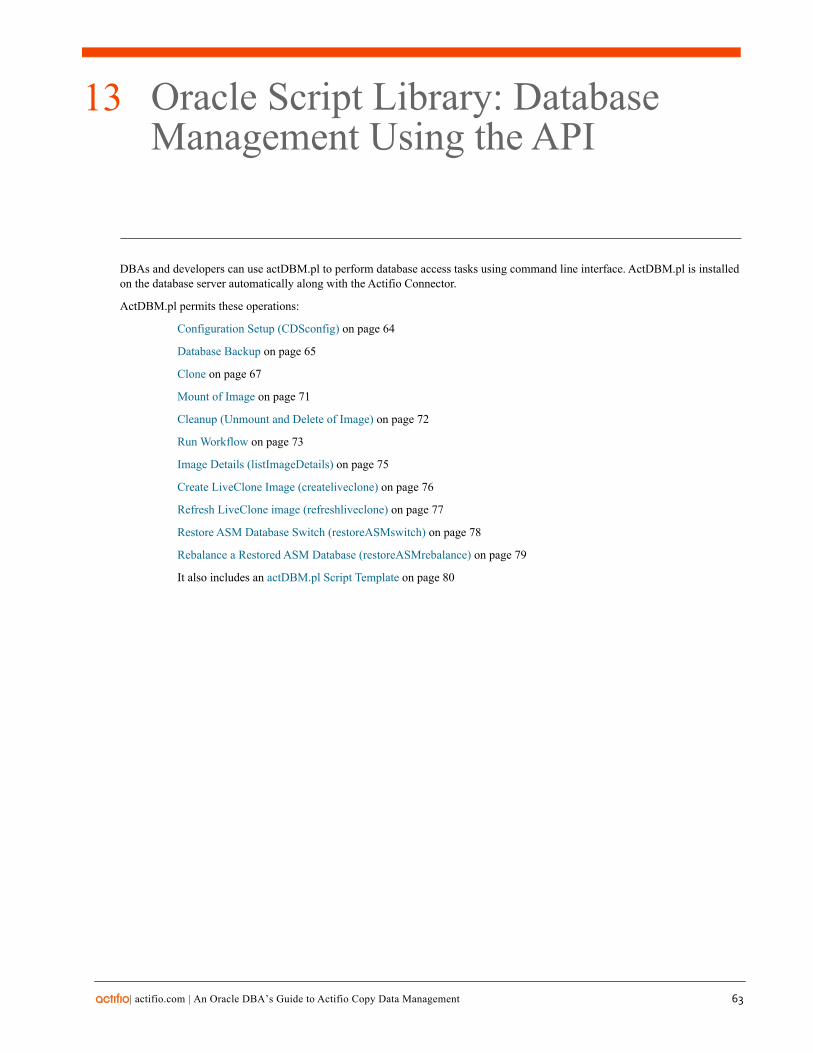
13
| a
Oracle Script Library: Database Management Using the API
DBAs and developers can use actDBM.pl to perform database access tasks using command line interface. ActDBM.pl is installed on the database server automatically along with the Actifio Connector.
ActDBM.pl permits these operations:
Configuration Setup (CDSconfig) on page 64
Database Backup on page 65
Clone on page 67
Mount of Image on page 71
Cleanup (Unmount and Delete of Image) on page 72
Run Workflow on page 73
Image Details (listImageDetails) on page 75
Create LiveClone Image (createliveclone) on page 76
Refresh LiveClone image (refreshliveclone) on page 77
Restore ASM Database Switch (restoreASMswitch) on page 78
Rebalance a Restored ASM Database (restoreASMrebalance) on page 79
It also includes an actDBM.pl Script Template on page 80
ctifio.com | An Oracle DBA’s Guide to Actifio Copy Data Management 63
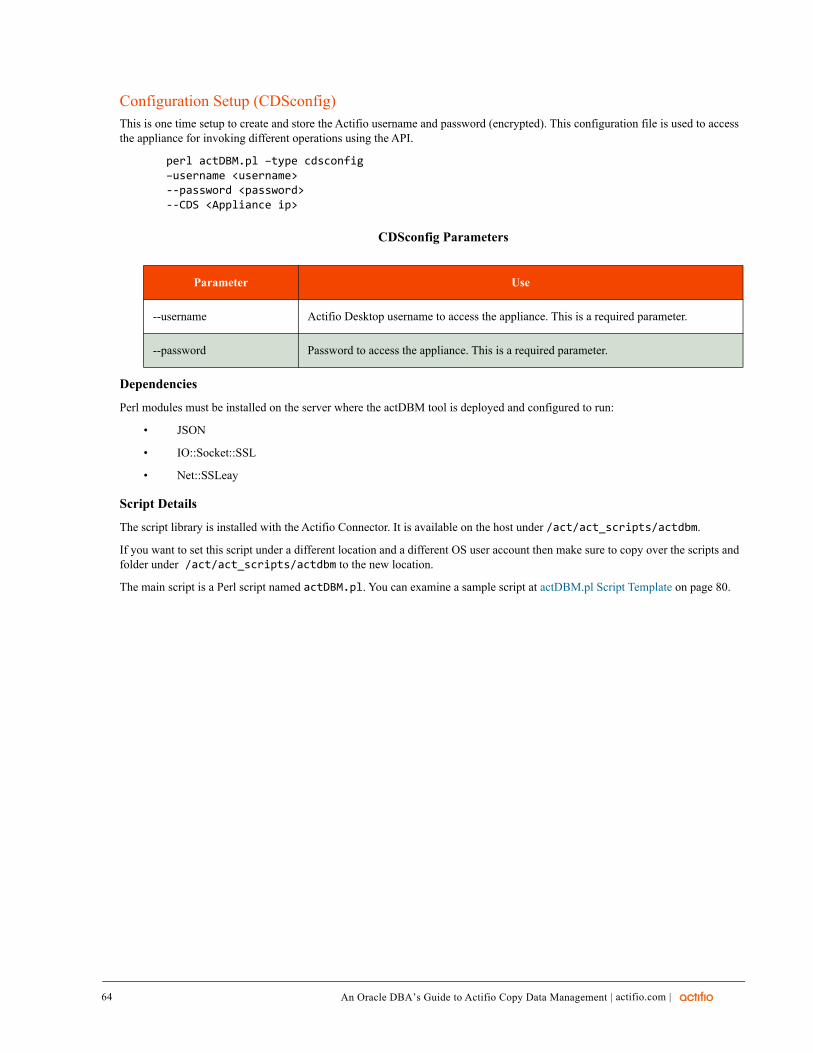
64
Configuration Setup (CDSconfig)This is one time setup to create and store the Actifio username and password (encrypted). This configuration file is used to access the appliance for invoking different operations using the API.
CDSconfig Parameters
--username Actifio Desktop username to access the appliance. This is a required parameter.
--password Password to access the appliance. This is a required parameter.
perl actDBM.pl –type cdsconfig –username <username> --password <password>--CDS <Appliance ip>
Dependencies
Perl modules must be installed on the server where the actDBM tool is deployed and configured to run:
• JSON
• IO::Socket::SSL
• Net::SSLeay
Script Details
The script library is installed with the Actifio Connector. It is available on the host under /act/act_scripts/actdbm.
If you want to set this script under a different location and a different OS user account then make sure to copy over the scripts and folder under /act/act_scripts/actdbm to the new location.
The main script is a Perl script named actDBM.pl. You can examine a sample script at actDBM.pl Script Template on page 80.
Parameter Use
| actifio.com |An Oracle DBA’s Guide to Actifio Copy Data Management
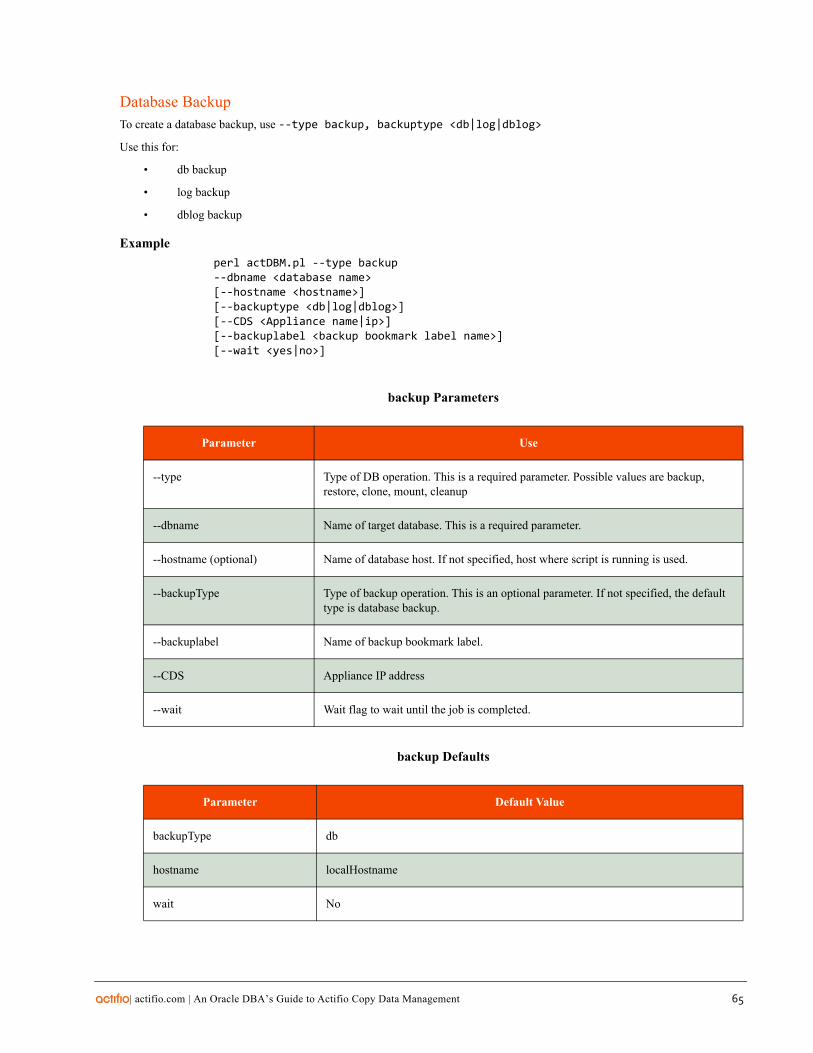
Database BackupTo create a database backup, use --type backup, backuptype <db|log|dblog>
Use this for:
• db backup
• log backup
• dblog backup
Example
backup Parameters
--type Type of DB operation. This is a required parameter. Possible values are backup, restore, clone, mount, cleanup
--dbname Name of target database. This is a required parameter.
--hostname (optional) Name of database host. If not specified, host where script is running is used.
--backupType Type of backup operation. This is an optional parameter. If not specified, the default type is database backup.
--backuplabel Name of backup bookmark label.
--CDS Appliance IP address
--wait Wait flag to wait until the job is completed.
backup Defaults
backupType db
hostname localHostname
wait No
perl actDBM.pl --type backup --dbname <database name> [--hostname <hostname>] [--backuptype <db|log|dblog>] [--CDS <Appliance name|ip>][--backuplabel <backup bookmark label name>][--wait <yes|no>]
Parameter Use
Parameter Default Value
| actifio.com | An Oracle DBA’s Guide to Actifio Copy Data Management 65
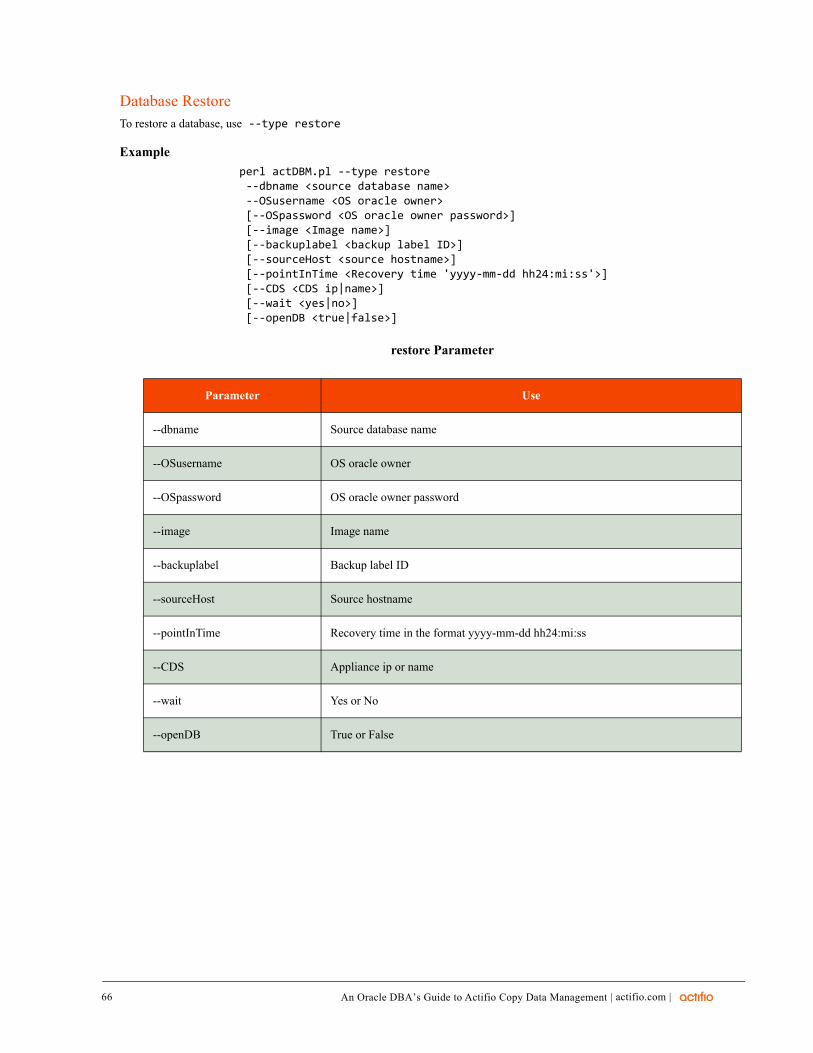
66
Database RestoreTo restore a database, use --type restore
Example
restore Parameter
--dbname Source database name
--OSusername OS oracle owner
--OSpassword OS oracle owner password
--image Image name
--backuplabel Backup label ID
--sourceHost Source hostname
--pointInTime Recovery time in the format yyyy-mm-dd hh24:mi:ss
--CDS Appliance ip or name
--wait Yes or No
--openDB True or False
perl actDBM.pl --type restore --dbname <source database name> --OSusername <OS oracle owner> [--OSpassword <OS oracle owner password>] [--image <Image name>] [--backuplabel <backup label ID>] [--sourceHost <source hostname>] [--pointInTime <Recovery time 'yyyy-mm-dd hh24:mi:ss'>] [--CDS <CDS ip|name>] [--wait <yes|no>] [--openDB <true|false>]
Parameter Use
| actifio.com |An Oracle DBA’s Guide to Actifio Copy Data Management
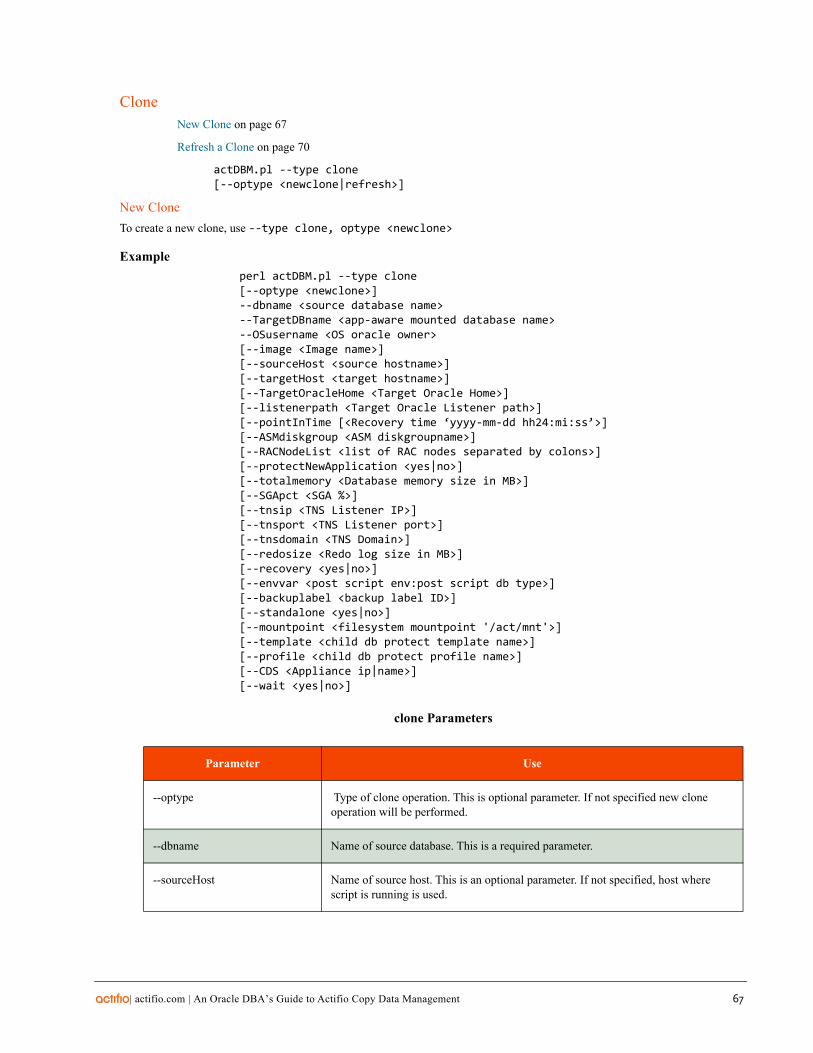
CloneNew Clone on page 67
Refresh a Clone on page 70
actDBM.pl --type clone [--optype <newclone|refresh>]
New Clone
To create a new clone, use --type clone, optype <newclone>
Example
perl actDBM.pl --type clone [--optype <newclone>] --dbname <source database name> --TargetDBname <app-aware mounted database name> --OSusername <OS oracle owner> [--image <Image name>] [--sourceHost <source hostname>] [--targetHost <target hostname>] [--TargetOracleHome <Target Oracle Home>] [--listenerpath <Target Oracle Listener path>] [--pointInTime [<Recovery time ‘yyyy-mm-dd hh24:mi:ss’>] [--ASMdiskgroup <ASM diskgroupname>] [--RACNodeList <list of RAC nodes separated by colons>] [--protectNewApplication <yes|no>] [--totalmemory <Database memory size in MB>] [--SGApct <SGA %>][--tnsip <TNS Listener IP>] [--tnsport <TNS Listener port>] [--tnsdomain <TNS Domain>] [--redosize <Redo log size in MB>] [--recovery <yes|no>] [--envvar <post script env:post script db type>] [--backuplabel <backup label ID>] [--standalone <yes|no>][--mountpoint <filesystem mountpoint '/act/mnt'>][--template <child db protect template name>] [--profile <child db protect profile name>][--CDS <Appliance ip|name>] [--wait <yes|no>]
clone Parameters
Parameter Use
--optype Type of clone operation. This is optional parameter. If not specified new clone operation will be performed.
--dbname Name of source database. This is a required parameter.
--sourceHost Name of source host. This is an optional parameter. If not specified, host where script is running is used.
| actifio.com | An Oracle DBA’s Guide to Actifio Copy Data Management 67
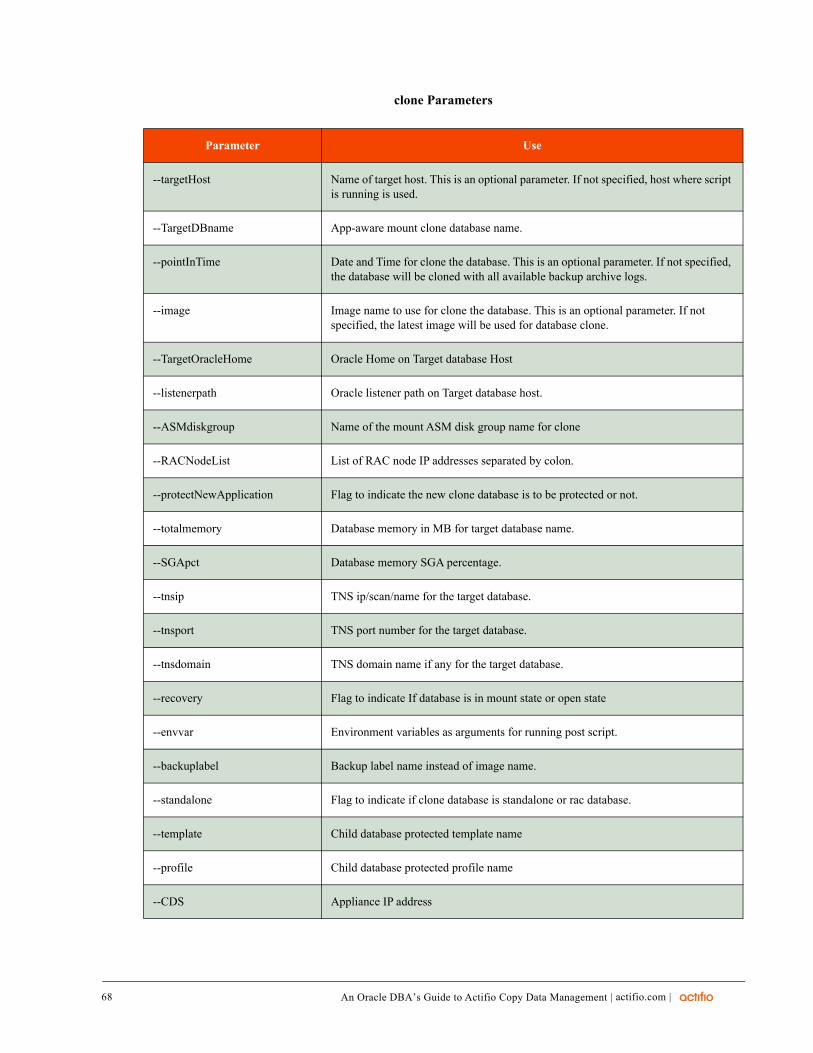
68
--targetHost Name of target host. This is an optional parameter. If not specified, host where script is running is used.
--TargetDBname App-aware mount clone database name.
--pointInTime Date and Time for clone the database. This is an optional parameter. If not specified, the database will be cloned with all available backup archive logs.
--image Image name to use for clone the database. This is an optional parameter. If not specified, the latest image will be used for database clone.
--TargetOracleHome Oracle Home on Target database Host
--listenerpath Oracle listener path on Target database host.
--ASMdiskgroup Name of the mount ASM disk group name for clone
--RACNodeList List of RAC node IP addresses separated by colon.
--protectNewApplication Flag to indicate the new clone database is to be protected or not.
--totalmemory Database memory in MB for target database name.
--SGApct Database memory SGA percentage.
--tnsip TNS ip/scan/name for the target database.
--tnsport TNS port number for the target database.
--tnsdomain TNS domain name if any for the target database.
--recovery Flag to indicate If database is in mount state or open state
--envvar Environment variables as arguments for running post script.
--backuplabel Backup label name instead of image name.
--standalone Flag to indicate if clone database is standalone or rac database.
--template Child database protected template name
--profile Child database protected profile name
--CDS Appliance IP address
clone Parameters
Parameter Use
| actifio.com |An Oracle DBA’s Guide to Actifio Copy Data Management
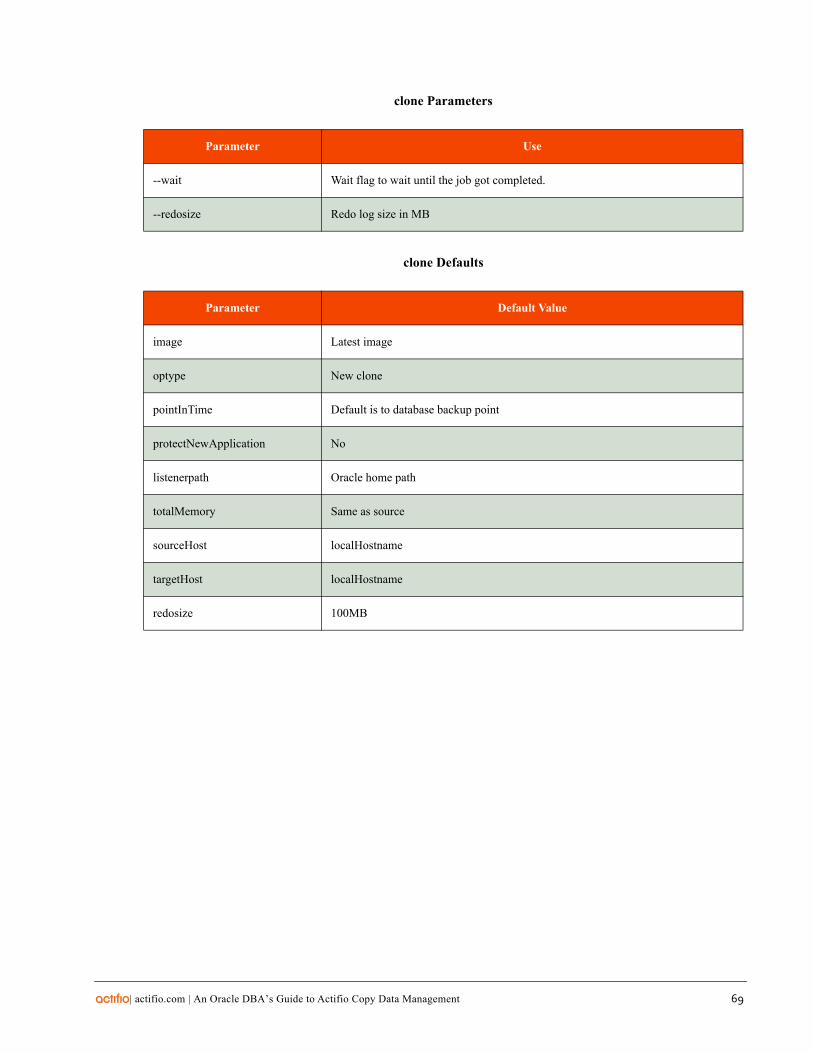
--wait Wait flag to wait until the job got completed.
--redosize Redo log size in MB
clone Defaults
image Latest image
optype New clone
pointInTime Default is to database backup point
protectNewApplication No
listenerpath Oracle home path
totalMemory Same as source
sourceHost localHostname
targetHost localHostname
redosize 100MB
Parameter Default Value
clone Parameters
Parameter Use
| actifio.com | An Oracle DBA’s Guide to Actifio Copy Data Management 69

70
Refresh a Clone
To refresh a clone, use --type clone, optype refresh
Example
refresh Parameters
--optype Type of Clone operation. This is optional parameter. If not specified new clone operation will be performed.
--dbname Name of source database. This is a required parameter.
--sourceHost Name of source host. This is an optional parameter. If not specified, host where script is running is used
--targetHost Name of target host. This is an optional parameter. If not specified, host where script is running is used.
--TargetDBname App-aware mount clone database name.
--pointInTime Date and Time for clone the database. This is an optional parameter. If not specified, the database will be cloned with all the available backup archive logs.
--image Image name to use for clone the database. This is an optional parameter. If not specified, the latest image will be used for database clone.
perl actDBM.pl --type clone --optype refresh --dbname <source database name> --TargetDBname <app-aware mounted database name> [--image <Image name>] [--sourceHost <source hostname>] [--targetHost <target hostname>] [--pointInTime [<Recovery time ‘yyyy-mm-dd hh24:mi:ss’>][--CDS <Appliance ip|name>] [--wait <yes|no>]
Parameter Use
| actifio.com |An Oracle DBA’s Guide to Actifio Copy Data Management
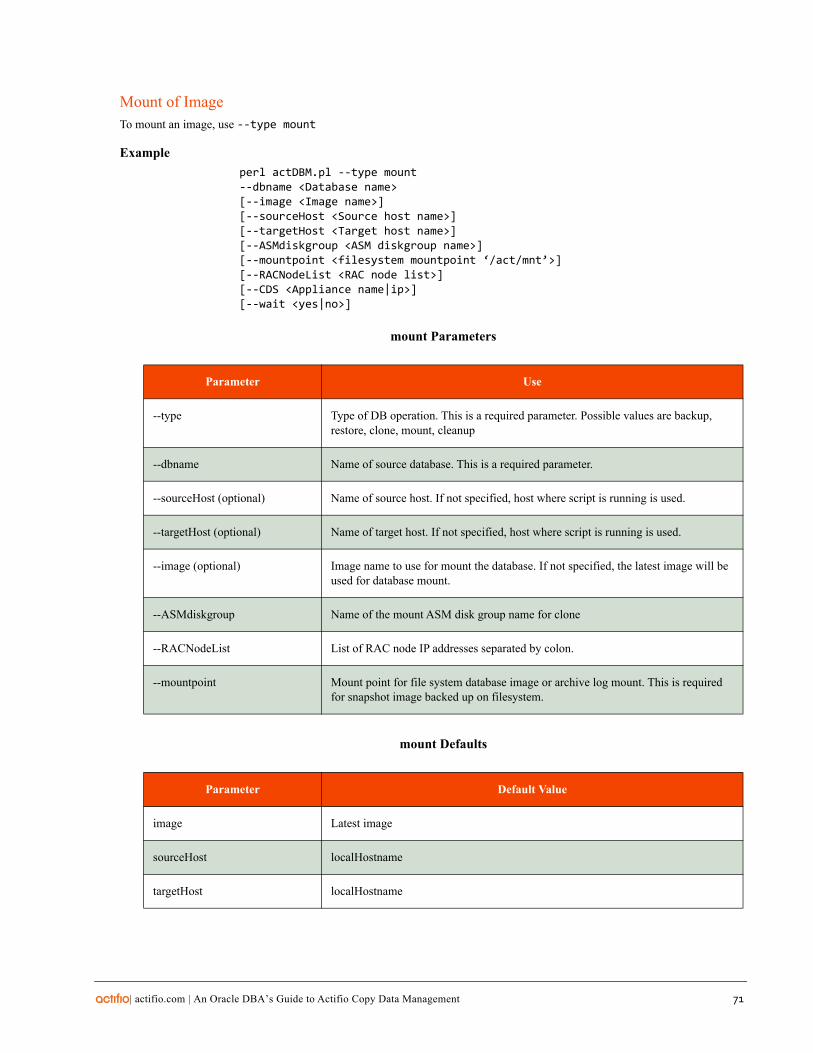
Mount of ImageTo mount an image, use --type mount
Example
mount Parameters
--type Type of DB operation. This is a required parameter. Possible values are backup, restore, clone, mount, cleanup
--dbname Name of source database. This is a required parameter.
--sourceHost (optional) Name of source host. If not specified, host where script is running is used.
--targetHost (optional) Name of target host. If not specified, host where script is running is used.
--image (optional) Image name to use for mount the database. If not specified, the latest image will be used for database mount.
--ASMdiskgroup Name of the mount ASM disk group name for clone
--RACNodeList List of RAC node IP addresses separated by colon.
--mountpoint Mount point for file system database image or archive log mount. This is required for snapshot image backed up on filesystem.
mount Defaults
image Latest image
sourceHost localHostname
targetHost localHostname
perl actDBM.pl --type mount --dbname <Database name> [--image <Image name>] [--sourceHost <Source host name>] [--targetHost <Target host name>] [--ASMdiskgroup <ASM diskgroup name>] [--mountpoint <filesystem mountpoint ‘/act/mnt’>][--RACNodeList <RAC node list>] [--CDS <Appliance name|ip>] [--wait <yes|no>]
Parameter Use
Parameter Default Value
| actifio.com | An Oracle DBA’s Guide to Actifio Copy Data Management 71
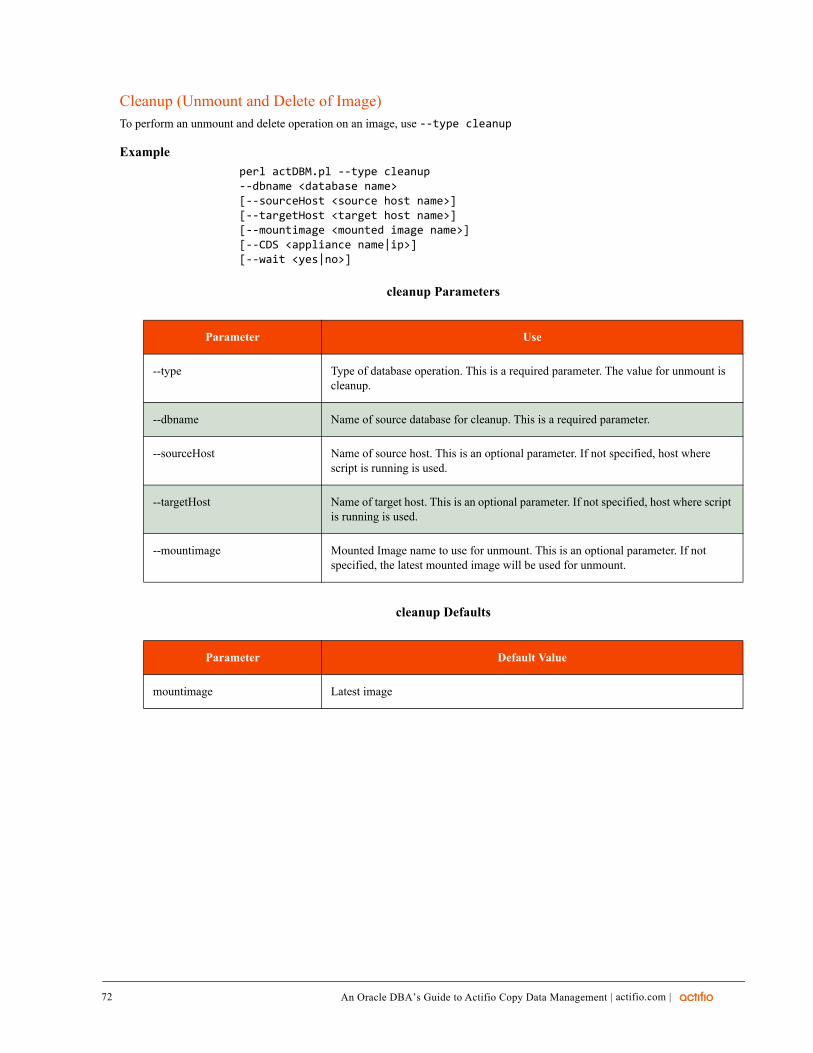
72
Cleanup (Unmount and Delete of Image)To perform an unmount and delete operation on an image, use --type cleanup
Example
cleanup Parameters
--type Type of database operation. This is a required parameter. The value for unmount is cleanup.
--dbname Name of source database for cleanup. This is a required parameter.
--sourceHost Name of source host. This is an optional parameter. If not specified, host where script is running is used.
--targetHost Name of target host. This is an optional parameter. If not specified, host where script is running is used.
--mountimage Mounted Image name to use for unmount. This is an optional parameter. If not specified, the latest mounted image will be used for unmount.
cleanup Defaults
mountimage Latest image
perl actDBM.pl --type cleanup --dbname <database name> [--sourceHost <source host name>] [--targetHost <target host name>] [--mountimage <mounted image name>] [--CDS <appliance name|ip>] [--wait <yes|no>]
Parameter Use
Parameter Default Value
| actifio.com |An Oracle DBA’s Guide to Actifio Copy Data Management
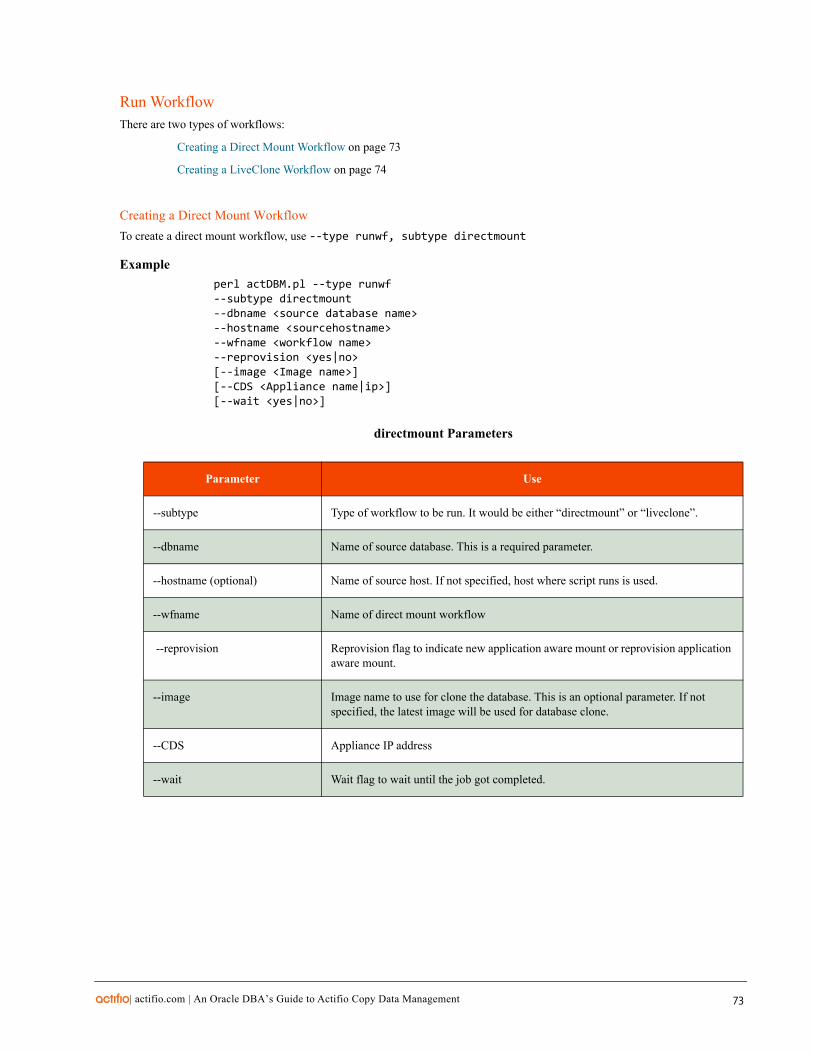
Run WorkflowThere are two types of workflows:
Creating a Direct Mount Workflow on page 73
Creating a LiveClone Workflow on page 74
Creating a Direct Mount Workflow
To create a direct mount workflow, use --type runwf, subtype directmount
Example
directmount Parameters
--subtype Type of workflow to be run. It would be either “directmount” or “liveclone”.
--dbname Name of source database. This is a required parameter.
--hostname (optional) Name of source host. If not specified, host where script runs is used.
--wfname Name of direct mount workflow
--reprovision Reprovision flag to indicate new application aware mount or reprovision application aware mount.
--image Image name to use for clone the database. This is an optional parameter. If not specified, the latest image will be used for database clone.
--CDS Appliance IP address
--wait Wait flag to wait until the job got completed.
perl actDBM.pl --type runwf --subtype directmount --dbname <source database name> --hostname <sourcehostname> --wfname <workflow name> --reprovision <yes|no> [--image <Image name>] [--CDS <Appliance name|ip>] [--wait <yes|no>]
Parameter Use
| actifio.com | An Oracle DBA’s Guide to Actifio Copy Data Management 73
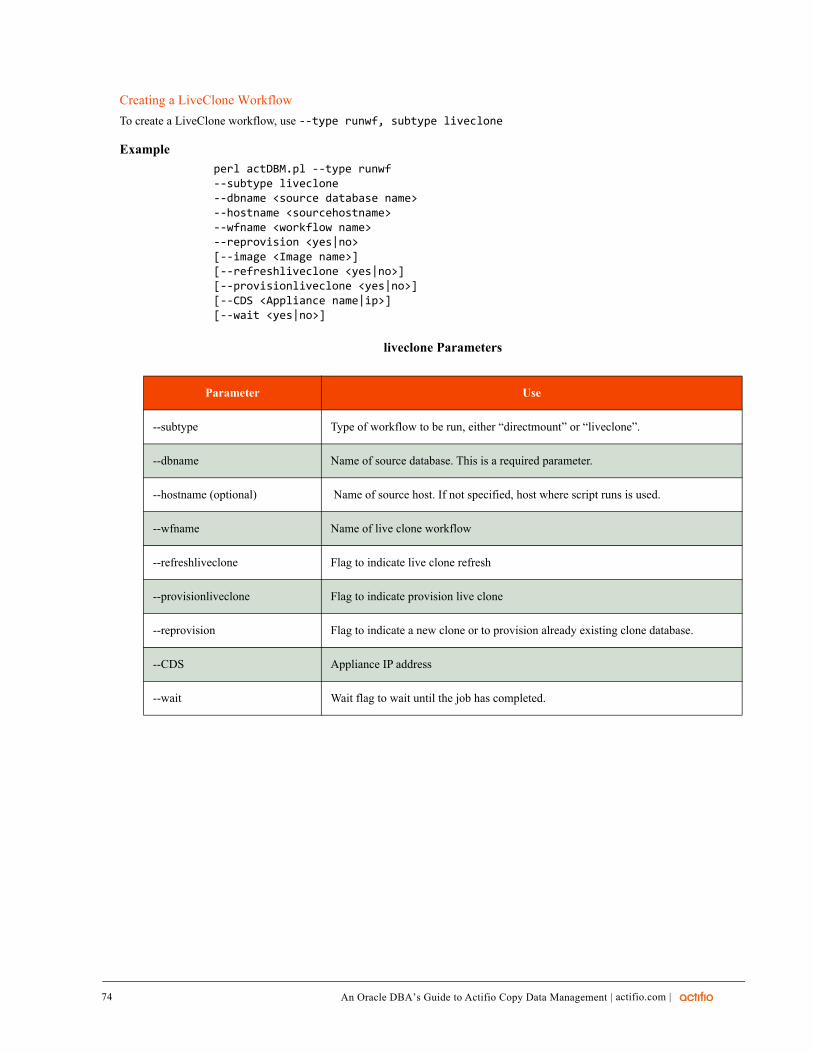
74
Creating a LiveClone Workflow
To create a LiveClone workflow, use --type runwf, subtype liveclone
Example
liveclone Parameters
--subtype Type of workflow to be run, either “directmount” or “liveclone”.
--dbname Name of source database. This is a required parameter.
--hostname (optional) Name of source host. If not specified, host where script runs is used.
--wfname Name of live clone workflow
--refreshliveclone Flag to indicate live clone refresh
--provisionliveclone Flag to indicate provision live clone
--reprovision Flag to indicate a new clone or to provision already existing clone database.
--CDS Appliance IP address
--wait Wait flag to wait until the job has completed.
perl actDBM.pl --type runwf --subtype liveclone --dbname <source database name> --hostname <sourcehostname> --wfname <workflow name> --reprovision <yes|no> [--image <Image name>] [--refreshliveclone <yes|no>] [--provisionliveclone <yes|no>] [--CDS <Appliance name|ip>] [--wait <yes|no>]
Parameter Use
| actifio.com |An Oracle DBA’s Guide to Actifio Copy Data Management
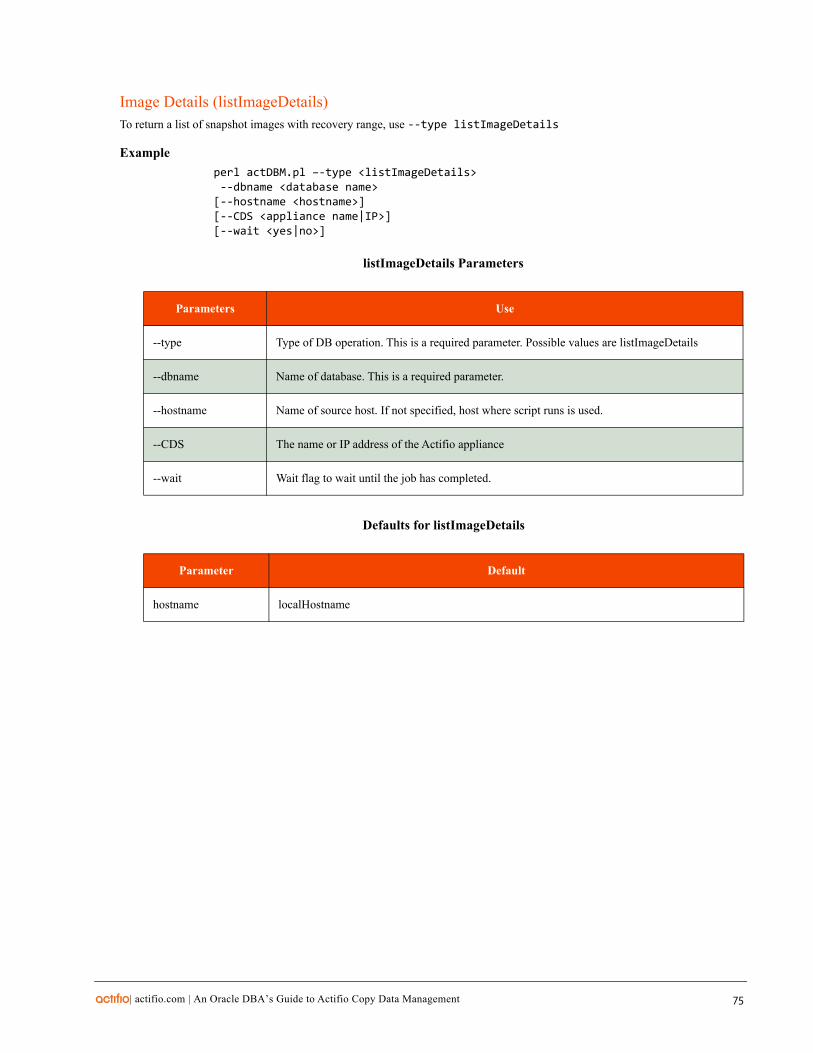
Image Details (listImageDetails)To return a list of snapshot images with recovery range, use --type listImageDetails
Example
listImageDetails Parameters
--type Type of DB operation. This is a required parameter. Possible values are listImageDetails
--dbname Name of database. This is a required parameter.
--hostname Name of source host. If not specified, host where script runs is used.
--CDS The name or IP address of the Actifio appliance
--wait Wait flag to wait until the job has completed.
Defaults for listImageDetails
hostname localHostname
perl actDBM.pl –-type <listImageDetails> --dbname <database name> [--hostname <hostname>][--CDS <appliance name|IP>][--wait <yes|no>]
Parameters Use
Parameter Default
| actifio.com | An Oracle DBA’s Guide to Actifio Copy Data Management 75
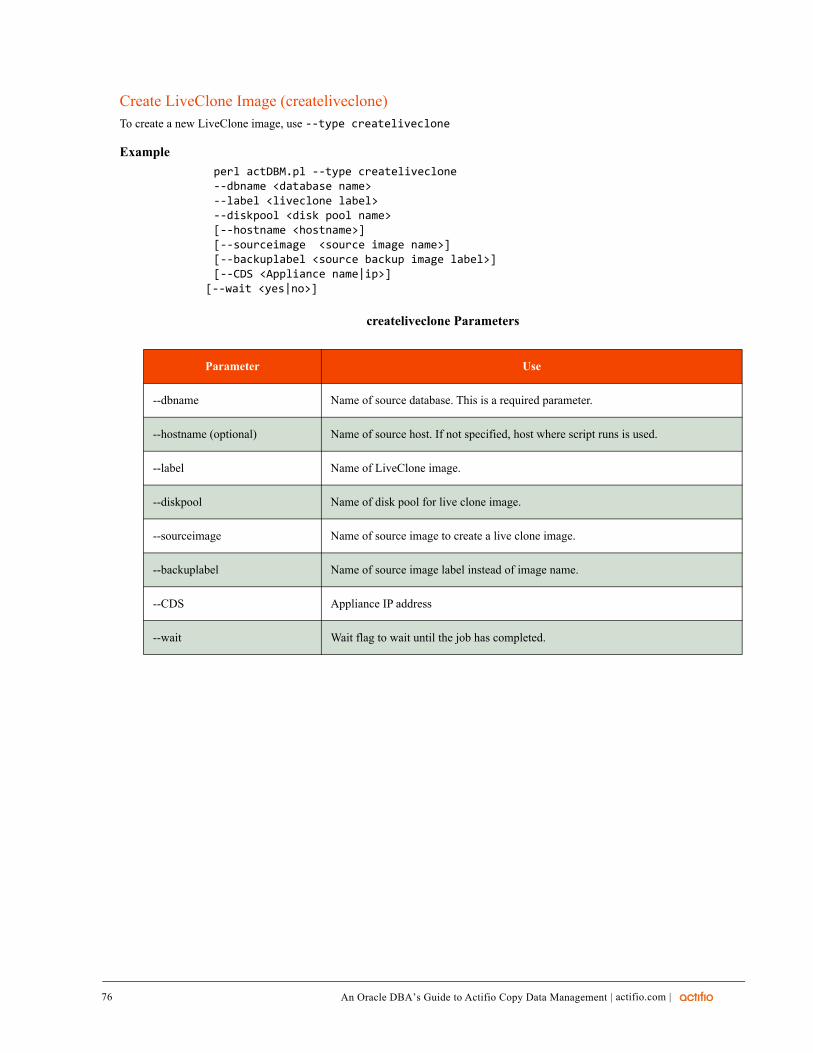
76
Create LiveClone Image (createliveclone)To create a new LiveClone image, use --type createliveclone
Example
createliveclone Parameters
--dbname Name of source database. This is a required parameter.
--hostname (optional) Name of source host. If not specified, host where script runs is used.
--label Name of LiveClone image.
--diskpool Name of disk pool for live clone image.
--sourceimage Name of source image to create a live clone image.
--backuplabel Name of source image label instead of image name.
--CDS Appliance IP address
--wait Wait flag to wait until the job has completed.
perl actDBM.pl --type createliveclone --dbname <database name> --label <liveclone label> --diskpool <disk pool name> [--hostname <hostname>] [--sourceimage <source image name>] [--backuplabel <source backup image label>] [--CDS <Appliance name|ip>] [--wait <yes|no>]
Parameter Use
| actifio.com |An Oracle DBA’s Guide to Actifio Copy Data Management
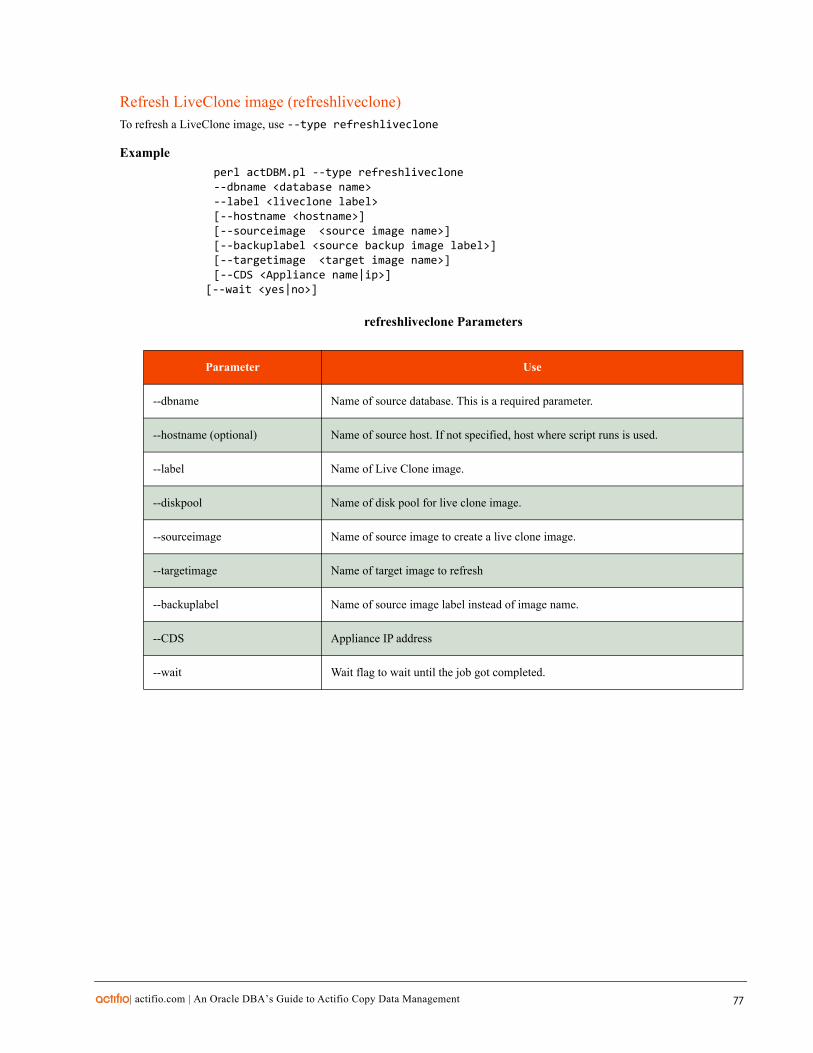
Refresh LiveClone image (refreshliveclone)To refresh a LiveClone image, use --type refreshliveclone
Example
refreshliveclone Parameters
--dbname Name of source database. This is a required parameter.
--hostname (optional) Name of source host. If not specified, host where script runs is used.
--label Name of Live Clone image.
--diskpool Name of disk pool for live clone image.
--sourceimage Name of source image to create a live clone image.
--targetimage Name of target image to refresh
--backuplabel Name of source image label instead of image name.
--CDS Appliance IP address
--wait Wait flag to wait until the job got completed.
perl actDBM.pl --type refreshliveclone --dbname <database name> --label <liveclone label> [--hostname <hostname>] [--sourceimage <source image name>] [--backuplabel <source backup image label>] [--targetimage <target image name>] [--CDS <Appliance name|ip>] [--wait <yes|no>]
Parameter Use
| actifio.com | An Oracle DBA’s Guide to Actifio Copy Data Management 77

78
Restore ASM Database Switch (restoreASMswitch)To restore an ASM database switch, use --type restoreASMswitch
Example
restoreASMswitch Parameters
--dbname Name of source database. This is a required parameter.
--OSusername OS oracle owner name
--OSgridusername OS grid owner name
--pointInTime Date and Time for clone the database. This is an optional parameter. If not specified, the database will be cloned with all the available backup archive logs.
--image Image name to use for clone the database. This is an optional parameter. If not specified, the latest image will be used for database clone.
--TargetOracleHome Oracle Home on Target database Host
--ASMdiskgroup Name of the mount ASM disk group name for clone
--RACNodeList List of RAC node IP addresses separated by colon.
--standalone Standalone flag indicator to create target database as
--sourceHost Name of source host. This is required parameter.
--mountpoint Archivelog filesystem mountpoint
--CDS Appliance IP address
--wait Wait flag to wait until the job got completed.
perl actDBM.pl --type restoreASMswitch --dbname <database name> --TargetOracleHome <Target Oracle Home> --OSusername <OS oracle username> --OSgridusername <OS grid username> --standalone <yes/no> --ASMdiskgroup <ASM diskgroup name> --RACNodeList <RAC node list> --sourceHost <source host name>[--image <Image name>] [--pointInTime <Recovery time 'yyyymmddhh24mi'>] [--mountpoint <archivelog filesystem mountpoint '/act/mnt'>][--CDS <Appliance name|ip>] [--wait <yes|no>]
Parameter Use
| actifio.com |An Oracle DBA’s Guide to Actifio Copy Data Management
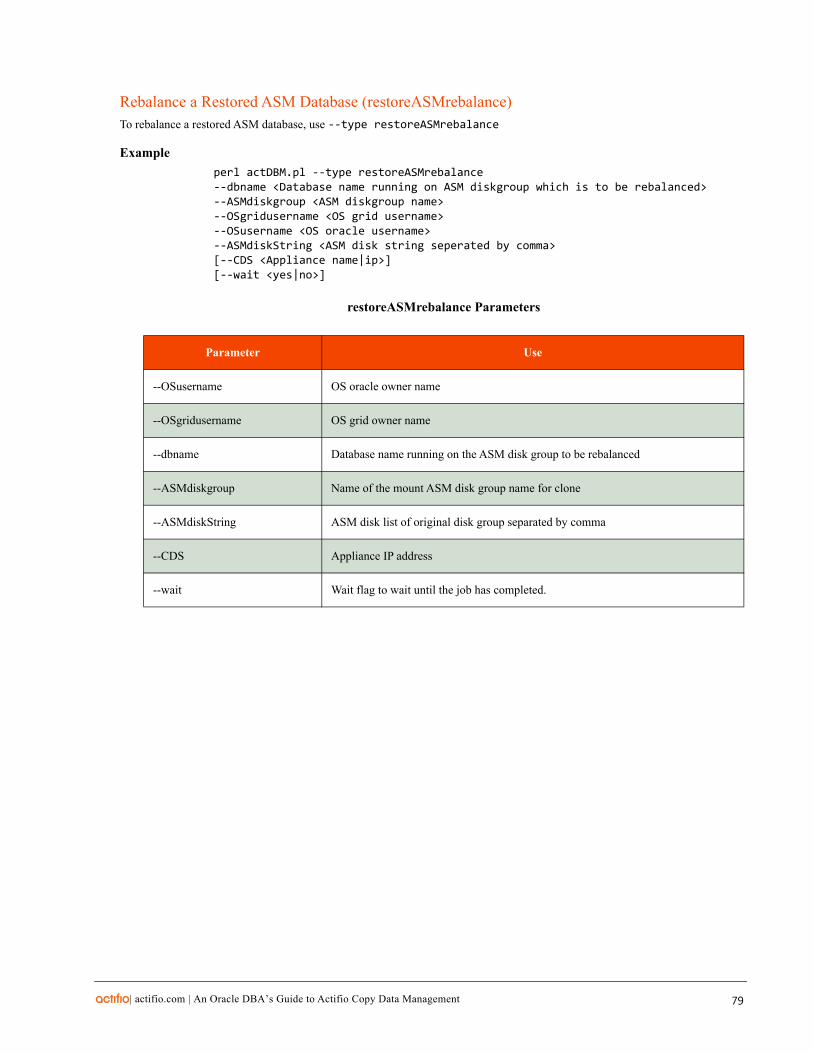
Rebalance a Restored ASM Database (restoreASMrebalance)To rebalance a restored ASM database, use --type restoreASMrebalance
Example
restoreASMrebalance Parameters
--OSusername OS oracle owner name
--OSgridusername OS grid owner name
--dbname Database name running on the ASM disk group to be rebalanced
--ASMdiskgroup Name of the mount ASM disk group name for clone
--ASMdiskString ASM disk list of original disk group separated by comma
--CDS Appliance IP address
--wait Wait flag to wait until the job has completed.
perl actDBM.pl --type restoreASMrebalance --dbname <Database name running on ASM diskgroup which is to be rebalanced>--ASMdiskgroup <ASM diskgroup name> --OSgridusername <OS grid username> --OSusername <OS oracle username> --ASMdiskString <ASM disk string seperated by comma> [--CDS <Appliance name|ip>] [--wait <yes|no>]
Parameter Use
| actifio.com | An Oracle DBA’s Guide to Actifio Copy Data Management 79
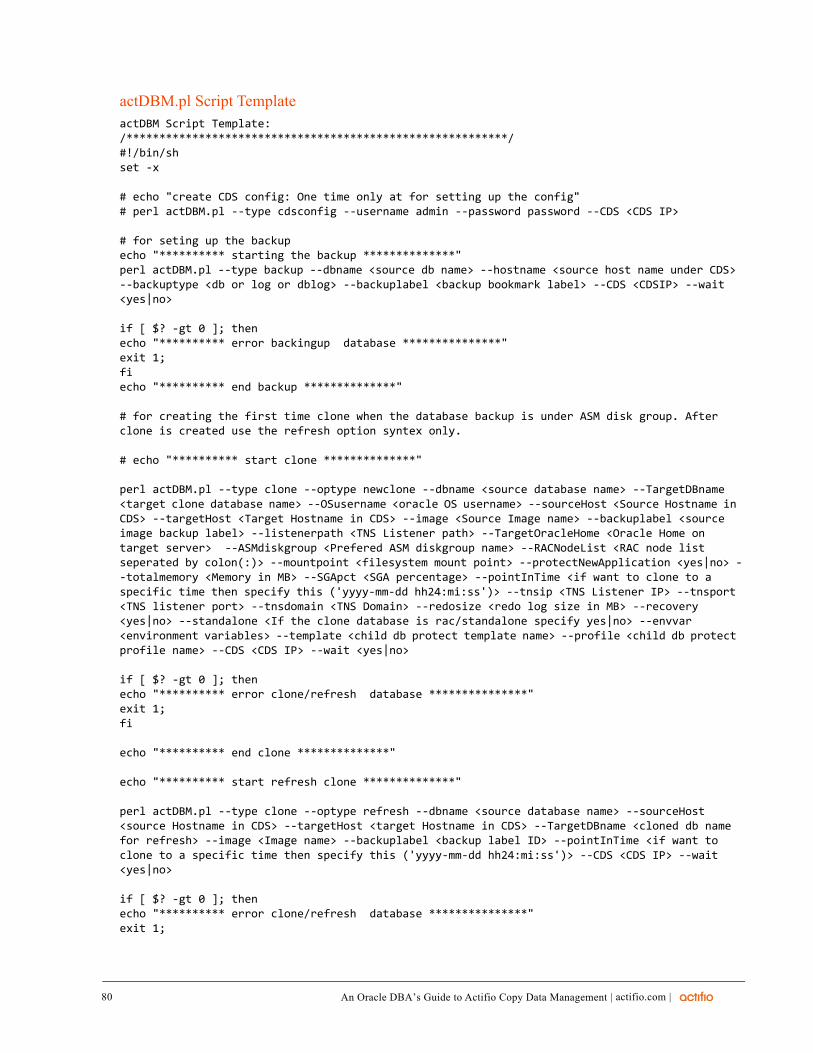
80
actDBM.pl Script TemplateactDBM Script Template:/**********************************************************/#!/bin/shset -x
# echo "create CDS config: One time only at for setting up the config"# perl actDBM.pl --type cdsconfig --username admin --password password --CDS <CDS IP>
# for seting up the backupecho "********** starting the backup **************"perl actDBM.pl --type backup --dbname <source db name> --hostname <source host name under CDS> --backuptype <db or log or dblog> --backuplabel <backup bookmark label> --CDS <CDSIP> --wait <yes|no>
if [ $? -gt 0 ]; thenecho "********** error backingup database ***************"exit 1;fiecho "********** end backup **************"
# for creating the first time clone when the database backup is under ASM disk group. After clone is created use the refresh option syntex only.
# echo "********** start clone **************"
perl actDBM.pl --type clone --optype newclone --dbname <source database name> --TargetDBname <target clone database name> --OSusername <oracle OS username> --sourceHost <Source Hostname in CDS> --targetHost <Target Hostname in CDS> --image <Source Image name> --backuplabel <source image backup label> --listenerpath <TNS Listener path> --TargetOracleHome <Oracle Home on target server> --ASMdiskgroup <Prefered ASM diskgroup name> --RACNodeList <RAC node list seperated by colon(:)> --mountpoint <filesystem mount point> --protectNewApplication <yes|no> --totalmemory <Memory in MB> --SGApct <SGA percentage> --pointInTime <if want to clone to a specific time then specify this ('yyyy-mm-dd hh24:mi:ss')> --tnsip <TNS Listener IP> --tnsport <TNS listener port> --tnsdomain <TNS Domain> --redosize <redo log size in MB> --recovery <yes|no> --standalone <If the clone database is rac/standalone specify yes|no> --envvar <environment variables> --template <child db protect template name> --profile <child db protect profile name> --CDS <CDS IP> --wait <yes|no>
if [ $? -gt 0 ]; thenecho "********** error clone/refresh database ***************"exit 1;fi
echo "********** end clone **************"
echo "********** start refresh clone **************"
perl actDBM.pl --type clone --optype refresh --dbname <source database name> --sourceHost <source Hostname in CDS> --targetHost <target Hostname in CDS> --TargetDBname <cloned db name for refresh> --image <Image name> --backuplabel <backup label ID> --pointInTime <if want to clone to a specific time then specify this ('yyyy-mm-dd hh24:mi:ss')> --CDS <CDS IP> --wait <yes|no>
if [ $? -gt 0 ]; thenecho "********** error clone/refresh database ***************"exit 1;
| actifio.com |An Oracle DBA’s Guide to Actifio Copy Data Management
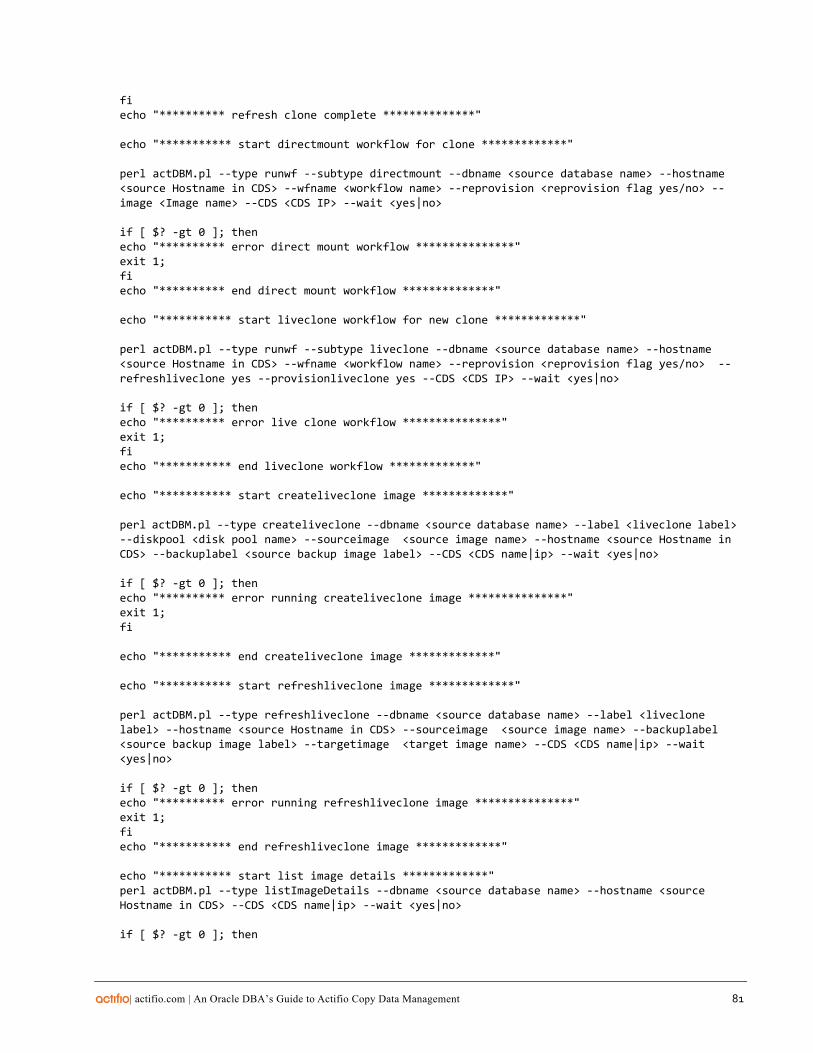
fiecho "********** refresh clone complete **************"
echo "*********** start directmount workflow for clone *************"
perl actDBM.pl --type runwf --subtype directmount --dbname <source database name> --hostname <source Hostname in CDS> --wfname <workflow name> --reprovision <reprovision flag yes/no> --image <Image name> --CDS <CDS IP> --wait <yes|no>
if [ $? -gt 0 ]; thenecho "********** error direct mount workflow ***************"exit 1;fiecho "********** end direct mount workflow **************"
echo "*********** start liveclone workflow for new clone *************"
perl actDBM.pl --type runwf --subtype liveclone --dbname <source database name> --hostname <source Hostname in CDS> --wfname <workflow name> --reprovision <reprovision flag yes/no> --refreshliveclone yes --provisionliveclone yes --CDS <CDS IP> --wait <yes|no>
if [ $? -gt 0 ]; thenecho "********** error live clone workflow ***************"exit 1;fiecho "*********** end liveclone workflow *************"
echo "*********** start createliveclone image *************"
perl actDBM.pl --type createliveclone --dbname <source database name> --label <liveclone label> --diskpool <disk pool name> --sourceimage <source image name> --hostname <source Hostname in CDS> --backuplabel <source backup image label> --CDS <CDS name|ip> --wait <yes|no>
if [ $? -gt 0 ]; thenecho "********** error running createliveclone image ***************"exit 1;fi
echo "*********** end createliveclone image *************"
echo "*********** start refreshliveclone image *************"
perl actDBM.pl --type refreshliveclone --dbname <source database name> --label <liveclone label> --hostname <source Hostname in CDS> --sourceimage <source image name> --backuplabel <source backup image label> --targetimage <target image name> --CDS <CDS name|ip> --wait <yes|no>
if [ $? -gt 0 ]; thenecho "********** error running refreshliveclone image ***************"exit 1;fiecho "*********** end refreshliveclone image *************"
echo "*********** start list image details *************"perl actDBM.pl --type listImageDetails --dbname <source database name> --hostname <source Hostname in CDS> --CDS <CDS name|ip> --wait <yes|no>
if [ $? -gt 0 ]; then
| actifio.com | An Oracle DBA’s Guide to Actifio Copy Data Management 81

82
echo "********** error running list image details ***************"exit 1;fiecho "*********** end list image details *************"
echo "*********** start mount image *************"
perl actDBM.pl --type mount --dbname <source database name> --sourceHost <source Hostname in CDS> --targetHost <target Hostname in CDS> --image <Image name> --ASMdiskgroup <ASM diskgroup name> --RACNodeList <RAC node list> --mountpoint <filesystem mountpoint> --CDS <CDS name|ip> --wait <yes|no>
if [ $? -gt 0 ]; thenecho "********** error running mount image ***************"exit 1;fiecho "*********** end mount image *************"
echo "*********** start restore image *************"
perl actDBM.pl --type restore --dbname <source database name> --OSusername <oracle OS username> --sourceHost <source Hostname in CDS> --OSpassword <OS oracle owner password> --image <Image name> --backuplabel <source backup image label> --pointInTime <if want to clone to a specific time then specify this ('yyyy-mm-dd hh24:mi:ss')> --CDS <CDS IP> --wait <yes|no> --openDB <flag to indicate the restored database need to be in open or in mount state true|false>
if [ $? -gt 0 ]; thenecho "********** error running restore image ***************"exit 1;fiecho "*********** end restore image *************"
echo "*********** start unmount+delete image *************"
perl actDBM.pl --type cleanup --dbname <source database name> --image <Mounted Image name> --sourceHost <source Hostname in CDS> --targetHost <target Hostname in CDS> --CDS <CDS IP> --wait <yes|no>
if [ $? -gt 0 ]; thenecho "********** error running unmount+delete image ***************"exit 1;fiecho "*********** end unmount+delete image *************"
echo "*********** start ASM restore database switch *************"
perl actDBM.pl --type restoreASMswitch --dbname <source database name> --sourceHost <source Hostname in CDS> --TargetOracleHome <Oracle Home path for the database> --OSusername <OS Oracle username> --OSgridusername <OS grid username> --standalone <standalone flag yes|no> --image <Image name> --ASMdiskgroup <ASM diskgroup name> --RACNodeList list of RAC nodes seperated by colon> --pointInTime <if want to clone to a specific time then specify this ('yyyymmddhh24mi')> --CDS <CDS IP> --wait <yes|no>
if [ $? -gt 0 ]; thenecho "********** error running ASM restore database switch ***************"exit 1;fiecho "*********** end ASM restore database switch *************"
| actifio.com |An Oracle DBA’s Guide to Actifio Copy Data Management

echo "*********** start ASM restore rebalance *************"
perl actDBM.pl --type restoreASMrebalance --ASMdiskgroup <ASM diskgroup name> --OSgridusername <OS grid username> --OSusername <OS Oracle username> --ASMdiskString <ASM disk string seperated by comma 'ORCL:ASMDISK0'> --CDS <CDS IP> --wait <yes|no>
if [ $? -gt 0 ]; thenecho "********** error running ASM restore rebalance ***************"exit 1;fiecho "*********** end ASM restore rebalance *************"
echo "*********** completed all operation *************"exit 0
/**************************************************/
| actifio.com | An Oracle DBA’s Guide to Actifio Copy Data Management 83

84
| actifio.com |An Oracle DBA’s Guide to Actifio Copy Data Management