Embed Size (px)
Citation preview
Amazon AppStream 2.0Developer Guide

Amazon AppStream 2.0 Developer Guide
Amazon AppStream 2.0: Developer GuideCopyright © 2018 Amazon Web Services, Inc. and/or its affiliates. All rights reserved.
Amazon's trademarks and trade dress may not be used in connection with any product or service that is not Amazon's, in any mannerthat is likely to cause confusion among customers, or in any manner that disparages or discredits Amazon. All other trademarks notowned by Amazon are the property of their respective owners, who may or may not be affiliated with, connected to, or sponsored byAmazon.

Amazon AppStream 2.0 Developer Guide
Table of ContentsWhat Is AppStream 2.0? .... . . . . . . . . . . . . . . . . . . . . . . . . . . . . . . . . . . . . . . . . . . . . . . . . . . . . . . . . . . . . . . . . . . . . . . . . . . . . . . . . . . . . . . . . . . . . . . . . . . . . . . . . . . . . . . . . . 1
Features .... . . . . . . . . . . . . . . . . . . . . . . . . . . . . . . . . . . . . . . . . . . . . . . . . . . . . . . . . . . . . . . . . . . . . . . . . . . . . . . . . . . . . . . . . . . . . . . . . . . . . . . . . . . . . . . . . . . . . . . . . . . . . . . . . 1Key Concepts .... . . . . . . . . . . . . . . . . . . . . . . . . . . . . . . . . . . . . . . . . . . . . . . . . . . . . . . . . . . . . . . . . . . . . . . . . . . . . . . . . . . . . . . . . . . . . . . . . . . . . . . . . . . . . . . . . . . . . . . . . . 2How to Get Started .... . . . . . . . . . . . . . . . . . . . . . . . . . . . . . . . . . . . . . . . . . . . . . . . . . . . . . . . . . . . . . . . . . . . . . . . . . . . . . . . . . . . . . . . . . . . . . . . . . . . . . . . . . . . . . . . . 2Accessing AppStream 2.0 .... . . . . . . . . . . . . . . . . . . . . . . . . . . . . . . . . . . . . . . . . . . . . . . . . . . . . . . . . . . . . . . . . . . . . . . . . . . . . . . . . . . . . . . . . . . . . . . . . . . . . . . . . 3
Setting Up .... . . . . . . . . . . . . . . . . . . . . . . . . . . . . . . . . . . . . . . . . . . . . . . . . . . . . . . . . . . . . . . . . . . . . . . . . . . . . . . . . . . . . . . . . . . . . . . . . . . . . . . . . . . . . . . . . . . . . . . . . . . . . . . . . . . . . 4Sign Up for AWS .... . . . . . . . . . . . . . . . . . . . . . . . . . . . . . . . . . . . . . . . . . . . . . . . . . . . . . . . . . . . . . . . . . . . . . . . . . . . . . . . . . . . . . . . . . . . . . . . . . . . . . . . . . . . . . . . . . . . . 4
Getting Started .... . . . . . . . . . . . . . . . . . . . . . . . . . . . . . . . . . . . . . . . . . . . . . . . . . . . . . . . . . . . . . . . . . . . . . . . . . . . . . . . . . . . . . . . . . . . . . . . . . . . . . . . . . . . . . . . . . . . . . . . . . . . . . . 5Step 1: Set Up a Sample Stack, Choose an Image, and Configure a Fleet ... . . . . . . . . . . . . . . . . . . . . . . . . . . . . . . . . . . . . . . . . . 5Step 2: Provide Access to Users ... . . . . . . . . . . . . . . . . . . . . . . . . . . . . . . . . . . . . . . . . . . . . . . . . . . . . . . . . . . . . . . . . . . . . . . . . . . . . . . . . . . . . . . . . . . . . . . . . 7Resources .... . . . . . . . . . . . . . . . . . . . . . . . . . . . . . . . . . . . . . . . . . . . . . . . . . . . . . . . . . . . . . . . . . . . . . . . . . . . . . . . . . . . . . . . . . . . . . . . . . . . . . . . . . . . . . . . . . . . . . . . . . . . . . . 7
Network Settings .... . . . . . . . . . . . . . . . . . . . . . . . . . . . . . . . . . . . . . . . . . . . . . . . . . . . . . . . . . . . . . . . . . . . . . . . . . . . . . . . . . . . . . . . . . . . . . . . . . . . . . . . . . . . . . . . . . . . . . . . . . . . 9Port Requirements for User Connections to AppStream 2.0 .... . . . . . . . . . . . . . . . . . . . . . . . . . . . . . . . . . . . . . . . . . . . . . . . . . . . . . . . . . 9
Ports for AppStream 2.0 User Devices .... . . . . . . . . . . . . . . . . . . . . . . . . . . . . . . . . . . . . . . . . . . . . . . . . . . . . . . . . . . . . . . . . . . . . . . . . . . . . . . 9Whitelisted Domains .... . . . . . . . . . . . . . . . . . . . . . . . . . . . . . . . . . . . . . . . . . . . . . . . . . . . . . . . . . . . . . . . . . . . . . . . . . . . . . . . . . . . . . . . . . . . . . . . . . . . . . 10
Port Requirements for AppStream 2.0 Connections .... . . . . . . . . . . . . . . . . . . . . . . . . . . . . . . . . . . . . . . . . . . . . . . . . . . . . . . . . . . . . . . . . . . 10Network Interfaces .... . . . . . . . . . . . . . . . . . . . . . . . . . . . . . . . . . . . . . . . . . . . . . . . . . . . . . . . . . . . . . . . . . . . . . . . . . . . . . . . . . . . . . . . . . . . . . . . . . . . . . . . 10Management Network Interface IP Address Range and Ports ... . . . . . . . . . . . . . . . . . . . . . . . . . . . . . . . . . . . . . . . . . . . . . . . 10Customer Network Interface Ports ... . . . . . . . . . . . . . . . . . . . . . . . . . . . . . . . . . . . . . . . . . . . . . . . . . . . . . . . . . . . . . . . . . . . . . . . . . . . . . . . . . . . 11
Network Setup Guidelines .... . . . . . . . . . . . . . . . . . . . . . . . . . . . . . . . . . . . . . . . . . . . . . . . . . . . . . . . . . . . . . . . . . . . . . . . . . . . . . . . . . . . . . . . . . . . . . . . . . . . . . 11Fleets ... . . . . . . . . . . . . . . . . . . . . . . . . . . . . . . . . . . . . . . . . . . . . . . . . . . . . . . . . . . . . . . . . . . . . . . . . . . . . . . . . . . . . . . . . . . . . . . . . . . . . . . . . . . . . . . . . . . . . . . . . . . . 11Image Builders ... . . . . . . . . . . . . . . . . . . . . . . . . . . . . . . . . . . . . . . . . . . . . . . . . . . . . . . . . . . . . . . . . . . . . . . . . . . . . . . . . . . . . . . . . . . . . . . . . . . . . . . . . . . . . . . 12
Security Groups .... . . . . . . . . . . . . . . . . . . . . . . . . . . . . . . . . . . . . . . . . . . . . . . . . . . . . . . . . . . . . . . . . . . . . . . . . . . . . . . . . . . . . . . . . . . . . . . . . . . . . . . . . . . . . . . . . . . . . 12Home Folders and VPC Endpoints ... . . . . . . . . . . . . . . . . . . . . . . . . . . . . . . . . . . . . . . . . . . . . . . . . . . . . . . . . . . . . . . . . . . . . . . . . . . . . . . . . . . . . . . . . . . 13Enabling Internet Access Using a Public Subnet .... . . . . . . . . . . . . . . . . . . . . . . . . . . . . . . . . . . . . . . . . . . . . . . . . . . . . . . . . . . . . . . . . . . . . . . . . 13
Enabling Internet Access for a Fleet ... . . . . . . . . . . . . . . . . . . . . . . . . . . . . . . . . . . . . . . . . . . . . . . . . . . . . . . . . . . . . . . . . . . . . . . . . . . . . . . . . . 14Enabling Internet Access for an Image Builder ... . . . . . . . . . . . . . . . . . . . . . . . . . . . . . . . . . . . . . . . . . . . . . . . . . . . . . . . . . . . . . . . . . . . 14
Enabling Internet Access Using a NAT Gateway .... . . . . . . . . . . . . . . . . . . . . . . . . . . . . . . . . . . . . . . . . . . . . . . . . . . . . . . . . . . . . . . . . . . . . . . . . 15Enabling Internet Access for a Fleet Using a NAT Gateway .... . . . . . . . . . . . . . . . . . . . . . . . . . . . . . . . . . . . . . . . . . . . . . . . . . 15Enabling Internet Access for an Image Builder Using a NAT Gateway .... . . . . . . . . . . . . . . . . . . . . . . . . . . . . . . . . . . . 16
Image Builders ... . . . . . . . . . . . . . . . . . . . . . . . . . . . . . . . . . . . . . . . . . . . . . . . . . . . . . . . . . . . . . . . . . . . . . . . . . . . . . . . . . . . . . . . . . . . . . . . . . . . . . . . . . . . . . . . . . . . . . . . . . . . . . . 17Actions .... . . . . . . . . . . . . . . . . . . . . . . . . . . . . . . . . . . . . . . . . . . . . . . . . . . . . . . . . . . . . . . . . . . . . . . . . . . . . . . . . . . . . . . . . . . . . . . . . . . . . . . . . . . . . . . . . . . . . . . . . . . . . . . . . 17Tutorial: Create a Custom Image .... . . . . . . . . . . . . . . . . . . . . . . . . . . . . . . . . . . . . . . . . . . . . . . . . . . . . . . . . . . . . . . . . . . . . . . . . . . . . . . . . . . . . . . . . . . . . 18
Step 1: Create an Image Builder ... . . . . . . . . . . . . . . . . . . . . . . . . . . . . . . . . . . . . . . . . . . . . . . . . . . . . . . . . . . . . . . . . . . . . . . . . . . . . . . . . . . . . . . 18Step 2: Install Applications to an Image .... . . . . . . . . . . . . . . . . . . . . . . . . . . . . . . . . . . . . . . . . . . . . . . . . . . . . . . . . . . . . . . . . . . . . . . . . . . 20Step 3: Add Applications to an Image .... . . . . . . . . . . . . . . . . . . . . . . . . . . . . . . . . . . . . . . . . . . . . . . . . . . . . . . . . . . . . . . . . . . . . . . . . . . . . . 20Step 4: Optimize Applications .... . . . . . . . . . . . . . . . . . . . . . . . . . . . . . . . . . . . . . . . . . . . . . . . . . . . . . . . . . . . . . . . . . . . . . . . . . . . . . . . . . . . . . . . . 21Step 5: Create an Image .... . . . . . . . . . . . . . . . . . . . . . . . . . . . . . . . . . . . . . . . . . . . . . . . . . . . . . . . . . . . . . . . . . . . . . . . . . . . . . . . . . . . . . . . . . . . . . . . . 21Step 6 (Optional): Tag and Copy an Image .... . . . . . . . . . . . . . . . . . . . . . . . . . . . . . . . . . . . . . . . . . . . . . . . . . . . . . . . . . . . . . . . . . . . . . . 22Step 7: Clean Up .... . . . . . . . . . . . . . . . . . . . . . . . . . . . . . . . . . . . . . . . . . . . . . . . . . . . . . . . . . . . . . . . . . . . . . . . . . . . . . . . . . . . . . . . . . . . . . . . . . . . . . . . . . . 23
Images .... . . . . . . . . . . . . . . . . . . . . . . . . . . . . . . . . . . . . . . . . . . . . . . . . . . . . . . . . . . . . . . . . . . . . . . . . . . . . . . . . . . . . . . . . . . . . . . . . . . . . . . . . . . . . . . . . . . . . . . . . . . . . . . . . . . . . . . . . 24Windows Image Versions .... . . . . . . . . . . . . . . . . . . . . . . . . . . . . . . . . . . . . . . . . . . . . . . . . . . . . . . . . . . . . . . . . . . . . . . . . . . . . . . . . . . . . . . . . . . . . . . . . . . . . . . . 24Amazon AppStream 2.0 Agent Versions .... . . . . . . . . . . . . . . . . . . . . . . . . . . . . . . . . . . . . . . . . . . . . . . . . . . . . . . . . . . . . . . . . . . . . . . . . . . . . . . . . . . 26
Fleets and Stacks .... . . . . . . . . . . . . . . . . . . . . . . . . . . . . . . . . . . . . . . . . . . . . . . . . . . . . . . . . . . . . . . . . . . . . . . . . . . . . . . . . . . . . . . . . . . . . . . . . . . . . . . . . . . . . . . . . . . . . . . . . . 28Fleet Type .... . . . . . . . . . . . . . . . . . . . . . . . . . . . . . . . . . . . . . . . . . . . . . . . . . . . . . . . . . . . . . . . . . . . . . . . . . . . . . . . . . . . . . . . . . . . . . . . . . . . . . . . . . . . . . . . . . . . . . . . . . . . 28Session Context ... . . . . . . . . . . . . . . . . . . . . . . . . . . . . . . . . . . . . . . . . . . . . . . . . . . . . . . . . . . . . . . . . . . . . . . . . . . . . . . . . . . . . . . . . . . . . . . . . . . . . . . . . . . . . . . . . . . . . 28Instance Families ... . . . . . . . . . . . . . . . . . . . . . . . . . . . . . . . . . . . . . . . . . . . . . . . . . . . . . . . . . . . . . . . . . . . . . . . . . . . . . . . . . . . . . . . . . . . . . . . . . . . . . . . . . . . . . . . . . . . 29Create Fleets and Stacks .... . . . . . . . . . . . . . . . . . . . . . . . . . . . . . . . . . . . . . . . . . . . . . . . . . . . . . . . . . . . . . . . . . . . . . . . . . . . . . . . . . . . . . . . . . . . . . . . . . . . . . . . 30
Create a Fleet ... . . . . . . . . . . . . . . . . . . . . . . . . . . . . . . . . . . . . . . . . . . . . . . . . . . . . . . . . . . . . . . . . . . . . . . . . . . . . . . . . . . . . . . . . . . . . . . . . . . . . . . . . . . . . . . . 31Create a Stack .... . . . . . . . . . . . . . . . . . . . . . . . . . . . . . . . . . . . . . . . . . . . . . . . . . . . . . . . . . . . . . . . . . . . . . . . . . . . . . . . . . . . . . . . . . . . . . . . . . . . . . . . . . . . . . 32Provide Access to Users ... . . . . . . . . . . . . . . . . . . . . . . . . . . . . . . . . . . . . . . . . . . . . . . . . . . . . . . . . . . . . . . . . . . . . . . . . . . . . . . . . . . . . . . . . . . . . . . . . . . 33Clean Up Resources .... . . . . . . . . . . . . . . . . . . . . . . . . . . . . . . . . . . . . . . . . . . . . . . . . . . . . . . . . . . . . . . . . . . . . . . . . . . . . . . . . . . . . . . . . . . . . . . . . . . . . . . 33
Customize Fleets ... . . . . . . . . . . . . . . . . . . . . . . . . . . . . . . . . . . . . . . . . . . . . . . . . . . . . . . . . . . . . . . . . . . . . . . . . . . . . . . . . . . . . . . . . . . . . . . . . . . . . . . . . . . . . . . . . . . . 34Persist Environment Variables .... . . . . . . . . . . . . . . . . . . . . . . . . . . . . . . . . . . . . . . . . . . . . . . . . . . . . . . . . . . . . . . . . . . . . . . . . . . . . . . . . . . . . . . . . 34
iii

Amazon AppStream 2.0 Developer Guide
Set Default File Associations for Your Users ... . . . . . . . . . . . . . . . . . . . . . . . . . . . . . . . . . . . . . . . . . . . . . . . . . . . . . . . . . . . . . . . . . . . . . . 36Set Google Chrome as the Default Browser for Users' Streaming Sessions .... . . . . . . . . . . . . . . . . . . . . . . . . . . . . 37Change the Default Internet Explorer Home Page for Users' Streaming Sessions .... . . . . . . . . . . . . . . . . . . . . 38
Fleet Auto Scaling .... . . . . . . . . . . . . . . . . . . . . . . . . . . . . . . . . . . . . . . . . . . . . . . . . . . . . . . . . . . . . . . . . . . . . . . . . . . . . . . . . . . . . . . . . . . . . . . . . . . . . . . . . . . . . . . . . 39Scaling Concepts .... . . . . . . . . . . . . . . . . . . . . . . . . . . . . . . . . . . . . . . . . . . . . . . . . . . . . . . . . . . . . . . . . . . . . . . . . . . . . . . . . . . . . . . . . . . . . . . . . . . . . . . . . . . 40Managing Fleet Scaling Using the Console .... . . . . . . . . . . . . . . . . . . . . . . . . . . . . . . . . . . . . . . . . . . . . . . . . . . . . . . . . . . . . . . . . . . . . . . . 41Managing Fleet Scaling Using the AWS CLI ... . . . . . . . . . . . . . . . . . . . . . . . . . . . . . . . . . . . . . . . . . . . . . . . . . . . . . . . . . . . . . . . . . . . . . . . 42
Add Your Custom Branding to AppStream 2.0 .... . . . . . . . . . . . . . . . . . . . . . . . . . . . . . . . . . . . . . . . . . . . . . . . . . . . . . . . . . . . . . . . . . . . . . . . . . . . . . . . . . . 46Custom Branding Options .... . . . . . . . . . . . . . . . . . . . . . . . . . . . . . . . . . . . . . . . . . . . . . . . . . . . . . . . . . . . . . . . . . . . . . . . . . . . . . . . . . . . . . . . . . . . . . . . . . . . . . 46Adding Your Custom Branding to AppStream 2.0 .... . . . . . . . . . . . . . . . . . . . . . . . . . . . . . . . . . . . . . . . . . . . . . . . . . . . . . . . . . . . . . . . . . . . . . 47Specifying a Custom Redirect URL and Feedback URL .... . . . . . . . . . . . . . . . . . . . . . . . . . . . . . . . . . . . . . . . . . . . . . . . . . . . . . . . . . . . . . . . 48Previewing Your Custom Branding Changes .... . . . . . . . . . . . . . . . . . . . . . . . . . . . . . . . . . . . . . . . . . . . . . . . . . . . . . . . . . . . . . . . . . . . . . . . . . . . . . 48Color Theme Palettes .... . . . . . . . . . . . . . . . . . . . . . . . . . . . . . . . . . . . . . . . . . . . . . . . . . . . . . . . . . . . . . . . . . . . . . . . . . . . . . . . . . . . . . . . . . . . . . . . . . . . . . . . . . . . 48
Red .... . . . . . . . . . . . . . . . . . . . . . . . . . . . . . . . . . . . . . . . . . . . . . . . . . . . . . . . . . . . . . . . . . . . . . . . . . . . . . . . . . . . . . . . . . . . . . . . . . . . . . . . . . . . . . . . . . . . . . . . . . . . . . 49Light Blue .... . . . . . . . . . . . . . . . . . . . . . . . . . . . . . . . . . . . . . . . . . . . . . . . . . . . . . . . . . . . . . . . . . . . . . . . . . . . . . . . . . . . . . . . . . . . . . . . . . . . . . . . . . . . . . . . . . . . 49Blue .... . . . . . . . . . . . . . . . . . . . . . . . . . . . . . . . . . . . . . . . . . . . . . . . . . . . . . . . . . . . . . . . . . . . . . . . . . . . . . . . . . . . . . . . . . . . . . . . . . . . . . . . . . . . . . . . . . . . . . . . . . . . . 50Pink .... . . . . . . . . . . . . . . . . . . . . . . . . . . . . . . . . . . . . . . . . . . . . . . . . . . . . . . . . . . . . . . . . . . . . . . . . . . . . . . . . . . . . . . . . . . . . . . . . . . . . . . . . . . . . . . . . . . . . . . . . . . . . 51
Enable Persistent Storage for Your Users ... . . . . . . . . . . . . . . . . . . . . . . . . . . . . . . . . . . . . . . . . . . . . . . . . . . . . . . . . . . . . . . . . . . . . . . . . . . . . . . . . . . . . . . . . . . 52Enable and Administer Home Folders ... . . . . . . . . . . . . . . . . . . . . . . . . . . . . . . . . . . . . . . . . . . . . . . . . . . . . . . . . . . . . . . . . . . . . . . . . . . . . . . . . . . . . . . 52
Enable Home Folders for Your AppStream 2.0 Users ... . . . . . . . . . . . . . . . . . . . . . . . . . . . . . . . . . . . . . . . . . . . . . . . . . . . . . . . . . . 52Administer Your Home Folders ... . . . . . . . . . . . . . . . . . . . . . . . . . . . . . . . . . . . . . . . . . . . . . . . . . . . . . . . . . . . . . . . . . . . . . . . . . . . . . . . . . . . . . . . . 53Provide Your AppStream 2.0 Users with Guidance for Working with Home Folders ... . . . . . . . . . . . . . . . . . . 56
Enable and Administer Google Drive .... . . . . . . . . . . . . . . . . . . . . . . . . . . . . . . . . . . . . . . . . . . . . . . . . . . . . . . . . . . . . . . . . . . . . . . . . . . . . . . . . . . . . . . . 57Enable Google Drive for Your AppStream 2.0 Users ... . . . . . . . . . . . . . . . . . . . . . . . . . . . . . . . . . . . . . . . . . . . . . . . . . . . . . . . . . . . 57Disable Google Drive for Your AppStream 2.0 Users ... . . . . . . . . . . . . . . . . . . . . . . . . . . . . . . . . . . . . . . . . . . . . . . . . . . . . . . . . . . . 58Provide Your AppStream 2.0 Users with Guidance for Working with Google Drive .... . . . . . . . . . . . . . . . . . . 59
Manage Access with the User Pool ... . . . . . . . . . . . . . . . . . . . . . . . . . . . . . . . . . . . . . . . . . . . . . . . . . . . . . . . . . . . . . . . . . . . . . . . . . . . . . . . . . . . . . . . . . . . . . . . . . . 62User Pool End User Experience .... . . . . . . . . . . . . . . . . . . . . . . . . . . . . . . . . . . . . . . . . . . . . . . . . . . . . . . . . . . . . . . . . . . . . . . . . . . . . . . . . . . . . . . . . . . . . . . 62
Resetting a Forgotten Password .... . . . . . . . . . . . . . . . . . . . . . . . . . . . . . . . . . . . . . . . . . . . . . . . . . . . . . . . . . . . . . . . . . . . . . . . . . . . . . . . . . . . . . 63User Pool Administration .... . . . . . . . . . . . . . . . . . . . . . . . . . . . . . . . . . . . . . . . . . . . . . . . . . . . . . . . . . . . . . . . . . . . . . . . . . . . . . . . . . . . . . . . . . . . . . . . . . . . . . . . 63
Creating a User ... . . . . . . . . . . . . . . . . . . . . . . . . . . . . . . . . . . . . . . . . . . . . . . . . . . . . . . . . . . . . . . . . . . . . . . . . . . . . . . . . . . . . . . . . . . . . . . . . . . . . . . . . . . . . . 63Assigning Stacks to Users ... . . . . . . . . . . . . . . . . . . . . . . . . . . . . . . . . . . . . . . . . . . . . . . . . . . . . . . . . . . . . . . . . . . . . . . . . . . . . . . . . . . . . . . . . . . . . . . . 64Unassigning Stacks from Users ... . . . . . . . . . . . . . . . . . . . . . . . . . . . . . . . . . . . . . . . . . . . . . . . . . . . . . . . . . . . . . . . . . . . . . . . . . . . . . . . . . . . . . . . 64Disabling Users ... . . . . . . . . . . . . . . . . . . . . . . . . . . . . . . . . . . . . . . . . . . . . . . . . . . . . . . . . . . . . . . . . . . . . . . . . . . . . . . . . . . . . . . . . . . . . . . . . . . . . . . . . . . . . . 65Enabling Users ... . . . . . . . . . . . . . . . . . . . . . . . . . . . . . . . . . . . . . . . . . . . . . . . . . . . . . . . . . . . . . . . . . . . . . . . . . . . . . . . . . . . . . . . . . . . . . . . . . . . . . . . . . . . . . . 65Re-Sending Welcome Email ... . . . . . . . . . . . . . . . . . . . . . . . . . . . . . . . . . . . . . . . . . . . . . . . . . . . . . . . . . . . . . . . . . . . . . . . . . . . . . . . . . . . . . . . . . . . . 65
Single Sign-on Access .... . . . . . . . . . . . . . . . . . . . . . . . . . . . . . . . . . . . . . . . . . . . . . . . . . . . . . . . . . . . . . . . . . . . . . . . . . . . . . . . . . . . . . . . . . . . . . . . . . . . . . . . . . . . . . . . . . . . 66Example Authentication Workflow ..... . . . . . . . . . . . . . . . . . . . . . . . . . . . . . . . . . . . . . . . . . . . . . . . . . . . . . . . . . . . . . . . . . . . . . . . . . . . . . . . . . . . . . . . . . 66Setting Up SAML .... . . . . . . . . . . . . . . . . . . . . . . . . . . . . . . . . . . . . . . . . . . . . . . . . . . . . . . . . . . . . . . . . . . . . . . . . . . . . . . . . . . . . . . . . . . . . . . . . . . . . . . . . . . . . . . . . . . 67
Prerequisites ... . . . . . . . . . . . . . . . . . . . . . . . . . . . . . . . . . . . . . . . . . . . . . . . . . . . . . . . . . . . . . . . . . . . . . . . . . . . . . . . . . . . . . . . . . . . . . . . . . . . . . . . . . . . . . . . . . 67Step 1: Create a SAML Identity Provider in AWS IAM ..... . . . . . . . . . . . . . . . . . . . . . . . . . . . . . . . . . . . . . . . . . . . . . . . . . . . . . . . . 67Step 2: Create a SAML 2.0 Federation IAM Role .... . . . . . . . . . . . . . . . . . . . . . . . . . . . . . . . . . . . . . . . . . . . . . . . . . . . . . . . . . . . . . . . . 68Step 3: Embed an Inline Policy for the IAM Role .... . . . . . . . . . . . . . . . . . . . . . . . . . . . . . . . . . . . . . . . . . . . . . . . . . . . . . . . . . . . . . . . 68Step 4: Configure Your SAML-Based IdP .... . . . . . . . . . . . . . . . . . . . . . . . . . . . . . . . . . . . . . . . . . . . . . . . . . . . . . . . . . . . . . . . . . . . . . . . . . . 69Step 5: Create Assertions for the SAML Authentication Response .... . . . . . . . . . . . . . . . . . . . . . . . . . . . . . . . . . . . . . . . . 69Step 6: Configure the Relay State of Your Federation .... . . . . . . . . . . . . . . . . . . . . . . . . . . . . . . . . . . . . . . . . . . . . . . . . . . . . . . . . 70
AppStream 2.0 Integration with SAML 2.0 .... . . . . . . . . . . . . . . . . . . . . . . . . . . . . . . . . . . . . . . . . . . . . . . . . . . . . . . . . . . . . . . . . . . . . . . . . . . . . . . . 70Using Active Directory .... . . . . . . . . . . . . . . . . . . . . . . . . . . . . . . . . . . . . . . . . . . . . . . . . . . . . . . . . . . . . . . . . . . . . . . . . . . . . . . . . . . . . . . . . . . . . . . . . . . . . . . . . . . . . . . . . . . 72
Active Directory Domains .... . . . . . . . . . . . . . . . . . . . . . . . . . . . . . . . . . . . . . . . . . . . . . . . . . . . . . . . . . . . . . . . . . . . . . . . . . . . . . . . . . . . . . . . . . . . . . . . . . . . . . . 72Before You Begin .... . . . . . . . . . . . . . . . . . . . . . . . . . . . . . . . . . . . . . . . . . . . . . . . . . . . . . . . . . . . . . . . . . . . . . . . . . . . . . . . . . . . . . . . . . . . . . . . . . . . . . . . . . . . . . . . . . 74Tutorial: Setting Up .... . . . . . . . . . . . . . . . . . . . . . . . . . . . . . . . . . . . . . . . . . . . . . . . . . . . . . . . . . . . . . . . . . . . . . . . . . . . . . . . . . . . . . . . . . . . . . . . . . . . . . . . . . . . . . . 74
Step 1: Create a Directory Config Object ... . . . . . . . . . . . . . . . . . . . . . . . . . . . . . . . . . . . . . . . . . . . . . . . . . . . . . . . . . . . . . . . . . . . . . . . . . . 75Step 2: Create an Image by Using a Domain-Joined Image Builder ... . . . . . . . . . . . . . . . . . . . . . . . . . . . . . . . . . . . . . . . 75Step 3: Create a Domain-Joined Fleet ... . . . . . . . . . . . . . . . . . . . . . . . . . . . . . . . . . . . . . . . . . . . . . . . . . . . . . . . . . . . . . . . . . . . . . . . . . . . . . . 76Step 4: Configure SAML 2.0 .... . . . . . . . . . . . . . . . . . . . . . . . . . . . . . . . . . . . . . . . . . . . . . . . . . . . . . . . . . . . . . . . . . . . . . . . . . . . . . . . . . . . . . . . . . . . 76
Administration .... . . . . . . . . . . . . . . . . . . . . . . . . . . . . . . . . . . . . . . . . . . . . . . . . . . . . . . . . . . . . . . . . . . . . . . . . . . . . . . . . . . . . . . . . . . . . . . . . . . . . . . . . . . . . . . . . . . . . . 77Granting Permissions to Create and Manage Active Directory Computer Objects ... . . . . . . . . . . . . . . . . . . . . 77
iv

Amazon AppStream 2.0 Developer Guide
Finding the Organizational Unit Distinguished Name .... . . . . . . . . . . . . . . . . . . . . . . . . . . . . . . . . . . . . . . . . . . . . . . . . . . . . . . . . 78Granting Local Administrator Rights on Image Builders ... . . . . . . . . . . . . . . . . . . . . . . . . . . . . . . . . . . . . . . . . . . . . . . . . . . . . . . 78Updating the Service Account Used for Joining the Domain .... . . . . . . . . . . . . . . . . . . . . . . . . . . . . . . . . . . . . . . . . . . . . . . . 80Locking the Streaming Session When the User is Idle .... . . . . . . . . . . . . . . . . . . . . . . . . . . . . . . . . . . . . . . . . . . . . . . . . . . . . . . . . 80Editing the Directory Configuration .... . . . . . . . . . . . . . . . . . . . . . . . . . . . . . . . . . . . . . . . . . . . . . . . . . . . . . . . . . . . . . . . . . . . . . . . . . . . . . . . . 81Deleting a Directory Configuration .... . . . . . . . . . . . . . . . . . . . . . . . . . . . . . . . . . . . . . . . . . . . . . . . . . . . . . . . . . . . . . . . . . . . . . . . . . . . . . . . . . 82Configuring AppStream 2.0 to Use Domain Trusts ... . . . . . . . . . . . . . . . . . . . . . . . . . . . . . . . . . . . . . . . . . . . . . . . . . . . . . . . . . . . . . 82Managing AppStream 2.0 Computer Objects in Active Directory .... . . . . . . . . . . . . . . . . . . . . . . . . . . . . . . . . . . . . . . . . . 83
More Info .... . . . . . . . . . . . . . . . . . . . . . . . . . . . . . . . . . . . . . . . . . . . . . . . . . . . . . . . . . . . . . . . . . . . . . . . . . . . . . . . . . . . . . . . . . . . . . . . . . . . . . . . . . . . . . . . . . . . . . . . . . . . . 84Monitoring Resources .... . . . . . . . . . . . . . . . . . . . . . . . . . . . . . . . . . . . . . . . . . . . . . . . . . . . . . . . . . . . . . . . . . . . . . . . . . . . . . . . . . . . . . . . . . . . . . . . . . . . . . . . . . . . . . . . . . . . . 85
Viewing Fleet Usage Using the Console .... . . . . . . . . . . . . . . . . . . . . . . . . . . . . . . . . . . . . . . . . . . . . . . . . . . . . . . . . . . . . . . . . . . . . . . . . . . . . . . . . . . . 85AppStream 2.0 Metrics and Dimensions .... . . . . . . . . . . . . . . . . . . . . . . . . . . . . . . . . . . . . . . . . . . . . . . . . . . . . . . . . . . . . . . . . . . . . . . . . . . . . . . . . . . 85
Amazon AppStream 2.0 Metrics ... . . . . . . . . . . . . . . . . . . . . . . . . . . . . . . . . . . . . . . . . . . . . . . . . . . . . . . . . . . . . . . . . . . . . . . . . . . . . . . . . . . . . . . 85Dimensions for Amazon AppStream 2.0 Metrics ... . . . . . . . . . . . . . . . . . . . . . . . . . . . . . . . . . . . . . . . . . . . . . . . . . . . . . . . . . . . . . . . . 87
Controlling Access with IAM ..... . . . . . . . . . . . . . . . . . . . . . . . . . . . . . . . . . . . . . . . . . . . . . . . . . . . . . . . . . . . . . . . . . . . . . . . . . . . . . . . . . . . . . . . . . . . . . . . . . . . . . . . . . . 88IAM Service Roles Required for Managing AppStream 2.0 Resources .... . . . . . . . . . . . . . . . . . . . . . . . . . . . . . . . . . . . . . . . . . . . . 88Permissions Required for IAM Service Role Creation .... . . . . . . . . . . . . . . . . . . . . . . . . . . . . . . . . . . . . . . . . . . . . . . . . . . . . . . . . . . . . . . . . . . 89Checking for the AmazonAppStreamServiceAccess Service Role and Policies ... . . . . . . . . . . . . . . . . . . . . . . . . . . . . . . . . . . 89
AmazonAppStreamServiceAccess permissions policy .... . . . . . . . . . . . . . . . . . . . . . . . . . . . . . . . . . . . . . . . . . . . . . . . . . . . . . . . . . 89AmazonAppStreamServiceAccess trust relationship policy .... . . . . . . . . . . . . . . . . . . . . . . . . . . . . . . . . . . . . . . . . . . . . . . . . . . 90
Checking for the ApplicationAutoScalingForAmazonAppStreamAccess Service Role and Policies ... . . . . . . . 90ApplicationAutoScalingForAmazonAppStreamAccess permissions policy .... . . . . . . . . . . . . . . . . . . . . . . . . . . . . . . 91ApplicationAutoScalingForAmazonAppStreamAccess trust relationship policy .... . . . . . . . . . . . . . . . . . . . . . . . 91
Application Auto Scaling Required IAM Permissions .... . . . . . . . . . . . . . . . . . . . . . . . . . . . . . . . . . . . . . . . . . . . . . . . . . . . . . . . . . . . . . . . . . . 92IAM Policies and the Amazon S3 Bucket for Home Folders ... . . . . . . . . . . . . . . . . . . . . . . . . . . . . . . . . . . . . . . . . . . . . . . . . . . . . . . . . . . 92
Deleting the Amazon S3 Bucket for Home Folders ... . . . . . . . . . . . . . . . . . . . . . . . . . . . . . . . . . . . . . . . . . . . . . . . . . . . . . . . . . . . . . 93Restricting Administrator Access to the Amazon S3 Bucket for Home Folders ... . . . . . . . . . . . . . . . . . . . . . . . . . 93
Tagging Your Resources .... . . . . . . . . . . . . . . . . . . . . . . . . . . . . . . . . . . . . . . . . . . . . . . . . . . . . . . . . . . . . . . . . . . . . . . . . . . . . . . . . . . . . . . . . . . . . . . . . . . . . . . . . . . . . . . . . 95Tagging Basics ... . . . . . . . . . . . . . . . . . . . . . . . . . . . . . . . . . . . . . . . . . . . . . . . . . . . . . . . . . . . . . . . . . . . . . . . . . . . . . . . . . . . . . . . . . . . . . . . . . . . . . . . . . . . . . . . . . . . . . . 95Tag Restrictions .... . . . . . . . . . . . . . . . . . . . . . . . . . . . . . . . . . . . . . . . . . . . . . . . . . . . . . . . . . . . . . . . . . . . . . . . . . . . . . . . . . . . . . . . . . . . . . . . . . . . . . . . . . . . . . . . . . . . . 96Working with Tags in the AppStream 2.0 Console .... . . . . . . . . . . . . . . . . . . . . . . . . . . . . . . . . . . . . . . . . . . . . . . . . . . . . . . . . . . . . . . . . . . . . . 96Working with Tags by Using the AppStream 2.0 API, an AWS SDK, or AWS CLI ... . . . . . . . . . . . . . . . . . . . . . . . . . . . . . . . 96
Troubleshooting .... . . . . . . . . . . . . . . . . . . . . . . . . . . . . . . . . . . . . . . . . . . . . . . . . . . . . . . . . . . . . . . . . . . . . . . . . . . . . . . . . . . . . . . . . . . . . . . . . . . . . . . . . . . . . . . . . . . . . . . . . . . . 99General Troubleshooting .... . . . . . . . . . . . . . . . . . . . . . . . . . . . . . . . . . . . . . . . . . . . . . . . . . . . . . . . . . . . . . . . . . . . . . . . . . . . . . . . . . . . . . . . . . . . . . . . . . . . . . . . 99
SAML federation is not working. The user is not authorized to view AppStream 2.0 applications. .. 99After federating from an ADFS portal, my streaming session doesn't start. I am getting theerror "Sorry connection went down". ... . . . . . . . . . . . . . . . . . . . . . . . . . . . . . . . . . . . . . . . . . . . . . . . . . . . . . . . . . . . . . . . . . . . . . . . . . . . . . . . 99I get an invalid redirect URI error. .. . . . . . . . . . . . . . . . . . . . . . . . . . . . . . . . . . . . . . . . . . . . . . . . . . . . . . . . . . . . . . . . . . . . . . . . . . . . . . . . . . . . 100My stack's home folders aren't working correctly. .. . . . . . . . . . . . . . . . . . . . . . . . . . . . . . . . . . . . . . . . . . . . . . . . . . . . . . . . . . . . . . 100My users can't access their home folder directory from one of our applications. ... . . . . . . . . . . . . . . . . . . . . 100
Troubleshooting Image Builders ... . . . . . . . . . . . . . . . . . . . . . . . . . . . . . . . . . . . . . . . . . . . . . . . . . . . . . . . . . . . . . . . . . . . . . . . . . . . . . . . . . . . . . . . . . . . . 100I cannot connect to the internet from my image builder. .. . . . . . . . . . . . . . . . . . . . . . . . . . . . . . . . . . . . . . . . . . . . . . . . . . . . 101When I tried installing my application, I see an error that the operating system version is notsupported. ... . . . . . . . . . . . . . . . . . . . . . . . . . . . . . . . . . . . . . . . . . . . . . . . . . . . . . . . . . . . . . . . . . . . . . . . . . . . . . . . . . . . . . . . . . . . . . . . . . . . . . . . . . . . . . . . . . . 101When I connect to my image builder, I see a login screen asking me to enter Ctrl+Alt+Delete tolog in. However, my local machine intercepts the key strokes. ... . . . . . . . . . . . . . . . . . . . . . . . . . . . . . . . . . . . . . . . . . . . . 101When I switched between admin and test modes, I saw a request for a password. I don't knowhow to get a password. ... . . . . . . . . . . . . . . . . . . . . . . . . . . . . . . . . . . . . . . . . . . . . . . . . . . . . . . . . . . . . . . . . . . . . . . . . . . . . . . . . . . . . . . . . . . . . . . . . 101I get an error when I add my installed application. ... . . . . . . . . . . . . . . . . . . . . . . . . . . . . . . . . . . . . . . . . . . . . . . . . . . . . . . . . . . . 101I accidentally quit a background service on the image builder and got disconnected. I am nowunable to connect to that image builder. .. . . . . . . . . . . . . . . . . . . . . . . . . . . . . . . . . . . . . . . . . . . . . . . . . . . . . . . . . . . . . . . . . . . . . . . . . . 102The application fails to launch in test mode. ... . . . . . . . . . . . . . . . . . . . . . . . . . . . . . . . . . . . . . . . . . . . . . . . . . . . . . . . . . . . . . . . . . . . 102The application could not connect to a network resource in my VPC. ... . . . . . . . . . . . . . . . . . . . . . . . . . . . . . . . . . . 102I customized my image builder desktop, but my changes are not available when connecting toa session after launching a fleet from the image I created. ... . . . . . . . . . . . . . . . . . . . . . . . . . . . . . . . . . . . . . . . . . . . . . . . . 102My application is missing a command line parameter when launching. ... . . . . . . . . . . . . . . . . . . . . . . . . . . . . . . . . 102I am unable to use my image with a fleet after installing an antivirus application. ... . . . . . . . . . . . . . . . . . 103
v

Amazon AppStream 2.0 Developer Guide
My image creation failed. ... . . . . . . . . . . . . . . . . . . . . . . . . . . . . . . . . . . . . . . . . . . . . . . . . . . . . . . . . . . . . . . . . . . . . . . . . . . . . . . . . . . . . . . . . . . . . . 103Troubleshooting Fleets ... . . . . . . . . . . . . . . . . . . . . . . . . . . . . . . . . . . . . . . . . . . . . . . . . . . . . . . . . . . . . . . . . . . . . . . . . . . . . . . . . . . . . . . . . . . . . . . . . . . . . . . . . . 103
My applications won't work correctly unless I use the Internet Explorer defaults. How do Irestore the Internet Explorer default settings? .... . . . . . . . . . . . . . . . . . . . . . . . . . . . . . . . . . . . . . . . . . . . . . . . . . . . . . . . . . . . . . . . . 103I need to persist environment variables across my fleet instances. ... . . . . . . . . . . . . . . . . . . . . . . . . . . . . . . . . . . . . . . 105I want to change the default Internet Explorer home page for my users. .. . . . . . . . . . . . . . . . . . . . . . . . . . . . . . . 105When my users end a streaming session and then start a new one, they see a message thatsays no streaming resources are available. ... . . . . . . . . . . . . . . . . . . . . . . . . . . . . . . . . . . . . . . . . . . . . . . . . . . . . . . . . . . . . . . . . . . . . . . 105
Troubleshooting Active Directory Domain Join .... . . . . . . . . . . . . . . . . . . . . . . . . . . . . . . . . . . . . . . . . . . . . . . . . . . . . . . . . . . . . . . . . . . . . . . . 105My image builders and fleet instances are stuck in the PENDING state. ... . . . . . . . . . . . . . . . . . . . . . . . . . . . . . . . 106My users aren't able to log in with the SAML application. ... . . . . . . . . . . . . . . . . . . . . . . . . . . . . . . . . . . . . . . . . . . . . . . . . . 106My fleet instances work for one user but don't cycle correctly. .. . . . . . . . . . . . . . . . . . . . . . . . . . . . . . . . . . . . . . . . . . . . . 106My user Group Policy objects aren't applying successfully. .. . . . . . . . . . . . . . . . . . . . . . . . . . . . . . . . . . . . . . . . . . . . . . . . . . . 106My AppStream 2.0 streaming instances aren't joining the Active Directory domain. ... . . . . . . . . . . . . . . . 107User login is taking a long time to complete on a domain-joined streaming session. ... . . . . . . . . . . . . . . 107The changes I made in the image builder aren't reflected in end user streaming sessions. ... . . . . . . . 108My users can't access a domain resource in a domain-joined streaming session but they canaccess the resource from a domain-joined image builder. .. . . . . . . . . . . . . . . . . . . . . . . . . . . . . . . . . . . . . . . . . . . . . . . . . . . . 108
Troubleshooting Notification Codes .... . . . . . . . . . . . . . . . . . . . . . . . . . . . . . . . . . . . . . . . . . . . . . . . . . . . . . . . . . . . . . . . . . . . . . . . . . . . . . . . . . . . . . . 108Active Directory Domain Join .... . . . . . . . . . . . . . . . . . . . . . . . . . . . . . . . . . . . . . . . . . . . . . . . . . . . . . . . . . . . . . . . . . . . . . . . . . . . . . . . . . . . . . . . 108
Limits ... . . . . . . . . . . . . . . . . . . . . . . . . . . . . . . . . . . . . . . . . . . . . . . . . . . . . . . . . . . . . . . . . . . . . . . . . . . . . . . . . . . . . . . . . . . . . . . . . . . . . . . . . . . . . . . . . . . . . . . . . . . . . . . . . . . . . . . . . . 111Document History .... . . . . . . . . . . . . . . . . . . . . . . . . . . . . . . . . . . . . . . . . . . . . . . . . . . . . . . . . . . . . . . . . . . . . . . . . . . . . . . . . . . . . . . . . . . . . . . . . . . . . . . . . . . . . . . . . . . . . . . 112
vi

Amazon AppStream 2.0 Developer GuideFeatures
What Is Amazon AppStream 2.0?Amazon AppStream 2.0 is a fully managed application streaming service that provides users with instantaccess to their desktop applications from anywhere. AppStream 2.0 manages the AWS resources requiredto host and run your applications, scales automatically, and provides access to your users on demand.AppStream 2.0 provides users access to the applications they need on the desktop device of their choice,with a responsive, fluid user experience that is indistinguishable from natively installed applications.There are no files to download and no time-consuming installations.
With AppStream 2.0, you can easily add your existing desktop applications to AWS and instantly startstreaming them to an HTML5 compatible browser. You can maintain a single version of each of yourapplications, which makes application management easier. Your users always access the latest versionsof their applications. Your applications run on AWS compute resources, and data is never stored on users'devices, which means they always get a high performance, secure experience.
Unlike traditional on-premises solutions for desktop application streaming, AppStream 2.0 offers pay-as-you-go pricing, with no upfront investment and no infrastructure to maintain. You can scale instantlyand globally, ensuring that your users always have the best possible experience.
For more information, see AppStream 2.0.
FeaturesUsing Amazon AppStream 2.0 provides the following advantages:
Run desktop applications securely on any desktop device
Your desktop applications run securely in an HTML5 web browser on Windows and Linux PCs, Macs,and Chromebooks.
Secure applications and data
Applications and data remain on AWS — only encrypted pixels are streamed to end users.Applications run on an AppStream 2.0 instance dedicated to each user so that compute resourcesare not shared. Applications can run inside your own virtual private cloud (VPC), and you can useAmazon VPC security features to control access. This enables you to isolate your applications anddeliver them in a secure way.
Consistent, scalable performance
AppStream 2.0 runs on AWS with access to compute capabilities not available on local devices, whichmeans that your applications run with consistently high performance. You can instantly scale locallyand globally, and ensure that your users always get a low-latency experience. Unlike on-premisessolutions, you can quickly deploy your applications to the AWS region that is closest to your users,and start streaming with no incremental capital investment.
Integrate with your IT environment
Integrate with your existing AWS services and your on-premises environments. By runningapplications inside your VPCs, your users can access data and other resources that you have in AWS.This reduces the movement of data between AWS and your environment and provides a faster userexperience.
Integrate with your existing Microsoft Active Directory environment. This enables you to use existingActive Directory governance, user experience, and security policies with your streaming applications.
1

Amazon AppStream 2.0 Developer GuideKey Concepts
Configure identity federation, which allows your users to access their applications using theircorporate credentials. You can also allow authenticated access to your IT resources from applicationsrunning on AppStream 2.0.
Choose the fleet type that meets your needs
There are two types of fleets:• Always-On — Your instances run all the time, even when no users are streaming applications. Use
an Always-On fleet to provide your users with instant access to their applications.• On-Demand — Your instances run only when users are streaming applications. Idle instances
that are available for streaming are in a stopped state. Use an On-Demand fleet to optimize yourstreaming charges and provide your users with access to their applications after a 1-2 minute wait.
For more information, see Amazon AppStream 2.0 Pricing.
Key ConceptsTo get the most out of AppStream 2.0, be familiar with the following concepts:
image builder
An image builder is a virtual machine that you use to create an image. You can launch and connectto an image builder by using the AWS Management Console. After you are connected to an imagebuilder, you can install, add, and test your apps, and then use the image builder to publish an image.
image
An image contains applications that are streamed to users. AWS provides base images that you canuse to create images that include your own applications.
fleet
A fleet consists of streaming instances that run the image that you specify. You can set the desirednumber of streaming instances for your fleet and configure policies to scale your fleet automaticallybased on demand. Note that one user requires one instance.
stack
A stack consists of an associated fleet, user access policies, and storage configurations. You set up astack to start streaming applications to users.
user pool
Use the user pool to manage users and their assigned stacks.
How to Get StartedIf you are using AppStream 2.0 for the first time, you can use the Try it Now feature or follow theGetting Started with Amazon AppStream 2.0 (p. 5) tutorial (both are available in the AppStream 2.0console).
• Try It Now provides you with a free trial experience that allows you to easily start desktop applicationsfrom your desktop browser.
• The Getting Started tutorial enables you to set up application streaming by using sample applicationsor your own applications. If you decide to start by using sample applications, you can always add yourown applications later.
For more information about these two options, see Amazon AppStream 2.0 FAQs.
2
Amazon AppStream 2.0 Developer GuideAccessing AppStream 2.0
When you use the service for the first time, AppStream 2.0 creates an AWS Identity and AccessManagement (IAM) role to create and manage AppStream 2.0 resources on your behalf.
To use the Try It Now feature
1. Open the AppStream 2.0 console at https://console.aws.amazon.com/appstream2.2. Choose Try it now.3. Sign in using your AWS account credentials, if requested.4. Read the terms and conditions and choose Agree and Continue.5. From the list of applications shown, select one to try.
To run the Getting Started tutorial
1. Open the AppStream 2.0 console at https://console.aws.amazon.com/appstream2.2. Choose Get Started.3. Select the option to learn more about AppStream 2.0 resources.
Accessing AppStream 2.0You can work with AppStream 2.0 using any of the following interfaces:
AWS Management Console
The console is a browser-based interface to manage AppStream 2.0 resources. For more information,see Getting Started with Amazon AppStream 2.0 (p. 5).
AWS command line tools
AWS provides two sets of command line tools: the AWS Command Line Interface (AWS CLI) andthe AWS Tools for Windows PowerShell. To use the AWS CLI to run AppStream 2.0 commands, seeAmazon AppStream 2.0 Command Line Reference.
AWS SDKs
You can access AppStream 2.0 from a variety of programming languages. The SDKs automaticallytake care of tasks such as the following:• Setting up an AppStream 2.0 stack or fleet• Getting an application streaming URL to your stack• Describing your resources
For more information, see Tools for Amazon Web Services.
3
Amazon AppStream 2.0 Developer GuideSign Up for AWS
Setting Up for Amazon AppStream2.0
Complete the following tasks to get set up for Amazon AppStream 2.0.
Sign Up for AWSWhen you sign up for AWS, your AWS account is automatically signed up for all services, includingAppStream 2.0. You are charged only for the services that you use.
If you have an AWS account already, skip to the next task. If you don't have an AWS account, use thefollowing procedure to create one.
To create an AWS account
1. Open https://aws.amazon.com/, and then choose Create an AWS Account.
NoteThis might be unavailable in your browser if you previously signed into the AWSManagement Console. In that case, choose Sign in to a different account, and then chooseCreate a new AWS account.
2. Follow the online instructions.
Part of the sign-up procedure involves receiving a phone call and entering a PIN using the phonekeypad.
4

Amazon AppStream 2.0 Developer GuideStep 1: Set Up a Sample Stack, Choose
an Image, and Configure a Fleet
Getting Started with AmazonAppStream 2.0
To stream your applications, Amazon AppStream 2.0 requires an environment that includes a fleet thatis associated with a stack, and at least one application image. This tutorial describes how to configure asample AppStream 2.0 environment for application streaming and give users access to that stream.
NoteFor additional guidance in learning how to get started with AppStream 2.0, see the AmazonAppStream 2.0 Getting Started Guide. This guide describes how to install and configure twoapplications, perform foundational administrative tasks using the AppStream 2.0 console, andprovision an Amazon Virtual Private Cloud by using a provided AWS CloudFormation template.
Tasks
• Step 1: Set Up a Sample Stack, Choose an Image, and Configure a Fleet (p. 5)
• Step 2: Provide Access to Users (p. 7)
• Resources (p. 7)
Step 1: Set Up a Sample Stack, Choose an Image,and Configure a Fleet
Before you can stream your applications, you need to set up a stack, choose an image that hasapplications installed, and configure a fleet. In this step, you use a template to help simplify these tasks.
To set up a sample stack, choose an image, and configure a fleet
1. Open the AppStream 2.0 console at https://console.aws.amazon.com/appstream2.
2. Choose Get Started if you are new to the console, or Quick Links from the left navigation menu.Choose Set up with sample apps.
3. For Step 1: Stack Details, keep the default stack name or enter your own. Optionally, you canprovide the following:
• Display name — Enter a name to display for the stack (maximum of 100 characters).
• Description— Keep the default description or enter your own (maximum of 256 characters).
• Redirect URL — Specify a URL to which users are redirected after their streaming sessions end.
• Feedback URL — Specify a URL to which users are redirected after they click the Send Feedbacklink to submit feedback about their application streaming experience. If you do not specify a URL,this link is not displayed.
4. Choose Next.
5. For Step 2: Choose Image, choose an image, and then choose Next. The sample image containspre-installed open source applications for evaluation purposes. For more information, see AmazonAppStream 2.0 Windows Image Version History (p. 24).
6. For Step 3: Configure Fleet, we recommend that you keep the default values and choose Next. Youcan change most of these values after fleet creation.
5

Amazon AppStream 2.0 Developer GuideStep 1: Set Up a Sample Stack, Choose
an Image, and Configure a Fleet
• Choose instance type — Choose the instance type that matches the performance requirementsof your applications. All streaming instances in your fleet launch with the instance type that youselect. For more information, see AppStream 2.0 Instance Families (p. 29).
• Fleet type — Choose the fleet type that suits your use case. The fleet type determines itsimmediate availability and how you pay for it.
• Maximum session duration — Choose the maximum amount of time that a streaming session canremain active. If users are still connected to a streaming session five minutes before this limit isreached, they are prompted to save any open documents before being disconnected.
• Disconnect timeout — Choose the time that a streaming instance should remain active after usersdisconnect. If users try to reconnect to the streaming session after a disconnection or networkinterruption within this time interval, they are connected to the previous session. Otherwise, theyare connected to a new session with a new instance. If you associate a stack with a fleet for whicha redirect URL is specified, after users’ streaming sessions end, the users are redirected to thatURL.
If a user ends the session by choosing End Session on the streaming session toolbar, thedisconnect timeout does not apply. Instead, the user is prompted to save any open documents,and then immediately disconnected from the streaming instance.
• Minimum capacity — Choose a minimum number of instances for your fleet based on theminimum number of expected concurrent users. Every unique user session is served by aninstance. For example, to have your stack support 100 concurrent users during low demand,specify a minimum capacity of 100. This ensures that 100 instances are running even if there arefewer than 100 users.
• Maximum capacity — Choose a maximum number of instances for your fleet based on themaximum number of expected concurrent users. Every unique user session is served by aninstance. For example, to have your stack support 500 concurrent users during high demand,specify a maximum capacity of 500. This ensures that up to 500 instances can be created ondemand.
7. For Step 4: Configure Network, choose a VPC and two subnets with access to the network resourcesthat your application needs, and then choose Next. If you don't have a VPC or subnets, you cancreate them using the links provided and then click the refresh icons. For Security groups, youcan select up to five security groups. Otherwise, the default security group is used. For moreinformation, see Network Settings for Amazon AppStream 2.0 (p. 9).
8. For Step 5: Enable Storage, do the following, then choose Next.
• Enable Home Folders — By default, this setting is enabled. Keep the default setting. Forinformation about requirements for enabling home folders, see Enable Home Folders for YourAppStream 2.0 Users (p. 52).
• Enable Google Drive — Optionally, you can also enable users to link their Google Drive accountto AppStream 2.0. You can enable Google Drive for accounts in G Suite domains only, not forpersonal Gmail accounts. For information about requirements for enabling Google Drive, seeEnable Google Drive for Your AppStream 2.0 Users (p. 57).
9. For Step 6: User Settings, select the ways in which your users can transfer data between theirstreaming session and their local device. When you're done, choose Review:
• Clipboard — By default, users can copy and paste data between their local device and streamingapplications. You can limit Clipboard options so that users can paste data to their remotestreaming session only or copy data to their local device only, or you can disable Clipboard optionsentirely. Note that users can still copy and paste between applications in their streaming session.
• File transfer — By default, users can upload and download files between their local deviceand streaming session. You can limit file transfer options so that users can upload files to theirstreaming session only or download files to their local device only, or you can disable file transferentirely.
6

Amazon AppStream 2.0 Developer GuideStep 2: Provide Access to Users
• Print to local device — By default, users can print to their local device from within a streamingapplication. When they choose Print in the application, they can download a .pdf file that they canprint to a local printer. You can disable this option to prevent users from printing to a local device.
NoteThese settings affect only whether users can use AppStream 2.0 data transfer features. Ifyour image provides access to a browser, network printer, or other remote resource, yourusers might be able to transfer data to or from their streaming session in other ways.
10. For Step 7: Review, confirm the details for the stack. To change the configuration for any section,choose Edit and make the needed changes. After you finish reviewing the configuration details,choose Create.
11. After the service sets up resources, the Stacks page appears. The status of your new stack appears asActive when it is ready to use.
Optionally, you can apply one or more tags to help manage the stack. Choose Tags, choose Add/Edit Tags, choose Add Tag, specify the key and value for the tag, and then choose Save. For moreinformation, see Tagging Your Amazon AppStream 2.0 Resources (p. 95).
Step 2: Provide Access to UsersAfter you create a stack, each user needs an active URL for access. The AppStream 2.0 User Pool featureenables you to create and manage users, using a permanent login portal URL. For more information,see Manage Access Using the AppStream 2.0 User Pool (p. 62). To quickly test application streamingwithout setting up users, create a temporary URL as shown below.
To provide access to users with a temporary URL
1. In the navigation pane, choose Stacks. Select the radio button for the stack, and then chooseActions, Create Streaming URL.
2. For User id, type the user ID. Select an expiration time, which determines how long the generatedURL is valid.
3. To view the user ID and URL, choose Get URL.4. To copy the link to the clipboard, choose Copy Link.
ResourcesFor more information, see the following:
• Learn how to use the AppStream 2.0 image builder to add your own applications and createimages that you can stream to your users. For more information, see Tutorial: Create a CustomImage (p. 18).
• Provide persistent storage for your session users by using AppStream 2.0 home folders and GoogleDrive. For more information, see Enable Persistent Storage for Your AppStream 2.0 Users (p. 52).
• Integrate your AppStream 2.0 streaming resources with your Microsoft Active Directory environment.For more information, see Using Active Directory with AppStream 2.0 (p. 72).
• Control who has access to your AppStream 2.0 streaming instances. For more information, seeControlling Access to Amazon AppStream 2.0 with IAM Policies and Service Roles (p. 88), ManageAccess Using the AppStream 2.0 User Pool (p. 62) and Single Sign-on Access to AppStream 2.0Using SAML 2.0 (p. 66).
• Monitor your AppStream 2.0 resources by using Amazon CloudWatch. For more information, seeAppStream 2.0 Metrics and Dimensions (p. 85).
7

Amazon AppStream 2.0 Developer GuideResources
• Troubleshoot your AppStream 2.0 streaming experience. For more information, seeTroubleshooting (p. 99).
8

Amazon AppStream 2.0 Developer GuidePort Requirements for User Connections to AppStream 2.0
Network Settings for AmazonAppStream 2.0
The following sections contain information about enabling users to connnect to AppStream 2.0streaming instances and enabling your AppStream 2.0 fleets and image builders to access networkresources and the internet.
Contents• Port Requirements for User Connections to Amazon AppStream 2.0 (p. 9)
• Ports for AppStream 2.0 User Devices (p. 9)• Whitelisted Domains (p. 10)
• Port Requirements for Amazon AppStream 2.0 Connections to Network Resources and theInternet (p. 10)
• Network Interfaces (p. 10)• Management Network Interface IP Address Range and Ports (p. 10)• Customer Network Interface Ports (p. 11)
• Network Setup Guidelines (p. 11)• Fleets (p. 11)• Image Builders (p. 12)
• Security Groups (p. 12)• Home Folders and VPC Endpoints (p. 13)• Enabling Internet Access Using a Public Subnet (p. 13)
• Enabling Internet Access for a Fleet (p. 14)• Enabling Internet Access for an Image Builder (p. 14)
• Enabling Internet Access Using a NAT Gateway (p. 15)• Enabling Internet Access for a Fleet Using a NAT Gateway (p. 15)• Enabling Internet Access for an Image Builder Using a NAT Gateway (p. 16)
Port Requirements for User Connections toAmazon AppStream 2.0
For AppStream 2.0 users to connect to streaming instances and stream applications, the network thatthe users' devices are connected to must allow access to certain IP addresses and ports.
Ports for AppStream 2.0 User DevicesAppStream 2.0 users' devices require outbound access on port 443 (TCP), and if you are using DNSservers for domain name resolution, port 53 (UDP).
• Port 443 is used for HTTPS communication between AppStream 2.0 users' devices and streaminginstances. Typically, when end users browse the web during streaming sessions, the web browserrandomly selects a source port in the high range for streaming traffic. You must ensure that returntraffic to this port is allowed.
9

Amazon AppStream 2.0 Developer GuideWhitelisted Domains
• Port 53 is used for communication between AppStream 2.0 users' devices and your DNS servers. Theport must be open to the IP addresses for your DNS servers so that public domain names can beresolved. This port is optional if you are not using DNS servers for domain name resolution.
Whitelisted DomainsFor AppStream 2.0 users to access streaming instances, you must whitelist the following domains on thenetwork from which users are trying to access the streaming instances.
• Session Gateway: *.amazonappstream.com
• CloudFront: *.cloudfront.net
Amazon Web Services (AWS) publishes its current IP address ranges, including the ranges that theSession Gateway and CloudFront domains may resolve to, in JSON format. For information about howto download the .json file and view the current ranges, see AWS IP Address Ranges in the Amazon WebServices General Reference. Or, if you are using AWS Tools for Windows PowerShell, you can access thesame information by using the Get-AWSPublicIpAddressRange cmdlet. For more information, seeQuerying the Public IP Address Ranges for AWS.
Port Requirements for Amazon AppStream 2.0Connections to Network Resources and theInternet
To enable AppStream 2.0 connectivity to network resources and the internet, configure your streaminginstances as follows.
Network InterfacesEach AppStream 2.0 streaming instance has the following network interfaces:
• The customer network interface provides connectivity to the resources within your VPC, as well as theinternet, and is used to join the streaming instance to your directory.
• The management network interface is connected to a secure AppStream 2.0 management network. Itis used for interactive streaming of the streaming instance to a user's device, and to allow AppStream2.0 to manage the streaming instance.
AppStream 2.0 selects the IP address for the management network interface from the following privateIP address range: 198.19.0.0/16. Do not use this range for your VPC CIDR or peer your VPC with anotherVPC with this range, as this might create a conflict and cause streaming instances to be unreachable.Also, do not modify or delete any of the network interfaces attached to a streaming instance, as thismight also cause the streaming instance to become unreachable.
Management Network Interface IP Address Rangeand PortsThe management network interface IP address range is 198.19.0.0/16. The following ports must be openon the management network interface of all streaming instances:
10

Amazon AppStream 2.0 Developer GuideCustomer Network Interface Ports
• Inbound TCP on port 8300. This is used for establishment of the streaming connection.• Inbound TCP on port 8443. This is used for management of the streaming instance by AppStream 2.0.
Limit the inbound range on the management network interface to 198.19.0.0/16.
Under normal circumstances, AppStream 2.0 correctly configures these ports for your streaminginstances. If any security or firewall software is installed on a streaming instance that blocks any of theseports, the streaming instance may not function correctly or may be unreachable.
Customer Network Interface Ports• For internet connectivity, the following ports must be open to all destinations. If you are using
a modified or custom security group, you need to add the required rules manually. For moreinformation, see Security Group Rules in the Amazon VPC User Guide.• TCP 80 (HTTP)• TCP 443 (HTTPS)
• If you join your streaming instances to a directory, the following ports must be open between yourAppStream 2.0 VPC and your directory controllers.• TCP/UDP 53 - DNS• TCP/UDP 88 - Kerberos authentication• UDP 123 - NTP• TCP 135 - RPC• UDP 137-138 - Netlogon• TCP 139 - Netlogon• TCP/UDP 389 - LDAP• TCP/UDP 445 - SMB• TCP 1024-65535 - Dynamic ports for RPC
For a complete list of ports, see Active Directory and Active Directory Domain Services PortRequirements in the Microsoft documentation.
• All streaming instances require that port 80 (HTTP) be open to IP address 169.254.169.254 toallow access to the EC2 metadata service. Any HTTP proxy assigned to your streaming instances mustexclude 169.254.169.254.
Network Setup GuidelinesThere are some network setup guidelines to consider for fleets and image builders. If your fleets andimage builders require internet access, you can use the Default Internet Access feature. You could alsomanually control internet access using an advanced networking configuration, such as a VPC with NATgateways. For more information, see Enabling Internet Access Using a Public Subnet (p. 13) andEnabling Internet Access Using a NAT Gateway (p. 15).
FleetsYou can provide subnets to establish network connections from your fleet instances to your VPC. Werecommend that you specify two private subnets from different Availability Zones for high availabilityand fault tolerance. Also, ensure that the network resources for your applications are accessible throughboth of the specified private subnets.
AppStream 2.0 creates as many elastic network interfaces as the maximum desired capacity of your fleet.The following guidelines will help you set up a VPC to support scaling behavior for your fleet.
11

Amazon AppStream 2.0 Developer GuideImage Builders
• Make sure that your AWS account has sufficient elastic network interface capacity to support thescaling requirements of your fleet. If you are planning to launch a large fleet of streaming instances,contact AWS Support and request a higher ENI limit to match the maximum number of instances thatyou plan to launch.
• Specify subnets with a sufficient number of elastic IP addresses to match the maximum desiredcapacity of your fleet.
• Use security groups to provide your VPC with specific security settings. For more information, seeSecurity Groups (p. 12).
Image BuildersYou can choose one subnet while launching an image builder. Ensure the subnet accessibility of thenetwork resources, with which your applications may interact. The typical resources required for thesuccessful execution of your apps may include licensing servers, database servers, file servers, and so on.
Security GroupsYou can provide additional access control to your VPC from streaming instances in a fleet or an imagebuilder in Amazon AppStream 2.0 by associating them with VPC security groups. Security groups thatbelong to your VPC allow you to control the network traffic between AppStream 2.0 streaming instancesand VPC resources such as license servers, file servers, and database servers. For more information, seeSecurity Groups for your VPC in the Amazon VPC User Guide.
The rules that you define for your VPC security group are applied when the security group is associatedwith a fleet or image builder. The security group rules determine what network traffic is allowed fromyour streaming instances. For more information, see Security Group Rules in the Amazon VPC User Guide.
You can associate up to five security groups while launching a new image builder or while creating a newfleet. You can also associate security groups to an existing fleet or change the security groups of a fleet.For more information, see Working with Security Groups in the Amazon VPC User Guide.
If you don't select a security group, your image builder or fleet is associated with the default securitygroup for your VPC. For more information, see Default Security Group for Your VPC in the Amazon VPCUser Guide.
Use these additional considerations when using security groups with AppStream 2.0.
• All end user data, such as internet traffic, Home folder data, or application communication with VPCresources, are affected by the security groups associated with the streaming instance.
• Streaming pixel data is not affected by security groups.• If you have enabled default internet access for your fleet or image builder, the rules of the associated
security groups must allow internet access.
You can create or edit rules for your security groups or create new security groups using the Amazon VPCconsole.
• To associate security groups with an image builder — Follow the instructions at Step 1: Create anImage Builder (p. 18).
• To associate security groups with a fleet• While creating the fleet — Follow the instructions at Create a Fleet (p. 31).• For an existing fleet — Edit the fleet settings using the AWS Management Console.
You can also associate security groups to your fleets using the AWS CLI and SDKs.
12

Amazon AppStream 2.0 Developer GuideHome Folders and VPC Endpoints
• AWS CLI — Use the create-fleet and update-fleet commands.• AWS SDKs — Use the CreateFleet and UpdateFleet API operations.
For more information, see the AWS Command Line Interface User Guide and Tools for Amazon WebServices.
Home Folders and VPC EndpointsTo support home folders on a private network, AppStream 2.0 needs access permissions to the VPCendpoint. To enable AppStream 2.0 access to your private Amazon S3 endpoint, attach a custom policy,as defined below, to your VPC endpoint for Amazon S3. For more information about private Amazon S3endpoints, see VPC Endpoints and Endpoints for Amazon S3 in the Amazon VPC User Guide.
{ "Version": "2012-10-17", "Statement": [ { "Sid": "Allow-AppStream-to-access-specific-bucket", "Effect": "Allow", "Principal": { "AWS": "arn:aws:sts::account-id-without-hyphens:assumed-role/AmazonAppStreamServiceAccess/AppStream2.0" }, "Action": [ "s3:ListBucket", "s3:GetObject", "s3:PutObject", "s3:DeleteObject", "s3:GetObjectVersion", "s3:DeleteObjectVersion" ], "Resource": "arn:aws:s3:::appstream2-36fb080bb8-*" } ]}
Enabling Internet Access Using a Public SubnetAppStream 2.0 can provide your fleets with a default internet connection by using your Amazon VPCpublic subnet. This subnet has a route to the internet through an internet gateway.
AppStream 2.0 enables internet connectivity by associating an Elastic IP address to the network interfacethat is attached from the streaming instance to your VPC public subnet. You can have a VPC with a publicsubnet in several ways:
Default VPC
Your AWS account, if it was created after 2013-12-04, has a default VPC that has public subnets.You can use this default VPC to enable internet access from your streaming instances. For moreinformation, see Default VPC and Default Subnets in the Amazon VPC User Guide.
New VPC
If your AWS account was created before 2013-12-04 or to manage a new VPC, you can create a newVPC with a public subnet using the VPC creation wizard. For more information, see Implementationof VPC with a single public subnet in the Amazon VPC User Guide.
13

Amazon AppStream 2.0 Developer GuideEnabling Internet Access for a Fleet
Existing VPC
To use an existing VPC that does not have a public subnet, you can add a new public subnet usingthe following steps.
To add a new public subnet to an existing VPC
1. Follow the steps in Creating a Subnet in the Amazon VPC User Guide, using the existing VPC youintend to use with AppStream 2.0.
2. To add an internet gateway to your VPC, follow the steps in Attaching an Internet Gateway inthe Amazon VPC User Guide.
3. To configure your subnets to route internet traffic through the internet gateway, followthe steps in Creating a Custom Route Table in the Amazon VPC User Guide. Use IPv4 format(0.0.0.0/0) for Destination.
Enabling Internet Access for a FleetAfter you have a public subnet available on a VPC, you can enable internet access for your fleet. This canbe performed either when you create the fleet, or by editing the fleet details after creation.
To enable internet access at fleet creation
1. Follow the instructions at Create a Fleet (p. 31) up to the Network access section.
2. Choose Default Internet Access.
3. If the subnet fields are empty, select a subnet for Subnet 1 and, if desired, Subnet 2.
4. Continue with the instructions at Create a Fleet (p. 31).
To enable internet access after fleet creation
1. In the navigation pane, choose Fleets.
2. Select a fleet and check that its state is Stopped.
3. Choose Fleet Details, Edit, Default Internet Access.
4. Choose a subnet for Subnet 1 and, if desired, Subnet 2. Choose Update.
You can test internet connectivity by starting your fleet, creating a stack, associating the fleet to astack, and browsing the internet within a streaming session for stack. For more information, see CreateAppStream 2.0 Fleets and Stacks (p. 30).
Enabling Internet Access for an Image BuilderAfter you have a public subnet available on a VPC, and can enable internet access for your image builder.This can be performed when you create the image builder.
To enable internet access for an image builder
1. Follow the instructions at Step 1: Create an Image Builder (p. 18) up to the Network Accesssection.
2. Choose Default Internet Access.
3. If Subnet is empty, select a subnet.
4. Continue with the instructions at Step 1: Create an Image Builder (p. 18).
14

Amazon AppStream 2.0 Developer GuideEnabling Internet Access Using a NAT Gateway
Enabling Internet Access Using a NAT GatewayYou can control internet access for your users using an advanced networking configuration such as NATgateways. To manage your own VPC and VPC NAT gateway, launch your AppStream 2.0 image buildersand fleets in private VPC subnets that provide a route to the internet. Use the instructions below toquickly create a network setup for enabling internet access. For more information, see NAT Gateways andVPC with Public and Private Subnets (NAT) in the Amazon VPC User Guide.
To create and configure a new VPC to use with a VPC NAT gateway
1. Navigate to Implementing VPC with Public and Private Subnets (NAT) in the Amazon VPC User Guide,and follow the steps given in the section To create a VPC, leaving out the optional IPv6 step.
2. For Availability Zone, leave the public subnet zone as the default, and select a specific zone for theprivate subnet. Make a note of the zones you chose.
3. For Elastic IP Allocation ID, choose an existing Elastic IP address. If you don't have one, create anElastic IP address from the Elastic IPs section on the Amazon VPC console.
4. Leave the other fields as their default values, making a note of the value for Private subnet's IPv4CIDR, and then choose Create VPC. This may take some time to complete.
5. If you want to add another private subnet to your VPC, perform the following steps.
a. In the left navigation pane, choose Subnets, Create Subnet. Be sure to choose a different namethan the ones specified in step 3.
b. For VPC, enter the VPC that you created earlier. For Availability Zone, enter a different valuethan the one noted earlier.
c. For IPv4 CIDR block, provide a unique for the new subnet. For example, if you noted that thefirst subnet has a IPv4 CIDR block range of 10.0.1.0/24, the new subnet could have a validCIDR block range of 10.0.2.0/24.
6. Choose Yes, Create.
To add a NAT gateway to an existing VPC
1. Follow the instructions in Creating a NAT Gateway in the Amazon VPC User Guide.2. To update the route tables of your private subnets and route internet traffic through the NAT
gateway, follow the instructions in Updating Your Route Table in the Amazon VPC User Guide.3. Check your VPC to be sure it has at least one private subnet and, if needed, create a new private
subnet. For more information, see Creating a Subnet in the Amazon VPC User Guide.
Enabling Internet Access for a Fleet Using a NATGatewayAfter you have a NAT gateway available on a VPC, you can enable internet access for your fleet. This canbe performed either when you create it, or by editing the fleet details after creation.
To enable internet access at fleet creation using a NAT gateway
1. Follow the instructions at Create a Fleet (p. 31) up to the Network access section.2. Choose a VPC with a NAT gateway.3. If the subnet fields are empty, select a private subnet for Subnet 1 and, if desired, another private
subnet for Subnet 2. If one is not already present for your VPC, you may need to create a secondprivate subnet .
4. Continue with the instructions at Create a Fleet (p. 31).
15

Amazon AppStream 2.0 Developer GuideEnabling Internet Access for an
Image Builder Using a NAT Gateway
To enable internet access after fleet creation using a NAT gateway
1. In the navigation pane, choose Fleets.2. Select a fleet and check that the state is Stopped.3. Choose Fleet Details, Edit, and choose a VPC with a NAT gateway.4. Choose a private subnet for Subnet 1 and, if desired, another private Subnet 2. You may need to
create a second private subnet if one is not already present for your VPC.5. Choose Update.
You can test your internet connectivity by starting your fleet, and then connecting to your streaminginstance and browsing to the internet.
Enabling Internet Access for an Image Builder Using aNAT GatewayAfter you have a NAT gateway available on a VPC, and can enable internet access for your image builder.This can be performed when you create the image builder.
To enable internet access for an image builder using a NAT gateway
1. Follow the instructions at Step 1: Create an Image Builder (p. 18), up to the Network Accesssection.
2. Choose the VPC with a NAT gateway.3. If Subnet is empty, select a subnet.4. Continue with the instructions at Step 1: Create an Image Builder (p. 18).
16

Amazon AppStream 2.0 Developer GuideActions
AppStream 2.0 Image BuildersAppStream 2.0 provides virtual machines, or instances, that are used to install and add applications intoand create your image. These instances are called image builders. You can launch an image builder froma base image provided by AWS, or from an image that you create. After your image builder instanceis available (running), you can connect to the image builder to start a desktop session, install yourapplications, add your applications to an image, and create an image.
While launching a new image builder, you can choose from different instance types with variouscompute, memory, and graphics configurations. Note that the instance type must align with the instancefamily you need. For more information, see AppStream 2.0 Instance Families (p. 29).
You also provide a VPC subnet so that AppStream 2.0 can establish a network interface to the imagebuilder. This connection provides your image builder with access to resources that might be needed whileyou install and add applications; for example, file servers, licensing servers, database servers, and so on.For more information, see Tutorial: Create a Custom Image (p. 18).
ActionsThe following actions can be performed on an image builder, depending on the current state (status) ofthe image builder instance.
Delete
Permanently delete an image builder.
The instance must be in a Stopped state.Connect
Connect to a running image builder. This action starts a desktop streaming session with the imagebuilder to install and add applications to the image, and create an image.
The instance must be in a Running state.Start
Start a stopped image builder. A running instance is billed to your account.
The instance must be in a Stopped state.Stop
Stop a running image builder. A stopped instance is not billed to your account.
The instance must be in a Running state.
None of these actions can be performed on an instance in any of the following intermediate states:
• Pending• Snapshotting• Stopping• Starting• Deleting
17

Amazon AppStream 2.0 Developer GuideTutorial: Create a Custom Image
Tutorial: Create a Custom ImageBefore you can stream your applications, Amazon AppStream 2.0 requires at least one image that youcreate by using an image builder. This tutorial describes how to create custom images by using an imagebuilder.
ImportantAfter you create an image builder and it is running, your account may incur nominal charges. Formore information, see AppStream 2.0 Pricing.
ImportantThis tutorial contains details that apply to the latest base image release. For more information,see Amazon AppStream 2.0 Windows Image Version History (p. 24).If you are using images that are created from base images dated before 2017-07-24, youcan view a compatible version of this tutorial by downloading the PDF file appstream2-dg-2017-07-23.pdf.
Contents• Step 1: Create an Image Builder (p. 18)
• Step 2: Install Applications to an Image (p. 20)
• Step 3: Add Applications to an Image (p. 20)
• Step 4: Optimize Applications (p. 21)
• Step 5: Create an Image (p. 21)
• Step 6 (Optional): Tag and Copy an Image (p. 22)
• Step 7: Clean Up (p. 23)
Step 1: Create an Image BuilderIn this step, you create a new image builder so that you can add applications and create images forstreaming.
To create an image builder for adding applications
1. Open the AppStream 2.0 console at https://console.aws.amazon.com/appstream2.
2. You can launch the image builder in the following ways:
• If a welcome screen appears displaying two options (Try it now and Get started), choose Getstarted, Custom set up.
For information about these two options, see Amazon AppStream 2.0 FAQs.
• If a welcome screen does not appear, choose Quick links in the left navigation pane, then Customset up.
• Alternatively, choose Images in the left navigation pane, then the Image Builder tab, LaunchImage Builder.
3. For Step 1: Choose Image, select a base image. If you are launching the image builder for the firsttime, you can use one of the latest base images released by AWS (selected by default). For a list ofthe latest versions of base images released by AWS, see Amazon AppStream 2.0 Windows ImageVersion History (p. 24). If you have already created images, or you want to update applicationsin an existing image, you can select one of your existing images. Be sure to select an image thataligns with the instance family that you need. For more information, see AppStream 2.0 InstanceFamilies (p. 29).
Choose Next.
18

Amazon AppStream 2.0 Developer GuideStep 1: Create an Image Builder
4. For Step 2: Configure Image Builder, configure the image builder by accepting the default values orproviding inputs for the following fields:
Name
Type a unique name identifier for the image builder.Instance Type
Select the instance type for the image builder. Choose a type that matches the performancerequirements of the applications that you plan to install. For more information, see AppStream2.0 Instance Families (p. 29).
ImportantThe AppStream 2.0 agent software runs on your streaming instances, enabling yourusers to connect to and stream their applications. Starting December 7, 2017, yourstreaming instances can be automatically updated with the latest AppStream 2.0 agentsoftware. This capability helps to ensure that your image builder includes the latestfeatures, performance improvements, and security updates that are available fromAWS.You can enable automatic updates of the AppStream 2.0 agent by creating a newimage from any base image published by AWS on or after December 7, 2017. If theimage from which you are launching your image builder is not using the latest versionof the AppStream 2.0 agent, we recommend that you select the option to launch yourimage builder with the latest agent. This option is not displayed if you are already usingthe latest base image from AWS or if you are using a custom image that uses the latestversion of the agent.
Choose Next.5. For Step 3: Configure Network, choose a virtual private cloud (VPC) subnet in which to launch your
image builder. Your image builder has access to any of the network resources that are accessiblefrom within this VPC subnet.
For internet access on the image builder, choose Default Internet Access, select a VPC that haspublic subnets on your default VPC, and then select one of the public subnets listed for Subnet. Ifyou are controlling internet access using a NAT gateway, leave Default Internet Access unselectedand use the VPC with the NAT gateway. For more information, see Network Settings for AmazonAppStream 2.0 (p. 9).
For Security group(s), select up to five security groups to associate with this image builder. Ifneeded, choose Create new security group. If you do not choose a security group, the image builderis associated with the default security group for your VPC. For more information, see SecurityGroups (p. 12).
For Active Directory Domain (Optional), expand this section to choose which Active Directory andorganizational unit in which to place your streaming instance computer objects. Ensure that theselected network access settings enable DNS resolvability and communication with your directory.For more information, see Using Active Directory with AppStream 2.0 (p. 72).
6. Choose Review and confirm the details for the image builder. To change the configuration for anysection, choose Edit and make the needed changes. After you finish reviewing the configurationdetails, choose Launch.
After the service prepares the needed resources, the image builder instance list appears. The status ofyour new image builder appears as Running when the image builder is ready to use.
Optionally, you can apply one or more tags to help manage the image builder. Choose Tags, chooseAdd/Edit Tags, choose Add Tag, specify the key and value for the tag, and then choose Save. For moreinformation, see Tagging Your Amazon AppStream 2.0 Resources (p. 95).
19

Amazon AppStream 2.0 Developer GuideStep 2: Install Applications to an Image
Step 2: Install Applications to an ImageIn this step, you connect to the image builder that you created and launched, then install theapplications to be included in the image.
To install applications
1. On the left navigation pane, choose Images, Image Builder.2. Select the image builder to use, check to be sure it has a Running status, and choose Connect.
For this step to work, you may need to configure your browser to allow pop-ups from https://stream.<aws-region>.amazonappstream.com/.
3. Sign in by choosing one of the following options:
Administrator
This mode has full administrator permissions on the image builder instance. Use this mode toinstall your applications, add applications to the image, and create an image.
Test User
This mode has the same limited permissions as your end users have on their streaminginstances. Use this mode to test applications for proper function as an end user.
Directory User
If your image builder is joined to an Active Directory domain, this mode allows you to log in as auser in your domain to access resources that are managed by Active Directory. Provide the username and password of the user to log in as. The user must have local administrator permissionsto install applications. For more information, see Granting Local Administrator Rights on ImageBuilders (p. 78).
At any point after logging in, you can switch between users by selecting Switch Users from theAdmin Commands menu. This disconnects your current session and brings up the login menu.
4. Install applications by browsing to an application website or other download source. Completethe application's installation process before moving to the next step. If an application requires theWindows operating system to be restarted, let the operating system restart. Before the operatingsystem restarts, you are disconnected from your image builder. Wait a few minutes, connect to theimage builder again, open Image Assistant, and then finish installing the application.
NoteDownload and install applications only from sites that you trust.
Step 3: Add Applications to an ImageIn this step, you can add applications (.exe), batch scripts (.bat), and application shortcuts (.lnk) to theimage.
To add your applications
1. From the image builder desktop, start the Image Assistant application.2. Choose Add Application and navigate to the location of the application, script, or shortcut to add.
Choose Open.3. In the Application Properties dialog box, enter a display name to be shown to the users in the
catalog, change the icon, and enter launch parameters (additional arguments passed to theapplication when it is launched). Repeat this step for each application that you add to the image.
4. When you finish adding applications, choose Next.
20

Amazon AppStream 2.0 Developer GuideStep 4: Optimize Applications
To test your applications
• Verify that the applications you've added start correctly. To do this, start a new Windows session as auser who has similar access rights as your end users.
a. From the Admin Commands menu, choose Switch user. This disconnects you from the currentsession and shows the login menu.
b. To log in as a local test user, choose Test User. To log in as an Active Directory user, chooseDirectory User, and provide the user name and password of the user to log in as. Choose Log in.
c. Launch Image Assistant from the shortcut on the desktop. Choose Launch next to theapplication to launch, and test your application.
d. Repeat the previous step for each application in the image.e. To return to the admin mode, choose Switch user, and select the user used to add applications
to the image.
NoteDo not exit the Image Assistant application, as you need to use it in the next section.
Step 4: Optimize ApplicationsIn this step, you optimize your applications and create the image. The image builder optimizes yourapplications for startup performance. This is a required step that is performed on all applications in thelist. All applications must be launched before optimization.
To optimize your applications
1. Choose Launch and the service automatically launches the first application in your list. When theapplication is running, choose Continue.
2. Provide any interactions or inputs that are required by the application to bring it to a usable state.For example, a web browser may prompt you to import settings before it is completely up andrunning.
3. After you bring the application to a usable state, choose Continue. The application helper launchesthe next application automatically.
4. Repeat the previous steps until all applications are launched, and leave them running. After youlaunch all applications, in the Image Assistant application, choose Next.
Step 5: Create an ImageIn this step, you choose an image name and create the image.
To create the image
1. Enter a unique image name and image display name (a description is optional), and choose Next.The name you choose cannot begin with "Amazon", "AWS", or "AppStream".
2. Review the image details.
NoteIf you choose a base image that is published by AWS on or after December 7, 2017, theoption Always use the latest agent version appears, and it is selected by default. Werecommend that you leave this option selected so that streaming instances that arelaunched from the image always use the latest version of the agent. If you deselect thisoption, you cannot re-select it after you finish creating the image. For information aboutthe latest release of the AppStream 2.0 agent, see Amazon AppStream 2.0 Agent VersionHistory (p. 26).
21

Amazon AppStream 2.0 Developer GuideStep 6 (Optional): Tag and Copy an Image
Choose Disconnect and Create Image. After your new image is created and the session isdisconnected, you can close the session window. Your image builder transitions into a Snapshottingstate while the image is being created. After the image is created, your image builder transitions intothe Stopped state. You might need to refresh the console listing to see the state change.
3. Return to the console and navigate to Images, Image Registry. Verify that your new image appearsin the list.
The new image first appears with a status of Pending in the image registry of your console. After theimage is successfully created, the status of the image changes to Available, which means that youcan use the image to launch a stack and stream your applications.
To continue creating images, you can start the image builder and connect to it from the console, orcreate a new image builder. There is a limit of five image builders per account.
Step 6 (Optional): Tag and Copy an ImageAfter you create an image, you can apply one or more tags to help manage the image. You can also copythe image within the same region or to a new region within the same AWS account. Copying a sourceimage results in an identical but distinct destination image. AWS does not copy any user-defined tags,however. Also, you can only copy custom images that you create, not the base images that are providedby AWS.
NoteYou can copy up to two images at the same time to a destination. If the destination to whichyou are copying an image is at the image limit, you receive an error. To copy the image in thiscase, you must first remove images from the destination. After the destination is below theimage limit, initiate the image copy from the source region. For more information, see AmazonAppStream 2.0 Service Limits (p. 111).
To add tags to an image
1. In the navigation pane, choose Images, Image Registry.
2. In the image list, select the image to which you want to add tags.
3. Choose Tags, choose Add/Edit Tags, choose Add Tag, specify the key and value for the tag, andthen choose Save.
For more information, see Tagging Your Amazon AppStream 2.0 Resources (p. 95).
To copy an image
Copying an image across geographically diverse regions enables you to stream applications frommultiple regions based on the same image. By streaming your applications in closer proximity to yourusers, you can improve your users' experience streaming applications with AppStream 2.0.
1. In the navigation pane, choose Images, Image Registry.
2. In the image list, select the image that you want to copy.
3. Choose Actions, Copy.
4. In the Copy Image dialog box, specify the following information, and then choose Copy Image:
• For Destination region, choose the region to which to copy the new image.
• For Name, specify a name that the image will have when it is copied to the destination.
• For Description (optional), specify a description that the image will have when it is copied to thedestination.
22

Amazon AppStream 2.0 Developer GuideStep 7: Clean Up
5. To check on the progress of the copy operation, return to the console and navigate to Images,Image Registry. Use the navigation bar to switch to the destination region (if applicable), andconfirm that your new image appears in the list of images.
The new image first appears with a status of Copying in the image registry of your console. After theimage is successfully created, the status of the image changes to Available, which means that youcan use the image to launch a stack and stream your applications.
Step 7: Clean UpFinally, stop your running image builders to free up resources and avoid unintended charges to youraccount. We recommend stopping any unused, running image builders. For more information, seeAppStream 2.0 Pricing.
To stop a running image builder
1. In the navigation pane, choose Images, Image Builders, and select the running image builderinstance.
2. Choose Actions, Stop.
23

Amazon AppStream 2.0 Developer GuideWindows Image Versions
AppStream 2.0 ImagesAn Amazon AppStream 2.0 image contains applications that can be streamed to users. The image is usedto launch streaming instances that are part of an AppStream 2.0 fleet. All images available to you arelisted under the Image Registry section in the AWS Management Console. Note that the image's instancefamily must align with the instance type you need. For more information, see AppStream 2.0 InstanceFamilies (p. 29).
The images in your image registry are differentiated by these visibility attributes:
• Public Images — Base images that are made available by AWS to help you create images with yourown applications.
• Private Images — Images that are created and owned by you.
You can use either public or private images to launch an image builder and set up your AppStream 2.0fleet. For more information, see Tutorial: Create a Custom Image (p. 18).
You can also delete your private images. Note that a private image cannot be deleted if there are activefleets using it. You must stop all associated fleets before deleting the image.
Amazon AppStream 2.0 Windows Image VersionHistory
AWS publishes base images to help you create images that include your own applications. Base imagesinclude the latest Windows operating system and the AppStream 2.0 agent software. For informationabout the latest AppStream 2.0 software, see Amazon AppStream 2.0 Agent Version History (p. 26).
The following are the latest images:
• Base — Base-Image-Builder-05-02-2018• Graphics Design — Graphics-Design-Image-Builder-05-02-2018• Graphics Desktop — Graphics-Desktop-Image-Builder-05-02-2018• Graphics Pro — Graphics-Pro-Image-Builder-05-02-2018
The latest base image released on May 2, 2018 includes the following software components:
• Amazon SSM Agent — 2.2.392.0• Amazon WDDM Hook Driver — 1.0.0.56• EC2Config service — 4.9.2586
The following table describes all released images.
Release Image Description
05-02-2018 • Base• Graphics Design• Graphics Desktop• Graphics Pro
• Includes Microsoft Windows updates up to April 10,2018
24
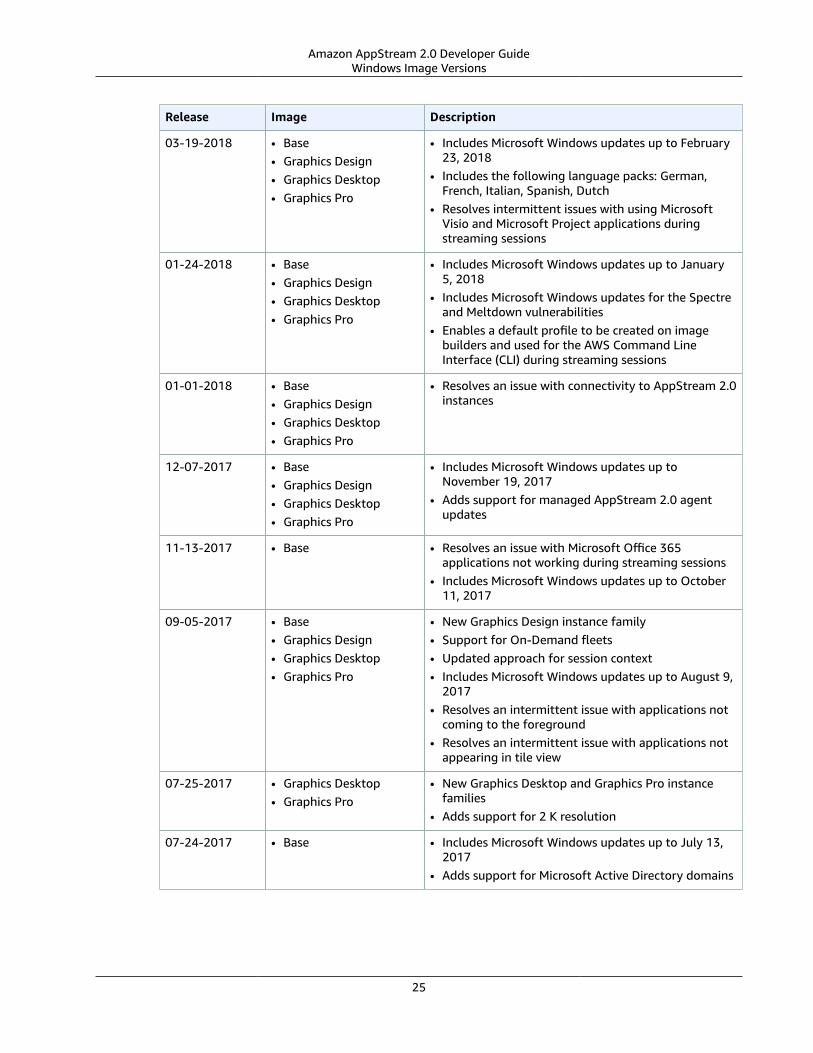
Amazon AppStream 2.0 Developer GuideWindows Image Versions
Release Image Description
03-19-2018 • Base• Graphics Design• Graphics Desktop• Graphics Pro
• Includes Microsoft Windows updates up to February23, 2018
• Includes the following language packs: German,French, Italian, Spanish, Dutch
• Resolves intermittent issues with using MicrosoftVisio and Microsoft Project applications duringstreaming sessions
01-24-2018 • Base• Graphics Design• Graphics Desktop• Graphics Pro
• Includes Microsoft Windows updates up to January5, 2018
• Includes Microsoft Windows updates for the Spectreand Meltdown vulnerabilities
• Enables a default profile to be created on imagebuilders and used for the AWS Command LineInterface (CLI) during streaming sessions
01-01-2018 • Base• Graphics Design• Graphics Desktop• Graphics Pro
• Resolves an issue with connectivity to AppStream 2.0instances
12-07-2017 • Base• Graphics Design• Graphics Desktop• Graphics Pro
• Includes Microsoft Windows updates up toNovember 19, 2017
• Adds support for managed AppStream 2.0 agentupdates
11-13-2017 • Base • Resolves an issue with Microsoft Office 365applications not working during streaming sessions
• Includes Microsoft Windows updates up to October11, 2017
09-05-2017 • Base• Graphics Design• Graphics Desktop• Graphics Pro
• New Graphics Design instance family• Support for On-Demand fleets• Updated approach for session context• Includes Microsoft Windows updates up to August 9,
2017• Resolves an intermittent issue with applications not
coming to the foreground• Resolves an intermittent issue with applications not
appearing in tile view
07-25-2017 • Graphics Desktop• Graphics Pro
• New Graphics Desktop and Graphics Pro instancefamilies
• Adds support for 2 K resolution
07-24-2017 • Base • Includes Microsoft Windows updates up to July 13,2017
• Adds support for Microsoft Active Directory domains
25

Amazon AppStream 2.0 Developer GuideAmazon AppStream 2.0 Agent Versions
Release Image Description
06-20-2017 • Base• Sample apps
• Optimizes application launch performance• Resolves an issue with applications not displaying in
tile view• Resolves an issue with applications displaying in tile
view only• Resolves an issue with applications displaying
multiple times in tile view• Resolves an issue with recently launched application
windows not appearing in the foreground• Resolves an issue with page margins when printing
05-18-2017 • Base• Sample apps
• Adds support for Amazon AppStream 2.0 homefolders
• Includes Microsoft Windows updates up to May 16,2017
• Resolves an intermittent network issue that affectsinternet connections from streaming instances
• Resolves an issue with application tiles notfunctioning correctly
Amazon AppStream 2.0 Agent Version HistoryThe Amazon AppStream 2.0 agent software runs on your streaming instances, enabling end users toconnect to and start their streaming applications. Starting December 7, 2017, your streaming instancescan be automatically updated with the latest features, performance improvements, and security updatesthat are available from AWS. Before December 7, 2017, agent updates were included with new baseimage releases.
To use the latest AppStream 2.0 agent software, you need to rebuild your images by using new baseimages published by AWS on or after December 7, 2017. When you do this, the option to enableautomatic updates of the agent is selected by default in the Image Assistant. We recommend that youleave this option selected so that any new image builder or fleet instance that is launched from yourimage always uses the latest version of the agent. For more information, see Tutorial: Create a CustomImage (p. 18).
The following table describes the latest updates that are available in released versions of the AppStream2.0 agent.
Amazon AppStream 2.0 agent version Description
05-31-2018 • Adds support for Google Drive storage• Works with these software components:
• Amazon SSM Agent — 2.2.392.0• Amazon WDDM Hook Driver — 1.0.0.56• EC2Config service — 4.9.2586
05-21-2018 • Adds support for administrative controls for data transfer• Works with these software components:
• Amazon SSM Agent — 2.2.392.0
26

Amazon AppStream 2.0 Developer GuideAmazon AppStream 2.0 Agent Versions
Amazon AppStream 2.0 agent version Description
• Amazon WDDM Hook Driver — 1.0.0.56• EC2Config service — 4.9.2586
03-19-2018 • Resolves an issue with minimizing the application windowin certain environments
• Works with these software components:• Amazon SSM Agent — 2.2.160.0• Amazon WDDM Hook Driver — 1.0.0.56• EC2Config service — 4.9.2400.0
01-24-2018 • Resolves an issue with the Alt Graph key not working oncertain keyboard layouts
• Works with these software components:• Amazon SSM Agent — 2.2.93.0• Amazon WDDM Hook Driver — 1.0.0.50• EC2Config service — 4.9.2262.0
12-07-2017 • Resolves issues with using ALT key combinations• Resolves an issue with file uploads from local computers
to streaming sessions• Works with these software components:
• Amazon SSM Agent — 2.2.93.0• Amazon WDDM Hook Driver — 1.0.0.21• EC2Config service — 4.9.2218.0
27

Amazon AppStream 2.0 Developer GuideFleet Type
Amazon AppStream 2.0 Fleets andStacks
With Amazon AppStream 2.0, you create stacks and fleets as part of the process of streamingapplications. A fleet consists of streaming instances that run the image that you specify. A stack consistsof an associated fleet, user access policies, and storage configurations.
Contents• Fleet Type (p. 28)• Session Context (p. 28)• AppStream 2.0 Instance Families (p. 29)• Create AppStream 2.0 Fleets and Stacks (p. 30)• Customize AppStream 2.0 Fleets (p. 34)• Fleet Auto Scaling for Amazon AppStream 2.0 (p. 39)
Fleet TypeThe fleet type determines when your instances run and how you pay for them. You can specify a fleettype when you create a fleet. You cannot change the fleet type after you create the fleet.
The following are the possible fleet types:
Always-On
Instances run all the time, even when no users are streaming applications.On-Demand
Instances run only when users are streaming applications. Idle instances that are available forstreaming are in a stopped state.
Use an Always-On fleet to provide your users with instant access to their applications. Use anOn-Demand fleet to optimize your streaming charges and provide your users with access to theirapplications after a 1-2 minute wait. For more information, see Amazon AppStream 2.0 Pricing.
To create an On-Demand fleet, you must use a base image starting with 09-05-2017.
Session ContextYou can pass parameters to your streaming application using session context. The format is a string withparameters separated by commas. Session context is supported using the AWS CLI and the AWS SDKs,but is not supported using the AWS Management Console.
Starting with the images released on 09-05-2017, the parameters are passed using theAppStream_Session_Context environment variable. This environment variable is accessible onlythrough .NET, and we provide an executable file, SessionContextRetriever.exe, that you can use toaccess it. With images released prior to 09-05-2017, parameters are passed to the application.
28

Amazon AppStream 2.0 Developer GuideInstance Families
The following example uses session context to launch a specific website using Google Chrome.
To use session context to launch a website
1. Connect to your image builder in Administrator mode. For this example, install Google Chrome onthe image builder.
2. Create a child folder of C:\. For this example, use C:\Scripts.3. For images released on or after 09-05-2017, download SessionContextRetriever.exe.4. Create a Windows batch file in the new folder. For this example, create C:\Scripts\session-
context-test.bat and add a script that launches Chrome with the URL from session context, andthen waits for keyboard input.
For images released on or after 09-05-2017, use the following script:
for /f "tokens=* USEBACKQ" %%f in (`SessionContextRetriever.exe`) do (set var=%%f)chrome.exe %var%pause
For images released prior to 09-05-2017, use the following scripts:
chrome.exe %1pause
5. In Image Assistant, add session-context-test.bat and change the working directory to C:\Program Files (x86)\Google\Chrome\Application.
6. Create an image, fleet, and stack. For this example, use a fleet name of session-context-test-fleet and a stack name of session-context-test-stack.
7. After the fleet is running, you can call create-streaming-url with the session-context parameter,as shown in this example.
aws appstream create-streaming-url --stack-name session-context-test-stack \ --fleet-name session-context-test-fleet \--user-id username –validity 10000 \--application-id chrome --session-context "www.google.com"
8. Open the streaming URL in a browser. The batch file launches Chrome and loads http://www.google.com.
AppStream 2.0 Instance FamiliesAmazon AppStream 2.0 users stream applications from stacks created by an administrator. Each stackis associated with a fleet. When you create a fleet, the instance type that you specify determines thehardware of the host computers used for your fleet. Each instance type offers different compute,memory, and GPU capabilities. Instance types are grouped into instance families based on thesecapabilities.
When you create a fleet or image builder, you must select an image that is compatible with the instancefamily on which you intend to run your fleet.
• When launching a new image builder, you are presented with a list of the images in your imageregistry. Select the appropriate base image.
• When launching a fleet, ensure that the private image you select was created from the appropriatebase image.
29

Amazon AppStream 2.0 Developer GuideCreate Fleets and Stacks
The following table summarizes the available instance families and provides the base image namingformat for each. Select an instance type from an instance family based on the requirements of theapplications that you plan to stream on your fleet, and match the base image according to the followingtable.
Instance Family Description Base Image Name
General Purpose Basic computing resources for runningweb browsers and most businessapplications.
Base-Image-Builder-MM-DD-YYYY
Memory Optimized Optimized for memory-intensiveapplications that process large amounts ofdata.
Base-Image-Builder-MM-DD-YYYY
Compute Optimized Optimized for compute-boundapplications that benefit from highperformance processors.
Base-Image-Builder-MM-DD-YYYY
Graphics Design Uses AMD FirePro S7150x2 Server GPUsand AMD Multiuser GPU technology tosupport graphics applications that useDirectX, OpenGL, or OpenCL.
Graphics-Design-Image-Builder-MM-DD-YYYY
Graphics Desktop Uses NVIDIA GRID K520 GPU to supportapplications that benefit from or requiregraphics acceleration. This instance familysupports DirectX, OpenGL, OpenCL, andCUDA.
Graphics-Desktop-Image-Builder-MM-DD-YYYY
Graphics Pro Uses NVIDIA Tesla M60 GPUs and providea high-performance, workstation-likeexperience for graphics applications thatuse DirectX, OpenGL, OpenCL, or CUDA.
Graphics-Pro-Image-Builder-MM-DD-YYYY
For more information, see the following:
• Amazon AppStream 2.0 Windows Image Version History (p. 24)• Amazon AppStream 2.0 Service Limits (p. 111)• AppStream 2.0 Pricing
Create AppStream 2.0 Fleets and StacksTo stream your applications, Amazon AppStream 2.0 requires an environment that includes a fleet thatis associated with a stack, and at least one application image. This tutorial describes the steps to set up afleet and stack, and how to give users access to the stack. If you haven't already done so, we recommendthat you try the procedures in Getting Started with Amazon AppStream 2.0 (p. 5) first.
If you want to create an image to use, see Tutorial: Create a Custom Image (p. 18).
If you plan to join a fleet to an Active Directory domain, configure your Active Directory domain beforecompleting the following steps. For more information, see Using Active Directory with AppStream2.0 (p. 72).
Tasks
30

Amazon AppStream 2.0 Developer GuideCreate a Fleet
• Create a Fleet (p. 31)
• Create a Stack (p. 32)
• Provide Access to Users (p. 33)
• Clean Up Resources (p. 33)
Create a FleetSet up and create a fleet from which user applications are launched and streamed.
To set up and create a fleet
1. Open the AppStream 2.0 console at https://console.aws.amazon.com/appstream2.
2. Choose Get Started if you are new to the console, or Fleets from the left navigation pane. ChooseCreate Fleet.
3. For Step 1: Provide Fleet Details, provide a fleet name, optional display name, and optionaldescription. Choose Next.
4. For Step 2: Choose an Image, choose an image that meets your needs and then choose Next.
5. For Step 3: Configure Fleet, do the following:
a. For Choose instance type, choose the instance type that meets the performance requirementsof your applications.
b. For Fleet type, choose the fleet type that suits your use case. The fleet type determines itsimmediate availability and how you pay for it.
c. For Maximum session duration — Choose the maximum amount of time that a streamingsession can remain active. If users are still connected to a streaming session five minutes beforethis limit is reached, they are prompted to save any open documents before being disconnected.
d. For Disconnect timeout, choose the time that a streaming instance should remain active afterusers disconnect. If users try to reconnect to the streaming session after a disconnection ornetwork interruption within this time interval, they are connected to the previous session.Otherwise, they are connected to a new session with a new instance. If you associate a stackwith a fleet for which a redirect URL is specified, after users’ streaming sessions end, the usersare redirected to that URL.
If a user ends the session by choosing End Session on the streaming session toolbar, thedisconnect timeout does not apply. Instead, the user is prompted to save any open documents,and then immediately disconnected from the streaming instance.
e. For Minimum capacity, choose a minimum number of instances for your fleet based on theminimum number of expected concurrent users.
f. For Maximum capacity, choose a maximum number of instances for your fleet based on themaximum number of expected concurrent users.
g. For Scaling details, specify the scaling policies that AppStream 2.0 uses to increase anddecrease the capacity of your fleet. Note that the size of your fleet is limited by the minimumand maximum capacity that you specified. For more information, see Fleet Auto Scaling forAmazon AppStream 2.0 (p. 39).
6. For Step 4: Configure Network, do the following:
a. To add internet access for fleet instances in a VPC with a public subnet, choose Default InternetAccess. If you are providing internet access using a NAT gateway, leave Default Internet Accessunselected. For more information, see Network Settings for Amazon AppStream 2.0 (p. 9).
b. Choose a VPC and two subnets with access to the network resources that your applicationneeds. If you don't have a VPC or subnets, you can create them using the links provided andthen click the refresh icons.
31
Amazon AppStream 2.0 Developer GuideCreate a Stack
c. For Security groups, select up to five security groups to associate with this fleet. Otherwise, thedefault security group for the VPC is used. If you need to create a security group, use the linkprovided and then click the refresh icon.
d. For Active Directory Domain (Optional), choose the Active Directory and organizational unit(OU) for your streaming instance computer objects. Ensure that the network access settingsyou selected enable DNS resolvability and communication with your directory. For moreinformation, see Using Active Directory with AppStream 2.0 (p. 72).
7. Choose Create.
While your fleet is being created and fleet instances are provisioned, the status of your fleetsdisplays as Starting in the Fleets list. Choose the Refresh icon periodically to update the fleet statusuntil the status is Running. You cannot associate the fleet with a stack and use it for streamingsessions until the status of the fleet is Running.
Optionally, you can apply one or more tags to help manage the fleet. Choose Tags, choose Add/Edit Tags, choose Add Tag, specify the key and value for the tag, and then choose Save. For moreinformation, see Tagging Your Amazon AppStream 2.0 Resources (p. 95).
Create a StackSet up and create a stack to control access to your fleet.
To set up and create a stack
1. In the left navigation pane, choose Stacks, and then choose Create Stack.
2. For Step 1: Stack Details, provide a stack name. Optionally, you can provide the following:
• Display name — Enter a name to display for the stack (maximum of 100 characters).
• Description— Enter a description for the stack (maximum of 256 characters).
• Redirect URL — Specify a URL to which users are redirected after their streaming sessions end.
• Feedback URL — Specify a URL to which users are redirected after they click the Send Feedbacklink to submit feedback about their application streaming experience. If you do not specify a URL,this link is not displayed.
• Fleet — Select an existing fleet or create a new one to associate with your stack.
3. Choose Next.
4. For Step 2: Enable Storage, you can provide persistent storage for your users by choosing either orboth of the following:
• Enable Home Folders — Users can save their files to their home folder and access existing files intheir home folder during application streaming sessions. For information about requirements forenabling home folders, see Enable Home Folders for Your AppStream 2.0 Users (p. 52).
• Enable Google Drive — Users can link their Google Drive account to AppStream 2.0, and duringapplication streaming sessions, they can sign in to their Google Drive account, save files to GoogleDrive, and access their existing files in Google Drive. You can enable Google Drive for accounts in GSuite domains only, not for personal Gmail accounts.
NoteAfter you select Enable Google Drive, type at least one G Suite domain name. Access toGoogle Drive during application streaming sessions will be limited to user accounts thatare in the domains that you specify. You can specify up to 10 G Suite domains. For moreinformation about requirements for enabling Google Drive, see Enable Google Drive forYour AppStream 2.0 Users (p. 57).
5. Choose Next.
32
Amazon AppStream 2.0 Developer GuideProvide Access to Users
6. For Step 3: User Settings, select the ways in which your users can transfer data between theirstreaming session and their local device. When you're done, choose Review:
• Clipboard — By default, users can copy and paste data between their local device and streamingapplications. You can limit Clipboard options so that users can paste data to their remotestreaming session only or copy data to their local device only, or you can disable Clipboard optionsentirely. Note that users can still copy and paste between applications in their streaming session.
• File transfer — By default, users can upload and download files between their local deviceand streaming session. You can limit file transfer options so that users can upload files to theirstreaming session only or download files to their local device only, or you can disable file transferentirely.
• Print to local device — By default, users can print to their local device from within a streamingapplication. When they choose Print in the application, they can download a .pdf file that they canprint to a local printer. You can disable this option to prevent users from printing to a local device.
NoteThese settings affect only whether users can use AppStream 2.0 data transfer features. Ifyour image provides access to a browser, network printer, or other remote resource, yourusers might be able to transfer data to or from their streaming session in other ways.
7. For Step 4: Review, confirm the details for the stack. To change the configuration for any section,choose Edit and make the needed changes. After you finish reviewing the configuration details,choose Create.
After the service sets up resources, the Stacks page appears. The status of your new stack appears asActive when it is ready to use.
Optionally, you can apply one or more tags to help manage the stack. Choose Tags, choose Add/Edit Tags, choose Add Tag, specify the key and value for the tag, and then choose Save. For moreinformation, see Tagging Your Amazon AppStream 2.0 Resources (p. 95).
Provide Access to UsersAfter you create a stack with an associated fleet, you can provide access to users through the AppStream2.0 user pool. For more information, see User Pool Administration (p. 63).
Note that user pool users cannot be assigned to stacks with fleets that are joined to an Active Directorydomain.
Clean Up ResourcesYou can stop your running fleet and delete your active stack to free up resources and to avoidunintended charges to your account. We recommend stopping any unused, running fleets.
Note that you cannot delete a stack with an associated fleet.
To clean up your resources
1. In the navigation pane, choose Stacks.2. Select the stack and choose Actions, Disassociate Fleet.3. From Stack Details, open the Associated Fleet link to select the fleet.4. Choose Actions, Stop. It takes about 5 minutes to stop a fleet.5. When the status of the fleet is Stopped, choose Actions, Delete.6. In the navigation pane, choose Stacks.
33

Amazon AppStream 2.0 Developer GuideCustomize Fleets
7. Select the stack and choose Actions, Delete.
Customize AppStream 2.0 FleetsBy customizing AppStream 2.0 fleet instances, you can define specific aspects of your AppStream 2.0environment to optimize your users' application streaming experience. For example, you can persistenvironment variables to dynamically pass settings across applications and set default file associationsthat are applied to all of your users. At a high level, customizing a fleet instance includes the followingtasks:
• Connecting to an image builder and customizing it as needed.
• On the image builder, using Image Assistant to create a new image that includes your customizations.
• Creating a new fleet instance or modifying an existing one. When you configure the fleet instance,select the new customized image that you created.
• Creating a new stack or modifying an existing one and associating it with your fleet instance.
NoteFor certain fleet customizations, in Active Directory environments, you might need to use theGroup Policy Management Console (GPMC) to update Group Policy object (GPO) settings on adomain-joined computer.
Contents
• Persist Environment Variables (p. 34)
• Set Default File Associations for Your Users (p. 36)
• Set Google Chrome as the Default Browser for Users' Streaming Sessions (p. 37)
• Change the Default Internet Explorer Home Page for Users' Streaming Sessions (p. 38)
Persist Environment VariablesEnvironment variables enable you to dynamically pass settings across applications. For example, manyengineering applications rely on environment variables to specify the IP address or host name of alicense server to locate and check out a license from that server.
Follow the steps in these procedures to make environment variables available across your fleet instances.
NoteIf you are using Active Directory and Group Policy with AppStream 2.0, keep in mind thatstreaming instances must be joined to an Active Directory domain to use Group Policy forenvironment variables. For information about how to configure the Group Policy EnvironmentVariable preference item, see Configure an Environment Variable Item in the Microsoftdocumentation.
To change system environment variables on an image builder
This procedure applies only to system environment variables, not user environment variables. Tochange user environment variables that persist across your fleet instances, follow the steps in the nextprocedure.
1. Open the AppStream 2.0 console at https://console.aws.amazon.com/appstream2.
2. Connect in Administrator mode to the image builder on which you want to change systemenvironment variables.
34

Amazon AppStream 2.0 Developer GuidePersist Environment Variables
3. Choose the Windows Start menu, open the context (right-click) menu for Computer, and thenchoose Properties.
4. In the navigation pane, choose Advanced system settings.
5. In System variables, change the environment variables that you want to persist across your fleetinstances, and then choose OK.
6. On the image builder desktop, open Image Assistant and install and configure applications asneeded.
The changes to the system environment variables persist across your fleet instances and areavailable to streaming sessions launched from those instances.
NoteSetting AWS CLI credentials as system environment variables might prevent AppStream 2.0from creating the image.
To change user environment variables on an image builder
1. Open the AppStream 2.0 console at https://console.aws.amazon.com/appstream2.
2. Connect in Administrator mode to the image builder on which you want to change user environmentvariables.
3. Create a child folder of C:\ drive for the script (for example, C:\Scripts).
4. Open Notepad to create the new script.
5. In Notepad, enter the following lines:
setx variable value
Where:
variable is the variable name to be used
value is the value for the given variable name
6. Choose File, Save. Name the file and save it with the .bat extension to C:\Scripts. For example, namethe file CreateVariable.bat.
7. Open Local Group Policy Editor by opening the command prompt as an administrator, typinggpedit.msc, and then pressing ENTER.
8. In the console tree, under Computer Configuration, expand Administrative Templates, System, andthen choose Group Policy.
9. Double-click Configure Logon Script Delay.
10. In the Configure Login Script Delay dialog box, choose Enabled.
11. Under Options, set the value to 0.
12. Choose Apply, OK.
13. In the console tree, under User Configuration, expand Windows Settings, and then choose Scripts(Logon/Logoff).
14. Double-click Logon.
15. In the Logon Properties dialog box, on the Scripts tab, choose Add, and then browse to C:\Scripts\CreateVariable.bat.
16. Choose Apply, OK.
17. Close Local Group Policy Editor.
18. On the image builder desktop, open Image Assistant and install and configure applications asneeded.
35

Amazon AppStream 2.0 Developer GuideSet Default File Associations for Your Users
The logon script runs when fleet users log in, setting the user environment variable. This processmakes the variable available in the associated streaming sessions.
To create an environment variable with limited scope
Follow these steps to create an environment variable that is limited in scope to the processes thatare spawned off the script. This approach is useful when you need to use the same environmentvariable name with different values for different applications. For example, if you have two differentapplications that use the environment variable "LIC_SERVER", but each application has a different valuefor "LIC_SERVER".
1. Open the AppStream 2.0 console at https://console.aws.amazon.com/appstream2.
2. Connect in Administrator mode to the image builder on which you want to create an environmentvariable with a limited scope.
3. Create a child folder of C:\ drive for the script (for example, C:\Scripts).
4. Open Notepad to create the new script, and enter the following lines:
set variable=value
start " "C:\path\to\application.exe
Where:
variable is the variable name to be used
value is the value for the given variable name
NoteIf the application path includes spaces, the entire string must be encapsulated withinquotation marks. For example:start " " "C:\Program Files\application.exe"
5. Choose File, Save. Name the file and save it with the .bat extension to C:\Scripts. For example, namethe file LaunchApp.bat.
6. If needed, repeat steps 4 and 5 to create a script for each additional application that requires its ownenvironment variable and values.
7. On the image builder desktop, start Image Assistant.
8. Choose Add Application, browse to C:\Scripts, and select one of the scripts that you created in step5. Choose Save.
9. If you created multiple scripts, repeat step 8 for each script.
10. Continue installing and configuring applications as needed.
The environment variable and specific value are now available for processes that are run from thescript. Other processes cannot access this variable and value.
Set Default File Associations for Your UsersThe associations for application file extensions are set on a per-user basis and so are not automaticallyapplied to all users who launch AppStream 2.0 streaming sessions. For example, if you set Adobe Readeras the default application for .pdf files on your image builder, this change is not applied to your users.
To set default file associations for your users
1. Open the AppStream 2.0 console at https://console.aws.amazon.com/appstream2.
36

Amazon AppStream 2.0 Developer GuideSet Google Chrome as the Default
Browser for Users' Streaming Sessions
2. Connect in Administrator mode to the image builder on which you want to set file associations.
3. Set file associations as needed.
4. Open the Windows command prompt as an administrator.
5. At the command prompt, type the following command to export the image builder file associationsas an XML file, and then press ENTER:
dism.exe/online/export-DefaultAppAssociations:c:\default_associations.xml
If you receive an error message stating that you cannot service a running 64-bit operating systemwith a 32-bit version of DISM, close the command prompt window. Open File Explorer, browse toC:\Windows\System32, right-click cmd.exe, choose Run as Administrator, and run the commandagain.
6. Open Local Group Policy Editor by opening the command prompt as an administrator, typinggpedit.msc, and then pressing ENTER.
7. In the console tree, under Computer Configuration, expand Administrative Templates, WindowsComponents, and then choose File Explorer.
8. Double-click Set a default associations configuration file.
9. In the Set a default associations configuration file properties dialog box, choose Enabled, andenter this path: c:\default_associations.xml.
10. Choose Apply, OK.
11. Close Local Group Policy Editor.
12. On the image builder desktop, open Image Assistant and install and configure applications asneeded.
The file associations that you configured are applied to the fleet instances and user streamingsessions that are launched from those instances.
Set Google Chrome as the Default Browser for Users'Streaming SessionsBy default, new user accounts for Microsoft Windows have Internet Explorer set as the default browser.Follow these steps to set Google Chrome as the default browser for your fleet instances.
To set Google Chrome as the default browser for fleet instances
1. Open the AppStream 2.0 console at https://console.aws.amazon.com/appstream2.
2. Connect in Administrator mode to the image builder on which you want to set Chrome as thedefault browser.
3. On the image builder desktop, start Image Assistant.
4. Choose Add Application, browse to the location where Chrome is installed (for example, C:\ProgramFiles (x86)\Google\Chrome\Application\), and select chrome.exe.
5. In the Edit Application Setting dialog box, in Launch Parameters, enter the following:
--make-default-browser-for-user --no-first-run
6. Choose Save.
7. Continue installing and configuring applications as needed.
Users who are connected to streaming sessions launched from those fleet instances have GoogleChrome as the default browser for http:// and https:// connections. The users’ existing applicationpreferences for opening files with .htm and .html extensions are not changed.
37

Amazon AppStream 2.0 Developer GuideChange the Default Internet Explorer
Home Page for Users' Streaming Sessions
Change the Default Internet Explorer Home Page forUsers' Streaming SessionsYou can use Group Policy to change the default Internet Explorer home page for users' streamingsessions and optionally, enable your users to change the default home page. To use the GPMC MMCsnap-in to perform this task, do the following first:
• Obtain access to a computer or an EC2 instance that is joined to your domain.
• Install the GPMC. For more information, see Installing or Removing Remote Server AdministrationTools for Windows 7 in the Microsoft documentation.
• Log in as a domain user with permissions to create GPOs. Link GPOs to the appropriate organizationalunits (OUs).
To change the default Internet Explorer home page by using a Group Policy administrativetemplate
You can use an administrative template in Group Policy to set a default home page that users can’tchange. For more information about administrative templates, see Edit Administrative Template PolicySettings in the Microsoft documentation.
1. Open the AppStream 2.0 console at https://console.aws.amazon.com/appstream2.
2. If you are not using Active Directory in your environment, open Local Group Policy Editor. If you areusing Active Directory, open the GPMC. Locate the Scripts (Logon\Logoff) policy setting:
• Local Group Policy Editor:
On your image builder, open the command prompt as an administrator, type gpedit.msc, andthen press ENTER.
Under User Configuration, expand Administrative Templates, Windows Components, and thenchoose Internet Explorer.
• GPMC:
In your directory or on a domain controller, open the command prompt as an administrator, typegpmc.msc, and then press ENTER.
In the left console tree, select the OU in which you want to create a new GPO, or use an existingGPO, and then do either of the following: :
• Create a new GPO by opening the context (right-click) menu and choosing Create a GPO in thisdomain, Link it here. For Name, provide a descriptive name for this GPO.
• Select an existing GPO.
Open the context menu for the GPO, and choose Edit.
Under User Configuration, expand Policies, Administrative Templates, Windows Components,and then choose Internet Explorer.
3. Double-click Disable changing home page settings, choose Enabled, and in Home Page, enter aURL.
4. Choose Apply, OK.
5. Close Local Group Policy Editor or the GPMC.
38

Amazon AppStream 2.0 Developer GuideFleet Auto Scaling
To change the default Internet Explorer home page by using Group Policy preferences
You can use Group Policy preferences to set a default home page that users can change. For moreinformation about working with Group Policy preferences, see Configure a Registry Item and GroupPolicy Preferences Getting Started Guide in the Microsoft documentation.
1. In your directory or on a domain controller, open the command prompt as an administrator, typegpmc.msc, and then press ENTER.
2. In the left console tree, select the OU in which you want to create a new GPO, or use an existingGPO, and then do either of the following:
• Create a new GPO by opening the context (right-click) menu and choosing Create a GPO in thisdomain, Link it here. For Name, provide a descriptive name for this GPO.
• Select an existing GPO.
3. Open the context menu for the GPO, and choose Edit.
4. Under User Configuration, expand Preferences, and then choose Windows Settings.
5. Open the context (right-click) menu for Registry and choose New, Registry Item.
6. In the New Registry Properties dialog box, specify the following registry settings for Group Policyto configure:
• For Action, choose Update.
• For Hive, choose HKEY_CURRENT_USER.
• For Key Path, browse to and select HKEY_CURRENT_USER\SOFWARE\Microsoft\Internet Explorer\Main.
• For Value Name, enter Start Page.
• For Value Data, enter your home page URL.
7. On the Common tab, choose Apply Once, Do not Re-Apply.
NoteTo enable your users to choose the Use Default button in their Internet Explorer browsersettings and reset their default home page to your company home page, you can also set avalue for Default_Page_URL without choosing Apply Once and Do not Re-Apply.
8. Choose OK and close the GPMC.
Fleet Auto Scaling for Amazon AppStream 2.0Fleet Auto Scaling allows you to automatically change the size of your AppStream 2.0 fleet to match thesupply of available instances to user demand. Because each instance in a fleet can be used by only oneuser at a time, the size of your fleet determines the number of users who can stream concurrently. Youcan define scaling policies that adjust the size of your fleet automatically based on a variety of utilizationmetrics, and optimize the number of available instances to match user demand. You can also choose toturn off automatic scaling and make the fleet run at a fixed size.
AppStream 2.0 scaling is provided by Application Auto Scaling. For more information, see the ApplicationAuto Scaling API Reference.
Before you can use Fleet Auto Scaling, Application Auto Scaling needs permissions to access AmazonCloudWatch alarms and AppStream 2.0 fleets. For more information, see IAM Service Roles Requiredfor Managing AppStream 2.0 Resources (p. 88) and Application Auto Scaling Required IAMPermissions (p. 92).
For a walk-through of AppStream 2.0 scaling, see Scaling Your Desktop Application Streams withAmazon AppStream 2.0 in the AWS Compute Blog.
39

Amazon AppStream 2.0 Developer GuideScaling Concepts
Scaling ConceptsTo use Application Auto Scaling effectively, there are a few terms and concepts that you should befamiliar with and understand.
Minimum Capacity
The minimum size of the fleet. Scaling policies do not scale your fleet below this value. For example,if you specify 2, your fleet will never have less than 2 instances available. Note that if DesiredCapacity (set by editing Fleet Details and not Scaling Policies) is set below the value of MinimumCapacity and a scale-out activity is triggered, Application Auto Scaling scales the Desired Capacityvalue up to the value of Minimum Capacity and then continues to scale out as required, based onthe scaling policy. However, in this example, a scale-in activity does not adjust Desired Capacity,because it is already below the Minimum Capacity value.
Maximum Capacity
The maximum size of the fleet. Scaling policies do not scale your fleet above this value. For example,if you specify 10, your fleet will never have more than 10 instances available. Note that if DesiredCapacity (set by editing Fleet Details and not Scaling Policies) is set above the value of MaximumCapacity and a scale-in activity is triggered, Application Auto Scaling scales Desired Capacity downto the value of Maximum Capacity and then continues to scale in as required, based on the scalingpolicy. However, in this example, a scale-out activity does not adjust Desired Capacity, because it isalready above the Maximum Capacity value.
Scaling Policy Action
The action that scaling policies perform on your fleet when the Scaling Policy Condition is met.You can choose an action based on % capacity or number of instance(s). For example, if DesiredCapacity is 4 and Scaling Policy Action is set to "Add 25% capacity", Desired Capacity is increasedby 25% to 5 when Scaling Policy Condition is met.
Scaling Policy Condition
The condition that triggers the action set in Scaling Policy Action. This condition includes a scalingpolicy metric, a comparison operator, and a threshold. For example, to scale a fleet if the utilizationof the fleet is greater than 50%, your scaling policy condition should be "If Capacity Utilization >50%".
Scaling Policy Metric
This is the metric on which your scaling policy is based. The following metrics are available forscaling policies:Capacity Utilization
Percentage of instances in a fleet that are being used. You can use this metric to scale your fleetbased on usage of the fleet. For example, Scaling Policy Condition: "If Capacity Utilization <25%" perform Scaling Policy Action: "Remove 25 % capacity".
Available Capacity
Number of instances in your fleet that are available for user sessions. You can use this metric tomaintain a buffer in your capacity available for users to start streaming sessions. For example,Scaling Policy Condition: "If Available Capacity < 5" perform Scaling Policy Action: "Add 5instance(s)".
Insufficient Capacity Error
Number of session requests rejected due to lack of capacity. You can use this metric to provisionnew instances for users that are unable to get sessions because of lack of capacity. For example,Scaling Policy Condition: "If Insufficient Capacity Error > 0" perform Scaling Policy Action:"Add 1 instance(s)".
40

Amazon AppStream 2.0 Developer GuideManaging Fleet Scaling Using the Console
Managing Fleet Scaling Using the ConsoleYou can set up and manage fleet scaling using the AWS Management Console in two ways: duringfleet creation, or anytime using the Fleets tab. Two default scaling policies are associated with newlycreated fleets after launch and can be edited via the console from the Scaling Policies tab. For moreinformation, see Create a Fleet (p. 31).
For user environments that vary in number, define scaling policies to control how scaling responds todemand. If you expect a fixed number of users or have other reasons for disabling scaling, you can setyour fleet with a fixed number of instances.
To set a fleet scaling policy using the console
1. Open the AppStream 2.0 console at https://console.aws.amazon.com/appstream2.2. In the navigation pane, choose Fleets.3. Select the fleet and then choose Scaling Policies.4. Edit existing policies by choosing the edit icon next to each value. Set the desired values in the edit
field and choose Update. The policy changes go into effect within a few minutes.5. Add (create) new policies using the Add Policy link. Set the desired values in the edit field and
choose Create. The new policy goes into effect within a few minutes.
You can use the Fleet Usage tab to monitor the effects of your scaling policy changes. The following isan example usage graph of scaling activity when five users connect to the fleet and then disconnect. Thisexample is from a fleet using the following scaling policy values:
• Minimum Capacity = 1• Maximum Capacity = 5• Scale Out = Add 2 instances if Capacity Utilization > 75%• Scale In = Remove 1 instance if Capacity Utilization < 25%
To set a fixed capacity fleet using the console
1. Open the AppStream 2.0 console at https://console.aws.amazon.com/appstream2.2. In the navigation pane, choose Fleets.
41

Amazon AppStream 2.0 Developer GuideManaging Fleet Scaling Using the AWS CLI
3. Select the fleet.4. For Scaling Policies, remove all policies associated with the fleet.5. For Fleet Details, edit the fleet to set Desired Capacity.
The fixed fleet has constant capacity based on the value that you specified as Desired Capacity. Notethat a fixed fleet has the desired number of instances available at all times and the fleet must bestopped to stop billing costs for that fleet.
Managing Fleet Scaling Using the AWS CLIYou can set up and manage fleet scaling using the AWS Command Line Interface (CLI). Before runningscaling policy commands, you must register your fleet as a scalable target. Use the following register-scalable-target command:
aws application-autoscaling register-scalable-target --service-namespace appstream \ --resource-id fleet/fleetname \ --scalable-dimension appstream:fleet:DesiredCapacity \ --min-capacity 1 --max-capacity 5 \ --role-arn arn:aws:iam::account-number-without-hyphens:role/service-role/ApplicationAutoScalingForAmazonAppStreamAccess
Examples• Example 1: Applying a Scaling Policy Based on Capacity Utilization (p. 42)• Example 2: Applying a Scaling Policy Based on Insufficient Capacity Errors (p. 43)• Example 3: Change the Fleet Capacity Based on a Schedule (p. 44)
Example 1: Applying a Scaling Policy Based on CapacityUtilizationThis CLI example sets up a scaling policy that scales out a fleet by 25% if Utilization >= 75%.
The following put-scaling-policy command defines a utilization-based scaling policy:
aws application-autoscaling put-scaling-policy --cli-input-json file://scale-out-utilization.json
The contents of the file scale-out-utilization.json are as follows:
{ "PolicyName": "policyname", "ServiceNamespace": "appstream", "ResourceId": "fleet/fleetname", "ScalableDimension": "appstream:fleet:DesiredCapacity", "PolicyType": "StepScaling", "StepScalingPolicyConfiguration": { "AdjustmentType": "PercentChangeInCapacity", "StepAdjustments": [ { "MetricIntervalLowerBound": 0, "ScalingAdjustment": 25 } ], "Cooldown": 1500 }
42

Amazon AppStream 2.0 Developer GuideManaging Fleet Scaling Using the AWS CLI
}
If the command is successful, the output looks something like the following, although some detailsare unique to your account and region. In this example, the policy identifier is e3425d21-16f0-d701-89fb-12f98dac64af.
{"PolicyARN": "arn:aws:autoscaling:us-west-2:123456789012:scalingPolicy:e3425d21-16f0-d701-89fb-12f98dac64af:resource/appstream/fleet/SampleFleetName:policyName/SamplePolicyName"}
Now, set up a CloudWatch alarm for this policy. Use the names, region, account number, and policyidentifier from your information. You can use the policy ARN returned by the previous command for the--alarm-actions parameter.
aws cloudwatch put-metric-alarm --alarm-name alarmname \--alarm-description "Alarm when Capacity Utilization exceeds 75 percent" \--metric-name CapacityUtilization \--namespace AWS/AppStream \--statistic Average \--period 300 \--threshold 75 \--comparison-operator GreaterThanThreshold \--dimensions "Name=FleetName,Value=fleetname" \--evaluation-periods 1 --unit Percent \--alarm-actions "arn:aws:autoscaling:your-region-code:account-number-without-hyphens:scalingPolicy:policyid:resource/appstream/fleet/fleetname:policyName/policyname"
Example 2: Applying a Scaling Policy Based on InsufficientCapacity ErrorsThis CLI example sets up a scaling policy that scales out the fleet by 1 if the fleet throws anInsufficientCapacityError error.
The following command defines a insufficient capacity-based scaling policy:
aws application-autoscaling put-scaling-policy --cli-input-json file://scale-out-capacity.json
The contents of the file scale-out-capacity.json are as follows:
{ "PolicyName": "policyname", "ServiceNamespace": "appstream", "ResourceId": "fleet/fleetname", "ScalableDimension": "appstream:fleet:DesiredCapacity", "PolicyType": "StepScaling", "StepScalingPolicyConfiguration": { "AdjustmentType": "ChangeInCapacity", "StepAdjustments": [ { "MetricIntervalLowerBound": 0, "ScalingAdjustment": 1 } ], "Cooldown": 1500 }}
43

Amazon AppStream 2.0 Developer GuideManaging Fleet Scaling Using the AWS CLI
If the command is successful, the output looks something like the following, althoughsome details are unique to your account and region. In this example, the policy identifier isf4495f21-0650-470c-88e6-0f393adb64fc.
{"PolicyARN": "arn:aws:autoscaling:us-west-2:123456789012:scalingPolicy:f4495f21-0650-470c-88e6-0f393adb64fc:resource/appstream/fleet/SampleFleetName:policyName/SamplePolicyName"}
Now, set up a CloudWatch alarm for this policy. Use the names, region, account number, and policyidentifier from your information. You can use the policy ARN returned by the previous command for the--alarm-actions parameter.
aws cloudwatch put-metric-alarm --alarm-name alarmname \--alarm-description "Alarm when out of capacity is > 0" \--metric-name InsufficientCapacityError \--namespace AWS/AppStream \--statistic Maximum \--period 300 \--threshold 0 \--comparison-operator GreaterThanThreshold \--dimensions "Name=FleetName,Value=fleetname" \--evaluation-periods 1 --unit Count \--alarm-actions "arn:aws:autoscaling:your-region-code:account-number-without-hyphens:scalingPolicy:policyid:resource/appstream/fleet/fleetname:policyName/policyname"
Example 3: Change the Fleet Capacity Based on a ScheduleChanging your fleet capacity based on a schedule allows you to scale your fleet capacity in responseto predictable changes in demand. For example, at the start of a work day, you might expect a certainnumber of users to request streaming connections at one time. To change your fleet capacity based on aschedule, you can use the Application Auto Scaling PutScheduledAction API action or the put-scheduled-action CLI command.
Before changing your fleet capacity, you can list your current fleet capacity by using the AppStream 2.0describe-fleets CLI command.
aws appstream describe-fleets --name fleetname
The current fleet capacity will appear similar to the following output (shown in JSON format):
{ { "ComputeCapacityStatus": { "Available": 1, "Desired": 1, "Running": 1, "InUse": 0 },}
Then, use the put-scheduled-action command to create a scheduled action to change your fleetcapacity. For example, the following command changes the minimum capacity to 3 and the maximumcapacity to 5 every day at 9:00 AM.
aws application-autoscaling put-scheduled-action --service-namespace appstream \--resource-id fleet/fleetname \--schedule="cron(0 9 * * ? *)" \
44
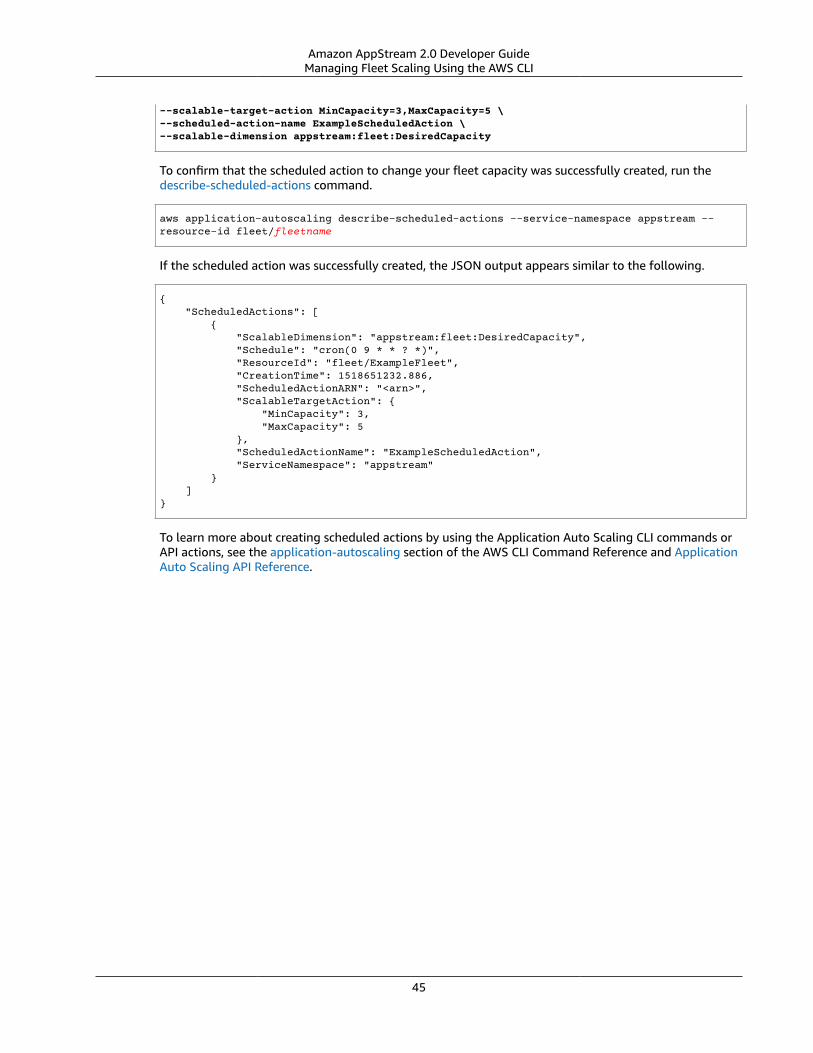
Amazon AppStream 2.0 Developer GuideManaging Fleet Scaling Using the AWS CLI
--scalable-target-action MinCapacity=3,MaxCapacity=5 \--scheduled-action-name ExampleScheduledAction \--scalable-dimension appstream:fleet:DesiredCapacity
To confirm that the scheduled action to change your fleet capacity was successfully created, run thedescribe-scheduled-actions command.
aws application-autoscaling describe-scheduled-actions --service-namespace appstream --resource-id fleet/fleetname
If the scheduled action was successfully created, the JSON output appears similar to the following.
{ "ScheduledActions": [ { "ScalableDimension": "appstream:fleet:DesiredCapacity", "Schedule": "cron(0 9 * * ? *)", "ResourceId": "fleet/ExampleFleet", "CreationTime": 1518651232.886, "ScheduledActionARN": "<arn>", "ScalableTargetAction": { "MinCapacity": 3, "MaxCapacity": 5 }, "ScheduledActionName": "ExampleScheduledAction", "ServiceNamespace": "appstream" } ]}
To learn more about creating scheduled actions by using the Application Auto Scaling CLI commands orAPI actions, see the application-autoscaling section of the AWS CLI Command Reference and ApplicationAuto Scaling API Reference.
45

Amazon AppStream 2.0 Developer GuideCustom Branding Options
Add Your Custom Branding toAmazon AppStream 2.0
To create a familiar experience for your users when they stream applications, you can customizethe appearance of AppStream 2.0 with your own branding images, text, and website links, and youcan choose from one of several color palettes. When you customize AppStream 2.0, your brandingis displayed to users during application streaming sessions rather than the default AppStream 2.0branding.
Custom Branding OptionsYou can customize the appearance of the streaming application catalog page by using the followingbranding options.
NoteCustom branding is not available for the user pool sign-in portal or for the email notificationsthat AppStream 2.0 sends to user pool users.
Brandingelement
Description Requirements and recommendations
Organizationlogo
Enables you to displayan image that is familiarto your users. The imageappears in the header ofthe streaming applicationcatalog page, which isdisplayed to users afterthey sign in to AppStream2.0.
File type: .png, jpg, .jpeg, or .gif
Maximum dimensions: 1000 px x 500 px
Maximum file size: 300 KB
Organizationwebsite links
Enables you to displaylinks to helpful resourcesfor your users, such asyour organization's ITsupport and productmarketing sites. Thelinks are displayed in thefooter of the streamingapplication catalog page.
Maximum number of links: 3
Format (URL): https://example.com or http://example.com
Maximum length (display name): 100 letters, spaces,and numbers
Special characters allowed (display name): @ . / # & +$
Color theme Applied to websitelinks, text, and buttons.These colors are alsoapplied as accents inthe background for thestreaming applicationcatalog page.
Predefined themes from which to choose: 4
For information about each color theme, see ColorTheme Palettes (p. 48) later in this topic.
Page title Displayed at the topof the browser tab
Maximum length: 200 letters, spaces, and numbers.
46

Amazon AppStream 2.0 Developer GuideAdding Your Custom Branding to AppStream 2.0
Brandingelement
Description Requirements and recommendations
during users' applicationstreaming sessions.
Special characters allowed: @ . / # & + $
Favicon Enables your users torecognize their applicationstreaming site in abrowser full of tabs orbookmarks. The faviconicon is displayed atthe top of the browsertab for the applicationstreaming site duringusers' streaming sessions.
File type: .png, .jpg, .jpeg, .gif, or .ico
Maximum dimensions: 128 px x 128 px
Maximum file size: 50 KB
Redirect URL Enables you to specify aURL to which users areredirected when they enda streaming session.
Format: https://example.com or http://example.com
This URL is configured in the Details page for a stackwhen you create or edit a stack, not in the Brandingpage.
Feedback URL Enables you to specify aURL for a Send Feedbacklink, so that your users cansubmit feedback. If youdo not specify a URL, theSend Feedback link is notdisplayed.
Format: https://example.com or http://example.com
This URL is configured in the Details page for a stackwhen you create or edit a stack, not in the Brandingpage.
Adding Your Custom Branding to AppStream 2.0To customize AppStream 2.0 with your organizational branding, use the AppStream 2.0 console to selectthe stack to customize, and then add your branding.
To add your custom branding to AppStream 2.0
1. Open the AppStream 2.0 console at https://console.aws.amazon.com/appstream2.2. In the left pane, choose Stacks.3. In the stack list, select the stack to customize with your branding.4. Choose Branding, Custom.5. For Application catalog page, customize how the streaming application catalog page appears to
users after they sign in to AppStream 2.0.
a. For Organization logo, do either of the following:
• If you are uploading a logo for the first time, choose Upload, and then select the image todisplay in the header of the streaming application catalog page.
• If you have already uploaded a logo and need to change it, choose Change Logo, and thenselect the image to display.
b. For Organization website links, specify up to three website links to display in the page footer.For each link, choose the Add Link button, and then enter a display name and URL. To addmore links, repeat these steps for each link to add. To remove a link, choose the Remove buttonunder the link URL.
47

Amazon AppStream 2.0 Developer GuideSpecifying a Custom Redirect URL and Feedback URL
c. For Color theme, choose the colors to use for your website links, body text, and buttons, and asan accent for the page background. For information about each color theme, see Color ThemePalettes (p. 48) later in this topic.
6. For Browser tab, customize the page title and icon to display to users at the top of their browser tabduring streaming sessions.
a. For Page title, enter the title to display at the top of the browser tab.b. For Favicon, do either of the following:
• If you are uploading a favicon for the first time, choose Upload, and then select the image todisplay at the top of the browser tab.
• If you have already uploaded a favicon and want to change it, choose Change Logo, and thenselect the image to display.
7. Do either of the following:
• To apply your branding changes, choose Save. When users connect to new streaming sessions thatare launched for the stack, your branding changes are displayed.
NoteAppStream 2.0 retains the custom branding changes that you save. If you save yourcustom branding changes, but then choose to restore the AppStream 2.0 defaultbranding, your custom branding changes are saved for later use. If you restore theAppStream 2.0 default branding and decide later to reapply your custom branding,choose Custom, Save. In this case, the most recently saved custom branding is displayedto your users.
• To discard your branding changes, choose Cancel. When prompted to confirm your choice, chooseConfirm. If you cancel your changes, the most recently saved branding is displayed to your users.
Specifying a Custom Redirect URL and FeedbackURL
You can specify a URL to which your users are redirected when they end their streaming session, as wellas a URL where your users can submit feedback. By default, AppStream 2.0 displays a Send Feedbacklink that enables users to submit feedback to AWS about the quality of their application streamingsession. To enable your users to submit feedback to a site that you specify, you can provide a customfeedback URL. You can specify the redirect URL and feedback URL when you create a new stack or editthe details for an existing stack. For more information, see Create a Stack (p. 32).
Previewing Your Custom Branding ChangesYou can preview how your branding changes will appear to your users by applying your brandingchanges to a test stack before you apply them to a production stack, and then creating a streamingURL for the test stack. After you validate your branding changes, you can them deploy them to yourproduction stack. For information, see Step 2: Provide Access to Users (p. 7) in Getting Started withAmazon AppStream 2.0.
Color Theme PalettesWhen you choose a color theme, the colors for that theme are applied to the website links, text,and buttons in your streaming application catalog page. A color is also applied as an accent in the
48

Amazon AppStream 2.0 Developer GuideRed
background for your streaming application catalog page. For each color in a color theme palette, the hexvalue is also noted.
Color Themes• Red (p. 49)• Light Blue (p. 49)• Blue (p. 50)• Pink (p. 51)
RedThe following colors are applied when you select the red color theme.
Red (#d51900) – Used for buttons and website links.
White (#faf9f7) – Used as a background accent.
Dark grey (#404040) – Used for the body text and in the progress spinner.
When you choose the red color theme, the website links, body text, and background accent appear inyour streaming application catalog page as follows.
Light BlueThe following colors are applied when you select the light blue color theme:
Light blue (#1d83c2) – Used for buttons and website links.
White (#f6f6f6) – Used as a background accent.
Dark grey (#333333) – Used for the body text and in the progress spinner.
49

Amazon AppStream 2.0 Developer GuideBlue
When you choose the light blue color theme, the website links, body text, and background accent appearin your streaming application catalog page as follows.
BlueThe following colors are applied when you select the blue color theme:
Blue (#0070ba) – Used for website links.
White (#ffffff) – Used as a background accent.
Light green (#8ac53e) – Used for buttons.
Grey (#666666) – Used for the body text and in the progress spinner.
When you choose the blue color theme, the website links, body text, and background accent appear inyour streaming application catalog page as follows.
50

Amazon AppStream 2.0 Developer GuidePink
PinkThe following colors are applied when you select the pink color theme:
Pink (#ec0069) – Used for website links.
White (#ffffff) – Used as a background accent.
Blue (#3159a2) – Used for buttons.
Dark grey (#333333) – Used for the body text and in the progress spinner.
When you choose the pink color theme, the website links, body text, and background accent appear inyour streaming application catalog page as follows.
51

Amazon AppStream 2.0 Developer GuideEnable and Administer Home Folders
Enable Persistent Storage for YourAppStream 2.0 Users
Amazon AppStream 2.0 supports persistent storage for your users with home folders and Google Drive.As an AppStream 2.0 administrator, you must understand how to perform the following tasks to enableand administer persistent storage for your users.
Contents• Enable and Administer Home Folders for Your AppStream 2.0 Users (p. 52)• Enable and Administer Google Drive for Your AppStream 2.0 Users (p. 57)
Enable and Administer Home Folders for YourAppStream 2.0 Users
AppStream 2.0 supports persistent storage for your users with home folders and Google Drive. Youcan enable one or both options as needed for your organization. When you enable home folders foran AppStream 2.0 stack, end users of the stack can access a persistent storage folder during theirapplication streaming sessions. No further configuration is required on your users' part to access theirhome folder. Data stored by users in their home folder is automatically backed up to an Amazon S3bucket in your AWS account and is made available in subsequent sessions for those users.
NoteAs an administrator, you can access a home folder in the following default location on animage builder instance: C:\Users\PhotonUser\My Files\Home Folder. Use this path if you areconfiguring your applications to save to the home folder. In some cases, your end users may notbe able to find their home folder because some applications do not recognize the redirect thatdisplays the home folder as a top-level folder in File Explorer. If this is the case, your users canaccess their home folder by browsing to the same directory in File Explorer.
Contents• Enable Home Folders for Your AppStream 2.0 Users (p. 52)• Administer Your Home Folders (p. 53)• Provide Your AppStream 2.0 Users with Guidance for Working with Home Folders (p. 56)
Enable Home Folders for Your AppStream 2.0 UsersBefore enabling home folders, you must do the following:
• Check that you have the correct IAM permissions for Amazon S3 actions. For more information, seeIAM Policies and the Amazon S3 Bucket for Home Folders (p. 92).
• Use an image that was created from an AWS base image released on or after May 18, 2017.For a current list of released AWS images, see Amazon AppStream 2.0 Windows Image VersionHistory (p. 24).
• Enable network connectivity to Amazon S3 from your VPC by configuring internet access or a VPCendpoint for Amazon S3. For more information, see Network Settings for Amazon AppStream 2.0 (p. 9) and Home Folders and VPC Endpoints (p. 13).
52

Amazon AppStream 2.0 Developer GuideAdminister Your Home Folders
You can enable or disable home folders while creating a stack (see Create a Stack (p. 32)), or after thestack is created by using the AWS Management Console for AppStream 2.0, AWS SDK, or AWS CLI. Foreach AWS Region, home folders are backed up by an S3 bucket.
The first time you enable home folders for an AppStream 2.0 stack in an AWS Region, the service createsan S3 bucket in your account in that same region. The same bucket is used to store the content ofhome folders for all users and all stacks in that region. For more information, see Amazon S3 BucketStorage (p. 54).
To enable home folders while creating a stack
• Follow the steps in Create a Stack (p. 32), and ensure that Enable Home Folders is selected.
To enable home folders for an existing stack
1. Open the AppStream 2.0 console at https://console.aws.amazon.com/appstream2.2. On the left navigation pane, choose Stacks, and select the stack for which to enable home folders.3. Below the stacks list, choose Storage and select Enable Home Folders.4. In the Enable Home Folders dialog box, choose Enable.
Administer Your Home FoldersContents
• Disable Home Folders (p. 53)• Amazon S3 Bucket Storage (p. 54)• Home Folder Formats (p. 54)• Using the AWS Command Line Interface or AWS SDKs (p. 55)
Disable Home FoldersYou can disable home folders for a stack without losing user content already stored in home folders.Disabling home folders for a stack has the following effects:
• For any users who are connected to active streaming sessions for the stack, an error message displaysduring the session to inform these users that they can no longer store content in their home folder.
• Any new sessions that use the stack with home folders disabled do not present home folders.• Disabling home folders for one stack does not disable it for other stacks. Only the specific stack for
which home folders is disabled is affected.• Even if home folders are disabled for all stacks, AppStream 2.0 does not delete the user content.
To restore access to home folders for the stack, enable home folders again by following the stepsdescribed earlier in this topic.
To disable home folders while creating a stack
• Follow the steps in Create a Stack (p. 32) and ensure that Enable Home Folders is cleared.
To disable home folders for an existing stack
1. Open the AppStream 2.0 console at https://console.aws.amazon.com/appstream2.2. On the left navigation pane, choose Stacks, and select the stack.
53

Amazon AppStream 2.0 Developer GuideAdminister Your Home Folders
3. Below the stacks list, choose Storage and clear Enable Home Folders.
4. In the Disable Home Folders dialog box, type CONFIRM (case-sensitive) to confirm your choice, thenchoose Disable.
Amazon S3 Bucket StorageAppStream 2.0 manages user content stored in home folders by using S3 buckets created in youraccount. For every region, AppStream 2.0 creates a bucket in your account and stores all user contentgenerated from streaming sessions of stacks in that region in that bucket. The buckets are fully managedby the service without any admin inputs or configuration. The buckets are named in a specific format asfollows:
appstream2-36fb080bb8-region-code-account-id-without-hyphens
Where region-code is the AWS region code in which the stack is created and account-id-without-hyphens is your AWS account ID. The first part of the bucket name, appstream2-36fb080bb8-, doesnot change across accounts or regions.
For example, if you enable home folders for stacks in region us-west-2 on account number123456789012, the service creates an S3 bucket in the us-west-2 region with the name shown. Thisbucket name cannot change or be deleted without manual modification by an administrator.
appstream2-36fb080bb8-us-west-2-123456789012
As mentioned, disabling home folders for stacks does not delete any user content stored in the S3bucket. To permanently delete user content, an administrator with adequate access must do so from theAmazon S3 console. AppStream 2.0 adds a bucket policy that prevents accidental deletion of the bucket.For more information, see IAM Policies and the Amazon S3 Bucket for Home Folders (p. 92).
Additional Resources
To learn more about managing S3 buckets and best practices, see the following topics in the AmazonSimple Storage Service Developer Guide:
• You can provide offline access to user data for your users with Amazon S3 policies. For moreinformation, see Allow Users to Access a Personal "Home Directory" in Amazon S3.
• You can enable file versioning for content stored in S3 buckets used by AppStream 2.0. For moreinformation, see Using Versioning.
Home Folder FormatsWhen home folders are enabled, users are provided with a unique folder in which to store their content(one folder per user). The folder is created and maintained as a unique Amazon S3 object within thebucket for that region. The hierarchy of a user folder depends on how the user launches a streamingsession.
AWS SDKs and AWS CLI
For sessions created using CreateStreamingURL or create-streaming-url the user folder structureis as follows:
bucket-name/user/custom/user-id-SHA-256-hash/
54

Amazon AppStream 2.0 Developer GuideAdminister Your Home Folders
Where bucket-name is in the format shown in Amazon S3 Bucket Storage (p. 54) and user-id-SHA-256-hash is the user-specific folder name created using a lower case SHA-256 hash hexadecimalstring generated from the UserId value passed to the CreateStreamingURL API operation or create-streaming-url command. For more information, see CreateStreamingURL in the Amazon AppStream2.0 API Reference and create-streaming-url in the AWS CLI Command Reference.
The following example folder structure applies to session access using the API or CLI with a [email protected], account id 123456789012 in region us-west-2:
appstream2-36fb080bb8-us-west-2-123456789012/user/custom/a0bcb1da11f480d9b5b3e90f91243143eac04cfccfbdc777e740fab628a1cd13/
Administrators can identify the folder for a user by generating the lower case SHA-256 hash value of theUserId using websites or open source coding libraries available online.
SAML
For sessions created using SAML federation, the user folder structure is as follows:
bucket-name/user/federated/user-id-SHA-256-hash/
In this case, user-id-SHA-256-hash is the folder name created using a lower case SHA-256 hashhexadecimal string generated from the NameID SAML attribute value passed in the SAML federationrequest. To differentiate users with the same name belonging to two different domains, send the SAMLrequest with NameID in the format domainname\username. For more information, see Single Sign-onAccess to AppStream 2.0 Using SAML 2.0 (p. 66).
The following example folder structure applies to session access using SAML federation with a NameIDSAMPLEDOMAIN\testuser, account ID 123456789012 in region us-west-2:
appstream2-36fb080bb8-us-west-2-123456789012/user/federated/34832ec7383294b01bface2ebc32ab9cacfb5fc12ad33d5eb5d0fcc1d78ae144
When part or all of the NameID string is capitalized (as the domain name SAMPLEDOMAIN is in theexample), AppStream 2.0 converts the string to lowercase and then generates the hash value based onthe lowercase string. So for the example, AppStream 2.0 converts the NameID string SAMPLEDOMAIN\test user to sampledomain\testuser and generates the hash value based on that string.Administrators can identify the folder for a user by generating the SHA-256 hash value of the lowercaseNameID by using websites or open source coding libraries available online.
Using the AWS Command Line Interface or AWS SDKsYou can enable and disable home folders for a stack using the AWS CLI or AWS SDKs.
Use the following create-stack command enable home folders while creating a new stack:
aws appstream create-stack --name ExampleStack –-storage-connectors type=HOMEFOLDERS
Use the following update-stack command to enable home folders for an existing stack:
aws appstream update-stack –-name ExistingStack –-storage-connectors type=HOMEFOLDERS
Use the following command to disable home folders for an existing stack. This command does not deleteany user data.
55

Amazon AppStream 2.0 Developer GuideProvide Your AppStream 2.0 Users with
Guidance for Working with Home Folders
aws appstream update-stack –name ExistingStack –-delete-storage-connectors
Provide Your AppStream 2.0 Users with Guidance forWorking with Home FoldersTo help your users understand how to work with home folders, you can provide them with the followinginformation.
Guidance for Users
When you are signed in to an AppStream 2.0 streaming session, you can do the following with yourhome folder:
• Open and edit files and folders that you store in your home folder. Content that is stored in your homefolder is specific to you and cannot be accessed by other users.
• Upload and download files between your local computer and your home folder. AppStream 2.0continuously checks for the most recently modified files and folders and backs them up to your homefolder.
• When you are working in an application, you can access files and folders that are stored in your homefolder by choosing File Open from the application interface and browsing to the file or folder that youwant to open. To save changes to a file that you are working in to your home folder, choose File Savefrom the application interface and browse to the location in your home folder where you want to savethe file.
• You can also access your home folder by choosing My Files from the web view session toolbar.
NoteIf your home folder doesn't appear, you can view your home folder files by browsing to thefollowing directory in File Explorer: C:\Users\PhotonUser\My Files\Home Folder.
To upload and download files between your local computer and your home folder
1. In the AppStream 2.0 web view session, choose the My Files icon at the top left of your browser.
2. Navigate to an existing folder, or choose Add Folder to create a new folder.
3. When the folder that you want is displayed, do one of the following:
• To upload a file to the folder, select the file that you want to upload, and choose Upload.
• To download a file from the folder, select the file that you want to download, choose the downarrow to the right of the file name, and choose Download.
56

Amazon AppStream 2.0 Developer GuideEnable and Administer Google Drive
Enable and Administer Google Drive for YourAppStream 2.0 Users
AppStream 2.0 supports persistent storage for your users with Google Drive and home folders. Youcan enable one or both options as needed for your organization. When you enable Google Drive for anAppStream 2.0 stack, end users of the stack can link their Google Drive account to AppStream 2.0. Aftertheir account is linked to AppStream 2.0, your users can sign into their Google Drive account and accesstheir Google Drive folder during application streaming sessions. Any changes that your users make tofiles or folders in their Google Drive during application streaming sessions are automatically backed upand synchronized so that they are available to users outside their streaming session.
ImportantYou can enable Google Drive for accounts in G Suite domains only, not for personal Gmailaccounts.
Contents
• Enable Google Drive for Your AppStream 2.0 Users (p. 57)
• Disable Google Drive for Your AppStream 2.0 Users (p. 58)
• Provide Your AppStream 2.0 Users with Guidance for Working with Google Drive (p. 59)
Enable Google Drive for Your AppStream 2.0 UsersBefore enabling Google Drive, you must do the following:
• Make sure that the stack on which you enable Google Drive is associated with a fleet based on animage that uses a version of the AppStream 2.0 agent released on or after May 31, 2018. For moreinformation, see Amazon AppStream 2.0 Agent Version History (p. 26). The fleet must also have accessto the internet.
• Add Amazon AppStream 2.0 as a trusted app in one or more G Suite domains. You can enable GoogleDrive for up to 10 G Suite domains.
Follow these steps to add Amazon AppStream 2.0 as a trusted app in your G Suite domains.
To add Amazon AppStream 2.0 as a trusted app in your G Suite domains
1. Sign in to the G Suite Admin console at https://admin.google.com/.
2. Choose Dashboard.
3. Choose the main menu in the upper left of the window (to the left of the Google Admin title), thenchoose Security, Settings.
4. Choose API Permissions.
5. At the bottom of the API Access list, choose the Trusted Apps link.
6. Choose the Whitelist an App [plus sign (+) icon] in the bottom right of the window.
7. In the Add APP to Trusted List dialog box, do the following. When you're done, choose Add:
• For Select App Type, choose Web Application.
• For OAuth2 Client ID, type the Amazon AppStream 2.0 OAuth client ID for your AWS Region. For alist of client IDs, see the table that follows this procedure.
8. Confirm that Amazon AppStream 2.0 appears in the list of trusted apps.
57

Amazon AppStream 2.0 Developer GuideDisable Google Drive for Your AppStream 2.0 Users
Amazon AppStream 2.0 OAuth2 client IDs
Region Amazon AppStream 2.0 OAuth client ID
us-east-1 (N.Virginia) 266080779488-15n5q5nkiclp6m524qibnmhmbsg0hk92.apps.googleusercontent.com
us-west-2 (Oregon) 1026466167591-i4jmemrggsjomp9tnkkcs5tniggfiujb.apps.googleusercontent.com
ap-northeast-1 (Tokyo) 922579247628-qpl9kpihg3hu5dul2lphbjs4qbg6mjm2.apps.googleusercontent.com
ap-southeast-1 (Singapore) 856871139998-4eia2n1db5j6gtv4c1rdte1fh1gec8vs.apps.googleusercontent.com
ap-southeast-2 (Sydney) 151535156524-b889372osskprm4dt1clpm53mo3m9omp.apps.googleusercontent.com
eu-central-1 (Frankfurt) 643727794574-1se5360a77i84je9j3ap12obov1ib76q.apps.googleusercontent.com
eu-west-1 (Ireland) 599492309098-098muc7ofjfo9vua5rm5u9q2k3mlok3j.apps.googleusercontent.com
Follow these steps to enable Google Drive for your AppStream 2.0 users.
To enable Google Drive while creating a stack
• Follow the steps in Create a Stack (p. 32), and ensure that Enable Google Drive is selected and thatyou have specified at least one G Suite domain.
To enable Google Drive for an existing stack
1. Open the AppStream 2.0 console at https://console.aws.amazon.com/appstream2.
2. In the left navigation pane, choose Stacks, and select the stack for which to enable Google Drive.
3. Below the stacks list, choose Storage and select Enable Google Drive.
4. In the Enable Google Drive dialog box, in G Suite domain name, type the name of at least one GSuite domain. To specify another domain, choose Add another domain, and type the name of the GSuite domain.
5. After you finish adding G Suite domain names, choose Enable.
Disable Google Drive for Your AppStream 2.0 UsersYou can disable Google Drive for a stack without losing user content that is already stored on GoogleDrive. Disabling Google Drive for a stack has the following effects:
• For any users who are connected to active streaming sessions for the stack, an error message displaysduring the session to inform these users that they do not have permissions to access their GoogleDrive.
• Any new sessions that use the stack with Google Drive disabled do not display Google Drive.
• Disabling Google Drive for one stack does not disable it for other stacks. Only the specific stack forwhich Google Drive is disabled is affected.
• Even if Google Drive is disabled for all stacks, AppStream 2.0 does not delete the user content.
Follow these steps to disable Google Drive for an existing stack.
58
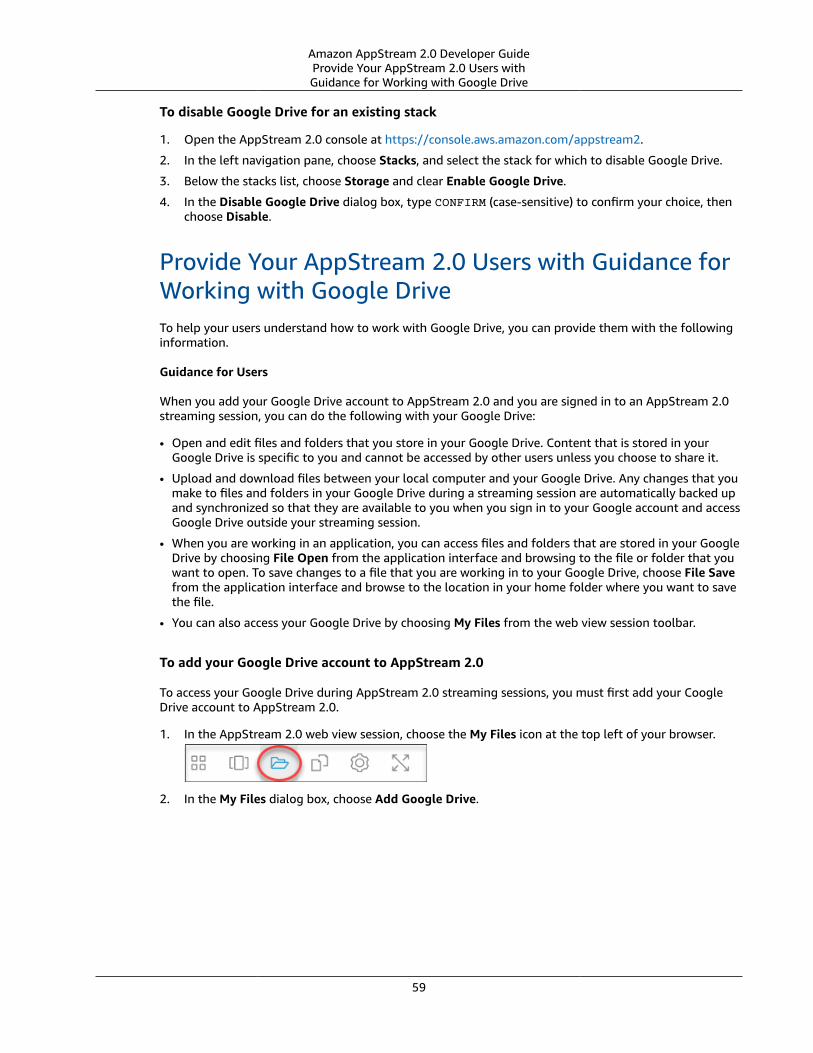
Amazon AppStream 2.0 Developer GuideProvide Your AppStream 2.0 Users withGuidance for Working with Google Drive
To disable Google Drive for an existing stack
1. Open the AppStream 2.0 console at https://console.aws.amazon.com/appstream2.
2. In the left navigation pane, choose Stacks, and select the stack for which to disable Google Drive.
3. Below the stacks list, choose Storage and clear Enable Google Drive.
4. In the Disable Google Drive dialog box, type CONFIRM (case-sensitive) to confirm your choice, thenchoose Disable.
Provide Your AppStream 2.0 Users with Guidance forWorking with Google DriveTo help your users understand how to work with Google Drive, you can provide them with the followinginformation.
Guidance for Users
When you add your Google Drive account to AppStream 2.0 and you are signed in to an AppStream 2.0streaming session, you can do the following with your Google Drive:
• Open and edit files and folders that you store in your Google Drive. Content that is stored in yourGoogle Drive is specific to you and cannot be accessed by other users unless you choose to share it.
• Upload and download files between your local computer and your Google Drive. Any changes that youmake to files and folders in your Google Drive during a streaming session are automatically backed upand synchronized so that they are available to you when you sign in to your Google account and accessGoogle Drive outside your streaming session.
• When you are working in an application, you can access files and folders that are stored in your GoogleDrive by choosing File Open from the application interface and browsing to the file or folder that youwant to open. To save changes to a file that you are working in to your Google Drive, choose File Savefrom the application interface and browse to the location in your home folder where you want to savethe file.
• You can also access your Google Drive by choosing My Files from the web view session toolbar.
To add your Google Drive account to AppStream 2.0
To access your Google Drive during AppStream 2.0 streaming sessions, you must first add your CoogleDrive account to AppStream 2.0.
1. In the AppStream 2.0 web view session, choose the My Files icon at the top left of your browser.
2. In the My Files dialog box, choose Add Google Drive.
59
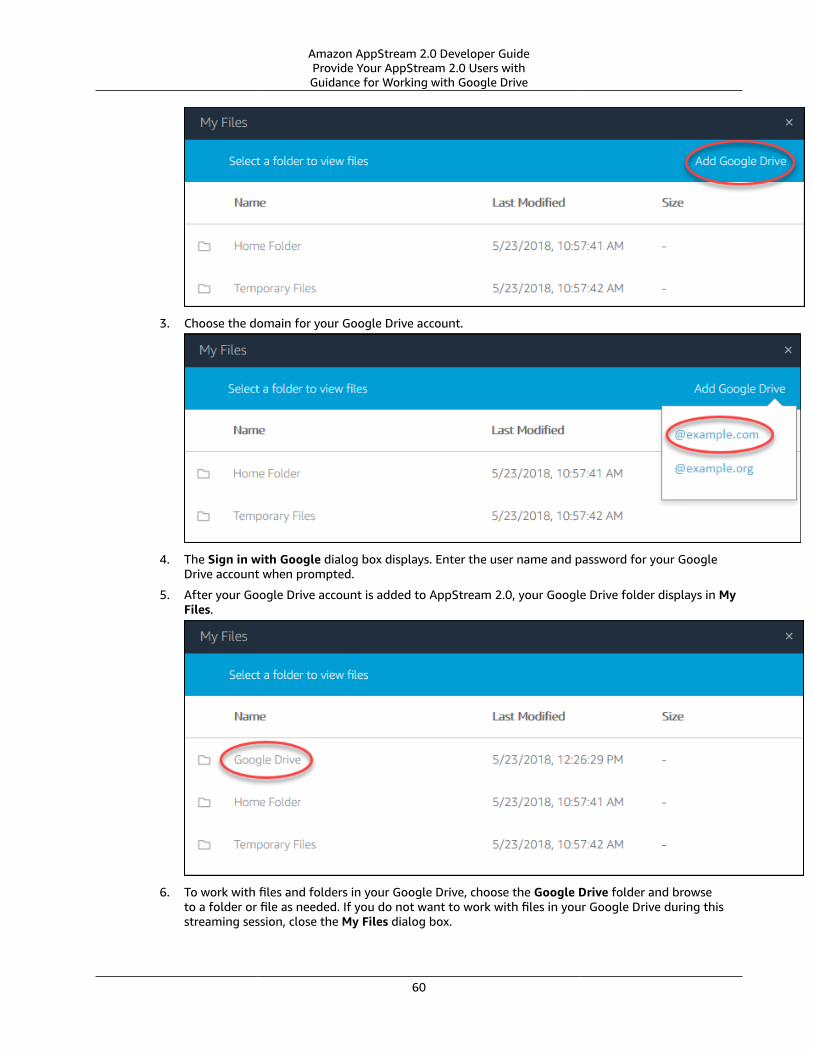
Amazon AppStream 2.0 Developer GuideProvide Your AppStream 2.0 Users withGuidance for Working with Google Drive
3. Choose the domain for your Google Drive account.
4. The Sign in with Google dialog box displays. Enter the user name and password for your GoogleDrive account when prompted.
5. After your Google Drive account is added to AppStream 2.0, your Google Drive folder displays in MyFiles.
6. To work with files and folders in your Google Drive, choose the Google Drive folder and browseto a folder or file as needed. If you do not want to work with files in your Google Drive during thisstreaming session, close the My Files dialog box.
60

Amazon AppStream 2.0 Developer GuideProvide Your AppStream 2.0 Users withGuidance for Working with Google Drive
To upload and download files between your local computer and your Google Drive
1. In the AppStream 2.0 web view session, choose the My Files icon at the top left of your browser.
2. In the My Files dialog box, choose Google Drive.3. Navigate to an existing folder, or choose Add Folder to create a new folder.4. When the folder that you want displays, do one of the following:
• To upload a file to the folder, select the file that you want to upload, and choose Upload.• To download a file from the folder, select the file that you want to download, choose the down
arrow to the right of the file name, and choose Download.
61
Amazon AppStream 2.0 Developer GuideUser Pool End User Experience
Manage Access Using the AppStream2.0 User Pool
The AppStream 2.0 user pool offers a simplified way to manage access to applications for your endusers through a persistent portal for each region. This feature is offered as a built-in alternative to usermanagement through Active Directory and SAML 2.0 federation. To use external identity providers foruser management, see Single Sign-on Access to AppStream 2.0 Using SAML 2.0 (p. 66). To join yourActive Directory domain to AppStream 2.0, see Using Active Directory with AppStream 2.0 (p. 72).
NoteUser pool users cannot be assigned to stacks with fleets that are joined to an Active Directorydomain.
The AppStream 2.0 user pool offers the following key features:
• Users can access application stacks through a persistent URL and login credentials using their emailaddress and a password that they choose.
• Administrators can assign a user multiple stacks, offering multiple application catalogs to the userwhen they log in.
• When an administrator creates a new user, a welcome email is automatically sent to the end user witha login portal link and instructions.
• After being created, a user in the pool remains valid and usable unless an administrator specificallydisables that user.
• Administrators can control which users have access to which application stacks, or disable accesscompletely.
User Pool End User ExperienceWith the user pool, the following flow of actions summarizes the initial connection experience for theend user.
1. An administrator creates a new user in the desired region using the end user's email address.
2. AppStream 2.0 sends a welcome email with instructions and a temporary password.
3. An administrator assigns the user one or more stacks.
4. AppStream 2.0 sends an optional notification email to the end user with information and instructionsfor the stacks to which the user is newly assigned.
5. Using the information in the welcome email, the end user connects to the login portal and uses theirtemporary password to set a permanent password. The login portal link never expires and can be usedanytime.
6. Using the email address and permanent password they set up earlier, the end user signs in and ispresented with their application catalogs.
The login portal link provided in the welcome email should be saved for future use, as it does not changeand is valid for all user pool users. Note that the login portal URL and user pool user are managed on aper-region basis.
62

Amazon AppStream 2.0 Developer GuideResetting a Forgotten Password
Resetting a Forgotten PasswordIf a user forgets their password, they can connect to the login portal link (provided in the welcome email)to choose a new password.
To choose a new password
1. Open the AppStream 2.0 login portal using the login link provided in the welcome email.
2. Choose Forgot Password?.
3. Type the email address used to create your user pool user. Choose Next.
4. Check your email for the password reset request message. If you are having difficulty finding theemail, check your spam email folder. Type the verification code from the email in Verification Code.
NoteThe verification code is valid for 24 hours. If a new password is not chosen within this time,request a new verification code.
5. Following the password rules shown, type and confirm your new password. Choose Reset Password.
User Pool AdministrationTo perform administrator actions, sign in to the AppStream 2.0 console in the AWS Management Consolefor the desired region and select User Pool in the left navigation pane. The User Pool dashboard supportsbulk operations on a list of users for some actions. An administrator can select multiple users on whichto perform the same action from the Actions list. Bulk user creation or disable is not supported. Userpool users are created and managed on a per-region basis.
NoteAppStream 2.0 sends email to users on your behalf, such as when a new user is created or auser is assigned to a stack. To ensure that email is delivered, add [email protected] to your whitelist, where aws-region-code is a validAWS region code in which you are working. If users are having difficulty finding the emails, askthem to check their "spam" email folder.
Tasks
• Creating a User (p. 63)
• Assigning Stacks to Users (p. 64)
• Unassigning Stacks from Users (p. 64)
• Disabling Users (p. 65)
• Enabling Users (p. 65)
• Re-Sending Welcome Email (p. 65)
Creating a UserUsers are managed on a per-region basis. You must use a valid and unique email address for each newuser within a region. However, you can reuse an email address for a new user in another region.
When you create a new user, be aware of the following:
• There is no limit on the number of users in the user pool.
• You can enable or disable a user, but you cannot delete a user.
63

Amazon AppStream 2.0 Developer GuideAssigning Stacks to Users
• You cannot change the email address, first name, or last name for a user that you have alreadycreated. To change this information for a user, disable the user. Then, recreate the user (as a new user)and specify the updated information as needed.
• You can assign one or more stacks to the user after the user is created.
To create a new user
1. Open the AppStream 2.0 console at https://console.aws.amazon.com/appstream2.2. On the left navigation pane, choose User Pool, Create User.3. For Email, type the unique email address for this user.4. For First name and Last name, type values. These fields need not be unique.5. Choose Create User.
After the user is created, AppStream 2.0 sends a welcome email to the user. This email has the loginportal link, the login email address to be used, and a temporary password. By browsing to the loginportal and using the temporary password, the user can set a permanent password to access theirapplications.
By default, the new user's status is Enabled, meaning you can assign one or more stacks to the user, orperform other actions.
Assigning Stacks to UsersAn AppStream 2.0 administrator can assign one or more stacks to one or more user pool users. Afterbeing assigned at least one stack, the user can log in and launch applications. If users are assigned morethan one stack, they are presented with a list of stacks as catalogs to choose from before launchingapplications. User Pool users cannot be assigned to stacks with fleets that are joined to an ActiveDirectory domain.
To assign a stack to users
1. Open the AppStream 2.0 console at https://console.aws.amazon.com/appstream2.2. On the left navigation pane, choose User Pool and select the users.3. Choose Actions, Assign stack. Note that users cannot be assigned to stacks that have a fleet joined
to an Active Directory domain. For more information, see Using Active Directory with AppStream2.0 (p. 72).
4. Confirm the list of users in the resulting dialog box. For Stack, choose the desired stack.5. By default, Send email notification to user is enabled. Clear this option if you do not want to send
the notification email to the user at this time.6. Choose Assign stack.
Unassigning Stacks from UsersAn AppStream 2.0 administrator can unassign stacks from one or more user pool users. After beingunassigned a stack, the user can no longer launch applications from that stack.
To unassign a stack from users
1. Open the AppStream 2.0 console at https://console.aws.amazon.com/appstream2.2. On the left navigation pane, choose User Pool and select the users.3. Choose Actions, Unassign stack.
64

Amazon AppStream 2.0 Developer GuideDisabling Users
4. Confirm the list of users in the resulting dialog box. For Stack, choose the desired stack. This listincludes all stacks, assigned or unassigned.
5. Choose Unassign stack.
Disabling UsersAn AppStream 2.0 administrator can disable one or more user pool users, one at a time. After beingdisabled, the user can no longer log in until they are re-enabled. This action does not delete the user. Ifthe user is currently connected when an administrator disables them, their session remains active untilthe session cookie expires (about one hour). Stack assignments for the user are retained. If the user is re-enabled, the stack assignment becomes active again.
To disable a user
1. Open the AppStream 2.0 console at https://console.aws.amazon.com/appstream2.2. On the left navigation pane, choose User Pool and select the user.3. Choose Actions, Disable user.4. Confirm the user in the resulting dialog box and choose Disable User.
Enabling UsersAn AppStream 2.0 administrator can enable one or more user pool users, one at a time. After beingenabled, the user can log in and launch applications from the stacks to which they are assigned. If theuser was disabled, these assignments are retained.
To enable users
1. Open the AppStream 2.0 console at https://console.aws.amazon.com/appstream2.2. On the left navigation pane, choose User Pool and select the users.3. Choose Actions, Enable user.4. Confirm the user in the resulting dialog box and choose Enable User.
Re-Sending Welcome EmailAn AppStream 2.0 administrator can re-send the welcome email with connection instructions to userpool users. Unused passwords expire after seven days. To provide a new temporary password, theadministrator must re-send the welcome email. This option is only available until the user sets theirpermanent password. If they've already set a password and have forgotten it, they can set a new one. Formore information, see Resetting a Forgotten Password (p. 63).
To resend the welcome email for a user
1. Open the AppStream 2.0 console at https://console.aws.amazon.com/appstream2.2. On the left navigation pane, choose User Pool and select a user.3. For User Details, choose Resend welcome email.4. Confirm the success message at the top of the dashboard.
65

Amazon AppStream 2.0 Developer GuideExample Authentication Workflow
Single Sign-on Access to AppStream2.0 Using SAML 2.0
Amazon AppStream 2.0 supports identity federation to AppStream 2.0 stacks through Security AssertionMarkup Language 2.0 (SAML 2.0). You can use an identity provider (IdP) that supports SAML 2.0—such asActive Directory Federation Services (AD FS) in Windows Server, Ping One Federation Server, or Okta—toprovide an onboarding flow for your AppStream 2.0 users.
This feature offers your users the convenience of one-click access to their AppStream 2.0 applicationsusing their existing identity credentials. You also have the security benefit of identity authentication byyour IdP. By using your IdP, you can control which users have access to a particular AppStream 2.0 stack.
Example Authentication WorkflowThe following diagram illustrates the authentication flow between AppStream 2.0 and a third-partyIdP. In this example, the administrator has set up a sign-in page to access AppStream 2.0, calledapplications.exampleco.com. The webpage uses a SAML 2.0–compliant federation service totrigger a sign-on request. The administrator has also set up a user to allow access to AppStream 2.0.
1. The user browses to https://applications.exampleco.com. The sign-on page requestsauthentication for the user.
2. The federation service requests authentication from the organization's identity store.
3. The identity store authenticates the user and returns the authentication response to the federationservice.
4. On successful authentication, the federation service posts the SAML assertion to the user's browser.
5. The user's browser posts the SAML assertion to the AWS Sign-In SAML endpoint (https://signin.aws.amazon.com/saml). AWS Sign-In receives the SAML request, processes the request,authenticates the user, and forwards the authentication token to AppStream 2.0.
66

Amazon AppStream 2.0 Developer GuideSetting Up SAML
6. Using the authentication token from AWS, AppStream 2.0 authorizes the user and presentsapplications to the browser.
From the user's perspective, the process happens transparently: The user starts at your organization'sinternal portal and lands at an AppStream 2.0 application portal, without ever having to supply any AWScredentials.
Setting Up SAMLTo enable users to sign in to AppStream 2.0 by using their existing credentials, and start streamingapplications, you can set up identity federation using SAML 2.0. To do this, use an IAM role and a relaystate URL to configure your SAML 2.0-compliant identity provider (IdP) and enable AWS to permit yourfederated users to access an AppStream 2.0 stack. The IAM role grants users the permissions to accessthe stack. The relay state is the stack portal to which users are forwarded after successful authenticationby AWS.
Contents• Prerequisites (p. 67)
• Step 1: Create a SAML Identity Provider in AWS IAM (p. 67)
• Step 2: Create a SAML 2.0 Federation IAM Role (p. 68)
• Step 3: Embed an Inline Policy for the IAM Role (p. 68)
• Step 4: Configure Your SAML-Based IdP (p. 69)
• Step 5: Create Assertions for the SAML Authentication Response (p. 69)
• Step 6: Configure the Relay State of Your Federation (p. 70)
PrerequisitesComplete the following prerequisites before configuring your SAML 2.0 connection.
1. Configure your SAML-based IdP to establish a trust relationship with AWS.
• Inside your organization's network, configure your identity store to work with a SAML-based IdP. Forconfiguration resources for using Ping Identity, Okta, Active Directory Federation Services (AD FS) inWindows Server, Shibboleth, or Google as your SAML-based IdP, see AppStream 2.0 Integration withSAML 2.0 (p. 70).
• Use your SAML-based IdP to generate and download a federation metadata document thatdescribes your organization as an IdP. This signed XML document is used to establish the relyingparty trust. Save this file to a location that you can access from the IAM console later.
2. Use the AppStream 2.0 management console to create an AppStream 2.0 stack. You need the stackname to create the IAM policy and to configure your IdP integration with AppStream 2.0, as describedlater in this topic.
You can create an AppStream 2.0 stack by using the AppStream 2.0 management console, AWS CLI, orAppStream 2.0 API. For more information, see Create AppStream 2.0 Fleets and Stacks (p. 30).
Step 1: Create a SAML Identity Provider in AWS IAMFirst, create a SAML IdP in AWS IAM. This IdP defines your organization's IdP-to-AWS trust relationshipusing the metadata document generated by the IdP software in your organization. For more information,see Creating and Managing a SAML Identity Provider (AWS Management Console) in the IAM User Guide.
67

Amazon AppStream 2.0 Developer GuideStep 2: Create a SAML 2.0 Federation IAM Role
Step 2: Create a SAML 2.0 Federation IAM RoleNext, create a SAML 2.0 federation IAM role. This step establishes a trust relationship between IAM andyour organization's IdP, which identifies your IdP as a trusted entity for federation.
To create an IAM role for the SAML IdP
1. Open the IAM console at https://console.aws.amazon.com/iam/.
2. In the navigation pane, choose Roles, Create role.
3. For Role type, choose SAML 2.0 federation.
4. For SAML Provider, select the SAML IdP that you created.
ImportantDo not choose either of the two SAML 2.0 access level methods.
5. For Attribute, choose SAML:sub_type.
6. For Value, type persistent. This step restricts role access to only SAML user streaming requeststhat include a SAML subject type assertion with a value of persistent. If the SAML:sub_type ispersistent, your IdP sends the same unique value for the NameID element in all SAML requestsfrom a particular user. For more information about the SAML:sub_type assertion, see the UniquelyIdentifying Users in SAML-Based Federation section in Using SAML-Based Federation for API Access toAWS.
7. Review your SAML 2.0 trust information, confirming the correct trusted entity and condition, andthen choose Next: Permissions.
8. On the Attach permissions policies page, choose Next: Review. You create and embed an inlinepolicy for this role later.
9. For Role name, type a name that helps you identify the purpose of this role. Because various entitiesmight reference the role, you cannot edit the name of the role after it has been created.
10. (Optional) For Role description, type a description for the new role.
11. Review the role details and choose Create role.
Step 3: Embed an Inline Policy for the IAM RoleNext, embed an inline IAM policy for the role that you created. When you embed an inline policy, thepermissions in the policy cannot be inadvertently attached to the wrong principal entity. The inlinepolicy provides federated users with access to the AppStream 2.0 stack that you created. For informationabout how to embed the inline policy in JSON, see Create a Policy on the JSON Tab.
As you follow the steps in the procedure for embedding an inline policy for a user or role, note that you’llcreate a policy on the JSON tab. To do this, copy and paste the following JSON policy into the JSONwindow and modify the resource by entering your AWS Region Code, account ID, and stack name. In thefollowing policy, "Action": "appstream:Stream" is the action that provides your AppStream 2.0users with permissions to connect to streaming sessions on the stack that you created.
{ "Version": "2012-10-17", "Statement": [ { "Effect": "Allow", "Action": "appstream:Stream", "Resource": "arn:aws:appstream:REGION-CODE:ACCOUNT-ID-WITHOUT-HYPHENS:stack/STACK-NAME", "Condition": {
68

Amazon AppStream 2.0 Developer GuideStep 4: Configure Your SAML-Based IdP
"StringEquals": { "appstream:userId": "${saml:sub}", "saml:sub_type": "persistent" } } } ]}
Choose a value for REGION-CODE that corresponds to the AWS Region where your AppStream 2.0 stackexists. Replace STACK-NAME with the name of the stack. Note that this value is case-sensitive, so the casein the stack name that you specify in this policy must match the case in the AppStream 2.0 stack nameas it appears in the Stacks dashboard of the AppStream 2.0 management console.
NoteAfter you copy and paste the JSON policy, you may see an error message that indicates thevalidation failed. Ignore the error and continue with policy creation. You may also see an erroron the Review policy page that indicates the policy does not grant any permissions. Ignore thiserror. The JSON policy is valid and provides the needed permissions.
Step 4: Configure Your SAML-Based IdPNext, depending on your SAML-based IdP, you may need to manually update your IdP to trust AWS as aservice provider by uploading the saml-metadata.xml file at https://signin.aws.amazon.com/static/saml-metadata.xml to your IdP. This step updates your IdP’s metadata. For some IdPs, the update mayalready be configured. If this is the case, proceed to the next step.
If this update is not already configured in your IdP, review the documentation provided by your IdP forinformation about how to update the metadata. Some providers give you the option to type the URL,and the IdP obtains and installs the file for you. Others require you to download the file from the URLand then provide it as a local file.
Step 5: Create Assertions for the SAMLAuthentication ResponseNext, depending on your SAML-based IdP, you may need to configure the information that the IdP passesas SAML attributes to AWS as part of the authentication response. For some IdPs, this information mayalready be configured. If this is the case, proceed to the next step.
If this information is not already configured in your IdP, provide the following:
• SAML Subject NameID – The unique identifier for the user who is signing in.
NoteFor stacks with domain-joined fleets, the NameID value for the user must be provided in theformat of "domain\username" using the sAMAccountName or "[email protected]"using userPrincipalName. If you are using the sAMAccountName format, you can specify thedomain by using either the NetBIOS name or the fully qualified domain name (FQDN). Formore information, see Using Active Directory with AppStream 2.0 (p. 72).
• SAML Subject Type (with a value set to persistent) – Setting the value to persistent ensures thatyour IdP sends the same unique value for the NameID element in all SAML requests from a particularuser. Make sure that your IAM policy includes a condition to only allow SAML requests with a SAMLsub_type set to persistent, as described in the section called “Step 2: Create a SAML 2.0 FederationIAM Role” (p. 68).
• Attribute element with the Name attribute set to https://aws.amazon.com/SAML/Attributes/Role – This element contains one or more AttributeValue elements that list the IAM role and SAML
69

Amazon AppStream 2.0 Developer GuideStep 6: Configure the Relay State of Your Federation
IdP to which the user is mapped by your IdP. The role and IdP are specified as a comma-delimited pairof ARNs.
• Attribute element with the SessionDuration attribute set to https://aws.amazon.com/SAML/Attributes/SessionDuration (optional) – This element contains one AttributeValue element thatspecifies the maximum amount of time that a federated streaming session for a user can remain activebefore reauthentication is required. The default value is 60 minutes. For more information, see the Anoptional Attribute element with the SessionDuration attribute set to https://aws.amazon.com/SAML/Attributes/SessionDuration section in Configuring SAML Assertions for the Authentication Response.
For more information about how to configure these elements, see Configuring SAML Assertions forthe Authentication Response in the IAM User Guide. For information about specific configurationrequirements for your IdP, see the documentation for your IdP.
Step 6: Configure the Relay State of Your FederationFinally, use your IdP to configure the relay state of your federation to point to the AppStream 2.0 stackrelay state URL. After successful authentication by AWS, the user is directed to the AppStream 2.0 stackportal, defined as the relay state in the SAML authentication response.
The format of the relay state URL is as follows:
https://relay-state-region-endoint?stack=stackname&accountId=aws-account-id-without-hyphens
Construct your relay state URL from your AWS account ID, stack name, and the relay state endpointassociated with the region in which your stack is located.
Region Relay state endpoint
us-east-1 (N.Virginia) https://appstream2.us-east-1.aws.amazon.com/saml
us-west-2 (Oregon) https://appstream2.us-west-2.aws.amazon.com/saml
ap-northeast-1 (Tokyo) https://appstream2.ap-northeast-1.aws.amazon.com/saml
ap-southeast-1 (Singapore) https://appstream2.ap-southeast-1.aws.amazon.com/saml
ap-southeast-2 (Sydney) https://appstream2.ap-southeast-2.aws.amazon.com/saml
eu-central-1 (Frankfurt) https://appstream2.eu-central-1.aws.amazon.com/saml
eu-west-1 (Ireland) https://appstream2.eu-west-1.aws.amazon.com/saml
AppStream 2.0 Integration with SAML 2.0The following links help you configure third-party SAML 2.0 identity provider solutions to work withAppStream 2.0.
70

Amazon AppStream 2.0 Developer GuideAppStream 2.0 Integration with SAML 2.0
IdP solution More information
Ping Identity Configuring an SSO connection to Amazon AppStream 2.0 —Describes how to set up single sign-on (SSO) to AppStream2.0.
Okta How to Configure SAML 2.0 for Amazon AppStream 2.0— Describes how to use Okta to set up SAML federationto AppStream 2.0. For stacks that are joined to a domain,the "Application username format" must be set to "AD userprincipal name".
Active Directory Federation Services(AD FS) for Windows Server
Enabling Identity Federation with AD FS 3.0 and AmazonAppStream 2.0 — Describes how to provide users with SSOaccess to AppStream 2.0 by using their existing enterprisecredentials. You can configure federated identities forAppStream 2.0 by using AD FS 3.0.
Shibboleth Single Sign-On: Integrating AWS, OpenLDAP, and Shibboleth— Describes how to set up the initial federation between theShibboleth IdP and the AWS Management Console. You mustcomplete the following additional steps to enable federationto AppStream 2.0.
Step 4 of the AWS Security whitepaper describes how tocreate IAM roles that define the permissions that federatedusers have to the AWS Management Console. After you createthese roles and embed the inline policy as described in thewhitepaper, modify this policy so that it provides federatedusers with permissions to access only an AppStream 2.0 stack.To do this, replace the existing policy with the policy noted inStep 3: Embed an Inline Policy for the IAM Role, in Setting UpSAML (p. 67).
When you add the stack relay state URL as described in Step6: Configure the Relay State of Your Federation, in SettingUp SAML (p. 67), add the relay state parameter to thefederation URL as a target request attribute. For informationabout configuring relay state parameters, see the SAML 2.0section in the Shibboleth documentation.
Google Configuring Google SSO with Amazon AppStream 2.0 andAmazon AppStream 2.0 Chrome Packaging and Deployment— Describes how to set up SSO to AppStream 2.0 and howto package AppStream 2.0 as a Chrome app to improvemanagement and deployment.
For solutions to common problems you may encounter, see Troubleshooting (p. 99).
For more information about additional supported SAML providers, see Integrating Third-Party SAMLSolution Providers with AWS in the IAM User Guide.
71

Amazon AppStream 2.0 Developer GuideActive Directory Domains
Using Active Directory withAppStream 2.0
You can join your Amazon AppStream 2.0 fleets and image builders to domains in Microsoft ActiveDirectory and use your existing Active Directory domains, either cloud-based or on-premises, to launchdomain-joined streaming instances. You can also use AWS Directory Service for Microsoft ActiveDirectory, also known as Microsoft AD, to create an Active Directory domain and use that to support yourAppStream 2.0 resources. For more information about using Microsoft AD, see Microsoft Active Directoryin the AWS Directory Service Administration Guide.
By joining AppStream 2.0 to your Active Directory domain, you can:
• Allow your users and applications to access Active Directory resources such as printers and file sharesfrom streaming sessions.
• Use Group Policy settings that are available in the Group Policy Management Console (GPMC) todefine the end user experience.
• Stream applications such as Microsoft SharePoint or Microsoft Outlook that require users to beauthenticated using their Active Directory login credentials.
• Apply your enterprise compliance and security policies to your AppStream 2.0 streaming instances.
Contents
• Overview of Active Directory Domains (p. 72)
• Before You Begin Using Active Directory with AppStream 2.0 (p. 74)
• Tutorial: Setting Up Active Directory (p. 74)
• AppStream 2.0 Active Directory Administration (p. 77)
• More Info (p. 84)
Overview of Active Directory DomainsUsing Active Directory domains with AppStream 2.0 requires an understanding of how they worktogether and the configuration tasks that you'll need to complete. You'll need to complete the followingtasks:
1. Configure Group Policy settings as needed to define the end user experience and securityrequirements for applications.
2. Create the domain-joined application stack in AppStream 2.0.
3. Create the AppStream 2.0 application in the SAML 2.0 identity provider and assign it to end userseither directly or through Active Directory groups.
For your users to be authenticated to a domain, several steps must occur when these users initiate anAppStream 2.0 streaming session. The following diagram illustrates the end-to-end user authenticationflow from the initial browser request through SAML and Active Directory authentication.
72
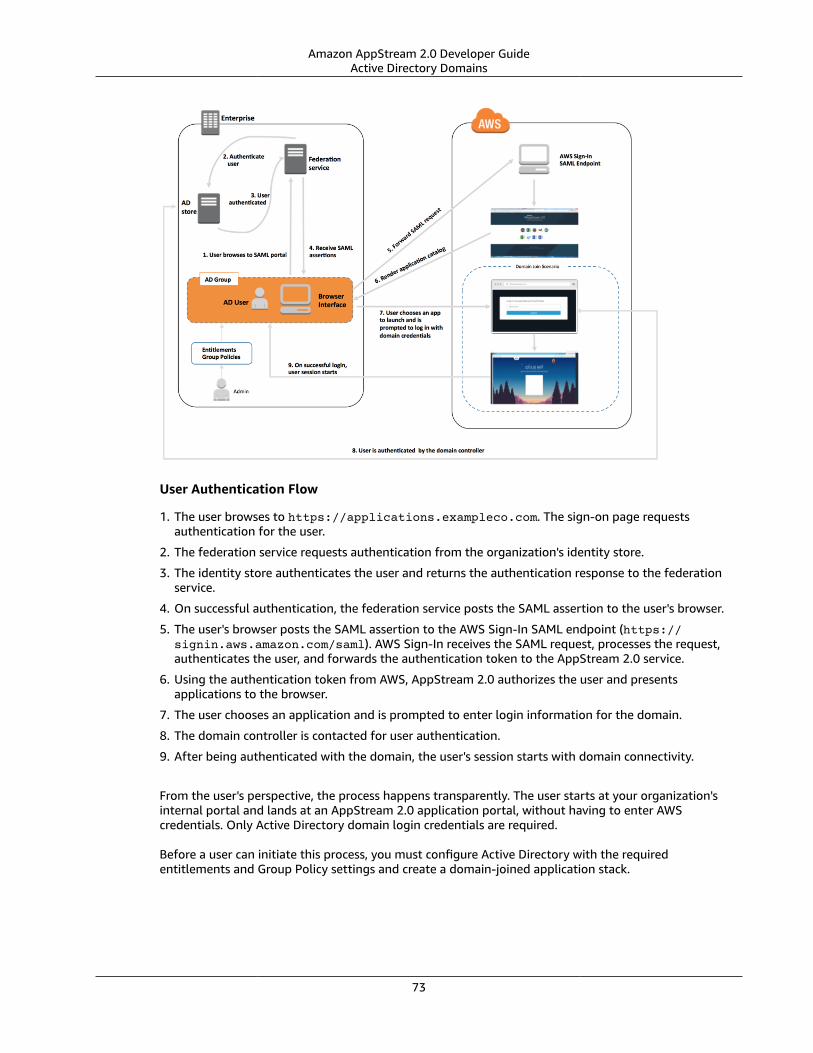
Amazon AppStream 2.0 Developer GuideActive Directory Domains
User Authentication Flow
1. The user browses to https://applications.exampleco.com. The sign-on page requestsauthentication for the user.
2. The federation service requests authentication from the organization's identity store.
3. The identity store authenticates the user and returns the authentication response to the federationservice.
4. On successful authentication, the federation service posts the SAML assertion to the user's browser.
5. The user's browser posts the SAML assertion to the AWS Sign-In SAML endpoint (https://signin.aws.amazon.com/saml). AWS Sign-In receives the SAML request, processes the request,authenticates the user, and forwards the authentication token to the AppStream 2.0 service.
6. Using the authentication token from AWS, AppStream 2.0 authorizes the user and presentsapplications to the browser.
7. The user chooses an application and is prompted to enter login information for the domain.
8. The domain controller is contacted for user authentication.
9. After being authenticated with the domain, the user's session starts with domain connectivity.
From the user's perspective, the process happens transparently. The user starts at your organization'sinternal portal and lands at an AppStream 2.0 application portal, without having to enter AWScredentials. Only Active Directory domain login credentials are required.
Before a user can initiate this process, you must configure Active Directory with the requiredentitlements and Group Policy settings and create a domain-joined application stack.
73

Amazon AppStream 2.0 Developer GuideBefore You Begin
Before You Begin Using Active Directory withAppStream 2.0
Before you use Microsoft Active Directory domains with AppStream 2.0, be aware of the followingrequirements.
Requirements
• You need a Microsoft Active Directory domain to which to join your streaming instances. If you don'thave an Active Directory domain or you want to use your on-premises Active Directory environment,see Active Directory Domain Services on the AWS Cloud: Quick Start Reference Deployment.
• You need a domain service account with permissions to create and manage computer objects in thedomain that you intend to use with AppStream 2.0. For information, see How to Create a DomainAccount in Active Directory in the Microsoft documentation.
When you associate this Active Directory domain with AppStream 2.0, provide the service accountname and password. AppStream 2.0 uses this account to create and manage computer objects in thedirectory. For more information, see Granting Permissions to Create and Manage Active DirectoryComputer Objects (p. 77).
• When you register your Active Directory domain with AppStream 2.0, you must provide anorganizational unit (OU) distinguished name. Create an OU for this purpose. The default Computerscontainer is not an OU and cannot be used by AppStream 2.0. For more information, see Finding theOrganizational Unit Distinguished Name (p. 78).
• The directories that you plan to use with AppStream 2.0 must be accessible through their fullyqualified domain names (FQDNs) through the virtual private cloud (VPC) in which your streaminginstances are launched. For more information, see Active Directory and Active Directory DomainServices Port Requirements in the Microsoft documentation.
• SAML 2.0-based user federation is required for application streaming from domain-joined fleets. Youcannot launch sessions to domain-joined instances by using CreateStreamingURL or the AppStream2.0 User Pool.
• You must use an image that supports joining image builders and fleets to an Active Directory domain.All public images published on or after July 24, 2017 support joining an Active Directory domain. Formore information, see Amazon AppStream 2.0 Windows Image Version History (p. 24) and Tutorial:Setting Up Active Directory (p. 74).
Tutorial: Setting Up Active DirectoryTo use Active Directory with AppStream 2.0, you must first register your directory configuration bycreating a Directory Config object in AppStream 2.0. This object includes the information requiredto join streaming instances to an Active Directory domain. You create a Directory Config object byusing the AppStream 2.0 management console, AWS SDK, or AWS CLI. You can then use your directoryconfiguration to launch domain-joined fleets and image builders.
Tasks
• Step 1: Create a Directory Config Object (p. 75)
• Step 2: Create an Image by Using a Domain-Joined Image Builder (p. 75)
• Step 3: Create a Domain-Joined Fleet (p. 76)
• Step 4: Configure SAML 2.0 (p. 76)
74

Amazon AppStream 2.0 Developer GuideStep 1: Create a Directory Config Object
Step 1: Create a Directory Config ObjectThe Directory Config object that you create in AppStream 2.0 will be used in later steps.
If you are using the AWS SDK, you can use the CreateDirectoryConfig operation. If you are using the AWSCLI, you can use the create-directory-config command.
To create a Directory Config object by using the AppStream 2.0 console
1. Open the AppStream 2.0 console at https://console.aws.amazon.com/appstream2.
2. In the navigation pane, choose Directory Configs, Create Directory Config.
3. For Directory Name, provide the fully qualified domain name (FQDN) of the Active Directory domain(for example, corp.example.com). Each region can have only one Directory Config value with aspecific directory name.
4. For Service Account Name, enter the name of an account that can create computer objects andthat has permissions to join the domain. For more information, see Granting Permissions to Createand Manage Active Directory Computer Objects (p. 77). The account name must be in the formatDOMAIN\username.
5. For Password and Confirm Password, type the directory password for the specified account.
6. For Organizational Unit (OU), type the distinguished name of at least one OU for streaminginstance computer objects. The default Computers container is not an OU and cannot be usedby AppStream 2.0. For more information, see Finding the Organizational Unit DistinguishedName (p. 78).
7. To add more than one OU, select the plus sign (+) next to Organizational Unit (OU). To removeOUs, choose the x icon.
8. Choose Next.
9. Review the configuration information and choose Create.
Step 2: Create an Image by Using a Domain-JoinedImage BuilderNext, using the AppStream 2.0 image builder, create a new image with Active Directory domain-joincapabilities. Note that the fleet and image can be members of different domains. You join the imagebuilder to a domain to enable domain join and to install applications. Fleet domain join is discussed inthe next section.
To create an image for launching domain-joined fleets
1. Follow the procedures in Tutorial: Create a Custom Image (p. 18).
2. For the base image selection step, use an AWS base image released on or after July 24, 2017.For a current list of released AWS images, see Amazon AppStream 2.0 Windows Image VersionHistory (p. 24).
3. For Step 3: Configure Network, select a VPC and subnets with network connectivity to your ActiveDirectory environment. Select the security groups that are set up to allow access to your directorythrough your VPC subnets.
4. Also in Step 3: Configure Network, expand the Active Directory Domain (Optional) section, andselect values for the Directory Name and Directory OU to which the image builder should bejoined.
5. Review the image builder configuration and choose Create.
6. Wait for the new image builder to reach a Running state, and choose Connect.
75

Amazon AppStream 2.0 Developer GuideStep 3: Create a Domain-Joined Fleet
7. Log in to the image builder in Administrator mode or as a directory user with local administratorpermissions. For more information, see Granting Local Administrator Rights on ImageBuilders (p. 78).
8. Complete the steps in Tutorial: Create a Custom Image (p. 18) to install applications and create anew image.
Step 3: Create a Domain-Joined FleetUsing the private image created in the previous step, create an Active Directory domain-joined fleet forstreaming applications. The domain can be different than the one that you used for the image builder tocreate the image.
To create a domain-joined fleet
1. Follow the procedures in Create a Fleet (p. 31).
2. For the image selection step, use the image that was created in the previous step, Step 2: Create anImage by Using a Domain-Joined Image Builder (p. 75).
3. For Step 4: Configure Network, select a VPC and subnets with network connectivity to your ActiveDirectory environment. Select the security groups that are set up to allow communication to yourdomain.
4. Also in Step 4: Configure Network, expand the Active Directory Domain (Optional) section andselect the values for the Directory Name and Directory OU to which the fleet should be joined.
5. Review the fleet configuration and choose Create.
6. Complete the remaining steps in Create AppStream 2.0 Fleets and Stacks (p. 30) so that your fleet isassociated with a stack and running.
Step 4: Configure SAML 2.0Your users must use your SAML 2.0-based identity federation environment to launch streaming sessionsfrom your domain-joined fleet.
To configure SAML 2.0 for single sign-on access
1. Follow the procedures in Setting Up SAML (p. 67).
2. AppStream 2.0 requires that the SAML_Subject NameID value for the user who is logging in beprovided in either of the following formats:
• domain\username using the sAMAccountName
• [email protected] using the userPrincipalName
If you are using the sAMAccountName format, you can specify the domain by using either theNetBIOS name or the fully qualified domain name (FQDN).
3. Provide access to your Active Directory users or groups to enable access to the AppStream 2.0 stackfrom your identity provider application portal.
4. Complete the remaining steps in Setting Up SAML (p. 67).
To log in a user with SAML 2.0
1. Log in to your SAML 2.0 provider's application catalog and open the AppStream 2.0 SAMLapplication that you created in the previous procedure.
76

Amazon AppStream 2.0 Developer GuideAdministration
2. When the AppStream 2.0 application catalog is displayed, select an application to launch.
3. When a loading icon is displayed, you are prompted to provide a password. The domain user nameprovided by your SAML 2.0 identity provider appears above the password field. Enter your password,and choose log in.
The streaming instance performs the Windows login procedure, and the selected application opens.
AppStream 2.0 Active Directory AdministrationSetting up and using Active Directory with AppStream 2.0 involves the following administrative tasks.
Tasks
• Granting Permissions to Create and Manage Active Directory Computer Objects (p. 77)
• Finding the Organizational Unit Distinguished Name (p. 78)
• Granting Local Administrator Rights on Image Builders (p. 78)
• Updating the Service Account Used for Joining the Domain (p. 80)
• Locking the Streaming Session When the User is Idle (p. 80)
• Editing the Directory Configuration (p. 81)
• Deleting a Directory Configuration (p. 82)
• Configuring AppStream 2.0 to Use Domain Trusts (p. 82)
• Managing AppStream 2.0 Computer Objects in Active Directory (p. 83)
Granting Permissions to Create and Manage ActiveDirectory Computer ObjectsTo allow AppStream 2.0 to perform Active Directory computer object operations, you need an accountwith sufficient permissions. As a best practice, use an account that has only the minimum privilegesnecessary. The minimum Active Directory organizational unit (OU) permissions are as follows:
• Create Computer Object
• Change Password
• Reset Password
• Write Description
Before setting up permissions, you'll need to do the following first:
• Obtain access to a computer or an EC2 instance that is joined to your domain.
• Install the Active Directory User and Computers MMC snap-in. For more information, see Installing orRemoving Remote Server Administration Tools for Windows 7 in the Microsoft documentation.
• Log in as a domain user with appropriate permissions to modify the OU security settings.
• Create or identify the user account, service account, or group for which to delegate permissions.
To set up minimum permissions
1. Open Active Directory Users and Computers in your domain or on your domain controller.
77

Amazon AppStream 2.0 Developer GuideFinding the Organizational Unit Distinguished Name
2. In the left navigation pane, select the first OU on which to provide domain join privileges, open thecontext (right-click) menu , and then choose Delegate Control.
3. On the Delegation of Control Wizard page, choose Next, Add.
4. For Select Users, Computers, or Groups, select the pre-created user account, service account, orgroup, and then choose OK.
5. On the Tasks to Delegate page, choose Create a custom task to delegate, and then choose Next.
6. Choose Only the following objects in the folder, Computer objects.
7. Choose Create selected objects in this folder, Next.
8. For Permissions, choose Read, Write, Change Password, Reset Password, Next.
9. On the Completing the Delegation of Control Wizard page, verify the information and chooseFinish.
10. Repeat steps 2-9 for any additional OUs that require these permissions.
If you delegated permissions to a group, create a user or service account with a strong password and addthat account to the group. This account will then have sufficient privileges to connect your streaminginstances to the directory. Use this account when creating your AppStream 2.0 directory configuration.
Finding the Organizational Unit Distinguished NameWhen you register your Active Directory domain with AppStream 2.0, you must provide an organizationalunit (OU) distinguished name. Create an OU for this purpose. The default Computers container is not anOU and cannot be used by AppStream 2.0. The following procedure shows how to obtain this name.
NoteThe distinguished name must start with OU= or it cannot be used for computer objects.
Before you complete this procedure, you'll need to do the following first:
• Obtain access to a computer or an EC2 instance that is joined to your domain.
• Install the Active Directory User and Computers MMC snap-in. For more information, see Installing orRemoving Remote Server Administration Tools for Windows 7 in the Microsoft documentation.
• Log in as a domain user with appropriate permissions to read the OU security properties.
To find the distinguished name of an OU
1. Open Active Directory Users and Computers in your domain or on your domain controller.
2. Under View, ensure that Advanced Features is enabled.
3. In the left navigation pane, select the first OU to use for AppStream 2.0 streaming instancecomputer objects, open the context (right-click) menu, and then choose Properties.
4. Choose Attribute Editor.
5. Under Attributes, for distinguishedName, choose View.
6. For Value, select the distinguished name, open the context menu, and then choose Copy.
Granting Local Administrator Rights on ImageBuildersBy default, Active Directory domain users do not have local administrator rights on image builderinstances. You can grant these rights by using Group Policy preferences in your directory, or manually,by using the local administrator account on an image builder. Granting local administrator rights to a
78

Amazon AppStream 2.0 Developer GuideGranting Local Administrator Rights on Image Builders
domain user allows that user to install applications on and create images in an AppStream 2.0 imagebuilder.
Contents• Using Group Policy preferences (p. 79)• Using the local Administrators group on the image builder (p. 80)
Using Group Policy preferencesYou can use Group Policy preferences to grant local administrator rights to Active Directory users orgroups and to all computer objects in the specified OU. The Active Directory users or groups to whichyou want to grant local administrator permissions must already exist. To use Group Policy preferences,you'll need to do the following first:
• Obtain access to a computer or an EC2 instance that is joined to your domain.• Install the Group Policy Management Console (GPMC) MMC snap-in. For more information, see
Installing or Removing Remote Server Administration Tools for Windows 7 in the Microsoftdocumentation.
• Log in as a domain user with permissions to create Group Policy objects (GPOs). Link GPOs to theappropriate OUs.
To use Group Policy preferences to grant local administrator permissions
1. In your directory or on a domain controller, open the command prompt as an administrator, typegpmc.msc, and then press ENTER.
2. In the left console tree, select the OU where you will create a new GPO or use an existing GPO, andthen do either of the following:
• Create a new GPO by opening the context (right-click) menu and choosing Create a GPO in thisdomain, Link it here. For Name, provide a descriptive name for this GPO.
• Select an existing GPO.3. Open the context menu for the GPO, and choose Edit.4. In the console tree, choose Computer Configuration, Preferences, Windows Settings, Control
Panel Settings, and Local Users and Groups.5. Select Local Users and Groups selected, open the context menu , and choose New, Local Group.6. For Action, choose Update.7. For Group name, choose Administrators (built-in).8. Under Members, choose Add… and specify the Active Directory user accounts or groups to which to
assign local administrator rights on the streaming instance. For Action, choose Add to this group,and choose OK.
9. To apply this GPO to other OUs, select the additional OU, open the context menu and choose Linkan Existing GPO.
10. Using the new or existing GPO name that you specified in step 2, scroll to find the GPO, and thenchoose OK.
11. Repeat steps 9 and 10 for additional OUs that should have this preference.12. Choose OK to close the New Local Group Properties dialog box.13. Choose OK again to close the GPMC.
To apply the new preference to the GPO, you must stop and restart any running image builders orfleets. The Active Directory users and groups that you specified in step 8 are automatically granted localadministrator rights on the image builders and fleets in the OU to which the GPO is linked.
79
Amazon AppStream 2.0 Developer GuideUpdating the Service Account Used for Joining the Domain
Using the local Administrators group on the image builderTo grant Active Directory users or groups local administrator rights on your image builder, you canmanually add these users or groups to the local Administrators group on the image builder. Imagebuilders that are created from images with these rights maintain the same rights.
The Active Directory users or groups to which to grant local administrator rights must already exist.
To add Active Directory users or groups to the local Administrators group on the imagebuilder
1. Open the AppStream 2.0 console at https://console.aws.amazon.com/appstream2.2. Connect to the image builder in Administrator mode. The image builder must be running and
domain-joined. For more information, see Tutorial: Setting Up Active Directory (p. 74).3. Choose Start, Administrative Tools, and then double-click Computer Management.4. In the left navigation pane, choose Local Users and Groups and open the Groups folder.5. Open the Administrators group and choose Add....6. Select all Active Directory users or groups to which to assign local administrator rights and choose
OK. Choose OK again to close the Administrator Properties dialog box.7. Close Computer Management.8. To log in as an Active Directory user and test whether that user has local administrator rights on
the image builder, choose Admin Commands, Switch user, and then enter the credentials of therelevant user.
Updating the Service Account Used for Joining theDomainTo update the service account that AppStream 2.0 uses for joining the domain, we recommend using twoseparate service accounts for joining image builders and fleets to your Active Directory domain. Usingtwo separate service accounts ensures that there is no disruption in service when a service account needsto be updated (for example, when a password expires).
To update a service account
1. Create an Active Directory group and delegate the correct permissions to the group.2. Add your service accounts to the new Active Directory group.3. When needed, edit your AppStream 2.0 Directory Config object by entering the user name and
password for the new service account.
After you've set up the Active Directory group with the new service account, any new streaming instanceoperations will use the new service account, while in-process streaming instance operations continue touse the old account without interruption.
The service account overlap time while the in-process streaming instance operations complete is veryshort, no more than a day. The overlap time is needed because you shouldn't delete or change thepassword for the old service account during the overlap period, or existing operations can fail.
Locking the Streaming Session When the User is IdleAppStream 2.0 relies on a setting that you configure in the GPMC to lock the streaming session afteryour user is idle for specified amount of time. To use the GPMC, you'll need to do the following first:
• Obtain access to a computer or an EC2 instance that is joined to your domain.
80

Amazon AppStream 2.0 Developer GuideEditing the Directory Configuration
• Install the GPMC. For more information, see Installing or Removing Remote Server AdministrationTools for Windows 7 in the Microsoft documentation.
• Log in as a domain user with permissions to create GPOs. Link GPOs to the appropriate OUs.
To automatically lock the streaming instance when your user is idle
1. In your directory or on a domain controller, open the command prompt as an administrator, typegpmc.msc, and then press ENTER.
2. In the left console tree, select the OU where you will create a new GPO or use an existing GPO, andthen do either of the following:
• Create a new GPO by opening the context (right-click) menu and choosing Create a GPO in thisdomain, Link it here. For Name, provide a descriptive name for this GPO.
• Select an existing GPO.3. Open the context menu for the GPO, and choose Edit.4. Under User Configuration, expand Policies, Administrative Templates, Control Panel, and then
choose Personalization.5. Double-click Enable screen saver.6. In the Enable screen saver policy setting, choose Enabled.7. Choose Apply, and then choose OK.8. Double-click Force specific screen saver.9. In the Force specific screen saver policy setting, choose Enabled.10. Under Screen saver executable name, enter scrnsave.scr. When this setting is enabled, the
system displays a black screen saver on the user's desktop.11. Choose Apply, and then choose OK.12. Double-click Password protect the screen saver.13. In the Password protect the screen saver policy setting, choose Enabled.14. Choose Apply, and then choose OK.15. Double-click Screen saver timeout.16. In the Screen saver timeout policy setting, choose Enabled.17. For Seconds, specify the length of time that users must be idle before the screen saver is applied. To
set the idle time to 10 minutes, specify 600 seconds.18. Choose Apply, and then choose OK.19. In the console tree, under User Configuration, expand Policies, Administrative Templates, System,
and then choose Ctrl+Alt+Del Options.20. Double-click Remove Lock Computer.21. In the Remove Lock Computer policy setting, choose Disabled.22. Choose Apply, and then choose OK.
Editing the Directory ConfigurationAfter a AppStream 2.0 directory configuration has been created, you can edit it to add, remove, ormodify organizational units, update the service account username, or update the service accountpassword.
To update a directory configuration
1. Open the AppStream 2.0 console at https://console.aws.amazon.com/appstream2.2. In the left navigation pane, choose Directory Configs and select the directory configuration to edit.
81

Amazon AppStream 2.0 Developer GuideDeleting a Directory Configuration
3. Choose Actions, Edit.
4. Update the fields to be changed. To add additional OUs, select the plus sign (+) next to the topmostOU field. To remove an OU field, select the x next to the field.
NoteAt least one OU is required. OUs that are currently in use cannot be removed.
5. To save changes, choose Update Directory Config.
6. The information in the Details tab should now update to reflect the changes.
Changes to the service account user name and password do not impact in-process streaming instanceoperations. New streaming instance operations use the updated credentials. For more information, seeUpdating the Service Account Used for Joining the Domain (p. 80).
Deleting a Directory ConfigurationYou can delete an AppStream 2.0 directory configuration that is no longer needed. Directoryconfigurations that are associated with any image builders or fleets cannot be deleted.
To delete a directory configuration
1. Open the AppStream 2.0 console at https://console.aws.amazon.com/appstream2.
2. In the left navigation pane, choose Directory Configs and select the directory configuration todelete.
3. Choose Actions, Delete.
4. Verify the name in the pop-up message, and choose Delete.
5. Choose Update Directory Config.
Configuring AppStream 2.0 to Use Domain TrustsAppStream 2.0 supports Active Directory domain environments where network resources such as fileservers, applications, and computer objects reside in one domain, and the user objects reside in another.The domain service account used for computer object operations does not need to be in the samedomain as the AppStream 2.0 computer objects.
When creating the directory configuration, specify a service account that has the appropriatepermissions to manage computer objects in the Active Directory domain where the file servers,applications, computer objects and other network resources reside.
Your end user Active Directory accounts must have the "Allowed to Authenticate" permissions for thefollowing:
• AppStream 2.0 computer objects
• Domain controllers for the domain
For more information, see Granting Permissions to Create and Manage Active Directory ComputerObjects (p. 77).
82

Amazon AppStream 2.0 Developer GuideManaging AppStream 2.0 Computer
Objects in Active Directory
Managing AppStream 2.0 Computer Objects in ActiveDirectoryAppStream 2.0 does not delete computer objects from Active Directory. These computer objectscan be easily identified in your directory. Each computer object in the directory is created with theDescription attribute, which specifies a fleet or an image builder instance and the name.
Computer Object Description Examples
Type Name Description Attribute
Fleet ExampleFleet AppStream 2.0 - fleet:ExampleFleet
Image builder ExampleImageBuilder AppStream 2.0 - image-builder:ExampleImageBuilder
You can identify and delete inactive computer objects created by AppStream 2.0 by using the followingdsquery computer and dsrm commands. For more information, see Dsquery computer and Dsrm inthe Microsoft documentation.
The dsquery command identifies inactive computer objects over a certain period of time and uses thefollowing format. The dsquery command should also be run with the parameter -desc "AppStream2.0*" to display only AppStream 2.0 objects.
dsquery computer "OU-distinguished-name" -desc "AppStream 2.0*" -inactive number-of-weeks-since-last-login
• OU-distinguished-name is the distinguished name of the organizational unit. For moreinformation, see Finding the Organizational Unit Distinguished Name (p. 78). If you don't providethe OU-distinguished-name parameter, the command searches the entire directory.
• number-of-weeks-since-last-log-in is the desired value based on how you want to defineinactivity.
For example, the following command displays all computer objects in theOU=ExampleOU,DC=EXAMPLECO,DC=COM organizational unit that have not been logged into within thepast two weeks.
dsquery computer OU=ExampleOU,DC=EXAMPLECO,DC=COM -desc "AppStream 2.0*" -inactive 2
If any matches are found, the result is one or more object names. The dsrm command deletes thespecified object and uses the following format:
dsrm objectname
Where objectname is the full object name from the output of the dsquery command. For example,if the dsquery command above results in a computer object named "ExampleComputer", the dsrmcommand to delete it would be as follows:
dsrm "CN=ExampleComputer,OU=ExampleOU,DC=EXAMPLECO,DC=COM"
You can chain these commands together by using the pipe (|) operator. For example, to delete allAppStream 2.0 computer objects, prompting for confirmation for each, use the following format. Addthe -noprompt parameter to dsrm to disable confirmation.
83

Amazon AppStream 2.0 Developer GuideMore Info
dsquery computer OU-distinguished-name -desc "AppStream 2.0*" –inactive number-of-weeks-since-last-log-in | dsrm
More InfoFor more information related to this topic, see the following resources:
• Troubleshooting Notification Codes (p. 108)—Resolutions to notification code errors.• Troubleshooting Active Directory Domain Join (p. 105)—Help with common difficulties.• Microsoft Active Directory—Information about using AWS Directory Service.
84

Amazon AppStream 2.0 Developer GuideViewing Fleet Usage Using the Console
Monitoring Amazon AppStream 2.0Resources
AppStream 2.0 publishes metrics to Amazon CloudWatch to enabled detailed tracking and deep diveanalysis. These statistics are recorded for an extended period so you can access historical informationand gain a better perspective on how your fleets are performing. For more information, see the AmazonCloudWatch User Guide.
Viewing Fleet Usage Using the ConsoleYou can monitor Amazon AppStream 2.0 using the AppStream 2.0 console or the CloudWatch console.
To view fleet usage in the AppStream 2.0 console
1. Open the AppStream 2.0 console at https://console.aws.amazon.com/appstream2.2. In the left pane, choose Fleets.3. Select a fleet and choose its Fleet Usage tab.4. By default, the graph displays the following metrics: ActualCapacity, InUseCapacity, and
CapacityUtilization. You can select additional metrics to graph or change the period.
To view fleet usage in the CloudWatch console
1. Open the CloudWatch console at https://console.aws.amazon.com/cloudwatch/.2. In the left pane, choose Metrics.3. Choose the AppStream namespace and then choose Fleet Metrics.4. Select the metrics to graph.
AppStream 2.0 Metrics and DimensionsAmazon AppStream 2.0 sends the following metrics and dimension information to Amazon CloudWatch.
Amazon AppStream 2.0 MetricsAppStream 2.0 sends metrics to CloudWatch one time every minute. The AWS/AppStream namespaceincludes the following metrics.
Metric Description
ActualCapacity The total number of instances that are available for streaming or arecurrently streaming.
ActualCapacity = AvailableCapacity + InUseCapacity
Units: Count
Valid statistics: Average, Minimum, Maximum
85

Amazon AppStream 2.0 Developer GuideAmazon AppStream 2.0 Metrics
Metric Description
AvailableCapacity The number of idle instances currently available for user sessions.
AvailableCapacity = ActualCapacity - InUseCapacity
Units: Count
Valid statistics: Average, Minimum, Maximum
CapacityUtilization The percentage of instances in a fleet that are being used, using thefollowing formula.
CapacityUtilization = (InUseCapacity/ActualCapacity) * 100
Monitoring this metric helps with decisions about increasing or decreasingthe value of a fleet's desired capacity.
Units: Percent
Valid statistics: Average, Minimum, Maximum
DesiredCapacity The total number of instances that are either running or pending. Thisrepresents the total number of concurrent streaming sessions your fleet cansupport in a steady state.
DesiredCapacity = ActualCapacity + PendingCapacity
Units: Count
Valid statistics: Average, Minimum, Maximum
InUseCapacity The number of instances currently being used for streaming sessions. OneInUseCapacity count represents one streaming session.
Units: Count
Valid statistics: Average, Minimum, Maximum
PendingCapacity The number of instances being provisioned by AppStream 2.0. Representsthe additional number of streaming sessions the fleet can support afterprovisioning is complete. When provisioning starts, it usually takes 10-20minutes for an instance to become available for streaming.
Units: Count
Valid statistics: Average, Minimum, Maximum
RunningCapacity The total number of instances currently running. Represents the numberof concurrent streaming sessions that can be supported by the fleet in itscurrent state.
This metric is provided for Always-On fleets only, and has the same value asthe ActualCapacity metric.
Units: Count
Valid statistics: Average, Minimum, Maximum
86

Amazon AppStream 2.0 Developer GuideDimensions for Amazon AppStream 2.0 Metrics
Metric Description
InsufficientCapacityErrorThe number of session requests rejected due to lack of capacity.
You can set alarms to use this metric to be notified of users waiting forstreaming sessions.
Units: Count
Valid statistics: Average, Minimum, Maximum, Sum
Dimensions for Amazon AppStream 2.0 MetricsTo filter the metrics provided by Amazon AppStream 2.0, use the following dimension.
Dimension Description
Fleet The name of the fleet.
87

Amazon AppStream 2.0 Developer GuideIAM Service Roles Required for
Managing AppStream 2.0 Resources
Controlling Access to AmazonAppStream 2.0 with IAM Policies andService Roles
AWS Identity and Access Management (IAM) policies grant permissions to specific resources and APIactions. To manage AppStream 2.0 resources and perform API actions through the AWS Command LineInterface (AWS CLI), AWS SDK, or AWS Management Console, you must have the permissions defined inthe AmazonAppStreamFullAccess managed policy.
If you sign into the AppStream 2.0 console as an IAM user, you must attach this policy to your IAM useraccount. If you sign in through console federation, you must attach this policy to the IAM role that wasused for federation.
The AmazonAppStreamReadOnlyAccess managed policy is available for users who require only readaccess to AppStream 2.0 resources.
Contents• IAM Service Roles Required for Managing AppStream 2.0 Resources (p. 88)• Permissions Required for IAM Service Role Creation (p. 89)• Checking for the AmazonAppStreamServiceAccess Service Role and Policies (p. 89)• Checking for the ApplicationAutoScalingForAmazonAppStreamAccess Service Role and
Policies (p. 90)• Application Auto Scaling Required IAM Permissions (p. 92)• IAM Policies and the Amazon S3 Bucket for Home Folders (p. 92)
IAM Service Roles Required for ManagingAppStream 2.0 Resources
In addition to having the permissions defined in the AmazonAppStreamFullAccess policy, you must alsohave the AmazonAppStreamServiceAccess and the ApplicationAutoScalingForAmazonAppStreamAccessIAM service roles present in your AWS account, with the appropriate policies attached. The AppStream2.0 and Application Auto Scaling services assume these roles and call other AWS services as needed tomanage your resources.
AmazonAppStreamServiceAccess
While AppStream 2.0 resources are being created, the AppStream 2.0 service makes API calls toother AWS services on your behalf by assuming this role. If this service role is not present in yourAWS account and the required IAM permissions and trust relationship policies are not attached, youcannot create AppStream 2.0 fleets.
ApplicationAutoScalingForAmazonAppStreamAccess
The Application Auto Scaling service uses this service role to scale AppStream 2.0 resources on yourbehalf. If this service role is not present in your AWS account and the required IAM permissions andtrust relationship policies are not attached, you cannot scale AppStream 2.0 fleets.
88

Amazon AppStream 2.0 Developer GuidePermissions Required for IAM Service Role Creation
Permissions Required for IAM Service Role CreationIf you have the required permissions, these two service roles are automatically created by AppStream2.0, with the required IAM policies attached, when you get started with the AppStream 2.0 service in anAWS Region. You or an administrator must have one of the following permissions to get started withAppStream 2.0 in your AWS account:
• Permissions to create an IAM role and attach IAM policies to a role• AdministratorAccess permissions
NoteIAM roles and policies control which AppStream 2.0 resources can be accessed. The user poolcontrols access to AppStream 2.0 itself. For more information, see Manage Access Using theAppStream 2.0 User Pool (p. 62).
Checking for the AmazonAppStreamServiceAccessService Role and Policies
Follow the steps in this section to check whether the AmazonAppStreamServiceAccess service role ispresent and has the correct policies attached. If this service role is not present and must be created, youor an administrator with the required permissions must perform the steps to get started with AppStream2.0 in your AWS account.
Policies• AmazonAppStreamServiceAccess permissions policy (p. 89)• AmazonAppStreamServiceAccess trust relationship policy (p. 90)
To check whether the AmazonAppStreamServiceAccess IAM service role is present
1. Open the IAM console at https://console.aws.amazon.com/iam/.2. In the navigation pane, choose Roles.3. In the search box, type amazonappstreamservice to narrow the list of roles to select, and then
choose AmazonAppStreamServiceAccess. If this role is listed, select it to view the role summary.4. On the Permissions tab, confirm whether the AmazonAppStreamServiceAccess permissions policy is
attached and follows the correct format. If so, the permissions policy is correctly configured.5. On the Trust relationships tab, choose Edit trust relationship, and then confirm whether the
AmazonAppStreamServiceAccess trust relationship policy is attached and follows the correct format.If so, the trust relationship is correctly configured. Choose Cancel and close the IAM console.
AmazonAppStreamServiceAccess permissions policyThe format for this permissions policy is as follows:
{ "Version": "2012-10-17", "Statement": [ { "Effect": "Allow", "Action": [ "ec2:DescribeVpcs",
89

Amazon AppStream 2.0 Developer GuideAmazonAppStreamServiceAccess trust relationship policy
"ec2:DescribeSubnets", "ec2:DescribeAvailabilityZones", "ec2:CreateNetworkInterface", "ec2:DescribeNetworkInterfaces", "ec2:DeleteNetworkInterface", "ec2:DescribeSubnets", "ec2:AssociateAddress", "ec2:DisassociateAddress", "ec2:DescribeRouteTables", "ec2:DescribeSecurityGroups" ], "Resource": "*" }, { "Effect": "Allow", "Action": [ "s3:CreateBucket", "s3:ListBucket", "s3:GetObject", "s3:PutObject", "s3:DeleteObject", "s3:GetObjectVersion", "s3:DeleteObjectVersion", "s3:PutBucketPolicy" ], "Resource": "arn:aws:s3:::appstream2-36fb080bb8-*" } ]}
AmazonAppStreamServiceAccess trust relationshippolicyThe format for this trust relationship policy is as follows:
{ "Version": "2012-10-17", "Statement": [ { "Effect": "Allow", "Principal": { "Service": "appstream.amazonaws.com" }, "Action": "sts:AssumeRole" } ]}
Checking for theApplicationAutoScalingForAmazonAppStreamAccessService Role and Policies
Follow the steps in this section to check whether theApplicationAutoScalingForAmazonAppStreamAccess service role is present and has the correct policiesattached. If this service role is not present and must be created, you or an administrator with therequired permissions must perform the steps to get started with AppStream 2.0 in your AWS account.
90

Amazon AppStream 2.0 Developer GuideApplicationAutoScalingForAmazonAppStreamAccess
permissions policy
Policies• ApplicationAutoScalingForAmazonAppStreamAccess permissions policy (p. 91)• ApplicationAutoScalingForAmazonAppStreamAccess trust relationship policy (p. 91)
To check whether the ApplicationAutoScalingForAmazonAppStreamAccess IAM service roleis present
1. Open the IAM console at https://console.aws.amazon.com/iam/.2. In the navigation pane, choose Roles.3. In the search box, type applicationautoscaling to narrow the list of roles to select, and then
choose ApplicationAutoScalingForAmazonAppStreamAccess. If this role is listed, select it to viewthe role summary.
4. On the Permissions tab, confirm whether the ApplicationAutoScalingForAmazonAppStreamAccesspermissions policy is attached and follows the correct format. If so, the permissions policy iscorrectly configured.
5. On the Trust relationships tab, choose Edit trust relationship, and then confirm whether theApplicationAutoScalingForAmazonAppStreamAccess trust relationship policy is attached and followsthe correct format. If so, the trust relationship is correctly configured. Choose Cancel and close theIAM console.
ApplicationAutoScalingForAmazonAppStreamAccesspermissions policyThe format for this permissions policy is as follows:
{ "Version": "2012-10-17", "Statement": [ { "Effect": "Allow", "Action": [ "appstream:UpdateFleet", "appstream:DescribeFleets" ], "Resource": [ "*" ] }, { "Effect": "Allow", "Action": [ "cloudwatch:DescribeAlarms" ], "Resource": [ "*" ] } ]}
ApplicationAutoScalingForAmazonAppStreamAccesstrust relationship policyThe format for this trust relationship policy is as follows:
91

Amazon AppStream 2.0 Developer GuideApplication Auto Scaling Required IAM Permissions
{ "Version": "2012-10-17", "Statement": [ { "Effect": "Allow", "Principal": { "Service": "application-autoscaling.amazonaws.com" }, "Action": "sts:AssumeRole" } ]}
Application Auto Scaling Required IAM PermissionsTo use AppStream 2.0 Fleet Auto Scaling, the IAM user accessing fleet creation and scaling settings musthave appropriate permissions for the services that support dynamic scaling. AppStream 2.0 requires thefollowing permissions:
{ "Version": "2012-10-17", "Statement": [ { "Effect": "Allow", "Action": [ "appstream:*", "application-autoscaling:*", "cloudwatch:DeleteAlarms", "cloudwatch:DescribeAlarmsForMetric", "cloudwatch:DisableAlarmActions", "cloudwatch:DescribeAlarms", "cloudwatch:EnableAlarmActions", "cloudwatch:ListMetrics", "cloudwatch:PutMetricAlarm", "iam:passrole", "iam:ListRoles" ], "Resource": "*" } ]}
IAM Policies and the Amazon S3 Bucket for HomeFolders
Access to the Amazon S3 bucket for home folders is managed using IAM permissions and policies.
Examples
• Deleting the Amazon S3 Bucket for Home Folders (p. 93)
• Restricting Administrator Access to the Amazon S3 Bucket for Home Folders (p. 93)
92

Amazon AppStream 2.0 Developer GuideDeleting the Amazon S3 Bucket for Home Folders
Deleting the Amazon S3 Bucket for Home FoldersAppStream 2.0 adds an Amazon S3 bucket policy that prevents the accidental deletion of the S3 bucket,shown at the end of this section. You must delete the S3 bucket policy first, and then you can deletethe S3 bucket. For more information, see Deleting or Emptying a Bucket in the Amazon Simple StorageService Developer Guide.
{ "Version": "2012-10-17", "Statement": [ { "Sid": "PreventAccidentalDeletionOfBucket", "Effect": "Deny", "Principal": "*", "Action": "s3:DeleteBucket", "Resource": "arn:aws:s3:::appstream2-36fb080bb8-region-code-account-id-without-hyphens" } ]}
Restricting Administrator Access to the Amazon S3Bucket for Home FoldersBy default, administrators who can access the Amazon S3 bucket created by AppStream 2.0 can viewand modify content that is part of users' home folders. To restrict administrator access to the S3 bucketcontaining user files, we recommend applying the S3 bucket access policy based on the followingtemplate:
{ "Sid": "RestrictedAccess", "Effect": "Deny", "NotPrincipal": { "AWS": [ "arn:aws:iam::account:role/service-role/AmazonAppStreamServiceAccess", "arn:aws:sts::account:assumed-role/AmazonAppStreamServiceAccess/PhotonSession", "arn:aws:iam::account:user/IAM-user-name" ] }, "Action": "s3:*", "Resource": "arn:aws:s3:::appstream2-36fb080bb8-region-account" } ]}
This policy allows home folder S3 bucket access only to the users specified and to the AppStream 2.0service. For every IAM user who should have access, replicate the following line:
"arn:aws:iam::account:user/IAM-user-name"
In the following example, the policy restricts access to the home folder S3 bucket for anyone otherthan IAM users marymajor and johnstiles, and also restricts access to the AppStream 2.0 service, in AWSRegion us-west-2 for account ID 123456789012.
{
93

Amazon AppStream 2.0 Developer GuideRestricting Administrator Access to theAmazon S3 Bucket for Home Folders
"Sid": "RestrictedAccess", "Effect": "Deny", "NotPrincipal": { "AWS": [ "arn:aws:iam::123456789012:role/service-role/AmazonAppStreamServiceAccess", "arn:aws:sts::123456789012:assumed-role/AmazonAppStreamServiceAccess/PhotonSession", "arn:aws:iam::123456789012:user/marymajor", "arn:aws:iam::123456789012:user/johnstiles" ] }, "Action": "s3:*", "Resource": "arn:aws:s3:::appstream2-36fb080bb8-us-west-2-123456789012" } ]}
94

Amazon AppStream 2.0 Developer GuideTagging Basics
Tagging Your Amazon AppStream2.0 Resources
AWS enables you to assign metadata to your AWS resources in the form of tags. You can use these tagsto help manage your AppStream 2.0 image builders, images, fleets, and stacks, and also organize data,including billing data.
You can:
• Logically group resources in different ways (for example, by purpose, owner, or environment).
This is useful when you have many resources of the same type.
• Quickly identify a specific resource based on the tags that you've assigned to it
• Identify and control AWS costs
For example, you can identify and group AppStream 2.0 fleets that are in different environments (suchas Development or Production) or that are assigned to different business units (such as HR or Marketing).You can then track the associated AWS costs for these fleets on a detailed level. To do this, sign up toget your AWS account bill with tag key values included. For more information about setting up a costallocation report with tags, see Monthly Cost Allocation Report in the AWS Billing and Cost ManagementUser Guide.
Contents• Tagging Basics (p. 95)
• Tag Restrictions (p. 96)
• Working with Tags in the AppStream 2.0 Console (p. 96)
• Working with Tags by Using the AppStream 2.0 API, an AWS SDK, or AWS CLI (p. 96)
Tagging BasicsTags consist of a key-value pair, similar to other AWS services tags. To tag a resource, you specify a keyand a value for each tag. A key can be a general category, such as "project", "owner", or "environment",with specific associated values, and you can share the same key and value across multiple resources. Youcan tag an AppStream 2.0 resource immediately after you create it or later on. If you delete a resource,the tags are removed from that resource on deletion. However, other AppStream 2.0 and AWS resourcesthat have the same tag key are not impacted.
You can edit tag keys and values, and you can remove tags from a resource at any time. You can set thevalue of a tag to an empty string, but you can't set the name of a tag to null. If you add a tag that hasthe same key as an existing tag on that resource, the new value overwrites the old value. If you delete aresource, any tags for the resource are also deleted.
NoteIf you plan to set up a monthly cost allocation report to track AWS costs for AppStream 2.0resources, keep in mind that tags added to existing AppStream 2.0 resources appear in yourcost allocation report on the first of the following month for resources that are renewed in thatmonth.
95

Amazon AppStream 2.0 Developer GuideTag Restrictions
Tag Restrictions• The maximum number of tags per AppStream 2.0 resource is 50.• The maximum key length is 128 Unicode characters in UTF-8.• The maximum value length is 256 Unicode characters in UTF-8.• Tag keys and values are case-sensitive.• Do not use the "aws:" prefix in your tag names or values because it is a system tag that is reserved for
AWS use. You cannot edit or delete tag names or values with this prefix. Tags with this prefix do notcount against your tags per resource limit.
• You can only use the following special characters: + - = . _ : / @.• Although you can share the same key and value across multiple resources, you cannot have duplicate
keys on the same resource.• Tags can only be added to resources that are already created (you cannot specify tags on resource
creation).
Working with Tags in the AppStream 2.0 ConsoleYou can add, edit, and delete tags for existing resources by using the AppStream 2.0 console.
To add, edit, or delete tags for an existing AppStream 2.0 resource
1. Open the AppStream 2.0 console at https://console.aws.amazon.com/appstream2.2. From the navigation bar, select the region that contains the resource for which you want to add,
edit, or delete tags.3. In the navigation pane, select the resource type. The resource type can be an image builder, image,
fleet, or stack.4. Select the resource from the resource list.5. Choose Tags, Add/Edit Tags, and then do one or more of the following:
• To add a tag, choose Add Tag, and then specify the key and value for each tag.
• To edit a tag, modify the key and value for the tag as needed.
• To delete a tag, choose the Delete icon (X) for the tag.6. Choose Save.
Working with Tags by Using the AppStream 2.0API, an AWS SDK, or AWS CLI
If you're using the AppStream 2.0 API, an AWS SDK or the AWS Command Line Interface (CLI), you canuse the following AppStream 2.0 actions to add, edit, remove, or list tags for your resources:
Task AWS CLI API Action
Add or overwrite one or moretags for a resource.
tag-resource TagResource
96

Amazon AppStream 2.0 Developer GuideWorking with Tags by Using the AppStream
2.0 API, an AWS SDK, or AWS CLI
Task AWS CLI API Action
Remove one or more tags for aresource.
untag-resource UntagResource
List one or more tags for aresource.
list-tags-for-resource ListTagsForResource
When you use the AppStream 2.0 API, an AWS SDK, or AWS CLI actions to add, edit, remove, or list tagsfor an AppStream 2.0 resource, specify the resource by using its Amazon Resource Name (ARN). An ARNuniquely identifies an AWS resource and uses the following general syntax.
arn:aws:appstream:region:account:resourceType/resourceName
region
The AWS Region in which the resource was created (for example, us-east-1).
account
The AWS account ID, with no hyphens (for example, 123456789012).
resourceType
The type of resource. You can tag the following AppStream 2.0 resource types: image-builder,image, fleet, and stack.
resourceName
The name of the resource.
For example, you can obtain the ARN for an AppStream 2.0 fleet by using the AWS CLI describe-fleetscommand. Copy the following command.
aws appstream describe-fleets
For an environment that contains a single fleet named TestFleet, the ARN for this resource wouldappear in the JSON output similar to the following.
"Arn": "arn:aws:appstream:us-east-1:123456789012:fleet/TestFleet"
After you obtain the ARN for this resource, you can add two tags by using the tag-resource command:
aws appstream tag-resource --resource arn:awsappstream:us-east-1:123456789012:fleet/TestFleet --tags Environment=Test,Department=IT
The first tag, Environment=Test, indicates that the fleet is in a test environment. The second tag,Department=IT, indicates that the fleet is in the IT department.
You can use the following command to list the two tags that you added to the fleet.
aws appstream list-tags-for-resource --resource arn:aws:appstream:us-east-1:123456789012:fleet/TestFleet
For this example, the JSON output appears as follows:
97

Amazon AppStream 2.0 Developer GuideWorking with Tags by Using the AppStream
2.0 API, an AWS SDK, or AWS CLI
{ "Tags": { "Environment" : "Test", "Department" : "IT" }}
98

Amazon AppStream 2.0 Developer GuideGeneral Troubleshooting
TroubleshootingIf you encounter difficulties when working with Amazon AppStream 2.0, consult the followingtroubleshooting resources.
Contents
• General Troubleshooting (p. 99)
• Troubleshooting Image Builders (p. 100)
• Troubleshooting Fleets (p. 103)
• Troubleshooting Active Directory Domain Join (p. 105)
• Troubleshooting Notification Codes (p. 108)
General TroubleshootingThe following are possible general issues you might have while using Amazon AppStream 2.0.
Issues
• SAML federation is not working. The user is not authorized to view AppStream 2.0applications. (p. 99)
• After federating from an ADFS portal, my streaming session doesn't start. I am getting the error"Sorry connection went down". (p. 99)
• I get an invalid redirect URI error. (p. 100)
• My stack's home folders aren't working correctly. (p. 100)
• My users can't access their home folder directory from one of our applications. (p. 100)
SAML federation is not working. The user is notauthorized to view AppStream 2.0 applications.This might happen because the inline policy that is embedded for the SAML 2.0 federation IAM role doesnot include permissions to the stack ARN. The IAM role is assumed by the federated user who is accessingan AppStream 2.0 stack. Edit the role permissions to include the stack ARN. For more information,see Single Sign-on Access to AppStream 2.0 Using SAML 2.0 (p. 66) and Troubleshooting SAML 2.0Federation with AWS in the IAM User Guide.
After federating from an ADFS portal, my streamingsession doesn't start. I am getting the error "Sorryconnection went down".Set the claim rule's Incoming Claim Type for the NameID SAML attribute to UPN and try the connectionagain.
99

Amazon AppStream 2.0 Developer GuideI get an invalid redirect URI error.
I get an invalid redirect URI error.This error occurs due to a malformed or invalid AppStream 2.0 stack relay state URL. Make sure that therelay state configured in your federation setup is the same as the stack relay state that is displayed inthe stack details through the AppStream 2.0 console. If they are the same and the problem still persists,contact AWS Support. For more information, see Single Sign-on Access to AppStream 2.0 Using SAML2.0 (p. 66).
My stack's home folders aren't working correctly.Problems with home folder backup to an S3 bucket can occur in the following scenarios:
• There is no internet connectivity from the streaming instance, or there is no access to the privateAmazon S3 VPC endpoint, if applicable.
• Network bandwidth consumption is too high. For example, multiple large files are being downloadedor streamed by the user while the service is trying to back up a home folder that contains large files toAmazon S3.
• An administrator deleted the bucket created by the service.
• An administrator incorrectly edited the Amazon S3 permissions for theAmazonAppStreamServiceAccess service role.
For more information, see the Amazon Simple Storage Service Console User Guide and Amazon SimpleStorage Service Developer Guide.
My users can't access their home folder directoryfrom one of our applications.Some applications do not recognize the redirect that displays the home folder as a top-level folder in FileExplorer. If this is the case, your users can access their home folder from within an application during astreaming session by choosing File Open from the application interface and browsing to the followingdirectory: C:\Users\PhotonUser\My Files\Home Folder.
Troubleshooting Image BuildersThe following are possible issues you might have while using Amazon AppStream 2.0 image builders.
Issues
• I cannot connect to the internet from my image builder. (p. 101)
• When I tried installing my application, I see an error that the operating system version is notsupported. (p. 101)
• When I connect to my image builder, I see a login screen asking me to enter Ctrl+Alt+Delete to log in.However, my local machine intercepts the key strokes. (p. 101)
• When I switched between admin and test modes, I saw a request for a password. I don't know how toget a password. (p. 101)
• I get an error when I add my installed application. (p. 101)
• I accidentally quit a background service on the image builder and got disconnected. I am now unableto connect to that image builder. (p. 102)
100

Amazon AppStream 2.0 Developer GuideI cannot connect to the internet from my image builder.
• The application fails to launch in test mode. (p. 102)
• The application could not connect to a network resource in my VPC. (p. 102)
• I customized my image builder desktop, but my changes are not available when connecting to asession after launching a fleet from the image I created. (p. 102)
• My application is missing a command line parameter when launching. (p. 102)
• I am unable to use my image with a fleet after installing an antivirus application. (p. 103)
• My image creation failed. (p. 103)
I cannot connect to the internet from my imagebuilder.Image builders cannot communicate to the internet by default. To resolve this issue, launch your imagebuilder in a VPC subnet that has internet access. You can enable internet access from your VPC subnetusing a NAT gateway. Alternatively, you can configure an internet gateway in your VPC, and attachan Elastic IP address to your image builder. For more information, see Network Settings for AmazonAppStream 2.0 (p. 9).
When I tried installing my application, I see an errorthat the operating system version is not supported.Only applications that can be installed on Windows Server 2012 R2 can be added to an AppStream 2.0image. Check if your application is supported on Microsoft Windows Server 2012 R2.
When I connect to my image builder, I see a loginscreen asking me to enter Ctrl+Alt+Delete to login. However, my local machine intercepts the keystrokes.Your client may intercept certain key combinations locally instead of sending them to the image buildersession. To reliably send the Ctrl+Alt+Delete key combination to the image builder, choose AdminCommands, Send Ctrl+Alt+Delete. The Admin Commands menu is available on the top right corner ofthe image builder session toolbar.
When I switched between admin and test modes, Isaw a request for a password. I don't know how toget a password.AppStream 2.0 usually logs you into the user mode that you choose automatically. On some occasions,the switch may not happen automatically. If a password is requested, choose Admin Commands, Log mein. This sends a one-time password, securely, to your image builder and pastes it into the Password field.
I get an error when I add my installed application.Check if your application type is supported. You can add applications of the types .exe, .lnk, and .bat.
101

Amazon AppStream 2.0 Developer GuideI accidentally quit a background service on
the image builder and got disconnected. I amnow unable to connect to that image builder.
Check if your application is installed under the C:\Users folder hierarchy. Any application installedunder C:\Users is not supported. Select a different installation folder under C:\ when installing theapplication.
I accidentally quit a background service on the imagebuilder and got disconnected. I am now unable toconnect to that image builder.Try stopping the image builder, restarting it and connecting to it again. If the problem persists, you mustlaunch (create) a new image builder. Do not stop any background services running on the image builderinstance. Doing so may interrupt your image builder session or interfere with the image creation.
The application fails to launch in test mode.Check if your application requires elevated user privileges or any special permissions that are usuallyavailable only to an administrator. The Image Builder Test mode has the same limited permissions onthe image builder instance as your end users have on an AppStream 2.0 test fleet. If your applicationsrequire elevated permissions, they do not launch in the Image Builder Test mode.
The application could not connect to a networkresource in my VPC.Check if the image builder was launched in the correct VPC subnet. You may also need to verify that theroute tables in your VPC are configured to allow a connection.
I customized my image builder desktop, but mychanges are not available when connecting to asession after launching a fleet from the image Icreated.Changes that are saved as part of a local user session, such as time settings, are not persisted whencreating an image. To persist any local user session changes, add them to the local group policy on theimage builder instance.
My application is missing a command line parameterwhen launching.You can provide a command line parameter when using image builder to add an application to an image.If the launch parameters for the application do not change for each user, you can enter them whileadding an application to the image in the image builder instance.
If the launch parameters are different for every launch, you can pass them programmatically when usingthe CreateStreamingURL API. Set the sessionContext and applicationID parameters in the APIfields. The sessionContext is included as a command line option when launching the application.
If the launch parameters must be computed on the fly, you can launch your application using a script.You can parse the sessionContext parameter within your script before launching your application witha computed parameter.
102
Amazon AppStream 2.0 Developer GuideI am unable to use my image with a fleetafter installing an antivirus application.
I am unable to use my image with a fleet afterinstalling an antivirus application.You can install any tools, including antivirus programs, on your AppStream 2.0 stack by using the imagebuilder before creating an image. However, these programs should not block any network ports or stopany processes that are used by the AppStream 2.0 service. We recommend testing your application inImage Builder Test mode before creating an image and attempting to use it with a fleet.
My image creation failed.Verify that you did not make any changes to AppStream 2.0 services before starting the image creation.Try creating your image again; if it fails, contact AWS Support. For more information, see AWS SupportCenter.
Troubleshooting FleetsThe following are possible issues that might occur when users connect to streaming sessions launchedfrom fleet instances.
Issues• My applications won't work correctly unless I use the Internet Explorer defaults. How do I restore the
Internet Explorer default settings? (p. 103)• I need to persist environment variables across my fleet instances. (p. 105)• I want to change the default Internet Explorer home page for my users. (p. 105)• When my users end a streaming session and then start a new one, they see a message that says no
streaming resources are available. (p. 105)
My applications won't work correctly unless I usethe Internet Explorer defaults. How do I restore theInternet Explorer default settings?If your AppStream 2.0 environment includes applications that render elements, you might need torestore the Internet Explorer default settings to enable full enable access to the internet. To do this,follow these steps to create a logon script and use Group Policy to enable the script. The logon scriptruns as the user and restores these settings. To use the Group Policy Management Console (GPMC) MMCsnap-in to perform this task, do the following first:
• Obtain access to a computer or an EC2 instance that is joined to your domain.• Install the GPMC. For more information, see Installing or Removing Remote Server Administration
Tools for Windows 7 in the Microsoft documentation.• Log in as a domain user with permissions to create Group Policy objects (GPOs). Link GPOs to the
appropriate organizational units (OUs).
To automatically restore the Internet Explorer default settings
1. Open the AppStream 2.0 console at https://console.aws.amazon.com/appstream2.2. On your image builder, create a child folder of C:\ (for example, use C:\Scripts).
103
Amazon AppStream 2.0 Developer GuideMy applications won't work correctly unless Iuse the Internet Explorer defaults. How do I
restore the Internet Explorer default settings?3. Copy the reset-ie.bat batch file from the location where you extracted the zip file in the previous
procedure to C:\Scripts.
4. If you are not using Active Directory in your environment, open Local Group Policy Editor. If you areusing Active Directory, open the GPMC. Locate the Scripts (Logon\Logoff) policy setting:
• Local Group Policy Editor:
On your image builder, open the command prompt as an administrator, type gpedit.msc, andthen press ENTER.
Under User Configuration, expand Windows Settings, and then choose Scripts (Logon\Logoff).
• GPMC:
In your directory or on your domain controller, open the command prompt as an administrator,type gpmc.msc, and then press ENTER.
In the left console tree, select the OU in which you want to create a new GPO, or use an existingGPO, and then do either of the following: :
• Create a new GPO by opening the context (right-click) menu and choosing Create a GPO in thisdomain, Link it here. For Name, provide a descriptive name for this GPO.
• Select an existing GPO.
Open the context menu for the GPO, and choose Edit.
Under User Configuration, expand Policies, Windows Settings, and then choose Scripts (Logon\Logoff).
5. In the Logon Properties dialog box, on the Scripts tab, choose Add, browse to and select C:\Scripts\reset-ie.bat, and then choose OK.
6. Choose Apply, OK.
7. To set the script as a Windows Logon script in either Local Group Policy Editor or the GPMC, locatethe Group Policy administrative templates:
• Local Group Policy Editor:
Under Computer Configuration, expand Administrative Templates, System, and then chooseGroup Policy.
• GPMC:
Under Computer Configuration, expand Policies, Administrative Templates, System, and thenchoose Group Policy.
8. Double-click Configure Logon Script Delay.
9. In the Configure Login Script Delay policy setting, choose Enabled.
10. Under Options, set the value to 0.
11. Choose Apply, OK.
12. Close Local Group Policy Editor or the GPMC.
When end users connect to streaming sessions that are launched from the associated fleet instance, thisbatch file runs and restores the Internet Explorer default settings.
104

Amazon AppStream 2.0 Developer GuideI need to persist environment
variables across my fleet instances.
I need to persist environment variables across myfleet instances.Environment variables enable you to dynamically pass settings across applications. You can make userenvironment variables and system environment variables available across your fleet instances. You canalso create environment variables with limited scope, which is useful when you need to use the sameenvironment variable with different values across different applications. For more information, seePersist Environment Variables (p. 34).
I want to change the default Internet Explorer homepage for my users.You can use Group Policy to set the default home page in Internet Explorer for your users. You can alsoenable users to change the default page that you set. For more information, see Change the DefaultInternet Explorer Home Page for Users' Streaming Sessions (p. 38).
When my users end a streaming session and thenstart a new one, they see a message that says nostreaming resources are available.When a user ends a session, AppStream 2.0 terminates the underlying instance and creates a newinstance if needed to meet the desired capacity of the fleet. If a user tries to start a new session beforeAppStream 2.0 creates the new instance and all other instances are in use, the user will receive anerror stating that no streaming resources are available. If your users start and stop sessions frequently,consider increasing your fleet capacity. For more information, see Fleet Auto Scaling for AmazonAppStream 2.0 (p. 39). Or, consider increasing the maximum session duration for your fleet andinstructing your users to close their browser during periods of inactivity rather than ending their session.
Troubleshooting Active Directory Domain JoinThe following are possible issues you might have while setting up and using Active Directory withAmazon AppStream 2.0. For help troubleshooting notification codes, see Troubleshooting NotificationCodes (p. 108).
Issues
• My image builders and fleet instances are stuck in the PENDING state. (p. 106)
• My users aren't able to log in with the SAML application. (p. 106)
• My fleet instances work for one user but don't cycle correctly. (p. 106)
• My user Group Policy objects aren't applying successfully. (p. 106)
• My AppStream 2.0 streaming instances aren't joining the Active Directory domain. (p. 107)
• User login is taking a long time to complete on a domain-joined streaming session. (p. 107)
• The changes I made in the image builder aren't reflected in end user streaming sessions. (p. 108)
• My users can't access a domain resource in a domain-joined streaming session but they can accessthe resource from a domain-joined image builder. (p. 108)
105

Amazon AppStream 2.0 Developer GuideMy image builders and fleet instances
are stuck in the PENDING state.
My image builders and fleet instances are stuck in thePENDING state.Image builders and fleet instances can take up to 25 minutes to move into a ready state and becomeavailable. If your instances are taking longer than 25 minutes to become available, in Active Directory,verify whether new computer objects were created in the correct organizational units (OUs). If thereare new objects, the streaming instances will be available soon. If the objects aren't there, checkthe directory configuration details in your AppStream 2.0 Directory Config: Directory name (thefully qualified domain name of the directory, service account username and password, and the OUdistinguished name.
Image builder and fleet errors are displayed in the AppStream 2.0 console on the Notifications tabfor the fleet or image builder. Fleet errors are also available using the AppStream 2.0 API via theDescribeFleets operation, or the CLI command describe-fleets.
My users aren't able to log in with the SAMLapplication.AppStream 2.0 relies on the SAML_Subject "NameID" attribute from your identity provider to populatethe username field to log in your user. The username can either be formatted as "domain\username", or"[email protected]". If you are using "domain\username" format, domain can either be the NetBIOSname or the fully qualified domain name. If using "[email protected]" format, the UserPrincipalNameattribute can be used. If you've verified your SAML_Subject attribute is configured correctly and theproblem persists, contact AWS Support. For more information, see AWS Support Center.
My fleet instances work for one user but don't cyclecorrectly.Fleet instances are cycled after a user completes a session, ensuring that each user has a new instance.When the cycled fleet instance is brought online, it joins the domain using the computer name of theprevious instance. To ensure that this operation happens successfully, the service account requiresChange Password and Reset Password permissions on the organizational unit (OU) to which thecomputer object is joining. Check the service account permissions and try again. If the problem persists,contact AWS Support. For more information, see AWS Support Center.
My user Group Policy objects aren't applyingsuccessfully.By default, computer objects apply computer-level policies based on the OU in which the computerobject resides, while applying user-level policies based on the OU in which the user resides. If your user-level policies aren't being applied, you can do one of the following:
• Move the user-level policies to the OU in which the user Active Directory object resides
• Enable computer-level "loopback processing," which applies the user-level policies in the computerobject OU.
For more information, see Loopback processing of Group Policy at Microsoft Support.
106

Amazon AppStream 2.0 Developer GuideMy AppStream 2.0 streaming instances
aren't joining the Active Directory domain.
My AppStream 2.0 streaming instances aren't joiningthe Active Directory domain.The Active Directory domain to use with AppStream 2.0 must be accessible through its fully qualifieddomain name (FQDN) via the VPC in which your streaming instances are launched.
To test that your domain is accessible
1. Launch an Amazon EC2 instance in the same VPC, subnet, and security groups that you use withAppStream 2.0.
2. Manually join the EC2 instance to your Active Directory domain using the FQDN (for example,yourdomain.exampleco.com) with the service account that you intend to use with AppStream2.0. Use the following command in a Windows PowerShell console:
netdom join computer /domain:FQDN /OU:path /ud:user /pd:password
If this manual join fails, proceed to the next step.
3. If you cannot manually join to your domain, open a command prompt and verify that you canresolve the FQDN using the nslookup command. For example:
nslookup yourdomain.exampleco.com
Successful name resolution returns a valid IP address. If you are unable to resolve your FQDN, youmay need to update your VPC DNS servers by using a DHCP option set for your domain. Then, comeback to this step. For more information, see DHCP Options Sets in the Amazon VPC User Guide.
4. If the FQDN resolves, validate connectivity by using the following telnet command.
telnet yourdomain.exampleco.com 389
A successful connection shows a blank command prompt window without any connection errors.You may need to install the Telnet Client feature on your EC2 instance. For more information, seeInstall Telnet Client in the Microsoft documentation.
If you were not able to manually join the EC2 instance to your domain, but were successful in resolvingthe FQDN and testing connectivity with the Telnet Client, your VPC security groups may be preventingaccess. Active Directory requires certain network port settings. For more information, see ActiveDirectory and Active Directory Domain Services Port Requirements in the Microsoft documentation.
User login is taking a long time to complete on adomain-joined streaming session.AppStream 2.0 performs a Windows login action after the end user provides their domain password,and then launches the application after successful authentication. The login and launch time is impactedby many variables, such as network contention to the domain controllers or time taken to apply grouppolicies to the streaming instance. If domain authentication takes too long to complete, try the followingactions.
• Minimize the network latency from your AppStream 2.0 region to your domain controllers by choosingthe correct domain controllers. For example, if your fleet is in us-east-1, use domain controllerswith high bandwidth and low latency to us-east-1 through Active Directory Sites and Services
107

Amazon AppStream 2.0 Developer GuideThe changes I made in the image builder
aren't reflected in end user streaming sessions.
zone mappings. For more information, see Active Directory Sites and Services in the Microsoftdocumentation.
• Ensure that your group policies and user login scripts don't take prohibitively long to apply or execute.
If your login to AppStream 2.0 fails after 3 minutes with a message "An unknown error occurred,"validate that your group policies are not restricting third-party credential providers. There are twopolicies that block AppStream 2.0 from authenticating your domain users:
• Computer Configuration > Administrative Templates > Windows Components > Windows LogonOptions > Disable or Enable software Secure Attention Sequence — This policy should be set toEnabled for Services.
• Computer Configuration > Administrative Templates > System > Logon > Excludecredential providers — Ensure that the following CLSID is not listed: e7c1bab5-4b49-4e64-a966-8d99686f8c7c
The changes I made in the image builder aren'treflected in end user streaming sessions.User-specific settings in the image builder are saved in the specific user profile, and do not persist tothe streaming instances. Examples include drive mounting, wallpaper changes, browser customizations,or Internet Explorer customizations. You need to manage these settings using the Microsoft ActiveDirectory Group Policy settings that are applied to the OUs under which your streaming instances arecreated.
To quickly test whether your Group Policy settings are applied to the end user, connect to your imagebuilder, login as a domain user and test the experience. For more information, see Group Policy forBeginners in the Microsoft documentation.
My users can't access a domain resource in a domain-joined streaming session but they can access theresource from a domain-joined image builder.Confirm that your fleet is created in the same VPC, subnets, and security groups as your image builder,and that your user has the appropriate permissions to access and use the domain resource.
Troubleshooting Notification CodesThe following are notification codes and resolution steps for notifications you may see while settingup and using Amazon AppStream 2.0. These notifications can be found in the Notifications tab in theAppStream 2.0 console, after selecting an image builder or fleet. Fleet notifications can also be obtainedusing the AppStream 2.0 API operation DescribeFleets, or using the describe-fleets CLI command.
Active Directory Domain JoinThe following are notification codes and resolution steps for codes you might encounter while setting upand using Active Directory with Amazon AppStream 2.0.
DOMAIN_JOIN_ERROR_ACCESS_DENIED
Message: Access is denied.
108

Amazon AppStream 2.0 Developer GuideActive Directory Domain Join
Resolution: The service account specified in the directory configuration does not have permissionsto create the computer object, or reuse an existing one. Validate the permissions and start theimage builder or fleet. For more information, see Granting Permissions to Create and Manage ActiveDirectory Computer Objects (p. 77).
DOMAIN_JOIN_ERROR_LOGON_FAILURE
Message: The username or password is incorrect.
Resolution: The service account specified in the directory configuration has an invalid username orpassword. Update the configuration and re-create the image builder or fleet that had the error.
DOMAIN_JOIN_NERR_PASSWORD_EXPIRED
Message: The password of this user has expired.
Resolution: The password for the service account specified in the AppStream 2.0 directoryconfiguration has expired. Change the password for the service account in your Active Directorydomain, then update the configuration, and re-create the image builder or fleet that had the error.
DOMAIN_JOIN_ERROR_DS_MACHINE_ACCOUNT_QUOTA_EXCEEDED
Message: Your computer could not be joined to the domain. You have exceeded the maximumnumber of computer accounts you are allowed to create in this domain. Contact your systemadministrator to have this limit reset or increased.
Resolution: The service account specified on the directory configuration does not have permissionsto create the computer object, or reuse an existing one. Validate the permissions and start theimage builder or fleet. For more information, see Granting Permissions to Create and Manage ActiveDirectory Computer Objects (p. 77).
DOMAIN_JOIN_ERROR_INVALID_PARAMETER
Message: A parameter is incorrect. This error is returned if the LpName parameter is NULL or theNameType parameter is specified as NetSetupUnknown or an unknown nametype.
Resolution: This error can occur when the distinguished name for the OU is incorrect. Validate theOU chosen. If you continue to encounter this error, contact AWS Support. For more information, seeAWS Support Center.
DOMAIN_JOIN_ERROR_MORE_DATA
Message: More data is available.
Resolution: This error can occur when the distinguished name for the OU is incorrect. Validate theOU chosen. If you continue to encounter this error, contact AWS Support. For more information, seeAWS Support Center.
DOMAIN_JOIN_ERROR_NO_SUCH_DOMAIN
Message: The specified domain either does not exist or could not be contacted.
Resolution: The streaming instance was unable to contact your Active Directory domain. To ensurenetwork connectivity, confirm your VPC, subnet, and security group settings. For more information,see My AppStream 2.0 streaming instances aren't joining the Active Directory domain. (p. 107).
DOMAIN_JOIN_NERR_WORKSTATION_NOT_STARTED
Message: The Workstation service has not been started.
Resolution: An error occurred starting the Workstation service. Ensure that the service is enabled inyour image. If you continue to encounter this error, contact AWS Support. For more information, seeAWS Support Center.
109

Amazon AppStream 2.0 Developer GuideActive Directory Domain Join
DOMAIN_JOIN_ERROR_NOT_SUPPORTED
Message: The request is not supported. This error is returned if a remote computer was specified inthe lpServer parameter and this call is not supported on the remote computer.
Resolution: Contact AWS Support for assistance. For more information, see AWS Support Center.DOMAIN_JOIN_ERROR_FILE_NOT_FOUND
Message: The system cannot find the file specified.
Resolution: This error occurs when an invalid organizational unit (OU) distinguished name isprovided. The distinguished name must start with OU=. Validate the OU distinguished name and tryagain. For more information, see Finding the Organizational Unit Distinguished Name (p. 78).
110

Amazon AppStream 2.0 Developer Guide
Amazon AppStream 2.0 ServiceLimits
By default, AWS limits the resources that you can create and the number of users who can use theservice. To request a limit increase, use the AppStream 2.0 Limits form.
The following table lists the limits for each AppStream 2.0 resource. Where no default limit is listed for aspecific instance family (p. 29) or instance type, the limit is 0.
Default Limits Per AWS Region Per Account
Resource Default Limit
Stacks 5
Fleets 5
Fleet instances • Stream.standard.medium: 5• Stream.standard.large: 5• Stream.graphics-design.large: 2
Image builder instances • Stream.standard.medium: 5• Stream.standard.large: 5• Stream.graphics-design.large: 1
Images 5
Concurrent image copies 2 per destination region
Image copies (per month) 20
111

Amazon AppStream 2.0 Developer Guide
Document History for AmazonAppStream 2.0
The following table describes important changes to the documentation for Amazon AppStream 2.0.
• API version: 2016-12-01
Google Drive support Created Enable and Administer Google Drive forYour AppStream 2.0 Users (p. 57) and updatedother content as needed.
June 4, 2018
Administrative controls for datatransfer
Updated Create AppStream 2.0 Fleets andStacks (p. 30) and other content as needed.
May 24, 2018
New region Updated Setting Up SAML (p. 67) to add one newAppStream 2.0 region: Frankfurt.
March 28,2018
Custom branding Created Add Your Custom Branding to AmazonAppStream 2.0 (p. 46) and updated other contentas needed.
March 26,2018
Image copy Updated Tutorial: Create a Custom Image (p. 18)and other content as needed.
February 23,2018
New regions Updated Setting Up SAML (p. 67) to add two newAppStream 2.0 regions: Singapore and Sydney.
January 24,2018
Resource tagging Created Tagging Your Amazon AppStream 2.0Resources (p. 95) and updated other content asneeded.
December 15,2017
Managed AppStream 2.0 agentupdates
Created Amazon AppStream 2.0 Agent VersionHistory (p. 26) and updated other content asneeded.
December 7,2017
On-Demand fleets Created Fleet Type (p. 28) and updated othercontent as needed.
September 19,2017
Instance families Created AppStream 2.0 Instance Families (p. 29)and updated other content as needed.
July 25, 2017
Active Directory Created Using Active Directory with AppStream2.0 (p. 72) and updated other content as needed.
July 24, 2017
User pool Created Manage Access Using the AppStream 2.0User Pool (p. 62) and updated other content asneeded.
June 15, 2017
Security groups Created Security Groups (p. 12) and updated othercontent as needed.
May 26, 2017
Home folders Created Home Folders and VPC Endpoints (p. 13)and updated other content as needed.
May 18, 2017
112
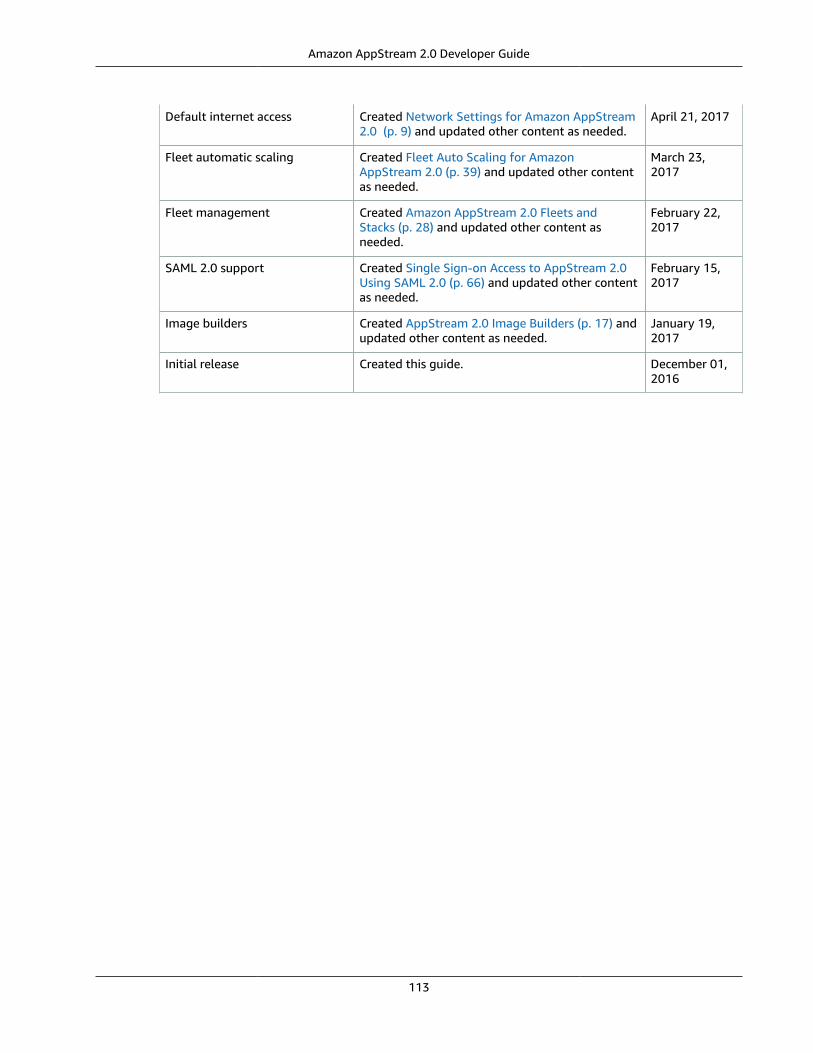
Amazon AppStream 2.0 Developer Guide
Default internet access Created Network Settings for Amazon AppStream2.0 (p. 9) and updated other content as needed.
April 21, 2017
Fleet automatic scaling Created Fleet Auto Scaling for AmazonAppStream 2.0 (p. 39) and updated other contentas needed.
March 23,2017
Fleet management Created Amazon AppStream 2.0 Fleets andStacks (p. 28) and updated other content asneeded.
February 22,2017
SAML 2.0 support Created Single Sign-on Access to AppStream 2.0Using SAML 2.0 (p. 66) and updated other contentas needed.
February 15,2017
Image builders Created AppStream 2.0 Image Builders (p. 17) andupdated other content as needed.
January 19,2017
Initial release Created this guide. December 01,2016
113