Embed Size (px)
Citation preview

Maximize Your IT Universe™
Edition 2.8August 25, 2009
Alloy DiscoveryVersion 5.1
Getting Started Guide
Copyright © 2002-2009 Alloy Software, Inc. All rights reserved.
Alloy Software, the Alloy Software logo, Asset Navigator, Alloy Navigator, Alloy Network Inventory, Alloy Discovery, and other Alloy Software products are the trademarks owned by Alloy Software, Inc. All other trademarks and brand names are the property of their respective owners. This manual, as well as the software described in it, is furnished under license and may be used or copied only in accordance with the terms of such license. The content of this manual is furnished for informational use only, is subject to change without notice, and should not be construed as a commitment by Alloy Software, Inc. Alloy Software, Inc. assumes no responsibility or liability for any errors or inaccuracies that may appear in this book. This manual is protected by United States and foreign copyright. This manual shall not be reproduced, stored in a retrieval system, or transmitted, in any form or by any means, electronic, mechanical, recording, or otherwise, without the prior permission of Alloy Software, Inc.
PuTTY is copyright 1997-2009 Simon Tatham.
Portions copyright Robert de Bath, Joris van Rantwijk, Delian Delchev, Andreas Schultz, Jeroen Massar, Wez Furlong, Nicolas Barry, Justin Bradford, Ben Harris, Malcolm Smith, Ahmad Khalifa, Markus Kuhn, Colin Watson, and CORE SDI S.A.
Alloy Discovery - Getting Started Guide i
Table of Contents
Table of ContentsAbout This Document . . . . . . . . . . . . . . . . . . . . . . . . . . . . . . . . . . . . . . . . 1
Document Audience . . . . . . . . . . . . . . . . . . . . . . . . . . . . . . . . . . . . . . . . . . . . . . . . . . . . . . . . 2Document Scope and Structure . . . . . . . . . . . . . . . . . . . . . . . . . . . . . . . . . . . . . . . . . . . . . . . 3
Chapter 1. Introducing Alloy Discovery . . . . . . . . . . . . . . . . . . . . . . . . . . . . . . . . . . . 4
Overview . . . . . . . . . . . . . . . . . . . . . . . . . . . . . . . . . . . . . . . . . . . . . . . . . . . . . . . . . . . . . . . . 5Alloy Discovery at a Glance . . . . . . . . . . . . . . . . . . . . . . . . . . . . . . . . . . . . . . . . . . . . . . . . . . . . . 5Basic Architecture . . . . . . . . . . . . . . . . . . . . . . . . . . . . . . . . . . . . . . . . . . . . . . . . . . . . . . . . . . . . . 5New Features. . . . . . . . . . . . . . . . . . . . . . . . . . . . . . . . . . . . . . . . . . . . . . . . . . . . . . . . . . . . . . . . . 6
Notes for Alloy Network Inventory 4 Users. . . . . . . . . . . . . . . . . . . . . . . . . . . . . . . . . . . . . . 8Upgrading to the Latest Version . . . . . . . . . . . . . . . . . . . . . . . . . . . . . . . . . . . . . . . . . . . . . . . . . . 8
Notes for Upgrading to Alloy Discovery 5.1.0 (from 5.x) . . . . . . . . . . . . . . . . . . . . . . . . . . 13Upgrade Considerations . . . . . . . . . . . . . . . . . . . . . . . . . . . . . . . . . . . . . . . . . . . . . . . . . . . . . . . 15
Chapter 2. Installing Alloy Discovery . . . . . . . . . . . . . . . . . . . . . . . . . . . . . . . . . . . . 16
Planning Your Installation . . . . . . . . . . . . . . . . . . . . . . . . . . . . . . . . . . . . . . . . . . . . . . . . . . 17Supported Platforms and System Requirements . . . . . . . . . . . . . . . . . . . . . . . . . . . . . . . . . . . . . 17Licensing Alloy Discovery . . . . . . . . . . . . . . . . . . . . . . . . . . . . . . . . . . . . . . . . . . . . . . . . . . . . . 19
Installing Alloy Discovery . . . . . . . . . . . . . . . . . . . . . . . . . . . . . . . . . . . . . . . . . . . . . . . . . . 20Running Setup. . . . . . . . . . . . . . . . . . . . . . . . . . . . . . . . . . . . . . . . . . . . . . . . . . . . . . . . . . . . . . . 20
Next Steps . . . . . . . . . . . . . . . . . . . . . . . . . . . . . . . . . . . . . . . . . . . . . . . . . . . . . . . . . . . . . . . 22
Chapter 3. Quick Start with Alloy Discovery . . . . . . . . . . . . . . . . . . . . . . . . . . . . . . 23
Running the Application. . . . . . . . . . . . . . . . . . . . . . . . . . . . . . . . . . . . . . . . . . . . . . . . . . . . 24Instant Audit with the Quick Start Wizard . . . . . . . . . . . . . . . . . . . . . . . . . . . . . . . . . . . . . . 24Next Steps . . . . . . . . . . . . . . . . . . . . . . . . . . . . . . . . . . . . . . . . . . . . . . . . . . . . . . . . . . . . . . . 27
Chapter 4. Configuring Alloy Discovery . . . . . . . . . . . . . . . . . . . . . . . . . . . . . . . . . . 28
Overview of the Audit Methods . . . . . . . . . . . . . . . . . . . . . . . . . . . . . . . . . . . . . . . . . . . . . . 29On-Demand Audit . . . . . . . . . . . . . . . . . . . . . . . . . . . . . . . . . . . . . . . . . . . . . . . . . . . . . . . . . . . . 29On-Demand Audit on Schedule . . . . . . . . . . . . . . . . . . . . . . . . . . . . . . . . . . . . . . . . . . . . . . . . . 30Scriptable Audit . . . . . . . . . . . . . . . . . . . . . . . . . . . . . . . . . . . . . . . . . . . . . . . . . . . . . . . . . . . . . 30Audit via E-mail . . . . . . . . . . . . . . . . . . . . . . . . . . . . . . . . . . . . . . . . . . . . . . . . . . . . . . . . . . . . . 30Portable Audit . . . . . . . . . . . . . . . . . . . . . . . . . . . . . . . . . . . . . . . . . . . . . . . . . . . . . . . . . . . . . . . 30
Setting Audit Configuration . . . . . . . . . . . . . . . . . . . . . . . . . . . . . . . . . . . . . . . . . . . . . . . . . 31Choosing Asset Tag Options. . . . . . . . . . . . . . . . . . . . . . . . . . . . . . . . . . . . . . . . . . . . . . . . . . . . 33Setting Display Options . . . . . . . . . . . . . . . . . . . . . . . . . . . . . . . . . . . . . . . . . . . . . . . . . . . . . . . 34Setting Available Controls . . . . . . . . . . . . . . . . . . . . . . . . . . . . . . . . . . . . . . . . . . . . . . . . . . . . . 35Setting Custom Input Fields . . . . . . . . . . . . . . . . . . . . . . . . . . . . . . . . . . . . . . . . . . . . . . . . . . . . 37Setting Registry Key Values . . . . . . . . . . . . . . . . . . . . . . . . . . . . . . . . . . . . . . . . . . . . . . . . . . . . 41Setting Event Log Options . . . . . . . . . . . . . . . . . . . . . . . . . . . . . . . . . . . . . . . . . . . . . . . . . . . . . 44Configuring File Scan Options . . . . . . . . . . . . . . . . . . . . . . . . . . . . . . . . . . . . . . . . . . . . . . . . . . 47Setting the SMBIOS Filter . . . . . . . . . . . . . . . . . . . . . . . . . . . . . . . . . . . . . . . . . . . . . . . . . . . . . 53Setting the Exclusion Rules . . . . . . . . . . . . . . . . . . . . . . . . . . . . . . . . . . . . . . . . . . . . . . . . . . . . 54Setting the Bypass Rules. . . . . . . . . . . . . . . . . . . . . . . . . . . . . . . . . . . . . . . . . . . . . . . . . . . . . . . 56
Next Steps . . . . . . . . . . . . . . . . . . . . . . . . . . . . . . . . . . . . . . . . . . . . . . . . . . . . . . . . . . . . . . . 57
Alloy Discovery - Getting Started Guide ii
Table of Contents
Chapter 5. Auditing Computers with Alloy Discovery. . . . . . . . . . . . . . . . . . . . . . . 58
On-Demand Audit. . . . . . . . . . . . . . . . . . . . . . . . . . . . . . . . . . . . . . . . . . . . . . . . . . . . . . . . . 59Managing Audit Credentials . . . . . . . . . . . . . . . . . . . . . . . . . . . . . . . . . . . . . . . . . . . . . . . . . . . . 59Enabling Discovery via SNMP . . . . . . . . . . . . . . . . . . . . . . . . . . . . . . . . . . . . . . . . . . . . . . . . . . 61Auditing Groups of Computers . . . . . . . . . . . . . . . . . . . . . . . . . . . . . . . . . . . . . . . . . . . . . . . . . . 62Auditing Single Computers. . . . . . . . . . . . . . . . . . . . . . . . . . . . . . . . . . . . . . . . . . . . . . . . . . . . . 72Scheduling an On-Demand Audit . . . . . . . . . . . . . . . . . . . . . . . . . . . . . . . . . . . . . . . . . . . . . . . . 73
Scriptable Audit . . . . . . . . . . . . . . . . . . . . . . . . . . . . . . . . . . . . . . . . . . . . . . . . . . . . . . . . . . 74Deploying Inventory Analyzer onto a Shared Folder . . . . . . . . . . . . . . . . . . . . . . . . . . . . . . . . . 74Automating the Scriptable Audit . . . . . . . . . . . . . . . . . . . . . . . . . . . . . . . . . . . . . . . . . . . . . . . . 76Next Steps . . . . . . . . . . . . . . . . . . . . . . . . . . . . . . . . . . . . . . . . . . . . . . . . . . . . . . . . . . . . . . . . . . 81
Audit via E-mail . . . . . . . . . . . . . . . . . . . . . . . . . . . . . . . . . . . . . . . . . . . . . . . . . . . . . . . . . . 82Creating E-mail Audit Groups . . . . . . . . . . . . . . . . . . . . . . . . . . . . . . . . . . . . . . . . . . . . . . . . . . 83Building Inventory Analyzer packages for the Audit via E-mail . . . . . . . . . . . . . . . . . . . . . . . . 86Running the Audit via E-mail on the Target Network . . . . . . . . . . . . . . . . . . . . . . . . . . . . . . . . 88Checking E-mail Audit Groups for New Snapshots . . . . . . . . . . . . . . . . . . . . . . . . . . . . . . . . . . 89Next Steps . . . . . . . . . . . . . . . . . . . . . . . . . . . . . . . . . . . . . . . . . . . . . . . . . . . . . . . . . . . . . . . . . . 90
Portable Audit . . . . . . . . . . . . . . . . . . . . . . . . . . . . . . . . . . . . . . . . . . . . . . . . . . . . . . . . . . . . 91Building Inventory Analyzer Packages for the Portable Audit. . . . . . . . . . . . . . . . . . . . . . . . . . 92Running the Portable Audit on Client Machines . . . . . . . . . . . . . . . . . . . . . . . . . . . . . . . . . . . . 94Transporting Audit Snapshots to the Inventory Repository . . . . . . . . . . . . . . . . . . . . . . . . . . . . 94Next Steps . . . . . . . . . . . . . . . . . . . . . . . . . . . . . . . . . . . . . . . . . . . . . . . . . . . . . . . . . . . . . . . . . . 95
Auditing Linux and Mac Computers . . . . . . . . . . . . . . . . . . . . . . . . . . . . . . . . . . . . . . . . . . 95
Chapter 6. Integrating Alloy Discovery with Alloy Navigator . . . . . . . . . . . . . . . . . 96
Mirroring Audit Snapshots to External Repository . . . . . . . . . . . . . . . . . . . . . . . . . . . . . . . 97Configuring the Mirroring option . . . . . . . . . . . . . . . . . . . . . . . . . . . . . . . . . . . . . . . . . . . . . . . . 97
Integrating with External Sources of Audit Snapshots . . . . . . . . . . . . . . . . . . . . . . . . . . . . . 98Configuring Alloy Navigator’s Inventory Server . . . . . . . . . . . . . . . . . . . . . . . . . . . . . . . . . . . . 98Creating External Audit Data Source Groups . . . . . . . . . . . . . . . . . . . . . . . . . . . . . . . . . . . . . . . 99Configuring External Audit Data Source Groups . . . . . . . . . . . . . . . . . . . . . . . . . . . . . . . . . . . . 99Next Steps . . . . . . . . . . . . . . . . . . . . . . . . . . . . . . . . . . . . . . . . . . . . . . . . . . . . . . . . . . . . . . . . . 100
Chapter 7. Viewing Audit Results . . . . . . . . . . . . . . . . . . . . . . . . . . . . . . . . . . . . . . 101
Viewing Software and Hardware Inventory . . . . . . . . . . . . . . . . . . . . . . . . . . . . . . . . . . . . 102Viewing Audit Data for Groups of Computers . . . . . . . . . . . . . . . . . . . . . . . . . . . . . . . . . . . . . 102
Viewing Individual Audit Snapshots . . . . . . . . . . . . . . . . . . . . . . . . . . . . . . . . . . . . . . . . . 106Previewing Computer Data . . . . . . . . . . . . . . . . . . . . . . . . . . . . . . . . . . . . . . . . . . . . . . . . . . . . 106Viewing SNMP Data. . . . . . . . . . . . . . . . . . . . . . . . . . . . . . . . . . . . . . . . . . . . . . . . . . . . . . . . . 107Viewing Audit Snapshots . . . . . . . . . . . . . . . . . . . . . . . . . . . . . . . . . . . . . . . . . . . . . . . . . . . . . 108
Working with Static and Dynamic Computer Groups . . . . . . . . . . . . . . . . . . . . . . . . . . . . 113Configuring Dynamic Computer Groups . . . . . . . . . . . . . . . . . . . . . . . . . . . . . . . . . . . . . . . . . 113
Chapter 8. Advanced Options . . . . . . . . . . . . . . . . . . . . . . . . . . . . . . . . . . . . . . . . . 115
Understanding Audit Snapshots . . . . . . . . . . . . . . . . . . . . . . . . . . . . . . . . . . . . . . . . . . . . . 116Comparing Audit Snapshots . . . . . . . . . . . . . . . . . . . . . . . . . . . . . . . . . . . . . . . . . . . . . . . . . . . 117
Understanding the Audit Data Viewer . . . . . . . . . . . . . . . . . . . . . . . . . . . . . . . . . . . . . . . . 119Configuring Computer List. . . . . . . . . . . . . . . . . . . . . . . . . . . . . . . . . . . . . . . . . . . . . . . . . 120External Tools. . . . . . . . . . . . . . . . . . . . . . . . . . . . . . . . . . . . . . . . . . . . . . . . . . . . . . . . . . . 121
Configuring External Tools. . . . . . . . . . . . . . . . . . . . . . . . . . . . . . . . . . . . . . . . . . . . . . . . . . . . 123
Alloy Discovery - Getting Started Guide iii
Table of Contents
User-Defined Fields . . . . . . . . . . . . . . . . . . . . . . . . . . . . . . . . . . . . . . . . . . . . . . . . . . . . . . 125Working with User-Defined Fields. . . . . . . . . . . . . . . . . . . . . . . . . . . . . . . . . . . . . . . . . . . . . . 125Entering Data for User-Defined Fields . . . . . . . . . . . . . . . . . . . . . . . . . . . . . . . . . . . . . . . . . . . 126Batch Updating User-Defined Fields . . . . . . . . . . . . . . . . . . . . . . . . . . . . . . . . . . . . . . . . . . . . 126
Inventory Analyzer Command-Line Options . . . . . . . . . . . . . . . . . . . . . . . . . . . . . . . . . . . 127Output Options . . . . . . . . . . . . . . . . . . . . . . . . . . . . . . . . . . . . . . . . . . . . . . . . . . . . . . . . . . . . . 127User ID Options . . . . . . . . . . . . . . . . . . . . . . . . . . . . . . . . . . . . . . . . . . . . . . . . . . . . . . . . . . . . 127Mode Options . . . . . . . . . . . . . . . . . . . . . . . . . . . . . . . . . . . . . . . . . . . . . . . . . . . . . . . . . . . . . . 127Asset Tag Options . . . . . . . . . . . . . . . . . . . . . . . . . . . . . . . . . . . . . . . . . . . . . . . . . . . . . . . . . . . 128Inventory Options . . . . . . . . . . . . . . . . . . . . . . . . . . . . . . . . . . . . . . . . . . . . . . . . . . . . . . . . . . . 128Interactive Mode Options . . . . . . . . . . . . . . . . . . . . . . . . . . . . . . . . . . . . . . . . . . . . . . . . . . . . . 128E-mail Options . . . . . . . . . . . . . . . . . . . . . . . . . . . . . . . . . . . . . . . . . . . . . . . . . . . . . . . . . . . . . 128
Linux Inventory Analyzer Command-Line options . . . . . . . . . . . . . . . . . . . . . . . . . . . . . . 129Mac Inventory Analyzer Command-Line options . . . . . . . . . . . . . . . . . . . . . . . . . . . . . . . 130Report Designer . . . . . . . . . . . . . . . . . . . . . . . . . . . . . . . . . . . . . . . . . . . . . . . . . . . . . . . . . 131
Chapter 9. Obtaining Technical Support . . . . . . . . . . . . . . . . . . . . . . . . . . . . . . . . 132
Troubleshooting On-Demand Audit . . . . . . . . . . . . . . . . . . . . . . . . . . . . . . . . . . . . . . . . . . 133Summary . . . . . . . . . . . . . . . . . . . . . . . . . . . . . . . . . . . . . . . . . . . . . . . . . . . . . . . . . . . . . . . . . . 133Computers Being Audited. . . . . . . . . . . . . . . . . . . . . . . . . . . . . . . . . . . . . . . . . . . . . . . . . . . . . 133Host Machine . . . . . . . . . . . . . . . . . . . . . . . . . . . . . . . . . . . . . . . . . . . . . . . . . . . . . . . . . . . . . . 137
Troubleshooting Linux Inventory Analyzer . . . . . . . . . . . . . . . . . . . . . . . . . . . . . . . . . . . . 138Contacting Alloy Software . . . . . . . . . . . . . . . . . . . . . . . . . . . . . . . . . . . . . . . . . . . . . . . . . 139
Premium Support . . . . . . . . . . . . . . . . . . . . . . . . . . . . . . . . . . . . . . . . . . . . . . . . . . . . . . . . . . . 139Using the Community Forums and Online FAQ’s . . . . . . . . . . . . . . . . . . . . . . . . . . . . . . . . . . 139Contact Information . . . . . . . . . . . . . . . . . . . . . . . . . . . . . . . . . . . . . . . . . . . . . . . . . . . . . . . . . 139
Chapter 10. Glossary . . . . . . . . . . . . . . . . . . . . . . . . . . . . . . . . . . . . . . . . . . . . . . . . . 140
Asset Tag . . . . . . . . . . . . . . . . . . . . . . . . . . . . . . . . . . . . . . . . . . . . . . . . . . . . . . . . . . . . . . 141Audit . . . . . . . . . . . . . . . . . . . . . . . . . . . . . . . . . . . . . . . . . . . . . . . . . . . . . . . . . . . . . . . . . . 141Audit Configuration . . . . . . . . . . . . . . . . . . . . . . . . . . . . . . . . . . . . . . . . . . . . . . . . . . . . . . 141Audit Snapshot . . . . . . . . . . . . . . . . . . . . . . . . . . . . . . . . . . . . . . . . . . . . . . . . . . . . . . . . . . 141Audit Data Viewer . . . . . . . . . . . . . . . . . . . . . . . . . . . . . . . . . . . . . . . . . . . . . . . . . . . . . . . 141Audit Group . . . . . . . . . . . . . . . . . . . . . . . . . . . . . . . . . . . . . . . . . . . . . . . . . . . . . . . . . . . . 141Audit via E-mail . . . . . . . . . . . . . . . . . . . . . . . . . . . . . . . . . . . . . . . . . . . . . . . . . . . . . . . . . 141Client Machine . . . . . . . . . . . . . . . . . . . . . . . . . . . . . . . . . . . . . . . . . . . . . . . . . . . . . . . . . . 141Computer Group . . . . . . . . . . . . . . . . . . . . . . . . . . . . . . . . . . . . . . . . . . . . . . . . . . . . . . . . . 141Default On-Demand Audit Credentials . . . . . . . . . . . . . . . . . . . . . . . . . . . . . . . . . . . . . . . 141Dynamic Group. . . . . . . . . . . . . . . . . . . . . . . . . . . . . . . . . . . . . . . . . . . . . . . . . . . . . . . . . . 142E-mail Audit Group . . . . . . . . . . . . . . . . . . . . . . . . . . . . . . . . . . . . . . . . . . . . . . . . . . . . . . 142External Audit Data Source Group. . . . . . . . . . . . . . . . . . . . . . . . . . . . . . . . . . . . . . . . . . . 142Group for the On-Demand Audit of an IP Address Range. . . . . . . . . . . . . . . . . . . . . . . . . 142Group for the On-Demand Audit on a Windows Domain . . . . . . . . . . . . . . . . . . . . . . . . . 142Hardware/Software Inventory. . . . . . . . . . . . . . . . . . . . . . . . . . . . . . . . . . . . . . . . . . . . . . . 142Host Machine . . . . . . . . . . . . . . . . . . . . . . . . . . . . . . . . . . . . . . . . . . . . . . . . . . . . . . . . . . . 142Interactive Mode . . . . . . . . . . . . . . . . . . . . . . . . . . . . . . . . . . . . . . . . . . . . . . . . . . . . . . . . . 142Interactive Once Mode . . . . . . . . . . . . . . . . . . . . . . . . . . . . . . . . . . . . . . . . . . . . . . . . . . . . 142Intermediary Repository . . . . . . . . . . . . . . . . . . . . . . . . . . . . . . . . . . . . . . . . . . . . . . . . . . 142Inventory Analyzer . . . . . . . . . . . . . . . . . . . . . . . . . . . . . . . . . . . . . . . . . . . . . . . . . . . . . . . 142Inventory Analyzer Package . . . . . . . . . . . . . . . . . . . . . . . . . . . . . . . . . . . . . . . . . . . . . . . . 143Inventory Repository . . . . . . . . . . . . . . . . . . . . . . . . . . . . . . . . . . . . . . . . . . . . . . . . . . . . . 143
Alloy Discovery - Getting Started Guide iv
Table of Contents
Minimally Necessary Permissions . . . . . . . . . . . . . . . . . . . . . . . . . . . . . . . . . . . . . . . . . . . 143On-Demand Audit. . . . . . . . . . . . . . . . . . . . . . . . . . . . . . . . . . . . . . . . . . . . . . . . . . . . . . . . 143On-Demand Audit Credentials . . . . . . . . . . . . . . . . . . . . . . . . . . . . . . . . . . . . . . . . . . . . . . 143On-Demand Audit Group . . . . . . . . . . . . . . . . . . . . . . . . . . . . . . . . . . . . . . . . . . . . . . . . . . 143Portable Audit . . . . . . . . . . . . . . . . . . . . . . . . . . . . . . . . . . . . . . . . . . . . . . . . . . . . . . . . . . . 143Scriptable Audit . . . . . . . . . . . . . . . . . . . . . . . . . . . . . . . . . . . . . . . . . . . . . . . . . . . . . . . . . 143Scriptable Audit Group. . . . . . . . . . . . . . . . . . . . . . . . . . . . . . . . . . . . . . . . . . . . . . . . . . . . 144Shared Folder Machine . . . . . . . . . . . . . . . . . . . . . . . . . . . . . . . . . . . . . . . . . . . . . . . . . . . . 144Side Bar. . . . . . . . . . . . . . . . . . . . . . . . . . . . . . . . . . . . . . . . . . . . . . . . . . . . . . . . . . . . . . . . 144Silent Mode. . . . . . . . . . . . . . . . . . . . . . . . . . . . . . . . . . . . . . . . . . . . . . . . . . . . . . . . . . . . . 144SMBIOS Filter . . . . . . . . . . . . . . . . . . . . . . . . . . . . . . . . . . . . . . . . . . . . . . . . . . . . . . . . . . 144Static Group . . . . . . . . . . . . . . . . . . . . . . . . . . . . . . . . . . . . . . . . . . . . . . . . . . . . . . . . . . . . 144Style . . . . . . . . . . . . . . . . . . . . . . . . . . . . . . . . . . . . . . . . . . . . . . . . . . . . . . . . . . . . . . . . . . 144UNC . . . . . . . . . . . . . . . . . . . . . . . . . . . . . . . . . . . . . . . . . . . . . . . . . . . . . . . . . . . . . . . . . . 144
Alloy Discovery - Getting Started Guide v
List of Figures
List of Figures Figure 1: Import Alloy Network Inventory 4 Settings. . . . . . . . . . . . . . . . . . . . . . . . . . . . . . . . . 9Figure 2: Alloy Network Inventory 4 Settings Imported . . . . . . . . . . . . . . . . . . . . . . . . . . . . . . . 9Figure 3: Installation Completed . . . . . . . . . . . . . . . . . . . . . . . . . . . . . . . . . . . . . . . . . . . . . . . . 21Figure 4: Specifying an IP address range. . . . . . . . . . . . . . . . . . . . . . . . . . . . . . . . . . . . . . . . . . 25Figure 5: Providing Credentials for On-Demand Audit Account . . . . . . . . . . . . . . . . . . . . . . . 26Figure 6: Audit Methods Diagram . . . . . . . . . . . . . . . . . . . . . . . . . . . . . . . . . . . . . . . . . . . . . . . 29Figure 7: Audit Settings Dialog . . . . . . . . . . . . . . . . . . . . . . . . . . . . . . . . . . . . . . . . . . . . . . . . . 31Figure 8: Asset Tag Options . . . . . . . . . . . . . . . . . . . . . . . . . . . . . . . . . . . . . . . . . . . . . . . . . . . 33Figure 9: Display Options . . . . . . . . . . . . . . . . . . . . . . . . . . . . . . . . . . . . . . . . . . . . . . . . . . . . . 34Figure 10: Available Controls . . . . . . . . . . . . . . . . . . . . . . . . . . . . . . . . . . . . . . . . . . . . . . . . . . . 35Figure 11: Inventory Analyzer Splash Screen with All Controls Enabled . . . . . . . . . . . . . . . . . 36Figure 12: Custom Input Fields . . . . . . . . . . . . . . . . . . . . . . . . . . . . . . . . . . . . . . . . . . . . . . . . . . 37Figure 13: Editing Custom Field . . . . . . . . . . . . . . . . . . . . . . . . . . . . . . . . . . . . . . . . . . . . . . . . . 38Figure 14: Inventory Analyzer Splash Screen with Two Custom Fields. . . . . . . . . . . . . . . . . . . 39Figure 15: Registry Keys . . . . . . . . . . . . . . . . . . . . . . . . . . . . . . . . . . . . . . . . . . . . . . . . . . . . . . 41Figure 16: Edit Registry Key Window. . . . . . . . . . . . . . . . . . . . . . . . . . . . . . . . . . . . . . . . . . . . . 42Figure 17: Microsoft Registry Editor . . . . . . . . . . . . . . . . . . . . . . . . . . . . . . . . . . . . . . . . . . . . . 42Figure 18: Adding Registry Key . . . . . . . . . . . . . . . . . . . . . . . . . . . . . . . . . . . . . . . . . . . . . . . . . 43Figure 19: Event Log Options . . . . . . . . . . . . . . . . . . . . . . . . . . . . . . . . . . . . . . . . . . . . . . . . . . . 44Figure 20: Adding Filtering Condition . . . . . . . . . . . . . . . . . . . . . . . . . . . . . . . . . . . . . . . . . . . . 46Figure 21: File Scan Options . . . . . . . . . . . . . . . . . . . . . . . . . . . . . . . . . . . . . . . . . . . . . . . . . . . . 47Figure 22: Adding a File Mask . . . . . . . . . . . . . . . . . . . . . . . . . . . . . . . . . . . . . . . . . . . . . . . . . . 48Figure 23: File Scan Item. . . . . . . . . . . . . . . . . . . . . . . . . . . . . . . . . . . . . . . . . . . . . . . . . . . . . . . 49Figure 24: Excluding Files . . . . . . . . . . . . . . . . . . . . . . . . . . . . . . . . . . . . . . . . . . . . . . . . . . . . . . 50Figure 25: Adding Drives and Directories . . . . . . . . . . . . . . . . . . . . . . . . . . . . . . . . . . . . . . . . . . 51Figure 26: Excluding Drives and Directories. . . . . . . . . . . . . . . . . . . . . . . . . . . . . . . . . . . . . . . . 52Figure 27: SMBIOS Filter . . . . . . . . . . . . . . . . . . . . . . . . . . . . . . . . . . . . . . . . . . . . . . . . . . . . . . 53Figure 28: Exclusion Rules . . . . . . . . . . . . . . . . . . . . . . . . . . . . . . . . . . . . . . . . . . . . . . . . . . . . . 54Figure 29: Bypass Rules. . . . . . . . . . . . . . . . . . . . . . . . . . . . . . . . . . . . . . . . . . . . . . . . . . . . . . . . 56Figure 30: Default On-Demand Audit Credentials . . . . . . . . . . . . . . . . . . . . . . . . . . . . . . . . . . . 60Figure 31: Specifying an IP address range. . . . . . . . . . . . . . . . . . . . . . . . . . . . . . . . . . . . . . . . . . 63Figure 32: Specifying Custom On-Demand Audit Account . . . . . . . . . . . . . . . . . . . . . . . . . . . . 64Figure 33: Specifying SNMP Discovery settings . . . . . . . . . . . . . . . . . . . . . . . . . . . . . . . . . . . . 65Figure 34: Finishing the New Group Wizard. . . . . . . . . . . . . . . . . . . . . . . . . . . . . . . . . . . . . . . . 66Figure 35: On-Demand Audit Group Created . . . . . . . . . . . . . . . . . . . . . . . . . . . . . . . . . . . . . . . 66Figure 36: Status of the Discovering Process . . . . . . . . . . . . . . . . . . . . . . . . . . . . . . . . . . . . . . . 67Figure 37: Computers Discovered . . . . . . . . . . . . . . . . . . . . . . . . . . . . . . . . . . . . . . . . . . . . . . . . 68Figure 38: Audit Progress pane . . . . . . . . . . . . . . . . . . . . . . . . . . . . . . . . . . . . . . . . . . . . . . . . . . 69Figure 39: On-Demand Audit Status . . . . . . . . . . . . . . . . . . . . . . . . . . . . . . . . . . . . . . . . . . . . . . 70Figure 40: Refreshing the Data View. . . . . . . . . . . . . . . . . . . . . . . . . . . . . . . . . . . . . . . . . . . . . . 70Figure 41: Audited On-Demand Audit Group . . . . . . . . . . . . . . . . . . . . . . . . . . . . . . . . . . . . . . . 71Figure 42: Auditing a Single Computer . . . . . . . . . . . . . . . . . . . . . . . . . . . . . . . . . . . . . . . . . . . . 72Figure 43: Scheduled On-Demand Audit Status shown in the System Tray . . . . . . . . . . . . . . . . 73Figure 44: Creating Network Share on the Alloy Discovery Host Machine . . . . . . . . . . . . . . . . 75

Alloy Discovery - Getting Started Guide vi
List of Figures
Figure 45: Auditing Computers on a Windows Domain . . . . . . . . . . . . . . . . . . . . . . . . . . . . . . . 77Figure 46: Registry Editor . . . . . . . . . . . . . . . . . . . . . . . . . . . . . . . . . . . . . . . . . . . . . . . . . . . . . . 78Figure 47: Startup Menu Items . . . . . . . . . . . . . . . . . . . . . . . . . . . . . . . . . . . . . . . . . . . . . . . . . . 79Figure 48: Inventory Analyzer as a Scheduled Task . . . . . . . . . . . . . . . . . . . . . . . . . . . . . . . . . . 80Figure 49: Auditing Computers via E-mail . . . . . . . . . . . . . . . . . . . . . . . . . . . . . . . . . . . . . . . . . 82Figure 50: Configuring Incoming Mail Server Settings . . . . . . . . . . . . . . . . . . . . . . . . . . . . . . . 84Figure 51: Configuring Outgoing Mail Server Settings. . . . . . . . . . . . . . . . . . . . . . . . . . . . . . . . 85Figure 52: Configuring Outgoing Mail Server Settings. . . . . . . . . . . . . . . . . . . . . . . . . . . . . . . . 87Figure 53: Processing E-mail Messages . . . . . . . . . . . . . . . . . . . . . . . . . . . . . . . . . . . . . . . . . . . 90Figure 54: Auditing Non-Networked Computers . . . . . . . . . . . . . . . . . . . . . . . . . . . . . . . . . . . . 91Figure 55: Specifying Destination Folder . . . . . . . . . . . . . . . . . . . . . . . . . . . . . . . . . . . . . . . . . . 93Figure 56: Configuring the Mirroring Option . . . . . . . . . . . . . . . . . . . . . . . . . . . . . . . . . . . . . . . 97Figure 57: Configuring External Audit Data Source Group Properties . . . . . . . . . . . . . . . . . . . 100Figure 58: Viewing Audit Data for an Audit Group . . . . . . . . . . . . . . . . . . . . . . . . . . . . . . . . . 103Figure 59: Computer List tab Being Filtered by Operating System . . . . . . . . . . . . . . . . . . . . . 105Figure 60: Preview Pane . . . . . . . . . . . . . . . . . . . . . . . . . . . . . . . . . . . . . . . . . . . . . . . . . . . . . . 106Figure 61: Previewing SNMP Data from a Network Device. . . . . . . . . . . . . . . . . . . . . . . . . . . 107Figure 62: Computer Snapshot, System Overview . . . . . . . . . . . . . . . . . . . . . . . . . . . . . . . . . . 108Figure 63: Computer Snapshot, Windows Disk Drives . . . . . . . . . . . . . . . . . . . . . . . . . . . . . . 111Figure 64: Viewing Snapshot File Name . . . . . . . . . . . . . . . . . . . . . . . . . . . . . . . . . . . . . . . . . . 116Figure 65: Compare With window. . . . . . . . . . . . . . . . . . . . . . . . . . . . . . . . . . . . . . . . . . . . . . . 117Figure 66: Audit Files Compare. . . . . . . . . . . . . . . . . . . . . . . . . . . . . . . . . . . . . . . . . . . . . . . . . 118Figure 67: Viewing File Scan results in Audit Data Viewer . . . . . . . . . . . . . . . . . . . . . . . . . . . 119Figure 68: Configuring the Computer List. . . . . . . . . . . . . . . . . . . . . . . . . . . . . . . . . . . . . . . . . 120Figure 69: External Tools (Preview Pane) . . . . . . . . . . . . . . . . . . . . . . . . . . . . . . . . . . . . . . . . . 121Figure 70: External Tools dialog . . . . . . . . . . . . . . . . . . . . . . . . . . . . . . . . . . . . . . . . . . . . . . . . 123Figure 71: “Ping” Properties . . . . . . . . . . . . . . . . . . . . . . . . . . . . . . . . . . . . . . . . . . . . . . . . . . . 124Figure 72: Configuring User-Defined Fields . . . . . . . . . . . . . . . . . . . . . . . . . . . . . . . . . . . . . . . 125

Alloy Discovery - Getting Started Guide Page 1 of 144
About This Document
About This DocumentThis chapter introduces Alloy Discovery 5 Getting Started Guide.
Document Audience ........................................................................................................................................................... 2
Document Scope and Structure ....................................................................................................................................... 3

Alloy Discovery - Getting Started Guide Page 2 of 144
About This Document
Document Audience
This guide targets system administrators who are installing, configuring, and managing Alloy Discovery 5. The manual provides a complete overview of the installation and configuration steps to help you get started with Alloy Discovery.
This document is intended for those individuals who have the basic knowledge and skills necessary for system administration.
Alloy Discovery - Getting Started Guide Page 3 of 144
About This Document
Document Scope and Structure
This guide includes the following chapters:
• Chapter 1. Introducing Alloy Discovery provides an overview of Alloy Discovery. It also contains important information and detailed instructions for users upgrading from Alloy Network Inventory version 4.
• Chapter 2. Installing Alloy Discovery helps you plan your installation and explains the installation procedure in detail.
• Chapter 3. Quick Start with Alloy Discovery explains the Quick Start Wizard.
• Chapter 4. Configuring Alloy Discovery provides an overview of various audit methods and guides you through the configuration tasks.
• Chapter 5. Auditing Computers with Alloy Discovery provides a detailed description of various audit methods.
• Chapter 7. Viewing Audit Results explains how to view and analyze the audit results.
• Chapter 6. Integrating Alloy Discovery with Alloy Navigator explains how to pair up Alloy Discovery and Alloy Navigator so that one complements the other as the source of audit snapshots.
• Chapter 8. Advanced Options explains audit snapshots and provides a list of command-line options for the Inventory Analyzer.
• Chapter 9. Obtaining Technical Support explains how to contact Alloy Software and provides instructions for troubleshooting potential issues with Alloy Discovery.
• Chapter 10. Glossary explains terms used throughout the document.
Alloy Discovery - Getting Started Guide Page 4 of 144
Chapter 1. Introducing Alloy Discovery
Chapter 1. Introducing Alloy DiscoveryThis chapter provides an overview of Alloy Discovery and includes the following sections:
Overview ............................................................................................................................................................................ 5Alloy Discovery at a Glance ........................................................................................................................................... 5Basic Architecture ........................................................................................................................................................... 5
Notes for Alloy Network Inventory 4 Users..................................................................................................................... 8New Features................................................................................................................................................................... 6Upgrading to the Latest Version ..................................................................................................................................... 8
Notes for Upgrading to Alloy Discovery 5.1.0 (from 5.x) ............................................................................................. 13Upgrade Considerations ................................................................................................................................................ 15
Alloy Discovery - Getting Started Guide Page 5 of 144
Chapter 1. Introducing Alloy Discovery
Overview
Alloy Discovery is a budget-friendly, easy-to-deploy solution for automated discovery and auditing of hardware and software configurations for networked and standalone computers.
The new generation of the former Alloy Network Inventory product line sets the new standard in productivity and usability. It delivers accurate and up-to-date configuration information in a matter of minutes from the moment you install it. Targeted for small and medium business environments and IT service providers, Alloy Discovery offers a compelling menu of best-in-class features and functions that support today’s ever changing business climate.
Alloy Discovery at a Glance
Alloy Discovery provides you with the following features:
• Automated discovery, identification, and analysis of computers, network devices, and installed software assets throughout your organization.
• Audit networked and non-networked computers running Windows, Linux, and Mac OS.
• Automated discovery and identification of networked computers and SNMP devices.
• Accurate inventory of installed software products.
• Web reporting for publishing audit results on your intranet.
• Reporting and charting.
• Automatic grouping of audited computers based on custom criteria.
Basic Architecture
Alloy Discovery includes the following modules:
• Main Console is the central user interface for Alloy Discovery. The console provides you with tools you need to configure, deploy, and run audits. It also provides the tools for analyzing audit results.
• Inventory Analyzer is the primary tool for auditing computers. It captures the information about hardware configurations and installed software, and produces audit snapshot files.
• Audit Data Viewer is the viewer for audit snapshot (.adt) files. This tool can be used to view audit snapshot files from the hard drive, or opening the file as an E-mail attachment. You can also run the Audit Data Viewer from the command line.
• ADT to XML conversion utility is a command-line utility for converting audit snapshots to XML format. (Not available in the Free Edition.)

Alloy Discovery - Getting Started Guide Page 6 of 144
Chapter 1. Introducing Alloy Discovery
• Web Report Module is a command-line utility for generating HTML reports. (Not available in the Free Edition.)
New Features
The most important changes are listed below. For a comprehensive list of changes please see the Product Fact Sheet (http://www.alloy-software.com/doc/AD5FactSheet.pdf).
• The On-Demand Audit feature was greatly revised, resulting in ease of configuration, increased reliability, and enhanced usability. Client-side configuration is no longer required. In addition, the following On-Demand Audits are now supported:
° On-Demand Audit for Linux and Mac computers
° On-Demand audit for SNMP devices
• The new Quick Start Wizard gets you started with Alloy Discovery, guiding you through the steps of discovering and auditing computers that are part of your network.
• The new group infrastructure was created. Now you can combine computers in groups that represent physical or logical subsets of your network, audit the combined computers with individual group settings, and analyze the audit data for these groups.
• The user interface was improved:
° The new Side Bar allows you to manage your audit and computers groups.
° The Preview Pane provides a quick digest of configuration information for a selected computer or device. Also, now you can run external tools right from the Preview Pane.
° The Audit Configuration window has been renamed to “Audit Settings” and has been redesigned using tabs. It provides access to Audit Configuration, On-demand Audit Credentials, and SNMP settings.
° The Audit Status window displayed when monitoring the progress of an audit can now be docked into position at the bottom of the main console window.
• The Active Directory integration feature facilitates computer network discovery.
• The Inclusion Rules feature provides criteria for adding computers to a dynamic group through a combination of logical expressions (rules) based on the values reported in audit snapshots. As soon as the computers matching the inclusion rules are audited, they will be added to the group automatically. This feature can be accessed by right-clicking on any dynamic group and selecting Properties.
• The new Audit via E-mail feature allows you to configure an audit package for delivering audit snapshots to a designated mailbox, which Alloy Discovery will automatically collect them from.
Important For information on the Alloy Discovery Free Edition, see “Free Version of Alloy Discovery” on page 19.
Alloy Discovery - Getting Started Guide Page 7 of 144
Chapter 1. Introducing Alloy Discovery
• The new Portable Audit Wizard lets you create portable audit solutions (e.g. using flash drives), for auditing computers that are not part of the internal network domain.
• The Inventory Analyzer for Windows includes many enhancements and bug fixes, including:
° A number of new data items are now captured in audit snapshots: used disk space, data bus slots, Windows updates, events in the Directory Service, DNS Service and File Replication Service Event Logs, USB and PCI devices, etc.
° Now the Inventory Analyzer can send audit snapshots by E-mail; secure SMTP connections (TLS/SSL) are supported.
° System environment variables now can be used in path-related command line options.
• The Inventory Analyzers for Linux and Mac OS are updated to the latest versions.
• Categorization of audit data in the Audit Data Viewer (former Audit Snapshot Viewer) is more comprehensive now.
• MS Windows Vista is now supported on both host and client machines.
• Alloy Discovery can be paired up with Alloy Navigator so that one complements the other as the source of audit snapshots.
• Unicode is now supported.
• Audit snapshots now collect Windows-specific security information for each audited computer (running Windows XP Professional SP2 and later, or Windows Vista). This information can be viewed by selecting the Security section newly added to the Audit Data Viewer. The Security information includes:
° Windows Security Center (WSC)
° Installed antivirus software
° Windows firewall information
• User-defined fields allow users to store custom information about computers. Using the Batch Update feature you can populate or update user-defined fields for multiple computers at once. User-defined fields can be added to the Computer List; they are also displayed in the Audit Data Viewer when you're viewing a computer's details.
• Alloy Discovery lets you compare the configurations of two audited computers by comparing their audit files using custom criteria.
• Alloy Discovery is now packaged with a comprehensive set of standard reports for general use (such as “Assets by Operating System”, “SNMP Devices”, “Top 10 Software”, etc.). The layout of any standard report can be customized, or a new report can be created from scratch by using the Report Designer feature.
Alloy Discovery - Getting Started Guide Page 8 of 144
Chapter 1. Introducing Alloy Discovery
Notes for Alloy Network Inventory 4 Users
Alloy Discovery ® 5 is the new generation of the former Alloy Network Inventory product line. The new release includes many important new features, improvements, and bug fixes. Please read the “Upgrading to the Latest Version” on page 8 for instructions on updating your system to the new version.
Upgrading to the Latest Version
When installing Alloy Discovery 5, you can import the configuration settings from Alloy Network Inventory version 4.
Perform the following steps to install the Alloy Discovery 5:
1. Download the Alloy Discovery 5 installer (see “Download Alloy Discovery 5 installer” on page 8);
2. Run the installer on the machine(s) hosting Alloy Network Inventory and perform the upgrade (see “Run the installer on your Alloy Network Inventory host machine” on page 8);
3. Optional: Update the audit settings in the Shared Folder (see “Update the audit settings in the Shared Folder” on page 11);
4. Uninstall Alloy Network Inventory version 4 (see “Uninstall Alloy Network Inventory version 4” on page 11);
5. Optional: Remove version 4 configuration settings (see “Remove Alloy Network Inventory 4 configuration settings” on page 12).
Download Alloy Discovery 5 installer
You can find the Alloy Discovery 5 installer in the Downloads & Updates section of the Support Portal (http://support.alloy-software.com/?mode=updates).
Run the installer on your Alloy Network Inventory host machine
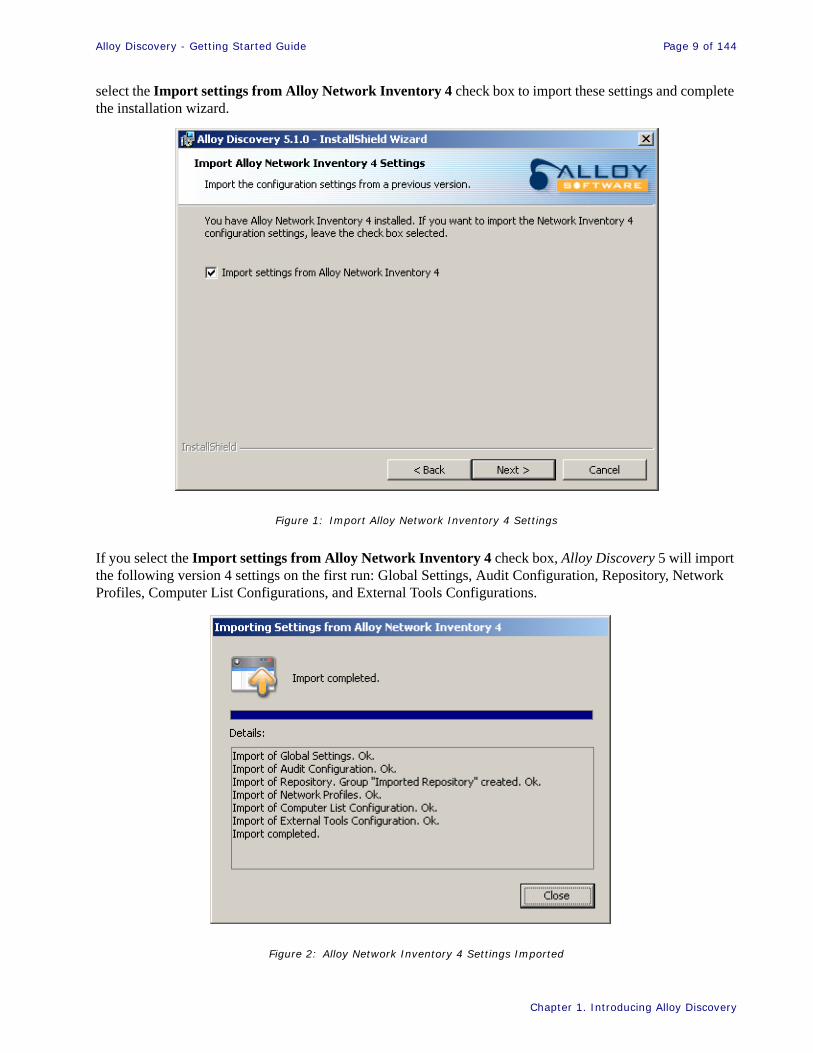
Run the Alloy Discovery 5 installer on your administrator’s workstation hosting Alloy Network Inventory. This will upgrade your existing installation and prompt you to import the configuration settings from Alloy Network Inventory 4. On the Import Alloy Network Inventory 4 Settings page of the installation wizard,
Alloy Discovery - Getting Started Guide Page 9 of 144
Chapter 1. Introducing Alloy Discovery
select the Import settings from Alloy Network Inventory 4 check box to import these settings and complete the installation wizard.
Figure 1: Import Alloy Network Inventory 4 Settings
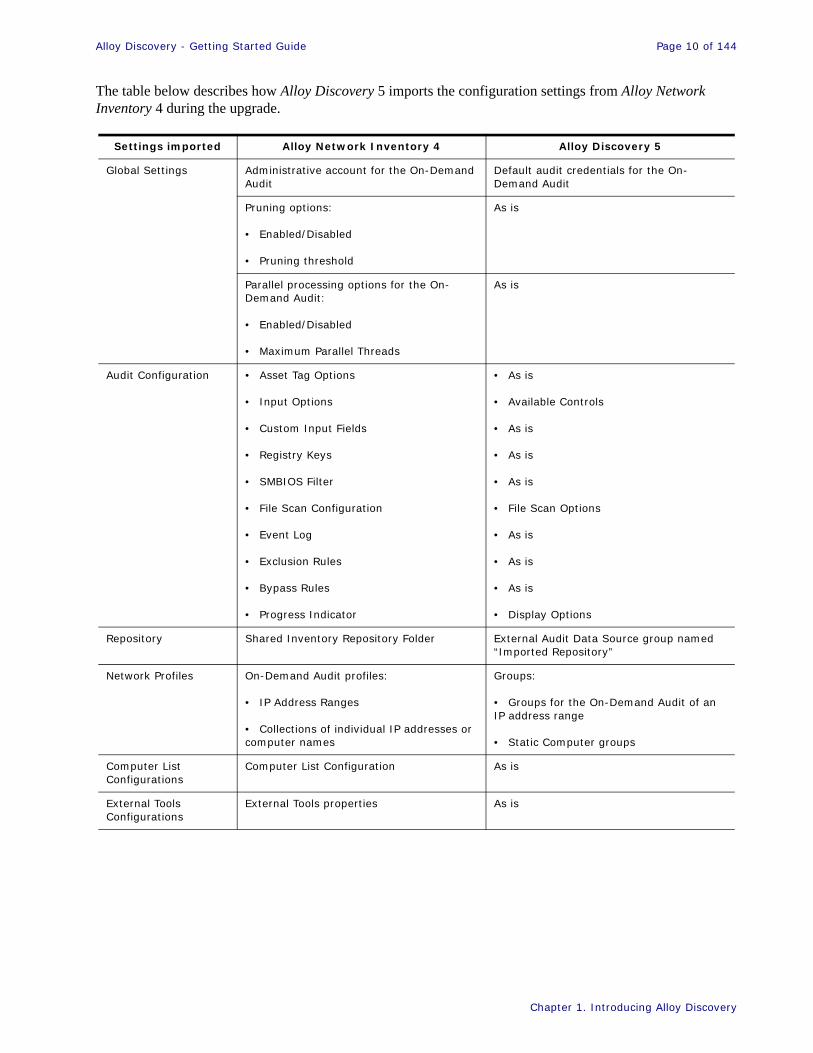
If you select the Import settings from Alloy Network Inventory 4 check box, Alloy Discovery 5 will import the following version 4 settings on the first run: Global Settings, Audit Configuration, Repository, Network Profiles, Computer List Configurations, and External Tools Configurations.
Figure 2: Alloy Network Inventory 4 Settings Imported
Alloy Discovery - Getting Started Guide Page 10 of 144
Chapter 1. Introducing Alloy Discovery
The table below describes how Alloy Discovery 5 imports the configuration settings from Alloy Network Inventory 4 during the upgrade.
Settings imported Alloy Network Inventory 4 Alloy Discovery 5
Global Settings Administrative account for the On-Demand Audit
Default audit credentials for the On-Demand Audit
Pruning options:
• Enabled/Disabled
• Pruning threshold
As is
Parallel processing options for the On-Demand Audit:
• Enabled/Disabled
• Maximum Parallel Threads
As is
Audit Configuration • Asset Tag Options
• Input Options
• Custom Input Fields
• Registry Keys
• SMBIOS Filter
• File Scan Configuration
• Event Log
• Exclusion Rules
• Bypass Rules
• Progress Indicator
• As is
• Available Controls
• As is
• As is
• As is
• File Scan Options
• As is
• As is
• As is
• Display Options
Repository Shared Inventory Repository Folder External Audit Data Source group named “Imported Repository”
Network Profiles On-Demand Audit profiles:
• IP Address Ranges
• Collections of individual IP addresses or computer names
Groups:
• Groups for the On-Demand Audit of an IP address range
• Static Computer groups
Computer List Configurations
Computer List Configuration As is
External Tools Configurations
External Tools properties As is
Alloy Discovery - Getting Started Guide Page 11 of 144
Chapter 1. Introducing Alloy Discovery
Update the audit settings in the Shared FolderOptional
If you automated the audit on your network using domain logon scripts or scheduled tasks, you can use the “Imported Repository” group to view the existing results of that audit. This group is automatically created during the upgrade process. For details, see “Integrating with External Sources of Audit Snapshots” on page 98.
When you are ready to start using Alloy Discovery 5, update the audit infrastructure on the server hosting the network share.
Before you begin, you need to know the path to the Shared Agent Folder. If you are unsure you can find what folder was being used by Alloy Network Inventory 4 as the Shared Agent Folder as follows:
1. In Alloy Network Inventory 4, select Audit > Deployment Wizard from the main menu to access the Deployment Wizard.
2. Navigate to the Deployment Location screen. The path is displayed in the Shared Agent Folder field.
Then run Alloy Discovery 5 and re-deploy the Inventory Analyzer to the Shared Agent Folder as follows:
1. Select File > New Group from the main menu to start the New Group Wizard.
2. On the Group Type page of the wizard, choose to create an Audit group.
3. On the Audit Groups page, choose the Scriptable audit method.
4. On the Shared Folder page, click Yes, I already have a shared folder.
5. On the Shared Folder Location page, enter the UNC path to the Shared Agent Folder.
6. When prompted to replace the existing Inventory Analyzer, click Yes.
7. Complete the wizard.
After the first round of the automated audit, audit snapshots will be loaded by Alloy Discovery 5 into the Inventory Repository. Now you can delete the “Imported Repository” group since you won’t need it anymore.
Uninstall Alloy Network Inventory version 4
At this point the upgrade is complete. You can use the Add or Remove Programs tool to uninstall Alloy Network Inventory 4 from the host machine.
Alloy Discovery - Getting Started Guide Page 12 of 144
Chapter 1. Introducing Alloy Discovery
Remove Alloy Network Inventory 4 configuration settingsOptional
Even though you can safely skip this step, for security reasons you may want to remove the configuration settings that were necessary to enable the On-Demand Audit in Alloy Network Inventory 4.
• On the machine where Alloy Network Inventory 4 was formerly installed, remove the null session share as follows:
1. On the Start menu, click Run and type regedt32.
2. Select the following registry key:HKEY_LOCAL_MACHINE\SYSTEM\CurrentControlSet\Services\lanmanserver\parameters
3. Double-click the NullSessionShares value to edit it.
4. Delete the audit share name from the list. For example, if ina32.exe is in \\AuditServer\AuditShare, delete the “AuditShare” item.
5. Disable anonymous access:
° Under HKEY_LOCAL_MACHINE\System\CurrentControlSet\Control\Lsa,set the RestrictAnonymous value to 1.
° For Windows XP SP2 or later and for Windows Server 2003 or later:Under HKEY_LOCAL_MACHINESystem\CurrentControlSet\Control\Lsa, set the EveryoneIncludesAnonymous value to 0.
• On each remote client computer configured for On-Demand Audit, go the WMI properties and disable the Remote Enable option for the on-demand audit’s administrative account as follows:
1. On the Start menu, click Run and type wmimgmt.msc.
2. Right-click WMI Control and select Properties.
3. Click the Security tab.
4. Choose the ROOT\CIMV2 namespace and click Security.
5. Select the On-Demand Audit’s administrative account and clear the Allow check box (or select the Deny check box) for Remote Enable in the Permissions list.
Alloy Discovery - Getting Started Guide Page 13 of 144
Chapter 1. Introducing Alloy Discovery
Notes for Upgrading to Alloy Discovery 5.1.0 (from 5.x)
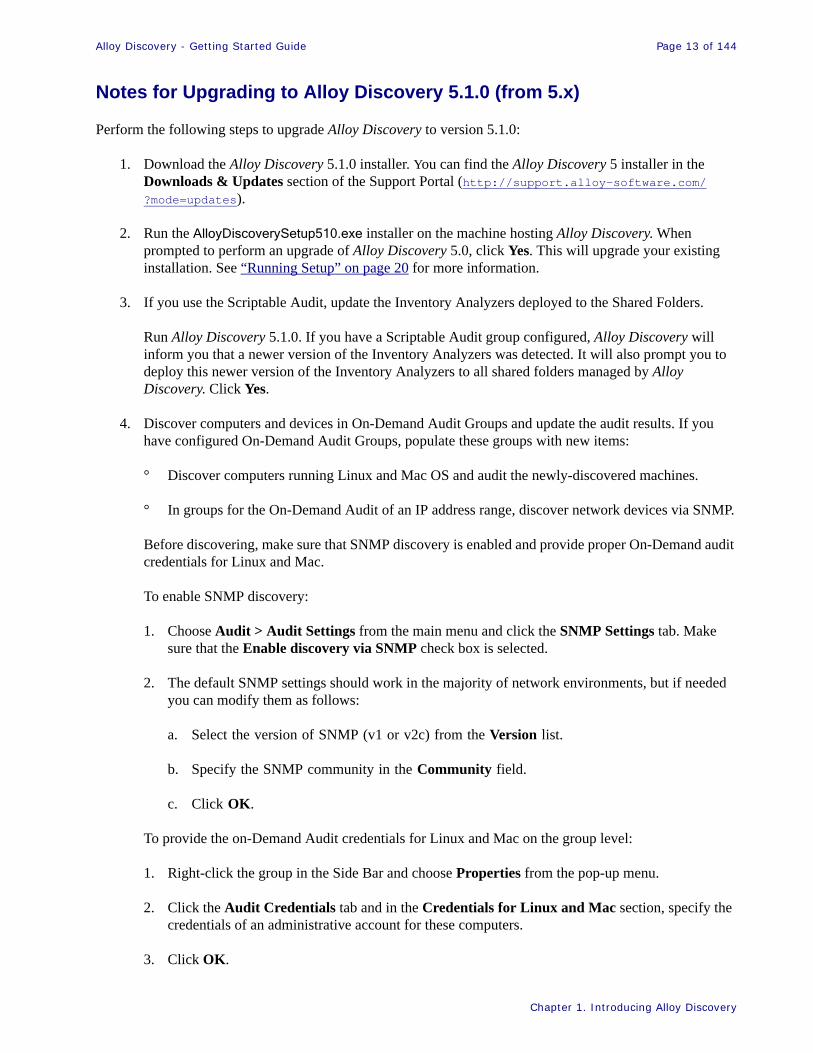
Perform the following steps to upgrade Alloy Discovery to version 5.1.0:
1. Download the Alloy Discovery 5.1.0 installer. You can find the Alloy Discovery 5 installer in the Downloads & Updates section of the Support Portal (http://support.alloy-software.com/?mode=updates).
2. Run the AlloyDiscoverySetup510.exe installer on the machine hosting Alloy Discovery. When prompted to perform an upgrade of Alloy Discovery 5.0, click Yes. This will upgrade your existing installation. See “Running Setup” on page 20 for more information.
3. If you use the Scriptable Audit, update the Inventory Analyzers deployed to the Shared Folders.
Run Alloy Discovery 5.1.0. If you have a Scriptable Audit group configured, Alloy Discovery will inform you that a newer version of the Inventory Analyzers was detected. It will also prompt you to deploy this newer version of the Inventory Analyzers to all shared folders managed by Alloy Discovery. Click Yes.
4. Discover computers and devices in On-Demand Audit Groups and update the audit results. If you have configured On-Demand Audit Groups, populate these groups with new items:
° Discover computers running Linux and Mac OS and audit the newly-discovered machines.
° In groups for the On-Demand Audit of an IP address range, discover network devices via SNMP.
Before discovering, make sure that SNMP discovery is enabled and provide proper On-Demand audit credentials for Linux and Mac.
To enable SNMP discovery:
1. Choose Audit > Audit Settings from the main menu and click the SNMP Settings tab. Make sure that the Enable discovery via SNMP check box is selected.
2. The default SNMP settings should work in the majority of network environments, but if needed you can modify them as follows:
a. Select the version of SNMP (v1 or v2c) from the Version list.
b. Specify the SNMP community in the Community field.
c. Click OK.
To provide the on-Demand Audit credentials for Linux and Mac on the group level:
1. Right-click the group in the Side Bar and choose Properties from the pop-up menu.
2. Click the Audit Credentials tab and in the Credentials for Linux and Mac section, specify the credentials of an administrative account for these computers.
3. Click OK.
Alloy Discovery - Getting Started Guide Page 14 of 144
Chapter 1. Introducing Alloy Discovery
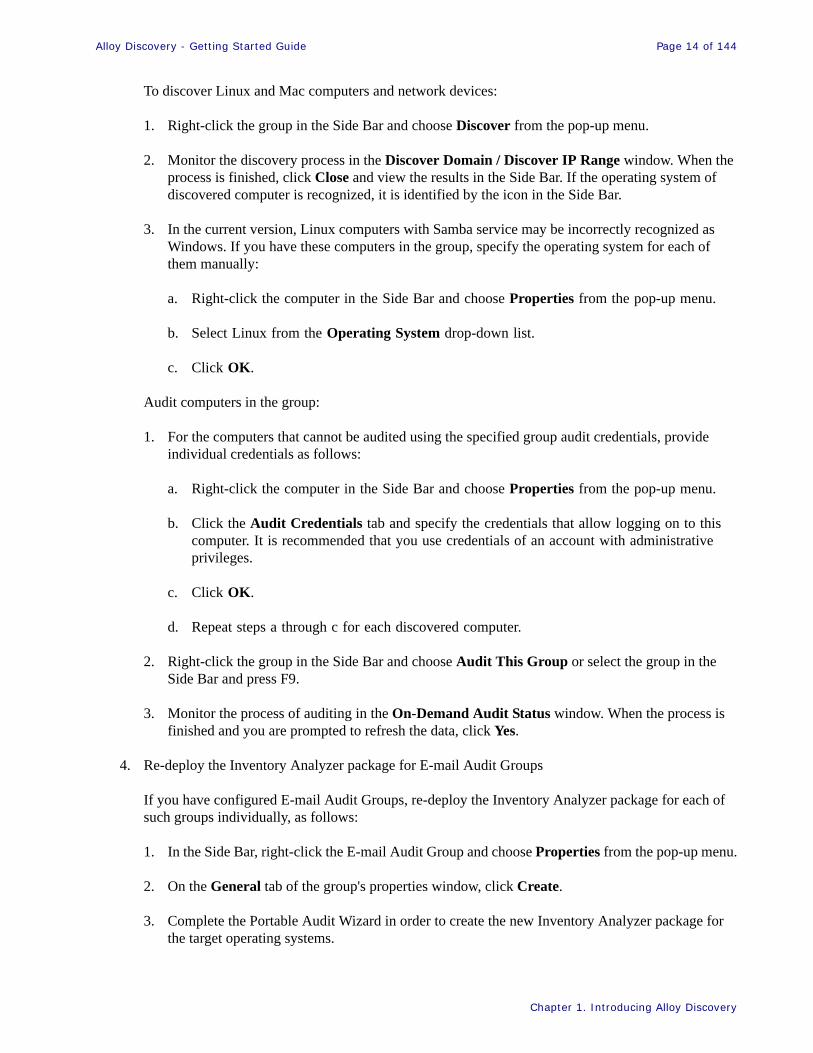
To discover Linux and Mac computers and network devices:
1. Right-click the group in the Side Bar and choose Discover from the pop-up menu.
2. Monitor the discovery process in the Discover Domain / Discover IP Range window. When the process is finished, click Close and view the results in the Side Bar. If the operating system of discovered computer is recognized, it is identified by the icon in the Side Bar.
3. In the current version, Linux computers with Samba service may be incorrectly recognized as Windows. If you have these computers in the group, specify the operating system for each of them manually:
a. Right-click the computer in the Side Bar and choose Properties from the pop-up menu.
b. Select Linux from the Operating System drop-down list.
c. Click OK.
Audit computers in the group:
1. For the computers that cannot be audited using the specified group audit credentials, provide individual credentials as follows:
a. Right-click the computer in the Side Bar and choose Properties from the pop-up menu.
b. Click the Audit Credentials tab and specify the credentials that allow logging on to this computer. It is recommended that you use credentials of an account with administrative privileges.
c. Click OK.
d. Repeat steps a through c for each discovered computer.
2. Right-click the group in the Side Bar and choose Audit This Group or select the group in the Side Bar and press F9.
3. Monitor the process of auditing in the On-Demand Audit Status window. When the process is finished and you are prompted to refresh the data, click Yes.
4. Re-deploy the Inventory Analyzer package for E-mail Audit Groups
If you have configured E-mail Audit Groups, re-deploy the Inventory Analyzer package for each of such groups individually, as follows:
1. In the Side Bar, right-click the E-mail Audit Group and choose Properties from the pop-up menu.
2. On the General tab of the group's properties window, click Create.
3. Complete the Portable Audit Wizard in order to create the new Inventory Analyzer package for the target operating systems.

Alloy Discovery - Getting Started Guide Page 15 of 144
Chapter 1. Introducing Alloy Discovery
4. Once this is completed, depending on how you use the Audit via E-mail method, do one of the following:
° If the Inventory Analyzer package has been deployed and automated on the target network, deliver the new package to the remote site and re-deploy it on the target network.
° If you've used the Audit vie E-mail method to audit single computers, just deliver there the new Inventory Analyzer package (for example, using a USB flash drive).
5. Re-create the Inventory Analyzer package for the Portable Audit
If you use the Portable Audit, re-create each of the Inventory Analyzer packages that you use for this audit method as follows:
1. Choose Audit > Create Portable Audit Package from the main menu.
2. Complete the Portable Audit Wizard in order to create the new Inventory Analyzer package for the target operating systems.
3. Deliver and deploy the new Inventory Analyzer package to the client machines (for example, using a USB flash drive).
Upgrade Considerations
The Preview Panel and HTML report templates in the “Sysdata” folder will be replaced during the upgrade, so if you have made any customizations your changes will be overwritten.
Alloy Discovery - Getting Started Guide Page 16 of 144
Chapter 2. Installing Alloy Discovery
Chapter 2. Installing Alloy DiscoveryThis chapter helps you plan your installation and explains the installation procedure in detail.
Planning Your Installation.............................................................................................................................................. 17Supported Platforms and System Requirements ........................................................................................................... 17Licensing Alloy Discovery............................................................................................................................................ 19
Installing Alloy Discovery ............................................................................................................................................... 20Running Setup ............................................................................................................................................................... 20
Next Steps.......................................................................................................................................................................... 22
Alloy Discovery - Getting Started Guide Page 17 of 144
Chapter 2. Installing Alloy Discovery
Planning Your Installation
Please read both of the following sections, “Supported Platforms and System Requirements” and the “Licensing Alloy Discovery” sections before installing Alloy Discovery. The following link will provide you with a list of known issues associated with this release.
http://support.alloy-software.com/?mode=kb_category_view&category_id=DA29BE63-C85F-49FD-BF0B-E080A70604C1
Supported Platforms and System Requirements
Alloy Discovery Host Machine
Alloy Discovery is usually run from the network administrator's workstation or from a workstation dedicated to the task. The following configuration is recommended:
• CPU − Intel Pentium or AMD processor (1 GHz or faster).
• RAM − 512 MB plus approximately 330 KB RAM for each audit snapshot file (or 560 KB, if the File Scan is enabled). For example, viewing 500 audit files will require 160 MB (or 275 MB) of additional RAM.
• OS − Windows 2000, Windows XP Professional, Windows Vista, Windows Server 2003, or Windows Server 2008.
• Hard Disk − 45 MB of free hard disk space for the installation plus approximately 400 KB for each audit snapshot file. For example, processing 500 audit files will require 200 MB of additional free disk space.
Client Machines
Client machines are the computers to be audited. The following operation systems are supported:
• MS Windows OS:
° On-Demand Audit:Windows NT 4.0 (Service Pack 4 or later), Windows 2000, Windows XP, Windows Vista, Windows Server 2003, or Windows Server 2008
° Agent-based audit methods (Scriptable Audit, Audit via E-mail, Portable Audit):Windows 98, Windows NT 4.0, Windows ME, Windows 2000, Windows XP, Windows Vista, Windows Server 2003, or Windows Server 2008.
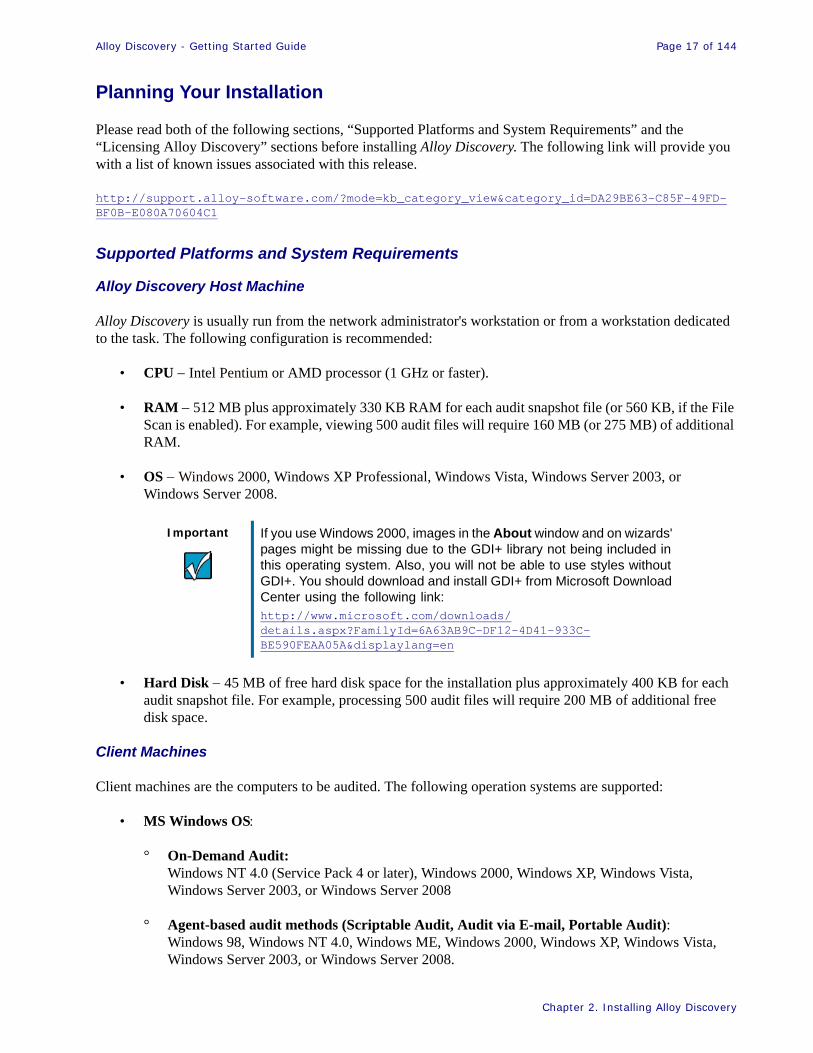
Important If you use Windows 2000, images in the About window and on wizards' pages might be missing due to the GDI+ library not being included in this operating system. Also, you will not be able to use styles without GDI+. You should download and install GDI+ from Microsoft Download Center using the following link:http://www.microsoft.com/downloads/details.aspx?FamilyId=6A63AB9C-DF12-4D41-933C-BE590FEAA05A&displaylang=en

Alloy Discovery - Getting Started Guide Page 18 of 144
Chapter 2. Installing Alloy Discovery
• Linux OS − Fedora 8, GentOS 5.1, Mandriva Linux release 2008.one, openSUSE 10.3, SUSE Linux Enterprise Desktop 10, Gentoo 2007, Slackware 12, Debian 4.0, Knoppix 4.0, Ubuntu 7.10, Red Hat Enterprise Linux Server 5.1.
• Mac OS − Mac OS X 10.3, 10.4, or 10.5.
Shared Folder Machine
If you plan to use the Scriptable Audit feature, which allows you to audit networked computers on a regular basis, you need to dedicate a server to host a shared folder for the Inventory Analyzer and an intermediate inventory repository, where audit snapshots will be created. The following configuration is recommended for the machine hosting the network share:
• Operating System:
° Windows OS − Windows 2000 (Server or Advanced Server), Windows Server 2003, or Windows Server 2008.
° Linux OS − A Linux OS with Samba 3 or higher installed and configured to support high availability and seamless integration into the Windows network environment (for details, see the Official Samba HOWTO at http://us3.samba.org/samba/docs/man/Samba-HOWTO-Collection/).
• Hard Disk − Each audit snapshot requires about 100 KB on the hard disk. If the File Scan is enabled, it will require an additional 100 to 500 KB per audit snapshot.
Important The On-Demand Audit feature requires that the SSH server is running on client computers and listening on the standard TCP port 22.
Important It is recommended that server-based OSes are used to host the shared folder for audit snapshots.There is a limitation when using client-based OSes, including Windows 2000 Professional, Windows XP, and Windows Vista, as the deployment share host since the number of computers permitted to simultaneously connect over the network is limited. This limitation will only be noticeable in larger environments (i.e, 500 computers and more), when using scriptable audits, where the chances of simultaneous attempts to access the shared folder used for storing audit snapshots would be greater.For more information on inbound connection limitations, see the Microsoft documentation for your OS. For example, for Windows XP see http://support.microsoft.com/?kbid=122920.
Alloy Discovery - Getting Started Guide Page 19 of 144
Chapter 2. Installing Alloy Discovery
Licensing Alloy Discovery
Licensing Model
The licensing model for Alloy Discovery is determined by audit licenses per repository. Audit licenses determine how many machines can be audited.
Please consider the following examples:
1. If you have no need to physically separate audit information for reasons of security or due to any other reasons, you will manage your computers from a single repository. This situation requires one license for however many computers you are managing in that repository.
2. If you do have a need to physically separate audit information, you may manage your computers from multiple repositories. This situation requires one license for each repository for however many computers you are managing per repository.
License File
When you purchase Alloy Discovery or decide to evaluate it, you receive an E-mail from Alloy Software, Inc. with an attached license, Support Portal login information, and installation instructions. The attached license.zip archive contains the product's digital license file − license.dat.
Extract the license file from the archive and save it to your computer. You will need this file to activate the product.
Free Version of Alloy Discovery
Alloy Discovery Free Edition is a free version of Alloy Discovery that provides full functionality of the application with only the following limitations:
• The number of audit licenses is limited to 10 and cannot be increased. Any larger number of audit licenses requires that you purchase the commercial version of Alloy Discovery.
• The command-line utility for publishing to the Web (wr.exe) is not included.
• The command-line utility for exporting audit snapshots to XML (adt2xml.exe) is not included.
• The report designer is not included.
Alloy Discovery - Getting Started Guide Page 20 of 144
Chapter 2. Installing Alloy Discovery
Installing Alloy Discovery
Before starting, be sure you review all of the system requirements carefully. The administrator's computer where you install Alloy Discovery must meet the Host Machine requirements (see “Alloy Discovery Host Machine” on page 17). Any computers on the network that you want to audit must meet the Client Machines requirements (see “Client Machines” on page 17).
Running Setup
To install Alloy Discovery, follow the instructions below:
1. Run the Alloy Discovery 5 installer.
2. Click Next on the Welcome… page. The License Agreement page appears.
3. Read the End-User License Agreement, select the check box if you agree to the terms of the agreement, and click Next. The Customer Information page appears.
4. Enter your user name and organization and choose whether you’re installing Alloy Discovery for all users or just for yourself, then click Next. The Destination Folder page appears.
5. Click Next to keep the default Destination Folder. Otherwise, click Change and browse for a destination folder, then click OK. Click Next to view the Alloy Audit Data Viewer Settings page appears.
6. We recommend keeping this Associate .adt files with the Alloy Audit Data Viewer check box selected. This will allow you to open and view audit data files with the standalone Alloy Audit Data Viewer. If for some reason you don't want to associate the .adt extension with the Audit Data Viewer, clear the check box. Click Next to navigate to the Product Activation page.
7. Install the digital license as follows:
° If you have your digital license .dat file available, click Browse and browse to this file. Then click Open. The path pointing to the selected license file will be populated within the input field. Review the target path on the next page, and click Next. (When the installation is complete, the selected file will be copied into the /Bin subfolder under your Alloy Discovery installation folder with the license.dat name.) The Ready to Install the Program page appears.
° If you don’t have your license file available at the moment, skip the step by selecting the I will manually install the digital license later check box. In this case, you will need to manually copy the license.dat file into the /Bin subfolder under your Alloy Discovery installation folder. Click Next. The Ready to Install the Program page appears.
Important If you are upgrading to Alloy Discovery 5.1.0, please reference one of the following sections for important information:
“Notes for Alloy Network Inventory 4 Users” on page 8“Notes for Upgrading to Alloy Discovery 5.1.0 (from 5.x)” on page 13
Alloy Discovery - Getting Started Guide Page 21 of 144
Chapter 2. Installing Alloy Discovery
8. If you are ready to start the installation process, click Install. Otherwise, click Back to review and modify your installation settings.
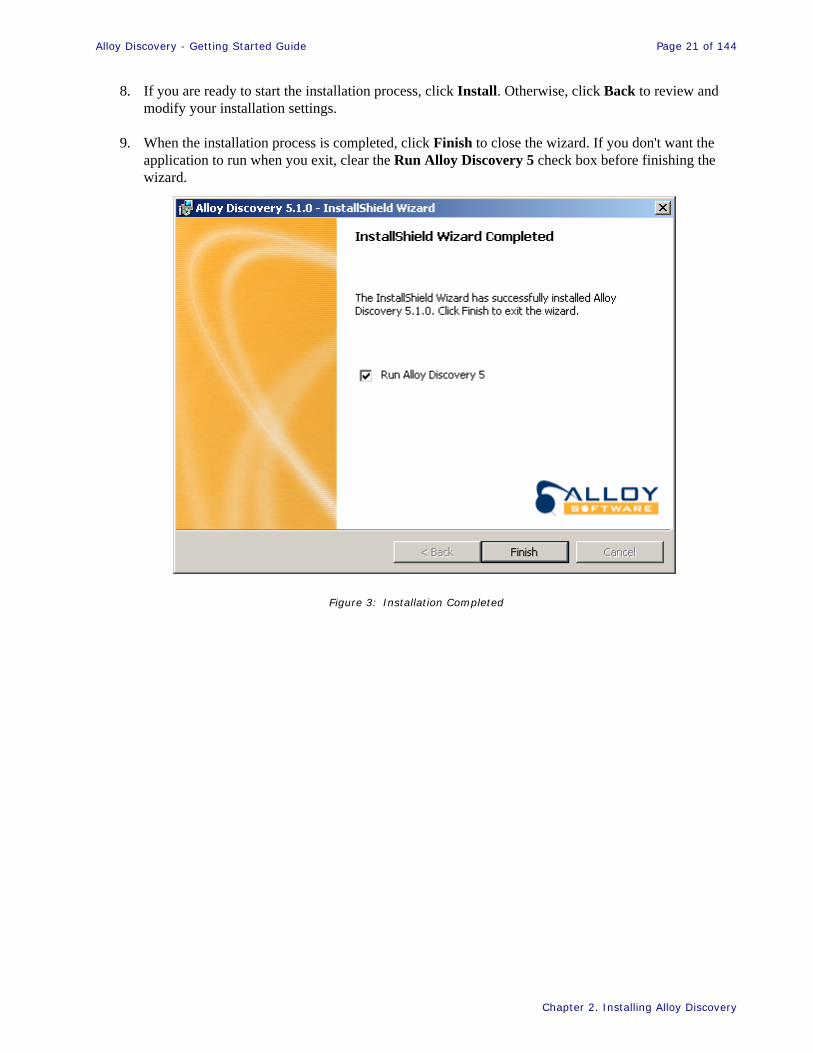
9. When the installation process is completed, click Finish to close the wizard. If you don't want the application to run when you exit, clear the Run Alloy Discovery 5 check box before finishing the wizard.
Figure 3: Installation Completed
Alloy Discovery - Getting Started Guide Page 22 of 144
Chapter 2. Installing Alloy Discovery
Next Steps
Now that you have installed Alloy Discovery, run the application and complete the Quick Start Wizard. The wizard will start automatically and guide you through the steps required to initially configure the system and audit computers that are part of your network. For instructions, see “Quick Start with Alloy Discovery” on page 23.
You can also quickly audit your computer and try the product's features before performing a full-featured audit deployment of the network. To audit your computer, select Audit > Audit My Computer from the main menu. For details, see “Audit Your Computer” on page 73.
Alloy Discovery - Getting Started Guide Page 23 of 144
Chapter 3. Quick Start with Alloy Discovery
Chapter 3. Quick Start with Alloy DiscoveryThis chapter gives you step-to-step instructions on how to quickly configure Alloy Discovery to begin auditing computers on your network.
Running the Application ................................................................................................................................................. 24
Instant Audit with the Quick Start Wizard................................................................................................................... 24
Next Steps.......................................................................................................................................................................... 27

Alloy Discovery - Getting Started Guide Page 24 of 144
Chapter 3. Quick Start with Alloy Discovery
Running the Application
After Alloy Discovery is installed, you can run the application using the Alloy Discovery shortcut added to your Desktop or from the Start menu: All Programs > Alloy Software > Alloy Discovery 5 > Alloy Discovery 5.
Instant Audit with the Quick Start Wizard
When you run Alloy Discovery for the first time, you are greeted by the Quick Start Wizard. This wizard guides you through a simple process of configuring Alloy Discovery and allows you to audit computers on your network immediately.
A successful completion of the Quick Start Wizard results in the following:
• networked computers are discovered and organized into an Audit Group.
• Default On-Demand Audit Credentials are specified.
• Optionally (if you chose to do so), Alloy Discovery initiates the On-Demand Audit of the computers in this group.
To complete the Quick Start Wizard:
1. When the Wizard starts, click Next on the Welcome page. The Discovering Method page appears.
2. Choose a method of discovering computers in the group:
° To discover computers in a Windows domain or workgroup, click In a Windows Domain and click Next. The On-Demand Audit on a Windows Domain page opens. Proceed to Step 3.
° To discover computers within an IP address range, click Within an IP address range and click Next. The IP Address Range page opens. Proceed to Step 4.
3. Specify a Windows domain or workgroup using either of the following methods:
° Type the domain or workgroup name in the Domain field and click Next. The On-Demand Audit Account page appears. Proceed to Step 6.
° Click Browse and choose a domain or workgroup in one of the two search areas:
° To search through the list of all domains and workgroups currently available on your network, select MS Network Browser in the Discover list. Then double-click the desired domain or workgroup and click Next. The On-Demand Audit Account page appears. Proceed to Step 6.
Important You can also start the Quick Start Wizard by selecting Tools > Quick Start Wizard from the main menu, if you would like to use the wizard at a later time.
Alloy Discovery - Getting Started Guide Page 25 of 144
Chapter 3. Quick Start with Alloy Discovery
° To search through the list of domains specified in your Active Directory, select Active Directory in the Discovery list. Then double-click the desired domain or workgroup and click Next. The On-Demand Audit Account page appears. Proceed to Step 6.
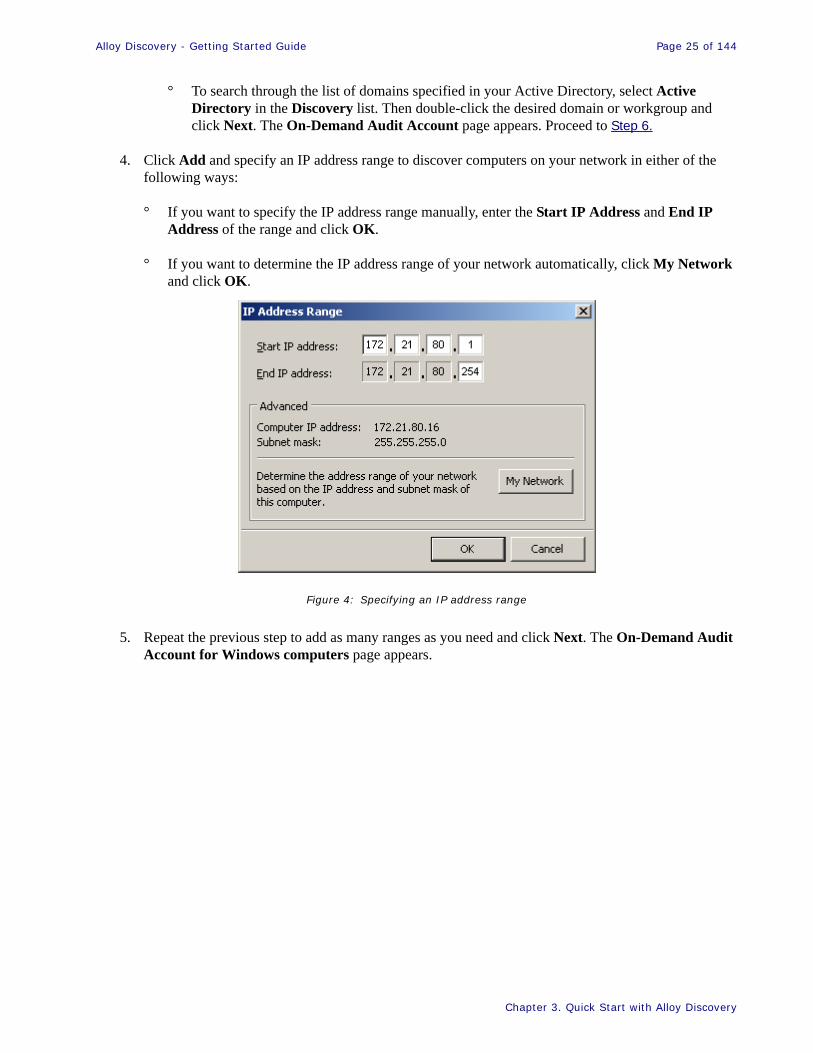
4. Click Add and specify an IP address range to discover computers on your network in either of the following ways:
° If you want to specify the IP address range manually, enter the Start IP Address and End IP Address of the range and click OK.
° If you want to determine the IP address range of your network automatically, click My Network and click OK.
Figure 4: Specifying an IP address range
5. Repeat the previous step to add as many ranges as you need and click Next. The On-Demand Audit Account for Windows computers page appears.
Alloy Discovery - Getting Started Guide Page 26 of 144
Chapter 3. Quick Start with Alloy Discovery
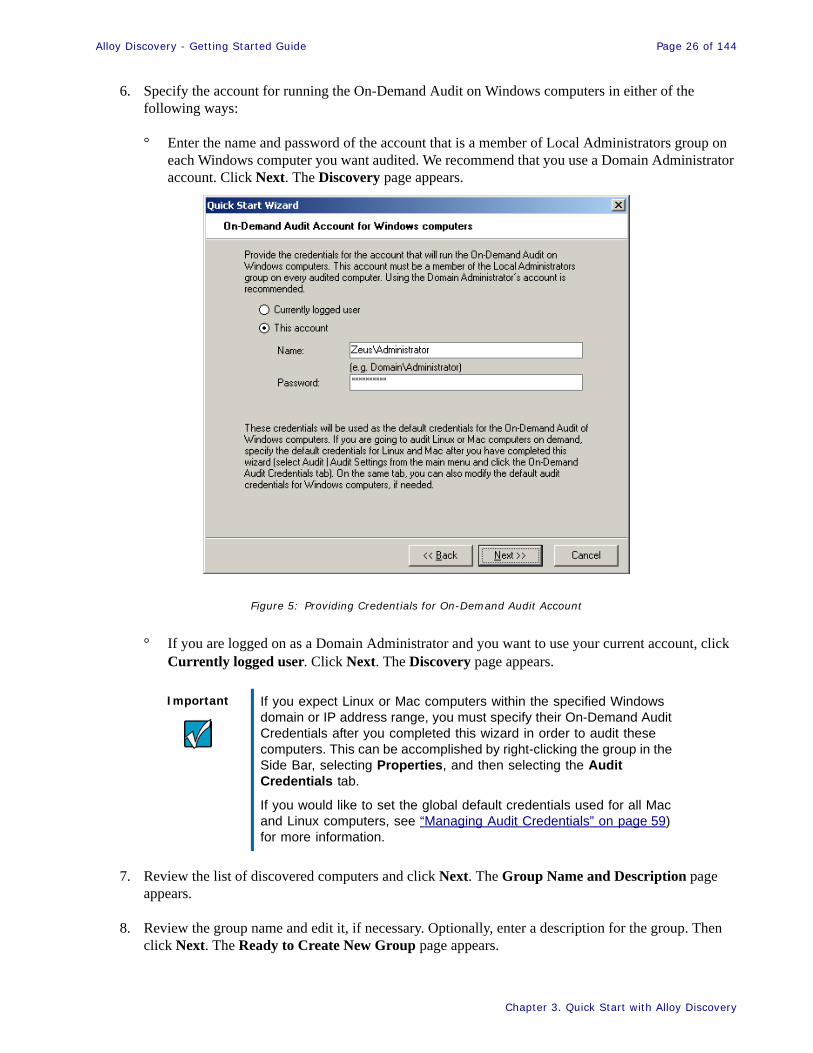
6. Specify the account for running the On-Demand Audit on Windows computers in either of the following ways:
° Enter the name and password of the account that is a member of Local Administrators group on each Windows computer you want audited. We recommend that you use a Domain Administrator account. Click Next. The Discovery page appears.
Figure 5: Providing Credentials for On-Demand Audit Account
° If you are logged on as a Domain Administrator and you want to use your current account, click Currently logged user. Click Next. The Discovery page appears.
7. Review the list of discovered computers and click Next. The Group Name and Description page appears.
8. Review the group name and edit it, if necessary. Optionally, enter a description for the group. Then click Next. The Ready to Create New Group page appears.
Important If you expect Linux or Mac computers within the specified Windows domain or IP address range, you must specify their On-Demand Audit Credentials after you completed this wizard in order to audit these computers. This can be accomplished by right-clicking the group in the Side Bar, selecting Properties, and then selecting the Audit Credentials tab.
If you would like to set the global default credentials used for all Mac and Linux computers, see “Managing Audit Credentials” on page 59) for more information.
Alloy Discovery - Getting Started Guide Page 27 of 144
Chapter 3. Quick Start with Alloy Discovery
9. Review your settings. When you are ready to proceed with creating the group, click Next. If you want to modify any settings, click Back and make the necessary changes. After the wizard finishes creating the audit group, it will display the Group Created page.
10. Choose what to do after finishing the wizard:
° If you want to audit the discovered computers immediately after finishing the wizard, keep the Audit computers in this group now check box selected and click Finish. The On-Demand Audit window appears, where you can monitor the progress of the audit.
° To run the audit later, clear the Audit computers in this group now check box and click Finish. You can audit the computers in that group when you are ready to do so. (See “Auditing Groups of Computers” on page 62).
Next Steps
Now that you have completed the Quick Start Wizard, you can do the following:
• View the audit results by locating and selecting the group you created on the Side Bar. Then you can view the associated audit results in the right pane. For details, see “Viewing Audit Data for Groups of Computers” on page 102.
• Use other audit methods and deployment options, see “Configuring Alloy Discovery” on page 28.
Alloy Discovery - Getting Started Guide Page 28 of 144
57Chapter 4. Configuring Alloy Discovery
Chapter 4. Configuring Alloy DiscoveryThis chapter explains the audit methods available in Alloy Discovery and outlines how to set audit configuration so you can get the most value out of each audit.
Overview of the Audit Methods...................................................................................................................................... 29On-Demand Audit ......................................................................................................................................................... 29On-Demand Audit on Schedule .................................................................................................................................... 30Scriptable Audit............................................................................................................................................................. 30Audit via E-mail ............................................................................................................................................................ 30Portable Audit ............................................................................................................................................................... 30
Setting Audit Configuration............................................................................................................................................ 31Choosing Asset Tag Options......................................................................................................................................... 33Setting Display Options ................................................................................................................................................ 34Setting Available Controls ........................................................................................................................................... 35Setting Custom Input Fields .......................................................................................................................................... 37Setting Registry Key Values ......................................................................................................................................... 41Setting Event Log Options ............................................................................................................................................ 44Configuring File Scan Options...................................................................................................................................... 47Setting the SMBIOS Filter ............................................................................................................................................ 53Setting the Exclusion Rules........................................................................................................................................... 54Setting the Bypass Rules ............................................................................................................................................... 56
Next Steps.......................................................................................................................................................................... 57
Alloy Discovery - Getting Started Guide Page 29 of 144
57Chapter 4. Configuring Alloy Discovery
Overview of the Audit Methods
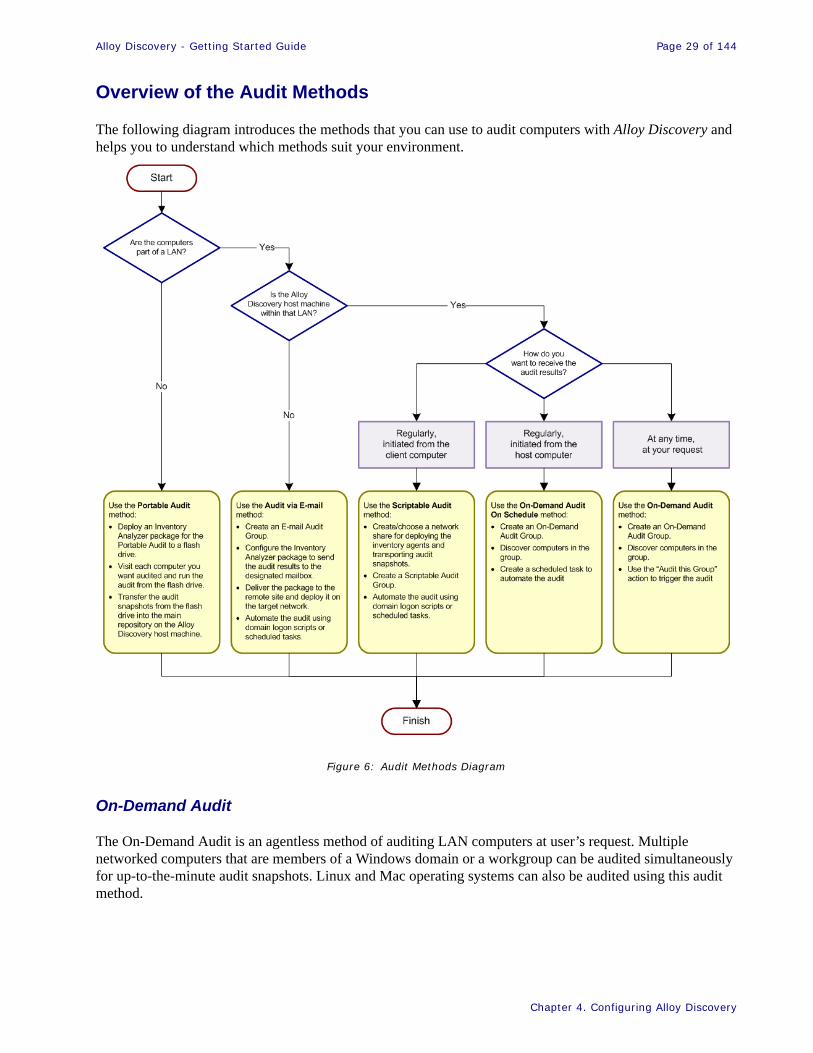
The following diagram introduces the methods that you can use to audit computers with Alloy Discovery and helps you to understand which methods suit your environment.
Figure 6: Audit Methods Diagram
On-Demand Audit
The On-Demand Audit is an agentless method of auditing LAN computers at user’s request. Multiple networked computers that are members of a Windows domain or a workgroup can be audited simultaneously for up-to-the-minute audit snapshots. Linux and Mac operating systems can also be audited using this audit method.
Alloy Discovery - Getting Started Guide Page 30 of 144
57Chapter 4. Configuring Alloy Discovery
On-Demand Audit on Schedule
The On-Demand Audit on Schedule is an agentless method of auditing LAN computers. With this feature, you can schedule the silent agentless On-Demand Audit method to audit the specified computers on a regular basis. For example, you may create a Windows Scheduled Task that runs a batch file at your desired interval.
Scriptable Audit
The Scriptable Audit is an agent-based method of LAN audit that allows you to audit networked computers on a regular basis. It involves deploying the Inventory Analyzer to a network share and automating it through logon scripts, group policy or scheduled tasks. Once the audit snapshots are created, they are then sent to a central repository. The shared folder must be accessible by everyone on this network segment (meaning all computers and all authorized users).
Audit via E-mail
The Audit via E-mail is an agent-based method of WAN audit used in situations where a direct link between the host machine and your network may not exist. This method involves two steps: configuring the Inventory Analyzer on the target machine to run via scheduled task, start up folder or the registry run section and delivering the resulting audit snapshots to a pre-configured mailbox which is later processed by Alloy Discovery.
Portable Audit
The Portable Audit is an agent-based method of auditing computers on locked-down networks and non-networked computers. Typically, the audit agent is deployed to a flash drive, which is used to audit individual computers manually. Audit snapshots are stored on the same flash drive and then manually transported into the main Inventory Repository.
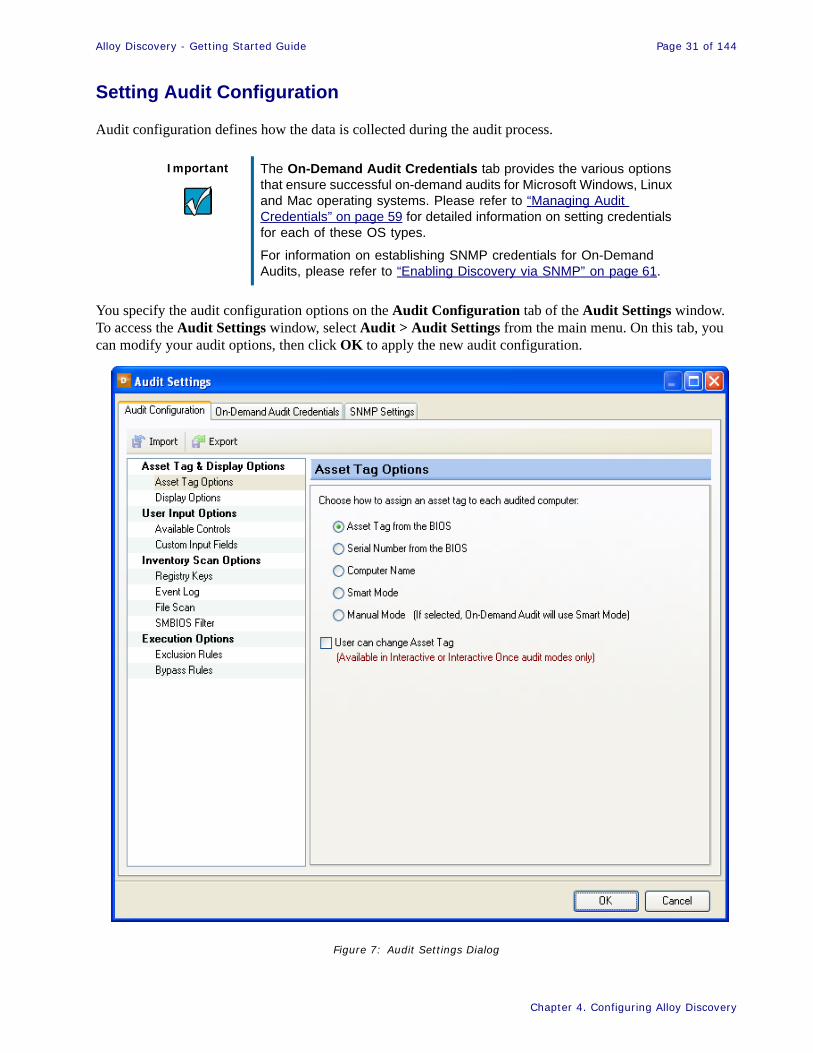
Alloy Discovery - Getting Started Guide Page 31 of 144
57Chapter 4. Configuring Alloy Discovery
Setting Audit Configuration
Audit configuration defines how the data is collected during the audit process.
You specify the audit configuration options on the Audit Configuration tab of the Audit Settings window. To access the Audit Settings window, select Audit > Audit Settings from the main menu. On this tab, you can modify your audit options, then click OK to apply the new audit configuration.
Figure 7: Audit Settings Dialog
Important The On-Demand Audit Credentials tab provides the various options that ensure successful on-demand audits for Microsoft Windows, Linux and Mac operating systems. Please refer to “Managing Audit Credentials” on page 59 for detailed information on setting credentials for each of these OS types.
For information on establishing SNMP credentials for On-Demand Audits, please refer to “Enabling Discovery via SNMP” on page 61.
Alloy Discovery - Getting Started Guide Page 32 of 144
57Chapter 4. Configuring Alloy Discovery
To modify the default audit configuration, click each node you want to reconfigure and follow the instructions below. The following screens are available:
• Asset Tag & Display Options section, where you define how to assign asset tags and whether to show the progress indicator during the audit. The section includes the following screens:
° Asset Tag Options screen, where you choose how to assign asset tags to audited computers (for details, see “Choosing Asset Tag Options” on page 33).
° Display Options screen, where you define whether the progress indicator appears on the screens of client machines during the audit (for details, see “Setting Display Options” on page 34).
• User Input Options section, where you define the appearance of the Inventory Analyzer splash screen displayed to the users if the audit runs interactively. The section includes the following screens:
° Available Controls screen, where you can add various interactive options for the user (for details, see “Setting Available Controls ” on page 35).
° Custom Input Fields screen, where you can define a number of custom fields to prompt the user for additional information (for details, see “Setting Custom Input Fields” on page 37).
• Inventory Scan Options section, where you define various audit settings using the following screens:
° Registry Keys screen, where you can configure a list of registry keys to capture (for details, see “Setting Registry Key Values” on page 41).
° Event Log screen, where you can choose the entries of Windows Event Log to capture (for details, see “Setting Event Log Options” on page 44).
° File Scan screen, where you configure the file scan process (for details, see “Configuring File Scan Options” on page 47).
° SMBIOS Filter screen, where you can customize the filter for bogus values from the System BIOS (for details, see “Setting the SMBIOS Filter” on page 53).
• Exclusion Options section, where you define exclusions from the audit. The section provides the following screens:
° Exclusion Rules screen, where you can exclude some computers from the audit (for details, see “Setting the Exclusion Rules” on page 54).
° Bypass Rules screen, where you can exclude some user accounts from the audit (for details, see “Setting the Bypass Rules” on page 56).
Important Using the Import and Export buttons, you can save or restore your audit settings from an external configuration file (.cfg).
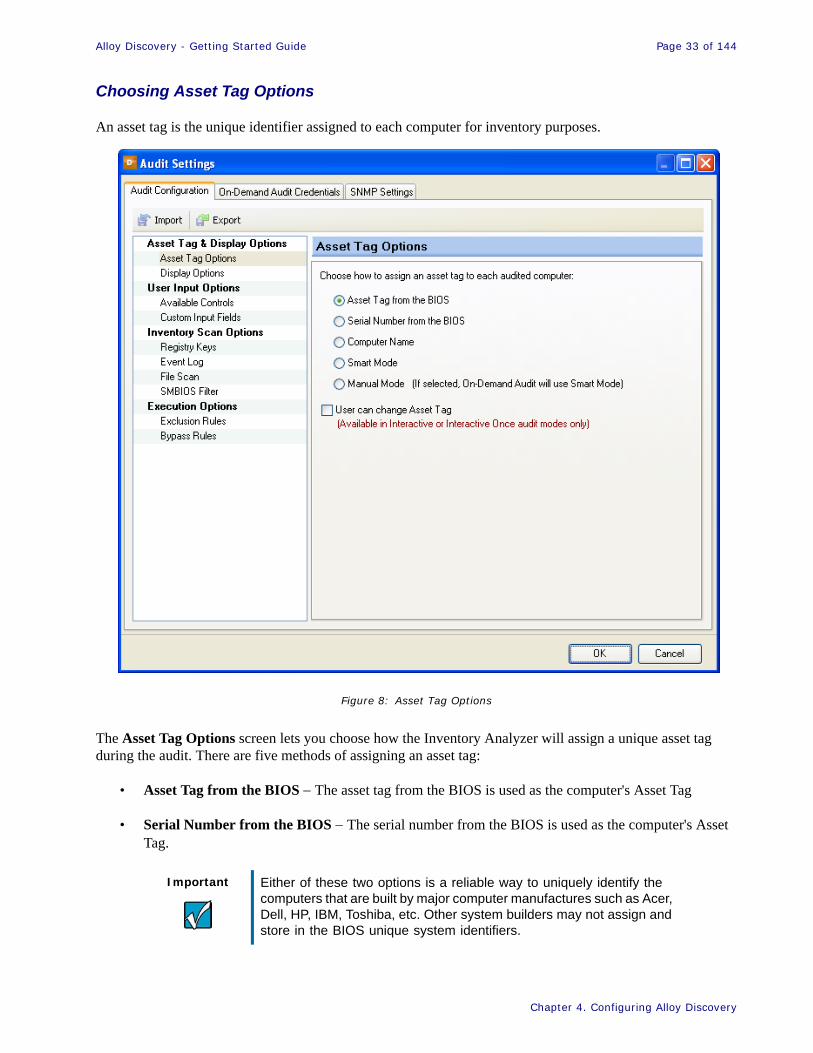
Alloy Discovery - Getting Started Guide Page 33 of 144
57Chapter 4. Configuring Alloy Discovery
Choosing Asset Tag Options
An asset tag is the unique identifier assigned to each computer for inventory purposes.
Figure 8: Asset Tag Options
The Asset Tag Options screen lets you choose how the Inventory Analyzer will assign a unique asset tag during the audit. There are five methods of assigning an asset tag:
• Asset Tag from the BIOS − The asset tag from the BIOS is used as the computer's Asset Tag
• Serial Number from the BIOS − The serial number from the BIOS is used as the computer's Asset Tag.
Important Either of these two options is a reliable way to uniquely identify the computers that are built by major computer manufactures such as Acer, Dell, HP, IBM, Toshiba, etc. Other system builders may not assign and store in the BIOS unique system identifiers.
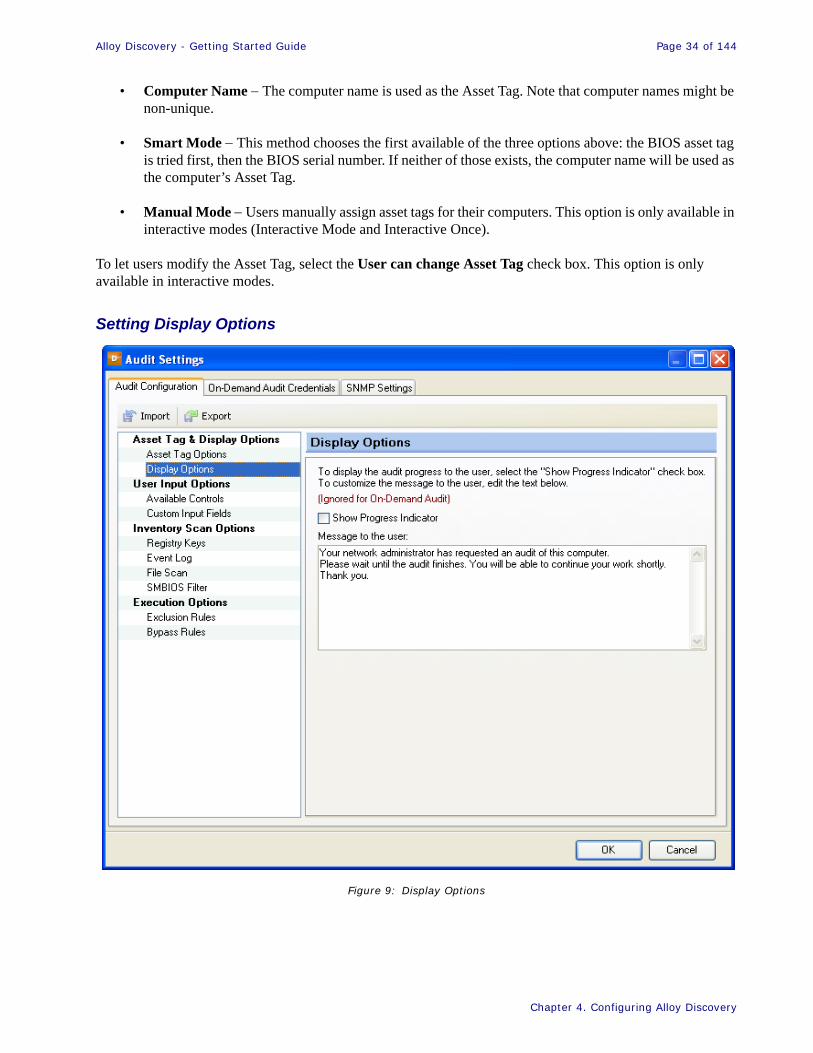
Alloy Discovery - Getting Started Guide Page 34 of 144
57Chapter 4. Configuring Alloy Discovery
• Computer Name − The computer name is used as the Asset Tag. Note that computer names might be non-unique.
• Smart Mode − This method chooses the first available of the three options above: the BIOS asset tag is tried first, then the BIOS serial number. If neither of those exists, the computer name will be used as the computer’s Asset Tag.
• Manual Mode − Users manually assign asset tags for their computers. This option is only available in interactive modes (Interactive Mode and Interactive Once).
To let users modify the Asset Tag, select the User can change Asset Tag check box. This option is only available in interactive modes.
Setting Display Options
Figure 9: Display Options
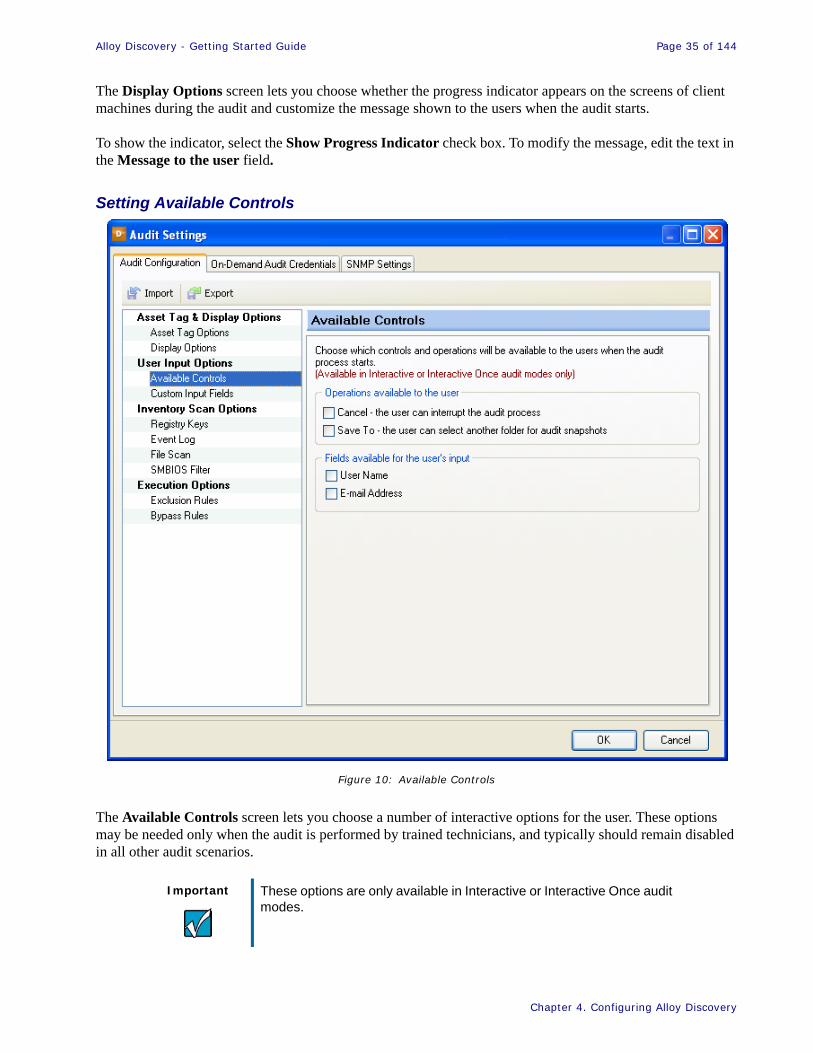
Alloy Discovery - Getting Started Guide Page 35 of 144
57Chapter 4. Configuring Alloy Discovery
The Display Options screen lets you choose whether the progress indicator appears on the screens of client machines during the audit and customize the message shown to the users when the audit starts.
To show the indicator, select the Show Progress Indicator check box. To modify the message, edit the text in the Message to the user field.
Setting Available Controls
Figure 10: Available Controls
The Available Controls screen lets you choose a number of interactive options for the user. These options may be needed only when the audit is performed by trained technicians, and typically should remain disabled in all other audit scenarios.
Important These options are only available in Interactive or Interactive Once audit modes.
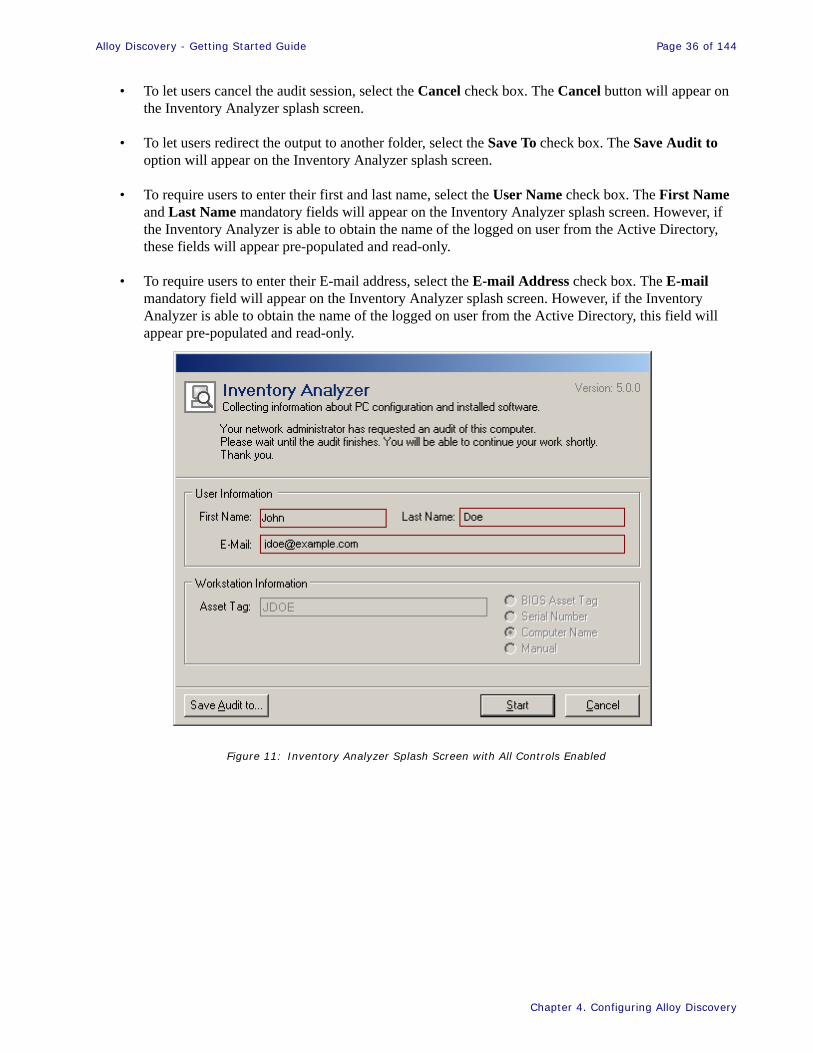
Alloy Discovery - Getting Started Guide Page 36 of 144
57Chapter 4. Configuring Alloy Discovery
• To let users cancel the audit session, select the Cancel check box. The Cancel button will appear on the Inventory Analyzer splash screen.
• To let users redirect the output to another folder, select the Save To check box. The Save Audit to option will appear on the Inventory Analyzer splash screen.
• To require users to enter their first and last name, select the User Name check box. The First Name and Last Name mandatory fields will appear on the Inventory Analyzer splash screen. However, if the Inventory Analyzer is able to obtain the name of the logged on user from the Active Directory, these fields will appear pre-populated and read-only.
• To require users to enter their E-mail address, select the E-mail Address check box. The E-mail mandatory field will appear on the Inventory Analyzer splash screen. However, if the Inventory Analyzer is able to obtain the name of the logged on user from the Active Directory, this field will appear pre-populated and read-only.
Figure 11: Inventory Analyzer Splash Screen with All Controls Enabled
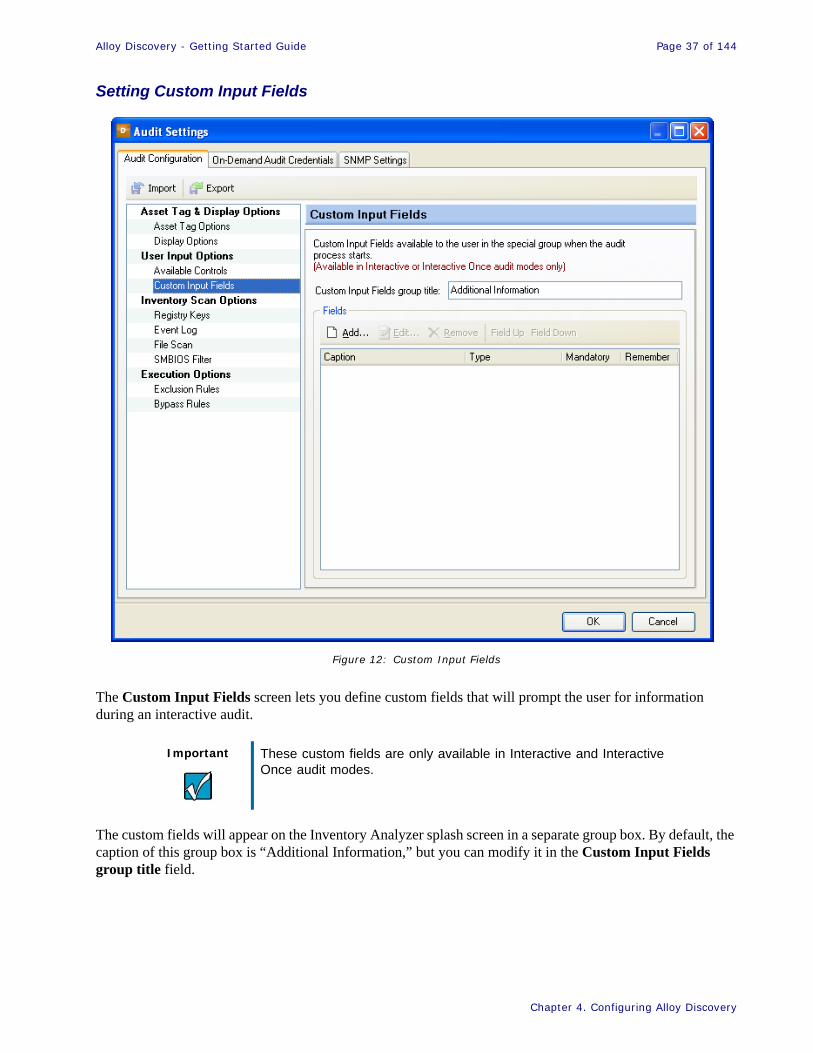
Alloy Discovery - Getting Started Guide Page 37 of 144
57Chapter 4. Configuring Alloy Discovery
Setting Custom Input Fields
Figure 12: Custom Input Fields
The Custom Input Fields screen lets you define custom fields that will prompt the user for information during an interactive audit.
The custom fields will appear on the Inventory Analyzer splash screen in a separate group box. By default, the caption of this group box is “Additional Information,” but you can modify it in the Custom Input Fields group title field.
Important These custom fields are only available in Interactive and Interactive Once audit modes.
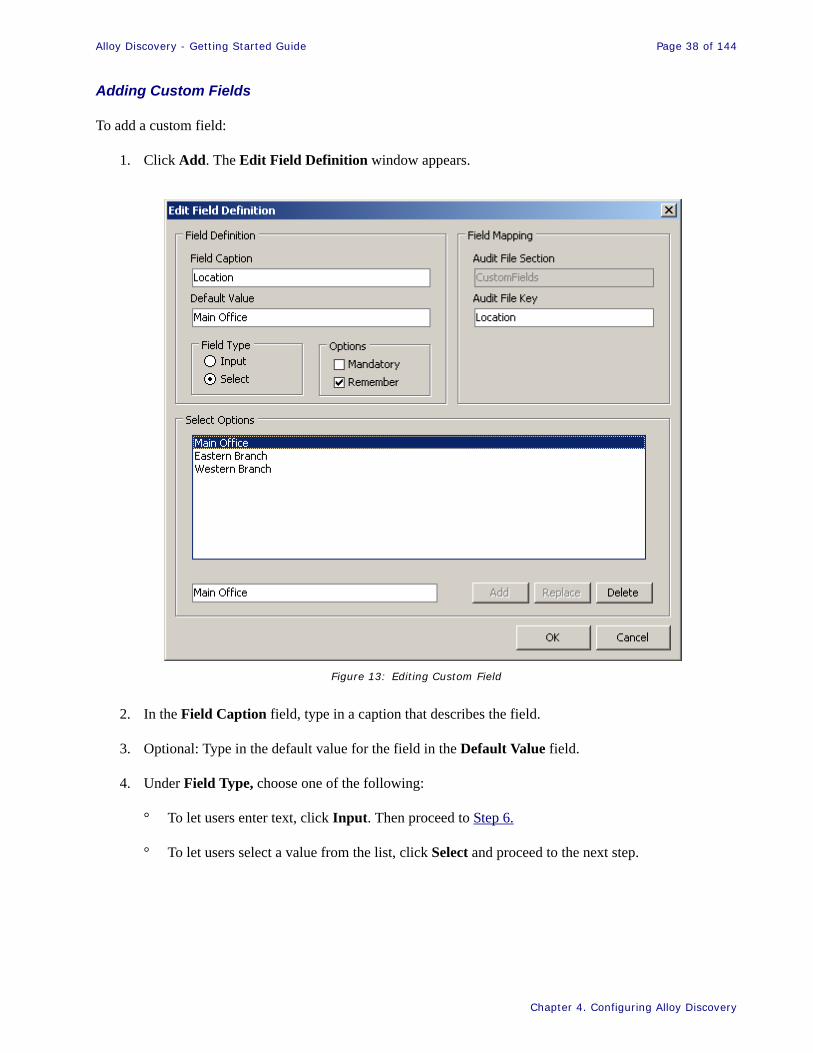
Alloy Discovery - Getting Started Guide Page 38 of 144
57Chapter 4. Configuring Alloy Discovery
Adding Custom Fields
To add a custom field:
1. Click Add. The Edit Field Definition window appears.
Figure 13: Editing Custom Field
2. In the Field Caption field, type in a caption that describes the field.
3. Optional: Type in the default value for the field in the Default Value field.
4. Under Field Type, choose one of the following:
° To let users enter text, click Input. Then proceed to Step 6.
° To let users select a value from the list, click Select and proceed to the next step.
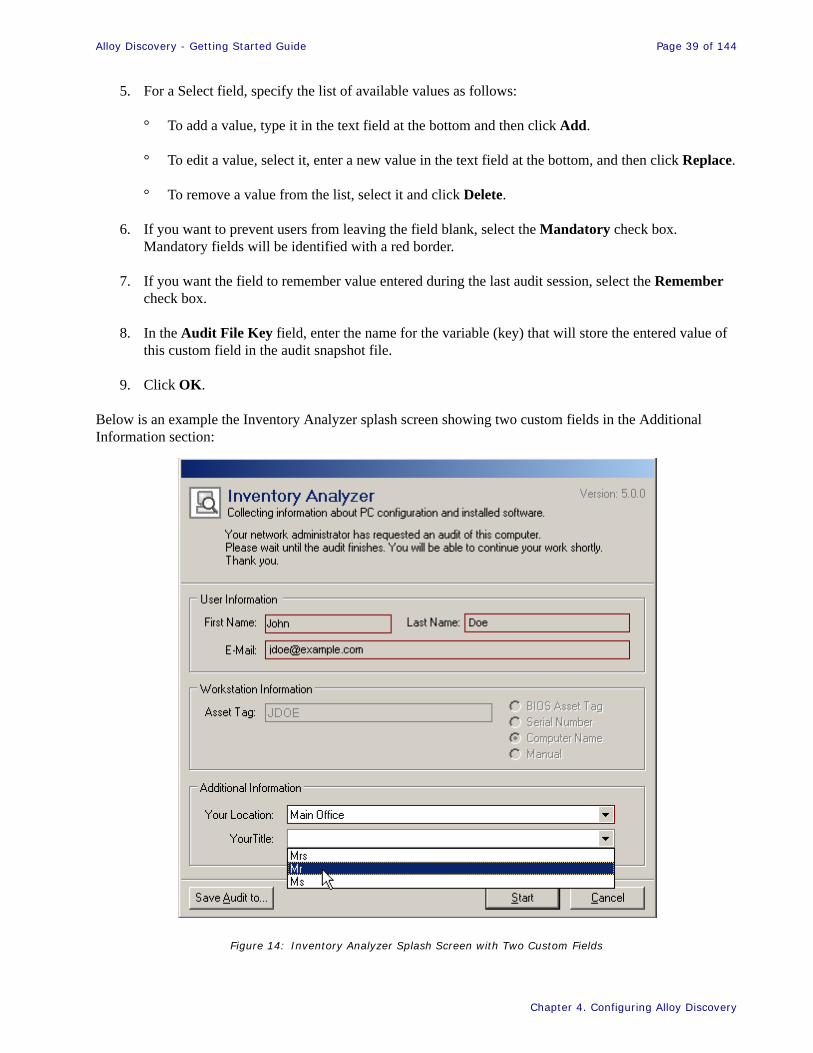
Alloy Discovery - Getting Started Guide Page 39 of 144
57Chapter 4. Configuring Alloy Discovery
5. For a Select field, specify the list of available values as follows:
° To add a value, type it in the text field at the bottom and then click Add.
° To edit a value, select it, enter a new value in the text field at the bottom, and then click Replace.
° To remove a value from the list, select it and click Delete.
6. If you want to prevent users from leaving the field blank, select the Mandatory check box. Mandatory fields will be identified with a red border.
7. If you want the field to remember value entered during the last audit session, select the Remember check box.
8. In the Audit File Key field, enter the name for the variable (key) that will store the entered value of this custom field in the audit snapshot file.
9. Click OK.
Below is an example the Inventory Analyzer splash screen showing two custom fields in the Additional Information section:
Figure 14: Inventory Analyzer Splash Screen with Two Custom Fields
Alloy Discovery - Getting Started Guide Page 40 of 144
57Chapter 4. Configuring Alloy Discovery
Arranging Custom Fields
The custom fields appear in the order you added them. To change the order in which the custom fields appear on the splash screen:
• To move a field up, select the field in the list and click Field Up.
• To move a field down, select the field and click Field Down.
Modifying Custom Fields
To modify a custom field:
1. Double-click the field. The Edit Field Definition window appears.
2. Make the necessary changes and click OK.
Removing Custom Fields
To remove a custom field, select the field and click Remove.
Displaying Custom Fields
After defining custom fields, configure Alloy Discovery to display them in the Computer List:
1. Select Tools > Configure Computer List from the main menu.
2. Expand the Custom Fields node and double-click each field you want to be displayed.
3. Click OK.
For details, see the Customizing Computer List section in the embedded Help system.
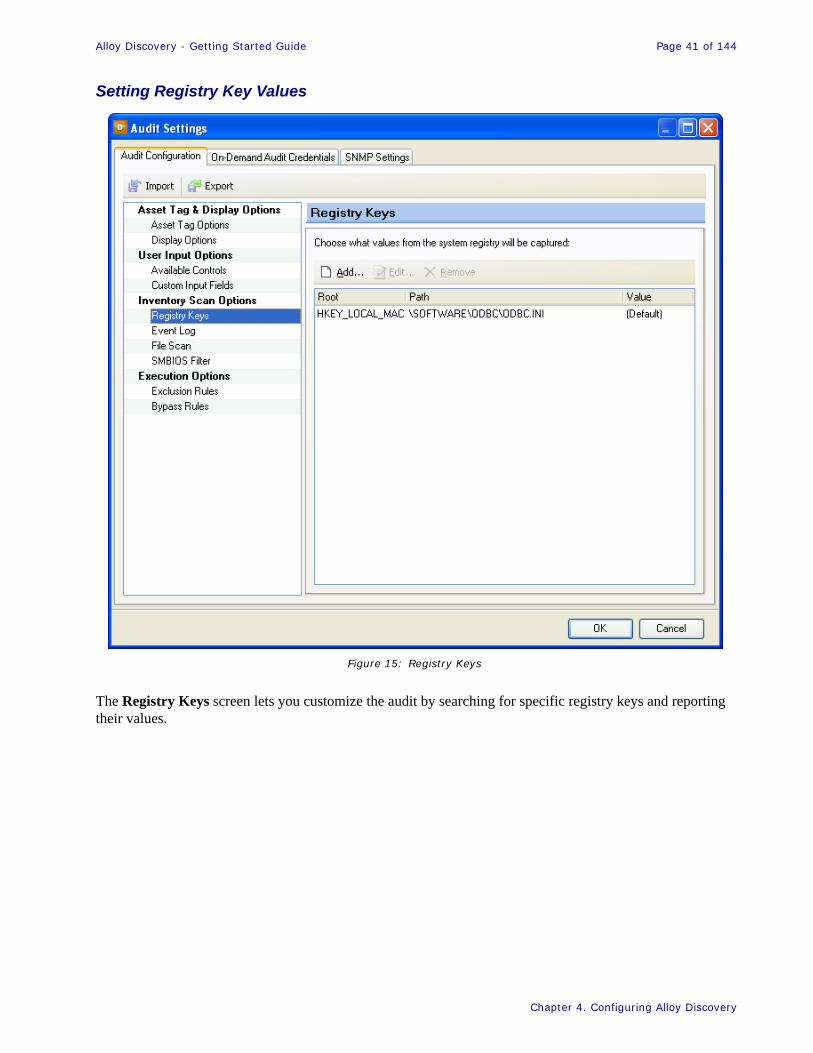
Alloy Discovery - Getting Started Guide Page 41 of 144
57Chapter 4. Configuring Alloy Discovery
Setting Registry Key Values
Figure 15: Registry Keys
The Registry Keys screen lets you customize the audit by searching for specific registry keys and reporting their values.

Alloy Discovery - Getting Started Guide Page 42 of 144
57Chapter 4. Configuring Alloy Discovery
Adding Registry Keys
To add a new registry key:
1. Click Add. The Edit Registry Key window appears.
Figure 16: Edit Registry Key Window
2. Open the Microsoft Registry Editor. For example, click Launch Regedit; the Registry Editor window opens.
Figure 17: Microsoft Registry Editor

Alloy Discovery - Getting Started Guide Page 43 of 144
57Chapter 4. Configuring Alloy Discovery
3. In the navigation area of the Registry Editor, locate the key to query during the audit, right-click it, and choose Copy Key Name from the context menu.
4. Switch to the Edit Registry Key window and paste the copied value into the Registry Path field. The value of the Root Key field will be set automatically to match the selected registry hive.
5. In the Value Name field, enter the name of the value entry you want to capture. If you want to query the default value for that registry key, select the Default Registry Value check box.
The following data types are currently supported:
REG_SZREG_DWORDREG_MULTI_SZREG_EXPAND_SZREG_DWORD_LITTLE_ENDIAN
6. Type a description in the Description field. This description will be used to identify the registry key in audit snapshot files.
Figure 18: Adding Registry Key
Modifying Registry Keys
To edit a registry key:
1. On the list of Registry Keys, double-click a key. The Edit Registry Key window appears.
2. Make the necessary changes and click OK.
Important The descriptions you provide for registry keys must be unique.
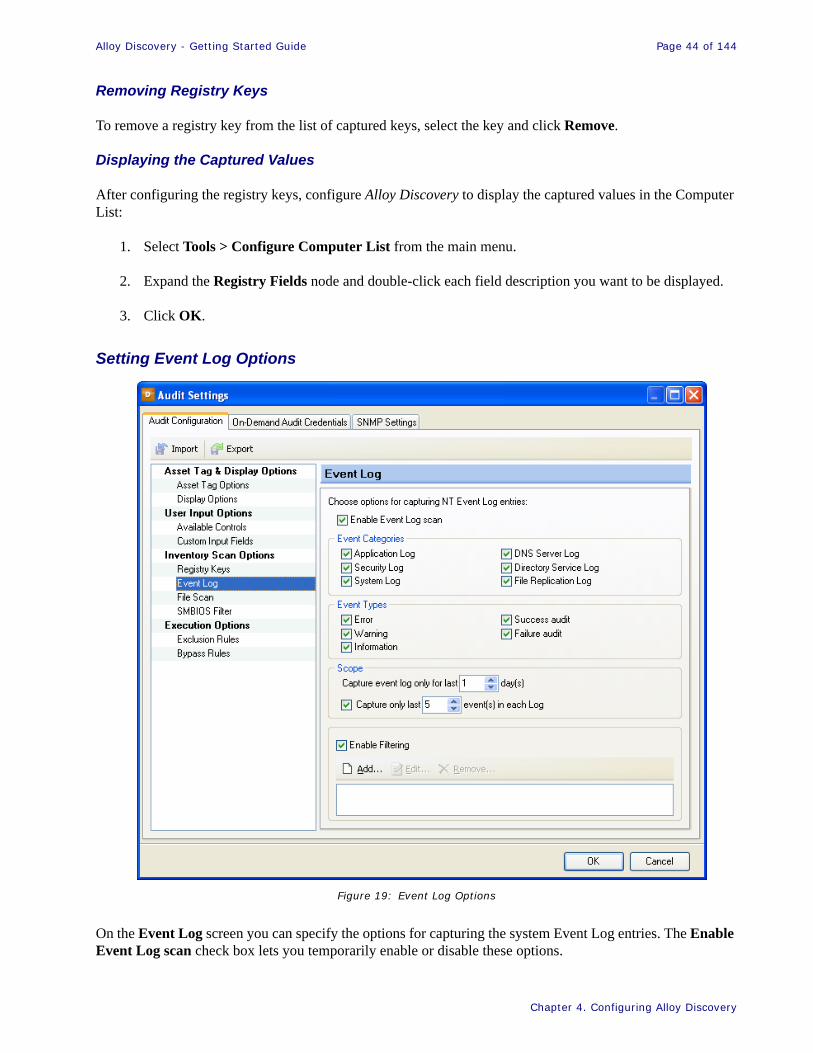
Alloy Discovery - Getting Started Guide Page 44 of 144
57Chapter 4. Configuring Alloy Discovery
Removing Registry Keys
To remove a registry key from the list of captured keys, select the key and click Remove.
Displaying the Captured Values
After configuring the registry keys, configure Alloy Discovery to display the captured values in the Computer List:
1. Select Tools > Configure Computer List from the main menu.
2. Expand the Registry Fields node and double-click each field description you want to be displayed.
3. Click OK.
Setting Event Log Options
Figure 19: Event Log Options
On the Event Log screen you can specify the options for capturing the system Event Log entries. The Enable Event Log scan check box lets you temporarily enable or disable these options.
Alloy Discovery - Getting Started Guide Page 45 of 144
57Chapter 4. Configuring Alloy Discovery
Using the Event Log screen you can specify the following options:
1. Under Event Types, select any check boxes corresponding to the types of events you want captured − Error, Warning, Information, Success audit, or Failure audit.
2. Under Event Categories, select appropriate check boxes to capture records from the following event logs:
° Application Log − The application log contains events logged by Windows applications or programs.
° Security Log − The security log records all security-related events: logons and logoffs, file-access failures and successes, startups and shutdowns, etc.
° System Log − The system log contains events logged by Windows system components.
° DNS Server Log − The DNS server log contains events logged by Windows DNS service. Events are associated with resolving DNS names to or from Internet Protocol (IP) addresses. The DNS server log is available only on computers configured as DNS servers.
° Directory Service Log − The directory service log contains events logged by Windows directory service. The log is available on Windows 2000 Server or Advanced Server, Windows Server 2003, or Windows Server 2008 domain controllers.
° File Replication Service Log − The File Replication service log contains events logged by Windows File Replication service during the replication process between domain controllers. The log is available on Windows 2000 Server or Advanced Server, Windows Server 2003, or Windows Server 2008 domain controllers.
3. Under Scope, enter the period (up to 30 days) for which you want the specified Windows Event Logs captured. Entering a long period can significantly increase the length of the audit and the size of audit snapshots.
4. If you want to capture only a limited number of most recent events in each of the selected logs, select the Capture only last check box and enter the number of events to capture.
5. If you want to capture only events that satisfy certain criteria, select the Enable Filtering check box and create a number of filtering conditions.
Events can be filtered by the following parameters:
° Source – the name of the application
° Category – the classification of the event, as defined by the event source
° Event ID – the event ID, as defined by the event source
Important To ensure that the Event Security Log is populated with the event information you need, you must properly configure this log on each client machine. For details, see Microsoft Knowledge Base article 300549 (http://support.microsoft.com/kb/300549).
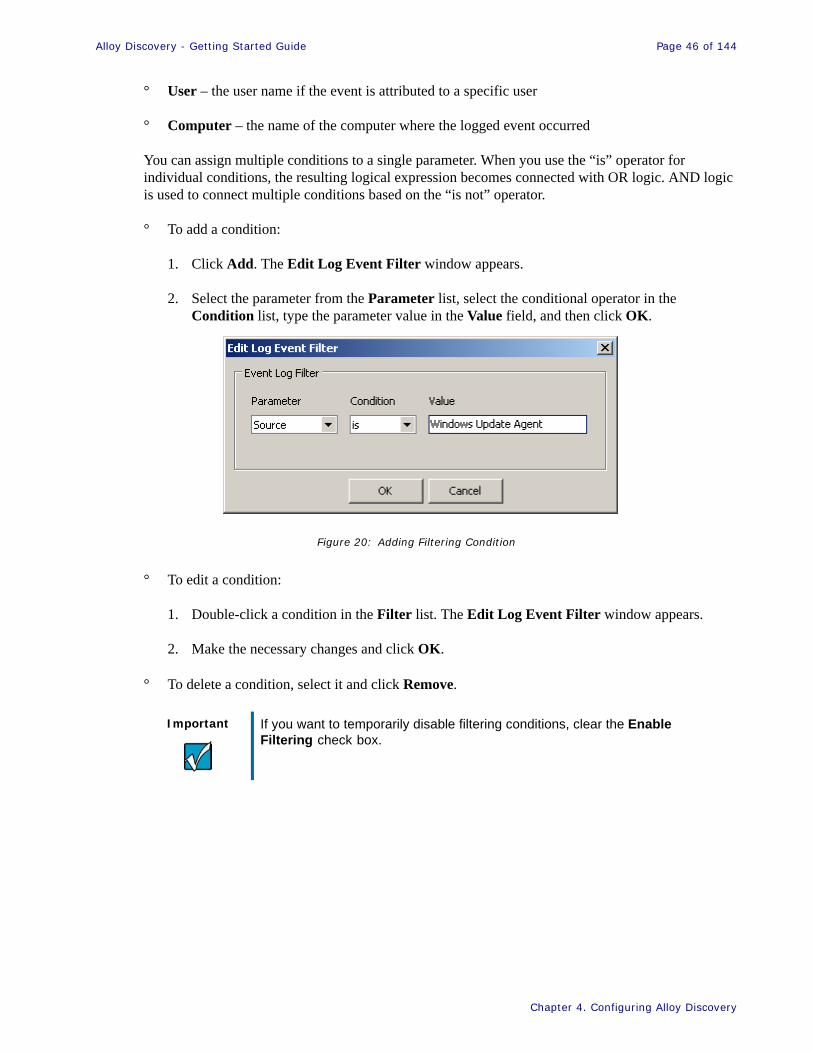
Alloy Discovery - Getting Started Guide Page 46 of 144
57Chapter 4. Configuring Alloy Discovery
° User – the user name if the event is attributed to a specific user
° Computer – the name of the computer where the logged event occurred
You can assign multiple conditions to a single parameter. When you use the “is” operator for individual conditions, the resulting logical expression becomes connected with OR logic. AND logic is used to connect multiple conditions based on the “is not” operator.
° To add a condition:
1. Click Add. The Edit Log Event Filter window appears.
2. Select the parameter from the Parameter list, select the conditional operator in the Condition list, type the parameter value in the Value field, and then click OK.
Figure 20: Adding Filtering Condition
° To edit a condition:
1. Double-click a condition in the Filter list. The Edit Log Event Filter window appears.
2. Make the necessary changes and click OK.
° To delete a condition, select it and click Remove.
Important If you want to temporarily disable filtering conditions, clear the Enable Filtering check box.

Alloy Discovery - Getting Started Guide Page 47 of 144
57Chapter 4. Configuring Alloy Discovery
Configuring File Scan Options
Figure 21: File Scan Options
The Inventory Analyzer provides options for searching client computers' hard drives for individual files or collecting volume statistic on certain file types, such as executable or multimedia. Since the hard disk scan may take significant time, the File Scan option is turned off by default.
If you want to include file scan results into the audit data, clear the Disable File Scan globally option, then use the File Scan screen to enable the file scan to specify the files and/or directories you want scanned and the level of detail you want. The following types of the file scan can be configured independently:
• Detailed Scan collects physical characteristics as well as the file version properties of individual files that match the search mask: file size, date, location, version, description, product version, product name, software manufacturer, and copyright information.
• Summary Scan produces volume statistics for all files that match the search mask, broken down by folder location.
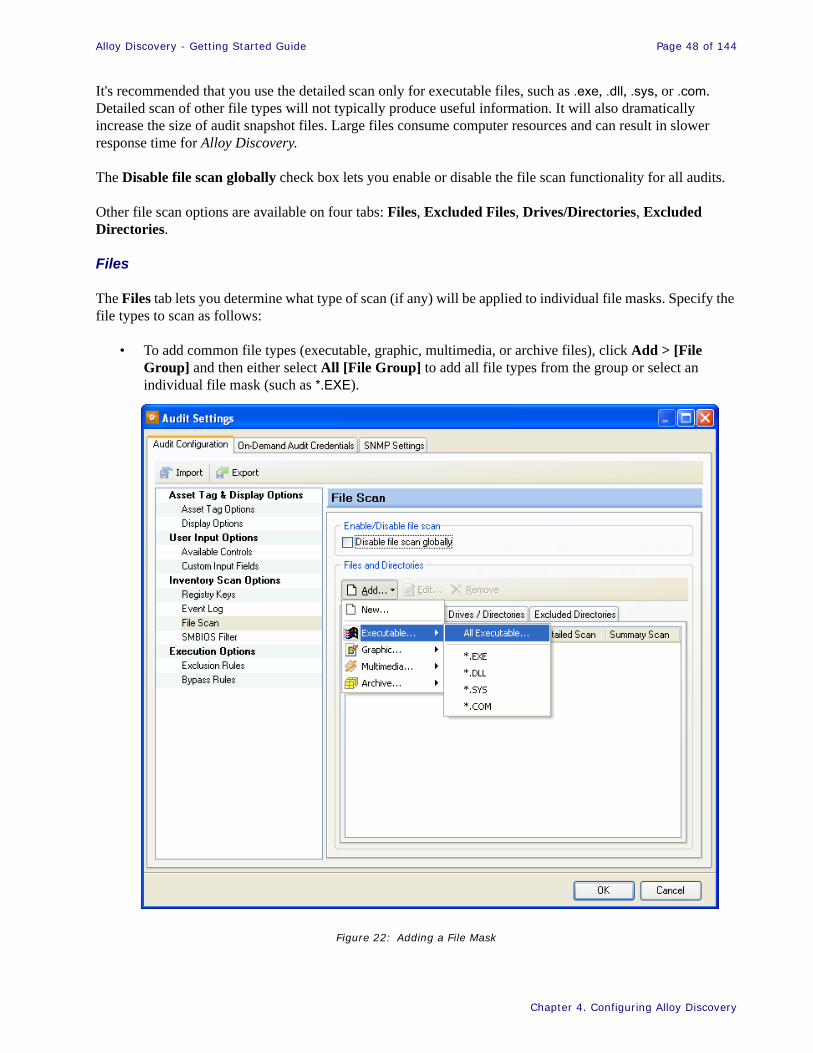
Alloy Discovery - Getting Started Guide Page 48 of 144
57Chapter 4. Configuring Alloy Discovery
It's recommended that you use the detailed scan only for executable files, such as .exe, .dll, .sys, or .com. Detailed scan of other file types will not typically produce useful information. It will also dramatically increase the size of audit snapshot files. Large files consume computer resources and can result in slower response time for Alloy Discovery.
The Disable file scan globally check box lets you enable or disable the file scan functionality for all audits.
Other file scan options are available on four tabs: Files, Excluded Files, Drives/Directories, Excluded Directories.
Files
The Files tab lets you determine what type of scan (if any) will be applied to individual file masks. Specify the file types to scan as follows:
• To add common file types (executable, graphic, multimedia, or archive files), click Add > [File Group] and then either select All [File Group] to add all file types from the group or select an individual file mask (such as *.EXE).
Figure 22: Adding a File Mask
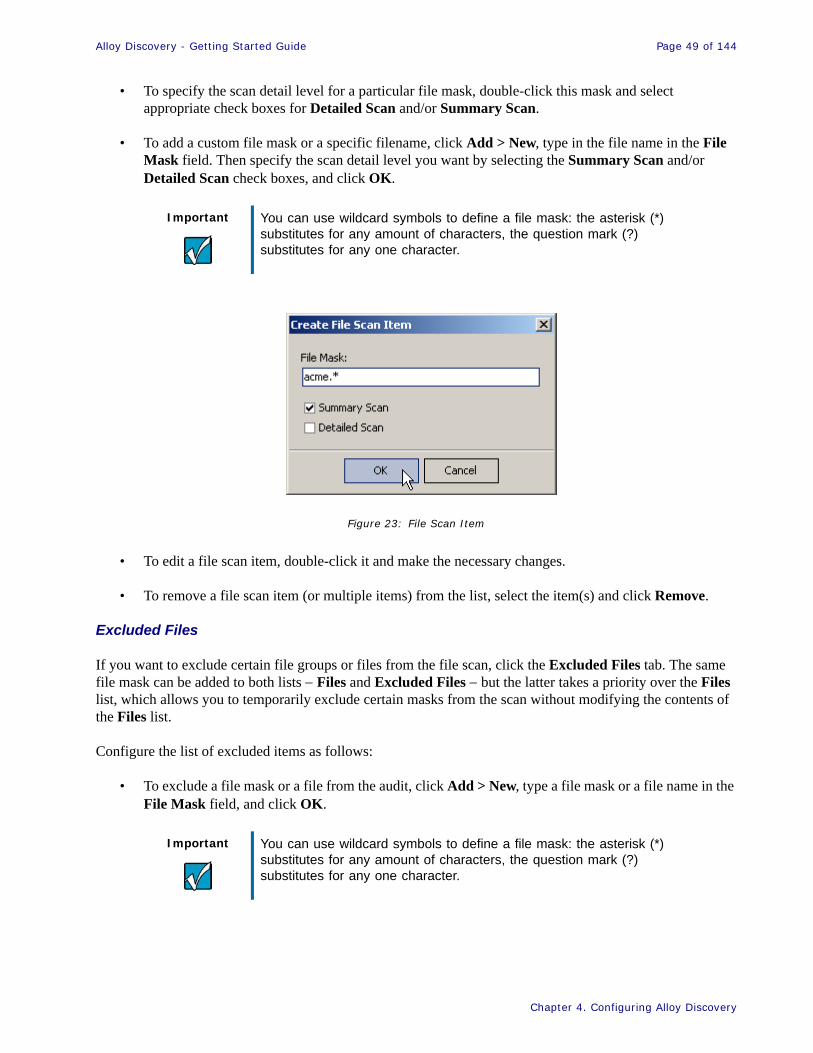
Alloy Discovery - Getting Started Guide Page 49 of 144
57Chapter 4. Configuring Alloy Discovery
• To specify the scan detail level for a particular file mask, double-click this mask and select appropriate check boxes for Detailed Scan and/or Summary Scan.
• To add a custom file mask or a specific filename, click Add > New, type in the file name in the File Mask field. Then specify the scan detail level you want by selecting the Summary Scan and/or Detailed Scan check boxes, and click OK.
Figure 23: File Scan Item
• To edit a file scan item, double-click it and make the necessary changes.
• To remove a file scan item (or multiple items) from the list, select the item(s) and click Remove.
Excluded Files
If you want to exclude certain file groups or files from the file scan, click the Excluded Files tab. The same file mask can be added to both lists − Files and Excluded Files − but the latter takes a priority over the Files list, which allows you to temporarily exclude certain masks from the scan without modifying the contents of the Files list.
Configure the list of excluded items as follows:
• To exclude a file mask or a file from the audit, click Add > New, type a file mask or a file name in the File Mask field, and click OK.
Important You can use wildcard symbols to define a file mask: the asterisk (*) substitutes for any amount of characters, the question mark (?) substitutes for any one character.
Important You can use wildcard symbols to define a file mask: the asterisk (*) substitutes for any amount of characters, the question mark (?) substitutes for any one character.

Alloy Discovery - Getting Started Guide Page 50 of 144
57Chapter 4. Configuring Alloy Discovery
• To exclude files of one of four predefined groups (executable, graphic, multimedia, or archive files), click Add > [File Group] and then choose either all files of the selected group or a particular file format.
Figure 24: Excluding Files
• To edit a file scan item, double-click the item and make the necessary changes.
• To remove a file scan item (or multiple items) from the list, select the item(s) and click Remove.
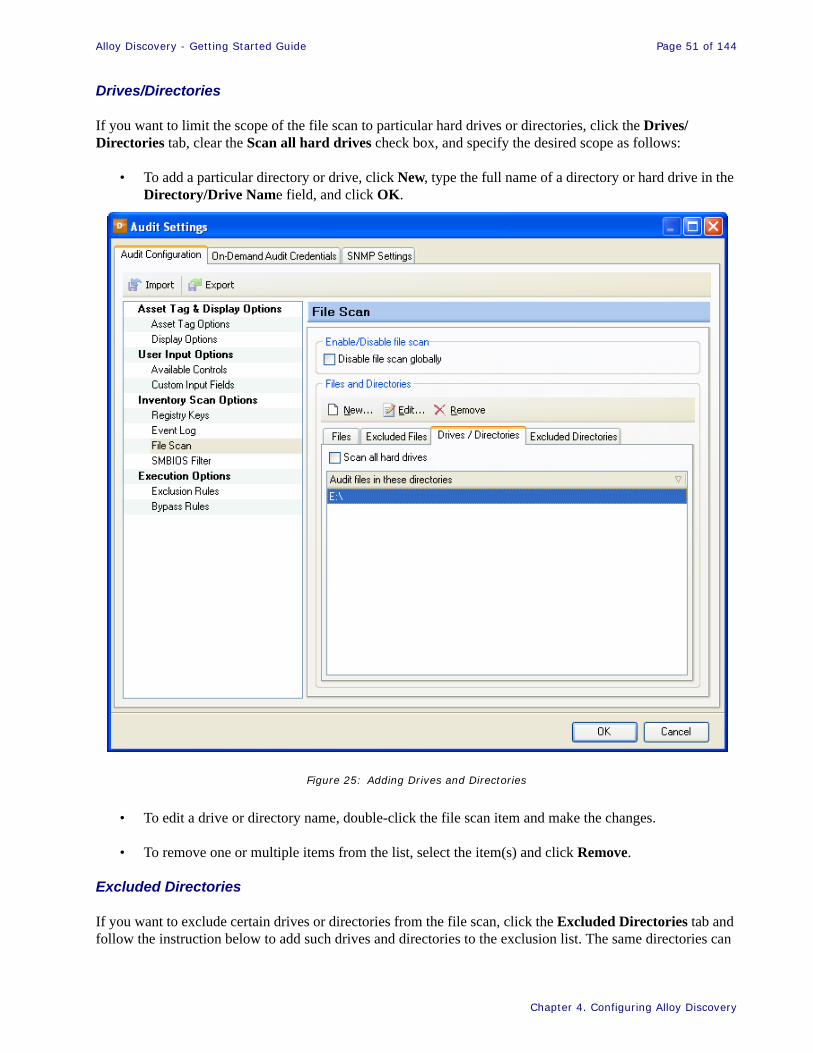
Alloy Discovery - Getting Started Guide Page 51 of 144
57Chapter 4. Configuring Alloy Discovery
Drives/Directories
If you want to limit the scope of the file scan to particular hard drives or directories, click the Drives/Directories tab, clear the Scan all hard drives check box, and specify the desired scope as follows:
• To add a particular directory or drive, click New, type the full name of a directory or hard drive in the Directory/Drive Name field, and click OK.
Figure 25: Adding Drives and Directories
• To edit a drive or directory name, double-click the file scan item and make the changes.
• To remove one or multiple items from the list, select the item(s) and click Remove.
Excluded Directories
If you want to exclude certain drives or directories from the file scan, click the Excluded Directories tab and follow the instruction below to add such drives and directories to the exclusion list. The same directories can
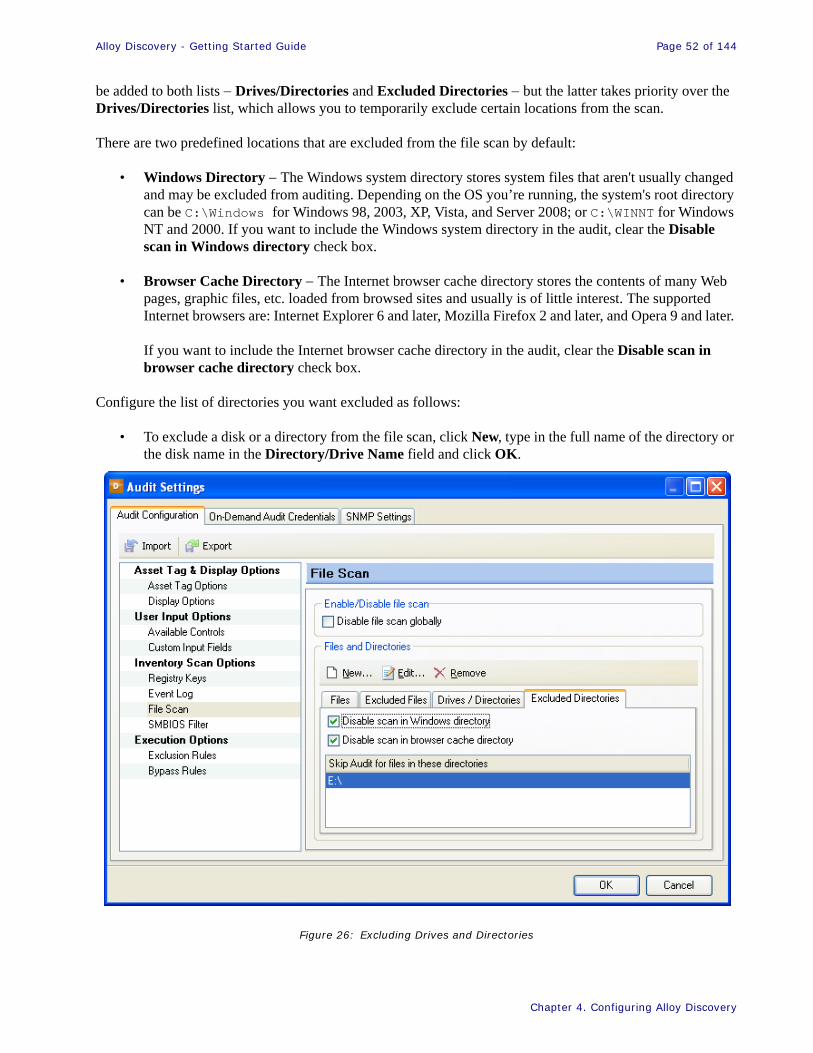
Alloy Discovery - Getting Started Guide Page 52 of 144
57Chapter 4. Configuring Alloy Discovery
be added to both lists − Drives/Directories and Excluded Directories − but the latter takes priority over the Drives/Directories list, which allows you to temporarily exclude certain locations from the scan.
There are two predefined locations that are excluded from the file scan by default:
• Windows Directory − The Windows system directory stores system files that aren't usually changed and may be excluded from auditing. Depending on the OS you’re running, the system's root directory can be C:\Windows for Windows 98, 2003, XP, Vista, and Server 2008; or C:\WINNT for Windows NT and 2000. If you want to include the Windows system directory in the audit, clear the Disable scan in Windows directory check box.
• Browser Cache Directory − The Internet browser cache directory stores the contents of many Web pages, graphic files, etc. loaded from browsed sites and usually is of little interest. The supported Internet browsers are: Internet Explorer 6 and later, Mozilla Firefox 2 and later, and Opera 9 and later.
If you want to include the Internet browser cache directory in the audit, clear the Disable scan in browser cache directory check box.
Configure the list of directories you want excluded as follows:
• To exclude a disk or a directory from the file scan, click New, type in the full name of the directory or the disk name in the Directory/Drive Name field and click OK.
Figure 26: Excluding Drives and Directories
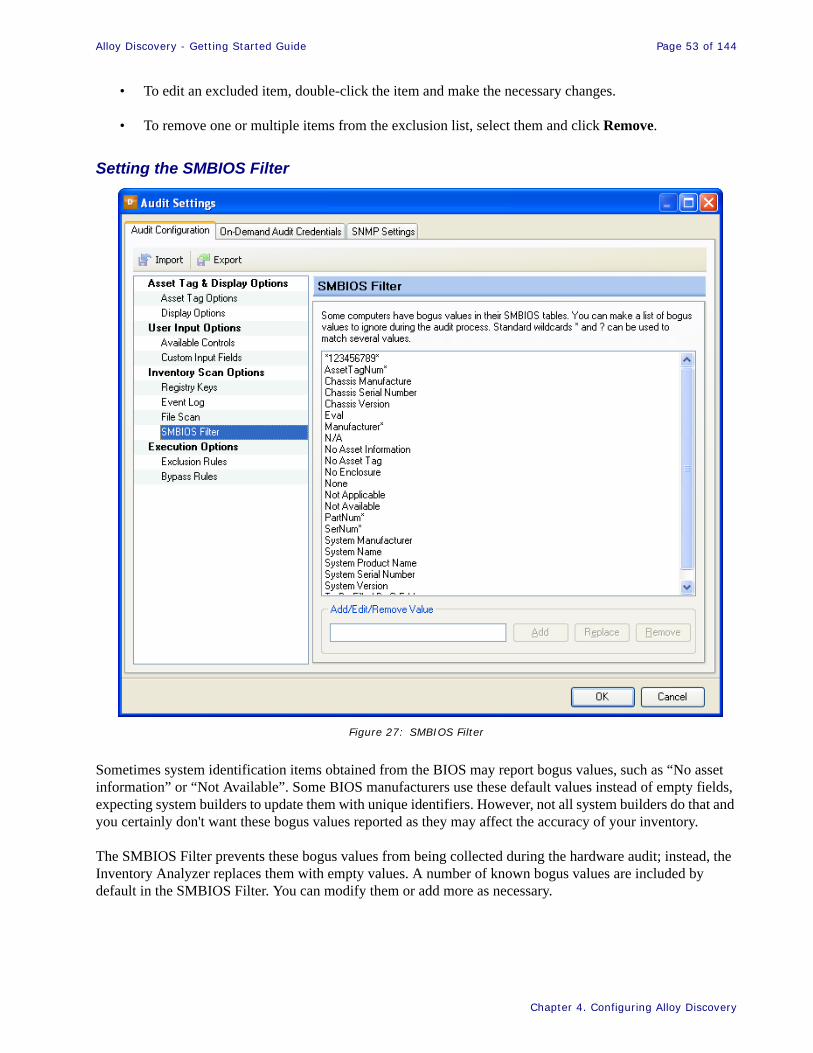
Alloy Discovery - Getting Started Guide Page 53 of 144
57Chapter 4. Configuring Alloy Discovery
• To edit an excluded item, double-click the item and make the necessary changes.
• To remove one or multiple items from the exclusion list, select them and click Remove.
Setting the SMBIOS Filter
Figure 27: SMBIOS Filter
Sometimes system identification items obtained from the BIOS may report bogus values, such as “No asset information” or “Not Available”. Some BIOS manufacturers use these default values instead of empty fields, expecting system builders to update them with unique identifiers. However, not all system builders do that and you certainly don't want these bogus values reported as they may affect the accuracy of your inventory.
The SMBIOS Filter prevents these bogus values from being collected during the hardware audit; instead, the Inventory Analyzer replaces them with empty values. A number of known bogus values are included by default in the SMBIOS Filter. You can modify them or add more as necessary.
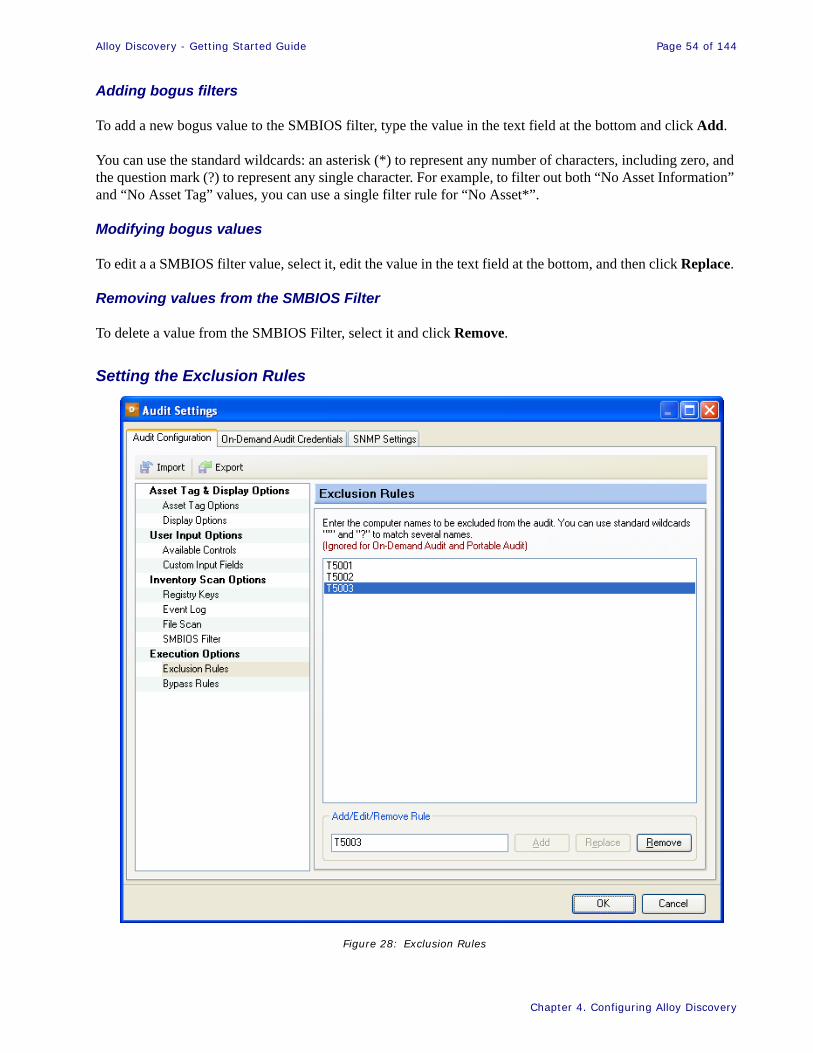
Alloy Discovery - Getting Started Guide Page 54 of 144
57Chapter 4. Configuring Alloy Discovery
Adding bogus filters
To add a new bogus value to the SMBIOS filter, type the value in the text field at the bottom and click Add.
You can use the standard wildcards: an asterisk (*) to represent any number of characters, including zero, and the question mark (?) to represent any single character. For example, to filter out both “No Asset Information” and “No Asset Tag” values, you can use a single filter rule for “No Asset*”.
Modifying bogus values
To edit a a SMBIOS filter value, select it, edit the value in the text field at the bottom, and then click Replace.
Removing values from the SMBIOS Filter
To delete a value from the SMBIOS Filter, select it and click Remove.
Setting the Exclusion Rules
Figure 28: Exclusion Rules
Alloy Discovery - Getting Started Guide Page 55 of 144
57Chapter 4. Configuring Alloy Discovery
The Exclusion Rules screen lets you specify a list of computers that must not be audited.
Excluding computers from the audit
To add a new computer to the exclusion list, type its name in the text field at the bottom and click Add.
You can use the standard wildcards: an asterisk (*) to represent any number of characters, including zero, and the question mark (?) to represent any single character. For example, to match all of the three computers shown in the picture above, you could type in a single 'TS00?' value.
Modifying the exclusion list
To edit an existing computer name, select it, edit the name in the text field at the bottom, and then click Replace.
Removing computers from the exclusion list
To remove a computer from the exclusion list, select its name and click Remove.
Important The list of Exclusion Rules affects only the Scriptable Audit and Audit via E-mail methods. These rules are ignored in the On-Demand Audit and Portable Audit methods.

Alloy Discovery - Getting Started Guide Page 56 of 144
57Chapter 4. Configuring Alloy Discovery
Setting the Bypass Rules
With some audit methods the audit is triggered from the client computer, typically when a user logs on the network. Besides the regular users, computers can be accessed by the system administrator or by technicians performing maintenance. In such situations, you wouldn't want the audit to run.
Figure 29: Bypass Rules
Using the Bypass Rules screen you can specify a list of user accounts that the audit must not be triggered for.
Excluding users from the audit
To add a user account to the bypass list, type the user name in the text field at the bottom and click Add.
You can use the standard wildcards: an asterisk (*) to represent any number of characters, including zero, and the question mark (?) to represent any single character.
Important The list of Bypass Rules affects only the Scriptable Audit and Audit via E-mail methods. These rules are ignored in the On-Demand Audit and Portable Audit methods.
Alloy Discovery - Getting Started Guide Page 57 of 144
57Chapter 4. Configuring Alloy Discovery
Modifying exclusion list
To edit an existing user name, select it, edit the name in the text field at the bottom, and then click Replace.
Removing names from the bypass list
To remove a user account from the bypass list, select its name and click Remove.
Next Steps
Now that you have learned about various audit methods and set the audit configuration, start auditing computers using any of the following methods:
• To audit the local network at your request, use the On-Demand Audit method. See “On-Demand Audit” on page 59.
• To audit the local network on a regular basis, use the Scriptable Audit. See “Scriptable Audit” on page 74.
• To audit a remote site, use the Audit via E-mail. See “Audit via E-mail” on page 82.
• To audit stand-alone computers or locked-down network segments, use the Portable Audit. See “Portable Audit” on page 91.
Alloy Discovery - Getting Started Guide Page 58 of 144
Chapter 5. Auditing Computers with Alloy Discovery
Chapter 5. Auditing Computers with Alloy DiscoveryThis chapter provides a detailed description of each audit method available for use when auditing computers.
On-Demand Audit............................................................................................................................................................ 59Managing Audit Credentials ......................................................................................................................................... 59Enabling Discovery via SNMP ..................................................................................................................................... 61Auditing Groups of Computers ..................................................................................................................................... 62Auditing Single Computers........................................................................................................................................... 72Scheduling an On-Demand Audit ................................................................................................................................. 73
Scriptable Audit ............................................................................................................................................................... 74Deploying Inventory Analyzer onto a Shared Folder ................................................................................................... 74Automating the Scriptable Audit................................................................................................................................... 76Next Steps ..................................................................................................................................................................... 81
Audit via E-mail ............................................................................................................................................................... 82Creating E-mail Audit Groups ...................................................................................................................................... 83Building Inventory Analyzer packages for the Audit via E-mail.................................................................................. 86Running the Audit via E-mail on the Target Network .................................................................................................. 88Checking E-mail Audit Groups for New Snapshots ..................................................................................................... 89Next Steps ..................................................................................................................................................................... 90
Portable Audit .................................................................................................................................................................. 91Building Inventory Analyzer Packages for the Portable Audit..................................................................................... 92Running the Portable Audit on Client Machines .......................................................................................................... 94Transporting Audit Snapshots to the Inventory Repository.......................................................................................... 94Next Steps ..................................................................................................................................................................... 95
Auditing Linux and Mac Computers ............................................................................................................................. 95
Alloy Discovery - Getting Started Guide Page 59 of 144
Chapter 5. Auditing Computers with Alloy Discovery
On-Demand Audit
The On-Demand Audit is an agentless method of auditing LAN computers at a user’s request. Multiple networked computers running on Windows, Mac or Linux can be audited simultaneously for up-to-the-minute audit snapshots. See “Supported Platforms and System Requirements” on page 17 for information on supported operating systems.
The On-Demand Audit is initiated from the host computer to audit any remote computer, as long as there is a direct network connection between the host and remote computers, and the user is successfully authenticated as an administrator at the remote computer.
You can audit a single computer or multiple computers using the on-demand audit:
• Audit a group of computers − First you need to create an on-demand audit group. An On-Demand Audit group represents a physical or logical subset of your network, such as a Microsoft Windows domain or an IP address range. For details, see “Auditing Groups of Computers” on page 62.
• Auditing a single computer − You can specify a single computer by its computer name or IP address. For details, see “Auditing Single Computers” on page 72.
Managing Audit Credentials
To start the audit on a remote computer, Alloy Discovery needs administrative access to the computer. If you are running Alloy Discovery under a domain administrative account, you can configure the On-Demand Audit to use the currently logged on user. Otherwise, you may specify another account with administrative access rights (or credentials) for accessing the computers in the group. Similarly, a unique set of valid audit credentials must be specified for computers running either Linux or Mac operating systems if they are included within the audit group.
You have the flexibility to define an administrative account at the global level (the default audit credentials), or override this setting by using unique audit credentials for the individual audit group. In turn, setting unique audit credentials for a individual computer will override any global audit credentials and the audit credentials set for a particular audit group.

Alloy Discovery - Getting Started Guide Page 60 of 144
Chapter 5. Auditing Computers with Alloy Discovery
If you need to modify the default credentials, select Audit > Audit Settings from the main menu and click the On-Demand Audit Credentials tab. On this tab, you can specify the Default Audit Credentials for Windows, and Linux and Mac computers.
Figure 30: Default On-Demand Audit Credentials
Specifying Default Audit Credentials for Windows Computers
You can specify the Default Audit Credentials for Windows computers in either of the following ways:
• To use the credentials of the logged on user (i.e. use Windows Authentication), select Currently logged user.
• To assign specific credentials, select This account and type the login name and password. You can enter either a domain login name (such as ZEUS\Administrator) or a local login name (such as Administrator).
Specifying Default Audit Credentials for Linux and Mac Computers
When specifying the Default Audit Credentials for Linux and Mac computers, enter the Name and Password to be used.
Alloy Discovery - Getting Started Guide Page 61 of 144
Chapter 5. Auditing Computers with Alloy Discovery
Enabling Discovery via SNMP
On-Demand audit groups using an IP address range allow for the detection of devices such as switches, routers, and printers via SNMP.
To successfully perform SNMP discovery, the SNMP agent must be configured and running on the target device. You must also specify the SNMP settings that allow access to the SNMP data on the device being discovered.
You have the flexibility to define SNMP credentials at the global level (the default SNMP credentials), or override this setting by using unique SNMP credentials for the individual group. In turn, setting unique SNMP credentials for a individual computer will override both the default credentials and the credentials set on the group level.
Default SNMP settings
You can specify default SNMP settings via the SNMP Settings tab located on the Audit Settings window (Audit > Audit Settings):
• Enable discovery via SNMP − when selected, discovery via SNMP is used when discovering computers and devices in a Group for the On-Demand audit of an IP Address range.
• Version − Select the version of SNMP: either v1 or v2c.
• Community − Specify the SNMP community value. An SNMP community is the group that devices running SNMP belong to. The community name is used to identify the group. A SNMP device or agent may belong to more than one SNMP community.
SNMP Settings for On-Demand Audit IP Address Range Group
You may specify individual SNMP settings for an individual On-Demand Audit Group created to discover an IP address range. Alloy Discovery will use these settings when discovering devices in this group. Specifying SNMP settings in this manner can be accomplished in either of these two methods:
• By accessing the audit group properties − Right-click on the group, select Properties, then select the SNMP Settings tab.
• During the creation of the group via the New Group Wizard. See “Creating On-Demand Audit Groups” on page 62 for more information.
You can specify the SNMP settings for an On-Demand Audit IP Address Range group via the SNMP Settings tab in the same manner used when setting the default SNMP Settings with the addition of the following options:
• Use default SNMP credentials − choose this option to discover computers and devices in the group using the default SNMP credentials.
Important The current version of Alloy Discovery supports both SNMPv1 and SNMPv2c versions.

Alloy Discovery - Getting Started Guide Page 62 of 144
Chapter 5. Auditing Computers with Alloy Discovery
• This SNMP credentials − choose this option to discover computers and devices via the SNMP using the credentials specified within the Version and Community fields.
Auditing Groups of Computers
To audit a group of computers using an On-Demand Audit group, follow the instructions below:
1. Create an On-Demand Audit Group. See “Creating On-Demand Audit Groups” on page 62.
2. Discover computers within the group. See “Discovering Computers” on page 67.
3. Run the On-Demand Audit for the group. See “Auditing Computers” on page 68.
4. (Optional) Schedule the On-Demand Audit. See, “Scheduling an On-Demand Audit” on page 73
Creating On-Demand Audit Groups
Each On-Demand Audit Group reflects either logical (a domain or workgroup) or physical (an IP address range or a subnet) structure of your LAN. To create an On-Demand Audit Group, complete the following steps:
1. Select File > New Group from the main menu. The New Group Wizard starts.
2. On the Welcome page, click Next to proceed. The Group Type page opens.
3. Click Audit group and click Next. The Audit Groups page opens.
4. Select where to search for computers:
° If the computers reside within a Windows domain or workgroup, click On-Demand audit on a Windows domain, and then click Next. The On-Demand Audit on a Windows Domain page opens. Proceed to Step 5.
° If you want to specify an IP address range, click On-Demand audit of an IP address range, and then click Next. The On-Demand Audit of an IP Address Range page opens. Proceed to Step 8.
5. On the On-Demand Audit on a Windows domain page, click Browse. The Select Domain window appears.
6. Choose a domain or workgroup in either of the following search areas:
° To search through the list of all domains and workgroups currently available on your network, select MS Network Browser in the Discover list, and then double-click the desired domain or workgroup. The On-Demand Audit Account page opens. Proceed to Step 10.
° To search through the list of domains specified in your Active Directory, select Active Directory in the Discovery list, and then double-click the desired domain or workgroup. The On-Demand Audit Account page opens. Proceed to Step 10.
7. On the Discovery Method page, select the method you want to use for discovering computers in the group:

Alloy Discovery - Getting Started Guide Page 63 of 144
Chapter 5. Auditing Computers with Alloy Discovery
° If you want to list machines registered in the Active Directory (including computers that are switched off or unavailable on the network at the time of discovery), click Active Directory.
° If you want to search for new computers among those machines that are available on the network at the time of discovery, click Network Browser.
° If you want to scan both the Active Directory and the network, click Both Active Directory and Network Browser. Alloy Discovery will list all computers registered in the domain (including those computers that are off or that are unavailable on the network), and then scan the network to discover new computers that are on and that are part of the network, but which are not necessarily registered in the Active Directory.
8. On the On-Demand Audit of an IP Address Range page, click Add and specify an IP address range to discover computers on your network in either of the following ways:
° To specify the IP address range manually, enter the Start IP Address and End IP Address of the range and click OK.
° To detect the IP address range of your network automatically, click My Network and click OK.
Figure 31: Specifying an IP address range
Important Depending on your network configuration, the IP address range produced by clicking My Network can be unreasonably large so that discovering computers takes a long time. In this case, you can manually edit the start and end IP addresses to restrict the range to include only those IP addresses that are in use.
If the IP address range of your network consists of several non-contiguous segments, you can cover the whole range by adding IP address ranges corresponding to each segment one by one.
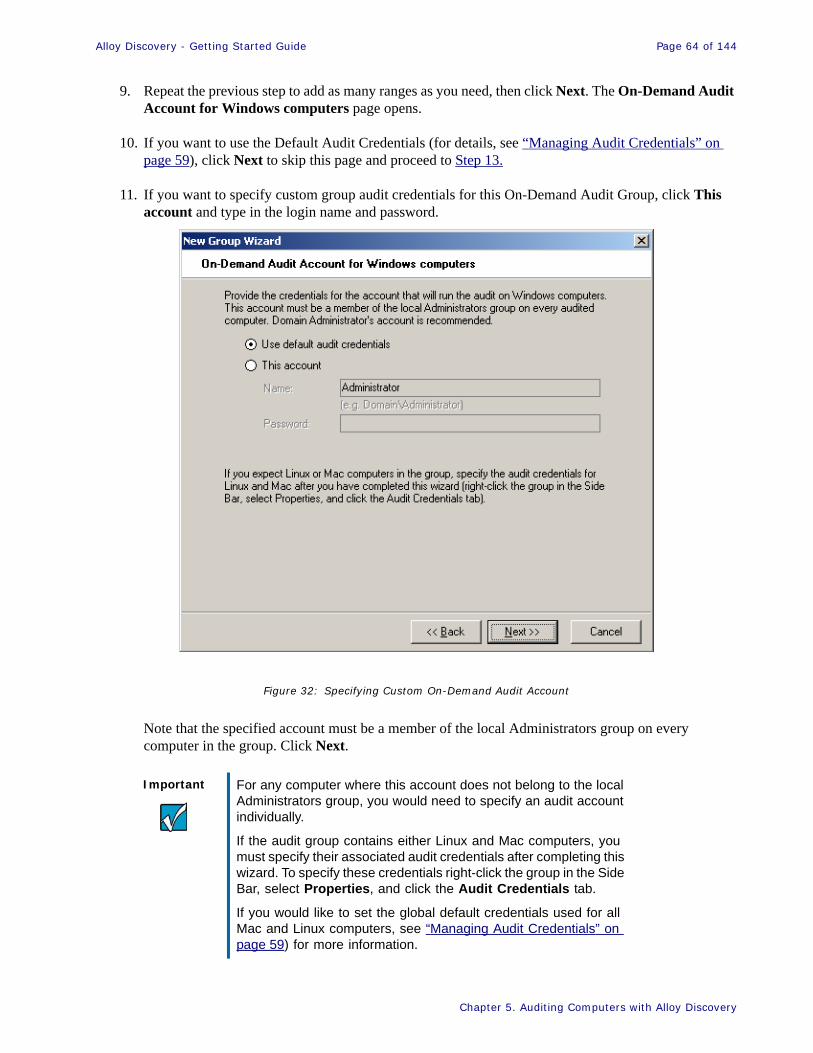
Alloy Discovery - Getting Started Guide Page 64 of 144
Chapter 5. Auditing Computers with Alloy Discovery
9. Repeat the previous step to add as many ranges as you need, then click Next. The On-Demand Audit Account for Windows computers page opens.
10. If you want to use the Default Audit Credentials (for details, see “Managing Audit Credentials” on page 59), click Next to skip this page and proceed to Step 13.
11. If you want to specify custom group audit credentials for this On-Demand Audit Group, click This account and type in the login name and password.
Figure 32: Specifying Custom On-Demand Audit Account
Note that the specified account must be a member of the local Administrators group on every computer in the group. Click Next.
Important For any computer where this account does not belong to the local Administrators group, you would need to specify an audit account individually.
If the audit group contains either Linux and Mac computers, you must specify their associated audit credentials after completing this wizard. To specify these credentials right-click the group in the Side Bar, select Properties, and click the Audit Credentials tab.
If you would like to set the global default credentials used for all Mac and Linux computers, see “Managing Audit Credentials” on page 59) for more information.
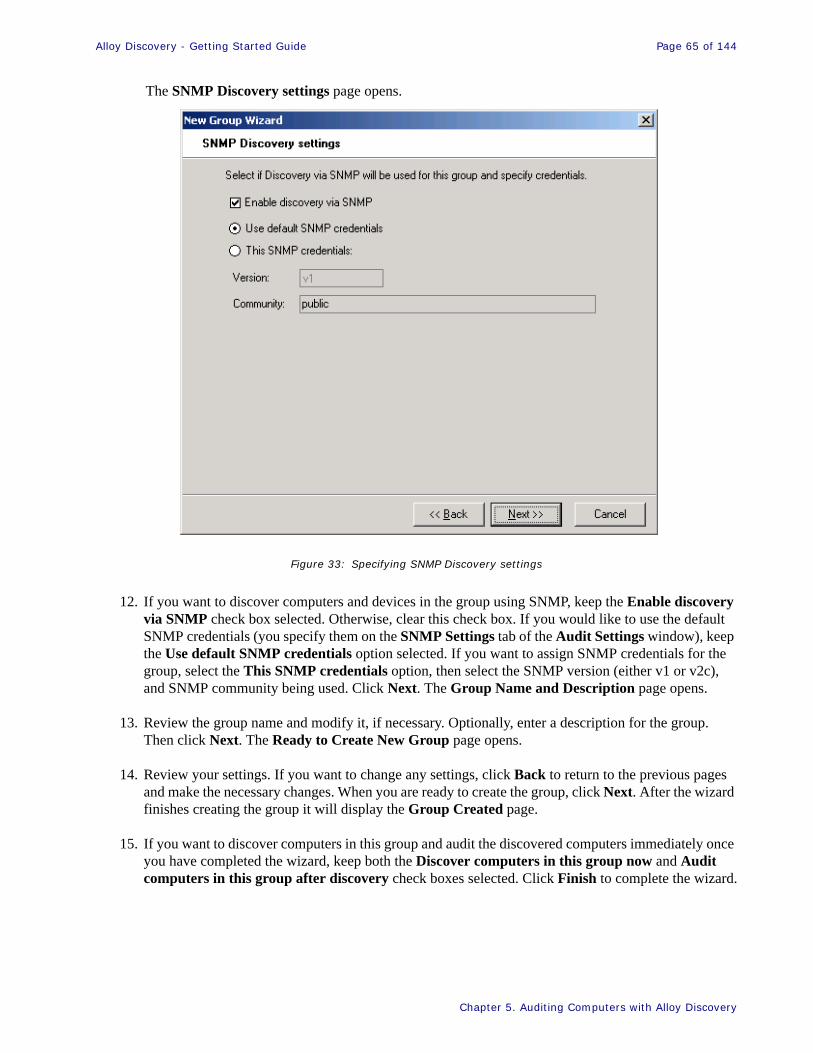
Alloy Discovery - Getting Started Guide Page 65 of 144
Chapter 5. Auditing Computers with Alloy Discovery
The SNMP Discovery settings page opens.
Figure 33: Specifying SNMP Discovery settings
12. If you want to discover computers and devices in the group using SNMP, keep the Enable discovery via SNMP check box selected. Otherwise, clear this check box. If you would like to use the default SNMP credentials (you specify them on the SNMP Settings tab of the Audit Settings window), keep the Use default SNMP credentials option selected. If you want to assign SNMP credentials for the group, select the This SNMP credentials option, then select the SNMP version (either v1 or v2c), and SNMP community being used. Click Next. The Group Name and Description page opens.
13. Review the group name and modify it, if necessary. Optionally, enter a description for the group. Then click Next. The Ready to Create New Group page opens.
14. Review your settings. If you want to change any settings, click Back to return to the previous pages and make the necessary changes. When you are ready to create the group, click Next. After the wizard finishes creating the group it will display the Group Created page.
15. If you want to discover computers in this group and audit the discovered computers immediately once you have completed the wizard, keep both the Discover computers in this group now and Audit computers in this group after discovery check boxes selected. Click Finish to complete the wizard.
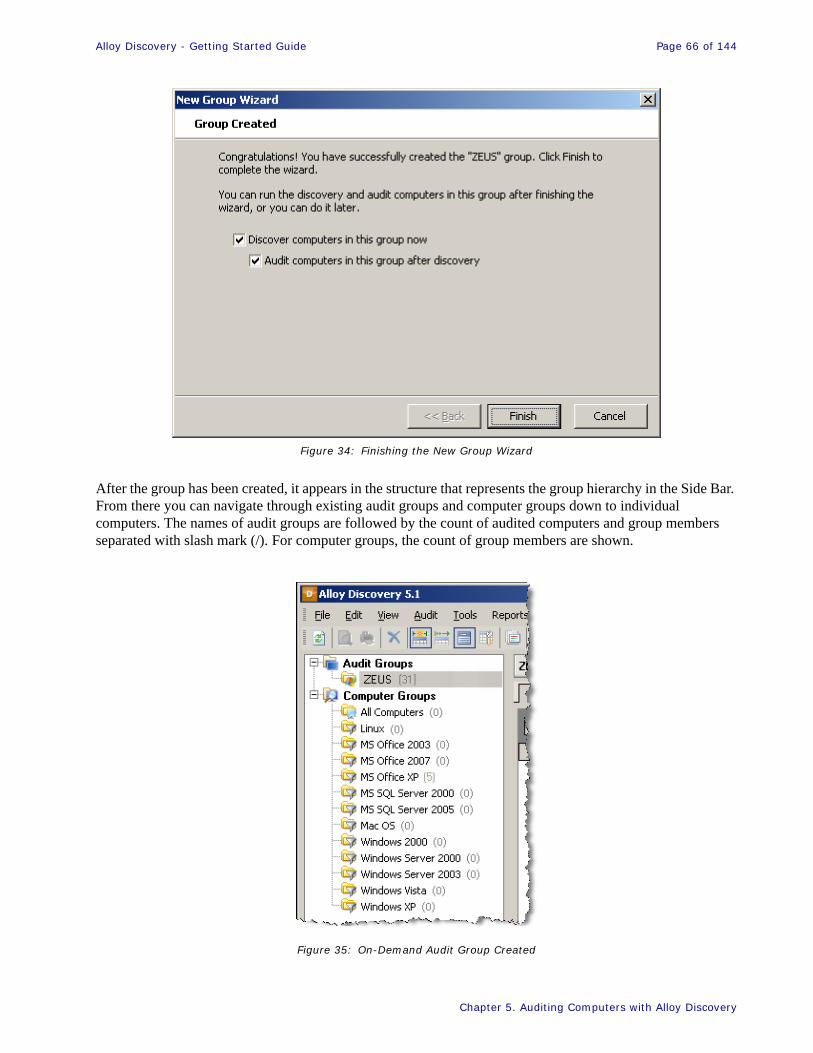
Alloy Discovery - Getting Started Guide Page 66 of 144
Chapter 5. Auditing Computers with Alloy Discovery
Figure 34: Finishing the New Group Wizard
After the group has been created, it appears in the structure that represents the group hierarchy in the Side Bar. From there you can navigate through existing audit groups and computer groups down to individual computers. The names of audit groups are followed by the count of audited computers and group members separated with slash mark (/). For computer groups, the count of group members are shown.
Figure 35: On-Demand Audit Group Created

Alloy Discovery - Getting Started Guide Page 67 of 144
Chapter 5. Auditing Computers with Alloy Discovery
Discovering Computers
After you create an On-Demand Audit group, you need to populate the group with computers through the process of discovery.
If you left the Discover computers in this group now check box selected on the last page of the New Group Wizard, the discovering starts once you have completed the wizard. Otherwise, you can start the discovery by right-clicking the group in the Side Bar and selecting Discover from the pop-up menu. When you start discovering computers, Alloy Discovery displays a progress window where you can monitor the process.
Figure 36: Status of the Discovering Process
Each row in the Discover Domain window shows the computer name and current operation status. The Discover IP Range window displays the IP address, computer name (if known), and the current operation status. For explanation of the operation statuses, see the Discovering Computers section in the embedded Help system.
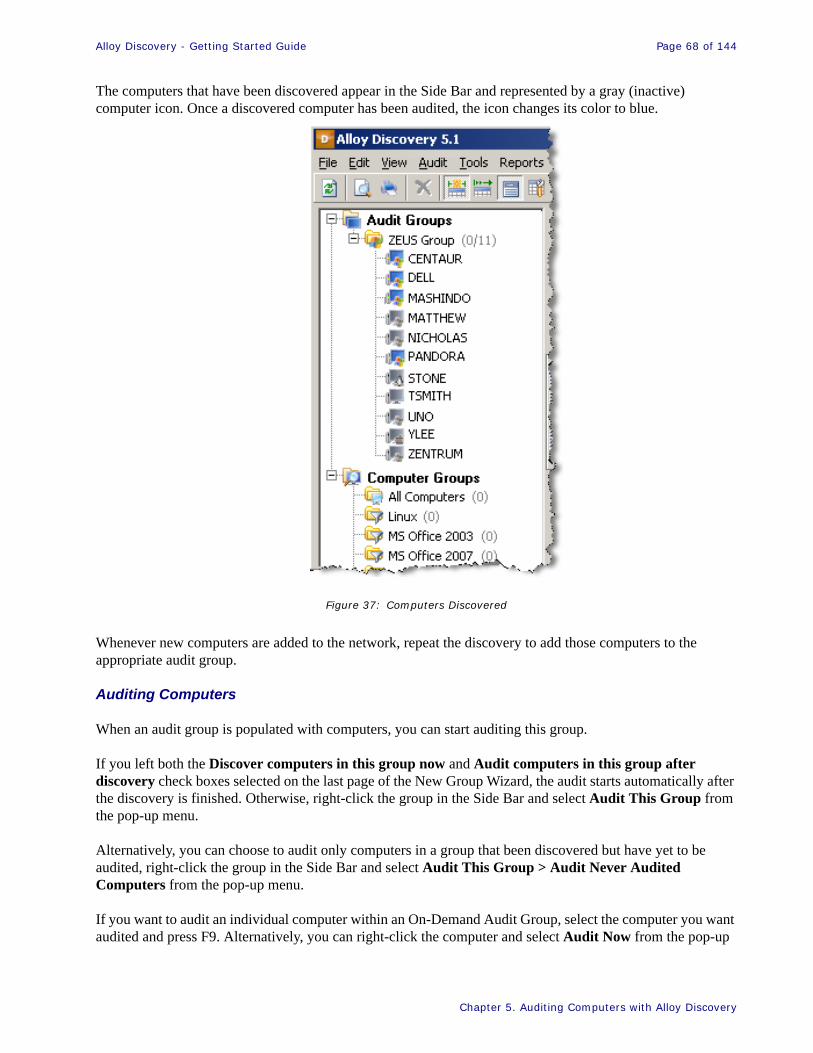
Alloy Discovery - Getting Started Guide Page 68 of 144
Chapter 5. Auditing Computers with Alloy Discovery
The computers that have been discovered appear in the Side Bar and represented by a gray (inactive) computer icon. Once a discovered computer has been audited, the icon changes its color to blue.
Figure 37: Computers Discovered
Whenever new computers are added to the network, repeat the discovery to add those computers to the appropriate audit group.
Auditing Computers
When an audit group is populated with computers, you can start auditing this group.
If you left both the Discover computers in this group now and Audit computers in this group after discovery check boxes selected on the last page of the New Group Wizard, the audit starts automatically after the discovery is finished. Otherwise, right-click the group in the Side Bar and select Audit This Group from the pop-up menu.
Alternatively, you can choose to audit only computers in a group that been discovered but have yet to be audited, right-click the group in the Side Bar and select Audit This Group > Audit Never Audited Computers from the pop-up menu.
If you want to audit an individual computer within an On-Demand Audit Group, select the computer you want audited and press F9. Alternatively, you can right-click the computer and select Audit Now from the pop-up

Alloy Discovery - Getting Started Guide Page 69 of 144
Chapter 5. Auditing Computers with Alloy Discovery
menu. For information how Alloy Discovery looks for the On-Demand Audit account, see “Managing Audit Credentials” on page 59.
When you start the On-Demand Audit, the Audit Progress pane appears under the preview pane. The count of processed computers and group members are separated with slash mark (/) and is displayed in the window title bar.
Figure 38: Audit Progress pane
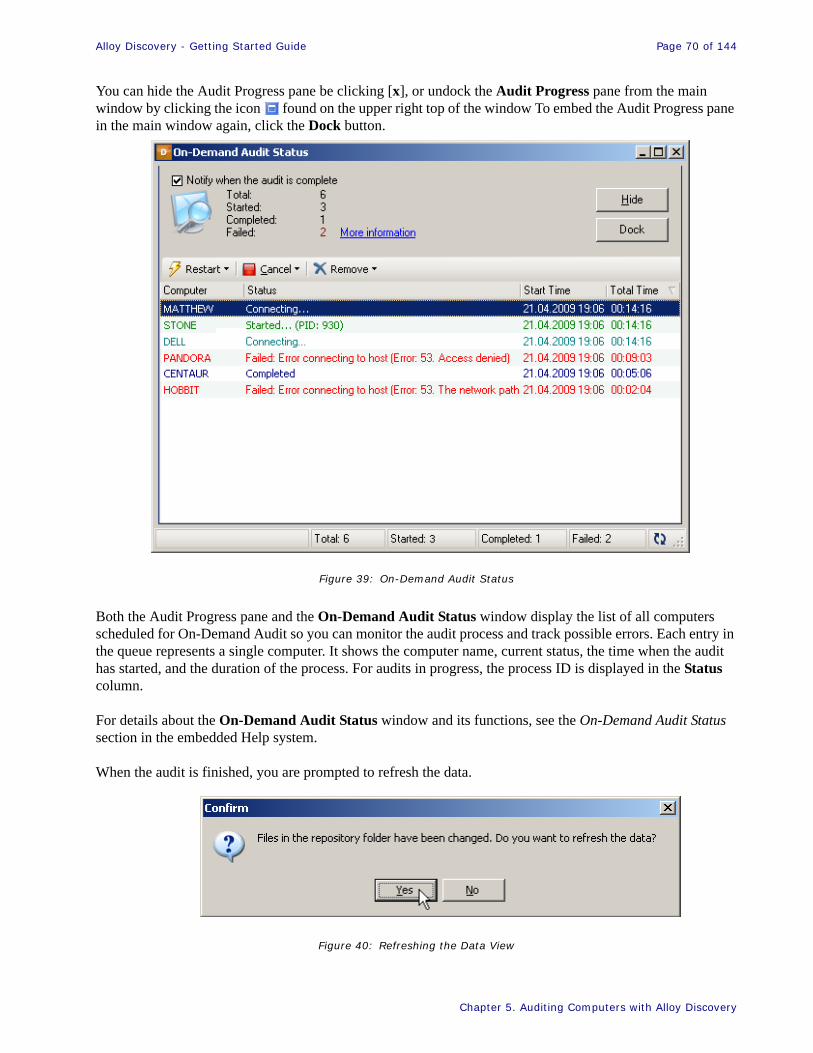
Alloy Discovery - Getting Started Guide Page 70 of 144
Chapter 5. Auditing Computers with Alloy Discovery
You can hide the Audit Progress pane be clicking [x], or undock the Audit Progress pane from the main window by clicking the icon found on the upper right top of the window To embed the Audit Progress pane in the main window again, click the Dock button.
Figure 39: On-Demand Audit Status
Both the Audit Progress pane and the On-Demand Audit Status window display the list of all computers scheduled for On-Demand Audit so you can monitor the audit process and track possible errors. Each entry in the queue represents a single computer. It shows the computer name, current status, the time when the audit has started, and the duration of the process. For audits in progress, the process ID is displayed in the Status column.
For details about the On-Demand Audit Status window and its functions, see the On-Demand Audit Status section in the embedded Help system.
When the audit is finished, you are prompted to refresh the data.
Figure 40: Refreshing the Data View
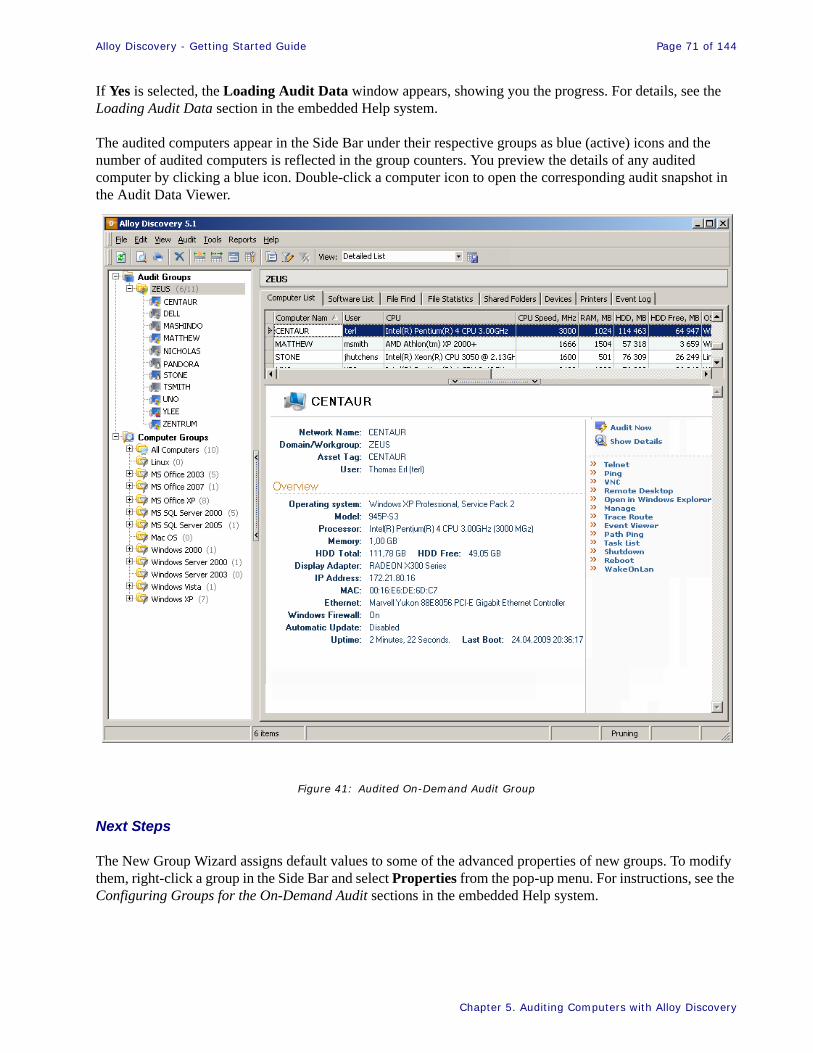
Alloy Discovery - Getting Started Guide Page 71 of 144
Chapter 5. Auditing Computers with Alloy Discovery
If Yes is selected, the Loading Audit Data window appears, showing you the progress. For details, see the Loading Audit Data section in the embedded Help system.
The audited computers appear in the Side Bar under their respective groups as blue (active) icons and the number of audited computers is reflected in the group counters. You preview the details of any audited computer by clicking a blue icon. Double-click a computer icon to open the corresponding audit snapshot in the Audit Data Viewer.
Figure 41: Audited On-Demand Audit Group
Next Steps
The New Group Wizard assigns default values to some of the advanced properties of new groups. To modify them, right-click a group in the Side Bar and select Properties from the pop-up menu. For instructions, see the Configuring Groups for the On-Demand Audit sections in the embedded Help system.
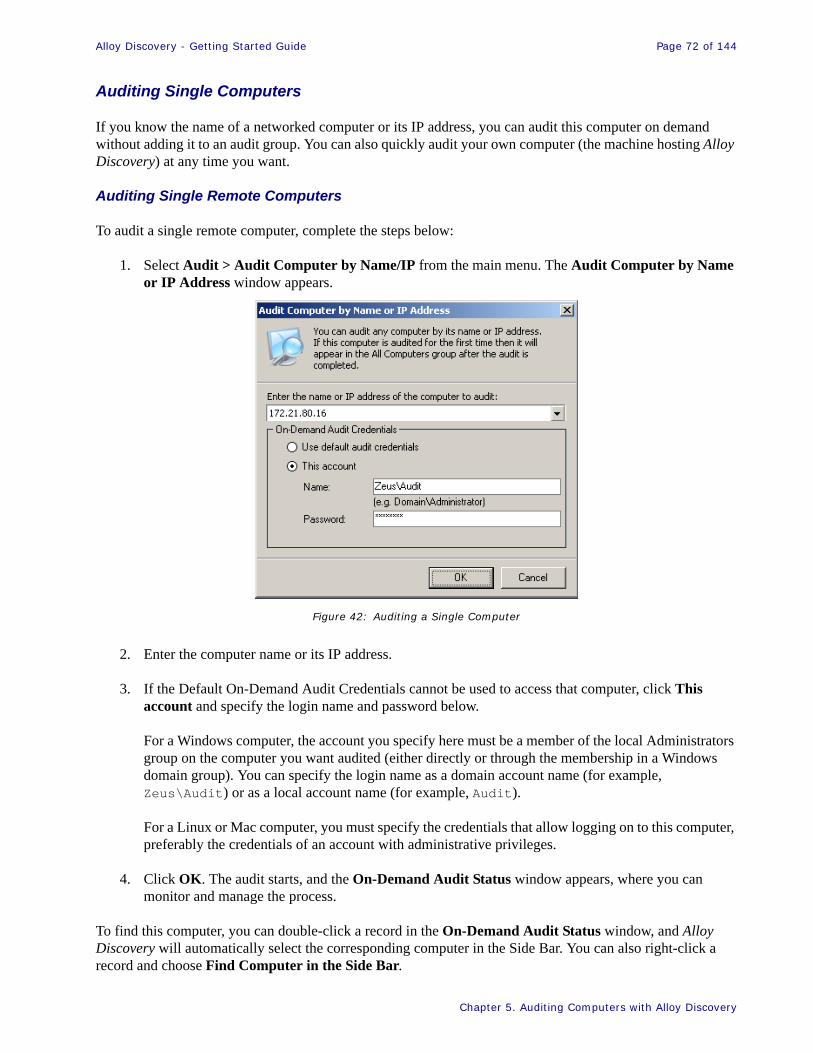
Alloy Discovery - Getting Started Guide Page 72 of 144
Chapter 5. Auditing Computers with Alloy Discovery
Auditing Single Computers
If you know the name of a networked computer or its IP address, you can audit this computer on demand without adding it to an audit group. You can also quickly audit your own computer (the machine hosting Alloy Discovery) at any time you want.
Auditing Single Remote Computers
To audit a single remote computer, complete the steps below:
1. Select Audit > Audit Computer by Name/IP from the main menu. The Audit Computer by Name or IP Address window appears.
Figure 42: Auditing a Single Computer
2. Enter the computer name or its IP address.
3. If the Default On-Demand Audit Credentials cannot be used to access that computer, click This account and specify the login name and password below.
For a Windows computer, the account you specify here must be a member of the local Administrators group on the computer you want audited (either directly or through the membership in a Windows domain group). You can specify the login name as a domain account name (for example, Zeus\Audit) or as a local account name (for example, Audit).
For a Linux or Mac computer, you must specify the credentials that allow logging on to this computer, preferably the credentials of an account with administrative privileges.
4. Click OK. The audit starts, and the On-Demand Audit Status window appears, where you can monitor and manage the process.
To find this computer, you can double-click a record in the On-Demand Audit Status window, and Alloy Discovery will automatically select the corresponding computer in the Side Bar. You can also right-click a record and choose Find Computer in the Side Bar.

Alloy Discovery - Getting Started Guide Page 73 of 144
Chapter 5. Auditing Computers with Alloy Discovery
Audit Your Computer
If you want to audit your own computer hosting Alloy Discovery, select Audit > Audit My Computer from the main menu. The audit starts, and the On-Demand Audit Status window appears, where you can monitor and manage the process. In this case, the audit runs under your current account, and no administrative privileges are needed. To find this computer, you can double-click a record in the Audit Status window, and Alloy Discovery will automatically select the corresponding computer in the Side Bar. You can also right-click a record and choose Find Computer in the Side Bar.
Scheduling an On-Demand Audit
You can audit one or several audit groups or computer groups by running AlloyDiscovery.exe from the command line. This executable file is located in your Alloy Discovery installation folder (typically, C:\Program Files\Alloy Software\Alloy Discovery 5\Bin\.)
With this feature, you can initiate the silent agentless On-demand audit method to audit the specified computers from a script or a scheduled task. For example, you may create a Windows Scheduled task that runs a batch file on a regular basis at your desired interval. For detailed information on how to automate the Inventory Analyzer to produce audit snapshots on a regular basis, see “Automating the Scriptable Audit” on page 76.
When AlloyDiscovery.exe is started from the command line with the /Audit option, the Alloy Discovery’s Main Console is not open, but the application runs in the background, minimized to the notification area.
Figure 43: Scheduled On-Demand Audit Status shown in the System Tray
To view the audit status, double-click the application icon in the notification area. The Alloy Discovery On-Demand Audit window opens, where the progress is displayed.
The following command-line options are available:
/Audit=[GroupName] This option is required to run Alloy Discovery in a hidden mode.
Specifies the name of the group to audit. Several groups can be specified except for the “All Computers” group.
Examples:
/Audit=MyGroup
/Audit="MS SQL Server 2000" /Audit=Linux_Group
/Log=[Path] Specifies the output directory for log files. Every Alloy Discovery instance creates its own log file.
If this option is not specified, the default /log folder is created in your Alloy Discovery installation folder.
Alloy Discovery - Getting Started Guide Page 74 of 144
Chapter 5. Auditing Computers with Alloy Discovery
Scriptable Audit
Scriptable Audit is initiated from remote computers using either group policy, domain logon scripts, local scripts, or scheduled tasks. The Scriptable Audit is an agent-based method of LAN audit. Using this method you can audit networked computers that cannot be normally audited using the On-Demand Audit (for example, when some computer are turned off during the time the On-Demand Audit runs).
It involves two steps: the deployment of the Inventory Analyzer to a network share and its automation using domain logon scripts or scheduled tasks. Audit snapshots are stored in an intermediary repository on the same network share until they are loaded by Alloy Discovery into the main repository. Alloy Discovery automatically reflects changes in the audit configuration on the host machine in the configuration of the deployed audit agents. For more information on the different types of audit methods available see “Overview of the Audit Methods” on page 29.
To audit computers using the Scriptable Audit method, follow the instructions below:
1. Deploy Inventory Analyzer to a shared folder. See “Deploying Inventory Analyzer onto a Shared Folder” on page 74
2. Automate the audit. See “Automating the Scriptable Audit” on page 76
Deploying Inventory Analyzer onto a Shared Folder
First, review the requirements for shared folder machine (see “Shared Folder Machine” on page 18). Depending on your environment, the following scenarios are possible:
• You have a remote server on your network dedicated to host the Shared Folder. In that case, you must complete the following steps prior to deploying the Inventory Analyzer there:
° Create a dedicated folder on the server and assign both the “Modify” permission and the “Change Permissions” special permission for the account for this folder.
° Share this folder and grant the Full Control share permission to your user account for this network share.
• You host the Shared Folder on your computer where Alloy Discovery is installed. In that case, you will create a shared folder when deploying the Inventory Analyzer.
You deploy the Inventory Analyzer onto a network share by creating a Scriptable Audit group. To create such group, complete the following steps:
1. Select Audit > New Group from the main menu. The New Group Wizard starts.
2. On the Welcome page, click Next to proceed. The Group Type page opens.
3. Click Audit Group and click Next. The Audit Groups page opens.
4. Click Scriptable Audit and click Next. The Shared Folder page opens.
5. Choose where you want to deploy the Inventory Analyzer:
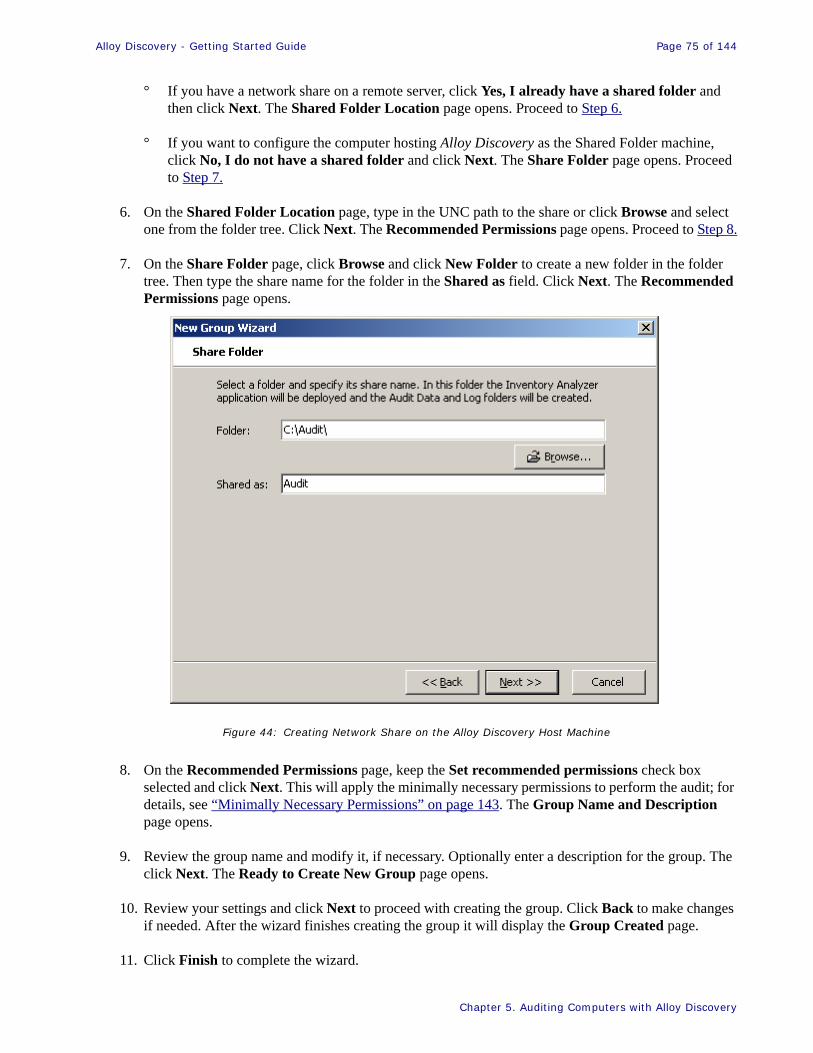
Alloy Discovery - Getting Started Guide Page 75 of 144
Chapter 5. Auditing Computers with Alloy Discovery
° If you have a network share on a remote server, click Yes, I already have a shared folder and then click Next. The Shared Folder Location page opens. Proceed to Step 6.
° If you want to configure the computer hosting Alloy Discovery as the Shared Folder machine, click No, I do not have a shared folder and click Next. The Share Folder page opens. Proceed to Step 7.
6. On the Shared Folder Location page, type in the UNC path to the share or click Browse and select one from the folder tree. Click Next. The Recommended Permissions page opens. Proceed to Step 8.
7. On the Share Folder page, click Browse and click New Folder to create a new folder in the folder tree. Then type the share name for the folder in the Shared as field. Click Next. The Recommended Permissions page opens.
Figure 44: Creating Network Share on the Alloy Discovery Host Machine
8. On the Recommended Permissions page, keep the Set recommended permissions check box selected and click Next. This will apply the minimally necessary permissions to perform the audit; for details, see “Minimally Necessary Permissions” on page 143. The Group Name and Description page opens.
9. Review the group name and modify it, if necessary. Optionally enter a description for the group. The click Next. The Ready to Create New Group page opens.
10. Review your settings and click Next to proceed with creating the group. Click Back to make changes if needed. After the wizard finishes creating the group it will display the Group Created page.
11. Click Finish to complete the wizard.
Alloy Discovery - Getting Started Guide Page 76 of 144
Chapter 5. Auditing Computers with Alloy Discovery
Automating the Scriptable Audit
When it starts, Alloy Discovery can automatically scan all intermediary repositories (if you have multiple instances of the Scriptable Audit), and load the audit snapshots from there into the main Inventory Repository. For more information on the different types of audit methods available see “Overview of the Audit Methods” on page 29
After you’ve installed and configured the Inventory Analyzer, you need to automate the Inventory Analyzer to produce audit snapshots on a regular basis. There are two main scenarios for automating the audit, depending on your environment:
• Windows workgroup networks. See “Automating the Scriptable Audit on Windows Domains” on page 76.
• Windows non-workgroup networks. See “Automating the Scriptable Audit on Windows Non-Domain Networks” on page 78.
• For networked computers running Linux or Mac OS, you can use the Linux and Mac OS features such as the cron daemon to automate the Inventory Analyzer for Linux (lina) or the Inventory Analyzer for Mac (ina_mac) from the shared folder where the Inventory Analyzer has been deployed. See your Linux or Mac OS documentation for details.
Novell users who have ZenWorks installed should note that it can be configured to run ina32.exe on startup. For details, please see your Novell documentation.
Automating the Scriptable Audit on Windows Domains
Windows 2000, 2003, and 2008 domain controllers feature the logon scripting facility for configuring desktop environments for users. The default location for logon scripts is the NETLOGON shared folder built during Active Directory installation.
For details on domain logon scripting, see Microsoft article “Logon Scripts” at http://www.microsoft.com/downloads/details.aspx?FamilyID=3533B6BB-7AC7-4F42-825F-B122474D9A89&displaylang=en.
To automate the audit:
1. In your domain logon script, add a line that would start the deployed Inventory Analyzer.
2. Assign this script for each domain member. For instructions, see the Assigning Domain User Logon Scripts section of the above-mentioned Microsoft article “Logon Scripts”.
This will run the Inventory Analyzer on each domain member when logging on to the domain, as shown in Figure 45 on page 77.
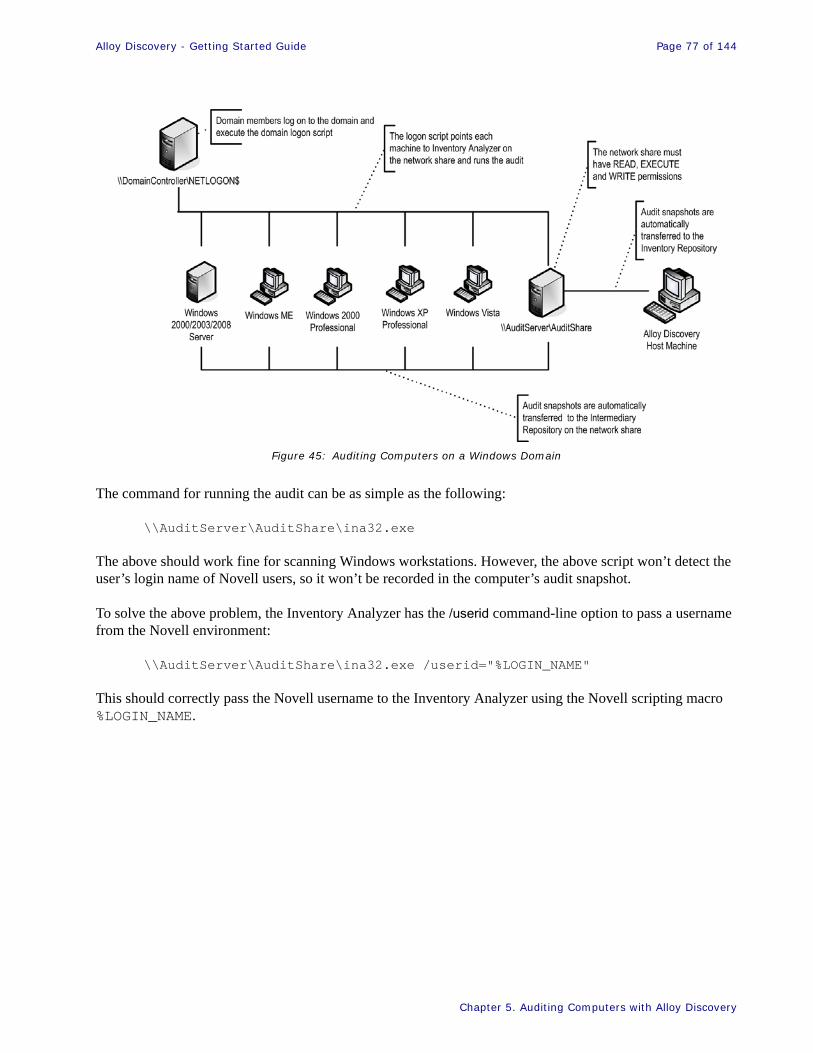
Alloy Discovery - Getting Started Guide Page 77 of 144
Chapter 5. Auditing Computers with Alloy Discovery
Figure 45: Auditing Computers on a Windows Domain
The command for running the audit can be as simple as the following:
\\AuditServer\AuditShare\ina32.exe
The above should work fine for scanning Windows workstations. However, the above script won’t detect the user’s login name of Novell users, so it won’t be recorded in the computer’s audit snapshot.
To solve the above problem, the Inventory Analyzer has the /userid command-line option to pass a username from the Novell environment:
\\AuditServer\AuditShare\ina32.exe /userid="%LOGIN_NAME"
This should correctly pass the Novell username to the Inventory Analyzer using the Novell scripting macro %LOGIN_NAME.
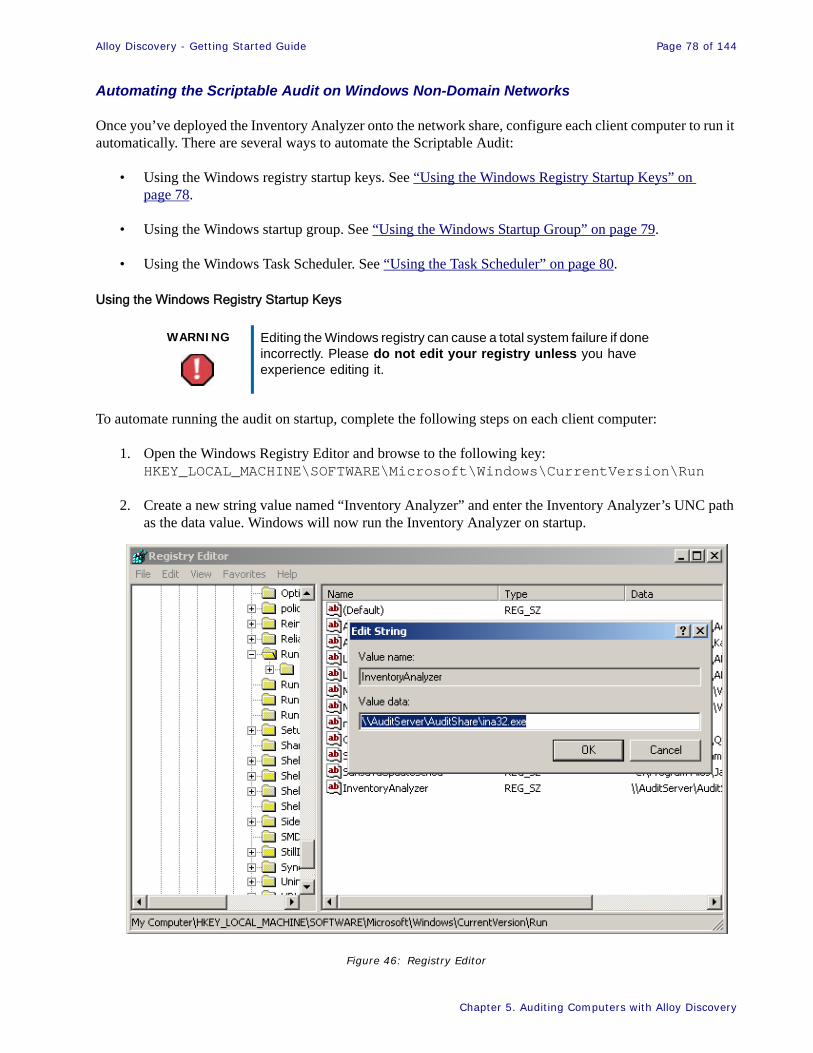
Alloy Discovery - Getting Started Guide Page 78 of 144
Chapter 5. Auditing Computers with Alloy Discovery
Automating the Scriptable Audit on Windows Non-Domain Networks
Once you’ve deployed the Inventory Analyzer onto the network share, configure each client computer to run it automatically. There are several ways to automate the Scriptable Audit:
• Using the Windows registry startup keys. See “Using the Windows Registry Startup Keys” on page 78.
• Using the Windows startup group. See “Using the Windows Startup Group” on page 79.
• Using the Windows Task Scheduler. See “Using the Task Scheduler” on page 80.
Using the Windows Registry Startup Keys
To automate running the audit on startup, complete the following steps on each client computer:
1. Open the Windows Registry Editor and browse to the following key:HKEY_LOCAL_MACHINE\SOFTWARE\Microsoft\Windows\CurrentVersion\Run
2. Create a new string value named “Inventory Analyzer” and enter the Inventory Analyzer’s UNC path as the data value. Windows will now run the Inventory Analyzer on startup.
Figure 46: Registry Editor
WARNING Editing the Windows registry can cause a total system failure if done incorrectly. Please do not edit your registry unless you have experience editing it.
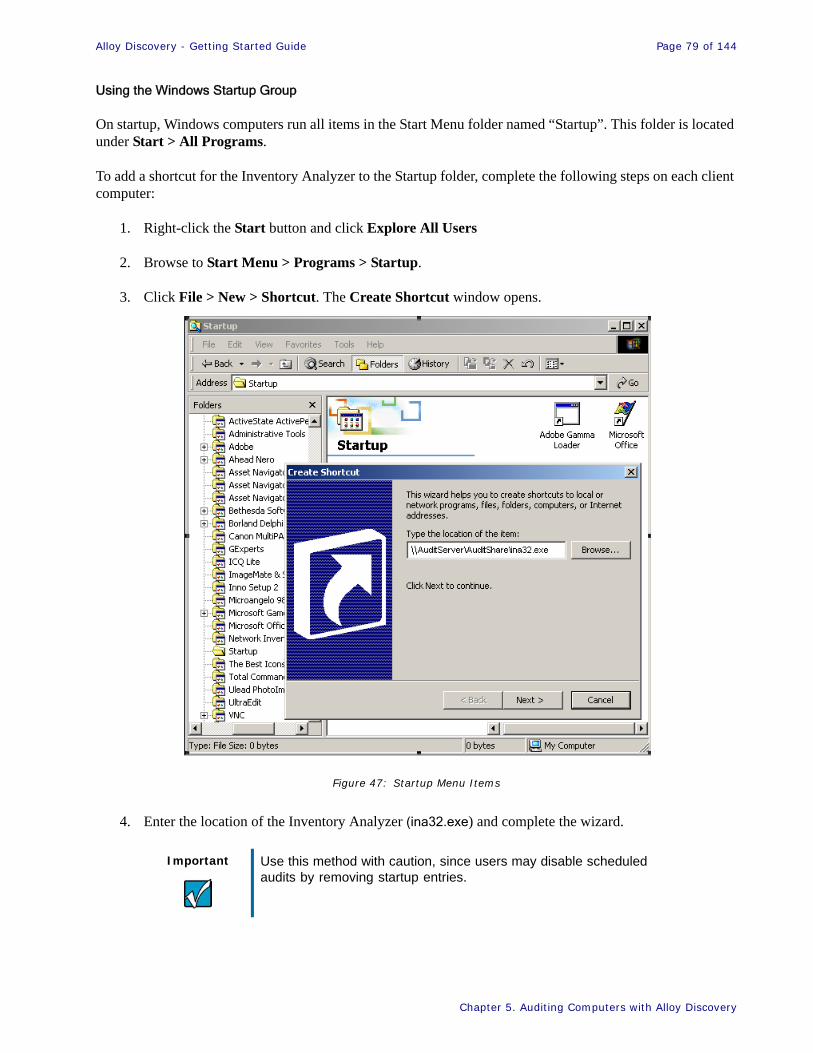
Alloy Discovery - Getting Started Guide Page 79 of 144
Chapter 5. Auditing Computers with Alloy Discovery
Using the Windows Startup Group
On startup, Windows computers run all items in the Start Menu folder named “Startup”. This folder is located under Start > All Programs.
To add a shortcut for the Inventory Analyzer to the Startup folder, complete the following steps on each client computer:
1. Right-click the Start button and click Explore All Users
2. Browse to Start Menu > Programs > Startup.
3. Click File > New > Shortcut. The Create Shortcut window opens.
Figure 47: Startup Menu Items
4. Enter the location of the Inventory Analyzer (ina32.exe) and complete the wizard.
Important Use this method with caution, since users may disable scheduled audits by removing startup entries.
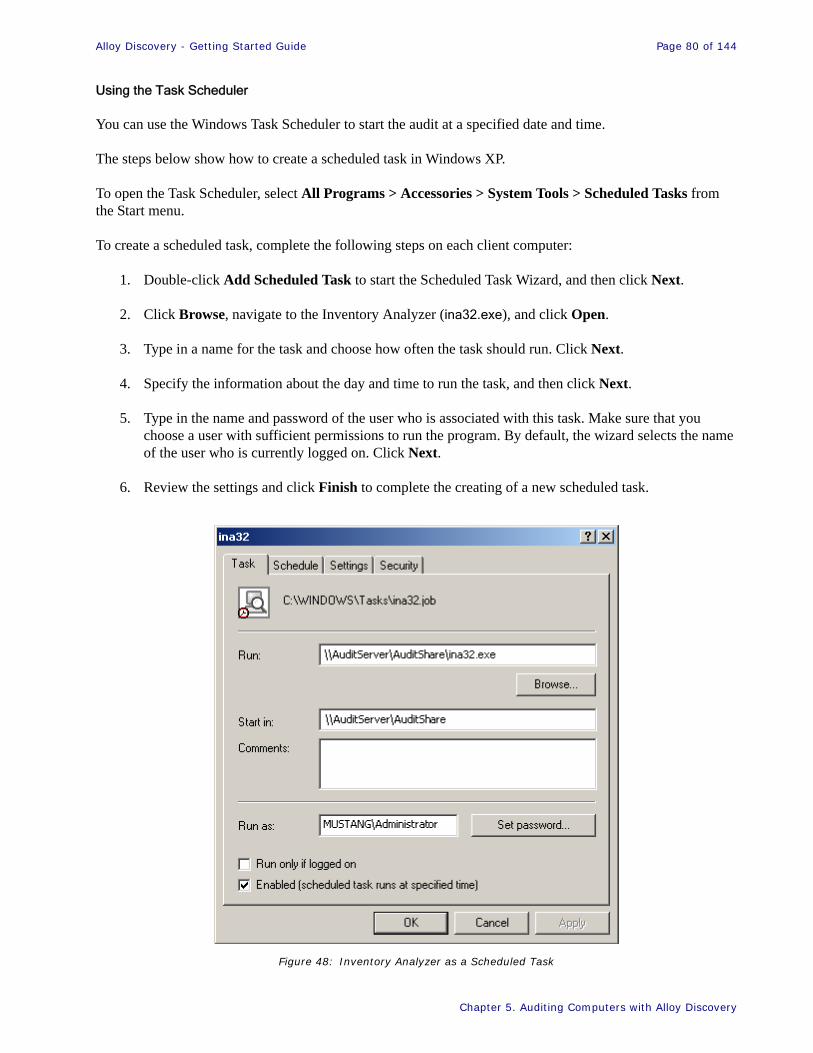
Alloy Discovery - Getting Started Guide Page 80 of 144
Chapter 5. Auditing Computers with Alloy Discovery
Using the Task Scheduler
You can use the Windows Task Scheduler to start the audit at a specified date and time.
The steps below show how to create a scheduled task in Windows XP.
To open the Task Scheduler, select All Programs > Accessories > System Tools > Scheduled Tasks from the Start menu.
To create a scheduled task, complete the following steps on each client computer:
1. Double-click Add Scheduled Task to start the Scheduled Task Wizard, and then click Next.
2. Click Browse, navigate to the Inventory Analyzer (ina32.exe), and click Open.
3. Type in a name for the task and choose how often the task should run. Click Next.
4. Specify the information about the day and time to run the task, and then click Next.
5. Type in the name and password of the user who is associated with this task. Make sure that you choose a user with sufficient permissions to run the program. By default, the wizard selects the name of the user who is currently logged on. Click Next.
6. Review the settings and click Finish to complete the creating of a new scheduled task.
Figure 48: Inventory Analyzer as a Scheduled Task
Alloy Discovery - Getting Started Guide Page 81 of 144
Chapter 5. Auditing Computers with Alloy Discovery
The new task appears on the list of Scheduled Tasks. If you want to modify any of the task's properties, or to change the advanced configuration, double-click the task to open its Properties dialog.
Automating the Scriptable Audit on Linux and Mac Machines
For networked computers running Linux or Mac OS, you can use the cron daemon to automate the inventory analyzers for Linux (lina) or for Mac (ina_mac) from the shared folder where the inventory analyzers are deployed.
Cron is a time-based scheduling service in service in Unix-like computer operating systems. Each crontab file entry contains six fields separated by spaces or tabs in the following form:
minute hour day_of_month month day_of_week command_to_be_executed
Users can have their own individual crontab files and often there is a system-wide crontab file (usually in /etc or a sub-directory of /etc) which is also used but can only be edited by the system administrator.
For more details about scheduling tasks, see the crontab(1) and crontab(5) man pages.
For the list of switches you can use with lina and ina_mac, see “Linux Inventory Analyzer Command-Line options” on page 129 or “Mac Inventory Analyzer Command-Line options” on page 130.
Next Steps
Now that you have deployed the Inventory Analyzer to a network share and automated the audit to produce audit snapshots on a regular basis, you can choose to customize the Scriptable Audit. Some properties of the Scriptable Audit group have been set to their default values when you created the group. You can fine-tune group's settings in the Properties window.
To access the Properties window, right-click the group in the Side Bar and select Properties from the pop-up menu. There you can modify various settings: you can reduce the frequency of regular audit by specifying the schedule, you can choose whether the audit will run interactively or silently by selecting the audit mode, etc. For instructions, see the Configuring Scriptable Audit Groups section in the embedded Help system.
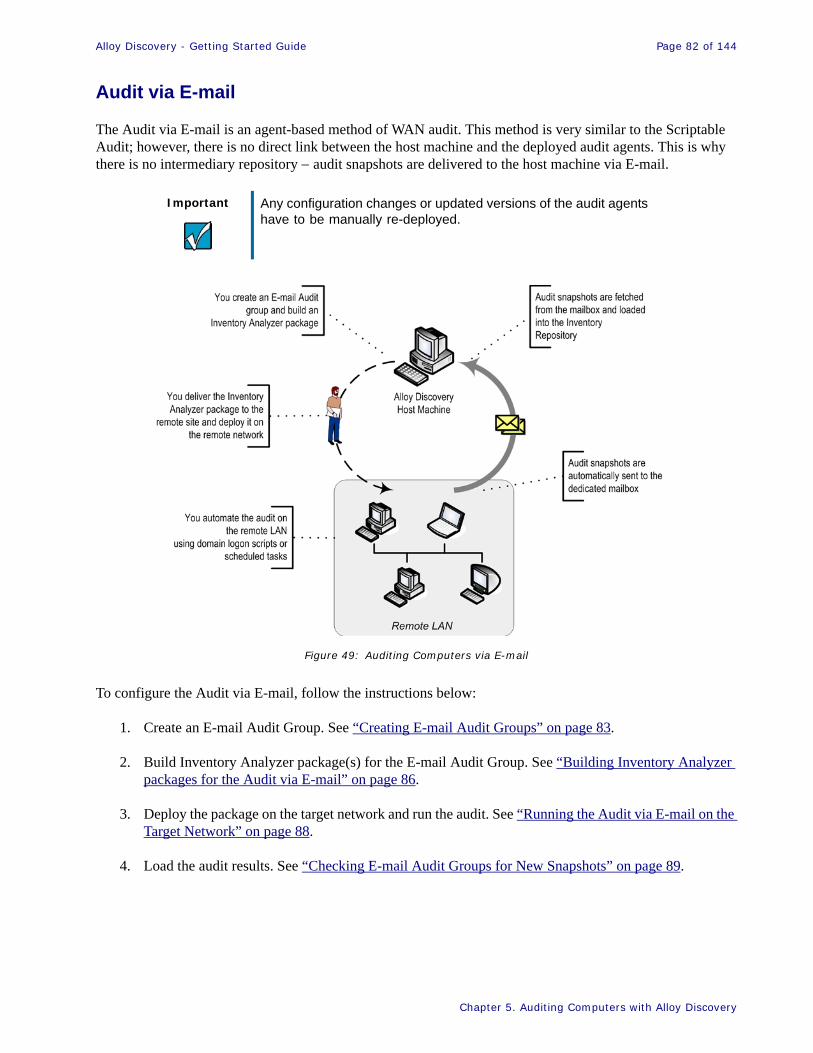
Alloy Discovery - Getting Started Guide Page 82 of 144
Chapter 5. Auditing Computers with Alloy Discovery
Audit via E-mail
The Audit via E-mail is an agent-based method of WAN audit. This method is very similar to the Scriptable Audit; however, there is no direct link between the host machine and the deployed audit agents. This is why there is no intermediary repository − audit snapshots are delivered to the host machine via E-mail.
Figure 49: Auditing Computers via E-mail
To configure the Audit via E-mail, follow the instructions below:
1. Create an E-mail Audit Group. See “Creating E-mail Audit Groups” on page 83.
2. Build Inventory Analyzer package(s) for the E-mail Audit Group. See “Building Inventory Analyzer packages for the Audit via E-mail” on page 86.
3. Deploy the package on the target network and run the audit. See “Running the Audit via E-mail on the Target Network” on page 88.
4. Load the audit results. See “Checking E-mail Audit Groups for New Snapshots” on page 89.
Important Any configuration changes or updated versions of the audit agents have to be manually re-deployed.

Alloy Discovery - Getting Started Guide Page 83 of 144
Chapter 5. Auditing Computers with Alloy Discovery
Creating E-mail Audit Groups
To create an E-mail Audit Group:
1. Select Audit > New Group from the main menu. The New Group Wizard starts.
2. On the Welcome page, click Next to proceed. The Group Type page opens.
3. Click Audit group and click Next. The Audit Groups page opens.
4. Click Automated audit via email, then click Next. The E-mail Address page opens.
5. Specify the email address where the Inventory Analyzer will be delivering audit snapshots in the form of email messages. Optionally, specify the “From” address for the email messages. Click Next. The Incoming Mail Server page opens.
6. Configure the settings for the mail server that you want to handle the incoming audit results. Optionally, click Test Connection and make sure that the settings are correct. Then click Next. The Testing Mail Server Settings page opens.
Important Before you begin, make sure to complete setting the Audit Configuration, as the Inventory Analyzer package you will create in the following steps would need to be rebuilt after making any Audit Configuration changes. See “Setting Audit Configuration” on page 31. Also, make sure to designate a mailbox on the Mail Server for handling incoming audit snapshots.
Important If you want to use a secure connection (TLS/SSL), you can configure it later by modifying the group’s properties.
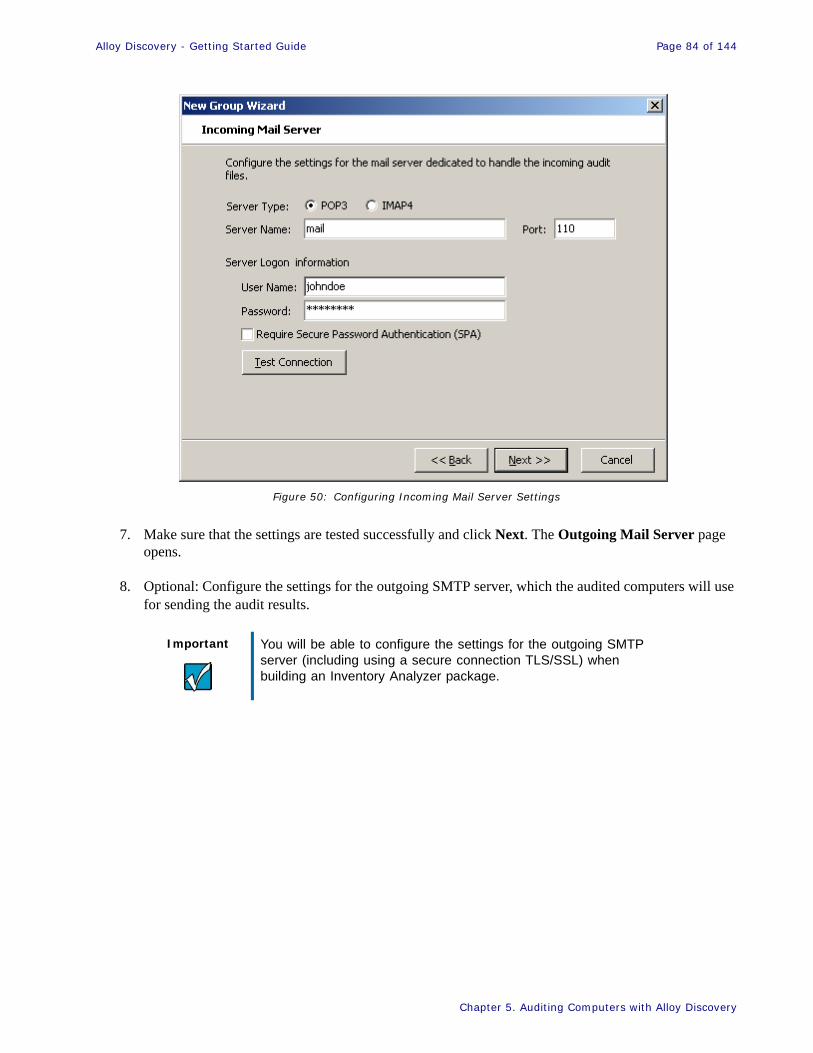
Alloy Discovery - Getting Started Guide Page 84 of 144
Chapter 5. Auditing Computers with Alloy Discovery
Figure 50: Configuring Incoming Mail Server Settings
7. Make sure that the settings are tested successfully and click Next. The Outgoing Mail Server page opens.
8. Optional: Configure the settings for the outgoing SMTP server, which the audited computers will use for sending the audit results.
Important You will be able to configure the settings for the outgoing SMTP server (including using a secure connection TLS/SSL) when building an Inventory Analyzer package.

Alloy Discovery - Getting Started Guide Page 85 of 144
Chapter 5. Auditing Computers with Alloy Discovery
Figure 51: Configuring Outgoing Mail Server Settings
Click Test Connection to make sure that Alloy Discovery is able to connect to the server using specified credentials, and then click Next. The Group Name and Description page opens.
9. Review the group name and modify it, if necessary. Optionally enter a description for the group. Then click Next. The Ready to Create New Group page opens.
10. Review your settings. When you are ready to create the group, click Next. If you want to change any settings, click Back. After the wizard finishes creating the group it will display the Group Created page.
11. Some properties of the E-mail Audit group have been set to their default values. Complete the wizard as either of the following:
° If you want to use the default properties and immediately create an Inventory Analyzer package for auditing computers in this group, keep the Build Inventory Analyzer package(s) after finish check box selected. Then click Finish to complete the wizard.
° If you want to fine-tune some properties of the E-mail Audit group before creating an Inventory Analyzer package, clear the check box and click Finish to complete the wizard.
To review and modify group properties, right-click the group in the Side Bar and select Properties from the pop-up menu. In the Properties window, you can modify various settings (reduce the frequency of regular audit by specifying the schedule, you can choose whether the audit will run automatically or silently by
Alloy Discovery - Getting Started Guide Page 86 of 144
Chapter 5. Auditing Computers with Alloy Discovery
selecting the audit mode, etc.). For instructions, see the Configuring E-mail Audit Groups section in the embedded Help system.
Building Inventory Analyzer packages for the Audit via E-mail
To create an Inventory Analyzer package for the Audit via E-mail, run the Portable Audit Wizard as follows:
• If you kept the Build Inventory Analyzer package(s) after finish check box selected on the last page of the New Group Wizard, the Portable Audit Wizard starts automatically after the E-mail Audit Group is created.
• To start the Portable Audit Wizard manually, right-click the created E-mail Audit Group in the Side Bar, click Properties, and then click Create under Inventory Analyzer Packages. The Portable Audit Wizard starts.
To create an Inventory Analyzer package:
1. On the Welcome page of the Portable Audit Wizard, click Next. The Operating System page opens.
2. Select the check boxes for the types of operating systems that you want to audit (the wizard will create separate packages for each of the selected OSes). Click Next.
° If you selected Windows OS, the Audit Mode page opens. Proceed to Step 3.
° If you selected Linux and Mac OS, the E-mail Address page opens. Proceed to Step 4.
3. Select one of the following audit modes:
° If you want the Inventory Analyzer to prompt the users before starting the audit, click Interactive Mode.
° If you want the audit to run silently without requiring any user action, click Silent Mode.
° If you want the Inventory Analyzer to prompt the users only at the first audit and run the subsequent audits silently, click Interactive Once.
Click Next. The E-mail Address page opens.
4. Enter the E-mail address where the audit results will be sent to. Optionally, enter the “From” E-mail address to appear on the sent messages. Click Next. If you selected Windows OS in Step 2, the Outgoing Server (SMTP) Settings page opens. If you selected Linux and Mac OS, skip the next page and proceed to Step 6.
5. Configure the outgoing server (SMTP) settings, which Inventory Analyzer will be using for sending audit snapshots by E-mail as follows (the page may be populated with the values you entered when creating the E-mail Audit Group):
Important In the Silent Mode, the User Input Options configured in Audit Configuration will be ignored (see “Setting Available Controls ” on page 35 and “Setting Custom Input Fields” on page 37).

Alloy Discovery - Getting Started Guide Page 87 of 144
Chapter 5. Auditing Computers with Alloy Discovery
Figure 52: Configuring Outgoing Mail Server Settings
6. Enter the name and port number for the SMTP mail server. (The default port number is 25 for unsecure connection. For secure connection via SSL, the default port number is 465.
7. If the outgoing mail server requires authentication, select the Server Requires Authentication check box and enter the user name and password. If the server requires SPA, select the Require Secure Password Authentication (SPA) check box.
8. If you want to use secure connection, select one of the following options under Secure Connection:
° TLS, if available − This establishes a secure connection using the Transport Layer Security (TLS) protocol. If TLS protocol is not available, establishes non-secure connection.
° TLS − This establishes a secure connection using the Transport Layer Security (TLS) protocol.
° SSL − This establishes a secure connection using the Secure Sockets Layer (SSL) protocol.
Click Next. The Destination Folder page opens.
9. Optionally: click Test Connection to make sure that the settings are correct. Click Next. The Destination Folder page opens.
10. Specify the output folder for the prepared Inventory Analyzer package(s). If you want the package to be compressed, select the Compress the Inventory Analyzer files check box. This can be useful if you intend to deploy the package via E-mail or via File Transfer Protocol (FTP) because compressing ensures the integrity of file attributes during the transfer. Click Next. The Finish page opens.
Alloy Discovery - Getting Started Guide Page 88 of 144
Chapter 5. Auditing Computers with Alloy Discovery
11. Review your settings. If you want to change any settings, click Back. When you are ready, click Finish to complete the wizard.
The following folders and files are created in the output folder:
• AuditData − This is the folder in which audit snapshots will be stored before sending them to the Alloy Discovery host machine.
• Log − This is the folder in which the Inventory Analyzer will store logged events (the folder is created for the Windows package only).
• Windows package:
° ina32.cfg – This is the configuration file in which settings for the Windows Inventory Analyzer are stored.
° ina32.exe – This is the Windows Inventory Analyzer executable file.
• Linux package:
° lina – This is the script to automatically detect kernel version and launch the appropriate Linux Inventory Analyzer executable.
° lina24 – This is the Linux Inventory Analyzer executable for Linux kernel version 2.4 and earlier.
° lina26 – This is the Linux Inventory Analyzer executable for Linux kernel version 2.6 and later.
° lina.ini – This is the configuration file for Linux Inventory Analyzer.
• Mac package:
° ina_mac – This is the Mac Inventory Analyzer executable.
° ina_mac.ini – This is the configuration file for Mac Inventory Analyzer.
Running the Audit via E-mail on the Target Network
After building the Inventory Analyzer package, deploy it to the target network and run the audit as follows:
• If you want to audit multiple computers on a remote network:
1. Deliver the Inventory Analyzer Package to the remote site.
2. Deploy the Inventory Analyzer Package on the target network. You would need to create a shared folder and set its permissions manually. For instructions on creating shared folders, see your Microsoft Windows documentation. For information on setting the minimally necessary permissions to perform the audit, see “Minimally Necessary Permissions” on page 143.
3. Make sure the Internet connectivity is available to allow for sending E-mail.
Alloy Discovery - Getting Started Guide Page 89 of 144
Chapter 5. Auditing Computers with Alloy Discovery
4. Automate the audit on the target network using domain logon script or scheduled task. For instructions, see “Automating the Scriptable Audit” on page 76.
• If you want to audit a single computer:
1. Deliver the Inventory Analyzer package to the client machine (for example, using a USB flash drive).
2. Make sure the Internet connectivity is available to allow for sending E-mail.
3. Run the Inventory Analyzer.
The Inventory Analyzer will send the audit snapshots as E-mail messages to the specified mailbox.
For Linux machines: Make sure that a sendmail-compatible Mail Transfer Agent is installed on every Linux machine. For instructions, see your Linux documentation or Linux Internet recourses such as http://www.redhat.com/docs/manuals/linux/RHL-7-Manual/ref-guide/s1-rpm-using.html.
For Mac OS machines: Configure and start postfix on each Mac OS client machine. The postfix tool ships with OS but is not started by default. For instructions, see your Mac OS documentation or Mac OS Internet recourses such as http://egopoly.com/2006/08/15/enable-postfix-mail-on-mac-os-x-tiger/.
Checking E-mail Audit Groups for New Snapshots
To load audit data collected using the Audit via E-mail method to the Inventory Repository, you should check the E-mail Audit Group as follows:
• To make Alloy Discovery check an E-mail Audit Group for new snapshots each time the application starts, right-click the group in the Side Bar and select Properties from the pop-up menu. Click the Options tab, select the Look for new audit files check box, and click OK.
• To check an E-mail Audit Group for new snapshots when the application is already running, right-click the group in the Side Bar and choose Check for New Audits from the pop-up menu. The Check for New Audits window appears where you can monitor the progress of processing E-mail messages.
E-mail messages are handled in accordance with the options you specified for the E-mail Audit Group (you can view these options on the Options tab of the group’s Properties window). The following statuses describe various processing stages for each individual email message in the mailbox:
• Succeed − The audit snapshot has successfully imported from the E-mail message into the Inventory Repository.
• Failed − The e-mail message has been identified as containing an audit snapshot, however the snapshot failed to import.
• Skipped − No audit snapshot has been found in the E-mail message.
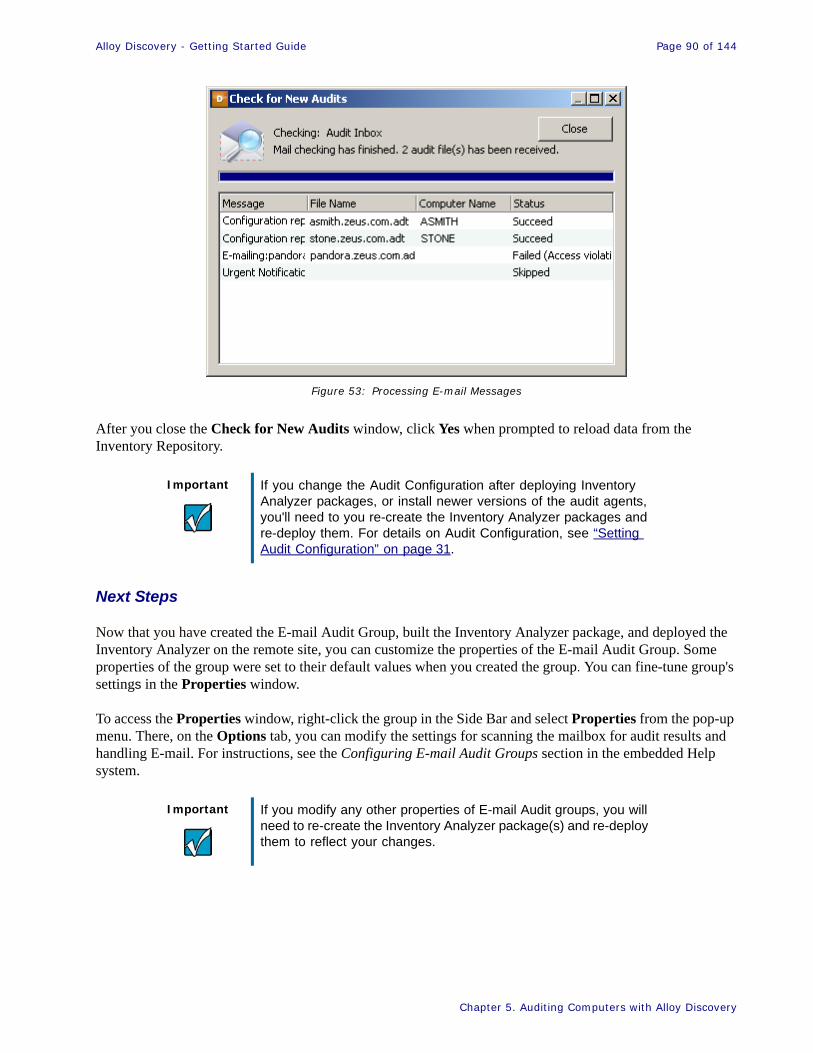
Alloy Discovery - Getting Started Guide Page 90 of 144
Chapter 5. Auditing Computers with Alloy Discovery
Figure 53: Processing E-mail Messages
After you close the Check for New Audits window, click Yes when prompted to reload data from the Inventory Repository.
Next Steps
Now that you have created the E-mail Audit Group, built the Inventory Analyzer package, and deployed the Inventory Analyzer on the remote site, you can customize the properties of the E-mail Audit Group. Some properties of the group were set to their default values when you created the group. You can fine-tune group's settings in the Properties window.
To access the Properties window, right-click the group in the Side Bar and select Properties from the pop-up menu. There, on the Options tab, you can modify the settings for scanning the mailbox for audit results and handling E-mail. For instructions, see the Configuring E-mail Audit Groups section in the embedded Help system.
Important If you change the Audit Configuration after deploying Inventory Analyzer packages, or install newer versions of the audit agents, you'll need to you re-create the Inventory Analyzer packages and re-deploy them. For details on Audit Configuration, see “Setting Audit Configuration” on page 31.
Important If you modify any other properties of E-mail Audit groups, you will need to re-create the Inventory Analyzer package(s) and re-deploy them to reflect your changes.
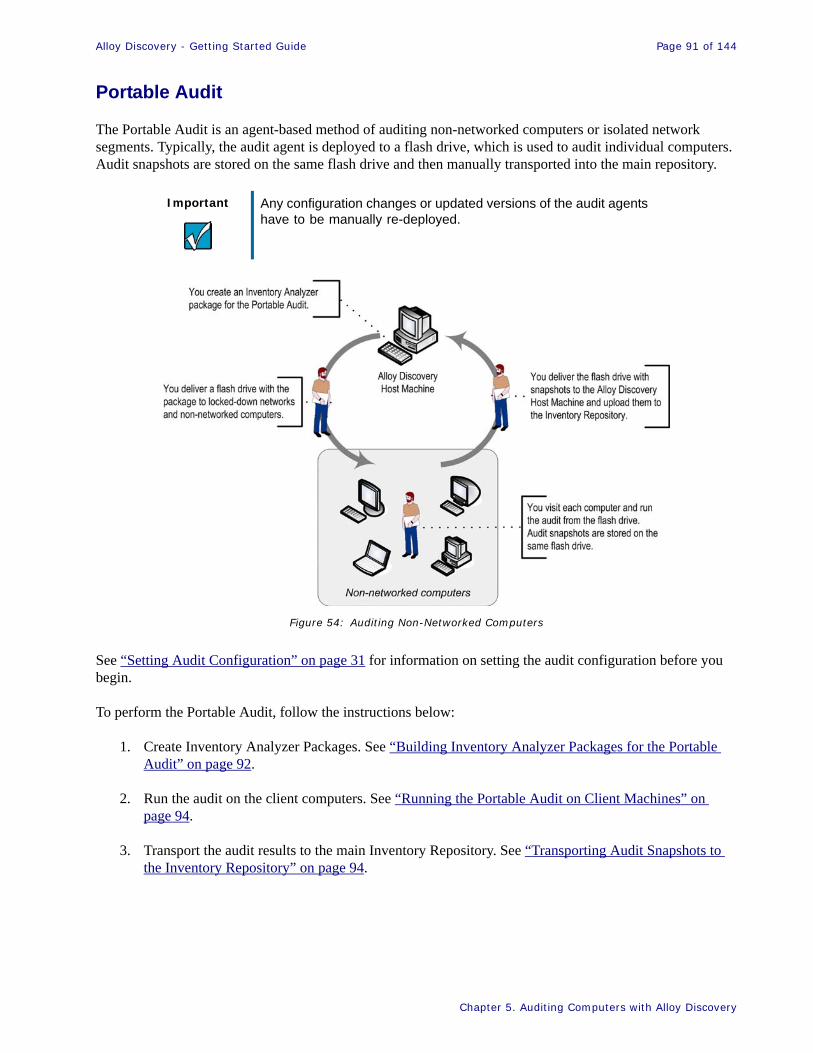
Alloy Discovery - Getting Started Guide Page 91 of 144
Chapter 5. Auditing Computers with Alloy Discovery
Portable Audit
The Portable Audit is an agent-based method of auditing non-networked computers or isolated network segments. Typically, the audit agent is deployed to a flash drive, which is used to audit individual computers. Audit snapshots are stored on the same flash drive and then manually transported into the main repository.
Figure 54: Auditing Non-Networked Computers
See “Setting Audit Configuration” on page 31 for information on setting the audit configuration before you begin.
To perform the Portable Audit, follow the instructions below:
1. Create Inventory Analyzer Packages. See “Building Inventory Analyzer Packages for the Portable Audit” on page 92.
2. Run the audit on the client computers. See “Running the Portable Audit on Client Machines” on page 94.
3. Transport the audit results to the main Inventory Repository. See “Transporting Audit Snapshots to the Inventory Repository” on page 94.
Important Any configuration changes or updated versions of the audit agents have to be manually re-deployed.
Alloy Discovery - Getting Started Guide Page 92 of 144
Chapter 5. Auditing Computers with Alloy Discovery
Building Inventory Analyzer Packages for the Portable Audit
You can build Inventory Analyzer packages for: Windows, Linux, and Mac computers. For more information on the supported platforms, see “Client Machines” on page 17. To create an Inventory Analyzer package for the Portable Audit, complete the Portable Audit Wizard as follows:
1. Choose Audit > Create Portable Audit Package from the main menu. The Portable Audit Wizard starts.
2. On the Welcome page, click Next. The Operating System page opens.
3. Select the check boxes for the types of operating systems that you want to audit (the wizard will create separate packages for each of the selected OSes). Click Next. If you selected Windows, the Audit Mode page opens; proceed to the next step. Otherwise, proceed to Step 6.
4. Select one of the following audit modes:
° If you want the Inventory Analyzer to prompt the users before starting the audit, click Interactive Mode.
° If you want the audit to run silently without requiring any user action, click Silent Mode.
° If you want the Inventory Analyzer to prompt the users only at the first audit and run the subsequent audits silently, click Interactive Once.
Important In the Silent Mode, the User Input Options configured in Audit Configuration will be ignored (see “Setting Available Controls ” on page 35 and “Setting Custom Input Fields” on page 37).
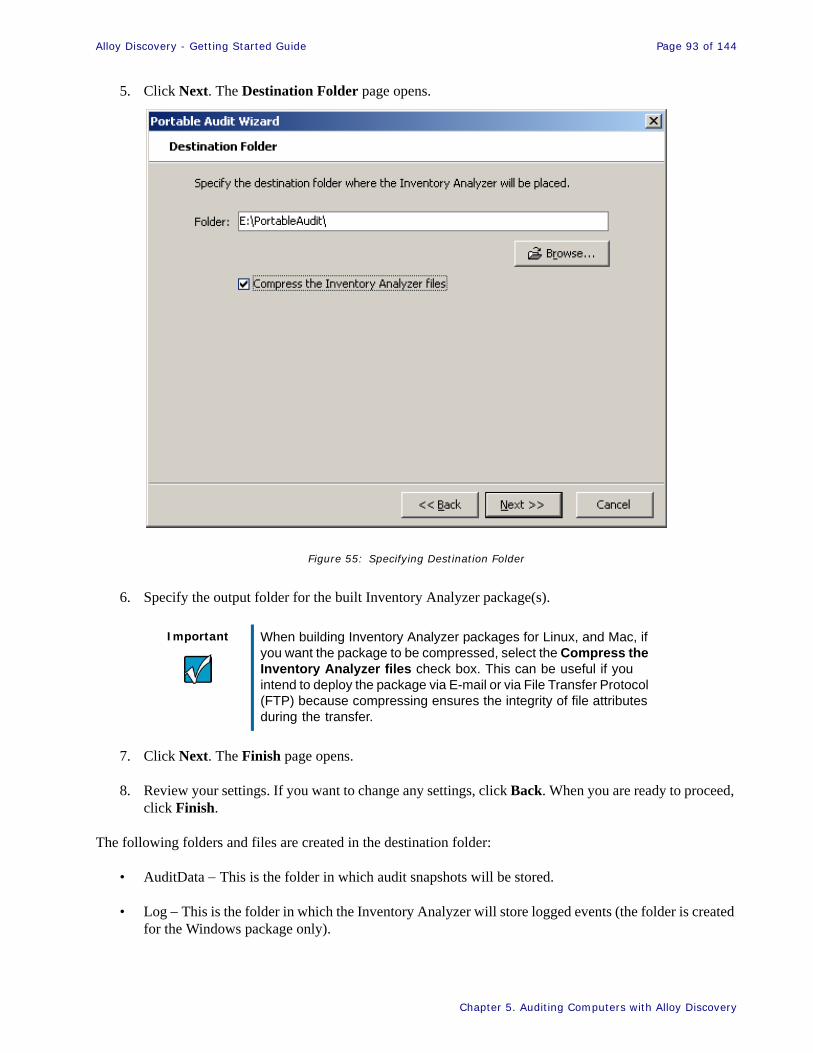
Alloy Discovery - Getting Started Guide Page 93 of 144
Chapter 5. Auditing Computers with Alloy Discovery
5. Click Next. The Destination Folder page opens.
Figure 55: Specifying Destination Folder
6. Specify the output folder for the built Inventory Analyzer package(s).
7. Click Next. The Finish page opens.
8. Review your settings. If you want to change any settings, click Back. When you are ready to proceed, click Finish.
The following folders and files are created in the destination folder:
• AuditData − This is the folder in which audit snapshots will be stored.
• Log − This is the folder in which the Inventory Analyzer will store logged events (the folder is created for the Windows package only).
Important When building Inventory Analyzer packages for Linux, and Mac, if you want the package to be compressed, select the Compress the Inventory Analyzer files check box. This can be useful if you intend to deploy the package via E-mail or via File Transfer Protocol (FTP) because compressing ensures the integrity of file attributes during the transfer.
Alloy Discovery - Getting Started Guide Page 94 of 144
Chapter 5. Auditing Computers with Alloy Discovery
• Windows package:
° ina32.cfg – This is the configuration file in which settings for the Windows Inventory Analyzer are stored.
° ina32.exe – This is the Windows Inventory Analyzer executable file.
• Linux package:
° lina – This is the script to automatically detect kernel version and launch the appropriate Linux Inventory Analyzer executable.
° lina24 – This is the Linux Inventory Analyzer executable for Linux kernel version 2.4 and earlier.
° lina26 – This is the Linux Inventory Analyzer executable for Linux kernel version 2.6 and later.
° lina.ini – This is the configuration file for Linux Inventory Analyzer.
• Mac package:
° ina_mac – This is the Mac Inventory Analyzer executable.
° ina_mac.ini – This is the configuration file for Mac Inventory Analyzer.
Running the Portable Audit on Client Machines
After building the Inventory Analyzer packages, run the Inventory Analyzer from the flash drive (or from the media of your choice) on each individual client machine.
Transporting Audit Snapshots to the Inventory Repository
After running the audit and collecting audit snapshots, transport the flash drive (or any other media you used) with audit results to the computer that hosts Alloy Discovery.
Load the audit snapshot files into the Inventory Repository as follows:
1. Choose Audit > Load Audit Files from Media from the main menu.
2. Browse to and select the audit snapshot file(s) to load. Click OK. Alloy Discovery loads selected snapshots into the Inventory Repository.
The audited computers appear in the pre-defined All Computers group.
Important When the Audit Configuration is changed or the audit agents are updated, you need to re-create the Inventory Analyzer packages and re-deploy them. For details on Audit Configuration, see “Setting Audit Configuration” on page 31.
Alloy Discovery - Getting Started Guide Page 95 of 144
Chapter 5. Auditing Computers with Alloy Discovery
Next Steps
Now that you have created your Inventory Analyzer packages, ran the Portable Audit, and imported the audit snapshots into the Inventory Repository on the host machine, you may want to create a Computer Group to view results of the Portable Audit for computers on an isolated network. For instructions, see “Working with Static and Dynamic Computer Groups” on page 113.
Auditing Linux and Mac Computers
With Alloy Discovery, you can audit computers running Linux and Mac OS X. Depending on your environment, the following audit methods apply:
• If the Linux and Mac machines are part of your LAN, you may use either the On-Demand Audit method (See “On-Demand Audit” on page 59), or the Scriptable Audit method (see “Scriptable Audit” on page 74).
• If the Linux and Mac machines are part of a remote site, use the Audit via E-mail method. See “Audit via E-mail” on page 82.
• If the Linux and Mac machines are on an isolated network or standalone, use the Portable Audit. See “Portable Audit” on page 91.
For details about the configuration files and command-line parameters you can use with lina and ina_mac, see “Linux Inventory Analyzer Command-Line options” on page 129 or “Mac Inventory Analyzer Command-Line options” on page 130.
Important Make certain that the computers you are auditing meet Client Machines requirements (see “Client Machines” on page 17 for more information.)
Alloy Discovery - Getting Started Guide Page 96 of 144
Chapter 6. Integrating Alloy Discovery with Alloy Navigator
Chapter 6. Integrating Alloy Discovery with Alloy Navigator
This chapter explains how to integrate Alloy Discovery 5 with Alloy Navigator 5 so that one complements the other as the source of audit snapshots.
Mirroring Audit Snapshots to External Repository ..................................................................................................... 97Configuring the Mirroring option ................................................................................................................................. 97
Integrating with External Sources of Audit Snapshots ................................................................................................ 98Configuring Alloy Navigator’s Inventory Server ......................................................................................................... 98Creating External Audit Data Source Groups ............................................................................................................... 99Configuring External Audit Data Source Groups ......................................................................................................... 99Next Steps ..................................................................................................................................................................... 99
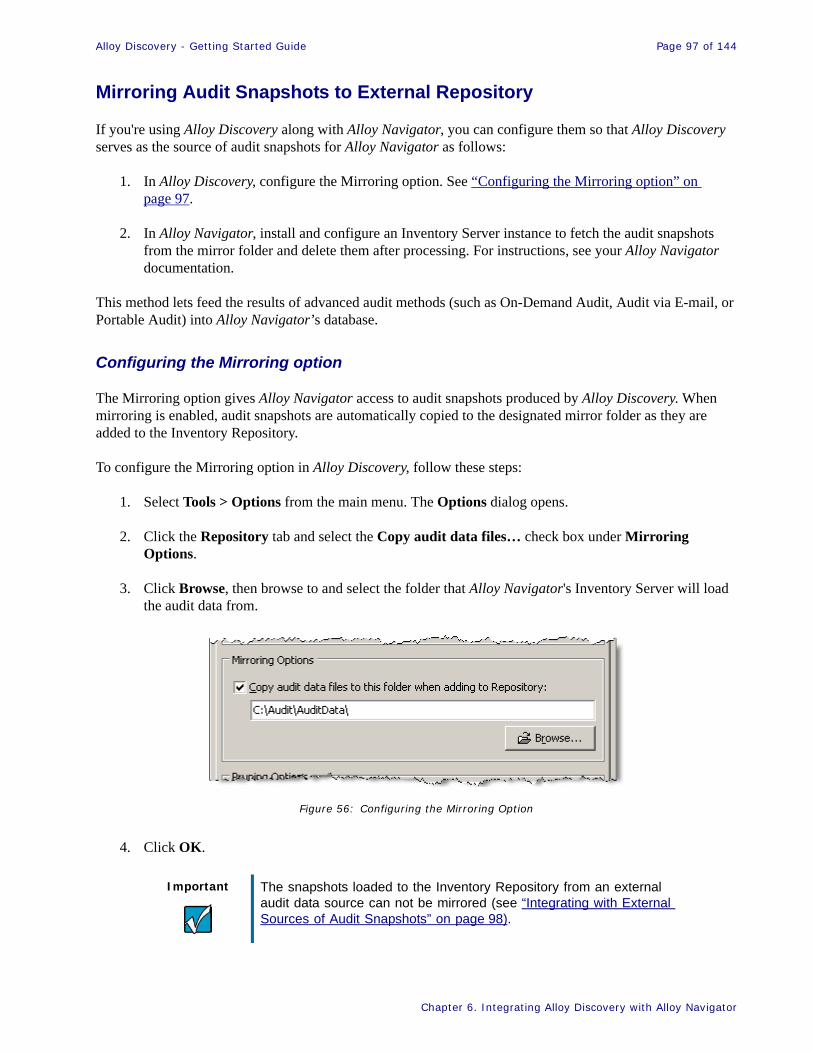
Alloy Discovery - Getting Started Guide Page 97 of 144
Chapter 6. Integrating Alloy Discovery with Alloy Navigator
Mirroring Audit Snapshots to External Repository
If you're using Alloy Discovery along with Alloy Navigator, you can configure them so that Alloy Discovery serves as the source of audit snapshots for Alloy Navigator as follows:
1. In Alloy Discovery, configure the Mirroring option. See “Configuring the Mirroring option” on page 97.
2. In Alloy Navigator, install and configure an Inventory Server instance to fetch the audit snapshots from the mirror folder and delete them after processing. For instructions, see your Alloy Navigator documentation.
This method lets feed the results of advanced audit methods (such as On-Demand Audit, Audit via E-mail, or Portable Audit) into Alloy Navigator’s database.
Configuring the Mirroring option
The Mirroring option gives Alloy Navigator access to audit snapshots produced by Alloy Discovery. When mirroring is enabled, audit snapshots are automatically copied to the designated mirror folder as they are added to the Inventory Repository.
To configure the Mirroring option in Alloy Discovery, follow these steps:
1. Select Tools > Options from the main menu. The Options dialog opens.
2. Click the Repository tab and select the Copy audit data files… check box under Mirroring Options.
3. Click Browse, then browse to and select the folder that Alloy Navigator's Inventory Server will load the audit data from.
Figure 56: Configuring the Mirroring Option
4. Click OK.
Important The snapshots loaded to the Inventory Repository from an external audit data source can not be mirrored (see “Integrating with External Sources of Audit Snapshots” on page 98).
Alloy Discovery - Getting Started Guide Page 98 of 144
Chapter 6. Integrating Alloy Discovery with Alloy Navigator
Integrating with External Sources of Audit Snapshots
If you're using Alloy Discovery along with Alloy Navigator with the Network Inventory module installed, you can configure them so that Alloy Navigator serves as the source of audit snapshots for Alloy Discovery as follows:
1. In Alloy Navigator, configure Inventory Server to move the audit data files to another folder after loading them into the Alloy Navigator database. See “Configuring Alloy Navigator’s Inventory Server” on page 98.
2. In Alloy Discovery, create an External Audit Data Source group. See “Creating External Audit Data Source Groups” on page 99.
3. In Alloy Discovery, configure the External Audit Data Source group to check the external repository automatically. See “Configuring External Audit Data Source Groups” on page 99.
If you’ve upgraded to Alloy Discovery 5 from the Alloy Network Inventory 4, you can use this method to work with the “Imported Repository” group, which is created automatically during the upgrade process. This will allow you to access audit snapshots from the Inventory Repository of Alloy Network Inventory version 4.
Configuring Alloy Navigator’s Inventory Server
Configure the Inventory Server to move the audit data files to the specified folder after these files have been loaded into the Alloy Navigator database. Alloy Discovery must have access to this folder to load the audit snapshots from it.
To configure the Inventory Server, follow the instructions below:
1. Run the Inventory Server Configurator and click the Audit File Handling tab.
2. Click Move Audit Files to and specify the folder where the Inventory Server will move the audit data files after loading them into the Alloy Navigator database. The Alloy Discovery users must have at least the Read permissions to this folder.
3. Click OK to apply your changes.
Important If you want to have access to the audit data from multiple instances of Inventory Server, you can configure all instances to move audit data files either to the same folder for all instances or to individual folders. In the latter case, you will need to create multiple External Audit Data Source groups, one for each Inventory Server instance.
Alloy Discovery - Getting Started Guide Page 99 of 144
Chapter 6. Integrating Alloy Discovery with Alloy Navigator
Creating External Audit Data Source Groups
At this step you create a special audit group in Alloy Discovery, pointed to the folder where Alloy Navigator moves its audit snapshots to. This folder becomes the source of audit snapshots for the group.
To create an External Audit Data Source group in Alloy Discovery, follow the instructions below:
1. Select File > New Group from the main menu. The New Group Wizard starts.
2. On the Welcome page, click Next to proceed. The Group Type screen opens.
3. Click Audit Group and click Next. The Audit Groups screen opens.
4. Click External audit data source and click Next. The External Repository Location screen opens.
5. Click Browse and browse to the folder you've configured in Alloy Navigator as the target for audit snapshots (see “Configuring Alloy Navigator’s Inventory Server” on page 98). Click Next. The Group Name and Description screen opens.
6. Review the group name and modify it, if necessary. Optionally, enter a description for the group. Then click Next. The Ready to Create New Group screen opens.
7. Review your settings. When you are ready to create the group, click Next. If you want to change any settings, click Back to return to the previous screens and make the necessary changes. After the wizard finishes creating the group it will display the Group Created screen.
8. Click Finish to complete the wizard.
Configuring External Audit Data Source Groups
After creating an External Audit Data Source group, configure its additional properties as follows:
1. Right-click the group in the Side Bar and select Properties from the pop-up menu. The Properties dialog opens.
2. Click the Options tab and proceed as follows:
° Under When Application starts, select the Look for new audit files check box. This will instruct Alloy Discovery to automatically check the source folder for this group for new audit snapshots at startup.
° Optional: Under After loading files to Repository, select the Delete processed files check box. It’s recommended to delete these files as you don’t need them anymore. If you choose to delete
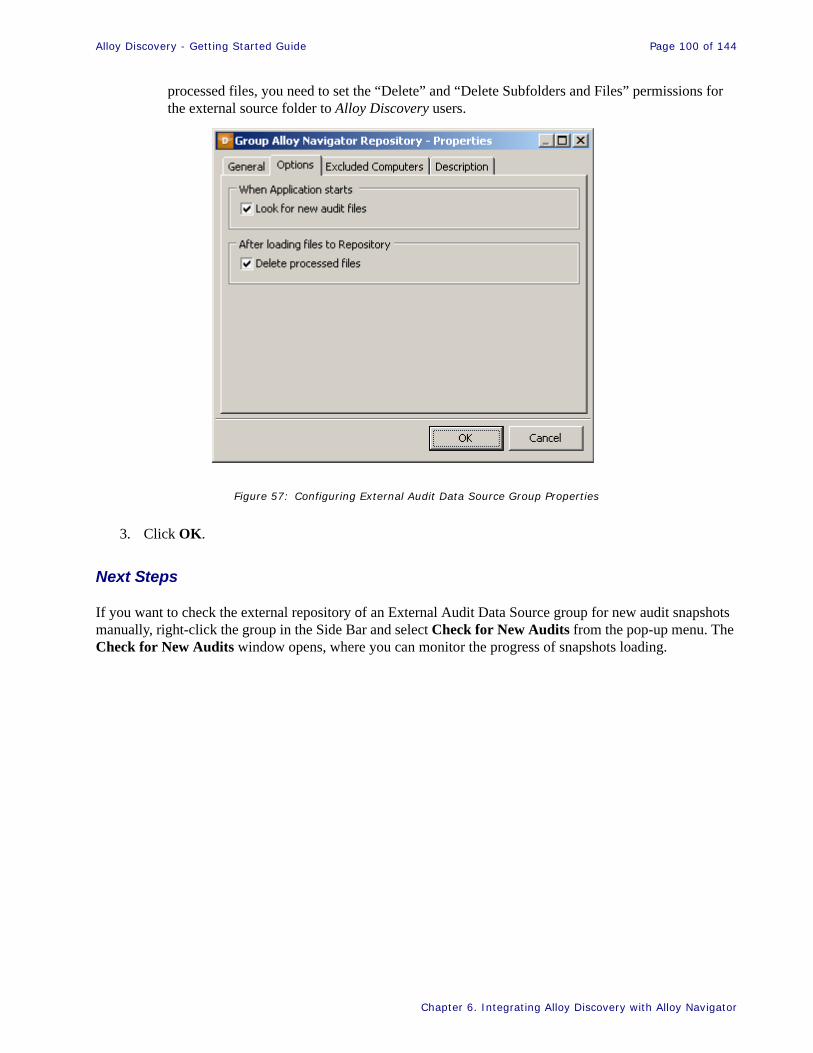
Alloy Discovery - Getting Started Guide Page 100 of 144
Chapter 6. Integrating Alloy Discovery with Alloy Navigator
processed files, you need to set the “Delete” and “Delete Subfolders and Files” permissions for the external source folder to Alloy Discovery users.
Figure 57: Configuring External Audit Data Source Group Properties
3. Click OK.
Next Steps
If you want to check the external repository of an External Audit Data Source group for new audit snapshots manually, right-click the group in the Side Bar and select Check for New Audits from the pop-up menu. The Check for New Audits window opens, where you can monitor the progress of snapshots loading.
Alloy Discovery - Getting Started Guide Page 101 of 144
114Chapter 7. Viewing Audit Results
Chapter 7. Viewing Audit ResultsThis chapter explains how to view and analyze audit results.
Viewing Software and Hardware Inventory ............................................................................................................... 102Viewing Audit Data for Groups of Computers ........................................................................................................... 102
Viewing Individual Audit Snapshots............................................................................................................................ 106Previewing Computer Data ......................................................................................................................................... 106Viewing SNMP Data................................................................................................................................................... 108Viewing Audit Snapshots............................................................................................................................................ 108
Working with Static and Dynamic Computer Groups............................................................................................... 102Configuring Dynamic Computer Groups.................................................................................................................... 113
Alloy Discovery - Getting Started Guide Page 102 of 144
114Chapter 7. Viewing Audit Results
Viewing Software and Hardware Inventory
Viewing Audit Data for Groups of Computers
Alloy Discovery collects in-depth hardware and software inventory information from all audited computers. This includes information about installed hardware and software, files available on the computers, security information, event log records, and more.
Once your computers have been audited and the audit snapshot files have been collected and loaded into the Inventory Repository, you can browse and analyze the audit results using various data grids in the right pane of the Main Console.
The scope of your computer inventory used to populate data grids is identified by the group that is currently selected in the Side Bar. For example, if you select the predefined All Computers group then Alloy Discovery will populate the data grids with information from all computers in your inventory. If you select a particular audit group, the contents of the grids will reflect all audited computers within that group. If you apply filters to the Computer List (i.e., narrow down the visible contents of the current group), the information associated with these hidden computers will also be removed from other data grids.
Important File information is collected only when the File Scan is enabled; for details, see “Configuring File Scan Options” on page 47.

Alloy Discovery - Getting Started Guide Page 103 of 144
114Chapter 7. Viewing Audit Results
Figure 58: Viewing Audit Data for an Audit Group
The Preview Pane (located below the Computer List) provides a digest of the information about the selected computer. From here you can access additional actions for that computer:
• Initiate an on-demand audit by selecting Audit Now.
• View the audit snapshot details for the selected computer via Show Details. For more information see, “Previewing Computer Data” on page 106.
• Launch various external commands. Please refer to “External Tools” on page 121 for more information.
Alloy Discovery - Getting Started Guide Page 104 of 144
114Chapter 7. Viewing Audit Results
Audit data for selected groups is organized on the following tabs:
• Computer List − lists computers in the current group and displays their key parameters, such as CPU type and speed, memory size, operating system details, the network card and address, and others.
• Software List − displays software inventory data for the current group.
• File Find − lets you search through the file scan data. This information is available only if you run the audit with the Detailed Scan option enabled. For information on configuring the audit to collect file details, see “Configuring File Scan Options” on page 47.
• File Statistics − shows file statistics collected during the file scan. This information will only be available after you have completed an audit with the Summary Scan option enabled. For information on configuring the audit to collect file statistics, see “Configuring File Scan Options” on page 47.
• Shared Folders − lists all shared folders found on the computers in the current group.
• Devices − displays devices installed on the computers in the current group.
• Printers − lists printers installed on the computers in the current group.
• Event Log − displays event log entries collected from computers in the current group. For information on configuring the audit to capture event log entries, see “Setting Event Log Options” on page 44.
For additional information about the contents of the tabs, see the Viewing Hardware and Software Inventory section in the embedded Help system.
You can filter the contents of grids and group data records to achieve the desired level of detail and visibility. You can export grid records for external analysis, charting, and reporting.
Important The Computer List can be configured to show any of the user-defined fields as well. For details on configuring and populating user-defined fields, see “User-Defined Fields” on page 125.
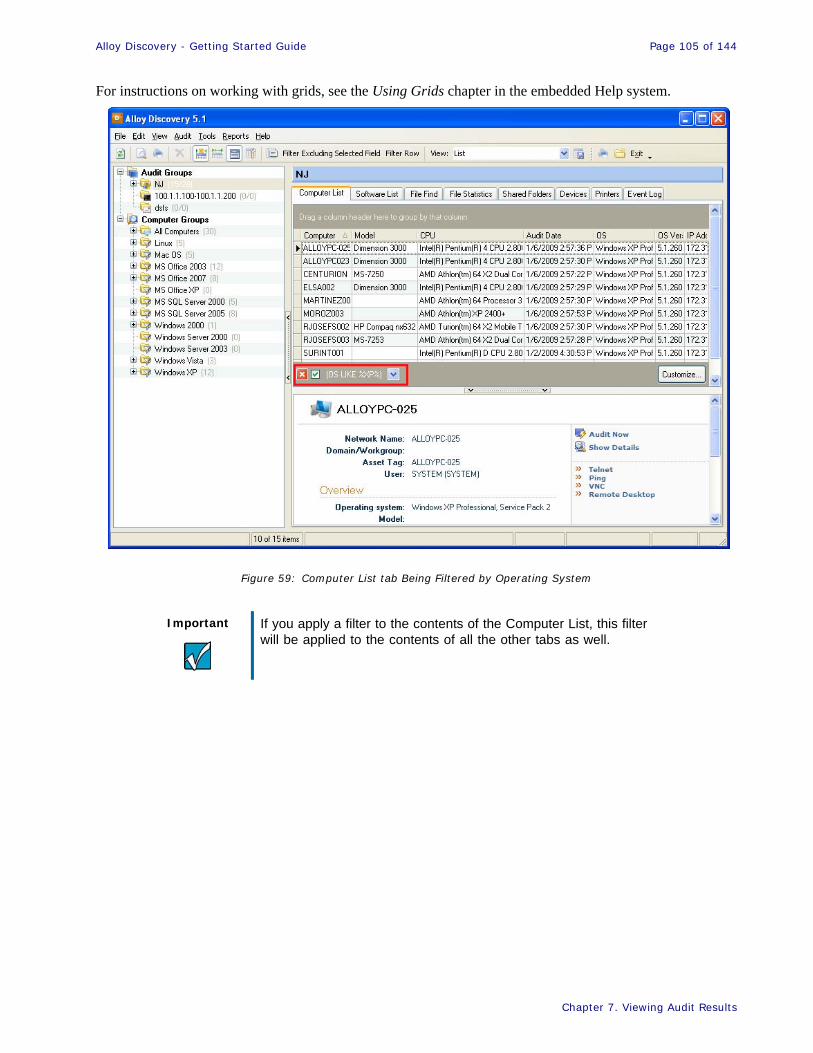
Alloy Discovery - Getting Started Guide Page 105 of 144
114Chapter 7. Viewing Audit Results
For instructions on working with grids, see the Using Grids chapter in the embedded Help system.
Figure 59: Computer List tab Being Filtered by Operating System
Important If you apply a filter to the contents of the Computer List, this filter will be applied to the contents of all the other tabs as well.
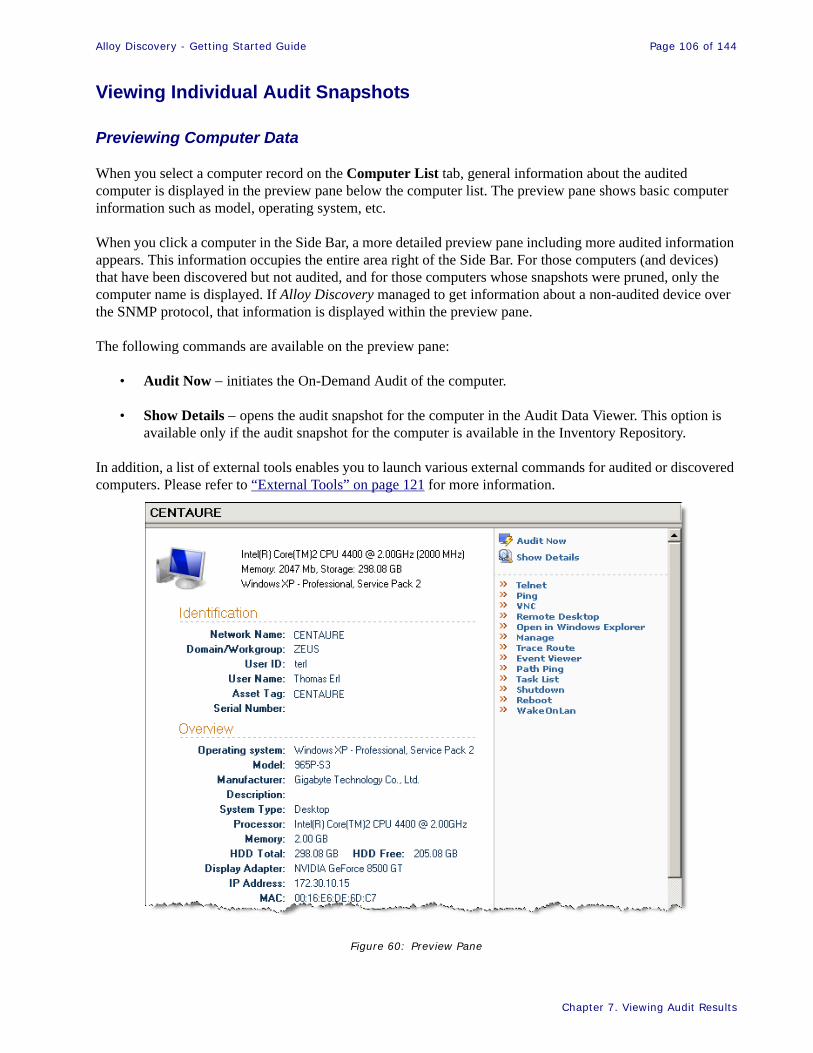
Alloy Discovery - Getting Started Guide Page 106 of 144
114Chapter 7. Viewing Audit Results
Viewing Individual Audit Snapshots
Previewing Computer Data
When you select a computer record on the Computer List tab, general information about the audited computer is displayed in the preview pane below the computer list. The preview pane shows basic computer information such as model, operating system, etc.
When you click a computer in the Side Bar, a more detailed preview pane including more audited information appears. This information occupies the entire area right of the Side Bar. For those computers (and devices) that have been discovered but not audited, and for those computers whose snapshots were pruned, only the computer name is displayed. If Alloy Discovery managed to get information about a non-audited device over the SNMP protocol, that information is displayed within the preview pane.
The following commands are available on the preview pane:
• Audit Now − initiates the On-Demand Audit of the computer.
• Show Details − opens the audit snapshot for the computer in the Audit Data Viewer. This option is available only if the audit snapshot for the computer is available in the Inventory Repository.
In addition, a list of external tools enables you to launch various external commands for audited or discovered computers. Please refer to “External Tools” on page 121 for more information.
Figure 60: Preview Pane
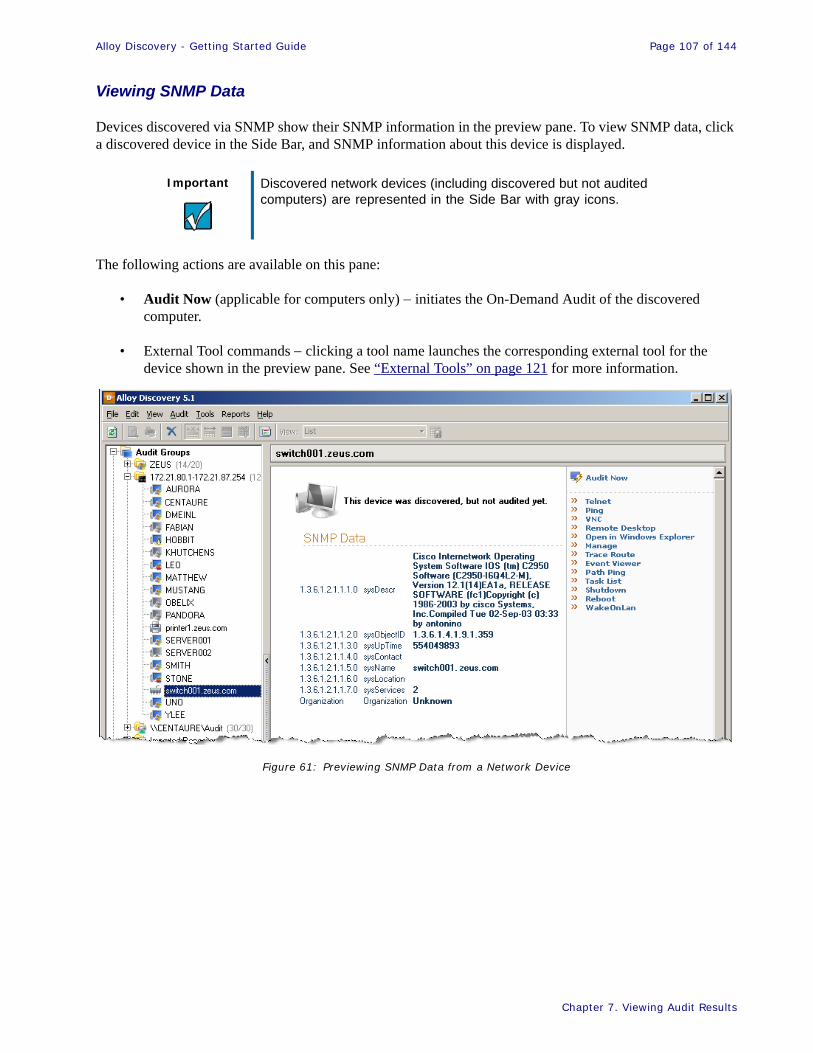
Alloy Discovery - Getting Started Guide Page 107 of 144
114Chapter 7. Viewing Audit Results
Viewing SNMP Data
Devices discovered via SNMP show their SNMP information in the preview pane. To view SNMP data, click a discovered device in the Side Bar, and SNMP information about this device is displayed.
The following actions are available on this pane:
• Audit Now (applicable for computers only) − initiates the On-Demand Audit of the discovered computer.
• External Tool commands − clicking a tool name launches the corresponding external tool for the device shown in the preview pane. See “External Tools” on page 121 for more information.
Figure 61: Previewing SNMP Data from a Network Device
Important Discovered network devices (including discovered but not audited computers) are represented in the Side Bar with gray icons.
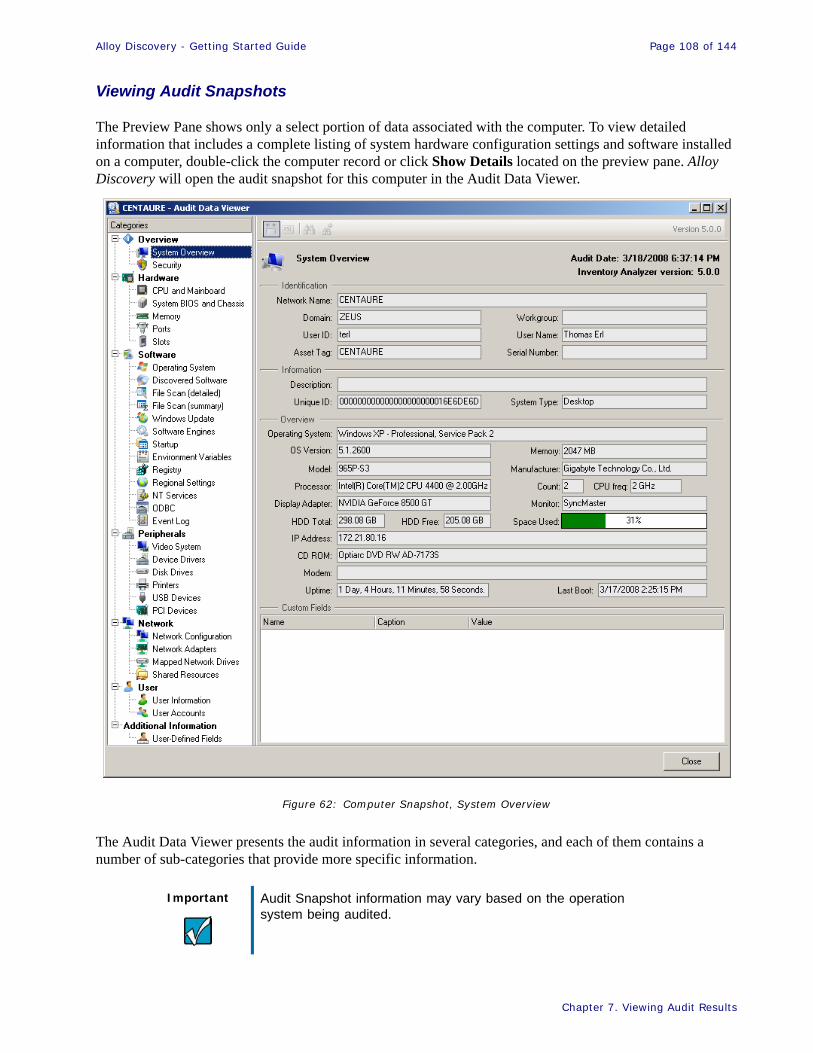
Alloy Discovery - Getting Started Guide Page 108 of 144
114Chapter 7. Viewing Audit Results
Viewing Audit Snapshots
The Preview Pane shows only a select portion of data associated with the computer. To view detailed information that includes a complete listing of system hardware configuration settings and software installed on a computer, double-click the computer record or click Show Details located on the preview pane. Alloy Discovery will open the audit snapshot for this computer in the Audit Data Viewer.
Figure 62: Computer Snapshot, System Overview
The Audit Data Viewer presents the audit information in several categories, and each of them contains a number of sub-categories that provide more specific information.
Important Audit Snapshot information may vary based on the operation system being audited.
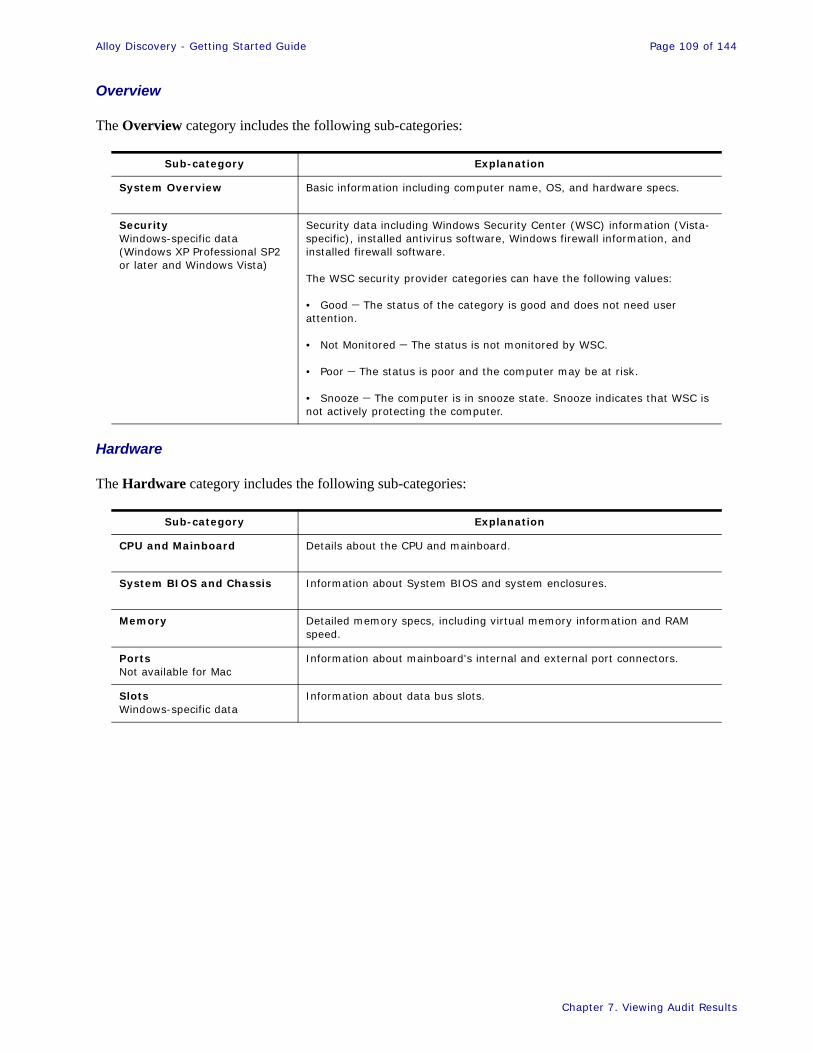
Alloy Discovery - Getting Started Guide Page 109 of 144
114Chapter 7. Viewing Audit Results
Overview
The Overview category includes the following sub-categories:
Hardware
The Hardware category includes the following sub-categories:
Sub-category Explanation
System Overview Basic information including computer name, OS, and hardware specs.
SecurityWindows-specific data (Windows XP Professional SP2 or later and Windows Vista)
Security data including Windows Security Center (WSC) information (Vista-specific), installed antivirus software, Windows firewall information, and installed firewall software.
The WSC security provider categories can have the following values:
• Good − The status of the category is good and does not need user attention.
• Not Monitored − The status is not monitored by WSC.
• Poor − The status is poor and the computer may be at risk.
• Snooze − The computer is in snooze state. Snooze indicates that WSC is not actively protecting the computer.
Sub-category Explanation
CPU and Mainboard Details about the CPU and mainboard.
System BIOS and Chassis Information about System BIOS and system enclosures.
Memory Detailed memory specs, including virtual memory information and RAM speed.
PortsNot available for Mac
Information about mainboard's internal and external port connectors.
SlotsWindows-specific data
Information about data bus slots.
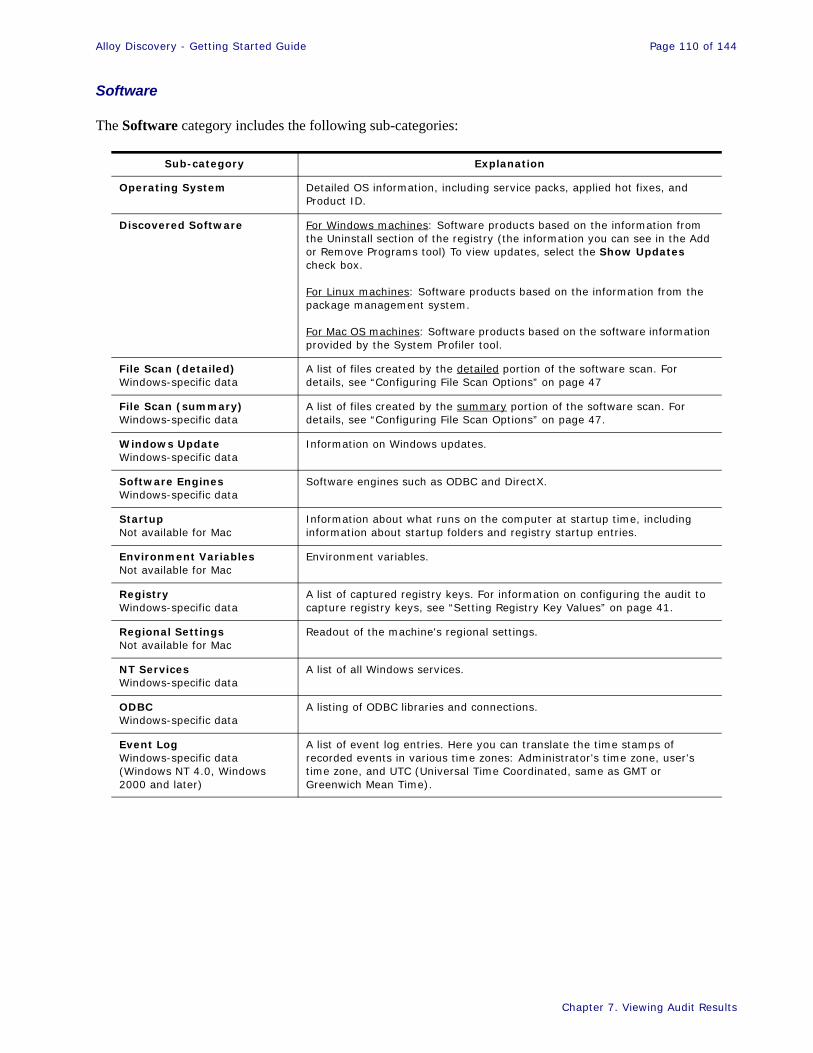
Alloy Discovery - Getting Started Guide Page 110 of 144
114Chapter 7. Viewing Audit Results
Software
The Software category includes the following sub-categories:
Sub-category Explanation
Operating System Detailed OS information, including service packs, applied hot fixes, and Product ID.
Discovered Software For Windows machines: Software products based on the information from the Uninstall section of the registry (the information you can see in the Add or Remove Programs tool) To view updates, select the Show Updates check box.
For Linux machines: Software products based on the information from the package management system.
For Mac OS machines: Software products based on the software information provided by the System Profiler tool.
File Scan (detailed)Windows-specific data
A list of files created by the detailed portion of the software scan. For details, see “Configuring File Scan Options” on page 47
File Scan (summary)Windows-specific data
A list of files created by the summary portion of the software scan. For details, see “Configuring File Scan Options” on page 47.
Windows UpdateWindows-specific data
Information on Windows updates.
Software EnginesWindows-specific data
Software engines such as ODBC and DirectX.
Startup Not available for Mac
Information about what runs on the computer at startup time, including information about startup folders and registry startup entries.
Environment VariablesNot available for Mac
Environment variables.
RegistryWindows-specific data
A list of captured registry keys. For information on configuring the audit to capture registry keys, see “Setting Registry Key Values” on page 41.
Regional SettingsNot available for Mac
Readout of the machine's regional settings.
NT ServicesWindows-specific data
A list of all Windows services.
ODBCWindows-specific data
A listing of ODBC libraries and connections.
Event LogWindows-specific data(Windows NT 4.0, Windows 2000 and later)
A list of event log entries. Here you can translate the time stamps of recorded events in various time zones: Administrator's time zone, user's time zone, and UTC (Universal Time Coordinated, same as GMT or Greenwich Mean Time).
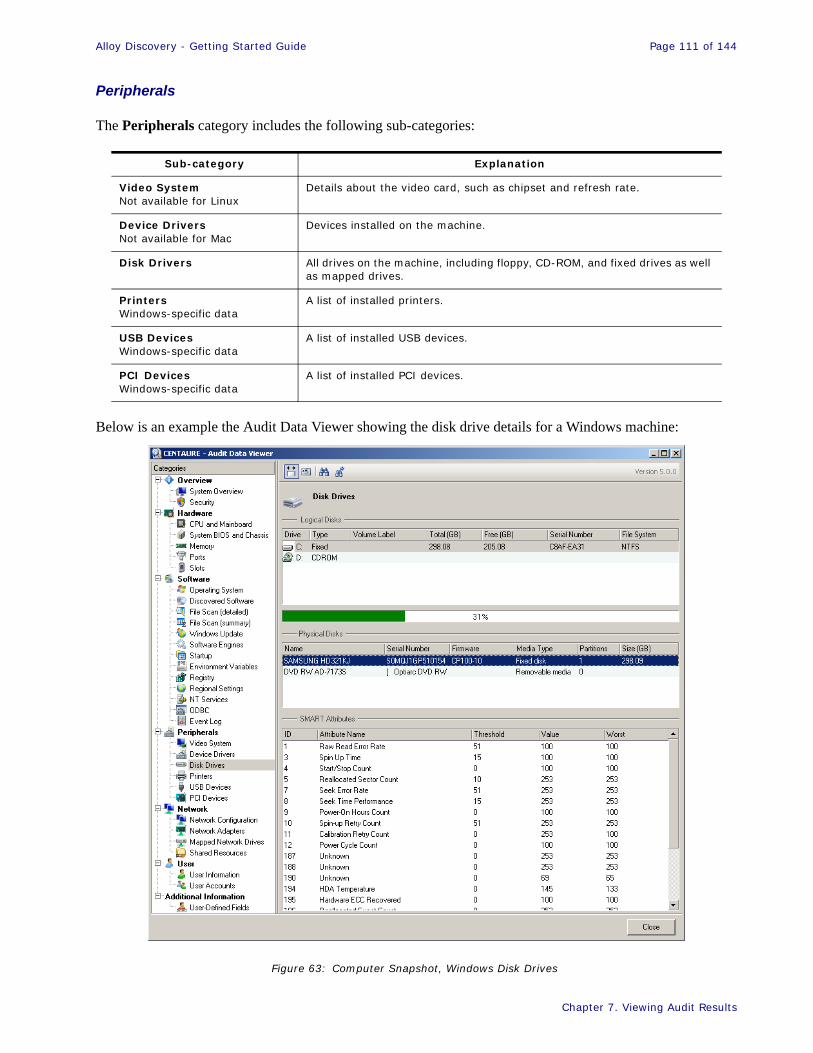
Alloy Discovery - Getting Started Guide Page 111 of 144
114Chapter 7. Viewing Audit Results
Peripherals
The Peripherals category includes the following sub-categories:
Below is an example the Audit Data Viewer showing the disk drive details for a Windows machine:
Figure 63: Computer Snapshot, Windows Disk Drives
Sub-category Explanation
Video SystemNot available for Linux
Details about the video card, such as chipset and refresh rate.
Device DriversNot available for Mac
Devices installed on the machine.
Disk Drivers All drives on the machine, including floppy, CD-ROM, and fixed drives as well as mapped drives.
PrintersWindows-specific data
A list of installed printers.
USB DevicesWindows-specific data
A list of installed USB devices.
PCI DevicesWindows-specific data
A list of installed PCI devices.
Alloy Discovery - Getting Started Guide Page 112 of 144
114Chapter 7. Viewing Audit Results
Network
The Network category includes the following sub-categories:
User
The User category includes the following sub-categories:
Additional Information
The Additional Information category includes the following sub-categories:
Sub-category Explanation
Network ConfigurationWindows-specific data
Miscellaneous network information, such as current user and domain name.
Network Adapters Parameters (IP Address, DHCP, MAC address, etc.) of each network adapter.
Mapped Network DriversWindows-specific data
A list of drive mappings.
Shared ResourcesNot available for Mac
List of shared resources.
Sub-category Explanation
User InformationWindows-specific data
Details about the current user (when available, this shows information from the Active Directory, such as E-mail address, contact numbers, physical address, etc.).
User AccountNot available for Mac
A list of local user accounts and users groups.
Sub-category Explanation
User-Defined Fields A list of the populated user-defined fields and their values. If no user-defined fields are configured or none of them are filled out for this computer or device, the grid is shown empty. The information for user-defined fields is unavailable when an audit snapshot is opened outside of Alloy Discovery, for example by clicking on an .adt file in Windows Explorer.
For more information, see “User-Defined Fields” on page 125.
Alloy Discovery - Getting Started Guide Page 113 of 144
114Chapter 7. Viewing Audit Results
Working with Static and Dynamic Computer Groups
After you have audited your computers and obtained their audit snapshots, you can create computer groups to analyze your inventory.
A computer group can be of either of the following types:
• Dynamic − these groups are populated automatically based on a combination of criteria you specify for the group. Alloy Discovery ships with a number of pre-defined dynamic computer groups: Windows XP, Windows Vista, Linux, Mac OS, MS Office 2007, MS SQL Server 2005, etc.
• Static − these groups are created by manually assigning computers. For example, you can use static groups to independently analyze and report inventory data from multiple networks or subdivisions within your organization.
For instructions on working with these groups, see the Working with Computer Groups section in the embedded Help system.
Although computer groups are meant for analyzing audit data, you can also perform the On-Demand Audit of a computer group: right-click the group in the Side Bar and choose Audit this Group from the pop-up menu. For static computer groups, you can also start the On-Demand Audit of never audited computers: right-click the group in the Side Bar and choose Audit This Group > Audit Never Audited Computers from the pop-up menu. The audit will run under the default On-Demand Audit credentials, unless different On-Demand Audit credentials are specified for individual computers in this group. For details, see “Managing Audit Credentials” on page 59.
Configuring Dynamic Computer Groups
The Group Properties window shows the current settings for a Dynamic Group and lets you modify these settings. To open this window, right-click a Dynamic Computer group in the Side Bar and choose Properties from the pop-up menu.
The properties are organized on the following tabs: General and Description.
General tab
On this tab you can view and edit the name of the group and its inclusion rules.
• Name − shows the name of the group.
The Inclusion Rules section shows the criteria for adding computers to this group. The criteria are a combination of logical expressions (rules) based on the values reported in audit snapshots.
You can work with the inclusion rules using the following functions:
• Add − opens the Inclusion Rule window, where you can create an inclusion rule.
• Edit − opens the Inclusion Rule window, where you can modify the selected rule.
• Remove − removes the selected rule.

Alloy Discovery - Getting Started Guide Page 114 of 144
114Chapter 7. Viewing Audit Results
You can select one of the following options in association with the Include computers that match field:
• all rules − if you want to include in the group only those computers that match all rules in the list.
• any of rules − if you want to include in the group any computer that matches at least one inclusion rule.
Specifying Inclusion Rules
In this window, you can define an inclusion rule as follows:
1. Select a field (a computer attribute whose values are stored in audit snapshots) that you want to use in the rule.
Click the plus icon to expand the category that contains the attribute.
2. Define the rule condition:
° If you want to construct a rule based on a computer attribute from any category except for the Printers, Shares, and Software, take the following steps:
a. Select a computer attribute field.
b. In the Operator list, select an operator.
c. If the selected operator requires a value to compare the field with, type a value in the Value field. You can view an example of a field value in the Example column.
° If you want to construct the rule based on computer attributes from the Printers, Shares, and Software categories, take the following steps:
a. Select a general logical condition from an expanded Field node (such as “Shares Not Exist” or “Discovered Program”).
b. Under Define rule condition, supplement the general condition with additional conditions (these simple conditions will be connected with AND logic):
° Select an operator (from the drop-down menu) for a computer field you want to use. If the selected operator requires a value, type in the value.
° Repeat the previous step for each field you want to use.
° For the Software category only: If you want to view all properties available, click the Show All Properties link. The Advanced Fields for Software Products window opens. Using this window, you can specify additional conditions for the advanced software fields (such as Product ID or Install Date).
3. Click OK. The rule is added to the list of inclusion rules.
Alloy Discovery - Getting Started Guide Page 115 of 144
Chapter 8. Advanced Options
Chapter 8. Advanced OptionsThis chapter explains audit snapshots and provides a list of command-line options for the Inventory Analyzer.
Understanding Audit Snapshots ................................................................................................................................... 116Comparing Audit Snapshots........................................................................................................................................ 117
Understanding the Audit Data Viewer......................................................................................................................... 119
Configuring Computer List........................................................................................................................................... 120
External Tools ................................................................................................................................................................ 121Configuring External Tools......................................................................................................................................... 123
User-Defined Fields........................................................................................................................................................ 125Working with User-Defined Fields ............................................................................................................................. 125Entering Data for User-Defined Fields ....................................................................................................................... 126Batch Updating User-Defined Fields .......................................................................................................................... 126
Inventory Analyzer Command-Line Options.............................................................................................................. 127Output Options ............................................................................................................................................................ 127User ID Options .......................................................................................................................................................... 127Mode Options.............................................................................................................................................................. 127Asset Tag Options ....................................................................................................................................................... 128Inventory Options........................................................................................................................................................ 128Interactive Mode Options............................................................................................................................................ 128E-mail Options ............................................................................................................................................................ 128
Linux Inventory Analyzer Command-Line options ................................................................................................... 129
Mac Inventory Analyzer Command-Line options ...................................................................................................... 130
Report Designer.............................................................................................................................................................. 131
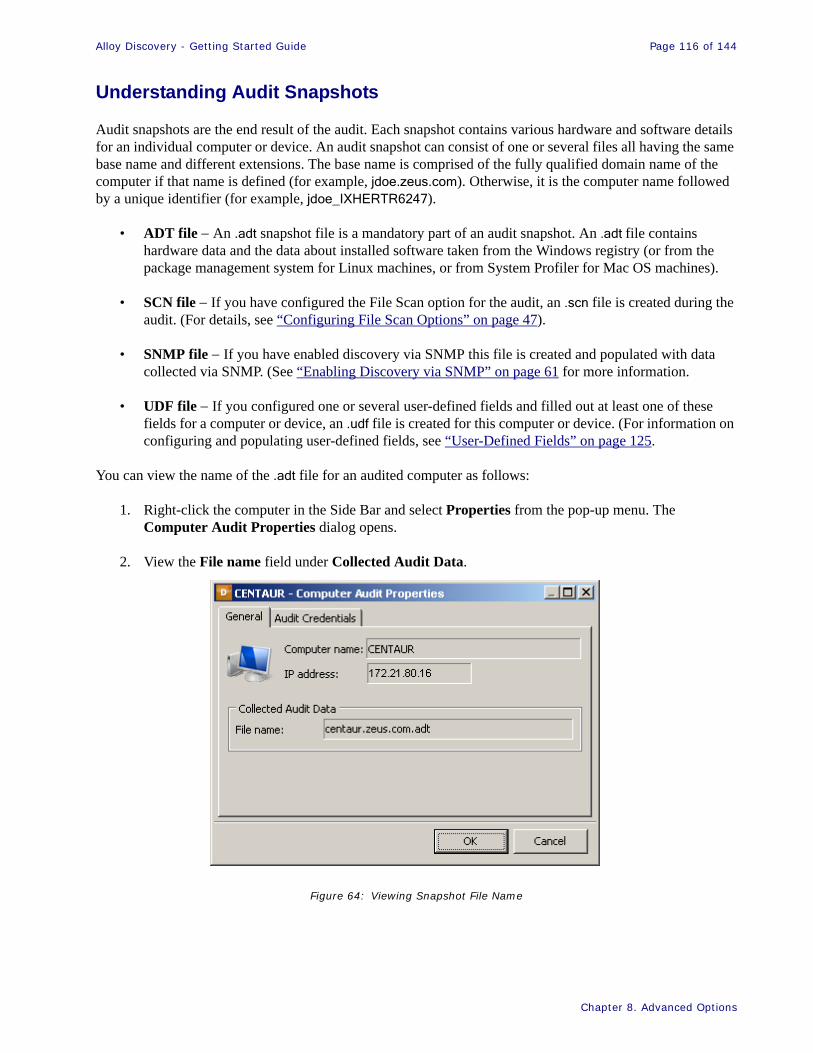
Alloy Discovery - Getting Started Guide Page 116 of 144
Chapter 8. Advanced Options
Understanding Audit Snapshots
Audit snapshots are the end result of the audit. Each snapshot contains various hardware and software details for an individual computer or device. An audit snapshot can consist of one or several files all having the same base name and different extensions. The base name is comprised of the fully qualified domain name of the computer if that name is defined (for example, jdoe.zeus.com). Otherwise, it is the computer name followed by a unique identifier (for example, jdoe_IXHERTR6247).
• ADT file − An .adt snapshot file is a mandatory part of an audit snapshot. An .adt file contains hardware data and the data about installed software taken from the Windows registry (or from the package management system for Linux machines, or from System Profiler for Mac OS machines).
• SCN file − If you have configured the File Scan option for the audit, an .scn file is created during the audit. (For details, see “Configuring File Scan Options” on page 47).
• SNMP file − If you have enabled discovery via SNMP this file is created and populated with data collected via SNMP. (See “Enabling Discovery via SNMP” on page 61 for more information.
• UDF file − If you configured one or several user-defined fields and filled out at least one of these fields for a computer or device, an .udf file is created for this computer or device. (For information on configuring and populating user-defined fields, see “User-Defined Fields” on page 125.
You can view the name of the .adt file for an audited computer as follows:
1. Right-click the computer in the Side Bar and select Properties from the pop-up menu. The Computer Audit Properties dialog opens.
2. View the File name field under Collected Audit Data.
Figure 64: Viewing Snapshot File Name

Alloy Discovery - Getting Started Guide Page 117 of 144
Chapter 8. Advanced Options
Comparing Audit Snapshots
Alloy Discovery lets you compare configurations of two audited computers by providing a side-by-side comparison of their audit files.
To compare two computers:
1. Right-click the first computer in the Side Bar or in the Computer List and select Compare With from the pop-up menu. The Compare With window opens.
Figure 65: Compare With window
The Compare With window displays a hierarchical tree of audit groups and computer groups containing audited computers.
Important Comparisons between computers can only be initiated between two audited computers. Audited computers are shown in the Side Bar with blue icons.
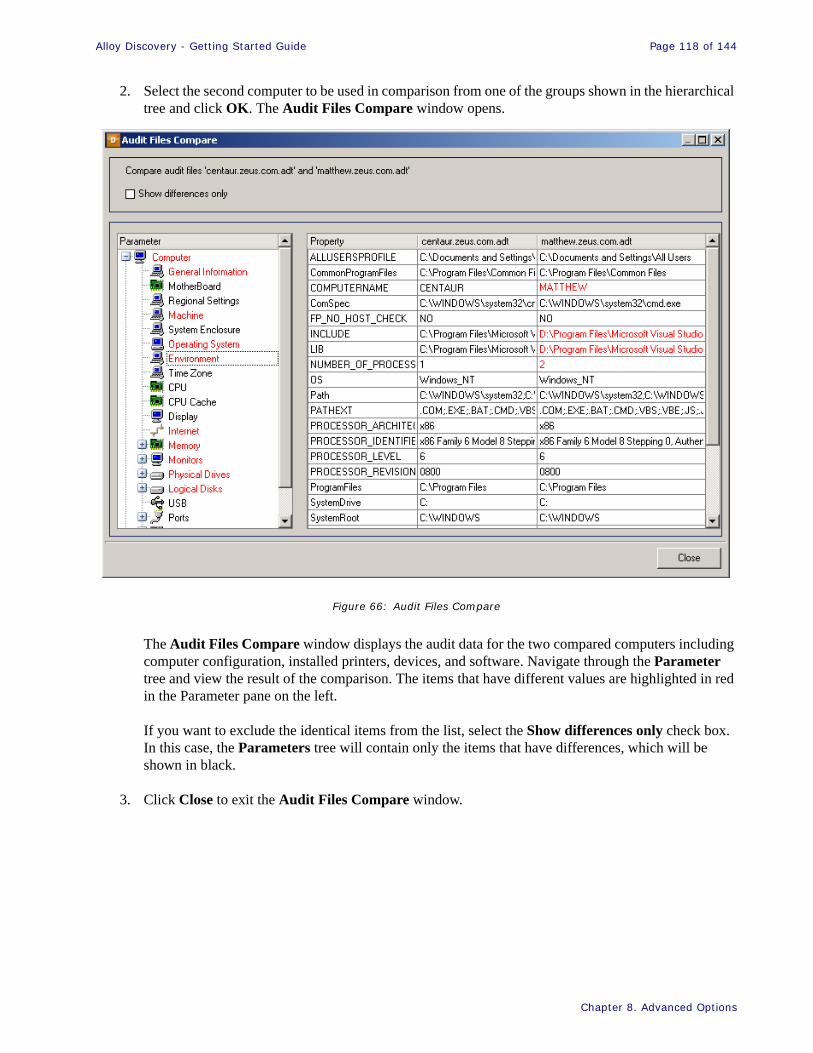
Alloy Discovery - Getting Started Guide Page 118 of 144
Chapter 8. Advanced Options
2. Select the second computer to be used in comparison from one of the groups shown in the hierarchical tree and click OK. The Audit Files Compare window opens.
Figure 66: Audit Files Compare
The Audit Files Compare window displays the audit data for the two compared computers including computer configuration, installed printers, devices, and software. Navigate through the Parameter tree and view the result of the comparison. The items that have different values are highlighted in red in the Parameter pane on the left.
If you want to exclude the identical items from the list, select the Show differences only check box. In this case, the Parameters tree will contain only the items that have differences, which will be shown in black.
3. Click Close to exit the Audit Files Compare window.
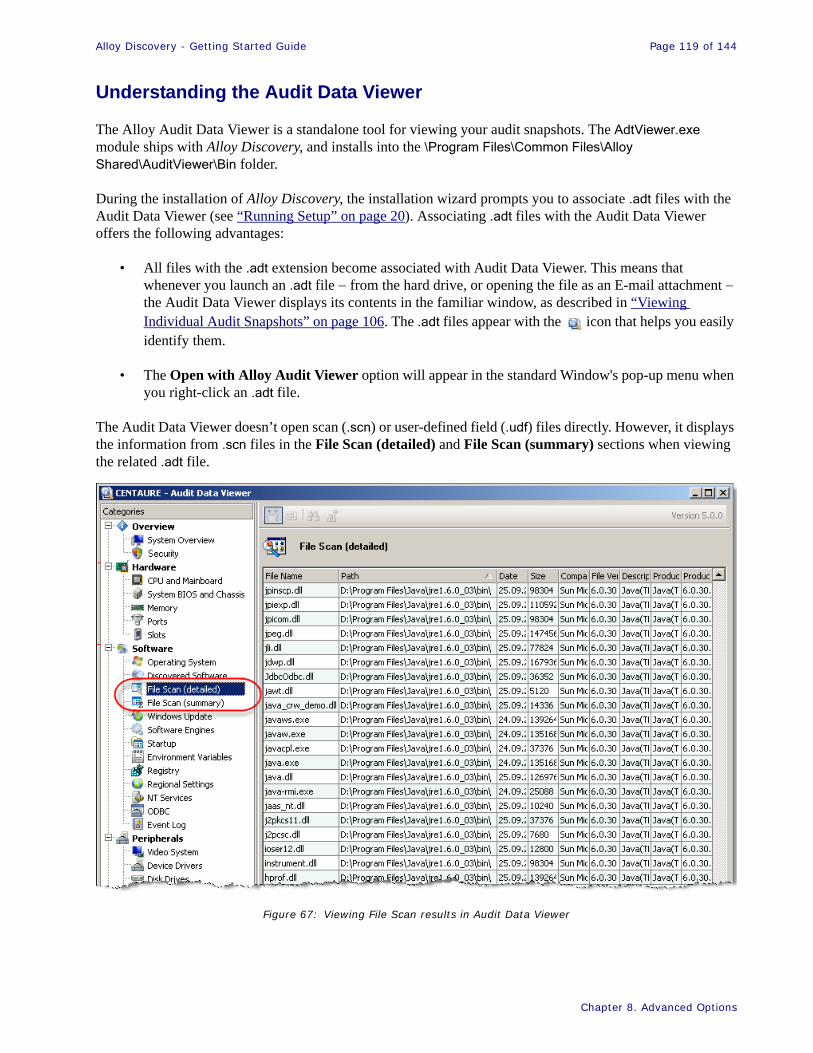
Alloy Discovery - Getting Started Guide Page 119 of 144
Chapter 8. Advanced Options
Understanding the Audit Data Viewer
The Alloy Audit Data Viewer is a standalone tool for viewing your audit snapshots. The AdtViewer.exe module ships with Alloy Discovery, and installs into the \Program Files\Common Files\Alloy Shared\AuditViewer\Bin folder.
During the installation of Alloy Discovery, the installation wizard prompts you to associate .adt files with the Audit Data Viewer (see “Running Setup” on page 20). Associating .adt files with the Audit Data Viewer offers the following advantages:
• All files with the .adt extension become associated with Audit Data Viewer. This means that whenever you launch an .adt file − from the hard drive, or opening the file as an E-mail attachment − the Audit Data Viewer displays its contents in the familiar window, as described in “Viewing Individual Audit Snapshots” on page 106. The .adt files appear with the icon that helps you easily identify them.
• The Open with Alloy Audit Viewer option will appear in the standard Window's pop-up menu when you right-click an .adt file.
The Audit Data Viewer doesn’t open scan (.scn) or user-defined field (.udf) files directly. However, it displays the information from .scn files in the File Scan (detailed) and File Scan (summary) sections when viewing the related .adt file.
Figure 67: Viewing File Scan results in Audit Data Viewer

Alloy Discovery - Getting Started Guide Page 120 of 144
Chapter 8. Advanced Options
Configuring Computer List
Audit snapshots contain many fields, but only few of them are displayed in the Computer List. You can customize your Computer List using the Computer List Configuration window by adding or removing certain fields by adding or removing columns mapped to certain fields in audit snapshots. To access this window, select Tools > Computer List Configuration from the main menu.
Under Available fields is the list of all the snapshot fields available for mapping into the Computer List. Under Show these fields in the Computer List is the list of the current Computer List columns.
Figure 68: Configuring the Computer List
Three additional sections may appear at the bottom of the list of available snapshot fields:
• The Custom Fields section appears if you have defined any custom input fields in the Audit Configuration (for details, see “Setting Custom Input Fields” on page 37).
• The Registry Fields section appears if you have added any registry keys to capture (for details, see “Setting Registry Key Values” on page 41).
• The User-Defined Fields section appears, if you have added any user-defined fields. For details on using this feature see “User-Defined Fields” on page 125.
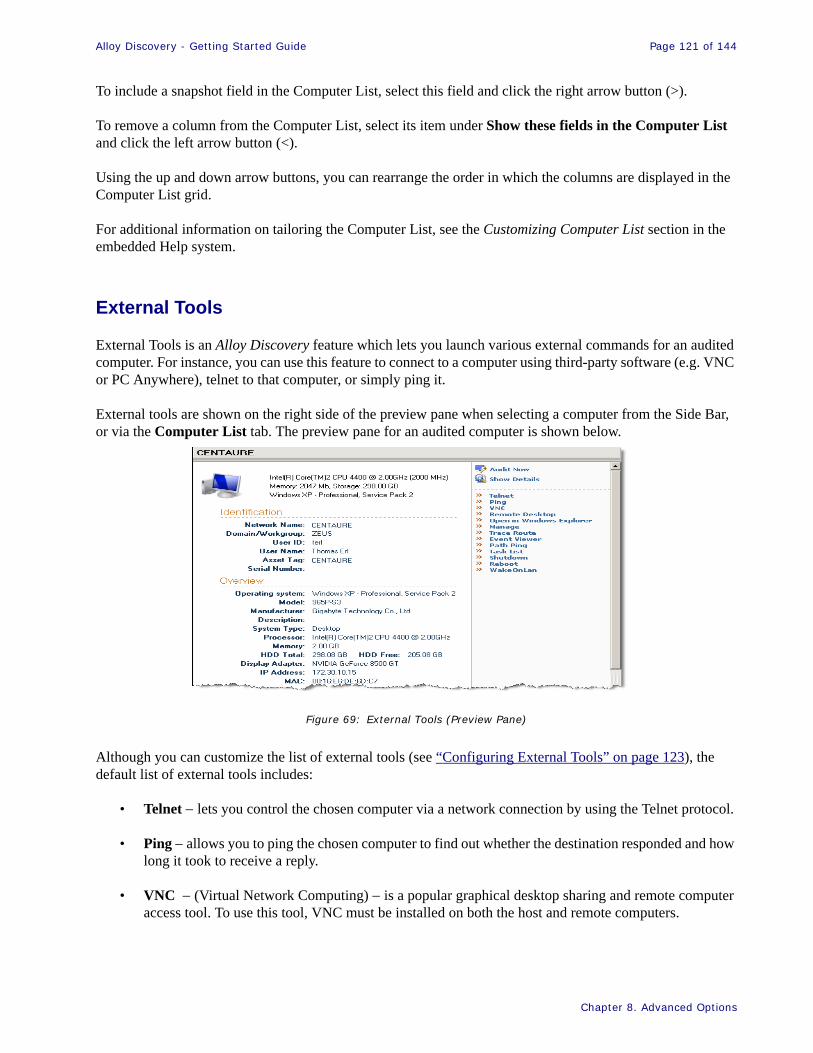
Alloy Discovery - Getting Started Guide Page 121 of 144
Chapter 8. Advanced Options
To include a snapshot field in the Computer List, select this field and click the right arrow button (>).
To remove a column from the Computer List, select its item under Show these fields in the Computer List and click the left arrow button (<).
Using the up and down arrow buttons, you can rearrange the order in which the columns are displayed in the Computer List grid.
For additional information on tailoring the Computer List, see the Customizing Computer List section in the embedded Help system.
External Tools
External Tools is an Alloy Discovery feature which lets you launch various external commands for an audited computer. For instance, you can use this feature to connect to a computer using third-party software (e.g. VNC or PC Anywhere), telnet to that computer, or simply ping it.
External tools are shown on the right side of the preview pane when selecting a computer from the Side Bar, or via the Computer List tab. The preview pane for an audited computer is shown below.
Figure 69: External Tools (Preview Pane)
Although you can customize the list of external tools (see “Configuring External Tools” on page 123), the default list of external tools includes:
• Telnet − lets you control the chosen computer via a network connection by using the Telnet protocol.
• Ping − allows you to ping the chosen computer to find out whether the destination responded and how long it took to receive a reply.
• VNC − (Virtual Network Computing) − is a popular graphical desktop sharing and remote computer access tool. To use this tool, VNC must be installed on both the host and remote computers.
Alloy Discovery - Getting Started Guide Page 122 of 144
Chapter 8. Advanced Options
• Remote Desktop (RDC) − is a Microsoft client tool (included by default in Windows XP and above) that allows a user to access the desktop, applications, and data on a remote computer and control it remotely.
• Open in Windows Explorer − lets you access the computer's shared resources using Windows Explorer.
• Manage − allows you to open the Computer Management console for the chosen computer.
• Trace Route − lets you determine the network path to the chosen computer.
• Event Viewer − allows you to open the Event Viewer for the chosen computer.
• Path Ping − lets you find out the details of the network path to the destination computer and obtain the ping-like statistics for each node in the path.
• Task List − allows you to view a list of applications and services for all tasks running on the chosen computer.
• Shutdown − lets you shut down the chosen computer.
• Reboot − allows you to restart the chosen computer.
• WakeOnLan − lets you turn on the chosen computer via a network connection.
To launch an external tool, select a computer in the Side Bar or in the Computer List, and perform either of the following operations:
• Choose Tools > External Tools from the main menu and click the tool name,
• Click the tool name from the External Tools list located on the preview pane.
Important Executing the WakeOnLan command requires that the computer meets the technical conditions of the Wake on LAN (WOL) standard. Also, you may need to make some changes in the target computer's BIOS configuration in order to enable this feature.
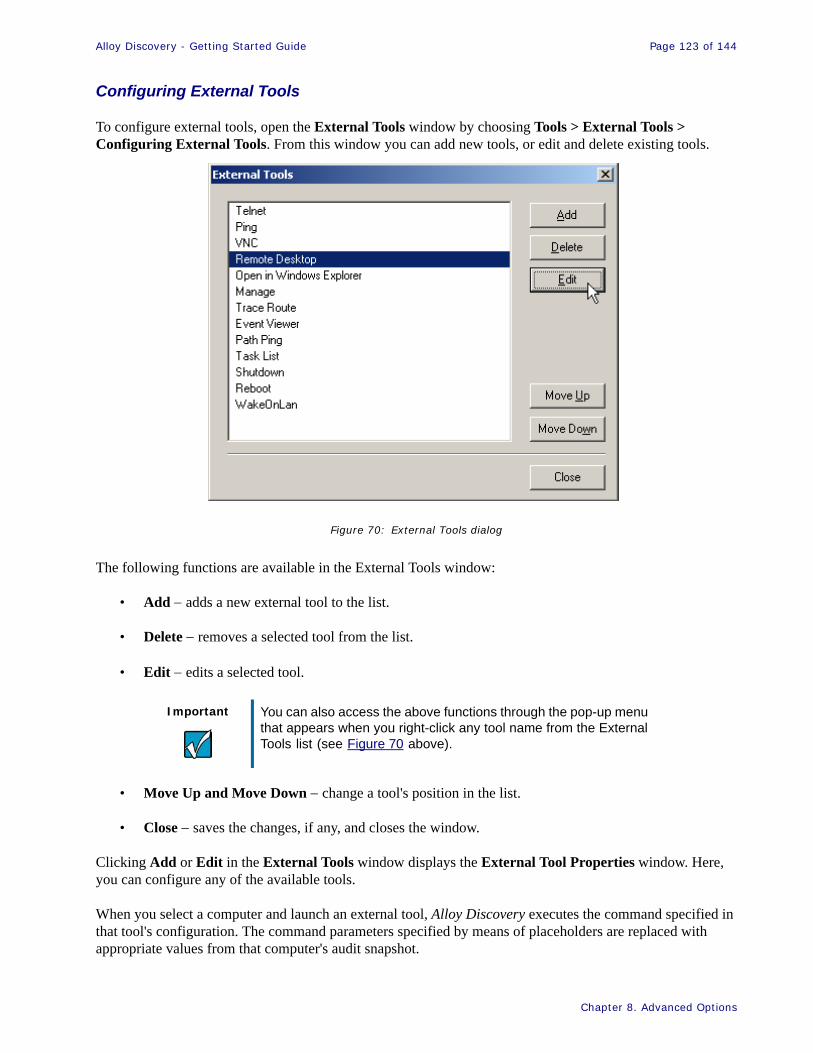
Alloy Discovery - Getting Started Guide Page 123 of 144
Chapter 8. Advanced Options
Configuring External Tools
To configure external tools, open the External Tools window by choosing Tools > External Tools > Configuring External Tools. From this window you can add new tools, or edit and delete existing tools.
Figure 70: External Tools dialog
The following functions are available in the External Tools window:
• Add − adds a new external tool to the list.
• Delete − removes a selected tool from the list.
• Edit − edits a selected tool.
• Move Up and Move Down − change a tool's position in the list.
• Close − saves the changes, if any, and closes the window.
Clicking Add or Edit in the External Tools window displays the External Tool Properties window. Here, you can configure any of the available tools.
When you select a computer and launch an external tool, Alloy Discovery executes the command specified in that tool's configuration. The command parameters specified by means of placeholders are replaced with appropriate values from that computer's audit snapshot.
Important You can also access the above functions through the pop-up menu that appears when you right-click any tool name from the External Tools list (see Figure 70 above).
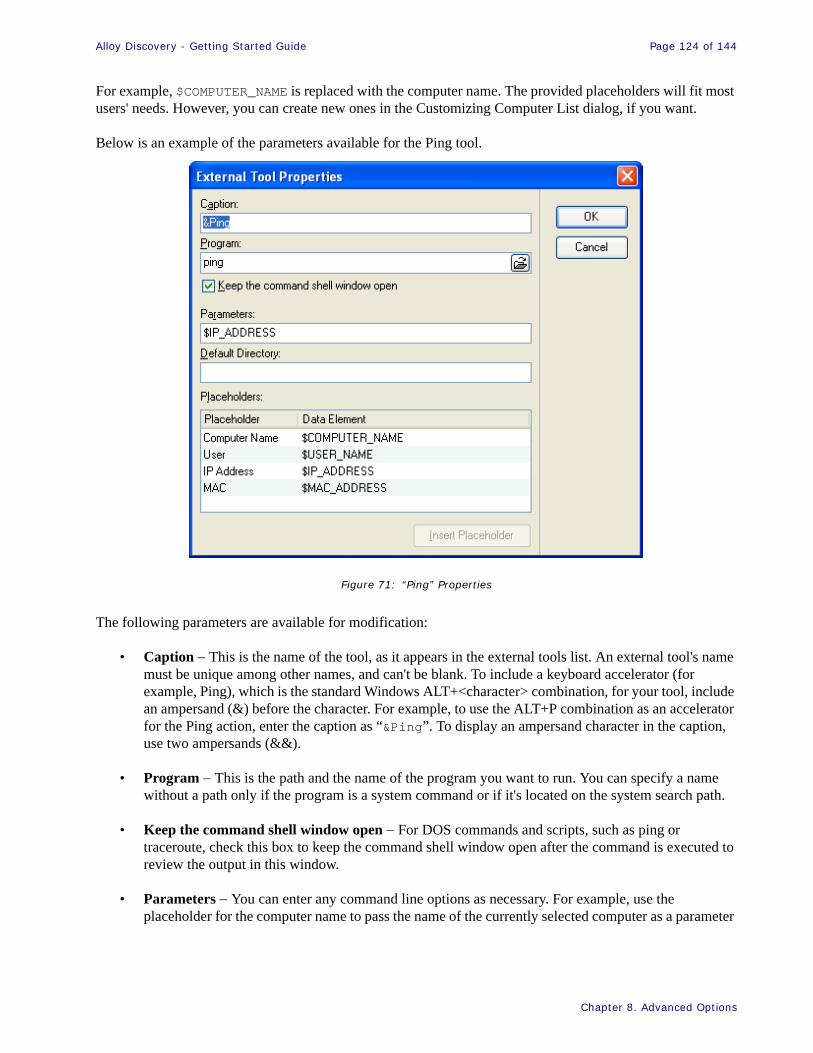
Alloy Discovery - Getting Started Guide Page 124 of 144
Chapter 8. Advanced Options
For example, $COMPUTER_NAME is replaced with the computer name. The provided placeholders will fit most users' needs. However, you can create new ones in the Customizing Computer List dialog, if you want.
Below is an example of the parameters available for the Ping tool.
Figure 71: “Ping” Properties
The following parameters are available for modification:
• Caption − This is the name of the tool, as it appears in the external tools list. An external tool's name must be unique among other names, and can't be blank. To include a keyboard accelerator (for example, Ping), which is the standard Windows ALT+<character> combination, for your tool, include an ampersand (&) before the character. For example, to use the ALT+P combination as an accelerator for the Ping action, enter the caption as “&Ping”. To display an ampersand character in the caption, use two ampersands (&&).
• Program − This is the path and the name of the program you want to run. You can specify a name without a path only if the program is a system command or if it's located on the system search path.
• Keep the command shell window open − For DOS commands and scripts, such as ping or traceroute, check this box to keep the command shell window open after the command is executed to review the output in this window.
• Parameters − You can enter any command line options as necessary. For example, use the placeholder for the computer name to pass the name of the currently selected computer as a parameter
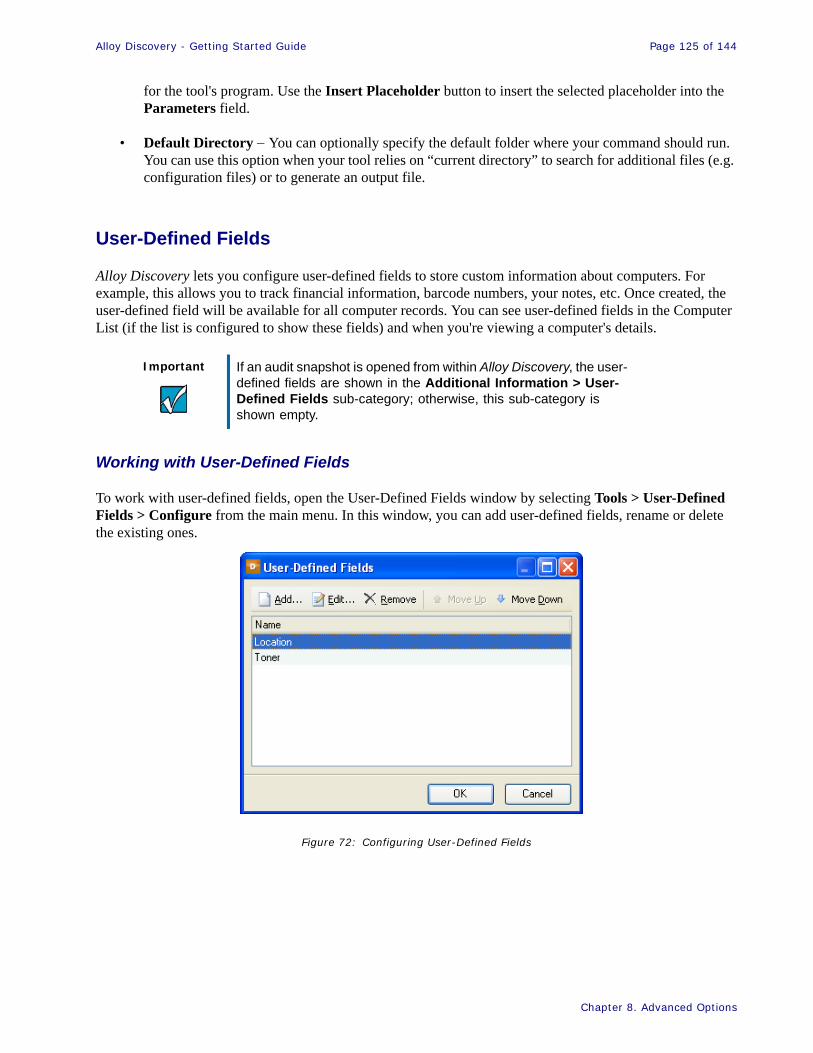
Alloy Discovery - Getting Started Guide Page 125 of 144
Chapter 8. Advanced Options
for the tool's program. Use the Insert Placeholder button to insert the selected placeholder into the Parameters field.
• Default Directory − You can optionally specify the default folder where your command should run. You can use this option when your tool relies on “current directory” to search for additional files (e.g. configuration files) or to generate an output file.
User-Defined Fields
Alloy Discovery lets you configure user-defined fields to store custom information about computers. For example, this allows you to track financial information, barcode numbers, your notes, etc. Once created, the user-defined field will be available for all computer records. You can see user-defined fields in the Computer List (if the list is configured to show these fields) and when you're viewing a computer's details.
Working with User-Defined Fields
To work with user-defined fields, open the User-Defined Fields window by selecting Tools > User-Defined Fields > Configure from the main menu. In this window, you can add user-defined fields, rename or delete the existing ones.
Figure 72: Configuring User-Defined Fields
Important If an audit snapshot is opened from within Alloy Discovery, the user-defined fields are shown in the Additional Information > User-Defined Fields sub-category; otherwise, this sub-category is shown empty.

Alloy Discovery - Getting Started Guide Page 126 of 144
Chapter 8. Advanced Options
To add a user-defined field, click Add, specify the field name, and click OK.
To rename a user-defined field, select the field in the list, click Edit, type a new name for the field, and click OK. To delete a user-defined field, select the field and click Remove.
The Move Up and Move Down buttons let you change the order of the fields in the list. The user-defined fields will be shown in the same order also in the User-Defined Fields section of the Available fields pane in the Computer List Configuration and Inclusion Rule windows.
Entering Data for User-Defined Fields
To enter data for a user-defined field in a computer record:
1. Right-click the computer either in the Side Bar or in the Computer List and choose Edit User-Defined Fields from the pop-up menu.
2. Enter the data for the required field.
3. Click OK.
Batch Updating User-Defined Fields
The Batch Update feature lets you change the values of a user-defined field in multiple computer records at once.
To update a user-defined field in multiple computer records:
1. In the Computer List, select the computer records you want to update using the following methods:
° To select adjacent records, hold down SHIFT and click the first and the last record of the desired selection;
° To select non-adjacent records, hold down CTRL and click each record you want to update;
° To select all records in the grid, press CTRL+A.
2. Choose Tools > User-Defined Fields > Batch Update from the main menu and select the field to update.
3. Choose one of the following:
° To set a value for the field, type the required value in the text field and click OK.
° To clear the field, click Clear.
Important To view a newly added user-defined field in any other Computer List view, you need to have that field set to be displayed. You can do this by selecting Tools > Configure Computer List from the main menu.
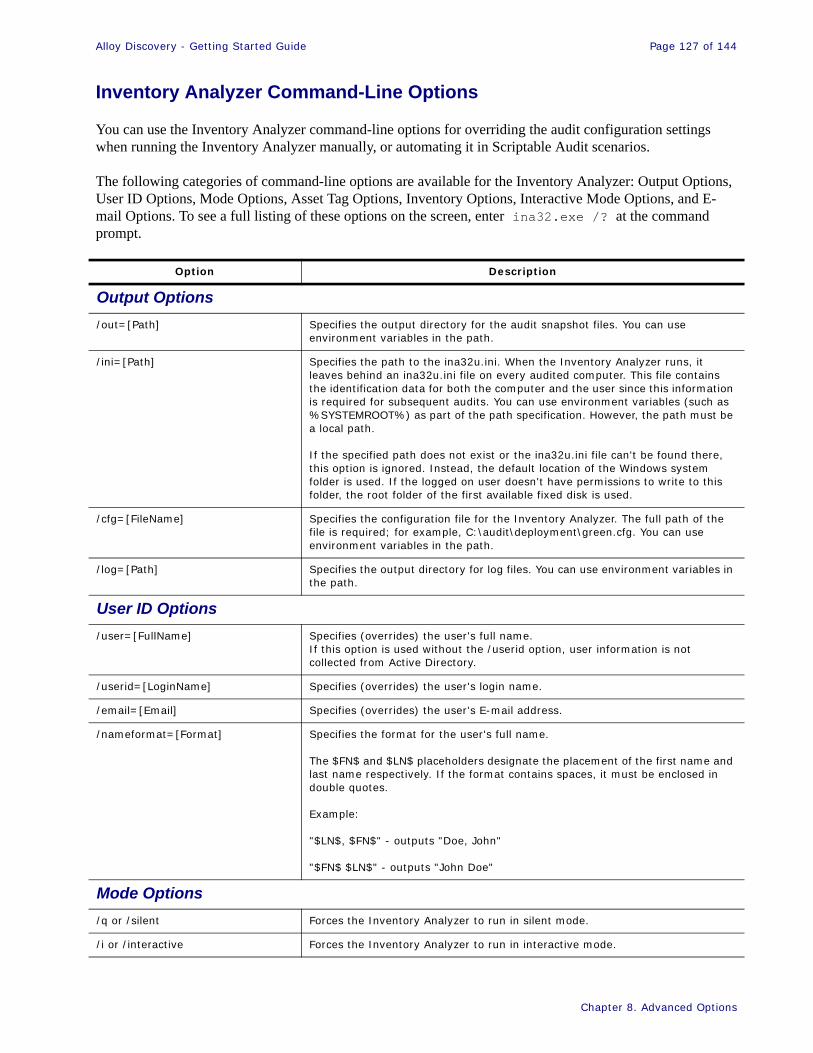
Alloy Discovery - Getting Started Guide Page 127 of 144
Chapter 8. Advanced Options
Inventory Analyzer Command-Line Options
You can use the Inventory Analyzer command-line options for overriding the audit configuration settings when running the Inventory Analyzer manually, or automating it in Scriptable Audit scenarios.
The following categories of command-line options are available for the Inventory Analyzer: Output Options, User ID Options, Mode Options, Asset Tag Options, Inventory Options, Interactive Mode Options, and E-mail Options. To see a full listing of these options on the screen, enter ina32.exe /? at the command prompt.
Option Description
Output Options/out=[Path] Specifies the output directory for the audit snapshot files. You can use
environment variables in the path.
/ini=[Path] Specifies the path to the ina32u.ini. When the Inventory Analyzer runs, it leaves behind an ina32u.ini file on every audited computer. This file contains the identification data for both the computer and the user since this information is required for subsequent audits. You can use environment variables (such as %SYSTEMROOT%) as part of the path specification. However, the path must be a local path.
If the specified path does not exist or the ina32u.ini file can't be found there, this option is ignored. Instead, the default location of the Windows system folder is used. If the logged on user doesn't have permissions to write to this folder, the root folder of the first available fixed disk is used.
/cfg=[FileName] Specifies the configuration file for the Inventory Analyzer. The full path of the file is required; for example, C:\audit\deployment\green.cfg. You can use environment variables in the path.
/log=[Path] Specifies the output directory for log files. You can use environment variables in the path.
User ID Options/user=[FullName] Specifies (overrides) the user's full name.
If this option is used without the /userid option, user information is not collected from Active Directory.
/userid=[LoginName] Specifies (overrides) the user's login name.
/email=[Email] Specifies (overrides) the user's E-mail address.
/nameformat=[Format] Specifies the format for the user's full name.
The $FN$ and $LN$ placeholders designate the placement of the first name and last name respectively. If the format contains spaces, it must be enclosed in double quotes.
Example:
"$LN$, $FN$" - outputs "Doe, John"
"$FN$ $LN$" - outputs "John Doe"
Mode Options/q or /silent Forces the Inventory Analyzer to run in silent mode.
/i or /interactive Forces the Inventory Analyzer to run in interactive mode.

Alloy Discovery - Getting Started Guide Page 128 of 144
Chapter 8. Advanced Options
Asset Tag Options/assettag=[AssetTag] Specifies (overrides) the computer's asset tag.
/autotag Specify the order in which the Inventory Analyzer will attempt to automatically assign the Asset Tag.
AT - BIOS asset tag
SN - BIOS serial number
CN - computer name
Example:
/autotag=AT,SN,CN - first use the BIOS asset tag, if it's blank then try the BIOS serial number, if it's also blank then take the computer name.
Inventory Options/forceinventory Forces an immediate hardware/software inventory, ignoring the schedule from
the audit configuration file (ina32.cfg) and exclusion rules for computers and users.
/forcescan Forces an immediate file scan, ignoring the file scan schedule from the audit configuration file (ina32.cfg) and exclusion rules for computers and users.
/force Forces an immediate audit process, ignoring any schedule settings and exclusion rules from the audit configuration file (ina32.cfg). This option is a combination of the /forceinventory and /forcescan options.
/auditdelay=[Delay] Specifies the time delay in minutes before starting the audit process. If no value is specified, the time delay is set to 1 minute.
Use this option to ensure that any resource-intensive tasks that may take place at logon are finished and the initialization is complete.
/samba Prevents the Inventory Analyzer from setting permissions to the audit data files. Use this option if your audit snapshot files are stored on a non-Windows file server.
/logsize=[Size] Automatically rotates the log file when it reaches the specified size (in kilobytes)
Interactive Mode OptionsThese options apply if only the Inventory Analyzer runs in interactive mode and define the appearance of the Inventory Analyzer splash screen. If the Inventory Analyzer runs in silent mode, these options are ignored.
/nocancel Hides the Cancel button.
/nosaveto Hides the Save To option.
E-mail OptionsAny of the /smtp_* options forces the Inventory Analyzer to send audit snapshot files by E-mail. The /smtp_to and /smtp_server options are required to send E-mail, the rest of the E-mail options are optional.
/smtp_to=[ToAddress] Specifies the "To" E-mail address for sending audit snapshots.
/smtp_from=[FromAddress] Specifies the "From" address for sending audit snapshots via E-mail.
/smtp_server=[ServerName] Specifies SMTP server name.
/smtp_port=[PortNumber] Specifies SMTP server port number. If this option is not specified, the default port number '25' is used for non-secure connection and '465' for secure connection.
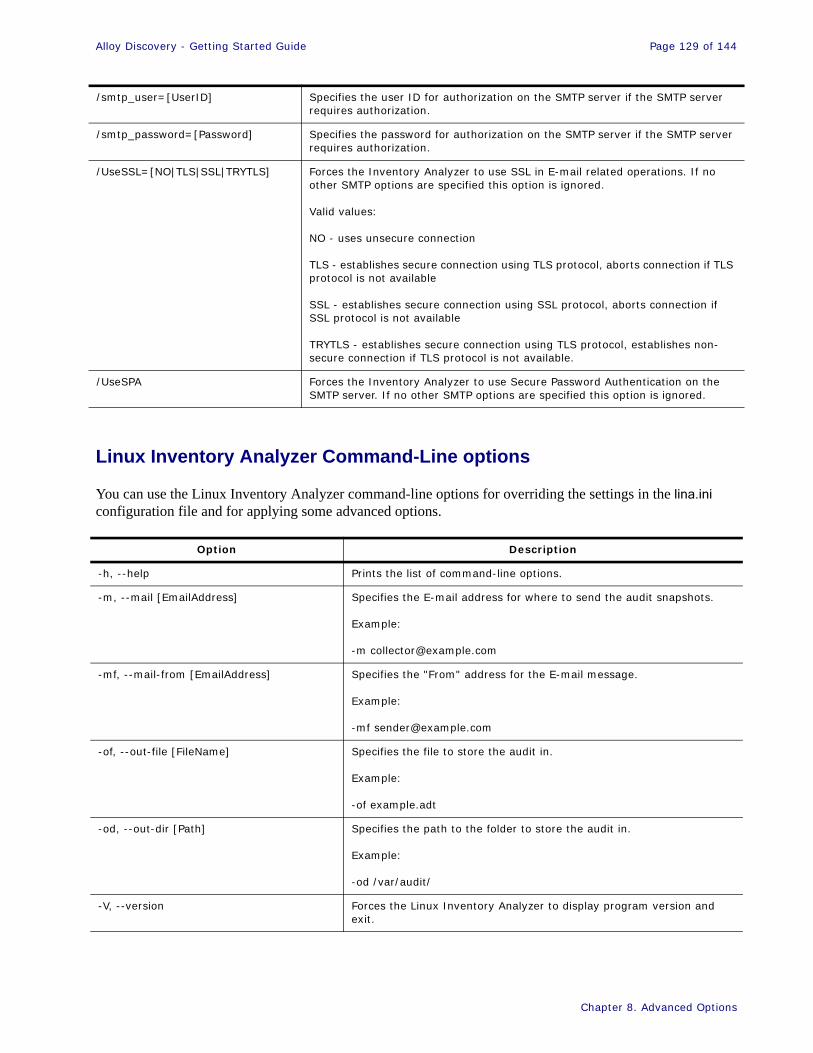
Alloy Discovery - Getting Started Guide Page 129 of 144
Chapter 8. Advanced Options
Linux Inventory Analyzer Command-Line options
You can use the Linux Inventory Analyzer command-line options for overriding the settings in the lina.ini configuration file and for applying some advanced options.
/smtp_user=[UserID] Specifies the user ID for authorization on the SMTP server if the SMTP server requires authorization.
/smtp_password=[Password] Specifies the password for authorization on the SMTP server if the SMTP server requires authorization.
/UseSSL=[NO|TLS|SSL|TRYTLS] Forces the Inventory Analyzer to use SSL in E-mail related operations. If no other SMTP options are specified this option is ignored.
Valid values:
NO - uses unsecure connection
TLS - establishes secure connection using TLS protocol, aborts connection if TLS protocol is not available
SSL - establishes secure connection using SSL protocol, aborts connection if SSL protocol is not available
TRYTLS - establishes secure connection using TLS protocol, establishes non-secure connection if TLS protocol is not available.
/UseSPA Forces the Inventory Analyzer to use Secure Password Authentication on the SMTP server. If no other SMTP options are specified this option is ignored.
Option Description
-h, --help Prints the list of command-line options.
-m, --mail [EmailAddress] Specifies the E-mail address for where to send the audit snapshots.
Example:
-mf, --mail-from [EmailAddress] Specifies the "From" address for the E-mail message.
Example:
-of, --out-file [FileName] Specifies the file to store the audit in.
Example:
-of example.adt
-od, --out-dir [Path] Specifies the path to the folder to store the audit in.
Example:
-od /var/audit/
-V, --version Forces the Linux Inventory Analyzer to display program version and exit.

Alloy Discovery - Getting Started Guide Page 130 of 144
Chapter 8. Advanced Options
Note that some parameters are mutually exclusive: either the output file or E-mail address can be specified, but not both.
If the output file is not explicitly specified in the lina.ini configuration file or with the --out-file command-line option, it is assigned automatically. The format is hostname_MACaddress.adt. If neither host name nor MAC address can be determined, then the file is named lina.adt.
When run with the --mail command-line option, the Linux Inventory Analyzer looks for sendmail in PATH. If it is not there by default, you can use the following syntax:
PATH=/usr/local/lib:$PATH ./lina -m [email protected]
The following values are used for illustrative purposes:
• /usr/local/lib – This is the folder where sendmail resides.• [email protected] – This is the E-mail address where to send the audit files.
Mac Inventory Analyzer Command-Line options
You can use the Mac Inventory Analyzer command-line options for overriding the settings in the ina_mac.ini configuration file and for applying some advanced options.
Note that some parameters are mutually exclusive: either the output file or E-mail address can be specified, but not both.
Option Description
-h, --help Prints the list of command-line options.
-m, --mail [EmailAddress] Specifies the E-mail address for where to send the audit snapshots.
Example:
-mf, --mail-from [EmailAddress] Specifies the "From" address for the E-mail message.
Example:
-of, --out-file [FileName] Specifies the file to store the audit in.
Example:
-of example.adt
-od, --out-dir [Path] Specifies the path to the folder to store the audit in.
Example:
-od /var/audit/
-V, --version Forces the Mac Inventory Analyzer to display program version and exit.
-v, --verbose Verbose output.
Alloy Discovery - Getting Started Guide Page 131 of 144
Chapter 8. Advanced Options
If the output file is not explicitly specified in the ina_mac.ini configuration file or with the --out-file command-line option, it is assigned automatically.
If you want to run ina_mac with --mail command-line option, you must configure and start a sendmail-compatible Mail Transfer Agent (for example, postfix) on each Mac machine, and the PATH environment variable should contain the sendmail directory. The postfix tool ships with OS but is not started by default. For instructions, see your Mac OS documentation or Mac OS Internet recourses such as http://egopoly.com/2006/08/15/enable-postfix-mail-on-mac-os-x-tiger/.
Report Designer
Alloy Discovery features the following pre-configured reports:
• Asset summary• Asset Tag Stickers• Assets by Operating System• Assets by Platform• Assets by Software• Computer Cards• Discovered but not Audited• Disk usage• SNMP devices• Software by Asset• Software by Publisher• Software summary by Title
To generate a preconfigured report:
1. Select Reports > [Report Name] from the main menu.
2. If the Report Options window opens, specify the required options for the report and click OK. The report preview window opens.
3. View the report on the computer screen or send it to the printer.
The Alloy Discovery's reporting component is based on the FastReport's designer by Fast Report, Inc. (http://fast-report.com). The designer provides all the tools for designing new report templates. You can access Report Designer by selecting Reports > Create Report from the Alloy Discovery's main menu, or from the report preview window by clicking Design Report.
Report Designer contains its own Help system (Report Designer Help). Please refer to this help system for more information. To access this Help, open the FastReport designer (Reports > Create Reports) and then select Help > Help Contents from FastReport’s main menu.
Alloy Discovery - Getting Started Guide Page 132 of 144
Chapter 9. Obtaining Technical Support
Chapter 9. Obtaining Technical SupportPlease feel free to contact Alloy Software for any issues related to Alloy Discovery. We appreciate your feedback, suggestions, and comments about our technologies and services. For more information about the technical support options, please see our Technical Support Guidelines (http://www.alloy-software.com/support/guidelines.html). H
This chapter explains how to contact Alloy Software and provides instructions for troubleshooting potential issues with Alloy Discovery.
Troubleshooting On-Demand Audit............................................................................................................................. 133Summary ..................................................................................................................................................................... 133Computers Being Audited........................................................................................................................................... 133Host Machine .............................................................................................................................................................. 137
Troubleshooting Linux Inventory Analyzer................................................................................................................ 138
Contacting Alloy Software ............................................................................................................................................ 139Premium Support......................................................................................................................................................... 139Using the Community Forums and Online FAQ’s...................................................................................................... 139Contact Information .................................................................................................................................................... 139
Alloy Discovery - Getting Started Guide Page 133 of 144
Chapter 9. Obtaining Technical Support
Troubleshooting On-Demand Audit
Summary
The On-Demand Audit feature relies on the hidden administrative share (ADMIN$) that Windows uses to manage the computer environment on the network. Typically, computers that are running Windows NT 4.0, Windows 2000, Windows XP, Windows Vista, Windows Server 2003, or Windows Server 2008 automatically create the administrative share during the install. For the most part, the On-Demand Audit works right out of the box without any tweaking needed; however, the feature does require a few things to be in place.
This section will show the most common issues and known solutions for them. These issues might refer to computers being audited (see “Computers Being Audited” on page 133) and to the Alloy Discovery host machine (see “Host Machine” on page 137).
Computers Being Audited
The most common issues and known solutions referring to client computers follow:
• Administrative Shares are Disabled
• File and Printer Sharing Components are Disabled
• Configuration Issues Preventing Access to Administrative Shares
• Error Messages
Administrative Shares are Disabled
Some administrators consider administrative shares to be a security risk and disable them completely. This is a result of certain vulnerabilities found in early versions of Windows. However, these were mostly issues with the local administrator password which was simply left blank, which allowed for unauthorized access to the administrative share.
Since then, Microsoft has restricted file sharing and improved security significantly. Today, with reasonable precautions in place, it is quite safe to have administrative shares enabled. Without them the On-Demand Audit will not work. Moreover, you may experience a variety of other issues unrelated to Alloy Discovery when administrative shares are removed or are unavailable. Please see Microsoft Knowledge Base article 842715 “Overview of problems that may occur when administrative shares are missing” (http://support.microsoft.com/kb/842715) for details and resolution.
File and Printer Sharing Components are Disabled
You will be unable to remotely audit Windows computers unless you have configured the File and Printer Sharing for Microsoft Networks component and the Server service on them.
Alloy Discovery - Getting Started Guide Page 134 of 144
Chapter 9. Obtaining Technical Support
Make sure that the File and Printer Sharing for Microsoft Networks component is installed and enabled as follows:
1. Open the Network Connections folder:
° For Windows XP: on the Start menu, click Control Panel, and then click Network Connections.
° For Windows Vista: on the Start menu, click Control Panel > Network and Internet > Network and Sharing Center, and then click Manage network connections on the left Tasks pane.
2. Right-click the network connection attached to the LAN and select Properties.
3. On the General tab, verify that File and Printer Sharing for Microsoft Networks appears on the list of installed items (i.e. the check box next to this component is selected).
The File and Printer Sharing for Microsoft Networks component corresponds to Windows network service Server. Configure the Server service as follows:
1. In Control Panel, double-click Administrative Tools, and then double-click Services.
2. Double-click the Server service.
3. Set the startup type to Automatic.
4. Make sure that the service status is set to Started. Otherwise, click Start.
Please note that Microsoft Windows Vista has made some important changes to the way that file and printer sharing works. To enable file and printer sharing in Windows Vista, complete the following steps in addition to the listed above:
1. Open Network and Sharing Center window (for example, click Start, right-click Network, and then select Properties).
2. In the Sharing and Discovery section, click the down arrow next to File sharing and click Turn on file sharing under File sharing settings. Then click Apply.
3. Set the Network Location Type to either Private or Domain as follows:
1. To the right of the network name and location type, click Customize.
2. In the Set Network Location dialog, click Private or Domain, and then click Next.
3. In the Successfully set network settings dialog box, click Close.
Alloy Discovery - Getting Started Guide Page 135 of 144
Chapter 9. Obtaining Technical Support
Configuration Issues Preventing Access to Administrative Shares
Simple File Sharing
The Simple File Sharing feature is always turned on for the Windows XP Home Edition. By default, Simple File Sharing is also turned on for Windows XP Professional when the computer is in a workgroup environment. Windows Vista by default does not allow Simple File Sharing.
When Simple File Sharing is turned on, access to the administrative share is disabled because all remote users authenticate as “Guest”. Guest accounts do not have administrative rights; therefore, you must turn off Simple File Sharing to allow the On-Demand Audit feature to work.
To turn Simple File Sharing off in Windows XP Professional, follow these steps:
1. Double-click My Computer on the desktop.
2. Select Tools > Folder Options.
3. Click the View tab, and then clear the Use Simple File Sharing (Recommended) check box.
For details, see Microsoft Knowledge Base article 304040 “How to configure file sharing in Windows XP” (http://support.microsoft.com/kb/304040) for further details.
Windows Firewall and Third-Party Firewall Products
By default, Windows Firewall closes the ports that are used for file and printer sharing to prevent Internet computers from accessing your shared files and printers. Third-party firewall products may also employ this approach.
The On-Demand Audit may not work if you have a firewall between the Alloy Discovery host machine and remote client machines.
If you are using a firewall, you should open the ports that are used by File and Printer Sharing for your local network to enable the On-Demand Audit.
Please see Microsoft Knowledge Base article 298804 “Internet firewalls can prevent browsing and file sharing” (http://support.microsoft.com/kb/298804/) for details and resolution.
Windows Vista User Account Control (UAC)
User Account Control (UAC) is a new security component of the Microsoft Windows Vista operating system. UAC enables users to perform common tasks as non-administrators, called standard users in Windows Vista, and as administrators without having to switch users, log off, or use Run As. Microsoft developed the UAC feature for Windows Vista to prevent silent installation of malware. UAC is enabled by default.
UAC also affects remote connections to computers. When a local user account is used to connect to a machine, the user is identified as a standard user even if the account is in the Administrators group. Since regular users do not have administrative rights, access to administrative shares is refused and the On-Demand Audit fails.
Alloy Discovery - Getting Started Guide Page 136 of 144
Chapter 9. Obtaining Technical Support
The method of solving this issue depends on whether you are connecting to a remote computer in a domain or in a workgroup, since this determines whether UAC filtering is enabled.
If your computer is part of a domain, the On-Demand audit account should be a domain account that is in the local Administrators group on the remote computer because UAC does not affect the domain accounts in the local Administrators group. Do not use a local, non-domain account on the remote computer, even if it is in the Administrators group.
You can control UAC by accessing the Control Panel > Turn on and off User Account Control.
Other Issues
Access to administrative shares and file sharing may also fail for the following reasons (this is true mostly for Windows XP SP2 and higher):
1. Windows will deny access under accounts with a blank password.
2. Windows will deny access if there are DNS issues related to the name of the host machine or the IP address of the client machine. For example, the name of the DNS entry for the host machine must match its computer name, and the IP address of the client machine must be unique within the DNS.
Error Messages
When the operating system denies access to the administrative share due to authentication - or network-related issues, Windows will report a generic error code. Keep in mind that in some cases this error code and the corresponding system error message may not reflect the actual cause of the failure and be misleading.
Troubleshooting Administrative Shares
Microsoft offers a guide for troubleshooting file and printer sharing in Windows which is available for downloading at Microsoft Download Center. When downloaded, please see the Common Problems with File and Printer Sharing section of the document.
File Name: FP_Tshoot.doc
Title: Troubleshooting File and Printer Sharing in Microsoft Windows XP
URL: http://www.microsoft.com/downloads/details.aspx?FamilyID=fd7fd48d-6b4a-448e-a632-076f98a351a2&displaylang=en
Important The text that follows applies to Windows XP and higher.

Alloy Discovery - Getting Started Guide Page 137 of 144
Chapter 9. Obtaining Technical Support
Host Machine
The most common issue and known solution referring to the Alloy Discovery host machine is the following:
• Client for Microsoft Component is Disabled
Client for Microsoft Component is Disabled
On computers running Windows 2000 or later, you will be unable to remotely audit computers when the Client for Microsoft Networks component and Workstation service is not installed and configured.
Make sure that the Client for Microsoft Networks component is installed and enabled as follows:
1. Open the Network Connections folder:
° For Windows XP: on the Start menu, click Control Panel, and then click Network Connections.
° For Windows Vista: on the Start menu, click Control Panel > Network and Internet > Network and Sharing Center, and then click Manage network connections on the left Tasks pane.
2. Right-click the network connection attached to the LAN and select Properties.
3. On the General tab, verify that Client for Microsoft Networks appears on the list of installed items (i.e. the check box next to this component is selected).
The Client for Microsoft Networks component corresponds to Windows network service Workstation. Configure the Workstation service as follows:
1. In Control Panel, double-click Administrative Tools, and then double-click Services.
2. Double-click the Workstation service.
3. Set the startup type to Automatic.
4. Make sure that the service status is set to Started. Otherwise, click Start.

Alloy Discovery - Getting Started Guide Page 138 of 144
Chapter 9. Obtaining Technical Support
Troubleshooting Linux Inventory Analyzer
In some cases, Linux Inventory Analyzer (lina) may not work as expected. For instance, it may not collect some information about the computer, or it may rarely halt with an error message. In most cases this indicates an operating system, device driver, or hardware problem. To resolve such issues, contact Alloy Software Technical Support. Before contacting, you should prepare troubleshooting information for the Technical Support representatives as follows:
Note that "$(hostname)" is a command and is to be used as is; do not replace "hostname" with the name of the computer.
1. If you are not at the terminal screen, launch the terminal application.
2. In the terminal window, type:
cd <path_to_lina>
Then press ENTER to change directory into your lina directory. Note that <path_to_lina> is the path to the lina directory.
3. In the terminal window, type:
sudo ./lina -n -d -w $(hostname).bin -of $(hostname).adt
Then press ENTER. If prompted, type in the password of the root account. This will run lina in the debug mode.
4. Wait until the information message about the creation of an audit snapshot file is displayed. Three output files are expected to be created:
° <your_computer_name>.adt° <your_computer_name>_Debug.log° <your_computer_name>.bin
Note that <your_computer_name> is the name of the computer.
5. In the terminal window, type:
tar czvf $(hostname).tgz $(hostname)*
Press ENTER. This will compress all the created files into the <your_computer_name>.tgz archive file.
The next step is to contact Alloy Software Technical Support by E-mail, describe the problem and attach the archive file. See “Contacting Alloy Software” on page 139 for more information.

Alloy Discovery - Getting Started Guide Page 139 of 144
Chapter 9. Obtaining Technical Support
Contacting Alloy Software
Premium Support
If you purchased a Premium Support plan and your plan is current, you can use the Alloy Software Support Portal at https://support.alloy-software.com/ to search the product knowledge base, submit incident tickets, and download product updates. To purchase a Premium Support plan for Alloy Discovery please contact our sales team at [email protected].
Using the Community Forums and Online FAQ’s
You can use our Community Forums at http://www.alloy-software.com/support/forums.html?pid=AD5 to ask your technical or general questions about our products, report a problem, or browse existing postings. We moderate the Forum daily and answer your questions either publicly or by E-mail. To become a member of the Forum, you must register free of charge. Once registered, you can visit the Forum as often as you want.
These forums are intended to support and promote knowledge transfer among product users. While our technical team is doing their best to monitor the postings and provide their expert knowledge of the product, these forums must not be used to submit bug reports. All support requests must be submitted in accordance with our Support Guidelines at http://www.alloy-software.com/support/guidelines.html.
We also encourage all of our customers to use the online FAQ at http://www.alloy-software.com/discovery/faq.html.
Contact Information
You can contact us by E-mail, phone, fax, or regular E-mail using the contact information below:
Sales and licensing: [email protected]
Technical support (premium support): [email protected]
General questions: [email protected]
Reseller inquiries: [email protected]
Website: [email protected]
Phone(9:00 A.M. to 6:00 P.M. EST):
(800) 810-9020 – US Toll Free(973) 661-9700 – International or Long Distance
Fax: (866) 422-1658 – US Toll Free (973) 661-9777 – International or Long Distance
Mailing Address: Alloy Software, Inc. 88 Park Avenue Suite 2B Nutley, New Jersey 07110USA
Alloy Discovery - Getting Started Guide Page 140 of 144
Copyright © 2002-2009 Alloy Software, Inc. Chapter 10. Glossary
Chapter 10. GlossaryThis chapter explains terms used throughout this document.
Asset Tag ..................................................................................................................................................................... 141Audit ............................................................................................................................................................................ 141Audit Configuration..................................................................................................................................................... 141Audit Snapshot ............................................................................................................................................................ 141Audit Data Viewer....................................................................................................................................................... 141Audit Group................................................................................................................................................................. 141Audit via E-mail .......................................................................................................................................................... 141Client Machine ............................................................................................................................................................ 141Computer Group.......................................................................................................................................................... 141Default On-Demand Audit Credentials ....................................................................................................................... 141Dynamic Group ........................................................................................................................................................... 142E-mail Audit Group..................................................................................................................................................... 142External Audit Data Source Group.............................................................................................................................. 142Group for the On-Demand Audit of an IP Address Range ......................................................................................... 142Group for the On-Demand Audit on a Windows Domain .......................................................................................... 142Hardware/Software Inventory ..................................................................................................................................... 142Host Machine............................................................................................................................................................... 142Interactive Mode.......................................................................................................................................................... 142Interactive Once Mode ................................................................................................................................................ 142Intermediary Repository ............................................................................................................................................. 142Inventory Analyzer...................................................................................................................................................... 142Inventory Analyzer Package........................................................................................................................................ 143Inventory Repository ................................................................................................................................................... 143Minimally Necessary Permissions .............................................................................................................................. 143On-Demand Audit ....................................................................................................................................................... 143On-Demand Audit Credentials .................................................................................................................................... 143On-Demand Audit Group ............................................................................................................................................ 143Portable Audit.............................................................................................................................................................. 143Scriptable Audit........................................................................................................................................................... 143Scriptable Audit Group................................................................................................................................................ 144Shared Folder Machine................................................................................................................................................ 144Side Bar ....................................................................................................................................................................... 144Silent Mode ................................................................................................................................................................. 144SMBIOS Filter............................................................................................................................................................. 144Static Group................................................................................................................................................................. 144Style............................................................................................................................................................................. 144UNC............................................................................................................................................................................. 144

Alloy Discovery - Getting Started Guide Page 141 of 144
144Copyright © 2002-2009 Alloy Software, Inc. Chapter 10. Glossary
A _____________________
Asset TagAsset tag is a unique identifier generated by Inventory Analyzer for each computer for inventory purposes.
AuditAudit is the process of collecting hardware and software information from computers. The results of an audit are stored in audit snapshot files.
Audit ConfigurationAudit configuration is a combination of options that define how the data is collected during the audit process.
Audit SnapshotAudit snapshots contain information about an individual computer or device. This information is collected by the Inventory Analyzer during the audit and optionally supplemented with data entered into the user-defined fields.
For computers, an audit snapshot stores information in the following files (located in the \Repository directory of the Alloy Discovery installation): an .adt file and optionally .scn, .snmp, and .udf files.
The .adt files contain the hardware and basic-level software information; the .scn file contain the results of the detailed and summary file scans; the SNMP file contains the data about the computer as an SNMP device; the .udf file contains the values specified for user-defined fields. For devices, an audit snapshot may consist of one or two files: the .snmp file contains the data about the SNMP device and the .udf file contains the values of user-defined values. You can view audit snapshots in Alloy Discovery or in the standalone Audit Data Viewer.
Audit Data ViewerAudit Data Viewer is an Alloy Software tool for viewing audit snapshot files. This tool is installed into the \Program Files\Common Files\Alloy Shared\AuditViewer\Bin folder; the name of its executable file is AdtViewer.exe. Alloy Discovery
uses the Audit Data Viewer to display the contents of audit snapshots.
Audit GroupAudit group is a combination of computers sharing a single audit method. There are the following types of audit groups: On-Demand Audit Groups, Scriptable Audit Groups, and E-mail Audit Groups.
Audit via E-mailAudit via E-mail is an agent-based method of WAN audit. This method involves two steps: deploying an Inventory Analyzer Package to the target network and (optionally) automating the Inventory Analyzer using domain logon scripts or scheduled tasks. In contrast to the Scriptable Audit method, there is no direct link between the host machine and the deployed audit agents. This is why there is no intermediary repository – audit snapshots are delivered to the host machine via E-mail. Also, any configuration changes or updated versions of the audit agents have to be manually re-deployed.
C _____________________
Client MachineClient machine is a computer tracked and audited with Alloy Discovery.
Computer GroupComputer group is a combination of computers for analyzing their audit results. A computer group can be either dynamic or static.
D _____________________
Default On-Demand Audit CredentialsDefault On-Demand Audit Credentials are the On-Demand Audit Credentials that are used by default for the On-Demand Audit if the target computer (or the target on-demand audit group) doesn't have custom on-demand audit credentials assigned.
Alloy Discovery - Getting Started Guide Page 142 of 144
144Copyright © 2002-2009 Alloy Software, Inc. Chapter 10. Glossary
Dynamic GroupDynamic group is a computer group maintained by Alloy Discovery automatically, based on the group's inclusion criteria.
E _____________________
E-mail Audit GroupE-mail Audit group is an audit group created for the Audit via E-mail method.
External Audit Data Source GroupExternal Audit Data Source group is an audit group created to import audit snapshots from the designated source folder to the Inventory Repository. These groups are necessary to integrate Alloy Discovery with Alloy Navigator, when the audit facilities of Alloy Navigator are used to provide audit snapshots to Alloy Navigator and Alloy Discovery.
G _____________________
Group for the On-Demand Audit of an IP Address RangeGroup for the On-Demand Audit of an IP Address Range is an audit group created for the On-Demand Audit of the computers whose IP addresses belong to a specified IP address range.
Group for the On-Demand Audit on a Windows DomainGroup for the On-Demand Audit on a Windows Domain is an audit group created for the On-Demand Audit of the computers that belong to a specified Windows domain or a workgroup.
H _____________________
Hardware/Software InventoryHardware and Software Inventory is a collection of data about hardware and software products installed on an audited computer.
Host MachineHost machine is the computer hosting Alloy Discovery.
I ______________________
Interactive ModeInteractive mode is an audit mode that allows you to prompt the users before starting the audit. In this mode the Inventory Analyzer can be configured to ask the user for certain information, such as their name, location, or any other custom information. You can choose an audit mode for auditing Windows computers using the Scriptable Audit, Audit via E-mail, or Portable Audit methods.
Interactive Once ModeInteractive Once mode is a combination of the Interactive mode and the Silent mode. In the Interactive Once mode, the users are prompted to enter their information only at the first run of the Inventory Analyzer. The subsequent audits run silently. Note that in the Interactive Once mode the Inventory Analyzer will run interactively not only at the first audit of each individual computer, but also every time after you modify the audit configuration the very next audit will run interactively as well.You can choose an audit mode for auditing Windows computers using the Scriptable Audit, Audit via E-mail, or Portable Audit methods.
Intermediary Repository Intermediary Repository is a shared folder where the audit snapshots produced by the Scriptable Audit are collected (typically, it is the /AuditData sub-folder of the shared folder designated for the Scriptable Audit Group).
Inventory AnalyzerInventory Analyzer is the primary tool for auditing computers. It captures information about hardware configurations and installed software, and it produces audit snapshots. There are separate Inventory Analyzers for Windows, Linux, and for Mac operating systems.
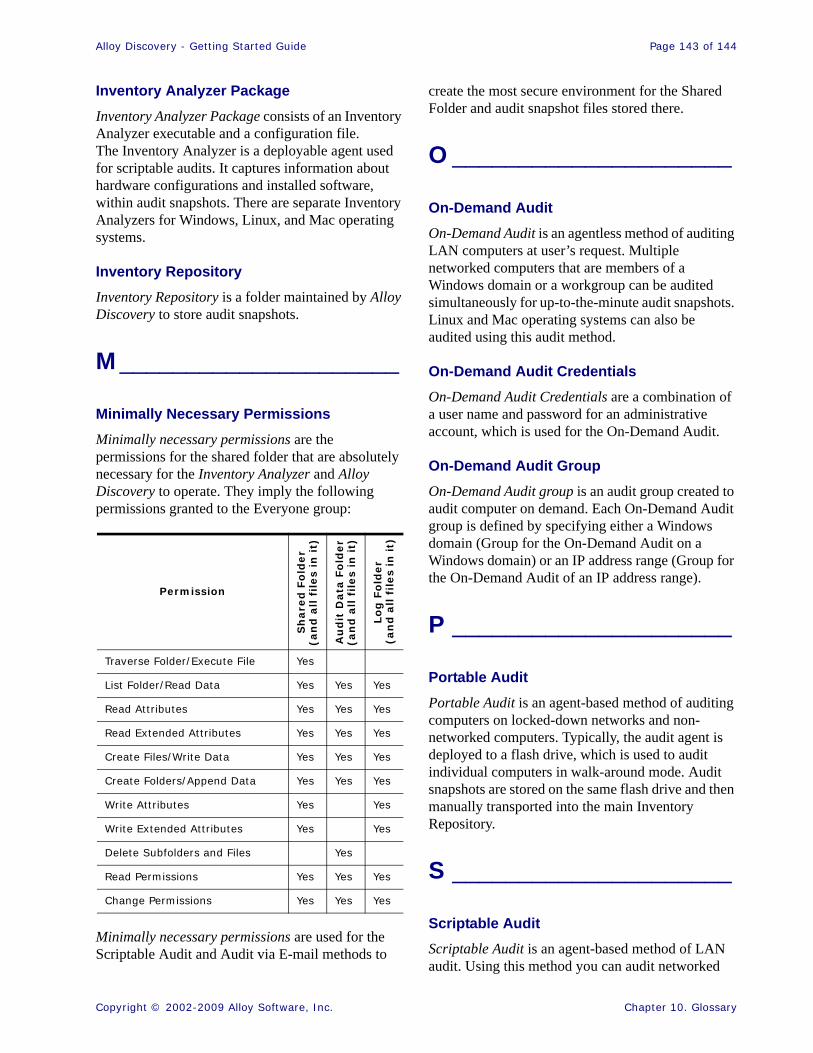
Alloy Discovery - Getting Started Guide Page 143 of 144
144Copyright © 2002-2009 Alloy Software, Inc. Chapter 10. Glossary
Inventory Analyzer PackageInventory Analyzer Package consists of an Inventory Analyzer executable and a configuration file. The Inventory Analyzer is a deployable agent used for scriptable audits. It captures information about hardware configurations and installed software, within audit snapshots. There are separate Inventory Analyzers for Windows, Linux, and Mac operating systems.
Inventory RepositoryInventory Repository is a folder maintained by Alloy Discovery to store audit snapshots.
M _____________________
Minimally Necessary PermissionsMinimally necessary permissions are the permissions for the shared folder that are absolutely necessary for the Inventory Analyzer and Alloy Discovery to operate. They imply the following permissions granted to the Everyone group:
Minimally necessary permissions are used for the Scriptable Audit and Audit via E-mail methods to
create the most secure environment for the Shared Folder and audit snapshot files stored there.
O _____________________
On-Demand AuditOn-Demand Audit is an agentless method of auditing LAN computers at user’s request. Multiple networked computers that are members of a Windows domain or a workgroup can be audited simultaneously for up-to-the-minute audit snapshots. Linux and Mac operating systems can also be audited using this audit method.
On-Demand Audit CredentialsOn-Demand Audit Credentials are a combination of a user name and password for an administrative account, which is used for the On-Demand Audit.
On-Demand Audit GroupOn-Demand Audit group is an audit group created to audit computer on demand. Each On-Demand Audit group is defined by specifying either a Windows domain (Group for the On-Demand Audit on a Windows domain) or an IP address range (Group for the On-Demand Audit of an IP address range).
P _____________________
Portable AuditPortable Audit is an agent-based method of auditing computers on locked-down networks and non-networked computers. Typically, the audit agent is deployed to a flash drive, which is used to audit individual computers in walk-around mode. Audit snapshots are stored on the same flash drive and then manually transported into the main Inventory Repository.
S _____________________
Scriptable AuditScriptable Audit is an agent-based method of LAN audit. Using this method you can audit networked
Permission
Sh
are
d F
old
er
(an
d a
ll f
iles
in i
t)
Au
dit
Data
Fo
lder
(an
d a
ll f
iles
in i
t)
Lo
g F
old
er
(an
d a
ll f
iles
in it)
Traverse Folder/Execute File Yes
List Folder/Read Data Yes Yes Yes
Read Attributes Yes Yes Yes
Read Extended Attributes Yes Yes Yes
Create Files/Write Data Yes Yes Yes
Create Folders/Append Data Yes Yes Yes
Write Attributes Yes Yes
Write Extended Attributes Yes Yes
Delete Subfolders and Files Yes
Read Permissions Yes Yes Yes
Change Permissions Yes Yes Yes

Alloy Discovery - Getting Started Guide Page 144 of 144
144Copyright © 2002-2009 Alloy Software, Inc. Chapter 10. Glossary
computers on a regular basis. It involves two steps: the deployment of the Inventory Analyzer to a network share, and its automation using domain logon scripts or scheduled tasks. Audit snapshots are stored in an intermediary repository on the same network share until they are processed by Alloy Discovery and loaded into the main Inventory Repository. Alloy Discovery automatically reflects changes of the audit configuration on the host machine in the configurations of its deployed audit agents.
Scriptable Audit GroupScriptable Audit group is an audit group created for the Scriptable Audit.
Shared Folder MachineThe Shared Folder Machine is the server hosting the shared folder where the Inventory Analyzer is deployed to. The Shared Folder machine is essential for the Scriptable Audit.
Side BarSide Bar is the left navigation pane in Alloy Discovery interface that displays the group hierarchy and allows you to navigate through audit groups and computer groups down to individual computers.
Silent ModeSilent mode is an audit mode that allows you to audit computers silently without requiring any user action. You can choose an audit mode for auditing Windows computers using the Scriptable Audit, Audit via E-mail, or Portable Audit methods.
SMBIOS FilterSMBIOS Filter is an Alloy Discovery feature that allows to correctly handle the bogus values (such as No Asset Information, System Product Name, None, etc.) found in SMBIOS tables when auditing computers.
Static GroupStatic group is a computer group populated by manually adding computers to that group. For example, you can use static groups to independently analyze and report inventory data from multiple networks or subdivisions within your organization.
StyleStyle is a custom visual appearance that can be applied to various elements of application's graphical interface: grids, menus, tabs, check boxes, buttons, and others. A style customizes the look of the application but does not affect its functionality.
U _____________________
UNCUNC, short for Universal Naming Convention or Uniform Naming Convention, specifies a common syntax to describe the location of a network resource, such as a shared file, directory, or printer. The UNC syntax for Windows systems is as follows:\\ComputerName\SharedFolder\Resource