Embed Size (px)
Citation preview
All about the
Use & Careof your
TA B L E O F C O N T E N T S
www.frigidaire.com USA 1-800-944-9044 www.frigidaire.ca Canada 1-800-265-8352
Dishwasher
675000612098 (March 2011)
Important Safety Instructions .............................. 2
Dishwasher Features ......................................... 3
Operating Instructions ................................... 4 - 5
Preparing and Loading Dishes ............................. 6
Dishwasher Dispenser & Detergents .................... 7
Factors Affecting Performance ............................ 8
Care and Cleaning ....................................... 9 - 10
Connecting & Disconnecting the Portable
Dishwasher ..................................................... 11
Common Dishwashing Problems & Solutions 12 - 13
Notes ............................................................. 14
Warranty ........................................................ 15

2
Read all instructions before using this appliance.Save these instructions for future reference.
Thank you for choosing Frigidaire.
This Use & Care Guide is part of our commitment to customersatisfaction and product quality throughout the service life ofyour new appliance.
We view your purchase as the beginning of a relationship. Toensure our ability to continue serving you, please use this pageto record important product information.
©2009 Electrolux Home Products, Inc. All rights reserved. Printed in the USA
Serial number
Registering your product with Frigidaire enhances our abilityto serve you. You can register online atwww.frigidaire.com or by dropping your ProductRegistration Card in the mail.
IMPORTANT SAFETY INSTRUCTIONS
• Use your dishwasher only as instructed in this Use andCare Manual.
• This Manual does not cover every possible condition andsituation that may occur. Use common sense and cautionwhen installing, operating and maintaining any appliance.
• NSF certified residential dishwashers are not intended forlicensed food establishments.
• DISHWASHER MUST BE ELECTRICALLY GROUNDED. Readthe Installation Instructions for details.
• This dishwasher is designed to operate on regular housecurrent (120 V, 60 Hz). Use a circuit equipped with a 15ampere fuse or circuit breaker. Use a 20 ampere fuse ifdishwasher is connected with a food waste disposer.
• Do not operate dishwasher unless all enclosure panelsare in their proper place.
• To avoid entrapment and/or suffocation, remove door ordoor latch mechanism from any dishwasher that isdiscarded or not in use.
• Keep young children and infants away from dishwasherwhen it is operating.
• Do not let children abuse, sit, stand or play on door orracks of a dishwasher.
• Use only detergents and rinse agents recommended foruse in a dishwasher.
• Store dishwasher detergent and rinse agents out of thereach of children.
• Do not wash plastic items unless marked “dishwashersafe” or the equivalent. Check with manufacturer forrecommendations, if not marked. Items that are notdishwasher safe may melt and create a potential firehazard.
• Disconnect electrical power to dishwasher beforeservicing.
• If the dishwasher drains into a food disposer, make suredisposer is completely empty before running dishwasher.
• Repairs should be done by a qualified technician.
• Do not tamper with controls.
• Do not touch the heating element during or immediatelyafter use.
• When loading items to be washed:
- Locate sharp items and knives so that they are not likely to damage the door seal or tub.
- Load sharp items and knives with the handles up to reduce the risk of cut-type injuries.
• Under certain conditions, hydrogen gas may beproduced in a hot water system that has not been usedfor 2 weeks or more. HYDROGEN GAS IS EXPLOSIVE. Ifhot water system has not been used for such a period,before using dishwasher, turn on all hot water faucetsand let water flow from each for several minutes. Thiswill release any accumulated hydrogen gas. HYDROGENGAS IS FLAMMABLE. Do not smoke or use an openflame during this time.
• Do not store or use combustible materials, gasoline orother flammable vapors and liquids in the vicinity of thisor any other appliance.
This symbol will help alert you to such dangers aspersonal injury, burns, fire, and electrical shock.
WARNING
To reduce the risk of fire, electrical shock, or injurywhen using your dishwasher, follow basic precautionsincluding the following:
WARNING
Purchase date
Model number
Product Registration
3
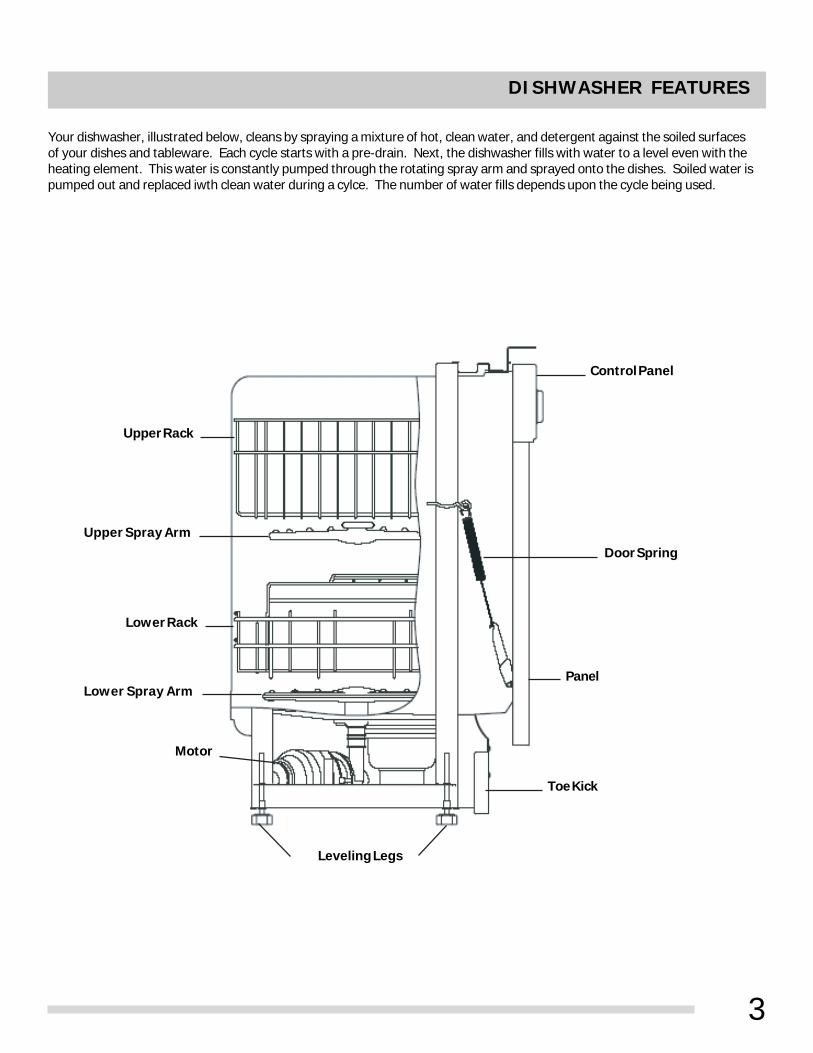
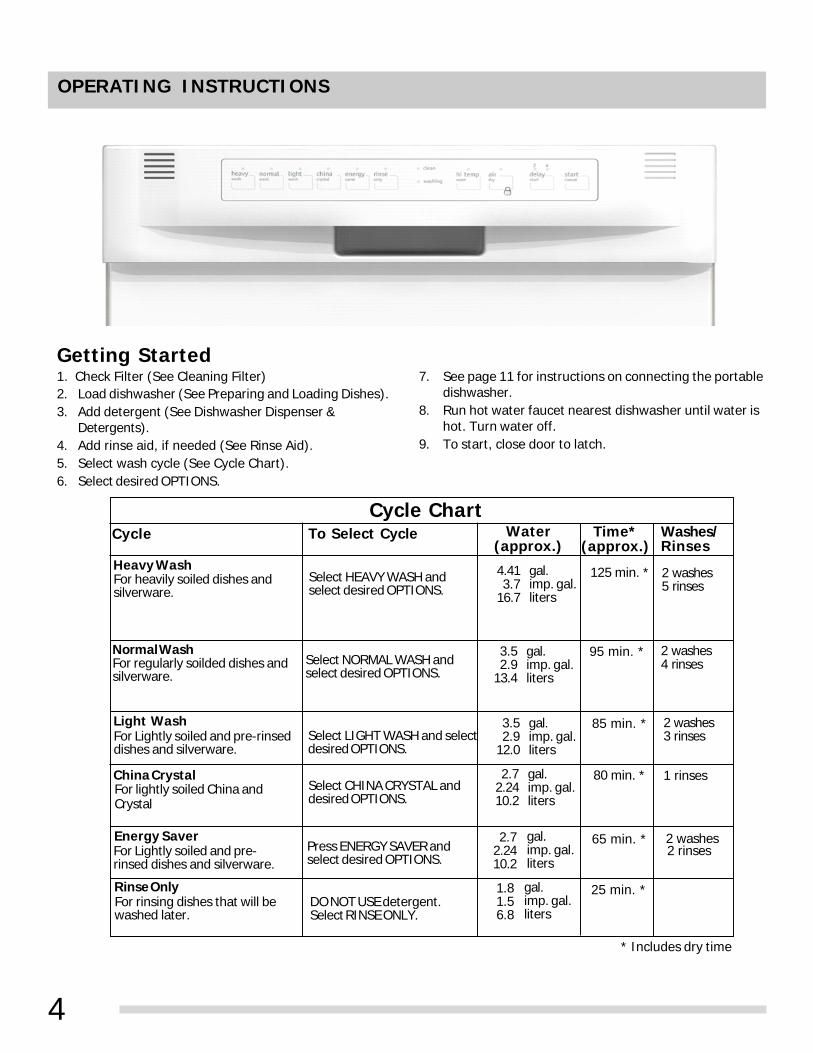
DISHWASHER FEATURES
Your dishwasher, illustrated below, cleans by spraying a mixture of hot, clean water, and detergent against the soiled surfacesof your dishes and tableware. Each cycle starts with a pre-drain. Next, the dishwasher fills with water to a level even with theheating element. This water is constantly pumped through the rotating spray arm and sprayed onto the dishes. Soiled water ispumped out and replaced iwth clean water during a cylce. The number of water fills depends upon the cycle being used.
Control Panel
Door Spring
Panel
Toe Kick
Leveling Legs
Motor
Lower Spray Arm
Lower Rack
Upper Spray Arm
Upper Rack
4
OPERATING INSTRUCTIONS
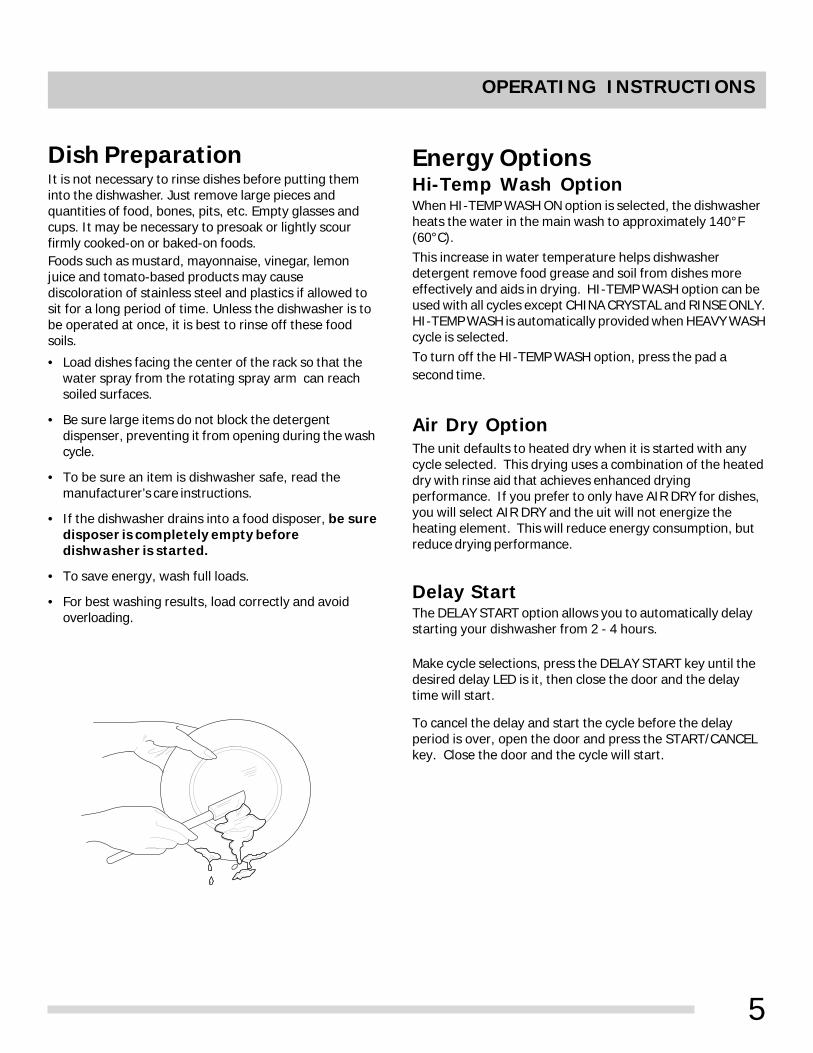
Select HEAVY WASH andselect desired OPTIONS.
2 washes5 rinses
125 min. *For heavily soiled dishes andsilverware.
Cycle ChartTime*
(approx.)Washes/Rinses
Water(approx.)
To Select CycleCycle
Heavy Wash
Select NORMAL WASH andselect desired OPTIONS.
2 washes4 rinses
95 min. *For regularly soilded dishes andsilverware.
Normal Wash
gal.imp. gal.liters
4.413.7
16.7
gal.imp. gal.liters
3.52.9
13.4
DO NOT USE detergent.Select RINSE ONLY.
1 rinses80 min. *For lightly soiled China andCrystal
China Crystal
Press ENERGY SAVER andselect desired OPTIONS.
2 washes65 min. *For Lightly soiled and pre-rinsed dishes and silverware.
Energy Saver
gal.imp. gal.liters
2.72.2410.2
gal.imp. gal.liters
2.72.2410.2
Light WashFor Lightly soiled and pre-rinseddishes and silverware.
Select LIGHT WASH and selectdesired OPTIONS.
2 washes3 rinses
85 min. *gal.imp. gal.liters
3.52.9
12.0
Getting Started1. Check Filter (See Cleaning Filter)2. Load dishwasher (See Preparing and Loading Dishes).3. Add detergent (See Dishwasher Dispenser &
Detergents).4. Add rinse aid, if needed (See Rinse Aid).5. Select wash cycle (See Cycle Chart).6. Select desired OPTIONS.
7. See page 11 for instructions on connecting the portabledishwasher.
8. Run hot water faucet nearest dishwasher until water ishot. Turn water off.
9. To start, close door to latch.
Select CHINA CRYSTAL anddesired OPTIONS.
For rinsing dishes that will bewashed later.
Rinse Only
* Includes dry time
2 rinses
25 min. *gal.imp. gal.liters
1.81.56.8
5
OPERATING INSTRUCTIONS
Dish PreparationIt is not necessary to rinse dishes before putting theminto the dishwasher. Just remove large pieces andquantities of food, bones, pits, etc. Empty glasses andcups. It may be necessary to presoak or lightly scourfirmly cooked-on or baked-on foods.Foods such as mustard, mayonnaise, vinegar, lemonjuice and tomato-based products may causediscoloration of stainless steel and plastics if allowed tosit for a long period of time. Unless the dishwasher is tobe operated at once, it is best to rinse off these foodsoils.
• Load dishes facing the center of the rack so that thewater spray from the rotating spray arm can reachsoiled surfaces.
• Be sure large items do not block the detergentdispenser, preventing it from opening during the washcycle.
• To be sure an item is dishwasher safe, read themanufacturer’s care instructions.
• If the dishwasher drains into a food disposer, be suredisposer is completely empty beforedishwasher is started.
• To save energy, wash full loads.
• For best washing results, load correctly and avoidoverloading.
Energy OptionsHi-Temp Wash OptionWhen HI-TEMP WASH ON option is selected, the dishwasherheats the water in the main wash to approximately 140°F(60°C).This increase in water temperature helps dishwasherdetergent remove food grease and soil from dishes moreeffectively and aids in drying. HI-TEMP WASH option can beused with all cycles except CHINA CRYSTAL and RINSE ONLY.HI-TEMP WASH is automatically provided when HEAVY WASHcycle is selected.To turn off the HI-TEMP WASH option, press the pad asecond time.
Air Dry OptionThe unit defaults to heated dry when it is started with anycycle selected. This drying uses a combination of the heateddry with rinse aid that achieves enhanced dryingperformance. If you prefer to only have AIR DRY for dishes,you will select AIR DRY and the uit will not energize theheating element. This will reduce energy consumption, butreduce drying performance.
Delay StartThe DELAY START option allows you to automatically delaystarting your dishwasher from 2 - 4 hours.
To cancel the delay and start the cycle before the delayperiod is over, open the door and press the START/CANCELkey. Close the door and the cycle will start.
Make cycle selections, press the DELAY START key until thedesired delay LED is it, then close the door and the delaytime will start.
6
PREPARING AND LOADING DISHES
Adding a Dish1. Make sure there is a full wash cycle yet to be completed
so that any added items are thoroughly washed andrinsed.
2. Unlatch door and wait for water action to stop.3. Open door and add dish.4. Firmly close door to latch and resume cycle.
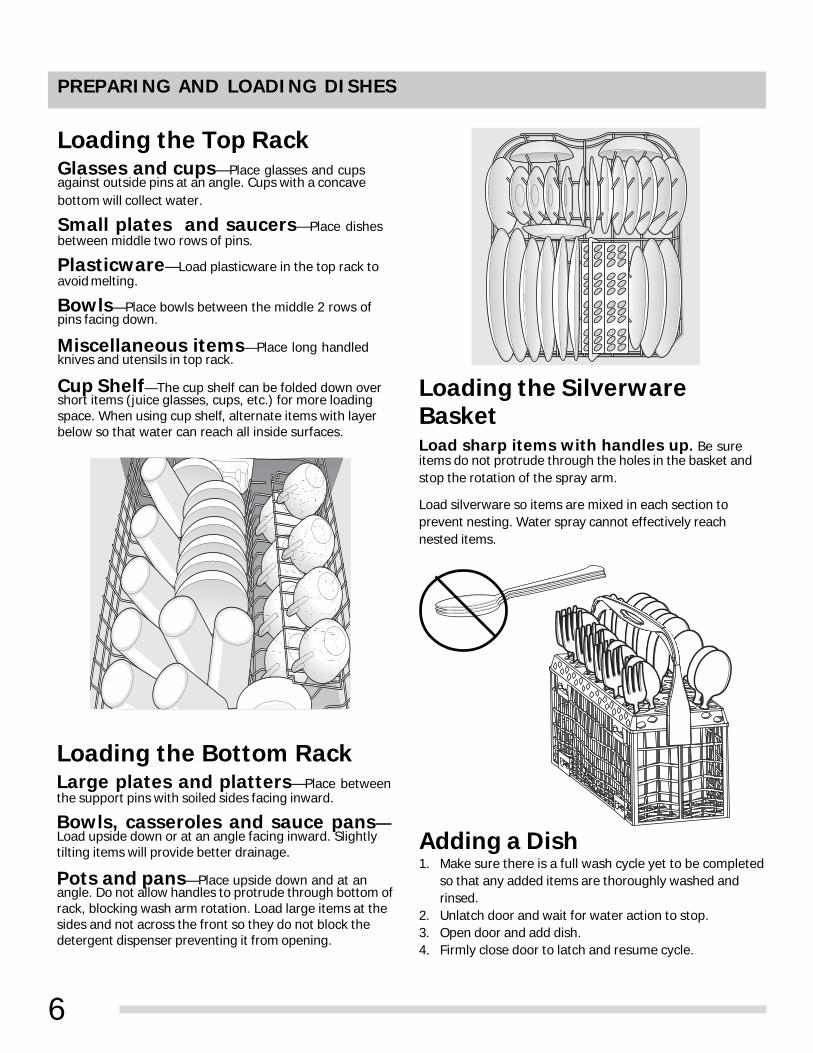
Loading the SilverwareBasketLoad sharp items with handles up. Be sureitems do not protrude through the holes in the basket andstop the rotation of the spray arm.
Load silverware so items are mixed in each section toprevent nesting. Water spray cannot effectively reachnested items.
Loading the Bottom RackLarge plates and platters—Place betweenthe support pins with soiled sides facing inward.
Bowls, casseroles and sauce pans—Load upside down or at an angle facing inward. Slightlytilting items will provide better drainage.
Pots and pans—Place upside down and at anangle. Do not allow handles to protrude through bottom ofrack, blocking wash arm rotation. Load large items at thesides and not across the front so they do not block thedetergent dispenser preventing it from opening.
Loading the Top RackGlasses and cups—Place glasses and cupsagainst outside pins at an angle. Cups with a concavebottom will collect water.
Small plates and saucers—Place dishesbetween middle two rows of pins.
Plasticware—Load plasticware in the top rack toavoid melting.
Bowls—Place bowls between the middle 2 rows ofpins facing down.
Miscellaneous items—Place long handledknives and utensils in top rack.
Cup Shelf—The cup shelf can be folded down overshort items (juice glasses, cups, etc.) for more loadingspace. When using cup shelf, alternate items with layerbelow so that water can reach all inside surfaces.
7
DISHWASHER DISPENSER & DETERGENTS
• Use only fresh automatic dishwashing detergent.Other detergents will cause oversudsing.
• Add detergent just before starting cycle.
• Store detergent in a cool, dry location. Moist orcaked detergent will not dissolve properly.
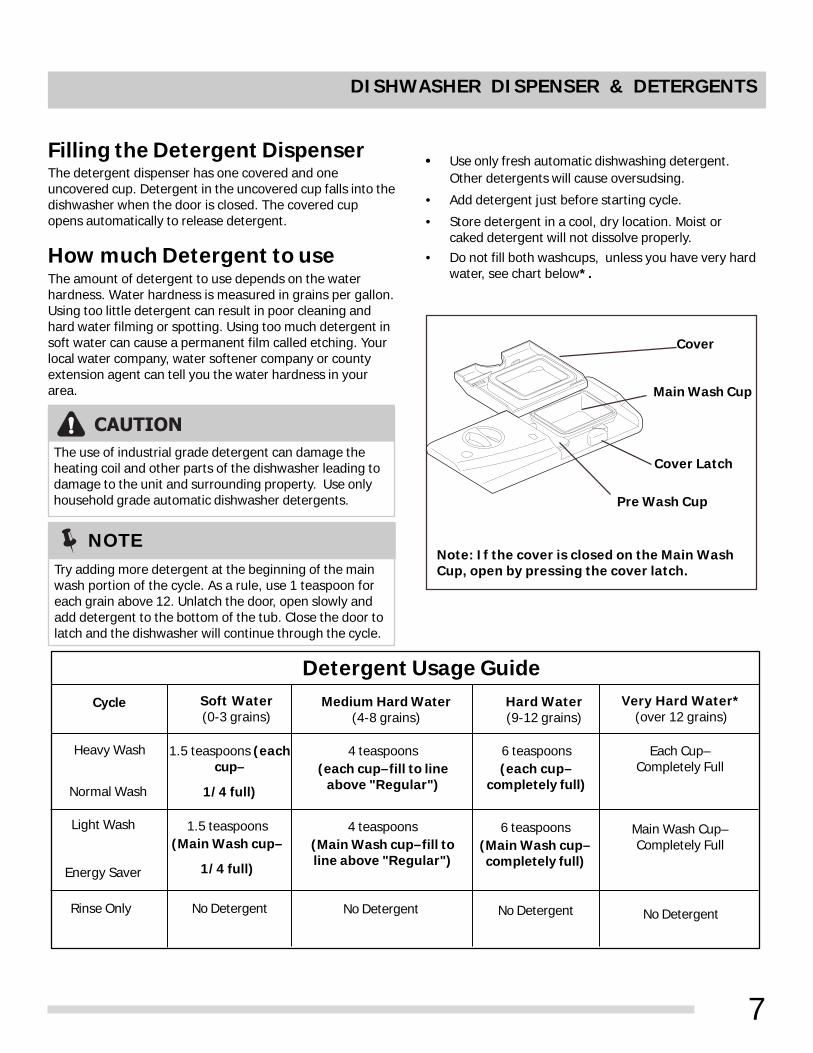
Filling the Detergent DispenserThe detergent dispenser has one covered and oneuncovered cup. Detergent in the uncovered cup falls into thedishwasher when the door is closed. The covered cupopens automatically to release detergent.
Heavy Wash
Normal Wash
How much Detergent to useThe amount of detergent to use depends on the waterhardness. Water hardness is measured in grains per gallon.Using too little detergent can result in poor cleaning andhard water filming or spotting. Using too much detergent insoft water can cause a permanent film called etching. Yourlocal water company, water softener company or countyextension agent can tell you the water hardness in yourarea.
Detergent Usage GuideCycle Soft Water
(0-3 grains)Medium Hard Water
(4-8 grains)Hard Water(9-12 grains)
Very Hard Water*(over 12 grains)
1.5 teaspoons (eachcup–
1/4 full)
4 teaspoons(each cup–fill to line
above "Regular")
6 teaspoons(each cup–
completely full)
Each Cup–Completely Full
Light Wash
Energy Saver
1.5 teaspoons(Main Wash cup–
1/4 full)
4 teaspoons(Main Wash cup–fill toline above "Regular")
6 teaspoons(Main Wash cup–completely full)
Main Wash Cup–Completely Full
Rinse Only No Detergent No Detergent No Detergent No Detergent
The use of industrial grade detergent can damage theheating coil and other parts of the dishwasher leading todamage to the unit and surrounding property. Use onlyhousehold grade automatic dishwasher detergents.
Note: If the cover is closed on the Main WashCup, open by pressing the cover latch.
• Do not fill both washcups, unless you have very hardwater, see chart below*.
CAUTION
Try adding more detergent at the beginning of the mainwash portion of the cycle. As a rule, use 1 teaspoon foreach grain above 12. Unlatch the door, open slowly andadd detergent to the bottom of the tub. Close the door tolatch and the dishwasher will continue through the cycle.
NOTE
Cover
Main Wash Cup
Pre Wash Cup
Cover Latch
8
FACTORS AFFECTING PERFORMANCE
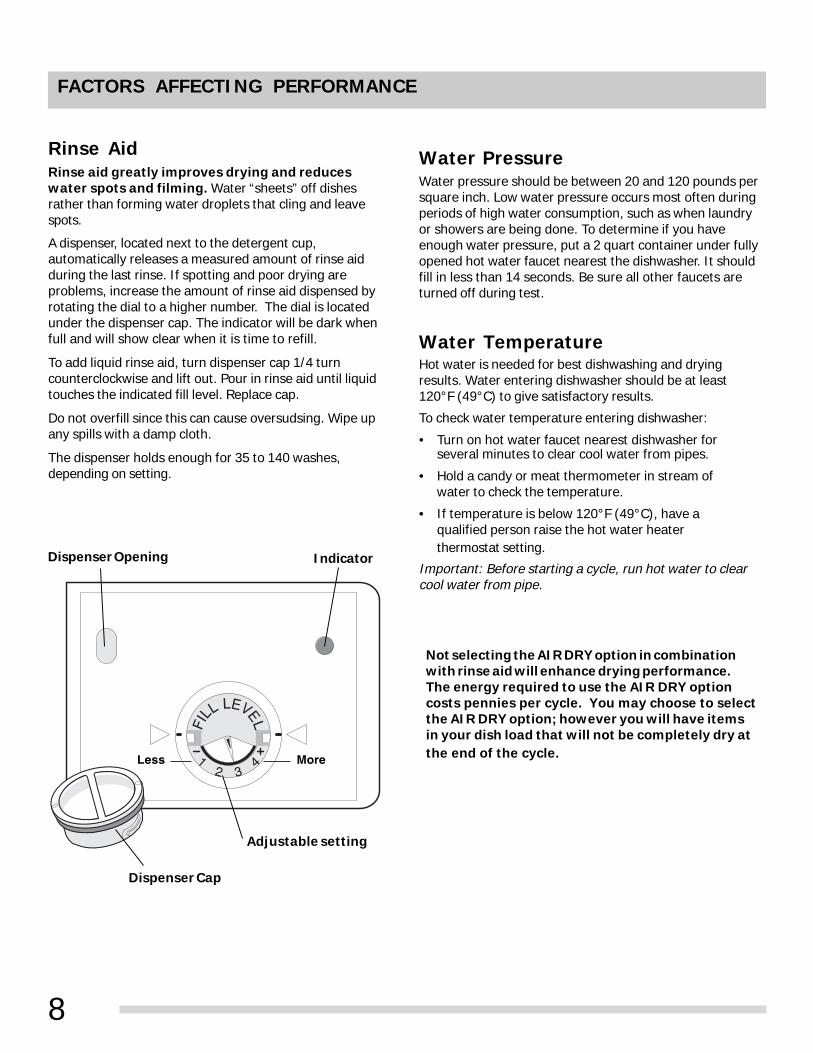
Rinse AidRinse aid greatly improves drying and reduceswater spots and filming. Water “sheets” off dishesrather than forming water droplets that cling and leavespots.
A dispenser, located next to the detergent cup,automatically releases a measured amount of rinse aidduring the last rinse. If spotting and poor drying areproblems, increase the amount of rinse aid dispensed byrotating the dial to a higher number. The dial is locatedunder the dispenser cap. The indicator will be dark whenfull and will show clear when it is time to refill.
To add liquid rinse aid, turn dispenser cap 1/4 turncounterclockwise and lift out. Pour in rinse aid until liquidtouches the indicated fill level. Replace cap.
Do not overfill since this can cause oversudsing. Wipe upany spills with a damp cloth.
The dispenser holds enough for 35 to 140 washes,depending on setting.
Not selecting the AIR DRY option in combinationwith rinse aid will enhance drying performance.The energy required to use the AIR DRY optioncosts pennies per cycle. You may choose to selectthe AIR DRY option; however you will have itemsin your dish load that will not be completely dry atthe end of the cycle.
Adjustable setting
Dispenser Opening
Dispenser Cap
Indicator
MoreLess
Water pressure should be between 20 and 120 pounds persquare inch. Low water pressure occurs most often duringperiods of high water consumption, such as when laundryor showers are being done. To determine if you haveenough water pressure, put a 2 quart container under fullyopened hot water faucet nearest the dishwasher. It shouldfill in less than 14 seconds. Be sure all other faucets areturned off during test.
Water TemperatureHot water is needed for best dishwashing and dryingresults. Water entering dishwasher should be at least120°F (49°C) to give satisfactory results.
To check water temperature entering dishwasher:
• Turn on hot water faucet nearest dishwasher forseveral minutes to clear cool water from pipes.
• Hold a candy or meat thermometer in stream ofwater to check the temperature.
• If temperature is below 120°F (49°C), have aqualified person raise the hot water heaterthermostat setting.
Important: Before starting a cycle, run hot water to clearcool water from pipe.
Water Pressure
9
CARE AND CLEANING
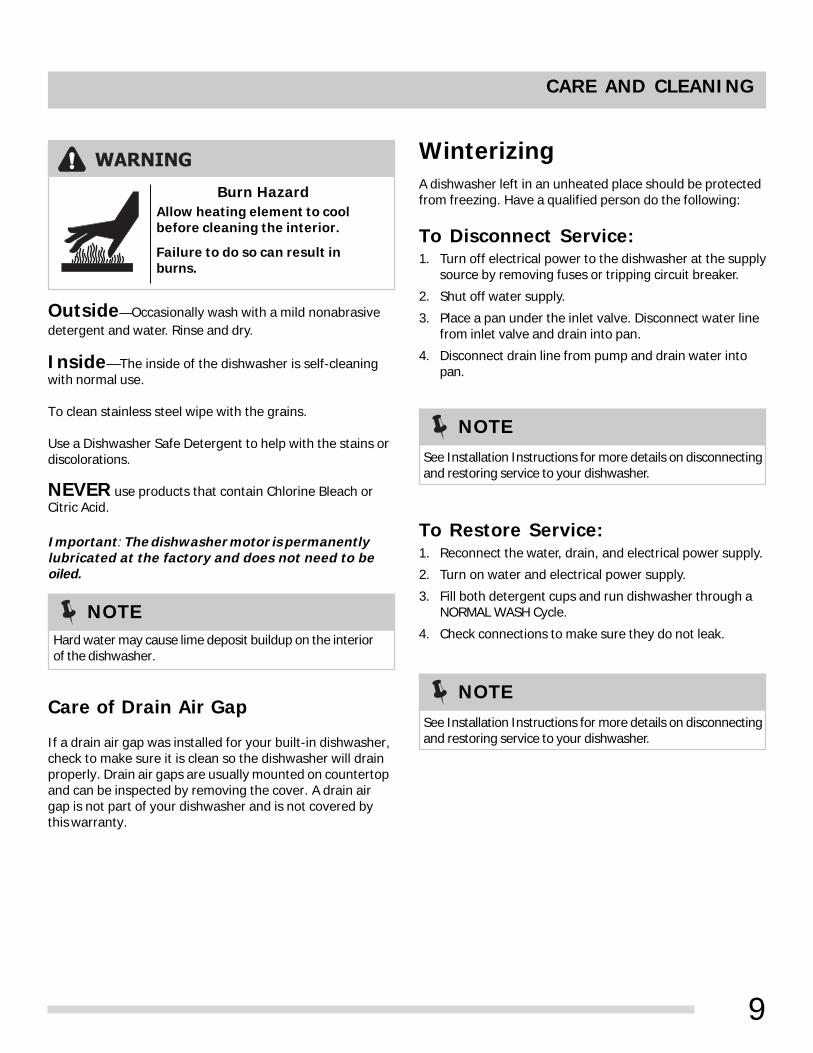
Allow heating element to coolbefore cleaning the interior.
Failure to do so can result inburns.
Burn Hazard
WARNING
NOTESee Installation Instructions for more details on disconnectingand restoring service to your dishwasher.
Hard water may cause lime deposit buildup on the interiorof the dishwasher.
NOTE
Outside—Occasionally wash with a mild nonabrasivedetergent and water. Rinse and dry.
Inside—The inside of the dishwasher is self-cleaningwith normal use.
To clean stainless steel wipe with the grains.
Use a Dishwasher Safe Detergent to help with the stains ordiscolorations.
NEVER use products that contain Chlorine Bleach orCitric Acid.
Important: The dishwasher motor is permanentlylubricated at the factory and does not need to beoiled.
If a drain air gap was installed for your built-in dishwasher,check to make sure it is clean so the dishwasher will drainproperly. Drain air gaps are usually mounted on countertopand can be inspected by removing the cover. A drain airgap is not part of your dishwasher and is not covered bythis warranty.
Winterizing
To Disconnect Service:1. Turn off electrical power to the dishwasher at the supply
source by removing fuses or tripping circuit breaker.
2. Shut off water supply.
3. Place a pan under the inlet valve. Disconnect water linefrom inlet valve and drain into pan.
4. Disconnect drain line from pump and drain water intopan.
To Restore Service:1. Reconnect the water, drain, and electrical power supply.
2. Turn on water and electrical power supply.
3. Fill both detergent cups and run dishwasher through aNORMAL WASH Cycle.
4. Check connections to make sure they do not leak.
Care of Drain Air Gap
NOTESee Installation Instructions for more details on disconnectingand restoring service to your dishwasher.
A dishwasher left in an unheated place should be protectedfrom freezing. Have a qualified person do the following:

10
CARE AND CLEANING
For optimum performance, your dishwasher is equippedwith a filter assembly featuring a main filter, cup andfine filter as shown in the drawing above. All foodfragments are removed from the dishwasher as waterpasses through the filter assembly.
Each part of the assembly should be cleaned often toensure that all food fragments are removed from thedishes. To remove food fragments from the filterassembly, the filters must be removed from thedishwasher. To remove the filters, pull up on the edgeof the main filter. Next, rinse the main filter and finefilter under running water. Cleaning with a brush mayalso be necessary to remove any fragments trapped inthe filters. Once cleaning has been completed, simplyreassemble the filter as shown in the drawing above. Toensure that the filter is fully seated, please press downon the top of the main filter. Using the dishwasherwithout a properly installed filter is notrecommended as it will reduce the cleaningefficiency and may damage dishware.
Cleaning the Filter
The spray arm may need to be cleaned to insure thatthere are no clogs to the spray arm jets and bearingsdue to hard water chemicals.
To remove spray arm simply hold the spray arm in placeand turn the retaining nut clockwise and pull up on thespray arm lifting off the shaft.
To clean the spray arm use warm soapy water using asoft brush to clean the jets and bearings.
To replace the spray arm simply set the spray arm onthe shaft, take the retaining nut and turn it counterclockwise till it has locked into place.
Property Damage HazardFreezing temperatures may cause water lines torupture. Be sure all supply lines to and circulating lineswithin dishwasher are protected. Failure to do so couldresult in property damage.
CAUTION
Cleaning the Spray Arm
11
The portable dishwasher must be connected to a faucet and electrical outlet each time it is used. Follow directions on thispage to properly connect dishwasher.
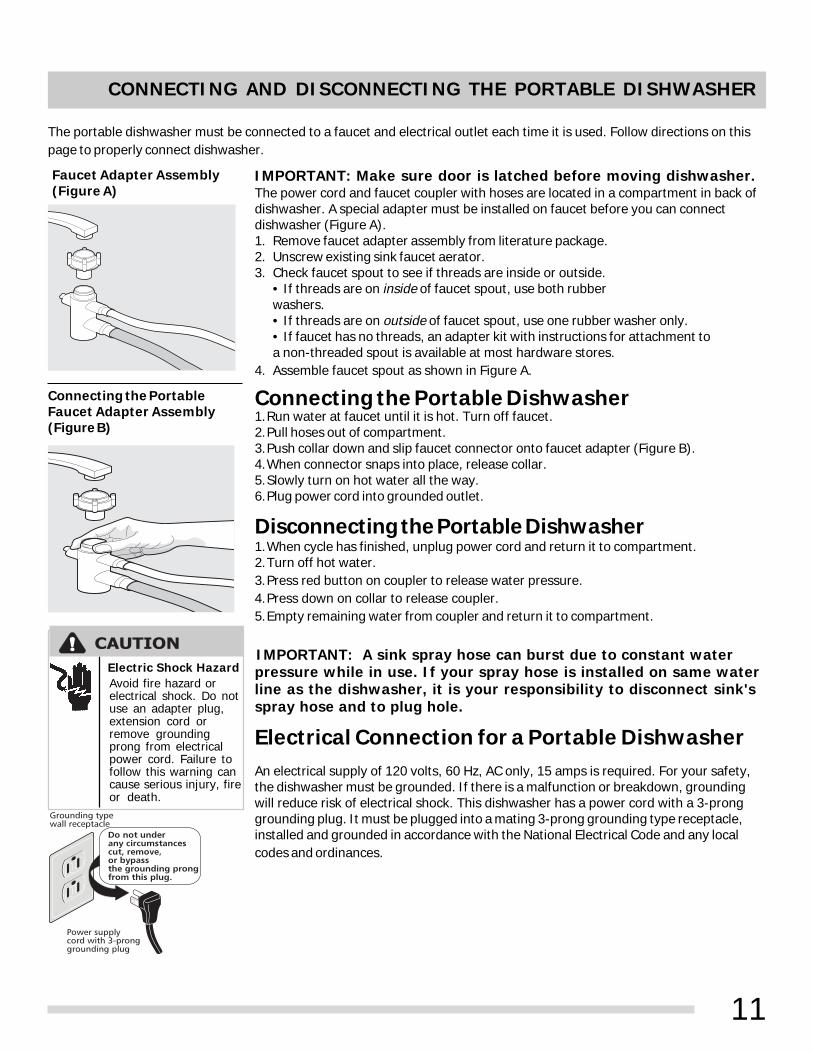
IMPORTANT: Make sure door is latched before moving dishwasher.The power cord and faucet coupler with hoses are located in a compartment in back ofdishwasher. A special adapter must be installed on faucet before you can connectdishwasher (Figure A).1. Remove faucet adapter assembly from literature package.2. Unscrew existing sink faucet aerator.3. Check faucet spout to see if threads are inside or outside.
• If threads are on inside of faucet spout, use both rubberwashers.• If threads are on outside of faucet spout, use one rubber washer only.• If faucet has no threads, an adapter kit with instructions for attachment toa non-threaded spout is available at most hardware stores.
4. Assemble faucet spout as shown in Figure A.
Connecting the Portable Dishwasher1.Run water at faucet until it is hot. Turn off faucet.2.Pull hoses out of compartment.3.Push collar down and slip faucet connector onto faucet adapter (Figure B).4.When connector snaps into place, release collar.5.Slowly turn on hot water all the way.6.Plug power cord into grounded outlet.
Disconnecting the Portable Dishwasher1.When cycle has finished, unplug power cord and return it to compartment.2.Turn off hot water.3.Press red button on coupler to release water pressure.4.Press down on collar to release coupler.5.Empty remaining water from coupler and return it to compartment.
IMPORTANT: A sink spray hose can burst due to constant waterpressure while in use. If your spray hose is installed on same waterline as the dishwasher, it is your responsibility to disconnect sink'sspray hose and to plug hole.
Electrical Connection for a Portable DishwasherAn electrical supply of 120 volts, 60 Hz, AC only, 15 amps is required. For your safety,the dishwasher must be grounded. If there is a malfunction or breakdown, groundingwill reduce risk of electrical shock. This dishwasher has a power cord with a 3-pronggrounding plug. It must be plugged into a mating 3-prong grounding type receptacle,installed and grounded in accordance with the National Electrical Code and any localcodes and ordinances.
Faucet Adapter Assembly(Figure A)
Connecting the PortableFaucet Adapter Assembly(Figure B)
CONNECTING AND DISCONNECTING THE PORTABLE DISHWASHER
Electric Shock HazardAvoid fire hazard orelectrical shock. Do notuse an adapter plug,extension cord orremove groundingprong from electricalpower cord. Failure tofollow this warning cancause serious injury, fireor death.
CAUTION
12
Dishes not clean—Check pages 4 to 8 forinformation on correct wash cycle, proper loading, watertemperature, water pressure, hard water, amount ofdetergent, old and ineffective detergent, and dishplacement. To maximize wash performance clean thefilter of all large food particles after each wash. Toensure that you clean the filter correctly refer to page12.
Dishes not drying can be greatly improved byusing a rinse aid and hot water. Hot water raisestemperature of dishes to speed up drying. When loading,invert cups and bowls so that water can run off. Avoidnesting of articles. If dishes are not completely dry atend of cycle (which may occur when COOL DRY setting isused), open door, roll out racks, and allow dishes to airdry.
Spotting—Spots form when hard water dropletsevaporate leaving a deposit. Low phosphate detergentsincrease the problem in hard water. To prevent, use hotwater and a detergent with a higher level of phosphates(preferably 8.7% or higher), or use more of a lowphosphate detergent. Be sure to use a rinse aid. If wateris very hard, it may be necessary to install a watersoftener. Load glasses and plates so they have minimumcontact with racks and pins. Avoid overloading. Spottingwill occur where dishes and glasses touch.
Cloudy films and streaking are usuallycaused by a combination of hard water and aninsufficient amount of detergent. Low phosphatedetergents are also a factor. To correct, increaseamount of detergent, check water temperature andalways use a rinse aid. If water is very hard, it may benecessary to install a water softener.
Etched film on glassware is caused byusing too much detergent in soft or softened water. Thisfilm cannot be removed. It is more likely to occur on softleaded glass or expensive crystal. An early warning ofthis condition is a cloudy iridescent appearance onglasses. To prevent, be sure dishwasher is getting a fullfill of water. Water should reach base of heatingelement. If water level is low, have water pressurechecked by a plumber. Use less detergent and make surewater temperature is not higher than 150°F (66°C).Underload to assure thorough rinsing. Use the COOL DRYOption.
Chipped dishes and glasses can resultfrom rough handling and improper loading. Do not putglasses in direct contact with other items. Place glassessecurely against pins.
Crazing of older china and potteryhappens when items are subjected to very hot water.Once crazing (fine cracks in the glaze) appears, it cannotbe removed. Do not machine wash again or conditionmay worsen.
Coffee and tea stains can occur when watercontains traces of iron. To avoid stains, rinse cups outimmediately after use. Increase amount of detergent anduse a rinse aid. Water temperature should beapproximately 140°F (60°C). If problem persists, install awater softener with an iron removal unit. To removestains, hand wash cups in solution of 1/2 cup (120 ml)bleach and a quart (1 L) of warm water. Rinsethoroughly.
Gray-black stains on dishes are causedby manganese in water supply. To correct, install amanganese filtering system into house water supply.
Reddish-brown stains on dishes,glasses and interior are caused by iron inwater. To avoid iron stain, increase detergent, use waterheated to approximately 140°F (60°C) and a rinse aid. Itmay be necessary to install a water softener with an ironremoval unit. To improve appearance, use a commercialrust and lime scale remover.
Plastic items can lose their shape due to hightemperatures of automatic dishwashing. Read labelsbefore washing. Place washable items in top rack awayfrom heating element.
Discoloration of plasticware by somefoods, such as tomato sauce, can stain plasticware. Ifstained, soak item in solution of 1 tablespoon dishwasherdetergent and a quart of hot water or in a solution of 1/2cup (120 ml) bleach and a quart (1 L) of hot water.
Fading of patterns and metallictrim is due to many washings, detergent and hotwater. Most of today’s china is dishwasher safe.Antique, handpainted china, and handpainted potteryshould be washed by hand.
COMMON DISHWASHING PROBLEMS AND SOLUTIONS
13
Do not place silver next to or touchingstainless steel utensils in dishwasher silverware basket.This can cause pitting of stainless steel blades. (Mostsilver knives have stainless steel blades. Do not letblades touch other stainless steel utensils during washcycle.)
Tarnish on silver plate occurs when worndown to the base metal and turns a bronze color whenexposed to hot water and detergent. Remove bronzingby soaking item in vinegar for 10 minutes or use a silverpolish. For permanent protection, have silver replated.
Silver tarnish can be caused by prolongedcontact with air or with foods containing sulphur likeeggs, mayonnaise, or seafood. Contact with undissolveddetergent can also cause tarnish. To prevent this, rinsesilver soon after use. Use care not to pour detergentdirectly onto silver. Remove tarnish with a silver polish.
Discoloration of stainless steel—Food soil can create a film or discoloration. To avoid,rinse stainless items promptly. Food soil films can beremoved with a stainless steel cleanser or mild cleanser.Rinse thoroughly.
Pitting of stainless steel is caused byprolonged contact with detergent granules and foods likesalt, mayonnaise, fruits, butter or milk. To prevent, rinsesoon after use. Do not allow detergent to fall directlyonto stainless steel items.
Discoloration of aluminum—Anodized(colored) aluminum cannot withstand machine washing.Resulting loss of color is permanent. Other aluminummay darken when machine washed. To decrease chanceof discoloration, do not place aluminum directly beneathdetergent dispenser. To brighten darkened items, scourwith soap filled steel wool pads. For severely darkenedpans, simmer an acidic food or a solution of2 teaspoons (10 ml) cream of tartar per quart(1 L) of water for 1/2 hour. Scour with soap filled steelwool pad, rinse and dry.
Knife handles become loose when thecement is exposed to very hot water. Test wash a singleknife for several weeks. Damaged knives should beprofessionally re-cemented.
Noise problems?It is normal to hear swishing and pulsating sounds.These sounds mean that water is circulating through thedishwasher.It is normal to hear motor sounds before water enterstub.Loud ticking usually means something is hitting washarm. See Preparing and Loading Dishes.Vibrating or rattling sounds can mean dishes aretouching each other. See Preparing and LoadingDishes.
Operating problems?Be sure door is firmly closed. It is normal for dishwasherto pause between cycles.
Leaking?Check for items sticking out of dishwasher that couldprevent door from closing and sealing properly. Use onlyfresh dishwashing detergent to avoid oversudsing.Water coming through door vents? When a dish is addedafter starting dishwasher, wait a few seconds beforelatching door. This permits entering cold air to expandslowly inside dishwasher.
Dishes not dry?Check to see if rinse aid dispenser needs refilling.Hot water temperature may be too low (min. 120°F49°C). If COOL DRY option is being used, additionaldrying time may be required with door open.
Before calling for service, review this list. It maysave you both time and expense. This list includescommon experiences that are not the result ofdefective workmanship or material.
COMMON DISHWASHING PROBLEMS AND SOLUTIONS
Troubleshooting
Water in tub?A small amount of water in bottom of tub is normal. Itkeeps water seal lubricated.
Detergent left in cup?Detergent may be too old. Discard old detergent.Use freshdetergent. Dishes may not be loaded properly. Be sureitems do not protrude from front of bottom rackpreventing detergent cup from opening.

14
NOTES
15
WARRANTY
Canada1.800.265.8352
Electrolux Canada Corp.5855 Terry Fox Way
Mississauga, Ontario, CanadaL5V 3E4
USA1.800.944.9044Electrolux Major AppliancesNorth America10200 David Taylor DriveCharlotte, NC 28262
Your appliance is covered by a one year limited warranty. For one year from your original date of purchase, Electrolux will pay all costsfor repairing or replacing any parts of this appliance that prove to be defective in materials or workmanship when such appliance isinstalled, used and maintained in accordance with the provided instructions.
This warranty does not cover the following:
1. Products with original serial numbers that have been removed, altered or cannot be readily determined.2. Product that has been transferred from its original owner to another party or removed outside the USA orCanada.3. Rust on the interior or exterior of the unit.4. Products purchased “as-is” are not covered by this warranty.5. Food loss due to any refrigerator or freezer failures.6. Products used in a commercial setting.7. Service calls which do not involve malfunction or defects in materials or workmanship, or for appliances not inordinary household use or used other than in accordance with the provided instructions.8. Service calls to correct the installation of your appliance or to instruct you how to use your appliance.9. Expenses for making the appliance accessible for servicing, such as removal of trim, cupboards, shelves, etc.,which are not a part of the appliance when it is shipped from the factory.10. Service calls to repair or replace appliance light bulbs, air filters, water filters, other consumables, or knobs,handles, or other cosmetic parts.11. Surcharges including, but not limited to, any after hour, weekend, or holiday service calls, tolls, ferry tripcharges, or mileage expense for service calls to remote areas, including the state of Alaska.12. Damages to the finish of appliance or home incurred during installation, including but not limited to floors,cabinets, walls, etc.13. Damages caused by: services performed by unauthorized service companies; use of parts other than genuineElectrolux parts or parts obtained from persons other than authorized service companies; or external causes suchas abuse, misuse, inadequate power supply, accidents, fires, or acts of God.DISCLAIMER OF IMPLIED WARRANTIES; LIMITATION OF REMEDIES
CUSTOMER’S SOLE AND EXCLUSIVE REMEDY UNDER THIS LIMITED WARRANTY SHALL BE PRODUCT REPAIR ORREPLACEMENT AS PROVIDED HEREIN. CLAIMS BASED ON IMPLIED WARRANTIES, INCLUDING WARRANTIES OFMERCHANTABILITY OR FITNESS FOR A PARTICULAR PURPOSE, ARE LIMITED TO ONE YEAR OR THE SHORTESTPERIOD ALLOWED BY LAW, BUT NOT LESS THAN ONE YEAR. ELECTROLUX SHALL NOT BE LIABLE FOR CONSE-QUENTIAL OR INCIDENTAL DAMAGES SUCH AS PROPERTY DAMAGE AND INCIDENTAL EXPENSES RESULTINGFROM ANY BREACH OF THIS WRITTEN LIMITED WARRANTY OR ANY IMPLIED WARRANTY. SOME STATES ANDPROVINCES DO NOT ALLOW THE EXCLUSION OR LIMITATION OF INCIDENTAL OR CONSEQUENTIAL DAMAGES,OR LIMITATIONS ON THE DURATION OF IMPLIED WARRANTIES, SO THESE LIMITATIONS OR EXCLUSIONS MAYNOT APPLY TO YOU. THIS WRITTEN WARRANTY GIVES YOU SPECIFIC LEGAL RIGHTS. YOU MAY ALSO HAVEOTHER RIGHTS THAT VARY FROM STATE TO STATE.
Keep your receipt, delivery slip, or some other appropriate payment record to establish the warranty periodshould service be required. If service is performed, it is in your best interest to obtain and keep all receipts.Service under this warranty must be obtained by contacting Electrolux at the addresses or phonenumbers below.
This warranty only applies in the USA and Canada. In the USA, your appliance is warranted by Electrolux Major Appliances NorthAmerica, a division of Electrolux Home Products, Inc. In Canada, your appliance is warranted by Electrolux Canada Corp. Electroluxauthorizes no person to change or add to any obligations under this warranty. Obligations for service and parts under this warrantymust be performed by Electrolux or an authorized service company. Product features or specifications as described or illustrated aresubject to change without notice.
Exclusions
If You NeedService