Embed Size (px)
Citation preview

AkamaiWorkbook
Q U I C K 3 0 M I N T U T O R I A L S
V E R S I O N 2
AkamaiAkamaiAkamaiAkamaiAkamaiAkamaiAkamaiAkamaiAkamaiAkamaiAkamaiAkamaiAkamaiAkamaiAkamaiAkamaiAkamaiAkamaiAkamaiAkamaiWorkbookWorkbookWorkbookWorkbookWorkbookWorkbookWorkbookWorkbookWorkbookWorkbookWorkbookWorkbookWorkbookWorkbookWorkbookWorkbookWorkbookWorkbookWorkbookWorkbookWorkbookWorkbookWorkbookWorkbookWorkbookWorkbookWorkbookWorkbook
Q U I C K 3 0 M I N T U T O R I A L SQ U I C K 3 0 M I N T U T O R I A L SQ U I C K 3 0 M I N T U T O R I A L SQ U I C K 3 0 M I N T U T O R I A L SQ U I C K 3 0 M I N T U T O R I A L SQ U I C K 3 0 M I N T U T O R I A L SQ U I C K 3 0 M I N T U T O R I A L S

Akamai Workbook Part 2 More adventures, for users who have completed the Akamai Workbook
Sign up for the Akamai Developer Program Get access to the latest developer tools, exclusive BETAs, upcoming events, and so much more. bit.ly/akamaidev
Advanced Akamai Workbook Page 1

Table of Contents
Advanced Web Performance with Cloudlets 4 Prerequisites 4
Create the Edge Redirector Cloudlet 4 Configure Edge Redirector in Property Manager 5 Summary 6
Create the Visitor Prioritization Cloudlet 7 Configure Visitor Prioritization in Property Manager 8 Summary 8
Test the Cloudlets 8 Summary 9
Environment Management 10 Prerequisites 10 Tools Required 10
Tutorial 1: Create a variable-based configuration 10 Objective 10 Create the configuration 11 Identify the host names and origins 11 Create environment variable 12 Extract and set the correct environment variable 13 Set the origin 15 Add CP Code 15 Cleanup non-related rules 16 Save and activate to staging 17 Testing 17
Tutorial 2: Use PAPI to toggle a feature 17 Objective 17 Add a toggle variable 17 Add behavior to handle the feature 18 Enable feature on QA and Dev 19 Add the check for feature flag and enable feature 22 Save, activate and test 26
Tutorial 3: Toggle Feature Flag with CLI (optional) 26 Objective 26 Install CLI and generate credentials 26 Modify the Feature Flag variable 27
Advanced Akamai Workbook Page 2
Dynamic Caching 30 Prerequisites 30 Tools Required 30
Homepage Dynamic Page Caching 30 Device characterization: Desktop vs Mobile 30 Dynamic page caching: Session vs No Session 33 See device characterization and advanced caching in action 34
Product page caching 35 Create a rule for caching product pages 35 Look at Debug Headers 40 Move query string parameters to the Cache ID 40 Look at Debug Headers (Again) 42 Purge cached data 43
HTTP Streaming with Token Authentication 44 Implement Token Authentication with HTTP Streaming 44 Generating tokens and testing 48 Summary 52
Advanced Akamai Workbook Page 3

Advanced Web Performance with Cloudlets Cloudlets are smart, value-add applications at the Akamai Edge that help simplify your web operations and improve end-user experience. In this tutorial, you will implement and test the Edge Redirector and Visitor Prioritization Cloudlets. Both these Cloudlets will help manage high volumes of traffic by offloading data from the origin and redirecting some users to waiting rooms.
Prerequisites You must first complete Getting Started with Akamai Web Performance. After doing that tutorial, you’ll have an Akamai property with the hostname edge2017-[YourID].www.wp1.akamaiuweb.com , which you’ll use in this tutorial.
Create the Edge Redirector Cloudlet The Edge Redirector Cloudlet offloads data from the origin to servers located on the edge of the network. In this tutorial, we’ll enable this feature for your website.
1. Click the Ion Premier-3-1A42HS1 breadcrumb trail below the context selector icon. 2. Click the CONFIGURE tab. 3. Click the Cloudlets Policy Manager link.
Advanced Akamai Workbook Page 4

4. Click Create New Policy. 5. Select Edge Redirector from the Cloudlet Type drop-down menu. 6. Specify the Policy Name: Redirect_Edge2017_[YourID] (e.g.
Redirect_Edge2017_001 ) 7. Select Ion Premier-3-1A42HS1 in the Group Association box. This should be the
same group as your Property delivery configuration. 8. Enter any additional information you want to specify in the Additional Notes field. 9. Select the property you want to link the policy with from the drop-down list. 10. Click Create Policy.
11. Click Add Rule.
Advanced Akamai Workbook Page 5

12. Specify http://www-YourID.edge2017.akamaiuweb.com/<your_company_name>
in the Source URL field. For example: http:// www-001.edge2017.akamaiuweb.com/akamai
13. Specify http://<your_company_url> in the Redirect URL field. For example: http://www.akamai.com
14. Select either Permanent (301) or Temporary (302) from the Redirect Type drop-down.
15. Click Save Rule. 16. Back in the Version Details screen, click Save Changes. 17. Click Activate Version. 18. Be sure select the Staging environment and add the Property associated with this
Cloudlet Policy.
Configure Edge Redirector in Property Manager 1. Edit a new version of your configuration in Property Manager (there are multiple ways of
doing this - one way is to click into the most recent version of your property and click the “Edit New Version” button).
Advanced Akamai Workbook Page 6
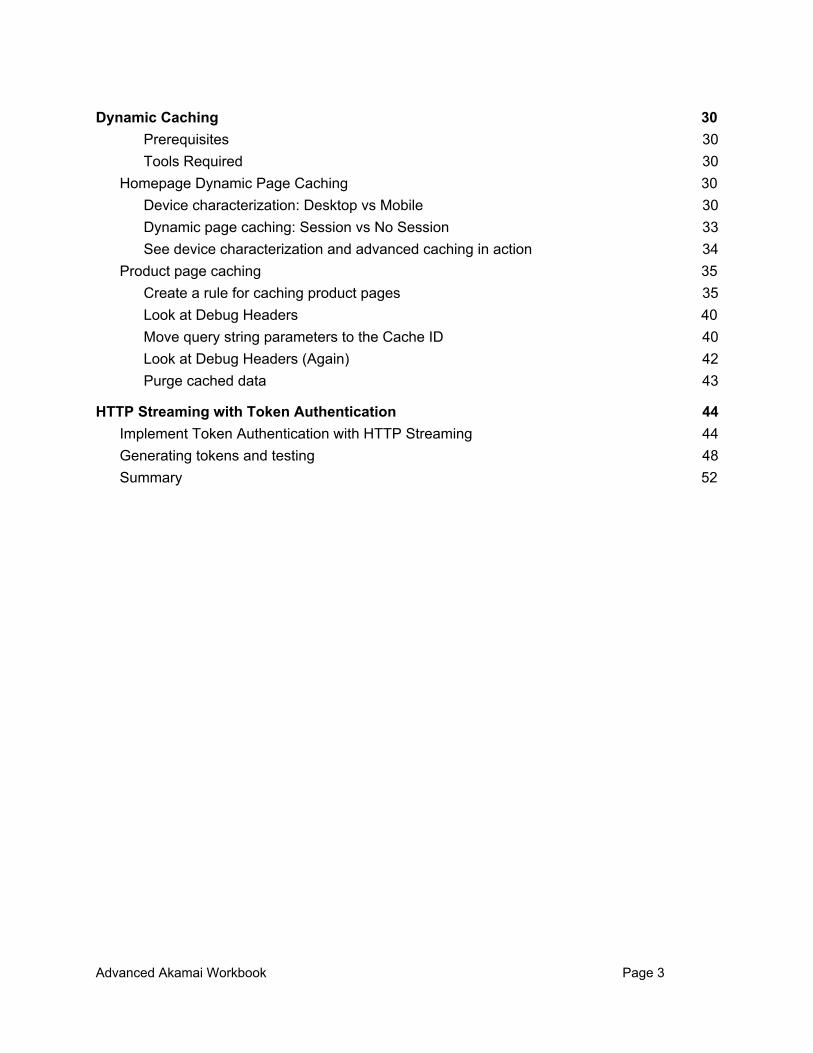
2. Add the Edge Redirector Cloudlet behavior to your Default Rule, and specify the policy
name you gave to your cloudlet. Click the Add Behavior button and select the Edge Redirector Cloudlet behavior.
3. Save and activate your configuration in Property Manager. Note: You will need to wait for both the Cloudlet Policy and the Property Manager configuration to activate before you can test it. You’ll activate the Visitor Prioritization Cloudlet, then come back to this later.
Summary In this lab, you learned how to:
● Create an Edge Redirector Cloudlet Policy using the Cloudlets Policy Manager. ● Configure the Edge Redirector behavior in the Ion Premier configuration you’ve used so
far and activating it on the Staging network. ● Activate the Edge Redirector Cloudlet Policy on the Staging network.
Advanced Akamai Workbook Page 7

Create the Visitor Prioritization Cloudlet Configure a Visitor Prioritization Cloudlet policy to redirect some of your end users to waiting rooms when traffic volume is high.
1. Click the Ion Premier-3-1A42HS1 breadcrumb trail below the context selector icon. 2. Click the CONFIGURE tab. 3. Click the Cloudlets Policy Manager link. 4. Click Create New Policy. 5. Select Visitor Prioritization from the Cloudlet Type drop-down. 6. Specify the Policy Name: VP_Edge2017_[YourID] (e.g. VP_Edge2017_001 ) 7. Select the Ion Premier-3-1A42HS1 in the Group Association box. This should be the
same group as your Property delivery configuration. 8. Enter any additional information you want to specify in the Additional Notes field. 9. Click Create Policy.
10. Click Add Rule. 11. Specify the match condition. For example, when should Akamai check for the waiting
room? In our example, you can set this to match on the top level path “/”. 12. Specify the percentage you would like to send to the origin. For this tutorial, set it to
Always send to Waiting Room. 13. Click Save Rule. 14. Back in the Version Details screen, click Save Changes. 15. Click Activate Version. 16. Be sure select the Staging environment and add the Property associated with this
Cloudlet Policy. 17. Note how fast this Policy is activated! The policy is active when the policy changes to
GREEN.
Advanced Akamai Workbook Page 8
Configure Visitor Prioritization in Property Manager 1. Edit a new version of your configuration in Property Manager. 2. Add the Visitor Prioritization Cloudlet behavior to your Default Rule, and specify the
name you gave to your cloudlet. 3. Use the same name for the Instance Label. 4. For the NetStorage section use: AkamaiUniversity
(akamaiu.download.akamai.com/315249 ) 5. The directory should be /edge2017 6. Set the Waiting Room Duration to 10 seconds. 7. Save and activate your configuration in Property Manager.
Note: You will need to wait for both the Cloudlet Policy and the Property Manager configuration to activate before you can test it.
Summary In this lab, you learned how to:
1. Create a Visitor Prioritization Cloudlet Policy using the Cloudlets Policy Manager. 2. Configure the Visitor Prioritization behavior in the Ion Premier configuration you’ve used
so far and activating it on the Staging network. 3. Activate the Visitor Prioritization Cloudlet Policy on the Staging network.
Test the Cloudlets In this section, you test the Edge Redirector and Visitor Prioritization Cloudlet policies.
1. To test Edge Redirector, make a request for http://www-YourID.edge2017.akamaiuweb.com/<your_company_name> and see if it redirects properly to your company’s website.
2. To test Visitor Prioritization: a. Make a request to http://www-YourID.edge2017.akamaiuweb.com/
(top level). b. This should now show the waiting room. c. Open a new tab, and go back into Luna. d. Go back to the Cloudlet Policy Manager and create a new version of the VP
Cloudlet. e. Edit the policy to allow the request to go through at 100% to Origin and activate it
to staging. f. Notice how fast the Cloudlet responds to the changes. g. Go back to the tab with the Waiting Room page. h. Wait for the page to reload to see what happens (please wait for the timer to run
out a couple times).
Advanced Akamai Workbook Page 9
Summary You’ve now learned how to configure two of the Akamai Cloudlets. For information on the broader range of available cloudlets, visit the Akamai Marketplace online or https://cloudlets.akamai.com/.
Advanced Akamai Workbook Page 10

Environment Management The purpose of this tutorial is to show you a mechanism to use the Property Manager variables. We’ll then use this setup for creating dynamic configurations that can select origin domains based on the incoming host header. Finally, we’ll use the variable mechanism to implement a feature toggle that represents a real life scenario. In these tutorials, you will create a variable-based configuration and use PAPI to toggle features in your Akamai environment.
Prerequisites You must first complete Getting Started with Akamai Web Performance. After doing that tutorial, you’ll have an Akamai property with the hostname edge2017-[YourID].www.wp1.akamaiuweb.com , which you’ll use in this tutorial. The tutorial also assumes that you are familiar with Property Manager, you can create a configuration, and you are able to override your machine’s DNS settings to spoof and test the setup. Optionally, if you the Akamai CLI installed, you can follow along by using the CLI for activation and minor configuration tweaks. The Akamai CLI is required for Tutorial 3.
Tools Required The laptops in the Developer Zone all have Chrome with built-in Developer Tools and Modify Headers. If you’re using your own laptop, you must have these installed.
Tutorial 1: Create a variable-based configuration
Objective In this tutorial, you will create a property that will use property manager variables and regular expression behavior to dynamically set the correct origin and route traffic for three different domains. You will architect the configuration such that the origin name will be derived from the host name. So, www.example.com will get mapped to origin-www.example.com. In other words, we’ll assume that the hostname to origin mapping follows a fixed pattern.
Advanced Akamai Workbook Page 11
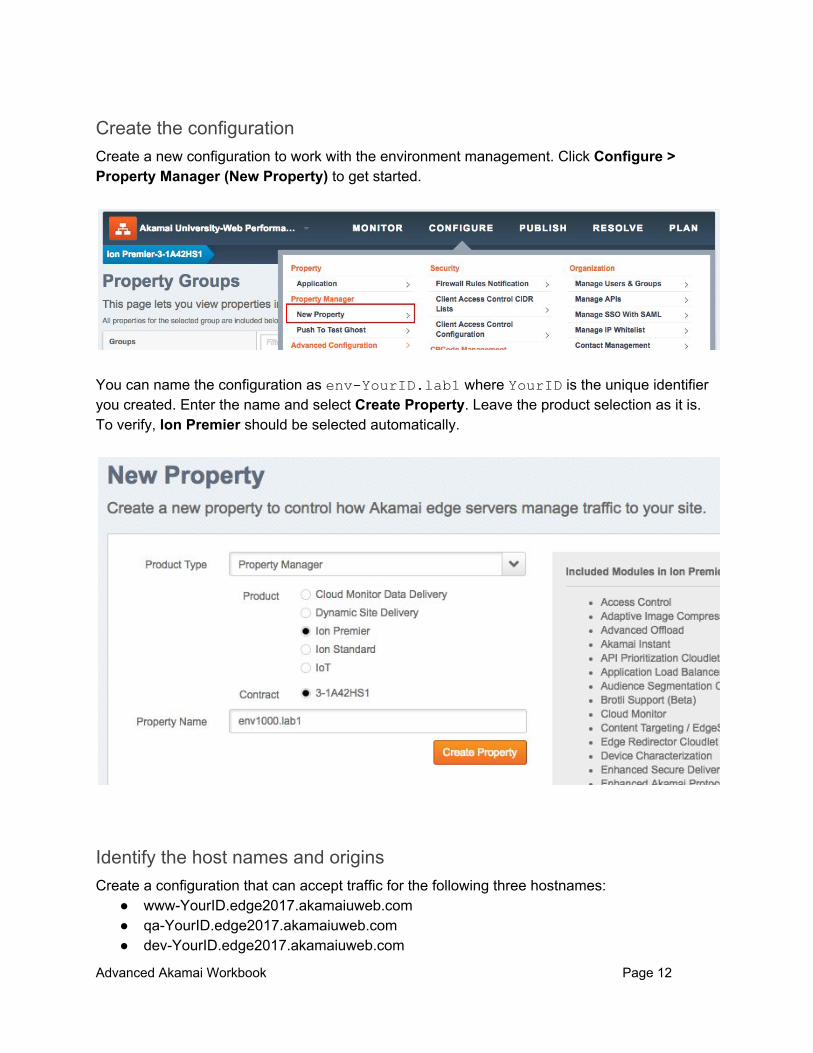
Create the configuration Create a new configuration to work with the environment management. Click Configure > Property Manager (New Property) to get started.
You can name the configuration as env-YourID.lab1 where YourID is the unique identifier you created. Enter the name and select Create Property. Leave the product selection as it is. To verify, Ion Premier should be selected automatically.
Identify the host names and origins Create a configuration that can accept traffic for the following three hostnames:
● www-YourID.edge2017.akamaiuweb.com ● qa-YourID.edge2017.akamaiuweb.com ● dev-YourID.edge2017.akamaiuweb.com
Advanced Akamai Workbook Page 12
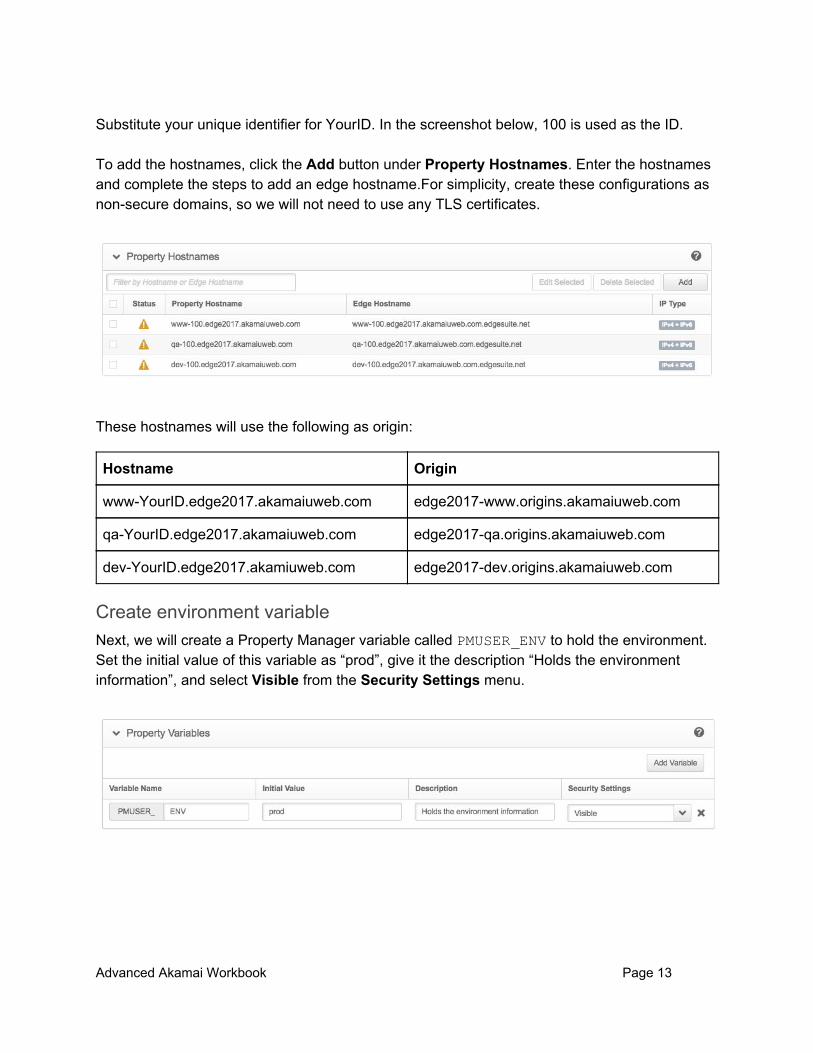
Substitute your unique identifier for YourID. In the screenshot below, 100 is used as the ID. To add the hostnames, click the Add button under Property Hostnames. Enter the hostnames and complete the steps to add an edge hostname.For simplicity, create these configurations as non-secure domains, so we will not need to use any TLS certificates.
These hostnames will use the following as origin:
Hostname Origin
www-YourID.edge2017.akamaiuweb.com edge2017-www.origins.akamaiuweb.com
qa-YourID.edge2017.akamaiuweb.com edge2017-qa.origins.akamaiuweb.com
dev-YourID.edge2017.akamiuweb.com edge2017-dev.origins.akamaiuweb.com
Create environment variable Next, we will create a Property Manager variable called PMUSER_ENV to hold the environment. Set the initial value of this variable as “prod”, give it the description “Holds the environment information”, and select Visible from the Security Settings menu.
Advanced Akamai Workbook Page 13
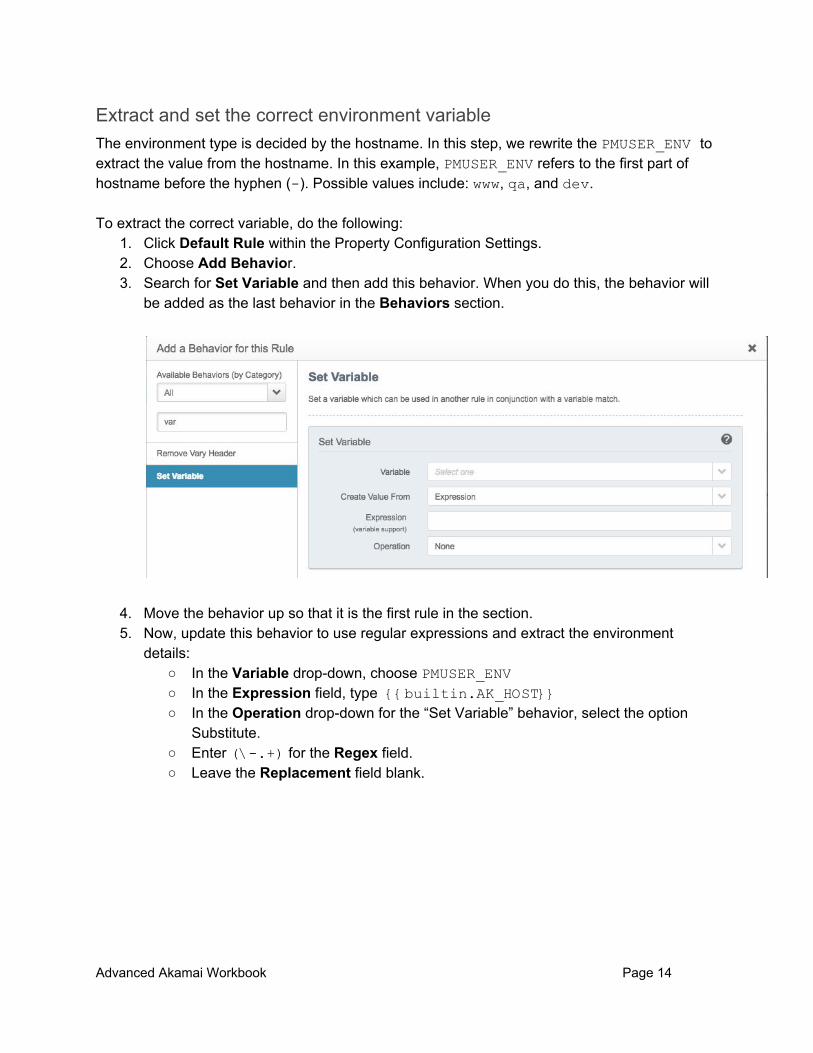
Extract and set the correct environment variable The environment type is decided by the hostname. In this step, we rewrite the PMUSER_ENV to extract the value from the hostname. In this example, PMUSER_ENV refers to the first part of hostname before the hyphen (- ). Possible values include: www , qa , and dev . To extract the correct variable, do the following:
1. Click Default Rule within the Property Configuration Settings. 2. Choose Add Behavior. 3. Search for Set Variable and then add this behavior. When you do this, the behavior will
be added as the last behavior in the Behaviors section.
4. Move the behavior up so that it is the first rule in the section. 5. Now, update this behavior to use regular expressions and extract the environment
details: ○ In the Variable drop-down, choose PMUSER_ENV ○ In the Expression field, type {{builtin.AK_HOST}} ○ In the Operation drop-down for the “Set Variable” behavior, select the option
Substitute. ○ Enter (\-.+) for the Regex field. ○ Leave the Replacement field blank.
Advanced Akamai Workbook Page 14
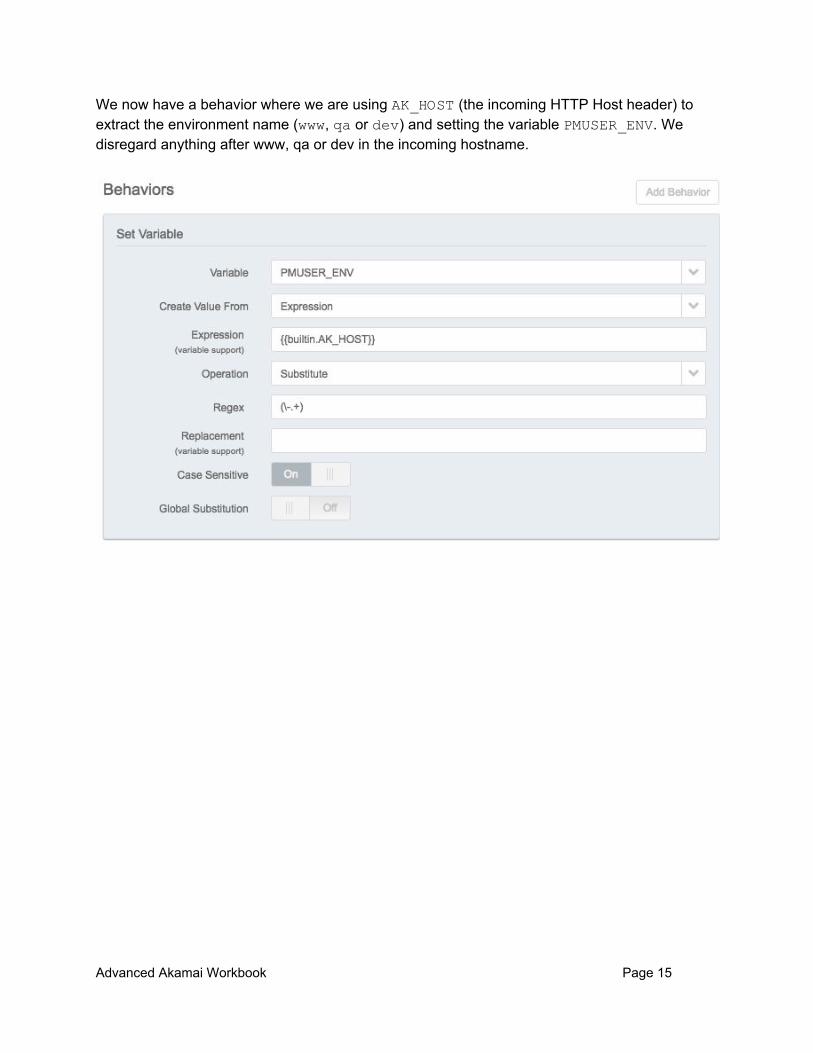
We now have a behavior where we are using AK_HOST (the incoming HTTP Host header) to extract the environment name (www , qa or dev ) and setting the variable PMUSER_ENV . We disregard anything after www, qa or dev in the incoming hostname.
Advanced Akamai Workbook Page 15
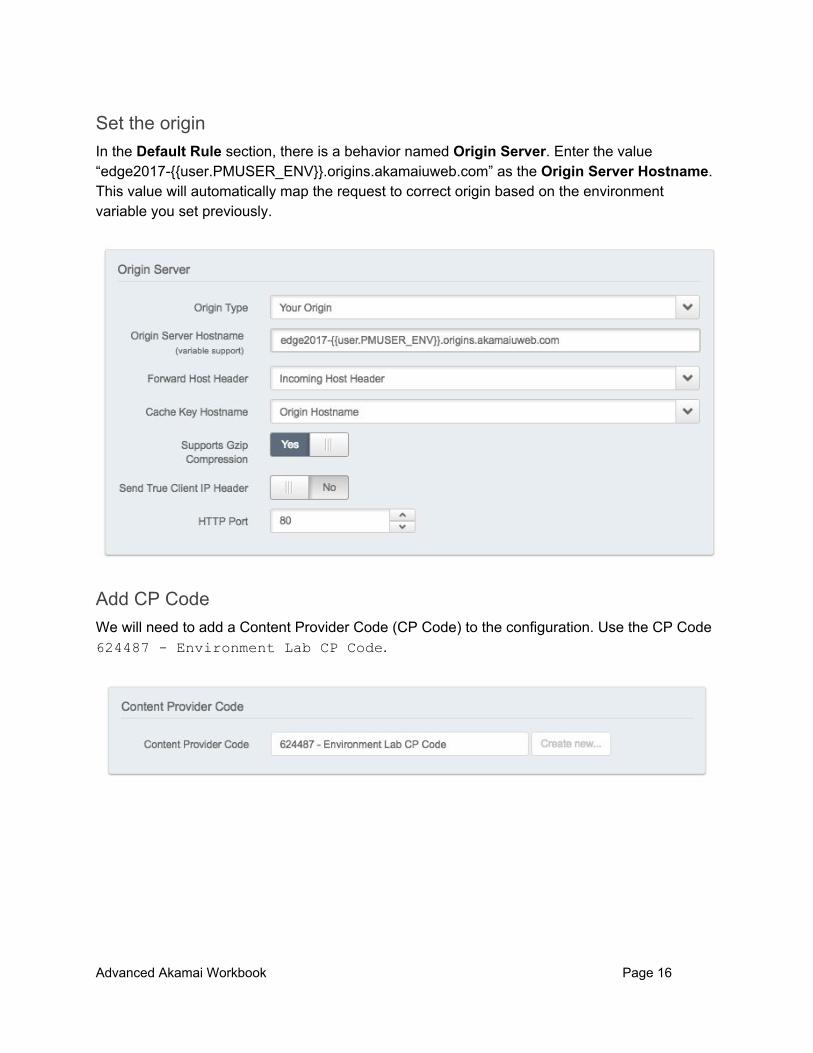
Set the origin In the Default Rule section, there is a behavior named Origin Server. Enter the value “edge2017-{{user.PMUSER_ENV}}.origins.akamaiuweb.com” as the Origin Server Hostname. This value will automatically map the request to correct origin based on the environment variable you set previously.
Add CP Code We will need to add a Content Provider Code (CP Code) to the configuration. Use the CP Code 624487 - Environment Lab CP Code .
Advanced Akamai Workbook Page 16

Cleanup non-related rules For this tutorial, we don’t need all the rules. So, delete the following rules:
● Performance ● Offload
To remove a rule, click the gear icon and select Delete.
Advanced Akamai Workbook Page 17

You can leave the rest of the rules as is.
Save and activate to staging Once you have set up the configuration, save and activate the configuration to Akamai staging network.
Testing Once the configuration is active, you can test to verify that your website is now accessible using the www, qa, and dev host names. Just make a request to your dev, qa and production (www) hostnames and you should see the home page.
Tutorial 2: Use PAPI to toggle a feature
Objective In this tutorial, you will add a feature flag capability. If the user sends a query-string change-origin=true for the home page, the response will be fetched from the origin www.example.com. By default, this feature is applied for qa and dev environments. By toggling the feature flag variable, this feature could be applied to prod domain as well.
Add a toggle variable Create a new variable named PMUSER_FEATURE_TOGGLE with the default value of OFF . This variable will be used to control if the new feature will be applied for the client request.
Advanced Akamai Workbook Page 18

Add behavior to handle the feature You will now use a modularized behavior. First, create an empty rule by clicking Add Rule > Blank Rule Template and name the feature “New Fabulous Feature”.
Advanced Akamai Workbook Page 19
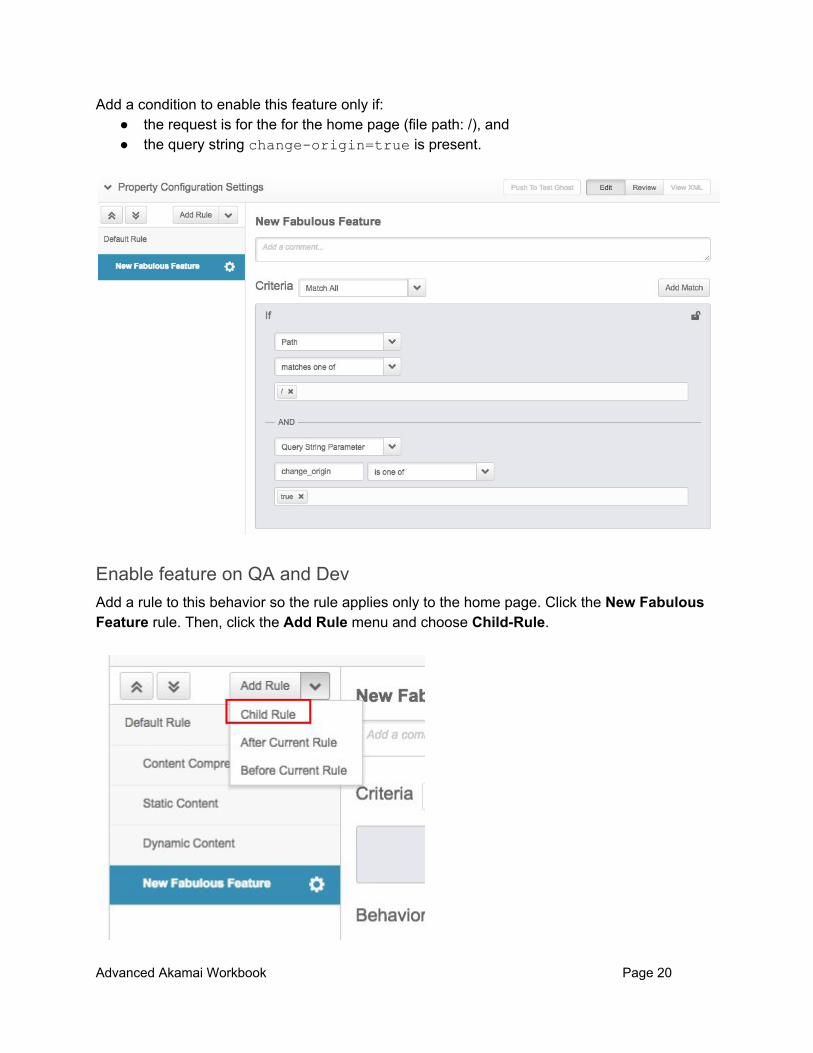
Add a condition to enable this feature only if: ● the request is for the for the home page (file path: /), and ● the query string change-origin=true is present.
Enable feature on QA and Dev Add a rule to this behavior so the rule applies only to the home page. Click the New Fabulous Feature rule. Then, click the Add Rule menu and choose Child-Rule.
Advanced Akamai Workbook Page 20

Then, add another blank rule and name it “Feature Trigger”.
Within this rule, add a condition: if the current environment is dev or qa . To do this, click Add Match and select Variable from the drop-down. Then, add a check on PMUSER_ENV for the values of dev and qa .
Advanced Akamai Workbook Page 21
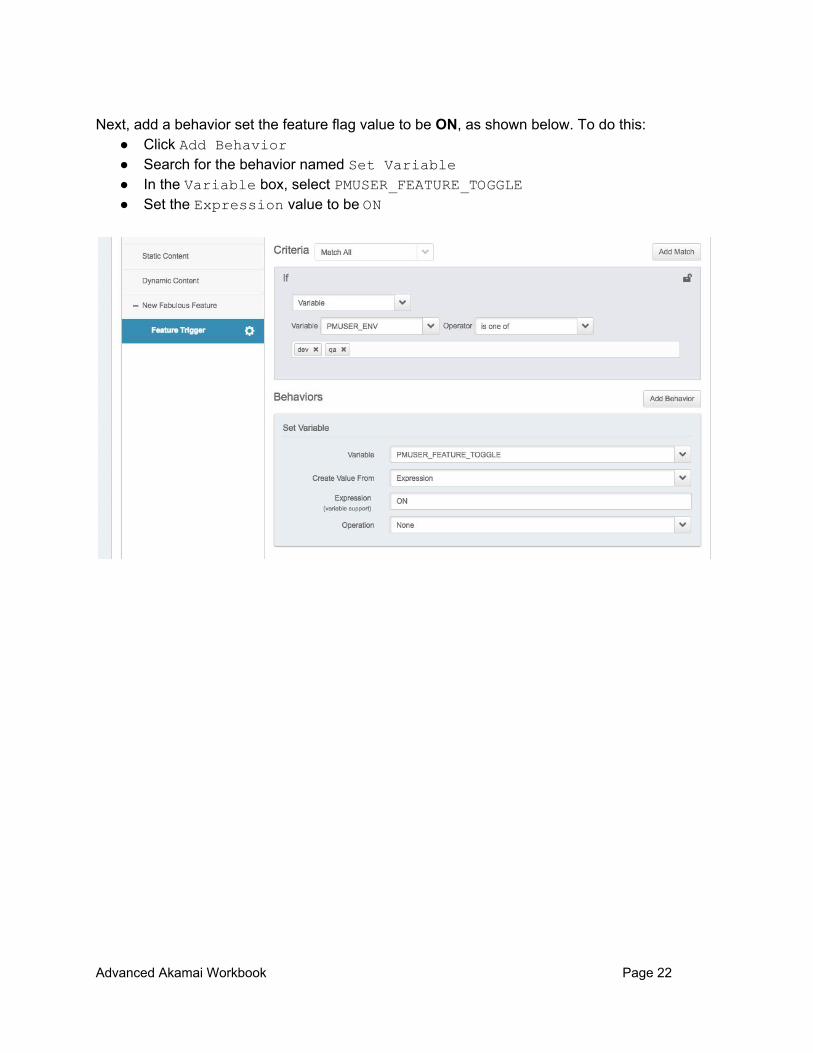
Next, add a behavior set the feature flag value to be ON, as shown below. To do this:
● Click Add Behavior ● Search for the behavior named Set Variable ● In the Variable box, select PMUSER_FEATURE_TOGGLE ● Set the Expression value to be ON
Advanced Akamai Workbook Page 22
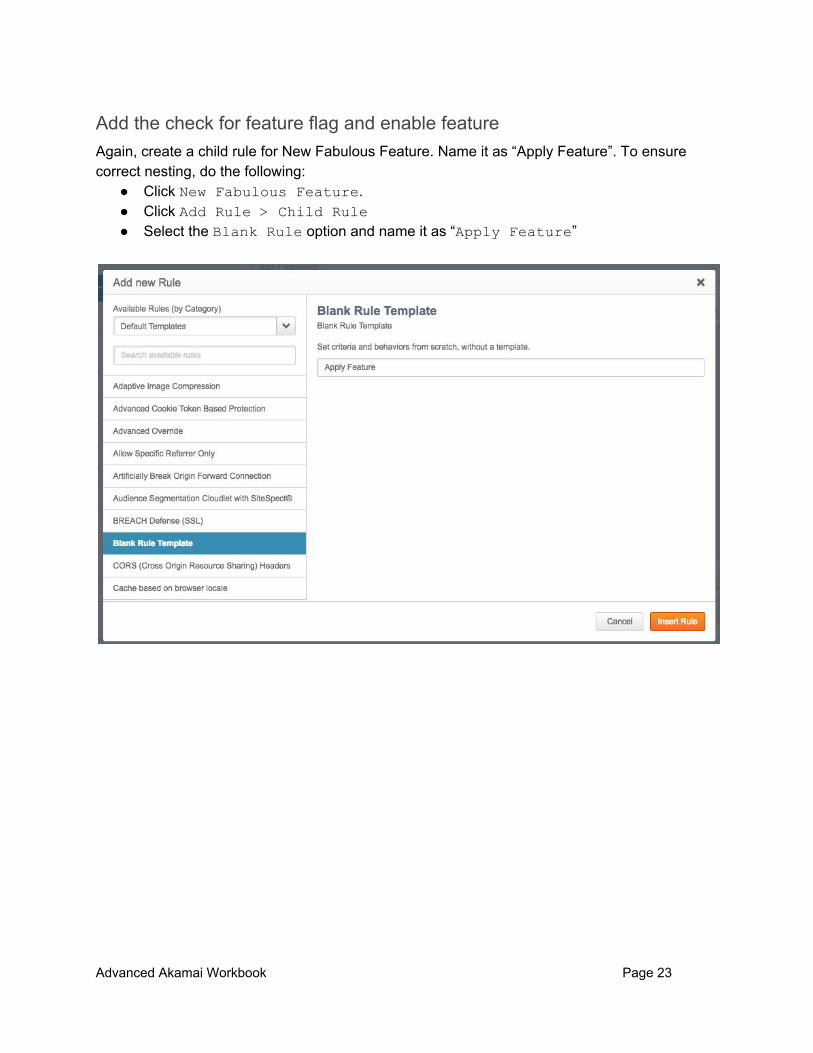
Add the check for feature flag and enable feature Again, create a child rule for New Fabulous Feature. Name it as “Apply Feature”. To ensure correct nesting, do the following:
● Click New Fabulous Feature . ● Click Add Rule > Child Rule ● Select the Blank Rule option and name it as “Apply Feature ”
Advanced Akamai Workbook Page 23

Within the Apply Feature section, add the following condition: ● If variable PMUSER_FEATURE_TOGGLE is set to ON .
For this, follow similar process as previous rule by selecting Add Match and selecting Variable .
Once the match is added, set the variable name to be PMUSER_FEATURE_TOGGLE and the value to be ON .
Advanced Akamai Workbook Page 24
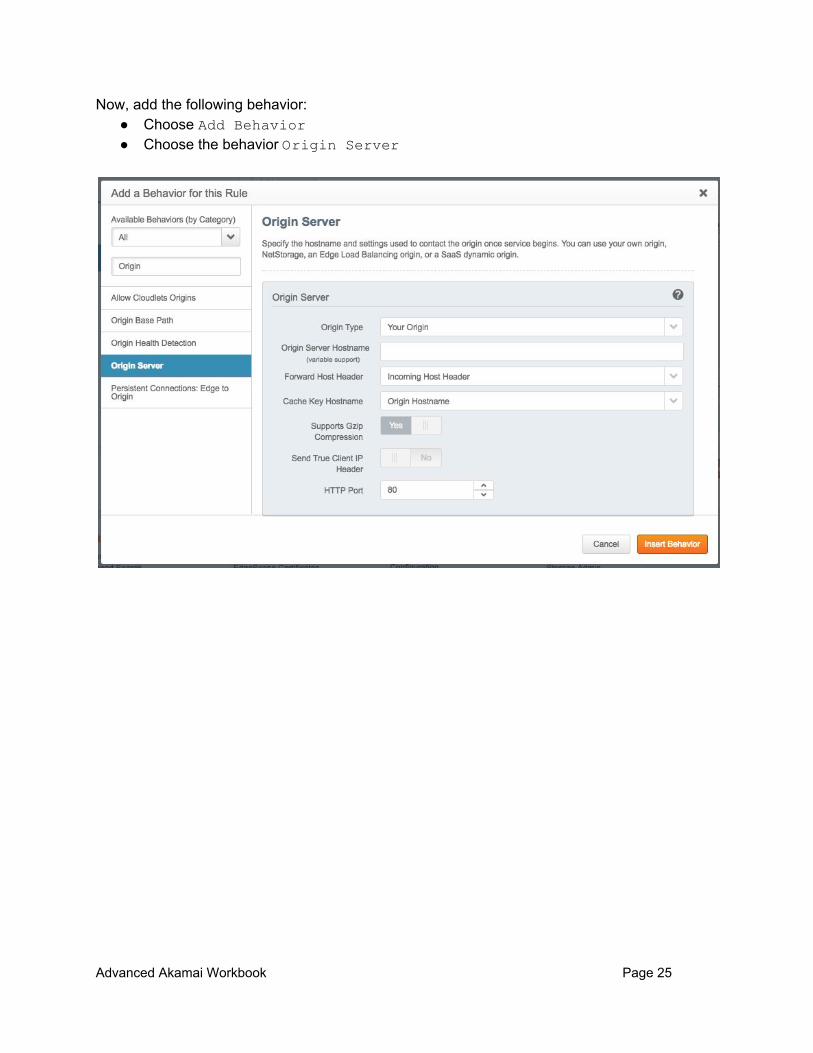
Now, add the following behavior: ● Choose Add Behavior ● Choose the behavior Origin Server
Advanced Akamai Workbook Page 25

● Within the behavior, make the following changes: ○ Add the origin name as www.example.com ○ Change the Forward Host Header drop-down value to Origin Hostname .
This will ensure that we send the HTTP host header as www.example.com when we go to origin.
Advanced Akamai Workbook Page 26
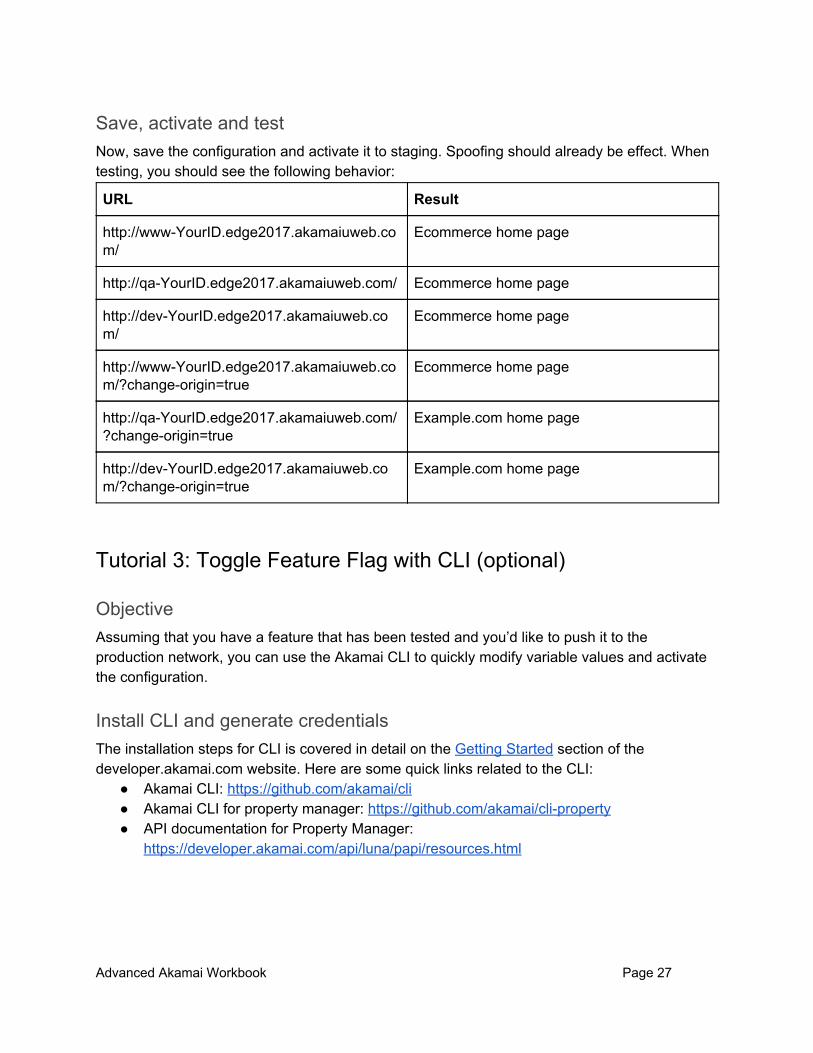
Save, activate and test Now, save the configuration and activate it to staging. Spoofing should already be effect. When testing, you should see the following behavior:
URL Result
http://www-YourID.edge2017.akamaiuweb.com/
Ecommerce home page
http://qa-YourID.edge2017.akamaiuweb.com/ Ecommerce home page
http://dev-YourID.edge2017.akamaiuweb.com/
Ecommerce home page
http://www-YourID.edge2017.akamaiuweb.com/?change-origin=true
Ecommerce home page
http://qa-YourID.edge2017.akamaiuweb.com/?change-origin=true
Example.com home page
http://dev-YourID.edge2017.akamaiuweb.com/?change-origin=true
Example.com home page
Tutorial 3: Toggle Feature Flag with CLI (optional)
Objective Assuming that you have a feature that has been tested and you’d like to push it to the production network, you can use the Akamai CLI to quickly modify variable values and activate the configuration.
Install CLI and generate credentials The installation steps for CLI is covered in detail on the Getting Started section of the developer.akamai.com website. Here are some quick links related to the CLI:
● Akamai CLI: https://github.com/akamai/cli ● Akamai CLI for property manager: https://github.com/akamai/cli-property ● API documentation for Property Manager:
https://developer.akamai.com/api/luna/papi/resources.html
Advanced Akamai Workbook Page 27

Modify the Feature Flag variable In Tutorial 2, we created the configuration with the feature toggle flag as PMUSER_FEATURE_TOGGLE with the default value of OFF . Now, we will toggle the variable to have a default value of ON . First, pull down the rules of the activated configuration: $ akamai property retrieve env100.lab1 --file rules.json Retrieving env100.lab1 ... retrieved rules formats: 520.687ms ... searching propertyName for env100.lab1 ... getting info for prp_404187 Retrieving env100.lab1 v2 ... retrieving property (env100.lab1) v2 ... retrieving: 1393.015ms Writing env100.lab1 rules to rules.json Update back with the same rules to create a new version of the configuration: $ akamai property update env100.lab1 --file rules.json Updating property env100.lab1 ... retrieved rules formats: 740.183ms ... searching propertyName for env100.lab1 ... getting info for prp_404187 Updating [object Object] ... copy property ([object Object]) v2 ... copy: 874.484ms Retrieving env100.lab1 v3 ... retrieving property (env100.lab1) v3 ... retrieving: 1502.084ms ... updating property ([object Object]) v3 ... updating: 5690.128ms Update Complete Update: 0.17725 mins
Advanced Akamai Workbook Page 28

Create a variable toggle file. In this file, set the value of PMUSER_FEATURE_TOGGLE to ON . Save this in a file. In this example, the file is named toggle.txt . [{
"name": "PMUSER_FEATURE_TOGGLE", "value": "ON", "description": "This feature is now world-deployed", "hidden": false, "sensitive": false, "action":["update"]
}]
Update the configuration to toggle the variable value: $ akamai property modify env100.lab1 --variables ~/Downloads/toggle.txt
Modifying property env100.lab1 ... retrieved rules formats: 394.265ms ... searching propertyName for env100.lab1 ... getting info for prp_404187 ... retrieving property (env100.lab1) v3 ... retrieving: 1786.005ms ... updating existing variable PMUSER_FEATURE_TOGGLE ... updating property (env100.lab1) v3 ... updating: 5793.865ms Modify: 0.16238333333333335 mins Activate the configuration: $ akamai property activate env100.lab1 --network STAG Activating env100.lab1 on STAG ... retrieved rules formats: 709.260ms ... searching propertyName for env100.lab1 ... getting info for prp_404187 Activating env100.lab1 to STAGING ... activating property (env100.lab1) v3 on STAGING ... activating: 7140.401ms ... automatically acknowledging 5 warnings! ... activating property (env100.lab1) v3 on STAGING ... activating: 15248.935ms ... waiting 30s ... waiting 30s ... waiting 30s ... waiting 30s Activation Complete Activation: 2.4878833333333334 mins
Advanced Akamai Workbook Page 29
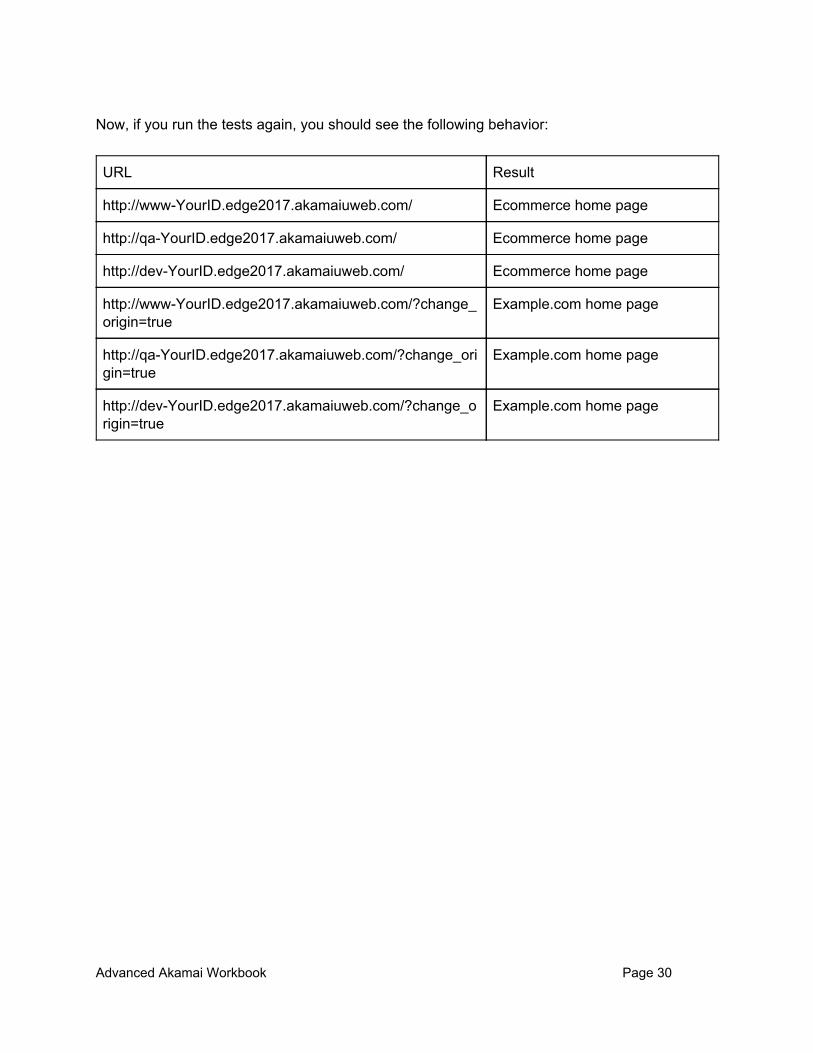
Now, if you run the tests again, you should see the following behavior:
URL Result
http://www-YourID.edge2017.akamaiuweb.com/ Ecommerce home page
http://qa-YourID.edge2017.akamaiuweb.com/ Ecommerce home page
http://dev-YourID.edge2017.akamaiuweb.com/ Ecommerce home page
http://www-YourID.edge2017.akamaiuweb.com/?change_origin=true
Example.com home page
http://qa-YourID.edge2017.akamaiuweb.com/?change_origin=true
Example.com home page
http://dev-YourID.edge2017.akamaiuweb.com/?change_origin=true
Example.com home page
Advanced Akamai Workbook Page 30
Dynamic Caching Caching stores frequently-used content near the edge of the Akamai network, so end users can load webpages quickly. This increases the responsiveness of your site and improves the user experience. Static caches store common objects, like your site’s logo, that are used across many pages, for many users, over longer periods of time. Dynamic caches, on the other hand, store objects which change frequently or which are personalized to a specific end user or small group of end users. You might use dynamic cache for breaking news images or the items stored in your customer’s shopping cart.
Prerequisites You must first complete Getting Started with Akamai Web Performance. After doing that tutorial, you’ll have an Akamai property with the hostname edge2017-[YourID].www.wp1.akamaiuweb.com , which you’ll use in this tutorial.
Tools Required The laptops in the Developer Zone all have Chrome with built-in Developer Tools and Modify Headers. If you’re using your own laptop, you must have these installed.
Homepage Dynamic Page Caching Your homepage is one of the most frequently accessed parts of your site, and can benefit the most from fast load times and responsiveness that dynamic caching can provide.
Device characterization: Desktop vs Mobile First you’ll create a rule called “Desktop vs Mobile”. This will be useful for serving content which is different on the mobile or desktop versions of your homepage.
Advanced Akamai Workbook Page 31

1. Select the Default Rule and then click the Add Rule button.
2. Choose the Blank Rule Template and give it the name “Desktop vs Mobile”.
Advanced Akamai Workbook Page 32

3. Now set up the match condition. Within your “Desktop vs Mobile” rule, match on the homepage paths (/ and /index.php ).
4. Next you’ll add two behaviors, one to send the Device Characteristics parameter is_mobile to the origin server as a header (so the origin can make intelligent use of it), and another to add this value to the cache key. Use the Add Behavior button to add the Device Characterization – Forward in Header behavior.
5. Use the Add Behavior button to add the Device Characterization – Define Cached Content behavior.
Note: So far we have setup the cache key for the homepage so that it will include the is_mobile parameter, but we haven’t actually cached it.
Advanced Akamai Workbook Page 33
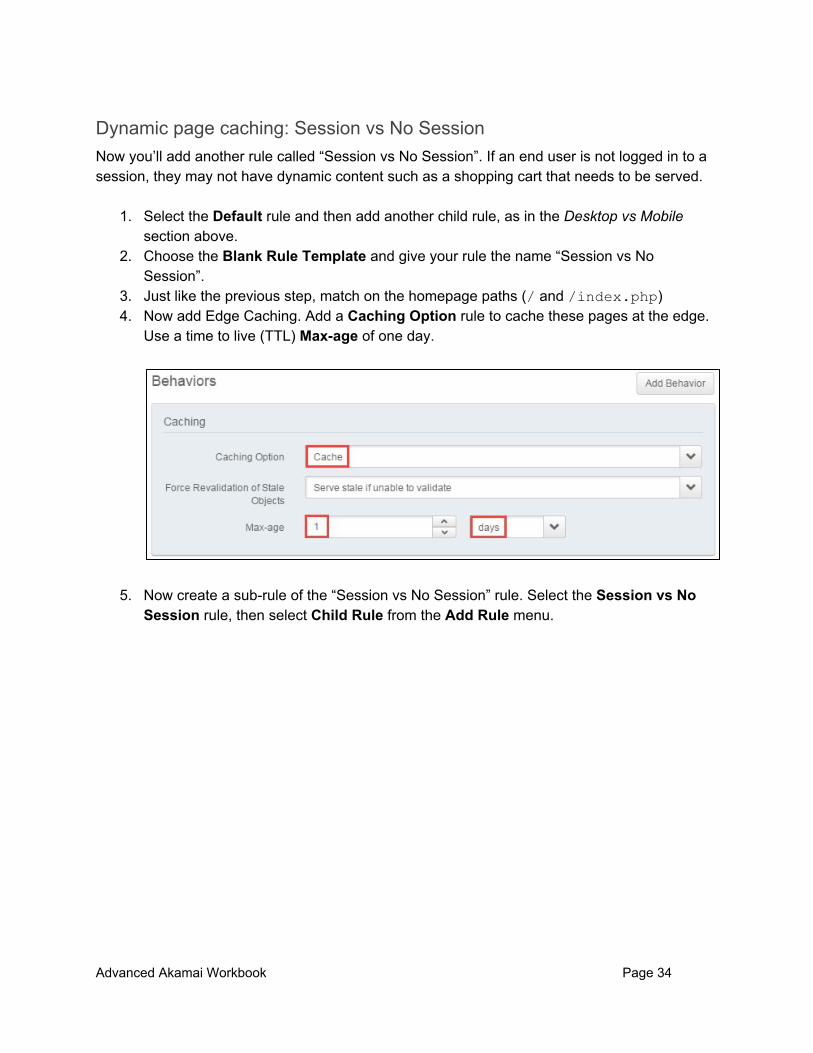
Dynamic page caching: Session vs No Session Now you’ll add another rule called “Session vs No Session”. If an end user is not logged in to a session, they may not have dynamic content such as a shopping cart that needs to be served.
1. Select the Default rule and then add another child rule, as in the Desktop vs Mobile section above.
2. Choose the Blank Rule Template and give your rule the name “Session vs No Session”.
3. Just like the previous step, match on the homepage paths (/ and /index.php ) 4. Now add Edge Caching. Add a Caching Option rule to cache these pages at the edge.
Use a time to live (TTL) Max-age of one day.
5. Now create a sub-rule of the “Session vs No Session” rule. Select the Session vs No Session rule, then select Child Rule from the Add Rule menu.
Advanced Akamai Workbook Page 34

6. Name your new child rule “Session Exists”. Create a match condition which matches on the condition if a Request Cookie called “PHPSESSID” exists.
7. Add the Caching Option behavior Bypass Cache.
8. Save and activate your configuration.
Advanced Akamai Workbook Page 35
See device characterization and advanced caching in action Now that you have your rules and behaviors established, let’s see how they perform on the site.
1. Make sure you have Modify Headers enabled in your browser and that you are adding the Akamai Pragma headers required for debugging: Pragma: akamai-x-get-request-id, akamai-x-cache-on, akamai-x-cache-remote-on, akamai-x-check-cacheable, akamai-x-get-cache-key, akamai-x-get-extracted-values, akamai-x-get-nonces, akamai-x-get-ssl-client-session-id, akamai-x-get-true-cache-key, akamai-x-serial-no
If you want to copy and paste these header values, you can do so from: http://edge2017-[YourID].www.wp1.akamaiuweb.com/labs/
2. Open your browser to the homepage of your unique site: http://edge2017-[YourID].www.wp1.akamaiuweb.com/
3. To view Debug Headers, open Developer Tools and go to the Network tab. 4. Make sure the browser caching is disabled (this is an option within Developer Tools). 5. Reload your product page. Then click into the first object (the / page) and look at the
response headers. You should see that: ○ The X-Check-Cacheable is YES ○ The X-Cache-Key indicates a time to live of 1d (one day) ○ The X-Cacke-Key has cid=___EDC_IS_MOBILE=false
If you want, you can also verify that X-Cacke-Key has cid=___EDC_IS_MOBILE=true when you view the page with Chrome’s mobile emulation mode enabled.
6. On your site, click a product page of your choice and add it to your cart. This will create a session cookie, allowing you to test the dynamic caching. You should also see that you then have one item in your cart (top-right).
7. Now go back to your homepage and look at the debug headers. You should now see: The X-Check-Cacheable is NO. This is because the edge cache is being bypassed because you now have a session cookie.
Product page caching In this tutorial you create an initial rule to cache product pages.
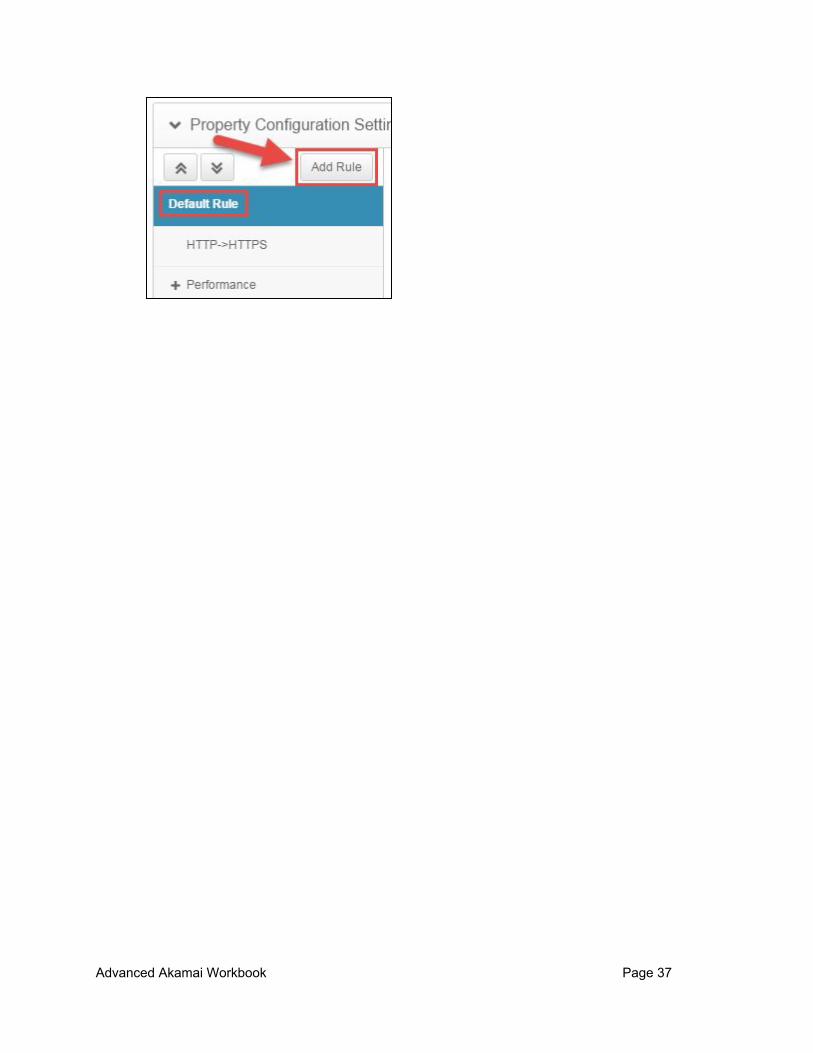
Create a rule for caching product pages 1. Create a new, editable version of your property. Select the Default rule and click Add
Rule.
Advanced Akamai Workbook Page 36
Advanced Akamai Workbook Page 37

2. Select Blank Rule Template and give it the name “Product Pages”.
3. Give your new rule a match condition. Select your new Product Pages rule. Click the Add Match button. Select a Path match and insert the path /product.php , as shown here:
Advanced Akamai Workbook Page 38

4. Under Behaviors in the Product Pages rule, click Add Behavior and insert a Caching rule. Select Cache from the Caching Option menu, and select Serve stale if unable to validate from the Force Revalidation of State Objects menu, as shown here:
5. Configure your Caching rule with a TTL of 30 days. Set Max-age to 30 and select days from the menu, as shown here:
Advanced Akamai Workbook Page 39
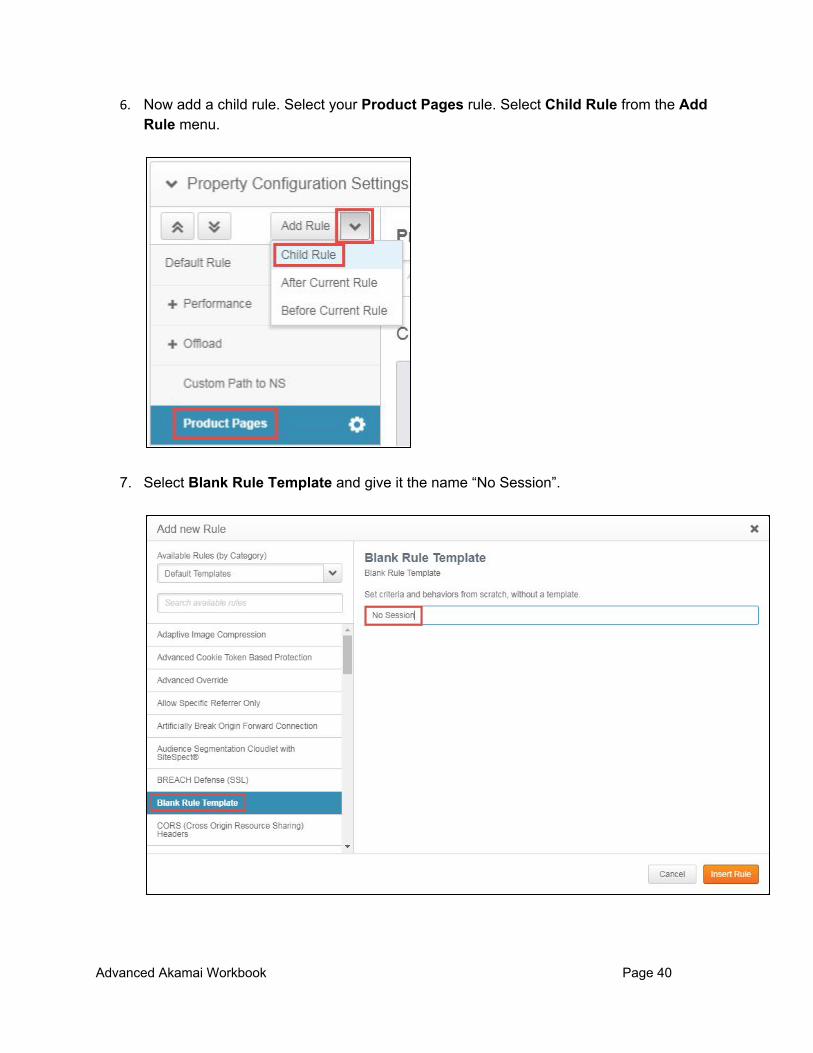
6. Now add a child rule. Select your Product Pages rule. Select Child Rule from the Add Rule menu.
7. Select Blank Rule Template and give it the name “No Session”.
Advanced Akamai Workbook Page 40
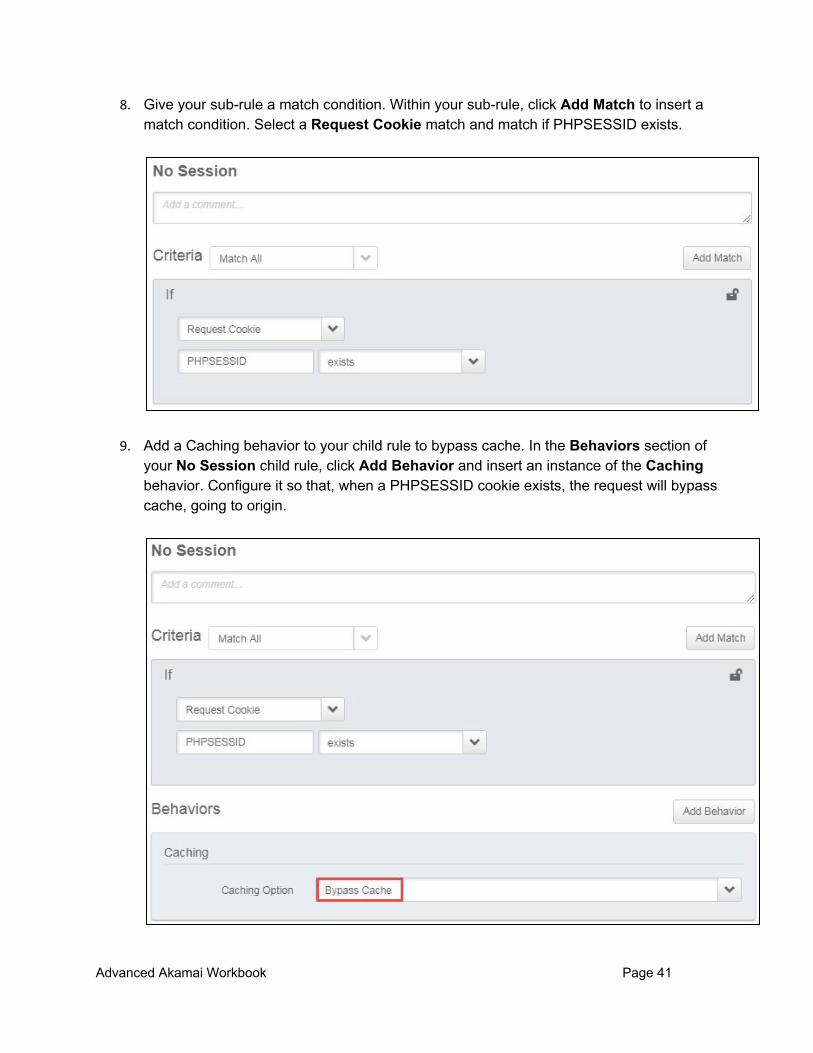
8. Give your sub-rule a match condition. Within your sub-rule, click Add Match to insert a match condition. Select a Request Cookie match and match if PHPSESSID exists.
9. Add a Caching behavior to your child rule to bypass cache. In the Behaviors section of your No Session child rule, click Add Behavior and insert an instance of the Caching behavior. Configure it so that, when a PHPSESSID cookie exists, the request will bypass cache, going to origin.
Advanced Akamai Workbook Page 41

10. Save and then Activate on Staging.
Look at Debug Headers Verify that the debugging tools you have enabled are working as expected.
1. Make sure you added the Akamai Pragma headers required for debugging in See device characterization and advanced caching in action section.
2. Open your browser to the homepage of your unique site: http://edge2017-[YourID].www.wp1.akamaiuweb.com/
3. Once there, click a product image to go to a product page of your choice. 4. In a previous step, you established a session on your site. Delete the PHPSESSID
cookie before proceeding. You can do this by clearing all your browser history, cache, and cookies, or you can choose just this cookie by going to the Application tab within Developer Tools.
5. Open Debug Headers and go to the Network tab. Make sure the browser caching is disabled (this is an option with Developer Tools).
6. Reload your product page and then click into the first object (the /product.php page) and look at the response headers. You should see that:
○ The X-Check-Cacheable is YES. (Note: it will be NO if you have a PHPSESSID cookie. Clear this cookie if you want to get back to a no-session state).
○ Your page has a TTL of 30 days ○ The productId query string parameter is in the main part of the Cache Key, not
the cid= part ○ Your page is likely cached at the edge (and if it isn’t, try reloading it).
7. Now try loading a different product page and notice how the productId query string parameter is always included in the main part of the cache key (not in the cid= ). Therefore, each URL is fully unique.
8. If you purge one product page URL, including the query string parameter, you will see that the other product page URLs are still cached. Try this using Fast Purge: PUBLISH > Fast Purge.
Move query string parameters to the Cache ID 1. Create a new editable version of your property.
Advanced Akamai Workbook Page 42

2. Edit your Product Pages rule. Select your Product Pages rule. In the behaviors section,
use the Add Behavior button to add an instance of the Cache ID Modification behavior. Chose the action Include all query parameters to move the query string parameters to the Cache ID (the cid= part of the Cache Key):
3. Add an instance of the Cache Key Query Parameters behavior and chose to reorder the parameters, by selecting Include all parameters (reorder alphabetically) from the menu.
4. Although this application only has the one query string parameter (productId= ) on the product.php pages, it’s generally a good idea to choose the reorder alphabetically option, since in applications where there are more than one query string parameter, the order of the parameters can easily get confused, creating duplicate cache keys or cache IDs.
Advanced Akamai Workbook Page 43
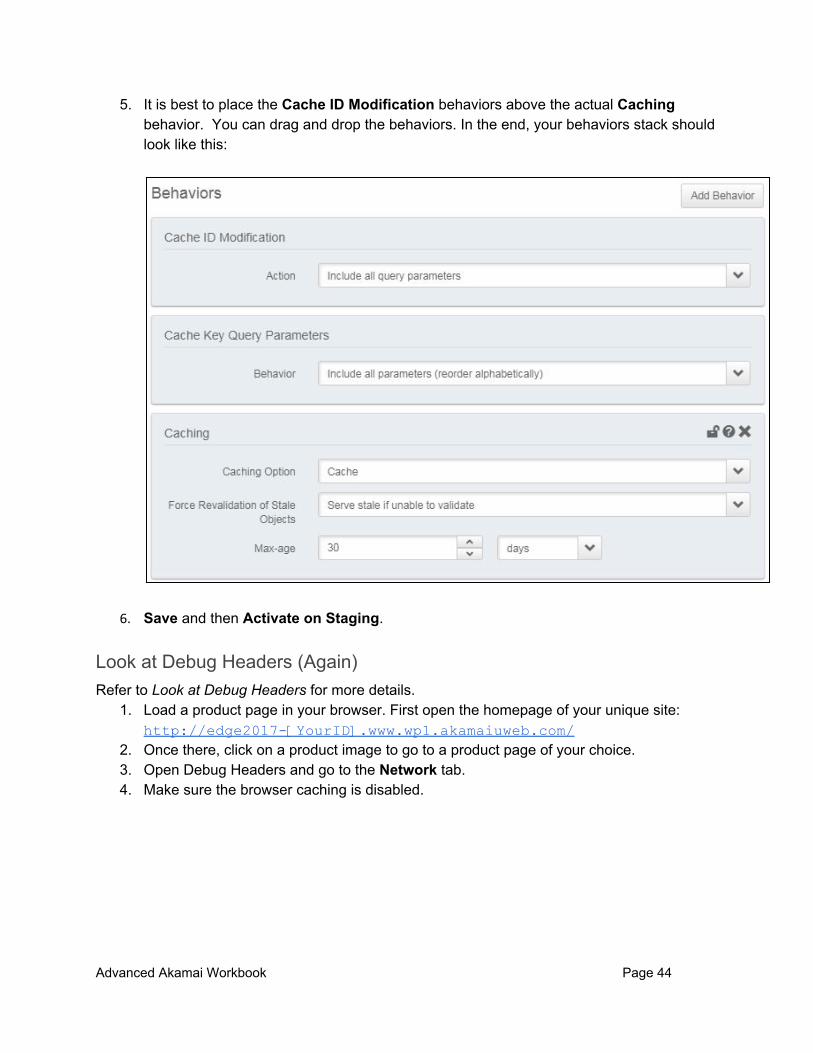
5. It is best to place the Cache ID Modification behaviors above the actual Caching behavior. You can drag and drop the behaviors. In the end, your behaviors stack should look like this:
6. Save and then Activate on Staging.
Look at Debug Headers (Again) Refer to Look at Debug Headers for more details.
1. Load a product page in your browser. First open the homepage of your unique site: http://edge2017-[YourID].www.wp1.akamaiuweb.com/
2. Once there, click on a product image to go to a product page of your choice. 3. Open Debug Headers and go to the Network tab. 4. Make sure the browser caching is disabled.
Advanced Akamai Workbook Page 44

5. Reload your product page. Then, click the first object (the /product.php page) and look at the response headers. You should see that:
○ Your productId query string parameter is now in the Cache ID cid= part of the Cache Key
○ The X-Check-Cacheable is YES. (Note: it will be NO if you have a PHPSESSID cookie. Clear this cookie if you want to get back to a no-session state).
○ your page has a TTL of 30 days ○ your page is likely cached at the Edge (and if it isn’t, try reloading it)
Purge cached data Explore your website, and try purging data to observe how caching works.
1. Try loading a different product page and notice how the productId query string parameter is now always contained in the Cache ID part of the Cache Key, i.e. the cid= part. This means that all these pages are variants of the main Cache Key and therefore can be purged with a single URL. Therefore each URL is fully unique.
2. Now you purge all product pages by using Fast Purge to purge the URL: http://edge2017-[YourID].www.wp1.akamaiuweb.com/product.php
You can do this either by using Fast Purge (PUBLISH > Fast Purge) or by using the purge page built into your website. To use the purge page:
3. Go to the purge page URL (http://edge2017-[YourID].www.wp1.akamaiuweb.com/ccu/purge.html)
4. Select /product.php 5. Under Method, select Purge 6. Click Generate Code to generate the content refresh code (shown in the Refresh Code
text area) 7. Click Run Refresh API to run the content refresh (this uses the CCUv3 API)
After purging your object, you can then reload any product page with Developer Tools open, and sending your Akamai Pragma headers, and you should see the X-Cache header indicate TCP_MISS . This confirms that all product pages were purged by purging just a single object (/product.php ).
Advanced Akamai Workbook Page 45

HTTP Streaming with Token Authentication Token Authentication is a common security method that requires an end user to present a cryptographically signed token as part of a URL request. Typically, this token is generated by a service that performs a lookup of the end user to ensure they should be granted access. Here is an example of a URL with a token appended to it as a query string: https://example.com/secret?token=93bf3ef1bd5854eeff582cdac5c9df32ce
Tokens can also be passed to the server via a cookie in the request. In fact, Akamai relies on both query strings and cookies to secure HTTP streaming content when the Edge Authorization behavior is enabled on a property.
Implement Token Authentication with HTTP Streaming Akamai delivers HTTP streaming content via Adaptive Media Delivery. In this step, you log in to an account and configure a new configuration with Token Authentication.
1. Navigate to Luna at https://control.akamai.com 2. Log in with these credentials:
User: [email protected] Password: media082017
3. Click Configure and then New Property.
4. From the dropdown, select Create new Property in PM.
Advanced Akamai Workbook Page 46

5. In the Products list, select Adaptive Media Delivery, and then give it a name that follows the pattern [YOUR IDENTIFIER].edgelab.2017 where [YOUR IDENTIFIER] is something unique to you like your initials, name, postal code, etc. Then click Create Property.
This brings you to Property Manager, the tool you use to create, modify, and control your HTTP streaming configurations on Akamai’s platform. When creating a configuration, you’ll want to provide complete details including a delivery hostname, an origin server, and a Content Provider Code (CP Code). For the purpose of this tutorial, we’ll ignore those elements and focus on implementing Token Authentication. Property Manager is a rules-based system, allowing you to specify conditions and then assign behaviors that occur in those cases. For this tutorial, we want to create a new rule that applies token security to any URLs with /protected/ in the path.
1. In the upper left corner, click Add Rule. 2. Click Blank Rule Template. Name it Token Authentication and click Insert Rule.
3. You now have a blank rule ready to have a matching criteria specified, along with the desired behavior. Click Add Match.
Advanced Akamai Workbook Page 47
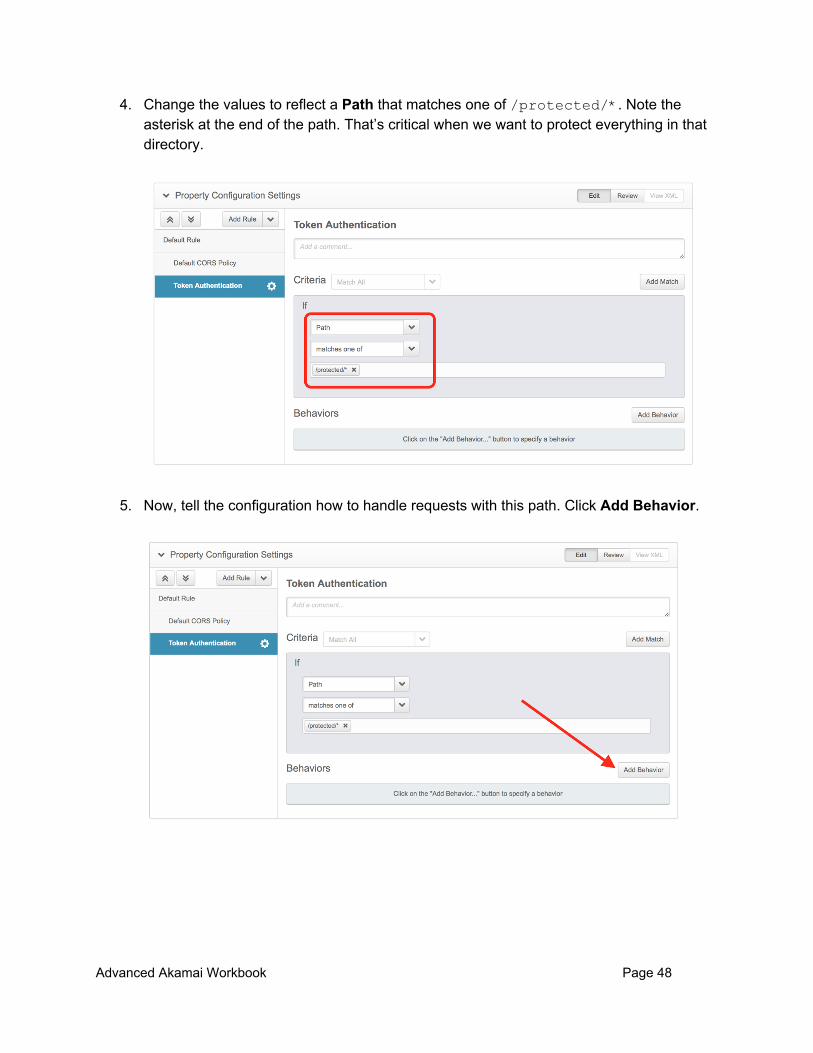
4. Change the values to reflect a Path that matches one of /protected/* . Note the asterisk at the end of the path. That’s critical when we want to protect everything in that directory.
5. Now, tell the configuration how to handle requests with this path. Click Add Behavior.
Advanced Akamai Workbook Page 48
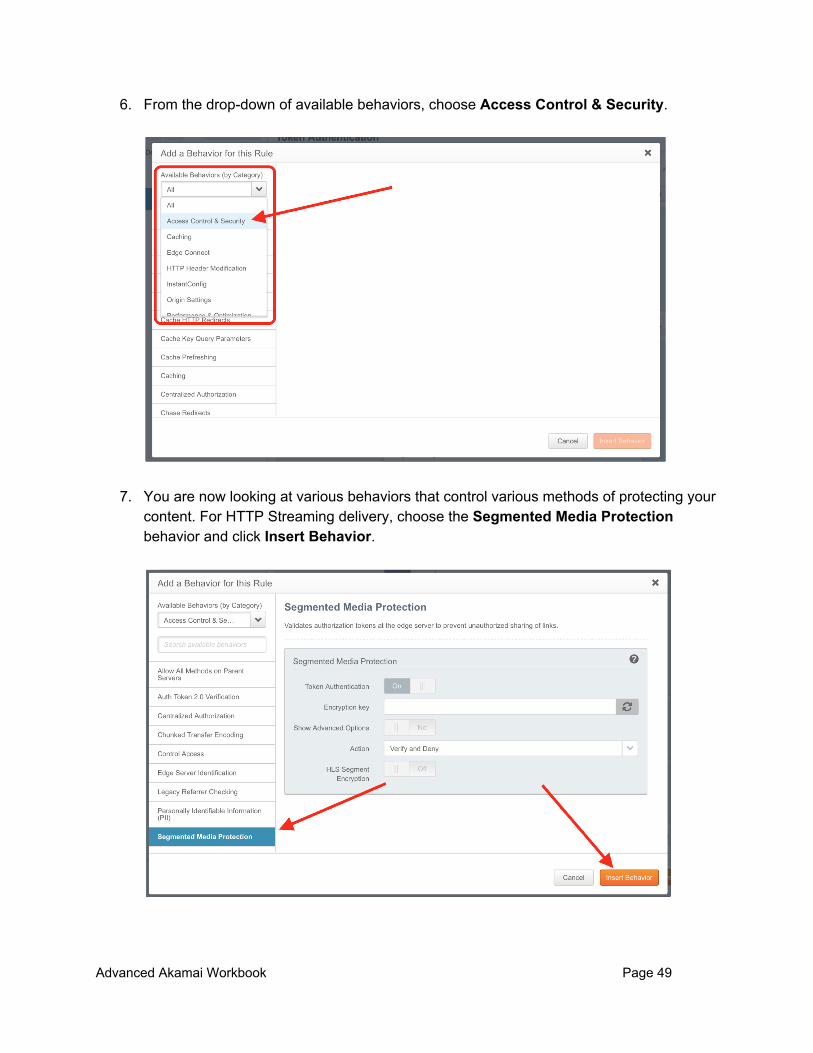
6. From the drop-down of available behaviors, choose Access Control & Security.
7. You are now looking at various behaviors that control various methods of protecting your content. For HTTP Streaming delivery, choose the Segmented Media Protection behavior and click Insert Behavior.
Advanced Akamai Workbook Page 49
This behavior not only applies a token protection scheme on the initial request for content (like your streaming in M3U8, MPD, or other formats), but also provides intelligence specific to HTTP Streaming. It extends that security you apply on the manifest to each subsequent media fragment request, as well as any companion files like individual bitrate manifests, encryption keys, etc.
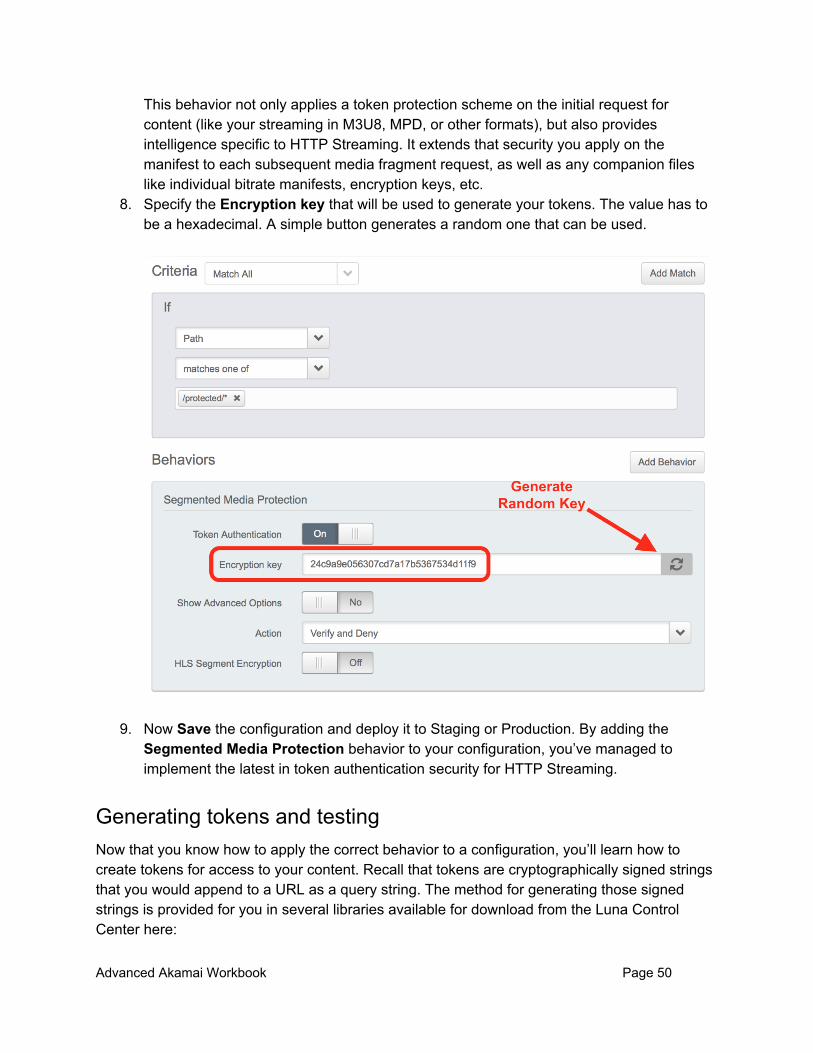
8. Specify the Encryption key that will be used to generate your tokens. The value has to be a hexadecimal. A simple button generates a random one that can be used.
9. Now Save the configuration and deploy it to Staging or Production. By adding the Segmented Media Protection behavior to your configuration, you’ve managed to implement the latest in token authentication security for HTTP Streaming.
Generating tokens and testing Now that you know how to apply the correct behavior to a configuration, you’ll learn how to create tokens for access to your content. Recall that tokens are cryptographically signed strings that you would append to a URL as a query string. The method for generating those signed strings is provided for you in several libraries available for download from the Luna Control Center here:
Advanced Akamai Workbook Page 50
https://control.akamai.com/dl/customers/SPE/EdgeAuth-latest.zip
For convenience, the machines in the Hands-on Lab area already have the necessary libraries downloaded and ready to use on them. In this exercise, use the Python version of those libraries to generate a token at the command line. Other languages use the same basic methods and options for generating appropriate keys. In order to test this, you need an existing configuration that already has the Segmented Media Protection behavior enabled and live on the Akamai platform. Here’s a sample URL that is protected with Segmented Media Protection: http://edge.akamailabs.com/protected/sintel.mpd
Examine this URL and work to generate a valid token.
1. Open the Terminal application from the dock. 2. Change your working directory to the location of the Python Token Authentication library:
cd ~/bin/EdgeAuth/python/akamai_token_v2/ 3. In this directory is a script called akamai_token_v2.py . It generates a valid token.
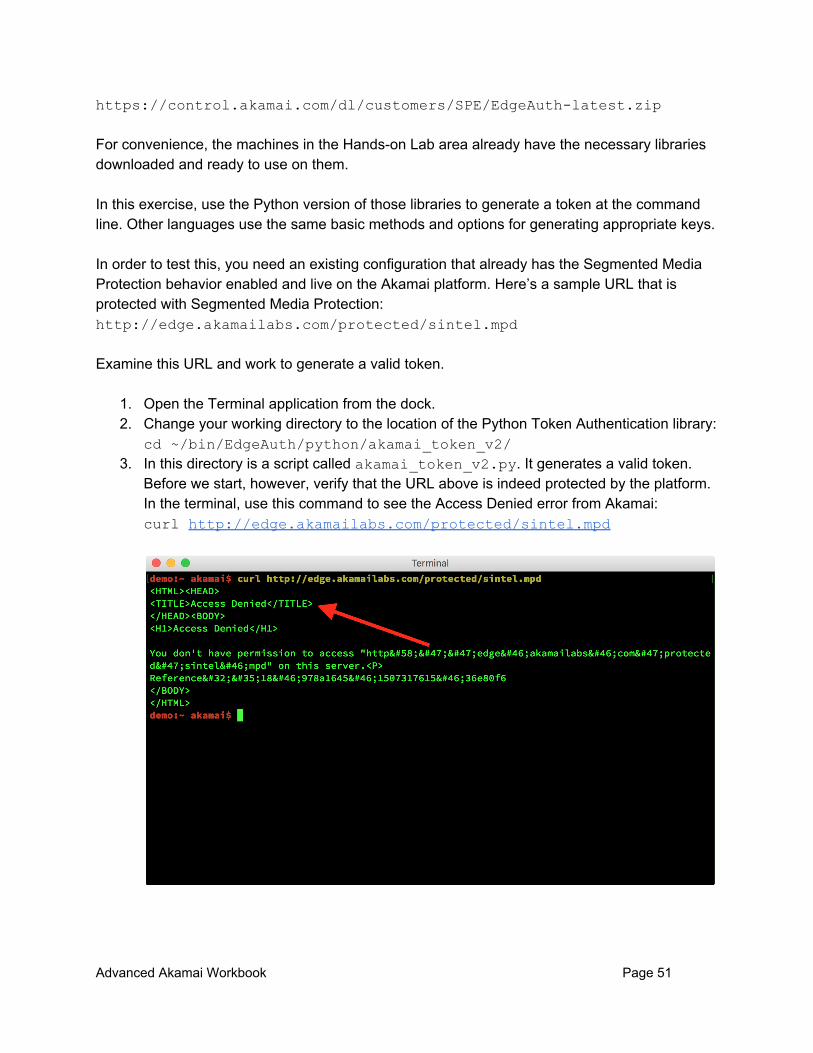
Before we start, however, verify that the URL above is indeed protected by the platform. In the terminal, use this command to see the Access Denied error from Akamai: curl http://edge.akamailabs.com/protected/sintel.mpd
Advanced Akamai Workbook Page 51
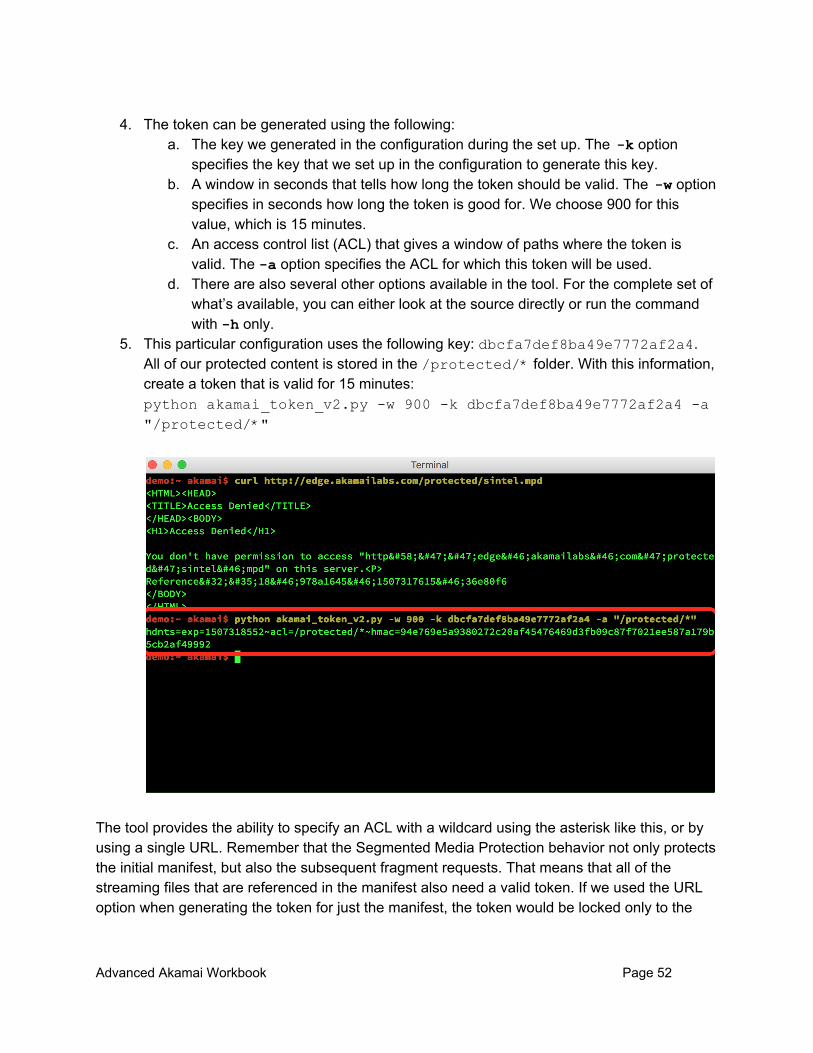
4. The token can be generated using the following: a. The key we generated in the configuration during the set up. The -k option
specifies the key that we set up in the configuration to generate this key. b. A window in seconds that tells how long the token should be valid. The -w option
specifies in seconds how long the token is good for. We choose 900 for this value, which is 15 minutes.
c. An access control list (ACL) that gives a window of paths where the token is valid. The -a option specifies the ACL for which this token will be used.
d. There are also several other options available in the tool. For the complete set of what’s available, you can either look at the source directly or run the command with -h only.
5. This particular configuration uses the following key: dbcfa7def8ba49e7772af2a4 . All of our protected content is stored in the /protected/* folder. With this information, create a token that is valid for 15 minutes: python akamai_token_v2.py -w 900 -k dbcfa7def8ba49e7772af2a4 -a "/protected/*"
The tool provides the ability to specify an ACL with a wildcard using the asterisk like this, or by using a single URL. Remember that the Segmented Media Protection behavior not only protects the initial manifest, but also the subsequent fragment requests. That means that all of the streaming files that are referenced in the manifest also need a valid token. If we used the URL option when generating the token for just the manifest, the token would be locked only to the
Advanced Akamai Workbook Page 52
manifest and would cause a failure in the subsequent media fragments. That’s why we use the ACL option to make the token flexible for all content in this directory. You can further restrict the token to deeper subdirectories or file naming conventions depending on how you’ve set up your content library. For our purpose, a simple ACL of /protected/* will suffice. The output produced by the tool can be used directly with our protected URL to grant access to the content.
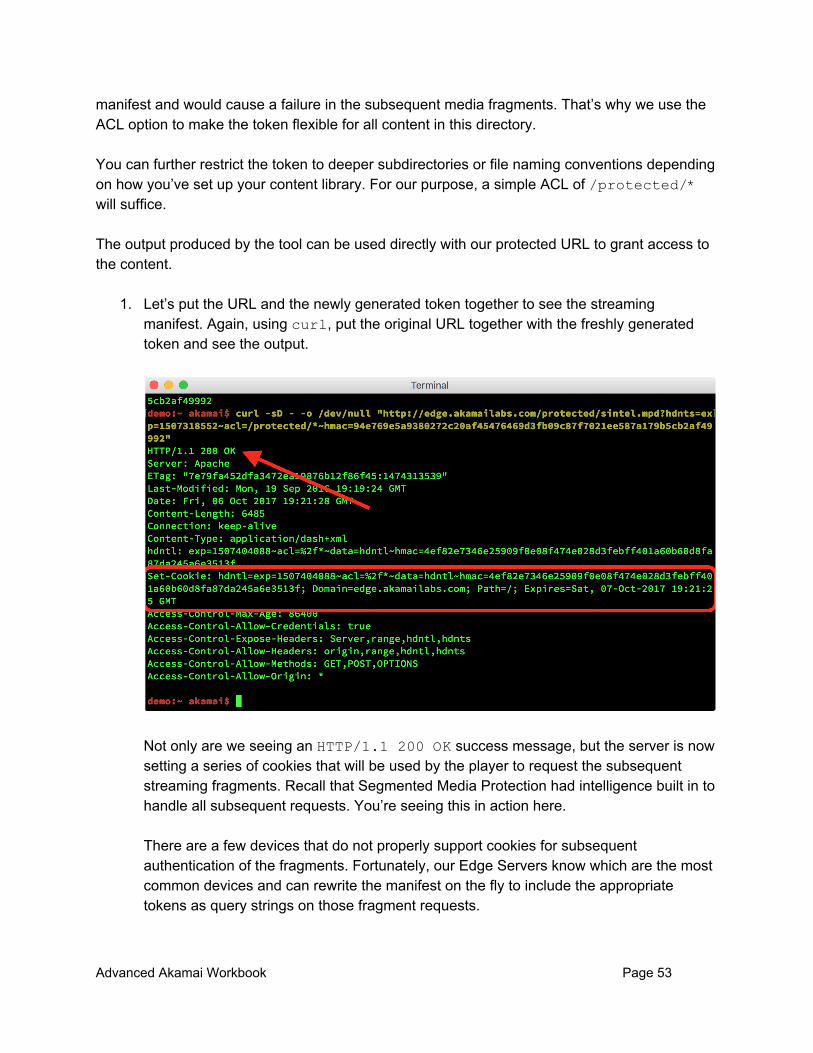
1. Let’s put the URL and the newly generated token together to see the streaming manifest. Again, using curl , put the original URL together with the freshly generated token and see the output.
Not only are we seeing an HTTP/1.1 200 OK success message, but the server is now setting a series of cookies that will be used by the player to request the subsequent streaming fragments. Recall that Segmented Media Protection had intelligence built in to handle all subsequent requests. You’re seeing this in action here. There are a few devices that do not properly support cookies for subsequent authentication of the fragments. Fortunately, our Edge Servers know which are the most common devices and can rewrite the manifest on the fly to include the appropriate tokens as query strings on those fragment requests.
Advanced Akamai Workbook Page 53
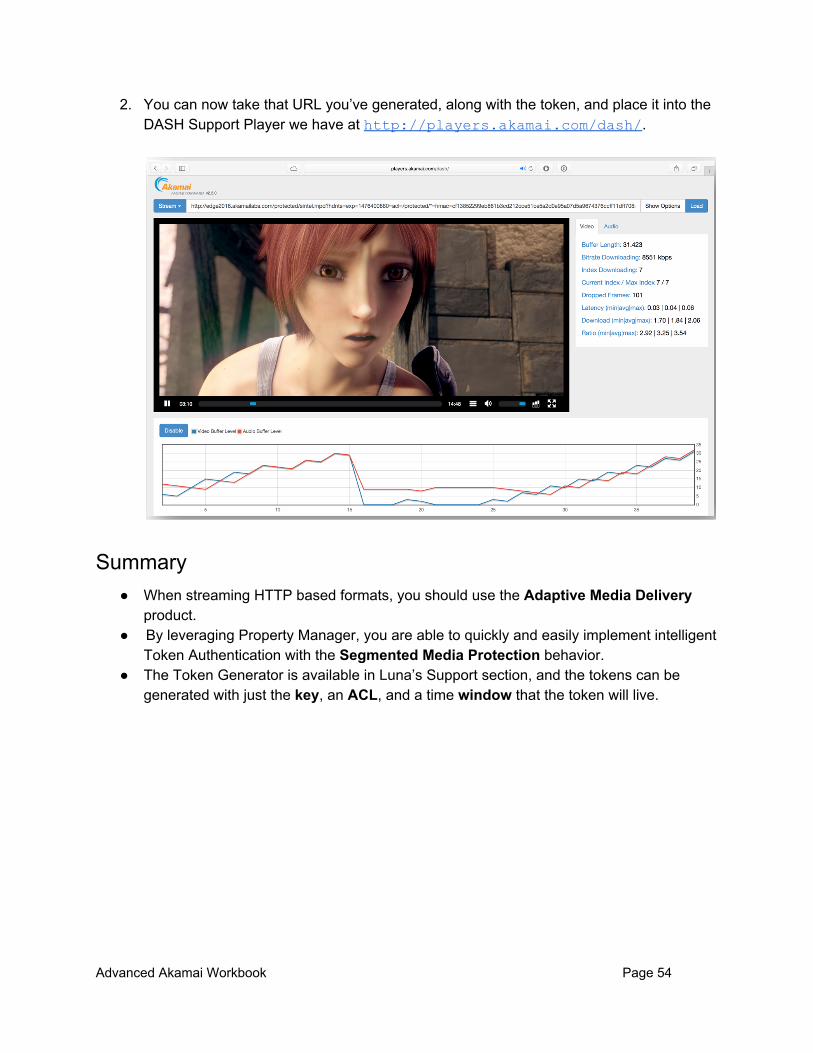
2. You can now take that URL you’ve generated, along with the token, and place it into the DASH Support Player we have at http://players.akamai.com/dash/ .
Summary ● When streaming HTTP based formats, you should use the Adaptive Media Delivery
product. ● By leveraging Property Manager, you are able to quickly and easily implement intelligent
Token Authentication with the Segmented Media Protection behavior. ● The Token Generator is available in Luna’s Support section, and the tokens can be
generated with just the key, an ACL, and a time window that the token will live.
Advanced Akamai Workbook Page 54