Embed Size (px)
Citation preview

AIOMAD u _ u A
335497A 3/01/95
ALL-WHEEL-STEERINGLAWN TRACTOR
Model F4315-000
• Safety Rules • Assembly • Operation • Maintenance ° Adjustments
NOTICE! This unit has a mulching plug installed on the mower deck. To side discharge mow you MUST remove the mulching
plug. To remove mulching plug see Mulching Plug Instructions in the Maintenance section of this manual.
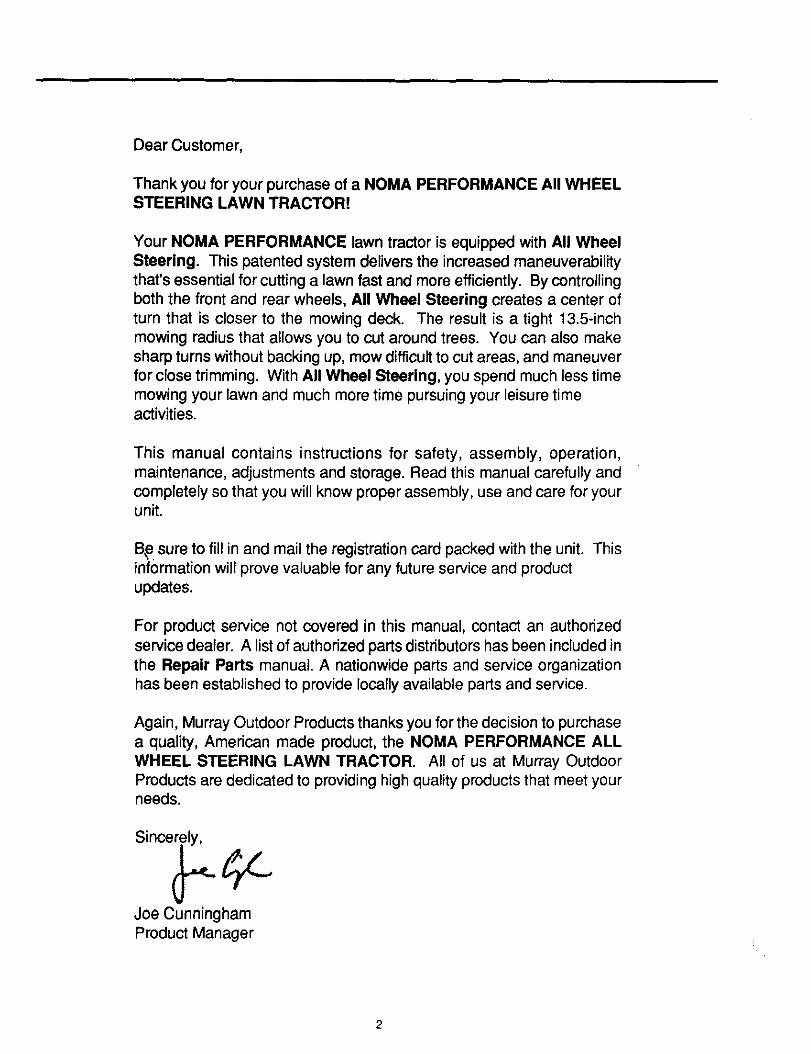
Dear Customer,
Thank you for your purchase of a NOMA PERFORMANCE All WHEELSTEERING LAWN TRACTOR!
Your NOMA PERFORMANCE lawn tractor is equipped with All WheelSteering. This patented system delivers the increased maneuverability
that's essential for cutting a lawn fast and more efficiently. By controllingboth the front and rear wheels, All Wheel Steering creates a center ofturn that is closer to the mowing deck. The result is a tight 13.5-inch
mowing radius that allows you to cut around trees. You can also makesharp turns without backing up, mow difficult to cut areas, and maneuver
for close trimming. With All Wheel Steering, you spend much less timemowing your lawn and much more time pursuing your leisure timeactivities.
This manual contains instructions for safety, assembly, operation,maintenance, adjustments and storage. Read this manual carefully andcompletely so that you will know proper assembly, use and care for yourunit.
B,.esure to fill in and mail the registration card packed with the unit. Thisinformation will prove valuable for any future service and productupdates.
For product service not covered in this manual, contact an authorizedservice dealer. A list of authorized parts distributors has been included inthe Repair Parts manual. A nationwide parts and service organizationhas been established to provide locally available parts and service.
Again, Murray Outdoor Products thanks you for the decision to purchase
a quality, American made product, the NOMA PERFORMANCE ALLWHEEL STEERING LAWN TRACTOR. All of us at Murray Outdoor
Products are dedicated to providing high quality products that meet yourneeds.
Si°°e CJoe CunninghamProduct Manager

TABLE OF €ONTENTSINTERNATIONALSYMBOLS .............................................4OWNER'S INFORMATION .................................................5RESPONSIBILITY OF THE OWNER ..................................5SAFETY RULES ..............................................................5-6SAFE MOWING GUIDE ...................................................7-9STEPS TO FOLLOW ........................................................10ASSEMBLY ..................................................................11-12OPERATION ................................................................13-17
MAINTAINENANCE ..................................................... t8-24ADJUSTMENTS .................................................... :...... 25-28TROUBLESHOOTING GUIDE ..................................... 29-30STORAGE ......................................................................... 31SLOPE GUIDE .................................................................. 32NOTES ......................................................................... 33-35WARRANTY ...................................................................... 36
IS NOTE 1ome tractor models may require different instructions for assembTyand/or repair than shown in this manual The
epelr Parts manual (supplied with tractor) will contain these instructions if required on your model.
This lawn tractor is equipped with an internal combustion engine and should not be used on or near anyunimproved forest-covered, brush-covered, or grass-covered land unless the engine's exhaust system is
_IL quipped with a spark arrestsr meeting applicable local or state laws (If any). If a spark arrester Is used, it
should be maintained in effective working order by the operator.In the State of California the above Is required by law (Section 4442 of the California Public Resources Code).Other states may have similar laws. Federal laws apply on federal lands. A spark arrester for the muffler isavailable through an Authorized Service Center
References throughout this manual concerning the right or left side are determined as you face forward whileseated in operator's seat.
Photographs and illustrations in this manual may not show your model but are for reference. They are based on the latestinformation.

/
INTERNATIONAL SYMBOLS
IMPORTANT! These symbols may appear on your unit or in literature suppliedwith the product. Learn and understandtheir meaning.
@ @ 0 I I\1ENGINE ENGINE ENGINE OFF ON FAST SLOW CHOKESTART RUN STOP
OIL FUEL BATTERY LIGHTS,' LIGHTS OFF HOUR METER ALL- NEUTRALPRESSURE LIGHTS ON SYSTEMS-GO
FORWARD REVERSE CLUTCH BRAKE PARKING MOWER MOWER MOWERBRAKE HEIGHT CUTTING CUTT_NG
HEIGHT RAISE HEIGHT LOWER
It +ARROW INCREASE DECREASE CLUTCH MOWERMOWER BLADE MOWER MOWER BLADE
CLUTCH BLADE DISENGAGEENGAGE
m
OFF
BRAKE
ON
u
PARKING CAUTION DANGER! KEEP DANGER! KEEP DO NOT USE THIS REMOVEBRAKE HANDS AND FEET HANDS AND FEET AREA AS A STEP SPARK PLUG
AWAY AWAY
DO NOT MOW GO UP AND DOWN KEEP BYSTANDERS BEWARE OF READ OWNER'S/WHEN SLOPES, NOT AWAY THROWN OBJECTS OPERATOR'S
CHILDREN & ACROSS, MANUALOTHERS ARE
AROUND
HOTSURFACE
SHIELD EYES NO SPARKS, SULFURIC ACID FLUSH EYESEXPLOSIVE GASES FLAMES, OR CAN CAUSE IMMEDIATELY WITH
CAN CAUSE SMOKING BLINDNESSOR WATER. GETBLINDNESS OR SEVERE BURNS MEDICAL HELP
INJURY FAST

OWNER'S INFORMATIONThis Owner's/Operator's Manual isfor several d_erent models. The instructions are wr_en for a person with some mechanical ability.Like most service books, not all the steps are described. Steps on howto loosen or tighten fasteners are steps anyone can follow withsome mechanical ability. Read and follow these instructionsbefore you use the unit.Know your product: ifyou understand the unitand howthe unitoperates, youwillget the best performance. As you read thisman ual,compare the illustrationstothe unit. Learn the locationand the function ofthe controls. To help prevent an accident, followtheoperatinginstructions and the safety rules. Keep this manual for future reference.
IMPORTANT: Many units are not assembled and are sold in cartons. It is the responsibilityof the owner to make sure the assemblyinstructions in this manual are exactly followed. Other unitsare purchased in an assembled condition. On assembled units, it is the
responsibility of the owner to make sure the unit is correctly assembled. The owner must carefully check the unit according to theinstructions inthis manual before it is first used.
RESPONSIBILITY OF THE OWNERThe responsibility of the owner Is to follow the Instructionsbelow.
1. Carefully read and follow the rules for safe operation.2. Follow all the assembly instructions.3. Inspect the unit.4. Make sure theoperator of the unit knows howtooorrectly use
all standard and accessory equipment.5+ Operate the unit only with guards, shields, and other safety
items in place and working correctly,6. Correctly adjust the unit.7. Service the unit only with authorized or approved replace-
ment parts.8. Complete all maintenance on the unit.
Environmental Awareness
• Do not fill the engine's fuel tank completely full.• Drain fuel for off-season storage.
• Use only unleaded gasoline.• Service the air cleaner regularly.
• Change oil regularly. Use 30W oil in summer.• Tune-upthe engine regularly.• Keep equipment in efficient operating condition.
• Dispose of used engine oil properly.
SAFETY RULESSafe Operation Practices for Riding Vehicles
As Recommended by American National Standards InstituteWARNING: This cutting machine Is capable of amputating hands and feet and throwing objects. Failure to observethe following safety instructions could result In serious injury or death to the operator or bystanders.
G ENERAL OPERATION:
1. Read, understand and follow all instructions in the Owner's/Operator's Manual, on the machine, the engine and with anyattachments before starting,
2. Only allow responsible adults familiar with the instructions to operate the machine.
3. Clear the area of objects such as rocks, toys, wire, etc. which could be picked up and thrown by the blade.4. Be sure the area is clear of other people before mowing, Stop the machine if anyone enters the area.5. Never carry passengers,
6. Disengagepowertothemoweroranyattachmentsbeforebackingup. Donotmowinreverseunlessabsoluteiynecessary. Alwayslook down and behind before and while backing.
7. Beawareofthedirectionthemowerdischarges. Donotpointdischargefromthemoweratanyoneoratplaceswherepeoplemaybe. Do not operate the mower without either the entire grass bagger or the mower guard in place.
8. Slow down before turning.9. Neverleaveamachineunaltendedwiththeenginerunning. Alwaysdisengagetheblade(s),settheparkingbrake, stoptheengine
and remove the key before dismounting.10. Disengage power to attachment(s) when transporting or not in use. Disengage the blade(s) when not mowing.11. Stop the engine before removing the grass bagger or unclogging the chute.12. Mow only in daylight or good artificial light.13. Do not operate the machine while under the influence of alcohol or drugs or when very tired.14. Watch for traffic when operating near or crossing roadways.15. Use extra caution when loading or unloading the machine when using a trailer or truck for transporting.16. Disengage all attachment clutches and shift into Neutral before attempting to start the engine. (on gear drive models)17. Disengage all attachment clutches before attempting to start the engine. (on hydro models)18. Always wear safety g_asses _r an eye shie_dwhen y_u _perate _heunit t_ pr_tect y_ur eyes fr_m f_reign _bjects that can be thr_wn
from the unit. Always wear eye protection when you make an adjustment or repair to the machine19. Use care when pulling loads or using heavy equipment.
a. Use onry approved drawbar hitch points.b. Limit loads to those you can safely controlc. Do not turn sharply. Use care when backing.d. Use counterweights when suggested in the Owner's/Operator's Manual.

SLOPE OPERATION:Slopes and rough terrain are major factors related to loss of control and tip over accidents which can result In severe Injuryor death. ALL slopes require extra caution. If you cannot back up the slope or if you feel uneasy on the slope, do not mowit. See the "Slope Guide" in the back of this book to check for safe operation.
DO1. Mow up end down slopes, not across.2. Remove obstacles such as rocks, limbs, etc...
3. Watch for holes, ruts or bumps. Uneven terrain could overturn the machine. "Tall grass can hide obstacles."4. Use slow speed. Choose a low enough gear so that you will not have to stop or shiftwhile on the slope. (on gear drive models)5. Use slow speed on slopes. Do not make sudden speed changes. (on hydro models)6. Follow the manufacturer's recommendations for wheel weights or counterweights to improve stability.7. Use extra care with grass baggers or other attachments, they can change the stability of the machine.8. Keep all movement on the slopes slow and gradual. Do not make sudden changes in speed or direction.9. Avoid starting or stopping on a slope, ff tires lose traction, disengage the blades and proceed slowly straight down the slope.
DO NOT1. Do not turn on slopes unless absolutely necessary, then only turn slowly and gradually downhill, if possible.
2. Do not mow near drop..offs, ditches or embankments. A wheat over the edge or an edge caving in could cause a sudden overturnand an injury or death.
3. Do not mow on wet grass. Reduced traction could cause sliding.4. Do not try to stabilize the machine by putting your foot on the ground.5. Do not use a grass catcher or other rear mounted accessories on steep slopes (greater than 10 degrees),
CHILDREN:Tragic accidents can occur If the operator Is not alert to the presence of ch ndren. Children are often attracted to the machineand the mowing activity. NEVER assume that children will remain where you last saw them.1. Keep children out of the mowing area and in the watchful care of an adult other than the operator.2. Be alert and turn the engine off if children enter the area.3. Before and when backing, look behind and down for small children.
4. Never carry children or any passengers. They may fall off and be seriously injures or interfere with the safe operation of themachine.
5. Never allow children to operate the machine. Instruct children in the dangers of the machine.6. Use extra care v/hen approaching blind corners, shrubs, trees or other objects that may obscure vision.
SERVICE:
1. Use extra care when handling gasoline and other fuels. Fuels are flammable and the vapors are explosive,a. Use only an approved container.
b. Never remove the gas cap or add fuel with the engine running. Allow the engine to cool for several minutes before refueling.Do not smoke.
c. Never refuelthe machine indoors.
d. Never store the machine with fuel in the tank or fuel container inside where there is an open flame, such as a water heater.
2. Never start or run the engine inside a closed area.3. Keep all nuts and bolts, especially the blade attachment nuts tight. Frequently check the blade(s) for wear or damage such as
cracks and nicks. A blade that is bent or damaged must be immediately replaced with an original equipment blade(s) from anauthorized service dealer. For safety, replace the blade(s) every two years. Keep the equipment in good condition.
4. Never tamper with the safety devices. Check their proper operation regurarly.5. Toraducefirehazardskeepthemachinefreeofgrass, leavesorotherdebdsbuild-up. Cleanupoilcrfuelspilts. AIIowthemachine
to cool before storing.
6. Stop and inspect the equipment if your strike an object. Repair, if necessary, before restarting.7. Never make adjustments or repairs with the engine running. The carburetor can be adjusted with the engine running. Do not
change the engine governor settings or over-speed the engine.8. Grass bagger components are subject to wear, damage and deterioration, which could expose moving parts or allow obiects to
be thrown. For storage, always make sure the grass bag is empty. Frequently check components and replace with man ufacturar'srecommended parts when necessary.
9. Mowerblade(s)aresharpandcancut. Wraptheblade(s)orwearglovesanduseextracautionwhenservicingthemorthemowerdeck area.
10. Check the brake operation frequently. Adjust and service as requirad.
11. Wait for all movement to stop before servicing any part of the unit.
Look for this symbol to indicate Important safety precautions. This symbol indicates: "Attention! Become Alert"Your Safety Is At Risk."
6

SAFE MOWING GUIDEEach person that operates power equip-ment must learn to use correct and safe
mowing procedures. To help you learn,carefullyreadthe following pages. Mostof the time the operator was not correctlyshown or did not read the instructions on
theunltor intheOwner's/Operator's Manualbefore using the unit. Also, some opera-
tots do not have enough experience. Theresult is unsafe use, endangering the op-
erator, bystanders and the equipment. An-other result can be a poor appearance ofthe area mowed.
Read this book. Read the instructions on
the unit. Operate the mower according tothe Safe Mowing Guide. Follow all safetyrules, cautionsor warnings in thisbeck andon the unit. Make sure anyone that usesthe unit reads the instructions and is told
how to safely operate the mower.
The mower will give you good service anddurability, ifoperated innormal conditions.If the mower is not correctly serviced or isused where the terrain is rough or unsuit-
able, product performance and safety willbe decreased.
Correct clothingis an important part of safe
mowing. Safety glasses will protect theeyes from objectsdischarged bythe mower.Safety shoes with steel plates can protecta foct from injury bytheblade. For prctec-tion from objects discharged from themower, wear clothing that will cover thearms and legs.
Before you start cutting the grass, practiceusing the mower in a large open and levelarea. Learn the location of the controls on
the mower. Know the purpose of thecontrols and how they work. In an emer-
gency, how fast you can stop the blade isimportant. Learn howto control the mowerat all times.
Many engines are started by hand. Whenyou use a pull start or rope start, place yourfeet apart and away from the blade(s).Hold the rope handle tight. Never wrap therope around you r arm or fingers for a "Bet-ter grip". To start the engine, follow theinstructions on the mower, inthis book and
in the engine operating instructions.
For electric start engines, sit in the seat to
start the engine. The battery can be dan-gerous. Follow the instructions on thebattery, the acid container, and in this bookwhen working with the battery. Even smallbatteries have enough voltage to cause aninjury. Always be careful.
The mower is designed to be operated byone person. Never let another person ridewith you on the unit or on any accessories.A passenger will make the unit harder tocontrol, block the visibility or distract theoperator and is dangerous to the operator,the passenger and the equipment. Without
a passenger seat, the passenger can fallfromthe mower orcontact dangerous parts.A mower is not a toy for showing off or forgiving rides.
Never cutawet lawn. Wet grasscancausean accident, affect mower performanceand can cause problems with future lawngrowth and appearance. Wet grass isslippery and can cause the mower to slip.Someone can get injured by touching theblade(s). Wet grass tends to clog themower, causing poor discharge. Cut wetgrass will collect on the lawn, retarding thegrowth of the grass. Also, getting themower wet will cause parts to rust anddecrease the life of the unit.
When you look over the lawn, rememberobstacles that cannot be removed, like
pipes, stumps or rocks. Keep away fromthese obstacles that can cause damage tothe mower or injury to the operator or aperson near the mower. Clear the area ofrocks, toys, wire or other loose objects.These ffems can damage the mower or canbe discharged by the mower blade.
7
The blade of power mower rot_es veryfast. It can discharge rocks and otherobjects over a long distance which can be
dangerous. The force of the objects canbreak windows, cause injuries or even putan eye out. Most of the time the injury is toa person, like a child. Keep every personcompletely away from the area to bemowed. Make sure the grass is not dis-charged toward anyone. Planning yourmowing pattern has a double advantage. Itcan decrease the possibility of an injuryand make the clean up after mowing easier.
Check the terrain of the area to be mowed.
Mow inpattern that will keep you away fromdangerous areas. Checkthe distance youneed to stop and the distance avairable toturn. Slopes and rough terrain must bemowed carefully and some areas must notbe mowed at all. With riding mowers, mowup and down the hill When you must mowrough terrain or on slopes, never changedirections or change speeds and stop inthese areas only in and emergency.
Before you ride up or down a slope, try toback straight up the slope. Do not ride upor down a slope that is too steep to backstraight up. See the "Guide" in the back ofthis Owner's/Operator's Manual to checkany slopes.

SAFE MOWING GUIDEBefore you start cutting, make sure themowerwas completely assembled accord-
ing to the Owner's/Operator's Manual. Ifthe mower was completely assembled atthe store, you must still check the moweraccording to the assembly instructions.Make sure the mower is correctly as-sembled and that all fasteners are tight.Make sure the engine has the correctamount of oil. Check these items often
during the life of the mower.
Your mower has a gasoline engine. Gaso-line is a dangerous fuel. Keep gasolineonly in an approved safety gasoline con-tainer, Do not keep large amounts ofgasoline. When you add gasoline to thefualtank, do not smoke. Storetha gasolinecontainer and the mower in an area that
has good ventilation. Also, keep the gaso-line away from any flames like the pilot lightof a furnace or any other source of ignition.If the mower is to be stored for more than a
few weeks, remove the gasoline from thefuel tank. When inside an enclosure, donot add gasoline to the fuel tank. Beforeyou add gasoline move the mower outsideand add gasoline carefully. Before your
start the angina, remove anygasoline fromthe outside of the fuel tank or from the
mower. Warm gasoline will expand. Leave
some space in the fu_tank for the gasolineto expand. Also, the fuel cap has a venthole for fuelvapors. Always usathe correctfuel cap. Failure to follow safety rules
about gasoline will cause fires and explo-sions, injury to you and damage to the
equipment and other property.
If you add gasoline to an engine that isrunning or hot, the result can be an explo-sion. Before you add gasoline, stop theengine and let the engine cool for severalseconds. Remove dry grass and otherdebris from the mower. Keep the mowerclean to improve the performance, help the
engine and transmission run cooler, ex-tend the like of moving parts, and decrease
the danger of a fire.
Fires and explosions are not the only dan-gers when working around a mower. Theengine, transmission, and the muffler willget hot in several minutes when the engine
is running. Do nottouch these parts of themower. Stop the engine. Let the engineand transmission cool before servicing themowerRemember, exhaustfumesaredan-gerous. Never operate the engine insidea
building.
When you get a new mower, itcan be a newexperience for the family. Tell each personhow a mower can be dangerous. Remem-ber, a mower is not a toy. A mower is notto be used by children or anyone not oldenough, strong enough or that does nothave experience.
If the mower is not correctly assembled, not
operated correctly, or not regularly ser-viced, the mower can be dangerous. Themost important rule to follow is always usegood judgement and common sense. Mowsafely and carefully.
Your mower will easily cut thick grass.Fingers, feet and other parts can also be
cut by the blade. Injuries occur when theoperator does not think and reaches intothe chute opening. Always operate themower as if the blade is rotating. Do notservice or make an adjustment, except tothe carburetor, while the engine is running.
Use only accessories that are factory ap-proved for your mower. The wrong acces-
sory can decrease the safety of the mowerand can even damage the unit. Read andfollow the instructions included with the
accessory and the mower.
Use only original equipment or replace-ment parts that are factory approved forservice. If you need service, select andAuthorized Service Center for your mower.If you do the work on the unit, follow theinstructions Jn the Owner's/Operator's
When you mow, remember that childrenare attracted to the mower. Always usacaution when mowing around obstacleslike trees or shrubs or when moving back-ward. Only mow in a forward direction if
possible. You r visibility is decreased whenyou mow backward. Also, the blades aremade to cut while the unit is moving for-ward. If you mow backward, the cuttingperformance decreases.
Before you leave the mower, stop the en-
gine. Remove the key. Disengage andlower any attachment. Set the parkingbrake. Never mount or dismount from the
seat while the engine is running. An acci-dent can occur if you touch the brake, shiftlever, throttle, clutch, or mower clutch leverwhile the engine is running. Mount anddismount from the seat on the side oppo-site the discharge chute.
Make sure you are in good condition whenyou mow. When you mow for severalhours your reflexes will decrease and yourmind will not be as alert. Take a short break
or an accident can occur. If the tempera-ture is hot, use caution to prevent dehydra-tion. If you are tired, angry or not com-pletely alert, do not operate the mower. Ifyou use alcohol, medication or drugs, donot use the mower or any type of powerequipment.
Engine speed is a key to safe mowing andto a good looking lawn. The maximumspeed of the engine was set at the factory.Do not change the setting of the engine
governor.
Select the maximum engine and groundspeed that is right for the terrain and theheight of the grass. The blade cuts bestwhen the engine is operating at maximum
8

SAFE MOWING GUIDEspeed. Also, the grass catcher willf unctionbetter when the engine is operating atmaximum speed. On slopes, decrease theground speed and use care making suremower feels safe to operate.
If the weather conditions are bad, do notmow. If weather conditions become bad,
stop cutting and finish later. It is dangerousto cut grass in the rain. Always find protec-tion in an electrical storm. If the weather
conditions are extra dry, protect your eyeswith safety glasses from the dust and fromthe objects discharged by the mower. Also,a dust or a pollen mask can help.
Your mower is equipped with a number ofsafety devices which are important to thesafety of the operator and bystanders andmust never be changed or removed fromthe mower. If a safety device is lost,damaged or no longer functions, repair orreplace the device before you operate themower.
It is best to mow during the day. If you mustmow at night, make sure there is enoughlight for safe operation.
Your mower will require regular mainte-nance and service. The maintenance
schedule depends on the hours of use.Also, mowing conditions can change theschedule. Check the Owner's/Operator'sManual for more information. Correct main-
tenance will help the mower function safely.
Do not service the mower
(except for the carburetoradjustment) while the en-
gine is running. Before il_,lyou service the un t, even I_with the engine stopped, Itl
always disconnect the wirefrom the spark plug to pre-vent the engine from start-ing.
If you hit a large object during operation,stop the engine. Remove the wire from thesparkplug. Carefully inspect the mower fordamage. Before you start the engine again,make the necessary repairs. If you feelnew or excessive vibration, immediatelystop the engine and check for the problem.
Vibration can be a warning of a problem,Keep all nuts, bolts and screws tight.
The blade is the most dangerous part of themower. Frequently check the blade andthe blade mounting fasteners. Keep thefasteners tight. If the blade hits a solid
object, stop the engine. Remove the wirefrom the spark plug. Check for a blade thatis bent, cracked or for other damages.Before you start the engine, replace thedamaged blade. For safety, replace theblade every two years.
A sharp blade decreases the work load on
the engine and more evenly cuts grass.Frequently sharpen the blade for a betterlooking cut. Use the left side of the mowerdeck to trim near an object.
A grass catcher is a good a accessory foryour mower. For best performance andsafety, make sure the grass catcher isapproved for use with your mower. Followthe assembly and operation instructionsincluded with the grass catcher.
Some grass catchers require a specialblade for best performance. Before you
attach, check, or empty the grass catcher,always stopthe engine. Beforeeach useofthe grass catcher, check for cracks, wear ordeterioration. Before you use the grasscatcher, replace a damaged part with areplacement part approved by the factory.
For you to have a good green lawn, followthe mowing procedures below. Do not cutthe grass too short. If you cut the grass toshort you can cause the grass to becomeyellow or make the lawn look brown. Usea lower height of cut in cool months whenthe grass is thicker. Raise the height of cutin hot dry periods, if you cut the grass with
a blade that is not sharp or at a slow enginespeed you can damage the grass. Movethe throttle control to the FAST positionwhen mowing and using the grass catcher.Also, use a slower ground speed whenusing the grass catcher.
Ifyou change the direction or pattern of cutslightly every time you mow willmake thegrass grow stronger and thicker. Do notadd oil or gasoline to the mower while onthe lawn. Spilled oil or gasoline can kill thegrass. In high or thick grass, do not try tocut all the grass the first time. Raise theheight of cut on the first cutting and lowerthe heightfor the next cutting Anotherwayis to cut only part of the width of the mowerand decrease your ground speed (not theengine) to move more slowly so that themower can discharge the grass as it movesforward.
Understand the controls and how they
work. Learn the ground speed(s) of yourmower. Check the stopping distance re-
quired at different travel speeds. Checkthe turning radius of the mower. Thecontrols on your riding mower are differentfrom an automobile. The throttle is oper-
ated by hand and holds the engine speedconstant until it is changed. The location ofthe shift lever and the shift pattern is differ-ent from that of an automobile. Also, thebrake and clutch systems are different.Remember the procedures to follow in anemergency. Remember, turning off theignition switch will stop the blade and thedrive mechanism. If the traction of the
wheels is lost or does not feel safe, disen-
gage all systems and stop the engine.Dismount from the mower. Pushthe unif to
a safe place before you begin mowingagain.
Your unit has an electrical system thatincludes an seat switch in the seat. The
seat switch detects if the operator is sittingon the seat. The engine will stop if theoperator leaves the seat when the bladeengagement control is engaged. This seatswitch is a safety device only. Itmust notregularly be used to stop the engine or theblade. There are other control systems onthe mower for this purpose. Always keepthe seat switch and other safety devicesand controls in place and operating for yourprotection.
Remember, your mower is a tool that canbe dangerous if it is not correctly used.Follow the instructions in this Owner's/
Operator's Manual. Safe and careful useof the mower willgive you ma _,_,safe hoursof problem free use.

STEPS TO FOLLOW
BEFORE MOWING
• Be sure to dress correctly. Wear hard shoes, not sandals or tennis shoes.
• Examine the blade. A blade that is bent, cracked or damaged must be replaced with a factory replacement blade.
• Fillthe fueltank outside. Clean off spilled fuel.
• Read and follow the Owner's/Operator's Manual, the instructions with the engine, and the instructions with any attachments.Owner's/Operator's Manual instructions are for your safety and the safety of others.
• Exhaust fumes are dangerous. Start the engine outside.
• Make sure all safety devices are in place and working correctly.
• Operation of the mower is only for a person that has experience.
• Wet grass can be dangerous. Let the grass dry.
• Instruct children and others to keep away from the work area.
• Never cut the grass w_thoutgood light.
• Pick up loose objects. Remove them from the mowing area,
WHILE MOWING
• Watch for fixed objects and avoid them. They can damage the mower or cause injury.
• A hot engine, muffler, and transmission will cause a burn. Do not touch.
• Inclines and slopes must be carefully mowed. See the "Guide* in the back of this book to check a slope.
• Lack of daylight or good artificial light is cause to stop mowing.
• Examine the mower, the blade, and other parts for damage after hitting a foreign object or if the unit vibrates excessively.
• Do not make adjustments or repairs without stopping the engine (except for carburetor). Disconnect the spark plug wire.\.
• On or near roads, watch out for traffic. Direct discharge away from roads.
• When mowing, avoid areas where traction is unsure. Look back before changing direction of travel.
• In heavy grass, raise the cutting height. Cut slower. Stop the engine to remove clogged grass from the mower.
• Never remove any safety related parts.
• Do not pour gasoline into a engine that is hot or running.
AFTER MOWING• Always let the mower cool before storing in an enclosed area.
• Foreign material on the mower is dangerous. Clean off grass, leaves, grease, and oil before storing.
• Tighten all loose nuts, bolts, and screws before you use the unit.
• Empty and clean any grass catcher or other accessory.
• Remove the key or disconnect the spark plug wire to prevent unauthorized use.
• Make sure the mower is not kept near a source of ignition. Gas fumes can cause an explosion.
• Only original parts or factory approved substitutes can be used to service the mower.
• When storing the mower for an extended period, remove the fuel from the fuel tank.
• Instruct children to leave the mower alone. Jt is not a toy.
• Never keep gasoline near a source of ignition. Always use an approved container. Keep gasoline away from children
• Lubricate according to the Owner's/Operator's Manual. See "Lubrication".
IMPORTANT- READ THE OWNER'S/OPERATOR'S MANUAL. KEEP THIS BOOK FOR FUTURE USE AND REFERENCE.
,_ WARNING: Look for this symbol to point out important safety precautions. It means: "Altentlon! Become Alert!Your Safety Is Involved."
10

ASSEMBLY
Your lawn tractor has a right side and left side as you faceforward while seated in operator's seat.
TO ACTIVATE BATTERYIMPORTANT: : Before you attach the battery cables to the
battery, check the battery date code. The battery date code tellsif the battery must be charged.
1. Check the battery date code on top of the battery.
2. If the battery is put into service before the battery date, thebattery cables can be attached without charging the battery.See Battery Installation paragraph in Maintenance sec-tion of this manual.
3. If the battery is put into service after the battery date, thebattery must be charged. To charge proceed:
When you charge the battery, do not smoke,_
Keep the battery away from any sparks. Thefumes from the battery acid can cause an
explosion. •
TO CHARGE THE "MAINTENANCE FREE" BATTERY
NOTE: Before you attach the battery cables, make sure thebattery is fully charged. This will extend the life of the battery andprovide the necessary power to start the engine.
4. Remove battery from lawn tractor (see Battery Removalparagraph in Maintenance section of this manual).
5. Remove the protective caps from the battery terminals.
6. Use a 12 volt battery charger to charge the battery. Chargeat a rate of 6 amperes for one hour. If you do not have abattery charger, have an authorized service center chargethe battery. Complete assembly section of this man ual whilewaiting for battery to charge.
7. Reinstall battery (see Battery Installation paragraph inMaintenance section of this manual).
STEERING WHEEL INSTALLATION(FIG. 2-ASSY)1. Position front wheels straight forward.
2. Place spacer (If so equipped) on steering shaft.
3. Place steering shaft cover (if so equipped) over spacer.
4. Align cross holes in steering wheel and steedng shaft. Makesure wheel single wheel spoke points down. NOTE: Use asmall Phillips screwd river with a 1/4 inch shaft to aFignholes.
5. Drive spring pin through holes with a hammer.
STEERINGWHEEL
STEERINGSHAFT COVER(
SPRING PIN
SPACER(IF SO EQUIPPED) STEERING SHAFT
11

ASSEMBLYTO ADJUST QUICK ADJUST SEAT(FIG.3-ASSY!if adjustment Is needed:
1. Loosen T-knob located underneath seat (Do notremove).
2, Move seat forward or rearward to desired operator'sposition.
3. T_ghtenT-knob securely.
I_ Never fill the gas tank while the engine is |
running or Is hot. Immediately wipe off any |
spilled gasoline before attempting to start |
engine. J
TO SERVICE ENGINE (FIG. 4-ASSY)1. Place tractor so engine is in a level position.
2. Raise hood to gain access to engine. NOTE: Raise andlower slowly to avoid personal injury or damage to tractor.
3. Remove oir fill cal'/dipstick. Clean dipstick with a rag.
4. Check oil level. Use a funnel to add oil to the enginecrankcase, if the oil level is below the full mark. See Engine
Operating and Maintenance manual for proper prooedu re.
5. Reinstall oil fill cap/dipstick and tighten securely.
6. Check to make sure that spark plugwire(s) is attachedtospark plug(s).
7. Fill gas tank with clean, fresh lead-free gasoline with aminimum rating of 77 octane. Low-lead or regular gradeleaded gasolines are acceptable. Do not mix oil with gaso-line, Be certain container is clean and free from rust or other
foreign particles. Never use gasoline that may be stale fromlong periods of storage in the container.
TO SERVICE TRACTOR
1. Check tire pressure. Recommended operating tire pressureis 10 to 14 pounds per square inch. Check side wall of tiresfor manufacturer's maximum tire pressure. Do not exceedthis pressure. Equal tire pressure shoutd be maintained in alltires,
2. Check all nuts and bolts to be sure none are loose.
3. ReturntotheToActivateBattery paragraphinthissection
and complete the battery installation.
12

OPERATIONThe operation of this lawn tractor canresult in objects being thrown into theayes, which can result insevere eye dam-age. Always wear safety glasses or eyeshields while operating a lawn tractor. Werecommend standard safety glasses or awide vision safety mask for overspectacles.
Get to know your lawn tractor and its controls. Be sure you (orany other operator) have read and understood the SafetyPages listed in the front of this manual.
Your new lawn tractor wUigive years of service if cared forproperly. Never run intotrees, curbs, etc. Service regularly andstore in a dry area. Operate your lawn tractorat slow speeds untilyou become familiar with the machine. Avoid sharp turnsat highspeed and uphillor downhillturns. Operate tractor carefully. Beespecially cautious on hills. When riding down inclines, keepshiftcontrol in low speed withbrake-clutch pedal out.This allowsthe engine to control the speed. Use brake for fast stops on hills.
KEEP MOWER CLEAN. Grass clippings may pack under themower deck due to the internal moisture content of the grass.This accumulation of cut grass should be removed after each
mowing. Remove ignitionkey and scrape accumulation off witha putty knife or similar tool. Cleaning of the underside is easierif mower deck is removed. See Mower Deck Removal para-graph in Malntenanca sectionof this manual. Remove dirtanddebris from engine area with a brush or cloth.
CONTROLS
FIG. 1-OP shows all operating controls. The controls and theirfunctions are as follows:
I Do Not operate this tractor without a chute]
deflector In place. A lawn tractor can be dan- Igerous to operate if misused. On slopes, be Ivery cautious and avoid sharp turns to pre- I
vent tipping or loss of control. NEVER carry I
passengers. ,J
Battery Charoe Indicator (if so equipped)- Indicates whetherbattery is being recharged when engine is running. The batterycharge indicator light is GREEN. When engine is running andlight is lit this means the battery IS charging. If indicator is noton, have battery and/or engine charging system checked by anauthorized service dealer.
Oil Pressure Indicator (if so eauioDed)- Indicates engine oilpressure. If it is lit, stop immediately and check the oil.
OAll Systems Go Liaht - If this indicator is lit, the engine will notstart.
1. Your clutch-brake pedal may not be fully depressed.
2. The mower clutch lever may not be in the DISENGAGEposition.
®
13

OPERATION
o - Regulates engine and blade speed.Engine should always be run at fast speed for best grass cut-ting. NOTE: For models without a choke control button thechoke is regulated with the throttle control lever.
Ionltlon Switch - Used to start and stop engine. Turn key allthe way right to 3rd position to start engine. When key is re-leased after starting engine it will return to 2nd position. Tostop engine, turn kay to 1st position. Remove key to lock igni-tion.
Headltoht Switch - Turns headlights on and off. Withengine running, push ON and of switch to turn headlights on.To turn headlights off push OFF and of switch.
B
Transmission Control Lever - Used to select ground speedranges as well as direction of motion (forward-neutraFreverse).Forward speed ranges are labeled (1 -2-3-4-5) or (1-2-3-4-5-6).
No. 1 range isslowest forward speed, used for traveling upor down steep hillsor for snow removal.
No. 2 range is used for cutting tall or heavy grass.
No. 3 range is used for average mowing conditions.
No. 4 range is used for light mowing.
No. 5 range is used for very light mowing on smooth flatsurfaces on a 6 speed. On a 5 speed it is used fortransporting the unit.
No. 6 range should be used for transporting unit only.
_ ome to a full stop before changing direct,o_of motion.
Hour Meter flf so soulor, ed) - Counts total number of hours
lawn tractor has been operated. Use meter with MaintenanceCheck List to schedule maintenance for lawn tractor. ®I\1Choke Control (If so eauloned) - Used to start cold engine.
Parkino Brake Lever - Used to lock brake-clutch pedal inbrakeposition. NOTE: Check gear shift position and know op e r -ating intentions before releasing brake.
1. Depress brake-clutch pedal fully, engaging brake.
Ammeter fir so eaulnoed) - Indicates whether battery is be-ing recharged wheh engine is running. If charge is not indi-cared while engine is running at full throttle, have enginecharging system checked by an authorized engine servicedealer.
2.
3.
Push parking brake lever forward and engage notch inparking brake lever against main frame.
To release parking brake, apply pressure to pedal andspring will release parking brake lever.
I l -I lBrake-Clutch Pedal - This is a dual purpose control. Press
pedal halfway down to disengage dutch. It is used for changingspeed range or direction of traver (forward or reverse). Releasepedalto engage clutch. With pedal compretely depressed, brakeis applied.
14

OPERATION
Mower Clutch Lever - Used to engage or disengage the powerto the mower deck blades. With mower clutch lever moved all the
way to DISENGAGE (rearward) position, blades should stop ina safe period of time. Use DISENGAGE position when using asa tractor for yard jobs such as pulling a roller, seeder, sweeperor other accessories.
1. Move lever slowly(Never "snap" the lever) toward frontoflawn tractor to engage power to the blades, it is importantto engage mower clutch lever while engine is running at fullspeed.
2. Move lever slowly toward rear of lawn tractor to
disengage power to blades and to apply blade brakes.
Mower clutch lever must always be In full DISENGAGEposition to start engine. Never place lever in ENGAGEposltlonuntilengine is warmed upandoperator ison seat,readyto start mowing. Alwaysreturn leverto DISENGAGEposition before dismounting from tractor.
(_uttine Heloht Adjustment Lever- Used to change height ofcut. The bottom position of lever is the lowest
cutting height and the top position is the highest cutting height.Other positions change height of cut approximately 1/2 incheach.
t.
2.
Grasp lever (RG.I-OP) with left hand and pull upward toraise mower deck. You will hear a click sound as lever
passes to next height position.
Grasp lever with left hand and pull upward slightly. Depr'essbutton on end of lever with thumb to release height adjust-ment lever latch and lower mower deck to
desired height. Release latch button and allow lever to latchin place.
_k Blades will not stop immediately. Keep'_hands and feet from under the mower deck|and away from the discharge chute. |
J
15

OPERATION
TO START ENGINERead Operation section in this manual and Engine Operat-Ing and Maintenance manual before trying to start engine,
NOTE: Be sure engine crancase Is filled to the full markbefore starting engine. Never run engine unless crank-case is properly filled with o11and dipstick is tightened se-curely.
IMPORTANT: When starting engine, the brake+clutch pedalmust be fully depressed and mower clutch lever must be in fullDISENGAGE positionto engage the lockout switches, The AllSystems Go light (if so equipped) on dash will glow andengine will not crank unless these conditions are met.
Your lawn tractor Is equipped with a seat switch. The
engine will stop if operator is not firmly seated inoperator's seat when mower clutch lever is engaged.Leaning forward or to one side on the seat may cause theengine to stop. To leave operator's seat, the brake-clutchpedal must be pushed all the way down and locked orengine will stop.
To start engine proceed as follows:
1+ Check to make sure fuel tank contains clean, fresh gaso-line, and engine crankcase is properly filled with oil.
2. Depress and hold brake-clutch pedal all the way down.Place shift lever in NEUTRAL position.
3. Place mower clutch lever in DISENGAGE position.
4. Place throttle control lever to FAST position.
5, A warm engine will require little or no choking. For coldstarts place throttle control lever in choke position or pullchoke control out. This will depend on the type choke yourunit is equipped with.
6, Turn ignition key to START position. Release key whenengine has started. NOTE: Continuous cranking of morethan 15 seconds per minute can cause starter to overheat.Allow startei" to cool two minutes after prolonged crankingof more than 15 seconds per minute.
7+ After engine starts, move throttle control out of choke
position to desired engine speed or gradually push chokecontrol all the way in and move throttle control lever to
desired engine speed. This will depend on the type chokeyour unit is equipped with.
8. To stop engine, turn ignition key to OFF position.
I IMPORTANT 1Move throttle to slow before turning ignition off toreduce muffler "POP".
Failure to do so will result In engine and exhaustsystem damage.
If engine cranks but fails to start, proceed as follows:
1. Checkto make sure fueltank contains clean, fresh gasoline.
2. Check to make sure spark plug(s) is/are tightened securelyinto engine and spark plug wire(s) is/are attached to sparkplug(s).
3. Carburetor adjustment may be necessary (see EngineOperating and Maintenance manual).
If engine does not crank, check the following:
1. Be sure brake-clutch pedal is fully depressed and mowerclutch lever is in DISENGAGE position.
2. Be sure the battery has been serviced and charged.
3. Check fuse in red wire near back of ignition switch.
may exceed 150° F. Avoid these areas.
LAWN TRACTOR OPERATION
Take a comfortable riding position on seat of lawn tractorand start engine as outlined. After engine warm-up, move thetransmission control lever to a slow speed position to get usedto your lawn tractor. After you become familiar with the opera-tion of your tractor, move the transmission control lever to a
faster speed. With mower blades stopped, make your first runin a large, open, level area. Learn to start, stop, and change
direction in this area. Once you learn to maneuver your lawntractor, move throttle control to FAST position. Slowly move
mower clutch lever to ENGAGE position and start mowing. Tostop blades, move lever to DISENGAGE position. To stopengine, move throttle control toSLOW position, turn ignition keyto OFF position. CAUTION: Disengage mower clutch lever,set parking brake, stop engine, lower mower deck andremove key before leaving operator's position. Alwaysdismount from left side.
Your lawn tractor is equipped with a seat switch. Theengine will stop ifoperator is not firmly seated inoperator'sseat when mower clutch lever is engaged. Leaning forwardor to one side on the seat may cause the engine to stop. Toleave operator's seat, the brake-clutch pedal must bepushed all the way down and locked or engine will stop.
16

OPERATION
f TO AVOID SERIOUS INJURY OR DEATH
Read Owner's/Operator's Manual(s).
Know location & function of all controls.
Keep guards, safety shields and switches Inplace and working.
Remove objects that could be thrown byblade(s).
_. _IL Do not mowwhen chlldren & othersare around.
Never carry children or passengers.
Look down and behind before and while back-
ing.
Do not mow where machlns could tlp or sllp.
If machine stops going uphlll, disengageblade(s) and back down slowly.
Remove key when leavlng machine.
Avoid sudden turns.
Go up and down slopes, not across. jMOWING HINTS
For best mowing results, engine should be run at fast throttleandground speed controlled by shift control lever position. Forwardspeed of the lawn tractor must be controlled in accordance with
thetype and quantityof grass being mowed. The more grassthatmust be cut, the slower the speed forward should be. When
cutting light grass, the forward speed can be increased. Byobserving the cutting action of your mower, you can determinehow fast you can travel.
Your mower may tend to leave unmowed strips when long andtender grass is being mowed. Tender grass has a high internalmoisture content and is easily depressed by the lawn tractorwheels, and may not always spring back in time to be cut. Toovercome this condition, we advise mowing the lawn in acounterclockwise direction, overlapping previous cut, whichallows the lifting action of the rotating blades to lift the grass intothe cutting path.
The rear wheels are driven by a transaxle, similar to anautomobile differential. This makes short turns possible andprevents marring of the lawn. It is possible to spin the drivewheels of the lawn tractor under adverse conditions. When one
wheel slips, shift your weight over this wheel to obtain morepulling power. Your lawn traclor is very maneuverable and canbe reversed to back out of dead ends. CAUTION: Disengagemower blades before backing up. Carefully check areabehind tractor for children or pets before backing up.
MULCHING MOWING TIPS1,
2
3.
4
5,
6,
7
Blades must be sharp. A dull blade willrip or tear grass,creating an uneven appearing cut lawn.
Mow grass when it has grown 1/2-1 inch above the recom-mended height (consult your local nursery for advice onrecommended height).
To achieve best mulching results, mow the lawn oftenenough to cut less than 1 inch.
Do not cut off more than 1/3 of the total height of the grassin one mowing. If the lawn is overgrown cut a little at a timeand let grass recover before mowing again.
Avoid mowing wet grass, it will clog the mower deck andleave clumps ofgrassonthe lawn. Ifthis occurs even undernormal conditions mow more frequently, at a slower speed,a narrower swath, or raise the cutting height.
Place engine throttle control in fast position whenmowing.
Always clean under mower housing after each use.
ALL-WHEEL STEERING FEATUREBecause both front and rear wheels turn, an all-wheel steer-
ing lawn tractor is very maneuverable. If the lawn tractorbecomes wedged against a wall, fence or other obstruction,do the following:
1. Move transmission control lever to No. 1 position.
2. Turn steering wheel slightly away from obstruction. NOTE:If you turn sharply (7° or more), rear wheels will turn in oppositedirection of front wheels (turning into obstruction you are tryingto turn away from).
3. You can reverse tractor to back out of dead ends.
CAUTION: Before backing up, stop mower blades. Be suretractor is completely stopped before shiftinginto reverse. Before backing up, carefully check thearea behind the lawn tractor for children, pets, and otherobstructions.
17

MAINTENANCEThe warranty on this lawn tractor does not cover items thathave been subjected to operator abuse or negligence. Toreceive full value from the warranty, operator must maintainlawn tractor as instructed in this manual. The following IVlaln-
tsnance Check List is supplied to assist operator to properlymaintain lawn tractor. This is a check list only.Adjustments referred to will be found in Adjustments sectionof this manual.
BEFORE STORAGE
BEGINNING EACH SEASON
EVERY 100 HOURS
EVERY 50 HOURS
EVERY 25 HOURS
MONTHLY
FREQUENTLY
AFTER FIRST 5 HOURS
BEFORE EACH USE
Check Engine Oil Level
Change Engine Oil
Change Oil Filter (if so equipped)
Clean Air Fitter
Change Spark Plug(s)
Replace Air Filter Paper Cartridge
Clean Air Screen
Inspect Muffler/Spark Arrestor
Rep[ace Fuel Filter
Check Battery Fluid Level/Recharge (if so _qui_ped)
Clean Battery and Terminals
Adjust Motion Drive Belt Tension
Check Brake Operat on • •
Check Transmission Cooling
Check Tire Pressure (10-14 Ibs) • •
Adjust Mower Deck Belt
Sharpen or Replace Mower Blades
Check for Loose Fasteners •
Clean Lawn Tractor •
See Lubrication Chart !
MAINTENANCE CHECK LIST
SERVICE RECORDFILL IN DATES
AS YOU COMPLETEREGULAR SERVICE
NOTES: 1. Change more often when operating under a heavy load or in HIGH temperatures. (90°and above)2. Service more often when operating in dirty or dusty conditions. 3. Replace more often when mowing in sandy soil.
At no time dur ing maintenance or adjustmentscan the lawn tractor be lifted more than 20
inches from level position without taking the
_ following precautions:
1. Remove gasoline from tank and run engineuntil carburetor is dry.
2. Remove battery. (see BATTERY REMOVALparagraph in MAINTENANCE section.)
3. Remove oll from crankcase.
LUBRICATION
For lubrication frequency see Maintenance Check List. Forlubrication points and type of lubricant see LubricationChart. The transmission has been lubricated for life.
18

MAINTENANCE
CLEANING LAWN TRACTOR
Grass clippings may pack under the mower deck due tothe internal moisture content of the grass, This accumulationof cut grass should be removed after each mowing. Removeignifionkey and scrape accumulation off with a putty knife orsimilar tool. Cleaning of the underside is easier if mower deckis removed, Sea paragraph Mower Deck Removal. Removedirt and debris from engine area with a brush or cloth.
ENGINE MAINTENANCESee Engine Operating and Maintenance manual for mainte-nance instructions.
MAINTAIN THE AIR FILTERThe air filter should be cleaned and/or replaced every 25 hoursof operation under normal operating conditions; more often un-der dusty conditions. To clean the air filter see Engine Oper-ating and Maintenance manual.
SPARK PLUG MAINTENANCESpark plug should be checked periodically for excessive car-ben and gap. The spark plug gap should be checked with awire feeler gauge and set at .030 inch as shown in the EngineOperating and Maintenance manual.
MAINTAIN THE OIL FILTERThe oil filter should be changed every 100 hours of operationunder normal operating conditions, more often under severeconditions. See the Engine Operating and Maintenancemanual for proper procedure,
MAINTAIN THE FUEL FILTERCheck the in-line fuel filter at frequent intervals and replacebefore the screen becomes clogged with sediment. Make surenew filter is installed with the IN marking toward the tank andthe OUT marking toward the engine. Check fuel system com-ponents frequently and replace any parts showing wear orcracks. See the Engine Operating and Maintenancemanual for proper procedure.
TO CHANGE CRANKCASE OIL(FIG. 1-MAINT)
Change crankcase oil after first 5 hours of operation and every25 hours thereafter. See Engine Operating and Mainte-nance manual for proper procedure.
1. Place a flat bottom 2 quart container beneath oil drain valve.NOTE: The user has the option of connecting a vinyl hose(1/2" diameter) to pert end of valve in order to drain used oilinto container for disposal. Hose may be purchased at anylocal hardware store.
NOTE: It may be necessary to raise left side of lawn tractor (with ,blocks under left wheels) to get proper drainage.
2. Turn oil drain valve counterclockwise and pull to drain oil.NOTE: Oil fill cap/dipstick should be loosen ed to serve as anair vent,
3. Tocioseoildrain valve push and turn clockwise. Removeoilfill cap/dipstick and refill crankcase as outlined inEngine Operating and Maintenance manual.
4. Reinstall oil fill cap/dipstick.
19
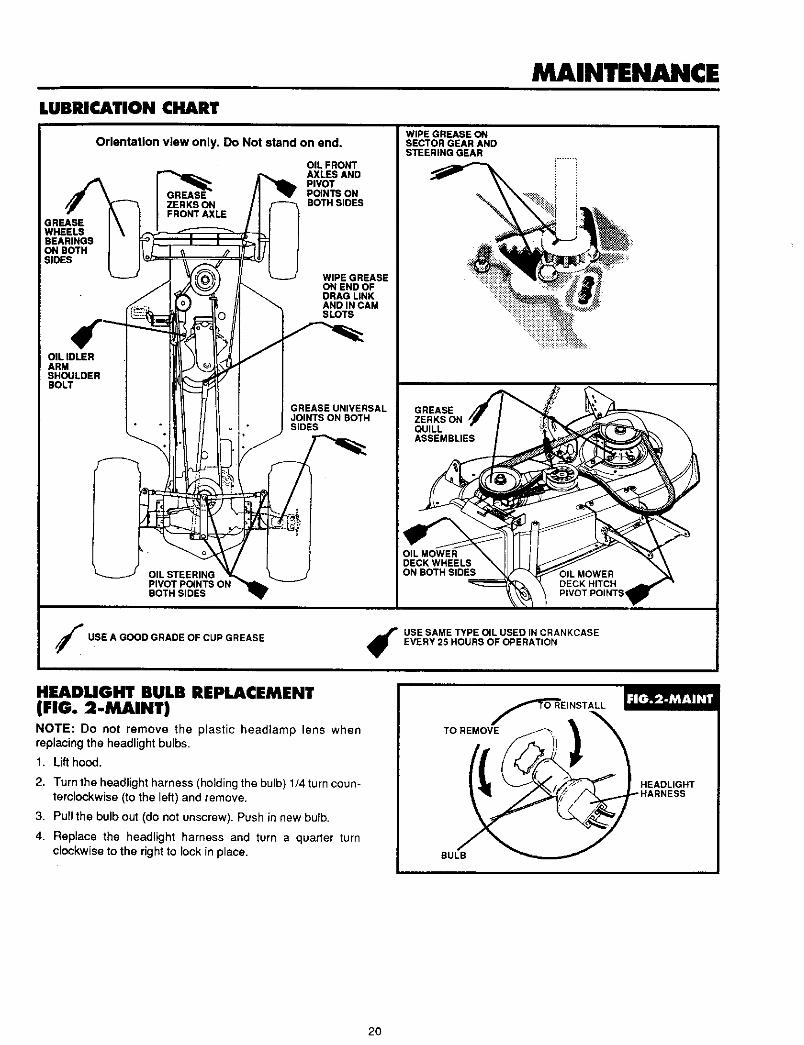
MAINTENANCELUBRICATION CHART
GREASEWHEELSBEARINGSON BOTHSIDES
OIL IDLERARMSHOULDERBOLT
Orientation view only. Do Not stand on end.
OIL FRONTAXLES ANDPIVOTPOINTSONBOTH SLOES
WIPE GREASEON END OFDRAG LINKAND IN CAMSLOTS
GREASE UNIVERSALI JOINTS ON BOTHI SIDES
/
OIL STEERINGPIVOT POINTS ONBOTH SIDES
WIPE GREASE ONSECTOR GEAR ANDSTEERING GEAR
GREASEZERKS ONQUILLASSEMBLIES
OIL MOWERDECK WHEELSON BOTH SIDES MOWER
DECK HITCHPIVOT POINTSq
USE A GOOD GRADE OF CUP GREASE USE SAME TYPE OIL USED IN CRANKCASEEVERY 25 HOURS OF OPERATION
HEADUGHT BULB REPLACEMENT(FIG. 2-MAINT)NOTE: Do not remove the plastic headlamp lens whenreplacing the headlight bulbs.
1. Lift hood.
2. Turn the headlight harness (holding the bulb) t/4 turn coun-temlockwise (to the left) and remove.
3. Pull the bulb out (do not unscrew). Push in new bulb.
4. Replace the headlight harness and turn a quarter turnclockwise to the right to lock in place.
TO REMOVE
BULB
HEADLIGHT
2O

MAINTENANCE
When you charge the battery, do not smoke. I
Keep the battery away from any sparks. The Ifumes from the battery acid can cause an/
explosion. J
BATTERY MAINTENANCE
When starter operates properly and battery connections areclean and tight but cranking difficulty is experienced, batterymay not be charged. Battery should be taken to an authorizedservice station and tested.
if engine will not start right away under normal cranking speed,continued cranking will run down the battery and may causedamage to starter. Check ignitionand fuel systems and correctany faults.
The battery should be kept clean. If the top has an accumula-tion of dirt or grease, remove the battery from vehicle for clean-ing. The battery should be cleaned with a mild solution of bak-ing soda and water. Brush this on, keeping vent plugs tightly inplace to prevent any solution from entering the cells, Allow so-lution to work for a few minutes, then rinse with clean water
and wipe battery dry. ff battery terminals are corroded, deanwith a wire brush and coat terminals with petroleum jelly, Besure to reinstall battery in the same position and properlyreconnect battery cables (red to positive, black to negative).
Proper care will lengthen battery life. When replacement
becomes necessary, use battery of same size and type forcontinued trouble-free service (see Repair Parts section/
manual).
Always disconnect negative (black) cable first."_
I _ Removing positive cable first can result In|I J V _, sparks if the wrench touches any metal aur-/I _ face. Be sure battery hold-down bracket does I
L not touch battery terminals and cause a spark.J
BATTERY REMOVAL (FIG.3-MAINT)
1. Raise seat and disconnect negative (black) battery cableand move away from terminal.
2. Pull away battery cable boot (if so equipped) from positive(+) battery terminal. Disconnect positive (red) battery cablefrom battery.
3. Remove plastic wing nut from battery hold-down rod.
4. Remove battery hold-down bracket and hold-down rod.
5. Lift battery out of tractor.
6. Reinstall battery (see Battery Installation paragraph).
NEGATIVE (-) BLACKBATTERY CABLE
BATTERY HOLD-DOWN BRACKET
1/4 X 3/4 INCH HEX HEAD SCREW
BLOT%
BATTERYBOOT _.-,_(IF SO EQUIPPED) ;'"'_;_'"
POSITIVE (+) REDBATTERY BATTERY CABLE
BATTERY
\
1/4 X 3/4 INCH HEX HEAD SCREW
PLASTIC WlNGNUT
(-) BATTERY TERMINAL
1/4 INCHKEP_ NUTS
NEGATIVE (-) BLACK BATTERYCABLE
BATTERYHOLD-DOWN
;MALL HOLE
/LARGE HOLE
POSITIVE (+) RED BATTERY TERMINAL
BATTERY BOO*T(IF SO EQUIPPED) POSITIVE (+) RED BATTERY CABLE
CUT-AWAY VIEW FROM RIGHT-HAND SiDE OF TRACTOR
21

MAINTENANCE
I,A Always connect positive (red) cable first. Con-'_
nectlng negative cable first can rseult In sparks|if the wrench touches any metal surface. Be/sure battery hold-down bracket does nottouch|battery terminals and cause a spark |
J
BAYIrERY INSTALLATION(FIG.3- Um)1. Raise seat plate and place battery back into tractor with
positive (+) terminal toward right side of tractor.
2. Place battery hold-down bracket through slot in back ofconsole. NOTE: Turn bracket to side, place through slot inconsole and rotate upright.
3. Place hook end of battery hold-down rod through shift leverhole in main frame and hook into small hole in front of battery.
4. Placethreaded endofhold-down rod throughloopinbracketand securewith plasticwingnut.
5. Attach positive (red) battery cable to positive (+) terminal onbattery with a 1/4 X 3/4 inch hex head screw and a 1/4 inchkeps nut.
6. Slide battery beot ifso equippod up cable and over terminal.
7. Attach negative (black) battery cable to negative (-)terminal on battery with a 1/4 X 3/4 inch hex head screw anda 1/4 inch keps nut.
BELT GUIDE S
This unit is equipped with belt guides (FIG. 4-MAINT) locatednext to engine pulley. These belt guides are angle rods se-cured to main frame. The guides are moved (by looseningIocknuts) before replacing belts. When repositioning (afternew belt installation) allow 1/16 inch gap between guide andpulley.
6. Before clutch idler pulley and belt retainer are repositionedand tightened, make drive belt adjustment. See Lawn Trac-tor Drive Belt Adjustment paragraph in Adjustmentssection.
7. If blade drive belt needs replacement, do so before
reinstalling mower deck assembly.
8. Reinstall mower deck in reverse order of removal.
c UPPER ENGINE
,DLE.PULLEY-. OuW ENG'NE
PULLEY BELT GUIDE
!" _I___DRIVE BELT
LAWN TRACTOR DRIVE BELTREPLACEMENTYour lawn tractor uses v-belts made of special compounds. Ifany belt becomes worn or breaks, replace with originalequipment belt (see Repair Parts section/manual). NEVERUSE A SUBSTITUTE. To replace tractor drive belt proceed:
1. Remove mower deck. See Mower Deck Removal para-graph.
2. Depress brake clutch pedal and set parking brake.
3. Loosen clutch idler pulley mounting screw enough to allowbelt to be removed between pulley and retainer (FIG.5-MAINT).
4. Remove belt from transaxle pulley (roll belt over top ofpulley),
5. Replace belt with new original equipment belt in reverseorder of removal. NOTE: Be sure drive belt is installed to
inside of upper engine pulley belt guide (FIG. 4-MAINT).
BELTRETAINER
CLUTCH IDLERPULLEY MOUNTINGSCREW
CLUTCHIDLERPULLEY
I
22

MAINTENANCE
MOWER DECK REMOVAL1.
2.
:3.
4.
5.
6,
7.
8.
g,
Set parking brake.
Set mower clutch lever to the DISENGAGE position. Setcutting height adjustment lever to the lowest cut position,
Turn front wheels all the way to left to allow deck hitch toslide past right front wheel.
Remove hairpin cotter from mower deck hitch rodat front ofdeck (FIG. 6-MAINT). Remove hitch rod and lower deckhitch.
Remove hairpin cotter and flatwasher from right rear lift arm
(RG. 6A-MAINT). Slide right lift bracket off rear liftarm.
Remove hairpin cotter and flatwasher from left rear lift arm.Slide the left lift bracket off of the rear lift arm.
Slide deck toward front of tractor.
Flax lower pulley belt guides away from engine pulley andslip mower deck drive belt off lower engine pulley. Noteoriginal position of lower engine pulley belt guides (FIG. 4-MAINT). Correct distance between guide and pulley is 1/16". Loosen guides and swing away from pulley.
Move deck forward and remove the mower deck drive belt
from the lower engine pulley.
10. Disconnect mower deck engagement cable (FIG. 7-MAINT)from mower deck clutch spring.
11. Place in high cut position, deck can now be pulled out fromright side of unit.
12. Installation of deck is reverse of removal
ii
FRONT MOUNTING
BLADE DRIVE BELT REPLACEMENT(FIG. 7-MAINT)1. Remove mower deck. See Mower Deck Removal para-
graph.
2. Remove LH mowerdeck belt guard.
3. Note position of belt retainer on idler pulley so thatretainer can be reposltioned properly after belt installation.Loosen idler pulley.
4. Remove old belt and replace with a new originalequipment belt.
5. Reinstall LH belt guard.
6. Reposifion belt retainer and retighten idler pulley.
7. Reinstall mower deck assembly.
8. Adjust belt as described in paragraph Blade Drive BeltAdjustment in Adjustments section. Adjustment inAd-justments section.
HAIRPIN COTTER
HITCH ROODECK HITCH EARS
HANGER PIN REAR LIFT ARM
LIFT Rl_(RIGHT SIDE)
23

MAINTENANCE
BLADE RIEPLACEMEHT (FIG. 8-MAINIr)The cutting blades should be sharp and well-balanced to runsmoothly. Blades should have correct amount of "lift" forproper cutting and discharge of clippings. Lift is created by up-turned bent tip edges of blade ends. As cutting edges ofblades wear, the bent tip edges also wear, decreasing bladelift, resulting in decreased cutting ability. It is recommendedblades be replaced when upturned ends show signs of wear.
IMPORTANT: Stop engine and Inspect blades at once ifyou strike any solid unyielding object. Check to makesure blade mounting screws are tight. To remove blades:
1. Remove mower deck. See Mower Deck Removal para-graph.
I,A_ DO NOT handle blades with bare hands. Wser_
gloves or wrap blade with newspaper or other J
material white removing or Installing blade. J
2. With a 9/16 inch wrench, remove blade mounting screws byturning screws counterclockwise.
When replacing blades, be sure all parts are reassembled inproper order (see Repair Parts section/manual) or severevibration will occur. Bent tip edges of blades must be uptoward top of mower deck or blades will not cut. NOTE: Make
sure blade mounting screws are tightened securely. Werecommend using a 10 inch wrench or atorque wrench, ff atorque wrench is used, torque blade mounting screws tobetween 30 and 35 foot pounds.
3. Reinstall mower_leck.
TO SHARPEN BLADE (FIG. 9-MAINT)Care should be taken to keep blades balanced. An unbal-anced blade will cause excessive vibration and eventual dam-
age to mower and engine.
1. Blade can be sharpened with a file or on a grindingwheel. Do not attempt to sharpen while on mower.
2. Place center hole of blade over head of the nail or end
of a screwdriver clamped horizontally in a vice. If bladeis balanced, it should remain in a horizontal position. Ifeither end of the blade moves downward, sharpenheavy end until the blade is balanced.
BLADE
CENTER HOLE
MULCHING PLUG INSTRUCTIONS(FIG. 9A-MAINT)It yourtractor has a mulching kitinstalled on the mower deck andyou want to convert from mulching to regular lawnmowing, themulching plug may be removed as follows:
NOTE: If mulching plug is supplied in a kit installation is reverseof removal.
NOTE: If mulching blades are not installed see Blade Replace-ment paragraph in this section.
1. Remove the two 5/16-18 wing nuts and 5/16 lock washersfrom atop of mulching plug installed inside mower deckchute.
2.
3.
4.
The two 5/16-18 x .75 inch carriage bolts will drop and canbe easily removed from underneath the mulching plugand toe guard.
Remove mulching plug from mower chute. DO NOTremove toe guard. Your tractor is now ready to be used asa conventional mower.
Store mulching plug and hardware in a safe place for futureuse.
5. To reinstall plug reverse the above steps.
IMPORTANT: On installation head of carriage bolt must be tounderneath side of skid bar.
TOEGUARD
CARRIAGE BOLTS5116-18X .75
_,_l CAU'RON: DO NOT OPERATE THE MOWER_IWNITpHLOUT.DISCHARGECHUTE DEFLECTORJ
24

ADJUSTMENTS
I_iiK eep hands, feet, hair, and loose clothing 1
away from any moving parts on engine or
lawn tractor when making any adjustments
that require engine to be running. DO NOT
carry passengers.
Located beneath the main frame are two v-belts. One v-belt(lawn tractor drive belt) transmits power to the transaxla, whichin turn transmits power to the rear wheels. The other v-belttransmits power to the mower blades.
Located on the mower deck is a clutch that disengages powerto the blades and a deck leveling adjustment.
Before any adjustments are made, it is necessary that you un-derstand the function of the brake, clutch, and the brake-clutchpedal. The pedal disengages the clutch when partially de-pressed and applies the brake when fully depressed.Adjustment of the lawn tractor drive belt and brake must besynchronized so brake does not grab before clutchdisengages. An incorrect adjustment causes brakes to grab orholdwhile power is being transmitted to the rear wheels. Lawntractor will try to move with brake applied; this will cause diffi-culty when shifting from one speed range or direction to an-other.
To replace drive belt, you must remove mower deck.Removal of deck isn't necessary for other adjustments, but ifseveral adjustments are needed, it will be more convenient ffdeck is removed.
At no time during the adjustment or repairs _can the lawn tractor be lifted more than 20
Inches from level position without taking thefollowing precautions:
1. Remove gasoline from tank and run en-gine until carburetor is dry.
2. Remove battery. (see BA'rrERY REMOVALparagraph in MAINTENANCE section of thismanual.)
3. Remove oil from crankcase.
J
LAWN TRACTOR DRIVE BELTADJUSTMENTThe drive belt is kept tight by a spring attached to the brake-
clutch pedal assembly. The Brake-clutch pedal in fullyreleased position should appear as shown in FIG. t-ADJwhen drive belt is properly adjusted.
If drive belt requires adjustment, adjust as follows:
1. Depress brake-clutch pedal far enough to latch parkingbrake lever in third notch (FIG. 2-ADJ inset).
2. Loosanclutchingidlerpu]ley(FIG. 2-ADJ)mountingscrew.
3. If brake-clutch pedal was too far forward, slide idlerpulley in toward engine pulley, if pedal was too far rearward,slide idlerpulley out away from engine pulley.
4. Ratighten idler pulley mounting screw. NOTE: Beltretainer should point toward position where running boardmeets main frame (FIG. 2-ADJ).
5. Release brake-clutch pedal and recheck pedal for properposition. Readjust if necessary.
6. Check lawn tractor brake adjustment as outlined in
paragraph Lawn Tractor Brake Adjustment.
LAWN TRACTOR BRAKE ADJUSTMENT
Your tractor is equipped with an adjustable disc brakemounted on the transaxle.
To check brake operation:
1. Stop tractor on a hard flat surface and turn off engine.
2. Place shift control lever in NEUTRAL position.
3. Depress brake-cJutchpedalenough to latch parking brake in2nd notch (FIG. 2-ADJ).
4. Try to push tractor. If you are unable to push tractor, brake
is too tight and should be loosened (see To adjust tightbrake).
5. Depress brake-clutch pedal enough to Jatchparkingbrake in4th notch ( FIG. 2-ADJ).
6, Try to push tractor, if you are able to push tractor, brake istoo loose and should be tightened (see To adjust loosebrake).
25
ADJUSTMENTS
LAWN TRACTOR BRAKE ADJUSTMENT(com.)To adjust loose brake:
1. Place shiftcontrol lever in NEUTRAL pesition and depressbrake-clutch pedal enough to latch parking brake in 4thnotch.
2. Turn brake adjusting nut clockwise until you cannot pushtractor.
3. Recheck tractor brake adjustment as outlined in To checkbrake operstlon.
To adjust tight brake:
1. Place shift control lever in NEUTRAL position and depressbrake-clutch pedal enough to latch parking brake in 2ndnotch.
2. Turn brake adjusting nut counter-clockwise until you canpush tractor.
3. Recheck tractor brake adjustment as outlined in To checkbrake operation.
During tractor operation, check for stopping distance. If tractorrequires more than six (6) feet for stopping distance at high
speed in highest gear, the brake must be adjusted (see LawnTractor Brake Adjustment above)
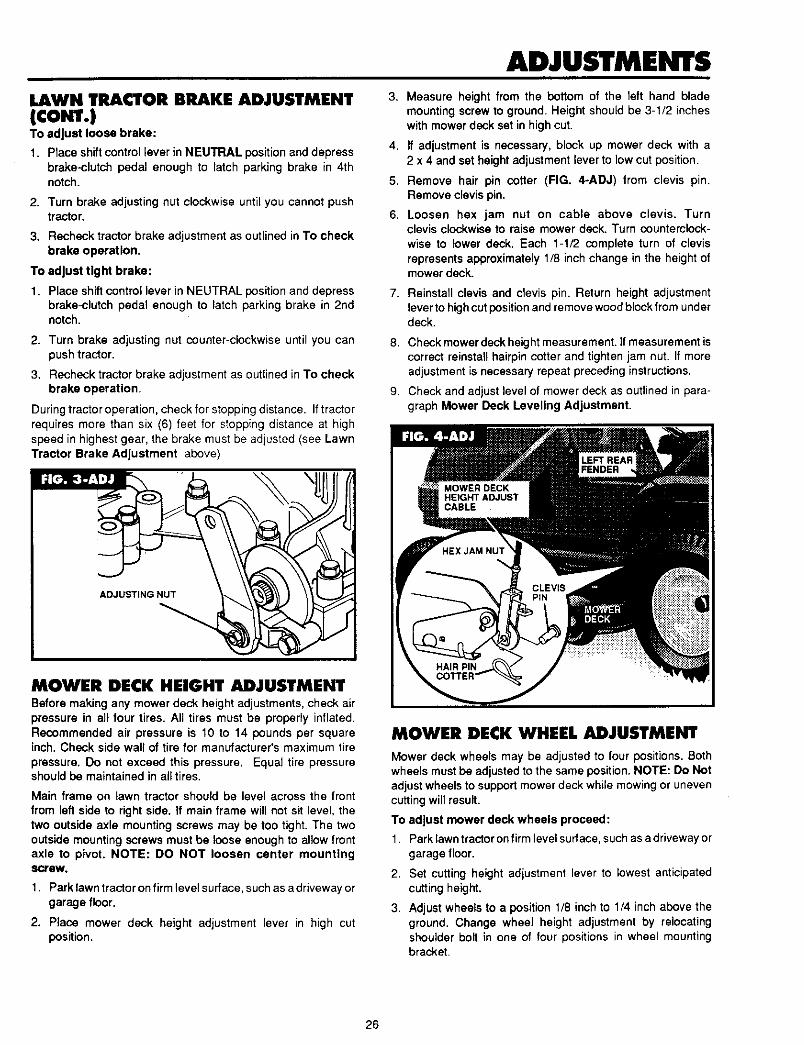
3.
4.
5.
6.
7.
8.
9.
Measure height from the bottom of the left hand blade
mounting screw to ground. Height should be 3-1/2 incheswith mower deck set in high cut.
If adjustment is necessary, block up mower deck with a2 x 4 and set height adjustment lever to low cut position.
Remove hair pin cotter (FIG. 4-ADJ) from clevis pin.Remove clevis pin.
Loosen hex jam nut on cable above clevis. Turnclevis clockwise to raise mower deck. Turn counterclock-
wise to lower deck. Each 1-1/2 complete turn of clevis
represents approximately 1/8 inch change in the height ofmower deck.
Reinstall clevis and clevis pin. Return height adjustment
lever to high cut position and remove wood block from underdeck.
Check mower deck height measurement, if measurement iscorrect reinstall hairpin cotter and tighten jam nut. If moreadjustment is necessary repeat preceding instructions.
Check and adjust level of mower deck as outlined in para-graph Mower Deck Leveling Adjustment.
MOWER DECK HEIGHT ADJUSTMENTBefore making any mower deck height adjustments, check airpressure in all four tires. All tires must be properly inflated.
Recommended air pressure is 10 to 14 pounds per squareinch. Check side wall of tire for manufacturer's maximum tire
pressure. Do not exceed this pressure. Equal tire pressureshould be maintained in all tires.
Main frame on lawn tractor should be level across the front
from left side to right side. If main frame will not sit level, thetwo outside axle mounting screws may be too tight. The twooutside mounting screws must be loose enough to allow frontaxle to pivot. NOTE: DO NOT loosen center mountings_row.
1. Park lawn tractor on firm level surface, such as a driveway orgarage floor.
2. Place mower deck height adjustment lever in high cutposition.
MOWER DECK WHEEL ADJUSTMENT
Mower deck wheels may be adjusted to four positions. Bothwheels must be adjusted to the same position. NOTE: Do Notadjust wheels to support mower deck while mowing or unevencutting will result.
To adjust mower deck wheels proceed:
1. Park lawn tractor on firm level surface, such as a driveway or
garage floor.
2. Set cutting height adiustment lever to lowest anticipatedcutting height.
3. Adjust wheels to a position 1/8 inch to 1/4 inch above theground. Change wheel height adjustment by relocatingshoulder bolt in one of four positions in wheel mountingbracket.
26

ADJUSTMENTS
MOWERDECKMOUNTINGBRACKET
BRACKET
MOUNTING BRACKET ADJUSTMENT HOLES
To adjust side to side level.
7,
8.
Measure height, from level surface, of leftand rightblade tipsat outside edge of deck. Ifblades are equal or not more than
1/8 inch different, no side to side adjustment is necessary.
If adjustment is necessary, loosen right side eccentric mount-ing screw (FIG. 6-ADJ) and turn eccentric clockwise orcounterclockwise as required to level mower deck. NOTE:When groove in eccentric is pointing downward, right side ofdeck is in lowest position. When groove is pointing upward,right side of deck is in highest position.
9. Hold eccentric with a wrench while tightening right sideeccentric mounting screw securely.
MOWER DECK LEVEUNG ADJUSTMENTBefore making any mower deck leveling adjustments, checkair pressure in all four tires. Recommended air pressure is t 0to 14 pounds per square inch. Check sidewall of tires formanufacturer's maximum tire pressure. Do not exceed thispressure. Equal tire pressure should be maintained in all tires.
Tractor main frame should be level across the front from leftside to right side. ff main frame will not sit level, the two outsideaxle mounting screws may be too tight. The two outsidemounting screws must be loose enough to allow front axle topivot. NOTE: DO NOT loosen center mounting screw.
The mower deck level can be adjusted from front to back andfrom side to side. Always adjust front to back level first.
1. Park tractor on firm level surface, such as a driveway orgarage ficor.
2. Checkandadjustheightof mowerdeckasoutlined inMowerDeck HeightAdjustment paragraph.
3. Place mower deck cutting height adjustment lever/pedal inmid cut position. NOTE: All adjustments will be made frommid cut position.
To adjust front to back level.
4. Measure height, from level surface, of right side blade tips atfront and rear of mower deck (be sure all tires areproperly inflated). If distances are equal or not more than 1/8 inch lower in front, no front to back adjustment is neces-sary.
5. If adjustment is necessary, loosen front eccentric mountingscrews (FIG. 5-ADJ) and turn front adjustment eccentricclockwise or counterclockwise as required. NOTE: Whengroove on eccentric is pointed straight forward (FIG. 5-ADJinset) front of deck is at the lowest point. Turn both eccentrics
so grooves are pointing same direction (upward or down-ward). Always keep grooves toward front of lawn tractor.
If more adjustment is necessary, front of mower deck may beraised or lowered by relocating eccentric mounting screws inhigher or lower hole position on mower deck mounting bracket.
6. Hold eccentric with a wrench while tightening eccentricmounting screws securely.
BLADE DRIVE BELT ADJUSTMENT
When mower blade drive belt slips and blades will not rev tofull speed while mowing, the blade drive belt should be tight-ened.
To adjust:
1. Place mower clutch lever in DISENGAGE position.
2. Loosen idler pulley hex nut (FIG. 6-ADJ). Note position ofbelt retainer location and replace in same location aftermaking adjustment.
3. Slide idler pulley toward center of deckto tighten belt. NOTE:Only a small amount of movement should be required.
4. Re-tighten hax nut on idler pulley.
5, To check adjustment start engine and run engine at FASTthrottle setting. Engage mower clutch lever and allow suffi-
cient time for blades to run to full speed, then disengagemower clutchlever. Blades should stop withina few secondsand remain stopped. Ifblades do not step or tend to creep,adjustment is too tight.
6. To loosen blade drive belt, reverse step 3 above.
27

ADJUSTMENTS
SECTORGEAR
ALIGN 1 iARROWS STEERING
\
MOUNTINGSCREWS
LOWER STEERING:ARING
BLADE BRAKE ADJUSTMENTBrake pad should completely clear quill assembly whenmower clutch lever is in ENGAGE position.
1. Place height adjustment lever/pedal in lowest cut position.
2. Move mower clutch lever back to disengaged position.
3. In the disengaged position there should be no tension on the
mower deck clutch spring. There should be only enoughslack as to allow approximately 1 inch total sideways move-ment on the ceble/spring junction. This ensures that thebrake engagement spring is exerting proper pressu re to stopthe right side blade effectively. Make adjustment if neces-
sary for the proper disengaged position requirements.
4. If adjustment is necessary, proceed as follows:
a. Move Spring hook to another hole on idler armextension.
b. Adjust cable conduit and. To increase or decrease cableslack.
5. Check adjustment on left hand brake pad. Locknut on end of
brake rod should be approximately 1/8 inch from brake padmounting bracket with mower clutch lever disengaged andleft hand brake pad against quill pulley. Adjust Iocknut ifnecessary.
STEERING GEAR ADJUSTMENT(FIG. 8-ADJ)If excessive play develops in steering, adjust pinion andsector gears as follows:
1. Position front wheels straight forward.
2. Arrows should align in pinion and sector gear.
3. Slightly loosen mounting screws in lower steering shaftbearing.
4. Move lower steering bearing toward back of tractor, asneeded.
5. Hold bearing in place, tighten mounting screws securely.Use a 10-inch wrench or a torque wrench. If to rque wrenchis usad, torque mounting screws to between 30 and 35 footpounds.
TRANSMISSION CONTROL LEVERADJUSTMENT FIG. 9-ADJ)Should the lawn tractor fail to shift correctly when you shift intoa forward, neutral or reverse position, the transmission controllever may need adjusting.
To adjust transmission lever:
t. Locate true neutral by choosing a transmission control leverposition and attempting to push the tractor. You should beable to push the lawn tractor when the transmission controllever is in the true neutral position.
2. Loosen the screw on the shift bracket on top of the tran-saxle. (See 'A' In FIG, 9-ADJ).
3. Place the transmission control lever into the center of theneutral slot.
4. Tighten screw'A'.
5. Checkthe transmission control lever adjustment by pushingthe lawn tractor. Put the transmission control lever in neutral
slot. You should be able to push the lawn tractor. You shouldnot be able to pus h the lawn tractor when you shift to forwardor reverse.
SHIFTLEVERBRACKET
28
ENGINE ADJUSTMENTS
See Engine Operating and Maintenance manual for engineadjustment instructions.

TROUBLESHOOTING GUIDE
PROBLEM
Mower CutsRagged orUneven
Mower Leaves
Unmowed StripBetween Blades
Mower ScalpsLawn
Mower Will
Not DischargeClippings
Blade DriveBelt Comes Off
During Use
CORRECTION
1. Remove any accumulation of grass clippings from underside of mower deck housing2. Make certain blades are sharp and in good condition (not bent or incorrectly mounted).3. Check blade mounting screw(s). Blade screw(s) must be tight.4. Check mower deck leveling adjustment per manual. Adjust if necessary.5. Check blade belt tension per manual. Adjust if necessary.6. Check quill assembly(s) for damage or wear. Replace if necessary.7. Check for possible damage to mower deck housing. Repair or replace if necessary. •8. Check pivot tube (if so equipped) assembly for damage. If bent or damaged, repair or replace9. Check deck wheels being run on ground.
1. Mowing a heavy stand of grass or grass with excessive surface moisture could allow mower to leave an
unmowed strip.
2. Forward speed should be adjusted to mowing conditions by transmission lever position. Engine should be run at fullthrottle.
3. Make certain blades are sharp and in good condition. Replace if necessary.4. Check blade belt tension. Adjust if necessary.
5. Check quill assembly(s) for damage or wear. Replace if necessary.6. Check for damage to mower deck housing. Repair or replace if necessary.
1. Check mower height adjustment setting and readjust if needed. Scalping is more likely on rough or uneven lawns2. Check for damage to mower deck housing. Repair or replace if necessary.3. Check for bent blade(s) or quill assembly(s). Replace if necessary.4. Check mower deck leveling adjustment and adjust if necessary.5. Check for damaged deck wheels.
1, Remove any accumulation of grass clippings from underside of mower deck housing.2. Wet conditions can cause the discharge chute and underside of mower deck to become plugged with clippings.
Do not mow wet grass.
3. Forward speed should be adjusted to mowing conditions by transmission lever position. Engine should be run at fullthrottle.
4. When mowing long grass make first cutting in high position, then re-cut at normal cutting height.5. Check blade belt tension per manual. Adjust if necessary.6. If blade(s) have been replaced, make sure they have been correctly mounted.7. When mulching plug is installed clippings will not discharge.
1. Blade drive belt may suffer internal damage to cords when it comes off during use If belt still comes off after checkingall steps below, replace with a new original equipment belt.
2. Check belt tension pe_ manual. Adjust if necessary.
3. Check belt guide Correct clearance is 1/16 inch from belt when blade engage lever is engaged4. Check mower deck leveling adjustment per manual. Adjust if necessary.5. Check for and remove any foreign objects interfering with belt travel.
6. Check all pulleys on mower deck A bent or split pulley could cause problems. Replace if necessary7. Check engine drive pulley inner surface. If inner surface is rough or split, pulley should be replaced.8. Check blade engagement idler assembly for wear. Replace necessary parts.
1. If grass is too high or wet, belt slippage may occur.Blade Drive 2. Check belt for wear or damage Replace if necessary.
Belt Slips 3. Check blade belt tension per manual. Adjust if necessary.
4. Check blade drive belt tension spring, If spring is stretched or damaged, replace spring,
I. Check all belt guides. Correct clearance is 1/16 inch from belt when blade engage lever is engaged.Blade Drive 2. Check for and remove any foreign objects interfering with belt travelBelt Wears 3. Check pulleys for damage. Replace if necessary.
Excessively 4. Make certain blade brake is clearing belt when mower clutch lever is engaged Adjust or replace if necessary.5. Make certain mower deck leveling adjustment is correct. Adjust if necessary.6. Check blade belt tension per manual. Adjust if necessary.
Blade(s) 1. Check belt. If worn or broken, replace. If belt is too loose, make belt adjustmentWill Not 2. Check engagement spring on deck engagement idler. If broken or damaged, replaceEngage 3. Check for and remove any foreign objects interfering with engagement idler travel
Blada(s) 1. Check blade belt tension per manual. Adjust if necessary
Will Not 2 If blade belt adjustment witl not provde enough slack in drive belt, replace with correct Original Equipment BeltDisengage 3. Check for and remove any foreign objects interfering with engagement idler travel. .
29

TROUBLESHOOTING GUIDE
PROBLEM CORRECTION
ExtremeVibration
Occurs WhenBlade ls
Engaged
1. Check blade(s) and make certain they are not bent, out of balance or loose. Replace if necessary2. Check belt for burn spots or irregularities that might cause vibration. Replace if necessary.3. Check quill assembly(s) for damage or wear. Replace if necessary.4. Check for worn or damaged blade engagement parts. Repair or replace if necessary.
5. Check engine drive pulley inner surface. If inner surface is rough or split, pulley should be replaced.6. Check under side of mower deck housing for accumulation of clippings. Remove accumulated clippings.7. Check for loose or damaged angina mounts. Tighten or replace as necessary.8. Check blade belt tension per manual. Adjust if necessary.
Unit Drive 1. Check unit drive belt adjustment(s). Adjust ifnecessary.Belt Slips 2. Check for damaged or broken clutching idler spring. Replace if necessary.
3. Check belt(s) for wear or damage. Replace if necessary.4. Check for and remove any foreign objects obstructing clutching idler mechanism.5. Check for split engine or transmission pulley. Replace if necessary.
Unit Drive Belt 1. Check lawn tractor drive belt adjustment and lawn tractor brake adjustment per manual. Adjust if necessary.Squeals When 2. Check for and remove any foreign objects obstructing clutching idler mechanism.
Brake Is Applied
Unit Drive Belt 1, Check belt tension. Adjust if necessary.Comes Off 2. Check belt guides. Adjust if necessary.During Use 3. Check for split or damaged pulley(s). Replace if necessary.
4. Check clutching idler pulley alignment. If out of alignment, idler bracket may be bent. Replace if necessary
Unit Will Not 1. Bee Steps I through 5 in Unit Drive Belt Slip== section of this chart.Propel Itself 2. Check engine, transmission or transaxle pulley(s) for sheared or missing key. Replace if necessary.
When Clutch 3. Check transaxle to make certain it is operable.is Engaged
Extreme VilxatJon 1. Check for split or damaged pulley(s). Replace ifnecessary.Occurs When '2. Check belt for irregularities or burned spots. Replace if necessary.
Clutch Is Engaged 3. Make certain belt tension is correct. Adjust if necessary.
(Let-Out) 4. Check clutching idler assembly for wear or damage. Replace parts as necessary.
eUnit Will Not 1. Check shifting procedure. Unit MUST come to a complete stop before shifting on all models except _hift-on-the=GoShift or Shifts and Hydrostatic.
Hard 2. Check lawn tractor drive belt adjustment and lawn tractor brake adjustment per manual Adjust if necessary3. Have transaxle checked by an authorized service dealer,
Steering Slips t. Check for steering sector gear and pinion looseness. If gears are loose, make sector gear adjustmentOr Is Loose 2. Check ball joints for wear. Replace if necessary.
Engine Will Not"rum Over
Engine TurnsOver But Will
Not Start
1. Check starting procedure. Make sure starting instructions are followed.2. Check fuse (if so equipped) (See wiring Schematic and diagram in Repair Parts section/manual)3. Check battery for charge. Make sure battery has been activated and charged (on new units).
4. On new units, remove spark plug and check cylinder for accumulation of oil due to improper handling5. Make visual check of electrical system to make sure all connections and lockout switches are secure (See wiring
Schematic and diagram in Repair Parts saction/manual)6. Check engine according to engine manufacturer's instructions
7. Have electrical system checked by an authorized service dealer. (See wiring Schematic and diagram in Repair Partssaction/manual)
1. Check starting procedure. Make sure starting instructions are followed.2. Make certain fuel tank is filled with clean, fresh gasoline
3. Make certain fuel shut-off is open (if so equipped)4. Make certain that throttle is in start or fast position (check for remote choke use).5. Check engine according to engine manufacturer's instructions
6. Have wiring and lockout switches checked by an authorized service dealer. (See wiring Schematic and diagram inRepair Parts section/manual)
7. Check fuel filter for obstructions.
3O

STORAGE
The tractor should be immediateJy prepared for storage at theend of the season or if the unit is to be un-usecl for 30 days ormore. Gasoline, if permitted to stand un-used for extendedperiods (30 days or more), may develop gummy depositswhich can adversely affect the engine carburetor andcause engine malfunction.
To prepare tractor for storage, proceed as follows:
1. Clean the tractor thoroughly.
2. Inspect the tractor for worn or damaged parts and tighten allloose screws and nuts.
3. Prepare engine for storage (see Engine Operating andMaintenance Manual).
4. Lubricate all points shown in Lubrication Chart.
5. Remove battery (see Batiery Removal paragraph in Main-tenance section of this manual).
6. Clean battery as instructed in Battery Maintenance para-
graph inMaintenanca section of this manual. Fully chargebattery. A discharged battery will freeze and may burst. Ifpossible place battery in a cool, dry area. Charge batteryovernight every 30 days.
7. Store the tractor ina clean, dry area and cover for additional
protection.
A yearly check-up or a tune-up by an authorized service dealeris a good way of insuring that your tractor will providemaximum performance for the next season.
NOTE: Fuel stabilizer is an acceptable alternative inminimizing the formation of fuel gum deposits during storage.Add stabilizer to gasoline in fuel tank or storage container.
Always follow the mix ratio found in stabilizer container. Runengine at least 10 minutes after adding stabilizer to allow thestabilizer to reach the carburetor, Do not drain the gas tankand carburetor if using stabilizer.
31

-SIGHT AND HOLD THIS GUIDE LEVEL WITH A VERTICAL
TREE, A CORNER OF A STRUCTURE, A POWER LINEPOLE, OR A FENCE POST.
I10 DEGREES 15 REES
) or down slopes,the face of slopes,
To determine if a slope is safe to mow: (1) disengage the blade(s), (2) put the unit in reverse, and (3) try to back straight up the slope. If you canback up the slope, It Is generally safe to mow. However, If you do not feel safe, or If you are not completely sure, use this guide and do not mowa slope that is greater than 15 degrees. If the riding mower is used with a pull-behind attachment, do not operate the unit on a slope that is greaterthan 10 degrees.
A 15 degree slope is a hill that increases in height at approximately 2.5 feet in 10 feet.
A 10 degree slope is a hill that increases in height at approximately 1.7 feet in 10 feet.
Use extreme care at all times, and avoid sudden turns or maneuvers. Follow other instructions in this manual for safety in mowing onslopes. Operate a riding mower up or down slopes, never across the face of slopes. Use extra care when operating on or near slopesand obstructions.
CUT HERE TO USE SLOPE GUIDE

NOTES
33

NOTES
34

NOTES
35

MURRAY OUTDOOR PRODUCTS, INC. Two Year Limited Warranty
Murray Outdoor Products, Inc. warrants to the original purchaser that this unit shall be free from defectsin material and workmanship under normal use and service for a period of Two (2) Years from the dateof purchase: however, thiswarrantydoes not coverengines, accessories (such as snow blowers, snowblades, grass catchers and plows), transmissions, batteries and Normal Wear Parts (except as notedbelow) or transaxles as the companies that manufacture these items furnish their own warranties andprovide service through their authorized field service facilities. For additional information, see the
warranties covering these particular parts. If you are uncertain whether your unit contains or is equippedwith one or more of these parts, consult your dealer prior to purchase. Subject to the terms and conditionsnoted inthis Limited Warranty, we shall, at our option, repair or replace at no cost to the original purchase rany part covered by this Limited Warranty during the applicable warranty period.
In the event the battery proves defective within ninety (90) days from the date of purchase, we will replaceit without charge. If the battery proves defective after (90) days but within one hundred twenty (120) daysfrom the date of purchase, we will replace it for a charge of one half (1/2) of the retail price of the batteryin effect at the time of return.
Normal Wear Parts are defined as belts, blades, blade adapters, pneumatic tires, headlights and seat
covers. These parts are warranted to be free from defects in material and workmanship as delivered withthe product. Any claim for repair or replacement of Normal Wear Parts must be made within thirty (30)days ofthe date of purchase. No claims involving damage caused from material use, abuse or misusewill be honored.
This Murray Outdoor Products, Inc. Two (2) Year Limited Warranty is your exclusive remedy;however, this warranty is void or does not apply to any unit that has been tampered with, altered, misused,abused or used for rental or other commercial and/or professional (non-homeowner) uses. Yourwarranty does_not cover minor mechanical adjustments which are not due to any defect in material
workmanship. For assistance in making such adjustments, consult your Owner's/Operator's Manual.
To make a claim under this Murray Outdoor Products, Inc. Two (2) Year Limited Warranty, returnthe unit (or if authorized In advance, the defective part) along with your proof of purchase to anAuthorized Service Center near you. To locate the nearest Authorized Service Center, call the Central
Parts Distributor for your area shown in the list provided with your unit or check the Yellow Page listingsin your local telephone directory. If you return the entire unit, we will repair the unit. if we authorize thereturn of the defective part only, we will either replace or repair the part. In the case of a defect in atransmission differential (as distinguished from a transaxle), the entire transmission or differential
must be returned since they do not include user serviceable parts.
This Murray Outdoor Products, Inc. Two (2) Year Limited Warranty gives you specific legal rights,and you may also have other rights which vary from state to state. This Limited Warranty Is given inlieu of all other expressed and implied warranties including the Implied warranty ofmerchantability and warranty of fitness for a particular purpose. Ifyou need additional informationon this written warranty or assistance in obtaining service, write or calh
MURRAY
Outdoor Power EquipmentCustomer Service Department
PO Box 8000
Jackson, Tennessee 383081-800-247-7464
36