Embed Size (px)
Citation preview

Final: 4/21/2020
Summer Assignment Template
Course Title: Honors Geometry Teacher: Reich and Webb PLC Content Area: Geometry Summer Assignment Description
Tiny House Project
Date Due
First Day of School
Estimated Time for Completion
Approximately 5 hours (1 week of regular class)
Tennessee Academic Standards/Approved Standards
Supporting Reference (List standard(s) correlation to
summer work)
Modeling with Geometry (G.MG)
Geometric Measurement and Dimension (G.MD)
Rationale for Summer Assignment
This project will require students to review basic geometry skills and prepare students for the
upcoming Honors Geometry course.
Resources needed to complete Summer assignment
The project assignment includes all of the directions and handouts. Students will also need
tape and colored pencils.
How and when will this summer assignment be
assessed and scored? Also, what grading category and
what percentage will this summer assignment count in
the student’s grade?
There is a rubric that goes along with the project. Students should self-asses their own work
according to the rubric in order to have a good grasp of what grade they will earn. This
grading rubric is set up for a 100 point grade and the grade will be counted as a test score.
Additional Summer Assessments (If applicable - what
grading category and what percentage will each
additional summer assignment count in the student’s
grade?)
None
Teacher Summer Contact Information
Coach Reich: [email protected] or
Mr. Webb: [email protected]

Student’s Name: _______________________________ Overall Score ________/100
Grading Rubric for Build a Tiny House Project Honors Geometry Summer Project (100 Points Total)
Steps 1-8 on the To-Do List
Finding Area Finding Perimeter Construction of Tiny House
Reflection & Overall Neatness
20 points = All 8 steps are finished and
complete.
20 points = Demonstrates an understanding of finding area and finds all 29 of the areas correctly on
the specs list.
20 points = Demonstrates an understanding of finding perimeter and finds all 29 of
the areas correctly on the
specs list.
20 points = The Tiny House is completely built and contains all
22 of the required items. Your tiny house should be completely put
together!
20 points = The student reflection is thoughtfully
completed and the entire project is nicely colored
with straight lines and easy to read.
15 points = 6 or 7 steps are
finished and complete.
15 points = Demonstrates an understanding of finding area and finds 20 or more
of the areas correctly.
15 points = Demonstrates an understanding of finding perimeter
and finds 20 or more of the perimeters correctly.
15 points = The Tiny House
may be missing a few items or the construction of
the house is almost finished
but not.
15 points = The student reflection is
completed but not well thought out or the project
is a little messy and not easy to
read. 10 points =
4 or 5 steps are finished and
complete.
10 points = Finds 10 to 19 of
the areas correctly.
10 points = Finds 10 to 19 of the perimeters
correctly.
10 points = The Tiny House
may be missing a few items and the
construction of the house is
almost finished but not.
10 points = The student reflection is
completed but not well thought
out and the project is a little messy and not easy to read.
Teacher Notes (If a student earns less than 10 points in any category):

©Digital: Divide & Conquer 2016
Making A Tiny House
wall
wall
baseroof
Cut out each of the FOUR major parts once you have fully finished designing them.

©Digital: Divide & Conquer 2016
Making A Tiny Housewall
wall
base
Make sure all the pieces line up with each other.You won’t need to add the roof until the end.

©Digital: Divide & Conquer 2016
Making A Tiny HousewallWall folded
in on bold line.
base
Make sure all the pieces line up with each other.You won’t need to add the roof until the end.

©Digital: Divide & Conquer 2016
Making A Tiny HousewallWall folded
in on bold line.
base
This is the same house, but opposite wall side is shown.

©Digital: Divide & Conquer 2016
Making A Tiny Housewall
base
There is no need to tape or glue the wall down.They should stand on their own once the paper is folded.

©Digital: Divide & Conquer 2016
Making A Tiny House
wall
base
Overhead view of the house pieces placed together.
wall

©Digital: Divide & Conquer 2016
Making A Tiny House
wall
base
Roof/ceiling added to the top.
roof/ceiling
©Digital: Divide & Conquer 2016
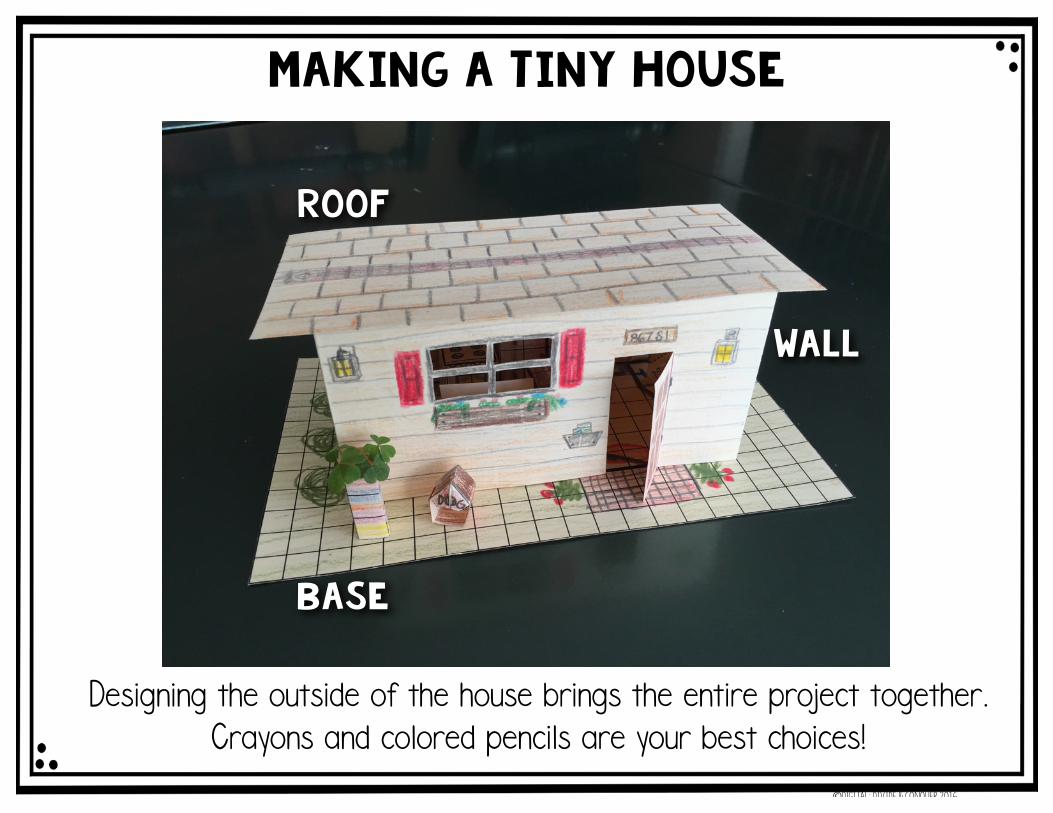
Making A Tiny House
wall
base
Designing the outside of the house brings the entire project together.Crayons and colored pencils are your best choices!
roof

©Digital: Divide & Conquer 2016
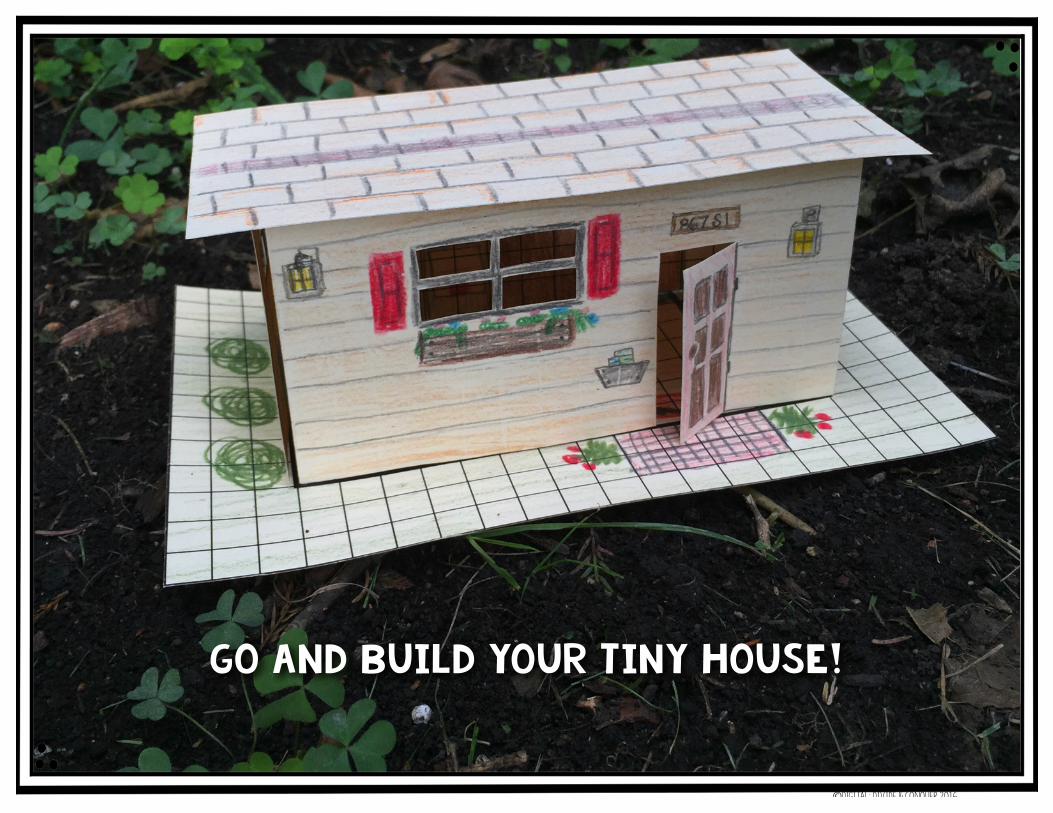
Making A Tiny House
wall
base
A view from the back of the house.
roof

©Digital: Divide & Conquer 2016
Making A Tiny House
tablestove/oven
Make sure you furnish your house with 3D objects.There are cutouts included, but you can create many on your own.
It takes practice and patience, but your ideas are unlimited.
counter
TVplanter dog house
Mail box, bunk beds, flag pole, chimney, A/C, fence, walls, stool, washer/dryer, holiday lights hanging off the house....so many ideas!

©Digital: Divide & Conquer 2016
Making A Tiny HousePlace your 3D furnishing in the house. You can remove walls to see how it looks.
You will begin to see how much space they take up. This gives you a better idea of how important it is to be a designer.

©Digital: Divide & Conquer 2016
Making A Tiny House
Take a peek inside your house once you have cut out all the windows.
TV
©Digital: Divide & Conquer 2016
go and build your tiny house!

©Digital: Divide & Conquer 2016
Build ATINYHOUSE
name
Area, perimeter, and geometry are hiding in your house.

©Digital: Divide & Conquer 2016
Most people will say that a tiny house is a home with less than 400 square feet of space.Four hundred might sound like a lot, but it is probably only half the size of most classrooms.
Many times, tiny houses are built on wheels. This means they are mobile and can be moved to different locations. A lot of tiny house owners like this because they can live in different areas or even in someone’s backyard (as long as it’s big enough).
What is a tiny house?
Anyone can live in a tiny house. It doesn’t matter if it is a single person or a family of five. A tiny house is just like any other home, except it’s much smaller.
Who lives in Tiny Houses?
1. It is much cheaper than buying a larger home. Many people don’t want to have large
mortgages or monthly payments, so a tiny home fits their needs best.2. Many owners don’t want a lot of space. A small home is just perfect for what they need.3. It can be an adventure! It’s new, it’s fun, and people like the challenge of living small.
Why live in a Tiny House?
Before you begin...

©Digital: Divide & Conquer 2016
Build A Tiny House
If you’ve been watching TV or reading magazines, chances are you have seen a tiny house. These little homes are popping up everywhere! People love them. They cost less than regular homes and they can be moved around. There’s even TV shows where buyers pick a tiny home that will fit their needs the best.
Your city council has been paying attention to the amazing things happening in your classroom. They want to use those skills to build and design a set of tiny houses.
You are being been asked to create a tiny house that will be showed off at the Tri-City Realtor Convention. If these houses are a hit, they might choose to build them in town!
This means you’ll be responsible for designing and building the perfect tiny house. It will include the layout, picking furniture, and using real-world math skills to finish this project.
Are you ready to build?
Let’s go see your To-Do List...

©Digital: Divide & Conquer 2016
Tiny House To-Do List
first: Directions Read ALL the directions in TINY HOUSE PARTS. VERY IMPORTANT! >>>> Refer back to them as much as you need.
Second: Rough Draft Create a rough draft of your tiny house and include all items on the requirements list.
Third: Final Version Create a final version of the tiny house. There are 4 pages for the Base, Walls, and Roof. Check off each item from the requirement list.
Fourth: spec home 1 Record the area, perimeter, and geometric shape of each item from the requirement list.
Fifth: spec home 2 Record the area and perimeter of the major sections of the house (base, walls, roof/ceiling).
Sixth: Build the house Cut out each of the four sections of the house and fit them together.
Seventh: exterior Continue your design and decorate the outside of your house.
Eighth: reflection Answer questions about the house design and reflect on your creation.
Ninth: building furniture
OPTIONAL: Create 3D nets of the furnishings in your house. There is a page included or you may use graph paper included.
tenth: housing problems
OPTIONAL: Create area and perimeter word problems for your house and have other students solve them.

©Digital: Divide & Conquer 2016
Tiny House partsThere are four major parts of the house that you will build and design.
THE BASE This is where you create the floor plan of the house.
This is a central part of creating the house.
The WALL, piece 1 Each WALL section contains two walls. They are folded to create house corners.
The WALL, piece 2 They can be cut out to create a rectangle that fits exactly around the base of the house.
The ROOFThe final part of the house.
You will be designing the ceiling (fans, lights, vents).
BASE
WALL
WALL
ROOF
Each of the MAJOR PARTS will be on separate pieces of paper. They can be cut out and placed together to form a tiny house in the shape of a rectangular prism.

©Digital: Divide & Conquer 2016
Tiny House partsThings To Know
requirements list
Your house will have a list of items that must be included.
This will be a list of items for the floor plan and the walls. You will decide where to put everything!
Area & Perimeter
As you create the layout of the house, you will need to find the area and perimeter of items from the requirement list.
Units will be the measurement used for perimeter and area.
Example:-Perimeter is 24 units -Area is 26 square units (or units squared).
geometry Design
Use your geometry skills to find the best solution to fitting all items into the house.
All houses are filled with geometry in real life. Use those ideas to help you make the best choices.
Math is everywhere!
Be PREPARED!Your house must make sense and fit together.
You will want to make sure the layout makes sense.

©Digital: Divide & Conquer 2016
After you have created the layout, you will have to find the area and perimeter of items in the house. Not all items will be exactly perfect, so estimate as close as you can.
Tiny House PartsMore important things to know.
You can add your own walls
too!
You will design the base using a bird’s eye view. Imagine looking
straight down as you add in the
furniture and lay it all out.
This is an example of a BASE floor plan.
COUCHAREA: 8 square unitsPERIMETER: 12 units
SinkAREA: 2 square unitsPERIMETER: 6 unitsTable
AREA: 9 square unitsPERIMETER: 12 units
toiletAREA: 1 square unitPERIMETER: 4 units
bathtubAREA: 6 square unitsPERIMETER: 10 units

©Digital: Divide & Conquer 2016
rough draft: InstructionsOn the following page you will create a rough draft of the house.
Refer back to the directions and look at the examples to help you out.
Include all the furnishing in your house. ADD YOUR
OWN IDEAS TOO!
Make it your house!
The house looks like the four walls have been laid down.
This is the BASE and main floor.
As you design the layout, you may have to turn your paper so your drawings
match up.
This rough draft will be used as a blueprint and will include all items from the Requirement List. The Requirement List will be included on the page. Check off each item once you have included it.
A finished wall or base could look like this. Design carefully!
As seen on the previous page.

©Digital: Divide & Conquer 2016
rough draft: BlueprintsCreate your rough draft of the tiny house. Check off each item after you add it to your house.
wall
wallw
all
wa
llshower or tub
bathroom sink
toilet
bed
table
chair
closet
desk or side table
couch/sofa or recliner
counter
microwave
stove/oven
kitchen sink
TV or computer
refrigerator
front door
window
window
picture/artwork
mirror

©Digital: Divide & Conquer 2016
shower or tub
bathroom sink
toilet
bed
table
chair
closet
desk or side table
couch/sofa or recliner
counter
microwave
Final Version: requirement Lists
Item
Listed below are all the furnishing elements that must be included inside your tiny house. Check off each item once it has been added in your house design.
stove/oven
kitchen sink
TV or computer
refrigerator
front door
window
window
light
light
picture/artwork
mirror
completed Item completed
©Digital: Divide & Conquer 2016
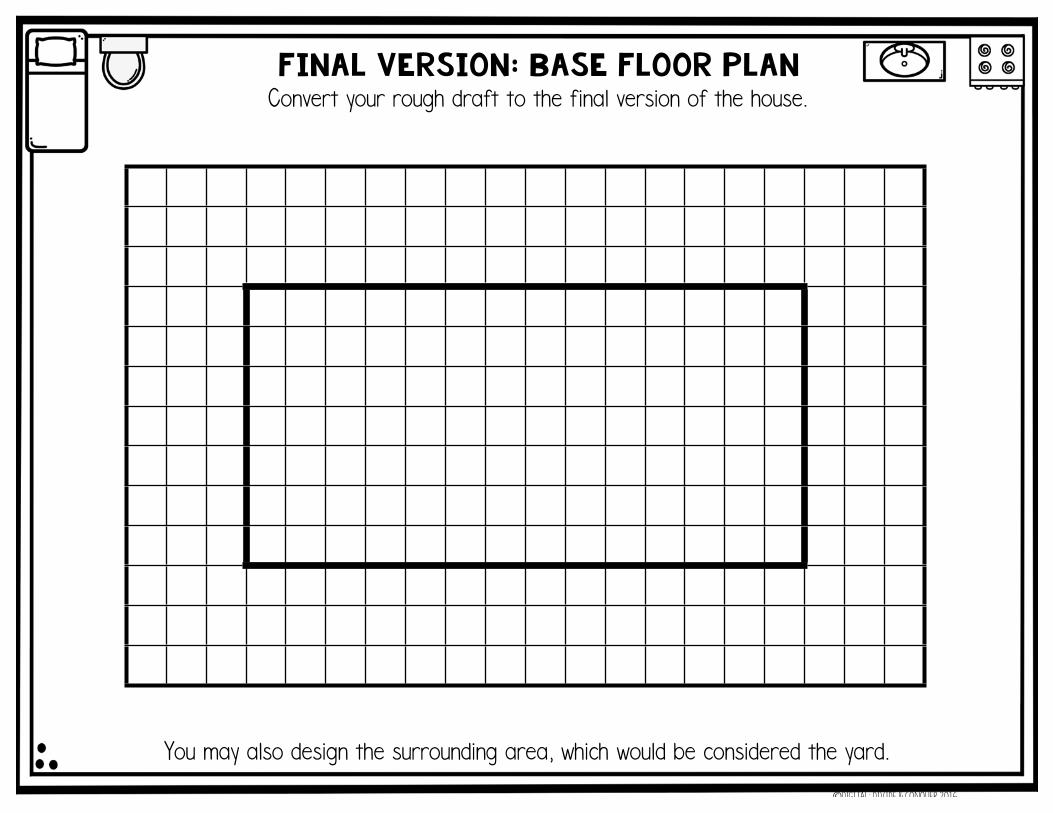
Final Version: Base floor planConvert your rough draft to the final version of the house.
You may also design the surrounding area, which would be considered the yard.

©Digital: Divide & Conquer 2016
The inside walls of your tiny house are where you will add furnishings, create doors, windows, and finish out the design.
Final Version: Walls

©Digital: Divide & Conquer 2016
Include any remaining items on the roof and ceiling. Add other items you think would go on a house ceiling.
Final Version: Roof & Ceiling
The dark outline is inside your house. There is a single row that will hang over the side. You could add lighting or other
home decorations to it.

©Digital: Divide & Conquer 2016
shower or tub
bathroom sink
toilet
bed
table
chair
closet
desk or side table
couch/sofa or recliner
counter
microwave
Find the AREA, PERIMETER, and SHAPE of each required item in your house.Fill in the information below.
Item PERIMETER AREA shape
Spec Home

©Digital: Divide & Conquer 2016
Spec Home
stove/oven
kitchen sink
TV or computer
refrigerator
front door
window
window
light
light
picture/artwork
mirror
Item PERIMETER AREA shape
Find the AREA, PERIMETER, and SHAPE of each required item in your house.Fill in the information below.

©Digital: Divide & Conquer 2016
House Base
Wall One
Wall Two
Wall Three
Wall Four
Roof
Find the AREA and PERIMETER of the base, four walls, and roof/ceiling.
Item PERIMETER AREA
Yard
Item PERIMETER AREA
Spec Home

©Digital: Divide & Conquer 2016
Exterior design
Awesome! You designed your house and the inside looks great!
But--you need to decorate the outside. Make it look like a REAL house!
BE CAREFUL with your coloring!-ONLY USE crayons or colored pencils.-Markers could bleed through and ruin the inside--no leaky house!-Look at some pictures of houses to see what the outsides look like.
WINDOWS and DOORS-If you are up to the challenge, try cutting out where you have windows.-Be patient and work slow. Doors are easier, but windows take time.
OUTDOOR SIDING-Decide what kind of exterior you want for your house: wood, stucco, log cabin, or something else.-Color it or add designs...just be creative.

©Digital: Divide & Conquer 2016
student reflection
I can... Yesneeds more work
I completed steps 1-8 on the To-Do List.
I can find the area of an object.
I can find the perimeter of an object
I can find the area and perimeter of an object I create.
I can connect area, perimeter, and geometry to real-world situations.
I can use problem-solving techniques to complete this activity.
I can use collaboration techniques to complete this activity.
name
The most challenging part of this project was...
My favorite part of this project was...
One thing that really surprised me was...
something I learned from a classmate was...

©Digital: Divide & Conquer 2016
building furniture
First: Make sure your furniture size matches what you created in your house.
It’s time to build your furniture by creating three dimensional shapes.Use two provided graphing sheets with furniture included or create your own.
second: 3D (three dimensional) means you’ll have to design on all the sides. Minecraft and LEGOS are good examples.
Third: Don’t cut out the net until you are sure you have enough. Map out what you need.
fourth: Tape your shapes together. You can try glue, but it might not work as well.
fifth: DON’T get discouraged! This is a very difficult element of design. It will take you a while to master it...but you can do it!
For this couch, I would cut out on my dotted line and tape the 4 sides together.
WALLS: If you created walls--add those!
DON’t Tape or glue anything to your house, unless your teacher says you can!

©Digital: Divide & Conquer 2016
three-dimensional piecesUse this graph paper to create your own three-dimensional furniture for the house.

©Digital: Divide & Conquer 2016
three-dimensional piecesUse this graph paper to create your own three-dimensional furniture for the house.