Embed Size (px)
Citation preview
B r i g h t w a r e ™
Agent Guide
Version 8.1.4
Trademark, Copyright, and Patent Acknowledgementsedocs is a trademark of edocs, Inc.Brightware is a registered trademark of edocs, Inc.Brightware Contact Center Suite, Answer, Concierge, and Converse are trademarks of edocs, Inc.
Adobe and Acrobat are registered trademarks of Adobe Systems IncorporatedInternet Explorer, Microsoft Data Access Components Software Development Kit, Microsoft Management Console,
Microsoft Virtual Machine, Personal Web Server, SQL Server, SQL 2000, Windows, and Word are registered trademarks of Microsoft Corporation
Java, JavaScript, Solaris, and JRE are trademarks of Sun Microsystems, Inc.Linux is a registered trademark of Linus TorvaldsNetscape Navigator is a registered trademark of Netscape Communications CorporationOracle is a registered trademark of Oracle CorporationRed Hat is a registered trademark of Red Hat, Inc.Visual C++ is a trademark of Microsoft CorporationWebLogic Server is a trademark of BEA Systems, Inc.WebSphere is a registered trademark of International Business Machines Corporation.
This document, as well as the software described in it, is delivered under license and may be used or copied only in accordance with the terms of such license. The content in this document is delivered for informational use only, is believed accurate at time of publication, is subject to change without notice, and should not be construed as a commitment by edocs, Inc. edocs, Inc. assumes no responsibility or liability for any errors or inaccuracies that may appear in this document. The User of the edocs applications is subject to the terms and conditions of all license agreements signed by the licensee of this application. This unpublished work contains valuable confidential and proprietary information. Disclosure, use, or reproduction outside of edocs is prohibited except as authorized in writing. This unpublished work by edocs is protected by the laws of the United States and other countries. If publication occurs, the following notice shall apply: Copyright © 1997-2004 edocs, Inc. All rights reserved.
Covered by one or more of the following U.S. patent numbers: U.S. 6,278,996; U.S. 6,182,059; U.S. 6,411,947.
Portions of the software copyrighted by:Copyright © 1991-2001 Sheridan Software Systems, Inc.Copyright © 2001, JANUS SYSTEMS SA DE CV. All Rights Reserved. Copyright © 1996-2001 VideoSoft Copyright © 1997-2001 KL Group Inc.Copyright © 2001 Microsoft Corporation. All Rights Reserved.Copyright © 2001 ProtoView Development Corporation. All Rights Reserved.Copyright © 2001 Adobe Systems Incorporated. All Rights Reserved.Sentry Spelling-Checker Engine Copyright © 2000 Wintertree Software Inc.
In addition to the other applicable agreements, use of this edocs software product shall indicate that Licensee agrees that it has reviewed and will abide by the terms and conditions of all license agreements related to third-party software incorporated in or required for the use of the edocs software product.
Version Date: November 24, 2004
edocs Confidential and Proprietary
Table of Contents
About this Guide ................................................................................................................. 1Organization ................................................................................................................................................ 1Related Documentation ............................................................................................................................... 1Conventions................................................................................................................................................. 2Technical Support........................................................................................................................................ 3Help ............................................................................................................................................................. 3
Getting Started .................................................................................................................... 5Login ............................................................................................................................................................ 5Request Toolbar .......................................................................................................................................... 6The View Tabs............................................................................................................................................. 7
Sorting and Viewing Information............................................................................................................ 7
Agent Desktop Details ........................................................................................................ 9My Requests View....................................................................................................................................... 9Working Requests View............................................................................................................................. 11
The Response Library ......................................................................................................................... 13Reason Codes..................................................................................................................................... 16A Note About Tracking Numbers......................................................................................................... 17
Customer History View .............................................................................................................................. 17Action History View.................................................................................................................................... 19My Queues View........................................................................................................................................ 19
Queue & Message Condition............................................................................................................... 20Outbound Requests View.......................................................................................................................... 21Options View.............................................................................................................................................. 22Answering Messages................................................................................................................................. 22Address Book ............................................................................................................................................ 24
edocs Confidential and Proprietary ii

Table of Contents
iii edocs Confidential and Proprietary
Chapter
1
About this GuideOrganizationThis documentation provides the information necessary to set up and run Agent Desktop:
Chapter 2, “Getting Started”, on page 5, introduces the Agent Desktop’s basic controls and views.Chapter 3, “Agent Desktop Details”, on page 9, discusses each of the Agent Desktop views in detail.
Related DocumentationFor more information about Agent Desktop please refer to these documents included in PDF format on the installation CD:
Contact Center Console Guide
edocs Confidential and Proprietary 1
Chapter 1 - About this Guide
ConventionsThe following typographic conventions are used in this document:
Items that you are instructed to click or select, such as button names and hyperlinks, are bold:• Select Add Response.• Click the OK button.
Documents, headings, and chapter titles are italicized:• “Refer to the Reference Manual for more information.”
Notes are flagged along the left margin:
This icon indicates noteworthy information.
Cautions are flagged along the left margin:
I This icon indicates critical information.
Programming code and system messages appear in a fixed-width font:Set-request-condition (<condition>)
Hyperlinks and Cross References - If viewing a document online, you can navigate through it using hyperlinks, which appear in blue text, and cross references. Although not displayed in blue, the Table of Contents and Index entries are also hyperlinks. Cross references are specific page number references. Click the page number to navigate to that page:
• Refer to “Technical Support”, on page 3.
The term Type usually refers to typing information on your keyboard:• Type the number of decimal places you want displayed.
The term Enter typically refers to the “Enter” key on your keyboard:• Type the number of decimal places you want displayed and press the Enter key.
When a directory path is given, the hard drive letter is omitted since it is unknown what hard drive the system is installed on. Only the default install path is supported:
• Documents are available under edocs\Brightware\docs\.
2 edocs Confidential and Proprietary
Contact Center Console Guide
Technical SupportPlease contact your Support Helpdesk for any questions or concerns related to the Brightware application.
HelpYou can access this guide from the Help link on the Contact Center Console. The file is in Adobe Acrobat Portable Document Format (PDF). You need Acrobat Reader installed on your computer to view the file.
To access the Help file:Select Help from the Applications view.
edocs Confidential and Proprietary 3

Chapter 1 - About this Guide
4 edocs Confidential and Proprietary

Chapter
2
Getting StartedThis chapter introduces the Agent Desktop’s basic controls and views. Each view is discussed in more detail in Chapter 3.
LoginTo open the Agent Desktop:
1. Open a Web browser window and enter the URL specified by your supervisor to display the login screen (Figure 2-1). For example:
http://MyServer:7001/Logon
2. Enter your username and password, then click OK to display the My Requests view.
Leave the password field blank the first time you log into the Agent Desktop (enter your username then click OK). The Set Password screen will appear so you can set up a password of your own choosing. Leave the Old Password field blank and type your new password into the New Password field. Type again in the Retry Password field, then click OK. Use your new password the next time you log in.
The first screen to appear is the My Request screen. Click the View tabs on the left-hand side of the screen to display the different Desktop views. The Agent Desktop Toolbar at the top of the screen (just below the browser controls) contains these controls:
The Logout button – Click this button to quit the Agent Desktop application.The Online/Offline toggle button – Click this button to switch to Offline when you will be spending some time working on one request or when you will be away from your desk for a short period of time. This will prevent the assignment of additional requests to you.
Figure 2-1. Agent Desktop Login Screen
edocs Confidential and Proprietary 5
Chapter 2 - Getting Started
The Help button – Click this button to display this user guide.
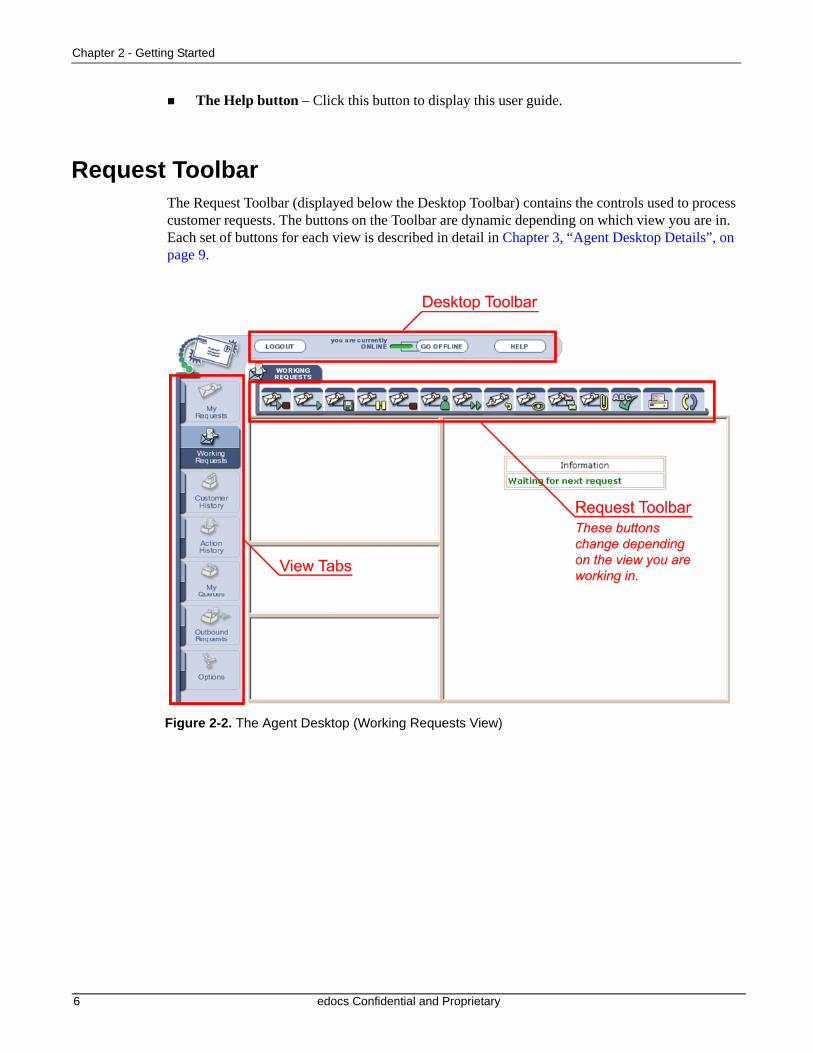
Request ToolbarThe Request Toolbar (displayed below the Desktop Toolbar) contains the controls used to process customer requests. The buttons on the Toolbar are dynamic depending on which view you are in. Each set of buttons for each view is described in detail in Chapter 3, “Agent Desktop Details”, on page 9.
Figure 2-2. The Agent Desktop (Working Requests View)
6 edocs Confidential and Proprietary
Agent Guide
The View TabsBelow is a description of the Agent Desktop views. Views are described in detail in Chapter 3, “Agent Desktop Details”, on page 9.
My Requests View – Display a list of messages in your working area and their status.Working Requests View – Respond to customer requests.Customer History View – Display all messages associated with a particular customer.Action History View – Display all actions associated with a particular message.My Queues View – Display the status of the queues to which you are assigned.Outbound Requests View – Send (initiate) an e-mail message to someone.Options View – Change password, select font options, set working request options, and set customer history options.
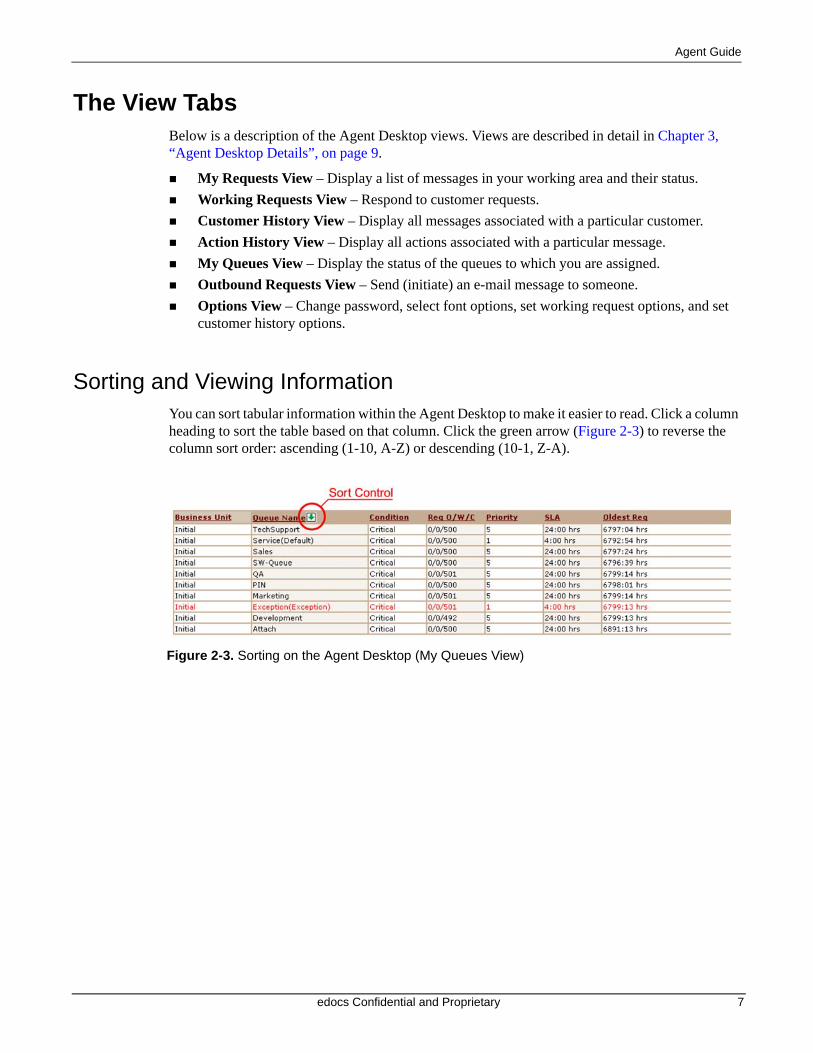
Sorting and Viewing InformationYou can sort tabular information within the Agent Desktop to make it easier to read. Click a column heading to sort the table based on that column. Click the green arrow (Figure 2-3) to reverse the column sort order: ascending (1-10, A-Z) or descending (10-1, Z-A).
Figure 2-3. Sorting on the Agent Desktop (My Queues View)
edocs Confidential and Proprietary 7

Chapter 2 - Getting Started
8 edocs Confidential and Proprietary
Chapter
3
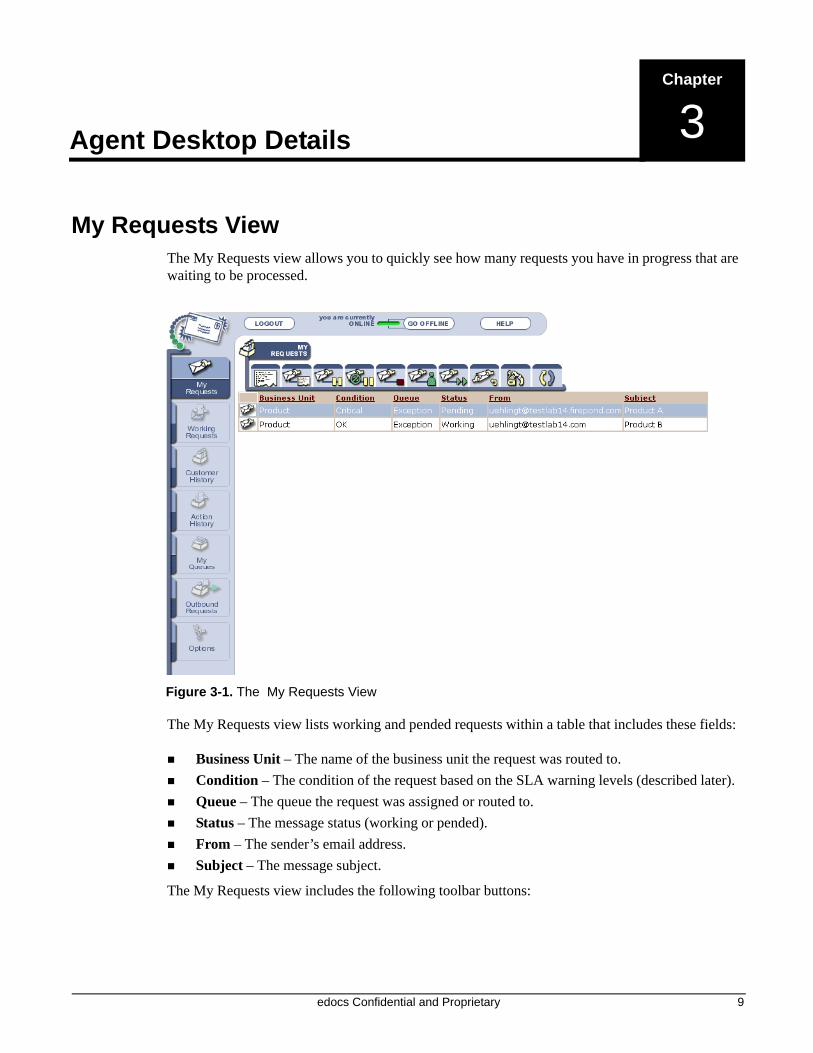
Agent Desktop DetailsMy Requests ViewThe My Requests view allows you to quickly see how many requests you have in progress that are waiting to be processed.
Figure 3-1. The My Requests View
The My Requests view lists working and pended requests within a table that includes these fields:
Business Unit – The name of the business unit the request was routed to.Condition – The condition of the request based on the SLA warning levels (described later).Queue – The queue the request was assigned or routed to.Status – The message status (working or pended).From – The sender’s email address.Subject – The message subject.
The My Requests view includes the following toolbar buttons:
edocs Confidential and Proprietary 9
Chapter 3 - Agent Desktop Details
Table 3-1. My Requests View Toolbar
Button Description
Display a table that shows all of the pended and working requests assigned to you.
Preview the currently selected request. Next and Previous buttons are provided on the preview screen so you can quickly navigate to other request previews.
Pend the currently-selected request. Pend a request when you need more time to seek information. For example, you might need to discuss the request with a person who is not currently in the office. Pending a request allows you to make yourself available to handle other requests.
Unpend the currently-selected request. The Agent Desktop will switch to the Working Requests view and display the request. If you have a current working request at the time you unpend, that request is automatically pended by the system.
Close the currently-selected request. You might close a request when no response is needed. For example, the request might be a thank-you note or advertisement. You might also close a request that was previously responded to but not closed.
Reassign the currently-selected request to another queue and/or agent. When you reassign the request, any draft responses are included. You can assign a reason code or comments to explain the reassignment. You might reassign a request when it was assigned to you by mistake, or if you know another agent who is better able to handle a specific request.
Forward the currently-selected request to an e-mail recipient. The request is still assigned to you. Forwarding is typically used when an agent needs to gather more information through e-mail. You may want to pend the request while you wait for a response.
Transfer the currently-selected request to another business unit. When you transfer the request, any draft responses are included. You can select the business unit to transfer to, and the Knowledge Base to use for processing. If you do not specify a Knowledge Base, the default Knowledge Base for the business unit is used. You might transfer a request when it was assigned to you or your business unit by mistake.
Show all actions associated with the sender of the currently-selected request. This is identical to the Action History view. When you scroll to the bottom of the Actions table, you can click the Add Comment button to add a comment (it appears as another item in the Action table).
10 edocs Confidential and Proprietary
Agent Guide
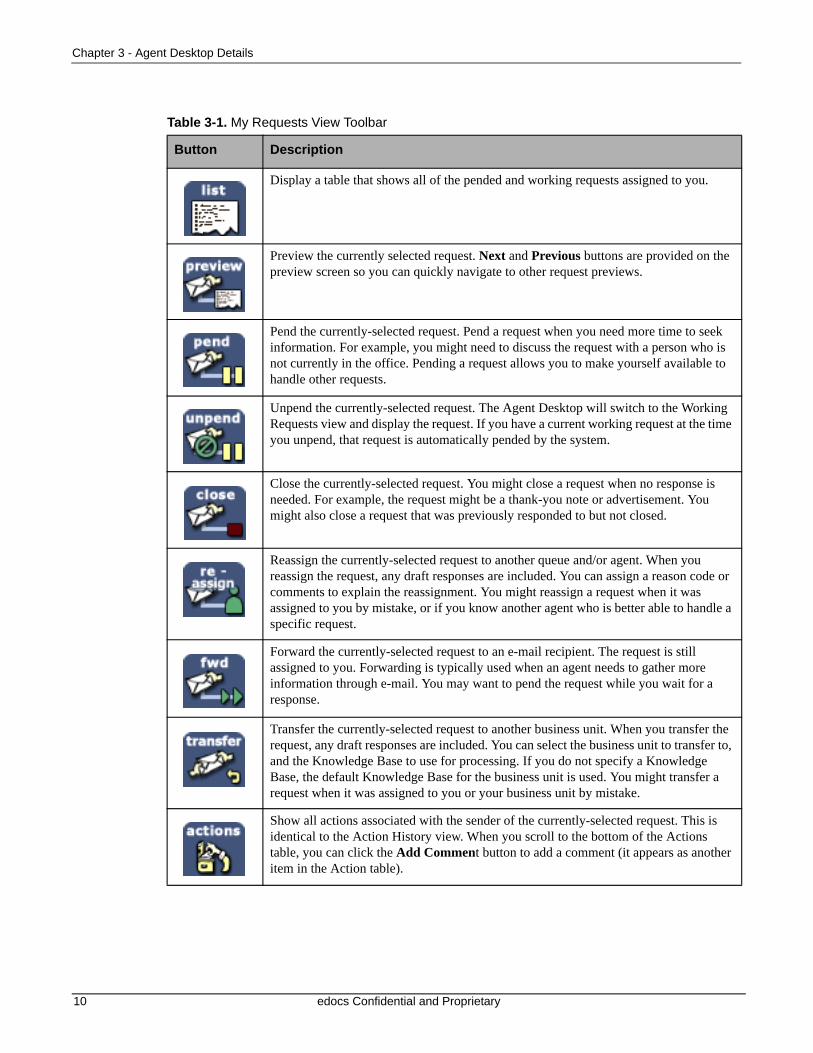
Working Requests ViewUse the Working Requests view to handle customer requests. This is the main screen you use to process requests. When you respond to a request, the next request assigned to you is automatically loaded into the Working Requests View.
Figure 3-2. The Working Requests View
The Working Requests view contains four separate panes:
Original Message – Displays the customer’s original request. Response Library – Displays the Response Library which contains responses used to answer requests. Response Preview – Displays the contents of the response selected in the Response Library.
• If variables are used in the response, they will appear here in red if no value was assigned. You must replace the variable with text before sending the response. Refer to the Contact Center Console Guide for more information about variables.
Refresh the screen. If new requests have been added, they will appear after you click Refresh.
Table 3-1. My Requests View Toolbar
Button Description
edocs Confidential and Proprietary 11
Chapter 3 - Agent Desktop Details
Reply Pane – Displays customer requests and responses selected from the Response Library pane. Use this area to edit responses or compose new ones.
• The Reply pane includes typical email boxes for To, CC, and BCC. Click the To, CC, or BCC icons to search for an e-mail address (only available if this feature is set up by the system administrator).
• The Subject box defaults to “RE:” plus the original e-mail subject.• The Reply pane features typical Cut, Copy, and Paste editing functions. • Click the Include original message box to add the text of the original message to your
response.• The Reply Pane may include a default greeting or signature if one was configured by
the supervisor.
You can resize these panes by dragging their borders to the desired location. However, these adjustments will be lost when you log out. To permanently adjust the panes, use the Options view (refer to “Options View”, on page 22).
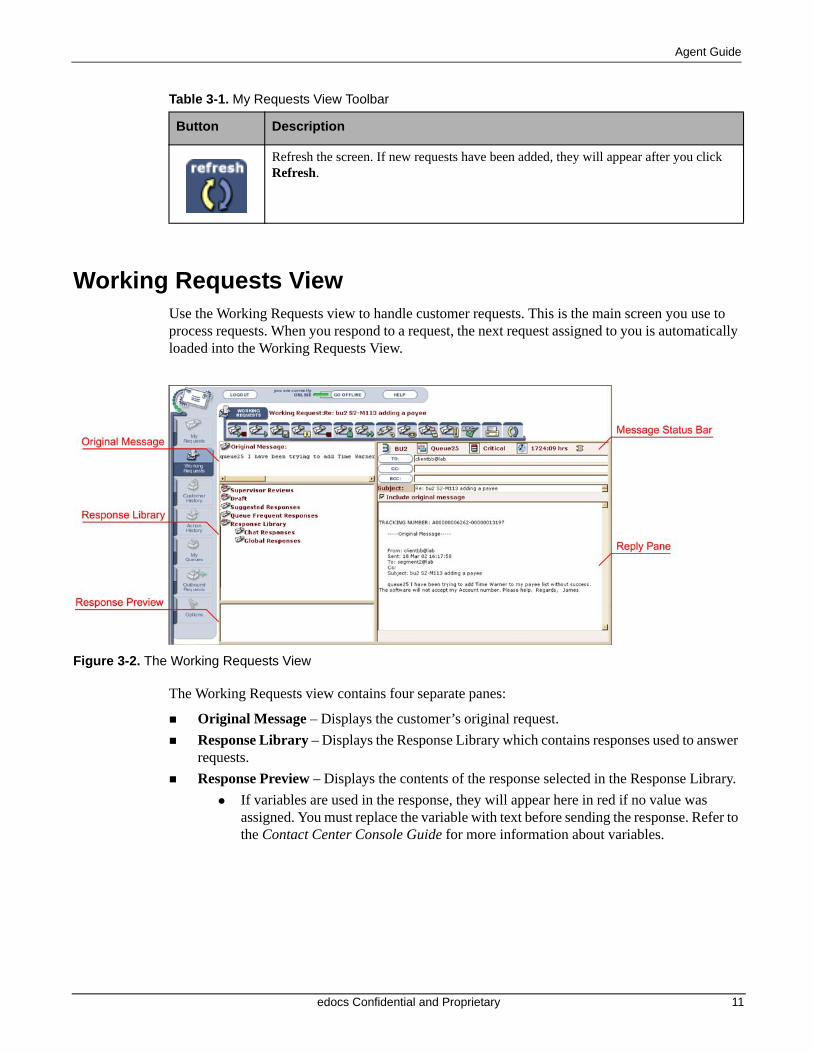
The Message Status bar displays information about the current working request (Figure 3-3).
Figure 3-3. The Message Status Bar
Under certain conditions three clickable icons will appear in the Message Status bar (right side).
Attachment icon – Indicates the message has an attachment. Click the icon to view the names of attached files, delete attached files, or add additional files.Customer History – Indicates the person you are responding to has communicated with your organization before. Click on it to display a list of those requests.Action History icon – Indicates Action History information is available. Click the icon to review Action History.
If you cannot see all the icons on the Message Status bar, resize the window by dragging its border until the whole bar is displayed. A window size of 1024 x 768 is recommended.
As noted above, the paperclip icon indicates the presence of an attached file. It can also appear in the:
Original Message window when an inbound message has an attachment.Response Library next to responses that include an attachment.Response Preview window when viewing a response with an attachment.
12 edocs Confidential and Proprietary

Agent Guide
The Response LibraryThe Response Library contains the preformatted replies you use to answer customer requests. When you open a request, Agent Desktop displays suggested responses (if the system was able to determine a suggested response). Its highest scoring choice appears in the Response Preview window. You may accept a suggested response, select a different response from the Response Library, or type your own response in the Reply window. You may also modify responses after they have been selected.
Figure 3-4. The Response Library Pane
The Response Library pane always contains main folders for Drafts, Suggested Responses, Queue Frequent Responses, and Response Library. Click (check) the box next to a response to select the response and place its text into the Reply pane. To preview a response in the Response Preview pane, click the response name.
Supervisor Reviews – The Supervisor Reviews folder holds any rejected messages from your supervisor in draft form. Rejection comments from the Supervisor appear in the Response Preview pane.Drafts – The Drafts folder holds any draft responses you save. When you send a draft response it is automatically removed from the Draft folder.Suggested Responses – If you use a Knowledge Base for advanced Intelligence Engine processing, the Suggested Responses folder will contain responses suggested by the Intelligence Engine and listed by score. Otherwise this folder is empty.Queue Frequent Responses – The Queue Frequent Responses folder contains frequent responses for the queue. For example, if the request is in the Sales queue, the Sales Queue Frequent Responses folder will appear. If it is in the Services queue, the Service Queue Frequent Responses folder will appear, and so on.
edocs Confidential and Proprietary 13
Chapter 3 - Agent Desktop Details
Response Library – The Response Library folder contains all pre-composed responses. This list includes both global responses (always available) as well as Business Unit specific responses (specific to the relevant Business Unit only).
Let your Supervisor know if there’s a response you think should be added as a suggested response, or to the Queue Frequent Responses folder, for a particular request or queue.
The Working Requests view includes the following toolbar buttons:
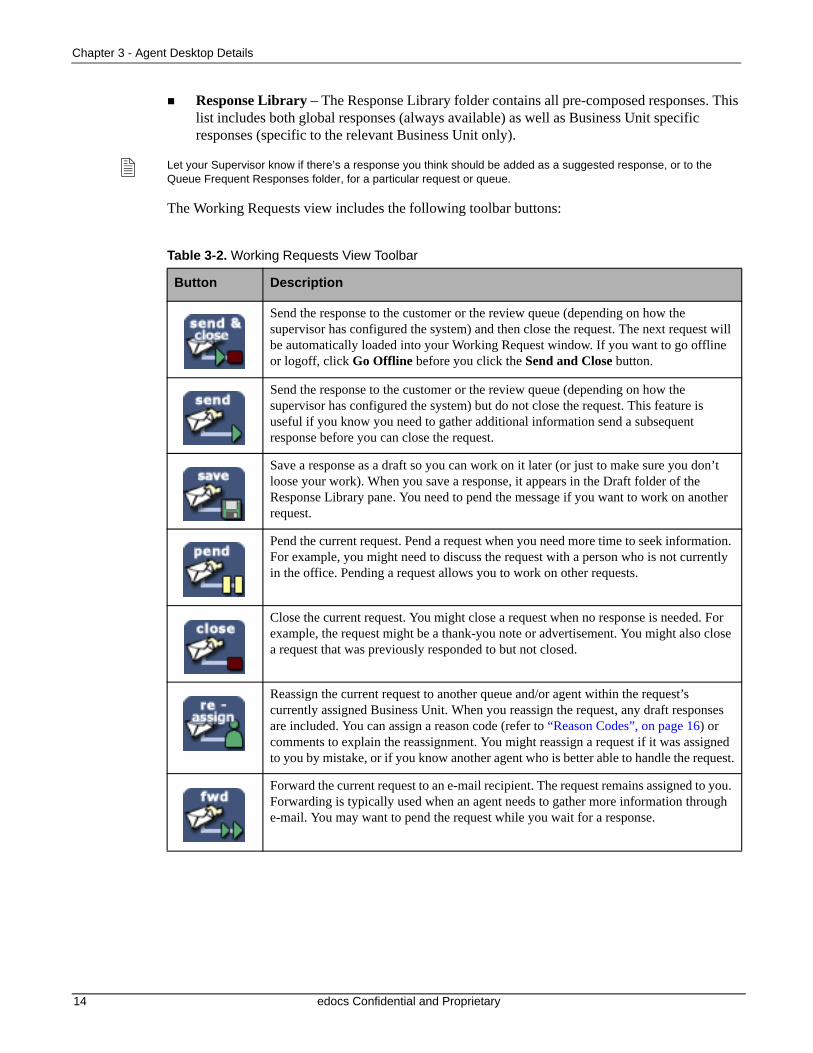
Table 3-2. Working Requests View Toolbar
Button Description
Send the response to the customer or the review queue (depending on how the supervisor has configured the system) and then close the request. The next request will be automatically loaded into your Working Request window. If you want to go offline or logoff, click Go Offline before you click the Send and Close button.
Send the response to the customer or the review queue (depending on how the supervisor has configured the system) but do not close the request. This feature is useful if you know you need to gather additional information send a subsequent response before you can close the request.
Save a response as a draft so you can work on it later (or just to make sure you don’t loose your work). When you save a response, it appears in the Draft folder of the Response Library pane. You need to pend the message if you want to work on another request.
Pend the current request. Pend a request when you need more time to seek information. For example, you might need to discuss the request with a person who is not currently in the office. Pending a request allows you to work on other requests.
Close the current request. You might close a request when no response is needed. For example, the request might be a thank-you note or advertisement. You might also close a request that was previously responded to but not closed.
Reassign the current request to another queue and/or agent within the request’s currently assigned Business Unit. When you reassign the request, any draft responses are included. You can assign a reason code (refer to “Reason Codes”, on page 16) or comments to explain the reassignment. You might reassign a request if it was assigned to you by mistake, or if you know another agent who is better able to handle the request.
Forward the current request to an e-mail recipient. The request remains assigned to you. Forwarding is typically used when an agent needs to gather more information through e-mail. You may want to pend the request while you wait for a response.
14 edocs Confidential and Proprietary
Agent Guide
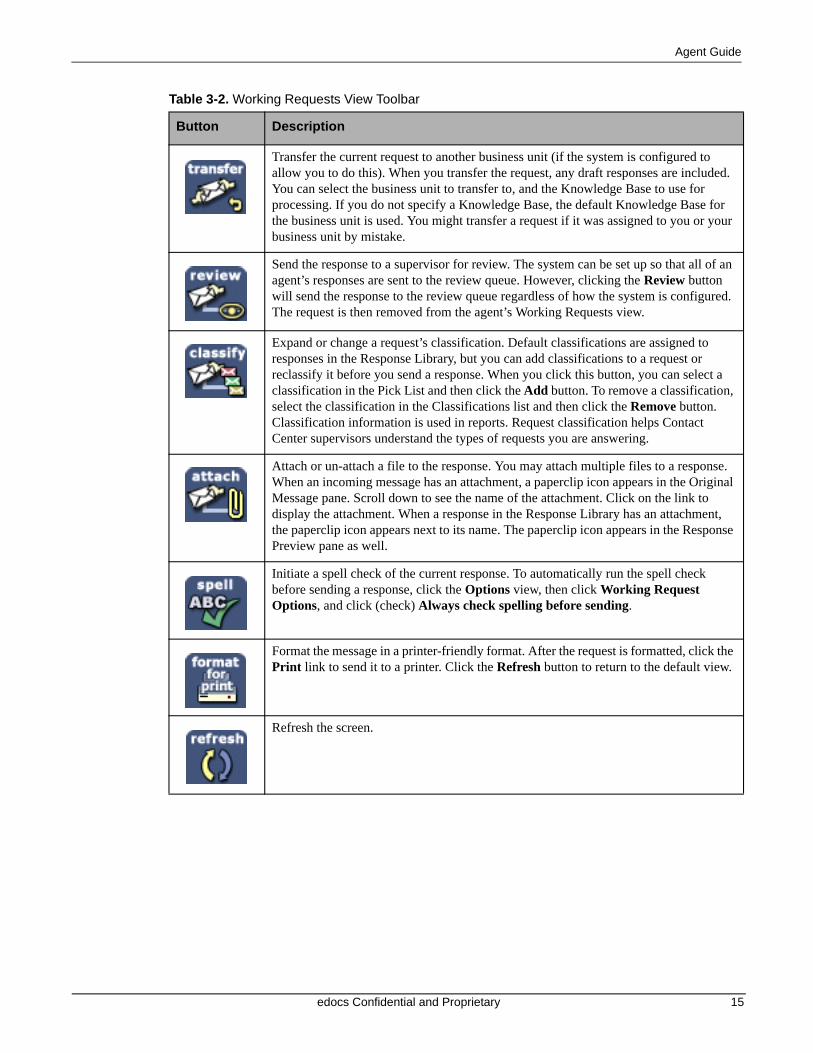
Transfer the current request to another business unit (if the system is configured to allow you to do this). When you transfer the request, any draft responses are included. You can select the business unit to transfer to, and the Knowledge Base to use for processing. If you do not specify a Knowledge Base, the default Knowledge Base for the business unit is used. You might transfer a request if it was assigned to you or your business unit by mistake.
Send the response to a supervisor for review. The system can be set up so that all of an agent’s responses are sent to the review queue. However, clicking the Review button will send the response to the review queue regardless of how the system is configured. The request is then removed from the agent’s Working Requests view.
Expand or change a request’s classification. Default classifications are assigned to responses in the Response Library, but you can add classifications to a request or reclassify it before you send a response. When you click this button, you can select a classification in the Pick List and then click the Add button. To remove a classification, select the classification in the Classifications list and then click the Remove button. Classification information is used in reports. Request classification helps Contact Center supervisors understand the types of requests you are answering.
Attach or un-attach a file to the response. You may attach multiple files to a response. When an incoming message has an attachment, a paperclip icon appears in the Original Message pane. Scroll down to see the name of the attachment. Click on the link to display the attachment. When a response in the Response Library has an attachment, the paperclip icon appears next to its name. The paperclip icon appears in the Response Preview pane as well.
Initiate a spell check of the current response. To automatically run the spell check before sending a response, click the Options view, then click Working Request Options, and click (check) Always check spelling before sending.
Format the message in a printer-friendly format. After the request is formatted, click the Print link to send it to a printer. Click the Refresh button to return to the default view.
Refresh the screen.
Table 3-2. Working Requests View Toolbar
Button Description
edocs Confidential and Proprietary 15
Chapter 3 - Agent Desktop Details
Reason CodesReason codes are a shorthand description of why you took a particular action when handling a request. Reason codes become part of a request’s Action History. There are four actions in which reason codes apply: Pend, Reassign, Close, and Reopen. The table below shows some sample codes:
Reason Codes are created by the Contact Center Supervisor(s). If no other Reason Codes are created Default (or “DFT”), Contact Center’s default Reason Code, will be used.
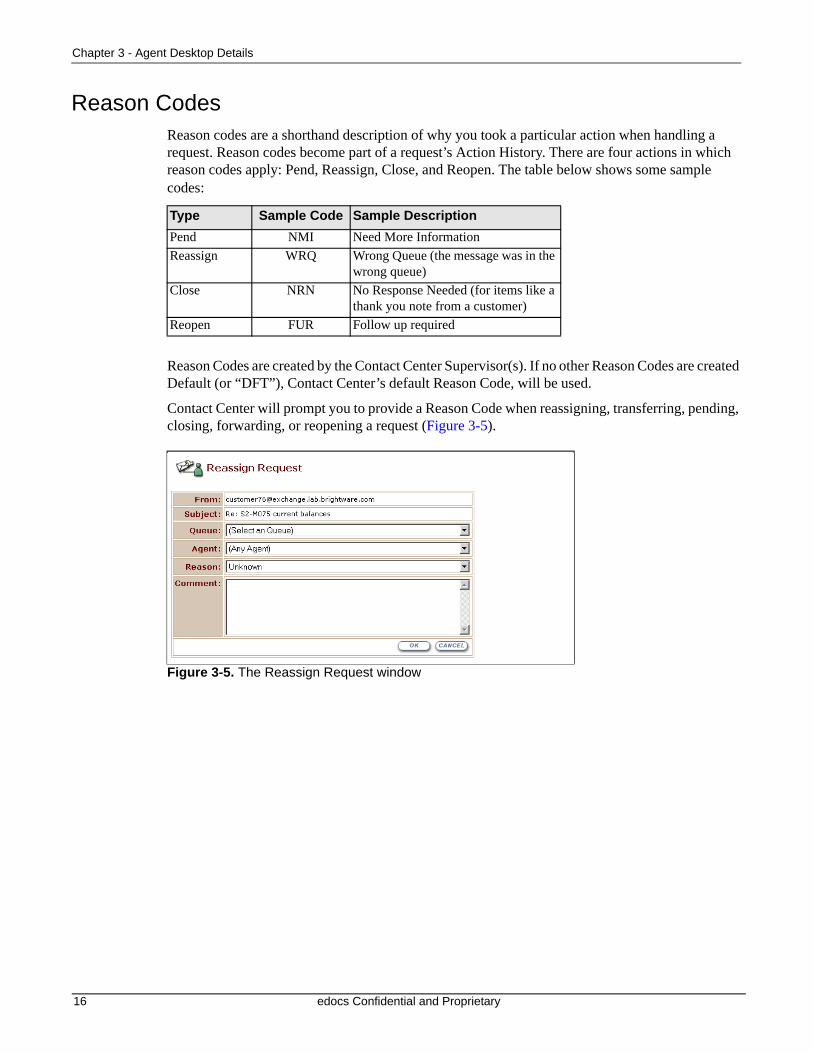
Contact Center will prompt you to provide a Reason Code when reassigning, transferring, pending, closing, forwarding, or reopening a request (Figure 3-5).
Type Sample Code Sample DescriptionPend NMI Need More InformationReassign WRQ Wrong Queue (the message was in the
wrong queue)Close NRN No Response Needed (for items like a
thank you note from a customer)Reopen FUR Follow up required
Figure 3-5. The Reassign Request window
16 edocs Confidential and Proprietary
Agent Guide
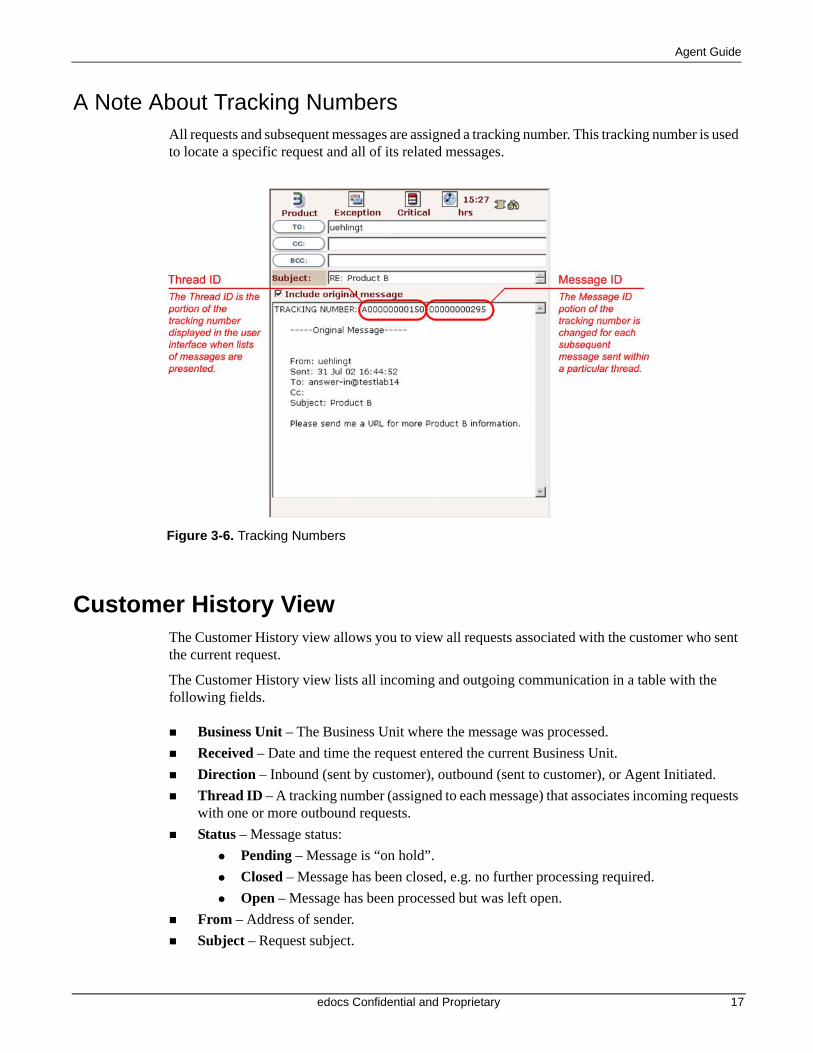
A Note About Tracking NumbersAll requests and subsequent messages are assigned a tracking number. This tracking number is used to locate a specific request and all of its related messages.
Figure 3-6. Tracking Numbers
Customer History ViewThe Customer History view allows you to view all requests associated with the customer who sent the current request.
The Customer History view lists all incoming and outgoing communication in a table with the following fields.
Business Unit – The Business Unit where the message was processed.Received – Date and time the request entered the current Business Unit.Direction – Inbound (sent by customer), outbound (sent to customer), or Agent Initiated.Thread ID – A tracking number (assigned to each message) that associates incoming requests with one or more outbound requests.Status – Message status:
• Pending – Message is “on hold”.• Closed – Message has been closed, e.g. no further processing required.• Open – Message has been processed but was left open.
From – Address of sender.Subject – Request subject.
edocs Confidential and Proprietary 17

Chapter 3 - Agent Desktop Details
The Customer History view includes the following toolbar buttons:
Table 3-3. Customer History View Toolbar
Button Description
Display a table that shows all of the messages associated with the customer who sent the current request.
Preview the currently selected message. Next and Previous buttons are provided on the preview screen so you can quickly navigate to other requests.
Show all messages associated with a particular request sequence. Messages within a thread are tied together through the tracking number.
Display all actions associated with the sender of the currently-selected request. This is identical to the Action History view. When you scroll to the bottom of the Actions table, you can click the Add Comment button to add a comment (the comment appears as another row in the Action table).
Reopen a previously closed request (if the system has been configured to allow you to do that). You will be prompted to select a queue and agent to assign the request to. You can also select a reason for reopening the request.
Search the database for a specific message or a set of messages. You can search on:· Thread ID.· Customer name.· Customer domain (i.e. the string after the @ in an email address, e.g. “@aol.com,”
“@edocs.com,”).· A range of dates (specify From: and To: dates).· Log in name of the processing agent.· Open messages, closed messages, or both (includes pended messages).· Business units (current or all assigned). (The system must be configured to allow
you to search this).
The more information you can provide, the more refined the search will be. If you search by Thread ID, no other fields on this screen are used in the search.
Refresh the screen.
18 edocs Confidential and Proprietary
Agent Guide
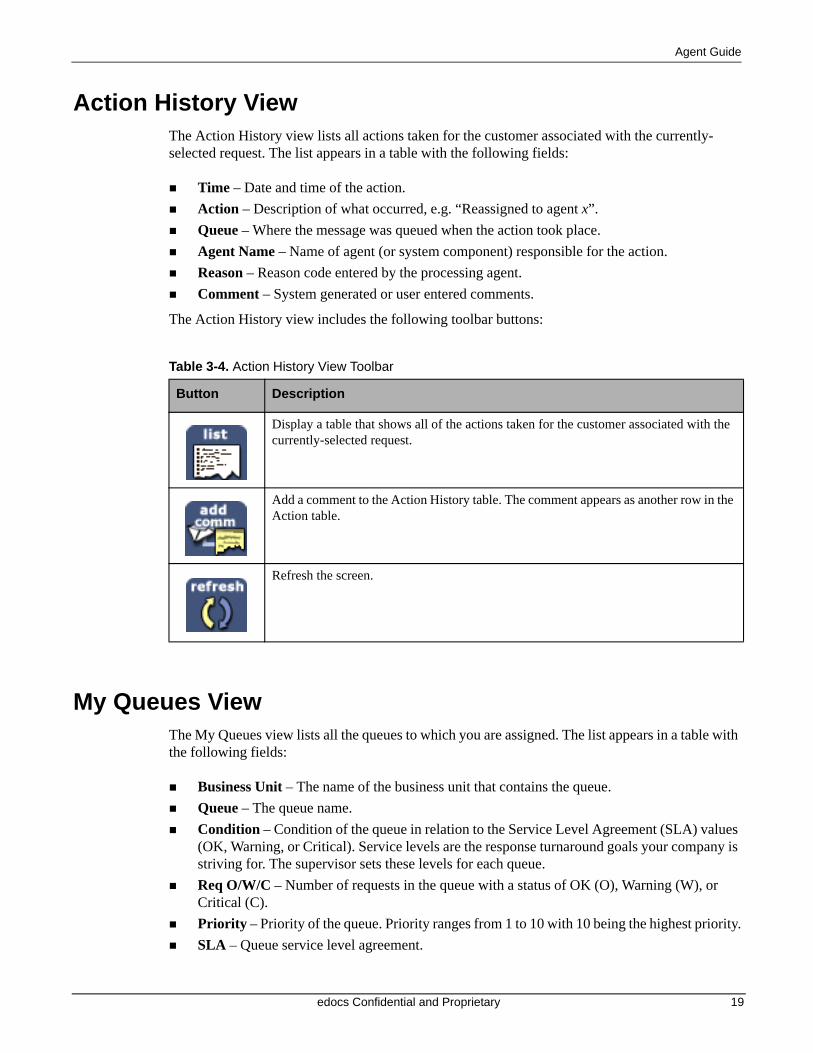
Action History ViewThe Action History view lists all actions taken for the customer associated with the currently-selected request. The list appears in a table with the following fields:
Time – Date and time of the action.Action – Description of what occurred, e.g. “Reassigned to agent x”.Queue – Where the message was queued when the action took place.Agent Name – Name of agent (or system component) responsible for the action.Reason – Reason code entered by the processing agent.Comment – System generated or user entered comments.
The Action History view includes the following toolbar buttons:
My Queues ViewThe My Queues view lists all the queues to which you are assigned. The list appears in a table with the following fields:
Business Unit – The name of the business unit that contains the queue.Queue – The queue name.Condition – Condition of the queue in relation to the Service Level Agreement (SLA) values (OK, Warning, or Critical). Service levels are the response turnaround goals your company is striving for. The supervisor sets these levels for each queue.Req O/W/C – Number of requests in the queue with a status of OK (O), Warning (W), or Critical (C).Priority – Priority of the queue. Priority ranges from 1 to 10 with 10 being the highest priority.SLA – Queue service level agreement.
Table 3-4. Action History View Toolbar
Button Description
Display a table that shows all of the actions taken for the customer associated with the currently-selected request.
Add a comment to the Action History table. The comment appears as another row in the Action table.
Refresh the screen.
edocs Confidential and Proprietary 19
Chapter 3 - Agent Desktop Details
Oldest Req – Age of oldest request in queue.
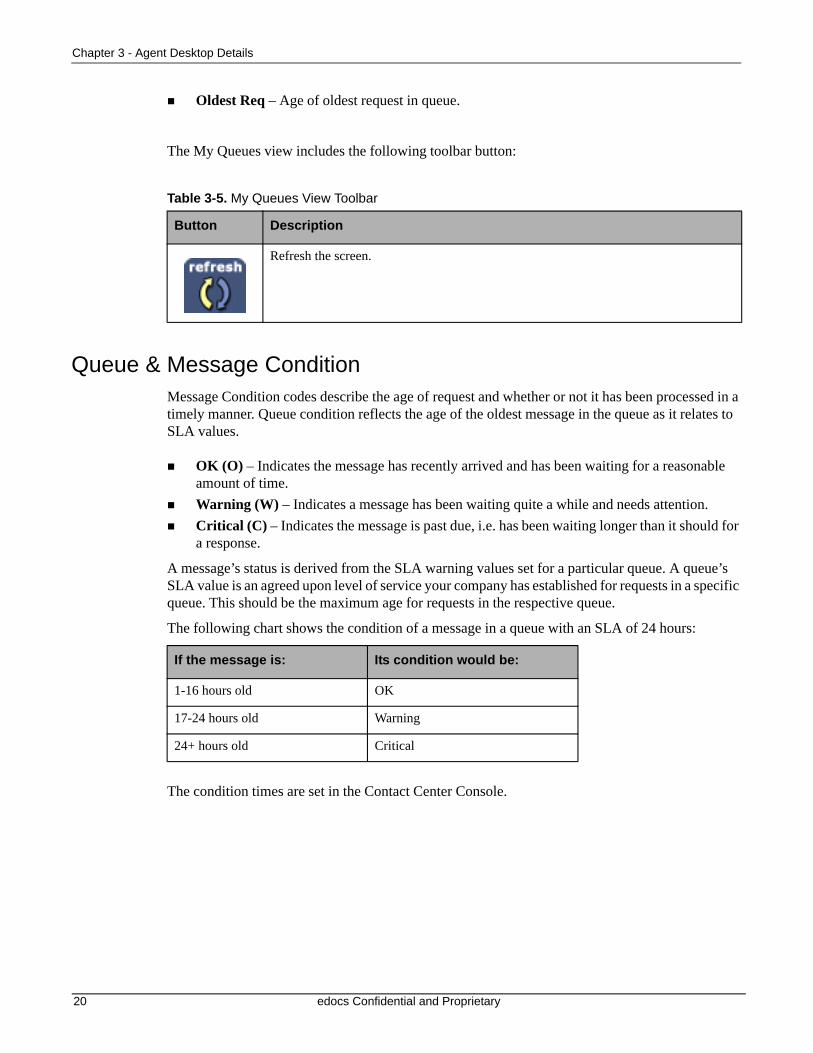
The My Queues view includes the following toolbar button:
Queue & Message ConditionMessage Condition codes describe the age of request and whether or not it has been processed in a timely manner. Queue condition reflects the age of the oldest message in the queue as it relates to SLA values.
OK (O) – Indicates the message has recently arrived and has been waiting for a reasonable amount of time.Warning (W) – Indicates a message has been waiting quite a while and needs attention. Critical (C) – Indicates the message is past due, i.e. has been waiting longer than it should for a response.
A message’s status is derived from the SLA warning values set for a particular queue. A queue’s SLA value is an agreed upon level of service your company has established for requests in a specific queue. This should be the maximum age for requests in the respective queue.
The following chart shows the condition of a message in a queue with an SLA of 24 hours:
The condition times are set in the Contact Center Console.
Table 3-5. My Queues View Toolbar
Button Description
Refresh the screen.
If the message is: Its condition would be:
1-16 hours old OK
17-24 hours old Warning
24+ hours old Critical
20 edocs Confidential and Proprietary
Agent Guide
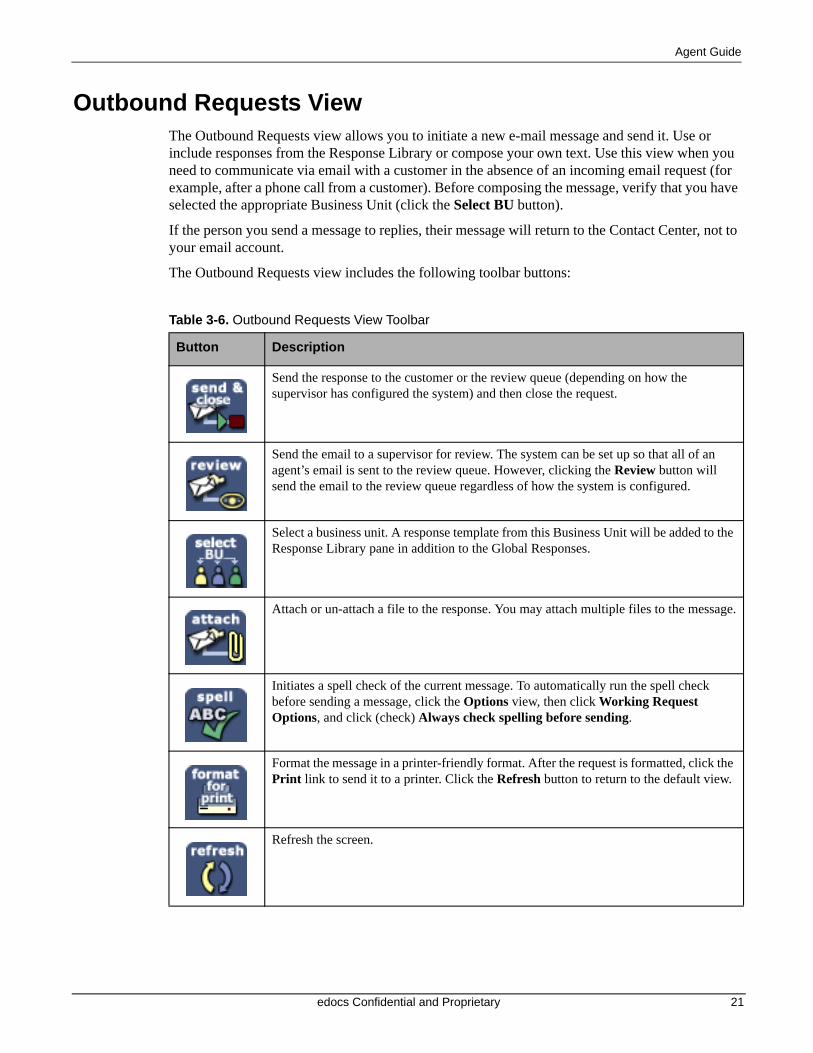
Outbound Requests ViewThe Outbound Requests view allows you to initiate a new e-mail message and send it. Use or include responses from the Response Library or compose your own text. Use this view when you need to communicate via email with a customer in the absence of an incoming email request (for example, after a phone call from a customer). Before composing the message, verify that you have selected the appropriate Business Unit (click the Select BU button).
If the person you send a message to replies, their message will return to the Contact Center, not to your email account.
The Outbound Requests view includes the following toolbar buttons:
Table 3-6. Outbound Requests View Toolbar
Button Description
Send the response to the customer or the review queue (depending on how the supervisor has configured the system) and then close the request.
Send the email to a supervisor for review. The system can be set up so that all of an agent’s email is sent to the review queue. However, clicking the Review button will send the email to the review queue regardless of how the system is configured.
Select a business unit. A response template from this Business Unit will be added to the Response Library pane in addition to the Global Responses.
Attach or un-attach a file to the response. You may attach multiple files to the message.
Initiates a spell check of the current message. To automatically run the spell check before sending a message, click the Options view, then click Working Request Options, and click (check) Always check spelling before sending.
Format the message in a printer-friendly format. After the request is formatted, click the Print link to send it to a printer. Click the Refresh button to return to the default view.
Refresh the screen.
edocs Confidential and Proprietary 21
Chapter 3 - Agent Desktop Details
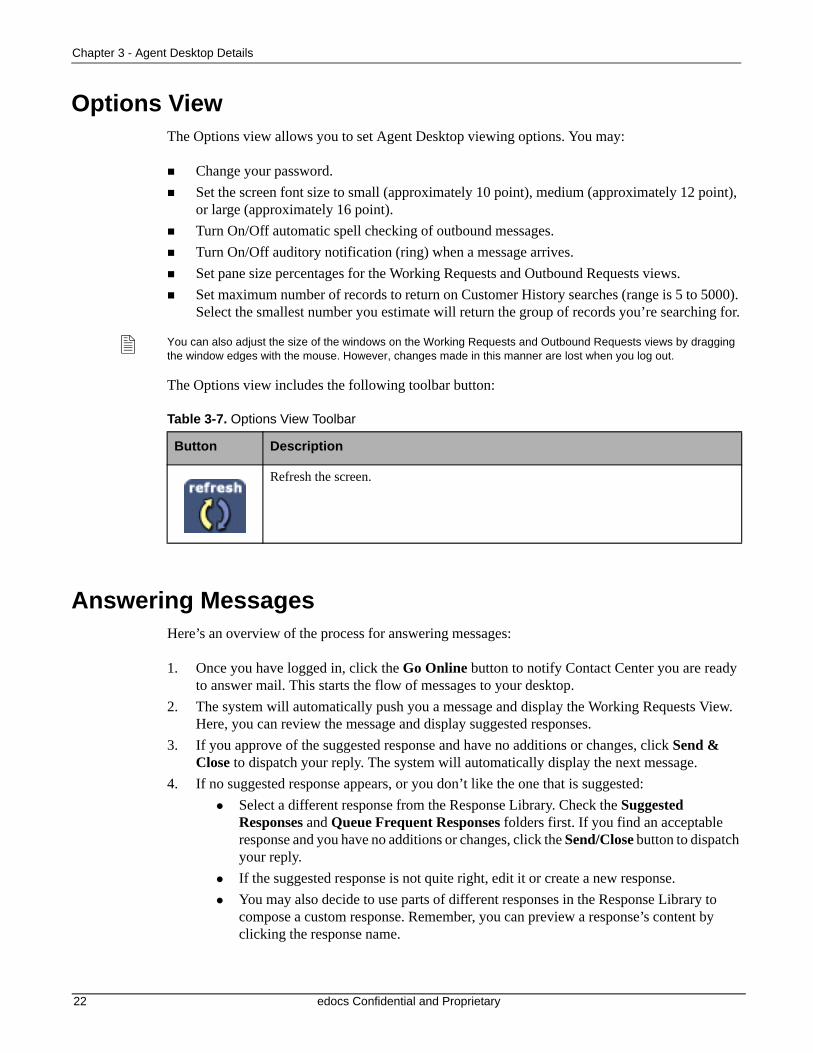
Options ViewThe Options view allows you to set Agent Desktop viewing options. You may:
Change your password.Set the screen font size to small (approximately 10 point), medium (approximately 12 point), or large (approximately 16 point).Turn On/Off automatic spell checking of outbound messages.Turn On/Off auditory notification (ring) when a message arrives.Set pane size percentages for the Working Requests and Outbound Requests views.Set maximum number of records to return on Customer History searches (range is 5 to 5000). Select the smallest number you estimate will return the group of records you’re searching for.
You can also adjust the size of the windows on the Working Requests and Outbound Requests views by dragging the window edges with the mouse. However, changes made in this manner are lost when you log out.
The Options view includes the following toolbar button:
Answering MessagesHere’s an overview of the process for answering messages:
1. Once you have logged in, click the Go Online button to notify Contact Center you are ready to answer mail. This starts the flow of messages to your desktop.
2. The system will automatically push you a message and display the Working Requests View. Here, you can review the message and display suggested responses.
3. If you approve of the suggested response and have no additions or changes, click Send & Close to dispatch your reply. The system will automatically display the next message.
4. If no suggested response appears, or you don’t like the one that is suggested:• Select a different response from the Response Library. Check the Suggested
Responses and Queue Frequent Responses folders first. If you find an acceptable response and you have no additions or changes, click the Send/Close button to dispatch your reply.
• If the suggested response is not quite right, edit it or create a new response.• You may also decide to use parts of different responses in the Response Library to
compose a custom response. Remember, you can preview a response’s content by clicking the response name.
Table 3-7. Options View Toolbar
Button Description
Refresh the screen.
22 edocs Confidential and Proprietary
Agent Guide
5. Use the editing tools available in the Reply window and type your changes. Before you send the reply, click the Spell button in the toolbar to spell check the message (unless you have set this to be automatic), and then click Send & Close.
6. If you choose to create your own custom response, you may need to classify the response manually. Click the Classify button, select a classification from the Pick List (if configured) and then click the Add button.
You can create original responses to customer inquiries, but you cannot save them in the Response Library. Talk to your Contact Center Supervisor about adding a response you think would be useful.
edocs Confidential and Proprietary 23
Chapter 3 - Agent Desktop Details
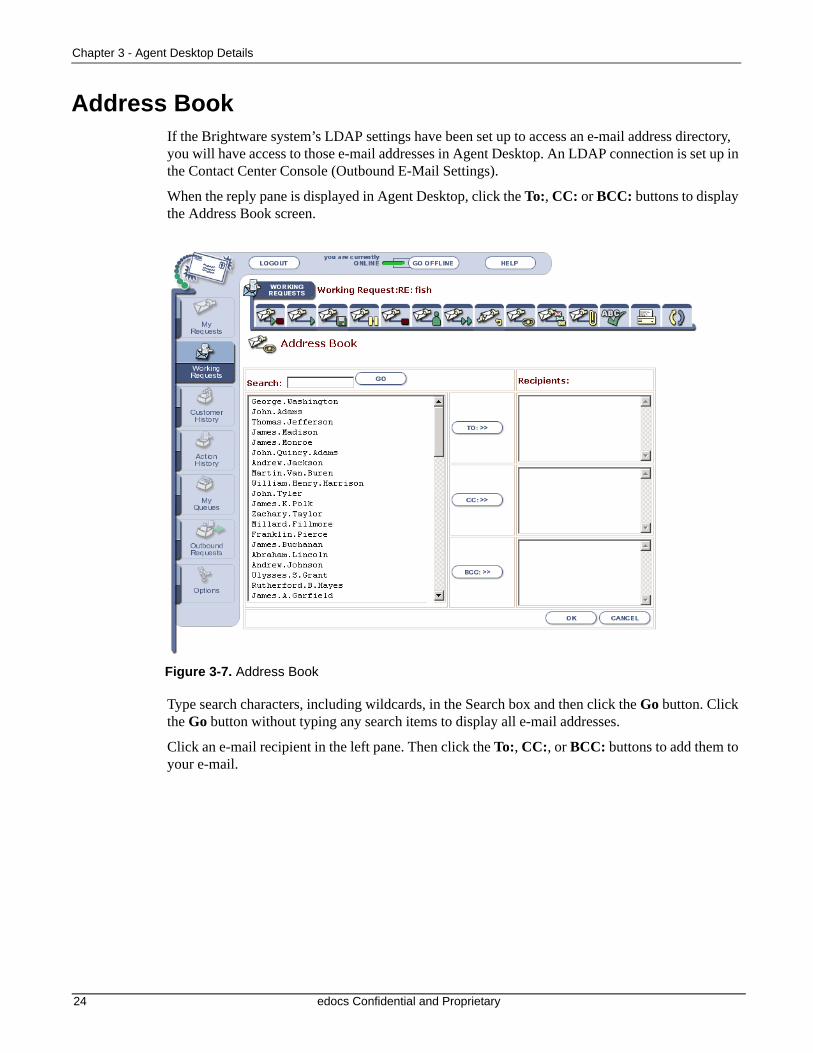
Address BookIf the Brightware system’s LDAP settings have been set up to access an e-mail address directory, you will have access to those e-mail addresses in Agent Desktop. An LDAP connection is set up in the Contact Center Console (Outbound E-Mail Settings).
When the reply pane is displayed in Agent Desktop, click the To:, CC: or BCC: buttons to display the Address Book screen.
Figure 3-7. Address Book
Type search characters, including wildcards, in the Search box and then click the Go button. Click the Go button without typing any search items to display all e-mail addresses.
Click an e-mail recipient in the left pane. Then click the To:, CC:, or BCC: buttons to add them to your e-mail.
24 edocs Confidential and Proprietary