Embed Size (px)
Citation preview
Discover the Microbes Within: The Wolbachia Project
DNA Electrophoresis Lab-CIBT Version 1
AGAROSE GEL ELECTROPHORESIS LAB
ACTIVITY AT A GLANCE Goal: To determine the presence or absence of DNA that has been amplified through PCR and to quantify the size (length of the DNA molecule) of the product. Learning Objectives: Upon completion of this activity, students will:
1. Determine the presence and size of Wolbachia 16S rDNA amplified by PCR. 2. Develop important skills in gel electrophoresis, a widely used technique for the
preparation and analysis of DNA and proteins. Prerequisite Skills:
• Prior practice with micropipettors. • Familiarity with the basic principles of agarose gel electrophoresis.
TEACHING TIME: 90 minutes or two class periods of 45min each
Thursday 3 days prior
Monday Tuesday Wednesday 8 weeks prior
Friday Monday
Order insects or
assign collection
At this point, all insects
should be preserved in ethanol & stored
in lab freezer
Activity 1: Insect
Identifi-cation Lab
Order laboratory materials
Activity 2: DNA
Extraction Lab
Activity 3: DNA Amplifi-
cation Lab
Activity 4: Gel
Electro-phoresis
Activity 5: Bioin-formatics
Activity 6: DNA
Sequence Alignments & Phylogenetics
Reserve Computer
Lab
Check out Insect Field
Guides
Timeline for Teaching Timeline for Teaching Discover the Microbes Within: The Wolbachia ProjectDiscover the Microbes Within: The Wolbachia Project
Discover the Microbes Within: The Wolbachia Project
DNA Electrophoresis Lab-CIBT Version 2
OVERVIEW Electrophoresis is a method of separating DNA and other substances based on the rate of movement under the influence of an electrical field. Agarose is a polysaccharide purified from seaweed. An agarose gel is created by suspending dry agarose powder in a liquid buffer solution, boiling the mixture until the agarose is completely dissolved. The resulting clear solution is then poured into a casting tray and allowed to cool. The result is a flexible gelatin-like slab. During electrophoresis, the gel is submersed in a chamber containing a buffer solution and a positive and negative electrode. The DNA to be analyzed is pulled through the pores of the gel by the electrical current. Under an electrical field, the negatively charged DNA will move to the positive electrode (red) and away from the negative electrode (black). Several factors influence how fast the DNA moves through the gel, including the strength of the electrical field, the concentration of agarose, and most importantly, the size of the DNA molecules. Smaller DNA molecules move through the agarose faster and thus, farther than larger molecules. DNA itself is not visible within an agarose gel. The DNA will be made visible by the use of a dye that specifically binds to DNA. MATERIALS (per 3 teams of two students)
q 3 X 5 PCR products from previous lab
q About 20 1.5 ml microtubes* q Latex gloves q Waste containers for tips, etc. q 3 sharpies q 3 boxes of P20 pipet tips* q 3-6 P20 pipettors* q 3 tube racks* q 5X loading dye (Fisher TAK-
9156)* q DNA standard (HindIII cut
lambda DNA)* q 1 bottle 10X TBE Buffer (enough
for 4 gels)* q 1 conical tube (10 g) agarose for
entire class*
q 1 gel box with tray and comb (for 3 teams of students)*
q Power supply (can run 2 gels)* q GelStar® DNA stain* q Electronic balance for entire class q Weighing dishes or paper q 250 ml glass flask q 2-liter glass flask q 100 ml graduated cylinder q Microwave or hot plate for class q Oven mitt or tongs for class q 1 liter distilled H2O (forTBE
buffer) q Microcentrifuge* q Thermometer* q Safety goggles (optional) q Dark Reader for entire class*
*provided with CIBT kit

Discover the Microbes Within: The Wolbachia Project
DNA Electrophoresis Lab-CIBT Version 3
TEACHER PREPARATION Set up each activity station with its own set of materials as reflected above.
NOTES FOR ACTIVITY PROCEDURE
• Determine ahead of time which group(s) of students will prepare the 0.5x TBE buffer. The TBE powder when prepared will make 200ml of 10X buffer. After dilution to 0.5X, this will yield 4 liters of 0.5X buffer, which is enough to run 4 gels. A group of students will prepare 2 liters of 0.5X buffer by diluting 100ml of the 10X buffer with 1900ml of distilled water. They will use half of this amount for their gel and will be able to share the extra buffer with another group of students. If 4 gels are to be run, another group of students will dilute the other 100ml of 10X buffer to make 2 more liters of 0.5X buffer. If 3 gels are to be run, a group of students may prepare just 1 liter of 0.5X buffer by combining 50ml of the 10X buffer with 950ml of distilled water.
• There should be a piece of red tape on the bottom of the gel box marking the negative terminal. This red tape has two basic functions: 1) To make sure the gel is positioned in the correct orientation after it has solidified (i.e., the comb end is placed right above the red tape, which denotes the negative pole); 2) Once the comb is removed, darker red squares surrounded by the pinkish tape (due to the opacity of the gel) indicate the position of the wells when viewed from above. This color contrast will help the students finding the wells when loading the samples on to the gel.
• We recommend that the HindIII cut lambda DNA standard remain in the freezer and not be handed out until the students are ready to load their gels.
0.6 kb
2.0 kb2.3 kb
23 kb
4.3 kb6.6 kb
9 kb Wells - samples areloaded at thisend from leftto right
+ End
- End
Lane 1: HindIII/LambdaDNA marker
1
Discover the Microbes Within: The Wolbachia Project
DNA Electrophoresis Lab-CIBT Version 4
• It is absolutely essential that the PCR samples be kept in a prescribed order at all times when loading the gels and thereafter! Always store the PCR tubes in a tube rack in the order #1 through #5 per student team. This order is outlined in step 4 of the student section. The labeling on these small PCR tubes easily comes off during handling and could make future identification difficult. Keeping them in order makes identification easier.
• Each gel has 20 wells that are molded by the comb. These 20 wells are enough to accommodate the PCR products from 3 student teams. Once one team has loaded their 5 samples, a DNA standard should be added to the next lane OR a lane should be skipped before the next team loads their samples to avoid cross-contamination between two adjacent wells. Having for example tube 5 with the positive Wolbachia DNA control from the first team adjacent to tube 1 with insect 1 DNA from the next team could introduce false positive results if cross-contamination occurred between the two wells.
• The placement of the DNA standard can be used to distinguish gels from each other. A unique pattern of DNA standard lanes should be used on each individual gel so that they each look different from one another. The size standard lane is the easiest to identify (characteristic pattern of 7 bands). E.g., if you have 1 gel with 3 student teams, and 2 gels with 2 student teams, the one with 3 teams is unique in itself. However, the other two gels have the potential to look exactly the same with regard to the placement of the standard.. A simple solution would be to set up one gel with a standard between the samples from each team and a standard after the samples from the second team. The other gel could be set up with a standard in the first lane before the samples of team 1, and the second standard after the last sample of team 2 (or the second standard could be eliminated completely). Either way, the order of the samples and standards MUST be carefully recorded on the Class Summary sheet that can be found towards the end of this protocol. It is highly recommended that one student is put in charge of note taking for all teams at each workstation.
• Please make sure to take digital pictures as soon as possible after the gel has run its course. It’s best to turn the flash off and mount the camera on a tripod. Within hours and certainly within a day after the gel run, the DNA bands will begin to diffuse and become fuzzy. After photographing, the gel can be disposed of in the regular trash.
Discover the Microbes Within: The Wolbachia Project
DNA Electrophoresis Lab-CIBT Version 5
Student Activity Sheet Name:__________
Agarose Gel Electrophoresis Protocol Hypothesis: ________________________________________________________________________________________________________________________________________________________________________________________________________________________________________ MATERIALS (per 3 teams of two students) q PCR products from previous lab q About 20 1.5 ml microtubes q Latex gloves q Waste containers for tips, etc. q 3 sharpies q 3 boxes of P20 pipet tips q 3-6 P20 pipettors q 3 tube racks q 5X loading dye (Fisher TAK-
9156) q DNA standard (HindIII cut
lambda DNA) q 1 bottle 10X TBE Buffer (enough
for 4 gels) q 1 conical tube (10 g) agarose for
entire class
q 1 gel box with tray and comb (for 3 teams of students)
q Power supply (can run 2 gels) q GelStar® DNA stain q Electronic balance for entire class q Weighing dishes or paper q 250 ml glass flask q 2-liter glass flask q 100 ml graduated cylinder q Microwave or hot plate for class q Oven mitt or tongs for class q 1 liter distilled H2O (forTBE
buffer) q Microcentrifuge q Thermometer q Safety goggles (optional) q Dark Reader for entire class
INTRODUCTION In this activity, you will:
1. Determine the presence and size of Wolbachia 16S rDNA amplified by PCR. 2. Understand the basic principles of Agarose Gel Electrophoresis and use it as a
molecular tool to generate data to accept or reject your Wolbachia hypothesis.
Discover the Microbes Within: The Wolbachia Project
DNA Electrophoresis Lab-CIBT Version
6
PROCEDURE Preparing the Agarose Gel 1. Up to 3 teams of 2 students will work together on one gel as an investigatory group.
One group will prepare the 0.5 X TBE buffer that is needed to make and run 2 gels (for two groups). The group of students that is to prepare the buffer will need to add 200 ml of distilled water to the bottle of TBE powder (USB #70454). Mix thoroughly. This is now a 10X concentration of the TBE buffer. Pour 100 ml of the 10x TBE into a 2-liter beaker or Erlenmeyer flask. Carefully add 1900 ml of distilled water and mix until fully dissolved. This is enough buffer for two gels. Share the extra buffer with another group of students. If only 1 liter of 0.5X TBE is needed for one gel, then it can be prepared by combining 50 ml of the 10X concentrate and 950 ml of distilled water.
2. Each investigatory group (1-3 teams of 2 students) will need to prepare a gel. Each pair of students in the Investigatory group will load their samples on to this gel.
a. Weigh out 1.0 gram of agarose and add it to 100 ml of 0.5X TBE buffer in a 250 ml Erlenmeyer flask.
b. Place a magnetic stir bar into the flask and heat the flask on a stirring hot plate until the agarose powder is completely dissolved. The solution will have to boil for several minutes for this to occur. If a magnetic hot plate isn’t available, heat the materials in a 250 ml or 500 ml beaker and stir frequently. The agarose solution will look clear when the agarose is completely dissolved. Alternatively, a microwave oven can be used for this purpose if it is available. If a microwave is used, microwave on high for 1 minute, then swirl the flasks. If the agarose is not completely dissolved, microwave for a few seconds longer until it is.
c. Once the agarose is fully dissolved remove the flask from the hotplate, insert a thermometer, and allow the solution to cool to about 75°C.
3. While the agarose is cooling, the next step is to prepare the casting tray. Place the casting tray in the gel running apparatus so that the open ends of the casting tray are facing the sides of the gel box. The gaskets should make a seal with the sides of the gel apparatus. To prevent leakage, make sure that the gaskets have not popped out of their grooves when you have pushed the casting tray in the gel box.
a. Add 2 µl of GelStar® to 100 ml of the cooled agarose before pouring the gel. Wear gloves when handling the GelStar® stain.
b. Pour the cooled agarose solution into the tray to a height of approximately 0.8 to 1 cm.

Discover the Microbes Within: The Wolbachia Project
DNA Electrophoresis Lab-CIBT Version
7
c. After the gel is poured, place the comb so that it fits in the slots that are closest to the end of the gel-casting tray. There are two sets of slots in the gel casting tray, one close to the end of the tray and one in the middle of the tray. Do not use the slots in the middle of the tray. You will notice that the green comb has teeth on both sides. One set of teeth is slightly thicker than the other. Position the comb so that the thicker teeth are facing down into the gel.
d. Leave the gel undisturbed for 20 minutes until the agarose becomes firm and opaque.
4. When the gel has cooled, carefully lift the gel casting tray and turn it 90˚. The gel should be positioned so that the comb/wells are near the negative (black) terminal of the gel box. There should be a piece of red tape marking the negative terminal on the bottom of the gel box.
a. Add 0.5X TBE buffer to the gel chamber until the level reaches the black fill line. The gel should be fully covered by about 2 - 3 mm of buffer.
b. Remove the comb by gently pulling it straight upward. If the gel moves during this process, gently push it back into place using the blunt end of a pipette tip. You will load your samples into the slots created by the comb.
Loading the gel
1. Label a new 1.5 ml microtube for each of your reactions (5 tubes total for your group). Use a P20 micropipette to add 8 µl of each reaction product (from the small PCR tubes) to the appropriately labeled microtube. Add 2 µl of 5X Loading Dye to each tube. The loading dye is a mixture of an indicator dye and a dense molecule called glycerol. Place all five tubes into the microcentrifuge and spin for 5 seconds to make sure that all the liquid is combined in the bottom of the microtube.
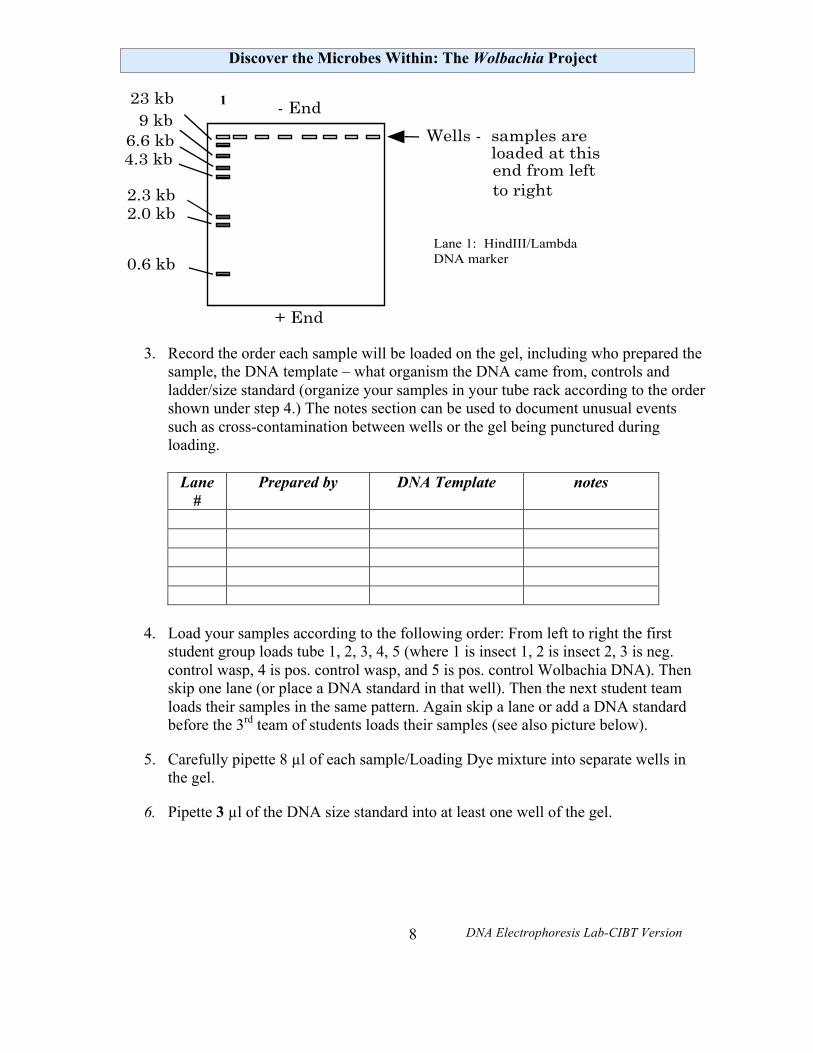
2. Your teacher will give you a microtube with the DNA size standard. This size standard is actually the genome of a virus, bacteriophage λ (lambda) that has been previously digested with HindIII into fragments of known lengths (see the figure below).
Discover the Microbes Within: The Wolbachia Project
DNA Electrophoresis Lab-CIBT Version
8
0.6 kb
2.0 kb2.3 kb
23 kb
4.3 kb6.6 kb
9 kbWells - samples are
loaded at thisend from leftto right
+ End
- End
Lane 1: HindIII/LambdaDNA marker
1
3. Record the order each sample will be loaded on the gel, including who prepared the sample, the DNA template – what organism the DNA came from, controls and ladder/size standard (organize your samples in your tube rack according to the order shown under step 4.) The notes section can be used to document unusual events such as cross-contamination between wells or the gel being punctured during loading.
Lane
# Prepared by DNA Template notes
4. Load your samples according to the following order: From left to right the first
student group loads tube 1, 2, 3, 4, 5 (where 1 is insect 1, 2 is insect 2, 3 is neg. control wasp, 4 is pos. control wasp, and 5 is pos. control Wolbachia DNA). Then skip one lane (or place a DNA standard in that well). Then the next student team loads their samples in the same pattern. Again skip a lane or add a DNA standard before the 3rd team of students loads their samples (see also picture below).
5. Carefully pipette 8 µl of each sample/Loading Dye mixture into separate wells in the gel.
6. Pipette 3 µl of the DNA size standard into at least one well of the gel.
Discover the Microbes Within: The Wolbachia Project
DNA Electrophoresis Lab-CIBT Version
9
Running the gel
1. Place the lid on the gel box, connecting the electrodes appropriately – positive (red) and negative (black).
2. Turn on the power supply to about 180 volts. Maximum allowed voltage will vary depending on the size of the electrophoresis chamber – it should not exceed 5 volts/cm between electrodes!
3. Check to make sure the current is running through the buffer by looking for bubbles forming on each electrode.
4. Check to make sure that the current is running in the correct direction by observing the movement of the blue loading dye – this will take a couple of minutes.
5. Let the power run until the blue dye approaches the middle of the gel, then turn off the power, disconnect the electrodes, remove the lid and the gel using gloves.
Gel Viewing 1. Wearing gloves, gently transfer the gel onto the blue surface of the Dark Reader for
viewing. Place the orange filter screen over the gel and turn on the Dark Reader. The DNA bands will now be visible. A darkened room works best for viewing the gel with a Dark Reader.
2. Scientific results need to be documented in permanent form. We recommend using a digital camera to take a photograph of the gel. We have found that digital cameras work best in a dark room with the camera flash turned off. We also recommend using a tripod or a ring stand and a clamp to steady the camera.
3. Once the pictures are taken, you can add labels to each of the lanes using programs such as Photoshop™ or PowerPoint™, or by hand on the paper print out.
Discover the Microbes Within: The Wolbachia Project
DNA Electrophoresis Lab-CIBT Version
10
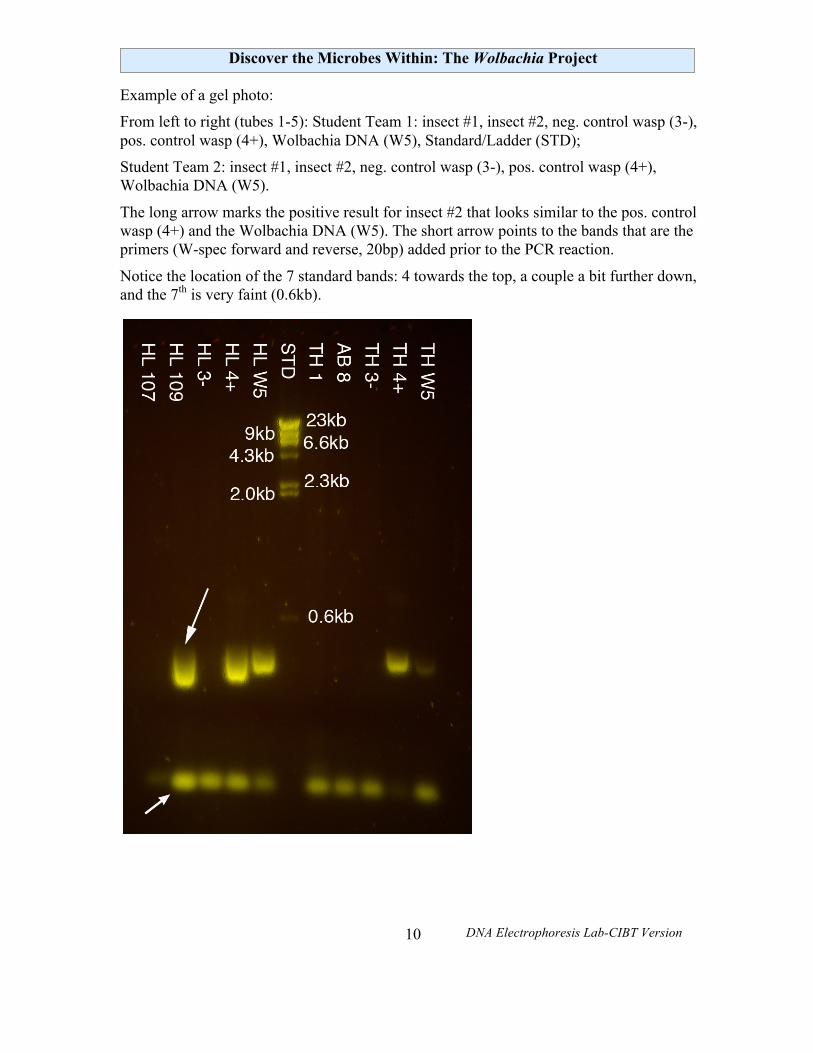
Example of a gel photo:
From left to right (tubes 1-5): Student Team 1: insect #1, insect #2, neg. control wasp (3-), pos. control wasp (4+), Wolbachia DNA (W5), Standard/Ladder (STD);
Student Team 2: insect #1, insect #2, neg. control wasp (3-), pos. control wasp (4+), Wolbachia DNA (W5).
The long arrow marks the positive result for insect #2 that looks similar to the pos. control wasp (4+) and the Wolbachia DNA (W5). The short arrow points to the bands that are the primers (W-spec forward and reverse, 20bp) added prior to the PCR reaction.
Notice the location of the 7 standard bands: 4 towards the top, a couple a bit further down, and the 7th is very faint (0.6kb).
Discover the Microbes Within: The Wolbachia Project
DNA Electrophoresis Lab-CIBT Version
11
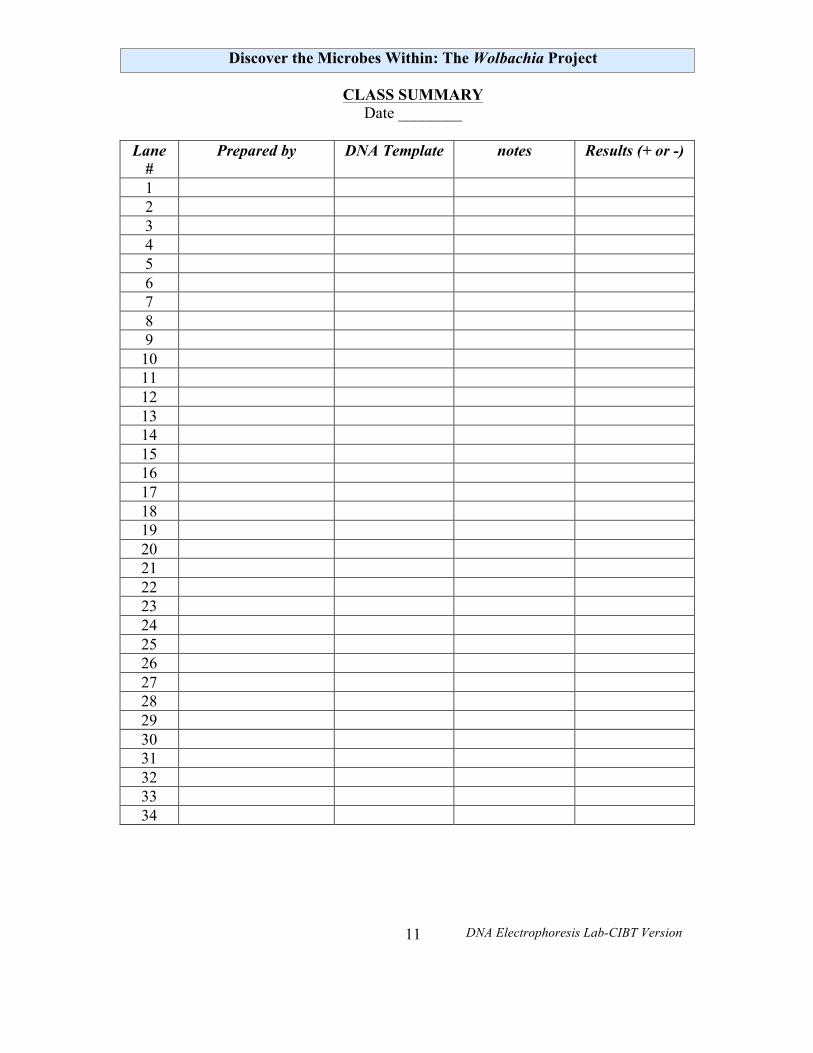
CLASS SUMMARY Date ________
Lane
# Prepared by DNA Template notes Results (+ or -)
1 2 3 4 5 6 7 8 9 10 11 12 13 14 15 16 17 18 19 20 21 22 23 24 25 26 27 28 29 30 31 32 33 34
Discover the Microbes Within: The Wolbachia Project
DNA Electrophoresis Lab-CIBT Version
12
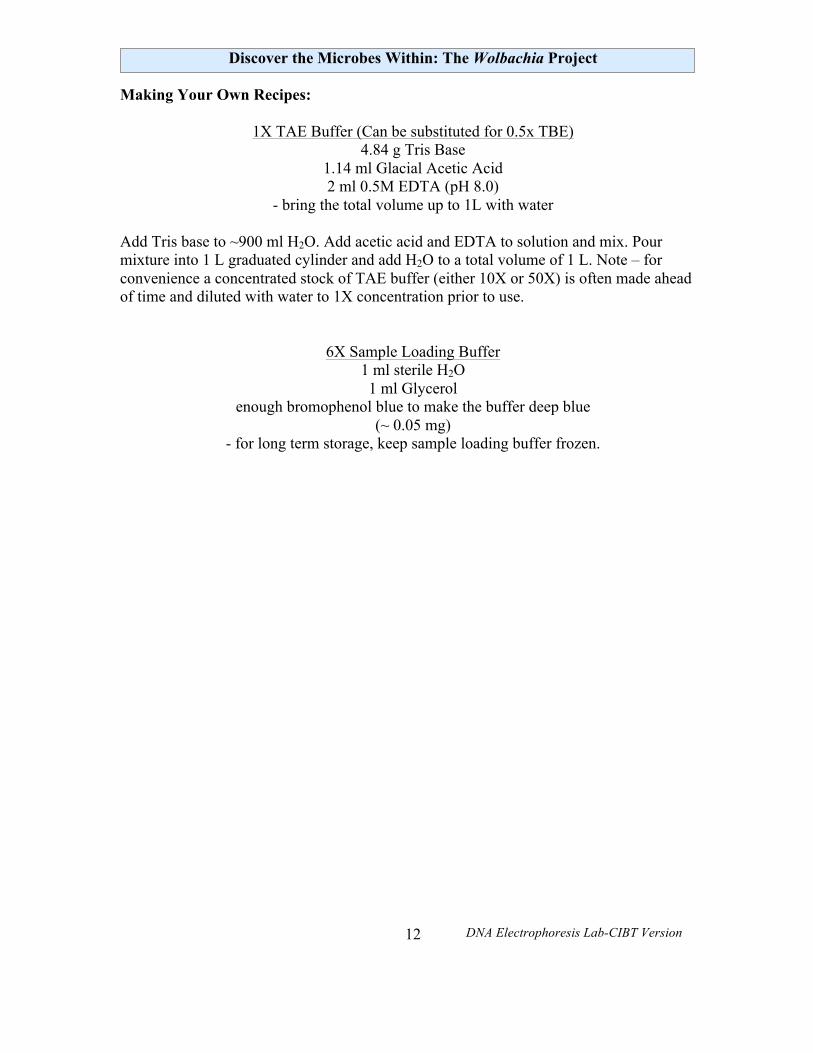
Making Your Own Recipes:
1X TAE Buffer (Can be substituted for 0.5x TBE) 4.84 g Tris Base
1.14 ml Glacial Acetic Acid 2 ml 0.5M EDTA (pH 8.0)
- bring the total volume up to 1L with water Add Tris base to ~900 ml H2O. Add acetic acid and EDTA to solution and mix. Pour mixture into 1 L graduated cylinder and add H2O to a total volume of 1 L. Note – for convenience a concentrated stock of TAE buffer (either 10X or 50X) is often made ahead of time and diluted with water to 1X concentration prior to use.
6X Sample Loading Buffer 1 ml sterile H2O 1 ml Glycerol
enough bromophenol blue to make the buffer deep blue (~ 0.05 mg)
- for long term storage, keep sample loading buffer frozen.