Embed Size (px)
Citation preview

Front Arena Your Intelligent Engine
Developer Guide: AEF Basic Extensions PRIME 2021.1 Refer to the Front Arena Knowledgebase for a complete list of valid releases.
FCA3724-24
March 2021

Notices
Copyright Copyright © 2021. By Fidelity National Information Services (FIS).
FIS, the FIS logo, and Front Arena are trademarks or registered trademarks of FIS, or its subsidiaries in the U.S. and other countries. All other trade names are trademarks or registered trademarks of their respective holders.
This document and the software described within are copyrighted with all rights reserved. No part of this document may be reproduced, transcribed, transmitted, stored in an electronic retrieval system, or translated into any language in any form by any means without prior written permission of FIS. FIS makes no warranties, express or implied, in this document. In no event shall FIS be liable for damages of any kind, direct or indirect, arising out of the use of this document or the information contained within.
Confidentiality statement This document contains information that is confidential or proprietary to FIS (or its direct or indirect subsidiaries). By accepting this document, you agree that: (1) if there is any pre-existing contract containing disclosure and use restrictions between your company and FIS, you and your company will use this information in reliance on and submit to the terms of any such pre-existing context; or (2) if there is no contractual relationship between you or your company and FIS, you and your Company agree to protect this information and not reproduce, disclose, or use the information in any way, except as may be required by law.
Disclaimer The screens and illustrations are representative of those created by the software, and are not always exact copies of what appears on the computer monitor. Companies, names, and data used in examples herein are fictitious unless otherwise noted. The material in this document is for information only, and is subject to change without notice. FIS reserves the right to make changes in the product design and installation software without reservation and without notice to users.
Supplementary legal notice for product documentation Any information expressed in this document regarding standard practice or conventions in financial markets or in the administration or functioning of banks is included to provide context to information provided about our products and services and thereby clarify how these products and services function. Such information is expressed in good faith but FIS accepts no liability for its accuracy or validity. Users are responsible for verifying the validity and accuracy of such information to their own satisfaction.
Products belonging to third party suppliers other than FIS or its subsidiaries are mentioned in this document only as information to the reader and are not to be regarded as specific recommendations. FIS or its subsidiaries does not guarantee the quality of these products, their performance, or their usage for any special purpose.
Contents 1 ....... Introduction...................................................................................................................................7
2 ....... Developing extensions ................................................................................................................8
2.1..... Understanding extension contexts and modules .................................................................8
2.1.1 .... Compound modules ...............................................................................................8 2.2..... Override and inheritance principles .....................................................................................8
2.2.1 .... Viewing extension definitions and overrides in the Extension Editor ...................10 2.2.2 .... Viewing the hierarchy of parent and child classes in the ACM ............................10
2.3..... Creating a dedicated development context .......................................................................11
2.4..... Starting PRIME in a development context .........................................................................12
2.5..... Built-in modules for developers ..........................................................................................12
2.6..... Performance profiling tools ................................................................................................12
2.6.1 .... Code profiling ........................................................................................................12 2.6.2 .... Grid cell profiling ...................................................................................................12 2.6.3 .... PRIME client profiling ...........................................................................................13
3 ....... AEF for data model extensions ................................................................................................14
3.1..... Adding additional information fields to the ADM ................................................................14
3.2..... Adding instrument/party aliases to the ADM ......................................................................16
3.3..... Accessing additional information fields programmatically .................................................17
3.4..... Accessing aliases programmatically ..................................................................................18
3.5..... Adding choice lists to additional information fields ............................................................18
3.6..... Example: Prepayment choice list fields for bonds .............................................................19
3.7..... Defining exotic events for derivatives ................................................................................24
3.8..... Example: Exotic event fixing levels for underlyings ...........................................................27
3.9..... Defining a time series ........................................................................................................30
4 ....... AEF for basic calculations ........................................................................................................33
4.1..... Defining new extension attributes and calculations ...........................................................34
4.1.1 .... Viewing the public extension attributes in the AEF Browser ................................34 4.1.2 .... Viewing column definitions in the Extension Editor ..............................................34 4.1.3 .... Viewing calculations in sheets ..............................................................................35 4.1.4 .... Which extension attribute definition is used in a sheet?.......................................35 4.1.5 .... Viewing column properties in sheets ....................................................................35
4.2..... Defining a new extension attribute .....................................................................................36
4.3..... Defining and publishing columns to sheets .......................................................................36
4.3.1 .... Matching group names with sheet names ............................................................37 4.4..... Example: Cash minus funding on a Portfolio Sheet ..........................................................38
4.5..... Defining and generating vector columns ...........................................................................39
5 ....... AEF for GUI customization ........................................................................................................41
5.1..... Adding action buttons to columns ......................................................................................42
5.1.1 .... Example: Vertical trading buy and sell action buttons ..........................................43 5.2..... Customising the appearance of columns ...........................................................................44
5.3..... Colouring cells dynamically ................................................................................................45
5.3.1 .... Example: Colouring a volatility column dynamically .............................................45 5.4..... Customising the formatting of values in columns ..............................................................46
5.4.1 .... Example: Customising the format of Ask column values .....................................48 5.5..... Adding choice lists to fields ................................................................................................49
5.5.1 .... Example: Choice list populated by a Python module ...........................................50 5.6..... Defining custom groupings for sheet items ........................................................................52
5.6.1 .... Example: Custom grouper for instruments and trades .........................................53 5.7..... Customising instrument definition and trading windows ....................................................54
5.7.1 .... Window layout and pane definitions .....................................................................54 5.7.2 .... Special pane layouts – Pricing pane columns ......................................................56 5.7.3 .... Viewing pane and layout extensions ....................................................................56 5.7.4 .... Structure of a pane definition ................................................................................56 5.7.5 .... Structure of a layout definition ..............................................................................56 5.7.6 .... Controls and fields ................................................................................................57 5.7.7 .... Labels ...................................................................................................................58 5.7.8 .... Overriding pane or layout extension definitions ...................................................58 5.7.9 .... Example: Modifying the fields of an instrument pane ...........................................58
5.8..... Customising Insert Items date periods ..............................................................................60
5.8.1 .... Example: Custom Insert Items date period ..........................................................61 5.9..... Creating and customising commands ................................................................................62
5.9.1 .... Specifying the window ..........................................................................................63 5.9.2 .... Invocation parameter – Function ..........................................................................64 5.9.3 .... Default command..................................................................................................64 5.9.4 .... Alternative invocation parameter – CreateFunction .............................................64 5.9.5 .... Example: Exploring the Calc+Sim command .......................................................64
5.10... Creating runtime scripts and validating user input .............................................................65
5.10.1 .. Run script ..............................................................................................................66 5.10.2 .. Developing runtime scripts in Python ...................................................................66 5.10.3 .. Configuring input fields with ael_variables ...........................................................66 5.10.4 .. Using input hooks to modify input fields ...............................................................69 5.10.5 .. Configuring the run script window with ael_gui_parameters ................................69 5.10.6 .. Executing Run with ael_main or ael_main_ex .....................................................70 5.10.7 .. Passing custom parameters and overriding ael_variables ...................................70
5.11... Customising the Valuation Information window .................................................................71
6 ....... AEF for creating custom GUI objects with the AUX ...............................................................73
6.1.1 .... The AUX classes in the ARENA Class Model ......................................................73 6.1.2 .... Methods in the AUX namespace ..........................................................................74 6.1.3 .... FUxCore and FUxUtils Python modules for custom dialogs ................................74 6.1.4 .... AUX in AEF Examples ..........................................................................................74

6.1.5 .... Viewing the AUX examples and FUxCore/FUxUtils .............................................75 6.2..... Creating a custom AUX dialog from Python ......................................................................75
6.2.1 .... Getting the shell ....................................................................................................76 6.2.2 .... Creating a layout...................................................................................................76 6.2.3 .... Creating a custom dialog instance .......................................................................77 6.2.4 .... Displaying the dialog ............................................................................................77 6.2.5 .... Closing the dialog .................................................................................................77 6.2.6 .... Using .NET WinForms in the AUX ........................................................................77 6.2.7 .... Example: Simple custom dialog ...........................................................................78
6.3..... Creating a custom AUX panel from Python .......................................................................79
6.3.1 .... Creating a layout...................................................................................................80 6.3.2 .... Creating a custom panel instance ........................................................................80 6.3.3 .... Adding the panel to an application .......................................................................80 6.3.4 .... Reacting to application events ..............................................................................81 6.3.5 .... Context menu events on FUxControls and FUxDataBinder .................................82
6.4..... Creating a custom application with the AUX ......................................................................84
6.4.1 .... Creating an FCustomApplicationDefinition ...........................................................84 6.4.2 .... Creating a custom application Python class .........................................................84 6.4.3 .... Creating application commands ...........................................................................85 6.4.4 .... Designing ribbons for a custom application ..........................................................86 6.4.5 .... Additional information ...........................................................................................86 6.4.6 .... Example: Simple custom application ....................................................................86
6.5..... Dynamic ribbon menus ......................................................................................................88
6.6..... Adding icons dynamically ...................................................................................................90
6.7..... Adding images from file .....................................................................................................91
6.8..... Working with Insert Items programmatically ......................................................................91
7 ....... AEF for reporting ........................................................................................................................93
7.1..... Report generation methods ...............................................................................................93
7.2..... Reports based on Trading Manager sheets ......................................................................94
7.2.1 .... Reporting scripts ...................................................................................................95 7.2.2 .... Run script window.................................................................................................96 7.2.3 .... Python report API .................................................................................................97 7.2.4 .... XSL templates and style sheets ...........................................................................97 7.2.5 .... Translating strings in reports ................................................................................98
7.3..... Creating a report based on a Portfolio Sheet ....................................................................98
7.4..... Creating a report from a Python module ......................................................................... 101
7.4.1 .... sheetSettings ..................................................................................................... 102 7.5..... Creating a custom style sheet ......................................................................................... 102
7.6..... Example: Creating custom trade tickets ......................................................................... 103
7.7..... Querying the database with FASQLReport .................................................................... 105
7.8..... Reports based on Position Sheets ................................................................................. 106
8 ....... AEF for trading workflows ...................................................................................................... 108
8.1..... Using hook functions to modify the trading workflow ...................................................... 109
8.2..... Example: Creating a custom method for calculating broker fees ................................... 111
8.3..... Example: Calculating a proprietary haircut for a trade ................................................... 112
8.4..... Example: Creating a custom method for suggesting instrument IDs .............................. 113
8.5..... Example: Modifying the creation of a repriced trade ...................................................... 113
8.6..... Modifying the user's permission to change the trade status ........................................... 114
8.7..... Example: Checking a user's right to change the trade status ......................................... 115
8.8..... Example: Limiting the trade statuses a user can choose ............................................... 116
8.9..... Customising trade routing operations ............................................................................. 118
8.10... Customising back-to-back sales cover behaviour .......................................................... 118
9 ....... AEF for security and validation ............................................................................................. 119
9.1..... Validating and modifying sheet data on input ................................................................. 120
9.1.1 .... Hook function parameters ................................................................................. 121 9.2..... Example: Scaling theoretical price on data entry ............................................................ 121
9.3..... Validating transaction or entity data before committing .................................................. 122
9.4..... Example: Checking whether a value has been set before committing ........................... 123
9.5..... Disabling four-eyes control for a transaction .................................................................. 124
9.6..... Validating instrument definition data on saving .............................................................. 125
9.6.1 .... FParameterGUIDefinition .................................................................................. 125 9.6.2 .... FPythonCode ..................................................................................................... 125
9.7..... Validating user password choices................................................................................... 126
9.8..... Preventing extension overrides with safe modules ......................................................... 126
9.8.1 .... Normal module override behaviour ................................................................... 127 9.8.2 .... Override behaviour for safe modules ................................................................ 127
10 ..... Appendix: AEF Examples module ......................................................................................... 129
Developer Guide: AEF Basic Extensions (FCA3724-24)
1 Introduction 7 of 136
1 Introduction This guide is intended primarily for developers who are adapting and extending Front Arena to meet the needs of a FIS customer. It provides instructions for making many of the simplest types of extensions to Front Arena, and it gives detailed examples of each extension.
All extensions described in this guide make use of tools and techniques which are a part of the ARENA Extension Framework (AEF). Before developing extensions to Front Arena, it is strongly recommended that all developers read the top-level AEF guide Overview: Extending Front Arena (FCA2736). That guide provides a thorough introduction to AEF, including the classification of extension areas, a complete survey of all supported extensions and their uses, the tools and techniques available to developers, licensing requirements, training and certification, support, and the formal usage policy for the AEF.
This present guide provides background information, instructions, and examples for creating many of the simpler extension types that are supported within the AEF. These extension types are grouped by area:
• 3 AEF for data model extensions shows how you can add new fields to the ADM database, configure aspects of the fields in the GUI, and access the fields programmatically.
• 4 AEF for basic calculations shows you how to add new sheet columns and calculation based on ADFL and extension attributes.
• 5 AEF for GUI customization and 6 AEF for creating custom GUI objects with the AUX look at the many ways in which it is possible to customise the PRIME GUI, from colouring and formatting sheet values through running Python scripts from menu options to creating custom GUI objects using AUX.
• 7 AEF for reporting covers the various methods of reporting from PRIME and shows how custom reports can be built.
• 8 AEF for trading workflows looks at the various ways in which you can modify the processing of trades using ARENA customisation hooks.
• 9 AEF for security and validation covers various customisable aspects including validation of input data after saving and before committing to the database.
All of these extension areas are classified as AEF Base, and therefore full support is provided under the standard Front Arena/PRIME site license, within the scope of each extension area's supported uses, through FIS Client Services.
The AEF covers many more extension areas than are described here. You can find a complete list of all extension areas and their supported uses in Overview: Extending Front Arena (FCA2736).
Before developing extensions for Front Arena, read section 2 Developing extensions, which contains important background information you need to know before embarking on your journey.
Developer Guide: AEF Basic Extensions (FCA3724-24)
2 Developing extensions 8 of 136
2 Developing extensions This section provides some important background information for developers of extensions to Front Arena.
2.1 Understanding extension contexts and modules To customise PRIME for different users and user groups, a combination of extension contexts and extension modules is used:
• Extension modules, for example the Default module, are containers for extensions. One module can contain many different extensions of different types.
• Extension contexts (for example, the Standard context) are ordered lists of extension modules. By switching contexts, users can change the set of extension modules (and hence the set of extensions) applied in their current session.
PRIME's Extension Editor can be used to view the current context, switch contexts, and add or remove modules from contexts.
The Default module is the principle extension module in all contexts. It contains the majority of the default values, options, settings, and definitions used by PRIME.
The Standard context is the context that most users are expected to use in a live production system. All of the main modules used by the majority of users are found in the Standard context. The context that is loaded when a user starts PRIME is determined by the user's Preferences settings, see section 2.4 Starting PRIME in a development context.
Other contexts can also be defined in the live system, containing different subsets of modules, and therefore providing different functionality for different users. Note that, when a module is listed in more than one context, a change to that module will affect all the contexts in which it is present.
Furthermore, some areas in PRIME allow extension definitions from different contexts to be used together. One example is when a Trading Manager sheet displays columns originating from different contexts, see section 4.3 Defining and publishing columns to sheets.
2.1.1 Compound modules Compound modules are in fact contexts. These are used as multiple-module-packets. For example, rather than inserting ten modules into five different contexts, you can create one context with these five modules and then insert that context as a compound module into the five contexts.
In other words, instead of adding modules M01-M10 to contexts C01-C05, you can create context CM01 and add modules M01-M10 to it and then insert CM01 into contexts C01-C05. Any change to M01-10 or CM01 is immediately effective in C01-C05.
2.2 Override and inheritance principles The order of extension modules within an extension context is important as it affects both the overriding and inheritance of extension definitions:
• Extension inheritance principle: An object of a child class inherits all the extensions of its parent classes according to the hierarchy of classes defined in the ACM.
• Extension override principle: Extensions in modules lower in a context override extensions with the same name on the same object higher in the context.

Developer Guide: AEF Basic Extensions (FCA3724-24)
2 Developing extensions 9 of 136
How these principles work together is best illustrated by some simple examples. First, assume that a user has in their current context the following modules in the order listed:
• Default • TeamXYZ • User007
For this user, the following table shows the value of an extension attribute called foo at the stock, instrument, and all object level.
The first row of the table shows the outcome when there is just a single definition of foo stored in the Default module. Subsequent rows show how different combinations of extension definitions in lower modules can override inherited definitions.
Set of extension definitions in the context
Value of foo in the session for User007
Explanation
[Default]FObject:foo=1; Any stock: 1 Any instrument except a stock: 1 Any object except an instrument: 1
All stocks and all instruments inherit the default value of foo for all objects.
[Default]FObject:foo=1; [TeamXYZ]FStock:foo=3;
Any stock: 3 Any instrument except a stock: 1 Any object except an instrument: 1
The team's value of foo for a stock overrides the default value of foo for all objects.
[Default]FObject:foo=1; [Default]FInstrument:foo=2; [Default]FStock:foo=3;
Any stock: 3 Any instrument except a stock: 2 Any object except an instrument: 1
The default value of foo for a stock overrides the default value for an instrument which in turn overrides the default value for all objects.
[Default]FObject:foo=1; [Default]FInstrument:foo=2; [Default]FStock:foo=3; [TeamXYZ]FStock:foo=4;
Any stock: 4 Any instrument except a stock: 2 Any object except an instrument: 1
The team's value of foo for a stock overrides the default value of foo for a stock.
[Default]FObject:foo=1; [Default]FInstrument:foo=2; [Default]FStock:foo=3; [TeamXYZ]FStock:foo=4; [User007]FStock:foo=5;
Any stock: 5 Any instrument except a stock: 2 Any object except an instrument: 1
The user's value of foo for a stock overrides the team's value of foo for a stock.

Developer Guide: AEF Basic Extensions (FCA3724-24)
2 Developing extensions 10 of 136
Set of extension definitions in the context
Value of foo in the session for User007
Explanation
[Default]FObject:foo=1; [Default]FInstrument:foo=2; [Default]FStock:foo=3; [TeamXYZ]FInstrument:foo=4; [TeamXYZ]FStock:foo=5; [User007]FStock:foo=6;
Any stock: 6 Any instrument except a stock: 4 Any object except an instrument: 1
The user's value of foo for a stock overrides the team's value of foo for a stock, while the team's value of foo for all instruments overrides the default value for all objects.
[Default]FObject:foo=1; [Default]FInstrument:foo=2; [Default]FStock:foo=3; [TeamXYZ]FInstrument:foo=4; [TeamXYZ]FStock:foo=5; [User007]FInstrument:foo=6;
Any stock: 6 Any instrument except a stock: 6 Any object except an instrument: 1
The user's value of foo for any instrument overrides the team's value of foo for a stock. (Probably not what was intended!)
As can be understood from these examples, modules higher in the context should usually contain extensions of broad scope and applicability while modules lower in the context should be used to refine those extensions towards the need of organisational groups and particular users.
Some extension types have their own particular way of dealing with inheritance – for example, FColumnDefinitions only override higher definitions at the property level (see 5.3.1 Example: Colouring a volatility column dynamically).
Python modules stored outside of the AEF extension system can also have an impact on inheritance and overrides (see section 9.8 Preventing extension overrides with safe modules).
2.2.1 Viewing extension definitions and overrides in the Extension Editor To see which extension definitions exist and are overridden in a context, you can use the Extension Editor (All>System>Extension Editor):
1. In the Search pane, select the search criteria (for example, Type, Module, and Context). 2. Select the Module check box to display modules in the search result tree. 3. Click Search.
For more information, refer to PRIME Help (FCA1260).
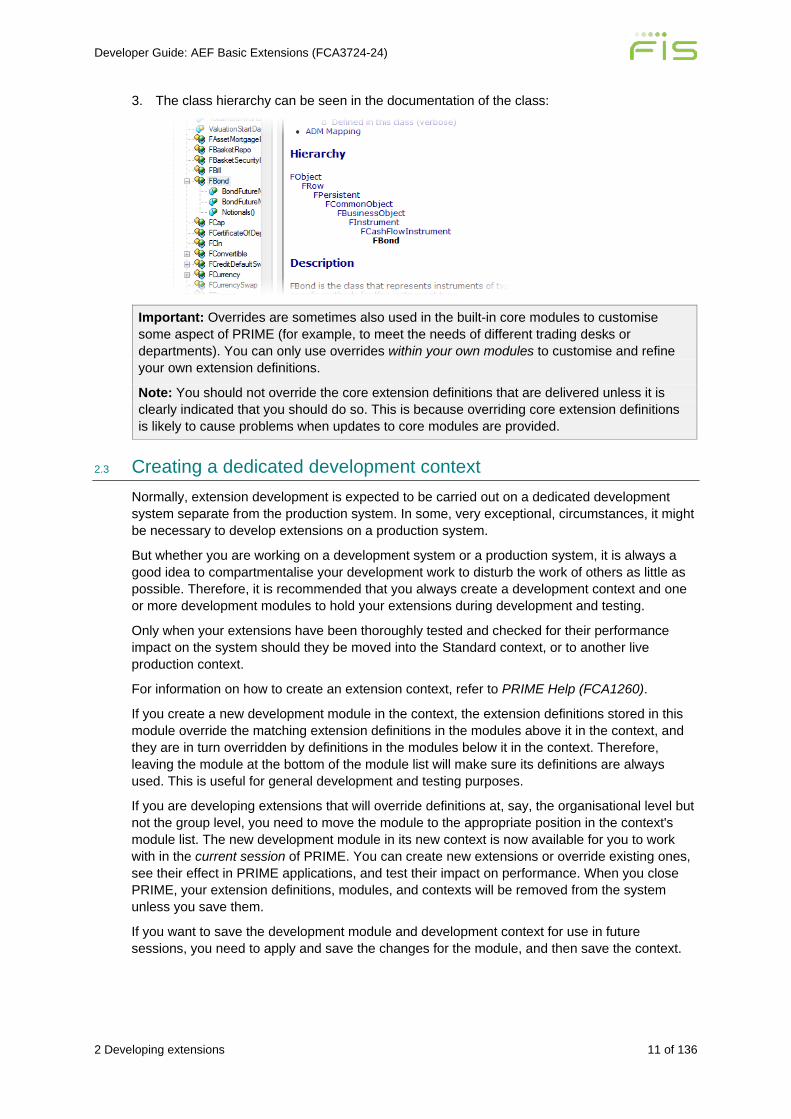
2.2.2 Viewing the hierarchy of parent and child classes in the ACM 1. In the PRIME Session Manager, select All>System>AEF Browser. 2. In the Index tab, enter the name of a class, for example, FBond.
Developer Guide: AEF Basic Extensions (FCA3724-24)
2 Developing extensions 11 of 136
3. The class hierarchy can be seen in the documentation of the class:
Important: Overrides are sometimes also used in the built-in core modules to customise some aspect of PRIME (for example, to meet the needs of different trading desks or departments). You can only use overrides within your own modules to customise and refine your own extension definitions.
Note: You should not override the core extension definitions that are delivered unless it is clearly indicated that you should do so. This is because overriding core extension definitions is likely to cause problems when updates to core modules are provided.
2.3 Creating a dedicated development context Normally, extension development is expected to be carried out on a dedicated development system separate from the production system. In some, very exceptional, circumstances, it might be necessary to develop extensions on a production system.
But whether you are working on a development system or a production system, it is always a good idea to compartmentalise your development work to disturb the work of others as little as possible. Therefore, it is recommended that you always create a development context and one or more development modules to hold your extensions during development and testing.
Only when your extensions have been thoroughly tested and checked for their performance impact on the system should they be moved into the Standard context, or to another live production context.
For information on how to create an extension context, refer to PRIME Help (FCA1260).
If you create a new development module in the context, the extension definitions stored in this module override the matching extension definitions in the modules above it in the context, and they are in turn overridden by definitions in the modules below it in the context. Therefore, leaving the module at the bottom of the module list will make sure its definitions are always used. This is useful for general development and testing purposes.
If you are developing extensions that will override definitions at, say, the organisational level but not the group level, you need to move the module to the appropriate position in the context's module list. The new development module in its new context is now available for you to work with in the current session of PRIME. You can create new extensions or override existing ones, see their effect in PRIME applications, and test their impact on performance. When you close PRIME, your extension definitions, modules, and contexts will be removed from the system unless you save them.
If you want to save the development module and development context for use in future sessions, you need to apply and save the changes for the module, and then save the context.
Developer Guide: AEF Basic Extensions (FCA3724-24)
2 Developing extensions 12 of 136
2.4 Starting PRIME in a development context Usually, PRIME starts in the Standard context. To start PRIME in another context (for example, in your development context), perform the following steps:
1. From PRIME Session Manager, select File>Preferences>User. 2. Set the Default Context to the context you want to use when PRIME starts, for example
MyTestContext. 3. Click OK. 4. Restart PRIME.
Now when PRIME starts your selected context will be loaded and its definitions applied.
Remember to reset your Default Context preference if you want PRIME to always start up in (and apply the extension definitions in) another context.
2.5 Built-in modules for developers Two built-in extension modules are provided to assist developers:
• The AEF Examples module contains examples of many, although not all, extension types which you can create through the Extension Editor. For a list of some of the available examples, see section 10 Appendix: AEF Examples module.
• The AEFDevTools module contains useful tools for extension developers, including, for example, profiling tools (see section 2.6 Performance profiling tools).
For information on how to add these modules to your development context, refer to PRIME Help (FCA1260).
To apply the definitions in these modules so that, for example, the menu items for them are available in Session Manager, save your development context and then restart PRIME in that context (see section 2.4 Starting PRIME in a development context).
2.6 Performance profiling tools Many of the extensions described in this guide require the development of Python code modules and ADFL valuation trees. If such extensions are not fully optimised, they can have a significant impact on the overall performance of Front Arena. For this reason, it is strongly suggested that you make use of the in-built profiling and troubleshooting tools.
Below is a brief summary of some of these tools. For more information about these and other performance measurement tools, refer to Overview: Extending Front Arena (FCA2736).
2.6.1 Code profiling The ARENA Class Model includes a generic framework that enables code operations to be profiled with respect to time. The key class is FTimeProfiler – a profiler specialised for measuring the time of code operations. Its Profile method returns an object of type FTimeProfilingData that contains measurements collected by the profiler. These measurements include the accumulated and average times for code operations and their descendant, as well as minimums and maximums execution times.
2.6.2 Grid cell profiling Extensions that affect sheets (for example, extensions that calculate new values for business objects and display them in sheet columns) can also have a major impact on system performance and memory usage. The AEFDevTools module includes grid cell profiling tools that can provide detailed measurements of sheet computation times. When grid cell profiling is

Developer Guide: AEF Basic Extensions (FCA3724-24)
2 Developing extensions 13 of 136
enabled, cells in sheets and in the Valuation Viewer are coloured; hence, it is easy to notice the most time-consuming calculations.
2.6.3 PRIME client profiling The AEFDevTools module also makes available summary and detailed snapshots of the operations of the PRIME client, including the time taken to start up.
Developer Guide: AEF Basic Extensions (FCA3724-24)
3 AEF for data model extensions 14 of 136
3 AEF for data model extensions • Extension arena: AEF for data model extensions. • Licensing: Base (included in basic site license). • Supported uses:
− Adding additional information fields to the ADM − Adding instrument/party aliases to the ADM − Accessing additional information fields programmatically − Accessing aliases programmatically − Adding choice lists to additional information fields − Defining exotic events for derivatives − Defining time series (a series of values by date)
• Extension types (definitions): Field/item specifications for:
− F<x>AdditionalInfo − FInstrumentAlias − FChoiceList − FExoticEvent − FTimeSeries
• Tools and techniques: Define field/item specifications in Administration Console. Access through FPythonCode or FExtensionAttribute extensions created in Extension Editor or Python modules written in Python Editor.
• Support: Standard support through Client Services. • Services: Standard professional Services through FIS Capital Markets Consulting
Services.
3.1 Adding additional information fields to the ADM You can use AEF tools and techniques to add your own information fields to the ARENA Data Model (ADM). The new fields are known as additional information fields. They are specified in the PRIME Administration Console.
Developer Guide: AEF Basic Extensions (FCA3724-24)
3 AEF for data model extensions 15 of 136
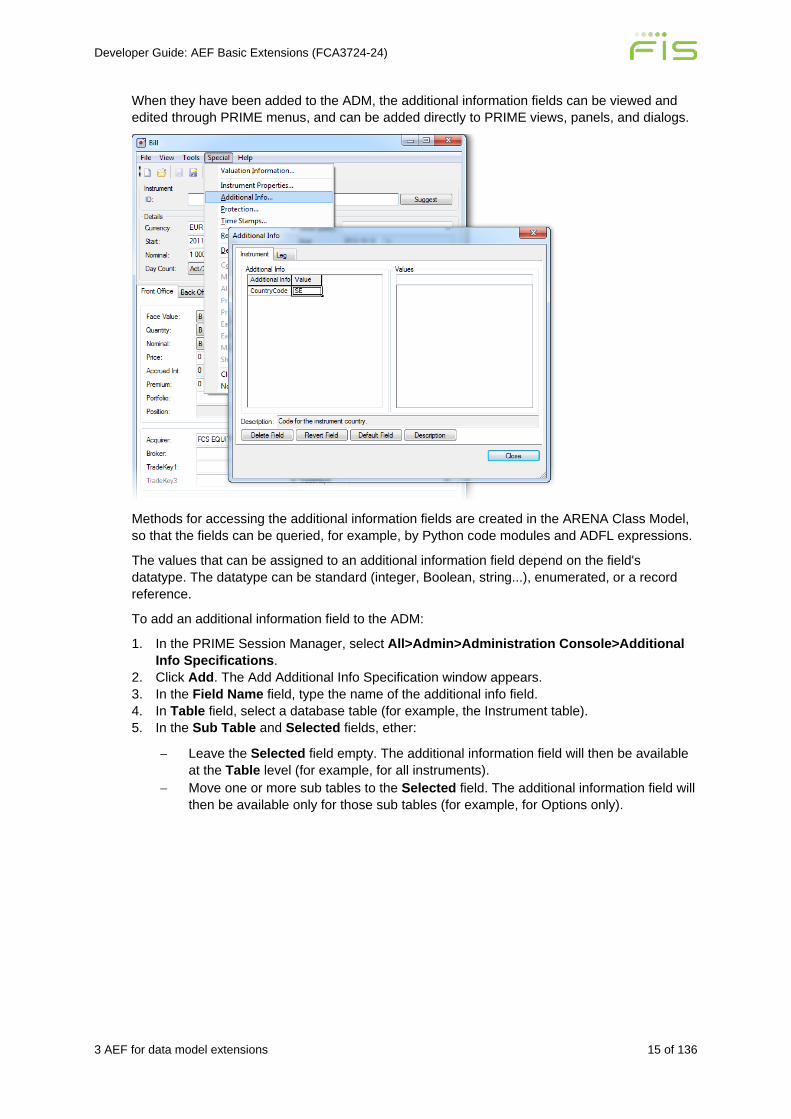
When they have been added to the ADM, the additional information fields can be viewed and edited through PRIME menus, and can be added directly to PRIME views, panels, and dialogs.
Methods for accessing the additional information fields are created in the ARENA Class Model, so that the fields can be queried, for example, by Python code modules and ADFL expressions.
The values that can be assigned to an additional information field depend on the field's datatype. The datatype can be standard (integer, Boolean, string...), enumerated, or a record reference.
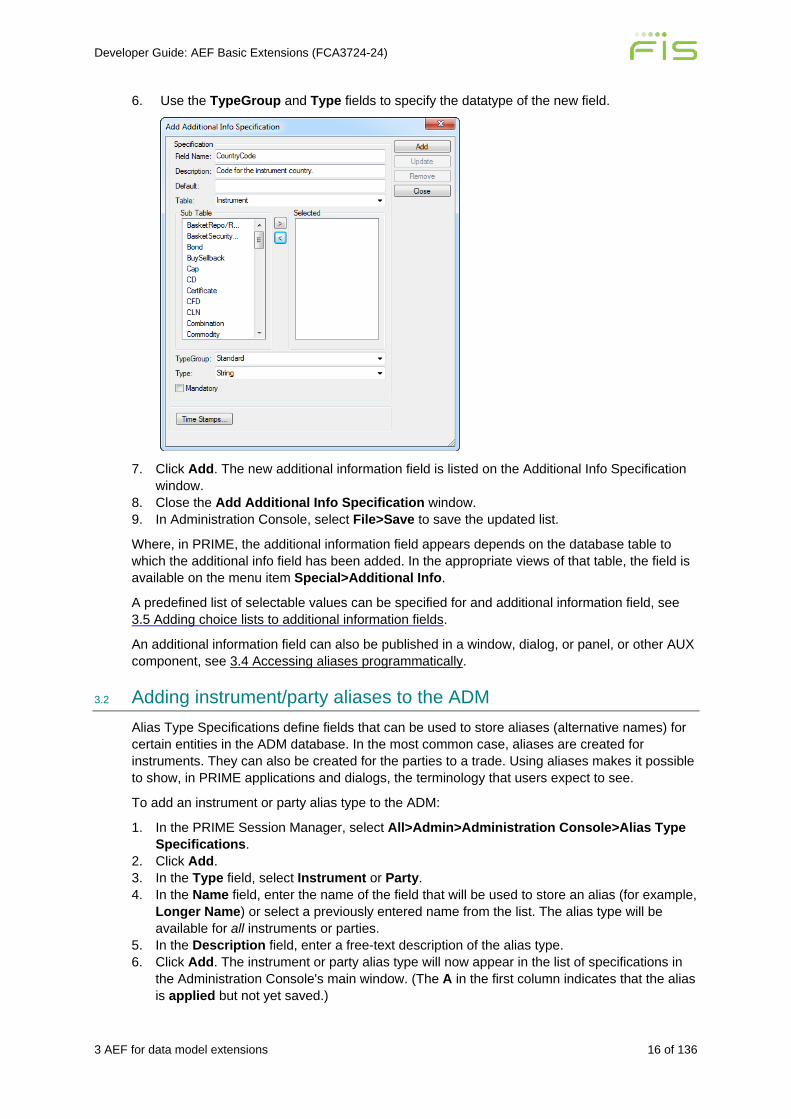
To add an additional information field to the ADM:
1. In the PRIME Session Manager, select All>Admin>Administration Console>Additional Info Specifications.
2. Click Add. The Add Additional Info Specification window appears. 3. In the Field Name field, type the name of the additional info field. 4. In Table field, select a database table (for example, the Instrument table). 5. In the Sub Table and Selected fields, ether:
− Leave the Selected field empty. The additional information field will then be available at the Table level (for example, for all instruments).
− Move one or more sub tables to the Selected field. The additional information field will then be available only for those sub tables (for example, for Options only).
Developer Guide: AEF Basic Extensions (FCA3724-24)
3 AEF for data model extensions 16 of 136
6. Use the TypeGroup and Type fields to specify the datatype of the new field.
7. Click Add. The new additional information field is listed on the Additional Info Specification
window. 8. Close the Add Additional Info Specification window. 9. In Administration Console, select File>Save to save the updated list.
Where, in PRIME, the additional information field appears depends on the database table to which the additional info field has been added. In the appropriate views of that table, the field is available on the menu item Special>Additional Info.
A predefined list of selectable values can be specified for and additional information field, see 3.5 Adding choice lists to additional information fields.
An additional information field can also be published in a window, dialog, or panel, or other AUX component, see 3.4 Accessing aliases programmatically.
3.2 Adding instrument/party aliases to the ADM Alias Type Specifications define fields that can be used to store aliases (alternative names) for certain entities in the ADM database. In the most common case, aliases are created for instruments. They can also be created for the parties to a trade. Using aliases makes it possible to show, in PRIME applications and dialogs, the terminology that users expect to see.
To add an instrument or party alias type to the ADM:
1. In the PRIME Session Manager, select All>Admin>Administration Console>Alias Type Specifications.
2. Click Add. 3. In the Type field, select Instrument or Party. 4. In the Name field, enter the name of the field that will be used to store an alias (for example,
Longer Name) or select a previously entered name from the list. The alias type will be available for all instruments or parties.
5. In the Description field, enter a free-text description of the alias type. 6. Click Add. The instrument or party alias type will now appear in the list of specifications in
the Administration Console's main window. (The A in the first column indicates that the alias is applied but not yet saved.)
Developer Guide: AEF Basic Extensions (FCA3724-24)
3 AEF for data model extensions 17 of 136
7. Select File>Save. 8. Restart PRIME.
Instrument and party alias types can be accessed programmatically from Python modules and extension attributes, see 3.4 Accessing aliases programmatically.
3.3 Accessing additional information fields programmatically The values of additional information fields can be accessed through get and set methods in the ACM.
The database table to which the field has been added determines the class on which the methods are available: for example, if field has been added to the Instrument table, the corresponding methods are added to the class FInstrumentAdditionalInfo.
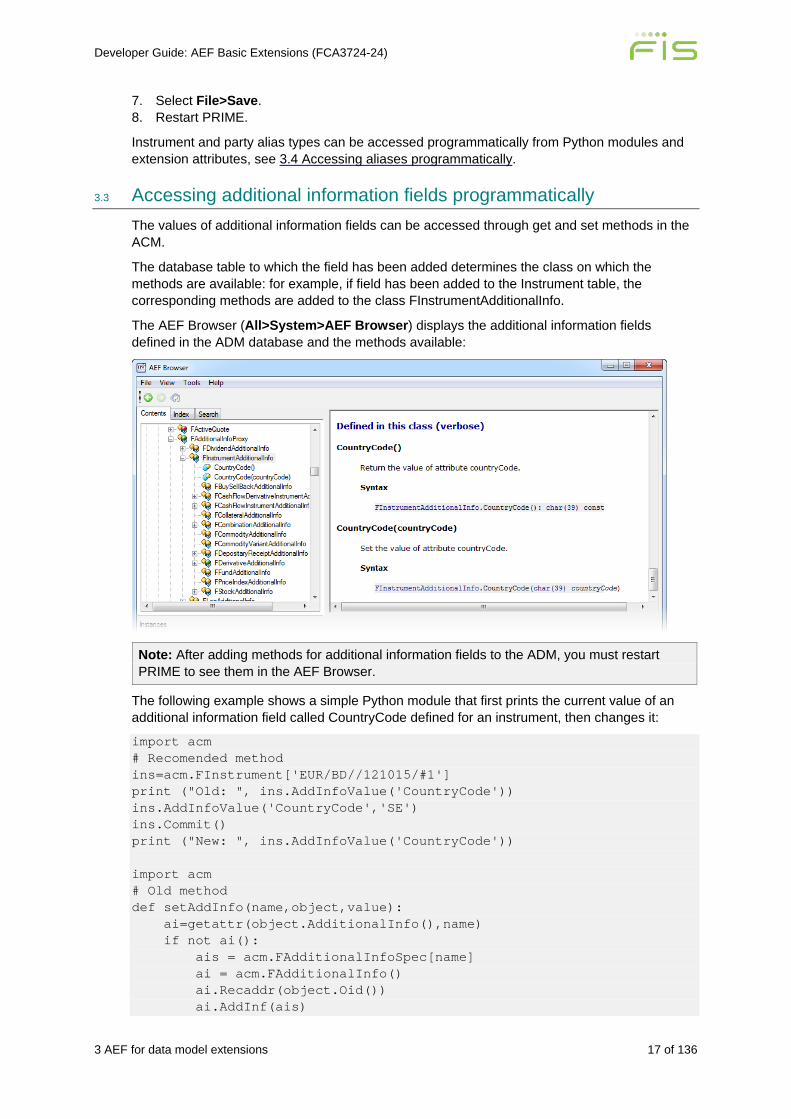
The AEF Browser (All>System>AEF Browser) displays the additional information fields defined in the ADM database and the methods available:
Note: After adding methods for additional information fields to the ADM, you must restart PRIME to see them in the AEF Browser.
The following example shows a simple Python module that first prints the current value of an additional information field called CountryCode defined for an instrument, then changes it:
import acm # Recomended method ins=acm.FInstrument['EUR/BD//121015/#1'] print ("Old: ", ins.AddInfoValue('CountryCode')) ins.AddInfoValue('CountryCode','SE') ins.Commit() print ("New: ", ins.AddInfoValue('CountryCode')) import acm # Old method def setAddInfo(name,object,value): ai=getattr(object.AdditionalInfo(),name) if not ai(): ais = acm.FAdditionalInfoSpec[name] ai = acm.FAdditionalInfo() ai.Recaddr(object.Oid()) ai.AddInf(ais)
Developer Guide: AEF Basic Extensions (FCA3724-24)
3 AEF for data model extensions 18 of 136
ai.FieldValue(value) ai.Commit() else: ai(value) object.Commit() ins=acm.FInstrument['EUR/BD//121015/#1'] print ("Old: ", ins.AdditionalInfo().CountryCode()) setAddInfo('CountryCode',ins,'SE') print ("New: ", ins.AdditionalInfo().CountryCode())
You can also work with the additional information field values in ADFL expressions (see 4.2 Defining a new extension attribute) and publish their values in Trading Manager sheets (see 4.3 Defining and publishing columns to sheets).
3.4 Accessing aliases programmatically Instrument and party alias types that have been added through Alias Type Specifications (see 3.2 Adding instrument/party aliases to the ADM) can be accessed from Python modules and extension attributes.
In Python, the alias types are accessed through the normal get and set methods defined on the FInstrument and FParty classes.
The following example shows a simple Python module that, for an instrument called ABC, first prints the current value of an alias type called Longer Name and then changes the value. Note how space characters in the alias type name are replaced by underscore characters:
import acm ins = acm.FInstrument['ABC'] print (ins.InstrumentAlias().Longer_Name()) ins.InstrumentAlias().Longer_Name("AAABBBCCC") print (ins.InstrumentAlias().Longer_Name()) ins.Commit()
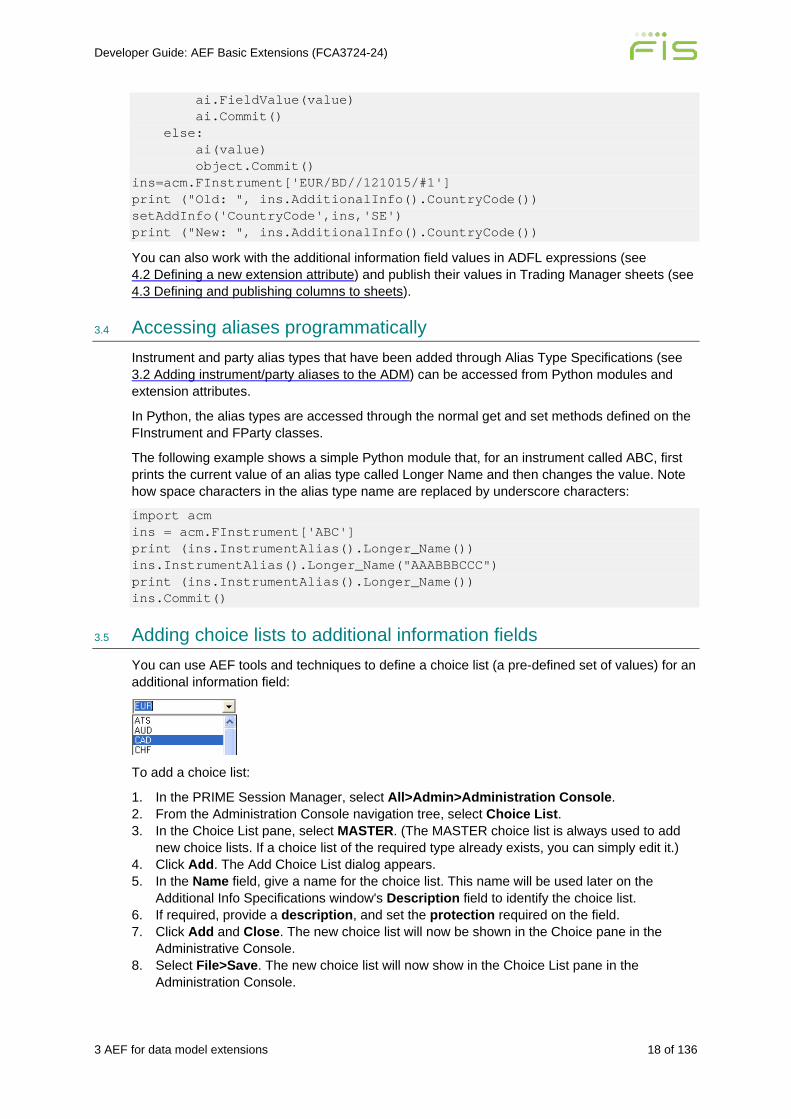
3.5 Adding choice lists to additional information fields You can use AEF tools and techniques to define a choice list (a pre-defined set of values) for an additional information field:
To add a choice list:
1. In the PRIME Session Manager, select All>Admin>Administration Console. 2. From the Administration Console navigation tree, select Choice List. 3. In the Choice List pane, select MASTER. (The MASTER choice list is always used to add
new choice lists. If a choice list of the required type already exists, you can simply edit it.) 4. Click Add. The Add Choice List dialog appears. 5. In the Name field, give a name for the choice list. This name will be used later on the
Additional Info Specifications window's Description field to identify the choice list. 6. If required, provide a description, and set the protection required on the field. 7. Click Add and Close. The new choice list will now be shown in the Choice pane in the
Administrative Console. 8. Select File>Save. The new choice list will now show in the Choice List pane in the
Administration Console.
Developer Guide: AEF Basic Extensions (FCA3724-24)
3 AEF for data model extensions 19 of 136
Now that the choice list itself has been defined, you must specify the actual values it holds. To do this:
1. In the Choice List pane, select the new choice list. 2. Click Add. The Add Choice List dialog appears. 3. In Name, enter a choice list value. Add other information, such as the sort order for the list
(an integer value), as required. 4. Click Add. The new choice list item is added to the choice list. 5. In the same way, add other values. 6. In the Administration Console window, select File>Save to save the new choice list.
Finally, attach the choice list to an additional information field:
1. From the Administration Console navigation tree, select Additional Info Specifications. 2. In the Specifications pane, select the additional information field to which the choice list will
be added. 3. Click Update. 4. In the Update Additional Info Specification window, set the Description field to the name of
the choice list. 5. Set TypeGroup to RecordRef. 6. Set Type to ChoiceList. 7. Click Update. 8. In the Administration Console, select File>Save to save the updated specification.
Note: You can use choice lists are used in various places in PRIME to provide selections in list boxes. For example, the name field and other trade keys fields are choice lists that you can customise.
3.6 Example: Prepayment choice list fields for bonds This example demonstrates how to:
• Create a new choice list called Prepayment. • Create a new additional information field called Prepay Type. • Attach the choice list to the additional information field. • Display the additional information field in a trading window for a Bond. • Read the value of an additional information field programmatically.
The choice list provides the user of the trading window with the choice of two options for the prepayment type: Constant Prepayment Rate (CPR) or PSA (the Public Securities Association method).
1. In the PRIME Session Manager, select All>Admin>Administration Console. 2. In the Administration Console navigation tree, select Choice List. 3. In the Choice List pane, select MASTER. 4. Click Add.
Developer Guide: AEF Basic Extensions (FCA3724-24)
3 AEF for data model extensions 20 of 136
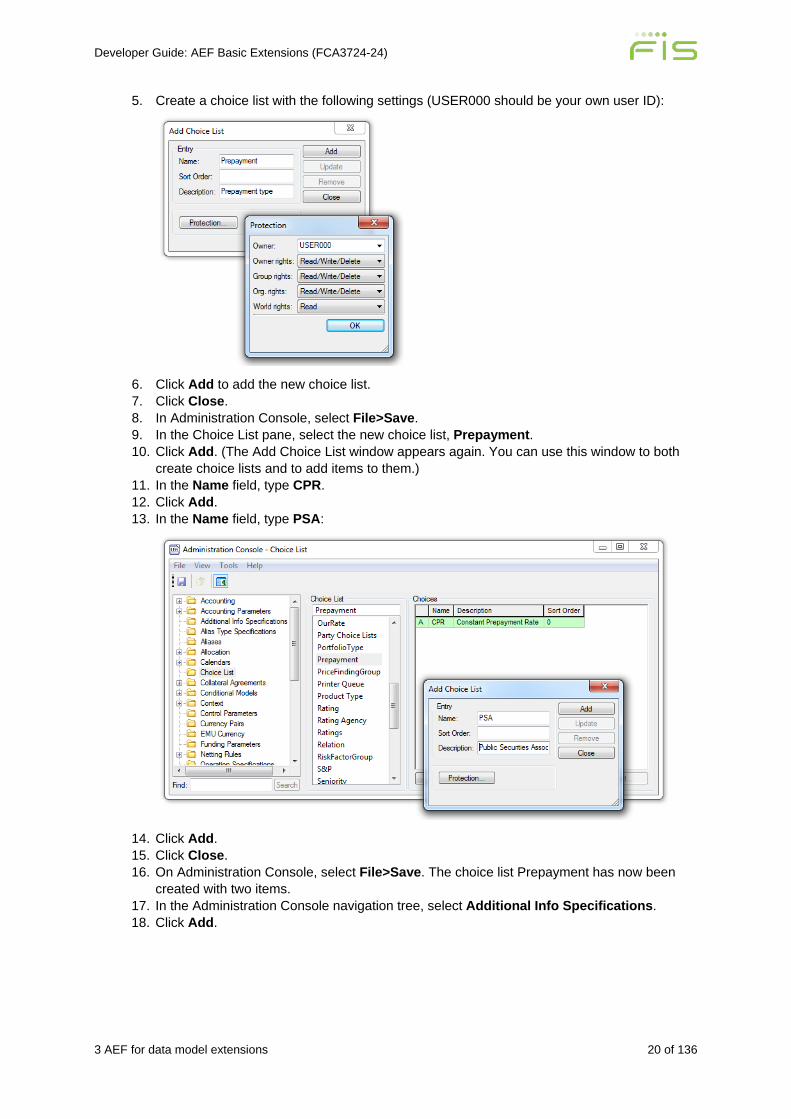
5. Create a choice list with the following settings (USER000 should be your own user ID):
6. Click Add to add the new choice list. 7. Click Close. 8. In Administration Console, select File>Save. 9. In the Choice List pane, select the new choice list, Prepayment. 10. Click Add. (The Add Choice List window appears again. You can use this window to both
create choice lists and to add items to them.) 11. In the Name field, type CPR. 12. Click Add. 13. In the Name field, type PSA:
14. Click Add. 15. Click Close. 16. On Administration Console, select File>Save. The choice list Prepayment has now been
created with two items. 17. In the Administration Console navigation tree, select Additional Info Specifications. 18. Click Add.
Developer Guide: AEF Basic Extensions (FCA3724-24)
3 AEF for data model extensions 21 of 136
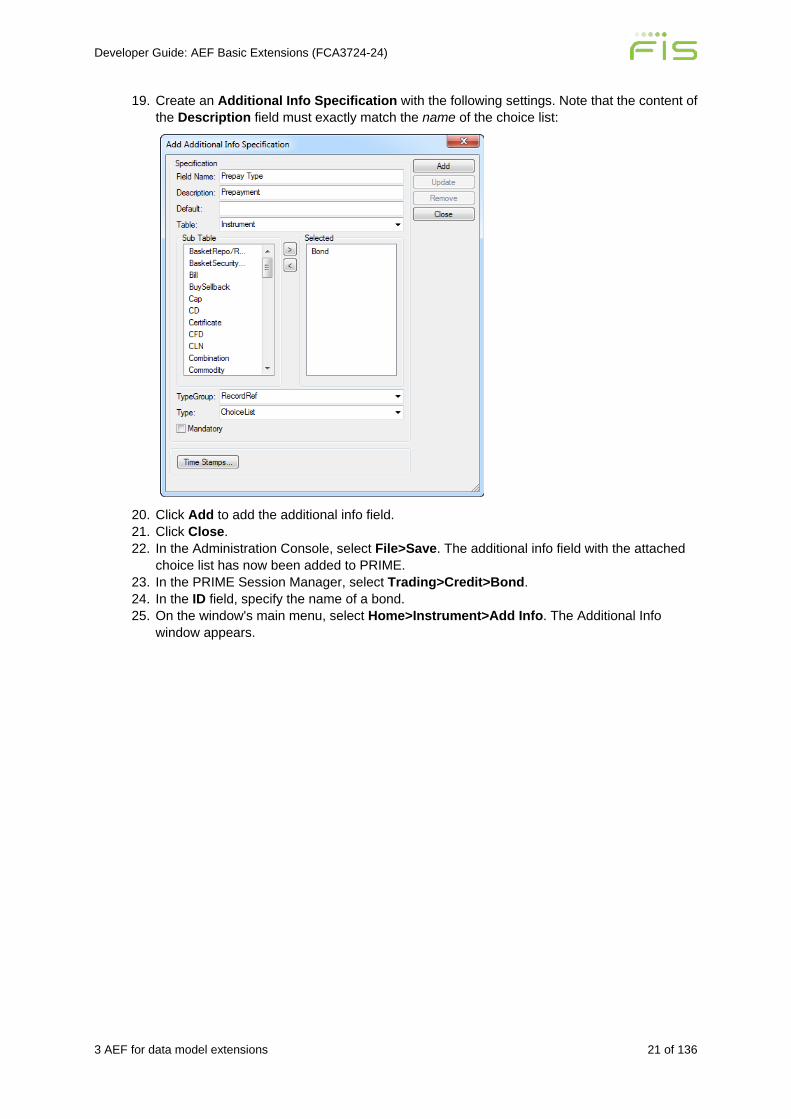
19. Create an Additional Info Specification with the following settings. Note that the content of the Description field must exactly match the name of the choice list:
20. Click Add to add the additional info field. 21. Click Close. 22. In the Administration Console, select File>Save. The additional info field with the attached
choice list has now been added to PRIME. 23. In the PRIME Session Manager, select Trading>Credit>Bond. 24. In the ID field, specify the name of a bond. 25. On the window's main menu, select Home>Instrument>Add Info. The Additional Info
window appears.
Developer Guide: AEF Basic Extensions (FCA3724-24)
3 AEF for data model extensions 22 of 136
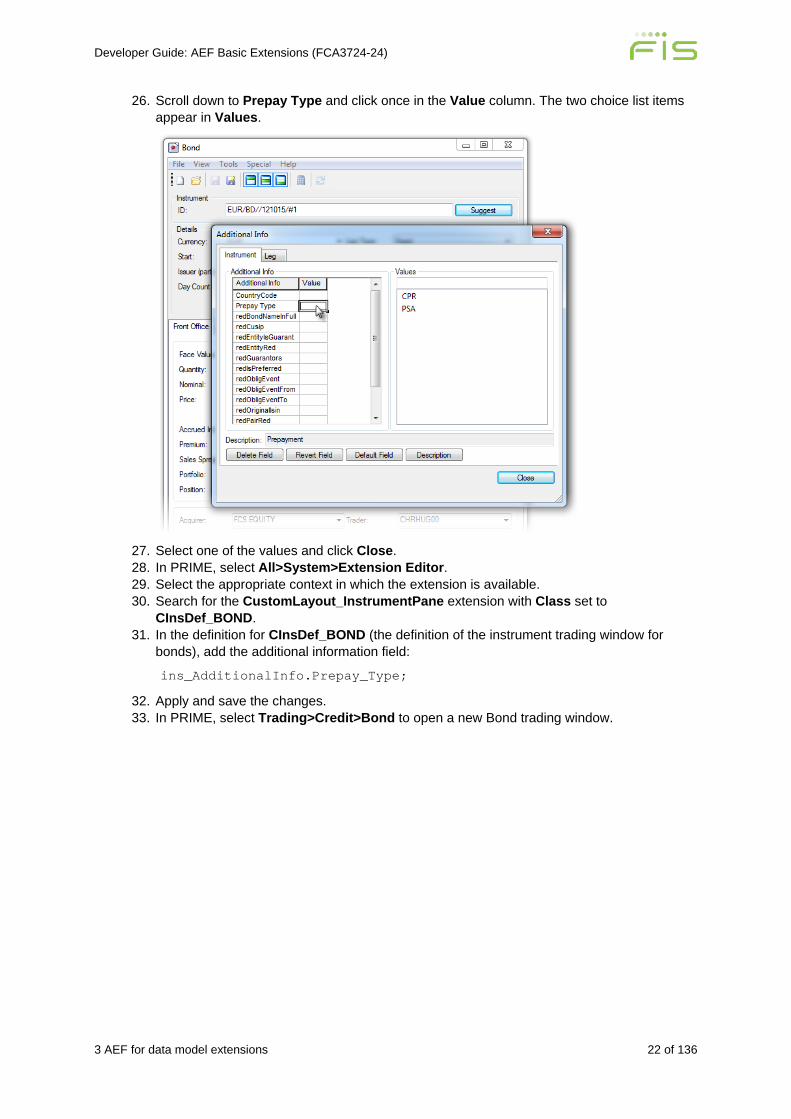
26. Scroll down to Prepay Type and click once in the Value column. The two choice list items appear in Values.
27. Select one of the values and click Close. 28. In PRIME, select All>System>Extension Editor. 29. Select the appropriate context in which the extension is available. 30. Search for the CustomLayout_InstrumentPane extension with Class set to
CInsDef_BOND. 31. In the definition for CInsDef_BOND (the definition of the instrument trading window for
bonds), add the additional information field:
ins_AdditionalInfo.Prepay_Type;
32. Apply and save the changes. 33. In PRIME, select Trading>Credit>Bond to open a new Bond trading window.
Developer Guide: AEF Basic Extensions (FCA3724-24)
3 AEF for data model extensions 23 of 136
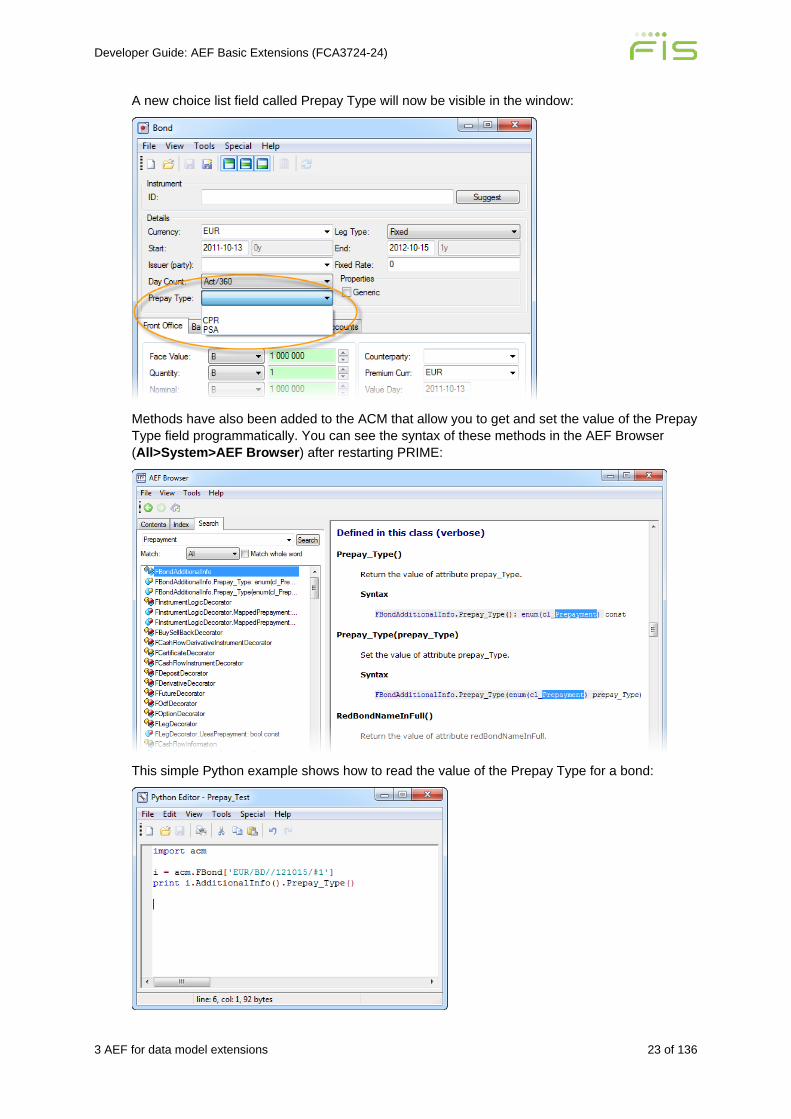
A new choice list field called Prepay Type will now be visible in the window:
Methods have also been added to the ACM that allow you to get and set the value of the Prepay Type field programmatically. You can see the syntax of these methods in the AEF Browser (All>System>AEF Browser) after restarting PRIME:
This simple Python example shows how to read the value of the Prepay Type for a bond:
Developer Guide: AEF Basic Extensions (FCA3724-24)
3 AEF for data model extensions 24 of 136
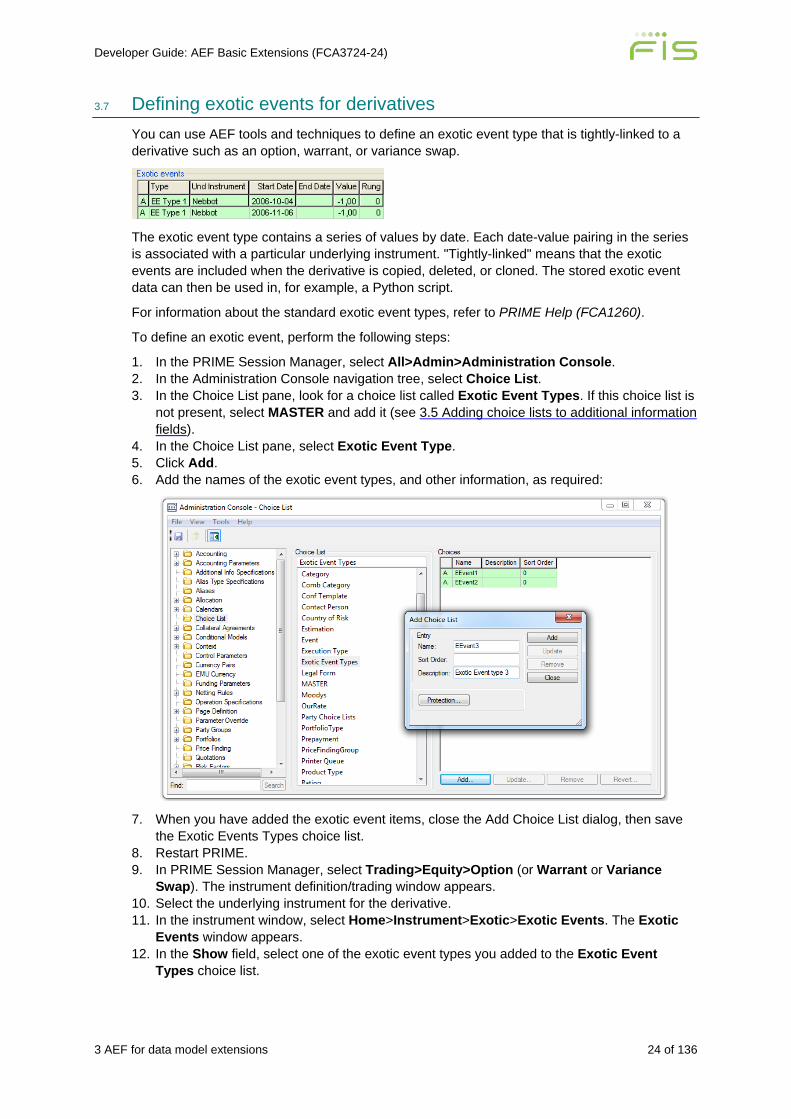
3.7 Defining exotic events for derivatives You can use AEF tools and techniques to define an exotic event type that is tightly-linked to a derivative such as an option, warrant, or variance swap.
The exotic event type contains a series of values by date. Each date-value pairing in the series is associated with a particular underlying instrument. "Tightly-linked" means that the exotic events are included when the derivative is copied, deleted, or cloned. The stored exotic event data can then be used in, for example, a Python script.
For information about the standard exotic event types, refer to PRIME Help (FCA1260).
To define an exotic event, perform the following steps:
1. In the PRIME Session Manager, select All>Admin>Administration Console. 2. In the Administration Console navigation tree, select Choice List. 3. In the Choice List pane, look for a choice list called Exotic Event Types. If this choice list is
not present, select MASTER and add it (see 3.5 Adding choice lists to additional information fields).
4. In the Choice List pane, select Exotic Event Type. 5. Click Add. 6. Add the names of the exotic event types, and other information, as required:
7. When you have added the exotic event items, close the Add Choice List dialog, then save
the Exotic Events Types choice list. 8. Restart PRIME. 9. In PRIME Session Manager, select Trading>Equity>Option (or Warrant or Variance
Swap). The instrument definition/trading window appears. 10. Select the underlying instrument for the derivative. 11. In the instrument window, select Home>Instrument>Exotic>Exotic Events. The Exotic
Events window appears. 12. In the Show field, select one of the exotic event types you added to the Exotic Event
Types choice list.

Developer Guide: AEF Basic Extensions (FCA3724-24)
3 AEF for data model extensions 25 of 136
To add exotic events one at a time:
1. Click Add. The Add Exotic Event window appears. 2. In the Start Date field, enter a start date for the exotic event. In the End Date field, enter an
end date, if required. 3. In the Value fields, enter values that apply for the event. (The default value is -1, which is
usually accepted to mean that the value has not yet been set.) 4. In the Rung Number field, enter a rung number, if required. You can use Rung Number to
add more than one value for the same date or date range.
5. Click Add. 6. Add further exotic events as required. 7. Click Close. The specified exotic events are listed on the Exotic Events window.
Note: The A in the first column indicates that the events are applied but not yet saved. The exotic events will be saved when the instrument is saved.
To automatically generate a series of exotic events between two dates:
1. In the Exotic Events window in the Show field, select one of the exotic event types you added to the Exotic Event Types choice list.
2. Click Generate. The Generate Exotic Events window appears.
Developer Guide: AEF Basic Extensions (FCA3724-24)
3 AEF for data model extensions 26 of 136
3. Enter the parameters required to generate the series. The fields are:
− Type: The type of exotic event. − Start Date: The start date for the generated series of exotic events. − End date: The end date for the generated series of exotic events. − Calendar: The calendar used to determine business days and non-banking days. The
Target calendar is mapped by default to the derivative's underlying's currency. − Period: The period between each exotic event, for example: 1d, 1w, 1m, or 1y. Exotic
events are generated according to the period, between the start date and end date. − Window Period: Use to generate an end date for each of the generated exotic
events. The window period specifies the period between the start date and end date for each exotic event.
− Adjust Method: Use to specify how non-banking dates in the Calendar are handled when the exotic events are generated on such dates. For example, if set to Following, the event is moved to the next business day in the calendar. The selected adjust method is applied to each underlying component.
− Generate events per underlying: This option appears if the underlying type is EquityIndex. If checked, exotic events are generated for each of the underlying instruments in the basket. If not checked, the exotic events are only generated at the basket level.
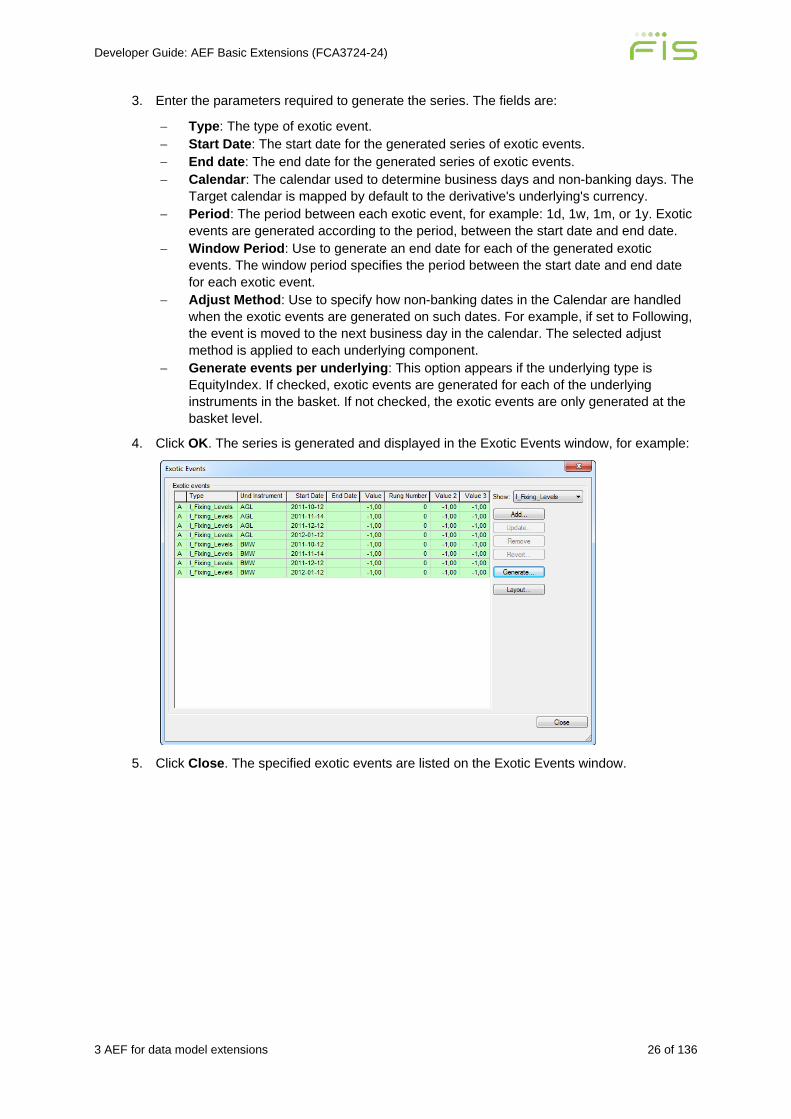
4. Click OK. The series is generated and displayed in the Exotic Events window, for example:
5. Click Close. The specified exotic events are listed on the Exotic Events window.
Developer Guide: AEF Basic Extensions (FCA3724-24)
3 AEF for data model extensions 27 of 136
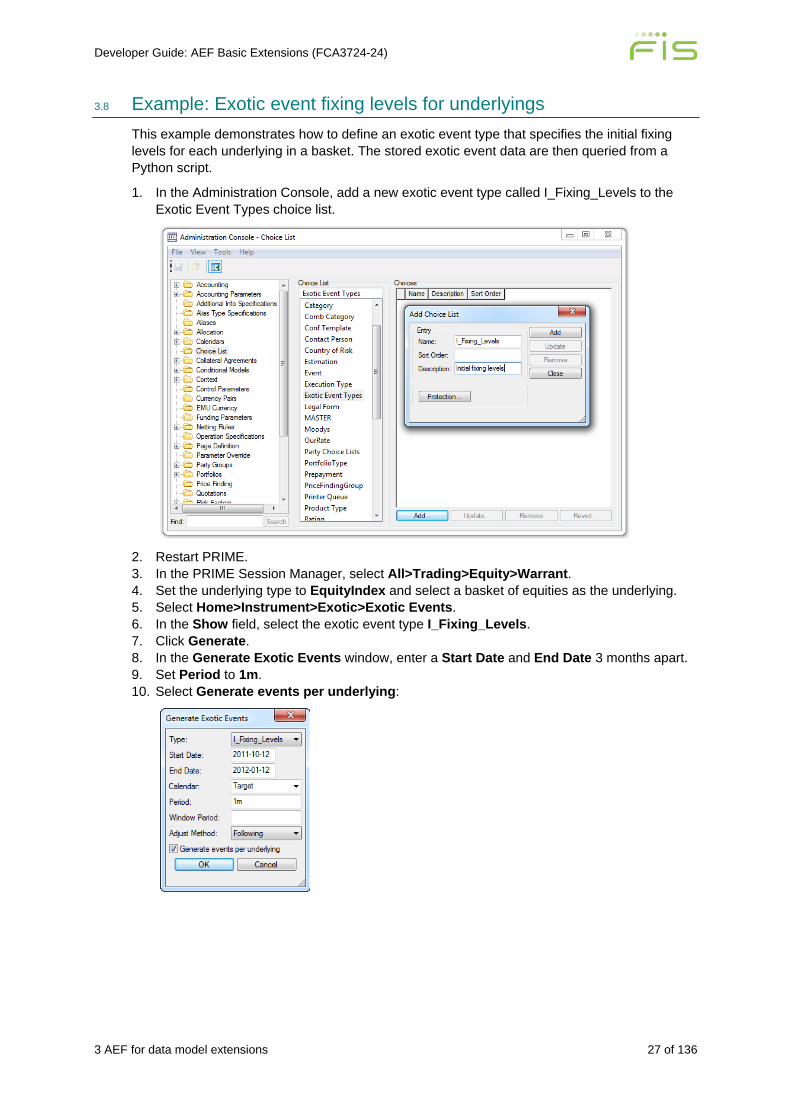
3.8 Example: Exotic event fixing levels for underlyings This example demonstrates how to define an exotic event type that specifies the initial fixing levels for each underlying in a basket. The stored exotic event data are then queried from a Python script.
1. In the Administration Console, add a new exotic event type called I_Fixing_Levels to the Exotic Event Types choice list.
2. Restart PRIME. 3. In the PRIME Session Manager, select All>Trading>Equity>Warrant. 4. Set the underlying type to EquityIndex and select a basket of equities as the underlying. 5. Select Home>Instrument>Exotic>Exotic Events. 6. In the Show field, select the exotic event type I_Fixing_Levels. 7. Click Generate. 8. In the Generate Exotic Events window, enter a Start Date and End Date 3 months apart. 9. Set Period to 1m. 10. Select Generate events per underlying:
Developer Guide: AEF Basic Extensions (FCA3724-24)
3 AEF for data model extensions 28 of 136
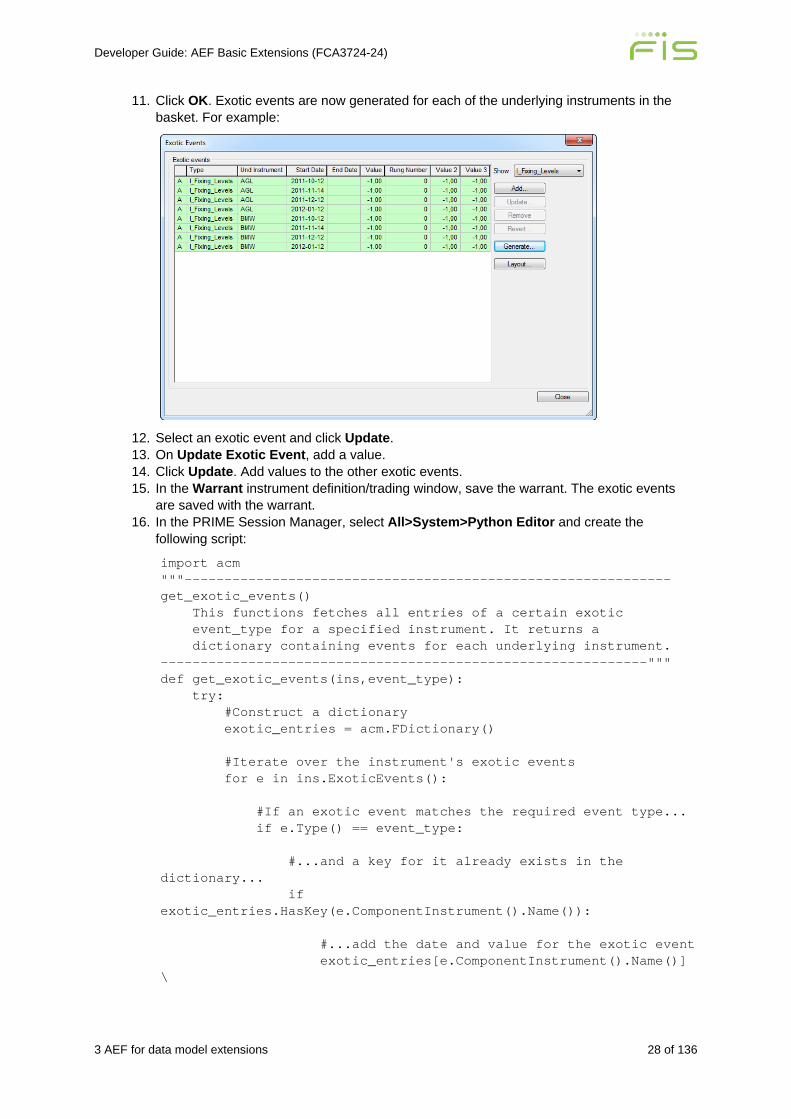
11. Click OK. Exotic events are now generated for each of the underlying instruments in the basket. For example:
12. Select an exotic event and click Update. 13. On Update Exotic Event, add a value. 14. Click Update. Add values to the other exotic events. 15. In the Warrant instrument definition/trading window, save the warrant. The exotic events
are saved with the warrant. 16. In the PRIME Session Manager, select All>System>Python Editor and create the
following script:
import acm """------------------------------------------------------------- get_exotic_events() This functions fetches all entries of a certain exotic event_type for a specified instrument. It returns a dictionary containing events for each underlying instrument. -------------------------------------------------------------""" def get_exotic_events(ins,event_type): try: #Construct a dictionary exotic_entries = acm.FDictionary() #Iterate over the instrument's exotic events for e in ins.ExoticEvents(): #If an exotic event matches the required event type... if e.Type() == event_type: #...and a key for it already exists in the dictionary... if exotic_entries.HasKey(e.ComponentInstrument().Name()): #...add the date and value for the exotic event exotic_entries[e.ComponentInstrument().Name()] \
Developer Guide: AEF Basic Extensions (FCA3724-24)
3 AEF for data model extensions 29 of 136
.Add((e.Date(),e.EventValue())) #...otherwise... else: #...create a new entry. exotic_entries[e.ComponentInstrument().Name()] \ = [(e.Date(),e.EventValue())] #Return the dictionary return exotic_entries #On failure return and error message except Exception as msg: return msg #Try out the function ins=acm.FInstrument['EUR/P/EQX/120112'] exotic_event='I_Fixing_Levels' ee = get_exotic_events(ins,exotic_event) print (ee['BMW'])
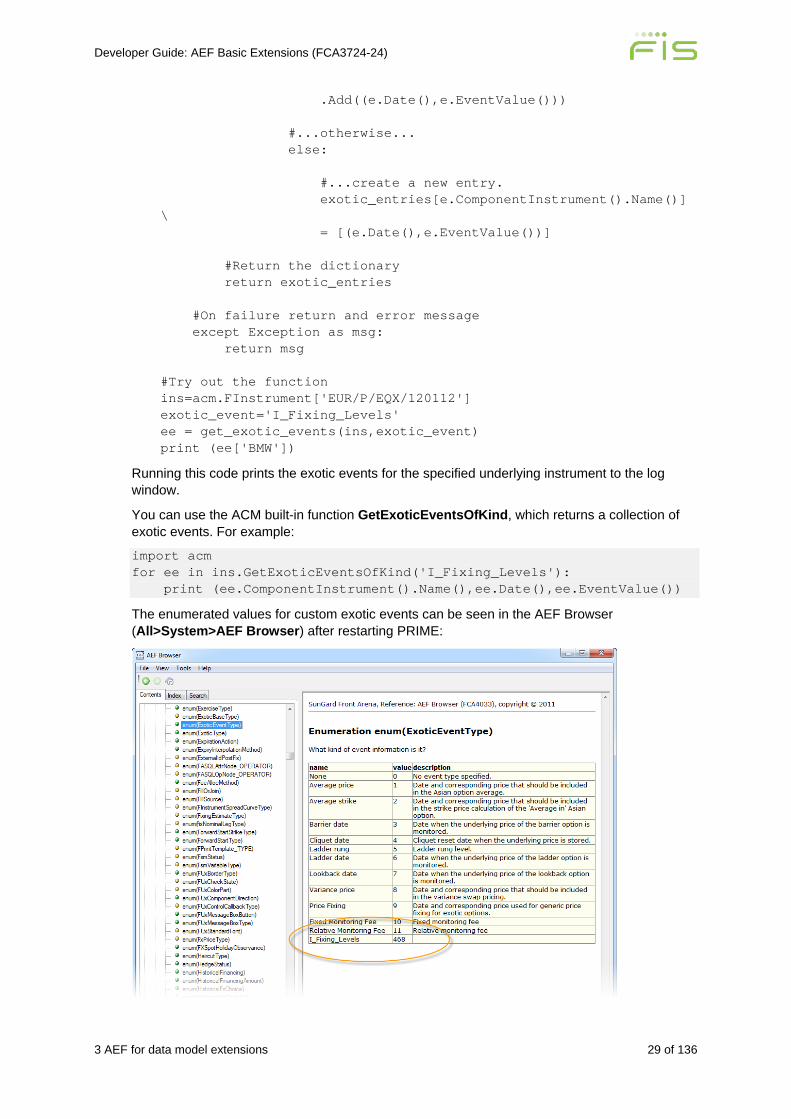
Running this code prints the exotic events for the specified underlying instrument to the log window.
You can use the ACM built-in function GetExoticEventsOfKind, which returns a collection of exotic events. For example:
import acm for ee in ins.GetExoticEventsOfKind('I_Fixing_Levels'): print (ee.ComponentInstrument().Name(),ee.Date(),ee.EventValue())
The enumerated values for custom exotic events can be seen in the AEF Browser (All>System>AEF Browser) after restarting PRIME:
Developer Guide: AEF Basic Extensions (FCA3724-24)
3 AEF for data model extensions 30 of 136
You can also fetch exotic events in ADFL. Here is an example from the Default extension module:
[Default]FOption:asianAveragePriceEvents = object:genericSingleExoticEventsAsDenominatedValues [genericSingleExoticEventType := "Average price", priceSource, doSplitAll];
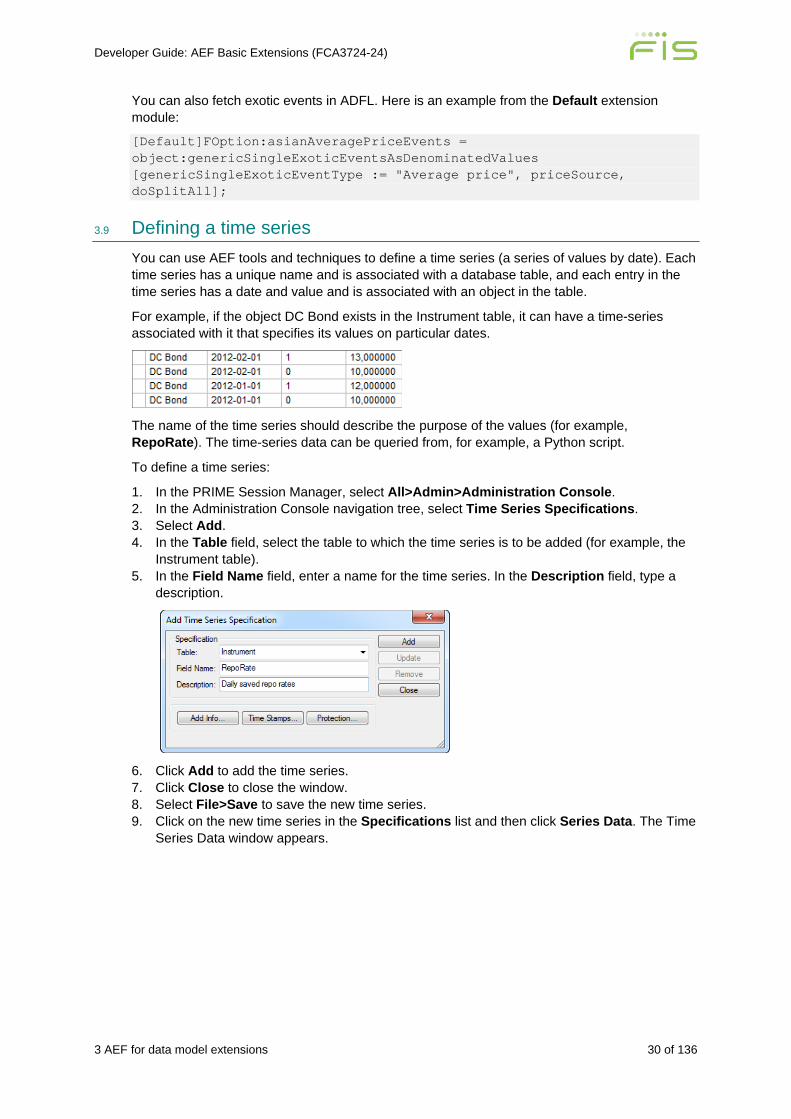
3.9 Defining a time series You can use AEF tools and techniques to define a time series (a series of values by date). Each time series has a unique name and is associated with a database table, and each entry in the time series has a date and value and is associated with an object in the table.
For example, if the object DC Bond exists in the Instrument table, it can have a time-series associated with it that specifies its values on particular dates.
The name of the time series should describe the purpose of the values (for example, RepoRate). The time-series data can be queried from, for example, a Python script.
To define a time series:
1. In the PRIME Session Manager, select All>Admin>Administration Console. 2. In the Administration Console navigation tree, select Time Series Specifications. 3. Select Add. 4. In the Table field, select the table to which the time series is to be added (for example, the
Instrument table). 5. In the Field Name field, enter a name for the time series. In the Description field, type a
description.
6. Click Add to add the time series. 7. Click Close to close the window. 8. Select File>Save to save the new time series. 9. Click on the new time series in the Specifications list and then click Series Data. The Time
Series Data window appears.
Developer Guide: AEF Basic Extensions (FCA3724-24)
3 AEF for data model extensions 31 of 136
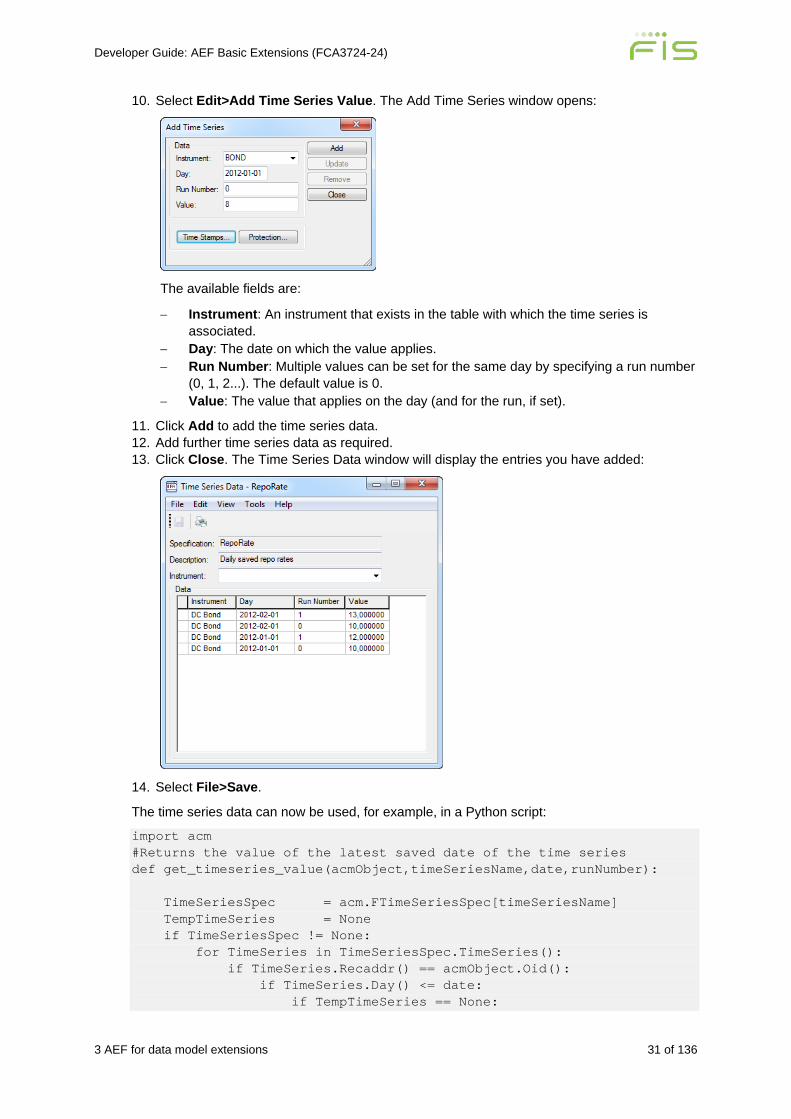
10. Select Edit>Add Time Series Value. The Add Time Series window opens:
The available fields are:
− Instrument: An instrument that exists in the table with which the time series is associated.
− Day: The date on which the value applies. − Run Number: Multiple values can be set for the same day by specifying a run number
(0, 1, 2...). The default value is 0. − Value: The value that applies on the day (and for the run, if set).
11. Click Add to add the time series data. 12. Add further time series data as required. 13. Click Close. The Time Series Data window will display the entries you have added:
14. Select File>Save.
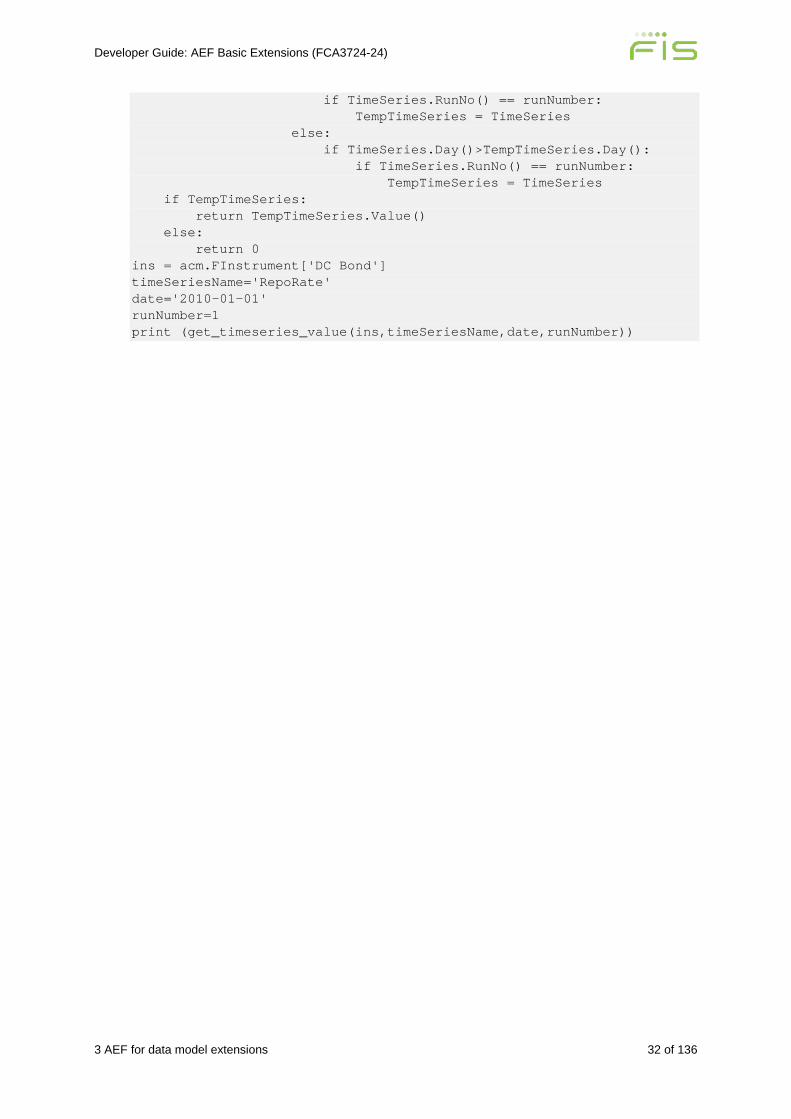
The time series data can now be used, for example, in a Python script:
import acm #Returns the value of the latest saved date of the time series def get_timeseries_value(acmObject,timeSeriesName,date,runNumber): TimeSeriesSpec = acm.FTimeSeriesSpec[timeSeriesName] TempTimeSeries = None if TimeSeriesSpec != None: for TimeSeries in TimeSeriesSpec.TimeSeries(): if TimeSeries.Recaddr() == acmObject.Oid(): if TimeSeries.Day() <= date: if TempTimeSeries == None:
Developer Guide: AEF Basic Extensions (FCA3724-24)
3 AEF for data model extensions 32 of 136
if TimeSeries.RunNo() == runNumber: TempTimeSeries = TimeSeries else: if TimeSeries.Day()>TempTimeSeries.Day(): if TimeSeries.RunNo() == runNumber: TempTimeSeries = TimeSeries if TempTimeSeries: return TempTimeSeries.Value() else: return 0 ins = acm.FInstrument['DC Bond'] timeSeriesName='RepoRate' date='2010-01-01' runNumber=1 print (get_timeseries_value(ins,timeSeriesName,date,runNumber))
Developer Guide: AEF Basic Extensions (FCA3724-24)
4 AEF for basic calculations 33 of 136
4 AEF for basic calculations The PRIME Trading Manager provides users with comprehensive tailored views of portfolios, instruments, trades, and other business objects in the system. There are many different sheet types available in Trading Manager. Each sheet is built from a set of column definitions (that control the display of values) and extension attribute definitions (that calculate the values).
Within the AEF, the extension area AEF for Basic Calculations provides all the tools and techniques you need to create new columns in Trading Manager:
• Extension area: AEF for basic calculations. • Licensing: Base (included in basic site license). • Supported uses:
− Defining new extension attributes and calculations − Defining and publishing new columns in sheets
• Extension types (definitions):
− FColumnDefinition − FExtensionAttribute
• Tools and techniques:
− Define new FExtensionAttributes (based on public ones) using Extension Editor and ADFL. Publish through new FColumnDefinitions. Save to extension module.
• References: Developer Guide: ARENA Data Flow Language (FCA1559). • Examples in the AEF Examples module:
− FColumnDefinition:
• Portfolio Cash No Funding • Portfolio Cash No Funding - Multiplied by
− FactorsFExtensionAttribute:
• cashMinusFunding • cashMinusFundingTimesFactors
− FPythonCode:
• FprintSheetInformation
• Training and certification: FA103 AEF: Calculation Trees, ADFL, and ACM. • Support: Standard support through Client Services. • Services: Standard professional services through FIS Capital Markets Consulting
Services.
To query the value of a column or field or to get the value of a standard financial calculation outside of Trading Manager, the AEF provides an extension area called AEF for Accessing Calculated Values. The extension area is fully described, along with many examples, in Developer Guide: Programmatic Access to Calculated Values (FCA4102).
Developer Guide: AEF Basic Extensions (FCA3724-24)
4 AEF for basic calculations 34 of 136
4.1 Defining new extension attributes and calculations Most calculated values in PRIME, particularly those displayed in Trading Manager sheets, are calculated through trees of ARENA Data Flow Language (ADFL) expressions.
Each ADFL expression in a tree is associated with an extension attribute definition (an extension of type FExtensionAttribute).
A full description of the ADFL language, its operators, extension attributes, and valuation trees is found in Developer Guide: ARENA Data Flow Language (FCA1559).
By combining the built-in public extension attributes using ADFL operators you can calculate new values for business objects. These values can then be displayed in Trading Manager sheets or used in your own Python modules.
For example, you can create a new calculated value that removes funding costs from profit and loss generated cash and then show that value in a new column on the Portfolio Sheet.
Note: Avoid using extension attributes that are marked "private" or "unclassified" in the AEF Browser (All>System>AEF Browser) in your calculations. The definitions of private extension attributes are likely to change or be removed without notice between versions of PRIME.
4.1.1 Viewing the public extension attributes in the AEF Browser Before you create a new extension attribute, review the set of public extension attributes that are already built into PRIME. These are the extension attributes that are available for you to use in your own ADFL expressions. To do this, perform the following steps:
1. From the Session Manager, select All>System>AEF Browser. 2. Select Home>View>Public. 3. In the Contents tab, select AEF Extension Types>FExtensionAttribute. All the public
extension attributes are marked with a green spot on their icon.
4.1.2 Viewing column definitions in the Extension Editor Extension attributes are referenced in sheet column definitions (extensions of type FColumnDefinition). When Trading Manager displays a value in a sheet column it is displaying the current value calculated for a particular extension attribute, which in turn is calculated resolving the tree of ADFL expressions behind it.
To view the set of sheet column definitions already built in to PRIME:
1. From the Session Manager, select All>System>Extension Editor. 2. Search for FColumnDefinition extensions in the Default module in the Standard context.
A sheet column definition consists of a set of properties that are used by Trading Manager when it builds the column for the sheet. The property ExtensionAttribute determines which extension attribute to resolve to get the value to display in the sheet. The other properties determine the format, appearance, and behaviour of the column. For a list of all the properties available in column definitions, refer to the entry for FColumnDefinition in the AEF Browser.
Note that one column definition can inherit properties from another through the InheritsFrom property.
Developer Guide: AEF Basic Extensions (FCA3724-24)
4 AEF for basic calculations 35 of 136
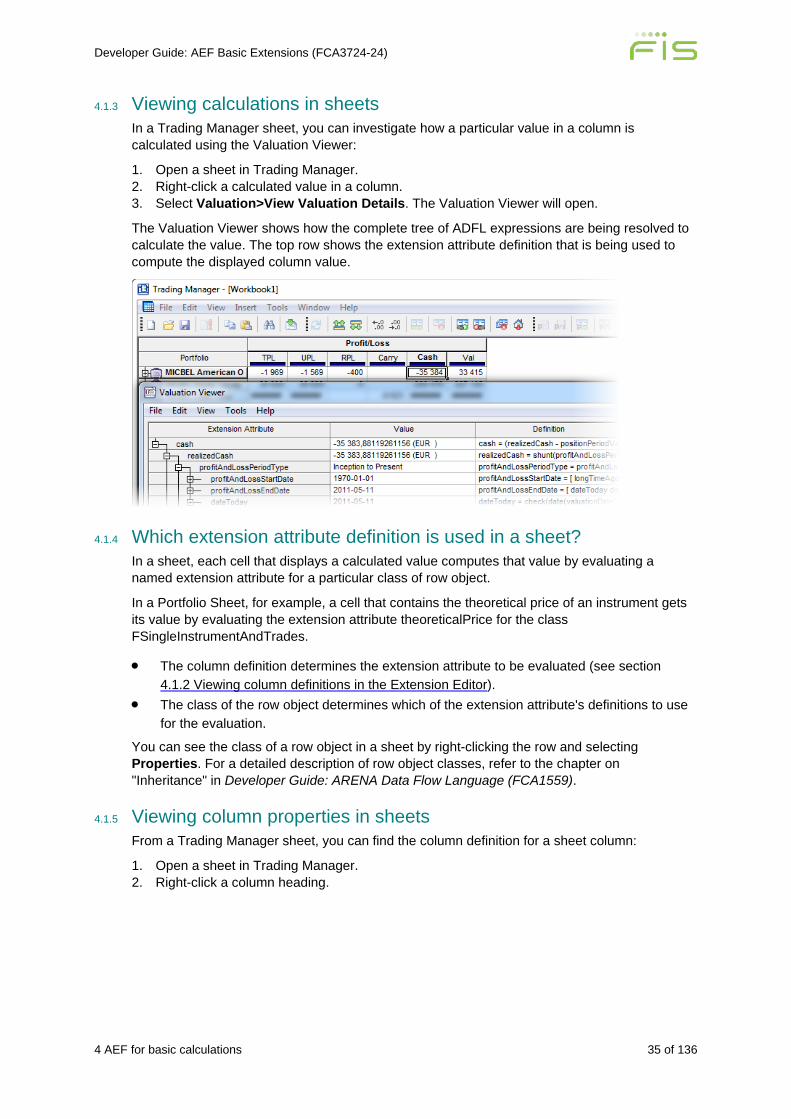
4.1.3 Viewing calculations in sheets In a Trading Manager sheet, you can investigate how a particular value in a column is calculated using the Valuation Viewer:
1. Open a sheet in Trading Manager. 2. Right-click a calculated value in a column. 3. Select Valuation>View Valuation Details. The Valuation Viewer will open.
The Valuation Viewer shows how the complete tree of ADFL expressions are being resolved to calculate the value. The top row shows the extension attribute definition that is being used to compute the displayed column value.
4.1.4 Which extension attribute definition is used in a sheet? In a sheet, each cell that displays a calculated value computes that value by evaluating a named extension attribute for a particular class of row object.
In a Portfolio Sheet, for example, a cell that contains the theoretical price of an instrument gets its value by evaluating the extension attribute theoreticalPrice for the class FSingleInstrumentAndTrades.
• The column definition determines the extension attribute to be evaluated (see section 4.1.2 Viewing column definitions in the Extension Editor).
• The class of the row object determines which of the extension attribute's definitions to use for the evaluation.
You can see the class of a row object in a sheet by right-clicking the row and selecting Properties. For a detailed description of row object classes, refer to the chapter on "Inheritance" in Developer Guide: ARENA Data Flow Language (FCA1559).
4.1.5 Viewing column properties in sheets From a Trading Manager sheet, you can find the column definition for a sheet column:
1. Open a sheet in Trading Manager. 2. Right-click a column heading.
Developer Guide: AEF Basic Extensions (FCA3724-24)
4 AEF for basic calculations 36 of 136
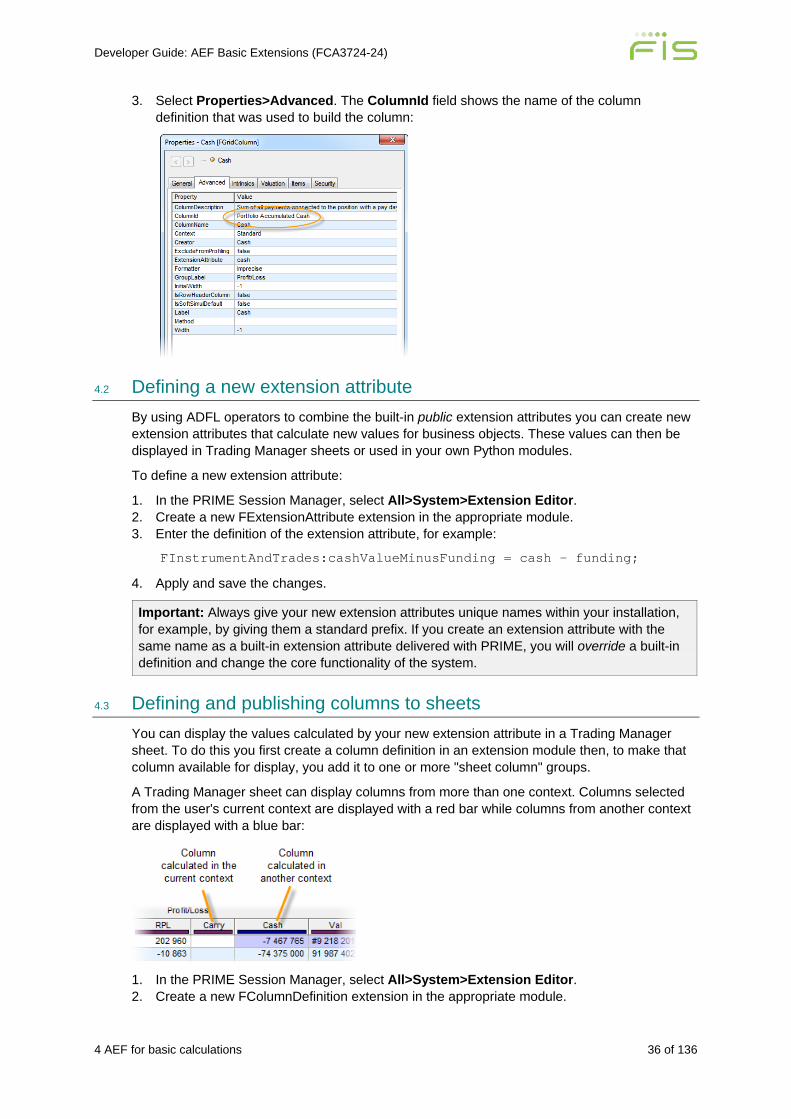
3. Select Properties>Advanced. The ColumnId field shows the name of the column definition that was used to build the column:
4.2 Defining a new extension attribute By using ADFL operators to combine the built-in public extension attributes you can create new extension attributes that calculate new values for business objects. These values can then be displayed in Trading Manager sheets or used in your own Python modules.
To define a new extension attribute:
1. In the PRIME Session Manager, select All>System>Extension Editor. 2. Create a new FExtensionAttribute extension in the appropriate module. 3. Enter the definition of the extension attribute, for example:
FInstrumentAndTrades:cashValueMinusFunding = cash – funding;
4. Apply and save the changes.
Important: Always give your new extension attributes unique names within your installation, for example, by giving them a standard prefix. If you create an extension attribute with the same name as a built-in extension attribute delivered with PRIME, you will override a built-in definition and change the core functionality of the system.
4.3 Defining and publishing columns to sheets You can display the values calculated by your new extension attribute in a Trading Manager sheet. To do this you first create a column definition in an extension module then, to make that column available for display, you add it to one or more "sheet column" groups.
A Trading Manager sheet can display columns from more than one context. Columns selected from the user's current context are displayed with a red bar while columns from another context are displayed with a blue bar:
1. In the PRIME Session Manager, select All>System>Extension Editor. 2. Create a new FColumnDefinition extension in the appropriate module.
Developer Guide: AEF Basic Extensions (FCA3724-24)
4 AEF for basic calculations 37 of 136
3. Add the column definition. For information about the available properties, refer to the entry for FColumnDefinition in the AEF Browser.
4. Set the property ExtensionAttribute to the name of your new extension attribute. 5. Apply and save the changes. 6. Right-click the column definition in the result tree and select Groups>Add to>sheet
columns, and then a sheet to which you want to publish the new column, for example, orderbooksheet.
Note that the names of the groups do not always match the names of the sheets. See 4.3.1 Matching group names with sheet names.
7. Save the changes. 8. Open a Trading Manager sheet of the selected type. 9. Choose Select Columns from the View menu. The Select Columns window opens. 10. In the Context field, select a context in which the column definition is available. This does
not have to be the current context: it can be any context that contains the column definition. 11. In the list of column groups, locate your new column. (The group to which it belongs is
defined by the GroupLabel property you set in the column definition. You can also find your column using the Search box beneath the group list.
12. Highlight the column and Add it to the sheet. 13. Click OK.
When you have defined your new column, you can change its appearance when it is shown in a sheet, as well as the way in which its values are formatted. For more information, see sections 5.2 Customising the appearance of columns, 5.3 Colouring cells dynamically, and 5.4 Customising the formatting of values in columns.
4.3.1 Matching group names with sheet names When publishing a column to a sheet you need to add the column definition to the sheet column group belonging to that sheet. In some cases, it is not obvious which group that corresponds to which sheet. There is a tool to find out and here is how to use it.
1. In the Extension Editor, add the built-in module AEF Examples. 2. Close and open the Extension Editor. 3. Select Extensions>Tools>AEF Examples>Show Sheet Information.
This will produce a list of all sheets display name (as seen in Trading Manager), ACM class name, and group name.
Example Cash Analysis Sheet =FMoneyFlowSheet, moneyflowsheet

Developer Guide: AEF Basic Extensions (FCA3724-24)
4 AEF for basic calculations 38 of 136
4.4 Example: Cash minus funding on a Portfolio Sheet The code for this example can be found in the AEF Examples module, if you have added that extension module to your current context.
This example shows you how to calculate a new value (cashMinusFunding) using the two existing extension attributes cash and funding, and then how to publish that value on a Portfolio sheet in a column named CashNoFund.
1. From the Session Manager, select All>Trading>Trading Manager. 2. Insert a Portfolio Profit and Loss Sheet and insert a portfolio 3. Add the columns Cash and Funding. For full instructions on inserting items in sheets and
adding columns, refer to PRIME Help (FCA1260). 4. Right-click any cell in the Cash column and select Valuation>View Valuation Details. In
the Valuation Viewer, the top row shows the extension attribute that computes the value shown in the cell, in this case cash.
5. Repeat for the Funding column. For this column, the top extension attribute is funding. 6. From the Session Manager, select All>System>Extension Editor. 7. Select the appropriate context. 8. Click Groups and add aef base. 9. Search for FExtensionAttribute extensions. 10. From the result tree, open the cash extension. If you look back in the Valuation Viewer, you
see that it is the definition for FInstrumentAndTrades that is being used in the Portfolio Sheet.
11. From the result tree, open the funding extension. It also has a definition for FInstrumentAndTrades. For more information about sheet row classes and inheritance, refer to Developer Guide: ARENA Data Flow Language (FCA1559).
12. Remove the aef base Groups filter. 13. Create a new FExtensionAttribute extension in the appropriate module. 14. Enter the following definition:
FInstrumentAndTrades:cashMinusFunding = cash - funding;
Note that the new extension attribute, like the existing extension attributes cash and funding, is defined for the class FInstrumentAndTrades - the row object base class for all Portfolio sheet rows.
15. Apply and save the changes. 16. Create a new FColumnDefinition extension in the appropriate module. 17. Enter a column definition called Portfolio Cash No Funding, setting the following
properties:
FTradingSheet:Portfolio Cash No Funding = Access=ReadOnly Description=Cash value with the funding part removed ExtensionAttribute=cashMinusFunding Format=Imprecise GroupLabel=My Columns

Developer Guide: AEF Basic Extensions (FCA3724-24)
4 AEF for basic calculations 39 of 136
LabelList=CashNoFund Name=Cash No Funding
18. Apply and save the changes. 19. Right-click the column definition in the result tree and select Groups>Add to>sheet
columns>portfoliosheet. 20. Save the changes. 21. Switch to the Trading Manager. 22. Select Home>Insert>Columns. 23. In the Available columns list, open the group My Columns. 24. Highlight the column Cash No Funding and click Add. 25. Use the Up and Down buttons below the list of Current Columns to position your column
where you want it. 26. Click OK. The new column with its calculated values should now be visible in the Portfolio
Sheet. 27. Check that the calculated values in the CashNoFund column are equal to the values of
Cash minus Funding.
4.5 Defining and generating vector columns The column definition properties Type, Vector, and VectorTypes together provide a simple but powerful way to generate a set of vectorised columns in a sheet (a set of columns whose values are shifted in relation to one another). When these properties are set, a user who chooses to add vector columns to a sheet is shown an auto-generated dialog box.
A column definition called Portfolio Cash No Funding - Multiplied by Factors that can be found in the AEF Examples extension module provides an example of the use of these properties.
When adding a column of type Cash No Funding - Multiplied by Factors from the group AEF Examples to a Portfolio Sheet, the user is presented with the following window:
This window is auto-generated by PRIME using the user-interface customisation suite AUX. For more information about this tool suite, see section 6 AEF for creating custom GUI objects with the AUX. From here the user can add individual vector columns or generate a set of vector columns.
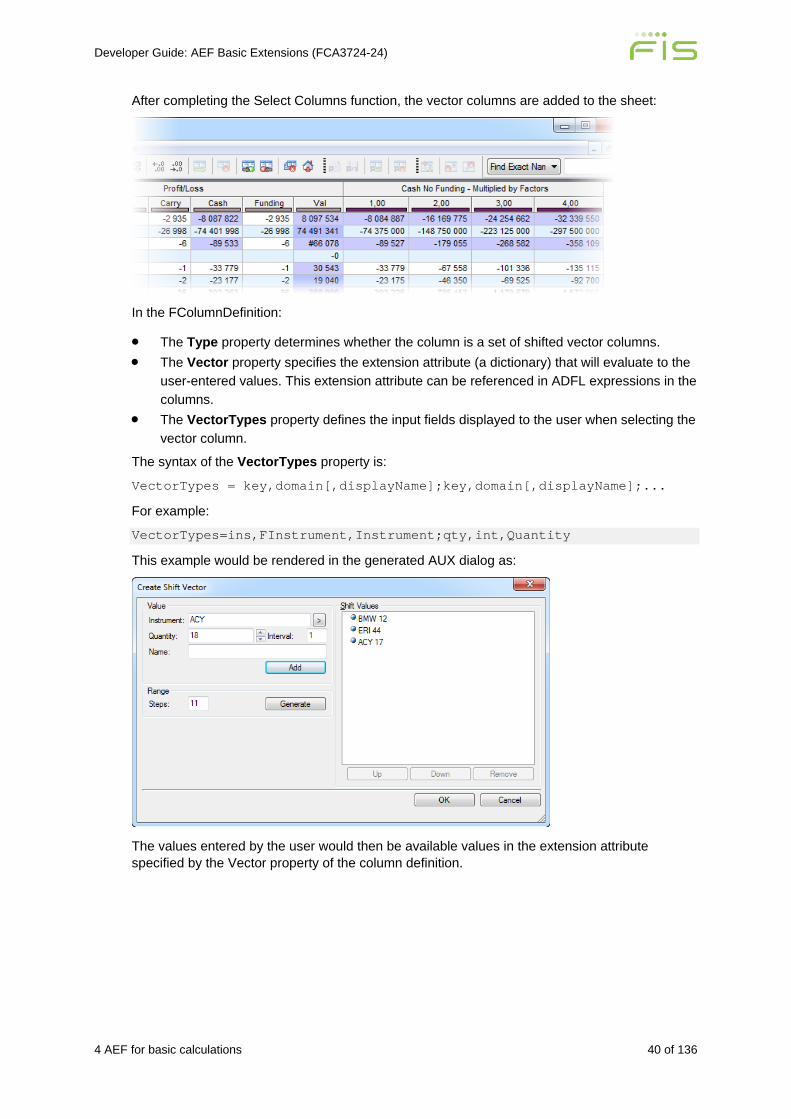
Developer Guide: AEF Basic Extensions (FCA3724-24)
4 AEF for basic calculations 40 of 136
After completing the Select Columns function, the vector columns are added to the sheet:
In the FColumnDefinition:
• The Type property determines whether the column is a set of shifted vector columns. • The Vector property specifies the extension attribute (a dictionary) that will evaluate to the
user-entered values. This extension attribute can be referenced in ADFL expressions in the columns.
• The VectorTypes property defines the input fields displayed to the user when selecting the vector column.
The syntax of the VectorTypes property is:
VectorTypes = key,domain[,displayName];key,domain[,displayName];...
For example:
VectorTypes=ins,FInstrument,Instrument;qty,int,Quantity
This example would be rendered in the generated AUX dialog as:
The values entered by the user would then be available values in the extension attribute specified by the Vector property of the column definition.
Developer Guide: AEF Basic Extensions (FCA3724-24)
5 AEF for GUI customization 41 of 136
5 AEF for GUI customization You can customise many of the elements of the PRIME graphical user interface, including buttons, menus, dialogues, cell colours, column formats, lists, icons, and images. Within the AEF, the extension area AEF for GUI Customization provides tools and techniques for modifying these GUI elements and for creating new ones. Many basic customisation options and settings are described in PRIME Help (FCA1260). This section looks at more advanced extensions to the GUI. See also section 6 AEF for creating custom GUI objects with the AUX for more information on how to create your own GUI objects.
• Extension area: AEF for GUI customization. • Licensing: Base (included in basic site license). • Supported uses:
− Adding action buttons to columns − Customising the appearance of columns − Colouring sheet cells dynamically − Customising the formatting of values in columns − Customising Insert Items date periods − Adding choice lists to fields − Defining custom groupings for sheet items − Customising instrument definition and trading windows − Creating and customising commands − Inserting items via a menu command − Creating runtime scripts and validating user input − Customising the Valuation Information window − Adding custom date periods to date selections in Insert Items − Adding icons and images programmatically
• Extension types (definitions):
− FColumnDefinition = ButtonAction − FColumnAppearance − FColor − FExtensionValue (CustomLayout...) − FPythonCode − FColumnDefinition − FExtensionAttribute − FMenuExtension − FCommandExtension − FDateTimeCalendarFormatter − FDateTimeFormatter − FDateTimeSpanFormatter − FEnumFormatter − FNumFormatter − FPriceFormatter − FValuationInfoDefinition − FUIEventHandlers − FParameterGUIDefinition
• Tools and techniques: Create UI element definitions in Extension Editor. Link to FPythonCode modules as necessary. Save to extension module.
Developer Guide: AEF Basic Extensions (FCA3724-24)
5 AEF for GUI customization 42 of 136
• Examples in AEF Examples module:
− FMenuExtension:
• Custom Control Dialog • Custom Layout Dialog with Data Binding • Custom Layout Dialog, Custom Layout Tabbed Dialog • Insert Items++
− FParameterGUIDefinition:
• FUX_* • InsertItemsDateAlgorithm
− FPythonCode:
• FUX_*, GenerateDateNodes
− FUIEventHandlers
• FUX_InsdefDockWindow
• Training and certification: FA105 AEF: User Interface Customization. • Support: Standard support through Client Services. • Services: Standard professional services through FIS Capital Markets Consulting
Services.
5.1 Adding action buttons to columns You can add action buttons to certain PRIME applications, for example, the Trading Manager. The buy (+) and sell (-) buttons in Trading Manager's vertical trading feature has been developed using these tools and techniques.
To add an action button, perform the following steps:
1. In the PRIME Session Manager, select All>System>Extension Editor. 2. Create a new FColumnDefinition extension in the appropriate module. 3. Enter the definition of the column in the editing pane. 4. Apply and save the changes.
To implement action buttons, you need to specify the column definition properties ButtonAction and ButtonCreate. Both of these are assigned to a previously added Python function. You will also need to specify the Method property.
• ButtonAction determines the action to perform when the button is clicked.
Use of the column property ActionProcessingMode is required in distributed mode (PACE). Refer to System Administration: Distributed Processing Using PACE (FCA4619).
• ButtonCreate specifies the row types on which the button appears. • Method specifies the text that appears on the button. • BidOrAsk specifies whether the action button refers to a bid or ask order. It is used, for
example, for vertical trading columns. • GroupLabel determines the folder name in which the column will be stored.
Developer Guide: AEF Basic Extensions (FCA3724-24)
5 AEF for GUI customization 43 of 136
For a description of all available column definition properties, refer to the entry for FColumnDefinition in the AEF Browser.
1. Highlight the entire extension definition in the edit pane and select Home>Apply. 2. Right-click the column definition in the result tree and select Groups>Add to>sheet
columns. Then select the sheet you want the action button column to appear in, for example, the orderbooksheet.
3. Select File>Save. 4. From the Session Manager, select All>Trading>Trading Manager. 5. Open a sheet and add items. 6. Select Home>Insert>Columns. 7. In the Available columns list, open the folder in which you stored the column definition. 8. Highlight your column and click Add. 9. Use the Up and Down buttons below the list of Current Columns to position your column
where you want it. 10. Click OK. The new column with its calculated values should now be visible in the sheet. 11. Check that the action button works as expected.
5.1.1 Example: Vertical trading buy and sell action buttons The vertical trading functionality in an Order Book Sheet in PRIME Trading Manager makes use of + and - action buttons to buy and sell. This core feature cannot be customised, but it is described here to show how action buttons can be implemented. The following example shows the Add Vertical Ask Order extension in the built-in VerticalTrading module.
[VerticalTrading]FTradingSheet:Add Vertical Ask Order = BidOrAsk=Ask ButtonAction=FVerticalTrading.onAddVerticalOrder ButtonCreate=FVerticalTrading.wantButton ButtonIcon="Add" Class=PriceValueRow ColumnAppearance=VerticalOrderButton Description=This button adds the given quantity to the ask order at this price. GroupLabel=Vertical Trading LabelList=A+ Method=''
When the button is clicked, the Python function FVerticalTrading.onAddVerticalOrder is called. The Python function FVerticalTrading.wantButton specifies the row types on which the button appears. The label in the column heading on a Trading Manager sheet is A+, while the button text is specified by the Method property and is +. For a description of all column definition properties, refer to the entry for FColumnDefinition in the AEF Browser.
In the FVerticalTrading FPythonCode extension, you can see how onAddVerticalOrder, wantButton, and other functions are implemented. For information on how to publish columns to sheets, see 4.3 Defining and publishing columns to sheets.
Note that the button is added only on rows with a class of PriceValueRow, as specified in the column definition's Class property. In other words, the button is added to the column for rows that contain the depth prices.
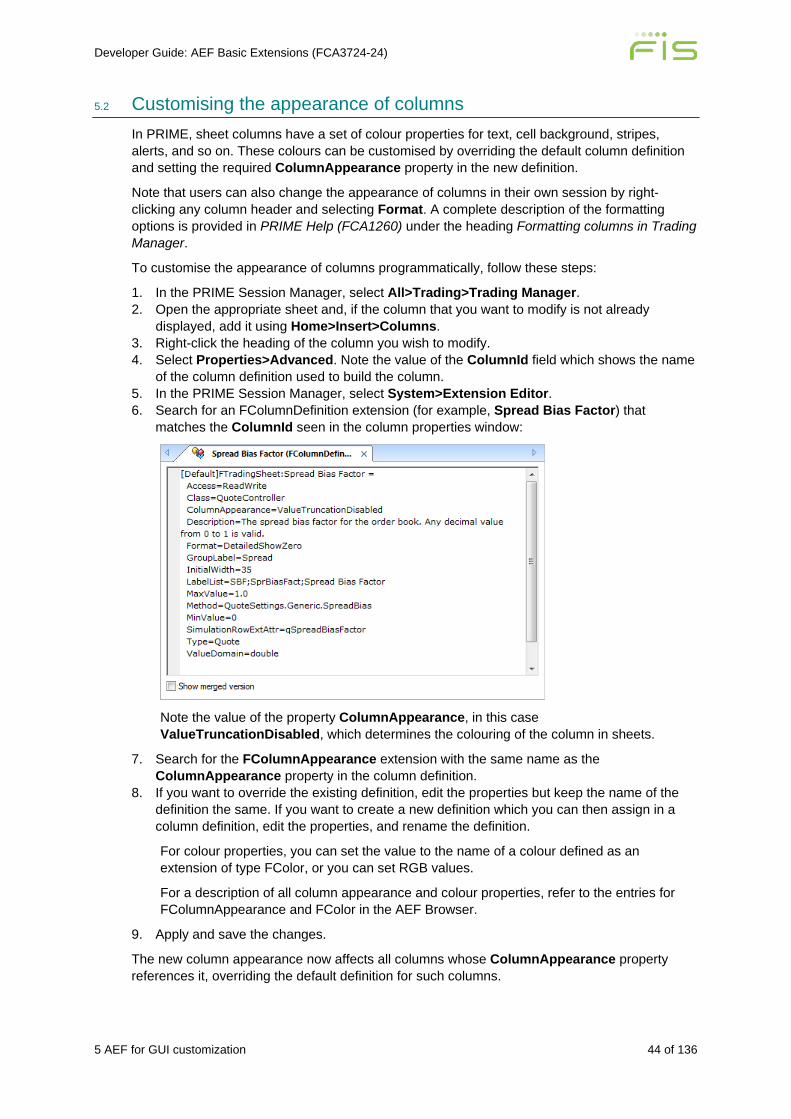
Developer Guide: AEF Basic Extensions (FCA3724-24)
5 AEF for GUI customization 44 of 136
5.2 Customising the appearance of columns In PRIME, sheet columns have a set of colour properties for text, cell background, stripes, alerts, and so on. These colours can be customised by overriding the default column definition and setting the required ColumnAppearance property in the new definition.
Note that users can also change the appearance of columns in their own session by right-clicking any column header and selecting Format. A complete description of the formatting options is provided in PRIME Help (FCA1260) under the heading Formatting columns in Trading Manager.
To customise the appearance of columns programmatically, follow these steps:
1. In the PRIME Session Manager, select All>Trading>Trading Manager. 2. Open the appropriate sheet and, if the column that you want to modify is not already
displayed, add it using Home>Insert>Columns. 3. Right-click the heading of the column you wish to modify. 4. Select Properties>Advanced. Note the value of the ColumnId field which shows the name
of the column definition used to build the column. 5. In the PRIME Session Manager, select System>Extension Editor. 6. Search for an FColumnDefinition extension (for example, Spread Bias Factor) that
matches the ColumnId seen in the column properties window:
Note the value of the property ColumnAppearance, in this case ValueTruncationDisabled, which determines the colouring of the column in sheets.
7. Search for the FColumnAppearance extension with the same name as the ColumnAppearance property in the column definition.
8. If you want to override the existing definition, edit the properties but keep the name of the definition the same. If you want to create a new definition which you can then assign in a column definition, edit the properties, and rename the definition.
For colour properties, you can set the value to the name of a colour defined as an extension of type FColor, or you can set RGB values.
For a description of all column appearance and colour properties, refer to the entries for FColumnAppearance and FColor in the AEF Browser.
9. Apply and save the changes.
The new column appearance now affects all columns whose ColumnAppearance property references it, overriding the default definition for such columns.
Developer Guide: AEF Basic Extensions (FCA3724-24)
5 AEF for GUI customization 45 of 136
If you have created a new FColumnAppearance extension, you can reference it from an FColumnDefinition extension through the ColumnAppearance property. To do this you will need to override the FColumnDefinition in the Default module, by copying it to an extension module to which you have write permission and editing it and saving it there.
5.3 Colouring cells dynamically Background colours and text colours for any sheet column can be set dynamically by referencing an extension attribute and by specifying number ranges to match against the values that appear in the column.
You can use the FColumnAppearance properties BkgColumn and TextColumn to specify the extension attribute that will supply the values, and the properties BkgIntervals and TextIntervals to specify the value ranges. The names of the intervals are separated by semicolons (;) and must be specified in the same order in which they are to be evaluated.
Note: BkgExtensionAttribute and TextExtensionAttribute can be used instead of BkgColumn and TextColumn respectively, for legacy reasons. However, when using these attributes, the column will not display the defined colours for the calculated value, if the calculations of the column are done in a PACE environment.
For the interval definitions, use the properties Bkg1, Bkg2, Txt1, Txt2, and so on, for example:
BkgColumn=qTradeSinceManualUpdateIndication BkgIntervals=Bkg1;Bkg2;Bkg3 Bkg1=White:0;DarkGrey:0.9 Bkg2=DarkGrey:1;Black:1.9 Bkg3=Black:2;Black:2.9 Bkg4=LightGrey:3;infinity BkgIntervals=Bkg1;Bkg2;Bkg3;Bkg4
You can define several intervals with different colours for the same column. One colour is assigned to a minimum value and one to a maximum value. If the value is less than or equal to the minimum value, the minimum colour is used. If the value is more than or equal to the maximum value, the maximum colour is used. If the value falls between the minimum value and maximum value, the new colour falls between the minimum and maximum colours.
You can also define a colour with a span from infinity or -infinity to a predefined value. If a value does not fall within a defined interval, the background colour defined for the column is used. For example:
An interval ranging between 10 and 50 that goes from black to red: Bkg1=Black:10;Red:50 Colour all values between -infinity and -5, yellow: Bkg3=Yellow:-5:-infinity
5.3.1 Example: Colouring a volatility column dynamically This example shows you how to modify the Portfolio Volatility column so that its background colouring is determined dynamically.
1. In the PRIME Session Manager, select All>System>Extension Editor. 2. Search for the Portfolio Volatility FColumnDefinition extension in the correct context. 3. Add or change the property ColumnAppearance:
ColumnAppearance=PortfolioVolatility
4. Apply and save the changes. 5. Create a new FColumnAppearance extension in the appropriate module.

Developer Guide: AEF Basic Extensions (FCA3724-24)
5 AEF for GUI customization 46 of 136
6. Add the column appearance definition for PortfolioVolatility:
FObject:PortfolioVolatility = Bkg1=White:0.1;Red:1 Bkg2=White:-0.1;Green:-1 Bkg3=Red:1;infinity Bkg4=Green:-1;-infinity BkgColumn=volatilityInTheoreticalPrice BkgIntervals=Bkg1;Bkg2;Bkg3;Bkg4 Flashing=Disabled Stripes=Disabled ValueTruncation=Disabled
This definition uses the property BkgColumn to specify an extension attribute called volatilityInTheoreticalPrice. That extension attribute calculates the value in the column at run time (that is, dynamically). The object used with this property is the same object used with an extension attribute for the column.
The properties BkgIntervals, Bkg1, Bkg2, Bkg3, and Bkg4 specify the colour to show based on the calculated value. For example, the column background colour moves between white and red as the value moves between 0.1 and 1. The column background colour is green if the value falls between -1 and -infinity. The properties Stripes, Flashing, and ValueTruncation are disabled.
7. Apply and save the changes. 8. In the PRIME Session Manager, select All>Trading>Trading Manager. 9. Insert a Default Portfolio Sheet and add some items. 10. Select Home>Insert>Columns. 11. In the Available columns list, open the Pricing folder. 12. Select the Volatility column. 13. Click Add. The volatility column will be coloured according to the column appearance
definition for PortfolioVolatility.
5.4 Customising the formatting of values in columns In PRIME, sheet columns have a default set of format properties for numbers, prices, dates, and so on. This value formatting can be customised. For example, you can change the number of decimal places for values in a particular column.
The format of values in a column is controlled by definitions belonging to the extension types:
• FDateTimeCalendarFormatter • FDateTimeFormatter • FDateTimeSpanFormatter • FEnumFormatter • FNumFormatter • FPriceFormatter
For more information about these extension types, rfer to their entries in the AEF Browser.
Note that users can also change the format of values in columns in their own session by right-clicking any column header and selecting Format. A complete description of the formatting options is provided in PRIME Help (FCA1260) under the heading Formatting columns in Trading Manager.
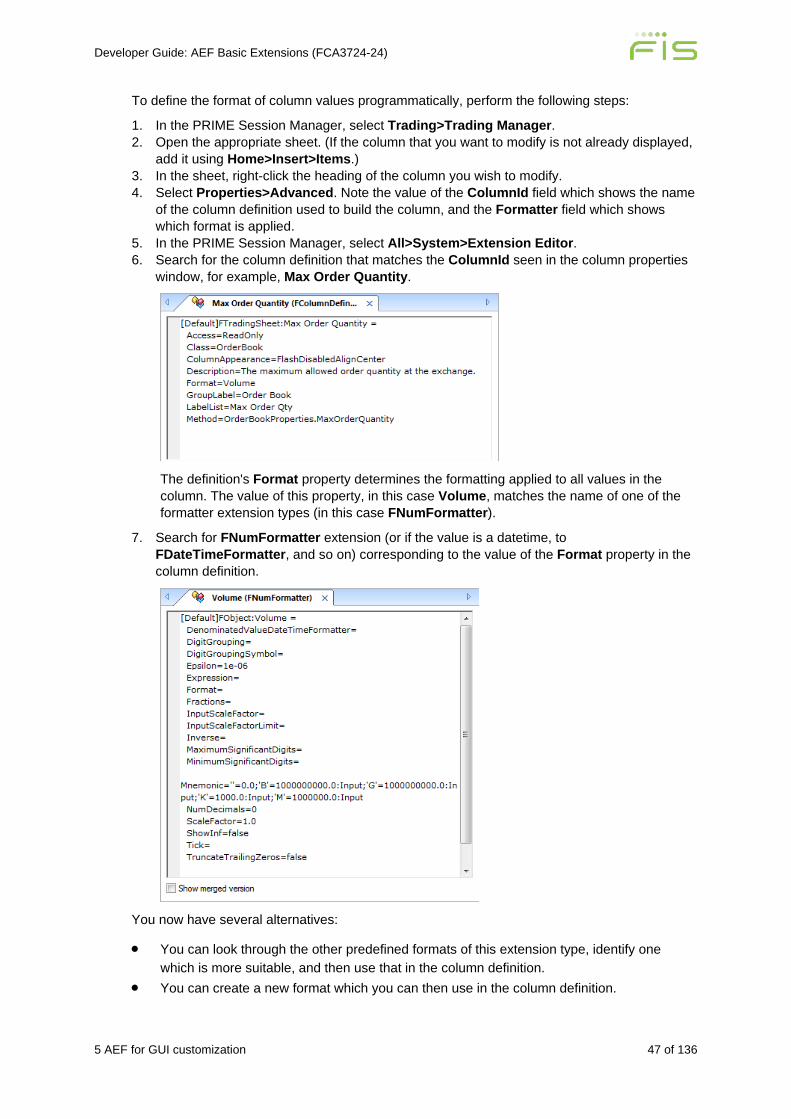
Developer Guide: AEF Basic Extensions (FCA3724-24)
5 AEF for GUI customization 47 of 136
To define the format of column values programmatically, perform the following steps:
1. In the PRIME Session Manager, select Trading>Trading Manager. 2. Open the appropriate sheet. (If the column that you want to modify is not already displayed,
add it using Home>Insert>Items.) 3. In the sheet, right-click the heading of the column you wish to modify. 4. Select Properties>Advanced. Note the value of the ColumnId field which shows the name
of the column definition used to build the column, and the Formatter field which shows which format is applied.
5. In the PRIME Session Manager, select All>System>Extension Editor. 6. Search for the column definition that matches the ColumnId seen in the column properties
window, for example, Max Order Quantity.
The definition's Format property determines the formatting applied to all values in the column. The value of this property, in this case Volume, matches the name of one of the formatter extension types (in this case FNumFormatter).
7. Search for FNumFormatter extension (or if the value is a datetime, to FDateTimeFormatter, and so on) corresponding to the value of the Format property in the column definition.
You now have several alternatives:
• You can look through the other predefined formats of this extension type, identify one which is more suitable, and then use that in the column definition.
• You can create a new format which you can then use in the column definition.
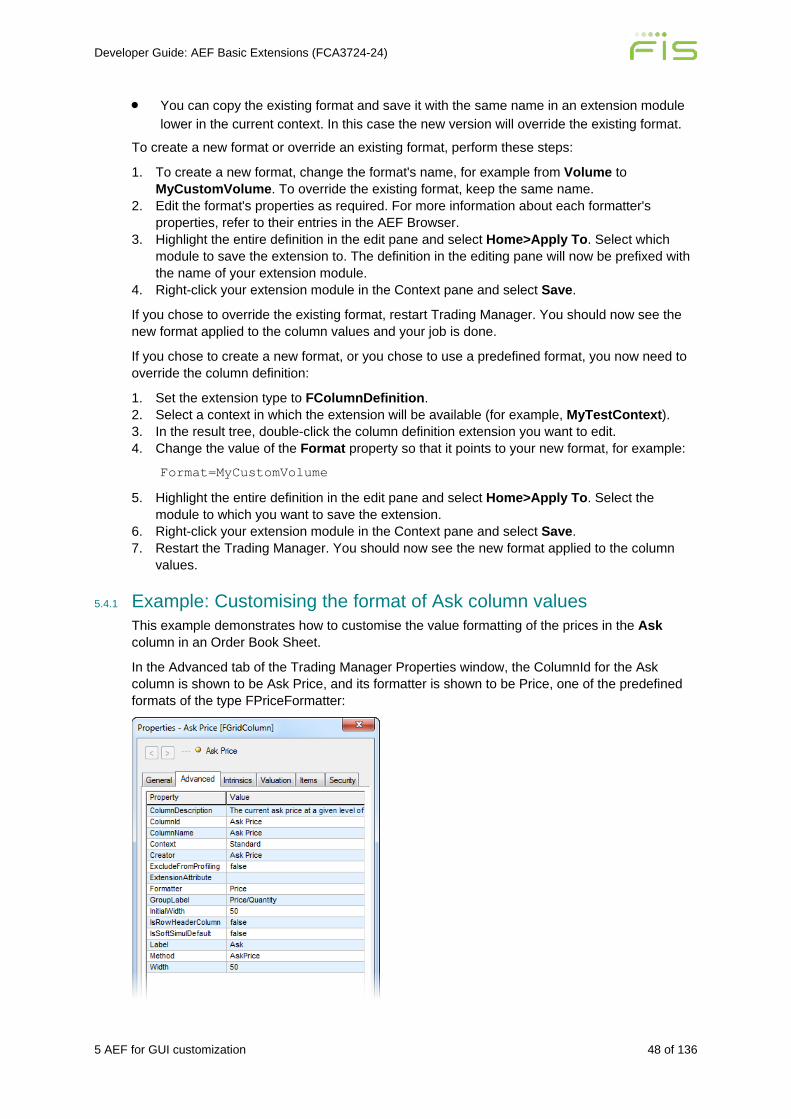
Developer Guide: AEF Basic Extensions (FCA3724-24)
5 AEF for GUI customization 48 of 136
• You can copy the existing format and save it with the same name in an extension module lower in the current context. In this case the new version will override the existing format.
To create a new format or override an existing format, perform these steps:
1. To create a new format, change the format's name, for example from Volume to MyCustomVolume. To override the existing format, keep the same name.
2. Edit the format's properties as required. For more information about each formatter's properties, refer to their entries in the AEF Browser.
3. Highlight the entire definition in the edit pane and select Home>Apply To. Select which module to save the extension to. The definition in the editing pane will now be prefixed with the name of your extension module.
4. Right-click your extension module in the Context pane and select Save.
If you chose to override the existing format, restart Trading Manager. You should now see the new format applied to the column values and your job is done.
If you chose to create a new format, or you chose to use a predefined format, you now need to override the column definition:
1. Set the extension type to FColumnDefinition. 2. Select a context in which the extension will be available (for example, MyTestContext). 3. In the result tree, double-click the column definition extension you want to edit. 4. Change the value of the Format property so that it points to your new format, for example:
Format=MyCustomVolume
5. Highlight the entire definition in the edit pane and select Home>Apply To. Select the module to which you want to save the extension.
6. Right-click your extension module in the Context pane and select Save. 7. Restart the Trading Manager. You should now see the new format applied to the column
values.
5.4.1 Example: Customising the format of Ask column values This example demonstrates how to customise the value formatting of the prices in the Ask column in an Order Book Sheet.
In the Advanced tab of the Trading Manager Properties window, the ColumnId for the Ask column is shown to be Ask Price, and its formatter is shown to be Price, one of the predefined formats of the type FPriceFormatter:
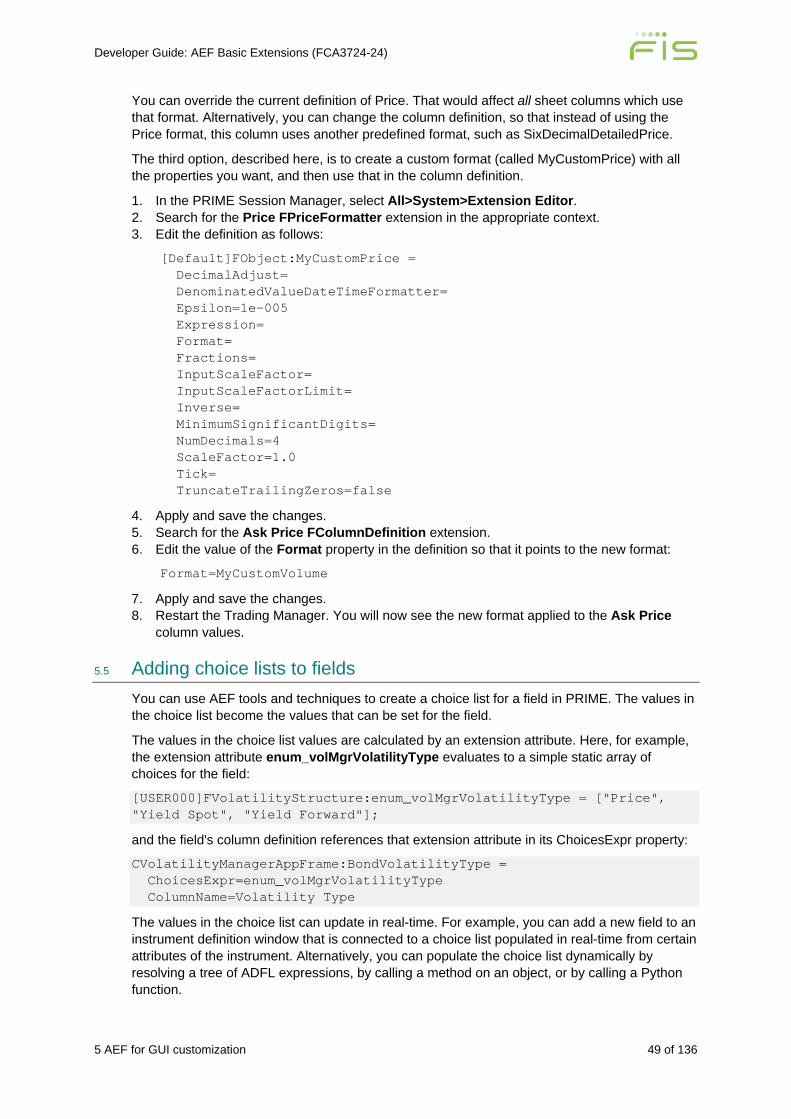
Developer Guide: AEF Basic Extensions (FCA3724-24)
5 AEF for GUI customization 49 of 136
You can override the current definition of Price. That would affect all sheet columns which use that format. Alternatively, you can change the column definition, so that instead of using the Price format, this column uses another predefined format, such as SixDecimalDetailedPrice.
The third option, described here, is to create a custom format (called MyCustomPrice) with all the properties you want, and then use that in the column definition.
1. In the PRIME Session Manager, select All>System>Extension Editor. 2. Search for the Price FPriceFormatter extension in the appropriate context. 3. Edit the definition as follows:
[Default]FObject:MyCustomPrice = DecimalAdjust= DenominatedValueDateTimeFormatter= Epsilon=1e-005 Expression= Format= Fractions= InputScaleFactor= InputScaleFactorLimit= Inverse= MinimumSignificantDigits= NumDecimals=4 ScaleFactor=1.0 Tick= TruncateTrailingZeros=false
4. Apply and save the changes. 5. Search for the Ask Price FColumnDefinition extension. 6. Edit the value of the Format property in the definition so that it points to the new format:
Format=MyCustomVolume
7. Apply and save the changes. 8. Restart the Trading Manager. You will now see the new format applied to the Ask Price
column values.
5.5 Adding choice lists to fields You can use AEF tools and techniques to create a choice list for a field in PRIME. The values in the choice list become the values that can be set for the field.
The values in the choice list values are calculated by an extension attribute. Here, for example, the extension attribute enum_volMgrVolatilityType evaluates to a simple static array of choices for the field:
[USER000]FVolatilityStructure:enum_volMgrVolatilityType = ["Price", "Yield Spot", "Yield Forward"];
and the field's column definition references that extension attribute in its ChoicesExpr property:
CVolatilityManagerAppFrame:BondVolatilityType = ChoicesExpr=enum_volMgrVolatilityType ColumnName=Volatility Type
The values in the choice list can update in real-time. For example, you can add a new field to an instrument definition window that is connected to a choice list populated in real-time from certain attributes of the instrument. Alternatively, you can populate the choice list dynamically by resolving a tree of ADFL expressions, by calling a method on an object, or by calling a Python function.
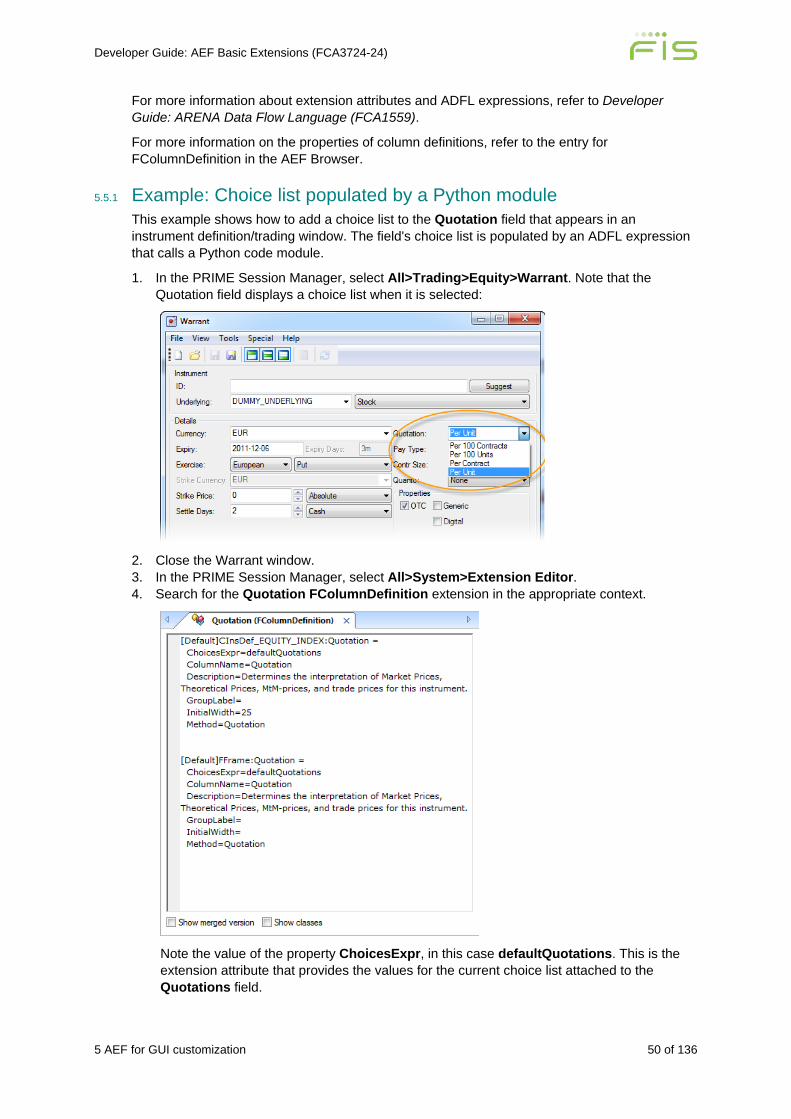
Developer Guide: AEF Basic Extensions (FCA3724-24)
5 AEF for GUI customization 50 of 136
For more information about extension attributes and ADFL expressions, refer to Developer Guide: ARENA Data Flow Language (FCA1559).
For more information on the properties of column definitions, refer to the entry for FColumnDefinition in the AEF Browser.
5.5.1 Example: Choice list populated by a Python module This example shows how to add a choice list to the Quotation field that appears in an instrument definition/trading window. The field's choice list is populated by an ADFL expression that calls a Python code module.
1. In the PRIME Session Manager, select All>Trading>Equity>Warrant. Note that the Quotation field displays a choice list when it is selected:
2. Close the Warrant window. 3. In the PRIME Session Manager, select All>System>Extension Editor. 4. Search for the Quotation FColumnDefinition extension in the appropriate context.
Note the value of the property ChoicesExpr, in this case defaultQuotations. This is the extension attribute that provides the values for the current choice list attached to the Quotations field.
Developer Guide: AEF Basic Extensions (FCA3724-24)
5 AEF for GUI customization 51 of 136
5. Search for the defaultQuotations FExtensionAttribute extension. 6. Modify the definition of defaultQuotations so that it calls a Python code module:
FInstrument:defaultQuotations = py("Quotations", context).getDefaultQuotations(object);
7. Apply and save the changes. 8. Create a new FPythonCode extension in the appropriate module. 9. Add the following Python code:
FObject:Quotations import acm def getDefaultQuotations(ins): defQuotations = ins.DefaultQuotations() myQuotation = "DQ-200" defQuotations.Add(myQuotation) return defQuotations
10. Apply and save the changes. 11. In the Session Manager, select All>Admin>Administration Console. In the Administration
Console, select Quotations and click Add. Enter Name (DQ-200), Type (Per Unit), and Factor (1.0). Click Add. Select File>Save.
12. From PRIME Session Manager, select Trading>Equity>Warrant. The Quotation field will now show the choice list options built by the Python code module:
Add on: Choice list custom sorting using FChoiceListPopulator By default, the elements in a choice list are alphanumerically sorted, custom sorting is possible through FChoiceListPopulator. This example shows how to modify the sorting of the choice list created in the previous example.
Follow the same steps as in the previous example, but change the Python code to:
FObject:Quotations import acm def customSorting(object1,object2): retVal = 0 if object2 < object1: retVal = -1 elif object2>object1: retVal = 1 return retVal
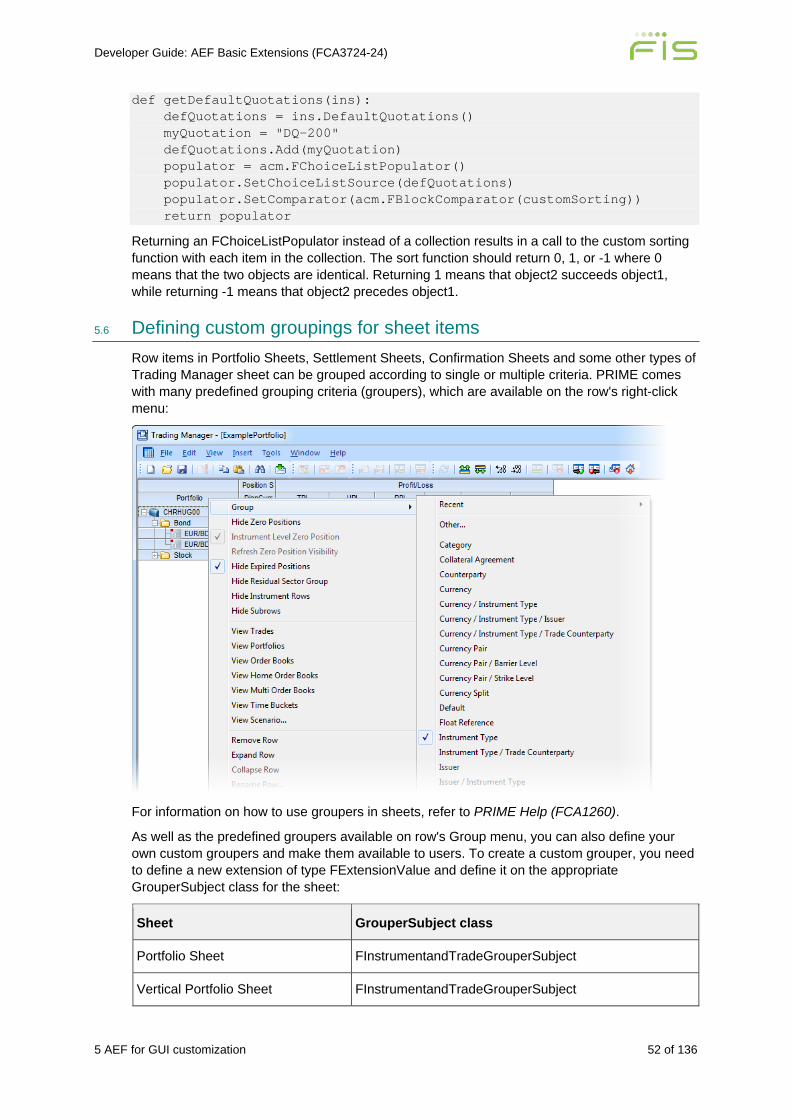
Developer Guide: AEF Basic Extensions (FCA3724-24)
5 AEF for GUI customization 52 of 136
def getDefaultQuotations(ins): defQuotations = ins.DefaultQuotations() myQuotation = "DQ-200" defQuotations.Add(myQuotation) populator = acm.FChoiceListPopulator() populator.SetChoiceListSource(defQuotations) populator.SetComparator(acm.FBlockComparator(customSorting)) return populator
Returning an FChoiceListPopulator instead of a collection results in a call to the custom sorting function with each item in the collection. The sort function should return 0, 1, or -1 where 0 means that the two objects are identical. Returning 1 means that object2 succeeds object1, while returning -1 means that object2 precedes object1.
5.6 Defining custom groupings for sheet items Row items in Portfolio Sheets, Settlement Sheets, Confirmation Sheets and some other types of Trading Manager sheet can be grouped according to single or multiple criteria. PRIME comes with many predefined grouping criteria (groupers), which are available on the row's right-click menu:
For information on how to use groupers in sheets, refer to PRIME Help (FCA1260).
As well as the predefined groupers available on row's Group menu, you can also define your own custom groupers and make them available to users. To create a custom grouper, you need to define a new extension of type FExtensionValue and define it on the appropriate GrouperSubject class for the sheet:
Sheet GrouperSubject class
Portfolio Sheet FInstrumentandTradeGrouperSubject
Vertical Portfolio Sheet FInstrumentandTradeGrouperSubject
Developer Guide: AEF Basic Extensions (FCA3724-24)
5 AEF for GUI customization 53 of 136
Sheet GrouperSubject class
Settlement Sheet FSettlementGrouperSubject
Confirmation Sheet FConfirmationGrouperSubject
The simplest type of grouper uses the value of one of the row object's attributes to determine grouping. Here, for example, are some of the definitions of the grouper Instrument Type, which can be found in the Default extension module:
[Default]FConfirmationGrouperSubject:Instrument Type Attribute;Confirmation.Trade.Instrument.InsType ... [Default]FFixingGrouperSubject:Instrument Type Attribute;Reset.Leg.Instrument.InsType ... [Default]FInstrumentAndTradesGrouperSubject:Instrument Type Attribute;Instrument.InsType ...
Other groupers chain together primitive groupers to create a hierarchy of grouping criteria, for example, the grouper Instrument Type / Trade Counterparty:
[Default]FInstrumentAndTradesGrouperSubject:Instrument Type / Trade Counterparty Chained;Instrument Type, Trade Counterparty
5.6.1 Example: Custom grouper for instruments and trades This example shows how to create a custom chained grouper that, when applied to the rows of a Portfolio Sheet groups items first by trade status then by instrument type.
1. In the PRIME Session Manager, select All>System>Extension Editor. 2. Search for all FExtensionValue extensions in the appropriate context. 3. Select the Instrument Type extension and view its definition. Then select the Trade Status
extension and view its definition. These are the two attribute groupers that will be used as the basis of the new grouper. (As they already exist in the Default extension module, they do not need to be copied to the user extension module.)
4. Create a new FExtensionValue extension and select the appropriate module. 5. Add the following code:
FInstrumentAndTradesGrouperSubject:Trade Status / Instrument Type Chained;Trade Status, Instrument Type
6. Apply and save the changes. 7. Right-clicking the new extension and select Groups>Add to>standard
groupers>standard groupers. This puts the grouper on the right-click menu item Group>Other. To put it straight on the Group menu item, select the group standard groupers - favourite groupers.
8. Save the changes. 9. In the PRIME Session Manager, select All>Trading>Trading Manager. 10. Insert a Portfolio Sheet and then insert some items. 11. Right-click a first-level row heading and select Group>Other.

Developer Guide: AEF Basic Extensions (FCA3724-24)
5 AEF for GUI customization 54 of 136
12. From the Select Grouper window, select the grouper Trade Status / Instrument Type, then click Open. The rows in the sheet will now be grouped first by trade status, then by instrument type.
The grouping system uses row object attribute values as criteria. You can create your own attributes to use as grouping criteria by defining extensions of type FExtensionValue.
5.7 Customising instrument definition and trading windows
Warning: Removing fields using CustomLayout_InstrumentPane or CustomLayout_FrontOfficePane is not recommended. Removing fields can change or break a functionality and alter the calculation of values in unexpected ways. This is because methods called from the fields are not called if the field is not present.
There are many predefined instrument definition and trading windows in PRIME. In some cases, it can be useful to customise these windows by, for example, adding user-defined fields, or changing the names of existing fields, or changing the order and visibility of the tabs. You might, for example, want to add a field called Authorizer to the main instrument pane.
5.7.1 Window layout and pane definitions Each PRIME window can have one or more panes. If a window has more than one pane, it will have tabs, which enable the user to switch between them.
For each window, there is a pane definition, which defines the panes that can be shown in the window, as well as the names of the tabs. All pane definitions are extensions of type FExtensionValue and have a name prefixed by CustomPanes_.
Each pane has a layout definition, which determines the position and the form of its fields and controls. All layout definitions can be viewed in the Extension Editor as extensions of type FExtensionValue with a name prefixed by CustomLayout_.
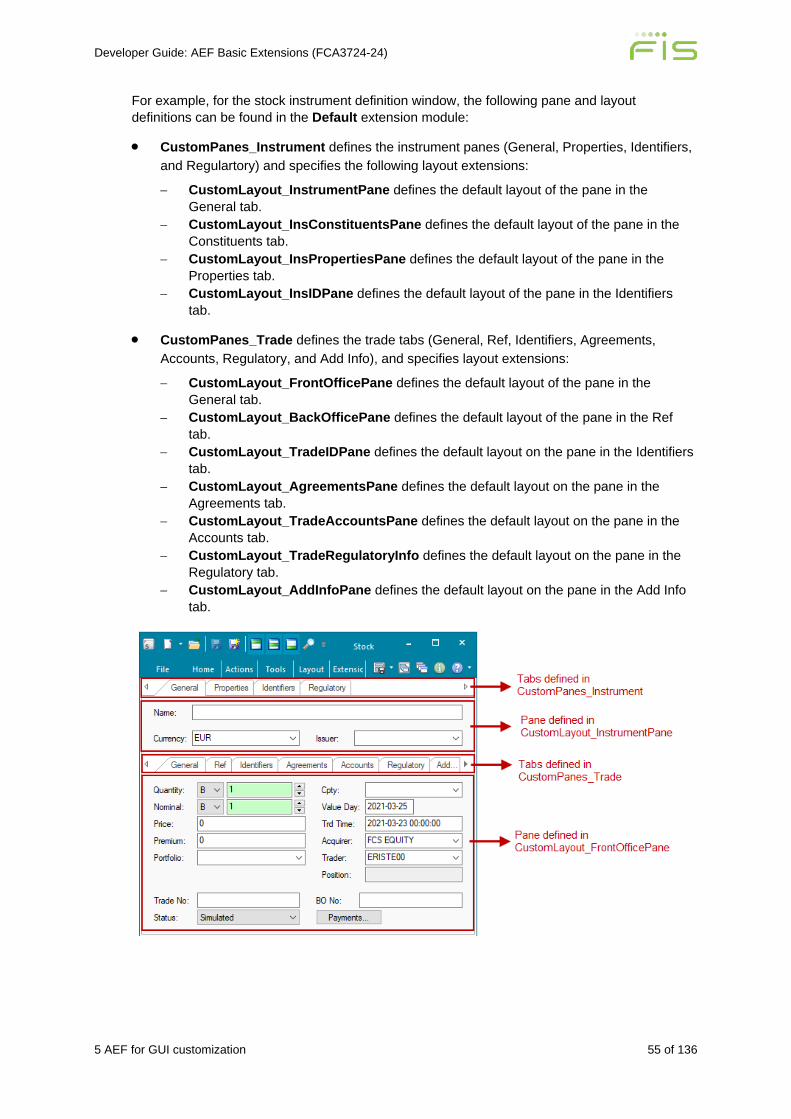
Developer Guide: AEF Basic Extensions (FCA3724-24)
5 AEF for GUI customization 55 of 136
For example, for the stock instrument definition window, the following pane and layout definitions can be found in the Default extension module:
• CustomPanes_Instrument defines the instrument panes (General, Properties, Identifiers, and Regulartory) and specifies the following layout extensions:
− CustomLayout_InstrumentPane defines the default layout of the pane in the General tab.
− CustomLayout_InsConstituentsPane defines the default layout of the pane in the Constituents tab.
− CustomLayout_InsPropertiesPane defines the default layout of the pane in the Properties tab.
− CustomLayout_InsIDPane defines the default layout of the pane in the Identifiers tab.
• CustomPanes_Trade defines the trade tabs (General, Ref, Identifiers, Agreements, Accounts, Regulatory, and Add Info), and specifies layout extensions:
− CustomLayout_FrontOfficePane defines the default layout of the pane in the General tab.
− CustomLayout_BackOfficePane defines the default layout of the pane in the Ref tab.
− CustomLayout_TradeIDPane defines the default layout on the pane in the Identifiers tab.
− CustomLayout_AgreementsPane defines the default layout on the pane in the Agreements tab.
− CustomLayout_TradeAccountsPane defines the default layout on the pane in the Accounts tab.
− CustomLayout_TradeRegulatoryInfo defines the default layout on the pane in the Regulatory tab.
− CustomLayout_AddInfoPane defines the default layout on the pane in the Add Info tab.
Developer Guide: AEF Basic Extensions (FCA3724-24)
5 AEF for GUI customization 56 of 136
5.7.2 Special pane layouts – Pricing pane columns Some tabs/panes have no editable layout extensions and are not customisable. Other panes are created through a particular extension type. For example, the default set of columns displayed in the Pricing pane of an instrument definition/trading window is defined through the extension of type FExtensionValue called _InsDef_Pricing_DefaultColumns.
When the instrument is an option or a future, the columns for displaying the pricing of the underlying (for example, a swap) are defined in further refinements of this extension (for example, in the FExtensionValue called _InsDef_Pricing_DefaultColumns_Swap).
5.7.3 Viewing pane and layout extensions To see the pane and layout extensions active in the current context, open the Extension Editor (System>Extension Editor) and search for FExtensionValue extensions with Name = Custom*.
You can use the Find function to help you locate the definition of a specific window, pane, or tab by selecting all extensions in the result tree and pressing Ctrl+F.
Like all extensions, pane and layout extensions can be overridden. The Default extension module contains the base extensions delivered with PRIME. If a pane or layout extension with a matching name is stored in a module lower in the current context it will override the extension in the Default module. That extension can, in turn, be overridden by an extension in a module lower in the context. This behaviour makes it possible to provide custom windows for users according to the modules they have loaded into their context.
To see the default pane and layout extensions delivered with PRIME, right-click the Default module, select Show Extensions, and search for FExtensionValue extensions with Name = Custom*.
Note also that users can themselves add fields to the trade pane on-the-fly using the View>Trade Layout>Select Columns window in the instrument definition window.
5.7.4 Structure of a pane definition The syntax of pane definitions (FExtensionValue CustomPanes_*) is straightforward, consisting of pairs of pane layout identifiers and tab labels.
Some pane extensions (for example, CustomPanes_Instrument), can include multiple definitions. The one that will be used depends on the business object being displayed.
Note that, as with other extension types, inheritance and override principles apply: CInsDefAppFrame is the parent class for all instrument definitions windows and its children inherit that default definition; CInsDef_BASKET_CLN overrides the default definition in the case of a Basket CLN instrument. (For more about inheritance and overrides, see 2.2 Override and inheritance principles.)
5.7.5 Structure of a layout definition Layout definitions (FExtensionValue CustomLayout_*) have a more complex syntax. Like pane extensions, a layout extension can include multiple definitions, and the one that will be used will be determined by the business object being displayed.
The keywords hbox and vbox define the basic structure of the pane: hbox organises its sub elements horizontally, vbox vertically. All layout definitions use nested combinations of hbox and vbox to position the pane's elements.
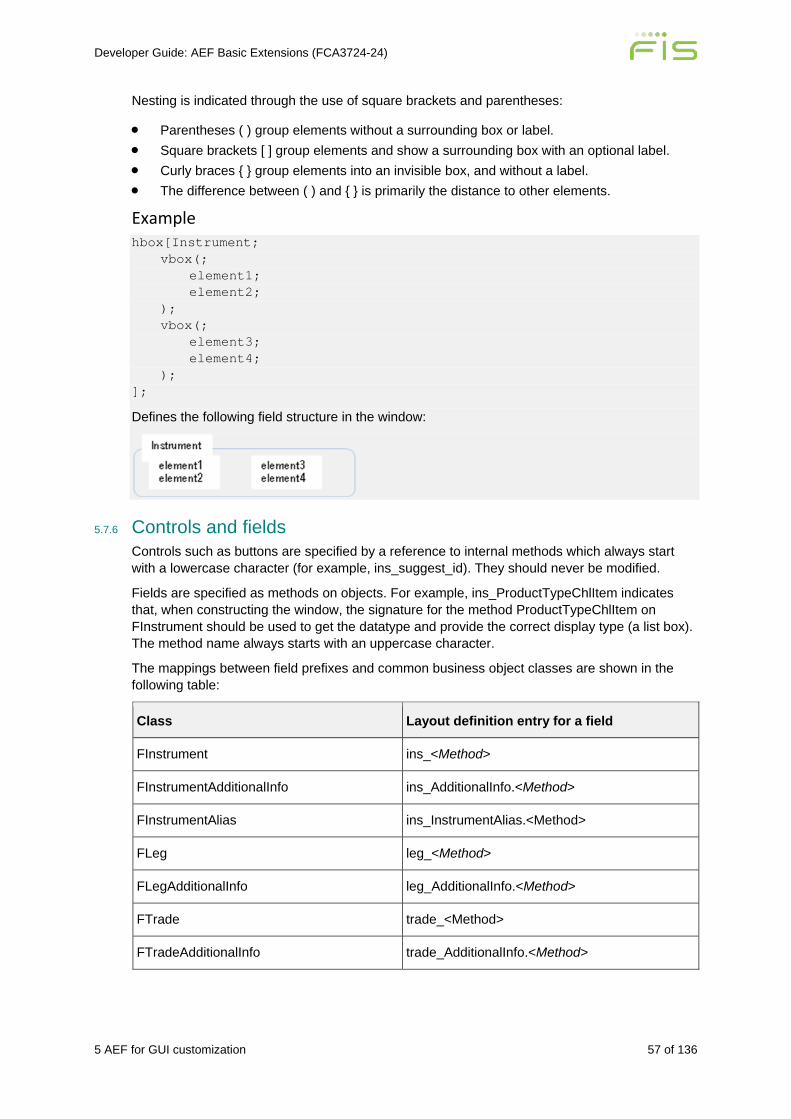
Developer Guide: AEF Basic Extensions (FCA3724-24)
5 AEF for GUI customization 57 of 136
Nesting is indicated through the use of square brackets and parentheses:
• Parentheses ( ) group elements without a surrounding box or label. • Square brackets [ ] group elements and show a surrounding box with an optional label. • Curly braces { } group elements into an invisible box, and without a label. • The difference between ( ) and { } is primarily the distance to other elements.
Example hbox[Instrument; vbox(; element1; element2; ); vbox(; element3; element4; ); ];
Defines the following field structure in the window:
5.7.6 Controls and fields Controls such as buttons are specified by a reference to internal methods which always start with a lowercase character (for example, ins_suggest_id). They should never be modified.
Fields are specified as methods on objects. For example, ins_ProductTypeChlItem indicates that, when constructing the window, the signature for the method ProductTypeChlItem on FInstrument should be used to get the datatype and provide the correct display type (a list box). The method name always starts with an uppercase character.
The mappings between field prefixes and common business object classes are shown in the following table:
Class Layout definition entry for a field
FInstrument ins_<Method>
FInstrumentAdditionalInfo ins_AdditionalInfo.<Method>
FInstrumentAlias ins_InstrumentAlias.<Method>
FLeg leg_<Method>
FLegAdditionalInfo leg_AdditionalInfo.<Method>
FTrade trade_<Method>
FTradeAdditionalInfo trade_AdditionalInfo.<Method>
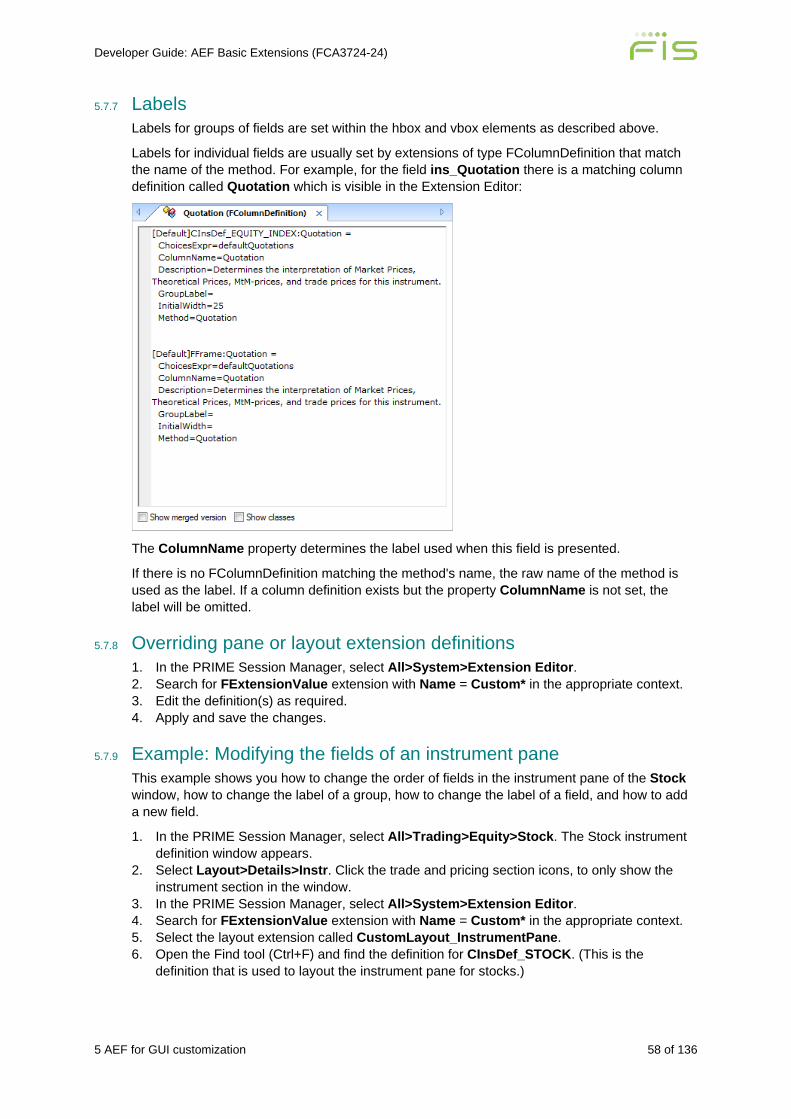
Developer Guide: AEF Basic Extensions (FCA3724-24)
5 AEF for GUI customization 58 of 136
5.7.7 Labels Labels for groups of fields are set within the hbox and vbox elements as described above.
Labels for individual fields are usually set by extensions of type FColumnDefinition that match the name of the method. For example, for the field ins_Quotation there is a matching column definition called Quotation which is visible in the Extension Editor:
The ColumnName property determines the label used when this field is presented.
If there is no FColumnDefinition matching the method's name, the raw name of the method is used as the label. If a column definition exists but the property ColumnName is not set, the label will be omitted.
5.7.8 Overriding pane or layout extension definitions 1. In the PRIME Session Manager, select All>System>Extension Editor. 2. Search for FExtensionValue extension with Name = Custom* in the appropriate context. 3. Edit the definition(s) as required. 4. Apply and save the changes.
5.7.9 Example: Modifying the fields of an instrument pane This example shows you how to change the order of fields in the instrument pane of the Stock window, how to change the label of a group, how to change the label of a field, and how to add a new field.
1. In the PRIME Session Manager, select All>Trading>Equity>Stock. The Stock instrument definition window appears.
2. Select Layout>Details>Instr. Click the trade and pricing section icons, to only show the instrument section in the window.
3. In the PRIME Session Manager, select All>System>Extension Editor. 4. Search for FExtensionValue extension with Name = Custom* in the appropriate context. 5. Select the layout extension called CustomLayout_InstrumentPane. 6. Open the Find tool (Ctrl+F) and find the definition for CInsDef_STOCK. (This is the
definition that is used to layout the instrument pane for stocks.)
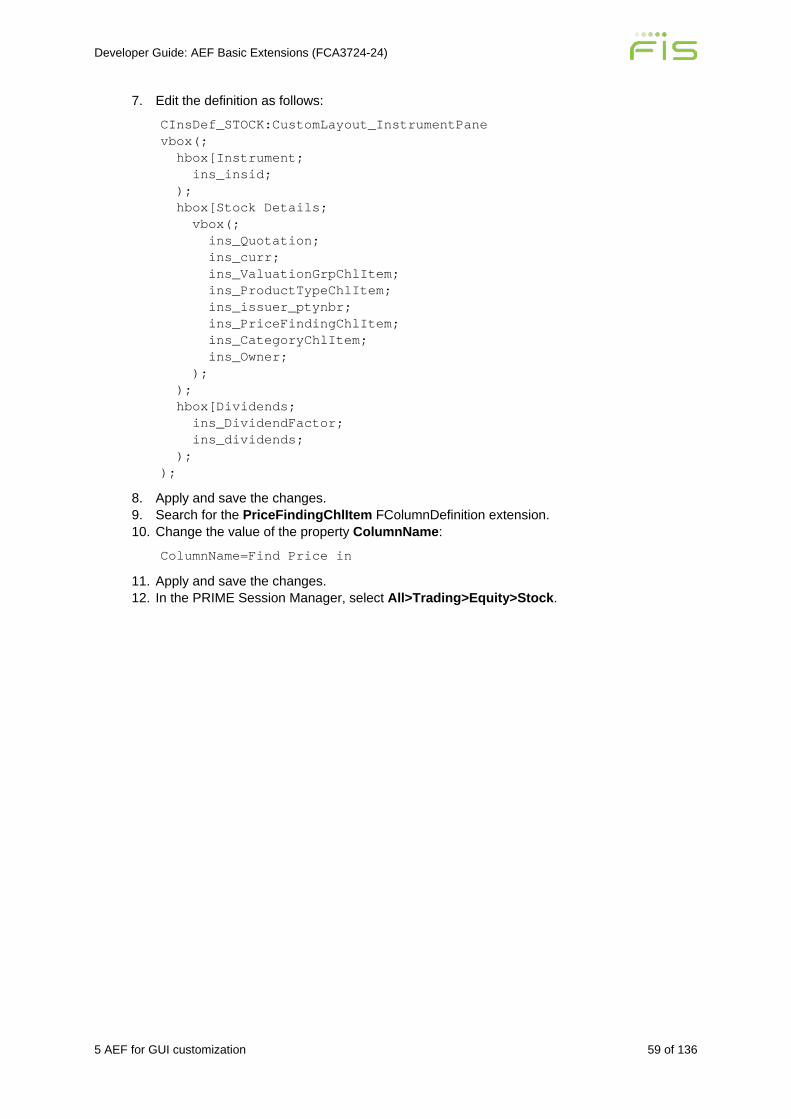
Developer Guide: AEF Basic Extensions (FCA3724-24)
5 AEF for GUI customization 59 of 136
7. Edit the definition as follows:
CInsDef_STOCK:CustomLayout_InstrumentPane vbox(; hbox[Instrument; ins_insid; ); hbox[Stock Details; vbox(; ins_Quotation; ins_curr; ins_ValuationGrpChlItem; ins_ProductTypeChlItem; ins_issuer_ptynbr; ins_PriceFindingChlItem; ins_CategoryChlItem; ins_Owner; ); ); hbox[Dividends; ins_DividendFactor; ins_dividends; ); );
8. Apply and save the changes. 9. Search for the PriceFindingChlItem FColumnDefinition extension. 10. Change the value of the property ColumnName:
ColumnName=Find Price in
11. Apply and save the changes. 12. In the PRIME Session Manager, select All>Trading>Equity>Stock.
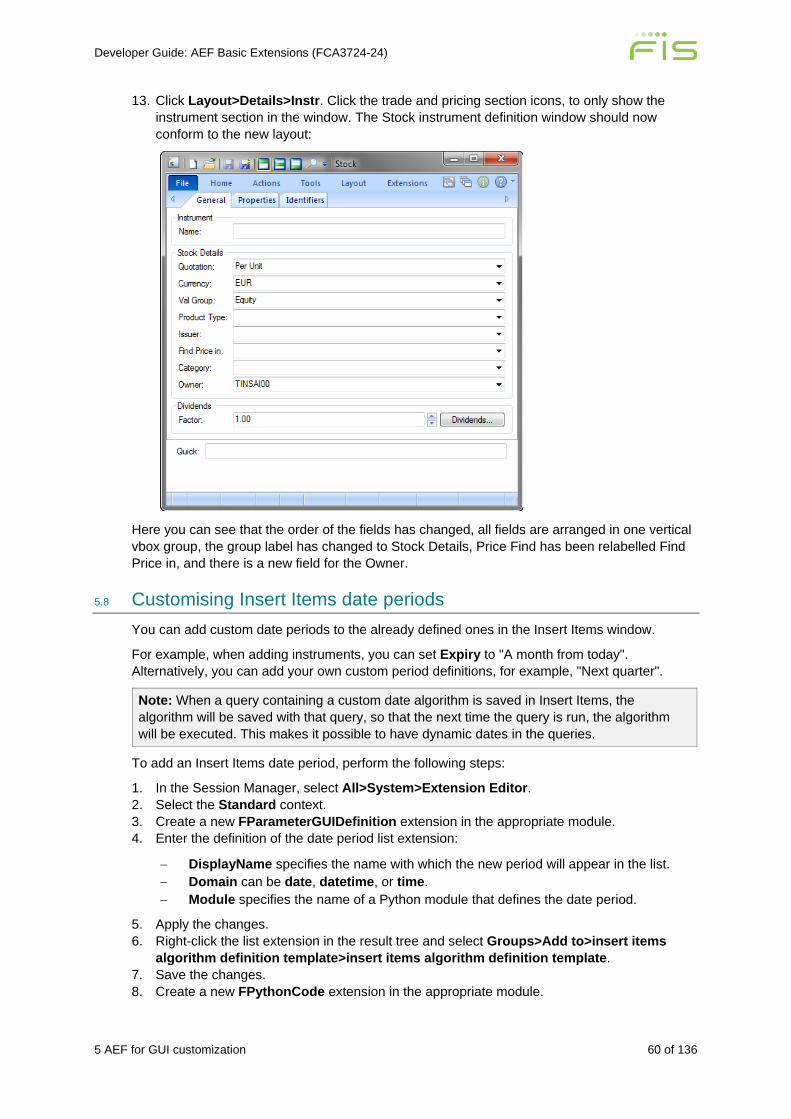
Developer Guide: AEF Basic Extensions (FCA3724-24)
5 AEF for GUI customization 60 of 136
13. Click Layout>Details>Instr. Click the trade and pricing section icons, to only show the instrument section in the window. The Stock instrument definition window should now conform to the new layout:
Here you can see that the order of the fields has changed, all fields are arranged in one vertical vbox group, the group label has changed to Stock Details, Price Find has been relabelled Find Price in, and there is a new field for the Owner.
5.8 Customising Insert Items date periods You can add custom date periods to the already defined ones in the Insert Items window.
For example, when adding instruments, you can set Expiry to "A month from today". Alternatively, you can add your own custom period definitions, for example, "Next quarter".
Note: When a query containing a custom date algorithm is saved in Insert Items, the algorithm will be saved with that query, so that the next time the query is run, the algorithm will be executed. This makes it possible to have dynamic dates in the queries.
To add an Insert Items date period, perform the following steps:
1. In the Session Manager, select All>System>Extension Editor. 2. Select the Standard context. 3. Create a new FParameterGUIDefinition extension in the appropriate module. 4. Enter the definition of the date period list extension:
− DisplayName specifies the name with which the new period will appear in the list. − Domain can be date, datetime, or time. − Module specifies the name of a Python module that defines the date period.
5. Apply the changes. 6. Right-click the list extension in the result tree and select Groups>Add to>insert items
algorithm definition template>insert items algorithm definition template. 7. Save the changes. 8. Create a new FPythonCode extension in the appropriate module.
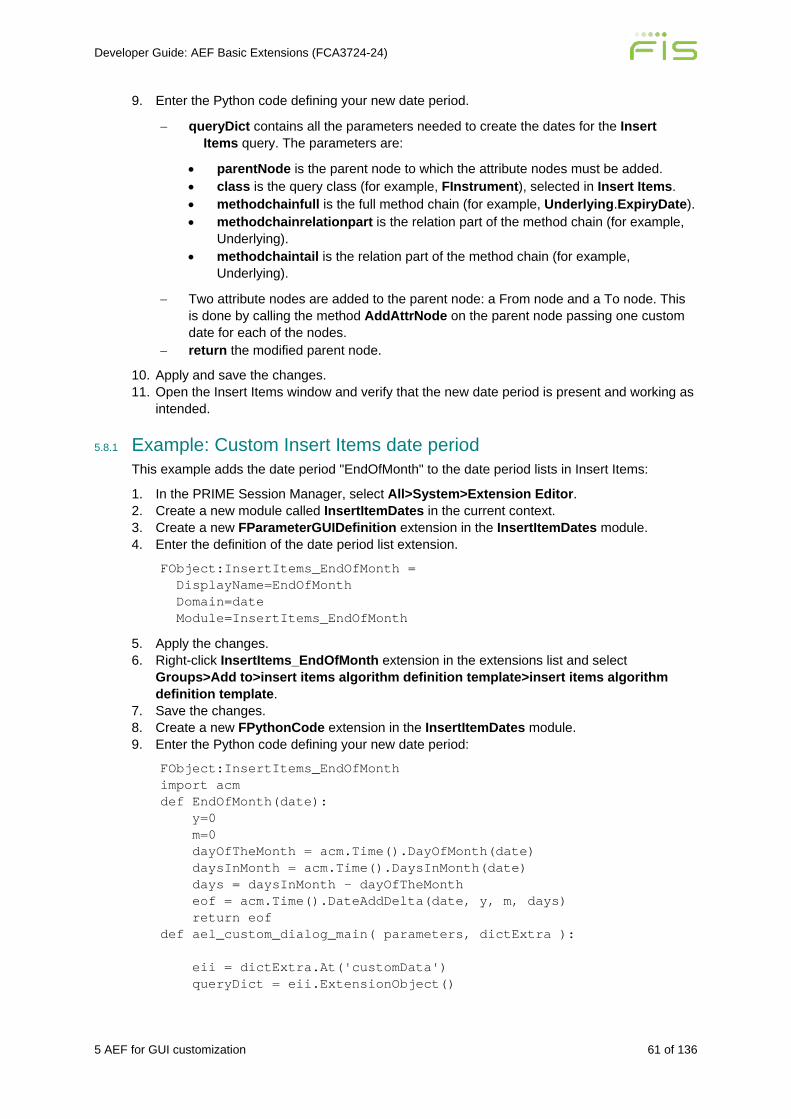
Developer Guide: AEF Basic Extensions (FCA3724-24)
5 AEF for GUI customization 61 of 136
9. Enter the Python code defining your new date period.
− queryDict contains all the parameters needed to create the dates for the Insert Items query. The parameters are:
• parentNode is the parent node to which the attribute nodes must be added. • class is the query class (for example, FInstrument), selected in Insert Items. • methodchainfull is the full method chain (for example, Underlying.ExpiryDate). • methodchainrelationpart is the relation part of the method chain (for example,
Underlying). • methodchaintail is the relation part of the method chain (for example,
Underlying).
− Two attribute nodes are added to the parent node: a From node and a To node. This is done by calling the method AddAttrNode on the parent node passing one custom date for each of the nodes.
− return the modified parent node.
10. Apply and save the changes. 11. Open the Insert Items window and verify that the new date period is present and working as
intended.
5.8.1 Example: Custom Insert Items date period This example adds the date period "EndOfMonth" to the date period lists in Insert Items:
1. In the PRIME Session Manager, select All>System>Extension Editor. 2. Create a new module called InsertItemDates in the current context. 3. Create a new FParameterGUIDefinition extension in the InsertItemDates module. 4. Enter the definition of the date period list extension.
FObject:InsertItems_EndOfMonth = DisplayName=EndOfMonth Domain=date Module=InsertItems_EndOfMonth
5. Apply the changes. 6. Right-click InsertItems_EndOfMonth extension in the extensions list and select
Groups>Add to>insert items algorithm definition template>insert items algorithm definition template.
7. Save the changes. 8. Create a new FPythonCode extension in the InsertItemDates module. 9. Enter the Python code defining your new date period:
FObject:InsertItems_EndOfMonth import acm def EndOfMonth(date): y=0 m=0 dayOfTheMonth = acm.Time().DayOfMonth(date) daysInMonth = acm.Time().DaysInMonth(date) days = daysInMonth - dayOfTheMonth eof = acm.Time().DateAddDelta(date, y, m, days) return eof def ael_custom_dialog_main( parameters, dictExtra ): eii = dictExtra.At('customData') queryDict = eii.ExtensionObject()
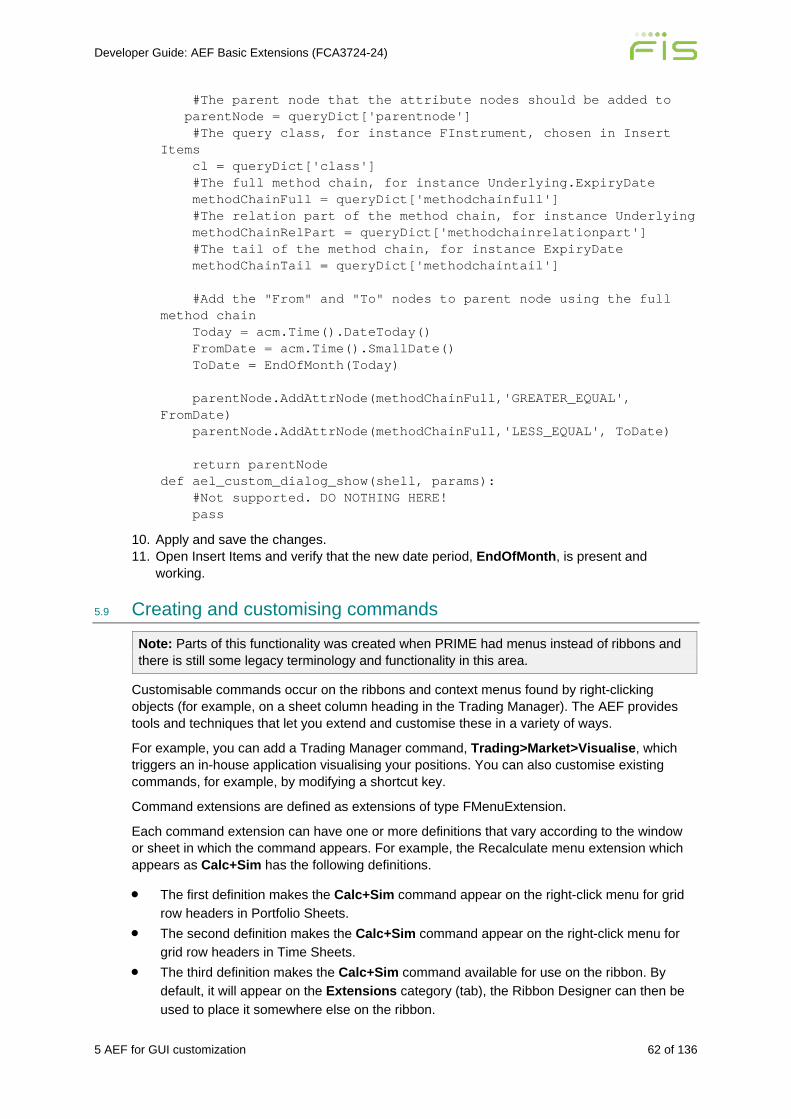
Developer Guide: AEF Basic Extensions (FCA3724-24)
5 AEF for GUI customization 62 of 136
#The parent node that the attribute nodes should be added to parentNode = queryDict['parentnode'] #The query class, for instance FInstrument, chosen in Insert Items cl = queryDict['class'] #The full method chain, for instance Underlying.ExpiryDate methodChainFull = queryDict['methodchainfull'] #The relation part of the method chain, for instance Underlying methodChainRelPart = queryDict['methodchainrelationpart'] #The tail of the method chain, for instance ExpiryDate methodChainTail = queryDict['methodchaintail'] #Add the "From" and "To" nodes to parent node using the full method chain Today = acm.Time().DateToday() FromDate = acm.Time().SmallDate() ToDate = EndOfMonth(Today) parentNode.AddAttrNode(methodChainFull,'GREATER_EQUAL', FromDate) parentNode.AddAttrNode(methodChainFull,'LESS_EQUAL', ToDate) return parentNode def ael_custom_dialog_show(shell, params): #Not supported. DO NOTHING HERE! pass
10. Apply and save the changes. 11. Open Insert Items and verify that the new date period, EndOfMonth, is present and
working.
5.9 Creating and customising commands
Note: Parts of this functionality was created when PRIME had menus instead of ribbons and there is still some legacy terminology and functionality in this area.
Customisable commands occur on the ribbons and context menus found by right-clicking objects (for example, on a sheet column heading in the Trading Manager). The AEF provides tools and techniques that let you extend and customise these in a variety of ways.
For example, you can add a Trading Manager command, Trading>Market>Visualise, which triggers an in-house application visualising your positions. You can also customise existing commands, for example, by modifying a shortcut key.
Command extensions are defined as extensions of type FMenuExtension.
Each command extension can have one or more definitions that vary according to the window or sheet in which the command appears. For example, the Recalculate menu extension which appears as Calc+Sim has the following definitions.
• The first definition makes the Calc+Sim command appear on the right-click menu for grid row headers in Portfolio Sheets.
• The second definition makes the Calc+Sim command appear on the right-click menu for grid row headers in Time Sheets.
• The third definition makes the Calc+Sim command available for use on the ribbon. By default, it will appear on the Extensions category (tab), the Ribbon Designer can then be used to place it somewhere else on the ribbon.
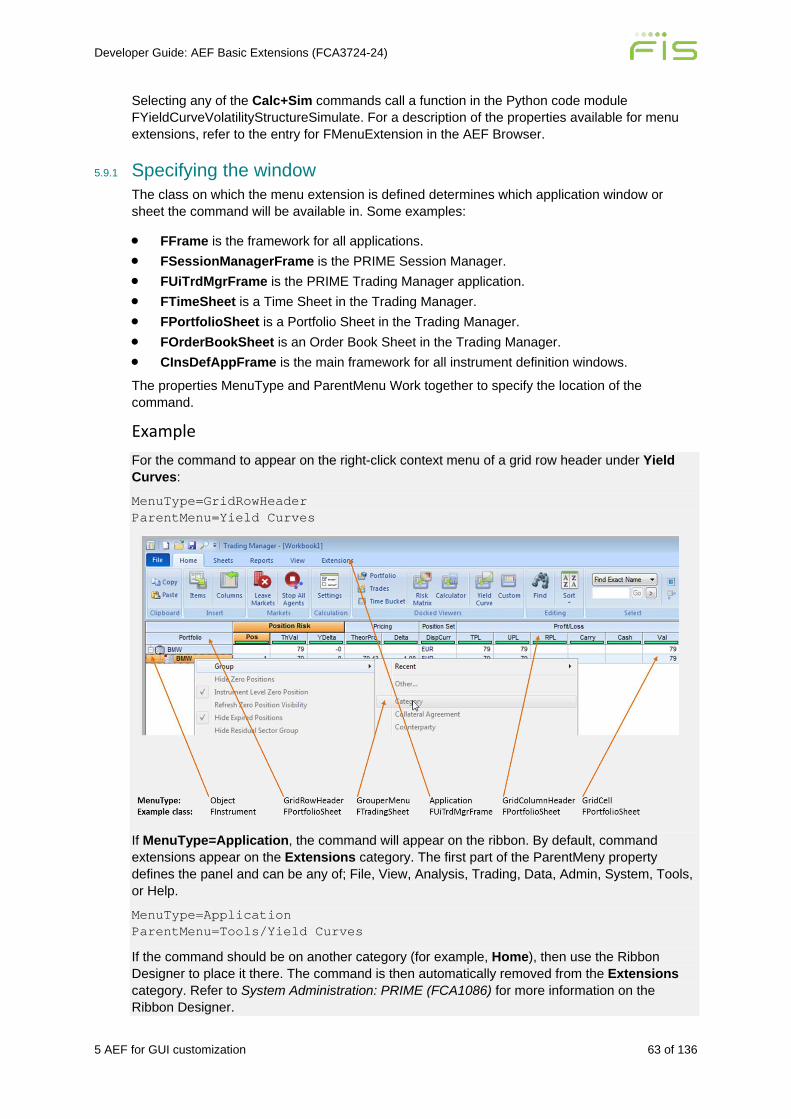
Developer Guide: AEF Basic Extensions (FCA3724-24)
5 AEF for GUI customization 63 of 136
Selecting any of the Calc+Sim commands call a function in the Python code module FYieldCurveVolatilityStructureSimulate. For a description of the properties available for menu extensions, refer to the entry for FMenuExtension in the AEF Browser.
5.9.1 Specifying the window The class on which the menu extension is defined determines which application window or sheet the command will be available in. Some examples:
• FFrame is the framework for all applications. • FSessionManagerFrame is the PRIME Session Manager. • FUiTrdMgrFrame is the PRIME Trading Manager application. • FTimeSheet is a Time Sheet in the Trading Manager. • FPortfolioSheet is a Portfolio Sheet in the Trading Manager. • FOrderBookSheet is an Order Book Sheet in the Trading Manager. • CInsDefAppFrame is the main framework for all instrument definition windows.
The properties MenuType and ParentMenu Work together to specify the location of the command.
Example For the command to appear on the right-click context menu of a grid row header under Yield Curves:
MenuType=GridRowHeader ParentMenu=Yield Curves
If MenuType=Application, the command will appear on the ribbon. By default, command extensions appear on the Extensions category. The first part of the ParentMeny property defines the panel and can be any of; File, View, Analysis, Trading, Data, Admin, System, Tools, or Help.
MenuType=Application ParentMenu=Tools/Yield Curves
If the command should be on another category (for example, Home), then use the Ribbon Designer to place it there. The command is then automatically removed from the Extensions category. Refer to System Administration: PRIME (FCA1086) for more information on the Ribbon Designer.
Developer Guide: AEF Basic Extensions (FCA3724-24)
5 AEF for GUI customization 64 of 136
5.9.2 Invocation parameter – Function The Python function which is invoked by a menu command receives one parameter, typically called eii, an instance of the class FExtensionInvokationInfo:
def mymenu(eii): print ("my menu called with:") print (eii.ExtensionObject())
From the eii parameter, two types of information can be accessed:
• The object (for example, the application) in (or on) which the menu command was activated. This information can be accessed through the ExtensionObject method.
• The menu extension itself. This information can be accessed through the MenuExtension method.
Being able to access the command extension from the function makes it possible for the same function to be called by several different extensions in different locations. For example, a function which splits a trade into several parts can be called with the commands Split trade into 2, Split trade into 4, and so on.
5.9.3 Default command A command in a context menu can be set to be default command, that is, the command that that will be invoked when double-clicking or pressing Enter. This is defined in FMenuExtension by the FExtensionValue DefaultMenuCommand.
For example, if you want the FMenuExtension TransactionHistory to be the default value for trades, you add the FExtensionValue:
FTrade::DefaultMenuCommand TransactionHistory
This is applicable where the default command does not interfere with core functionality, for instance it will not work in the Trading Manager's context menu since that would change the core behaviour.
5.9.4 Alternative invocation parameter – CreateFunction CreateFunction is a more advanced alternative to Function. With CreateFunction it is possible to programmatically decide if the command should appear, appear greyed out (disabled), or not appear. CreateFunctions points to a user defined Python function that creates a FUxCore.MenuItem object. Refer to Reference: AEF Browser standalone version (FCA4033) for more information.
5.9.5 Example: Exploring the Calc+Sim command This example shows how the command Calc+Sim, found in several places in the Trading Manager, is constructed.
View the yield curve simulation commands 1. Start the Trading Manager (All>Trading>Trading Manager). 2. Insert a Portfolio Sheet by selecting Sheets>Add Position Control Sheet>Portfolio. 3. View the predefined yield curve simulation commands, by clicking Home>Simulate /
Apply>Yield Curve.
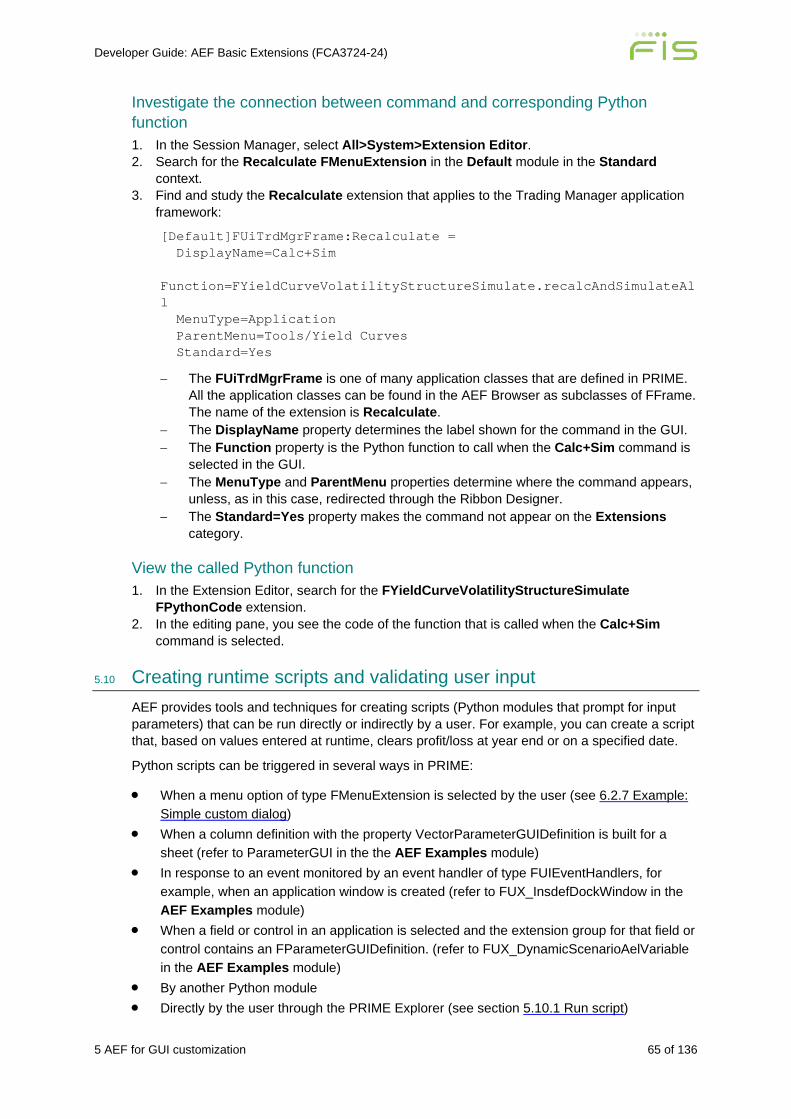
Developer Guide: AEF Basic Extensions (FCA3724-24)
5 AEF for GUI customization 65 of 136
Investigate the connection between command and corresponding Python function 1. In the Session Manager, select All>System>Extension Editor. 2. Search for the Recalculate FMenuExtension in the Default module in the Standard
context. 3. Find and study the Recalculate extension that applies to the Trading Manager application
framework:
[Default]FUiTrdMgrFrame:Recalculate = DisplayName=Calc+Sim Function=FYieldCurveVolatilityStructureSimulate.recalcAndSimulateAll MenuType=Application ParentMenu=Tools/Yield Curves Standard=Yes
− The FUiTrdMgrFrame is one of many application classes that are defined in PRIME. All the application classes can be found in the AEF Browser as subclasses of FFrame. The name of the extension is Recalculate.
− The DisplayName property determines the label shown for the command in the GUI. − The Function property is the Python function to call when the Calc+Sim command is
selected in the GUI. − The MenuType and ParentMenu properties determine where the command appears,
unless, as in this case, redirected through the Ribbon Designer. − The Standard=Yes property makes the command not appear on the Extensions
category.
View the called Python function 1. In the Extension Editor, search for the FYieldCurveVolatilityStructureSimulate
FPythonCode extension. 2. In the editing pane, you see the code of the function that is called when the Calc+Sim
command is selected.
5.10 Creating runtime scripts and validating user input AEF provides tools and techniques for creating scripts (Python modules that prompt for input parameters) that can be run directly or indirectly by a user. For example, you can create a script that, based on values entered at runtime, clears profit/loss at year end or on a specified date.
Python scripts can be triggered in several ways in PRIME:
• When a menu option of type FMenuExtension is selected by the user (see 6.2.7 Example: Simple custom dialog)
• When a column definition with the property VectorParameterGUIDefinition is built for a sheet (refer to ParameterGUI in the the AEF Examples module)
• In response to an event monitored by an event handler of type FUIEventHandlers, for example, when an application window is created (refer to FUX_InsdefDockWindow in the AEF Examples module)
• When a field or control in an application is selected and the extension group for that field or control contains an FParameterGUIDefinition. (refer to FUX_DynamicScenarioAelVariable in the AEF Examples module)
• By another Python module • Directly by the user through the PRIME Explorer (see section 5.10.1 Run script)
Developer Guide: AEF Basic Extensions (FCA3724-24)
5 AEF for GUI customization 66 of 136
Python scripts can be scheduled to run at a specified time. To schedule a script, you first need to create a task – refer to scheduling and executing BDP scripts in Overview: BDP Business Data Processing (FCA2324).
5.10.1 Run script The run script component of PRIME provides the user with a simple window for entering the parameters the Python module needs, and it permits the user's input to be validated. Run script is also used in other parts of PRIME. For example, it is an important part of PRIME's reporting system (see section 7 AEF for reporting).
To run a Python module through run script as a user:
1. In the PRIME Session Manager, select All>Data>Explorer. 2. In the Explorer window, navigate to the folder Business Objects>Scripts>All.
The Location field shows where the Python source code module is currently stored:
− <current context> (for example, Standard), the Python module is stored in an extension module loaded in the current context.
− ADS, the Python module is stored outside of the extension system as a text file.
3. Select the Python module to run, right-click, and select Open with Run Script (or simply double-click on the script). The run script window appears with the tabs and fields specified in the Python module.
5.10.2 Developing runtime scripts in Python Python code modules can be developed directly in Extension Editor as extensions of type FPythonCode. It is recommended that all development is done in a development context in dedicated extension module (see section 2.3 Creating a dedicated development context).
Python code modules can also be developed in the Python Editor outside of the extension system and saved directly to the ARENA Data Server (ADS). For more information, see section 9.8 Preventing extension overrides with safe modules.
To trigger run script, your Python code module must contain the variable ael_variables and either the function ael_main or the function ael_main_ex. You can also use the optional ael_gui_parameters variable.
5.10.3 Configuring input fields with ael_variables The variable ael_variables determines the following:
• Naming of the input fields shown in the run script window • Validation or the user input • Grouping of fields under tabs
It consists of a list of tuples, each containing arguments. There is one tuple for each parameter to be entered by the user.
The order of the arguments is important. If you need to use one of the optional arguments later in the list but do not need to use preceding optional arguments, the preceding optional arguments must be assigned the value None.
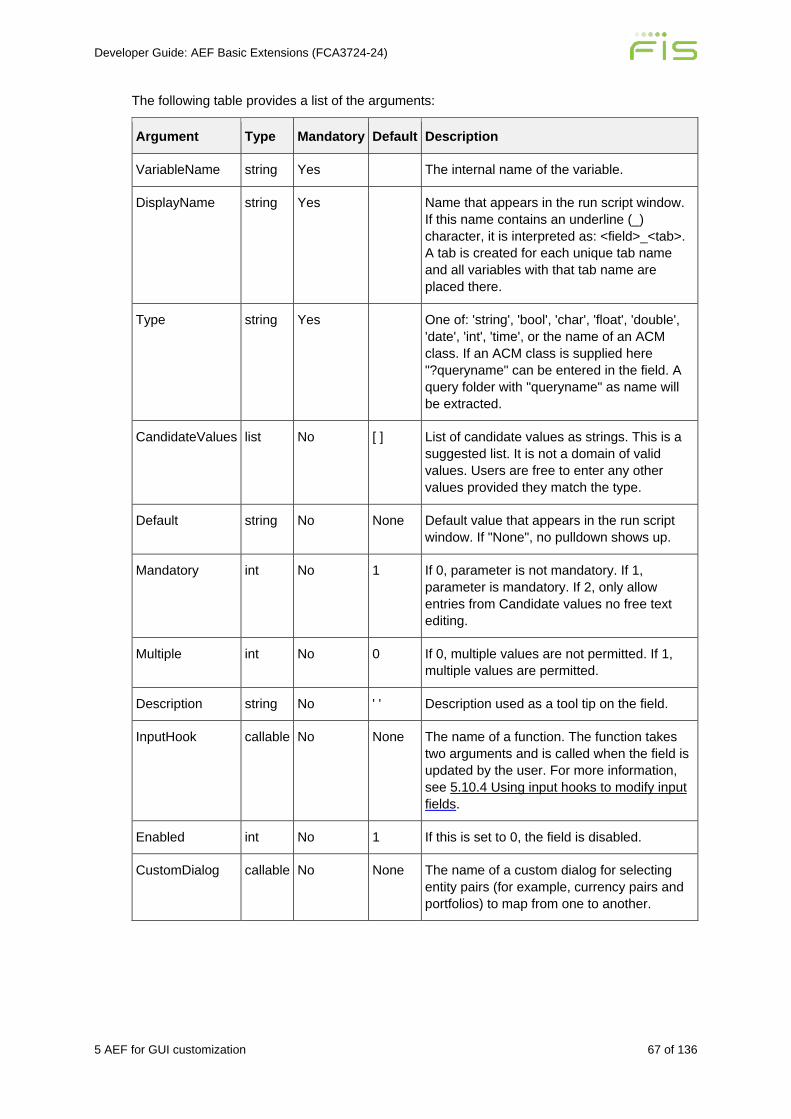
Developer Guide: AEF Basic Extensions (FCA3724-24)
5 AEF for GUI customization 67 of 136
The following table provides a list of the arguments:
Argument Type Mandatory Default Description
VariableName string Yes The internal name of the variable.
DisplayName string Yes Name that appears in the run script window. If this name contains an underline (_) character, it is interpreted as: <field>_<tab>. A tab is created for each unique tab name and all variables with that tab name are placed there.
Type string Yes One of: 'string', 'bool', 'char', 'float', 'double', 'date', 'int', 'time', or the name of an ACM class. If an ACM class is supplied here "?queryname" can be entered in the field. A query folder with "queryname" as name will be extracted.
CandidateValues list No [ ] List of candidate values as strings. This is a suggested list. It is not a domain of valid values. Users are free to enter any other values provided they match the type.
Default string No None Default value that appears in the run script window. If "None", no pulldown shows up.
Mandatory int No 1 If 0, parameter is not mandatory. If 1, parameter is mandatory. If 2, only allow entries from Candidate values no free text editing.
Multiple int No 0 If 0, multiple values are not permitted. If 1, multiple values are permitted.
Description string No ' ' Description used as a tool tip on the field.
InputHook callable No None The name of a function. The function takes two arguments and is called when the field is updated by the user. For more information, see 5.10.4 Using input hooks to modify input fields.
Enabled int No 1 If this is set to 0, the field is disabled.
CustomDialog callable No None The name of a custom dialog for selecting entity pairs (for example, currency pairs and portfolios) to map from one to another.
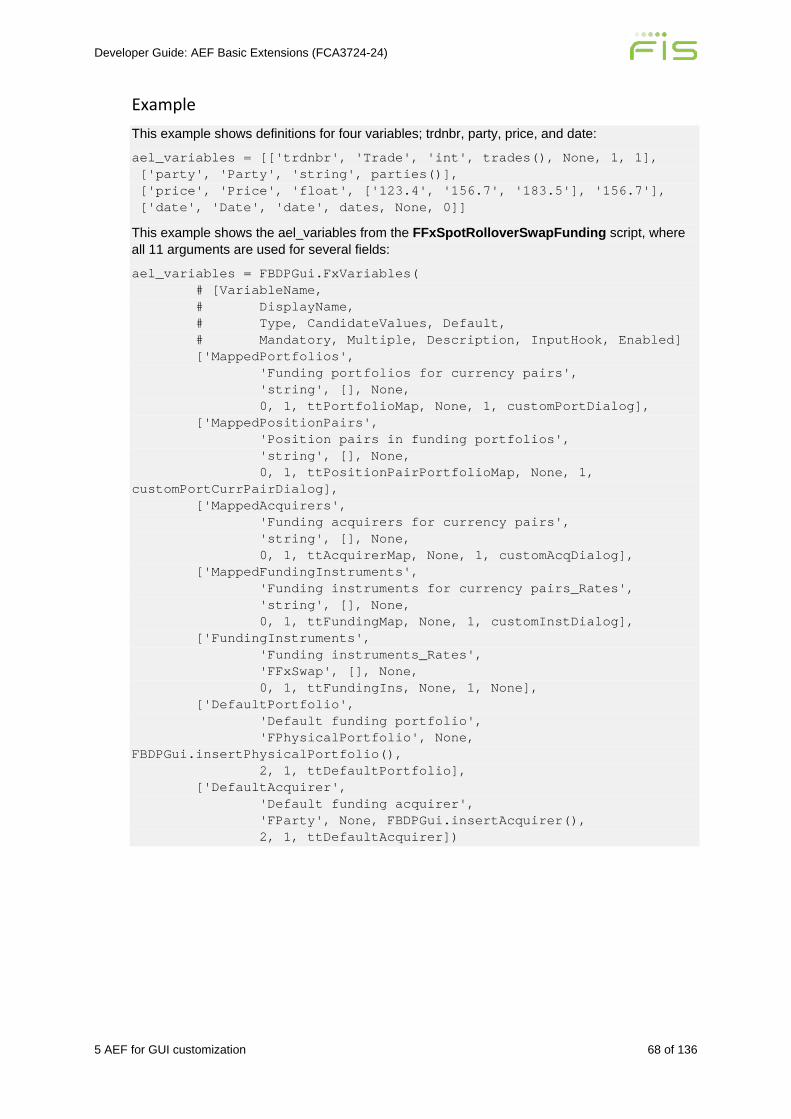
Developer Guide: AEF Basic Extensions (FCA3724-24)
5 AEF for GUI customization 68 of 136
Example This example shows definitions for four variables; trdnbr, party, price, and date:
ael_variables = [['trdnbr', 'Trade', 'int', trades(), None, 1, 1], ['party', 'Party', 'string', parties()], ['price', 'Price', 'float', ['123.4', '156.7', '183.5'], '156.7'], ['date', 'Date', 'date', dates, None, 0]]
This example shows the ael_variables from the FFxSpotRolloverSwapFunding script, where all 11 arguments are used for several fields:
ael_variables = FBDPGui.FxVariables( # [VariableName, # DisplayName, # Type, CandidateValues, Default, # Mandatory, Multiple, Description, InputHook, Enabled] ['MappedPortfolios', 'Funding portfolios for currency pairs', 'string', [], None, 0, 1, ttPortfolioMap, None, 1, customPortDialog], ['MappedPositionPairs', 'Position pairs in funding portfolios', 'string', [], None, 0, 1, ttPositionPairPortfolioMap, None, 1, customPortCurrPairDialog], ['MappedAcquirers', 'Funding acquirers for currency pairs', 'string', [], None, 0, 1, ttAcquirerMap, None, 1, customAcqDialog], ['MappedFundingInstruments', 'Funding instruments for currency pairs_Rates', 'string', [], None, 0, 1, ttFundingMap, None, 1, customInstDialog], ['FundingInstruments', 'Funding instruments_Rates', 'FFxSwap', [], None, 0, 1, ttFundingIns, None, 1, None], ['DefaultPortfolio', 'Default funding portfolio', 'FPhysicalPortfolio', None, FBDPGui.insertPhysicalPortfolio(), 2, 1, ttDefaultPortfolio], ['DefaultAcquirer', 'Default funding acquirer', 'FParty', None, FBDPGui.insertAcquirer(), 2, 1, ttDefaultAcquirer])
Developer Guide: AEF Basic Extensions (FCA3724-24)
5 AEF for GUI customization 69 of 136
5.10.4 Using input hooks to modify input fields Input hooks are used to implement logic in the run script window. There are two arguments. The first argument is an index of the variables defined in ael_variables. The second argument is the current values of all variables.
Example Hook that disables fields in the run script window when the user selects a check box:
def snapshot_cb(index, fieldValues): ael_variables[11][9] = (fieldValues[10] != 'True') return fieldvalue
Hook that adds a choice to a list at runtime:
def add_cb(index, fieldValues): choices.append(fieldValues[17]) return fieldValues
5.10.5 Configuring the run script window with ael_gui_parameters To configure some aspects of the run script window, you can use the optional dictionary variable ael_gui_parameters in your script, for example:
ael_gui_parameters = { 'windowCaption':'Hello world', 'runButtonLabel':'&&Save', 'runButtonTooltip':'Save me', 'hideExtraControls':True, 'closeWhenFinished':True, 'InsertItemsShowExpired':False }
Key Description
closeWhenFinished Close the run script window after ael_main or ael_main_ex has finished ("True" or "False").
hideExtraControls Hide the controls Source, Save Task, Use Parameters from Task and History ("True" or "False").
InsertItemsShowExpired Override the user settings for the Show expired check box ("True" or "False").
runButtonLabel The label for the Run button; && indicates a keyboard mnemonic.
runButtonTooltip The tooltip for the Run button.
windowCaption The window caption.
Developer Guide: AEF Basic Extensions (FCA3724-24)
5 AEF for GUI customization 70 of 136
5.10.6 Executing Run with ael_main or ael_main_ex When the Run button in the run script window is clicked, PRIME calls the function ael_main. The input argument to this function is a Python dictionary containing the internal parameter names and values entered or selected by the user.
Before the ael_main function is executed, PRIME checks the validity of the entered values. If any of the values are invalid, an error message appears in the Python Console and the function is not run. The syntax is:
ael_main(dict)
where dict is a Python dictionary object. The keys of the dictionary are the internal names of each parameter and the values are the values entered by the user.
Example def ael_main(dict): print (dict["trdnbr"], dict["party"], dict["price"], dict["date"])
The ael_main_ex function is similar to ael_main, with the difference that it is used to pass data, as well as the variables defined in ael_variables.
Example def ael_main_ex(parameter, addData): print (addData.At('customData')) print (parameter['Decimals'])
When Run is selected in the run script window, if RunModuleWithParametersAndData is used and the data parameter is not NULL, ael_main_ex is called instead of ael_main.
5.10.7 Passing custom parameters and overriding ael_variables It is possible to pass custom parameters and/or overriding ael_variables when executing a task from an ATS or from PRIME. This is done by using the command-line option -task_parameters. The option is formatted as follows:
-task_parameters "\"CustomParam1=Param1Val1;CustomParam2=Param2Val;Task.Parameters.AelVarID1=AelVarID1Val;Task.Parameters.AelVarID2=AelVarID2Val1,AelVarID2Val2\""
• The whole string needs to be enclosed within double quotes ("). • The list of variables needs to be enclosed within \" in order for the parser to take the string
as is. • The variable-value pairs need to be separated from each other with semicolons (;). • Variables are separated from their values with an equals sign (=). • Multiple values for ael_variables are separated from each other with commas (,). For the
custom parameters, it depends on what has been implemented in the Python code. • ael_variables are indicated with Task.Parameters.AelVarID, where AelVarID is the ID of
the ael_variable you want to override. • In the case of overriding the macros ael_variable in the FWorksheetReport script to
parameterise Information Manager queries or Insert Item queries, the macro names or field's attribute paths are separated from their values by equals signs (=), and multiple values enclosed in square brackets ([]) and separated by commas. For example: Task.Parameters.macros=Name1=Value1,Name2=[Value2,Value3]
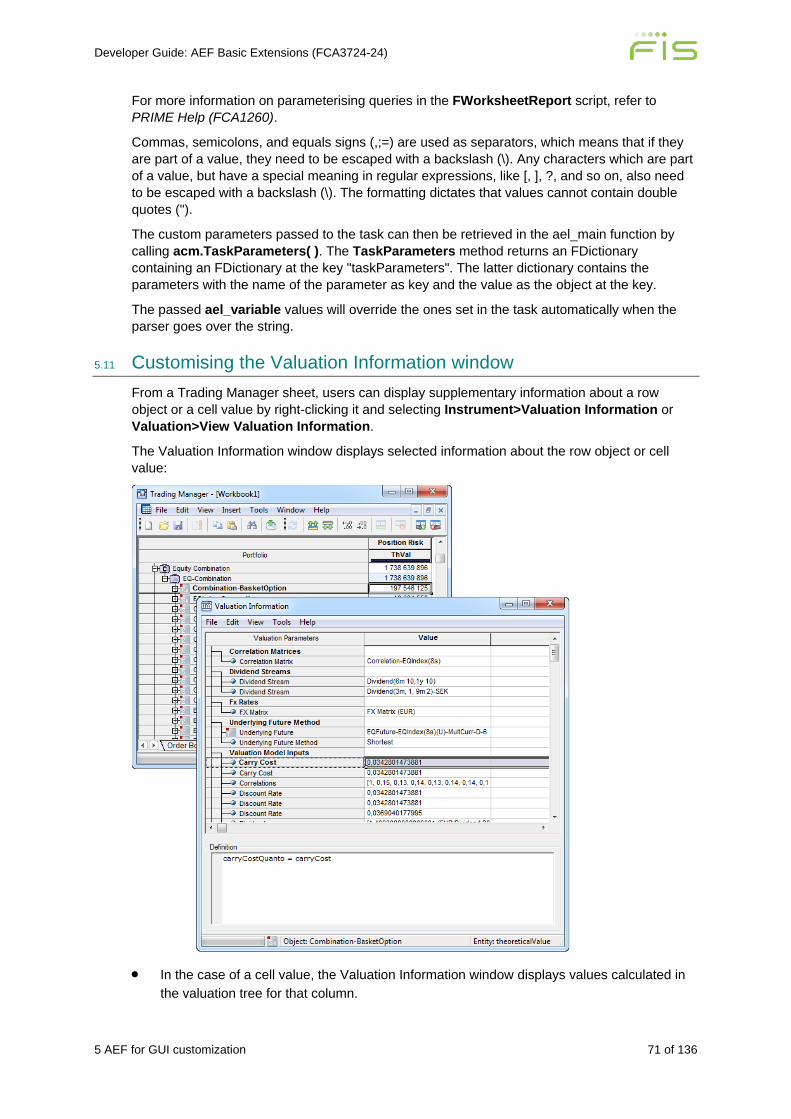
Developer Guide: AEF Basic Extensions (FCA3724-24)
5 AEF for GUI customization 71 of 136
For more information on parameterising queries in the FWorksheetReport script, refer to PRIME Help (FCA1260).
Commas, semicolons, and equals signs (,;=) are used as separators, which means that if they are part of a value, they need to be escaped with a backslash (\). Any characters which are part of a value, but have a special meaning in regular expressions, like [, ], ?, and so on, also need to be escaped with a backslash (\). The formatting dictates that values cannot contain double quotes (").
The custom parameters passed to the task can then be retrieved in the ael_main function by calling acm.TaskParameters( ). The TaskParameters method returns an FDictionary containing an FDictionary at the key "taskParameters". The latter dictionary contains the parameters with the name of the parameter as key and the value as the object at the key.
The passed ael_variable values will override the ones set in the task automatically when the parser goes over the string.
5.11 Customising the Valuation Information window From a Trading Manager sheet, users can display supplementary information about a row object or a cell value by right-clicking it and selecting Instrument>Valuation Information or Valuation>View Valuation Information.
The Valuation Information window displays selected information about the row object or cell value:
• In the case of a cell value, the Valuation Information window displays values calculated in the valuation tree for that column.
Developer Guide: AEF Basic Extensions (FCA3724-24)
5 AEF for GUI customization 72 of 136
• In the case of a row object, the Valuation Information window displays values calculated in the valuation tree for the object's theoretical value.
For detailed information about valuation trees, refer to Developer Guide: ARENA Data Flow Language (FCA1559).
The rows displayed in the Valuation Information window are defined by extensions of type FValuationInfoDefinition, which can be viewed and created in the PRIME Extension Editor.
The properties of the FValuationInfoDefinition extensions control how the information is displayed on the row in the Valuation Information window, and which rows are displayed:
Property Description
ExpandElements optional An extension attribute that resolves to a set of underlyings. If given, each underlying will display its extension attribute value as a distinct row.
ExpandElementsTransform optional An ACM method. If ExpandElements is a collection of combination links, for example, an object of type FCombInstrMap, this ACM method can be used to transform the collection into the instruments themselves.
ExtensionAttribute mandatory The extension attribute that computes the row value. When the Valuation Information window opens, all FValuationInfoDefinitions in the current context are parsed. If the extension attribute specified here is found in the valuation tree for the row object or cell, it is displayed in the window.
Formatter optional A formatter for the row value. For example, an extension of type FNumFormatter.
Label mandatory The display name for the row.
The Groups functionality in the Extension Editor determines the grouping of rows in the Valuation Information window.
To add a row or rows to the Valuation Information window:
1. In the PRIME Session Manager, select All>System>Extension Editor. 2. Select an appropriate context. 3. Create a new FValuationInfoDefinition extension in the appropriate module. 4. Enter the row definition in the editing pane. (For information about the available properties,
see the previous section or refer to the entry for FValuationInfoDefinition in the AEF Browser.)
5. Apply and save the changes. 6. Right-click the extension in the result tree and select Groups>Add to>valuation
parameters, and then the Group Item under which you want the row to appear. 7. Save the changes. 8. Open a Trading Manager sheet of the appropriate type and add items. 9. Right-click a row or a cell and select Instrument>Valuation Information or
Valuation>View Valuation Information. 10. Check that the new row (or rows) displays correctly.
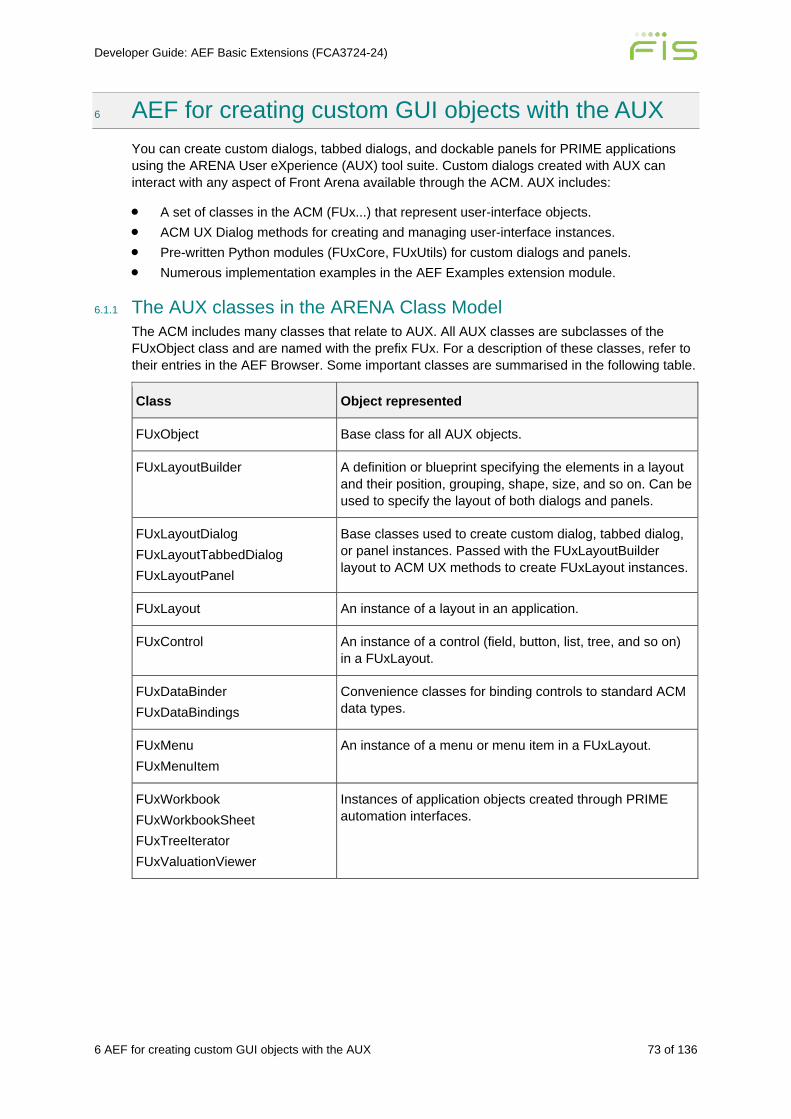
Developer Guide: AEF Basic Extensions (FCA3724-24)
6 AEF for creating custom GUI objects with the AUX 73 of 136
6 AEF for creating custom GUI objects with the AUX You can create custom dialogs, tabbed dialogs, and dockable panels for PRIME applications using the ARENA User eXperience (AUX) tool suite. Custom dialogs created with AUX can interact with any aspect of Front Arena available through the ACM. AUX includes:
• A set of classes in the ACM (FUx...) that represent user-interface objects. • ACM UX Dialog methods for creating and managing user-interface instances. • Pre-written Python modules (FUxCore, FUxUtils) for custom dialogs and panels. • Numerous implementation examples in the AEF Examples extension module.
6.1.1 The AUX classes in the ARENA Class Model The ACM includes many classes that relate to AUX. All AUX classes are subclasses of the FUxObject class and are named with the prefix FUx. For a description of these classes, refer to their entries in the AEF Browser. Some important classes are summarised in the following table.
Class Object represented
FUxObject Base class for all AUX objects.
FUxLayoutBuilder A definition or blueprint specifying the elements in a layout and their position, grouping, shape, size, and so on. Can be used to specify the layout of both dialogs and panels.
FUxLayoutDialog FUxLayoutTabbedDialog FUxLayoutPanel
Base classes used to create custom dialog, tabbed dialog, or panel instances. Passed with the FUxLayoutBuilder layout to ACM UX methods to create FUxLayout instances.
FUxLayout An instance of a layout in an application.
FUxControl An instance of a control (field, button, list, tree, and so on) in a FUxLayout.
FUxDataBinder FUxDataBindings
Convenience classes for binding controls to standard ACM data types.
FUxMenu FUxMenuItem
An instance of a menu or menu item in a FUxLayout.
FUxWorkbook FUxWorkbookSheet FUxTreeIterator FUxValuationViewer
Instances of application objects created through PRIME automation interfaces.

Developer Guide: AEF Basic Extensions (FCA3724-24)
6 AEF for creating custom GUI objects with the AUX 74 of 136
6.1.2 Methods in the AUX namespace The AUX namespace FNamespaceUXDialogs contains the methods available for displaying dialogs and panels. The ACM method acm.UX().Dialogs() is used to run these methods. The two core methods for custom dialogs are:
• ShowCustomDialog creates and displays a dialog for a specified application, based on a FUxLayoutBuilder layout and your custom dialog instance. The dialog floats on top of its parent.
• ShowCustomDialogModal does the same, except the parent application is disabled until the modal dialog has been closed.
Other methods in this namespace simplify the creation and display of standard dialogs:
• SelectObject for creating a list box that can be used to select objects from a collection. • SelectInstrument which makes it possible to access the standard Select Instrument dialog
through AUX. • MessageBox and variants for creating message boxes. • BrowseForFiles for creating a file browse box. • CreateNamedParametersVector for creating a dialog that can be used to capture vector
shifts. For an example of this dialog, see 4.5 Defining and generating vector columns. You can supply the window heading and label for the results field as parameters to the method.
• SelectObjectsInsertItems for creating an Insert Items dialog.
For example, the SelectObject method can be used to prompt the user to select a marketplace:
import acm shell = acm.UX().SessionManager().Shell() mp = acm.UX().Dialogs().SelectObject \ (shell, 'Select Marketplace', 'Marketplaces', acm.FMarketPlace.Select(''), None)
Methods also exist in the AUX namespace for creating dialogs for selecting scenarios, ASQL queries, time buckets, and getting a user input string.
6.1.3 FUxCore and FUxUtils Python modules for custom dialogs Two built-in Python modules provide base classes and methods for defining dialogs and panels:
• FUxCore provides classes for custom dialogs and panels. The source code of this Python module can be found in the built-in extension module called UX Core Module.
• FUxUtils provides classes for working with parameters. The source code of this Python module can be found in the built-in extension module called UX Utils Module.
You do not need to add these built-in modules to the current context because they are present in the Default extension module which must always be present as the first module in all contexts.
6.1.4 AUX in AEF Examples PRIME includes several examples of the custom dialogs and panels created with AUX in the built-in extension module called AEF Examples.
The examples consist of extensions of type FPythonCode for creating the dialog or panel and executing its logic and either FParameterGUIDefinition or FMenuExtension to create the user-interface control that starts the dialog. (The extension type FParameterGUIDefinition provides a convenient way to add enumerable items to an existing PRIME framework, for example, a custom hedge algorithm, while FMenuExtension just creates a standalone menu item.)
Developer Guide: AEF Basic Extensions (FCA3724-24)
6 AEF for creating custom GUI objects with the AUX 75 of 136
The following list provides good starter examples:
• For dialogs:
− FUX_CustomControlDialog − FUX_CustomLayoutDialog − FUX_CustomLayoutDialogDataBinding − FUX_CustomLayoutDialogGenerateOptions − FUX_CustomListAndTreeControlDialog − FUX_DynamicVectorNamedParametersDialog
• For tabbed dialogs:
− FUX_CustomLayoutTabbedDialog
• For panels:
− FUX_InsdefDockWindow − FUX_InsertItems
• For application control through AUX:
− FUX_StartAndStopApplications
6.1.5 Viewing the AUX examples and FUxCore/FUxUtils 1. In the PRIME Session Manager, select All>System>Extension Editor. 2. Select the appropriate context. 3. Insert the built-in modules AEF Examples, UX Core Module, and UX Utils Module. 4. Search for FParameterGUIDefinition or FMenuExtension extensions in the AEF
Examples module. 5. For FParameterGUIDefinition extensions, note the value of the Module. This is the name
of the Python module that is called when the user-interface item is selected. For FMenuExtension extensions, note the name of the Function property. This is the name of the Python module and function called when the menu item is selected. For a complete description of the properties of FParameterGUIDefinition and FMenuExtension extensions, refer to the AEF Browser.
To view the source code of the matching Python module:
1. Search for FPythonCode extensions. 2. Select the extension with the name specified by the Module property in
FParameterGUIDefinition.
Some of the examples import just the base classes from FUxCore. Others import both FUxCore and FUxUtils.
To view the prewritten classes and methods available for custom dialogs, search for the FUxCore or FUxUtils extensions in the UX Core Module or UX Utils Module modules.
6.2 Creating a custom AUX dialog from Python When developing a custom AUX dialog, you must do the following in your Python code:
1. Get the shell. 2. Create a layout. 3. Create a custom dialog instance. 4. Display the dialog. 5. Close the dialog.
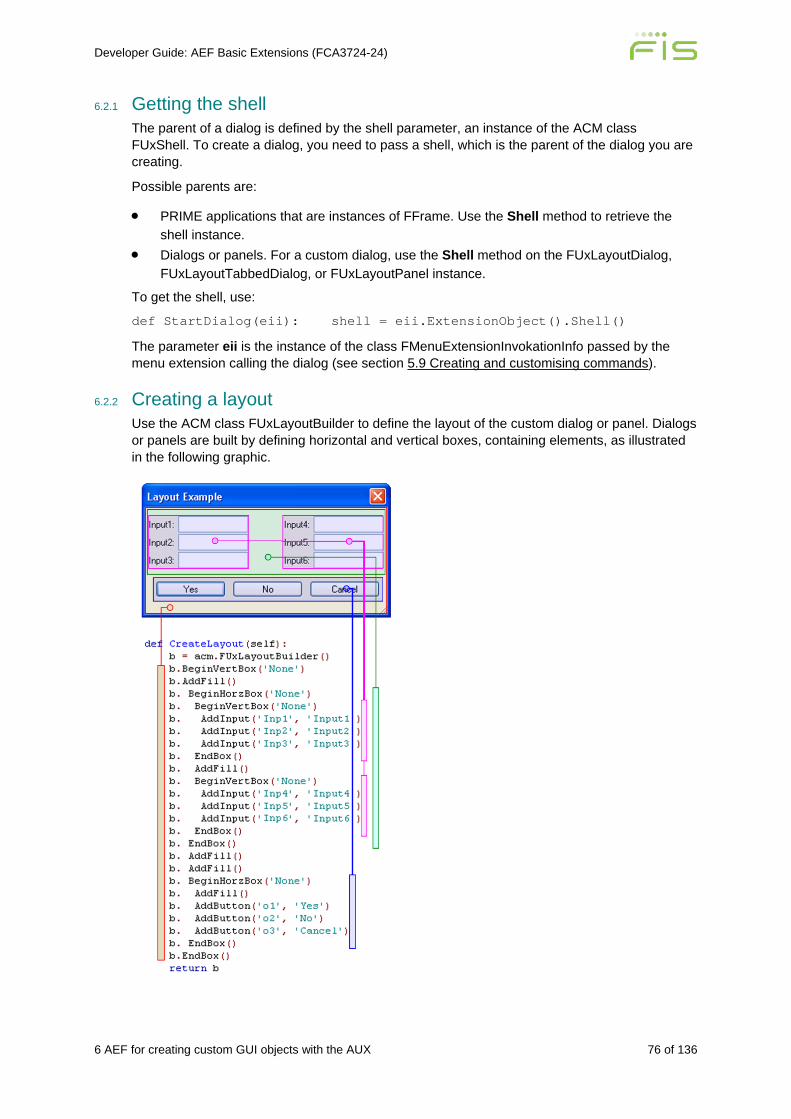
Developer Guide: AEF Basic Extensions (FCA3724-24)
6 AEF for creating custom GUI objects with the AUX 76 of 136
6.2.1 Getting the shell The parent of a dialog is defined by the shell parameter, an instance of the ACM class FUxShell. To create a dialog, you need to pass a shell, which is the parent of the dialog you are creating.
Possible parents are:
• PRIME applications that are instances of FFrame. Use the Shell method to retrieve the shell instance.
• Dialogs or panels. For a custom dialog, use the Shell method on the FUxLayoutDialog, FUxLayoutTabbedDialog, or FUxLayoutPanel instance.
To get the shell, use:
def StartDialog(eii): shell = eii.ExtensionObject().Shell()
The parameter eii is the instance of the class FMenuExtensionInvokationInfo passed by the menu extension calling the dialog (see section 5.9 Creating and customising commands).
6.2.2 Creating a layout Use the ACM class FUxLayoutBuilder to define the layout of the custom dialog or panel. Dialogs or panels are built by defining horizontal and vertical boxes, containing elements, as illustrated in the following graphic.
Developer Guide: AEF Basic Extensions (FCA3724-24)
6 AEF for creating custom GUI objects with the AUX 77 of 136
6.2.3 Creating a custom dialog instance Create a class that inherits from the appropriate FUxCore base class: LayoutDialog or LayoutTabbedDialog. Override the HandleCreate method as required.
Create an instance of your class.
When PRIME has created the dialog and its controls, it will call the method HandleCreate on your class instance. The parameters included in the call are an instance of the ACM class FUxLayoutDialog and an instance of the ACM class FUxLayout.
Use the FUxLayout instance to retrieve the instances of FUxControl for each of your controls:
self.m_okBtn = layout.GetControl("ok")
The instances of FUxControl can then be used to set data, get data, set up callbacks, and manage your controls.
6.2.4 Displaying the dialog To display a dialog, use acm.UX().Dialogs().ShowCustomDialogModal or acm.UX().Dialogs().ShowCustomDialog.
• ShowCustomDialogModal displays a modal dialog and the parent window is disabled until the dialog closes.
• ShowCustomDialog displays a non-modal dialog floating on top of its parent.
6.2.5 Closing the dialog A dialog is closed using the FUxLayoutDialog method CloseDialogOK or CloseDialogCancel.
A dialog can also be closed by clicking the buttons OK or Apply if these buttons have been added using the standard syntax:
AddButton('ok', 'OK') AddButton('cancel', 'Cancel')
• If the dialog is closed by selecting OK, the HandleApply method on your class will be called, where any data validation must take place. If None is returned, the dialog is not closed, and any error must be indicated to the user. If any other value is returned, the dialog is closed, and the returned value will be returned from the call to ShowCustomDialogModal (for a modal dialog).
• If the dialog is closed using the Cancel button, the HandleCancel method on your class will be called, where it is possible to let the user choose whether the Cancel action must be performed or not. Returning True from HandleCancel will make the window continue with the cancellation and the window will be closed. Returning None will cancel the closing of the window. The HandleApply method will not be called. This is also the case when selecting the standard close button in the caption.
• HandleDestroy is always called when the dialog is about to be closed. Put any cleanup code in this method.
6.2.6 Using .NET WinForms in the AUX For more information and example code, refer to FUX_NetControlDialog in the AEF Examples module.
It is possible to use GUI controls from the .NET framework in AUX (currently only controls in WinForms are supported, not WPF controls). First you need to import the FUxNet and the clr modules into your Python code. The .NET controls are then added to the layout by calling
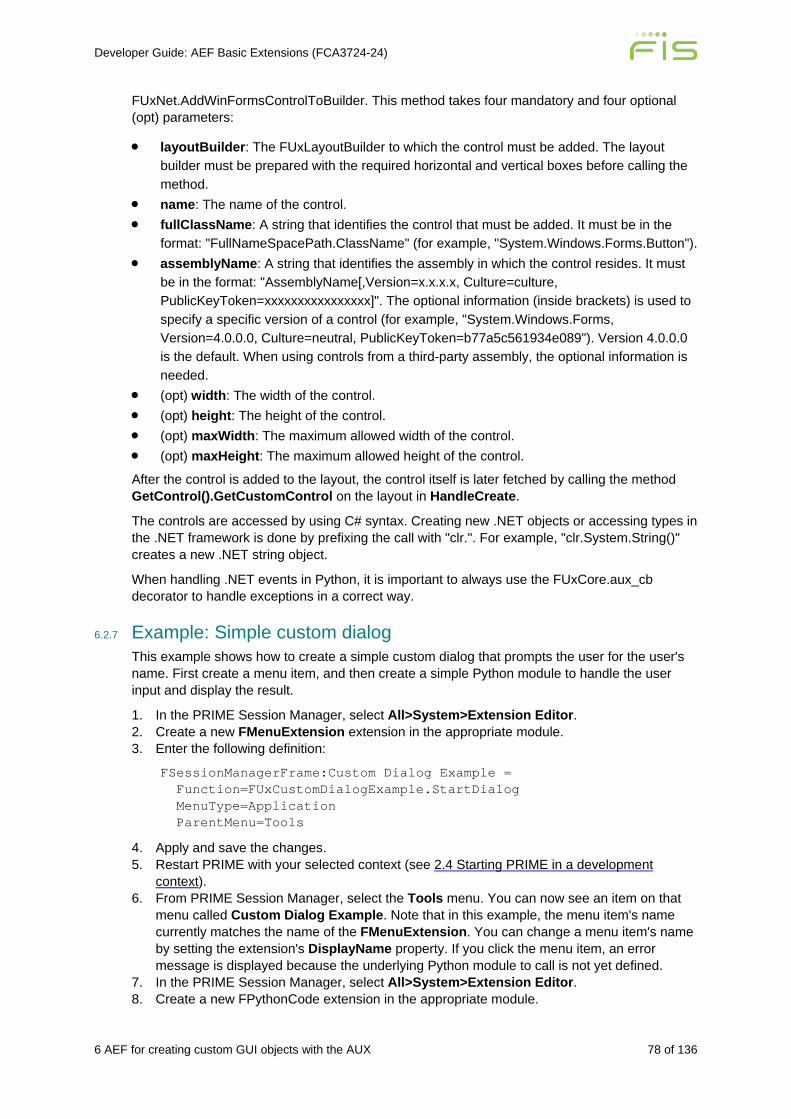
Developer Guide: AEF Basic Extensions (FCA3724-24)
6 AEF for creating custom GUI objects with the AUX 78 of 136
FUxNet.AddWinFormsControlToBuilder. This method takes four mandatory and four optional (opt) parameters:
• layoutBuilder: The FUxLayoutBuilder to which the control must be added. The layout builder must be prepared with the required horizontal and vertical boxes before calling the method.
• name: The name of the control. • fullClassName: A string that identifies the control that must be added. It must be in the
format: "FullNameSpacePath.ClassName" (for example, "System.Windows.Forms.Button"). • assemblyName: A string that identifies the assembly in which the control resides. It must
be in the format: "AssemblyName[,Version=x.x.x.x, Culture=culture, PublicKeyToken=xxxxxxxxxxxxxxxx]". The optional information (inside brackets) is used to specify a specific version of a control (for example, "System.Windows.Forms, Version=4.0.0.0, Culture=neutral, PublicKeyToken=b77a5c561934e089"). Version 4.0.0.0 is the default. When using controls from a third-party assembly, the optional information is needed.
• (opt) width: The width of the control. • (opt) height: The height of the control. • (opt) maxWidth: The maximum allowed width of the control. • (opt) maxHeight: The maximum allowed height of the control.
After the control is added to the layout, the control itself is later fetched by calling the method GetControl().GetCustomControl on the layout in HandleCreate.
The controls are accessed by using C# syntax. Creating new .NET objects or accessing types in the .NET framework is done by prefixing the call with "clr.". For example, "clr.System.String()" creates a new .NET string object.
When handling .NET events in Python, it is important to always use the FUxCore.aux_cb decorator to handle exceptions in a correct way.
6.2.7 Example: Simple custom dialog This example shows how to create a simple custom dialog that prompts the user for the user's name. First create a menu item, and then create a simple Python module to handle the user input and display the result.
1. In the PRIME Session Manager, select All>System>Extension Editor. 2. Create a new FMenuExtension extension in the appropriate module. 3. Enter the following definition:
FSessionManagerFrame:Custom Dialog Example = Function=FUxCustomDialogExample.StartDialog MenuType=Application ParentMenu=Tools
4. Apply and save the changes. 5. Restart PRIME with your selected context (see 2.4 Starting PRIME in a development
context). 6. From PRIME Session Manager, select the Tools menu. You can now see an item on that
menu called Custom Dialog Example. Note that in this example, the menu item's name currently matches the name of the FMenuExtension. You can change a menu item's name by setting the extension's DisplayName property. If you click the menu item, an error message is displayed because the underlying Python module to call is not yet defined.
7. In the PRIME Session Manager, select All>System>Extension Editor. 8. Create a new FPythonCode extension in the appropriate module.

Developer Guide: AEF Basic Extensions (FCA3724-24)
6 AEF for creating custom GUI objects with the AUX 79 of 136
9. Enter the following definition:
FObject:FUxCustomDialogExample import acm import FUxCore class myCustomDialog (FUxCore.LayoutDialog): def __init__(self): self.m_nameEdit = 0 self.m_fuxDlg = 0 def HandleApply( self ): name = str(self.m_nameEdit.GetData()) print (type(name)) return name def HandleCreate( self, dlg, layout): self.m_fuxDlg = dlg self.m_fuxDlg.Caption('Simple Custom Dialog' ) self.m_nameEdit = layout.GetControl("name") def StartDialog(eii): shell = eii.ExtensionObject().Shell() builder = CreateLayout() customDlg = myCustomDialog() result = acm.UX().Dialogs().ShowCustomDialogModal(shell, builder, customDlg ) if result != None: print ('OK was selected, name=', result) else: print ('Cancel was selected!') def CreateLayout(): b = acm.FUxLayoutBuilder() b.BeginVertBox('None') b. AddInput('name', 'Name') b. BeginHorzBox('None') b. AddFill() b. AddButton('ok', 'OK') b. AddButton('cancel', 'Cancel') b. EndBox() b.EndBox() return b
10. Apply and save the changes. 11. In the PRIME Session Manager, select All>Tools>Custom Dialog Example. A simple
dialog box is now displayed. 12. Type some text in the Name field then click OK. The text that you typed is displayed in the
Front Arena Log window.
6.3 Creating a custom AUX panel from Python When developing a custom AUX panel, you will need to do the following things in your Python code:
• Create a layout • Create a custom panel instance • Add the panel to an application • React to application events
Developer Guide: AEF Basic Extensions (FCA3724-24)
6 AEF for creating custom GUI objects with the AUX 80 of 136
6.3.1 Creating a layout Use the ACM class FUxLayoutBuilder to define the layout of the custom panel, in the same way as described for a custom AUX dialog earlier in this document (see 6.2.2 Creating a layout).
6.3.2 Creating a custom panel instance Create a class that inherits from the FUxCore base class LayoutPanel. Override the HandleCreate method as required.
Create an instance of your class.
When PRIME has created the panel and its controls, it will call the method HandleCreate on your class instance. The parameters included in the call are an instance of the ACM class FUxLayoutPanel and an instance of the ACM class FUxLayout.
The instances of FUxControl can then be used to set data, get data, set up callbacks, and manage your controls.
For panels, you can use the SetLayout method to change the layout after it is displayed. You can also use the Owner method to access the parent application's FFrame subclass instance.
6.3.3 Adding the panel to an application To add your panel to an application, use the method RegisterDockWindowType or CreateCustomDockWindow on the application that you want to extend. The first method allows you to only register your panel with the application at the application's startup, as well as to create the actual panel at a later stage.
Practically, use Extension Editor to create an extension of type FUIEventHandlers for the target application and use the property OnCreate to identify the function to call at startup.
As an example of the CreateCustomDockWindow method, there is a YieldCurveView event handler predefined for Trading Manager in the Default module:
[Default]FUiTrdMgrFrame:YieldCurveView = OnCreate=YieldCurveView.OnCreate SelectionChanged=
When the Trading Manager starts, this extension causes the function OnCreate in the Python module YieldCurveView to be called:
def OnCreate(eii): basicApp = eii.ExtensionObject() myPanel = YieldCurveView(basicApp) basicApp.CreateCustomDockWindow(myPanel, 'yieldCurveView', 'Yield Curve View', 'Left', None, True, False)
Here, you can see the CreateCustomDockWindow method being called with the custom layout (myPanel), a unique identifier for the panel ('yieldCurveView'), and various other parameters.
The same yield curve panel is used to illustrate the RegisterDockWindowType method in the following example:
FUiTrdMgrFrame:YieldCurveViewRegistered = OnCreate=YieldCurveView.RegisterPanel
When the Trading Manager starts, this extension causes the function RegisterPanel in the Python module YieldCurveView to be called:
def RegisterPanel(eii): basicApp = eii.ExtensionObject()
Developer Guide: AEF Basic Extensions (FCA3724-24)
6 AEF for creating custom GUI objects with the AUX 81 of 136
basicApp.RegisterDockWindowType("Yield Curve Viewer", "YieldCurveView.OnCreateRegistered")
The Yield Curve Viewer panel is created in the function OnCreateRegistered:
def OnCreateRegistered(eii): basicApp = eii.ExtensionObject() myPanel = YieldCurveView(basicApp) return myPanel
Lastly, some event (clicking a ribbon button, selecting a cell in a sheet…) will trigger the actual creation of the panel in the application:
def CreateYieldCurvePane(eii): basicApp = eii.ExtensionObject() panel = basicApp.CreateRegisteredDockWindow("Yield Curve Viewer", "key", None, "Left")
After a panel has been created, it will be displayed in the application as a dockable window under Home>Docked>Panes. The user can show and hide these dock windows like any other dock window and the visibility will be stored with the workspace (or workbook in case of Operations Manager and Trading Manager), like other dock windows.
When setting up a workbench or application through Python, containing several custom panels, you have full control of where panels are docked after the panels are created. Use the functions DockInSameTab and DockOnSameRowCol on the application frame. For example, four panels of the same custom panel (MyPanel) added to the Trading Manager as follows:
tm = acm.StartApplication('Trading Manager',None) tm.RegisterDockWindowType('P0', MyPanel()) tm.RegisterDockWindowType('P1', MyPanel()) tm.RegisterDockWindowType('P2', MyPanel()) tm.RegisterDockWindowType('P3', MyPanel()) tm.CreateRegisteredDockWindow('P0','Pnl_0','Panel 0','Left') tm.CreateRegisteredDockWindow('P1','Pnl_1','Panel 1','Bottom') tm.CreateRegisteredDockWindow('P2','Pnl_2','Panel 2','Bottom') tm.CreateRegisteredDockWindow('P3','Pnl_3','Panel 3','Right')
Initially, these panels have been added as separate panels, 1 on the left, 2 on the bottom, and 1 on the right. To show 1 panel on the left, 2 panels in the same tab on the bottom, and the last panel also on the bottom next to the previous panel, you would enter the following code:
tm.DockOnSameRowCol('Pnl_1','Pnl_3','Right') tm.DockInSameTab('Pnl_1','Pnl_2')
Note: From the example, you notice that order of instructions and order of parameters in the instructions is very important to achieve the desired layout of panels in your application.
6.3.4 Reacting to application events To be able to react to events from the application (for example, when a selection changes) you need your module to register as a listener.
A good example of this can be seen in the AEF Examples module FUX_InsdefDockWindow:
[AEF Examples]FObject:FUX_InsdefDockWindow import acm import FUxCore

Developer Guide: AEF Basic Extensions (FCA3724-24)
6 AEF for creating custom GUI objects with the AUX 82 of 136
def ServerUpdate(self, sender, aspect, parameter ): if str(aspect) == str('ContentsChanged'): self.UpdateUI() def HandleOnIdle(self): self.UpdateUI() def HandleCreate(self): layout = self.SetLayout( self.CreateLayout() ) self.m_insName = layout.GetControl('ins') self.openUnderlying = layout.GetControl('openUnderlying') self.openUnderlying.AddCallback( "Activate", OnUnderlyingClicked, self ) self.m_insName.Editable(False) self.Owner().AddDependent(self) self.EnableOnIdleCallback(True) self.UpdateUI() ...
Here, the HandleCreate method registers the panel instance as a listener with the AddDependent method. The ServerUpdate method is called each time an application event occurs, and the aspect parameter describes what type of event occurred.
The HandleCreate method also registers the panel to react to OnIdle messages, by setting EnableOnIdleCallback to True. Each time this message is sent, the HandleOnIdle method is called.
Different host applications have different events available for them. For example, an instrument definition frame has "ContentsChanged" and "OnCreate" as possible events. An easy way to look up which events are available for an application is to use Extension Editor and add a FUIEventHandlers entry for the application class of interest, for instance CInsDefAppFrame for the instrument definition application. This will generate a stub with all the registered events for that application.
If you need to access your custom panel instance, for example, from a menu extension in the same application, you can use the unique identifier for the panel (here, customInsdefPane):
basicApp.CreateCustomDockWindow(myCustomPanel, 'customInsdefPane', 'AEF Examples Insdef Panel', 'Bottom')
The instance provided as myCustomPanel can later be retrieved using:
panel = app.GetCustomDockWindow('customInsdefPane').CustomLayoutPanel()
6.3.5 Context menu events on FUxControls and FUxDataBinder It is possible to listen to right-clicks on the controls FUxListControl, FUxTreeControl, FUx2DChartControl and FUxPieChartControl. To subscribe to the right-click event, use the FUxControl.AddCallback method with the event name 'ContextMenu'. When the callback is invoked a dictionary of parameters is sent from the control. The content of the dictionary depends on which control that sends the event:
Control Dictionary key name
Dictionary key value
FUxListControl menuBuilder A FUxContextMenuBuilder.
items An array of FUxListItems representing the selected items.
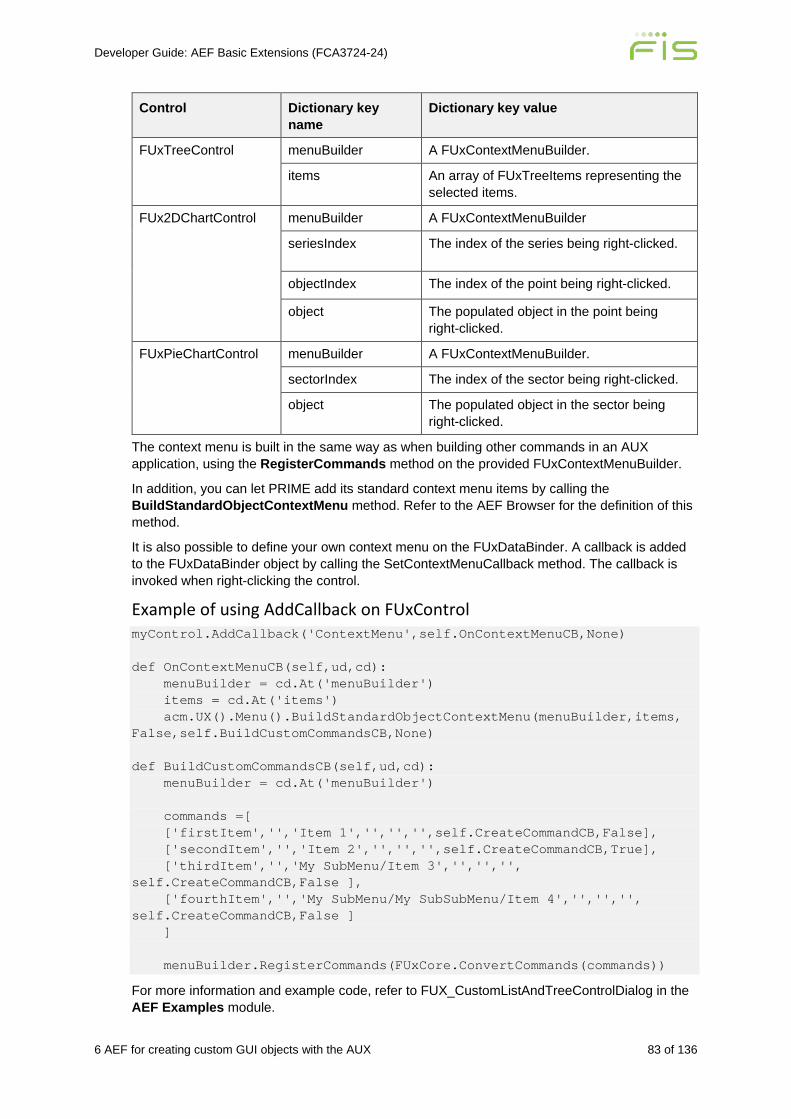
Developer Guide: AEF Basic Extensions (FCA3724-24)
6 AEF for creating custom GUI objects with the AUX 83 of 136
Control Dictionary key name
Dictionary key value
FUxTreeControl menuBuilder A FUxContextMenuBuilder.
items An array of FUxTreeItems representing the selected items.
FUx2DChartControl menuBuilder A FUxContextMenuBuilder
seriesIndex The index of the series being right-clicked.
objectIndex The index of the point being right-clicked.
object The populated object in the point being right-clicked.
FUxPieChartControl menuBuilder A FUxContextMenuBuilder.
sectorIndex The index of the sector being right-clicked.
object The populated object in the sector being right-clicked.
The context menu is built in the same way as when building other commands in an AUX application, using the RegisterCommands method on the provided FUxContextMenuBuilder.
In addition, you can let PRIME add its standard context menu items by calling the BuildStandardObjectContextMenu method. Refer to the AEF Browser for the definition of this method.
It is also possible to define your own context menu on the FUxDataBinder. A callback is added to the FUxDataBinder object by calling the SetContextMenuCallback method. The callback is invoked when right-clicking the control.
Example of using AddCallback on FUxControl myControl.AddCallback('ContextMenu',self.OnContextMenuCB,None) def OnContextMenuCB(self,ud,cd): menuBuilder = cd.At('menuBuilder') items = cd.At('items') acm.UX().Menu().BuildStandardObjectContextMenu(menuBuilder,items, False,self.BuildCustomCommandsCB,None) def BuildCustomCommandsCB(self,ud,cd): menuBuilder = cd.At('menuBuilder') commands =[ ['firstItem','','Item 1','','','',self.CreateCommandCB,False], ['secondItem','','Item 2','','','',self.CreateCommandCB,True], ['thirdItem','','My SubMenu/Item 3','','','', self.CreateCommandCB,False ], ['fourthItem','','My SubMenu/My SubSubMenu/Item 4','','','', self.CreateCommandCB,False ] ] menuBuilder.RegisterCommands(FUxCore.ConvertCommands(commands))
For more information and example code, refer to FUX_CustomListAndTreeControlDialog in the AEF Examples module.
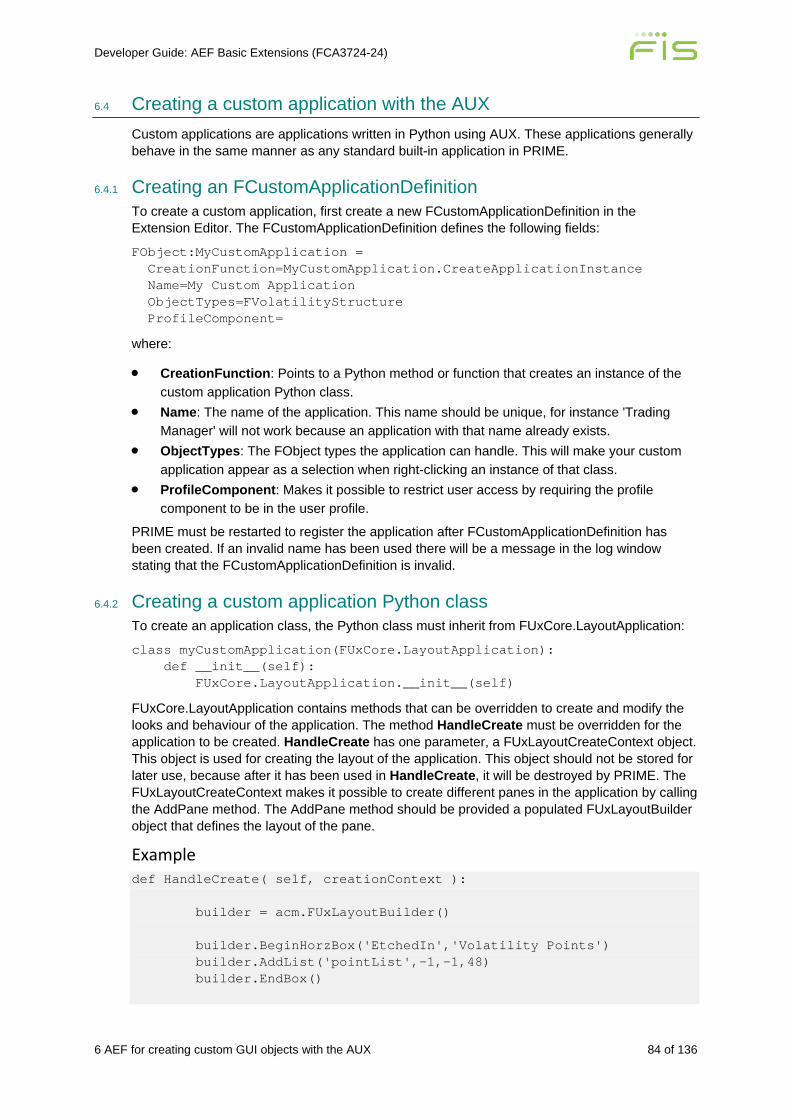
Developer Guide: AEF Basic Extensions (FCA3724-24)
6 AEF for creating custom GUI objects with the AUX 84 of 136
6.4 Creating a custom application with the AUX Custom applications are applications written in Python using AUX. These applications generally behave in the same manner as any standard built-in application in PRIME.
6.4.1 Creating an FCustomApplicationDefinition To create a custom application, first create a new FCustomApplicationDefinition in the Extension Editor. The FCustomApplicationDefinition defines the following fields:
FObject:MyCustomApplication = CreationFunction=MyCustomApplication.CreateApplicationInstance Name=My Custom Application ObjectTypes=FVolatilityStructure ProfileComponent=
where:
• CreationFunction: Points to a Python method or function that creates an instance of the custom application Python class.
• Name: The name of the application. This name should be unique, for instance 'Trading Manager' will not work because an application with that name already exists.
• ObjectTypes: The FObject types the application can handle. This will make your custom application appear as a selection when right-clicking an instance of that class.
• ProfileComponent: Makes it possible to restrict user access by requiring the profile component to be in the user profile.
PRIME must be restarted to register the application after FCustomApplicationDefinition has been created. If an invalid name has been used there will be a message in the log window stating that the FCustomApplicationDefinition is invalid.
6.4.2 Creating a custom application Python class To create an application class, the Python class must inherit from FUxCore.LayoutApplication:
class myCustomApplication(FUxCore.LayoutApplication): def __init__(self): FUxCore.LayoutApplication.__init__(self)
FUxCore.LayoutApplication contains methods that can be overridden to create and modify the looks and behaviour of the application. The method HandleCreate must be overridden for the application to be created. HandleCreate has one parameter, a FUxLayoutCreateContext object. This object is used for creating the layout of the application. This object should not be stored for later use, because after it has been used in HandleCreate, it will be destroyed by PRIME. The FUxLayoutCreateContext makes it possible to create different panes in the application by calling the AddPane method. The AddPane method should be provided a populated FUxLayoutBuilder object that defines the layout of the pane.
Example def HandleCreate( self, creationContext ): builder = acm.FUxLayoutBuilder() builder.BeginHorzBox('EtchedIn','Volatility Points') builder.AddList('pointList',-1,-1,48) builder.EndBox()

Developer Guide: AEF Basic Extensions (FCA3724-24)
6 AEF for creating custom GUI objects with the AUX 85 of 136
pane = creationContext.AddPane(builder,"listPane") self.m_pointList = pane.GetControl('pointList')
This small example creates a pane containing a list control and assigns a member variable the control to be able to use it later.
This should be enough to get a small application up and running. All that is needed is the function that creates the actual instance of the class:
def CreateApplicationInstance(): return myCustomApplication()
To start the application, call acm.UX( ).SessionManager( ).StartApplication with the name of the application:
acm.UX().SessionManager().StartApplication(‘My Custom Application’,None)
6.4.3 Creating application commands To create application commands, such as menus or ribbons, override the method HandleRegisterCommands. This method provides a FUxCommandBuilder that should be populated with the commands that should be available in the application:
def HandleRegisterCommands(self,builder): commands =[ ['firstItem','View','Item 1','This is Item 1','Ctrl+1','1',self.CreateCommandCB, False ], FUxCore.Separator(), ['secondItem', 'View', ' My SubMenu/Item 2','This is Item 2','','2',self.CreateCommandCB, False ], fileCommands = acm.FSet() fileCommands.Add('FileOpen') fileCommands.Add('FileSave') fileCommands.Add('FileSaveAs') builder.RegisterCommands(FUxCore.ConvertCommands(commands), fileCommands)
The commands are defined as an array of arrays where each command array should contain the following:
• The name of the item. • The parent menu (such as View). • The item path, ending with the item label. • A tooltip text, or an empty string if no tooltip is desired. • The accelerator of the item, or an empty string if no tooltip is desired. • The mnemonic for the item, or an empty string if no mnemonic is desired. • A callback method that creates an instance of a class that inherits from
FUxCore.MenuItem. This item will handle the different states of the item as well as performing the action when invoked.
• A Boolean that specifies if the item should be the default item (only applicable for context menus).
All eight parameters must be provided when calling the FUxCore.ConvertCommands method that converts the commands into a format that can be interpreted by PRIME. The result of the
Developer Guide: AEF Basic Extensions (FCA3724-24)
6 AEF for creating custom GUI objects with the AUX 86 of 136
ConvertCommands method should be used as an argument when calling the FUxCommandBuilder.RegisterCommands method.
To add a separator, use the predefined FUxCore.Separator() method.
To be able to let the application use standard file commands create an FSet and add the desired commands to it and pass the set as the second argument to the RegisterCommands method. The available file commands can be found in the FUxStandardFileCommands enum.
Each FUxCore.MenuItem is responsible for handling the states of the item, as well as the action taken when invoking the command. The standard file commands are handled differently. To be able to react to those commands, override the methods HandleStandardFileCommandInvoke and HandleStandardFileCommandEnabled:
def HandleStandardFileCommandInvoke(self,commandName): if commandName == 'FileOpen': self.OnFileOpen() def HandleStandardFileCommandEnabled(self,commandName): if commandName == 'FileSave': return False else: return True
6.4.4 Designing ribbons for a custom application To create ribbons for a custom application, start PRIME with the command-line parameter -ribbons 2. This will make it possible to access the Ribbon Designer from the File category in your application. Use the Ribbon Designer to find your commands and add them to a category and panel. If desired select an icon for the command from the list of built-in icons. When the changes made in the Ribbon Designer are saved, you can close PRIME and start it without any additional -ribbons command-line parameter, because the application now has the support for ribbons.
For more information on the Ribbon Designer, refer to System Administration. PRIME (FCA1086).
6.4.5 Additional information Additional information and examples can be found in the AEF Browser, as well as in the AEF Examples module. Have a look at the FUxCore module to see the definition of the LayoutApplication class.
6.4.6 Example: Simple custom application This example shows how to create a simple custom application containing a text box and a custom command that fills the text box with the command label.
1. In the PRIME Session Manager, select All>System>Extension Editor. 2. Create a new FCustomApplicationDefinition extension in the appropriate module. 3. Enter the following definition:
FObject:CustomApplicationExample = CreationFunction=FUX_CustomApplicationExample.CreateApplicationInstance Name=Custom Application Example ObjectTypes= ProfileComponent=
4. Apply and save the changes.
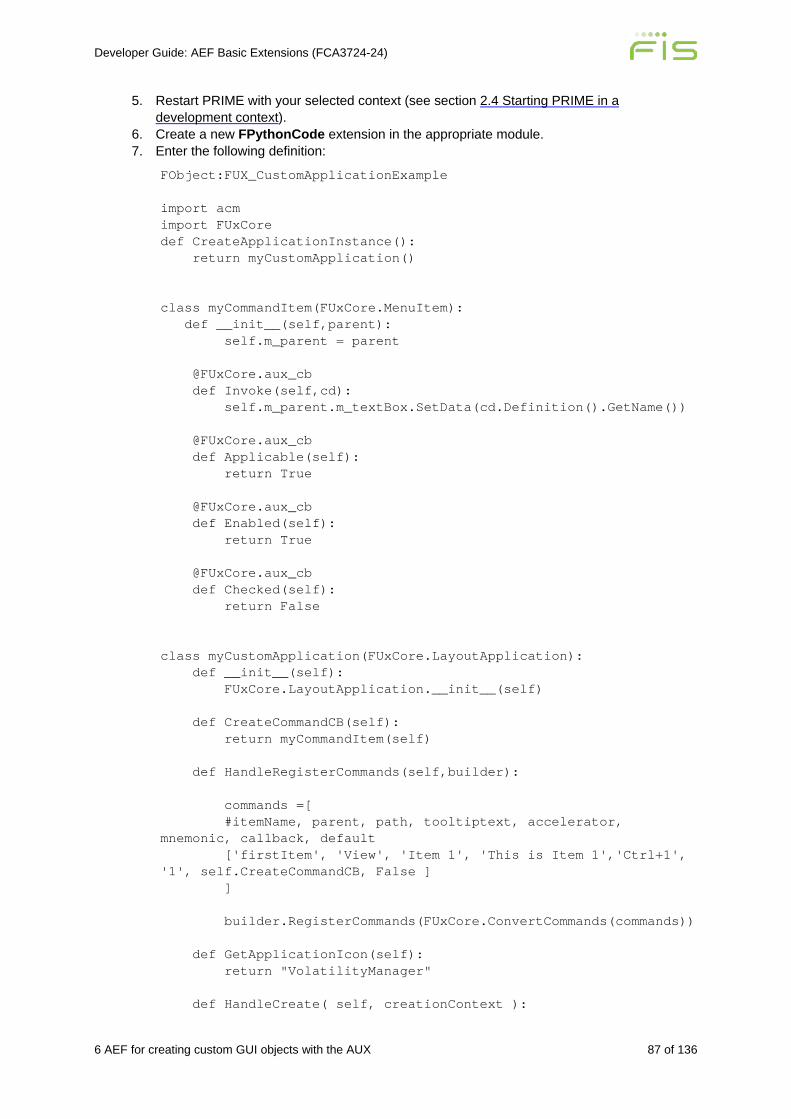
Developer Guide: AEF Basic Extensions (FCA3724-24)
6 AEF for creating custom GUI objects with the AUX 87 of 136
5. Restart PRIME with your selected context (see section 2.4 Starting PRIME in a development context).
6. Create a new FPythonCode extension in the appropriate module. 7. Enter the following definition:
FObject:FUX_CustomApplicationExample import acm import FUxCore def CreateApplicationInstance(): return myCustomApplication() class myCommandItem(FUxCore.MenuItem): def __init__(self,parent): self.m_parent = parent @FUxCore.aux_cb def Invoke(self,cd): self.m_parent.m_textBox.SetData(cd.Definition().GetName()) @FUxCore.aux_cb def Applicable(self): return True @FUxCore.aux_cb def Enabled(self): return True @FUxCore.aux_cb def Checked(self): return False class myCustomApplication(FUxCore.LayoutApplication): def __init__(self): FUxCore.LayoutApplication.__init__(self) def CreateCommandCB(self): return myCommandItem(self) def HandleRegisterCommands(self,builder): commands =[ #itemName, parent, path, tooltiptext, accelerator, mnemonic, callback, default ['firstItem', 'View', 'Item 1', 'This is Item 1','Ctrl+1', '1', self.CreateCommandCB, False ] ] builder.RegisterCommands(FUxCore.ConvertCommands(commands)) def GetApplicationIcon(self): return "VolatilityManager" def HandleCreate( self, creationContext ):

Developer Guide: AEF Basic Extensions (FCA3724-24)
6 AEF for creating custom GUI objects with the AUX 88 of 136
builder = acm.FUxLayoutBuilder() builder.BeginHorzBox('None') builder. AddInput('textBox','My Text Box',10) builder.EndBox() pane = creationContext.AddPane(builder,"mainPane") self.m_textBox = pane.GetControl('textBox')
8. Apply and save the changes. 9. In the Session Manager, select All>System>Python Editor. 10. In the Python Editor, insert the following:
import acm acm.UX().SessionManager().StartApplication('Custom Application Example',None)
11. Save the Python module. 12. Reload the Python module by clicking the Reload button. 13. The following small application should be shown:
14. Select View>Item 1 to fill the text box with "firstItem".
6.5 Dynamic ribbon menus A ribbon menu command can be made dynamic, so that it can be, for example, context-sensitive and dynamically updated when the context changes.
The RegisterDynamicCommand method in FUxCommandBuilder() is used for dynamically building menus from Python.
Example This is a simple example for showing how the RegisterDynamicCommand method can be used for building a ribbon menu command dynamically.
The ribbon menu command Item 2 is updated each time it is selected.
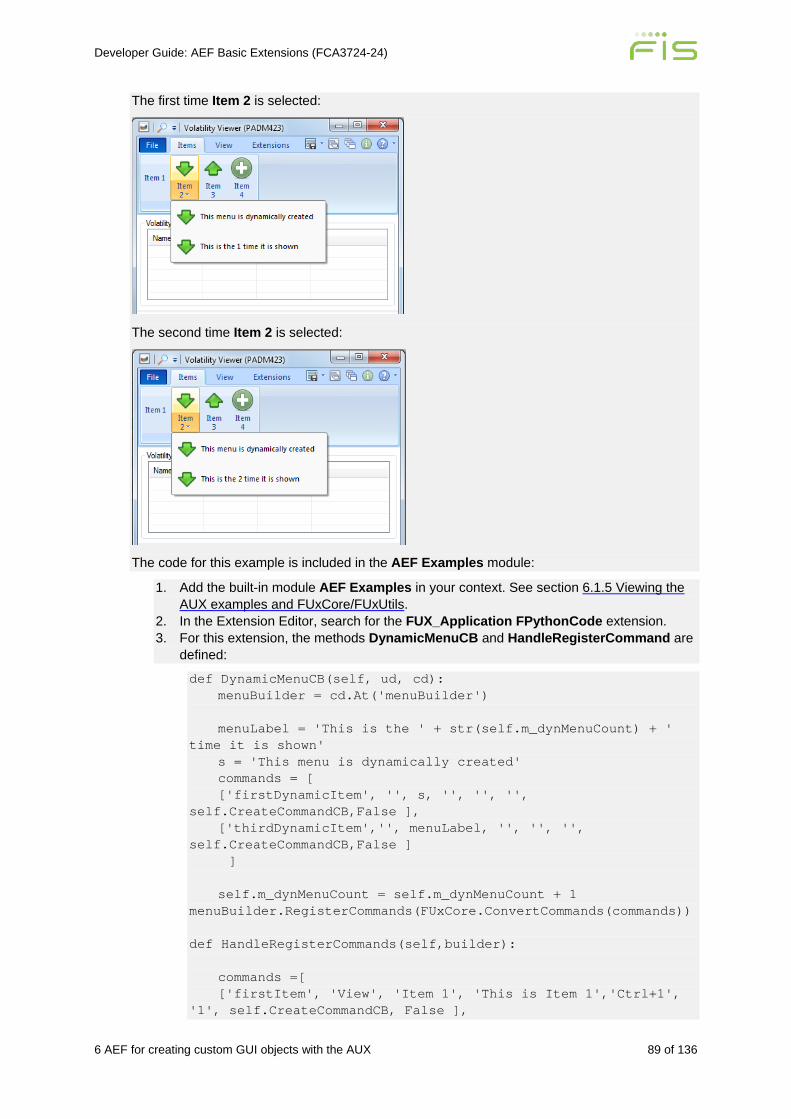
Developer Guide: AEF Basic Extensions (FCA3724-24)
6 AEF for creating custom GUI objects with the AUX 89 of 136
The first time Item 2 is selected:
The second time Item 2 is selected:
The code for this example is included in the AEF Examples module:
1. Add the built-in module AEF Examples in your context. See section 6.1.5 Viewing the AUX examples and FUxCore/FUxUtils.
2. In the Extension Editor, search for the FUX_Application FPythonCode extension. 3. For this extension, the methods DynamicMenuCB and HandleRegisterCommand are
defined:
def DynamicMenuCB(self, ud, cd): menuBuilder = cd.At('menuBuilder') menuLabel = 'This is the ' + str(self.m_dynMenuCount) + ' time it is shown' s = 'This menu is dynamically created' commands = [ ['firstDynamicItem', '', s, '', '', '', self.CreateCommandCB,False ], ['thirdDynamicItem','', menuLabel, '', '', '', self.CreateCommandCB,False ] ] self.m_dynMenuCount = self.m_dynMenuCount + 1 menuBuilder.RegisterCommands(FUxCore.ConvertCommands(commands)) def HandleRegisterCommands(self,builder): commands =[ ['firstItem', 'View', 'Item 1', 'This is Item 1','Ctrl+1', '1', self.CreateCommandCB, False ],
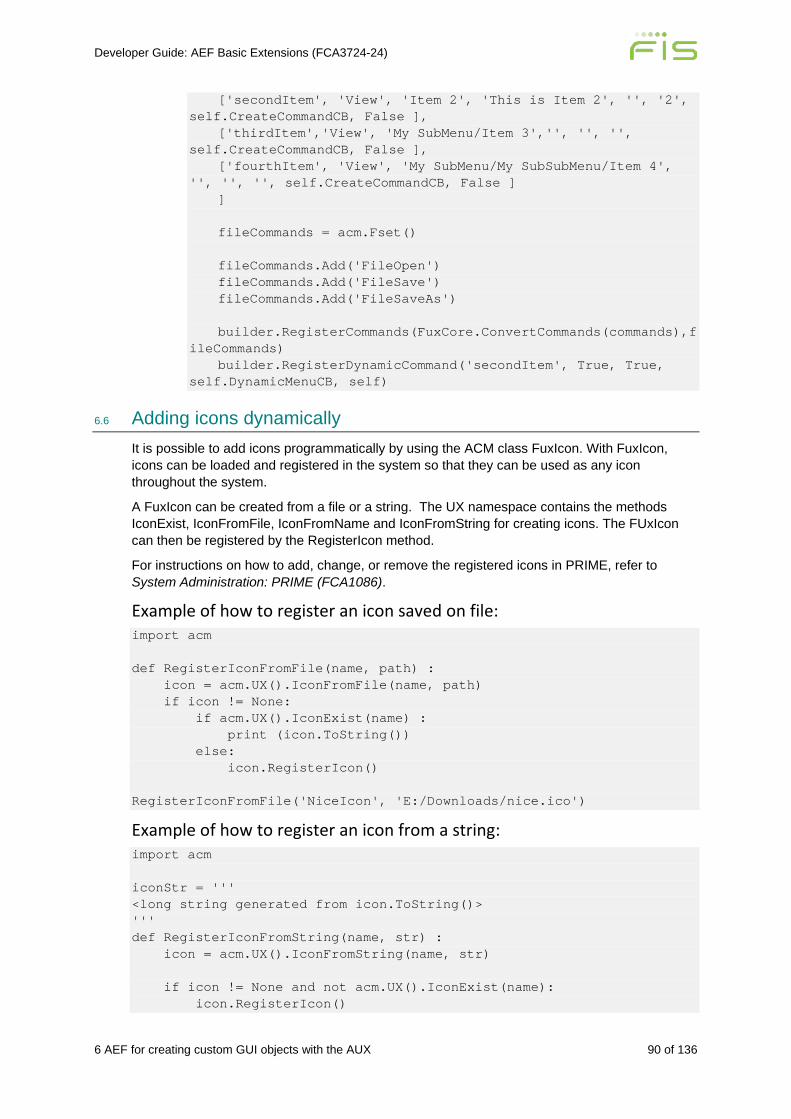
Developer Guide: AEF Basic Extensions (FCA3724-24)
6 AEF for creating custom GUI objects with the AUX 90 of 136
['secondItem', 'View', 'Item 2', 'This is Item 2', '', '2', self.CreateCommandCB, False ], ['thirdItem','View', 'My SubMenu/Item 3','', '', '', self.CreateCommandCB, False ], ['fourthItem', 'View', 'My SubMenu/My SubSubMenu/Item 4', '', '', '', self.CreateCommandCB, False ] ] fileCommands = acm.Fset() fileCommands.Add('FileOpen') fileCommands.Add('FileSave') fileCommands.Add('FileSaveAs') builder.RegisterCommands(FuxCore.ConvertCommands(commands),fileCommands) builder.RegisterDynamicCommand('secondItem', True, True, self.DynamicMenuCB, self)
6.6 Adding icons dynamically It is possible to add icons programmatically by using the ACM class FuxIcon. With FuxIcon, icons can be loaded and registered in the system so that they can be used as any icon throughout the system.
A FuxIcon can be created from a file or a string. The UX namespace contains the methods IconExist, IconFromFile, IconFromName and IconFromString for creating icons. The FUxIcon can then be registered by the RegisterIcon method.
For instructions on how to add, change, or remove the registered icons in PRIME, refer to System Administration: PRIME (FCA1086).
Example of how to register an icon saved on file: import acm def RegisterIconFromFile(name, path) : icon = acm.UX().IconFromFile(name, path) if icon != None: if acm.UX().IconExist(name) : print (icon.ToString()) else: icon.RegisterIcon() RegisterIconFromFile('NiceIcon', 'E:/Downloads/nice.ico')
Example of how to register an icon from a string: import acm iconStr = ''' <long string generated from icon.ToString()> ''' def RegisterIconFromString(name, str) : icon = acm.UX().IconFromString(name, str) if icon != None and not acm.UX().IconExist(name): icon.RegisterIcon()
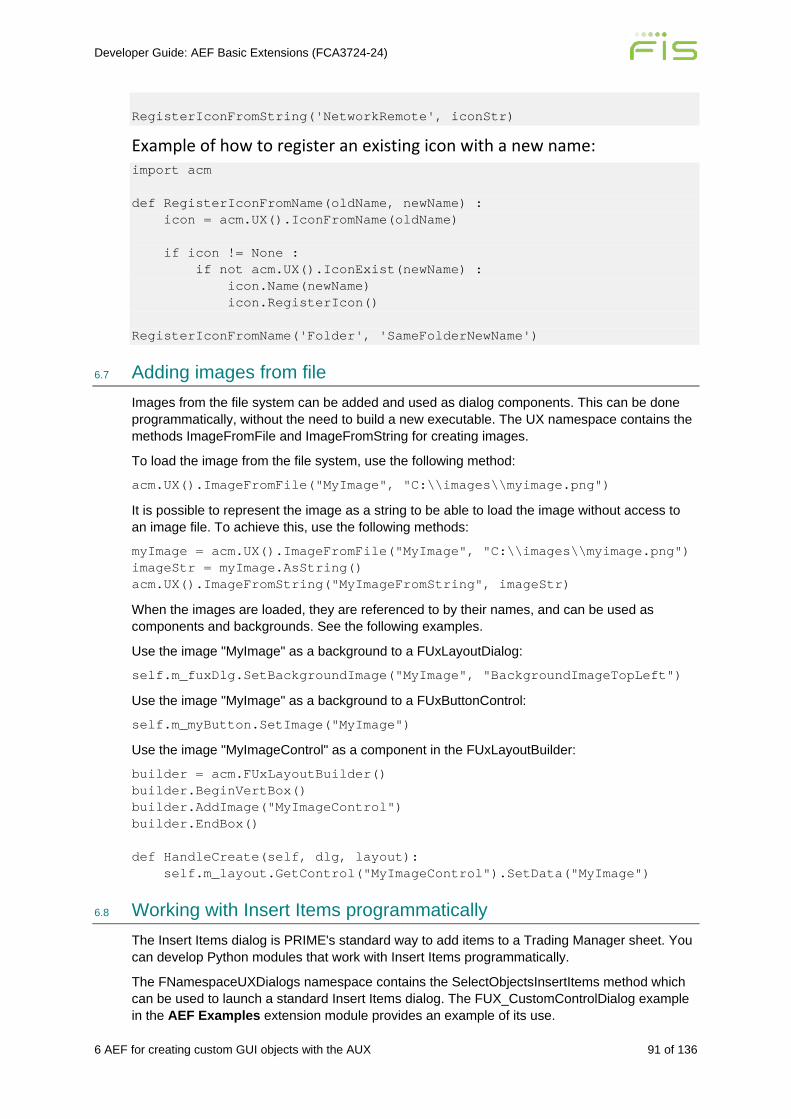
Developer Guide: AEF Basic Extensions (FCA3724-24)
6 AEF for creating custom GUI objects with the AUX 91 of 136
RegisterIconFromString('NetworkRemote', iconStr)
Example of how to register an existing icon with a new name: import acm def RegisterIconFromName(oldName, newName) : icon = acm.UX().IconFromName(oldName) if icon != None : if not acm.UX().IconExist(newName) : icon.Name(newName) icon.RegisterIcon() RegisterIconFromName('Folder', 'SameFolderNewName')
6.7 Adding images from file Images from the file system can be added and used as dialog components. This can be done programmatically, without the need to build a new executable. The UX namespace contains the methods ImageFromFile and ImageFromString for creating images.
To load the image from the file system, use the following method:
acm.UX().ImageFromFile("MyImage", "C:\\images\\myimage.png")
It is possible to represent the image as a string to be able to load the image without access to an image file. To achieve this, use the following methods:
myImage = acm.UX().ImageFromFile("MyImage", "C:\\images\\myimage.png") imageStr = myImage.AsString() acm.UX().ImageFromString("MyImageFromString", imageStr)
When the images are loaded, they are referenced to by their names, and can be used as components and backgrounds. See the following examples.
Use the image "MyImage" as a background to a FUxLayoutDialog:
self.m_fuxDlg.SetBackgroundImage("MyImage", "BackgroundImageTopLeft")
Use the image "MyImage" as a background to a FUxButtonControl:
self.m_myButton.SetImage("MyImage")
Use the image "MyImageControl" as a component in the FUxLayoutBuilder:
builder = acm.FUxLayoutBuilder() builder.BeginVertBox() builder.AddImage("MyImageControl") builder.EndBox() def HandleCreate(self, dlg, layout): self.m_layout.GetControl("MyImageControl").SetData("MyImage")
6.8 Working with Insert Items programmatically The Insert Items dialog is PRIME's standard way to add items to a Trading Manager sheet. You can develop Python modules that work with Insert Items programmatically.
The FNamespaceUXDialogs namespace contains the SelectObjectsInsertItems method which can be used to launch a standard Insert Items dialog. The FUX_CustomControlDialog example in the AEF Examples extension module provides an example of its use.
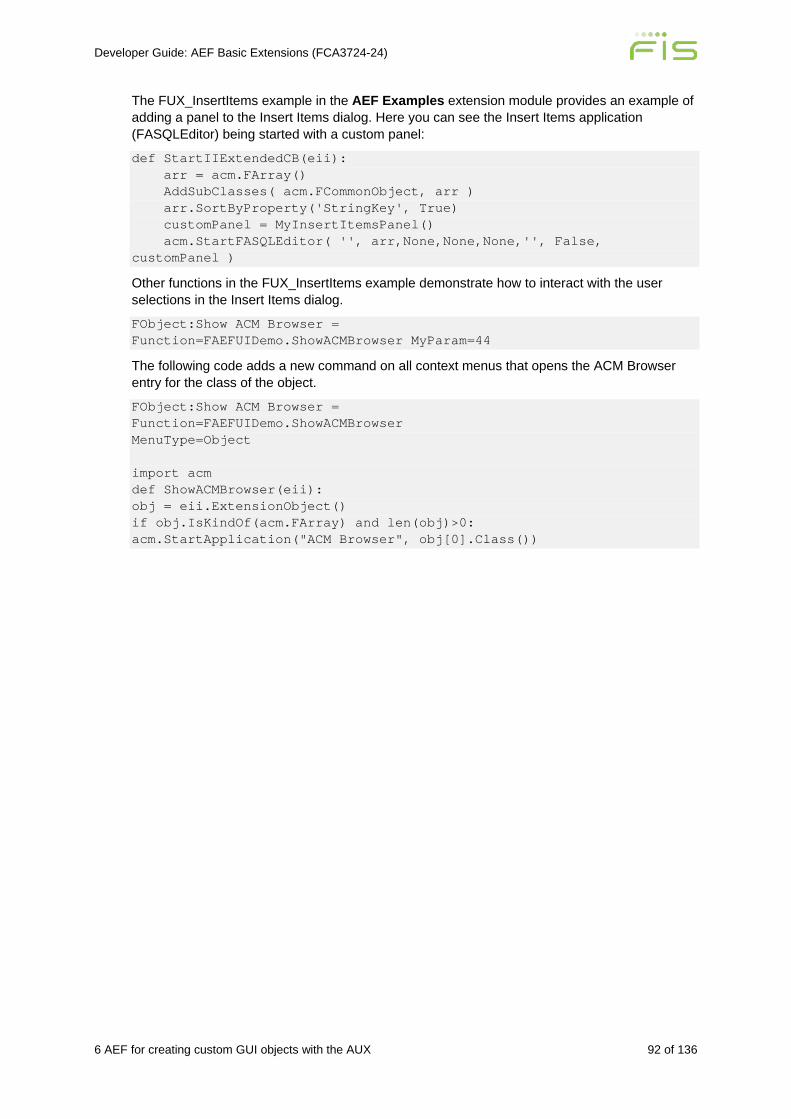
Developer Guide: AEF Basic Extensions (FCA3724-24)
6 AEF for creating custom GUI objects with the AUX 92 of 136
The FUX_InsertItems example in the AEF Examples extension module provides an example of adding a panel to the Insert Items dialog. Here you can see the Insert Items application (FASQLEditor) being started with a custom panel:
def StartIIExtendedCB(eii): arr = acm.FArray() AddSubClasses( acm.FCommonObject, arr ) arr.SortByProperty('StringKey', True) customPanel = MyInsertItemsPanel() acm.StartFASQLEditor( '', arr,None,None,None,'', False, customPanel )
Other functions in the FUX_InsertItems example demonstrate how to interact with the user selections in the Insert Items dialog.
FObject:Show ACM Browser = Function=FAEFUIDemo.ShowACMBrowser MyParam=44
The following code adds a new command on all context menus that opens the ACM Browser entry for the class of the object.
FObject:Show ACM Browser = Function=FAEFUIDemo.ShowACMBrowser MenuType=Object import acm def ShowACMBrowser(eii): obj = eii.ExtensionObject() if obj.IsKindOf(acm.FArray) and len(obj)>0: acm.StartApplication("ACM Browser", obj[0].Class())
Developer Guide: AEF Basic Extensions (FCA3724-24)
7 AEF for reporting 93 of 136
7 AEF for reporting The AEF provides tools and techniques for customising the built-on reports based on Trading Manager sheets and creating new reports. Also, support for the older technique of reading database values through ASQL queries continues.
• Extension arena: AEF for reporting. • Licensing: Base (included in basic site license). • Supported uses:
− Creating reports from Trading Manager sheets − Creating a sheet report from a Python module − Creating a database report using ASQL − Customising the appearance of reports − Translating strings in reports − Creating custom trade tickets
• Extension types (definitions):
− FWorksheetReport − FASQLReport − FReportSettings − FPythonCode − FReportAPI − FXSLTemplate − FPrintTemplate
• Tools and techniques:
− Save sheets as sheet templates from Trading Manager and other PRIME applications. Create and modify print templates in Extension Editor. Save to extension module.
• References: Developer Guide: ARENA SQL (FCA1050). • Training and certification:
− FA104 AEF: Customized Reporting. − FA109 ARENA Data Model and ASQL: Real Time Reports and Applications.
• Support: Standard support through Client Services. • Services: Standard professional services through FIS Capital Markets Consulting
Services.
7.1 Report generation methods There are several modules (Python scripts) which can be used to produce custom reports in PRIME, each suited to a different purpose.
• The FWorksheetReport module provides facilities for producing reports based on Trading Manager sheets. As sheets are infinitely flexible in PRIME, unlimited reports of different types can be produced.
• The FASQLReport module makes it possible to produce reports directly from the data in the ADM database. Note that complex ASQL queries can also be run through the Information Manager in PRIME. For more information, refer to Developer Guide: ARENA SQL (FCA1050).
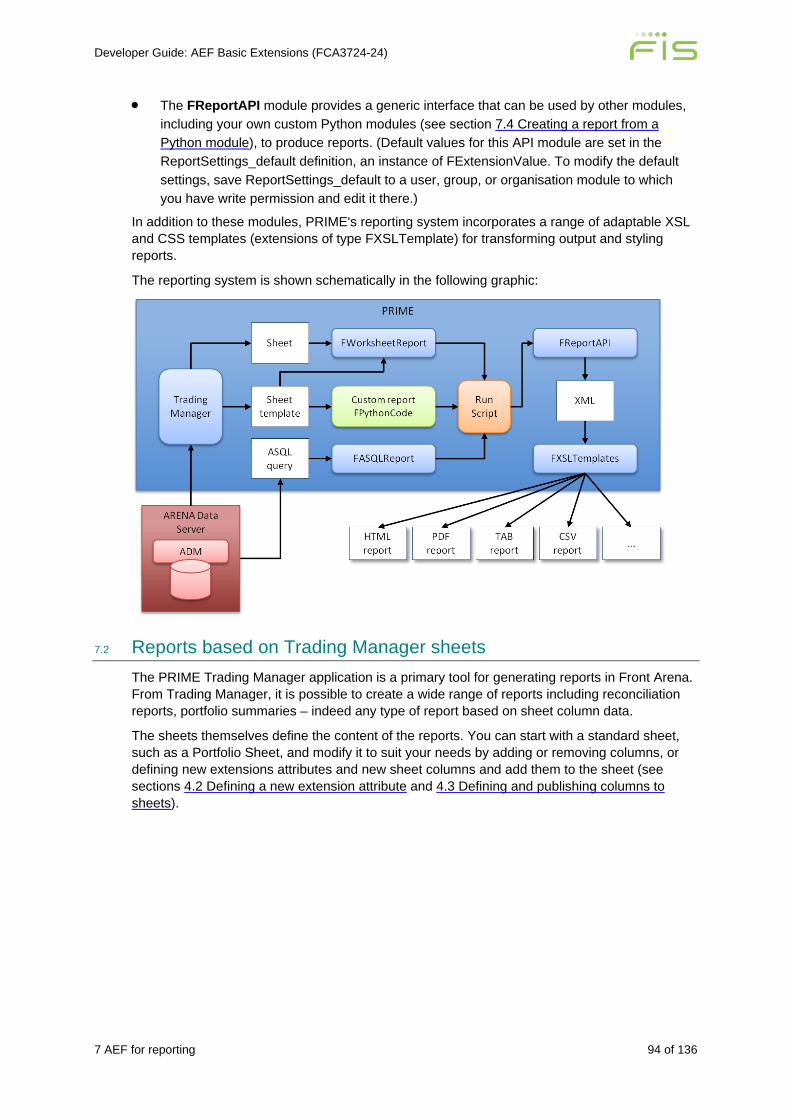
Developer Guide: AEF Basic Extensions (FCA3724-24)
7 AEF for reporting 94 of 136
• The FReportAPI module provides a generic interface that can be used by other modules, including your own custom Python modules (see section 7.4 Creating a report from a Python module), to produce reports. (Default values for this API module are set in the ReportSettings_default definition, an instance of FExtensionValue. To modify the default settings, save ReportSettings_default to a user, group, or organisation module to which you have write permission and edit it there.)
In addition to these modules, PRIME's reporting system incorporates a range of adaptable XSL and CSS templates (extensions of type FXSLTemplate) for transforming output and styling reports.
The reporting system is shown schematically in the following graphic:
7.2 Reports based on Trading Manager sheets The PRIME Trading Manager application is a primary tool for generating reports in Front Arena. From Trading Manager, it is possible to create a wide range of reports including reconciliation reports, portfolio summaries – indeed any type of report based on sheet column data.
The sheets themselves define the content of the reports. You can start with a standard sheet, such as a Portfolio Sheet, and modify it to suit your needs by adding or removing columns, or defining new extensions attributes and new sheet columns and add them to the sheet (see sections 4.2 Defining a new extension attribute and 4.3 Defining and publishing columns to sheets).

Developer Guide: AEF Basic Extensions (FCA3724-24)
7 AEF for reporting 95 of 136
Any sheet can be saved as a sheet template. For example, you can customise a basic Portfolio Sheet and from that create a sheet template that can be distributed to other users.
Reports can be prepared as HTML and output to screen or file.
7.2.1 Reporting scripts Front Arena's reporting scripts are executed from the PRIME Explorer. They can be access from the Session Manager, by selecting All>Data>Explorer>Business Objects>Scripts>Reporting. Some reporting scripts can also be run from the Trading Manager.
You can create your own menu options within PRIME applications to execute the reporting scripts directly (see section 5.9 Creating and customising commands).
The default reporting scripts are all extensions of type FPythonCode and stored in the Default extension module that is included in all contexts. The scripts are:
Reporting script Description
FASQLReport Creates a report based on the result of an ASQL query.
FOperationsWorksheetReport Creates a report for settlements and confirmations based on the content of workbooks or trading sheet templates.
FTransactionHistoryReport Creates a hierarchical transaction history report with changed objects as top-level rows and the changed attributes as child rows.
FWorksheetReport Creates a report based on the content of workbooks or trading sheet templates. Additional content can be added on the fly, such as portfolios, trade filters and trades. For the XML schema, see the FXSLTemplate called FWorkSheetReportSchema in the Extension Editor.
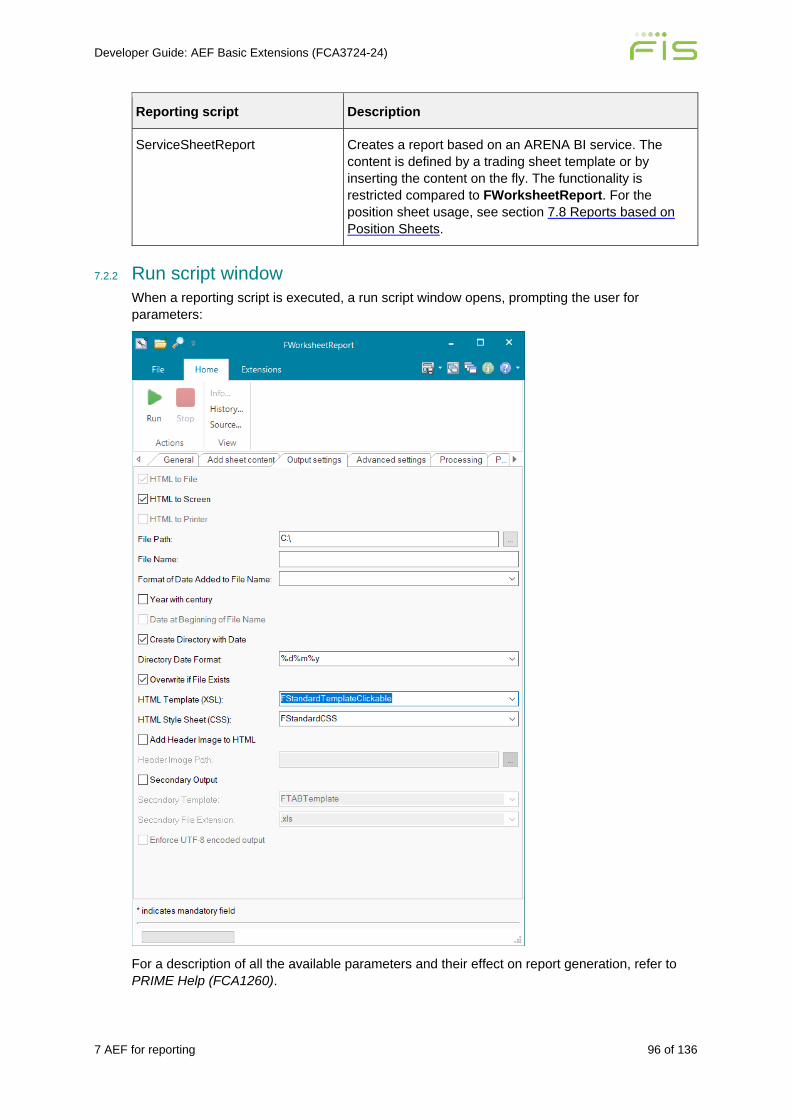
Developer Guide: AEF Basic Extensions (FCA3724-24)
7 AEF for reporting 96 of 136
Reporting script Description
ServiceSheetReport Creates a report based on an ARENA BI service. The content is defined by a trading sheet template or by inserting the content on the fly. The functionality is restricted compared to FWorksheetReport. For the position sheet usage, see section 7.8 Reports based on Position Sheets.
7.2.2 Run script window When a reporting script is executed, a run script window opens, prompting the user for parameters:
For a description of all the available parameters and their effect on report generation, refer to PRIME Help (FCA1260).
Developer Guide: AEF Basic Extensions (FCA3724-24)
7 AEF for reporting 97 of 136
7.2.3 Python report API After clicking the Run button in the run script window, the parameters entered by the user are sent to the Python module FReportAPI. This Python module outputs XML.
As well as handling input from the run script window, the FReportAPI module also provides a generic interface through which any Python script can create reports. The API allows the specification of the same parameters as the run script opened by FWorksheetReport.
7.2.4 XSL templates and style sheets The XML output from the scripts is transformed into HTML and other formats using cascading style sheets and XSL templates.
All the XSL templates and cascading style sheets are extensions of type FXSLTemplate and are stored in the Default extension module. They include primary templates for HTML output, and secondary templates for other output formats.
All XSL templates and style sheets are documented in the AEF Browser and can be viewed in Extension Editor.
When generated, all reports are saved to the location specified by File Path / File Name in the run script window (or in the triggering Python script). HTML files can also be displayed on the screen.
The following table lists primary HTML templates:
Primary HTML templates Description
FStandardTemplate Basic HTML report
FStandardTemplateClickable HTML report with active content
FStandardTemplateUpdated HTML report template, refreshed periodically
FTradeTicketHTML HTML report template, with one trade per page when printing
FStandardCSS Default cascading style sheet for HTML presentation
The following table lists secondary templates:
Secondary templates Description
FCSVTemplate Comma separated values, no formatting
FCSVTemplateFormattedData Comma separated values and formatting
FLandscapePDF PDF report template, landscape*
FStandardPDF PDF report template, portrait*
FTABTemplate Tab-separated report template
Developer Guide: AEF Basic Extensions (FCA3724-24)
7 AEF for reporting 98 of 136
Secondary templates Description
FTradeTicketFOP PDF report template, with one trade per page*
FTradeTicketTXT TXT report template, with one trade per page
* To generate a PDF report from the Trading Manager, your workstation must be able to produce PDFs. If you do not have Adobe Acrobat, you can use an open-source application called Apache FOP to create PDF output. Download FOP from xmlgraphics.apache.org/fop/download.html, and install it to C:\program files\fop. The path to fop.bat is specified in the FPythonCode module FReportSettings.
You can create your own XSL templates and style sheets use them to customise reports (see section 7.5 Creating a custom style sheet).
7.2.5 Translating strings in reports ASCII strings in XML reports can be translated to other UTF-8 strings. This can be used, for example, to replace default English keywords with local language keywords in the report output.
Two extensions govern the translation of strings:
• TranslationFile, an extension of type FExtensionValue. This file defines the mappings between strings. To change this file, copy it to an organisation, group, or user extension module to which you have write access and edit it there. For more information on the contents of this file, refer to the entry for TranslationFile in the AEF Browser.
• FTranslateReportXML, an extension of type FPythonCode. This module contains the translate_xml function that starts the translation. To set up report translations, specify this module and function on the run script window's Processing tab. The field Pre Process XML is both a select list and a text box, so type in the string FTranslateReportXML. translate_xml.
In XML reports, non-breaking spaces (\xa0) are used to replace blanks in calculated values. The Python library functions used for translations cannot process non-breaking spaces therefore they are replaced with normal spaces inside the translate_xml function. This has no effect HTML output.
7.3 Creating a report based on a Portfolio Sheet You can create a simple Profit/Loss report based on a customised Portfolio Sheet and output it as HTML to the screen. You can save the sheet as a template so that it can be used for future reports and by other users and by Python scripts.
1. In the PRIME Session Manager, select All>Trading>Trading Manager. 2. In the Trading Manager, open a Portfolio Sheet (Sheets>Add Position Control
Sheet>Portfolio) and add a portfolio to it (Insert>Items). 3. Select Home>Insert>Columns. 4. Select a context (for example, MyTestContext). See section 2.3 Creating a dedicated
development context.
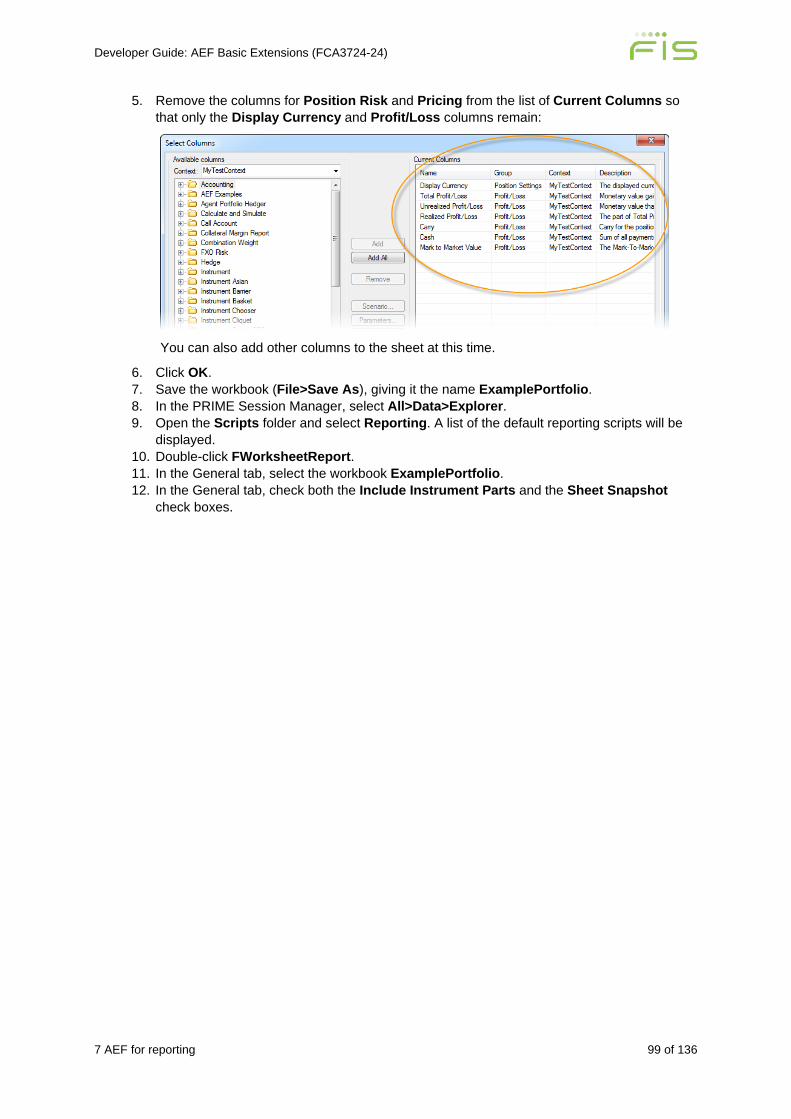
Developer Guide: AEF Basic Extensions (FCA3724-24)
7 AEF for reporting 99 of 136
5. Remove the columns for Position Risk and Pricing from the list of Current Columns so that only the Display Currency and Profit/Loss columns remain:
You can also add other columns to the sheet at this time.
6. Click OK. 7. Save the workbook (File>Save As), giving it the name ExamplePortfolio. 8. In the PRIME Session Manager, select All>Data>Explorer. 9. Open the Scripts folder and select Reporting. A list of the default reporting scripts will be
displayed. 10. Double-click FWorksheetReport. 11. In the General tab, select the workbook ExamplePortfolio. 12. In the General tab, check both the Include Instrument Parts and the Sheet Snapshot
check boxes.
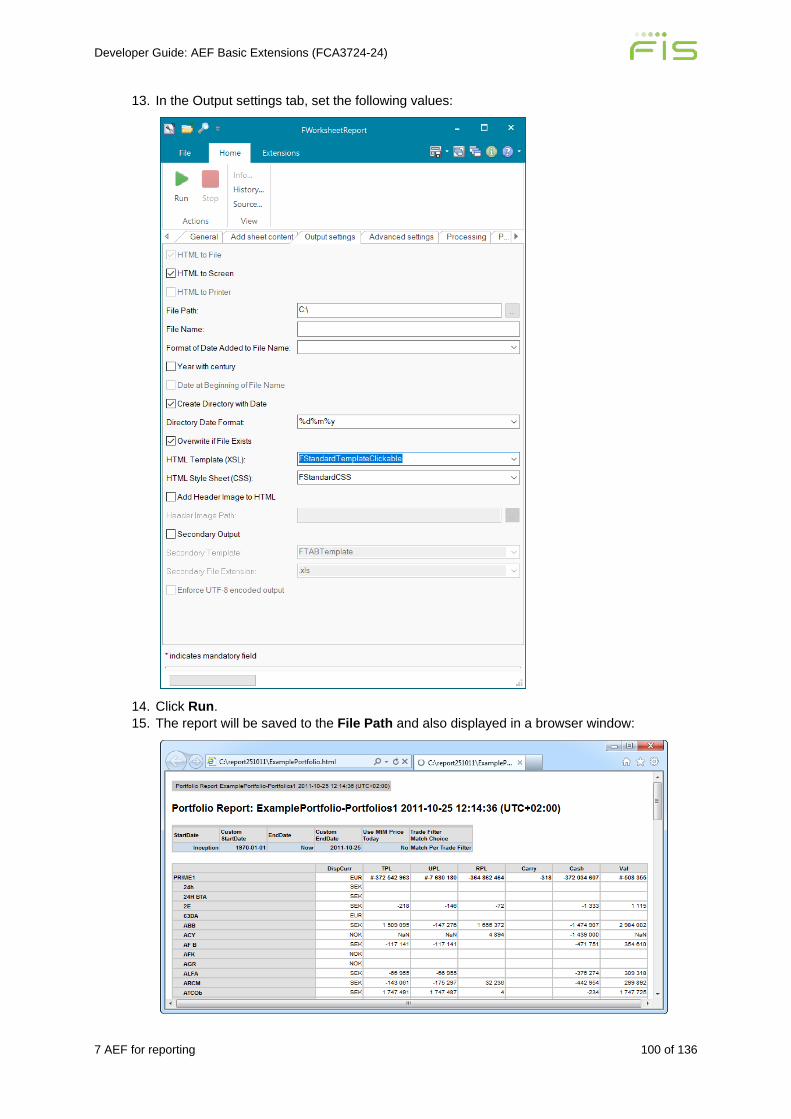
Developer Guide: AEF Basic Extensions (FCA3724-24)
7 AEF for reporting 100 of 136
13. In the Output settings tab, set the following values:
14. Click Run. 15. The report will be saved to the File Path and also displayed in a browser window:

Developer Guide: AEF Basic Extensions (FCA3724-24)
7 AEF for reporting 101 of 136
16. In the Trading Manager, select File>Save Sheet as Template, tick the Save Shared box, and save the sheet with the name Profit/Loss Report.
17. In the PRIME Session Manager, open another instance of the Trading Manager. 18. Select Sheets>Add Sheet>From Template. 19. Select Profit/Loss Report and click Open. The sheet will open with your selected columns
and items. 20. Select Reports>Reports>Worksheet Report. (This menu option performs the same
function as running the FWorksheetReport script from the PRIME Explorer.) The worksheet report dialog will open, enabling you to specify the parameters for the report.
7.4 Creating a report from a Python module You can create a report from a Python module using the FReportAPI. The Python module effectively performs the same function as the run script GUI, setting the various parameters that are needed to generate the report and identifies a saved template.
1. Create the Profit/Loss Report template, as described in section 7.3 Creating a report based on a Portfolio Sheet.
2. In the PRIME Session Manager, select All>System>Extension Editor. 3. Search for the FReportAPI FPythonCode extension. 4. In the extension, scroll down to the section commented '''Public Properties'''. Here you will
find a list of the properties that can be set in your Python scripts, and an indication of the tabs on which they are set in the normal run script window.
5. Create a new FPythonCode extension in the appropriate module. 6. Enter the following Python code definition, replacing YourPortfolio with the name of a
portfolio that exists in the database:
FObject:MyCustomReport import acm import FReportAPI #Create an instance of the FReportAPI. report = FReportAPI.FWorksheetReportApiParameters() #Set the template to use when creating the report. report.template = ['Profit/Loss Report'] #Are we going to add additional portfolios to the report? Yes. report.addPortfolio = True #Add the portfolio ExamplePortfolio to the report. To add several portfolios #use ['ExamplePortfolio','AnotherExamplePortfolio',...]. report.portfolios = ['YourPortfolio'] #Should the report be output as HTML to the screen? Yes. report.htmlToScreen = True #Should the report include raw, unformatted data? Yes. report.includeRawData = True #Start generating the report report.RunScript()
7. Apply and save the changes. 8. In the PRIME Session Manager, select All>Data>Explorer. 9. Select Business Objects>Python Modules>MyCustomReport, right-click and select
Run. The report will be generated and displayed as HTML in a browser.
You can create your own menu options within PRIME applications to execute your Python reporting module directly (see 5.9 Creating and customising commands).

Developer Guide: AEF Basic Extensions (FCA3724-24)
7 AEF for reporting 102 of 136
7.4.1 sheetSettings It is also possible to set the sheetSettings property, which corresponds to the Portfolio sheet settings and Trade sheet settings tabs in the FWorksheetReport script. The sheetSettings property should be used together with the corresponding override property to have effect. Note that the names of the parameters that can be added in the sheetSettings property differ from the names of the sheet settings in the GUI.
Example report.overridePortfolioSheetSettings = 'True' report.overrideTradeSheetSettings = 'True' report.sheetSettings={'FPortfolioSheet':{'Portfolio Profit Loss Start Date':'Yesterday','Portfolio Profit Loss End Date':'Now'},'FTradeSheet':{'Portfolio Profit Loss Start Date':'Yesterday','Portfolio Profit Loss End Date':'Now'}}
7.5 Creating a custom style sheet You can create new XSL templates and cascading style sheets to produce reports in other output formats, to perform simple calculations, or modify the appearance of a report.
The procedure for creating a new XSL transform and a new CSS is essentially the same. This example shows how to create a custom CSS that modifies the background colour of a report, and how to make that CSS available in the FWorksheetReport dialog.
1. Create the ExamplePortfolio workbook, as described in section 7.3 Creating a report based on a Portfolio Sheet.
2. In the Session Manager, select All>System>Extension Editor. 3. Select the appropriate context. 4. Search for the FStandardCSS FXSLTemplate extension. 5. Change the name of the extension to MyCustomCSS, and change the body background
attribute to red.
6. Apply and save the changes. 7. Add the MyCustomCSS extension to the group aef reporting>aef reporting - style
sheets. This, of course, is the group for style sheets. If you have created a custom XSL template instead, you need to add it to the appropriate reporting group.
8. Save the changes.
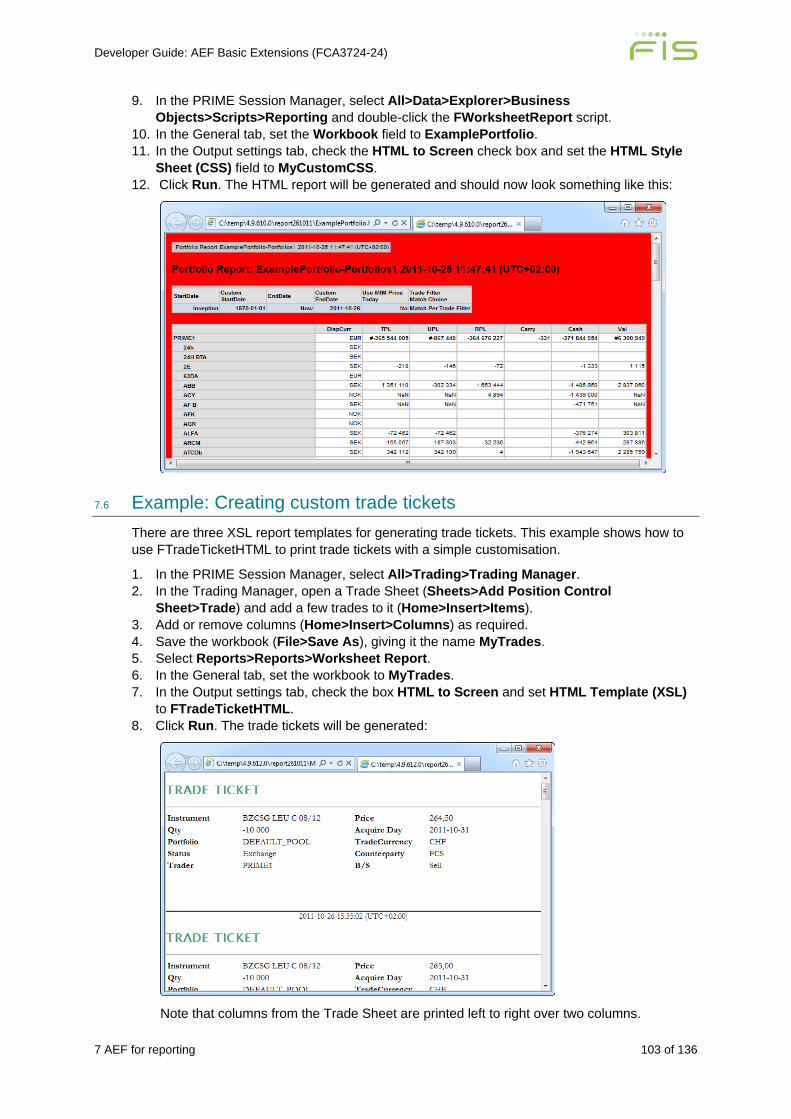
Developer Guide: AEF Basic Extensions (FCA3724-24)
7 AEF for reporting 103 of 136
9. In the PRIME Session Manager, select All>Data>Explorer>Business Objects>Scripts>Reporting and double-click the FWorksheetReport script.
10. In the General tab, set the Workbook field to ExamplePortfolio. 11. In the Output settings tab, check the HTML to Screen check box and set the HTML Style
Sheet (CSS) field to MyCustomCSS. 12. Click Run. The HTML report will be generated and should now look something like this:
7.6 Example: Creating custom trade tickets There are three XSL report templates for generating trade tickets. This example shows how to use FTradeTicketHTML to print trade tickets with a simple customisation.
1. In the PRIME Session Manager, select All>Trading>Trading Manager. 2. In the Trading Manager, open a Trade Sheet (Sheets>Add Position Control
Sheet>Trade) and add a few trades to it (Home>Insert>Items). 3. Add or remove columns (Home>Insert>Columns) as required. 4. Save the workbook (File>Save As), giving it the name MyTrades. 5. Select Reports>Reports>Worksheet Report. 6. In the General tab, set the workbook to MyTrades. 7. In the Output settings tab, check the box HTML to Screen and set HTML Template (XSL)
to FTradeTicketHTML. 8. Click Run. The trade tickets will be generated:
Note that columns from the Trade Sheet are printed left to right over two columns.
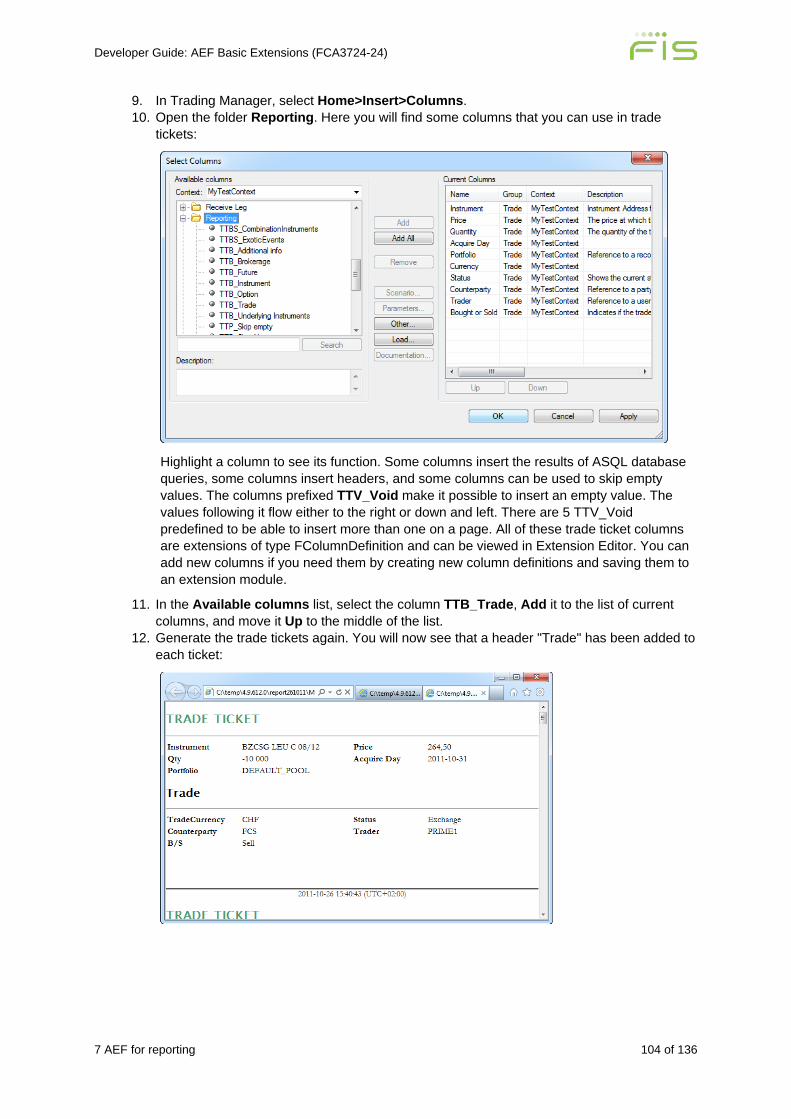
Developer Guide: AEF Basic Extensions (FCA3724-24)
7 AEF for reporting 104 of 136
9. In Trading Manager, select Home>Insert>Columns. 10. Open the folder Reporting. Here you will find some columns that you can use in trade
tickets:
Highlight a column to see its function. Some columns insert the results of ASQL database queries, some columns insert headers, and some columns can be used to skip empty values. The columns prefixed TTV_Void make it possible to insert an empty value. The values following it flow either to the right or down and left. There are 5 TTV_Void predefined to be able to insert more than one on a page. All of these trade ticket columns are extensions of type FColumnDefinition and can be viewed in Extension Editor. You can add new columns if you need them by creating new column definitions and saving them to an extension module.
11. In the Available columns list, select the column TTB_Trade, Add it to the list of current columns, and move it Up to the middle of the list.
12. Generate the trade tickets again. You will now see that a header "Trade" has been added to each ticket:
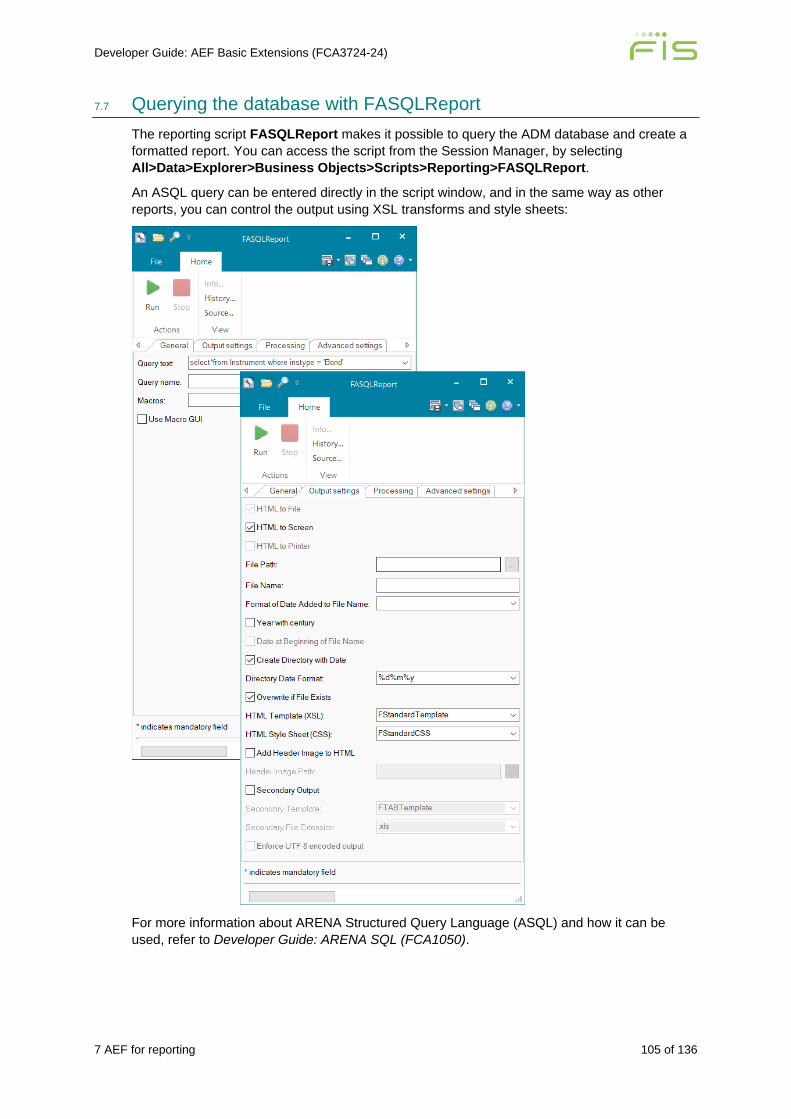
Developer Guide: AEF Basic Extensions (FCA3724-24)
7 AEF for reporting 105 of 136
7.7 Querying the database with FASQLReport The reporting script FASQLReport makes it possible to query the ADM database and create a formatted report. You can access the script from the Session Manager, by selecting All>Data>Explorer>Business Objects>Scripts>Reporting>FASQLReport.
An ASQL query can be entered directly in the script window, and in the same way as other reports, you can control the output using XSL transforms and style sheets:
For more information about ARENA Structured Query Language (ASQL) and how it can be used, refer to Developer Guide: ARENA SQL (FCA1050).
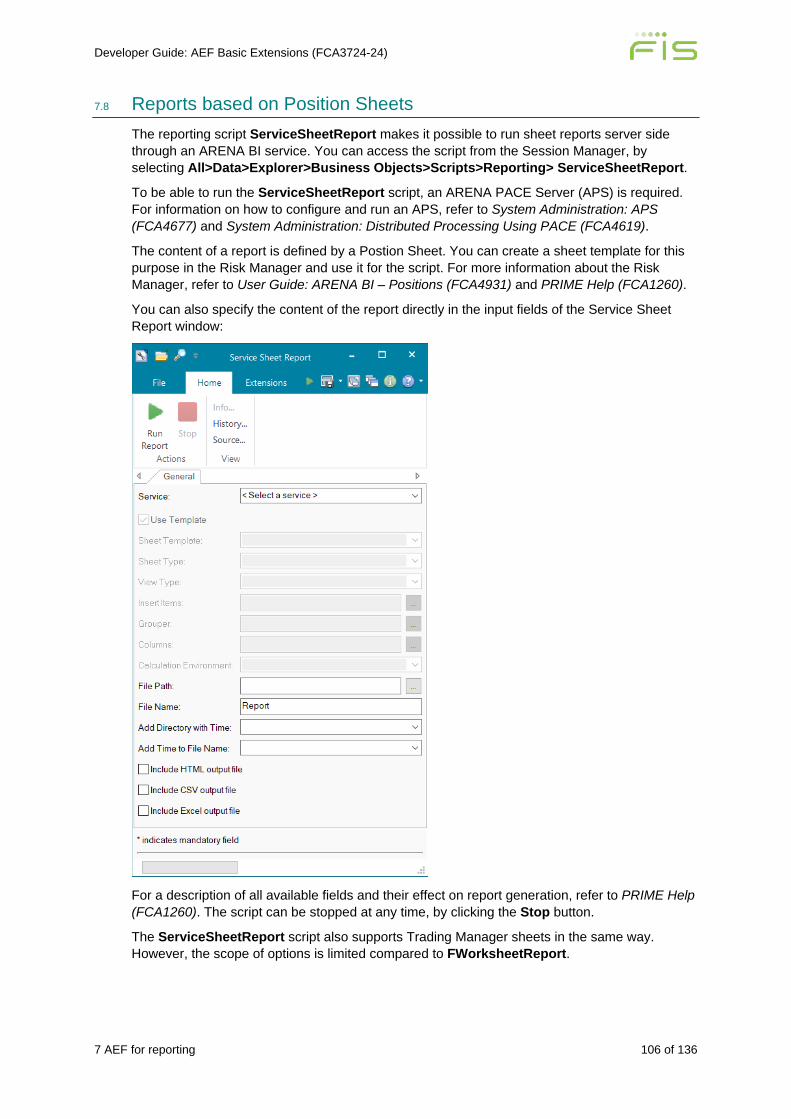
Developer Guide: AEF Basic Extensions (FCA3724-24)
7 AEF for reporting 106 of 136
7.8 Reports based on Position Sheets The reporting script ServiceSheetReport makes it possible to run sheet reports server side through an ARENA BI service. You can access the script from the Session Manager, by selecting All>Data>Explorer>Business Objects>Scripts>Reporting> ServiceSheetReport.
To be able to run the ServiceSheetReport script, an ARENA PACE Server (APS) is required. For information on how to configure and run an APS, refer to System Administration: APS (FCA4677) and System Administration: Distributed Processing Using PACE (FCA4619).
The content of a report is defined by a Postion Sheet. You can create a sheet template for this purpose in the Risk Manager and use it for the script. For more information about the Risk Manager, refer to User Guide: ARENA BI – Positions (FCA4931) and PRIME Help (FCA1260).
You can also specify the content of the report directly in the input fields of the Service Sheet Report window:
For a description of all available fields and their effect on report generation, refer to PRIME Help (FCA1260). The script can be stopped at any time, by clicking the Stop button.
The ServiceSheetReport script also supports Trading Manager sheets in the same way. However, the scope of options is limited compared to FWorksheetReport.

Developer Guide: AEF Basic Extensions (FCA3724-24)
7 AEF for reporting 107 of 136
The following are the benefits of ServiceSheetReport:
• Avoids locking the user interface by offloading the calculation work to a server. • Significant performance gains for large sheets due to using a transport protocol optimised
for large results.
A Python API is provided to create reports asynchronously without having an associated window. In this API, you can generate an .xml file containing results for further processing. Alternatively, you can skip the .xml file and traverse the report result to retrieve data using native data types. Depending on your use case, avoiding XML parsing can provide significant performance improvements.
Using the API, real-time updates can be enabled. This allows for incremental updates of sheet data after the full sheet report has been generated. For trading sheets, the protocol optimisation (for very large sheets) is no longer available if real-time updates are enabled.
For more information, refer to ServiceSheetReportApiExample in the extension module AEF Examples.

Developer Guide: AEF Basic Extensions (FCA3724-24)
8 AEF for trading workflows 108 of 136
8 AEF for trading workflows Within the AEF, the extension area AEF for trading workflows provides the tools and techniques you need to modify many aspects of the standard workflows:
• Extension arena: AEF for trading workflows. • Licensing: Base (included in basic site license). • Supported uses:
− Modifying the user's permission to change trade status − Modifying the method for calculating trade brokerage fees − Modifying the creation of closing trades from original trades − Modifying the add-on factor percentage for issuers/counterparties − Modifying the credit limit check on a trade − Modifying the credit limit utilisation for issuers/counterparties − Modifying the credit limit remaining for issuers/counterparties − Modifying the creation of exercise trades from original trades − Modifying the method for suggesting an ID for a new instrument − Modifying the creation of mirrored trades from original trades − Modifying the fields of a prolonged trade − Modifying the default reference price for trades − Modifying the default haircut for repo counterparties − Modifying the method for calculating repo haircuts − Modifying the creation of re-priced trades from original trades
• Extension types (definitions): FPythonCode/FAel:
− FTradeStatus − FBrokerage.broker_fee − FClose.close_trade − FCreditLimit − FExercise − FInstrumentSuggestId − FMirror − FProlong − FSuggestPrice − FHaircut − FHaircutApply − FReprice
• Tools and techniques:
− Create FPythonCode hook module and functions in the Extension Editor and save to extension module.
− Alternatively, create in Python Editor and save to ADS. Note that all the hook modules except FExercise are "safe" modules (see section 9.8 Preventing extension overrides with safe modules).
• References:
− Overview: BDP Business Data Processing (FCA2324) − User Guide: Repo Trading (FCA1475)
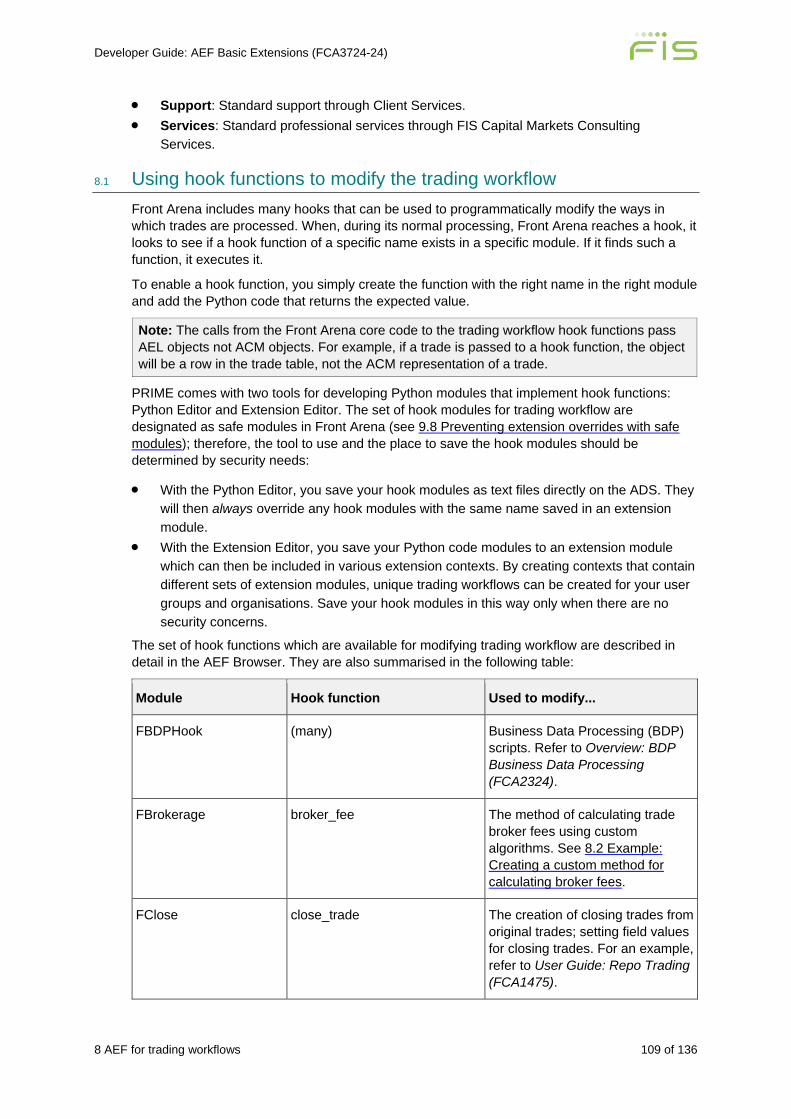
Developer Guide: AEF Basic Extensions (FCA3724-24)
8 AEF for trading workflows 109 of 136
• Support: Standard support through Client Services. • Services: Standard professional services through FIS Capital Markets Consulting
Services.
8.1 Using hook functions to modify the trading workflow Front Arena includes many hooks that can be used to programmatically modify the ways in which trades are processed. When, during its normal processing, Front Arena reaches a hook, it looks to see if a hook function of a specific name exists in a specific module. If it finds such a function, it executes it.
To enable a hook function, you simply create the function with the right name in the right module and add the Python code that returns the expected value.
Note: The calls from the Front Arena core code to the trading workflow hook functions pass AEL objects not ACM objects. For example, if a trade is passed to a hook function, the object will be a row in the trade table, not the ACM representation of a trade.
PRIME comes with two tools for developing Python modules that implement hook functions: Python Editor and Extension Editor. The set of hook modules for trading workflow are designated as safe modules in Front Arena (see 9.8 Preventing extension overrides with safe modules); therefore, the tool to use and the place to save the hook modules should be determined by security needs:
• With the Python Editor, you save your hook modules as text files directly on the ADS. They will then always override any hook modules with the same name saved in an extension module.
• With the Extension Editor, you save your Python code modules to an extension module which can then be included in various extension contexts. By creating contexts that contain different sets of extension modules, unique trading workflows can be created for your user groups and organisations. Save your hook modules in this way only when there are no security concerns.
The set of hook functions which are available for modifying trading workflow are described in detail in the AEF Browser. They are also summarised in the following table:
Module Hook function Used to modify...
FBDPHook (many) Business Data Processing (BDP) scripts. Refer to Overview: BDP Business Data Processing (FCA2324).
FBrokerage broker_fee The method of calculating trade broker fees using custom algorithms. See 8.2 Example: Creating a custom method for calculating broker fees.
FClose close_trade The creation of closing trades from original trades; setting field values for closing trades. For an example, refer to User Guide: Repo Trading (FCA1475).
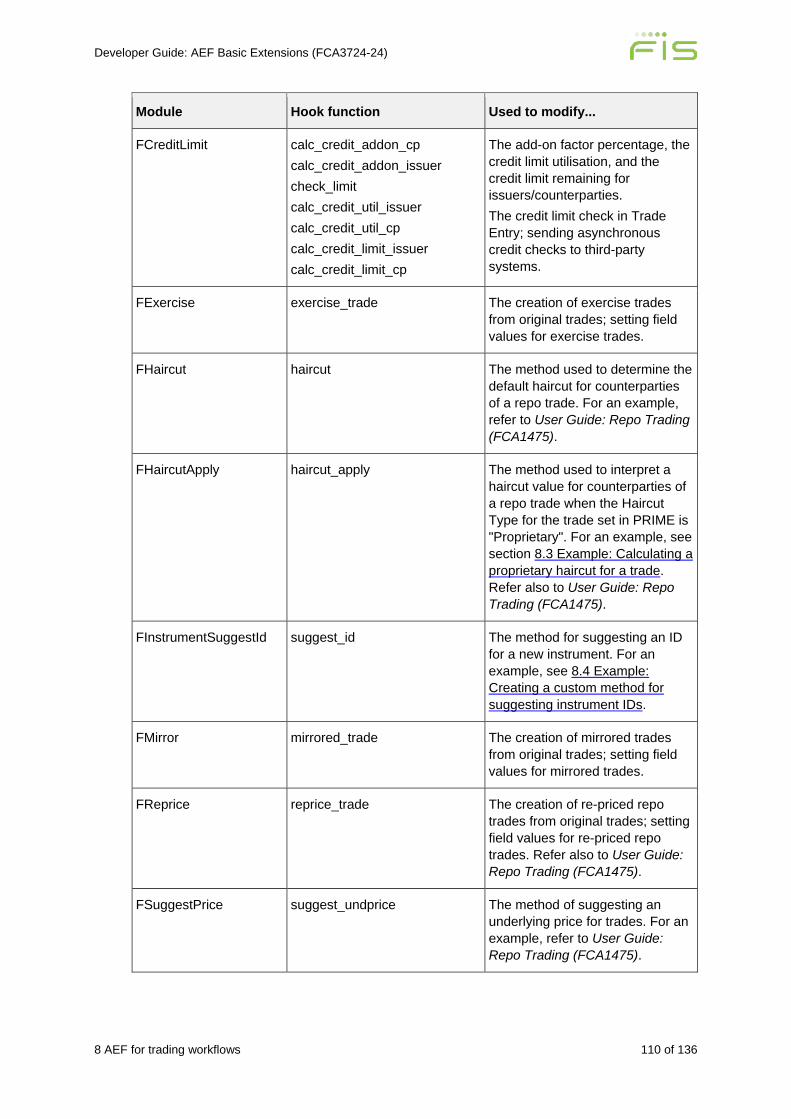
Developer Guide: AEF Basic Extensions (FCA3724-24)
8 AEF for trading workflows 110 of 136
Module Hook function Used to modify...
FCreditLimit calc_credit_addon_cp calc_credit_addon_issuer check_limit calc_credit_util_issuer calc_credit_util_cp calc_credit_limit_issuer calc_credit_limit_cp
The add-on factor percentage, the credit limit utilisation, and the credit limit remaining for issuers/counterparties. The credit limit check in Trade Entry; sending asynchronous credit checks to third-party systems.
FExercise exercise_trade The creation of exercise trades from original trades; setting field values for exercise trades.
FHaircut haircut The method used to determine the default haircut for counterparties of a repo trade. For an example, refer to User Guide: Repo Trading (FCA1475).
FHaircutApply haircut_apply The method used to interpret a haircut value for counterparties of a repo trade when the Haircut Type for the trade set in PRIME is "Proprietary". For an example, see section 8.3 Example: Calculating a proprietary haircut for a trade. Refer also to User Guide: Repo Trading (FCA1475).
FInstrumentSuggestId suggest_id The method for suggesting an ID for a new instrument. For an example, see 8.4 Example: Creating a custom method for suggesting instrument IDs.
FMirror mirrored_trade The creation of mirrored trades from original trades; setting field values for mirrored trades.
FReprice reprice_trade The creation of re-priced repo trades from original trades; setting field values for re-priced repo trades. Refer also to User Guide: Repo Trading (FCA1475).
FSuggestPrice suggest_undprice The method of suggesting an underlying price for trades. For an example, refer to User Guide: Repo Trading (FCA1475).
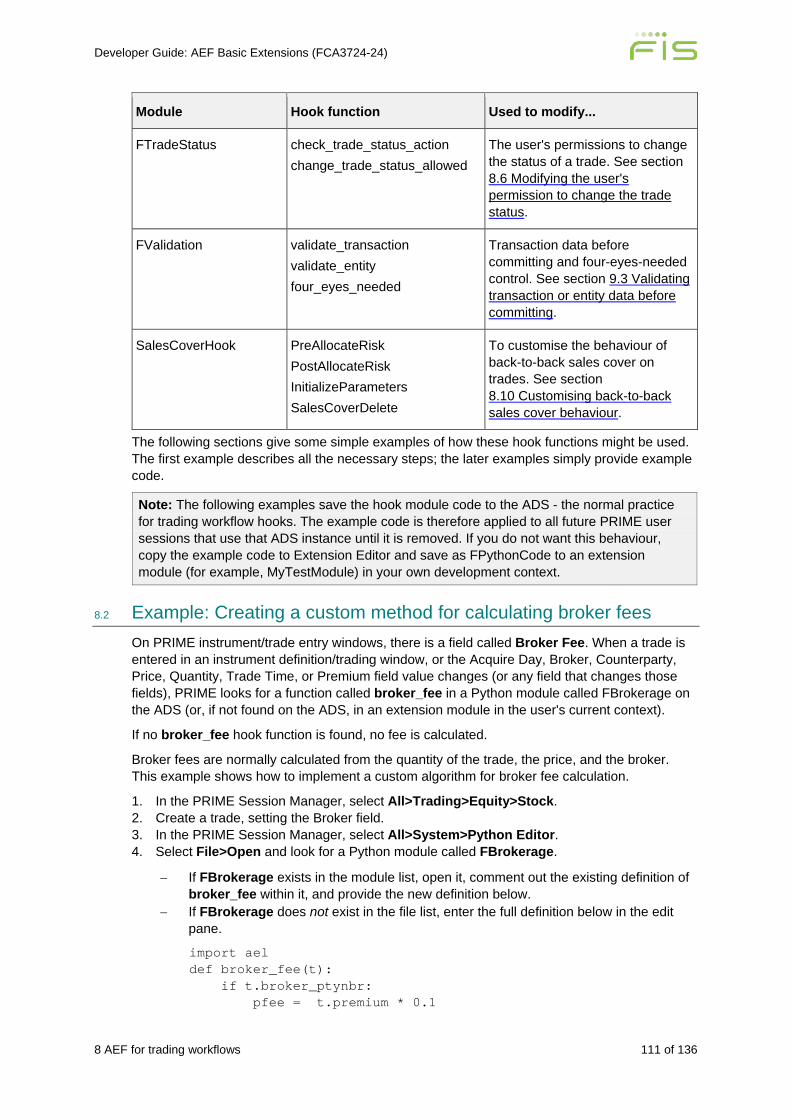
Developer Guide: AEF Basic Extensions (FCA3724-24)
8 AEF for trading workflows 111 of 136
Module Hook function Used to modify...
FTradeStatus check_trade_status_action change_trade_status_allowed
The user's permissions to change the status of a trade. See section 8.6 Modifying the user's permission to change the trade status.
FValidation validate_transaction validate_entity four_eyes_needed
Transaction data before committing and four-eyes-needed control. See section 9.3 Validating transaction or entity data before committing.
SalesCoverHook PreAllocateRisk PostAllocateRisk InitializeParameters SalesCoverDelete
To customise the behaviour of back-to-back sales cover on trades. See section 8.10 Customising back-to-back sales cover behaviour.
The following sections give some simple examples of how these hook functions might be used. The first example describes all the necessary steps; the later examples simply provide example code.
Note: The following examples save the hook module code to the ADS - the normal practice for trading workflow hooks. The example code is therefore applied to all future PRIME user sessions that use that ADS instance until it is removed. If you do not want this behaviour, copy the example code to Extension Editor and save as FPythonCode to an extension module (for example, MyTestModule) in your own development context.
8.2 Example: Creating a custom method for calculating broker fees On PRIME instrument/trade entry windows, there is a field called Broker Fee. When a trade is entered in an instrument definition/trading window, or the Acquire Day, Broker, Counterparty, Price, Quantity, Trade Time, or Premium field value changes (or any field that changes those fields), PRIME looks for a function called broker_fee in a Python module called FBrokerage on the ADS (or, if not found on the ADS, in an extension module in the user's current context).
If no broker_fee hook function is found, no fee is calculated.
Broker fees are normally calculated from the quantity of the trade, the price, and the broker. This example shows how to implement a custom algorithm for broker fee calculation.
1. In the PRIME Session Manager, select All>Trading>Equity>Stock. 2. Create a trade, setting the Broker field. 3. In the PRIME Session Manager, select All>System>Python Editor. 4. Select File>Open and look for a Python module called FBrokerage.
− If FBrokerage exists in the module list, open it, comment out the existing definition of broker_fee within it, and provide the new definition below.
− If FBrokerage does not exist in the file list, enter the full definition below in the edit pane.
import ael def broker_fee(t): if t.broker_ptynbr: pfee = t.premium * 0.1

Developer Guide: AEF Basic Extensions (FCA3724-24)
8 AEF for trading workflows 112 of 136
if abs(pfee) < 100: return 100 elif abs(pfee)>10000: return 10000 else: return pfee
This code uses the ael library because the object being passed into the hook (the trade) is an AEL object. If the hook function is written using the acm library, the trade object would first need to be converted to ACM like this:
acm_t=acm.FTrade[t.trdnbr]
The attribute broker_ptynbr identifies the broker for whom the fee should be calculated. This is determined by the broker chosen by the user in the Broker field.
5. Save the module with the name FBrokerage. 6. In the Python Editor, select Home>Module>Reload. The new definition of broker_fee will
be applied in the current PRIME session. 7. Go to the trade window. 8. Change the trade quantity, or price, or premium, or broker. You should see the broker fee
change accordingly:
Refer to Developer Guide: AEF Python (FCA2831) for a second simpler example.
8.3 Example: Calculating a proprietary haircut for a trade In the PRIME Instrument/Trade Entry windows for repo instrument types (Repo/Reverse, Security Loan, Buy-Sellback, and Collateral Trades), there is an option that lets the user select how the haircut is calculated.
If Haircut Type is set to Proprietary, PRIME will look for an implementation of the hook function haircut_apply in a Python module called FHaircutApply on the ADS (or, if not found on the ADS, in an extension module in the user's current context).
The haircut_apply hook function receives the trade and its nominal cash value as parameters, and it must return the new cash value of the trade with an opposite sign to the nominal cash value. A possible implementation can look like this:
def haircut_apply(trade, nominal): cash = 1 instr = trade.insaddr if instr: cash = nominal/0.98 return -cash
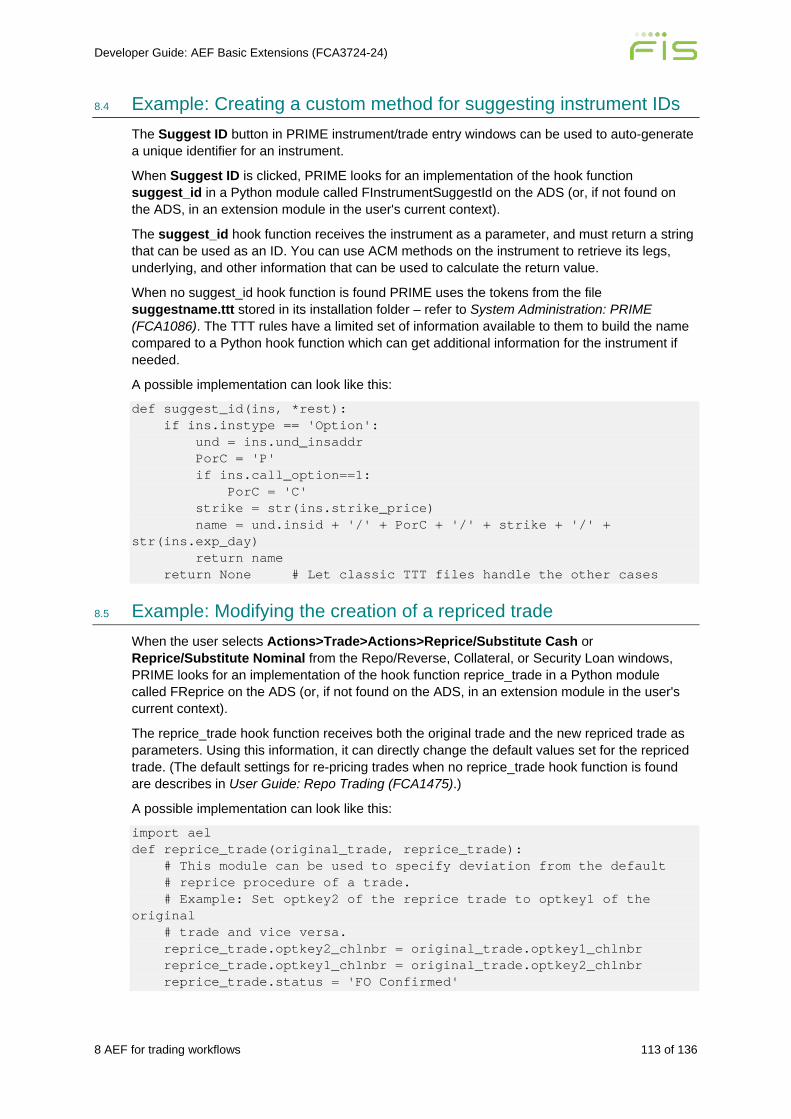
Developer Guide: AEF Basic Extensions (FCA3724-24)
8 AEF for trading workflows 113 of 136
8.4 Example: Creating a custom method for suggesting instrument IDs The Suggest ID button in PRIME instrument/trade entry windows can be used to auto-generate a unique identifier for an instrument.
When Suggest ID is clicked, PRIME looks for an implementation of the hook function suggest_id in a Python module called FInstrumentSuggestId on the ADS (or, if not found on the ADS, in an extension module in the user's current context).
The suggest_id hook function receives the instrument as a parameter, and must return a string that can be used as an ID. You can use ACM methods on the instrument to retrieve its legs, underlying, and other information that can be used to calculate the return value.
When no suggest_id hook function is found PRIME uses the tokens from the file suggestname.ttt stored in its installation folder – refer to System Administration: PRIME (FCA1086). The TTT rules have a limited set of information available to them to build the name compared to a Python hook function which can get additional information for the instrument if needed.
A possible implementation can look like this:
def suggest_id(ins, *rest): if ins.instype == 'Option': und = ins.und_insaddr PorC = 'P' if ins.call_option==1: PorC = 'C' strike = str(ins.strike_price) name = und.insid + '/' + PorC + '/' + strike + '/' + str(ins.exp_day) return name return None # Let classic TTT files handle the other cases
8.5 Example: Modifying the creation of a repriced trade When the user selects Actions>Trade>Actions>Reprice/Substitute Cash or Reprice/Substitute Nominal from the Repo/Reverse, Collateral, or Security Loan windows, PRIME looks for an implementation of the hook function reprice_trade in a Python module called FReprice on the ADS (or, if not found on the ADS, in an extension module in the user's current context).
The reprice_trade hook function receives both the original trade and the new repriced trade as parameters. Using this information, it can directly change the default values set for the repriced trade. (The default settings for re-pricing trades when no reprice_trade hook function is found are describes in User Guide: Repo Trading (FCA1475).)
A possible implementation can look like this:
import ael def reprice_trade(original_trade, reprice_trade): # This module can be used to specify deviation from the default # reprice procedure of a trade. # Example: Set optkey2 of the reprice trade to optkey1 of the original # trade and vice versa. reprice_trade.optkey2_chlnbr = original_trade.optkey1_chlnbr reprice_trade.optkey1_chlnbr = original_trade.optkey2_chlnbr reprice_trade.status = 'FO Confirmed'

Developer Guide: AEF Basic Extensions (FCA3724-24)
8 AEF for trading workflows 114 of 136
8.6 Modifying the user's permission to change the trade status The status of a trade indicates the position the trade has reached in the trading workflow. For example, the status "FO Confirmed" indicates that the trade has been executed with a counterparty and is ready for processing by the back office.
Front Arena comes with several predefined trade statuses, for example:
• 1 Exchange • 2 Simulated • 3 FO Confirmed • 4 BO Confirmed • 5 BO-BO Confirmed • 6 Legally Confirmed • 7 Internal • 8 Void • 9 Terminated • 10 Reserved • 11 Confirmed Void
A description of the meaning of these standard trade statuses, and the valid transitions between them, is found in PRIME Help (FCA1260).
New trade status types can be added by creating Trade Status Specifications in the PRIME Administration Console (see section 8.8 Example: Limiting the trade statuses a user can choose, and refer to PRIME Help (FCA1260)).
Fine control over a user's permissions to change the status of trades can be controlled through hook functions, user profiles and operational specifications.
To enable you to programmatically add checks and restrictions on users attempting to change the status of a trade, two Python hook functions are provided within the AEF:
• check_trade_status_action can be used to allow or prevent the user from making a change to the status of a trade. This hook function is called with two parameters: the trade currently stored in the database, and the new trade.
• change_trade_status_allowed can be used to limit the available statuses to which the user can change the trade. This hook function is called with three parameters: the trade status currently stored in the database, the new trade status, and the trade itself.
These hooks need to be defined in a custom Python module called FTradeStatus which, for security reasons, should be stored directly on the ADS. (FTradeStatus is a designated "safe" module in Front Arena, see section 9.8 Preventing extension overrides with safe modules).
These hook functions can be used, for example, to check that the user belongs to a group that is permitted to perform the required change to a trade's status. Both User Profiles and Operation Specifications are managed in the PRIME Administration Console, and they are both fully described in PRIME Help (FCA1260).
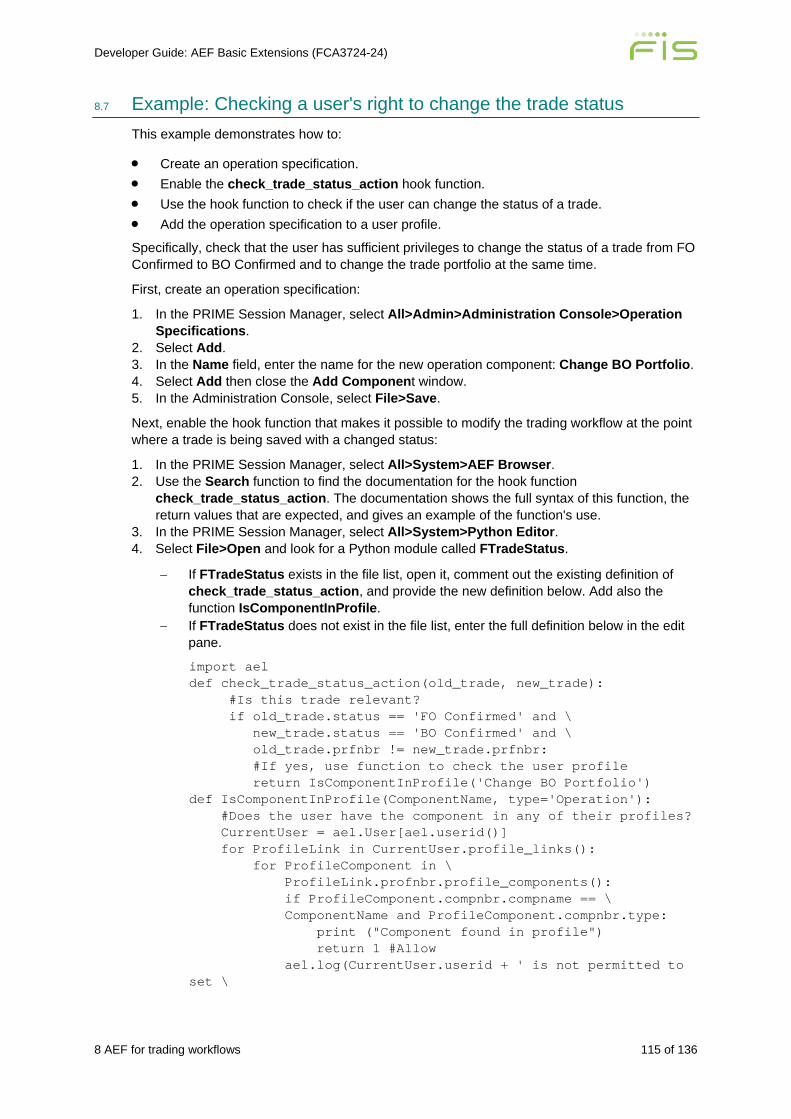
Developer Guide: AEF Basic Extensions (FCA3724-24)
8 AEF for trading workflows 115 of 136
8.7 Example: Checking a user's right to change the trade status This example demonstrates how to:
• Create an operation specification. • Enable the check_trade_status_action hook function. • Use the hook function to check if the user can change the status of a trade. • Add the operation specification to a user profile.
Specifically, check that the user has sufficient privileges to change the status of a trade from FO Confirmed to BO Confirmed and to change the trade portfolio at the same time.
First, create an operation specification:
1. In the PRIME Session Manager, select All>Admin>Administration Console>Operation Specifications.
2. Select Add. 3. In the Name field, enter the name for the new operation component: Change BO Portfolio. 4. Select Add then close the Add Component window. 5. In the Administration Console, select File>Save.
Next, enable the hook function that makes it possible to modify the trading workflow at the point where a trade is being saved with a changed status:
1. In the PRIME Session Manager, select All>System>AEF Browser. 2. Use the Search function to find the documentation for the hook function
check_trade_status_action. The documentation shows the full syntax of this function, the return values that are expected, and gives an example of the function's use.
3. In the PRIME Session Manager, select All>System>Python Editor. 4. Select File>Open and look for a Python module called FTradeStatus.
− If FTradeStatus exists in the file list, open it, comment out the existing definition of check_trade_status_action, and provide the new definition below. Add also the function IsComponentInProfile.
− If FTradeStatus does not exist in the file list, enter the full definition below in the edit pane. import ael def check_trade_status_action(old_trade, new_trade): #Is this trade relevant? if old_trade.status == 'FO Confirmed' and \ new_trade.status == 'BO Confirmed' and \ old_trade.prfnbr != new_trade.prfnbr: #If yes, use function to check the user profile return IsComponentInProfile('Change BO Portfolio') def IsComponentInProfile(ComponentName, type='Operation'): #Does the user have the component in any of their profiles? CurrentUser = ael.User[ael.userid()] for ProfileLink in CurrentUser.profile_links(): for ProfileComponent in \ ProfileLink.profnbr.profile_components(): if ProfileComponent.compnbr.compname == \ ComponentName and ProfileComponent.compnbr.type: print ("Component found in profile") return 1 #Allow ael.log(CurrentUser.userid + ' is not permitted to set \
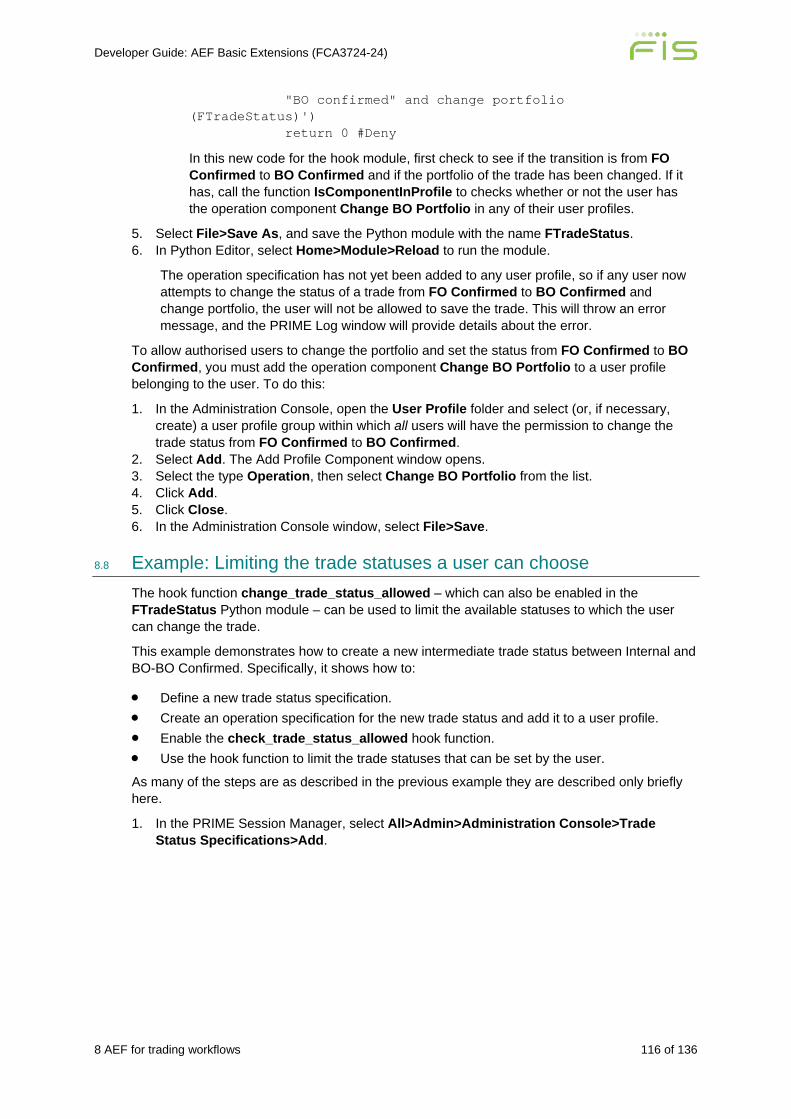
Developer Guide: AEF Basic Extensions (FCA3724-24)
8 AEF for trading workflows 116 of 136
"BO confirmed" and change portfolio (FTradeStatus)') return 0 #Deny
In this new code for the hook module, first check to see if the transition is from FO Confirmed to BO Confirmed and if the portfolio of the trade has been changed. If it has, call the function IsComponentInProfile to checks whether or not the user has the operation component Change BO Portfolio in any of their user profiles.
5. Select File>Save As, and save the Python module with the name FTradeStatus. 6. In Python Editor, select Home>Module>Reload to run the module.
The operation specification has not yet been added to any user profile, so if any user now attempts to change the status of a trade from FO Confirmed to BO Confirmed and change portfolio, the user will not be allowed to save the trade. This will throw an error message, and the PRIME Log window will provide details about the error.
To allow authorised users to change the portfolio and set the status from FO Confirmed to BO Confirmed, you must add the operation component Change BO Portfolio to a user profile belonging to the user. To do this:
1. In the Administration Console, open the User Profile folder and select (or, if necessary, create) a user profile group within which all users will have the permission to change the trade status from FO Confirmed to BO Confirmed.
2. Select Add. The Add Profile Component window opens. 3. Select the type Operation, then select Change BO Portfolio from the list. 4. Click Add. 5. Click Close. 6. In the Administration Console window, select File>Save.
8.8 Example: Limiting the trade statuses a user can choose The hook function change_trade_status_allowed – which can also be enabled in the FTradeStatus Python module – can be used to limit the available statuses to which the user can change the trade.
This example demonstrates how to create a new intermediate trade status between Internal and BO-BO Confirmed. Specifically, it shows how to:
• Define a new trade status specification. • Create an operation specification for the new trade status and add it to a user profile. • Enable the check_trade_status_allowed hook function. • Use the hook function to limit the trade statuses that can be set by the user.
As many of the steps are as described in the previous example they are described only briefly here.
1. In the PRIME Session Manager, select All>Admin>Administration Console>Trade Status Specifications>Add.
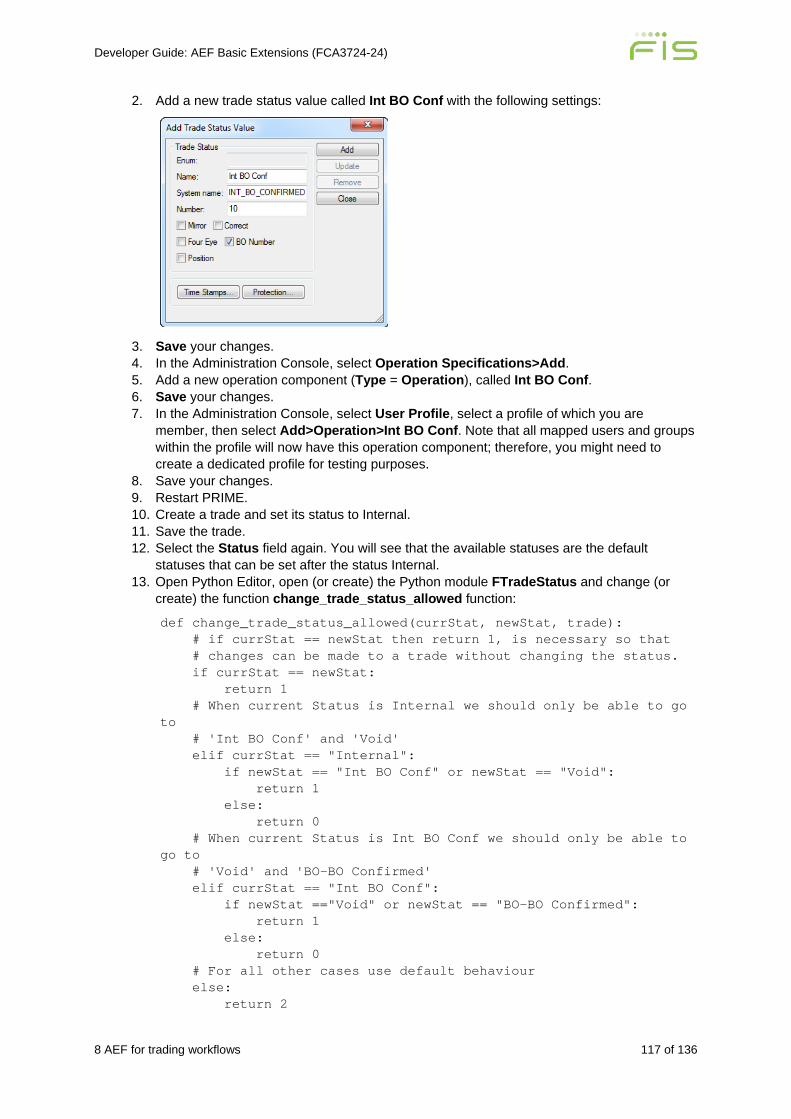
Developer Guide: AEF Basic Extensions (FCA3724-24)
8 AEF for trading workflows 117 of 136
2. Add a new trade status value called Int BO Conf with the following settings:
3. Save your changes. 4. In the Administration Console, select Operation Specifications>Add. 5. Add a new operation component (Type = Operation), called Int BO Conf. 6. Save your changes. 7. In the Administration Console, select User Profile, select a profile of which you are
member, then select Add>Operation>Int BO Conf. Note that all mapped users and groups within the profile will now have this operation component; therefore, you might need to create a dedicated profile for testing purposes.
8. Save your changes. 9. Restart PRIME. 10. Create a trade and set its status to Internal. 11. Save the trade. 12. Select the Status field again. You will see that the available statuses are the default
statuses that can be set after the status Internal. 13. Open Python Editor, open (or create) the Python module FTradeStatus and change (or
create) the function change_trade_status_allowed function:
def change_trade_status_allowed(currStat, newStat, trade): # if currStat == newStat then return 1, is necessary so that # changes can be made to a trade without changing the status. if currStat == newStat: return 1 # When current Status is Internal we should only be able to go to # 'Int BO Conf' and 'Void' elif currStat == "Internal": if newStat == "Int BO Conf" or newStat == "Void": return 1 else: return 0 # When current Status is Int BO Conf we should only be able to go to # 'Void' and 'BO-BO Confirmed' elif currStat == "Int BO Conf": if newStat =="Void" or newStat == "BO-BO Confirmed": return 1 else: return 0 # For all other cases use default behaviour else: return 2
Developer Guide: AEF Basic Extensions (FCA3724-24)
8 AEF for trading workflows 118 of 136
14. Save FTradeStatus. 15. In the Python Editor, select Home>Module>Reload. 16. Reopen the trade and select the Status field. Now you will see that the available statuses
that can be set after Internal are limited in accordance with the change_trade_status_allowed function.
If you save the trade with the status Int BO Conf, you will see that the statuses that can then be set are Void and BO-BO Confirmed.
8.9 Customising trade routing operations Front Arena provides a framework for routing trades according to instructions defined in the PRIME Administration Console. Using FPythonCode and FRoutingOperationDefinition extensions customers with AEF certification can develop custom routing operations for use with routing instructions.
For step-by-step instructions, refer to User Guide: Risk-Based Routing (FCA4583).
8.10 Customising back-to-back sales cover behaviour The hook functions in the SalesCover Python module can be used to customise the trades and instruments, which are created when a trade is back-to-back sales covered. The module has four hooks, PreAllocateRisk, PostAllocateRisk, InitializeParameters and SalesCoverDelete.
The PreAllocateRisk hook is called after the parameters are set, but before risk allocation is run. A typical case is after the user saves the instrument and trade, but before the sales cover trades are created. Input is an FB2BSalesCoverConstellationParameters object, and output is a pass on argument to the PostAllocateRisk hook and can be any FObject object.
The PostAllocateRisk hook is called after the trades are created, but not yet persisted. First input is a FRiskAllocationResult and contains the Artifacts to be committed (trades and instruments) among other things. Second input is the return object from the PreAllocateRisk hook.
The InitializeParameters hook is called when a trade is opened in the instrument definition window. Input is an FB2BSalesCoverConstellationParameters object.
The SalesCoverDelete hook is called when a trade is deleted or when the back-to-back sales cover is removed from a trade.
The built-in Deal Capture Examples module contains an example of a hook that moves the sales spread to payments on the sales desk, and trading desk trades.
Developer Guide: AEF Basic Extensions (FCA3724-24)
9 AEF for security and validation 119 of 136
9 AEF for security and validation The AEF provides interfaces, tools, techniques for extending the security and validation features of Front Arena, as summarised in the following table. For more information about AEF, including information about training and support, refer to Overview: Extending Front Arena (FCA2736).
• Extension area: AEF for security and validation. • Licensing: Base (included in basic site license). • Supported uses:
− Validating and modifying sheet data on input − Validating transaction or entity data before committing − Disabling four-eyes control for a transaction − Validating instrument definition data on saving − Validating user password choices − Preventing extension overrides with safe modules
• Extension types (definitions):
− FColumnDefinition:
• OnInputHook and OnPostInputHook properties
− FParameterGUIDefinition:
• InsDefPreSaveUiValidation
− FPythonCode:
• InsDefPreSaveUiValidation
− FAel (safe modules):
• FPassword • FValidation
• Tools and techniques:
− To validate sheet input data, create in Extension Editor an FColumnDefinition with OnInputHook/OnPostInputHook properties. Link to FPythonCode. Save to extension module.
− To validate saved instrument definition data, create in Extension Editor an FParameterGUIDefinition. Link to InsDefPreSaveUiValidation FPythonCode module. Save to extension module.
− For other validations, create hook module(s) and functions in Python Editor and save to ADS. Modify sheet column definitions in Extension Editor. Save to extension module.
• Examples in AEF Examples module:
− FValidationSample − FValidationSampleCommon − FValidationSampleTrade − InsDefPreSaveUiValidation
• Training and certification: FA110 Front Arena: installation and Administration. • Support: Standard support through Client Services. • Services: Standard professional services through FIS Capital Markets Consulting
Services.
Developer Guide: AEF Basic Extensions (FCA3724-24)
9 AEF for security and validation 120 of 136
9.1 Validating and modifying sheet data on input Sometimes you might want an action to be performed when data is entered in a column in a Trading Manager sheet. Typical actions that might be performed include validating, rescaling, and storing the input data, or making changes to data in other cells.
The AEF provides two hooks which can be used to perform these actions. The Python functions to call for these hooks are specified by the properties within the column definition.
Note: The usage of the column property ActionProcessingMode is required in distributed mode (PACE). Refer to System Administration: Distributed Processing Using PACE (FCA4619).
Hook Description Valid return values
OnInputHook Identifies the function to call whenever data is entered into or removed from a cell before the change is presented in the sheet by PRIME. The function can be used to validate the change, and/or to modify the input value.
return 0 The change to the cell value is not allowed. return str(input) The change to the cell value is allowed: PRIME will use the value entered by the user. return str(newInput) The change to the cell value is allowed: PRIME will use the value of newInput.
OnPostInputHook Identifies the function to call after processing the change by the OnInputHook and by PRIME and before presentation in the cell. The entered data cannot be changed. The function can be used to trigger other functions that save the data, make changes to other cells, activate or deactivate buttons, and so on.
[ignored]
Example The function postChangeAbsoluteOffset in the Python module FEqSpread is called by OnPostInputHook in an Absolute Offset column:
[Default]FTradingSheet:Absolute Offset = Access=ReadWrite Class=QuoteController Description=The value that offsets both the Bid and Ask Proposed Quote. Format=Detailed GroupLabel=Pricing InitialWidth=35 LabelList=Ofs;Offset;Absolute Offset OnPostInputHook=FEqSpread.postChangeAbsoluteOffset Method=QuoteSettings.Generic.AbsoluteOffset SimulationRowExtAttr=qTheorOffset
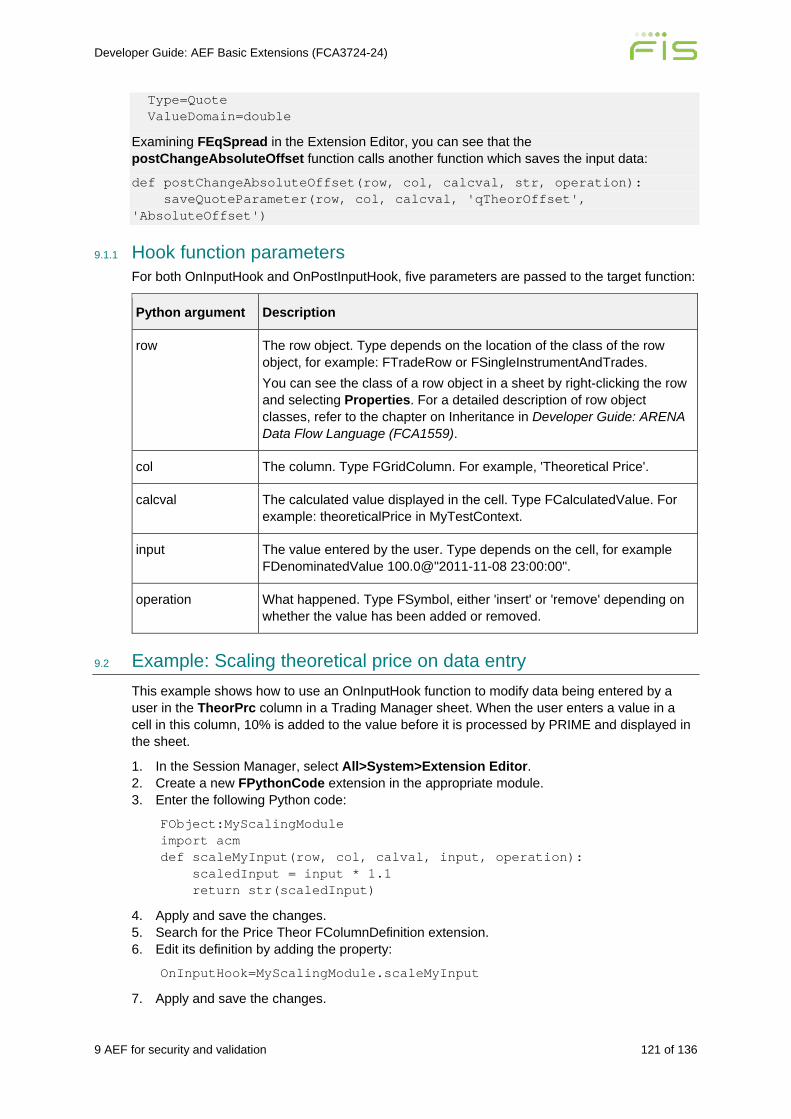
Developer Guide: AEF Basic Extensions (FCA3724-24)
9 AEF for security and validation 121 of 136
Type=Quote ValueDomain=double
Examining FEqSpread in the Extension Editor, you can see that the postChangeAbsoluteOffset function calls another function which saves the input data:
def postChangeAbsoluteOffset(row, col, calcval, str, operation): saveQuoteParameter(row, col, calcval, 'qTheorOffset', 'AbsoluteOffset')
9.1.1 Hook function parameters For both OnInputHook and OnPostInputHook, five parameters are passed to the target function:
Python argument Description
row The row object. Type depends on the location of the class of the row object, for example: FTradeRow or FSingleInstrumentAndTrades. You can see the class of a row object in a sheet by right-clicking the row and selecting Properties. For a detailed description of row object classes, refer to the chapter on Inheritance in Developer Guide: ARENA Data Flow Language (FCA1559).
col The column. Type FGridColumn. For example, 'Theoretical Price'.
calcval The calculated value displayed in the cell. Type FCalculatedValue. For example: theoreticalPrice in MyTestContext.
input The value entered by the user. Type depends on the cell, for example FDenominatedValue 100.0@"2011-11-08 23:00:00".
operation What happened. Type FSymbol, either 'insert' or 'remove' depending on whether the value has been added or removed.
9.2 Example: Scaling theoretical price on data entry This example shows how to use an OnInputHook function to modify data being entered by a user in the TheorPrc column in a Trading Manager sheet. When the user enters a value in a cell in this column, 10% is added to the value before it is processed by PRIME and displayed in the sheet.
1. In the Session Manager, select All>System>Extension Editor. 2. Create a new FPythonCode extension in the appropriate module. 3. Enter the following Python code:
FObject:MyScalingModule import acm def scaleMyInput(row, col, calval, input, operation): scaledInput = input * 1.1 return str(scaledInput)
4. Apply and save the changes. 5. Search for the Price Theor FColumnDefinition extension. 6. Edit its definition by adding the property:
OnInputHook=MyScalingModule.scaleMyInput
7. Apply and save the changes.

Developer Guide: AEF Basic Extensions (FCA3724-24)
9 AEF for security and validation 122 of 136
8. Select Trading>Credit>Bond or any sheet/pane that incorporates the theoretical price column.
9. Type the value 100 in the TheorPrc column. 10. Click Enter. The entered value will be scaled and displayed as 110:
9.3 Validating transaction or entity data before committing Within the AEF, there are two hooks which can be used to validate transaction data before it is written to the database. These hooks call Python functions with predefined names in a Python module called FValidation.
Hook function Description Valid return values
validate_transaction (transaction_list)
This function is called once for each database transaction, before the transaction is committed. It is called before validate_entity and before PRIME checks referential integrity, access rights, and data completeness. The argument transaction_list is a list of tuples, each consisting of an entity and an operation. For the 'Update' operation, the entity will be a clone of the original entity. For 'Insert', it will be a new entity. For 'Delete', it will be the original object.
return transaction_list Complete the transaction. return newTransaction_list Complete the transaction, using the tuples in newTransaction_list. raise Exception("message") Stop the transaction and inform the user of a problem via message.

Developer Guide: AEF Basic Extensions (FCA3724-24)
9 AEF for security and validation 123 of 136
Hook function Description Valid return values
validate_entity (entity, operation)
This function is called once for each entity in an 'Update', 'Insert', or 'Delete' operation in a transaction, before the transaction is committed. It is called after validate_transaction, but before PRIME checks referential integrity, access rights, and data completeness. You can use this hook to change certain entity values directly before the transaction is committed.
raise Exception("message") Stop the operation and inform the user of a problem via message. [returned values are ignored]
Using these hooks provides fine control over the commitment of transactions to the ADM database. A full description of these hooks, along with examples, can be found in the AEF Browser.
The Python module FValidation is a "safe" module in PRIME. It should be stored on the ADS, not in an extension module (see 9.8 Preventing extension overrides with safe modules).
Functions with FValidation can of course call other functions stored in non-safe Python modules in user extension modules. The AEF Examples module includes three Python modules (FValidationSample*) that together show how FValidation hook modules can be structured to permit both safe validation and customised validation for users and groups.
Note: In addition to FValidation, which is a general validation hook for all database commits, there is a special hook that is called before FValidation for user-initiated saves from the Instrument definition/trading window (see 9.6 Validating instrument definition data on saving).
9.4 Example: Checking whether a value has been set before committing
Note: This example assumes that the file FValidation does not yet exist on the ADS. If the file does exist and it already contains the function validate_transaction, you will need to edit the function in such a way as to not affect other users. To do this you can open your code with a for statement that limits the code's affect to you.
Example def validate_transaction(transaction_list): if ael.userid() in ('USER00'): #example code...
This example demonstrates how the validate_transaction hook can be used to check that the user has set a value in an additional information field called SubType.
1. In the PRIME Session Manager, select All>System>Python Editor. 2. Select File>Open and check to see if the file FValidation exists.
− If it exists, open it and read the note above. − If it does not exist, click Cancel.
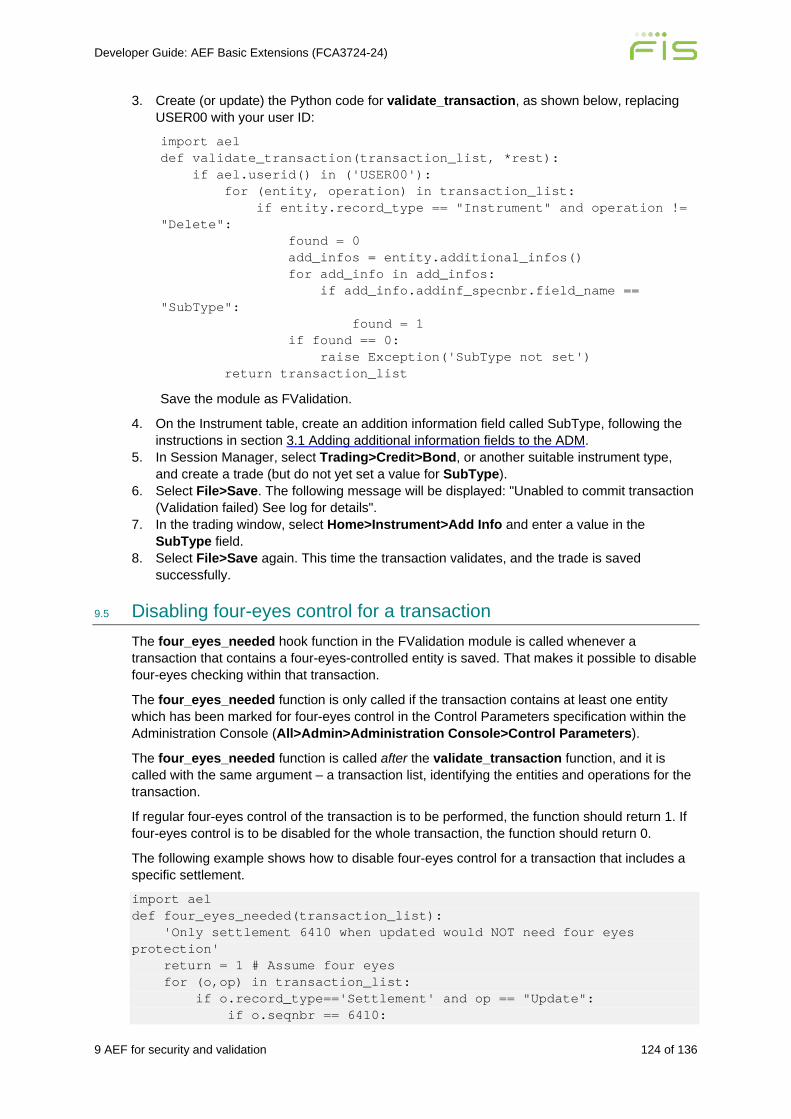
Developer Guide: AEF Basic Extensions (FCA3724-24)
9 AEF for security and validation 124 of 136
3. Create (or update) the Python code for validate_transaction, as shown below, replacing USER00 with your user ID:
import ael def validate_transaction(transaction_list, *rest): if ael.userid() in ('USER00'): for (entity, operation) in transaction_list: if entity.record_type == "Instrument" and operation != "Delete": found = 0 add_infos = entity.additional_infos() for add_info in add_infos: if add_info.addinf_specnbr.field_name == "SubType": found = 1 if found == 0: raise Exception('SubType not set') return transaction_list
Save the module as FValidation.
4. On the Instrument table, create an addition information field called SubType, following the instructions in section 3.1 Adding additional information fields to the ADM.
5. In Session Manager, select Trading>Credit>Bond, or another suitable instrument type, and create a trade (but do not yet set a value for SubType).
6. Select File>Save. The following message will be displayed: "Unabled to commit transaction (Validation failed) See log for details".
7. In the trading window, select Home>Instrument>Add Info and enter a value in the SubType field.
8. Select File>Save again. This time the transaction validates, and the trade is saved successfully.
9.5 Disabling four-eyes control for a transaction The four_eyes_needed hook function in the FValidation module is called whenever a transaction that contains a four-eyes-controlled entity is saved. That makes it possible to disable four-eyes checking within that transaction.
The four_eyes_needed function is only called if the transaction contains at least one entity which has been marked for four-eyes control in the Control Parameters specification within the Administration Console (All>Admin>Administration Console>Control Parameters).
The four_eyes_needed function is called after the validate_transaction function, and it is called with the same argument – a transaction list, identifying the entities and operations for the transaction.
If regular four-eyes control of the transaction is to be performed, the function should return 1. If four-eyes control is to be disabled for the whole transaction, the function should return 0.
The following example shows how to disable four-eyes control for a transaction that includes a specific settlement.
import ael def four_eyes_needed(transaction_list): 'Only settlement 6410 when updated would NOT need four eyes protection' return = 1 # Assume four eyes for (o,op) in transaction_list: if o.record_type=='Settlement' and op == "Update": if o.seqnbr == 6410:
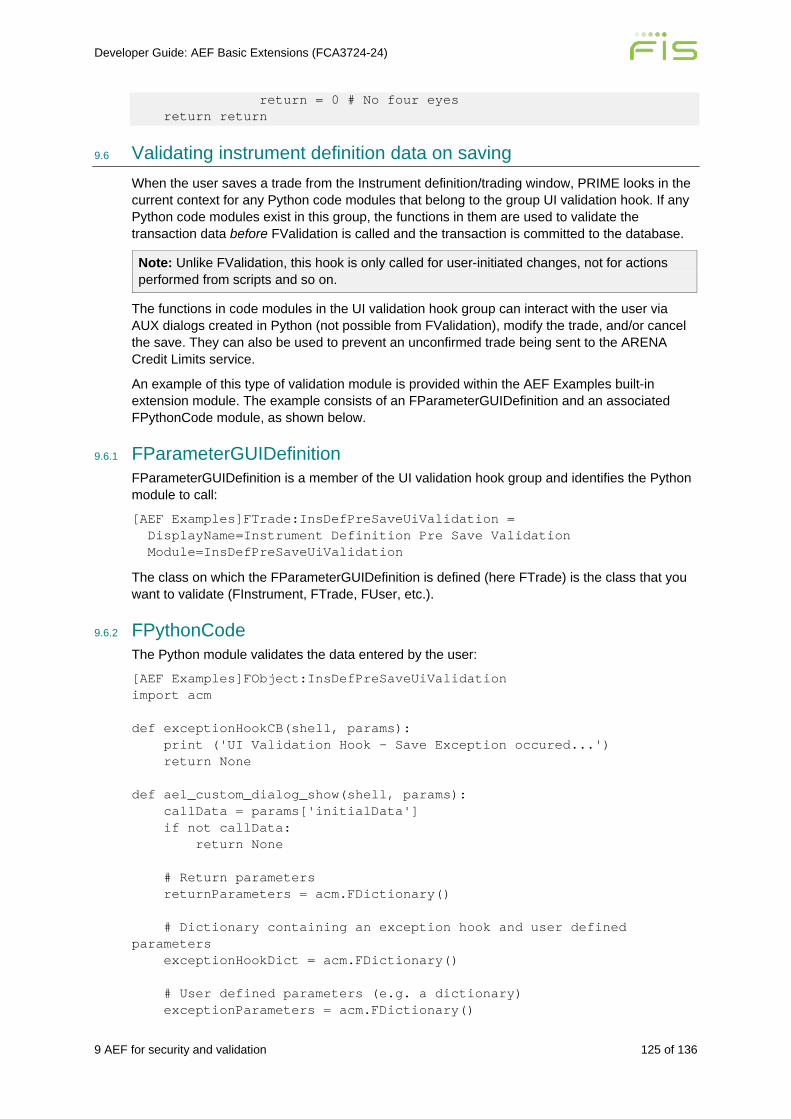
Developer Guide: AEF Basic Extensions (FCA3724-24)
9 AEF for security and validation 125 of 136
return = 0 # No four eyes return return
9.6 Validating instrument definition data on saving When the user saves a trade from the Instrument definition/trading window, PRIME looks in the current context for any Python code modules that belong to the group UI validation hook. If any Python code modules exist in this group, the functions in them are used to validate the transaction data before FValidation is called and the transaction is committed to the database.
Note: Unlike FValidation, this hook is only called for user-initiated changes, not for actions performed from scripts and so on.
The functions in code modules in the UI validation hook group can interact with the user via AUX dialogs created in Python (not possible from FValidation), modify the trade, and/or cancel the save. They can also be used to prevent an unconfirmed trade being sent to the ARENA Credit Limits service.
An example of this type of validation module is provided within the AEF Examples built-in extension module. The example consists of an FParameterGUIDefinition and an associated FPythonCode module, as shown below.
9.6.1 FParameterGUIDefinition FParameterGUIDefinition is a member of the UI validation hook group and identifies the Python module to call:
[AEF Examples]FTrade:InsDefPreSaveUiValidation = DisplayName=Instrument Definition Pre Save Validation Module=InsDefPreSaveUiValidation
The class on which the FParameterGUIDefinition is defined (here FTrade) is the class that you want to validate (FInstrument, FTrade, FUser, etc.).
9.6.2 FPythonCode The Python module validates the data entered by the user:
[AEF Examples]FObject:InsDefPreSaveUiValidation import acm def exceptionHookCB(shell, params): print ('UI Validation Hook - Save Exception occured...') return None def ael_custom_dialog_show(shell, params): callData = params['initialData'] if not callData: return None # Return parameters returnParameters = acm.FDictionary() # Dictionary containing an exception hook and user defined parameters exceptionHookDict = acm.FDictionary() # User defined parameters (e.g. a dictionary) exceptionParameters = acm.FDictionary()
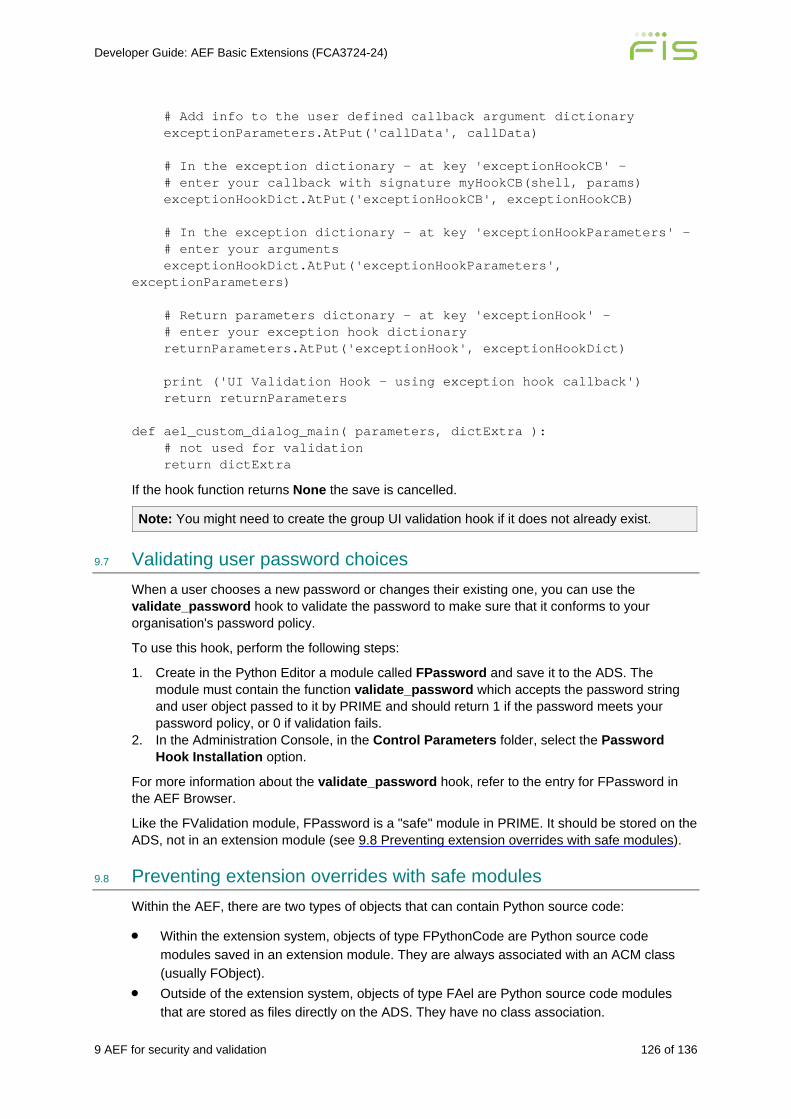
Developer Guide: AEF Basic Extensions (FCA3724-24)
9 AEF for security and validation 126 of 136
# Add info to the user defined callback argument dictionary exceptionParameters.AtPut('callData', callData) # In the exception dictionary - at key 'exceptionHookCB' - # enter your callback with signature myHookCB(shell, params) exceptionHookDict.AtPut('exceptionHookCB', exceptionHookCB) # In the exception dictionary - at key 'exceptionHookParameters' - # enter your arguments exceptionHookDict.AtPut('exceptionHookParameters', exceptionParameters) # Return parameters dictonary - at key 'exceptionHook' - # enter your exception hook dictionary returnParameters.AtPut('exceptionHook', exceptionHookDict) print ('UI Validation Hook - using exception hook callback') return returnParameters def ael_custom_dialog_main( parameters, dictExtra ): # not used for validation return dictExtra
If the hook function returns None the save is cancelled.
Note: You might need to create the group UI validation hook if it does not already exist.
9.7 Validating user password choices When a user chooses a new password or changes their existing one, you can use the validate_password hook to validate the password to make sure that it conforms to your organisation's password policy.
To use this hook, perform the following steps:
1. Create in the Python Editor a module called FPassword and save it to the ADS. The module must contain the function validate_password which accepts the password string and user object passed to it by PRIME and should return 1 if the password meets your password policy, or 0 if validation fails.
2. In the Administration Console, in the Control Parameters folder, select the Password Hook Installation option.
For more information about the validate_password hook, refer to the entry for FPassword in the AEF Browser.
Like the FValidation module, FPassword is a "safe" module in PRIME. It should be stored on the ADS, not in an extension module (see 9.8 Preventing extension overrides with safe modules).
9.8 Preventing extension overrides with safe modules Within the AEF, there are two types of objects that can contain Python source code:
• Within the extension system, objects of type FPythonCode are Python source code modules saved in an extension module. They are always associated with an ACM class (usually FObject).
• Outside of the extension system, objects of type FAel are Python source code modules that are stored as files directly on the ADS. They have no class association.
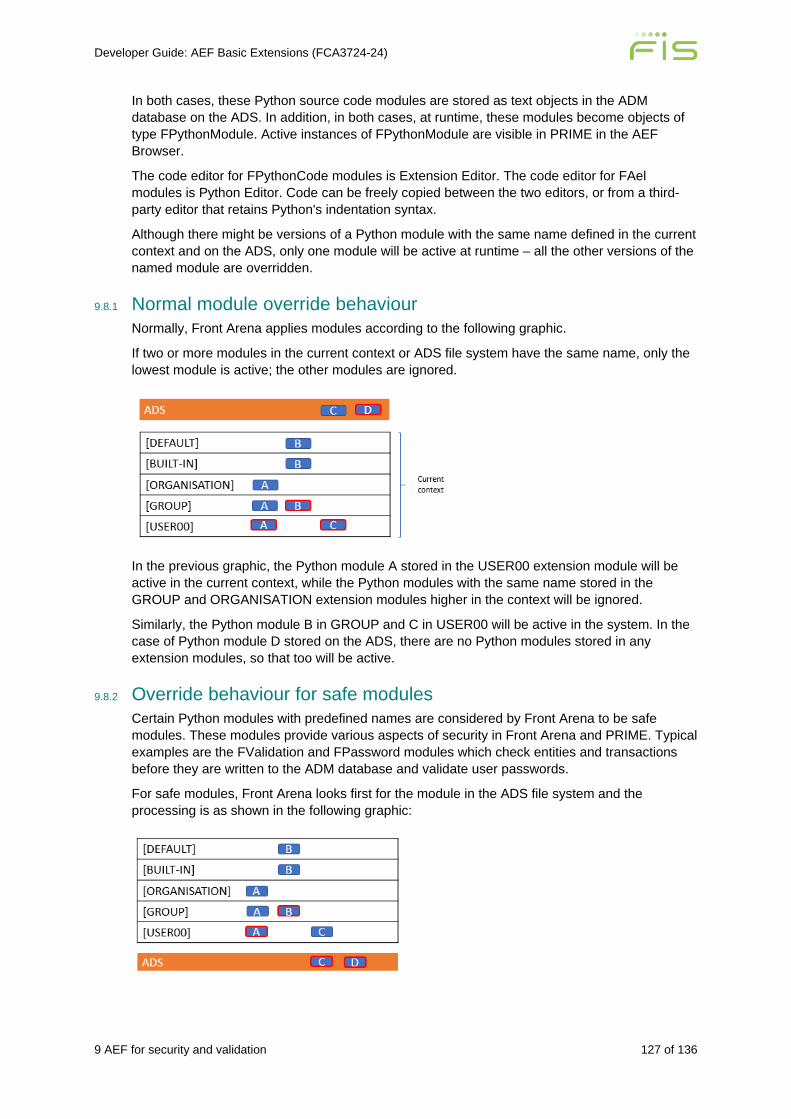
Developer Guide: AEF Basic Extensions (FCA3724-24)
9 AEF for security and validation 127 of 136
In both cases, these Python source code modules are stored as text objects in the ADM database on the ADS. In addition, in both cases, at runtime, these modules become objects of type FPythonModule. Active instances of FPythonModule are visible in PRIME in the AEF Browser.
The code editor for FPythonCode modules is Extension Editor. The code editor for FAel modules is Python Editor. Code can be freely copied between the two editors, or from a third-party editor that retains Python's indentation syntax.
Although there might be versions of a Python module with the same name defined in the current context and on the ADS, only one module will be active at runtime – all the other versions of the named module are overridden.
9.8.1 Normal module override behaviour Normally, Front Arena applies modules according to the following graphic.
If two or more modules in the current context or ADS file system have the same name, only the lowest module is active; the other modules are ignored.
In the previous graphic, the Python module A stored in the USER00 extension module will be active in the current context, while the Python modules with the same name stored in the GROUP and ORGANISATION extension modules higher in the context will be ignored.
Similarly, the Python module B in GROUP and C in USER00 will be active in the system. In the case of Python module D stored on the ADS, there are no Python modules stored in any extension modules, so that too will be active.
9.8.2 Override behaviour for safe modules Certain Python modules with predefined names are considered by Front Arena to be safe modules. These modules provide various aspects of security in Front Arena and PRIME. Typical examples are the FValidation and FPassword modules which check entities and transactions before they are written to the ADM database and validate user passwords.
For safe modules, Front Arena looks first for the module in the ADS file system and the processing is as shown in the following graphic:

Developer Guide: AEF Basic Extensions (FCA3724-24)
9 AEF for security and validation 128 of 136
In this case, the version of Python module C that is stored on the ADS will be active in the system, while the Python module with the same name stored in the USER00 module will be ignored.
If a safe module is not stored in the ADS file system, but is stored in an extension module, the normal override rules for Python modules apply.
For a complete list of safe modules, refer to PRIME Help (FCA1260).

Developer Guide: AEF Basic Extensions (FCA3724-24)
10 Appendix: AEF Examples module 129 of 136
10 Appendix: AEF Examples module PRIME comes with many examples, particularly examples demonstrating the use of AUX. These examples are found in the AEF Examples extension module. The module contains many types of extensions, including column definitions, custom functions, extension attributes, GUI definitions, menu extensions, event handlers, and Python code modules.
To add the AEF Examples module to your development context, see section 2.5 Built-in modules for developers.
The definitions in the modules are now visible in Extension Editor. To apply the definitions in these modules so that, for example, the menu items for them are available in Session Manager, save your development context and then restart PRIME in that context (see 2.4 Starting PRIME in a development context).
The Python modules (extensions of type FPythonCode) contain code samples that demonstrate many of the key extension principles that are recommended to follow in AEF. The following table provides a brief summary of the Python examples and reference for further information:
Python module Extension area
Description References
CustomRoutingFunctions AEF for Trade Routing Operations
An example of custom routing operations, used when creating routing definitions for risk-based routing.
User Guide: Risk-Based Routing (FCA4583)
DynamicWorksheetReport AEF for GUI Customization
An example of how to deal with custom parameters passed in when running a task from the command line.
5.10.7 Passing custom parameters and overriding ael_variables
FCalcAPIDemo AEF for Accessing Calculated Values
An example of how to use the Calculation API to replicate and simulate the values given in Trading Manager, making use of run script.
Developer Guide: Programmatic Access to Calculated Values (FCA4102)
FCustomFunctions A simple example of how to create a custom function of custom method in your Python code.
Developer Guide: AEF Python (FCA2831)
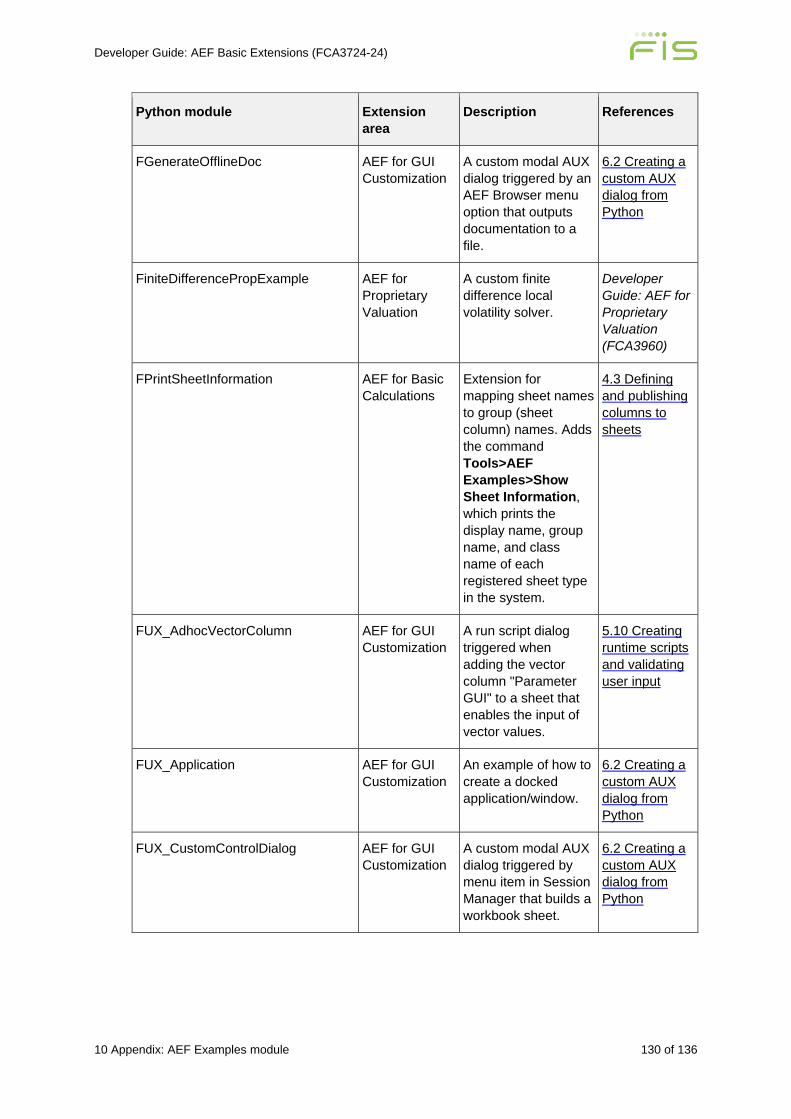
Developer Guide: AEF Basic Extensions (FCA3724-24)
10 Appendix: AEF Examples module 130 of 136
Python module Extension area
Description References
FGenerateOfflineDoc AEF for GUI Customization
A custom modal AUX dialog triggered by an AEF Browser menu option that outputs documentation to a file.
6.2 Creating a custom AUX dialog from Python
FiniteDifferencePropExample AEF for Proprietary Valuation
A custom finite difference local volatility solver.
Developer Guide: AEF for Proprietary Valuation (FCA3960)
FPrintSheetInformation AEF for Basic Calculations
Extension for mapping sheet names to group (sheet column) names. Adds the command Tools>AEF Examples>Show Sheet Information, which prints the display name, group name, and class name of each registered sheet type in the system.
4.3 Defining and publishing columns to sheets
FUX_AdhocVectorColumn AEF for GUI Customization
A run script dialog triggered when adding the vector column "Parameter GUI" to a sheet that enables the input of vector values.
5.10 Creating runtime scripts and validating user input
FUX_Application AEF for GUI Customization
An example of how to create a docked application/window.
6.2 Creating a custom AUX dialog from Python
FUX_CustomControlDialog AEF for GUI Customization
A custom modal AUX dialog triggered by menu item in Session Manager that builds a workbook sheet.
6.2 Creating a custom AUX dialog from Python

Developer Guide: AEF Basic Extensions (FCA3724-24)
10 Appendix: AEF Examples module 131 of 136
Python module Extension area
Description References
FUX_CustomLayoutDialog AEF for GUI Customization
A custom modal AUX dialog triggered by menu item in Session Manager that demonstrates many of the dialog fields and controls that can be defined in AUX.
6.2 Creating a custom AUX dialog from Python
FUX_CustomLayoutDialogDataBinding
AEF for GUI Customization
A custom modal AUX dialog triggered by menu item in Session Manager that demonstrates data binding in AUX dialogs.
6.2 Creating a custom AUX dialog from Python
FUX_CustomLayoutDialogGenerateOptions
AEF for GUI Customization
A custom modal AUX dialog, triggered by a menu option, which generates a series of options for testing purposes.
6.2 Creating a custom AUX dialog from Python
FUX_CustomLayoutTabbedDialog AEF for GUI Customization
A custom modal AUX dialog triggered by menu item in Session Manager that demonstrates how to configure tabs and panes in AUX.
6.2 Creating a custom AUX dialog from Python
FUX_CustomListAndTreeControlDialog
AEF for GUI Customization
Example of how to use FUxTreeControl and FUxTreeItem, and FUxListControl and FUxListItem to access and create tree and list controls in AUX.
6 AEF for creating custom GUI objects with the AUX
FUX_DynamicScenarioAelVariables AEF for GUI Customization
A run script dialog triggered when selecting a dynamic scenario template that enables the input of scenario values.
5.10 Creating runtime scripts and validating user input
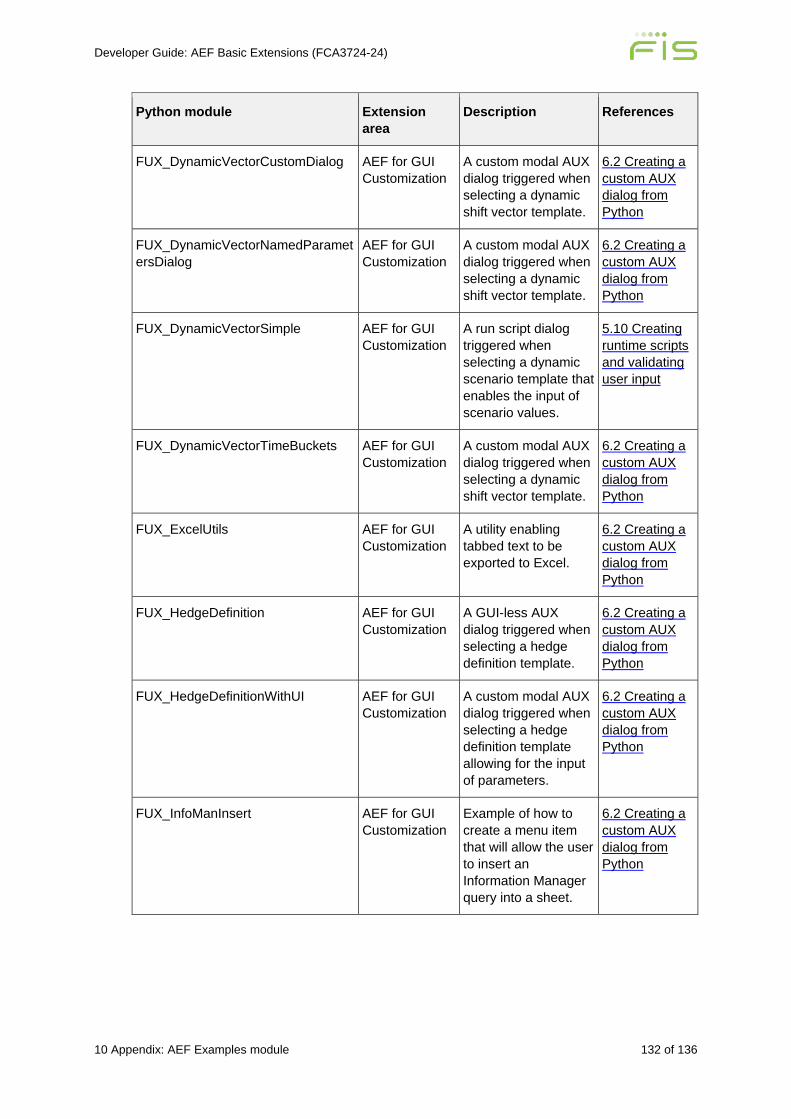
Developer Guide: AEF Basic Extensions (FCA3724-24)
10 Appendix: AEF Examples module 132 of 136
Python module Extension area
Description References
FUX_DynamicVectorCustomDialog AEF for GUI Customization
A custom modal AUX dialog triggered when selecting a dynamic shift vector template.
6.2 Creating a custom AUX dialog from Python
FUX_DynamicVectorNamedParametersDialog
AEF for GUI Customization
A custom modal AUX dialog triggered when selecting a dynamic shift vector template.
6.2 Creating a custom AUX dialog from Python
FUX_DynamicVectorSimple AEF for GUI Customization
A run script dialog triggered when selecting a dynamic scenario template that enables the input of scenario values.
5.10 Creating runtime scripts and validating user input
FUX_DynamicVectorTimeBuckets AEF for GUI Customization
A custom modal AUX dialog triggered when selecting a dynamic shift vector template.
6.2 Creating a custom AUX dialog from Python
FUX_ExcelUtils AEF for GUI Customization
A utility enabling tabbed text to be exported to Excel.
6.2 Creating a custom AUX dialog from Python
FUX_HedgeDefinition AEF for GUI Customization
A GUI-less AUX dialog triggered when selecting a hedge definition template.
6.2 Creating a custom AUX dialog from Python
FUX_HedgeDefinitionWithUI AEF for GUI Customization
A custom modal AUX dialog triggered when selecting a hedge definition template allowing for the input of parameters.
6.2 Creating a custom AUX dialog from Python
FUX_InfoManInsert AEF for GUI Customization
Example of how to create a menu item that will allow the user to insert an Information Manager query into a sheet.
6.2 Creating a custom AUX dialog from Python
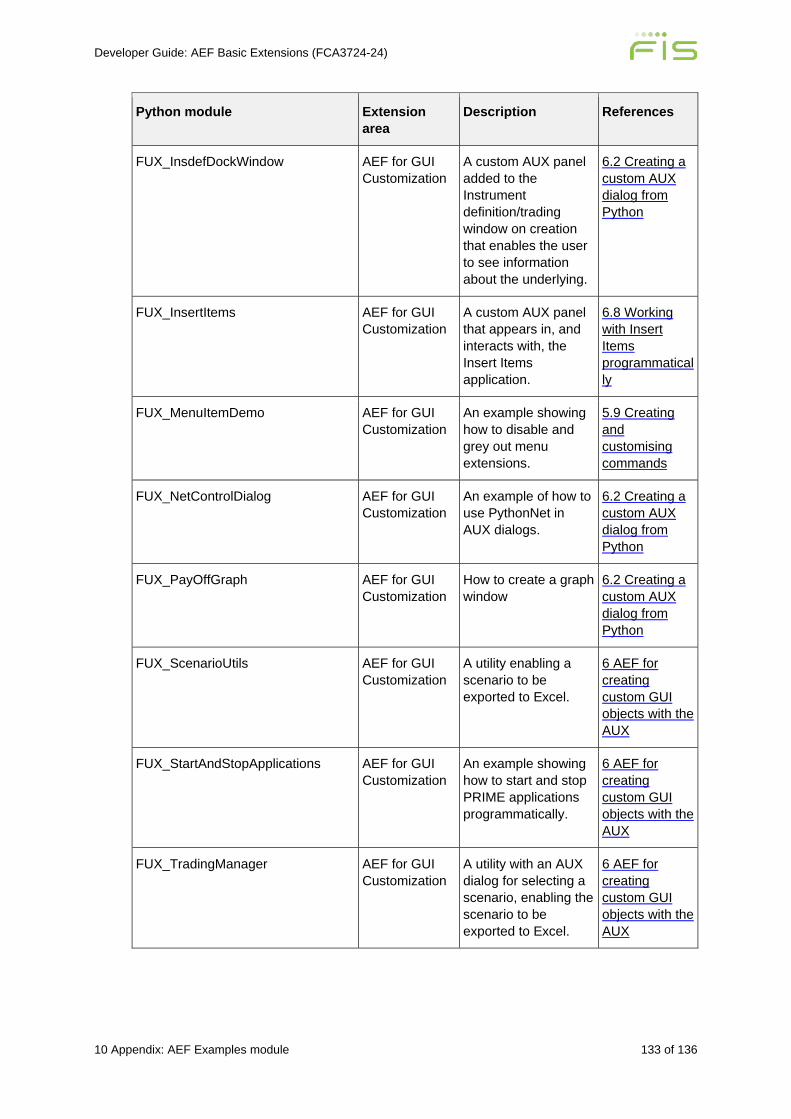
Developer Guide: AEF Basic Extensions (FCA3724-24)
10 Appendix: AEF Examples module 133 of 136
Python module Extension area
Description References
FUX_InsdefDockWindow AEF for GUI Customization
A custom AUX panel added to the Instrument definition/trading window on creation that enables the user to see information about the underlying.
6.2 Creating a custom AUX dialog from Python
FUX_InsertItems AEF for GUI Customization
A custom AUX panel that appears in, and interacts with, the Insert Items application.
6.8 Working with Insert Items programmatically
FUX_MenuItemDemo AEF for GUI Customization
An example showing how to disable and grey out menu extensions.
5.9 Creating and customising commands
FUX_NetControlDialog AEF for GUI Customization
An example of how to use PythonNet in AUX dialogs.
6.2 Creating a custom AUX dialog from Python
FUX_PayOffGraph AEF for GUI Customization
How to create a graph window
6.2 Creating a custom AUX dialog from Python
FUX_ScenarioUtils AEF for GUI Customization
A utility enabling a scenario to be exported to Excel.
6 AEF for creating custom GUI objects with the AUX
FUX_StartAndStopApplications AEF for GUI Customization
An example showing how to start and stop PRIME applications programmatically.
6 AEF for creating custom GUI objects with the AUX
FUX_TradingManager AEF for GUI Customization
A utility with an AUX dialog for selecting a scenario, enabling the scenario to be exported to Excel.
6 AEF for creating custom GUI objects with the AUX
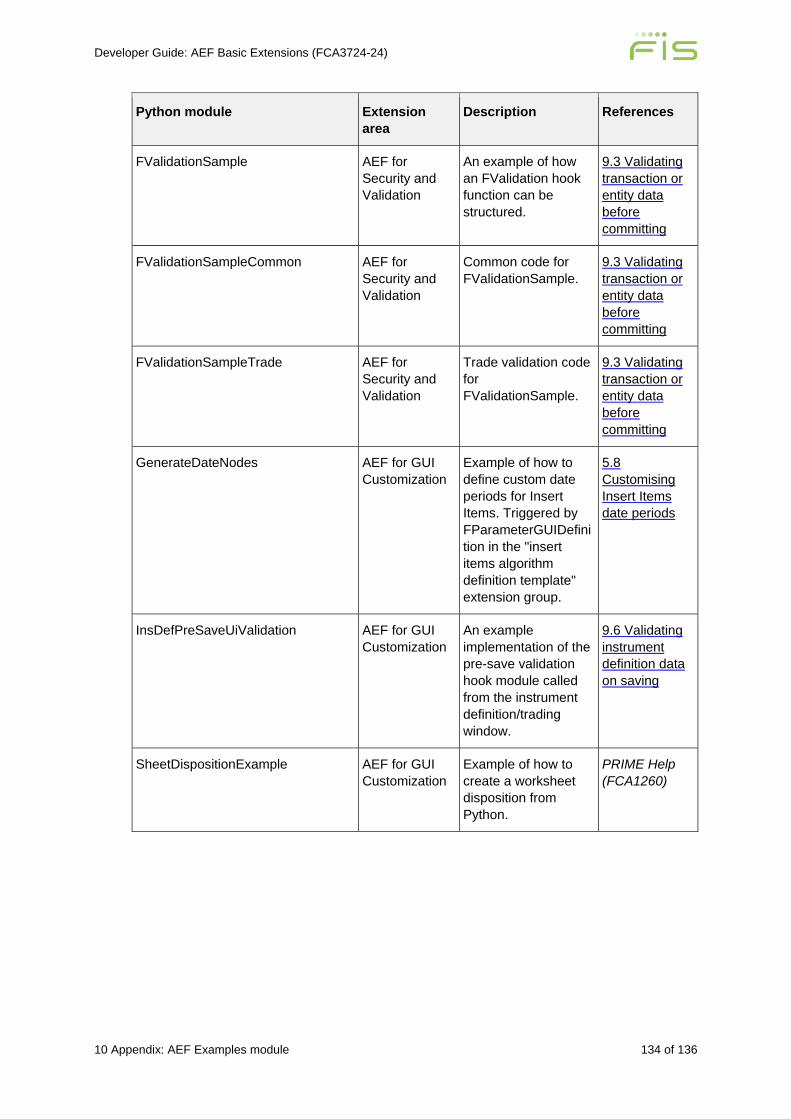
Developer Guide: AEF Basic Extensions (FCA3724-24)
10 Appendix: AEF Examples module 134 of 136
Python module Extension area
Description References
FValidationSample AEF for Security and Validation
An example of how an FValidation hook function can be structured.
9.3 Validating transaction or entity data before committing
FValidationSampleCommon AEF for Security and Validation
Common code for FValidationSample.
9.3 Validating transaction or entity data before committing
FValidationSampleTrade AEF for Security and Validation
Trade validation code for FValidationSample.
9.3 Validating transaction or entity data before committing
GenerateDateNodes AEF for GUI Customization
Example of how to define custom date periods for Insert Items. Triggered by FParameterGUIDefinition in the "insert items algorithm definition template" extension group.
5.8 Customising Insert Items date periods
InsDefPreSaveUiValidation AEF for GUI Customization
An example implementation of the pre-save validation hook module called from the instrument definition/trading window.
9.6 Validating instrument definition data on saving
SheetDispositionExample AEF for GUI Customization
Example of how to create a worksheet disposition from Python.
PRIME Help (FCA1260)

Developer Guide: AEF Basic Extensions (FCA3724-24)
10 Appendix: AEF Examples module 135 of 136
Python module Extension area
Description References
timeBucketsFromVolStructDialog AEF for Proprietary Risk Functions
A custom modal AUX dialog for selecting a volatility structure. The points and/or skews in the Volatility Structure are used for extracting the expiry dates/periods and a time bucket definition is created for each expiry.
Developer Guide: Risk Functions (Alternative Evaluation of Shifted Calculation Trees) (FCA4098)