Embed Size (px)
Citation preview

AcroTEX.Net
AcroTEX eDucation Bundle Professional
Enhanced AeB Features using AcrobatPro
D. P. Story
Copyright © 2010 [email protected] www.acrotex.netPrepared: July 22, 2010 Version 1.0
Table of Contents
1 Overview 4
1.1 Dedication . . . . . . . . . . . . . . . . . . . . . . . . . . . . . . . . . . . . . 4
1.2 Features . . . . . . . . . . . . . . . . . . . . . . . . . . . . . . . . . . . . . . . 4
1.3 Requirements . . . . . . . . . . . . . . . . . . . . . . . . . . . . . . . . . . . 5
1.4 The AeB Pro Family of Software . . . . . . . . . . . . . . . . . . . . . . . . . 6
1.5 Package Options . . . . . . . . . . . . . . . . . . . . . . . . . . . . . . . . . . 7
1.6 Installation . . . . . . . . . . . . . . . . . . . . . . . . . . . . . . . . . . . . . 8
• Unzipping the AeB Pro Distribution . . . . . . . . . . . . . . . . . . . . . . 8
• Installing aeb_pro.js and aeb.js . . . . . . . . . . . . . . . . . . . . . . 9
• Installing aebpro.cfg . . . . . . . . . . . . . . . . . . . . . . . . . . . . . 9
1.7 Examples . . . . . . . . . . . . . . . . . . . . . . . . . . . . . . . . . . . . . . 10
2 AeB Control Central 10
3 Declaring the Initial View 11
4 Document Actions 14
4.1 Document Level JavaScripts . . . . . . . . . . . . . . . . . . . . . . . . . . . 14
4.2 Set Document Actions . . . . . . . . . . . . . . . . . . . . . . . . . . . . . . 14
4.3 Document Open Actions . . . . . . . . . . . . . . . . . . . . . . . . . . . . . 16
5 Page Actions 17
5.1 Open/Close Page Actions for First Page . . . . . . . . . . . . . . . . . . . . 18
5.2 Open/Close Page Actions for the other Pages . . . . . . . . . . . . . . . . . 19
5.3 Every Page Open/Close Events . . . . . . . . . . . . . . . . . . . . . . . . . . 20
6 Fullscreen Support 21
6.1 See Fullscreen Defaults: \setDefaultFS . . . . . . . . . . . . . . . . . . . 21
6.2 Page Transition Effects . . . . . . . . . . . . . . . . . . . . . . . . . . . . . . 23
7 Attaching Documents 25
7.1 The attachsource option . . . . . . . . . . . . . . . . . . . . . . . . . . . . 25
7.2 The attachments option . . . . . . . . . . . . . . . . . . . . . . . . . . . . . 26
Table of Contents (cont.) 3
8 Doc Assembly Methods 26
8.1 Certain Security Restricted JS Methods . . . . . . . . . . . . . . . . . . . . . 27
8.2 Examples . . . . . . . . . . . . . . . . . . . . . . . . . . . . . . . . . . . . . . 30
8.3 Pre-docassembly Methods . . . . . . . . . . . . . . . . . . . . . . . . . . . . 32
• Importing and Placing Images . . . . . . . . . . . . . . . . . . . . . . . . . 32
• Creating Custom Button Appearances . . . . . . . . . . . . . . . . . . . . 34
• Methods in support of Button Anime . . . . . . . . . . . . . . . . . . . . . 35
9 Linking to Attachments 37
9.1 Naming Attachments . . . . . . . . . . . . . . . . . . . . . . . . . . . . . . . 38
• Default Descriptions and Labels . . . . . . . . . . . . . . . . . . . . . . . . 38
• Assigning Labels and Descriptions . . . . . . . . . . . . . . . . . . . . . . 38
• Notes on the <description> . . . . . . . . . . . . . . . . . . . . . . . . . 40
9.2 Linking to Embedded Files . . . . . . . . . . . . . . . . . . . . . . . . . . . . 40
9.3 Jumping to a target . . . . . . . . . . . . . . . . . . . . . . . . . . . . . . . . 41
• Jumping to a \hypertarget with \ahyperlink . . . . . . . . . . . . . . 42
• Jumping to a \label with \ahyperref . . . . . . . . . . . . . . . . . . . 42
9.4 Optional Args of \ahyperref and \ahyperlink . . . . . . . . . . . . . . . 43
9.5 Opening and Saving with \ahyperextract . . . . . . . . . . . . . . . . . . 43
9.6 The child document . . . . . . . . . . . . . . . . . . . . . . . . . . . . . . . . 45
10 Creating a PDF Package 45
11 Initializing a Text Field with Unicode 46
12 Using Layers, Rollovers and Animation. 47
12.1 Rollovers . . . . . . . . . . . . . . . . . . . . . . . . . . . . . . . . . . . . . . 48
12.2 Layers and Animation . . . . . . . . . . . . . . . . . . . . . . . . . . . . . . . 48
13 Button and Ocg Anime 49
13.1 The \btnAnime Command . . . . . . . . . . . . . . . . . . . . . . . . . . . . 49
13.2 The ocgAnime Environment . . . . . . . . . . . . . . . . . . . . . . . . . . . 52
13.3 Moving the Control Buttons . . . . . . . . . . . . . . . . . . . . . . . . . . . 53
References 55
4
1. Overview
AeB Pro, package file base name aeb_pro, is an assortment of features (see Section 1.2below) implemented through a combination of pdfmark operators, which are native toa PostScript file, and JavaScript techniques, some of which require Acrobat Professional.These features were meant to be used with AeB (AcroTEX eDucation Bundle); in particular,the insdljs and eforms packages are essential to AeB Pro. The document author mustuse distiller to create the PDF and use Acrobat Pro 7.0 or later to access the advanceJavaScript methods. For the most part, once the document is assembled, it can beviewed by Adobe Reader 7.0 or later.
1.1. Dedication
This is a package that I’ve been meaning to write for some time, it has had to wait for myretirement. The AeB Pro package includes several techniques that I’ve developed overthe years for my personal use, and a few new ones. The techniques require Acrobat Pro7.0 or later, as well as the Acrobat Distiller.
As a now former educator, I’ve always preferred the use of Acrobat/distiller over pdf-tex/Adobe Reader. I recognize the debt I owe to the Y&Y TEX System,1 and to Acrobatand distiller.2 These systems have inspired me and have made it easy to develop newideas. I believe that if I had not used the Windows/Acrobat platform, I would not havedeveloped all the packages and systems that I did.3
I dedicate AeB Pro to Y&Y (developer Berthold K. P. Horn) and to Adobe Systems, devel-oper of Acrobat. Since I entered the Internet education business, I’ve gotten to knowBerthold quite well through our email correspondence, and many of the software en-gineers of the Acrobat software engineering team.4 Thank you all for your wonderfulwork.
1.2. Features
As you might discern from the table of contents, this package features:
1Sadly, now out of business. Y&Y was a critically important partner in my efforts: its early use of type1 fonts made it easy to use different fonts; its excellent dviwindo previewer—still unsurpassed by currentpreviewers—was an essential tool in much of what I did, and really fired my imagination.
2Though pdftex and dvipdfm are important applications and have their place in the LATEX to PDF workflow,I found them too limiting and too slow in development. For Acrobat, you have a team of top professionalsoftware developers working on the Acrobat/Adobe Reader applications, as opposed to academics workingsporadically on a PDF creator. The viability of the applications (pdftex and dvipdfm) ultimately depend ontoo few individuals.
3An Internet colleague once asked me why I didn’t switch over to Linux, I responded that if I had donethat, we would not know each other. We were brought together by the software development that I did onthe Windows/Acrobat platform. Switching would have shut me down from the beginning.
4In the year 2000, I took a seven month sabbatical in San José, CA, and worked on the Acrobat softwareengineering team, for Acrobat 5.0. Good memories from my days with Adobe remain. I made good friendsthere.
Overview 5
1. AeB Central Control: A uniform way of handling the packages in the AcroTEX Familyof Software.
2. Supports all fields in the Initial View tab of the Document Properties dialog box.
3. Complete support for document level JavaScripts and for document actions.
4. Complete support for page actions, both open and close events.
5. Complete support for fullscreen mode.
6. Support for attaching documents, and for linking to and for launching embeddedfiles.
7. Support for creating a PDF Package, new to version 8 of Acrobat.
8. Support for what I call document assembly methods, which I’ve found to be veryuseful through the years. (This technique was developed in the year 2000 while Iwas out in San José.)
9. Support for the use of Optional Content Groups, rollovers and animations.
I anticipate future developments.
1.3. Requirements
The major requirement of this package is Acrobat 7.0 Professional or later,5 to repeat
Acrobat 7.0 Professional or later and accompanying Distiller
are required for this package to perform as designed. Once the document is built,however, Adobe Reader 7.0, or later, is sufficient to view the document. This is areasonable restriction since some JavaScript techniques used by this package requireAcrobat Pro. Also, layer (OCG), which AeB Pro uses, creation using pdftex and dvipdfm,the two major applications used by most of the TEX-users to produce PDF (along withpdfwrite6), has not been developed. Therefore, I assume you are using Acrobat 7.0 Proand the accompanying Distiller. This package supports the use of dvips and dvipsoneto produce a PostScript file to distill.
The AeB Pro requires the insdljs eforms packages, both of which are included withthe AcroTEX eDucation Bundle (AeB) distribution. The use of the Web package is op-tional, though highly recommended. These are all meant to fit together as a compre-hensive and unified family of packages, after all.
Below is a list of other required packages used by the APB:
1. hyperref: The hyperref bundle should be already on your system, it is standardto most LATEX distributions.
5In the United States and Europe, Adobe offers a significant academic discount on its software, includingAcrobat 7.0 Pro and now Acrobat 8 Pro. Educators should look into the price structure of Adobe Acrobatat their institutions; perhaps, their Department or College can supply a financial grant for the purchase ofthe software.
6I know very little of pdfwrite and its capabilities.
Overview 6
2. xkeyval: The very excellent package by Hendri Adriaens. This package allowsdevelopers to write commands that take a variety of complex optional arguments.You should get the most recent version, at this writing, the latest is v2.5e, or later.
3. xcolor: An amazing color package by Dr. Uwe Kern. This package makes it easyto write commands to dim the color. Get a recent version, at this writing, thelatest is v2.08 (2005/11/25).
4. truncate: This package, by Donald Arseneau, is used in the navigation panel toabbreviate the section titles if they are too wide for the panel. This package isdistributed with the APB.
5. comment: A general purpose package, Victor Eijkhout, for creating environmentsthat can be included in the document or excluded as comments. A very usefulpackage for LATEX package developers. This package is distributed with the APB.
6. eso-pic by Rolf Niepraschk and everyshi by Martin Schröder, these are used byWeb to create background graphics and graphic overlays.
One of the extremely nice features of MiKTEX is that it can automatically downloadand install any unknown packages onto your hard drive, so getting the AeB Pro up andrunning is not a problem!
1.4. The AeB Pro Family of Software
Earlier in the year 2006, I published some packages that pre-date AeB Pro, yet I considerto be part of the AeB Pro family. These are
1. The aebXMP Package: A LaTeX package that fills in the advance metadata. Re-quires Acrobat 8 Professional, and uses E4X, the xml parser that is built intoversion 8 JavaScript engine.
2. The AcroSort Package: A novelty package for importing an image that has beensliced into rows and columns and randomly rearranged. The JavaScript does abubble sort on the picture.
3. AeB Slicing batch sequence: This is a batch sequence for Acrobat Pro that takes theimage open in Acrobat and slices it into a specified number of rows and columns,and saves the slices to a designated folder.
4. The AcroMemory Package: A LaTeX package that implements two variations of amemory game: (1) a single game board consisting of a number of tiles, each tilehas a matching twin, the object is to find all the matching twins; (2) two gameboards, both identical except one has been randomly rearranged, the object isthe find the matching pieces in each of the two game boards. The AeB Slicing isused to slice the image into a specified number of rows and columns.
These, as well as the AeB Pro distribution itself, are available through the package website
www.math.uakron.edu/~dpstory/aeb_pro.html
and through my “commercial” web site www.acrotex.net.
Overview 7
1.5. Package Options
Below is a list of all options of the AeB Pro package:
1. driver: Permissible values are dvipsone and dvips. If the nopro option is taken,in which case AeB Pro acts as a AeB Control Central, then pdftex, dvipdfm andtextures are also accepted.
2. AeB Package Options: The AeB Pro package recognizes the components of AeB,these are web, exerquiz, dljslib, eforms, insdljs, eq2db, aebxmp, hyperref,and graphicxsp. The value of each of these is a list of options you want thatpackage to use. (The hyperref package is not a component of AeB, but it is suchan integral part of AeB that it is included.) See Section 2, page 10.
3. uselayers: Taking this option brings in code in support of Optional ContentGroups, see Section 12, page 47.
4. nopro: If this option is taken, then no code that requires Distiller is input. With thenopro option, AeB Pro acts as AeB Control Central allowing the document authorhave a nice interface to input the various components of the AeB package. SeeSection 2, page 10.
5. gopro: Some components of AeB have a pro option, when you use the goprooption of AeB Pro, the pro option is passed to all components of AeB Pro thathave a pro option.
6. attachsource: This key has as its value a list of extensions. For each extensionlisted, the file \jobname.ext will be attached to the parent PDF. See Section 7.1,page 25.
7. attachments: This key has its value a list of paths to files to be attached to theparent document. See Section 7.2, page 26.
8. linktoattachments: Invoking this option causes code for linking to attachments,or for giving attachments descriptions other than the default ones. See Section 9,page 37.
9. latin1: A companion option to linktoattachments. When this option is used,the set of latin1 unicodes are input and are available to be used in the descriptionsof attachments. See ‘Notes on the <description>’ on page 40.
10. childof: In a LATEX child document, use this option to set the path back to theparent document. See Section 9.6, page 45.
11. btnanime: When this option is taken, the code for button animation is includedin the compilation. See Section 13, page 49 for details.
12. ocganime: When this option is taken, the code for ocg animation is included inthe compilation. See Section 13.2, page 52 for details.
Overview 8
1.6. Installation
We outline the method of installing AeB Pro in this section.
• Unzipping the AeB Pro Distribution
The AeB Pro distribution comes in two ZIP files: aebpro_pack.zip and aebpro.zip.The first contains the program files and documentation, the latter contains extensiveexample files. If you already have AeB Pro, it suffices to update your installation usingaebpro_pack.zip. If you don’t have AeB Pro already installed, the install both ZIP files.
To install AeB Pro, use the following steps:
1. Place aebpro_pack.zip (and possibly aebpro.zip) on your latex search file andunzip. (If you already have an aeb_pro folder, unzip aebpro_pack.zip one levelabove the aeb_pro folder.) Unzipping creates a folder named aeb_pro.
Installing AeB Pro with MiKTEX 2.8. MiKTEX 2.8 is more particular about whereyou install packages by hand. If you are installing AeB Pro by hand (recom-mended), MiKTEX 2.8 requires that you install the distribution in a local root TDStree. Review the MiKTEX help page on this topic
http://docs.miktex.org/manual/localadditions.html
Within C:\Local TeX Files\tex\latex, copy aebpro_pack.zip (and possiblyaebpro.zip) and unzip. Unzipping creates a folder named aeb_pro.
If you already have AeB Pro that was automatically installed on your MiKTEX 2.8system, you should delete this old version of AeB Pro. You may have to use theMiKTEX package manager to remove them from the MiKTEX database registry.
2. Within the aeb_pro folder, latex the file aeb_pro.ins file, this unpacks the in-stallation.
Users of MiKTEX need to refresh the filename database.
3. Install the JavaScript file, aeb_pro.js, as explained in the next subsection.
AeB (AcroTEX eDucation Bundle) is also required, installation instructions are containedin the AeB reference document, the instructions are reproduced here for your conve-nience.
To install AeB, use the following steps:
1. Place acrotex_pack.zip (and possibly acrotex_exdoc.zip) in your latex searchfile and unzip. (If you already have an acrotex folder, you should unzip the fileacrotex_pack.zip one level above the acrotex folder.) Unzipping creates afolder named acrotex.
Installing AeB with MiKTEX 2.8. MiKTEX 2.8 is more particular about where youinstall packages by hand. If you are installing AeB by hand (recommended),
Overview 9
MiKTEX 2.8 requires that you install the distribution in a local root TDS tree. Reviewthe MiKTEX help page on this topic
http://docs.miktex.org/manual/localadditions.html
Within the local root folder, e.g., C:\Local TeX Files\tex\latex, copy the fileacrotex_pack.zip (and possibly acrotex_exdoc.zip) and unzip it. Unzippingcreates a folder named acrotex.
If you already have AeB that was automatically installed on your MiKTEX 2.8 system,you should delete this old version of AeB. You may have to use the MiKTEX packagemanager to remove them from the MiKTEX database registry.
2. Within the acrotex folder, latex the file acrotex.ins file, this unpacks the in-stallation.
Users of MiKTEX need to refresh the filename database.
3. Install the JavaScript file, aeb.js, as explained in the next subsection.
• Installing aeb_pro.js and aeb.js
The JavaScript methods used by the docassemble environment, see ‘Doc AssemblyMethods’ on page 26, have a security setting in Acrobat; Acrobat requires that thatsuch methods be trusted methods. The file aeb_pro.js enables you to execute thedoc assembly methods described later without Acrobat raising security exception.
The JavaScript file aeb.js, which comes with AeB, is only needed if you use Acrobat Pro8.1 or later. Increased security in that version has made it necessary to install a folderJavaScript file to be able to install document level JavaScripts.
Start Acrobat Pro 7.0 or later, and open the console window Advanced > JavaScript >Debugger (Ctrl+J). Copy and paste the following code into the window.
app.getPath("user","javascript");
Now, this the mouse cursor on the line containing this script, press the Ctrl+Enterkey. This will execute this JavaScript. This JavaScript method returns the path to whereaeb.js and aeb_pro.js should be placed. For example, on my system, the returnstring is
/C/Documents and Settings/story/Application Data/Adobe/Acrobat/7.0/JavaScripts
Follow the path to this folder. If the JavaScripts folder does not exist, create it.Finally, copy both aeb.js and aeb_pro.js into this folder. Close Acrobat, the nexttime Acrobat is started, it will read in the to .js files.
• Installing aebpro.cfg
The distribution comes with a file named aebpro.cfg, the contents of which are
10
%% AeB Pro Configuration file%%\ExecuteOptionsX{driver=dvipsone}%\ExecuteOptionsX{driver=dvips}
Locate this file in the root folder of the AeB Pro installation, open it in your text editorand uncomment one of the two \ExecuteOptionsX lines. If the driver is specified inthe configuration file, it need not be included in the option list of aeb_pro.
1.7. Examples
The following is a list of the example files that illustrate and test various features ofAeB Pro.
1. aebpro_ex1.tex: Illustrates the document and page open/close actions andfullscreen support of AeB Pro.
2. aebpro_ex2.tex: Demonstrates the features of the pro option of the web pack-age, including enhanced control over the layout of section headings and the titlepage.
3. aebpro_ex3.tex: Highlights the various attachment options and the doc assem-bly methods.
4. aebpro_ex4.tex: A discussion of layers, rollovers and animation.
5. aebpro_ex5.tex: This file discusses linking to attachments and covers com-mands \ahyperref, \ahyperlink and \ahyperextract.
6. aebpro_ex6.tex: Learn how to create a PDF Package out of your attachments.
7. aebpro_ex7.tex: Explore the \DeclareInitView command, documentation in-cluded in this file.
8. aebpro_ex8.tex: Details of how to use unicode to set the initial value(s) of field,or as captions on a button.
See the file aebpro_index_ex.tex for a this listing in a separate file.
b Throughout this document, the above exercises are referenced using icons in the leftmargins. These icons are live hyperlinks to the source file or the PDF. For example,we reference aebpro_ex1 in this paragraph. The example files can be found in theexamples sub-folder of the aeb_pro distribution.
2. AeB Control Central
The AeB family of software, LATEX packages all, are for the most part stand alone; how-ever, usually they are used in combination with each other, at least that is the purposefor which they were originally designed. When several members of family AeB are used,
Declaring the Initial View 11
they should be loaded in the optimal order. With AeB Pro, you can now list the membersof the AeB family you wish to use, along with their optional parameters you wish to use.
The list of AeB components supported by AeB Pro is web, exerquiz, dljslib, eforms,insdljs, eq2db, aebxmp and hyperref.
Simply listing a component will cause AeB Pro to install that component, with its defaultoptional parameters; by specifying a value—a list of options required—will cause AeBPro to load the package with the listed options.
Example 1: Below is a representative example of the use of the AeB options of AeB Pro,AeB Control Central!
\usepackage[%driver=dvips,web={pro,designv,tight,nodirectory,usesf},exerquiz={<optional parameters>},...,aebxmp
]{aeb_pro}
Yes, yes, I know this is not necessary, you can always load the packages earlier thanAeB Pro, but please, humor me.
By default, the code for supporting features that require the use of Distiller and Ac-robat Pro are included; there is a nopro option that excludes these features. Use thenopro if you only wish to use the AeB Control Center feature to load the various mem-bers of the AcroTEX family. If nopro is used, AeB Pro can be used with pdftex anddvipdfm, for example.
See the new AeB manual for documentation on the pro option of Web. The supportdocument aebpro_ex2 also presents a tutorial on the the pro option.
b The support file aebpro_ex2 has a section discussing the AeB Control Central, as wellas features of the pro option of Web.
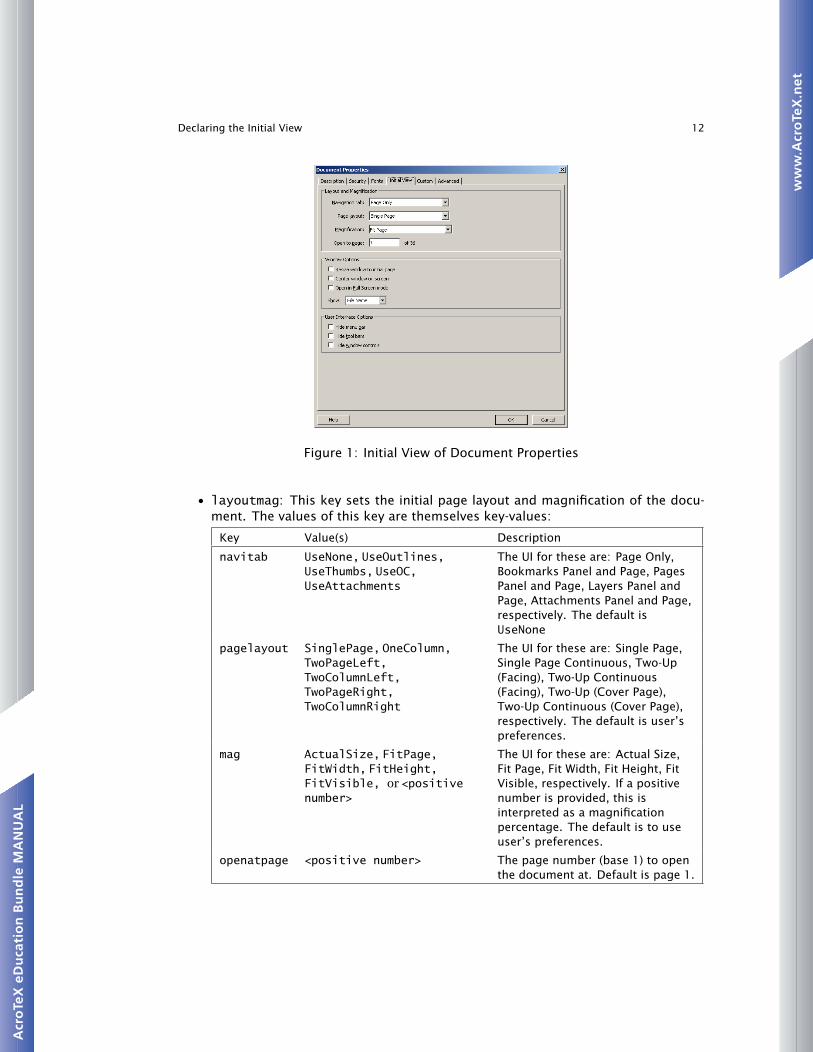
3. Declaring the Initial View
\DeclareInitView is a “data structure” for setting the Initial View of the DocumentProperties dialog box, See Figure 1.
\DeclareInitView takes up to three key-value pairs, the three keys correspond to thethree named regions of the UI (User Interface):
Key User Interface Namelayoutmag Layout and Magnificationwindowoptions Window Optionsuioptions User Interface Options
The values of each these three are described in the tables below:
Declaring the Initial View 12
Figure 1: Initial View of Document Properties
• layoutmag: This key sets the initial page layout and magnification of the docu-ment. The values of this key are themselves key-values:
Key Value(s) Description
navitab UseNone, UseOutlines,UseThumbs, UseOC,UseAttachments
The UI for these are: Page Only,Bookmarks Panel and Page, PagesPanel and Page, Layers Panel andPage, Attachments Panel and Page,respectively. The default isUseNone
pagelayout SinglePage, OneColumn,TwoPageLeft,TwoColumnLeft,TwoPageRight,TwoColumnRight
The UI for these are: Single Page,Single Page Continuous, Two-Up(Facing), Two-Up Continuous(Facing), Two-Up (Cover Page),Two-Up Continuous (Cover Page),respectively. The default is user’spreferences.
mag ActualSize, FitPage,FitWidth, FitHeight,FitVisible, or <positivenumber>
The UI for these are: Actual Size,Fit Page, Fit Width, Fit Height, FitVisible, respectively. If a positivenumber is provided, this isinterpreted as a magnificationpercentage. The default is to useuser’s preferences.
openatpage <positive number> The page number (base 1) to openthe document at. Default is page 1.
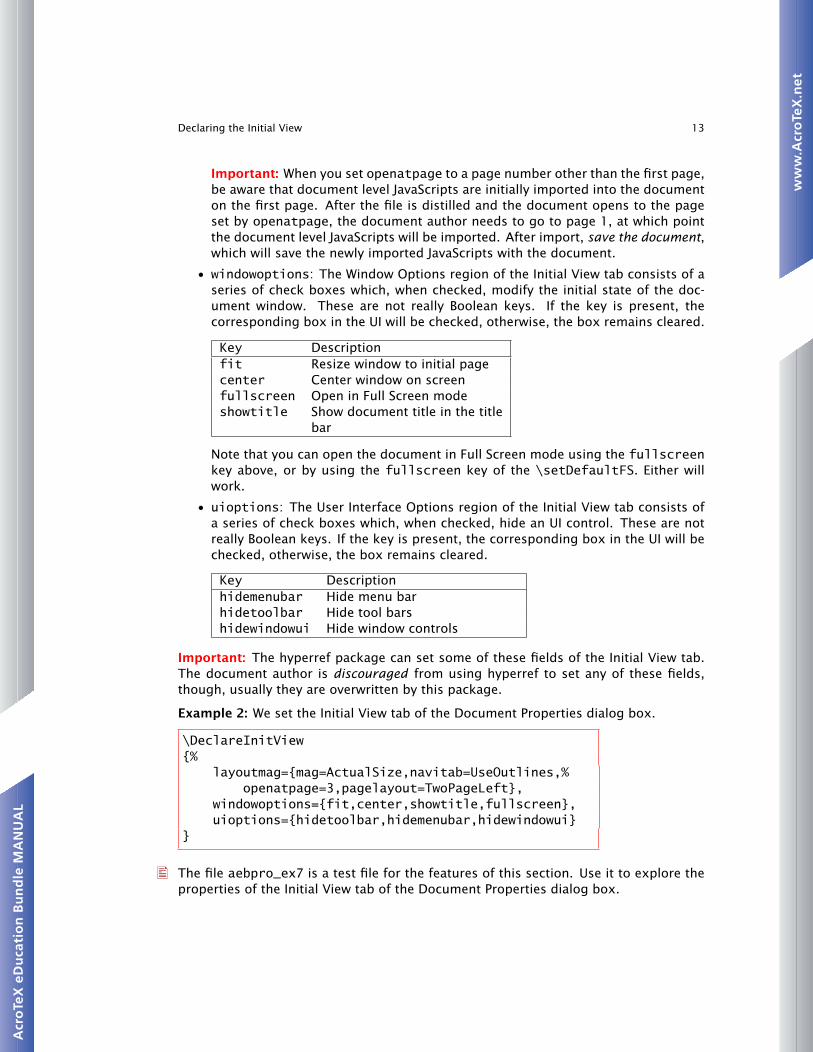
Declaring the Initial View 13
Important: When you set openatpage to a page number other than the first page,be aware that document level JavaScripts are initially imported into the documenton the first page. After the file is distilled and the document opens to the pageset by openatpage, the document author needs to go to page 1, at which pointthe document level JavaScripts will be imported. After import, save the document,which will save the newly imported JavaScripts with the document.
• windowoptions: The Window Options region of the Initial View tab consists of aseries of check boxes which, when checked, modify the initial state of the doc-ument window. These are not really Boolean keys. If the key is present, thecorresponding box in the UI will be checked, otherwise, the box remains cleared.
Key Descriptionfit Resize window to initial pagecenter Center window on screenfullscreen Open in Full Screen modeshowtitle Show document title in the title
bar
Note that you can open the document in Full Screen mode using the fullscreenkey above, or by using the fullscreen key of the \setDefaultFS. Either willwork.
• uioptions: The User Interface Options region of the Initial View tab consists ofa series of check boxes which, when checked, hide an UI control. These are notreally Boolean keys. If the key is present, the corresponding box in the UI will bechecked, otherwise, the box remains cleared.
Key Descriptionhidemenubar Hide menu barhidetoolbar Hide tool barshidewindowui Hide window controls
Important: The hyperref package can set some of these fields of the Initial View tab.The document author is discouraged from using hyperref to set any of these fields,though, usually they are overwritten by this package.
Example 2: We set the Initial View tab of the Document Properties dialog box.
\DeclareInitView{%
layoutmag={mag=ActualSize,navitab=UseOutlines,%openatpage=3,pagelayout=TwoPageLeft},
windowoptions={fit,center,showtitle,fullscreen},uioptions={hidetoolbar,hidemenubar,hidewindowui}
}
The file aebpro_ex7 is a test file for the features of this section. Use it to explore theproperties of the Initial View tab of the Document Properties dialog box.
14
\DeclareInitView is a companion command to \DeclareDocInfo. Each fills in aseparate tab of the Document Properties dialog box. Use the package aebxmp to fill inadvance metadata through \DeclareDocInfo.
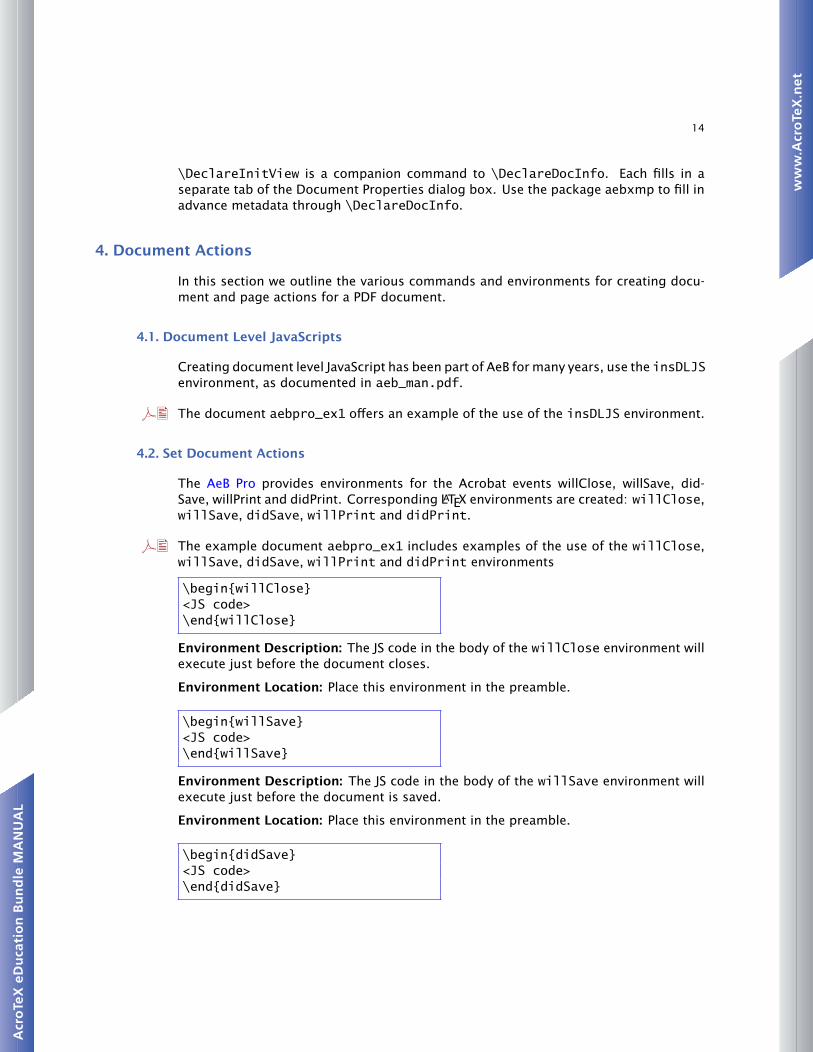
4. Document Actions
In this section we outline the various commands and environments for creating docu-ment and page actions for a PDF document.
4.1. Document Level JavaScripts
Creating document level JavaScript has been part of AeB for many years, use the insDLJSenvironment, as documented in aeb_man.pdf.
b The document aebpro_ex1 offers an example of the use of the insDLJS environment.
4.2. Set Document Actions
The AeB Pro provides environments for the Acrobat events willClose, willSave, did-Save, willPrint and didPrint. Corresponding LATEX environments are created: willClose,willSave, didSave, willPrint and didPrint.
b The example document aebpro_ex1 includes examples of the use of the willClose,willSave, didSave, willPrint and didPrint environments
\begin{willClose}<JS code>\end{willClose}
Environment Description: The JS code in the body of the willClose environment willexecute just before the document closes.
Environment Location: Place this environment in the preamble.
\begin{willSave}<JS code>\end{willSave}
Environment Description: The JS code in the body of the willSave environment willexecute just before the document is saved.
Environment Location: Place this environment in the preamble.
\begin{didSave}<JS code>\end{didSave}
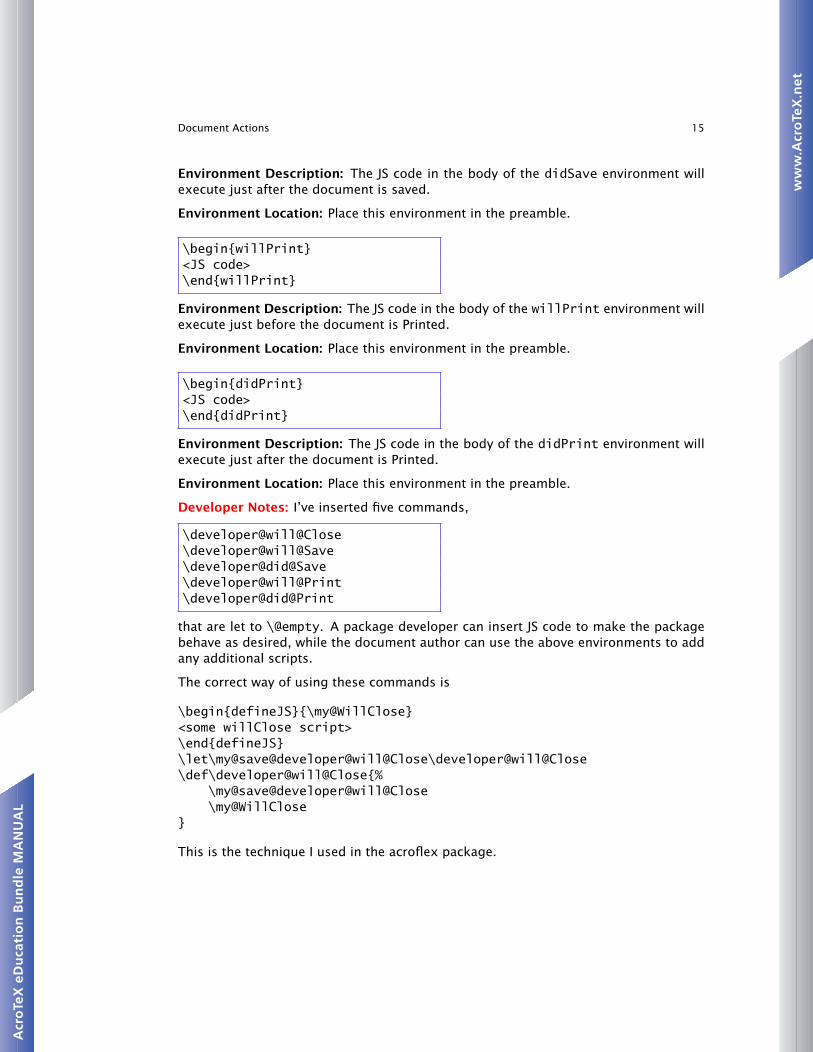
Document Actions 15
Environment Description: The JS code in the body of the didSave environment willexecute just after the document is saved.
Environment Location: Place this environment in the preamble.
\begin{willPrint}<JS code>\end{willPrint}
Environment Description: The JS code in the body of the willPrint environment willexecute just before the document is Printed.
Environment Location: Place this environment in the preamble.
\begin{didPrint}<JS code>\end{didPrint}
Environment Description: The JS code in the body of the didPrint environment willexecute just after the document is Printed.
Environment Location: Place this environment in the preamble.
Developer Notes: I’ve inserted five commands,
\developer@will@Close\developer@will@Save\developer@did@Save\developer@will@Print\developer@did@Print
that are let to \@empty. A package developer can insert JS code to make the packagebehave as desired, while the document author can use the above environments to addany additional scripts.
The correct way of using these commands is
\begin{defineJS}{\my@WillClose}<some willClose script>\end{defineJS}\let\my@save@developer@will@Close\developer@will@Close\def\developer@will@Close{%
\my@save@developer@will@Close\my@WillClose
}
This is the technique I used in the acroflex package.
Document Actions 16
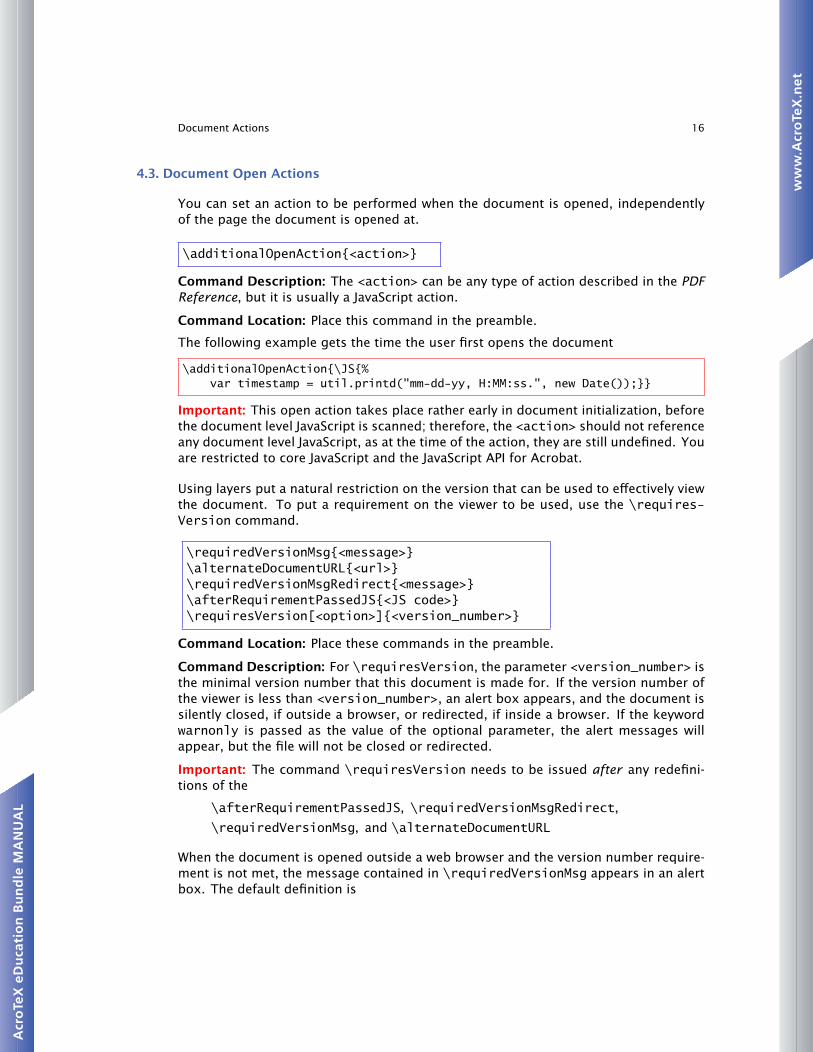
4.3. Document Open Actions
You can set an action to be performed when the document is opened, independentlyof the page the document is opened at.
\additionalOpenAction{<action>}
Command Description: The <action> can be any type of action described in the PDFReference, but it is usually a JavaScript action.
Command Location: Place this command in the preamble.
The following example gets the time the user first opens the document
\additionalOpenAction{\JS{%var timestamp = util.printd("mm-dd-yy, H:MM:ss.", new Date());}}
Important: This open action takes place rather early in document initialization, beforethe document level JavaScript is scanned; therefore, the <action> should not referenceany document level JavaScript, as at the time of the action, they are still undefined. Youare restricted to core JavaScript and the JavaScript API for Acrobat.
Using layers put a natural restriction on the version that can be used to effectively viewthe document. To put a requirement on the viewer to be used, use the \requires-Version command.
\requiredVersionMsg{<message>}\alternateDocumentURL{<url>}\requiredVersionMsgRedirect{<message>}\afterRequirementPassedJS{<JS code>}\requiresVersion[<option>]{<version_number>}
Command Location: Place these commands in the preamble.
Command Description: For \requiresVersion, the parameter <version_number> isthe minimal version number that this document is made for. If the version number ofthe viewer is less than <version_number>, an alert box appears, and the document issilently closed, if outside a browser, or redirected, if inside a browser. If the keywordwarnonly is passed as the value of the optional parameter, the alert messages willappear, but the file will not be closed or redirected.
Important: The command \requiresVersion needs to be issued after any redefini-tions of the
\afterRequirementPassedJS, \requiredVersionMsgRedirect,\requiredVersionMsg, and \alternateDocumentURL
When the document is opened outside a web browser and the version number require-ment is not met, the message contained in \requiredVersionMsg appears in an alertbox. The default definition is
17
\requiredVersionMsg{%This document requires Adobe Reader or Acrobat,version \requiredVersionNumber\space or later.The document is now closing.}
The argument of \requiresVersion is contained in \requireVersionNumber, andthis macro should be used in the message, as illustrated above.
When the document is opened in a browser and the version number requirement is notmet the message contained in \requiredVersionMsgRedirect appears in an alertbox. The default definition is
\requiredVersionMsgRedirect{%This document requires Adobe Reader or Acrobat,version \requiredVersionNumber\space or later.Redirecting browser to an alternate page.}
The browser is redirected to the URL specified in the argument of \alternateDocu-mentURL, the default definition of which is
\alternateDocumentURL{http://www.acrotex.net/}
The command \requiresVersion uses \additionalOpenAction; if you want to com-bine several actions, including an action for checking for the version number, use\afterRequirementPassedJS. For example,
\afterRequirementPassedJS{%
var timestamp = util.printd("mm-dd-yy, H:MM:ss.", new Date());}
The above code will be executed if the version requirement is passed.
You can use \afterRequirementPassedJS, for example, to put deadline to view thedocument; that is, if the document is opened after a pre-selected date and time, thedocument should close down (or redirected to an alternate web page).
Important: When using AeB Pro with the uselayers option, the minimum requiredversion is 7. Thus,
\requiresVersion{7}
should be issued in the preamble of any document that uses layers.
5. Page Actions
When a page opens or closes a JavaScript occurs. Predefined JavaScript can execute inreaction to these events. AeB Pro provides several commands and environments.
b The commands and environments described in this section are illustrated in the supportdocument aebpro_ex1.
Page Actions 18
5.1. Open/Close Page Actions for First Page
Because of the way AeB was originally written—exerquiz, actually—, the first page is aspecial case.
There is a command, \OpenAction, that is part of the insdljs package for severalyears, that is used to introduce open page actions:
\OpenAction{\JS{<JS code>}}
Command Location: This command goes in the preamble to define action for the firstpage. This command is capable of defining non-JavaScript action, see the documenta-tion of insdljs for some details.
Below is an example of usage:
\OpenAction{\JS{%console.show();\rconsole.clear();\rconsole.println("Show the output of the page actions");
}}
In addition to \OpenAction, addJSToPageOpen and addJSToPageClose are also de-fined by AeB Pro. The <JS code> is executed each time the page is opened or closed.
\begin{addJSToPageOpen}<JS code>\end{addJSToPageOpen}
For page close events, we have the addJSToPageClose environment.
\begin{addJSToPageClose}<JS code>\end{addJSToPageClose}
Environment Description: When placed in the preamble, these provide JavaScript sup-port for page open/close events of the first page.
Below are examples of usage. These appear in the document aebpro_ex1.
\begin{addJSToPageOpen}var str = "This should be the first page"console.println(str + ": page " + (this.pageNum+1));\end{addJSToPageOpen}
and
\begin{addJSToPageClose}var str = "This is the close action for the first page!"console.println(str + ": page " + (this.pageNum+1));\end{addJSToPageClose}

Page Actions 19
5.2. Open/Close Page Actions for the other Pages
The same two environments addJSToPageOpen and addJSToPageClose can be used inthe body of the text to generate open or close actions for the page on which they appear.It’s a rather hit or miss proposition because the tex compiler may break the page atan unexpected location and the environments are processed on the page following theone you wanted them to appear on.
\begin{addJSToPageOpen}<JS code>\end{addJSToPageOpen}
\begin{addJSToPageClose}<JS code>\end{addJSToPageClose}
Environment Description: Place on the page that these actions are to apply.
Another approach to trying to place addJSToPageOpen or addJSToPageClose on thepage you want is to use the addJSToPageOpenAt or addJSToPageCloseAt environ-ments. These are the same as their cousins, but are more powerful. Each of thesetakes an argument that specifies the page, pages, and/or page ranges of the open/closeeffects you want.
\begin{addJSToPageOpenAt}{<page ranges(s)>}<JS code>\end{addJSToPageOpenAt}
For page close events, we have the addJSToPageClose environment.
\begin{addJSToPageCloseAt}{<page ranges(s)>}<JS code>\end{addJSToPageCloseAt}
Environment Location: Place these just after \begin{document} and before the com-mand \maketitle.
Environment Description: When placed in the preamble, these provide JavaScript sup-port for page open/close events of the first page.
Parameter Description: The two environments take a comma-delimited list of pagesand page ranges, for example, an argument might be {2-6,9,12,15-}. This argumentstates that the open or close JavaScript listed in the environment should execute onpages 2 through 6, page 9, page 11, and pages 15 through the end of the document.Very cool!
This is all well and good if you know exactly which pages are the ones you want theeffects to appear. What’s even more cool is that you can use LATEX’s cross-referencingmechanism to specify the pages. By placing these after \begin{document}, the cross
Page Actions 20
referencing information (the .aux) has been input and you can use \atPage, a specialsimplified version of \pageref, to reference the pages. below.
\atPage{<label>}
Command Description: Returns the page number on which the LATEX cross-referencelabel <label> resides.
For example,
\begin{addJSToPageOpenAt}{1,\atPage{test}-\atPage{exam}}var str = "Add to open page at pages between "
+ "\\\\atPage{test} and \\\\atPage{exam} "+ (this.pageNum+1);
console.println(str);\end{addJSToPageOpenAt}
In the above, we specify a range \atPage{test}-\atPage{exam}. If the first pagenumber is larger than the second number, the two numbers are switched; consequently,the specification \atPage{exam}-\atPage{test} yields the same results.
\begin{addJSToPageCloseAt}{5-8,12,15-}var str = "Add to close page at page " + (this.pageNum+1);console.println(str);\end{addJSToPageCloseAt}
In the above example, notice that in the addJSToPageOpenAt environment above, page1 was specified. This specification is ignored. You do remember that the first pageevents need to be defined in the preamble, don’t you.
5.3. Every Page Open/Close Events
As an additional feature, there may be an occasion where you want to define an eventfor every page. These are handled separately from the earlier mentioned open/closedevents so one does not overwrite the other. These environments are everyPageOpenand everyPageClose. They can go in the preamble, or anywhere. They will takeeffect on the page they are processed on. Using these environments a second timeoverwrites any earlier definition. To cancel out the every page action you can use\canceleveryPageOpen and \canceleveryPageClose.
\begin{everyPageOpen}<JS code>\end{everyPageOpen}
For page close events, we have the everyPageClose environment.
\begin{everyPageClose}<JS code>\end{everyPageClose}
21
Environment Location: Place in the preamble or in the body of the document.
For example,
\begin{everyPageOpen}var str = "every page open";console.println(str + ": page " + (this.pageNum+1));\end{everyPageOpen}
\begin{everyPageClose}var str = "every page close";console.println(str + ": page " + (this.pageNum+1));\end{everyPageClose}
\canceleveryPageOpen\canceleveryPageClose
Command Description: Cancels the current everyPageOpen or everyPageClose events.After these commands, additional everyPageOpen or everyPageClose environmentscan be used to create different every page events.
6. Fullscreen Support
In this section we present the controlling commands for default fullscreen mode andfor defining page transition effects.
b The sample file aebpro_ex1 demonstrates many of the full screen features describedin this section.
6.1. See Fullscreen Defaults: \setDefaultFS
Set the default fullscreen behavior of Adobe Reader/Acrobat by using \setDefaultFSin the preamble. This command takes a number of arguments using the xkeyval pack-age. Each key corresponds to a JavaScript property of the fullscreen object.
\setDefaultFS{<key-values>}
The command for setting how you want to viewer to behave in fullscreen. This commandis implemented through JavaScript, as opposed to the pdfmark operator. See JavaScriptfor Acrobat API Reference [2], the section on the FullScreen object.
Command Location: This command must be executed in the preamble.
Fullscreen Support 22
Key-Value Pairs: The command has numerous key-value pairs, the defaults of most ofthese are set in the Preferences menu of the viewer. These values are the ones listedin the Acrobat JavaScript Scripting Reference [2].
1. Trans: permissible values are NoTransition, UncoverLeft, UncoverRight,UncoverDown, UncoverUp, UncoverLeftDown, UncoverLeftUp,UncoverRightDown, UncoverRightUp, CoverLeft, CoverRight, CoverDown,CoverUp, CoverLeftDown, CoverLeftUp, CoverRightDown, CoverRightUp,PushLeft, PushRight, PushDown, PushUp, PushLeftDown, PushLeftUp,PushRightDown, PushRightUp, FlyInRight, FlyInLeft, FlyInDown, FlyInUp,FlyOutRight, FlyOutLeft, FlyOutDown, FlyOutUp, FlyIn, FlyOut, Blend,Fade, Random, Dissolve, GlitterRight, GlitterDown, GlitterRightDown,BoxIn, BoxOut, BlindsHorizontal, BlindsVertical, SplitHorizontalIn,SplitHorizontalOut, SplitVerticalIn, SplitVerticalOut, WipeLeft,WipeRight, WipeDown, WipeUp, WipeLeftDown, WipeLeftUp, WipeRightDown,WipeRightUp, Replace, ZoomInDown, ZoomInLeft, ZoomInLeftDown,ZoomInLeftUp, ZoomInRight, ZoomInRightDown, ZoomInRightUp, ZoomInUp,ZoomOutDown, ZoomOutLeft, ZoomOutLeftDown, ZoomOutLeftUp,ZoomOutRight, ZoomOutRightDown, ZoomOutRightUp, ZoomOutUp,CombHorizontal, CombVertical. The default is Replace.
The following are new to Acrobat/Adobe Reader version 8: PushLeftDown,PushLeftUp, PushRightDown, PushRightUp, WipeLeftDown, WipeLeftUp,WipeRightDown, WipeRightUp, ZoomInDown, ZoomInLeft, ZoomInLeftDown,ZoomInLeftUp, ZoomInRight, ZoomInRightDown, ZoomInRightUp, ZoomInUp,ZoomOutDown, ZoomOutLeft, ZoomOutLeftDown, ZoomOutLeftUp,ZoomOutRight, ZoomOutRightDown, ZoomOutRightUp, ZoomOutUp,CombHorizontal, CombVertical
The transition chosen by this key will be in effect for each page that does nothave a transition effect separately defined for it (by the \setPageTransitioncommand).
2. bgColor: Sets the background color in fullscreen mode. The color specified mustbe a JavaScript Color array, e.g., bgColor = ["RGB" 0 1 0], or you can use somepreset colors, bgColor = color.ltGray.
3. timeDelay: The default number of seconds before the page automatically ad-vances in full screen mode. See useTimer to activate/deactivate automatic pageturning.
4. useTimer: A Boolean that determines whether automatic page turning is enabledin full screen mode. Use timeDelay to set the default time interval before pro-ceeding to the next page.
5. loop: A Boolean that determines whether the document will loop around back tothe first page.
6. cursor: Determines the behavior of the mouse in full screen mode. Permissiblevalues are hidden, delay (hidden after a short delay) and visible.
Fullscreen Support 23
7. escape: A Boolean use to determine if the escape key will cause the viewer toleave full screen mode.
8. clickAdv: A Boolean that determines whether a mouse click on the page willcause the page to advance.
9. fullscreen: A Boolean, which if true, causes the viewer to go into full screenmode. Has no effect from within a browser.
10. usePageTiming: A Boolean that determines whether automatic page turning willrespect the values specified for individual pages in full screen mode (which canbe set through \setDefaultFS.
This example causes the viewer to go into full screen mode, sets the transition toRandom, instructs the viewer to loop back around to the first page, and to make thecursor hidden after a short period of inactivity.
\setDefaultFS{fullscreen,Trans=Random,loop,cursor=delay,escape}
On closing the document, the user’s original full screen preferences are restored.
In the preamble of this document, I have placed \setDefaultFS specifying that thedocument should go into fullscreen mode with a random transition for its default tran-sition effect.
6.2. Page Transition Effects
The \setDefaultFS command can set the full screen behavior of the viewer for theentire document, including a transition effect applicable to all pages in the document;for transition effects of individual pages, use the \setPageTransition command.
\setPageTransition{<key-values>}
Sets the transition effect for the next page only, viewer must be in full screen mode.The command \setPageTransition is implemented using the pdfmark operator.
Command Location: This command should be used in the preamble for the first page,and between slides for subsequent pages.
Key-Value Pairs: The \setPageTransition command has several key-value pairs:
1. Trans: permissible values are NoTransition, UncoverLeft, UncoverRight,UncoverDown, UncoverUp, UncoverLeftDown, UncoverLeftUp,UncoverRightDown, UncoverRightUp, CoverLeft, CoverRight, CoverDown,CoverUp, CoverLeftDown, CoverLeftUp, CoverRightDown, CoverRightUp,PushLeft, PushRight, PushDown, PushUp, PushLeftDown, PushLeftUp,PushRightDown, PushRightUp, FlyInRight, FlyInLeft, FlyInDown, FlyInUp,FlyOutRight, FlyOutLeft, FlyOutDown, FlyOutUp, FlyIn, FlyOut, Blend,Fade, Random, Dissolve, GlitterRight, GlitterDown, GlitterRightDown,BoxIn, BoxOut, BlindsHorizontal, BlindsVertical, SplitHorizontalIn,
Fullscreen Support 24
SplitHorizontalOut, SplitVerticalIn, SplitVerticalOut, WipeLeft,WipeRight, WipeDown, WipeUp, WipeLeftDown, WipeLeftUp, WipeRightDown,WipeRightUp, Replace, ZoomInDown, ZoomInLeft, ZoomInLeftDown,ZoomInLeftUp, ZoomInRight, ZoomInRightDown, ZoomInRightUp, ZoomInUp,ZoomOutDown, ZoomOutLeft, ZoomOutLeftDown, ZoomOutLeftUp,ZoomOutRight, ZoomOutRightDown, ZoomOutRightUp, ZoomOutUp,CombHorizontal, CombVertical. The default is Replace.
The following are new to Acrobat/Adobe Reader version 8: PushLeftDown,PushLeftUp, PushRightDown, PushRightUp, WipeLeftDown, WipeLeftUp,WipeRightDown, WipeRightUp, ZoomInDown, ZoomInLeft, ZoomInLeftDown,ZoomInLeftUp, ZoomInRight, ZoomInRightDown, ZoomInRightUp, ZoomInUp,ZoomOutDown, ZoomOutLeft, ZoomOutLeftDown, ZoomOutLeftUp,ZoomOutRight, ZoomOutRightDown, ZoomOutRightUp, ZoomOutUp,CombHorizontal, CombVertical
These values are the ones listed in the Acrobat JavaScript Scripting Reference [2].
2. TransDur: Duration of the transition effect, in seconds. Default value: 1.
3. Speed: (APB 2.0) Same as TransDur, the duration of the transition effect, exceptthis key takes values Slow, Medium or Fast, corresponding to the Acrobat UI. IfTransDur and Speed are both specified, Speed is used. Use TransDur for finergranularity.
4. PageDur: The PDF Reference, version 1.6 [5], describes this as “The page’s dis-play duration (also called its advance timing): the maximum length of time, inseconds, that the page is displayed during presentations before the viewer appli-cation automatically advances to the next page. By default, the viewer does notadvance automatically.”
For example,
\setPageTransition{Trans=Blend,PageDur=20,TransDur=5}
\setPageTransition suffers from the same malady as do addJSToPageOpen andaddJSToPageClose, it has to be placed on the page you want to apply. For this reason,there is the \setPageTransitionAt.
\setPageTransitionAt{<page ranges(s)>}{<key-values>}
Key-Value Pairs: Same as \setPageTransitionAt
Parameter Description: The parameter <page ranges(s)> has the same format asdescribed in Section 5.2, page 19. This command obeys the \atPage.
For example,
\setPageTransitionAt{1,\atPage{test}-\atPage{exam},7}{Trans=Blend,PageDur=20,TransDur=5}
25
7. Attaching Documents
AeB Pro has two options for attaching files to the source PDF. The approach is theimportDataObject JavaScript method in conjunction with the FDF techniques.
There are two options for attaching files
1. attachsource is a simplified option for attaching a file with the same base nameas \jobname, that is a file of the form \jobname.ext.
2. attachments is a general option for attaching a file, as specified by its absoluteor relative path.
b The file aebpro_ex3 demonstrates many of the commands presented in this section.
7.1. The attachsource option
Use this option to attach a file with the same base name as \jobname.\usepackage[%
driver=dvips,web={
pro,...usesf
},attachsource={tex,dvi,log,tex.log},...
]{aeb_pro}
Simply list the extensions you wish to attach to the current document. In the exampleabove, we attach the original source file \jobname.tex, \jobname.dvi, \jobname.log(the distiller log) and \jobname.tex.log (the tex log).
Important: There should be no space following a comma in the lists of extensions.Thus, the list should be
attachsource={tex,dvi,log,tex.log}
notattachsource={tex, dvi, log, tex.log}
orattachsource={tex,
dvi,log,tex.log
}
However, the following works,attachsource={
tex,%dvi,%log,%tex.log
}

26
Frankly, the argument list for extensions is so short, there is no reason to put them onseparate lines.
One problem with attaching the log file is that the distiller also produces a log file withthe same name \jobname.log. Consequently, the log file for the tex file is overwrittenby the distiller log file. You’ll see from the PDF document, that the log file attached isthe one for the distiller.
A work around for this is to latex your file, rename the log file to another extension,such as \jobname.tex.log, then distill. You may want to send that log file so somepoor TEXpert for TEXpert analysis!
7.2. The attachments option
The attachments key is for attaching files other than ones associated with the sourcefile. The value of this key is a comma-delimited list (enclosed in braces) of absolutepaths and/or relative paths to the file required to attach. For example,\usepackage[%
driver=dvips,web={
pro,...usesf
},attachments={robot man/robot_man.pdf,%/C/Documents and Settings/dps/My Documents/birthday17.jpg},...
]{aeb_pro}
The first reference is relative to the folder that this source file is contained in (and isattached to this PDF), and second one is an example of an absolute path.
Important: There are some files that Acrobat does not attach, but there is no publiclist of these. One finds them by discovery, .exe and .zip files, for example.
A trick that I use to send .zip files through the email (they are often stripped away bymail servers) is to hide the .zip file in a PDF as an attachment. But since Acrobat doesnot attach .zip, I change the extension from .zip to .txt, then inform the recipientto save the .txt file and change the extension back to .zip. Swave!
8. Doc Assembly Methods
Ahhhh, document assembly. What can be said? This is a method that I have used formany years and is incorporated into the insdljs package under the name of execJS.Whereas the execJS environment is still available to you, I’ve simplified things. Theterm doc assembly refers to the use of the docassembly environment (which is just anexecJS environment).
Doc Assembly Methods 27
\begin{docassembly}<JS code to be executed when doc is first opened>\end{docassembly}
The execJS/docassembly environments create an FDF file with the various JavaScriptcommands that were contained in the body of the environment. These environmentsalso place in open page action so that when the PDF is opened for the first time inAcrobat Pro, the FDF file will be imported and the JS will be executed one time and thendiscarded, see [1] for an article on this topic. This technique only works if you haveAcrobat Pro.
8.1. Certain Security Restricted JS Methods
In addition to the docassembly environment, AeB Pro also has several macros thatexpand to JavaScript methods that I find useful. These JavaScript methods are quiteuseful, yet they have a security restriction on them; they cannot be executed fromwithin a document, and certainly not by Adobe Reader.
The use of these methods requires the installation of aeb_pro.js, the folder levelJavaScript file that comes with this package. These methods are normally called fromthe docassembly environment.
\addWatermarkFromFile({<key-values>});
Command Description: Inserts a watermark into the PDF
Key-Value Pairs: Numerous, see [1]. Here, we mention only two.
1. cDIPath: The absolute path to the background or watermark document.
2. bOnTop: (optional) A Boolean value specifying the z-ordering of the watermark. Iftrue (the default), the watermark is added above all other page content. If false,the watermark is added below all other page content.
\importIcon({<key-values>});
Command Description: Imports icon files7
Key-Value Pairs: There are three key-value pairs:
1. cName: The name to associate with the icon
2. cDIPath: The path to the icon file, it may be absolute or relative
3. nPage: The 0-based index of the page in the PDF file to import as an icon. Thedefault is 0.
\importSound({<key-values>});
Command Description: Imports a sound file
7The AcroMemory package uses these environments and functions to import icons.
Doc Assembly Methods 28
Key-Value Pairs: There are two key-value pairs:
1. cName: The name to associate with the sound object
2. cDIPath: The path to the sound file, it may be absolute or relative
\appopenDoc({<key-values>});
Command Description: Opens a document
Key-Value Pairs: Here, we list only two of five
1. cPath: A device-independent path to the document to be opened. If oDoc isspecified, the path can be relative to it. The target document must be accessiblein the default file system.
2. oDoc: (optional) A Doc object to use as a base to resolve a relative cPath. Must beaccessible in the default file system.
\insertPages({<key-values>});
Command Description: Inserts pages into the PDF, useful for inserting pages of dif-ference sizes, such as tables or figures, into a LATEX document which requires that allpage be of a fixed size.
Key-Value Pairs: There are five key-value pairs:
1. nPage: (optional) The 0-based index of the page after which to insert the sourcedocument pages. Use -1 to insert pages before the first page of the document.
2. cPath: The device-independent path to the PDF file that will provide the insertedpages. The path may be relative to the location of the current document.
3. nStart: (optional) A 0-based index that defines the start of an inclusive range ofpages in the source document to insert. If only nStart is specified, the range ofpages is the single page specified by nStart.
4. nEnd: (optional) A 0-based index that defines the end of an inclusive range ofpages in the source document to insert. If only nEnd is specified, the range ofpages is 0 to nEnd.
\importDataObject({<key-values>});
Command Description: Attaches a file to the PDF. This function is used in the twoattachments options of AeB Pro.
Doc Assembly Methods 29
Key-Value Pairs: There are two key-value pairs of interest:
1. cName: The name to associate with the data object.
2. cDIPath: (optional) A device-independent path to a data file on the user’s harddrive. This path may be absolute or relative to the current document. If notspecified, the user is prompted to locate a data file.
\executeSave();
Command Description: As you know, you must always save your document after it isdistilled, this saves document JavaScripts in the document. This command saves thecurrent file so you don’t have do it yourself. This command should be the last onelisted in the docassembly environment.8
\sigInfo{cSigFieldName: "mySig",ohandler: security.PPKLiteHandler,cert: "D_P_Story.pfx",password: "dps017",oInfo: {
location: "Niceville, FL",reason: "I am approving this document",contactInfo: "[email protected]",appearance: "My Signature"
}};\signatureSign
Command Description: The eforms package supports the creation of signature fields.Such fields can be signed using the Acrobat UI, or programmatically using the \sigInfoand \signatureSign commands. See the eforms manual, eformman.pdf for a detaileddescription of the parameters of \sigInfo.
\signatureSetSeedValue(oSeedValue)
Command Description: The Acrobat JavaScript methods Field.signatureSetSeed-Value is implemented through the LATEX comment \signatureSetSeedValue. Themethod needs the field object of the signature field, this is passed to \signature-SetSeedValue through the JavaScript variable oSigFileName. To use this command,you first get oSigFileName, like so,
8Later commands may dirty the document again, and I have found that saving the document can causelater commands, like \addWatermarkFromFile, not to execute.
Doc Assembly Methods 30
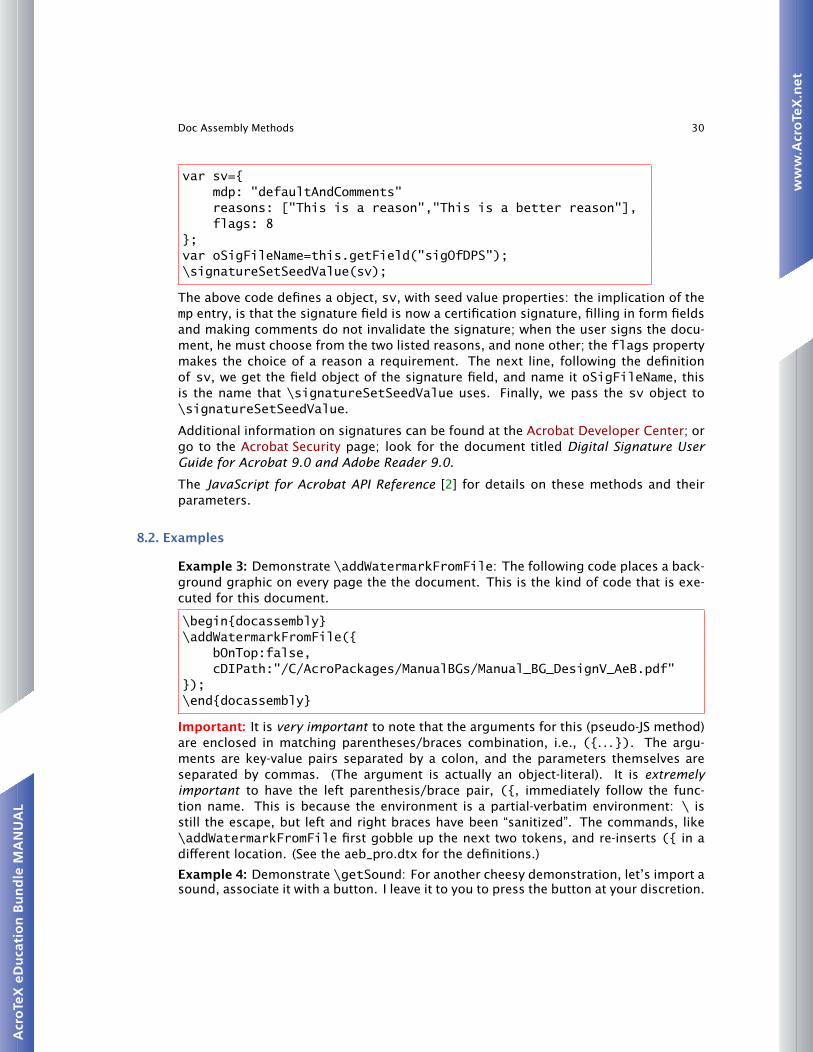
var sv={mdp: "defaultAndComments"reasons: ["This is a reason","This is a better reason"],flags: 8
};var oSigFileName=this.getField("sigOfDPS");\signatureSetSeedValue(sv);
The above code defines a object, sv, with seed value properties: the implication of themp entry, is that the signature field is now a certification signature, filling in form fieldsand making comments do not invalidate the signature; when the user signs the docu-ment, he must choose from the two listed reasons, and none other; the flags propertymakes the choice of a reason a requirement. The next line, following the definitionof sv, we get the field object of the signature field, and name it oSigFileName, thisis the name that \signatureSetSeedValue uses. Finally, we pass the sv object to\signatureSetSeedValue.
Additional information on signatures can be found at the Acrobat Developer Center; orgo to the Acrobat Security page; look for the document titled Digital Signature UserGuide for Acrobat 9.0 and Adobe Reader 9.0.
The JavaScript for Acrobat API Reference [2] for details on these methods and theirparameters.
8.2. Examples
Example 3: Demonstrate \addWatermarkFromFile: The following code places a back-ground graphic on every page the the document. This is the kind of code that is exe-cuted for this document.
\begin{docassembly}\addWatermarkFromFile({
bOnTop:false,cDIPath:"/C/AcroPackages/ManualBGs/Manual_BG_DesignV_AeB.pdf"
});\end{docassembly}
Important: It is very important to note that the arguments for this (pseudo-JS method)are enclosed in matching parentheses/braces combination, i.e., ({. . .}). The argu-ments are key-value pairs separated by a colon, and the parameters themselves areseparated by commas. (The argument is actually an object-literal). It is extremelyimportant to have the left parenthesis/brace pair, ({, immediately follow the func-tion name. This is because the environment is a partial-verbatim environment: \ isstill the escape, but left and right braces have been “sanitized”. The commands, like\addWatermarkFromFile first gobble up the next two tokens, and re-inserts ({ in adifferent location. (See the aeb_pro.dtx for the definitions.)
Example 4: Demonstrate \getSound: For another cheesy demonstration, let’s import asound, associate it with a button. I leave it to you to press the button at your discretion.
Doc Assembly Methods 31
\setbox0=\hbox{\includegraphics[height=16bp]{../extras/AeB_Logo.eps}}\pushButton[\S{S}\W{0}\A{\JS{%
var s = this.getSound("StarTrek");\rs.play();
}}]{cheesySound}{\the\wd0 }{\the\ht0 }
\begin{docassembly}try {
\importSound({cName: "StarTrek", cDIPath: "../extras/trek.wav" });} catch(e) { console.println(e.toString()) };\end{docassembly}
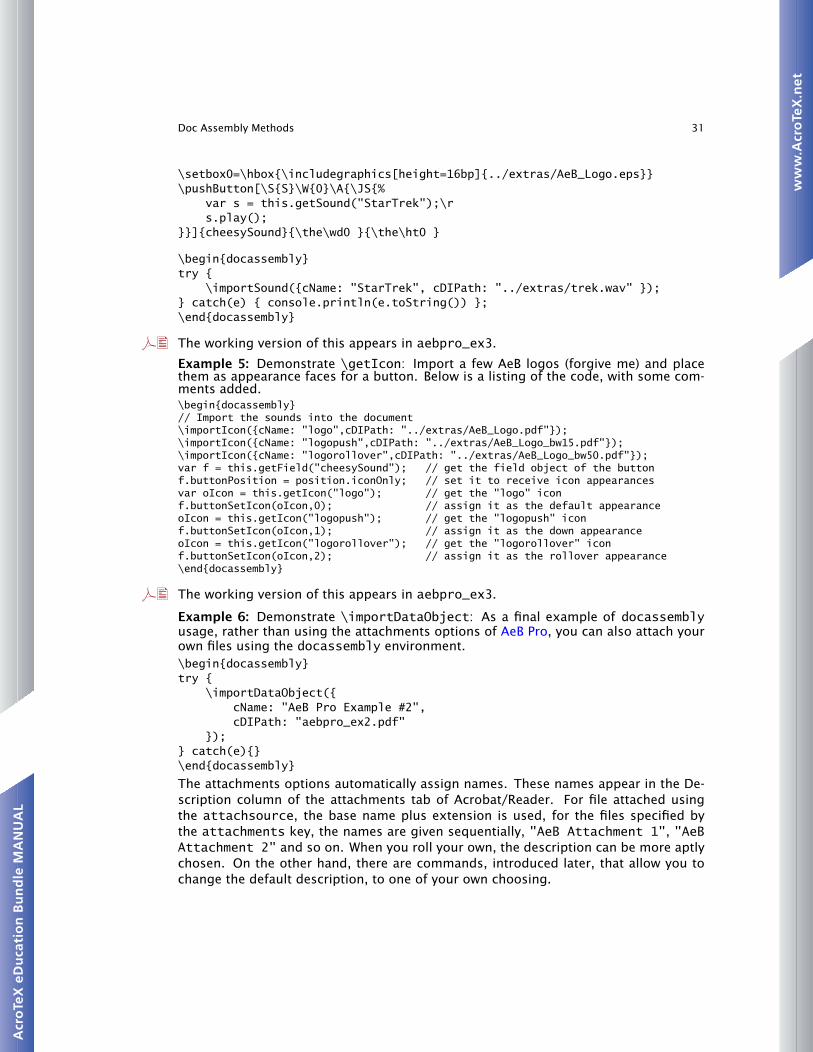
b The working version of this appears in aebpro_ex3.
Example 5: Demonstrate \getIcon: Import a few AeB logos (forgive me) and placethem as appearance faces for a button. Below is a listing of the code, with some com-ments added.\begin{docassembly}// Import the sounds into the document\importIcon({cName: "logo",cDIPath: "../extras/AeB_Logo.pdf"});\importIcon({cName: "logopush",cDIPath: "../extras/AeB_Logo_bw15.pdf"});\importIcon({cName: "logorollover",cDIPath: "../extras/AeB_Logo_bw50.pdf"});var f = this.getField("cheesySound"); // get the field object of the buttonf.buttonPosition = position.iconOnly; // set it to receive icon appearancesvar oIcon = this.getIcon("logo"); // get the "logo" iconf.buttonSetIcon(oIcon,0); // assign it as the default appearanceoIcon = this.getIcon("logopush"); // get the "logopush" iconf.buttonSetIcon(oIcon,1); // assign it as the down appearanceoIcon = this.getIcon("logorollover"); // get the "logorollover" iconf.buttonSetIcon(oIcon,2); // assign it as the rollover appearance\end{docassembly}
b The working version of this appears in aebpro_ex3.
Example 6: Demonstrate \importDataObject: As a final example of docassemblyusage, rather than using the attachments options of AeB Pro, you can also attach yourown files using the docassembly environment.\begin{docassembly}try {
\importDataObject({cName: "AeB Pro Example #2",cDIPath: "aebpro_ex2.pdf"
});} catch(e){}\end{docassembly}
The attachments options automatically assign names. These names appear in the De-scription column of the attachments tab of Acrobat/Reader. For file attached usingthe attachsource, the base name plus extension is used, for the files specified bythe attachments key, the names are given sequentially, "AeB Attachment 1", "AeBAttachment 2" and so on. When you roll your own, the description can be more aptlychosen. On the other hand, there are commands, introduced later, that allow you tochange the default description, to one of your own choosing.
Doc Assembly Methods 32
I have found many uses for the execJS environment, or the simplified docassemblyenvironment. You are only limited by your imagination, and knowledge of JavaScriptfor Acrobat.
8.3. Pre-docassembly Methods
In this section, we’ll gather some “useful” commands that may be useful in combin-ing several docassembly tasks together. The docassembly environment is a partial-verbatim environment, expansion is severely limited. The trick is to expand beforeplacing the lines in the docassembly environment.
• Importing and Placing Images
In this section we introduce four commands for importing images (possibly with variousgraphic formats) into the PDF document, and inserting them as images that appear inthe document itself. These are
\declareImageAndPlacement, \declareMultiImages,\insertPreDocAssembly, and \placeImage.
b The file placeimages.pdf is a demo of the commands of this section. The source fileand images are attached to the PDF. The PDF, titled Importing and Placing Images usingAeB Pro, is found at the AeB Blog web site.
\declareImageAndPlacement{<key-values>}
Command Description: This command creates the JavaScript code to import images(icons) and associates them with target push buttons that are created by \placeImage.The images are imported into the document when the document is first opened inAcrobat. The images themselves can be PDF, BMP, GIF, JPEG, PCX, PNG, TIFF, or someother supported format. (See the documentation on the method Doc.importIcon fordetails.) The file is converted to PDF when imported.
Important: This command is executed in the preamble only, can be executed morethan once, (once for each image being imported), and outside of the docassemblyenvironment.
Key-Value Pairs: This command takes up to four key-value pairs.
• name: (Optional) The symbolic name to be associated with this image. The nameis later used to attach the image to the push button (created by \placeImage). Ifa value for this key is not provided, one will be automatically created.
• path: (Required) The path to the image, this can be a relative path or an absolutepath. If absolute, use the device independent path notation of Acrobat; for exam-ple,
/C/acrotex/myimages/myimage.png.
Doc Assembly Methods 33
• page: (Optional) If the image is a PDF, the PDF may contain several pages, eachwith an image on it. You can specify which of the pages to import using the pagekey. If no page key is specified, page 0 is assumed.
• placement: (Optional) This is a comma-delimited list of names of push buttonscreated by the command \placeImage. Multiple place images with the samename all get the image imported into it. If you want several place images withdifferent names, list these in a comma delimited list, like so
placement={image1,image2,image3}.
If a value for this key is not provided, a message in the log is generated; theimages are imported (embedded) in the document, are not used to create visibleimages. Either provide a placement key-value pair, or learn how to use (named)icons that are embedded in the document with the Doc.importIcon() method.
Multiple images can be imported and set by simply executing \declareImageAnd-Placementmultiple times with a different set of arguments, or, by executing \declare-MultiImages.
\declareMultiImages{
{<key-values1>}{<key-values2>}{<key-values3>}...{<key-valuesn>}}
Command Description: This command calls \declareImageAndPlacement for eachof its arguments. The arguments {<key-values>} are a list (without commas) of thearguments of \declareImageAndPlacement. The command \declareMultiImagesloops through the list, calling \declareImageAndPlacement with the current set of<key-values>. An example follows.
\declareMultiImages{%
{path=graphics/girl.png,placement={Avatar3,Avatar4}}{path=graphics/AcroFord.jpg,placement=AcroFord}{path=graphics/scot.gif,placement=Scot}
}
Important: This command is executed in the preamble only, can be executed morethan once, (once for each image being imported), and outside of the docassemblyenvironment.
Once the images have been defined and referenced using any of the above commands,you need to actually executed the JavaScript code these commands created. This isdone with the \insertPreDocAssembly inside the docassembly environment.
\insertPreDocAssembly
Command Description: This command expands to all the JavaScript code created bythe commands \declareImageAndPlacement and \declareMultiImages. It is placedwithin the docassembly environment, like so
Doc Assembly Methods 34
\begin{docassembly}\insertPreDocAssembly\end{docassembly}
The target buttons are be created by the \pushButton command from the eformspackage, but as a convenience, AeB Pro defines the \placeImage command
\placeImage[<optional_params>]{<name>}{<width>}{<height>}
Command Description: Creates a readonly push button with an icon only appearance.The <optional_params> can be used to modify the appearance of the button (adda border, for example); the <name> is used as the field name, and is referenced inthe placement key of \declareImageAndPlacement. The <width> and <height> arewhat they appear to be, the width and height of the image.
If the width and height is not correct, Acrobat will scale the image. There are othercontrols that can be used through the optional arguments to position the image withinits bounding box. The dimensions of the image you want to use can be acquired throughvarious methods. On windows, the dimension of the image for PNG and JPG are displacewhen the mouse is moved over the image (while using explorer).
Note. At times, I have imported images this way, these commands just simply the task.This method may be preferred over using \includegraphics when the image hastransparency that you want to preserve. For example, if a PNG image has a transparentbackground, it will be imported into the document with the transparent background.For those using Acrobat Distiller, the transparency is often lost (unless the image usesvector graphics) when converting to an EPS file.
• Creating Custom Button Appearances
The \placeImage command described in the last section is a \pushButton designedto be read only and is meant to be used to place non-interactive images in the docu-ment. The methods of the previous section can also be used to create custom buttonappearances using graphics files of various formats.
To this end, an optional parameter is defined for the value(s) of the placement param-eter in \declareImageAndPlacement and \declareMultiImages. Each button has(at most) three appearance states: normal, rollover, and down. The additional optionalparameter allows you to specify what appearance state the icon is to be used for. Theoptional parameter is shown in the example below.
\declareMultiImages{%
{path=graphics/man1.pdf,placement={Avatar1,[2]Avatar2}}{path=graphics/scot.gif,placement={[1]Avatar1,[1]Avatar2}}{path=graphics/girl.png,placement={[2]Avatar1,[0]Avatar2}}
}
Doc Assembly Methods 35
The optional argument precedes the field name and determines the appearance stateof the button the icon is to be used; the values are [0] (default, normal icon); [1](down icon); and [2] (rollover icon). There must be no space between the optionalargument and the field name; if you type "[2] Avatar1", for example, the field nameis interpreted as " Avatar1", which is incorrect.
b Further details and examples may be found in the blog article button_appr.pdf titledCreating Button Appearances, found at the AeB Blog web site. The source file andimages are attached to the PDF.
• Methods in support of Button Anime
The commands and methods described in this section are in support for ‘Button andOcg Anime’ on page 49.
The btnanime option brings in the code necessary to create what I call button anime,as opposed to OCG anime (using using layers). Two pre-docassembly commands werecreated for this purpose \embedMultiPageImages and \placeAnimeCtrlBtnFaces.
\embedMultiPageImages{<optional_params>}
Command Description: The command embeds (in the document) and optionally placesa series of icons all of which are pages of the same PDF file. This command does notneed the btnanime option, it is part of the core AeB code.
Key-Value Pairs: There are a number of key-value pairs the argument recognizes.
• path: The path to the PDF containing the images to be used. This path can berelative or absolute. This key is required.
• name: The base name to be associated with the images being embedded. Thiskey is required.
• placement: A comma-delimited list, each member of the list is the base nameof the button anime field created by \btnAnime that is to use this set of images.This key is optional, if not present, the images are embedded only.
• firstpage: The page number (the first page is page 1) of the first image to beembedded and used. This key is optional; if firstpage is not specified, its defaultvalue is 1.
• lastpage: The page number (base-1 page numbering) of the last image to beembedded and used. The value of this key is required.
For example, here we embed the first 41 pages from the file sine_anime.pdf, whichresides in the subfolder graphics, and associates it with the button anime field mysine.
\embedMultiPageImages{lastpage=41,name=sine,path=graphics/sine_anime.pdf,placement=mysine}
Doc Assembly Methods 36
The control buttons for a button anime require a custom appearance. AeB Pro suppliesone set of custom icons, and allows for the creation of more by the interested documentauthor, that’s you.
\placeAnimeCtrlBtnFaces[<path>]{<appr_icons>.pdf}{<list_of_animes>}
Command Description: This command associate the icon set to be used for the but-ton appearances of the buttons used to control the button animation. (That’s a lot ofbuttons in that last sentence!)
Parameter Description: The command takes three parameters, one of which is op-tional.
[#1] is the (optional) path to the button control appearance icons. If no argument ispresent, the value of \pathToBtnCtrlIcons is used, see aebpro.cfg for its def-inition. The icon set distributed with AeB Pro is named btn_anime_icons1.pdf,and is found in the icons folder of the aeb_pro folder.
#2 is the name of the PDF file that contains the icons to be used for the appearancesof the control buttons.
#3 is a comma-delimited list of the base names of the anima created by \btnAnimathat will be using these appearance icons.
Example:
\placeAnimeCtrlBtnFaces{btn_anime_icons1.pdf}{myclock,mysine}
The above example uses no optional parameter, so \placeAnimeCtrlBtnFaces usesthe path defined by \pathToBtnCtrlIcons in aebpro.cfg. On my personal system,the aebpro.cfg file reads
%% AeB Pro Configuration file%\ExecuteOptionsX{driver=dvips}\renewcommand{\pathToBtnCtrlIcons}
{C:/Users/Public/Documents/My TeX Files/tex/latex/aeb_pro/icons}
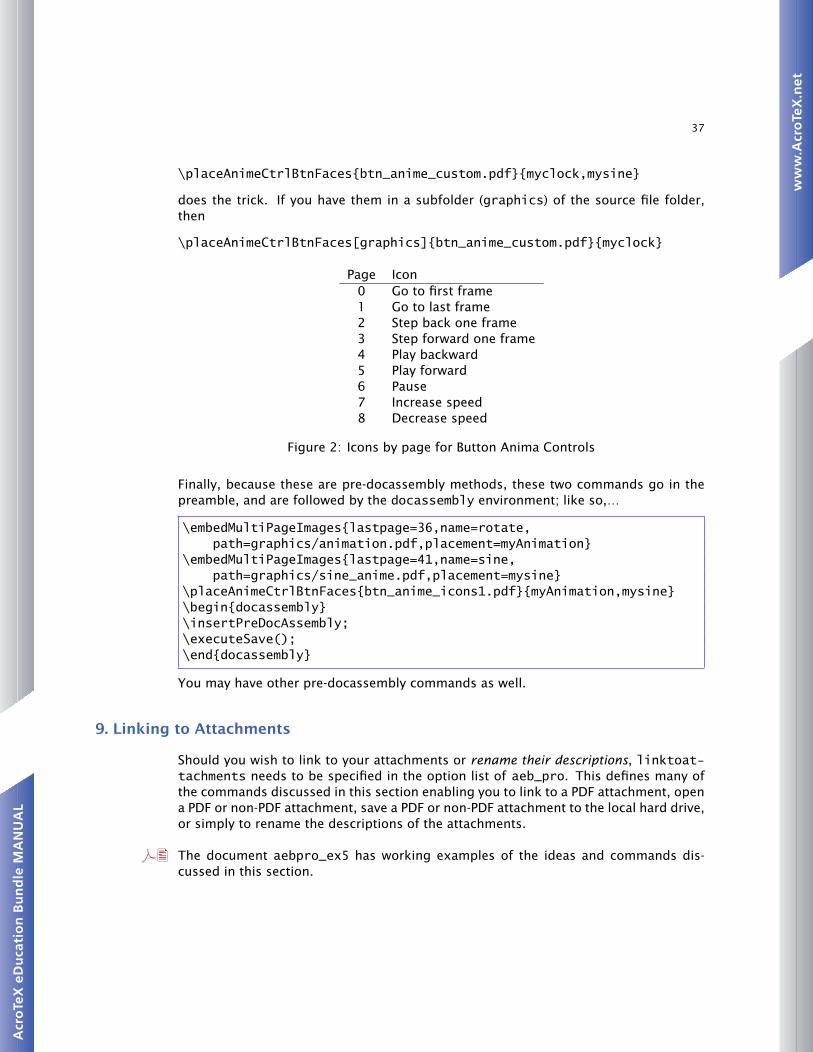
You should seek out the aebpro.cfg and edit this command to point to the iconsfolder of aeb_pro. You can create your own icon PDF file in the icons folder; theguidelines for creating such an icon PDF file are simple. Places the icon from each pageas the appearance of a corresponding control button. The expected order of the iconsis given in Figure 2, page 37.
If you put your custom appearance icon set in the source folder, you can reference likeso,
\placeAnimeCtrlBtnFaces[.]{btn_anime_custom.pdf}{myclock,mysine}
The optional [.] overrides the definition of \pathToBtnCtrlIcons, and refers to thecurrent folder. If you never defined \pathToBtnCtrlIcons (its default definition isempty), then
37
\placeAnimeCtrlBtnFaces{btn_anime_custom.pdf}{myclock,mysine}
does the trick. If you have them in a subfolder (graphics) of the source file folder,then
\placeAnimeCtrlBtnFaces[graphics]{btn_anime_custom.pdf}{myclock}
Page Icon0 Go to first frame1 Go to last frame2 Step back one frame3 Step forward one frame4 Play backward5 Play forward6 Pause7 Increase speed8 Decrease speed
Figure 2: Icons by page for Button Anima Controls
Finally, because these are pre-docassembly methods, these two commands go in thepreamble, and are followed by the docassembly environment; like so,…
\embedMultiPageImages{lastpage=36,name=rotate,path=graphics/animation.pdf,placement=myAnimation}
\embedMultiPageImages{lastpage=41,name=sine,path=graphics/sine_anime.pdf,placement=mysine}
\placeAnimeCtrlBtnFaces{btn_anime_icons1.pdf}{myAnimation,mysine}\begin{docassembly}\insertPreDocAssembly;\executeSave();\end{docassembly}
You may have other pre-docassembly commands as well.
9. Linking to Attachments
Should you wish to link to your attachments or rename their descriptions, linktoat-tachments needs to be specified in the option list of aeb_pro. This defines many ofthe commands discussed in this section enabling you to link to a PDF attachment, opena PDF or non-PDF attachment, save a PDF or non-PDF attachment to the local hard drive,or simply to rename the descriptions of the attachments.
b The document aebpro_ex5 has working examples of the ideas and commands dis-cussed in this section.
Linking to Attachments 38
9.1. Naming Attachments
The description of give an attachment (an embedded file) is used by Acrobat to ref-erences its location within the PDF document it is embedded in. This description (orname) is used when creating links to the embedded document as well; consequently,the description is quite important.
• Default Descriptions and Labels
With AeB Pro, you can attach files in three ways: (1) with the attachsource key, (2) withthe attachments key; and (3) using the \importDataObject method, as demonstratedin Example 6. For attachments that fall into categories (1) and (2), AeB assigns defaultlabels and descriptions. These are presented in Table 1, page 38.
attachsource label descriptiontex tex \jobname.texdvi dvi \jobname.dvilog log \jobname.log. . . . . . . . .
attachments label description1st file attach1 AeB Attachment 12nd file attach2 AeB Attachment 23rd file attach3 AeB Attachment 34th file attach4 AeB Attachment 4. . . . . . . . .
Table 1: Default label/descriptions
For documents attached by attachsource, the default label is the extension, and thedefault description is the filename with extension.
For documents attached by the attachments option, AeB Pro assigns them “names,”which appear in the attachments tab of Acrobat/Reader as the Description.9 The namesassigned are AeB Attachment 1, AeB Attachment 2, AeB Attachment 3, and so on.
If you embed the file using the docassembly environment and the \importDataObjectmethod (see Example 6, page 31), then you are free to assign a name of your preference.
• Assigning Labels and Descriptions
Whatever method is used to attach a document to the parent document, the names mustbe converted to unicode on the TEX side of things to set up the links, and there must be aLATEX-like way of referencing this unicode name, hence the development of the attach-mentsNames environment and the two commands \autolabelNum and \labelName.10
9The Description is important as it is the way embedded files are referenced internally.10It is important to note that these are not needed unless you are linking to the embedded files.
Linking to Attachments 39
These two commands, described below, should appear in the attachmentNames envi-ronment in the preamble.
\begin{attachmentNames}<\autolabelNum and \labelName commands>\end{attachmentNames}
Environment Location: The preamble of the document. The attachmentNames envi-ronment and the commands \autolabelNum and \labelName should be used only inthe parent document; for child documents they are not necessary.
Example 7: Below are the declaration that appear in the supporting file aebpro_ex5:\begin{attachmentNames}
\autolabelNum{1}\autolabelNum*{2}{target2.pdf Attachment File}\autolabelNum*[AeST]{3}{AeBST Components}\labelName{cooltarget}{My (cool) $|xˆ3|$ ˜ % ’<attachment>’}
\end{attachmentNames}
Descriptions of these commands follow.
\autolabelNum[<label>]{<attachment_number>}
Command Description: For PDFs (or other files) embedded using the attachmentsoption, use the \autolabelNum command.
Parameter Description: The first optional argument is the label to be used to referto this embedded file; the default is attach<attachment_number>. The second ar-gument is the second is a number, <attachment_number>, which corresponds to theorder the file is listed in the value of the attachments key.11
There is a star form of \autolabelNum, which allows to to change the description ofthe attachment.
\autolabelNum*[<label>]{<attachment_number>}{<description>}
Command Description: Each file listed as a value in the attachments key has a num-ber, <attachment_number>, assigned to it according to the order it appears in the list,and a default description of AeB Attachment <attachment_number>, This commandallows you not only to change the label, but to change the description of the attachmentas well.
Parameter Description: The first optional argument is the label to be used to referto this embedded file; the default is attach<attachment_number>. The second argu-ment is the second is a number, <attachment_number>. The third parameter is thedescription that will appear in the attachments pane of Acrobat/Reader.
11To minimize the number of changes to the document, if you later add an attachment, add it to the endof the list so the earlier declarations are still valid.
Linking to Attachments 40
For files that are embedded using \importDataObject, use the command \labelNamefor assigning the name, and setting up the correspondence between the name and thelabel.
\labelName{<label>}{<description>}
Parameter Description: The first argument is the label to be used to reference thisembedded file. The second parameter you can assign an arbitrary name used for thedescription.
• Notes on the <description>
The <description> parameter used in \autolabelNum* and \labelName can be anarbitrary string assigned to the description of this embedded file, the characters canbe most anything in the Basic Latin unicode set, 0021–007E, with the exception of leftand right braces {}, backslash \ and double quotes ". If you take the latin1 option,the unicodes for 00A1–00FF are also included.
A unicode character code can also be entered directly into the description by typing\uXXXX, where XXXX are four hex digits. (Did I say not to use ‘\’?) This is very usefulwhen using the trouble making characters such as backslash, left and right braces,and double quotes, or using unicode above 00FF (Basic Latin + Latin-1). To illustrate,suppose we wish the description of cooltarget to be
"$|eˆ{\ln(17)}|$"
All the bad characters!\labelName{cooltarget}{\u0022$|eˆ\u007B\u005Cln(17)\u007D|$\u0022}
From the unicode character tables we see that
• left brace \u007B
• right brace \u007D
• backslash \u005C
• double quotes \u0022
b See the example file aebpro_ex6.tex for additional examples of the use of \uXXXXcharacter codes.
There are several “helper” commands as well: \EURO, \DQUOTE, \BSLASH, \LBRACE and\RBRACE. When the \u is detected, an \expandafter is executed. This allows a com-mand to appear immediately after the \u, things work out well if the command ex-pands to four hex numbers, as it should. Thus, instead of typing \u0022 you can type\u\DQUOTE.
9.2. Linking to Embedded Files
This package defines two commands, \ahyperref and \ahyperlink, to create linksbetween parent and child and child and child. The default behavior of \ahyperref (and
Linking to Attachments 41
\ahyperlink) is to set up a link from parent to child. \ahyperlink and \ahyperrefare identical in all respects except for how it interprets the destination. (Refer to‘Jumping to a target’ on page 41 for details.)
The commands each take three arguments, the first one of which is optional
\ahyperref[<options>]{<target_label>}{<text>}\ahyperlink[<options>]{<target_label>}{<text>}
Command Description: \ahyperref is used to jump to a destination (as specified bythe dest key, listed in Table 2, page 42) defined by the \label command, whereas\ahyperlink is used to jump to a destination (as specified by the dest key) definedby the \hypertarget of hyperref. See Section 9.3, page 41 for details.
Parameter Description: The commands each take three arguments, the first one ofwhich is optional.
1. <options>: Options for modifying the appearance of the link, and for specifyingthe relationship between the source and the target file. These are key-value pairsdocumented in Table 2, page 42.
2. <target_label>: The label of the target file, the label is the default label, if thereis one, or as defined by \autolabelNum or \labelName.
3. <text>: The text that is highlighted for this link.
Example 8: We assume the declarations as given in Example 7, page 39. In the simplestcase, we jump from the parent to the first page of a child file given by. . .
\ahyperref{attach1}{target1.pdf}This is the same as
\ahyperref[goto=p2c]{attach1}{target1.pdf}
The goto key is one of the key-value pairs taken by the optional argument. Permissiblevalues for the goto key are p2c (the default), c2p (child to parent) and c2c (child tochild).
Example 9: We assume the declarations as given in Example 7, page 39. Similarly, linkto the other embedded files in this parent:
\ahyperref{attach2}{target2.pdf}\ahyperref{cooltarget}{aebpro\_ex2.pdf}
In all cases above, the \ahyperlink command could have been used, because nonamed destination was specified, without a named destination, the these links jump topage 1.
9.3. Jumping to a target
As you may know, LATEX, more exactly, hyperref has two methods of jumping to atarget in another document, jump to a label (defined by \label) and jump to a targetset by \hypertarget. Each of these is demonstrated for embedded files in the nexttwo sections.
b The document aebpro_ex5 has working examples of the ideas and commands dis-cussed in this section.
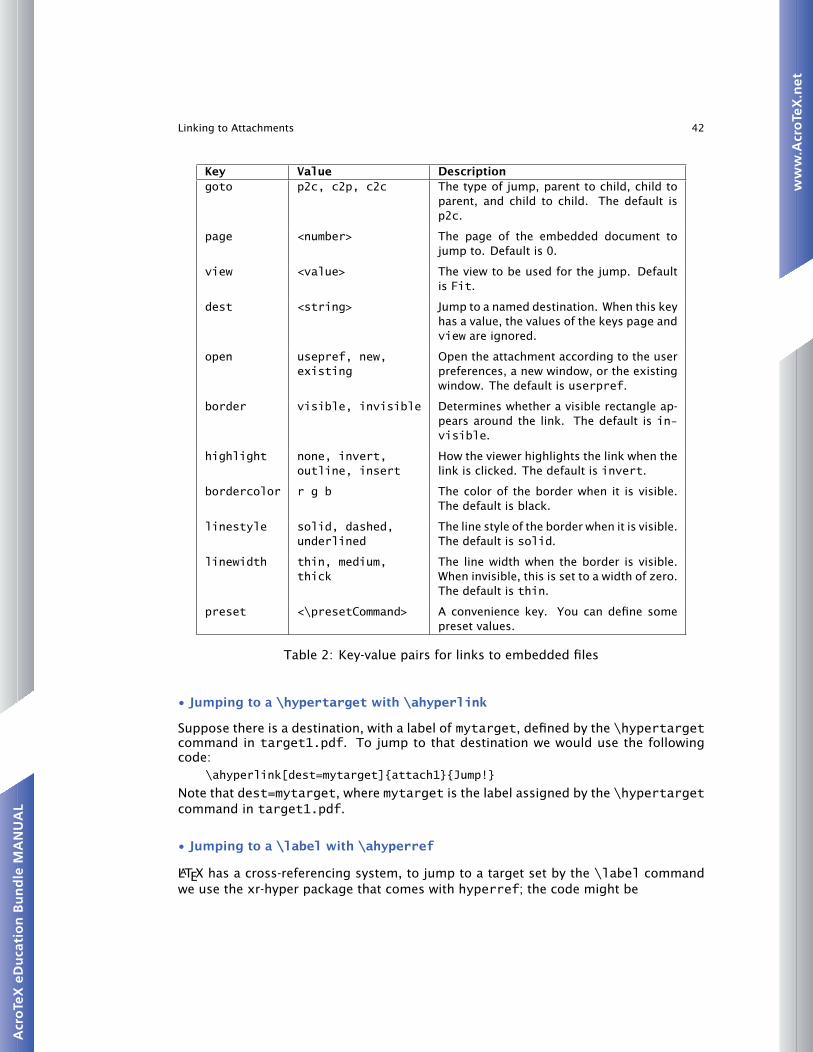
Linking to Attachments 42
Key Value Descriptiongoto p2c, c2p, c2c The type of jump, parent to child, child to
parent, and child to child. The default isp2c.
page <number> The page of the embedded document tojump to. Default is 0.
view <value> The view to be used for the jump. Defaultis Fit.
dest <string> Jump to a named destination. When this keyhas a value, the values of the keys page andview are ignored.
open usepref, new,existing
Open the attachment according to the userpreferences, a new window, or the existingwindow. The default is userpref.
border visible, invisible Determines whether a visible rectangle ap-pears around the link. The default is in-visible.
highlight none, invert,outline, insert
How the viewer highlights the link when thelink is clicked. The default is invert.
bordercolor r g b The color of the border when it is visible.The default is black.
linestyle solid, dashed,underlined
The line style of the border when it is visible.The default is solid.
linewidth thin, medium,thick
The line width when the border is visible.When invisible, this is set to a width of zero.The default is thin.
preset <\presetCommand> A convenience key. You can define somepreset values.
Table 2: Key-value pairs for links to embedded files
• Jumping to a \hypertarget with \ahyperlink
Suppose there is a destination, with a label of mytarget, defined by the \hypertargetcommand in target1.pdf. To jump to that destination we would use the followingcode:
\ahyperlink[dest=mytarget]{attach1}{Jump!}
Note that dest=mytarget, where mytarget is the label assigned by the \hypertargetcommand in target1.pdf.
• Jumping to a \label with \ahyperref
LATEX has a cross-referencing system, to jump to a target set by the \label commandwe use the xr-hyper package that comes with hyperref; the code might be

Linking to Attachments 43
\ahyperref[dest=target1-s:intro]{attach1}{Section˜\ref*{target1-s:intro}}
we set dest=target1-s:intro
The label in target1.pdf is s:intro, in the preamble of this document we have\externaldocument[target1-]{children/target1}
which causes xr-hyper to append a prefix to the label (this avoids the possibility ofduplication of labels, over multiple embedded files).
9.4. Optional Args of \ahyperref and \ahyperlink
The \ahyperref commands has a large number of optional arguments, see Table 2,page 42, enabling you to create any link that the user interface of Acrobat Pro can create,and more. These are documented in aeb_pro.dtx and well as the main documentation.Suffice it to have an example or two.
By using the optional parameters, you can create any link the UI can create, for example,\ahyperref[%
dest=target1-s:intro,bordercolor={0 1 0},highlight=outline,border=visible,linestyle=dashed
]{attach1}{Jump!}
Now what do you think of that?
The argument list can be quite long, as shown above. If you have some favorite settings,you can save them in a macro, like so,
\def\preseti{bordercolor={0 0 1},highlight=outline,open=new,%border=visible,linestyle=dashed}
Then, we can say more simply, This link is given by. . .\ahyperref[dest=target1-s:intro,preset=\preseti]{attach1}{Jump!}
I’ve defined a preset key so you can predefine some common settings you like to use,the enter these settings through preset key, like so preset=\preseti. Cool.
Note that in the second example, open=new is included. This causes the embedded fileto open in a new window. For Acrobat/Reader operating in MDI, a new child windowwill open; for SDI (version 8), and if the user preferences allows it, it will open in itsAcrobat/Adobe Reader window.
9.5. Opening and Saving with \ahyperextract
In addition to embedding and linking a PDF, you can embed most any file and program-matically (or through the UI) open and/or save it to the local file system.
Linking to Attachments 44
To attach a file to the parent PDF, you can use the attachsource or the attachmentsoptions of AeB Pro, or you can embed your own using the importDataObject method,as described earlier in this file.
If an embedded file is a PDF, then you can link to it, using \ahyperref or \ahyperlink;we can jump to an embedded PDF and jump back. If the embedded file is not a PDF,then jumping to it makes no sense; the best we can do is to open the file (using anapplication to display the file) and/or save it to the local hard drive.
The AeB Pro package has the command \ahyperextract to extract the embedded file,and to save it to the local hard drive, with an option to start the associated applicationand to display the file. The syntax for \ahyperextract is the same as that of the othertwo commands:
\ahyperextract[<options>]{<target_label>}{<text>}
Parameter Description: The <options> are the same as \ahyperref (see Table 2,page 42), the <target_label> is the one associated with the attachment name, andthe <text> is the link text.
In addition to the standard options of \ahyperref, \ahyperextract recognizes oneadditional key, launch. This key accepts three values: save (the default), view andviewnosave. The following is a partial verbatim listing of the descriptions given inthe JavaScript for Acrobat API Reference, in the section describing importDataObjectmethod of the Doc object:
1. save: The file will not be launched after it is saved. The user is prompted for asave path.
2. view: The file will be saved and then launched. Launching will prompt the userwith a security alert warning if the file is not a PDF file. The user will be promptedfor a save path.
3. viewnosave: The file will be saved and then launched. Launching will prompt theuser with a security alert warning if the file is not a PDF file. A temporary path isused, and the user will not be prompted for a save path. The temporary file thatis created will be deleted by Acrobat upon application shutdown.
Example 10: Here is a series of examples of usage:
1. Launch and view this PDF. The code is\ahyperextract[launch=view]{cooltarget}{aebpro\_ex3.pdf}
When you extract (or open) PDF in this way, any links created by \ahyperref or\ahyperlink will not work since the PDF being viewed is no longer an embeddedfile of the parent.
2. View the a file, but do not save. The code is\ahyperextract[launch=viewnosave]{tex}{aebpro\_ex5.tex}
Note that for attachments brought in by the attachsource option, the label forthat attachment is the file extension, in this case tex.
3. Save a file without viewing.\ahyperextract[launch=save]{AeST}{AeBST Component List}
45
9.6. The child document
If one of the documents to be attached is a PDF document created from a LATEX sourceusing AeB Pro, and you want link back to either the parent document or another childdocument, then use the childof option in the aeb_pro option list. The value of thiskey is the path back to the base name of the parent document. For example, a childdocument might specify childof={../aebpro_ex5}.
b See the support documents aebpro_ex5, the parent document and its two child docu-ments children/target1 and children/target2, found in the examples folder.
10. Creating a PDF Package
The concept of a PDF Package is introduced in Acrobat 8. On first blush, it is nothingmore than a fancy user interface to display embedded files; however, it is also usedin the new email form data workflow. Using the new Forms menu, data contained inFDF files can be packaged, and summary data can be displayed in the user interface.Consequently, the way forms uses it, a PDF package can be used as a simple database.
Unfortunately, at this time, the form feature/database feature of PDF Packages is inac-cessible to the JavaScript API and AeB Pro. What AeB Pro provides is packaging of theembedded files with the nice UI.
b The document aebpro_ex6 provides a working example of a PDF Package.
To create a PDF Package, embed all files in the parent and use the command \make-PDFPackage in the preamble to package the attachments.
\makePDFPackage{<key-values>}
Key-Value Pairs: There are only two sets of key-value pairs
1. initview=<label>: Specifying a value for the initview key determines which filewill be used as the initial view when the document is opened. If, for example,initview=attach2, the file corresponding to the label attach2, as set up inthe attachmentNames environment is the initial view. Listing initview with novalue (or if initview is not listed at all) causes the parent document to be initiallyshown.
2. viewmode=details|tile|hidden: The viewmode determines which of the threeuser interfaces is to be used initially. In terms of the UI terminology: details =View top; tile = View left; and hidden = Minimize view. The default is details.
If you use this command with an empty argument list, \makePDFPackage{}, you createa PDF package with the defaults.
TIP: Use the \autolabelNum* command to assign more informative descriptions to theattachments, like so.
46
\autolabelNum*{1}{European Currency \u20AC}\autolabelNum*{2}{\u0022$|eˆ\u007B\u005Cln(17)\u007D|$\u0022}\autolabelNum*[AeST]{3}{The AeBST Components}\autolabelNum*[atease]{4}{The @EASE Control Panel}
Warning: There seems to be a bug when you email a PDF Package. When the initial viewis not a PDF document, the PDF Package is corrupted when set by email and cannot beopened by the recipient. When emailing a PDF Package, as produced by AeB Pro, alwayshave the initial view as a PDF document.
11. Initializing a Text Field with Unicode
One of the side benefits of the work on linking to attachments of a PDF document isthat the techniques are now in place to be able to initialize a text field using unicodecharacters.
The technique uses a combination of a recently introduced command \labelName anda new command \unicodeStr.
\labelName{<label>}{<string>}\unicodeStr(<label>)
Parameter Description: The parameter <label> is a LATEX-type of label name, and<string> is a combination of ASCII characters and unicodes \uXXXX, as described ear-lier (Review the discussion in ‘Assigning Labels and Descriptions’ on page 38).
Command Description: The command \unicodeStr takes its argument, which is de-limited by parentheses, looks up the string referenced by <label> and converts thestring to unicode. The unicode tables that come with AeB Pro are used to look upany ASCII characters; for characters that are available on a standard keyboard, unicodeescape sequences can be used. This is illustrated below.
For example, we first define a unicode string, and reference it using a label.\labelName{myCoolIV}{\u0022\u20AC|eˆ\u007B\u005Cln(17)\u007D|$\u0022}
Note that the use of \labelName should not occur within the attachmentNames envi-ronment, this is for linking to attachments. Here, \labelName can be used anywherebefore the creation of the text field.
Then we can define a text field with this value as its initial value and its default valuelike so,
\textField[\textSize{10}\textFont{MyriadPro-Regular}\uDV{\unicodeStr(myCoolIV)}\uV{\unicodeStr(myCoolIV)}
]{myCoolIV}{1.5in}{12bp}
The result is the field
The technique uses special keys as optional arguments of the command \textField(defined in the eforms package). The keys \uDV and \uV signal to the eforms packagethat the string is given in unicode.

47
b The support document aebpro_ex8 is a short tutorial on these topics, including addi-tional examples on creating a button and combo box that use unicode encoded strings.
12. Using Layers, Rollovers and Animation.
When the uselayers option is taken, the necessary code is input to produce layers(Optional Content Groups). The AcroTEX Presentation Bundle (APB), which has a verysophisticated method of control over layers, by comparison, the AeB Pro layer supportis very primitive indeed. As a rule, after you create a layer, you will need a control ofthat layer. This could be a button or a link that executes JavaScript.
\xBld[true|false|print=(true|false)]{<layer_name>}<content in layer>\eBld
Command Description: The basic command for creating a layer is \xBld. The contentof the layer is set off by the \xBld/\eBld pair.
Parameter Description: The command \xBld takes two parameters: (1) the first isoptional, true if the layer is initially visible or false, the default, if the layer is hiddeninitially; (2) the name of the layer, this is used to reference the layer, to make it visibleor hidden. The print key sets the printing attribute of the of the layer:
• print=true (or just print): the layer always prints, no matter if it is visible ornot.
• print=false: the layer never prints, no matter if it is visible or not.
• If the print key does appear in the list of optional parameters, the layer will printif visible, otherwise, it does not print. Normally, the print key is not specified,and the layer is printed only if visible.
A link can be made visible or hidden by getting its OCG object and setting the stateproperty. A simple example of this would be. . .\setLinkText[%\A{\JS{%
var oLayer = getxBld("mythoughts");if ( oLayer != null )
oLayer.state = !oLayer.state;}}
]{\textcolor{red}{Click here}}
The link text has a JavaScript action. First we get the OCG object for this layer bycalling the getxBld function (this is part of the AeB Pro JavaScript) then if non-null (youmay not have spelled the name correctly) we toggle the current state, oLayer.state= !oLayer.state.
This is such a common action that a formal JavaScript function is defined by AeB Pro\setLinkText[%\A{\JS{toggleSetThisLayer("mythoughts");}}]{\textcolor{red}{Click here}}
Using Layers, Rollovers and Animation. 48
The above examples uses a link, but a form field action can also be used.
An advantage of the layers approach is that the content of the layers are latexed as partof the content of the tex file; consequently, you can include virtually anything in yourlayer that tex can handle, math, figures, PSTricks, etc. Acrobat Pro 7.0 (and distiller)or later is required to build the layers, but only Adobe Reader 7.0 or later is needed toview the document, once constructed.
b The file xbld_options.pdf is a demo of the optional parameters for \xBld of thissection. The source file and images are attached to the PDF. The PDF, titled Exploringthe options of \xBld, is found at the AeB Blog web site.
12.1. Rollovers
The AeB Pro package offers you two rollovers, which ostensibly provides help to thedocument consumer.
b These topics are illustrated in the support file aebpro_ex4.
The \texHelp is a command for creating a rollover for some text. When the user rollsover the text, a defined layer is made visible with helpful information. See aebpro_ex4for working examples and extensive details.
12.2. Layers and Animation
Let’s see if we can conjure up a little animation, shall we?
b A working version of this example appears in aebpro_ex4.
Example 11: This examples create a sine graph using PSTricks. When the start buttonis pressed, the function will be graphed in an animated sort of way.
\begin{minipage}{.65\linewidth}\centering\DeclareAnime{sinegraph}{10}{40}\def\thisframe{\animeBld\psplot[linecolor=red]{0}{\xi}{sin(x)}\eBld}\psset{llx =-12pt,lly=-12pt,urx =12pt,ury =12pt}\begin{psgraph*}[arrows=->](0,0)(-.5,-1.5)(6.5,1.5){164pt}{70pt}
\psset{algebraic=true}%\rput(4,1){$y=\sin(x)$}\FPdiv{\myDelta}{\psPiTwo}{\nFrames}%\def\xi{0}%\multido{\i=1+1}{\nFrames}{\FPadd{\xi}{\xi}{\myDelta}\thisframe}
\end{psgraph*}\end{minipage}\hfill\begin{minipage}{.3\linewidth}\backAnimeBtn{24bp}{12bp}\kern1bp\clearAnimeBtn{24bp}{12bp}\kern1bp\forwardAnimeBtn{24bp}{12bp}\end{minipage}
49
You will have to delve through the working version of this example in aebpro_ex4 tofully understand it.
\DeclareAnime{<basename>}{<speed>}{<nframes>}
This sets the basic parameters of an anime: the base name for the animation, the speedof the animation as measured in milliseconds, and the number of frames to appear inthe anime.
\animeBld<frame_content>\eBld
This \animeBld/\eBld pair enclose the “ith” frame.
\backAnimeBtn[<opts>]{<width>}{<height>}\clearAnimeBtn[<opts>]{<width>}{<height>}\forwardAnimeBtn[<opts>]{<width>}{<height>}
These are basic button controls for the anime: back, stop/clear, and forward. Each ofthese has an optional parameter where you can modify the appearance of the button.See the eforms manual for details of these optional parameters.
13. Button and Ocg Anime
In this section. we introduce some commands and one environment for creating buttonand OCG anime (see page 52).
13.1. The \btnAnime Command
When animating with layers, we create a series of frames in different layers, and weanimate by successively making visible then hiding each of the layers in turn. Thesame can be done with buttons. Buttons can take on appearances using what I’ll callicons. We create a series of stacked buttons, each with an icon appearance; when theanimation is started, each button becomes visible and hidden in turn.
b The demo file for the material in this section, (and for the support material in ‘Methodsin support of Button Anime’ on page 35) is titled \btnAnime: Animation using FormField Buttons with AeB Pro can be found at the AeB Blog web site.
To create a button anima, follow these steps:
1. Create your animation by placing one frame of your animation on one page of aPDF. If the anime has 40 frames, the PDF has 40 pages, each page contains oneframe. The anime must be placed on the page exactly in the same place to avoidany noticeable shaking or trembling of the anime as it plays. (I use PSTricks tocreate a few of the demo animations.) Give your animation PDF some name, say,myAnime.pdf
2. In the preamble, place the following commands
Button and Ocg Anime 50
\embedMultiPageImages{lastpage=36,name=myAnime,path=graphics/myAnime.pdf,placement=myFirstAnime}
\placeAnimeCtrlBtnFaces{btn_anime_icons1.pdf}{myFirstAnime}\begin{docassembly}\insertPreDocAssembly;\executeSave();\end{docassembly}
The commands \embedMultiPageImages and \placeAnimeCtrlBtnFaces aredescribed in detail in ‘Methods in support of Button Anime’ on page 35. Thesecommands embed the icons (or graphic images) in the PDF document, and asso-ciates them with the anime being created.
3. Use the \btnAnime command to create your animation. \btnAnime is describedbelow, for now, we present an example.
\btnAnime{%fieldName=myFirstAnime,iconName=myAnime,nFrames=36,controls=skin3,nospeedcontrol,type=loop,autorun,autopause
}{72bp}{72bp}
The centerpiece of button anime is the \btnAnime command, which is the one thatactually creates the button fields to display the animation, and the button to controlthe anime.
\btnAnime{<key-values>}{<width>}{<height>}
Command Description: Create a series of stacked buttons that hold and display theframes of the animation; it also creates the control buttons.
Parameter Description: The first parameter,12 taking key-value pairs, is describe be-low, the <width> and <height> parameters are the width and height of the buttonfields to display the animation. These buttons are all the same size and stacked oneon top the other.
Key-Value Pairs: The first optional parameter takes key-value pairs.
• fieldName: The base name of the anime fields to be created. The key fieldNamecorresponds to the placement key of \embedMultiPageImages.
• iconName: The base name of the icon set to be used in this anime. The iconNamekey corresponds to the name key of \embedMultiPageImages.
• nFrames: The number of frames in this anime; must be the same number aslastpage-firstpage+1 as declared in \embedMultiPageImages. (If the first-page key is not used, then nFrames=lastpage.)
• type: This is a choice key that takes any of three values: loop, palindrome,or stopatboundary. The latter being the default. For loop, the goes through
12In version 1.1 (dated 07/10/10) the first parameter was optional, since there are required keys in thisparameter, I’ve changed this first parameter to required.
Button and Ocg Anime 51
the stack of frames from 1 to nFrames, then repeats 1 to nFrames, and so onuntil the anime is paused. For palindrome, the anime plays in the order 1 tonFrames, nFrames-1 to 1, then repeat. This anime continues until the paused.For stopatboundary, the anima pauses when the frame reaches nFrames forforward play, and pauses at frame 1 for backward play.
• poster This is a choice key that takes any of three values: first, last, and none;the default is first.
• speed: When the anime is played, the value of speed is the initial or defaultspeed of the animation. The speed is measured in milliseconds. There are controlsfor changing the speed dynamically. When the speed key is not listed, the defaultspeed is 200 milliseconds.
• autorun: Determines whether the anime plays when the page is either open or be-comes visible; see autoplayevent below. The default is autorun=false. Listingautorun in the list of options is the same as autorun=true.
• autopause: Determines whether the anime pauses when the page is either closedor becomes invisible; see autopauseevent below for more detail. The defaultis autopause=false. Listing autopause in the list of options is the same asautopause=true.
• autoplayevent: This is a choice key that takes one of two values: pageopen orpagevisible. The distinction between these two only becomes significant whenthe user is viewing pages continuously. The default is pageopen.
• autopauseevent: This is a choice key that takes one of two values: pagecloseor pageinvisible. The distinction between these two only becomes significantwhen the user is viewing pages continuously. The default is pageclose.
The following keys concerning the buttons that control the anime.
• ctrlwidth: The common width of the various control buttons, the default is 18bp.
• ctrlheight: The common height of the various control buttons, the default is9bp.
Note: The next two keysctrlbdrycolor and ctrlbdrycolor, are needed to get thespace between the buttons and the space between the rows correct. These two pa-rameters, under different names, can be set through \btnAnimeCtrlPresets, but it isnot recommended that you use this command to set the border color or size, use thefollowing two keys are part of the key-value list.
• ctrlbdrycolor: Three numbers representing color in the RGB space. This coloris used as the color of the boundary line for the button. The default color istransparent, obtained by simply listing ctrlbdrycolor with no value.
• ctrlbdrywidth: A choice key determining the width of the boundary line (orstroke). The choices are thin, medium, and thick, and correspond to a boundaryline of width 1bp, 2bp, and 3bp, respectively. The default is thin (1bp).
Button and Ocg Anime 52
• controls: Determines the design of the set of control buttons. The followingvalues are recognized: none, skin1, skin2, skin3, skin4, skin5, skin6. Whencontrols=none, no controls are displayed (better use autoplay/autopause);skins 1–4 have various buttons included in them, skin1 includes all buttons.
Values of skin5 and skin6 are left for the author to design his/her own buttonlayout. Without a redefinition, these skins opt to skin1. See the appropriatesection of aeb_pro.dtx to see who one might create a custom layout.
The space between control buttons is determined by \btnanimebtnsep, the de-fault definition is \newcommand{\btnanimebtnsep}{1bp}.
\aep@vspacectrlsep: The vertical space between the bottom of the anime andthe control button set, \newcommand{\aep@vspacectrlsep}{3bp} is the defaultdefinition.
• nospeedcontrol: There are two buttons for increasing and decreasing the speed.(The minimal speed is 10 milliseconds, by the way.) If nospeedcontrols areincluded in the option list, then this Plus/Minus pair of buttons are not includedin the set of control buttons.
• usetworows: If usetworows is in the option list, then two rows are taken to listall the buttons. The second row usually consists of the Plus/Minus buttons.
The vertical space between two rows of buttons is \btnanimerowsep, the defaultdefinition is \newcommand{\btnanimerowsep}{1bp}.
Controlling the appearance of the Anime Fields. You can influence of the appearanceof buttons that display the images by using the command \btnAnimePresets.
\btnAnimePresets{<key-values>}
Parameter Description: The key values are ones associated with button form fields,as described in the eForm reference.
Controlling the appearance of the Anime Control Buttons. You can influence of theappearance of the buttons that provide the control for the anime by using the command\btnAnimeCtrlPresets.
\btnAnimeCtrlPresets{<key-values>}
Parameter Description: The key values are ones associated with button form fields,as described in the eForm reference.
13.2. The ocgAnime Environment
AeB Pro has provided for several years a basic animation feature using layers (or, inAdobe’s terminology, OCG, optional content groups). We now upgrade OCG animationup to the same level as button anime, much of the same code is used. Code for OCGanime is include when the ocganime option is taken.
Button and Ocg Anime 53
b The demo file for the material in this section, is titled ocgAnime: Animation using OCG(Layers) with AeB Pro can be found at the AeB Blog web site.
OCG animation is available through the ocgAnime environment.
\begin{ocgAnime}{<key-values>}<a set of ocg frames built using \animeBld/\eBld pairs>\end{ocgAnime}
Key-Value Pairs: The key-value pairs are the same ones described in Section 13.1,page 49. The iconName key is not recognized (this is a button anime key), and ocg-AnimeName is an alias for fieldName, ocgAnimeName being more descriptive of the basename for the OCG animation. The two keys ocgAnimeName and nFrames are required.
Below is an example of this syntax.
1 \begin{ocgAnime}{ocgAnimeName=sineAnime,nFrames=41,2 type=palindrome,speed=10,controls=skin1}3 \FPdiv{\myDelta}{\psPiTwo}{40}4 \def\thisframe{\animeBld\psplot[linecolor=red]{0}{\xi}{sin(x)}\eBld}5 \def\xi{0}\psset{algebraic=true}6 \psset{llx =-12pt,lly=-12pt,urx =12pt,ury =12pt}7 \begin{psgraph*}[arrows=->,trigLabels=true,trigLabelBase=2,8 dx=\psPiH](0,0)(-.5,-1.5)(6.75,1.5){164pt}{70pt}%9 \rput(4,1){$y=\sin(x)$}%
10 \animeBld\eBld11 \multido{\i=1+1}{40}{\FPadd{\xi}{\xi}{\myDelta}\thisframe}%12 \end{psgraph*}13 \end{ocgAnime}
As with \btnAnime, \placeAnimeCtrlBtnFaces is used to import the icon appear-ances of the control buttons.
13.3. Moving the Control Buttons
The default location of the control buttons is below the anime. It is possible to movethem elsewhere. Use the commands \animeSetup and \insertCtrlButtons for thispurpose.
b The demo file for the material in this section, is titled Moving the Control Buttons forButton and OCG Animation can be found at the AeB Blog web site.
\animeSetup{<key-values>}
Command Description: The argument is the key-value pairs of \btnAnime or theocgAnime environment. The command processes the key-value pairs.
Following the execution of \animeSetup, use \insertCtrlButtons to layout the but-tons according to the values specified by the key-value pairs. An example follows.

Button and Ocg Anime 54
1 \begin{minipage}[c]{190pt}\centering2 \begin{ocgAnime}{ocgAnimeName=sineAnime,nFrames=41,3 type=palindrome,speed=10,controls=none}4 \FPdiv{\myDelta}{\psPiTwo}{40}5 \def\thisframe{\animeBld\psplot[linecolor=red]{0}{\xi}{sin(x)}\eBld}6 \def\xi{0}\psset{algebraic=true}7 \psset{llx =-12pt,lly=0pt,urx=12pt,ury=12pt}8 \begin{psgraph*}[arrows=->,trigLabels=true,trigLabelBase=2,9 dx=\psPiH](0,0)(-.5,-1.5)(6.75,1.5){164pt}{70pt}%
10 \rput(4,1){$y=\sin(x)$}\animeBld\eBld % first (empty) frame11 \multido{\i=1+1}{40}{\FPadd{\xi}{\xi}{\myDelta}\thisframe}%12 \end{psgraph*}13 \end{ocgAnime}14 \end{minipage}\quad{\animeSetup{ocgAnimeName=sineAnime,nFrames=41,15 type=palindrome,speed=10,controls=skin3,usetworows}%16 \insertCtrlButtons}
Comments: The key-value pairs passed in line (2) are minimal, with controls=none.After closing the minipage environment in line (14), we begin with a left-brace ({)to enclose \animeSetup and \insertCtrlButtons in a group so all changes in theparameters are local. In lines (13)–(16), we execute \animeSetup with our selectedoptions, and follow this with \insertCtrlButtons and we are done!
\insertCtrlButtons itself expands to a \parbox, \insertCtrlButtons has an op-tional parameter that is passed to the optional parameter of the underlying \parbox,permissible values are c (the default), b, and t.
Note that if you want to use autorun and autoresume, these parameters must bepassed in the parameter set of ocgAnime, not from the parameter set of \animeSetup
Rather just enclosing \animeSetup and \insertCtrlButtons in grouping braces, youcould also use a \parbox, and add, perhaps, a caption.
In theory, the control button can be placed anywhere on the page, above the anime,below it, to the left or to the right of it.
b The AeB Blog post titled Custom Designing Anime Control Button Layout shows how todesign your own button layout, and how to define your own “skin.”
One last command, \insertCtrlButtons is normally expanded at the end of the\btnAnime or ocgAnime environments. It appears in the form
\ctrlButtonsWrapper{\insertCtrlButtons}
b The command \ctrlButtonsWrapper can be redefined to create special effects, asillustrated in the AeB Blog post titled Some Comments on Anime Button Layouts.
55
References
[1] “execJS: A new technique for introducing discardable JavaScript into a PDF from aLATEX source,” TUGBoat, The Communications of the TEX User Group, Vol. 22, No. 4,pp. 265-268 (2001). 27
[2] JavaScript for Acrobat® API Reference, Adobe® Acrobat® SDK, Version 8.0., AdobeSystems, Inc., 2006http://www.adobe.com/go/acrobat_developer 21, 22, 24, 30
[3] Developing Acrobat® Applications Using JavaScript, Version 8.0., Adobe Systems,Inc., 2006http://www.adobe.com/go/acrobat_developer
[4] pdfmark Reference Manual, Version 8.0, Adobe® Acrobat® SDK, Version 8.0, 2006http://www.adobe.com/go/acrobat_developer
[5] PDF Reference, Version 1.7., Adobe Systems, Inc., 2006http://www.adobe.com/go/acrobat_developer 24
Now, I simply must get back to my retirement. DPS