Embed Size (px)
Citation preview

1
Advanced and Customized Net Conference With Cisco WebEx Meeting Center Leader Quick Tips Leader Quick Tips for WebEx Meeting Center provides tips and techniques that you can use to conduct more efficient meetings on the Web. This guide assumes that you are already familiar with the basics of WebEx Meeting Center. It does not provide detailed instructions for using WebEx Meeting Center. To obtain detailed instructions for using the options and features that this guide describes, refer to the online Help on your WebEx Meeting Center Web site or the other Reference materials on e-meetings and My Meetings.
How to Start a Net Conference using WebEx Meeting Center: Starting a scheduled meeting As the meeting host, you must first start a meeting before attendees can join it.
Start a meeting about 10 minutes before its scheduled starting time, to accommodate any attendees who want to join a few minutes early.
Alternatively, you can let attendees join a meeting before you actually start it. In this case, the meeting automatically becomes “open” at a time that you specify when scheduling it.
There are several ways to start your WebEx Meeting Center meeting:
Meet Now Microsoft Outlook® Calendar WebEx Meeting Center Homepage
Opening the WebEx Meet Now panel: To open the Meet Nowpanel:
o Double-click the WebEx Meet Now icon on your desktop.

2
OR
o Go to Start >Programs >WebEx Productivity Tools. For windows XP and 7, as well as 8.1 in classic, corrected directions.
Note: If you did not specify the option to remember your user name and password, enter the required WebEx account information in the Account tab of the WebEx Settings dialog box, and then click OK.
Starting a Meeting via Meet Now: You can use the WebEx Meet Now to start a Meet Now Meeting and to send invitation email messages to those whom you want to invite to the meeting. Before you start a meeting, you can review or modify your meeting options in the WebEx Settings dialog box. To start a meeting from the WebEx Meet Nowpanel: • Open your WebEx Meet Now panel. • Optional. Invite attendees to the meeting by entering contacts from your Microsoft Outlook or IBM Lotus
Notes address book or mobile number book or by typing their email addresses or mobile phone numbers in the text box.
o You can invite up to 16 attendees at one time. Use semicolons to separate email addresses and mobile numbers. You can invite additional attendees after you start the meeting.
• Click Start Meeting. o After a brief setup, you are in the meeting; and invited attendees receive their invitation email
messages. o If you invited an attendee using the attendee's email address, the attendee must enter his or her
name on the Join Meeting page before joining the meeting. o If you invited an attendee using the attendee's name from your Microsoft Outlook or IBM Lotus
Notes address book, WebEx Meet Now identifies the attendee, and the attendee can then join the meeting immediately.
• Depending on your settings, the Request to Join dialog box may appear, asking for your approval for the joining requests. The following figure shows an example.
• Select one of the three approval options, and then click Acceptor Reject, as appropriate. o If your site administrator specifies that your approval is required for each of your Meet Now
meetings, the Request to Join dialog box shows only the Accept and Reject options.

3
• Starting a Meeting via the Outlook Calendar:
o In your Microsoft Outlook calendar, open the meeting item. o Click the Link to the WebEx Meeting center Website o Log in to your account o Click Meet Now
Starting a Meeting via the WebEx Meeting Center Homepage: To start a scheduled meeting from your meeting list on your WebEx Meeting Center Web site:
• Log in to your WebEx Meeting Center Web site. • On the navigation bar, click My WebEx. • Choose My Meetings from the left-hand menu, displaying a list of each meeting that you have scheduled. • In the meeting list, under Status, click one of the following:
o Start. Appears if the meeting is not in progress. o Join - Appears if you allowed participants to join the meeting before its starting time and
participants have already joined the meeting.

4
How to Join a Net Conference using WebEx Meeting Center: There are several ways you may join a WebEx Meeting Center meeting.
• Microsoft® Outlook® Calendar • WebEx Meeting Center homepage • WebEx Meet Now
• Joining a meeting via Microsoft Outlook Calendar:
o Participants join the WebEx Meeting Center meeting by clicking the link embedded in their Outlook
Calendar entry. o Click the meeting link in your invitation email message, and then o Click Join Now. o When joining a meeting, you may need enter some details on the Join Meeting page:
Your name: Enter the name you want attendees to use to identify you during the meeting. Email address: Enter your email address, in this format: name@your_company.com— for
example, [email protected]. Meeting password: Enter the meeting password. The meeting host may have included the
password in the email invitation or, for security reasons, provided it to you in another way. If the meeting does not require a password, the text box does not appear on this page.
o To join the audio conference portion of the call, you may either dial the telephone number in the email and/or console page or you may have the audio bridge dial back out to you after you enter the meeting console.
Joining a meeting via the WebEx Meeting Center Homepage: You may join a meeting from the WebEx Meeting Center Homepage.
o For Advanced Net Conference users: Go to your WebEx Meeting Center homepage Click Attend a Meeting

5
Enter the Meeting Number Click Join
Joining a meeting via Meet Now:
To open the Meet Nowpanel: Double-click the WebEx Meet Now icon on your desktop.
OR Go to Start >Programs >WebEx Productivity Tools. Right-click the WebEx Meet Now icon in taskbar, and then click Open Meet Now.
Note: If you did not specify the option to remember your user name and password, enter the required WebEx account information in the Account tab of the WebEx Settings dialog box, and then click OK.
o Joining an in-progress meeting from Meet Now : To join a meeting from your WebEx Meet Nowpanel: Open your WebEx Meet Now panel. Enter either the host's email address or the meeting number in the text box Click Join Meeting.

6
Depending on the host's settings, either wait for the host's approval or enter the password for joining the meeting.
Once you join the meeting, the controls on your WebEx Meet Now panel become unavailable. You cannot start a meeting or join another meeting from the panel. The following figure shows an example.
Note: If your site administrator turns off the Meet Now Meeting function for unlisted meetings for security reasons, you cannot join an unlisted meeting from the Meet Now panel. In this case, join an unlisted meeting by providing the meeting number on your WebEx service site or at the meeting URL provided by your host. Joining a meeting from the WebEx Meet Now taskbar menu
You can use the WebEx Meet Now taskbar menu to join an instant meeting or scheduled meeting.
To join a meeting from the WebEx Meet Now menu: Right-click the Meet Now icon in your Windows taskbar. The WebEx Meet Now taskbar menu appears. Choose Join a Meeting.
The Join Meeting dialog box opens and shows a list of meetings you are invited to for the current day. (Optional) Select a different date to show the meetings for that date, or select Weeklyor Monthly to show the
meetings for that week or month. (Optional) If you want to view all the meetings you are invited to, click All Meetings to see the complete list of
meetings on your WebEx service site. In the box, enter your email address. Click Join Meeting.

7
The Leader Console The console is an easy interface that uses the familiar Microsoft Windows® menus to make controlling a meeting very intuitive. Leaders can select to have only those windows that are most important to them open during the meeting, showing the participants, chat, notes, or video. Simple tabs make it easy to flip from presentation to presentation.
Toolbar
Video Button
Recorder Chat
Participant
Video Panels

8
Floating Icon Tray
The Floating Icon Tray appears when sharing an Application. The tray includes:
Join Teleconference Leaders and Participants may join the audio portion of the meeting multiple ways. They may:
• Call into the Instant Meeting audio bridge. • Enter their phone number to receive a call back.
Call into the Instant Meeting audio conference - When participants enter the meeting console the dial-in numbers
will display on the Info tab and in the Meeting Information section. In addition to toll and toll free, global numbers are available as well. Dial In User Merge is also supported as a dial in option which merges the user’s audio and net identities within the participant panel. Please refer to the Dial In User Merge User Guide for more.
Dial Back: Leaders and participants may enter their number to receive a call from the conference service. This
synchronizes the audio and net sessions so that each user is identified by name in the participants panel. This also enables the active speaker functionality. (see Telephone: Identify Active Speaker section.)
Stop Sharing
Temporarily Freeze Attendee View of Shared Content
Select Content to Share
Assign Control
Participants
Chat
Start Annotations

9
Press 1 to Join Audio:
• If the Site Administrator has the Press *1 feature turned on for your site, participants will be asked to enter a *1 to join the audio portion of the conference if they are joining the audio by having the audio bridge dial out to them. This will prevent voicemail boxes from being added into the audio conference by mistake.
• The pop up window for the Join Teleconference will indicate press 1 however the audio command will tell participant to Press *1.
• Please follow the audio instruction to Press *1 and disregard the Press 1 instruction in the pop up window within the WebEx console.
• A future release of WebEx will allow the text within the Join Teleconference window to be customized. Note: The Host/Leader will not be prompted to press *1. If the Leader has selected the option to allow the first participant to become the presenter, they will also not be required to Press *1 to enter the audio portion of the call. Site Admin setting: When the Site Administrator selects Off for the Press 1 feature, participants must enter *1 to join the audio portion of the call when the audio bridge dials out to them.
Telephony: Identify Active Speaker
• The active speaker icon reacts to sounds during a live call, informing leaders who are currently speaking, even allowing them to mute callers who may have background noises that could be interrupting the flow of the call. This feature also lets leaders identify the party speaking, allowing them to address parties by name.
10
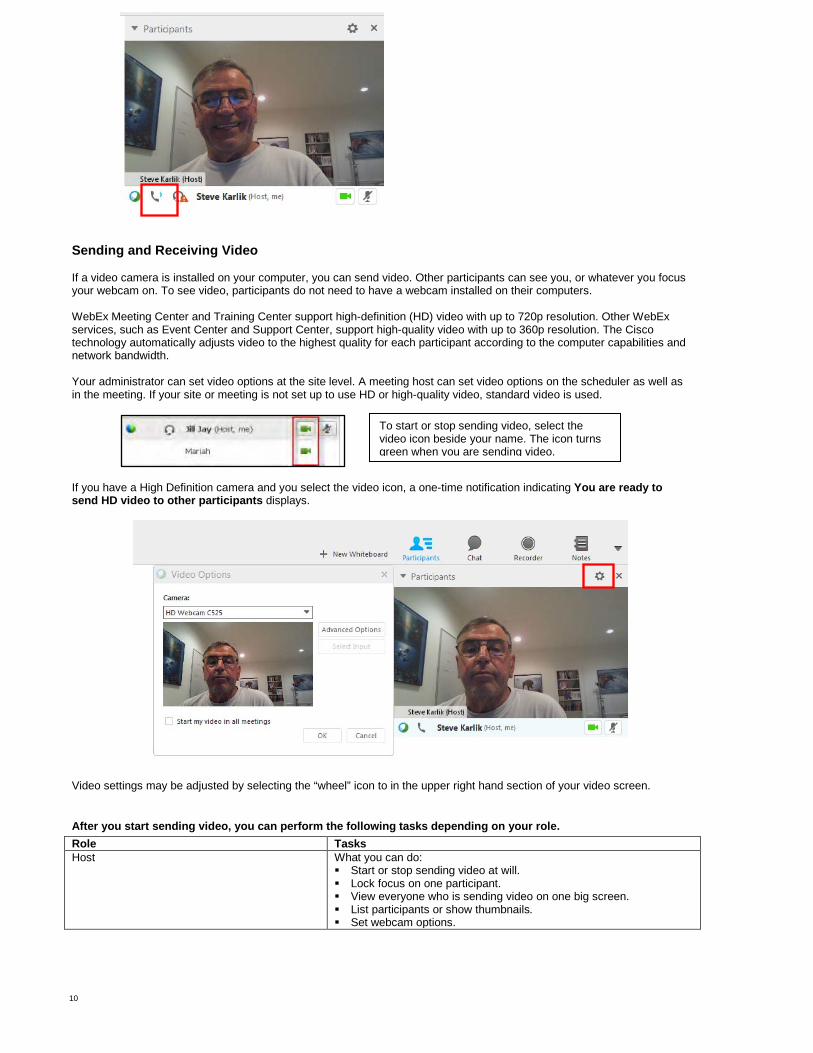
Sending and Receiving Video If a video camera is installed on your computer, you can send video. Other participants can see you, or whatever you focus your webcam on. To see video, participants do not need to have a webcam installed on their computers. WebEx Meeting Center and Training Center support high-definition (HD) video with up to 720p resolution. Other WebEx services, such as Event Center and Support Center, support high-quality video with up to 360p resolution. The Cisco technology automatically adjusts video to the highest quality for each participant according to the computer capabilities and network bandwidth. Your administrator can set video options at the site level. A meeting host can set video options on the scheduler as well as in the meeting. If your site or meeting is not set up to use HD or high-quality video, standard video is used.
If you have a High Definition camera and you select the video icon, a one-time notification indicating You are ready to send HD video to other participants displays.
Video settings may be adjusted by selecting the “wheel” icon to in the upper right hand section of your video screen. After you start sending video, you can perform the following tasks depending on your role. Role Tasks Host What you can do:
Start or stop sending video at will. Lock focus on one participant. View everyone who is sending video on one big screen. List participants or show thumbnails. Set webcam options.
To start or stop sending video, select the video icon beside your name. The icon turns green when you are sending video.
11
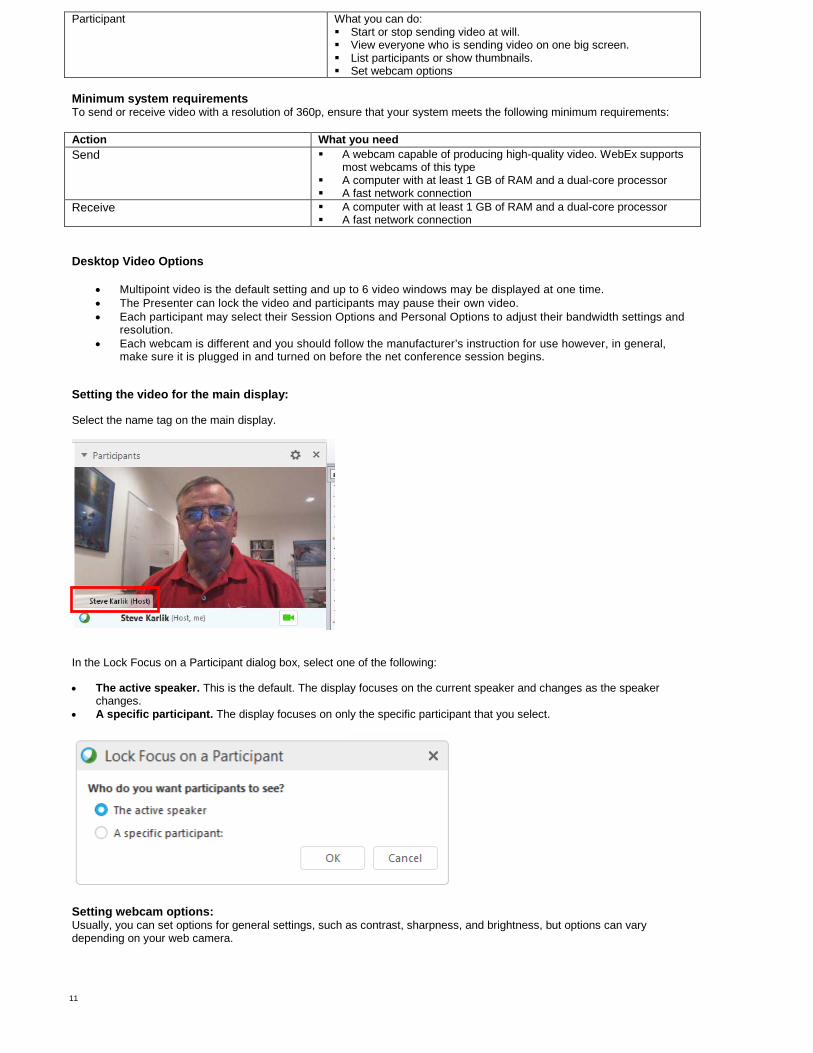
Participant What you can do: Start or stop sending video at will. View everyone who is sending video on one big screen. List participants or show thumbnails. Set webcam options
Minimum system requirements To send or receive video with a resolution of 360p, ensure that your system meets the following minimum requirements: Action What you need Send A webcam capable of producing high-quality video. WebEx supports
most webcams of this type A computer with at least 1 GB of RAM and a dual-core processor A fast network connection
Receive A computer with at least 1 GB of RAM and a dual-core processor A fast network connection
Desktop Video Options
• Multipoint video is the default setting and up to 6 video windows may be displayed at one time. • The Presenter can lock the video and participants may pause their own video. • Each participant may select their Session Options and Personal Options to adjust their bandwidth settings and
resolution. • Each webcam is different and you should follow the manufacturer’s instruction for use however, in general,
make sure it is plugged in and turned on before the net conference session begins. Setting the video for the main display: Select the name tag on the main display.
In the Lock Focus on a Participant dialog box, select one of the following: • The active speaker. This is the default. The display focuses on the current speaker and changes as the speaker
changes. • A specific participant. The display focuses on only the specific participant that you select.
Setting webcam options: Usually, you can set options for general settings, such as contrast, sharpness, and brightness, but options can vary depending on your web camera.

12
Video Full Screen Mode (Active Talker)
• Click the Full Screen Icon.
• The active speaker (or a specific participant) is shown in the main display with all other participant videos arranged in a
row beneath.
• To return to the view where you see everyone who is sending video, select this icon in the upper-right corner of your screen
Floating Icon Tray in Video Full Screen Mode Meeting participants have access the Floating Icon Tray in full video mode making it easy to use the all the common WebEx functions. The Floating Icon Tray automatically displays at the top of the video screen.
Note: There are additional video instructions in the Cisco WebEx Meeting Center Guide. How to Present or Share an Application: Quick Start
WebEx provides two ways to share presentations, applications, or your desktop: Quick Start or Drop-down menu views.

13
Quick Start Panel offers a simplified view of the basic WebEx features: Present a Document, Share an Application, or Share Your Desktop.
Start your Net Conference using WebExMeetingCenter Select from the Share Screen icons on the Quick Start Panel: Present a Document - Click the three dots on the Screen Share icon, select the file to share, and click Open. Share an Application - WebEx allows two ways to share applications:
1. Ensure the application you want to share is open on your desktop: - Click Share an Application from the Toolbar. - Select the application you wish to incorporate and select Share.
2. Click on New Application to share an application not currently running on your computer o Select Share. o Share Your Desktop. Click the icon and your desktop immediately opens.
Drop Down Menu: The Drop down menu view provides the same features from Quick Start and a few additional features.
Start your Instant Net Conference. Click Share to select the type of file or application to share. Click Presentation or Document, select the file to share and click Open. Click on New Application to share an application not currently running on your computer.
Additional Features:
Whiteboard creates a screen where the presenter and participants can annotate. Web Content allows presenter to display multimedia content—streaming and flash animation. Web Browser allows the leader to take participants to a website where they each can interact with the site.

14
Participant Options o Change Role To Host or Presenter
How to Save Files and More:
Save, Save As, and Save All allows the presenter to save on-screen documents, polls, poll results, chats, and notes to the desktop. If the presenter has given the participants the privilege to save, they can also save those files to the computer.
Transfer allows the presenter to publish files to a server where participants can download them. Send Transcript allows the leader to e-mail the notes and shared documents from the meeting. Print allows on-screen files to be printed (if the presenter has given this privilege to participants.) End Meeting allows the presenter to disconnect all participants from the meeting.
As you exit the meeting you will be asked which items you would like to save. Other Quick Tips for Presenting
Upload the slides in advance. Rehearse the presentation. Have an agenda and checklist. Conduct the meeting in a quiet place. Use a headset to keep your hands free. Use polls to engage your attendees. Use the Chat tool to communicate with your participants and to maximize interaction. Use the annotation tools to enhance the presentation

15
Instant Meeting Service Touchtone: In addition to the audio controls available from the WebEx Meeting Center console, you may also use the Verizon Instant Meeting touchtone commands on your phone to control the audio portion of the call or Web Moderator. Touchtone Features: *0 Operator Assistance. Leaders or participants can press *0 for operator assistance. *1 Help Menu. A pre-recorded message is played privately, listing the touchtone features available to the leader or participant. *2 Roll Call (in-conference). The leader may initiate the announcement of the names of all individuals who have joined the conference. All participants will hear the playback. #2 Sub-conferencing. The leader may activate sub-conferencing, allowing participants to confer in mini-conferences within the original conference. *3 Private Roll Call. The leader may initiate the announcement of the names of all individuals who have joined the conference. The playback will be heard only by the leader who has pressed *3. *4 Mute All. The leader may mute/unmute the conference participants en masse. The leader line always remains unmuted. *5 Conference Continuation. The leader may specify whether or not the active conference will continue once they hang up. The default setting is for the call to continue once the leader disconnects. To ensure the call ends when you leave, press *5 to activate this feature, then hang up. *6 Self Mute/Unmute. The leader and/or participants may mute/unmute their own line. *7 Lock/Unlock. The leader may “lock” the conference to prevent any additional participants from joining. *9 Guest entry. The leader can specify how the entry and exit of participants are announced into the active conference: tone, recorded name, or silent. The default setting is “tone.” Contact Us If you would like technical assistance with Net Conferencing, please contact us at https://www.mymeetings.com/custom/res/content/resNumbers.php Our e-mail address is [email protected].
© 2015 Verizon. All Rights Reserved. The Verizon name and logo and all other names, logos, and slogans identifying Verizon’s products and services are trademarks and service marks or registered trademarks and service marks of Verizon Trademark Services LLC or its affiliates in the United States and/or other countries. Microsoft Windows and Internet Explorer are either registered trademarks or trademarks of Microsoft Corporation in the United States and/or other countries. All other trademarks and service marks are the property of their respective owners.