Embed Size (px)
Citation preview

S E C T I O N
3ADULTS


231
C H A P T E R
INTRODUCTION
The purpose of this chapter is to present one of the most fre-quently used treatment interventions in neurologic rehabil-itation, proprioceptive neuromuscular facilitation (PNF).PNF can be used to improve performance of functionaltasks by increasing strength, flexibility, and range of motion.Integration of these gains assists the patient to: (1) establishhead and trunk control, (2) initiate and sustain movement,(3) control shifts in the center of gravity, and (4) control thepelvis and trunk in the midline while the extremities move.Utilizing the developmental sequence as a guide, the goal ofthese techniques is to promote achievement of progressivelyhigher levels of functional independence in bed mobility,transitional movements, sitting, standing, and walking.
HISTORY OF PNF
Dr. Herman Kabat, a medical physician, applied his back-ground in neurophysiology to conceptualize the PNF ther-apeutic approach in the early 1940s. He was joined by twophysical therapists, Margaret Knott in 1947 and DorothyVoss in 1953. The team collaborated in expanding and refin-ing treatment techniques and procedures to improve motorfunction. Knott and Voss authored the first book introduc-ing this treatment approach in 1956.
During PNF’s inception, focus was on the key conceptsof using resistance, stretch reflexes, approximation, traction,
and manual contacts to facilitate movement. The goal wasto allow the patient to be more efficient in motor functionand independent in activities of daily living (Kabat, 1961).PNF was based on the understanding of the central nervoussystem at the time and grew to become a viable treatmentmethod. Kabat, Knott, and Voss continued to treat patients,review the literature, and refine their approach during theensuing years. Today, clinicians and researchers continue toprovide input that allows PNF to grow and evolve. Thischapter presents a combination of the traditional interven-tions used by clinical practitioners and the tenets of theInternational PNF Association’s program.
BASIC PRINCIPLES OF PNF
Motor learning is enhanced through skilled application of theten identified essential components of PNF (Knott and Voss,1968). These elements or concepts are listed in Table 9-1.
Manual Contacts
Placing the hands on the skin stimulates pressure receptorsand provides information to the patient about the desireddirection of movement. Optimally, manual contacts areplaced on the skin overlying the target muscle groups and inthe direction of the desired movement (Adler, Beckers,Buck, 2000). For example, to facilitate shoulder flexion, oneor both of the clinician’s hands are placed on the anteriorand superior surface of the upper extremity; to facilitate
9
OBJECTIVES After reading this chapter, the student will be able to:
1. State the philosophy of proprioceptive neuromuscular facilitation.
2. List the proprioceptive neuromuscular facilitation patterns for the extremities and trunk.
3. Describe applications of extremity and trunk patterns in neurorehabilitation.
4. Explain the use of proprioceptive neuromuscular facilitation patterns and techniques withinpostures of the developmental sequence.
5. Identify which proprioceptive neuromuscular facilitation techniques are most appropriate topromote the different stages of motor control.
6. Understand the rationale for using the proprioceptive neuromuscular facilitation approach inneurorehabilitation.
7. Discuss the motor learning strategies used in proprioceptive neuromuscular facilitation.
Proprioceptive NeuromuscularFacilitationTerry Chambliss, PT, MHS, and Cathy Jeremiason Finch, PT, IPNFAI

232 SECTION 3 ■ ADULTS
trunk flexion, the hands contact the anterior surface of thetrunk. A lumbrical grip is preferred to control movementand provide optimal resistance, especially regarding rota-tion, while avoiding excessive pressure or producing dis-comfort (Fig. 9-1).
Body Position and Body Mechanics
Dynamic clinician movement that mirrors the patient’sdirection of movement is essential to effective facilitation.The pelvis, shoulders, arms, and hands of the clinicianshould be placed in line with the movement. When this isnot possible, the arms and hands of the clinician should bein alignment with the movement. Resistance is createdthrough use of the clinician’s body weight while the handsand arms remain relatively relaxed (Adler, Beckers, Buck,2000).
Stretch
Kabat proposed that the stretch reflex could be utilized tofacilitate muscle activity. He hypothesized that if the mus-cle is placed in an elongated position, a stretch reflex could
be elicited by producing slight movement farther into theelongated range. A stretch facilitates the muscle that is elon-gated, synergistic muscles at the same joint, and other asso-ciated muscles (Loofbourrow and Gellhorn, 1948). Whilequick stretch tends to increase motor response, prolongedstretch can potentially decrease muscle activity; therefore,patient response should be closely monitored. The presenceof joint hypermobility, fracture or pain contraindicates theuse of facilitatory stretch. Stretch, especially quick stretch,should be applied with caution in the presence of spasticity.In this clinical situation, individual responses vary andundesired motor activity may result.
Manual Resistance
Resistance is defined by Sullivan and Markos (1995) as “an internal or external force that alters the difficulty ofmoving.” The status of the involved tissue regarding stiff-ness, length, and neurologic influences dictates the internalresistance that the patient encounters during movement.Manual, mechanical, or gravitational forces can be utilizedto apply resistance external to the body surface. Some PNFprocedures focus on reducing internal resistance by alteringneural firing patterns; other activities or techniques provideexternal resistance. Therefore, in the context of PNF, resist-ance may be considered either a means of facilitation,through reduction of internal resistance, or a way tostrengthen or train the target muscles, by providing an out-side force. Through complex interactions among neural andcontractile components, resistance may influence move-ment initiation, postural stability, timing of functionalmovement patterns, motor learning, endurance, and musclemass (Sullivan and Markos, 1995).
TABLE 9-1 Essential Components of PNF
1. Manual contacts2. Body position and body mechanics3. Stretch4. Manual resistance5. Irradiation6. Joint facilitation7. Timing of movement8. Patterns of movement9. Visual cues
10. Verbal input
FIGURE 9-1. Lumbrical Grip. A lumbrical grip is one in which the metacarpophalangeal jointsare flexed and adducted while the fingers are in relaxed extension. This position allows flexionforces to be generated through the clinician’s hand without squeezing or exerting excessivepressure. This grip provides optimal control of the three-dimensional movements that occur inPNF patterns.

Proprioceptive Neuromuscular Facilitation ■ CHAPTER 9 233
Appropriate resistance facilitates the maximum motorresponse that allows proper completion of the defined task(Knott and Voss, 1968). If the goal of intervention is mobil-ity, appropriate resistance is the greatest amount of resist-ance that allows the patient to move smoothly and withoutpain through the available range of motion (Kisner andColby, 2002). The amount and direction of the appliedforce must adapt to the changes in muscle function andpatient ability that may occur throughout the range. If thegoal of intervention is stability, appropriate resistance is thegreatest amount that allows the patient to isometricallymaintain the designated position.
Irradiation
Irradiation is a neurophysiologic phenomenon defined asthe spread of muscle activity in response to resistance.This term is often used synonymously with overflow andreinforcement (Adler et al.; Sullivan et al., 1982). Themagnitude of the response increases as the stimulusincreases in intensity and duration (Sherrington, 1947).PNF utilizes the process of irradiation to increase muscu-lar activity in the agonist muscle(s) or to inhibit opposingantagonist muscle groups. Each person’s response toresistance varies; therefore, different patterns of overflowoccur among individuals. By watching the patient’sresponse, the clinician can identify the manual contactsand amount of resistance that maximize a patient’s abil-ity to generate the desired movement. Examples of activ-ities and typical patterns of response include thefollowing:
1. Resistance to trunk flexion produces overflow intothe hip flexors and ankle dorsiflexors.
2. Resistance to trunk extension produces overflow intothe hip and knee extensors.
3. Resistance to upper-extremity extension and adduc-tion produces overflow into the trunk flexors.
4. Resistance to hip flexion, adduction, and externalrotation produces overflow into the dorsiflexors.
Joint Facilitation
Traction and approximation stimulate receptors within thejoint and periarticular structures. Traction creates elonga-tion of a body segment, which can be used to facilitatemotion and decrease pain (Sullivan et al., 1982).Approximation produces compression of body segments,which can be used to promote stability and weight bearing(Adler et al., 2000). Individual responses to traction andapproximation vary. These forces may be applied duringperformance of extremity patterns or superimposed uponbody positions.
Timing of Movement
Normal movement requires smooth sequencing of muscleactivation. Timing of most functional movements occurs ina distal to proximal direction, as in picking up a pencil. Thepencil is grasped in the hand and then positioned for use by
actions of the elbow and shoulder. A related considerationis that development of postural control proceeds fromcephalad to caudal and from proximal to distal (Shumway-Cook and Woollacott, 2001). These issues must be consid-ered when assessing, facilitating, and teaching movementstrategies in the neurologically impaired individual (Carrand Shepherd, 1998). Adequate muscle strength and jointrange of motion may be present to allow execution of aspecified functional task; however, sequencing of the com-ponents within a movement pattern may be faulty. Also,sufficient control of the trunk and proximal extremity jointsmust be attained before mastery of tasks that require precisemovements of the distal joints.
Patterns of Movement
PNF is characterized by its unique diagonal patterns ofmovement. Kabat and Knott recognized that groups ofmuscles work together synergistically in functional contexts.They combined these related movements to create PNF pat-terns. Furthermore, because muscles are spiral and diagonalin both structure and function, most functional movementsdo not occur in cardinal planes. For example, reaching withan upper extremity and walking are two common activitiesthat occur as triplanar versus uniplanar movements. PNFpatterns, therefore, more closely simulate the demandsincurred during functional movements.
Visual Cues
Visual cues can help a patient control and correct bodyposition and motion. Eye movement influences both headand body position. Feedback from the visual system maybe used to promote a stronger muscle contraction (Adleret al., 2000) and to facilitate proper alignment of bodyparts, such as the head and trunk, through use of posturalreactions.
Verbal Input
A verbal command is utilized to provide information to thepatient. The command should be concise and provide adirectional cue. The verbal command consists of threephases: preparation, action, and correction. The preparatoryphase readies the patient for action. The action phase pro-vides information about the desired action and signals thepatient to initiate the movement. The correction phase tellsthe patient how to modify the action if necessary. PNF usesthe knowledge of the effects of voice volume and intonationto promote the desired response, such as relaxation orgreater effort (Adler et al., 2000).
Application of PNF Principles
When considered as a group, the preceding principles pro-vide a template for clinical application of PNF techniques.The clinician’s hands are placed on the surface of thepatient’s body in the direction of the desired diagonalmovement utilizing a lumbrical grip (see Fig. 9-1). Theclinician positions herself to allow for dynamic movement
234 SECTION 3 ■ ADULTS
by aligning her body with the diagonal movement pattern.The body segment is elongated prior to requesting thepatient to move, and a quick stretch is applied if appropri-ate. A concise verbal command is given and timed to coin-cide with the initiation of the desired movement. Theamount of resistance is graded (increased or decreased tomatch the patient’s ability to generate force) to allow for thedesired response. Normal timing is considered and rein-forced during the movement pattern. The clinician moni-tors the patient’s response and may add a visual cue toenhance the response. Table 9-2 lists key points to use as abackup tool for clinical application. This checklist may helpthe clinician select specific PNF techniques to address indi-vidual patient needs.
BIOMECHANICAL CONSIDERATIONS
Other considerations that affect relative ease or difficulty ofmovement include biomechanical factors such as the baseof support (BOS), center of gravity (COG), number ofweight-bearing joints, and length of the lever arm. The BOSinvolves both the body surface in contact with the support-ing surface and the area enclosed by the contacting bodysegments. COG refers to the distance of the center of massof the patient’s body to the supporting surface. The numberof weight-bearing joints involved indicates the complexityand degree of control inherent in the activity. The lever armis affected by gravity, body weight, and the location of theresistive force. The resultant force on the moving segmentincreases as the distance between the applied force and thetarget muscles increases. All of these factors must be con-sidered when selecting and progressing activities and tech-niques within a therapeutic exercise program. A relativeincrease in difficulty is experienced by the patient when theheight of the COG, number of weight-bearing joints, andlength of lever arm are increased or the BOS is decreased.Within the developmental sequence, the natural progres-sion of postures is that of increasing challenge to the stabi-lizing muscles. A quadruped is understandably a moredemanding position than the prone-on-elbows positionbecause of differences in base of support and location of thecenter of gravity relative to the support surface.
PATTERNS
Early development of PNF techniques included analysis oftypical movement strategies (Knott and Voss, 1968). The
results of these observations were integrated into specificcombinations of joint movements called patterns. Althoughoften combined in clinical practice, patterns focus on eitherthe extremities or the trunk. All PNF patterns consist of acombination of motions occurring in three planes. The rota-tion component is especially important and should berecruited during the beginning range of the pattern. Earlyrotation reinforces normal distal to proximal timing ofextremity movements while recruiting greater participationof the trunk musculature.
Extremity Patterns
The two major extremity diagonal patterns are diagrammedin Figure 9-2. These are named diagonal 1 (D1) and diagonal2 (D2). Extremity patterns are named for the direction ofmovement occurring in the proximal joint and represent themovement that results from performing the pattern. Eachdiagonal is further subdivided into flexion and extensiondirections. For example, in D1 flexion in the upper extrem-ity (UE) the shoulder moves into flexion and in D1 exten-sion, the shoulder moves into extension. The middle orintermediate joint may be flexed or extended. Straight armand leg patterns are used to emphasize the proximal com-ponent of the pattern and recruit greater trunk activity.When the intermediate joints are flexed, more emphasis canbe placed on the intermediate or distal components. TheUE patterns will be described in a supine position. Figure 9-2 illustrates the components of the UE patterns.
Upper-Extremity Patterns
The UE D1 Flexion pattern consists of shoulder Flexion/-Adduction/External Rotation. The arm begins in an extendedposition slightly out to the side, about one fist width from thehip. The shoulder is extended/abducted/internally rotatedwith the forearm pronated, and the wrist ulnarly deviated. Theclinician requests that the patient “squeeze my hand and pullup.” It is helpful for the clinician to suggest that the patientthink about reaching up to bring a scarf over the oppositeshoulder.
The UE D1 Extension pattern is the reverse of the flexionpattern and consists of Extension/Abduction/InternalRotation. The patient starts with the arm flexed with theelbow across the midline of the body at about nose level. Theforearm is supinated with the wrist and fingers flexed and thewrist radially deviated. The clinician requests that the patient“open your hand and push down.” The UE D1 Flexion diag-onal pattern is often thought of as functional for feeding andthe UE D1 Extension pattern as functional for performing aprotective reaction when in a sitting position. Detaileddescriptions of the UE D1 Flexion and UE D1 Extension pat-terns are found in Tables 9-3 and 9-4, respectively.Performance of the UE D1 Flexion and UE D1 Extensionpatterns is depicted in Interventions 9-1 and 9-2, respectively.
The second UE diagonal (D2) pattern comprises shoulderFlexion/Abduction/External Rotation. The arm beginsextended across the body with the elbow crossing the midline,
TABLE 9-2 PNF Checklist for Clinical Use
Component Correct Incorrect
Patient positionClinician positionClinician’s body mechanicsManual contactsDesired movementStretchVerbal commandResistance

Proprioceptive Neuromuscular Facilitation ■ CHAPTER 9 235
D1 Flexion
D2 Extension D2 Extension
Radial deviation(wrist)
Radial deviation(wrist)
Radial deviation(wrist)
Radial deviation(wrist)
External rotation
D1 ExtensionUlnar deviation
(wrist)
Ulnar deviation (wrist)
D1 ExtensionUlnar deviation(wrist)
Internal rotation
ABDUCTION ADDUCTION
D1 Flexion
External rotation
D2 Flexion D2 Flexion
Internal rotation
ABDUCTION ADDUCTION
Radial deviation(wrist)
Radial deviation(wrist)
External rotation
Ulnar deviation (wrist)
Internal rotation
ABDUCTION ADDUCTION
External rotation
Internal rotation
ABDUCTION ADDUCTION
AB
C DFIGURE 9-2. Upper-extremity Diagonal Patterns. The two major diagonal patterns (D1 and D2) of the upper extremity are depicted inthis diagram. The reader should orient herself to the illustration as if she is the person moving her left arm with her head at the top ofthe diagram. The posture of the hands is used to help the reader guide her movements in the correct combinations. The shaded areasrepresent the components of the highlighted pattern: A is D1 Flexion, B is D1 Extension, C is D2 Flexion, and D is D2 Extension. Forexample, to perform D1 Flexion, the reader places her hand in the D1 Extension hand position in which the left hand is thrust slightlyout from the left side of the body as if in preparation to stop a fall and performs the shaded movements depicted in view A so that herhand ends up in the D1 hand position (the left hand now curls in a fist as if grabbing a scarf and bringing it across the body and up overthe right shoulder). To perform D1 Extension, the reader looks at Figure 9-2, B and starts in the D1 Flexion hand position, performingthe shaded movements in a reverse sequence. To perform D2 Flexion, the reader starts with her left hand in a curled fist next to herright hip with her arm across the body and then moves the arm up and across the body as if in preparation to throw a bouquet overher left shoulder. D2 Extension is performed in a reverse sequence.

236 SECTION 3 ■ ADULTS
TABLE 9-3 Upper-Extremity D1 Flexion—Flexion/Abduction ExternalRotation—Straight Arm
Joint Starting Position Ending Position
Scapula Posterior depression Anterior elevationShoulder Extension/abduction/ Flexion/adduction/
internal rotation external rotationElbow Extension ExtensionForearm Pronation SupinationWrist Extension/ulnar Flexion/radial
deviation deviationFingers Extension Flexion
TABLE 9-4 Upper-Extremity D1 Extension—Extension/Adduction/InternalRotation—Straight Arm
Joint Starting Position Ending Position
Scapula Anterior elevation Posterior depressionShoulder Flexion/adduction/ Extension/abduction/
external rotation internal rotationElbow Extension ExtensionForearm Supination PronationWrist Flexion/radial Extension/ulnar
deviation deviationFingers Flexion Extension
Continued
INTERVENTION 9-1 Upper-Extremity D1 Flexion
forearm pronated, wrist and fingers flexed, and wrist ulnarlydeviated. The clinician asks the patient to “lift your wrist andarm up.” The UE D2 Extension pattern is the reverse of theflexion pattern and consists of shoulder Extension/Adduction/Internal Rotation. The arm begins in flexion aboutone fist width from the ipsilateral ear. The shoulder is exter-nally rotated with the forearm supinated, wrist and fingersextended and wrist radially deviated. The clinician requeststhat the patient “squeeze my hand and pull across.”
Students can remember these diagonals functionally bythinking of D2 Flexion as throwing a wedding bouquet overthe same shoulder and D2 Extension as placing a sword in
its sheath. Detailed descriptions of the UE D2 Flexion andUE D2 Extension patterns are found in Tables 9-5 and 9-6,respectively. Performance of the UE D2 Flexion and UE D2Extension patterns is depicted in Interventions 9-3 and 9-4,respectively.
The following associations may help students rememberthe movement combinations in the upper extremity.Flexion patterns are always paired with shoulder externalrotation, forearm supination, and radial deviation of thewrist. Conversely, UE extension patterns are always pairedwith shoulder internal rotation, forearm pronation, andulnar deviation of the wrist.

Proprioceptive Neuromuscular Facilitation ■ CHAPTER 9 237
INTERVENTION 9-1 Continued
The pattern begins in the lengthened position of the primarymuscles involved (extension) and ends in the shortened posi-tion of the same muscle groups (flexion). The patient’s leftupper extremity is being treated. The clinician’s right hand isplaced distally, her left hand proximally.A. Beginning—The clinician stands in the diagonal position and
faces the patient’s feet. The clinician’s right hand contactsthe patient’s left palm, similar to holding hands as if goingfor a walk. The palmar surface of the clinician’s left hand isplaced on the anterior aspect of the patient’s arm just prox-imal to the elbow. The verbal command is given to “turnyour hand up and pull up and across your body.”
B. Midrange—As the patient pulls her left upper extremityacross her body, the clinician remains in the diagonalposition while pivoting to face the patient. Manual contactsmay shift slightly to accommodate patient effort.
C. End range—The patient completes the range with handplacements consistent with the previous description ofmidrange.
Continued
INTERVENTION 9-2 Upper-Extremity D1 Extension

238 SECTION 3 ■ ADULTS
INTERVENTION 9-2 Continued
The pattern begins in the lengthened range of the involved mus-cle groups (flexion) and ends in the shortened range (extension).The patient’s left upper extremity is treated. The clinician’s lefthand contacts the dorsal aspect of the patient’s hand, includingthe fingers. Her right palm contacts the patient’s dorsal arm,just proximal to the elbow.A. Beginning—The clinician stands in the diagonal position and
faces the patient. The verbal command is given to “turn yourhand down and push down and out to the side.” The patientextends her wrist and fingers and pronates her forearm, as ifpushing the clinician away. Note that some clinicians preferto face the patient’s feet in the starting position of thispattern.
B. Midrange—The clinician shifts her body weight and positionto accommodate movement through the range. Manualcontacts continue on the dorsal hand/fingers and the dorsaland distal aspect of the patient’s humerus.
C. End range—The clinician pivots toward the patient’s feet,remaining in the diagonal position. Manual contacts remainas previously. It is important that during the latter part of thispattern that as the clinician facilitates or resists wristextension that the force is parallel to the patient’s forearm.
CAUTION: Care must be taken to avoid application of forceperpendicular to the forearm, which can result in resistance tothe shoulder flexors. This input disrupts the flows of the patternand often confuses the patient as to the intent of the movement.
TABLE 9-5 Upper Extremity D2 Flexion—Flexion/Abduction/ExternalRotation—Straight Arm
Joint Starting Position Ending Position
Scapula Anterior depression Posterior elevationShoulder Extension/adduction/ Flexion/abduction/
internal rotation external rotationElbow Extension ExtensionForearm Supination PronationWrist Flexion/ulnar Extension/radial
deviation deviationFingers Flexion Extension
TABLE 9-6 Upper-Extremity D2 Extension—Extension/Adduction/InternalRotation—Straight Arm
Joint Starting Position Ending Position
Scapula Posterior elevation Anterior depressionShoulder Flexion/abduction/ Extension/adduction/
external rotation internal rotationElbow Extension ExtensionForearm Pronation SupinationWrist Extension/radial Flexion/ulnar
deviation deviationFingers Extension Flexion
Scapular Patterns
The scapula moves in diagonal patterns in keeping withscapulohumeral biomechanics. The scapular patternassociated with D1 Flexion is anterior elevation. The scapulaelevates and protracts as the arm comes across the body.The scapular pattern associated with D1 Extension is theopposite of anterior elevation or posterior depression. Thescapula is depressed and retracted. To help visualize thesemovements, consider shrugging your shoulder forwardtoward your ear as being associated with the UE D1 Flexionpattern and putting the inferior angle of your right scapula
in the left hip pocket as related to D1 extension. These pat-terns are pictured in Intervention 9-5 and 9-6, respectively.
The scapular pattern associated with D2 Flexion is poste-rior elevation. As the arm is lifted up and outwardly rotated,the scapula is posteriorly elevated. Shrugging with theshoulder held back is approximately the same motion as thescapula is elevated and retracted. Scapular anterior depressionis part of the D2 Extension pattern and is the opposite ofposterior elevation. The scapula is depressed and protractedas when pushing up to sitting from side lying. Thesepatterns are shown in Intervention 9-7 and 9-8, respectively.
Proprioceptive Neuromuscular Facilitation ■ CHAPTER 9 239
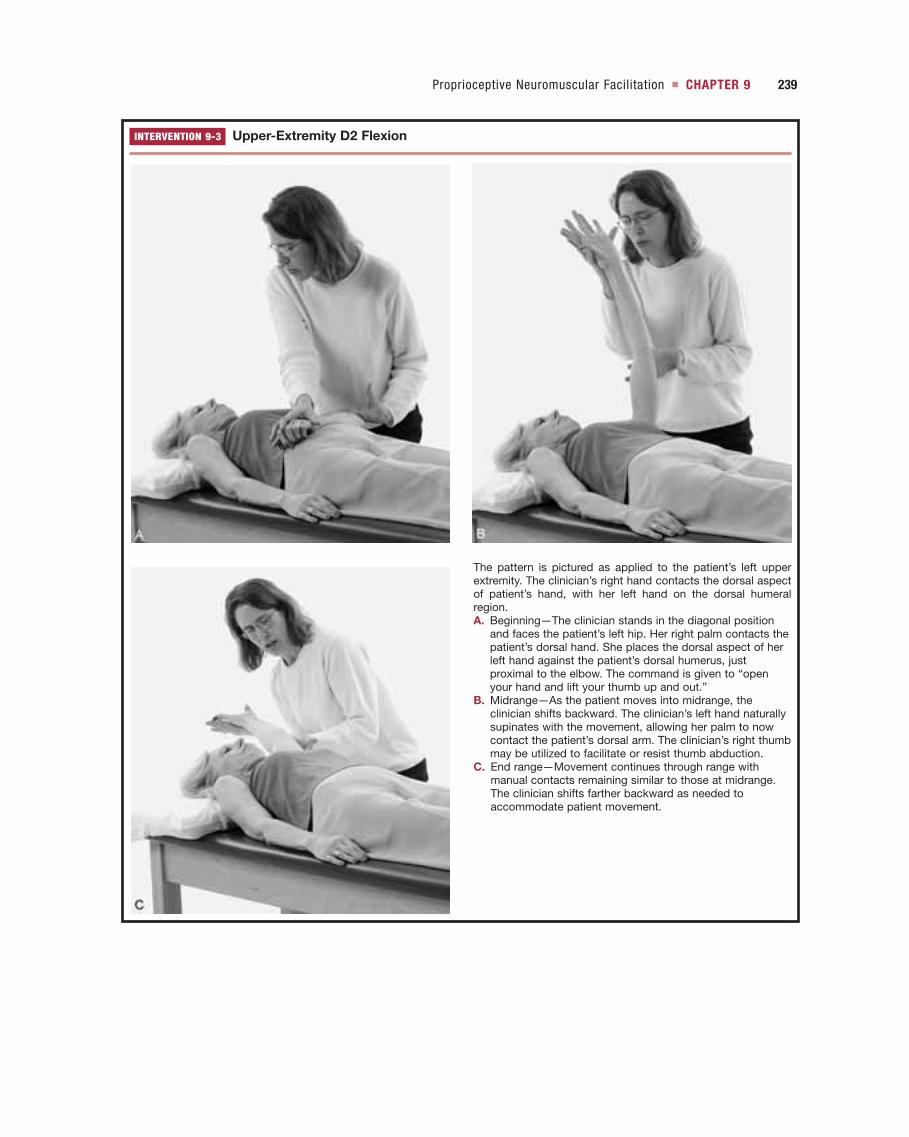
INTERVENTION 9-3 Upper-Extremity D2 Flexion
The pattern is pictured as applied to the patient’s left upperextremity. The clinician’s right hand contacts the dorsal aspectof patient’s hand, with her left hand on the dorsal humeralregion.A. Beginning—The clinician stands in the diagonal position
and faces the patient’s left hip. Her right palm contacts thepatient’s dorsal hand. She places the dorsal aspect of herleft hand against the patient’s dorsal humerus, justproximal to the elbow. The command is given to “openyour hand and lift your thumb up and out.”
B. Midrange—As the patient moves into midrange, theclinician shifts backward. The clinician’s left hand naturallysupinates with the movement, allowing her palm to nowcontact the patient’s dorsal arm. The clinician’s right thumbmay be utilized to facilitate or resist thumb abduction.
C. End range—Movement continues through range withmanual contacts remaining similar to those at midrange.The clinician shifts farther backward as needed toaccommodate patient movement.

240 SECTION 3 ■ ADULTS
INTERVENTION 9-4 Upper-Extremity D2 Extension
The patient’s left upper extremity participates, starting with theshoulder in a flexed position overhead.A. Beginning—The clinician stands in the diagonal position and
faces the patient. She places her left hand in the patient’spalm and the dorsal aspect of her right hand on the anteriorsurface of the patient’s arm, just proximal to the elbow. Thepattern commences upon the command to “squeeze myhand, turn your thumb down and toward your opposite hip.”The patient then flexes her fingers to grasp the clinician’shand, flexes her wrist, and pronates her forearm.
B. Midrange—As the patient extends and adducts, theclinician pivots to face the patient’s feet and supinates herforearm such that the patient’s dorsal arm now lies withinthe clinician’s open hand.
C. End range—The patient completes the motion as theclinician shifts her weight backward to resist the patient’sefforts as appropriate. The clinician maintains similarmanual contacts as described for midrange.

Proprioceptive Neuromuscular Facilitation ■ CHAPTER 9 241
INTERVENTION 9-5 Scapular Anterior Elevation
The patient is pictured in left side lying with the cervical spine in neutral position. The right scapular region is addressed. The clini-cian stands behind the patient, approximately level with the patient’s pelvis. The clinician stands in the diagonal position and facesthe patient’s head.A. Beginning—The clinician’s right hand contacts the patient’s right acromial region. Her left hand is placed on top of and reinforces
her right. The patient is asked to “shrug your shoulder forward toward your ear.”B. End—The patient completes the motion while the clinician shifts her body weight onto her forward foot, mirroring patient
movement.
INTERVENTION 9-6 Scapular Posterior Depression
The patient is lying on her left side and the right shoulder region is treated. The clinician stands in the diagonal position, behind thepatient and facing her head.A. Beginning—The clinician’s right hand is placed on the patient’s right acromion with her left hand contacting the inferior and
medial border of the scapula. The pattern begins upon the command to “pull your shoulder blade down and back.”B. End—As the patient continues through the range, the clinician shifts her body weight onto her back leg to counter patient effort.
A clock is a useful way to visualize the scapula movingon the thorax. The patient is positioned in left side lying.Twelve o’clock is toward the patient’s head, and six o’clockis toward the feet. Figure 9-3 depicts the placement of the
scapular diagonals on a clock face. Posterior elevation is ateleven o’clock, and diagonally opposite at five o’clock isanterior depression. Anterior elevation is at one o’clock, anddiagonally opposite at seven o’clock is posterior depression.

242 SECTION 3 ■ ADULTS
INTERVENTION 9-7 Scapular Posterior Elevation
The pattern is performed with the right scapula with the patient lying on her left side. The clinician stands in the diagonal position atthe end of the table adjacent to the top of the patient’s head.A. Beginning—The clinician’s left hand is placed slightly posterior to the patient’s right acromion; her right hand covers her left hand.
The patient is asked to “shrug your shoulder up and back.”B. End—As the patient elevates and adducts her scapula, the clinician shifts her body weight backward.
INTERVENTION 9-8 Scapular Anterior Depression
The pattern is applied to the patient’s right scapula while the patient is left side lying. The clinician stands at the head of the tableand faces the patient.A. Beginning—Manual contacts are positioned slightly anterior to the patient’s right acromion with the left hand under the right. The
verbal command to “push your shoulder blade down and forward” is given.B. End—The clinician shifts her weight forward as the patient depresses and adducts the scapula.
Lower-Extremity PatternsThe lower extremity (LE) patterns will be described insupine position but will be related to functional movementsin sitting and standing (Fig. 9-4). The first LE diagonal
(D1) pattern consists of hip Flexion/Adduction/ExternalRotation. The leg begins extended at the side with the heelin line with the shoulder of that same side. The leg isabducted and internally rotated. The foot is plantar flexed

Proprioceptive Neuromuscular Facilitation ■ CHAPTER 9 243
and everted. The patient is requested to “pull your foot upand in and pull your leg across.” Knee flexion frequentlyaccompanies associated functional movements and is, there-fore, the most common direction of movement for the inter-mediate joint during this pattern. This is the motion used tocross one leg over the other in sitting or to bring the foot upto the opposite hand to take off a shoe. If the person issupine, the lower extremity is up in the air.
The reverse pattern, D1 Extension, is comprised of hipExtension/Abduction/Internal Rotation. The leg begins inhip and knee flexion with external rotation of the hip. Thefoot is dorsiflexed and inverted. The patient is requested to“push your foot down and out.” This motion is similar tothe stance phase of gait and coming to stand from a seatedposition. The leg is extended at the hip and knee with theankle in plantar flexion and eversion. Detailed descriptionsof LE D1 Flexion and LE D1 Extension patterns are foundin Tables 9-7 and 9-8, respectively. Performance of the LED1 Flexion and LE D1 Extension patterns is depicted inInterventions 9-9 and 9-10, respectively.
The second LE diagonal (D2) pattern consists of hipFlexion/Abduction/Internal Rotation. The leg begins in hipand knee extension with external rotation of the hip. Inorder to position the knee past the midline of the body, theleg not involved in the pattern is abducted. The foot isplantar flexed and inverted. The patient is requested to “pullyour foot up and out.” This pattern has euphemisticallybeen called the fire hydrant as the end position resembles themovement used by an animal to relieve itself. D2 Flexion isnot used as frequently as the other LE patterns but doesprovide a means to elicit eversion with dorsiflexion, a move-
ment combination that is often difficult for patients whohave had a stroke. The reverse of the LE D2 Flexion patternis the LE D2 Extension pattern. The LE D2 Extensionpattern consists of hip Extension/Adduction/ExternalRotation. To start, the hip and knee are flexed with the hipabducted. The hip is internally rotated with care taken toavoid excessive stress on the medial aspect of the knee. Thepatient is asked to “push your foot down and in.” In standing,this movement resembles a soccer kick. Detailed descrip-tions of the LE D2 Flexion and LE D2 Extension patternsare found in Tables 9-9 and 9-10, respectively. Performanceof the LE D2 Flexion and LE D2 Extension patterns isdepicted in Interventions 9-11 and 9-12, respectively.
Pelvic Patterns
Just as scapular patterns are related to UE diagonal patterns,pelvic patterns are related to LE patterns. There is consider-ably less motion available in the pelvis than at the scapularesulting in extremely narrow ranges of movement. All fourpelvic diagonals can be visualized on the same clock as thescapular diagonals because they have the same names.Figure 9-3 pictures this clock. Intervention 9-13 features theAnterior Elevation pattern and Intervention 9-14 illustratesthe Posterior Depression Pelvic pattern. These are the mostfunctionally relevant pelvic patterns.
Patterns may be modified using the PNF philosophy andbasic principles in order to address the particular needs ofthe patient or demands of the desired activity. Specificmuscle groups or components of functional movementsmay be targeted with the patient supine. For example, theUE D2 Flexion/Abduction/External Rotation pattern may
Posteriordepression
Posteriorelevation
Anteriorelevation
Anteriordepression
1
56
7
11
39
12
Posteriordepression
Posteriorelevation
Anteriorelevation
Anteriordepression
1
56
7
11
39
12
A B
FIGURE 9-3. Scapula and Pelvic Diagonal Patterns. Visualizing a clock is a useful way tounderstand the scapular and pelvic diagonals. In view A, the axis for the scapular diagonalsoccurs at the right shoulder. Posterior elevation is diagonally opposite anterior depression, whileanterior elevation is diagonally opposite posterior depression. In view B, the axis of motion is atthe right hip.

244 SECTION 3 ■ ADULTS
D1 Flexion
D2 Extension D2 Extension
Externalhip rotation
D2 Flexion D2 Flexion
D1 Extension
Internalhip rotation
Posteriorpelvic tilt
Anteriorpelvic tilt
ABDUCTION ADDUCTION
D1 Flexion
Externalhip rotation
D1 Extension
Internalhip rotation
Posteriorpelvic tilt
Anteriorpelvic tilt
ABDUCTION ADDUCTION
Externalhip rotation
Internalhip rotation
Posteriorpelvic tilt
Anteriorpelvic tilt
ABDUCTION ADDUCTIONExternal
hip rotationInternal
hip rotation
Posteriorpelvic tilt
Anteriorpelvic tilt
ABDUCTION ADDUCTION
A
C
B
D
FIGURE 9-4. Lower-Extremity Diagonal Patterns. The two major diagonal patterns (D1 and D2)of the lower extremity are depicted in this diagram. The reader should orient himself to the illus-tration as if he is the person moving his left leg with his head at the top of the diagram. The pos-ture of the feet is used to help the reader guide his movements in the correct combinations.Unlike the upper extremity, hip internal rotation is always paired with ABDUCTION, and hipexternal rotation is always paired with ADDUCTION. The shaded areas represent the compo-nents of the highlighted pattern: A is D1 Flexion, B is D1 Extension, C is D2 Flexion, and D isD2 Extension. For example to perform D1 Flexion, the reader places his foot in the D1 Extensionposition (which is out to the side as if taking a protective step) and performs the shaded move-ment depicted in Figure 9-4, A so that the foot ends up in the D1 Flexion position with the bot-tom of the foot turned up (as if about to cross the left leg over the right). To perform D1Extension, the reader looks at Figure 9-4, B and places the foot in the D1 foot position. He thenperforms the shaded movements in a reverse sequence. To perform D2 Flexion, the readerplaces his left foot in the D2 Extension position. To get to the D2 foot position, the reader movesthe right leg out to the side allowing the left foot to cross the midline of the body. The readerperforms the shaded movements in Figure 9-4, C so the foot ends up in the D1 Flexion foot posi-tion much like a dog lifting its leg at a fire hydrant. D2 extension is performed in a reversesequence as in a soccer kick.

Proprioceptive Neuromuscular Facilitation ■ CHAPTER 9 245
be used to strengthen the deltoids in supine. This positionis inherently stable; therefore, patient and clinician can con-centrate on the focal movement. Extremity patterns mayalso be performed in more challenging postures such asquadruped to incorporate dynamic total body control intothe activity. Progression and functional integration mayinclude performance of the UE D2 Flexion/Abduction/External Rotation pattern in quadruped, sitting or standing.Each respective posture creates different demands on thetarget muscles and imposes increasingly greater challenge tothe trunk stabilizers.
Trunk Patterns
The PNF approach recognizes the patient’s trunk as thefoundation of controlled movement. To maximize recruit-ment of the trunk musculature, patterns are utilized thatemphasize either the shoulder or pelvic girdles, or bilateralextremity patterns. The scapula and pelvis are the connect-ing segments between the trunk and the respective extremi-ties. Thus scapular and pelvic patterns are utilized toimprove the quality, sequence, strength, range of motion,and coordination of both trunk and extremity movements.Scapular patterns directly influence upper-extremity function
INTERVENTION 9-9 Lower-Extremity D1 Flexion
Continued
TABLE 9-7 Lower-Extremity D1 Flexion—Flexion/Adduction/ExternalRotation—with Knee Flexion
Joint Starting Position Ending Position
Pelvis Posterior depression Anterior elevationHip Extension/abduction/ Flexion/adduction/
internal rotation external rotationKnee Extension FlexionAnkle Plantarflexion/eversion Dorsiflexion/inversion
TABLE 9-8 Lower-Extremity D1 Extension—Extension/Abduction/InternalRotation—with Knee Extension
Joint Starting Position Ending Position
Pelvis Anterior elevation Posterior depressionHip Flexion/adduction/ Extension/abduction/
external rotation internal rotationKnee Flexion ExtensionAnkle Dorsiflexion/inversion Plantarflexion/eversion

246 SECTION 3 ■ ADULTS
INTERVENTION 9-9 Continued
The pattern is applied to the patient’s left lower extremity,beginning with the primary muscles in a lengthened position(extension). The patient may be requested to maintain isomet-ric knee extension throughout the pattern, or as pictured here,to flex the knee as the hip flexes.A. Beginning—The clinician stands in the diagonal position and
faces the patient’s feet. Alternatively, the clinician may beginfacing the patient. She places her left hand on the patient’sdorsomedial foot and her right hand on the anteriomedialthigh. The patient is requested to “pull your foot up and in,and lift your leg across the other leg.” The clinician facilitatesankle dorsiflexion and inversion, then hip flexion withadduction and medial rotation. The knee is pictured asflexing but may remain extended, depending upon the goalsfor this patient.
B. Midrange—As the patient moves toward midrange of thepattern, the clinician pivots to face the patient. The distalhand placement remains consistent. The proximal handshifts as appropriate to facilitate or resist as needed toaddress the individual patient’s needs.
C. End range—As the patient completes the pattern, the clinicianremains in the diagonal position and shifts her body weightonto her back foot. This allows for more efficient application ofresistance, if needed. Manual contacts continue as previouslydescribed; however, the proximal hand may be shifted topromote the optimal combination of hip flexion, adduction,and medial rotation for this patient.
INTERVENTION 9-10 Lower-Extremity D1 Extension
Continued

Proprioceptive Neuromuscular Facilitation ■ CHAPTER 9 247
and alignment of the cervical and thoracic spine, whilepelvic patterns influence lower-extremity function andalignment of the lumbar spine. Scapular and pelvic move-ments may be targeted as components of related extremitypatterns or performed in a more isolated manner.
Side lying is an excellent position for performing scapularand pelvic patterns because it provides ease of access for theclinician and unrestricted movement for the patient. Thescapular and pelvic PNF patterns are components of func-tional activities such as rolling, reciprocal arm movements,scooting in supine and sitting, and gait. As previouslydescribed, there are two diagonal patterns for both thescapula and pelvis. These diagonals are narrow, andexcessive spinal rotation should be avoided.
Lifts and Chops
Combining UE PNF patterns can promote activation of thetrunk musculature, especially the rotators. The two extremi-ties are in contact with each other. One hand holds theother extremity at the wrist; the other hand is free. Theextremity in which the hand is free may also be referred toas the lead arm (Sullivan et al., 1982; Adler et al., 2000). Themovement of the lead arm determines the name of thetrunk pattern. If the lead arm follows the D2 Flexion-Flexion/Abduction/External Rotation, the movement istermed a lifting pattern. This pattern is depicted inIntervention 9-15.
Facilitatory manual contacts may be used and vary accord-ing to the patient situation. The combination of two extrem-ities working together increases the irradiation or overflowinto the trunk musculature. Resistance may be used to pro-mote isotonic movement throughout the entire range or to
TABLE 9-9 Lower-Extremity D2 Flexion—Flexion/Abduction/InternalRotation—with Knee Flexion
Joint Starting Position Ending Position
Pelvis Posterior elevation Anterior depressionHip Extension/adduction/ Flexion/abduction/internal
external rotation rotationKnee Extension FlexionAnkle Plantarflexion/inversion Dorsiflexion/eversion
TABLE 9-10 Lower-Extremity D2 Extension—Extension/Adduction/ExternalRotation—with Knee Extension
Joint Starting Position Ending Position
Pelvis Anterior depression Posterior elevationHip Flexion/abduction/internal Extension/adduction/
rotation external rotationKnee Flexion ExtensionAnkle Dorsiflexion/eversion Plantarflexion/inversion
INTERVENTION 9-10 Continued
The pattern begins with primary muscle groups involved in alengthened position (flexion). The knee is shown moving from aflexed to an extended position, although the knee may remainextended throughout as appropriate for the individual patient.The left limb is being treated. The clinician stands close to theplinth in the diagonal position and faces the patient.A. Beginning—The clinician’s left hand contacts the plantar
surface of the patient’s foot, with her right hand on theposterolateral thigh. When asked to “step down and out intomy hand,” the patient plantarflexes and everts the foot whileextending the hip and knee.
B. Midrange—The clinician’s left hand may pivot about theplantar surface of the patient’s foot to promote optimalplantarflexion and eversion. She shifts her body weight asneeded to accommodate patient movement and effort.
C. End range—The patient completes the pattern to rest on theplinth. Manual contacts are similar to those described atmidrange. The clinician continues to shift her weight asneeded within the diagonal position. The patient may bepositioned closer to the edge of the plinth to allowmovement into further hip extension.

248 SECTION 3 ■ ADULTS
INTERVENTION 9-11 Lower-Extremity D2 Flexion
The pattern is presented on the left lower extremity. The clini-cian stands in the diagonal position and faces the patient’s feet,with her left hand on the patient’s foot and her right hand on thethigh.A. Beginning—The clinician contacts the patient’s dorsolateral
foot with her left hand and the patient’s anterolateral thighwith her right hand. The patient is requested to “pull yourfoot up and out and lift your leg out to the side.” Near-full-range ankle dorsiflexion and eversion should be achievedearly in the range to promote normal timing of the movementpattern. This also provides a “handle” for the clinician thatimproves her ability to control the patient’s limb.
B. Midrange—The clinician remains in the diagonal positionand shifts her body weight to optimize patient effort. Theproximal contact (right hand) may shift in position toenhance the quality of the movement. For example, ifinadequate hip medial rotation is produced, the clinicianmay move her hand to the medial thigh.
C. End range—As the patient completes the pattern, theclinician may continue to make subtle adjustments in herbody and hand positions to enhance the patient’s motorresponse.

Proprioceptive Neuromuscular Facilitation ■ CHAPTER 9 249
INTERVENTION 9-12 Lower-Extremity D2 Extension
The pattern begins in the lengthened position of the pattern(flexion). The clinician stands in the diagonal position and facesthe patient’s feet. Her left hand is placed distally and her righthand proximally on the patient’s lower extremity. To allow forgreater hip adduction at the end of the pattern, the patient’sstationary limb may be pre-positioned in abduction. The patientmay also lie close to the edge of the plinth or in side-lying posi-tion to allow a greater range of hip extension.A. Beginning—Manual contacts are such that the clinician’s left
hand is placed on the medial and plantar aspect of thepatient’s foot and her right hand is placed on the posteriorthigh. In this example, the clinician’s hand is shownposteromedial, which helps to facilitate hip adduction andthe general direction of the pattern. If the patient hasdifficulty producing hip lateral rotation, a posterolateralcontact may enhance the patient’s effort. The verbalcommand to “step down into my hand” initiates themovement pattern.
B. Midrange—Full or nearly full ankle motion and hip rotationshould be attained by midrange of the pattern. The clinicianmay pivot her left hand and shift her body weight toaccommodate patient movement and effort.
C. End range—The pattern ends as the moving limb contactsthe stationary limb. Alternatively, the patient may be pre-positioned to allow for greater range of movement into hipextension and adduction, as previously described.

250 SECTION 3 ■ ADULTS
enhance isometric contraction in a desired position. Holdingthe end range position of a lift can facilitate trunk extension,elongation on one side of the trunk, and a weight shift. Thedownward motion from the lift position is called a reverse lift.In a reverse lift, the lead arm performs a D2 extension pattern.This trunk pattern is pictured in Intervention 9-16.
The other trunk pattern created by concurrentmovement of the upper extremities is called a chopping
pattern. The extremities are in contact as previously described.The extremity with the free hand, or the lead arm, is againutilized for naming the pattern. In a chop, the lead armfollows moves through the D1 Extension-Extension/Abduction/Internal Rotation pattern as seen inIntervention 9-17. This combination of UE patternsfacilitates trunk flexion, shortening of the trunk on one side,and a weight shift. The upward motion returning from the
INTERVENTION 9-13 Pelvic Anterior Elevation
The pelvic pattern of Anterior Elevation is pictured with the patient in left side-lying position. The clinician stands in the diagonalposition, behind and facing the patient. The clinician flexes her hips and knees to adjust her position according to the plinth height.A. The clinician’s left hand contacts the patient’s right ASIS with her right hand reinforcing the left. The patient is requested to “pull
your pelvis up and forward.”B. The clinician’s body follows the line of the pattern as the patient completes the movement.
INTERVENTION 9-14 Pelvic Posterior Depression
The pelvic pattern of Posterior Depression is also pictured with the patient in left side-lying position.A. The clinician’s left hand contacts the patient’s right ischial tuberosity, and the right hand is placed over the left. The patient is
asked to “sit back into my hands.”B. The clinician shifts her weight onto her back leg as the patient moves to the end of the range.

Proprioceptive Neuromuscular Facilitation ■ CHAPTER 9 251
INTERVENTION 9-15 Lifting Pattern
A left lifting pattern is shown, which involves movement of theleft lead arm through the D2 Flexion pattern. Many options existfor appropriate manual contacts. Both the clinician and patientsit and face each other; however, the activity may be performedin various positions, including supine, kneeling, and standing.Hand placements on the patient’s distal upper extremities areshown. The patient is encouraged to watch her hands as shemoves through all trunk patterns.A. Beginning—The clinician facilitates the D2 Flexion pattern in
the left lead arm through manual contact on the dorsalforearm; she also promotes the D1 Flexion pattern in theright upper extremity through contact with the anteriorforearm. The command is given to “turn your left hand upand lift your arms over your left shoulder.”
B. Midrange—The clinician actively maintains an upright trunkas she observes the patient’s trunk position throughout therange of the pattern. Additional verbal cues or changes inmanual contacts may be used to enhance trunk extensionand rotation.
C. End range—The patient completes the range of the patternincluding trunk extension rotation while the clinician mirrorsthe movement and applies resistance as indicated topromote the optimal patient response.

252 SECTION 3 ■ ADULTS
INTERVENTION 9-16 Reverse Lifting Pattern
A left Reverse Lift is pictured involving movement of the leftlead arm through the D2 Extension pattern. Both the clinicianand patient are shown in sitting. Manual contacts at the distalupper extremities are utilized in this example.A. Beginning—The clinician places one hand on the right
dorsal forearm and the other on the left anteriorforearm/wrist. The request is made for the patient to “makea fist with your left hand, turn your thumb down, and bringyour arms down toward your right hip.”
B. Midrange—The clinician shifts her body weight toaccommodate patient movement. Manual contacts mayalso shift slightly to adjust to changes in the patient’s upper-extremity position. The clinician monitors the patient’s trunkand provides verbal or manual cues to promote the desiredamounts of flexion and rotation.
C. End range—The patient completes the appropriate range ofupper-extremity and trunk movement, shifting her bodyweight and hand positions to evoke the optimal patientresponse.

Proprioceptive Neuromuscular Facilitation ■ CHAPTER 9 253
chop is a reverse chop (Adler et al., 2000; Sullivan et al., 1982),which is shown in Intervention 9-18. The direction of theweight shift during both chopping and lifting differs frompatient to patient. The clinician is encouraged to vary theposition of the arms and to try both traction and approxi-mation forces to determine the optimal response for eachindividual.
PNF TECHNIQUES
The goal of PNF techniques is to promote functionalmovement through facilitation, inhibition, strengthening,or relaxation of muscle groups (Adler et al., 2000). Thesetechniques are designed to promote or enhance specific
types of muscle activity associated with a target pattern, pos-ture, or task. Some techniques focus on isometric contractionsto increase stability in a chosen position; others promotemovement through a functional range utilizing isotonic con-tractions. Techniques can be used to alleviate impairments inmotor-control characteristic of specific stages such as mobility,stability, controlled mobility, and skill (Table 9-11).
Some techniques address tissue shortness, which limitsjoint range of motion; others enhance movement initiation.Names assigned to the techniques indicate the focus of thattechnique. These names have evolved over the last severaldecades. This process has caused confusion as a specifictechnique may be referred to by more than one name. The
INTERVENTION 9-17 Chopping Pattern
The left Chopping pattern is pictured, which involves movement of the left lead arm through the D1 Extension pattern. Both partic-ipants sit and face each other. Manual contacts may be placed on both or either upper extremity depending on the clinical situationand goals of the activity. Manual contacts at the distal forearms are demonstrated.A. Beginning—The clinician and patient sit and face each other. A lumbrical grip is utilized to contact the anterior surface of both of
the patient’s forearms. A request is made for the patient to “open your left hand, turn your thumb down, and push down towardyour left hip as if chopping wood.”
B. Midrange to End range—The patient moves through the pattern as the clinician mirrors patient movement and shifts her bodyweight to facilitate optimal motor strategies. End range—The patient completes the range of trunk and upper-extremitymovement. The clinician continues to alter her own body position to accommodate patient effort.
SPECIAL NOTE: The patient’s left wrist and fingers should extend as the pattern proceeds, which is not depicted in picture B.

254 SECTION 3 ■ ADULTS
INTERVENTION 9-18 Reverse Chopping Pattern
The left Reverse Chopping pattern involves movement of theleft lead arm through the D1 Flexion pattern. The clinician andpatient sit and face each other. Manual contacts at the distalforearms are shown.A. Beginning—The clinician places one hand on the anterior
surface of the patient’s left forearm and the other hand onthe dorsal surface of the right forearm. The patient is askedto “make a fist with your left hand, turn your thumb up, andpull your arms toward your right shoulder.” SPECIAL NOTE:The patient’s wrist and fingers should be extended wheninitiating the pattern, which is not shown here.
B. Midrange—The clinician observes the patient’s trunk andprovides manual or verbal cues as needed. The clinicianshifts her body weight to adapt to patient movements.
C. End range—The patient completes the desired range ofmovement of the trunk and upper extremities. The clinicianmirrors patient movement and alters her body and handpositions to optimize patient efforts.

names of techniques presented in this chapter are thosemost commonly used by clinicians. If the InternationalPNF Association uses a different term, it is given in paren-theses (still need reference). The techniques will bepresented according to the primary stage of motor controlthat each promotes, beginning with the mobility stage.
Rhythmic Initiation
Rhythmic Initiation is a technique that focuses on improvingmobility that is impaired by deficits in movement initiation,coordination, or relaxation. This technique involves sequen-tial application of first passive, then active assisted, thenactive or slightly resisted motion. Passive movement is usedto encourage relaxation and teach the movement or task.Once relaxation is achieved, the patient is asked to assist. Theclinician constantly monitors the patient’s movement strate-gies. If appropriate recruitment patterns are noted, the pro-gression continues such that manual contacts remain in placebut no assistance is provided by the clinician. Slight resist-ance may then be added to promote further muscle contrac-tion and reinforce the movement pattern. This technique canbe used successfully with any pattern or activity, particularlyas a teaching tool. It is frequently utilized with lower-levelfunctional tasks such as rolling. Patients with hypertonicitywho have difficulty initiating functional movements are espe-cially appropriate candidates for this technique.
Rolling is an example of Rhythmic Initiation. The patientbegins supine with the head turned toward the side to whichshe is rolling. The upper extremity on that side is preposi-tioned so that it is away from the body. The patient is passivelymoved into a side-lying position using manual contacts on thetrunk and extremities while being asked to feel the movement.The clinician then asks the patient to assist with the motion.
This continues until the patient can demonstrate the ability todo more of the movement independently. Facilitatory manualcontacts remain in place, but assistance is gradually with-drawn. When appropriate, the clinician may apply slightresistance to the rolling movement through manual contactson the trunk or extremities.
Rhythmic Rotation
Rhythmic rotation is characterized by application of passivemovement in a rotational pattern. The movement is slowand rhythmical in an attempt to promote total body relax-ation or tone reduction. The goal is to lessen spasticity toallow further active or passive joint mobility. The clinicianapplies slow rotary movements about the longitudinal axisof the part. The patient is instructed to relax and allow theclinician to perform these movements without assistance.The technique can affect both resting muscle tone andhypertonicity that presents during attempts at active move-ment. (Sullivan et al., 1982).
Lower trunk rotation in hook lying is an example ofRhythmic Rotation. The patient is positioned supine withthe hips and knees flexed and feet flat on the surface. Theclinician kneels and faces the patient with her knees oneither side of the patient’s feet to help stabilize the lowerextremities. Manual contacts are placed on the lateral aspectof the knees or another suitable position on the thighs toallow adequate control. With the clinician’s trunk movingas a unit with the patient’s lower body, the patient’s kneesare moved side to side, producing lower trunk rotation.
Hold Relax Active Movement
The hold relax active movement (replication) techniqueenhances functional mobility by facilitating recruitment ofmuscle contraction in the lengthened range of the agonist.Only one direction of a movement pattern is emphasized.A resisted isometric contraction of the agonist pattern in ashortened range is used to increase muscle spindle sensitivity.Once an optimal contraction is achieved, the patient isasked to relax. The clinician then passively moves the parttoward the lengthened position in increments according topatient response. A quick stretch may be applied concurrentlywith a command for the patient to move into the agonistpattern. Light resistance is often applied as a facilitatoryelement, although resistance is not mandatory.
Scapular Anterior Elevation is an example of Hold RelaxActive Movement. The patient is side lying with theclinician kneeling behind. The patient’s scapula is passivelyplaced in anterior elevation and she is asked to hold thisposition. The clinician provides resistance to the isometriccontraction. The patient is then told to relax and is movedback slightly toward posterior depression. The patient is toldto “pull up” and moves back into anterior elevation. Thismotion can be performed actively or with resistance. Thepatient holds the end position of anterior elevation onceagain, relaxes upon verbal command, and then is movedfurther back toward posterior depression. This cycle is
Proprioceptive Neuromuscular Facilitation ■ CHAPTER 9 255
TABLE 9-11 PNF Techniques Related to Stagesof Motor Control
Stage/Technique Mobility Stability Controlled Mobility Skill
Agonistic X XReversal
Alternating XIsometrics
Contract XRelax
Hold Relax XHold Relax
ActiveMovement
Rhythmic XInitiation
Rhythmic XRotation
RhythmicStabilization X
Slow X X XReversal Hold
Slow Reversals X X

repeated as the patient moves through a greater range eachtime until he completes the entire pattern.
Hold Relax
The purpose of the hold relax technique is to increase passivejoint mobility and decrease movement-related pain. Maincomponents of the technique include resisted isometric con-traction, verbal cues, and active or passive stretch. The patientor clinician moves the joint or body segment to the limit ofpain-free motion. The patient maintains this position whilethe therapist resists an isometric contraction of the antagonistmuscle group, the muscles restricting the desired direction ofmovement. A verbal cue of “hold” is given as the cliniciangradually increases the amount of applied resistance. A com-mand is given for the patient to slowly relax. When possible,the joint or body segment is moved through a greater rangeof motion. The clinician may perform the movement pas-sively; however, active patient-controlled movement is pre-ferred, especially when pain is a factor. All steps are repeateduntil there is no further improvement in range of motion. Avariation in the traditional method is to elicit an isometriccontraction of the agonist muscle, instead of the antagonist,then proceed with active or passive movement into furtherrange (Prentice, 2001).
Increasing hip flexion with concurrent knee extension asin a straight leg raise is an example of Hold Relax. If hipflexion with knee extension (agonist movement) is limited,the hip extensors, or hamstrings, would be the limitingmuscles (antagonist). With the person in hook lying, anactive or passive straight leg raise is performed. An isometriccontraction of the hip extensors (hamstrings), or alterna-tively the hip flexors (iliopsoas/rectus femoris), is elicitedthrough a request to “hold” the position. After the contrac-tion is held for a minimum of five seconds, the patient isasked to relax as resistance is slowly withdrawn. Furtherrange of hip flexion is attempted either actively or passively.Intervention 13-3 depicts the patient position and themanual contacts utilized by the clinician.
Contract Relax
The contract relax technique provides another method toincrease passive joint range. It is most appropriate and effectivewhen addressing decreased length in two-joint muscles andwhen pain is not a significant factor. Components of thetechnique are composed of resisted isotonic and isometric con-tractions of the short muscles, verbal cues, and active or passivestretch. Either the clinician or the patient moves the joint orbody segment to the end of the available range of motion. Averbal cue to “turn and push or pull” is given. The resistanceovercomes all motion except rotation. Thus, the result is aresisted concentric contraction of the rotary component andan isometric contraction of the remaining muscles (Sullivan et al.,1982; Knott and Voss, 1968; Kisner and Colby, 2002). A strongmuscle contraction is elicited and held for a minimum of fiveseconds. After the contraction, the patient relaxes and thejoint or body segment is repositioned either actively or
passively to the new limit of passive range of motion. As inHold Relax, the sequence is repeated until no further gains aremade. Changes in muscle tension with this technique are rela-tively abrupt, while those used during Hold Relax are gradual.
Increasing shoulder range of motion into D2 Flexion-Flexion/Abduction/External Rotation is an example ofContract Relax. The arm is placed at the end of the availablerange of the D2 Flexion-Flexion/Abduction/ExternalRotation pattern. The shoulder and elbow extensors areidentified as the muscles that are short and limiting motioninto flexion. The patient is asked to lift the arm up andout to the side into the D2 Flexion pattern. An isometriccontraction of the shoulder extensors and adductors isheld for a minimum of five seconds while resisted rota-tion through available range is allowed to occur. Then acommand to “relax” is given. The arm is moved into furtherflexion, abduction, and external rotation by either thepatient or the clinician, establishing the new limit tomotion. The technique is repeated until there is no furtherimprovement. The arm is then resisted through the UE D2patterns of Flexion/Abduction/External Rotation andExtension/Adduction/Internal Rotation to help integratethe new range into functional movements.
Alternating Isometrics
The alternating isometrics (isotonic stabilizing reversals,alternating holds) technique promotes stability, strength,and endurance in identified muscle groups or in a specificposition. Isometric contractions of both agonist and antag-onist muscle groups are facilitated in an alternating manner.Manual contacts and verbal cues are the primary facilitatoryelements. As proximal extremity joint or trunk stability is acommon focus, this technique is often applied in develop-mental postures; however, it may also be utilized withbilateral or unilateral extremity patterns.
Manual resistance is imparted to encourage isometric con-traction of agonist muscles. Once an optimal response isachieved, the clinician changes one hand to a new locationover the antagonist muscles and gradually increases resistancein the appropriate direction. The second hand may be movedto the new location or removed from the surface until the nextchange in direction of resistance is initiated. Manual contactsare smoothly changed to encourage gradual shifting of con-tractions between agonist and antagonist muscle groups.
Trunk stability is an example of Alternating Isometrics. Theclinician resists trunk flexion with manual contacts on the ante-rior trunk. A verbal cue of “don’t let me push you backward”is used. Once the trunk flexors contract, input is maintainedwith one hand and the second hand is moved to the posteriortrunk to activate the trunk extensors. The verbal cue thenbecomes “don’t let me pull you forward.” As the patientresponds to the initial posterior input, the second hand ismoved to the posterior trunk. The hands continue to switchfrom the anterior to posterior trunk, challenging trunk stabilityin the sagittal plane. Intervention 9-19 shows this techniquebeing used to increase trunk stability in unsupported sitting.
256 SECTION 3 ■ ADULTS

Proprioceptive Neuromuscular Facilitation ■ CHAPTER 9 257
INTERVENTION 9-19 Alternating Isometrics to Increase Trunk Stability in Sitting
A. Resistance is provided to trunk flexion through symmetrical manual contacts on the anterior shoulder. The verbal cue of “don’tlet me push you backward” is given as the clinician leans forward using her body weight to produce the resistance.
B. The clinician places her hands bilaterally on the superior aspect of the patient’s scapulae. The command to “don’t let me pushyou backward” is voiced as the clinician shifts her body weight backward.
C. The clinician provides resistance to right trunk lateral flexion through placement of her right hand on the patient’s right lateral trunk.The verbal command “don’t let me push you to the left” is spoken as the clinician shifts her weight to produce the resistance.
D. Resistance is provided to left trunk lateral flexion through placement of the clinician’s left hand on the patient’s left lateral trunk.

258 SECTION 3 ■ ADULTS
Rhythmic Stabilization
Rhythmic stabilization (isometric stabilizing reversals)enhances stability through co-contraction of musclessurrounding the target joint(s). Resistance is applied topromote isometric contraction. Often the goal is to enhancethe patient’s ability to maintain a specific developmentalposition. A rotary force is emphasized to encouragesimultaneous contraction of the primary stabilizers aboutthe involved joints. The patient is asked simply to hold theposition. Force is increased slowly, emphasizing therotary component of the motion and matching patienteffort. When the patient has built up muscular force in onedirection, the clinician changes the position of one handand begins to slowly apply force in a different direction,again emphasizing rotation. Depending upon the demandsof the clinical situation, Rhythmic Stabilization can be used
to promote stability and balance, decrease pain upon move-ment, and increase ROM and strength.
Trunk stability in unsupported sitting is an example ofRhythmic Stabilization. Rotation of the trunk is resistedwith the clinician placing one hand on the anterior trunkand one hand on the posterior trunk. The patient isexpected to isometrically hold an erect trunk position. Averbal cue of “hold; don’t let me move you” is used. Thereis no intention of movement on the part of the patient. Thepatient matches the resistance provided by the clinician andactively holds the position. Once the patient stabilizes ade-quately in response to the applied force, the relative posi-tions of the right and left hand are sequentially changed sothat resistance is applied in the opposite rotational direc-tion. Intervention 9-20 depicts the use of RhythmicStabilization to promote trunk stability in sitting.
INTERVENTION 9-20 Rhythmic Stabilization to Increase Trunk Stability in Sitting
The patient sits on the edge of plinth with feet resting on the floor. The clinician kneels behind the patient. Suggested manual con-tacts allow the clinician to resist flexion, extension, and rotation simultaneously or sequentially as placements are rhythmically movedbetween the two options pictured.A. The clinician places her left hand on the anterior aspect of the patient’s left shoulder and her right hand on the posterior right
shoulder.B. Manual contacts are shifted to vary the forces applied to the patient. The clinician’s left hand is now posterior and her right hand
is anterior.

Slow Reversal
The Slow Reversal (Reversal of Antagonists, DynamicReversals) is a versatile technique that may be used to addressa variety of patient problems such as lack of strength, ROM,and coordination. Concentric contraction of muscles in anagonist pattern is facilitated through manual contacts and ver-bal cues. At the desired end of range, manual contacts of oneor both hands are changed to facilitate concentric contractionof the antagonist pattern. Resistance is applied to both direc-tions of movement with force varying from slight to maximal,in accordance with the patient’s abilities and goals. As theamount of force generated by a patient may vary throughouta pattern, resistance must accommodate changes in patienteffort. Emphasis is placed on smooth transitions betweendirections of movement patterns such as when moving fromD2 Flexion to D2 Extension. The mobility, controlled mobility,and skill stages of motor control can be addressed through thistechnique. In the skill stage, smooth reversal of movementfrom one direction to another is especially emphasized.Fatigue is minimized by rhythmically alternating betweenagonist and antagonist muscle groups.
Performance of the UE D2 Flexion-Flexion/Abduction/External Rotation pattern as the agonist and D2 Extension-Extension/Adduction/Internal Rotation as the antagonist isan example of the Slow Reversal technique. Beginning inthe lengthened position of the agonist (D2 Flexion) pattern,appropriate resistance is applied through both proximal anddistal manual contacts. The flexion pattern is initiated bythe command to “open your hand and lift the arm up andout.” Near the completion of the pattern, the clinician’sproximal hand is moved to resist the distal component ofthe antagonist (D2 Extension) pattern. The verbal cue to“squeeze my hand and pull down” is timed with the changein direction. As the patient starts to move into extension,the clinician’s other hand moves to resist the remainingcomponents (usually proximal) of the antagonist pattern.This process of reversing directions and altering manualcontacts continues. Either full or partial range of motionmay be utilized. Although there are personal preferencesamong clinicians, some specific suggestions regarding handplacements will be offered. When the patient performs a UEflexion (D1 or D2) pattern with her right hand, the clinicianplaces her left hand distally and right hand proximally onthe patient’s arm. The placements reverse when D1 or D2extension patterns are performed. These manual contactstend to allow more consistent application of appropriateresistance throughout both directions of the pattern.Interventions 9-1 and 9-2 demonstrate the patterns andmanual contacts recommended with this technique.
Slow Reversal Hold
Slow Reversal Hold is a variation of the Slow Reversal tech-nique in which a resisted isometric contraction is held at thecompletion of the range in each direction of the chosen pat-tern or activity. Movement may proceed through the available
joint range or a lesser excursion may be used, depending onthe patient situation or goal. Movement occurs as describedfor the Slow Reversal hold; however, at the desired endpointin each direction, a resisted isometric contraction of allinvolved muscles is elicited. This technique aids in the transi-tion from the mobility to stability stages of motor control, bypromoting increased strength, balance, and endurance. TheSlow Reversal Hold is appropriate for use with single extrem-ity or trunk patterns as well as functional movements.
Performance of the UE D2 Flexion/Abduction/ExternalRotation as agonist pattern in kneeling is an example of theSlow Reversal Hold technique. Concentric contraction ofthe muscles involved in the D2 Flexion (agonist) pattern isresisted throughout the desired range. Without changingmanual contacts, the patient is requested to hold the chosenend position using all muscles within the flexion pattern.The distal then proximal hand placements are carefullyreestablished to facilitate a smooth transition into the D2Extension-Extension/Adduction/ Internal Rotation pattern.Graded resistance is applied throughout the D2 extensionpattern. An isometric contraction of the D2 Extension pat-tern is held at the desired end of range.
Agonistic Reversals
The Agonistic Reversal technique (Combination ofIsotonics) is used to facilitate functional movement through-out a pattern or task. Both concentric and eccentric contrac-tions of the agonist musculature are utilized. The focus ofthe technique is to promote functional stability in a smooth,controlled manner (controlled mobility). Other goals includeincreasing muscle strength and endurance, improving coor-dination, and training eccentric control. To implement thetechnique, a concentric contraction of the agonist musclegroup(s) is resisted through a specific direction and range ofthe chosen pattern or task. At the desired endpoint of themovement, the patient holds isometrically against resistance.The clinician then resists the patient’s slow, controlled returntoward the beginning of the movement pattern, promotingan eccentric contraction. The patient holds again at the com-pletion of the eccentric phase to further encourage stabilityin this range. In summary, the technique begins with resist-ance to a concentric contraction, followed by a stabilizinghold, resistance to an eccentric contraction, and another sta-bilizing hold. The agonist groups are targeted throughoutthis sequence (Saliba et al., 1993).
Bridging is an example of the Agonistic Reversal tech-nique. The patient lifts the pelvis into a bridge against resist-ance from the clinician (concentric phase). Manual contactsare on the anterolateral pelvis with force directed posteri-orly. The patient is requested to hold the pelvis in this posi-tion (stabilizing hold) and then asked to slowly lower thepelvis toward the bed while the clinician’s manual contactsand direction of resistance remain consistent (eccentricphase). The clinician instructs the patient to hold the newposition (stabilizing hold). Intervention 9-21 depicts thistechnique as used with bridging.
Proprioceptive Neuromuscular Facilitation ■ CHAPTER 9 259

Resisted Progression
The Resisted Progression technique focuses on the skill leveltask of locomotion. Resistance is utilized to increasestrength or endurance, develop normal timing, or reinforcemotor learning. This technique may be applied duringcrawling, creeping or walking. Manual contacts are selectedaccording the desired emphasis, including upper or lowertrunk, extremities, pelvis, and scapula (Sullivan et al.,1982).
Backward locomotion in quadruped (creeping) is anexample of the Resisted Progression technique. Backwardprogression may occur by moving each extremity by itself orby moving contralateral upper and lower extremities simul-taneously. This choice is dependent upon the patient’smotor abilities, coordination, trunk control, strength, andcognitive status. Typical manual contacts include the poste-rior thigh, posterior humerus, ischial tuberosity, and inferior
angle of the scapula. Any combination of contacts may beused, depending on the desired focus. In this technique, theclinician’s hands may be placed on the ischial tuberositiesbilaterally, on the right posterior humerus and left posteriorthigh, or on the left scapula and right ischial tuberosity. Theclinician kneels beside or behind the patient and faces thepatient’s head.
Application of PNF Techniques
The physical therapist examines each patient and deter-mines an individualized plan of care. Specific interventionsare selected to meet individual patient’s needs; however,there are some typical combinations of PNF basic principlesand techniques that are used to address certain impairments.Table 9-12 matches specific impairments with suggestedPNF techniques. The use of these techniques in appropriateclinical situations has already been discussed in the sections
260 SECTION 3 ■ ADULTS
INTERVENTION 9-21 Agonistic Reversal Technique During Bridging
Manual contacts are consistent throughout the activity. The clinician places the heel of each hand on the patient’s ASIS with resist-ance applied in line with the patient’s ischial tuberosities.A. The patient begins in hook-lying position. Upon the command to “lift your buttocks,” the patient pushes the pelvis upward,
performing a resisted concentric contraction of the hip extensors.B. When the patient reaches a full bridge position, she is requested to “hold” this position briefly. The final command is to “let me
push you down slowly” as the patient lowers her buttocks to the surface by eccentrically contracting the hip extensors againstresistance.

about techniques. Clinicians should always follow the basicprinciples of PNF when using any of these techniques, whilebeing mindful of those principles that are emphasized inthe management of particular impairments.
DEVELOPMENTAL SEQUENCE
PNF patterns and principles of intervention may beutilized within the different postures that constitute thedevelopmental sequence. The fundamental motorabilities represented within the developmental sequenceare interrelated and universal. Most typically developinginfants learn to roll (supine ←→ prone), to move in theprone position, to assume a sitting position, to standerectly, walk, and run. Individual variations occur in themethod of performance, sequence, and rate of change.Typical movement patterns emerge from the maturationand interaction of multiple body systems. Developmentalpostures and patterns of movement can provide a basisfor restoration of motor function in people with neuro-muscular impairments and deficits. A review of thedevelopmental process and patterns can be found inChapter 4.
The developmental sequence provides a means toprogress from simple to complex movements and postures(McGraw, 1962). The supine progression and the prone pro-gression comprise the developmental sequence. Supine pro-gression consists of the following positions: supine,hook-lying, side-lying, propping up on one elbow, pushingup to one hand, sitting, and standing. Prone progressionconsists of the following positions: prone, prone on elbows,quadruped, kneeling, half-kneeling, and standing.
Impairments in strength, flexibility, coordination, bal-ance, and endurance can be addressed using the prone andsupine progressions. The patient is familiar with these posi-tions and understands the movements; therefore, the pro-gression is relevant and functional. Within thedevelopmental sequence, the natural progression of pos-tures is that of increasing challenge to the stabilizing mus-cles. For example, in prone-on-elbows position, a broadsurface area is in contact with the supporting base; theCOG is very close to the surface; and only the shoulder andcervical spine segments bear significant weight. Therefore,this position is very stable and requires relatively minimalmuscular effort to maintain.
In quadruped, however, the demands placed upon themuscles are much greater. The BOS is reduced. The COGis higher. The muscles about the hips, shoulders, andelbows must work in a coordinated fashion to sustain theposition, both statically and during superimposed activity.Each posture within the developmental sequence fostersachievement of motor skills that serve as a foundation formore advanced functional activities. The stronger compo-nents of a total pattern are used to augment the weakercomponents (Voss et al., 1985). Greater demands may beplaced on the patient within each position by consideringthe stages of motor control and applying these principles indevelopmental postures. The following section addressesselected postures as to possible treatment progressionstrategies.
Supine Progression
Working in a hook-lying position prepares the patient forbridging and scooting, which are essential for bed mobility.Weight bearing through the feet facilitates co-contraction ofthe trunk and lower extremity muscles needed to maintainthe position. Unilateral and bilateral LE PNF patterns areused to facilitate acquisition of the hook-lying position.Initial focus within any position is on the mobility stage,which is defined as the ability to assume a stated position.Sufficient joint range of motion and muscular strength inthe pertinent regions are prerequisite to mastering this stage.
Use of PNF patterns helps the patient gain the ability topull the legs into a hook-lying position independently. LE D1Flexion-Flexion/Adduction/External Rotation with knee flex-ion is an appropriate pattern to utilize. Please refer toIntervention 9-7 for a review of the pattern and manual con-tacts. Mass flexion of the lower extremity may also be used toaid in assuming hook lying as pictured in Intervention 9-22.
Proprioceptive Neuromuscular Facilitation ■ CHAPTER 9 261
TABLE 9-12 Use of PNF Techniques to TreatImpairments
Impairment Goal Technique
Pain Decrease pain Alternating IsometricsHold RelaxRhythmic Stabilization
Decreased Increase Agonistic Reversalstrength strength Rhythmic Stabilization
Slow ReversalDecreased range Increase range Alternating Isometrics
of motion of motion Contract RelaxHold RelaxHold Relax Active MotionRhythmic InitiationRhythmic Stabilization
Decreased Increase Alternating Isometricscoordination coordination Agonistic Reversal
Rhythmic InitiationSlow Reversal
Decreased Increase Alternating Isometricsstability stability Agonistic Reversal
Rhythmic StabilizationMovement Initiate Rhythmic Initiation
initiation movement Hold Relax Active MotionMuscle stiffness/ Promote tone Rhythmic Initiation
hypertonicity reduction Rhythmic RotationHold Relax
Decreased Increase Alternating Isometricsendurance endurance Rhythmic Stabilization
Slow Reversal

Resisted movement of the uninvolved extremity can enhancemuscular activity through irradiation into the trunk andinvolved lower extremity.
Once the patient has achieved a hook-lying position, sta-bility can be created by applying Alternating Isometrics andRhythmic Stabilization. Both of these techniques employfacilitation of isometric contractions to sustain a position.Manual contacts may be applied from proximal thigh toankle as appropriate to vary the lever arm and thus thedemand on the patient. The stability stage of motor controlis reached when the patient can independently maintain thehook-lying position. The third stage of motor control, con-trolled mobility, then becomes the focus of treatment.Controlled mobility involves superimposing proximalmobility on a stable position. Activities in the hook-lyingposition that contribute to functional gains in this stageinclude hip abduction/adduction and lower trunk rotation.
Slow Reversal, Slow Reversal Hold, and Agonistic Reversalsmay be applied with either activity. Both Slow Reversal andSlow Reversal Hold include resisted alternating concentriccontractions of agonist and antagonist patterns (e.g., hipabduction and adduction, or D1 flexion and D1 extension).
Slow Reversal Hold adds a held isometric contraction inthe shortened range of each muscle group or pattern.Agonistic Reversal focuses on one muscle group only, thedesignated agonist, and concentric then eccentric contrac-tions are facilitated. The medial and lateral femoral condylesprovide effective manual contacts for hip abduction/adduc-tion and lower trunk rotation, with care taken to facilitate thedesired direction of movement. The clinician positions her-self in front of the patient, or off to one side in the diagonal.The diagonal position will produce a different muscularresponse from the patient and increase recruitment of trunkmuscles.
Bridging is a prerequisite to many functional activitiesincluding dressing, toileting, scooting in bed, and weightshifting for pressure relief. The motion of bridging alsoincludes hip extension and pelvic rotation, which are bothcomponents of the stance phase of gait. Bridging increasesweight bearing through the plantar surface of the foot andcan reduce extensor tone in a patient with hypertonicity.Bridging addresses balance, coordination, and functionwhile activating multiple muscle groups. Bridging is anexample of the third stage of motor control.
Bridging is facilitated by use of manual contacts on thepatient’s anterior pelvis near the anterior superior iliac spine(ASIS). Manual contacts and an appropriate level of assis-tance are provided to teach the proper movement strategy toachieve the mobility stage of motor control. Patients are oftenable to hold the bridge position (stability stage) prior to beingable to actively move into the posture. Once in the position,techniques such as Alternating Isometrics or RhythmicStabilization may be applied at the pelvis, then more distallyto enhance stability. For patients who are weaker on one side,resistance is given to the stronger side while assistance isoffered to the weaker side. Once the patient no longerrequires assistance to achieve a bridge position, AgonisticReversals may be utilized to promote controlled mobility.Eccentric lowering of the pelvis in a smooth coordinatedmanner is often difficult for patients. The Agonistic Reversaltechnique is used with bridging to address coordination andstrengthening of both the concentric and eccentric compo-nents of the movement. The reader is referred toIntervention 9-18 for illustrations of this technique as usedwith bridging. The clinician can increase the challenge ofbridging by changing the base of support, increasing thehold duration, or adding extremity movements. Examplesinclude removing one limb from the surface through hip
262 SECTION 3 ■ ADULTS
INTERVENTION 9-22 Mass Flexion Pattern of the Lower Extremity to Assist in Achieving Hook-Lying Position
A. The clinician kneels to one side, approximately level with the knees. Beginning in supine position, manual contacts are placedon the dorsal foot and posterior calf and are used to facilitate flexion throughout the lower extremity.
B. The patient completes the flexion movement of first one LE, then the other to assume the hook-lying position.

flexion or knee extension while the patient holds the bridgeposition or applying a resistive technique such as SlowReversal to an extremity pattern.
Scooting in bed is considered a skilled movement associ-ated with the hook-lying and bridging positions. Skill is thefourth stage of motor control. Scooting is often a difficulttransitional movement and requires coordination of thehead, upper trunk, lower trunk and extremities. Movementmay be initiated with either the upper trunk, lower extrem-ities, or lower trunk. Manual contacts facilitate the directionof movement and offer assistance or resistance to the com-ponent movements as appropriate. Manual contacts may beused below the clavicles to facilitate upper-trunk flexionwhile verbal cues can be given for head and neck flexion.Manual contacts on the pelvis similar to those used to facil-itate bridging are used to provide input to the lower trunk.
Rolling
Many components of higher-level activities such as gaitcan be found in movements associated with rolling.Additionally, rolling stimulates cutaneous receptors, thevestibular and reticular systems, and proprioceptors withinthe joints and muscles. Rolling can positively influencemuscle tone, the level of arousal/alertness, and body aware-ness. Rolling is an excellent total body activity that providesopportunities to improve strength, coordination, and sensa-tion in the trunk and extremities.
There are several key points to consider when incorpo-rating rolling into a therapeutic program. Individuals usedifferent strategies for rolling, including flexion movements,extension movements, or pushing/pulling with onearm or leg (Richter et al., 1989). As with all complex
functional activities, individuals utilize various strategies toaccomplish this task. Patients need to learn to roll in bothdirections early in rehabilitation. Rolling to the involvedside may be easier in individuals with hemiplegia becausethe movement is initiated primarily with the uninvolvedside of the body. Prepositioning in hook lying or side lyingencourages use of certain components or methods ofrolling. In hook lying, a shorter lever arm is created for ini-tiation of lower-extremity and trunk movements withemphasis on the lower trunk and hip musculature. Sidelying provides an ideal position to focus on trunk rotationor to minimize the effects of gravity on extremity patterns.Specific extremity and trunk patterns and PNF techniquesallow the clinician to incorporate the individual’s strengthsinto rolling. Rolling is also an effective task through whichto enhance head control and eye-hand coordination. Basicprepositioning and one example of manual contacts areshown in Intervention 9-23.
Because of the transitional nature of the activity, thestages of motor control are not as useful in providing a clearpath of functional treatment progression; therefore, treat-ment applications will focus on tools to enhance rolling ingeneral. Mass flexion and extension trunk patterns providean initial means to facilitate rolling supine to side lying andside lying to supine, respectively. Greater trunk rotation canbe introduced through use of extremity patterns, such as UED2 Extension-Extension/Adduction/Internal Rotationpattern or the LE D1 Flexion-Flexion/Adduction/ExternalRotation pattern with knee flexion. In both examples, theright extremity would be used to encourage rolling fromsupine to left side lying. The antagonist patterns of the rightextremity can be used when focusing on rolling from left
Proprioceptive Neuromuscular Facilitation ■ CHAPTER 9 263
INTERVENTION 9-23 Prepositioning and Manual Contacts to Facilitate Rolling Supine to Right Side Lying
A. Beginning position—In preparation to roll to the right, the patient turns her head to the right. The left hip and knee are flexed. Theleft upper extremity is placed in flexion with the shoulder adducted. The left upper extremity is positioned away from the body inextension and adduction.
B. End position—Through manual contacts at the right anterior shoulder and pelvis, the patient is assisted, facilitated, or resisted,as appropriate, to aid in assumption of right side-lying position.

side lying back to supine. Either the UE D2 Flexion-Flexion/Abduction/External Rotation pattern or the LE D1Extension-Extension/Adduction/Internal Rotation patterncan be used to accomplish the latter transition. In side lying,both directions of the D1 and D2 patterns of the uppermostextremities may be used in a reciprocal manner to improvetrunk and extremity strength and coordination and to rein-force the components necessary for rolling. Use of the D1pattern with the left lower extremity to promote rolling fromsupine to right side lying is pictured in Intervention 9-24.
Trunk patterns such as chops, lifts, and lower trunk rota-tion are also quite helpful in facilitating the movementsrequired to roll. For example, rolling supine to left side lyingcan be performed by using a left chop in which the leftupper extremity moves through the D1 Extension pattern.
A left lift in which the left upper extremity moves throughthe D2 Flexion pattern may also be used to roll from supineto left side lying. Determining which pattern depends uponthe patient’s abilities. When a person’s preferred strategy isto initiate rolling with the lower extremities, incorporatinglower trunk rotation in hook lying is advantageous. Thisactivity has been described previously in relation to thehook-lying developmental posture.
Rhythmic Initiation is often used when teaching apatient to roll. Movement is progressed from passive toassistive to active or slightly resisted. Supine or hook lyingmay be used as the starting position. The reader canreview the section on Rhythmic Initiation for a morecomplete description in promoting rolling. The techniqueHold Relax Active Movement may also be an effective
264 SECTION 3 ■ ADULTS
INTERVENTION 9-24 D1 Pattern with the Left Lower Extremity to Promote Rolling Supine to Right Side Lying
A. The clinician positions herself in half-kneeling just left of the patient’s left lower extremity. She contacts on the patient’s dorsalfoot with her right hand and the posterior tibia with her left hand.
B. The clinician shifts her body weight forward as the patient completes the left LE D1 Flexion pattern to assist in rolling to right sidelying.
C. To return to supine, the patient performs the D1 Extension pattern with the left lower extremity. The clinician places her right handon the patient’s posterior knee region and her left hand on the plantar surface of the foot.
D. The patient moves through the D1 Extension pattern with her left lower extremity and completes the transition back to supineposition. The clinician shifts her weight onto her back leg during the transition.

tool to enhance the patient’s ability to roll. Initially thepatient is placed in the side-lying position and asked to“hold” while the clinician applies resistance to thepatient’s trunk, as if trying to roll the patient back towardsupine. The command to “relax” is given and the patientis passively rolled slightly back toward supine. The patientis then requested to actively roll toward side lying asresistance is applied. This sequence is repeated with theclinician progressively taking the patient through a greaterrange of motion until the patient is able to roll fromsupine to side lying against resistance. Slow Reversal,Slow Reversal Hold, and Agonistic Reversals may then beincorporated into the roll with focus on appropriatemovement strategies, normal timing, trunk control, andeffective use of extremity patterns.
Prone Progression
Prone lying and prone on elbows are the beginning posturesof the prone progression. Use of an external support such asa wedge, pillow, or towel roll may be necessary to promotecomfort due to joint or soft-tissue restrictions or respiratorydysfunction. The progression begins with the patient mov-ing from prone to prone on elbows (mobility). The prone-on-elbows position provides minimal biomechanical stressesdue to the low center of gravity, large base of support, andminimal number of weight-bearing joints. This situationprovides an ideal opportunity for early weight bearing onthe upper extremities. Activities such as weight shifting andreaching form a natural functional progression and promoteco-contraction of the upper trunk and shoulder girdle mus-cles, asymmetrical use of the arms, and the foundation forbed mobility in prone or crawling.
Rhythmic Initiation utilizes manual cues and gradedassistance to teach the patient to transition from prone toprone on elbows (see PNF Techniques section). Once thepatient has learned to assume the position, AlternatingIsometrics and Rhythmic Stabilization may be applied tothe shoulder girdle or head to create stability. Controlledmobility may be facilitated first through lateral or diagonalweight shifting and then through use of unilateral upper-extremity patterns with Slow Reversal and Slow ReversalHold techniques.
Lifting one arm reduces the base of support, providinggreater biomechanical challenge to the patient. Patientsoften fatigue quickly in the prone-on-elbows position; there-fore, the patient should be monitored for discomfort andproper postural alignment. Frequent verbal and manualcues may be needed to help the patient maintain appropri-ate cervical and thoracic spine extension, scapular adduc-tion, and shoulder alignment; otherwise, excessive strainmay be placed on the periarticular structures of the shoul-der, such as the capsule and ligaments. Commando stylecrawling is defined as a skill level activity in this position.Manual cues at the anterior humerus to guide directionalmovement or on the scapula to promote stability may assistin developing effective movement strategies. This task also
provides an opportunity to introduce reciprocal pelvic andlower-trunk rotation early in the prone progression.
Quadruped
Quadruped represents the first posture in the developmen-tal sequence in which the COG is a significant distancefrom the supporting surface. The higher COG combinedwith less body surface contact and a greater number ofweight-bearing joints make this posture much more chal-lenging from a biomechanical perspective than any of thosepreviously addressed. The added biomechanical stresses inaddition to weight bearing on all four extremities createunique opportunities to pursue gains in strength, range ofmotion, balance, coordination, and endurance throughoutthe body. Musculoskeletal dysfunction and pain may pro-hibit or limit the therapeutic use of this posture, especiallyregarding the knees, shoulders, and hands. Padding thepalms or knees and altering the amount of the hip andshoulder flexion through forward or backward weight shift-ing can improve patient comfort. This position may alsoplace additional stress on the cardiovascular system; there-fore, patients must be carefully screened for pre-existingconditions and monitored for signs of intolerance.
To obtain quadruped position from prone on elbows,patients may begin by moving their upper or lower trunk, orone lower extremity. This transition (mobility) can beenhanced through Rhythmic Initiation by using variousmanual contacts at the shoulders or pelvis. Intervention 9-25demonstrates facilitatory manual contacts that allow for tran-sition from prone on elbows to quadruped. Individuals withpoor control of the lower trunk will have more difficultycompleting this transition. Manual contacts on the ischialtuberosities help to guide the movement of the pelvis, as wellas allow the clinician to provide assistance as needed. Oncethe patient is in quadruped, Alternating Isometrics andRhythmic Stabilization are appropriate to create stabilitywithin the position. Examples of manual contacts are shownin Intervention 9-26. Only the creativity of the clinician lim-its the array of activities in this posture, especially during thecontrolled mobility stage of motor control. Some possibilitiesinclude forward, backward, and diagonal weight shifts; sin-gle-extremity patterns; and contralateral arm/leg lifts.Movement-oriented techniques such as Slow Reversal, SlowReversal Hold, and Agonistic Reversals may be applied asindicated by patient abilities and impairments. Intervention9-27 pictures the use of Slow Reversal in facilitation of rock-ing backward. Intervention 9-28 provides examples of activi-ties utilizing the extremities to promote this stage of motorcontrol. Combinations of techniques can be very effective inmaximally challenging the patient. One example would beapplication of Rhythmic Stabilization to the trunk while theSlow Reversal technique is applied to an extremity pattern.
Kneeling
Kneeling is a logical progression from quadruped andprovides an opportunity to exercise the trunk and lower
Proprioceptive Neuromuscular Facilitation ■ CHAPTER 9 265

266 SECTION 3 ■ ADULTS
INTERVENTION 9-25 Transition from Prone-on-Elbows to Quadruped
A. Beginning—The patient lies prone, propped on her elbows. The clinician is positioned in half-kneeling, straddling the patient’slower legs. Manual contacts are at the posterior pelvis, near the ischial tuberosities. The patient is requested to “push up on yourarms and sit back into my hands.”
B. End—The clinician shifts her body weight back to accommodate patient movement into the quadruped position, while providingfacilitation or resistance as appropriate.
extremities while the upper extremities are free or used forsupport (Adler et al., 2000). In kneeling, the hips are inextension and the knees in flexion, which can lessen theinfluence of an extensor synergy pattern in the lowerextremity. Weight bearing through the lower extremities canalso decrease extensor tone. Hip range of motion andstrength can be gained in this position, as well as improve-ment in static and dynamic balance. Kneeling providesfunctional carryover as an intermediate position betweenfloor activities and standing.
The transition from quadruped to kneeling (mobility) maybe considered a continuation of the process of moving fromprone on elbows to quadruped. Because the two transitionsshare key components, facilitation techniques are similar.Manual contacts are adjusted throughout the movement tomost effectively facilitate shifting of the body posteriorly, asportrayed in Intervention 9-29. The transition to upright iscued by traction or approximation to the upper trunk orapproximation to the pelvis. The applied force is small asthe patient is already lifting his body weight against gravity.Once the patient is in a kneeling position with the trunkerect, Alternating Isometrics or Rhythmic Stabilization isused to create stability with suggested manual contacts pic-tured in Intervention 9-30. Manual contacts may be appliedon the pelvis or on the lower or upper trunk, depending onthe desired focus and lever arm.
There are many ways to promote controlled mobility in akneeling position, especially because the upper extremities arefree in this posture. Several examples are weight shifting in alldirections with the trunk upright; chopping and lifting; andmoving in and out of heel sitting or side sitting. Intervention9-31 presents examples of activities that may be used toenhance achievement of the controlled mobility stage in
INTERVENTION 9-26 Alternating Isometrics andRhythmic Stabilization toPromote Stability inQuadruped
Continued

Proprioceptive Neuromuscular Facilitation ■ CHAPTER 9 267
INTERVENTION 9-26 Continued
A. The clinician kneels behind the patient with manual contacts on the right and left sides of the pelvis. The verbal commands of“don’t let me push you to the right/left” are given as the clinician provides resistance in the frontal plane.
B. The clinician is positioned in half-kneeling and faces the top of the patient’s head. The clinician places one hand on either of thepatient’s scapula and requests that the patient “hold this position.” The clinician alternates pressure from hand to hand topromote co-contraction in the patient’s trunk.
C. The clinician is positioned in half-kneeling just to the right of the patient’s pelvis. She places her right hand on the patient’s rightscapula and her left hand on the left iliac crest. The patient is requested to “hold” as the clinician applies alternating forces.
INTERVENTION 9-27 Slow Reversal Technique to Promote Rocking in Quadruped
A. The clinician assumes half-kneeling behind the patient andplaces the heels of her hands over the ischial tuberosities.The patient is requested to “push back into my hands.”
B. The patient continues the weight shift until the buttocksapproximate the heels or through the desired excursion. Theclinician shifts her body weight to accommodate thepatient’s movement.
C. The clinician changes her manual contacts to the ASISregion bilaterally and provides the verbal command to “pullyour pelvis forward” as the patient returns to quadrupedposition.

kneeling. Trunk control is trained by progressing from movingwith an upright trunk in kneeling to moving the trunk intoflexion or extension, and finally, moving with trunk rotation.These activities promote the hip and trunk control needed forsit to stand transfers. As in quadruped, Slow Reversal, SlowReversal Hold and Agonistic Reversals are frequently utilizedto apply appropriate resistance to selected patterns and move-
ments of the upper extremities or trunk. Functional activitiessuch throwing/catching and writing on a chalkboard may beused to improve strength and endurance in the trunk, hip, andupper-extremity muscles while also increasing eye-hand andupper-extremity coordination.
Half-kneeling is the last posture in the prone progressionand is necessary for floor to stand transfers. In cases of
268 SECTION 3 ■ ADULTS
INTERVENTION 9-28 Extremity Patterns to Facilitate the Controlled Mobility Stage in Quadruped
The clinician kneels or half-kneels on the patient’s left side.A. The clinician facilitates or resists the D2 flexion pattern on the left upper extremity while the patient is in quadruped. She places
her left hand on the patient’s dorsal wrist and her right hand on the anterolateral shoulder. The clinician asks the patient to “liftyour arm up and out.”
B. The patient continues through the pattern and shifts her body weight to accommodate the change in base of support. Theclinician mirrors patient movement.
C. As the patient nears end range of the pattern, the clinician may shift her right hand to the patient’s left scapular region to promotegreater scapular and trunk control as shown. The clinician continues to shift her body weight to follow the patient’s movement.

Proprioceptive Neuromuscular Facilitation ■ CHAPTER 9 269
unilateral or asymmetrical impairment, either lower extremitymay assume the forward position as there are therapeuticbenefits associated with either placement. The asymmetricalpositioning of the lower extremities encourages dissociationof hip and knee musculature with the potential for func-tional carryover to higher-level activities such as walking andstair climbing. Similar activities and techniques as thoseused in kneeling can be applied successfully in half-kneelingto enhance the stability and controlled mobility stages of motorcontrol.
Sitting
Sitting is the chief functional position for many activities, aswell as the midpoint of the transition between recumbency
and standing. The sitting position frees both upper extrem-ities and loads the trunk in an erect position. Learning toweight shift and control the midline position of the trunkand pelvis helps develop the balance, strength, and neuro-muscular control necessary for efficient gait. Multiple com-binations of trunk and extremity movements are possible insitting, allowing patients to develop both mobility and sta-bility in different body regions concurrently. Balance reac-tions can be facilitated in this position.
Ideal sitting posture is one in which the pelvis is neutralwith normal spinal curvatures; the head is over the shoul-ders; and feet are firmly on the floor. Attention to thesedetails will enhance the effectiveness of sitting activities andtheir carryover into functional tasks in higher-level postures.
INTERVENTION 9-29 Transition from Quadruped to Kneeling
The clinician positions herself in half-kneeling to one side of the patient. Her front foot is at the level of the patient’s knees.A. The clinician places the heels of her hands on the patient’s ischial tuberosities. The verbal command is given to “sit back into my
hands and push off your hands.”B. The patient shifts her weight backward to unload the upper extremities, which is facilitated through manual contacts at the iliac
crest and posterior pelvis.C. The patient is now requested to “straighten your hips and trunk.” Manual contacts shift as needed to promote hip and trunk
extension. The transition is completed with the patient assuming the kneeling position.

270 SECTION 3 ■ ADULTS
INTERVENTION 9-30 Alternating Isometrics and Rhythmic Stabilization Techniques to Promote Stability inKneeling
A. The patient kneels at the edge of the mat table with the footextending off the surface. The right hand is supported on astool. The clinician stands and faces the patient. The verbalcommand of “don’t let me move you forward” is given.Symmetrical manual contacts are used to facilitate trunkextension. The clinician alternates between anterior andposterior hand placements to apply the AlternatingIsometrics technique to enhance trunk stability.
B. The clinician kneels in front of the patient and places herhands on the patient’s anterior pelvis. The verbal commandof “don’t let me push you back” is provided. Resistance isapplied to match patient effort as Alternating Isometrics isapplied. The clinician alternates between anterior andposterior manual contacts to sequentially facilitate both thetrunk flexors and extensors.
C. The clinician stands in front of the patient and applies herhands to scapula and anterolateral pelvis. She requests thatthe patient “hold” the position as forces are applied topromote co-contraction of the trunk musculature during theRhythmic Stabilization technique.

Proprioceptive Neuromuscular Facilitation ■ CHAPTER 9 271
INTERVENTION 9-31 Activities to Promote Controlled Mobility in Kneeling
Continued

Because many people, especially those with neurologic dys-function, tend to sit with the thoracic and lumbar spineflexed and the pelvis posteriorly tilted, facilitation is oftenrequired to assist patients in achieving an erect trunk.Postural correction should occur at the pelvis first because itis the foundation for upright sitting. The heels of the clini-cian’s hands are placed between the iliac crest and ASISwith the fingers pointing down and back toward the ischialtuberosities. The clinician may passively move the patient’spelvis from a posterior to an anterior tilt to help the patientto gain awareness of the desired movements. To facilitateassumption of an anterior tilt position, the clinician maypassively move the pelvis into a posterior tilt and give resist-ance down and back as the patient attempts to move thepelvis up and forward. Verbal cues such as “sit up tall” or“push your hips up to me” are utilized. Approximation ortraction through the scapulae or shoulders provides a stim-ulus to move into an upright posture. Assistance is given ifnecessary for the patient to successfully achieve an uprightposture. The therapist may be able to resist the stronger sideand assist the weaker side, thus using the principle of over-flow. Intervention 9-32 demonstrates methods of facilitatingerect sitting posture using a variety of manual contacts.
Rhythmic Initiation and Hold Relax Active Movementare effective techniques to teach patients to assume anupright symmetrical sitting posture (mobility). Intervention
9-33 depicts use of the latter technique. Manual contacts areplaced in the direction of the desired movement, unlessassistance is needed during early rehabilitation. Once thepatient has achieved vertical posture, Alternating Isometricsor Rhythmic Stabilization can be applied to create stability.Upper extremity weight-bearing activities, with or withoutfacilitatory techniques, may be appropriate in sitting, espe-cially during the stability stage of motor control. Furtherprogression into the controlled mobility stage includes lateralweight shifts on the pelvis, unilateral upper-extremity pat-terns, trunk movements in cardinal or diagonal planes, andchops and lifts. Recommended techniques for promotingdynamic trunk control include Slow Reversal, Slow ReversalHold, and Agonistic Reversal.
Emphasis may be placed on trunk rotation by incorpo-rating lifting and chopping patterns. The combination oftwo extremities working together increases irradiation intothe trunk musculature. Lifting patterns facilitate trunkextension, elongation on one side of the trunk, and a weightshift. Chopping promotes trunk flexion, shortening of thetrunk on one side, and a weight shift. The direction of theweight shift with either movement pattern varies amongpatients. Resistive techniques (Slow Reversal, Slow ReversalHold, Agonistic Reversal) are applied as appropriate toincrease strength, motor control, endurance and coordina-tion in the trunk and upper extremities. Intervention 9-15
272 SECTION 3 ■ ADULTS
INTERVENTION 9-31 Continued
A. Right Lifting pattern—The clinician stands behind thepatient, adjacent to the right lead arm. She places her righthand on the dorsal surface of the patient’s right hand andher left hand on the anterior humerus. The command to“turn your right hand up and lift your arms over your rightshoulder” initiates the pattern.
B. As the patient moves through the right lifting pattern, theclinician also moves through the diagonal position toaccommodate the patient’s movements and to maintaineffective manual contacts.
C. Rising from heel sitting to kneeling—The clinician kneels(shown) or half-kneels and faces the patient. She contactsthe anterior aspect of the patient’s left shoulder and rightpelvis. The patient’s trunk should be erect and her arms ather sides. A request is made for the patient to “straightenyour hips.”
D. The patient proceeds through midrange of the transition,maintaining manual contacts and shifts her own bodyposition as needed to enhance patient effort.
E. The patient completes the transition to kneeling position.Alternative manual contacts may be used to addressindividual patient strengths and impairments, including thejudicious use of assistance and resistance at the thigh,pelvis, trunk, and head.

provides an example of the use of trunk patterns in pro-moting erect sitting posture.
Scooting
The key to successful scooting is the weight shift that occursprior to advancing the pelvis forward. In order for attemptsat reciprocal scooting to be successful, a weight shift to theleft must occur to unweight the right side of the pelvis. Theright pelvis may then be advanced forward. The weight shiftoccurs in a lateral and slightly forward direction with elon-gation of the trunk to the left and shortening of the trunkon the right. Left trunk lengthening is facilitated by placingone hand on the patient’s left anterior superior shoulderand the other hand on the right anterior superior pelvis. Theclinician stands in front of and to the left of the patient. Anapproximation force is applied concurrent with a verbal cue
to “shift to me.” The patient responds by lengthening thetrunk on the left and shortening the trunk on the right. Amanual contact on the right side of the pelvis is used tofacilitate the advancement of the right pelvis. The clinicianassists the pelvis forward if the patient is unable to performthe movement. The sequence is repeated to obtain elonga-tion to the right side of the trunk and advancement of theleft pelvis. The clinician switches position from side to sideas the motion of scooting is facilitated. If the patient isunable to perform the motion of reciprocal scooting, theclinician can isolate component parts, assisting as needed.Rhythmic Initiation and Hold Relax Active Movement areuseful in teaching the patient the motions necessary forscooting. Once each component has been facilitated, theentire motion is then practiced to ensure motor learning ofthe task as a whole.
Proprioceptive Neuromuscular Facilitation ■ CHAPTER 9 273
INTERVENTION 9-32 Erect Sitting Posture
The clinician stands and faces the patient, who is seated on the edge of the mat table with feet on the floor.A. She may use her lower extremities to stabilize the patient’s lower extremities as needed. The clinician utilizes manual contacts
on the pelvis to facilitate an anterior pelvic tilt as a component of upright sitting posture. She requests that the patient “bring yourpelvis up and forward into my hands.” The patient starts in a slouched sitting position. The end position of the requestedmovement is pictured.
B. The patient sits on the mat table with feet on the floor. The clinician faces the patient with manual contacts on the scapulae. Thepatient is requested to “sit up tall” while the clinician applies approximation in a downward and posterior direction.

INTERVENTION 9-33 Hold Relax Active Movement Technique to Promote Assumption of Erect SittingPosture
The patient sits without external support on the edge of the mattable with feet securely on the floor. The clinician stands in mid-stance position and faces the patient.A. Manual contacts are placed on the patient’s posterior trunk
in the intrascapular area. The clinician resists an isometrichold of the trunk extensors in the shortened range.
B. Upon the command to “relax,” the clinician passively movesthe patient into the lengthened range of trunk extensors.She shifts her body weight posteriorly during the movement.
C. The patient actively returns to the upright sitting positionwhile the clinician facilitates or resists concentric contractionof the trunk extensors. She shifts her weight forward as thepatient moves into erect sitting.
274 SECTION 3 ■ ADULTS

Sit to Stand
Moving from a seated position into standing requires thepatient to move the center of gravity over the base of sup-port and lift the body against gravity. This is challenging formany patients. Forward inclination of an extended trunkwith the hips flexed and the knees anterior to the feet bringsthe center of gravity over the feet and enables the weight ofthe body to be shifted forward and upward (Carr andShepherd, 1998). As the patient continues to lean forward,the buttocks are lifted off the chair, and ultimately, the hipsand knees are extended as the trunk moves into an erectstanding posture. Sit to stand can be facilitated by assistanceor resistance. It is important that normal timing of the move-ment is maintained regardless of the degree of assistance orresistance. Many patients extend the knees before the hips.This should be avoided as much as possible because it makesachieving an erect trunk position more difficult.
The clinician stands in front of the patient or on a diag-onal when facilitating the transition from sitting to stand-ing. Standing on a diagonal encourages a weight shift in thatdirection and is particularly recommended for the patientwho tends to push up only with the stronger limb. Manualcontacts vary based on the patient’s needs and abilities.Manual contacts on the upper trunk are effective forpatients who have the ability to stand but need cues for thecorrect sequence or timing of the motion. Manual cues onthe pelvis are more appropriate for patients who requiregreater facilitation with sit to stand. The clinician’s handsare placed on both sides of the pelvis in the space betweenthe anterior superior iliac spine and the iliac crest. Duringthe transitional movement, the clinician mirrors the forwardmovement expected from the patient. Failure of the clini-cian to weight shift backward and time the movement tomatch the patient’s will lessen the quality of the resultingmovement. Only slight resistance is applied as the patientmoves forward and up into a standing position. The verbalcommands consist of “lean toward me and stand up.” Thepatient may use momentum to come to stand, thus pre-serving the normal timing of the motion. If the patientremains leaning forward too long before trying to stand, itis more difficult to generate sufficient force to achieve thetransition. Manual contacts on the pelvis, the clinician’smovements, and concise verbal cues inform the patient asto which direction to move. Lifting patterns may be incor-porated into the movement to enhance forward weighttransfer and maintenance of erect trunk posture as picturedin Intervention 9-34.
If assistance is needed only on the weaker side, the clini-cian can maintain manual contact on the pelvis on thestrong side and assist the weaker side through a manual con-tact on the posterolateral iliac crest or at the buttocks. If thepatient requires more assistance, both of the clinician’shands are placed on the buttocks in order to assist thepatient into standing, maintaining appropriate timing dur-ing the transition. Practicing initially with a higher chair orhi-lo mat table eliminates some of the difficulty involved in
generating adequate force to successfully complete themovement (Carr and Shepherd, 1998). Resistive lower-extremity patterns, bridging, and controlled mobility activi-ties in sitting or kneeling help the patient to develop therequisite strength, coordination, and motor control to suc-cessfully perform a sit-to-stand transfer.
Standing
Safety and stability in standing are paramount to functionalindependence. Standing provides the foundation for manyhigher level functional tasks such as gait, stand-pivot trans-fers, activities of daily living, cleaning/cooking tasks, andwork-related skills. The transition from the sitting positionto standing comprises the mobility stage of motor controland was addressed in the previous section. Once the patienthas achieved erect standing, approximation may be used atthe pelvis to enhance co-contraction of the muscles in thelower extremities and create stability. The clinician standsand faces the patient on a diagonal with one foot forwardwhile applying approximation.
A lumbrical grip (see Fig. 9-1) is used with the thenareminence on the anterior superior aspect of the patient’siliac crest and fingers pointing toward the ischial tuberosi-ties. Approximation is given through both sides of thepelvis equally and directed downward and backward at a 45-degree angle toward the patient’s heels. Suggested handplacements are pictured in Intervention 9-35. The cliniciangradually increases the amount of force used as the patientresponds. Further stability can be developed through the useof Alternating Isometrics or Rhythmic Stabilization as isalso shown in Intervention 9-35. The clinician may standdirectly in front of the patient or on a diagonal while apply-ing these techniques.
Varying manual contacts assists in providing the amountof resistance that appropriately challenges the patient’s abili-ties through changes in lever arm. The least resistance isexperienced through use of contacts on the pelvis, and anintermediate amount through contacts on the thigh andlower trunk. The greatest resultant force is produced throughhand placements on the lower leg, ankle, shoulder girdle, orupper extremity. Controlled mobility activities include weightshifting and squatting through partial range.
Pre-Gait Activities
In standing, controlled mobility activities are targeted atacquiring the skills needed to walk. Weight shifting is a fun-damental movement that must be mastered before actualsteps are attempted. Symmetrical standing may be used ini-tially, with progression to midstance position (one foot for-ward) as soon as warranted. The midstance position in itselffacilitates a weight shift from one limb to the other.Procedurally, the clinician uses contacts on the anteriorpelvis similar to those used for scooting and the transitionfrom sitting to standing. Intervention 9-36 shows severaloptions for application of approximation and facilitation ofpelvic control.
Proprioceptive Neuromuscular Facilitation ■ CHAPTER 9 275

276 SECTION 3 ■ ADULTS
INTERVENTION 9-34 Activities to Promote Independent Standing in Symmetrical Stance Position
The patient stands with symmetrical foot placement. The clinician stands in midstance position and faces the patient.A. The clinician applies approximation at the pelvis through manual contacts at the iliac crest. A verbal cue may be given to “stand
up straight.”B. The clinician applies approximation through the superior aspect of the shoulder girdle to promote upright trunk posture.C. The clinician applies traction through hand placements over the scapula to promote upright standing.D. Rhythmic Stabilization is applied with asymmetrical manual contacts at the shoulder and pelvis. Emphasis is in on application of
rotary forces to promote trunk co-contraction to enhance upright standing posture.

Proprioceptive Neuromuscular Facilitation ■ CHAPTER 9 277
INTERVENTION 9-35 Activities to Promote Stability and Pelvic Control While Standing in Midstance Position
The patient stands in midstance position with her right lowerextremity forward. The clinician also stands, but her relativeposition varies according to the specific patient situation andgoal.A. The clinician is shown standing in front of the patient to
apply approximation through the pelvis. The heels of theclinician’s hands are placed symmetrically on the anteriorsuperior aspect of the iliac crests.
B. An alternative position for application of approximation ispictured with the clinician standing behind the patient.Manual contacts are similar to those described above;however, the clinician’s hands are shifted posteriorly.
C. The clinician facilitates pelvic control through contact on theunloaded limb. The patient assumes midstance positionwith her weight shifted onto the forward lower extremity, inthis case, the left. The clinician stands on the left side. Sheuses her right hand to facilitate, assist, or resist isometriccontrol of the left lower extremity. She places her left handon the patient’s right pelvis, near the ASIS. The patient isasked to “push your pelvis into my hand” to promoteinitiation of swing phase on the unloaded limb, in this case,the right.

278 SECTION 3 ■ ADULTS
INTERVENTION 9-36 Methods of Facilitating and Assisting with Swing Phase of Gait
Continued

Rhythmic Initiation assists the patient with the act ofweight shifting by using a sequence of passive, active-assisted, active, and slightly resisted motions. Slow ReversalHold can be an effective tool that simulates the sequence ofisotonic then isometric muscle contractions utilized duringgait. Lever arm may be varied through manual contacts atthe pelvis, thigh, lower leg, or trunk. Contacts and resistancemay be applied symmetrically or asymmetrically as indi-cated by patient abilities or responses. For example, appro-priately strong resistance may be utilized through contacton the left midanterior thigh to produce overflow while lessresistance is applied on the left anterior pelvis to facilitatemovement.
Some patients tolerate only short periods of time in theupright position, due to multiple factors including cardiovas-
cular status, balance, trunk control, coordination deficits, anddeficiencies in mental processing. Musculoskeletal conditions,such as arthritis in the hips, knees, or spine, may also limit tol-erance to standing. It is often appropriate to determine alter-native activities in lower-level developmental positions tosimulate the movements or muscle contractions required dur-ing standing and walking. Bridging and weight shifting inquadruped or half-kneeling represent controlled mobility activi-ties with direct functional carryover into components of thegait process. Slow Reversal Hold and Agonistic Reversals facil-itate and reinforce the types of muscle contractions and move-ment strategies most crucial to upright locomotion, as well asincrease strength. Depending upon the patient’s unique abili-ties and needs, other suggested interventions include resistedextremity patterns in quadruped; Rhythmic Stabilization or
Proprioceptive Neuromuscular Facilitation ■ CHAPTER 9 279
INTERVENTION 9-36 Continued
The clinician and patient both stand in midstance position and face each other.A. The clinician facilitates initiation of the swing phase of gait through manual contacts and appropriate assistance at the ischial
tuberosity. The clinician’s other hand facilitates trunk extension.B. The clinician assists the patient’s right lower extremity through midswing. She steps backward during the movement to mirror
the patient’s progression.C. The clinician facilitates weight transfer onto the right lower extremity through manual contacts at the posterior pelvis. The clinician
repositions her body as needed.D. The clinician demonstrates use of manual contacts at the posterior thigh to assist and facilitate initiation of swing phase.E. The patient progresses through midswing. The clinician shifts her manual contacts and body weight to accommodate patient
movement.F. The clinician promotes weight transfer onto the right lower extremity through manual contacts at the posterior thigh.

Alternating Isometrics in quadruped, kneeling, or half-kneel-ing; and resisted LE patterns in side lying, especially D1 exten-sion with emphasis on pelvic control. Some of these activitiesmay also be adapted for inclusion in a home program.
After the patient achieves an adequate weight shift in themidstance position, further stability can be developed in theforward limb through use of Rhythmic Stabilization. Manualcontacts may be altered to focus on control of the pelvis, knee,or ankle. The importance of stability in the stance phase of gaitcannot be overemphasized. Efficient progression, or swingthrough, of the unloaded limb can occur only when the stancelimb provides adequate support and security. Once this goal isreached, swing of the unloaded limb may be facilitated by anapplied stretch to ipsilateral pelvis through a lumbrical grip onthe ASIS. The direction of the force is posterior and inferior,toward the ischial tuberosity. Application of the stretch is timedwith the verbal cue to “step forward.” Judiciously applied resist-ance may also facilitate greater movement. When the patientdemonstrates sufficient control of the pelvis, manual contactsmay be moved to the anterior thigh to facilitate further hipflexion. As the foot again contacts the surface, the process ofweight shifting and stabilization of the forward limb resumes.Many options exist for continued gait preparation and train-ing. Suggested manual contacts are shown in Intervention 9-36.Dependent upon the patient’s responses, several typical routesare pursued. Repeated forward and backward stepping may bepracticed with or without applied stretch. The procedure forfacilitating backward stepping is similar to that of forward step-ping, with the therapist’s hands now placed on the patient’sposterior thigh. The therapist may also alternate focus on theswing and stance limb through the procedures previouslydescribed. Resisted Progression with manual contacts on thetrunk, pelvis, or lower extremity is introduced when facilitationthrough stretch is no longer needed.
Retraining of a safe, efficient gait pattern in individualswith neurologic impairments is challenging for both theindividual and the clinician. Although no one strategy isoptimally effective for everyone, the following progressionmay prove helpful:
■ Approximation and stability exercises in standing withfeet symmetrically placed
■ Approximation and stability exercises in midstanceand then with the patient’s weight shifted forwardonto the front limb
■ Application of resistance at the pelvis of the advancinglimb as the patient steps forward
■ Repetitive stepping forward and backward with one limb■ Reciprocal gait with manual contacts at the pelvis and
facilitatory stretch to the hip flexors at the initiation ofswing phase
■ Resistive reciprocal gait with manual contacts at thepelvis, then the trunk and lower extremities
PNF AND MOTOR LEARNING
Motor learning is defined as “a set of processes associatedwith practice or experience leading to relatively permanent
changes in the capability for producing skilled action”(Shumway-Cook and Woollacott, 2001). From its concep-tion, the intended outcome of PNF as a therapeuticapproach has been to develop and refine functional move-ment strategies. In the preface to the second edition of theirclassic text, Proprioceptive Neuromuscular Facilitation: Patternsand Techniques, Margaret Knott and Dorothy Voss statedrepeatedly that development and application of the PNFapproach was targeted at maximizing motor learning. Thefollowing excerpt summarizes their perceptions:
. . . all of the procedures suggested for the facilitationof total patterns have a common purpose—to promotemotor learning. Oddly this term strikes some physicaltherapists as new or foreign, yet we have always triedto “teach the patient” to perform a motor act and havebeen pleased when the patient has learned (Knott &Voss, 1968, p xiii).
A positive environment that nurtures an interactive rela-tionship between clinician and patient sets the stage foroptimal learning and relearning of motor skills. This envi-ronment creates a place where the patient is motivated byrealistic demands, clearly articulated expectations, and func-tionally relevant outcomes. Auditory, tactile, and proprio-ceptive input are crucial elements in promoting andreinforcing the motor performance that comprises thedesired functional skills. The continual process of imple-menting techniques and patterns matched with the patient’scurrent abilities, observing the patient’s responses, and mak-ing appropriate modifications is key to optimal achievementof the patient’s functional goals.
280 SECTION 3 ■ ADULTS
CHAPTER SUMMARY
Kabat and Knott created an approach to patient treatmentin the 1940s that continues to grow and evolve today. ThePNF treatment approach has clinical application to a widevariety of patients and diagnoses. It consists of a philoso-phy and basic principles, which can be adapted andapplied by clinicians to any functional activity. By incorpo-rating the basic principles of PNF, clinicians broaden theirrepertoire of intervention strategies and are better able tocustomize therapeutic exercise programs to each patient’sunique needs. When using PNF principles to create specificactivities and patterns of movement for individual clients, achecklist ensures that the basic principles are being foll-owed. Such care allows the clinician to incorporate PNFtechniques to address specific problems and enhancepatient performance. When the emphasis of treatment is onfunction, PNF is a viable treatment option. ■

REFERENCESAlder SS, Beckers D, Buck M. PNF in Practice: An Illustrated Guide,
2nd ed. Berlin, Springer, 2000.Carr J, Shepherd R. Neurological Rehabilitation Optimizing Motor
Performance. Woburn, MA, Butterworth-Heinemann, 1998.Gellhorn E. Proprioception and the motor cortex. Brain 72:35–62,
1949.Hanson C. Proprioceptive neuromuscular facilitation. In Hall C,
Brody L. Therapeutic Exercise: Moving Toward Function, Philadelphia,Lippincott Williams, & Wilkins, 1999.
Jacobs MJ. Development of normal motor behavior. Am J PhysMed Rehabil 46(1):41–51, 1967.
Kabat H. Proprioceptive facilitation in therapeutic exercise. InLicht S, Johnson EW (eds). Therapeutic Exercise, 2nd ed.Baltimore, Waverly, 1961.
Kisner C, Colby LA. Therapeutic Exercise Foundations and Techniques,4th ed. Philadelphia, FA Davis, 2002, pp 113–122.
Knott M, Voss D. Proprioceptive Neuromuscular Facilitation: Patternsand Techniques, 2nd ed. New York, Harper & Row, 1968.
Loofbourrow GN, Gellhorn E. Proprioceptively induced reflexpatterns. Am J Physiol 154:433–438, 1948.
McGraw MB. The Neuromuscular Maturation of the Human Infant.New York, Columbia University Press, 1962.
Prentice WE. Proprioceptive neuromuscular facilitation techniquesin rehabilitation. In Prentice WE, Voight ML (eds). Techniques inMusculoskeletal Rehabilitation. New York, McGraw-Hill, 2001, pp197–213.
O’Sullivan SB. Strategies to improve motor control and motorlearning. In O’Sullivan SB, Schmitz TJ (eds). PhysicalRehabilitation: Assessment and Treatment, 4th ed. Philadelphia, FADavis, 2001, pp 363–410.
Richter RR, VanSant AF, Newton RA. Description of adult rollingmovements and hypothesis of developmental sequence. PhysTher 69:63–71, 1989.
Saliba V, Johnson G, Wardlaw C. Proprioceptive neuromuscu-lar facilitation. In Basmajian J, Nyberg R (eds). RationalManual Therapies. Baltimore, Williams & Wilkins, 1993, pp243–284.
Sherrington C. The Integrative Action of the Nervous System, 2nd ed.New Haven, Yale Press, 1947.
Shumway-Cook A, Woollacott MH. Motor Control: Theory andPractical Applications. Lippincott, Williams & Wilkins, 2001.
Sullivan PE, Markos PD, Minor MA. An Integrated Approach toTherapeutic Exercise: Theory and Clinical Application. Reston, VA,Reston Publishing Company, 1982.
Sullivan PE, Markos PD. Clinical Decision Making in TherapeuticExercise. Norwalk, CT, Appleton & Lange, 1995.
Voss DE, Ionta M, Meyers B. Proprioceptive NeuromuscularFacilitation: Patterns and Techniques, 3rd ed. New York, Harper &Row, 1985.
Proprioceptive Neuromuscular Facilitation ■ CHAPTER 9 281
REVIEW QUESTIONS
1. Define the term appropriate resistance according to thePNF approach.
2. What is irradiation? Describe how this phenomenon maybe used to promote movement in individuals withhemiplegia.
3. What two PNF techniques are frequently applied toincrease stability?
4. What activities, patterns, or techniques are appropriate touse when the outcome is improvement of the functionalability to roll to the left in a patient who has sustained aright CVA? How would clinician strategies change whenteaching rolling to the right in the same individual?
5. A patient is having difficulty weight bearing on the rightlower extremity after a left CVA. What interventions areappropriate to enhance the patient’s ability regarding rightstance during gait?
6. A patient has weakness in the right gluteals. Identifyactivities to strengthen these muscles eccentrically. WhatPNF technique is most appropriate to address aneccentric deficit?
7. Hamstring shortness is limiting a patient’s ability to sitwith the knees extended (long sitting position). What PNFtechnique promotes lengthening of this muscle group?


![[ ] CVP-and-Arterial-Moni](https://img.pdfslide.us/doc/110x75/587f81631a28ab3f4e8b6ee3/-cvp-and-arterial-moni.jpg)


