Embed Size (px)
Citation preview
www.adselfserviceplus.com
Guide to integrate ManageEngine ADSelfService Plus
with Microsoft SharePoint
Document Summary 3
ADSelfService Plus - Introduction 3
About Microsoft SharePoint 3
ADSelfService Plus Integration with SharePoint – Steps Involved 4
Step 1: Adding ADSelfService Plus as a Web Part in the Site 4
Step 2: Adding Reset Password/Unlock Account link in the login page 8
Steps to enable Forms-based Authentication for a Site 9
1
2
3
4
Contents
[email protected] | www.adselfserviceplus.com
1.Document SummaryThis document will guide you through the steps involved in integrating ADSelfService Plus with SharePoint. The document is written with the assumption that you are a system administrator with a basic knowledge of Windows operating system and Microsoft SharePoint. However, care has been taken to keep the integration steps as simple as possible. We have used SharePoint Server 2010 for illustration in this document.
ADSelfService Plus is a secure, web-based, end-user Windows Active Directory self-service password management solution. Some of the major features of ADSelfService Plus are:
2.About ADSelfService Plus
3
Self-service reset password
Self-service unlock account
Password expiration notification
Directory self-update and employee search
Multi-platform password synchronizer
Single sign-on for SaaS apps
and more.
SharePoint is a web application platform developed by Microsoft. Using SharePoint, users can setup websites to share information, create and share documents, publish reports, etc., making it easier for them to collaborate with each other.
By integrating ADSelfService Plus with Microsoft SharePoint, users will have easy access to the self-service portal from their SharePoint site. Also, they can securely reset their domain passwords and unlock their locked-out accounts, on their own, right form the login page of SharePoint.
3.About Microsoft SharePoint
[email protected] | www.adselfserviceplus.com

Please follow the steps given below to integrate ADSelfService Plus with Microsoft SharePoint:
4.ADSelfService Plus Integration with SharePoint – Steps Involved
4
Step 1: Adding ADSelfService Plus as a Web Part
1) Go to the Central Administration Page of the desired SharePoint site from your browser. (e.g.:http://<sharepoint_server>:<port_no>/) Note: <sharepoint_server> = server name of the SharePoint site <port_no> = port number of the SharePoint site
2) Click Site Actions > More Options…
[email protected] | www.adselfserviceplus.com
Note: Before adding a web part in site, make sure that you have the required site, site collection and
web application. Click here to learn about creating a new web application and site collection in
SharePoint.
5 [email protected] | www.adselfserviceplus.com
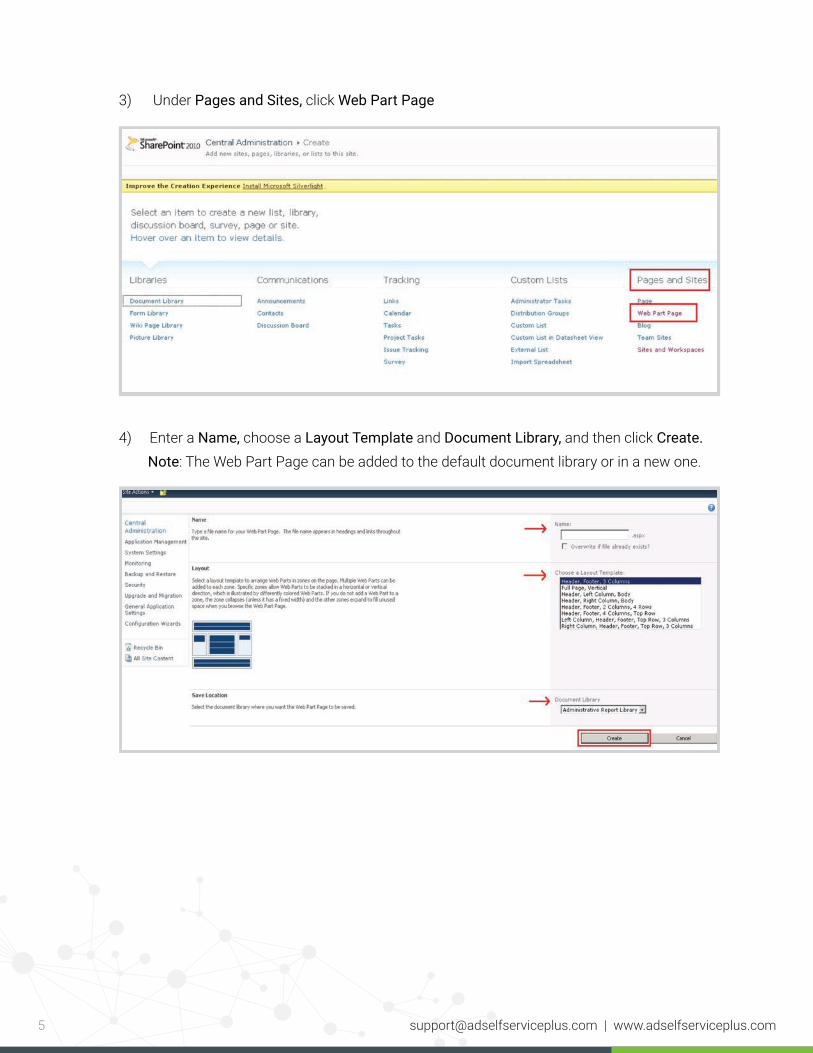
3) Under Pages and Sites, click Web Part Page
4) Enter a Name, choose a Layout Template and Document Library, and then click Create. Note: The Web Part Page can be added to the default document library or in a new one.
6 [email protected] | www.adselfserviceplus.com
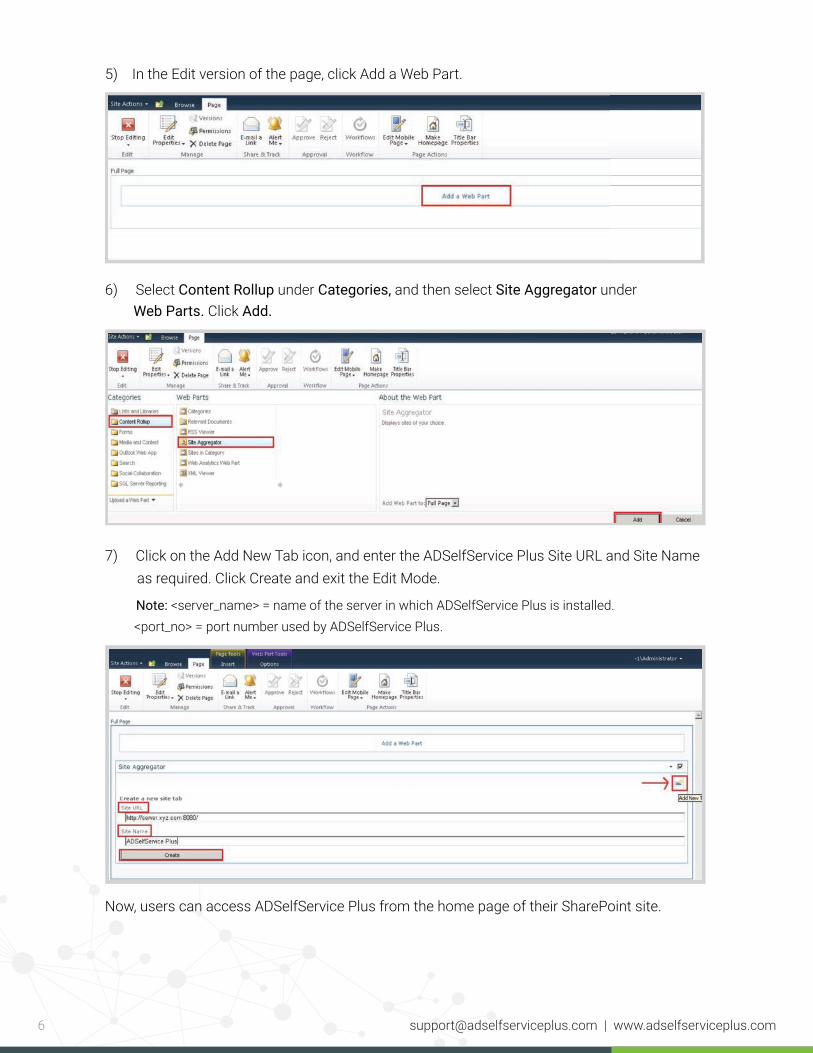
5) In the Edit version of the page, click Add a Web Part.
6) Select Content Rollup under Categories, and then select Site Aggregator under Web Parts. Click Add.
7) Click on the Add New Tab icon, and enter the ADSelfService Plus Site URL and Site Name as required. Click Create and exit the Edit Mode.
Note: <server_name> = name of the server in which ADSelfService Plus is installed. <port_no> = port number used by ADSelfService Plus.
Now, users can access ADSelfService Plus from the home page of their SharePoint site.
7 [email protected] | www.adselfserviceplus.com
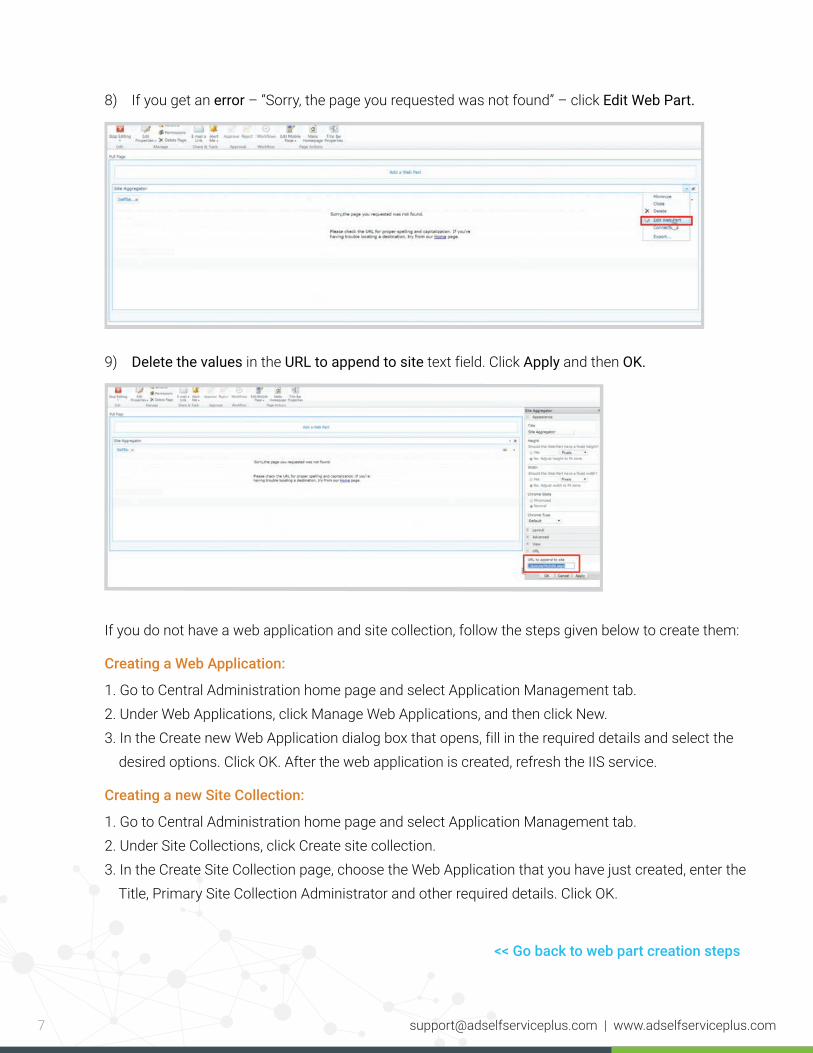
8) If you get an error – “Sorry, the page you requested was not found” – click Edit Web Part.
9) Delete the values in the URL to append to site text field. Click Apply and then OK.
If you do not have a web application and site collection, follow the steps given below to create them:
Creating a Web Application:
1. Go to Central Administration home page and select Application Management tab.2. Under Web Applications, click Manage Web Applications, and then click New.3. In the Create new Web Application dialog box that opens, fill in the required details and select the desired options. Click OK. After the web application is created, refresh the IIS service.
Creating a new Site Collection:
1. Go to Central Administration home page and select Application Management tab.2. Under Site Collections, click Create site collection. 3. In the Create Site Collection page, choose the Web Application that you have just created, enter the Title, Primary Site Collection Administrator and other required details. Click OK.
<< Go back to web part creation steps
8 [email protected] | www.adselfserviceplus.com
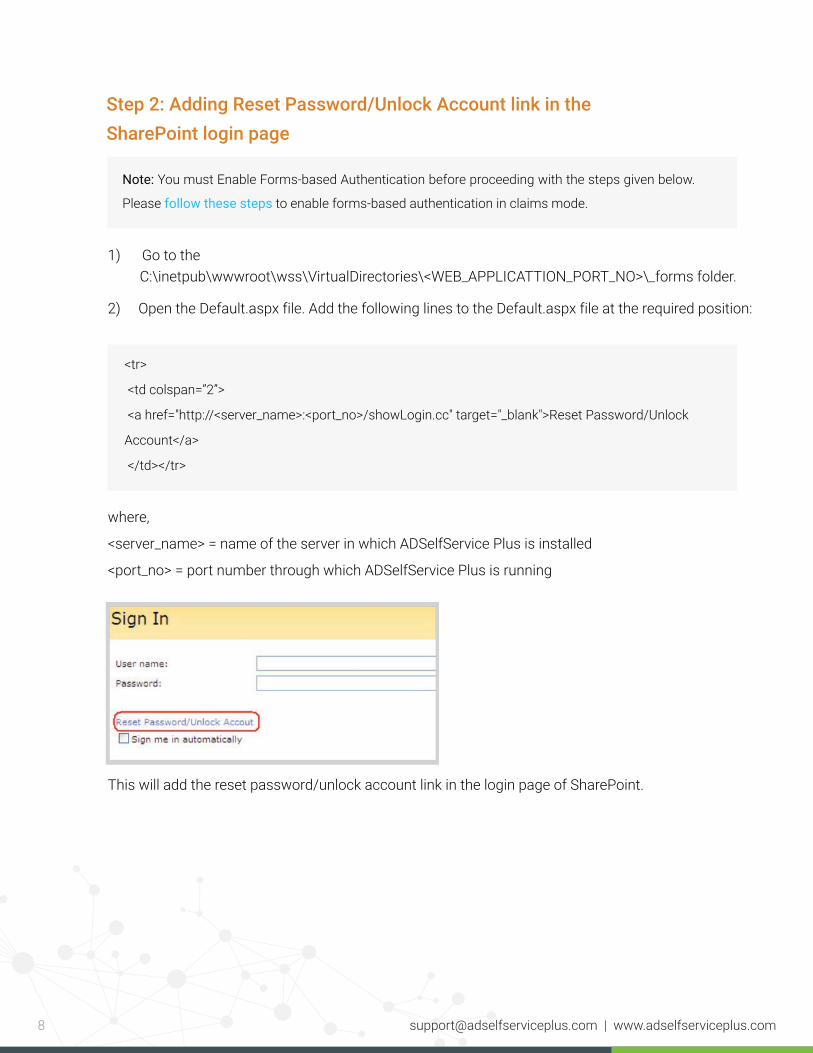
Step 2: Adding Reset Password/Unlock Account link in the SharePoint login page
Note: You must Enable Forms-based Authentication before proceeding with the steps given below.
Please follow these steps to enable forms-based authentication in claims mode.
1) Go to the C:\inetpub\wwwroot\wss\VirtualDirectories\<WEB_APPLICATTION_PORT_NO>\_forms folder.
2) Open the Default.aspx file. Add the following lines to the Default.aspx file at the required position:
where,
<server_name> = name of the server in which ADSelfService Plus is installed
<port_no> = port number through which ADSelfService Plus is running
This will add the reset password/unlock account link in the login page of SharePoint.
<tr>
<td colspan=”2”>
<a href="http://<server_name>:<port_no>/showLogin.cc" target="_blank">Reset Password/Unlock
Account</a>
</td></tr>
You must configure Forms-based Authentication so that the login prompt with the reset password/unlock account link will appear when users open their SharePoint site. You must also make the required entries for membership provider in web.config files and configure required user rights for accessing the Reset password/Unlock Account link.
This TechNet article illustrates in detail how to configure forms-based authentication and the required web.config files.
Once you have completed the steps discussed in the TechNet article, you must manually enable claims-based authentication using a PowerShell script. Follow the steps given below:
9
Steps to enable Forms-based Authentication in claims mode for a site
[email protected] | www.adselfserviceplus.com
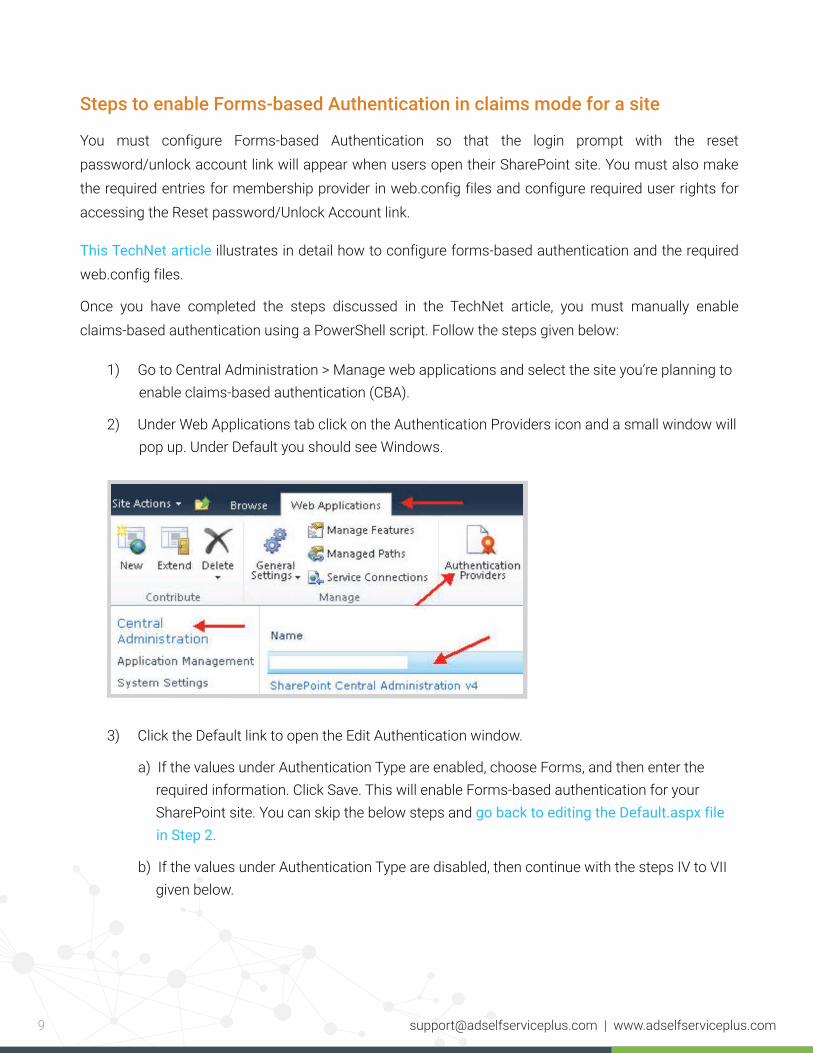
1) Go to Central Administration > Manage web applications and select the site you’re planning to enable claims-based authentication (CBA).
2) Under Web Applications tab click on the Authentication Providers icon and a small window will pop up. Under Default you should see Windows.
3) Click the Default link to open the Edit Authentication window.
a) If the values under Authentication Type are enabled, choose Forms, and then enter the required information. Click Save. This will enable Forms-based authentication for your SharePoint site. You can skip the below steps and go back to editing the Default.aspx file in Step 2.
b) If the values under Authentication Type are disabled, then continue with the steps IV to VII given below.
10 [email protected] | www.adselfserviceplus.com
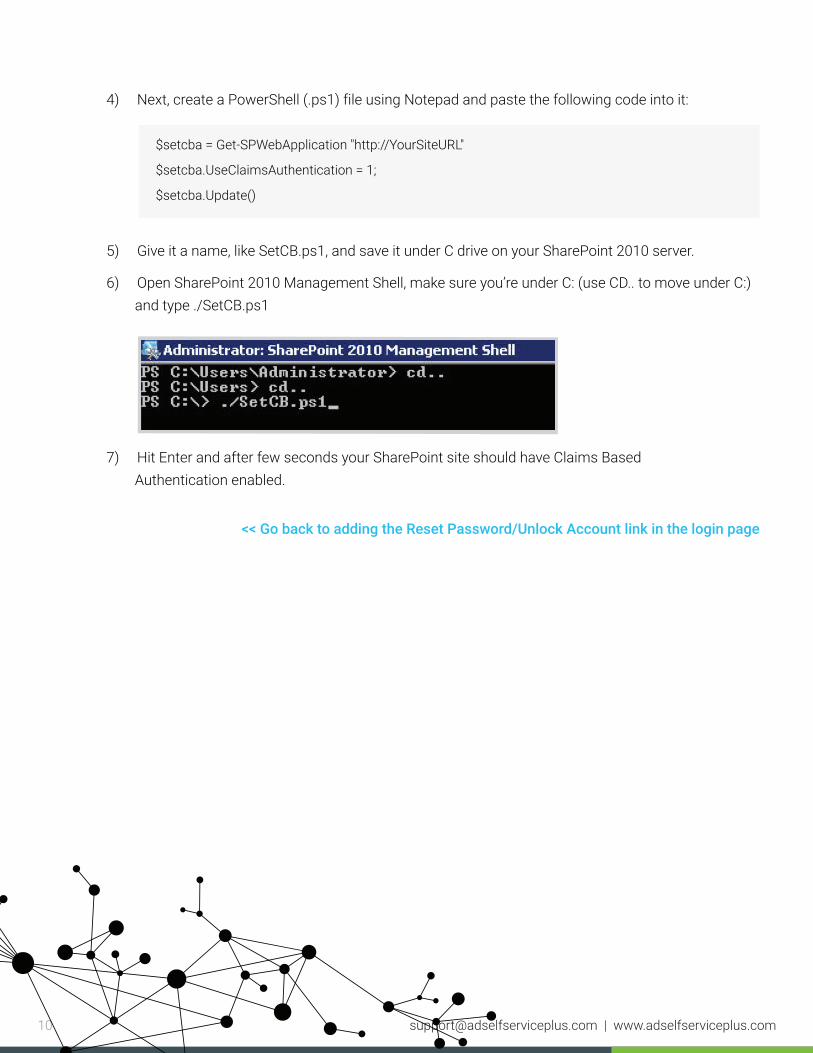
4) Next, create a PowerShell (.ps1) file using Notepad and paste the following code into it:
5) Give it a name, like SetCB.ps1, and save it under C drive on your SharePoint 2010 server.
6) Open SharePoint 2010 Management Shell, make sure you’re under C: (use CD.. to move under C:) and type ./SetCB.ps1
7) Hit Enter and after few seconds your SharePoint site should have Claims Based Authentication enabled.
$setcba = Get-SPWebApplication "http://YourSiteURL"
$setcba.UseClaimsAuthentication = 1;
$setcba.Update()
<< Go back to adding the Reset Password/Unlock Account link in the login page
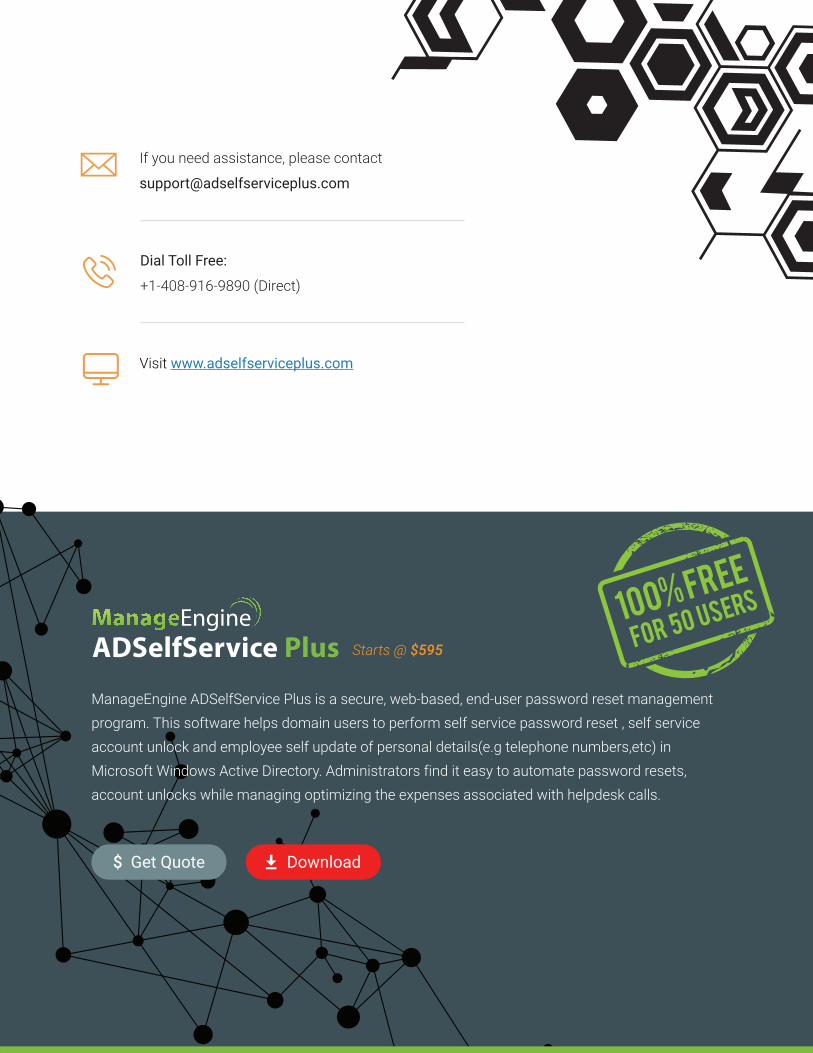
If you need assistance, please contact
Visit www.adselfserviceplus.com
Dial Toll Free:
+1-408-916-9890 (Direct)
ManageEngine ADSelfService Plus is a secure, web-based, end-user password reset management program. This software helps domain users to perform self service password reset , self service account unlock and employee self update of personal details(e.g telephone numbers,etc) in Microsoft Windows Active Directory. Administrators find it easy to automate password resets, account unlocks while managing optimizing the expenses associated with helpdesk calls.
Starts @ $595
Download$ Get Quote
100% FREE
FOR 50 USERS