Embed Size (px)
Citation preview
The world-standardimage-editingsolution for printand the Web
Adobe Photoshop software is an essential creative tool for the majority of Web designers and producers who
design and edit Web graphics. Now Adobe Photoshop 5.5 software is expanding that role, adding compre-
hensive optimization features for producing the highest quality Web graphics with the smallest possible file
sizes. It also provides the Adobe ImageReady™ 2.0 component for advanced Web-production tasks, such as
creating sliced images, sophisticated JavaScript rollovers, dynamic animations, and image maps. In addition,
Photoshop 5.5 fulfills customer requests for more creativity features by providing powerful new masking
tools, automated creation of printed and Web-based contact sheets, and a versatile new art history brush for
transforming images into painterly strokes.
With this new functionality, Photoshop 5.5 delivers a complete, integrated image-editing solution for print
and the Web. The best way to learn the benefits of these new features is to see them in action. This hands-on
look at key features in Adobe Photoshop explains how these features work and gives you a chance to try them
yourself. You can follow the examples through in order or jump around looking only at the features that
interest you the most (this is not a tutorial, so you don’t have to follow a set sequence through the guide). You
can even skip the step-by-step review of the program and just skim the procedures and illustrations for a
taste of what this innovative release offers.
This reviewer’s guide is divided into these sections:
• Quick Reference: Key Features in Adobe Photoshop 5.5 (page 3)
• Rely on Consistent Adobe Design Tools (page 4)
• Produce Superb Web Graphics (page 8)
—Basic Web Tasks: Creating the Smallest Possible Web Graphics (page 9)
—Advanced Web Tasks: Designing Interactive Graphics (page 13)
• Expand Your Creative Power (page 26)
All of the features described apply to both Macintosh and Windows versions of Adobe Photoshop software,
so feel free to work on your platform of choice or even to move back and forth between platforms.
Before You BeginPlease do the following before you dive into the reviewer’s guide:
• Locate the Rev_Guide folder on your Adobe Photoshop 5.5 reviewer’s CD-ROM, and copy the folder and
sample files to your hard disk.
• Install the Adobe Photoshop 5.5 and Adobe ImageReady 2.0 software. The installer streamlines this pro-
cess by installing both programs at once.
• Make sure that Adobe Photoshop and Adobe ImageReady are using their default preferences settings.
If you’ve already run either program and made any changes, you may need to restore the default prefer-
ences settings. To do this, close Photoshop and ImageReady if they are running. Then locate and delete
these files:
For Photoshop 5.5: Locate the Adobe Photoshop 5.5 Prefs file in the Settings folder in the Adobe
Photoshop 5.5 folder. Then delete or rename it. When you launch Photoshop, it generates a new prefer-
ences file with default settings.
Power Macintosh/Windows® 95 & 98/Windows NT® 4.0
Reviewer’s Guide
5.5Adobe® Photoshop®
version
®
2
For ImageReady 2.0: On a Mac OS system, locate the Adobe ImageReady 2.0 Prefs file in the System
folder and delete or rename it. ImageReady then generates a new preferences file when you launch the
program. On a Windows system, press Ctrl+Alt+Shift as you launch the program, and then click yes
when asked whether to reset preferences to their defaults.
• Launch both programs. If you’re launching Photoshop for the first time (or you renamed or deleted the
Color Settings file when you reset the default preferences), you’ll be prompted to run the Adobe Color
Management Assistant to tailor the color management settings for your system. You can step through
the color management setup or cancel out of it for now.
Photoshop 5.5 Reviewer’s Guide FilesThe exercises in this reviewer’s guide use the files listed below:
File name File location Used to demonstrate this feature
flwportrait.psd* Rev_Guide folder on your reviewer’s CD Adobe integration, Web graphics optimization
flwhome.psd* Rev_Guide folder on your reviewer’s CD Image slicing, JavaScript rollovers, animated GIFs
flwhome.html* Rev_Guide folder on your reviewer’s CD Final results of Web optimization/creative tasks
<Images> folder* Rev_Guide folder on your reviewer’s CD Image slices for final HTML page
fern.psd Rev_Guide folder on your reviewer’s CD Magic eraser tool
zebra.psd Rev_Guide folder on your reviewer’s CD Background eraser tool
gorilla.psd Rev_Guide folder on your reviewer’s CD Extract Image command
sunflower.psd Rev_Guide folder on your reviewer’s CD Art history brush
flowers.psd Rev_Guide folder on your reviewer’s CD Art history brush
port.psd Rev_Guide folder on your reviewer’s CD Art history brush
<Samples> folder Goodies folder in the Adobe Instant contact sheetsPhotoshop 5.5 folder
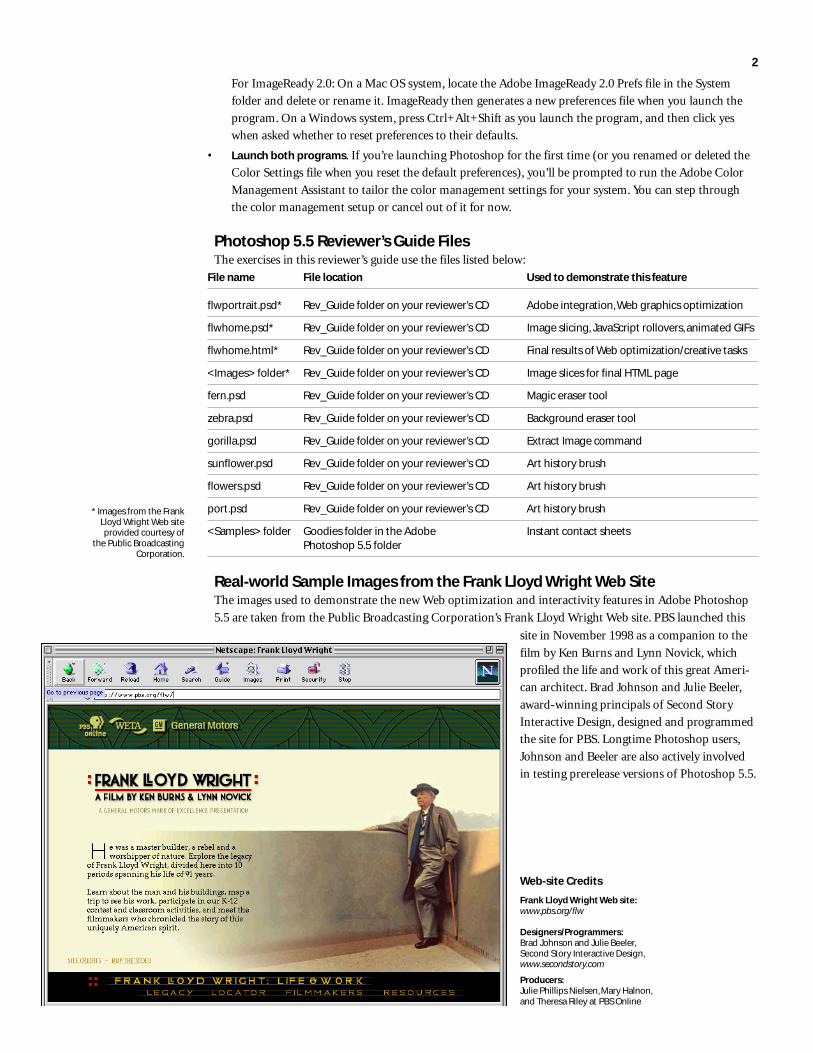
Real-world Sample Images from the Frank Lloyd Wright Web SiteThe images used to demonstrate the new Web optimization and interactivity features in Adobe Photoshop
5.5 are taken from the Public Broadcasting Corporation’s Frank Lloyd Wright Web site. PBS launched this
Web-site Credits
Frank Lloyd Wright Web site:www.pbs.org/flw
Designers/Programmers:Brad Johnson and Julie Beeler,Second Story Interactive Design,www.secondstory.com
Producers:Julie Phillips Nielsen, Mary Halnon,and Theresa Riley at PBS Online
* Images from the FrankLloyd Wright Web siteprovided courtesy of
the Public BroadcastingCorporation.
site in November 1998 as a companion to the
film by Ken Burns and Lynn Novick, which
profiled the life and work of this great Ameri-
can architect. Brad Johnson and Julie Beeler,
award-winning principals of Second Story
Interactive Design, designed and programmed
the site for PBS. Longtime Photoshop users,
Johnson and Beeler are also actively involved
in testing prerelease versions of Photoshop 5.5.
3
Quick Reference: Top Features in Adobe Photoshop 5.5Rely on Consistent Adobe Design ToolsAdobe-standard user interface Get up to speed quickly and move between Photoshop 5.5 and ImageReady
2.0 without breaking your creative flow because of common commands, palettes, tools, and keyboard short-
cuts. For details, see page 4.
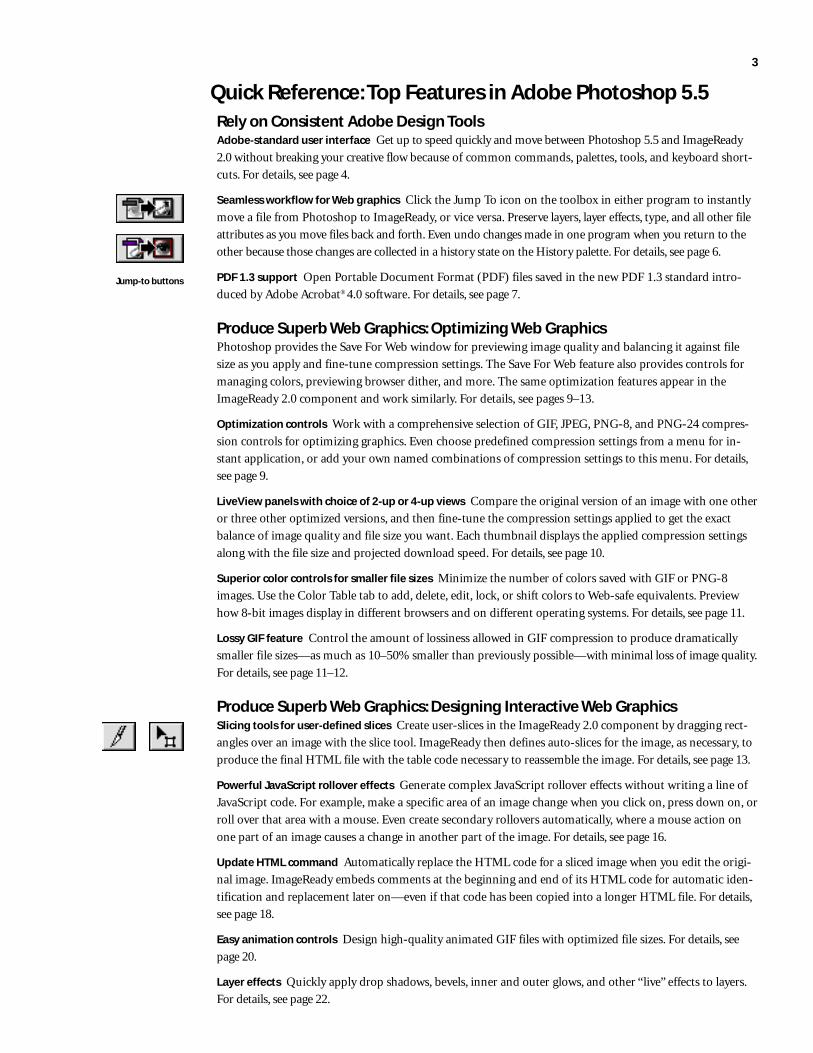
Seamless workflow for Web graphics Click the Jump To icon on the toolbox in either program to instantly
move a file from Photoshop to ImageReady, or vice versa. Preserve layers, layer effects, type, and all other file
attributes as you move files back and forth. Even undo changes made in one program when you return to the
other because those changes are collected in a history state on the History palette. For details, see page 6.
PDF 1.3 support Open Portable Document Format (PDF) files saved in the new PDF 1.3 standard intro-
duced by Adobe Acrobat® 4.0 software. For details, see page 7.
Produce Superb Web Graphics: Optimizing Web GraphicsPhotoshop provides the Save For Web window for previewing image quality and balancing it against file
size as you apply and fine-tune compression settings. The Save For Web feature also provides controls for
managing colors, previewing browser dither, and more. The same optimization features appear in the
ImageReady 2.0 component and work similarly. For details, see pages 9–13.
Optimization controls Work with a comprehensive selection of GIF, JPEG, PNG-8, and PNG-24 compres-
sion controls for optimizing graphics. Even choose predefined compression settings from a menu for in-
stant application, or add your own named combinations of compression settings to this menu. For details,
see page 9.
LiveView panels with choice of 2-up or 4-up views Compare the original version of an image with one other
or three other optimized versions, and then fine-tune the compression settings applied to get the exact
balance of image quality and file size you want. Each thumbnail displays the applied compression settings
along with the file size and projected download speed. For details, see page 10.
Superior color controls for smaller file sizes Minimize the number of colors saved with GIF or PNG-8
images. Use the Color Table tab to add, delete, edit, lock, or shift colors to Web-safe equivalents. Preview
how 8-bit images display in different browsers and on different operating systems. For details, see page 11.
Lossy GIF feature Control the amount of lossiness allowed in GIF compression to produce dramatically
smaller file sizes—as much as 10–50% smaller than previously possible—with minimal loss of image quality.
For details, see page 11–12.
Produce Superb Web Graphics: Designing Interactive Web GraphicsSlicing tools for user-defined slices Create user-slices in the ImageReady 2.0 component by dragging rect-
angles over an image with the slice tool. ImageReady then defines auto-slices for the image, as necessary, to
produce the final HTML file with the table code necessary to reassemble the image. For details, see page 13.
Powerful JavaScript rollover effects Generate complex JavaScript rollover effects without writing a line of
JavaScript code. For example, make a specific area of an image change when you click on, press down on, or
roll over that area with a mouse. Even create secondary rollovers automatically, where a mouse action on
one part of an image causes a change in another part of the image. For details, see page 16.
Update HTML command Automatically replace the HTML code for a sliced image when you edit the origi-
nal image. ImageReady embeds comments at the beginning and end of its HTML code for automatic iden-
tification and replacement later on—even if that code has been copied into a longer HTML file. For details,
see page 18.
Easy animation controls Design high-quality animated GIF files with optimized file sizes. For details, see
page 20.
Layer effects Quickly apply drop shadows, bevels, inner and outer glows, and other “live” effects to layers.
For details, see page 22.
Jump-to buttons

4
Work with common colorcorrection controls inboth programs.
Flexible type options Choose among multiple anti-aliasing controls to fine-tune the appearance of type in
Photoshop or ImageReady, or apply synthetic text styles, such as bold, italic, or underlining, for fonts that
don’t support these styles. Even type text directly on an image in ImageReady. For details, see page 25.
Expand Your Creative PowerThe magic eraser tool Erase sections of a layer—creating transparency—with a simple click of your mouse.
For details, see page 26.
The background eraser tool Drag your mouse across an image to dynamically erase pixels on a layer and
create transparency. This tool also “decontaminates” the edge pixels, removing the tint of background color
and making them partially transparent so you can cleanly composite them on another background. For
details, see page 27.
The Extract Image command Mask foreground images that have intricate, wispy, or hard-to-define edges
more accurately with the new Extract Image command. As with the background eraser, the Extract Image
command decontaminates the remaining edge pixels to prevent haloing when you composite the image. For
details, see page 29.
Art history brush Paint stylized strokes on an image, much as you would brush paint onto a canvas, with
the art history brush. Don’t worry about specifying colors or applying careful strokes—simply move the art
history brush around on the image, interactively creating realistic paint strokes. For details, see page 30.
Instant contact sheets Create print and Web-based contact sheets automatically to streamline how you
present and share images with colleagues and clients. For example, arrange a single image multiple times,
and even at multiple sizes, on a single sheet in a picture package. For details, see page 34.
Rely on Consistent Adobe Design ToolsAdobe Photoshop 5.5 provides tight integration and a smooth workflow with its advanced Web production
component, Adobe ImageReady 2.0. Wherever possible, these programs work similarly, so you can quickly
apply what you know about one program to the other. You can move files instantly from Photoshop to
ImageReady for different tasks, and even undo changes made in one program in the other. In addition,
Photoshop 5.5 supports the new Portable Document Format (PDF) 1.3 standard introduced by Adobe
Acrobat® 4.0. This section guides you through how to make the most of these features.
Adobe-Standard User Interface
Photoshop and ImageReady fit together impeccably, providing a consistent, streamlined environment that
helps you prepare Web graphics more efficiently. If you’re familiar with Photoshop, you can pick up
ImageReady quickly because they share similar commands, palettes, tools, and keyboard shortcuts. Here are
the highlights of this built-in integration:
• Adobe look and feel Photoshop and ImageReady both offer the toolbox, palettes, and menu structure
common to all of Adobe’s professional graphics programs.
• Image selection You can make selections in either program using different marquee selection tools, the
lasso and polygon lasso tools, and the magic wand tool. Both programs provide Selection menus with
commands for saving and loading selections, softening their edges, expanding or contracting them,
and more.
• Editing/retouching of images Editing tools include rulers and guides for precisely laying out elements;
transformation tools for rotating, skewing, flipping, and other actions; and more. Extensive retouching
tools include rubber stamp, airbrush, dodge, burn, sponge, sharpen, blur, and smudge tools—all of
which work identically in both programs.
Rely on tools, such as theairbrush, dodge, burn, andsmudge tools, which workidentically in Photoshopand ImageReady.
• Color correction Both programs offer the core color correction controls you need, such
as Auto Contrast, Brightness/Contrast, Hue/Saturation, Desaturate, Levels, Auto Levels,
Invert, Variations, and Unsharp Mask. Photoshop also provides advanced color-correc-
tion controls for high-end printing.
5
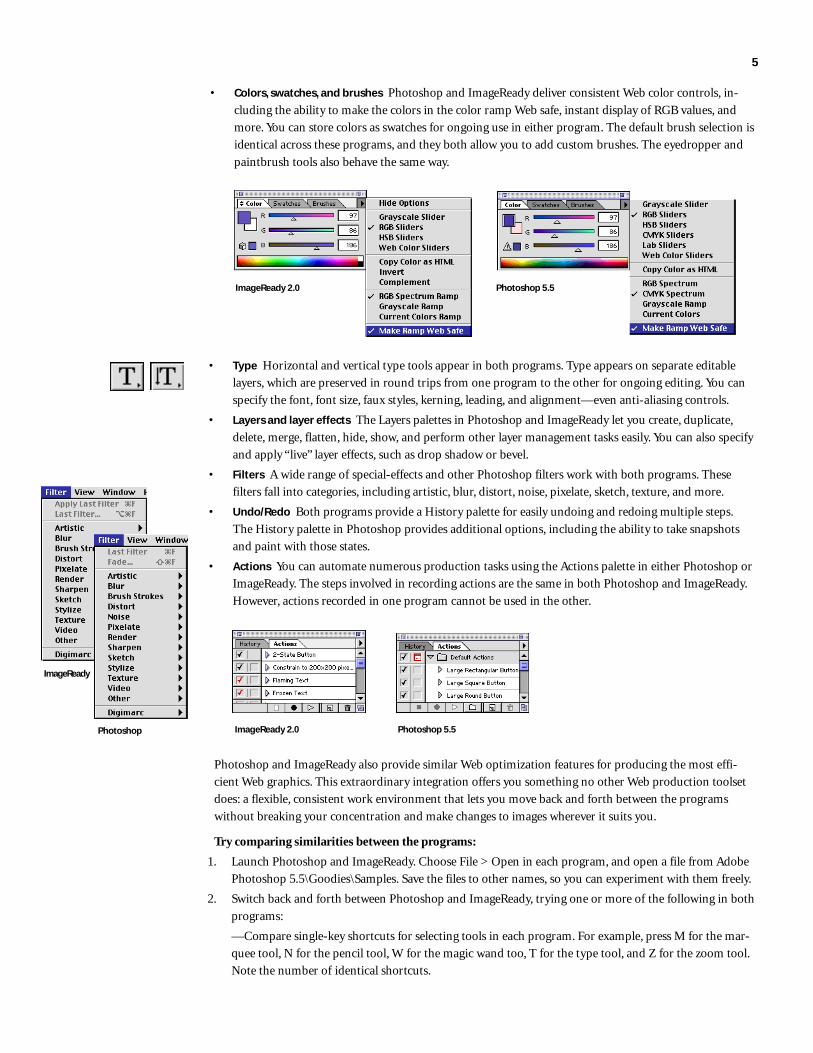
• Colors, swatches, and brushes Photoshop and ImageReady deliver consistent Web color controls, in-
cluding the ability to make the colors in the color ramp Web safe, instant display of RGB values, and
more. You can store colors as swatches for ongoing use in either program. The default brush selection is
identical across these programs, and they both allow you to add custom brushes. The eyedropper and
paintbrush tools also behave the same way.
• Type Horizontal and vertical type tools appear in both programs. Type appears on separate editable
layers, which are preserved in round trips from one program to the other for ongoing editing. You can
specify the font, font size, faux styles, kerning, leading, and alignment—even anti-aliasing controls.
• Layers and layer effects The Layers palettes in Photoshop and ImageReady let you create, duplicate,
delete, merge, flatten, hide, show, and perform other layer management tasks easily. You can also specify
and apply “live” layer effects, such as drop shadow or bevel.
• Filters A wide range of special-effects and other Photoshop filters work with both programs. These
filters fall into categories, including artistic, blur, distort, noise, pixelate, sketch, texture, and more.
• Undo/Redo Both programs provide a History palette for easily undoing and redoing multiple steps.
The History palette in Photoshop provides additional options, including the ability to take snapshots
and paint with those states.
• Actions You can automate numerous production tasks using the Actions palette in either Photoshop or
ImageReady. The steps involved in recording actions are the same in both Photoshop and ImageReady.
However, actions recorded in one program cannot be used in the other.
ImageReady 2.0 Photoshop 5.5
ImageReady 2.0 Photoshop 5.5Photoshop
ImageReady
Photoshop and ImageReady also provide similar Web optimization features for producing the most effi-
cient Web graphics. This extraordinary integration offers you something no other Web production toolset
does: a flexible, consistent work environment that lets you move back and forth between the programs
without breaking your concentration and make changes to images wherever it suits you.
Try comparing similarities between the programs:
1. Launch Photoshop and ImageReady. Choose File > Open in each program, and open a file from Adobe
Photoshop 5.5\Goodies\Samples. Save the files to other names, so you can experiment with them freely.
2. Switch back and forth between Photoshop and ImageReady, trying one or more of the following in both
programs:
—Compare single-key shortcuts for selecting tools in each program. For example, press M for the mar-
quee tool, N for the pencil tool, W for the magic wand too, T for the type tool, and Z for the zoom tool.
Note the number of identical shortcuts.

6
—In ImageReady, select the dodge, burn, smudge, or airbrush tool (all newly available in ImageReady
2.0). Click the Options tab to make the tool’s Options palette visible (or double-click the tool in the
toolbox to open the palette). Adjust the settings, and then practice using these tools to lighten, darken,
or otherwise edit the image. Try these tools in Photoshop.
—Choose Window > Layers or click the Layers tab in each program to make the Layers palette visible.
Then choose New Layer from each palette menu, name the layer, and click OK.
—Click the Foreground color box in the Photoshop or ImageReady toolbox to open the Color Picker.
Select a color, and click OK. Target the new layer you created, and press Option+Delete (Mac OS) or
Alt+Backspace (Windows) to fill the layer with the foreground color.
—Press Tab to hide or show all open palettes. Or press Shift+Tab to hide or show all open palettes ex-
cept the toolbox.
3. Close your open documents without saving them.
Seamless Workflow for Web GraphicsPhotoshop 5.5 is designed to make creating and optimizing Web graphics easy. You can move files back and
forth between Photoshop and ImageReady as often as you like without data loss. The programs preserve
layers, layer effects, type, rollovers, animations, and other file attributes through every handoff. Photoshop
even stores the changes you make in ImageReady as one or more history states—and vice versa,
ImageReady notes changes made in Photoshop—so you can quickly undo steps if you change your mind.
You jump from one program to the other by clicking the Jump To icon on the toolbox in either Photoshop
5.5 or ImageReady 2.0. If the other program is running, the focus switches to that program instantly and
the image you’re preparing appears, so you can work with it. If the program isn’t running, then Photoshop or
ImageReady launches the other program and transfers the image to it for editing.
When you jump from one program to the other, the image stays open and active in both programs. You
decide whether the changes you’re making in the second program automatically update the image in the
first program when you save, or whether you must manually update the image when you return to the first
program. (In Photoshop, choose File > Preferences > General, and check or uncheck Auto-Update Open
Documents. In ImageReady, open General Preferences and check or uncheck Auto-Update Files.) Each time
you update the original image, those changes appear as a single history state in the History palette list for
easy undoing.
Try jumping from program to program:
1. In Photoshop 5.5, choose File > Open. Then locate flwportrait.psd in the Rev_Guide folder and open it.
If prompted, click Don’t Convert in the Profile Mismatch dialog box.
2. Choose File > Save As, and save the file to a different name (so you can use the original file in later
sections).
3. Click the Jump To icon on the Photoshop toolbox to switch to ImageReady if it’s running or to launch
and switch to ImageReady if it’s not.
4. If necessary, click the Optimize palette tab, or choose Window > Show Optimize to make the palette
visible.
5. Click the double arrow on the Optimize palette tab to see more options. Then choose GIF 64 Dithered
from the Settings menu to apply these optimization settings.
Work with commonimage-editing tools thatbehave the same way inboth programs.
ImageReady Photoshop
Click the double arrows to cyclethrough the palette options.

7
6. Click the 2-up tab to see the original and optimized version side by side, and then click the 4-up tab to
see the original version with an optimized version and two alternatives.
For more details about the LiveView panels and other optimization options available in both programs,
see pages 9–13 later in this document.
2-up view with the original imageand an optimized version
7. Choose File > Save to save the change. Then click the Jump To icon on the ImageReady toolbox to
return to Photoshop.
8. Click the History palette tab or choose Window > Show History to make the palette visible.
9. Click the Open state above Update From File in the History palette list to undo the optimization settings
you’ve applied.
10. Close the file.
PDF 1.3 and Other SupportPhotoshop 5.5 extends its long-standing support for other professional Adobe design programs by updating
its PDF support—it now opens and rasterizes PDF files saved in the new PDF 1.3 standard introduced by
Acrobat 4.0. PDF 1.3 files offer better support for high-end print production, Adobe PostScript 3™ printing
capabilities, color management, font embedding, late-stage editing, and reviews and annotation.
Photoshop and ImageReady can also be configured to jump to Adobe Illustrator® software or other graphics
editing programs as easily as they jump to each other. In addition, ImageReady can jump to an HTML
editor, such as Adobe GoLive™ software. If you have these programs installed when you install Photoshop
5.5, the installer creates the connection automatically. If you install an Adobe graphics editing program
afterwards or you want to link to a non-Adobe program, you simply add an alias or shortcut to the appro-
priate Photoshop 5.5 subfolder. Graphics editing programs then appear on the File > Jump To menu in
both programs.
Try adding more jump-to programs to either program:
1. If Photoshop and/or ImageReady are running, close them.
2. Locate the application you want to add to your Jump To list, and create an alias or shortcut for it.
Undo the optimization settings youapplied in ImageReady, even afteryou’ve returned to Photoshop.

8
3. Store the alias or shortcut in the Adobe Photoshop 5.5\Helpers\Jump to Graphics Editor folder or the
Adobe Photoshop 5.5\Helpers\Jump to HTML Editor folder.
4. Launch Photoshop and ImageReady, and open a test file from the files in Adobe Photoshop
5.5\Goodies\Samples.
5. Choose File > Jump To > [Application Name].
6. After experimenting, close the Jump To application, and close the test file in Photoshop or ImageReady.
Produce Superb Web GraphicsPhotoshop 5.5 provides a comprehensive, integrated toolset for designing effective, high-quality Web graph-
ics. These tools include important optimization features for creating the smallest possible Web graphics, as
well as advanced tools in its ImageReady 2.0 component for producing interactive Web graphics, such as
JavaScript rollovers, animations, and image maps. This section walks you through the main Web graphics
optimization and design features in Photoshop 5.5.
Before you begin, look at the Frank Lloyd Wright home page you’ll be working on:
1. Locate flwhome.html in the Rev_Guide folder.
2. Drag the file on top of your Internet Explorer or Netscape Navigator Web browser icon to open it, or
launch your Web browser and open the file.
Note: If the images don’t appear in your Web browser, then the Images folder is not stored in the correct
location. Locate the Images folder in Rev_Guide on your reviewer’s CD. Then copy it into the same
folder as the flwhome.html file you’re viewing.
3. Run your cursor over the linked text at the bottom of the page to see the interactivity on the page.
Tip for Adobe GoLive UsersIn ImageReady, you can set apreference that adds a GoLivestyle coding to your HTML code,so GoLive can fully support theJavaScript rollovers you set up ina file. Simply choose File >Preferences > HTML inImageReady, and then chooseGoLive for Code under Coding. Store aliases or shortcuts in the Helper folders, so you
can jump to a graphics editor, HTML editor, or Webbrowser to work on or preview Web files as you work.
Move your mouseover the navigation
text to see theJavaScript rollovers.

9
This home page typifies the kind of pages people are developing for their Web sites today. It contains a
number of sliced images to support interactivity. Later in this section, we’ll look at how easy it is to use
ImageReady to slice graphics and add rollovers and animations. First, let’s look at how to use the optimiza-
tion features to prepare the portrait of Frank Lloyd Wright for Web display.
Basic Web Tasks: Creating the Smallest Possible Web GraphicsWhen you’re preparing Web graphics for online viewing, you typically focus as much attention on balanc-
ing image quality and file size as you do on designing your graphics. Your goal is to get the best-looking
graphics possible while maintaining optimal download and display times. You also need to check out other
factors that affect your final image quality, including how 8-bit graphics look in different browsers and how
screen brightness differences on Macintosh and Windows monitors alter your image’s look.
Photoshop 5.5 presents easy-to-use controls for all of these tasks in the Save For Web window. It even deliv-
ers higher levels of compression than previously possible with its unique Lossy GIF feature, which achieves
10–50% smaller GIF files with minimal loss of image quality. The Save For Web window provides:
• Optimization controls Photoshop 5.5 supports the GIF, JPEG, PNG-8, and PNG-24 optimization for-
mats for reducing file sizes. You choose the optimization format that’s appropriate for your image based
on its colors and tonal range. In general, use GIF and PNG-8 to compress images with flat color or
sharp edges and crisp detail; JPEG to compress photographic images; and PNG-24 for photographs
where you need to preserve variable levels of transparency.
• LiveView panels with choice of 2-up or 4-up views Comparing an original image to an optimized ver-
sion on-screen is the best way to make tradeoffs in image quality and file size. You can then fine-tune
the compression settings applied until you achieve just the balance you want. With Photoshop 5.5, you
can look at an original and optimized version side by side in 2-up view, or an original image along with
three optimized variations in 4-up view. Each view also displays pertinent details, such as the compres-
sion settings applied, the final file size, and the projected download speed.
• Powerful color controls One of the best ways to reduce GIF or PNG-8 file sizes while maintaining image
quality is to minimize the number of colors saved with an image. The Color Table tab in the Save For
Web window displays the colors associated with the 8-bit image you’re optimizing. Using the controls
available, you can add, delete, edit, or lock colors. Locking colors ensures that the color remains un-
touched as you eliminate other colors. You can easily shift colors to Web-safe equivalents. You can also
view RGB and Hexadecimal values for colors at a glance.
• Preview controls With the Save For Web window, you can preview browser dither by selecting the
Browser Dither option from a popup menu, or by setting your computer display to 8-bit and then pre-
viewing the optimized image in the Web browsers you specify. In addition, you can simulate the effect
that Windows and Mac OS displays have on your graphics and make corrections (Mac OS and Windows
systems use different gamma values to display graphics on-screen with the side effect that graphics look
darker on Windows systems).
All of the options available in the Save For Web window are also available and work the same way in the
ImageReady 2.0 component to ensure a completely flexible workflow.
Try optimizing a file:
1. In Photoshop 5.5, choose File > Open. Then locate flwportrait.psd, and open the file.
If prompted, click Don’t Convert in the Profile Mismatch dialog box.
2. Choose File > Save As and save the file to a different name, so you can use the original file as necessary.
3. Choose File > Save For Web.
4. Click each of the tabs to see the different views with the default optimization settings applied: Original,
Optimized, 2-Up, and 4-Up.
For example, in 4-Up view, look at the original image, the image with the selected optimization settings
applied, and two Photoshop-generated variations.
5. Return to the Original tab, and choose JPEG High from the Settings menu.
Photoshop 5.5 includes a selection of standard settings on this menu, so you can quickly apply them
to your images. You can choose among preset GIF combinations using 32, 64, or 128 colors with or
Choose presetoptimizationsettings fromthe Settingsmenu in theSave For Webwindow
Quick Overview: GIF/PNG-8 andJPEG Compression SettingsPhotoshop 5.5 provides comprehen-sive compression settings for GIF/PNG-8 files. You can control:• The type of palette generated• The amount of dither applied• The dithering algorithm used• Whether transparent pixels are
maintained or filled with a mattecolor
• The matte color used to filltransparent areas or to blend withpartially transparent edge pixels,preventing haloing for transparentgraphics
• Whether a file uses interlacing todownload in multiple passes for abetter viewing experience
• The amount of lossy compressionadded to GIF files with minimalimage degradation
• The number of colors generatedfor an image
• The range of colors that snapautomatically to their Web equiva-lents
For JPEG files, you can control:• The level of image quality you
want—Low, Medium, High, orMaximum
• The precise balance betweenimage quality and final file size(numerical image quality)
• Whether a file uses a progressivesetting so it can download inmultiple passes for a betterviewing experience
• Whether to embed an ICC profile(if available)
• Whether you want the mostoptimized file with the smallestfile size despite some loss ofcompatibility
• The amount of blur applied toimages to reduce JPEG compres-sion artifacts
• The matte color used to blendtransparent pixels (JPEG doesn’tsupport transparency)
For detailed descriptions of theseoptions, see the Adobe Photoshop 5.5New Feature Highlights document.
10
without dither; JPEG Low, Medium, or High settings; PNG-8 128 dithered; and PNG-24. You can also
specify your own optimization settings and save them in named sets on this menu.
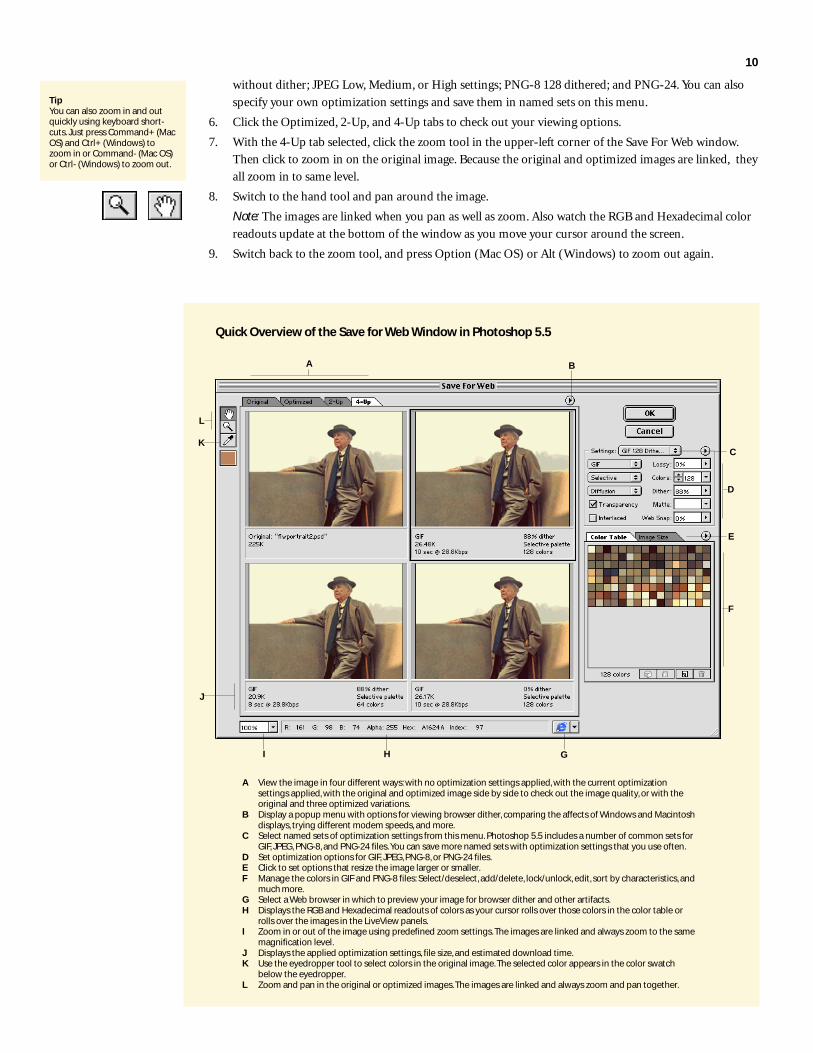
6. Click the Optimized, 2-Up, and 4-Up tabs to check out your viewing options.
7. With the 4-Up tab selected, click the zoom tool in the upper-left corner of the Save For Web window.
Then click to zoom in on the original image. Because the original and optimized images are linked, they
all zoom in to same level.
8. Switch to the hand tool and pan around the image.
Note: The images are linked when you pan as well as zoom. Also watch the RGB and Hexadecimal color
readouts update at the bottom of the window as you move your cursor around the screen.
9. Switch back to the zoom tool, and press Option (Mac OS) or Alt (Windows) to zoom out again.
TipYou can also zoom in and outquickly using keyboard short-cuts. Just press Command+ (MacOS) and Ctrl+ (Windows) tozoom in or Command- (Mac OS)or Ctrl- (Windows) to zoom out.
A View the image in four different ways: with no optimization settings applied, with the current optimizationsettings applied, with the original and optimized image side by side to check out the image quality, or with theoriginal and three optimized variations.
B Display a popup menu with options for viewing browser dither, comparing the affects of Windows and Macintoshdisplays, trying different modem speeds, and more.
C Select named sets of optimization settings from this menu. Photoshop 5.5 includes a number of common sets forGIF, JPEG, PNG-8, and PNG-24 files. You can save more named sets with optimization settings that you use often.
D Set optimization options for GIF, JPEG, PNG-8, or PNG-24 files.E Click to set options that resize the image larger or smaller.F Manage the colors in GIF and PNG-8 files: Select/deselect, add/delete, lock/unlock, edit, sort by characteristics, and
much more.G Select a Web browser in which to preview your image for browser dither and other artifacts.H Displays the RGB and Hexadecimal readouts of colors as your cursor rolls over those colors in the color table or
rolls over the images in the LiveView panels.I Zoom in or out of the image using predefined zoom settings. The images are linked and always zoom to the same
magnification level.J Displays the applied optimization settings, file size, and estimated download time.K Use the eyedropper tool to select colors in the original image. The selected color appears in the color swatch
below the eyedropper.L Zoom and pan in the original or optimized images. The images are linked and always zoom and pan together.
A B
C
D
E
F
GHI
J
K
L
Quick Overview of the Save for Web Window in Photoshop 5.5
11
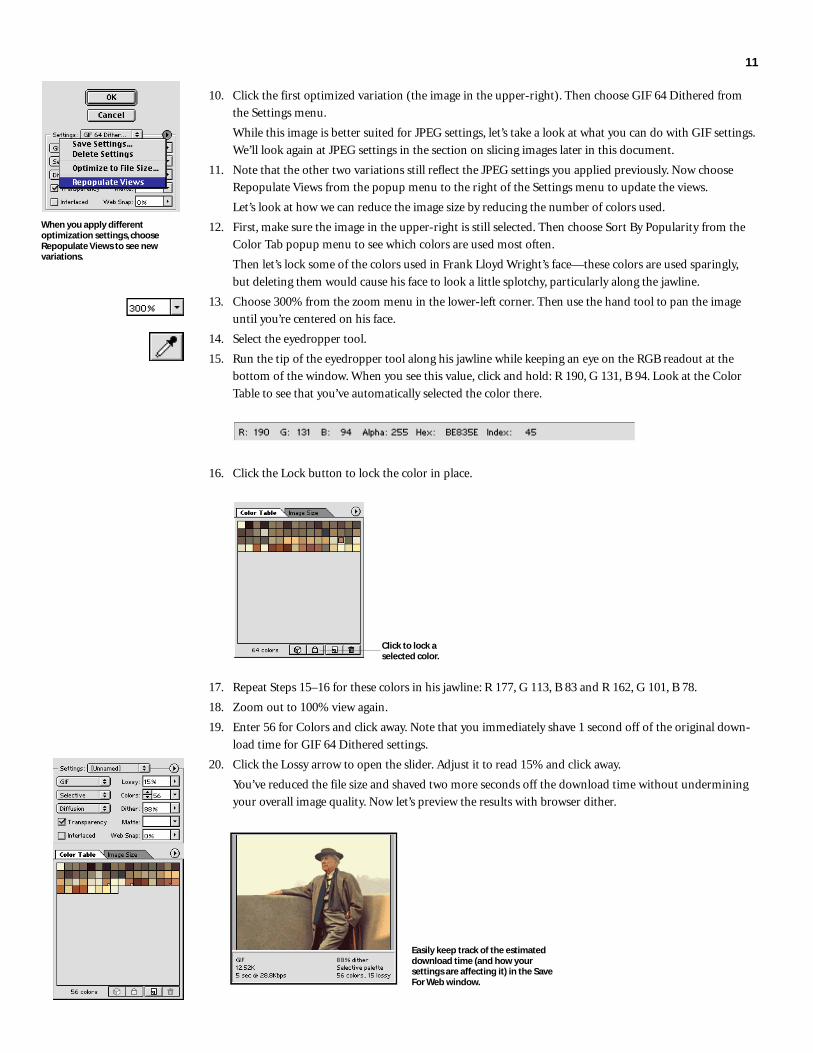
10. Click the first optimized variation (the image in the upper-right). Then choose GIF 64 Dithered from
the Settings menu.
While this image is better suited for JPEG settings, let’s take a look at what you can do with GIF settings.
We’ll look again at JPEG settings in the section on slicing images later in this document.
11. Note that the other two variations still reflect the JPEG settings you applied previously. Now choose
Repopulate Views from the popup menu to the right of the Settings menu to update the views.
Let’s look at how we can reduce the image size by reducing the number of colors used.
12. First, make sure the image in the upper-right is still selected. Then choose Sort By Popularity from the
Color Tab popup menu to see which colors are used most often.
Then let’s lock some of the colors used in Frank Lloyd Wright’s face—these colors are used sparingly,
but deleting them would cause his face to look a little splotchy, particularly along the jawline.
13. Choose 300% from the zoom menu in the lower-left corner. Then use the hand tool to pan the image
until you’re centered on his face.
14. Select the eyedropper tool.
15. Run the tip of the eyedropper tool along his jawline while keeping an eye on the RGB readout at the
bottom of the window. When you see this value, click and hold: R 190, G 131, B 94. Look at the Color
Table to see that you’ve automatically selected the color there.
16. Click the Lock button to lock the color in place.
Click to lock aselected color.
17. Repeat Steps 15–16 for these colors in his jawline: R 177, G 113, B 83 and R 162, G 101, B 78.
18. Zoom out to 100% view again.
19. Enter 56 for Colors and click away. Note that you immediately shave 1 second off of the original down-
load time for GIF 64 Dithered settings.
20. Click the Lossy arrow to open the slider. Adjust it to read 15% and click away.
You’ve reduced the file size and shaved two more seconds off the download time without undermining
your overall image quality. Now let’s preview the results with browser dither.
Easily keep track of the estimateddownload time (and how yoursettings are affecting it) in the SaveFor Web window.
When you apply differentoptimization settings, chooseRepopulate Views to see newvariations.

12
21. With the optimized image still selected in the 4-Up window, choose Browser Dither from the popup
menu just above the upper-right image (the one you’ve been working on).
22. Click OK to save the final GIF file. Then close the original GIF file.
Saving and Deleting Optimization SettingsYou can easily add your own custom combinations of optimization settings to or delete them from the
Settings menu in the Save For Web window.
Try saving a set of optimization settings:
1. In Photoshop 5.5, open a new file. For example, open flwportrait.psd in the Rev_Guide folder. Then save
it to a new name.
2. Choose File > Save For Web.
3. Set options in the optimization area.
When the current optimization settings don’t match any named set, Unnamed appears in the Settings
menu.
4. Choose Save Settings from the popup menu to the right of the Settings menu.
5. Name the settings, and click OK.
Try deleting a named set of optimization settings:
1. In the Save For Web window, choose the named set you want to delete from the Settings menu.
2. Choose Delete Settings from the popup menu to the right of the Settings menu.
Optimizing a Graphic to a Particular SizeSometimes file size is the most important consideration when you’re optimizing a graphic. You need the
graphic to fit within a certain size limit to meet the requirements for a Web page. What’s more, making the
tradeoffs to get there may take more time than you have. That’s why the Save For Web window includes an
option for specifying the file size and letting Photoshop instantly calculate and present the optimal combi-
nation of settings to achieve it.
Try optimizing a graphic to meet a file size limit:
1. In Photoshop 5.5, open a new file. For example, open the flwportrait.psd in the Rev_Guide folder. Then
save it to a new name.
2. Choose File > Save For Web.
3. Click the 4-Up View to see several options that Photoshop generates automatically.
4. If you want Photoshop to base its calculations on certain settings, choose them in the optimization area
or from the Settings menu.
5. Choose Optimize For File Size from the popup menu to the right of the Settings menu.
Specify the desired file size forPhotoshop to achieve.
About Lossy GIFPhotoshop 5.5 is introducing aunique new compressionalgorithm, called Lossy GIF. Thisalgorithm delivers significantlyhigher levels of compressionthan previously possible, allow-ing you to achieve 10–50%smaller GIF files with minimalloss of image quality. You controlthe Lossy GIF setting by enteringvalues or adjusting the slidercontrol for the Lossy option inthe Save For Web window(Photoshop) or the Optimizepalette (ImageReady).
The Browser Dither option simulatesthe extra dithering that would beapplied if this image were displayed ina browser on a monitor set to 256-color(8-bit) display.
Save settings for ongoingapplication by choosingSave Settings from thepopup menu in the SaveFor Web window.
13
6. Specify whether Photoshop should start from current settings, or it should determine for you whether
JPEG or GIF settings are more appropriate for the graphic.
7. Then enter the target file size and click OK.
The resulting file will achieve the targeted size or a slightly smaller size.
8. View the results and fine-tune the settings as appropriate. Then save the optimized file.
Editing ColorsPhotoshop makes it simple for you to edit colors, changing any selected color in the Color Table to another
RGB color.
Try editing a color:
1. In Photoshop 5.5, open a new file. For example, open flwportrait.psd in the Rev_Guide folder. Then
save it to a new name.
2. Choose File > Save For Web.
3. Click the 2-Up View. Then choose GIF 64 Dithered from the Settings menu.
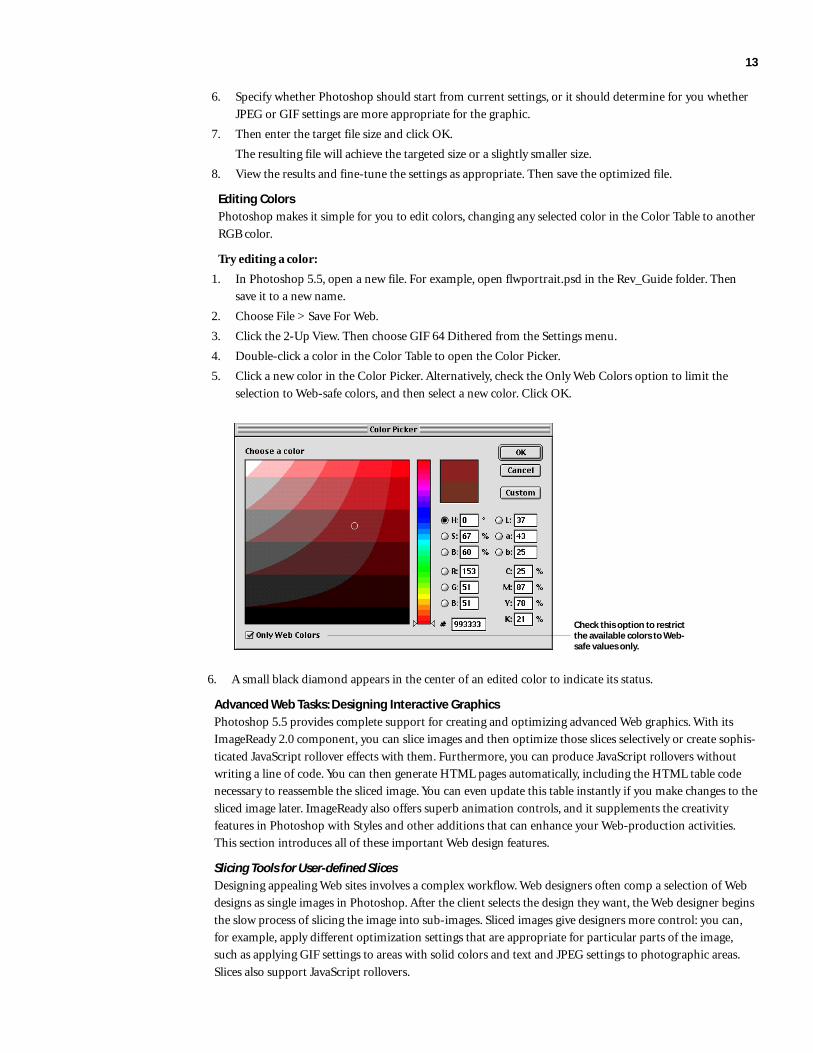
4. Double-click a color in the Color Table to open the Color Picker.
5. Click a new color in the Color Picker. Alternatively, check the Only Web Colors option to limit the
selection to Web-safe colors, and then select a new color. Click OK.
6. A small black diamond appears in the center of an edited color to indicate its status.
Advanced Web Tasks: Designing Interactive GraphicsPhotoshop 5.5 provides complete support for creating and optimizing advanced Web graphics. With its
ImageReady 2.0 component, you can slice images and then optimize those slices selectively or create sophis-
ticated JavaScript rollover effects with them. Furthermore, you can produce JavaScript rollovers without
writing a line of code. You can then generate HTML pages automatically, including the HTML table code
necessary to reassemble the sliced image. You can even update this table instantly if you make changes to the
sliced image later. ImageReady also offers superb animation controls, and it supplements the creativity
features in Photoshop with Styles and other additions that can enhance your Web-production activities.
This section introduces all of these important Web design features.
Slicing Tools for User-defined SlicesDesigning appealing Web sites involves a complex workflow. Web designers often comp a selection of Web
designs as single images in Photoshop. After the client selects the design they want, the Web designer begins
the slow process of slicing the image into sub-images. Sliced images give designers more control: you can,
for example, apply different optimization settings that are appropriate for particular parts of the image,
such as applying GIF settings to areas with solid colors and text and JPEG settings to photographic areas.
Slices also support JavaScript rollovers.
Check this option to restrictthe available colors to Web-safe values only.

14
Once the image is sliced, the designer then builds an HTML table that references the slices and reassembles
them into the original image. At that point, the designer—or the production person working with the de-
signer—can add JavaScript code that creates the rollover. If the client then comes back with last-minute
changes, the whole time-consuming process starts over again. The ImageReady 2.0 component streamlines
this process, giving you the control you need to:
• Create and display user slices ImageReady includes a slice tool for creating user-slices. You simply drag
rectangles over the image areas you want to slice, and ImageReady defines auto-slices automatically to fill
in the final HTML table. You can then hide and show slices anytime. You can also arrange guides yourself
or space them evenly with the Create Guides command, and then use the Create Slices From Guides
command to generate the image slices.
• Manage image slices ImageReady makes it easy to select individual user-slices and apply different opti-
mization settings to them, as well as assign URLs, Alt tags, or JavaScript messages. You can specify
whether a slice is an image slice or a non-image slice. Non-image slices contain solid colors or HTML
text. After creating slices, you can divide, combine, duplicate, resize, align, or delete slices—or even rear-
range the stacking order of overlapping slices. You can also link slices. Then the settings you apply to one
slice automatically apply to the others. Linked slices share a dither pattern to prevent seamlines from
appearing along their edges.
• Produce and update HTML tables After preparing a sliced image, you save an optimized file, automatically
generating a set of named image-slice files and an HTML file with the table code necessary to reassemble
the image. This process produces high-quality HTML code that you can copy directly into an HTML
editor. You control the formatting of this code, including indenting and whether tags are upper- or low-
ercase, so you can match the HTML coding standards for your Web site or for your clients. You also
control how ImageReady handles the image files—you can structure how ImageReady auto-names the
files used, where it stores them, and more.
Slicing an image does not interfere with moving files back and forth to Photoshop. ImageReady simply
embeds this Web-specific information in your PSD file.
Try slicing and optimizing an image:
1. In ImageReady, choose File > Open. Then locate and open flwhome.psd.
2. Choose File > Save As to save the file to a different name.
3. Choose Slices > Show Slices to display the slices that have already been made in the file. Or click the
Show Slices button at the bottom of the toolbox.
4. Click the Slice palette tab or choose Window > Show Slice to make the palette visible.
5. Click the double arrow on the Slice palette tab to show more of the options available.
6. Select the slice-select tool, and click on slice 1 in the upper-left corner of the image. View the URL and
Alt message assigned to it in the Slice palette. Repeat this step by selecting slices 2 and 3, or by selecting
any of the slices at the bottom of the image.
Click thesebuttons totogglebetweenshowing andhiding slicesin an image.By default,every imagehas one slice.
7. Select the slice tool, and cut slice 5 into two halves: position the slice tool in the upper-left corner of the
current slice 5. Then drag down and to the right around the text.
ImageReady automatically adds new slice lines and makes the area containing the portrait of Frank
Lloyd Wright slice number 6.
Use the Slice palette to assign and viewURLs, Alt tags, messages, and more.
Try it!As you create advanced Webgraphics, remember that you canstill move your PSD files back andforth between ImageReady andPhotoshop without a hitch.ImageReady simply embeds therollover, animation, and otherinformation in the PSD file. Justclick the Jump To buttons on thetoolboxes anytime to try it as youwork in this section.

15
8. Repeat Step 8 but drag around the portrait of Frank Lloyd Wright. Be sure to drag to the edge of the
image to avoid slivers.TipYou can set slices that are filledwith solid colors or solid colorsand text to a No Image state inthe Slice palette. ImageReadythen creates an empty HTMLtable cell, which can containHTML text. The advantage ofthis setting is smaller file sizes:it’s yet another way to reducethe overall size of a graphicallyrich image. The potentialdownside depends on yourphilosophy about look and feel:with No Image areas with HTMLtext, your audience then hasbrowser-level control over theappearance of the text.
9. Select the slice-select tool, and click the new slice 5. In the Slice palette, enter an Alt tag, such as FLW
Main Text, for this slice. Then assign an Alt tag, such as FLW Portrait, to slice 6.
10. Click 2-Up or 4-Up view. Click an optimized view to select it. Then use the hand tool to move the image
until you’re centered on the Frank Lloyd Wright portrait.
11. Click the Optimize palette tab or choose Window > Show Optimize to make the palette visible.
A Specify the precise location or size of a selected slice. Checking ConstrainProportions preserves the current proportions as you resize the slice.
B Indicates the slice number and file format for the selected slice.C Displays a thumbnail of the slice.D Determine whether the slice is an image or a non-image slice. Non-image slices
contain HTML text or solid colors and download more quickly.E Indicates whether the slice has a rollover.F Indicates whether the slice is linked to other slices.G Specify the background color for slices containing transparency. You can select
the current matte color, a Web-safe color, no color, the current foreground orbackground color, or other for choosing a color with the color picker.
H Enter a new name or accept the default name for the slice. Note: You can alter thedefault pattern that ImageReady uses to name slices by choosing File > Prefer-ences > Slices and selecting different elements.
I Assign a URL to link the slice to another file.J Specify the target frame in which the slice appears. Only necessary in pages
where you’re using frames to divide the browser window, so that more than oneWeb page can appear at once.
K Enter a message to appear in the browser’s status area. By default, the assignedURL appears.
L Enter an Alt tag for the selected slice.
A
B
C
D E F G
H
I
J
K
L
Overview of the Slice PaletteImageReady provides a Slice palette that streamlines working with slices. It displays the optimized size and download time of each
selected slice, so you can evaluate sliced images with the same ease as other images. Here’s a quick look at the Slice palette.
Drag around the paintingof Frank Lloyd Wright tocreate another user slice.
Assign an Alt tag tothe slice.

16
12. If necessary, select slice 6 (the portrait) with the slice-select tool. Then choose JPEG Medium from the
Settings menu in the Optimize palette to apply these optimization settings.
13. Select slice 5, and apply GIF 32 Dithered from the Settings menu.
14. Before starting the next section, click the Optimize tab. Or, if you’re not planning to do the steps in the
next section, close the file.
Powerful JavaScript Rollover EffectsJavaScript rollover effects are the technique of choice for adding interactivity to Web sites. Rollovers make
an image change in one area when you click that area, roll a mouse over it, or press down the mouse button
on it. For example, a button could flash or change colors when a mouse rolled over it to invite interaction.
In addition, you can create secondary rollovers with ImageReady: when you click, roll over, or mouse down
on one part of an image, a change occurs in another part of an image. You can even trigger an animation in
a secondary rollover.
ImageReady gives nonprogrammers control over these effects by making it possible to generate complex
rollovers without mastering JavaScript or writing a line of code. Instead, you slice an image, and then define
rollovers for different slices with the Rollover, Layers, and Animation palettes. A rollover could simply
involve changing a layer’s visibility or applying a layer effect.
The controls in ImageReady are flexible, so you can explore different ideas quickly to achieve exactly the
results you want. For example, creating secondary rollovers is easy: you simply make changes anywhere in
an image as you set up the rollover, and ImageReady detects the change and automatically generates the
secondary rollover for you. When you save an optimized file that contains rollover effects, ImageReady
writes JavaScript code in the HTML table cells for each affected image slice. It also saves each rollover image
in a separate named file.
If you’re proficient with JavaScript, you can define custom mouse actions to supplement the ones provided
by ImageReady (Over, Down, Click, Out, and Up). This advanced technique involves adding your own
JavaScript code to the HTML files.
You can also take advantage of the easy roundtripping between ImageReady and Photoshop, using the
powerful creativity features in Photoshop to create a distinctive range of rollover effects. As with other
attributes, rollovers are perfectly preserved in round trips between these programs.
Try creating a rollover:
1. If you just completed the slicing exercise, skip this step. Otherwise, do the following:
—Launch ImageReady.
—Choose File > Open, and then locate and open flwhome.psd.
—Choose File > Save As to save the file to a different name.
—Click the Show Slices button at the bottom of the toolbox.
—Select the slice tool, and slice the current slice 5 into two. First drag a rectangle around the main text.
Then drag a rectangle around the portrait of Frank Lloyd Wright. Be careful to drag to the edge of the
slices to avoid slivers.
2. Click the Rollover palette tab, or choose Window > Show Rollover to make the palette visible. Also click
the Layers palette tab, or choose Window > Show Layers to make this palette visible.
This image already contains a few rollovers. Let’s look at those rollovers and then add three more.
3. With the slice-select tool, click slice 12, Frank Lloyd Wright: His Life & Work. Two states appear in the
Rollover palette—the Normal state and the Over state.
More slicing tips• You can easily promote an
auto-slice (a slice thatImageReady generates auto-matically) to a user-slice: justselect the slice with the slice-select tool, and choose Slices >Promote to User-slice.
• You can link slices and applyoptimization settings to themall at once. Press the Shift keyand click the slices you want tolink with the slice-select tool.Then choose Slices > LinkSlices.
Select the mouseaction for the rolloverfrom this menu.
17
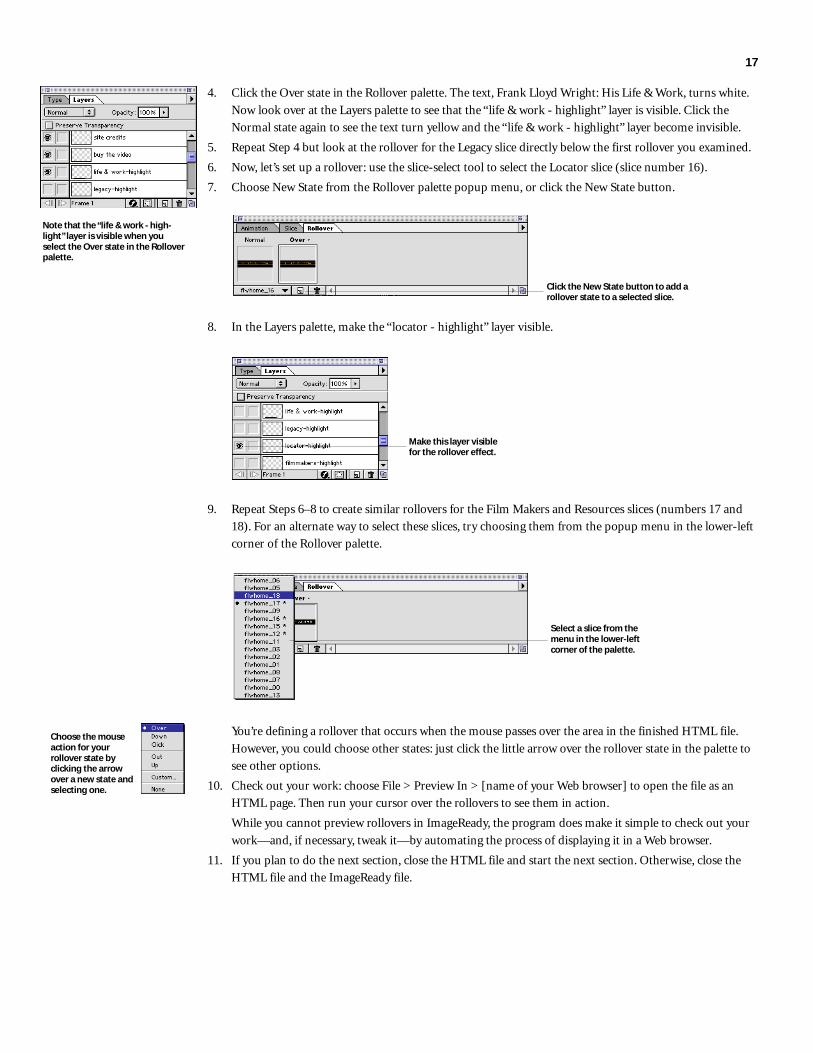
4. Click the Over state in the Rollover palette. The text, Frank Lloyd Wright: His Life & Work, turns white.
Now look over at the Layers palette to see that the “life & work - highlight” layer is visible. Click the
Normal state again to see the text turn yellow and the “life & work - highlight” layer become invisible.
5. Repeat Step 4 but look at the rollover for the Legacy slice directly below the first rollover you examined.
6. Now, let’s set up a rollover: use the slice-select tool to select the Locator slice (slice number 16).
7. Choose New State from the Rollover palette popup menu, or click the New State button.
Note that the “life & work - high-light” layer is visible when youselect the Over state in the Rolloverpalette.
8. In the Layers palette, make the “locator - highlight” layer visible.
Click the New State button to add arollover state to a selected slice.
Make this layer visiblefor the rollover effect.
9. Repeat Steps 6–8 to create similar rollovers for the Film Makers and Resources slices (numbers 17 and
18). For an alternate way to select these slices, try choosing them from the popup menu in the lower-left
corner of the Rollover palette.
Select a slice from themenu in the lower-leftcorner of the palette.
You’re defining a rollover that occurs when the mouse passes over the area in the finished HTML file.
However, you could choose other states: just click the little arrow over the rollover state in the palette to
see other options.
10. Check out your work: choose File > Preview In > [name of your Web browser] to open the file as an
HTML page. Then run your cursor over the rollovers to see them in action.
While you cannot preview rollovers in ImageReady, the program does make it simple to check out your
work—and, if necessary, tweak it—by automating the process of displaying it in a Web browser.
11. If you plan to do the next section, close the HTML file and start the next section. Otherwise, close the
HTML file and the ImageReady file.
Choose the mouseaction for yourrollover state byclicking the arrowover a new state andselecting one.
18
Update HTML CommandAfter completing production on an image, the final step is to generate an HTML file. ImageReady stream-
lines this step, and also makes it simple for you to update an HTML file if you edit the original image later.
This easy updating shaves significant time from the arduous process Web designers currently go through of
preparing an image, generating the HTML, and then starting over because the client has last-minute
changes.
ImageReady simplifies the HTML updating process by embedding comments at the beginning and end of a
file for easy detection later on. Even if you need to copy the HTML table into a bigger HTML file,
ImageReady can read the file, recognize its original code, and replace the appropriate portion. ImageReady
can also identify and replace the correct code in HTML files containing several tables from different image
files. You just choose the Update HTML command when you make your edits and let ImageReady handle
the rest!
Try updating an HTML file:
1. Using the file you worked on in the last two exercises, choose File > Save Optimized As.
If necessary, go back and quickly complete the previous two sections. It takes only a few minutes.
2. Specify the Save Optimized options you want and click OK. ImageReady then generates an HTML page
and an Images folder containing the image slices for the page.
Check out the HTML Options button to view the HTML formatting controls provided. Then click OK
to return to the Save Optimized dialog box.
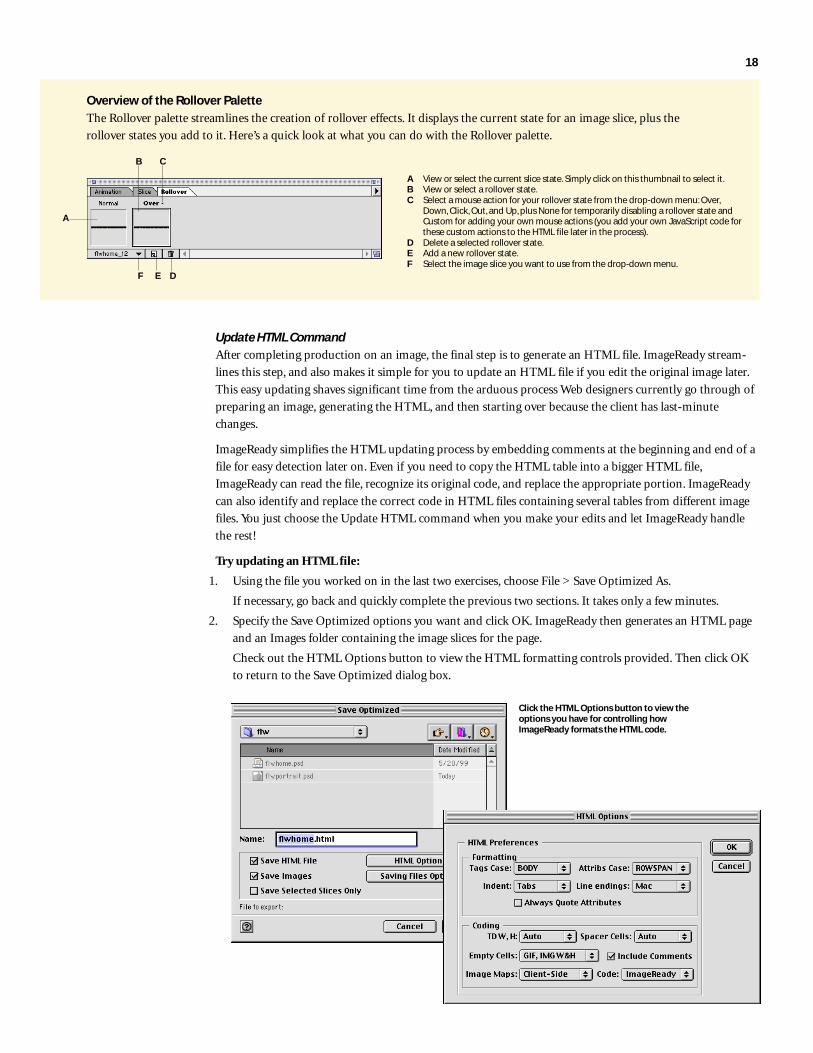
Overview of the Rollover Palette
The Rollover palette streamlines the creation of rollover effects. It displays the current state for an image slice, plus the
rollover states you add to it. Here’s a quick look at what you can do with the Rollover palette.
A View or select the current slice state. Simply click on this thumbnail to select it.B View or select a rollover state.C Select a mouse action for your rollover state from the drop-down menu: Over,
Down, Click, Out, and Up, plus None for temporarily disabling a rollover state andCustom for adding your own mouse actions (you add your own JavaScript code forthese custom actions to the HTML file later in the process).
D Delete a selected rollover state.E Add a new rollover state.F Select the image slice you want to use from the drop-down menu.
A
B C
DEF
Click the HTML Options button to view theoptions you have for controlling howImageReady formats the HTML code.

19
3. Open the page in your Web browser. Check out your rollovers. Then close the Web page.
4. Return to the original file and make any kind of change. For example, you could make a simple change
of painting the line above “A Film by Ken Burns & Lynn Novick” black to match the text:
—Click the Original tab or click to select the Original image on the 2-Up or 4-Up tabs (you can only
edit the original version, not an optimized version).
—Make the Background layer invisible by clicking the eye icon to the left of the layer name.
—Select the Logo layer in the Layers palette.
—Zoom in on the logo using the zoom tool.
—Select the eyedropper tool and sample the black in the logo text.
—Switch to the paintbucket tool and click on the line to color it black.
—Choose 100% from the zoom menu in the lower-left corner, and then make the Background layer
visible again.
5. Optional: Alternatively, you could change the rollovers, so that they appear when you click the text, not
when your cursor passes over the text:
—Click the Rollover palette tab or choose Window > Show Rollover.
—In succession, choose slices 11, 14, 15, 16, and 17 from the drop-down menu to select and change each
rollover.
Change the rollover state fromOver to Click by choosing Clickfrom this menu.
—Click the rollover state for each slice in the palette, and then choose a different mouse action from the
drop-down menu. For example, choose Click for each of them.
6. Choose File > Update HTML. Select the HTML file you created in Step 2, and click Open. When
prompted to replace the image slices, click Yes All.
7. Switch to the Web browser. Then open the page again to see your changes. Or, if you didn’t close the
page earlier, click Reload to update the page with your changes.

20
Enhanced Animation ControlsAnimated GIF files create the illusion of movement by presenting a sequence of frames in rapid succession
that each vary slightly from the previous frame. Animated GIF files are widely used on the Web to create an
appealing sense of interactivity. Just as with still images, the trick to using animated GIFs effectively is to
get the best animation quality you can with the smallest possible file sizes. ImageReady provides the right
set of tools to accomplish this goal.
With ImageReady, you can open one or more multi-layered files from Photoshop, Adobe Illustrator, or
other sources; create new frames and make changes to the layers in each frame with the Animation palette;
and then output animated GIF files for incorporation into a site.
Each layer is a separate object (or “cel” in traditional animation terms) in the animation. As with rollover
states, changes you make to layers—hiding or showing them, moving them, applying opacity or special
effects, and more—occur in each frame, while changes you make to actual pixels occur across all subse-
quent frames. Alternatively, you can move elements in an image onto separate layers and manipulate those
layers to create simple animations that are saved directly in the HTML file.
The Animation palette provides tween (short for “in-betweening”) controls, so you can automatically add a
series of frames between two existing frames while varying layer attributes such as position, opacity, or
layer effects. You can tween selected layers within existing frames to fine-tune their look. You can also select
multiple frames and move them around easily, or tween a selected layer between them.
You use the Animation palette to preview an animation as you work on it, as well as to set playback options
for the final animation. This palette gives you direct access to delay values for each frame, so you can pre-
cisely control when frames appears. ImageReady can import frames from Apple QuickTime movies (or
movies saved in formats that QuickTime supports), as well as export animations to QuickTime. It also
provides advanced compression options for animated GIFs, ensuring the smallest possible file sizes.
Try creating a simple animation for the Frank Lloyd Wright page:
1. If you just completed the previous exercise, skip this step. Otherwise, do the following:
—Launch ImageReady.
—Choose File > Open, and then locate and open flwhome.psd.
—Choose File > Save As to save the file to a different name.
2. Click the Animation palette tab, or choose Window > Show Animation to make the palette visible. Also
click the Layers palette tab, or choose Window > Show Layers to make this palette visible.
3. Use the zoom tool to zoom into 500% view of the four little red dots next to Frank Lloyd Wright: Life
and Work.
4. Click the Background layer in the Layers palette to target it.
Now you’re going to move the 4 red dots to separate layers so you can animate them easily.
5. Marquee-select the upper-left dot.
Then press Command+J (Mac OS) or
Ctrl+J (Windows) to paste the dot into
the same location on a new layer.
6. Double-click Layer 1 which appears
just above the Background layer in
your Layers palette list. Rename this
layer Upper-Left Dot, and click OK.
Marquee-select theupper-left dot.

21
7. Repeat Steps 5–6 for each of the other three dots. Use these names for the appropriate layers: Upper-
Right Dot, Lower-Left Dot, and Lower-Right Dot. Remember to click the Background layer again after
pasting each dot to target that layer.
8. Make the four new layers invisible temporarily.
9. Now you need to delete the original dots:
—Select the eyedropper tool and sample the background behind the red dots.
—Target the Background layer in the Layers palette.
—Marquee-select each dot, and use the paintbucket tool to fill it with the color you just sampled.
10. Make the four new layers visible again.
11. Click the Animation palette tab or choose Window > Show Animation to make the palette visible.
12. Click the New Frame button or choose the New Frame command from the palette menu eight times to
add eight new frames to the animation sequence.
Add eight frames to the animation.Then specify your animationsettings for each frame.
13. Click Frame 2. Then make the Upper-Left Dot layer invisible for this frame. Click the frame delay arrow
just under Frame 2 and set the delay to 0.5 seconds.
Make the Upper-Left Dot layer invisiblein frame 2. Then set the frame delay forthe frame.
14. Click Frame 3. Set the frame delay for this frame to 0.2 seconds.
15. Repeat Steps 13-14 for Frames 4 and 5, but make the Lower-Right Dot layer invisible and then visible.
16. Repeat again for Frames 6 and 7 with the Upper-Right Dot layer. Then make the Lower-Left dot layer
invisible for 0.5 seconds in Frame 8.
17. Click Frame 9 and set the timing to 1 second.
18. Choose Other from the Loops menu in the lower-left corner of the palette. Enter 3 for Play, and click OK.
19. Return to Frame 1, and click the Play button in the palette to see your animation in action.
20. If you want, change the sequence of layers and the frame delays applied to create more complex patterns.
When you have something you like, choose File > Preview In > [your browser name] to see the anima-
tion play back in context.
Specify the number of timesthe animation should loop.

22
Overview of the Animation Palette
The Animation palette provides the controls you need to create high-quality animations. Here’s a quick look at what you
can do with the Animation palette.
Layer Effect StylesPhotoshop and ImageReady both offer “live” layer effects, so you can instantly add drop shadows, bevels,
inner and outer glows, and other effects to layers. In addition, Photoshop and ImageReady now support a
new solid-color layer effect, and ImageReady provides gradient and pattern layer effects as well. Layer effects
have proven popular with Web and other designers because they’re easy and fast to use, they produce at-
tractive results, and they update instantly if you edit the contents of the layer.
To apply layer effects in ImageReady, you select a layer in the Layers palette and then select an effect from
the Layer Effects menu at the bottom of the palette. A nested effects layer then appears under the targeted
layer. You can vary its settings by selecting it in the Layers palette and adjusting options in the Layer Op-
tions palette.
If you like a particular custom effect you’ve created, you can save it for ongoing use as a style in the Styles
palette (ImageReady also ships with some predefined styles for quickly styling buttons and other Web
graphics). You could, for example, apply a drop shadow effect, tailor its options, and then save it as a style
by dragging it from the Layers palette into the Styles palette. To apply the style, you simply drag it from the
Styles palette onto an image layer or onto a layer in the Layers palette list, or you double-click it in the Styles
palette to apply it to the currently selected layer.
Try several cool features at once—layer effects, basic shape tools, secondary rollovers, and an animation
too!:
1. Launch Photoshop. Then save three files as JPEG files for use in a secondary rollover in ImageReady:
—Locate flowers.psd among your reviewer guide files. Open it, and save a copy to a different name.
Select the Background layer, click the Delete Current Layer button at the bottom of the palette, and click
Yes to confirm deleting the layer. Then choose File > Save For Web. Click the Image Size tab, enter 160
by 157 with Constrain Proportions checked, and then click Apply. Choose GIF 64 Dithered for Settings.
Then click OK to save the file as a Web-ready GIF file.
A View the frame number and a thumbnail of the frame.B Select a frame delay value from the popup menu.C Specify the number of times the animation plays, or that it
play continuously.D Return to the first frame in the animation.E Step back one frame.F Stop the animation preview.G Play a preview of the animation.H Move forward one frame.I Add a frame to the sequence right after the currently
selected frame.J Delete selected frames.K Display a menu with a range of animation options, including
a command for optimizing an animated GIF file.
A
B
C D F G H I J
K
E
—Repeat this process with Sunflower.psd. Be sure to delete the Background layer
before saving for the Web. Then resize it to 150 by 100 pixels, apply GIF 64 Dithered
for optimization settings, and click OK.
—For the third image, select Port.psd. Save it to a new name. Delete the Background
and Layer 1 layers. Then save it for the Web with GIF 64 Dithered compression set-
tings applied. (It’s not necessary to resize the image.)
These three images offer excellent examples of what you can do with the new art
history brush. We’ll work more with the original versions of these files later in this
document.
2. Close Photoshop, and open ImageReady.
3. Choose File > New, name the page Rollover Practice, and set the Width to 640 and
the Height to 480. Then click OK.
Specify settings for a new document.
23
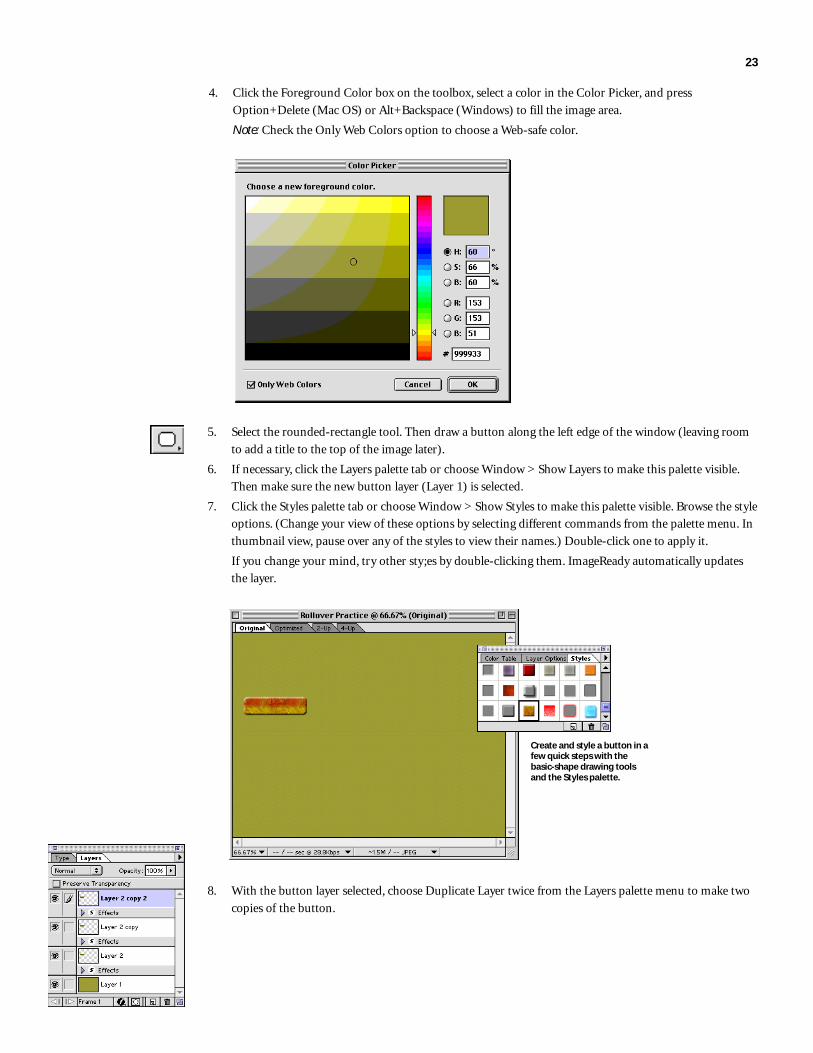
4. Click the Foreground Color box on the toolbox, select a color in the Color Picker, and press
Option+Delete (Mac OS) or Alt+Backspace (Windows) to fill the image area.
Note: Check the Only Web Colors option to choose a Web-safe color.
5. Select the rounded-rectangle tool. Then draw a button along the left edge of the window (leaving room
to add a title to the top of the image later).
6. If necessary, click the Layers palette tab or choose Window > Show Layers to make this palette visible.
Then make sure the new button layer (Layer 1) is selected.
7. Click the Styles palette tab or choose Window > Show Styles to make this palette visible. Browse the style
options. (Change your view of these options by selecting different commands from the palette menu. In
thumbnail view, pause over any of the styles to view their names.) Double-click one to apply it.
If you change your mind, try other sty;es by double-clicking them. ImageReady automatically updates
the layer.
Create and style a button in afew quick steps with thebasic-shape drawing toolsand the Styles palette.
8. With the button layer selected, choose Duplicate Layer twice from the Layers palette menu to make two
copies of the button.
24
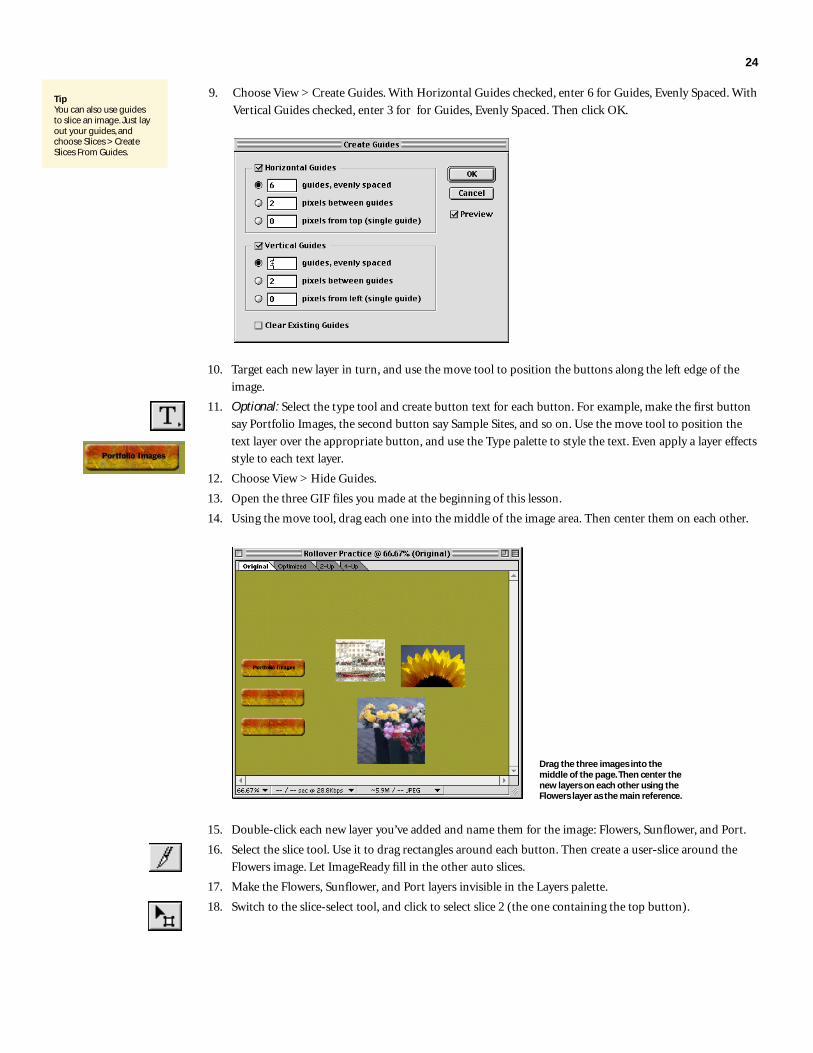
9. Choose View > Create Guides. With Horizontal Guides checked, enter 6 for Guides, Evenly Spaced. With
Vertical Guides checked, enter 3 for for Guides, Evenly Spaced. Then click OK.
10. Target each new layer in turn, and use the move tool to position the buttons along the left edge of the
image.
11. Optional: Select the type tool and create button text for each button. For example, make the first button
say Portfolio Images, the second button say Sample Sites, and so on. Use the move tool to position the
text layer over the appropriate button, and use the Type palette to style the text. Even apply a layer effects
style to each text layer.
12. Choose View > Hide Guides.
13. Open the three GIF files you made at the beginning of this lesson.
14. Using the move tool, drag each one into the middle of the image area. Then center them on each other.
Drag the three images into themiddle of the page. Then center thenew layers on each other using theFlowers layer as the main reference.
15. Double-click each new layer you’ve added and name them for the image: Flowers, Sunflower, and Port.
16. Select the slice tool. Use it to drag rectangles around each button. Then create a user-slice around the
Flowers image. Let ImageReady fill in the other auto slices.
17. Make the Flowers, Sunflower, and Port layers invisible in the Layers palette.
18. Switch to the slice-select tool, and click to select slice 2 (the one containing the top button).
TipYou can also use guidesto slice an image. Just layout your guides, andchoose Slices > CreateSlices From Guides.

25
19. Click the Rollover palette tab or choose Window > Show Rollover to make the palette visible. Then
click the New State button.
Select the first button slice,and then create a rolloverstate for it.
20. Click the Animation palette tab to switch your focus. Leave the first frame blank with no delay assigned
to it. Then:
—Click the New Frame button to add a second frame. Make the Flowers layer visible in the Layers pal-
ette, and set the delay to 1 second.
—Click the New Frame button to add a third frame. Make the Flowers layer invisible in the Layers pal-
ette, and make the Sunflower layer visible. The frame delay should already be set to 1 second because it
uses the previous frame’s settings by default.
—Click the New Frame button to add a fourth frame. Make the Sunflower layer invisible in the Layers
palette, and make the Port layer visible. Make sure the delay is still set to 1 second.
Layers palette for Frame 2 Layers palette for Frame 3 Layers palette for Frame 4
—Click the New Frame button to add a final frame, and make the Port layer invisible (with nothing
visible in its place).
—Choose Other from the Loop menu, and enter 3 for number of times to loop.
—Click the first frame, and then click the Play button to preview the animation.
After you specify your anima-tion settings, your Animationpalette should look like this.
21. Choose File > Preview In > [Your Browser Name] to preview the secondary rollover and
animation in a Web browser. Move your cursor over the top button to see the rollover in
action.
Preview your animated second-ary rollover, and then fine-tuneit as necessary.
Flexible type optionsPhotoshop 5.5 and its ImageReady2.0 component both includeenhancements to their text capa-bilities. They offer multiple anti-aliasing controls to fine-tune theappearance of type, and they letyou create and apply synthetic textstyles, such as bold, italics, orunderlining, for fonts that don’tsupport these styles. ImageReadyalso allows you to type text directlyon the image.
To create and anti-alias text ineither program:1. Select the type tool.2. Type a few words, such as Cool
Web Graphics.3. Choose a font, font size, and faux
settings for your text:
—In Photoshop, select typeoptions in the Type Tool dialog box.
—In ImageReady, select typeoptions with the Type palette. Toapply faux settings, highlightthe text and choose the styleyou want from the popup menu.
4. Select the different anti-aliasingoptions from the popup menuin the Type Tool dialog box orthe Type palette. You can chooseNone, Smooth, Crisp, or Strong.
—In Photoshop: If you’rezoomed out, close the Type Tooldialog box, and zoom in closerto the text, so you can see theaffect of the different settings.Then double-click the type layerin the Layers palette to return tothe Type Tool dialog box. CheckPreview, and apply the differentsettings from the Anti-Aliasmenu.
—In ImageReady, zoom in onthe text you created. Be sureyour type tool cursor is insertedin the text. Then apply thedifferent anti-aliasing settings.
26
22. Optional: Return to ImageReady and complete the image, adding more rollovers to the other buttons
and a heading at the top of the image. You could also add more detail to the animation—for example,
add more frames for each layer and then vary the opacity of the layers using the Opacity control in the
Layers palette. Then one image will appear to dissolve out as another image appears. Additionally, try
saving this file as an HTML file by choosing File > Save Optimized As.
23. Save and close the file. Then close ImageReady.
Expand Your Creative PowerIn addition to its extensive new Web support, Photoshop 5.5 delivers new creativity features that fulfill
specific designer needs. These features include more intuitive masking tools, a new Art History brush, and
automated tools for generating several types of print and Web-based contact sheets. This section introduces
these powerful new creativity features.
Powerful, Intuitive Masking Tools
Photoshop 5.5 delivers three new masking tools that streamline your workflow, while offering you better
results: the magic eraser and background eraser tools both simplify masking, making it more intuitive and
easy for new or intermittent Photoshop users to create transparencies in images. The new Extract Image
command provides a centralized set of tools for masking foreground images with hard-to-define edges,
such as hair glowing in sunlight.
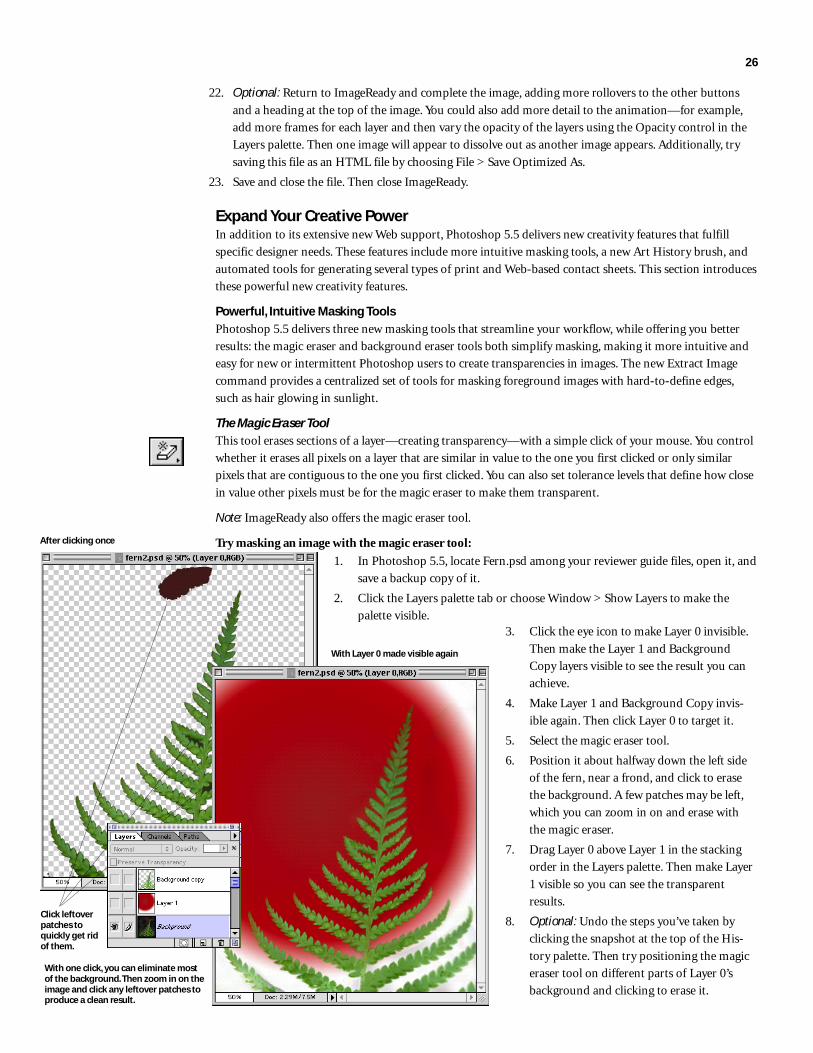
The Magic Eraser Tool
This tool erases sections of a layer—creating transparency—with a simple click of your mouse. You control
whether it erases all pixels on a layer that are similar in value to the one you first clicked or only similar
pixels that are contiguous to the one you first clicked. You can also set tolerance levels that define how close
in value other pixels must be for the magic eraser to make them transparent.
Note: ImageReady also offers the magic eraser tool.
Try masking an image with the magic eraser tool:
1. In Photoshop 5.5, locate Fern.psd among your reviewer guide files, open it, and
save a backup copy of it.
2. Click the Layers palette tab or choose Window > Show Layers to make the
palette visible.3. Click the eye icon to make Layer 0 invisible.
Then make the Layer 1 and Background
Copy layers visible to see the result you can
achieve.
4. Make Layer 1 and Background Copy invis-
ible again. Then click Layer 0 to target it.
5. Select the magic eraser tool.
6. Position it about halfway down the left side
of the fern, near a frond, and click to erase
the background. A few patches may be left,
which you can zoom in on and erase with
the magic eraser.
7. Drag Layer 0 above Layer 1 in the stacking
order in the Layers palette. Then make Layer
1 visible so you can see the transparent
results.
8. Optional: Undo the steps you’ve taken by
clicking the snapshot at the top of the His-
tory palette. Then try positioning the magic
eraser tool on different parts of Layer 0’s
background and clicking to erase it.
With one click, you can eliminate mostof the background. Then zoom in on theimage and click any leftover patches toproduce a clean result.
After clicking once
With Layer 0 made visible again
Click leftoverpatches toquickly get ridof them.
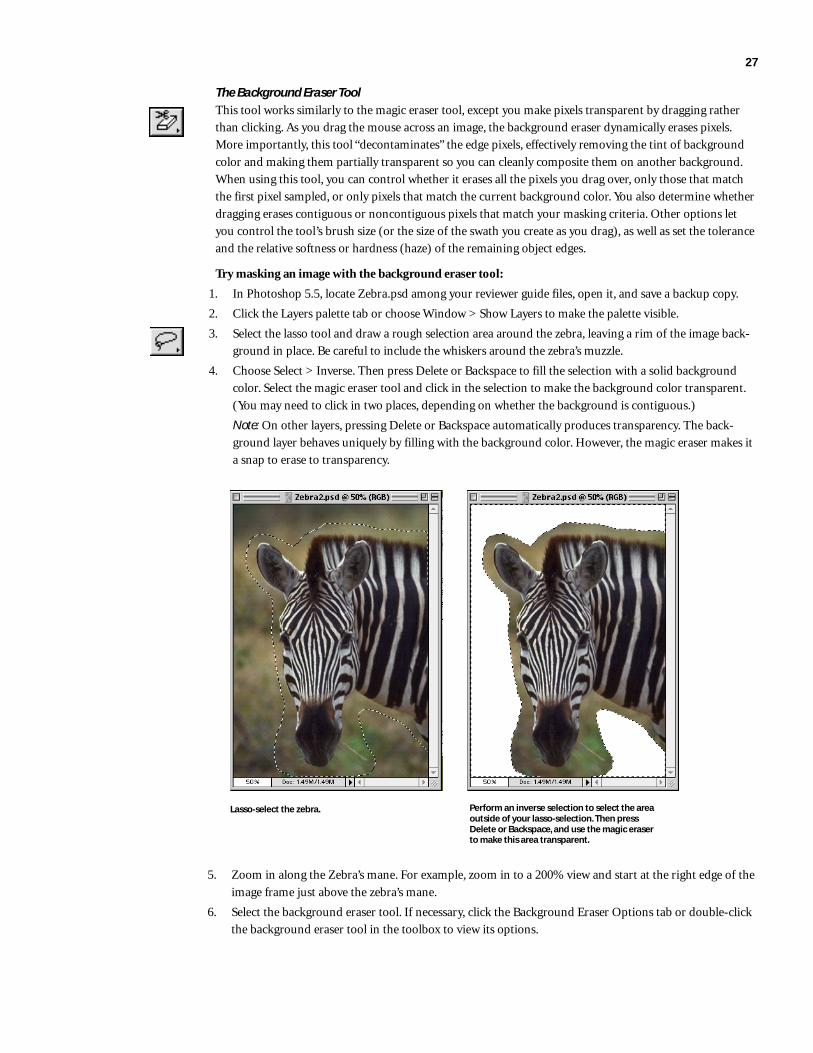
27
The Background Eraser Tool
This tool works similarly to the magic eraser tool, except you make pixels transparent by dragging rather
than clicking. As you drag the mouse across an image, the background eraser dynamically erases pixels.
More importantly, this tool “decontaminates” the edge pixels, effectively removing the tint of background
color and making them partially transparent so you can cleanly composite them on another background.
When using this tool, you can control whether it erases all the pixels you drag over, only those that match
the first pixel sampled, or only pixels that match the current background color. You also determine whether
dragging erases contiguous or noncontiguous pixels that match your masking criteria. Other options let
you control the tool’s brush size (or the size of the swath you create as you drag), as well as set the tolerance
and the relative softness or hardness (haze) of the remaining object edges.
Try masking an image with the background eraser tool:
1. In Photoshop 5.5, locate Zebra.psd among your reviewer guide files, open it, and save a backup copy.
2. Click the Layers palette tab or choose Window > Show Layers to make the palette visible.
3. Select the lasso tool and draw a rough selection area around the zebra, leaving a rim of the image back-
ground in place. Be careful to include the whiskers around the zebra’s muzzle.
4. Choose Select > Inverse. Then press Delete or Backspace to fill the selection with a solid background
color. Select the magic eraser tool and click in the selection to make the background color transparent.
(You may need to click in two places, depending on whether the background is contiguous.)
Note: On other layers, pressing Delete or Backspace automatically produces transparency. The back-
ground layer behaves uniquely by filling with the background color. However, the magic eraser makes it
a snap to erase to transparency.
Lasso-select the zebra. Perform an inverse selection to select the areaoutside of your lasso-selection. Then pressDelete or Backspace, and use the magic eraserto make this area transparent.
5. Zoom in along the Zebra’s mane. For example, zoom in to a 200% view and start at the right edge of the
image frame just above the zebra’s mane.
6. Select the background eraser tool. If necessary, click the Background Eraser Options tab or double-click
the background eraser tool in the toolbox to view its options.
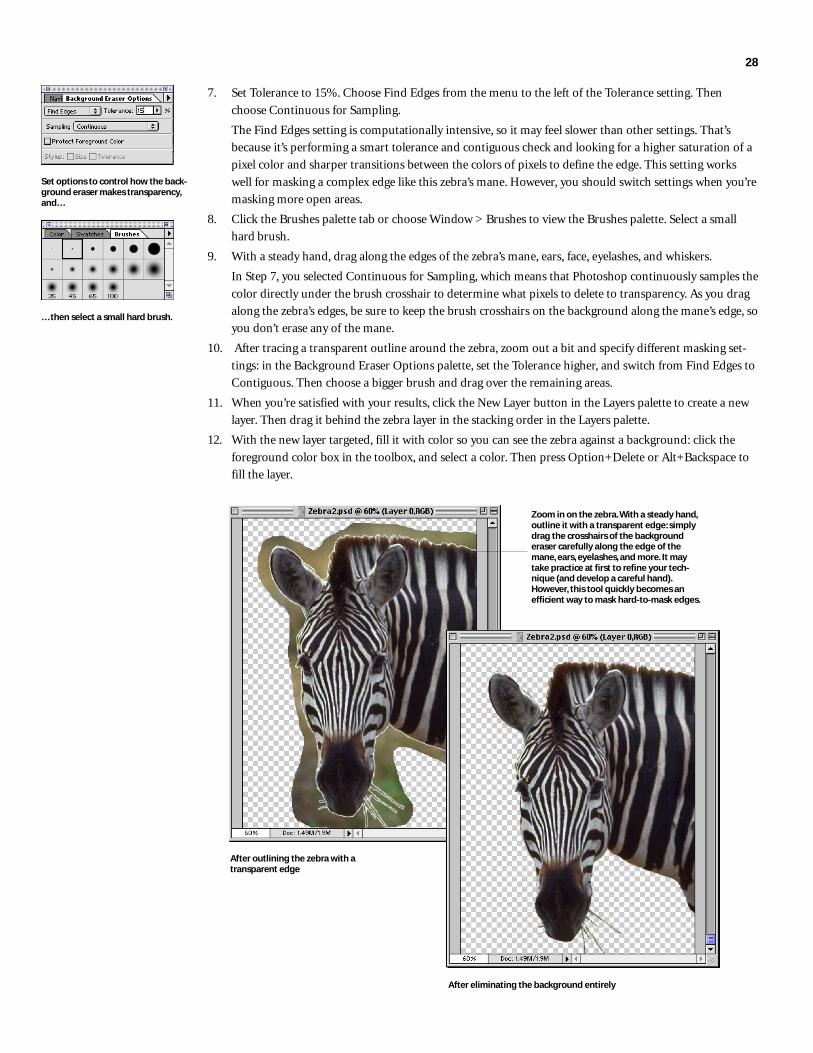
28
7. Set Tolerance to 15%. Choose Find Edges from the menu to the left of the Tolerance setting. Then
choose Continuous for Sampling.
The Find Edges setting is computationally intensive, so it may feel slower than other settings. That’s
because it’s performing a smart tolerance and contiguous check and looking for a higher saturation of a
pixel color and sharper transitions between the colors of pixels to define the edge. This setting works
well for masking a complex edge like this zebra’s mane. However, you should switch settings when you’re
masking more open areas.
8. Click the Brushes palette tab or choose Window > Brushes to view the Brushes palette. Select a small
hard brush.
9. With a steady hand, drag along the edges of the zebra’s mane, ears, face, eyelashes, and whiskers.
In Step 7, you selected Continuous for Sampling, which means that Photoshop continuously samples the
color directly under the brush crosshair to determine what pixels to delete to transparency. As you drag
along the zebra’s edges, be sure to keep the brush crosshairs on the background along the mane’s edge, so
you don’t erase any of the mane.
10. After tracing a transparent outline around the zebra, zoom out a bit and specify different masking set-
tings: in the Background Eraser Options palette, set the Tolerance higher, and switch from Find Edges to
Contiguous. Then choose a bigger brush and drag over the remaining areas.
11. When you’re satisfied with your results, click the New Layer button in the Layers palette to create a new
layer. Then drag it behind the zebra layer in the stacking order in the Layers palette.
12. With the new layer targeted, fill it with color so you can see the zebra against a background: click the
foreground color box in the toolbox, and select a color. Then press Option+Delete or Alt+Backspace to
fill the layer.
…then select a small hard brush.
Set options to control how the back-ground eraser makes transparency,and…
Zoom in on the zebra. With a steady hand,outline it with a transparent edge: simplydrag the crosshairs of the backgrounderaser carefully along the edge of themane, ears, eyelashes, and more. It maytake practice at first to refine your tech-nique (and develop a careful hand).However, this tool quickly becomes anefficient way to mask hard-to-mask edges.
After outlining the zebra with atransparent edge
After eliminating the background entirely
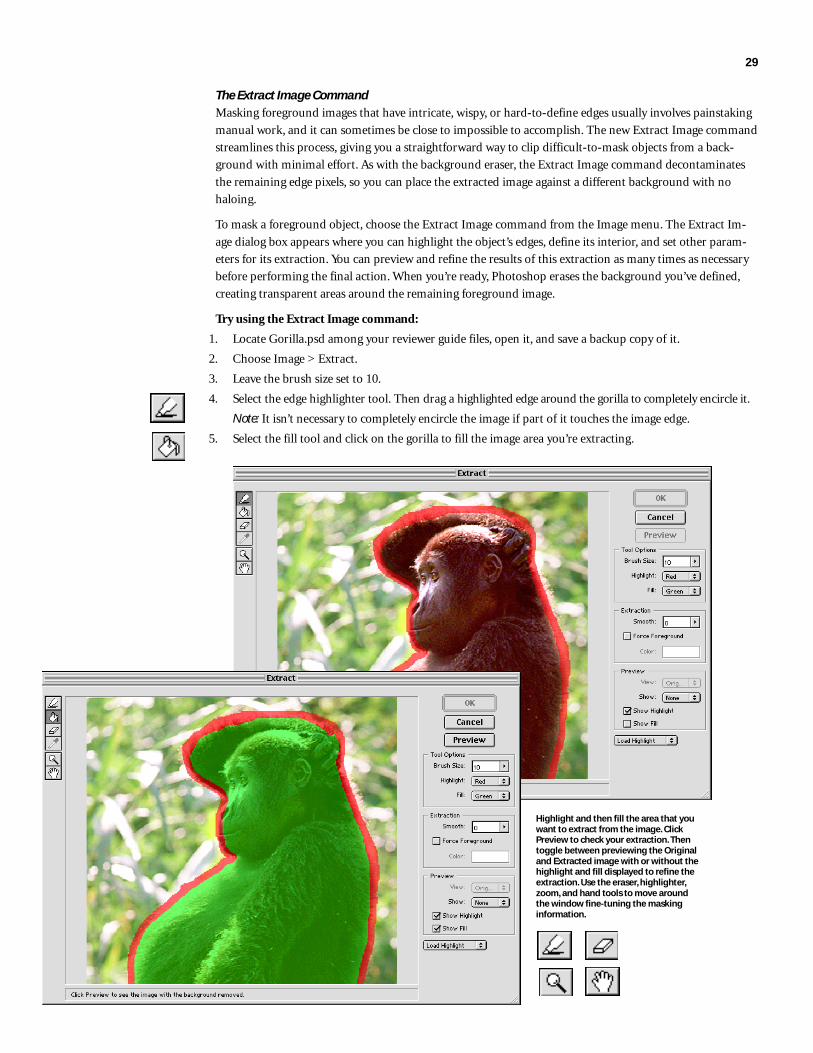
29
The Extract Image CommandMasking foreground images that have intricate, wispy, or hard-to-define edges usually involves painstaking
manual work, and it can sometimes be close to impossible to accomplish. The new Extract Image command
streamlines this process, giving you a straightforward way to clip difficult-to-mask objects from a back-
ground with minimal effort. As with the background eraser, the Extract Image command decontaminates
the remaining edge pixels, so you can place the extracted image against a different background with no
haloing.
To mask a foreground object, choose the Extract Image command from the Image menu. The Extract Im-
age dialog box appears where you can highlight the object’s edges, define its interior, and set other param-
eters for its extraction. You can preview and refine the results of this extraction as many times as necessary
before performing the final action. When you’re ready, Photoshop erases the background you’ve defined,
creating transparent areas around the remaining foreground image.
Try using the Extract Image command:
1. Locate Gorilla.psd among your reviewer guide files, open it, and save a backup copy of it.
2. Choose Image > Extract.
3. Leave the brush size set to 10.
4. Select the edge highlighter tool. Then drag a highlighted edge around the gorilla to completely encircle it.
Note: It isn’t necessary to completely encircle the image if part of it touches the image edge.
5. Select the fill tool and click on the gorilla to fill the image area you’re extracting.
Highlight and then fill the area that youwant to extract from the image. ClickPreview to check your extraction. Thentoggle between previewing the Originaland Extracted image with or without thehighlight and fill displayed to refine theextraction. Use the eraser, highlighter,zoom, and hand tools to move aroundthe window fine-tuning the maskinginformation.

30
6. Click Preview to view your results before completing the extraction:
—Choose Original and Extracted from the View menu under Preview to switch back and forth and see
the results of your extraction.
—Choose a matte from the Show menu under Preview to see what the extracted image looks like
against a background.
7. As necessary, use the edge highlighter, eraser, and fill tools to modify the size and shape of your edge
highlight and refine your extraction. Then click OK to complete the extraction.
Art History BrushThe new art history brush gives you the creative tools to paint stylized strokes on an image, much as you
would brush paint onto a canvas. This dynamic new brush produces painterly effects easily without requir-
ing you to specify colors or apply careful strokes. You simply move the art history brush around on the
image, interactively creating realistic paint strokes. The art history brush bases its changes on a targeted
history state or snapshot, using it as the source data for painting the image. You control the size, opacity,
fidelity, tolerance, and stroke style options for the brush, all of which affect the results of this paint simula-
tion. For inspiration, just take a look at the sample images included with your reviewer guide files. Then
select the art history brush and start experimenting. The results can be breathtaking.
Before Working with the Art History BrushThis section guides you through the basics of using the art history brush. It starts by showing you three
different images that have been set up with before and after layers, so you can see the original image and
what you can accomplish with the art history brush. The best way to learn this tool is to start with some
suggested brush settings until you get the hang of it (the brush is highly interactive, so that takes only a
short time), and then to experiment with different combinations of settings on your own. Make multiple
copies of each of the files, so you can freely explore your ideas and compare your results with the Adobe
designer’s results. The creative possibilities are endless!
To set up for this section:
• Launch Photoshop.
• Locate and open Sunflower.psd, Flowers.psd, and Port.psd. (If you’re prompted, click Don’t Convert in
the Profile Mismatch dialog box when opening these files.)
• Make copies of these files for further experimentation.
• Click the Layers palette tab or choose Window > Show Layers to make the palette visible.
• Select the art history brush tool. Then click the Options palette to display the options for this tool.
Extracted image Extracted image with new background
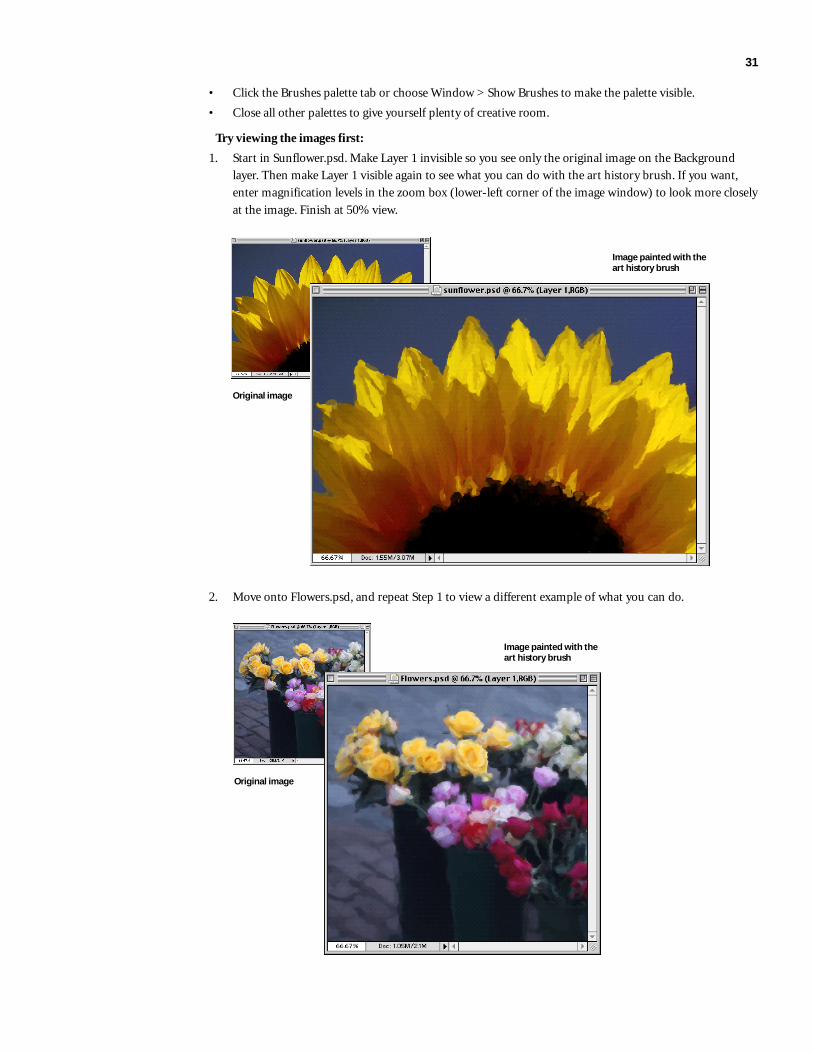
31
• Click the Brushes palette tab or choose Window > Show Brushes to make the palette visible.
• Close all other palettes to give yourself plenty of creative room.
Try viewing the images first:
1. Start in Sunflower.psd. Make Layer 1 invisible so you see only the original image on the Background
layer. Then make Layer 1 visible again to see what you can do with the art history brush. If you want,
enter magnification levels in the zoom box (lower-left corner of the image window) to look more closely
at the image. Finish at 50% view.
2. Move onto Flowers.psd, and repeat Step 1 to view a different example of what you can do.
Original image
Image painted with theart history brush
Original image
Image painted with theart history brush
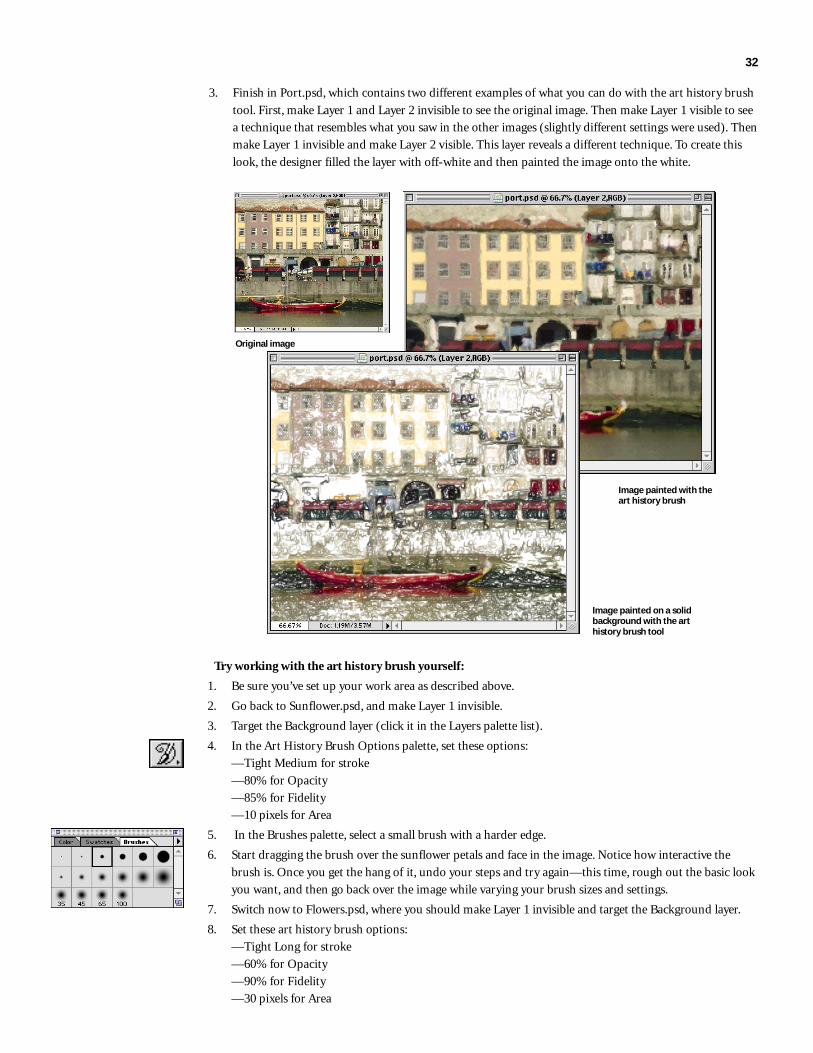
32
3. Finish in Port.psd, which contains two different examples of what you can do with the art history brush
tool. First, make Layer 1 and Layer 2 invisible to see the original image. Then make Layer 1 visible to see
a technique that resembles what you saw in the other images (slightly different settings were used). Then
make Layer 1 invisible and make Layer 2 visible. This layer reveals a different technique. To create this
look, the designer filled the layer with off-white and then painted the image onto the white.
Try working with the art history brush yourself:
1. Be sure you’ve set up your work area as described above.
2. Go back to Sunflower.psd, and make Layer 1 invisible.
3. Target the Background layer (click it in the Layers palette list).
4. In the Art History Brush Options palette, set these options:
—Tight Medium for stroke
—80% for Opacity
—85% for Fidelity
—10 pixels for Area
5. In the Brushes palette, select a small brush with a harder edge.
6. Start dragging the brush over the sunflower petals and face in the image. Notice how interactive the
brush is. Once you get the hang of it, undo your steps and try again—this time, rough out the basic look
you want, and then go back over the image while varying your brush sizes and settings.
7. Switch now to Flowers.psd, where you should make Layer 1 invisible and target the Background layer.
8. Set these art history brush options:
—Tight Long for stroke
—60% for Opacity
—90% for Fidelity
—30 pixels for Area
Original image
Image painted with theart history brush
Image painted on a solidbackground with the arthistory brush tool

33
9. Select a small brush again and start brushing over the image. Vary how thoroughly you attack an area,
producing more lightly adjusted areas and heavier areas of painting.
10. Switch now to Port.psd. If you like, turn off Layer 1 and Layer 2 and focus first on transforming the
Background layer using the techniques you used in Sunflower.psd and Flowers.psd. Then save those
changes to another file name (if you want to keep your experiments), and undo the changes in this file
by clicking the snapshot at the top of the History palette.
11. Look briefly at Layer 2 again. Then hide the layer again and get to work recreating the art.
12. Click the Foreground color box in the toolbox to open the color picker. Select white for the fill color,
and click OK.
13. Target the Background layer again, and press Option+Delete (Mac OS) or Alt+Delete (Windows) to fill
the layer with white.
A history brush appears next to the snapshot of the background layer that appears at the top of the
History palette, making it the designated source layer for the art history brush.
14. With the art history brush selected, choose Tight Short and set the Opacity to 70%. Then choose a
smaller hard-edged brush, and start painting the target layer onto the white fill.
15. Paint loosely at first, using broad swaths of your brush. Then zoom in and fill in the detail in certain
areas. Refer to Layer 2 as reference, but don’t worry about matching it exactly. Just use it as inspiration.
Try varying the brush size, opacity, and even the type of stroke to get different results.
16. When you’re done experimenting, save your changes if you want to keep them as reference, or undo the
changes and close the file.
Overview of the Art History Brush Options Palette
A Set the blending mode, which controls how the base color and blend colorcombine to produce the final resulting color.
B Specify the shape of the paint stroke.C Enter a value to specify the area covered by the paint strokes.D Check Size to make increased pressure produce a larger paint area. Check
Opacity to have increased pressure make the paint more opaque.E Specify how transparent or opaque the painterly effect is. A low percentage
produces a transparent look, while a high percentage achieves an opaquelook.
F Specify how much the paint color can deviate from the source color.Entering a low number allows the brush to deviate significantly, whileentering a high number constrains the color.
G Specify where strokes may be applied. A low tolerance value lets you paintanywhere in the image. A higher value limits your strokes to areas that differfrom the color in the source state or snapshot.
A
B
C
D
E
F
G
Roughly apply the image to the solidbackground. Then vary your settingsas you go back over the image to fillin more detail.
Art History Brush TipsOnce you get the hang of theart history brush tool, you cancombine it with otherPhotoshop tools with artfulresults. Here are a few tips fromAdobe’s pros about workingwith this versatile creative tool:• Vary your stroke style, brush
size, and opacity settings fordifferent parts of an image.
• Vary the type of brushyou’re using within a singleimage. For example, youmight roughly brush overan entire image with a hardor textured brush. Thenswitch to a smaller, moresoft-edged brush to softenthe results.
• To preserve detail in animage—for example, in aface—use a very smallbrush and very low opacitysettings.
• Define your own brushesfrom textured filters. Thenuse those brushes to paintimages.
• Create a canvas to paint onby filling the layer withwhite or another color, or byapplying a filter to it such asconté crayon (with itschoice of textures).

34
Selection of Instant Contact Sheets
Contact sheets are vital in photography, providing an inexpensive way for you and your clients to view,
share, and select images. This important tool even has a corollary on the Web as photographers look for the
most efficient, cost-effective ways to present images to clients for signoff and promote samples of their
work. In addition, portrait photographers typically offer picture packages, which present the same image
printed in multiple sizes.
Photoshop 5.5 is automating the creation of all of these types of contact sheets, saving you the time of
creating them by hand. Photoshop includes automation plug-ins for turning a folder of images into printed
contact sheets and Web galleries, as well as for creating picture packages from individual photographs.
Together these new automation features streamline how you present and share images with colleagues,
clients, and customers.
Contact SheetsPhotoshop can help you preview and catalog related groups of images by turning a folder of images into a
contact sheet. You control how big the thumbnails are, whether they use their original file names as cap-
tions, how they are organized on the page, and more.
Try creating a contact sheet:
1. In Photoshop, choose File > Automate > Contact Sheet II.
2. Select the Samples folder in the Goodies folder in the Adobe Photoshop 5.5 folder. Then adjust any
settings you want, and click OK.
Picture PackagesPhotoshop instantly produces picture packages, similar to the ones taken by traditional portrait studios, by
arranging an image multiple times and even at multiple sizes on a single sheet. You determine the configu-
ration of image sizes from a preset list in Photoshop. For example, you could create a sheet with two 4x5
and four 2.5x3.5-inch versions of a portrait.
Try creating a picture package:
1. In Photoshop, choose File > Automate > Picture Package.
2. In the Picture Package dialog box, click the Choose button. Then locate Gorilla.psd among your re-
viewer files.
Turn a folder full ofimages into contactsheets instantly.
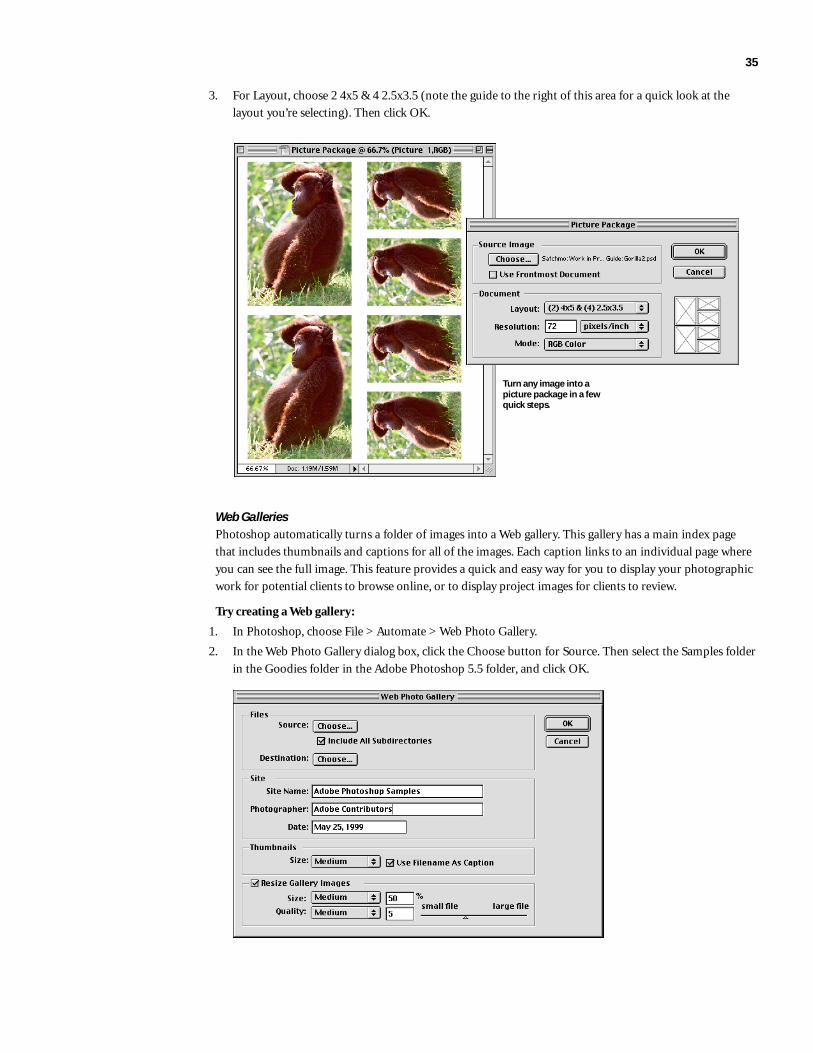
35
3. For Layout, choose 2 4x5 & 4 2.5x3.5 (note the guide to the right of this area for a quick look at the
layout you’re selecting). Then click OK.
Web GalleriesPhotoshop automatically turns a folder of images into a Web gallery. This gallery has a main index page
that includes thumbnails and captions for all of the images. Each caption links to an individual page where
you can see the full image. This feature provides a quick and easy way for you to display your photographic
work for potential clients to browse online, or to display project images for clients to review.
Try creating a Web gallery:
1. In Photoshop, choose File > Automate > Web Photo Gallery.
2. In the Web Photo Gallery dialog box, click the Choose button for Source. Then select the Samples folder
in the Goodies folder in the Adobe Photoshop 5.5 folder, and click OK.
Turn any image into apicture package in a fewquick steps.

36
This document was created with Adobe software and font software from the Adobe Type Library.
Adobe, the Adobe logo, Acrobat, GoLive, Illustrator, ImageReady, Photoshop, and PostScript 3 are trademarks of Adobe Systems Incorporated. Macintosh, Mac, Mac OS, and PowerMacintosh are trademarks of Apple Computer, Inc., registered in the United States and other countries. QuickTime is a trademark of Apple Computer, Inc., used under license.QuickTime is registered in the U.S. and other countries. Intel and Pentium are registered trademarks of Intel Corporation. PowerPC is a registered trademark of International BusinessMachines Corporation. Microsoft, Windows, and Windows NT are either registered trademarks or trademarks of Microsoft Corporation. All other trademarks are the property of theirrespective owners.
© 1999 Adobe Systems Incorporated. All rights reserved. Printed in the USA. 6/99, vers. 2
Adobe Systems Incorporated345 Park AvenueSan Jose, CA 95110-2704 USA
Adobe Systems Europe LimitedAdobe House, Mid New CultinsEdinburgh EH11 4DUScotland, United Kingdom
Adobe Systems Co., Ltd.Yebisu Garden Place Tower4-20-3 Ebisu, Shibuya-kuTokyo 150 Japan
Adobe Systems Pty. Ltd.Level 5, 18–20 Orion RoadLane Cove, New South Wales 2066Australia
World Wide Webhttp://www.adobe.com
3. Click the Choose button for Destination and specify where Photoshop should store the files it produces
for this Web gallery.
4. Enter a site name and a photographer’s name. Then click OK.
About Adobe SystemsAdobe Systems Incorporated, the award-winning provider of graphics and publishing solutions, gives you
the power to make your ideas stand out exactly as you intend. Whether you work in a design studio, an
office, or at home, Adobe’s software, images, type, and printing technologies offer you a seamless workflow
for creating and distributing graphically rich communications in print and electronic media.
Easily prepare onlinegalleries to display yourimages on the Web.
System Requirements*Power Macintosh• PowerPC® processor or better• Mac OS Software version 7.6
or later• Combined Installation of
Photoshop and ImageReady:—64 MB of RAM†—125 MB of available hard-diskspace for full installation (large-capacity hard disk recommendedfor on-going work)
• Photoshop Only Installation:—32 MB of RAM (64 MB or morerecommended)—80 MB of available hard-diskspace
• 256-color (8-bit) display adapterrequired (24-bit, high-resolutiondisplay recommended)
• Sound card recommended forviewing interactive tutorial files
• CD-ROM drive
Windows• Intel® Pentium® or faster processor• Microsoft Windows 95, Windows
98, Windows NT 4.0, or lateroperating system
• Combined Installation ofPhotoshop and ImageReady:—64 MB of RAM†—125 MB of available hard-diskspace for full installation (large-capacity hard disk recommendedfor on-going work)
• Photoshop Only Installation:—32 MB of RAM (64 MB or morerecommended)—80 MB of available hard-diskspace
• 256-color (8-bit) display adapterrequired (24-bit, high-resolutiondisplay recommended)
• Sound card recommended forviewing interactive tutorial files
• CD-ROM drive
* System requirements are subjectto change prior to the productshipping.
† 96 MB of RAM recommended forbest performance when usingPhotoshop and ImageReadyconcurrently


![WELCOME []Adobe Photoshop I am an expert in using Adobe Photoshop specialized in photo editing, photo enhancement, photo retouching, photo manipulation, image resizing, removing background,](https://img.pdfslide.us/doc/110x75/602cb77d7113b8630d645efd/welcome-adobe-photoshop-i-am-an-expert-in-using-adobe-photoshop-specialized.jpg)