Embed Size (px)
Citation preview

Adobe Photoshop Elements 5.0
Derek Floyd
This tutorial is designed to introduce many of the basic editing skills needed when working with Adobe Photoshop Elements 5.0. To make the tutorials easier, you need to work with actual images, so I have provided images that are carefully selected to enable you to learn the relevant skills. You can then use your own images for further practice. The images are available on the OSAPAC web site in the same location as this tutorial. You will need the following images:
You can also download them from my web site at: http://www.dfres.com/ Just click on the Digital Images link in the left frame, select Digital Images in the main frame and the Tutorial Images. The direct link is: http://www.dfres.com/photos/tutorialimages.htm Make sure you do not download thumbnail images. Click on a thumbnail image to open a larger image and download the larger image. There are also additional tutorials on my web site and you are free to use them. If you have any questions on this tutorial, please email me at: [email protected] I hope you find the tutorial helpful. Sincerely, Derek Floyd
www.dfres.com Adobe Photoshop Elements 5.0 Page 1
Adobe Photoshop Elements 5.0 (Editing Digital Images) Adobe Photoshop Elements 5.0 is a graphics editing program that allows the user to edit and adjust digital photographs and images. Adobe Photoshop Elements 5.0 (and 2.0) is licensed by the Ministry of Education for use in all publicly funded schools.
Starting and Leaving Adobe Photoshop Elements 5.0 To start Adobe Photoshop Elements, locate and double click the Adobe Photoshop Elements icon or select Adobe Photoshop Elements from the Start menu. It will be located by selecting Start < Programs < Adobe group. To exit Adobe Photoshop Elements, select File < Exit.
Adobe Photoshop Screen Display The screen capture below shows the opening screen for Adobe Photoshop elements. There are 4 main functions. These are: View and Organize Photos - Quickly Fix Photos – Edit and Enhance Photos - Make Photo Creations This tutorial will explore the Edit and Enhance Photo options. It is assumed that the user will be familiar with general file handling to view and organize their images and that the user can explore Photo Creations in their own time. The Quick fixes will be covered in the tutorial. For this tutorial, you need open images in Adobe Photoshop Elements. To follow the tutorial more easily, I recommend you download the images on the next page from the OSAPAC web site. They are in the same location as this tutorial. You can also download them from my web site at: http://www.dfres.com Select Digital Images from the left frame and then Digital Images. Click on the Tutorial section and download the following images.
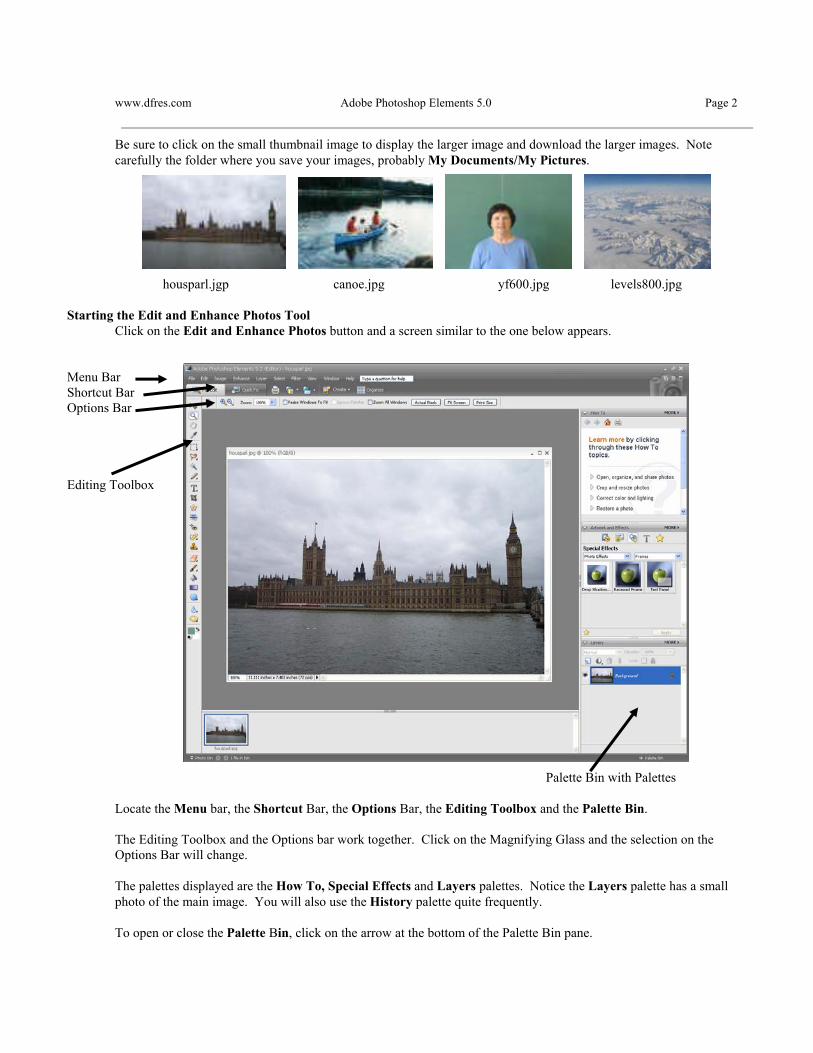
www.dfres.com Adobe Photoshop Elements 5.0 Page 2 Be sure to click on the small thumbnail image to display the larger image and download the larger images. Note carefully the folder where you save your images, probably My Documents/My Pictures.
housparl.jgp canoe.jpg yf600.jpg levels800.jpg
Starting the Edit and Enhance Photos Tool Click on the Edit and Enhance Photos button and a screen similar to the one below appears.
Menu Bar Shortcut Bar Options Bar
Editing Toolbox
Palette Bin with Palettes Locate the Menu bar, the Shortcut Bar, the Options Bar, the Editing Toolbox and the Palette Bin. The Editing Toolbox and the Options bar work together. Click on the Magnifying Glass and the selection on the Options Bar will change. The palettes displayed are the How To, Special Effects and Layers palettes. Notice the Layers palette has a small photo of the main image. You will also use the History palette quite frequently. To open or close the Palette Bin, click on the arrow at the bottom of the Palette Bin pane.
www.dfres.com Adobe Photoshop Elements 5.0 Page 3 You should open the Layers and the Undo History palettes by selecting them from Window menu and clicking on the topics. If they do not appear in the Palette window, click on the More button and select Place Palette in bin when closed and close the palette. Some of the tools, e.g. Eraser, Clone, Text on the Editing Toolbox have a small downward pointing triangle at the bottom right corner. This indicates that there are more selections for that tool. Click and hold down the mouse pointer on the arrow and the list of tools will be displayed.
Obtaining Images There are many ways to obtain images. Images can be obtained from: Photographs (from clip art disk) Images from scanner Images from digital cameras Images from the Internet The remainder of this section assumes you have obtained digital images from one of the above sources, they are in a folder and you are ready to import them into Adobe Photoshop Elements 5.0.
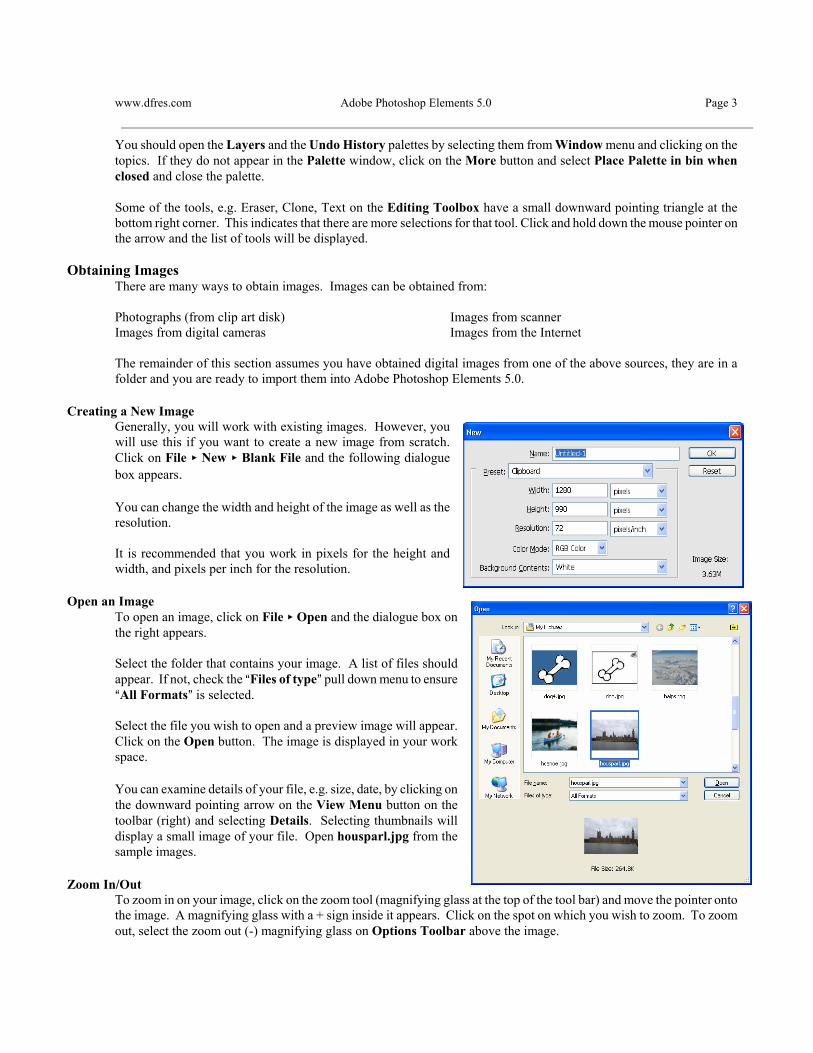
Creating a New Image Generally, you will work with existing images. However, you will use this if you want to create a new image from scratch. Click on File < New < Blank File and the following dialogue box appears. You can change the width and height of the image as well as the resolution. It is recommended that you work in pixels for the height and width, and pixels per inch for the resolution.
Open an Image To open an image, click on File < Open and the dialogue box on the right appears. Select the folder that contains your image. A list of files should appear. If not, check the AFiles of type@ pull down menu to ensure AAll Formats@ is selected. Select the file you wish to open and a preview image will appear. Click on the Open button. The image is displayed in your work space. You can examine details of your file, e.g. size, date, by clicking on the downward pointing arrow on the View Menu button on the toolbar (right) and selecting Details. Selecting thumbnails will display a small image of your file. Open housparl.jpg from the sample images.
Zoom In/Out To zoom in on your image, click on the zoom tool (magnifying glass at the top of the tool bar) and move the pointer onto the image. A magnifying glass with a + sign inside it appears. Click on the spot on which you wish to zoom. To zoom out, select the zoom out (-) magnifying glass on Options Toolbar above the image.
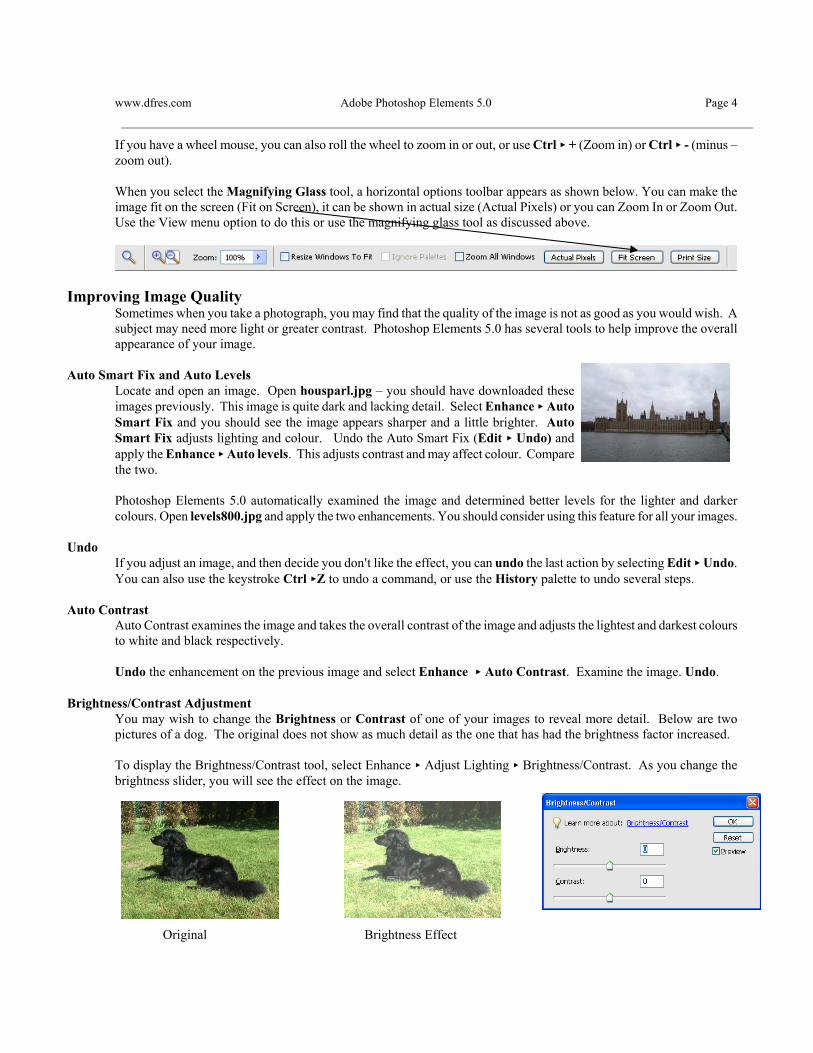
www.dfres.com Adobe Photoshop Elements 5.0 Page 4 If you have a wheel mouse, you can also roll the wheel to zoom in or out, or use Ctrl < + (Zoom in) or Ctrl < - (minus – zoom out). When you select the Magnifying Glass tool, a horizontal options toolbar appears as shown below. You can make the image fit on the screen (Fit on Screen), it can be shown in actual size (Actual Pixels) or you can Zoom In or Zoom Out. Use the View menu option to do this or use the magnifying glass tool as discussed above.
Improving Image Quality Sometimes when you take a photograph, you may find that the quality of the image is not as good as you would wish. A subject may need more light or greater contrast. Photoshop Elements 5.0 has several tools to help improve the overall appearance of your image.
Auto Smart Fix and Auto Levels Locate and open an image. Open housparl.jpg – you should have downloaded these images previously. This image is quite dark and lacking detail. Select Enhance < Auto Smart Fix and you should see the image appears sharper and a little brighter. Auto Smart Fix adjusts lighting and colour. Undo the Auto Smart Fix (Edit < Undo) and apply the Enhance < Auto levels. This adjusts contrast and may affect colour. Compare the two. Photoshop Elements 5.0 automatically examined the image and determined better levels for the lighter and darker colours. Open levels800.jpg and apply the two enhancements. You should consider using this feature for all your images.
Undo If you adjust an image, and then decide you don=t like the effect, you can undo the last action by selecting Edit < Undo. You can also use the keystroke Ctrl <Z to undo a command, or use the History palette to undo several steps.
Auto Contrast Auto Contrast examines the image and takes the overall contrast of the image and adjusts the lightest and darkest colours to white and black respectively. Undo the enhancement on the previous image and select Enhance < Auto Contrast. Examine the image. Undo.
Brightness/Contrast Adjustment You may wish to change the Brightness or Contrast of one of your images to reveal more detail. Below are two pictures of a dog. The original does not show as much detail as the one that has had the brightness factor increased. To display the Brightness/Contrast tool, select Enhance < Adjust Lighting < Brightness/Contrast. As you change the brightness slider, you will see the effect on the image.
Original Brightness Effect
www.dfres.com Adobe Photoshop Elements 5.0 Page 5
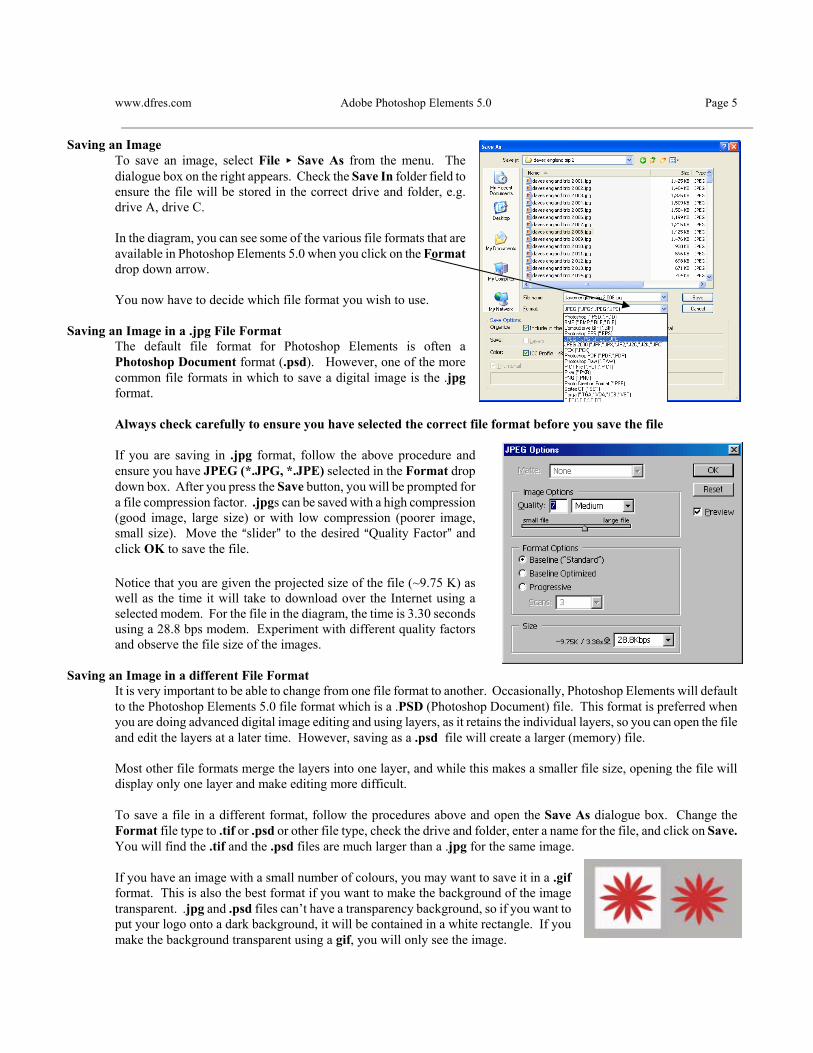
Saving an Image To save an image, select File < Save As from the menu. The dialogue box on the right appears. Check the Save In folder field to ensure the file will be stored in the correct drive and folder, e.g. drive A, drive C. In the diagram, you can see some of the various file formats that are available in Photoshop Elements 5.0 when you click on the Format drop down arrow. You now have to decide which file format you wish to use.
Saving an Image in a .jpg File Format The default file format for Photoshop Elements is often a Photoshop Document format (.psd). However, one of the more common file formats in which to save a digital image is the .jpg format. Always check carefully to ensure you have selected the correct file format before you save the file If you are saving in .jpg format, follow the above procedure and ensure you have JPEG (*.JPG, *.JPE) selected in the Format drop down box. After you press the Save button, you will be prompted for a file compression factor. .jpgs can be saved with a high compression (good image, large size) or with low compression (poorer image, small size). Move the Aslider@ to the desired AQuality Factor@ and click OK to save the file. Notice that you are given the projected size of the file (~9.75 K) as well as the time it will take to download over the Internet using a selected modem. For the file in the diagram, the time is 3.30 seconds using a 28.8 bps modem. Experiment with different quality factors and observe the file size of the images.
Saving an Image in a different File Format It is very important to be able to change from one file format to another. Occasionally, Photoshop Elements will default to the Photoshop Elements 5.0 file format which is a .PSD (Photoshop Document) file. This format is preferred when you are doing advanced digital image editing and using layers, as it retains the individual layers, so you can open the file and edit the layers at a later time. However, saving as a .psd file will create a larger (memory) file. Most other file formats merge the layers into one layer, and while this makes a smaller file size, opening the file will display only one layer and make editing more difficult. To save a file in a different format, follow the procedures above and open the Save As dialogue box. Change the Format file type to .tif or .psd or other file type, check the drive and folder, enter a name for the file, and click on Save. You will find the .tif and the .psd files are much larger than a .jpg for the same image. If you have an image with a small number of colours, you may want to save it in a .gif format. This is also the best format if you want to make the background of the image transparent. .jpg and .psd files can’t have a transparency background, so if you want to put your logo onto a dark background, it will be contained in a white rectangle. If you make the background transparent using a gif, you will only see the image.
www.dfres.com Adobe Photoshop Elements 5.0 Page 6
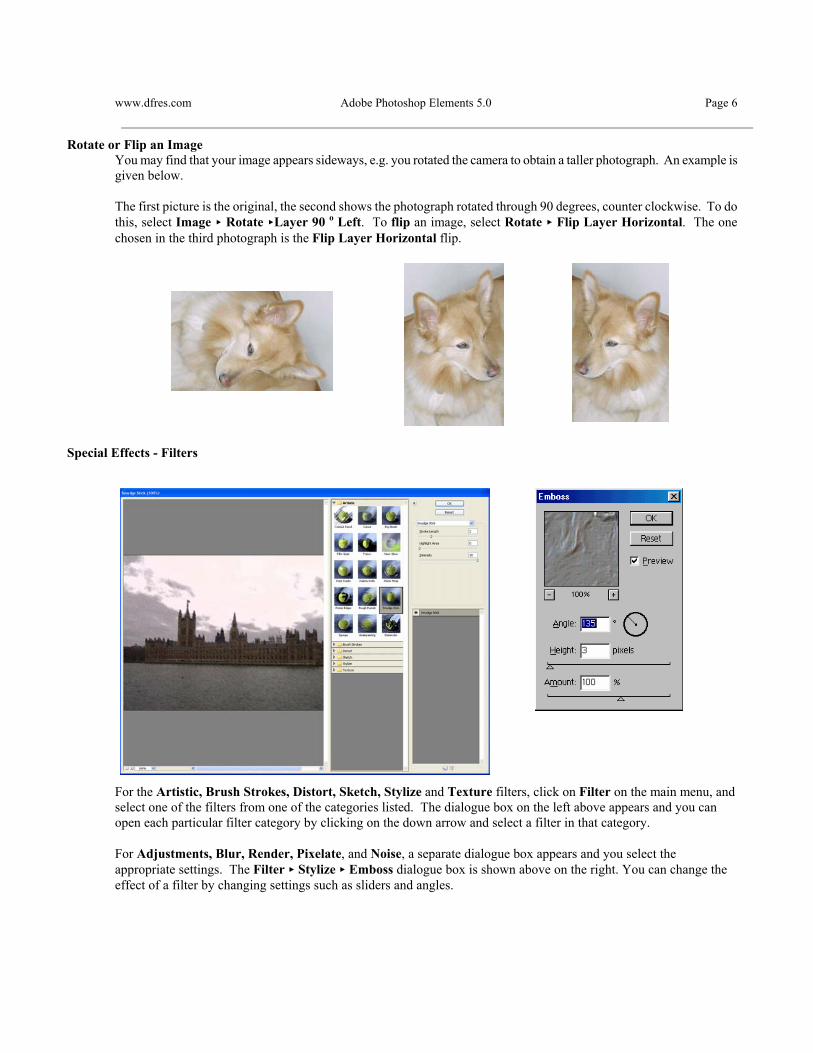
Rotate or Flip an Image You may find that your image appears sideways, e.g. you rotated the camera to obtain a taller photograph. An example is given below. The first picture is the original, the second shows the photograph rotated through 90 degrees, counter clockwise. To do this, select Image < Rotate <Layer 90 o Left. To flip an image, select Rotate < Flip Layer Horizontal. The one chosen in the third photograph is the Flip Layer Horizontal flip.
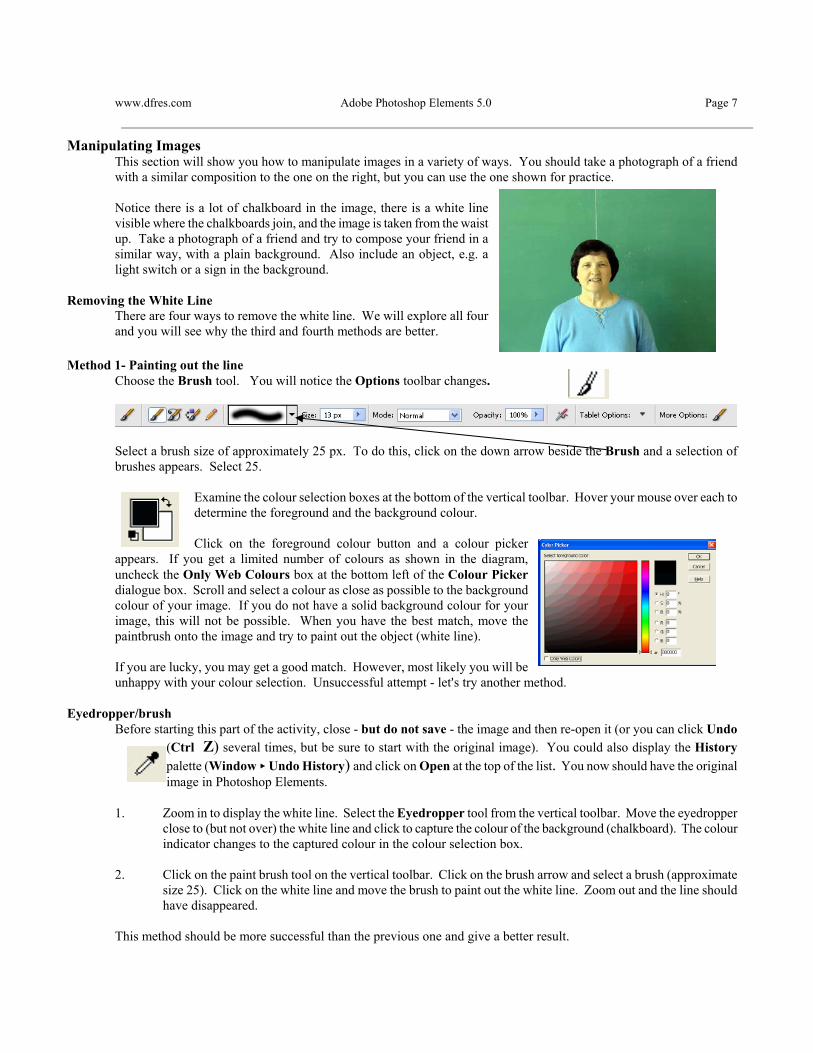
Special Effects - Filters
For the Artistic, Brush Strokes, Distort, Sketch, Stylize and Texture filters, click on Filter on the main menu, and select one of the filters from one of the categories listed. The dialogue box on the left above appears and you can open each particular filter category by clicking on the down arrow and select a filter in that category. For Adjustments, Blur, Render, Pixelate, and Noise, a separate dialogue box appears and you select the appropriate settings. The Filter < Stylize < Emboss dialogue box is shown above on the right. You can change the effect of a filter by changing settings such as sliders and angles.
www.dfres.com Adobe Photoshop Elements 5.0 Page 7
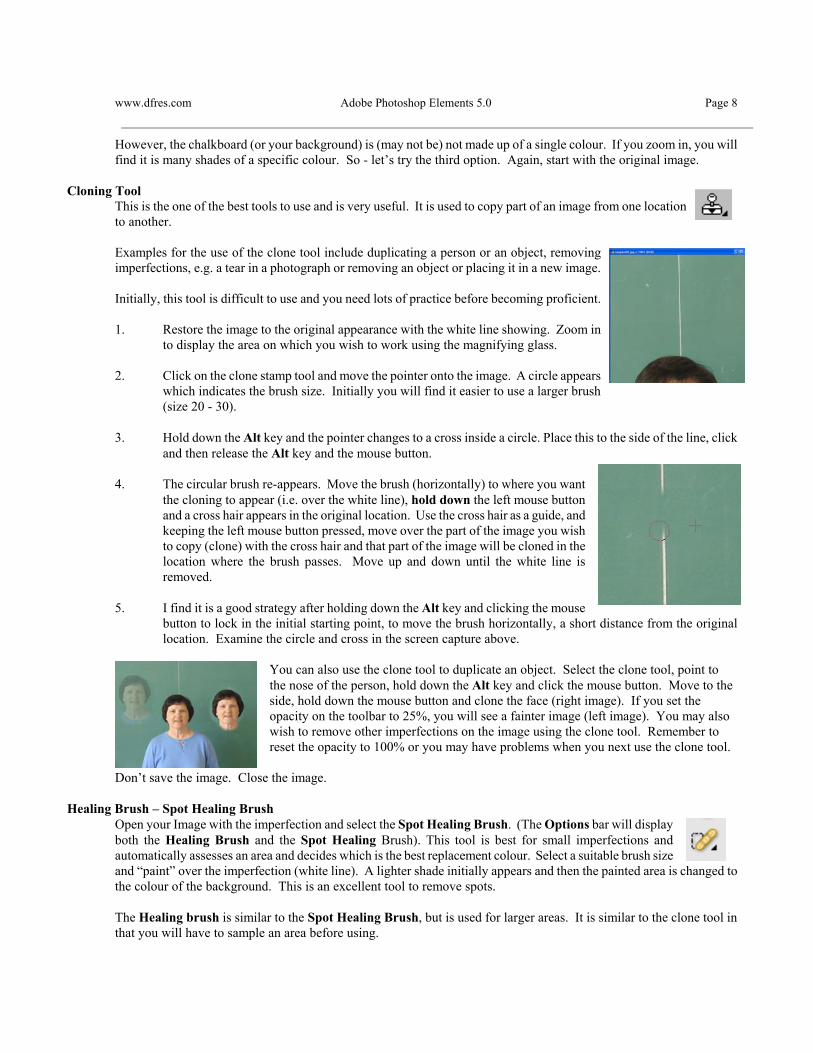
Manipulating Images This section will show you how to manipulate images in a variety of ways. You should take a photograph of a friend with a similar composition to the one on the right, but you can use the one shown for practice. Notice there is a lot of chalkboard in the image, there is a white line visible where the chalkboards join, and the image is taken from the waist up. Take a photograph of a friend and try to compose your friend in a similar way, with a plain background. Also include an object, e.g. a light switch or a sign in the background.
Removing the White Line There are four ways to remove the white line. We will explore all four and you will see why the third and fourth methods are better.
Method 1- Painting out the line Choose the Brush tool. You will notice the Options toolbar changes.
Select a brush size of approximately 25 px. To do this, click on the down arrow beside the Brush and a selection of brushes appears. Select 25.
Examine the colour selection boxes at the bottom of the vertical toolbar. Hover your mouse over each to determine the foreground and the background colour. Click on the foreground colour button and a colour picker
appears. If you get a limited number of colours as shown in the diagram, uncheck the Only Web Colours box at the bottom left of the Colour Picker dialogue box. Scroll and select a colour as close as possible to the background colour of your image. If you do not have a solid background colour for your image, this will not be possible. When you have the best match, move the paintbrush onto the image and try to paint out the object (white line). If you are lucky, you may get a good match. However, most likely you will be unhappy with your colour selection. Unsuccessful attempt - let=s try another method.
Eyedropper/brush Before starting this part of the activity, close - but do not save - the image and then re-open it (or you can click Undo
(Ctrl Z) several times, but be sure to start with the original image). You could also display the History palette (Window < Undo History) and click on Open at the top of the list. You now should have the original image in Photoshop Elements.
1. Zoom in to display the white line. Select the Eyedropper tool from the vertical toolbar. Move the eyedropper
close to (but not over) the white line and click to capture the colour of the background (chalkboard). The colour indicator changes to the captured colour in the colour selection box.
2. Click on the paint brush tool on the vertical toolbar. Click on the brush arrow and select a brush (approximate
size 25). Click on the white line and move the brush to paint out the white line. Zoom out and the line should have disappeared.
This method should be more successful than the previous one and give a better result.
www.dfres.com Adobe Photoshop Elements 5.0 Page 8 However, the chalkboard (or your background) is (may not be) not made up of a single colour. If you zoom in, you will find it is many shades of a specific colour. So - let’s try the third option. Again, start with the original image.
Cloning Tool This is the one of the best tools to use and is very useful. It is used to copy part of an image from one location to another. Examples for the use of the clone tool include duplicating a person or an object, removing imperfections, e.g. a tear in a photograph or removing an object or placing it in a new image. Initially, this tool is difficult to use and you need lots of practice before becoming proficient. 1. Restore the image to the original appearance with the white line showing. Zoom in
to display the area on which you wish to work using the magnifying glass. 2. Click on the clone stamp tool and move the pointer onto the image. A circle appears
which indicates the brush size. Initially you will find it easier to use a larger brush (size 20 - 30).
3. Hold down the Alt key and the pointer changes to a cross inside a circle. Place this to the side of the line, click
and then release the Alt key and the mouse button. 4. The circular brush re-appears. Move the brush (horizontally) to where you want
the cloning to appear (i.e. over the white line), hold down the left mouse button and a cross hair appears in the original location. Use the cross hair as a guide, and keeping the left mouse button pressed, move over the part of the image you wish to copy (clone) with the cross hair and that part of the image will be cloned in the location where the brush passes. Move up and down until the white line is removed.
5. I find it is a good strategy after holding down the Alt key and clicking the mouse
button to lock in the initial starting point, to move the brush horizontally, a short distance from the original location. Examine the circle and cross in the screen capture above.
You can also use the clone tool to duplicate an object. Select the clone tool, point to the nose of the person, hold down the Alt key and click the mouse button. Move to the side, hold down the mouse button and clone the face (right image). If you set the opacity on the toolbar to 25%, you will see a fainter image (left image). You may also wish to remove other imperfections on the image using the clone tool. Remember to reset the opacity to 100% or you may have problems when you next use the clone tool.
Don’t save the image. Close the image.
Healing Brush – Spot Healing Brush Open your Image with the imperfection and select the Spot Healing Brush. (The Options bar will display both the Healing Brush and the Spot Healing Brush). This tool is best for small imperfections and automatically assesses an area and decides which is the best replacement colour. Select a suitable brush size and “paint” over the imperfection (white line). A lighter shade initially appears and then the painted area is changed to the colour of the background. This is an excellent tool to remove spots. The Healing brush is similar to the Spot Healing Brush, but is used for larger areas. It is similar to the clone tool in that you will have to sample an area before using.
www.dfres.com Adobe Photoshop Elements 5.0 Page 9
Cloning between two images Open two images and ensure they are both visible. Hold down the Alt key, click in the centre of the object to be cloned, move the pointer to the second image, select the location and start to clone.
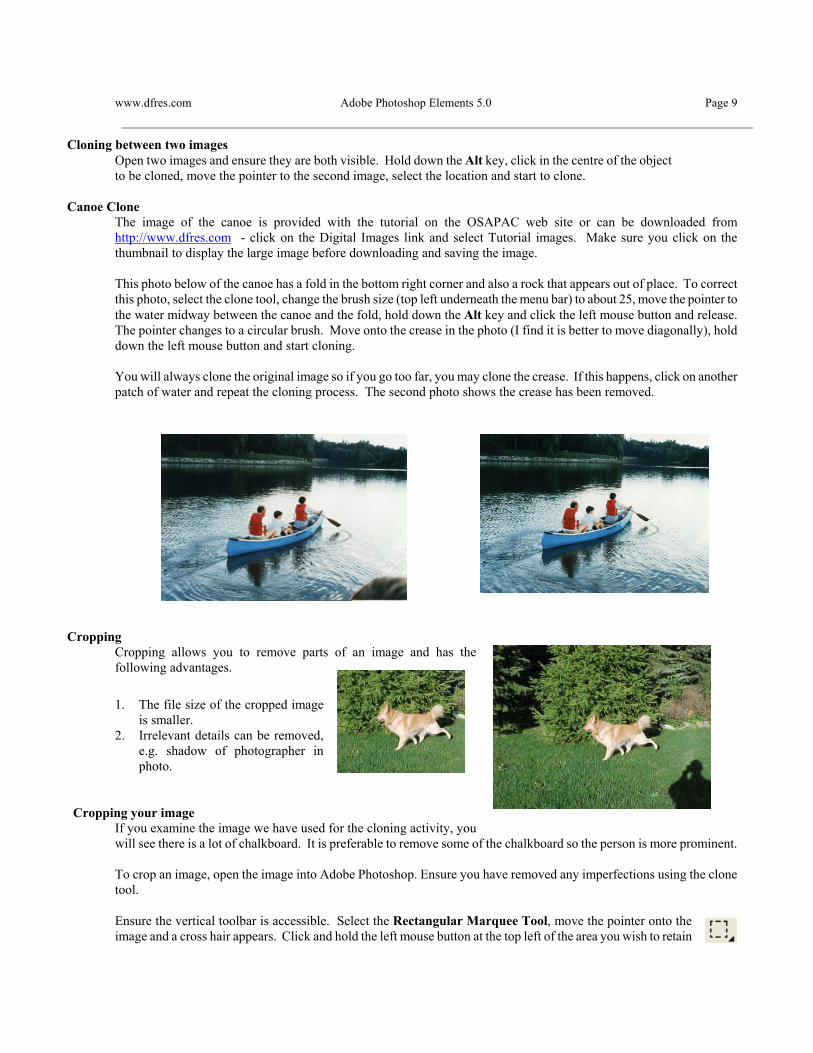
Canoe Clone The image of the canoe is provided with the tutorial on the OSAPAC web site or can be downloaded from http://www.dfres.com - click on the Digital Images link and select Tutorial images. Make sure you click on the thumbnail to display the large image before downloading and saving the image. This photo below of the canoe has a fold in the bottom right corner and also a rock that appears out of place. To correct this photo, select the clone tool, change the brush size (top left underneath the menu bar) to about 25, move the pointer to the water midway between the canoe and the fold, hold down the Alt key and click the left mouse button and release. The pointer changes to a circular brush. Move onto the crease in the photo (I find it is better to move diagonally), hold down the left mouse button and start cloning. You will always clone the original image so if you go too far, you may clone the crease. If this happens, click on another patch of water and repeat the cloning process. The second photo shows the crease has been removed.
Cropping Cropping allows you to remove parts of an image and has the following advantages. 1. The file size of the cropped image
is smaller. 2. Irrelevant details can be removed,
e.g. shadow of photographer in photo.
Cropping your image
If you examine the image we have used for the cloning activity, you will see there is a lot of chalkboard. It is preferable to remove some of the chalkboard so the person is more prominent. To crop an image, open the image into Adobe Photoshop. Ensure you have removed any imperfections using the clone tool. Ensure the vertical toolbar is accessible. Select the Rectangular Marquee Tool, move the pointer onto the image and a cross hair appears. Click and hold the left mouse button at the top left of the area you wish to retain
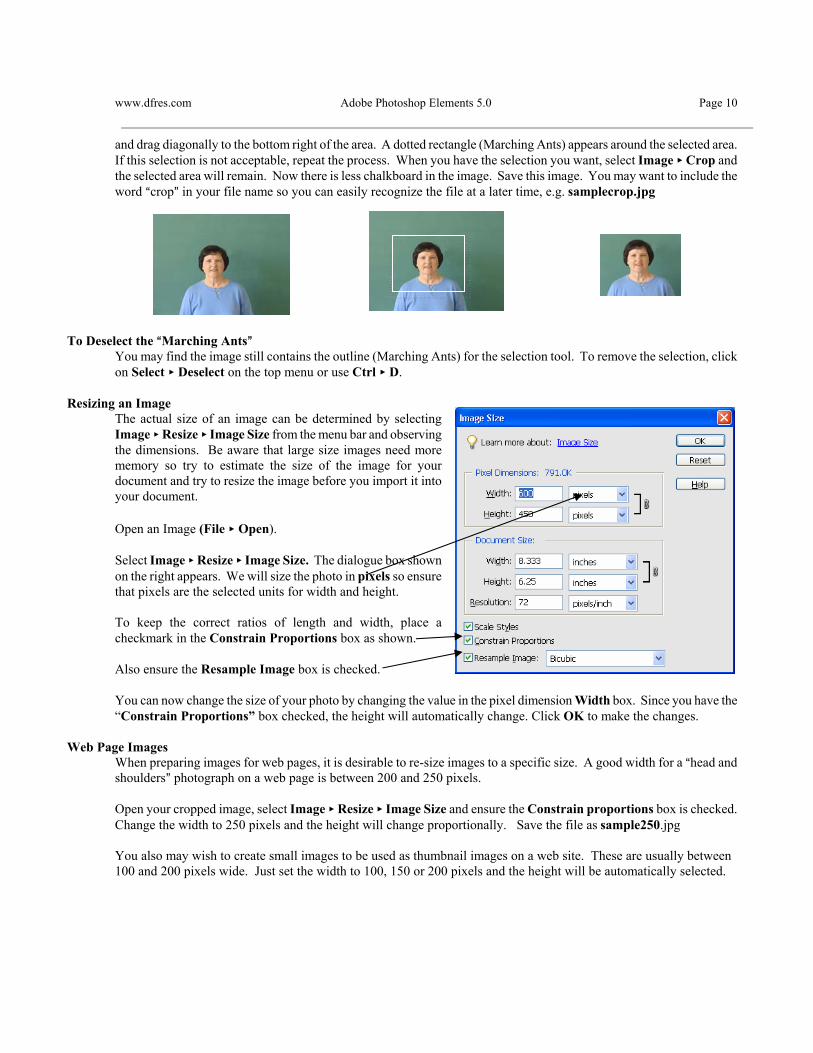
www.dfres.com Adobe Photoshop Elements 5.0 Page 10 and drag diagonally to the bottom right of the area. A dotted rectangle (Marching Ants) appears around the selected area. If this selection is not acceptable, repeat the process. When you have the selection you want, select Image < Crop and the selected area will remain. Now there is less chalkboard in the image. Save this image. You may want to include the word Acrop@ in your file name so you can easily recognize the file at a later time, e.g. samplecrop.jpg
To Deselect the AMarching Ants@ You may find the image still contains the outline (Marching Ants) for the selection tool. To remove the selection, click on Select < Deselect on the top menu or use Ctrl < D.
Resizing an Image The actual size of an image can be determined by selecting Image < Resize < Image Size from the menu bar and observing the dimensions. Be aware that large size images need more memory so try to estimate the size of the image for your document and try to resize the image before you import it into your document. Open an Image (File < Open). Select Image < Resize < Image Size. The dialogue box shown on the right appears. We will size the photo in pixels so ensure that pixels are the selected units for width and height. To keep the correct ratios of length and width, place a checkmark in the Constrain Proportions box as shown. Also ensure the Resample Image box is checked. You can now change the size of your photo by changing the value in the pixel dimension Width box. Since you have the “Constrain Proportions” box checked, the height will automatically change. Click OK to make the changes.
Web Page Images When preparing images for web pages, it is desirable to re-size images to a specific size. A good width for a Ahead and shoulders@ photograph on a web page is between 200 and 250 pixels. Open your cropped image, select Image < Resize < Image Size and ensure the Constrain proportions box is checked. Change the width to 250 pixels and the height will change proportionally. Save the file as sample250.jpg You also may wish to create small images to be used as thumbnail images on a web site. These are usually between 100 and 200 pixels wide. Just set the width to 100, 150 or 200 pixels and the height will be automatically selected.
www.dfres.com Adobe Photoshop Elements 5.0 Page 11
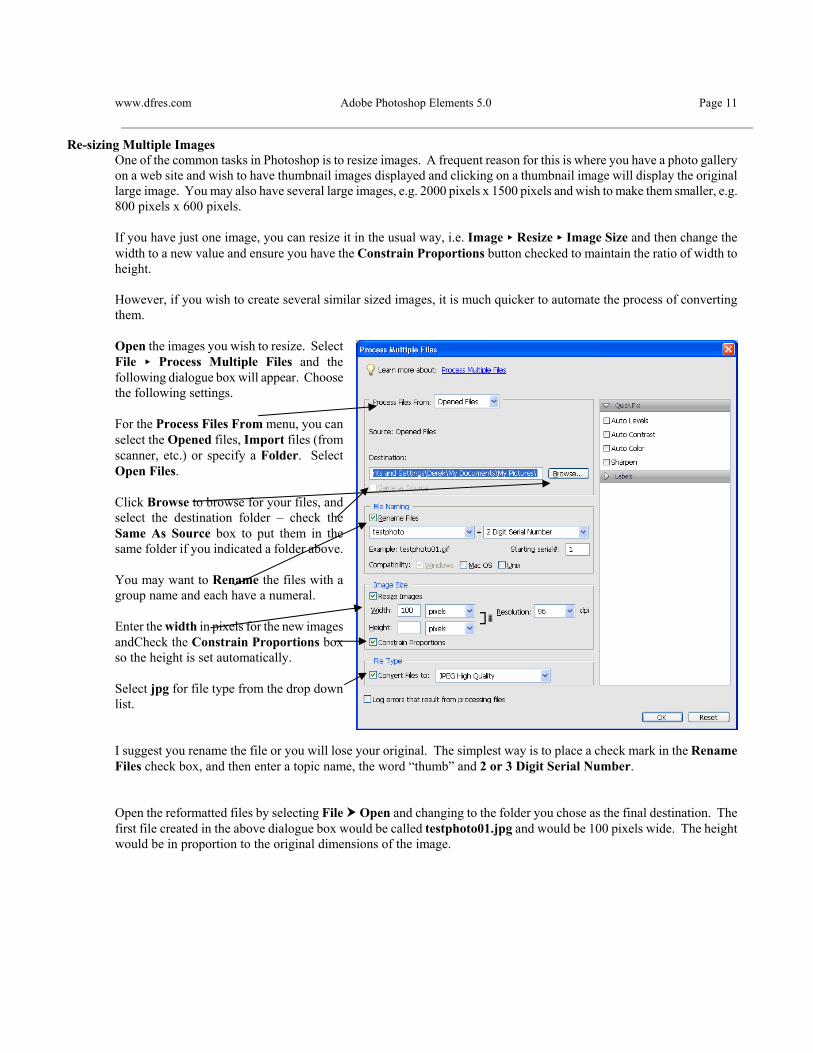
Re-sizing Multiple Images One of the common tasks in Photoshop is to resize images. A frequent reason for this is where you have a photo gallery on a web site and wish to have thumbnail images displayed and clicking on a thumbnail image will display the original large image. You may also have several large images, e.g. 2000 pixels x 1500 pixels and wish to make them smaller, e.g. 800 pixels x 600 pixels. If you have just one image, you can resize it in the usual way, i.e. Image < Resize < Image Size and then change the width to a new value and ensure you have the Constrain Proportions button checked to maintain the ratio of width to height. However, if you wish to create several similar sized images, it is much quicker to automate the process of converting them. Open the images you wish to resize. Select File < Process Multiple Files and the following dialogue box will appear. Choose the following settings. For the Process Files From menu, you can select the Opened files, Import files (from scanner, etc.) or specify a Folder. Select Open Files. Click Browse to browse for your files, and select the destination folder – check the Same As Source box to put them in the same folder if you indicated a folder above. You may want to Rename the files with a group name and each have a numeral. Enter the width in pixels for the new images andCheck the Constrain Proportions box so the height is set automatically. Select jpg for file type from the drop down list. I suggest you rename the file or you will lose your original. The simplest way is to place a check mark in the Rename Files check box, and then enter a topic name, the word “thumb” and 2 or 3 Digit Serial Number. Open the reformatted files by selecting File Open and changing to the folder you chose as the final destination. The first file created in the above dialogue box would be called testphoto01.jpg and would be 100 pixels wide. The height would be in proportion to the original dimensions of the image.
www.dfres.com Adobe Photoshop Elements 5.0 Page 12
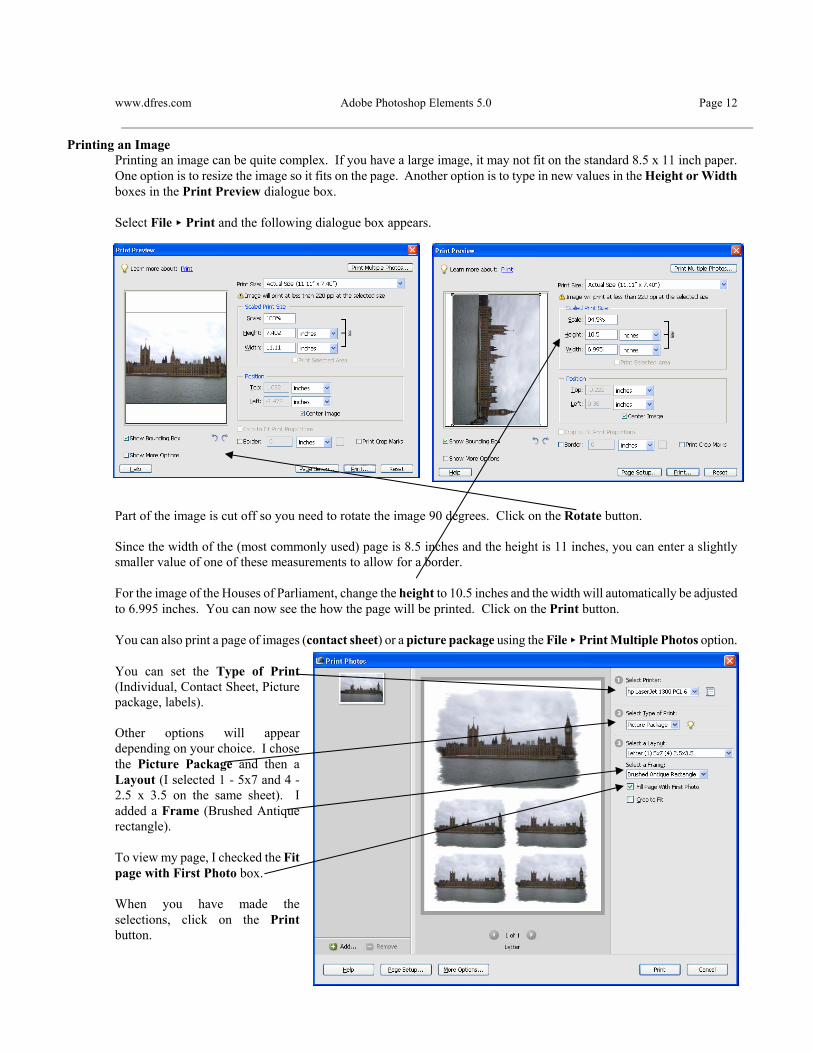
Printing an Image Printing an image can be quite complex. If you have a large image, it may not fit on the standard 8.5 x 11 inch paper. One option is to resize the image so it fits on the page. Another option is to type in new values in the Height or Width boxes in the Print Preview dialogue box. Select File < Print and the following dialogue box appears.
Part of the image is cut off so you need to rotate the image 90 degrees. Click on the Rotate button. Since the width of the (most commonly used) page is 8.5 inches and the height is 11 inches, you can enter a slightly smaller value of one of these measurements to allow for a border. For the image of the Houses of Parliament, change the height to 10.5 inches and the width will automatically be adjusted to 6.995 inches. You can now see the how the page will be printed. Click on the Print button. You can also print a page of images (contact sheet) or a picture package using the File < Print Multiple Photos option. You can set the Type of Print (Individual, Contact Sheet, Picture package, labels). Other options will appear depending on your choice. I chose the Picture Package and then a Layout (I selected 1 - 5x7 and 4 - 2.5 x 3.5 on the same sheet). I added a Frame (Brushed Antique rectangle). To view my page, I checked the Fit page with First Photo box. When you have made the selections, click on the Print button.
www.dfres.com Adobe Photoshop Elements 5.0 Page 13
Layers This section will introduce you to several ways of selecting objects on an image, and moving the object to another image. It will also show how images can have several “layers” selection of layers. You will select and remove cloudy sky from and image and replace it with bright blue and white clouds, and then add a person to the scene.
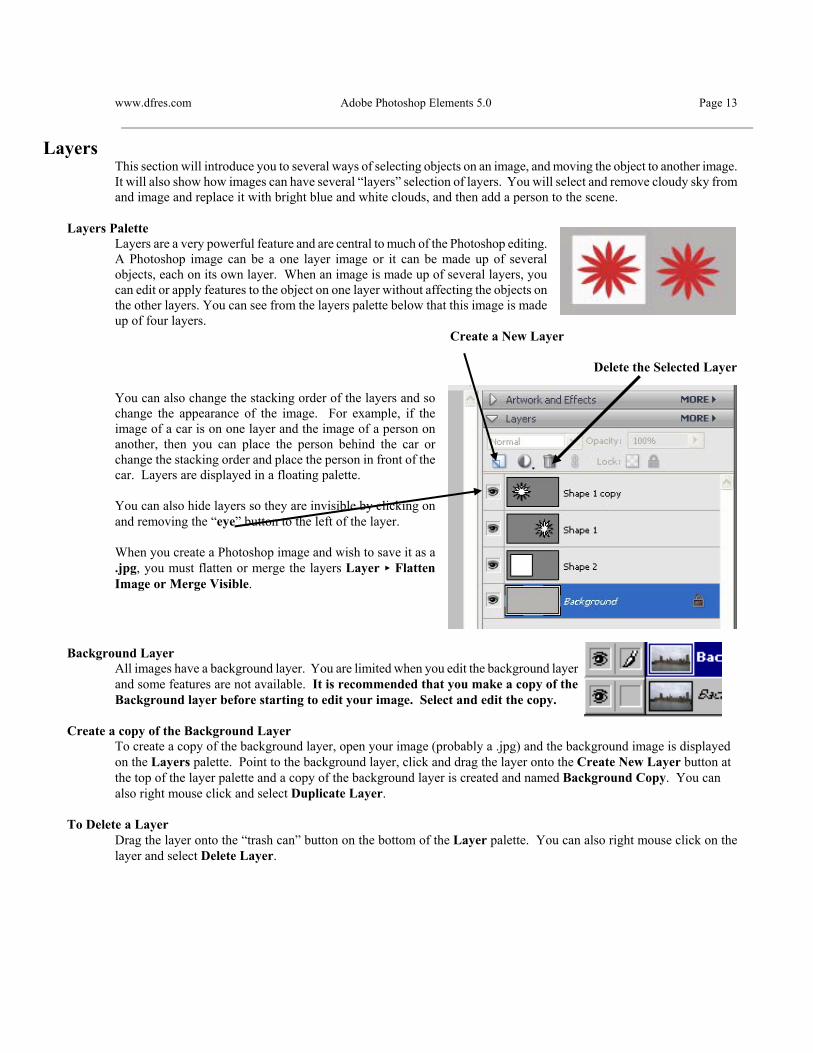
Layers Palette Layers are a very powerful feature and are central to much of the Photoshop editing. A Photoshop image can be a one layer image or it can be made up of several objects, each on its own layer. When an image is made up of several layers, you can edit or apply features to the object on one layer without affecting the objects on the other layers. You can see from the layers palette below that this image is made up of four layers.
Create a New Layer
Delete the Selected Layer You can also change the stacking order of the layers and so change the appearance of the image. For example, if the image of a car is on one layer and the image of a person on another, then you can place the person behind the car or change the stacking order and place the person in front of the car. Layers are displayed in a floating palette. You can also hide layers so they are invisible by clicking on and removing the “eye” button to the left of the layer. When you create a Photoshop image and wish to save it as a .jpg, you must flatten or merge the layers Layer < Flatten Image or Merge Visible.
Background Layer
All images have a background layer. You are limited when you edit the background layer and some features are not available. It is recommended that you make a copy of the Background layer before starting to edit your image. Select and edit the copy.
Create a copy of the Background Layer
To create a copy of the background layer, open your image (probably a .jpg) and the background image is displayed on the Layers palette. Point to the background layer, click and drag the layer onto the Create New Layer button at the top of the layer palette and a copy of the background layer is created and named Background Copy. You can also right mouse click and select Duplicate Layer.
To Delete a Layer Drag the layer onto the “trash can” button on the bottom of the Layer palette. You can also right mouse click on the layer and select Delete Layer.
www.dfres.com Adobe Photoshop Elements 5.0 Page 14
Selection Tools You have four selection tools in Adobe Photoshop Elements. They are used to select areas of an image, e.g. the sky, so you can apply a command to the selected area, e.g. crop, filter, colour, etc. and only the selected area will be affected. There will be dotted line (marching ants) around the selection. Use Ctrl < D to remove the selection or Select <Deselect.
Rectangular/Elliptical Marquee Tool These tools are used to select a rectangle or ellipse. Click and hold down the mouse button on the small triangle on the bottom right to display the elliptical tool. It can also be selected on the Options toolbar.
Magic Wand Tool This is a valuable tool allowing you to click on an area of your image, and pixels of the same general colour will be selected. There is a tolerance setting which increases or decreases the sensitivity of your selection. This tool is used in conjunction with the shift key. Holding down the shift key will allow you to add more pixels to those already selected.
Lasso Tool There are three different lasso tools, the basic lasso tool, the magnetic and the polygonal lasso tools. (Click and hold down the mouse button on the small triangle on the bottom right to display them),
Selection Brush Tool There are the Selection Brush Tool and the magic Selection Brush Tool. Again, click and hold down the mouse button on the small triangle on the bottom right to display them.
Photoshop Touchup Open the image called housparl.jpg
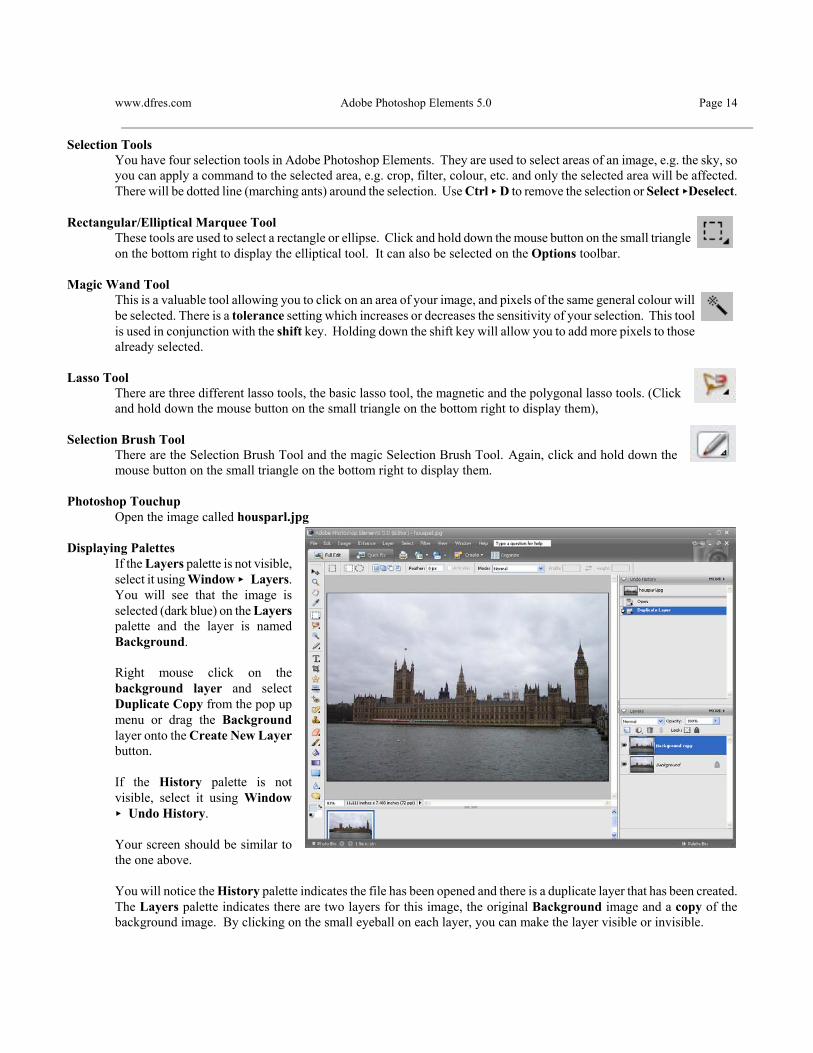
Displaying Palettes If the Layers palette is not visible, select it using Window < Layers. You will see that the image is selected (dark blue) on the Layers palette and the layer is named Background. Right mouse click on the background layer and select Duplicate Copy from the pop up menu or drag the Background layer onto the Create New Layer button. If the History palette is not visible, select it using Window < Undo History. Your screen should be similar to the one above. You will notice the History palette indicates the file has been opened and there is a duplicate layer that has been created. The Layers palette indicates there are two layers for this image, the original Background image and a copy of the background image. By clicking on the small eyeball on each layer, you can make the layer visible or invisible.
www.dfres.com Adobe Photoshop Elements 5.0 Page 15 Delete the Background layer by dragging the layer into the trash can or by clicking the right mouse button and selecting Delete Layer. We will work on the Background Copy layer which should now be selected.
Auto Smart Fix – Auto Levels This image is quite dark. Select Enhance < Auto Levels or Enhance <Auto Smart Fix. The image should be brighter and you should see more detail. Select your preferred appearance.
Creating Clouds The sky is quite overcast since the photo was taken on one of the few cloudy days in England, so we will change the grey sky to the more usual blue. Select the Magic Wand (selection) tool, set the Tolerance (on the Options toolbar at the top of the screen) to 20 and click on the sky. Some sky will be selected. Hold down (and continue to hold down the Shift key) and keep clicking in areas that are not selected until all the sky is selected. Press the Delete key to delete the grey sky. You should see a checkered background showing the sky has been removed from this layer and you now have a transparent background. If you were working on the original background layer, the background would be white. It is often an advantage to have a transparent background layer and this is one of the reasons we work on a copy of the background layer - the copy can have a transparent background. Examine the foreground and background colour indicator at the bottom of the vertical toolbar. Click on the Set Foreground Colour square (front one) and from the colour picker, choose a light blue. Click on the Set background Colour square and select white (it may already be white). Select Filter < Render < Clouds and the sky should change to a bright blue sky with some white clouds. Try different shades of blue while the sky is still selected. If the blue, cloudy sky is still selected, use Ctrl < D to de-select the sky or Select < Deselect.
Blur If you feel the outline of the buildings is a little “stark”, select the Blur” tool, set the brush at approximately 20 pixels and move the blur tool over the outline to soften the edges. Save the image as parlbluesky.jpg.
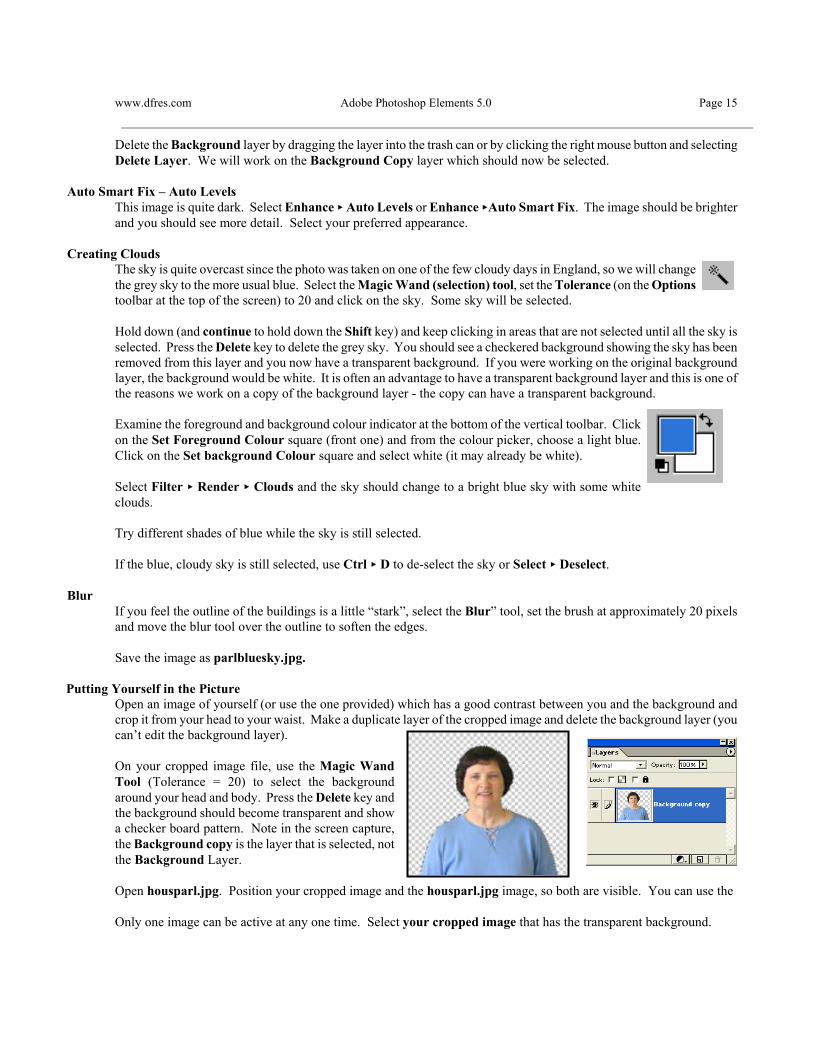
Putting Yourself in the Picture Open an image of yourself (or use the one provided) which has a good contrast between you and the background and crop it from your head to your waist. Make a duplicate layer of the cropped image and delete the background layer (you can’t edit the background layer). On your cropped image file, use the Magic Wand Tool (Tolerance = 20) to select the background around your head and body. Press the Delete key and the background should become transparent and show a checker board pattern. Note in the screen capture, the Background copy is the layer that is selected, not the Background Layer. Open housparl.jpg. Position your cropped image and the housparl.jpg image, so both are visible. You can use the Only one image can be active at any one time. Select your cropped image that has the transparent background.
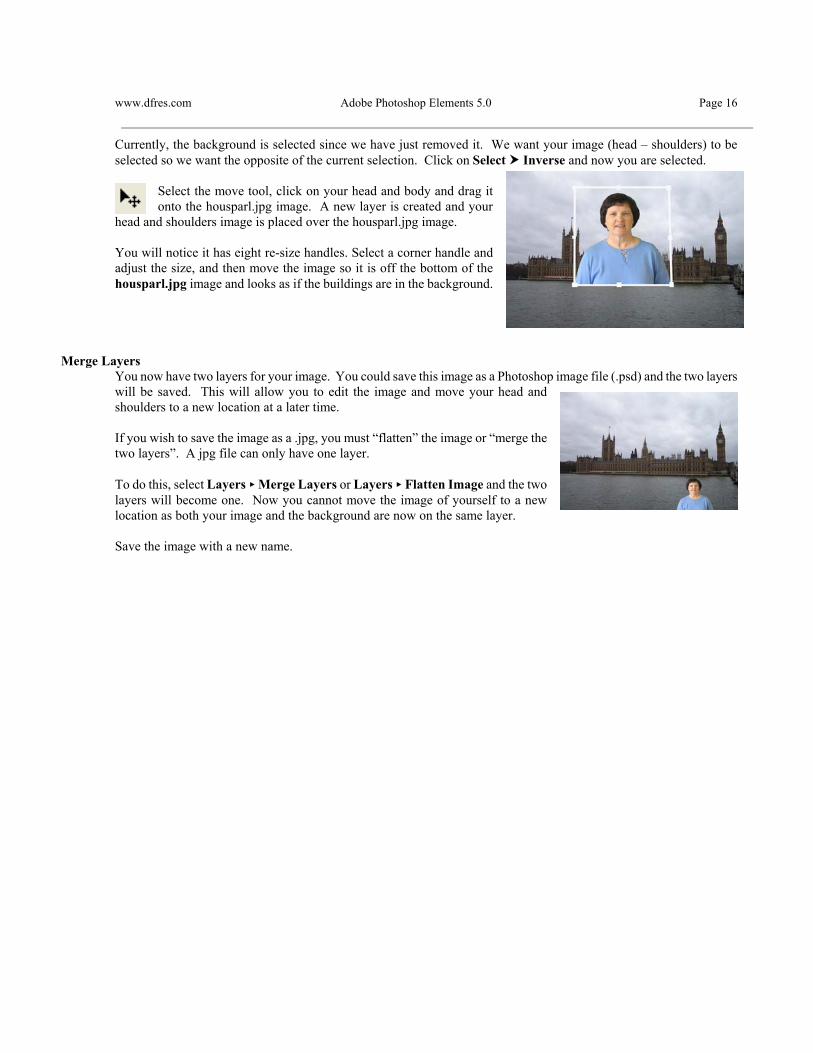
www.dfres.com Adobe Photoshop Elements 5.0 Page 16 Currently, the background is selected since we have just removed it. We want your image (head – shoulders) to be selected so we want the opposite of the current selection. Click on Select Inverse and now you are selected.
Select the move tool, click on your head and body and drag it onto the housparl.jpg image. A new layer is created and your
head and shoulders image is placed over the housparl.jpg image. You will notice it has eight re-size handles. Select a corner handle and adjust the size, and then move the image so it is off the bottom of the housparl.jpg image and looks as if the buildings are in the background.
Merge Layers
You now have two layers for your image. You could save this image as a Photoshop image file (.psd) and the two layers will be saved. This will allow you to edit the image and move your head and shoulders to a new location at a later time. If you wish to save the image as a .jpg, you must “flatten” the image or “merge the two layers”. A jpg file can only have one layer. To do this, select Layers < Merge Layers or Layers < Flatten Image and the two layers will become one. Now you cannot move the image of yourself to a new location as both your image and the background are now on the same layer. Save the image with a new name.