Embed Size (px)
Citation preview
Adobe Photoshop 7.0
Beginner
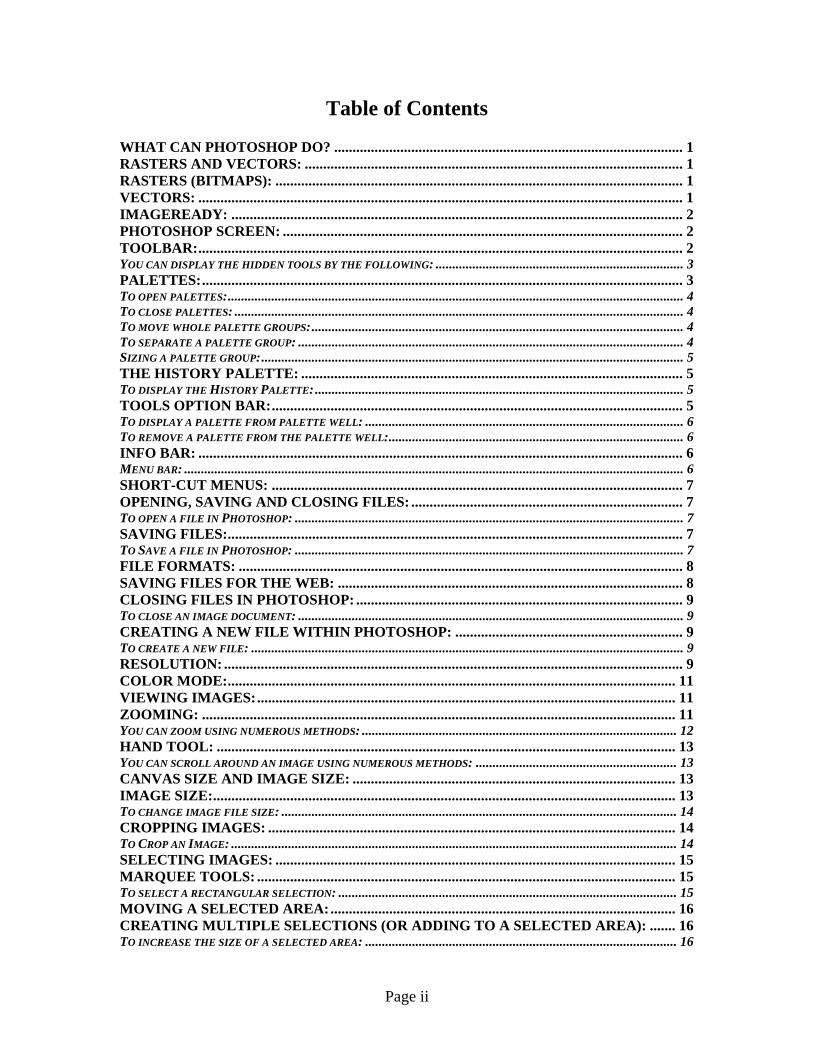
Table of Contents WHAT CAN PHOTOSHOP DO? ............................................................................................... 1 RASTERS AND VECTORS: ....................................................................................................... 1 RASTERS (BITMAPS): ............................................................................................................... 1 VECTORS: .................................................................................................................................... 1 IMAGEREADY: ........................................................................................................................... 2 PHOTOSHOP SCREEN: ............................................................................................................. 2 TOOLBAR:.................................................................................................................................... 2 YOU CAN DISPLAY THE HIDDEN TOOLS BY THE FOLLOWING: .......................................................................... 3 PALETTES:................................................................................................................................... 3 TO OPEN PALETTES:........................................................................................................................................ 4 TO CLOSE PALETTES: ...................................................................................................................................... 4 TO MOVE WHOLE PALETTE GROUPS:............................................................................................................... 4 TO SEPARATE A PALETTE GROUP: ................................................................................................................... 4 SIZING A PALETTE GROUP:.............................................................................................................................. 5 THE HISTORY PALETTE: ........................................................................................................ 5 TO DISPLAY THE HISTORY PALETTE:.............................................................................................................. 5 TOOLS OPTION BAR:................................................................................................................ 5 TO DISPLAY A PALETTE FROM PALETTE WELL: ............................................................................................... 6 TO REMOVE A PALETTE FROM THE PALETTE WELL:........................................................................................ 6 INFO BAR: .................................................................................................................................... 6 MENU BAR: ..................................................................................................................................................... 6 SHORT-CUT MENUS: ................................................................................................................ 7 OPENING, SAVING AND CLOSING FILES: .......................................................................... 7 TO OPEN A FILE IN PHOTOSHOP: .................................................................................................................... 7 SAVING FILES:............................................................................................................................ 7 TO SAVE A FILE IN PHOTOSHOP: .................................................................................................................... 7 FILE FORMATS: ......................................................................................................................... 8 SAVING FILES FOR THE WEB: .............................................................................................. 8 CLOSING FILES IN PHOTOSHOP: ......................................................................................... 9 TO CLOSE AN IMAGE DOCUMENT: ................................................................................................................... 9 CREATING A NEW FILE WITHIN PHOTOSHOP: .............................................................. 9 TO CREATE A NEW FILE: ................................................................................................................................. 9 RESOLUTION: ............................................................................................................................. 9 COLOR MODE:.......................................................................................................................... 11 VIEWING IMAGES:.................................................................................................................. 11 ZOOMING: ................................................................................................................................. 11 YOU CAN ZOOM USING NUMEROUS METHODS: .............................................................................................. 12 HAND TOOL: ............................................................................................................................. 13 YOU CAN SCROLL AROUND AN IMAGE USING NUMEROUS METHODS: ............................................................ 13 CANVAS SIZE AND IMAGE SIZE: ........................................................................................ 13 IMAGE SIZE:.............................................................................................................................. 13 TO CHANGE IMAGE FILE SIZE: ...................................................................................................................... 14 CROPPING IMAGES: ............................................................................................................... 14 TO CROP AN IMAGE: ..................................................................................................................................... 14 SELECTING IMAGES: ............................................................................................................. 15 MARQUEE TOOLS: .................................................................................................................. 15 TO SELECT A RECTANGULAR SELECTION: ..................................................................................................... 15 MOVING A SELECTED AREA:.............................................................................................. 16 CREATING MULTIPLE SELECTIONS (OR ADDING TO A SELECTED AREA): ....... 16 TO INCREASE THE SIZE OF A SELECTED AREA: ............................................................................................. 16
Page ii
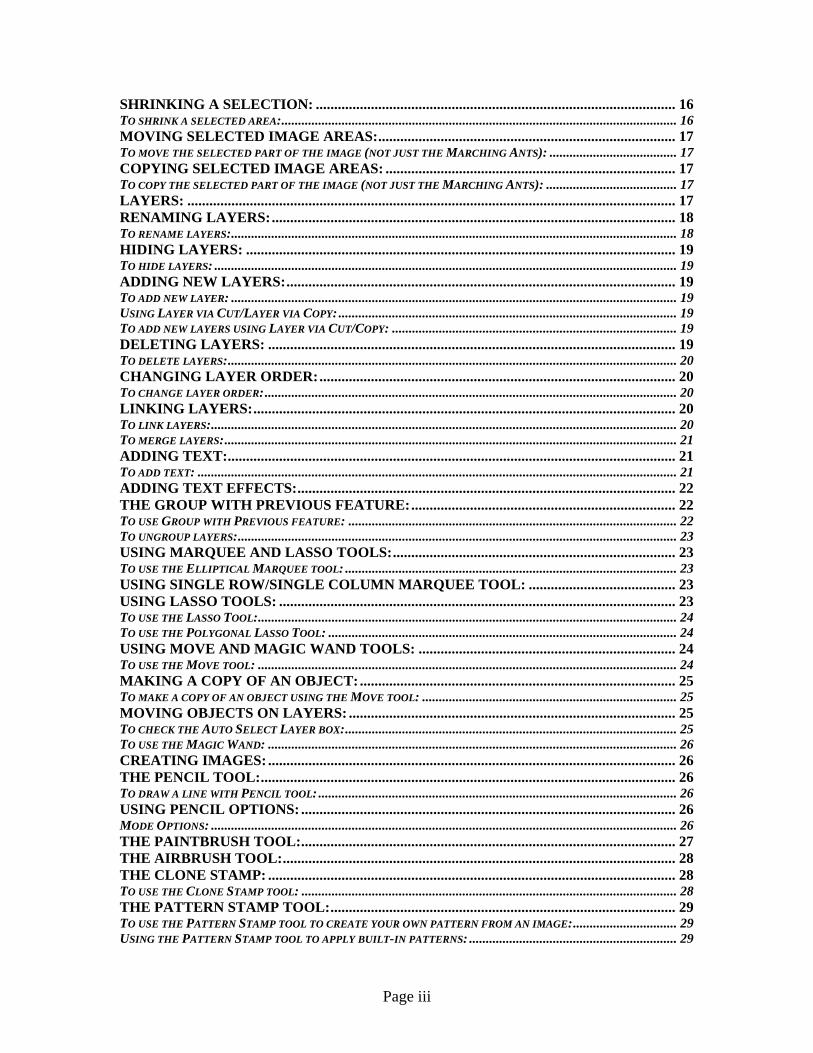
SHRINKING A SELECTION: .................................................................................................. 16 TO SHRINK A SELECTED AREA:...................................................................................................................... 16 MOVING SELECTED IMAGE AREAS:................................................................................. 17 TO MOVE THE SELECTED PART OF THE IMAGE (NOT JUST THE MARCHING ANTS): ...................................... 17 COPYING SELECTED IMAGE AREAS: ............................................................................... 17 TO COPY THE SELECTED PART OF THE IMAGE (NOT JUST THE MARCHING ANTS): ....................................... 17 LAYERS: ..................................................................................................................................... 17 RENAMING LAYERS:.............................................................................................................. 18 TO RENAME LAYERS:..................................................................................................................................... 18 HIDING LAYERS: ..................................................................................................................... 19 TO HIDE LAYERS: .......................................................................................................................................... 19 ADDING NEW LAYERS:.......................................................................................................... 19 TO ADD NEW LAYER: ..................................................................................................................................... 19 USING LAYER VIA CUT/LAYER VIA COPY:..................................................................................................... 19 TO ADD NEW LAYERS USING LAYER VIA CUT/COPY: ..................................................................................... 19 DELETING LAYERS: ............................................................................................................... 19 TO DELETE LAYERS:...................................................................................................................................... 20 CHANGING LAYER ORDER:................................................................................................. 20 TO CHANGE LAYER ORDER:........................................................................................................................... 20 LINKING LAYERS:................................................................................................................... 20 TO LINK LAYERS:........................................................................................................................................... 20 TO MERGE LAYERS:....................................................................................................................................... 21 ADDING TEXT:.......................................................................................................................... 21 TO ADD TEXT: ............................................................................................................................................... 21 ADDING TEXT EFFECTS:....................................................................................................... 22 THE GROUP WITH PREVIOUS FEATURE:........................................................................ 22 TO USE GROUP WITH PREVIOUS FEATURE: .................................................................................................. 22 TO UNGROUP LAYERS:................................................................................................................................... 23 USING MARQUEE AND LASSO TOOLS:............................................................................. 23 TO USE THE ELLIPTICAL MARQUEE TOOL: ................................................................................................... 23 USING SINGLE ROW/SINGLE COLUMN MARQUEE TOOL: ........................................ 23 USING LASSO TOOLS: ............................................................................................................ 23 TO USE THE LASSO TOOL:............................................................................................................................. 24 TO USE THE POLYGONAL LASSO TOOL: ........................................................................................................ 24 USING MOVE AND MAGIC WAND TOOLS: ...................................................................... 24 TO USE THE MOVE TOOL: ............................................................................................................................. 24 MAKING A COPY OF AN OBJECT:...................................................................................... 25 TO MAKE A COPY OF AN OBJECT USING THE MOVE TOOL: ............................................................................ 25 MOVING OBJECTS ON LAYERS: ......................................................................................... 25 TO CHECK THE AUTO SELECT LAYER BOX:................................................................................................... 25 TO USE THE MAGIC WAND: .......................................................................................................................... 26 CREATING IMAGES: ............................................................................................................... 26 THE PENCIL TOOL:................................................................................................................. 26 TO DRAW A LINE WITH PENCIL TOOL: ........................................................................................................... 26 USING PENCIL OPTIONS: ...................................................................................................... 26 MODE OPTIONS: ........................................................................................................................................... 26 THE PAINTBRUSH TOOL:...................................................................................................... 27 THE AIRBRUSH TOOL:........................................................................................................... 28 THE CLONE STAMP: ............................................................................................................... 28 TO USE THE CLONE STAMP TOOL: ................................................................................................................ 28 THE PATTERN STAMP TOOL:.............................................................................................. 29 TO USE THE PATTERN STAMP TOOL TO CREATE YOUR OWN PATTERN FROM AN IMAGE:............................... 29 USING THE PATTERN STAMP TOOL TO APPLY BUILT-IN PATTERNS: .............................................................. 29
Page iii
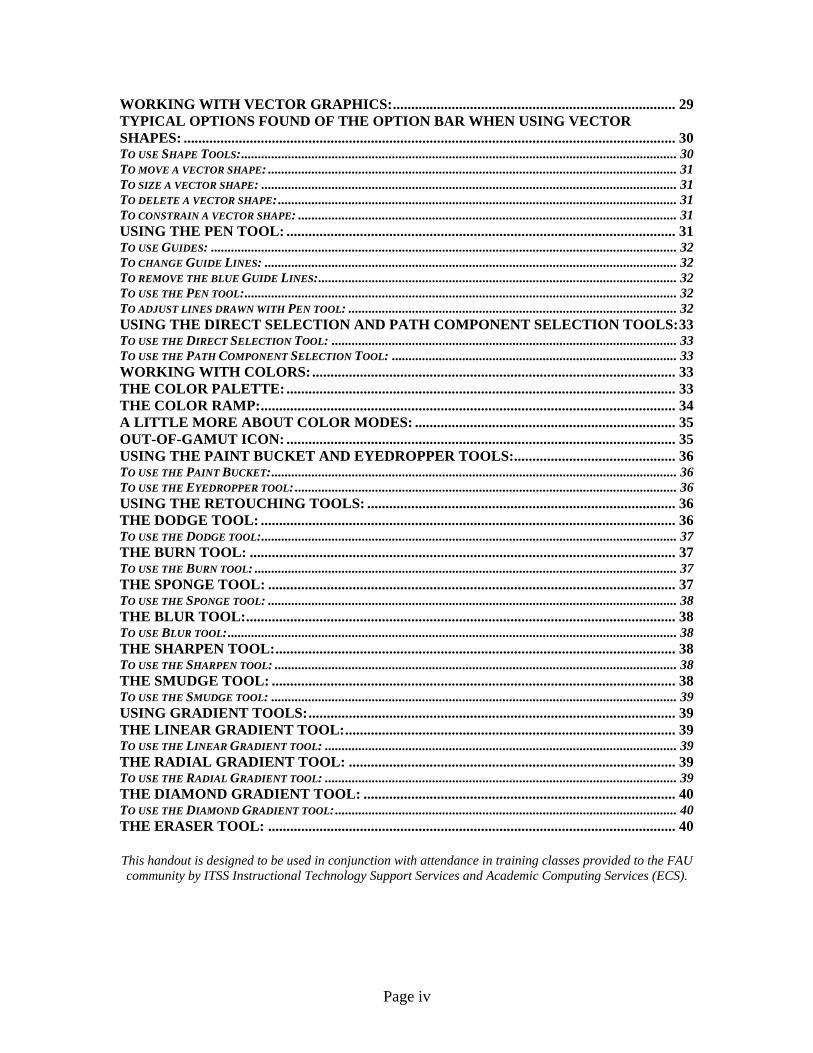
WORKING WITH VECTOR GRAPHICS:............................................................................. 29 TYPICAL OPTIONS FOUND OF THE OPTION BAR WHEN USING VECTOR SHAPES: ...................................................................................................................................... 30 TO USE SHAPE TOOLS:.................................................................................................................................. 30 TO MOVE A VECTOR SHAPE: .......................................................................................................................... 31 TO SIZE A VECTOR SHAPE: ............................................................................................................................ 31 TO DELETE A VECTOR SHAPE:....................................................................................................................... 31 TO CONSTRAIN A VECTOR SHAPE: ................................................................................................................. 31 USING THE PEN TOOL: .......................................................................................................... 31 TO USE GUIDES: ........................................................................................................................................... 32 TO CHANGE GUIDE LINES: ........................................................................................................................... 32 TO REMOVE THE BLUE GUIDE LINES:........................................................................................................... 32 TO USE THE PEN TOOL:................................................................................................................................. 32 TO ADJUST LINES DRAWN WITH PEN TOOL: .................................................................................................. 32 USING THE DIRECT SELECTION AND PATH COMPONENT SELECTION TOOLS:33 TO USE THE DIRECT SELECTION TOOL: ....................................................................................................... 33 TO USE THE PATH COMPONENT SELECTION TOOL: ..................................................................................... 33 WORKING WITH COLORS:................................................................................................... 33 THE COLOR PALETTE:.......................................................................................................... 33 THE COLOR RAMP:................................................................................................................. 34 A LITTLE MORE ABOUT COLOR MODES: ....................................................................... 35 OUT-OF-GAMUT ICON: .......................................................................................................... 35 USING THE PAINT BUCKET AND EYEDROPPER TOOLS:............................................ 36 TO USE THE PAINT BUCKET:......................................................................................................................... 36 TO USE THE EYEDROPPER TOOL:.................................................................................................................. 36 USING THE RETOUCHING TOOLS: .................................................................................... 36 THE DODGE TOOL: ................................................................................................................. 36 TO USE THE DODGE TOOL:............................................................................................................................ 37 THE BURN TOOL: .................................................................................................................... 37 TO USE THE BURN TOOL: .............................................................................................................................. 37 THE SPONGE TOOL: ............................................................................................................... 37 TO USE THE SPONGE TOOL: .......................................................................................................................... 38 THE BLUR TOOL:..................................................................................................................... 38 TO USE BLUR TOOL:...................................................................................................................................... 38 THE SHARPEN TOOL:............................................................................................................. 38 TO USE THE SHARPEN TOOL: ........................................................................................................................ 38 THE SMUDGE TOOL: .............................................................................................................. 38 TO USE THE SMUDGE TOOL: ......................................................................................................................... 39 USING GRADIENT TOOLS:.................................................................................................... 39 THE LINEAR GRADIENT TOOL:.......................................................................................... 39 TO USE THE LINEAR GRADIENT TOOL: ......................................................................................................... 39 THE RADIAL GRADIENT TOOL: ......................................................................................... 39 TO USE THE RADIAL GRADIENT TOOL: ......................................................................................................... 39 THE DIAMOND GRADIENT TOOL: ..................................................................................... 40 TO USE THE DIAMOND GRADIENT TOOL:...................................................................................................... 40 THE ERASER TOOL: ............................................................................................................... 40 This handout is designed to be used in conjunction with attendance in training classes provided to the FAU community by ITSS Instructional Technology Support Services and Academic Computing Services (ECS).
Page iv
What can Photoshop do? Photoshop is a powerful graphics creation and editing application used by professional and amateur image designers alike to create, modify and correct images and make them ready for Web or Print. Photoshop allows you to create new images within the application, import images from other graphics applications, or scan in images from photographs, transparencies, negatives or other graphics. You can also bring in images by capturing a video image, or importing other digital images such as from a digital camera or by the Kodak Photo CD process. Rasters and Vectors: Computer graphics fall in to two main categories – raster and vector. Photoshop allows you to work with both kinds and also one Photoshop file can contain both bitmap and vector data. You may have noticed that when you look at an image on a computer screen, some seem to be very fuzzy and unclear while others seem to keep their clarity no matter how large you may resize them. What you are noticing is the difference between a raster (bitmap) graphic and a vector image. Rasters (bitmaps): With a raster graphic, the clarity of the image depends entirely on the number of pixels it contains. A pixel is a picture element and is the smallest whole unit that makes up a bitmap image. You can think of a pixel as a little box of color, and a whole bunch of pixels put together create one whole bitmap image. Each pixel is assigned a specific location and color value in the image. Bitmap images are the most common electronic medium for continuous-tone images, (i.e. .gif, .jpg, .bmp, .tiff) such as photographs, because they can represent subtle graduations of shades and colors. Bitmaps are also resolution dependent, meaning they contain a fixed number of pixels. The more pixels a bitmap contains the better quality picture (also bigger the file size). As a result, they can also lose detail and appear jagged or blurry if they are resized larger on screen or if they are printed at a lower resolution than they were created for. Vectors: Vector graphics aren’t made of up pixels, but rather mathematical calculations called vectors (i.e .eps, .wmf, .cmx). These mathematical calculations can create lines and
Page 1 10/10/2003
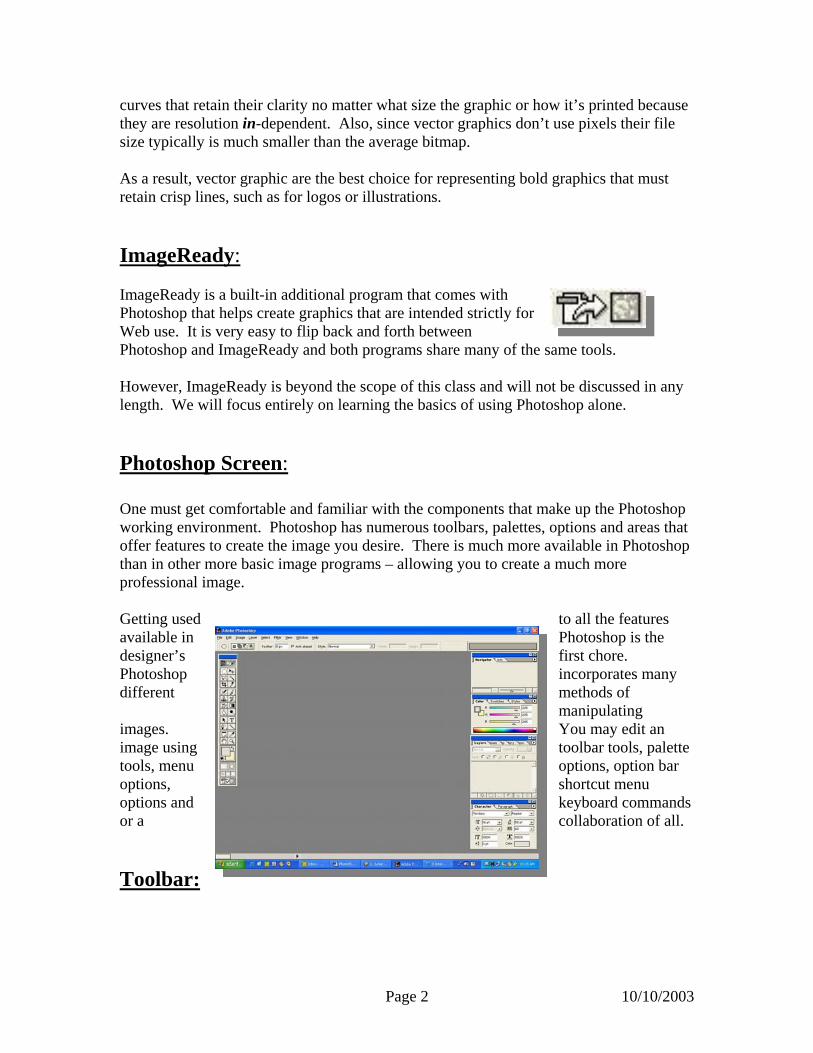
curves that retain their clarity no matter what size the graphic or how it’s printed because they are resolution in-dependent. Also, since vector graphics don’t use pixels their file size typically is much smaller than the average bitmap. As a result, vector graphic are the best choice for representing bold graphics that must retain crisp lines, such as for logos or illustrations. ImageReady: ImageReady is a built-in additional program that comes with Photoshop that helps create graphics that are intended strictly for Web use. It is very easy to flip back and forth between Photoshop and ImageReady and both programs share many of the same tools. However, ImageReady is beyond the scope of this class and will not be discussed in any length. We will focus entirely on learning the basics of using Photoshop alone. Photoshop Screen: One must get comfortable and familiar with the components that make up the Photoshop working environment. Photoshop has numerous toolbars, palettes, options and areas that offer features to create the image you desire. There is much more available in Photoshop than in other more basic image programs – allowing you to create a much more professional image. Getting used to all the features available in Photoshop is the designer’s first chore. Photoshop incorporates many different methods of
manipulating images. You may edit an image using toolbar tools, palette tools, menu options, option bar options, shortcut menu options and keyboard commands or a collaboration of all. Toolbar:
Page 2 10/10/2003
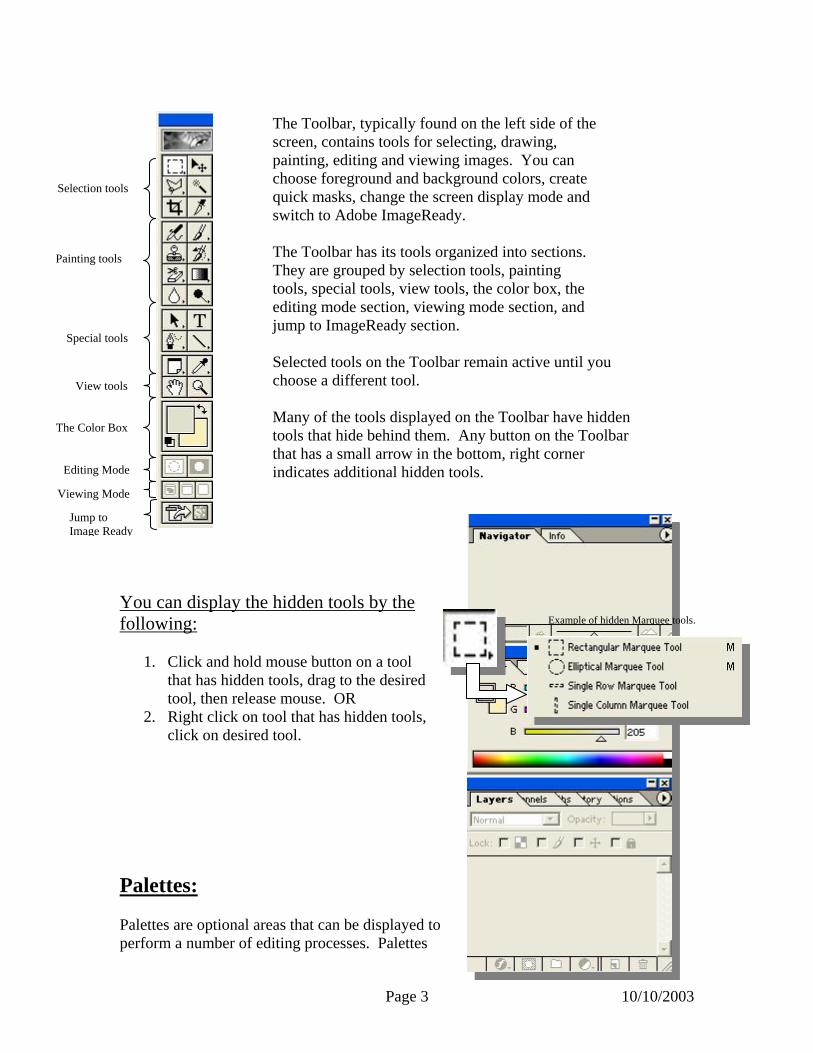
The Toolbar, typically found on the left side of the screen, contains tools for selecting, drawing, painting, editing and viewing images. You can choose foreground and background colors, create quick masks, change the screen display mode and switch to Adobe ImageReady.
The Toolbar has its tools organized into sections. They are grouped by selection tools, painting tools, special tools, view tools, the color box, the editing mode section, viewing mode section, and jump to ImageReady section.
Selected tools on the Toolbar remain active until you choose a different tool.
Many of the tools displayed on the Toolbar have hidden tools that hide behind them. Any button on the Toolbar that has a small arrow in the bottom, right corner indicates additional hidden tools.
Viewing Mode
y
Editing Mode
The Color Box
View tools
Special tools
Painting tools
Selection tools
Jump to Image Read
You can display the hidden tools by the following:
1. Click and hold mouse button on a tool that has hidden tools, drag to the desired tool, then release mouse. OR
2. Right click on tool that has hidden tools, click on desired tool.
Palettes: Palettes are optional areas that can be displayed to perform a number of editing processes. Palettes
Page 3
Example of hidden Marquee tools.
10/10/2003
allow you to change tool settings, select colors, work with layers, channels and p There are ten (10) palette
aths, etc.
s available in Photoshop, however there are three (3) that will ppear by default when you open Photoshop (if not manually closed); Navigator, Color
ypically displayed grouped together, by default. However you can split alettes into their own group or combine different palettes together to form a new group.
bar
e opened, closed, moved and sized at will.
aand Layers. Palettes are tpYou can also keep palettes stored, but out of the way, by keeping them in the Optionspalette well. Palettes can b To open palettes:
1. Choose Window from Menu bar. 2. Show desired palette.
To close palettes:
1. Click X in upper, right corner of palette OR 2. Choose Window from Menu bar and close desired palette.
To move whole palette groups:
1. Click and hold on Title bar of palette group. 2. Drag to new location
ot be docked, but only float on the screen.Palettes can n
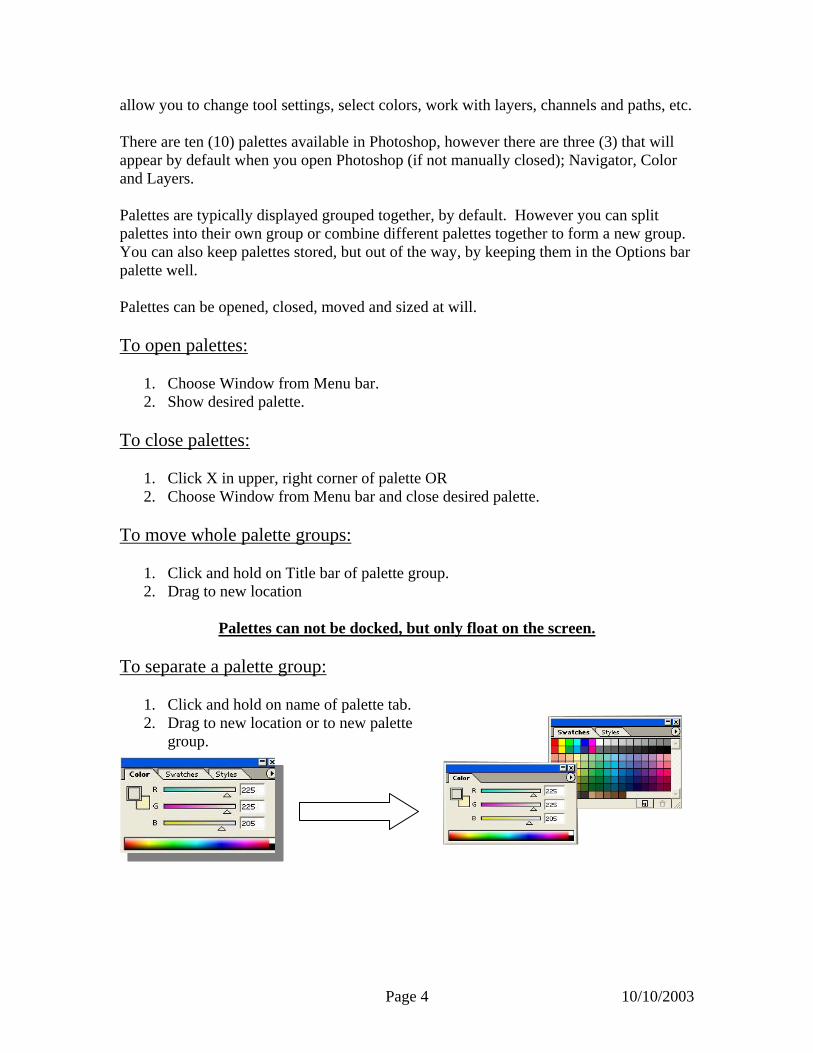
To separate a
palette group:
1. Click and hold on name of palette tab. 2. Drag to new location or to new palette
group.
Page 4 10/10/2003
Sizing a palette group: 1. Point to any edge of the palette group until a double-headed arrow appears. 2. Click and hold with double-headed arrow. 3. Drag in the direction you wish to size the palette group.
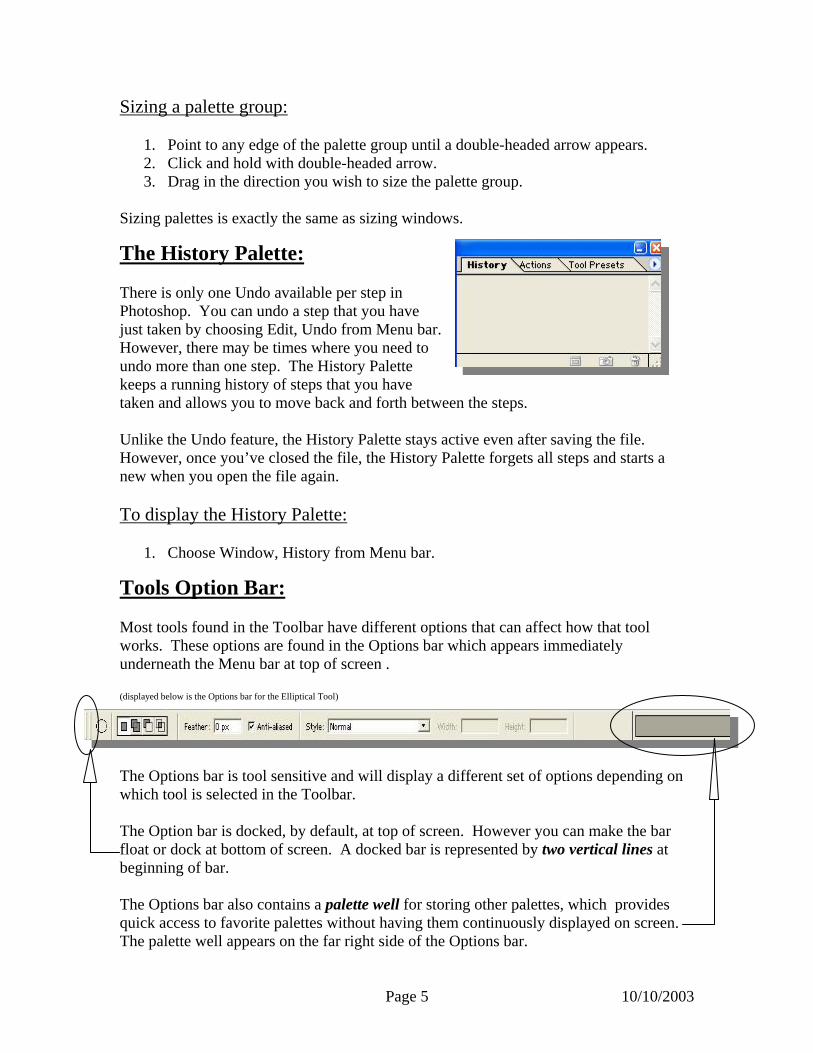
Sizing palettes is exactly the same as sizing windows. The History Palette: There is only one Undo available per step in Photoshop. You can undo a step that you have just taken by choosing Edit, Undo from Menu bar. However, there may be times where you need to undo more than one step. The History Palette keeps a running history of steps that you have taken and allows you to move back and forth between the steps. Unlike the Undo feature, the History Palette stays active even after saving the file. However, once you’ve closed the file, the History Palette forgets all steps and starts a new when you open the file again. To display the History Palette:
1. Choose Window, History from Menu bar. Tools Option Bar: Most tools found in the Toolbar have different options that can affect how that tool works. These options are found in the Options bar which appears immediately underneath the Menu bar at top of screen . (displayed below is the Options bar for the Elliptical Tool)
The Options bar is tool sensitive and will display a different set of options depending on which tool is selected in the Toolbar. The Option bar is docked, by default, at top of screen. However you can make the bar float or dock at bottom of screen. A docked bar is represented by two vertical lines at beginning of bar. The Options bar also contains a palette well for storing other palettes, which provides quick access to favorite palettes without having them continuously displayed on screen. The palette well appears on the far right side of the Options bar.
Page 5 10/10/2003
To move a palette into the Options bar palette well:
1. Click and hold on name tab of palette. 2. Drag to palette well. 3. Release mouse.
To display a palette from palette well:
1. Simply click on palette name in palette well. To remove a palette from the palette well:
1. Click and hold on name tab of palette in palette well. 2. Drag to new palette group or create new group. 3. Release mouse.
Info Bar: The Info bar (very similar to Microsoft’s Status bar) is positioned at the bottom of the screen. The Info bar contains a Zoom text box, a pop-up menu that displays information about the current document, and an information statement about the current tool selected from Toolbar.
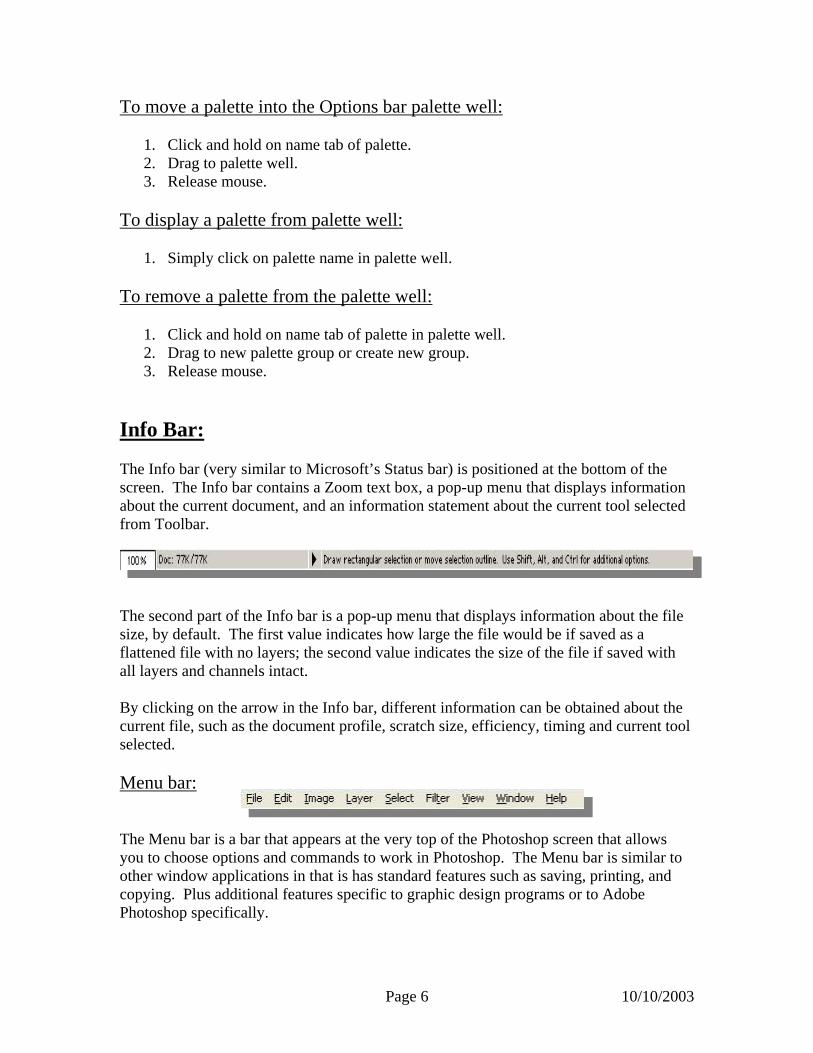
The second part of the Info bar is a pop-up menu that displays information about the file size, by default. The first value indicates how large the file would be if saved as a flattened file with no layers; the second value indicates the size of the file if saved with all layers and channels intact. By clicking on the arrow in the Info bar, different information can be obtained about the current file, such as the document profile, scratch size, efficiency, timing and current tool selected. Menu bar: The Menu bar is a bar that appears at the very top of the Photoshop screen that allows you to choose options and commands to work in Photoshop. The Menu bar is similar to other window applications in that is has standard features such as saving, printing, and copying. Plus additional features specific to graphic design programs or to Adobe Photoshop specifically.
Page 6 10/10/2003
Short-Cut menus: You can also reach menu options by using the Short-Cut menu feature. By right-clicking on specific areas in Photoshop you will display a menu of area-specific options. For example, if you right-click on the Toolbar, you’ll display a menu that allows you to choose hidden tools. If you right click on an image file Title bar, you’ll display a different menu with options to duplicate the image or change the image size, etc. Opening, Saving and Closing Files: In order to be able to edit an image, it must be opened within Photoshop. If there is nothing open in Photoshop most of the Palettes won’t display any data and although you may be able to choose a tool from the Toolbar, you won’t be able to use it. To open a file in Photoshop:
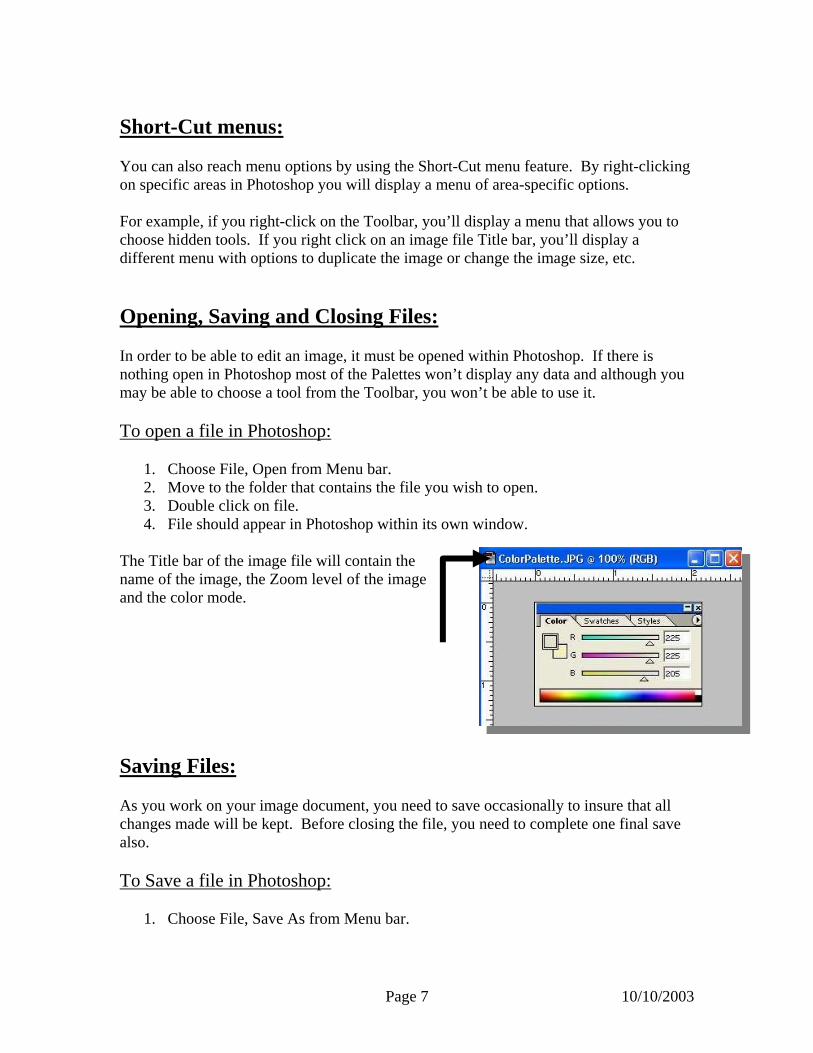
1. Choose File, Open from Menu bar. 2. Move to the folder that contains the file you wish to open. 3. Double click on file. 4. File should appear in Photoshop within its own window.
The Title bar of the image file will contain the name of the image, the Zoom level of the image and the color mode. Saving Files: As you work on your image document, you need to save occasionally to insure that all changes made will be kept. Before closing the file, you need to complete one final save also. To Save a file in Photoshop:
1. Choose File, Save As from Menu bar.
Page 7 10/10/2003
2. Move to the folder in which you want to save the file from the Save In window at top of Save As dialog box.
3. Name the file in the File Name window. 4. Choose the desired file format from the Format window. 5. Click Save button.
Once you’ve saved the document once and wish to keep the same name and location, to continue to save changes can you simply choose File, Save (instead of Save As from Menu bar) or Control + S keyboard shortcut. File Formats: There are multiple different formats that Photoshop allows you to save your images as. By default, Photoshop will save all images as .psd files, which stands for Photoshop Document. However, you can change what format you wish to save the images as. You have options to save the file as a raster or vector image. Images that you intend to use for the WWW, should be saved in either .gif, .jpg, or .png formats. Images that you intend to print for a professional publication, should be saved in .eps, .tiff or Scitex CT formats in CMYK color mode. To change File Formats:
1. Choose File, Save As from Menu bar. 2. Click the pull-down arrow from the Format window at bottom of Save As dialog
box. 3. Choose the desired file format. 4. Click Save.
Saving Files for the Web: In addition to simply saving files as whatever format desired. Photoshop gives you a save option specifically designed to create optimal images for use on the World Wide Web. Without having to flip to the ImageReady program, you can automatically save your images optimized for Web. To Save files for the Web:
1. Choose File, Save for Web from Menu bar. 2. By choosing different format settings from the options area on the right side of
screen, you can optimize your image for best viewing via the WWW. 3. Once you’ve picked the correct format options, click OK.
Page 8 10/10/2003
Closing Files in Photoshop: There are multiples ways to close an image document in Photoshop. You can close a document by using the Close button, Menu bar or Keyboard shortcut. To close an image document:
1. Choose the X in the upper, right corner of the image document window OR 2. Choose File, Close from Menu bar OR 3. Press Control+W on keyboard.
Once a document window has been closed, any other still open images will appear in Photoshop or a gray area will appear indicating there are no more open image documents. Creating a New File within Photoshop: By starting a new image document from within Photoshop, you can set the width and height, resolution, color mode and content of the image before ever starting to work on the image. It’s important to decide how the image is going to be used, either for Print or Web use, so that you can set the image with the correct properties. To create a new file:
1. Choose File, New from Menu bar. 2. Name the new file. 3. Decide the height and width of the file in either inches (by default) or other size
format. 4. Decide what resolution and color mode you wish to use. 5. Decide how you want the background of the image to look by choosing white,
background color or transparent (by default) from the Contents area.
White the background of the image will be white. Background color the background of the image will be whatever you choose
as the background color. Transparent the background of the image will be transparent allowing
whatever is behind the graphic to shine through.
Resolution: Image Resolution refers to the number of pixels in an image. An image’s resolution determines its quality. Images with high image resolution have more and smaller pixels than images with low resolution.
Page 9 10/10/2003
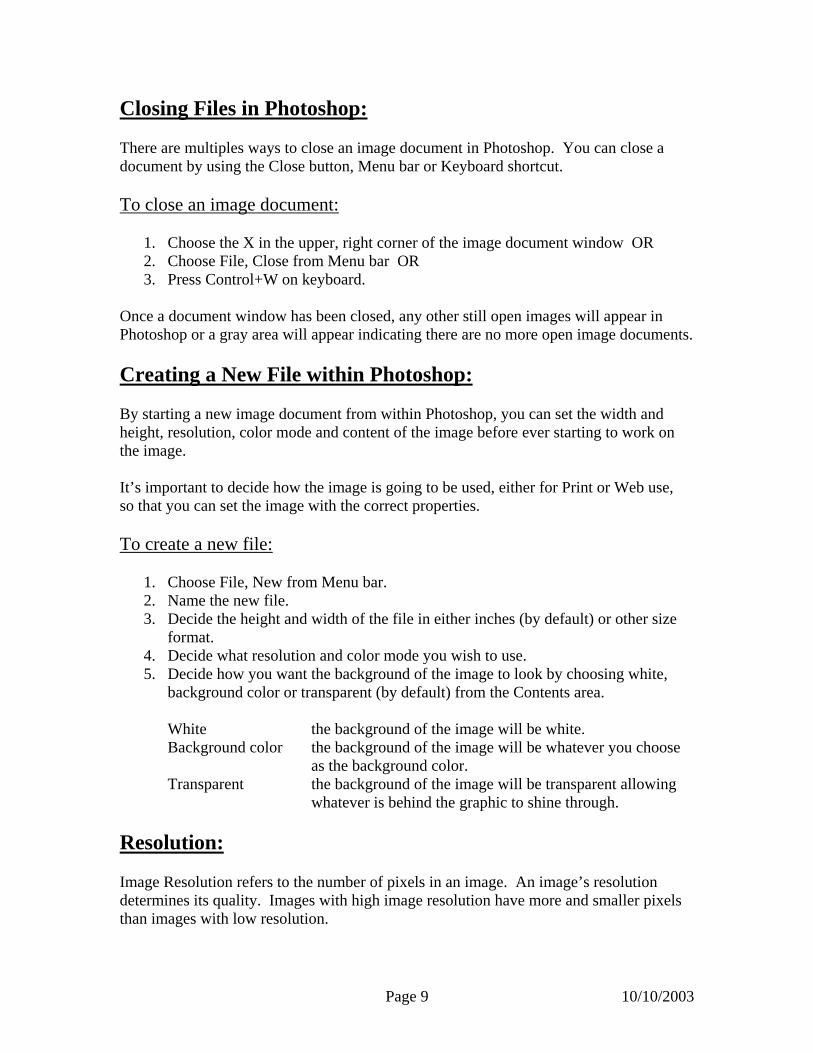
Resolution is very important because it is directly responsible for the quality of the image whether it appears in printed form, onscreen or on the Web. See examples below.
i i i
For ex72 piximage A highsize animagerarely There resoluthe quresolu Imageusuallcentim Alwayyou shpurpoimageadjust Monitresolumonit PrinteMost l Usinglookintoo hig
72 pp
ample, an image that is 2-inches wels per inch (ppi) has 20,736 total resolution of 250 ppi has 250,000
er resolution usually provides a bd require more memory. Howev
only spreads the original pixel in improves image quality.
are different types of resolution: Ition. If the image is designed for ality of the image. If the image istion become the important factors
Resolution: this is the number ofy measured in inches: pixels per ineters. When you increase an ima
s keep in mind the final output ofould set it to use a typical monito
ses, the image resolution should b resolution ranging from 72 to 150ed.
or Resolution: this is the number tion is usually measured in dots por and its pixel settings. Most PC
r Resolution: this is the number oaser printers have resolutions rang
too low a resolution for a printed g pixilated) – which is an image wh a resolution for a printed image
150 pp
ide by 2-inches tall with an image pixels compared to the same image total pixels.
etter quality image, but will create aer, increasing the resolution of a lowformation across a greater number o
mage resolution, Monitor resolutionprint, image and printer resolution i designed for the Web, image and m.
pixels per unit length in an image. ch (ppi), but also can be measured
ge’s resolution, the file size with als
an image, for screen or print. For sr resolution which is 72 to 96 ppi. Fe proportional to the printer resoluti ppi is typical. However these setti
of pixels per inch on a monitor. Moer inch (dpi) and depends on the size monitors are usually set at about 96
f ink dots per inch (dpi) produced bing from 300 to 600 dpi.
image results in “pixelation” (or theith large, course-looking, fuzzy pix (which means pixels smaller than t
Page 10
250 pp
resolution of with an
bigger file -resolution f pixels; it
, and Printer s involved in onitor
Unit length is in o increase.
creen display, or printing
on. Using a ngs can be
nitor of the dpi.
y the printer.
image els. Using he output
10/10/2003
device can produce) increases the file size and slows the printing of the image, plus the device will be unable to reproduce the extra detail that the higher resolution contains. So what resolution should I use??? The following table provides suggestions for typical output purposes: Ideal Resolution Purpose 300 ppi Full-color images for magazines. 300 ppi Full-color slides. 180 ppi Color images for laser printing or overhead projections. 72 ppi Color images for multi-media productions and Web pages. 180 ppi Black and white images for newsletters. 120 ppi Black and white images for laser printing. Color Mode: The color mode of a Photoshop document dictates how many and what kinds of color will be used in the image. Available types of color modes are: Bitmap, Grayscale, RGB, CMYK and Lab color.
Bitmap: images are made up of 1 bit of color (black or white) per pixel. Bitmapped images use the least disk space. Grayscale: images are made up of 8 bits of color per pixel. These images use 256 shades of gray to reproduce graduations in color. RGB: images use 3 colors (Red, Green & Blue) to simulate 16.7 million colors on-screen. RGB images consist of 24 (8X3) bits of color per pixel. CMYK: images use 4 colors (Cyan, Magenta, Yellow & Black) for professional printing purposes only. CMYK images consist of 32 (8X4) bits of color per pixel. Lab: images are 3-channel images containing 24 (8X3) bits of color per pixel.
Viewing Images: Once you have any image open in Photoshop, there are many ways to view the image. You can zoom in for a closer look at a certain area, zoom out to get an overview, or move around the image to look at different areas Zooming: You can view your image at any magnification level starting from 0.25% to 1600%. When you are zooming, you are simply changing the display of the image, not the size of the image.
Page 11 10/10/2003
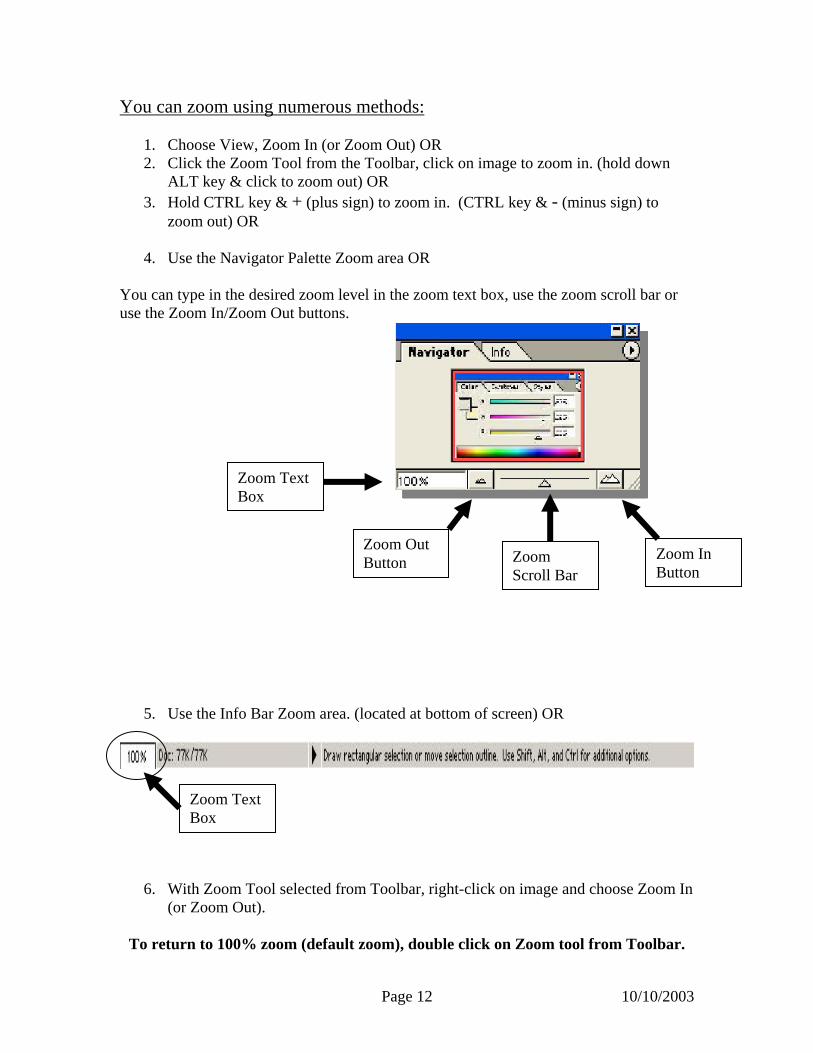
You can zoom using numerous methods:
1. Choose View, Zoom In (or Zoom Out) OR 2. Click the Zoom Tool from the Toolbar, click on image to zoom in. (hold down
ALT key & click to zoom out) OR 3. Hold CTRL key & + (plus sign) to zoom in. (CTRL key & - (minus sign) to
zoom out) OR
4. Use the Navigator Palette Zoom area OR You can type in the desired zoom level in the zoom text box, use the zoom scroll bar or use the Zoom In/Zoom Out buttons.
Zoom Text Box
Zoom Out Button Zoom In
Button Zoom Scroll Bar
5. Use the Info Bar Zoom area. (located at bottom of screen) OR
Zoom Text Box
6. With Zoom Tool selected from Toolbar, right-click on image and choose Zoom In (or Zoom Out).
To return to 100% zoom (default zoom), double click on Zoom tool from Toolbar.
Page 12 10/10/2003
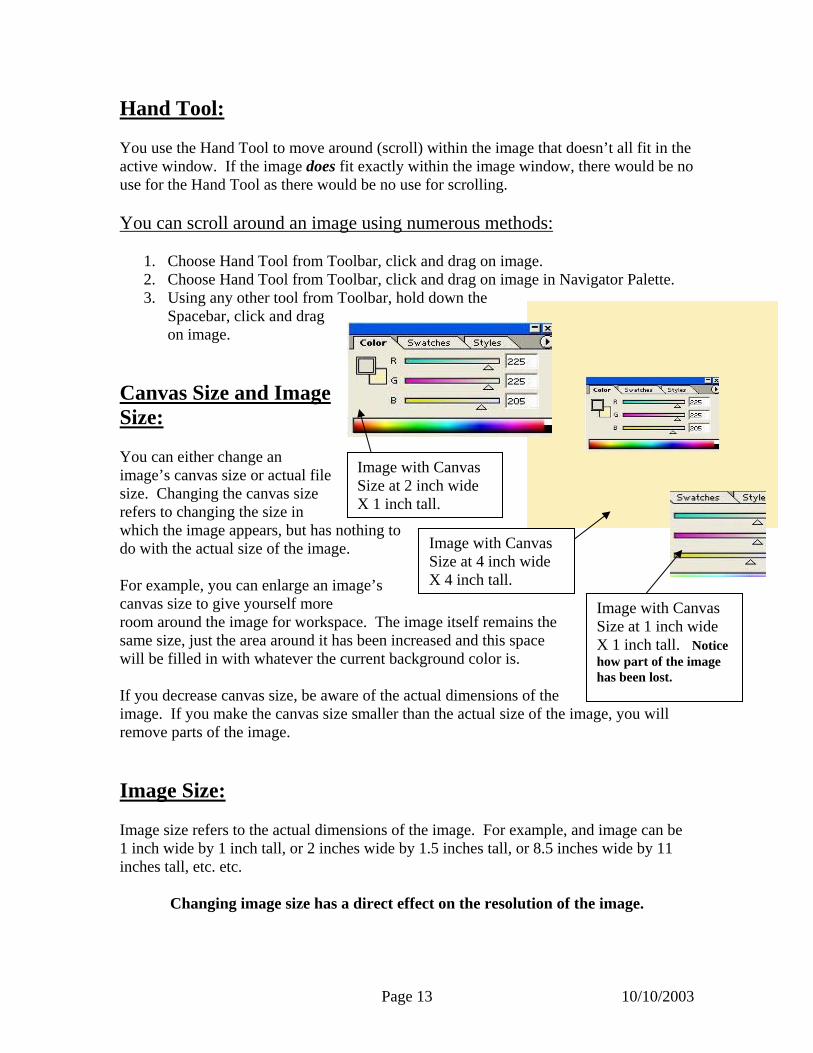
Hand Tool: You use the Hand Tool to move around (scroll) within the image that doesn’t all fit in the active window. If the image does fit exactly within the image window, there would be no use for the Hand Tool as there would be no use for scrolling. You can scroll around an image using numerous methods:
1. Choose Hand Tool from Toolbar, click and drag on image. 2. Choose Hand Tool from Toolbar, click and drag on image in Navigator Palette.
Image with Canvas Size at 2 inch wide X 1 inch tall.
Image with Canvas Size at 4 inch wide X 4 inch tall.
3. Using any other tool from Toolbar, hold down the Spacebar, click and drag on image.
Canvas Size and Image Size: You can either change an image’s canvas size or actual file size. Changing the canvas size refers to changing the size in which the image appears, but has nothing to do with the actual size of the image. For example, you can enlarge an image’s canvas size to give yourself more Image with Canvas
Size at 1 inch wide X 1 inch tall. Notice how part of the image has been lost.
room around the image for workspace. The image itself remains the same size, just the area around it has been increased and this space will be filled in with whatever the current background color is. If you decrease canvas size, be aware of the actual dimensions of the image. If you make the canvas size smaller than the actual size of the image, you will remove parts of the image. Image Size: Image size refers to the actual dimensions of the image. For example, and image can be 1 inch wide by 1 inch tall, or 2 inches wide by 1.5 inches tall, or 8.5 inches wide by 11 inches tall, etc. etc.
Changing image size has a direct effect on the resolution of the image.
Page 13 10/10/2003

If you enlarge an image, Photoshop, by default, will create the needed pixels to increase the resolution based on the image’s original pixels. This process is called resampling. If you enlarge an image, but Photoshop doesn’t increase the number of pixels, but rather retains the original resolution – this is called interpolation and can cause a pixilated effect. If you reduce the size of an image, Photoshop will discard a number of pixels, by default, to arrive at the correct number of pixels for the new file size (resampling). Changing file sizes can affect the image quality depending on the type of image being resized. Bitmap images are resolution dependent, so any changes in file size and/or resolution can negatively affect the quality of the image. Vector graphics are resolution independent, so resizing has no adverse affect on them. To change image file size:
1. Choose Image, Image Size from Menu bar. 2. Change the Pixel Dimensions or Document Size area to change the image size.
Constrain Proportions and Resample Image options are checked on by default. Constrain Proportions insures the original proportions stay in effect (will not allow skewing); Resample Image insures that as the image increases, the number of pixels will also automatically increase and vice versa.
3. Click OK. 4. Save file.
Cropping Images: There are times when you may only need part of an image. To exclude part of an image you can crop it by using the Crop tool. Cropping means that you are discarding the parts you don’t need. The Crop tool is in the first section of Selection tools on the Toolbar. To Crop an Image:
1. Click Crop tool from Toolbar. 2. Click, hold and drag over part of the image you wish to keep. 3. Adjust the cropped area, if necessary. 4. Press Enter. (or choose Image, Crop from Menu bar or double click cropped area). 5. Save the new cropped image.
Example of cropped image
Page 14 10/10/2003
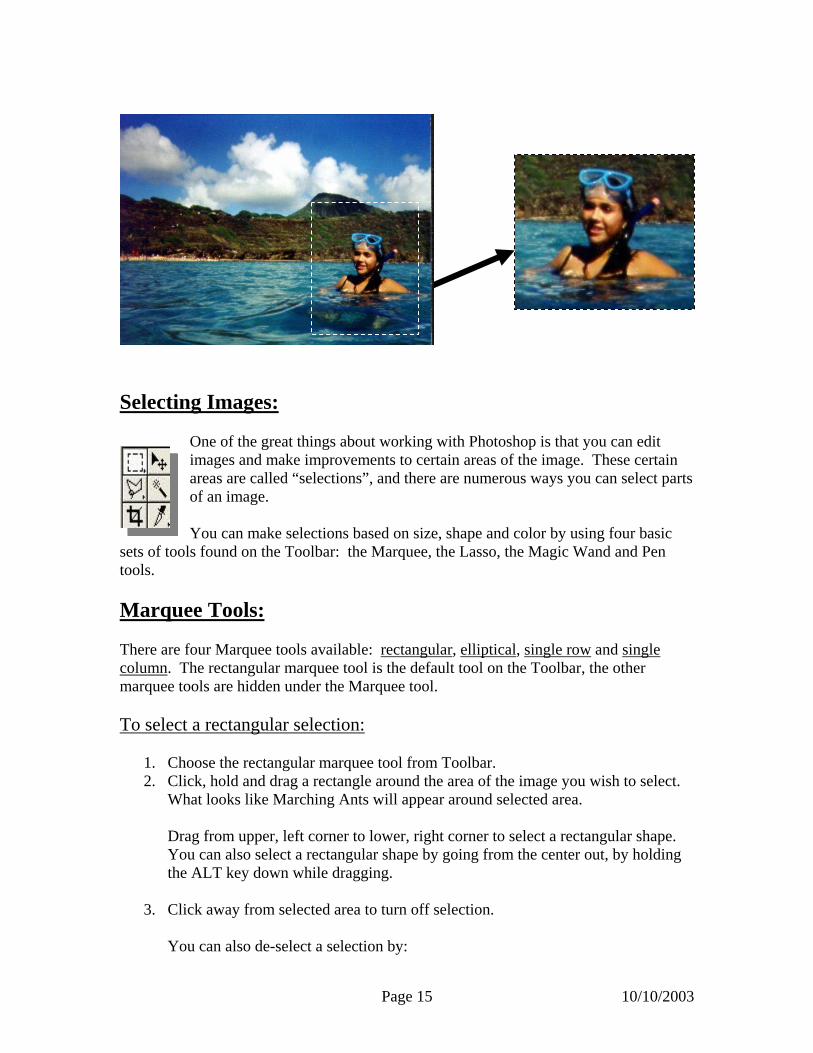
Selecting Images:
One of the great things about working with Photoshop is that you can edit images and make improvements to certain areas of the image. These certain areas are called “selections”, and there are numerous ways you can select parts of an image. You can make selections based on size, shape and color by using four basic
sets of tools found on the Toolbar: the Marquee, the Lasso, the Magic Wand and Pen tools. Marquee Tools: There are four Marquee tools available: rectangular, elliptical, single row and single column. The rectangular marquee tool is the default tool on the Toolbar, the other marquee tools are hidden under the Marquee tool. To select a rectangular selection:
1. Choose the rectangular marquee tool from Toolbar. 2. Click, hold and drag a rectangle around the area of the image you wish to select.
What looks like Marching Ants will appear around selected area.
Drag from upper, left corner to lower, right corner to select a rectangular shape. You can also select a rectangular shape by going from the center out, by holding the ALT key down while dragging.
3. Click away from selected area to turn off selection.
You can also de-select a selection by:
Page 15 10/10/2003
Right-clicking and choosing Deselect from Short Cut menu. Choosing Select, Deselect from Menu bar. Pressing Control + D on keyboard.
Moving a Selected Area: Once you’ve selected an area of an image, you may decide that it’s not in the right spot and needs to be moved.
1. Click and hold in center of selected area, drag to new location on image. Creating Multiple Selections (or adding to a selected area): There may be times when there is more than one area that needs to be selected or you may need to increase the size of a selected area.
1. Click and drag first selected area. 2. Hold SHIFT key down. 3. Drag additional selected areas.
If you realize that a selected area is too small, you can’t just resize the selection. You either have to deselect and start over, or add to the selection. To increase the size of a selected area:
1. Hold SHIFT key down.
You’ll notice a plus sign (+) on your mouse pointer - indicating that you are going to increase the size of a selection.
2. Drag an additional selection, making sure to drag across the part of the original selection where you wish to increase the size.
3. The two selections will merge into one larger selected area.
Shrinking a Selection: There will be times when you’ve drawn a selected area that is too large. Knowing that you can’t resize a selection, you either have to deselect and start over or shrink the selection. To shrink a selected area:
1. Hold ALT key down.
Page 16 10/10/2003
You’ll notice a minus sign (-) on your mouse pointer - indicating that you are going to shrink a selection.
2. Drag across the part of the selection that you wish to remove. Moving Selected Image Areas: Once you’ve selected an area of an image, you may wish to move that part of the image to a new location. For example, there may be a shape on the left side of an image that you would rather have the right side. Once the shape is selected, you can easily move it without having to change tools. To move the selected part of the image (not just the Marching Ants):
1. Hold CTRL key down.
You’ll notice your mouse pointer will look like a pair of scissors - indicating that you are about to move a selected portion of the image.
2. Drag the selected area to new location. 3. Area that the selection was moved from will allow whatever background color to
show through. Copying Selected Image Areas: There will be times where you may need to have a selected part of an image in more than one place. For example, you may wish to duplicate a palm tree in the background of your image. You could select the palm tree, then copy that selection to other areas of the image. To copy the selected part of the image (not just the Marching Ants):
1. Hold down CTRL and ALT keys together.
You’ll notice your mouse pointer will look like two arrows, one black and one white - indicating that you are about to copy a selected portion of the image.
2. Drag the selected area to the new location. 3. Release mouse and keyboard.
Layers:
Page 17 10/10/2003
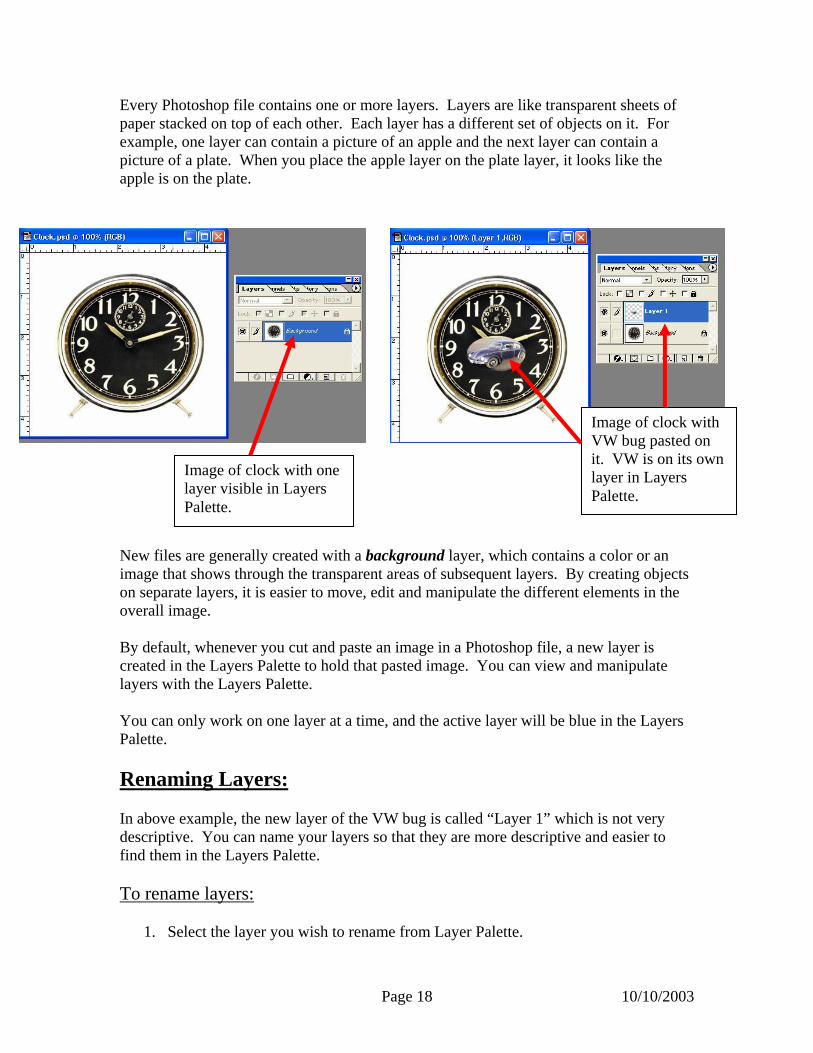
Every Photoshop file contains one or more layers. Layers are like transparent sheets of paper stacked on top of each other. Each layer has a different set of objects on it. For example, one layer can contain a picture of an apple and the next layer can contain a picture of a plate. When you place the apple layer on the plate layer, it looks like the apple is on the plate.
Image of clock with VW bug pasted on it. VW is on its own layer in Layers Palette.
Image of clock with one layer visible in Layers Palette.
New files are generally created with a background layer, which contains a color or an image that shows through the transparent areas of subsequent layers. By creating objects on separate layers, it is easier to move, edit and manipulate the different elements in the overall image. By default, whenever you cut and paste an image in a Photoshop file, a new layer is created in the Layers Palette to hold that pasted image. You can view and manipulate layers with the Layers Palette. You can only work on one layer at a time, and the active layer will be blue in the Layers Palette. Renaming Layers: In above example, the new layer of the VW bug is called “Layer 1” which is not very descriptive. You can name your layers so that they are more descriptive and easier to find them in the Layers Palette. To rename layers:
1. Select the layer you wish to rename from Layer Palette.
Page 18 10/10/2003
2. Choose Layer, Layer Properties from Menu bar. 3. Name new layer. 4. Click OK. 5. New layer should be renamed in Layers Palette.
You can also color code layers in the Layer Properties window to help locate certain layers more easily. Hiding Layers: Sometimes an image will have so many layers that it becomes difficult to see the area of the image you wish to work with. You can hide layers to make it easily to see other elements of the image. To hide layers:
1. Select the layer you wish to hide from Layers Palette. 2. Click the eye icon ( ) on the far left of the layer name. 3. When the eye icon is gone, the layer is invisible. (To redisplay the layer, click the
empty eye icon area again). Adding New Layers: You can add new, empty layers to an image at any time. You can create a maximum of 8000 layers per image (as long as your system memory can handle that number). New layers will appear above whatever layer is currently selected in the Layer Palette. To add new layer: 1. From Layers Palette, click Create New Layer button at bottom of Layer Palette. Using Layer via Cut/Layer via Copy: You can create new layers by copying or cutting selections from other layers or images. To add new layers using Layer via Cut/Copy:
1. Make a selection that you wish to appear on another layer. 2. Choose Layer, New, Layer via Cut or Copy. 3. A new layer will appear in Layers Palette containing the selection.
Deleting Layers:
Page 19 10/10/2003
In addition to being able to add new layers, you can always delete layers also. You may have created a number of layers as you were designing an image, then decided that you only wanted to keep one or some of the layers. To delete layers:
1. From the Layers Palette, right click on layer you wish to delete. 2. Choose Delete Layer from ShortCut menu. 3. Choose Yes to the delete confirmation window.
If you realize you’ve deleted the wrong layer, you can choose Edit, Undo from the Menu bar to immediately bring the layer back. However, you only have ONE undo option per step, so you can not Undo multiple times.
If you make a mistake, Undo it immediately! You can also delete a layer by choosing the Delete Layer button from bottom of Layer Palette. Changing Layer Order: Layers appear in the order they are created in the Layer Palette. The layer on the bottom, usually the background layer, will be the very last layer of the image. The layer at the top of the Layer Palette will be the layer that appears on the very top of the image. However, you can rearrange the order of the layers at anytime. To change layer order:
1. Click and hold the layer you wish to move. 2. Drag horizontal black line to that it appears above the layer you wish to move this
layer above. 3. Release mouse.
Image may change as layers get rearranged. Linking Layers: You may find that you have an object on one and layer and another object on another layer that you’d like to move together or manipulate together. You could handle them separately, but that would take longer. Instead, you could link the layers together you wish to work with and then work on both together. To link layers:
1. Activate one of the layers you wish to link to another.
Page 20 10/10/2003
2. Click on the empty box immediately to the right of eye icon ( ) in the Layers Palette of the layer you wish to link to.
3. A chain link will appear indicating the two layers are now linked. 4. With the layers linked, you can now move or manipulate them together.
You can link as many layers as needed.
Merging Layers: As you are working on your image, having multiple layers is a good idea and an easy way of working with multiple objects. But at some point, your image will be finished and ready for print, Web or online viewing. At that point, it’s a good idea to merge or flatter the layers into one background layer. This drastically reduces the file size; going from multiple layers to one. Also, if this file is meant for professional printing; printers won’t take it unless it is flattened. It’s also a good idea to keep one copy of the image with all its layers intact, and a second version flattened. This way, if for some reason, you need to edit the image further, you can open the layered image. Once an image has been flattened (or any number of layers merged together) there is no un-merging or un-flattening. Merge Layer Options Description Merge Visible Will merge all layers that are visible. Merge Down Will merge the active layer and all layers beneath it. Merge Linked Will only merge the layers that are linked together. Flatten Image Will merge all layers. To merge layers:
1. Choose Layer from Menu bar. 2. Choose the appropriate Merge option. 3. Save the file.
If you merge layers and then realize you’ve made a mistake, you can immediately Undo that operation. This Undo step must be done immediately or else you won’t be able to undo the step at all. Also, once the file is saved all Undos are gone. Adding Text: Photoshop, by default, will add text on its own layer. Layers that contain text or type are different from other layers because they can be easily edited at any time. To add text:
Page 21 10/10/2003
1. Click Text (Type) tool from Toolbar. 2. Click on image where you wish to add text. 3. Type the desired text.
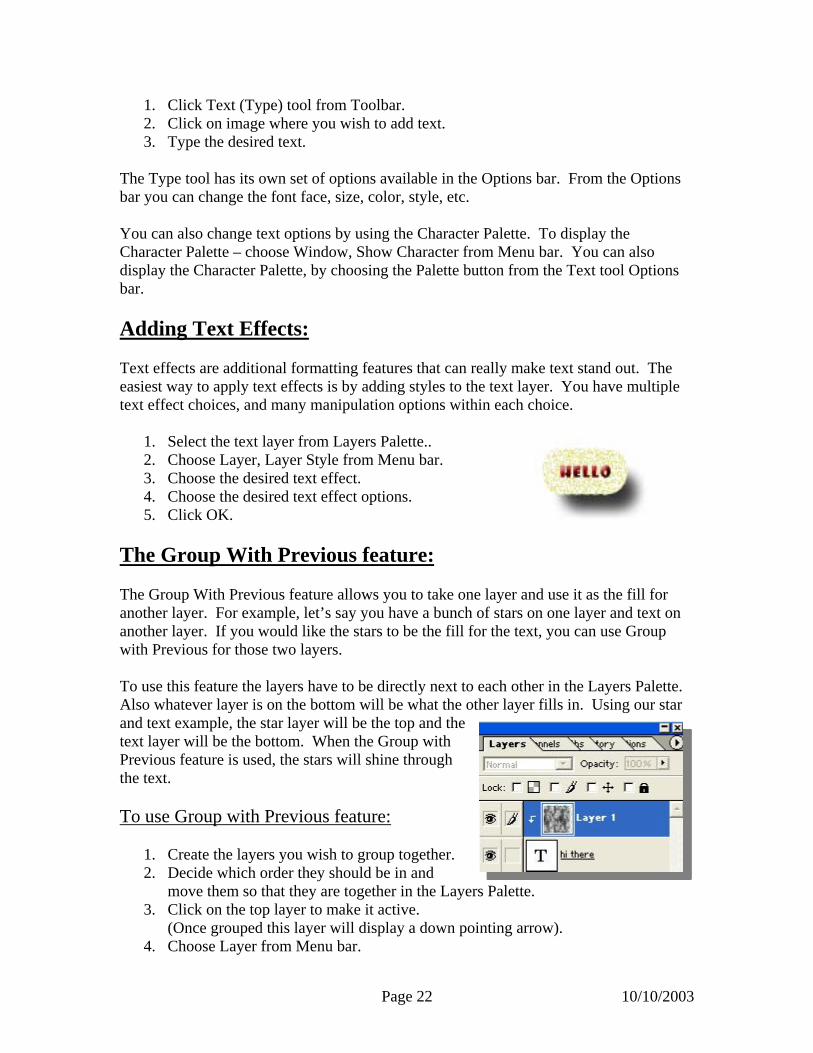
The Type tool has its own set of options available in the Options bar. From the Options bar you can change the font face, size, color, style, etc. You can also change text options by using the Character Palette. To display the Character Palette – choose Window, Show Character from Menu bar. You can also display the Character Palette, by choosing the Palette button from the Text tool Options bar. Adding Text Effects: Text effects are additional formatting features that can really make text stand out. The easiest way to apply text effects is by adding styles to the text layer. You have multiple text effect choices, and many manipulation options within each choice.
1. Select the text layer from Layers Palette..
The above image has stroke, drop shadow, bevel, plus more text effects applied
2. Choose Layer, Layer Style from Menu bar. 3. Choose the desired text effect. 4. Choose the desired text effect options. 5. Click OK.
The Group With Previous feature: The Group With Previous feature allows you to take one layer and use it as the fill for another layer. For example, let’s say you have a bunch of stars on one layer and text on another layer. If you would like the stars to be the fill for the text, you can use Group with Previous for those two layers. To use this feature the layers have to be directly next to each other in the Layers Palette. Also whatever layer is on the bottom will be what the other layer fills in. Using our star and text example, the star layer will be the top and the text layer will be the bottom. When the Group with Previous feature is used, the stars will shine through the text. To use Group with Previous feature:
1. Create the layers you wish to group together. 2. Decide which order they should be in and
move them so that they are together in the Layers Palette. 3. Click on the top layer to make it active.
(Once grouped this layer will display a down pointing arrow). 4. Choose Layer from Menu bar.
Page 22 10/10/2003
5. Choose Group with Previous. 6. Check for accuracy.
To ungroup layers:
1. Choose Layer, Ungroup from Menu bar. Using Marquee and Lasso Tools: The Marquee and Lasso tools are used for selecting parts of an image quickly and effectively. We’ve already used the Rectangular Marquee tool to select square-shaped selections. Now we will learn to use the other Marquee tools and the Lasso tools. To use the Elliptical Marquee tool:
1. Choose the Elliptical Marquee from Toolbar (it may be hidden under the Rectangular Marquee button).
2. Click and drag on image from one side to the other.
If you wish to create a perfect circle, hold down SHIFT key while dragging. If you wish to select from the center of the image instead of the edge, hold down ALT key while dragging from center.
3. Release mouse.
Remember, you can not resize a selection, but you can move or add/subtract from it. If you really mess up, just de-select and try again. Using Single Row/Single Column Marquee Tool: You also can select just a single row or column of pixels that extends the entire width or height of the image, by using the Single Row or Single Column Marquee Tool.
1. Choose proper Marquee tool from Toolbar. 2. Click on image where you wish to select. 3. An entire column or row’s worth of pixel will be selected.
Using Lasso Tools: Sometimes the shape of the object in the image may not be a perfect rectangle or ellipse, but an odd-shaped area. To select this type of object, you can use the Lasso tools. When using the Lasso tools, make sure that you complete the selection by connecting the beginning and ending points of selection line. If you don’t end the selection properly, Photoshop will end it for you and may cut off part of the area you wish to select.
Page 23 10/10/2003
Depending on how large the image is, you may wish to zoom in on the image before using the Lasso tools to make selection easier.
Lasso Tool – allows you to draw around an odd-shaped area to select. Polygonal Lasso Tool – allows you to draw around irregular, geometrical shapes (i.e. octagon or diamond shape). Magnetic Lasso Tool – allows you to make free-hand selections of areas with high-contrast edges. For example, if you are selecting an odd-shaped area that is red, while the background is white – using this tools will always snap to the edge of the area that you are selecting.
To use the Lasso Tool:
1. Choose Lasso Tool from Toolbar. 2. Click and hold while dragging around odd-shaped area. 3. Don’t release mouse until you’ve reached the end of the selection area.
To use the Polygonal Lasso Tool:
1. Choose Polygonal Lasso Tool from Toolbar. 2. Click where you wish to start the selection on the geometric shape. 3. Drag to first corner, then click. 4. Drag to next corner, then click. 5. Keep selecting until you’ve reach all the way around the object and are back to
where you began. 6. When you reach the starting point, the mouse pointer will display a small “o”
indicating you’ve reached the beginning. 7. When you get the small “o”, click once more. 8. The selection will be complete
Using the Lasso tools takes practice to get them just right. Take your time when using these tools. Remember, if you make a mistake you can always Undo the last step you did, move the selection or add/subtract from it or use the History Palette. Using Move and Magic Wand Tools: The Move tool allows you to move selections and layers; the Magic Wand is used to select areas with similar colors. The Move tool will allow you to move objects around per layer. By simply clicking and dragging on the object you wish to move with the Move tool from the Toolbar, you can rearrange any object in your image. To use the Move tool:
Page 24 10/10/2003

1. Click on Move tool from Toolbar. 2. Click and hold on object you wish to move in the image. 3. Drag to new location. 4. Release mouse.
Making a copy of an object: Sometimes you may need an exact duplicate of an object that you’ve added or drawn on an image. Using the move tool, you can easily make a copy. To make a copy of an object using the Move tool:
1. Click Move tool from Toolbar. 2. Hold down ALT key on keyboard. 3. Click and hold on object you wish to copy. 4. Drag copy to new location. 5. Release mouse. 6. Release ALT key.
Moving objects on Layers: Typically you can only access the objects that are on the active layer. You can change layers by using the Layers Palette. However, if the Auto Select Layer option is turned on in the Options bar, then you can select any object no matter the layer. To check the Auto Select Layer box:
1. Click the Move tool from the Toolbar. 2. Look at the Options bar at the top of the screen. 3. Make sure the Auto Select Layer option box is checked, if you wish to access any
object on any layer. (Make sure it’s off, if you only want to work with one layer at a time.)
The Magic Wand tool is used to select adjacent pixels of the same color tones. This tool is great for selecting difficult areas in an image. This tool only selects pixels of the same color. When using the Magic Wand tool, you can set the tolerance of the wand which will dictate the range of pixels selected. The higher the tolerance the greater range of pixels selected.
Page 25 10/10/2003

Tolerance is set in the Options bar when the Magic Wand tool is selected from the Toolbar. To use the Magic Wand:
1. Click the Magic Wand tool from Toolbar. 2. Decide the level of tolerance in the Tolerance box in the Options bar.
The range of tolerance runs from 0 – 255. 0 indicates that the wand will only pick up 1 pixel of color; 255 indicates the wand will pick up all colors.
Creating Images: In addition to modifying images that you import into Photoshop, you can also create original artwork by drawing the image yourself. The tools that will allow you to create your own drawn image are the pencil, the paintbrush, the airbrush and the stamp tools. The Pencil tool: To draw hard-edged or free-hand lines or to create sketches, the pencil tools would be used. Using the pencil options available in the Options bar, you can drastically change the look of the drawn object. You would choose these options before drawing the object. To draw a line with Pencil tool:
1. Choose Pencil tool from Toolbar (it may be hidden under the Paintbrush tool). 2. Click and hold where you wish to draw the line. 3. Drag to where you wish to end the line. 4. Release mouse.
Using Pencil Options: You can decide how large and what kind of brush stroke the pencil will use; the mode, opacity and brush dynamics of the pencil. Brush: by choosing the Painting Brush option drop-down box, you can choose what size point and the type of point you wish to use Mode: the Painting Mode (or Blending Mode) specified in the Options bar controls how the pixels in the image are affected by the painting or editing tool.
Mode Options:
Page 26 10/10/2003
Normal: edits or paints each pixel to make it the color chosen as the foreground color. Dissolve: paints with a random replacement of pixels with the base or blend color – gives a spray can affect. Behind: paints only on the transparent part of the layer. Clear: paints each pixel to make it transparent. Multiply: multiplies the base color by the blend color – the resulting color is always darker – the effect is similar to drawing on an image with multiple magic markers. Screen: multiplies the inverse of the base color by the inverse of the blend color – the resulting color is always lighter. Overlay: overlays the base color with the blend color. Soft Light: creates the effect of shining a diffused spotlight on image. Hard Light: creates the effect of shining a harsh spotlight on image. Color Dodge: brightens the base color to reflect the blend color. Color Burn: darkens the base color to reflect the blend color. Darken: selects whatever color is darker. Lighten: selects whatever color is lighter. Difference: subtracts one color from the other. Exclusion: creates same effect as Difference, but lower in contrast. Hue: creates a new color with the luminance and saturation of the base color and hue of the blend color. Saturation: creates a new color with the luminance and hue of the base color and saturation of the blend color. Color: creates a new color with the luminance of the base color and the hue and saturation of the blend color. Luminosity: creates a new color with the hue and saturation of the base color and the luminance of the blend color.
Opacity: dictates the level of transparency. Auto Erase: will allow you to erase a foreground color with the background color and vice versa. Brush Dynamics: will allow you to set the fade factor for the size of the point, the opacity of the point and the color of the point in pixel steps. The Paintbrush tool: The Paintbrush is a tool that will allow you to paint an image. It uses whatever the foreground color is and gives a soft, brushed effect.
Page 27 10/10/2003
The Paintbrush tool can be hidden behind the Pencil tool in the Toolbar. Just as with the Pencil tool, the Paintbrush tool has options accessible from the Options bar at top of screen. In addition to the same options available from the Pencil tool on the Options bar, is the Wet Edges checkbox. This option gives your paint stroke a water-colored effect. The Airbrush tool: Just as the name implies, the Airbrush tool allows you to create an airbrushed stroke. This effect allows you to spray the foreground color onto an image in gradual tones. The edges of the Airbrush stroke are softer than those of the Paintbrush. Just as with a real airbrush, the longer you hold the mouse pointer down over a particular spot, the darker the brush stroke with get. The Clone Stamp: The Clone Stamp tool allows you to duplicate the pattern of an image to another part of the same image or even to another image. For example, if you wanted to duplicate the texture of sky horizon to another image, you would use the Clone Stamp tool. The Clone Stamp tool will clone the entire image. It’s up to you how much of that cloned image is duplicated by how much you drag. The Aligned option, available in the Options bar for the Clone Stamp tool, will keep you from accidentally overwriting or distorting your pasted cloned image. By checking the Align checkbox, this will not allow you to distort the pasted cloned image even if you release the mouse button. If the Align checkbox is unchecked, this will allow you to overwrite the pasted cloned image numerous times – which in itself can create an interesting effect. To use the Clone Stamp tool:
1. Click the Clone Stamp tool from Toolbar (maybe hidden under the Pattern Stamp tool).
2. Hold down ALT key (holding this key allows you to clone the image). 3. While holding the ALT key, click on the image you wish to clone. 4. Release ALT key. 5. Place mouse pointer where you wish to paint the cloned image. 6. Click and drag mouse to “paint” cloned image.
Be careful. The Clone Stamp tool clones the entire image, not just a part of it. So when you start to “paste/paint” the cloned image, you can accidently paint too much.
Page 28 10/10/2003
A small “+” sign will appear over the image that you cloned while you are painting the cloned image in another area, so you can keep an eye on which parts that you are painting. The Pattern Stamp tool: The Pattern Stamp tool allows you to paste down a certain type of built-in pattern, such as the look of rocks or plaids; or you can copy a part of an image and use that as your new pattern. While the Clone Stamp tool will clone an entire image, the Pattern Stamp tool will allow you to only copy “part” of that image to use as your pattern. To use the Pattern Stamp tool to create your own pattern from an image:
1. Open the image that you wish to copy a pattern from. 2. Choose the correct selection tool from Toolbar (rectangular marquee, lasso, etc.) 3. Select the part of the image that you wish to make a pattern. 4. Choose Edit, Define Pattern from the Menu bar. 5. Name the new pattern. 6. Click OK. 7. Deselect the selection, if necessary. 8. Choose the Pattern Stamp tool from Toolbar (maybe be hidden under Clone
Stamp tool). 9. Select the new pattern from the Pattern pop-up window in the Options bar. 10. Click and drag to apply the new pattern to your image.
The Aligned checkbox is also available on the Options bar for the Pattern Stamp tool and works the same as for the Clone Stamp tool. Check the Aligned checkbox if you don’t want to accidentally distort your image if you release your mouse button; uncheck it if you would like to overwrite parts of the applied pattern. Brush, Mode, Opacity and Brush Dynamics options are still available on the Options bar when using the Stamp tools as they were when using the Pencil or Paintbrush tools. Using the Pattern Stamp tool to apply built-in patterns:
1. Open the image you wish to apply a pattern to and/or select the area of the image you wish to apply a pattern to.
2. Click the Pattern Stamp tool from Toolbar. 3. Choose the desired pattern from the Pattern pop-up window in the Options bar. 4. Click and drag to apply the pattern to the image.
Working with Vector Graphics:
Page 29 10/10/2003
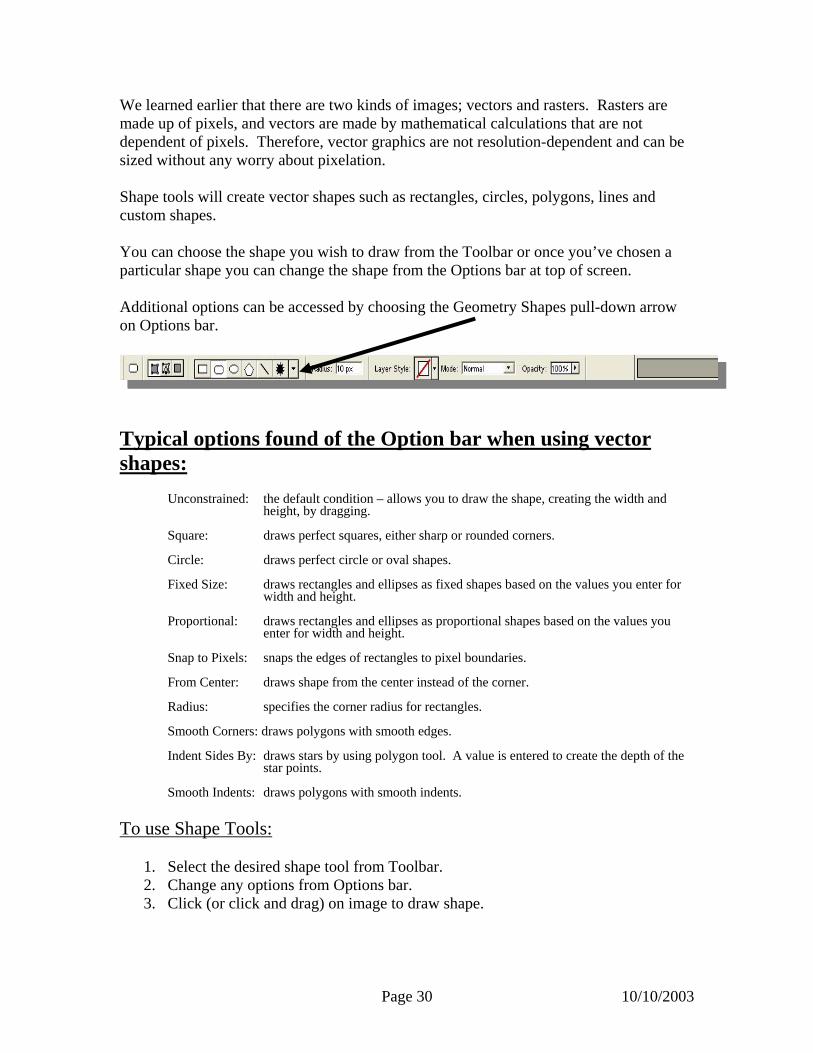
We learned earlier that there are two kinds of images; vectors and rasters. Rasters are made up of pixels, and vectors are made by mathematical calculations that are not dependent of pixels. Therefore, vector graphics are not resolution-dependent and can be sized without any worry about pixelation. Shape tools will create vector shapes such as rectangles, circles, polygons, lines and custom shapes. You can choose the shape you wish to draw from the Toolbar or once you’ve chosen a particular shape you can change the shape from the Options bar at top of screen. Additional options can be accessed by choosing the Geometry Shapes pull-down arrow on Options bar.
Typical options found of the Option bar when using vector shapes:
Unconstrained: the default condition – allows you to draw the shape, creating the width and height, by dragging.
Square: draws perfect squares, either sharp or rounded corners. Circle: draws perfect circle or oval shapes. Fixed Size: draws rectangles and ellipses as fixed shapes based on the values you enter for
width and height. Proportional: draws rectangles and ellipses as proportional shapes based on the values you
enter for width and height. Snap to Pixels: snaps the edges of rectangles to pixel boundaries. From Center: draws shape from the center instead of the corner. Radius: specifies the corner radius for rectangles. Smooth Corners: draws polygons with smooth edges. Indent Sides By: draws stars by using polygon tool. A value is entered to create the depth of the
star points. Smooth Indents: draws polygons with smooth indents.
To use Shape Tools:
1. Select the desired shape tool from Toolbar. 2. Change any options from Options bar. 3. Click (or click and drag) on image to draw shape.
Page 30 10/10/2003
You can draw multiple shapes that appear on the same layer. Once finished drawing all desired shapes for a layer, click the checkmark button on far right of Options bar. Once you’ve drawn an object, you may wish to move it. You can move a vector shape by either using the Move tool from Toolbar, or holding the CTRL key down and drag the shape with the Shape tool. To move a vector shape:
1. Hold down CTRL key on keyboard. 2. Click and hold on shape with shape tool. 3. Drag to new location.
To size a vector shape:
1. Make sure it’s selected (by holding CTRL key and clicking on shape). 2. Click and hold on sizing handles. 3. Drag to new size.
To delete a vector shape:
1. Select shape. 2. Press Delete key on keyboard.
There may be times when you wish to draw a perfect square or circle. By default, shapes are unconstrained (unless you change the options on the Options bar). If you wish to constrain the shape you are drawing, hold down the SHIFT key while dragging. To constrain a vector shape:
1. Choose the desired shape tool from Toolbar. 2. Hold down SHIFT key. 3. Drag shape. 4. Release mouse. 5. Release SHIFT key.
Using the Pen tool: The Pen tools allow you to create freehand drawings by drawing straight or curved lines. The lines drawn by the pen tools are called paths. With the Pen tool you can either create closed paths; such as a circle or an open path; such as a wavy line. Closed paths are continuous with no obvious beginning or ending point. Open paths have distinct starting and ending anchor points.
Page 31 10/10/2003
A path consists of three components: anchor points, straight segments and curved segments. Anchor points mark the end points of the path segments. On curved segments, each selected anchor point displays one or two direction lines that have direction points at the end. These direction lines and points allow you to change the shape of the path, if desired. Using the Pen tool takes much practice and patience to use successfully. When using the Pen tools, you may opt to use Guides while drawing. Guides are blue, floating lines that help you align objects in an image. Guides don’t print. To use Guides:
1. Choose View, Show Rulers from Menu bar to view the horizontal and vertical rulers, if not already displayed.
2. Choose View, Show Guides, if not already turned on. 3. Point to the horizontal or vertical rulers 4. Click and hold on ruler and pull either down (from horizontal ruler) or to the right
(from vertical ruler) to bring the blue guide lines onto the image. 5. Release mouse.
To change Guide Lines:
1. Point to blue guide line you wish to move. 2. Click and hold and drag line to new position. 3. Release mouse.
To remove the blue Guide Lines:
1. Click and hold and drag line back to the ruler from which you got it. 2. Release mouse.
Or to clear all the guide lines, choose View, Clear Guides from Menu bar. To use the Pen tool:
1. Choose Pen tool from Toolbar. 2. Click on image to set the first anchor point. 3. Click and HOLD where you wish to place 2nd anchor point. 4. With mouse still held down, drag directional lines to form the shape of the line. 5. Either continue clicking to set more anchor points or bring mouse pointer back to
starting anchor point and click to end line. To adjust lines drawn with Pen tool:
Page 32 10/10/2003

1. Hold CTRL key down on keyboard. 2. Click and hold on line, anchor points or directional line points to adjust. 3. Hold down CNTRL and click away (or click Pen tool on Toolbar) to deselect.
Using the Direct Selection and Path Component Selection Tools: Once you’ve drawn either an open or closed path with the Pen tool, you can continue to adjust it using the Direct Selection or Path Component Selection Tools. Direct Selection Tool: allows you to select individual segments in a path. Path Component Selection Tool: allows you to select all the components of a path. To use the Direct Selection Tool:
1. Click on Direct Selection Tool from Toolbar (maybe hidden under Path Component Selection Tool).
2. Click on any component of the path. 3. Click and hold on any anchor or directional point. 4. Drag to edit shape. 5. Click away from path to deselect.
To use the Path Component Selection Tool:
1. Click on Path Component Selection Tool from Toolbar (maybe hidden under Direct Selection Tool).
2. Click, hold and drag in middle of path to move (or click, hold and drag any sizing handle to change size).
3. Choose Edit, Transform Path from Menu bar for additional options. 4. Click Path Component Selection Tool from Toolbar. 5. Click Apply from Apply Transformation dialog box to accept change. 6. Click away from path to deselect.
Working with colors: Photoshop offers a multitude of options to enhance your images using colors. The Color Palette and Toolbar offer ways of changing colors quickly and easily. The Color Ramp allows you to change the mode of color used and the shade. The Color Picker allows you to mix your own custom colors or pick of a selection. Then using the Paint Bucket and Eye Dropper tools you can apply the desired colors to your image. The Color Palette: The Color Palette shows the values of the current foreground and background colors. It consists of the color sliders and color ramp.
Page 33 10/10/2003
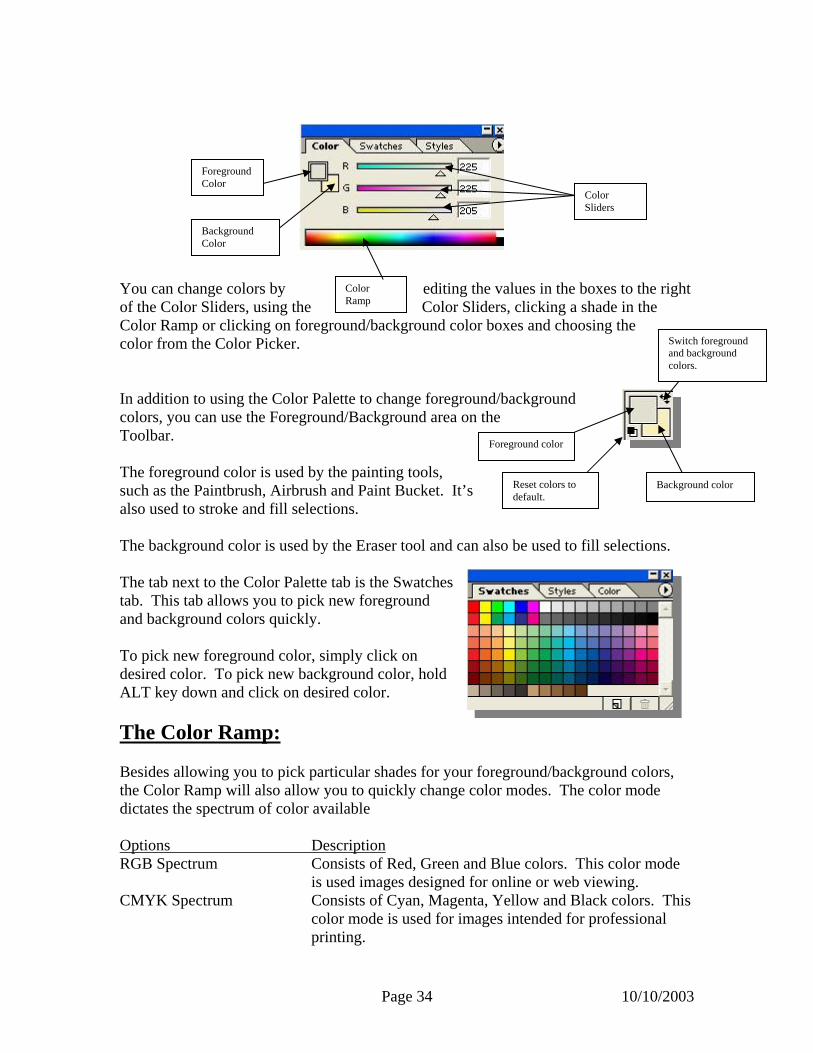
Foreground Color
Color Sliders
Background Color
Color Ramp
Switch foreground and background colors.
You can change colors by editing the values in the boxes to the right of the Color Sliders, using the Color Sliders, clicking a shade in the Color Ramp or clicking on foreground/background color boxes and choosing the color from the Color Picker.
Foreground color
In addition to using the Color Palette to change foreground/background colors, you can use the Foreground/Background area on the Toolbar. The foreground color is used by the painting tools, such as the Paintbrush, Airbrush and Paint Bucket. It’s also used to stroke and fill selections.
Reset colors to default.
Background color
The background color is used by the Eraser tool and can also be used to fill selections. The tab next to the Color Palette tab is the Swatches tab. This tab allows you to pick new foreground and background colors quickly. To pick new foreground color, simply click on desired color. To pick new background color, hold ALT key down and click on desired color. The Color Ramp: Besides allowing you to pick particular shades for your foreground/background colors, the Color Ramp will also allow you to quickly change color modes. The color mode dictates the spectrum of color available Options Description RGB Spectrum Consists of Red, Green and Blue colors. This color mode is used images designed for online or web viewing. CMYK Spectrum Consists of Cyan, Magenta, Yellow and Black colors. This
color mode is used for images intended for professional printing.
Page 34 10/10/2003

Grayscale Spectrum Consists of shades of gray. You would use this color mode to print black and white images.
Current Colors Consists of shades of the current foreground and background colors.
Make Ramp Web Safe Consists of shades of color that do not dither on the Web. Dithering means the colors may appear hazy or not as intended on some computers. Using Web safe colors insures that all Web browsers can display your image as intended.
You can change the color mode of your image at any time by either right-clicking on Color Ramp; clicking the arrow in the upper, right corner of Color Palette; or choosing Image, Mode from Menu bar. A Little More About Color Modes: The RGB and CMYK color models are based on two different processes by which the colors are created. One is an “additive” process and the other is a “subtractive” process. RGB is an additive color process. This means that you basically start with “no color” or “black” and as you add values to the Color Palette, you will start to get color – ranging from dark colors to light colors. With all components (Red, Green & Blue) turned all the way on (the highest value for RGB is 255), then you’d get white. CMYK is a subtractive process. Which is almost the opposite of RGB. With all components (Cyan, Magenta, Yellow and Black) turned on you get black. When you start removing color (or lowering the percent values in the Color Palette) you move toward white. Out-Of-Gamut Icon: Also, if you choose a color that looks great on your monitor, it may not print exactly as intended. Photoshop will tell you whether you’ve chosen a color “out of gamut” by displaying the out-of-gamut warning icon in the Color Palette or Color Picker box. The “out of gamut” warning icon looks like a triangle with an exclamation point in it. If you choose the color box immediately to the right of the “out-of-gamut” icon, Photoshop will choose the closest color to what you originally chose that is within the color gamut of your printer.
Not a Web Safe color icon
In addition, in the Color Picker box another icon may appear that will indicate whether the color you are choosing is Web Safe. It will also give you a color that is a close as possible to the color you originally chose that IS Web Safe. Web Safe option.
(Notice how close the colors are).
Page 35 10/10/2003
Using the Paint Bucket and Eyedropper Tools: The easiest way to fill in color on an image is to use the Paint Bucket tool. You make a selection on the image, click the Paint Bucket, choose your color, then click within the selection to fill. The Paint Bucket has options available in the Options bar that are similar to the Paintbrush and Airbrush tools. To use the Paint Bucket:
1. Make a selection of an area you wish to fill. 2. Choose the Paint Bucket tool from Toolbar. 3. Choose the color you wish to use from Toolbar, Color Palette, etc. 4. Click within the selected area. 5. Click on Selection tool again. 6. Click away from Selected area to deselect.
The eyedropper tool allows you to match an already existing color, instead of trying to match it in the Color Palette or Color Picket. To use the Eyedropper tool:
1. Click Eyedropper tool from Toolbar. 2. Click on part of image that you are trying to match. 3. The Foreground color will change to match the color clicked by Eyedropper. 4. To match the Background color, hold down ALT key while clicking with
Eyedropper.
Using the Retouching Tools: There will be times when you have an image that needs some repair, such as an old photograph. The Photoshop Retouching tools will help you make that photograph good as new. The Retouching tools are the Dodge tool, the Burn tool, the Sponge tool, the Blur tool, the Sharpen tool and the Smudge tool. The Dodge Tool: The Dodge tool is used to lighten an area of an image by increasing the brightness of the pixels. For example, if the sky in a photograph looks too dark, you can use this tool to lighten the sky.
Page 36 10/10/2003
This tool has its own set of options that are available in the Options bar. In the Options bar, you can choose from two preferences: Exposure and Range. Exposure determines the range of the area that is affected by the Dodge tool. Range classifies the tone of pixels from a dark to a light shade based on the three options: Shadows, Midtones and Highlights. The default setting for this preference is Midtones. Shadows specifies the dark areas, Midtones specifies the medium areas and Highlights specifies the light areas. To use the Dodge tool:
1. Make a selection of the area you wish to modify. 2. Zoom in, if necessary to see better. 3. Click the Dodge tool from Toolbar (maybe hidden under Burn or Sponge tools). 4. Choose the desired options from the Options bar. 5. Drag the Dodge tool over the selected area. 6. Deselect.
The Burn Tool: The Burn tool will darken an area just like the sun will darken your skin. The longer you are exposed to the sun, the darker your skin will get. The same is true for the Burn tool. The Burn tool also has its own options in the Options bar, including Exposure and Range preferences. However, the purpose of the Burn tool is to darken, not lighten. To use the Burn tool:
1. Make a selection of the area you wish to darken. 2. Click the Burn tool from Toolbar (maybe hidden under Dodge or Sponge tools). 3. Choose the desired options from the Options bar. 4. Drag the Burn tool over the selected area. 5. Deselect.
The Sponge Tool: The Sponge tool controls the saturation of a color in a selection or the brightness and contrast in a black-and-white image. Saturation specifies the intensity and purity of a color. You don’t want to over saturate or the image will look artificial. If you under saturate (desaturate), you can give an image a black-and-white or faded look like an old-timey photograph. The Sponge tool has many of the same options as the Dodge and Burn tools in the Options bar.
Page 37 10/10/2003
To use the Sponge tool:
1. Make a selection. 2. Click the Sponge tool from Toolbar (maybe hidden under Dodge or Burn tools). 3. Choose the desired options from the Options bar. 4. Drag the tool over the selection. 5. Deselect.
The Blur tool: The Blur tool is used to blur an object that doesn’t need much attention or if you want a hazy effect by softening the pixels. For example, this tool can be used to blur the background of a photo so only the main subject is in focus. The Blur tool has its own options in the Options bar; Mode and Pressure. Mode specifies how the Blur tool will affect the pixels and the Pressure option determines how much the pixels are blurred. To use Blur tool:
1. Make a selection. 2. Click the Blur tool from Toolbar. (maybe hidden under Sharpen or Smudge tools). 3. Choose the desired options from Options bar. 4. Drag the tool over the selected area. 5. Deselect.
The Sharpen Tool: The Sharpen tool basically does the opposite of the Blur tool. The Sharpen tools will bring into focus an area that is blurry or out-of-focus. The Sharpen tool also has similar options as the Blur tool in the Options bar. To use the Sharpen tool:
1. Make a selection. 2. Choose the Sharpen tool in Toolbar (maybe hidden under Blur or Smudge tools). 3. Drag the tool over the selected area. 4. Deselect.
The Smudge Tool: The Smudge tool will mimic the effect of running your finger through wet paint. This tool pushes color from one area to another giving a “smeared” effect. Options are available in the Options bar.
Page 38 10/10/2003

To use the Smudge tool:
1. You don’t have to make a selection first. 2. Click the Smudge tool in Toolbar (maybe hidden under Sharpen or Blur tools). 3. Drag the tool across the area you’d like to smudge.
Remember, if you make a mistake or don’t like an effect – undo it immediately!
You only have one Undo per step.
Using Gradient Tools: Gradient tools are commonly used to create backgrounds. Gradients are colors that blend together in a graduating pattern either horizontally, vertically, from the center out, etc. You can use gradients provided by Photoshop or create your own by editing the existing ones. The Gradient tools are the Linear Gradient tool, the Radial Gradient tool, the Angled Gradient tool, the Mirrored Gradient tool and the Diamond Gradient tool. The Gradient tools have their own options available from the Options bar. The Linear Gradient tool: This tool is best when used to create a background with only two colors. To use the Linear Gradient tool:
1. Create a new layer in the Layers Palette. 2. Click the Gradient tool in the Toolbar (maybe hidden under Paint Bucket tool). 3. Choose the Linear Gradient option from Options bar. 4. Choose the desired gradient colors, plus any additional options. 5. Drag the Gradient tools from point A to point B on the image. (For example,
from top to bottom; from left to right, etc.). 6. Observe the effect.
The Radial Gradient Tool: The Radial Gradient tool shades colors in a circular pattern, much like a halo effect. When dragging with the Radio Gradient tool, point A will be the center of the radial. To use the Radial Gradient tool:
1. Add new layer, if necessary. 2. Click the Gradient tool from Toolbar.
Page 39 10/10/2003
3. Choose Radial Gradient option from Options bar. 4. Choose any other desired options. 5. Drag the Radial Gradient tool from center out. 6. Observe the effect.
The Diamond Gradient Tool: The Diamond Gradient tool gives a color gradient in a diamond-like pattern and creates a sparkle effect. To use the Diamond Gradient tool:
1. Click the Gradient tool from Toolbar. 2. Choose the Diamond Gradient option from Options bar. 3. Choose any other desired options. 4. Drag the Diamond Gradient tool from point A to point B. 5. Observe the effect.
The Eraser Tool: No matter how good you get using Photoshop, there are times when you are going to make mistakes or want to redo something. The Eraser Tools makes this job easy. There are three types of Erasers; the Eraser tool, the Background Eraser tool and the Magic Eraser tool. The Eraser Tool: Erases to the background color. The Background Eraser: Erases with the background color. The Magic Eraser: Erases all of a continuous color. On a single layer image, using the Erasers will erase to transparency. On a multiplayer image, the pixels erase per layer to show the underlying layer. By using some of the options in the Options bar, you can change how and how much of the pixels are erased. Using the erasers correctly takes practice. Take your time in using these tools. Always remember you can undo a mistake or use the History palette.
Page 40 10/10/2003