Embed Size (px)
Citation preview

1
Admin User Guide

2
Table of Contents
Contents
Admin User Guide ........................................................................................................................................... 1
Welcome to ITrackLogsAdmin Training Guide! ........................................................................................... 7
General Overview of ITrackLogs .................................................................................................................. 8
New User Registration – Set up Profile ....................................................................................................... 9
Request Access for Additional ISB Products and Accounts ....................................................................... 11
Navigation of iTrackLogs ........................................................................................................................... 12
Launch Pad ................................................................................................................................................ 12
Navigation Buttons ................................................................................................................................... 12
My Profile ................................................................................................................................................. 12
Pathway Drop‐downs ................................................................................................................................ 14
Administrative Column .............................................................................................................................. 15
Quick Tasks ................................................................................................................................................ 15
Universal Functionality .............................................................................................................................. 16
User Management ..................................................................................................................................... 18
Search Caseloads ....................................................................................................................................... 21
Data Entry Clerk ........................................................................................................................................ 24
Caseload Reports ...................................................................................................................................... 25
Student Management ................................................................................................................................ 29
Student Details .......................................................................................................................................... 29
Evaluations ................................................................................................................................................ 32
Goals and Objectives ................................................................................................................................. 33

3
Student Service Summary .......................................................................................................................... 47
Student Identity Verification...................................................................................................................... 48
Calendar Management .............................................................................................................................. 49
District Management ................................................................................................................................. 51
Update District Information ...................................................................................................................... 53
Personnel Management ............................................................................................................................ 54
Medicaid Administration ........................................................................................................................... 56
Glossary of Terms ...................................................................................................................................... 57
7 Last Updated: 2/26/2013 2/14/2013
Welcome to ITrackLog Admin Training Guide!
Training Manual Information
ITrackLogsis a Service Delivery Tracking software and special education database system designed to assist educators and administrators in the management of special education programs. The ITrackLogsmanual will guide users through navigation of the system as well as steps to successful implementation within your district.
Terms that are bolded are defined within the Glossary.
Although this manual is a reference tool, it may not answer all of your questions. Remember that toll‐ free technical support is available Monday through Friday, 8am‐5pm (Mountain Standard Time) to assist with your questions. Please call if you experience difficulties: 1‐888-792-2350. You may also email Customer Care at [email protected]. or use the Live Chat feature.
Disable Pop‐Up Blockers
ITrackLogsutilizes window prompts to remind and notify users of events taking place within their ITrackLogsaccount. Users will need to allow pop‐ups when working with the ITrackLogsprogram.
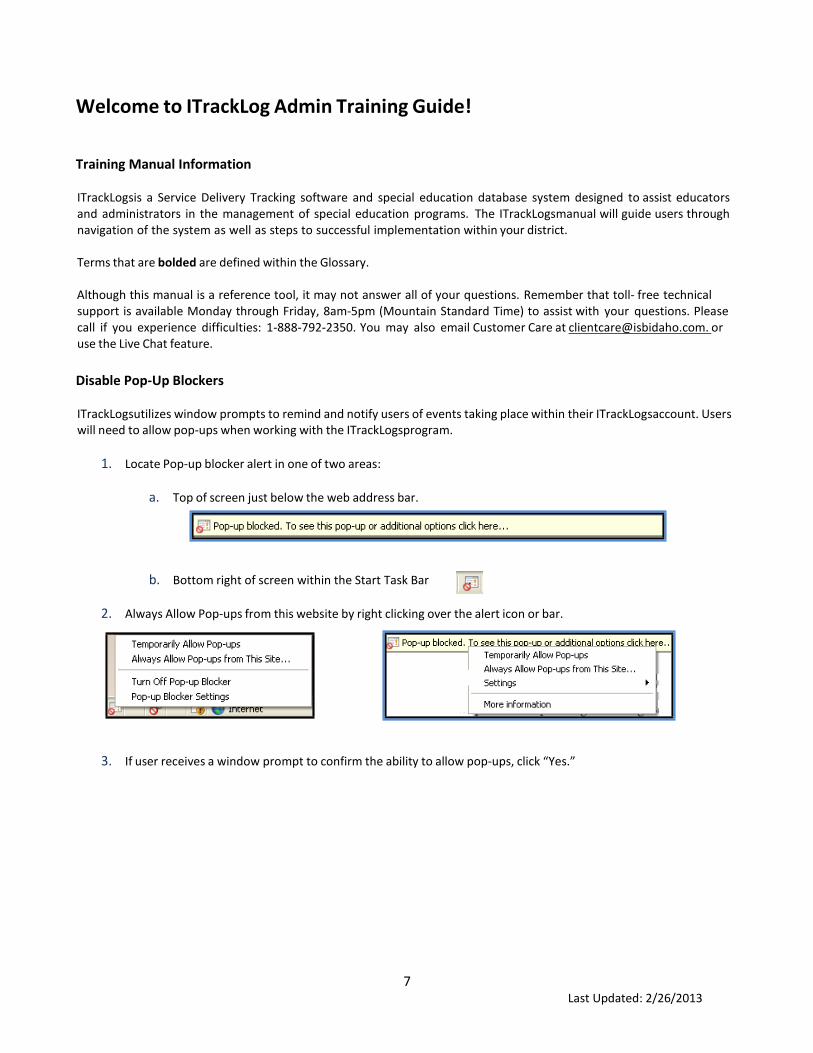
1. Locate Pop‐up blocker alert in one of two areas:
a. Top of screen just below the web address bar.
b. Bottom right of screen within the Start Task Bar .
2. Always Allow Pop‐ups from this website by right clicking over the alert icon or bar.
3. If user receives a window prompt to confirm the ability to allow pop‐ups, click “Yes.”

8 Last Updated: 2/26/2013 2/14/2013
General Overview of ITrackLogs
Welcome to ITrackLogs! ITrackLogs was designed with educators in mind. In fact, educators across New England and Texas facilitated the development of ITrackLogsthrough their workgroup participation and feedback. ISB is excited to bring educators’ vision of a service delivery database management to fruition. This overview of ItrackLogs will provide you information about the registration and log in process.
Log In Process
All users who will be accessing the program will need to register. Type the website address solutions.isbidaho.com in your internet browser. Once on our website, select the “Login” button. When entering ITrackLogs, the first screen you will encounter is the login page.
If you are a new user, you must go through the registration process.

9 Last Updated: 2/26/2013 2/14/2013
New User Registration – Set up Profile
1. Input email address a. The email address that is entered should be an email where you would expect to receive
school information. You will be able to send emails to Customer Care and District Administration to address questions or concerns. Be sure to use the following format: [email protected]
2. Confirm email address by typing it in again. 3. Select a password and type it in the password field
a. Choosing your password is an important and personal step. Be sure to choose something that you can easily remember, but that is not easily identifiable by others. For security purposes, passwords must be a minimum of 8 alpha‐numeric characters with at least one number.
4. Confirm your password by typing it in again. Enter First
Name. 5. Enter Name, Job Title, Phone Number, Select “Next” 6. Choose and answer Security Questions. 7. Select “Next” 8. Indicate the name of the account (district
account name) you are requesting to join and then press “Display Available Products” button
9. Choose the product(s) you wish to access and then select,
10. Press the button “Request Access”
11. Email will be sent to your administrators’ for approval.

11
Last Updated: 2/26/2013 2/14/2013
Additional log in information
Duplicate email addresses will not be allowed. If you receive a message that Username Already Exists than
go back to the main login page and select “Forgot Password”. Once you answer the security questions the
system will log you in.
You will be sent a welcome email when your account is approved.
Information collected during the registration process can be accessed by clicking on the “My Profile”
Navigation Button.
Forgotten Password
1. Return to the login page and click on the “Forgot Password” link.
2. Answer the security questions. If you did not set security questions or have forgotten your responses, please contact your Administrator for a password reset.
Request Access for Additional ISB Products and Accounts
If a user is already registered for an existing ISB account or product, such as Case‐e, the user will not need to re‐
register. The user will login using the same email and password that was initially created. If a user forgot their
password than select “Forgot Password” and the system will assist you in logging in.
Follow these steps to gain access to additional products such as ITrackLogs:
1. Go to solutions.isbidaho.com
2. Select “Login”
3. Login with email address and password
4. Select Navigation Button
5. Select
6. Select
7. Type in “Account” Name

12
Last Updated: 2/26/2013 2/14/2013
8. Select
9. Choose the product(s) you wish to access and then select
10. Select
11. Email will be sent to your administrators’ for approval.
Navigation of iTrackLogs
Launch Pad
The Launch Pad is located toward the top left of the screen within the Navigation Bar. It identifies which ISB product the user is logged into. The launch pad also serves as a quick‐link to the ISB websites by clicking on the different product logos.
Navigation Bar/Buttons
The Navigation Bar is located at the top of the screen and allows users to access their account information, review their Certification Level and the Navigation Buttons.
Navigation Buttons
Round blue buttons located on the right side of the Navigation Bar at the top of the screen.
My Profile
Displays the information provided during Login Registration. Users have the ability to change their security questions, email address, password, as well as request access to additional accounts and/or ISB products.
Under the My Profile Work Space, users can select the “My Accounts” icon which will allow users to request access to additional ISB products as well as review current access and security rights.

13
Last Updated: 2/26/2013 2/14/2013
Set‐up Defaults
If users have access to multiple accounts and products, the users can establish their defaults with their My Profile window.
Home
Returns the user to the home screen as established within the users My Profile Navigation Button – My Accounts – My Defaults section (see above).
Calendar
Displays the user’s personal/session calendar within the Work Space.

14
Last Updated: 2/26/2013 2/14/2013
Help Displays materials and resources to assist users with their learning.
Pathway The pathway is located above the action icons and identifies the “path” a user has taken to get to the current location in the program. Clicking on the Pathway will return the user to the window named in that arrow. Pathway Drop‐downs
If the Pathway contains a small arrow inside a square , it is also a navigation tool. Clicking on a section of the Pathway will open a drop‐down menu allowing you to select a different area in that section and/or any historical documentation.
Action Icons
Action Icons are located above the Work Space Tabs. They allow users to complete functions such as add, delete, print, etc.
Add Information
Delete Information
Print/Preview
15
Last Updated: 2/26/2013 2/14/2013
Administrative Column
Within the Administrative Column is a list of tasks that Administrators or Team Leaders can perform to assist in managing the ITrackLogsdatabase. ITrackLogsalso offer a way to organize the Administrative Column through a folder system. By selecting the folder, all the tasks that are available specific to that folder will be revealed.
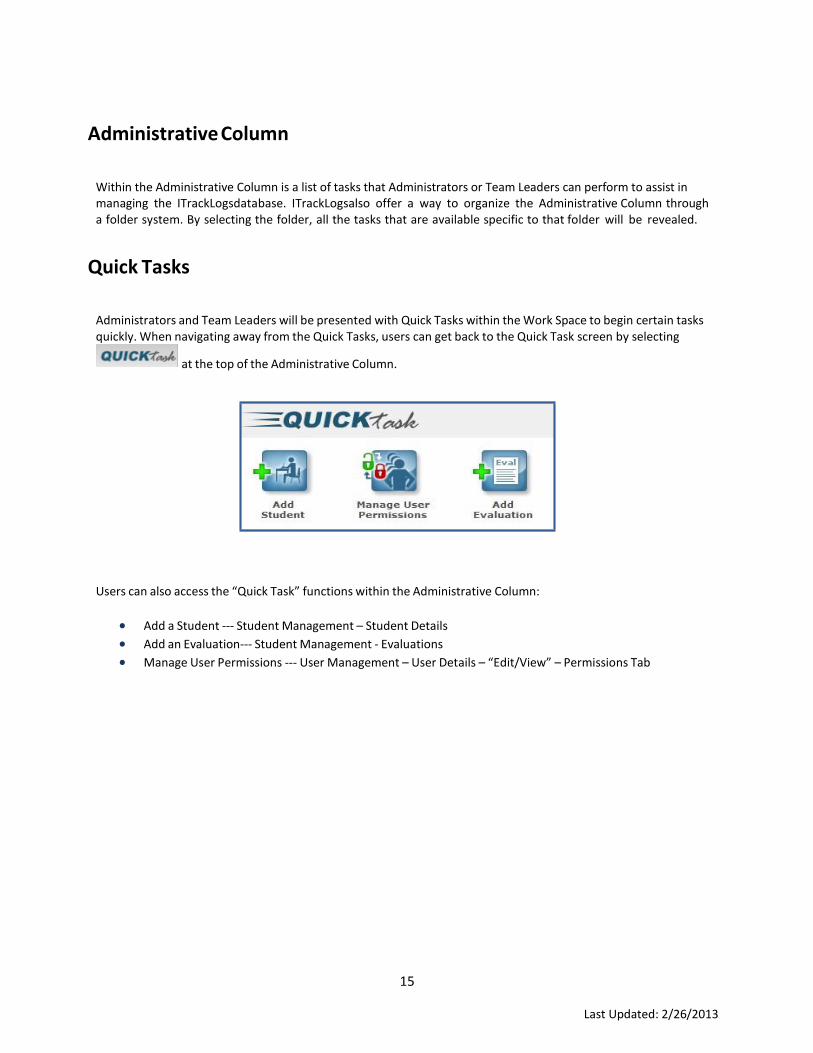
Quick Tasks
Administrators and Team Leaders will be presented with Quick Tasks within the Work Space to begin certain tasks quickly. When navigating away from the Quick Tasks, users can get back to the Quick Task screen by selecting
at the top of the Administrative Column.
Users can also access the “Quick Task” functions within the Administrative Column:
Add a Student ‐‐‐ Student Management – Student Details
Add an Evaluation‐‐‐ Student Management ‐ Evaluations
Manage User Permissions ‐‐‐ User Management – User Details – “Edit/View” – Permissions Tab

16
Last Updated: 2/26/2013 2/14/2013
Universal Functionality
Within the Student Menu users will experience a consistency in the ability to accomplish multiple tasks.
Add Information
Users will have the ability to add information in two ways:
1. QUICK TASKS ‐ When you select any student from the Caseload Column, the Quick Tasks window will display for that student within the Work Space. Choose the appropriate Quick Task. The Work
Space will populate the appropriate data to begin building information. Click on the Action Icon to add. Answer the questions and press “Save” button near the bottom of the Work Space once completed.
2. STUDENT MENU ‐ You can also add information for a student by selecting the student in the Caseload Column and selecting the appropriate task from the Student Menu. The Work Space will
populate the appropriate data to begin building information. Click on the Action Icon to add. The Work Space will populate with related questions. Answer the questions and press “Save” button near the bottom of the Work Space once completed.
Delete Information
Users will have the ability to delete information in two ways:
1. EACH ENTRY – Users have the ability to go to each field and delete manually by highlighting text and selecting “delete” on the keyboard OR by clicking at the end of the text and selecting “backspace” until completely removed.
2. Action Icon –This will delete all data stored within that section of the Work Space.

17
Last Updated: 2/26/2013 2/14/2013
Edit/Preview/Print Forms
Users will have the ability to edit, preview, and/or print forms.
EDITABLE PRINT PREVIEW – Users can select the Action Icon above the Work Space to change their database view to a form view which allows the user to edit the form, preview the form, and/or print the form.
WORK SPACE EDITING: Users have the option to utilize the Work Space scroll bar to edit all appropriate fields (see arrow on right), and/or utilize the Table of Contents to select a specific area to edit (see arrow on left).
Saving Data
Users will be required to save their data periodically as they work through the software. When changes occur on a workspace, a red save button will appear at the top of the workspace.
Spell Check
Spell Check becomes available when users are within a standard text field.
NOTE: there is no spell check available in the blue bordered hypertext boxes (i.e. In the Present Level of Performance (PLOP) in the Goals/Objectives area).

18
Last Updated: 2/26/2013 2/14/2013
User Management
Administrators can manage their users within the User Management folder.
Review/Update User Details
1. Select “User Details” from the User Management folder.
2. Select next to appropriate name.
3. Select appropriate Work Space Tab to update.
4. Summary ‐‐‐ Overview of users’ current roles and permissions. Admins also have the ability to reset a user’s password when needed.
‐‐‐ Online ‐‐‐ Deactivated
‐‐‐ Certification Level
a. Types ‐‐‐ If user has a role of a Service Provider and/or a Team Leader, Admins will need to identify
the exact area. b. Credentials ‐‐‐ If user has licensure as a State Approved Service Provider type, Admins will need to
keep this section up to date c. Federal Funding ‐‐‐ If user qualifies for Federal Funding, Admins will need to outline specifications
here
5. Select once complete.
NOTE: By identifying the Service Provider Type will organize the drop‐down menus within the ITrackLogsprogram, such as Student Provider Team, by role.

19 Last Updated: 2/26/2013
Add Service Provider or Team Leader Type
1. Select to “Edit” a user’s role
2. Select “Types” Work Space Tab
3. Select from the drop‐down which type
4. Select
5. Enter new Type
Press Save button to complete
NOTE: By adding more Service Provider Types will also add to the Service Provider Team drop‐downs as well.
Add Credentials
1. Press “Add New Credential”
2. Specify the credential to be added
3. Press Save to complete
Edit Credentials
1. Select “Edit” next to a credential record
2. Enter in appropriate date 3. Press Save to complete

20 Last Updated: 2/26/2013
Approve Users
1. Select “Approve Users” from the User Management folder in the Administrative Column.
2. Select appropriate role.
3. Select to grant access or .
NOTES
A confirmation email will be sent to the registering user that they have received or have been denied access.
Associate Users
This process allows Admins to associate an existing user to ITrackLogsLegacy to their specific caseloads that were initially assigned.
1. Select “User Details” from the User Management folder.
2. Select next to appropriate name.
3. Select “Associate User with previous ITrackLogsusername” to update.
4. ITrackLogswill look for any Staff Members that this user may associate with. Select “All” or the letter of the alphabet to search for the staff member to associate the caseload with.
5. Click on next to appropriate person.
6. Results will appear in the Work Space upon completion.

21 Last Updated: 2/26/2013
Locked Users
1. Select “User Details” from the User Management folder in the Administrative Column.
2. Locate User Name that has the lock icon
3. User that is locked will need to answer the three security questions the user set‐up during the registration process or Admin can select.
Caseload Management Administrators and Team Leaders have the ability to manage the Service Provider Caseloads within the Caseload Management folder.
Service Providers
Administrators have the ability to manage their Service Providers within the Caseload Management folder.
Search Caseloads
1. Select appropriate filters
2. In the “Current Caseload” pane, filter student list in one of three ways: a.
b.
c.
NOTE: To filter list more specifically for a Service Provider or Student, user can type in the name and the list will filter accordingly.

22 Last Updated: 2/26/2013
Assign Students to a Service Provider
1. Locate student in the “Current Caseload” column (if cannot locate student use Search feature).
2. Locate Service Provider to assign student(s) to in the “New Caseload” column.
3. Select the check box next to each appropriate student to be assigned in the “Current Caseload” column.
4. User has two options to assign student to the new Service Provider:
a. ‐‐‐ When selecting to “Move”, the student will move to the New Service Provider and will no longer be available to the Previous Service Provider.
b. ‐‐‐ When selecting to “Copy”, the student will be added to the New Service Provider while still remaining available to the Previous Service Provider.

23 Last Updated: 2/26/2013
Remove Student from a Service Provider
1. Select Service Provider from drop‐down in the “Current Caseload” column.
2. Select the check box next to each student to remove.
3. Press “Remove from Caseload” button
Team Leaders
Administrators have the ability to manage Team Leaders within the Caseload Management folder, Team Leaders Caseloads sub‐folder.
Search Caseloads
1. Select appropriate filters
Assign Service Providers to a Team Leader
1. Locate Service Providers in the “Current Caseload” column (if cannot locate Service Provider, use Search feature).
2. Locate Team Leader to assign Service Provider(s) to in the “New Caseload” column.
3. Select the check box next to each appropriate Service Provider to be assigned in the “Current Caseload” column. User has two options to assign Service Provider to the new Team Leader:
a. ‐‐‐ When selecting to “Move”, the Service Provider will moved to the New Team Leader and will no longer be available to the Previous Team Leader.
b. ‐‐‐ When selecting to “Copy”, the Service Provider will be added to the New Team Leader while still remaining available to the Previous Team Leader.

24 Last Updated: 2/26/2013
Data Entry Clerk
Administrators have the ability to manage their Evaluators within the Caseload Management folder, Data Entry Clerk Caseloads sub‐folder.
Search Caseloads
1. Select appropriate filter
Assign Service Providers to a Data Entry Clerk
1. Locate Service Provider in the “Current Caseload” column.
2. Locate Service Provider to assign in the “New Caseload” column.
3. Select the check box next to each appropriate student to be assigned in the “Current Caseload” column.
4. User has two options to assign student to the new Case Manager:
a. ‐‐‐ When selecting to “Move”, the student will be moved to the New Evaluator and will no longer be available to the Previous Evaluator.
b. ‐‐‐ When selecting to “Copy”, the student will be added to the New Evaluator while still remaining available to the Previous Evaluator.

25 Last Updated: 2/26/2013
Remove Service Provider from a Data Entry Clerk
1. Select Evaluator from drop‐down in the “Current Caseload” Column.
2. Select the check box next to each service provider to remove.
3. Press “Remove From Caseload” button
Caseload Reports
Administrators and Team Leaders can run Caseload Reports from the Administrative Column.
Administrators have the ability to run several reports in the ITrackLogsprogram. These reports enable Administrators to review utilization and update user/staff credentials. Administrators can access these reports by selecting the Caseload Reports section of the Administrative Column – District Reports task.
Service Provider Records Report
This report allows Administrators to review utilization of ITrackLogsby their providers in regards to “posting” sessions.
1. Select “Service Provider Details Report”
2. Select “Year” and “Month” (defaults to current year and month)

26 Last Updated: 2/26/2013
3. Press “Generate Report” Button
4. Review Results A Green cell indicates all sessions have been posted for that Service Provider on that day. A yellow cell indicates some sessions have yet to be posted by that Service Provider on that day. A red cell indicates no sessions have been posted by that Service Provider on that day. The numbers in the cells are displayed in a “Posted/Unposted” format. (i.e. “3/2” indicates a total of five sessions with three being posted and two unposted.) Blank cells indicate no sessions scheduled on that day.
5. OPTIONAL: Export data to Excel by pressing the button
Unposted Sessions Summary Report This report allows Administrators to review the number of “unposted” sessions a user has outstanding.
1. Select “Unposted Sessions Summary Report”
2. Review Results
The results indicate the total number of unposted sessions for each Service Provider and the date of their oldest unposted session.
3. Select “View Details” to review the descriptions of each session that is outstanding
4. Select to go back to the overall report
5. OPTIONAL: Select

27 Last Updated: 2/26/2013
Service Provider Details Report
This report allows Administrators to review all user’s details such as credentials, federal funding allocations, current caseload count, etc.
1. Select “Service Provider Details Report”
2. Review Results
3. OPTIONAL: Select
NOTE: To update Credentials and Federal Funding for a particular user, proceed to User Management – User Details
Session Logs
1. Select within the Work Space.
2. Select appropriate filters
3. Select students to print logs for
4. To print the official form, select Forms Action Icon
5. Review documentation
6. Select Icon to print to a printer of your choice
7. OPTIONAL: The user can review the results and/or export them to excel by selecting
and then at the top of the Work Space

28 Last Updated: 2/26/2013
Student Records Report
This report allows Administrators to review utilization of ITrackLogsby their providers in regards to student sessions.
1. Select “Student Records Report”
2. Select appropriate filter(s)
3. Select
4. Review Results
A Green cell indicates all sessions have been posted for that Service Provider on that day. A yellow cell indicates some sessions have yet to be posted by that Service Provider on that day. A red cell indicates no sessions have been posted by that Service Provider on that day. The numbers in the cells are displayed in a “Posted/Unposted” format. (i.e. “3/2” indicates a total of five sessions with three being posted and two unposted.) Blank cells indicate no sessions scheduled on that day.
5. OPTIONAL: Select

29 Last Updated: 2/26/2013
Student Management
Administrators and Team Leaders can manage students within the Student Management folder from the Administrative Column.
Student Details
Access Student Data
When selecting tasks throughout the Student Management Folder, admins will be able to search for Students by completing the following steps:
1. Search for Student by typing all or part of the student’s last name in the drop‐down box or by scrolling to the name directly in the drop‐down list.
2. Select appropriate student from the drop‐down list. The student’s most recent referral, evaluation, meeting, IEP, etc. will be displayed automatically.
3. Review documentation by utilizing the Work Space and/or Editable Print/Preview Action Icon.
4. To select historical documentation, use the task drop‐down segment of the pathway to select the appropriate option.
30 Last Updated: 2/26/2013
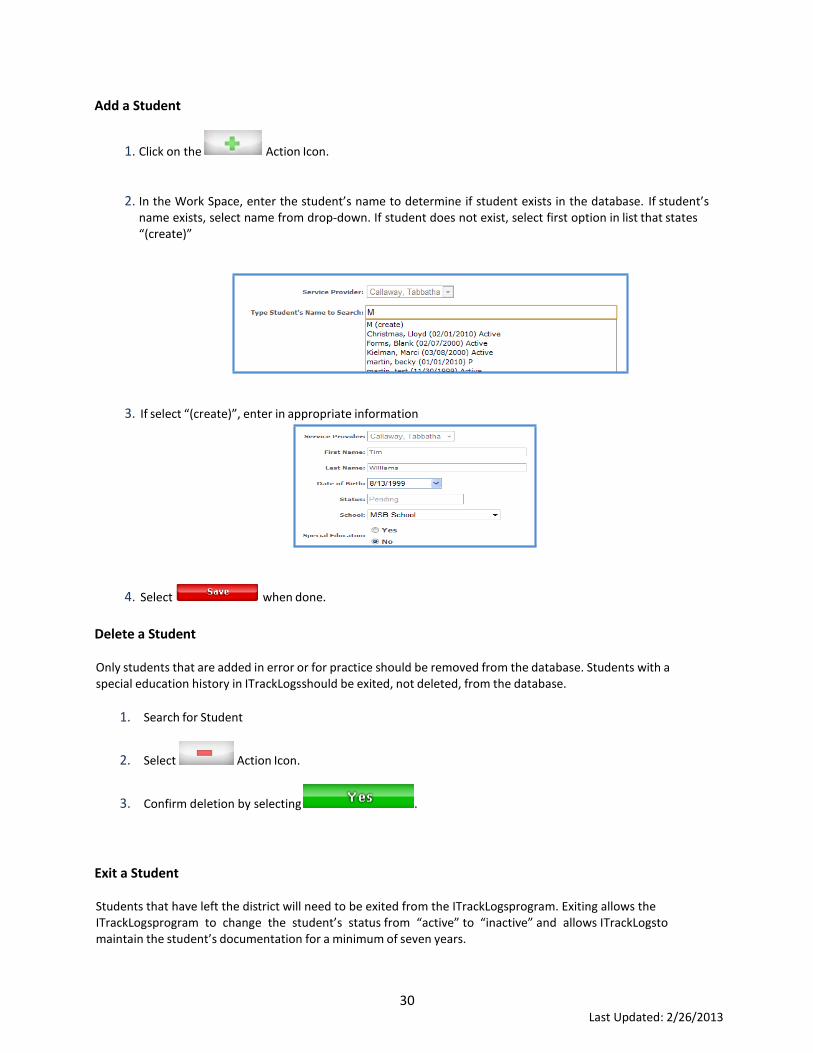
Add a Student
1. Click on the Action Icon.
2. In the Work Space, enter the student’s name to determine if student exists in the database. If student’s name exists, select name from drop‐down. If student does not exist, select first option in list that states “(create)”
3. If select “(create)”, enter in appropriate information
4. Select when done.
Delete a Student
Only students that are added in error or for practice should be removed from the database. Students with a special education history in ITrackLogsshould be exited, not deleted, from the database.
1. Search for Student
2. Select Action Icon.
3. Confirm deletion by selecting .
Exit a Student
Students that have left the district will need to be exited from the ITrackLogsprogram. Exiting allows the ITrackLogsprogram to change the student’s status from “active” to “inactive” and allows ITrackLogsto maintain the student’s documentation for a minimum of seven years.

31 Last Updated: 2/26/2013
1. Within the Table of Contents, click .
2. Address the exit information within the Work Space.
3. Select once complete.
Add Student Provider Team
1. Select “Student Provider Team” Work Space Tab.
2. Select Action Icon.
3. Enter appropriate information.
4. Select once complete.
NOTE: If a Service Provider is not listed in the drop‐down this indicates that the Administrators have not yet approved any users to this role. Please contact your Administrator to establish assignment if needed.

32 Last Updated: 2/26/2013
Delete Student Provider Team
1. Select Action Icon
2. Select person to delete.
3. Select to nfirm deletion
Evaluations
Add a Student Evaluation
1. Search for Student.
2. Select the Action Icon above the Work Space.
3. Enter appropriate information.
4. Select once complete.
Edit Student Evaluation 1. User has the option to utilize the Work Space to enter data and/or select the Editable Print Preview
Action Icon
2. Press “Save” button once complete.
Delete Student Evaluation
1. Select Action Icon.
2. Select to confirm deletion.

40 Last Updated: 2/26/2013
Goals and Objectives Add Goals Goals are written in the Goals and Objectives area and accessed through the Student Management Folder. After selecting a student, select “Goals and Objectives” from the Student Management Folder. Users will write the goals/objectives and save them to the student.
1. Search for student.
2. Select “Unlinked Goals” Work Space Tab.
3. Select Action Icon above the Work Space.
4. Enter appropriate information.
5. Select or .
NOTES:
If user selected “Add Custom Goal” user will be directed directly to the Work Space for continue editing. If user selects “Add Goal(s) From Catalog” they will be directed to the catalog options.
When adding a Goal users select how the goal will be observed within the ITrackLogssystem: “Standard” or “Successful Attempts”.
Standard:
Successful Attempts:
41 Last Updated: 2/26/2013
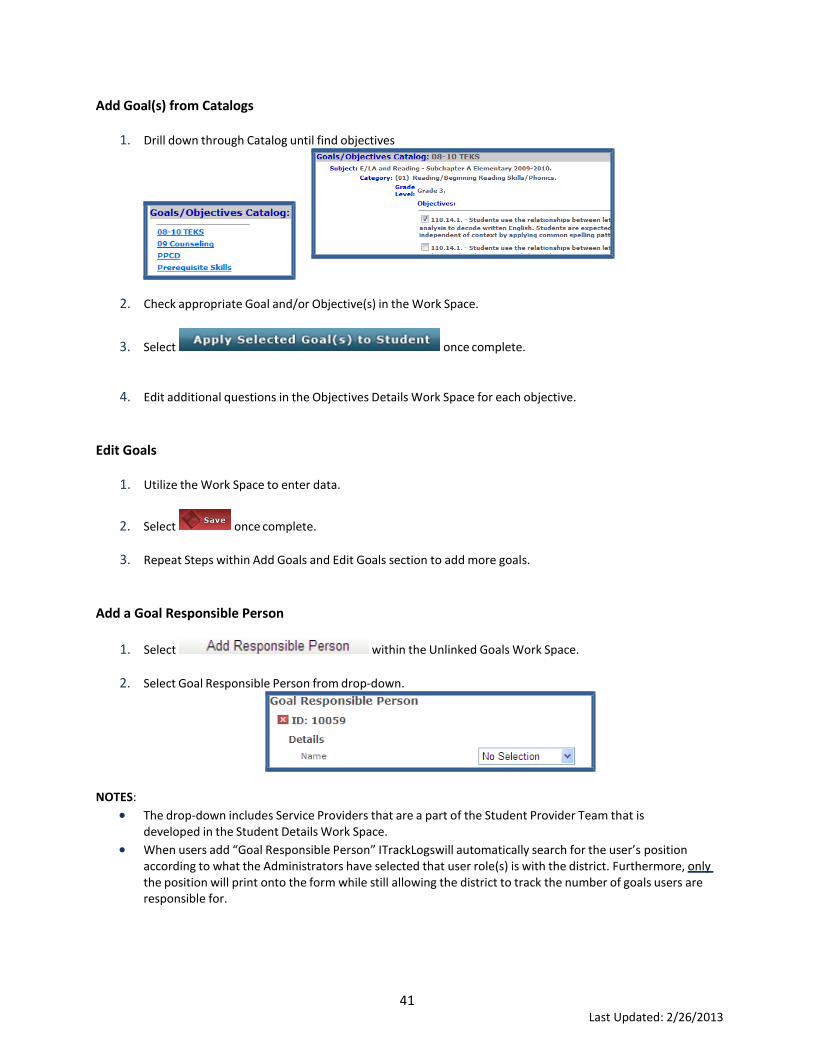
Add Goal(s) from Catalogs
1. Drill down through Catalog until find objectives
2. Check appropriate Goal and/or Objective(s) in the Work Space.
3. Select once complete.
4. Edit additional questions in the Objectives Details Work Space for each objective.
Edit Goals
1. Utilize the Work Space to enter data.
2. Select once complete.
3. Repeat Steps within Add Goals and Edit Goals section to add more goals.
Add a Goal Responsible Person
1. Select within the Unlinked Goals Work Space.
2. Select Goal Responsible Person from drop‐down.
NOTES:
The drop‐down includes Service Providers that are a part of the Student Provider Team that is developed in the Student Details Work Space.
When users add “Goal Responsible Person” ITrackLogswill automatically search for the user’s position according to what the Administrators have selected that user role(s) is with the district. Furthermore, only the position will print onto the form while still allowing the district to track the number of goals users are responsible for.

42 Last Updated: 2/26/2013
Delete a Goal Responsible Person
1. Locate Goal Responsible Person to delete in Unlinked Goals Work Space.
2. Press red “X” .
3. Press “OK” to confirm deletion.
Delete a Goal
1. Select Action Icon.
2. Select Goal to delete.
Add Objectives to Goals
1. Select “Unlinked Goals” Work Space Tab.
2. Select Goal Area and then the Goal from Table of Contents to add objectives to.
3. Select button at the top of the Work Space for appropriate goal.

43 Last Updated: 2/26/2013
4. Type objective in the Custom Objective field within the Work Space.
5. Select button once complete.
6. Edit additional questions in the Objectives Details Work Space for each objective.
7. Repeat Steps 3 and 6 in order to add additional objectives to goal.
NOTE: For organizational purposes, the Table of Contents will gather all goal ID numbers assigned by the ITrackLogsprogram, to assist with quick navigation. To access, simply click on Goal Area, then click on Goal ID number.
Add Objectives from Catalogs
1) Drill down through Catalog until find objectives
2) Check appropriate Goal and/or Objective(s) in the Work Space.
3) Select once complete.
4) Edit additional questions in the Objectives Details Work Space for each objective.
Delete Objective
1) Locate objective in Unlinked Goals Work Space.
2) Select .
3) Select “OK” to confirm deletion.
44 Last Updated: 2/26/2013
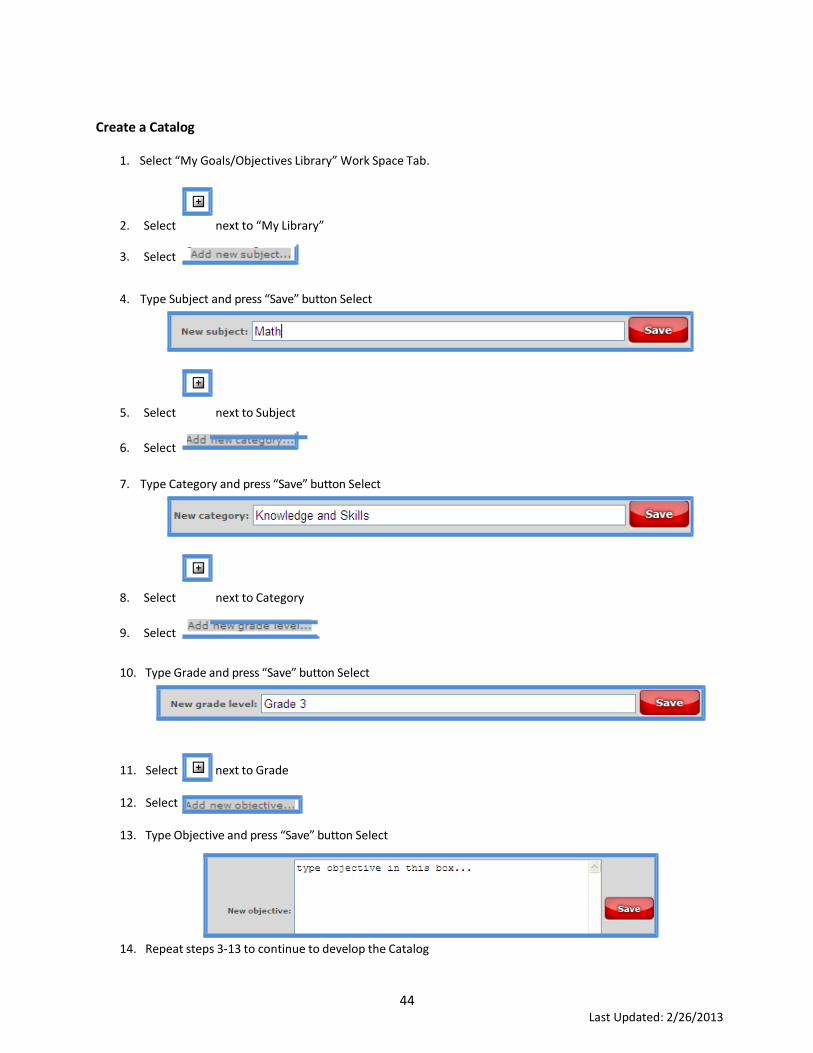
Create a Catalog
1. Select “My Goals/Objectives Library” Work Space Tab.
2.
Select
next to “My Library”
3. Select
4. Type Subject and press “Save” button Select
5.
Select
next to Subject
6. Select
7. Type Category and press “Save” button Select
8.
Select
next to Category
9. Select
10. Type Grade and press “Save” button Select
11. Select next to Grade
12. Select
13. Type Objective and press “Save” button Select
14. Repeat steps 3‐13 to continue to develop the Catalog

45 Last Updated: 2/26/2013
Delete Custom Catalog
1. Select “My Goals/Objectives Library” Work Space Tab.
2. Select next to “My Library”. Continue opening up each section until locate objectives.
3. Select objective to delete
4. Select button next to objective
Print Goals and Objectives
1. Select Goal from Table of Contents.
2. Select Editable Print Preview Action Icon
3. Select

46 Last Updated: 2/26/2013
Charting Progress
1. When adding a Goal users select how the goal will be observed: “Standard” or “Successful Attempts”
2. Once the user begins charting student observation within ITrackLogsthe graphing component will begin collecting the data Standard:
Successful Attempts:
3. Users can view the graph by clicking on at the top of the following Work Spaces:
a. Case‐e –Student Menu IEPs – Goals Work Space
b. Case‐e –Student Menu Goals and Objectives – Linked and Unlinked Goals Work Space
c. ITrackLogs– Goals and Objectives Student Menu – Linked and Unlinked Goals Workspace
NOTES:
Case‐e Clients: The graphing functionality will design a graph regardless of the status of the IEP.
Sessions are NOT required to be “posted” in order for the graphing functionality to design a graph.
47 Last Updated: 2/26/2013
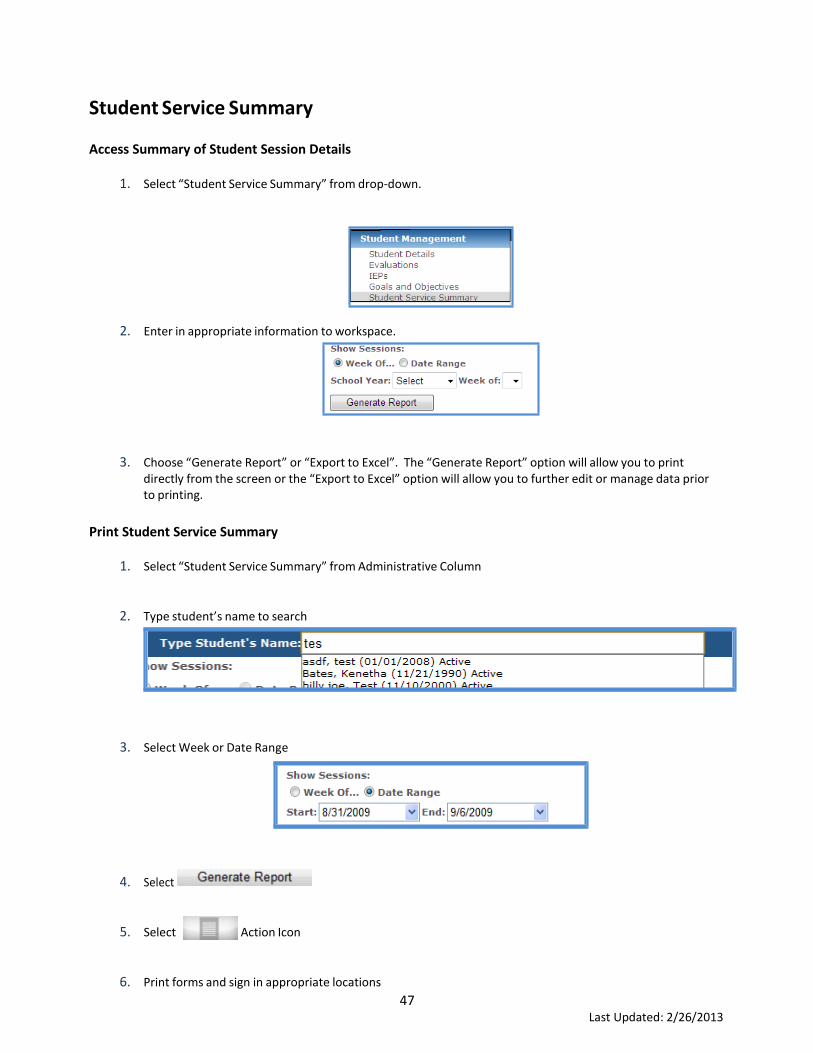
Student Service Summary
Access Summary of Student Session Details
1. Select “Student Service Summary” from drop‐down.
2. Enter in appropriate information to workspace.
3. Choose “Generate Report” or “Export to Excel”. The “Generate Report” option will allow you to print directly from the screen or the “Export to Excel” option will allow you to further edit or manage data prior to printing.
Print Student Service Summary
1. Select “Student Service Summary” from Administrative Column
2. Type student’s name to search
3. Select Week or Date Range
4. Select
5. Select Action Icon
6. Print forms and sign in appropriate locations

48 Last Updated: 2/26/2013
Student Identity Verification
Access Student Identity Information
1. Select “Student Identity Verification” from drop‐down.
2. Verify student identity and edit, deactivate or delete as necessary.
Edit Student Identity Information
1. Select the “Edit” button to change any details regarding a specific student’s name, birth date, service provider, school or gender.
2. Select the “deactivate” button if a student is no longer affiliated with the Special Education department.
3. Enter appropriate information in the workspace.
4. Select the button once you have entered the appropriate information in the workspace.
NOTE: Select the “delete” button only if you wish to delete all trace of a student from the database. Once a student is deleted all information associated with that particular student will be deleted as well. You also have the opportunity to search for matches to assure that there are no duplications in student information.

49 Last Updated: 2/26/2013
Calendar Management
Administrators can manage district and school calendars from the Calendar Management folder within the Administrative Column.
Manage District Calendar
1. Click on each date within the appropriate month(s) that school is not “in session”.
2. Select reason for school not in session
3. Select once complete.
Manage School(s) Calendar
1. Select appropriate school from drop‐down.
2. Select reason for school not in session
3. Select once complete.

50 Last Updated: 2/26/2013
Manage Personal/School Calendar
Calendar populates events scheduled throughout the ITrackLogsdatabase such as Annual Review Date, # Year Evaluation Dates, IEP Meetings, Students birthdays, etc.
1. Select to view Personal Calendar events.
2. To add a Personal Event double‐click on date.
3. Enter in appropriate information to schedule event.
4. Select and school drop‐down.
5. To add an Event to School Calendar double‐click on date.
6. Enter in appropriate information to schedule event.
Progress Reporting Calendar
1. Select “Progress Reporting Calendar” from the Administrative Column.
2. Select school year and school from drop‐down.
3. Click on date for Progress Reporting.
4. Select once complete.
5. Repeat steps to assign Progress Report dates for all campuses.

51 Last Updated: 2/26/2013
District Management
Administrators can add and manage their district’s contact information, RMTS participation, and Default Role Permissions by selecting “District Management” from the Administrative Column.
Add Service Provider Type
1. Enter the service provider type
2. Select the “Add Provider Type” button
3. Service provider type will display in “Custom Service Provider Types” pane.

52 Last Updated: 2/26/2013
Default Role Permissions/ Edit Permissions by Role
1. Select “Role” from drop‐down
2. Select all appropriate permissions
3. Select “Apply changes to all current users with selected role” to update the selected permissions for all users that have associated role.
4. Select once complete.
5. Select to bring the role back to ITrackLogsDefault Permissions
NOTE: To make adjustments to permissions for a specific user, proceed to the User Management – User Details section

53 Last Updated: 2/26/2013
District Information
This information is specific to your particular state and district. It serves as a reference for district contacts and identification numbers. Once a new contact has been added, an email notification will be sent to alert the person who has been added.
Update District Information
1. Enter in appropriate information in Work Space.
2. Select Action Icon to add personnel.
3. Enter in appropriate information
4. Select once complete.
Delete Contact
1. Select Action Icon.
2. Select appropriate contact to delete.
3. Select to confirm
District Parameters
District Administrators can override audit features established in ITrackLogs.
1. Select “No” to turn off audit
2. Select “Save” once complete

54 Last Updated: 2/26/2013
Personnel Management Manage Personnel Changes
1. Select “Personnel Management” from drop‐down.
2. Enter in appropriate information.
3. Select once complete.
NOTE: Personnel information entered here will update in the Cost Reporting Module.
Schools
Access School Information
1. Select “Schools” from drop‐down.

55 Last Updated: 2/26/2013
Edit/Delete School Information
1. Select the “Edit” or “Delete” button as necessary.
2. Enter appropriate information into workspace.
3. Select once complete.
Add a School
1. Select Action Icon to add school to list.
2. Enter in appropriate information.
3. Select once complete

56 Last Updated: 2/26/2013
Medicaid Administration
Review Student Medicaid Eligibility
1. Select “Eligibility” from drop‐down.
2. Select “Report”
3. Select if necessary

57 Last Updated: 2/26/2013
Glossary of Terms
Action Icons:
Action Icons are located above the Work Space Tabs as well as above the Caseload Column. They allow users to complete functions such as add, delete, clone, amend and print.
Active Student:
An active student has been evaluated and identified as a student requiring special services.
Add Student:
The Action Icon for adding a student is located on the upper left‐hand side of the gray status bar. Once you have clicked on this icon, follow “Add a Student” guide.
Administrative Column:
The Administrative Column is the window where the Administrative Tasks are displayed.
Caseload Column:
The Caseload Column is the window where the Student List is displayed.
Caseload Filter:
The “caseload filter” function is located above the Caseload Column and allows you to filter your student list in several ways depending on your current task. The student list can be filtered alphabetically, by Student Reminder Flags or by Student Progress Indicators.
Create Reports:
To create reports (queries) in ITrackLogs, users must click on the Action Icon in the upper left‐hand corner of the gray status bar.
Editable Print/Preview:
Editable Print/Preview allows users to fill in the fields of ITrackLogsdirectly on the forms. Data entered in these form fields will save directly to the database. The Editable Print/Preview Action Icon is located in the upper right‐hand corner of the gray status bar. Editable Print/Preview also generates forms for viewing and printing.
Home Screen:
The Home Screen consists of the Calendar View and the Student List.
Inactive Student:
An inactive student has been dismissed from special services. However, ITrackLogsretains historical information on inactive students for reporting purposes or re‐referral.

58 Last Updated: 2/26/2013
Launch Pad:
The Launch Pad is located at the top left of the screen within the Navigation Bar. The Launch Pad serves as a quick‐link to the ISB websites by clicking on the different product logos.
My Profile:
Demographic information for a user gathered by ISB during the registration process to create the user’s account.
Navigation Bar:
The Navigation Bar is located at the top of the screen and allows you to access your account information and the Navigation Buttons.
Navigation Buttons:
Round blue buttons located on the right side of the Navigation Bar at the top of the screen.
My Profile: Displays the information provided during Login Registration. Users have the ability to change their security questions as well as request access to additional accounts and/or ISB products.
Home: Returns user to the home screen.
Calendar: Returns user back to their calendar.
Help: Displays available user guides and contact information to reach our Customer Care Center via phone, email and live chat.
Pathway:
The Pathway is located above the Action Icons and identifies the “path” taken to get to the current location in the program.
Pathway Drop‐downs:
The Pathway is also a navigation tool. Clicking on a section of the Pathway will open a drop‐down menu allowing you to select a different area in that section.
Personal Calendar:
The Home Screen calendar can be populated by that user to contain personal calendar events viewed only by the user. To view the personal calendar, select the personal calendar icon in the upper right‐ hand corner of the Home Screen.
Quick Tasks:
Once a student has been chosen from the student list, the Quick Task pane allows the user to choose a task and go directly there in ITrackLogs. Districts can choose default Quick Tasks. Users can also customize their Quick Tasks according to their role within the system by clicking on the “Settings” button in the Quick Tasks pane.

61 Last Updated: 2/26/2013
School Calendar:
The Home Screen calendar is populated by staff with administrative rights for school events. Most of these events will be IEP related (IEP annual meetings, 3 year re‐evaluations, initial referrals). Administrators will also be able to add district, school, grade and user‐specific meetings on the school calendar. To view the school calendar, select the “School Calendar Icon” in the upper right‐hand corner of the Home Screen.
Search Tool:
The search tool is an administrative function in the Administrative Column allowing searches for students within the system.
Student Menu:
The Student Menu is the list of areas that appears under a student’s name when it is selected. The student’s name and Student Menu are defined by the orange background that appears when the student is selected.
Student Provider Team:
The Student Provider Team is created within the Student Details window. All providers added to the Student Provider Team have access to the student’s records and can perform tasks as identified by each provider’s access level.
Table of Contents:
The Table of Contents is within the IEP section of ITrackLogs. The buttons within the Table of Contents identify the sections of the tab to allow you to navigate through the tab efficiently.
Work Space:
The Work Space is the large area to the right of the Caseload Column and below the Work Space Tabs.
Work Space Tabs:
The Work Space Tabs are located above the Work Space and allow the user to navigate through the Work Space.