Embed Size (px)
Citation preview

Adding on-demand capacity and host failover to Dell VIS Self-Service Creator environments using Dell AIM
A Dell Technical White Paper
June 2011
Virtualization Solutions Engineering

2
THIS WHITE PAPER IS FOR INFORMATIONAL PURPOSES ONLY, AND MAY CONTAIN TYPOGRAPHICAL
ERRORS AND TECHNICAL INACCURACIES. THE CONTENT IS PROVIDED AS IS, WITHOUT EXPRESS OR
IMPLIED WARRANTIES OF ANY KIND.
© 2011 Dell Inc. All rights reserved. Reproduction of this material in any manner whatsoever without
the express written permission of Dell Inc. is strictly forbidden. For more information, contact Dell.
Dell, the DELL logo, PowerConnect, EqualLogic, and PowerEdge are trademarks of Dell Inc. VMware,
ESXi, and VMware vCenter are registered trademarks or trademarks (the “Marks”) of VMware, Inc. in
the United States and/or other jurisdictions. Other trademarks and trade names may be used in this
document to refer to either the entities claiming the marks and names or their products. Dell Inc.
disclaims any proprietary interest in trademarks and trade names other than its own.
June 2011

3
Contents
Introduction ................................................................................................................ 4
Audience and Scope ....................................................................................................... 4
Technology Overview ..................................................................................................... 5
Use Cases ................................................................................................................... 7
Reference Architecture ................................................................................................ 12
Deployment Guidelines ................................................................................................. 14
Operations ................................................................................................................ 17
Summary .................................................................................................................. 17
Reference ................................................................................................................. 18

4
Introduction Dell VIS Self-Service Creator allows authorized users to deploy and manage their IT resources on-
demand. Users have access to a tailored set of resources and activities which removes a number of
manual steps currently required to deploy a workload, speeding up access to IT resources.
IT can set up standard templates and blueprints that identify what the workload can be comprised of
and how to deploy a specific workload. Standard workload definition and deployment and access
controls both help IT improve consistency and gain control over their environment. Key features of VIS
Self-Service Creator are Automated Service Delivery Platform for Virtual Desktops and Servers, Role-
based, Self-service portal, VM Sprawl Control by proactively limiting consumption and automatically
reclaiming resources, Multi-vendor solution support across the ecosystem and extensibility.
Dell VIS Advanced Infrastructure Manager (AIM) allows system images, including Operating Systems and
hypervisors, to be dynamically targeted on any server hardware, without needing to make server
hardware, network, or storage area network (SAN) changes. Two key benefits of AIM are server failover
and rapid provisioning of new server hardware. AIM automatically detects server hardware failures and
restarts the failed system image to an available spare physical server. Network and storage
connectivity are automatically established for the spare server. Additionally, new servers can also be
quickly provisioned to provide additional computing resources to meet increasing business demands.
In this white paper we show how VIS Self-Service Creator can leverage Dell AIM to add dynamic host
failover and rapid server provisioning for VMware ESXi™ hosts. Within this environment, high availability
(HA) is provided at two levels; end-user deployed workloads are ensured by VMware HA and the
VMware ESXi hypervisors are ensured by AIM‟s server failover features. Dell AIM can also instantiate
additional ESXi hypervisors, in existing VMware clusters, to meet the changing resource demands of the
virtualized environments, while VMware‟s DRS features are utilized to rebalance the end-user
workloads over the newly expanded cluster.
This white paper also provides a reference architecture for VIS Self-Service Creator in a VMware
vSphere ESXi infrastructure with vSphere ESXi failover provided by AIM in a proof of concept
environment. In addition, this white paper discusses the key benefits of the architecture, deployment
best practices, and management guidelines.
Audience and Scope This white paper is intended for anyone who is planning using VIS Self-Service Creator in a virtualized
environment and plans to add Rapid Server Provisioning and Server Failover for virtualization hosts. The
white paper focuses on a scenario where the virtual machines running in the virtualized environment
are provisioned and managed by VIS Self-Service Creator and ESXi images are managed by AIM. The
white paper is meant to provide a reference architecture and deployment guidelines for a proof-of-
concept environment.
Readers are expected to have knowledge of VMware concepts. Only a basic overview of VIS Self-Service
Creator and AIM are provided in the following section. For a more detailed overview of the benefits of

5
VIS Self-Service Creator and AIM, as well as deployment steps and support details refer to the
corresponding product documents1.
Technology Overview In this section, we provide a brief overview of the benefits of VIS Self-Service Creator and AIM. We also
introduce terminologies and concepts used in this white paper.
Dell VIS Self-Service Creator VIS Self-Service Creator was developed to address the challenges of virtualized organizations in
managing virtual machine provisioning, sprawl, and user access. By leveraging virtualization
infrastructures and provisioning methods, VIS Self-Service Creator presents workload options to users
within a dynamic private cloud.
The benefits of VIS Self-Service Creator include:
Self-Service Portal
Web-based self-service portal with the ability to quickly provision systems is available.
Self- Service Portal enables automated, policy-enforced delivery of IT server and desktop
workloads from initial provisioning through decommissioning and archival.
Automated Sprawl Control
Designed to eliminate over provisioning and unauthorized usage
Identify and reclaim inactive and abandoned resources
Automate the decommissioning and reuse of retired resources
Virtual Desktop Infrastructure Provisioning (VDI)
Provisioning and management across desktops and servers
Integration with the desktop ecosystem
Workload Templates
Outlines the resource allocation, design parameters, and process automation
considerations that control how the resource will be managed throughout its life
Business Grouping
Multi-tier organizational grouping
Organizes resources, policies, processes, and management-access controls for each group
or service tier
Resource Reservations
Reserve resources and establish service tiers in a shared infrastructure for specific uses
and/or groups
Control resource consumption
Helps assure that resources are available when needed and reallocate resources as necessary
to meet shifting business priorities
Multi-vendor Interoperability
Orchestrate delivery across multi-vendor technology stacks: Hypervisors, Image/App
Deployment, Connection Brokers, and Management tools
1 VIS Self Service Creator: http://www.dell.com/creator
AIM Documentation: http://support.dell.com/support/edocs/SOFTWARE/aim/

6
Multiple Image Deployment Options
Platform tools like Windows WIM Imaging, Microsoft SCCM, and Linux Kickstart
Enterprise management tools like BMC BladeLogic, HP Server Automation, and others
Space-efficient tools like Citrix Provisioning Server and NetApp FlexClone
Extensibility:
Easy extensibility to include organization’s custom processes, such as VM level snapshotting
and rollbacks or the triggering of OS updates. For more information on VIS Self-Service
Creator extensibility, refer to the white paper VIS Self-Service Creator: Provisioning and
Extensibility Overview.
Dell Advanced Infrastructure Manager AIM enables data centers to react in real-time to changing business needs by dynamically changing
what servers are running and how those servers are connected to the network and the storage. The
result is an adaptive infrastructure, where data centers can transition between different configurations
- or from bare metal to live, connected servers – in less time, without manual intervention. The keys
benefits of AIM include:
Rapid Server Provisioning
Instantly provision servers, network connectivity, and storage access.
Automatically discover and provision a server in minutes by assigning a server image to a
specific server and booting the image from local disk or central storage (SAN, NAS,
Internet SCSI).
Simplify the provisioning process regardless of the target server‟s configuration using
sophisticated tools that can quickly migrate server images between local disks and
central storage.
Easily migrate server images from Physical to Physical (P2P), Physical to Virtual (P2V), or
Virtual to Physical (V2P) for server upgrades, refresh, or consolidation.
Cost-Effective Server Failover
Eliminate the need for complex and expensive clustering solutions for applications that
can sustain momentary failures, protecting all of your applications against hardware
failures.
Dispense with most “standby” servers while still protecting all of your servers by using spare
servers anywhere in the infrastructure to replace any failed server.
Automatically detect server failure, re-target the failed server‟ s image to an available spare
physical or virtual, and establish network and storage connectivity for the spare server.
Highly Efficient Shared IT Infrastructure
Provision capacity in real time, granting individual high-demand business system servers
more physical machine capacity on an as-needed basis without increasing the total number
of machines in the data center.
Create an enterprise computing cloud of any size internal to your company. Extensibility
Easy of extensibility through Java API and CLI options. Integrate into existing management
tools and environment.

7
Below are some of the AIM concepts and terminology used in this white paper.
VMRack – Within AIM, a VMRack is a collection of virtual machines managed by a hypervisor running on
a physical sever. In this white paper, we focus on the hypervisor and physical server aspects of the
VMRack. VIS Self-Service Creator is utilized to create the virtual machines and VMware vCenterTM
manages their placement and high availability.
Server Pool – A named group of one or more physical server that share common attributes. VMRacks
are assigned to Server Pools.
Channel – AIM organizes physical network resources into channels. Each channel may contain one or
more Virtual Local Area Networks (VLANs). Channels are applied to one or more physical interfaces on
servers in a server pool.
SCN – The System Control Network (SCN) is utilized by AIM to discover new servers and their
capabilities, to communicate status and configuration changes between the AIM controller and
VMRacks, and to connect the server with the network storage devices that contain the images from
which VMRacks boot.
Use Cases VIS Self-Service Creator can transform a virtualized infrastructure into a dynamic private cloud with
automated self-service provisioning, IT governance, workload failover. If AIM is also available in this
environment, it can add rapid server provisioning and dynamic capacity management to this
environment. Especially for Self-Service Creator setup running in a mixed physical and virtual
environment, AIM acts as a single management point for physical and virtual resources that accelerates
provisioning of heterogeneous hardware while providing a highly dynamic and flexible environment.
Figure 1 shows the logical view of the components managed by VIS Self-Service Creator and AIM in the
scenario described in this white paper. Workloads are provisioned as virtual machines and the lifecycle
of the workloads are managed through VIS Self-Service Creator. ESXi images are managed as VMRacks
through AIM.
Figure 1: Logical view of AIM and Self-Service Creator managing the virtual infrastructure Note that other scenarios, such as VIS Self-Service Creator provisioning non-virtual workloads and AIM
managing virtual machines as personas are outside the scope of this white paper.
When you configure ESXi as VMRacks, there are two key use cases or benefits: Server failover and
dynamic resource provisioning in VMware clusters. In this section we discuss the two use cases of
having ESXi managed by AIM as a VMRack.

8
Server Failover: In the event of server hardware failure, AIM can automatically retarget the ESXi
image on the failed server to a spare server. The spare server can be a server that was purchased to
replace the failed server or can be a part of a pool of servers that are ready to be provisioned in the
event of hardware failures.
Server Failover is explained through an example scenario as shown in Figure 2. In the scenario, there
are three servers running VMware ESXi, numbered 1, 2, and 3. The servers are a part of a VMware
cluster which has VMware HA and VMware DRS enabled. In this scenario, a single spare server is
available. The four servers in the scenario are part of a single server pool in AIM. Below are the
sequence of steps that occur upon a hardware failure.
1. A server running image "VMware ESXi 3" fails.
2. VMware HA automatically detects the failure and restarts the virtual machines running on
”VMware ESXi 3” to other servers in the pool.
3. AIM detects the failure of “VMware ESXi 3” and automatically restarts the image on the
spare server. For environments where spare servers are not readily available, AIM will not
power on the ESXi image; once a spare server is available, it can be discovered in AIM and
AIM will automatically power on the ESXi image on the spare server.
4. VMware vCenter detects the ESXi image is booted up and running. The fact that ESXi is now
running on a different server is abstracted from vCenter.
5. Once the ESXi image is running on the spare server, VMware DRS automatically migrates
virtual machines to balance resource usage evenly across all the servers.
VMware HA enables ESXi hosts to communicate with each other to monitor the health of each host.
This communication is done through the exchange of heartbeats, by default, every second. If a 15-
second2 period elapses without the receipt of heartbeats from a host, and the host cannot be pinged, it
is declared as failed. The virtual machines in the host are restarted in other ESXi hosts. AIM HA utilizes
heartbeats to the VMRacks and declares the server as failed, if no heartbeat is received in 60 seconds2.
Since VMware HA failure detection time is less than AIM, VM‟s are retargeted first using VMware HA
followed by ESXi being retargeted by AIM.
2 Both VMware HA and AIM failover times are configurable.

9
Figure 2: Server Failover

10
Dynamic Resource Provisioning in VMware Clusters: Server hardware can be quickly provisioned to a
VMware cluster to provide additional computing resources as needed. The newly provisioned server
hardware can be from a pool of spare servers, from other VMware clusters, or servers with non-virtual
workloads. In other words, server resources assigned to different clusters can be dynamically dialed up
or dialed down based on the workload demands.
This is explained through an example scenario shown in Figure 3. In this scenario there are two VMware
Clusters (VMware Cluster 1 and VMware Cluster 2), as well as a pool of servers running non-virtual
workloads. Each cluster has ESXi hosts managed as VMRacks and assigned to servers. Additional ESXi
images are created and added to the VMware cluster. These additional ESXi images are powered off
and kept as stand by, ready to be powered on to meet increase in resource demands. In the example,
VMware Cluster 1 has three VMRacks assigned to physical servers: ESXi 1, ESXi 2 and ESXi 3. VMware
Cluster 1 also has two ESXi images as part of the cluster: ESXi 4 and ESXi 5. These VMRacks are not
assigned to any physical server and would appear as powered off ESXi hosts in vCenter.
VMware Cluster 1 has resource constraints and needs more servers while VMware Cluster 2 has
excess servers.
Figure 3: Dynamic Hardware Provisioning

11
Using AIM, ESXi in VMware Cluster 2 can be powered off and the server can be moved to a pool of spare
servers. Then the available servers can be assigned to VMRacks in VMware Cluster 1. These VMRacks
are powered on and the powered on ESXi can be added to the cluster. VMware DRS will migrate virtual
machines to the newly available cluster as shown in Figure 4.
Figure 4: Dynamic Hardware Provisioning

12
Reference Architecture This section provides an overview of the architecture for VMware vSphere infrastructure with Dell AIM.
As shown in Figure 5, one or more Dell PowerEdge™ servers are running VMware ESXi and hosting virtual
machines. The servers are part of an AIM server pool. ESXi images in the servers are configured as
VMRacks in AIM.
The ESXi images running on each server are Boot from SAN (BFS) images. Each ESXi image is installed in
a volume in the EqualLogic™ SAN Array. Deployment guidelines for ESXi as a BFS are provided in the
following section. In addition to the ESXi installation volumes, the EqualLogic storage array also
includes Virtual Machine File System (VMFS) datastores for hosting virtual machines.
The ESXi servers are managed though VMware vCenter. VIS Self-Service Creator connects to the VMware
vCenter to provision VMs and manage the lifecycle of the VMs. AIM manages the physical servers, ESXi
images and the PowerConnect™ switches. The physical servers are managed as a server pool. ESXi
images are managed as AIM VMRacks.
Figure 5: Reference Architecture
The reference architecture has four PowerConnect switches, two of which are dedicated for SAN iSCSI
traffic and two for Local Area Network (LAN) traffic. LAN traffic includes VMs, management, and
vMotion traffic. AIM manages the four switches and automatically configures the ports with the

13
required VLAN information. The iSCSI network needs to be routable from the AIM controller; hence it is
connected to the core network.
Figure 6 shows a more detailed network architecture. Each PowerEdge server has a minimum of four
network interfaces. The first two network interfaces, enumerated as vmnic0 and vmnic1 in ESXi, are
connected to the two switches dedicated for iSCSI SAN traffic. The iSCSI switches are configured to be
in an AIM Channel (Channel 1). The other network interfaces, enumerated as vmnic2 and vmnic3, are
connected to the switches dedicated for LAN traffic. The LAN switches are configured to be in a
different AIM Channel (Channel 2). Having different channels for iSCSI and LAN switches allows users to
assign different VLAN IDs.
Figure 6: Network Architecture

14
Deployment Guidelines In this section, we provide guidelines for deploying the solution described in this white paper. Table 1
outlines the software versions utilized in the deployment of this reference architecture.
Table 1: Software Revisions
Software Version
Dell AIM 3.4 Dell VIS Self-Service Creator 2.0
VMware ESXi 4.1U1
VMware vCenter 4.1U1
Discovery Before AIM can manage hardware, the hardware must be discovered and inventoried within AIM.
Typically, this process involves a one-time PXE boot. For complete details on the process, consult the
AIM documentation.
Once discovery is complete, create a dedicated AIM Server Pool containing identical servers to be
utilized for ESXi hypervisors. It is recommended that all the servers in the server pool have the same
model number (such as PowerEdge M710HD) and the same network controllers. Identical hardware
ensures that the NICs are enumerated in the same order when ESXi is booted on any of the servers.
After installation of ESXi, detach any USB devices (such as CD ROMs) from the servers to ensure that
the devices do not impact device enumeration in ESXi.
Servers assigned to this server pool must have network interface cards that support iSCSI booting and
iSCSI Boot Firmware Table (iBFT). Verify that the servers and network interface cards are listed on
both the VMware Hardware Compatibility Guide and the AIM Interoperability Matrix.
Since AIM will initiate the iSCSI boot of each server, ensure that each server in the server pool has the
“Hardware ISCSI-booted” flag enabled within AIM.
Network Configuration Configure two distinct networks for each physical server: SAN and LAN. SAN will be utilized for iSCSI
boot and iSCSI storage connectivity. LAN will be utilized for all other traffic including virtual machine
traffic, VMware Management Network, and vMotion.
The networking configuration within the ESXi host, i.e. port groups, can be configured by the
administrator in VMware vCenter. AIM will continue to manage the network switches and ensure
appropriate VLANs are applied.
As shown in Figure 7, configure two channels in AIM dedicated for use by the VMRacks. Configure
Channel 1 to contain the iSCSI VLAN and Channel 2 to contain all other VLANs including vMotion,
Management, and Virtual Machine networks.

15
Figure 7: Using AIM Channels
Within AIM, assign the network switch ports, which are utilized by the physical servers in the server
pool, to the correct channels. Next create all VLANs needed for the ESXi environment within AIM and
assign them to the appropriate channels.
The iSCSI boot network must be reachable from the SCN network. Ensure that appropriate routing is
configured as necessary.
VMRack Creation Create a target iSCSI Logical Unit Number (LUN) of sufficient size on the storage array to be used for
ESXi installation. Each ESXi installation requires its own unique LUN. Secure the LUN to allow
connectivity from a single initiator iSCSI Qualified Name (IQN).
Follow the steps outlined in the AIM documentation to create a VMRack for each ESXi installation.
During the VMRack creation process, refer to Table 2 for key settings. All settings should reflect the
final configuration setting of the ESXi host, not the installation defaults.
Table 2: VMRack Properties
Wizard Tab Field Value
VMRack Properties Network Mode Trunk Automatically configure
VMware Standard Switches Unchecked
VMRack Management vCenter Server IP Address Leave Blank Management IP Address Management IP of the ESXi Host Management Username root Management Password root‟s password Boot Image Boot Type Hardware iSCSI-Booted Boot Image Details Initiator Name Set this to the single IQN initiator name to
which the LUN is secured
Once the creation process is complete, assign the VMRack to the dedicated AIM server pool created
earlier to support ESXi hypervisors.
16
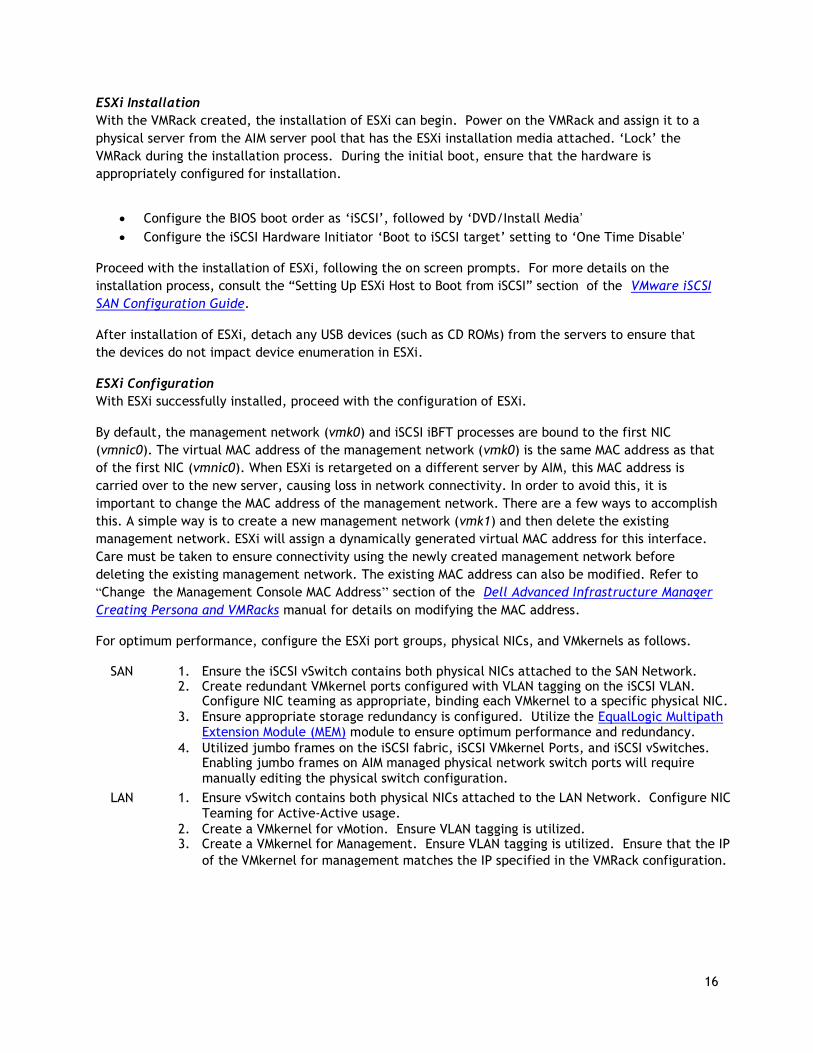
ESXi Installation
With the VMRack created, the installation of ESXi can begin. Power on the VMRack and assign it to a
physical server from the AIM server pool that has the ESXi installation media attached. „Lock‟ the
VMRack during the installation process. During the initial boot, ensure that the hardware is
appropriately configured for installation.
Configure the BIOS boot order as „iSCSI‟, followed by „DVD/Install Media’
Configure the iSCSI Hardware Initiator „Boot to iSCSI target‟ setting to „One Time Disable’
Proceed with the installation of ESXi, following the on screen prompts. For more details on the
installation process, consult the “Setting Up ESXi Host to Boot from iSCSI” section of the VMware iSCSI
SAN Configuration Guide.
After installation of ESXi, detach any USB devices (such as CD ROMs) from the servers to ensure that
the devices do not impact device enumeration in ESXi.
ESXi Configuration
With ESXi successfully installed, proceed with the configuration of ESXi.
By default, the management network (vmk0) and iSCSI iBFT processes are bound to the first NIC
(vmnic0). The virtual MAC address of the management network (vmk0) is the same MAC address as that
of the first NIC (vmnic0). When ESXi is retargeted on a different server by AIM, this MAC address is
carried over to the new server, causing loss in network connectivity. In order to avoid this, it is
important to change the MAC address of the management network. There are a few ways to accomplish
this. A simple way is to create a new management network (vmk1) and then delete the existing
management network. ESXi will assign a dynamically generated virtual MAC address for this interface.
Care must be taken to ensure connectivity using the newly created management network before
deleting the existing management network. The existing MAC address can also be modified. Refer to
“Change the Management Console MAC Address” section of the Dell Advanced Infrastructure Manager
Creating Persona and VMRacks manual for details on modifying the MAC address.
For optimum performance, configure the ESXi port groups, physical NICs, and VMkernels as follows.
SAN 1. Ensure the iSCSI vSwitch contains both physical NICs attached to the SAN Network. 2. Create redundant VMkernel ports configured with VLAN tagging on the iSCSI VLAN.
Configure NIC teaming as appropriate, binding each VMkernel to a specific physical NIC.
3. Ensure appropriate storage redundancy is configured. Utilize the EqualLogic Multipath Extension Module (MEM) module to ensure optimum performance and redundancy.
4. Utilized jumbo frames on the iSCSI fabric, iSCSI VMkernel Ports, and iSCSI vSwitches. Enabling jumbo frames on AIM managed physical network switch ports will require manually editing the physical switch configuration.
LAN 1. Ensure vSwitch contains both physical NICs attached to the LAN Network. Configure NIC Teaming for Active-Active usage.
2. Create a VMkernel for vMotion. Ensure VLAN tagging is utilized. 3. Create a VMkernel for Management. Ensure VLAN tagging is utilized. Ensure that the IP
of the VMkernel for management matches the IP specified in the VMRack configuration.

17
Placing ESXi Into Production
Once ESXi configuration is complete, verify through the AIM console that the AIM status of the VMRack
is “Running”. With configuration complete, “Unlock” the VMRack to enable AIM redundancy and
failover.
Using vCenter join the ESXi host to a new or existing vCenter cluster. Ensure that VMware HA and
VMware DRS are properly configured on all hosts in the cluster.
VIS Self-Service Creator Configuration Once configuration of the cluster is complete, proceed with the addition of resources within VIS Self-
Service Creator. VIS Self-Service Creator will manage an AIM-backed ESXi cluster the same as
traditional ESXi clusters. Ensure that discovery of the new cluster is complete and update existing
virtual reservations or create virtual reservations, as appropriate. Consult the VIS Self-Service Creator
User’s Guide for further details (registration required).
Operations Dell AIM Plugin for VMware vCenter can also be used to perform these operations.
Powering Down a VMRack
1. Within vCenter, place the host in maintenance mode.
2. Wait for the host to fully enter maintenance mode.
3. Within AIM, „Stop‟ the VMRack.
Powering Up a VMRack
1. Within AIM, „Start‟ the VMRack on any host.
2. Wait for the host to boot and reconnect with vCenter.
3. Within vCenter, remove the host in maintenance mode.
Summary VIS Self-Service Creator provides IT users the power to deploy and manage their resources while
enabling IT to respond faster to business requests and improve control over IT environments. In a Self-
Service Creator setup, AIM can add host server failover and dynamic resource provisioning for VMware
clusters providing a highly available environment for virtualization guests as well as ESXi hosts.
This whitepaper talks about how AIM can add additional capabilities such as host failover and dynamic
resource provisioning to a Creator environment. Customers can also engage Dell Services to enable
additional integration of VIS Self-Service Creator and AIM into their environment. As an example of
integration of Creator and AIM using individual SDKs please refer to the following whitepaper in
references.

18
Reference VIS Self-Service Creator manuals (registration required)
AIM User manuals
Enhancing a virtual environment through scripting whitepaper
VMware iSCSI SAN Configuration Guide
VMware Hardware Compatibility Guide