Embed Size (px)
Citation preview
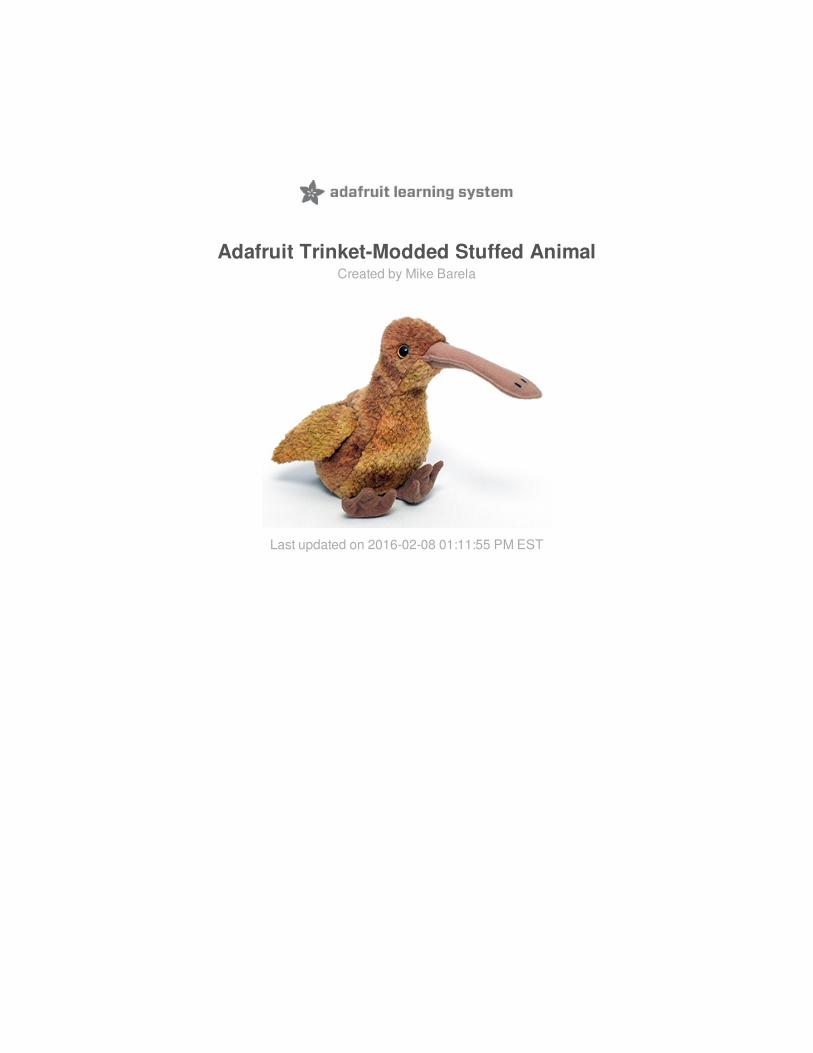
Adafruit Trinket-Modded Stuffed AnimalCreated by Mike Barela
Last updated on 2016-02-08 01:11:55 PM EST
233
49
11
131619
Guide Contents
Guide ContentsOverview
Choosing Your Animal
Animal SoundsCircuit
Circuit Variations
The CodeThe BirdYour Animal
© Adafruit Industries https://learn.adafruit.com/adafruit-trinket-modded-stuffed-animal Page 2 of 19
OverviewPeople love stuffed animals! One of the first toys a child gets is some representation of an animal.Over time, these beloved companions become part of what we surround ourselves with.
This project provides ideas for creating stuffed, papercraft or other toy animals with characteristics youwant. You can chose your animal, make it move and have it make sounds. Assembly isstraightforward, the most complex component is using your imagination.
The basic circuit shows you how to use a servo motor, a piezo speaker, and a photocell to provideinteractivity with your animal.
Choosing Your Animal
Technically you do not even have to use an animal - this can be for simple robots or other items.
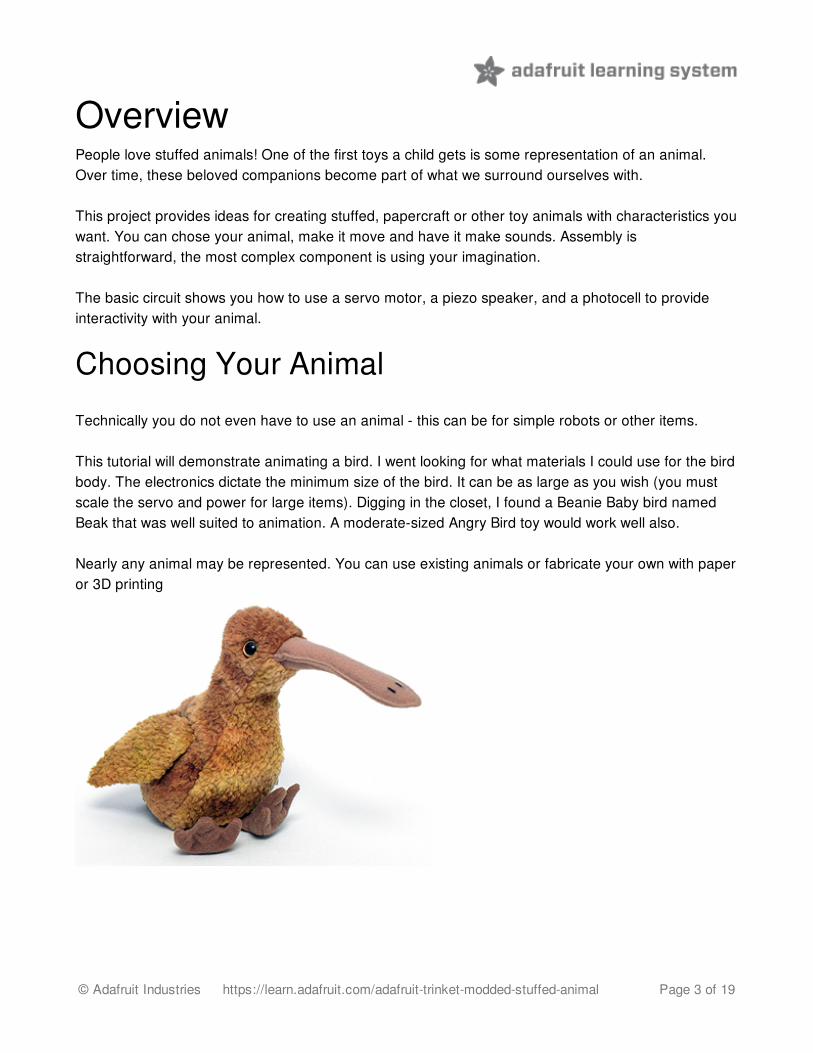
This tutorial will demonstrate animating a bird. I went looking for what materials I could use for the birdbody. The electronics dictate the minimum size of the bird. It can be as large as you wish (you mustscale the servo and power for large items). Digging in the closet, I found a Beanie Baby bird namedBeak that was well suited to animation. A moderate-sized Angry Bird toy would work well also.
Nearly any animal may be represented. You can use existing animals or fabricate your own with paperor 3D printing
© Adafruit Industries https://learn.adafruit.com/adafruit-trinket-modded-stuffed-animal Page 3 of 19
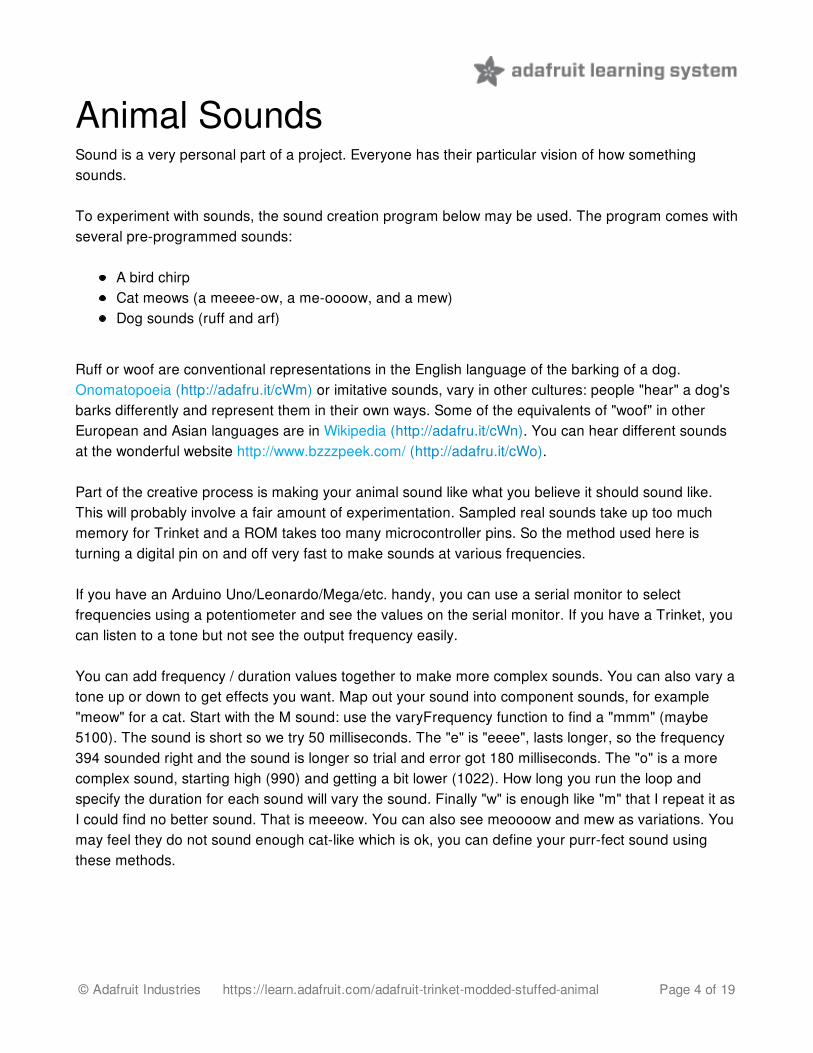
Animal SoundsSound is a very personal part of a project. Everyone has their particular vision of how somethingsounds.
To experiment with sounds, the sound creation program below may be used. The program comes withseveral pre-programmed sounds:
A bird chirpCat meows (a meeee-ow, a me-oooow, and a mew)Dog sounds (ruff and arf)
Ruff or woof are conventional representations in the English language of the barking of a dog.Onomatopoeia (http://adafru.it/cWm) or imitative sounds, vary in other cultures: people "hear" a dog'sbarks differently and represent them in their own ways. Some of the equivalents of "woof" in otherEuropean and Asian languages are in Wikipedia (http://adafru.it/cWn). You can hear different soundsat the wonderful website http://www.bzzzpeek.com/ (http://adafru.it/cWo).
Part of the creative process is making your animal sound like what you believe it should sound like.This will probably involve a fair amount of experimentation. Sampled real sounds take up too muchmemory for Trinket and a ROM takes too many microcontroller pins. So the method used here isturning a digital pin on and off very fast to make sounds at various frequencies.
If you have an Arduino Uno/Leonardo/Mega/etc. handy, you can use a serial monitor to selectfrequencies using a potentiometer and see the values on the serial monitor. If you have a Trinket, youcan listen to a tone but not see the output frequency easily.
You can add frequency / duration values together to make more complex sounds. You can also vary atone up or down to get effects you want. Map out your sound into component sounds, for example"meow" for a cat. Start with the M sound: use the varyFrequency function to find a "mmm" (maybe5100). The sound is short so we try 50 milliseconds. The "e" is "eeee", lasts longer, so the frequency394 sounded right and the sound is longer so trial and error got 180 milliseconds. The "o" is a morecomplex sound, starting high (990) and getting a bit lower (1022). How long you run the loop andspecify the duration for each sound will vary the sound. Finally "w" is enough like "m" that I repeat it asI could find no better sound. That is meeeow. You can also see meoooow and mew as variations. Youmay feel they do not sound enough cat-like which is ok, you can define your purr-fect sound usingthese methods.
© Adafruit Industries https://learn.adafruit.com/adafruit-trinket-modded-stuffed-animal Page 4 of 19
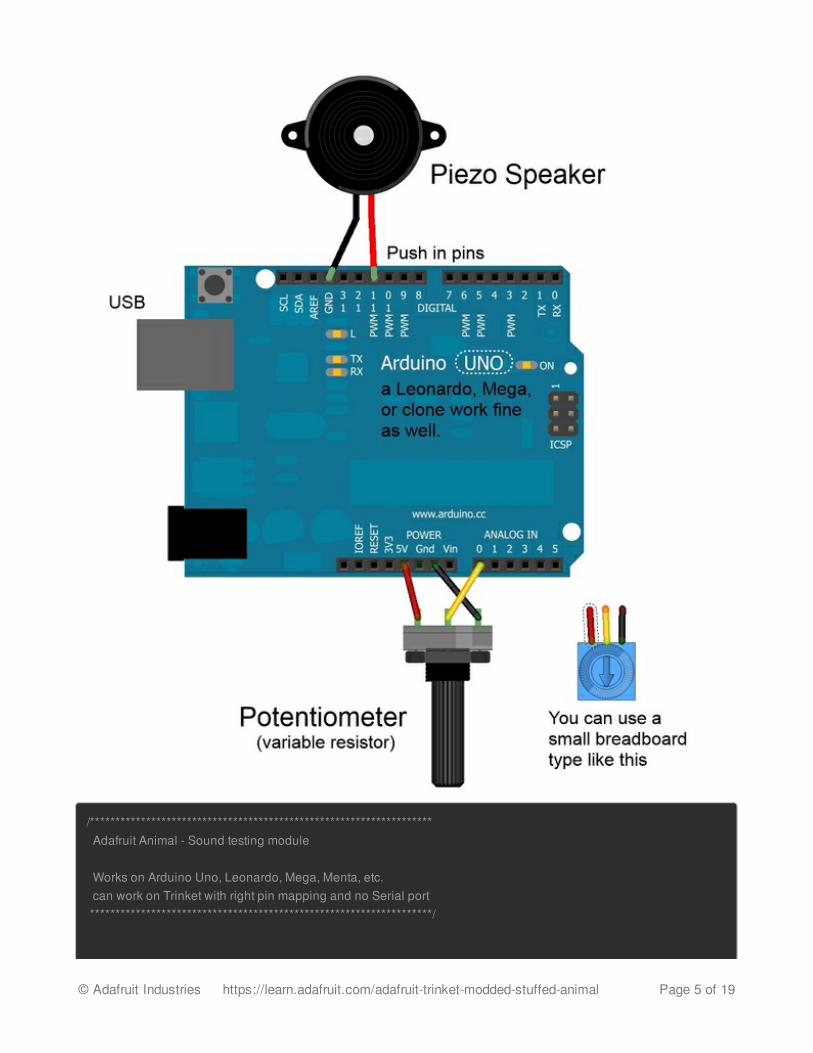
/******************************************************************* Adafruit Animal - Sound testing module Works on Arduino Uno, Leonardo, Mega, Menta, etc. can work on Trinket with right pin mapping and no Serial port *******************************************************************/
© Adafruit Industries https://learn.adafruit.com/adafruit-trinket-modded-stuffed-animal Page 5 of 19
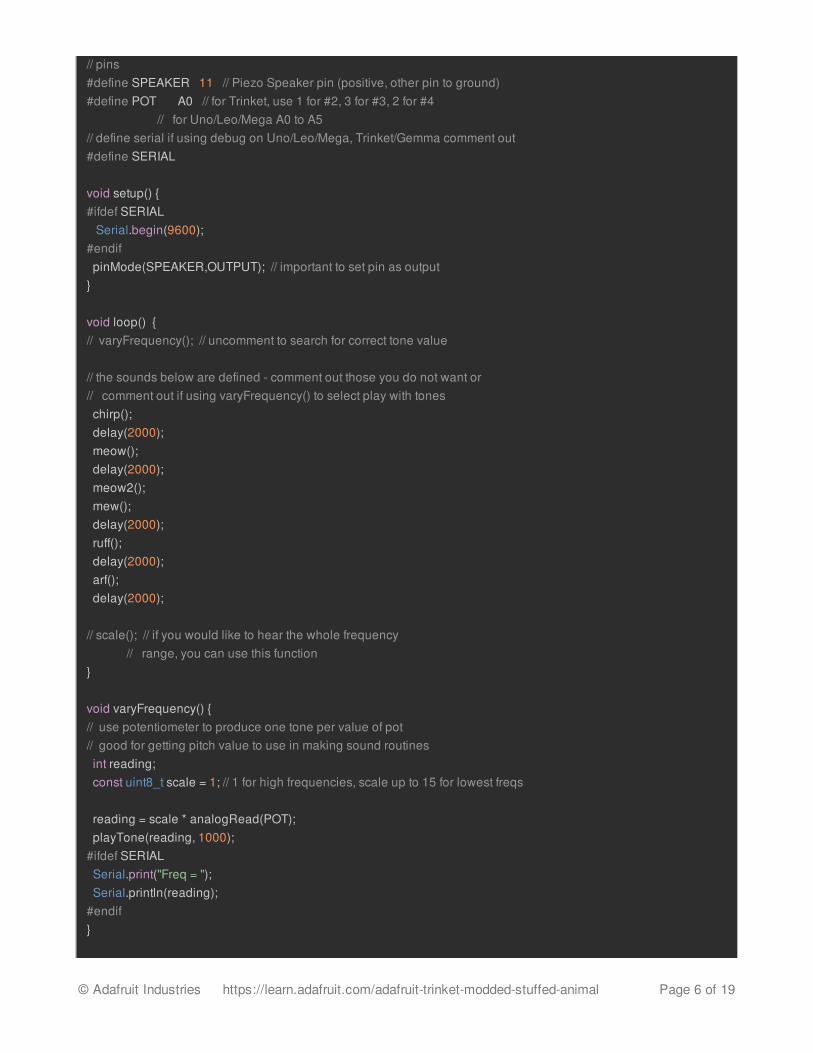
// pins#define SPEAKER 11 // Piezo Speaker pin (positive, other pin to ground)#define POT A0 // for Trinket, use 1 for #2, 3 for #3, 2 for #4 // for Uno/Leo/Mega A0 to A5// define serial if using debug on Uno/Leo/Mega, Trinket/Gemma comment out#define SERIAL void setup() {#ifdef SERIAL Serial.begin(9600);#endif pinMode(SPEAKER,OUTPUT); // important to set pin as output} void loop() {// varyFrequency(); // uncomment to search for correct tone value // the sounds below are defined - comment out those you do not want or// comment out if using varyFrequency() to select play with tones chirp(); delay(2000); meow(); delay(2000); meow2(); mew(); delay(2000); ruff(); delay(2000); arf(); delay(2000); // scale(); // if you would like to hear the whole frequency // range, you can use this function} void varyFrequency() { // use potentiometer to produce one tone per value of pot// good for getting pitch value to use in making sound routines int reading; const uint8_t scale = 1; // 1 for high frequencies, scale up to 15 for lowest freqs
reading = scale * analogRead(POT); playTone(reading, 1000);#ifdef SERIAL Serial.print("Freq = "); Serial.println(reading);#endif}
© Adafruit Industries https://learn.adafruit.com/adafruit-trinket-modded-stuffed-animal Page 6 of 19
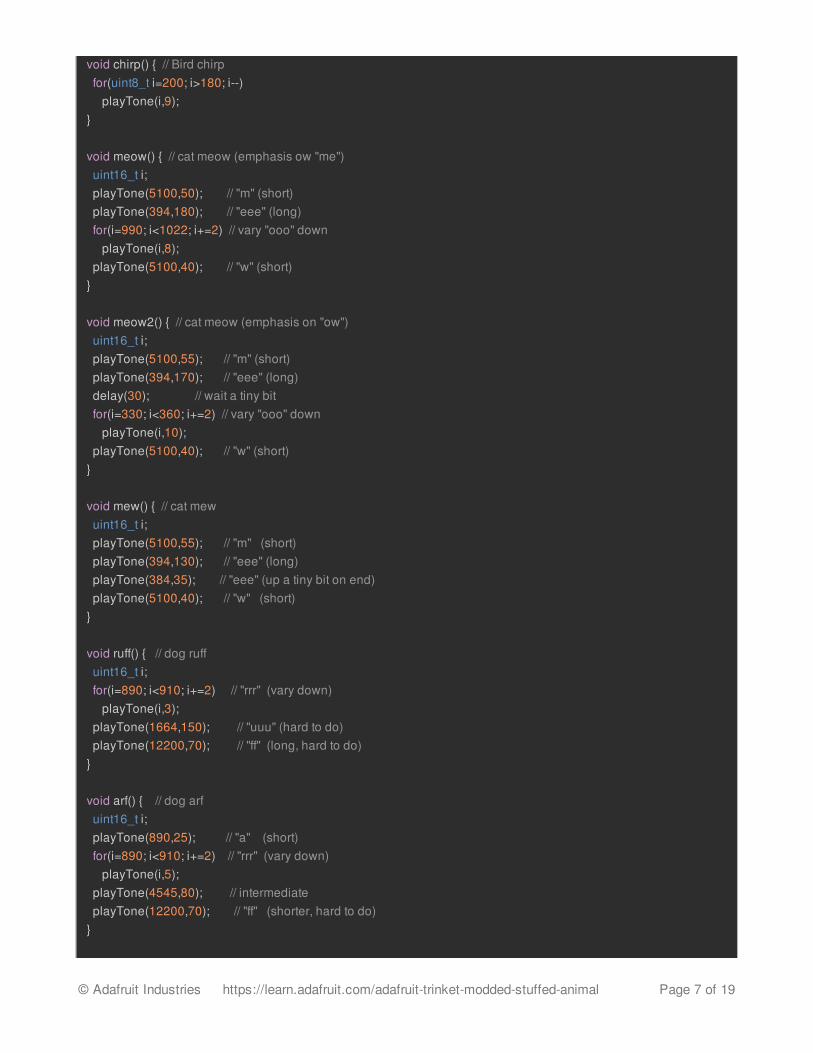
void chirp() { // Bird chirp for(uint8_t i=200; i>180; i--) playTone(i,9);}
void meow() { // cat meow (emphasis ow "me") uint16_t i; playTone(5100,50); // "m" (short) playTone(394,180); // "eee" (long) for(i=990; i<1022; i+=2) // vary "ooo" down playTone(i,8); playTone(5100,40); // "w" (short)}
void meow2() { // cat meow (emphasis on "ow") uint16_t i; playTone(5100,55); // "m" (short) playTone(394,170); // "eee" (long) delay(30); // wait a tiny bit for(i=330; i<360; i+=2) // vary "ooo" down playTone(i,10); playTone(5100,40); // "w" (short)}
void mew() { // cat mew uint16_t i; playTone(5100,55); // "m" (short) playTone(394,130); // "eee" (long) playTone(384,35); // "eee" (up a tiny bit on end) playTone(5100,40); // "w" (short)}
void ruff() { // dog ruff uint16_t i; for(i=890; i<910; i+=2) // "rrr" (vary down) playTone(i,3); playTone(1664,150); // "uuu" (hard to do) playTone(12200,70); // "ff" (long, hard to do)}
void arf() { // dog arf uint16_t i; playTone(890,25); // "a" (short) for(i=890; i<910; i+=2) // "rrr" (vary down) playTone(i,5); playTone(4545,80); // intermediate playTone(12200,70); // "ff" (shorter, hard to do)}
© Adafruit Industries https://learn.adafruit.com/adafruit-trinket-modded-stuffed-animal Page 7 of 19
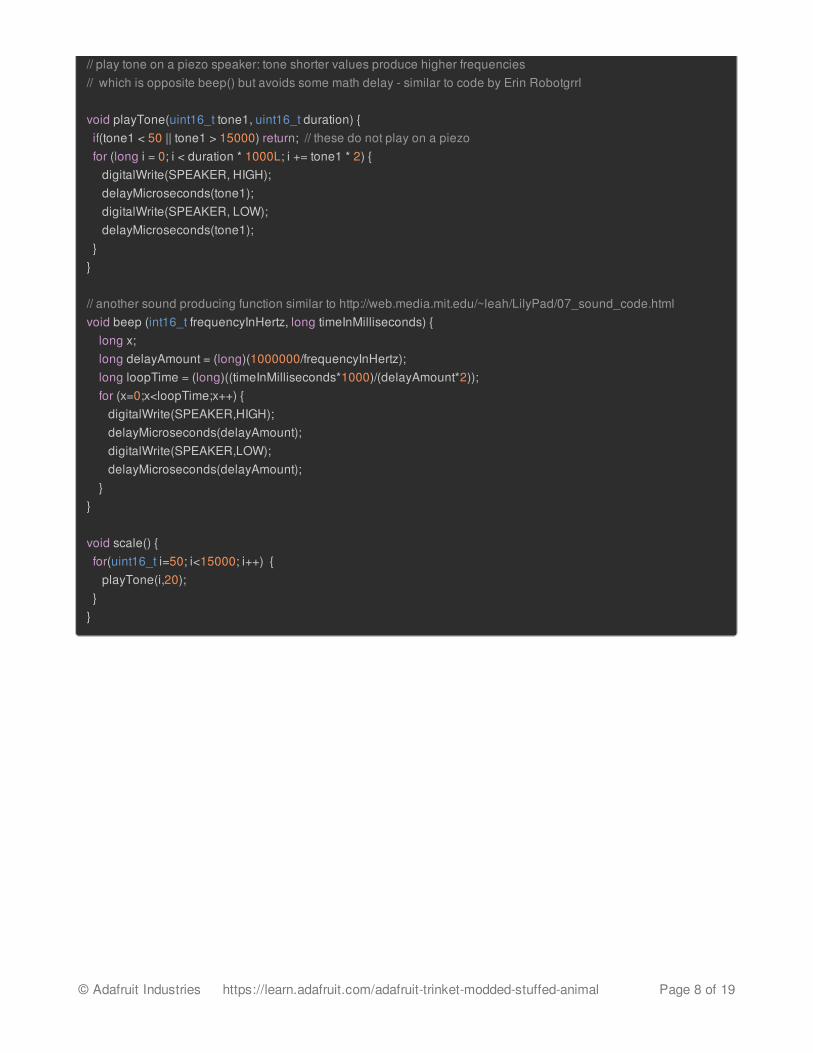
// play tone on a piezo speaker: tone shorter values produce higher frequencies// which is opposite beep() but avoids some math delay - similar to code by Erin Robotgrrl
void playTone(uint16_t tone1, uint16_t duration) { if(tone1 < 50 || tone1 > 15000) return; // these do not play on a piezo for (long i = 0; i < duration * 1000L; i += tone1 * 2) { digitalWrite(SPEAKER, HIGH); delayMicroseconds(tone1); digitalWrite(SPEAKER, LOW); delayMicroseconds(tone1); } }
// another sound producing function similar to http://web.media.mit.edu/~leah/LilyPad/07_sound_code.htmlvoid beep (int16_t frequencyInHertz, long timeInMilliseconds) { long x; long delayAmount = (long)(1000000/frequencyInHertz); long loopTime = (long)((timeInMilliseconds*1000)/(delayAmount*2)); for (x=0;x<loopTime;x++) { digitalWrite(SPEAKER,HIGH); delayMicroseconds(delayAmount); digitalWrite(SPEAKER,LOW); delayMicroseconds(delayAmount); } }
void scale() { for(uint16_t i=50; i<15000; i++) { playTone(i,20); }}
© Adafruit Industries https://learn.adafruit.com/adafruit-trinket-modded-stuffed-animal Page 8 of 19
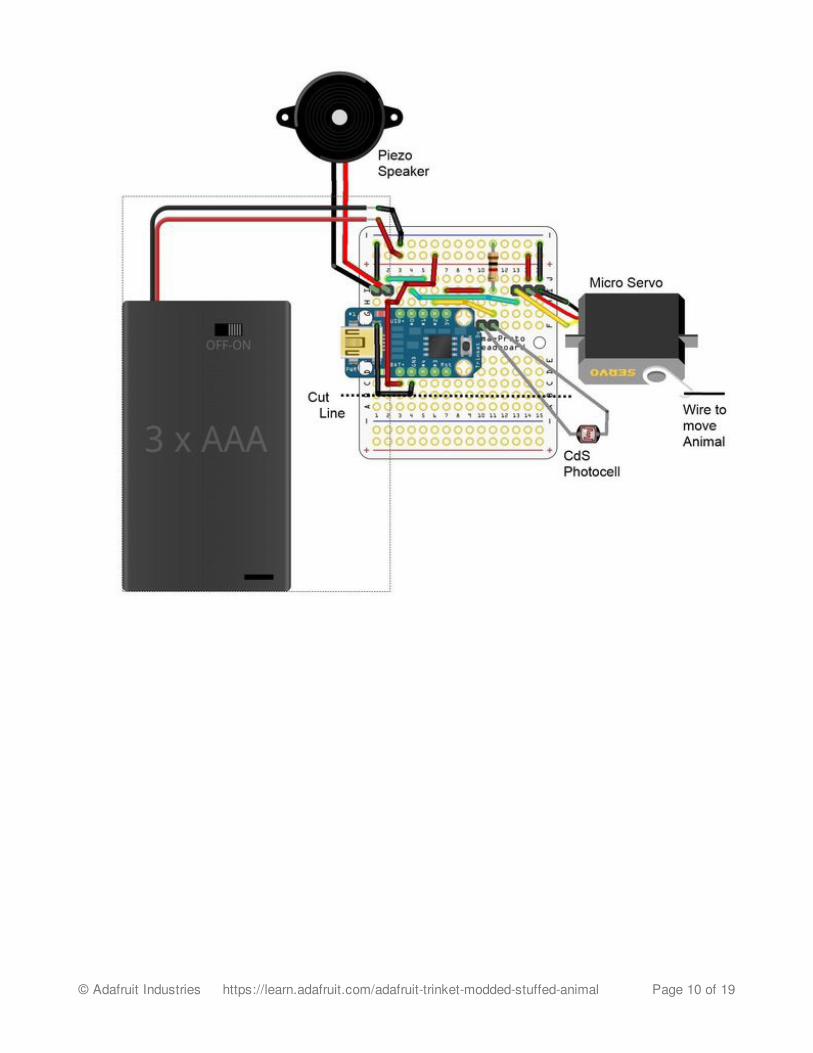
CircuitThe electronics are fairly straightforward, using a Trinket 3V. The circuit uses pins #0, #1, and #2making it compatible with Gemma as well. Solder the included male header pins to the Trinket pins.
A Quarter-size Adafruit Perma Proto board is used as the base. Hook-up wire connects various padsto route signal and power. A 1000 ohm (1K Ohm) resistor is needed in addition to the parts listed forthe photocell circuit.
Optionally, female headers may be used to make the Trinket removable from the Proto board - cut two5 pin sections. Male headers may be used to connect off-board components: 2 two-pin and 1 three-pin section connect the servo, piezo, and photocell. Connections are via strips of female-femalejumper wires, although any flexible wire may be used. Using headers allows for easy removal of theboard from the project if needed.
The Perma Proto may be cut at row B to make the board smaller if your Animal is smaller than can beaccommodated by the full board.
© Adafruit Industries https://learn.adafruit.com/adafruit-trinket-modded-stuffed-animal Page 9 of 19
© Adafruit Industries https://learn.adafruit.com/adafruit-trinket-modded-stuffed-animal Page 10 of 19
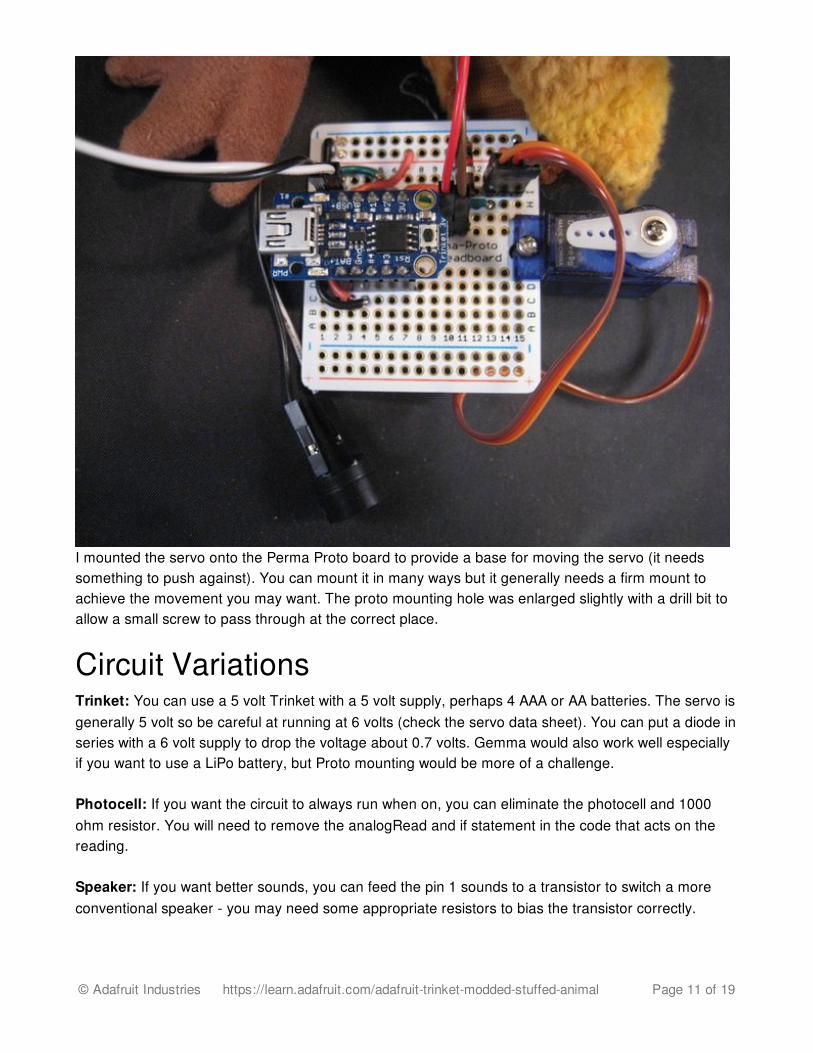
I mounted the servo onto the Perma Proto board to provide a base for moving the servo (it needssomething to push against). You can mount it in many ways but it generally needs a firm mount toachieve the movement you may want. The proto mounting hole was enlarged slightly with a drill bit toallow a small screw to pass through at the correct place.
Circuit VariationsTrinket: You can use a 5 volt Trinket with a 5 volt supply, perhaps 4 AAA or AA batteries. The servo isgenerally 5 volt so be careful at running at 6 volts (check the servo data sheet). You can put a diode inseries with a 6 volt supply to drop the voltage about 0.7 volts. Gemma would also work well especiallyif you want to use a LiPo battery, but Proto mounting would be more of a challenge.
Photocell: If you want the circuit to always run when on, you can eliminate the photocell and 1000ohm resistor. You will need to remove the analogRead and if statement in the code that acts on thereading.
Speaker: If you want better sounds, you can feed the pin 1 sounds to a transistor to switch a moreconventional speaker - you may need some appropriate resistors to bias the transistor correctly.
© Adafruit Industries https://learn.adafruit.com/adafruit-trinket-modded-stuffed-animal Page 11 of 19
Servo: If you use a larger servo, you may need more battery capacity. If you do not need your Animalto move, you can eliminate the servo and the wire from Pin 0, power and ground. You could then trimthe amount of Proto board used by cutting at line 12.
Battery: The 3 volt Trinket runs well on LiPo batteries stocked by Adafruit. The 3.7 volt 1200mAh (http://adafru.it/258) is a good size and capacity. If you use a LiPo, you may want some type ofon/off switch. AA and AAA battery packs may have the switch built in. You can see on the actualpicture, I used two of the gold pins from the female headers to make an ad-hoc JST male connectorfor a LiPo in the upper left corner. A Gemma would already have the JST battery connection if youwant to consider that as an option.
© Adafruit Industries https://learn.adafruit.com/adafruit-trinket-modded-stuffed-animal Page 12 of 19

The CodeThe code below is for the bird project. You can change the chirp function for one of the other soundsdefined on the Animal Sounds page.
The code reads the photocell and if the value is less than a certain amount (you pet the animal,lowering the light level), the animal makes sounds and moves. You can change the sensitivity of thephotocell (800) to a value between 200 and 1100 depending on ambient light you expect.
The register/interrupt code allows the servo to be refreshed periodically to have it stay where it iscommanded to. The Arduino Servo library does not work for Trinket/Gemma so the Adafruit Softservolibrary (http://adafru.it/cFs) is used.
Click on the link for the SoftServo library and select the "Download ZIP" button to get the library code. Install the library into the Arduino libraries directory. See All About Installing ArduinoLibraries (http://adafru.it/aYM) for a guide.
Please ensure your Arduino IDE is version 1.6.7 or above to support Trinket optimally. You candownload the Arduino IDE at arduino.cc (http://adafru.it/leL).
The code below may be copied into a new project window in the Arduino IDE.
Be sure to set your Board type as Adafruit Trinket 3V 8 MHz, and Programmer as USBtinyISP inthe Arduino IDE under the Tools menu. If you do not see Trinket as an option, add the AdafruitAVR boards in the Board Manager.
/******************************************************************* Adafruit Animal - control code for toy animal animation Required library is the Adafruit_SoftServo library available at https://github.com/adafruit/Adafruit_SoftServo The standard Arduino IDE servo library will not work with 8 bit AVR microcontrollers like Trinket and Gemma due to differences in available timer hardware and programming. We simply refresh by piggy-backing on the timer0 millis() counter Required hardware includes an Adafruit Trinket microcontroller a servo motor, a piezo speaker, a photocell, and a resistor As written, this is specifically for the Trinket although it should be Gemma compatible.
© Adafruit Industries https://learn.adafruit.com/adafruit-trinket-modded-stuffed-animal Page 13 of 19
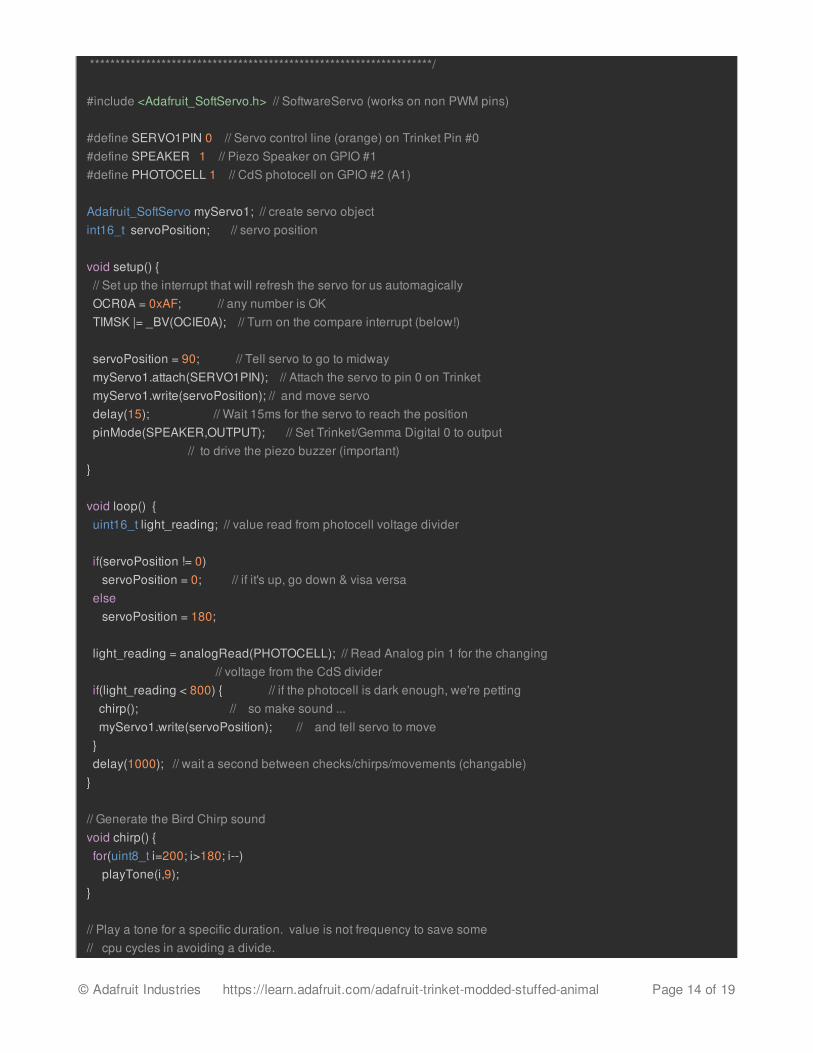
*******************************************************************/ #include <Adafruit_SoftServo.h> // SoftwareServo (works on non PWM pins) #define SERVO1PIN 0 // Servo control line (orange) on Trinket Pin #0#define SPEAKER 1 // Piezo Speaker on GPIO #1#define PHOTOCELL 1 // CdS photocell on GPIO #2 (A1) Adafruit_SoftServo myServo1; // create servo objectint16_t servoPosition; // servo position
void setup() { // Set up the interrupt that will refresh the servo for us automagically OCR0A = 0xAF; // any number is OK TIMSK |= _BV(OCIE0A); // Turn on the compare interrupt (below!) servoPosition = 90; // Tell servo to go to midway myServo1.attach(SERVO1PIN); // Attach the servo to pin 0 on Trinket myServo1.write(servoPosition); // and move servo delay(15); // Wait 15ms for the servo to reach the position pinMode(SPEAKER,OUTPUT); // Set Trinket/Gemma Digital 0 to output // to drive the piezo buzzer (important)} void loop() { uint16_t light_reading; // value read from photocell voltage divider if(servoPosition != 0) servoPosition = 0; // if it's up, go down & visa versa else servoPosition = 180; light_reading = analogRead(PHOTOCELL); // Read Analog pin 1 for the changing // voltage from the CdS divider if(light_reading < 800) { // if the photocell is dark enough, we're petting chirp(); // so make sound ... myServo1.write(servoPosition); // and tell servo to move } delay(1000); // wait a second between checks/chirps/movements (changable)}
// Generate the Bird Chirp soundvoid chirp() { for(uint8_t i=200; i>180; i--) playTone(i,9);}
// Play a tone for a specific duration. value is not frequency to save some// cpu cycles in avoiding a divide.
© Adafruit Industries https://learn.adafruit.com/adafruit-trinket-modded-stuffed-animal Page 14 of 19
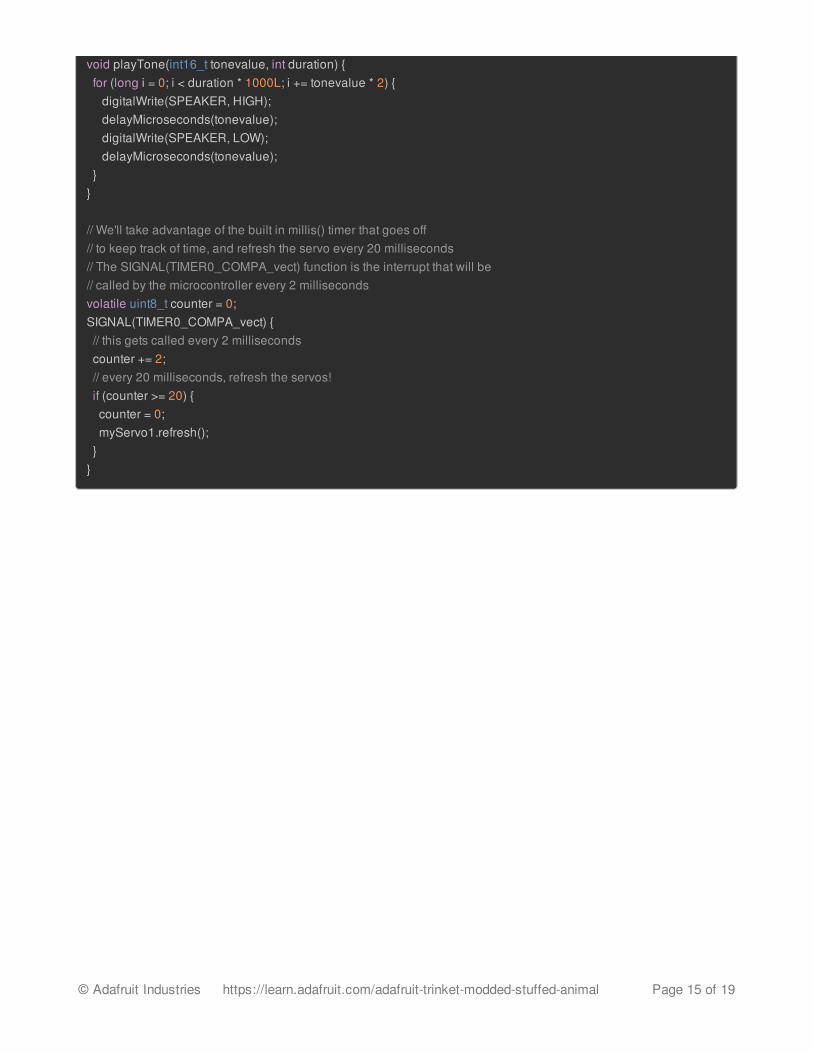
void playTone(int16_t tonevalue, int duration) { for (long i = 0; i < duration * 1000L; i += tonevalue * 2) { digitalWrite(SPEAKER, HIGH); delayMicroseconds(tonevalue); digitalWrite(SPEAKER, LOW); delayMicroseconds(tonevalue); } } // We'll take advantage of the built in millis() timer that goes off// to keep track of time, and refresh the servo every 20 milliseconds// The SIGNAL(TIMER0_COMPA_vect) function is the interrupt that will be// called by the microcontroller every 2 millisecondsvolatile uint8_t counter = 0;SIGNAL(TIMER0_COMPA_vect) { // this gets called every 2 milliseconds counter += 2; // every 20 milliseconds, refresh the servos! if (counter >= 20) { counter = 0; myServo1.refresh(); }}
© Adafruit Industries https://learn.adafruit.com/adafruit-trinket-modded-stuffed-animal Page 15 of 19
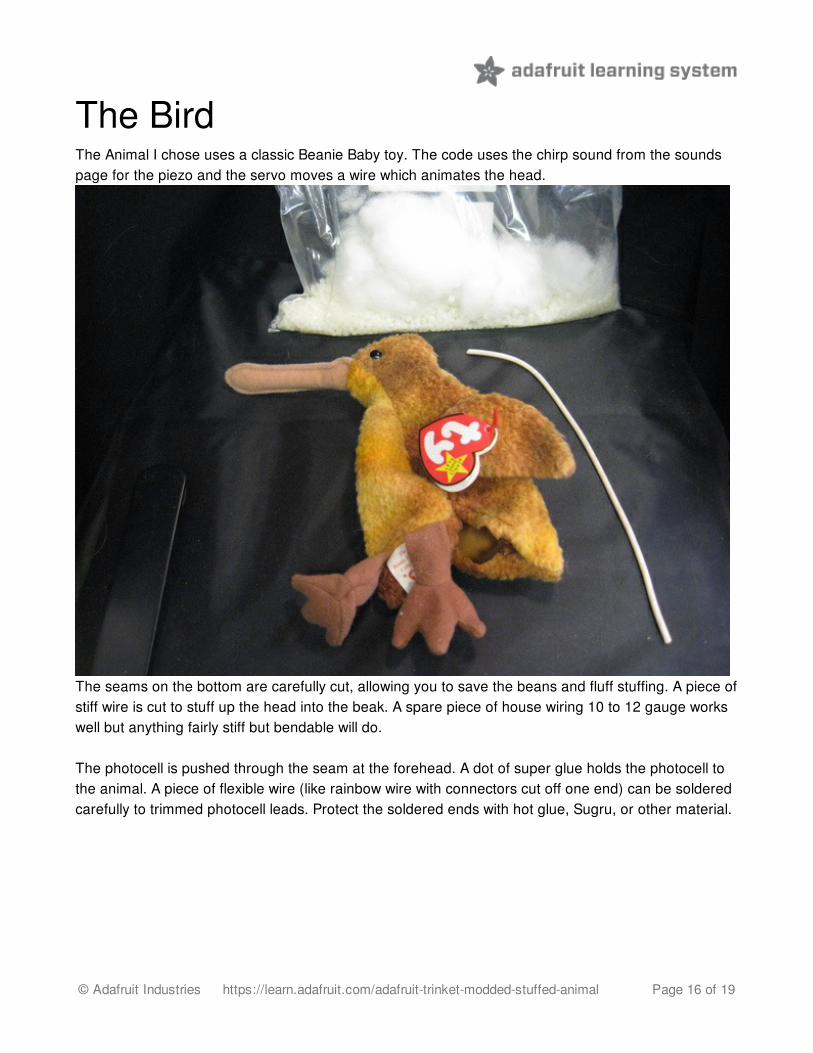
The BirdThe Animal I chose uses a classic Beanie Baby toy. The code uses the chirp sound from the soundspage for the piezo and the servo moves a wire which animates the head.
The seams on the bottom are carefully cut, allowing you to save the beans and fluff stuffing. A piece ofstiff wire is cut to stuff up the head into the beak. A spare piece of house wiring 10 to 12 gauge workswell but anything fairly stiff but bendable will do.
The photocell is pushed through the seam at the forehead. A dot of super glue holds the photocell tothe animal. A piece of flexible wire (like rainbow wire with connectors cut off one end) can be solderedcarefully to trimmed photocell leads. Protect the soldered ends with hot glue, Sugru, or other material.
© Adafruit Industries https://learn.adafruit.com/adafruit-trinket-modded-stuffed-animal Page 16 of 19
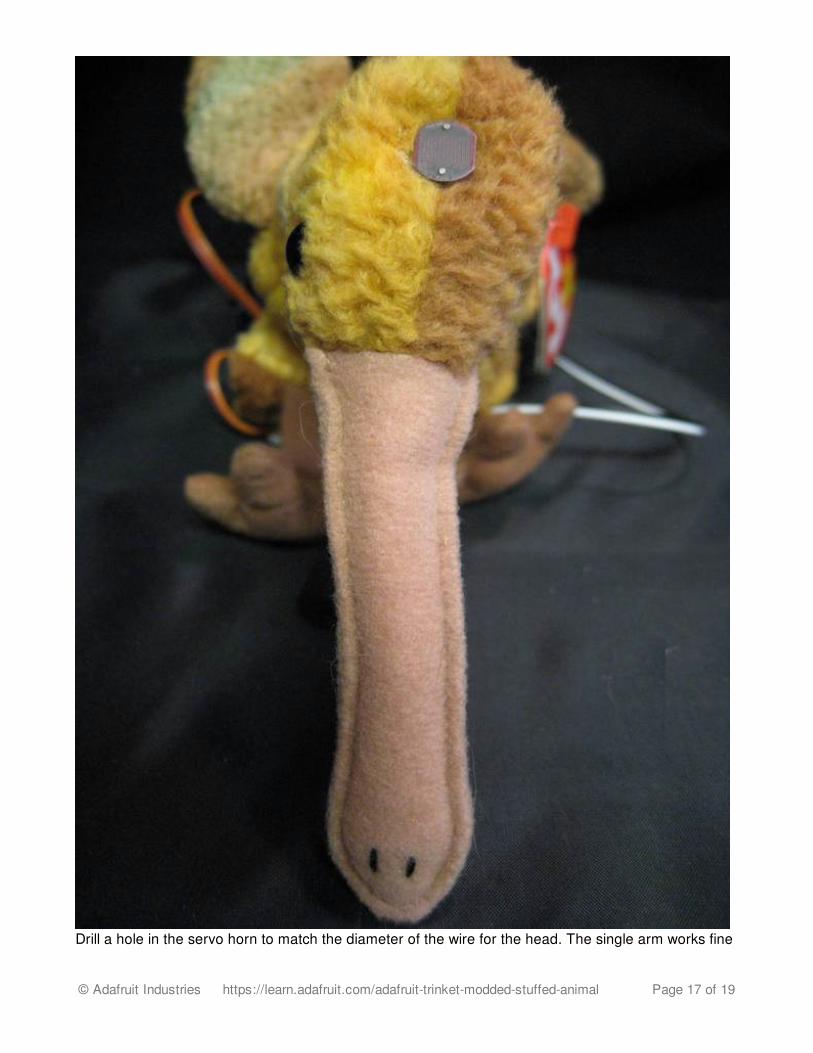
Drill a hole in the servo horn to match the diameter of the wire for the head. The single arm works fine
© Adafruit Industries https://learn.adafruit.com/adafruit-trinket-modded-stuffed-animal Page 17 of 19
but the double arm or circle will work as well. Strip and bend the end of the wire so it will fit on theservo horn and stay somewhat secure but move when needed.
Push the wire up through the beak. the other, stripped end is bent slightly and threaded into the servohorn.
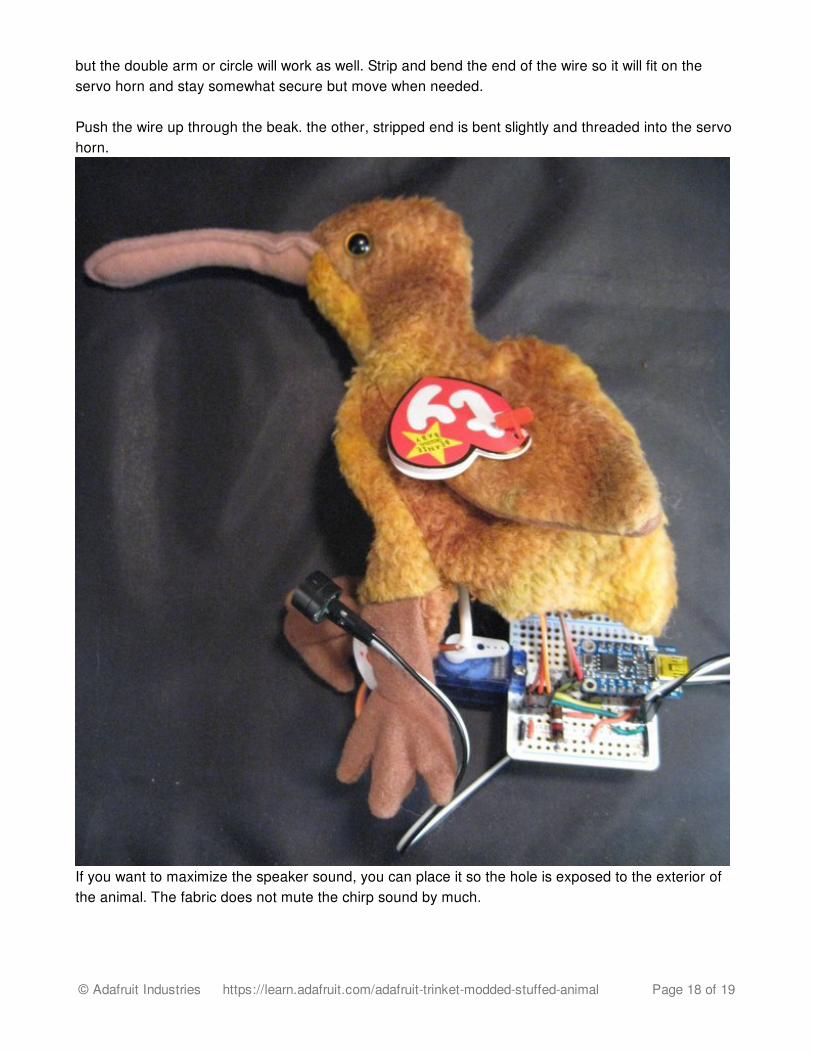
If you want to maximize the speaker sound, you can place it so the hole is exposed to the exterior ofthe animal. The fabric does not mute the chirp sound by much.
© Adafruit Industries https://learn.adafruit.com/adafruit-trinket-modded-stuffed-animal Page 18 of 19

Your AnimalAnd the project in action:The fun part of this project is you can animate any Animal or object you want. Do you want a cat, dog,cow? It's possible. Paper, plastic, 3D, that works very well.
You can also animate other objects like small robots. With Trinket, pins #3 and #4 are free whichallows for additional servos. Continuous rotation servos may be used to move forward and backward.
You can animate several parts with one servo using the round servo horn with multiple holes andwires.
Post your creations in the Trinket Adafruit forum (http://adafru.it/cOb).
© Adafruit Industries Last Updated: 2016-02-08 01:11:56 PM EST Page 19 of 19


![[SmartLTE]- APN Modded Fast OM7.5](https://img.pdfslide.us/doc/110x75/55cf984a550346d03396c628/smartlte-apn-modded-fast-om75.jpg)