Embed Size (px)
Citation preview
ActiveX ToolWorX Developer's Guide
Version 8.0 March 1, 2005
CONFIDENTIAL - Contains Proprietary Information
Modular automation
at your fingertips
ActiveX ToolWorX
Contents
ABOUT THIS DOCUMENT 1 Scope of the Document 1 Copyright 1 Revision History 1
INTRODUCTION 2 Purpose of ActiveX ToolWorX 2
OPC Connectivity 3 Powerful Animation Capabilities 3 Built-in User Interface Controls 3
Advantages of ActiveX ToolWorX 3
ARCHITECTURE 5 GraphWorX32 MFC Extension DLL (GwxExtDll) 5
GraphWorX32 Extension DLL Versioning 6 OLE Automation (Exposed by GwxExtDll) 6
OLExpress (OPC Communications DLL) 7
CREATING COMPONENTS WITH ACTIVEX TOOLWORX 8 Development Environment 8 Development Cycle 8
Development Cycle Without ActiveX ToolWorX 8 Development Cycle With ActiveX ToolWorX 8
Getting Started: ActiveX ToolWorX Wizard for Visual Studio v6.0 9 Tasks Automated by the Wizard 11
Getting Started: ActiveX ToolWorX Wizard .NET 13 Tasks Automated by the Wizard 15
Programming Techniques 17 Creating Objects 17 Programmatic Object Creation 17 Visual Object Creation 18 Tips for Visual Creation 21 Programmatic Creation vs. Visual Creation 22 Handling Property Changes 22 Handling Methods 22 Handling Events 22 Adding OPC Tag Browser Support to Property Pages 22
© Copyright 2005, Iconics, Inc. 100 Foxborough Blvd., Foxborough, MA Page i
ActiveX ToolWorX
Adding OPC Tag Browser Support to Property Pages in .NET 23 Using the ICONICS Security Server for OPC Data Security 26
Going Further: GWXGauge Example 26 Alternate Techniques: GWXGauge Example 28 Software Licensing: GWXGauge Example 29 Distributing Your ActiveX Controls 29
© Copyright 2005, Iconics, Inc. 100 Foxborough Blvd., Foxborough, MA Page ii
ActiveX ToolWorX
About This Document
Scope of the Document This document describes ICONICS' ActiveX ToolWorX product. Specifically, the document focuses on the following topics:
Purposes and advantages of ActiveX ToolWorX
Design and architecture of ActiveX ToolWorX
How ActiveX ToolWorX is used
Details of GWXGauge, an example ActiveX control created with ActiveX ToolWorX
This document assumes that the reader has some prior knowledge in the following topics:
Using Microsoft Developer Studio
Microsoft Visual C++
Microsoft Foundation Classes (MFC)
OLE Automation
Building ActiveX controls with MFC
This document focuses on programming topics directly related to using ICONICS’ ActiveX ToolWorX in the creation of ActiveX controls. It does not necessarily explain programming details pertaining to the prerequisite knowledge of the Microsoft tools and technologies listed above.
Copyright This document is © Copyright 2005, ICONICS, Inc., Foxborough, Massachusetts.
TRADEMARKS: ToolWorX, GraphWorX, GraphWorX32, and OLExpress are trademarks of ICONICS, Inc.
TRADEMARKS: Microsoft, Windows, Windows NT, ActiveX, Visual C++, Visual Basic, Win32, and/or other Microsoft products referenced herein are either trademarks or registered trademarks of Microsoft.
Other product and company names mentioned herein may be the trademarks of their respective owners.
Revision History July 2003 – Karel Jankovic – version 7.0
February 2005 – Tomas Rys – version 8.0
© Copyright 2005, Iconics, Inc. 100 Foxborough Blvd., Foxborough, MA Page 1
ActiveX ToolWorX
Introduction
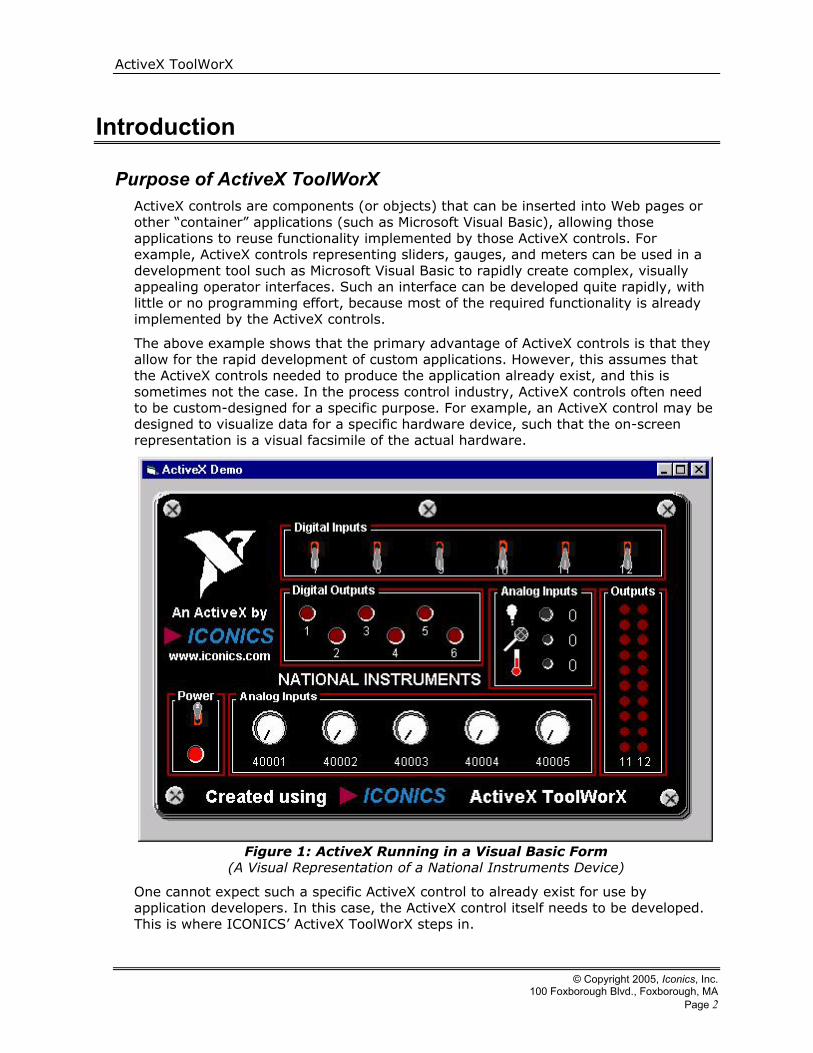
Purpose of ActiveX ToolWorX ActiveX controls are components (or objects) that can be inserted into Web pages or other “container” applications (such as Microsoft Visual Basic), allowing those applications to reuse functionality implemented by those ActiveX controls. For example, ActiveX controls representing sliders, gauges, and meters can be used in a development tool such as Microsoft Visual Basic to rapidly create complex, visually appealing operator interfaces. Such an interface can be developed quite rapidly, with little or no programming effort, because most of the required functionality is already implemented by the ActiveX controls.
The above example shows that the primary advantage of ActiveX controls is that they allow for the rapid development of custom applications. However, this assumes that the ActiveX controls needed to produce the application already exist, and this is sometimes not the case. In the process control industry, ActiveX controls often need to be custom-designed for a specific purpose. For example, an ActiveX control may be designed to visualize data for a specific hardware device, such that the on-screen representation is a visual facsimile of the actual hardware.
Figure 1: ActiveX Running in a Visual Basic Form
(A Visual Representation of a National Instruments Device)
One cannot expect such a specific ActiveX control to already exist for use by application developers. In this case, the ActiveX control itself needs to be developed. This is where ICONICS’ ActiveX ToolWorX steps in.
© Copyright 2005, Iconics, Inc. 100 Foxborough Blvd., Foxborough, MA Page 2
ActiveX ToolWorX
ICONICS’ ActiveX ToolWorX product is a development toolkit for easy creation of OPC (OLE for Process Control) enabled, HMI (Human Machine Interface) ActiveX controls. ActiveX ToolWorX is designed for rapid development of both highly specific components (as in the example above), as well as general-purpose ActiveX controls.
ActiveX controls developed with ActiveX ToolWorX are 32-bit, multithreaded, and run on Windows 95/98/NT/XP or later. ActiveX ToolWorX features include easy OPC connectivity, powerful animation capabilities, and built-in user interface controls.
OPC Connectivity ActiveX ToolWorX provides easy-to-use support for connection to OPC-compliant servers. OPC (OLE for Process Control) is a data communications standard developed and used by the process control industry. ActiveX controls built with ActiveX ToolWorX automatically handle OPC data updates (reads and writes). Simply provide a tag name (to identify the OPC item), and the toolkit takes care of the rest. Included in the toolkit, is an OPC tag browser (TagBrowser2.DLL), allowing your ActiveX controls to provide a tag name selection user interface.
Powerful Animation Capabilities Because data visualization is a key goal of ActiveX controls created with ActiveX ToolWorX, the toolkit provides a robust set of animation capabilities. Specifically, ActiveX ToolWorX includes all the animation capabilities of ICONICS’ GraphWorX32 HMI product (all of the available animation types are listed in the GraphWorX32 OLE Automation Reference in the GraphWorX32 documentation). Simply compose images with shapes like rectangles, lines, ellipses, text, bitmaps, arcs, and metafiles; then dynamically transform the images' size, location, rotation, color, and more. Dynamic updates are fast and flicker-free.
Built-in User Interface Controls ActiveX ToolWorX also makes it easy to interact with process data through the use of built-in user input controls. User input mechanisms include:
Sliders and dials for writing analog values
Alphanumeric data-entry fields
Buttons for downloading/toggling values
There is no need for developers to worry about handling mouse clicks, mouse moves, or keystrokes for these input controls; the toolkit takes care of it.
Advantages of ActiveX ToolWorX ICONICS’ ActiveX ToolWorX product is based on functionality originally implemented for ICONICS’ GraphWorX32 HMI application. Though GraphWorX32 has symbol capabilities (i.e. object aggregation capabilities) that already provide a basic form of reusable controls, ActiveX components go beyond GraphWorX32 symbols in two important ways. First, ActiveX components can be intelligent. For instance, they can be programmed to automatically alter their configuration based on the data source they are connected to (i.e. a gauge component could automatically update its range labels when the high or low range of an associated data source changes). Second, ActiveX components can be inserted into any ActiveX container, including GraphWorX32, Visual Basic forms, and HTML (Web) pages.
© Copyright 2005, Iconics, Inc. 100 Foxborough Blvd., Foxborough, MA Page 3
ActiveX ToolWorX
The development efforts already made by ICONICS in the areas of operator interfaces and OPC data handling provide an excellent foundation for the creation of ActiveX components for process control. By using ActiveX ToolWorX as a foundation for new ActiveX components, these components can leverage functionality already implemented by ICONICS (OPC data updates, flicker-free animation, mouse handling for sliders, dials, and data entries, etc.).
The toolkit promotes rapid development of HMI ActiveX controls because there is no need to implement features already supported by the toolkit (OPC connectivity, animation, UI controls, etc.). This permits the developer to focus on component-specific functionality (i.e. building the desired “intelligence” into your component). The developer doesn’t even need to understand OPC (the toolkit abstracts it).
When developing OPC-enabled HMI ActiveX controls with ActiveX ToolWorX (compared with using only Microsoft development tools), estimated development time savings can exceed six months (depending upon the complexity of the ActiveX control). For example, the GWXGauge example ActiveX control provided with this toolkit was developed using the toolkit in about three weeks (without ActiveX ToolWorX, this component would likely have taken more than six months to develop). A competent programmer (having the prerequisite knowledge of Visual C++ and MFC) with no prior knowledge of the ActiveX ToolWorX OLE Automation interface could still expect to be able to develop a component similar to GWXGauge in less than one month. Less flexible controls (having fewer properties, though potentially more visually complex) can be developed in an even shorter amount of time (a few days, or less) when using the “visual object creation” technique described later in this document. For example, the National Instruments ActiveX pictured above was developed in one day.
Key attributes of ActiveX ToolWorX include:
Wizard for generating new ActiveX ToolWorX projects
Built-in OPC client support and OPC tag browsing
Visual development tool for defining the appearance and behavior of ActiveX controls
Robust object-oriented programmatic interface for object creation, manipulation, and animation
These features make it possible to rapidly develop highly flexible and complex ActiveX controls for process control.
© Copyright 2005, Iconics, Inc. 100 Foxborough Blvd., Foxborough, MA Page 4
ActiveX ToolWorX
Architecture
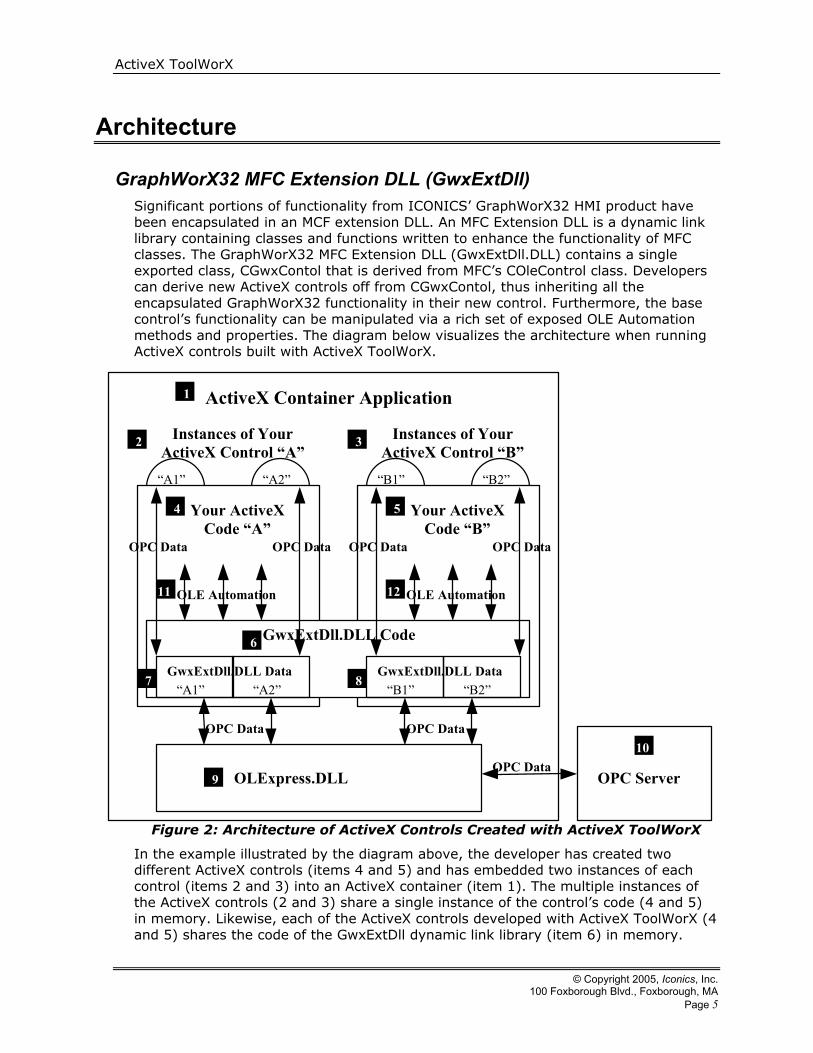
GraphWorX32 MFC Extension DLL (GwxExtDll) Significant portions of functionality from ICONICS’ GraphWorX32 HMI product have been encapsulated in an MCF extension DLL. An MFC Extension DLL is a dynamic link library containing classes and functions written to enhance the functionality of MFC classes. The GraphWorX32 MFC Extension DLL (GwxExtDll.DLL) contains a single exported class, CGwxContol that is derived from MFC’s COleControl class. Developers can derive new ActiveX controls off from CGwxContol, thus inheriting all the encapsulated GraphWorX32 functionality in their new control. Furthermore, the base control’s functionality can be manipulated via a rich set of exposed OLE Automation methods and properties. The diagram below visualizes the architecture when running ActiveX controls built with ActiveX ToolWorX.
Figure 2: Architecture of ActiveX Controls Created with ActiveX ToolWorX
Your ActiveXCode “B”
Your ActiveXCode “A”
ActiveX Container Application
Instances of YourActiveX Control “A”
OPC Data
OPC DataOPC Data
OPC Data
“B2”“B1”“A2”“A1”
“B2”“B1”“A1” “A2”
OPC Data
OLE AutomationOLE Automation
GwxExtDll.DLL Data GwxExtDll.DLL Data
GwxExtDll.DLL Code
OLExpress.DLL OPC Server
1
2
5 4
1211
6
8 7
10
9
Instances of YourActiveX Control “B”
3
OPC DataOPC Data
In the example illustrated by the diagram above, the developer has created two different ActiveX controls (items 4 and 5) and has embedded two instances of each control (items 2 and 3) into an ActiveX container (item 1). The multiple instances of the ActiveX controls (2 and 3) share a single instance of the control’s code (4 and 5) in memory. Likewise, each of the ActiveX controls developed with ActiveX ToolWorX (4 and 5) shares the code of the GwxExtDll dynamic link library (item 6) in memory.
© Copyright 2005, Iconics, Inc. 100 Foxborough Blvd., Foxborough, MA Page 5
ActiveX ToolWorX
Although the code of this DLL is shared, GwxExtDll.DLL maintains separate data (items 7 and 8) for each instance of the ActiveX controls. GwxExtDll.DLL (item 6) is linked to OLExpress.DLL (item 9) (like GwxExtDll, there is only one copy of OLExpress loaded into memory). OLExpress is a dynamic link library that implements the client-side interface of OPC. Because this DLL links to GwxExtDll and not directly to the controls developed with ActiveX ToolWorX, the details of OPC need not be understood by the developer. OLExpress.DLL (item 9) makes a single connection to the OPC server(s) (item 10) used by all instances of the ActiveX controls. Functionality of the base class (CGwxContol) can be accessed directly since the class is exported in GwxExtDll.DLL, however, most of the functionality provided by GwxExtDll is accessed via OLE Automation (items 11 and 12) (see next section for details).
Following the diagram in reverse order, data originates in an OPC server (10) and arrives in OLExpress.DLL (9). This OPC data is passed to GwxExtDll.DLL (7 and 8), and is then visualized by each instance of the ActiveX controls (2 and 3). The path that the OPC data follows is two-way because OPC data can be both read from the server and written to the server.
Note: ActiveX ToolWorX does not currently support Unicode builds.
GraphWorX32 Extension DLL Versioning ActiveX ToolWorX was designed to work both under Visual Studio v6.0 and Visual Studio .NET. For each Visual Studio, a different copy of GraphWorX32 extension library is required. The GwxExtDll.dll is used by ActiveX controls generated under Visual Studio v6.0, while the GwxExtDllNET.dll is used by controls generated under Visual Studio .NET.
OLE Automation (Exposed by GwxExtDll) Most of the functionality provided by GwxExtDll is accessed via OLE Automation. OLE Automation is a Microsoft technology that allows an application to expose programmable objects to be manipulated by other applications. There are two sides to OLE automation: the server side and the client side. An “automation server” is the application that exposes objects to other applications (also known as an "automation component").
An “automation client” (also known as an “automation controller”) is an application that can manipulate exposed objects belonging to the automation server application. In the case of ActiveX controls created with ActiveX ToolWorX, GwxExtDll.DLL is the “automation server” and the ActiveX control created by the developer is the “automation client.”
GwxExtDll exposes a variety of OLE Automation objects. These Automation objects have properties and methods that comprise their external interface. Properties are named attributes of the Automation object (properties are like the data members of a C++ class). Methods are functions that work on an Automation object (methods are like the public member functions of a C++ class). The properties and methods exposed by GwxExtDll are described in full detail in the OLE Automation Reference in the GraphWorX32 help documentation. Understanding the OLE Automation interface exposed by GwxExtDll is crucial to effectively creating ActiveX controls with ActiveX ToolWorX.
© Copyright 2005, Iconics, Inc. 100 Foxborough Blvd., Foxborough, MA Page 6
ActiveX ToolWorX
OLExpress (OPC Communications DLL) OLExpress.DLL is a dynamic link library that implements the client-side interface for OPC. There are two significant advantages gained by encapsulating OPC communications into a DLL. First, developers using this DLL need not understand the details of OPC. The OPC specification is complex, hence, by eliminating the time required to learn the intricacies OPC, OLExpress can reduce the time required to develop OPC client applications. ActiveX ToolWorX further reduces the learning curve by isolating the developer from the OLExpress interface (GwxExtDll interfaces with OLExpress, rather than the developer).
The second advantage of encapsulating OPC in OLExpress is that clients are shielded from changes in the OPC specification and/or changes in the implementation of the OPC specification. When changes do occur, they are isolated in OLExpress.DLL and consequently do not significantly impact the implementation of the client application that links to OLExpress.DLL. Hence, future versions of ActiveX ToolWorX can include enhancements to the OPC specification, and the developer would only need to recompile their ActiveX control using the new version of ActiveX ToolWorX (no changes to the developer’s code would be needed).
© Copyright 2005, Iconics, Inc. 100 Foxborough Blvd., Foxborough, MA Page 7
ActiveX ToolWorX
Creating Components With ActiveX ToolWorX This section describes the steps required to build component ActiveX controls with ICONICS’ ActiveX ToolWorX and Visual C++/MFC.
Development Environment ActiveX ToolWorX is designed for use with Visual Studio 6.0 and Visual Studio .NET 2003. Visual Studio .NET versions 2002 and 2005 are not supported.
Before installing ActiveX ToolWorX you should install the latest service packs for your system and developing environment.
If you are developing on Windows 95, you will also need to install Internet Explorer (Version 3.02 or later) to get the appropriate updated system DLLs into the operating system.
Development Cycle
Development Cycle Without ActiveX ToolWorX Creating an OPC-enabled HMI ActiveX control without ActiveX ToolWorX would be a time-consuming process. Though Microsoft provides good tools for developing general purpose ActiveX controls, the Microsoft tools are of limited help for data visualization and data input, and of no help for implementing OPC client functionality. Thus, without ActiveX ToolWorX, most of the development cycle time would be spent implementing these areas of functionality not supported by the Microsoft tools. The development cycle of an OPC-enabled HMI ActiveX control (without using ActiveX ToolWorX) includes the following tasks:
Use MFC Wizard to generate skeleton code.
Design/implement graphical animation engine.
Design/implement user input capabilities.
Implement OPC communications.
Define/implement specific visual rendering and behavior for the ActiveX.
Implement properties, methods, and events.
Development Cycle With ActiveX ToolWorX The development cycle of an OPC-enabled HMI ActiveX control (using ActiveX ToolWorX) includes the following tasks:
Use the ActiveX ToolWorX Wizard to generate framework code.
Define visual rendering and behavior via visual object creation using ICONICS’ GraphWorX32 or programmatic object creation using ActiveX ToolWorX provided function calls.
Implement properties, methods, and events.
It should be clear that the development cycle of an OPC-enabled HMI ActiveX component using ActiveX ToolWorX is significantly shorter than when not using the
© Copyright 2005, Iconics, Inc. 100 Foxborough Blvd., Foxborough, MA Page 8
ActiveX ToolWorX
toolkit. Details of the development cycle when using ActiveX ToolWorX are given in the following sections.
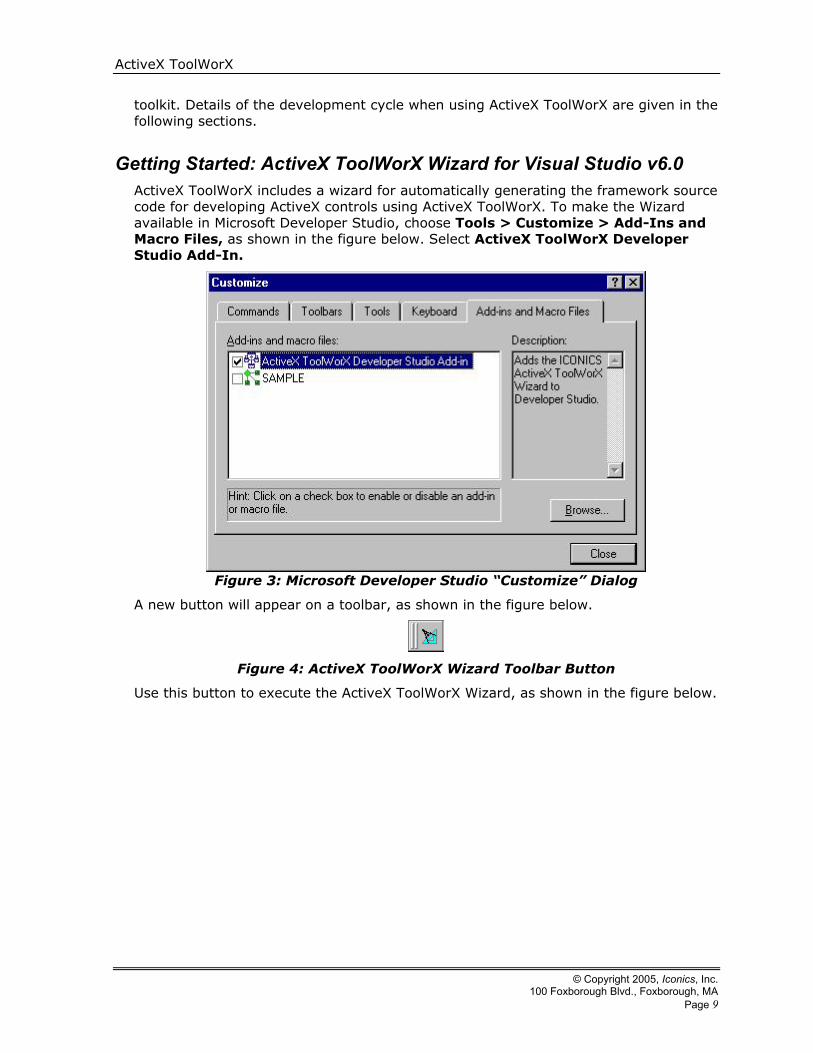
Getting Started: ActiveX ToolWorX Wizard for Visual Studio v6.0 ActiveX ToolWorX includes a wizard for automatically generating the framework source code for developing ActiveX controls using ActiveX ToolWorX. To make the Wizard available in Microsoft Developer Studio, choose Tools > Customize > Add-Ins and Macro Files, as shown in the figure below. Select ActiveX ToolWorX Developer Studio Add-In.
Figure 3: Microsoft Developer Studio “Customize” Dialog
A new button will appear on a toolbar, as shown in the figure below.
Figure 4: ActiveX ToolWorX Wizard Toolbar Button
Use this button to execute the ActiveX ToolWorX Wizard, as shown in the figure below.
© Copyright 2005, Iconics, Inc. 100 Foxborough Blvd., Foxborough, MA Page 9
ActiveX ToolWorX
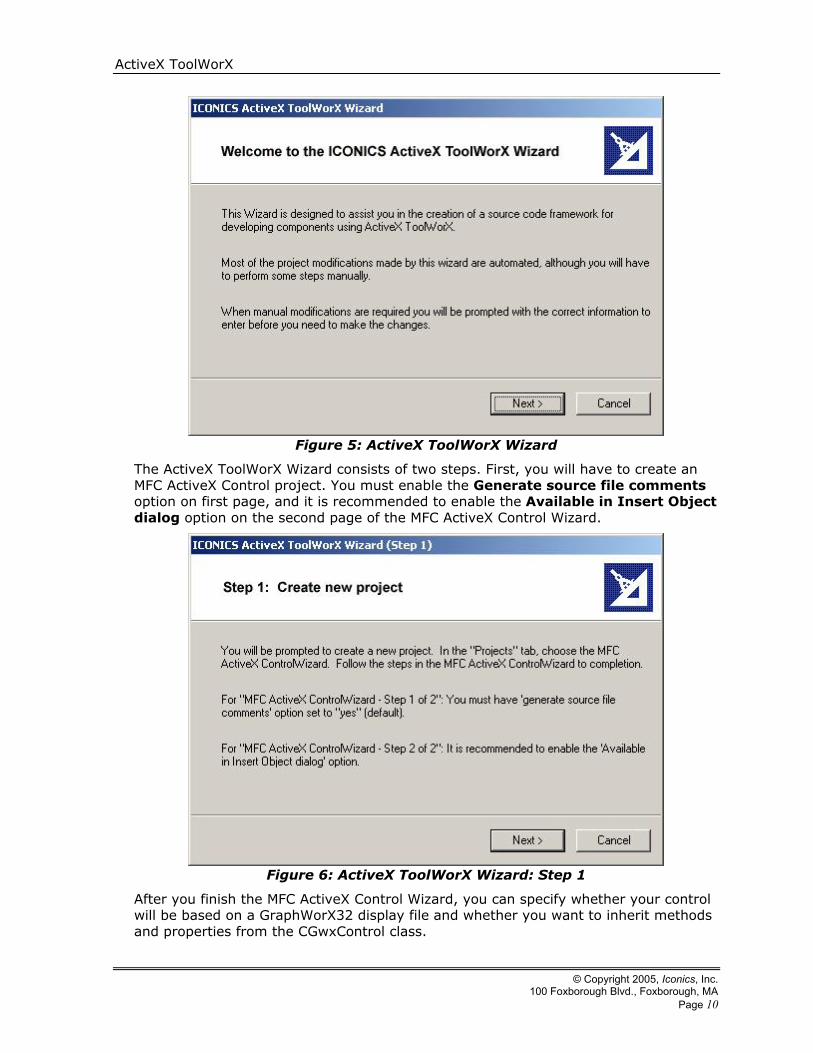
Figure 5: ActiveX ToolWorX Wizard
The ActiveX ToolWorX Wizard consists of two steps. First, you will have to create an MFC ActiveX Control project. You must enable the Generate source file comments option on first page, and it is recommended to enable the Available in Insert Object dialog option on the second page of the MFC ActiveX Control Wizard.
Figure 6: ActiveX ToolWorX Wizard: Step 1
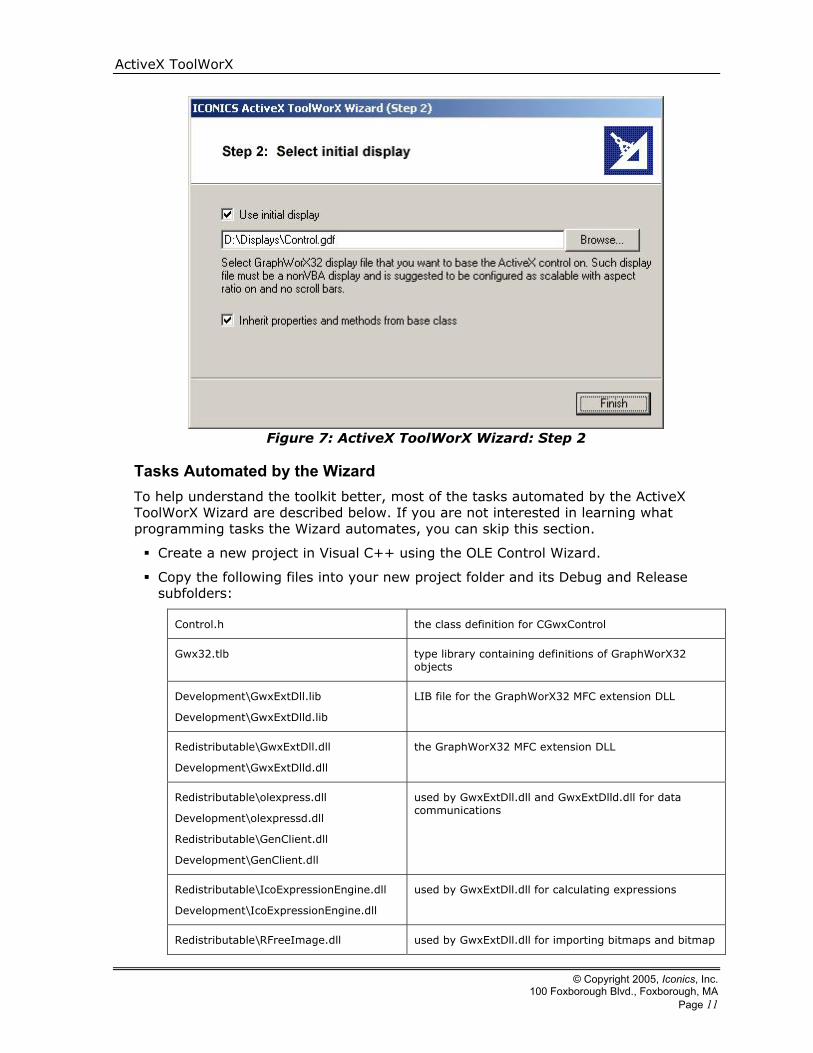
After you finish the MFC ActiveX Control Wizard, you can specify whether your control will be based on a GraphWorX32 display file and whether you want to inherit methods and properties from the CGwxControl class.
© Copyright 2005, Iconics, Inc. 100 Foxborough Blvd., Foxborough, MA Page 10
ActiveX ToolWorX
Figure 7: ActiveX ToolWorX Wizard: Step 2
Tasks Automated by the Wizard To help understand the toolkit better, most of the tasks automated by the ActiveX ToolWorX Wizard are described below. If you are not interested in learning what programming tasks the Wizard automates, you can skip this section.
Create a new project in Visual C++ using the OLE Control Wizard.
Copy the following files into your new project folder and its Debug and Release subfolders:
Control.h the class definition for CGwxControl
Gwx32.tlb type library containing definitions of GraphWorX32 objects
Development\GwxExtDll.lib
Development\GwxExtDlld.lib
LIB file for the GraphWorX32 MFC extension DLL
Redistributable\GwxExtDll.dll
Development\GwxExtDlld.dll
the GraphWorX32 MFC extension DLL
Redistributable\olexpress.dll
Development\olexpressd.dll
Redistributable\GenClient.dll
Development\GenClient.dll
used by GwxExtDll.dll and GwxExtDlld.dll for data communications
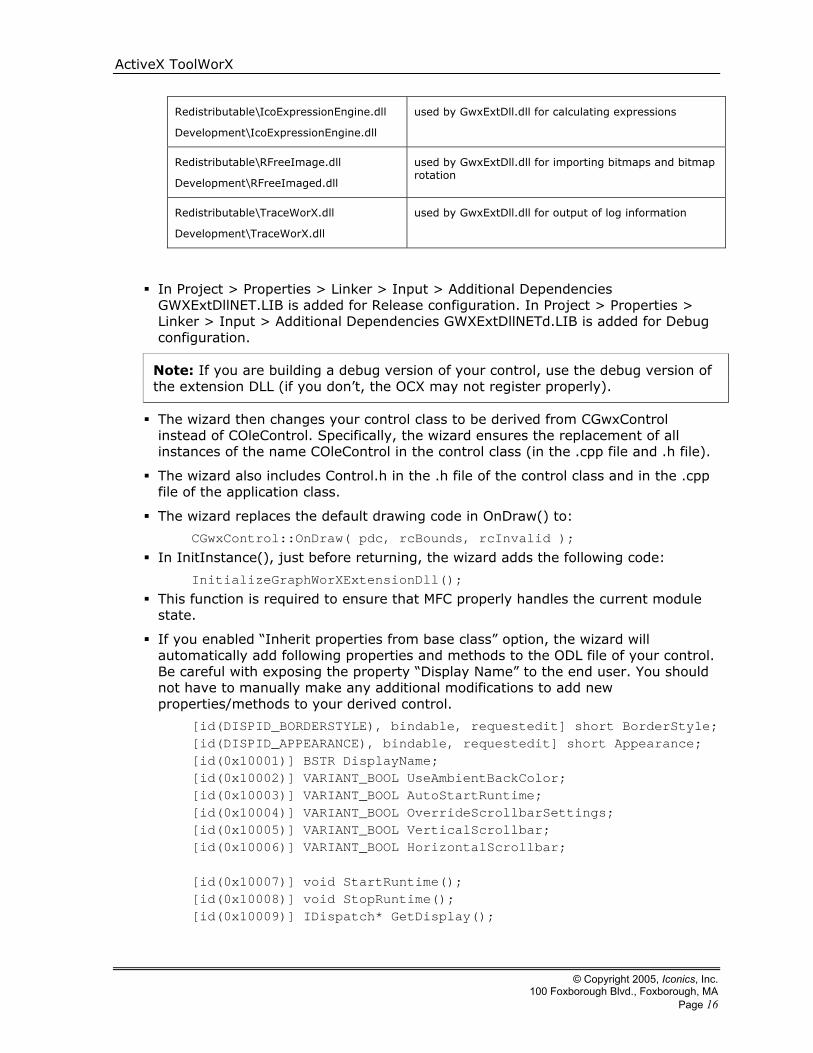
Redistributable\IcoExpressionEngine.dll
Development\IcoExpressionEngine.dll
used by GwxExtDll.dll for calculating expressions
Redistributable\RFreeImage.dll used by GwxExtDll.dll for importing bitmaps and bitmap
© Copyright 2005, Iconics, Inc. 100 Foxborough Blvd., Foxborough, MA Page 11
ActiveX ToolWorX
Development\RFreeImaged.dll rotation
Redistributable\TraceWorX.dll
Development\TraceWorX.dll
used by GwxExtDll.dll for output of log information
In Build > Setting > Link > Release add GWXExtDll.LIB. In Build > Setting > Link > Debug add GWXExtDlld.LIB.
Note: If you are building a debug version of your control, use the debug version of the extension DLL (if you don’t, the OCX may not register properly).
Change your control class to be derived from CGwxControl instead of COleControl. Make sure you replace all instances of the name COleControl in your control class (in the .cpp file and .h file).
Include Control.h in the .h file of your control class and in the .cpp file of your application class.
Replace the default drawing code in OnDraw() to:
CGwxControl::OnDraw( pdc, rcBounds, rcInvalid );
In InitInstance(), just before returning, add the following code. This function is required to ensure that MFC properly handles the current module state.
InitializeGraphWorXExtensionDll();
To properly inherit the properties and methods of the base class (CGwxControl), you must manually edit the ODL file of your new control (Class Wizard has no support to automatically handle inheritance for derived controls). Use GWXview32.ODL as a reference for the modifications that should be made. Copy the properties you want to inherit from GWXview32.ODL to the properties section of your new ODL file. Modify the ID numbers such that you set the first bit of the hi-word. If you want to inherit all the base class properties, your new properties section would look like this:
[id(DISPID_BORDERSTYLE), bindable, requestedit] short BorderStyle; [id(DISPID_APPEARANCE), bindable, requestedit] short Appearance; [id(0x10001)] BSTR DisplayName; [id(0x10002)] VARIANT_BOOL UseAmbientBackColor; [id(0x10003)] VARIANT_BOOL AutoStartRuntime; [id(0x10004)] VARIANT_BOOL OverrideScrollbarSettings; [id(0x10005)] VARIANT_BOOL VerticalScrollbar; [id(0x10006)] VARIANT_BOOL HorizontalScrollbar;
Make the same modifications for the methods section. You should not have to manually make any additional modifications to add new properties/methods to your derived control (Class Wizard’s default editing behavior will be OK).
[id(0x10007)] void StartRuntime(); [id(0x10008)] void StopRuntime(); [id(0x10009)] IDispatch* GetDisplay();
Using Class Wizard, add a new class by doing an import from the GraphWorX32 type library (Gwx32.TLB). This new class (IGwx32) will give you easy access to the exposed methods and properties of GraphWorX32. Include the header file of this new wrapper class the in the header file of your control class. To use this new
© Copyright 2005, Iconics, Inc. 100 Foxborough Blvd., Foxborough, MA Page 12

ActiveX ToolWorX
class, define a new member variable in your control class. This member should be deleted in the destructor. Initialize this variable in the constructor of your control as follows:
LPDISPATCH lpDispatch = GetDisplay(); m_pIGwx32 = new IGwx32(lpDispatch);
Note: You can create additional wrapper classes for other object types defined in Gwx32.TLB as you need them (for example IGwxRectangle). It is a good idea to comment out unused members of the wrapper class when you have finished developing your ActiveX control to help reduce the overall size of the compiled OCX file.
If you want, you can override the default settings of properties in the base class by changing them to the desired values in the constructor of your control class. For example, this will turn on the scroll bars by default in your derived control:
m_verticalScrollbar = TRUE; m_horizontalScrollbar = TRUE;
At this point, your new control is ready to be compiled.
Getting Started: ActiveX ToolWorX Wizard .NET ActiveX ToolWorX also includes a wizard for automatically generating the framework source code for developing ActiveX controls using ActiveX ToolWorX under Visual Studio .NET. The ActiveX ToolWorX Wizard is available as one of the Visual C++ project wizards. To activate the ActiveX ToolWorX wizard, choose File > New > Project and select ActiveX ToolWorX Project template in the New Project dialog, as shown in the figure below.
Figure 8: Microsoft Development Environment "New Project" Dialog
© Copyright 2005, Iconics, Inc. 100 Foxborough Blvd., Foxborough, MA Page 13
ActiveX ToolWorX
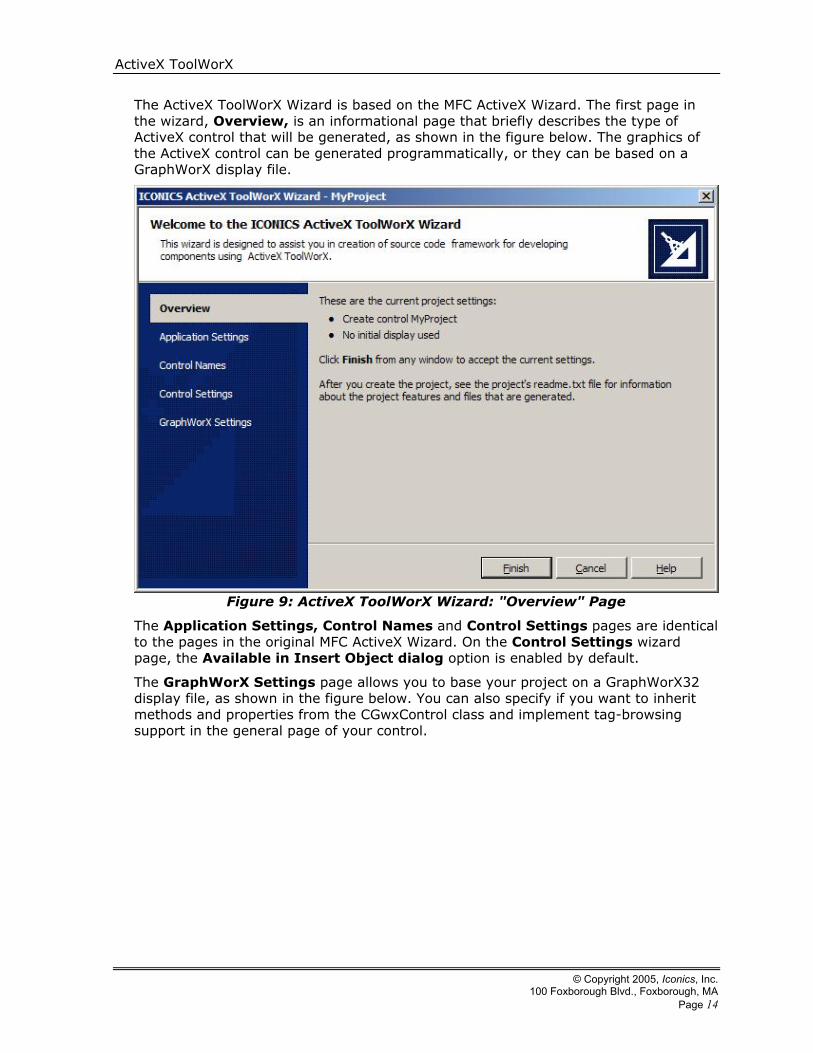
The ActiveX ToolWorX Wizard is based on the MFC ActiveX Wizard. The first page in the wizard, Overview, is an informational page that briefly describes the type of ActiveX control that will be generated, as shown in the figure below. The graphics of the ActiveX control can be generated programmatically, or they can be based on a GraphWorX display file.
Figure 9: ActiveX ToolWorX Wizard: "Overview" Page
The Application Settings, Control Names and Control Settings pages are identical to the pages in the original MFC ActiveX Wizard. On the Control Settings wizard page, the Available in Insert Object dialog option is enabled by default.
The GraphWorX Settings page allows you to base your project on a GraphWorX32 display file, as shown in the figure below. You can also specify if you want to inherit methods and properties from the CGwxControl class and implement tag-browsing support in the general page of your control.
© Copyright 2005, Iconics, Inc. 100 Foxborough Blvd., Foxborough, MA Page 14

ActiveX ToolWorX
Figure 10: ActiveX ToolWorX Wizard: "GraphWorX Settings" Page
Tasks Automated by the Wizard To help understand the toolkit better, most of the tasks automated by the ActiveX ToolWorX Wizard are described below. If you are not interested in learning what programming tasks the Wizard automates, you can skip this section.
The ActiveX ToolWorX Wizard copies the following files into the new project folder and its Debug and Release subfolders:
Control.h the class definition for CGwxControl
Gwx32.tlb type library containing definitions of GraphWorX32 objects
Development\GwxExtDllNET.lib
Development\GwxExtDllNETd.lib
LIB file for the GraphWorX32 MFC extension DLL
Redistributable\GwxExtDll.dll
Development\GwxExtDlld.dll
the GraphWorX32 MFC extension DLL
Redistributable\olexpress.dll
Development\olexpressd.dll
Redistributable\GenClient.dll
Development\GenClient.dll
used by GwxExtDll.dll and GwxExtDlld.dll for data communications
© Copyright 2005, Iconics, Inc. 100 Foxborough Blvd., Foxborough, MA Page 15
ActiveX ToolWorX
Redistributable\IcoExpressionEngine.dll
Development\IcoExpressionEngine.dll
used by GwxExtDll.dll for calculating expressions
Redistributable\RFreeImage.dll
Development\RFreeImaged.dll
used by GwxExtDll.dll for importing bitmaps and bitmap rotation
Redistributable\TraceWorX.dll
Development\TraceWorX.dll
used by GwxExtDll.dll for output of log information
In Project > Properties > Linker > Input > Additional Dependencies GWXExtDllNET.LIB is added for Release configuration. In Project > Properties > Linker > Input > Additional Dependencies GWXExtDllNETd.LIB is added for Debug configuration.
Note: If you are building a debug version of your control, use the debug version of the extension DLL (if you don’t, the OCX may not register properly).
The wizard then changes your control class to be derived from CGwxControl instead of COleControl. Specifically, the wizard ensures the replacement of all instances of the name COleControl in the control class (in the .cpp file and .h file).
The wizard also includes Control.h in the .h file of the control class and in the .cpp file of the application class.
The wizard replaces the default drawing code in OnDraw() to:
CGwxControl::OnDraw( pdc, rcBounds, rcInvalid );
In InitInstance(), just before returning, the wizard adds the following code:
InitializeGraphWorXExtensionDll();
This function is required to ensure that MFC properly handles the current module state.
If you enabled “Inherit properties from base class” option, the wizard will automatically add following properties and methods to the ODL file of your control. Be careful with exposing the property “Display Name” to the end user. You should not have to manually make any additional modifications to add new properties/methods to your derived control.
[id(DISPID_BORDERSTYLE), bindable, requestedit] short BorderStyle; [id(DISPID_APPEARANCE), bindable, requestedit] short Appearance; [id(0x10001)] BSTR DisplayName; [id(0x10002)] VARIANT_BOOL UseAmbientBackColor; [id(0x10003)] VARIANT_BOOL AutoStartRuntime; [id(0x10004)] VARIANT_BOOL OverrideScrollbarSettings; [id(0x10005)] VARIANT_BOOL VerticalScrollbar; [id(0x10006)] VARIANT_BOOL HorizontalScrollbar; [id(0x10007)] void StartRuntime(); [id(0x10008)] void StopRuntime(); [id(0x10009)] IDispatch* GetDisplay();
© Copyright 2005, Iconics, Inc. 100 Foxborough Blvd., Foxborough, MA Page 16
ActiveX ToolWorX
The wizard includes the header file of these new wrapper classes in the header file of your control class. The wizard also defines a new member variable in your control class and initializes this variable in the constructor of your control as follows. This member is deleted in the destructor of the control class.
LPDISPATCH lpDispatch = GetDisplay(); m_pIGwx32 = new IGwx32(lpDispatch);
Note: Using the Microsoft Class Wizard, you can create additional wrapper classes for other object types defined in Gwx32.TLB as you need them (for example IGwxRectangle). It is a good idea to comment out unused members of the wrapper class when you have finished developing your ActiveX control to help reduce the overall size of the compiled OCX file.
You can override the default settings of properties in the base class by changing them to the desired values in the constructor of your control class. The ActiveX ToolWorX Wizard inserts the available overrides into the constructor of your control class. For example, this will turn on the scroll bars by default in your derived control:
m_verticalScrollbar = TRUE; m_horizontalScrollbar = TRUE;
If you enabled the “Implement ICONICS Tag Browser” option, the wizard will implement the member function to the general property page of your control class.
BOOL BrowseForTag (UINT ctrlID);
Programming Techniques There are two primary programming tasks to undertake when creating ActiveX controls using ActiveX ToolWorX. First, you need to create GraphWorX32 objects that make up your control. In other words, create lines, rectangles, dynamic transformations, etc., that define the look and behavior of your ActiveX control. The second task is to manipulate existing GraphWorX32 objects in the control. This involves associating properties of your ActiveX control with the properties of the lines, rectangles, dynamic transformations, etc., that comprise your control.
Creating Objects There are two primary techniques you can use to create GraphWorX32 objects with ActiveX ToolWorX: dynamic programmatic creation of objects via OLE automation, and loading a pre-created set of objects created visually using ICONICS’ GraphWorX32 HMI application.
Programmatic Object Creation Programmatic object creation involves the use of exposed OLE automation methods defined in Gwx32.TLB to create the GraphWorX32 objects, based on the current values of your ActiveX properties. This involves using methods such as CreateRectangle() and CreateSizeDynamic() to build up the visual appearance and behavior of your ActiveX. The following code fragment shows how you might create a resizing bar in your control.
m_pIGwx32->CreateRectangle(l,t,w,h,filled,fillColor,lineColor, lineWidth,lineStyle,shadow,shadowColor,edgeStyle,hidden,
© Copyright 2005, Iconics, Inc. 100 Foxborough Blvd., Foxborough, MA Page 17
ActiveX ToolWorX
”bar1”,rounded)->Release(); LPDISPATCH lpDisp = m_pIGwx32->CreateSizeDynamic(“bar1”,”size1”, sizeType,clip,startSize,endSize); IGwxDynamic sizeDispDrv(lpDisp); sizeDispDrv.SetDataSource(dataSource); sizeDispDrv.SetRangeOverride(rangeOverride); if (rangeOverride) {
sizeDispDrv.SetLowRange(lowRange); sizeDispDrv.SetHighRange(highRange);
}
Note: Don’t forget to “release” dispatch pointers returned from ActiveX ToolWorX’s exposed OLE automation. If you attach a returned LPDISPATCH to a dispatch driver class, the dispatch driver will automatically release the LPDISPATCH when the driver is destroyed.
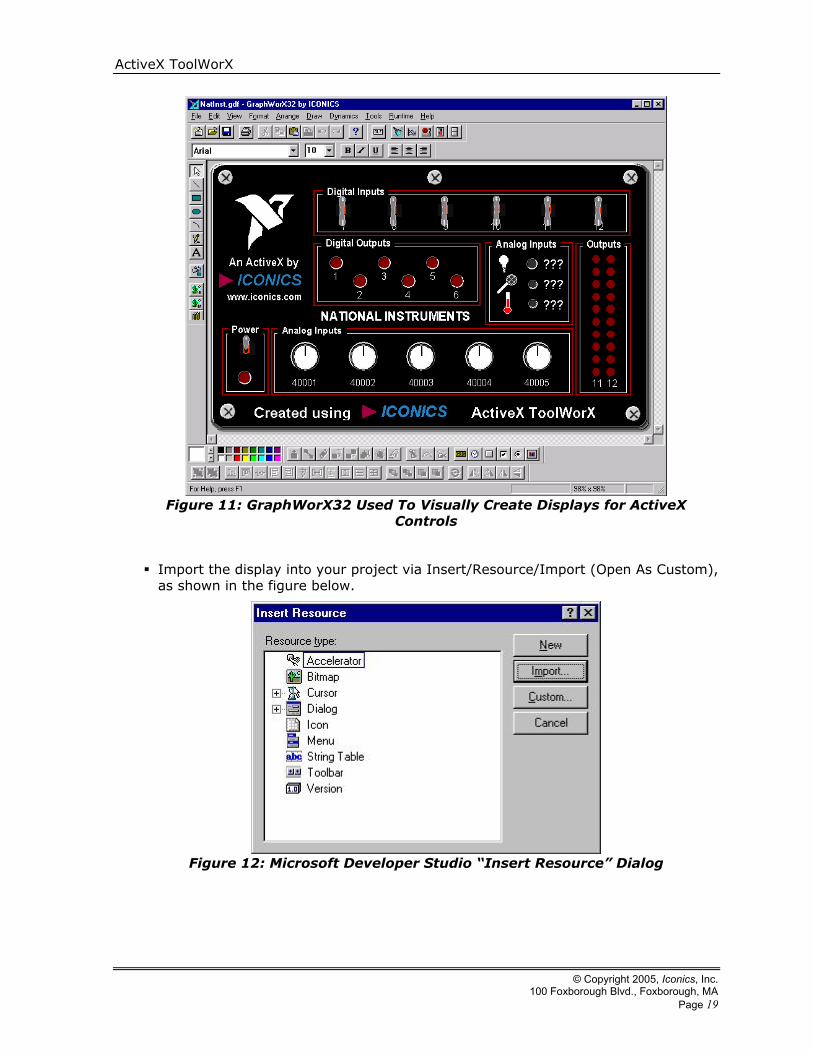
Visual Object Creation Visual object creation involves binding a pre-configured set of objects into the resources of your ActiveX control. This set of objects is created visually using ICONICS’ GraphWorX32 HMI application. GraphWorX32 saves the configured objects to a .GDF file. This “display” file can be bound directly into your ActiveX resources, and can be subsequently loaded from the resource area via the FileOpen() OLE automation method. The steps for visual object creation are outlined below:
First, visually create the control’s “display” using GraphWorX32. It is important that you save the display without VBA (Visual Basic for Applications) data (ActiveX ToolWorX derived controls do not include support for integrated VBA; displays that include VBA data may not be able to load in ActiveX ToolWorX derived controls). To save displays without VBA data, choose Save As from the File menu to open the Save As dialog box. In the Save as type combo box, choose GraphWorX32 Displays without VBA.
© Copyright 2005, Iconics, Inc. 100 Foxborough Blvd., Foxborough, MA Page 18
ActiveX ToolWorX
Figure 11: GraphWorX32 Used To Visually Create Displays for ActiveX
Controls
Import the display into your project via Insert/Resource/Import (Open As Custom), as shown in the figure below.
Figure 12: Microsoft Developer Studio “Insert Resource” Dialog
© Copyright 2005, Iconics, Inc. 100 Foxborough Blvd., Foxborough, MA Page 19
ActiveX ToolWorX
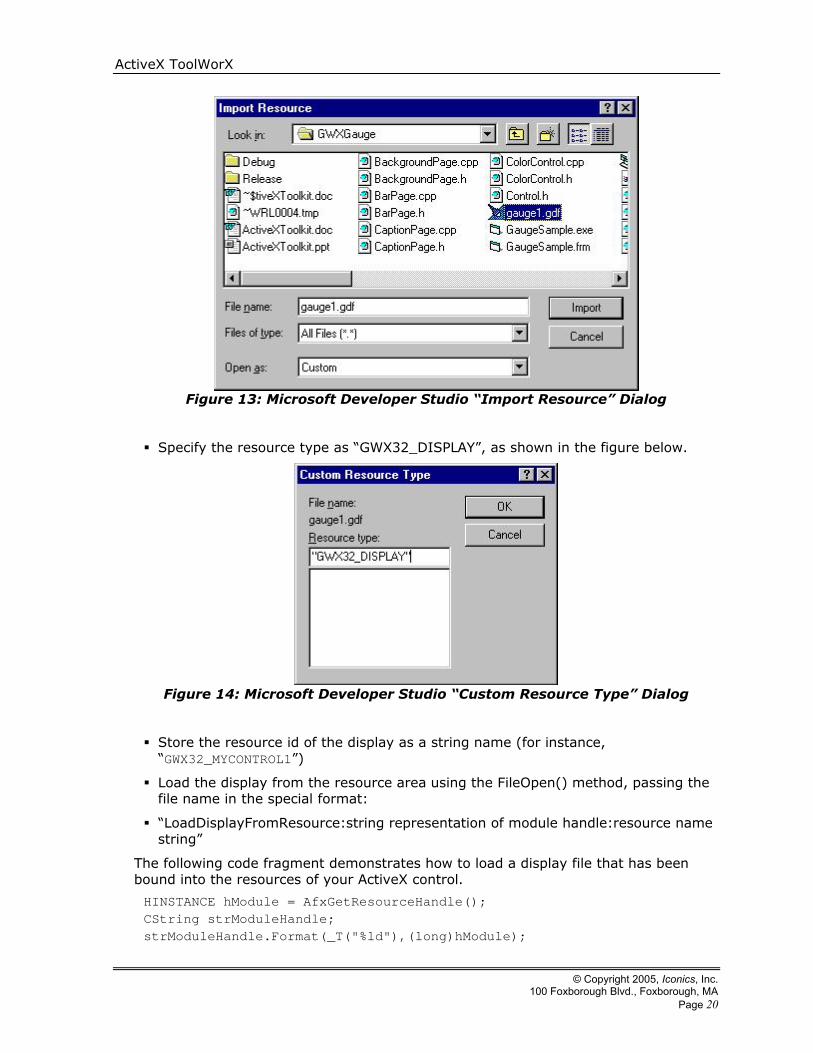
Figure 13: Microsoft Developer Studio “Import Resource” Dialog
Specify the resource type as “GWX32_DISPLAY”, as shown in the figure below.
Figure 14: Microsoft Developer Studio “Custom Resource Type” Dialog
Store the resource id of the display as a string name (for instance, “GWX32_MYCONTROL1”)
Load the display from the resource area using the FileOpen() method, passing the file name in the special format:
“LoadDisplayFromResource:string representation of module handle:resource name string”
The following code fragment demonstrates how to load a display file that has been bound into the resources of your ActiveX control.
HINSTANCE hModule = AfxGetResourceHandle(); CString strModuleHandle; strModuleHandle.Format(_T("%ld"),(long)hModule);
© Copyright 2005, Iconics, Inc. 100 Foxborough Blvd., Foxborough, MA Page 20

ActiveX ToolWorX
CString strDisplayName(_T("LoadDisplayFromResource:")); strDisplayName += strModuleHandle; strDisplayName += _T(":GWX32_MYCONTROL1"); m_pIGwx32->FileOpen(strDisplayName);
Note: You can bind more than one display file into your ActiveX, loading any one of those displays based on property value.
When creating the project under Visual Studio .NET, the integer identifier of the display resource is used instead of named resource identifier (e.g. GWX32_MYCONTROL1). Such integer resource identifier is the integer value of the named resource identifier (defined in the resource.h file) prefixed by a hash mark.
The following code fragment demonstrates how to load a display file bound into the resources on VS.NET:
HINSTANCE hModule = AfxGetResourceHandle(); CString strModuleHandle; strModuleHandle.Format(_T("%ld"),(long)hModule); CString strDisplayName(_T("LoadDisplayFromResource:")); strDisplayName += strModuleHandle; strDisplayName += _T(":#103"); m_pIGwx32->FileOpen(strDisplayName);
The integer value (as a part of the “#103” integer resource identifier) corresponds to the define included in the resource.h file:
#define GWX32_MYCONTROL1 103
Tips for Visual Creation When creating the objects for an ActiveX control visually using GraphWorX32, there are a few guidelines you should follow to maximize the benefits of the visual creation technique. These are just guidelines, not rules; you do not have to follow these tips if you don’t want to.
Make your control fill the entire “Display Dimensions” of the display. You can adjust the display dimensions via the dialog Format > Display Properties > General.
Set the display to be “scaleable” and “preserve aspect ratio” (set via the dialog Format > Display Properties > General.).
Use View > Show Whole Display to ensure that the entire display area is visible (ensure that the zoom percentage that results from showing the whole display is less than or equal to 100% when the display is saved.)
Draw your control at about twice the size you would expect it to be viewed in most situations (this tip only applies when the display is scaleable).
The first three items will ensure that the display objects will stretch to fit the dimensions of the ActiveX control window, and stay centered when the aspect ratio of the display does not match the aspect ratio of the control’s window. The last item, when used in conjunction with others, can help improve the redraw speed of your ActiveX control (by making the objects twice the expected size, it is unlikely that they will ever exceed 100% of their actual size (exceeding 100% zoom can slow down the redraw). For an example of a display file conforming to the above recommendations, see the file gauge1.gdf, which is included in the toolkit.
© Copyright 2005, Iconics, Inc. 100 Foxborough Blvd., Foxborough, MA Page 21
ActiveX ToolWorX
Programmatic Creation vs. Visual Creation The two aforementioned programming techniques have differing practical applications. Programmatic creation is highly flexible but tends to be more difficult to program. When using programmatic creation, the layout of objects is unrestricted, but the logic for intelligent layout can be tricky. On the other hand, visual creation is very easy to program, but tends to be less flexible. With visual creation, the layout of objects is done visually, but this layout is generally fixed. Also of note, with visual creation you can include bitmaps and metafiles in the layout. The visual creation technique is good for controls that are visually complex, but tend not to vary much in their appearance.
Handling Property Changes When a property of your ActiveX changes, you need to update the object(s) affected by that property. To do this, get the dispatch pointer of the appropriate object, given the object’s name (the name of an object is specified when the object is first created). Then, use the object’s dispatch pointer to modify the object’s properties via OLE automation. For example, to change the OPC tag to which a dynamic transformation is attached:
LPDISPATCH lpDisp = m_pIGwx32->GetDynamicObjectFromName(objName);
if (lpDisp != NULL) {
IGwxDynamic lpDispDrv(lpDisp); lpDispDrv.SetDataSource(newDataSource);
}
Handling Methods Typically you would handle methods in the same way that property changes are handled (i.e. get an object’s dispatch pointer and use that dispatch pointer to access the object’s methods and properties).
Handling Events The base class CGwxControl contains a set of virtual functions to assist in supporting events for user interface elements in your ActiveX control. These functions are called by GwxExtDll when user interface events occur, such as slider events, dial events, button events, and data entry events. The base class implementations of these functions do nothing. You can override these functions to fire events in whatever format you desire. The virtual function declarations for event support can be found in Control.h, and are described in detail in the OLE Automation reference section in the GraphWorX32 help documentation.
Note: Some of these virtual functions include dispatch pointer parameters; it is important that you do not add or release references to these dispatch pointers.
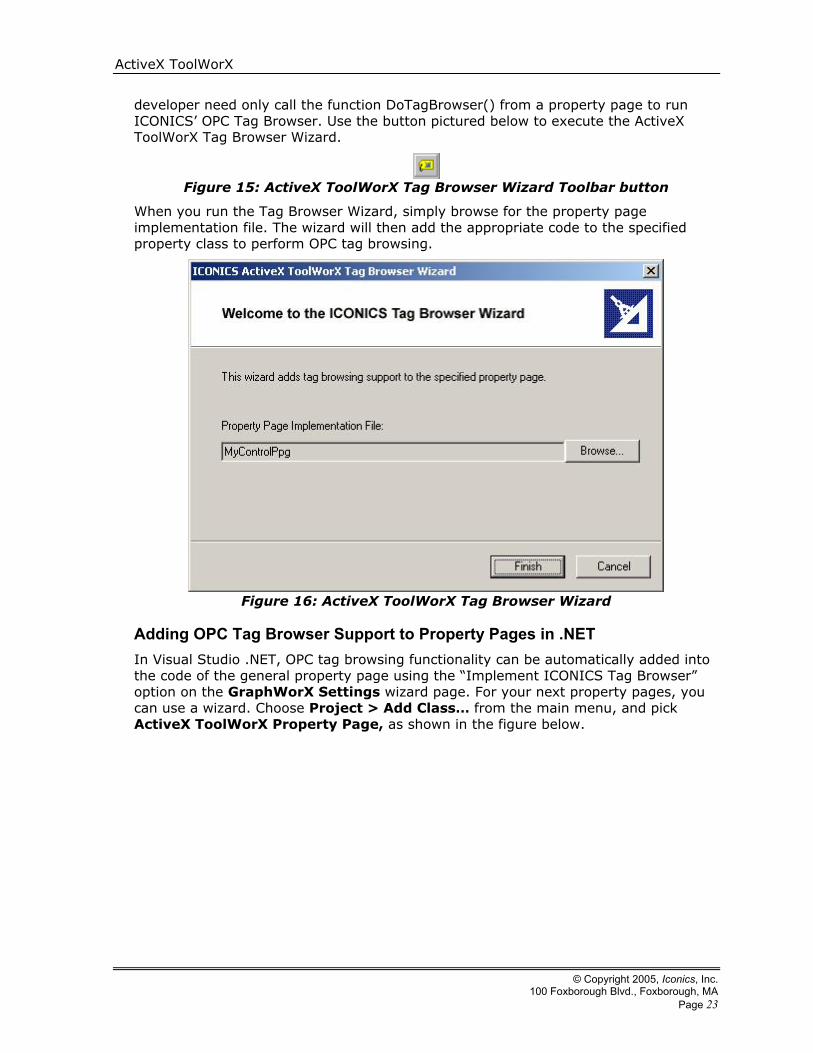
Adding OPC Tag Browser Support to Property Pages A commonly desired feature in an OPC-enabled HMI ActiveX is to provide OPC tag browsing functionality in the property pages of your ActiveX, thus making it easy for the user to connect the ActiveX to OPC data. ActiveX ToolWorX in Visual Studio v6 provides a wizard that automatically adds code to an ActiveX project such that the
© Copyright 2005, Iconics, Inc. 100 Foxborough Blvd., Foxborough, MA Page 22
ActiveX ToolWorX
developer need only call the function DoTagBrowser() from a property page to run ICONICS’ OPC Tag Browser. Use the button pictured below to execute the ActiveX ToolWorX Tag Browser Wizard.
Figure 15: ActiveX ToolWorX Tag Browser Wizard Toolbar button
When you run the Tag Browser Wizard, simply browse for the property page implementation file. The wizard will then add the appropriate code to the specified property class to perform OPC tag browsing.
Figure 16: ActiveX ToolWorX Tag Browser Wizard
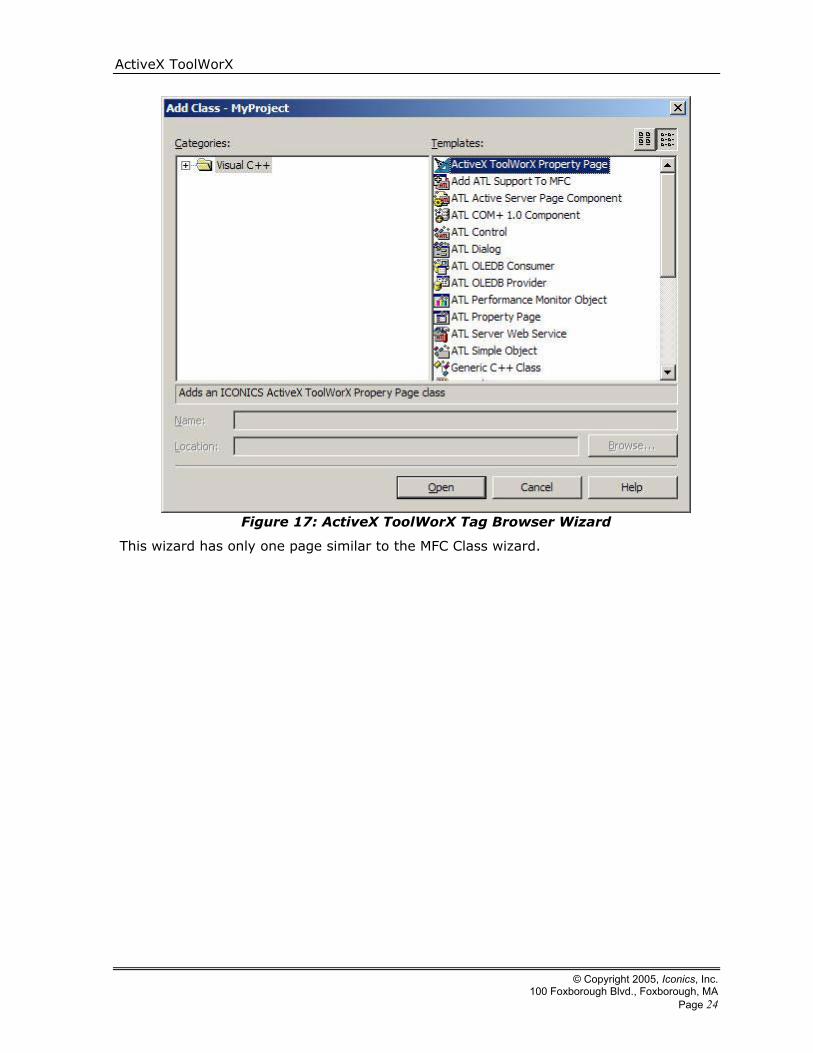
Adding OPC Tag Browser Support to Property Pages in .NET In Visual Studio .NET, OPC tag browsing functionality can be automatically added into the code of the general property page using the “Implement ICONICS Tag Browser” option on the GraphWorX Settings wizard page. For your next property pages, you can use a wizard. Choose Project > Add Class… from the main menu, and pick ActiveX ToolWorX Property Page, as shown in the figure below.
© Copyright 2005, Iconics, Inc. 100 Foxborough Blvd., Foxborough, MA Page 23
ActiveX ToolWorX
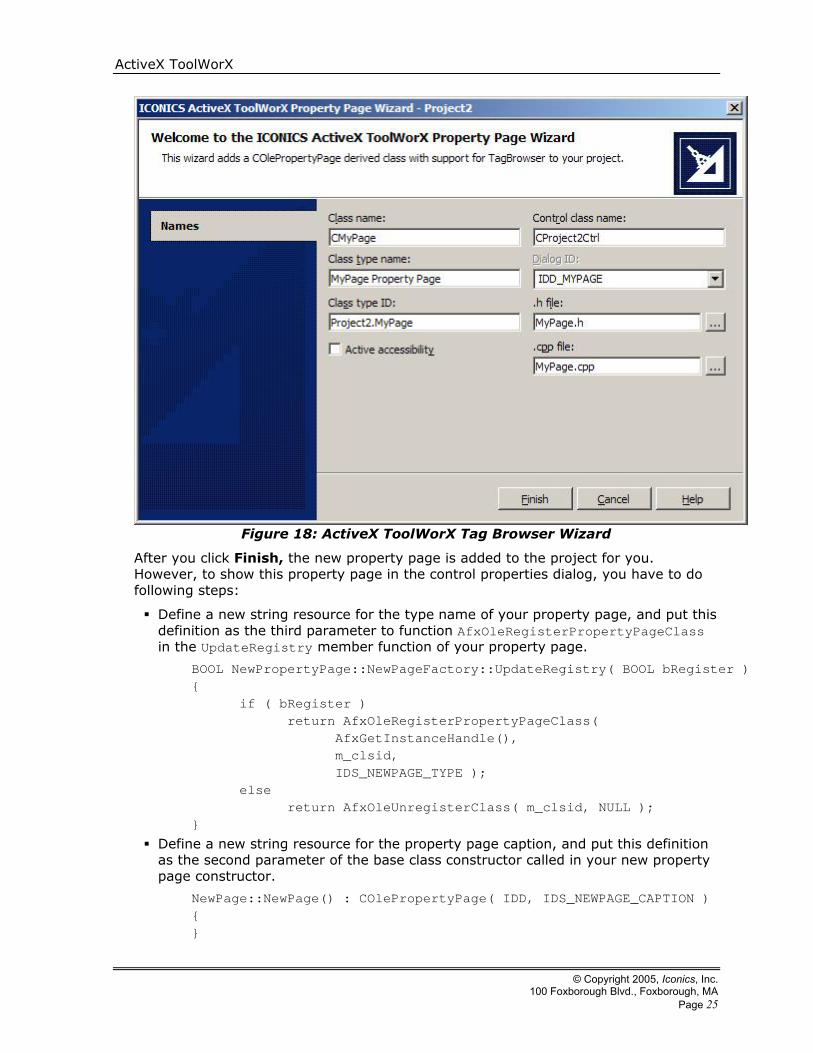
Figure 17: ActiveX ToolWorX Tag Browser Wizard
This wizard has only one page similar to the MFC Class wizard.
© Copyright 2005, Iconics, Inc. 100 Foxborough Blvd., Foxborough, MA Page 24
ActiveX ToolWorX
Figure 18: ActiveX ToolWorX Tag Browser Wizard
After you click Finish, the new property page is added to the project for you. However, to show this property page in the control properties dialog, you have to do following steps:
Define a new string resource for the type name of your property page, and put this definition as the third parameter to function AfxOleRegisterPropertyPageClass in the UpdateRegistry member function of your property page.
BOOL NewPropertyPage::NewPageFactory::UpdateRegistry( BOOL bRegister ) {
if ( bRegister ) return AfxOleRegisterPropertyPageClass(
AfxGetInstanceHandle(), m_clsid, IDS_NEWPAGE_TYPE );
else return AfxOleUnregisterClass( m_clsid, NULL );
}
Define a new string resource for the property page caption, and put this definition as the second parameter of the base class constructor called in your new property page constructor.
NewPage::NewPage() : COlePropertyPage( IDD, IDS_NEWPAGE_CAPTION ) { }
© Copyright 2005, Iconics, Inc. 100 Foxborough Blvd., Foxborough, MA Page 25
ActiveX ToolWorX
In your control class implementation, increase the second parameter of macro BEGIN_PROPPAGEIDS and insert another macro PROPPAGEID for your property page class.
BEGIN_PROPPAGEIDS(MyControlCtrl, 2) // increased page count PROPPAGEID(MyControlPropPage::guid) PROPPAGEID(NewPropertyPage::guid) // macro for new page
END_PROPPAGEIDS(MyControlCtrl)
Using the ICONICS Security Server for OPC Data Security ActiveX ToolWorX optionally allows the ActiveX controls you create to connect to ICONICS’ Security Server. The ICONICS Security Server can be used to protect OPC data being monitored and downloaded by your ActiveX controls. For instance, the Security Server can be configured to allow some users to download OPC data points to an OPC server, while other users can only view the data (no download permission).
To enable the use of the ICONICS Security Server in your ActiveX control, simply initialize pass TRUE as the first parameter to the CGwxControl base class constructor.
CGWXGaugeCtrl::CGWXGaugeCtrl() : CGwxControl( TRUE )
By default, new projects created with ActiveX ToolWorX do NOT enable the security option.
Note: The ICONICS Security Server can NOT be distributed as an individual product with your ActiveX Controls. The Security Server is only distributed with the ICONICS GENESIS32 product line. Contact ICONICS for more information regarding the ICONICS Security Server.
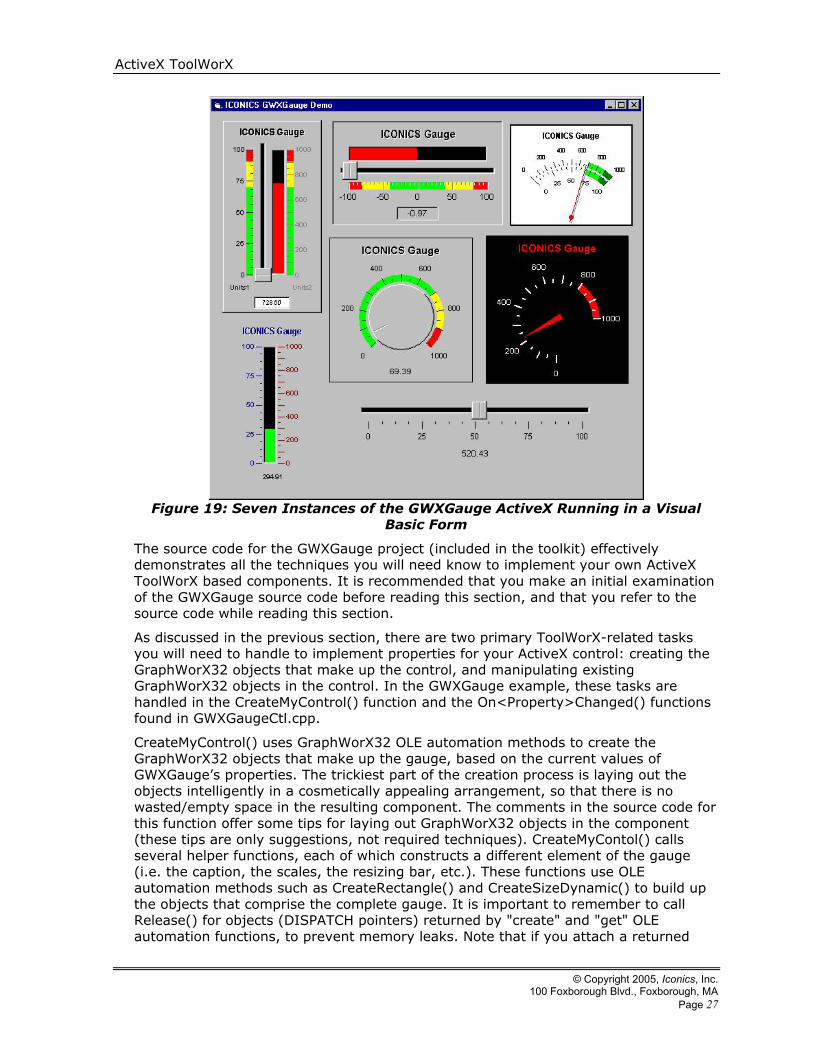
Going Further: GWXGauge Example Included in ICONICS’ ActiveX ToolWorX is a fully functional ActiveX control, GWXGauge, which was created using ActiveX ToolWorX. GWXGauge implements over 100 properties, making it a highly flexible control for monitoring and downloading analog OPC values.
© Copyright 2005, Iconics, Inc. 100 Foxborough Blvd., Foxborough, MA Page 26
ActiveX ToolWorX
Figure 19: Seven Instances of the GWXGauge ActiveX Running in a Visual
Basic Form
The source code for the GWXGauge project (included in the toolkit) effectively demonstrates all the techniques you will need know to implement your own ActiveX ToolWorX based components. It is recommended that you make an initial examination of the GWXGauge source code before reading this section, and that you refer to the source code while reading this section.
As discussed in the previous section, there are two primary ToolWorX-related tasks you will need to handle to implement properties for your ActiveX control: creating the GraphWorX32 objects that make up the control, and manipulating existing GraphWorX32 objects in the control. In the GWXGauge example, these tasks are handled in the CreateMyControl() function and the On<Property>Changed() functions found in GWXGaugeCtl.cpp.
CreateMyControl() uses GraphWorX32 OLE automation methods to create the GraphWorX32 objects that make up the gauge, based on the current values of GWXGauge’s properties. The trickiest part of the creation process is laying out the objects intelligently in a cosmetically appealing arrangement, so that there is no wasted/empty space in the resulting component. The comments in the source code for this function offer some tips for laying out GraphWorX32 objects in the component (these tips are only suggestions, not required techniques). CreateMyContol() calls several helper functions, each of which constructs a different element of the gauge (i.e. the caption, the scales, the resizing bar, etc.). These functions use OLE automation methods such as CreateRectangle() and CreateSizeDynamic() to build up the objects that comprise the complete gauge. It is important to remember to call Release() for objects (DISPATCH pointers) returned by "create" and "get" OLE automation functions, to prevent memory leaks. Note that if you attach a returned
© Copyright 2005, Iconics, Inc. 100 Foxborough Blvd., Foxborough, MA Page 27
ActiveX ToolWorX
LPDISPATCH to a dispatch driver class, the dispatch driver will automatically release the LPDISPATCH when the driver is destroyed.
Once the GraphWorX32 objects that make up the component have been constructed, properties of these objects can be changed in the On<Property>Changed member functions of your control class. This is achieved by getting a dispatch pointer for the object, given the “name” of the object (the object name is specified when the GraphWorX32 object is first created). The dispatch pointer of the object can then be used to modify the properties of that object (for example, see the function OnDataSourceChanged()). When some properties change, the whole control is reconstructed (to re-layout the objects), by calling the CreateMyControl() function. An example of this would be the function OnShowBackFaceChanged(). In theory, there could be only one OnPropertyChanged() function for all properties, which would call CreateMyControl(). This would reduce the amount of code, but would be less efficient during execution. As stated above, some of the On<Property>Changed functions call CreateMyControl() because they require objects to be recreated. However, for many of the GWXGauge properties, the properties of the existing object are simply changed. Notice that some of the gauge’s properties have been combined into single On<Property>Changed functions to reduce code (for example OnBackFaceChanged()). In such cases, the execution efficiency penalty is negligible.
The GWXGauge example implements an optimization in the DoDataExchange() member of the property page classes (although this optimization is not necessary it can be helpful in improving the efficiency of data exchange for ToolWorX based ActiveX controls). In DoDataExchange(), the function DDP_PostProcessing() calls the On<Property>Changed functions for all the properties of a given page. Since many of the GWXGauge properties cause a recreation of the control's objects, this could become quite inefficient if several recreations were to occur.
GWXGauge uses the function SetPreventCreate(), to suppress the recreations during DDP_PostProcessing() and forces a single recreation after DDP_PostProcessing(). Other than this optimization, the property page source code for GWXGauge is essentially just standard programming techniques for MFC ActiveX controls.
The GWXGauge example implements five events for the gauge’s slider, dial, and data entry field. The events are fired from overridden virtual functions that are called by GwxExtDll when user interface events occur. The overridden functions used by GWXGauge are:
virtual void OnSliderEndDragEvent(LPDISPATCH slider); virtual void OnSliderDragEvent(LPDISPATCH slider); virtual void OnDialEndDragEvent(LPDISPATCH dial); virtual void OnDialDragEvent(LPDISPATCH dial); virtual void OnDataEntryValueEnteredEvent(LPDISPATCH dataEntry);
The GWXGauge example implements two methods for getting and setting the primary data value of the control. Implementation of these methods is similar to the techniques used for handling property changes.
Alternate Techniques: GWXGauge Example In the GWXGauge ActiveX, the GraphWorX32 objects that comprise the control are all created programmatically. You can however compile GWXGauge to use the visual object creation technique described earlier in this document.
© Copyright 2005, Iconics, Inc. 100 Foxborough Blvd., Foxborough, MA Page 28
ActiveX ToolWorX
To build the GWXGauge project so that it loads a pre-configured set of GraphWorX32 objects from the resource area of the GWXGauge control, include the _LOAD_DISPLAY_EXAMPLE preprocessor definition in Project > Settings > C++. Also, import the file “gauge1.gdf” as a custom resource (type “GWX32_DISPLAY”) named “GWX32_GAUGE1”.
When you compile the GWXGauge example as just described, the “display” (a circular gauge) is quite simple, and only implements a few properties, but it effectively demonstrates the technique.
Software Licensing: GWXGauge Example By default, the GWXGauge example utilizes a software licensing scheme that engages a two hour demo mode when no valid user license is present. You can disable the software licensing support in the GWXGauge project by including the _NO_ICONICS_LICENSE preprocessor definition in Project > Settings > C++.
Distributing Your ActiveX Controls When distributing ActiveX controls created with ActiveX ToolWorX in Visual Studio v6, you must include the following files:
GwxExtDll.DLL
OLExpress.DLL
GenClient.DLL
IcoExpressionEngine.DLL
RFreeImage.DLL
TraceWorX.DLL
These six files must be present for your ActiveX controls to function properly. You may also optionally include the TagBrowser2.DLL when distributing your ActiveX controls.
When distributing ActiveX controls created with ActiveX ToolWorX in Visual Studio .NET, you must include the following files:
GwxExtDllNET.DLL
OLExpress.DLL
GenClient.DLL
IcoExpressionEngine.DLL
RFreeImage.DLL
TraceWorX.DLL
These six files must be present for your ActiveX controls to function properly. You may also optionally include the TagBrowser2.DLL when distributing your ActiveX controls.
These six files are the only files from the toolkit you are allowed to redistribute with your ActiveX controls. These files should be installed to one of the following directories:
The same directory where your ActiveX control (OCX file) resides.
© Copyright 2005, Iconics, Inc. 100 Foxborough Blvd., Foxborough, MA Page 29

ActiveX ToolWorX
The Windows system directory (in Windows 95/98 the directory name is SYSTEM; in Windows NT/XP or later the directory name is SYSTEM32).
The Windows directory.
One of the directories that are listed in the PATH environment variable.
You can find all redistributable files in Libraries\Redistributable folder.
During installation of your ActiveX control(s), your OCX file(s) , TraceWorX.DLL and TagBrowser2.DLL need to be registered using REGSVR32.EXE (version 4.00.1381 or greater).
© Copyright 2005, Iconics, Inc. 100 Foxborough Blvd., Foxborough, MA Page 30