Embed Size (px)
Citation preview
Acknowledgements
Copyright 2011 Eric Davis, All rights reserved. ii
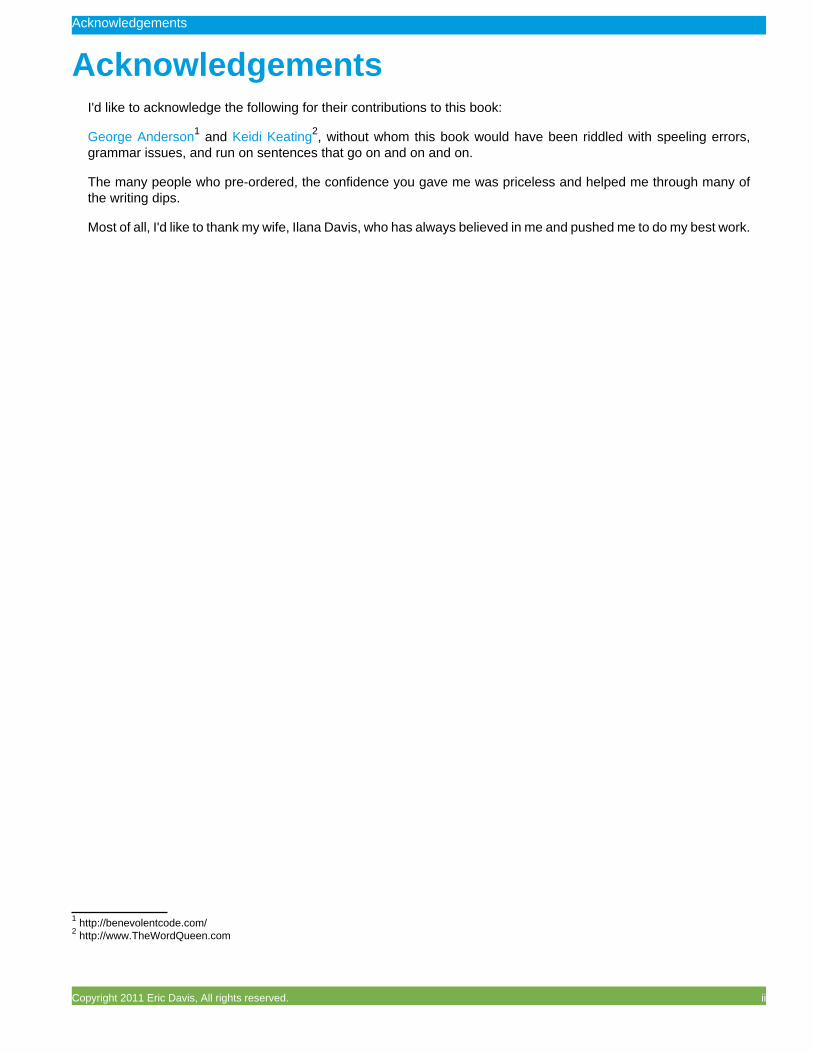
AcknowledgementsI'd like to acknowledge the following for their contributions to this book:
George Anderson1 and Keidi Keating2, without whom this book would have been riddled with speeling errors,grammar issues, and run on sentences that go on and on and on.
The many people who pre-ordered, the confidence you gave me was priceless and helped me through many ofthe writing dips.
Most of all, I'd like to thank my wife, Ilana Davis, who has always believed in me and pushed me to do my best work.
1 http://benevolentcode.com/2 http://www.TheWordQueen.com

Redmine Tips
Copyright 2011 Eric Davis, All rights reserved. iii
Table of Contents1. Introduction ............................................................................................................................................... 1I. Managing Projects ...................................................................................................................................... 3
2. Copy Projects to Save Time .............................................................................................................. 43. Don't Forget to Add Administrators to a Project ................................................................................... 54. Archive Old Projects .......................................................................................................................... 65. Version Start and End Dates .............................................................................................................. 76. Use Custom Fields for Project Start and End Dates ............................................................................ 87. Search Shortcut ............................................................................................................................... 108. Create a Personal Dashboard with "My Page" Blocks ........................................................................ 119. Keep Track of Contact Information with Custom Fields ...................................................................... 12
II. Managing Issues ...................................................................................................................................... 1410. Do Your Issue Statuses Help or Hurt Your Workflow? ...................................................................... 1511. Use the Default Issue Status as the First Step in Your Workflow ....................................................... 1612. Save a Minute on Each New Issue by Using a Default Tracker ......................................................... 1713. Is Everything Really a "High" Priority or Are Your Priorities Just Confused? ....................................... 1814. Use Issue Status for the % Done ................................................................................................... 1915. Make It Simple to Report an Issue .................................................................................................. 2016. Track Extra Data with Issue Custom Fields ..................................................................................... 2117. Automatically Set Issue Due Dates ................................................................................................. 2218. Edit Multiple Issues Using the Right-click Context Menu ................................................................... 2319. Add a Subtask for an Existing Issue ............................................................................................... 2420. Change an Existing Issue to a Subtask ........................................................................................... 2621. Subtask Limitations ........................................................................................................................ 2722. Use the Reminder Script to Keep Track of When Issues Are Due ..................................................... 2823. Use Avatars To Quickly Recognize People ...................................................................................... 29
III. Text Formatting ...................................................................................................................................... 3024. Link to an Issue ............................................................................................................................. 3125. Link to a Version ........................................................................................................................... 3226. Link to a Wiki in Another Project .................................................................................................... 3327. Link to the Project Overview ........................................................................................................... 34
IV. Wikis ...................................................................................................................................................... 3528. Creating Child Wiki Pages .............................................................................................................. 3629. Renaming Wiki Pages .................................................................................................................... 3830. Add Dynamic Content Using Macros ............................................................................................... 3931. Make Wiki Macros Even More Dynamic with Options ....................................................................... 40
V. Tracking Time ......................................................................................................................................... 4132. Log Time to a Project .................................................................................................................... 4233. Set a Default Activity for Time Tracking .......................................................................................... 4434. Put Common Activities at the Top of the List ................................................................................... 4535. Override Time Activities Per Project ................................................................................................ 46
VI. Files ....................................................................................................................................................... 4736. Use the Files Module for Final Releases ......................................................................................... 4837. Redmine's Neglected Module: Documents ....................................................................................... 4938. Attachments - Where all files end up .............................................................................................. 50
VII. Notifications ........................................................................................................................................... 5139. What Each Notification Option Really Means ................................................................................... 5240. Choosing the Best Notification Events ............................................................................................. 5441. Edit User Email Notifications .......................................................................................................... 5542. Default Email Notifications for New Users ....................................................................................... 5643. Speed Up Your Communication by Replying via Email ..................................................................... 57
VIII. System Administration ........................................................................................................................... 5844. Edit the Default Administrator to Prevent Unauthorized Access ......................................................... 5945. Backing Up Redmine's Database .................................................................................................... 60

Redmine Tips
Copyright 2011 Eric Davis, All rights reserved. iv
46. Backing Up Redmine's File Uploads ............................................................................................... 6247. Update Servers Easily with Capistrano ............................................................................................ 6348. Block Access to Sensitive Source Code Data .................................................................................. 6449. Lock Down Permissions on the Redmine Configuration Files ............................................................ 6550. Make Your Redmine Shine with a New Theme ................................................................................ 6651. Customize Labels and Text ............................................................................................................ 67
52. Conclusion ............................................................................................................................................. 68Tips by Role ................................................................................................................................................ 69Tips by Time Required ................................................................................................................................. 70Index ........................................................................................................................................................... 71

Introduction
Copyright 2011 Eric Davis, All rights reserved. 1
Chapter 1. Introduction
It's Just a Tool
Everyone wants to get more done each day. Whether it's so they can move on to the next todo item or so theycan stop working at the end of the day and arrive home on time, staying productive is important. One of the bestinventions ever created are tools. With tools we can leverage our efforts and get more done with less work.
That's probably one reason why you've chosen to use Redmine. You've found that it's the best project managementtool for you and your team. Sure you could manage your projects using email, paper, or just a telephone but they'reall inefficient tools when it comes to managing a project. Redmine is a tool, like every other piece of software.You've probably figured out one way to use it based on it's documentation and your own experimentation. But thatisn't the only way to use Redmine.
Many Experiences and Perspectives
I've been running Redmine since 2007 and I've consulted with a wide variety of businesses which use Redmine:from single person startups, to Fortune 500 companies; from open source projects, all the way up to nationalgovernments. Every single one of them had their own unique twist to using Redmine. Some of them got stuck ininefficient processes. Others perfected a workflow that proved to be a unique fit for them. One thing was constantwith all Redmine users though, each and every one of them continued to tweak and optimize how they usedRedmine.
The flexibility of Redmine is what makes it so powerful. You can configure it any way you want, support any projectprocess and workflow, and it will still work. However, this flexibility is also one of its greatest weaknesses. Whileyou can customize and tweak every part of Redmine, have you thought about whether you should?
How To Use This Book
I want you to think of this book as a collection of building blocks for your Redmine. Use the ones that fit yourbusiness and discard the ones that don't fit. But consider them all. Even the simplest tip can have far reachingeffects that might not be apparent at first.
Take Action
Whatever tips you pick, take action now. Change the settings, create a new option, or schedule a meeting to starta change. By taking action now, you'll be able to accomplish something. With tips like these, you don't even needa lot of action to produce significant results.
I'm a big believer in doing the simplest thing possible until you have enough information to make an informeddecision. The easiest way (not to mention the fastest way) to get value from this book is to:
1. Pick one section you feel your team is weak in
2. Read the chapter titles for that section
3. Pick one and only one tip to do today
4. Read the chapter and put that one change in place
5. Repeat again tomorrow
If you keep this up for a week, you'll start to see some rapid improvements in how you work.
Introduction
Copyright 2011 Eric Davis, All rights reserved. 2
Rough Calculations
To help get you started, here's a common scenario that I see time and time again:
Imagine you're a member of a team of 20 people who use Redmine and you decide to take five minutes to changehow your issues work. Let's say this change is so minor that it'll only save each team member five seconds through-out their entire day (about the time it takes to sneeze). Over the course of a year each person on your team wouldsave 21 minutes and 40 seconds. That's a total of over seven hours for your entire team. Is five minutes of yourtime worth saving the entire team seven hours of work each year?
5 seconds x 52 weeks x 5 day work weeks = 1,300 seconds = 21 minutes 40 seconds per person per year
21 minutes 40 seconds per person x 20 people = 7 hours, 13 minutes, and 13 seconds saved
Now imagine if you did something bigger, like removed a bunch of extra manual steps which everyone has to doevery day. Or if you did something that affects a larger team. Even if you take an entire day to do this, the timesavings could be huge over the long term.
But only if you take action. Don't let this information sit without doing anything about it. It's no use to anyone ifit's not put to use.
Comments, Suggestions, Criticisms, Praise, Cookies
My favorite reason for self-publishing is how easily and quickly I'm able to adapt based on feedback from readers.It's easier for me to think of you as a contributor to this book; someone with a voice I want to hear. In fact, all ofthe tips in this book resulted from a discussion I had with someone using Redmine or in response to a questionsomeone had.
If you enjoy this book (and even if you don't), would you post a short note on the feedback page1. I read everyone and I'm happy to reply.
1 http://www.redminetips.com/feedback/

Managing Projects
Copyright 2011 Eric Davis, All rights reserved. 3
Part I. Managing ProjectsProjects are the primary focus of Redmine, hence why it's called a project management system.
Everything in Redmine is done on or for projects. Over 90% of the data is linked to a project somewhere.
Given everything is tied to project, by optimizing how you work with a project you can make significant changes to howefficiently and effectively you work. Projects are typically worked on by a team and when you improve how you useprojects, the improvements have the potential to affect everyone else. Spending some time upfront might save the timeof every other members of your team. Even if the savings are minimal, say two to three minutes each day, they canreally add up in the long run.
Copy Projects to Save Time
Copyright 2011 Eric Davis, All rights reserved. 4
Chapter 2. Copy Projects to Save TimeDo you have routine projects that you do over and over again? You know, the ones where you end up doing thesame work 90% of the time with very few changes?
If so, you'll want to try out the Copy Project feature. As you might expect, it copies a project and its associateddata to a brand new project. I use this to create project templates, which save me hours of repetitive set up.
1. To copy a project, first you need to login as an Administrator. In the Project administration area you'll see aCopy button next to each project. (Admin > Projects)
2. Clicking this button will show you the Copy Project form. Here you'll need to enter details about the new projectand you can also select which items to copy.

Don't Forget to Add Administrators to a Project
Copyright 2011 Eric Davis, All rights reserved. 5
Chapter 3. Don't Forget to AddAdministrators to a Project
Have you ever tried to edit an Issue and found that you couldn't change the status even though you're an admin-istrator?
This is probably because you weren't a member on the project. Being an administrator is a separate set of permis-sions from project members. You need to be added to the project in order to have permission to change the status.
So when you create a new project that you'll be participating in, don't forget to add yourself and any other admin-istrators as members.
Archive Old Projects
Copyright 2011 Eric Davis, All rights reserved. 6
Chapter 4. Archive Old ProjectsAs you use Redmine you'll probably add more projects to keep things organized. After awhile however, you'll endup with a lot of projects, many which are complete.
It's a good idea to archive the old projects. This will hide the project from all parts of the system but will retainthe data. Archiving a project helps to reduce the clutter but still enables you access the project data if you needit in the future.
To archive a project, go to Administration > Projects and click the Archive button next to the project name.Unarchiving a project is the same process, just use the Unarchive button instead.

Version Start and End Dates
Copyright 2011 Eric Davis, All rights reserved. 7
Chapter 5. Version Start and End DatesVersions are used in Redmine as containers for tasks. The typical example is a software version that includesa list of things that need to be done. I've seen versions used for other things too though: marketing campaigns,product releases, and phases of building construction.
Each version has the option of having a due date set for it. This doesn't do much in Redmine by default but it'll showthe due date in various places (Roadmap, Calendar, Gantt). I recommend setting a due date because it helps tocommunicate the time frame with everyone else using the system.
To set the due date on a version, make sure you are logged in as a project manager first then go to the project'sSettings > Versions and click edit for the version.
Tip
ChiliProject 2.0.01 adds another feature for Versions: a start date. This was added to make it easierto plan versions in advance. Without a start date, the system "pretends" that the version start dateis the earliest creation date of its issues. This causes problems when you have older issues that getmoved into a future version.
1ChiliProject is a fork of Redmine that was started by several Redmine community members in 2010, including myself. It is largely compatible withRedmine. You can find out more information at https://www.chiliproject.org

Use Custom Fields for Project Start and End Dates
Copyright 2011 Eric Davis, All rights reserved. 8
Chapter 6. Use Custom Fields for ProjectStart and End Dates
Redmine does a lot with projects but one part that's missing is: tracking when a project starts and ends. Luckilythere's a way to work around this by using custom fields.
By tracking a project start and end date directly in Redmine, you can always remember exactly when a project wasstarted and when it ended (or when it was released). Tracking end dates is really useful for me, since many of myprojects take several months before they're complete and often no one can remember exactly when we started.
To set up project start and end dates follow these three steps:
1. As an administrator, create the Start date and End date custom fields in Admin > Custom Fields >Projects. Using the Date custom field format will let you use the date picker to make sure the date is valid.
2. This will add the fields to each project. Now you need to enter the dates for a project, so browse to the project'ssettings.
3. Once saved, the dates will appear on the Project Overview. This page is shared with everyone working on theproject so now it's easy to discover exactly when a project started and ended.
You're not limited to just start and end dates though. I've used date custom fields to track other things on myprojects too, including:
• Beta release date

Use Custom Fields for Project Start and End Dates
Copyright 2011 Eric Davis, All rights reserved. 9
• QA release date• Launch date• Maintenance date
Search Shortcut
Copyright 2011 Eric Davis, All rights reserved. 10
Chapter 7. Search ShortcutAs your Redmine grows you'll find yourself spending more time searching for information. The search field is onevery page but this shortcut will save you a few seconds each time you use it.
The search field in Redmine has what is called an access key. Access keys are triggered using keyboard shortcutsin your browser. To activate the search access key, use the F key which will put your cursor directly into the searchfield, ready and waiting for your search query.
• Google chrome - Hold down Alt and Shift, then press f• Firefox - Hold down Alt and Shift, then press f• Internet Explorer - Hold down Alt, then press f• Safari 4 - Hold down Control and Option, then press f
If your browser isn't listed here, Wikipedia1 has a list of access keys for each browser.
Caution
Be careful when searching for numbers. Redmine's search is configured to take you directly to anissue if your search term is only a number. For example, searching for 100 will take you to issue 100directly. Put quotes around the number if you want to override this: "100".
1 http://en.wikipedia.org/wiki/Access_key
Create a Personal Dashboard with "My Page" Blocks
Copyright 2011 Eric Davis, All rights reserved. 11
Chapter 8. Create a Personal Dashboardwith "My Page" Blocks
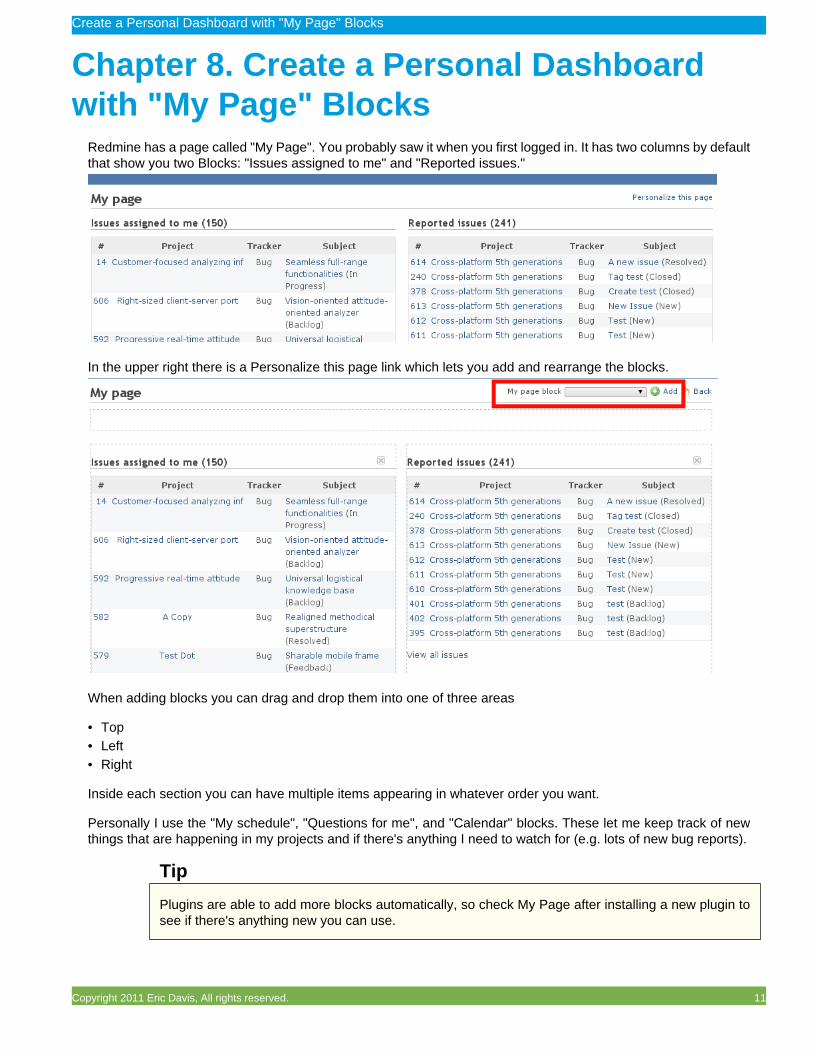
Redmine has a page called "My Page". You probably saw it when you first logged in. It has two columns by defaultthat show you two Blocks: "Issues assigned to me" and "Reported issues."
In the upper right there is a Personalize this page link which lets you add and rearrange the blocks.
When adding blocks you can drag and drop them into one of three areas
• Top• Left• Right
Inside each section you can have multiple items appearing in whatever order you want.
Personally I use the "My schedule", "Questions for me", and "Calendar" blocks. These let me keep track of newthings that are happening in my projects and if there's anything I need to watch for (e.g. lots of new bug reports).
Tip
Plugins are able to add more blocks automatically, so check My Page after installing a new plugin tosee if there's anything new you can use.
Keep Track of Contact Information with Custom Fields
Copyright 2011 Eric Davis, All rights reserved. 12
Chapter 9. Keep Track of ContactInformation with Custom Fields
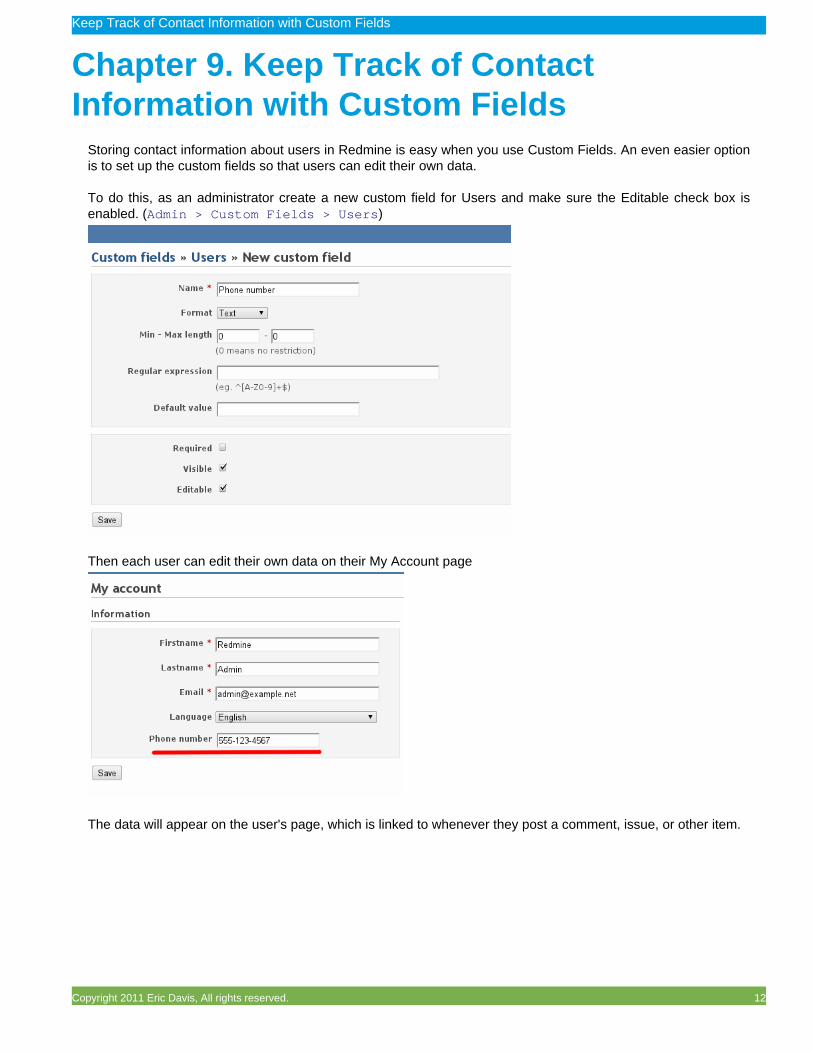
Storing contact information about users in Redmine is easy when you use Custom Fields. An even easier optionis to set up the custom fields so that users can edit their own data.
To do this, as an administrator create a new custom field for Users and make sure the Editable check box isenabled. (Admin > Custom Fields > Users)
Then each user can edit their own data on their My Account page
The data will appear on the user's page, which is linked to whenever they post a comment, issue, or other item.

Keep Track of Contact Information with Custom Fields
Copyright 2011 Eric Davis, All rights reserved. 13
Some other ideas of the contact information you can track are:
• Phone numbers• Office location• Chat user names• Account names, e.g. Twitter, Github• Short biography• Birthday• Hire date
Managing Issues
Copyright 2011 Eric Davis, All rights reserved. 14
Part II. Managing IssuesIf projects are the most important part of Redmine, then issues are the second most important. Projects are where youdescribe what to do, bring everyone together, and organize everything. Issues, on the other hand, involve actually sittingdown to do the day-to-day work.
You've probably already noticed that issues have a lot of data and workflow built around them. Redmine comes config-ured with a decent workflow but you can see some stellar productivity improvements by customizing how issues work.Several of the following tips will do just that: help you customize and optimize how you work with issues. They're littlethings that'll save you a few seconds here, or maybe minutes there. But these are the things that quickly add up asyou do them dozens of times each day.
Do Your Issue Statuses Help or Hurt Your Workflow?
Copyright 2011 Eric Davis, All rights reserved. 15
Chapter 10. Do Your Issue Statuses Helpor Hurt Your Workflow?
Issue Statuses are used in Redmine to create a workflow for issues. In an optimized setup, the issues will movethrough the different statuses as they're worked on. The Issue Statuses I use for Little Stream Software have beenoptimized to be as simple as possible for single-person business but they also communicate at a glance how theissue is doing.
• Proposed - Someone has an idea for some work but isn't sure about it yet.• New/Approved - Both my client and I like the idea and agree on the budgets.• In Progress - I'm actively working on the issue.• Resolved - I've finished the issue and I'm waiting for client to sign off on it. (i.e. ready to be tested).• Closed - My client agrees the work is complete.
I also use two issue statuses for when exceptions occur:
• Declined - one of us decides the issue isn't needed but we want to document the conversation (instead of deletingthe issue).
• Feedback - someone has a question about the issue that prevents us from working on it.
This same workflow works for my Open Source plugins but in those cases I act as both the client and the projectmanager.
Use the Default Issue Status as the First Step in Your Workflow
Copyright 2011 Eric Davis, All rights reserved. 16
Chapter 11. Use the Default Issue Statusas the First Step in Your Workflow
When a new issue is created in Redmine, it's given the default status. If you follow a specific workflow, it's a goodidea to make the default status the first step. Based on my workflow described in the last chapter, I'd want to setProposed as the default status. That way every new issue starts as Proposed which helps prevent working onan issue before it's approved by the client.
To set the default status, go to Administration > Issue Statuses and edit the status you want to set asthe default. There you'll see a check box for Default Value.

Save a Minute on Each New Issue by Using a Default Tracker
Copyright 2011 Eric Davis, All rights reserved. 17
Chapter 12. Save a Minute on Each NewIssue by Using a Default Tracker
The issue tracking module uses the tracker type to determine what type of issue this is (e.g. Bug, Feature, DesignRequest). It's important to pick the right tracker for an issue because the tracker determines the issue's workflowand custom data.
A simple improvement is to make your most common tracker become the default tracker. That way each new issuewill default to that tracker.
It's not very apparent in the administration user interface but the tracker on the top of the list will be used as thedefault. Just use the green arrows to move your most common tracker to the top.
In this example, Bug will be the default tracker.
Is Everything Really a "High" Priority or Are Your Priorities Just Confused?
Copyright 2011 Eric Davis, All rights reserved. 18
Chapter 13. Is Everything Really a "High"Priority or Are Your Priorities JustConfused?
Priority is the favorite field of people in a rush. While it'd be nice if everything was completed immediately, in realityyou'll need to prioritize the order of your work. Redmine's issues have a priority field but is it really helping you oris everything ending up as a "High" priority?
With priority I think fewer options are better. A simple "Low", "Normal", and "High" should accommodate mostteams. If you see a lot of people mislabeling issues with a "High" priority, consider removing it completely.
If you need more granularity consider a 10-50 scale where 10 is a high priority and 50 is low. In this case it's bestto label the high and low numbers so it's clear to the reporter: "10 - High" and "50 - Low". I like the 10-50 scalemore than a 1-5 scale because you can add more granularity later without having to edit all of the past issues(e.g. 5, 10, 15, 20).
Another good idea for priorities is to have one or two for special cases. Drawing from the software field there aretypically issues that can cause permanent data loss ("Data Loss" priority) or non-critical ideas you want to work onsomeday ("Wishlist"). Keeping these special cases as priorities makes it easy to filter the issues list for them.
Remember, at the end of the day it doesn't matter what priority issues are. What matters is that you complete theimportant ones, not just the urgent ones.

Use Issue Status for the % Done
Copyright 2011 Eric Davis, All rights reserved. 19
Chapter 14. Use Issue Status for the %Done
If your organization doesn't use the % done field in Redmine, there is a way to have it work automatically basedon the status of an issue. For example a "New" issue could be 0%, an "In Progress" issue could be 40%, and a"Resolved" issue could be 100%.
To set this up you need to do two things:
1. Login to Redmine's Administration panel and go to Settings > Issue Tracking. Set "Calculate the issuedone ratio" to Use the issue status
2. Next you need to edit each Issue Status to set the % Done rate. (Administration > Issue statuses)
Now Redmine will change the % done field automatically as an issue's status changes.
You can also click the "Update issue done ratios" button to force Redmine to update all of the existing issues. Thiswill update each issue's % done in the database so queries will use the new value.
Make It Simple to Report an Issue
Copyright 2011 Eric Davis, All rights reserved. 20
Chapter 15. Make It Simple to Report anIssue
The lifeblood of Redmine is its issues module. The issues are the most heavily used module, and they have tonsof features and options which you can enable.
Before you turn everything on though, take a minute to think about one of the common use cases: a first timeuser reporting a new issue.
Typically this person will report a problem like a software bug or a task for someone to do. They'll be inexperiencedwith Redmine and not understand how to use each field. They might take an educated guess at what option touse, but they'll probably get some of them wrong. So how do you make it easier for them to report an issue?
Reduce or simplify the number of required fields.
Tracker
Since the tracker is used to determine the type of issue, the custom fields, and the workflow; it's important to makethe names of your trackers clear and descriptive. It's even better if you can make the default tracker to be the mostcommon option (See Chapter 12).
Status
Every issue needs a status. Since Redmine uses a drop down field for this, the person shouldn't have to enteranything in here. To help them, set up a descriptive default status so they don't even have to think about whichone to use. "New", "Proposed", or "Open" are all good options.
Priority
I explained some of the complications with the priority field in Chapter 13. Basically, try to make it as simple aspossible for the first time user and be ready to change the priority later. "Low", "Normal", and "High" are probablyall they'll need at first.
Custom Fields
If you use custom fields, make sure that they aren't required. While it'd be nice to get the extra information upfront,if you ask for too much the person might choose to abandon reporting the issue. This means there could be a bugno one knows about, or the person may just email you directly.
Once you've setup the best defaults and options for these fields you might want to create a document or two thatgoes into more detail about each of the options. This is where you can get descriptive about each one and guideyour users to report better issues. The best way to turn a first time user into a repeat user is to make their firstexperience a friendly one.
Track Extra Data with Issue Custom Fields
Copyright 2011 Eric Davis, All rights reserved. 21
Chapter 16. Track Extra Data with IssueCustom Fields
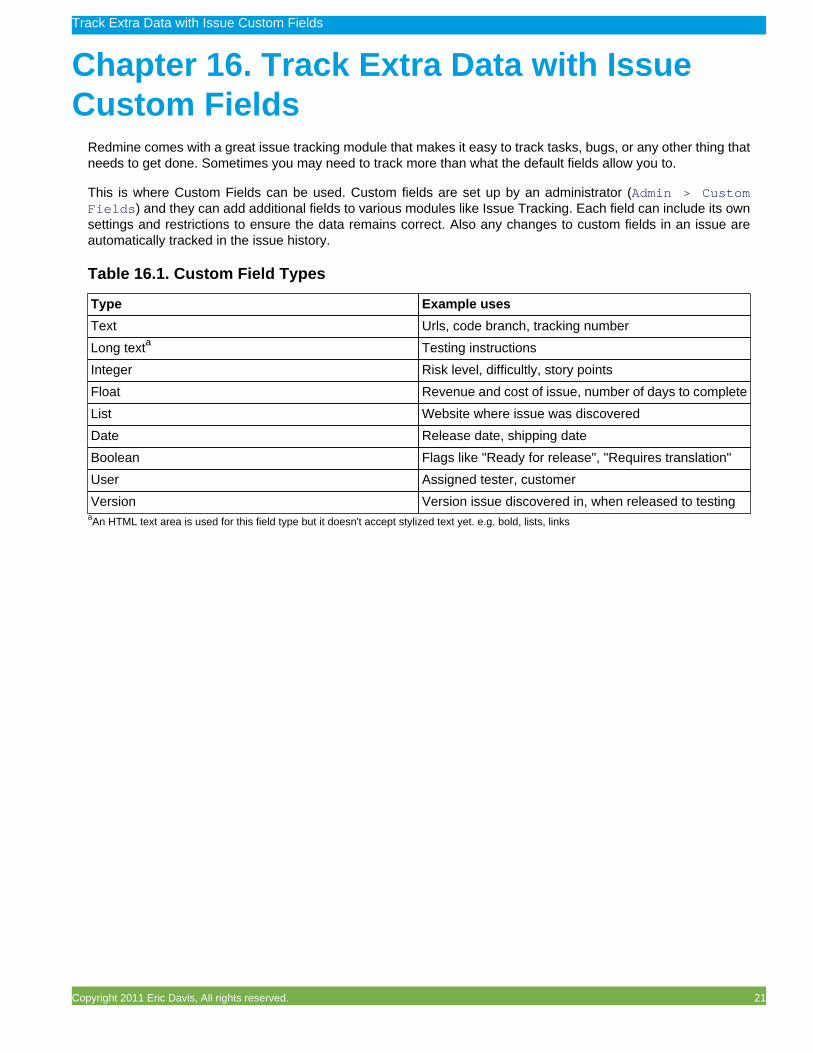
Redmine comes with a great issue tracking module that makes it easy to track tasks, bugs, or any other thing thatneeds to get done. Sometimes you may need to track more than what the default fields allow you to.
This is where Custom Fields can be used. Custom fields are set up by an administrator (Admin > CustomFields) and they can add additional fields to various modules like Issue Tracking. Each field can include its ownsettings and restrictions to ensure the data remains correct. Also any changes to custom fields in an issue areautomatically tracked in the issue history.
Table 16.1. Custom Field Types
Type Example uses
Text Urls, code branch, tracking number
Long texta Testing instructions
Integer Risk level, difficultly, story points
Float Revenue and cost of issue, number of days to complete
List Website where issue was discovered
Date Release date, shipping date
Boolean Flags like "Ready for release", "Requires translation"
User Assigned tester, customer
Version Version issue discovered in, when released to testingaAn HTML text area is used for this field type but it doesn't accept stylized text yet. e.g. bold, lists, links

Automatically Set Issue Due Dates
Copyright 2011 Eric Davis, All rights reserved. 22
Chapter 17. Automatically Set Issue DueDates
For many of my projects we track releases by using a version with a due date. This works well because we caneasily add and remove issues from the version depending on how work is progressing. One missing feature wasthat even with a version assigned to it, the issue's due date wasn't getting set so it became difficult to plan asequence of tasks.
To solve this problem I created the redmine_issue_due_date1 plugin. This plugin will automatically set anissue's due date based on the version's due date. It's also smart enough to know if an issue has a custom duedate different than the version. redmine_issue_due_date2 is Open Source and free to download.
1 https://github.com/edavis10/redmine_issue_due_date2 https://github.com/edavis10/redmine_issue_due_date

Edit Multiple Issues Using the Right-click Context Menu
Copyright 2011 Eric Davis, All rights reserved. 23
Chapter 18. Edit Multiple Issues Using theRight-click Context Menu
While working with Redmine you'll probably have to edit multiple issues at once in order to set a field to the samevalue, such as assigning everything to a certain person or a new priority. This can be done by updating each issueone by one. However, that will take a long time and wouldn't be much fun.
Instead, you can use the right click context menu to bulk edit a bunch of issues. To use this hidden menu:
1. Go to the issues list for your project2. Click the check boxes on the left of the table next to the issues you want3. Once all of the issues are selected, right click an empty space that's highlighted (Control-click in OSX)4. Redmine will then show the right click menu5. Clicking an option like Priority > High will update all of the issue automatically. Or you can select the "Edit"
option for a form where you can bulk edit multiple fields at once.
The right click menu also has a few other features. Try selecting only one issue or using the CTRL or spacebarkeys when clicking in the table.
Add a Subtask for an Existing Issue
Copyright 2011 Eric Davis, All rights reserved. 24
Chapter 19. Add a Subtask for an ExistingIssue
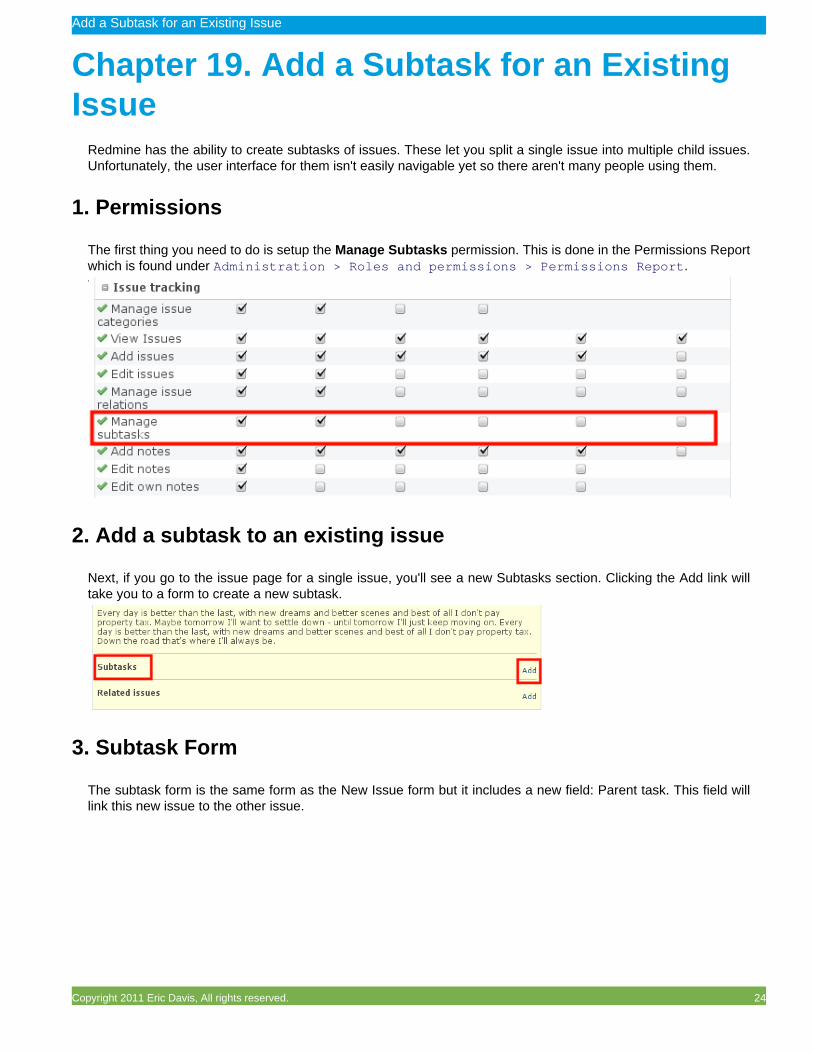
Redmine has the ability to create subtasks of issues. These let you split a single issue into multiple child issues.Unfortunately, the user interface for them isn't easily navigable yet so there aren't many people using them.
1. Permissions
The first thing you need to do is setup the Manage Subtasks permission. This is done in the Permissions Reportwhich is found under Administration > Roles and permissions > Permissions Report.
2. Add a subtask to an existing issue
Next, if you go to the issue page for a single issue, you'll see a new Subtasks section. Clicking the Add link willtake you to a form to create a new subtask.
3. Subtask Form
The subtask form is the same form as the New Issue form but it includes a new field: Parent task. This field willlink this new issue to the other issue.

Add a Subtask for an Existing Issue
Copyright 2011 Eric Davis, All rights reserved. 25
For example, in the image above the new issue will become a child of Issue #194.

Change an Existing Issue to a Subtask
Copyright 2011 Eric Davis, All rights reserved. 26
Chapter 20. Change an Existing Issue to aSubtask
When editing an existing issue it's easy to update it to become a subtask of another issue. Before you do this, youneed to setup the Manage Subtasks permission in the Permissions Report (Admin > Roles and Permissions> Permissions Report).
Once the Manage subtasks permission has been setup, go to the issue which you want to change into a subtask.Once there, click the Update link and the More link. You should now see the Parent Task field where you canenter the ID of the parent task.

Subtask Limitations
Copyright 2011 Eric Davis, All rights reserved. 27
Chapter 21. Subtask LimitationsRedmine's subtasks have a few limitations that you need to be aware of before you begin to use them. For example,if you have a parent issue and some subtasks:
• The parent's priority is set to the highest priority of the subtasks.• The parent's % done is calculated based on the values of the subtasks.• The parent's start date becomes the earliest start date of the subtasks.• The parent's due date becomes the latest due date of the subtasks.• The parent's estimated time is totaled from all of the subtasks.
These rules apply all the way down through subtasks, so a subtask of a subtask would get the latest due date.
Warning
A few of these are under discussion so they might change in future versions.

Use the Reminder Script to Keep Track of When Issues Are Due
Copyright 2011 Eric Davis, All rights reserved. 28
Chapter 22. Use the Reminder Script toKeep Track of When Issues Are Due
Entering all of the issues and tasks into Redmine is a great way of keeping a project organized. Sometimes (ifyou're like me), once everything is entered there's way too much information and it's hard to find what to work onnext. To make this easier to manage I've been adding due dates and assigning users to the issues then using thereminder script to keep everyone up to date.
Reminder Script
Once the issues have a due date, the reminder script will email each user the issues that are assigned to themand due in the next seven days. It can be scheduled using cron so every morning you'll receive an email of what'sdue in the next few days.
To use the reminder script, just run
$ rake redmine:send_reminders
You can also configure:
• how many days to check (defaults to 7)• the tracker type (e.g. Bug, Feature)• the project(s) to check• the users who should receive the reminder
Examples
On my Redmine, I use: 7 days, all projects, all trackers, and only myself. So my command looks like:
$ rake redmine:send_reminders days=7 users='1' RAILS_ENV=production
One of my clients schedules multiple reminder scripts using cron in order to receive reminders on different dates.
1. today - runs every morning with days=12. next week - runs every Saturday with days=73. next month - runs at the end of the month with days=30
This helps his team ensure they deal with emergencies right away, while still keeping things on track for theirlonger term projects.
Full list of reminder options1
Bonus Tip
If you don't want to set the due date for every issue, Chapter 17 shows how you can use a to set them automatically.
1 http://www.redmine.org/wiki/redmine/RedmineReminderEmails

Use Avatars To Quickly Recognize People
Copyright 2011 Eric Davis, All rights reserved. 29
Chapter 23. Use Avatars To QuicklyRecognize People
When using Redmine with remote teams it can be difficult to keep track of who said what. Turning on avatars canhelp you to visually recognize people.
An avatar is the little portrait of each person next to their name in various places. Right now they use the freeGravatar.com service associated with your email address.
Once you have an account you can enable gravatars in Administration > Settings > Display with the"User Gravatar user icons" setting.
The "Default Gravatar image" option lets you pick a style of image to use when a user doesn't have a Gravataraccount. Most of the styles are automatically generated so you can still easily recognize different people. I useIdenticons on my installation.
The avatars are used in several places, but the most useful is in the Activity page. They make it easy to quicklyscan the page and see what people have been doing.

Text Formatting
Copyright 2011 Eric Davis, All rights reserved. 30
Part III. Text FormattingRedmine has a powerful text formatting engine, especially when you're using the textile format, but there are a bunchof hidden features which you might not know about.
The most useful ones are when you link to other resources. You can copy the url for a resource and paste it into theform, but in doing this you'll lose a lot of the extra data Redmine adds to the link.
Link to an Issue
Copyright 2011 Eric Davis, All rights reserved. 31
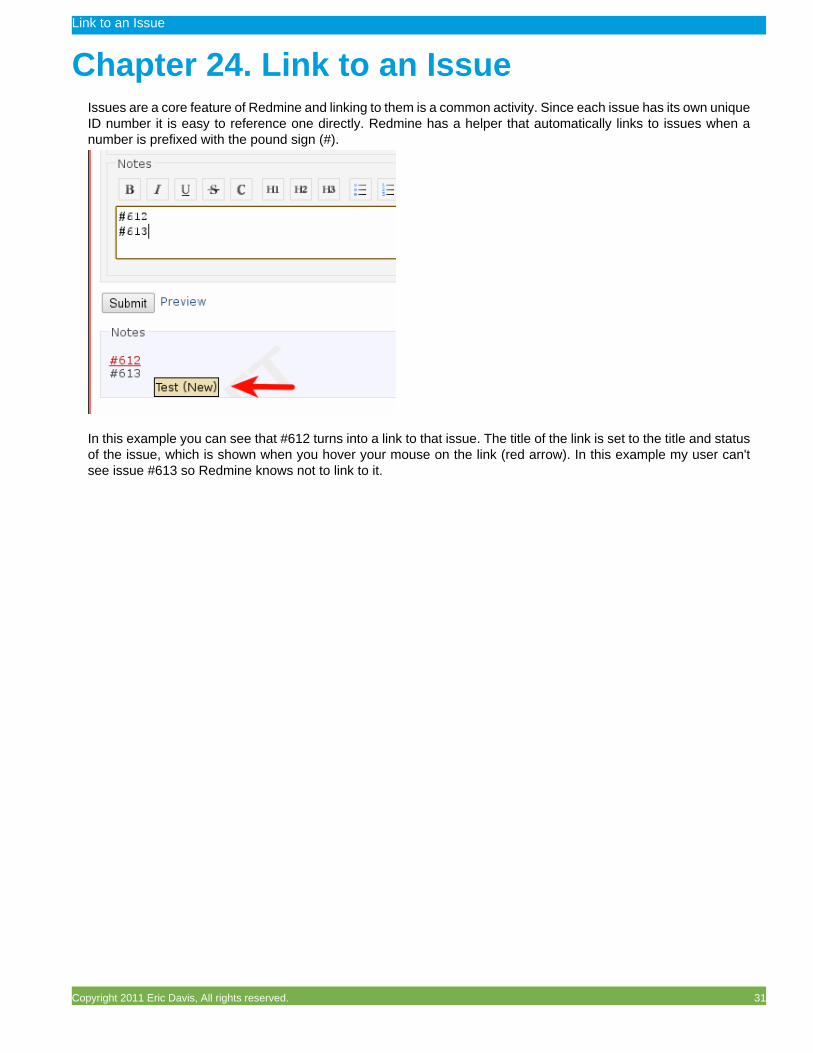
Chapter 24. Link to an IssueIssues are a core feature of Redmine and linking to them is a common activity. Since each issue has its own uniqueID number it is easy to reference one directly. Redmine has a helper that automatically links to issues when anumber is prefixed with the pound sign (#).
In this example you can see that #612 turns into a link to that issue. The title of the link is set to the title and statusof the issue, which is shown when you hover your mouse on the link (red arrow). In this example my user can'tsee issue #613 so Redmine knows not to link to it.
Link to a Version
Copyright 2011 Eric Davis, All rights reserved. 32
Chapter 25. Link to a VersionI use Versions to track project milestones. Sometimes these are actual software versions of my Redmine plugins,other times they're dates like website launches or project due dates. Whenever I discussed the different versions,I'd always end up pasting a full link to the version into Redmine.
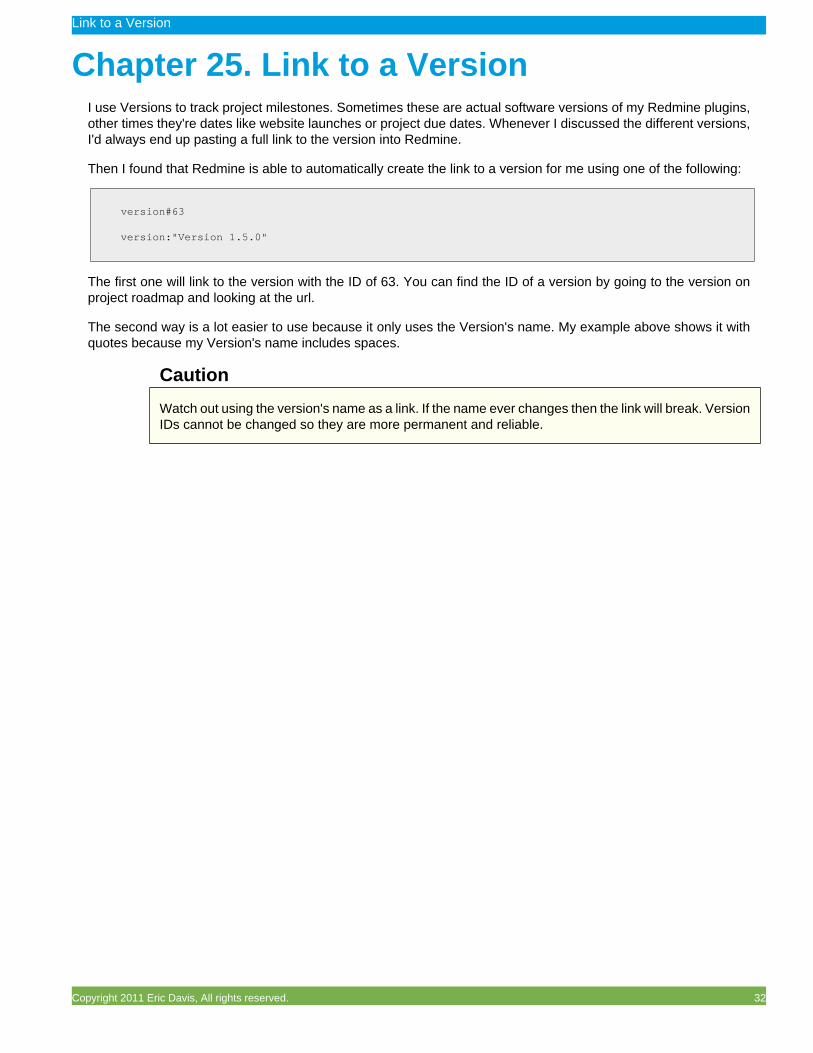
Then I found that Redmine is able to automatically create the link to a version for me using one of the following:
version#63
version:"Version 1.5.0"
The first one will link to the version with the ID of 63. You can find the ID of a version by going to the version onproject roadmap and looking at the url.
The second way is a lot easier to use because it only uses the Version's name. My example above shows it withquotes because my Version's name includes spaces.
Caution
Watch out using the version's name as a link. If the name ever changes then the link will break. VersionIDs cannot be changed so they are more permanent and reliable.

Link to a Wiki in Another Project
Copyright 2011 Eric Davis, All rights reserved. 33
Chapter 26. Link to a Wiki in AnotherProject
I use the wiki module in Redmine to store business documentation and processes. This makes it easy for me tolook up a process and also track a history of changes to the process. Sometimes, when I'm working on anotherproject I want to link to a specific page, like my release process.
Redmine makes it easy to automatically link across projects (although it's not easy to find). Just prefix the standardwiki link with the identifier of the other project. So to link to the Third page in the gusikowski22 project I'd use:
[[gusikowski22:Third page]]
You can use either the project's name or identifier but I recommend using the identifier. The project name can bechanged at any time so it could break any existing links, while the identifier cannot be changed once it's set.

Link to the Project Overview
Copyright 2011 Eric Davis, All rights reserved. 34
Chapter 27. Link to the Project OverviewRedmine has the ability to link to the Project Overview using the "project:name" syntax. The nice thing about thisis that Redmine will automatically check permissions and prevent linking to a project that the user doesn't haveaccess to.
project:"Cross-platform 5th generations"
project:nicolas14
You can use either the project's name or identifier but I recommend using the identifier. The project name can bechanged at any time so it could break existing links, while the identifier cannot be changed once it's set.
Wikis
Copyright 2011 Eric Davis, All rights reserved. 35
Part IV. WikisThe wiki system in Redmine seems simple enough. Enter some text, create pages, and link the pages. Like many otherthings that appear simple, underneath Redmine's wiki lurks something a lot more powerful; something that could saveyou hours of time if you're a heavy wiki user.
In the next set of tips you'll learn a few ways to organize your wikis more effectively and learn about the macro system. Ofall Redmine's features, if you can have the confidence to program your own macros you can do some wonderful things.
Creating Child Wiki Pages
Copyright 2011 Eric Davis, All rights reserved. 36
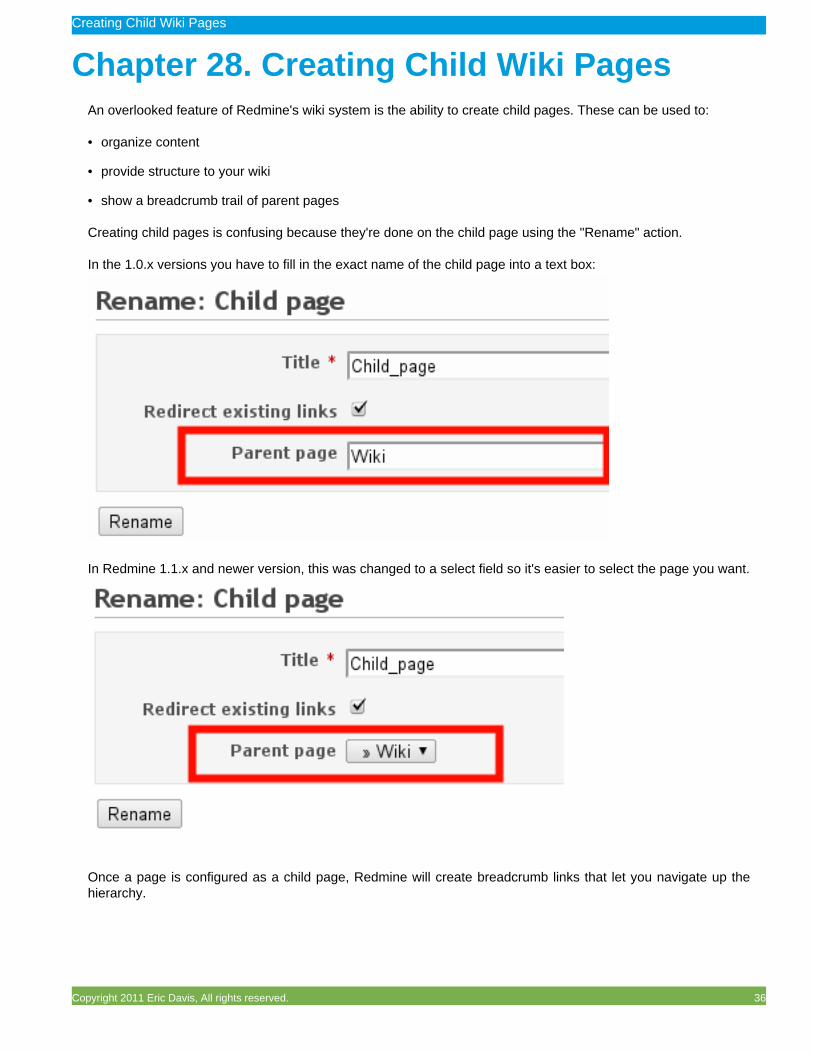
Chapter 28. Creating Child Wiki PagesAn overlooked feature of Redmine's wiki system is the ability to create child pages. These can be used to:
• organize content
• provide structure to your wiki
• show a breadcrumb trail of parent pages
Creating child pages is confusing because they're done on the child page using the "Rename" action.
In the 1.0.x versions you have to fill in the exact name of the child page into a text box:
In Redmine 1.1.x and newer version, this was changed to a select field so it's easier to select the page you want.
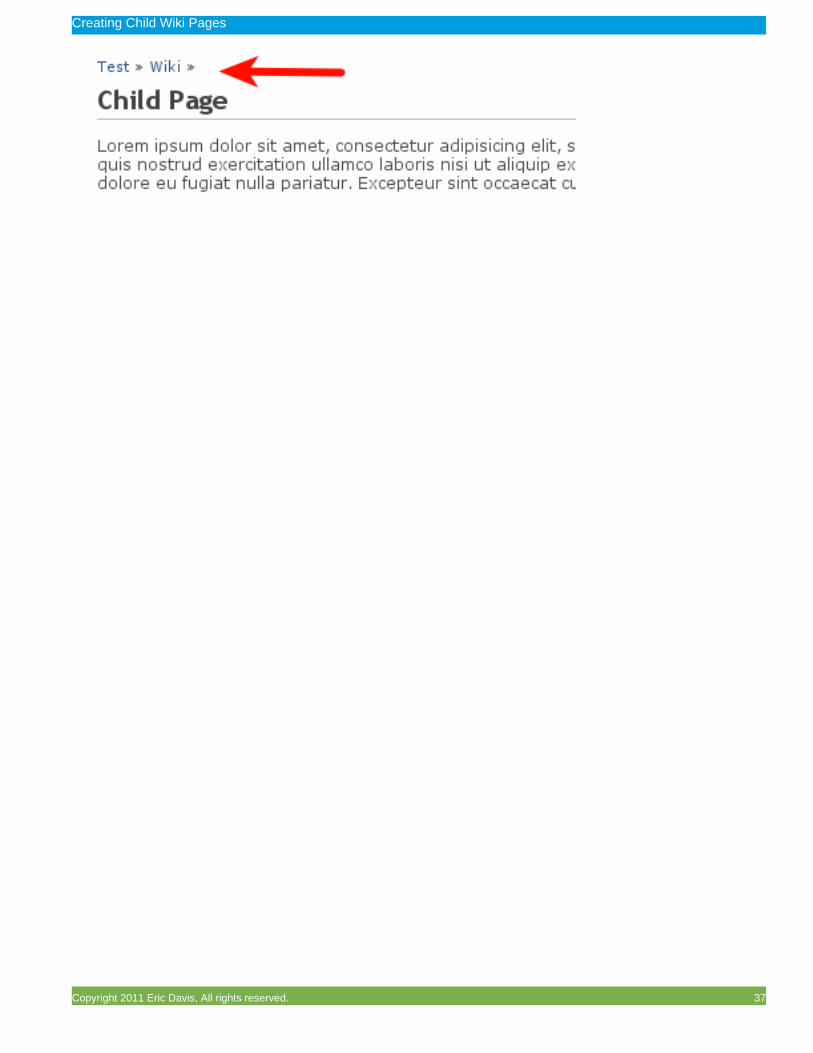
Once a page is configured as a child page, Redmine will create breadcrumb links that let you navigate up thehierarchy.
Creating Child Wiki Pages
Copyright 2011 Eric Davis, All rights reserved. 37

Renaming Wiki Pages
Copyright 2011 Eric Davis, All rights reserved. 38
Chapter 29. Renaming Wiki PagesSometimes you will create a wiki page in Redmine and later decide you want to rename it. Maybe the namechanged, there was a tpyo1, or you decided another page would work better in its place. The problem with doingthis by hand is that links to the old wiki page will break.
Luckily Redmine has a Wiki Rename function that can also redirect any existing links. So if you rename the page"Development" to "RedmineDevelopment", any old links to "Development" will redirect to the new "RedmineDe-velopment" page.
1. To rename a wiki page, just click the "Rename" link in the menu bar for the wiki page.
2. On the form you can change the title of the page, which is used in the url, and either choose to redirect existinglinks or not.
I don't choose to redirect existing links when I'm moving a page and intend to create a new one in place of theold one. For example, if I wanted to move "Development" to "RedmineDevelopment" but intended to fill in "Devel-opment" with something new.
1Or something that the speel chekcer missed.

Add Dynamic Content Using Macros
Copyright 2011 Eric Davis, All rights reserved. 39
Chapter 30. Add Dynamic Content UsingMacros
Wiki macros are part of Redmine's wiki that allow you to automatically insert content onto a wiki page (or anywhereelse where there's a wiki text area). The nice thing about the macros are that they run on every page load so youalways get the most recent content, without having to edit the page. To use a macro, just edit a Wiki page and putthe macro name in between two sets of curly braces like this: {{name}}.
Redmine comes with a few wiki macros by default and plugins are allowed to add additional ones. The easiestway to see which macros your Redmine has installed is to use the "macro_list" macro. This macro prints out all ofthe installed macros and their documentation. To use the "macro_list" macro, you should edit a wiki page and add{{macro_list}} to the content. This macro works with the Preview function so you don't even have to save thepage to see the results. In my Redmine I see this as the list of macros installed:

Make Wiki Macros Even More Dynamic with Options
Copyright 2011 Eric Davis, All rights reserved. 40
Chapter 31. Make Wiki Macros Even MoreDynamic with Options
In chapter 30 you learned how to use a simple wiki macro called {{macro_list}} which displayed a list ofmacros installed to Redmine. You might have noticed that some macros took some additional options so you couldpass data to them. This makes them more dynamic and lets you customize them to your Redmine. To use theseoptions just enclose them in parenthesis and separate the options with a comma.
For example the {{child_pages}} macro can take two options: a wiki page and a toggle for linking to the parentpage.
• {{child_pages}} -- lists all children of the current wiki page• {{child_pages(Guide)}} -- lists all children of page Guide• {{child_pages(Guide, parent=1)}} -- same as above with a link to page Guide
Another macro example comes from a plugin I wrote, redmine_news_macro1. It adds a {{recent_news}} macrothat shows recent project news on a wiki page. It takes two options:
1. the number of news items to show2. the project to show the news from
{{recent_news}} ...A box showing last 3 news items for all projects
{{recent_news(10)}} ...A box showing last 10 news items for all projects
{{recent_news(10, 123)}} ...A box showing last 10 news items for project 123
{{recent_news(10, 'the-identifier')}} ...A box showing last 10 news items for the project with the identifier of 'the-identifier'
{{recent_news(10, 'Little Stream Software')}} ...A box showing last 10 news items for the project named 'Little Stream Software'
Tip
Some macros will take a bit of trial and error in order to use. Whenever a macro has an error it willdisplay a red box with the error message to help you figure out the problem.
1 https://github.com/edavis10/redmine_news_macros
Tracking Time
Copyright 2011 Eric Davis, All rights reserved. 41
Part V. Tracking TimeWorking on projects takes time, whether you track it or not. In a business, tracking how long something takes to completecan be really valuable. It's especially valuable when you're trying to plan work in the future.
I recommend that everyone tracks their time. Even if it's only for a little while, you'll gain a lot of insight into how longthings take. The following tips will make it easier to do and help you realize that tracking time isn't wasting time.
Log Time to a Project
Copyright 2011 Eric Davis, All rights reserved. 42
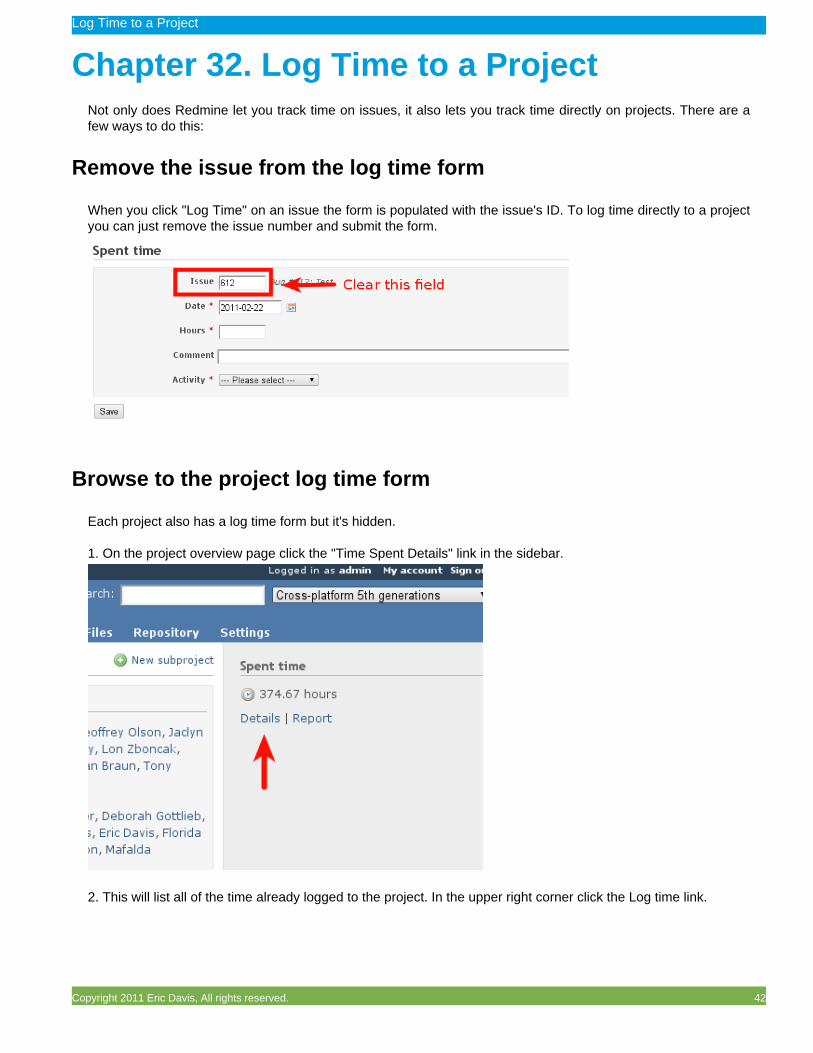
Chapter 32. Log Time to a ProjectNot only does Redmine let you track time on issues, it also lets you track time directly on projects. There are afew ways to do this:
Remove the issue from the log time form
When you click "Log Time" on an issue the form is populated with the issue's ID. To log time directly to a projectyou can just remove the issue number and submit the form.
Browse to the project log time form
Each project also has a log time form but it's hidden.
1. On the project overview page click the "Time Spent Details" link in the sidebar.
2. This will list all of the time already logged to the project. In the upper right corner click the Log time link.
Log Time to a Project
Copyright 2011 Eric Davis, All rights reserved. 43
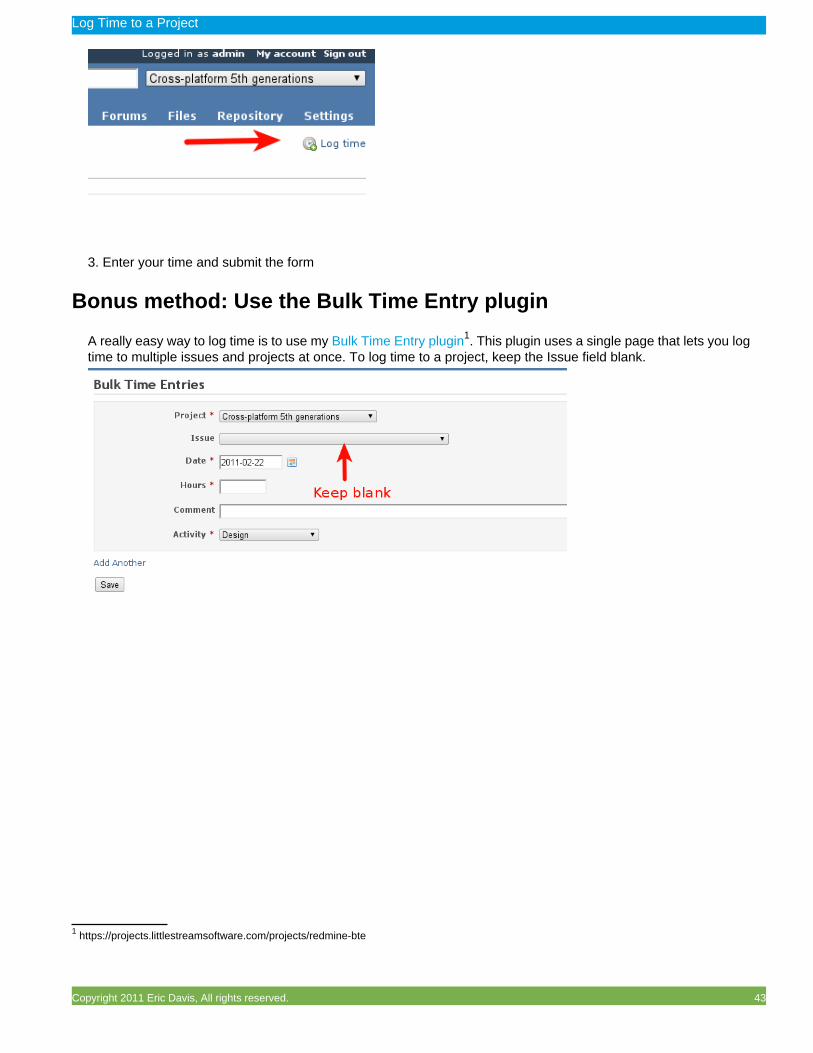
3. Enter your time and submit the form
Bonus method: Use the Bulk Time Entry plugin
A really easy way to log time is to use my Bulk Time Entry plugin1. This plugin uses a single page that lets you logtime to multiple issues and projects at once. To log time to a project, keep the Issue field blank.
1 https://projects.littlestreamsoftware.com/projects/redmine-bte
Set a Default Activity for Time Tracking
Copyright 2011 Eric Davis, All rights reserved. 44
Chapter 33. Set a Default Activity for TimeTracking
When using Redmine to track time spent on issues, you have to select an Activity type. This is done so time canbe grouped by the type of work done:
• Design• Development• Meetings• Client communication• Walking the dog• Taking over the world
There's a small feature that some people miss though. You can configure Redmine to use a specific activity asthe Default Activity.
So when entering new time, instead of having to select the Activity, Redmine will automatically select the DefaultActivity.
To configure the default activity, go to Admin > Enumerations, edit the Activity you'd like to use, and checkthe "Default value" option.
Put Common Activities at the Top of the List
Copyright 2011 Eric Davis, All rights reserved. 45
Chapter 34. Put Common Activities at theTop of the List
Chapter 33 talked about setting up a default activity for Redmine. Another time saver is to reorder the activitiesand put the common ones on top.
To reorder the activities go to Administration Panel > Enumerations and click the green arrows nextto each activity.
The single arrows are used to move an activity up or down one position, while the double arrows will move theactivity to the very top or bottom.
Override Time Activities Per Project
Copyright 2011 Eric Davis, All rights reserved. 46
Chapter 35. Override Time Activities PerProject
Redmine allows you to use Project Activities to override the system time entry activities. This lets you enable ordisable time entry activities on a per project basis. It also lets each project override the activity's custom fields.
For example, don't have any Frontend Development for this project? Turn it off. Want to add a Design activity fora few projects only? Only activate it for those projects.
This also lets you edit custom values for each activity. So if you're using the Redmine Overhead plugin1, you canset some activities as billable but override them on an internal project so they are non billable.
1 http://github.com/edavis10/redmine_overhead

Files
Copyright 2011 Eric Davis, All rights reserved. 47
Part VI. FilesEvery project needs to use files in one way or another. Sometimes they are artifacts of the project, while other timesthey're the whole point of the project. They way you track files in Redmine can have a dramatic effect on how easilythey're found later.
The following three chapters will give you an overview of how files work in Redmine and give you tips on creating thebest workflow for you.

Use the Files Module for Final Releases
Copyright 2011 Eric Davis, All rights reserved. 48
Chapter 36. Use the Files Module for FinalReleases
When you upload a file to the Files Module, Redmine lets you add some additional data about each file. When afile is uploaded to the Files Module it can be given:
• a description• a version
It automatically gets the rest of it's data from inspecting the file that was uploaded.
The best use for Files is to release official packages. Since they can be associated with a version, they workperfectly for final software releases. They're also great when you want an official archive of something like:
• a finalized set of designs• the final deliverables for a project, such as survey results• data snapshots (e.g. data as of today's date)• signed contracts
If you've used the Documents Module before you might think that signed contracts would be better saved as aDocument but I'd disagree for one reason: Files can't be edited once they're uploaded, whereas Documents canbe. So finalized contracts work great in the Files Module.
You can see an example of how Files are used on ChiliProject1. Here they use the Files Module for official down-loads and as the authoritative place to get them.
Note
Files uploaded to the Files module are separate from files uploaded to an issue, the latter of whichare called Attachments.
1 https://www.chiliproject.org/projects/chiliproject/files

Redmine's Neglected Module: Documents
Copyright 2011 Eric Davis, All rights reserved. 49
Chapter 37. Redmine's Neglected Module:Documents
In my opinion the Documents module is the most neglected module in all of Redmine. I've used Redmine since2007 and I've consulted for dozens of clients, and not a single one has ever found a good use for documents.
At first I tried using documents to storing official documents like signed contracts. That didn't work for severalreasons:
• A document is not required to have a file uploaded, so you could have a document called 'signed contract' andnever actually upload the file.
• Files attached to a document can be deleted without any tracking. Removed files just disappear from the activitystream, unlike issues where the deletion is tracked.
• Commenting on documents is not allowed so you can't receive any feedback on a specific file.
Due to these reasons, I recommend using different modules instead of documents.
If you want to track official files at a specific time, the Files module would be best. You can upload new versionsof a file and quickly see all of the files and when they were created.
If you want to have a discussion on a file, like trying to reach agreement on a decision, then I'd recommend usingthe Boards module (forums). You can attach files to each message and it's the easiest way to have a discussion.(It even has full email integration.)
If you want to provide a file download with instructions and documentation, I'd recommend using a wiki page.Each wiki page tracks its editing history so you can see the changes made to it over time. Also wiki pages haveconfigurable permissions so you can allow users to upload new files but not delete existing files.

Attachments - Where all files end up
Copyright 2011 Eric Davis, All rights reserved. 50
Chapter 38. Attachments - Where all filesend up
If you don't remember seeing an Attachments module, never fear because there isn't one.
Attachments are the name for all of the file uploads in Redmine. That means whenever you upload anything intothe Document module, Files module, or even an issue; an attachment is created.
The interesting thing about attachments is they have different behavior based on where they are uploaded:
• upload to an issue and a basic attachment is created and linked with the issue• upload to a wiki page and again a basic attachment is created and linked• upload to the Files module and the attachment is added to the project as a download in the Files module• upload to the Files module for a Version and the attachment is linked to the Version and available to be down-
loaded in the Files module• upload to the Documents module and the attachment is linked to the document
Since all of the file uploads use attachments, it's easy to write new code that affects all attachments.
Tip
One big proposed change has been about merging the Files and Documents1 modules into a singlemedia library module.
1 https://www.chiliproject.org/projects/chiliproject/wiki/Merging_of_Files_and_Documents
Notifications
Copyright 2011 Eric Davis, All rights reserved. 51
Part VII. NotificationsKeeping everyone up to date on the progress of a project is a large part of project management. The main way Redminedoes this is via email notifications.
Since it's impossible to have everyone working in Redmine all day long, it's important that people can be notified whenthings happen. Redmine has a robust notification system, though it can be daunting to pick the correct notifications foryou and your team.
The next tips will help you to configure notifications so you can balance information overload with too little information.There's also a tip which involves using email directly to update Redmine, perfect for when you can't or don't want touse the website itself.

What Each Notification Option Really Means
Copyright 2011 Eric Davis, All rights reserved. 52
Chapter 39. What Each Notification OptionReally Means
Every project with more than one person requires communication. Redmine does a good job to help communicatewhat is happening in a project, but you need notifications when new things happen. Redmine includes built in emailnotifications for many of the common events. Each user has a setting they can change to determine when and howmany email notifications they receive. Choosing the right notification for you involves a balance of getting enoughinformation on a project and getting overwhelmed with notifications.
Here are the different notification options you can choose from:
For any event on all my projects
This is the option when you want to know everything that happens in all of your projects. It includes events likethe creation of issues, updates to issues, new forum posts, etc. This option can generate a lot of email but it's thebest one if you don't want to miss anything.
For any event on the selected projects only...
This option works exactly the same as the "any event" option above but only for specific projects. When it's selectedyou can choose which projects you want.
Watch out though: when a new project is created you won't get events on it automatically.
Only for things I watch or I'm involved in
This is a good option if you want to reduce the amount of notifications but stay involved. You'll only be notifiedwhen an event occurs on:
• something you created. (e.g. you created an issue and someone posts a comment to it)• something you are assigned.• something you are watching.
Only for things I am assigned to
This is a more restrictive version of "Only for things I watch or I'm involved in:" you'll only be notified about eventsyou are assigned to or if you're watching the item.
Only for things I am the owner of
This is another restrictive version of "Only for things I watch or I'm involved in" but this time you'll only be notifiedon events where you are the author of the item, or if you are watching the item.
No events
This option completely disables email notifications. Even if you are watching an item, you'll not be notified aboutany changes. This option is used when someone is on vacation or if they are checking for updates using a differentsystem (e.g. the ATOM feeds).
What Each Notification Option Really Means
Copyright 2011 Eric Davis, All rights reserved. 53
Now that you know about all of the different notification options, you can determine which option would work bestfor you.
Choosing the Best Notification Events
Copyright 2011 Eric Davis, All rights reserved. 54
Chapter 40. Choosing the Best NotificationEvents
Redmine has two types of configuration for it's email notifications:
• User notification options - each user controls when they should be notified that an event happened (e.g. all ofthe time, only on specific projects) (Chapter 39)
• System notification events - what types of events trigger notifications
Together they are used to determine which actions will send email notifications to users. Here is a description ofall of the system notification events and when they are triggered:
• Issue added: when an issue is first created.• Issue updated: when an update is made to an issue, including adding notes or changing its fields. It is not
triggered when updating related information, like logging time.• Issue note added: is a subset of issue updated which is only triggered when an issue is updated with a new note.• Issue status updated: is another subset of issue updated, this time only when the status changes.• Issue priority updated: is a third subset of issue updated and is only triggered when an issue priority is changed.• News added: when a news item is created.• Comment added to a news item: when a comment is posted to a news item.• Document added: when a document is created. This is just the document object, not when files are uploaded.• File added: when a file is uploaded to the Files module. This does not trigger when files are attached to other
pages like issues, wiki pages, or documents.• Message added: when a post is made in the forums, either by starting a new thread or replying to an existing one.• Wiki page added: when a wiki page is first created.• Wiki page updated: when a wiki page is edited, after it was initially created.
All of these actions can be combined, so if you want to send notifications for every event you can select them all.For my site, I've enabled all of the actions because I want notifications when anything happens.
Note
I've seen many people configure a few system notification options when they first install Redmine andthen never review them again. When more notifications are added you'll want to review and enablethem. I found the best time is to review each of your settings every time you perform a major upgrade.

Edit User Email Notifications
Copyright 2011 Eric Davis, All rights reserved. 55
Chapter 41. Edit User Email NotificationsRedmine sends email notifications when specific events occur. Who gets notified about the event depends on theevent and each user's preference (Chapter 40). Normally you'll want to let users choose the setting that fits theiremail usage, but with fast-moving projects it can be useful to ensure everyone is notified of the changes.
As an administrator you are given the ability to change another user's notification preferences.
1. Go to the Users administration panel. Admin > Users2. Find the user you want to edit and click on their login3. On the user edit page, near the bottom you'll see the Email Notifications options
My clients have found this useful when an employee is on vacation and their auto responder starts to run amok.
Default Email Notifications for New Users
Copyright 2011 Eric Davis, All rights reserved. 56
Chapter 42. Default Email Notifications forNew Users
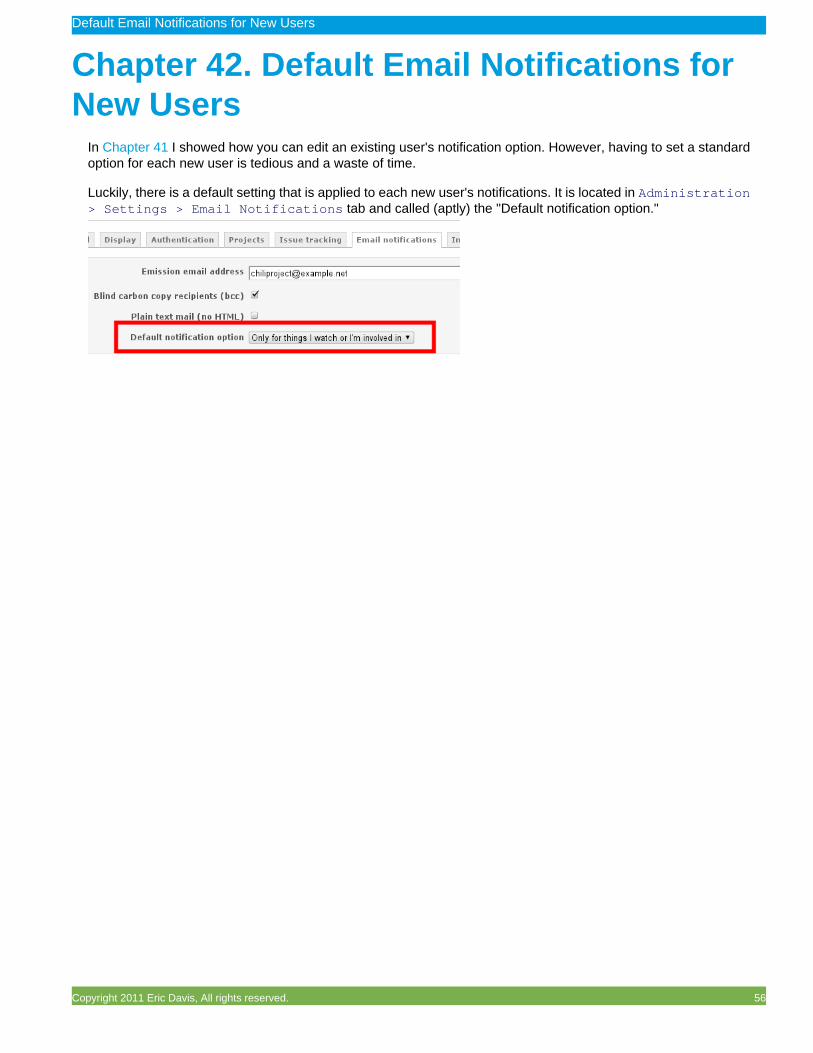
In Chapter 41 I showed how you can edit an existing user's notification option. However, having to set a standardoption for each new user is tedious and a waste of time.
Luckily, there is a default setting that is applied to each new user's notifications. It is located in Administration> Settings > Email Notifications tab and called (aptly) the "Default notification option."
Speed Up Your Communication by Replying via Email
Copyright 2011 Eric Davis, All rights reserved. 57
Chapter 43. Speed Up YourCommunication by Replying via Email
I'm sure you've seen Redmine's email notifications by now. These are the emails you receive when an issue isupdated or a note is added. But did you know that you can reply to those emails to add a new comment?
You'll need to set up one of the Receiving Email scripts1. These scripts are used on your Redmine server todownload your email reply and send it to Redmine. Make sure your Emission Email Address is configured to thesame mailbox as the script (Admin > Settings > Email notifications).
Once set up, you can then reply to an email notification which will be read by these scripts and imported intoRedmine.
Personally, I use and recommend the IMAP script running through a cronjob or scheduled task. It's easier to setup and it only requires an extra mailbox on your hosting account.
1 http://www.redmine.org/projects/redmine/wiki/RedmineReceivingEmails

System Administration
Copyright 2011 Eric Davis, All rights reserved. 58
Part VIII. System AdministrationThese final tips are for people who keep Redmine running; the system administrators. While the tips are more technical,they can make a huge difference to how you use Redmine because they affect every single user.
Two of the most important tips are found in this section; make sure your data is backed up. I have seen what happenswhen years worth of data is lost and I can't think of a worse thing to happen to your productivity (or your weekend).
Edit the Default Administrator to Prevent Unauthorized Access
Copyright 2011 Eric Davis, All rights reserved. 59
Chapter 44. Edit the Default Administratorto Prevent Unauthorized Access
One of the first things you should do when installing Redmine is edit the default administrator account. Since everyRedmine has a user account called "admin" with the password "admin," anyone can try to login with that account.A few ways to prevent this and secure your site are to:
• Change the admin password• Lock the default "admin" user (but make sure you have another admin account setup first)• Edit the default "admin" account giving it a different login
If you aren't sure if your default administrator has been changed, Redmine's Information panel has a test. Justbrowse to Administration > Information and look for the green checkmark.
Backing Up Redmine's Database
Copyright 2011 Eric Davis, All rights reserved. 60
Chapter 45. Backing Up Redmine'sDatabase
If you're anything like me, you store a lot of important data in Redmine; data that would really hurt if it was lost.Since most of this data is stored in the database, it's easy to backup Redmine using the existing database tools.
Note
For the following examples - Redmine is configured with a username of "redmine_user", a passwordof "redmine_rocks", and using the database of "redmine".
MySQL
Backing up MySQL would use mysqldump1:
$ mysqldump -u redmine_user -p redmine_rocks redmine > /a/safe/backup/location/redmine.sql
To restore a backup, first create a new database and then load it using the mysql command. MySQL will ask foryour password before each command.
$ mysql -u redmine_user -p redmine -e "create database new_redmine_database"$ mysql -u redmine_user -p redmine new_redmine_database < /a/safe/backup/location/redmine.sql
PostgreSQL
Backing up PostgreSQL would use pg_dump2. Since pg_dump doesn't allow the password on the command line,you'll need to setup a ~/.pgpass3 file with the password first.
$ pg_dump -U redmine_user redmine > /a/safe/backup/location/redmine.sql
Restoring a backup can be done by using the createdb tool to create a new database and then psql to loadthe data.
$ createdb -U redmine_user new_redmine_database$ psql -U redmine_user -f /a/safe/backup/location/redmine.sql new_redmine_database
SQLite
SQLite's database is completely contained in a file so you need to be careful if Redmine is in use right now. If youuse the .dump command4, you won't need to turn Redmine off.
$ sqlite3 /path/to/redmine.db '.dump' > /a/safe/backup/location/redmine.sql
Restoring a SQLite backup is easy. Just pipe the backup file to the sqlite3 command, it will create a new databaseautomatically.
$ cat /a/safe/backup/location/redmine.sql | sqlite3 new_redmine_database
1 http://dev.mysql.com/doc/refman/5.1/en/mysqldump.html2 http://www.postgresql.org/docs/8.4/static/app-pgdump.html3 http://wiki.postgresql.org/wiki/Pgpass4 http://www.ibm.com/developerworks/opensource/library/os-sqlite/#N1010
Backing Up Redmine's Database
Copyright 2011 Eric Davis, All rights reserved. 61
Offsite backup
Once you have a backup of the database on the server, send it offsite to a secure backup location. I use andrecommend Amazon's S3 service for storing backups; it's cheap, easy-to-use, and robust.

Backing Up Redmine's File Uploads
Copyright 2011 Eric Davis, All rights reserved. 62
Chapter 46. Backing Up Redmine's FileUploads
Chapter 45 showed you how to backup Redmine's database. Now I want to show you the second half of Redmine'sdata - the file uploads.
Redmine stores all file uploads in the directory named files/1. You can copy that to a secure backup locationusing cp but there's a better way using a tool called rsync2.
$ rsync --delete -artv /path/to/redmine/files /a/secure/backup/location/
This will copy the files from Redmine to the backup location, but it's smarter than a simple copy. rsync will actuallysynchronize the files, so if a file was deleted in Redmine it will be deleted in the backup. Or if a file was changedin Redmine, it will change the file in the backup.
rsync also supports sending the data to a remote server using ssh, perfect for remote backups. If you're interestedin more advanced rsync options, its documentation3 is excellent.
Restoring file uploads is just as easy, provided the backup files haven't been deleted. For individual files you canjust copy them from the backup directory. To restore all of the files, just copy the entire files/ directory from thebackup location to where your Redmine is installed.
1Starting in Redmine 1.2.x the file storage path became configurable from the config/configuration.yml file. Check there to make sureyou backup the correct path.2 http://www.samba.org/ftp/rsync/rsync.html3 http://www.samba.org/ftp/rsync/rsync.html
Update Servers Easily with Capistrano
Copyright 2011 Eric Davis, All rights reserved. 63
Chapter 47. Update Servers Easily withCapistrano
Redmine is a complex application to set up on a server but there are tools for Ruby on Rails that can help automatemany of the repetitive steps.
One of my favorite tools is capistrano1. Capistrano is an Open Source deployment tool that updates the coderunning on multiple servers. This means you can upgrade your Redmine code on your laptop then automaticallypush out that update to all of your servers.
For a Redmine administrator capistrano has two major benefits:
1. Capistrano always works the same way, so it will always make sure the same set up instructions are followedeach time. How many times have you updated Redmine but forgotten to run rake db:migrate or restart theweb server afterwords? Capistrano can be configured to do both of these for you automatically.
2. Capistrano makes it easy to try out new code or plugins. Since you can push an update out to the servers in undera minute, it becomes easier to experiment with new code and plugins. (As well as roll back mistakes and bugs.)
It may take a little investment of time upfront to get capistrano set up but it will be worth it in the long-term. Settingup capistrano is the first thing I do for my consulting clients and it's a requirement for fast-paced development.
Tip
I've posted my capistano configuration2 which I use for my installation. It's an advanced configurationbut can be modified easily.
1 https://github.com/capistrano/capistrano/wiki2 http://theadmin.org/articles/capistrano-for-chiliproject/

Block Access to Sensitive Source Code Data
Copyright 2011 Eric Davis, All rights reserved. 64
Chapter 48. Block Access to SensitiveSource Code Data
When deploying Redmine to a server, typically a source control system like SVN or git is used to make updatingthe site easier. Unfortunately, your web server needs to be configured to block a visitor from reading the meta-data files used by your source control. Otherwise they might gain access to sensitive information.
An easy way to prevent this is to send a 403 response whenever someone tries to access those meta-data files.If you're using the Apache server, you can use the mod_rewrite module1. Just add these to your apache host'sconfiguration file or the .htaccess file located in the public directory:
RewriteEngine On
# Important rule to prevent exposure of subversion files RewriteRule ^(.*/)?.svn/ - [F,L] # Important rule to prevent exposure of git files RewriteRule ^(.*/)?.git/ - [F,L]
Once this is added and Apache is restarted, any request to files inside of the .svn/ or .git/ directories will geta 403 unauthorized error. A similar rule can be used for other source control systems and web servers.
1 http://httpd.apache.org/docs/current/mod/mod_rewrite.html#rewriterule

Lock Down Permissions on the Redmine Configuration Files
Copyright 2011 Eric Davis, All rights reserved. 65
Chapter 49. Lock Down Permissions onthe Redmine Configuration Files
Redmine has a few configuration files that it uses to connect to your database and email servers. Since these filescontain user names and passwords you need to make sure that they are configured so other users can't read them.
• config/database.yml
• config/email.yml
• config/configuration.yml (Redmine 1.2.x and newer)
On a Linux server this means using the chown (change owner) and chmod (change mode) commands. For exam-ple, lets say your Redmine runs as the 'rails' user and 'server' group so we want to make sure to set the ownershipon the files.
$ chown rails.server config/database.yml config/email.yml config/configuration.yml
Then make sure that only the rails user can read or write those files. 600 means the owner can read and write (6)but the group and other users can do nothing (the two 0s)
$ chmod 600 config/database.yml config/email.yml config/configuration.yml
After doing this, restart your Redmine application server and check that Redmine starts up again.
If you get an error like No such file or directory - config/database.yml then the 600 permissions aretoo strict. Try running the chmod again but replace 600 with 640 (allow groups to read) and restart the applicationserver again. If that still doesn't work then try 644 (allow groups and other users to read) and restart again.
Changing permissions of these files is even more important on shared hosting because you might have thousandsof other users on the same server, any of which might be able to read your files. On private servers like a dedicatedor virtual private server, this tip isn't so important because you're the only user on the sever but it's still a goodprecaution to take.

Make Your Redmine Shine with a New Theme
Copyright 2011 Eric Davis, All rights reserved. 66
Chapter 50. Make Your Redmine Shinewith a New Theme
Redmine supports themes to change the look and feel of the site. There are several open source themes availableat Redmine.org1 that you can use for free.
Creating a new theme for Redmine is an easy process if you are familiar with CSS. There is a detailed tutorialabout how to do it on Redmine.org2.
1 http://www.redmine.org/wiki/redmine/Theme_List2 http://www.redmine.org/wiki/redmine/HowTo_create_a_custom_Redmine_theme

Customize Labels and Text
Copyright 2011 Eric Davis, All rights reserved. 67
Chapter 51. Customize Labels and TextAfter using Redmine for a while you might want to customize some of the text displayed. For example, you mightwant to change all "Issues" to "Tickets" for use as a support system.
Since all of the text displayed is stored in language files, it's easy to make your language files display somethingelse. You can do this directly in the code but this will cause problems when upgrading later. A better solution is touse a simple plugin which I created called the Redmine Language Change plugin1.
Using it is a simple process:
1. Download the plugin from Github into your Redmine.2. Copy and change the language text you want to change into the plugin. (Example shown in the README file)3. Restart your Redmine application server.
The best parts about the plugin are that:
• It's so simple that it should keep working for a long time (it's over a year old with no changes needed) and• It will enable you to keep upgrading Redmine without any conflicts
1 https://github.com/edavis10/redmine_language_change
Conclusion
Copyright 2011 Eric Davis, All rights reserved. 68
Chapter 52. ConclusionTake Action
I'd like to close by repeating what I said in the introduction; take action. I have done everything I could to teachyou how to become more productive with Redmine. The next part is completely up to you. Start with somethingsmall if you must, but start.

Tips by Role
Copyright 2011 Eric Davis, All rights reserved. 69
Tips by RoleA list of the tips organized by the role you would need.
Symbols
AAdministrator, 4, 6, 8, 12, 15, 16, 17, 18, 19, 20, 21, 29,44, 45, 54, 55, 56, 59
PProject manager, 5, 7, 46
SSystem administrator, 22, 28, 57, 60, 62, 63, 64, 65, 66, 67
UUser, 10, 11, 23, 24, 26, 31, 32, 33, 34, 36, 38, 39, 40, 42,48, 49, 52

Tips by Time Required
Copyright 2011 Eric Davis, All rights reserved. 70
Tips by TimeRequiredA list of the tips organized by the estimated amount of timerequired to set up and configure. Tips that are repeated arenot listed (e.g. linking to an issue).
Symbols1 hour, 15, 18, 57, 60, 62, 6315 minutes, 8, 11, 12, 45, 46, 54, 64, 65, 6630 minutes, 19, 21, 22, 28, 675 minutes, 6, 7, 16, 17, 29, 36, 44, 56, 59

Index
Copyright 2011 Eric Davis, All rights reserved. 71
IndexSymbols
AAutomation, 22, 28, 39, 40, 57, 63
BBackups, 60, 62
DDashboard, 11Design, 66, 67Documents, 49
FFiles, 48, 49, 50
IIncoming email, 57Issue, 20
Custom fields, 21Data, 15, 16, 17, 18, 19, 21, 22Dates, 22, 28Editing multiple, 23Organization, 24, 26Subtasks, 24, 26, 27
LLinking, 31, 32, 33, 34
NNotifications, 52, 54, 55, 56, 57
PProjects
Archive, 6Copy, 4Data, 8Dates, 7, 8Members, 5Organization, 6, 11Search, 10
SSecurity, 59, 64, 65
TTime entries, 42
Activities, 44, 45, 46
UUsers, 5, 29, 59
Custom fields, 12
VVersions, 7
WWiki
Child pages, 36Macros, 39, 40Organization, 36, 38Renaming, 38
Workflow, 15, 16, 18, 19, 20