Embed Size (px)
Citation preview
Hands-On LabAccessing Excel Data using Excel Rest APIsLab version: 1.0.0
Last updated: 5/18/2023
CONTENTS
OVERVIEW................................................................................................................................................. 3
EXERCISE 1: MODIFY AN EXISTING EXCEL WORKBOOK FOR DATA ACCESS................................4Task 1 – Adding the Name Manager Button to the Excel 2010 Ribbon................................................5
Task 2 – Adding the Name Manager Button to the Excel 2010 Ribbon................................................6
EXERCISE 2: RETRIEVE EXCEL WORKBOOK DATA USING SILVERLIGHT AND EXCEL REST.......7Task 1 – Updating the ViewModel to Retrieve Data Using List............................................................8
Task 2 – Creating the ViewModel......................................................................................................10
EXERCISE 3: DISPLAY THE QUERY RESULTS IN THE SILVERLIGHT USER INTERFACE...............12Task 1 – Modifying the Exiting Silverlight User Interface to Display the Query Results.....................12
Task 2 – Deploying and Testing the Silverlight Application................................................................15
EXERCISE 4: ADD IN-MEMORY UPDATE FUNCTIONALITY TO THE SILVERLIGHT APPLICATION 15Task 1– Updating the MainPage.xaml.cs View...................................................................................15
Task 2 – Deploying and Testing the Silverlight Application................................................................16
SUMMARY................................................................................................................................................ 17
Overview
Excel Services 2010 provides remote access to Excel data. Developers can use the Rest APIs available with Excel Services 2010 to query and process Excel data in their applications. Excel Services and the Rest APIs can also update the workbook and use the powerful Excel formulas to complete complex calculations. The updates are not persisted and are only in memory. This lab will demonstrate how Excel and Excel Rest APIs are used to return data and calculations.
Objectives
Modify Excel Workbooks for easy data access.
Use Silverlight and the Excel Rest API to retrieve and display list data.
Use in-memory modifications supporting workbook calculations.
System Requirements
You must have the following items to complete this lab:
2010 Information Worker Demonstration and Evaluation Virtual Machine
Microsoft Visual Studio 2010
Visual Studio 2010 SharePoint Power Tools
Silverlight 4 Toolkit
Silverlight WebPart
Setup
You must perform the following steps to prepare your computer for this lab...
1. Download the 2010 Information Worker Demonstration and Evaluation Virtual Machine from
http://tinyurl.com/2avoc4b and create the Hyper-V image.
2. Install the Visual Studio 2010 Silverlight Web Part. The Silverlight Web Part is an add-on to
Visual Studio 2010 and can be downloaded from http://code.msdn.microsoft.com/vsixforsp .
3. Install the Silverlight 4 Toolkit located at http://silverlight.codeplex.com/

4. Install the Visual Studio 2010 SharePoint Power Tools located at http://visualstudiogallery.msdn.microsoft.com/en-us/8e602a8c-6714-4549-9e95-f3700344b0d9
Exercises
This Hands-On Lab comprises the following exercises:
1. Modify an Existing Excel Workbook for Data Access
2. Retrieve Excel Workbook Data using Silverlight and Excel Rest
3. Display the Query Results in the Silverlight Interface
4. Use In-Memory Functionality to the Silverlight Application.
Estimated time to complete this lab: 40 minutes.
Starting Materials
This Hands-On Lab includes the following starting materials.
Visual Studio solutions. The lab provides the following Visual Studio solutions that you can use
as starting point for the exercises.
◦ <Install location>\Labs\AccessingExcelDataExcelRestAPIs\Source\Begin\
SilverlightExcelRest.sln: This soution is a a Silverlight Web Part with the starter code
commented out.
Note: Inside each exercise folder, you will find an end folder containing a solution with the completed lab exercise.
Exercise 1: Modify an Existing Excel Workbook for Data Access
In this exercise you will use Excel 2010 to modify an existing Excel Workbook by adding named ranges to
facilitate data access. Note: The SupportingFiles folder contains modified copy of the workbook. To skip
this task overlay the existing copy of the workbook with the modified copy.
Task 1 – Adding the Name Manager Button to the Excel 2010 Ribbon
1. Launch Internet Explorer and navigate to the http://intranet.contoso.com web site.
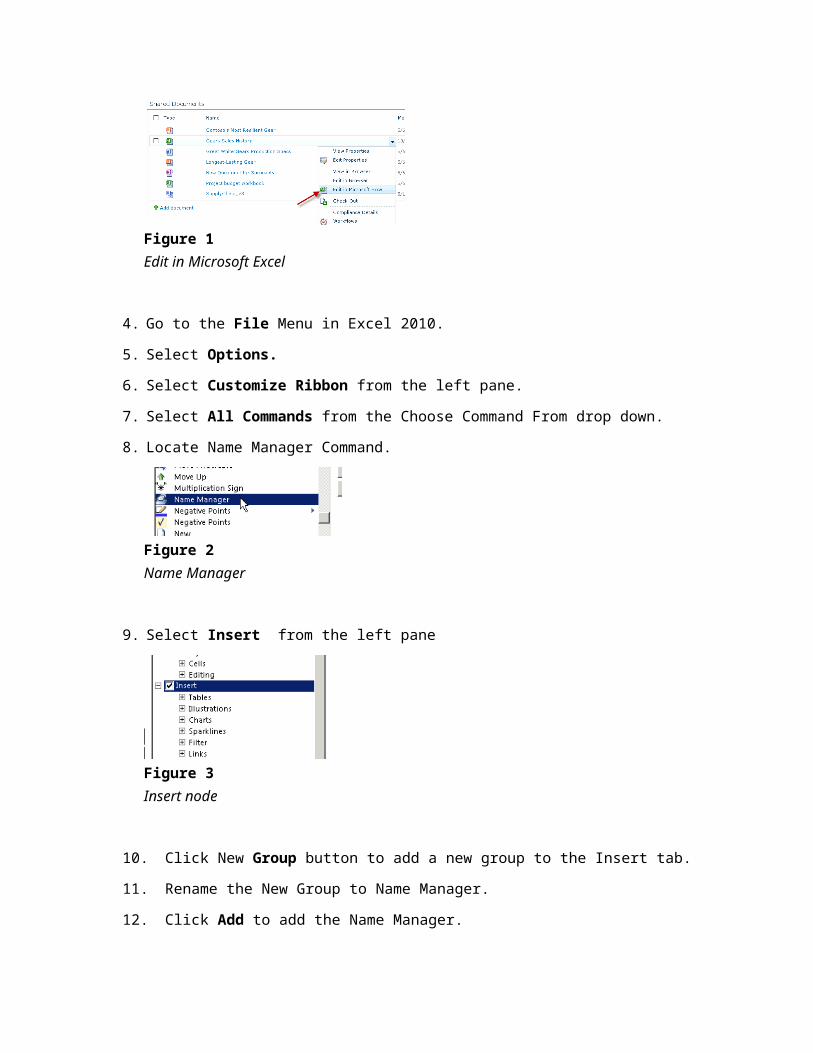
2. Hover over the Gears Sales History spread sheet in the Shared Documents list view.
3. Select the down arrow and click Edit in Microsoft Excel.
Figure 1Edit in Microsoft Excel
4. Go to the File Menu in Excel 2010.
5. Select Options.
6. Select Customize Ribbon from the left pane.
7. Select All Commands from the Choose Command From drop down.
8. Locate Name Manager Command.
Figure 2Name Manager
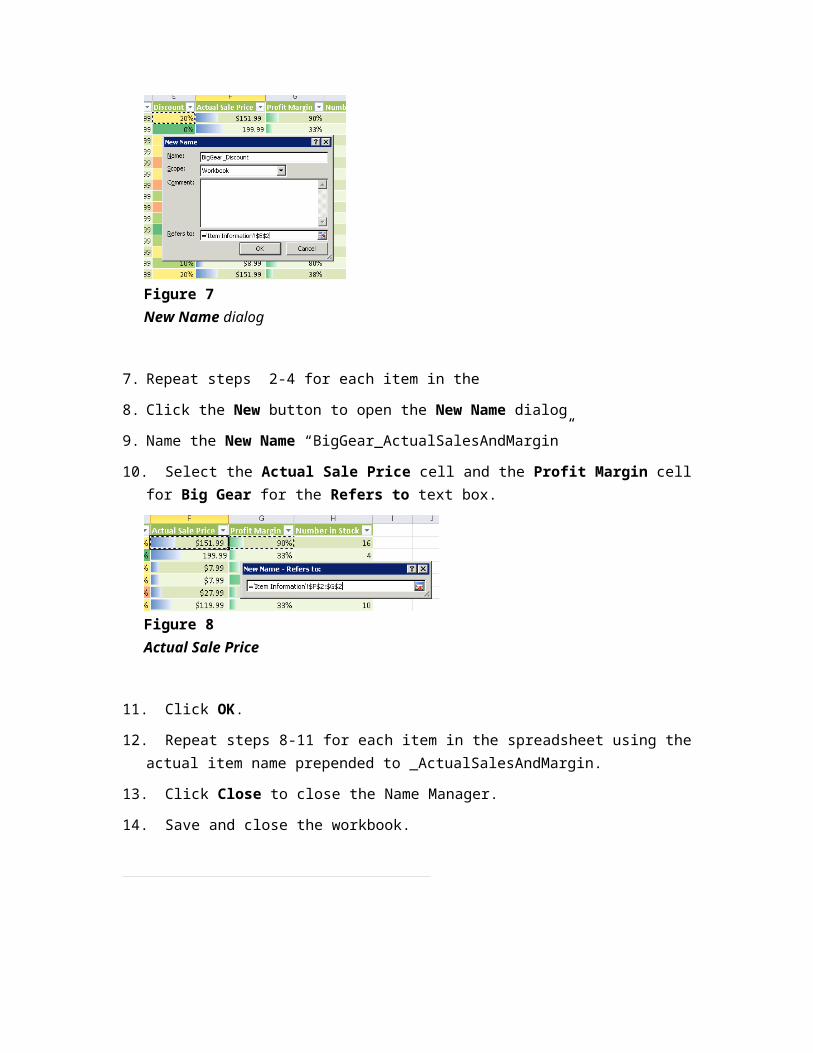
9. Select Insert from the left pane
Figure 3Insert node
10. Click New Group button to add a new group to the Insert tab.
11. Rename the New Group to Name Manager.
12. Click Add to add the Name Manager.
Figure 4Add>> button
13. Click OK to close Excel Options Dialog.
Task 2 – Adding the Name Manager Button to the Excel 2010 Ribbon
1. Select the Item Information sheet.
2. Select the cell containing Big Gear in the Name column.
3. Click the Name Manager button on the Insert Ribbon.
Figure 5Name Manager
4. Click the New button to open the New Name dialog.
Figure 6New Manager dialog
5. Set the Name to “BigGear_Discount”. You cannot use spaces in the name.
6. Select the Discount cell for Big Gear in the Refers to property.
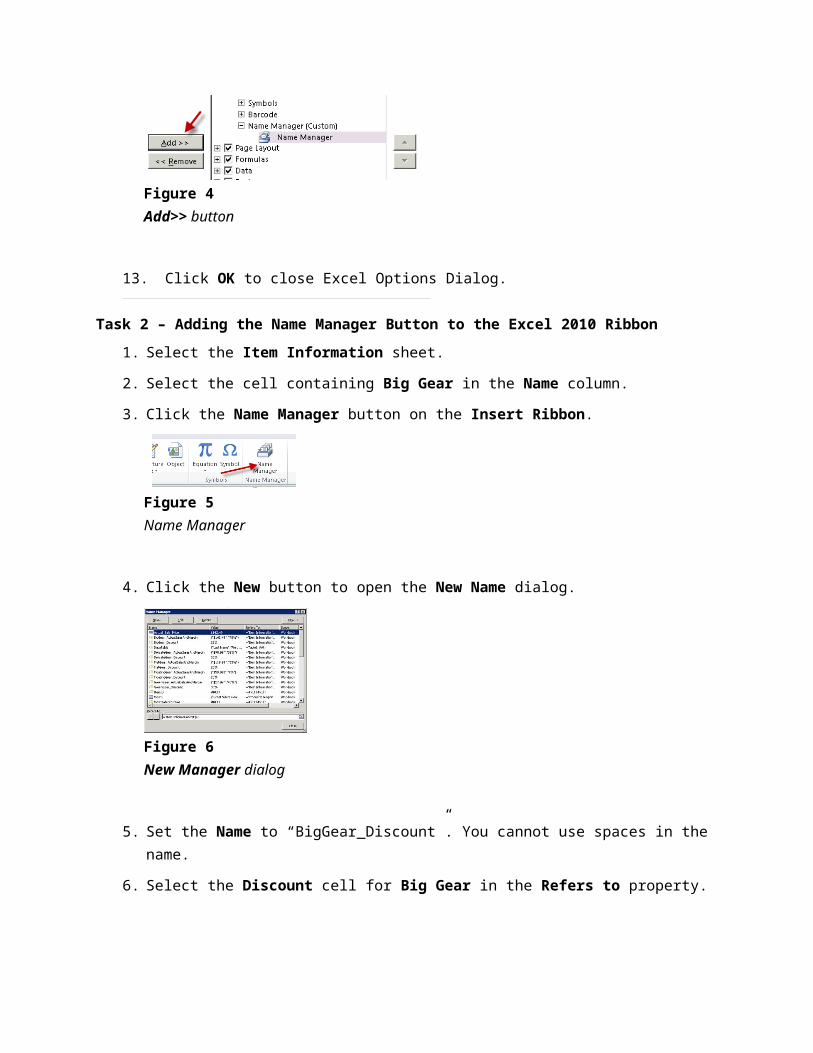
Figure 7New Name dialog
7. Repeat steps 2-4 for each item in the
8. Click the New button to open the New Name dialog
9. Name the New Name “BigGear_ActualSalesAndMargin”
10. Select the Actual Sale Price cell and the Profit Margin cell for Big Gear for the Refers to text box.
Figure 8Actual Sale Price
11. Click OK.
12. Repeat steps 8-11 for each item in the spreadsheet using the actual item name prepended to _ActualSalesAndMargin.
13. Click Close to close the Name Manager.
14. Save and close the workbook.
Exercise 2: Retrieve Excel Workbook data using Silverlight and Excel Rest
In this exercise, you will modify the existing Silverlight application project to use Excel Services Rest APIs to retrieve a list of product items and sales details.
Task 1 – Updating the ViewModel to Retrieve Data Using List
1. Using Visual Studio, open the starter solution from <Install>\Labs\AccessingExcelDataExcelRestAPIs\Source\Begin\SilverlightExcelRest.sln.
2. Right-click the GearItemsViewModel.cs file located in the ViewModels folder in the Silverlight project named Silverlight.ExcelRest and select Open.
3. Use snippet 4.4.1 to add a set of constants denoting the column positions.
Figure 9Constants denoting column positions
4. Use snippet 4.4.2 to add constants used to set the Rest Url. This lab uses Atom format, which is appended as a command.
Figure 10Rest url
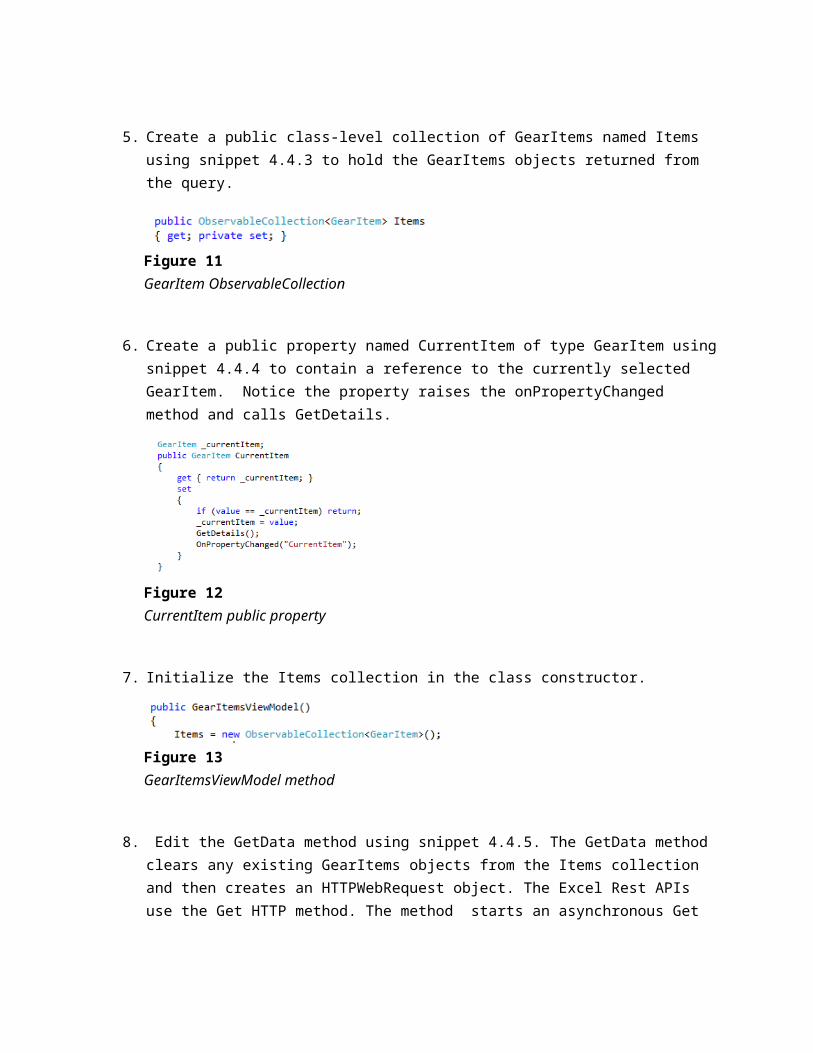
5. Create a public class-level collection of GearItems named Items using snippet 4.4.3 to hold the GearItems objects returned from the query.
Figure 11GearItem ObservableCollection
6. Create a public property named CurrentItem of type GearItem using snippet 4.4.4 to contain a reference to the currently selected GearItem. Notice the property raises the onPropertyChanged method and calls GetDetails.
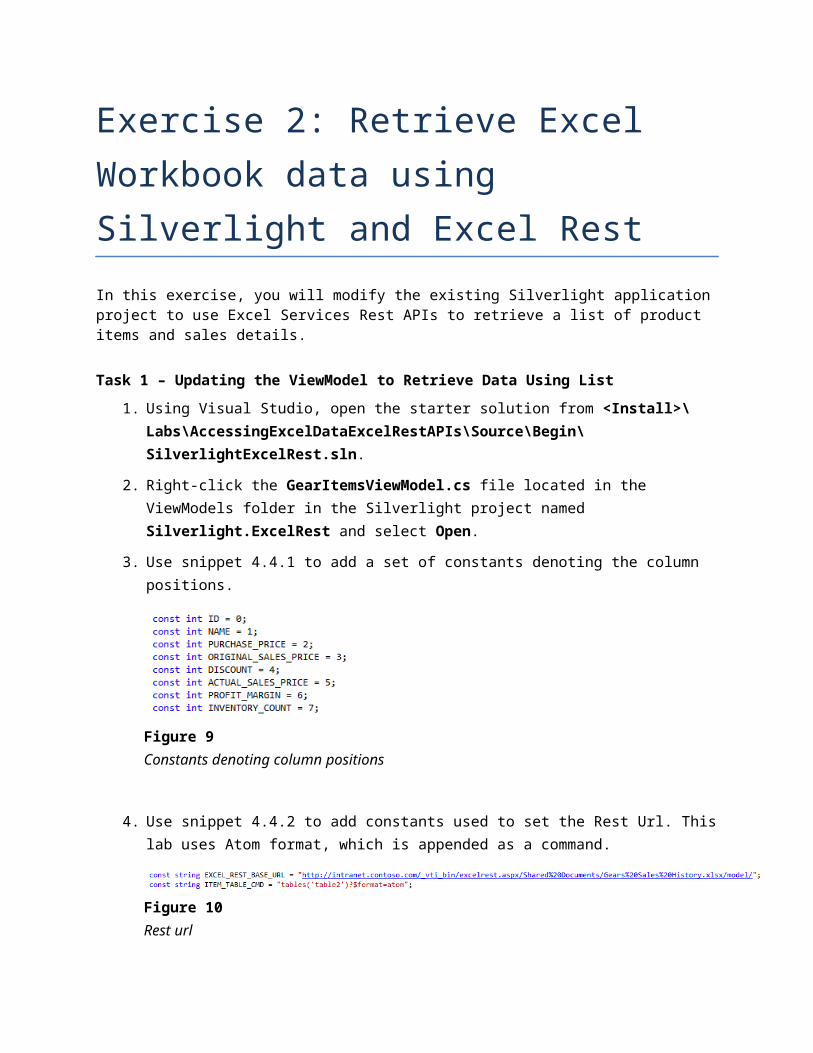
Figure 12CurrentItem public property
7. Initialize the Items collection in the class constructor.
Figure 13GearItemsViewModel method
8. Edit the GetData method using snippet 4.4.5. The GetData method clears any existing GearItems objects from the Items collection and then creates an HTTPWebRequest object. The Excel Rest APIs use the Get HTTP method. The method starts an asynchronous Get passing in the callback method. Silverlight only supports asynchronous communications.
Figure 14GetData method
9. Add a call to GetData in the class constructor.
Figure 15GearItemsViewModel method
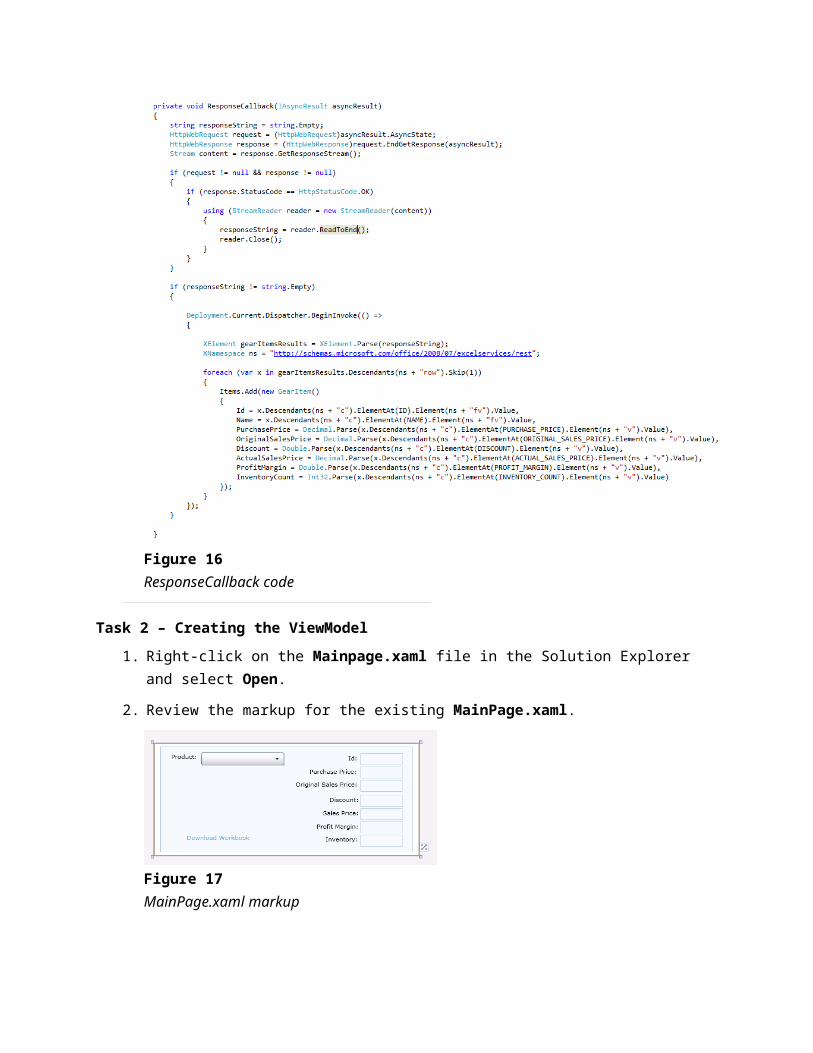
10. Edit the existing ResponseCallback method using snippet 4.4.6. The body of the ResponseCallback retrieves the response stream and reads it into a string variable. The method then uses the Dispatcher object to interact with the Items collection that will be data bound to the user interface. The response is Xml that is parsed. For each row in the response a new GearItem object is created and added to the Items collection.
Figure 16ResponseCallback code
Task 2 – Creating the ViewModel
1. Right-click on the Mainpage.xaml file in the Solution Explorer and select Open.
2. Review the markup for the existing MainPage.xaml.
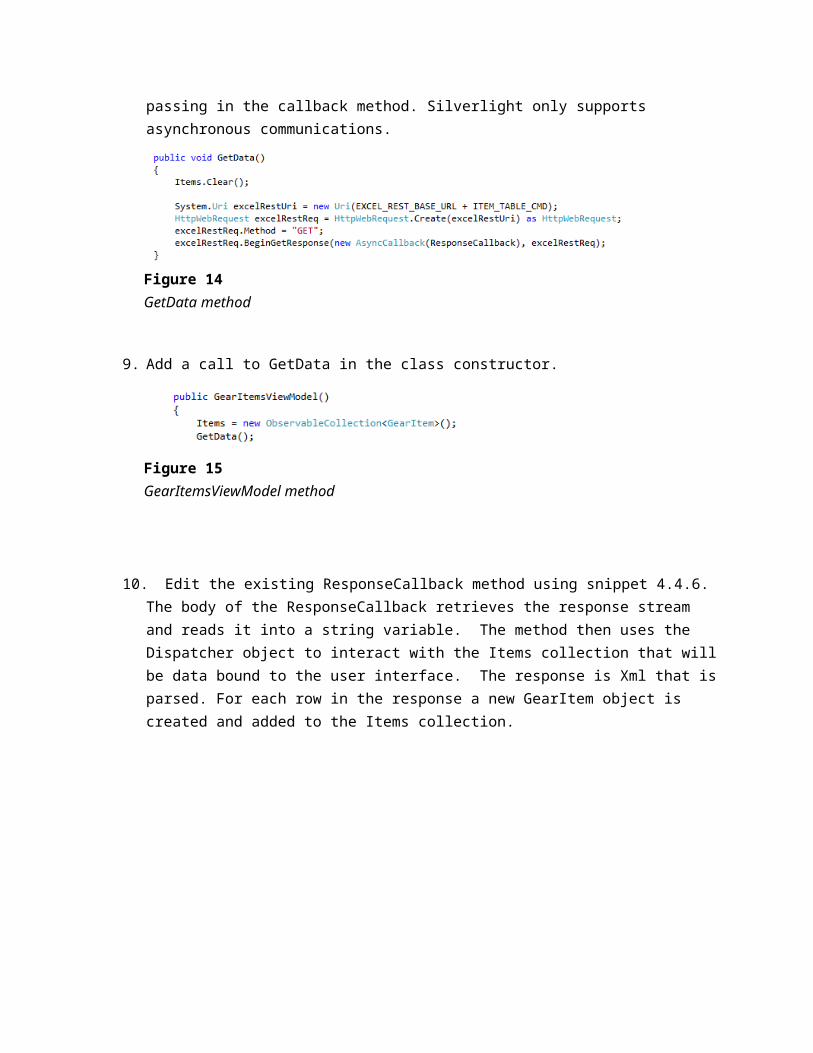
Figure 17MainPage.xaml markup
3. Notice the ExcelRestl namespace is included in the xaml.
Figure 18ExcelRestl namespace
4. This lab also uses custom formatters. The code for the custom formatters is located in the Silverlight project in the Formatter.cs file. Custom formatters are uses during data binding to format data appropriately. The formatter is included in the Xaml as a resource.
Figure 20Custom formatters
5. Notice the user interface is data bound to the Items and CurrentItem property in the application’s datacontext.
6. Right-click MainPage.xaml in the Solution Explorer and select View Code.
7. Add a private class-level variable named viewModel of type GearItemsViewModel.
8. Initalize the viewModel variable and set the DataContext to the viewModel reference in the MainPage constructor.
Figure 21MainPage method
9. Right-click the SharePoint.Client.ExcelRest project in Solution Explorer and select Set as StartUp Project.
10. Press F5 to build and deploy the solution.
11. Navigate to http://intranet.contoso.com/ExcelRestDemo.aspx using Internet Explorer.
Figure 22Product screen
12. Click the Product drop down and select a product. The product information is displayed on the right-hand side of the application. You can change the discount code but the change does not affect the calculations.
13. Click the Download Workbook link. This link uses an Excel Rest url with a format set to workbook.
Figure 23NavigateUri
Exercise 3: Display the Query Results in the Silverlight User Interface
In this exercise you will modify the existing Silverlight application to display the list of products and
product details of the currently selected product.
Task 1 – Modifying the Exiting Silverlight User Interface to Display the Query Results.
1. Right-click GetItemsViewModel.cs file in Solution Explorer and select Open.
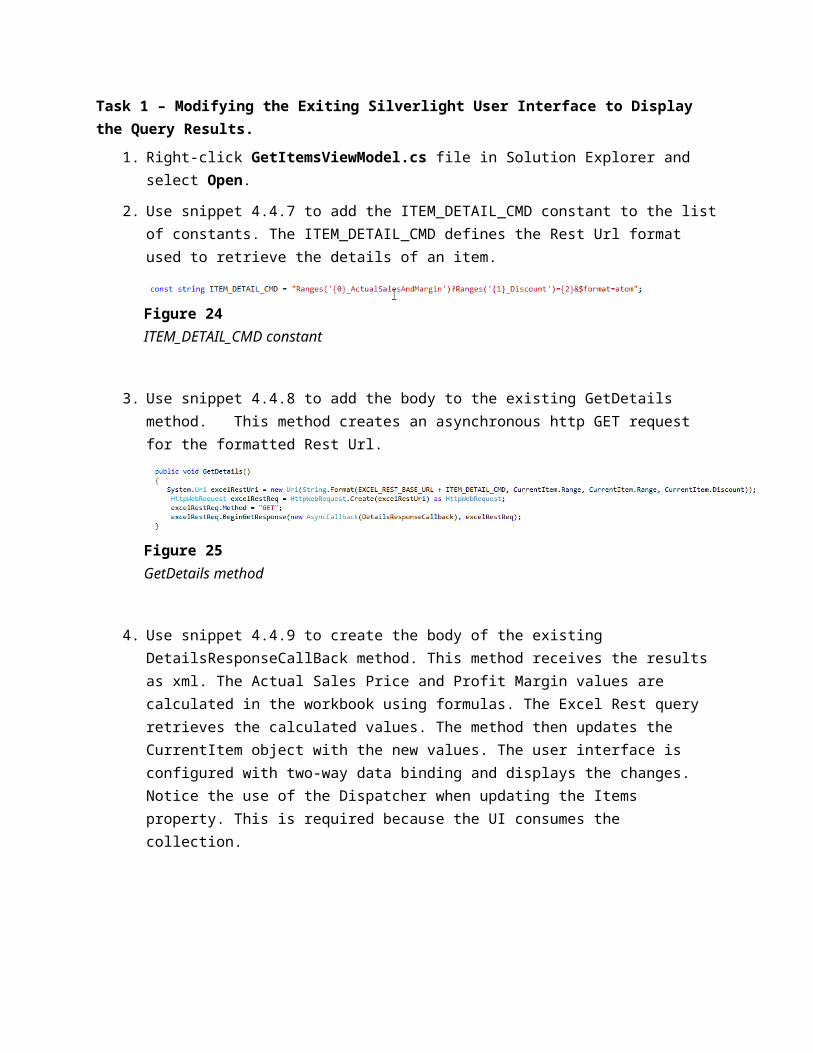
2. Use snippet 4.4.7 to add the ITEM_DETAIL_CMD constant to the list of constants. The ITEM_DETAIL_CMD defines the Rest Url format used to retrieve the details of an item.
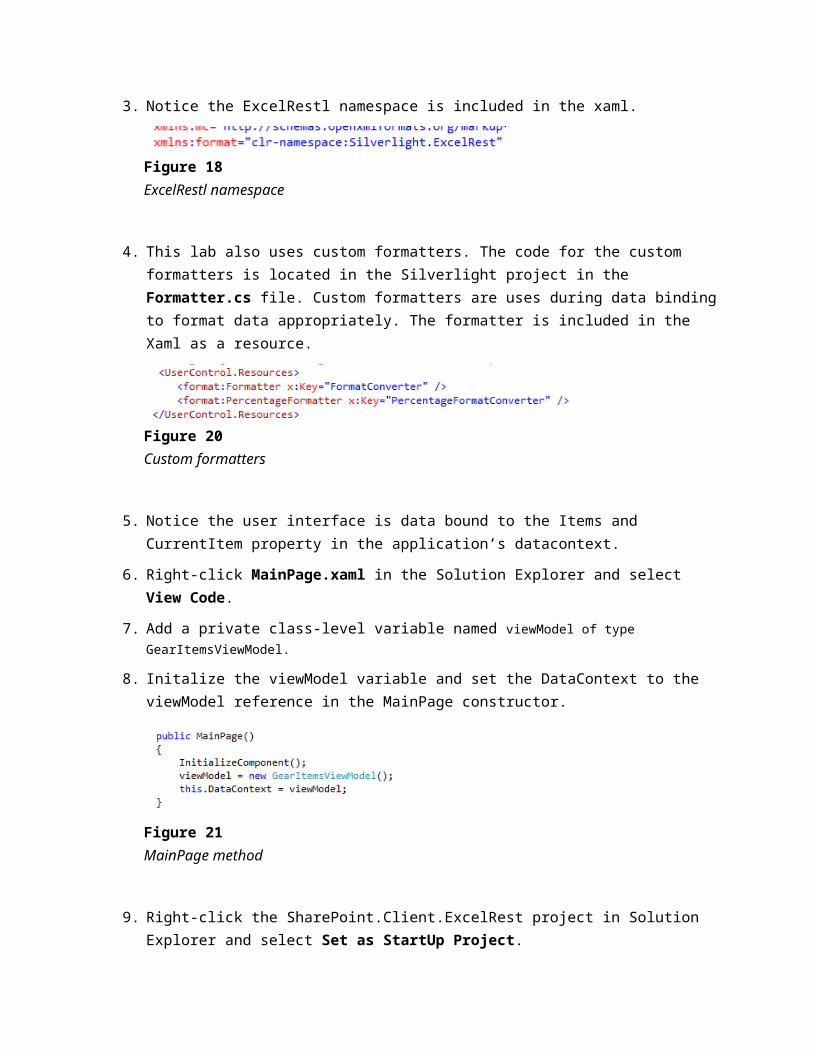
Figure 24ITEM_DETAIL_CMD constant
3. Use snippet 4.4.8 to add the body to the existing GetDetails method. This method creates an asynchronous http GET request for the formatted Rest Url.
Figure 25GetDetails method
4. Use snippet 4.4.9 to create the body of the existing DetailsResponseCallBack method. This method receives the results as xml. The Actual Sales Price and Profit Margin values are calculated in the workbook using formulas. The Excel Rest query retrieves the calculated values. The method then updates the CurrentItem object with the new values. The user interface is configured with two-way data binding and displays the changes. Notice the use of the Dispatcher when updating the Items property. This is required because the UI consumes the collection.
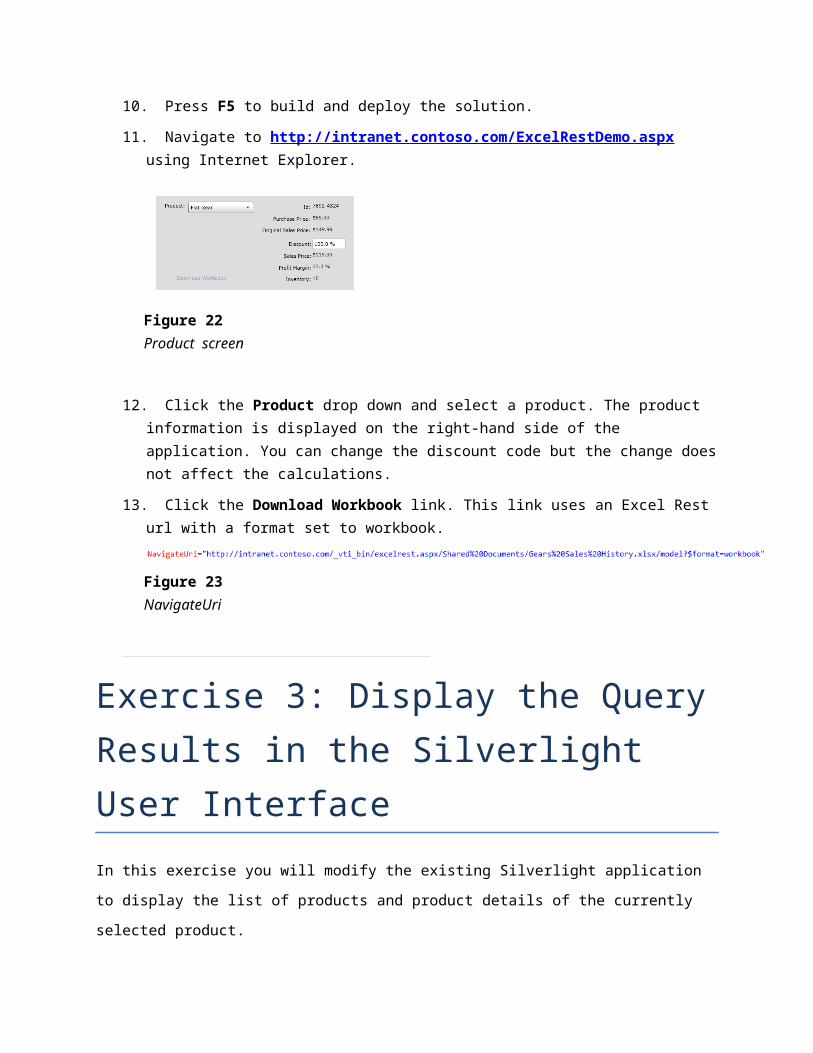
Figure 26DetailsResponseCallback method
5. Use snippet 4.4.9 to initialize the ViewModel reference and set the application’s DataContext.
Figure 27MainPage method
Task 2 – Deploying and Testing the Silverlight Application.
1. Right-click on the SharePoint.Client.ExcelRest project in Solution Explorer and select Set as StartUp Project.
2. Press F5 to build and deploy.
3. Use Internet Explorer to navigate to http://intranet.contoso.com/ExcelRestDemo.aspx
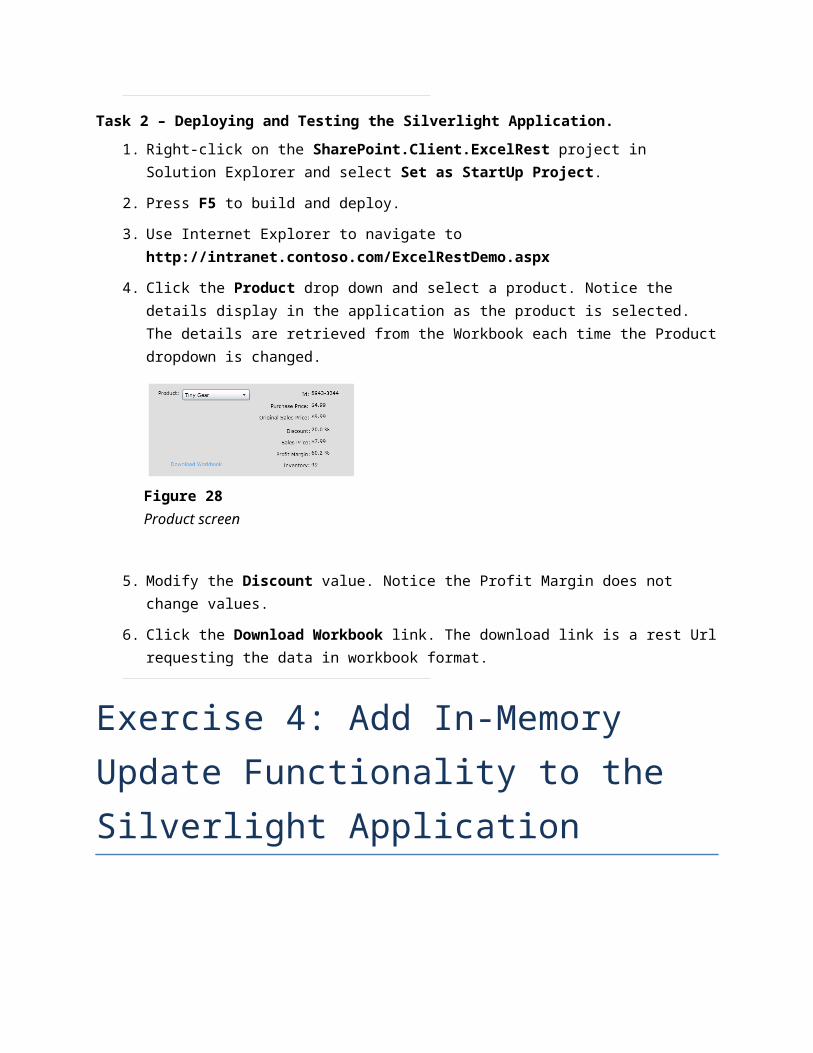
4. Click the Product drop down and select a product. Notice the details display in the application as the product is selected. The details are retrieved from the Workbook each time the Product dropdown is changed.
Figure 28Product screen
5. Modify the Discount value. Notice the Profit Margin does not change values.
6. Click the Download Workbook link. The download link is a rest Url requesting the data in workbook format.
Exercise 4: Add In-Memory Update Functionality to the Silverlight Application
In this exercise you will finish the Silverlight application. You will add functionality to update the in-memory Excel Workbook and retrieving updated calculated values.
Task 1– Updating the MainPage.xaml.cs View.
1. Right-click on MainPage.xaml in Solution Explorer and select View Code.
2. Use snippet 4.4.10 to modify the existing TextChanged event handler. This event updates the bound data in the ViewModel.
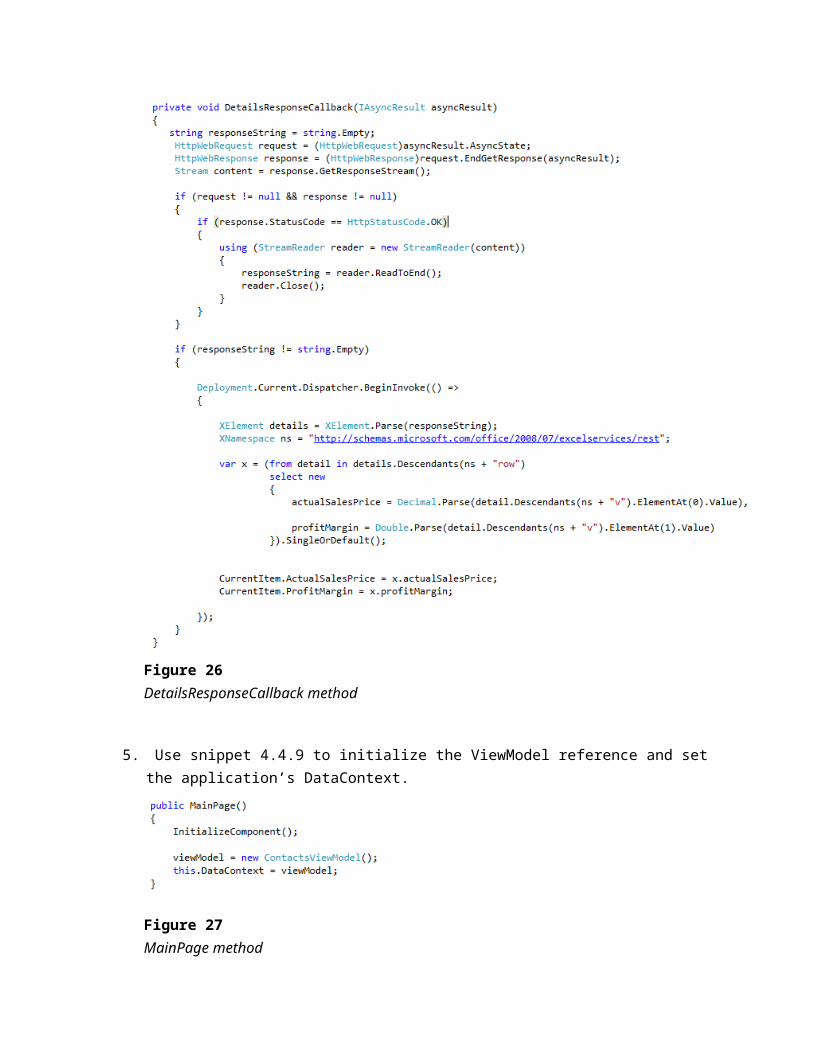
Figure 29textbox_DiscountChanged
Task 2 – Deploying and Testing the Silverlight Application.
1. Right-click on the SharePoint.Client.ExcelRest project in Solution Explorer and select Set as StartUp Project.
2. Press F5 to build and deploy.
3. Use Internet Explorer to navigate to http://intranet.contoso.com/ExcelRestDemo.aspx
4. Click the Product drop down and select a Vulcan Gear.
Figure 30Product screen
5. Change the Discount from 10 percent to 30 percent. The Sale Price changes from 188.99 to $146.99 and the Profit Margin changed from 71.8 % to 33.6%.
Figure 31
Product screen
6. The calculation of the product’s Profit Margin and Sales Price is located in the Excel Workbook and not calculated by the Silverlight application. The Url used in the GetDetails method passes in the current Discount value. The details are recalculated with the request for the details using the new Discount value.
Figure 32excelRestUri string
7. Navigate to http://intranet.contoso.com.
8. Navigate to http://intranet.contoso.com/ExcelRestDemo.aspx
Click the Product drop down and select a Vulcan Gear.
Figure 33Product screen
Notice the original 10% Discount value displays. “Updating” fields using Rest Urls do not persist to the Excel Workbook. Passing in updated values are in-memory only.
Summary
Excel Services provides a Rest API allowing developers to access data. Workbooks accessed using Rest will calculate values and applicatoins and update in-memory copies of the workbook and receive updated calculated values. The updated values do not persist in the actual workbook. Developers can easily access Excel data and create applications that display data and consume powerfull Excel functions.