Embed Size (px)
Citation preview

IS 365 – EKEDAHLBizAgi Lab 1
AbstractIn this lab, you will learn how to use the BizAgi software to model a production business process. For the purposes of this lab, assume that the production process requires the manufacture of a batch of Tennis shoes. All of the shoes manufactured in the batch are of exactly the same size and style. Thus, this is a make-to-stock process.
This lab is not graded. Instead, it is designed for you to learn the BizAgi software along with how to model a business process in preparation for completing your first assignment. You can complete the lab in class or on your own time.
Narrative of the ProcessRoughly speaking, the production process to manufacture shoes has the following steps:
Assume that an event triggers the production process. This event might be a materials requirements planning, a customer order, or something else. For the purpose of this exercise, we will treat this external event as a “black box”.
There are two actors in the production process. The production department manufactures the goods. Once the goods are manufactured, they are moved to the warehouse and placed into inventory for distribution. The warehouse also provides the raw materials needed to produce the finished goods.
The production process itself is made up of several steps listed below.o The production manager must first authorize the order for production to make sure that
the request is valid and necessary. If the production is deemed necessary, the request is passed on to the production line manager. If it is not necessary, then the process ends.
o The production line manager must then evaluate the production order to make sure that all the requirements can be satisfied. These requirements include making sure that raw materials, labor, and the production line are available. If the constrains are not met, the reasons are noted and the request is returned to the production manager. Once the constraints are met, the order is released to production and the production itself is scheduled.
o When the order is released to production, documents are prepared and sent to the warehouse. The warehouse pulls all of the raw materials from inventory.
Page 1 of 12

o Next, the goods are produced.
o The production manager then confirms that production is complete.
o The finished goods are transferred from the production department to the warehouse.
o The warehouse then records the receipt of goods into inventory.
Lab StepsThe lab is made up several hands-on steps. As you complete these steps, in addition to following the instructions, make sure that you understand the process that you are depicting, the actors in the process, and the decisions being made. Note that the hands-on steps that you complete appear as numbered lists.
To create a new process diagram:In this sequence of steps, you will create a new process diagram.
1. Start the BizAgi software. In the College of Business labs, the application should appear on the Start menu. Click Start, All Programs, BizAgi, BizAgi Process Modeler.
Note: you may be prompted to upgrade to a new software version. If so, click the Later button if you are in the College of Business labs, as students are not allowed to install software. In addition, you might be asked to register the software. Do not try to register the software in the labs either. Do feel free to register or upgrade the software if you are working at home. Also, feel free to upgrade the software to the current version if you are working at home. They will not send you junk mail.
2. Depending on your configuration, you will either see an introductory screen, or a new default process will be automatically created. If you do not see a default process created as shown in Figure 1, click File, New, and click Blank Model from the template.
The BizAgi process modeler should appear as shown in Figure 1.
Page 2 of 12
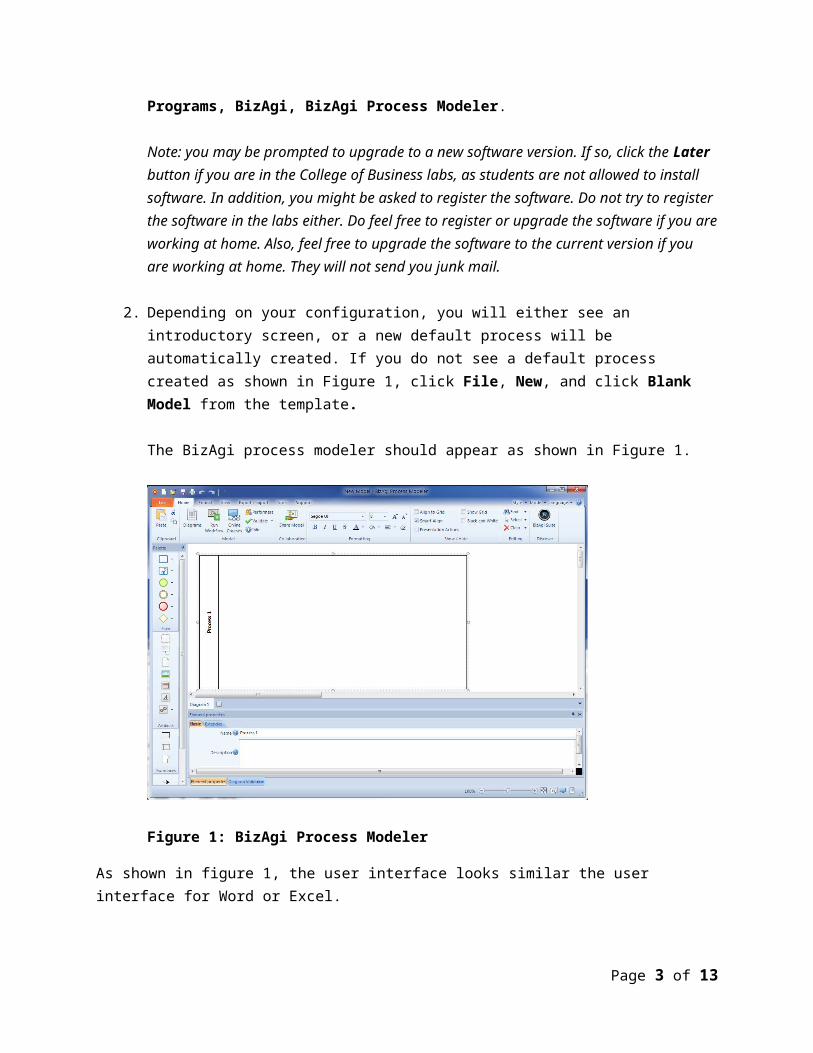
Figure 1: BizAgi Process Modeler
As shown in figure 1, the user interface looks similar the user interface for Word or Excel.
The ribbon appears across the top of the screen.
The palette contains the icons that you draw on the process window.
You set the properties for various object using the properties window appearing along the bottom of the screen.
In the next set of steps, you will create the swim lanes that will depict the actors in the process.
To create the pool and swim lanes:1. Select the swim pool by clicking on the pool’s border. Small circles should surround the pool.
These small circle are called sizing handles.
2. In the Element properties section at the bottom of the screen, enter the text Produce Goods in the Name property. Make sure that the Basic tab is selected. Click again in the main window and the title should change from Process 1 to Produce Goods. If the Element properties section does not appear, right-click on a region in the main screen. In the pop-up menu that appears, click Main Process properties. You can also press F4.
3. To create the first swim lane, drag the Lane icon from the Palette (window on the left) to the main screen. When you do, a swim lane named Lane1 should be created. The Lane Icon appears
Page 3 of 12

in the Swimlanes section of the palette.
4. Next, rename the swim lane. Right-click on the text in swim lane, if necessary. A popup menu should appear. In the Popup menu, click Edit Text. Type the text Production.
5. Create a second swim lane named Warehouse. You can change the height of a swim lane by dragging the horizontal line between the lanes up or down. When complete, your screen should look similar to the one in Figure 2:
Figure 2: Process with two swim lanes
Next you will begin to create the process diagram itself. To begin, you will create the Start event. The start event is depicted by the green circle in the palette.
To create the start event:1. Click and drag the green circle from the Palette to the Production swim lane in the main
screen. When you do, the event will appear in the Production swim lane. In addition, sizing handles will appear indicating that the object is selected. Finally, the objects will also appear indicating the process events and activities that are possible next in the sequence. The following figure shows the Start event selected:
Page 4 of 12

Figure 3: Creating a start event
To create activities:Next, you will begin to create the activities that make up the production process. These activities consist of the following steps:
Authorize production. The starting event is the request for production. This request comes from an external source such as a customer order, or a make to stock order.
When the request arrives, the production manager authorizes the production order. This step is called a planned order and results in a production order. A production order is a commitment to produce a specific quantity of goods by a certain date.
To create an activityNext, you will create activity to authorize the production order. This activity is performed by the production manager.
1. Make sure that the start event that you created in the previous steps is active. Sizing handles should appear along with the possible BPMN elements that can occur next. If the sizing handles are not active, click the start event that you just created to activate it.
2. Click the Task icon to the right of the start event. A task is created named Task 1. The object is active because sizing handles appear. Note that the task that you just created obscures the start event that you created previously.
3. Drag the task to the right so that it no longer obscures the start event.
4. Next, you will rename the task. Make sure that the task named Task 1 is selected. Again, sizing handles should appear. In the Element properties section, enter Authorize production replacing the text Task 1. When you click outside of the Name property, the text in the activity will change. At this point, you screen should look similar to Figure 4:
Page 5 of 12

Figure 4: Creating a task
To create a gateway:Next, you will create a gateway. Once production is authorized, the responsible line manager must verify that the constraints are met. These constraints are as follows:
There must be available line capacity to produce the order.
Raw materials must be available.
There must be sufficient labor capacity to produce the order.
1. Click the Authorize production activity that you created previously. Again, sizing handles should appear.
2. Click on the Gateway icon (diamond symbol in the Flow section of the palette) to create it. The gateway should appear along with the corresponding connector. Move the gateway to the right so that it does not obscure the Authorize production activity.
3. Name the gateway Constraints met? Note that the process depiction is simplified here. In practice, we might depict each constraint individually, and make separate decisions.
To create an event:We simplify the process in this example for brevity. If the constraints are met, then the order is released to production. If the constraints are not met, then, we wait on an intermediate event to occur.
Page 6 of 12

Realistically, this event will occur when the human resources are available, the raw materials are available, and the production equipment is available.
1. Using the following figure as your guide, create an intermediate event and name it Wait for constraint fulfillment.
2. Next, create an activity named Order release.
3. You might need to manually create the connectors between the objects. To do this, drag the Sequence flow icon to the main screen. Drag the end points from one object to another, as necessary. When complete, your process model should look similar to Figure 5:
Figure 5: creating an event.
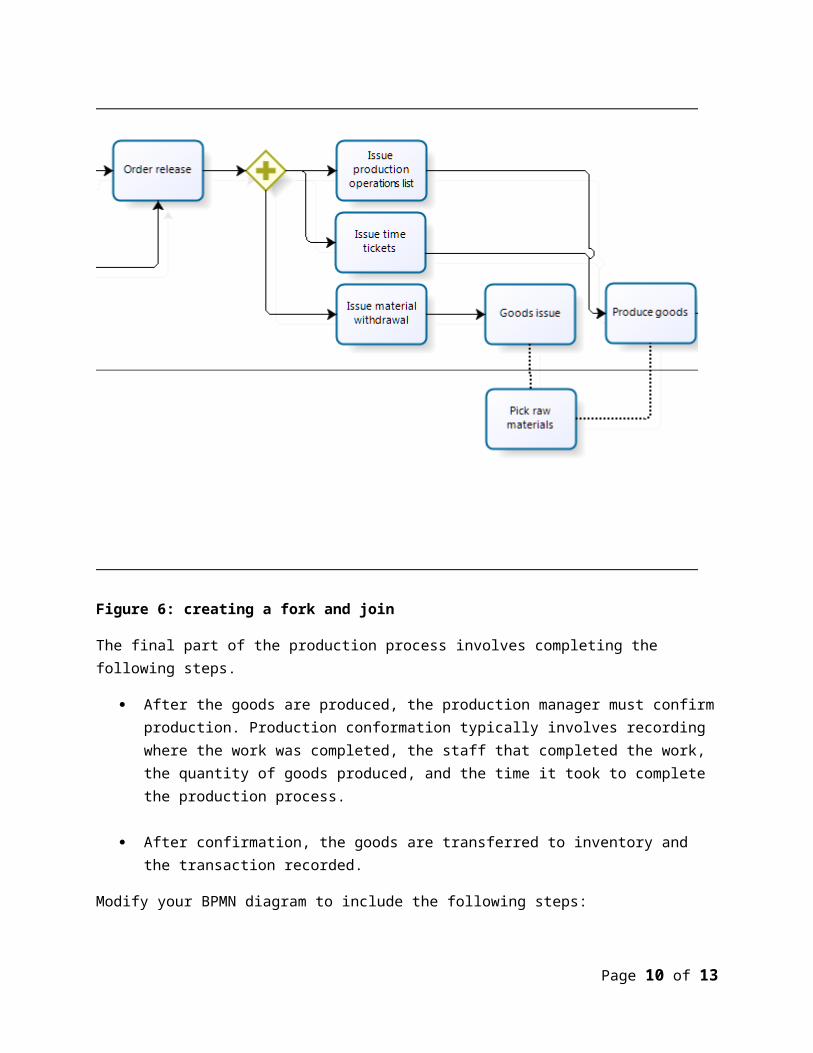
The outcome of the order release is several documents including the following:
Material withdrawal slips are issued to get raw materials from the warehouse.
Time tickets are issued to record the amount of time used in the production process.
Production operation lists are issued to describe the operations that need to be completed in the production process.
All of the above events are carried out in parallel. Thus, you will create a parallel split and join to depict the process. Once all of these documents are completed, process continues.
Page 7 of 12

To create splits and joins:1. Create the following symbols as shown in the Figure 6.
2. To create the parallel fork, first create the Gateway. Then right-click on the Gateway that you just created and select Gateway Type from the context menu. Another menu appears. Select Parallel Gateway.
3. Create the activities as you see fit. Note that I did not create the parallel join. This activity is implied, which is a common practice. As you complete the lab, you might consider adding the parallel join to better understand how to use the connectors.
Figure 6: creating a fork and join
The final part of the production process involves completing the following steps.
After the goods are produced, the production manager must confirm production. Production conformation typically involves recording where the work was completed, the staff that completed the work, the quantity of goods produced, and the time it took to complete the
Page 8 of 12

production process.
After confirmation, the goods are transferred to inventory and the transaction recorded.
Modify your BPMN diagram to include the following steps:
Figure 7: finishing the production diagram.
Creating AnnotationsFinally, you will modify the BPMN diagram to include an annotation.
1. Using the annotation item in the Palette, create the annotation and connector as shown in the following figure:
Page 9 of 12
Page 10 of 12

Try it yourselfIn this final part of the lab, you will create a BPMN diagram from the following narrative text:
Suppose that you are purchasing a house and plan on obtaining a loan. As you might guess, this is a complicated process that is described in the following word problem.
You begin with a purchase contract between buyer and seller.
You next step is to meet with financial institution. In this case, we will simplify the process and assume that you are working with a traditional bank and obtaining a conventional loan.
During the first meeting, you report your income, assets, and liabilities.
The bank “pulls” your credit. If your credit score is greater than 750 your request is accepted. If not, you are immediately rejected. (Realistically, the process is more complex.)
In parallel, the following steps occur:o The bank orders an appraisal so as to independently asses the home’s actual value.o You order an inspection to make sure that there are no material defects in the house.o The bank orders a title search which is processed by another party “the title (escrow)
company”.
If the appraisal estimates the home’s value at less than the purchase price, you as the buyer, have the opportunity to increase the down payment, or cancel the purchase. No decisions need to be made if the appraisal is greater than the purchase price.
You receive the inspection report. Based on the findings, you cano Do nothing and the process continues.o Request that the seller fix material defects. The seller can agree to make the repairs, or
cancel the contract.
For our exercise, we will assume that the results of the title search are acceptable.
Next, the entire application is forwarded to “underwriting” at the bank for final approval. Underwriting might approve the loan or request more documentation.
Once, the loan is approved, documents are sent to the funding office who actually makes final approval on the loan.
You sign all the paperwork at escrow.
Page 11 of 12

The bank funds the loan and the deed is then recorded.
Page 12 of 12