Embed Size (px)
Citation preview
ABL-6ABL-6
AbleAbleMarlinspikeMarlinspike
Instructors: George Crowl
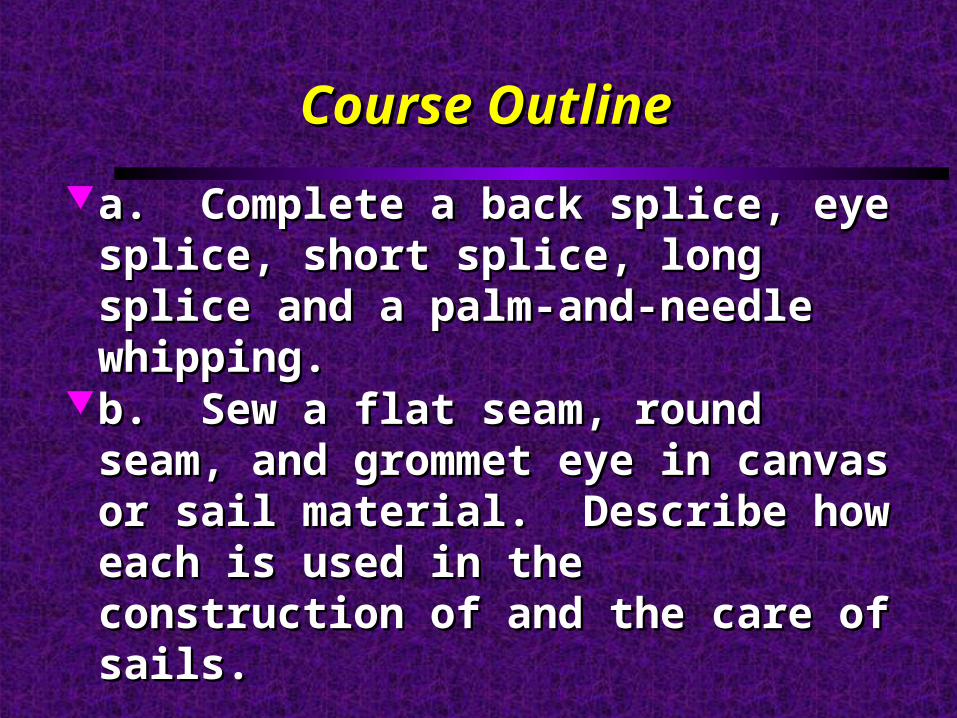
Course OutlineCourse Outline
a. Complete a back splice, eye splice, short a. Complete a back splice, eye splice, short splice, long splice and a palm-and-needle splice, long splice and a palm-and-needle whipping.whipping.
b. Sew a flat seam, round seam, and grommet b. Sew a flat seam, round seam, and grommet eye in canvas or sail material. Describe how eye in canvas or sail material. Describe how each is used in the construction of and the care each is used in the construction of and the care of sails. of sails.
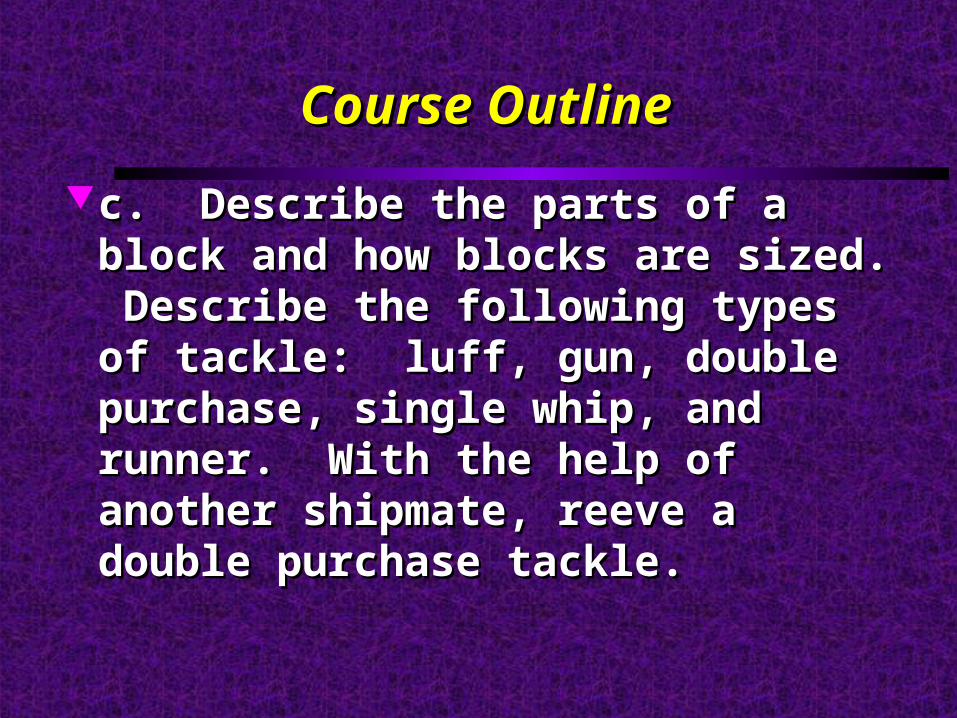
Course OutlineCourse Outline
c. Describe the parts of a block and how blocks c. Describe the parts of a block and how blocks are sized. Describe the following types of are sized. Describe the following types of tackle: luff, gun, double purchase, single whip, tackle: luff, gun, double purchase, single whip, and runner. With the help of another shipmate, and runner. With the help of another shipmate, reeve a double purchase tackle. reeve a double purchase tackle.
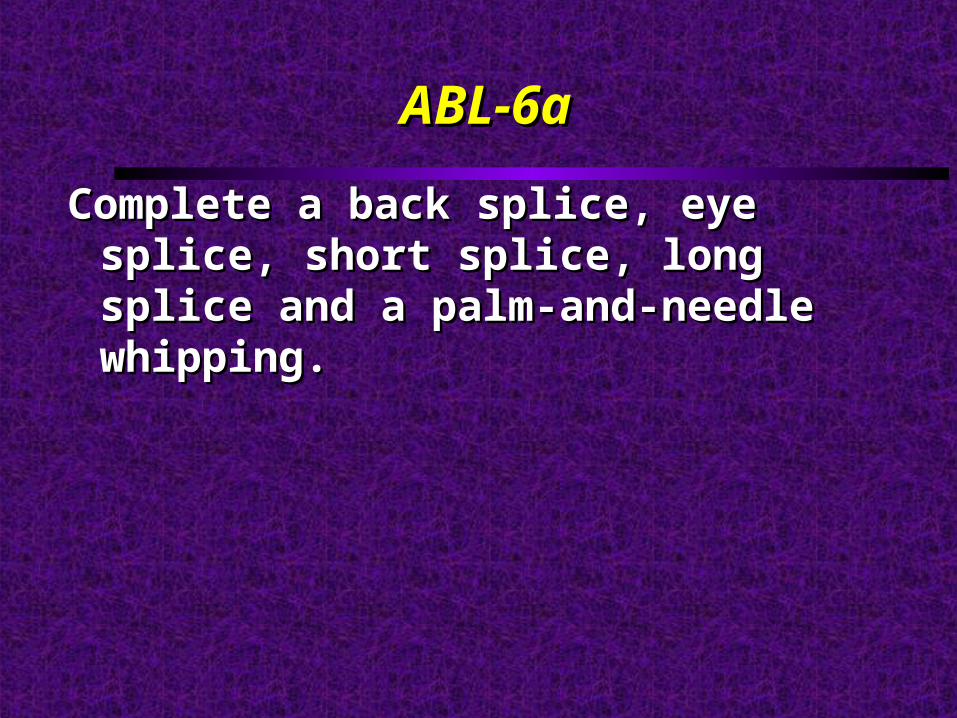
ABL-6aABL-6a
Complete a back splice, eye splice, short splice, Complete a back splice, eye splice, short splice, long splice and a palm-and-needle whipping. long splice and a palm-and-needle whipping.

SplicesSplices
We will work from simplest to more difficultWe will work from simplest to more difficultShort spliceShort spliceEye spliceEye spliceBack spliceBack spliceLong spliceLong spliceAll use three-strand laid ropeAll use three-strand laid ropeSplicing double braided line is a Quartermaster Splicing double braided line is a Quartermaster
tasktask
Short Splice (1)Short Splice (1)
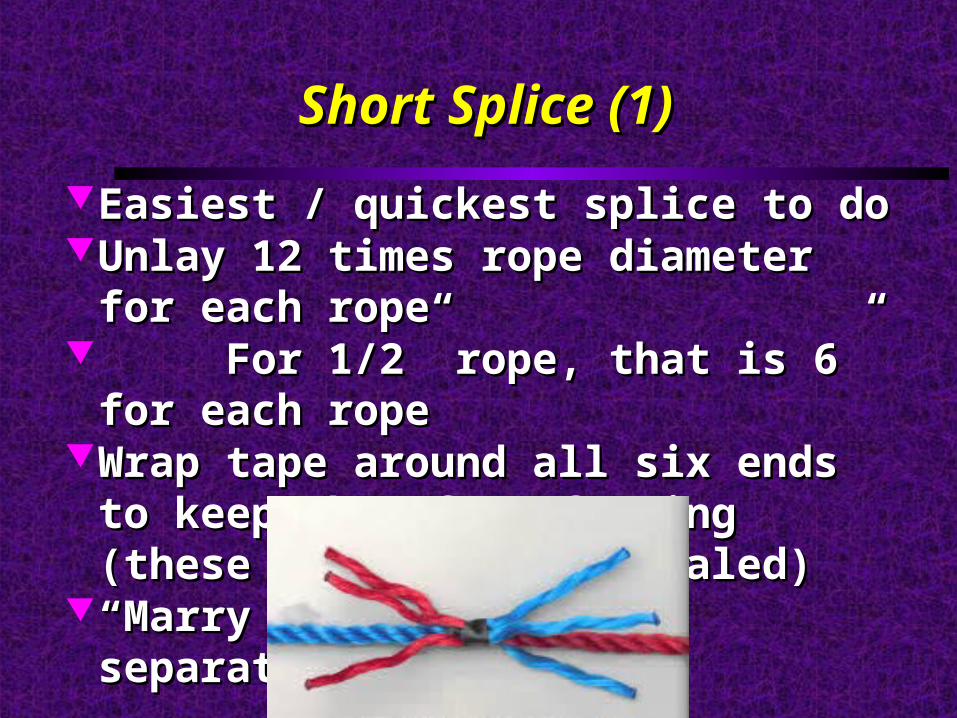
Easiest / quickest splice to doEasiest / quickest splice to doUnlay 12 times rope diameter for each ropeUnlay 12 times rope diameter for each rope For 1/2” rope, that is 6” for each ropeFor 1/2” rope, that is 6” for each ropeWrap tape around all six ends to keep them from Wrap tape around all six ends to keep them from
fraying (these ends are heat sealed)fraying (these ends are heat sealed)““Marry” them by sliding separated ends togetherMarry” them by sliding separated ends together
Short Splice (2)Short Splice (2)
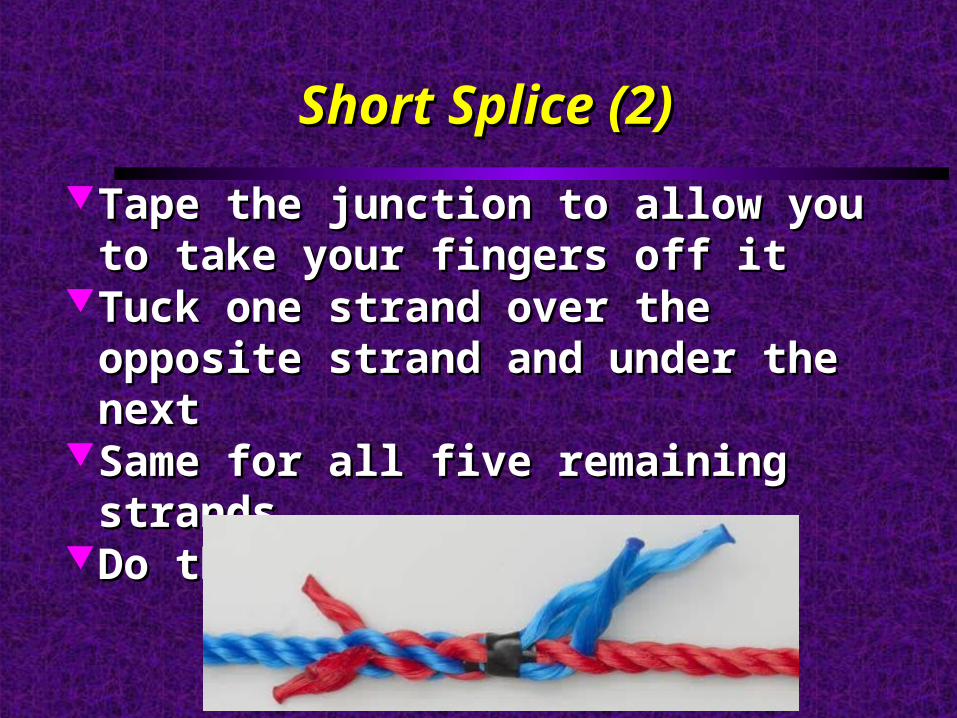
Tape the junction to allow you to take your Tape the junction to allow you to take your fingers off itfingers off it
Tuck one strand over the opposite strand and Tuck one strand over the opposite strand and under the nextunder the next
Same for all five remaining strandsSame for all five remaining strandsDo that 2-3 more timesDo that 2-3 more times
Short Splice (3)Short Splice (3)
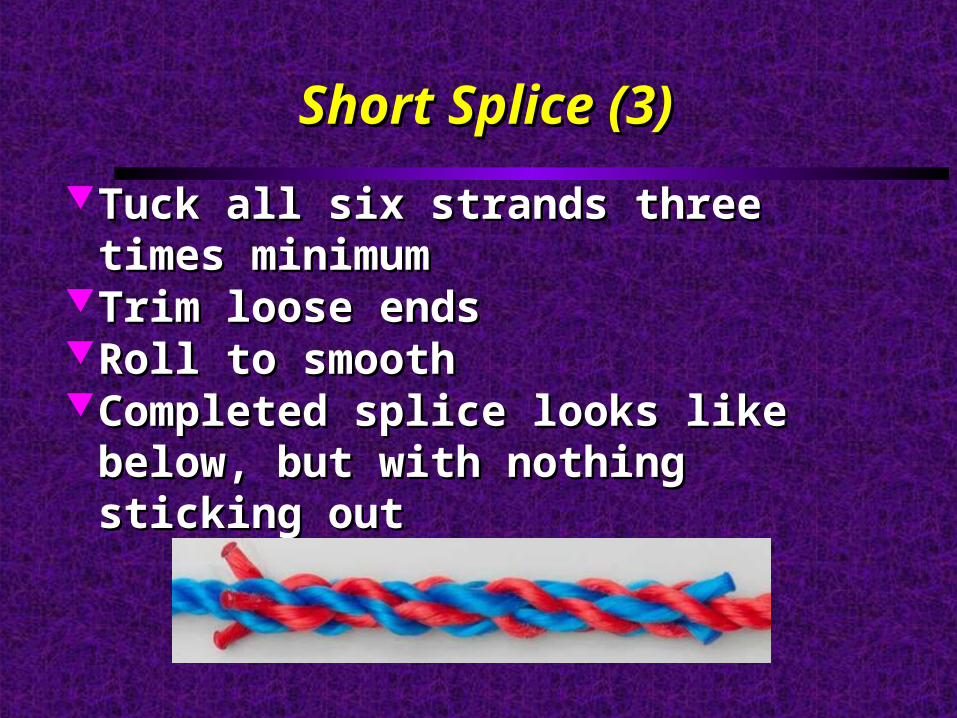
Tuck all six strands three times minimumTuck all six strands three times minimumTrim loose endsTrim loose endsRoll to smoothRoll to smoothCompleted splice looks like below, but with Completed splice looks like below, but with
nothing sticking outnothing sticking out

Short Splice VideoShort Splice Video
Video: Video: www.animatedknots.com/spliceshort
Eye Splice (1)Eye Splice (1)
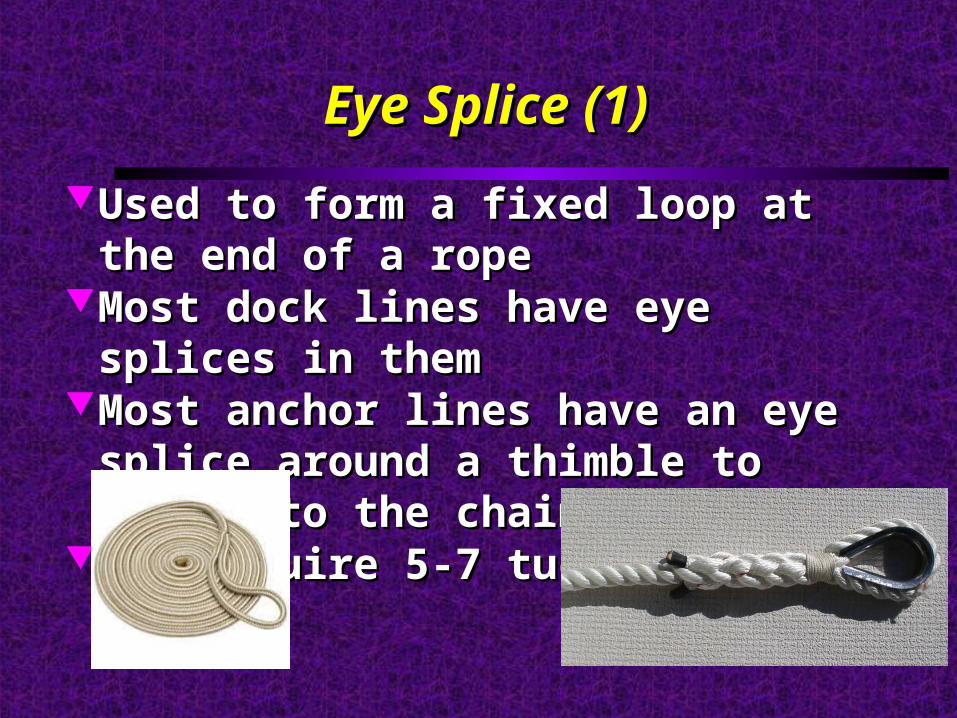
Used to form a fixed loop at the end of a ropeUsed to form a fixed loop at the end of a ropeMost dock lines have eye splices in themMost dock lines have eye splices in themMost anchor lines have an eye splice around a Most anchor lines have an eye splice around a
thimble to attach to the chainthimble to attach to the chainMay require 5-7 tucks, not 3May require 5-7 tucks, not 3
Eye Splice (2)Eye Splice (2)
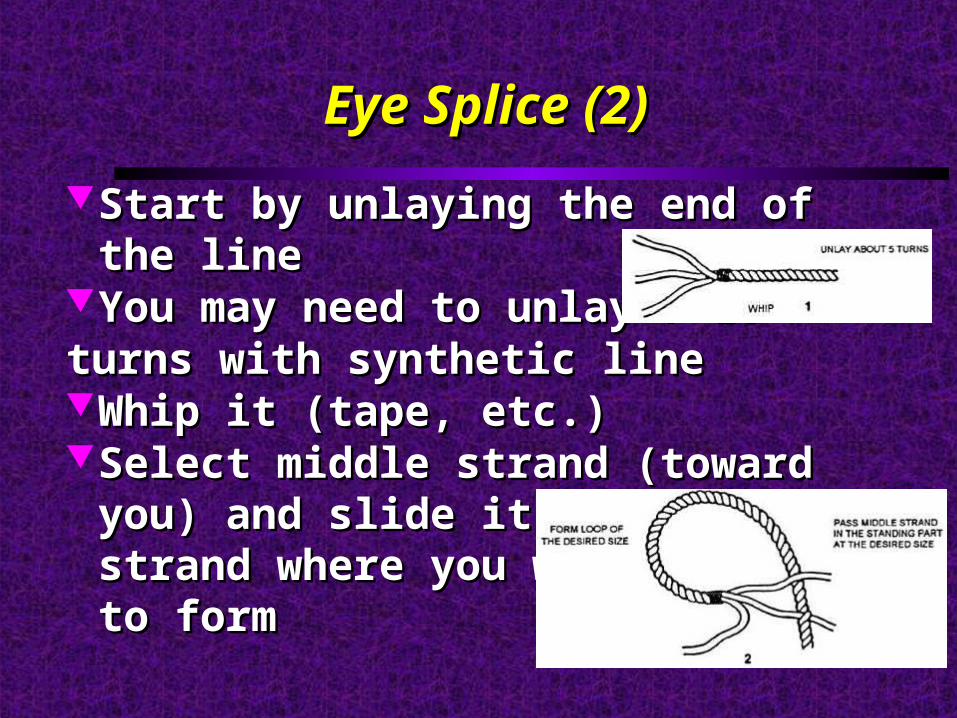
Start by unlaying the end of the lineStart by unlaying the end of the lineYou may need to unlay 7-10 You may need to unlay 7-10 turns with synthetic lineturns with synthetic lineWhip it (tape, etc.)Whip it (tape, etc.)Select middle strand (toward you) and slide it Select middle strand (toward you) and slide it
under the top strand where you want the loop to under the top strand where you want the loop to formform

Eye Splice (3)Eye Splice (3)
Pass top strand under next strandPass top strand under next strand
Pass bottom strand under lastPass bottom strand under lastremaining strand in standingremaining strand in standingpartpart

Eye Splice (4)Eye Splice (4)
Tuck three strands into the standing part Tuck three strands into the standing part as in the short spliceas in the short spliceWith synthetic line and critical splices,With synthetic line and critical splices,make more tucks!make more tucks!

Eye Splice VideoEye Splice Video
Video: Video: www.animatedknots.com/splice/
Back Splice (1)Back Splice (1)
Also called an end spliceAlso called an end spliceA more stable rope end than a whippingA more stable rope end than a whipping Is large like a short splice, therefore not good for Is large like a short splice, therefore not good for
a rope end that has to go through a blocka rope end that has to go through a blockRelatively simple to doRelatively simple to do
Back Splice (2)Back Splice (2)
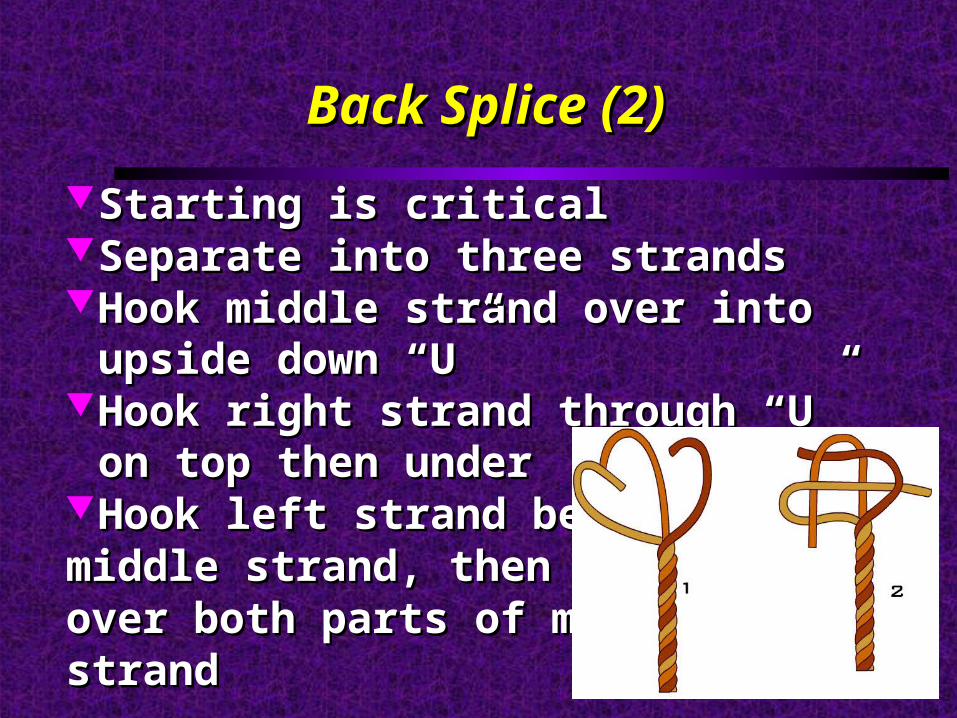
Starting is criticalStarting is criticalSeparate into three strandsSeparate into three strandsHook middle strand over into upside down “U”Hook middle strand over into upside down “U”Hook right strand through “U” on top then underHook right strand through “U” on top then underHook left strand behindHook left strand behindmiddle strand, then up and middle strand, then up and over both parts of middleover both parts of middlestrandstrand
Back Splice (3)Back Splice (3)
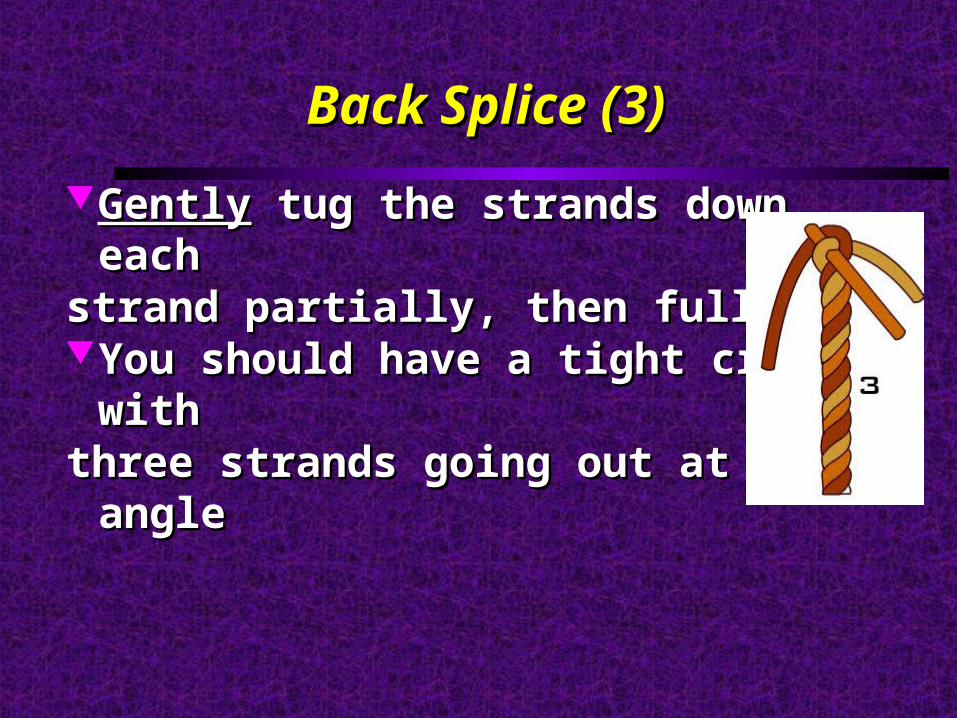
GentlyGently tug the strands down, each tug the strands down, eachstrand partially, then fullystrand partially, then fullyYou should have a tight crown, withYou should have a tight crown, withthree strands going out at 120° anglethree strands going out at 120° angle
Back Splice (4)Back Splice (4)
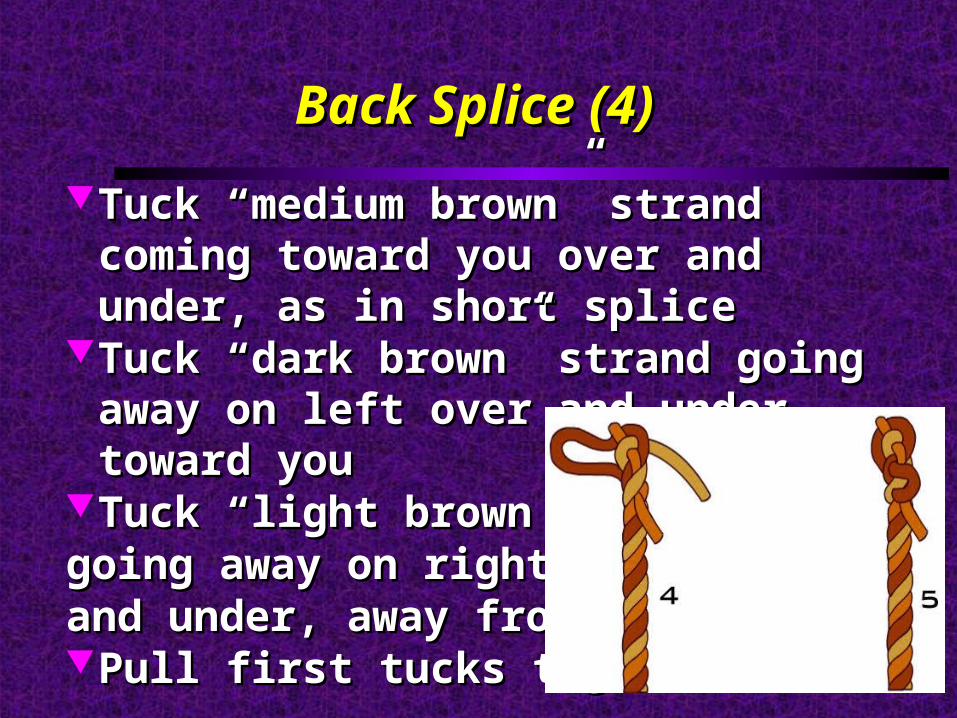
Tuck “medium brown” strand coming toward Tuck “medium brown” strand coming toward you over and under, as in short spliceyou over and under, as in short splice
Tuck “dark brown” strand going away on left Tuck “dark brown” strand going away on left over and under, toward youover and under, toward you
Tuck “light brown” strandTuck “light brown” strandgoing away on right overgoing away on right overand under, away from youand under, away from youPull first tucks tightPull first tucks tight

Back Splice (5)Back Splice (5)
Continue tucking, at least twice moreContinue tucking, at least twice moreTotal of three or more tucks for each Total of three or more tucks for each strandstrandFinish the ends of the strands as you Finish the ends of the strands as you would for a short splicewould for a short splice
Back Splice VideoBack Splice Video
Video: Video: www.animatedknots.com/backsplice/
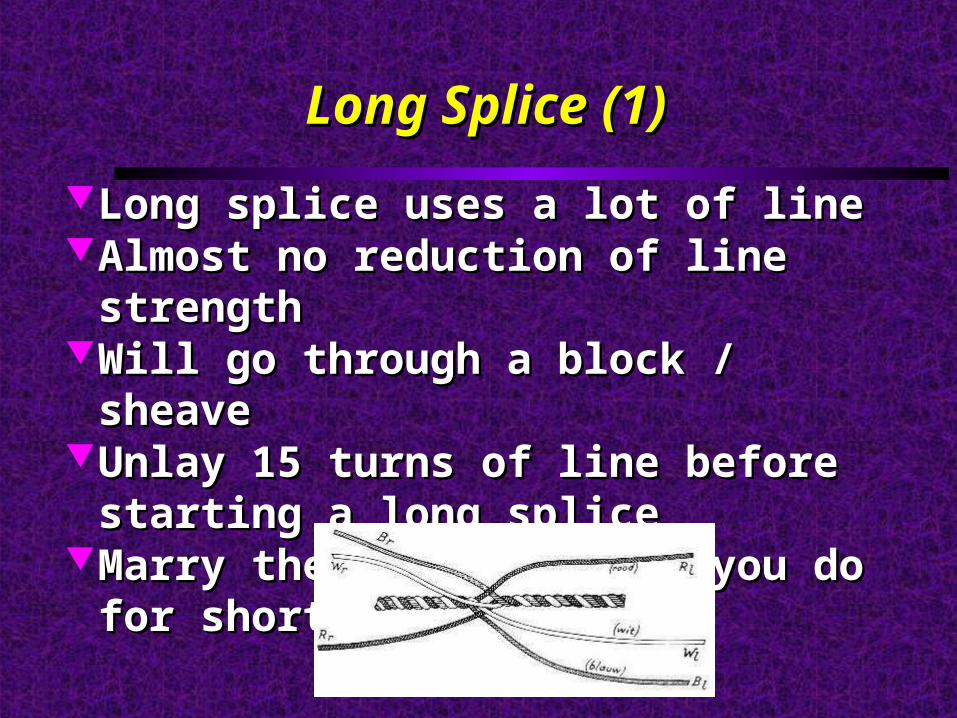
Long Splice (1)Long Splice (1)
Long splice uses a lot of lineLong splice uses a lot of lineAlmost no reduction of line strengthAlmost no reduction of line strengthWill go through a block / sheaveWill go through a block / sheaveUnlay 15 turns of line before starting a long Unlay 15 turns of line before starting a long
splicespliceMarry the lines just as you do for short spliceMarry the lines just as you do for short splice
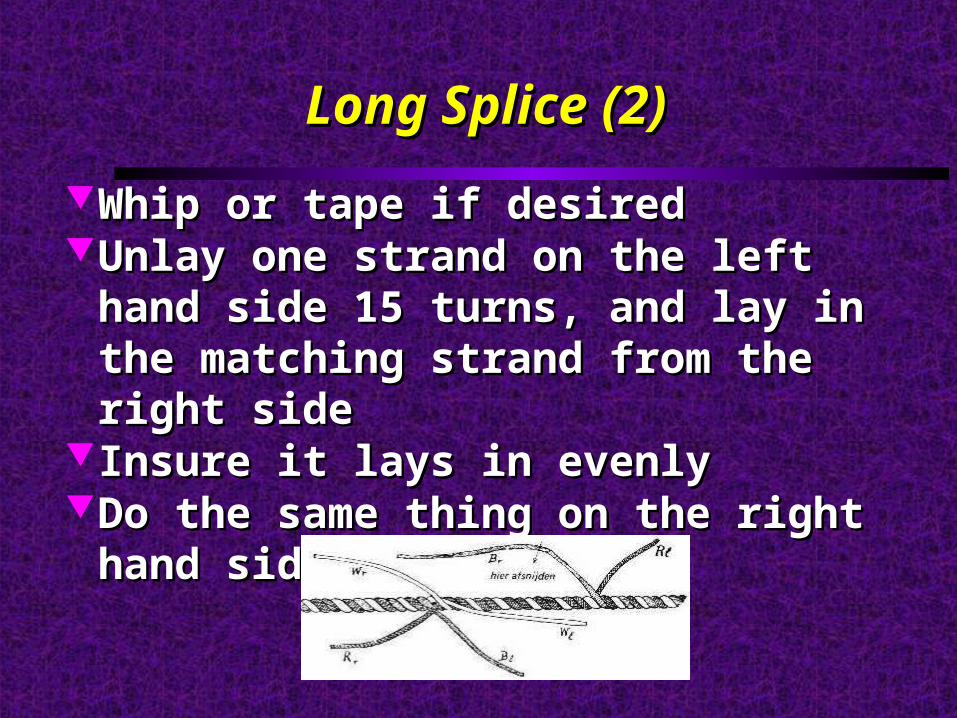
Long Splice (2)Long Splice (2)
Whip or tape if desiredWhip or tape if desiredUnlay one strand on the left hand side 15 turns, Unlay one strand on the left hand side 15 turns,
and lay in the matching strand from the right and lay in the matching strand from the right sideside
Insure it lays in evenlyInsure it lays in evenlyDo the same thing on the right hand sideDo the same thing on the right hand side
Long Splice (3)Long Splice (3)
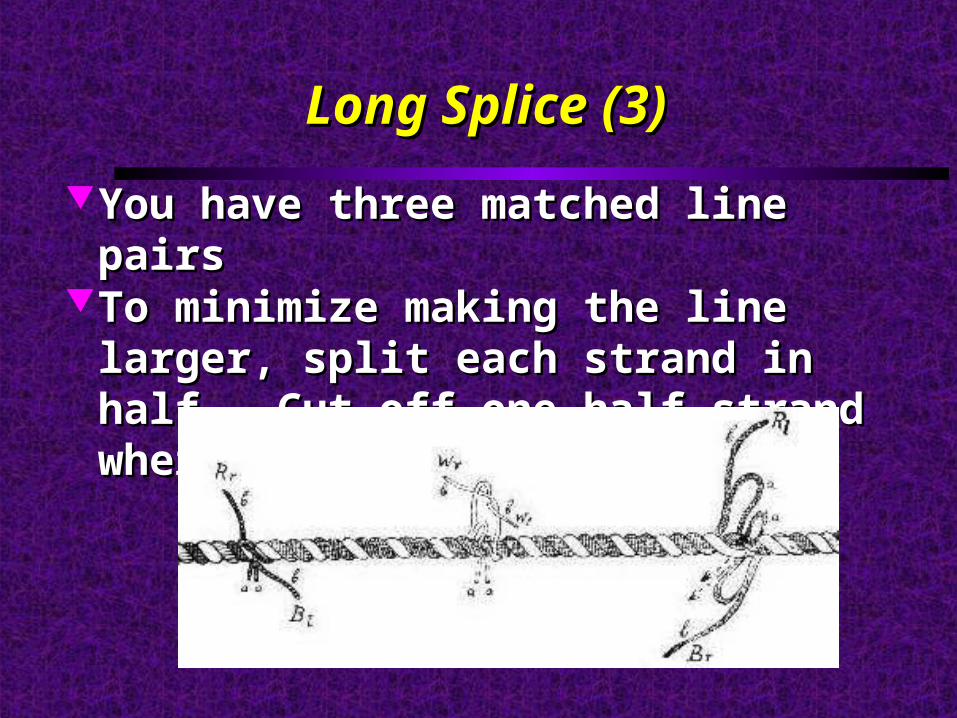
You have three matched line pairsYou have three matched line pairsTo minimize making the line larger, split each To minimize making the line larger, split each
strand in half. Cut off one half strand where they strand in half. Cut off one half strand where they will join.will join.
Long Splice (4)Long Splice (4)
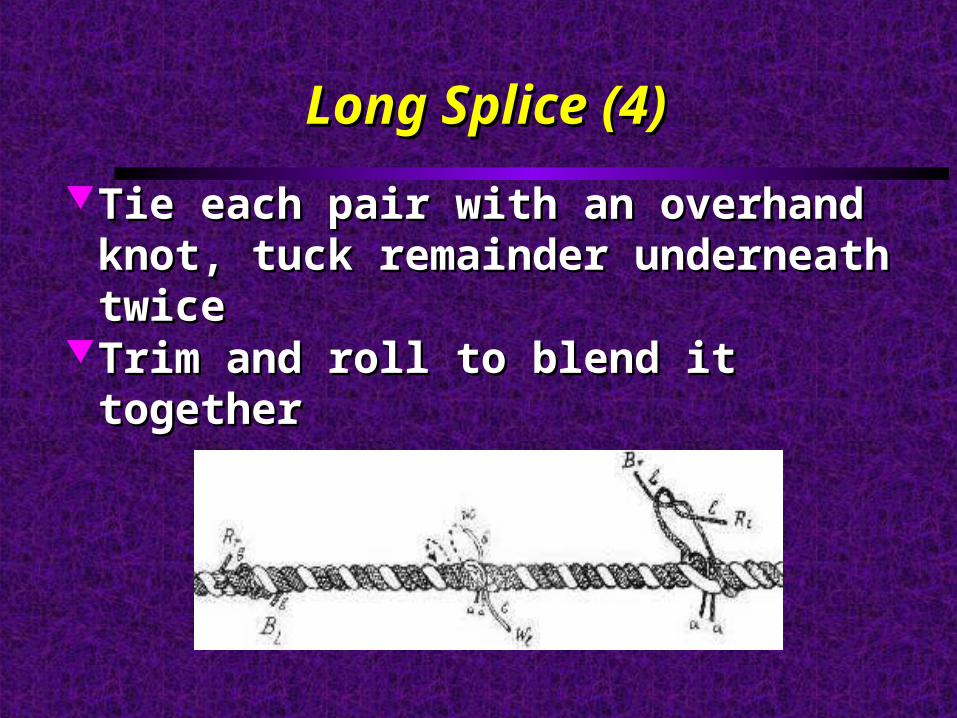
Tie each pair with an overhand knot, tuck Tie each pair with an overhand knot, tuck remainder underneath twiceremainder underneath twice
Trim and roll to blend it togetherTrim and roll to blend it together
Long Splice Alternate InstructionsLong Splice Alternate Instructions
www.samsonropes.com/Documents/Splicewww.samsonropes.com/Documents/Splice%20Instructions/3Strand_C1_Long%20Instructions/3Strand_C1_Long%20Splice_AUG2012_WEB.pdf %20Splice_AUG2012_WEB.pdf
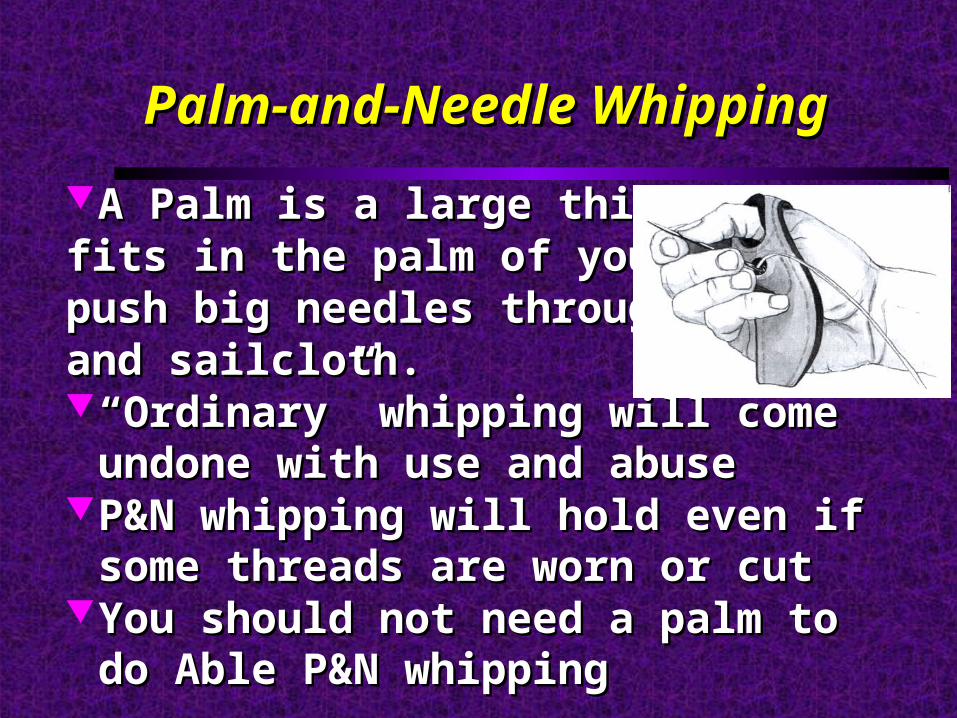
Palm-and-Needle WhippingPalm-and-Needle Whipping
A Palm is a large thimble that A Palm is a large thimble that fits in the palm of your hand to fits in the palm of your hand to push big needles through rope push big needles through rope and sailcloth. and sailcloth. ““Ordinary” whipping will come undone with use Ordinary” whipping will come undone with use
and abuseand abuseP&N whipping will hold even if some threads are P&N whipping will hold even if some threads are
worn or cutworn or cutYou should not need a palm to do Able P&N You should not need a palm to do Able P&N
whipping whipping
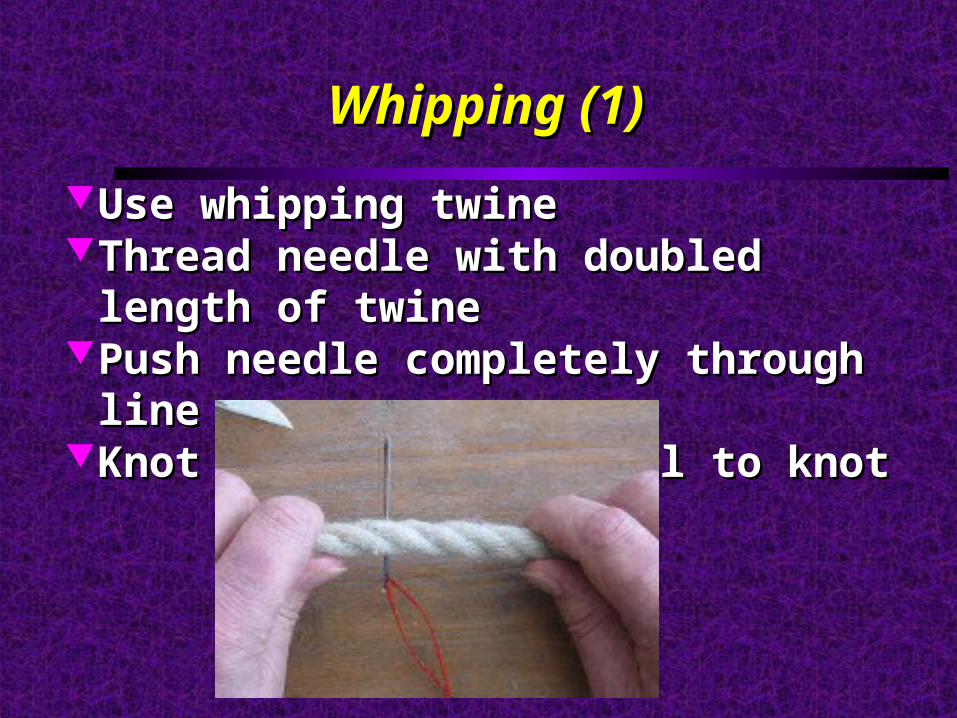
Whipping (1)Whipping (1)
Use whipping twineUse whipping twineThread needle with doubled length of twineThread needle with doubled length of twinePush needle completely through linePush needle completely through lineKnot end of twine, pull to knotKnot end of twine, pull to knot
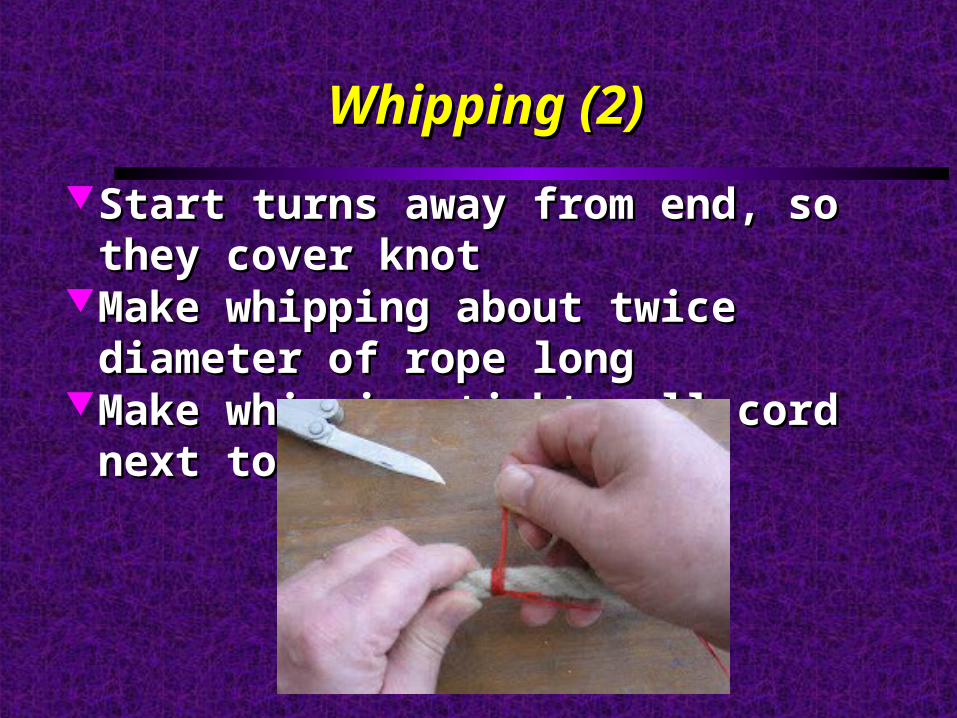
Whipping (2)Whipping (2)
Start turns away from end, so they cover knotStart turns away from end, so they cover knotMake whipping about twice diameter of rope Make whipping about twice diameter of rope
longlongMake whipping tight, all cord next to previous Make whipping tight, all cord next to previous
turnturn
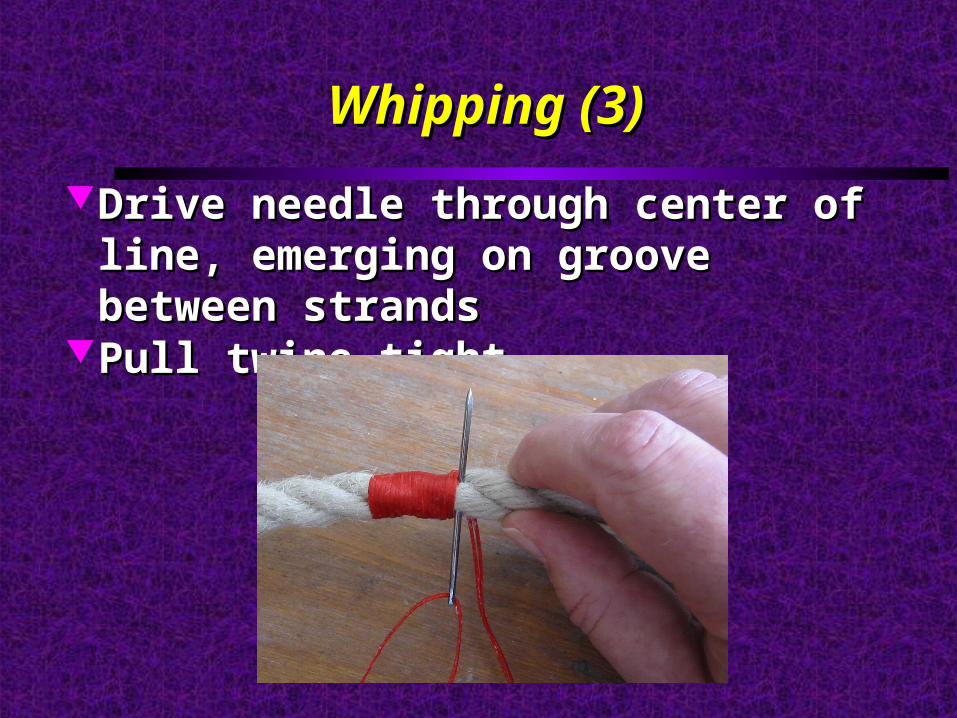
Whipping (3)Whipping (3)
Drive needle through center of line, emerging on Drive needle through center of line, emerging on groove between strandsgroove between strands
Pull twine tightPull twine tight
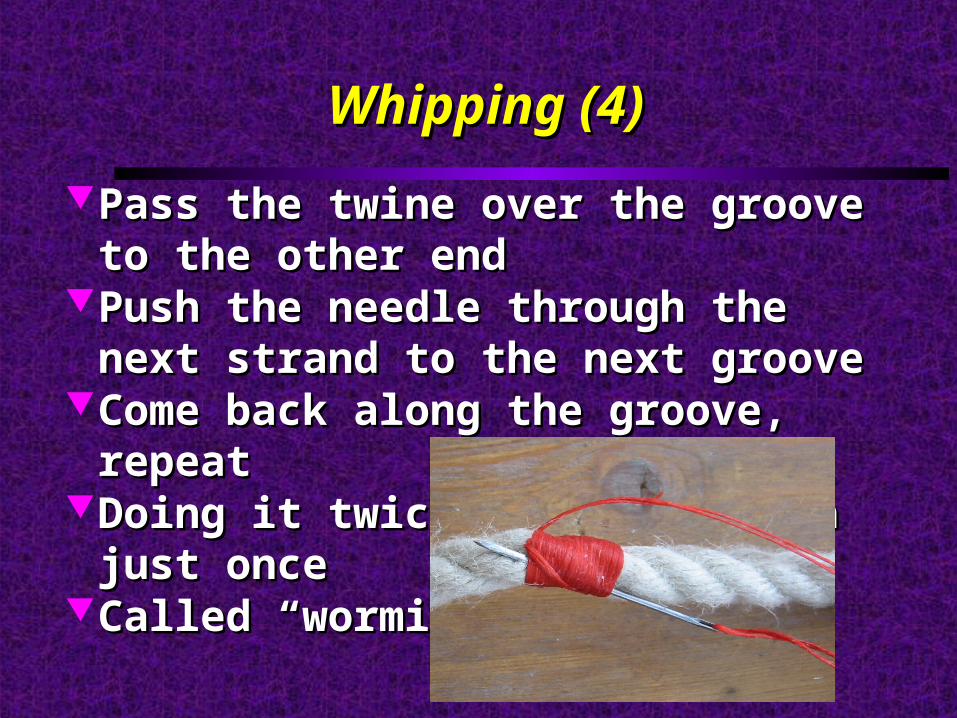
Whipping (4)Whipping (4)
Pass the twine over the groove to the other endPass the twine over the groove to the other endPush the needle through the next strand to the Push the needle through the next strand to the
next groovenext grooveCome back along the groove, repeatCome back along the groove, repeatDoing it twice is better than just onceDoing it twice is better than just onceCalled “worming”Called “worming”
Whipping (5)Whipping (5)
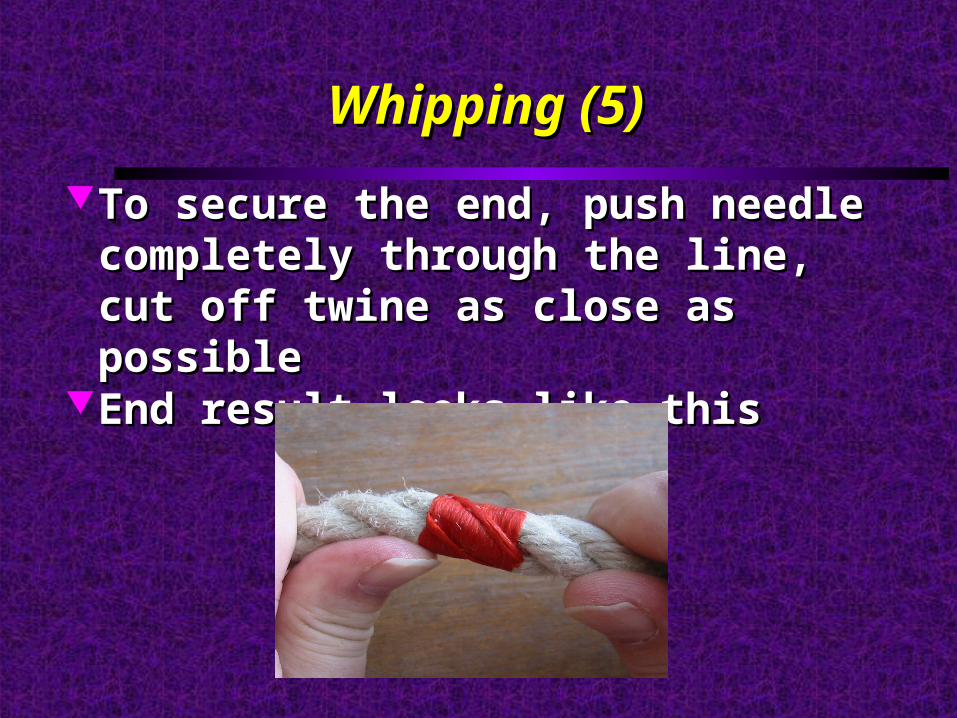
To secure the end, push needle completely To secure the end, push needle completely through the line, cut off twine as close as through the line, cut off twine as close as possiblepossible
End result looks like thisEnd result looks like this
ABL-6bABL-6b
Sew a flat seam, round seam, and grommet eye in Sew a flat seam, round seam, and grommet eye in canvas or sail material. Describe how each is canvas or sail material. Describe how each is used in the construction of and the care of sails. used in the construction of and the care of sails.
Flat SeamFlat Seam
Flat seams join two pieces of sailcloth or tent Flat seams join two pieces of sailcloth or tent clothcloth
They cover the raw edge of the fabric, They cover the raw edge of the fabric, preventing the edge from unravelingpreventing the edge from unraveling
Used to repair sails manuallyUsed to repair sails manuallyUsed to make sails with sewing machine Used to make sails with sewing machine
Sewing Machine Flat Seam (1)Sewing Machine Flat Seam (1)
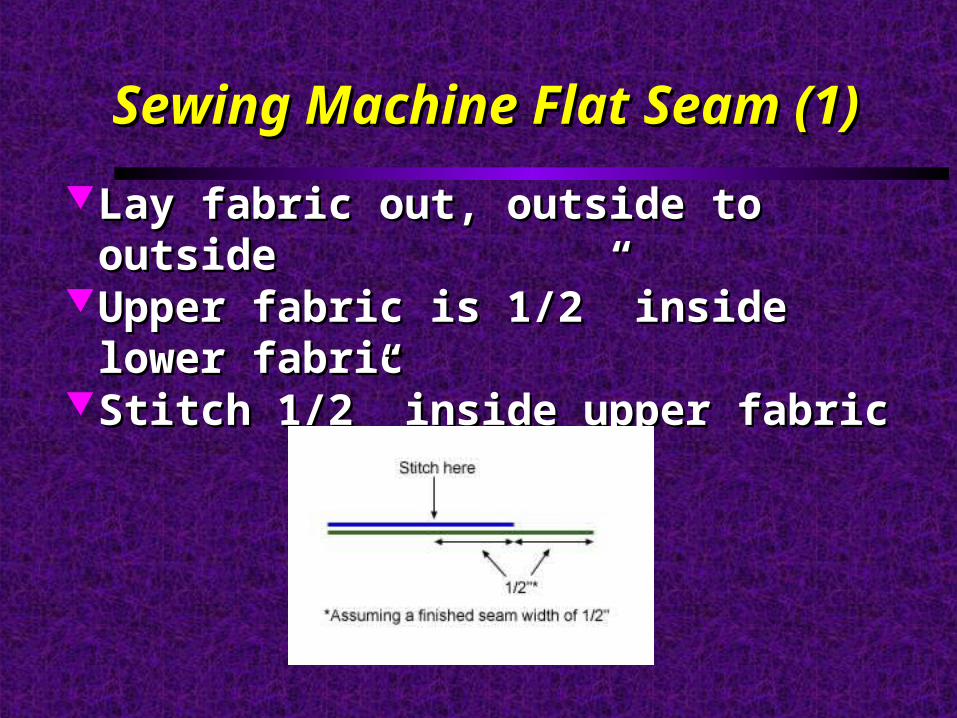
Lay fabric out, outside to outsideLay fabric out, outside to outsideUpper fabric is 1/2” inside lower fabricUpper fabric is 1/2” inside lower fabricStitch 1/2” inside upper fabricStitch 1/2” inside upper fabric
Sewing Machine Flat Seam (2)Sewing Machine Flat Seam (2)
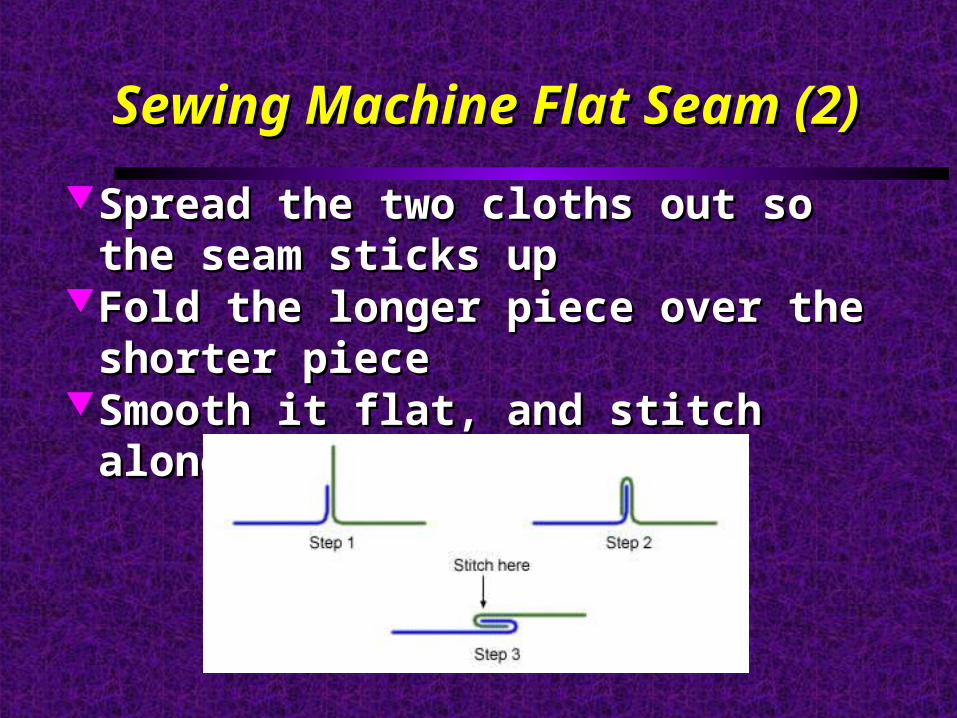
Spread the two cloths out so the seam sticks upSpread the two cloths out so the seam sticks upFold the longer piece over the shorter pieceFold the longer piece over the shorter pieceSmooth it flat, and stitch along the edge as Smooth it flat, and stitch along the edge as
shownshown
Hand Flat Seam (1)Hand Flat Seam (1)
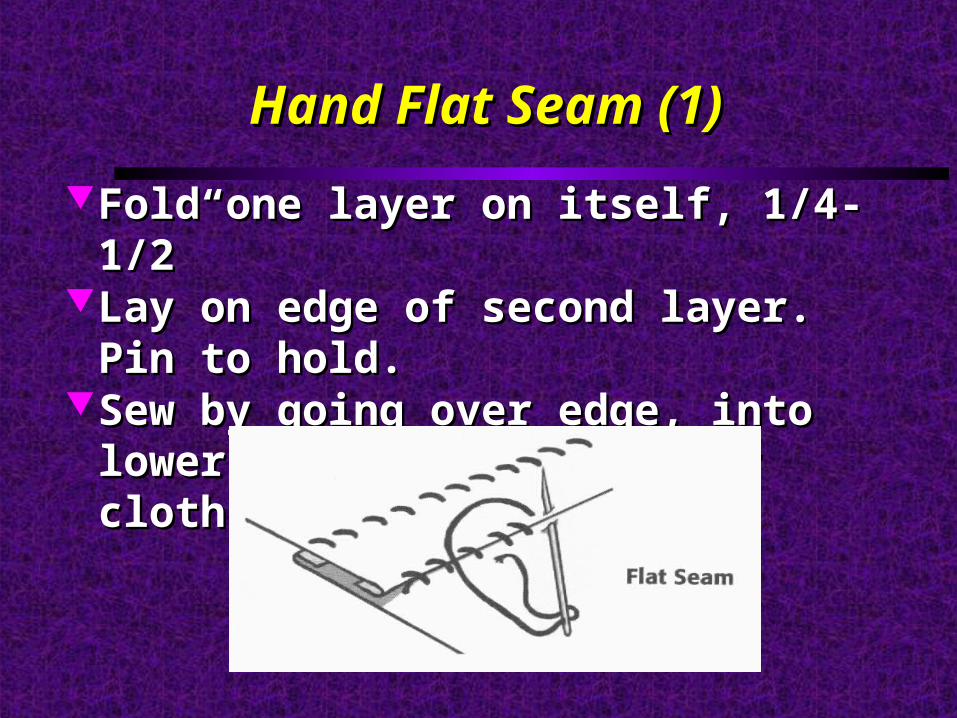
Fold one layer on itself, 1/4-1/2”Fold one layer on itself, 1/4-1/2”Lay on edge of second layer. Pin to hold.Lay on edge of second layer. Pin to hold.Sew by going over edge, into lower cloth, up into Sew by going over edge, into lower cloth, up into
upper cloth, as illustrated upper cloth, as illustrated
Hand Flat Seam (2)Hand Flat Seam (2)
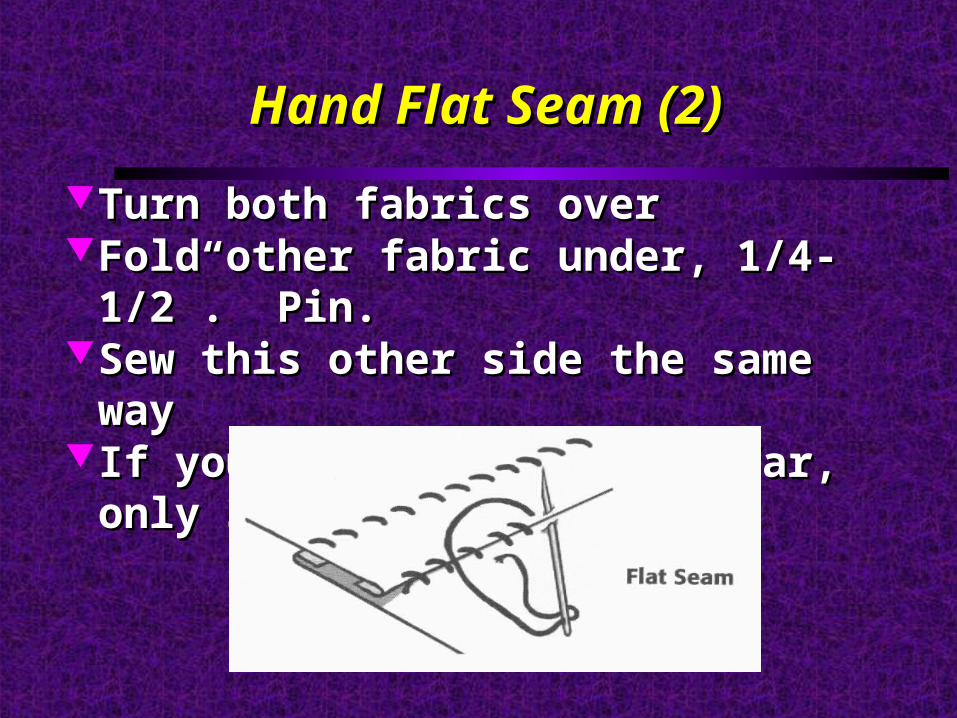
Turn both fabrics overTurn both fabrics overFold other fabric under, 1/4-1/2”. Pin.Fold other fabric under, 1/4-1/2”. Pin.Sew this other side the same waySew this other side the same way If you don't overlap too far, only 3 fabric layersIf you don't overlap too far, only 3 fabric layers
Round SeamRound Seam
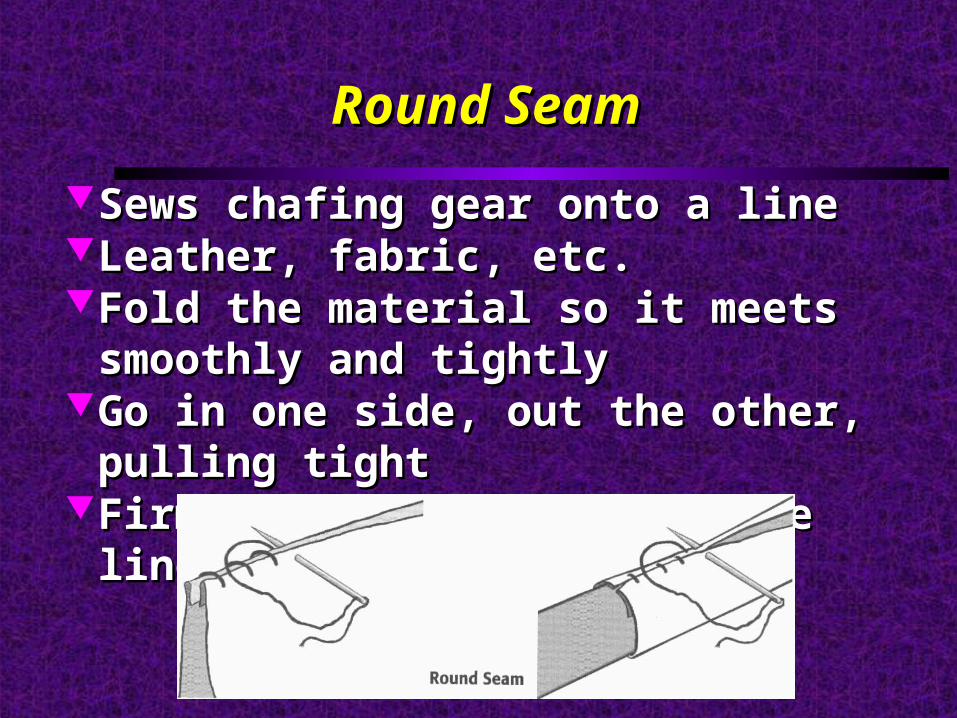
Sews chafing gear onto a lineSews chafing gear onto a lineLeather, fabric, etc.Leather, fabric, etc.Fold the material so it meets smoothly and Fold the material so it meets smoothly and
tightlytightlyGo in one side, out the other, pulling tightGo in one side, out the other, pulling tightFirmer if you go through the lineFirmer if you go through the line
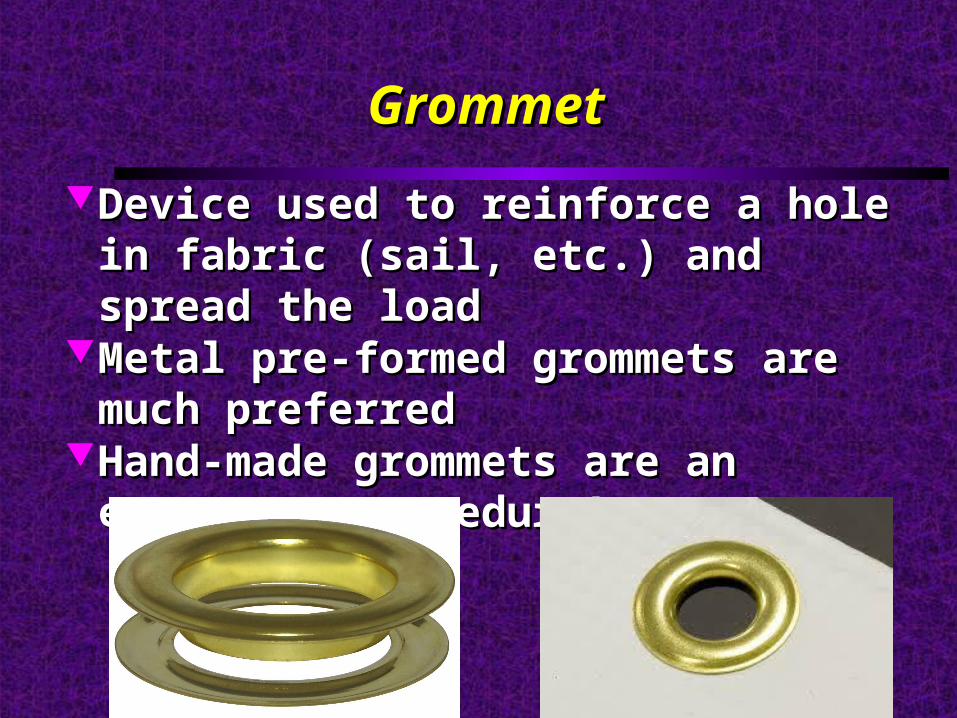
GrommetGrommet
Device used to reinforce a hole in fabric (sail, Device used to reinforce a hole in fabric (sail, etc.) and spread the loadetc.) and spread the load
Metal pre-formed grommets are much preferredMetal pre-formed grommets are much preferredHand-made grommets are an emergency Hand-made grommets are an emergency
procedure!procedure!
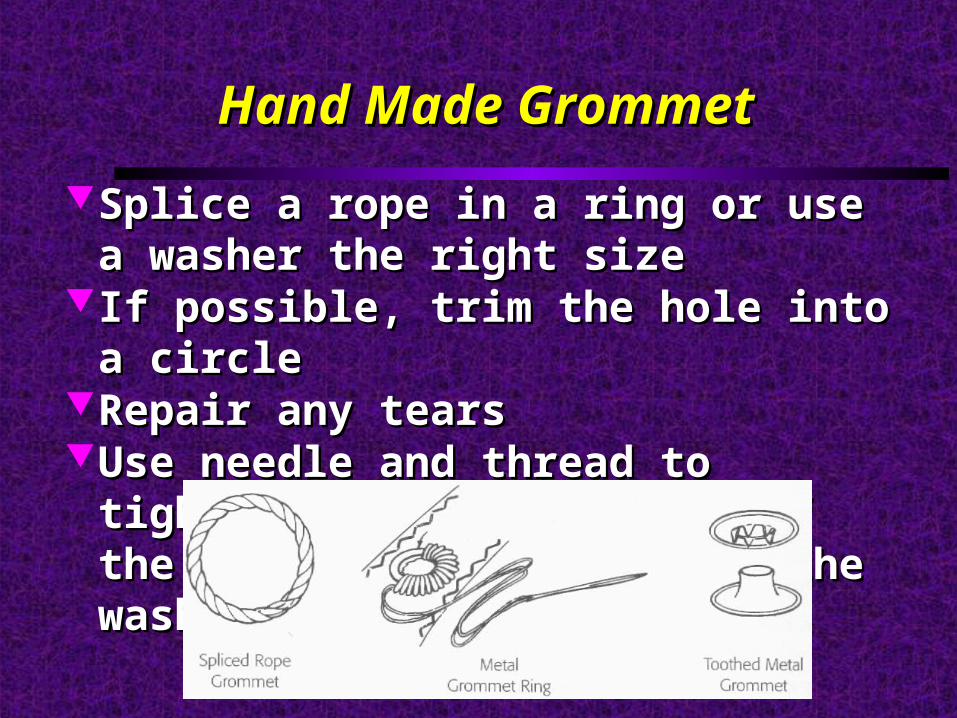
Hand Made GrommetHand Made Grommet
Splice a rope in a ring or use a washer the right Splice a rope in a ring or use a washer the right sizesize
If possible, trim the hole into a circleIf possible, trim the hole into a circleRepair any tearsRepair any tearsUse needle and thread to tightly circle the inside Use needle and thread to tightly circle the inside
of the hole to the outside of the washerof the hole to the outside of the washer

Hand Made Grommet (2)Hand Made Grommet (2)
Spread the load by making a second circle, Spread the load by making a second circle, using a second layer on the inside, and your using a second layer on the inside, and your outside stitches 1/4-1/2” further outoutside stitches 1/4-1/2” further out
ABL-6cABL-6c
Describe the parts of a block and how blocks are Describe the parts of a block and how blocks are sized. Describe the following types of tackle: sized. Describe the following types of tackle: luff, gun, double purchase, single whip, and luff, gun, double purchase, single whip, and runner. With the help of another shipmate, runner. With the help of another shipmate, reeve a double purchase tackle. reeve a double purchase tackle.
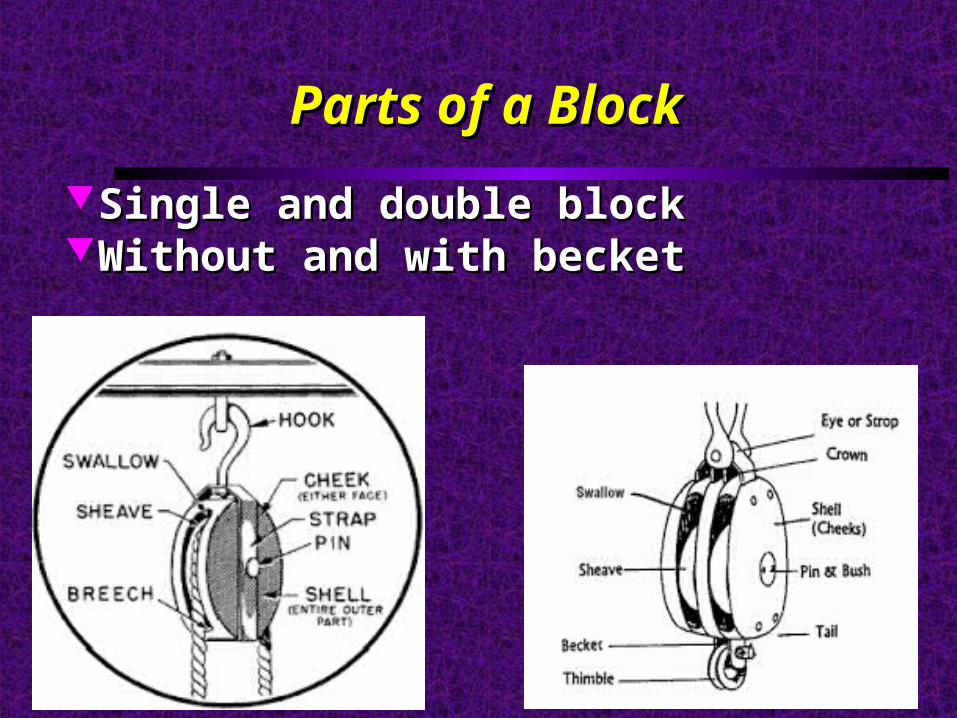
Parts of a BlockParts of a Block
Single and double blockSingle and double blockWithout and with becketWithout and with becket
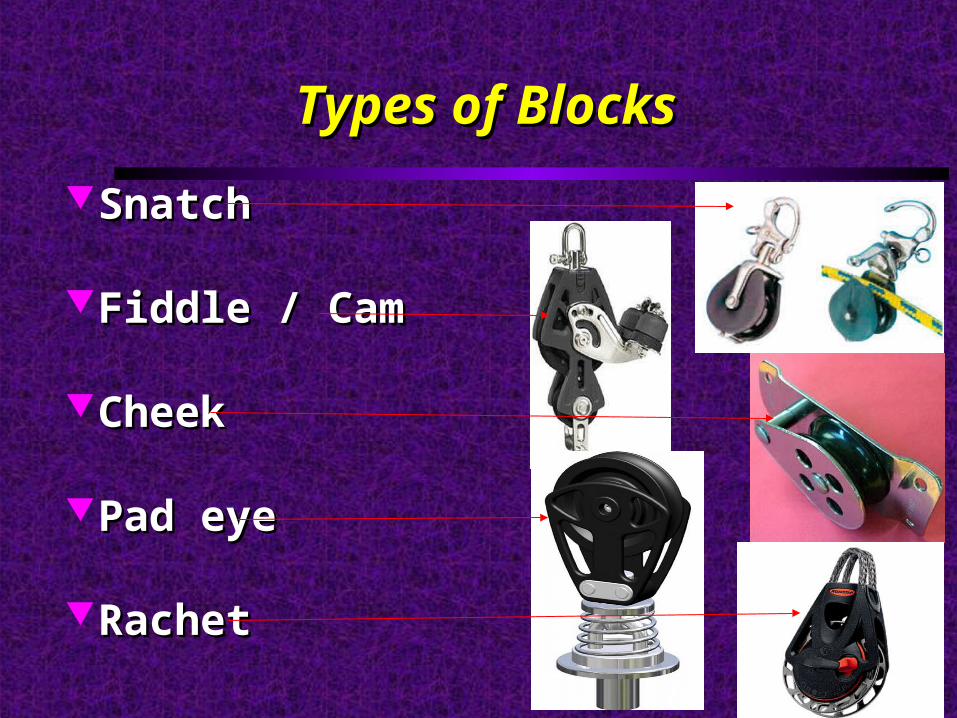
Types of BlocksTypes of Blocks
SnatchSnatch
Fiddle / CamFiddle / Cam
CheekCheek
Pad eyePad eye
RachetRachet
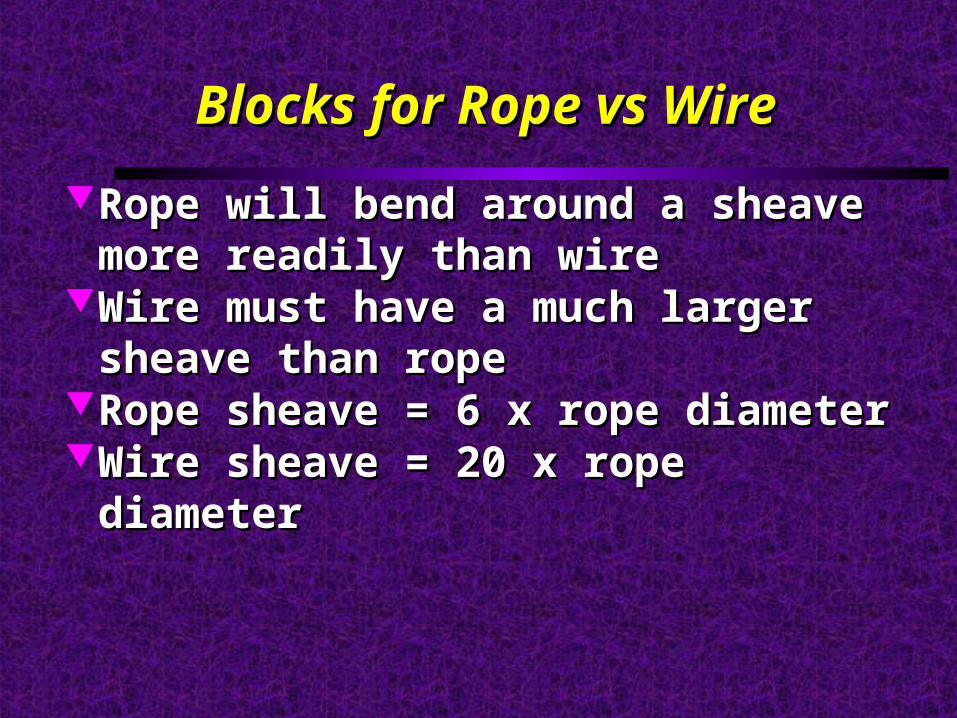
Blocks for Rope vs WireBlocks for Rope vs Wire
Rope will bend around a sheave more readily Rope will bend around a sheave more readily than wirethan wire
Wire must have a much larger sheave than ropeWire must have a much larger sheave than ropeRope sheave = 6 x rope diameterRope sheave = 6 x rope diameterWire sheave = 20 x rope diameterWire sheave = 20 x rope diameter
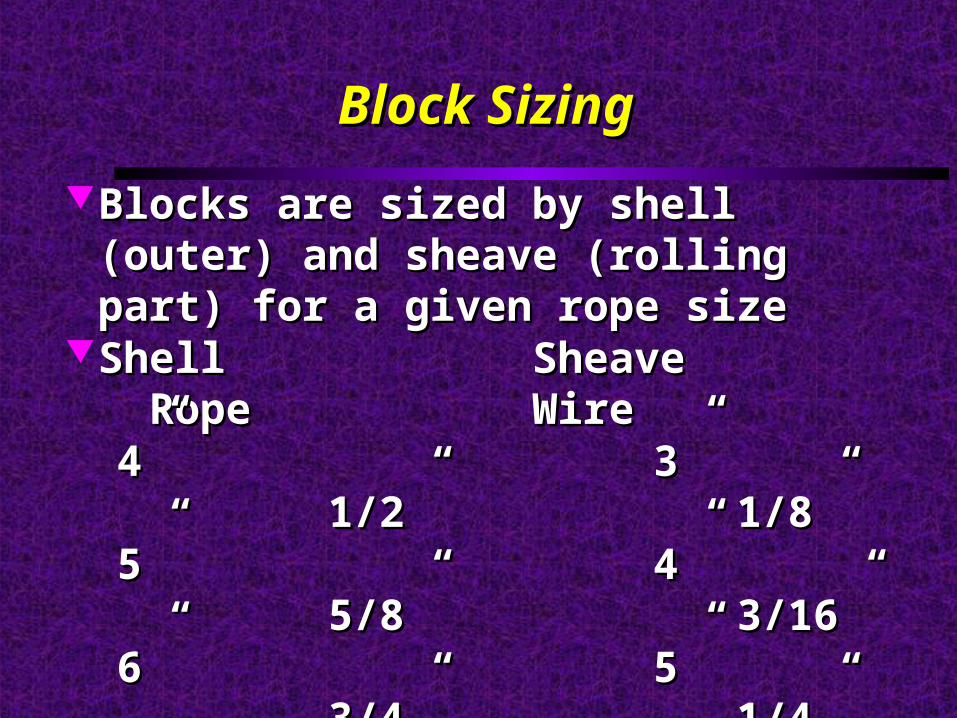
Block SizingBlock Sizing
Blocks are sized by shell (outer) and sheave Blocks are sized by shell (outer) and sheave (rolling part) for a given rope size(rolling part) for a given rope size
Shell Sheave Rope WireShell Sheave Rope Wire 4” 3” 1/2” 1/8”4” 3” 1/2” 1/8” 5” 4” 5/8” 3/16”5” 4” 5/8” 3/16” 6” 5” 3/4” 1/4”6” 5” 3/4” 1/4”Rope – Sheave diameter = rope diameter x 6Rope – Sheave diameter = rope diameter x 6Wire – Sheave diameter = wire diameter x 20Wire – Sheave diameter = wire diameter x 20
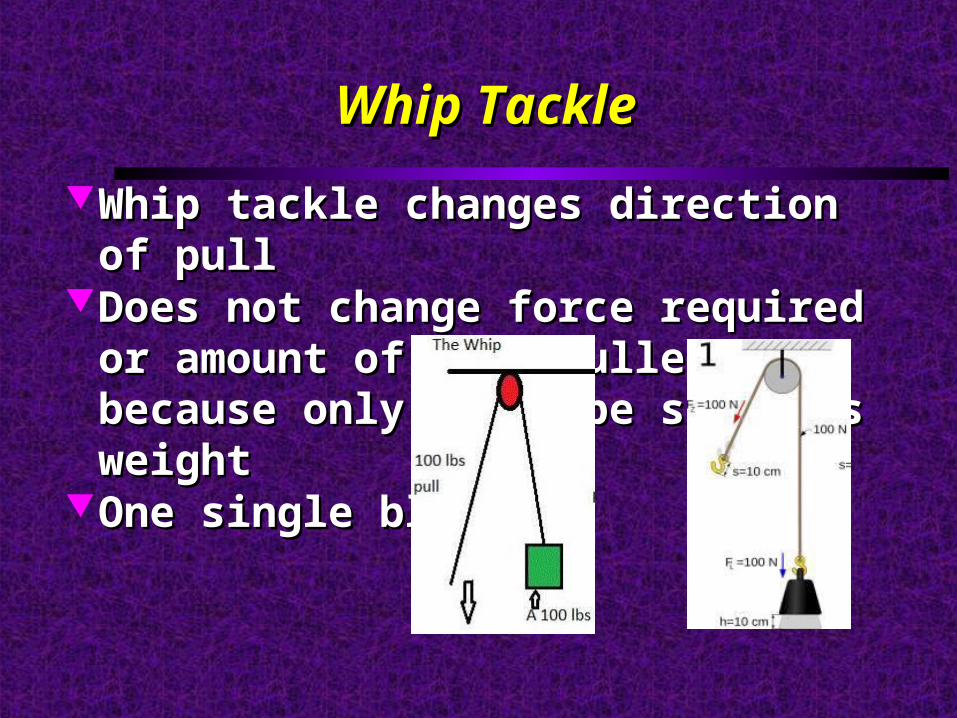
Whip TackleWhip Tackle
Whip tackle changes direction of pullWhip tackle changes direction of pullDoes not change force required or amount of Does not change force required or amount of
line pulled, because only one rope supports line pulled, because only one rope supports weightweight
One single blockOne single block
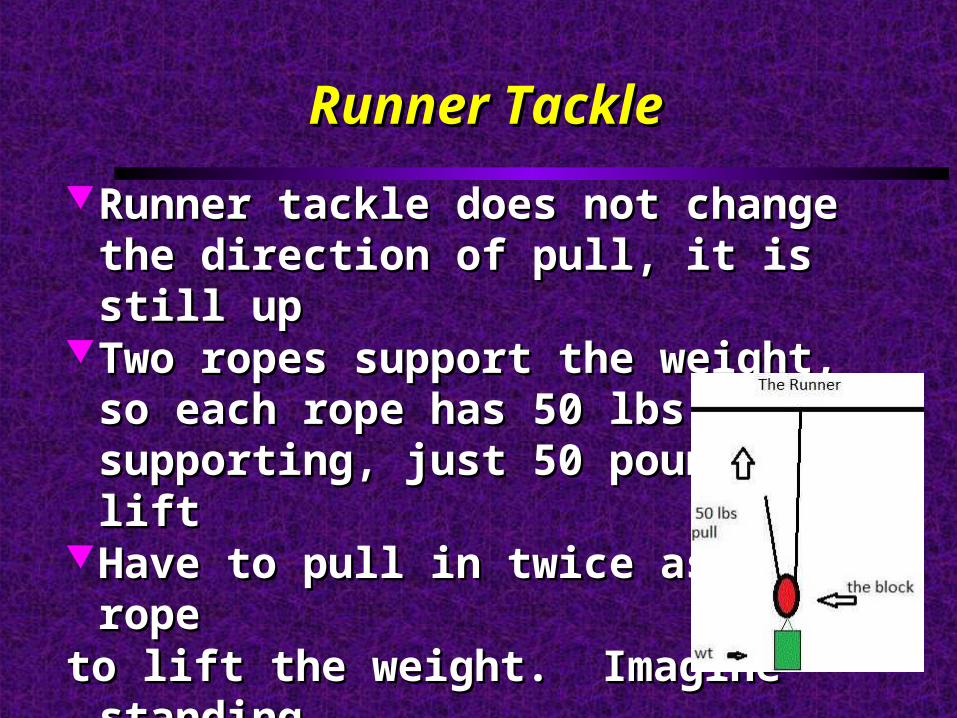
Runner TackleRunner Tackle
Runner tackle does not change the direction of Runner tackle does not change the direction of pull, it is still uppull, it is still up
Two ropes support the weight, so each rope has Two ropes support the weight, so each rope has 50 lbs supporting, just 50 pounds to lift50 lbs supporting, just 50 pounds to lift
Have to pull in twice as much ropeHave to pull in twice as much ropeto lift the weight. Imagine standingto lift the weight. Imagine standingon the black line lifting.on the black line lifting.One single blockOne single block
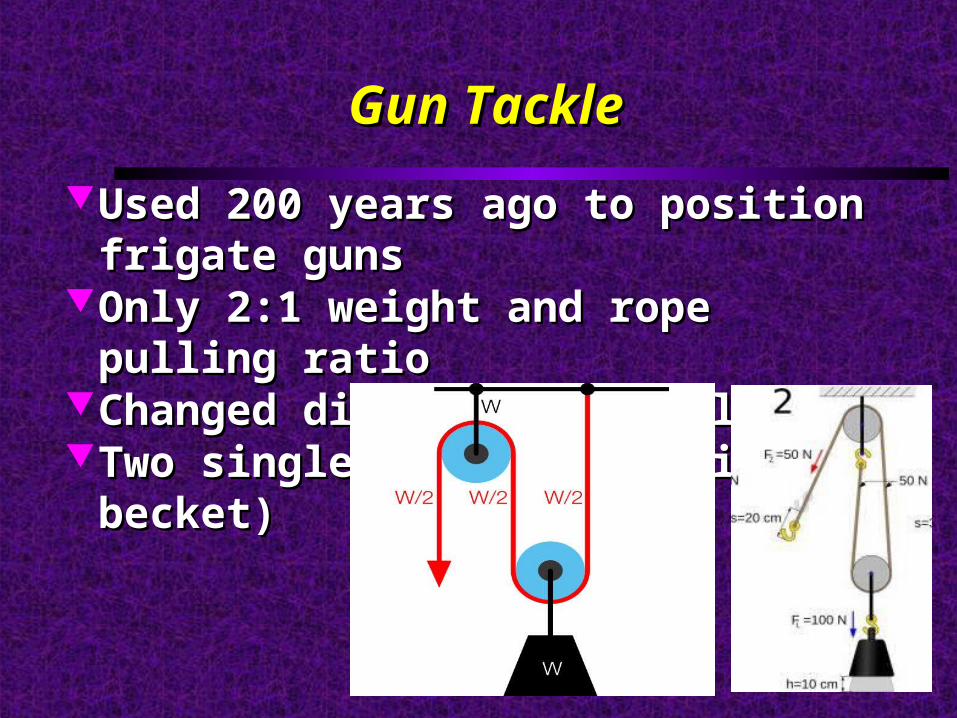
Gun TackleGun Tackle
Used 200 years ago to position frigate gunsUsed 200 years ago to position frigate gunsOnly 2:1 weight and rope pulling ratioOnly 2:1 weight and rope pulling ratioChanged direction of pullChanged direction of pullTwo single blocks (one with becket)Two single blocks (one with becket)
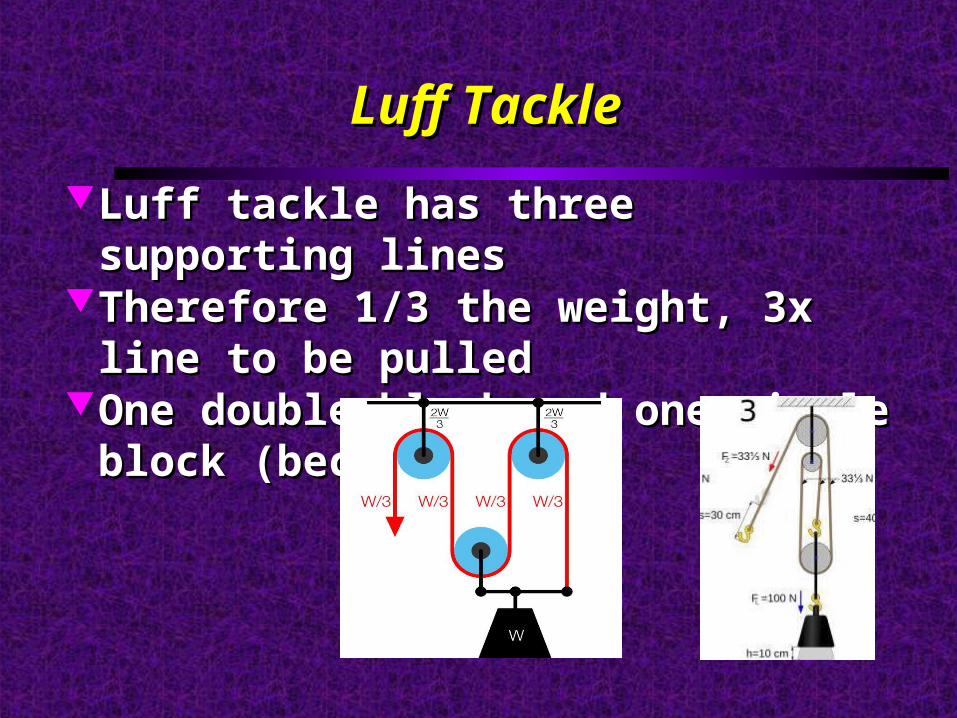
Luff TackleLuff Tackle
Luff tackle has three supporting linesLuff tackle has three supporting linesTherefore 1/3 the weight, 3x line to be pulledTherefore 1/3 the weight, 3x line to be pulledOne double block and one single block (becket)One double block and one single block (becket)
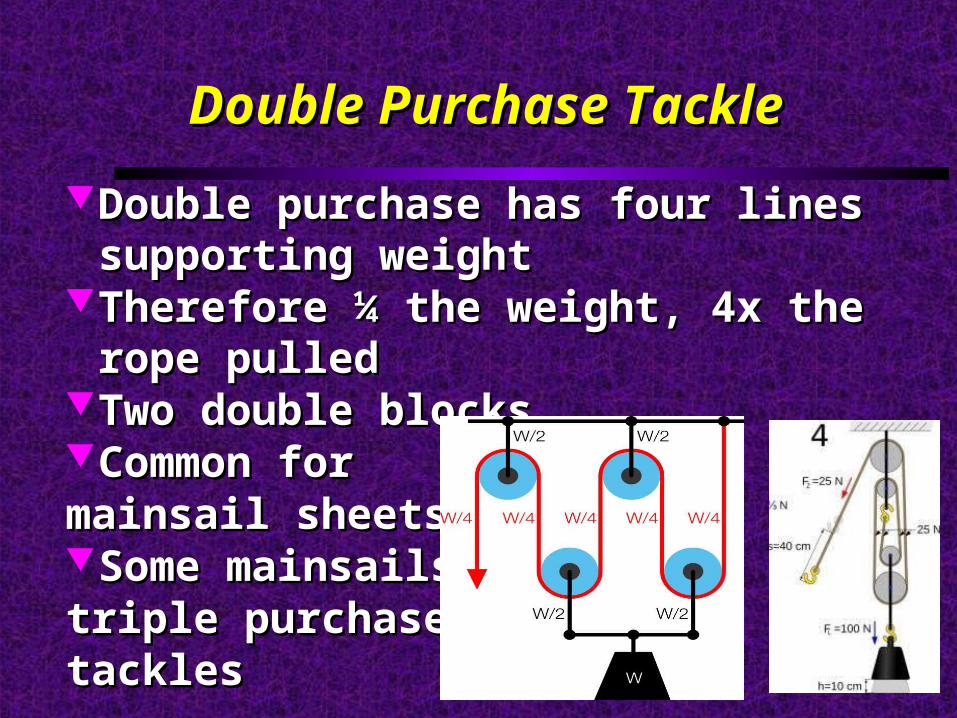
Double Purchase TackleDouble Purchase Tackle
Double purchase has four lines supporting Double purchase has four lines supporting weightweight
Therefore ¼ the weight, 4x the rope pulledTherefore ¼ the weight, 4x the rope pulledTwo double blocksTwo double blocksCommon for Common for mainsail sheetsmainsail sheetsSome mainsails useSome mainsails usetriple purchasetriple purchasetacklestackles
Friction LossFriction Loss
There is a friction loss from the theoretical There is a friction loss from the theoretical figures of 50%, 33% and 25%figures of 50%, 33% and 25%
Plan on 5-10% loss per sheave, depending on Plan on 5-10% loss per sheave, depending on the bearings in the sheavethe bearings in the sheave
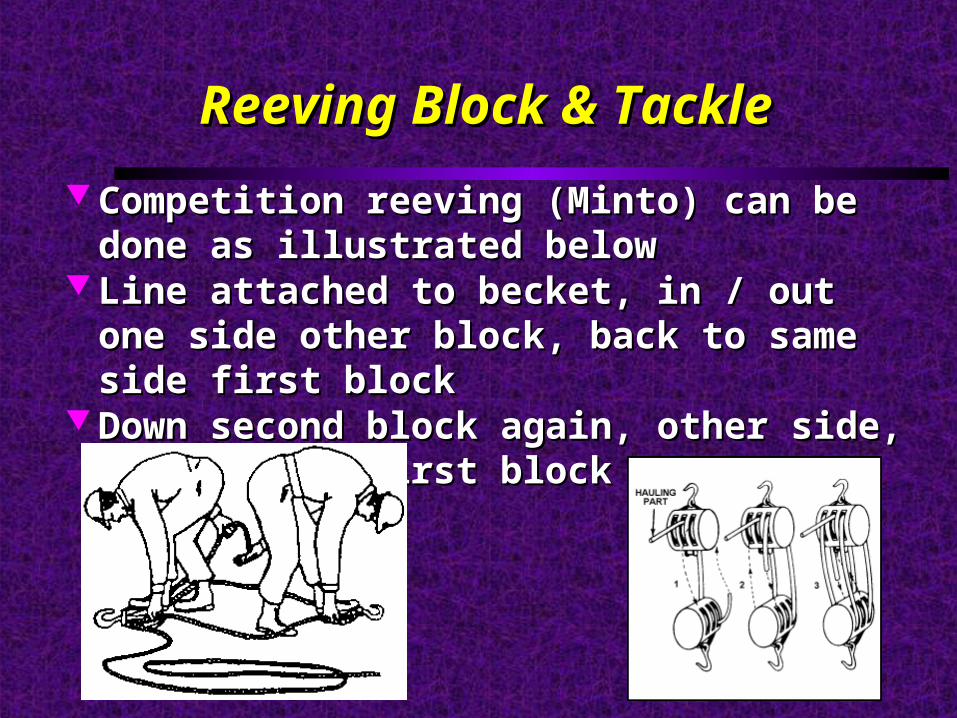
Reeving Block & TackleReeving Block & Tackle
Competition reeving (Minto) can be done as illustrated Competition reeving (Minto) can be done as illustrated belowbelow
Line attached to becket, in / out one side other block, Line attached to becket, in / out one side other block, back to same side first blockback to same side first block
Down second block again, other side, and back to first Down second block again, other side, and back to first blockblock

Questions?Questions?