Embed Size (px)
Citation preview
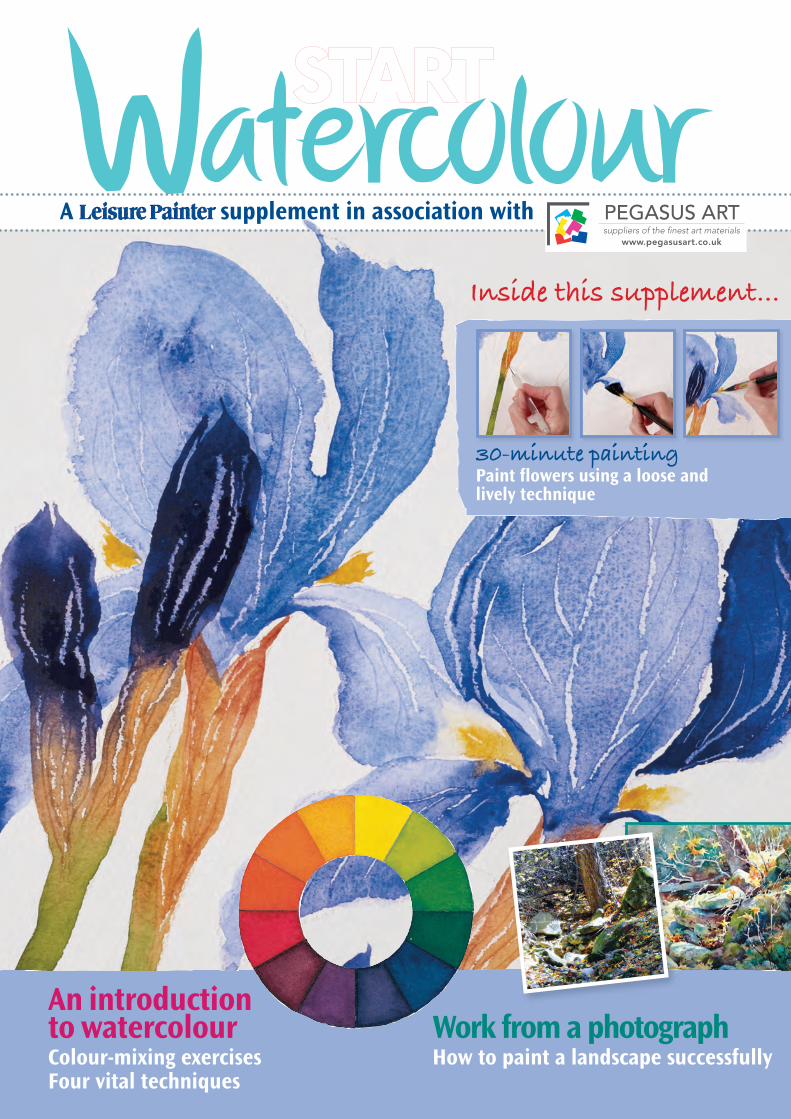
Inside this supplement...
30-minute paintingPaint flowers using a loose andlively technique
Work from a photographHow to paint a landscape successfully
An introductionto watercolourColour-mixing exercises Four vital techniques
STARTWatercolour
A supplement in association with
START Watercolour Cover _Layout 1 05/06/2013 11:41 Page 1
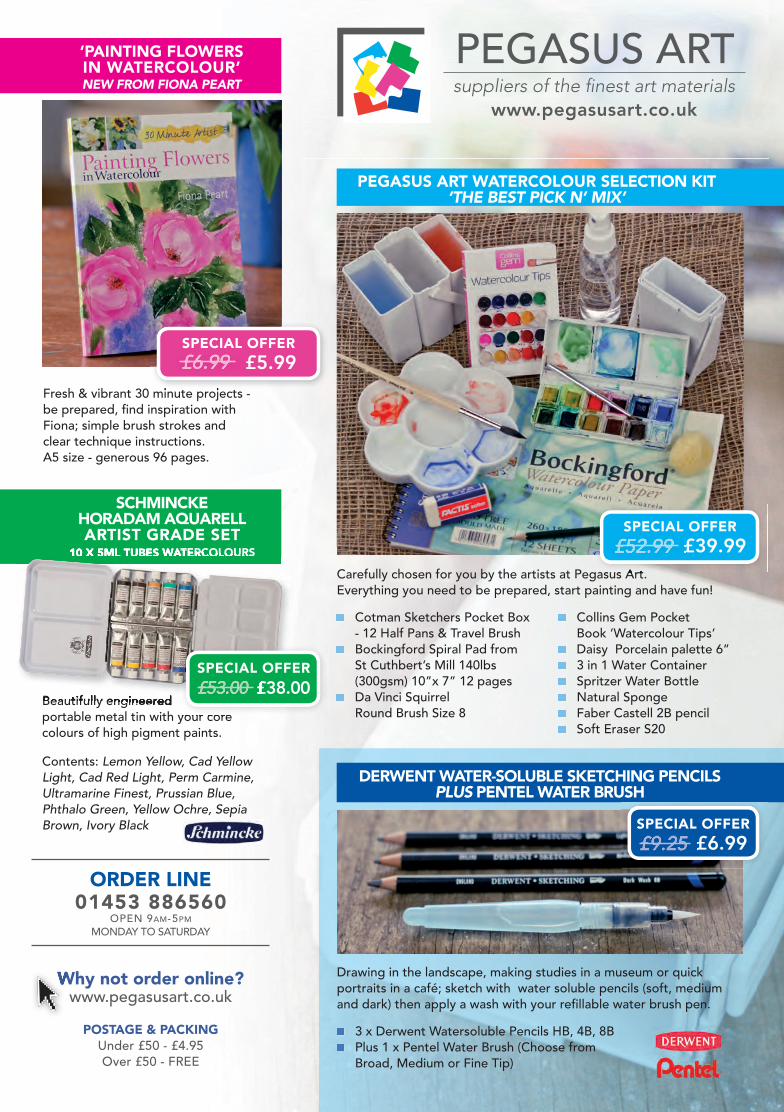
‘PAINTING FLOWERS IN WATERCOLOUR’NEW FROM FIONA PEART
Fresh & vibrant 30 minute projects - be prepared, find inspiration with Fiona; simple brush strokes and clear technique instructions.A5 size - generous 96 pages.
PEGASUS ART WATERCOLOUR SELECTION KIT ‘THE BEST PICK N’ MIX’
Carefully chosen for you by the artists at Pegasus Art. Everything you need to be prepared, start painting and have fun!
SCHMINCKEHORADAM AQUARELLARTIST GRADE SET
10 X 5ML TUBES WATERCOLOURS
Beautifully engineered portable metal tin with your core colours of high pigment paints.
Contents: Lemon Yellow, Cad Yellow Light, Cad Red Light, Perm Carmine, Ultramarine Finest, Prussian Blue, Phthalo Green, Yellow Ochre, Sepia Brown, Ivory Black
DERWENT WATER-SOLUBLE SKETCHING PENCILS PLUS PENTEL WATER BRUSH
Drawing in the landscape, making studies in a museum or quick portraits in a café; sketch with water soluble pencils (soft, medium and dark) then apply a wash with your refillable water brush pen.
3 x Derwent Watersoluble Pencils HB, 4B, 8BPlus 1 x Pentel Water Brush (Choose from Broad, Medium or Fine Tip)
Fresh & vibrant 30 minute projects -
SPECIAL OFFER
£6.99 £5.99£6.99
Collins Gem Pocket Book ‘Watercolour Tips’ Daisy Porcelain palette 6” 3 in 1 Water Container Spritzer Water Bottle Natural Sponge Faber Castell 2B pencil Soft Eraser S20
Cotman Sketchers Pocket Box - 12 Half Pans & Travel BrushBockingford Spiral Pad from St Cuthbert’s Mill 140lbs (300gsm) 10”x 7” 12 pagesDa Vinci Squirrel Round Brush Size 8
Carefully chosen for you by the artists at Pegasus Art.
SPECIAL OFFER
£52.99 £39.99£52.99 £39.99
Beautifully engineered
10 X 5ML TUBES WATERCOLOURS
Beautifully engineered Beautifully engineered Beautifully engineered Beautifully engineered portable metal tin with your core
SPECIAL OFFER
£53.00 £38.00£53.00 £38.00
SPECIAL OFFER
£9.25 £6.99£9.25 £6.99
Why not order online?www.pegasusart.co.uk
POSTAGE & PACKING Under £50 - £4.95Over £50 - FREE
ORDER LINE01453 886560
OPEN 9AM-5PM
MONDAY TO SATURDAY
Why not order online?
Pegasus.indd 1 06/06/2013 11:53:41
PublisherDr Sally Bulgin
EditorIngrid Lyon
AdvertisingSarah HubbardTel: 01778 392048
DesignSarah Poole
Printed by Headley Brothers Ltd, The Invicta Press, Queens Road, Ashford, Kent
All material copyrighted: reproduction forbidden without permission. Views expressed are not necessarily those of the publisher.
STARTWatercolouris published by TAPC (The Artists’ Publishing Company Ltd),Caxton House, 63/65 High Street, Tenterden, Kent TN30 6BD. Telephone 01580 763315
www.painters-online.co.uk the website for Leisure Painterand The Artist magazines Page 12
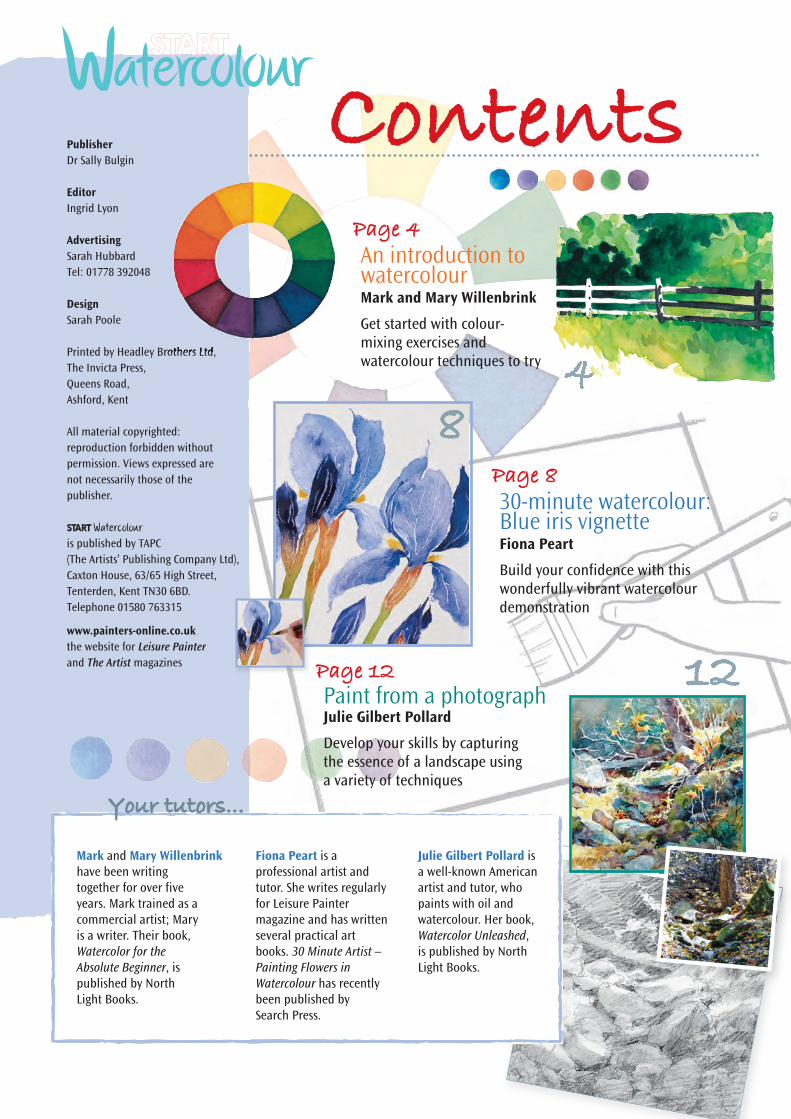
Paint from a photographJulie Gilbert Pollard
Develop your skills by capturing the essence of a landscape using a variety of techniques
Mark and Mary Willenbrinkhave been writingtogether for over fiveyears. Mark trained as acommercial artist; Maryis a writer. Their book,Watercolor for theAbsolute Beginner, ispublished by North Light Books.
Fiona Peart is aprofessional artist andtutor. She writes regularlyfor Leisure Paintermagazine and has writtenseveral practical artbooks. 30 Minute Artist –Painting Flowers inWatercolour has recentlybeen published by Search Press.
Julie Gilbert Pollard isa well-known Americanartist and tutor, whopaints with oil andwatercolour. Her book,Watercolor Unleashed,is published by NorthLight Books.
ContentsPage 4
An introduction towatercolour Mark and Mary Willenbrink
Get started with colour-mixing exercises andwatercolour techniques to try
Page 8
30-minute watercolour: Blue iris vignetteFiona Peart
Build your confidence with thiswonderfully vibrant watercolourdemonstration
Your tutors...
STARTWatercolour
Contents Start Watercolour_Layout 1 05/06/2013 11:11 Page 1

www.painters-online.co.uk4 START Watercolour Summer 2013
Introduction to watercolourColour and technique
Welcome to the wonderful world of watercolour! Mark and Mary Willenbrink offer a wealth of practical advice on colour,colour mixing and the basic techniques. Get yourself a small set ofwatercolours and after practising these exercises you’ll be ready to
paint along with the demonstrations that follow
Understanding colourColour, also referred to as hue, is based onthe three primary colours. From these allother colours are derived.
Primary coloursRed, yellow and blue can’t be madefrom other colours.
Secondary coloursOrange, green and violet result from mixingtwo of the three primary colours.
Tertiary coloursThese colours result from mixing a primarycolour with its adjacent secondary colour.
First steps
Red
Blue
Orange (red+yellow)
Green (yellow+blue)
Violet (blue+red)
Yellow-green
Blue-violet
Blue-green
Red-violet
Red-orange
Yellow-orange
Yellow
Colour & technique p4-7_Layout 1 05/06/2013 10:37 Page 1

www.painters-online.co.uk 5START Watercolour Summer 2013
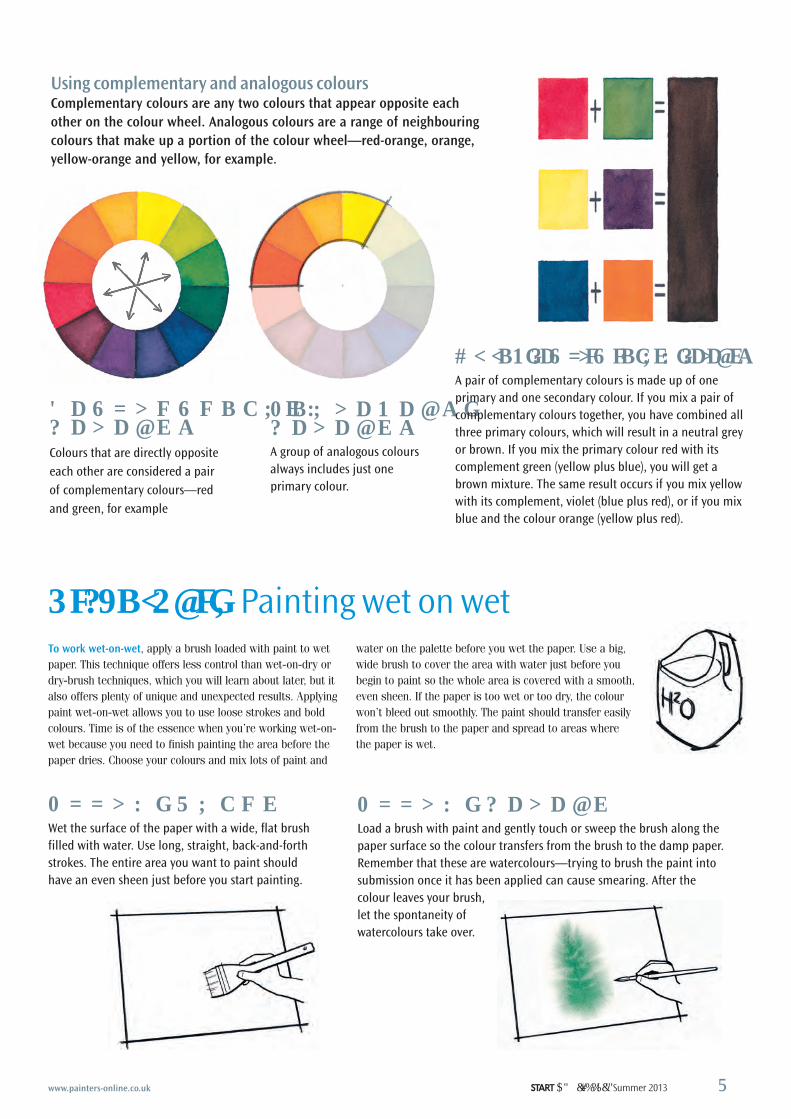
Using complementary and analogous coloursComplementary colours are any two colours that appear opposite eachother on the colour wheel. Analogous colours are a range of neighbouringcolours that make up a portion of the colour wheel—red-orange, orange,yellow-orange and yellow, for example.
ComplementarycoloursColours that are directly oppositeeach other are considered a pairof complementary colours—redand green, for example
Analogous coloursA group of analogous colours always includes just one primary colour.
Mixing complementary coloursA pair of complementary colours is made up of one primary and one secondary colour. If you mix a pair ofcomplementary colours together, you have combined allthree primary colours, which will result in a neutral greyor brown. If you mix the primary colour red with its complement green (yellow plus blue), you will get abrown mixture. The same result occurs if you mix yellowwith its complement, violet (blue plus red), or if you mixblue and the colour orange (yellow plus red).
Technique 1 Painting wet on wetTo work wet-on-wet, apply a brush loaded with paint to wetpaper. This technique offers less control than wet-on-dry ordry-brush techniques, which you will learn about later, but italso offers plenty of unique and unexpected results. Applyingpaint wet-on-wet allows you to use loose strokes and boldcolours. Time is of the essence when you’re working wet-on-wet because you need to finish painting the area before thepaper dries. Choose your colours and mix lots of paint and
water on the palette before you wet the paper. Use a big,wide brush to cover the area with water just before youbegin to paint so the whole area is covered with a smooth,even sheen. If the paper is too wet or too dry, the colourwon’t bleed out smoothly. The paint should transfer easilyfrom the brush to the paper and spread to areas where the paper is wet.
Apply waterWet the surface of the paper with a wide, flat brushfilled with water. Use long, straight, back-and-forthstrokes. The entire area you want to paint shouldhave an even sheen just before you start painting.
Apply colourLoad a brush with paint and gently touch or sweep the brush along thepaper surface so the colour transfers from the brush to the damp paper.Remember that these are watercolours—trying to brush the paint intosubmission once it has been applied can cause smearing. After the colour leaves your brush,let the spontaneity ofwatercolours take over.
Colour & technique p4-7_Layout 1 05/06/2013 10:37 Page 2

What paper to useThe smooth surface of hot-pressed paper doesn’t allowpaint to spread out as much as cold-pressed or Rough paperdoes, though I do like the interesting watermarks and hardedges. If you want to create soft edges with the wet-on-wettechnique, use cold-pressed or Rough paper.
Wet-on-wet on different papersExamples of this painting technique on different papersappear right: hot-pressed (1), cold-pressed (2) and Rough (3).
How much water do I use?The trick when painting wet-on-wet is to applyjust the right amount of water to the paperbefore painting. If the surface is too wet (4), it won’t want to accept the colour, and you willget pale, uneven results. Before adding colour,gently smooth any puddles of water so you havea thin, even sheen of water over the paper’ssurface. If the surface is too dry (5), the colourmay bleed out in an inconsistent manner. Don’t get frustrated. It may take some practise to learn how much water to use.
Wet-on-dry on different papersExamples of this technique used on different papers appear left:hot-pressed (1), cold-pressed (2) and Rough (3).
Technique 3 Dry-brush technique
Dry-brush on different papersExamples of this technique used on different papers appear left:hot-pressed (4), cold-pressed (5) and Rough (6).
To paint wet-on-dry, apply a wet brush loaded with paint to dry paper.Because there is no water on the paper to help the paint disperse, wet-on-dry produces defined strokes with hard edges. Different papersreact similarly to the wet-on-dry technique. However, the smooth surface of hot-pressed paper allows cleaner edges.
The dry-brush technique uses dry paper and a dry brush loaded with amixture that has very little water. Hot-pressed paper lets very littletexture show through after you’ve painted over it. Rough paper showsplenty of texture. If you want to use wet-on-dry or dry-brush techniques,make sure the area is completely dry before painting.
Technique 2 Wet-on-dry technique
6 www.painters-online.co.ukSTART Watercolour Summer 2013
1
2
3
1
2
3
45
6
4
5
Colour & technique p4-7_Layout 1 05/06/2013 10:37 Page 3
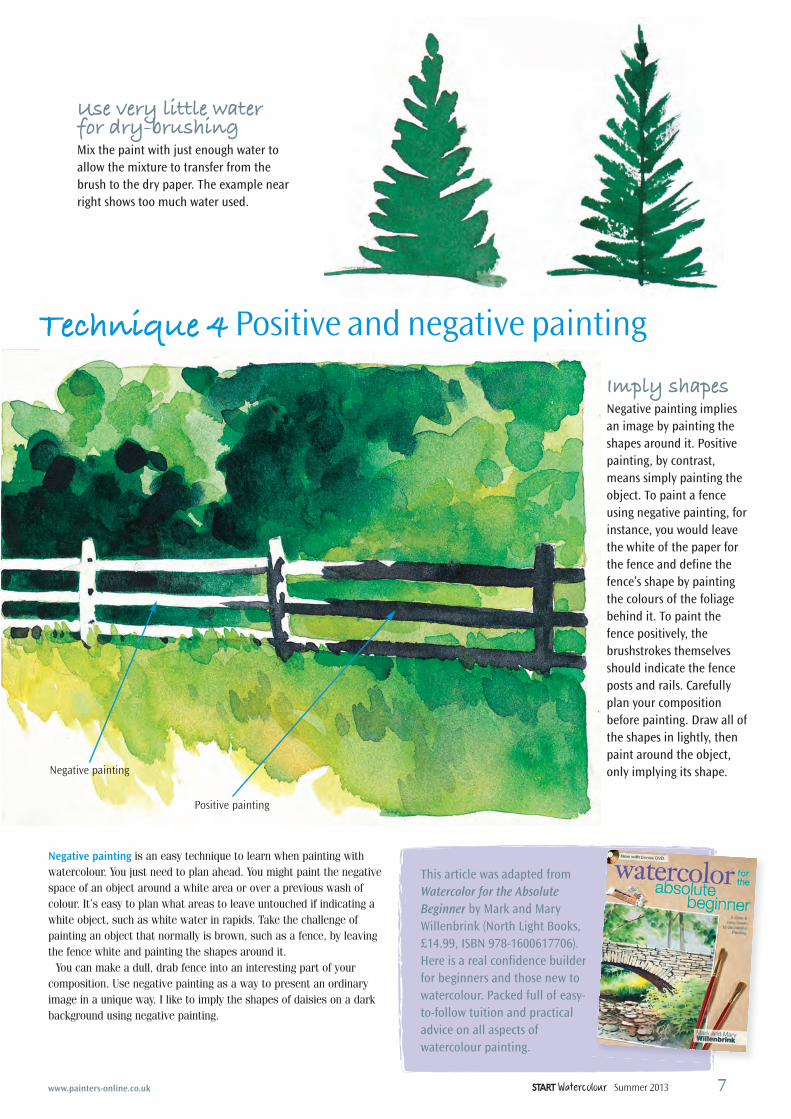
Negative painting is an easy technique to learn when painting withwatercolour. You just need to plan ahead. You might paint the negativespace of an object around a white area or over a previous wash ofcolour. It’s easy to plan what areas to leave untouched if indicating awhite object, such as white water in rapids. Take the challenge ofpainting an object that normally is brown, such as a fence, by leavingthe fence white and painting the shapes around it.You can make a dull, drab fence into an interesting part of your
composition. Use negative painting as a way to present an ordinaryimage in a unique way. I like to imply the shapes of daisies on a darkbackground using negative painting.
Imply shapesNegative painting impliesan image by painting theshapes around it. Positivepainting, by contrast,means simply painting theobject. To paint a fenceusing negative painting, forinstance, you would leavethe white of the paper forthe fence and define thefence’s shape by paintingthe colours of the foliagebehind it. To paint thefence positively, thebrushstrokes themselvesshould indicate the fenceposts and rails. Carefullyplan your compositionbefore painting. Draw all ofthe shapes in lightly, thenpaint around the object,only implying its shape.
This article was adapted fromWatercolor for the AbsoluteBeginner by Mark and MaryWillenbrink (North Light Books,£14.99, ISBN 978-1600617706).Here is a real confidence builderfor beginners and those new towatercolour. Packed full of easy-to-follow tuition and practicaladvice on all aspects ofwatercolour painting.
www.painters-online.co.uk
Use very little water for dry-brushingMix the paint with just enough water toallow the mixture to transfer from thebrush to the dry paper. The example nearright shows too much water used.
Technique 4 Positive and negative painting
Negative painting
Positive painting
7START Watercolour Summer 2013
Colour & technique p4-7_Layout 1 05/06/2013 10:38 Page 4
www.painters-online.co.uk8 START Watercolour Summer 2013
30-minute watercolourBlue iris vignette
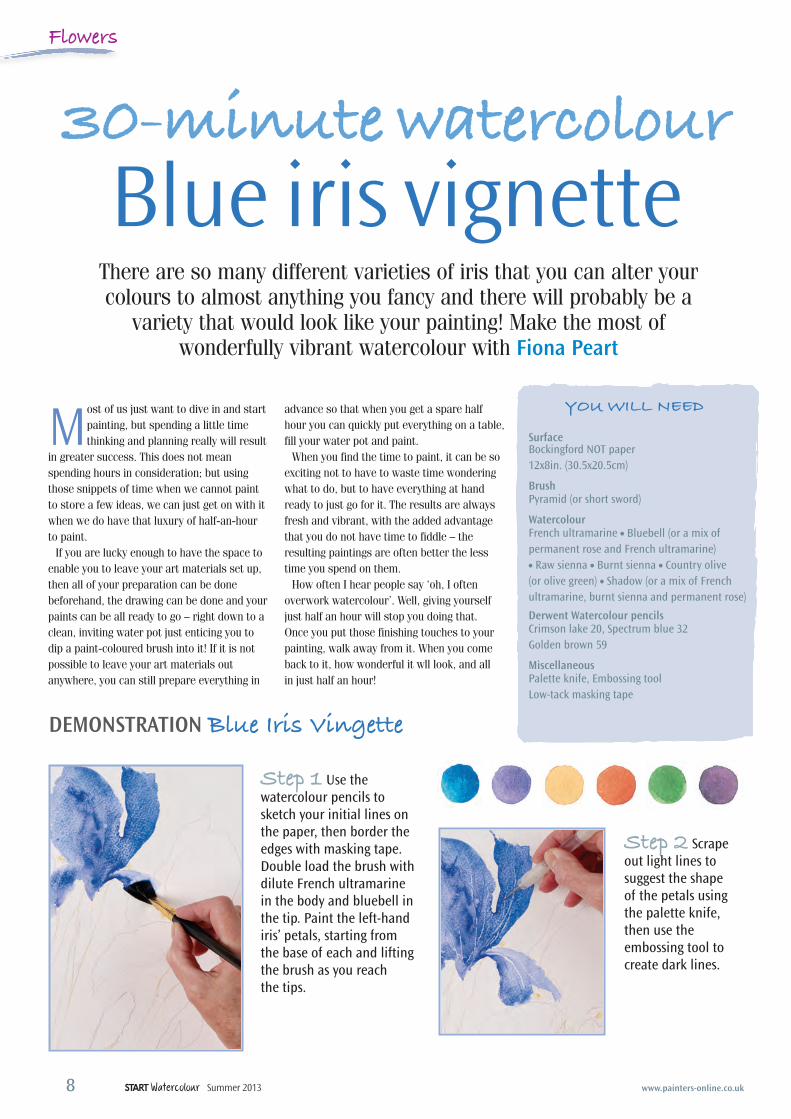
There are so many different varieties of iris that you can alter yourcolours to almost anything you fancy and there will probably be a
variety that would look like your painting! Make the most ofwonderfully vibrant watercolour with Fiona Peart
Most of us just want to dive in and startpainting, but spending a little timethinking and planning really will result
in greater success. This does not meanspending hours in consideration; but usingthose snippets of time when we cannot paintto store a few ideas, we can just get on with itwhen we do have that luxury of half-an-hourto paint. If you are lucky enough to have the space to
enable you to leave your art materials set up,then all of your preparation can be donebeforehand, the drawing can be done and yourpaints can be all ready to go – right down to aclean, inviting water pot just enticing you todip a paint-coloured brush into it! If it is notpossible to leave your art materials outanywhere, you can still prepare everything in
advance so that when you get a spare halfhour you can quickly put everything on a table,fill your water pot and paint. When you find the time to paint, it can be so
exciting not to have to waste time wonderingwhat to do, but to have everything at handready to just go for it. The results are alwaysfresh and vibrant, with the added advantagethat you do not have time to fiddle – theresulting paintings are often better the lesstime you spend on them. How often I hear people say ‘oh, I often
overwork watercolour’. Well, giving yourselfjust half an hour will stop you doing that. Once you put those finishing touches to yourpainting, walk away from it. When you comeback to it, how wonderful it wll look, and all in just half an hour!
SurfaceBockingford NOT paper12x8in. (30.5x20.5cm)
BrushPyramid (or short sword)
WatercolourFrench ultramarine ● Bluebell (or a mix of permanent rose and French ultramarine) ● Raw sienna ● Burnt sienna ● Country olive (or olive green) ● Shadow (or a mix of French ultramarine, burnt sienna and permanent rose)
Derwent Watercolour pencilsCrimson lake 20, Spectrum blue 32Golden brown 59
MiscellaneousPalette knife, Embossing toolLow-tack masking tape
DEMONSTRATION Blue iris Vingette
Flowers
You will need
Step 1 Use thewatercolour pencils tosketch your initial lines onthe paper, then border theedges with masking tape.Double load the brush withdilute French ultramarinein the body and bluebell inthe tip. Paint the left-handiris’ petals, starting fromthe base of each and liftingthe brush as you reachthe tips.
Step 2 Scrapeout light lines tosuggest the shape of the petals usingthe palette knife,then use theembossing tool tocreate dark lines.
Flower p8-11_Layout 1 04/06/2013 15:32 Page 1
9www.painters-online.co.uk START Watercolour Summer 2013
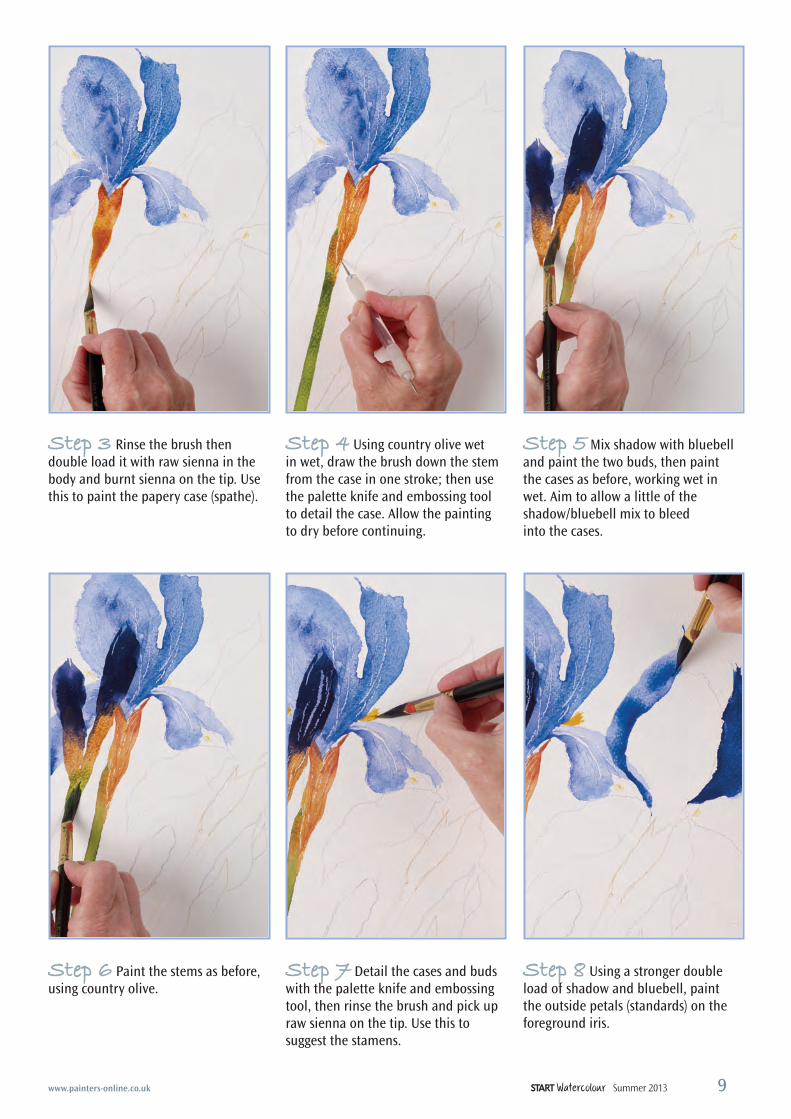
Step 3 Rinse the brush thendouble load it with raw sienna in thebody and burnt sienna on the tip. Usethis to paint the papery case (spathe).
Step 5 Mix shadow with bluebelland paint the two buds, then paintthe cases as before, working wet inwet. Aim to allow a little of theshadow/bluebell mix to bleed into the cases.
Step 6 Paint the stems as before,using country olive.
Step 7 Detail the cases and budswith the palette knife and embossingtool, then rinse the brush and pick upraw sienna on the tip. Use this tosuggest the stamens.
Step 8 Using a stronger doubleload of shadow and bluebell, paint the outside petals (standards) on theforeground iris.
Step 4 Using country olive wet in wet, draw the brush down the stemfrom the case in one stroke; then usethe palette knife and embossing toolto detail the case. Allow the painting to dry before continuing.
Flower p8-11_Layout 1 04/06/2013 15:32 Page 2

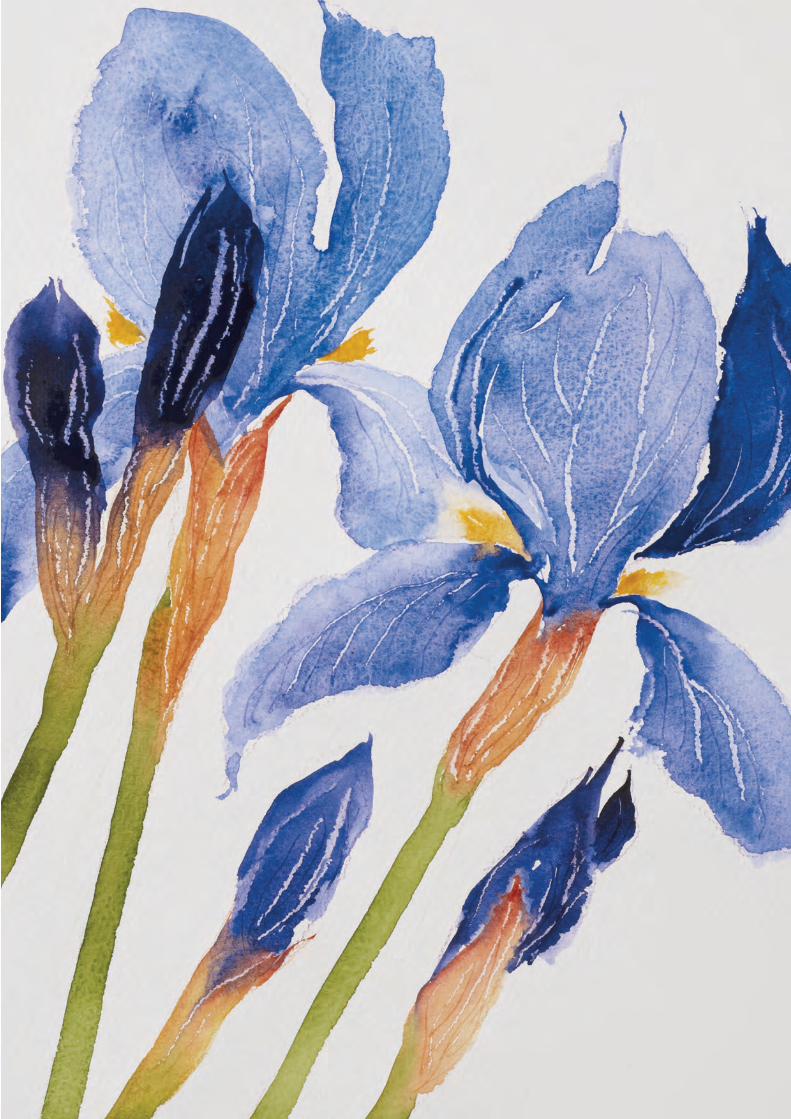
The finished painting Blue Iris, watercolour,12x8in. (30.5x20.5cm). Allow the painting to dry
to finish then remove the masking tape
Step 9 Paint the central standard witha slightly lighter mix, touching it to the outsidestandard to allow the colour to bleed at theedges, then paint the lower petals (falls).
Step 10 Scrape and bruise allof the petals using the embossingtool and palette knife.
Step 11 Paint the spathe and stem using the colours andtechniques in steps 3 and 4.
Step 12 Rinse the brush and touch in the stamens withraw sienna, then paint both foreground buds using the coloursand techniques in steps 5 and 6.
This tutorial was adaptedfrom Fiona Peart’s recentbook: 30 Minute Artist –Painting Flowers inWatercolour (SearchPress; £6.99; ISBN 978-1-84448-826-10). This practical andbeautifully illustratedbook is aimed atbeginners and busy artists, who want to complete loose and lively flowerpaintings in just half an hour. Fiona coverseverything from materials and techniques to tenstep-by-step demonstrations for you to follow. An inspiring read for everyone who loves thevibrancy of watercolour.
10 START Watercolour Summer 2013 www.painters-online.co.uk
Flower p8-11_Layout 1 04/06/2013 15:32 Page 3
Flower p8-11_Layout 1 04/06/2013 15:33 Page 4
www.painters-online.co.uk12 START Watercolour Summer 2013
landscapeCapturing the
landscape’s essenceJulie Gilbert Pollard takes you through the painting of rocks and howto place them in a landscape. You’ll learn here how to work on amulti-media canvas surface and use a variety of techniques and
media to produce a vibrant painting
We need to find a balance betweendrawing realistically enough so thatwe can capture the character and
personality of our subjects (even rocks), andputting in every little detail. Too stylised andnon-individualised and the rocks begin to looklike potatoes and popcorn. Rocks that are toorealistic lack the painterly quality so many ofus desire. While doing studies of rocks, don’t
worry about trying to paint them beautifully –focus on capturing the shapes, angles, planes,textures, colours and even the cracks. Learnall you can about your subject. When puttingthem into your paintings later, you can decidewhich details to leave out in order to paintthem in your individual style and capture theessence of rock.
SurfaceWatercolour canvas, coated with DanielSmith Watercolour Ground* 12x12in. (30x30cm)
WatercolourCerulean blue, Indian yellow, Manganeseblue, New gamboge, Permanent alizarincrimson, Scarlet lake, Transparent turquoise, Winsor yellow
Fluid acrylicsDioxazine purple, Nickel azo yellow, Pyrrole orange, Turquoise (phthalo)
Brushes3⁄4in. (19mm) aquarelle, No. 8 RoundSmall sumi bamboo brush
Miscellaneous2B pencil, charcoal pencil, masking fluid,palette knife, salt, watercolour ground, * available from Pegasus Art; telephone 01453 886560
DEMONSTRATION Rocky Hollow
Paint from a photograph
You will neeD
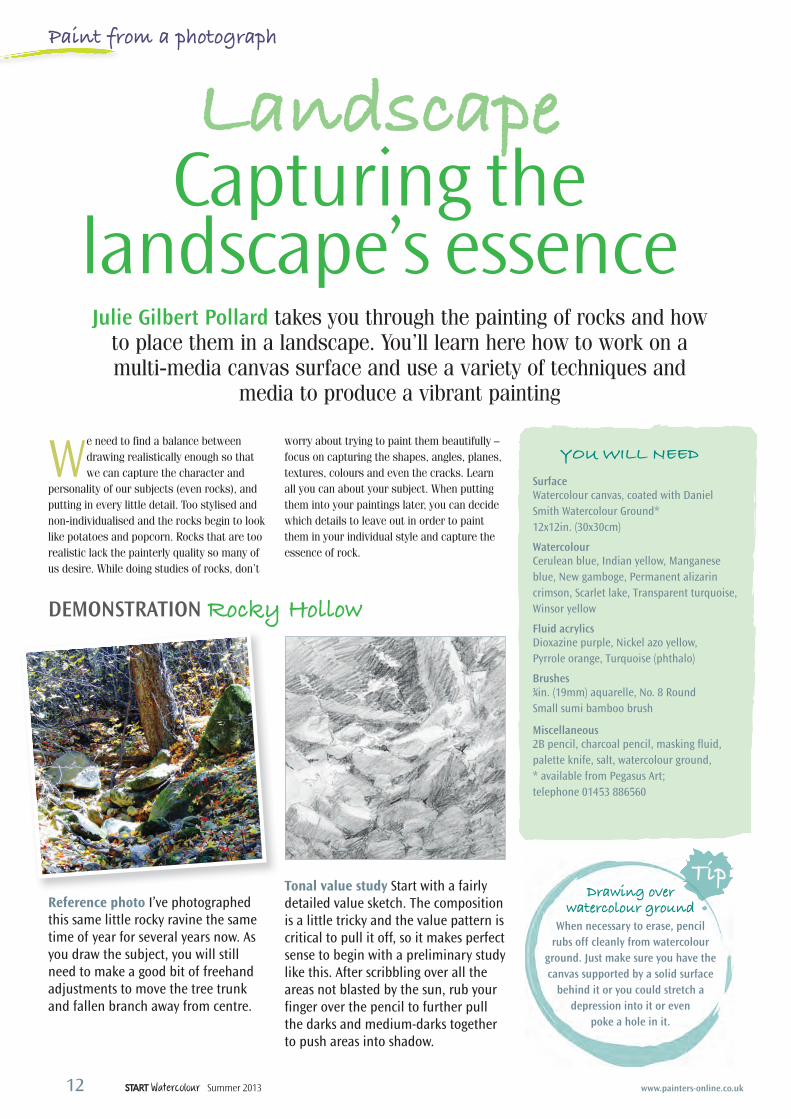
Reference photo I’ve photographedthis same little rocky ravine the sametime of year for several years now. Asyou draw the subject, you will stillneed to make a good bit of freehandadjustments to move the tree trunkand fallen branch away from centre.
Tonal value study Start with a fairlydetailed value sketch. The compositionis a little tricky and the value pattern iscritical to pull it off, so it makes perfectsense to begin with a preliminary studylike this. After scribbling over all theareas not blasted by the sun, rub yourfinger over the pencil to further pullthe darks and medium-darks togetherto push areas into shadow.
Drawing over watercolour ground
When necessary to erase, pencil rubs off cleanly from watercolour
ground. Just make sure you have thecanvas supported by a solid surface
behind it or you could stretch a depression into it or even
poke a hole in it.
Tip
Landscape p12-15 _Layout 1 05/06/2013 10:28 Page 1
13www.painters-online.co.uk
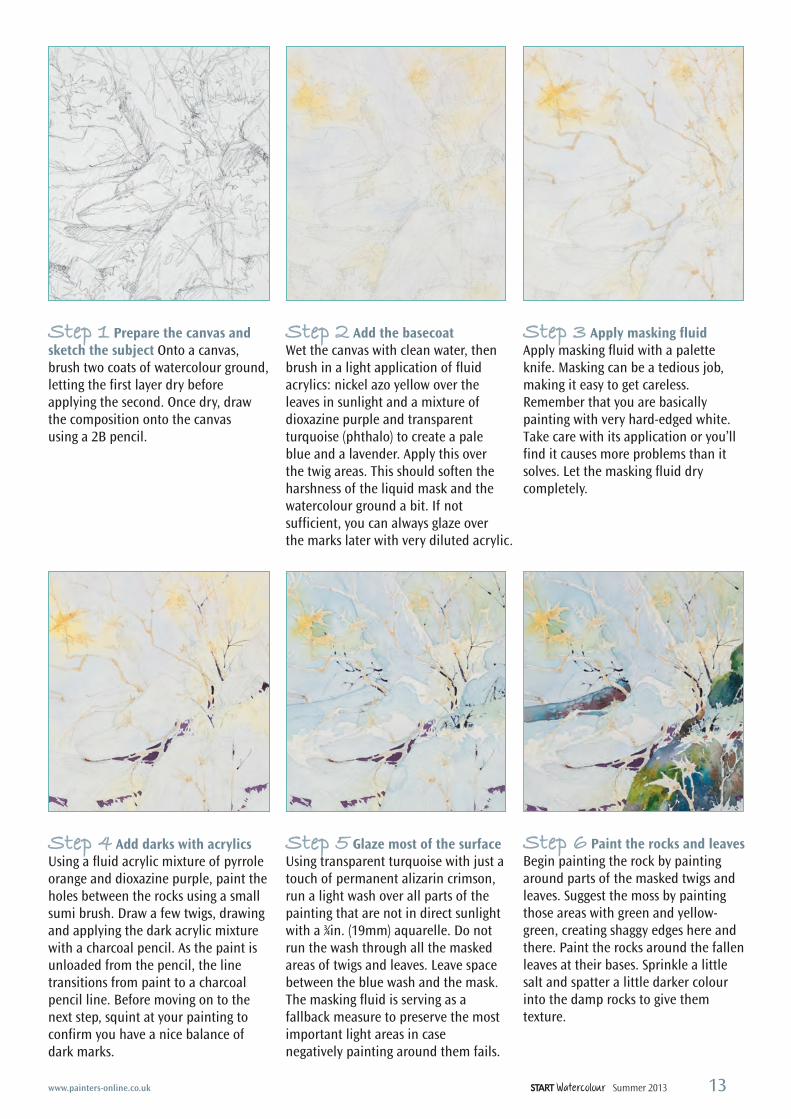
Step 1 Prepare the canvas andsketch the subject Onto a canvas,brush two coats of watercolour ground,letting the first layer dry beforeapplying the second. Once dry, drawthe composition onto the canvas using a 2B pencil.
Step 3 Apply masking fluidApply masking fluid with a paletteknife. Masking can be a tedious job,making it easy to get careless.Remember that you are basicallypainting with very hard-edged white.Take care with its application or you’llfind it causes more problems than itsolves. Let the masking fluid drycompletely.
Step 2 Add the basecoatWet the canvas with clean water, thenbrush in a light application of fluidacrylics: nickel azo yellow over theleaves in sunlight and a mixture ofdioxazine purple and transparentturquoise (phthalo) to create a pale blue and a lavender. Apply this over the twig areas. This should soften theharshness of the liquid mask and thewatercolour ground a bit. If notsufficient, you can always glaze over the marks later with very diluted acrylic.
Step 4 Add darks with acrylicsUsing a fluid acrylic mixture of pyrroleorange and dioxazine purple, paint theholes between the rocks using a smallsumi brush. Draw a few twigs, drawingand applying the dark acrylic mixturewith a charcoal pencil. As the paint isunloaded from the pencil, the linetransitions from paint to a charcoalpencil line. Before moving on to thenext step, squint at your painting toconfirm you have a nice balance ofdark marks.
Step 5 Glaze most of the surfaceUsing transparent turquoise with just atouch of permanent alizarin crimson,run a light wash over all parts of thepainting that are not in direct sunlightwith a 3⁄4in. (19mm) aquarelle. Do notrun the wash through all the maskedareas of twigs and leaves. Leave spacebetween the blue wash and the mask.The masking fluid is serving as afallback measure to preserve the mostimportant light areas in casenegatively painting around them fails.
Step 6 Paint the rocks and leavesBegin painting the rock by paintingaround parts of the masked twigs andleaves. Suggest the moss by paintingthose areas with green and yellow-green, creating shaggy edges here andthere. Paint the rocks around the fallenleaves at their bases. Sprinkle a littlesalt and spatter a little darker colourinto the damp rocks to give themtexture.
START Watercolour Summer 2013
Landscape p12-15 _Layout 1 05/06/2013 10:28 Page 2
www.painters-online.co.uk
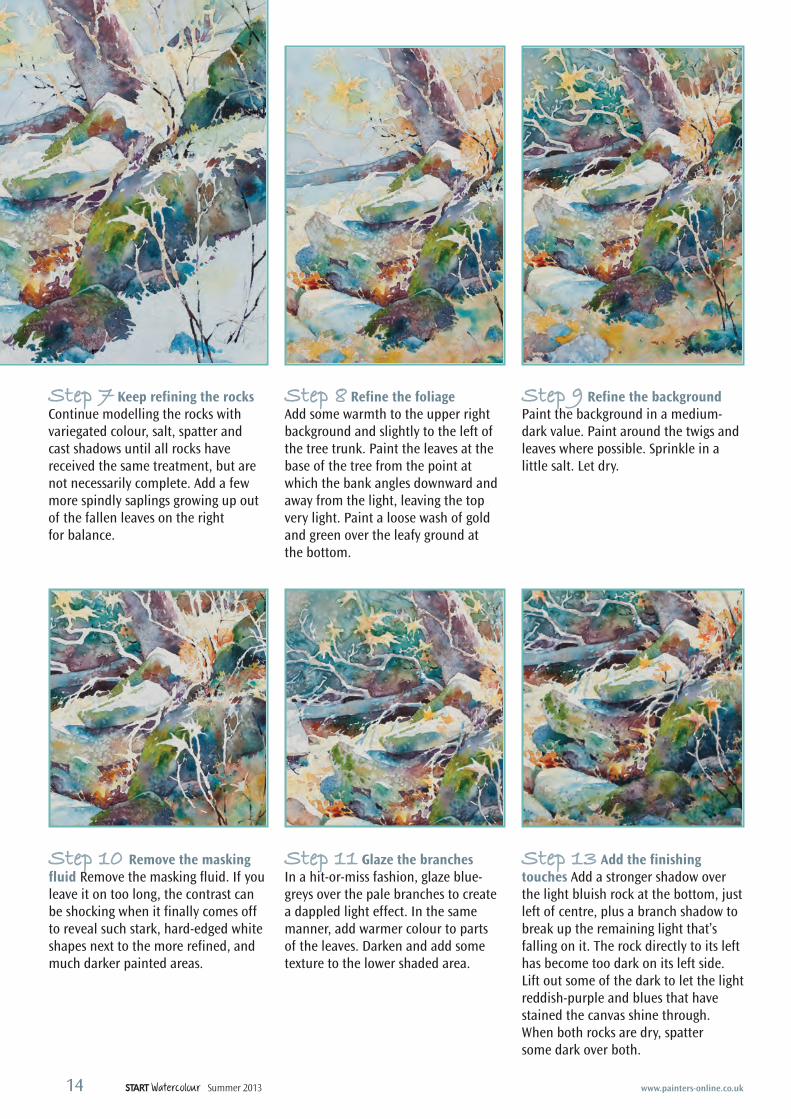
Step 7 Keep refining the rocksContinue modelling the rocks withvariegated colour, salt, spatter andcast shadows until all rocks havereceived the same treatment, but arenot necessarily complete. Add a fewmore spindly saplings growing up outof the fallen leaves on the right for balance.
Step 8 Refine the foliageAdd some warmth to the upper rightbackground and slightly to the left ofthe tree trunk. Paint the leaves at thebase of the tree from the point atwhich the bank angles downward andaway from the light, leaving the topvery light. Paint a loose wash of goldand green over the leafy ground at the bottom.
Step 9 Refine the backgroundPaint the background in a medium-dark value. Paint around the twigs andleaves where possible. Sprinkle in alittle salt. Let dry.
Step 10 Remove the maskingfluid Remove the masking fluid. If youleave it on too long, the contrast canbe shocking when it finally comes offto reveal such stark, hard-edged whiteshapes next to the more refined, andmuch darker painted areas.
Step 11 Glaze the branchesIn a hit-or-miss fashion, glaze blue-greys over the pale branches to createa dappled light effect. In the samemanner, add warmer colour to parts of the leaves. Darken and add sometexture to the lower shaded area.
Step 13 Add the finishingtouches Add a stronger shadow overthe light bluish rock at the bottom, justleft of centre, plus a branch shadow tobreak up the remaining light that’sfalling on it. The rock directly to its lefthas become too dark on its left side.Lift out some of the dark to let the lightreddish-purple and blues that havestained the canvas shine through.When both rocks are dry, spatter some dark over both.
14 START Watercolour Summer 2013
Landscape p12-15 _Layout 1 05/06/2013 10:28 Page 3
www.painters-online.co.uk
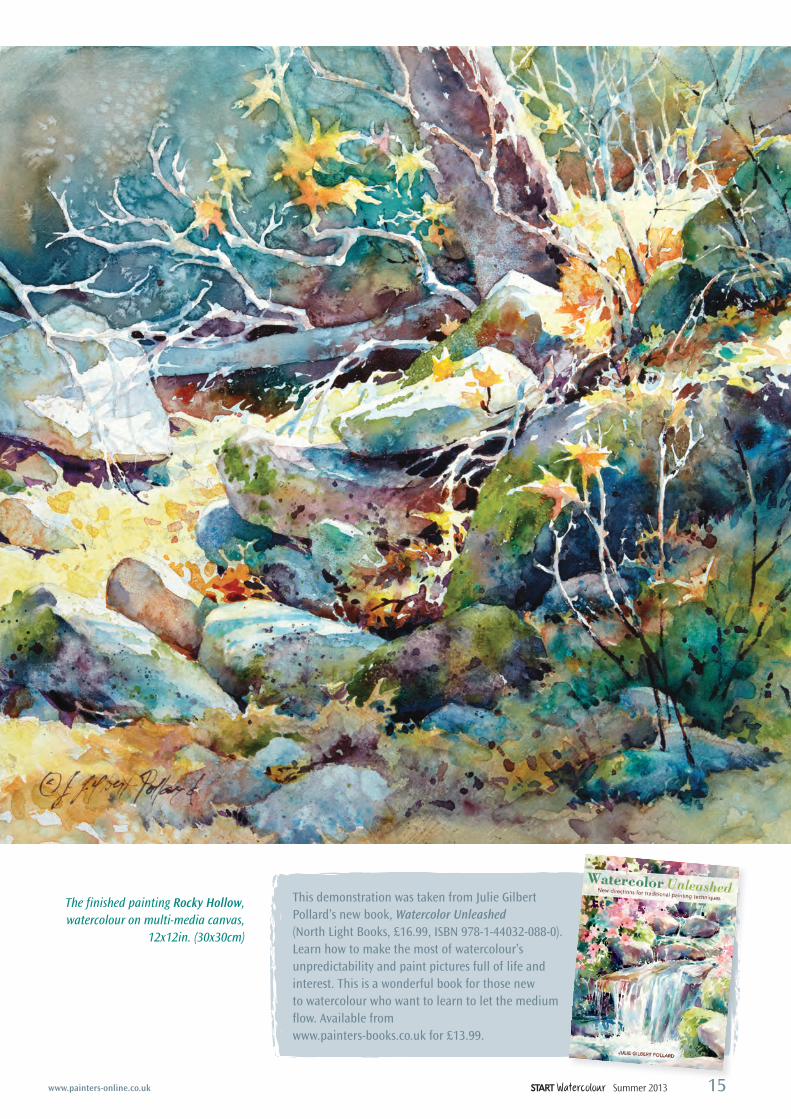
This demonstration was taken from Julie GilbertPollard’s new book, Watercolor Unleashed(North Light Books, £16.99, ISBN 978-1-44032-088-0). Learn how to make the most of watercolour’sunpredictability and paint pictures full of life andinterest. This is a wonderful book for those new to watercolour who want to learn to let the mediumflow. Available from www.painters-books.co.uk for £13.99.
The finished painting Rocky Hollow, watercolour on multi-media canvas,
12x12in. (30x30cm)
15START Watercolour Summer 2013
Landscape p12-15 _Layout 1 05/06/2013 10:28 Page 4
DANIEL SMITH WATERCOLOUR GROUND 473ML
Exciting new ground, anything you’ve dreamed of painting with watercolour can become a reality.Use for other mixed media techniques and with Golden Fluid acrylic paints. Thick, brushable white ground for absorbent or non-absorbent surfaces.
ST CUTHBERT’S BOCKINGFORD PAPER SPIRAL PADS 140LBS (300GSM) 12 SHEETS
Beautiful English watercolour paper, traditionally made on a cylinder mould machine at St Cuthberts Mill, is a high quality paper made using pure materials to archival standards.
PRO ARTE WATERCOLOUR 3 BRUSH SET + KHADI HANDMADE PAPER SKETCHBOOK
Beautiful section-stitched khadi hardback. White rough rag paper, 100% cotton, 210gsm, 21 x 25cm2 x Pro Arte 101 Round brushes Sizes 12 & 8 - good reservoir power, excellent tips1 x Pro Arte 106 Flat ½” - Versatile and hardwearing brushes
DA VINCI WATERCOLOUR BRUSH SET & BOCKINGFORD PAPER PAD + FREE NATURAL SPONGE
Beautifully soft squirrel brushes, round (Size 8) & flat (Size 16) for maximum paint load, blocking in colour, shapes and detail. Firmer Sable Round Brush (Size 6) for good paint control & fine point for detail.Bockingford Panoramic Pad 140lbs (300gsm) 14” x 5” 12 Sheets Natural Sponge
SPECIAL OFFER
£14.95 £12.95£14.95
GOLDEN FLUID ACRYLICS10 X 30ML SET
Golden Fluid Acrylics are ideal for pouring, puddling, dripping, staining and spray application. Use as an alternative to or with watercolours for wide variety of effects.
SPECIAL OFFER
£54.95 £41.20£54.95 £41.20
Beautiful English
SPECIAL OFFER10” x 7” £7.32 £4.20
14” x 10” £11.04 £6.3816” x 12” £13.80 £7.99
£7.32 £4.20£11.04 £6.38£11.04 £6.38£11.04£13.80 £7.99
PEGASUS ART SHOP, GRIFFIN MILL LONDON ROAD, THRUPP, STROUD
GLOS GL5 2AZ
Beautifully soft squirrel brushes, round (Size 8) & flat (Size 16)
SPECIAL OFFER
£41.00 £33.40£41.00 £33.40
Why not order online?www.pegasusart.co.uk
POSTAGE & PACKING Under £50 - £4.95Over £50 - FREE
ORDER LINE01453 886560
OPEN 9AM-5PM
MONDAY TO SATURDAY
Why not order online?
White rough rag paper, 100% cotton, 210gsm, 21 x 25cm
SPECIAL OFFER
£41.51 £25.50£41.51 £25.50
Bockingford Panoramic Pad 140lbs (300gsm) 14” x 5” 12 Sheets
Pegasus.indd 2 06/06/2013 11:53:50

‘PAINTING FLOWERS IN WATERCOLOUR’NEW FROM FIONA PEART
Fresh & vibrant 30 minute projects - be prepared, find inspiration with Fiona; simple brush strokes and clear technique instructions.A5 size - generous 96 pages.
PEGASUS ART WATERCOLOUR SELECTION KIT ‘THE BEST PICK N’ MIX’
Carefully chosen for you by the artists at Pegasus Art. Everything you need to be prepared, start painting and have fun!
SCHMINCKEHORADAM AQUARELLARTIST GRADE SET
10 X 5ML TUBES WATERCOLOURS
Beautifully engineered portable metal tin with your core colours of high pigment paints.
Contents: Lemon Yellow, Cad Yellow Light, Cad Red Light, Perm Carmine, Ultramarine Finest, Prussian Blue, Phthalo Green, Yellow Ochre, Sepia Brown, Ivory Black
DERWENT WATER-SOLUBLE SKETCHING PENCILS PLUS PENTEL WATER BRUSH
Drawing in the landscape, making studies in a museum or quick portraits in a café; sketch with water soluble pencils (soft, medium and dark) then apply a wash with your refillable water brush pen.
3 x Derwent Watersoluble Pencils HB, 4B, 8BPlus 1 x Pentel Water Brush (Choose from Broad, Medium or Fine Tip)
Fresh & vibrant 30 minute projects -
SPECIAL OFFER
£6.99 £5.99£6.99
Collins Gem Pocket Book ‘Watercolour Tips’ Daisy Porcelain palette 6” 3 in 1 Water Container Spritzer Water Bottle Natural Sponge Faber Castell 2B pencil Soft Eraser S20
Cotman Sketchers Pocket Box - 12 Half Pans & Travel BrushBockingford Spiral Pad from St Cuthbert’s Mill 140lbs (300gsm) 10”x 7” 12 pagesDa Vinci Squirrel Round Brush Size 8
Carefully chosen for you by the artists at Pegasus Art.
SPECIAL OFFER
£52.99 £39.99£52.99 £39.99
Beautifully engineered
10 X 5ML TUBES WATERCOLOURS
Beautifully engineered Beautifully engineered Beautifully engineered Beautifully engineered portable metal tin with your core
SPECIAL OFFER
£53.00 £38.00£53.00 £38.00
SPECIAL OFFER
£9.25 £6.99£9.25 £6.99
Why not order online?www.pegasusart.co.uk
POSTAGE & PACKING Under £50 - £4.95Over £50 - FREE
ORDER LINE01453 886560
OPEN 9AM-5PM
MONDAY TO SATURDAY
Why not order online?
Pegasus.indd 1 06/06/2013 11:53:41
PublisherDr Sally Bulgin
EditorIngrid Lyon
AdvertisingSarah HubbardTel: 01778 392048
DesignSarah Poole
Printed by Headley Brothers Ltd, The Invicta Press, Queens Road, Ashford, Kent
All material copyrighted: reproduction forbidden without permission. Views expressed are not necessarily those of the publisher.
START%#!'$& &"'is published by TAPC (The Artists’ Publishing Company Ltd),Caxton House, 63/65 High Street, Tenterden, Kent TN30 6BD. Telephone 01580 763315
www.painters-online.co.uk the website for Leisure Painterand The Artist magazines '()*+
Paint from a photographJulie Gilbert Pollard
Develop your skills by capturing the essence of a landscape using a variety of techniques
Mark and Mary Willenbrinkhave been writingtogether for over fiveyears. Mark trained as acommercial artist; Maryis a writer. Their book,Watercolor for theAbsolute Beginner, ispublished by North Light Books.
Fiona Peart is aprofessional artist andtutor. She writes regularlyfor Leisure Paintermagazine and has writtenseveral practical artbooks. 30 Minute Artist –Painting Flowers inWatercolour has recentlybeen published by Search Press.
Julie Gilbert Pollard isa well-known Americanartist and tutor, whopaints with oil andwatercolour. Her book,Watercolor Unleashed,is published by NorthLight Books.
"#%&*%&$'()*+ An introduction towatercolour Mark and Mary Willenbrink
Get started with colour-mixing exercises andwatercolour techniques to try
'()*+!30-minute watercolour: Blue iris vignetteFiona Peart
Build your confidence with thiswonderfully vibrant watercolourdemonstration
,#.-+&.&#-$///
START%#!'$& &"'Contents Start Watercolour_Layout 1 05/06/2013 11:11 Page 1

www.painters-online.co.uk4 START$" &#%%!&'''Summer 2013
/BCED8@?C<DBGCDG5;CFE?D>D@EColour and technique
Welcome to the wonderful world of watercolour! Mark and Mary Willenbrink offer a wealth of practical advice on colour,colour mixing and the basic techniques. Get yourself a small set ofwatercolours and after practising these exercises you’ll be ready to
paint along with the demonstrations that follow
Understanding colourColour, also referred to as hue, is based onthe three primary colours. From these allother colours are derived.
"E<6;E:G?D>D@EARed, yellow and blue can’t be madefrom other colours.
!F?DB8;E:G?D>D@EAOrange, green and violet result from mixingtwo of the three primary colours.
3FEC<;E:G?D>D@EAThese colours result from mixing a primarycolour with its adjacent secondary colour.
%<EACGACF=A
Red
Blue
Orange (red+yellow)
Green (yellow+blue)
Violet (blue+red)
Yellow-green
Blue-violet
Blue-green
Red-violet
Red-orange
Yellow-orange
Yellow
Colour & technique p4-7_Layout 1 05/06/2013 10:37 Page 1
www.painters-online.co.uk 5START$" &#%%!&'''Summer 2013
Using complementary and analogous coloursComplementary colours are any two colours that appear opposite eachother on the colour wheel. Analogous colours are a range of neighbouringcolours that make up a portion of the colour wheel—red-orange, orange,yellow-orange and yellow, for example.
'D6=>F6FBC;E:?D>D@EAColours that are directly oppositeeach other are considered a pairof complementary colours—redand green, for example
0B;>D1D@AG?D>D@EAA group of analogous colours always includes just one primary colour.
#<<B1G?D6=>F6FBC;E:G?D>D@EAA pair of complementary colours is made up of one primary and one secondary colour. If you mix a pair ofcomplementary colours together, you have combined allthree primary colours, which will result in a neutral greyor brown. If you mix the primary colour red with its complement green (yellow plus blue), you will get abrown mixture. The same result occurs if you mix yellowwith its complement, violet (blue plus red), or if you mixblue and the colour orange (yellow plus red).
3F?9B<2@FG,Painting wet on wetTo work wet-on-wet, apply a brush loaded with paint to wetpaper. This technique offers less control than wet-on-dry ordry-brush techniques, which you will learn about later, but italso offers plenty of unique and unexpected results. Applyingpaint wet-on-wet allows you to use loose strokes and boldcolours. Time is of the essence when you’re working wet-on-wet because you need to finish painting the area before thepaper dries. Choose your colours and mix lots of paint and
water on the palette before you wet the paper. Use a big,wide brush to cover the area with water just before youbegin to paint so the whole area is covered with a smooth,even sheen. If the paper is too wet or too dry, the colourwon’t bleed out smoothly. The paint should transfer easilyfrom the brush to the paper and spread to areas where the paper is wet.
0==>:G5;CFEWet the surface of the paper with a wide, flat brushfilled with water. Use long, straight, back-and-forthstrokes. The entire area you want to paint shouldhave an even sheen just before you start painting.
0==>:G?D>D@ELoad a brush with paint and gently touch or sweep the brush along thepaper surface so the colour transfers from the brush to the damp paper.Remember that these are watercolours—trying to brush the paint intosubmission once it has been applied can cause smearing. After the colour leaves your brush,let the spontaneity ofwatercolours take over.
Colour & technique p4-7_Layout 1 05/06/2013 10:37 Page 2

What paper to useThe smooth surface of hot-pressed paper doesn’t allowpaint to spread out as much as cold-pressed or Rough paperdoes, though I do like the interesting watermarks and hardedges. If you want to create soft edges with the wet-on-wettechnique, use cold-pressed or Rough paper.
.FC4DB45FCGDBG8<77FEFBCG=;=FEAExamples of this painting technique on different papersappear right: hot-pressed (1), cold-pressed (2) and Rough (3).
$D5G6@?9G5;CFEG8DG/G@AF(The trick when painting wet-on-wet is to applyjust the right amount of water to the paperbefore painting. If the surface is too wet (4), it won’t want to accept the colour, and you willget pale, uneven results. Before adding colour,gently smooth any puddles of water so you havea thin, even sheen of water over the paper’ssurface. If the surface is too dry (5), the colourmay bleed out in an inconsistent manner. Don’t get frustrated. It may take some practise to learn how much water to use.
.FC4DB48E:GDBG8<77FEFBCG=;=FEAExamples of this technique used on different papers appear left:hot-pressed (1), cold-pressed (2) and Rough (3).
3F?9B<2@FG*Dry-brush technique
&E:4-E@A9GDBG8<77FEFBCG=;=FEAExamples of this technique used on different papers appear left:hot-pressed (4), cold-pressed (5) and Rough (6).
To paint wet-on-dry, apply a wet brush loaded with paint to dry paper.Because there is no water on the paper to help the paint disperse, wet-on-dry produces defined strokes with hard edges. Different papersreact similarly to the wet-on-dry technique. However, the smooth surface of hot-pressed paper allows cleaner edges.
The dry-brush technique uses dry paper and a dry brush loaded with amixture that has very little water. Hot-pressed paper lets very littletexture show through after you’ve painted over it. Rough paper showsplenty of texture. If you want to use wet-on-dry or dry-brush techniques,make sure the area is completely dry before painting.
3F?9B<2@FG+Wet-on-dry technique
6 www.painters-online.co.ukSTART$" &#%%!&'''Summer 2013
1
2
3
1
2
3
45
6
4
5
Colour & technique p4-7_Layout 1 05/06/2013 10:37 Page 3

Negative painting is an easy technique to learn when painting withwatercolour. You just need to plan ahead. You might paint the negativespace of an object around a white area or over a previous wash ofcolour. It’s easy to plan what areas to leave untouched if indicating awhite object, such as white water in rapids. Take the challenge ofpainting an object that normally is brown, such as a fence, by leavingthe fence white and painting the shapes around it.You can make a dull, drab fence into an interesting part of your
composition. Use negative painting as a way to present an ordinaryimage in a unique way. I like to imply the shapes of daisies on a darkbackground using negative painting.
/6=>:GA9;=FANegative painting impliesan image by painting theshapes around it. Positivepainting, by contrast,means simply painting theobject. To paint a fenceusing negative painting, forinstance, you would leavethe white of the paper forthe fence and define thefence’s shape by paintingthe colours of the foliagebehind it. To paint thefence positively, thebrushstrokes themselvesshould indicate the fenceposts and rails. Carefullyplan your compositionbefore painting. Draw all ofthe shapes in lightly, thenpaint around the object,only implying its shape.
This article was adapted fromWatercolor for the AbsoluteBeginner by Mark and MaryWillenbrink (North Light Books,£14.99, ISBN 978-1600617706).Here is a real confidence builderfor beginners and those new towatercolour. Packed full of easy-to-follow tuition and practicaladvice on all aspects ofwatercolour painting.
www.painters-online.co.uk
AFG FE:G><CC>FG5;CFEG7DEG8E:4-E@A9<B1Mix the paint with just enough water toallow the mixture to transfer from thebrush to the dry paper. The example nearright shows too much water used.
3F?9B<2@FG)Positive and negative painting
Negative painting
Positive painting
7START$" &#%%!&'''Summer 2013
Colour & technique p4-7_Layout 1 05/06/2013 10:38 Page 4

www.painters-online.co.uk8 START$" &#%%!&'''Summer 2013
7910<3;CDE:%CD?.>=>;?Blue iris vignette
There are so many different varieties of iris that you can alter yourcolours to almost anything you fancy and there will probably be a
variety that would look like your painting! Make the most ofwonderfully vibrant watercolour with Fiona Peart
Most of us just want to dive in and startpainting, but spending a little timethinking and planning really will result
in greater success. This does not meanspending hours in consideration; but usingthose snippets of time when we cannot paintto store a few ideas, we can just get on with itwhen we do have that luxury of half-an-hourto paint. If you are lucky enough to have the space to
enable you to leave your art materials set up,then all of your preparation can be donebeforehand, the drawing can be done and yourpaints can be all ready to go – right down to aclean, inviting water pot just enticing you todip a paint-coloured brush into it! If it is notpossible to leave your art materials outanywhere, you can still prepare everything in
advance so that when you get a spare halfhour you can quickly put everything on a table,fill your water pot and paint. When you find the time to paint, it can be so
exciting not to have to waste time wonderingwhat to do, but to have everything at handready to just go for it. The results are alwaysfresh and vibrant, with the added advantagethat you do not have time to fiddle – theresulting paintings are often better the lesstime you spend on them. How often I hear people say ‘oh, I often
overwork watercolour’. Well, giving yourselfjust half an hour will stop you doing that. Once you put those finishing touches to yourpainting, walk away from it. When you comeback to it, how wonderful it wll look, and all in just half an hour!
SurfaceBockingford NOT paper12x8in. (30.5x20.5cm)
BrushPyramid (or short sword)
WatercolourFrench ultramarine Bluebell (or a mix of permanent rose and French ultramarine) Raw sienna Burnt sienna Country olive
(or olive green) Shadow (or a mix of French ultramarine, burnt sienna and permanent rose)
Derwent Watercolour pencilsCrimson lake 20, Spectrum blue 32Golden brown 59
MiscellaneousPalette knife, Embossing toolLow-tack masking tape
DEMONSTRATION'=;DE5?<2E<3/DCCD
$=>:D?2
# E"544E!66&
BCDAE@Use thewatercolour pencils tosketch your initial lines onthe paper, then border theedges with masking tape.Double load the brush withdilute French ultramarinein the body and bluebell inthe tip. Paint the left-handiris’ petals, starting fromthe base of each and liftingthe brush as you reachthe tips.
BCDAE8Scrapeout light lines tosuggest the shape of the petals usingthe palette knife,then use theembossing tool tocreate dark lines.
Flower p8-11_Layout 1 04/06/2013 15:32 Page 1

9www.painters-online.co.uk START$" &#%%!&'''Summer 2013
BCDAE7Rinse the brush thendouble load it with raw sienna in thebody and burnt sienna on the tip. Usethis to paint the papery case (spathe).
BCDAE,Mix shadow with bluebelland paint the two buds, then paintthe cases as before, working wet inwet. Aim to allow a little of theshadow/bluebell mix to bleed into the cases.
BCDAE+Paint the stems as before,using country olive.
BCDAE*Detail the cases and budswith the palette knife and embossingtool, then rinse the brush and pick upraw sienna on the tip. Use this tosuggest the stamens.
BCDAE)Using a stronger doubleload of shadow and bluebell, paint the outside petals (standards) on theforeground iris.
BCDAE-Using country olive wet in wet, draw the brush down the stemfrom the case in one stroke; then usethe palette knife and embossing toolto detail the case. Allow the painting to dry before continuing.
Flower p8-11_Layout 1 04/06/2013 15:32 Page 2

The finished painting Blue Iris, watercolour,12x8in. (30.5x20.5cm). Allow the painting to dry
to finish then remove the masking tape
BCDAE(Paint the central standard witha slightly lighter mix, touching it to the outsidestandard to allow the colour to bleed at theedges, then paint the lower petals (falls).
BCDAE@9Scrape and bruise allof the petals using the embossingtool and palette knife.
BCDAE@@EPaint the spathe and stem using the colours andtechniques in steps 3 and 4.
BCDA@8Rinse the brush and touch in the stamens withraw sienna, then paint both foreground buds using the coloursand techniques in steps 5 and 6.
This tutorial was adaptedfrom Fiona Peart’s recentbook: 30 Minute Artist –Painting Flowers inWatercolour (SearchPress; £6.99; ISBN 978-1-84448-826-10). This practical andbeautifully illustratedbook is aimed atbeginners and busy artists, who want to complete loose and lively flowerpaintings in just half an hour. Fiona coverseverything from materials and techniques to tenstep-by-step demonstrations for you to follow. An inspiring read for everyone who loves thevibrancy of watercolour.
10 START$" &#%%!&'''Summer 2013 www.painters-online.co.uk
Flower p8-11_Layout 1 04/06/2013 15:32 Page 3


![WESTERN BALKANS REGIONAL COMPETITIVENESS INITIATIVE brochure.pdf · RCI brochure [8]_Layout 1 03/10/2013 12:42 Page c. ... business plan competition with additional advisory services](https://img.pdfslide.us/doc/110x75/5f42f4db58ddd251dd05856c/western-balkans-regional-competitiveness-initiative-rci-brochure-8layout-1.jpg)


![Project Report - orgfree.comreto.orgfree.com/us/projectlinks/rc.pdf · Project Report Authors: Georgi Todorov / Reto Galli ... (RALU) in the pipeline [DA99, SaGrSp98]. We will now](https://img.pdfslide.us/doc/110x75/5b77cb027f8b9a515a8dd539/project-report-project-report-authors-georgi-todorov-reto-galli-ralu.jpg)